page 1 birthday cake project - create and craft
TRANSCRIPT

by Christina Ludlam
Page 1
ProjectBirthday Cake

Step 2a
To create a template for the bunting position, measure around the cake and cut a 5cm wide strip of paper to the exact length of the cake’s circumference. Fold strip into quarters then use a cake board or plate to draw a curve on the folded paper. Cut around the curve being careful to cut neatly through all four layers of paper. Make a second template for the top tier.
Page 2
• Selection of KSD Design Mats • KSD Moulds & Tools: Alphabet Bunting Domed Alphabet Bow Trio Little Flowers Impress Sugarcraft Tools • Leaf cutter • #1.5 or #2 Piping tube • Piping bag • 2 tbsp Royal icing • Sugarcraft rolling pin • Cutting wheel • Stitch wheel • Dresden tool/veining tool • Shell tool
Step 1
Cover the cake drum with blue sugarpaste then use the ‘pronged scallop’ KSD Impress Tool to create a border around the outer edge and the ‘triple pronged’ tool to impress the remainder of the board.
Split, fill and crumb coat the two cakes then cover with white or ivory sugarpaste (fondant). NOTE: It is essential to complete steps 2a and 2b before the fondant cake covering dries.
• Scribing tool • Craft knife • Scissors • Palette knife • Large brush for dusting • Cornflour • Fine paintbrush • Paintbrush (for glue) • Edible glue • Pearl lustre spray • Tylose Powder • Paper/greaseproof paper • Gold edible paint/lustre dust • Cone tool • 3cm Circle cutter or Garrett frill centre
• Small blossom cutter • Black food colour paste • Clear alcohol or lemon extract • 12” Cake drum • 6” Round cake (4” deep) and 8” Round cake (4” deep) • White vegetable fat (Trex/White Flora) • Rectangle of card (20 x 12 cms) • Applique templates • 150 g blue sugarpaste (to cover cake drum) • 1.25 KG white sugarpaste (to cover cakes) • 1 KG white sugarpaste (to make modelling paste)
Materials you will need:

Page 3
Step 3a
Brush a little cornflour into the KSD Bunting Alphabet mould, tap out the excess then press a pea-sized ball of modelling paste into the mould. Make enough letters to spell out your message. I have spelled the message “HAPPY BIRTHDAY TO YOU” twice around the cake.
The raised lettering on the bunting can be painted using edible paint or edible powders/lustres mixed with a little clear alcohol or Isopropyl alcohol. Simply dip a paintbrush into the paint, wipe off the excess to avoid overloading your brush, then use the side of the brush to carefully stroke over the raised surface of the lettering.
Step 2b
Wrap the curved template strips around each cake, making sure the top of the strip is in line with the top of the cake, and use a scribing tool to mark along the curved edge. Impress a pattern along the top of the curved line using the ‘pronged scallop KSD Impress tool.
Mix 3 tsp Tylose powder into 1 KG white sugarpaste (fondant) and knead thoroughly. Split paste into 8 pieces and colour each piece with brightly coloured food colour paste. Store each piece of paste in air-tight bags to avoid drying out.
Modelling Paste Preparation

Page 4
Step 3b
Dust the KSD Bow Trio mould with cornflour, tap out the excess, then make 4 large and 4 small bows using red modelling paste.
Add up the number of bunting letters you intend to use, divide the number by four (this will give you the number of letters required for each curve) then use edible glue to stick the bunting in place, spacing evenly along the bottom of the curves on the bottom tier. Add a large bow at the top point of each curve and paint the centre with gold paint to match the bunting lettering. Reserve the four small bows for the top tier.
Step 4a
To prepare the textured paste for the applique shapes, dust a selection of KSD Design Mats with a little cornflour and tap out the excess. Roll some coloured modelling paste to approximately 5-7 mm thick then use fingertips to press onto the top of the Design Mat, anchoring the paste down before rolling over it firmly with a rolling pin. Turn the mat 90 degrees (a quarter turn) then roll firmly again. Turn the mat over and carefully peel it away from the paste. Repeat using a variety of different Design Mats and paste colours.
TIPAdditional flower and heart bunting pieces can be used to even out and fill any spaces in your message if required.

Page 5
Step 4b
Cut out the applique templates provided and use a cutting wheel or craft knife to carefully cut out the pattern pieces from the textured paste. Use edible glue to attach the shapes around the bottom tier, slightly above the board to allow space to pipe a border later.
Use the curved KSD Impress tool to add a mouth for the snail and use a Dresden tool or cutting wheel to mark the spiral markings of the snail shell. Add little balls of black paste or black dragees for the eyes.
Step 4c
Continue to cut out the remaining applique pieces, adding details such as a flattened ball for the nose of the dog, a contrasting fin for the whale and black whiskers for the cat.

Page 6
Step 4d
The eyes and feet of the owl are made using flowers from the KSD Little Flowers mould and I’ve added a large button from the KSD Button Design Mat on his breast. Roll a small ball of paste into a cone shape and stick in place for the beak then add two small black balls to the centre of the eyes. Glue the remaining applique pieces in place and add any additional detail.
Step 5a
Use a cutting wheel to cut random, straight-edged, shapes in the remaining paste pieces. Start by sticking a layer of coloured paste pieces around the bottom edge of the top tier – this should be quite easy providing you have cut the edges of the pieces in straight lines.

Page 7
Step 5b
Once the bottom layer is complete, continue adding further pieces until the entire area below the curves is covered. Use a scribing tool and craft knife to mark and trim any overlapping pieces of paste to create neat edges and fine joins in your paste.
Step 5c
Glue a small bow moulding at the top of each of the four curves and paint the centre using gold paint as before.

Page 8
Step 6
Use some ‘stiff peak’ royal icing and a #1.5 or #2 piping tube to pipe a ‘snail-trail’ border around the base of each cake and along the curved edge of the top tier. Once the royal icing has dried, use a fine brush to paint with edible gold paint.
Step 7a
To make the sugar card, add an additional 1 tsp Tylose powder to 100 g of blue modelling paste. Cut a rectangle of thin card measuring 20cms x 12cms and use this as a template and drying former for your sugar card. Dust the work surface with a little cornflour, roll paste to a thickness of 1-2mm and using the rectangle of card as a template, cut out a rectangle of paste. Fold the paste in half to create a centre fold then open out and cut an oval (aperture) from the centre front of the card.
OPTIONAL you may wish to create additional patterns in your card using the Impress tools.
Carefully place the paste over the folded card and set aside to dry. You will need to place a cake smoother or design mat against the bottom edges of the card to hold the paste in place whilst it dries. Allow the card to dry for at least 24 hours before removing the support to decorate it.
Page 9
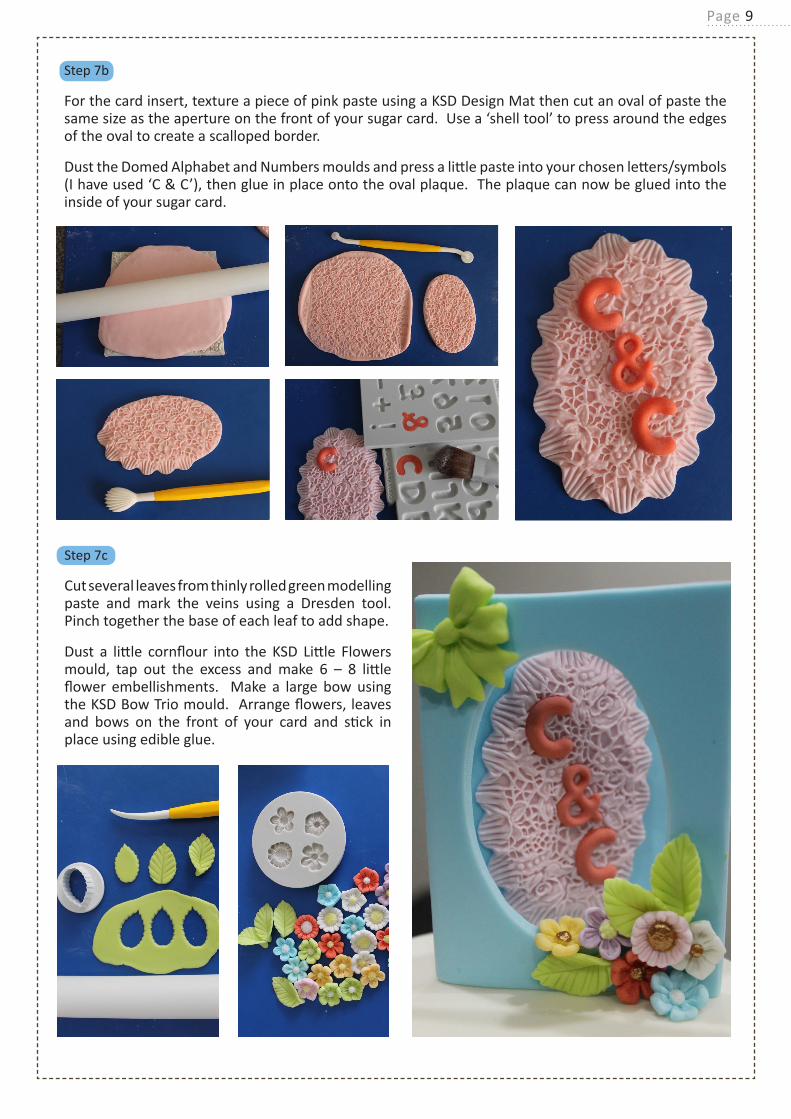
Step 7b
For the card insert, texture a piece of pink paste using a KSD Design Mat then cut an oval of paste the same size as the aperture on the front of your sugar card. Use a ‘shell tool’ to press around the edges of the oval to create a scalloped border.
Dust the Domed Alphabet and Numbers moulds and press a little paste into your chosen letters/symbols (I have used ‘C & C’), then glue in place onto the oval plaque. The plaque can now be glued into the inside of your sugar card.
Step 7c
Cut several leaves from thinly rolled green modelling paste and mark the veins using a Dresden tool. Pinch together the base of each leaf to add shape.
Dust a little cornflour into the KSD Little Flowers mould, tap out the excess and make 6 – 8 little flower embellishments. Make a large bow using the KSD Bow Trio mould. Arrange flowers, leaves and bows on the front of your card and stick in place using edible glue.

Page 10
Step 8a
For the giraffe, roll a 5cm ball of yellow modelling paste then apply a little pressure to one end as you continue to roll to create a bottle shape. Continue to roll between the palms of your hands until the paste measures approximately 8cms high. Smooth the top, narrow end and carefully thread a piece of dried spaghetti down through the centre, turning the spaghetti as you push it down into your paste. Snap the top of the spaghetti off approximately 1cm above the top of the paste. This will provide support for your giraffe’s head. Use a stitch wheel to mark a row of stitches down the centre front and centre back of the bottle shape.
Step 8b
For the legs, roll two 1cm wide sausages of yellow paste and trim to 5cms long. Roll two balls of soft brown paste, flatten slightly between finger and thumb then glue to the bottom of each leg to create hooves. Mark a row of stitches down each side of the two legs then use scissors to trim a wedge of paste from the top of each leg. Apply edible glue to this cut edge and stick in place on the front of the body.

Page 11
Step 8c
The back legs should be slightly fatter than the front (approximately) 2cms by 4cms long.
Roll one end to thin it slightly, apply flattened balls of soft brown paste to create hooves (as for front legs) then press the fatter end to flatten the thigh area slightly. Press a Dresden tool into the centre front of each leg and fold the leg forward a little. Run a line of stitches up the centre and glue each leg in place, wrapping them around from the back of the giraffe’s body to just behind the front legs.
Step 8d
Roll a piece of orange paste as thinly as possible and use a small blossom cutter to cut approximately 16 blossom shapes then stick them onto the giraffe’s body and legs. To make the giraffe’s tail, roll a sausage of yellow paste and a small teardrop of orange paste, mark lines in the teardrop using the Dresden tool then glue in to the end of the sausage of yellow paste and glue in place on the back of the giraffe indenting the end with the Dresden tool.

Page 12
Step 9a
For the giraffe’s head, roll a ball of yellow and a ball of soft brown paste to create two pear-shaped balls of paste measuring approximately 4 cms long. Cut the fat end of the pear-shaped balls of paste and glue the fat soft brown piece to the thinner yellow piece of paste. Use the centre of a Garrett frill cutter to create a curved ‘mouth’ in the soft brown end of the face, add dimples using the Dresden tool and stroke the corners of the mouth upwards to create a pleasing smile. Use the Cone tool to create two nostrils above the smile.
Step 9b
For the eyes, roll to balls of white paste the same size as the small end of a ball tool. Indent the eye sockets with the small ball tool, apply a little edible glue and press the eyes into place.
Roll two pea-sized balls of orange paste into little cone shapes, make two holes by inserting the ball tool into the top of the giraffe’s head then glue the narrow end of the horns into the holes pressing the top to flatten slightly. Add a row of stitches along the top edge of the soft brown paste where the paste joins the yellow paste.
Page 13
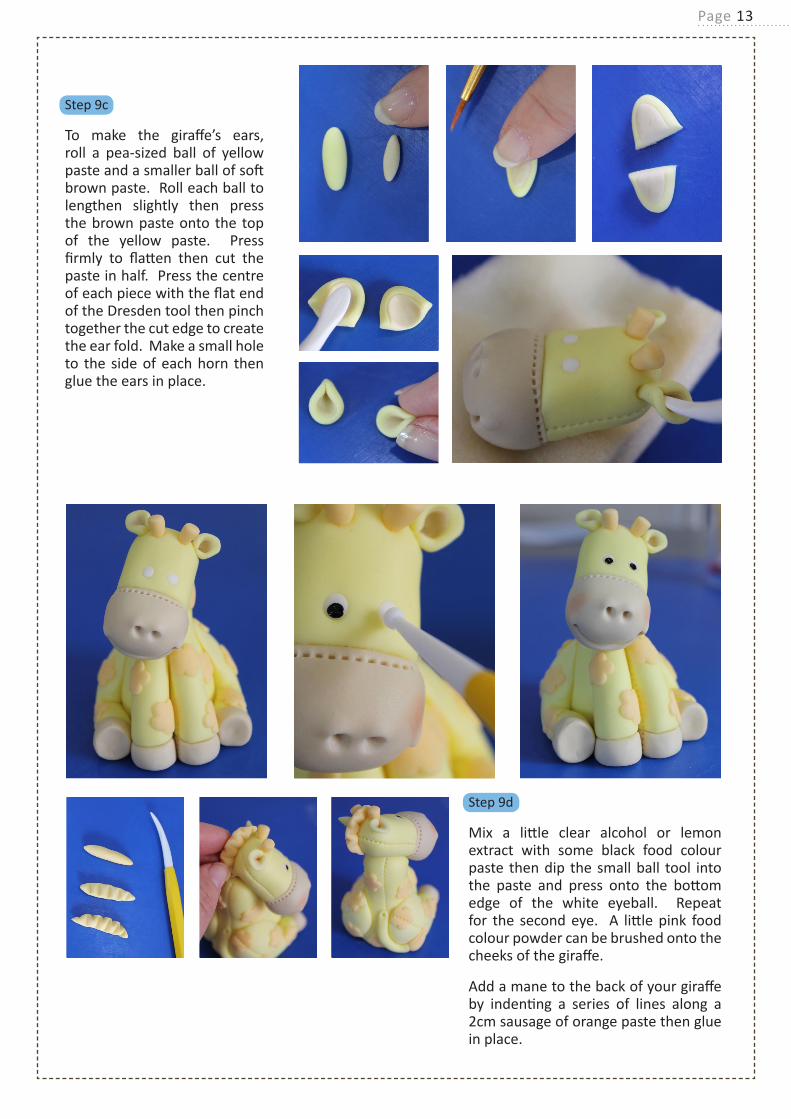
Step 9c
To make the giraffe’s ears, roll a pea-sized ball of yellow paste and a smaller ball of soft brown paste. Roll each ball to lengthen slightly then press the brown paste onto the top of the yellow paste. Press firmly to flatten then cut the paste in half. Press the centre of each piece with the flat end of the Dresden tool then pinch together the cut edge to create the ear fold. Make a small hole to the side of each horn then glue the ears in place.
Step 9d
Mix a little clear alcohol or lemon extract with some black food colour paste then dip the small ball tool into the paste and press onto the bottom edge of the white eyeball. Repeat for the second eye. A little pink food colour powder can be brushed onto the cheeks of the giraffe.
Add a mane to the back of your giraffe by indenting a series of lines along a 2cm sausage of orange paste then glue in place.
Page 14
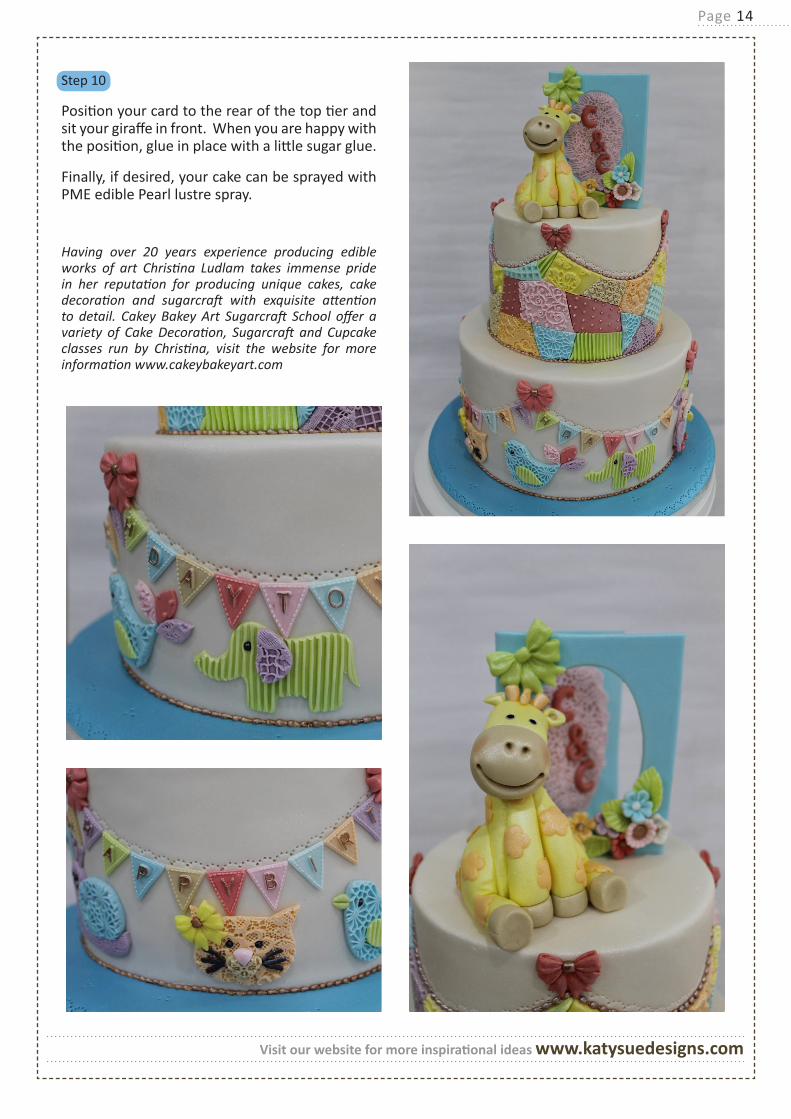
Step 10
Position your card to the rear of the top tier and sit your giraffe in front. When you are happy with the position, glue in place with a little sugar glue.
Finally, if desired, your cake can be sprayed with PME edible Pearl lustre spray.
Visit our website for more inspirational ideas www.katysuedesigns.com
Having over 20 years experience producing edible works of art Christina Ludlam takes immense pride in her reputation for producing unique cakes, cake decoration and sugarcraft with exquisite attention to detail. Cakey Bakey Art Sugarcraft School offer a variety of Cake Decoration, Sugarcraft and Cupcake classes run by Christina, visit the website for more information www.cakeybakeyart.com

Applique animal templates