pack 83 pinewood derby 2012 -...
TRANSCRIPT

Pack 83 Pinewood Derby 2012
The Pinewood Derby is an event that Scouts and parents typically remember for years to come. Some of us adults have even managed to hold onto the cars and trophies of our youth to this very day. There are very few events in life that can create such lasting memories.
The Pinewood Derby creates such powerful memories for a number of reasons. One of the more fundamental reasons is the fact that the boy and his partner set time aside to work together to create something that is uniquely theirs and theirs alone. Every step of the process from brainstorming design ideas, to shaping a simple block of wood, to painting the “car”, and ultimately participating in the final race is done together.
For adults new to Scouting this event can be intimidating. Particularly for those who aren't experienced woodworkers, modelers, or craftsman. We have designed this booklet to assist the adult partners and their Scouts in the creation of a Derby car that both the adult and the Scout can be proud of. Regardless of skill level. On the following pages you will find all of the basic information needed to create your car.
In addition to this booklet we will be holding a car building clinic where there will be an initial introductory presentation covering some of the dos and don'ts of the Derby.
After this introduction we will actually begin creating the cars. At the end of the clinic each Scout and his partner will have had the opportunity to complete a large part of their car. Aside from the wealth of knowledge which will be available we will also have on hand various hand and power tools which can be used to rough out any just about any design.
The minimum materials you need to bring to this clinic are your Derby kit and some ideas about the car you and your Scout would like to build. We will help you take care of the rest. By the end of the Clinic you should have in your hand a car that is well on its way to becoming a possible Derby winner.
Quick build kits as well as finished cars are available from various sources. Google Pinewood Derby and you will find an almost limitless listing of commercially produced cars, specialized kits, and performance parts. E-Bay also has a large number of Derby parts and car sellors. Purchasing these are frowned upon. They may actually not be able to pass the pre-race inspection. The car construction rules are covered later in this document. The hardest thing for all involved is to have to disqualify a Scout on race day.
Should you need extra wheels or axles please purchase them from an approved Pinewood Derby vendor. The Scout store sells these separate from the Derby kit.
Basics Tools
We do not expect that anyone go out and spend large amounts of money to purchase tools or materials. Expensive tools are NOT required to build a winning car. We will have power tools on hand at the clinic to assist you but more importantly we will have experience.
The list that follows is a suggestion only. Depending on your car design you may need all or none of these tools. Please do not run out and buy ANY tools until you have given some thought to your design. Please also remember that we will have these tools and more at the Derby Clinic. There will be more Scouts than tools available so plan accordingly. We will be sharing. If you decide to purchase any of these tools and supplies they are available from the Scout store, Michaels Craft Store, and Lowes.
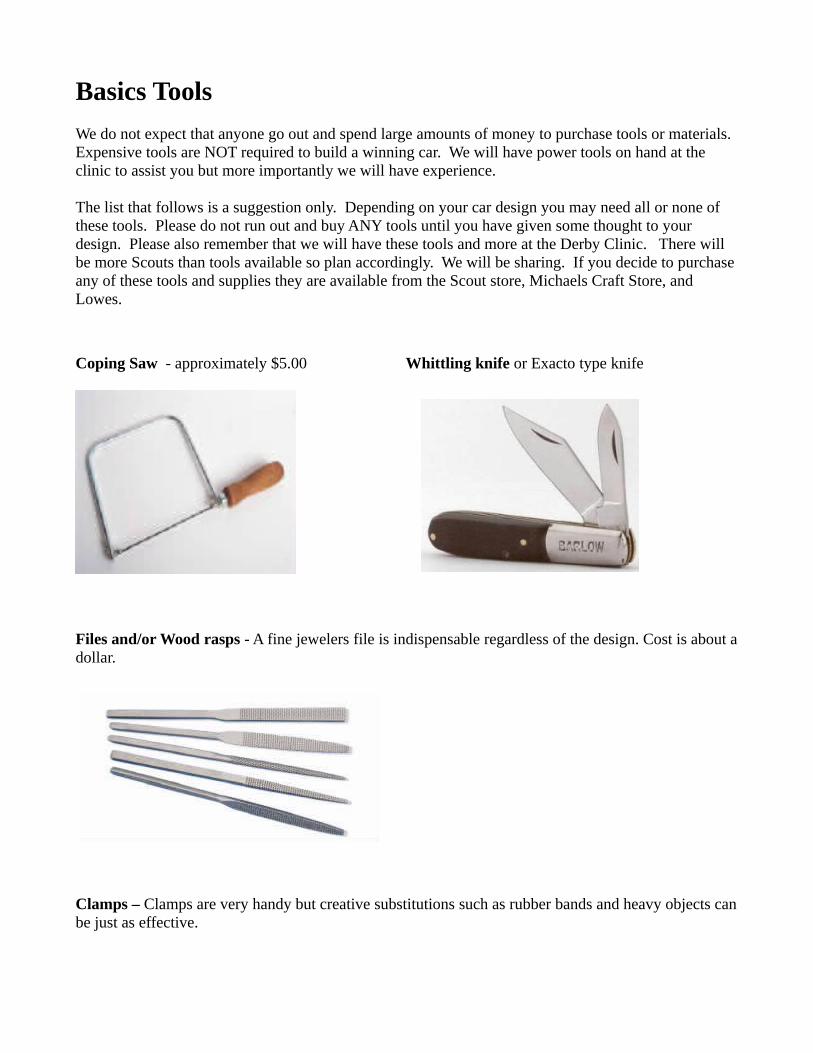
Coping Saw - approximately $5.00 Whittling knife or Exacto type knife
Files and/or Wood rasps - A fine jewelers file is indispensable regardless of the design. Cost is about a dollar.
Clamps – Clamps are very handy but creative substitutions such as rubber bands and heavy objects can be just as effective.

You WILL need some or all of the items on this page!
Sand Paper - Start with rough paper, and then progress to finer paper. A good progression is 60, 150, 220 grit. Assortment packs are available at Lowes for about 5 dollars.
• For sanding smooth flat surfaces, wrap the sandpaper sheet around a ruler or other small, straight block of wood.
• Sand back and forth in the direction of the wood grain. On the end of the car, sand in a circular motion.
• To sand inside a body hole or a small surface, use a piece of sandpaper taped to a small flat object (popsicle stick, small ruler, etc.).
• To sand inward curved surfaces, use a piece of sandpaper wrapped around a dowel rod, your finger, or piece of broomstick.
• Between coats of paint, lightly sand the car. For an ultra smooth finish sand with 600 – 800 grit paper.
Glues and Adhesives - Glue comes in several different types. Always use the proper glue for the job.
• "Carpenter’’s Glue" (yellow glue) or Elmers white school glue work well when gluing wood to wood but can take up to 24 hours to dry. An fantastic alternative is Gorilla brand wood glue which sets up in ½ hour. This allows the impatient among us to carefully keep building. $1.00 – $4.00
• Epoxy - Use epoxies when gluing non-wood parts to wood. For example, use epoxy for gluing weights or plastic parts such as mufflers, motors, drivers, etc to your car body. They are good for a variety of tasks however they are relatively expensive and take a bit of measuring and mixing to prepare them for use. I personally prefer the 5 minute cure time variety however the 30-minute variety gives the builder more time to make sure the parts are properly aligned. $3.00 - $8.00
• Hot Melt Glue – This can be used to glue on a variety of attachments and in a variety of situations. Some experience with this is helpful as it can get messy and you can easily get burned. Adult supervision is definitely required. $5.00 - $10.00 (for the gun and the glue sticks)
******** DO NOT USE SUPERGLUES OF ANY KIND ********
They just don't hold up for this type of project REGARDLESS of what the packaging says. The only time it is recommended that they be used is on race day if emergency repairs are needed. Even on race day there are usually better options such as 5 minute epoxies or hot melt glues.
Paints and Colorants – any basic enamel paints either in a spray form, can, or jar will work well. Colored stains, permanent markers, highlighters, etc. can also all be used to great effect.
Axle Lubricants – You may only use dry lubricants to lubricate your axles. Typically this is either a graphite lube or a teflon lube. Graphite lubes are black and can easily ruin a paint job if you aren't very careful. Teflon lubricants are typically white and are much easier on the paint. The jury is still out on which is the better lubricant from a speed perspective.

Materials - Parts – Ideas – Sources
This is the most difficult section to write as there are no right, wrong, or even best answers. Regardless of where the design idea originated you need to start formulating a plan to take that block and bring the design to life. The best recommendation is that you use things around you that are easily accessible and free or cheap.
When considering materials to use on your car pay attention to how easy they are to work with, availability, and weight. It is impossible to be specific in the section so we will stick to common materials and where you might find them.
Some material/parts ideas are;
• Cardboard • Tissue paper • Lumber scraps
• Colored plastic streamers • Broken toys • Sticks
• Coins • Clear Plastic Packaging • Rocks
• Styrofoam • Bits of wire • Old computer mother boards
• Junk jewelry • Balsa Wood (incredibly light but can be pricy.) Available at Michaels and hobby stores
• Food packaging
Material usage example
One great source for wood is the packaging that clementine oranges come in. There are four relatively large pieces of thin and light plywood used to construct the box. An added bonus is the orange mesh used to cover the box. What can you do with the mesh? Maybe its a fishing net? Maybe its a safety fence? Maybe its a net used to trap a wild man eating tiger? What do you think it can be? More importantly what does your Scout think it can be?
Material Sources
• Broken toys • Discarded packaging
• Office supplies • The kitchen junk draw
• Dollar store • Hardware store • The woods outside
• Junk jewelry
• Lumber yard scrap bins
• Adult partners place of employment
• Construction site scraps (Be super careful with this one)
One popular design is a steam locomotive. A great source for the boiler is 2 cardboard toilet paper tubes glued one inside the other. The front can be plugged with balsa wood, card board, thin plywood, or even modeling clay.

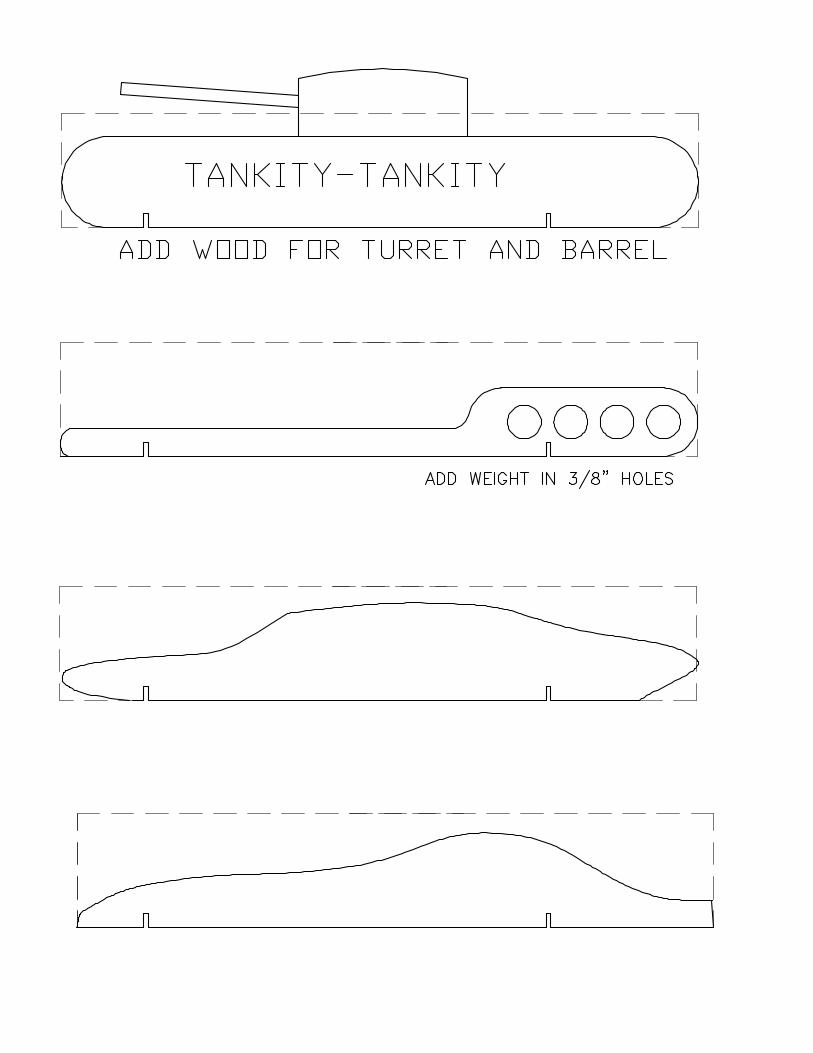
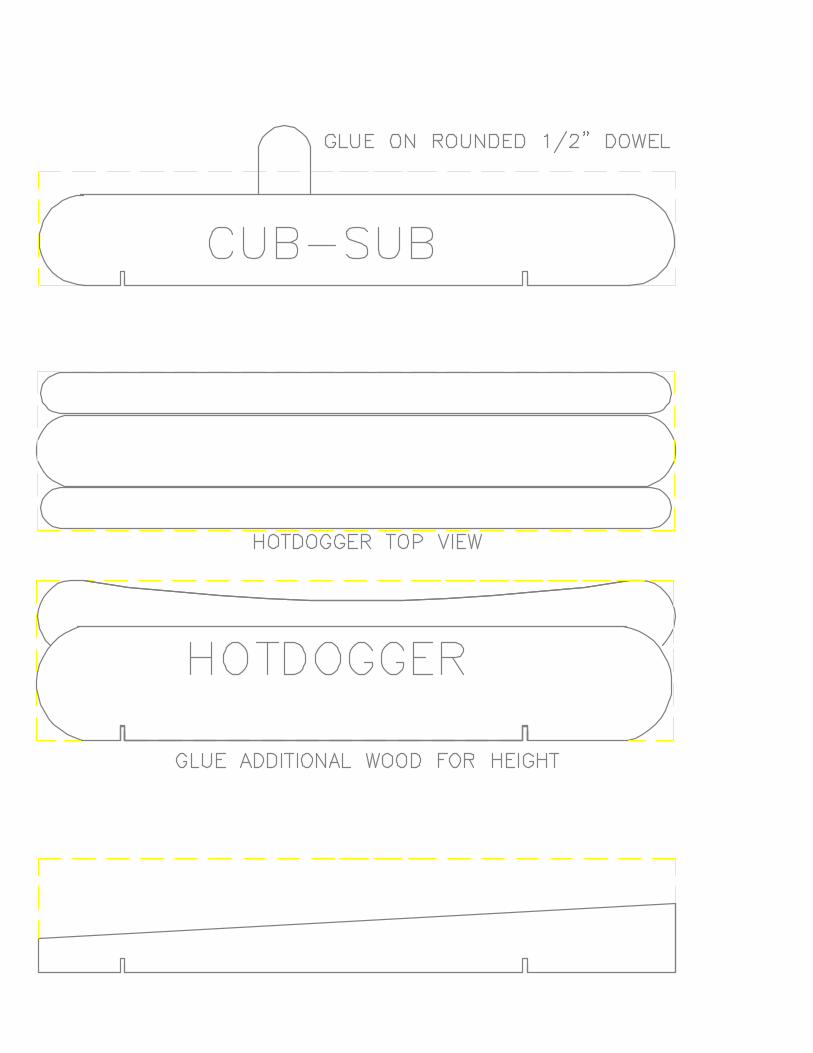
The base Derby car is a simple rectangular wood block. What you do with this block is up to you. Take a moment to look at the templates and the pictures on the following pages. These have been included for inspiration. You can either use these templates “As Is” and spend your energy on a superior paint job or use them as a starting point for something else.
This section was not intended to give you solutions to building problems for a car. The purpose of this section IS to get you and the Scout to start brainstorming a design and then start looking around for junk and scraps that will help you pull it off. If you and your Scout have a design idea but you just don't know how to pull it off then speak up. One of the more experienced adults is sure to have solutions.
Don't forget that the builders clinic will not only have tools available it will also have years of collective experience. It has been scheduled far enough in advance of the race to give ample time to complete your car.
As a final note, the most important advice we can give you is HAVE FUN. This is a team event! The team is you and your Scout.

�����������
�������������������������������������������������������� �������������
����������������������������������������������������������������� ������������
����������������������������������������������������� ����������
������������������������������ ��������
����������������������������������������������������������������������
�����������������������������������������������������������������������������
���������
����������������������������������������������������������������������
������������������������������������
��������������
������������������ ����
�����������������������������������������������������������������������������
������������������������������������������������������������������
��������������������
�� �������������������� ��������������������������������������
�� ��������������� ��������������
�� �������������������������������������������������������������������������
�� ����������������������������������������������������������
�� ������ ��� �� ������ �� ������� � ���� ����� ������ ��� ���� ������ ��� �������� ����� ��� ����
����������������
�� ����������������������
�� �����������������������������������������������������������������������
�� ������ ���� �� ������ �� � ���� ������� �� ������ ���� ��� ������ ����� �� �� ����� � ������ ����
�������������������������������������������
�� ���������� �� ���� ���� ����� �� ���� ��� ��� ������ ��������� �������� �������� �� �������
�����������������������������������������
�� ��������������������������������������������������������������������������������������������
�� ����������������������������������������������������������������������������������������������������
�����������������������������������������������������������������������������������������������
���������������������������������
�� �����������������������������������������������������������������������������������������
�� ������������������������������������������������������������������������