ox documents release v7.8 - software.open … document provides an overview of the new features...
TRANSCRIPT

OX Documents Release v7.8.4
Feature Overview

© Copyright 2017, Open-Xchange Inc. - 2 -
1 Objective of this Document ......................................................................... 3
1.1 The Purpose of this Document .......................................................... 3
2 General Improvements ................................................................................. 4
2.1 Security First: Working with Encrypted Files (OX Guard) .................. 42.2 Image Preview in File Picker .............................................................. 52.3 OX Text and OX Spreadsheet: Working with Shapes ....................... 52.4 Formatting Arrows .............................................................................. 9
3 OX Text ........................................................................................................ 10
3.1 Create Table of Contents ................................................................. 103.2 Disable Notification about Unavailable Languages .......................... 123.3 Repeat Table Header ....................................................................... 13
4 OX Spreadsheet .......................................................................................... 14
4.1 Formula Bar ..................................................................................... 144.2 Sort in Filtered Tables ...................................................................... 154.3 Table Styles ..................................................................................... 164.4 Change Sheet Protection ................................................................. 174.5 Lock or Unlock Specific Areas of a Protected Worksheet ................ 174.6 Display Chart Sheets ....................................................................... 18
5 OX Presentation .......................................................................................... 19
5.1 Support for OpenOffice / LibreOffice ................................................ 195.2 Insert Placeholder in Master & Layout Slides .................................. 205.3 Save as Template ............................................................................ 215.4 Format Shapes with Multi-Selection ................................................ 22
© Copyright 2017, Open-Xchange Inc. - 3 -
1 Objective of this Document
1.1 The Purpose of this Document
This document provides an overview of the new features available in the OX Documents v7.8.4 release. This release focused mainly on the following topics:
1. Working with encrypted documents
2. Creating more complex documents
3. Editing OpenOffice / LibreOffice presentations
Working with encrypted documents is now as easy as working with unencrypted documents as editing can be done without the need for users to decrypt the document first and then encrypt it after editing.
OX Text documents can now be more complex and longer with the new ability to create a table of contents.
OX Spreadsheet now allows an easier formula creation with the new formula bar.
OX Presentation users can now also edit presentations created with OpenOffice or LibreOffice.
The objective of this document is to help Open-Xchange customers and partners understand the benefits and features of all improvements in OX Documents.

© Copyright 2017, Open-Xchange Inc. - 4 -
2 General Improvements
2.1 Security First: Working with Encrypted Files (OX Guard)
More and more users are understanding how important the safeguarding of sensitive data and personal information is. OX Guard is a fully integrated security add-on to OX App Suite. It provides users with easy to use file encryption. OX Documents supports working with OX Guard encrypted documents. The goal of this support is to encourage use and drive familiarity with encryption.
Encrypted documents can be edited directly without the need for users to decrypt the document first and then encrypt it after editing. All versions edited with OX Documents are also encrypted automatically.
Encrypted documents can easily be identified in OX Documents. A lock indicates that a document is encrypted in the list of recent documents.
Encrypted document in recent document list
While editing an encrypted document users can see the lock also in the tab bar.
Tab bar with encrypted documents
Creating a new encrypted document is now as easy as creating any other document. The option to create an encrypted document is always next to creating a non-encrypted document. Also, for templates, the context menu allows for easy creation of an encrypted document via the context menu.

© Copyright 2017, Open-Xchange Inc. - 5 -
Creating new encrypted documents in OX Text
Further information about OX Guard can be found here.
2.2 Image Preview in File Picker
Adding images can make a document more interesting and engaging. Images can be inserted with the file picker. This file picker now shows a preview of the selected image before inserting it into the document. This gives users more control over images from digital cameras which often just have a sequential file name with some random collection of letters and numbers.
Image preview in “Insert image” dialog
2.3 OX Text and OX Spreadsheet: Working with Shapes
Shapes are predefined objects like circles, squares, arrows, stars and lines. Introduced with OX Presentation the same shapes can now also be created and edited in OX Text and OX Spreadsheet.

© Copyright 2017, Open-Xchange Inc. - 6 -
Shape gallery
Shapes are grouped in the following types:
• Recently used
• Lines
• Basic shapes
• Rectangles
• Block arrows
• Flow charts
• Stars and banners
• Equation
© Copyright 2017, Open-Xchange Inc. - 7 -
A shape in OX Text and OX Spreadsheet offers the same features as in OX Presentation:
• Copy or add new text to a shape, just start typing immediately after a shape is drawn
• Change border style, border color and background color of a shape
• Arrange shapes, so that one shape appears in front of another
• Rotate and flip shapes
• Align and distribute a shape in relation to itself and other objects
• Change height and width at the same time
• Resize shape vertically or horizontally
Inserting shapes with locked aspect ratio To avoid stretching a shape out of proportion it is possible to insert a shape with locked aspect ratio. Press the SHIFT key and the inserted shape can be resized proportionally. This allows an easy creation of circles or squares. If the CTRL key is pressed, the shape is resized from the center.
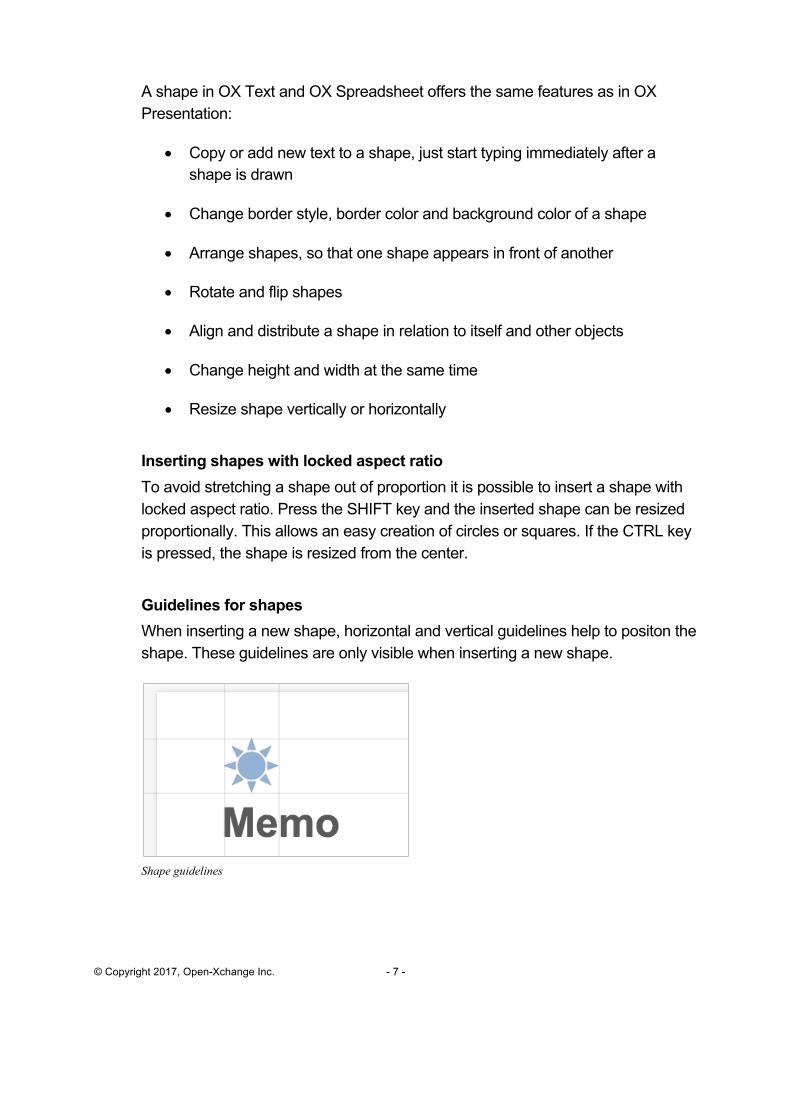
Guidelines for shapes When inserting a new shape, horizontal and vertical guidelines help to positon the shape. These guidelines are only visible when inserting a new shape.
Shape guidelines

© Copyright 2017, Open-Xchange Inc. - 8 -
Flip shapes A position of a shape can be changed in many ways. Flipping, or mirroring, a shape is now also possible via the mouse and not only via toolbar options. Select any of the shape handles and drag toward the other end of the shape. Keep dragging beyond the shape to the other side in order to flip the shape. Flipping a shape
Inserting shapes quickly Working with shapes often requires adding more than one shape. After a shape is inserted, the “Shape” toolbar is active to format the shape. Now a new shapes can easily be inserted with the “Shape” toolbar without switching to the “Insert” toolbar.
Inserting shapes form “Shape” toolbar

© Copyright 2017, Open-Xchange Inc. - 9 -
2.4 Formatting Arrows
Shapes can also be used to create arrows. Arrows can be very useful to highlight any element in your document. In addition to the different line types in the shape gallery, the arrow heads can now be customized with arrow styles.
Arrow styles
The “Line” toolbar is a contextual tab and only visible when needed. These line options are only visible when a line is selected.

© Copyright 2017, Open-Xchange Inc. - 10 -
3 OX Text
3.1 Create Table of Contents
A table of contents makes it easier for readers to work with long documents. In former versions of OX Text is was already possible to see an existing table of contents in a document. Now it is also possible to create your own table of content directly in OX Text.
In OX Text, tables of contents rely on the use of styles to format headings. If the styles “Heading 1”, “Heading 2” and ”Heading 3” are used to format a heading, a table of contents can be inserted. Click in the document where the table of contents should be created. Select “Table of contents” in the “Insert” toolbar and choose the layout of the table of contents that should be inserted.
Table of contents layouts OX Text will create a table of contents from the document text you styled with one of the three heading styles “Heading 1”, “Heading 2”, and “Heading 3”.
New table of contents

© Copyright 2017, Open-Xchange Inc. - 11 -
The example in the screenshot above includes a string of dots between the heading text and the page number for each heading. As the table of contents is created based on styles, it is also built to be formatted with styles. It is possible to change the formatting attributes of the table of contents for each heading level and update the style. Any formatting that is only applied directly to the table of contents without updating the style is discarded whenever the table of contents is updated.
After editing a longer document, page numbers and heading may change, which will make the table of contents out of date. To update a table of contents, right-click in the table and choose “Update field”. “Update all fields” will not only update the page numbers but also add new headings to the table of contents.
Update the table of contents
© Copyright 2017, Open-Xchange Inc. - 12 -
3.2 Disable Notification about Unavailable Languages
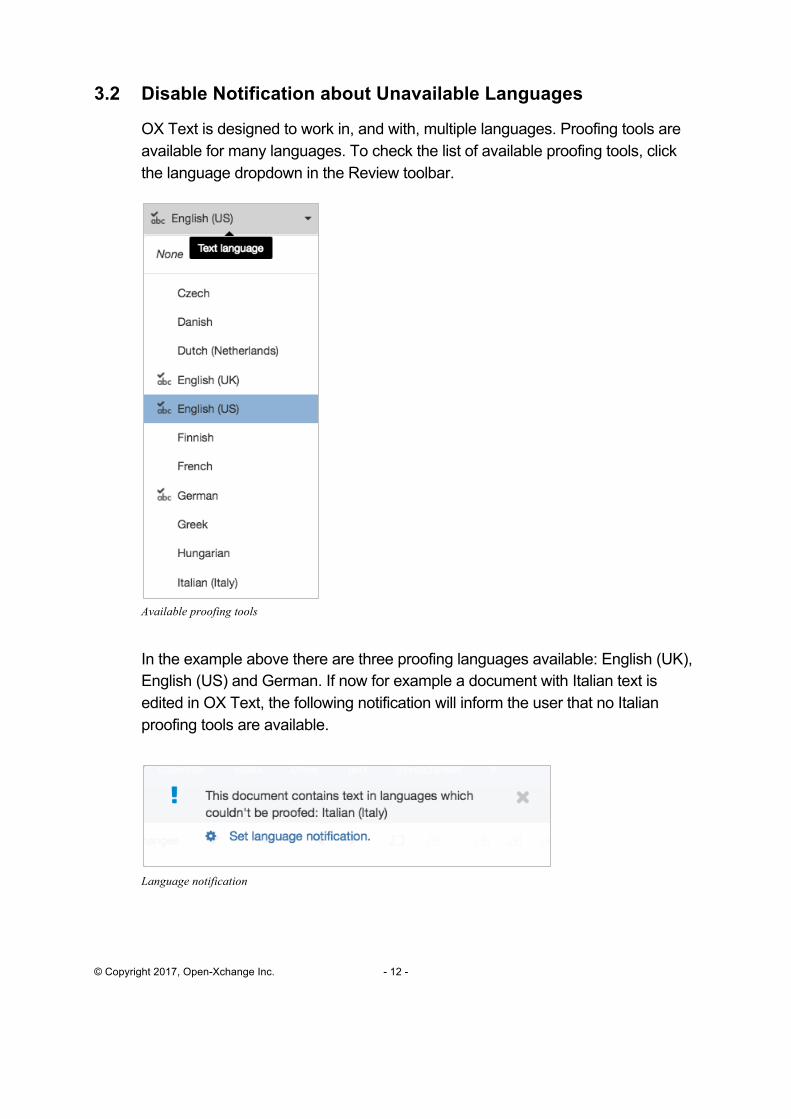
OX Text is designed to work in, and with, multiple languages. Proofing tools are available for many languages. To check the list of available proofing tools, click the language dropdown in the Review toolbar.
Available proofing tools
In the example above there are three proofing languages available: English (UK), English (US) and German. If now for example a document with Italian text is edited in OX Text, the following notification will inform the user that no Italian proofing tools are available.
Language notification

© Copyright 2017, Open-Xchange Inc. - 13 -
This user is now able to control this notification and disable it for all documents with Italian text if needed. This notification can be enabled again in settings.
Unsupported spell checker notification
3.3 Repeat Table Header
If a table extends over several pages in a document, it’s useful to be able to repeat the row at the top of each page automatically, so that the reader has a better overview about what the different columns contain. This repeating table header stays there no matter what is changed in the table.
OX Text is able to display repeating table headers, if they are defined in a document. Note: Defining repeating headers in OX Text will be possible in one of the next OX Text releases.
Repeat table header
© Copyright 2017, Open-Xchange Inc. - 14 -
4 OX Spreadsheet
4.1 Formula Bar
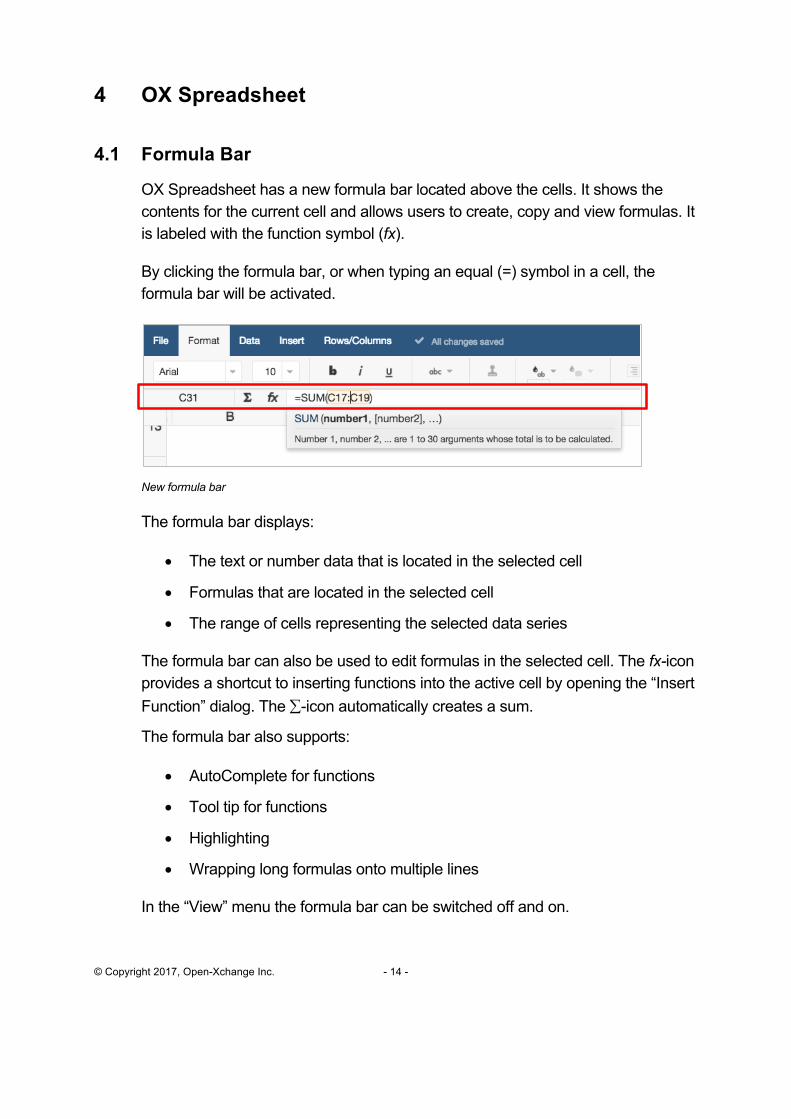
OX Spreadsheet has a new formula bar located above the cells. It shows the contents for the current cell and allows users to create, copy and view formulas. It is labeled with the function symbol (fx).
By clicking the formula bar, or when typing an equal (=) symbol in a cell, the formula bar will be activated.
New formula bar
The formula bar displays:
• The text or number data that is located in the selected cell
• Formulas that are located in the selected cell
• The range of cells representing the selected data series
The formula bar can also be used to edit formulas in the selected cell. The fx-icon provides a shortcut to inserting functions into the active cell by opening the “Insert Function” dialog. The å-icon automatically creates a sum.
The formula bar also supports:
• AutoComplete for functions
• Tool tip for functions
• Highlighting
• Wrapping long formulas onto multiple lines
In the “View” menu the formula bar can be switched off and on.

© Copyright 2017, Open-Xchange Inc. - 15 -
4.2 Sort in Filtered Tables
Filters in OX Spreadsheet allow to better analyze data. The filter offers a list of the unique values in this column. In addition, it is now possible to sort the items.
New sort option in filter
When data is filtered, only rows that meet the filter criteria are displayed, and other rows are hidden. Users can now also choose to sort filtered tables. A small down or up arrow will appear next to the filter icon.
Sort in filtered tables
To clear the filter, click the filter icon in the “Data” toolbar.

© Copyright 2017, Open-Xchange Inc. - 16 -
4.3 Table Styles
In Microsoft Excel a range of cells can be formatted by choosing a predefined table style. OX Spreadsheet imports these table styles and makes them available in a new toolbar control. The gallery of table styles appears if a table is selected that is formatted with a table style. The Gallery is divided into three sections – Light, Medium, and Dark, which describes the intensity of the colors used by its various formats.
The user can change the format for an existing table by selecting a different style and apply it to the table. Also a multi-selection for tables is supported
Note: Formatting new tables with table styles is not yet support in OX Spreadsheet but will be added in one of the next releases.
Gallery of table styles
© Copyright 2017, Open-Xchange Inc. - 17 -
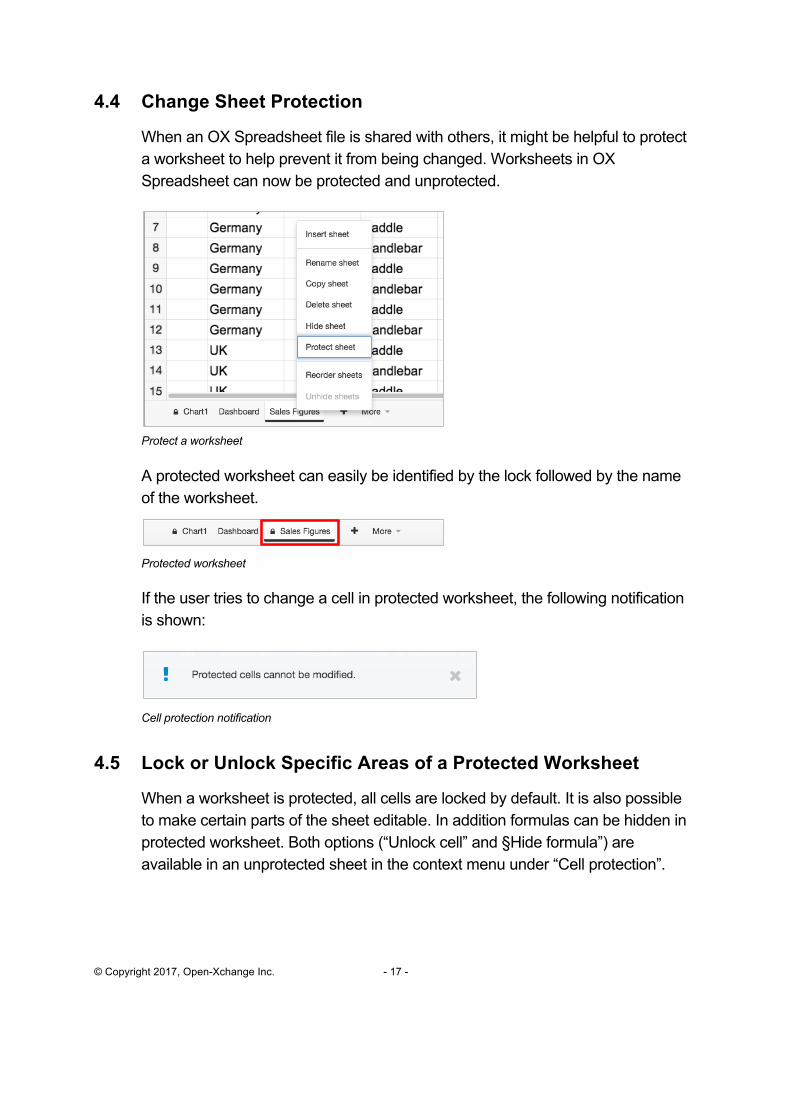
4.4 Change Sheet Protection
When an OX Spreadsheet file is shared with others, it might be helpful to protect a worksheet to help prevent it from being changed. Worksheets in OX Spreadsheet can now be protected and unprotected.
Protect a worksheet
A protected worksheet can easily be identified by the lock followed by the name of the worksheet.
Protected worksheet
If the user tries to change a cell in protected worksheet, the following notification is shown:
Cell protection notification
4.5 Lock or Unlock Specific Areas of a Protected Worksheet
When a worksheet is protected, all cells are locked by default. It is also possible to make certain parts of the sheet editable. In addition formulas can be hidden in protected worksheet. Both options (“Unlock cell” and §Hide formula”) are available in an unprotected sheet in the context menu under “Cell protection”.

© Copyright 2017, Open-Xchange Inc. - 18 -
4.6 Display Chart Sheets
A chart sheet is a Microsoft Excel worksheet that is dedicated to one chart. A chart in Excel is usually embedded into a sheet with other data. However, this chart can be moved to a separate sheet. OX Spreadsheet can now display chart sheets.
Chart sheet
Notice: Chart sheets are write protected and can only be displayed but not created in OX Spreadsheet.

© Copyright 2017, Open-Xchange Inc. - 19 -
5 OX Presentation
5.1 Support for OpenOffice / LibreOffice
OX Presentation can now also edit the OpenDocument Format (ODF), which is used by OpenOffice and LibreOffice.
OX Presentation now supports .odp-files
OX Presentation works natively with PowerPoint and OpenOffice Impress presentations. The document format of the presentation will not be changed in OX Presentation. This allows a smooth collaboration with Microsoft and OpenOffice and LibreOffice users.
Note: New presentations created in OX Presentation use the Office Open XML (OOXML) format, which is used by Microsoft PowerPoint.

© Copyright 2017, Open-Xchange Inc. - 20 -
5.2 Insert Placeholder in Master & Layout Slides
New placeholders can now be inserted in OX Presentation, which helps to create good looking presentations based on templates. A placeholder is a box with a dotted border, designed for the placement of content on a slide. This placeholder is most commonly used for text and can only be inserted in the “Master” view.
On a layout slide the following placeholders can be inserted:
• Title
• Footer objects
• Content
• Content vertical
• Text
• Text vertical
• Image
• Table
Inserting placeholder on a layout slide
The slide master is the largest slide at the top of the slide pane to the left of the screen. Related slide layouts are positioned beneath the slide master. The slide

© Copyright 2017, Open-Xchange Inc. - 21 -
master influences the layout of all slides in a presentation. Therefore only basic placeholders for the design are laid down in the slide master, whereas layout slides allow users to insert all placeholders.
Inserting placeholder on a master slide
5.3 Save as Template
Presentation templates are saved to a file with the extension .potx and will automatically show up in the first line of the template view.
Saving a template

© Copyright 2017, Open-Xchange Inc. - 22 -
5.4 Format Shapes with Multi-Selection
OX Presentation supports selecting multiple objects. Now it is also possible to change formatting, such as border style, border color and background color, for multi-selected shapes.
Formatting multiple shapes