owner’s manual - seljan company control cooler applies to models ... drop-offs such as: steps,...
TRANSCRIPT

Remote Control CoolerApplies to Models: ROVER, TRUCK, ZAMBONI
Styles and colors may varyDesigned, Molded and Assembled in the USA
Owner’s Manual This manual contains assembly, use and maintenance
instructions. The remote controlled cooler must be assembled by an adult who has read and understands the instructions in this manual.
Keep packaging away from children and properly dispose of all packaging. Keep instructions for future reference.

2
If you have any questions or comments, please contact us at: C3 Custom Cooler Creations 100 South CP Avenue Lake Mills, WI 53551 1-844-723-4909 [email protected] www.c3customcoolers.com
Important!Do not return the product to the store. Please contact customer service at 1-844-723-4909 for assistance and replacement parts.
Safety. . . . . . . . . . . . . . . . . . . . . . . . . . . . . . . . . . . . . . . . . . . . . . . . . . . . . . . . . . . . 03 General Warnings . . . . . . . . . . . . . . . . . . . . . . . . . . . . . . . . . . . . . . . . . . . . . . . . 03 Battery Warnings . . . . . . . . . . . . . . . . . . . . . . . . . . . . . . . . . . . . . . . . . . . . . . . . 04 User Requirements and Warnings . . . . . . . . . . . . . . . . . . . . . . . . . . . . . . . . . . . 05 Care Warnings . . . . . . . . . . . . . . . . . . . . . . . . . . . . . . . . . . . . . . . . . . . . . . . . . . 05
Parts. . . . . . . . . . . . . . . . . . . . . . . . . . . . . . . . . . . . . . . . . . . . . . . . . . . . . . . . . . . . . 06 List and Pictures . . . . . . . . . . . . . . . . . . . . . . . . . . . . . . . . . . . . . . . . . . . . . . . . . 06
Assembly. . . . . . . . . . . . . . . . . . . . . . . . . . . . . . . . . . . . . . . . . . . . . . . . . . . . . . . . . 08 Use . . . . . . . . . . . . . . . . . . . . . . . . . . . . . . . . . . . . . . . . . . . . . . . . . . . . . . . . . . . . . . 10 Charging the battery . . . . . . . . . . . . . . . . . . . . . . . . . . . . . . . . . . . . . . . . . . . . . . 10 Re-charging interval and time. . . . . . . . . . . . . . . . . . . . . . . . . . . . . . . . . . . . . . . 10 Battery Storage. . . . . . . . . . . . . . . . . . . . . . . . . . . . . . . . . . . . . . . . . . . . . . . . . . 10 Battery Replacement and Disposal. . . . . . . . . . . . . . . . . . . . . . . . . . . . . . . . . . . 10 Cooler Operating Parts . . . . . . . . . . . . . . . . . . . . . . . . . . . . . . . . . . . . . . . . . . . . 11 Cooler Control Panel Functions . . . . . . . . . . . . . . . . . . . . . . . . . . . . . . . . . . . . . 11 Turning On Cooler . . . . . . . . . . . . . . . . . . . . . . . . . . . . . . . . . . . . . . . . . . . . . . . 11 Operating MP3 Speakers . . . . . . . . . . . . . . . . . . . . . . . . . . . . . . . . . . . . . . . . . . 11 Operating Headlights . . . . . . . . . . . . . . . . . . . . . . . . . . . . . . . . . . . . . . . . . . . . . 11 Operating Remote Control . . . . . . . . . . . . . . . . . . . . . . . . . . . . . . . . . . . . . . . . . 12
Maintenance . . . . . . . . . . . . . . . . . . . . . . . . . . . . . . . . . . . . . . . . . . . . . . . . . . . . . . 13
Services, Repairs and Parts . . . . . . . . . . . . . . . . . . . . . . . . . . . . . . . . . . . . . . . . . 13
Troubleshooting Guide . . . . . . . . . . . . . . . . . . . . . . . . . . . . . . . . . . . . . . . . . . . . . 14
Warranty . . . . . . . . . . . . . . . . . . . . . . . . . . . . . . . . . . . . . . . . . . . . . . . . . . . . . . . . . 16
Contact Information . . . . . . . . . . . . . . . . . . . . . . . . . . . . . . . . . . . . . . . . . . . . . . . . 16
Table of Contents
Thank You For Your Purchase

3
General Warnings• Contains small parts, for adult assembly only. Keep small children away when assembling. Remove and dispose of all packaging material before assembly. Be sure to remove all packaging materials and parts from underneath the RC cooler body.
• Battery posts, terminals and related accessories contain lead and lead compounds (acids) chemicals known to the state of California to cause cancer, reproductive harm, and are toxic and corrosive. Never open battery.
• Body parts such as hands, legs, hair and clothing can get caught in moving parts. Never place a body part near a moving part or wear loose clothing while using the remote controlled cooler. Always wear shoes when using the remote controlled cooler.
• Using the remote controlled cooler near streets, motor vehicles, drop-offs such as: steps, water (swimming pools) or other bodies of water, sloped surfaces, hills, wet areas, flammable vapors, in alleys, at night or in the dark could result in an unexpected accident. Always use the remote controlled cooler in a safe, secure environment with continuous adult supervision.
• Using the cooler in unsafe conditions such as snow, rain, loose dirt, mud, wet sand or fine gravel may result in unexpected action such as tipping over and skidding, and damage to the electrical system and battery.
• Refrain from using the remote controlled cooler in an unsafe manner Examples include but are not limited to:
• Riding on top of or inside of the cooler
• Pulling the RC cooler with another vehicle or similar device
• Overloading cooler body (maximum load weight: 60 lbs.)
• Operating cooler outside of your line of sight
• Operating cooler at an unsafe speed for operating environment
Safety
WARNING!

4
Battery Warnings• Use of a battery or charger other than the 12V rechargeable
battery and charger supplied with the C3 cooler may cause a fire or explosion. Only use the supplied 12V rechargeable battery and charger with the C3 cooler.
• Liquids on the battery may cause fire or electric shock. Always keep all liquids away from the battery and keep the battery dry.
• Using the 12V rechargeable battery and charger for any product other than the C3 cooler may result in overheating, fire or explosion. Never use the C3 cooler 12V rechargeable battery and charger with another product.
• Explosive gases are created during charging. Charge the battery in a well ventilated area. Do not charge the battery near heat or flammable materials.
• Contact between the positive and negative terminals may result in fire or explosion. Avoid direct contact between the terminals. Picking up the battery by the wires or charger can cause damage to battery and may result in a fire. Always pick up battery by its case or handles.
• Tampering or modifying the electric circuit system may cause a shock, fire or explosion and permanently damage the system. Exposed wiring and circuitry in the charger may cause electric shock. Always keep the battery housing closed.
• Contact or exposure to battery leakage (lead acid) may cause serious injury. If contact or exposure occurs immediately call your physician. If the chemical is on the skin or in the eyes, flush with cool water for 15 minutes. If the chemical is swallowed, immediately give the person water or milk. Do not give water or milk if patient is vomiting or has a decreased level of alertness. Do not induce vomiting.
• Battery posts, terminals and related accessories contain lead compounds (acid), chemicals known to the State of California to cause cancer, reproductive harm and are toxic and corrosive. Never open the battery.
WARNING!

5
User Requirements and Warnings• Age Range: 16 years and older
• Maximum Load Weight: 60 lbs.
• Do not ride on, sit or stand on remote controlled cooler
• Only operate remote controlled cooler under adult supervision
• Always operate remote controlled cooler within your line of sight
• Keep your hands, hair and clothes away from moving parts
• Always wear shoes when using the remote controlled cooler
• Only drive on level ground
• Do not go near water, drop-offs or up and down steep slopes
• Do not drive cooler into loose dirt, mud, wet sand or fine gravel
• Do not drive cooler on streets or near cars
• Do not operate at night
• Do not drive cooler into people or objects
WARNING!
Care Warnings• NEVER RIDE IN OR ON TOP OF COOLER
• NEVER LEAVE COOLER UNATTENDED. ALWAYS keep children in view while operating cooler. Direct adult supervision is REQUIRED.
• NEVER use in roadways, near cars, on or near steep inclines or steps, swimming pools or other bodies of water
• ALWAYS wear shoes
• NEVER sit or stand on cooler
• NEVER overload cooler
• RISK OF FIRE. Do not bypass. Replace only with C3 Cooler battery, charger and circuitry.
• Park the remote controlled cooler indoors or cover it with a tarp to protect it from wet weather
• Do not leave the remote controlled cooler in the sun for long periods of time or fading may occur. Store in shade or cover with tarp.
• Do not wash with a hose or immerse in water

6
(1) Cooler Body • Includes:
• (1) 12 volt, 10A battery
• (2) working headlights
• (2) speakers
(1) Front axle assembly
(1) Front steering rod
(1) Rear axle rod
(6) Washers
(1) Lock nut
(1) Bolt
Parts
Important! Check that you have all parts before assembly.

7
Parts
Important! Check that you have all parts before assembly.
To order replacement parts, refer to our website: www.c3customcoolers.com
(6) Cotter pins
(4) Wheels
(4) Hubcaps
(1) Battery Charger
(1) Remote Control
(2) AAA Batteries

8
Step 4Insert front axle assembly as shown.
Insert (1) cotter pin in both bottom ends of front axle assembly.
Using needle nose pliers, bend back longer end of cotter pin to secure.
Attaching WheelsTools required: Phillips head screwdriver, wrench or needle nose pliersAssembly time: 10 minutes
Assembly
Step 3Line up notches on hubcaps with notches on wheels.
Gently press hubcaps to snap into place.
Step 1Place cooler body upside down on a non-abrasive, clean surface.
Remove rubber band from rear gear box assembly.
Holding gear boxes firmly in place, slide rear axle through gear boxes.
Step 2Place a wheel on left rear axle, then a washer.
Make sure the flat side of the wheel faces out as shown and inner wheel fits into gear box.
Insert (1) cotter pin through the axle to secure wheels.
Using needle nose pliers, bend back longer end of cotter pin to secure.
Repeat for right rear axle.
remove rubber band
insert pin & bend back

9
AssemblyStep 5Insert steering rod into gear box.
Using a Phillips head screwdriver and wrench, secure steering rod in place with bolt and lock nut.
Step 6Place a washer on left front axle, then wheel, then another washer.
Make sure the flat side of wheel faces out as shown.Insert (1) cotter pin through axle to secure wheels.
Using needle nose pliers, bend back longer end of cotter pin to secure.
Repeat for right front axle.insert pin & bend back
Step 7 Line up notches on hubcaps with notches on wheels.
Gently press hubcaps to snap into place.
Step 8 Pair cooler remote.
Refer to instructions on page 12 of the Owner’s Manual.
Step 9Charge battery for 12 hours.
Refer to instructions on page 10 of the Owner’s Manual.

10
Use
Charging the battery1. Locate battery charger
2. Plug round end of charger into charging port on back of cooler
3. Plug pronged end of charger into a standard 120V wall outlet
• Do not use an extension cord
4. Charge cooler for 12 hours to ensure a full charge
5. After charging is complete, unplug charger from wall and cooler
Re-Charging Interval and Time• On average, returning battery to a full charge will take 10 - 12 hours. Failure to charge battery as directed could cause permanent damage to battery and void warranty. Damage to battery may occur if allowed to drain completely. Do not allow battery to drain completely.
• Check battery charger and charging port for wear and damage prior to charging. Do not charge battery if damage has occurred. Only use the provided 12V rechargeable battery and charger.
Battery Storage• Store battery where temperatures are between -10°F and 75°F. Store on a wood surface. Do not store battery on cement floors, as this will result in battery discharge. Wipe battery clean with a dry cloth prior to storage. Charge battery at least once per month.
Battery Replacement and Disposal1. Remove back control panel cover from cooler, cut white zip ties, pull out old battery and disconnect the red and black wires from the battery.
2. Use the double-sided tape included with replacement battery and place two strips on the bottom of the replacement battery.
3. With the replacement battery outside of cooler, attach red and black wires to the top of the new battery, reference the red and black markings on the terminals.
4. Place new battery inside cooler on tray, pressing firmly to adhere double-sided tape to tray.
5. Using (2) zip ties included with replacement battery, secure zip ties around battery and tray on both sides, cut excess tie length.
6. Replace control panel cover to the cooler and charge battery (12) hours to ensure full charge.
7. Follow local battery disposal statutes & codes in disposal of battery waste.

11
Cooler Operating Parts1. Remote Control: Use to steer cooler right, left, forward and reverse
2. Power Switch: Flip switch to turn power on and off
3. Headlight Switch: Flip switch to turn headlights on and off
4. Speaker Switch: Flip switch to turn speakers on and off
5. MP3 Player Port: Plug in MP3 player here using MP3 cable included
6. Battery Charging:
• On Cooler: A red light indicates the charger is plugged in to cooler
• On Charger: A green light indicates a full charge and red indicates partial to no charge
Cooler Control Panel Functions
Turning On Cooler• Flip switch to turn cooler on and off. “I” is On, “O” is Off.
Operating MP3 Speakers• Flip switch to turn speakers on and off. “I” is On, “O” is Off.
Operating Headlights• Flip switch to turn headlights on and off. “I” is On, “O” is Off.
Use

12
UseOperating Remote Control
1. Pairing the Remote to the Cooler
• Ensure (2) AAA batteries are installed in the remote
• Ensure cooler power is switched OFF
• Press and HOLD Pairing Button. The green indicator light above button will blink rapidly
• Continue holding Pairing Button and turn cooler’s main power switch ON. Within a couple seconds, you will hear a slight buzz as pairing occurs.
• The remote will now control cooler
2. Direction Controls
• Forward: Press the “Up” button to move the cooler forward
• Backward: Press the “Down” button to move the cooler backward
• Left: Press the “Left” button to turn the cooler left
• Right: Press the “Right” button to turn the cooler right
3. Speed Controls
• Press button once for Low speed. One indicator light illuminates.
• Press button twice for Medium speed. Two indicator lights illuminate.
• Press button three times for High speed. Three indicator lights illuminate.
4. Sleep Mode
• Remote will “sleep” after 10-15 seconds of non-use to preserve battery
• Pressing any button will re-activate remote functionality
Select Speed
Pairing Button
Forward
TurnLeft
TurnRight
Reverse
Speed SettingLow - Medium - High

13
• Check the tightness of wheels
• Ensure the battery is properly charged before use
• Occasionally use lightweight oil to lubricate moving parts such as wheels and steering linkage. Do not oil plastic parts.
• Store the cooler indoors or cover it with a tarp to protect it from the wet weather. Keep it away from sources of heat, such as stoves and heaters.
• Clean the cooler with a soft, damp cloth. To restore shine to plastic parts, use a non-wax furniture polish. Do not use car wax, abrasive cleaners or wash with soap and water, as water may damage the motor, electrical system and battery.
• Call C3 Cooler Consumer Relations at 1-844-723-4909 if you have any questions regarding cooler maintenance.
Maintenance
DO NOT RETURN this product to the place of purchase.
If your RC cooler needs service, repairs or replacement parts, contact:
C3 Custom Cooler Creations 1-844-723-4909 [email protected] www.c3customcoolers.com
To order parts, please note serial number found on bottom of cooler.
The following is a list of available replacement parts:
• Wheels
• Hubcaps
• Brush Guard
• 12V C3 replacement battery
• Battery charger
• Drain Plug
• Headlights
• Control Panel
• Other parts available upon customer request
Services, Repairs and Parts
14
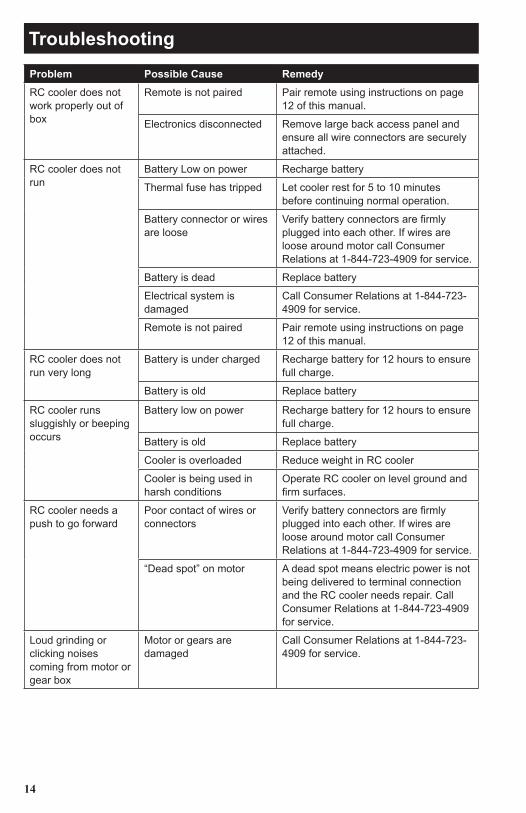
TroubleshootingProblem Possible Cause RemedyRC cooler does not work properly out of box
Remote is not paired Pair remote using instructions on page 12 of this manual.
Electronics disconnected Remove large back access panel and ensure all wire connectors are securely attached.
RC cooler does not run
Battery Low on power Recharge battery
Thermal fuse has tripped Let cooler rest for 5 to 10 minutes before continuing normal operation.
Battery connector or wires are loose
Verify battery connectors are firmly plugged into each other. If wires are loose around motor call Consumer Relations at 1-844-723-4909 for service.
Battery is dead Replace battery
Electrical system is damaged
Call Consumer Relations at 1-844-723-4909 for service.
Remote is not paired Pair remote using instructions on page 12 of this manual.
RC cooler does not run very long
Battery is under charged Recharge battery for 12 hours to ensure full charge.
Battery is old Replace battery
RC cooler runs sluggishly or beeping occurs
Battery low on power Recharge battery for 12 hours to ensure full charge.
Battery is old Replace battery
Cooler is overloaded Reduce weight in RC cooler
Cooler is being used in harsh conditions
Operate RC cooler on level ground and firm surfaces.
RC cooler needs a push to go forward
Poor contact of wires or connectors
Verify battery connectors are firmly plugged into each other. If wires are loose around motor call Consumer Relations at 1-844-723-4909 for service.
“Dead spot” on motor A dead spot means electric power is not being delivered to terminal connection and the RC cooler needs repair. Call Consumer Relations at 1-844-723-4909 for service.
Loud grinding or clicking noises coming from motor or gear box
Motor or gears are damaged
Call Consumer Relations at 1-844-723-4909 for service.

15
TroubleshootingProblem Possible Cause Remedy12V Battery will not recharge
Battery connector or adapter connector is loose
Verify battery connectors are firmly plugged into each other. If wires are loose around motor call Consumer Relations at 1-844-723-4909 for service.
Charger not plugged in Ensure battery charger is plugged into a working wall outlet.
Charger is not working (lights not glowing)
Call Consumer Relations at 1-844-723-4909 for service.
Battery bubbles or gurgles when charging
This is normal and not a cause for concern
No remedy needed.
Charger feels warm when recharging
This is normal and not a cause for concern
No remedy needed.
Music output has static
Volume on device is turned up too high
Adjust volume on music playing device lower until quality is restored (approximately 80% of volume on most devices).
Auxiliary cord is damaged Replace auxiliary cord with any standard MP3 auxiliary cord.
Cooler does not turn smoothly
Bolts on front axle assembly needs to be tightened
Turn cooler over and place on a non-abrasive, clean surface. Tighten bolts on front axle assembly until they no longer turn, then loosen very slightly. Do not over-tighten bolts, or turning radius will not be sharp.
16
90 Day Limited WarrantySeljan Company warrants that this product will be free from defect due to material and workmanship under normal use for a period of 90 days from the date of purchase. Please retain receipt for proof of purchase. Proof of purchase is required for any warranty claim. Warranty is void if product is abused, disassembled or exposed to atmosphere or conditions other than stated within instructions. If product fails within the specified time, return product with all accessories, original packing material and a copy of the sales receipt to Seljan Company. Your item will be repaired or replaced within six weeks of receipt of your product. Please ship your product to:
Seljan Company C3 Custom Cooler Creations 100 South CP Avenue Lake Mills, WI 53551 920-648-3402
Disclaimer of WarrantyWarranty is invalid if purchaser fails to properly operate and/or maintain the product. This Warranty is not transferable to third parties. There is no warranty for fitness for a particular purpose. This Warranty is in lieu of all other Warranties expressed or implied. No representative or any other person is authorized or permitted to make any Warranty changes or assume on behalf of Seljan Company any liability not strictly in accordance with this Warranty.Seljan Company shall not be liable for special or consequential loss or damages, direct or indirect, such as, but not limited to, damage or loss of property or equipment, loss of profit or revenue, loss of use of the product, cost or replacement of the product, or claims for service interruptions.Tampering, accident, abuse, negligence, unauthorized repairs or other causes unrelated to defective materials or workmanship will void this Warranty. This Warranty does not cover costs associated with shipping the product to the manufacturer. This Warranty does not cover replacement of remote battery.
Warranty Policy
If you have any questions or comments please contact us at:
C3 Custom Cooler Creations100 South CP AvenueLake Mills, [email protected]
Contact Information