owner's manual garage door opener - liftmaster · this garage door opener is designed and...
TRANSCRIPT

Garage Door OpenerModels:
139.53225SRT - 1/4 HP139.53325SRT - 1/3 HP139.53425SRT - 1/2 HP139.53628SRT - 1/2 HP139.53629SRT - 1/2 HP139.53635SRT - 1/2 HP139.53637SRT - 1/2 HP139.53824SRT - 1/2 HP
For Residential Use Only
Complies withUL 325RegulationseffectiveJanuary 1, 1993.
®
®
Owner's Manual■ Please read this manual and the enclosed safety materials carefully!
■ Fasten the manual near the garage door after installation.
■ The door WILL NOT CLOSE unless the Protector System® is connected andproperly aligned
■ Periodic checks and adjustment of the opener are required to ensure safeoperation.
■ The model number label is located under the light lens on the front end panelof your opener as shown.

Start by reviewing these important safety alert symbols
2
Contents PageA review of safety alert symbols.................................2You'll need tools..........................................................3Safety information regarding garage door locksand ropes ..................................................................3
Testing your garage door for sticking, bindingand balance...............................................................3
Illustration of sectional door installation .....................4Illustration of one-piece door installation ...................5Carton inventory..........................................................6Hardware inventory.....................................................7Assembly section - pages 8 – 11Assemble T-rail .........................................................8Attach cable pulley bracket.......................................8Install trolley ..............................................................9Fasten T-rail to opener .............................................9Install chain/cable ...................................................10Attach sprocket cover .............................................10Tighten the chain and cable ...................................11
Installation section - pages 11 – 27Installation safety instructions.................................11Determine header bracket locationSectional door .......................................................12One-piece door .....................................................13
Install the header bracket .......................................14Attach the T-rail to header bracket.........................15Position the opener.................................................16Hang the opener .....................................................17Install the wall control .............................................18
Contents PageInstall the light and lens .................................................19Attach emergency release rope and handle.................19Electrical requirememts.................................................20Safety reversing sensor information .............................21Install the safety reversing sensor...........................22, 23Fasten door bracket (sectional door) ............................24Fasten door bracket (one-piece door)...........................25Connect door arm to trolley (sectional door).................26Connect door arm to trolley (one-piece door) ...............27
Adjustment section - pages 28 – 30Travel limit adjustments.................................................28Force adjustments .........................................................29Test the safety reversing sensor ...................................30Test the safety reverse system ....................................30
Operation safety instructions...........................................31Care of your opener.........................................................31Maintenance schedule ....................................................31Operation of your opener ................................................32Receiver and remote control programming ....................33Having a problem? ....................................................34, 35Repair parts, rail assembly..............................................36Repair parts, installation ..................................................36Repair parts, opener assembly .......................................37Accessories......................................................................38Index ................................................................................39How to order repair parts.................................................40Maintenance agreement..................................................40Warranty ..........................................................................40
When you see these safety symbols on the following pages, they will alert you to the possibility ofserious injury or death if you do not comply with the corresponding instructions. The hazard maycome from something mechanical or from electric shock. Read the instructions carefully.
When you see this Safety Symbol on the following pages, it will alert you to the possibility of damageto your garage door and/or the garage door opener if you do not comply with the correspondinginstructions. Read the instructions carefully.
This garage door opener is designed and tested to offer safe service provided it is installed, operated,maintained and tested in strict accordance with the safety instructions contained in this manual.
Mechanical Electrical
WARNING WARNING
CAUTION

Pliers
Wire Cutters
Claw Hammer
Hack Saw
ScrewdriverAdjustable End Wrench
1/2" and 7/16" Sockets and Wrench
Drill
Tape Measure
21
Stepladder
Pencil
3/16", 5/16" and 5/32" Drill Bits
Carpenter's Level
You'll Need ToolsDuring assembly, installation and adjustment of the opener, instructions will call for hand tools shown below.
3
SECTIONAL DOOR ONE-PIECE DOOR
An unbalanced garage door might not reversewhen required and someone under the doorcould be seriously injured or killed. If your garage door binds, sticks or is out ofbalance, call for professional garage doorservice. Garage doors, door springs, cables,pulleys, brackets and their hardware are underextreme tension and can cause serious injuryor death. Do not try to loosen, move or adjustthem yourself!Ropes left on a garage door could causesomeone to become entangled and killed.Remove all ropes connected to the door beforeinstalling and operating the opener.
To avoid damage to the garage door andopener, disable locks before installing andoperating the opener. Use a wood screw or nailto hold locks in the "open" (unlocked)position.Operation at other than 120V 60 Hz will causeopener malfunction and damage.
Identify the type and height of your door and anyspecial conditions that exist and any additionalmaterials that may be required by referring to the listson page 4 or page 5.
WARNING CAUTION
Before you begin, complete the following test tomake sure your door is balanced, and is notsticking or binding:• Lift the door about halfway as shown. Release the
door. It should stay in place, supported entirely byits springs.
• Raise and lower the door to see if there is anybinding or sticking.

4
Safety Reversing Sensor
Horizontal and vertical reinforcementis needed for lightweight garage doors
(fiberglass, steel, aluminum, door with glass panels, etc.).See page 24 for details.
Support bracket & fastening hardware
is required.See page 17.
Slack in Chain Tensionis Normal When
Garage Door is Closed
— —
— —
— —
— —
Door Center
Header Wall
SafetyReversing
Sensor
Floor must be levelacross width of door
FINISHED CEILING
Extension Spring
Torsion Spring
Access Door
OR
Cable PulleyBracketHeader
Bracket Trolley
StraightDoorArm
EmergencyRelease
Rope & Handle
Door Bracket Garage
Door
CurvedDoorArm
GarageDoor
Spring
HeaderWall
Cable
Closed Position
Rail Assembly
Before you begin, survey your garage area tosee whether any of the conditions below applyto your installation.
Based on your particular requirements, there areseveral installation steps which might call formaterials and/or hardware not included in the carton.
• Step 1, page 12 - Look at the wall or ceiling abovethe garage door. The header bracket must besecurely fastened to structural supports.
• Step 5, page 17 - Do you have a finished ceiling inyour garage? If so, a support bracket andadditional fastening hardware may be required.
• Safety reversing sensor, page 21 - Dependingupon garage construction, wood blocks may needto be fastened to mounting locations beforesensors are installed.
• Step 10, page 22 - Alternate floor mounting of thesafety reversing sensor will require hardware notprovided.
• Step 11, page 24 - Do you have a steel, aluminum,fiberglass or glass panel door? If so, horizontaland vertical reinforcement is required.
• Look at the garage door where it meets the floor. Itmust close on the floor all the way across. Other-wise, the safety reverse system may not workproperly. See page 30. Floor or door should berepaired.
SECTIONAL Door Installation
• The opener can be installed within 2 feet of the leftor right of the door center if there is a torsion springor center bearing plate in the way of the headerbracket or door bracket area. If your door hasextension springs, the opener must be installed in the center of the door. See pages 12 and 24.
• Do you have an access door in addition to thegarage door? If not, Model 53702 Emergency Key Release is required. See page 38.
• If your door is more than 7 feet high, see the longerrails available on page 38.
You may find it helpful to refer back to this page as you proceed with the installation of your opener.

Safety Reversing Sensor
FINISHED CEILINGSupport bracket
& fasteninghardware is required.
See page 17.Slack in chain tensionis normal when
garage door is closed.
Safety Reversing Sensor
Gap between floor and bottomof door must not exceed 1/4".
HeaderWall
Access Door
Closed Position
CablePulley Bracket
HeaderBracket
Trolley
StraightDoorArm
EmergencyRelease
Rope & Handle
Door Bracket
CurvedDoorArm
HeaderWall
Cable
T-rail
GarageDoor
5
AccessDoor
Floor must be levelacross width of doorSafety
Reversing Sensor
HeaderBracket
CablePulley Bracket
DoorBracket
StraightDoorArm
CurvedDoor Arm
Trolley Chain
EmergencyRelease
Rope & Handle
T-rail
GarageDoor
CableHeader
Wall
SafetyReversing
Sensor
One-Piece Door With Track
Closed Position
Before you begin, survey your garage area tosee whether any of the conditions below applyto your installation.
Based on your particular requirements, there areseveral installation steps which might call formaterials and/or hardware not included in the carton.
• Step 1, page 13 - Look at the wall or ceiling abovethe garage door. The header bracket must besecurely fastened to structural supports.
• Step 5, page 17 - Do you have a finished ceiling inyour garage? If so, a support bracket andadditional fastening hardware (not supplied) maybe required.
• Safety reversing sensor, page 21 - Depending ongarage construction, wood blocks may need to besecurely fastened to mounting locations beforesensors are installed.
• Step 10, page 22 - Alternate floor mounting of thesafety reversing sensor will require hardware thatis not provided.
• Step 11, page 25 - Generally, a one-piece doordoes not require reinforcement. If your door islightweight, you can refer to the informationrelating to sectional doors on page 24.
• Step 11, page 25 - Depending on your door'sconstruction, you might need additional mountinghardware for the door bracket.
• Do you have an access door in addition to thegarage door? If not, Model 53702 Emergency Key Release is required. See page 38.
• The gap between the bottom of the garage doorand the floor cannot exceed 1/4". Otherwise, thesafety reverse system may not work properly. Seepage 30. The floor or the door should be repaired.
ONE-PIECE Door Installation
You may find it helpful to refer back to this page asyou proceed with the installation of your opener.

6
Straight DoorArm Section
Door Bracket Plate
Door Bracket
Curved DoorArm Section
Safety Labelsand
Literature
2-Conductor Bell WireWhite & White/Red
Sprocket Cover
TO GARAGE DOOR
Three-Function Remote controlwith Visor Clip
T-RailCenter Section
CablePulley Bracket
T-RailEnd Sections
Chain and Cable
LOCK LIGHT
SEARS /CRAFTSMAN
Deluxe Lighted Console Wall Control
Hanging Brackets
Header Bracket
UPCEILING MOUNT ONLY
Safety Reversing SensorMounting Bracket
With Square Holes (2)"C" Wrap (2)
Safety Reversing SensorMounting Bracket
With Slot (2)
Light Lens (2)
Trolley
Models 53525 (2), 53627SRT (1),53636SRT (2), 53640 (2), 53641 (2)
Model 53636 Only
Multi-Function Keyless EntryThree-FunctionCompact Remote Control
Model 53640 only
Safety Reversing Sensor (2) (1) Sending Eye
(1) Receiving Eye
2-Conductor Bell Wire with ConnectorWhite & White/Black (2 rolls)
Opener Carton InventoryYour garage door opener is packaged in two cartons which contain all parts illustrated below. If anything ismissing, carefully check the packing material. Parts may be "stuck" in the foam. Hardware for assembly andinstallation is shown on page 7.

7
Lock Washer5/16" (4)
Nut 5/16" - 18 (6)
Clevis Pin5/16" x 2-3/4" (1)
NOTICE
Handle
InsulatedStaples (10)
Assembly Hardware
Installation Hardware
Dry Wall Anchors (2)
Clevis Pin5/16" x 1" (2)
Hex Screw5/16"- 18 x 7/8" (4)
Rope
Lock Nut1/4" - 20 x 7/16" (4)
Nut5/16" - 18 (5)
Washered Screw5/16" - 18 x 1/2" (2)(mounted in opener)
Carriage Bolt5/16"-18 x 2-1/2" (2)
Carriage Bolts1/4" - 20 x 1/2" (4)
Hex Screw5/16" - 18 x 7/8" (3) Master Link (2)
Ring Fastener (3)
Trolley Threaded Shaft (1)
Screw6AB x 1" (2)
Lock Washer 5/16" (6)
Lag Screw5/16"-18 x 1-7/8" (4)
Lock Nut1/4" - 20 (4)
Carriage Bolts1/4" - 20 x 1/2" (4)
Safety Reversing Sensor Installation Hardware
Hex Screw1/4-20 x 1-1/2" (2)
Screw#10 - 32 x 3/8" (4)
Lock Nut#10 x 32 (4)
Wing Nut (2)
InsulatedStaples (20)
RAIL GREASE
NO. 83A4
Rail Grease
Lag Screw1/4 x 1-1/2" (4)
Separate all hardware from the packages in the rail carton and the opener carton, asshown below, for the assembly and installation procedures.

8
Assembly Step 1Assemble the T-rail & Attach the Cable Pulley Bracket
• Align the 3 T-rail sections on a flat surface exactlyas shown. The end sections are identical. Makesure the "arrow label" on the center section ispointing toward the door.
• Insert the carriage bolts so the square bolt necksseat in the square holes in the T-rail end sectionsand pass through the round holes in T-rail centersection. Assemble lock nuts, ensure alignment andtighten.
T-rail (Center Section)
1/4'' Lock Nut
T-RAIL FRONT (TO DOOR)
Cable pulley bracket attaches to FRONT
END of T-rail
T-rail (End Section)
T-RAIL BACK (TO OPENER)
T-rail (End Section)
Carriage Bolt 1/4"-20x1/2"
Brace
Brace
Square Carriage Bolt Holes
TO GARAGE DOOR
Bracket
Rail Bracket &
T-rail M
ust Be A
Lock Washer 5/16" Nut
5/16"
Hex Screws 5/16"-18x7/8"
Cable Pulley Bracket
Rail Bracket &
T-rail M
ust Be Aligned
Lock Washer 5/16" Nut
5/16"
If T-rail is not assembledEXACTLY as shown, trolleywill not travel smoothlyalong length of rail or it willhit against the nuts.
Make sure bolt necks areseated in the squareholes and rails arealigned before youtighten lock nuts. (Seeright and wrong views).Improper assembly cancause jerky trolleyoperation, noise and/ornuisance door reversals.
To avoid installation difficulties, do not run the garage door opener until instructed to do so.
Assembly Section: Pages 8 – 11
Right Wrong
Right Wrong
When tighteningthe screws, besure to keepbracket parallelto the rail.Otherwise, therail may bowwhen opener isoperated.
Lock Nut1/4" - 20 x 7/16"
Carriage Bolts1/4" - 20 x 1/2"
Hex Screw5/16" - 18 x 7/8"
Nut5/16" - 18
Lock Washer5/16"
Hardware Shown Actual Size
• Position the cable pulley bracket on the front end of theT-rail as shown. Fasten securely with the hardware.

Assembly Step 2Install the Trolley on the T-rail
• Place the opener on packing material to protectthe cover. For convenience, put a support underthe cable pulley bracket.
• Remove the (2) 5/16"-18x1/2" washered screwsmounted in the top of the opener.
• Align the holes in the back section of the T-rail withthe holes in the opener.
• Fasten the rail with the (2) washered screwspreviously removed. Tighten securely.
Remember to use only these screws! Any otherscrews will cause serious damage to the opener.• Insert a 5/16"-18x7/8" hex screw into the trolley
stop hole in the T-rail as shown. Tighten securelywith a 5/16" lock washer and nut. This screw limitstrolley travel in the UP direction.
Washered Screw5/16"-18x1/2"
T-rail(Back Section)
TrolleyStop Hole
Nut5/16"-18
Hex Screw5/16"-18x7/8"
Lock Washer5/16"
Use Only This Type and Size
Screw
9
• Attach the threaded shaft to the trolley with thelock washer and nuts as shown.
• As a temporary stop, insert a screwdriver into thehole in the front end of the T-rail.
• Slide the trolley assembly along the rail to thescrewdriver stop.
If trolley hits against the nut on the T-rail, thebolts and nuts were attached from the wrong side and must be repositioned. Review Step 1.
Temporary StopScrewdriver
TO GARAGE DOOR
Trolley
TrolleyThreaded
Shaft
Lock Washer5/16"
Outer Nut5/16"
Inner Nut5/16"
Trolley
Assembly Step 3Fasten the T-rail to the Opener
To fasten rail, use only those screws mountedin the top of the opener. Any other screws willcause serious damage to the opener.
Lock Washer5/16"
Nut5/16" - 18
Hardware ShownActual Size
Nut5/16"- 18
Lock Washer5/16"
Hex Screw5/16" - 18 x 7/8"
Hardware Shown Actual Size
CAUTION

Assembly Step 4Install the Chain/Cable &Attach the Sprocket Cover
Sprocket Cover
Mounting Plate
Front Tab Slot
Back Tab Slot
Top of Opener
Opener Sprocket
10
To attach the sprocket cover:• Insert the back tab in the opener slot. Squeeze the
cover slightly and insert the front tab in the slot onthe mounting plate.
Leave Chain and Cable Inside Dispensing
Carton to Prevent Kinking.
Dispensing Carton
Keep Chain and Cable Taut When Dispensing
Front Tab
Cable Pulley
Cable Loop
Master Link Bar
ThMaster
Link Cap
Master Link Clip-On Spring
Install Chain and Cable In This Direction
• Detach the cable loop from the carton and fasten itto the trolley with a master link from the hardwarebag. See master link procedure, Figure 1.
• With the trolley against the screwdriver, dispensethe cable around the pulley.
• Proceed back around the opener sprocket, Figure 2. Be sure sprocket teeth engage thechain. Continue forward to the trolleythreaded shaft, Figure 3.
• Use the second master link to connectthe chain to the flat end of the shaft.Check to make sure the chain isnot twisted.
• Remove the screwdriver.
ep Chain and Cable ut When Dispensing
Cable Pulley
Cable Loop
Master Link Bar
Master Link Clip-On Spring
Trolley
T-rail
Pin
Pin Notch
Chain
Flat End of Trolley
Threaded ShaftMaster
Link Cap
Master Link Cap
Master Link Clip-On Spring
Install Chain and Cable In This Direction
Master Link Procedure:
Push pins of master link barthrough cable loop and hole infront end of trolley. Push capover pins and into notches.Slide clip-on spring over capand into notches until bothpins are securely locked.
Figure 1
Figure 3
Figure 2
Serious injury can result if fingers becomeentangled in moving opener sprocket. Attachsprocket cover securely. Never operate openerwhile your hand is near the opener sprocket.
WARNING

• Spin the inner nut and lock washer down thethreaded shaft, away from the trolley.
• To tighten the chain, turn outer nut in the directionshown. As you turn the nut, keep the chainfrom twisting.
• When the chain is approximately 1/2" above thebase of the T-rail at its midpoint, re-tighten theinner nut to secure the adjustment.
Sprocket noise can result if chain is either tooloose or too tight.When installation is complete, you may notice somechain droop with the door closed. This is normal. Ifthe chain returns to the position shown when thedoor is open, do not re-adjust the chain.
NOTE: During future maintenance, ALWAYSpull the emergency release handle to disconnecttrolley before adjusting chain.
Lock Washer
To Tighten Outer Nut
Inner Nut
Trolley
Chain
Base of T-rail
1/2 Inch
To Tighten Inner Nut
Outer Nut
Assembly Step 5Tighten the Chain & Cable
IMPORTANT INSTALLATION INSTRUCTIONS
To reduce the risk of severe injury or death to persons:1. READ AND FOLLOW ALL INSTALLATION INSTRUCTIONS.2. Install only on a properly balanced and lubricated garage door. An improperly balanced door
could result in severe injury or death. Repairs to cables, spring assemblies and other hardwaremust be made by a professional service person before installing opener.
3. Disable all locks and remove all ropes connected to the garage door before installing the opener.Ropes connected to a garage door can cause entanglement and death.
4. If possible, install door opener 7 feet or more above floor with the emergency release handlemounted 6 feet above the floor.
5. Do not connect the opener to power source until instructed to do so.
6. Locate the Wall Control within sight of the door at a minimum height of 5 feet where smallchildren cannot reach and away from all moving parts of the door.
7. Install the User Safety Instruction Label on the wall adjacent to the control button and theMaintenance Instruction Label in a prominent location on the inside of the garage door.
8. Upon completion of the installation, the door must reverse when it comes in contact with a one-inch high object or a 2x4 laid flat on the floor.
9. Do not wear watches, rings or loose clothing while installing or servicing an opener. Jewelry orloose clothing can be caught in the mechanism of the garage door or the opener.
11
You have now finished assembling your garage door opener. Please read the followingwarnings before proceeding to the installation section:
WARNING WARNING

• Open your door to the highestpoint of travel as shown. Drawan intersecting horizontal lineon the header wall 2" abovethe high point. This height willprovide travel clearance for thetop edge of the door.
Door clearance brackets areavailable for sectional doorswhen headroom clearance isless than 2". See accessorypage 38.
Header Wall
Ceiling
Track
Highest Point of Travel
Door
2"
12
Proceed to Step 2, page 14.
Door
Track
Header Wall
Highest Point of Travel
2"
Vertical Guideline
Finished CeilingVertical
GuidelineHeader Wall
2x4 Structural Supports
SECTIONAL Door and ONE-PIECE Door With Track
• Close the door and mark the insidevertical centerline of the garage door.
• Extend the line onto the header wallabove the door.
Remember, you can fasten theheader bracket within 2 feet of theleft or right of the door center only ifa torsion spring or center bearingplate is in the way; or you can attachit to the ceiling (refer to page 14)when clearance is minimal.If you need to install the header bracketon a 2x4 (on wall or ceiling), use lagscrews (not supplied) to securely fastenthe 2x4 to structural supports as shownhere and on page 13.
Installation Section: Pages 12 – 27
Sectional doorwith curved track
One-piece door with horizontal track
Installation Step 1Determine Header Bracket LocationInstallation procedures vary according togarage door types. Follow the instructionswhich apply to your door.
If the header bracket is not rigidly fastened toa structural support on the header wall orceiling, the safety reverse system may notwork properly (see page 30). The door mightnot reverse when required, and could causeserious injury or death.The garage door springs, cables, pulleys,brackets and their hardware are under extremetension. Do not attempt to loosen, move oradjust them yourself. Serious personal injuryor death could result. Call for garage doorservice.
WARNING
Door
Highest Pointof Travel
HeaderWall
Pivot
Dis
tanc
e
Header WallVertical
Centerline
VerticalCenterline ofGarage Door
2x4
– Unfinished – Ceiling
Structural Supports
2x4
OPTIONAL CEILING MOUNT FOR HEADER BRACKET
• Close the door and mark theinside vertical centerline ofyour garage door. Extend theline onto the header wallabove door.
If headroom clearance isminimal, you can install theheader bracket on the ceiling.See page 14.
• If you need to install theheader bracket on a 2x4 (onwall or ceiling), use lag screws(not supplied) to securelyfasten the 2x4 to structuralsupports as shown.
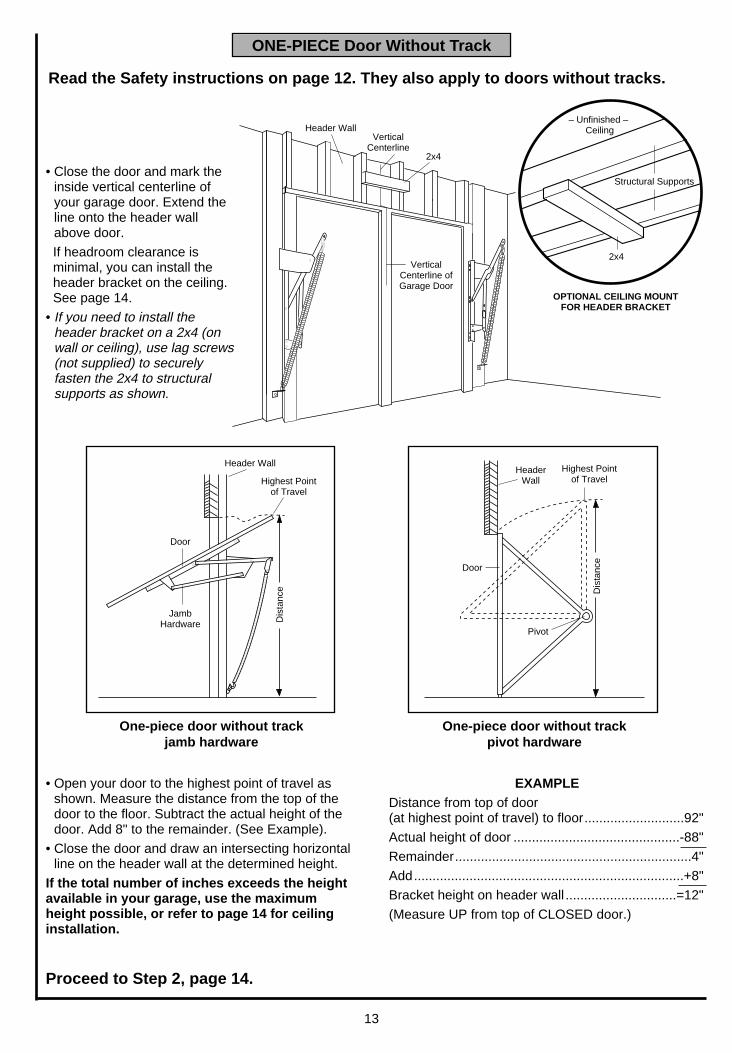
EXAMPLEDistance from top of door (at highest point of travel) to floor...........................92"
Actual height of door .............................................-88"
Remainder................................................................4"
Add.........................................................................+8"
Bracket height on header wall ..............................=12"
(Measure UP from top of CLOSED door.)
Proceed to Step 2, page 14.
13
Header Wall
Highest Pointof Travel
Door
Dis
tanc
e
JambHardware
ONE-PIECE Door Without Track
• Open your door to the highest point of travel asshown. Measure the distance from the top of thedoor to the floor. Subtract the actual height of thedoor. Add 8" to the remainder. (See Example).
• Close the door and draw an intersecting horizontalline on the header wall at the determined height.
If the total number of inches exceeds the heightavailable in your garage, use the maximumheight possible, or refer to page 14 for ceilinginstallation.
One-piece door without trackpivot hardware
One-piece door without trackjamb hardware
Read the Safety instructions on page 12. They also apply to doors without tracks.

Lag Screws 5/16"x18x1-7/8"
Highest Point of Travel
(of Garage Door)
Vertical Center LineHeader
Wall
Garage Door
UP
CEILING MOUNT ONLY
Wall Mounting Holes
Optional Wall Mounting
Holes
The nail hole is for positioning only. You must use lag screws to
mount the header bracket.
UPCEILING MOUNT ONLY
2"
Door Spring
Header Bracket
2x4 Structural Support
Vertical Center Line
14
UP
CEILING MOUNT ONLY
Ceiling Mounting Holes
The nail hole is for positioning only. You must use lag screws to mount
the header bracket.
You can attach the header bracket either to thewall above the garage door, or to the ceiling.Follow the instructions which will work best foryour particular requirements.
Fasten the Header Bracket to the Wall
• Center the bracket on the vertical guideline withthe bottom edge of the bracket on the horizontalline as shown (with the arrow pointing toward theceiling).
• Mark either set of bracket holes (do not use theholes designated for ceiling mount). Drill 3/16" pilotholes and fasten the bracket securely to a structuralsupport with the hardware provided.
Fasten the Header Bracket to the Ceiling
Installation Step 2Install the Header Bracket
Lag Screw 5/16"-18 x 1-7/8"
Hardware Shown Actual Size
UP
Lag Screws 5/16"x18x1-7/8"
Garage Door
Vertical Center Line
Header Wall
Finished Ceiling
Header Bracket
6" Maximum
Vertical Center Line
Door Spring
• Extend the vertical guideline onto the ceiling asshown.
• Center the bracket on the vertical mark, no morethan 6" from the wall. Make sure the arrow ispointing toward the wall. The bracket can bemounted flush against the ceiling when clearanceis minimal.
• Mark holes designated for ceiling mount only. Drill3/16" pilot holes and fasten bracket securely to astructural support with the hardware provided.

Header Bracket
Cable Pulley
Bracket
Temporary Support
Header Wall
Garage Door
T-rail
Clevis Pin 5/16"x2-3/4 "
Ring Fastener
Header Bracket
Cable Pulley
Bracket
T-rail
• Position the opener on the garage floor below theheader bracket. Use packing material as aprotective base.
If the door spring is in the way you'll need help.Have someone hold the opener securely on atemporary support to allow the T-rail to clear thespring.• Position the cable pulley bracket against the header
bracket.
• Align the bracket holes and join with a clevis pin asshown.
• Insert a ring fastener to secure.
15
Installation Step 3Attach the T-rail to the Header Bracket
Clevis Pin 5/16" x 2-3/4" Ring Fastener
Hardware Shown Actual Size

Installation Step 4Position the OpenerFollow instructions which apply to your doortype as illustrated.
To prevent damage to steel, aluminum,fiberglass or glass panel doors, do not rest theopener on the door without using a 2x4.
SECTIONAL Door & ONE-PIECE Door with Track
A 2x4 laid flat is convenient for setting an idealdoor-to-T-rail distance. • Raise the opener onto a stepladder.
You will need help at this point if the ladder isnot tall enough. • Open the door all the way and place a 2x4 laid flat
on the top section beneath the T-rail.
If the top panel hits the trolley when you raisethe door, pull down on the trolley release arm todisconnect the inner and outer sections. Thetrolley can remain disconnected until Step 12 iscompleted.
T-rail 2x4
Door
Stepladder
ONE-PIECE Door without Track
• With the door fully open and parallel to the floor,measure the distance from the floor to the top ofthe door.
• Using a stepladder as a support, raise the openerto the same distance as the door from the floor (itwill be at a slight angle as shown).
• The top of the door should be level with the top ofthe opener. Do not position the opener more than2" above this point.
Top of Opener
HeaderBracket
Stepladder
Top of Door
16
CAUTION
Trolley
TrolleyRelease Arm

Installation Step 5Hang the Opener
Two representative installations are shown.Yours may be different. Hanging brackets shouldbe angled, Figure 1, to provide rigid support. Onfinished ceilings, Figure 2, attach a sturdy metalbracket to structural supports before installing theopener. The bracket and fastening hardware are notsupplied. See accessory page 38.
• Measure the distance from each side of the openerto the structural support.
• Cut both pieces of the hanging bracket to requiredlengths.
• Drill 3/16" pilot holes in the structural supports.
• Attach one end of each bracket to a support with5/16"x1-7/8" lag screws.
• Fasten the opener to the hanging brackets with5/16"-18x7/8" screws, lock washers and nuts.
• Check to make sure the T-rail is centered over thedoor (or in line with the header bracket if thebracket is not centered above the door).
• Remove the 2x4. Operate the door manually. If thedoor hits the rail, raise the header bracket.
MeasureDistance
Lag Screws5/16"x1-7/8"
StructuralSupports
5/16"-18x7/8" Screw5/16" Lock Washer
5/16"-18 Nut
Bracket(Not Supplied)
Lag Screws5/16"x1-7/8"
(Not Supplied)5/16"-18x7/8" Screw5/16" Lock Washer
5/16"-18 Nut
— FINISHED CEILING —
5/16"-18x7/8" Screw5/16" Lock Washer
5/16"-18 Nut
HiddenSupport
17
The opener could fall and injure someone if itis not properly secured. Fasten the openersecurely to structural supports of the garage.
Lag Screw5/16"-18 x 1-7/8"
Hex Screw5/16"- 18 x 7/8" Nut 5/16" - 18 Lock Washer 5/16"
Hardware Shown Actual Size
WARNING
Figure 1
Figure 2
Grease the top and underside of therail surface where the trolleyslides. A tube of grease issupplied.
RAIL GREASE
NO. 83A4

Installation Step 6Install the Wall Control
18
Children operating or playing with a garagedoor opener can injure themselves or others.The garage door could close and cause seriousinjury or death.Install the Wall Control (or any additional pushbuttons) out of the reach of children and awayfrom all moving parts of the door and doorhardware, but where the garage door is visible.Do not allow children to operate the pushbutton(s) or the remote control(s).A moving garage door could injure someoneunder it. Activate the opener only when thedoor is properly adjusted, you can see it clearly,and there are no obstructions to door travel.
Terminal Screws
2-ConductorBell Wire
Install Wall Control or Lighted Push ButtonSears Front to Back3/30/92 - 4/2/92
REDWHITE
Terminal Screws Top InstallationFlange
Bottom InstallationFlange
Lighted Push ButtonWall Control
Deluxe Wall ControlLighted Console Wall Control
Lighted ConsoleWall Control
WHT2
1RED
LOCK LIGHT
SEARS /CRAFTSMAN
Deluxe Wall Control
LightedPush ButtonWall Control
Antenna
Back Panelof Opener
OpenerTerminal Screws
KG KG
M.D.C. CERT. NO.
1
3
9
7
5
132C2105-1
WARNING: To reduce the risk of severe injury or death by entrapment, when adjusting either the force or limits of travel controls ensure that the door reverses on a 1 inch object (or a 2 x 4 board laid flat). See instructions for proper adjustment procedure.
This device complies with FCC Rules Part 15. Operation of this device is subject to the following conditions:1. This device may not cause harmful interference. 2. This device must accept any interference that may be received, including interference that may cause undesired operation. PART NO: Nº DE PIÈCE:
D.O.C. CERT. NO. DATE:Sears Roebuck & Co.Sears Canada Inc., TorontoAssembled in Mexico - Assemblé du MexiquePAT. #RE29,525; 4,750,201; 4,806,930 Other Patents Pending.
AVERTISSEMENT: Pour réduire les risques deblessures mortelles par happement, après toutréglage de la force de déclenchement ou desseuils de fin de course s'assurer que le sens dela course s'inverse lorsque la porte entre encontact avec un object de 13 mm (1 po) dehauteur (ou un madrier de 2 x 4 de section, àplat) posé sur le sol. Effectuer les reglages selon les procédures décrites dans la notice.
1
3
9
7
5
2 3 TO PROGRAM RECEIVER CODE FOR EACH REMOTE CONTROL1. Press and HOLD remote control transmitter push button.
2. Press receiver code button. The opener light will flash once.
3. Release transmnitter button. Opener has learned code.
TO ERASE ALL RECEIVER CODES1. Press and HOLD receiver code button. Green indicator light alongside will turn ON.
2. When light turns OFF (about 6 seconds) ALL codes are erased from opener memory.
1
12
• Strip 1/4" of insulation from one end of the bellwire; connect the wire to the two screw terminalson the back of the Wall Control: white to 2 andwhite/red to 1.
• Locate the Wall Control within sight of the doorat a minimum height of 5 feet where smallchildren cannot reach, and away from allmoving parts of the door and door hardware.Fasten the Lighted Push Button Wall Controlsecurely with 6ABx1-1/2" screws. The consolestyle uses 6ABx1" screws. If installing into drywall,drill 5/32" holes and use the anchors provided.
• Run the bell wire up the wall and across the ceilingto the opener. Use insulated staples to secure thewire in several places. Be careful not to pierce thewire with a staple, thereby resulting in a short.
• Receiver terminal screws and the antenna arelocated on the back panel of the opener. Positionthe antenna wire as shown.
• Then connect the bell wire to the opener terminalscrews: white to 2; white/red to 1.
• Remember to affix the User Safety Instructionlabel to the wall near the Wall Control, and theMaintenance Instruction label in a prominentlocation on the inside of the garage door.
If the label adhesive will not adhere to your garagewall surface (or becomes loose with time) use tacksto secure the label alongside the wall control. Page 32 explains how to operate the opener usingthe lighted push bar or button, as well as the Lockand Light features on the Deluxe Wall Control.
Do NOT connect the power and operate theopener at this time. The trolley will travel to thefull open position but will not return to theclose position until the sensor beam isconnected and properly aligned.See Safety Reversing Sensor instructionsbeginning on page 21.
Dry Wall Anchors
Insulated Staples
6AB x 1" Screw Lighted Console Wall Control
6AB x 1-1/2" Screw Lighted Push Button Wall Control
Hardware Shown Actual Size
Outdoor Key Switch Accessory Connections
To opener terminal screws: white to 2; white/red to 1
WARNING

Lens Guide
Lens Slot
75 Watt Max.Light Bulb
Lens Tab
Light Lens
Install the lights• Install a 75 watt maximum light bulb in the socket.
The light will turn ON and remain lit forapproximately 4-1/2 minutes when power isconnected. Then the light will turn OFF.
• If the bulb burns out prematurely due to vibration,replace it with a standard neck "Garage DoorOpener" bulb.
Install the lens (except for Model 53225)
• Apply slight pressure on the sides of the lens andslide the tabs into the slots in the end panel.
• Reverse the procedure to remove the lens.
Installation Step 7Install the Light and the Lens
Installation Step 8Attach the Emergency Release Rope and Handle Do not use the red handle to pull the door
open or closed. The rope knot could becomeuntied and you could fall. Use the emergencyrelease only to disengage the trolley and, ifpossible, only when the door is closed.Garage doors are heavy. If the door is openwhen the handle is pulled, the door couldclose inadvertently if it is not properlybalanced. Serious injury may result to personsunder the door. Make sure the doorway is clearof persons and obstructions before pullinghandle when door is open.
• Thread one end of the rope through the hole in thetop of the red handle so "NOTICE" reads right sideup as shown. Secure with an overhand knot.
The knot should be at least 1" from the end of therope to prevent slipping.• Thread the other end of the rope through the hole in
the release arm of the outer trolley.
• Adjust rope length so the handle is 6 feet above thefloor. Secure with an overhand knot.
If it is necessary to cut the rope, heat seal the cutend with a match or lighter to prevent unraveling.
Trolley
NOTICE
Overhand Knot
Emergency Release Handle
Rope
Overhand Knot
Trolley Release Arm
19
WARNING
To reduce the risk of electric shock, your garagedoor opener has a grounding type plug with a thirdgrounding pin. This plug will only fit into a groundingtype outlet.
If the plug doesn't fit into the outlet you have,contact a qualified electrician to install the properoutlet.
RIGHT WRONG
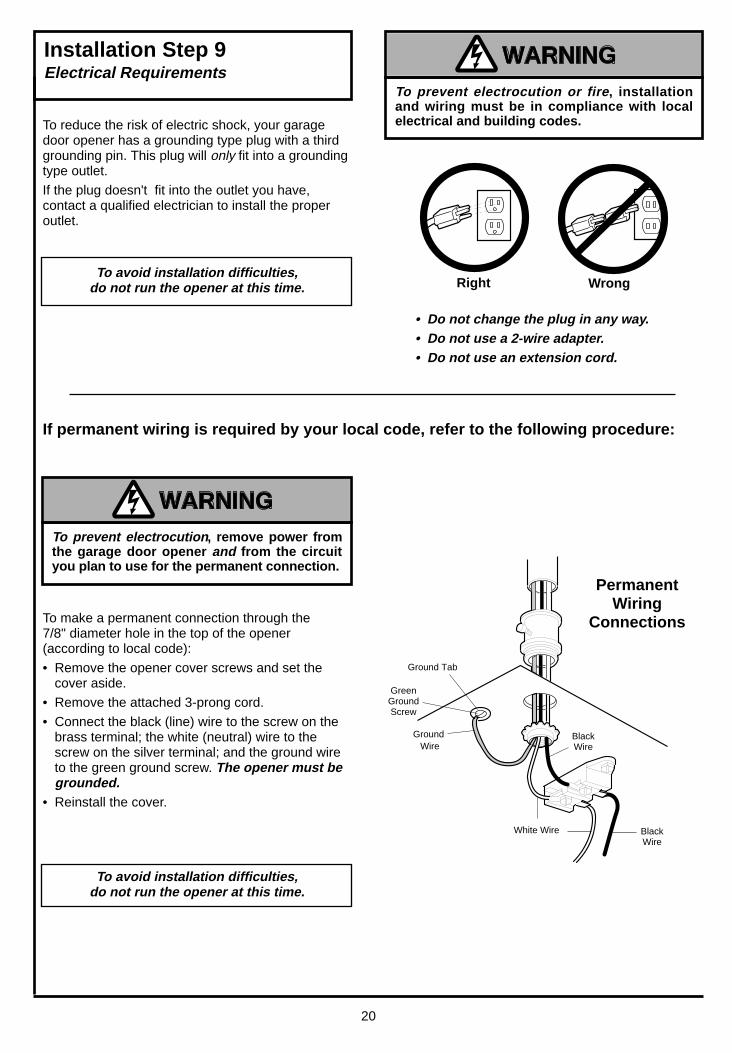
Installation Step 9Electrical Requirements
Ground Tab
GreenGroundScrew
Ground Wire
BlackWire
White Wire
BlackWire
To make a permanent connection through the 7/8" diameter hole in the top of the opener(according to local code):
• Remove the opener cover screws and set thecover aside.
• Remove the attached 3-prong cord.
• Connect the black (line) wire to the screw on thebrass terminal; the white (neutral) wire to thescrew on the silver terminal; and the ground wireto the green ground screw. The opener must begrounded.
• Reinstall the cover.
20
To prevent electrocution or fire, installationand wiring must be in compliance with localelectrical and building codes.
Right WrongTo avoid installation difficulties,
do not run the opener at this time.
To avoid installation difficulties,do not run the opener at this time.
• Do not change the plug in any way.• Do not use a 2-wire adapter.• Do not use an extension cord.
If permanent wiring is required by your local code, refer to the following procedure:
To prevent electrocution, remove power fromthe garage door opener and from the circuityou plan to use for the permanent connection.
WARNING
WARNING
PermanentWiring
Connections

The safety reversing sensor must be connectedand aligned correctly before the garage dooropener will move in the down direction. This is arequired safety device and cannot be disabled.
Installation procedures are the same for sectionaland one-piece doors.
Without a properly working safety reversingsensor, persons (particularly children) couldbe injured or killed by a closing garage door.Read and follow all instructions.To protect small children, install the safetyreversing sensor so that the beam will be nohigher than 4"-6" above the garage floor.Disconnect power to the garage door openerbefore installing the safety reversing sensor.
Invisible Light Beam Protection Area
Sensor Unit
Sensor Unit
— Right Side of Garage —
— Left Side of Garage —
Figure 1: Facing the door from inside the garage
The brackets must be securely fastened to a solidsurface such as the studs on either side of the door,or add a piece of wood at each location if installing inmasonry construction.
The invisible light beam path must be unobstructed.No part of the garage door (or door tracks, springs,hinges, rollers or other hardware) can interrupt thebeam while the door is closing. If it does, use a pieceof wood to build out each sensor mounting location tothe minimum depth required for light beam clearance.
21
Information you'll need before you begin the installation of the safety reversing sensor.
Be sure power to the opener is disconnected.The sending eye transmits an invisible light beam tothe receiving eye. The units can be installed oneither side of the garage door as long as the sunnever shines directly into the receiving eye lens.
Look at the label on the connector end of each caseto identify the sensors.
The brackets must be connected and fastened sothat the sending and receiving eyes face each otheras shown in Figure 1.
If an obstruction breaks the light beam while thegarage door is closing, the door will stop andreverse to full open position and the opener lightswill flash for 5 seconds.
WARNING

1/4 x 1-1/2" Lag Screw
#10 - 32 x 3/8" Screw
1/4" - 20 Lock Nut
#10 x 32 Lock Nut
Staples
1/4" - 20 x 1/2" Carriage Bolts
Installation Step 10Install the Safety Reversing Sensor
Mounting Bracket With Square Holes
#10-32x3/8" Screws
"C" Wrap
#10 - 32 Lock Nuts
Mounting Bracket with Slot1/4" - 20
Lock Nuts
1/4 x 1-1/2" Lag Screws
1/4-20 x 1/2" Carriage Bolts (with square shoulder)
Inside Garage
Wall
"C" Wrap
Mounting Bracket with Square Holes
Figures 2 and 3 show assembly of brackets and "C" wrap based on the recommended installation ofthe sensors as shown on page 21.
However, Figures 4 and 5 are variations which mayfit your installation requirements better. Make surethe wraps and brackets are aligned so thesensors will face each other across the garagedoor.• Fasten the "C" wraps to the mounting brackets
having square holes, using the hardware shown in Figure 2.
• Connect each assembly to a slotted bracket, usingthe hardware shown in Figure 3.
Note the alignment of the brackets for left andright sides of the door.• Finger tighten the lock nuts.
• Use bracket mounting holes as a template tolocate and drill (2) 3/16" diameter pilot holes onboth sides of the garage door, 4"-6" above thefloor but not exceeding 6". (See warning on page 21.)
• Attach bracket assemblies with 1/4"x1-1/2" lagscrews as shown in Figure 3.
• Adjust right and left side bracket assemblies to thesame distance out from the mounting surface.Make sure all door hardware obstructions arecleared. Tighten the nuts securely.
"C" Wrap
Inside Garage
Wall
Mounting Bracket with Square Holes
Mounting Bracket with Slot
Alternate Wall Mount
Sensor
Garage Floor
Indicator Light
Garage Floor
Inside Garage
Wall
Alternate Floor Mount
Mounting Bracket with Slot
Mounting Bracket with Square Holes
"C" Wrap
Sensor
Indicator Light
Attach with concrete anchors
(not provided)
22
Hardware Shown Actual Size
Figure 2
Figure 4 Figure 5
Figure 3

Invisible Light BeamProtection AreaSensor
Sensor
Connect Wire toOpener Terminals
Bell Wire
Bell Wire FinishedCeiling
1/4-20 x 1-1/2"Hex Bolt
"C" Wrap Wire
Sensor
Wing Nut
Indicator Light
OPENER TERMINAL SCREWS
SensorConnections
Wall ControlConnections(dotted line)
1 2 3
• Run paired wires from both sensors to the opener.Use insulated staples to secure wire to wall andceiling.
• Strip 1/4" of insulation from each set of wires.Separate white and white/black wires sufficiently toconnect to the opener terminal screws: white to 2and white/black to 3.
• Plug in the opener. Make sure the Lock Feature isoff. Green indicator lights in both the sending andreceiving eyes will glow steadily if wiringconnections and alignment are correct.
If the indicator light is off in the receiving eye (andthe invisible light beam path is not obstructed),alignment is required.
• Loosen the receiving eye wing nut to allow slightrotation of unit. Adjust sensor vertically and/orhorizontally until the green indicator light glowswith a steady light.
• When indicator lights are glowing steadily in bothunits, tighten the wing nut in the receiving eye unit.
23
Push connector inuntil you hear a click
Tab should beflush with backof connector
• Insert the wire connector into eachsensor and push until you hear aclick, Figure 6. The white tab on thesensor should be flush with the backof the connector.
Wire Connector
White Tab
Safety Sensor
1/4-20 x 1-1/2" Hex Bolt
Wing Nut
Hardware Shown Actual Size
• Center each sensor unit in a "C" wrap with lensespointing toward each other across the door.
• Secure sensors with the hardware shown. Fingertighten the wing nut on the receiving eye to allowfor final adjustment. Securely tighten the sendingeye wing nut.
Figure 7
Figure 6
Trouble Shooting1. If the sending eye indicator light does not glow
steadily after installation, check for:
• Electric power to the opener.
• A short in the white or white/black wires. Thesecan occur under staples or at screw terminalconnections.
• Incorrect wiring between sensors and opener.
• An open wire (wire break).
2. If the sending eye indicator light glows steadily butthe receiving eye indicator light doesn't:
• Check alignment.
• Check for an open wire to the receiving eye.

Installation Step 11Fasten Door Bracket Follow instructions which apply to your doortype as illustrated below or on page 25.
To prevent damage to steel, aluminum,fiberglass or glass panel doors, alwaysreinforce the inside of the door both verticallyand horizontally with an angle iron.
A horizontal brace should be long enough to be secured to 2 vertical supports. A vertical brace shouldcover the height of the top panel. The illustration shows one piece of angle iron as the horizontal brace. For the vertical brace, 2 pieces ofangle iron are used to create a "U"-shaped support. The best solution is to check with your garage doormanufacturer for an opener installation, door reinforcement kit.
• Center the door bracket on the previously markedvertical guideline used for the header bracketinstallation.
• Position the bracket on the face of the door withinthe following limits:
A) The top edge of the bracket 2"-4" below the topedge of the door.
B) The top edge of the bracket directly below anystructural support across the top of the door.
• Mark and drill 5/16" left and right fastening holes.Secure the bracket as shown in Figure 1 if there isvertical reinforcement.
If your installation doesn't require vertical reinforce-ment but does need top and bottom fastening holesfor the door bracket, position the door plate over thedoor bracket as shown in Figure 2. Fasten securelywith hardware shown in Figure 1.
24
Vertical Guideline
Door Bracket
Nut 5/16"-18
Carriage Bolt 5/16"-18x2-1/2"
Lock Washer 5/16"
Vertical Guideline
Door Bracket Location
Header Bracket
Door Bracket
Door Bracket Plate
Inside Edge of Door or
Reinforcement Board
Horizontal and vertical reinforcement is needed for lightweight garage doors
(fiberglass, aluminum, steel, doors with glass panel, etc).
Vertical Reinforcement
SECTIONAL Door Installation Procedure
Figure 1
Figure 2
Nut 5/16" - 18 Lock Washer 5/16"
Carriage Bolt5/16"-18 x 2-1/2"
Hardware Shown Actual Size
CAUTION

DoorBracket Top of Door
(Inside Garage)
Carriage Bolt5/16"-18x2-1/2"
OptionalPlacement
Lock Washer5/16"
Nut5/16"-18
Horizontal and verticalreinforcement is needed for
lightweight garage doors(fiberglass, aluminum, steel, door with glass panel, etc.).
Header Wall
VerticalCenterline ofGarage Door
– Finished Ceiling –
OptionalPlacement
of DoorBracket
HeaderBracket
Top Edgeof Door
2x4 Support
DoorBracket
For a door with noexposed framing or forthe optional installation,use 5/16"x1-1/2" lagscrew (not supplied) tofasten door bracket.
All ONE-PIECE Door Installation Procedure
• Center the bracket on the top of the door, in linewith the header bracket as shown. Mark holes.
• Drill 5/16" pilot holes and fasten the door bracketwith hardware supplied.
If the door has no exposed framing, drill 3/16" pilotholes and fasten the bracket with 5/16"x1-1/2" lagscrews (not supplied) to the top of the door.
The door bracket may be installed on the topedge of the door if required for your installation.(Refer to the dotted line optional placementdrawing.) Drill 3/16" pilot holes and substitute5/16"x1-1/2" lag screws (not supplied) to fastenthe bracket to the door.
25
Please read and comply with the warnings and reinforcement instructions on page 24.They apply to one-piece doors also.
Carriage Bolt5/16"-18 x 2-1/2"
Nut 5/16" - 18 Lock Washer 5/16"
Hardware Shown Actual Size

Installation Step 12 Connect Door Arm to TrolleyFollow instructions which apply to your doortype as illustrated below and on page 27.
Make sure garage door is fully closed. Pull the emergency release handle to disconnect the outer trolleyfrom the inner trolley. Slide the outer trolley back (away from the door) about 2" as shown in Figures 1, 2 and 3.
Figure 2:• Bring arm sections together. Find two pairs of holes
that line up and join sections. Select holes as farapart as possible to increase door arm rigidity.
Ring Fastener
Door Bracket
Clevis PinCurved
Door Arm
Straight Door Arm
Clevis Pin
Inner Trolley
Outer Trolley
Lock Washers
5/16"
Nuts 5/16"-18
Door Bracket
Screws 5/16"-18x7/8"
Emergency Release Handle
Rope
Figure 3:• If holes in curved arm are above holes in straight
arm, disconnect straight arm. Cut about 6" fromthe solid end. Reconnect to trolley with cut enddown as shown.
• Bring arm sections together.
• Find two pairs of holes that line up and join withscrews, lock washers and nuts.
Lock Washers
5/16"
Nuts 5/16"-18
Screws 5/16"-18x7/8"
Cut This End
Proceed to Adjustment Step 1, page 28. Trolley will re-engage automatically when the opener is operated.
26
Figure 1:• Fasten straight door arm section to outer trolley
with a clevis pin. Secure the connection with a ringfastener.
• Fasten curved door arm to the door bracket in thesame way as shown.
SECTIONAL Doors Only
Lock Washer 5/16"Nut 5/16" - 18 Ring Fastener
Hex Screw5/16"- 18 x 7/8"
Clevis Pin5/16" x 1"
Hardware Shown Actual Size
Hole Alignment Alternative
Figure 1 Figure 2
Figure 3

All ONE-PIECE Doors
Assemble the Door Arm:• Fasten the straight and curved door arm sections
together to the longest possible length (with a 2 or3 hole overlap).
• With the door closed, connect the straight doorarm section to the door bracket with a clevis pin.
• Secure with a ring fastener.
Nuts5/16"-18Lock
Washers5/16"
RingFastener
StraightArm
Screws5/16"-18x7/8
DoorBracket
Clevis Pin
CurvedDoor Arm
On one-piece doors, before connecting the door arm to the trolley the travel limits must be adjusted. Limit adjustmentscrews are located on the left side panel as shown on page 28. Follow adjustment procedures below.
Door Arm
Fully OpenTrolley
Door ArmConnector Hole
ClosedDoor Open Door Door with
Backward Slant
Door ArmConnector Hole
Fully ClosedTrolley
Door Arm
Adjustment Procedures for One-Piece Doors
Open Door Adjustment:Decrease UP limit
• Turn the UP limit adjustment screw counter-clockwise 5-1/2 turns.
• Press the Wall Control push bar or button. Thetrolley will travel to the fully open position.
• Manually raise the door to the open position(parallel to the floor), and lift the door arm to thetrolley. The arm should touch the trolley just inback of the door arm connector hole. Refer to thefully open trolley/door arm positions in theillustration. If the arm does not extend far enough,adjust the limit further. One full turn equals 2" oftrolley travel.
Closed Door Adjustment:Decrease DOWN limit
• Turn the DOWN limit adjustment screw clockwise 5complete turns.
• Press the Wall Control push bar or button. Thetrolley will travel to the fully closed position.
• Manually close the door and lift the door arm to thetrolley. The arm should touch the trolley just aheadof the door arm connector hole. Refer to the fullyclosed trolley/door arm positions in the illustration. Ifthe arm is behind the connector hole, adjust the limitfurther. One full turn equals 2" of trolley travel.
Connect the door arm to the trolley.• Close the door and join the curved arm to the connector hole in the trolley with the remaining clevis pin. It may
be necessary to lift the door slightly to make the connection.• Secure with a ring fastener.
• Run the opener through a complete travel cycle. If the door has a slight "backward" slant in full open positionas shown in the illustration, decrease the UP limit until the door is parallel to the floor.
27

Adjustment Step 1Adjust the UP and DOWN LimitsDo not make any limit adjustments until thesafety reversing sensors are completelyinstalled.
28
Limit adjustment settings regulate the points atwhich the door will stop when moving up or down.
The door will stop in the up direction if anythinginterferes with door travel. The door will reverse inthe down direction if anything interferes with thedoor travel (including binding or unbalanced doors).
To operate the opener, press the Wall Control pushbar. Run the opener through a complete travelcycle.
• Does the door open and close completely?
• Does the door stay closed and not reverseunintentionally when fully closed?
If your door passes both of these tests, no limitadjustments are necessary.
LimitAdjustment
Screws
Left Side Panel
Adjustment procedures are outlined below. Run the opener through a complete travel cycle after eachadjustment. Repeated operation of the opener during adjustment procedures may cause the motor to overheat andshut off. Simply wait 15 minutes and try again. Read the procedures carefully before proceeding to Adjustment Step 2. Use a screwdriver to make limitadjustments.
How and When to Adjust the Limits
If the door does not open completelybut opens at least five feet
Increase up travel. Turn the UP limit adjustmentscrew clockwise. One turn equals 2" of travel.
If door does not open at least 5 feet: Adjust theUP (open) force as explained in Adjustment Step 2.
If the door does not close completelyIncrease down travel. Turn the DOWN limitadjustment screw counterclockwise. One turnequals 2" of travel.
If door still won't close completely, try lengtheningthe door arm. (Page 26.)
If you have adjusted the door arm to the maximumlength and the door still will not close completely,lower the header bracket. See Installation Step 1,pages 12/13.
If the opener reverses in fully closed positionDecrease down travel. Turn the DOWN limitadjustment screw clockwise. One turn equals 2" oftravel.
If the door reverses when closing andthere is no visible interference to travel cycle
If the opener lights are flashing, the Safety ReversingSensor is obstructed. Remove the obstruction.
Test the door for binding: Pull the emergency releasehandle. Manually open and close the door. If the dooris binding, call for garage door service. If the door isnot binding or unbalanced, adjust the DOWN (close)force. See Adjustment Step 2.
Adjustment Section: Pages 28 – 30
Improper adjustment of the travel limits willinterfere with the proper operation of the safetyreverse system. The door might not reversewhen required and could seriously injure or killsomeone under it. Test the safety reversesystem following all adjustments to the travellimits. See page 30.
Adjustment Label
INCREASEDOWN
TRAVEL
INCREASEUP
TRAVEL
WARNING

Adjustment Step 2Adjust the Force
Too much force on the door will interfere withthe proper operation of the safety reversesystem. The door might not reverse properlywhen required and could seriously injure or killsomeone under it. Do not increase the forcebeyond the minimum amount required to closethe door. Do not use the force adjustments tocompensate for a binding or sticking garagedoor. Test the safety reverse system followingall adjustments to force levels. See page 30.
ForceAdjustment
Control
Adjustment Label
Back panel ofdoor opener
KG KG
M.D.C. CERT. NO.
1
3
9
7
5
132C2105-1
WARNING: To reduce the risk of severe injury or death by entrapment, when adjusting either the force or limits of travel controls ensure that the door reverses on a 1 inch object (or a 2 x 4 board laid flat). See instructions for proper adjustment procedure.
This device complies with FCC Rules Part 15. Operation of this device is subject to the following conditions:1. This device may not cause harmful interference. 2. This device must accept any interference that may be received, including interference that may cause undesired operation.
PART NO: Nº DE PIÈCE:
D.O.C. CERT. NO. DATE:Sears Roebuck & Co.Sears Canada Inc., TorontoAssembled in Mexico - Assemblé du MexiquePAT. #RE29,525; 4,750,201; 4,806,930 Other Patents Pending.
AVERTISSEMENT: Pour réduire les risques deblessures mortelles par happement, après toutréglage de la force de déclenchement ou desseuils de fin de course s'assurer que le sens dela course s'inverse lorsque la porte entre encontact avec un object de 13 mm (1 po) dehauteur (ou un madrier de 2 x 4 de section, àplat) posé sur le sol. Effectuer les reglages selon les procédures décrites dans la notice.
1
3
9
7
5
KG KG
1
3
9
7
5
1
3
9
7
5
1 2 TO PROGRAM RECEIVER CODE FOR EACH REMOTE CONTROL1. Press and HOLD remote control transmitter push button.
2. Press receiver code button. The opener light will flash once.
3. Release transmnitter button. Opener has learned code.
TO ERASE ALL RECEIVER CODES1. Press and HOLD receiver code button. Green indicator light alongside will turn ON.
2. When light turns OFF (about 6 seconds) ALL codes are erased from opener memory.
3
How and When to Adjust the Forces
Test the DOWN (close) forceGrasp the door bottom when the door is abouthalfway through DOWN (close) travel. The doorshould reverse. (Reversal halfway through downtravel does not guarantee reversal on a two-inchobstruction. See page 30.) If the door is hard tohold or doesn't reverse, decrease the DOWN (close)force by turning the control counterclockwise.
Make 10 degree turn adjustments until the doorreverses normally. After each adjustment, run theopener through a complete cycle.
Test the UP (open) forceGrasp the door bottom when the door is abouthalfway through UP (open) travel. The door shouldstop. If the door is hard to hold or doesn't stop,decrease UP (open) force by turning the controlcounterclockwise.
Make 10 degree turn adjustments until the door stopseasily. After each adjustment, run the opener througha complete travel cycle.
If the door doesn't open at least 5 feetIncrease UP (Open) force by turning the controlclockwise. Make 10 degree turn adjustments untildoor opens completely. Re-adjust the UP limit ifnecessary. After each adjustment, run the openerthrough a complete travel cycle.
If the door reverses during the down (close) cycleand the opener lights aren't flashingIncrease DOWN (close) force by turning the controlclockwise. Make 10 degree turn adjustments until thedoor completes a close cycle. After each adjustment,run the opener through a complete travel cycle. Donot increase the force beyond the minimumamount required to close the door.
29
WARNING
Force adjustment controls are located on the backpanel of the opener. Force adjustment settingsregulate the amount of power required to open andclose the door.
The door will stop in the up direction if anythinginterferes with its travel. The door will reverse in thedown direction if anything interferes with its travel(including binding or unbalanced doors).
If the forces are set too light, door travel may beinterrupted by nuisance reversals in the downdirection and stops in the up direction. Weatherconditions can affect the door movement, sooccasional adjustment may be needed.
The maximum force adjustment range is 260 degrees,about 3/4 of a complete turn. Do not force controlsbeyond that point. Turn force adjustment controlswith a screwdriver.

Adjustment Step 4Test the Safety Reverse System
Test:• Place a one-inch board (or a 2x4 laid flat) on the
floor, centered under the garage door.
• Operate the door in the down direction. The doormust reverse on striking the obstruction.
Adjustment:If the door stops on the obstruction, it is not travelingfar enough in the down direction.
• Increase the DOWN limit by turning the DOWNlimit adjustment screw counterclockwise 1/4 turn.
• Repeat the test.
On a sectional door, make sure limit adjustmentsdo not force the door arm beyond a straight upand down position. See the illustration on page 26.• When the door reverses on the one-inch board,
remove the obstruction and run the opener through3 or 4 complete travel cycles to test adjustment.
If the door will not reverse after repeatedadjustment attempts, call Sears Service Centerfor garage door opener service.
GARAGE DOOR
One-inch Board(or a 2x4 laid flat)
Failure to test and adjust the safety reversesystem may result in serious injury or deathfrom a closing garage door. Repeat this testonce a month and adjust as needed.
30
Adjustment Step 3Test The Safety Reversing Sensor
• Press the remote control push button to open thedoor.
• Place the opener carton in the path of the door.
• Press the remote control push button to close thedoor. The door will not move more than an inch,and the opener light will flash.
The garage door opener will not close from aremote control if the indicator light in eithersensor is off (alerting you to the fact that thesensor is misaligned or obstructed).The garage door can be closed by pressing and
holding the Wall Control push bar or button untildown travel is completed.
Professional service is required if the openercloses the door when the safety reversingsensor is obstructed.
Without a properly working safety reversingsensor, persons (particularly children) could beseriously injured or killed if trapped by aclosing garage door. Repeat this test once amonth.
Important safety checkRepeat Adjustment Steps 1, 2 and 4 after:• Each adjustment of door arm length, force controls
or limit controls.
• Any repair to or adjustment of the garage door(including springs and hardware).
• Any repair to or buckling of the garage floor.
• Any repair to or adjustment of the opener.
One-Inch board (or a 2x4 laid flat)
WARNING
WARNING
Safety Reversing Sensor Safety Reversing Sensor

The remote controlThe opener must learn the code of any new remotecontrol. Page 33 explains how to program yourreceiver and how to erase all codes if required. Selfservice of your receiver is not recommended. Ifservice is needed, contact your nearest SearsService Center.
The remote control batteryThe green test light should glow and the openershould operate when the remote control is activated.
If the green test light is dim or does not come on,replace the battery.
The 12 Volt battery should produce power for at leasta year.
Dispose of your old battery properly.
Once a MonthManually operate door. If it is unbalanced orbinding, call for professional garage door service.
Check to be sure door opens & closes fully.Adjust limits and/or force if necessary.(See pages 28 and 29.)
Repeat the safety reverse test. Make anynecessary adjustments (See page 30).
Twice a YearCheck chain tension. Disconnect trolley first.Adjust if necessary (See page 11).
Once a YearOil door rollers, bearings and hinges
The opener does not require additionallubrication. Do not grease the door tracks.
Weather conditions may cause some minorchanges in door operation requiring some re-adjustments, particularly during the first year ofoperation. Pages 28 and 29 refer to the limit and forceadjustments. Only a screwdriver is required. Followthe instructions carefully.
Repeat the safety reverse test (page 30) after anyadjustment of limits or force.
Care of Your Opener
31
IMPORTANT SAFETY INSTRUCTIONS
To reduce the risk of severe injury or death to persons:1. READ AND FOLLOW ALL INSTRUCTIONS.2. Do not permit children either to operate or to play with the opener. Keep remote control in a
location inaccessible to children.3. Operate opener only when the door is in full view and free from any obstruction. Keep the door in
sight until it is completely closed. NO ONE SHOULD CROSS THE PATH OF THE MOVING DOOR.4. Check safety reversal system monthly. See page 30. The garage door MUST reverse on contact
with a one-inch (or a 2x4 board laid flat) object placed on the floor. If an adjustment is made toeither the force or the limit of travel, both adjustments may be needed and the safety reversalsystem must be checked. Failure to properly adjust the opener may result in severe injury or death.
5. If possible, use the emergency release only when the door is in a closed position. Caution shouldbe taken whenever the disconnect cord is actuated with the door open. Weak or broken springsmay cause the door to fall rapidly, causing injury or death to persons.
6. KEEP GARAGE DOORS PROPERLY BALANCED. See page 3. An improperly balanced door may notreverse when required and could result in severe injury or death.Repairs to cables, springassemblies and other hardware must be made by a professional garage door person.
7. Disconnect the electric power to the garage door opener before making any repairs or removing thecovers.
8. SAVE THESE INSTRUCTIONS.
Adjustment Label(Located on the left side panel)
INCREASEDOWN
TRAVEL
INCREASEUP
TRAVEL
Force Controls
Adjustment Label(Located on the right side panel)
KG KG
1
3
9
7
5
1
3
9
7
5
Limit Controls
Maintenance Schedule
Limit and force adjustment controls
WARNING WARNING

To open the doormanually:The door should befully closed if possible.Pull down on the redemergency releasehandle and lift the doormanually. Toreconnect the door tothe opener, press theWall Control push baror button.
32
Activate the opener with any of the following devices:1. The Remote Control.
• 3-Function and Compact: Hold large pushbutton down until the door starts to move.
• Single function: Hold push button until the doorstarts to move.
2. The Wall Control. Hold push bar or button downuntil the door starts to move.
3. The Key Switch or Keyless Entry. (SeeAccessories)
When the Opener is Activated:1. If open, the door will close. If closed, it will open.
2. If closing, the door will reverse.
3. If opening, the door will stop (allowing space forentry and exit of pets and for fresh air).
4. If the door has been stopped in a partially openposition, it will close.
5. If obstructed while closing, the door will reverse.
6. If obstructed while opening, the door will stop.
7. The garage door will reverse in the closing cycle whenthe invisible beam is broken. If fully open, the door willnot close when the beam is broken. The sensor hasno effect in the opening cycle.
If the sensor is not installed or not aligned correctly,the door can't be closed from any portable remotecontrol. It can be closed with the Wall Control, the KeySwitch, or Keyless Entry, however, by pressing andholding the push bar or button until down travel iscomplete. If you release the push bar or button toosoon, the door will reverse.The opener lights will blink for 5 seconds when thesafety reversing sensor causes the door to reverse.
The Opener Lights will turn on under the followingconditions: When the opener is initially plugged in; whenthe power is interrupted; when the opener is activated. Itwill turn off automatically after 4-1/2 minutes or provideconstant light when the Light feature is activated. Bulbsize is 75 watts maximum.
The lockout featureprevents the trolleyfrom reconnectingautomatically. Pull theemergency handledown and back (towardthe opener). The doorcan then be raised andlowered manually asoften as necessary. Todisengage the lockoutfeature, pull theemergency handlestraight down. Thetrolley will reconnect onthe next UP or DOWNoperation.
Lockout position
Manual disconnect position
Weak or broken springs could allow an opendoor to fall (either rapidly or unexpectedly),resulting in serious injury, death or propertydamage. If possible, use the emergencyrelease rope and handle only when the door isfully closed.
Press the lighted push bar or button to open orclose the door.
Press again to reverse the door during the closingcycle or to stop the door while it's opening.
Deluxe Lighted Console (model 53824 only)Light feature: Press the Light button. If the openerlight is off, it will turn on.If the opener light is on, (even in the 4-1/2 minuteautomatic cycle) it will turn off.But if you use the Light button to turn the light onand then activate the opener, the light will turn offafter 4-1/2 minutes.
The Light button will not control the opener lightwhen the door is in motion.
Lock feature: The Lock feature is designed toprevent operation of the door from portable remotecontrols. However, the door will open and closefrom the Deluxe Wall Control push bar, the KeySwitch and the Multi-Function Keyless Entry.
To activate: Press and hold the Lock button for 2 seconds. The push bar light will flash as long asthe Lock feature is on.To turn off: Press and hold the Lock button againfor 2 seconds.The push bar light will stop flashing.Normal operation will resume. The Lock feature willalso turn off whenever the SRT button on the openerend panel is activated.
Operation of Your Opener
Operation of the Wall Control
WARNING
Trolley
TrolleyRelease Arm
NOTICE
EmergencyRelease Handle
(Pull Down)
Trolley
TrolleyRelease Arm
NOTICE
EmergencyRelease Handle
(Pull Down & BackTowards Opener)

Children operating or playing with a garagedoor opener can injure themselves or others.The garage door could close and causeserious injury or death. Do not allow childrento operate the wall push button(s) or remotecontrol(s).A moving garage door could injure or killsomeone under it. Activate the opener onlywhen you can see the door clearly, it is free ofobstructions, and is properly adjusted.
Models with 3-function remote controls: Theremote control(s) has been factory set to operatewith the large push button. However, you can useeither of the two small buttons, if you prefer. And,the 3-function remote control(s) can also activateadditional garage door openers and/or light controls.
Below are instructions for programming your openerto match the other buttons on your remote controlsand any additional remote controls you maypurchase. See available accessories on page 38.
Models with a single-function remote control:The garage door will operate when you press theremote control push button. Refer to the informationbelow if you want to add a 3-function remote controlor erase your programmed code.
33
Your "SRT" garage door opener will operate with asmany as four "SRT" portable remote controls andone Multi-Function Keyless Entry.
To Add A Remote Control1. Select a remote control push button to operate
the receiver.
2. Press and hold the selected remote control pushbutton, Figure 1.
3. Then press and release the "SRT" button on theback panel of the opener, Figure 2. The openerlight will flash once.
Now the opener will operate when the remotecontrol push button is pressed.
If you release the remote control push buttonbefore the opener light flashes, the opener willnot accept the code.
To Change the Selected Push ButtonOn the Same Remote Control
If you decide to use a different remote control buttonthan originally programmed into the opener, youneed to erase all the learned codes and reprogrameach remote control used to operate the garagedoor opener.
To Erase All Remote Control Codes• Press and hold the "SRT" button on the opener
panel until the indicator light turns off (about 6seconds). All the codes the opener has learnedwill be erased.
• To reprogram, repeat Steps 1, 2 and 3 for eachremote control in use.
Select a remote control pushbutton to operate opener
"SRT"Button
IndicatorLight
KG KG
1
3
9
7
5
1
3
9
7
5
1 2 3
53000SRT Series Garage Door Openers (With "SRT" Button)
Code programming instructions are also locatedon the opener panel.
Figure 2
Figure 1
Standard 3-Function Remote Control
Mini 3-FunctionRemote Control
Single FunctionRemote Control
Garage Door Opener (With "SRT" Button)
WARNING
Receiver and Remote Control ProgrammingTo comply with FCC rules, adjustment or modifications of thisreceiver and/or transmitter are prohibited, except for changingthe code setting or replacing the battery. THERE ARE NOOTHER USER SERVICEABLE PARTS.

1. Does the opener have electric power? Plug a lamp into the outlet. If it doesn't light,check the fuse box or the circuit breaker. (Some outlets are controlled by a wall switch.)
2. Have you disabled all door locks? Review installation instruction warnings on Page 11.3. Is there a build-up of ice or snow under the door? The door may be frozen to the
ground. Remove any restriction.4. The garage door spring may be broken. Have it replaced.5. Repeated operation may have tripped the overload protector in the motor. Wait
15 minutes. Try again.
Having a Problem?Situation Probable Cause and Solution
The opener doesn'toperate from eitherthe Wall Control orthe remote control:
Opener operatesfrom the remotecontrol, but not fromthe Wall Control:
1. Is the Wall Control lit? If not, remove the bell wire from the opener terminal screws.Short the red and white terminals by touching both terminals at the same time with apiece of wire. If the opener runs, check for a faulty wire connection at the WallControl, a short under the staples, or a broken wire.
2. Are the wiring connections correct? Review Step 6, page 18.
The door operatesfrom the Wall Control,but not from theremote control:
1. If your model has the Lock feature, make sure the lock is Off.2. Is any wall push button flashing? Your opener needs to re-learn a remote control
code. Refer to Instructions on the opener panel.3. Does the battery test light glow when the remote control push button is pressed? If
not, replace the battery.4. Program the receiver to match the remote control code.5. Repeat the receiver programming procedure with all remote controls.
The remote controlhas short range:
The garage dooropens and closesby itself:
1. Be sure that all remote control push buttons and battery indicator lights are off.2. Remove the bell wire from the Wall Control terminals and operate from the remote
control only. If this solves the problem, the Wall Control is faulty (replace), or there isan intermittent short on the wire between the Wall Control and the opener.
The door doesn'topen completely:
1. If the door has been working properly but now doesn't open all the way, increase theup force. See page 29.
2. Is something obstructing the door? Remove the obstruction or repair the door.3. If door opens at least 5 feet, the travel limits may need to be increased. One turn
equals 2 inches of travel. See page 28.Repeat the safety reverse test after the adjustment is complete.
The door stops butdoesn't closecompletely:
Review the travel limits adjustment procedures on page 28.Repeat the safety reverse test after any adjustment of door arm length, closeforce or down limit.
34
1. Check the battery test light. If the light is dim, replace the battery.2. Change the location of the remote control in your car.3. Check to be sure the antenna on the side or back panel of opener extends fully
downward.4. Some installations may have shorter range due to a metal door, foil backed
insulation, or metal garage siding.
Opener noise isdisturbing in livingquarters of home:
If operational noise is a problem because of proximity of the opener to the livingquarters, the Vibration Isolator Kit 41A3263 can be installed. This kit was designed tominimize vibration to the house and is easy to install.

Having a Problem? (continued)
Situation Probable Cause & Solution
The door reverses forno apparent reasonand opener lightsdon't blink:
1. Is something obstructing the door? Pull the red emergency release handle. Operatethe door manually. If it is unbalanced or binding, call for professional garage doorservice.
2. Clear any ice or snow from the garage floor area where the door closes.3. Review the force adjustment procedures on page 29.4. If door reverses in the fully closed position, decrease the travel limits (page 28).
Repeat safety reverse test after adjustments to force or travel limits. The needfor occasional adjustment of the force and limit settings is normal. Weatherconditions in particular can affect door travel.
The door reverses forno apparent reasonand opener lightsblink for 5 secondsafter reversing:
The opener lights: . . . don't turn on:Replace the light bulbs (75 watts maximum). Use a standard neck garage door openerbulb if regular bulb burns out.
. . . don't turn off:Is the Light feature on? Turn it off.
The opener strains ormaximum force isneeded to operatedoor:
The door may be out of balance or the springs are broken. Close the door and use theemergency release to disconnect the trolley. Open and close the door manually. A properlybalanced door will stay in any point of travel while being supported entirely by its springs. If itdoes not, disconnect the opener and call a professional garage door serviceman. Do notincrease the force to operate the opener.
The opener motorhums briefly, thenwon't work:
1. The garage door springs are broken. See above.2. If the problem occurs on the first operation of the opener, door may be locked. Disable
the door lock. If the chain was removed and reinstalled, the motor may be out of phase.Remove the chain; cycle the motor to the down position. Observe the drive sprocket.When it turns in a clockwise direction and stops in the down position, reinstall the chain.Repeat the safety reverse test after the adjustment is complete.
The opener won'toperate due topower failure:
1. Use the emergency release to disconnect the trolley. The door can be opened and closedmanually. When the power is restored, press the Wall Control push bar and trolley willautomatically reconnect (unless trolley is in lockout position.) See page 32.
2. The Emergency Key Release accessory (for use on garages with no service door)disconnects the trolley from outside the garage in case of power failure.
The chain droopsor sags:
It is normal for the chain to droop slightly in the closed door position. Use theemergency release to disconnect the trolley. If the chain returns to normal height whenthe trolley is disengaged and the door reverses on a one-inch board, no adjustmentsare needed (see page 11).
35
The door opens butwon't close:
Check the safety reversing sensor. Remove any obstruction or align the receiving eye.See page 23.
1. If the opener lights blink, check the safety reversing sensor. See page 23.2. If the opener lights do not blink and it is a new installation, check the down force.
See Adjustment Step 2, page 29. For an existing installation, see below.Repeat the safety reverse test after the adjustment is complete.

NOTICE
7
10
11
8
5 9
UPCEILING MOUNT ONLY
12
14
13
16
12VDC
31
2
6
17
19
18
15
20
21
LOCK LIGHT
SEARS /CRAFTSMAN 4
TO GARAGE DOOR
13
4
56
7Repair Parts SEARS '92
Models 535153/20/92 - 4/3/929 -9/92
4
2
RAIL GREASE
NO. 83A4
Repair Parts
Rail Assembly Parts
Installation Parts
36
KEY PARTNO. NO. DESCRIPTION
1 1A995 Master link kit2 41A3489 Complete trolley assembly3 1B3117 T-rail – center section4 183B110 T-rail – end section (each)5 83A4 Rail grease6 41A3473 Chain and cable7 41B2616 Cable pulley bracket assembly
NOT SHOWN41A3534 Rail assembly hardware kit (includes
hardware illustrated on page 7).
KEY PARTNO. NO. DESCRIPTION
1 41A4086-1 Lighted console wall control2 41A4166 Lighted push button wall control3 41A4086A Deluxe lighted wall control 4 41A4481 Single-function remote control housing & screw
only (no circuit board)5 41A3888 3-function remote control housing & screw only 6 41A3592 3-function compact remote control
housing & screw only7 10A14 12V battery8 29C128 Remote control visor clip9 41A2828 Emergency rope & handle assy.
10 217A238 2-conductor bell wire - white & white/red11 12B380 Door bracket plate12 12B374 Door bracket13 41A4353 Header bracket w/clevis pin & fastener14 41A4373 Safety sensor kit (receiving and sending eye only)15 41B4115 2-conductor bell wire with connector
2 Rolls – white & white/black16 178B35 Curved door arm section17 178B34 Straight door arm section18 12B350 Hanging brackets19 12B484 Square hole bracket20 12B483 "C" wrap bracket21 12B485 Slotted bracket
NOT SHOWN41A3535 Installation hardware bag (includes hardware
illustrated on page 7).41A4116 Safety sensor hardware114A1833 Owner's manual

Repair Parts
Opener Assembly Parts
1
2
10
8
1113
14
1516
19
43
DN
UP
BrownWire
(Down)Contact
LIMIT SWITCHASSEMBLY
GreyWire
YellowWire
(Up)Contact
Center LimitContact
DriveGear
9
2016
7
5
6
12
17183
KEY PARTNO. NO. DESCRIPTION
1 31D380 Sprocket cover 2 41C4220A Gear and sprocket assy.
Complete with:Spring washerThrust washerRetaining ringBearing plateRoll pins (2)Drive gear and worm gearHelical gear w/retainer and grease
3 41A2817 Drive/worm gear kit w/greaseRoll pins (2)
4 41B4245 Line cord5 41A4352 End panel6 175B88 Light socket 7 108D46 Lens8 30B363 Capacitor - 1/2 h.p.
30B387 Capacitor - 1/3 h.p30B366 Capacitor - 1/4 h.p
9 12A373 Capacitor bracket10 41A3150 Terminal block w/screws
KEY PARTNO. NO. DESCRIPTION
11 41D3058 Universal replacement motor andbracket assemblyComplete with: Motor, worm, bracket, bearing assembly, RPM sensor
12 41A3474-1 Cover - 1/2 h.p.41A3474-2 Cover - 1/3 h.p.41A3474-5 Cover - 1/4 h.p.
13 41A2818 Helical gear and retainer w/grease14 41D3452 Limit switch assembly15 41C4398A RPM sensor assembly16 41C4246 Wire harness assy. w/plug17 41A2826 Shaft bearing kit18 41A2822A Interrupter cup assy.19 41A4315-7B Receiver logic board assy.
Complete with:Logic boardEnd panel w/all labels
20 41A3691 End panel w/all labels
NOT SHOWN41A2825 Opener assembly hardware kit (includes
screws not designated by a number in illus.)
37

Sears offers many useful accessories for your garage door opener. They are illustrated below withSears model numbers and descriptions.
53779
53774
53759
53703
53709
53776
53702
3-Function Standard SizeRemote Control:
Includes visor clip.
3-Function Compact RemoteControl:
With key ring & Velcro fasteningstrip.
Multi-Function Keyless Entry:
Enables homeowner to operategarage door opener from outsideby entering code on speciallydesigned keyboard.
Outdoor Key Switch:
Opens the garage door automaticallyfrom outside when remote control isnot handy.
Door Clearance Brackets:
(For Sectional Doors Only)
Replace top brackets and rollers ondoor to reduce height of door travel.For use when installing opener ingarage with low headroomclearance.
Plug-In Light Control:
Controls interior lights. Plugs into awall receptacle.
Emergency Key Release:
Required for a garage with NOaccess door.
Support Bracket:
For finished ceilings or where you require additional support based on garage construction.Includes bracket and fastening hardware.
10 Foot Rail Extension:
To allow a 10 foot door to open fully.
8 Foot Rail Extension
To allow an 8 foot door to open fully.
53704
53705
53714
53773 Wire-In Light Control:
Controls interior or exterior lights.Wires into the electrical box like adimmer switch.
38
Accessories

IndexAccess Door/Outside Key Release Accessory ...............................................................................................4, 5
Chain Tension ..............................................................................................................................................4, 5, 11
Electrical Safety Warnings........................................................................................................................2, 20, 31
Garage DoorTesting for balance, binding and sticking...................................................................................................3, 28, 31Determining high point of travel:
Sectional door...................................................................................................................................................12One-piece door .................................................................................................................................................13
Disabling existing locks....................................................................................................................................3, 11Door clearance brackets (for garages with low headroom) ...........................................................................12, 38Force controls
Adjustment procedures.................................................................................................................................4, 29Problems that might require force adjustments ..........................................................................................34, 35Safety warnings ..........................................................................................................................................29, 31
Door hardware .....................................................................................................................3, 9, 11, 12, 18, 31, 32Maintenance instruction label ........................................................................................................................11, 28Reinforcement requirements ...........................................................................................................................4, 24Removing of all ropes .......................................................................................................................................3, 11Possible door damage...................................................................................................................................16, 24Travel limits
Adjustment procedures.....................................................................................................................................28Problems that might require limit adjustments............................................................................................34, 35Safety warnings ..........................................................................................................................................28, 31
Manual (Emergency) Release Rope & HandleLockout feature ....................................................................................................................................................32Manual disconnect...............................................................................................................................................32Safety warnings .................................................................................................................................11, 19, 31, 32
Opener TerminalsWall control connections......................................................................................................................................18Safety reversing sensor connections...................................................................................................................23Outdoor key switch accessory connections.........................................................................................................18
Operational NoiseSprocket noise .....................................................................................................................................................11Vibration noise (isolator kit) .................................................................................................................................34
Receiver and Remote ControlProgramming the receiver ...................................................................................................................................33Erasing all codes .................................................................................................................................................33Activating other openers ......................................................................................................................................33Safety warning .....................................................................................................................................................33Problems with remote control operation ..............................................................................................................34
Safety Reverse Test Procedure..........................................................................................................................30Testing required.................................................................................................................................11, 30, 34, 35Safety reverse system problems
Securing header bracket to wall .......................................................................................................................12Adjusting travel limits ........................................................................................................................................28Applying excessive force on the door ...............................................................................................................29 Buckling or uneven floor .................................................................................................................................4, 5
Safety Warnings.........................................................2, 3, 9, 11, 12, 16, 18, 19, 20, 21, 24, 28, 29, 30, 31, 32, 33
User Instruction Label for garage wall ........................................................................................................11, 1839

MAINTENANCE AGREEMENTS… YOUR WAY TO BUY TOMORROW'S SERVICE ATTODAY'S PRICE… With nationwide service and the benefits of a Sears warranty plus a Sears maintenanceagreement, you don't have to worry about costly repairs resulting from normal use.
The maintenance agreement does not cover installation or re-installation of the product or damage resulting fromexternal causes such as: acts of abuse, fire, flood, wind, lightning, freezing, etc.
To purchase a Sears Maintenance Agreement – ask any salesperson or call Sears Service today.
SEARS WARRANTYFULL 90 DAY WARRANTY ON GARAGE DOOR OPENER
For 90 days from the date of purchase, Sears will repair any defect in material or workmanship at no charge.
LIMITED WARRANTY
From the 91st day until one year from the date of purchase, Sears will furnish replacement parts for any defectiveparts, free of charge. You pay for labor.
LIMITED WARRANTY ON 1/2 HP AND 1/3 HP MOTORS FOR CRAFTSMAN OPENERS
1/2 HP Motor: After 1 year and through 5 years, Sears will furnish replacement parts for any defective parts in motor,free of charge. You pay for labor.
1/3 HP Motor: After 1 year and through 3 years, if the motor on this Garage Door Opener is defective, Sears willfurnish a replacement motor, free of charge. You pay for labor.
LIMITATION ON LIABILITY
Sears will not be liable for loss or damage to property or any incidental or consequential loss or expense fromproperty damage due directly or indirectly from the use of this product.
Some states do not allow the exclusion or limitation of incidental or consequential damages, so the above limitation orexclusion may not apply to you.
This warranty does not cover repairs necessary because of operator abuse or negligence, including failure to install,adjust and operate the opener according to instructions contained in the owner's manual.
WARRANTY SERVICE IS AVAILABLE BY SIMPLY CONTACTING THE NEAREST SEARS STORE OR SERVICECENTER IN THE UNITED STATES.
This warranty gives you specific legal rights, and you may also have other rights which vary from state to state.
SEARS ROEBUCK AND COMPANY, Dept. 817-WA, Hoffman Estates, IL 60179
©1994, Sears Roebuck and Company114A1833 All Rights Reserved Printed in Mexico
®
Garage DoorOpenerModels:139.53225SRT139.53325SRT139.53425SRT139.53628SRT139.53629SRT139.53635SRT139.53637SRT139.53824SRT
HOW TO ORDER REPAIR PARTS
Now that you have purchased your Sears Garage Door Opener, should aneed ever exist for repair parts or service, simply contact any Sears ServiceCenter and most Sears Roebuck and Co. Stores. Be sure to provide allpertinent facts when you call or visit.
The MODEL NUMBER of your garage door opener is printed on a labellocated on the front panel of the opener.
All parts listed may be ordered from any service center and most Sears stores.
TO ORDER REPAIR PARTS, ALWAYS GIVE THE FOLLOWING INFORMATION:
• PART NUMBER • PART DESCRIPTION• MODEL NUMBER • NAME OF ITEM
If the parts you need are not stocked locally, your order will be electronicallytransmitted to a Sears Repair Parts Distribution Center for handling.
If you suspect receiver/transmitter malfunction, contact your nearestSEARS Service Center.