owner’s manual - blackstar amplification · pdf fileowner’s manual id:core stereo...
TRANSCRIPT

Blackstar Amplification Ltd, Beckett House, 14 Billing Road, Northampton, NN1 5AW, UKFor the latest information go to: www.blackstaramps.com
Whilst the information contained herein is correct at the time of publication, due to our policy of constant improvement and development, Blackstar Amplification Ltd reserves the right to alter specifications without prior notice.
Designed and Engineered byBlackstar Amplification UK
120402M-1 02/16
Owner’s Manual
ID:CORE STEREO 100 & ID:CORE STEREO 150


3
US
A / C
anada
IMPORTANT SAFETY INSTRUCTIONS1. Read these instructions.
2. Keep these instructions.
3. Heed all warnings.
4. Follow all instructions.
5. Do not use this apparatus near water.
6. Clean only with dry cloth.
7. Do not block any ventilation openings.
8. Install in accordance with the manufacturer’s instructions.
9. Do not install near any heat sources such as radiators, heat registers, stoves, or other apparatus (including amplifiers) that produce heat.
10. Do not defeat the safety purpose of the polarized or grounding-type plug. A polarized plug has two blades with one wider than the other. A grounding type plug has two blades and a third grounding prong. The wide blade or the third prong are provided for your safety. If the provided plug does not fit into your outlet, consult an electrician for replacement of the obsolete outlet.
11. Protect the power cord from being walked on or pinched particularly at plugs, convenience receptacles, and the point where they exit from the apparatus.
12. Only use attachments/accessories specified by the manufacturer.
13. Unplug this apparatus during lightning storms or when unused for long periods of time.
14. Refer all servicing to qualified service personnel. Servicing is required when the apparatus has been damaged in any way, such as power-supply cord or plug is damaged, liquid has been spilled or objects have fallen into the apparatus, the apparatus has been exposed to rain or moisture, does not operate normally, or has been dropped.
“TO COMPLETELY DISCONNECT THIS APPARATUS FROM THE AC MAINS, DISCONNECT THE POWER-SUPPLY CORD PLUG FROM THE AC RECEPTACLE.”
“WARNING: TO REDUCE THE RISK OF FIRE OR ELECTRIC SHOCK, DO NOT EXPOSE THIS APPARATUS TO RAIN OR MOISTURE. THE APPARATUS SHALL NOT BE EXPOSED TO DRIPPING OR SPLASHING AND THAT OBJECTS FILLED WITH LIQUIDS, SUCH AS VASES, SHALL NOT BE PLACED ON APPARATUS.”
This symbol is intended to alert the user to the presence of uninsulated “dangerous voltage” within the product’s enclosure that may be of sufficient magnitude to constitute a risk of electric shock to persons.
This symbol is intended to alert the user to the presence of important operation and maintenance (servicing) instructions in the literature accompanying the appliance.

Eng
lish
4
Warning!
Important safety information!
READ THE FOLLOWING INFORMATION CAREFULLY. SAVE ALL INSTRUCTIONS FOR FUTURE REFERENCE!
Follow all warnings and instructions marked on the product!
Danger! High internal operating voltages.
Do not open the equipment case. There are no user serviceable parts in this equipment. Refer all servicing to qualified service personnel.
Clean only with a dry cloth.
Condensation can form on the inside of an amplifier if it is moved from a cold environment to a warmer location. Before switching the unit on, it is recommended that the unit be allowed to reach room temperature.
Unauthorised modification of this equipment is expressly forbidden by Blackstar Amplification Ltd.
Never push objects of any kind into ventilation slots on the equipment casing.
Do not expose this apparatus to rain, liquids or moisture of any type.
Avoid placing vessels filled with liquid on top of the amplifier.
Do not place this product on an unstable trolley, stand or table. The product may fall, causing serious damage to the product or to persons!
Do not cover or block ventilation slots or openings.
This product should not be placed near a source of heat such as a stove, radiator, or another heat producing amplifier.
Use only the supplied power cord which is compatible with the mains voltage supply in your area.
Power supply cords should always be handled carefully and should be replaced if damaged in any way.
Never break off the earth (ground) pin on the power supply cord.
The power supply cord should be unplugged when the unit is to be unused for long periods of time.
Before the unit is switched on, the loudspeaker should be connected as described in the handbook using the lead recommended by the manufacturer.
Always replace damaged fuses with the correct rating and type.
Never disconnect the protective mains earth connection.
High loudspeaker levels can cause permanent hearing damage. You should therefore avoid the direct vicinity of loudspeakers operating at high levels. Wear hearing protection if continuously exposed to high levels.
If the product does not operate normally when the operating instructions are followed, then refer the product to a qualified service engineer.

English
5
The U.S. Government's Occupational Safety and Health Administration (OSHA) has specified the following permissible noise level exposures:
Duration Per Day In Hours Sound Level dBA, Slow Response8 906 924 953 972 1001½ 1021 105½ 110¼ or less 115
According to OSHA, any exposure in excess of the above permissible limits could result in some hearing loss.
Ear plug protectors in the ear canals or over the ears must be worn when operating this amplification system in order to prevent a permanent hearing loss if exposure is in excess of the limits as set forth above. To ensure against potentially dangerous exposure to high sound pressure levels, it is recommended that all persons exposed to equipment capable of producing high sound pressure levels such as this amplification system be protected by hearing protectors while this unit is in operation.
All electrical and electronic products should be disposed of separately from the municipal waste stream via designated collection facilities appointed by the government or the local authorities.

IntroductionThank you for purchasing this Blackstar ID:Core amplifier. Like all our products, this amp is the result of countless hours of painstaking Research and Development by our world-class design team. Based in Northampton (UK), the Blackstar team are all experienced musicians themselves and the sole aim of the development process is to provide guitarists with products which are the ultimate tools for self-expression.
All Blackstar products are subjected to extensive laboratory and road testing to ensure that they are truly uncompromising in terms of reliability, quality and above all TONE.
ID:Core represents a truly ground-breaking achievement, combining unique innovations, an intuitive, traditional control set and the versatility of programmability.
Please read through this handbook carefully to ensure you get the maximum benefit from your new Blackstar product.
If you like what you hear and want to find out more about the Blackstar range of products please visit our website at www.blackstaramps.com.
Thanks!
The Blackstar Team
Eng
lish
6

FeaturesSince 2007, Blackstar has led the way in the innovation of guitar amplification. ID:Core represents the culmination of years of technical Research and Development. These amps have an intuitive control set like a traditional amp, but have the versatility of programmability. Designed to be compact and lightweight with high power, the unique controls allow you, the guitarist, to custom design your own sound.
The Voice control has six different settings – Clean Warm, Clean Bright, Crunch, Super Crunch, OD 1, and OD 2, all of which have been enhanced from the original ID:Core voices for an articulate live sound. When used together with Blackstar’s patented ISF control you can get the exact tone you’re thinking of.
The effects section delivers studio quality Super Wide Stereo modulation, delay and reverb effects simultaneously that you can store with your sound.
Deep editing and storing of patches is simple using the Blackstar INSIDER software. Patches can be shared, uploaded and downloaded via the online community. The USB connector also allows you to record from your amp directly to your computer.
The new built-in looper provides both live performance and personal home practice options for players of all skill levels. Whether playing live as a solo artist or as the lone guitarist in a power duo (or trio), the simple and intuitive looper helps you to achieve a stage-filling, multiple track sound at the press of a footswitch (included), with unlimited overdubs.
An emulated output, MP3/line input and effects loop complete the package.
By using the unique Voice control and the patented ISF, ID:Core amplifiers allow unparalleled flexibility and ease of use, enabling you to design the sound in your head and deliver it at home, in the studio and live.
English
7

Factory ResetThe default factory patches and settings can be restored to your amplifier at any time. Simply hold down the MOD, DLY and REV switches simultaneously, whilst switching on the amplifier.
The Voice LEDs will count down to indicate that a factory reset is imminent. If any of the MOD, DLY and REV switches are released before the Voice LEDs have switched off, then the operation is cancelled and the amplifier will remain unaffected.
Finally, switch the amplifier power off to complete the process. When powered on, your amplifier will be restored to the factory default settings.
IMPORTANT NOTE: This process will overwrite any user saved patches and settings.
Eng
lish
8

English
9
Front Panel
1. InputPlug your guitar in here. Always use a good quality screened guitar lead.
2. Voice The enhanced Voice control changes the preamp voicing, ranging from ultra clean to extremely overdriven.
Clean Warm – Classic clean, dynamic Clean Bright – ‘Boutique’, will break up when pushed hard Crunch – Classic medium gain overdrive Super Crunch – More gain and punch than Crunch OD 1 – Hot-rodded Master Volume overdrive OD 2 – Mid boosted overdrive
This setting is saved when you store a patch.
3. Gain The Gain control adjusts the amount of overdrive or distortion. Low settings (counter clockwise) will deliver a clean sound on the edge of break-up. As the Gain control is turned clockwise the sound will become more overdriven, moving through beautiful crunch tones until, at its maximum position, a full distorted tone is achieved. This setting is saved when you store a patch.
4. VolumeThis controls the preamp volume. High levels of volume will introduce the effect of valve power amp distortion and compression. This setting is saved when you store a patch.
5. BassThe bass control adjusts the amount of low-end frequencies in your tone. This amp has an advanced tone shaping circuit which allows the tone to be tight and cutting (counter clockwise) to warm and thumping (clockwise). This setting is saved when you store a patch.
6. MiddleThe middle control adjusts the amount of middle frequencies in your tone. The middle frequencies are particularly important in setting the amount of ‘body’ your tone has. With the middle control set to its minimum position (fully counter clockwise) the sound will be aggressive and scooped, a tone ideal for aggressive rhythm playing. As the middle control is increased (clockwise) the amount of ‘body’ is increased, which is more suitable for sustained lead guitar tones. This setting is saved when you store a patch.
7. TrebleThe treble control allows exact adjustment of the treble frequencies within the sound. At low settings (counter clockwise) the sound will be warm and dark in character. As the treble control is increased (clockwise) the sound will become brighter. At the maximum settings the sound will be aggressive and cutting. This setting is saved when you store a patch.
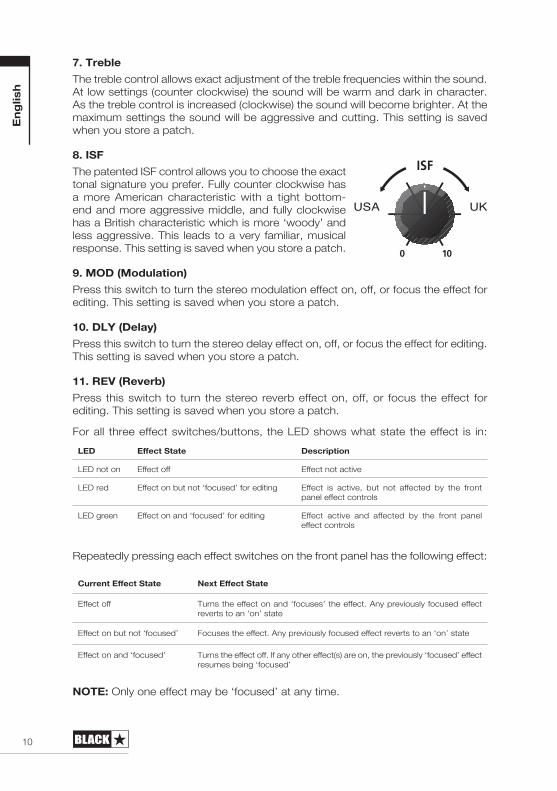
8. ISF The patented ISF control allows you to choose the exact tonal signature you prefer. Fully counter clockwise has a more American characteristic with a tight bottom-end and more aggressive middle, and fully clockwise has a British characteristic which is more ‘woody’ and less aggressive. This leads to a very familiar, musical response. This setting is saved when you store a patch.
9. MOD (Modulation) Press this switch to turn the stereo modulation effect on, off, or focus the effect for editing. This setting is saved when you store a patch.
10. DLY (Delay)Press this switch to turn the stereo delay effect on, off, or focus the effect for editing. This setting is saved when you store a patch.
11. REV (Reverb)Press this switch to turn the stereo reverb effect on, off, or focus the effect for editing. This setting is saved when you store a patch.
For all three effect switches/buttons, the LED shows what state the effect is in:LED Effect State Description
LED not on Effect off Effect not active
LED red Effect on but not ‘focused’ for editing Effect is active, but not affected by the front panel effect controls
LED green Effect on and ‘focused’ for editing Effect active and affected by the front panel effect controls
Repeatedly pressing each effect switches on the front panel has the following effect:
Current Effect State Next Effect State
Effect off Turns the effect on and ‘focuses’ the effect. Any previously focused effect reverts to an ‘on’ state
Effect on but not ‘focused’ Focuses the effect. Any previously focused effect reverts to an ‘on’ state
Effect on and ‘focused’ Turns the effect off. If any other effect(s) are on, the previously ‘focused’ effect resumes being ‘focused’
NOTE: Only one effect may be ‘focused’ at any time.
Eng
lish
10
USA UK

English
11
12. Effect TypeThis changes the effect type and edits a parameter of the currently ‘focused’ effect (modulation, delay, or reverb).Each segment represents a different effect (four for each type of effect). An LED shows which effect type is currently active. The distance travelled through the ‘segment’ modifies an effect parameter. The Effects Table below shows the modifiable parameters.This setting is saved when you store a patch.
13. Effect Level This modifies an effect parameter. For modulation and delay effects, turning the Level control while holding down the Tap button (14) modifies the rate/time of the effect. The Effects Table below shows the modifiable parameters.This setting is saved when you store a patch.
14. TapThe Tap switch is used to set the rate/time of the current ‘focused’ effect. The time between each press of the tap button defines the rate set.
Once set, the Tap LED will flash in time with the set rate of the currently ‘focused’ effect.
The Effects Table below shows the modifiable parameters:
Effects Table
Effect Segment Parameter Level Parameter Tap Parameter
MODULATION
Phaser Mix Depth Speed
Chorus/Flanger Morph Mix Speed
Octaver Octave down/up blend Octaver/original guitar mix -
Tremolo Frequency modulation depth Amplitude modulation depth Speed
DELAY
Linear Feedback Delay level Time
Analogue Feedback Delay level Time
Tape Feedback Delay level Time
Multi Feedback Delay level Time
REVERB
Room Size Reverb level -
Hall Size Reverb level -
Spring Size Reverb level -
Plate Size Reverb level -
This setting is saved when you store a patch.

15. Master Volume This controls the overall volume of your amplifier. Turning it clockwise increases the volume. This is a global setting and is not saved when storing a patch. If the master volume is at zero this allows for silent recording via the Emulated/Headphone Output or USB. The emulated level is controlled via the preamp volume.
16. USB Plug a USB cable in here to connect the amplifier to a Windows PC or Mac. Blackstar’s INSIDER software offers a host of features and can be downloaded from: www.blackstarinsider.co.uk
See the USB Audio section on page 15 for more information.
NOTE: The amplifier will appear on a personal computer as an audio capture device within recording software.
17. Manual
Press this switch to toggle between Manual Mode and the current patch. When the amplifier is in Manual Mode, the sound will reflect the current physical position of the knobs. This is applicable to the Voice, Gain, Volume, Bass, Middle, Treble and ISF controls. Any effects that are active when switching to Manual Mode will be turned off. While in Manual Mode any of the controls can still be modified by an external source (Blackstar INSIDER software, footcontroller), but this means that the sound will not represent the positions of the controls on the front panel.
While in Manual Mode any of the controls can still be modified by the Blackstar INSIDER software but this means that the sound will not represent the positions of the knobs on the front panel.
Tuner ModeHolding the Manual (17) switch for two seconds will engage the tuner. The Recall Indicator LED (20) will flash continuously to indicate the amplifier is in Tuner Mode. The amplifier output will be muted whilst in Tuner Mode.
The Voice LEDs will indicate the closest note to the note being played.
The MOD, DLY and REV LEDs act as indicators to show how close the played note is to the tuned note.
MOD LED red Note is sharp (above pitch)
DLY LED green Note is in tune
REV LED red Note is flat (below pitch)
All other LEDs on the front panel will be off in Tuner Mode.
Pressing any switch will exit Tuner Mode.
Eng
lish
12

English
13
18. BankPress the Bank switch to scroll through the first three banks of patches.
Bank 1 -> Bank 2
Bank 2 -> Bank 3
Bank 3 -> Bank 1
The green LED indicates you’re in Bank 1, the orange LED indicates you’re in Bank 2 and the red LED indicates you’re in Bank 3.
NOTE: The first three banks can be selected from the front panel. When you activate Bank 4 and higher from an external controller (e.g. Blackstar INSIDER software, footcontroller), the Bank LED will not be lit but the channel LEDs will continue to show you the patch location. For example:
Patch 9 – Bank LED red, Channel 3 LED lit.
Pressing Bank UP from an external controller will switch you to Patch 12 – Bank LED off, Channel 3 lit.
The channel will be remembered, therefore the corresponding patch within the current bank will be loaded when scrolling through the banks.
When the amplifier is in Manual Mode, the Bank LED will not be lit.
19. Channels 1-3Channel 1 activates the first patch within the currently active bank.
Channel 2 activates the second patch within the currently active bank.
Channel 3 activates the third patch within the currently active bank.
20. Recall Indicator
The Recall Indicator shows if there is a mismatch between the current value of a parameter within the amplifier and the corresponding physical front panel control. For example, when you change to a different patch the controls on the front panel may not always reflect the setting you are hearing.
To prevent unexpected level jumps in the control you are adjusting, the front panel knobs will have no effect on the sound until the knob reaches the current parameter value. Once reached the Recall Indicator flashes twice and the knob ‘takes control’ of the value and can increase or decrease the value.
The recall indicator will flash each time the physical knob ‘passes through’ the currently active value that you are hearing.
Recall is active for Gain, Volume, Bass, Middle, Treble and ISF.
When the Tuner is active the Recall Indicator will flash continuously.
When looping, the Recall Indicator will flash once to show when the currently playing loop has restarted. When a loop or overdub is being recorded, the Recall Indicator will flash continuously.

Rear Panel
1. Power Switch
This switch is used to turn the amplifier on and off.
2. Mains InputThe supplied detachable mains lead is connected here. Always ensure the Power Switch is in the OFF position before applying mains power. The lead should only be connected to a power outlet that is compatible with the voltage, power and frequency requirements stated on the rear panel. If in doubt get advice from a qualified technician.
3. Emulated/Headphone OutputThis output emulates the tonal characteristics of a guitar speaker cabinet and provides a natural tone for connection to a recording device or mixing desk. To make full use of the stereo effects, use a stereo jack to two mono jacks splitter lead to feed two channels of the recording device or mixer. The output will also function into a mono guitar type lead. Always use a good quality screened lead. Turning the Volume knob (4) will control the Emulated Output level. The Master Volume knob only affects the internal speakers.
NOTE: To ‘silently’ record or practice via headphones, set the Master Volume to zero.
4. MP3/Line InConnect the output of your MP3 or CD player here. Adjust the player’s volume to match that of your guitar to enable you to play along.
5. Footswitch
Connect your included FS-13 footcontroller here, or any other compatible Blackstar footcontroller (e.g. FS-12 programmable footcontroller). See the Footcontrollers section on pages 16-17 for more information.
6. Effects LoopIn addition to using the studio quality effects within your amplifier, you can place your own external effects processors and stomp boxes ‘in the loop’ for the best sonic performance. Connect the amplifier ‘Send’ to the input of your effects unit, and connect the output to the ‘Return’. If your effects unit has a stereo output, connect to both ‘Return’ sockets on your amplifier. If your external effect is mono connect the output of your effects unit to only the ‘Return L (Mono)’ socket.
ProgrammabilityStoring Patches
To store the current sound as a Patch:
1. Press and hold any of the three Channel switches (19) for one second. All three Channel LEDs will begin to flash.
Eng
lish
14

English
15
2. Press the Bank switch to scroll through the three banks (green, orange, red) to choose the store location.
3. Press any of the three Channel switches once to store the patch in the chosen location.
The LED corresponding to the chosen store location will illuminate and the new patch will be active.
Green bank = Patches 1-3
Orange bank = Patches 4-6
Red bank = Patches 7-9
The amplifier controls can be used to edit the patch at any stage of the store process. Press the Manual switch at any stage to cancel the store process and return the amplifier to the last state.
Storing a patch will overwrite any previous patch in that location. Patches can also be stored using Blackstar’s INSIDER software when connected to the amplifier via USB.
Recalling Patches
Press any Channel switch to load that patch. Pressing the Bank switch will cycle through the three banks – green-orange-red. The Channel will be preserved, therefore the corresponding patch within the current Bank will be loaded when scrolling through the Banks. Alternatively, patches can be recalled via Blackstar’s INSIDER software or any compatible footcontroller.
USB Audio Standard device drivers are used to connect the amplifier to a PC or Mac, therefore no additional device drivers are required. If your computer’s audio latency is found to be too high a generic ASIO driver can be downloaded and associated with your amplifier, for example ASIO4ALL – www.asio4all.com. For a guide on low-latency USB recording visit:
www.blackstaramps.com/usbrecording
NOTE: Always connect the amplifier via a main USB port, often found on the rear of the computer.
The amplifier will appear as an audio capture device within recording software.
The output of the audio over USB can be changed via the Blackstar INSIDER software, and can be one of the following:
Speaker emulated stereo effected audio channels2 x mono audio channels - Left – effected amplifier signal - Right – unprocessed guitar signal
Reamping Mode

ReampingThe amplifier can be switched into Reamping Mode via the Blackstar INSIDER software. This is a non-storable setting and will be switched off either when the USB cable is removed, or when the amplifier power is switched off.
When activated, Reamping Mode allows the amplifier to accept a pre-recorded, dry guitar signal via USB and return a fully processed audio signal. This return signal can then be captured using recording software on the connected PC or Mac.
Footcontrollers
FS-13 2-way footcontroller (supplied)
Connect this footcontroller to the Footswitch socket on the rear of your amplifier using any standard mono guitar cable or speaker cable (supplied).
By default, your FS-13 footcontroller will be in Looper Mode (see table above) Switch ‘A’ is used to start and finish recording your loops and overdubs, and switch ‘B’ will stop the loop playback, or cancel the current overdub if still recording. A single press of both switches ‘A’ and ‘B’ simultaneously will undo the last recorded overdub. Holding switch ‘B’ will erase the loop memory.
By holding down both the ‘A’ and ‘B’ switches for 3 seconds you can set your footcontroller to Patch Mode. In this mode, button ‘A’ will toggle between the patches in Channel 1 and Channel 2 of the currently active Bank. Pressing button ‘B’ will scroll ‘up’ through the first 3 Banks of patches, operating in the same way as the BANK switch on the amplifier front panel. The operation of Patch Mode can be changed via the Blackstar INSIDER software, as reflected in the table above. Simply hold down both the ‘A’ and ‘B’ switches again for 3 seconds to change back to Looper Mode.
The current mode of the FS-13 footcontroller will be stored when you power off the amplifier, and will be and recalled each time you power on. Upon powering on the amplifier with the FS-13 footcontroller connected (or connecting the FS-13 footcontroller with the amplifier already powered on) the current mode of the footcontroller will be indicated by an animation using the MANUAL, BANK, CH1, CH2 and CH3 LEDs. Looper Mode will be indicated by a ‘looping’ count up of these LEDs, whereas Patch Mode will be indicated by these LEDs flashing simultaneously twice before returning to normal operation.
Eng
lish
16
LOOPER MODE PATCH MODEAction Toggle Scroll
A (press) Play/Record/Start and Stop overdub
Patch toggle (CH1 and CH2 of the current BANK) Patch Down (1-12)
B (press) Stop playback/Cancel BANK scroll up Patch Up (1-12)
B (hold) Erase loop memory - -
A + B (press) Undo last overdub - -
A + B (hold) Switch to PATCH mode Switch to LOOPER Mode Switch to LOOPER Mode

17
FS-12 5-way programmable footcontroller (not supplied)Connect this footcontroller to the Footswitch socket on the rear of your amplifier using any standard mono guitar cable or speaker cable.
Switches ‘A’-‘C’ correspond to the ‘CH 1’ – ‘CH 3’ switches on the front panel of your amplifier. Pressing any of the ‘A’-‘C’ footcontroller switches will recall the corresponding patch within the current Bank. Banks can be navigated by a single press of both switches ‘A’ and ‘B’ simultaneously (Bank down) or a single press of both switches ‘B’ and ‘C’ simultaneously (Bank up). All 36 amplifier patches (12 banks of 3) can be accessed using the FS-12 footcontroller.
Switches ‘D’ and ‘E’ on the FS-12 footcontroller are programmable and can be configured to a number of different functions to suit your preference. By default, Switches ‘D’ and ‘E’ will control the Looper feature of the amplifier, and will behave as described in the following table.
To change this default setting, connect the amplifier to your computer via USB and use the free Blackstar INSIDER software to make your personal selection from various options such as Modulation/Delay/Reverb On/Off, Modulation/Delay Tap Tempo, Super Wide Stereo On/Off, amongst others. Please see the Footcontroller section of the INSIDER software for detail of the programmable functions.
Holding down the ‘D’ and ‘E’ switches will activate Tuner Mode of your amplifier. With the multifunctional FS-12 footcontroller you gain access to a fully chromatic tuner with note and cents display information appearing on the footcontroller display and LEDs. Press any switch to exit Tuner Mode.
FS-12 + FS-13 7-way switchingConnect the FS-12 5-way footcontroller to your amplifier as detailed above, then connect your supplied FS-13 2-way footcontroller to the ‘EXT.’ socket of your FS-12 footcontroller, using any standard mono guitar cable or speaker cable.
In this configuration you can add two extra, programmable switches which are configurable via the Blackstar INSIDER software. Please see the Footcontroller section of the INSIDER software for detail of the programmable functions.
By default, switch ‘A’ on your FS-13 will toggle the current Modulation effect, and switch ‘B’ will toggle the current Delay effect. When using this 7-way switching configuration the two markers at right side of the display of the FS-12 will show the on/off state of the effect for each switch, as shown below.
English
A B C D E
AMP EXT.
A B C D E
AMP EXT.
FS-12 FS-13 (supplied)
AFS-13 Effect switchtoggle states
B
ON
ON
LOOPER MODE
Action
D (press) Play/Record/Start and Stop overdub
E (press) Stop playback/Cancel
E (hold) Erase loop memory
D + E (press) Undo last overdub

18
Advanced Features
Your ID:Core amplifier has further advanced features which are aimed at more in-depth users who enjoy getting the most from their amplifier. These features do not have independent controls on the front panel of the amplifier, but instead are accessed by using the Tap switch (14) as a ‘shift key’ and using other controls to access these features.
Resonance – Tap + Bass
The Resonance control sets the overall bass response. At lower settings the cleans will be tight and funky and overdrives will be focused in their bass response. At increased settings the clean sounds will be become full and warm, whilst the crunch and overdrive tones will be more bass heavy and resonant.
Presence – Tap + Treble
The Presence control sets the overall treble response. Percussive high-end can be accentuated on clean sounds and the amount of aggressive treble controlled with crunch and overdrive settings.
USB Recording Level – Tap + Gain
As stated in the USB Audio section (see page 15), the output level of the USB audio signal from your ID:Core amplifier can be controlled independently of your amplifier’s speaker volume by holding down the Tap switch (14) whilst turning the Gain control (3) on the front panel.
Effect Speed/Time – Tap + Effects Level
As stated in the Effect Level section (see page 11), the speed/time of the modulation and delay effects can be controlled by holding down the Tap switch (14) whilst turning the Effect Level control (13) on the front panel. This can be very useful for setting a specific accurate effect tempo instead of using the Tap switch.
Global Emulated Output/Headphones Level – Tap + Volume
This controls the overall output volume of the Emulated Out/Phones connection, allowing you to tailor the level to best suit the connected device, whether audio interface, PA system or headphones of various impedance. This control can both cut and boost the level, with the halfway position of the Volume knob (4) being the default volume.
Eng
lish

19
Firmware UpdateFirmware updates are initiated via the Blackstar INSIDER software. A new version of the Blackstar INSIDER software will be released whenever an update is available.
Important note: Always connect the amplifier to a main USB port (usually found on the on the rear of your PC or Mac) when updating the firmware. Never use a front mounted USB port, USB hub or a USB extension cable. Doing so may result in a failed update, which could cause your amplifier to become unresponsive.
When the amplifier is connected (via USB) to a version of the Blackstar INSIDER software containing newer firmware, a message will be displayed prompting you to install the latest files. Whilst updating, the amplifier controls will be unresponsive. Front panel voice LEDs will cycle to indicate data activity during the update process.
The amplifier power should not be switched off during a firmware update. If the amplifier is switched off during an update, the controls may be unresponsive after the power is reapplied and the amplifier will produce no sound. The voice LEDs will cycle to indicate that the amplifier contains no valid firmware.
If you are experiencing problems with the firmware update process the amplifier can be forced to power up in Update Mode. Hold down the Manual (17) & MOD (9) switches simultaneously, whilst switching on the amplifer to enter this mode with the voice LEDs cycling to indicate Update Mode. Connect the amplifier to the Blackstar INSIDER software to begin a firmware updae.
The amplifier must be connected to the Blackstar INSIDER software to reinstall valid firmware. The update process will start automatically if the Blackstar INSIDER software detects that the amplifier is in this state.
Technical SpecificationID:CORE STEREO 100
Power: 2 x 50 Watts (Stereo 100 Watts)
Weight (kg): 12.5
Dimensions (mm): 573(W) x 447(H) x 241(D)
Technical SpecificationID:CORE STEREO 150
Power: 2 x 75 Watts (Stereo 150 Watts)
Weight (kg): 14.5
Dimensions (mm): 624(W) x 486(H) x 259(D)
English

Français
3
INSTRUCTIONS DE SÉCURITÉ IMPORTANTES
1. Lisezcesinstructions.
2. Conservezcesinstructions.
3. Tenezcomptedetouslesavertissements.
4. Suiveztouteslesinstructions.
5. N'utilisezpascetappareilavecdel'eauàproximité.
6. Nettoyez-leuniquementavecunchiffonsec.
7. Nebloquezaucuneouverturedeventilation.
8. Installez-leconformémentauxinstructionsdufabricant.
9. Nel'installezpasprèsdesourcesdechaleurtellesquedesradiateurs,bouchesde chauffage, poêles ou autres appareils (y compris des amplificateurs)produisantdelachaleur.
10.Neneutralisezpas la fonctiondesécuritéde la fichepolariséeoude terre.Une fichepolarisée adeuxbroches, l'uneplus largeque l'autre.Une fichedeterreadeuxbrochesidentiquesetunetroisièmebrochepourlamiseàlaterre.Labrochepluslargeoulatroisièmebrocheserventàvotresécurité.Sila fichefournien'entrepasdansvotreprise,consultezunélectricienpour leremplacementdelapriseobsolète.
11.Évitezdemarchersurlecordond'alimentationetdelepincer,enparticulierauniveaudesfiches,desprisessecteur,etdupointdesortiedel'appareil.
12.N'utilisezquedesfixations/accessoiresspécifiésparlefabricant.
13.Débranchezcetappareilencasd'orageoudenonutilisationprolongée.
14.Confiez toute réparation à des techniciens de maintenance qualifiés. Uneréparationest nécessaire si l'appareil a été endommagéd'unequelconquefaçon,parexemplesilecordonoulafiched'alimentationestendommagé,siduliquideaétérenversésurl'appareilousidesobjetssonttombésdedans,si l'appareil a été exposé à la pluie ou à l'humidité, s'il ne fonctionne pasnormalement,ous'ilesttombé.
« POUR COMPLÈTEMENT DÉCONNECTER CET APPAREIL DU SECTEUR, DÉBRANCHEZ LE CORDON D'ALIMENTATION DE LA PRISE DE COURANT.»
« ATTENTION : POUR RÉDUIRE LE RISQUE D'INCENDIE OU D'ÉLECTROCUTION, N'EXPOSEZ PAS CET APPAREIL À LA PLUIE NI À L'HUMIDITÉ. N'EXPOSEZ PAS CET APPAREIL AUX GOUTTES NI AUX ÉCLABOUSSURES ET NE PLACEZ PAS D'OBJET REMPLI DE LIQUIDE SUR L'APPAREIL, COMME PAR EXEMPLE UN VASE. »
Cesymboleestdestinéàalerterl'utilisateurdelaprésenced'une«tensiondangereuse»nonisoléedansl'enceinteduproduit,d'uneampleursuffisantepourconstituerunrisqued'électrocution.
Ce symbole est destiné à alerter l'utilisateur de la présenced'instructions importantes d’emploi et d’entretien (maintenance)danslesdocumentsaccompagnantl'appareil.

Français
4
Avertissement !
Instructions de sécurité importantes !
LISEZ ATTENTIVEMENT LES INFORMATIONS SUIVANTES. CONSERVEZ TOUTES LES INSTRUCTIONS POUR VOUS Y RÉFÉRER ULTÉRIEUREMENT !
Respectez tous les avertissements et instructions figurant sur le produit !
Danger ! Hautes tensions de fonctionnement internes.
N'ouvrezpas leboîtier de l'équipement.Aucunepiècedecet équipement n’estréparableparl'utilisateur.Confieztouteréparationàdestechniciensdemaintenancequalifiés.
Nettoyez-leuniquementavecunchiffonsec.
Delacondensationpeutseformerà l'intérieurd’unamplificateurs’ilestdéplacéd'unmilieu froidàunenvironnementpluschaud.Avant lamisesous tensiondel'unité,ilestrecommandédelalaisserreveniràlatempératureambiante.
ToutemodificationnonautoriséedecetéquipementestexpressémentinterditeparBlackstarAmplificationLtd.
Nefaitesjamaisentrerd’objetsquelsqu’ilssoientdanslesouverturesdeventilationduboîtierdel’équipement.
N'exposezpascetappareilàlapluie,àdesliquidesouàunequelconquehumidité.
Évitezdeplacerdesrécipientsremplisdeliquidesurl'amplificateur.
Neplacezpasceproduitsurunchariot,standoutableinstable.Leproduitpourraittomber,entraînantdegravesdommagespourlui-mêmeoudespersonnes!
Nerecouvrezetn’obstruezpaslesfentesououverturesdeventilation.
Ceproduitnedoitpasêtreplacéprèsd'unesourcedechaleurtellequ'unpoêle,unradiateur,ouunamplificateurdégageantdelachaleur.
N’utilisezquelecordond'alimentationfourniquiestcompatibleaveclesprisesdecourantdevotrerégion.
Lescordonsd'alimentationélectriquedoiventtoujoursêtremanipulésavecsoinetremplacéss'ilssontendommagésdequelquefaçonquecesoit.
Neneutralisezjamaislabrochedemiseàlaterreducordond’alimentation.
Lecordond'alimentationélectriquedoitêtredébranchéavanttoutelonguepérioded’inutilisationdel’unité.
Avant demettre l’unité sous tension, le haut-parleur doit être connecté commedécritdanslemanuelàl'aideducordonrecommandéparlefabricant.
Remplaceztoujourslesfusiblesgrilléspardesmodèlesdetypeetdevaleurcorrects.
Neneutralisezjamaisledispositifdeprotectionparmiseàlaterre.
Des haut-parleurs utilisés à fort volume peuvent causer des dommages auditifspermanents.Vousdevezdoncéviter laproximitédirecteavecdeshaut-parleursfonctionnant à haut niveau. Portez des protections auditives si vous êtescontinuellementexposéàdehautsniveaux.
Français
5
Sileproduitnefonctionnepasnormalementalorsquelesinstructionsd’utilisationsont correctement suivies, veuillez rapporter le produit à un service après-ventequalifié.
L'OccupationalSafetyandHealthAdministration(OSHA)dugouvernementdesUSAaspécifiélesniveauxd’expositionaubruitacceptables:
Nombred’heuresparjour NiveauacoustiqueendBA,réponselente
8 90
6 92
4 95
3 97
2 100
1½ 102
1 105
½ 110
¼oumoins 115
Selon l'OSHA, touteexpositionsupérieureaux limitesadmissibles indiquéesci-dessuspeutentraîneruneperteauditive.
Desbouchonsdeprotectiond'oreilledanslesconduitsauditifsouuncasquedeprotectiondoiventêtreportéslorsdufonctionnementdecesystèmed’amplificationpour éviter lespertes auditivespermanentes si l'expositiondépasse les limitesindiquées ci-dessus. Pour se prémunir contre une exposition potentiellementdangereuseàdesniveauxdepressionacoustiqueélevés, ilest recommandéàtouteslespersonnesexposéesàunéquipementpouvantproduiredehautsniveauxdepressionacoustique,telquecesystèmed’amplification,d'utiliserdesprotectionsdesoreillesquandcetéquipementestenservice.
Tous les produits électriques et électroniques doivent être traitésséparémentdelacollectemunicipaled'orduresménagèresdansdespointsdecollectedésignésparlesservicespublicsoulesautoritéslocales.

Français
Introduction
Mercid'avoirachetécetamplificateurID:CoreBlackstar.Commetousnosproduits,cetampliest le résultatd'innombrablesheuresderechercheetdéveloppementminutieuxparnotreéquipedeconception,unedesmeilleuresdumonde.BaséeàNorthampton(R-U),l'équipeBlackstarestcomposéedemusicienschevronnésdontleseulbutestdefournirauxguitaristesdesproduitsquisoient leursoutilsd'expressionultimes.
TouslesproduitsBlackstarsontsoumisàdestestsintensifsenlaboratoireetsurlarouteafind’assurerunefiabilitéetunequalitésanscompromis,etpardessustoutLEson!
L’ID:Core représente une avancée vraiment révolutionnaire en combinant desinnovationsuniques,unensembledecommandestraditionnelles,intuitives,etlapolyvalencedesespossibilitésdeprogrammation.
Veuillez lireattentivement la totalitédecemoded'emploipourvousassurerunrendementmaximaldevotrenouveauproduitBlackstar.
Sivousaimezcequevousentendezetvoulezensavoirplussur lagammedeproduitsBlackstar,veuillezvisiternotresiteinternetàl'adresse:
www.blackstaramps.com.
Merci!
L'équipeBlackstar
6
Français
Caractéristiques
Depuis2007,Blackstarouvrelavoiedel'innovationenamplificationpourguitare.L’ID:Corereprésentel'aboutissementd'annéesderechercheetdedéveloppementtechniques.Cesamplisontlejeudecommandesintuitivesd’unamplitraditionnelmaissontprogrammables,avectoutelapolyvalencequecelaimplique.Conçuspourêtrecompactsetlégersavecunefortepuissance,ilsvouspermettentàvous,leguitariste,deconcevoirvotrepropresongrâceàdescommandesuniques.
LacommandeVoiceproposesixréglages–CleanWarm,CleanBright,Crunch,SuperCrunch,OD1etOD2,tousaméliorésparrapportauxsonoritésdel'ID:Cored'originepourunsonlivebienarticulé.Enl’utilisantconjointementàlacommandeISFbrevetéeparBlackstar,vouspouvezobtenirlesonexactquevousavezentête.
Lasectiond’effetsoffredeseffetssimultanésdequalitéstudio:delay,reverbetmodulationàstéréoultralarge(«SuperWideStereo»),quevouspouvezmémoriseravecvotreson.
Retravaillervospatchesenprofondeuretlesenregistrerestchosesimpleaveclelogiciel INSIDERdeBlackstar.Lespatchespeuventêtrepartagés, téléversésettéléchargésgrâceà lacommunautéen ligne.LeconnecteurUSBvouspermetégalementd'enregistrerdirectementvotreamplidansvotreordinateur.
Lenouveau looper intégréoffreauxmusiciensde tousniveaux lapossibilitédeseproduireenliveetdepratiqueràlamaison.Quevousvousproduisiezensoloouquevoussoyezleseulguitaristed’unduo(outrio)électrique,leloopersimpleetintuitifvouspermetd'obtenirunsonmultipistequiremplit lascèneparsimplepressiond'unepédale(fournie),avecunnombreillimitédesuperpositions.
Unesortieémulantlebaffle,uneentréeMP3/ligneetuneboucled’effetscomplètentl’ensemble.
Grâce à la commande Voice unique en son genre et à l'ISF brevetée, lesamplificateursID:Coreprocurentuneflexibilitéetunefacilitéd'utilisationsanségalesvouspermettantdeconcevoirlesondansvotretêteetdeleretrouveràlamaison,enstudioetsurscène.
7
Français
Réinitialisation d'usine
Lespatchesetréglagesd’usinepardéfautpeuventêtreàtoutmomentrestaurésdans votre amplificateur. Il vous suffit demaintenir simultanément pressés lesboutonsMOD,DLYetREVpendantquevousallumezl’amplificateur.
LesLEDdelacommandeVoices’éteindronttouràtourpourindiquerl’imminencedelaréinitialisationd’usine.Sin’importelequeldesboutonsMOD,DLYouREVestrelâchéavantquelesLEDVoicenesesoienttouteséteintes,l’opérationestannuléeetl’amplificateurnesubitaucunemodification.
Enfin,éteignezl'amplificateurpourterminerlaprocédure.Quandvouslerallumerez,lesréglagesd’usinedevotreamplificateuraurontétérestaurés.
NOTE IMPORTANTE :Cetteprocédureécrasetouslesréglagesetpatchesenregistrésparl’utilisateur.
8

Français
9
Face avant
1. Entrée
Branchezicivotreguitare.Utiliseztoujoursuncâbledeguitareblindédebonnequalité.
2. Voice
LacommandeVoiceamélioréechangelevoicing(ou«harmonisation»)dupréampli,d’unsonultraclairàunesaturationextrême.
CleanWarm–ClassiquesonclairetdynamiqueCleanBright–«Boutique»,àlalimitedelasaturationsionlepousseàfondCrunch–ClassiquesaturationàgainmoyenSuperCrunch–PlusdegainetdepunchqueCrunchOD1–SaturationpousséeparlevolumeMasterOD2–Saturationrenforcéeenmédiums
Ceréglageestsauvegardéquandvousmémorisezunpatch.
3. Gain
LacommandeGainrèglel’ampleurdelasaturationoudeladistorsion.Lesréglagesbas(danslesensanti-horaire)donnentunsonclairàlalimitedelasaturation.QuandontournelacommandeGaindanslesenshoraire,lesondevientplussaturé,allantversdesuperbessonscrunchjusqu’àunedistorsiontotaleenboutdecourse.Ceréglageestsauvegardéquandvousmémorisezunpatch.
4. Volume
Contrôlelevolumedupréampli.Dehautsniveauxdevolumeintroduirontl’effetdedistorsionetdecompressiond’unampliàétagedepuissanceàlampes.Ceréglageestsauvegardéquandvousmémorisezunpatch.
5. Graves
LacommandeBassrèglelaquantitédebassesfréquences(graves)dansvotreson.Cetampliauncircuitdefaçonnagesonoresophistiquéquipermetdepasserd’unsonfermeettranchant(danslesensanti-horaire)àunsonchaudetlourd(senshoraire).Ceréglageestsauvegardéquandvousmémorisezunpatch.
6. Médiums
LacommandeMiddlerèglelaquantitédefréquencesmoyennes(médiums)dansvotreson.Les fréquencesmoyennessontparticulièrement importantespour le«corps»devotreson.AveclacommandeMiddleauminimum(àfonddanslesensanti-horaire), lesonseraagressifetcreusé,idéalpourunjeurythmiqueagressif.Quandonmonte(danslesenshoraire)lacommandeMiddle,le«corps»prenddel’importance,cequiconvientmieuxauxsonsdeguitare«lead»avecsustain.Ceréglageestsauvegardéquandvousmémorisezunpatch.

Français
7. Aigus
La commande Treble permet le réglage précis des hautes fréquences (aigus)dansvotreson.Avecdesréglagesbas(danslesensanti-horaire),lesonaurauncaractèrechaudetsourd.PlusonmontelacommandeTreble(senshoraire)etpluslesondevientbrillant.Aumaximum,lesonseraagressifettranchant.Ceréglageestsauvegardéquandvousmémorisezunpatch.
8. ISF
La commandebrevetée ISF vouspermet de choisirlasignaturetonaleexactequevouspréférez.À fonddanslesensanti-horaire,elledonneuncaractèreplusaméricain avec des graves fermes et desmédiumsplusagressifs,tandisqu'àfonddanslesenshoraire,elledonneuncaractèrebritannique,uncôté«bois»moinsagressif.Celaentraîneune réponsemusicale,trèsfamilière.Ceréglageestsauvegardéquandvousmémorisezunpatch.
9. MOD (Modulation)
Pressezceboutonafindemettrel'effetdemodulationstéréoen/horsservice,oudelechoisirpourl'éditer.Ceréglageestsauvegardéquandvousmémorisezunpatch.
10. DLY (Delay)
Pressezceboutonafindemettrel’effetdelay(retard)en/horsserviceoudelechoisirpourl'éditer.Ceréglageestsauvegardéquandvousmémorisezunpatch.
11. REV (Reverb)
Pressezceboutonafindemettrel’effetreverb(réverbération)en/horsserviceoudelechoisirpourl'éditer.Ceréglageestsauvegardéquandvousmémorisezunpatch.
Pourlestroisboutonsd’effet,laLEDindiqueleurétat:
LED État de l’effet Description
LEDéteinte Effetdésactivé L’effetn’estpasenservice
LEDrouge Effetactivémaispaschoisipourl’édition L’effetestenservicemaisn’estpasaffectéparlescommandesd’effetdelafaceavant
LEDverte Effetactivéetchoisipourl’édition L’effetestenserviceetaffectéparlescommandesd’effetdelafaceavant
Presserplusieurs foischaqueboutond’effetde la faceavantdonne le résultatsuivant:
État actuel de l'effet Résultat
Effetdésactivé Activel’effetetlechoisitpourl’édition.Toutautreeffetquiétaitchoisipourl’éditionretrouvesonsimpleétatactivé
Effetactivémaispaschoisipourl’édition
Choisitl’effetpourl’édition.Toutautreeffetquiétaitchoisipourl’éditionretrouvesonsimpleétatactivé
Effetactivéetchoisipourl’édition
Désactivel’effet.Siunouplusieursautreseffetssontactivés,l’effetpréalablementchoisipourl’éditionl’estànouveau
NOTE :pourl’édition,unseuleffetpeutêtrechoisiàlafois.
10
USA UK

Français
11
12. Type d'effet
Changeletyped'effetetmodifieunparamètredel’effetactuellementchoisipourl’édition(modulation,delayoureverb).Chaque segment représente un effet différent (quatre pour chaque type d'effet).UneLEDindiqueletyped’effetactuellementactivé.Ladistanceparcouruedansle«segment»modifieunparamètredel'effet.Letableaudeseffets(plusbas)montrelesparamètresmodifiables.Ceréglageestsauvegardéquandvousmémorisezunpatch.
13. Niveau d'effet
Modifieunparamètred'effet.Pour leseffetsdemodulationetderetard (delay),tourner lacommandeLevel enmaintenant enfoncé leboutonTAP (15)modifieleréglagedevitesse/tempsdel'effet.Letableaudeseffets(plusbas)montrelesparamètresmodifiables.
Ceréglageestsauvegardéquandvousmémorisezunpatch.
14. Battue manuelle
LeboutonTAPsertauréglagedevitesse/tempsdel’effetactuellementchoisipourl’édition.L’intervalledetempsséparantdeuxpressionsduboutonTapdéfinitlavitesse.
Unefoiscelaréglé,laLEDTapclignoteaurythmeainsifixédansl’effetactuellementchoisipourl’édition.
Letableaudeseffetsci-dessousmontrelesparamètresmodifiables:
Tableau des effets
Effet Paramètre du segment Paramètre réglé par Level
Paramètre réglé par Tap
MODULATION
Phaser Mixage Profondeur Vitesse
Chorus/Flanger Morphing Mixage Vitesse
Octaver Mélangeoctaveinf./sup. MixageOctaver/sondeguitared'origine
-
Tremolo Ampleurdemodulationdefréquence
Ampleurdemodulationd'amplitude
Vitesse
DELAY
Linéaire Réinjection Niveauderetard Temps
Analogique Réinjection Niveauderetard Temps
Bande Réinjection Niveauderetard Temps
Multi Réinjection Niveauderetard Temps
REVERB
Room(pièce) Taille Niveaudereverb -
Hall(salle) Taille Niveaudereverb -
Spring(àressorts) Taille Niveaudereverb -
Plate(àplaque) Taille Niveaudereverb -
Ceréglageestsauvegardéquandvousmémorisezunpatch.

Français
15. Volume Master
Cette commandecontrôle le volumegénéral de votre amplificateur. La tournerdans lesenshoraireaugmente levolume.C’estunréglageglobalquin’estpassauvegardéquandvousmémorisezunpatch.SilevolumeMasterestàzéro,celapermetd’enregistrerensilencevia lasortiecasqueavecémulationdebaffleoul’USB.Leniveauémuléestcontrôléaumoyenduvolumedupréampli.
16. USB
BrancheziciuncâbleUSBpourrelierl'amplificateuràunPCsousWindowsouàunMac.LelogicielINSIDERdeBlackstaroffreunefouledefonctionsetpeutêtretéléchargédepuisnotresiteweb:www.blackstarinsider.co.uk
VoirlasectionAudioUSBenpage15pourplusd’informations.
NOTE : l’amplificateurapparaîtradanslelogicield’enregistrementdel’ordinateurcommeunpériphériquedecaptureaudio.
17. Mode manuel
Pressezceboutonpouralternerentrelemodemanueletlepatchactuel.Quandl’amplificateur est en mode manuel, le son reflète la position physique descommandes.Celas’appliqueauxcommandesVoice,Gain,Volume,Bass,Middle,Trebleet ISF.Tous leseffetsquiétaientactifs lorsdupassageenmodemanuelsontdésactivés.Enmodemanuel,touteslescommandespeuventtoujoursêtremodifiéesparlelogicielINSIDERdeBlackstar,maiscelasignifiealorsquelesonnecorrespondplusauxpositionsdescommandesdelafaceavant.
Mode accordeur
MaintenirleboutonManual(17)durantdeuxsecondesactivel’accordeur.L'indicateurderappelàLED(20)clignoteracontinuellementpoursignalerquel’amplificateurestenmodeaccordeur.Lasortiedel’amplificateurestcoupéeenmodeaccordeur.
LesLEDVoiceindiquentlanotelaplusprochedelanotejouée.
LesLEDMOD,DLYetREVserventd’indicationdejustessedelanotejouéeparrapportàlanoteaccordée.
LEDMODrouge Lanoteesttrophaute(au-dessusdelahauteurjuste)
LEDDLYverte Lanoteestaccordée
LEDREVrouge Lanoteest tropbasse (au-dessousde lahauteurjuste)
TouteslesautresLEDdelafaceavantsontéteintesenmodeaccordeur.
Pressern’importequelboutonvousfaitquitterlemodeaccordeur.
12

Français
13
18. Banque
PressezleboutonBank(banque)pourpasserenrevuelestroispremièresbanquesdepatches.
Banque1->Banque2
Banque2->Banque3
Banque3->Banque1
LaLEDverte indiquequevousêtesdans laBanque1, laLEDorangedans labanque2,etlaLEDrougedanslabanque3.
NOTE:lestroispremièresbanquespeuventêtresélectionnéesdepuislafaçade.Quandvousactivezlabanque4ouplusdepuisuncontrôleurexterne(parexemplelelogicielINSIDERdeBlackstar,lepédalier),laLEDBanknes’allumepasmaislesLEDdecanaux(CH)continuentdevousindiquerl’emplacementdupatch.Parexemple:
Patch9–LEDBankrouge,LEDdecanal3allumée.
Demanderlabanquesupérieuredepuisuncontrôleurexternevousfaitpasseraupatch12–LEDBankéteinte,canal3allumé.
Lecanalseramémorisé,parconséquentlepatchcorrespondantdanslabanqueactuelleserachargélorsquevousferezdéfilerlesbanques.
Quandl’amplificateurestenmodemanuel,laLEDBankn’estpasallumée.
19. Canaux (CH) 1-3
Lecanal1activelepremierpatchdelabanqueactuellementactive.
Lecanal2activeledeuxièmepatchdelabanqueactuellementactive.
Lecanal3activeletroisièmepatchdelabanqueactuellementactive.
20. Indicateur de rappel
L'indicateurderappelsignaleunedisparitéentrelavaleuractuelled’unparamètredans l’amplificateur et la commande physique correspondante en façade. Parexemple,quandvouschangezdepatch,lescommandesdelafaceavantpeuventneplusrefléterlesréglagesquevousentendez.
Pouréviterdessautsdeniveaumalvenusquandvousréglezunecommande,lescommandesde la faceavantn’ontpasd’effetsur lesontantquevousne leuravezpas fait rejoindre lavaleuractuelleduparamètre.Unefoiscelle-ciatteinte,l’indicateurderappelclignotedeuxfoisetlacommande«reprendlecontrôle»delavaleur,cequiluipermetalorsdel’augmenteroudeladiminuer.
L'indicateurderappelclignoteàchaquefoisquelacommandephysique«passepar»lavaleuractuellementactivequevousentendez.
L’indicationderappelconcernelescommandesGain,Volume,Bass,Middle,TrebleetISF.
Quandl’accordeurestenservice,l’indicateurderappelclignotecontinuellement.
Lorsdubouclage,l'indicateurderappelclignoteunefoispourindiquerquandlaboucleactuellementlueredémarre.Durantl’enregistrementd'uneboucleoud’unesurperposition,l’indicateurderappelclignotecontinuellement.

Français
Face arrière
1. Interrupteur d'alimentation
Cetinterrupteursertàmettrel'amplificateursousethorstension.
2. Entrée d’alimentation secteur
Le cordon d'alimentation secteur détachable fourni se branche ici. Vérifieztoujoursquel'interrupteurd'alimentationestenpositiond'arrêtavantd'appliquerl'alimentation secteur. Le cordon ne doit être branché qu'à une prise secteurcompatibleaveclesbesoinsélectriquesdetension,puissanceetfréquenceindiquésenfacearrière.Encasdedoute,demandezconseilàuntechnicienqualifié.
3. Sortie émulée/casque
Cettesortieémulelescaractéristiquestonalesd'unbaffledeguitareetproduitunsonnaturelpourlebranchementàunenregistreurouàunetabledemixage.Pourtirerpleinementpartideseffetsstéréo,utilisezuncâbleenYavecunjackstéréoversdeuxjacksmonocommesourcepourdeuxcanauxdel’enregistreuroudelatabledemixage.Lasortiefonctionneraaussiavecuncâblemonodetypeguitare.Utiliseztoujoursuncâbleblindédebonnequalité.TournerlacommandeVolume(4)contrôleleniveaudelasortieémulée.LevolumeMastern’affectequeleshaut-parleursinternes.
NOTE :pourenregistrer«ensilence»,réglezlevolumeMasteràzéro.
4. Entrée MP3/ligne
BranchezicilasortiedevotrelecteurdeMP3oudeCD.Réglezlevolumedulecteurenfonctiondeceluidevotreguitarepourjoueravec.
5. Pédalier
BranchezicivotrepédalierFS-13fourni,outoutautrepédalierBlackstarcompatible(p.ex.lepédalierprogrammableFS-12).VoirlasectionPédaliersdespages16-17pourplusd'informations.
6. Boucle d'effets
Enplusd'utiliser leseffetsdequalitéstudiodevotreamplificateur,vouspouvezplacer vos propres processeurs d'effets externes et pédales d'effet « dans laboucle»pourlesmeilleuresperformancessonores.Connectezlaprisededépart«Send»del'amplificateuràl'entréedevotreunitéd'effets,etlasortiedecettedernièreàlaprisederetour«Return».Sivotreunitéd'effetsdisposed'unesortiestéréo,connectezsesdeuxprisesauxprises«Return»devotreamplificateur.Sivotreeffetexterneestmono,connectezsasortieàlaseuleprise«ReturnL(Mono)»devotreamplificateur.
Programmation
Mémorisation des patches
Pourmémoriserlesonactuelcommeunpatch:
1.Pressezetmaintenezn’importelequeldestroisboutonsCHdecanal(19)durantuneseconde.LestroisLEDdecanalcommencerontàclignoter.
14

Français
15
2.PressezleboutonBankpourpasserenrevuelestroisbanques(verte,orange,rouge)afindechoisirl'emplacementdemémorisationdevotrepatch.
3.Pressezunefoisn’importelequeldestroisboutonsdecanal(CH)pourmémoriserlepatchàl’endroitchoisi.
La LED correspondant à l’emplacement demémorisation choisi s’allume et lenouveaupatchestactivé.
Banqueverte=patches1-3
Banqueorange=patches4-6
Banquerouge=patches7-9
Lescommandesdel’amplificateurpeuventserviràmodifierlepatchàtoutmomentlors du processus de mémorisation. Pressez le bouton Manual pour annulern’importequand leprocessusdemémorisationet ramener l’amplificateuràsesderniersréglages.
Mémoriser un patch écrasera (remplacera) tout patch déjà mémorisé à cetemplacement.LespatchespeuventégalementêtremémorisésaumoyendulogicielINSIDERdeBlackstarquandl'amplificateuryestconnectéparUSB.
Rappel des patches
Pressezn’importequelboutondecanal(CH)pourchargerlepatchluicorrespondant.Presser le boutonBank vous fera parcourir les trois banques – verte, orange,rouge.Lecanalseraconservé,cequisignifiequelepatchcorrespondantdanslabanqueactuelleserachargélorsquevouspasserezenrevuelesbanques.Sinon,lespatchespeuventêtrerappelésaumoyendulogicielINSIDERdeBlackstaroudetoutpédaliercompatibleconnecté.
Audio USB
Lespilotesaudiostandardsontutiliséspourconnecterl’amplificateuràunPCouàunMac,aucunpilotespécifiquen’estnécessaire.Si la latenceaudiodevotreordinateurs'avèretropélevée,unpiloteASIOgénériquepeutêtretéléchargéetassociéàvotreamplificateur,parexempleASIO4ALL – www.asio4all.com.Pourunguidesurl'enregistrementUSBàfaiblelatence,consultez:
www.blackstaramps.com/usbrecording
NOTE : branchez toujours l'amplificateuràunportUSBprincipal,engénéralàl'arrièredel'ordinateur.
L’amplificateurapparaîtradanslelogicield’enregistrementcommeunpériphériquedecaptureaudio.
LasortiedusonparUSBpeutêtremodifiéeaumoyendu logiciel INSIDERdeBlackstar,etpeutprendrel'unedesformessuivantes:
Canauxaudioaveceffetsstéréoetémulationdebaffle
2canauxaudiomono
-Gauche–signald’amplificateurtraité
-Droite–signaldeguitarenontraité
Modederé-amplification

Français
Ré-amplification
L’amplificateurpeutêtrecommutéenmodederé-amplificationaumoyendulogicielINSIDERdeBlackstar.C’estunréglagenonmémorisablequiseradésactivésoitlorsquelecâbleUSBseraretirésoitlorsquel’amplificateurseraéteint.
Quandilestactivé,lemodederé-amplificationpermetàl’amplificateurd’accepterparUSBunsignaldeguitare secpréenregistréetde renvoyerunsignal audioentièrement traité. Ce signal de retour peut alors être capturé par le logicield’enregistrementsurlePCouMacconnecté.
Pédaliers
Pédalier FS-13 à deux boutons (fourni)
Connectezcepédalierà lapriseFootswitchenfacearrièredel'amplificateuraumoyend'uncâbledeguitaremonostandardoud’uncâbledebaffle(fourni).
Pardéfaut,votrepédalierFS-13seraenmodeLooper(voirletableauci-dessus).Le bouton « A » sert à lancer et à arrêter l'enregistrement de vos boucles etsuperpositions(«overdubs»)etle«B»àarrêterlalectureenboucle,ouàannulerla superposition en cours si l’enregistrement se poursuit. Une simple pressionsimultanémentsurlesdeuxboutons«A»et«B»annuleraladernièresuperpositionenregistrée.Maintenirlebouton«B»effaceralamémoiredeboucle.
Enmaintenantenfoncésàlafoislesboutons«A»et«B»durant3secondes,vouspouvezfairepasservotrepédalierenmodePatch.Danscemode,lebouton«A»faitalternerentrelespatchesducanal1etducanal2delabanqueactuellementactive.Presserlebouton«B»entraîneundéfilement«ascendant»dansles3premièresbanques de patches, fonctionnant comme le bouton BANK en face avant del'amplificateur.LefonctionnementdumodePatchpeutêtremodifiéaumoyendulogicielINSIDERdeBlackstar,commeindiquédansletableauci-dessus.Maintenezsimplementànouveaulesboutons«A»et«B»enfoncésdurant3secondespourreveniraumodeLooper.
Le mode actuel du pédalier FS-13 sera mémorisé lorsque vous éteindrezl'amplificateur,etserarappeléàchaquemisesoustension.Àlamisesoustensiondel'amplificateuraveclepédalierFS-13connecté(ouenreliantlepédalierFS-13avecl'amplificateurdéjàsoustension),lemodeactueldupédalierestindiquéparuneanimationdesLEDMANUAL,BANK,CH1,CH2etCH3.EnmodeLooper,cesLEDs’allumentsuccessivementetcycliquement,tandisqu’enmodePatch,ellesclignotentsimultanémentdeuxfoisavantdereveniràunfonctionnementnormal.
16
MODE LOOPER MODE PATCH
Action Commutation Défilement
A (presser)Lire/Enregistrer/
Lanceretarrêterlasuperposition
AlternerentrelespatchesCH1etCH2delabanque
actuellePatchinférieur(1-12)
B (presser) Arrêterlalecture/AnnulerFairedéfilerlabanquevers
lehautPatchsupérieur(1-12)
B (tenir)Effacerlamémoirede
boucle- -
A + B (presser)Annulerladernièresuperposition
- -
A + B (tenir) PasserenmodePATCH PasserenmodeLOOPER PasserenmodeLOOPER

17
Français
Pédalier FS-12 programmable à cinq boutons (non fourni)
ConnectezcepédalieràlapriseFootswitchenfacearrièredel'amplificateuraumoyend'uncâbledeguitaremonostandardoud’uncâbledebaffle.
Lesboutons«A»-«C»correspondentauxboutons«CH1»-«CH3»delafaceavantdel'amplificateur.Pressern’importelequeldesboutons«A»-«C»dupédalierrappellelepatchcorrespondantdanslabanqueactuelle.Lesbanquespeuventêtreparcouruesd’unesimplepressionsimultanémentsurlesdeuxboutons«A»et«B»(banqueinférieure)ousurlesdeuxboutons«B»et«C»(banquesupérieure).Les36patchesdel'amplificateur(12banquesde3)sontaccessiblesdepuislepédalierFS-12.
Lesboutons«D»et«E»dupédalierFS-12sontprogrammablesetpeuventêtreconfiguréspouruncertainnombredefonctionsdifférentesselonvospréférences.Pardéfaut,lesboutons«D»et«E»contrôlentlafonctionLooperdel'amplificateuretsecomportentcommedécritdansletableausuivant.
Pourmodifier ce réglagepardéfaut, connectez l'amplià votreordinateurparUSBet utilisez le logiciel gratuitINSIDER de Blackstar afin de faire votre sélectionpersonnelleparmidiversesoptionstellesqueModulation/Delay/Reverb On/Off, Modulation/Delay Tap Tempo,SuperWideStereoOn/Off,entreautres.VeuillezconsulterlasectionFootcontroller(«pédalier»)dulogicielINSIDERpour plus dedétails sur les fonctionsprogrammables.Maintenirlesboutons«D»et«E»activelemodeaccordeurdevotreamplificateur.AveclepédaliermultifonctionFS-12,vousavezaccèsàunaccordeurchromatiquecomplet
avecaffichagedesnotesetdescentièmesdedemi-tonsurl'écranetlesLEDdupédalier.Pressern’importequelboutonvousfaitquitterlemodeaccordeur.
FS-12 + FS-13, 7 boutons de commutation
ConnectezlepédalierFS-12(5boutons)àvotreamplificateurcommedétailléci-dessus,puisconnectezvotrepédalierFS-13(2boutons)fourniàlaprise«EXT.»devotreFS-12,aumoyend'uncâbledeguitaremonostandardoud’uncâbledebaffle.
Cette configuration vous permet d’ajouter deux boutons programmablessupplémentaires, configurables dans le logiciel INSIDER de Blackstar. VeuillezconsulterlasectionFootcontroller(«pédalier»)dulogicielINSIDERpourplusdedétailssurlesfonctionsprogrammables.
Pardéfaut,lebouton«A»devotreFS-13commutel'effetdemodulationactuel,etlebouton«B»l'effetDelayactuel.Lorsquevousutilisezcetteconfigurationà7boutons,lesdeuxmarqueursàdroitedel'écranduFS-12indiquentl'étaton/offdel'effetpourchaquebouton,commeillustréci-dessous.
A B C D E
AMP EXT.
A B C D E
AMP EXT.
FS-12 FS-13 (fourni)
MODE LOOPER
Action
D (presser)Lire/Enregistrer/
Lanceretarrêterlasuperposition
E (presser) Arrêterlalecture/Annuler
E (tenir)Effacerlamémoirede
boucle
D + E (presser)Annulerladernière
superposition

18
Français
Fonctionnalités avancées
Votre amplificateur ID:CORE possède des fonctionnalités avancées destinéesàceuxquiutilisentàfond leuramplificateuretaimententirer lemaximum.Cesfonctionnalitésn'ontpasdecommandespropresenfaceavantdel'amplificateur,maissontaccessiblesenutilisantàlafoisleboutonTap(14)commetouchedemodificationdefonctionetd'autrescommandes.
Résonance –Tap+Bass
Lacommandederésonancerèglelaréponsegénéraleengraves.Avecdesréglagesbas,lessonsclairsserontfermesetfunkyetlessaturationssefocaliserontsurlaréponseengraves.Avecdesréglagesplusélevés,lessonsclairsdeviendrontpleinsetchauds,tandisquelessonscrunchetsaturésaurontdesgravespluslourdsetplusrésonants.
Présence –Tap+Treble
Lacommandedeprésencerèglelaréponsegénéraleenaigus.Lesaiguspercussifspeuventêtreaccentuésdanslessonsclairsetlaquantitéd'aigusagressifspeutêtremaîtriséedanslessonscrunchetsaturés.
Niveau d'enregistrement USB –Tap+Gain
CommeindiquédanslasectionAudioUSB(voirpage15),leniveaudesortiedusignalaudioUSBdevotreamplificateurID:Corepeutêtrecontrôléindépendammentduvolumeduhaut-parleurdecedernierenmaintenantpresséleboutonTap(14)pendantquevoustournezlacommandedegain(3)enfaceavant.
Vitesse/Temps de l'effet – Tap+EffectsLevel
CommeindiquédanslasectionNiveaud'effet(voirpage11),leréglagedevitesse/tempsdeseffetsdemodulationetderetard(Delay)peutsefaireenmaintenantpresséleboutonTap(14)pendantquevoustournezlacommandedeniveaud'effetEffectsLevel(13)enfaceavant.Celapeutêtretrèsutilepourdéfinirprécisémentuntempod’effetspécifiqueplutôtqued'utiliserlabattuemanuelledestempssurleboutonTap.
Niveau global de sortie émulée/casque – Tap+Volume
Celacontrôlelevolumedesortiegénéraldelasortieémulée/casque,cequivouspermetd'adapterleniveauàl'appareilconnecté,selonqu’ils’agitd’uneinterfaceaudio,d’unesonorisationoudecasquesd'impédancesdiverses.Cettecommandepeutàlafoisréduireetaugmenterleniveau,levolumepardéfautcorrespondantàlapositionmédianeduboutonVolume(4).
AÉtats des boutonsdu FS-13
B
ON
ON

19
Français
Mise à jour du firmware
LesmisesàjourdufirmwaresefontaumoyendulogicielInsiderdeBlackstar.UnenouvelleversiondulogicielINSIDERdeBlackstarsortiralorsqu’unemiseàjourseradisponible.
Note importante : branchez toujours l'amplificateur à un port USB principal(généralementàl'arrièredevotrePCouMac)pourfairelamiseàjourdufirmware.N’utilisezjamaisunportUSBmontéàl'avant,unconcentrateur(«hub»)USBouunerallongeUSB.Celapeutentraînerl'échecdelamiseàjour,avecpourrisqueunamplificateurquinerépondplus.
Quand l’amplificateurestconnecté (parUSB)àuneversiondu logiciel INSIDERde Blackstar contenant un firmware plus récent, un message s’affiche, vousdemandantd’installerlesderniersfichiers.Durantlamiseàjour,lescommandesdel’amplificateurnesontpasopérationnelles.LesLEDVoiceclignotentenfaceavantpourindiquerl’activitéd’échangededonnéesdurantleprocessusdemiseàjour.
L’alimentationdel’amplificateurnedoitpasêtrecoupéedurantlamiseàjourdufirmware.Sil'amplificateurestéteintdurantunemiseàjour,lescommandespeuventnepasrépondrequandonlerallumeetl’amplificateurneproduireaucunson.LesLEDs’allumerontdefaçoncycliquepourindiquerquel’amplificateurnecontientpasdefirmwareexploitable
Sivousrencontrezdesproblèmeslorsdelaprocéduredemiseàjourdufirmware,ilestpossibledeforcerl’ampliàdémarrerenmodeMiseàjour.Maintenezpresséssimultanément lesboutonsManual (17) etMOD (9) pendantque vousallumezl'amplificateurpourpasserdanscemodeavec lesLEDVoicequis’allumentdefaçoncycliquepoursignalerlemodedemiseàjour.Connectezl'amplificateuraulogicielINSIDERdeBlackstarpourentamerlamiseàjourdufirmware.
L'amplificateurdoitêtreconnectéaulogicielINSIDERdeBlackstarpourréinstallerunfirmwarevalable.Leprocessusdemiseàjourdémarreautomatiquementquandle logiciel INSIDERdeBlackstar détecteque ces conditions sont réuniespourl’amplificateur.
Caractéristiques techniques
ID:CORE STEREO 100
Puissance :2x50watts(100wattsstéréo)
Poids (kg) :12,5
Dimensions (mm) : 573(L)x447(H)x241(P)
Caractéristiques techniques
ID:CORE STEREO 150
Puissance :2x75watts(150wattsstéréo)
Poids (kg) :14,5
Dimensions (mm) : 624(L)x486(H)x259(P)

20 21
INSTRUCCIONES IMPORTANTES DE SEGURIDAD1. Lea estas instrucciones.2. Guarde estas instrucciones.3. Preste atención a todas las advertencias.4. Siga todas las instrucciones.5. No utilice este aparato cerca del agua.6. Solo limpiar con un trapo seco.7. No bloquee ninguna salida de ventilación.8. Haga la instalación acorde con las instrucciones del fabricante.9. No lo instale cerca de fuentes de calor como radiadores, estufas u otros
aparatos (por ejemplo amplificadores) que producen calor.10. No anule el propósito de seguridad del enchufe polarizado o con conexión a
tierra. Los enchufes polarizados disponen de dos clavijas, una de mayor tamaño que la otra. Un enchufe de toma a tierra tiene dos clavijas y una tercera de toma a tierra. La clavija ancha en el enchufe polarizado o la tercera clavija en el de toma a tierra se proporcionan para su seguridad. Si el enchufe suministrado no encaja en la toma, póngase en contacto con un electricista para sustituir la toma antigua.
11. Proteja el cable de alimentación para no caminar sobre él ni pellizcarlo, particularmente en los enchufes, los receptáculos de conveniencia y en el punto donde éstos salen del aparato.
12. Use sólo los acoples/accesorios especificados por el fabricante.13. Desenchufe el aparato durante tormentas eléctricas o cuando no se utilice por
periodos prolongados.14. Toda reparación debe ser realizada por personal cualificado. Las reparaciones
deberán realizarse cuando el aparato se estropee de cualquier forma, cuando se dañe la clavija o el cable de alimentación, se derramen líquidos o caigan objetos dentro del aparato, cuando éste hay sido expuesto a la lluvia o a la humedad, cuando no funcione de manera normal o cuando se haya caído.
“PARA DESCNECTAR POR COMPLETO ESTE APARATO DE LA ELECTRICIDAD, DESENCHUFE EL CABLE DE ALIMENTACIÓN DE LA TOMA PERTINENTE TOMA DEL PANEL POSTERIOR DEL MISMO”.“ADVERTENCIA: PARA REDUCIR EL RIESGO DE INCENDIOS Y DESCARGAS ELÉCTRICAS, NO EXPONGA ESTE APARATO A LLUVIA NI HUMEDAD. EL APARATO NO DEBERÁ EXPONERSE A GOTEOS NI SALPICADURAS Y NINGÚN OBJETO CON LÍQUIDO, COMO UN JARRÓN, DEBERÁ COLOCARSE SOBRE EL APARATO”.
Este símbolo está destinado a alertar al usuario de la presencia de “tensión peligrosa” sin aislamiento dentro del gabinete del producto, que puede tener la suficiente magnitud para producir descarga eléctrica.
Éste símbolo tiene la intención de alertar al usuario de que existen instrucciones de operación y mantenimiento importantes en esta guía que acompaña al aparato.
Español

22
¡AVISO!
Importante Información de seguridad
LEA LA SIGUIENTE INFORMACIÓN DETENIDAMENTE Y CONSERVE LAS INSTRUCCIONES PARA FUTURAS CONSULTAS.
SIGA TODOS LOS AVISOS E INSTRUCCIONES MARCADAS EN LOS PRODUCTOS.
¡PELIGRO! Alto voltaje interno.
No abra la tapa del equipo. No hay partes utilizables para otros fines en este equipo. Remita cualquier anomalía al servicio técnico cualificado.
Utilice trapos secos para su limpieza.
Se puede formar condensación dentro del amplificador si este se ha movido de un lugar frío a otro más cálido. En el caso de que se moviera el amplificador de un sitio más frío a otro más cálido o a la inversa, deje un rato el amplificador sin encender para que este alcance la temperatura media del nuevo lugar.
Las modificaciones no autorizadas están expresamente prohibidas por Blackstar Amplification LTD.
Nunca apoye objetos en ninguno de los agujeros de ventilación localizados en las tapas del equipo.
No exponga los equipos a la lluvia, líquidos o humedad de cualquier tipo.
No ponga los equipos en carretillas o mesas inestables. El equipo puede caer dañándose seriamente, así como a otras personas.
No cubra o bloquee los agujeros de ventilación y apertura.
Este producto no debe ser expuesto cerca de una fuente de calor como puede ser un radiador, estufa o cualquier productor de calor o amplificador.
Use sólo la fuente de alimentación que sea compatible con los voltajes utilizados en el área donde esté.
La fuente de alimentación debe ser manejada con cuidado y debe ser reemplazada en caso de cualquier daño.
Nunca rompa la toma de tierra sobre el cable de la corriente.
El cable de la corriente deberá ser desconectado cuando la unidad no vaya a ser usada durante un tiempo.
Antes de encender un cabezal, la pantalla deberá estar conectada como se describe en el libro de instrucciones utilizando los conductores recomendados por el fabricante.
Reemplace siempre los fusibles dañados por otros de características idénticas.
Nunca desconecte el protector de la toma de tierra.
La potencia de sonido de los altavoces cuando los niveles son altos puede causar daño permanente. Se debe evitar por tanto la exposición directa a loa altavoces cuando estos estén operando a un alto nivel. Usa siempre protectores auditivos ante una exposición prolongada.
Si el producto no funcionara una vez seguidas todas las instrucciones, remítalo a un servicio técnico cualificado.
Español

23
La oficina Americana de Protección de la Salud ha especificado los siguientes niveles admisibles de exposición de ruido:
DURACIÓN POR DÍA Y HORAS NIVEL DE SONIDO DBA BAJA RESPUESTA8 906 924 953 972 1001½ 1021 105½ 110¼ or less 115
Cualquier exposición por encima de los límites mencionados puede provocar pérdidas auditivas.
Los tapones protectores deben ser utilizados cuando se opere este amplificador para prevenir una pérdida de oido permanente si la exposición es excesiva o está por encima de los límites descritos arriba. Para prevenir contra una exposición peligrosa a altos niveles de sonido se recomienda a todas las personas que puedan estar expuestas a niveles producidos por un amplificador como éste que protejan sus oídos mientras la unidad esté en funcionamiento.
All electrical and electronic products should be disposed of separately from the municipal waste stream via designated collection facilities appointed by the government or the local authorities.
Español

Introducción Gracias por comprar este amplificador Blackstar ID:Core. Como todos nuestros productos, este amplificador es el resultado de incontables horas de meticulosa Investigación y Desarrollo por parte de nuestro prestigioso equipo de diseño. Con base en Northampton (Reino Unido), el equipo de Blackstar está formado por músicos experimentados y el único objetivo del proceso de desarrollo es el de proporcionar a los guitarristas con productos que sean las herramientas de autoexpresión definitivas.
Todos los productos Blackstar son sometidos a intensivas pruebas de laboratorio y de rodaje para asegurar que están fuera de compromiso en términos de fiabilidad, calidad y, sobretodo, TONO.
ID:Core supone un verdadero logro, combina innovaciones únicas, un set de control tradicional e intuitivo y la versatilidad de un amplificador programable.
Por favor lee este manual detenidamente para asegurarte de que obtienes el máximo rendimiento de tu producto Blackstar.
Si te gusta lo que oyes y quieres averiguar mas acerca de la línea de productos Blackstar, por favor visita nuestro sitio web en www.blackstaramps.com.
¡Gracias!
El Equipo Blackstrar
24
Español

CaracterísticasDesde 2007, Blackstar ha liderado el camino de la innovación en amplificadores de guitarra. ID:Core representa la culminación de años de Investigación y Desarrollo. Este amplificador tiene un intuitivo panel de control, pero con la versatilidad que ofrece un amplificador programable. Los controles únicos te permiten a ti, el guitarrista, diseñar tu propio sonido.
El control Voice tiene seis ajustes diferentes: Clean Warm, Clean Bright, Crunch, Super Crunch, OD 1 y OD 2, los cuales han sido mejorados sobre el original ID:Core Voces para un claro sonido en vivo. Cuando el control ISF y Blackstar son usados simultáneamente puedes obtener el tono que estas pensando.
La sesión Effects proporciona efectos con calidad de estudio Super Wide Stereo para modulación, reverb y delay que puedes almacenar junto con tu sonido.
La edición avanzada de los bancos de sonido, muy sencilla, se realiza usando el software Insider de Blackstar. Los bancos se pueden descargar y compartir con la comunidad de usuarios en línea. El conector USB también te permite grabar directamente desde tu amplificador al ordenador.
El nuevo looper integrado proporciona opciones de actuaciones tanto en vivo como en casa para artistas de niveles diferentes. Tanto si tocas en vivo solo o como guitarrista en un duo o trio, el simple e intuitivo looper te ayuda a conseguir una sensación de estar en un escenario lleno, sonidos de pistas múltiples al presionar el pedal (incluido), con overdubs ilimitados.
Una salida emulada, entrada de línea/MP3 completan el paquete.
Usando el único control Voice y el patentado ISF, los amplificadores ID:Core ofrecen una incomparable flexibilidad y facilidad de uso, permitiéndote diseñar el sonido en t cabeza y llevarlo a casa, al estudio y al directo.
25
Español

Restablecer ajustes de fábricaLos bancos de sonido por defecto se pueden restablecer en cualquier momento. Simplemente mantén pulsados simultáneamente los botones MOD, DLY y REV, mientras enciendes el amplificador.
El indicador LED hará una cuenta atrás para indicar que se va a restablecer los ajustes de fábrica. Si alguno de los botones MOD, DLY o REV se suelta antes de que el indicador LED haya finalizado hasta finalmente apagarse, la operación será cancelada y el amplificador permanecerá como estaba antes de iniciar el proceso.
Finalmente, apague el amplificador para completar el proceso. Cuando se encienda, su amplificador se habrá restablecido.
NOTA IMPORTANTE: Este proceso eliminará cualquier contenido guardado por el usuario.
26
Español

27
Panel Frontal
1. INPUT Conecta tu guitarra aquí. Usa siempre un cable apantallado de calidad.
2. VOICE
El control Voice cambia el carácter previo, desde limpios cristalinos hasta distorsión extrema.
Clean Warm - Sonido muy limpio y dinámico.
Clean Bright - ‘Boutique’, romperá cuando se rasguee con fuerza.
Crunch - Distorsión clásica de alta ganancia.
Super Crunch - Versión más distorsionada del canal Crunch.
OD 1 - Potente distorsión con volumen master.
OD 2 - Potente distorsión con énfasis en frecuencias medias.
Este ajuste se almacenará al guardar un banco de sonido.
3. GAIN
El control Gain ajusta la cantidad de overdrive o distorsión. Ajustes bajos (sentido anti-horario) entregarán un sonido limpio a punto de romper. A medida que el control de distorsión se incrementa en sentido horario el sonido se volverá más distorsionado, moviéndose a través de ricos tonos Cruz hasta, en su máxima posición, alcanzar un sonido totalmente distorsionado. Este ajuste se almacenará al guardar un banco de sonido.
4. VOLUMEEste control ajusta el volumen previo. Altos niveles de volumen introducirán los efectos de distorsión y compresión. Este ajuste se almacenará al guarda un banco de sonido.
5. BASSEl control Bass ajusta la cantidad de frecuencias graves en tu sonido. Este amplificador tiene un avanzado circuito de formación de tono que permite que el sonido sea contundente y cortante (sentido anti-horario) o cálido y pesado (sentido horario). Este ajuste se almacenará al guardar un banco de sonido.
6. MIDDLEEl control Middle ajusta la cantidad de frecuencias medias en tu sonido. Las frecuencias medias son particularmente importantes al ajustar la cantidad de cuerpo que tiene tu sonido. Con el control Middle en su posición mínima (sentido anti-horario) el sonido será agresivo y cortante, un tono ideal para tonos rítmicos. A medida que el control Middle se incrementa en sentido horario, la cantidad de cuerpo aumenta, que es más apropiada para tonos solistas. Este ajuste se almacenará al guardar un banco de sonido.
Español

7. TREBLEEl control Treble permite un ajuste exacto de las frecuencias agudas o altas en tu sonido. A niveles bajos (sentido anti-horario) el sonido será oscuro y caliente en carácter. A medida que el control Treble se incrementa en sentido horario el sonido se volverá más brillante. En su ajuste máximo el sonido será agresivo. Este ajuste queda almacenado al guardar un banco de sonido.
8. ISF El control ISF te permite elegir la firma tonal exacta que prefieras. Ajustando de forma anti-horaria se proporciona una característica más Americana con bajos apretados y medios agresivos, en cambio al hacerlo de forma horaria se obtiene un tono Británico, que es más denso y menos agresivo.
9. MOD (MODULATION) Pulsa este interruptor para conectar o desconectar el efecto de modulación, o seleccionar el efecto para editarlo. Este ajuste queda almacenado al guardar un banco de sonido.
10. DLY (DELAY)Pulsa este interruptor para conectar o desconectar el efecto delay, o seleccionarlo para su edición. Este ajuste queda almacenado al guardar un banco de sonido.
11. REV (REVERB)Pulsa este interruptor para conectar o desconectar el efecto reverb, o seleccionarlo para su edición. Este ajuste queda almacenado al guardar un banco de sonido.
Para cada uno de los tres efectos el funcionamiento del LED es similar:LED Estado de efecto Descripción
LED apagado Apagado El efecto no estará activo
LED rojo Encendido (no permite edición) El efecto estará activo, pero no responde a los controles del panel frontal
LED verde Encendido (permite edición) El efecto estará activo y responderá a los controles del panel frontal
Al pulsar repetidamente cada uno de los controles de efecto obtendremos la siguiente secuencia:
Estado actual del efecto Estado del siguiente efecto
Efecto apagado Enciende el efecto y lo selecciona para edición. Cualquier efecto previamente seleccionado para edición vuelve a su estado normal.
Efecto encendido pero no seleccionado para edición
Selecciona el efecto para su edición. Cualquier efecto previamente seleccionado para edición vuelve a su estado normal.
Efecto encendido y seleccionado para edición
Apaga el efecto, quedando seleccionado para edición el último efecto seleccionado en caso de que quedase algún efecto encendido.
28
USA UK
Español

29
NOTA: Sólo un efecto puede estar seleccionado para edición cada vez.
12. EFFECT TYPE (TIPO DE EFECTO)
Cambia el tipo de efecto y edita un parámetro del efecto que esté actualmente seleccionado para edición. (Modulación, delay o reverb)
Cada segmento representa un efecto diferente (hay cuatro para cada tipo de efecto) Un LED muestra el tipo de efecto que se encuentra activo. La distancia recorrida por el segmento modifica un parámetro del efecto. La tabla mostrada más adelante nos indica los parámetros modificables. Este ajuste queda almacenado al guardar un banco de sonido.
13. EFFECT LEVEL (NIVEL DE EFECTO)Este control modifica un parámetro de efecto. Para los efectos de modulación y delay, girar el control de nivel mientras se presiona el interruptor Tap (14) modifica la frecuencia o el tiempo del efecto.
La tabla mostrada más adelante nos indica los parámetros modificables. Este ajuste queda almacenado al guardar un banco de sonido.
14. TAPEl interruptor Tap se usa para ajustar la frecuencia o tiempo del efecto seleccionado para la actual edición. El tiempo entre pulsaciones del interruptor Tap establece la frecuencia del efecto.Una vez establecido, el LED parpadeará indicando la frecuencia del efecto seleccionado. La tabla mostrada más adelante nos indica los parámetros modificables.
Este efecto queda almacenado al guardar un banco de sonido.
Effects Table
Efecto Segmento Level Parameter Tap Parameter
MODULACIÓN
Phaser Mezcla general Profundidad o ‘Depth’ Velocidad
Chorus/Flanger Morph Mix Velocidad
Octaver Octave down/up blend Profundidad o ‘Depth’ -
Tremolo Profundidad de la modulación de frecuencia
Profundidad de la modulación de amplitud
Velocidad
DELAY
Linear Realimentación Nivel de Delay Tiempo
Analógico Realimentación Nivel de Delay Tiempo
Cinta Realimentación Nivel de Delay Tiempo
Multi Realimentación Nivel de Delay Tiempo
REVERB
Room Tamaño Nivel de Reverb -
Español

Efecto Segmento Level Parameter Tap Parameter
Hall Tamaño Nivel de Reverb -
Spring Tamaño Nivel de Reverb -
Plate Tamaño Nivel de Reverb -
This setting is saved when you store a patch.
15. MASTER VOLUME Controla el volumen general de tu amplificador. Girándolo en sentido horario se incrementa el volumen. Este es un ajuste global y no queda almacenado al guardar un banco de sonido. Si el volumen maestro está a 0, el amplificador se puede utilizar para grabación silenciosa a través de la salida emulada o el conector USB. El nivel de la salida emulada es controlado mediante el volumen del preamplificador.
16. USB
Conecta un cable mini USB aquí para enlazar tu amplificador con un sistema Windows o Mac. El software Insider de Blackstar se puede descargar desde nuestro sitio web www.blackstarinsider.co.uk.
www.blackstarinsider.co.uk.
Consulta la sección de Audio USB en la página 15 para más información.
NOTA: el amplificador aparecerá como “Dispositivo de grabación de audio” en el ordenador.
17. MANUAL
Pulsa este interruptor para cambiar entre modo manual y el banco de sonido actual. Cuando el amplificador está en modo manual, el sonido reflejará la posición física de los controles del panel frontal. Esto es aplicable a los controles Voice, Gain, Volume, Bass, Middle, Treble, ISF. Los efectos que estén activos cuando se cambia el modo manual se desactivaran.
En modo manual cualquiera de los controles se puede modificar mediante una fuente externa (Blackstar Insider, pedal de control) pero esto significa que el sonido del amplificador no se corresponderá con la posición física de los controles del panel frontal.
Estando en el modo manual cualquiera de los controles puede ser modificado por el software Blackstar Insider pero esto significa que el sonido no representará la posición de los botones en el panel frontal.
AFINADOR
El mantener pulsado el interruptor manual (17) durante dos segundos se activará el afinador. El LED Recall (20) parpadeará continuamente para indicar que el amplificador se encuentra en modo afinador. Por defecto la salida del amplificador se silenciará en este modo.Los LEDs sonoros indicarán la nota más próxima a la nota detectada.
30
Español

31
Los LEDs MOD, DLY y REV te indicarán la desviación en la afinación para cada nota: LED MOD (rojo) La nota es más alta que el tono a afinar
LED DLY (verde) La nota está afinada
LED REV (rojo) La nota es más baja que el tono a afinar
Todos los otros LEDs se apagarán durante el modo afinador.Al pulsar cualquier interruptor volverá al modo normal.
18. BANK (BANCO)
Pulsa el interruptor Bank para moverte por los tres primeros bancos de sonido.
Banco 1 -> Banco 2
Banco 2 -> Banco 3
Banco 3 -> Banco 1
El LED verde indica que estás en el banco 1. El LED naranja indica que estás en el banco 2. El LED rojo indica que estás en el banco 3.
NOTA: sólo los tres primeros bancos se pueden seleccionar desde el panel frontal. Al activar el banco 4 y superiores mediante un controlador externo (Software, Pedal, MIDI…), el LED Bank no se encenderá pero los LEDs de los distintos canales te indicarán la ubicación del ajuste.
Por ejemplo:
Preajuste 9-LED de banco rojo. LED de canal 3 encendido.
Pulsando el banco hacia arriba con una controladora externa cambiará el preajuste a 12-LED de banco apagado. LED de canal 3 encendido.
El canal será recordado por el amplificador, por tanto el correspondiente preajuste del actual banco se cargará al cambiar entre bancos.
Cuando el amplificador se encuentra en modo manual el LED de banco estará apagado.
19. CANALES 1-3El canal 1 activa el primer preajuste del banco active actual.
El canal 2 activa el segundo preajuste del banco active actual.
El canal 3 activa el tercer preajuste del banco active actual.
20. INDICADOR RECALL
El indicador Recall muestra si hay alguna discrepancia entre el valor actual del parámetro del amplificador y la posición de los controles del panel frontal. Por ejemplo. Cuando cambias de preajuste los controles no siempre reflejarán el sonido que escuches.
Para prevenir cambios de nivel inesperados en el control que estás ajustando, los controles del panel frontal no tendrán ningún efecto en el sonido hasta que el mando alcance el valor del parámetro actual. Una vez alcanzado, el indicador Recall
Español

parpadeará dos veces y el mando tomará el control del parámetro, que se podrá aumentar o disminuir.
El indicador Recall parpadeará cada vez que el mando físico pasa por el valor almacenador que escucha actualmente en el preajuste actual.
El indicador Recall se activa para Gain, Volume, Bass, Middle, Treble e ISF.
Cuando el afinador está activo el indicador Recall parpadeará continuadamente.
Durante la secuencia de repetición, el indicador Recall parpadeará una vez para mostrar cuando la secuencia vuelve a empezar. Cuando una secuencia de repetición o Overdub se está grabando, el indicador Recall parpadeará continuamente.
Panel Trasero
1.BOTÓN DE ENCENDIDO
Este botón se usa para encender y apagar el amplificador.
2. MAINS INPUTEl cable de alimentación desmontable subministrado se conecta aquí. Asegúrate siempre que el botón de encendido está en OFF antes de conectar el cable. El cable solo debe estar conectado a un enchufe que sea compatible con el voltaje, la fuerza y la frecuencia requerida que se menciona en el panel trasero. En caso de duda pida consejo a un técnico cualificado.
3. EMULADO/ SALIDA DE AURICULARESEsta salida emula las características tonales de un altavoz de guitarra y proporciona un tono natural para la conexión de una tabla de mezclas o una grabadora. Para un uso completo de los efectos stereo, utilice un stereojack para conectar el cable de dos mono jacks para alimentar dos canales de la grabadora o tabla de mezclas. La salida también funcionará para un cable simple de guitarra. Siempre utilice un cable de alta calidad. El nivel emulado de salida se controlará girando el botón de volumen (4). El control Master Volume solo afecta a altavoces internos.
NOTA: para grabar “silenciosamente” o practicar con auriculares ponga el control Master Volume a 0.
4. MP3/LINE INConecta el cable de salida de tu MP3 o reproductor de CD aquí. Ajusta el volumen para enlazarlo con tu guitarra.
5. INTERRUPTOR DE PIE
Conecta el FS-13 Footcontroller (incluido) aquí, o cualquier otro Blackstar Footcontroller compatible (ej. FS-12 control de pide programable). Véase la sección de interruptores de pie en las páginas 16-17 para más información.
6. EFECTOS LOOP
Además de usar los efectos del estudio de tu amplificador puedes colocar tu propio procesador de efectos externo “In the Loop” para el mejor rendimiento
32
Español
33
sonoro. Conecta el amplificador “Send” a la entrada de la unidad de efectos, y conecta el cable de salida al de “Return”. Si tu unidad de efectos tiene un output stereo, conecta ambos al enchufe “Return” de tu amplificador. Si tus efectos externos se conectan de manera simple el cable de salida de tu unidad de efectos se conectará solo al enchufe “Return L (mono)”.
ProgrammabilityALMACENAMIENTO DE BANCOS DE SONIDO
Para guardar un banco de sonido:
1. Mantén pulsado cualquiera de los tres canales durante un segundo los tres LEDs de los canales empezarán a parpadear.
2. Pulsa el control Bank para buscar en los tres bancos (Verde, Naranja y Rojo) para seleccionar donde lo quieres guardar.
3. Pulsa una vez cualquiera de los tres canales para guardar el banco de sonido en el lugar escogido.
Se iluminará el LED que corresponde al lugar guardado y el nuevo banco de sonido estará activo.
Green Bank = Patches 1-3
Orange Bank = Patches 4-6
Red Bank = Patches 7-9
Los controles del amplificador pueden ser utilizados para modificar el banco de sonido en cualquier momento del proceso. Pulsa el control manual en cualquier momento para cancelar este proceso.
Al guardar un banco de sonido, éste se sobreescribirá cualquier banco de sonido previo guardado allí. Los bancos de sonido también se pueden guardar utilizando el software Blackstar Insider cuando éste se conecte al amplificador vía USB.
RECUPERANDO BANCOS DE SONIDO
Pulsa cualquier canal para cargar ese banco. Pulsando el control Bank éste buscará en los tres bancos-verde-naranja-rojo. El canal será preservado así pues el correspondiente banco de sonido dentro del Banco actual será cargado cuando se esté buscando en los Bancos. Como alternativa, los banco de sonido se pueden recuperar a través del software Blackstar’s Insider o cualquier Footcontroller compatible.
Audio USBLos controladores de dispositivo estándar se utilizan para conectar el amplificar a un PC o Mac, así pues ningún dispositivo adicional es necesario. Si la latencia de audio de tu ordenador es demasiado alta se puede descargar y asociar con tu amplificador un ASIO genérico por ejemplo, ASIO4ALL — www.asio4all.com. Para una guía en latencia baja visite:
www.blackstaramps.com/usbrecording
Español

NOTA: Siempre conecte el amplificador a través del puerto USB principal, normalmente se encuentra en la parte trasera del ordenador.
El amplificador aparecerá como un dispositivo de audio.
La salida de audio mediante USB puede ser cambiada a través del software Blackstar Insider, y puede ser uno de los siguientes:
Canales de audio estereofónicos anulados por el altavozCanales 2 x mono audio - Izquierda — señal de amplificador -Derecha — Señal de guitarra sin procesarModo de rearmado
Modo ReampingEl amplificador se puede configurar en modo ‘Reamping’ a través del software Blackstar Insider. Este es un ajuste no programable y se desactivará al desconectar el cable USB o al apagar el amplificador. Activar el modo ‘Reamping’ permite al amplificador procesar una señal de guitarra grabada previamente a través de USB y devolver una señal totalmente procesada. Esta señal se puede capturar usando un software en el PC o Mac que estemos utilizando.
Foot controllers
Foot controller FS-13 de dos controles (incluido)
Conecta el foot controller al enchufe en el panel trasero del amplificador usando cualquier cable estándar de guitarra o el cable del altavoz (incluido).
Por defecto, tu FS-13 Foot Controller estará en modo Looper (mirar tabla). El botón ‘A’ se usa para empezar y terminar de grabar una secuencia de audio o un overdub, y el botón B hace que pare de repetirse la secuencia de audio o cancela el overdub si aún está grabándose. Al pulsar simultáneamente una vez ambos botones borrará el último overdub grabado. Al mantener pulsado el botón ‘B’, éste borrará la memoria del modo de secuencia de repetición o Loop.
Al pulsar ambos botones durante 3 segundos puedes acceder al Modo Patch. En este modo, el botón ‘A’ cambiará entre el Canal 1 y el 2 del Banco actual. Al pulsar el botón ‘B’ se desplazará hacia arriba por los 3 primeros Bancos, funcionando igual que el control Bank del panel frontal. El funcionamiento del Modo Patch se puede cambiar a través del software Blackstar Insider, como se refleja en la tabla que encontramos más arriba. Se vuelve a cambiar al Modo Looper al pulsar de nuevo durante 3 segundos los botones ‘A’ y ‘B’.
34
LOOPER MODE PATCH MODEAction Toggle Scroll
A (press) Play/Record/Start and Stop overdub
Patch toggle (CH1 and CH2 of the current BANK) Patch Down (1-12)
B (press) Stop playback/Cancel BANK scroll up Patch Up (1-12)
B (hold) Erase loop memory - -
A + B (press) Undo last overdub - -
A + B (hold) Switch to PATCH mode Switch to LOOPER Mode Switch to LOOPER Mode
Español

35
El modo actual del Foot controller FS-13 se guardará cuando se apague el amplificador, y se reanudará un vez se vuelva a encender. AL encender el amplificador con el Foot Controller conectado (o conectando con el amplificador ya encendido) el modo del Foot Controller se indicará mediante una animación usando los LEDs del Manual, Bank, CH1, CH2 y CH3. El modo Looper se indicará por una suma de LEDs en secuencia, en cambio el Modo Patch se indicará por el doble parpadeo de los LEDs antes de volver a su funcionamiento normal.
Foot Controller programable FS-12 de 5-controles (no incluido)Conecta el Foot Controller al enchufe en el panel trasero del amplificador usando cualquier cable estándar de guitarra o el cable del altavoz.
Los pulsadores ‘A’ - ‘C’ corresponden a los canales 1, 2 y 3 del panel frontal del amplificador. Al pulsar cualquiera de estos (A-C) se reanudará el Patch correspondiente a cada Banco. Se puede navegar a través de los Bancos al pulsar
simultáneamente los botones ‘A’ y ‘B’ (hacia abajo) y los botones ‘B’ y ‘C’ para navegar en el Banco hacia arriba. Todos los 36 bancos de sonido del amplificador (12 bancos de 3) son accesibles mediante el Foot Controller FS.12.
Los botones ‘D’ y ‘E’ del FS-12 son programables y se pueden configurar de forma diferente dependiendo de las necesidades de cada uno. Por defecto, los botones ‘D’
y ‘E’ controlarán la función Looper del amplificador, y se comportará como sale descrito en la tabla siguiente.
Para cambiar este ajuste predeterminado, conecta el amplificador al ordenador a través del cable USB y utiliza el software Blackstar Insider para escoger entre varias opciones como Modulation/Delay/Reverb On/Off, Modulation/Delay Tap Tempo, Super Wide Stereo On/Off, entre otros. Por favor véase la sección de Foot Controller para más detalles sobre las funciones programables.
Al mantener pulsado los botones ‘D’ y ‘E’ se activará el modo Afinador (Tuner) del amplificador. Con el FS-12 y su multifunción se gana acceso a una amplia gama de tonos donde aparecerán mediante la pantalla del Foot Controller y los LEDs. Pulsa cualquier botón para salir del Modo Afinador.
FS-12 + FS-13 7-controlesConecte el FS-12 al amplificador como se detalla anteriormente, mas tarde conecte el FS-13 incluido a la entrada ‘EXT’ del FS-12 usando cualquier cable estándar de guitarra o el cable del altavoz.
A B C D E
AMP EXT.
A B C D E
AMP EXT.
FS-12 FS-13 (supplied)
LOOPER MODE
Action
D (press) Play/Record/Start and Stop overdub
E (press) Stop playback/Cancel
E (hold) Erase loop memory
D + E (press) Undo last overdub
Español

36
Con esta configuración puede añadir dos botones extras programables que se pueden configurar a través del software Blackstar Insider. Por favor véase la sección de Foot Controller para más detalles sobre las funciones programables.
Por defecto, el botón ‘A’ del FS-13 estará configurado como efecto Modulación y el ‘B’ como efecto Delay. Cuando se use la configuración de 7-controles, dos marcas a la derecha del panel del FS-12 aparecerán en ON/OFF por cada botón, como se muestra a continuación.
Características Avanzadas
El amplificador ID:Core tiene varias características avanzadas para una mayor profundidad de conocimiento y disfrute del usuario y sacar el mayor partido al amplificador. Estas características no tienen un control propio en el panel frontal del amplificador, pero se tiene acceso a ellos usando el control Tap (14) como una tecla ‘shift’ y otro control.
Resonance – Tap + Bass
El control de Resonancia configura la respuesta del bajo. En los ajustes más bajos los sonidos claros serán más apretados y funkies y los overdrives se enfocarán en la respuesta de sus graves. Al aumentar los ajustes el sonido será más cálido y lleno, mientras que el crunch y los tonos overdrive serán mucho más graves y resonantes.
Presence – Tap + Treble
El control Presence ajusta la respuesta del Treble en su totalidad. La gama alta de percusión se puede acentuar en sonidos claros así como también el control del Treble más agresivo con ajustes crunch y overdrive.
Nivel de Grabación USB – Tap + Gain
Como mencionamos en la sección de Audio USB (página 15), el nivel de salida de la señal de audio USB del amplificador ID:Core puede ser ajustado independientemente al volumen del amplificador al mantener pulsado el control Tap (14) mientras que se gira el control Gain (3) en el panel frontal.
Efecto Speed/Time – Tap + Effects Level
Como mencionamos en la sección de Nivel de Efecto (página 11), la velocidad/tiempo de los efectos de modulación y delay serán ajustados al mantener pulsado el control Tap (14) mientras que se gira el control de Nivel de Efecto (13) del panel frontal. Esto puede ser muy útil para configurar un efecto tempo especifico en vez de utilizar el control Tap.
Salida Global Emulada/Nivel de Auriculares – Tap + Volume
Controla la salida global del volumen del Emulated Out/Phones connection, permitiendo adaptar el nivel que mejor se ajusta al dispositivo conectado, tanto si es una interfaz de audio, un sistema PA o unos auriculares de varias impudencias. Esto puede controlar tanto el corte y aumentar el nivel, como volumen predeterminado al estar el control Volume (4) posicionado a la mitad.
AFS-13 Effect switchtoggle states
B
ON
ON
Español

37
Actualización de FirmwareLas actualizaciones de Software se realizaran mediante el software Blackstar Insider. Se lanzará una nueva versión del software siempre que una actualización esté disponible.
Nota importante: Siempre conecte el amplificador a un puerto USB principal (normalmente se encuentra detrás del PC o Mac) cuando se actualice el firmware. Nunca use un puerto USB frontal alternativo o montable, o un cable de extensión USB. Si fuera ese el caso la actualización puede fallar haciendo que el amplificador no responda.
Cuando el amplificador se conecta vía USB a una nueva versión del software conteniendo un nuevo firmware, se mostrará un mensaje preguntando por la instalación de los últimos ficheros. Mientras se actualiza, los controles del amplificador no responderán. El LED sonoro del panel frontal indicará la actividad durante el proceso de actualización.
El amplificador no se debe apagar durante una actualización de firmware. Si el amplificador se apaga durante el proceso, los controles no responderán tras volver a encenderlo y el amplificador no producirá ningún sonido. El LED sonoro irá cambiando para indicar que el amplificador no contiene un firmware válido.
Si experimenta problemas a la hora de actualizar el firmware el amplificador puede ser forzado a encenderse en Modo Actualización (Update). Mantenga pulsado simultáneamente el control Manual (17) y el MOD (9) mientras enciende el amplificador para entrar en ese modo con las LEDs moviendo indicando el modo. Conecte el amplificador al software Blackstar Insider para que empiece a actualizarse.
El amplificador debe estar conectado al Software pa reinstalar un firmware válido. El proceso de actualización empezará automáticamente si el software Blackstar Insider detecta el amplificador.
Especificaciones TécnicasID:CORE STEREO 100
Potencia: 2 x 50 Watios (Stereo 100 Watios)
Peso (kg): 12,5
Dimensiones (mm): 573(W) x 447(H) x 241(D)
Especificaciones TécnicasID:CORE STEREO 150
Potencia: 2 x 75 Watios (Stereo 150 Watios)
Peso (kg): 14,5
Dimensiones (mm): 624(W) x 486(H) x 259(D)
Español

3838
ID:CORE STEREO 100 Front Panel
USB BANK CH1 CH2 CH3100
ID:CORE STEREO 150 Front Panel
USB BANK CH1 CH2 CH3100
English
Deutsch
FrançaisJapanese
中文
Español

3939
ID:CORE STEREO 100 Rear Panel
SEND RETURN
LEFT (MONO) RIGHT
EM. OUT& PHONES
100V - 240V~50/60Hz 130 WATTS
T1.6AL250V
ID:CORE STEREO 150 Rear Panel
SEND RETURN
LEFT (MONO) RIGHT
EM. OUT& PHONES
English
Deutsch
FrançaisJapanese
中文
Español

Eng
lish
Deu
tsch
Fran
çais
Japa
nese
40
中文

41
English
Deutsch
FrançaisJapanese
中文

Eng
lish
Deu
tsch
Fran
çais
Japa
nese
42
中文

43
English
Deutsch
FrançaisJapanese
中文

Blackstar Amplification Ltd, Beckett House, 14 Billing Road, Northampton, NN1 5AW, UKFor the latest information go to: www.blackstaramps.com
Whilst the information contained herein is correct at the time of publication, due to our policy of constant improvement and development, Blackstar Amplification Ltd reserves the right to alter specifications without prior notice.
Designed and Engineered byBlackstar Amplification UK
120402M-1 02/16
Owner’s Manual
ID:CORE STEREO 100 & ID:CORE STEREO 150