owner’s manual · step 2: connect - create new or login to your existing myaspenta account. step...
TRANSCRIPT

OWNER’S MANUAL INSTALLED VEHICLE TRACKER
Internal GPS/GSM Antennas

2
CONTENTS
CONTENTS OF THE PACKAGE ......................................................................................................................................... 3
SAFETY ........................................................................................................................................................................... 3
GETTING STARTED ......................................................................................................................................................... 4
USING VECTU PRO ......................................................................................................................................................... 9
myAspenta WEB/MOBILE APP ..................................................................................................................................... 12
GENERAL USAGE TIPS .................................................................................................................................................. 23
SUPPORT ...................................................................................................................................................................... 23
CARE AND PREVENTIVE MAINTENANCE ...................................................................................................................... 23
LIMITED WARRANTY .................................................................................................................................................... 23
FCC COMPLIANCE ........................................................................................................................................................ 24
NOTICES ....................................................................................................................................................................... 24
A PRODUCT OF
3
CONTENTS OF THE PACKAGE
① Vectu PRO Installed Vehicle Tracker with installed SIM card & integrated rechargeable backup battery
② Power cable
③ Quick Start & Installation Guide
SAFETY
ELECTROMAGNETIC COMPATIBILITY Magnetic fields in the vicinity of Vectu PRO may cause disturbances in data transmission and should be avoided to prevent malfunction or damage to the device.
NOTE – NATIONAL LAWS ON GPS TRACKING You agree to use Vectu PRO only for lawful purposes. Certain states/countries may have legislation which restricts the GPS tracking of people, animals or objects. You are responsible for complying with all applicable federal, state and local laws. If you are located outside of the United States, you are responsible for complying with the laws of your country or legal jurisdiction with respect to your use of our Products and Services. Aspenta International bears no responsibility or liability for any use of its Products or Services that may be unlawful in the United States or elsewhere.
SAFETY ADVICE When in a hospital or other health care facility, observe the restrictions on the use of mobile devices, such as cellular phones. Do not operate this device where you are not able to operate your mobile / cellular phone.
THE BATTERY AND ITS USE Vectu PRO uses rechargeable lithium ion backup battery. To prevent malfunction or damage, it is advisable to follow these recommendations for the use of rechargeable batteries:
Do not remove or replace the original battery
To avoid irreparable damage to the battery and circuits, do not expose the device to heat sources.
DISPOSAL Batteries are a source of pollution. When you decide to dispose of Vectu PRO, seek advice from your local electronics recycling authority.
TEMPERATURES While charging, Vectu PRO should not be exposed to temperatures below 0°C or above 45°C. During normal use, Vectu PRO should not be exposed to temperatures below -20°C/-4 F or above 60°C/140 F. Vectu PRO should not be exposed to direct sunlight for long periods, and should be stored at temperatures between -20°C/-4 F and 55°C/131 F.
Hello!
Thank you for purchasing Vectu PRO Installed Vehicle Tracker. Before using your device for the first time, read this owner’s manual carefully and retain it for future
reference. Please note that Vectu PRO is designed for vehicles driven regularly and is not designed as a long-term
storage security solution.
4
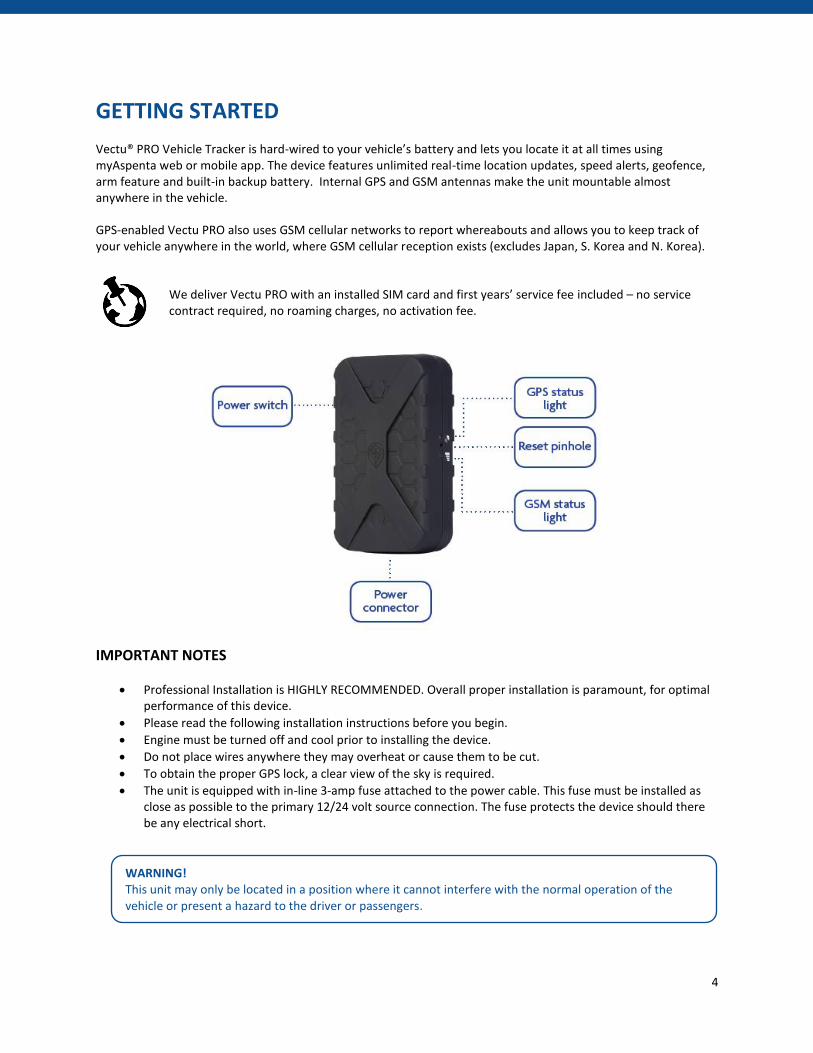
GETTING STARTED
Vectu® PRO Vehicle Tracker is hard-wired to your vehicle’s battery and lets you locate it at all times using myAspenta web or mobile app. The device features unlimited real-time location updates, speed alerts, geofence, arm feature and built-in backup battery. Internal GPS and GSM antennas make the unit mountable almost anywhere in the vehicle.
GPS-enabled Vectu PRO also uses GSM cellular networks to report whereabouts and allows you to keep track of your vehicle anywhere in the world, where GSM cellular reception exists (excludes Japan, S. Korea and N. Korea).
We deliver Vectu PRO with an installed SIM card and first years’ service fee included – no service contract required, no roaming charges, no activation fee.
IMPORTANT NOTES
Professional Installation is HIGHLY RECOMMENDED. Overall proper installation is paramount, for optimal performance of this device.
Please read the following installation instructions before you begin.
Engine must be turned off and cool prior to installing the device.
Do not place wires anywhere they may overheat or cause them to be cut.
To obtain the proper GPS lock, a clear view of the sky is required.
The unit is equipped with in-line 3-amp fuse attached to the power cable. This fuse must be installed as close as possible to the primary 12/24 volt source connection. The fuse protects the device should there be any electrical short.
WARNING! This unit may only be located in a position where it cannot interfere with the normal operation of the vehicle or present a hazard to the driver or passengers.

5
RECOMMENDED INSTALATION SEQUENCE
The following installation sequence is recommended.
STEP 1: Plan the whole installation and determine suitable locations, mounting arrangements and cable routes for all hardware items. STEP 2: Connect - create new or login to your existing myAspenta account. STEP 3: Activate device within your account. STEP 4: Temporarily mount the unit and temporarily connect all wiring, while still l able to see the status lights on the unit. STEP 5: Perform an Initial System Test to evaluate if all hardware features are working using myAspenta web or mobile app. STEP 6: Permanently mount the unit. Installation is complete and successful only when you have tested the device. INSTALLATION IS COMPLETE AND SUCCESSFUL ONLY WHEN YOU HAVE TESTED THE DEVICE.
STEP 1: PLAN
Plan your complete installation first to avoid re-wiring later. Follow below unit placements guidelines.
This unit should not be placed to direct sunlight or expose to high temperature.
Choose a location where 12/24V DC power can be mounted.
Choose best location within the vehicle, in a way that it is easily accessible for any possible future service or check status.
Do not place in an obvious, clearly-visible location, such as under the steering column or in the glove compartment.
Ensure that the vehicle mounting surface is clean and dry.
It is important that that unit be fixed firmly.
Install in a secure location i.e. far forward, high up under the dash or behind the instrument cluster. Secure excess wire with zip ties to prevent cable assemblies from damage or detachment. The required install orientation of this device is a horizontal mount, top side (with the PIN icon & embossed X) is towards the sky. Attach the device to the
solid body of the vehicle not to plastic panels.
Note that metal and metal oxide windshields (lead-based window tint) block GPS signals. Install device above or away from these materials so internal antenna can receive and transmit. Plastic, wood and regular glass does not interfere with GPS signals.
6
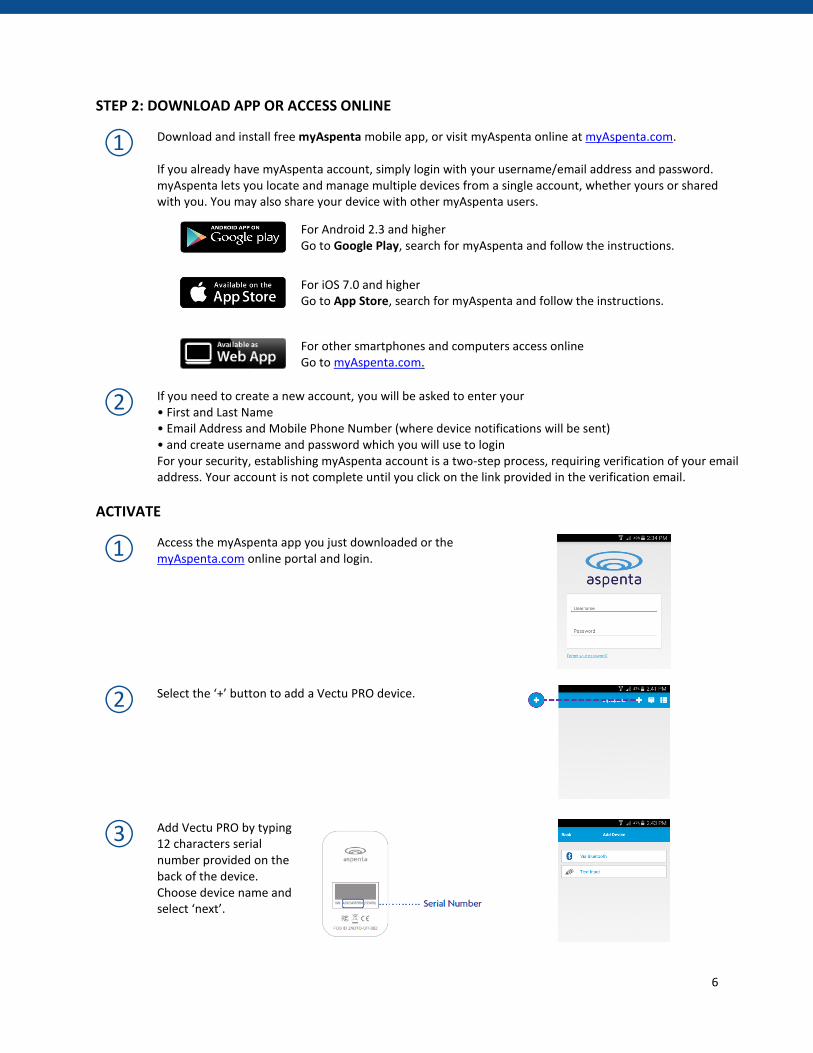
STEP 2: DOWNLOAD APP OR ACCESS ONLINE
① Download and install free myAspenta mobile app, or visit myAspenta online at myAspenta.com. If you already have myAspenta account, simply login with your username/email address and password. myAspenta lets you locate and manage multiple devices from a single account, whether yours or shared with you. You may also share your device with other myAspenta users.
For Android 2.3 and higher Go to Google Play, search for myAspenta and follow the instructions.
For iOS 7.0 and higher Go to App Store, search for myAspenta and follow the instructions.
For other smartphones and computers access online Go to myAspenta.com.
② If you need to create a new account, you will be asked to enter your • First and Last Name • Email Address and Mobile Phone Number (where device notifications will be sent) • and create username and password which you will use to login For your security, establishing myAspenta account is a two-step process, requiring verification of your email address. Your account is not complete until you click on the link provided in the verification email.
ACTIVATE
① Access the myAspenta app you just downloaded or the myAspenta.com online portal and login.
② Select the ‘+’ button to add a Vectu PRO device.
③
Add Vectu PRO by typing 12 characters serial number provided on the back of the device. Choose device name and select ‘next’.

7
④ You may designate up to four phone numbers and four email addresses to receive notifications. By default notifications will be also sent to the email address and phone number specified during myAspenta account creation. Visit your account settings to update notification and contact settings.
⑤ You may also share Vectu PRO with friends and family having myAspenta account. To do so, simply type username or email address of the user you wish to share your device with. myAspenta users you have shared Vectu PRO with will be able to view device location, settings, history, reports, receive in-app notifications and remotely arm the device for unauthorized movements.
STEP 4: TEMPORARLIY MOUNT
Connect the device to the vehicle’s 12/24-volt power. The device must be wired to a continuous source of power that is not controlled by the ignition key. This ensures the internal back-up battery is fully charged at all times
1. The
easiest method to hardwire the device is as follows:
• Locate a fused, constant 12/24 VDC power source and a suitable chassis ground2.
• Connect RED wire on harness to POWER source. • Connect BLACK wire on harness to chassis GROUND.
The device consumes approximately 60mAh of current at 12 VDC while active and 0.2mAh while on standby
3. This
is a small current draw, and is not sufficient to drain the vehicle’s battery provided that the vehicle is driven regularly. In the first initial state of battery charging, just after plugging unit to power source, the device may be overheating. This is fully normal operation. It will cool down once the battery is fully charged. 1 This is to insure that in the event your vehicle is stolen and the vehicle battery is disconnected, the covertly
mounted Vectu PRO will still be reporting its location via its own internal battery. 2
Note the cigarette lighter power may be switched and would therefore be unacceptable as the power source. 3 Most new cars normally have a “Key-Off” battery drain from 20 to 400 milliamps, therefore the additional power
drain from this device, is totally insignificant.
STEP 5: INITIAL SYSTEM TEST
Perform an initial system test to evaluate operational condition of the device.
① Slide the power switch to ON position – GPS and GSM status lights blinks green as the device go through network registration process. Once completed GSM status light will turn steady green, indicating successful network registration, Once GPS lock is established GPS status light will turn solid green.
② Shake the device 40 seconds to stimulate motion.

8
③ Log onto myAspenta account and verify that you can view device location on the map along with last seen date/time.
If the GSM status light doesn’t turn solid green within 3 minutes, turn the device OFF and repeat step 1. If the GPS status light doesn’t turn solid green after 5-7 minutes, try to find a better suitable location with clear sky view. It is advisable to carry out the first fixing in a completely open space.
STEP 6: PERMANENTLY MOUNT
After checking that all the functions are working properly, you are ready to permanently mount your unit. Pick a location according to provided guidelines and make sure it is secured firmly to prevent any rattling sounds after installation.
Vectu PRO uses GPS and GSM technology to determine its location. If the device is indoors or if the GPS signal is not strong enough, the GPS location data may not be received. In that case the device location will be based on the cellular network signal (GSM location), this location is not accurate, but rather an approximation of the device location. If GPS signal is not available, shaded circle around the marker on the map represents accuracy of the location.

9
USING VECTU PRO
In order to preserve battery life, Vectu PRO uses motion activated tracking intervals. It reports location every 60 seconds upon movement of the device. When Vectu PRO is stationary for more than 2 minutes, the device will go to sleep until it is moved again.
TURN VECTU ON/OFF
To turn the device ON, slide the switch to the ON, the status lights blinks green as Vectu PRO goes through network registration process. The status lights turns off when the device enters standby mode and is ready to use.
To turn the device OFF, slide the switch to the position OFF (when device is turned OFF it cannot send or receive communications).
MONITORING THE DEVICE STATUS
Status Light Event
GPS/GSM status light - blinks green Connecting to network
GPS/GSM status light - solid green Connected to the network
CHECKING BACKUP BATTERY LEVEL
Backup battery level can be viewed using myAspenta app; it is updated every 30 minutes.
NOTIFICATIONS
Notifications let device owner and pre-defined contacts know of an event experienced by the device – those depending on your settings can be delivered by SMS, email and in-app notification. myAspenta users with whom you have shared your device will automatically receive in-app notifications.
Geofence In Alert - when the device has departed a predefined geofence.
Speed Alert - when device has surpassed a pre-determined speed threshold.
Unauthorized Movement Alert – when device has detected unauthorized movement while armed.
External Power Cut Alert – when the device has been disconnected from its primary power source.
Low Battery Alert - low power notification sent when the battery life drops below 15%.
Following in-app notifications are sent only to device owner and myAspenta users with whom you have shared your device:
External Power Connect – when the device has been connected to its primary power source.
Geofence Out Alert - when the device has re-entered a predefined geofence.
Arm – when the device has been armed.
Disarm – when the device has been disarmed.
Every time you turn Vectu PRO ON, the status lights will blink green until it connects to the network. In the complete absence of a signal, the status light will blink green continuously.
10
POWER
Designed for installed vehicle-use, Vectu PRO is powered by your vehicle’s battery. Vectu PRO must be installed to a continuous source of 12 VDC or 24 VDC power from your vehicle. When vehicle power is no longer available, i.e. Vectu PRO is disconnected from your vehicle electrical system; Vectu PRO will transition to its internal back-up battery.
Note: The back-up battery is designed to maintaining security capability for up to 8 hours. You will receive low-battery and external power cut and external power connect notifications.
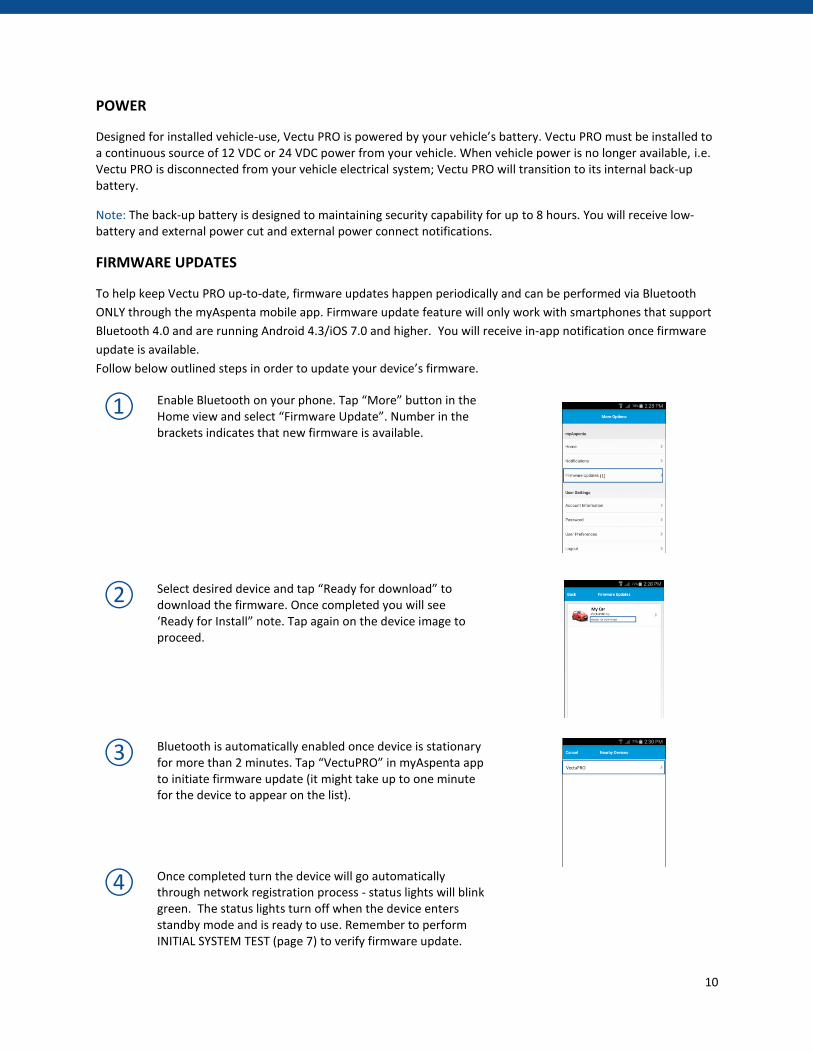
FIRMWARE UPDATES
To help keep Vectu PRO up-to-date, firmware updates happen periodically and can be performed via Bluetooth
ONLY through the myAspenta mobile app. Firmware update feature will only work with smartphones that support
Bluetooth 4.0 and are running Android 4.3/iOS 7.0 and higher. You will receive in-app notification once firmware
update is available.
Follow below outlined steps in order to update your device’s firmware.
① Enable Bluetooth on your phone. Tap “More” button in the Home view and select “Firmware Update”. Number in the brackets indicates that new firmware is available.
② Select desired device and tap “Ready for download” to download the firmware. Once completed you will see ‘Ready for Install” note. Tap again on the device image to proceed.
③
Bluetooth is automatically enabled once device is stationary for more than 2 minutes. Tap “VectuPRO” in myAspenta app to initiate firmware update (it might take up to one minute for the device to appear on the list).
④ Once completed turn the device will go automatically through network registration process - status lights will blink green. The status lights turn off when the device enters standby mode and is ready to use. Remember to perform INITIAL SYSTEM TEST (page 7) to verify firmware update.

11
SUBSCRIPTION RENEWAL
Vectu comes with first years’ service fee included. Service fee is required after the first year. You will receive reminder email & in-app notifications prior subscription expiry. To renew your subscription:
myAspenta web app: go to “User Settings” and select “Subscriptions” myAspenta mobile app: select “Subscriptions” from the main app menu
In case subscription has expired the device will be deactivated and cease to function. It is your responsibility to ensure that the subscription is renewed.

12
myAspenta WEB/MOBILE APP
In this section you will find information needed to start using the myAspenta app. In the following pages you will find two sub-sections: one for myAspenta mobile app (Android, iOS), the other for a web platform accessed from myAspenta.com.
MOBILE APP
MAP VIEW
When you open myAspenta app and select your device, you will immediately go to the MAP VIEW, last known location will be shown on the map. To view last “vehicle stop” date/time tap on the marker.
You can view more than one device at a time in MAP VIEW by simply taping device details box at the
top of the screen and selecting desired devices.
The first time you log into the myAspenta web or mobile app, you will be directed to the “Home” page. It is recommended that you go directly to the “User Settings” to complete User Preferences – time zone, measurement units and notification preferences.

13
Vehicle in motion - GPS location
Vehicle in motion - GSM location (location based on the GSM triangulation, this location is not accurate, but rather an approximation of the device location)
Vehicle stop – battery level updated in the last 2 hrs
Vehicle stop – battery level haven’t been updated in the last 2 hrs or more
ARM FEATURE
Arming your device creates an invisible “safety spot” around your device. If it moved from its location, you will be notified. While armed Vectu PRO is not only sensitive to unauthorized movement, it also reacts on tampering (vibration).
To arm/disarm your device select Arm/Disarm button in Map View. You will see confirmation once the device is successfully armed/disarmed.
HISTOTRACK
In this section of the app you can view the track currently being travelled by your device, or any track taken by your device in the past 90 days by selecting the date which interest you.
① To access the Histotrack mode, click on the icon “Histotrack”.
② The app will automatically display latest trip. You may also select the date you want to check. If data is saved from that date, the app will automatically display it. Otherwise you will see the message “There is no tracking history for this date”.
14
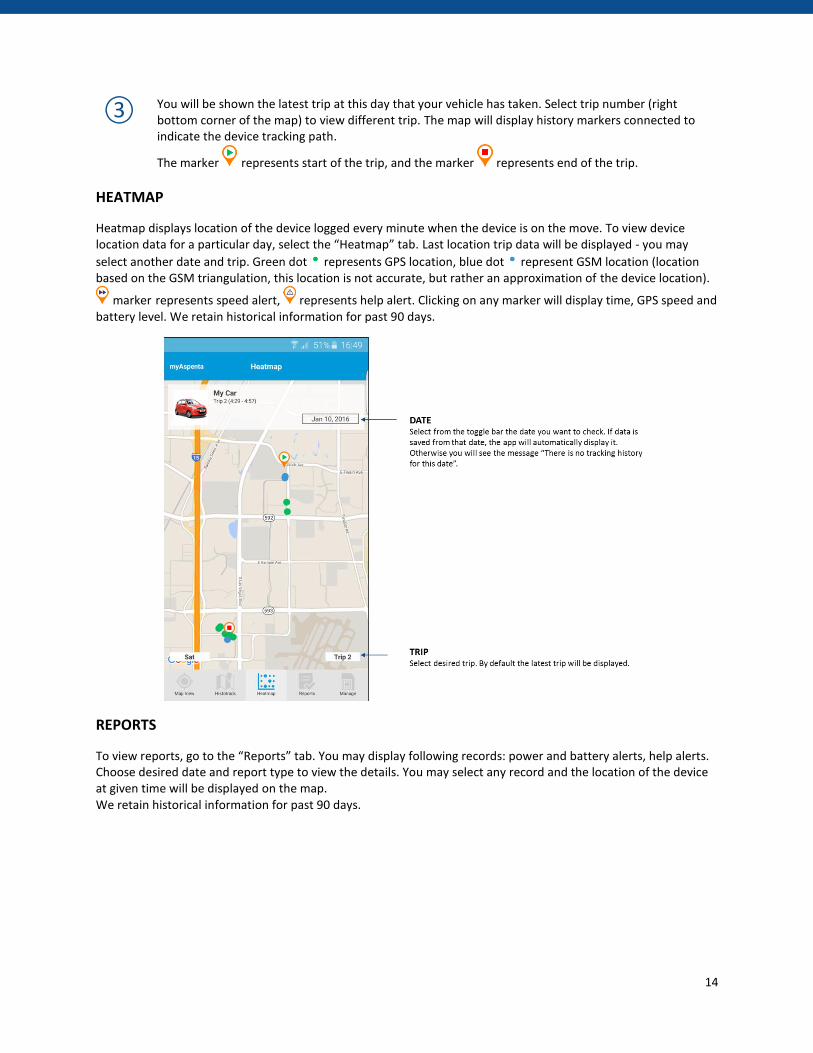
③ You will be shown the latest trip at this day that your vehicle has taken. Select trip number (right bottom corner of the map) to view different trip. The map will display history markers connected to indicate the device tracking path.
The marker represents start of the trip, and the marker represents end of the trip.
HEATMAP
Heatmap displays location of the device logged every minute when the device is on the move. To view device location data for a particular day, select the “Heatmap” tab. Last location trip data will be displayed - you may
select another date and trip. Green dot represents GPS location, blue dot represent GSM location (location based on the GSM triangulation, this location is not accurate, but rather an approximation of the device location).
marker represents speed alert, represents help alert. Clicking on any marker will display time, GPS speed and battery level. We retain historical information for past 90 days.
REPORTS
To view reports, go to the “Reports” tab. You may display following records: power and battery alerts, help alerts. Choose desired date and report type to view the details. You may select any record and the location of the device at given time will be displayed on the map. We retain historical information for past 90 days.
15
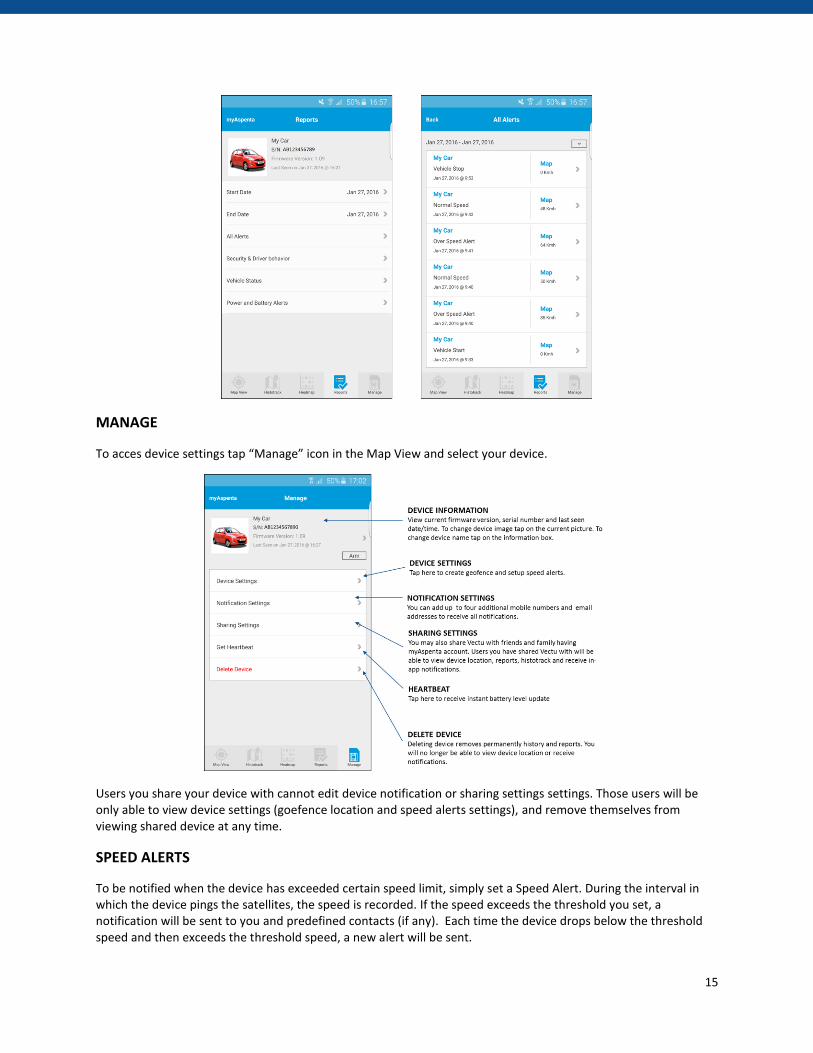
MANAGE
To acces device settings tap “Manage” icon in the Map View and select your device.
Users you share your device with cannot edit device notification or sharing settings settings. Those users will be only able to view device settings (goefence location and speed alerts settings), and remove themselves from viewing shared device at any time.
SPEED ALERTS
To be notified when the device has exceeded certain speed limit, simply set a Speed Alert. During the interval in which the device pings the satellites, the speed is recorded. If the speed exceeds the threshold you set, a notification will be sent to you and predefined contacts (if any). Each time the device drops below the threshold speed and then exceeds the threshold speed, a new alert will be sent.

16
Follow below steps to set a speed alert:
① Tap “Manage” icon, select your device and tap “Device Settings”
② Select “Set” maximum speed
③ Define maximum speed and tap “Done”
To disable speed alerts, set 0 as maximum speed.
GEOFENCING
A geofence is a virtual fence (a circle around certain location) that allows alerts to be triggered when the device enters and laves that area.
Follow below steps to create a geofence:
Android: To remove goefence click on the “X” symbol and tap “Save” button. iOS: To remove geofence go to “Device Settings”, swipe left “Geofence” and select delete.
① Tap “Manage” icon, select your device and tap “Device Settings”
② Select “Setup” geofence
③ Tap on the map to set geofence location. Long press peripheral marker (↔) to adjust the radius.
④ Add geofence name and tap “Save”
A geofence which is too limited in size may cause false alarms due to inherent inaccuracies in GPS. To
avoid getting false alerts, make sure your geofence has a radius of at least 300 m/980 feet.
technology.
17
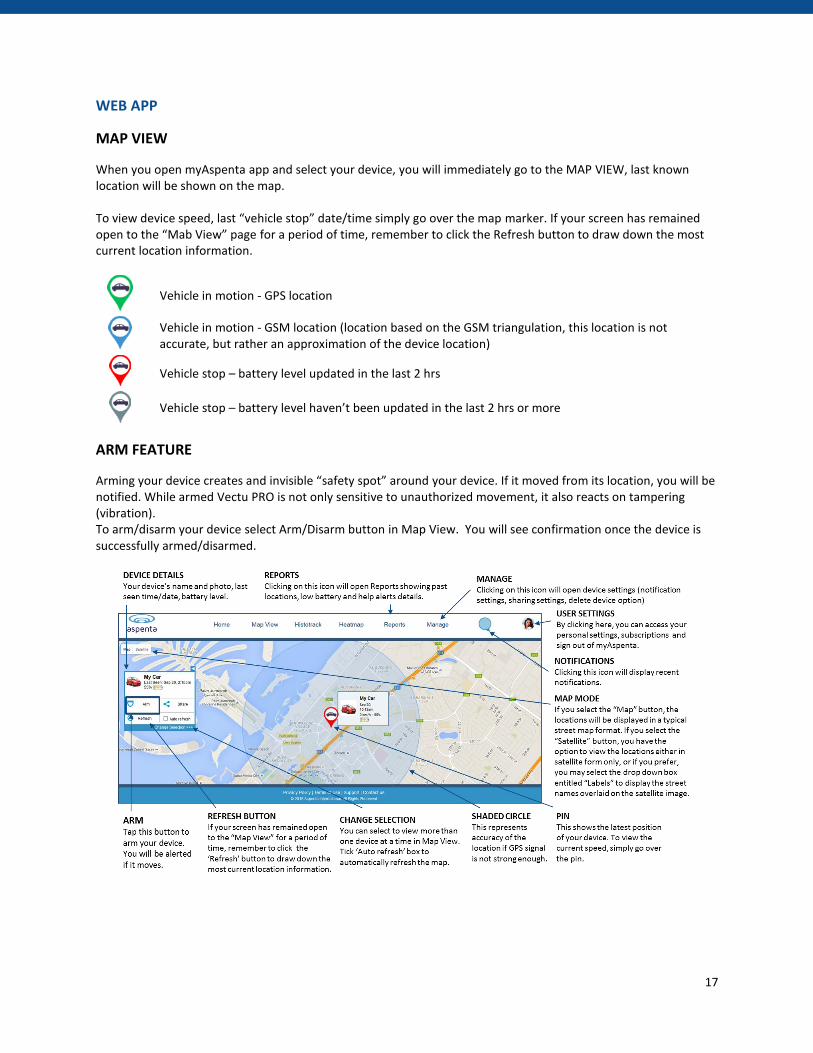
WEB APP
MAP VIEW
When you open myAspenta app and select your device, you will immediately go to the MAP VIEW, last known location will be shown on the map. To view device speed, last “vehicle stop” date/time simply go over the map marker. If your screen has remained open to the “Mab View” page for a period of time, remember to click the Refresh button to draw down the most current location information.
Vehicle in motion - GPS location
Vehicle in motion - GSM location (location based on the GSM triangulation, this location is not accurate, but rather an approximation of the device location)
Vehicle stop – battery level updated in the last 2 hrs
Vehicle stop – battery level haven’t been updated in the last 2 hrs or more
ARM FEATURE
Arming your device creates and invisible “safety spot” around your device. If it moved from its location, you will be notified. While armed Vectu PRO is not only sensitive to unauthorized movement, it also reacts on tampering (vibration). To arm/disarm your device select Arm/Disarm button in Map View. You will see confirmation once the device is successfully armed/disarmed.

18
HISTOTRACK
In this section of the app you can view the track currently being travelled by your device, or any track taken by your device in the past 90 days by selecting the date which interest you. Distance of each trip is also displayed in this view.
① To access the device history mode, click on the “Histotrack” button.
② The app will automatically display latest trip. You may also select the date you want to check, if data is saved from that date, the app will automatically display it. Otherwise you will see the message “There is no tracking history for this date”.
③ You will be shown the latest trip at this day that your vehicle has taken. Select trip number (left bottom corner of the map) to view different trip. The map will display history markers connected to indicate the
device tracking path. The marker represents start of the trip, and the marker represents end of the trip
HEATMAP
Heatmap displays location of the device logged every minute when the device is on the move. To view device location data for a particular day, select the “Heatmap” tab. Last location trip data will be displayed - you may

19
select another date and trip from dropdown menu. Green dot represents GPS location, blue dot represent GSM location (location based on the GSM triangulation, this location is not accurate, but rather an approximation
of the device location). The marker represents speed alert, represents help alert. Clicking on any marker will display time, GPS speed and battery level. We retain historical information for past 90 days.
REPORTS
To display the Report details, click the “Reports” button in “Map View”. You may display following records: power and battery alerts, standard location updates, security and driver behavior, vehicle status, unauthorized movement. Choose desired date and report type and click submit, you may select any record and the location of the device at given time will be displayed on the map. We retain historical information for past 90 days. If you wish to maintain a record, print the report or save the downloaded file.
DEVICE INFORMATION
In order to change device name or upload a picture go to “Device Information” tab within “Manage” menu. Click “Get Heartbeat” to update device’s battery level.
You may also delete the device. Deleting device removes permanently history and reports. You will no longer be able to view device location or receive notifications.

20
SPEED ALERTS
To be notified when the device has exceeded certain speed limit, simply set a Speed Alert. During the interval in which the device pings the satellites, the speed is recorded. If the speed exceeds the threshold you set, a notification will be sent to you and predefined contacts (if any). Each time the device drops below the threshold speed and then exceeds the threshold speed, a new alert will be sent.
Follow below steps to set a speed alert:
① Go to “Device Settings” within “Manage” menu
② Type maximum speed and click “Done”
To disable speed alerts, set 0 as maximum speed.
GEOFENCING
The geofence function allows you to create virtual limits around your device. In the park, on the beach, or at home you will always know whether your device is inside the area you have set. If you have requested device location or the help alert was initiated and the device has left the virtual fenced area, you and predesigned contacts will rapidly receive a notification.
Follow below steps to create a geofence:
① Go to “Device Settings” within “Manage” menu
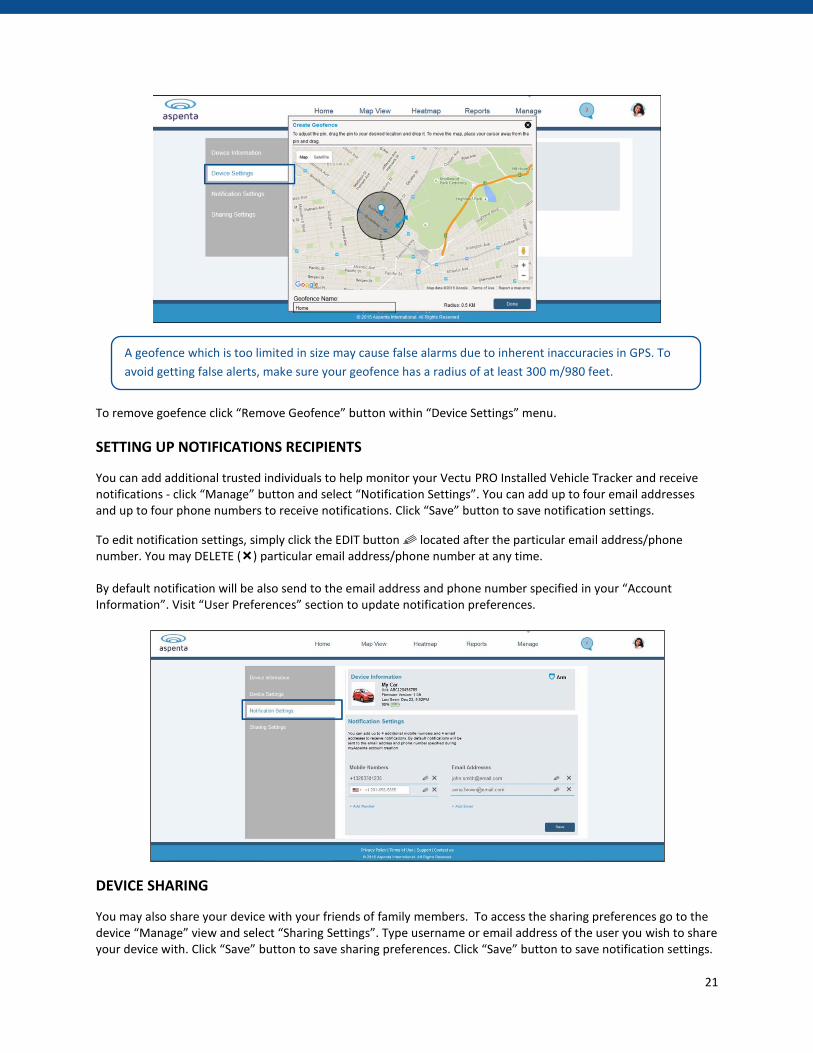
② Click “Create Geofence”
③ To adjust the pin, drag the pin to your desired location and drop it. To move the map, place your cursor away from the pin and drag. Click ↔ marker to adjust the radius.
④ Add geofence name and click “Done”
21
To remove goefence click “Remove Geofence” button within “Device Settings” menu.
SETTING UP NOTIFICATIONS RECIPIENTS
You can add additional trusted individuals to help monitor your Vectu PRO Installed Vehicle Tracker and receive notifications - click “Manage” button and select “Notification Settings”. You can add up to four email addresses and up to four phone numbers to receive notifications. Click “Save” button to save notification settings.
To edit notification settings, simply click the EDIT button located after the particular email address/phone number. You may DELETE () particular email address/phone number at any time.
By default notification will be also send to the email address and phone number specified in your “Account Information”. Visit “User Preferences” section to update notification preferences.
DEVICE SHARING
You may also share your device with your friends of family members. To access the sharing preferences go to the device “Manage” view and select “Sharing Settings”. Type username or email address of the user you wish to share your device with. Click “Save” button to save sharing preferences. Click “Save” button to save notification settings.
A geofence which is too limited in size may cause false alarms due to inherent inaccuracies in GPS. To
avoid getting false alerts, make sure your geofence has a radius of at least 300 m/980 feet.
technology.

22
In case this person is not registered yet, you may send an invitation to join myAspenta. Once this individual creates an account, you will be able to share your device.
You may stop sharing your device at any time by clicking the ‘x’ button. Users you have shared your device with can also unshare the device.
Users you have shared your device with will be able to request device location, view settings, reports, histotrack and heatmap as well as receive in-app notifications.
23
GENERAL USAGE TIPS
Vectu PRO includes installed SIM card and works worldwide, anywhere GSM cellular reception exists (excludes Japan, S. Korea and N. Korea).
GPS devices work by receiving satellite signals from the open sky. For optimal operating conditions, your Vectu PRO tracker needs to be in clear, unobstructed view of the sky in order to have a line of sight to a group of satellites. When placing the tracker in an item such as a briefcase, luggage, or backpack, please ensure that there is no solid material (eg. metal objects) above or surrounding the l which may block or weaken the signal it receives from the sky. GPS satellites are in constant motion, rising and setting. Under certain conditions this means a location position that was obtainable fifteen minutes ago in a specific location may not be obtainable in the next try. In this instance there is no fault with the device. Please wait a while before trying to obtain a new location.
SUPPORT
If you have any questions or comments, please contact our Customer Care:
+1 888-497-1329 Monday through Friday, 8am - 4pm (PST), Closed on Holidays
www.vectu.com/faq is updated regularly with answers to Frequently Asked Questions (FAQs)
CARE AND PREVENTIVE MAINTENANCE
Please review the Care and Preventive Maintenance section carefully.
This Product should be kept clean and dry at all times. Do not clean with liquid or aggressive solvents, but rather a clean dry cloth.
This Products should only be stored and operated within the specified temperature range
Avoid leaving the Product in direct sunlight for extended periods of time.
To minimize the risk of damage, avoid dropping and operating in high-shock and high-vibration environments
This Product uses an internal, non-user replaceable battery. Do not remove or attempt to remove this non-user replaceable battery.
Replace chargers with worn or frayed cables.
You should only use Aspenta approved AC chargers and accessories for this Product.
REPAIRING OR MODIFYING YOUR DEVICE
Never attempt to repair or modify Vectu PRO device, it does not contain any user‐serviceable parts. Attempting to disassemble your device may cause damage that is not covered under the warranty. Service should only be provided by Aspenta or an authorized Aspenta service provider.
LIMITED WARRANTY
This product is warranted to be free from defects in materials and workmanship under normal use for 12 months (24 months for European Customers) from the date of purchase. For full details regarding the Limited Warranty and warranty claim procedures, visit vectu.com/warranty.

24
EXCEPT AS PROVIDED ABOVE, THE PRODUCT IS SOLD “AS IS” WITHOUT ANY EXPRESS OR IMPLIED WARRANTIES FOR THE PRODUCT WHATSOEVER, INCLUDING, WITHOUT LIMITATION, ANY IMPLIED WARRANTIES REGARDING THE CONDITION, DESIGN, SPECIFICATIONS, WORKMANSHIP, MERCHANTABILITY OR FITNESS FOR A PARTICULAR PURPOSE OF THE PRODUCT, OR ANY WARRANTIES THAT THE PRODUCT IS FREE FROM LATENT DEFECTS OR DEFICIENCIES, OR THAT THE PRODUCT IS FREE FROM INFRINGEMENT OF ANY PATENT, TRADEMARK, COPYRIGHT OR PROPRIETARY RIGHT OF ANY THIRD PARTY AND SUCH WARRANTIES ARE HEREBY EXPRESSLY DISCLAIMED. THIS LIMITED WARRANTY PROVIDES THE SOLE AND EXCLUSIVE REMEDY FOR ANY DEFECTS IN THE PRODUCT. IN NO EVENT SHALL WE BE LIABLE FOR ANY INDIRECT, CONSEQUENTIAL, SPECIAL, INCIDENTAL OR PUNITIVE DAMAGES, WHETHER IN CONTRACT, TORT, NEGLIGENCE, STRICT LIABILITY OR OTHERWISE. OUR LIABILITY IS LIMITED TO THE AMOUNT YOU PAID FOR THE PRODUCT THAT IS THE SUBJECT OF A CLAIM. THE APPLICABILITY OF THE ABOVE LIMITATIONS AND EXCLUSIONS MAY VARY FROM STATE TO STATE, OR COUNTRY TO COUNTRY.
FCC COMPLIANCE
This device complies with part 15 of the FCC Rules. Operation is subject to the following two conditions: 1) This device may not cause harmful interference, and 2) this device must accept any interference received, including interference that may cause undesired operation. This device meets the FCC Radio Frequency Emission Guidelines and is certified with the FCC as FCC ID number: 2ADTO-CIT-002. This Product generates, uses, and can radiate radio frequency energy and, if not used in accordance with the instruction manual, may cause harmful interference to radio communications.
NOTICES
Information in this document is subject to change without notice. This document is provided “as is” and Aspenta International Inc. (“Aspenta”) and its affiliated companies and partners assume no responsibility for any typographical, technical or other inaccuracies in this document. Aspenta reserves the right to periodically change information that is contained in this document. However, Aspenta makes no commitment to provide any such changes, updates, enhancements or other additions to this document to you in a timely manner or at all. Visit the Aspenta Web site (www.aspenta.com) for current updates and information concerning the use and operation of this and other Aspenta Products.
The Service is provided at our discretion. We can modify or cancel it or take corrective action at any time without prior notice and for any reason, including, but not limited to, installation of required updates to the service or Aspenta Products or your violation of any of the Terms of Service. Aspenta may also change these Terms of Service from time to time, which changes shall become effective upon posting to the Aspenta Web site. To stay up‐to‐date, please make sure to check the Aspenta Web site.
Except as expressly provided herein, no part of this manual may be reproduced, copied, transmitted, disseminated, downloaded, or stored in any storage medium, for any purpose without the express prior written consent of Aspenta. Aspenta hereby grants permission to download a single copy of this manual onto some form of electronic storage medium to be viewed and to print one copy of this manual or any revision hereto, provided that such electronic or printed copy of this manual must contain the complete text of this copyright notice. Further, any unauthorized commercial distribution of this manual or any revision hereto is strictly prohibited. ©2015 Aspenta International Inc. All rights reserved. Aspenta and Vectu are registered trademarks of Aspenta International Inc. All other trademarks are property of their respective owners.

25
DECLARATION OF CONFORMITY FOR EUROPEAN CUSTOMERS Hereby, Aspenta International, Inc. declares that this Product is in compliance with the essential requirements and other relevant provisions of Directive 1995/5/EC. To view full Declaration of Conformity, visit www.vectu.com.
vectu.com @myVectu myVectu