owner’s manual - kuberg · the secret of learning to ride well is being able to ride a lot, and...
TRANSCRIPT

STArT TrIAL CrOSS
O W N E R ’ S M A N U A L
E N G L I S H

2 O W N E R ’ S M A N U A L 2 0 1 7

3
A WORD ABOUT THIS SAFETY MANUALDEAR KUBERG CUSTOMERCongratulations on your purchase of a Kuberg motorcycle. You now own a state of the art electric motorcycle that will give you endless thrills if you maintain it properly. We welcome you to the community of KUBERG riders.
Your KUBERG motorcycle is a performance motorcycle that should be treated with caution and used in safe environments. As the owner of this motorcycle, it is your responsibility for the safety of the rider at all times. If you defer this task to another adult, you need to pass this owner’s man-ual and all relevant information to whoever will take on this role, and ensure without question that the rider is controlled and taught in a safe manner.
Your KUBERG motorcycle is highly adjustable and can be set up specifically for the rider.Please do not allow the bike to be used or adjusted by other operators.
Your KUBERG motorcycle is driven by a powerful electric motor, which requires experience and careful handling. The speed and torque settings MUST be set to suit the abilities of the rider.Please remember that even when the torque setting is set to a slow setting, the torque on these motors is virtually instant. This means that opening the throttle will propel the motorcycle to a rapid speed almost instantly. For developing good riding skills this is a wonderful feature, as it will teach riders throttle control gradually with lower power. If the maximum power and torque is set too aggressively, the rider may accelerate to a speed he/she is not comfortable with. Your KUBERG motorcycle has great capabilities, and can grow with the skills of the rider to very high levels of performance, but it is IMPERITIVE that the responsible adult controls the entire learning process and pays full attention at all times. You need to foresee all potential situations and man-age the riding environment and the rider accordingly.
KUBERG motorcycles are designed for off road use only and must not be used on public roads or sidewalks. Please check and obey all local and state laws. KUBERG motorcycles should only be ridden in safe areas where all laws are being followed and all required permissions are given.
KUBERG motorcycles are amazingly capable, and can be used from the earliest stages of learning to ride all the way through to veteran riders. The secret of learning to ride well is being able to ride a lot, and KUBERG motorcycles make this learning process very gratifying teenagers and adults alike. Thanks again for purchasing a KUBERG motorcycle, and we hope you enjoy the ride!
Michal KubanekPresident, KUBERG, Inc.
KUBERG s.r.o.Zengrova 630/83 703 00 Ostrava – VitkoviceCzech Republicwww.kuberg.com

4 O W N E R ’ S M A N U A L 2 0 1 7
TABLE OF CONTENTS
A WORD ABOUT THIS SAFETY MANUAL 3INTRODUCTION 7IMPORTANT SYMBOLS AND TERMS 7
SAFETY ADVICE 8ELECTRIC DRIVETRAIN 8
SAFE RIDING PRACTICES 8
VEHICLE OVERVIEW 112016 KUBERG START 11
SPECIFICATIONS – KUBERG START 12
2016 KUBERG TRIAL 14
SPECIFICATIONS – KUBERG TRIAL 15
2016 KUBERG CROSS 17
SPECIFICATIONS – KUBERG CROSS 18
BEFORE FIRST RIDE 20UNPACKING AND ASSEMBLY 20
FIRST SETUP 20
BREAK-IN PERIOD 21
MOTORCYCLE CONTROLS 21
SETTING UP KUBERG START/TRIAL/CROSS FOR RIDING 24SETTING POWER & TORQUE MODES 24
SETTING THE TOP SPEED LIMIT 25
SETTING UP THE BRAKES 26
DRIVE TRAIN 27ADJUSTING CHAIN TENSION 27
MOTOR PERFORMANCE 28
WEATHER EFFECTS ON PERFORMANCE 28
MAINTENANCE 29BEFORE EACH RIDE 29
DAILY MAINTENANCE AND CLEANING 29
CLEANING 29
FRONT WHEEL REMOVAL AND INSTALLATION 30
5
REAR WHEEL REMOVAL AND INSTALLATION 30
FRONT BRAKE ADJUSTMENT - KUBERG START 31
REAR BRAKE ADJUSTMENT – KUBERG START 32
FRONT AND REAR BRAKE ADJUSTMENT - KUBERG CROSS AND TRIAL 32
BRAKE SQUEAL 35
BATTERY USE, CARE AND MAINTENANCE 36CHARGING INSTRUCTIONS – KUBERG START 36
CHARGING INSTRUCTIONS – KUBERG TRIAL 37
CHARGING INSTRUCTIONS – KUBERG CROSS 38
BATTERY REMOVAL AND INSTALLATION 39
LONG TERM STORAGE 40
BATTERY DISPOSAL 40
RIDING INSTRUCTIONS & SAFETY TIPS (NOVICE RIDERS) 41STATIONARY LEARNING 41
FIRST RIDE (NOVICE RIDERS) 42
LEARNING TO STAND UP 42
CORRECT RIDING TECHNIQUE 43
PROTECTIVE EQUIPMENT 44HELMETS 44
CLOTHING 44
ACCESSORIES 45LIMITED WARRANTY 47

6 O W N E R ’ S M A N U A L 2 0 1 7
7
INTRODUCTIONPLEASE READ THIS SAFETY INSTRUCTIONS MANUAL PRIOR TO OPERATION!
To ensure optimum performance from your new KUBERG motorcycle, and to ensure a safe operation, it is important to fully understand the features of the motorcycle. This manual contains IMPORTANT INFORMATION that every owner must fully understand. Please read this manual carefully and completely before operating your Kuberg motorcycle. Do not attempt to operate this motorcycle until you have attained adequate knowledge of its controls and operating proper-ties and until you have received training in proper and safe riding techniques.
Motorcycles as well as KUBERG electric motorcycles are single track vehicles. The safe use and operation of these single track vehicles depends on proper riding techniques and experience of their riders (operators).
Please read, understand and follow all Warning, Caution and Note notices on your KUBERG elec-tric bike and those included in this Manual. If you do not understand any of this important infor-mation, please contact your selling dealer/distributor or the KUBERG Customer Service ([email protected], +420 608 757 353)
Prop 65 WARNING CALIFORNIA PROPOSITION 65 WARNING: accessories contain lead and lead compounds, chemicals known to the State of California to cause cancer and reproductive harm. Batteries also contain chemicals known to the State of California to cause cancer. Wash hands after handling.
IMPORTANT SYMBOLS AND TERMSThis Owner’s Manual uses the following symbols and terms to call your attention to Warnings, Cautions and Notes:
WARNING!A Warning indicates a potentially hazardous situation which, if not avoided, could result in bodily injury or death, in addition to property damage. Read the text accompanying the warning to be aware of the specific hazard.
CAUTION!A Caution indicates a potentially hazardous situation which, if not avoided, may result in damage to equipment or inadvertent system failure. Read the text accompanying the Caution to be aware of the specific hazard and avoid damage or system failure.
NOTE:The text accompanying a Note provides helpful or other important related information.
8 O W N E R ’ S M A N U A L 2 0 1 7
SAFETY ADVICE WARNING!
Failure to obey all of the warnings & instructions contained in this manual may result in serious injury or death and permanent damage to your KUBERG motorcycle.
SPEED & TORQUE SETTINGSYour KUBERG motorcycle features a speed and torque control button that must be set for the abilities of the rider. This must be set by the responsible supervising adult before each and every ride. Instructing and practicing in a controlled situation will allow the rider to learn how to operate the motorcycle safely. Go to page 24 to find detailed instructions how to set up different speed and torque modes.
WARNING: ADULT SUPERVISION REQUIREDThis vehicle must be used in the presence of adult supervision to insure that safe riding practices are established and followed. A parent should supervise their child’s operation of this vehicle at all times. Parents should permit continued use of this vehicle only if they determine that their child has the ability and judgment to operate the vehicle safely.
WARNING: OFFROAD USE ONLYKuberg motorcycles are designed primarily for OFF-ROAD use. Please check your local, state and country regulations whether single-track, motorized electric vehicles are legal for road use in your area. Kuberg Start/Trial/Cross are not homologated for road use in the European Union.
WARNING: This bike is for personal use only and is not intended for commercial purposes. The use of this bike for commercial purposes, such as rentals, will void all warranties.
ELECTRIC DRIVETRAINThe fully electric drivetrain of this motorcycle is different than any gasoline motorcycle:
1 There is very little engine braking and no engine noise.2 When going into corners or coming to a stop the rider will be fully dependent on the bike’s
brakes.3 Passerby’s might not hear your approach – be extra cautious. Make yourself conspicuous to
reduce chance of other traffic participants not seeing you approaching.4 Be aware that your motorcycle is still ON during stops and while at an “idle”. Accidental-
ly twisting the throttle can cause serious harm.
SAFE RIDING PRACTICES 1 OPERATOR ONLY! No passengers!2 Long hair, loose clothing or items worn by the rider must be covered to prevent entangle-

9
ment in moving parts of the vehicle or surroundings while riding.3 Do not exceed the weight limit. Heavier riders may significantly reduce performance and/or
render the vehicle unstable and/or over-tax the brakes and other control devices. Heavier riders may cause structural damage not covered by the warranty.
4 Do not touch any moving or hot parts.5 DO NOT RIDE AT NIGHT OR UNDER LOW VISIBILITY CONDITIONS. Kuberg Start/Trial/Cross is
not equipped with lights.6 Do not immerse this vehicle in water.7 Do not ride on steep or uneven surfaces. Steep or uneven surfaces greatly increase the
likelihood of loss-of-control.8 Do not ride faster than conditions permit for safe operation. Excess speed greatly increases
the likelihood of loss-of-control.9 The rider should be securely seated on the vehicle ready to ride with the kickstand up be-
fore turning on the power switch ON.
Ride where other motorists and traffic participants can see you. Avoid riding in another motorist’s blind spot. Know your skills and limits. Stay within your limits to avoid an accident.
NOTE:Many accidents have been caused by rider error. A typical error made by motorcycle riders is veering wide on a turn due to EXCESSIVE SPEED or under cornering due to insufficient lean angle for the given speed.
WARNING!Maintain a proper posture while riding. The posture of rider is important for proper control of the motorcycle. The rider should keep both hands on the handlebar and both feet on rider’s footrests during operation to maintain control of the motorcycle. Never ride under the influence of alco-hol or other drugs. Go to page 43 to find detailed instructions for a proper riding technique.
ONE RIDER ONLYYour bike was engineered to carry one rider and no (0) passengers. Carrying a passenger would overload the motorcycle and alter the handling. Do not allow this to happen.
DO NOT OVERLOAD THE BIKEExceeding the weight limitations will adversely affect the handling of the motorcycle, and poten-tially cause damage.
OBEY ALL LAWSObey all laws. KUBERG bikes are for OFF-ROAD USE ONLY. KUBERG bikes cannot be used on public roads or sidewalks. The purchaser, owner, and/or riders of this motorcycle are directly responsible to know and obey all local, state, and federal laws regarding the riding and use of this motorcycle.
10 O W N E R ’ S M A N U A L 2 0 1 7
WEATHER & RIDING CONDITIONSDon’t ride in the rain or snow. Please be aware that distance to stop under wet conditions may double or triple over the distance that it takes under dry conditions. Ride more slowly, and antic-ipate your stops by applying the brakes MUCH earlier. Don’t allow children to ride on slopes that are too steep for their ability.
NIGHT TIMEDon’t ride after dark or in low light conditions.
BATTERIESWe have equipped your KUBERG Start/Trial/Cross with highly advanced sealed lead-acid batteries. Go to page 36 to learn about the correct charging procedure and batteries.
MIND THE MOTORCYCLE’S CHAINUnder no circumstances should any hands or other body parts be close to a moving chain. Riders should wear motorcycle boots without laces, and not have any loose clothing that could be caught by the chain.

11
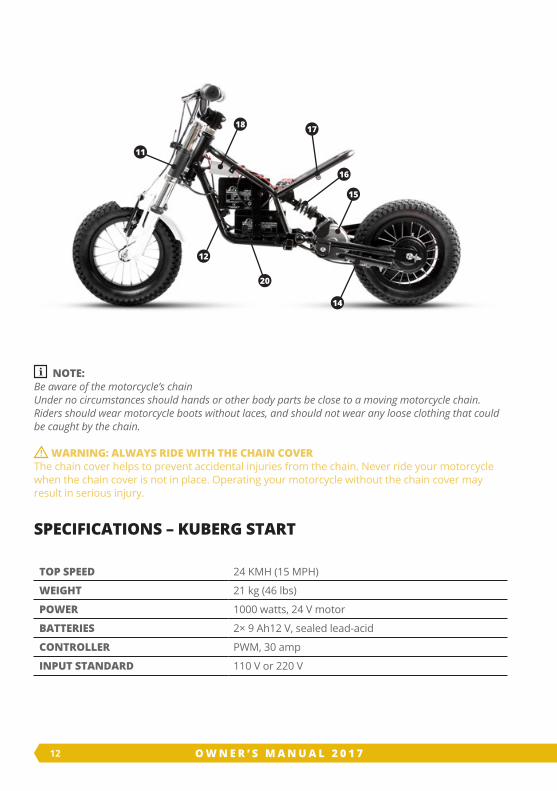
VEHICLE OVERVIEW
2016 KUBERG STARTKids just like to have fun. With a rugged build quality, safe design and reliable components, the Start is perfect for kids who are itching for fun! Ideal for kids from 3 to 5 years.
1 Throttle 2 Handlebar 3 Steering column4 Front brake5 Rear brake6 Number plate7 Safety kill-switch8 Battery level indicator9 Fender
10 Tire
11 Front fork 12 Speed & torque control button13 Foot pegs14 Kick stand15 Motor16 Shock absorber17 Charge port18 Controller 19 Seat (optional)20 Battery
1
8
4
9
105
3
13
6
27
19
12 O W N E R ’ S M A N U A L 2 0 1 7
NOTE:Be aware of the motorcycle’s chainUnder no circumstances should hands or other body parts be close to a moving motorcycle chain. Riders should wear motorcycle boots without laces, and should not wear any loose clothing that could be caught by the chain.
WARNING: ALWAYS RIDE WITH THE CHAIN COVER The chain cover helps to prevent accidental injuries from the chain. Never ride your motorcycle when the chain cover is not in place. Operating your motorcycle without the chain cover may result in serious injury.
SPECIFICATIONS – KUBERG START
TOP SPEED 24 KMH (15 MPH)
WEIGHT 21 kg (46 lbs)
POWER 1000 watts, 24 V motor
BATTERIES 2× 9 Ah12 V, sealed lead-acid
CONTROLLER PWM, 30 amp
INPUT STANDARD 110 V or 220 V
11
12
20
14
15
16
1718

13
TRANSMISSION Clutchless one speed
FINAL DRIVE T90 / 13T chain 25HA
FRAME Steel double cradle tube frame, powder-coated
WHEELBASE 32” (82 cm)
SEAT HEIGHT 15/17” (39 cm without seat, 44 cm with seat option)
HANDLEBAR HEIGHT 25.5” (65 cm)
FRONT BRAKE V type
REAR BRAKE Band type
FORKS Suspension fork with spring
SHOCK ABSORBER Spring
TIRES 12.5” × 2.4”
WEIGHT 72 lbs (33 kg)
COLORS White
WIFI WiFi ready - adapter sold separately
CARRYING CAPACITY Maximum 220 lbs (100 kg)
WARNING!The KUBERG START is designed to operate at 24 volts only. Use of any battery voltage other than 24 volts will result in motor failure. KUBERG Inc. considers modifications and/or changes to its electrical components to be a material alteration of its products, thereby cancelling any warran-ties and/ or guarantees in their entirety. Kuberg Inc. will not be responsible for any injuries, and/or death and/or other damage(s) caused by such modifications.

14 O W N E R ’ S M A N U A L 2 0 1 7
2016 KUBERG TRIALFeaturing up to 3 kW of smooth, linear power and instant torque, the Trial is perfect for 5 to 10-year-old riders looking to rip up anything from tracks to trails.
1 Throttle 2 Handlebar 3 Steering column4 Front brake5 Rear brake6 Number plate7 Safety kill-switch8 Battery level indicator9 Tire
10 Front fork 11 Battery12 Speed & torque control button13 Foot pegs14 Kick stand15 Motor16 Shock absorber17 Charge port18 Controller
1
2
3
4
5
6
7
10
8
9
13
17

15
NOTE:Be aware of the motorcycle’s chainUnder no circumstances should hands or other body parts be close to a moving motorcycle chain. Riders should wear motorcycle boots without laces, and should not wear any loose clothing that could be caught by the chain.
WARNING: ALWAYS RIDE WITH CHAIN COVER The chain cover helps to prevent accidental injuries from the chain. Never ride your motorcycle when the chain cover is not in place. Operating your motorcycle without the chain cover may result in serious injury.
SPECIFICATIONS – KUBERG TRIAL
TOP SPEED 27 KMH (17 MPH)
WEIGHT 33 kg (72 lbs)
POWER 3000 watts, 36 V motor
BATTERIES 3×12 Ah 12 V, sealed lead-acid
CONTROLLER PWM, 40 amp
INPUT STANDARD 110 V or 220 V
TRANSMISSION Clutchless one speed
12
14
15 16
18
11

16 O W N E R ’ S M A N U A L 2 0 1 7
FINAL DRIVE 69T / 10T, chain 219H
FRAME Steel double cradle tube frame, powder-coated
WHEELBASE 37” (94 cm)
SEAT HEIGHT 20.5/23” (52 cm without seat, 59 cm with seat option)
HANDLEBAR HEIGHT 32.5” (83 cm)
FRONT BRAKE AND REAR BRAKES Hydraulic Disc Brake system Tektro Auriga
BRAKE DISCS 160 mm diameter
FORKS Suspension fork Spinner Grind
SHOCK ABSORBER Spring
TIRES 16” × 2.4” KENDA
WEIGHT 72 lbs (33 kg)
COLORS White
WIFI WiFi ready - adapter sold separately
CARRYING CAPACITY Maximum 220 lbs (100 kg)
WARNING!The KUBERG Trial is designed to operate at 36 volts only. Use of any battery voltage other than 24 volts will result in motor failure. KUBERG Inc. considers modifications and/or changes to its electri-cal components to be a material alteration of its products, thereby cancelling any warranties and/ or guarantees in their entirety. Kuberg Inc. will not be responsible for any injuries, and/or death and/or other damage(s) caused by such modifications.

17
2016 KUBERG CROSSWith its durable construction, massive power and precision controller, the Cross is perfect for advanced riders, from 5 to 12 years of age, who want to push their riding to the limits.
1 Throttle 2 Handlebar 3 Steering column4 Front brake5 Rear brake6 Number plate7 Safety kill-switch8 Battery level indicator9 Fender
10 Tire
11 Front fork 12 Speed & torque control button13 Foot pegs14 Kick stand15 Motor16 Shock absorber17 Charge port18 Controller 19 Seat20 Battery
12
193
45
6
7
9
10
8
13
17

18 O W N E R ’ S M A N U A L 2 0 1 7
NOTE:Be aware of the motorcycle’s chainUnder no circumstances should hands or other body parts be close to a moving motorcycle chain. Riders should wear motorcycle boots without laces, and should not wear any loose clothing that could be caught by the chain.
WARNING: ALWAYS RIDE WITH CHAIN COVER The chain cover helps to prevent accidental injuries from the chain. Never ride your motorcycle when the chain cover is not in place. Operating your motorcycle without the chain cover may result in serious injury.
SPECIFICATIONS – KUBERG CROSS
TOP SPEED 27 KMH (17 MPH)
WEIGHT 35 kg (76 lbs)
POWER 3000 watts, 36 V motor
BATTERIES 3×12 Ah 12 V, sealed lead-acid
CONTROLLER PWM, 40 amp
INPUT STANDARD 110 V or 220 V
TRANSMISSION Clutchless one speed
11
12
14
15 16
18
20

19
FINAL DRIVE 69T / 10T, chain 219H
FRAME Steel double cradle tube frame, powder-coated
WHEELBASE 37” (94 cm)
SEAT HEIGHT 25” (63 cm)
HANDLEBAR HEIGHT 32.5” (83 cm)
FRONT BRAKE AND REAR BRAKES Hydraulic Disc Brake system Tektro Auriga
BRAKE DISCS 160 mm diameter
FORKS Suspension fork Spinner Grind
SHOCK ABSORBER Spring
TIRES 16” × 2.4” Kuberg Knobby
WEIGHT 77 lbs (35 kg)
COLORS White
WIFI WiFi ready - adapter sold separately
CARRYING CAPACITY Maximum 220 lbs (100 kg)
WARNING!The KUBERG CROSS is designed to operate at 36 volts only. Use of any battery voltage other than 24 volts will result in motor failure. KUBERG Inc. considers modifications and/or changes to its electrical components to be a material alteration of its products, thereby cancelling any warran-ties and/ or guarantees in their entirety. Kuberg Inc. will not be responsible for any injuries, and/or death and/or other damage(s) caused by such modifications.

20 O W N E R ’ S M A N U A L 2 0 1 7
BEFORE FIRST RIDE NOTE:
If you purchased your KUBERG motorcycle at a local dealer your motorcycle may be fully adjusted and ready to ride. If you purchased your KUBERG still in the original packing, please carefully follow the instructions below and any supplemental instructions to finish the assembly and adjustment of your KUBERG.
UNPACKING AND ASSEMBLY WARNING:
Failure to properly assemble and adjust your bike prior to use may result in an accident result-ing in death, serious injury and/or property damage. If you are uncertain about any aspect of the assembly and adjustment of your bike, seek help from a qualified mechanic or the KUBERG Customer Service.
1 Remove your KUBERG bike from the box.2 Lower kickstand and place your KUBERG on a solid & level surface.3 Remove all the packing materials.4 Using the supplied Allen wrench, make sure the steering stem is in the forward facing posi-
tion and tighten the top and side bolts securely and evenly. Secure the handlebars tightly in the steering stem. Double check tightness and alignment.
5 Adjust the brake lever positions to suit the rider.
FIRST SETUP1 Check tire pressure of both tires and confirm they are properly inflated. The optimal tire
pressure for Kuberg Start/Trial/Cross is 35-40 PSI (2.4–2.8 bar) for general use and should never exceed 50 PSI (3.4 bar).
2 Unpack charger from its box and charge the batteries, make sure to follow the correct charging procedure. Go to page 36 to find detailed charging instructions.
3 Compress each brake lever. The lever should not compress completely to the handlebar. Each individual brake should hold the bike securely when you push the motorcycle against the brake. If your brake needs adjustment, follow the instructions on page 31. For beginner riders adjust the front brake so it will not lock the front wheel easily. All riders should be aware which lever operates which brake.
4 Check the chain for tightness and lubrication. 5 Setup up power and speed settings to an adequate level to the rider’s experience and riding
skills. Go to page 24 to find detailed instructions how to set up top speed limits and differ-ent riding modes.
21
WARNING!There are no user serviceable elements incorporated into the motor, motor controller, batteries, battery charger, throttle, or wiring harness of your KUBERG electric bike. DO NOT ATTEMPT TO DISASSEMBLE OR ADJUST ANY OF THESE COMPONENTS. Doing so may cause extensive damage to these components, will void your warranty, and may cause a hazardous condition. If you can-not resolve a problem using this owner’s manual, contact your KUBERG authorized dealer, or call the KUBERG Customer Service for assistance.
BREAK-IN PERIODTo assure future reliability and top-notch performance of your Kuberg Start/Trial/Cross, pay extra attention during your first 15 km/10 miles (three full-charge cycles).
Avoid full-throttle starts and accelerate gradually. Avoid hard braking. New brakes need some time to break in with moderate use for the first 15 km / 10 miles or three full charges.
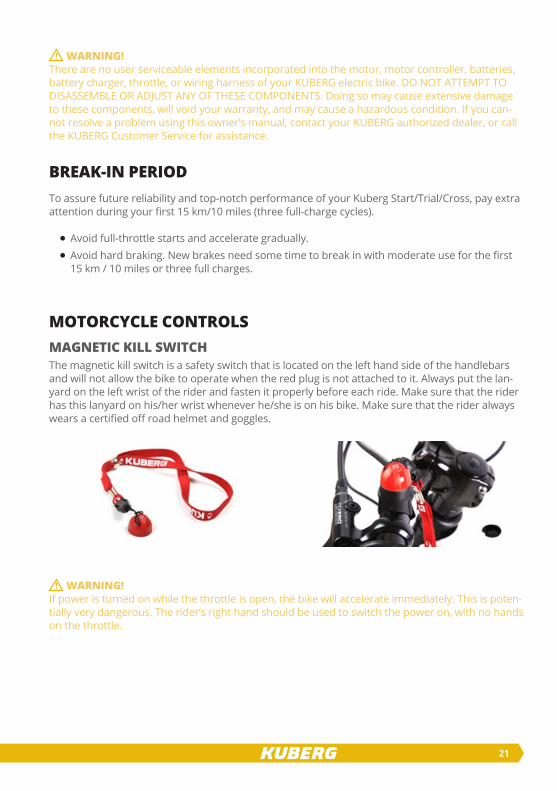
MOTORCYCLE CONTROLS MAGNETIC KILL SWITCHThe magnetic kill switch is a safety switch that is located on the left hand side of the handlebars and will not allow the bike to operate when the red plug is not attached to it. Always put the lan-yard on the left wrist of the rider and fasten it properly before each ride. Make sure that the rider has this lanyard on his/her wrist whenever he/she is on his bike. Make sure that the rider always wears a certified off road helmet and goggles.
WARNING!If power is turned on while the throttle is open, the bike will accelerate immediately. This is poten-tially very dangerous. The rider’s right hand should be used to switch the power on, with no hands on the throttle.
22 O W N E R ’ S M A N U A L 2 0 1 7
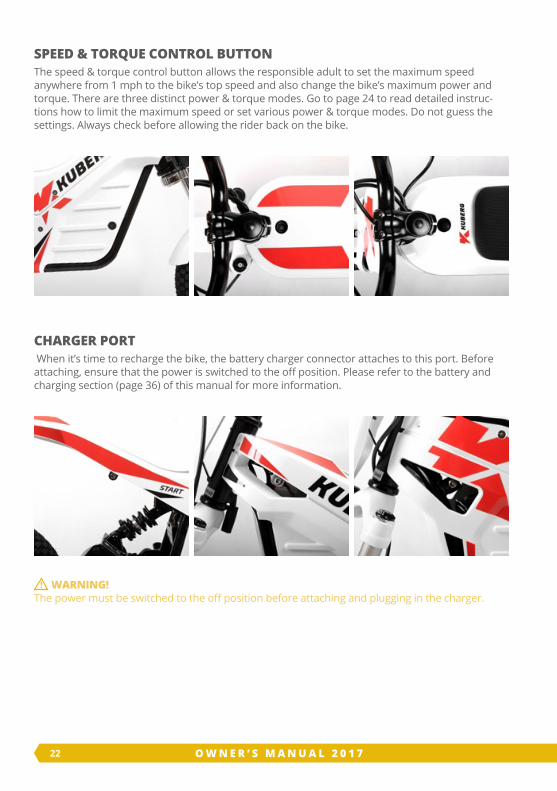
SPEED & TORQUE CONTROL BUTTONThe speed & torque control button allows the responsible adult to set the maximum speed anywhere from 1 mph to the bike’s top speed and also change the bike’s maximum power and torque. There are three distinct power & torque modes. Go to page 24 to read detailed instruc-tions how to limit the maximum speed or set various power & torque modes. Do not guess the settings. Always check before allowing the rider back on the bike.
CHARGER PORT When it’s time to recharge the bike, the battery charger connector attaches to this port. Before attaching, ensure that the power is switched to the off position. Please refer to the battery and charging section (page 36) of this manual for more information.
WARNING!The power must be switched to the off position before attaching and plugging in the charger.

23
CHARGE INDICATORThe battery charge indicator is located on the throttle assembly and shows the state of the batter-ies. The indicator lights are also an indication as to whether the bike is turned on or off.The battery charge indicators are also used to indicate which power mode is selected. Go to page 24 to find detailed instructions concerning the set up of different power and top speed modes.

24 O W N E R ’ S M A N U A L 2 0 1 7
SETTING UP KUBERG START/TRIAL/CROSS FOR RIDINGThere are several ways to set up your Kuberg motorcycle for riding. You can adjust the settings for:
1 Maximum power/torque2 Top speed limit3 Braking power
WARNING!Improper set-up is dangerous! It is your responsibility to set the motorcycle to the ability of the rider. Failure to do so could result in an injury or death, and damage to your motorcycle.
NOTE:As the responsible adult, you must ensure that the Kuberg motorcycle and its rider are prepared for ev-ery ride. The motorcycle must be set to the abilities of the rider, and you must ALWAYS supervise when, where and how the bike is ridden. Children can lose concentration quickly, and be distracted easily. If the speed is set too high or the brakes too severe an accident could occur. RIDE SAFE!
SETTING POWER & TORQUE MODESFollow these steps to limit the maximum power and torque on your KUBERG Start, Trial and Cross:
1 With the bike off press and hold the control button2 Continue to hold the button and turn the bike on (using the magnetic switch) wait a short
time (whilst still holding the button) and the battery level indicator next to the throttle will flash one, two or three times to indicate the desired power mode. One flash indicates Beginner Mode (low-power), two flashes indicate medium-power and three flashes indicate Race Mode (maximum-power). Let go of the control button after the number of flashes corresponding to your desired power mode. For example, if you want the medium power mode, hold the control button for two flashes and release.
On the Kuberg Start the speed & torque control button is located on the right side in the plastic panel wheel near the front wheel.

25
On the Kuberg Trial the speed & torque control button is located on the top plastic cover between the seat and the steering column.
On the Kuberg Cross the speed & torque control button is located on the top plastic cover between the seat and the steering column.
3 Release the button when the required mode is selected. The bike will remain in this mode if turned off and back on, and does not need to be re-selected each time. To select another mode, repeat this process.
CAUTION!Sport and Race modes should only be used by experienced riders!
SETTING TOP SPEED LIMITFollow these steps to limit the maximum speed on your Kuberg Start/Trial/Cross.
1 With the bike on, hold the programming button in for 5 seconds – The throttle lights will flash. - This means that programming mode has been selected.
2 Release the button and lift the back of the bike carefully and turn the throttle. Hold the throttle at the desired top speed, until the throttle lights flash again. The bike will then automatically turn off and back on again (this means the bike has now programmed to that top speed). The top speed will now be set at that speed. The bike will remain in this speed setting if turned off and back on, and does not need to be re-selected each time. To select another top speed, repeat this process.
START Trial CROSS

26 O W N E R ’ S M A N U A L 2 0 1 7
WARNING!The rear wheel will spin during the TOP SPEED set up procedure. Make sure that the rear wheel and chain cannot cause harm to you or other people, or come into contact with clothing, bags or other items. Make sure that the bike is firmly placed on its stand.
WARNING!It is very important to keep everyone clear of the bike when changing and checking the speed setting. The dial is very sensitive to small adjustments. Always this check before the rider gets back on.
SETTING UP BRAKESThe brakes on Kuberg motorcycles are adjustable. Novice riders should have the front brake ‘backed off’ somewhat so it does not bite too suddenly. As the rider gets better, the brake can be tightened up for a quicker reaction and a stronger braking force.
Go to page 31 to find detailed instructions to set up brakes

27
DRIVE TRAINYour KUBERG motorcycle features a traditional chain and sprockets, covered by a plastic chain-guard. It is direct drive with no gears. The motor is mounted in the swing arm so movement of suspension has no effect on chain tension. However, the chain does need to be checked and adjusted on a regular basis, especially when the bike is new.
The chain must be checked before every ride and adjusted as necessary. There should be very little slack in the chain.
ADJUSTING CHAIN TENSIONFollow these steps to adjust chain tension:
1 Ensure power is turned off.2 Remove chain guard by removing 4 bolts.3 Loosen axle nuts and band brake mount bolt.4 Turn adjustment nuts evenly on both sides. Very small movements can make a big differ-
ence. Do not tighten so much there is no slack at all. It should be ‘taught’, not ‘tight’.5 While the chain guard is off, lubricate the chain & check the sprocket bolts for tightness.6 Reverse the above procedure, ensuring all bolts are tight.7 Check the wheel for alignment, and the chain for tension.
WARNING: ALWAYS RIDE WITH CHAIN COVERThe chain cover helps to prevent accidental injuries from the chain. Never ride your motorcycle when the chain cover is not in place. Operating your motorcycle without the chain cover may result in serious injury.
WARNING!Failure to maintain and adjust the chain and align the wheel correctly could result in the chain jumping off the sprockets, causing a potentially dangerous and damaging condition.
28 O W N E R ’ S M A N U A L 2 0 1 7
MOTOR PERFORMANCEThe motor has a thermal sensor which measures the motor’s internal temperature and will shut the motor down before overheating causes any irreparable damage. It will reset itself in approxi-mately 15 to 30 minutes.
Motor thermal shutdown can occur when riding in situations that stress the motor, such as long up-hills or continuous full throttle operation when there is no rest period for the motor.
WEATHER EFFECTS ON PERFORMANCEVery cold weather is hard on the motorcycles batteries and, as a result, the battery charge won’t last as long compared to warm weather. This is normal and does not require maintenance or servicing.
29
MAINTENANCEKuberg motorcycles generally require significantly less maintenance compared to traditional gas bikes due to their having very few moving parts, no engine and no exhaust. Our authorized dealers have extensive experience and know Kuberg bikes inside and out, so they can provide high-quality service for your Kuberg motorcycle. However, service at a dealer is not required to maintain your warranty.
WARNING: PROPER MAINTENANCE OF THIS VEHICLE IS REQUIRED Failure to maintain this vehicle in proper operating condition can lead to an accident resulting in death or serious injury, and property damage. If you have any questions about the proper care and maintenance of this vehicle, consult your selling dealer/distributor or contact KUBERG Cus-tomer Service (email: [email protected], phone: +420 608 757 353).
BEFORE EACH RIDEBefore each ride, make sure that all bolts and nuts are fastened securely and that the tires are properly inflated. Before each ride, check that the throttle and brake controls are operating freely. Adjust and lubricate the drive chain as necessary. This vehicle should be returned for periodic maintenance to your selling dealer AT LEAST once per year, but more frequently if used under severe conditions.
DAILY MAINTENANCE AND CLEANINGKeep your KUBERG Start/Trial/Cross clean and dry. Regularly check all components for tightness and adjustment, including handlebars, levers, axles, chain, brakes. Check the settings for torque and maximum speed. Check the tires for damage and for proper inflation.
CLEANING Cleaning and maintaining your KUBERG correctly will provide a more enjoyable ownership and riding experience. By hand cleaning the bike, you can simultaneously inspect all of the compo-nents. We recommend cleaning with a damp cloth. Never use a hose and never pour water onto the bike. A hose or a power wash may cause irreparable damage to sensitive components.
WARNING!Do not power wash your Kuberg Start/Trial/Cross. Power washing may cause water to get into the bike’s electrical components and cause irreparable damage.
NOTE:The 2017 and later models have improved waterproofing. You are free to use a hose or power washer to clean your 2017 and later Start, Trial, and Cross bikes. Avoid directing the water towards electrical components and bearings. Dry the bike after washing. Earlier models do not have waterproofing.
30 O W N E R ’ S M A N U A L 2 0 1 7
WARNING!Do not operate your KUBERG if any damage is apparent. Immediately contact your local retailer/distributor or KUBERG Customer Service.
WARNING!There are no user serviceable elements incorporated into the motor, motor controller, batteries, battery charger, throttle, or wiring harness of your KUBERG electric bike. DO NOT ATTEMPT TO DISASSEMBLE OR ADJUST ANY OF THESE COMPONENTS. Doing so may cause extensive damage to these components, will void your warranty, and may result in danger to persons and/or property. If you cannot resolve any problem using this owner’s manual, contact your KUBERG authorized dealer, or call the KUBERG Customer Service for assistance.
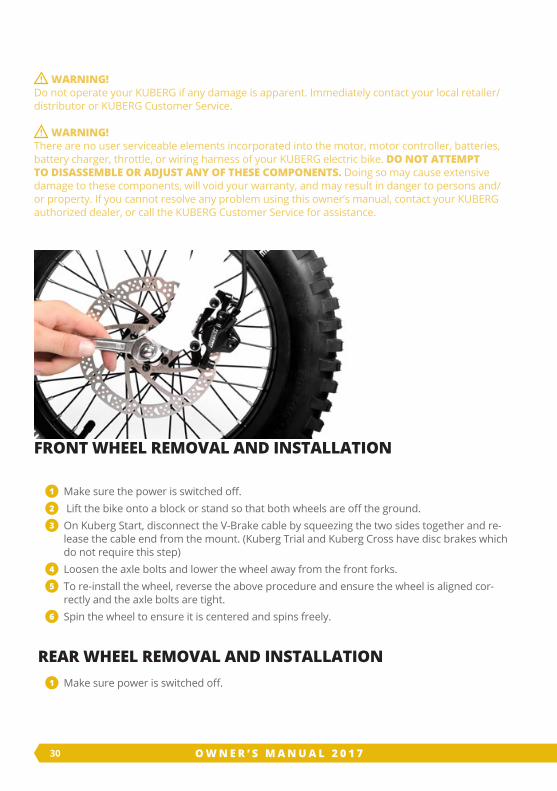
FRONT WHEEL REMOVAL AND INSTALLATION
1 Make sure the power is switched off. 2 Lift the bike onto a block or stand so that both wheels are off the ground. 3 On Kuberg Start, disconnect the V-Brake cable by squeezing the two sides together and re-
lease the cable end from the mount. (Kuberg Trial and Kuberg Cross have disc brakes which do not require this step)
4 Loosen the axle bolts and lower the wheel away from the front forks. 5 To re-install the wheel, reverse the above procedure and ensure the wheel is aligned cor-
rectly and the axle bolts are tight. 6 Spin the wheel to ensure it is centered and spins freely.
REAR WHEEL REMOVAL AND INSTALLATION1 Make sure power is switched off.

31
2 Lift the bike onto a block or stand so the wheels are off the ground.
3 Remove the chain-guard by removing the 4 bolts securing it. 4 On Kuberg Start, release the band brake cable by undoing the cable pinch bolt. Then re-
move the band brake securing bolt. (Kuberg Trial and Kuberg Cross have disc brakes which do not require this step).
5 Loosen the axle bolts. 6 Loosen the chain adjustment nuts to the point where the wheel can be pushed forward,
and the chain slipped off to the right of the sprockets. 7 Pull back on the wheel to remove it.
FRONT BRAKE ADJUSTMENT - KUBERG START1 Using an Allen wrench (Allen key), adjust the vertical height and rotation of each brake pad
so each pad is level and square on the rim.2 Re-tighten each pad once it is in the correct position. (Make certain that the pads are cen-
tered on the rim and do not rub on the tire or fall below the rim.)3 Using an Allen wrench (Allen key), loosen the cable fixing bolt.4 Check to make certain that the cable noodle (curved pipe) is properly seated in the RH
brake arm link.

32 O W N E R ’ S M A N U A L 2 0 1 7
5 Check to make certain that the black rubber boot is not binding the brake link wire.6 By pulling on the loose end of the brake link wire, tighten the brake arms until each brake
pad is 2 mm from the rim.7 Re-tighten the brake link wire fixing bolt with a 5 mm Allen wrench (Allen key). Test that the
cable will not slip by pulling hard on the lever a number of times.
REAR BRAKE ADJUSTMENT – KUBERG STARTAll brakes need periodic adjustment. Band brakes on the Kuberg Start should only be adjusted by a qualified service technician. If and when your brake shows any decline in efficiency or needs adjustment, it is very strongly recommended that you take your bike to your local dealer for maintenance. Improper adjustment of your brakes can cause poor braking and could lead to an accident and/or injury.
FRONT AND REAR BRAKE SYSTEM – KUBERG CROSS AND TRIALGENERAL MAINTENANCE Pad replacement: pads should be replaced if they become contaminated or have less than 0.8mm thickness.
Before riding:
1 Check if the brake system is operating correctly 2 Check the hose for cracking wear of deformation. Replace if necessary 3 Check the pads for wear or contamination
After riding:
1 Remove any mud or contamination from the rotor slot on the caliper 2 Clean the caliper body with a cloth
At regular intervals:
1 Check the oil level in the reservoir 2 Lubricate the brake lever pivot with grease if nessecery 3 Check to make sure that all the bolts are tightened to the correct torque specifications.
33
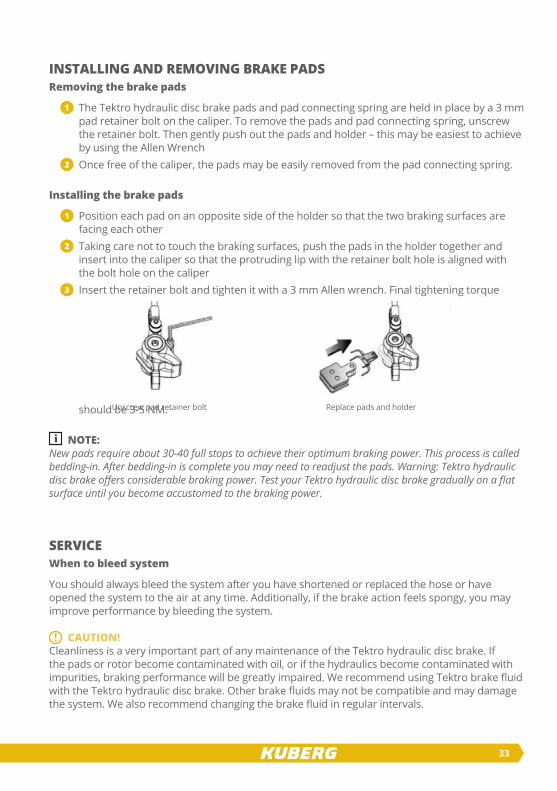
INSTALLING AND REMOVING BRAKE PADS Removing the brake pads
1 The Tektro hydraulic disc brake pads and pad connecting spring are held in place by a 3 mm pad retainer bolt on the caliper. To remove the pads and pad connecting spring, unscrew the retainer bolt. Then gently push out the pads and holder – this may be easiest to achieve by using the Allen Wrench
2 Once free of the caliper, the pads may be easily removed from the pad connecting spring.
Installing the brake pads
1 Position each pad on an opposite side of the holder so that the two braking surfaces are facing each other
2 Taking care not to touch the braking surfaces, push the pads in the holder together and insert into the caliper so that the protruding lip with the retainer bolt hole is aligned with the bolt hole on the caliper
3 Insert the retainer bolt and tighten it with a 3 mm Allen wrench. Final tightening torque
should be 3-5 NM.
NOTE:New pads require about 30-40 full stops to achieve their optimum braking power. This process is called bedding-in. After bedding-in is complete you may need to readjust the pads. Warning: Tektro hydraulic disc brake offers considerable braking power. Test your Tektro hydraulic disc brake gradually on a flat surface until you become accustomed to the braking power.
SERVICE When to bleed system
You should always bleed the system after you have shortened or replaced the hose or have opened the system to the air at any time. Additionally, if the brake action feels spongy, you may improve performance by bleeding the system.
CAUTION!Cleanliness is a very important part of any maintenance of the Tektro hydraulic disc brake. If the pads or rotor become contaminated with oil, or if the hydraulics become contaminated with impurities, braking performance will be greatly impaired. We recommend using Tektro brake fluid with the Tektro hydraulic disc brake. Other brake fluids may not be compatible and may damage the system. We also recommend changing the brake fluid in regular intervals.
Unscrew pad retainer bolt Replace pads and holder

34 O W N E R ’ S M A N U A L 2 0 1 7
STEP BY STEP GUIDE1 With the brake correctly installed, place the bike in a stand or similar device to hold it secur
ely parallel to the ground. 2 Firmly attach a ling plastic tube (supplied in the service kit) over the outlet valve. Placing the
other end into the syringe with oil by suitable volume. 3 Using a 4” Allen wrench, slightly loosen the brake lever’s bracket retaining bolt. Turn the
brake lever so that the reservoir tank is parallel to the ground. [see photo f-2]4 Using a T15 Torx wrench remove the bolt that is on top of the reservoir tank. [see photo f-3] 5 Place the outlet valve on the hole and firmly attach a long plastic tube over the outlet valve,
placing the other end into a clean, dry empty bottle, or plastic bag [see photo f-4] 6 Open the outlet valve on the caliper slightly (1/8 turn to ¼ turn) Brake fluid should now
appear in the plastic tube connected to it. You may also notice air bubbles in the tube. [see photo f-5]
7 Start filling the reservoir with new mineral oil by pushing the syringe. Air bubbles may come out the tube from the outlet valve on the reservoir tank of the brake lever’s bracket. Be sure to fill the oil by pushing the syringe until the oil is out of the outlet valve on the reservoir tank of the brake lever’s bracket, so that no air gets into the system. [see photo f-6]
8 Tighten the bleed valve. Final tightening torque should be 4-6 Nm. Replace the rubber outlet valve cover.
9 Depress the brake lever a few times. The action should feel stiff and not spongy. [see photo f-7]
10 When no more air bubbles appear to be coming out of the outlet valve, remove the outlet valve from the bracket. Using a T15 Torx wrench tighten the bolt on that side reservoir tank. Final tightening torque 2-4 Nm.
11 Wipe the lever, caliper, and hose with a lint-free towel
f–2. Position the lever parallel to ground
f–6. Fill the reservoir with oil by pushing the syringe
f–3. Remove the bolt f–4. Attach a bag or bottle to the tube
f–7. Depress the brake lever
f–5. Open the outlet valve 1/4 turn

35
WARNING: KUBERG brakes are adjustable. Beginning riders should have the front brake ‘backed off’ somewhat so it does not bite too sud-denly. As the rider gets better, the brake can be tightened up for a quicker and stronger response from the brake lever.
BRAKE SQUEALDirt and humidity can cause noisy or squealing brakes. These are normally temporary and should gradually disappear with regular use. Repair is not required. If you hear a metallic “screeching’ sound you might need to replace the brake pads. Visit your Kuberg dealer to replace the brake pads.
Unscrew pad retainer bolt Replace pads and holder

36 O W N E R ’ S M A N U A L 2 0 1 7
BATTERY USE, CARE AND MAINTENANCEFor the proper use, maintenance and storage of this battery, it is critically important that you follow and understand the instructions in this manual.
If you have any questions about this battery or its usage, please do not hesitate to contact the KUBERG Customer Service.
WARNING!Failure to properly use, charge and store this battery will void the warranty, and may cause a haz-ardous situation. DO NOT use this battery with any other vehicle or appliance. Use of this battery with any other product will void the warranty, and may create a hazardous condition that could cause a fire resulting in severe injury or death, and property damage.
WARNING!Never short circuit the discharge terminals of the battery. A short circuit will damage the battery and could cause a fire resulting in severe injury or death, and property damage.
WARNING!Never manipulate the battery, never open the battery pack and do not puncture the battery cover and the battery itself.
CAUTION!Keep the battery away from excessive heat and/or open flames. Avoid long term exposure to direct rays from the sun.
CAUTION!Protect the batteries from water or other moisture. If the batteries become wet from rain during use, dry as soon as possible. Remove the batteries from the bike before washing.
CAUTION!To avoid damage to the battery, never subject it to intense physical shock or severe vibration.
CHARGING INSTRUCTIONS – KUBERG STARTAlways follow these steps when charging your Kuberg Start.
1 Make sure your Kuberg Start is turned off.2 Make sure the electricity cable is plugged into the charger.3 Connect your charger to an electrical outlet (AC).4 Connect the charger cable to the battery connector on your Kuberg Start
WARNING!Only use the supplied battery charger. Using any other battery charger will void the warranty and may damage the battery.

37
CAUTION!If the charger is plugged into the bike with the charger switched OFF, a potential inward rush of electrical current from the bike’s battery to the charger may damage the charger.
The recommended charging time for a fully discharged battery is 6 hours. The battery level indicator on the Start’s handlebars will show the level of battery charge The LED light on the charger will illuminate RED while charging. The LED light on the charger will illuminate GREEN when the battery is fully charged.
CAUTION!The battery charger supplied with your Kuberg Start is for INDOOR use only.
CHARGING INSTRUCTIONS – KUBERG TRIALAlways follow these steps when charging your Kuberg Trial.
1 Make sure your Kuberg Trial is turned off.2 Make sure the electricity cable is plugged into the charger.3 Connect your charger to an electrical outlet (AC).4 Connect the charger cable to the battery connector on your Kuberg Trial
WARNING!Only use the supplied battery charger. Using any other battery charger will void the warranty and may damage the battery.

38 O W N E R ’ S M A N U A L 2 0 1 7
CAUTION!If the charger is plugged into the bike with the charger switched OFF, a potential inward rush of electrical current from the bike’s battery to the charger may damage the charger.
The recommended charging time for a fully discharged battery is 6 hours. The battery level indicator on the Trial’s handlebars will show the level of battery charge The LED light on the charger will illuminate RED while charging. The LED light on the charger will illuminate GREEN when the battery is fully charged.
CAUTION!The battery charger supplied with your Kuberg Start is for INDOOR use only.
CHARGING INSTRUCTIONS – KUBERG CROSSAlways follow these steps when charging your Kuberg Cross.
1 Make sure your Kuberg Cross is turned off.2 Make sure the electricity cable is plugged into the charger.3 Connect your charger to an electrical outlet (AC).4 Connect the charger cable to the battery connector on your Kuberg Cross
WARNING!Only use the supplied battery charger. Using any other battery charger will void the warranty and may damage the battery.
CAUTION!If the charger is plugged into the bike with the charger switched OFF, a potential inward rush of electrical current from the bike’s battery to the charger may damage the charger.

39
The recommended charging time for a fully discharged battery is 6 hours. The battery level indicator on the Cross’s handlebars will show the level of battery charge The LED light on the charger will illuminate RED while charging. The LED light on the charger will illuminate GREEN when the battery is fully charged.
CAUTION!The battery charger supplied with your Kuberg Start is for INDOOR use only.
IMPORTANT NOTES ABOUT BATTERY CHARGING
Fully charge the batteries for at least 12 hours before using your Kuberg Start/Trial/Cross for the first time.
Fully charge the batteries for at least 12 hours for the first 3 charges after using your Start/Trial/Cross.
Fully charge the batteries for at least 12 hours after every 10 charges.
WARNING!
Do not cover the charger while charging, as this ,may cause the charger to overheat. Avoid any contact with water or other fluids while charging the battery. If the battery, charger or any connections become wet, immediately unplug the charger and thoroughly dry all components.
Only charge the battery under the constant supervision of an adult. Children must not oper-ate the charger.
Keep the charger and the motorcycle away from flammable items during charging. Never dismantle or disassemble the supplied charger. Never use the supplied charger for any other purpose other than charging a KUBERG Trial motorcycle.
BATTERY REMOVAL AND INSTALLATIONDuring normal use, KUBERG does not recommend removing the batteries from the Kuberg Start/Trial/Cross. Should you need to replace the battery or remove it, KUBERG highly recommends tak-ing the motorcycle to a certified technician or a Kuberg dealer. If you choose to remove or replace the battery yourself, please follow the following instructions carefully:
1 Ensure the power switch is in the off position and the magnetic kill switch plug is removed.2 Remove the plastic bodywork side covers. 3 Undo the velcro tie straps on the sides of the battery. Carefully slide the battery connectors
off, one at a time. Note the direction and position of the batteries, and the terminal for each wire. When reconnecting, each wire must be connected to the correct terminal.
4 Push the remaining positive and negative wires to the back of the bike, so the batteries can be carefully lifted off and removed one by one.
5 To re-install the batteries, reverse the above procedure.

40 O W N E R ’ S M A N U A L 2 0 1 7
WARNING!Incorrectly connecting the battery wires to bike’s terminals might cause irreparable damage to motorcycle’s electrical components.
LONG TERM STORAGE If you do not plan to use your KUBERG for an extended period of time (1 month or more), remove the batteries from the bike for storage. Fully charge the batteries for at least 12 hours before storing the batteries.
Fully recharge the batteries for at least 12 hours at least every 60 days of storage. Store the batteries in a cool (50 °F to 70 °F, 10 °C to 21 °C), dry place. Avoid direct exposure from the sun.
Make sure the batteries are kept in place with temperature above 5 °C/41 °F. Lower tempera-tures will permanently damage the batteries.
Our motorcycles can be stored indoors or around flammable objects only if the battery is physi-cally disconnected.
You must disconnect the battery after every ride. Never leave the motorcycle unattended while the battery is still connected.
If you have any questions about the batteries or their usage, please do not hesitate to contact the Kuberg Customer Service ([email protected]).
BATTERY DISPOSALWe are confident that you will enjoy many kilometers or miles of thrilling riding with your KUBERG motorcycle. Batteries can eventually wear out. When this happens, we urge you to properly dispose of your used batteries. For guidance regarding proper disposal of your batteries, please contact the KUBERG Customer Service ([email protected]). Also, you can find useful informa-tion regarding used battery drop-off sites from the Rechargeable Battery Recycling Corporation (RBRC) at www.rbrc.org.

41
RIDING INSTRUCTIONS & SAFETY TIPS (BEGINNER RIDERS) With the bike set up correctly, your Kuberg Freerider is ready to ride! For novice riders, please follow these tips and instructions. The riders will get the most enjoyment if they feel safe and in control. Do not be tempted to start the riders too quickly. Make sure the speed and power set-tings are set slow to begin with. For first time riders, this should be near walking pace.
STATIONARY LEARNING 1 Ensure the power switch is in the off position. 2 Lift the motorcycle on to a stand or block so the back wheel is an inch or two off the ground. 3 Sit the rider on the motorcycle. 4 Explain all of the bike’s controls:
a Throttleb Front brake (right hand side)c Rear brake (left hand side)
5 Have the rider practice each control, while the power is still OFF. Then try stationary practice with the power turned ON. Place the rider’s feet either on the pegs, or on the ground. Either way, make sure the rider is wearing boots with no laces, and no loose clothing.
6 Start with both hands on the handlebars. Instruct the rider to flip the power swich to the ON position on his/her own by using the right hand.
7 With the power ON, and the rider’s hands back on the bars, have the rider practice opening and closing the throttle. The aim is to get some throttle control, and not use it as an ‘on-off’ switch.
8 While still practicing the throttle, practice using the rear brake to stop the back wheel. Make sure that this is coordinated. The throttle and brake should not be applied simultaneously.
9 DO NOT LET THE CHILD RIDE UNTIL THESE SKILLS ARE MASTERED.
WARNING!There must NEVER be a hand on the throttle when the power is switched ON. If the power is switched ON with the throttle open, the bike will immediately and suddenly accelerate, which could result in serious injury or death, and/or damage to your motorcycle.
NOTE:If the rider does not fully understand the controls, and demonstrate these skills, do not let them ride. They can try again at a later date when they are ready. All riders must learn at THEIR pace.
42 O W N E R ’ S M A N U A L 2 0 1 7
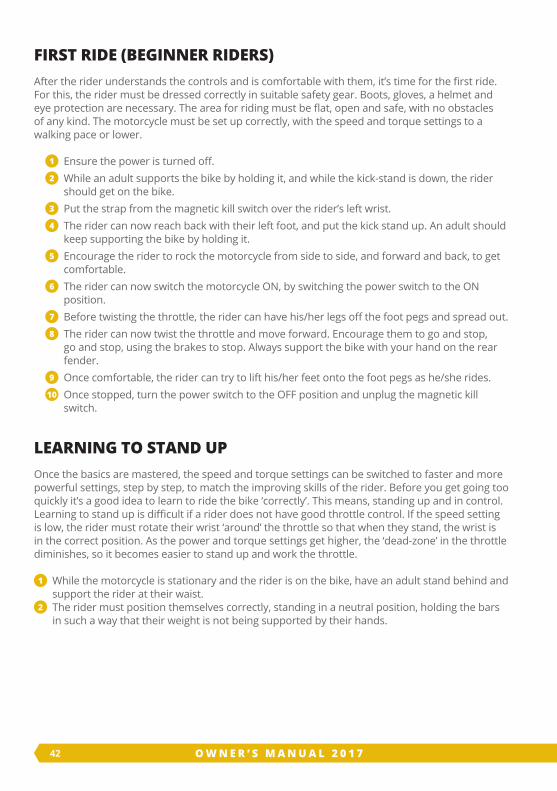
FIRST RIDE (BEGINNER RIDERS)After the rider understands the controls and is comfortable with them, it’s time for the first ride. For this, the rider must be dressed correctly in suitable safety gear. Boots, gloves, a helmet and eye protection are necessary. The area for riding must be flat, open and safe, with no obstacles of any kind. The motorcycle must be set up correctly, with the speed and torque settings to a walking pace or lower.
1 Ensure the power is turned off. 2 While an adult supports the bike by holding it, and while the kick-stand is down, the rider
should get on the bike.3 Put the strap from the magnetic kill switch over the rider’s left wrist.4 The rider can now reach back with their left foot, and put the kick stand up. An adult should
keep supporting the bike by holding it.5 Encourage the rider to rock the motorcycle from side to side, and forward and back, to get
comfortable. 6 The rider can now switch the motorcycle ON, by switching the power switch to the ON
position. 7 Before twisting the throttle, the rider can have his/her legs off the foot pegs and spread out. 8 The rider can now twist the throttle and move forward. Encourage them to go and stop,
go and stop, using the brakes to stop. Always support the bike with your hand on the rear fender.
9 Once comfortable, the rider can try to lift his/her feet onto the foot pegs as he/she rides. 10 Once stopped, turn the power switch to the OFF position and unplug the magnetic kill
switch.
LEARNING TO STAND UP Once the basics are mastered, the speed and torque settings can be switched to faster and more powerful settings, step by step, to match the improving skills of the rider. Before you get going too quickly it’s a good idea to learn to ride the bike ‘correctly’. This means, standing up and in control. Learning to stand up is difficult if a rider does not have good throttle control. If the speed setting is low, the rider must rotate their wrist ‘around’ the throttle so that when they stand, the wrist is in the correct position. As the power and torque settings get higher, the ‘dead-zone’ in the throttle diminishes, so it becomes easier to stand up and work the throttle.
1 While the motorcycle is stationary and the rider is on the bike, have an adult stand behind and support the rider at their waist.
2 The rider must position themselves correctly, standing in a neutral position, holding the bars in such a way that their weight is not being supported by their hands.

43
3 If the power and torque settings are set slow, have the rider rotate his/her hand around the throttle enough so that when the throttle is twisted, the wrist will be back in the correct position.
4 When the rider is ready, he can smoothly twist the throttle. An accompanying adult should walk along and help to support the rider when necessary.
5 Once comfortable riding in the standing position, the next step is to learn proper riding tech-nique.
NOTE:A common error is to put children on motorcycles that are too big for them. In such a case the child will not have leverage on the bike, and will be unable to develop proper riding technique. To develop a correct technique, it is better when the rider is too big for the bike rather than too small.
CORRECT RIDING TECHNIQUE Learning a correct riding techniques will prepare the rider for all forms of riding that come later. The rider needs to learn to control the bike at slow speeds, and use correct technique to execute tight turns. The natural approach of many riders is to turn the handlebars but this is not a correct riding technique. The correct technique is to lean and use so-called counter-steering. Count-er-steering is turning the handlebars in the opposite direction as the rider intends to travel. This will cause the bike to lean and turn in the desired direction. Counter-steering needs to be taught slowly and smoothly, sudden movements of the handlebars might cause an accident.
If tight turns are mastered correctly, many other skills will follow on naturally.
NOTE:When learning any technique, the most important thing is to do so slowly and safely. Remember that KUBERG Start/Trial/Cross are a children motorcycles, and are designed and developed for slow speed riding.

44 O W N E R ’ S M A N U A L 2 0 1 7
PROTECTIVE EQUIPMENTAlways follow these instructions for protective equipment at every ride to limit risk of injuries in case of an accident. KUBERG Start, Trial and Cross is intended for OFF ROAD use and therefore there is a high likelihood of dirt and other debris thrown into the air, which represents a risk of an injury. Also there is a high possibility of an accident or a fall.
The rider should use and wear:
1 A high quality helmet approved by your country’s governing body2 A helmet face-shield or goggles3 Protective clothing that covers rider’s legs, ankles, torso and arms4 Wrist, knee and elbow protection5 Heavy boots6 Gloves made from tear resistant materials (leather or kevlar)7 Motorcycle jacket from tear resistant materials (leather or Kevlar)8 Clothing that is brightly colored so other motorists and traffic participants can see you
WARNING: THE RIDER MUST WEAR PROTECTIVE EQUIPMENT, ESPECIALLY HELMET, BOOTS AND EYE PROTECTION.
HELMETSThere is no single factor that works better at reducing the severity of injuries sustained in acci-dents more than a quality helmet. Don’t ever allow your KUBERG motorcycle to be ridden without a helmet.
CLOTHINGMotorcycle leathers can prevent abrasion injuries in the event of a fall. Failure to use appropriate safety equipment greatly increases the likelihood of death or serious injury in the event of an accident.
Never wear loose-fitting clothes, otherwise they could catch on wheels, chains, control levers or footrests.
Do not wear shoes with laces as these can get caught in motorcycle’s chain or wheels and result in a serious injury.
Boots should not have laces.

45
ACCESSORIESAdding accessories or cargo to your KUBERG motorcycle can negatively affect stability and han-dling. To avoid the risk of an accident, use extreme caution when adding accessories or cargo to your KUBERG bike. Use additional care when riding with added accessories or cargo.
CAUTION!The total weight of the rider, accessories and cargo must not exceed the maximum load limit.
WARNING!Never attach any large or heavy items to the handlebar, front fork, or front fender.
Genuine KUBERG accessories have been specifically designed for use on this motorcycle. Since KUBERG cannot test all other accessories that may be available, you are personally responsible for the proper selection, installation and use of non-KUBERG accessories. Use extreme caution when selecting and installing any accessories.

46 O W N E R ’ S M A N U A L 2 0 1 7

47
LIMITED WARRANTYKUBERG motorcycles are warranted to the original retail purchaser to be free from defects in materials and workmanship in the frame and components except for batteries, tires, and inner tubes for a period of thirty (30) days from the date of purchase. Batteries are warranted to the original retail purchaser to be free from defects in materials and workman-ship for a period of thirty (30) days from the date of purchase. Tires and tubes are warrant-ed to be free of manufacturing and material defects for thirty (30) days. Such tire and tube warranty shall not include flat tires, tire cuts, skid through, over inflation blowouts, or other such misuse or normal hazards. Warranties are limited to repair and/or replacement of bike and/or parts found by KUBERG to be defective, at the sole discretion of KUBERG.
KUBERG Limited Warranty does not cover or apply to the following: Normal wear and tear; any damage, failure and/or loss caused by accident, shipping, misuse, neglect, abuse and/or failure to follow instructions or warnings as stated in the applicable owner’s manual or oth-er printed materials provided with the product; damage, failure and/or loss caused by the use of the product for stunt riding, ramp jumping, speed competition, inappropriate off-road use, acrobatics, trick riding or other similar activities, or in any other manner for which such products were not specifically designed. This warranty does not apply to any products or components, mechanical and/or electrical, which have in any way been altered from their original configuration by any person. KUBERG will not be liable and/or responsible for any damage, failure or loss caused by any unautho-rized service or use of unauthorized parts.
The KUBERG Limited Warranty does not cover or apply to any KUBERG product used for rental or commercial purposes unless the specific product is designated, labeled, or marketed by KUBERG as acceptable for rental
or commercial use. All warranty claims must be made directly to selling retailer. The selling retailer is the primary provider of warranty support and customer service. KUBERG may choose to perform warranty service at the sole choice of KUBERG. The original owner of the product must provide proof of purchase prior to approval of any warranty claim. Under no circumstances does this limited warranty include any costs associated with shipment and/or transportation to or from retailer or KUBERG. KUBERG, at its sole discretion, has the option of replacing with a new part, a factory recertified part, or repairing any defective product and/or component there- of, or to pay to the owner of such product an amount equal to the original purchase price of such product. The original owner shall pay for all costs of labor associated with any warranty claims. This warranty supersedes all previous warran-ties. The warranties stated herein are in lieu of and expressly excludes all other warranties not expressly set forth herein, whether express or implied by law or otherwise, including, but not limited to, any warranties for merchantabi-lity and/or fitness for any particular purpose. KUBERG shall in no event be liable or respon-sible for incidental or consequential losses, damages or expenses in connection with their electric dirt bike products.
The liability of KUBERG hereunder is expressly limited to the replacement of goods comply-ing with this warranty or at the sole election of KUBERG to the repayment of an amount equivalent to the purchase price of the product in question.
CAUTION!Some states may not permit the exclusion or limitation of consequential damages and therefore, such limitations may not apply to the consumer in which such impermissible exclusions are involved.
Contact information on the back cover.

48 O W N E R ’ S M A N U A L 2 0 1 7
KUBERG MOTORCYCLE SERVICE LOG
3 R D M O N T H
D AT E D E A L E R
N O T E S (DESCRIPTION OF SERVICES PERFORMED AND PARTS REPLACED) S I G N AT U R E
6 T H M O N T H
D AT E D E A L E R
N O T E S (DESCRIPTION OF SERVICES PERFORMED AND PARTS REPLACED) S I G N AT U R E
1 2 T H M O N T H
D AT E D E A L E R
N O T E S (DESCRIPTION OF SERVICES PERFORMED AND PARTS REPLACED) S I G N AT U R E
Kuberg motorcycles are designed for extreme riding conditions which can cause a lot of stress to the bike’s components. Because of this, Kuberg warranties require scheduled maintenance at 3, 6, and 12 months in order to maintain optimal performance.
Please keep this service log in your records to present to your dealer at each service visit.
K U B E R G M O T O R C Y C L E S R E C O M M E N D E D S E R V I C E S

49
D AT E D E A L E R
N O T E S (DESCRIPTION OF SERVICES PERFORMED AND PARTS REPLACED) S I G N AT U R E
D AT E D E A L E R
N O T E S (DESCRIPTION OF SERVICES PERFORMED AND PARTS REPLACED) S I G N AT U R E
D AT E D E A L E R
N O T E S (DESCRIPTION OF SERVICES PERFORMED AND PARTS REPLACED) S I G N AT U R E
D AT E D E A L E R
N O T E S (DESCRIPTION OF SERVICES PERFORMED AND PARTS REPLACED) S I G N AT U R E
D AT E D E A L E R
N O T E S (DESCRIPTION OF SERVICES PERFORMED AND PARTS REPLACED) S I G N AT U R E
D AT E D E A L E R
N O T E S (DESCRIPTION OF SERVICES PERFORMED AND PARTS REPLACED) S I G N AT U R E
K U B E R G M O T O R C Y C L E S O T H E R S E R V I C E S N E E D E D

ENG
LISH
WWW.KUBERG.COM
KUBERG s.r.o.
Zengrova 630/83Ostrava - Vítkovice, 703 00
Czech Republic
email: [email protected]: +420 596 628 898