overview - classes.ischool.syr.edu - /classes.ischool.syr.edu/.../06/lab2-physical-design.docx ·...
TRANSCRIPT
IST722 Data Warehousing Lab2Michael A. Fudge, Jr. The Dimensional Model Physical Design
Lab2: Dimensional Model Physical DesignAll labs are individual assignments. Your completed work should be your own.
OverviewThis lab will introduce the process of data warehouse development. You will implement the physical model for your detailed dimensional design, and then test that model by performing an initial manual data load. Upon completing this lab activity you learn:
How to translate a detailed dimensional design specifications into a ROLAP star-schema implementation, including
o Table creation,o Primary and foreign keys,o Database diagramso Initial data load for model verification
General table, index and key management in the SQL Query language. The nature of development is iterative, so you must be able to re-create your structures and re-
populate it with data at will.
Lab RequirementsTo complete this lab you will need the following:
Access to the Northwind Database as well as your personal dw and stage databases on Microsoft SQL Server 2014. This should be available through your provided database login.
For Part 2: The completed dimensional modeling Excel Workbook, titled: COMPLETED-Northwind-Detailed-Dimensional-Modeling-Workbook-KimballU.xlsm, available in the same place where you got this lab.
For Part 3 Your completed Detailed Dimensional Modeling workbook from the previous lab.
Deliverables from This Lab Part 1: an SQL refresher course will get you up to speed with SQL. It walks you through the
process of creating a star schema sample data mart called part1-college-data-mart.sql In Part 2, you will put your knowledge to practice by implementing and then loading data into a
dimensional model (ROLAP star schema) for Northwind trader’s sales. o In Part 2a, you will complete the star schema, as should save your SQL script as
part2a-northwind-sales-star-schema.sqlo In Part 2b, you will write SQL to stage the data from source into your stage database.
You should save your script as part2b-northwind-sales-data-stage.sqlo In Part 2c, you will complete the process and load data from stage into the data
warehouse. This script should be named part2c-northwind-sales-data-load.sqlo In Part 2d, you will test your ROLAP schema with Excel pivot tables!
1 | P a g e

IST722 Data Warehousing Lab2Michael A. Fudge, Jr. The Dimensional Model Physical Design
IMPORTANT: Make sure your name and email address appear in an SQL comment at the top of each script!
Part 1: A really quick SQL Refresher courseIn this first part, we’ll revisit some essential SQL commands you’ll need to complete this lab. While you re-learn SQL, you’ll also learn how to build a single script to create a star schema.
SQL is required! SQL is not required?Many people argue that there’s no need to learn how to create database objects with SQL since the tooling of the vendor’s DBMS products more than adequate for these types of tasks. My counterpoint to that argument is that using SQL gives you these advantages:
1) A means to automate the process. You can construct the entire dimensional model simply by executing a script.
2) Replay ability. You can quickly re-produce a dimensional model in your test, development and production environments.
3) Source code control. SQL is code, code can tracked using a Software Configuration Management (SCM) tool like Git, Subversion, or SVN.
Considering the advantages above, coupled with how easy it is to learn SQL and to create objects in it, I strongly recommend using SQL for database design project. I will require its use for this course!
SQL Data Definition Language 101At the heart of the SQL language are the data definition language (DDL) commands. These commands allow you to create, edit and delete tables and their complimentary structures:
DDL Command Purpose ExampleCREATE Creates a new database object CREATE VIEW vw_demo …ALTER Changes an existing database object ALTER TABLE demo …DROP Deletes an existing database object DROP INDEX ix_demo …
In addition to these commands are the types of database objects you can manipulate with them. Here’s some of the objects we’ll use in this class:
Database Object PurposeTABLE Data storage mechanism consisting of rows and columnsSYNONYM An alias for an existing tableINDEX A structure to improve the retrieval of data from a tableVIEW A named representation for an SQL SELECT Query
So you can combine any combination of DDL command + database object to produce the appropriate command you need. For example: CREATE VIEW, DROP INDEX, ALTER TABLE, etc… At this point all that’s left are the details.
Create TableTo make a new table, use the CREATE TABLE statement. The syntax is:
2 | P a g e

IST722 Data Warehousing Lab2Michael A. Fudge, Jr. The Dimensional Model Physical Design
CREATE TABLE tableName (column1 datatype null | not null,column2 datatype null | not null,...columnN datatype null | not null,CONSTRAINT pkTableNameColumn PRIMARY KEY (column1)
);
Okay, let’s create some tables that might be used in a simple data mart.
DO THIS: From your NorthwindDW database, open a new query window ( Press Ctrl+N) type in the SQL as it appears in the screenshot
Then press Ctrl+S to save your SQL script as college-data-mart.sql. When you’re done it should have the name of the sql code file in your tab (like the screenshot).
What do these commands do? The command in line two tells the script which database to use. The “GO” command tells SQL server to batch everything before this statement – guaranteeing it is executed before advancing to the next command in the script.
Next, let’s create the DimStudents table:
DO THIS: type in the following code, starting with line 5:
This table, called DimStudent has 4 columns and 1 constraint. The columns and their data types are listed first separated by a comma. None of the columns permit nulls. In line 12 of the statement is a primary key constraint rule over the StudentKey column. The type int identity in line 7 generates a surrogate key.
When you’re ready to execute your script, press the [F5] key. This will run your script and create your table. If it works, you should see Command(s) completed successfully. in the Messages area below.
If you have an error, see if you can troubleshoot the issue by comparing the screenshot to your code on the line number in question.
If you got it to work, press [F5] to execute your code again, you’ll notice that this time you will get an error:
3 | P a g e

IST722 Data Warehousing Lab2Michael A. Fudge, Jr. The Dimensional Model Physical Design
This error means exactly what it says. You’ve created the DimStudent table already and you
cannot create it again.
If you need to re-create it you’ll have to execute a command to get rid of it first.
Drop TableThe DROP TABLE command is used to remove a table (and all of the data therein) from the database. DROP TABLE should be used with caution and, in general is only useful when building out a database design.
Let’s modify our SQL script so that we can re-execute it by adding a DROP TABLE before the CREATE TABLE.
DO THIS: Inside your SQL script, insert the code as it appears on lines 4-7. Your updated code will now first drop the table DimStudent, as a command batch, then create the table DimStudent in the subsequent batch.
Press [F5] to execute your query. It should run without error each time!
NOTE: If your DimStudent has a red line under it, it’s probably because you didn’t create the table or you may simply need to refresh your intellisense cache. Try pressing Ctrl+Shift+R to see if that corrects the problem.
Where is my table?The really cool thing about SQL script is that they create real database objects that you can view through the GUI of the database management system. Let’s see if we can find and open our DimStudent table.
DO THIS: In Object Explorer, double-Click on the NorthwindDW database then Double-click on the Tables folder. You should see dbo.DimStudent if you do not, from the Menu choose View Refresh to refresh your view.
If you double-click on the Columns folder, you should see the columns and data types in our table.
4 | P a g e

IST722 Data Warehousing Lab2Michael A. Fudge, Jr. The Dimensional Model Physical Design
The rest Here’s the entire script with two dimension tables and 1 fact table. If you notice, I create my fact table last, but my DROP TABLE for my fact table comes first. This is because of the fact table’s foreign key dependencies. To preserve referential integrity, the DBMS prevents you from dropping any table which is referenced by a foreign key (and believe me this is a good thing). The fact table is full of foreign keys and so it must be dropped before the dimension tables.
DO THIS: Complete this script you see to your right and then press [F5]
NOTE: If you encounter errors, match up the line number of the error in your code to the screen shot on your right to see if you can reconcile the error!
5 | P a g e

IST722 Data Warehousing Lab2Michael A. Fudge, Jr. The Dimensional Model Physical Design
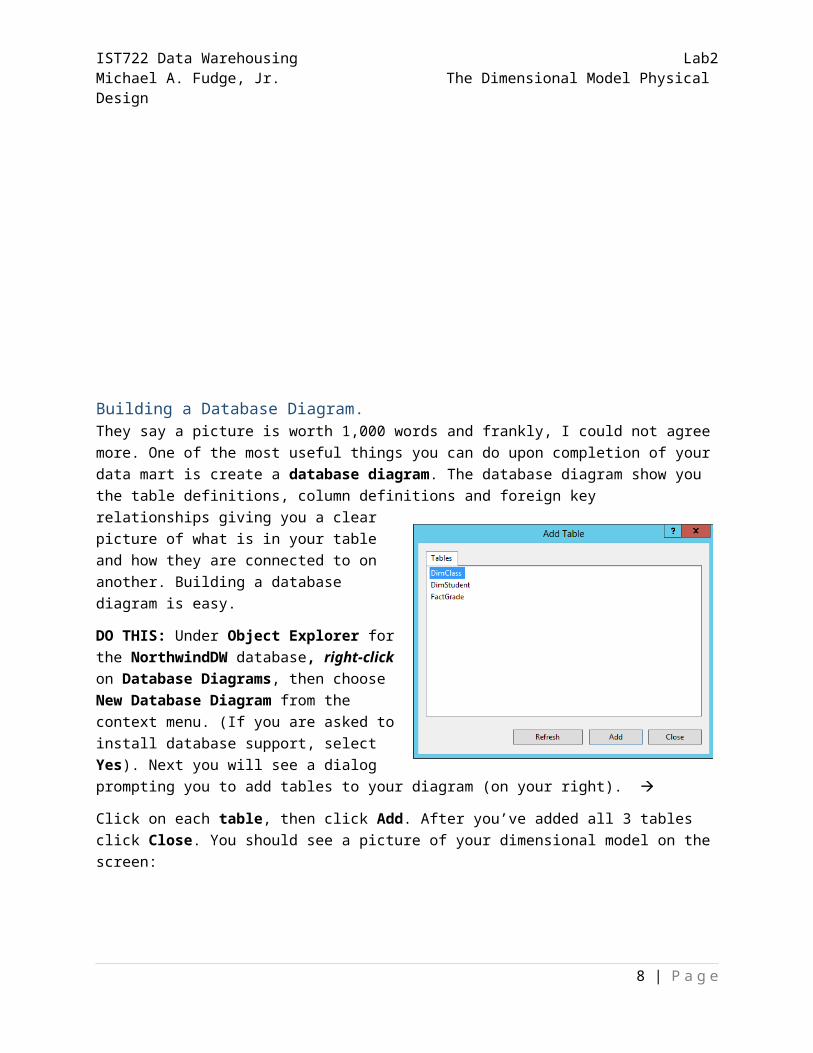
Building a Database Diagram.They say a picture is worth 1,000 words and frankly, I could not agree more. One of the most useful things you can do upon completion of your data mart is create a database diagram. The database diagram show you the table definitions, column definitions and foreign key relationships giving you a clear picture of what is in your table and how they are connected to on another. Building a database diagram is easy.
DO THIS: Under Object Explorer for the NorthwindDW database, right-click on Database Diagrams, then choose New Database Diagram from the context menu. (If you are asked to install database support, select Yes). Next you will see a dialog prompting you to add tables to your diagram (on your right).
Click on each table, then click Add. After you’ve added all 3 tables click Close. You should see a picture of your dimensional model on the screen:
Close your diagram window, and when it asks you to save, click Yes.
Save the diagram as CollegeDataMart and click OK.
NOTE: You can view or edit this database diagram anytime by double-clicking on it in the Database Diagrams folder.
6 | P a g e

IST722 Data Warehousing Lab2Michael A. Fudge, Jr. The Dimensional Model Physical Design
Part 2: Northwind Sales Reporting In this part we will implement, populate and test a ROLAP start schema for the Northwind sales reporting dimensional model:
Our plan it to turn the business process you see above into this star schema:
We will accomplish this by generating SQL code from the Northwind Detailed Dimensional Modeling Workbook. On to the steps!
7 | P a g e
IST722 Data Warehousing Lab2Michael A. Fudge, Jr. The Dimensional Model Physical Design
Part 2a: Create the Star SchemaWe’ll start by implementing the star schema in SQL. Your goal is to create one SQL script, part2a-northwind-sales-star-schema.sql which when executed will create the following schema and tables:
Your steps, at a high level.
1) Create a new SQL Query.2) Switch to your data warehouse (dw) database: (your name will vary, of course)
3) Open the completed dimensional modeling Excel Workbook, titled: COMPLETED-Northwind-Detailed-Dimensional-Modeling-Workbook-KimballU.xlsm and use it to start making your SQL. You can hand code the SQL from the design or try to use the macro to get started.
4) There should be a DROP TABLE commands before the CREATE TABLE commands so that it can be re-run without error. This is critical to the iterative nature of development, as you might need to re-run this script after changes.
5) Remember to drop the fact table first, but create it last to take care of the foreign key dependencies. Either that or drop the FKs.
6) Be sure to add the tables to a fudgemart schema, to avoid conflicts with other project tables.7) Remember to execute your script against your dw (data warehouse) database!
Part 2b: Initial Stage of DataNow that the ROLAP start schema has been created, it’s time to perform the initial ETL load from the source system. The goal of this process does not replace actual ETL tooling, since we have no means to automate, audit success or failure, track changes to data, or document this process. Instead our goals are simply to:
1. Understand how to source the data required for our implementation, 2. Verify that our model actually solves our business problem,3. Remove our dependency on the external world by staging our data, and 4. Complete these tasks in a manner in which we can re-create our data, when required.
Let’s start staging the source data. Open a query window, and save the query as part2b-northwind-sales-data-stage.sql. switch to your stage database (name will vary from the screenshot, of course):
Staging Northwind CustomersHere’s the basic structure of the command to stage data from source. This query stages Customers from Northwind.
8 | P a g e

IST722 Data Warehousing Lab2Michael A. Fudge, Jr. The Dimensional Model Physical Design
Type it in and execute it to create the stage table and populate it with data from the source. We want to save all the stage queries into this one file.
Staging Northwind EmployeesThis time, let’s focus on the process.
1. What data do we need? For the answer to this question, consult the DimEmployee table (the eventual target)
Looks like we need EmployeeID, EmployeeName, and EmployeeTitle. When in doubt, refer to the detailed design worksheet where you specified the source to target map.
2. Next write an SQL Select statement to acquire the data. Execute this:
Take a look at the output and make sure it’s the data you need.
9 | P a g e

IST722 Data Warehousing Lab2Michael A. Fudge, Jr. The Dimensional Model Physical Design
NOTE: You might be tempted to combine first name and last name, as required by the target. DO NOT DO THIS. Always stage data exactly as it appears from the source. Our goal is to have an exact version of the source pipeline without being dependent on the availability of the actual source. This allows us to design and implement the transformation logic over several iterations (which you will probably need) without taxing the source.
3. Finally, when the data is what you need, its time to sock it away into a stage table, adding it to the stage script including the INTO clause:
NOTE: The INTO clause of the SELECT statement creates the table and populates it with data. If for some reason you “mess this up” you will need to drop the table before you can execute this statement again.
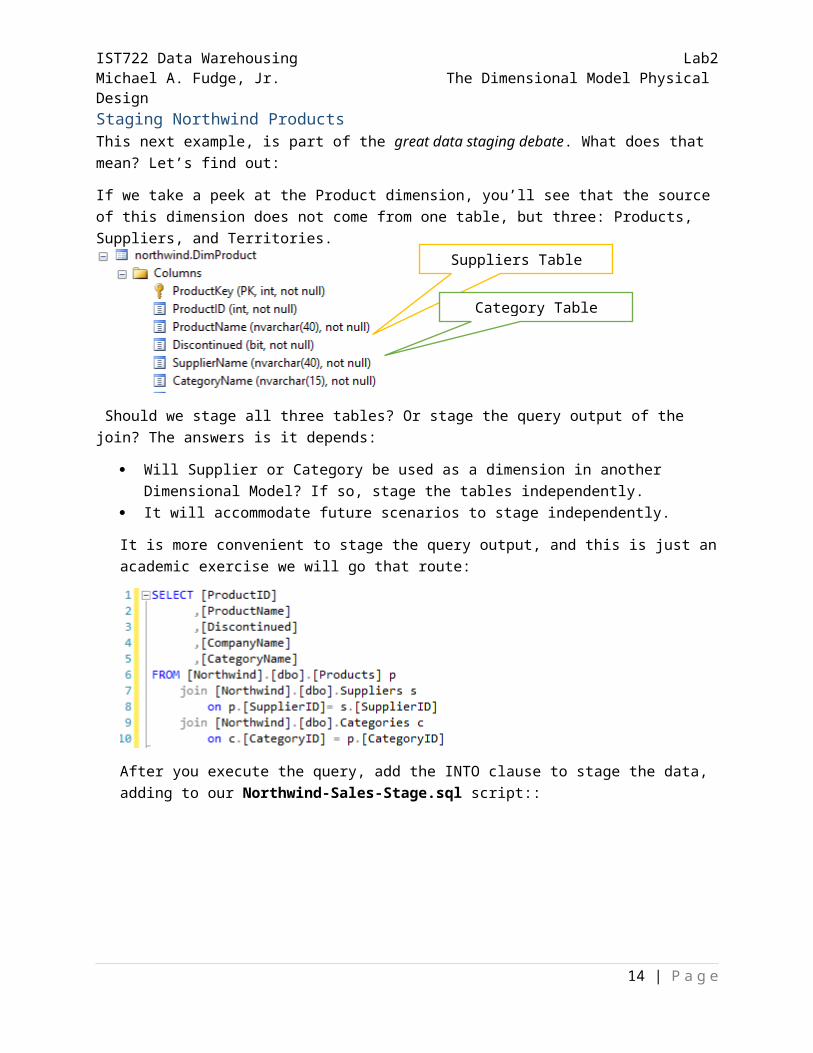
Staging Northwind ProductsThis next example, is part of the great data staging debate. What does that mean? Let’s find out:
If we take a peek at the Product dimension, you’ll see that the source of this dimension does not come from one table, but three: Products, Suppliers, and Territories.
Should we stage all three tables? Or stage the query output of the join? The answers is it depends:
Will Supplier or Category be used as a dimension in another Dimensional Model? If so, stage the tables independently.
10 | P a g e
Suppliers Table
Category Table

IST722 Data Warehousing Lab2Michael A. Fudge, Jr. The Dimensional Model Physical Design
It will accommodate future scenarios to stage independently.
It is more convenient to stage the query output, and this is just an academic exercise we will go that route:
After you execute the query, add the INTO clause to stage the data, adding to our Northwind-Sales-Stage.sql script::
Staging The Date DimensionThe date and time dimensions is the ultimate conformed dimensions. They are re-used everywhere in the data warehouse. There should be no reason to stage a date or time dimension, as your DW implementation will already have this dimension present and populated with data.
While we could use stage the entire date dimension, we’ll use this example to demonstrate how to only stage the data we need.
NOTE: The following is an academic exercise. Normally you would not stage a date dimension, let alone in this manner.
How many dates do we need? To answer this question, let’s query the Orders table for the min and max Order and Ship dates:
11 | P a g e

IST722 Data Warehousing Lab2Michael A. Fudge, Jr. The Dimensional Model Physical Design
It looks like we’re in good shape grabbing the years 1996 through 1998.
Here’s the SQL you should add to the script:
Staging the Fact TableAnd finally we stage the fact table:
But… the dimension keys like CustomerKey and ProductKey are not in the staged data!?!?! Instead we use the natural keys so that later in the ETL we can “lookup” the dimension keys. Also SoldAmount and UnitDiscountAmount will be calculated later in the ETL. Here’s the SQL:
12 | P a g e

IST722 Data Warehousing Lab2Michael A. Fudge, Jr. The Dimensional Model Physical Design
At this point, you should have 5 stage tables:
…and one script which will stage the data on demand by re-creating the tables. It’s time to move on to the scripts to migrate stage to our data mart!
Part 2c Load from stage to the data warehouseIn this next step we will load from the stage database into our data warehouse (dw database), bringing our star schema to life with actual data!
It’s important to document your findings in this step and this will help you plan out the actual ETL process later on. For example if you need to combine two columns into one, or replace NULL with a value then this will need to happen in your ETL tooling later on.
Since the dimensions depend on the fact table, we should start with the dimensions first.
First open a new query and save it as part2c-northwind-sales-data-load.sql. Execute this command to switch to your data warehouse database (again, this will be different based on your user id).
Loading DimEmployeeSince the dimension table exists already, and we do not want to replace them, we cannot use the SELECT .. INTO statement. Instead we will use the INSERT INTO … SELECT pattern to add data to the dimension. Here’s the process:
1. Identify the requirements of the dimension.
13 | P a g e
IST722 Data Warehousing Lab2Michael A. Fudge, Jr. The Dimensional Model Physical Design
2. Write a select statement using the staged data to source the dimension3. Create an INSERT INTO … SELECT statement to populate the data.
For example DimEmployee requires:
And the stage table has:
We need to combine the name into one column, like this:
14 | P a g e

IST722 Data Warehousing Lab2Michael A. Fudge, Jr. The Dimensional Model Physical Design
That looks good. Now that the data shape of our source matches the target dimension we can load it with this statement:
Then check to see that the data was inserted:
NOTE: It’s mere coincidence that the values of EmployeeKey and EmployeeID match up. Do not assume this will always be the case!
Loading DimCustomerYou probably have got this figured out by now. Here’s the SQL to load the Customer Dimension:
But when you execute this, you get an error:
Cannot insert the value NULL into column 'CustomerRegion', table 'ist722_mafudge_dw.northwind.DimCustomer'; column does not allow nulls. INSERT fails.
This is fairly common. The source permits null, but the dimension, as a best practice, does not. As such we need to replace NULL will a default value, such as ‘N/A’. To accomplish this I use the CASE WHEN expression. Here’s the updated code, fixing this problem in CustomerRegion and CustomerPostalCode:
15 | P a g e

IST722 Data Warehousing Lab2Michael A. Fudge, Jr. The Dimensional Model Physical Design
Loading DimProductTry to load the product dimension on your own. Here’s your approach:
1. Map each column in the dimension table DimProduct to a column in stgNorthwindProducts2. You’ll have to use CASE WHEN to change the bit field for Discontinued into a Y / N field in the
dimension. 3. If you don’t know what the dimension columns mean, consult the excel worksheet.
Loading DimDateFinally, load the Date Dimension on your own, again mapping the columns from source to target and consult the excel worksheet for the meaning of the columns. This step should be trivial.
Loading the Fact TableFinally on to our biggest challenge yet – loading the fact table.
The Surrogate Key PipelineThere’s a unique challenge to building the fact table since the source data is missing the dimension foreign keys. Observe:
Stage TableHas business key:
stgNorthwindSales Fact TableNeeds This Foreign Key:
FactSales Look up The Key value using this table:
ProductID ProductKey DimProductCustomerID CustomerKey DimCustomerOrderDate OrderDateKey DimDateShippedDate ShippedDateKey DimDateEmployeeID EmployeeKey DimEmployee
What we need to do is build what is known as a surrogate key pipeline:
For each foreign key in the fact table, match the source data business key to the dimension business key so we can look up to the dimension primary key.
For example, here’s the setup for customer ID
The output:
16 | P a g e

IST722 Data Warehousing Lab2Michael A. Fudge, Jr. The Dimensional Model Physical Design
If we repeat this process for the other dimensions of product and employee, we should get this:
That gives us everything but the date dimension keys. This can be handled differently because date keys are predictable. For example the date key for Aug-12-2015 would be 20150812. You can generate a date key with some simple formatting to YYYYMMDD. Fortunately I’ve written a SQL function for you to do this. It is accessible from the ExternalSources database.
Here’s the code completing the surrogate key pipeline, generating the Order and Shipping date keys:
Writing out the FactsNow that we’ve addressed the foreign keys, it’s time to write out the facts we require in the fact table. Most of our facts are derived from unit price, quantity and discount rate. However, should store the results of the calculations in our fact table not the source values. This is contradictory to what you learned in OLTP databases, but makes sense in the data warehouse because our data is static.
Fact SourceQuantity QuantityExtendedPriceAmount Quantity * UnitPriceDiscountAmount Quantity * UnitPrice * DiscountSoldAmount Quantity * UnitPrice * (1 – Discount)
17 | P a g e
We used this To look up this

IST722 Data Warehousing Lab2Michael A. Fudge, Jr. The Dimensional Model Physical Design
Here’s the query with just the columns we need and the required facts:
And the final query, which should be added to the SQL file, now becomes trivial:
Be sure to save your file as part2c-northwind-sales-data-load.sql.
Part 2d: Did it work? Verifying your Dimensional ModelOnce you get the data in the dimension and fact tables we need to verify our dimensional model for accuracy. To do this, we create an SQL view to represent the dimensional model. This view will make it easier for you and business users to explore the dimensional model to verify its accuracy.
18 | P a g e

IST722 Data Warehousing Lab2Michael A. Fudge, Jr. The Dimensional Model Physical Design
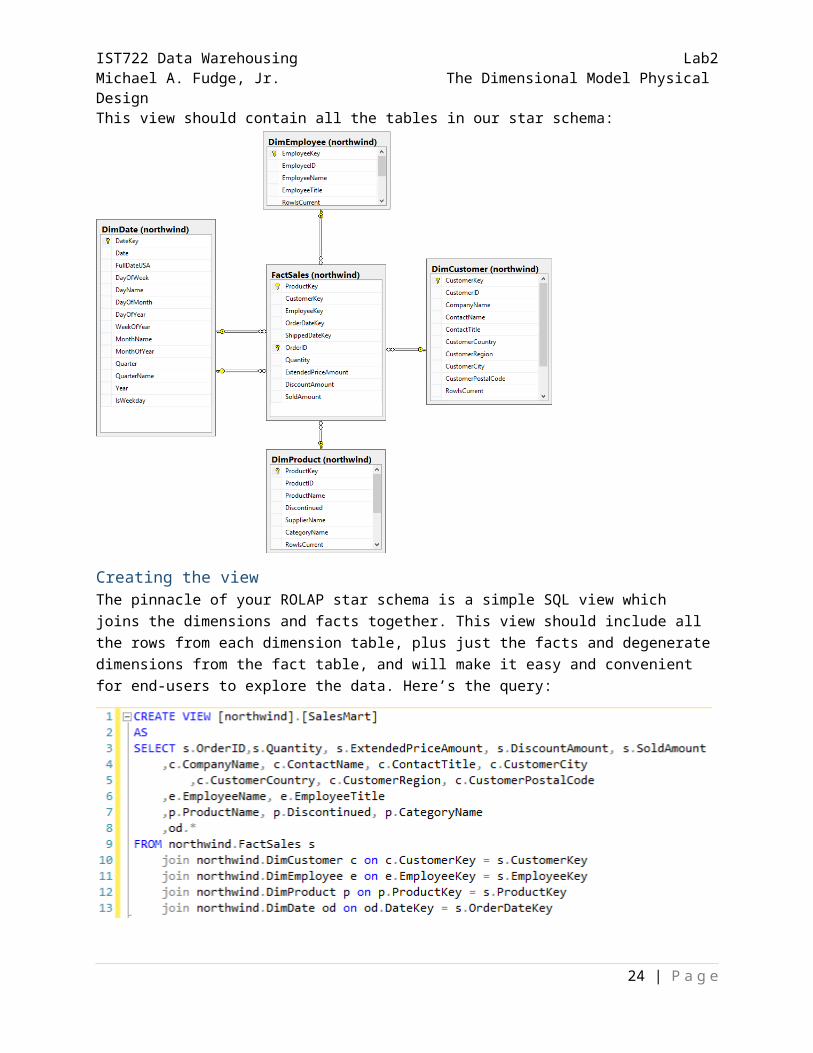
This view should contain all the tables in our star schema:
Creating the viewThe pinnacle of your ROLAP star schema is a simple SQL view which joins the dimensions and facts together. This view should include all the rows from each dimension table, plus just the facts and degenerate dimensions from the fact table, and will make it easy and convenient for end-users to explore the data. Here’s the query:
Connecting the view to excel for exploring the data.What better way to explore your newly-minted dimensional model than to use a BI tool? In this section we’ll hook up the SalesMart to an Excel pivot table so we can explore the data.
19 | P a g e

IST722 Data Warehousing Lab2Michael A. Fudge, Jr. The Dimensional Model Physical Design
First we need to connect to the source data.
1. Open Microsoft Excel. Create a blank workbook.2. From the ribbon, choose DATA From Other Sources From SQL Server
3. Enter our class SQL server information into the Data connection wizard dialog, then click Next>
20 | P a g e

IST722 Data Warehousing Lab2Michael A. Fudge, Jr. The Dimensional Model Physical Design
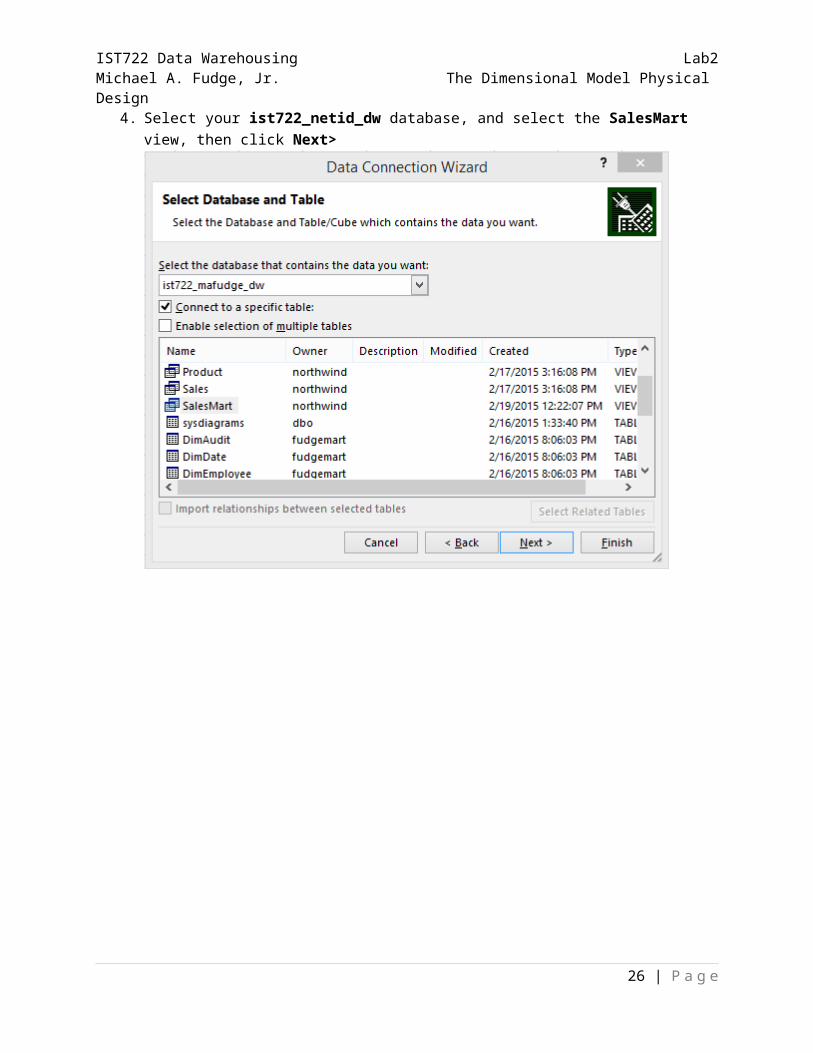
4. Select your ist722_netid_dw database, and select the SalesMart view, then click Next>
21 | P a g e

IST722 Data Warehousing Lab2Michael A. Fudge, Jr. The Dimensional Model Physical Design
5. Just click Finish on this screen:
6. This final screen allows you to decide what you need to do with the data. For this example, choose Table and then select Existing Sheet and click Ok.
Next we add the pivot table:
22 | P a g e

IST722 Data Warehousing Lab2Michael A. Fudge, Jr. The Dimensional Model Physical Design
1. From the Ribbon: INSERT Pivot Table
2. You will now see the pivot table screen:
23 | P a g e
IST722 Data Warehousing Lab2Michael A. Fudge, Jr. The Dimensional Model Physical Design
Drag and drop the fields into the row, column or values area of the pivot table and see if you can make the following pivot table reports:
3. Here’s a setup of Sales by day of the week:
4. And a breakdown of Sales by Product Category and year:
24 | P a g e

IST722 Data Warehousing Lab2Michael A. Fudge, Jr. The Dimensional Model Physical Design
5. Here’s the most heavily discounted products sold:
The queries are easy, the possibilities are endless, and you don’t need to write a single line of SQL to get your questions answered. That’s Business Intelligence!
Be sure to save your excel pivot table as part2-northwind-sales-pivot.xlsx
25 | P a g e
IST722 Data Warehousing Lab2Michael A. Fudge, Jr. The Dimensional Model Physical Design
Part 3: On Your Own – Order Fulfillment Star SchemaAfter you have finished up the sales reporting SQL, it’s time to move on to order fulfillment!
In this part, you will repeat the process outlined in parts 2a through 2d. This time you’ll use your own detailed dimensional design as opposed to the one I’ve provided.
InstructionsMake sure your name and email address appear at the top of each SQL script. I should be able to execute your script and they should work (create tables, import data, etc…)
1. The star schema / detailed dimensional model worksheet:a. Follow your own detailed design from the previous lab as you create your
implementation. b. Conform your dimensions! Do not re-create dimensions which exist already… reuse
them! If the dimension is already present from a previous step, then there’s no need to re-create it in SQL.
c. Save your sql as part3-northwind-order-fulfillment-rolap.sql2. Next, stage the data.
a. You only need to stage the data you do not already have.b. You should always stage the fact table, even if some of the data was staged already.c. Save your sql as part3-northwind-order-fulfillment-stage.sql
3. Finally, load the data.a. Use your staged data as a source to populate the dimensions and then fact table.b. Hopefully your technical specifications are good enough! If you encounter issues with
the import, you might need to tweak your detailed dimensional model, re-generate the SQL and then re-try the load.
c. Save your sql as part3-northwind-order-fulfillment-load.sql d. Create a view in your database, joining all the tables together and then query your
model with Excel to verify it makes sense. e. Save your excel pivot as part3-northwind-order-fulfillment-pivot.xlsx
Good Luck!
26 | P a g e