other product and company names mentioned herein may be
TRANSCRIPT

http
s://
wik
i.tel
toni
ka.lt
/

Copyright © 2019 TELTONIKA Ltd. all rights reserved. Reproduction, transfer, distribution or storage of part or all of the contents in this document in any form without the prior written permission of TELTONIKA Ltd is prohibited. The manufac-turer reserves the right to modify the product and manual for the purpose of technical improvement without prior notice.
Other product and company names mentioned herein may be trademarks or trade names of their respective owners.
LEGAL NOTICE
ATTENTION
To avoid voltage caused traumas please follow these safety requirements: - The device is intended to be powered from Limited Power Source (LPS) with a power of at least 18 W.- The overcurrent protective device rated current should not exceed 3A.- The highest transient overvoltage in the output (secondary circuit) of used PSU shall not exceed 55 V peak.- The device can be used with a Personal Computer (first safety class) or Notebook (second safety class). Associated equipment: PSU (power supply unit) (LPS) and personal computer (PC) shall comply with the requirements of standard EN 60950-1/EN 62368-1.- To avoid mechanical damage to the device it is recommended to transport it packed in a damage-proof pack.When using the device it should be placed so that its indicating LEDs would be visible as they inform in which working mode the device is in and if it has any working problems. Protection against over current, short circuiting and earth faults should be provided as a part of the building installation.
SAFETY
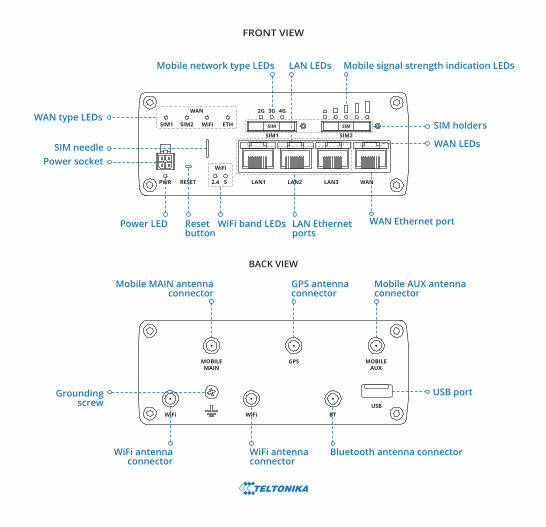
FRONT VIEW
BACK VIEW
USB port
Mobile MAIN antenna connector
Mobile AUX antenna connector
GPS antenna connector
WAN Ethernet portLAN Ethernet ports
Power LED Resetbutton
Power socketSIM needle
WAN type LEDs
Bluetooth antenna connector
WiFi band LEDs
WAN LEDs
LAN LEDs
Grounding screw
WiFi antenna connector
WiFi antenna connector

POWER SOCKET PINOUT
1. Pull out the SIM needle from the front panel of the router.2. Push the SIM holder button with the SIM needle.3. Pull out the SIM holder. 4. Insert your SIM card into the SIM holder. 5. Slide the SIM holder back into the router.6. Attach LTE, GPS, Bluetooth and WiFi antennas (max torque 0.4 Nm 3.5 in-lbs).7. Connect the power adapter to the socket on the front of the device. Then plug the other end of the power adapter into a power outlet.8. Connect to the device wirelessly (SSID: RUTX11_**** (unique to each device)) or use an Ethernet cable (connected to LAN port).
HARDWARE INSTALLATION
Sim insertion/removal

1. To enter the router's Web interface (WebUI), type http://192.168.1.1 into the URL field of your Internet browser.2. Use login information shown in image A when prompted for authentication.3. After you log in, you will be prompted to change your password for security reasons. The new password must contain at least 8 characters, including at least one uppercase letter, one lowercase letter, and one digit. This step is mandatory, and you will not be able to interact with the router's WebUI before you change the password.4. When you change the router's password, the Configuration Wizard will start. The Configuration Wizard is a tool used to set up some of the router's main operating parameters. 5. Go to the Status > Network page and pay attention to the Signal Strength indication (image B). To maximize the cellular performance try adjusting the antennas or changing the location of your device to achieve the best signal conditions.
LOGIN TO DEVICE
SIGNAL STRENGTH LEDSLED INDICATIONS
- 2G,3G and 4G LEDs constantly blinking sequential: no SIM or bad PIN or searching operator.- 2G/3G/4G LEDs blinking every 1 sec.: connected to 2G/3G/4G, but no data session established.- 2G/3G/4G LEDs turned on: connected to 2G/3G/4G with data session.- SIM1/SIM2/ETH LEDs turned on: SIM1/SIM2/ETH interface turned on.- 2.4, 5 WiFi LEDs blinking every sec.: connected to 2.4, 5 WiFi band, but no data session established.- 2.4, 5 WiFi LEDs turned on: connected to 2.4, 5 WiFi band with data session.
A. B.
admin
Password*
Bytes received/sent
SIM card slot in use
Data connection
State
-65 dBm
connected
N/A
not inserted
0 B / O B

GPL
Some products of Teltonika partly contain software code developed by third parties, including software code subject to the GNU General Public License (“GPL”) version 2, version 3, GNU Lesser General Public License (“LGPL”) version 2.1 and other open source licenses. In order to comply with the terms of the GPL, Teltonika, where applicable, offers a mail in service of a machine readable source code of the software subject to the GPL, on an optical media (CD-ROM) upon request by mail or email. Further information is provided with the relevant products or the software. You can download the free copies of the respective machine readable source code of the software which is subject to the GPL and contained in Teltonika products if you follow this internet link: https://wiki.teltonika.lt/index.php?title=GPLThe respective programs are distributed WITHOUT ANY WARRANTY; without even the implied warranty of MERCHANTABI-LITY or FITNESS FOR A PARTICULAR PURPOSE. See the respective GNU General Public License for more details. Please choose the model and version of your Teltonika product from the list found in the provided link in order to download the source code. You can also review and print the respective GPL license terms. If you have any more questions or suggestions regarding GPL, please contact us at [email protected]
SPECIFICATIONS
- IEEE 802.11ac Wave 2 (WiFi 5), 802.11b/g/n standards- 2x2 MIMO- 2.412-2.484 / 5.18-5.905 GHz WiFi frequency range*- 20dBm max WiFi TX power
WI-FI
- Quad-core ARM Cortex A7 717 MHz CPU- 256 MB of DDR3 memory, 256 MB SPI Flash memory- 4 pin industrial DC power socket- USB port for external devices- Reset/restore to default button- 2 x SIM slots (Mini SIM - 2FF), 1.8 V/3 V, external SIM holder- 2 x SMA for LTE, 1 x SMA for GNNS, 1 x BT antenna connector- 2 x RP-SMA for WiFi antenna connectors- 8 x Ethernet LEDs, 3x WAN type LEDs, 2 x WiFi band LEDs- 1 x power LED, 5 x Mobile connection signal strength LEDs - 3 x Mobile connection type LEDs- Grounding screw- Attachable DIN rail adapter
HARDWARE
- Bluetooth Version 4.0 - Bluetooth Low Energy, Dual-mode Bluetooth- Class 3, Class 2 and Class 1 support- High-sensitivity Bluetooth and Bluetooth low energy receiver
BLUETOOTH
- IEEE 802.3, IEEE 802.3u, 802.3az standards- 3 x LAN ports 10/100/1000 Mbps- 1 x WAN port (can be configured to LAN) 10/100/1000 Mbps- Supports Auto MDI/MDIX
ETHERNET
*Supported frequency bands are dependent on geographical location and may not be available in all markets
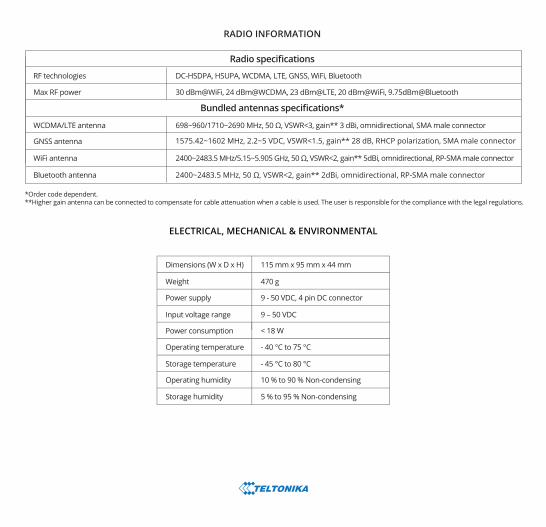
RADIO INFORMATION
*Order code dependent.**Higher gain antenna can be connected to compensate for cable attenuation when a cable is used. The user is responsible for the compliance with the legal regulations.
Radio specifications
Bundled antennas specifications*
RF technologies
Max RF power
DC-HSDPA, HSUPA, WCDMA, LTE, GNSS, WiFi, Bluetooth
30 dBm@WiFi, 24 dBm@WCDMA, 23 dBm@LTE, 20 dBm@WiFi, 9.75dBm@Bluetooth
WCDMA/LTE antenna 698~960/1710~2690 MHz, 50 Ω, VSWR<3, gain** 3 dBi, omnidirectional, SMA male connector
GNSS antenna 1575.42~1602 MHz, 2.2~5 VDC, VSWR<1.5, gain** 28 dB, RHCP polarization, SMA male connector
WiFi antenna 2400~2483.5 MHz/5.15~5.905 GHz, 50 Ω, VSWR<2, gain** 5dBi, omnidirectional, RP-SMA male connector
ELECTRICAL, MECHANICAL & ENVIRONMENTAL
- 40 °C to 75 °C Operating temperature
470 gWeight
115 mm x 95 mm x 44 mmDimensions (W x D x H)
9 - 50 VDC, 4 pin DC connectorPower supply
9 – 50 VDC Input voltage range
< 18 W Power consumption
10 % to 90 % Non-condensingOperating humidity
- 45 °C to 80 °CStorage temperature
5 % to 95 % Non-condensingStorage humidity
Bluetooth antenna 2400~2483.5 MHz, 50 Ω, VSWR<2, gain** 2dBi, omnidirectional, RP-SMA male connector

https://teltonika.lt/PRODUCT/RUTX11/
RUTX11 router must be used in compliance with any and all applicable national and international laws and with any special restrictions regulating the utilization of the communication module in prescribed applications and environments.
DECLARATION OF CONFORMITY
[EN] English Hereby, TELTONIKA declares that this RUTX11 is in compliance with the essential requirements and other relevant provisions of Directive RED.
[BG] BulgarianС настоящето, TELTONIKA декларира, че RUTX11 е в съответствие със съществените изисквания и другитеприложими разпоредби на Директива RED.
[CZ] Czech TELTONIKA tímto prohlašuje, že RUTX11splňuje základní požadavky a všechna příslušná ustanoveni Směrnice RED.
[DE] German Hiermit erklärt TELTONIKA dass sich das Gerät RUTX11 in Übereinstimmung mit den grundlegenden Anforderungen und den übrigen einschlägigen Bestimmungen der Richtlinie RED befindet.
[DK] Danish Undertegnede TELTONIKA erklærer herved, at følgende udstyr RUTX11 overholder de væsentlige krav og øvrige relevante krav i direktiv RED.
[EE] Estonian Käesolevaga kinnitab TELTONIKA seadme RUTX11 vastavust direktiivi RED põhinõuetele ja nimetatud direktiivist tulenevatele teistele asjakohastele sätetele.
[ES] Spanish Por la presente, TELTONIKA declara que este RUTX11 cumple con los requisitos esenciales y otras exigencias relevantes de la Directiva RED.
[FI] Finish TELTONIKA vakuuttaa täten että RUTX11 tyyppinen laite on direktiivin RED oleellisten vaatimusten ja sitä koskevien direktiivin muiden ehtojen mukainen.
[FR] French TELTONIKA déclare que cette RUTX11 est conforme aux exigences essentielles et aux autres dispositions pertinentes de la directive RED.
[GR] Greek ΜΕ ΤΗΝ ΠΑΡΟΥΣΑ Ο ΚΑΤΑΣΚΕΥΑΣΤΗΣ TELTONIKA ΔΗΛΩΝΕΙ ΟΤΙ RUTX11 ΣΥΜΜΟΡΦΩΝΕΤΑΙ ΠΡΟΣ ΤΙΣ ΟΥΣΙΩΔΕΙΣ ΑΠΑΙΤΗΣΕΙΣ ΚΑΙ ΤΙΣ ΛΟΙΠΕΣ ΣΧΕΤΙΚΕΣ ΔΙΑΤΑΞΕΙΣ ΤΗΣ ΟΔΗΓΙΑΣ RED.
[HU] HungarianA TELTONIKA ezzennel kijelenti, hogy a RUTX11 típusú berendezés teljesíti az alapvető követelményeket és más RED irányelvben meghatározott vonatkozó rendelkezéseket.
[IT] ItalianCon la presente TELTONIKA dichiara che questo RUTX11 è conforme ai requisiti essenziali ed alle altre disposizioni pertinenti stabilite dalla direttiva RED.
[LT] Lithuanian Šiuo dokumentu UAB TELTONIKA deklaruoja, kad šis RUTX11 atitinka esminius reikalavimus ir kitas RED Direktyvos nuostatas.
[LV] Latvian Ar šo TELTONIKA deklarē, ka RUTX11 atbilst Direktīvas RED būtiskajām prasībām un citiem ar to saistītajiem noteikumiem.
[NL] Dutch Hierbij verklaart TELTONIKA dat het toestel l RUTX11 in overeenstemming is met de essentiële eisen en de andere relevante bepalingen van richtlijn RED.
[NO] Norwegian TELTONIKA Erklærer herved at RUTX11 er i samsvar med de grunnleggende krav og øvrige relevante krav i direktiv RED.
[PL] Polish Niniejszym TELTONIKA deklaruje że RUTX11 jest zgodny z zasadniczymi wymaganiami i innymi właściwymi postanowieniami Dyrektywy RED.
[PT] Portuguese Eu, TELTONIKA declaro que o RUTX11 cumpre os requisitos essenciais e outras provisões relevantes da Directiva RED.
[RO] RomanianPrin prezenta, TELTONIKA declară că aparatul RUTX11 este în conformitate cu cerinţele esenţiale şi cu alte prevederi pertinente ale Directivei RED.
[SE] Swedish Härmed intygar TELTONIKA att denna RUTX11 är i överensstämmelse med de väsentliga egenskapskrav och övriga relevanta bestämmelser som framgår av direktiv RED.
[SI] Slovenian TELTONIKA izjavlja, da je ta RUTX11 v skladu z bistvenimi zahtevami in drugimi relevantnimi določili direktive RED.

[EN] Instruction Manual: Connect the power adapter to turn on the device. Open 192.168.1.1 in your web browser to configure it. More information on https://wiki.teltonika.lt[BG] Инструкция: Свържете адаптера на захранване, за да включите устройството. Отворете 192.168.1.1 в уеб браузър, за да настроите продукта. Повече информация в https://wiki.teltonika.lt[CZ] Návod k použití: Připojte napájecí adaptér k zapnutí přístroje. Otevřete 192.168.1.1 ve webovém prohlížeči pro konfiguraci produktu. Více informací najdete v https://wiki.teltonika.lt[DE] Bedienungsanleitung: Verbinden Sie das Netzteil, um das Gerät einzuschalten. Öffnen Sie 192.168.1.1 in einem Web Browser, um das Produkt zu konfigurieren. Weitere Informationen im https://wiki.teltonika.lt[DK] Instruktionsbog: Tilslut strømadapteren for at tænde for enheden. Åbn 192.168.1.1 i en webbrowser til at konfigurere produktet. Mere information i https://wiki.teltonika.lt[EE] Kasutusjuhend: Ühendage toiteadapter seadme sisselülitamiseks. Avatud 192.168.1.1 in veebilehitseja seadistada toodet. Rohkem teavet https://wiki.teltonika.lt[ES] Manual de instrucciones: Conecte el adaptador de alimentación para encender la unidad. Abra 192.168.1.1 en un navegador web para configurar el producto. Más información en https://wiki.teltonika.lt[FI] Käyttöohje: Kytke virtalähde päälle laitteen. Avaa 192.168.1.1 in selaimen määrittää tuotteen. Lisää tietoa https://wiki.teltonika.lt[FR] Mode d'emploi: Connectez l'adaptateur d'alimentation pour allumer l'appareil. Ouvrez 192.168.1.1 dans un navigateur Web pour configurer le produit. Plus d'informations dans https://wiki.teltonika.lt[GR] εγχειρίδιο οδηγιών: Συνδέστε τον προσαρμογέα τροφοδοσίας για να ενεργοποιήσετε τη μονάδα. Ανοίξτε 192.168.1.1 σε ένα πρόγραμμα περιήγησης στο Web για να διαμορφώσετε το προϊόν. Περισσότερες πληροφορίες στο https://wiki.teltonika.lt[HU] Használati utasítás: Csatlakoztassa a hálózati adaptert a készülék bekapcsolásához. Megnyitása 192.168.1.1 egy webböngészőben beállítani a terméket. Több információ https://wiki.teltonika.lt[IT] Manuale di istruzioni: Collegare l'adattatore di alimentazione per accendere l'unità. Aprire 192.168.1.1 in un browser Web per configurare il prodotto. Maggiori informazioni in https://wiki.teltonika.lt[LT] Naudojimosi instrukcija: Prijunkite maitinimo adapterį, įjunkite įrenginį. Interneto naršyklėje atidarykite adresą 192.168.1.1 - galite konfigūruoti gaminį. Daugiau informacijos rasite https://wiki.teltonika.lt[LV] Lietošanas instrukcija: Pievienojiet Strāvas adapteri, lai ieslēgtu ierīci. Atvērt 192.168.1.1 ar interneta pārlūku, lai konfigurētu produktu. Plašāka informācija https://wiki.teltonika.lt[NL] Handleiding: Sluit voedingsadapter aan op het apparaat in te schakelen. Open 192.168.1.1 in een webbrowser om het product te configureren. Meer informatie in https://wiki.teltonika.lt[NO] Bruksanvisningen: Koble strømadapteren for å slå på enheten. Åpne 192.168.1.1 i en nettleser for å konfigurere produktet. Mer informasjon på https://wiki.teltonika.lt[PL] Instrukcja obsługi: Podłącz adapter zasilania, aby włączyć urządzenie. Otwórz 192.168.1.1 w przeglądarce internetowej, aby skonfigurować urządzenie. Więcej informacji w https://wiki.teltonika.lt[PT] Manual de instruções: Conecte o adaptador de alimentação para ligar o aparelho. Abra 192.168.1.1 em um navegador da web para configurar o produto. Mais informações em https://wiki.teltonika.lt[RO] Instrucțiuni de utilizare: Conectați adaptorul de alimentare pentru a porni aparatul. Deschide 192.168.1.1 întrun browser web pentru a configura produsul. Mai multe informații în https://wiki.teltonika.lt[SE] Instruktionsmanual: Anslut nätadap tern för att slå på enheten. Öppna 192.168.1.1 i en webbläsare för att konfigurera produkten. Mer information på https://wiki.teltonika.lt[SI] Navodila: Priključite napajalnik za vklop naprave. Odprite 192.168.1.1 v spletnem brskalniku nastaviti izdelek. Več informacij v https://wiki.teltonika.lt[SK] NávoZd na použitie: Pripojte napájací adaptér k zapnutiu prístroja. Otvorte 192.168.1.1 vo webovom prehliadači pre konfiguráciu produktu. Viac informácií nájdete v https://wiki.teltonika.lt
For more information visit www.teltonika.lt
https://teltonika.lt/PRODUCT/RUTX11/