original instructions ie105b installation ... - corken… · 4.5 piston rod packing adjustment ......
TRANSCRIPT

ORIGINAL INSTRUCTIONS IE105B
Warning: (1) Periodic inspection and maintenance of Corken products is essential. (2) Inspection, maintenance and installation of Corken products must be made
only by experienced, trained and qualified personnel. (3) Maintenance, use and installation of Corken products must comply with Corken instructions, applicable laws
and safety standards (such as NFPA Pamphlet 58 for LP-Gas and ANSI K61.1-1972 for Anhydrous Ammonia). (4) Transfer of toxic, dangerous, flammable or explosive
substances using Corken products is at user’s risk and equipment should be operated only by qualified personnel according to applicable laws and safety standards.
Installation, Operation& Maintenance Manual
D-Style Two-Stage Gas CompressorsModels FD351, WFD351, D391, WD391,
FD391, and WFD391
WFD351/391 Compressor Shown

WarningInstall, use and maintain this equipment according to Corken, Inc. instructions and all applicable federal, state, local
laws and codes, and NFPA Pamphlet 58 for LP-Gas or ANSI K61.1-1989 for Anhydrous Ammonia. Periodic inspection
and maintenance is essential.
Corken One Year Limited WarrantyCorken, Inc. warrants that its products will be free from defects in material and workmanship for a period of 12
months following date of purchase from Corken. Corken products which fail within the warranty period due to defects
in material or workmanship will be repaired or replaced at Corken’s option, when returned freight prepaid to: Corken,
Inc., 3805 N.W. 36th Street, Oklahoma City, Oklahoma 73112.
Parts subject to wear or abuse, such as mechanical seals, blades, piston rings, valves, and packing, and other
parts showing signs of abuse are not covered by this limited warranty. Also, equipment, parts and accessories not
manufactured by Corken but furnished with Corken products are not covered by this limited warranty and purchaser
must look to the original manufacturer’s warranty, if any. This limited warranty is void if the Corken product has been
altered or repaired without the consent of Corken.
ALL IMPLIED WARRANTIES, INCLUDING ANY IMPLIED WARRANTY OF MERCHANTABILITY OR FITNESS
FOR A PARTICULAR PURPOSE, ARE EXPRESSLY NEGATED TO THE EXTENT PERMITTED BY LAW AND
SHALL IN NO EVENT EXTEND BEYOND THE EXPRESSED WARRANTY PERIOD.
Corken disclaims any liability for consequential damages due to breach of any written or implied warranty on Corken
products. Transfer of toxic, dangerous, flammable or explosive substances using Corken products is at the user’s
risk. Such substances should be handled by experienced, trained personnel in compliance with governmental
and industrial safety standards.
Contacting The FactoryFor your convenience, the model number and serial number are given on the compressor nameplate. Space is
provided below for you to keep a written record of this information.
Always include the model number and serial number when ordering parts.
Model No.
Serial No.
Date Purchased
Date Installed
Purchased From
Installed By
2

Table of Contents
COMPRESSOR FEATURES . . . . . . . . . . . . . . . . . . . . . . . . . . . . . . . . . . . . . . . . . . . . . . . . . . . . . . . . . . . . . . . . . . . . . 4
CHAPTER 1—INSTALLING YOUR CORKEN COMPRESSOR . . . . . . . . . . . . . . . . . . . . . . . . . . . . . . . . . . . . . . . . . . 5
1.1 Location . . . . . . . . . . . . . . . . . . . . . . . . . . . . . . . . . . . . . . . . . . . . . . . . . . . . . . . . . . . . . . . . . . . . . . . . . . . . . . . . . 5
1.2 Foundation . . . . . . . . . . . . . . . . . . . . . . . . . . . . . . . . . . . . . . . . . . . . . . . . . . . . . . . . . . . . . . . . . . . . . . . . . . . . . . . 5
1.3 Piping . . . . . . . . . . . . . . . . . . . . . . . . . . . . . . . . . . . . . . . . . . . . . . . . . . . . . . . . . . . . . . . . . . . . . . . . . . . . . . . . . . . 5
1.4 Liquid Trap . . . . . . . . . . . . . . . . . . . . . . . . . . . . . . . . . . . . . . . . . . . . . . . . . . . . . . . . . . . . . . . . . . . . . . . . . . . . . . . 6
1.5 Driver Installation/Flywheels . . . . . . . . . . . . . . . . . . . . . . . . . . . . . . . . . . . . . . . . . . . . . . . . . . . . . . . . . . . . . . . . . 7
1.6 Crankcase Lubrication . . . . . . . . . . . . . . . . . . . . . . . . . . . . . . . . . . . . . . . . . . . . . . . . . . . . . . . . . . . . . . . . . . . . . . 7
1.7 Purging, Padding, Venting and Draining of Distance Pieces on Two Stage D-Style Compressors. . . . . . . . . . . . 8
1.8 Relief Valves . . . . . . . . . . . . . . . . . . . . . . . . . . . . . . . . . . . . . . . . . . . . . . . . . . . . . . . . . . . . . . . . . . . . . . . . . . . . . . 9
1.9 Shutdown/Alarm Devices . . . . . . . . . . . . . . . . . . . . . . . . . . . . . . . . . . . . . . . . . . . . . . . . . . . . . . . . . . . . . . . . . . . . 9
1.10 Compressor Cooling . . . . . . . . . . . . . . . . . . . . . . . . . . . . . . . . . . . . . . . . . . . . . . . . . . . . . . . . . . . . . . . . . . . . . 10
CHAPTER 2—STARTING UP YOUR CORKEN COMPRESSOR . . . . . . . . . . . . . . . . . . . . . . . . . . . . . . . . . . . . . . . 10
2.1 Inspection After Extended Storage . . . . . . . . . . . . . . . . . . . . . . . . . . . . . . . . . . . . . . . . . . . . . . . . . . . . . . . . . . . 10
2.2 Flywheel and V-belt Alignment . . . . . . . . . . . . . . . . . . . . . . . . . . . . . . . . . . . . . . . . . . . . . . . . . . . . . . . . . . . . . . 10
2.3 Crankcase Oil Pressure Adjustment . . . . . . . . . . . . . . . . . . . . . . . . . . . . . . . . . . . . . . . . . . . . . . . . . . . . . . . . . . 11
2.4 Startup Check List . . . . . . . . . . . . . . . . . . . . . . . . . . . . . . . . . . . . . . . . . . . . . . . . . . . . . . . . . . . . . . . . . . . . . . . . 11
CHAPTER 3—ROUTINE MAINTENANCE CHART . . . . . . . . . . . . . . . . . . . . . . . . . . . . . . . . . . . . . . . . . . . . . . . . . . 12
CHAPTER 4—ROUTINE SERVICE AND REPAIR PROCEDURES . . . . . . . . . . . . . . . . . . . . . . . . . . . . . . . . . . . . . . 13
4.1 Valves . . . . . . . . . . . . . . . . . . . . . . . . . . . . . . . . . . . . . . . . . . . . . . . . . . . . . . . . . . . . . . . . . . . . . . . . . . . . . . . . . . 13
4.2 Heads . . . . . . . . . . . . . . . . . . . . . . . . . . . . . . . . . . . . . . . . . . . . . . . . . . . . . . . . . . . . . . . . . . . . . . . . . . . . . . . . . . 14
4.3 Piston Rings and Piston Ring Expanders Replacement . . . . . . . . . . . . . . . . . . . . . . . . . . . . . . . . . . . . . . . . . . . 14
4.4 Piston Replacement . . . . . . . . . . . . . . . . . . . . . . . . . . . . . . . . . . . . . . . . . . . . . . . . . . . . . . . . . . . . . . . . . . . . . . . 14
4.5 Piston Rod Packing Adjustment . . . . . . . . . . . . . . . . . . . . . . . . . . . . . . . . . . . . . . . . . . . . . . . . . . . . . . . . . . . . . 15
4.6 Cylinder Replacement . . . . . . . . . . . . . . . . . . . . . . . . . . . . . . . . . . . . . . . . . . . . . . . . . . . . . . . . . . . . . . . . . . . . . 15
4.7 Bearing Replacement for Crankcase and Connecting Rod . . . . . . . . . . . . . . . . . . . . . . . . . . . . . . . . . . . . . . . . 17
4.8 Oil Pump Inspection. . . . . . . . . . . . . . . . . . . . . . . . . . . . . . . . . . . . . . . . . . . . . . . . . . . . . . . . . . . . . . . . . . . . . . . 18
CHAPTER 5—EXTENDED STORAGE PROCEDURES . . . . . . . . . . . . . . . . . . . . . . . . . . . . . . . . . . . . . . . . . . . . . . . 19
APPENDICES
A. Model Number Identification Code . . . . . . . . . . . . . . . . . . . . . . . . . . . . . . . . . . . . . . . . . . . . . . . . . . . . . . . . . . . . 20
B. Material and Mechanical Specifications . . . . . . . . . . . . . . . . . . . . . . . . . . . . . . . . . . . . . . . . . . . . . . . . . . . . . . . . 23
C. Outline Dimensions . . . . . . . . . . . . . . . . . . . . . . . . . . . . . . . . . . . . . . . . . . . . . . . . . . . . . . . . . . . . . . . . . . . . . . . . 26
D. Troubleshooting . . . . . . . . . . . . . . . . . . . . . . . . . . . . . . . . . . . . . . . . . . . . . . . . . . . . . . . . . . . . . . . . . . . . . . . . . . . 31
E. Assembly Details . . . . . . . . . . . . . . . . . . . . . . . . . . . . . . . . . . . . . . . . . . . . . . . . . . . . . . . . . . . . . . . . . . . . . . . . . . 32
3

Tubing forwater connections
Water-cooledcylinder
Crosshead guide
Oil pressureadjustment screw
Oil filteradapter
Oil filter
Oil pressuregauge Crankcase
Flywheelhub
Flywheel
Nameplate &oil fill cover
Tubing forwater connections
ANSI flanges
Water-cooled head
Valve holddownassembly
Breathercap
Compressor Features
Figure 1.1
Corken industrial gas compressors are unique among
compressors their size. Unlike ordinary lubricated gas
compressors, Corken compressors completely isolate
the pressurized gas in the compression chamber from
the crankcase. While piston rings seal the piston tightly
enough for it to do compression work, they do not provide
enough sealing to isolate the compression chamber from
the crankcase. To further seal the compression chamber,
a crosshead/piston rod design with seals around the
piston rod is required.
By utilizing specialized piston-rod sealing systems,
Corken compressors can compress pressurized,
flammable and toxic gases. It is also used to compress
harmless gases where oil-free compression or elevated
suction pressures are required. With a large selection of
design options available, Corken offers the most versatile
line of small gas compressors in the world.
Why Corken Compressors are Special
4

1.1 Location
WARNING
Compressor must be installed in a well
ventilated area.
Corken compressors are designed and manufactured for
outdoor duty. For applications where the compressor will
be subjected to extreme conditions for extended periods
such as corrosive environments, arctic conditions, etc.,
consult Corken. Check local safety regulations and building
codes to assure installation will meet local safety standards.
Corken compressors handling toxic or flammable
gases such as LPG/NH3 should be located outdoors in
a well ventilated area. A minimum of 18 inches (45 cm)
clearance between the compressor and the nearest wall is
recommended. This will make it accessible from all sides
and provide unrestricted air flow for adequate cooling.
Noise Level: Many factors affect the noise level generated
by a compressor installation. Several of these, including
motor noise, piping vibration, foundation/skid design, and
surrounding structures are outside Corken’s control. The
use of sufficient pipe supports, flexible hoses, and proper
baseplate/skid support will all reduce noise. Thus, Corken can
not guarantee a particular noise level from our compressors.
However, noise levels from a properly installed Corken
compressor typically do not exceed 85dBa at three feet.
1.2 FoundationProper foundations are essential for a smooth running
compression system. Corken recommends the compressor
be attached to a concrete slab at least 8 inches thick with a
2 inch skirt around the circumference of the baseplate. The
baseplate should be securely anchored into the foundation
by 1/2 inch diameter “J” bolts that are 12 inches long. The
total mass of the foundation should be approximately
twice the weight of the compressor system (compressor,
baseplate, motor, etc.). See figure 1.2 for details.
After leveling and bolting down the baseplate, the volume
beneath the channel iron baseplate can be grouted to
prevent flexing of the top portion of the baseplate and
the “J” bolt that extends beyond the foundation. The
grout also improves the dampening capabilities of the
foundation by creating a solid interface between the
compressor and foundation.
On some of the longer baseplates, such as with the 107
mountings, a 3 inch hole can be cut in the baseplate for
filling the middle section of the baseplate with grout.
WARNING
For a more detailed explanation of a proper
foundation design, please refer to Important
“Instructions for Compressor Foundation
Design” (item number ED410).
Chapter 1—Installing Your Corken Compressor
1.3 PipingProper piping design and installation is as important as a
proper foundation is to a smooth operating compressor.
Improper piping installation will result in undesirable
transmission of compressor vibration to the piping.
WARNING
DO NOT SUPPORT PIPING WITH THE
COMPRESSOR. Unsupported piping is the most
frequent cause of vibration of the pipe. The best
method to minimize transmission of vibration from
the compressor to the piping is to use flexible
connectors (see figure 1.3 for details).
Pipe must be adequately sized to prevent excessive pressure
drop between the suction source and the compressor as
well as between the compressor and the final discharge
point. In most cases, piping should be at least the same
diameter as the suction nozzle on the compressor.
If a restrictive device such as a valve, pressure regulator,
or back-check valve is to be installed in the compressor’s
suction line, care must be taken. The suction line volume
Figure 1.2: Recommended Foundation Details
for Corken Compressors
Ground levelConcretefoundation
Baseplate should be
Groutedbaseplate
Pipe supportPipe support
Flexible connections Flexible connections
Figure 1.3: 103 mounting shown above. On 107 mountings, the
flexible connectors should be located near the four way valve.
2” MIN.
ALL SIDES
8” MIN.
HEX NUT
WASHERCOMPRESSOR
BASEPLATE
GROUT BENEATH
BASE
CONCRETE FOUNDATION
WITH REINFORCEMENTS
SHOULD BE USED ON ALL
MODELS
1/2” “J” BOLTS
12” LONG
NOTE:
LOCATE “J” BOLTS PER
COMPRESSOR OUTLINE
DIMENSION DRAWINGS.
5

between the restrictive device and the compressor
suction nozzle must be at least ten times the swept
cylinder volume.
On liquefied gas applications such as LPG/NH3, it is of
extreme importance to prevent the entry of liquid into
the compressor. Installing a liquid trap on the inlet side
will prevent liquid from entering the compressor (see
section 1.4).
It is of equal importance to protect the discharge side
of the compressor from liquid entry. This may be done
by installing a check valve on the discharge side of the
compressor and using a piping design that does not
allow liquid to gravity drain into the compressor.
For vapor recovery applications, be certain to install
a check valve on vapor lines discharging to the liquid
space of the tank.
All piping must be in accordance with the laws and codes
governing the service. In the United States, the following
codes apply:
For LP Gas—The National Fire Protection Association
Pamphlet No. 58, Standard for the Storage and Handling
of Liquefied Petroleum Gases.
For Ammonia—The American National Standards
Institute, Inc., K61.1-1989, Storage and Handling of
Anhydrous Ammonia.
Copies of these are available from NFPA, 60 Baterymarch
Street, Boston, Mass, 02110 and ANSI, 1430 Broadway,
New York, N.Y., 10018. Install, use and maintain this
equipment according to Corken instructions and all
applicable federal, state, and local laws and previously
mentioned codes. Other laws may apply in different
industries and applications.
1.4 Liquid TrapCompressors are designed to pressurize gas—not to
pump liquids. The entry of even a small amount of liquid
into the compressor will result in serious damage.
On liquefied gas applications, a liquid trap must be used
to prevent the entry of liquid into the compressor.
WARNING
If the liquid trap includes a level switch, the liquid
level switch MUST be removed from the trap before
grounding any welding devices to the trap or
associated piping! Failure to do so will damage
the switch contacts.
If your compressor is equipped with a liquid trap not
manufactured by Corken, make sure it is adequately
sized; otherwise it may not be able to remove the liquid
entrained in the suction stream.
Corken offers three types of liquid traps for removal of
entrained liquids. The simplest is a mechanical float trap
(see Figure 1.4A). As the liquid enters the trap, the gas
velocity is greatly reduced, allowing the entrained liquid
to drop out. If the liquid level should rise too high, the
float will plug the compressor suction. The compressor
creates a vacuum in the inlet piping and continues to
operate until it is manually shut down by the operator.
Before restarting the compressor, drain the trap and
open the vacuum-breaker valve to allow the float to drop
back to the bottom of its holder. This type of trap is only
appropriate for use where the compressor is kept under
fairly close observation by the operator.
For continuous-duty operation applications such as
those found in the chemical industry, an automatic trap
should be used (see Figure 1.4B). The automatic trap
replaces the mechanical float with an electrical float
switch. If the liquid level should rise too high, the level
switch will open and disconnect the power to the motor
starter, stopping the compressor. This design ensures
the machine will be protected even when it is not under
close observation.
The most sophisticated trap provides the most thorough
liquid separation (see Figure 1.4C). This trap is larger and is
American Society of Mechanical Engineers (ASME) code
stamped. It contains two level switches, one for alarm and
one for shutdown. In some cases, the alarm switch can
activate a dump valve (not included with trap) or sound an
alarm. A drain valve is included to manually drain the trap.
Figure 1.4A: Mechanical Trap Details
Drain valveInlet
Ball float
OutletVacuum breaker valve
6

This trap also contains a mist pad (a mesh of interwoven
wire to disentrain fine-liquid mists). The ASME code trap
is standard on the 109B mounting configuration. A smaller
ASME code trap with one level switch is used on a 109°F
mounting.
1.5 Driver Installation/FlywheelsCorken vertical compressors may be driven by either
electric motors or combustion engines (gasoline, diesel,
natural gas, etc.).
WARNING
Never operate a reciprocating compressor without
a flywheel.
Drivers should be selected so the compressor operates
between 400 and 825 RPM. The unit must not be
operated without the flywheel or severe torsional
imbalances will result that could cause vibration and
a high horsepower requirement. The flywheel should
never be replaced by another pulley unless it has a
higher wk2 value than the flywheel.
Humid climates can cause problems with explosion
proof motors. The normal breathing of the motor and
alternating between being warm when running and
cool when stopped can cause moist air to be drawn
into the motor. This moist air will condense, and may
eventually add enough water inside the motor to cause
it to fail. To prevent this, make a practice of running
the motor at least once a week on a bright, dry day
for an hour or so without the V-belts. During this
period of time, the motor will heat up and vaporize
the condensed moisture. No motor manufacturer will
guarantee their explosion proof or totally enclosed
(TEFC) motor against damage from moisture.
For installation with engine drivers, thoroughly review
instructions from the engine manufacturer to assure the
unit is properly installed.
1.6 Crankcase LubricationTo ensure proper lubrication of the crankcase parts
before startup, the crankcase should be filled through the
nameplate inspection opening (see figure 1.6C).
Non-detergent oil is recommended for Corken vertical
compressors. Detergent oils tend to keep wear particles
and debris suspended in the oil, whereas non-detergent
oils let them settle in the bottom of the crankcase.
When non-detergent oils are not available, detergent
oils may usually be successfully substituted, although
compressors handling ammonia, amine, or imine gases are
notable exceptions. These gases react with the detergent
and cause the crankcase oil to become corrosive and
contaminated. Figures 1.6A and 1.6B show recommended
oil viscosities and crankcase capacities. Ensure oil is
compatible with the product being compressed.
Synthetic lubricants are generally not necessary. Please
consult your lubricant supplier if you are considering the
use of synthetic oil.
Figure 1.4C: ASME Automatic Liquid TrapFigure 1.4B: Automatic Liquid Trap Details
Outlet
High liquid level shutdown switch
Liquid level alarm switch
Drain
Pressure gauge
Mist pad
InletBaffle
Inlet
Drain valve
Liquid level float switch
Outlet
Relief valve
7

Note: Fill crankcase with oil through this opening
Figure 1.6C
WARNING
New or rebuilt units should be filled with oil
through the opening behind the compressor
nameplate. This provides excellent lubrication
for the crossheads on initial startup (see
Figure 1.6C).
1.7 Purging, Padding, Venting and
Draining of Distance Pieces on
Two Stage D-Style Compressors.The key to leakage control and oil-free operation of
Corken compressors is the distance piece. The distance
piece is integral with the crosshead guide and forms
the upper portion of it. The distance piece is equipped
with tapped holes to allow purging, padding, venting,
and draining (see Figure 1.7). Proper connections to
and from these tapped holes are essential for optimum
compressor performance.
Flywheel
side
Typical connection points used to vent or purge.
Remove this plug periodically to drain distance piece.
Figure 1.7
Compressors with the A-Style packing arrangement are
shipped with all distance piece connections plugged.
These compressors are used with inlet pressures above
atmospheric pressure. Compressors with the B-Style
packing arrangement have a distance piece connection
tubed to the discharge of the compressor's first stage.
These compressors are most often used for vacuum
inlet conditions.
Corrosive gases should be prevented from entering the
crankcase, since even small amounts of gas leakage into
the crankcase can seriously contaminate the crankcase
oil. To prevent this contamination, the distance piece
may be purged, padded, or vented using a clean, non-
corrosive gas like dry air or nitrogen.
Purging:
Purging of the distance piece controls leakage of process
gas to the atmosphere. Process gas leakage into the
distance piece is quickly diluted by the purge gas and
swept away. The purge gas should be vented to a safe
release area, flare, compressor’s inlet, or treatment
facility, depending on the gas and local regulations.
Purging can be performed on units with either A-Style
packing or B-Style packing arrangements. If the
purge pressure is to be at a pressure lower than the
compressor’s suction pressure, use A-Style packing. If
the purge pressure is to be at a pressure higher than the
compressor’s suction pressure, use B-Style packing
(remove the tube to the compressor’s head if purging
with B-Style packing). A small amount of purge gas may
get into the process gas.
Compressor
Model
Approximate
Quarts
Capacity
Liters
FD/WFD351 3.0 2.8
Figure 1.6B: Oil capacity chart
Acceptable Crankcase Oil Productsfor Corken Compressors
Constant Weight - Non-Detergent - R&O Inhibited
Oil product ISO VI SAE Ambient Temp.
Exxon®
TERESSTIC
100 95 30 65° - 100° F
68 95 20+ 45° - 70° F
46 95 20 35° - 50° F
Mobil®
RARUS 427
Reciprocating
Compressor Oil
100 95 30 65° - 100° F
DTE Oil Heavy Medium 64 95 20+ 45° - 100° F
Dectol R&O Oil 44 95 20 35° - 50° F
Conoco®
Dectol R&O Oil
100 98 30 65° - 100° F
68 97 20+ 45° - 70° F
46 99 20 35° - 50° F
Texaco®
Regal R&O Oil
100 92 30 65° - 100° F
68 97 20+ 45° - 70° F
46 102 20 35° - 50° F
Sun®
SunVis 900 Oil
100 100 30 65° - 100° F
68 100 20+ 45° - 70° F
46 100 20 35° - 50° F
Figure 1.6A: Oil selection chart
8

When purging, it is critical to maintain the proper
pressure loading across each set of packing. The higher
pressure should be on the open side of the “V”, which is
also the side with the spring.
Moisture, oil, or condensate can be removed from the
distance piece with the purge gas by using the lower
distance piece connection (drain location) as the purge
gas outlet connection.
Corken offers purge kits which include the necessary
regulator, valves, fittings, etc. Consult the factory for
further information.
Padding (Buffering):
If purging is not practical, the distance piece can
be pressurized with a static pressure. This is called
padding or buffering. This is best done using B-Style
packing (remove the tube to the compressor’s head
when padding with B-Style packing). Padding is done
at a pressure above the compressor’s suction pressure
using a clean non-corrosive gas like dry air or nitrogen.
The higher pressure in the distance piece tends to
reduce the process gas leakage to the atmosphere. A
small amount of purge gas will likely get into the process
gas. A pressure regulator can be used to maintain proper
distance piece pressure.
When padding, it is critical to maintain the proper
pressure loading across each set of packing. The higher
pressure should be on the open side of the “V”, which is
also the side with the spring.
Venting:
The distance piece can also simply be vented to an
appropriate release area, flare, or treatment facility. This
is sometimes useful for indoor installations.
Draining:
WARNING
Since some oil will pass the bottom packing set,
regular draining of the distance piece is
essential to maintain oil-free operation (See
Figure 1.7).
Corken recommends draining the distance piece once a
week for units in continuous-duty operation. Installing a
drain cock to the distance piece drain will help simplify
draining of the distance piece.
Highly Corrosive Gases:
The compressor should be blocked from the system via
valves on the suction and discharge piping, then purged
with dry inert gas before being shut down. Experience
has proven this significantly lowers corrosion damage to
the machine.
1.8 Relief ValvesAn appropriate relief valve must be installed on the
discharge side of the compressor. Relief valves should
be made of a material compatible with the gas being
compressed. Local codes and regulations should be
checked for specific relief valve requirements. Also,
relief valves may be required at other points in the
compressor’s system piping.
1.9 Shutdown/Alarm DevicesFor many applications, shutdown/alarm switches
will provide worthwhile protection that may prevent
serious damage to your compressor system. All
electronic devices should be selected to meet local
code requirements. Shutdown/alarm devices typically
used on Corken compressors are as follows:
1. Low Oil Pressure Switch: Shuts down the unit if
crankcase oil pressure falls below 12 psi due to oil
pump failure or low oil level in crankcase. The switch
or the compressor controller must have a 30 second
delay on startup which allows the compressor to
build oil pressure in the crankcase.
2. High Discharge Temperature Switch: This switch
is strongly recommended for all applications. Both
the High Discharge Temperature switch (HDT) and
compressor have an operating pressure range. It is
preferable that the switch set point be midpoint in its
range and 30°F (-1°C) above the normal discharge
temperature, but below the maximum design
temperature for the compressor of 350°F (176°C).
3. Low Suction Pressure Switch: Shuts down the
unit if inlet pressure is not within the preset limit (set
point). In some cases, it is important not to pull a
vacuum because of the potential of pulling oil from the
crankcase into the gas stream.
4. High Discharge Pressure Switch: Shuts down the
unit if the outlet pressure reaches a preset limit (set
point). Both the switch and the compressor have an
operating range. The set point of the pressure switch
should be as follows:
Greater than the normal operating pressure for the
compressor.
Less than 90% of the relief valve set point pressure.
Less than the maximum operating pressure of the
compressor.
Midpoint of the pressure switch range.
5. Vibration Switch: Shuts down the unit if vibration
becomes excessive. Recommended for units mounted
to a portable skid.
9

1.10 Compressor CoolingOn air-cooled models, it is important to maintain good air
flow around your compressor. Keep this in mind as you
select a location for the compressor to operate.
A minimum of 18 inches (45 cm) clearance between the
compressor and the nearest wall is recommended.
Water-cooled models have a water-cooled head and
cylinder. There are two water connections on the
cylinder and six water connections on the head. All
tubing for the water connections is provided by the
factory except for the inlet connection at the cylinder
and the outlet connection at the head. The owner of
the compressor is responsible for the inlet and outlet
water connections.
The cylinder has one water jacket while the head has
three water jackets. See Figure 1.10 for details.
Gas outlet(second stage outlet)
Connected tointercooler inlet
(first stage outlet)
Connected tointercooler outlet
(second stage inlet)
Gas inlet(first stage inlet)
5
6
C4
A
1
2
B
D
3
D B
AC
Fly
wh
eel sid
e
Note: 1) Numbers one through six show water connections.
2) Letters A through D show direction of gas flow.
3) Dark shaded areas show the water jackets. Light shaded areas show the gas chambers.
Figure 1.10
NOTE: Read this entire chapter, then proceed with
the startup checklist.
2.1 Inspection After
Extended StorageIf your compressor has been out of service for a long
period of time, you should verify that the cylinder bore
and valve areas are free of rust and other debris. For
valve and/or cylinder head removal instructions, refer to
chapter 4 of this IOM manual.
Drain the oil from the crankcase and remove the
nameplate and crankcase inspection plate. Inspect the
running gear for signs of rust and clean or replace parts
as necessary. Replace the crankcase inspection plate
and fill crankcase with the appropriate lubricant through
the nameplate inspection opening. Squirt oil on the
crossheads and rotate the crankshaft by hand to ensure
that all bearing surfaces are coated with oil.
Rotate unit manually to ensure running gear functions
properly. Replace nameplate and proceed with startup.
2.2 Flywheel and V-belt AlignmentBefore working on the drive assembly, be sure that the
electric power is disconnected. When installing new
belts, always make sure the driver and compressor are
close enough together to avoid forcing the belt onto
the flywheel.
Chapter 2—Starting Up Your Corken Compressor
Figure 2.2A: Flywheel Installation
10

Improper belt tension and sheave alignment can cause
vibration, excessive belt wear and premature bearing
failures. Before operating your compressor, check alignment
of the V-grooves of the compressor flywheel and driver
sheave. Visual inspection often will indicate if the belts are
properly aligned, but use of a square is the best method.
The flywheel is mounted on the shaft via a split, tapered
bushing and three bolts (see figure 2.2A). These bolts
should be tightened in an even and progressive manner
to the specified torque values listed in the table below.
There must be a gap between the bushing flange and the
flywheel when installation is complete. Always check the
flywheel runout before startup and readjust if it exceeds
the value listed in Appendix B.
Bushing SizeDiameter
In. (cm)
Bolt Torque
Ft.-lb. (kg-meter)
SF 4.625 (11.7) 30 (4.1)
E 6.0 (15.2) 60 (8.3)
J 7.25 (18.4) 135 (18.7)
Tighten the belts so that they are taut, but not extremely
tight. Consult your V-belt supplier for specific tension
recommendations. Belts that are too tight may cause
premature bearing failure. Refer to figure 2.2B.
Figure 2.2B: Belt Tension
2.3 Crankcase Oil
Pressure AdjustmentYour Corken compressor is equipped with an
automatically reversible gear type oil pump. It is
essential to ensure the pumping system is primed and
the oil pressure is properly adjusted in order to assure
smooth operation.
Before starting your compressor, check and fill the
crankcase with the proper amount of lubricating oil.
When the compressor is first started, observe the crankcase
oil pressure gauge. If the gauge fails to indicate pressure
within 30 seconds, stop the machine. Loosen the oil filter and
remove the pressure gauge. Restart the compressor and
run it until oil comes out of the pressure gauge opening or
around the filter. Tighten the filter reinstall the gauge.
The oil pressure should be about 20 psi (1.4 bars)
minimum for normal service. If the compressor discharge
pressure is above 200 psi (14.8 bars) the oil pressure
must be maintained at a minimum of 25 psi (1.7 bars). A
spring-loaded relief valve mounted on the bearing housing
opposite the flywheel regulates the oil pressure. As shown
in figure 2.3, turn the adjusting screw clockwise to increase
the oil pressure and counterclockwise to lower it. Be sure
to loosen the adjusting screw locknut before trying to turn
the screw and tighten it after making any adjustment.
Oil filter
Oil pressure gaugeBreather cap
Oil pressurerelief valve and adjustment screw
Figure 2.3: Oil Pressure Adjustment
2.4 Startup Check ListPlease verify each item on this list below before
starting your compressor! Failure to do so may result
in a costly (or dangerous) mistake.
Before Starting the Compressor
1. Become familiar with the function of all piping
associated with the compressor. Know each line’s use!
2. Make certain actual operating conditions will match
the anticipated conditions.
3. Ensure that the line pressures are within cylinder
pressure ratings.
4. Clean out all piping.
5. Ensure all distance piece openings are tubed or
plugged as desired.
6. Check all mounting shims, cylinder and piping
supports to ensure that no undue twisting forces exist
on the compressor.
11

7. Make certain strainer elements are in place and clean.
8. Make certain cylinder bore and valve areas are clean.
9. Check V-belt tension and alignment or drive alignment
on direct drive units.
10. Rotate unit by hand and make certain there is no
wobble or play.
11. Check crankcase oil level.
12. Drain all liquid traps, separators, etc.
13. Verify proper electrical supply to motor and panel.
14. Check all gauges and confirm a zero level reading.
15. Test piping system for leaks.
16. Purge unit of air before pressurizing with gas.
17. Carefully check for any loose connections or bolts.
18. Remove all stray objects (rags, tools, etc.) from
vicinity of the unit.
19. Confirm all valves are open or closed as required.
20. Double-check all of the above.
After Starting Compressor
1. Verify and note proper oil pressure. Shut down and
correct any problems immediately.
2. Observe noise and vibration levels. Correct
immediately if excessive.
3. Verify proper compressor speed.
4. Examine entire system for gas or oil leaks.
5. Note rotation direction.
6. Check start-up voltage drop, running amperage and
voltage at motor junction box (not at the starter).
7. Verify proper lubrication rate (lubed units only).
8. Test each shutdown device and record set points.
9. Test or confirm set point on all relief valves.
10. Check and record all temperatures, pressures and
volumes after 30 minutes and 1 hour.
11. After 1 hour running time, tighten all head bolts, valve
holddown bolts, and baseplate bolts. See Appendix B
for torque values.
Item to Check Daily Weekly MonthlySix
MonthsYearly
Crankcase oil pressure
Compressor discharge pressure
Overall visual check
Crankcase oil level 2 2
Drain liquid from accumulation points 3
Drain distance pieces
Clean cooling surfaces on compressor and intercooler (if any)
Lubricator supply tank level (if any)
Check belts for correct tension
Inspect valve assemblies
Lubricate motor bearings in accordance with manufacturers'
recommendations
Inspect motor starter contact points
Inspect piston rings1 1
1 Piston ring life varies greatly, depending on application, gas, and operating pressures. Consult factory for additional recommendations for
your specific application.2 Change oil every 2,200 hours of operation or every 6 months, whichever occurs first. If the oil is unusually dirty, change it as often as needed
to maintain a clean oil condition. Change filter (part number 4225) with every oil change.3 Liquid traps should be drained prior to startup.
Chapter 3—Routine Maintenance Chart
WARNING
Note: The recommended maintenance procedures listed above are general guidelines only. Your specific
maintenance requirements may vary depending on the operating conditions and duty cycle.
12

Chapter 4—Routine Service and Repair Procedures
CAUTION: Always relieve pressure in the unit
before attempting any repairs. After repair, the unit
should be pressure tested and checked for leaks at
all joints and gasket surfaces.
If routine maintenance is performed as listed in chapter
3, repair service on your Corken gas compressor is
generally limited to replacing valves or piston rings.
When it comes time to order replacement parts, be sure
to consult the part details appendix in the back of this
Installation, Operation & Maintenance (IOM) manual for
a complete list of part numbers and descriptions.
4.1 ValvesTest the compressor valves by closing the inlet piping
valves while the unit is running; however, do not allow
the machine to operate in this way very long. If the
inlet pressure gauge does not drop to zero almost
immediately, one or more of the valves is probably
damaged or dirty. However, it is possible for the
pressure gauge itself to be faulty.
In most cases, if a valve or gasket is leaking, it will
create more heat. On a single stage compressor, you
may be able to compare the operating temperatures of
the two suction or discharge valves and cover plates
to each other. If a valve or gasket is leaking, it will have
a higher operating temperature. NOTE: This method
will not be suitable for two stage compressors if each
stage does not have more than one valve.
Each suction and/or discharge valve assembly is easily
removed as a unit for inspection. If any part of the
valve assembly is broken, the valve assembly should be
replaced. See valve assembly parts details in the Appendix
E for a complete list of part numbers and descriptions.
If a valve is leaking due to dirt or any other foreign
material that keeps the valve plate and seat from sealing,
the valve may be cleaned and reused. New valve gaskets
and O-rings should be used to assure a good seal.
The valve holddown assemblies and valve assemblies
on the following pages show the various specifications
used on models 351 and 391 compressors. Since more
than one suction valve arrangement is available for
each model of compressor, it is necessary to know your
complete model number so you can identify the valve
type specification number (see example listed below).
Model number FD351AM 4P FDAFSNN
Valve type = spec 4P
Valve Inspection and/or Replacement
Before removing and inspecting the valves, begin by
depressurizing and purging (if necessary) the unit.
Disassembly
1. Unscrew the valve cap (or unloader if applicable)
assembly and remove the O-ring.
2. Remove the valve cover plate, O-ring and holddown
screw by removing each of the four bolts. The
holddown screw is easily removed with the special
wrench supplied with your compressor.
3. After the cover plate and O-ring have been removed,
the valve cage, valve assembly and valve gasket can be
lifted out.
4. Inspect valves for breakage, corrosion, debris and
scratches on the valve plate. In many cases, valves
may simply be cleaned and reinstalled.
5. To clean your valve assemblies, disassemble by
removing the valve seat and/or bumper, valve
spring and valve plate and soak in some rubbing
alcohol for a few minutes. Remove the parts from
the rubbing alcohol and dry each with a lint-free
cloth. Reassemble the valve assemblies in the same
order using the part details in Appendix E. After you
have reassembled the valve assemblies, check for
leaks by pouring a small amount of rubbing alcohol
through the valve seat opening. If the valves are
sealing properly, no alcohol will be allowed to seep
through to the valve bumper.
6. If the valves show any damage, they should be
repaired or replaced. Replacement is usually
preferable although repair parts are available. If
valve plates are replaced, seats should also be
lapped until they are perfectly smooth. If more
than .005 of an inch must be removed to achieve
a smooth surface, the valve should be discarded.
If plates are replaced without relapping the seat,
rapid wear and leakage may occur.
Assembly
1. Insert metal valve gasket into the suction and/or
discharge opening of the head. The metal valve gasket
should always be replaced when the valve is reinstalled.
2. Insert cleaned or new valve assembly. Make sure
the suction and discharge valves are in the proper
suction and discharge opening in the head.
3. Insert the valve cage.
13
4. Replace the O-ring and valve cover plate. Torque the
bolts to the value listed in Appendix B. CAUTION:
Be sure the holddown screw has been removed.
5. To ensure the valve gasket is properly seated, insert
the holddown screw and tighten to the value listed
in Appendix B. NOTE: Gaskets and O-rings are not
normally reusable.
6. Replace the O-ring and valve cap (or unloader
assembly if applicable) and tighten to the value
listed in Appendix B.
7. Check bolts and valve holddown screws after first
week of operation. Re-torque if necessary. See
Appendix B for torque values.
4.2 HeadsA compressor cylinder and head very seldom requires
replacement if the compressor is properly maintained.
The primary cause of damage to a cylinder or head is
corrosion and the entry of solid debris or liquid into the
compression chamber. Improper storage can also result
in corrosion damage to the cylinder and head (for proper
storage instructions see chapter 5).
Many compressor repair operations require removal
of the cylinder and head. While the compressor is
disassembled, special care should be taken to avoid
damage or corrosion. If the compressor is to be left open
for more than a few hours, bare metal surfaces should be
coated with rust preventative.
When reassembling the compressor, make sure the bolts
are retightened per the torque values listed in Appendix B.
4.3 Piston Rings and Piston Ring
Expanders ReplacementPiston ring life will vary considerably from application to
application. Ring life will improve dramatically at lower
speeds and temperatures.
1. To replace the piston rings, depressurize the
compressor and purge if necessary.
2. Remove the cylinder and head to gain access to the
compressor cylinder.
3. Loosen the piston head bolts and remove the piston
head as shown in figure 4.3 by pinching two loose
bolts together.
4. Remove lock pin with needle nose pliers. Remove the
locknut and lift the piston platform off the end of the
piston rod.
5. Piston rings and expanders may then be easily
removed and replaced. Corken recommends replacing
expanders whenever rings are replaced. To determine
if rings should be replaced, measure the radial
thickness and compare it to the chart in Appendix B.
Figure 4.3: Piston head removal
4.4 Piston Replacement
WARNING
To replace the pistons, depressurize the
compressor and purge if necessary. Remove
the compressor head (see section 4.2).
1. To replace the first stage piston of the model
351 or the first and second stage pistons of the
model 391, remove the piston head by loosening and
removing the socket head bolts holding the piston
head to the piston platform (see Figure 4.3).
2. Next, remove the lock pin with needle nose pliers. The
locknut may now be removed and the piston platform
lifted off the end of the piston rod. Check the thrust
washer and shims for damage and replace if necessary
(see piston assembly details in Appendix E).
3. Reinstall the piston platform with the same thickness
of shims as before, BUT DO NOT REINSTALL THE
LOCK PIN. Reinstall the piston with new piston rings
and expanders.
4. Now measure dimension “X”, shown in figure 4.4A. If
“X” Piston Clearance
Piston Head
Shims
Thrust Washer
Roll PinPiston Bolt
Piston Locknut
Piston Ring Expander
Piston Ring
Piston Platform
Cylinder
Piston Rod
Figure 4.4A: 1st Stage Piston for Model 351 and
the 1st and 2nd Stage Pistons for Model 391.
14

this measurement does not fall within the tolerances
shown in Appendix B, remove the piston platform,
adjust the shims as necessary and re-measure the
“X” dimension. When the piston is properly shimmed,
torque the locknut to the value listed in Appendix B.
5. Now install a new lock pin to secure the locknut.
6. Install the piston head and tighten the socket head
bolts in an alternating sequence using the torque
specification in Appendix B.
7. Reinstall the head and follow standard start-up
procedure.
8. To replace the second stage piston of the model 351,
remove the piston by using the spanner tool (part number
5207-X). Turn the piston counterclockwise and remove
from the piston rod. NOTE: A LOCK PIN AND LOCKNUT
ARE NOT USED ON THE SECOND STAGE PISTON (SEE
PISTON ASSEMBLY DETAILS IN APPENDIX E).
9. Reinstall the piston with the same thickness of shims
as before.
10. Next, measure dimension “X” in figure 4.4B. If
necessary, add or remove shims until the piston
clearance meets the tolerances listed in Appendix B.
“X” PistonClearance
Piston Piston Rod ShimWasher
Piston RingPiston RingExpander
Cylinder
Figure 4.4B: 2nd Stage Piston for Model 351 Only.
11. After the piston is properly shimmed, apply a small
amount of Loctite No. 272 to the threads of the piston
rod and reinstall the piston with new piston rings
and expanders. Use the spanner tool and torque the
piston to the value listed in Appendix B.
4.5 Piston Rod Packing AdjustmentPiston rod packing should be replaced whenever
leakage approaches an unacceptable level. “Acceptable
leakage” should be determined by the customer
according to safety and environmental regulations for
their area . The upper packing is not adjustable. If the
lower packing cannot be adjusted to an “acceptable
leakage” rate, all packing sets (upper and lower) should
be replaced. Typically, it is a good idea to replace
piston rod packing and piston rings at the same time.
Instructions for packing replacement are included with
each set of packing.
To adjust the lower packing, remove the compressor
nameplate (see Figure 4.5A), tighten the packing adjusting
nut(s) 1/4 turn with the wrench supplied, then run the
compressor a few minutes to reseat the packing. If the
leakage is still unacceptable (see Figure 4.5B), tighten the
adjusting nut as necessary, 1/4 turn at a time; do not over
tighten! If the adjusting nut is tightened until the packing
spring is solid, the packing should be replaced. If packing
will not seal, carefully inspect piston rods for possible
scoring and replace if necessary. Reattach the compressor
nameplate after adjustments or repairs are made.
Figure 4.5A: Typical Nameplate
Also serves as the packing adjustment screw cover.
Figure 4.5B: Packing Adjusting Nuts
4.6 Cylinder ReplacementCylinders very seldom require replacement if the
compressor is properly maintained. The primary cause
of damage to cylinders is corrosion and the entry of solid
debris or liquid into the compression chamber. Improper
storage can also result in corrosion damage to the
cylinder (for proper storage instructions see chapter 5).
If the cylinder is damaged or corroded, use a hone to
smooth the cylinder bore and then polish it to the value
shown in Appendix B. If more than .005 of an inch must
be removed to smooth the bore, replace the cylinder.
Cylinder liners and oversized rings are not available.
WARNING
OVERBORING THE CYLINDER WILL RESULT IN
GREATLY REDUCED RING LIFE.
15

Many compressor repair operations require removal of
the cylinder. While the compressor is disassembled,
special care should be taken to avoid damage or
corrosion to the cylinder. If the compressor is to be left
open for more than a few hours, bare metal surfaces
should be coated with rust preventative.
When reassembling the compressor, make sure the
bolts are retightened using the torque values listed in
Appendix B.
4.6.1 Cylinder Installation and Alignment
Piston must not touch cylinder! To check this clearance,
assembly personnel will need to check clearance with
feeler gauges.
1. Place the cylinder on the crosshead guide and start
the six 3/8"-16 bolts. Do not tighten them all the way.
At this step, the cylinder must remain loose.
2. On the 1st stage of the model 351 and the 1st and
2nd stage of the model 391, attach the piston head
to the piston platform using the sockethead screws.
Tighten the sockethead screws using the torque
specification listed in Appendix B.
3. Before assembling the 2nd stage piston of the model
351, apply a small amount Loctite No. 272 to the piston
rod threads and tighten by hand. Using the Corken
spanner wrench (part #5207-X), tighten the piston
using the torque specification listed in Appendix B.
4. To properly align the cylinder, rotate the crankshaft
all the way through the stroke. MAKE CERTAIN
BOTH PISTONS ARE CENTERED ALL THE WAY
THROUGH THE STROKE by adjusting the position
of the cylinder as necessary. The cylinder wall must
not touch the piston.
5. After the cylinder is properly aligned to the pistons,
tighten the six 3/8”-16 bolts using the torque
specification listed in Appendix B. Start in the center
and work outward.
6. Rotate the crank one more time and make sure the
pistons do not bind against the cylinder wall.
7. If there is interference, repeat steps 1-6 until clearance
is obtained. When the proper clearance has been
obtained, re-torque the six 3/8”-16 bolts using the
torque specifications listed in Appendix B.
4.6.2 Packing Replacement
Caution: Before installing the new piston rod packing, bleed
all pressure from the compressor and piping and purge
if necessary. After the new piston rod packing has been
installed, the unit should be pressure tested and checked
for leaks at all joints and gasket surfaces. When the
compressor is being used with toxic, dangerous, flammable
or explosive gases, this pressure and leak testing should be
done with air or a dry, inert gas such as nitrogen.
For simplicity, heads, pistons, and inspection plates are
not shown. For specific construction details and actual
part numbers, consult Appendix E in the back of this
Installation, Operation & Maintenance (IOM) manual. Use
instructions below that apply to the MODEL and SERIAL
NUMBER of your compressor.
WARNING
BE CAREFUL TO ARRANGE PACKING SETS IN
THE PROPER ORDER.
Cleanliness:
Sealing a reciprocating piston rod is a very difficult
task. Keep all parts, tools and your hands clean during
installation. Your new packing needs every chance it can
get, so keep it clean.
Workmanship:
Your Corken compressor is a precision piece of equipment
with very close tolerances. Treat it as such. Never beat
on it to get parts in or out.
Packing Configuration
The packing for these compressors includes V-ring
packing in a packing cartridge.
Refer to Appendix E for packing assembly details. Note
the arrangement of the particular packing sets for the
model of machine that you have.
Disassembly of Packing
1. Depressurize and open the compressor.
2. Remove the head, pistons and cylinder.
3. Remove the cartridge holddown screw and spacer.
4. Remove the packing cartridge by rotating the flywheel
or by lifting the packing cartridge upward.
5. On the lower V-ring packing set, remove adjusting
screw, old packing, washers, packing spring, retainer
ring and oil deflector ring from the bottom of the
packing cartridge.
6. On the upper V-ring packing set, remove upper retainer
ring, washers, packing spring, old packing, and lower
retainer ring from the top of the packing cartridge.
Assembly of Packing
Replace packing as required and always use new O-rings
during assembly.
16

Lower V-ring packing set
1. Clean and lightly coat packing area inside packing
cartridge with oil.
2. From the bottom, install a retainer ring, packing
washer, packing spring and another packing washer.
3. Insert one male packing ring, five packing rings and
one female packing ring one at a time.
WARNING
Note the packing direction shown in
Appendix E. Push in each one completely
before adding the next ring.
4. Install adjusting screw so that locking device is
engaged into first thread in packing cartridge.
Upper V-ring packing set
1. Clean and lightly coat packing area inside packing
cartridge with oil.
2. From the top, insert the oil deflector ring and until it rests
on top of the retainer ring in the lower packing set.
3. Install the retainer ring and insert a packing washer.
4. Insert one female packing ring, five packing rings, and
one male packing ring one at a time.
WARNING
Note the packing direction shown in
Appendix E. Push in each one completely
before adding the next ring.
5. Insert one washer, one packing spring, another
packing washer.
6. Push down on washer and install retainer ring.
7. Install packing installation cone part number 4005
over the threaded end of the piston rod.
8. Carefully install packing cartridge on the piston rod.
9. Install and tighten cartridge holddown screw with
special wrench mounted on the side of the compressor
(part number 2901).
10. Remove packing installation cone.
11. Replace the cylinder, pistons and head. For proper
assembly of the cylinder, pistons and head, see
assembly details in Sections 4.2, 4.4, 4.6 and torque
specifications and sequence listed in Appendix B.
12. Rotate unit by hand to ensure proper assembly.
13. Refer to Section 4.5 for piston rod packing adjustment.
4.7 Bearing Replacement for
Crankcase and Connecting Rod1. To replace the crankcase roller bearings, wrist pin
bushing and connecting rod bearings, begin by
removing the head, cylinder, pistons, crosshead guide
and crosshead assemblies.
2. Drain the crankcase and remove the inspection plates.
3. Before disassembly, choose and mark one connecting
rod and the corresponding connecting rod cap.
WARNING
DO NOT MIX CONNECTING RODS AND CAPS.
Loosen and remove the connecting rod bolts in order to
remove the crosshead and connecting rod assembly.
4.7.1 Wrist Pin Bushing Replacement
1. To replace the wrist pin bushing, remove the retainer
rings that position the wrist pin in the crosshead.
2. Press out the wrist pin so the crosshead and
connecting rod may be separated. Inspect the wrist
pin for wear and damage and replace if necessary.
3. Press out the old wrist pin bushing and press a new
bushing into the connecting rod.
WARNING
DO NOT MACHINE THE O.D. OR I.D. OF
THE BUSHING BEFORE PRESSING INTO
CONNECTING ROD.
4. Make sure the lubrication hole in the bushing matches
the oil passage in the connecting rod. If the holes do not
align, drill out the bushing through the connecting rod
lubricant passage with a long drill bit. Bore the wrist pin
bushing I.D. as indicated in Appendix E, crosshead and
connecting rod assembly details. Over boring the bushing
can lead to premature failure of the wrist pin bushing.
5. Inspect the oil passage for debris and clean thoroughly
before proceeding.
6. Press the wrist pin back into the crosshead and wrist
pin bushing and reinstall retainer rings. NOTE: The
fit between the wrist pin and bushing is tighter than
lubricated air compressors and combustion engines.
4.7.2 Replacing Connecting Rod Bearings
Connecting rod bearings are easily replaced by removing
the semicircular bearings. Make sure the indentations in
the connecting rod bearing and connecting rod line up
when installing the new bearings.
WARNING
MAKE SURE THE ARROW AND/OR
ALIGNMENT NOTCH ON CONNECTING ROD
AND CAP ARE ALIGNED.
17

Before reinstalling the crosshead/connecting rod
assembly, make sure the crankshaft throw and bearing
surface are clean and lubricated. Tighten the connecting
rod bolts to the torque values listed in Appendix B.
4.7.3 Replacing Crankcase Roller Bearings
To inspect the roller bearings, remove the flywheel from
the crankshaft and then remove the bearing carrier and
crankshaft from the crankcase. If corrosion or pitting is
present, the roller bearings should be replaced. When
replacing roller bearings, always replace the entire
bearing and not just the cup or the cone.
1. To replace the bearings, press the cups out of the
crankcase and bearing carrier and press the cones off
the crankshaft.
2. Press the new bearings into position and reassemble
the crankshaft and bearing carrier to the crankcase.
When reinstalling the bearing carrier, make sure the oil
pump shaft slot is aligned with the pin in the crankshaft.
Make sure to install the bearing carrier gasket so the oil
passage hole is not blocked (see figure 4.7).
3. In order to check the crankshaft endplay, the oil pump
must first be removed (see section 4.8).
4. Press the end of crankshaft towards the crankcase; if
a clicking noise or motion is detected, the crankshaft
has too much endplay. For the proper amount of
endplay, see Appendix B.
5. To reduce endplay, remove the bearing cover and
remove a thin shim. Recheck the endplay after
replacing the bearing cover.
6. When there is no detectable endplay, the shaft must
still be able to rotate freely. If the crankshaft sticks
or becomes abnormally warm, then the crankshaft
bearings are too tight. If the crankshaft is too tight,
add more shims, but make sure not to over shim.
(Appendix B lists the proper crankshaft endplay). When
the crankshaft can be rotated freely by hand with
proper endplay, the rest of the compressor may be
reassembled. If the crankshaft roller bearings are too
tight or too loose, premature bearing failure will result.
7. Reinstall the oil pump and flywheel and check the run
out as shown in Appendix B.
4.8 Oil Pump InspectionIf the compressor operates for a prolonged period
with dirty or contaminated crankcase oil, damage to
the oil pump and bearings may result.
1. To check the oil pump, unbolt the pump cover and
remove the oil pump, spring guide, spring and oil
pump shaft adapter as shown in figure 4.8.
2. Inspect the gears in the oil pump for corrosion or
pitting and replace if necessary.
3. Check the oil pump shaft bushing in the bearing
carrier. If the bushing is corroded, pitted or worn,
the oil pump shaft bushing should be replaced.
Inspect and replace other parts as necessary.
Figure 4.7: Crankcase Bearing Replacement
18

4. Before reassembling the oil pump mechanism,
replace the O-rings in the oil pump cover and on
the oil pump shaft adapter (see figure 4.8).
5. Rotate the drive pin in the crankshaft to a vertical
position for easiest reassembly.
6. Insert the shaft adapter so it engages the drive pin.
7. Next, insert the spring, spring guide and oil pump
assembly. The pin on the oil pump must align with
the slot in the pump shaft adapter.
8. Install the pump cover so the pin on the case is in the
opening on the oil pump assembly as shown in figure
4.8. When you are sure the pin is properly aligned,
install the cover bolts finger tight. If alignment is
correct, the pump cover will mount flush to the bearing
carrier. If it does not, re-check the pin alignment.
9. Tighten the bolts in an alternating sequence. See
section 2.3 for directions on oil pressure adjustment.
10. Finally, rotate the crankshaft by hand to ensure
smooth operation. Then rotate it in opposite directions,
listening for a click, which indicates proper alignment
of the oil pump’s pins and slots.
Chapter 5—Extended
Storage ProceduresFollowing a few simple procedures will greatly minimize
the risk of the unit becoming corroded and damaged.
Corken recommends the following precautions to protect
the compressor during storage:
1. Drain the crankcase oil and refill with rust inhibiting oil.
2. Operate for a few minutes while fogging oil into the
compressor suction.
3. Relieve V-belt tension.
4. Plug all openings to prevent entry of insects and
moisture. (The cylinders may also be protected by the
use of a vapor phase inhibitor, silica gel, or dry nitrogen
gas. If the silica gel is used, hang a tag on the unit
indicating that it must be removed before start-up.)
5. Store in a dry area and off the ground if possible.
6. Rotate the flywheel every two weeks if possible.
Figure 4.8: Oil Pump Inspection
19

Appendix A—Model Number Identification Code—FD/WFD351MODEL NUMBER
BASE MODEL NUMBER FD351 WFD351Inlet* 1" ANSI (600#) 1" ANSI (600#) BASE X X X X X X X X X XOutlet* 1" ANSI (600#) 1" ANSI (600#)Intercooler connection* 1" ANSI (600#) 1" ANSI (600#)Ship weight (lbs.) 340 350*All ANSI flanges are 300 lb.
SPECIFICATION FIELDSInlet pressure above atmospheric AAtmospheric inlet or vacuum service B
Extended crankshaft EPressure lubricated crankcase MStd. crankcase with crankcase heater MHStd. crankcase with cylinder lubricator L
Standard valves with PEEK valve plates 4PReverse unloaders and PEEK valve plates 6P
PTFE piston ring and packing material FSame as F w/the addition of K-Ring spacers FKAlloy 50 piston rings and packing material GSame as G w/the addition of K-Ring spacers GKPEEK piston ring and Alloy 50 packing material HSame as H w/the addition of K-Ring spacers HK
Aluminum gasket material BCopper gasket material CIron-lead gasket material D
Buna-N ANeoprene® BViton® DPTFE EHigh pressure Viton® J
Piston Ring and Packing Material
Standard
No charge optionO-ring Material
No charge option
No charge option
Crankcase StyleStandard
Charge option
PackingArrangement
Standard
Valves
Gasket MaterialStandard
Standard
Charge option
Charge option
Charge option
Charge optionCharge option
Charge option
Standard
Charge optionCharge option
Charge optionCharge optionCharge option
No charge option
Intercooler Intercooler not provided F
14 flywheel for extended crankshaft EHeavy duty flywheel HNo flywheel supplied NStandard flywheel S
Coated cylinder only CNo coating NCoating on all necessary wetted parts W
Piston Rod Nitrotec® piston rod coating N NA = Not Available NC = No ChargeNeoprene® and Viton® are registered trademarks of DuPontNitrotec® is a registered trademark of TTI Group Ltd.
Protective Coating Standard
Standard
No charge option
FlywheelNo charge option
Standard
Charge option
Charge option
Charge option
Standard
20

Appendix A—Model Number Identification Code—D/WD391MODEL NUMBER
BASE MODEL NUMBER D391 WD391Inlet 1" NPT 1” NPT BASE X X X X X X X X X XOutlet ¾" NPT ¾" NPTIntercooler connection 1" NPT 1" NPTShip weight (lbs.) 340 350
SPECIFICATION FIELDSInlet pressure above atmospheric Standard Standard AAtmospheric inlet or vacuum service Optional Optional B
Extended crankshaft Optional Optional EPressure lubricated crankcase Standard Standard MStd. crankcase with crankcase heater Optional Optional MHStd. crankcase with cylinder lubricator Optional Optional L**
Liquid relief suction valves Optional Optional 3Standard suction and discharge valves Standard Standard 4Loadless start through suction valve unloaders and hydraulic unloader Optional Optional 7(a)Constant speed unloading through suction valve unloaders and pilot valve Optional Optional 8(b)Combination control: Loadless starting and constant speed unloading Optional Optional 78(a)(b)Suction valve unloaders Optional Optional 9Spec 3 valves with MC1002 corrosion resistant coating Optional Optional 3C*Spec 4 valves with MC1002 corrosion resistant coating Optional Optional 4C*Spec 9 valves with MC1002 corrosion resistant coating Optional Optional 9C*
PTFE piston ring and packing material Standard Standard FSame as F w/the addition of K-Ring spacers Optional Optional FKAlloy 50 piston rings and packing material Optional Optional GSame as G w/the addition of K-Ring spacers Optional Optional GKPEEK piston ring and Alloy 50 packing material Optional Optional HSame as H w/the addition of K-Ring spacers Optional Optional HK
Aluminum gasket material Standard Standard BCopper gasket material Optional Optional C
PackingArrangement
CrankcaseStyle
Gasket Material
Valves
Piston Ring and PackingMaterial
Iron-lead gasket material Optional Optional D
Buna-N Standard Standard ANeoprene® Optional Optional BViton® Optional Optional DPTFE Optional Optional E
Air-cooled steel (rated for 325 psi) Standard NA AWater-cooled brass (rated for 150 psi) Optional Standard CWater-cooled stainless steel (rated for 150 psi) Optional Optional DHeavy duty air cooled copper (rated for 250 psi) Optional Optional ENPT flanges only, no intercooler Optional Optional FCooling loop - copper Optional NA GCooling loop - stainless steel Optional NA H
14 flywheel for extended crankshaft Optional Optional EHeavy duty flywheel Optional Optional HNo flywheel supplied Optional Optional NStandard flywheel Standard Standard S
Coated cylinder only Optional Optional CNo coating Standard Standard NCoating on all necessary wetted parts Optional Optional W*
Chrome oxide piston rod coating Optional Optional CNitrotec® piston rod coating Standard Standard N
*Must select protective coating option “W” when selecting valve option “3C”, “4C”, or “9C”
Nitrotec® is a registered trademark of TTI Group Ltd.
Neoprene® and Viton® are registered trademarks of DuPontNA = Not Available NC = No Charge(b) 1 = 30 to 70 psi or 2 = 71 to 150 psi or 3 = 151 to 500 psi(a) 1 = up to 200 psi or 2 = above 200 psi** Not compatible with intercooler specification A
Flywheel
IntercoolerConnections
Piston Rod Coating
ProtectiveCoating
O-ring Material
21

Appendix A—Model Number Identification Code—FD/WFD391
MODEL NUMBERBASE MODEL NUMBER FD391 WFD391Inlet 1" ANSI (300#) 1” ANSI (300#) BASE X X X X X X X X X XOutlet 1" ANSI (300#) 1" ANSI (300#)Intercooler connection 1" ANSI (300#) 1" ANSI (300#)Ship weight (lbs.) 340 350
SPECIFICATION FIELDSInlet pressure above atmospheric Standard Standard AAtmospheric inlet or vacuum service Optional Optional B
Extended crankshaft Optional Optional EPressure lubricated crankcase Standard Standard MStd. crankcase with crankcase heater Optional Optional MHStd. crankcase with cylinder lubricator Optional Optional L
Liquid relief suction valves Optional Optional 3Standard suction and discharge valves Standard Standard 4Loadless start through suction valve unloaders and hydraulic unloader Optional Optional 7(a)Constant speed unloading through suction valve unloaders and pilot valve Optional Optional 8(b)Combination control: Loadless starting and constant speed unloading Optional Optional 78(a)(b)Suction valve unloaders Optional Optional 9Spec 3 valves with MC1002 corrosion resistant coating Optional Optional 3C*Spec 4 valves with MC1002 corrosion resistant coating Optional Optional 4C*Spec 9 valves with MC1002 corrosion resistant coating Optional Optional 9C*
PTFE piston ring and packing material Standard Standard FSame as F w/the addition of K-Ring spacers Optional Optional FKAlloy 50 piston rings and packing material Optional Optional GSame as G w/the addition of K-Ring spacers Optional Optional GKPEEK piston ring and Alloy 50 packing material Optional Optional HSame as H w/the addition of K-Ring spacers Optional Optional HK
Aluminum gasket material Standard Standard BCopper gasket material Optional Optional C
PackingArrangement
CrankcaseStyle
Gasket Material
Valves
Piston Ring and PackingMaterial
Iron-lead gasket material Optional Optional D
Buna-N Standard Standard ANeoprene® Optional Optional BViton® Optional Optional DPTFE Optional Optional E
Intercooler No intercooler provided Standard Standard F
14 flywheel for extended crankshaft Optional Optional EHeavy duty flywheel Optional Optional HNo flywheel supplied Optional Optional NStandard flywheel Standard Standard S
Coated cylinder only Optional Optional CNo coating Standard Standard NCoating on all necessary wetted parts Optional Optional W*
Chrome oxide piston rod coating Optional Optional CNitrotec® piston rod coating Standard Standard N
Flywheel
Piston Rod Coating
ProtectiveCoating
O-ring Material
Nitrotec® is registered trademark of TTI Group Ltd.Neoprene® and Viton® are registered trademarks of DuPontNA = Not Available NC = No Charge(b) 1 = 30 to 70 psi or 2 = 71 to 150 psi or 3 = 151 to 500 psi(a) 1 = up to 200 psi or 2 = above 200 psi*Must select protective coating option “W” when selecting valve option “3C”, “4C”, or “9C”
22

Appendix B—Material Specifications for All D-Style Models 351 and 391
Part Model No. Standard Material Optional Material
Head, cylinder351 Ductile iron ASTM A536 MC1002 coated
391 Ductile iron ASTM A536 MC1002 coated
Crosshead guide,
crankcase, flywheel,
bearing carrier
351, 391 Gray iron ASTM A48, Class 30
Valve seat & bumper351 17-4 PH stainless steel
391 Ductile iron ASTM A536
Valve plate351 PEEK
391 17-7 PH stainless steel
Valve spring351 17-7 PH stainless steel
391 Inconel
Valve gaskets351 Iron-lead Copper, aluminum
391 Soft aluminum Copper, iron-lead
Unloader body & spring cap 351
Unloader cap 391
Unloader spring 351, 391
Unloader piston 351, 391
Unloader actuator 351, 391
Piston & piston platform
351, 391 1st stage: Gray iron ASTM A48, class 30
351 2nd stage: 17-7 PH stainless steel
391 2nd stage: Gray iron ASTM A48, Class 30
Piston rod 351, 391 C1050 steel Nitrotec coated Chrome oxide (391 only)
Crosshead 351, 391 Gray iron ASTM 48, Class 30
Piston rings351
1st stage: PTFE, glass & molly filled Alloy 50
2nd stage: PTFE, glass & molly filled PEEK
391 1st & 2nd stage: PTFE, glass & molly filled Alloy 50, PEEK
Ring expanders 351, 391 302 stainless steel
Head gasket (O-ring) 351, 391 Buna-N PTFE, Viton®1, Neoprene®1
Packing cartridge,
connecting rod351, 391 Ductile iron ASTM A536
Packing rings 351, 391 PTFE, glass and moly filled Alloy 50
Crankshaft 351, 391 Ductile iron ASTM A536
Con. rod bearing 351, 391 Bimetal D-2 Babbit
Wrist pin 351, 391 C1018 steel
Wrist pin busing 351, 391 Bronze SAE 660
Main bearing 351, 391 Tapered roller
Inspection plate 351, 391 Aluminum
O-rings 351, 391 Buna-N PTFE, Viton®1, Neoprene®1
Retainer rings 351, 391 Steel
Misc. gaskets 351, 391 Rubber compositions1 Viton® and Neoprene® are registered trademarks of the DuPont company.
23

Appendix B—Mechanical Specifications for All D-Style Models 351 and 391
Mechanical Specifications Bolt Torque Values
Head Bolt Torque Sequence for All Air-cooled Models FD351, D391, and FD391
Head Bolt Torque Sequence for All Water-cooled Models WFD351, WD391, and WFD391
6
3
4
57
8
9
10
14
12
11
13
BOTTOM VIEWTOP VIEW
1
2
Gas Inlet Connect toIntercooler Inlet
Gas OutletConnect to
Intercooler Outlet
Note: Torque bolts in the sequence shown above. Two bolts are inserted through the top of the head while the remaining bolts are inserted
through the bottom.
Note: Torque head bolts in the sequence shown above. All bolts are inserted through the top of the head.
Specification All Models 351 All Models 391
Bore of cylinder, inches (mm)
first stage 2.75 (69.9) 4.5 (114.3)
second stage 1.75 (44.5) 2.5 (63.5)
Stroke, inches (mm) 3.0 (76.2) 3.0 (76.2)
Piston displacement, cfm (m3/hr)
minimum @ 400 RPM 4.1 (7.0) 11.0 (18.8)
maximum @ 825 RPM 8.5 (14.5) 22.8 (38.7)
Maximum working pressure, psig (bar g) 1,200 (82.8) 625 (43.1)
Maximum brake horsepower, kW 15 (11) 15 (11)
Maximum rod load, lb (kg) 4,000 (1,814) 4,000 (1,814)
Maximum outlet temperature °F (°C) 350 (177) 350 (177)
Approximate bare unit weight, lb (kg) 340 (154) 350 (158.8)
Connecting rod bolt 30 ft•lb
Bearing carrier 25 ft•lb
Bearing cover 35 ft•lb
Crankcase inspection plate 10 ft•lb
Crosshead guide 30 ft•lb
Cylinder to head1,2 30 ft•lb
Valve cover plate bolt 35 ft•lb
Valve holddown screw2 40 ft•lb
Piston locknut 45 ft•lb
Socket head piston screw 100 in•lb
Valve / unloader cap (w/ O-rings) 25 ft•lb
2nd stage piston (351 only) 15 ft•lb1 Preliminary tightening: Snug all head bolts in the
sequence shown below. Final torque: Torque all head
bolts in the sequence shown to the listed value.2 Re-torque to the value listed above after 2 to 5 hours
of running time.
24

Appendix B—Mechanical Specifications for All D-Style Models 351 and 391
Clearances and Dimensions
Distance Piece Connections and Piston Rod Packing Orientation
*Dimensions for honing are included with new bushings (install bushings before honing).
Piston Clearance ‘X’ (Cold)a Specifications
“X” Inches (Millimeter)
Minimum Maximum
0.025 (0.64) 0.049 (1.24)
a The distance from the bottom of the head to the top of the piston.
WARNING
CAUTION: Always relieve pressure in the unit before attempting any repairs.
ModelPacking
ArrangementConditions Service
Distance Piece Opening, 1/4" NPT V-Rings Point
Upper Lower Upper Lower
All models
351 and 391
Specification A Inlet pressure:
above 15 psia
1) General
gas transfer
Plugged to allow
the distance piece
pressure to reach its
own level.
Pipe to drain or
vent with a shut-off
valve. Distance piece
must be drained
weekly to prevent an
accumulation of oil or
condensate.
Spring Spring
2) Highly
toxic gases
Pressurized via an
external gas source
to a pressure below
suction pressure and
above atmospheric
pressure. Or, vented to
atmospheric pressure (at
a suitable location) or to
a low pressure flare.
All models
351 and 391
Specification B Inlet pressure:
below
atmosphere
(vacuum)
1) General
gas transfer
Tube to second stage
inlet.
Spring Spring
2) Highly
toxic gases
Pressurized via an
external gas source to a
pressure above suction
pressure and above
atmospheric pressure.
Description
351 391
1st Stage 2nd Stage 1st Stage 2nd Stage
Clearance: Conrod bearing to crankshaft journal 0.0005 to 0.0025 0.0005 to 0.0025
Clearance: Wrist pin to wrist pin bushing* (max) 0.0009 0.0009
Cylinder bore diameter (max) 2.754 1.753 4.506 2.504
Cylinder finish (RMS) 16–32 16–32
Piston ring radial thickness (min) 0.090 0.082 0.093 0.082
Clearance: Oil pump adapter shaft to bushing* (max) 0.0050 0.0050
Crankshaft end play (cold) 0.000 0.002 0.000 0.002
Flywheel runout at O.D. (max) 0.020 0.020
Clearance: Crosshead to crosshead guide bore (max) 0.011 0.011
Crosshead guide bore finish (max) 32 RMS (Limited number
of small pits and scratches
are acceptable)
32 RMS (Limited number
of small pits and scratches
are acceptable)
25

1508-X
1"
1302
CO
RK
EN
,INC
.
03
21
PSI
KG/C
M¬
010
2030
40
OIL
OU
TLE
T
INLE
T
14871488
(Back s
ide)
Co
nn
ec
ted
to in
terc
oo
ler o
utle
t
1" 3
00 lb
. R.F
. AN
SI fl
an
ge (F
D3
91 o
nly
)
1" 6
00 lb
. R.F
. AN
SI fl
an
ge (F
D3
51 o
nly
)
(Fro
nt s
ide)
Co
nn
ec
ted
to in
terc
oo
ler in
let
1" 3
00 lb
. R.F
. AN
SI fl
an
ge (F
D3
91 o
nly
)
1" 6
00 lb
. R.F
. AN
SI fl
an
ge (F
D3
51 o
nly
)
Suctio
n v
alv
e u
nlo
ad
ers
(op
tional)
Inle
t
1" 3
00 lb
. R.F
. AN
SI fl
an
ge (F
D3
91 o
nly
)
1" 6
00 lb
. R.F
. AN
SI fl
an
ge (F
D3
51 o
nly
)Cra
nkcase h
eate
r
(op
tional)
5-5
/8
(14.2
9)
5-5
/8
(14.2
9)
5-7
/8
(14.9
2)
11/1
6
(1.7
5)
4-1
1/1
6
(11.9
1)
4-1
1/1
6
(11.9
1)
Fo
ur
1/2
dia
. ho
les
13 (3
3.0
9)
5
(12.7
0)
4-1
/8
(10.4
8)
10-1
1/1
6 (2
7.1
5)
12-1
/4 (3
1.1
2)
Exte
nd
ed
cra
nkshaft
(op
tional)
1-3
/8
(3.4
9)
16 d
ia.
(40.6
4)
15-3
/16 p
itch d
ia.
(38.5
7)
3
(7.6
2)
36-5
/16
(92.1
9)
Cra
nkcase h
eate
r
(op
tional)
5-3
/8
(13.6
5)
30-1
5/1
6
(78.5
9) 34-1
5/1
6
(87.1
1)
Gas o
utle
t
1" 3
00 lb
. R.F. A
NS
I
Fla
ng
e (F
D391 o
nly
)
1" 6
00 lb
. R.F
. AN
SI
flan
ge (F
D3
51 o
nly
)
Inc
he
s (C
en
timete
rs)
Appendix C—Outline Dimensions
Model FD351 and FD391 Bare Compressor with Flywheel
26
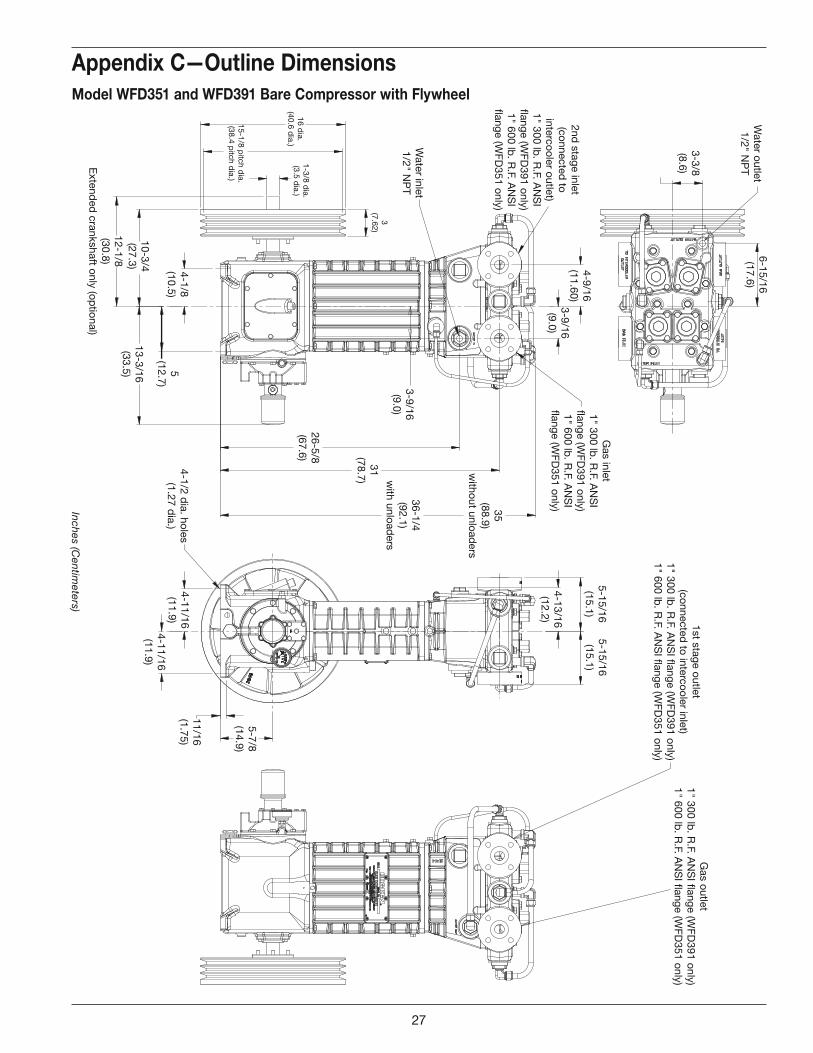
Wate
r outle
t
1/2
" NP
T
3-3
/8
(8.6
)
6-1
5/1
6
(17.6
)
4-9
/16
(11.6
0)
3-9
/16
(9.0
)
Wate
r inle
t
1/2
" NP
T
1-3
/8 d
ia.
(3.5
dia
.)16 d
ia.
(40.6
dia
.)
15-1
/8 p
itch d
ia.
(38.4
pitc
h d
ia.)
4-1
/8
(10.5
)
10-3
/4
(27.3
)
12-1
/8
(30.8
)
Exte
nd
ed
cra
nkshaft o
nly
(op
tional)
5
(12.7
)
13-3
/16
(33.5
)
4-1
/2 d
ia. h
ole
s
(1.2
7 d
ia.)
26-5
/8
(67.6
)
31
(78.7
)
3-9
/16
(9.0
)
35
(88.9
)
with
out u
nlo
ad
ers
36-1
/4
(92.1
)
with
unlo
ad
ers
4-1
1/1
6
(11.9
)
5-1
5/1
6
(15.1
)
4-1
3/1
6
(12.2
)
5-1
5/1
6
(15.1
)
5-7
/8
(14.9
)
11/1
6
(1.7
5)
3
(7.6
2)
4-1
1/1
6
(11.9
)
Gas in
let
1" 3
00 lb
. R.F. A
NS
I
flang
e (W
FD
391 o
nly
)
1" 6
00 lb
. R.F. A
NS
I
flang
e (W
FD
351 o
nly
)
2nd
sta
ge in
let
(co
nnecte
d to
inte
rco
ole
r outle
t)
1" 3
00 lb
. R.F. A
NS
I
flang
e (W
FD
391 o
nly
)
1" 6
00 lb
. R.F. A
NS
I
flang
e (W
FD
351 o
nly
)
1st s
tag
e o
utle
t
(co
nnecte
d to
inte
rco
ole
r inle
t)
1" 3
00 lb
. R.F. A
NS
I flang
e (W
FD
391 o
nly
)
1" 6
00 lb
. R.F. A
NS
I flang
e (W
FD
351 o
nly
)
Gas o
utle
t
1" 3
00 lb
. R.F. A
NS
I flang
e (W
FD
391 o
nly
)
1" 6
00 lb
. R.F. A
NS
I flang
e (W
FD
351 o
nly
)
Inc
he
s (C
en
timete
rs)
Appendix C—Outline Dimensions
Model WFD351 and WFD391 Bare Compressor with Flywheel
27

Inc
he
s (C
en
timete
rs)
Appendix C—Outline Dimensions
Model D391 Bare Compressor with Flywheel
CO
RK
EN
,INC
.
03
21
PSI
KG/C
M¬
010
2030
40
OIL
3/8Tx1/4P1991
14871488
Suctio
n v
alv
e u
nlo
ad
ers
(op
tional)
3
(7.6
2)
16 d
ia.
(40.6
4)
1-3
/8
(3.4
9)
15-3
/16
(38.5
7)
pitc
h d
ia.
Exte
nd
ed
cra
nkshaft
(op
tional)
10-1
1/1
6 (2
7.1
5)
12-3
/16 (3
0.9
5)
Cra
nkcase
oil h
eate
r
(op
tional)
4-1
/2 (1
.27)
dia
mete
r ho
les
36-1
/4
(921.9
)
5-7
/8
(14.9
2)
34-5
/16
(871.1
)
30-1
5/1
6
(785.9
)
Inle
t
(1" N
PT
)
4-1
/16
(10.3
4)
4-1
/16
(10.3
4)D
ischarg
e
(3/4
" NP
T)
13 (3
3.0
7)
5
(12.7
0)
4 (1
/8)
11/1
6
(1.7
5)
4-1
1/1
6
(11.9
1)
4-1
1/1
6
(11.9
1)
Inle
t
(1" N
PT
)
28

Inc
he
s (C
en
timete
rs)
1478
1302
CO
RK
EN
,INC
.
03
21
PSI
KG/C
M¬
010
2030
40
OIL
42
22
-X
OU
TLE
TIN
LET
Suctio
n v
alv
e
unlo
ad
ers
(op
tional)
Belt g
uard
& fl
yw
heel
Cra
nkcase h
eate
r
(op
tional)
Cra
nkcase o
il dra
in
Hig
h te
mp
era
ture
shutd
ow
n
sw
itch (o
ptio
nal)
Ele
ctric
mo
tor d
river
Use s
ix
1/2
" ancho
r
bo
lts
Ad
justa
ble
slid
e b
ase
Lo
w o
il pre
ssure
sw
itch (o
ptio
nal)
Cra
nkcase h
eate
r
(op
tional)
5-3
/8
(13.6
5)
43-5
/16
(110.0
9)
34-1
5/1
6
(88.7
5)
2-1
/4
(5.7
8)
10-3
/4 (2
7.3
1)
16-1
/2 (4
1.9
1)
18 (4
5.7
2)
40-5
/16
(102.3
3)38-5
/16
(97.2
5)
5-5
/8
(14.2
9)
5-5
/8
(14.2
9)
11-1
/16
(28.1
8)
1-1
/4
(3.1
7)
11-1
/4 (2
8.5
7)
38-3
/4 (9
8.4
3)
40 (1
01.6
0)
4
(10.1
6)
5-1
/4
(13.3
4)
(Back s
ide)
Co
nnecte
d to
inte
rco
ole
r outle
t
1" 3
00 lb
. R.F. A
NS
I
flang
e (W
FD
391 o
nly
)
1" 6
00 lb
. R.F. A
NS
I
flang
e (W
FD
351 o
nly
)
Gas o
utle
t
1" 3
00 lb
. R.F. A
NS
I
flang
e (W
FD
391)
1" 6
00 lb
. R.F. A
NS
I
flang
e (W
FD
351)
(Fro
nt s
ide)
Co
nnecte
d to
inte
rco
ole
r inle
t
1" 3
00 lb
. R.F. A
NS
I
flang
e (W
FD
391 o
nly
)
1" 6
00 lb
. R.F. A
NS
I
flang
e (W
FD
351 o
nly
)
Gas in
let
1" 3
00 lb
.
AN
SI fl
ang
e
(WF
D391 o
nly
)
1" 6
00 lb
.
AN
SI fl
ang
e
(WF
D351 o
nly
)
Appendix C—Outline Dimensions
Model FD351 and FD391 with 103 Mounting
29

03
21
010
2030
40
Beltg
uard
1-1
/2
(3.8
1)
28-1
/8 (7
1.4
0)
Cra
nkcase
oil d
rain
34-1
5/1
6
(88.7
5)
1-1
/4
(3.1
7)
37-1
/2 (9
5.2
5)
Use fo
ur 1
/2" a
ncho
r bo
lts
Lo
w o
il pre
ssure
sw
itch
Ele
ctric
mo
tor
6-3
/4
(17.1
5)
5-3
/4
(14.6
1)
15 (3
8.1
0)
6-3
/8
(16.1
5)
40 (1
01.6
0)
Dis
charg
e
(3/4
" NP
T)
Inle
t
(1" N
PT
)
Suctio
n v
alv
e u
nlo
ad
ers
(op
tional)
Inle
t
(1" N
PT
)
Inc
he
s (C
en
timete
rs)
Appendix C—Outline Dimensions
Model D391 with 103 Mounting
30

Two-Stage Compressor Troubleshooting
Two-stage compressors can have problems that never
occur with single-stage machines. Interstage pressure
is an important indicator of the condition of a two-
stage compressor.
If interstage pressure is too high:
1. Second stage valves may be broken or leaking.
2. Second stage piston rings may be worn.
If interstage pressure is too low:
1. First stage valves may be broken or leaking.
2. First stage piston rings may be worn.
In most cases, problems with your Corken gas compressor
can be solved quite simply. This chart lists some of the
more frequent problems that occur with reciprocating
compressors along with a list of possible causes. If you
are having a problem which is not listed, or if you cannot
find the source of the problem, consult the factory.
Appendix D—Troubleshooting
Problem Possible Cause
Low capacity 1, 2, 3, 4, 8, 15, 17
Overheating 1, 2, 3, 5, 6, 11, 16
Knocks, rattles and noise 1, 7, 9, 10, 11, 15
Oil in cylinder 8, 12, 15
Abnormal piston-ring wear 1, 3, 5, 6, 11, 15, 16
Product leaking through crankcase breather 8, 15
Product leakage 4, 8, 15, 17
Oil leakage around compressor base 17, 18, 19, 20
No oil pressure 19, 20
Excessive vibration 1, 7, 9, 10, 11, 13, 14, 28
Motor overheating or starter tripping out 21, 22, 23, 24, 25, 26, 27, 28
Ref. Possible Causes What To Do
1. Valves broken, stuck or leaking Inspect and clean or repair
2. Piston ring worn Inspect and replace as necessary
3. Inlet strainer clogged Clean or replace screen as necessary
4. Leaks in piping Inspect and repair
5. Inlet or ambient temperature too high Consult factory
6. Compression ratio too high Check application and consult factory
7. Loose flywheel or belt Tighten
8. Worn piston-rod packing Replace
9. Worn wrist-pin or wrist-pin bushing Replace
10. Worn connecting-rod bearing Replace
11. Unbalanced load Inspect valve or consult factory
12. Oil in distance piece Tighten packing nut — drain weekly
13. Inadequate compressor base Strengthen, replace or grout
14. Improper foundation or mounting Tighten mounting or rebuild foundation
15. Loose valve, piston or packing Tighten or replace as necessary
16. Dirty cooling fins Clean weekly
17. 4-way control valve not lubricated Inspect and lubricate
18. Leaking gas blowing oil from crankcase Tighten packing
19. Bad oil seal Replace
20. No oil in crankcase Add oil
21. Oil-pump malfunction See oil pressure adjustment
22. Low voltage Check line voltage with motor nameplate. Consult power company
23. Motor wired wrong Check wiring diagram
24. Wire size too small for length of run Replace with correct size
25. Wrong power characteristics Voltage, phase and frequency must coincide with motor nameplate. Consult with power company.
26. Wrong size of heaters in starter Check and replace according to manufacturer’s instructions
27. Compressor overloading Reduce speed
28. Motor shorted out See driver installation
29. Bad motor bearing Lubricate according to manufacturer’s instructions
Another cause for high interstage pressure is a low
compression ratio. Two-stage machines should not be
used in applications where the compression ratio is
below 5. To use two-stage compressors in this kind of
situation results in rapid ring wear, machine imbalance
and excessive horsepower. If you think you have a
problem in this area, consult factory.
31

Appendix E—Head and Valve Assembly Details—All D-Style Models 351
4
2
1
3
1
4
2
5
6
7
8
9
10
11
12
13
14
16
17
15
18
19
12
11
10
20
13
14
17
18
19
Suction(spec 6P)
Discharge(all specs)
12
11
10
20
13
14
17
21
19
Suction(spec 4P)
FD Head
WFD Head
Valve Holddown Assemblies
32

Unloader Assembly (5320-X1e)
Appendix E—Head and Valve Assembly Details—All D-Style Models 351
Ref No.
Part No. Description Qty.
14366 Head—FD351 1
4372-3 Head—WFD351 1
2 1647Center head bolt—FD351 only 2
Head bolt—WFD351 only 10
3 7005-043NC150A Head bolt—FD351 only 12
4
2-253_a O-ring—1st stage & 2nd stage (FD351 only)
2
2-253_a O-ring—2nd stage (WFD351 only) 1
2-256_a O-ring—1st stage (WFD351 only) 1
5. 7002-025TP125Af Socket head 1/4"-20 x 1-1/4" 6
6. 5275f Unloader body cap (spec 6P) 2
7. 5277f Unloader spring (spec 6P) 2
8. 5273 Unloader piston (spec 6P) 2
9. 5345f Unloader body (spec 6P) 2
10. 2-031_a O-ring 4
11. 2715 Valve hold-down screw 4
12. 7001-043NC125A Hex head 7/16-14 x 1-1/4" 16
13. 2205 Cover plate (3-1/4) 4
14. 2-143_a O-ring 4
15. 5319 Valve cage 4
16. 5320f Unloader actuator (spec 6P) 2
17. 5277f Unloader spring (spec 6P) 2
18. 5311-3X_d Suction valve assembly 2
19.
1418-2 Valve gasket (iron-lead standard) 4
1418-1 Valve gasket (copper optional) 4
1418 Valve gasket (aluminum optional) 4
20. 2714-1 Valve cap (spec 4P and discharge) 4
21. 5318-3X_d Discharge valve assembly 2
22. 5311 Valve seat 4
23. 3920c Valve stud 4
24. 5312 Valve plate 4
25. 5313 Valve spring 4
26. 5318-3 Valve bumper 4
27. 5281f Unloader washer 1
28. 5278-Xf Piston seal assembly 2
29. 2590f Pipe plug 1/8" NPT flush 1
30. 5280f Unloader washer 1
31. 5279-Xf Piston seal assembly 1
32. 5272f Unloader piston cap 1
33. 7002-025NC037Af Bolt 1/4-20 soc. button hd 1
34. 5000-87SSf Retainer ring 1
35. 5000-150SSf Retainer ring 1
36. 5320-X1e Unloader assembly 1
Head and Valve Assembly Bill of Materials
O-ring Code
A Buna-N
B Neoprene®b
D Viton®b
E PTFE
K Kalrez®b
Gasket Material Code
Aluminum
1 Copper
2 Iron-lead
a _ denotes O-ring code. See O-ring chart for details.b Registered trademark of the DuPont company.c Apply Loctite #263 before final assembly.d _ denotes gasket material.e Only the numbered items are included in the assembly.f Included with unloader assembly #5320-X1.
WARNING
CAUTION: Always relieve pressure in the unit before attempting
any repairs.
Suction Valve
22
23c 23c
24
25
18
26
19
Discharge Valve
22
19
24
25
26
21
Valve Assemblies
NOTE: A small amount of Loctite #263 should be applied around
the complete circumference of the valve stud (part number 3920)
before final assembly.
17
28
2930
31
6
327 33
5
9
34
8
35
28
16
27
36e
Note seal
direction
shown
below!
WARNING
33

Appendix E—Head and Valve Assembly Details—All D-Style Models 391
Ref No.
Part No. Description Qty.
1
4159 Head—D391 1
4366 Head—FD391 1
3745 Head—WD391 1
4372-3 Head—WFD391 1
2
1647Center head bolt—D391, FD391 only
2
1647Head bolt—WD391, WFD391 only
10
3 7005-043NC150A Head bolt—D391, FD391 only 12
4
2-253_a O-ring—1st stage & 2nd stage (D391, FD391 only)
2
2-253_a O-ring—2nd stage (WD391, WFD391 only)
1
2-256_a O-ring—1st stage (WD391, WFD391 only)
1
5 2598-1 Unloader cap (spec 7, 78, 8, 9) 2
6 2715 Holddown screw (spec 7, 78, 8, 9) 2
7 2-031_a O-ring (spec 7, 78, 8, 9) 2
8 7001-043NC125A Bolt—7/16-14x1-1/4" hex head 16
Head and Valve Assembly Bill of Materials
Valve Holddown Assemblies
5
20
19
18
17 17
18
19
20
10
21
14
22
16
10
21
14
15
16
SeeUnloaderAssembly
6
7
8
9
10
11
12
13
14
15
16
8 8
Suction(spec 7, 78, 8, 9)
Discharge(all specs)
Suction(spec 4)
4
2
1
3
1
4
2
FD Head Shown Below
WFD Head Shown Below
Ref No.
Part No. Description Qty.
9 2205 Valve cover plate (spec 7, 78, 8, 9) 2
10 2-143_a O-ring 4
11 2207 Valve spacer (spec 7, 78, 8, 9) 2
12 2449Unloader actuator (spec 7, 78, 8, 9)
2
13 2450 Unloader spring (spec 7, 78, 8, 9) 2
14 2448 Cage 4
15
2438-XSuction valve assembly (aluminum standard)
2
2438-X1Same as 2438-X but with copper gaskets (optional)
2
2438-X2Same as 2438-X but with iron-lead gaskets (optional)
2
16
1418 Valve gasket (aluminum standard) 4
1418-1 Valve gasket (copper optional) 4
1418-2 Valve gasket (iron-lead optional) 4
17 1477Valve screw nut (spec 4 and discharge)
4
34

Appendix E—Head and Valve Assembly Details—All D-Style Models 391
Valve AssembliesUnloader Assembly
18 18
23
30
28
27
26
25
31
16
23
24
25
26
27
28
29
16
Suction Valve
Place spacersback to back
as shown.
Discharge Valve
15 22
5
32 Apply loctite #290 whenassembling this part
7 not included inunloader assembly
33
34
35
33
37
36
12
13
Spec 7, 78, 8, 9
Ref No.
Part No. Description Qty.
18
1478Gasket—steel (standard) (spec 4 and discharge)
4
1478-1Gasket—copper (optional) (spec 4 and discharge)
4
19 1476Valve holddown screw (spec 4 and discharge)
4
20 1475Valve cover plate (spec 4 and discharge)
4
21 1409Valve spacer (spec 4 and discharge)
4
22
2439-XDischarge valve assembly (aluminum standard)
2
2439-X1Same as 2439-X but with copper gaskets (optional)
2
2439-X2Same as 2439-X but with iron-lead gaskets (optional)
2
23 2446 Valve bolt 4
24 2438 Suction valve seat 2
25 2442 Valve plate 4
26 2445_b Spacer (two per valve) 8
Ref No.
Part No. Description Qty.
27 3355 Washer 4
28 1407 Valve spring 4
29 2440 Suction valve bumper 2
30 2441 Discharge valve bumper 2
31 2439 Discharge valve seat 2
32 1910 Bolt (1/4-20 X 1/2 hex socket) 2
33 2619-X Piston seal assembly 2
34 2857 Piston cap 2
35 2858 Gasket 2
36 2618 Unloader piston 2
37 2618-X Unloader assembly 2
a _ denotes O-ring code. See O-ring chart for
details.b Included with valve assembly.c Registered trademark of the DuPont
company.
WARNING
CAUTION: Always relieve pressure in
the unit before attempting any repairs.
O-ring Code
A Buna-N
B Neoprene®c
D Viton®c
E PTFE
K Kalrez®c
WARNING
Note seal
direction
shown above!
35

1st Stage 2nd Stage
Appendix E—Piston Assembly Details—All D-Style Models 351
Piston Assembly No.1st Stage 2nd Stage
5305-X 5307-X
Piston Diameter 2-3/4" (6.98 cm) 1-3/4" (4.45 cm)
Ref. No.
Part Name Part No. Qty. Part No. Qty.
1.Screw, sockethead 7002-008 NC125A 6
Does not applyLock washer 7207-008A 6
2. Piston head 5305 1 5307 1
3. Ring expander 1774 3 2015 3
4. Piston ring
5315—PTFE (standard)
31770—PTFE (standard)
3
5315-2—Alloy 50 (optional)
31770-3—PEEK (optional)
3
5. Locknut 1482 1 Does not apply
6. Lock pin 1483 1 Does not apply
7. Piston platform 5306 1 Does not apply
8.Shim washer, thick 1528
As req. 1378 As req.Shim washer, thin 1528-1
9. Thrust washer 1527 1 Does not apply
5
6
7
8
9
Piston Rod
4
3
2
1
8
Piston Rod
4
3
2
Piston Assembly Bill of Materials
NOTE: Apply a small amount of Loctite #272 to the
circumference of the 2nd stage piston rod threads and
torque the piston with the spanner tool (part number
5207-X) to the value listed in Appendix B.
NOTE: Torque socket head screws and locknut to the
value listed in Appendix B.
36

Piston Assembly No.1st Stage 2nd Stage
1987-X 1981-X
Piston Diameter 4-1/2" (11.43 cm) 2-1/2" (6.35 cm)
Ref. No.
Part Name Part No. Qty. Part No. Qty.
1.Screw, sockethead 7002-025 OC125A 8 7002-008 NC125A 6
Lock washer 7207-025A 8 7207-008A 6
2. Piston head 1987 1 1981 1
3. Ring expander 1740 3 1774 3
4. Piston ring
1739—PTFE (std.) 3 1771—PTFE (std.) 3
1739-2—Alloy 50 (opt.)
31771-2—Alloy 50 (opt.)
3
1739-3—PEEK (opt.) 3 1771-3—PEEK (opt.) 3
5. Locknut 1482 1 1482 1
6. Lock pin 1483 1 1483 1
7. Piston platform 1986 1 1982 1
8.Shim washer, thick 1528 As
req.
1528 As req.Shim washer, thin 1528-1 1528-1
9. Thrust washer 1527 1 1527 1
1st Stage 2nd Stage
Appendix E—Piston Assembly Details—All D-Style Models 391
5
6
7
8
9
Piston Rod
4
3
2
1
5
6
7
8
9
Piston Rod
4
3
2
1
Piston Assembly Bill of Materials
NOTE: Torque socket head screws and locknut to the
value listed in Appendix B.
NOTE: Torque socket head screws and locknut to the
value listed in Appendix B.
37

Ref No.
Part No. Description Qty.
1.
5334 Cylinder—FD351 1
5259 Cylinder—WFD351 1
4160 Cylinder—D391, FD391 1
3744 Cylinder—WD391, WFD391 1
2.2-231_a O-ring—2nd stage (all models) 1
2-247_a O-ring—1st stage (all models) 1
3. 5000-125 Retainer ring 6
4. 1714 Packing box washer 10
5. 1628 Packing spring 4
6. 1453-1 Male packing ring 4
7. 1454 Packing ring 20
8. 1452-1 Female packing ring 4
9. 2801 Cartridge holddown screw 2
10. 2778 Spacer 2
11. 2-227_a O-ring 4
12. 2776d Packing cartridge 2
13. 1677-1 Oil deflector ring 2
14.
1387-XAdjustment screw assembly (includes part number 1192)
2
1192 Locking device TFE 1/8" dia. x 1/4" long
2
15. 2773-X Crosshead guide assembly 1
16. 2777c Cartridge plate 2
17. 5000-262c Retainer ring 2
18.7005-043NC125A Ferry head bolt 12
7206-043A Lock washer 6
19. 1489 Crankcase gasket 1
20. 1488 Inspection plate gasket 1
21. 1487 Inspection plate 1
22. 7003-025NC037E 1/4-20x3/8" 8
23.
1452-1X3Packing set (PTFE standard) includes 1452-1, 1453-1, 1454 (5), 1628, 1714
4
1452-2X3Packing set (Alloy 50 optional) includes 1452-1, 1453-1, 1454 (5), 1628, 1714
4
Packing Spec. A Packing Assembly Bill of Materials
a _ denotes O-ring code. See O-ring chart for details.b Registered trademark of the DuPont company.c Included with crosshead guide assembly 2773-X.d Before installing the packing cartridge and packing on the piston rod,
use packing cone (part number 4005) on the 1st stage of model 351
and both stages of model 391. Use packing cone (part number 5268)
on the 2nd stage of model 351 only. See crosshead and connecting
rod assembly details for more information.
WARNING
CAUTION: Always relieve pressure in the unit before attempting
any repairs.
3
4
5
4
4
3
9
10
11
12d
13
3
4
5
4
6
7
8
17
18
18
Piston Rod
16
15
2
1
23
14
19
20
21
22
11
Appendix E—Packing Assembly Details —All D-Style Models 351 and 391
O-ring Code
A Buna-N
B Neoprene®b
D Viton®b
E PTFE
K Kalrez®b
38

a _ denotes O-ring code. See O-ring chart for details.b Registered trademark of the DuPont company.c Included with crosshead guide assembly 2773-X.d Before installing the packing cartridge and packing on the piston rod,
use packing cone (part number 4005) on the 1st stage of model 351
and both stages of model 391. Use packing cone (part number 5268)
on the 2nd stage of model 351 only. See crosshead and connecting
rod assembly details for more information.
WARNING
CAUTION: Always relieve pressure in the unit before attempting
any repairs.
Packing Assembly Bill of Materials
Ref No.
Part No. Description Qty.
1.
5334 Cylinder—FD351 1
5259 Cylinder—WFD351 1
4160 Cylinder—D391, FD391 1
3744 Cylinder—WD391, WFD391 1
2.2-231_a O-ring—2nd stage (all models) 1
2-247_a O-ring—1st stage (all models) 1
3. 5000-125 Retainer ring 6
4. 1714 Packing box washer 10
5. 1628 Packing spring 4
6. 1453-1 Male packing ring 4
7. 1454 Packing ring 20
8. 1452-1 Female packing ring 4
9. 2801 Cartridge holddown screw 2
10. 2778 Spacer 2
11. 2-227_a O-ring 4
12. 2776d Packing cartridge 2
13. 1677-1 Oil deflector ring 2
14.
1387-XAdjustment screw assembly (includes part number 1192)
2
1192 Locking device TFE 1/8" dia. x 1/4" long
2
15. 2773-X Crosshead guide assembly 1
16. 2777c Cartridge plate 2
17. 5000-262c Retainer ring 2
18.7005-043NC125A Ferry head bolt 12
7206-043A Lock washer 6
19. 1489 Crankcase gasket 1
20. 1488 Inspection plate gasket 1
21. 1487 Inspection plate 1
22. 7003-025NC037E 1/4-20x3/8" 8
23.
1452-1X3Packing set (PTFE standard) includes 1452-1, 1453-1, 1454 (5), 1628, 1714
4
1452-2X3Packing set (Alloy 50 optional) includes 1452-1, 1453-1, 1454 (5), 1628, 1714
4
Packing Spec. B
3
4
5
4
4
3
9
10
11
12d
13
3
4
5
4
17
Piston Rod
16
15
2
23
23
14
11
18
18
19
20
21
22
8
7
6
6
7
8
1
Appendix E—Packing Assembly Details —All D-Style Models 351 and 391
O-ring Code
A Buna-N
B Neoprene®b
D Viton®b
E PTFE
K Kalrez®b
39

Appendix E—Crosshead and Connecting Rod Assembly Details—All
D-Style Models 351 and 391
5
10d
1
4
2
5
9
6, 7
3
2
Notealignment
marks
8
Ref
No.Part No. Description Qty.
1.
1384-X1
Crosshead assembly—1st stage (351
only)1
Crosshead assembly—1st and 2nd
stage (391 only)2
1384-X4Crosshead assembly—1st and 2nd
stage (391 only) - chrome oxide (opt.)2
1384-X5Crosshead assembly—2nd stage (351
only)1
2. 1498 Retainer ring 4
3. 1496 Wrist pin 2
4. 1495-Xa,b Wrist pin bushing 2
5. 1492b Bolt 4
6. 1490-X Connecting rod assembly 2
7. 1490b Connecting rod 2
8. 1491b Connecting rod bearing 2
9. 1493b,c Nut 4
10.4005d
Packing cone—1st stage (351 only) 1
Packing cone—1st and 2nd stage
(391 only)1
5268d Packing cone—2nd stage (351 only) 1a Must be rebored after replacing (0.8754/0.8751 dia.)b Included with connecting rod assembly c Torque connecting rod nut to value shown in Appendix B.d Only used when installing the packing cartridge and packing on the
piston rod.
Never attempt to separate the piston rod and crosshead. When repair
becomes necessary, the entire crosshead assembly must be replaced.
WARNING
CAUTION: Always relieve pressure in the unit before attempting
any repairs.
Connecting Rod Assembly Bill of Materials
40

Appendix E—Flywheel Assembly Details—All D-Style Models 351 and 391
Back Side
Front Side
Flywheel Assembly Bill of Materials
Assembly Number Assembly Name
2549-X
Flywheel assem-bly (flywheel, hub, three bolts and lockwashers)
2549 Flywheel: 16" O.D., 3 groove
H SF-1.375 Hub with three bolts and lockwashers
NOTE: For details on flywheel runout, refer to the
Clearances and Dimensions in Appendix B.
41

Appendix E—Crankcase Assembly Details—All D-Style Models 351 and 391
1 23 4
56
11 12
131415
1617
18
1920
19
212227
26 25 24 23
28
29
30
31
32
21
3536
36 (assembly)33
34
37
38
45
46
33
4342
4140
39
44 7
52
2953
37
55 (assembly) 54
4748
4950
51
87
9
10
42

Appendix E—Crankcase Assembly Details—All D-Style Models 351 and 391
Ref No.
Part No. Description
1. 4438 Oil seal2. 7001-037NC075A Hex head bolt 3/8-16 x 3/4
3.2847-1 Bearing cover
2847-1X Bearing cover assembly (includes 2847-1, 4438)
4.1504 Bearing adjustment shim (0.005")1504-1 Bearing adjustment shim (0.007")1504-2 Bearing adjustment shim (0.020")
5. 1502 Bearing cup
6.1508-X Oil bayonet
1508-X1 Oil bayonet assembly (includes part numbers 1508-X, 2-112A)
7. 2-112Ab O-ring (oil bayonet & pump shaft)8. 1511 Crankcase inspection plate gasket9. 7001-031NC075A Hex head bolt 5/16-18 x 3/410. 2853 Crankcase inspection plate11. 2803a Crankcase
12.1279 Breather cap
1279-X Breather cap assembly (includes part numbers 1279, 2-111A)
13. 2-111Ab O-ring (breather cap)14. 2796 Breather ball15. 1483 Lock pin16. 1663 Flywheel key17. 1501 Bearing cone
18.
1499-XCrankshaft assembly —standard (includes part numbers 1284 (2), 1286, 1499, 1501, 1503, 2590)
1499-SXExtended crankshaft assembly—optional(includes part numbers 1284 (2),1286, 1499-S, 1501, 1503, 2590)
19. 1284 Crankcase orifice (2)20. 1503 Bearing cone
21.1459 Crankshaft plug2590 Pipe plug
22. 1286 Pump shaft drive pin23. 1280 Filter screw24. 1281 Filter screen screw gasket25. 2-116Ab O-ring (filter screen)26. 1276 Filter screen washer27. 1275 Oil filter screen28. 1661 Plug 3/8" NPT29 3289 Pipe plug
30. 2961-X Air release valve assembly (includes part numbers 2961, 2962, 2963)
31. 1500 Bearing cup
Ref No.
Part No. Description
32.
2804 Bearing carrier
2804-X
Bearing carrier assembly (includes part numbers 1290, 1291, 1292, 1293, 1500, 1513, 1515-X, 1629 (2), 2590, 2804, 2849-X, 2850, 2851, 2852, 2961-X, 2-011A, 2-112A, 2-228A, 4222-X, 7001-025NC050A (10))
33. 1629 1/16" NPT pipe plug, flush seal
34. 2-218Ab O-ring for closure body (2) (Spec. 4, 8, 9 only)
35. 1516 Closure body
36.
1515 Closure cap
1515-XClosure cap assembly (includes part numbers 2-218A (2), 1516, 1515,7001-025NC050A) (Spec. 4, 8, 9 only)
37. 7001-025NC050A Hex head bolt 1/4-20 x 1/238. 1302 Oil pressure gauge39. 2-228Ab O-ring (pump cover)40. 2849-X Oil pump assembly41. 2851 Spring guide42. 2852 Oil pump spring43. 2850 Pump shaft adapter44. 2805-X Pump shaft bushing45. 7001-037NC100A Hex head bolt 3/8-16 x 146. 1513 Bearing carrier gasket47. 1290 Relief valve adjusting screw48. 1291 Adjusting screw locknut49. 2-011Ab O-ring (relief valve adjusting screw)50. 1292 Relief valve spring51. 1293 Relief valve ball
52.2798 Pump cover pin (included with part
number 2848-X)2848-X Pump cover (includes pin)
53. 4222 Oil filter adapter54. 4225 Oil filter55. 4222-X Oil filter assembly—external
Crankcase Assembly Bill of Materials
a Crankcase capacity: 3 quarts (2.8 liters)b See O-ring chart above for details.
WARNING
CAUTION: Always relieve pressure in the unit before attempting
any repairs.
O-ring Code
A Buna-N
43

Corken, Inc. • A Unit of IDEX Corporation
3805 N.W. 36th St., Oklahoma City, OK 73112
Phone (405) 946-5576 • Fax (405) 948-7343
Visit our website at http://www.corken.com
or e-mail us at [email protected]
Printed in the U.S.A.
April 2012