orienteering in schools - bsoabsoa.org/docs/misc/teaching orienteering in schools.pdforienteering in...
TRANSCRIPT
0
ORIENTEERING
IN
SCHOOLS
This manual is intended as an aid for use by anyone teaching orienteering in schools for children aged between 8 and 12. Some exercises and events are also suitable for children aged 5 – 7.
1
Contents Page Foreword 2 Credits 2 Who should use this manual? 2 ORIENTEERING 3 Orienteering Events 3 Understanding maps 4 Turning the map 6 Navigating simple courses 7 Setting one's own simple courses 7 Mini Maps and Mini Map Events 7 Map Symbols for Hand Drawn Maps 9 SCHOOL GROUNDS MAPS/SCHOOL GROUNDS EVENTS 9 School grounds maps 10 Motala event 10 Preparing for a Trivia Event 11 Trivia event 11 Cross country event 12 Score event 13 SCHOOL GROUNDS AND PARK EVENTS AND MAPS 14 Map walks 14 Different levels of technical difficulty 14 ORIENTEERING AND SCHOOL 16 MAP GAMES 16 - Circle of Friends 17 - Indoor Navigation 17 - Desktop Map 18 - Treasure Island 19 - Orienteering Island 20 - Individual Orienteering Islands 21 - Trying to Trick You game 22 MAP MAKING 23 Do-it-yourself maps 23 Computer drawn maps 24 Do-it-yourself maps using mapping software 24 Hiring a mapper 25 Printing maps 25 GENERAL INFORMATION 26 Making controls 26 Resources and contacts 26
Glossary 27
Explorer Challenge Certificates 28
BSOA Membership form 29
2
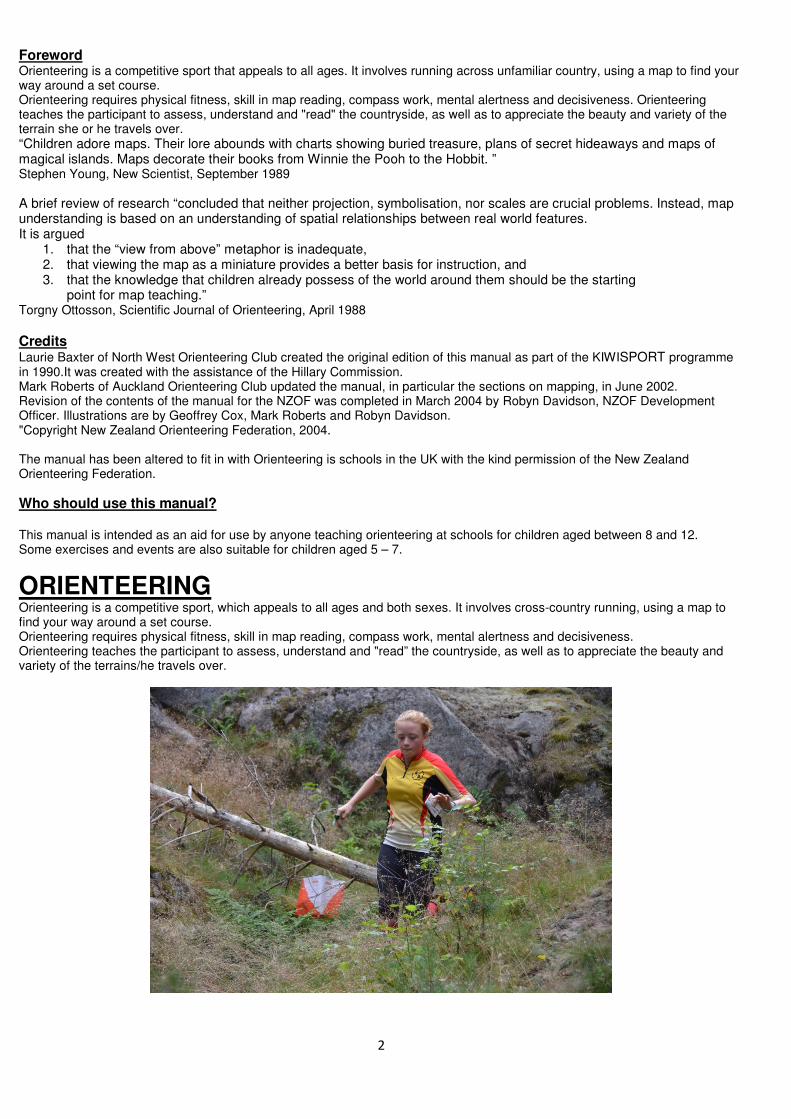
Foreword Orienteering is a competitive sport that appeals to all ages. It involves running across unfamiliar country, using a map to find your way around a set course. Orienteering requires physical fitness, skill in map reading, compass work, mental alertness and decisiveness. Orienteering teaches the participant to assess, understand and "read" the countryside, as well as to appreciate the beauty and variety of the terrain she or he travels over. “Children adore maps. Their lore abounds with charts showing buried treasure, plans of secret hideaways and maps of magical islands. Maps decorate their books from Winnie the Pooh to the Hobbit. ” Stephen Young, New Scientist, September 1989
A brief review of research “concluded that neither projection, symbolisation, nor scales are crucial problems. Instead, map understanding is based on an understanding of spatial relationships between real world features. It is argued
1. that the “view from above” metaphor is inadequate, 2. that viewing the map as a miniature provides a better basis for instruction, and 3. that the knowledge that children already possess of the world around them should be the starting
point for map teaching.” Torgny Ottosson, Scientific Journal of Orienteering, April 1988
Credits Laurie Baxter of North West Orienteering Club created the original edition of this manual as part of the KIWISPORT programme in 1990.It was created with the assistance of the Hillary Commission. Mark Roberts of Auckland Orienteering Club updated the manual, in particular the sections on mapping, in June 2002. Revision of the contents of the manual for the NZOF was completed in March 2004 by Robyn Davidson, NZOF Development Officer. Illustrations are by Geoffrey Cox, Mark Roberts and Robyn Davidson. "Copyright New Zealand Orienteering Federation, 2004. The manual has been altered to fit in with Orienteering is schools in the UK with the kind permission of the New Zealand Orienteering Federation.
Who should use this manual? This manual is intended as an aid for use by anyone teaching orienteering at schools for children aged between 8 and 12. Some exercises and events are also suitable for children aged 5 – 7.
ORIENTEERING Orienteering is a competitive sport, which appeals to all ages and both sexes. It involves cross-country running, using a map to find your way around a set course. Orienteering requires physical fitness, skill in map reading, compass work, mental alertness and decisiveness. Orienteering teaches the participant to assess, understand and "read” the countryside, as well as to appreciate the beauty and variety of the terrains/he travels over.
3
A standard orienteering course consists of a start, a series of checkpoints called controls at different features in the terrain, which must be visited in order, and a finish. Participants use an accurate, detailed map of the area to find the controls. While most orienteers also use a compass to keep their map orientated (“turned to fit”), this is not the only way to do so. Orienteering embodies a wide range of skills both physical and mental. The latter include:
• fitting map to terrain (and vice-versa)
• decision making (route choice)
• determination (sticking to one’s decision)
• self-confidence (in unfamiliar terrain)
• planning ahead
• adapting the correct navigational technique for the terrain, e.g. aiming off, use of attack points, compass skills, checking distance travelled.
See the Glossary for explanations of orienteering terms. Here, however, we only seek to introduce basic skills involved in navigating with a map. These skills include:
• understanding a map, including Key or Legend
• turning a map to fit the ground
• navigating a simple course, or similar exercise
• setting one’s own simple courses
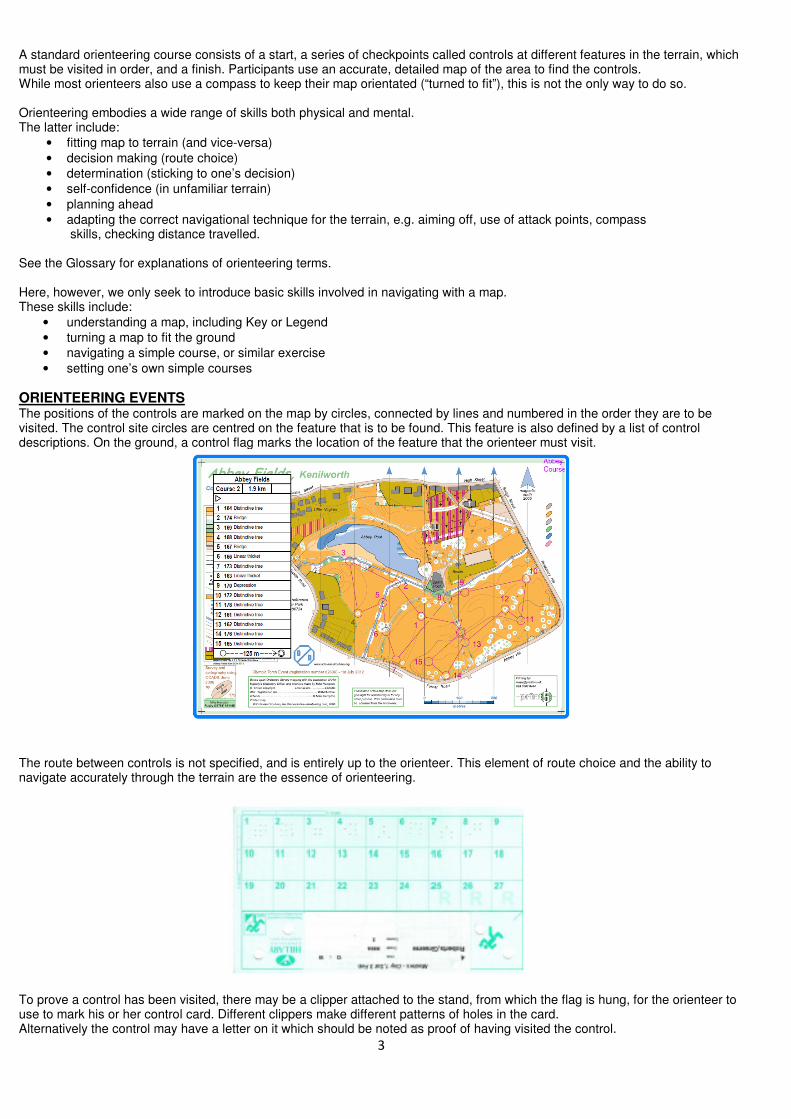
ORIENTEERING EVENTS The positions of the controls are marked on the map by circles, connected by lines and numbered in the order they are to be visited. The control site circles are centred on the feature that is to be found. This feature is also defined by a list of control descriptions. On the ground, a control flag marks the location of the feature that the orienteer must visit.
The route between controls is not specified, and is entirely up to the orienteer. This element of route choice and the ability to navigate accurately through the terrain are the essence of orienteering.
To prove a control has been visited, there may be a clipper attached to the stand, from which the flag is hung, for the orienteer to use to mark his or her control card. Different clippers make different patterns of holes in the card. Alternatively the control may have a letter on it which should be noted as proof of having visited the control.
4
There are also electronic ways of checking that an orienteer has visited a control site. There are two used widely in the UK – SI and Emit. Most orienteering events use staggered starts to ensure that each orienteer has a chance to do his or her own navigating, but there are several other popular formats, including relays and events in which the orienteer must find as many controls as possible within a specified time. Orienteering is also enjoyed as a recreational activity. Families, groups, couples and individuals walk around a course, enjoying the environment, with the added challenge of reading the map and working out the route to take. Other forms of orienteering include mountain bike (MTB-O), ski, canoe, trail (for people in wheelchairs), and rogaines – a long distance team version of the sport.
In this manual orienteering involves the children in playing a series of games and taking part in enjoyable events in which they
learn and practise the basic skills of orienteering.
This helps children become confident in their ability to use maps to find places. A map is an orienteer’s most valued piece of equipment and when first introducing orienteering to children, the skills of map reading is the first important skills to teach. These skills can be easily learned and practised in the school grounds. A description of these skills follows, with exercises or events to develop each skill, and type of map required. The exercises and events are listed in order of difficulty; i.e. those most suitable for younger children come first. Older children will also benefit from doing the simpler exercises and activities, but will not need to spend as much time on them as younger children. When the children have mastered the skills in the school grounds they can then use and develop those skills to orienteer at other school sites and in parks. See the section on “School Grounds, Parks Events and Maps” on page 14. That can be followed by orienteering at more challenging venues in unfamiliar parks. The next stage of orienteering in woods and forests, but that follows on from this level and is not covered in depth in this manual, though the skills used are basically the same. Orienteering is suitable for mixed age groups, for both boys and girls, for the well-coordinated and for the relatively uncoordinated. Children from the age of five and some children with intellectual disabilities will need to start off with pictorial maps, drawn by an adult or older child, symbols being introduced when they are ready. Children from the age of six are able to read simple maps and draw perfectly adequate sketch maps.
Orienteering Skills The orienteering skills to be learned and practised are:
• understanding maps, i.e. knowing that a map represents a set area, and what a Legend (or Key) tells one
• turning and thumbing a map
• holding it so it fits the ground and using a thumb to mark one’s location on it
• navigating a simple course
• reading the map, deciding on the direction to go and travelling around a set course shown on the map
• setting one’s own simple courses A fuller explanation of the skills follows, along with exercises and events to teach and practise each skill. Also the type of map needed for each exercise or event is listed. A compass is not part of this instead other ways of turning the map to fit the ground are used.
Skill: Understanding maps Understanding maps requires looking at the area mapped, noting features in that area and their relative positions in regard to one another. It requires understanding that certain symbols represent those features and are used to draw the map. It also means looking at the symbols on the map and matching them to the features in the mapped area. The symbols are usually listed in the legend (or key) on the map. The children need to understand that relationships of distance and direction on the map are the same as those in the area which the map represents because a map is, in many ways, simply a miniature representation of the terrain. Using a variety of maps helps develop map understanding. Drawing maps is a very good way to learn to understand maps. To draw a map a child has to observe the features in the area to be drawn, then choose the symbol from the list that matches each feature. Drawing different maps and playing map games practises and reinforces the understanding of symbols, and matching features and symbols.
5
Use the following exercises to help the children understand maps A list of symbols for hand-drawn maps is on page 9.
Exercises and events Type of map Desktop Map game Page 19 Drawn by the children Treasure Island game Page 19 Drawn by the children Orienteering Island game Page 20 Drawn by the children Individual Orienteering Island Page 21 Drawn by the children Mini map game Page 7 Drawn by the children
Skill: Turning the map Turning the map means turning the map to fit the ground. The map is turned so the layout of the features on the map exactly matches the layout of the features in the area. Some people, particularly males have less trouble reading a map without turning it to fit. But it is easier to read the map when it is turned to fit the ground, and is less work for the brain. Some children find turning the map disconcerting at first, because it means any writing on the map, such as the title, will be sideways or upside-down. The writing needs to be ignored when turning the map. Streets bordering a map can be named to help ensure the map is turned the correct way round. Thumbing the map is a technique to keep track of where you are on the map. The thumb is used to mark where you are, and to trace your route as you move along. The map sometimes needs to be folded so the thumb can comfortably reach your location on the map.
Exercises and events Type of map Desktop Map game Page 18 Drawn by the children Treasure Island game Page 18 Drawn by the children Orienteering Island game Page 20 Drawn by the children Individual Orienteering Island Page 21 Drawn by the children Mini map game Page 7 Drawn by the children Trying to Trick You game Page 22 All types Turning the map Page 6 School grounds map
Turning the map exercise Purpose
• To give practice in turning the map accurately
Required • Class set of maps of a familiar area.
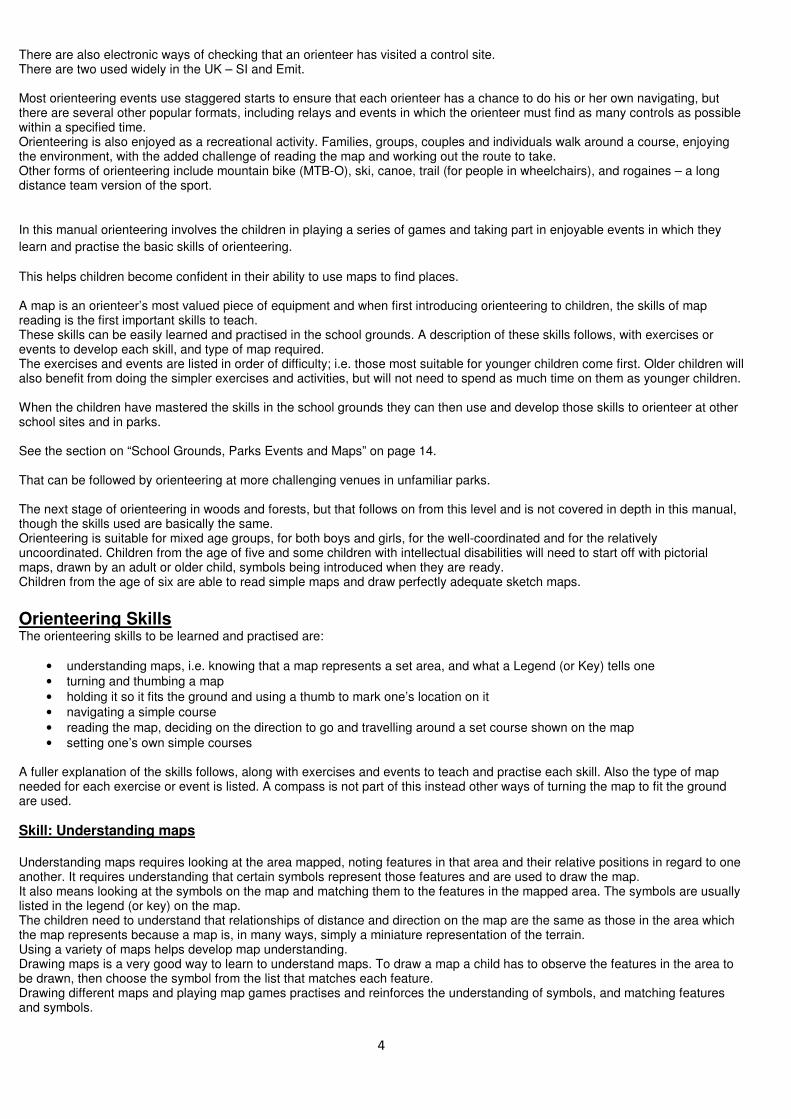
Procedure Take children to a place on the map. Tell them to turn their maps to fit the ground. Talk with them about how they did it. Ask questions such as "how do you know it's turned to fit the ground?" Establish that a good way to do it is to look around and find one or two big features that they think ought to be on the map. Ask everyone to do that. Look for a fence line, a building, a footpath or road. Ask them to look at their maps and find the big features, and to put a thumb on the map to show where they are standing. Then turn their maps until the big feature on their maps is on the correct side of their thumb, ie on the same side as the real thing is. Next, they should check that the second big feature is also on the correct side of their thumb. They may need to turn their maps a little. The map being turned correctly, the children should then be led to look about and check that other features fit too. Repeat the practice at a different place on the map, preferably on the opposite side of a given building.
6
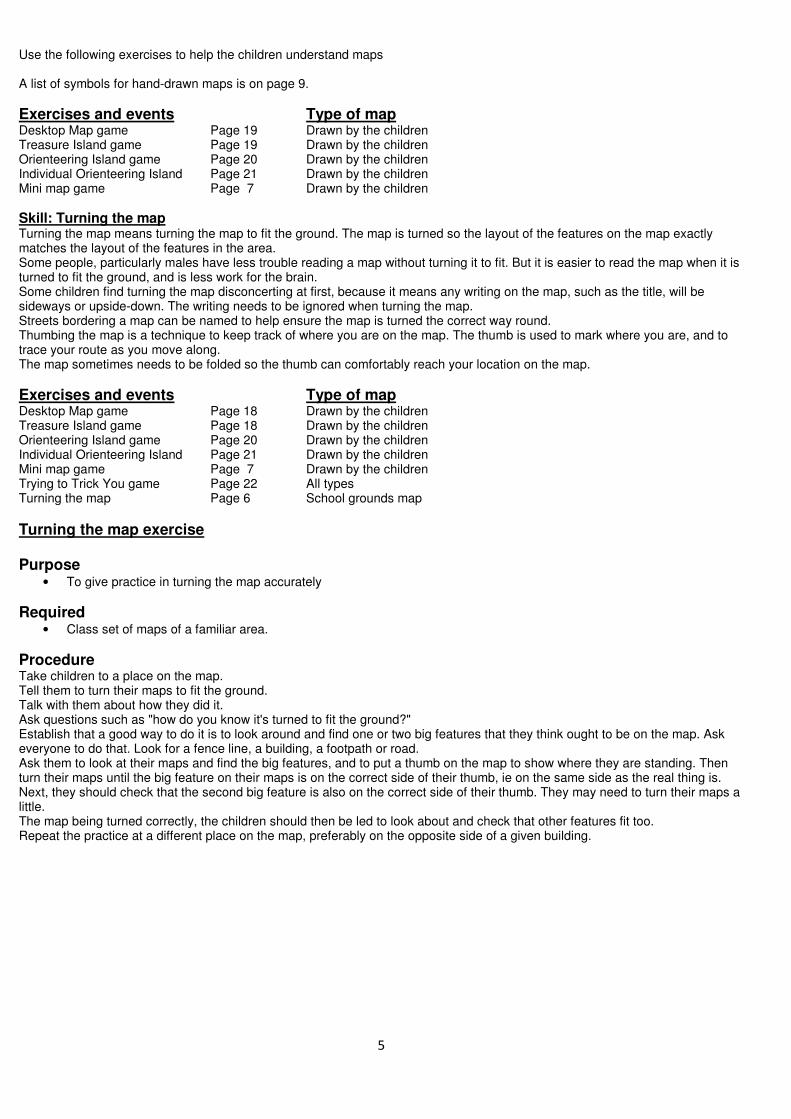
Folding and thumbing the map Once the map has been turned to fit the ground the tip of a thumb should be placed on the map immediately below the position where you are standing. As you move along the thumb is moved along, checking off each feature as it is passed. Thumbing helps keep track of where you are on the map. From time to time it will not be possible to comfortably thumb the map because of the width of the paper and where you need to put your thumb. In that case the map needs to be folded so the thumb can reach your present location on the map. Care has to be taken to fold the map so the areas around where you presently are and where you are next going to are visible. As you proceed around the course it will probably be necessary to refold the map to expose the next area that the course goes through.
Turning, folding and thumbing exercise To confirm that each child is secure in the practice of:
• Turning the map to fit the ground at each change of direction.
• Determining the direction of travel using the lines from control to control as a guide.
• Maintaining contact with the map by moving the thumb from feature to feature along the line of travel while progressing.
Required • Class set of maps with a three or four control cross-country course.
• Controls placed.
The map should remain orientated to surrounding features. The orienteer turns.
Procedure Children stand at the start. Each child puts the map on the floor or on the ground and turns it to fit the ground. Stands behind the triangle so he or she can look along the line from the start triangle to the number 1 control. Looks further along the line in the same direction to where control 1really is. Picks up the map, holds it turned the right way round, puts his/her thumb on the triangle, and walks in the direction shown by the line on the map to the first control. The thumb is moved along the map following the direction taken. Having reached the first control the procedure is repeated until the course is completed. Time being available, the course may be travelled in reverse, holding the map in the hand instead of placing it on the ground.
7
Skill: Navigating simple courses Navigating means deciding on what route to take to get around a course. It involves working out which direction to go and what features you will pass as you go along. Each leg of the course requires a decision as to which direction to go and what is the best route to take between those two places. A leg is each section of the course, that is: from the start to the first control, each section between each two controls, and the section between the last control and the finish. Once the direction of travel is established, it is also necessary to maintain that direction while travelling. On simpler courses where there is no route choice you can look ahead to the next feature you are going to. On handrail (linear features such as tracks, fences, and streams) courses it is easy to follow the handrail. Maintaining direction can become more difficult when shortcuts are taken. Before you start you need to locate your position on the map. While travelling it may be necessary to relocate; that is, if you have lost track of exactly where you are, being able to work out exactly where you are by looking around you to identify nearby features, and to find those features on the map. The first courses the children do should not require decision making as to which is the best way to go. As the children become more experienced route choice can be introduced. For example, if there is a building or high fence in the way on a leg, is it better to go round to the left or the right of the building or fence? Which is the shortest and quickest route?
Exercises and events Type of map Circle of Friend Page 17 Drawn by the teacher Indoor Navigation game Page 17 Drawn by the children Individual Islands game Page 21 Drawn by the children Mini Map game Page 7 Drawn by the children Motala event Page 10 School grounds map Trivia event Page 10/11 School grounds map Cross country event Page 12 School grounds map Camp and park events Page 14 Camp and park maps
Skill: Setting one’s own simple courses Getting the children to set their own simple courses helps reinforce map reading and navigation skills. The children choose a start place, 3 or more control sites and a finish place. They need to place the controls in the correct places. Controls should be put by a feature: and not, for example in the middle of an area of grass or concrete. Ideally controls should not be placed too close together. Also they should be visible when near them.
Exercises and events Type of map Orienteering Island game Page 20 Drawn by the children Individual Orienteering Island Page 21 Drawn by the children Mini map game Page 7 Drawn by the children Cross country event Page 12 School grounds map
Mini Maps and Mini Map Events Orienteering is enjoyed most when there is a new challenge to be faced. Most children will be very familiar with the layout of the school grounds. Mini maps - maps of small areas of the grounds, initially provide more of a challenge than a map of the whole grounds. In this section, the objective is to provide children with the challenges arising from a succession of new "maps". In this way the mental gymnastics involved in relating a new map to new terrain and terrain to map, of determining location, direction and distance, and of playing the new game, result in a high level of interest, challenge and skill development. The Mini Map event should be repeated at least once, using new small areas.
8
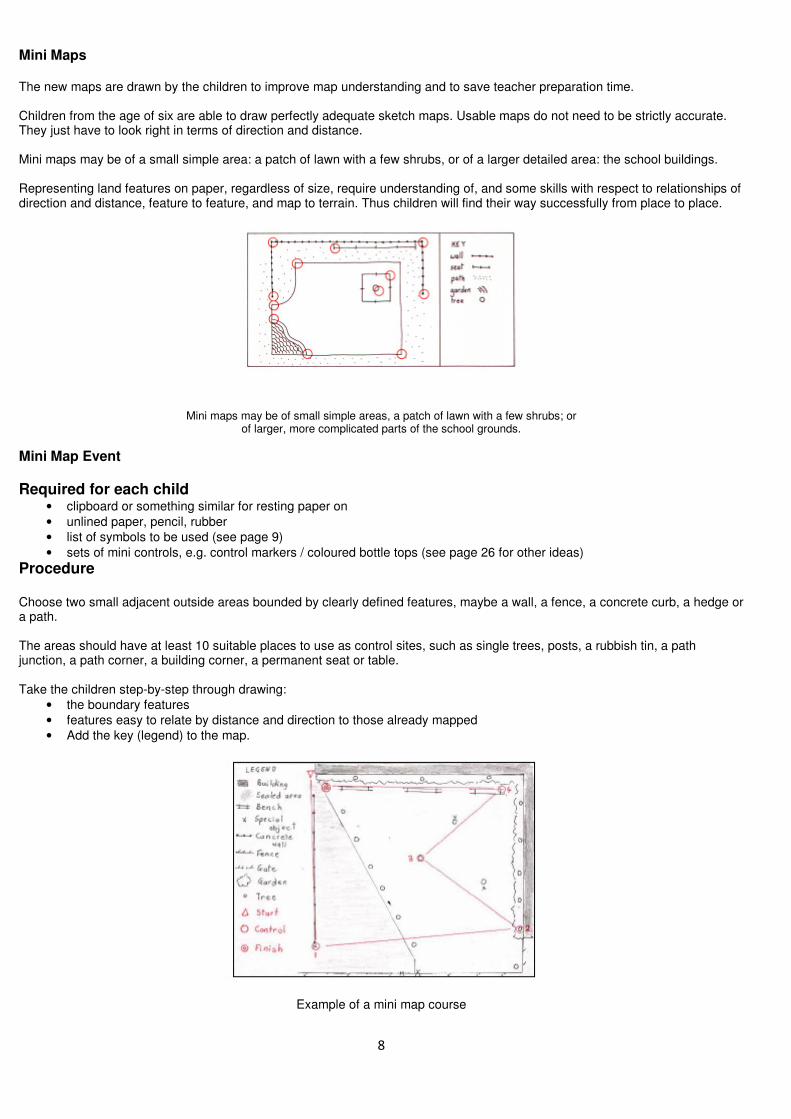
Mini Maps The new maps are drawn by the children to improve map understanding and to save teacher preparation time. Children from the age of six are able to draw perfectly adequate sketch maps. Usable maps do not need to be strictly accurate. They just have to look right in terms of direction and distance. Mini maps may be of a small simple area: a patch of lawn with a few shrubs, or of a larger detailed area: the school buildings. Representing land features on paper, regardless of size, require understanding of, and some skills with respect to relationships of direction and distance, feature to feature, and map to terrain. Thus children will find their way successfully from place to place.
Mini maps may be of small simple areas, a patch of lawn with a few shrubs; or of larger, more complicated parts of the school grounds.
Mini Map Event
Required for each child • clipboard or something similar for resting paper on
• unlined paper, pencil, rubber
• list of symbols to be used (see page 9)
• sets of mini controls, e.g. control markers / coloured bottle tops (see page 26 for other ideas)
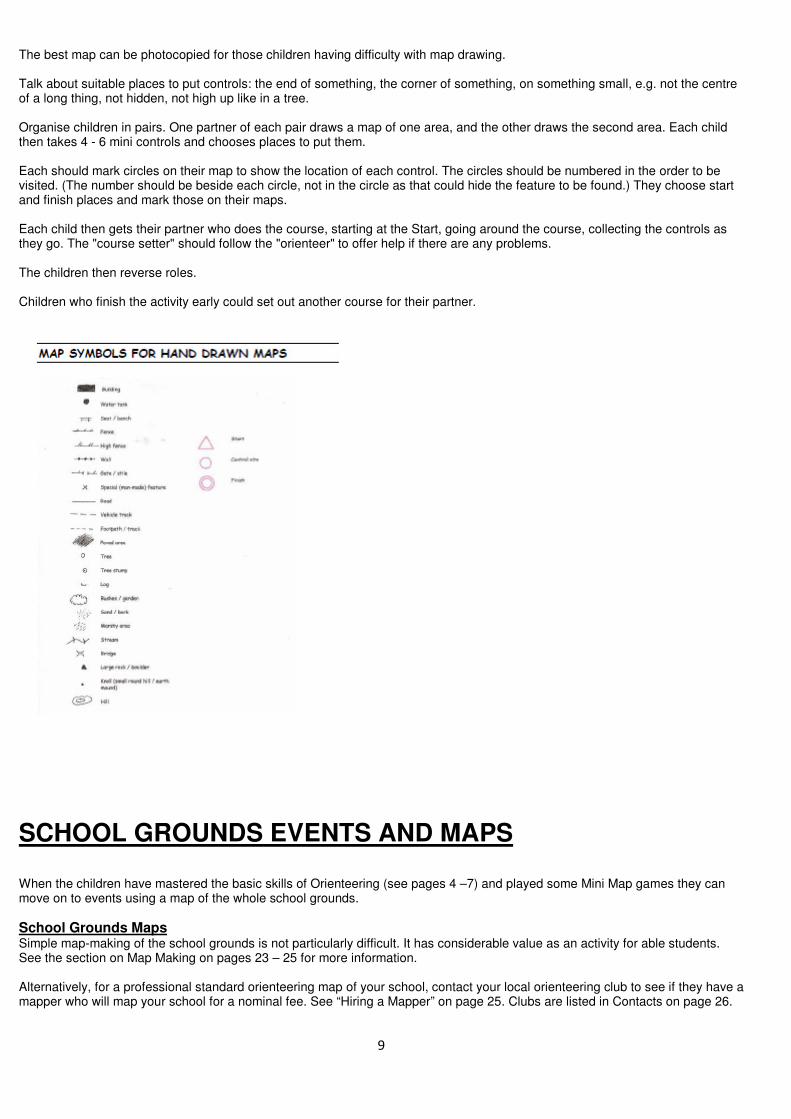
Procedure Choose two small adjacent outside areas bounded by clearly defined features, maybe a wall, a fence, a concrete curb, a hedge or a path. The areas should have at least 10 suitable places to use as control sites, such as single trees, posts, a rubbish tin, a path junction, a path corner, a building corner, a permanent seat or table. Take the children step-by-step through drawing:
• the boundary features
• features easy to relate by distance and direction to those already mapped
• Add the key (legend) to the map.
Example of a mini map course
9
The best map can be photocopied for those children having difficulty with map drawing. Talk about suitable places to put controls: the end of something, the corner of something, on something small, e.g. not the centre of a long thing, not hidden, not high up like in a tree. Organise children in pairs. One partner of each pair draws a map of one area, and the other draws the second area. Each child then takes 4 - 6 mini controls and chooses places to put them. Each should mark circles on their map to show the location of each control. The circles should be numbered in the order to be visited. (The number should be beside each circle, not in the circle as that could hide the feature to be found.) They choose start and finish places and mark those on their maps. Each child then gets their partner who does the course, starting at the Start, going around the course, collecting the controls as they go. The "course setter" should follow the "orienteer" to offer help if there are any problems. The children then reverse roles. Children who finish the activity early could set out another course for their partner.
SCHOOL GROUNDS EVENTS AND MAPS When the children have mastered the basic skills of Orienteering (see pages 4 –7) and played some Mini Map games they can move on to events using a map of the whole school grounds.
School Grounds Maps Simple map-making of the school grounds is not particularly difficult. It has considerable value as an activity for able students. See the section on Map Making on pages 23 – 25 for more information. Alternatively, for a professional standard orienteering map of your school, contact your local orienteering club to see if they have a mapper who will map your school for a nominal fee. See “Hiring a Mapper” on page 25. Clubs are listed in Contacts on page 26.
10
School Grounds Events Courses set using the school grounds map will:
• probably have controls that are not visible from one another
• at times include obstacles, e.g. buildings between controls, in order to force route choice
• May lead to attack points, aiming off, and handrails as navigation techniques. See the Glossary on page 27 for explanations of these terms.
Events Type of map Trying to Trick You game Page 22 School grounds map Motala event Page 10 School grounds map Trivia event Page 10/11 School grounds map Cross country event Page 12 School grounds map
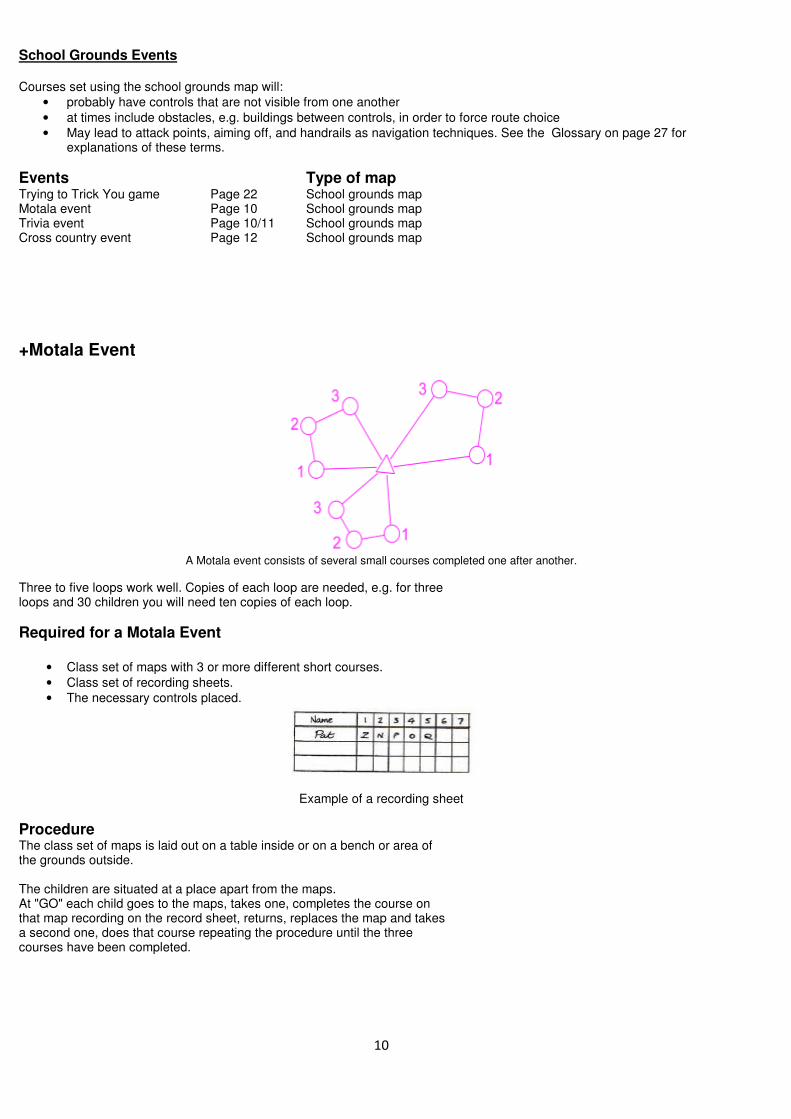
+Motala Event
A Motala event consists of several small courses completed one after another.
Three to five loops work well. Copies of each loop are needed, e.g. for three loops and 30 children you will need ten copies of each loop.
Required for a Motala Event
• Class set of maps with 3 or more different short courses.
• Class set of recording sheets.
• The necessary controls placed.
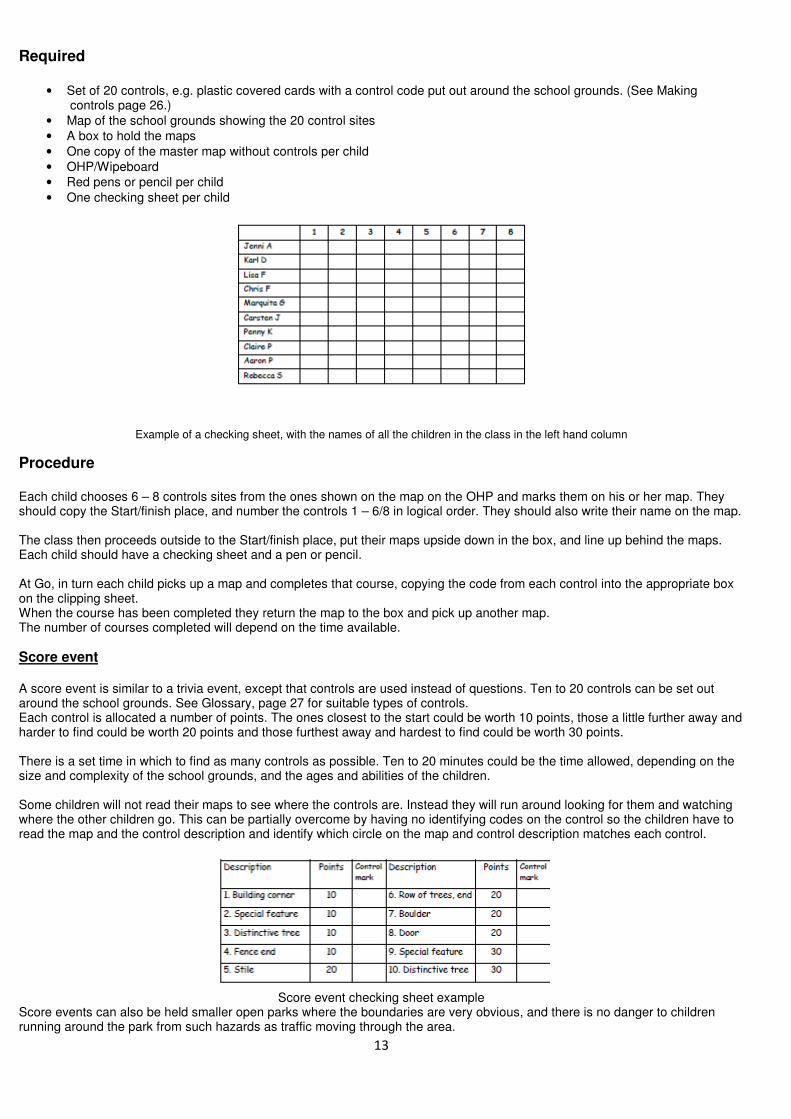
Example of a recording sheet
Procedure The class set of maps is laid out on a table inside or on a bench or area of the grounds outside. The children are situated at a place apart from the maps. At "GO" each child goes to the maps, takes one, completes the course on that map recording on the record sheet, returns, replaces the map and takes a second one, does that course repeating the procedure until the three courses have been completed.
11
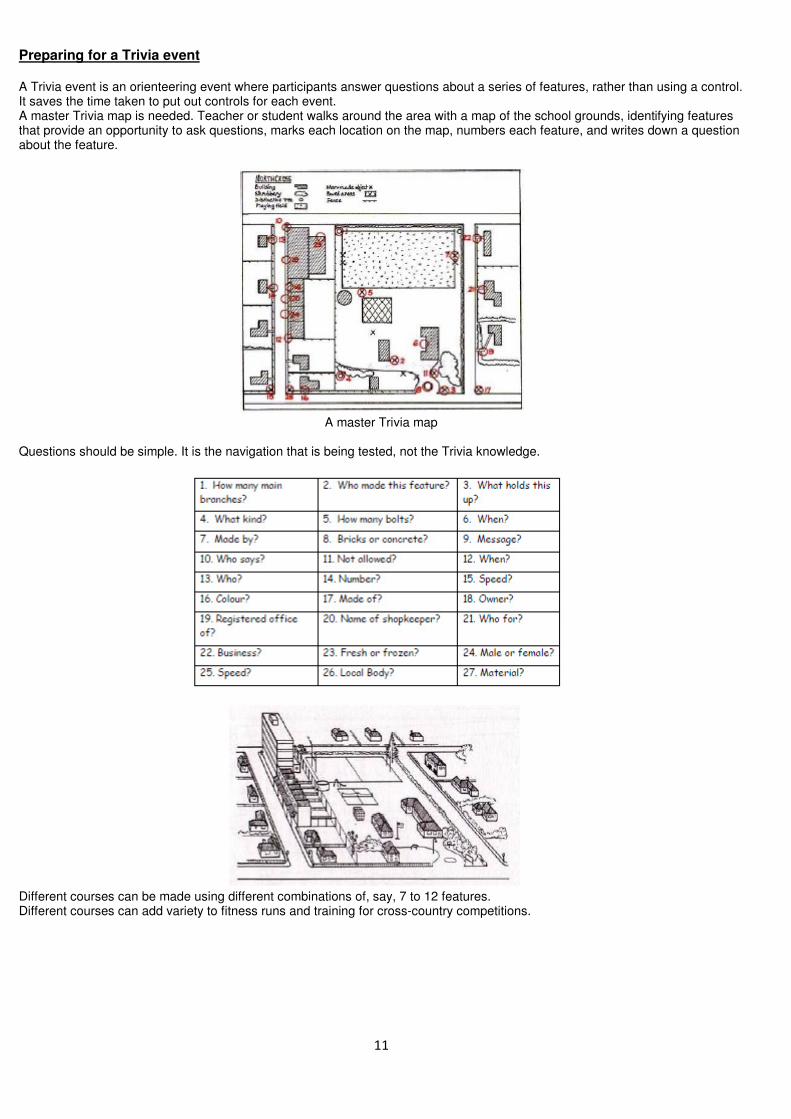
Preparing for a Trivia event A Trivia event is an orienteering event where participants answer questions about a series of features, rather than using a control. It saves the time taken to put out controls for each event. A master Trivia map is needed. Teacher or student walks around the area with a map of the school grounds, identifying features that provide an opportunity to ask questions, marks each location on the map, numbers each feature, and writes down a question about the feature.
A master Trivia map
Questions should be simple. It is the navigation that is being tested, not the Trivia knowledge.
Different courses can be made using different combinations of, say, 7 to 12 features. Different courses can add variety to fitness runs and training for cross-country competitions.
12
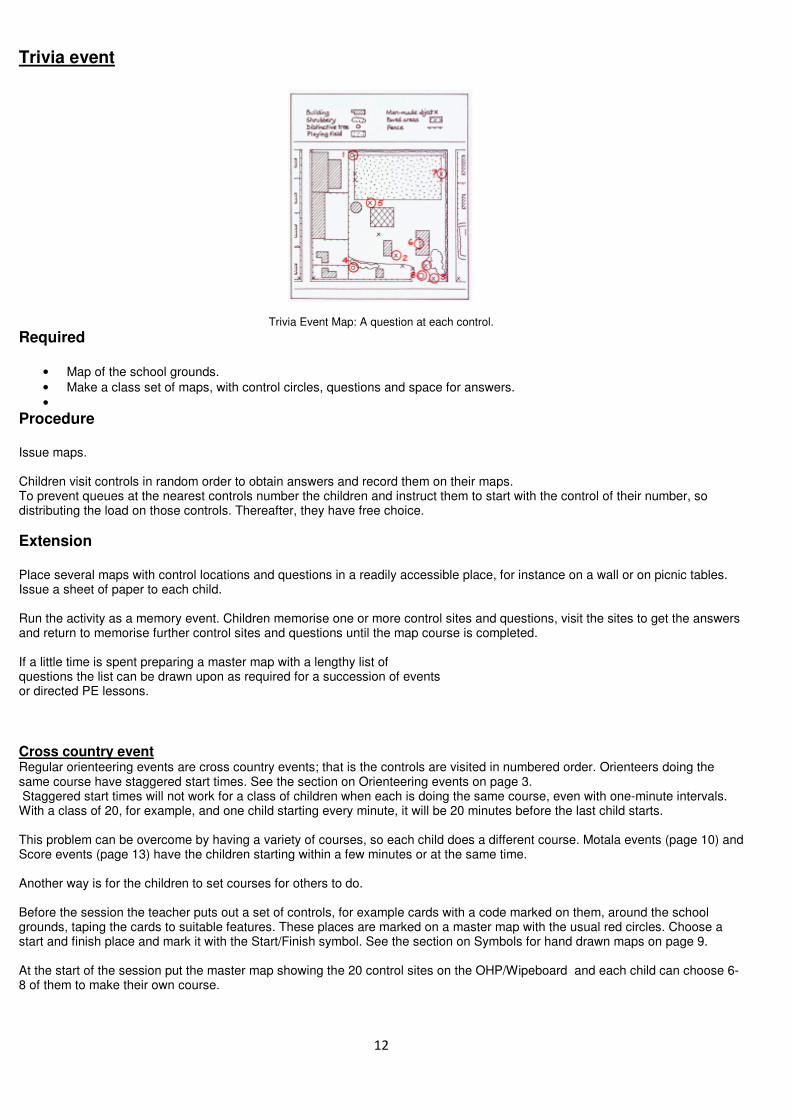
Trivia event
Trivia Event Map: A question at each control.
Required
• Map of the school grounds.
• Make a class set of maps, with control circles, questions and space for answers.
•
Procedure Issue maps. Children visit controls in random order to obtain answers and record them on their maps. To prevent queues at the nearest controls number the children and instruct them to start with the control of their number, so distributing the load on those controls. Thereafter, they have free choice.
Extension Place several maps with control locations and questions in a readily accessible place, for instance on a wall or on picnic tables. Issue a sheet of paper to each child. Run the activity as a memory event. Children memorise one or more control sites and questions, visit the sites to get the answers and return to memorise further control sites and questions until the map course is completed. If a little time is spent preparing a master map with a lengthy list of questions the list can be drawn upon as required for a succession of events or directed PE lessons.
Cross country event Regular orienteering events are cross country events; that is the controls are visited in numbered order. Orienteers doing the same course have staggered start times. See the section on Orienteering events on page 3. Staggered start times will not work for a class of children when each is doing the same course, even with one-minute intervals. With a class of 20, for example, and one child starting every minute, it will be 20 minutes before the last child starts. This problem can be overcome by having a variety of courses, so each child does a different course. Motala events (page 10) and Score events (page 13) have the children starting within a few minutes or at the same time. Another way is for the children to set courses for others to do. Before the session the teacher puts out a set of controls, for example cards with a code marked on them, around the school grounds, taping the cards to suitable features. These places are marked on a master map with the usual red circles. Choose a start and finish place and mark it with the Start/Finish symbol. See the section on Symbols for hand drawn maps on page 9. At the start of the session put the master map showing the 20 control sites on the OHP/Wipeboard and each child can choose 6-8 of them to make their own course.
13
Required
• Set of 20 controls, e.g. plastic covered cards with a control code put out around the school grounds. (See Making controls page 26.)
• Map of the school grounds showing the 20 control sites
• A box to hold the maps
• One copy of the master map without controls per child
• OHP/Wipeboard
• Red pens or pencil per child
• One checking sheet per child
Example of a checking sheet, with the names of all the children in the class in the left hand column
Procedure Each child chooses 6 – 8 controls sites from the ones shown on the map on the OHP and marks them on his or her map. They should copy the Start/finish place, and number the controls 1 – 6/8 in logical order. They should also write their name on the map. The class then proceeds outside to the Start/finish place, put their maps upside down in the box, and line up behind the maps. Each child should have a checking sheet and a pen or pencil. At Go, in turn each child picks up a map and completes that course, copying the code from each control into the appropriate box on the clipping sheet. When the course has been completed they return the map to the box and pick up another map. The number of courses completed will depend on the time available.
Score event A score event is similar to a trivia event, except that controls are used instead of questions. Ten to 20 controls can be set out around the school grounds. See Glossary, page 27 for suitable types of controls. Each control is allocated a number of points. The ones closest to the start could be worth 10 points, those a little further away and harder to find could be worth 20 points and those furthest away and hardest to find could be worth 30 points. There is a set time in which to find as many controls as possible. Ten to 20 minutes could be the time allowed, depending on the size and complexity of the school grounds, and the ages and abilities of the children. Some children will not read their maps to see where the controls are. Instead they will run around looking for them and watching where the other children go. This can be partially overcome by having no identifying codes on the control so the children have to read the map and the control description and identify which circle on the map and control description matches each control.
Score event checking sheet example
Score events can also be held smaller open parks where the boundaries are very obvious, and there is no danger to children running around the park from such hazards as traffic moving through the area.
14
SCHOOL GROUNDS AND PARK EVENTS AND MAPS
Navigating on a new map in an unfamiliar environment such as another school or park may require a higher level of skill than that developed in the familiar area of the school grounds. It is therefore desirable to reinforce and practice turning and thumbing the map: two skills which some children may, till now, have been carrying out almost intuitively and very approximately. The first visit to an unfamiliar map should include playing the “Trying to Trick You” game (page 22) and a map walk: a group follow-my-leader along line features: roads, tracks, fences, streams and hedges, the children turning their maps and moving their thumbs from feature to feature as they progress. If several controls have been put out but not marked on the maps, children can be asked to mark the location of the controls as they find them. This enables the leader to check which children really know where they are. Most events held on unfamiliar maps will be cross-country events. It is important that the courses set are appropriate to the level of skill of the weakest navigator because ALL must succeed in finding all the controls, though some will be faster than others. It is better to set a series of small courses, rather than one big long course at school camps and in local parks. The children can then complete a number of courses according to their ability, and all achieve success, whether they have done three, five or however many courses. A series of courses also makes fuller use of the area and the map. Score events can also be held in school grounds, and small parks if they are open so children can be observed at all times, and there are clearly defined boundaries.
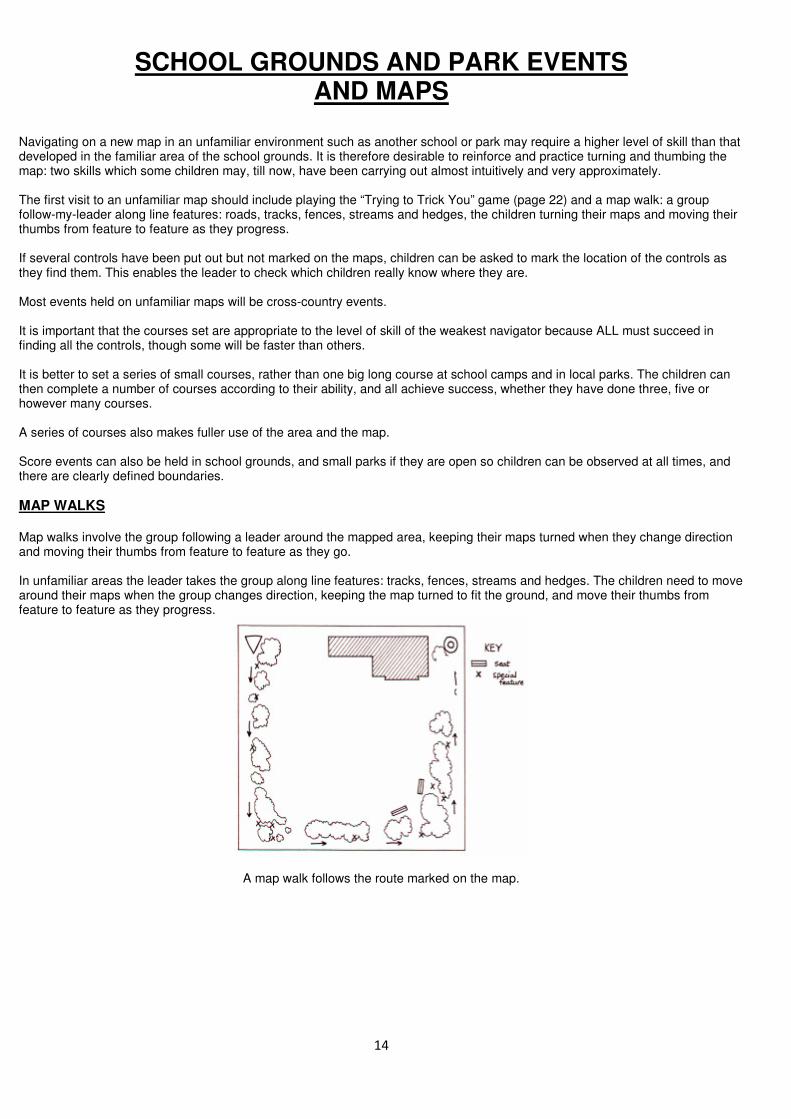
MAP WALKS Map walks involve the group following a leader around the mapped area, keeping their maps turned when they change direction and moving their thumbs from feature to feature as they go. In unfamiliar areas the leader takes the group along line features: tracks, fences, streams and hedges. The children need to move around their maps when the group changes direction, keeping the map turned to fit the ground, and move their thumbs from feature to feature as they progress.
A map walk follows the route marked on the map.
15
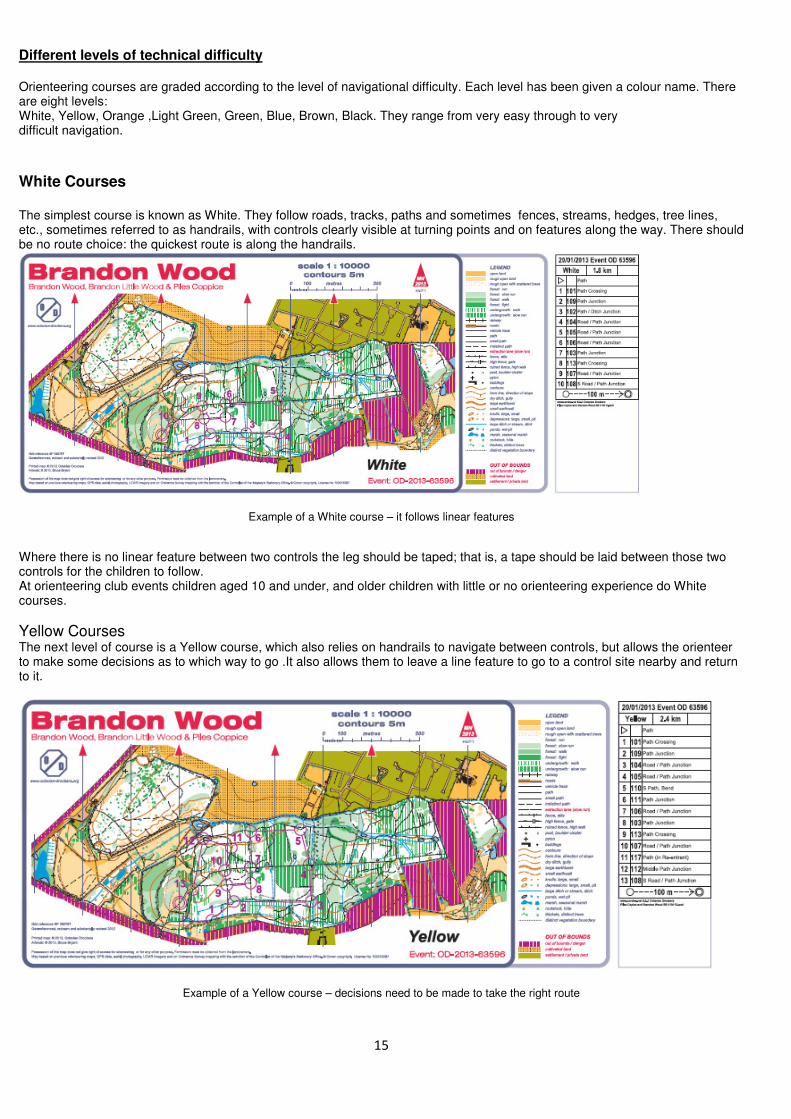
Different levels of technical difficulty Orienteering courses are graded according to the level of navigational difficulty. Each level has been given a colour name. There are eight levels: White, Yellow, Orange ,Light Green, Green, Blue, Brown, Black. They range from very easy through to very difficult navigation.
White Courses The simplest course is known as White. They follow roads, tracks, paths and sometimes fences, streams, hedges, tree lines, etc., sometimes referred to as handrails, with controls clearly visible at turning points and on features along the way. There should be no route choice: the quickest route is along the handrails.
Example of a White course – it follows linear features
Where there is no linear feature between two controls the leg should be taped; that is, a tape should be laid between those two controls for the children to follow. At orienteering club events children aged 10 and under, and older children with little or no orienteering experience do White courses.
Yellow Courses The next level of course is a Yellow course, which also relies on handrails to navigate between controls, but allows the orienteer to make some decisions as to which way to go .It also allows them to leave a line feature to go to a control site nearby and return to it.
Example of a Yellow course – decisions need to be made to take the right route
16
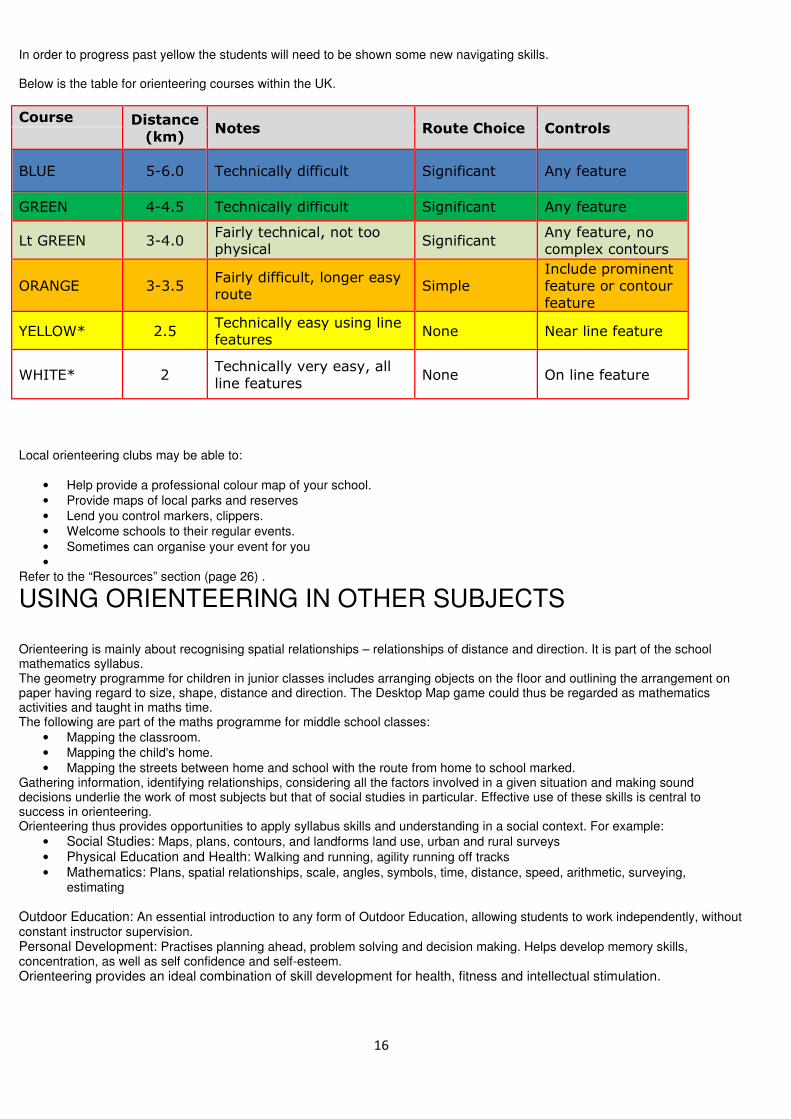
In order to progress past yellow the students will need to be shown some new navigating skills. Below is the table for orienteering courses within the UK.
Course Distance
(km) Notes Route Choice Controls
BLUE 5-6.0 Technically difficult Significant Any feature
GREEN 4-4.5 Technically difficult Significant Any feature
Lt GREEN 3-4.0 Fairly technical, not too physical
Significant Any feature, no complex contours
ORANGE 3-3.5 Fairly difficult, longer easy route
Simple Include prominent feature or contour
feature
YELLOW* 2.5 Technically easy using line features
None Near line feature
WHITE* 2 Technically very easy, all
line features None On line feature
Local orienteering clubs may be able to:
• Help provide a professional colour map of your school.
• Provide maps of local parks and reserves
• Lend you control markers, clippers.
• Welcome schools to their regular events.
• Sometimes can organise your event for you
• Refer to the “Resources” section (page 26) .
USING ORIENTEERING IN OTHER SUBJECTS Orienteering is mainly about recognising spatial relationships – relationships of distance and direction. It is part of the school mathematics syllabus. The geometry programme for children in junior classes includes arranging objects on the floor and outlining the arrangement on paper having regard to size, shape, distance and direction. The Desktop Map game could thus be regarded as mathematics activities and taught in maths time. The following are part of the maths programme for middle school classes:
• Mapping the classroom.
• Mapping the child's home.
• Mapping the streets between home and school with the route from home to school marked. Gathering information, identifying relationships, considering all the factors involved in a given situation and making sound decisions underlie the work of most subjects but that of social studies in particular. Effective use of these skills is central to success in orienteering. Orienteering thus provides opportunities to apply syllabus skills and understanding in a social context. For example:
• Social Studies: Maps, plans, contours, and landforms land use, urban and rural surveys
• Physical Education and Health: Walking and running, agility running off tracks
• Mathematics: Plans, spatial relationships, scale, angles, symbols, time, distance, speed, arithmetic, surveying, estimating
Outdoor Education: An essential introduction to any form of Outdoor Education, allowing students to work independently, without constant instructor supervision. Personal Development: Practises planning ahead, problem solving and decision making. Helps develop memory skills, concentration, as well as self confidence and self-esteem. Orienteering provides an ideal combination of skill development for health, fitness and intellectual stimulation.
17
MAP GAMES Map games are games that can be played indoors, in the classroom, hall,, etc. that practise navigational skills. Several games are described on the following pages (17 – 22). The games can be a useful lead-in to orienteering.
• Circle of Friend, page 17. All ages
• Indoor Navigation, page 17. All ages
• Desktop Map, page 19. All ages
• Treasure Island, page 19. All ages
• Orienteering Island, page 20. 7+ years old
• Individual Orienteering Island, page 21. 7+ years old
• Trying to Trick You, page 22. 7+ years old
Circle of Friends games
Aim of session • To introduce map reading and drawing.
• To demonstrate the importance of turning a map the right way round before doing any map reading.
• To give the instructor the opportunity to learn a few names when working with a new group or class.
• To introduce following a marked route.
Required • A2 paper, e.g. newsprint
• Several different coloured vivid markers or crayons.
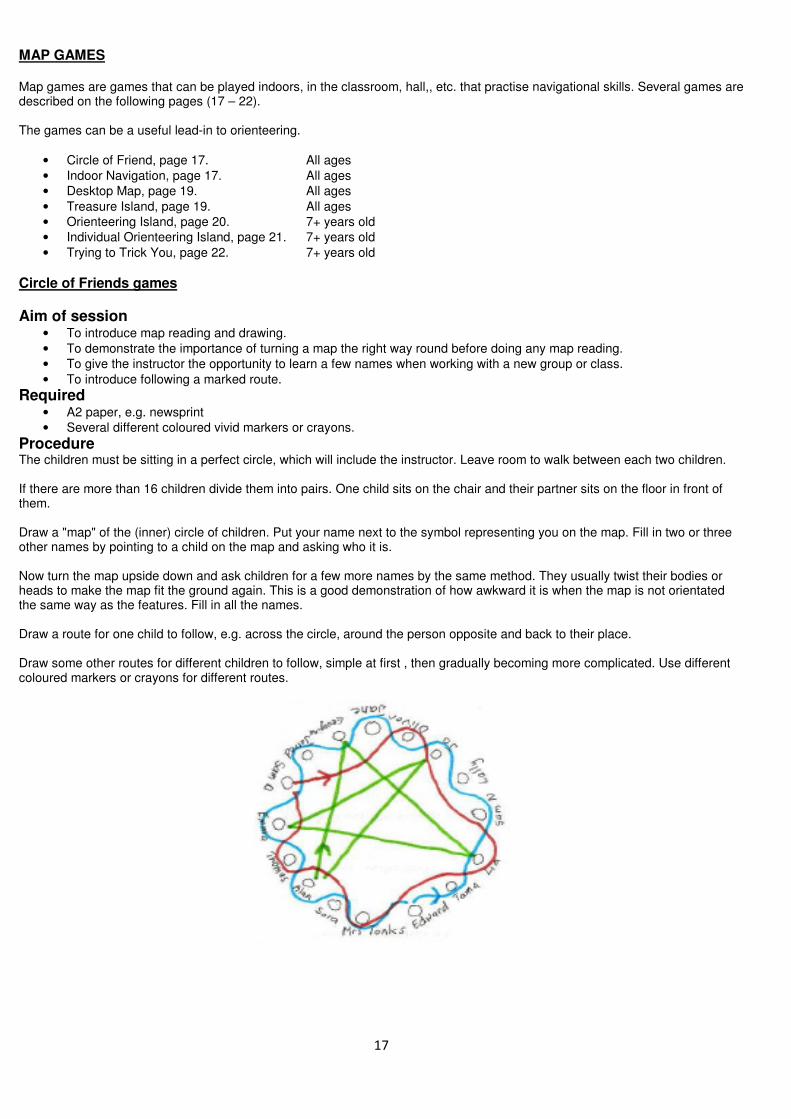
Procedure The children must be sitting in a perfect circle, which will include the instructor. Leave room to walk between each two children. If there are more than 16 children divide them into pairs. One child sits on the chair and their partner sits on the floor in front of them. Draw a "map" of the (inner) circle of children. Put your name next to the symbol representing you on the map. Fill in two or three other names by pointing to a child on the map and asking who it is. Now turn the map upside down and ask children for a few more names by the same method. They usually twist their bodies or heads to make the map fit the ground again. This is a good demonstration of how awkward it is when the map is not orientated the same way as the features. Fill in all the names. Draw a route for one child to follow, e.g. across the circle, around the person opposite and back to their place. Draw some other routes for different children to follow, simple at first , then gradually becoming more complicated. Use different coloured markers or crayons for different routes.
18
Indoor Navigation game
Aim of session • To continue the introduction of map reading and drawing
• To practise putting out control markers
• To practise reading the map and finding control markers
Required • A2 paper, A5 or similar paper and pencils
• Black and red vivid markers or crayons
• Mini controls – coloured stickers
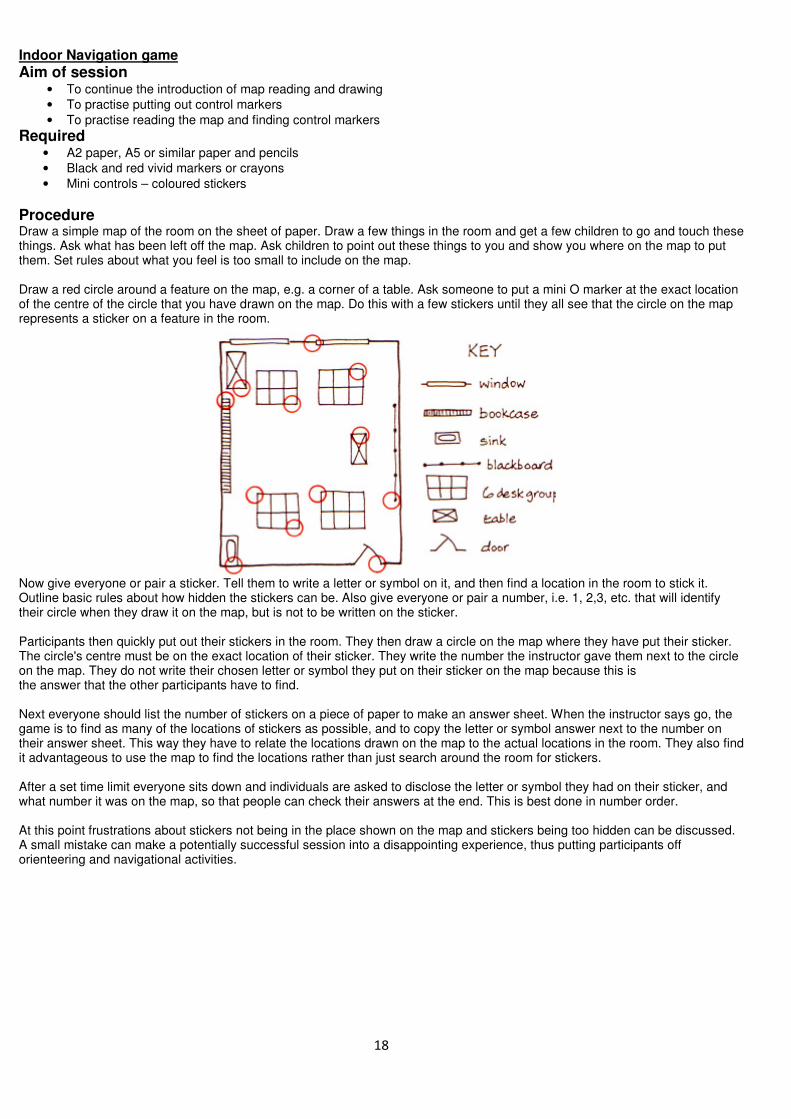
Procedure Draw a simple map of the room on the sheet of paper. Draw a few things in the room and get a few children to go and touch these things. Ask what has been left off the map. Ask children to point out these things to you and show you where on the map to put them. Set rules about what you feel is too small to include on the map. Draw a red circle around a feature on the map, e.g. a corner of a table. Ask someone to put a mini O marker at the exact location of the centre of the circle that you have drawn on the map. Do this with a few stickers until they all see that the circle on the map represents a sticker on a feature in the room.
Now give everyone or pair a sticker. Tell them to write a letter or symbol on it, and then find a location in the room to stick it. Outline basic rules about how hidden the stickers can be. Also give everyone or pair a number, i.e. 1, 2,3, etc. that will identify their circle when they draw it on the map, but is not to be written on the sticker. Participants then quickly put out their stickers in the room. They then draw a circle on the map where they have put their sticker. The circle's centre must be on the exact location of their sticker. They write the number the instructor gave them next to the circle on the map. They do not write their chosen letter or symbol they put on their sticker on the map because this is the answer that the other participants have to find. Next everyone should list the number of stickers on a piece of paper to make an answer sheet. When the instructor says go, the game is to find as many of the locations of stickers as possible, and to copy the letter or symbol answer next to the number on their answer sheet. This way they have to relate the locations drawn on the map to the actual locations in the room. They also find it advantageous to use the map to find the locations rather than just search around the room for stickers. After a set time limit everyone sits down and individuals are asked to disclose the letter or symbol they had on their sticker, and what number it was on the map, so that people can check their answers at the end. This is best done in number order. At this point frustrations about stickers not being in the place shown on the map and stickers being too hidden can be discussed. A small mistake can make a potentially successful session into a disappointing experience, thus putting participants off orienteering and navigational activities.
19
Desktop Map game
Aim of session
• To continue the introduction of map reading and drawing.
• To practice relating maps to the areas they represent.
Required
• Items in each child's desk.
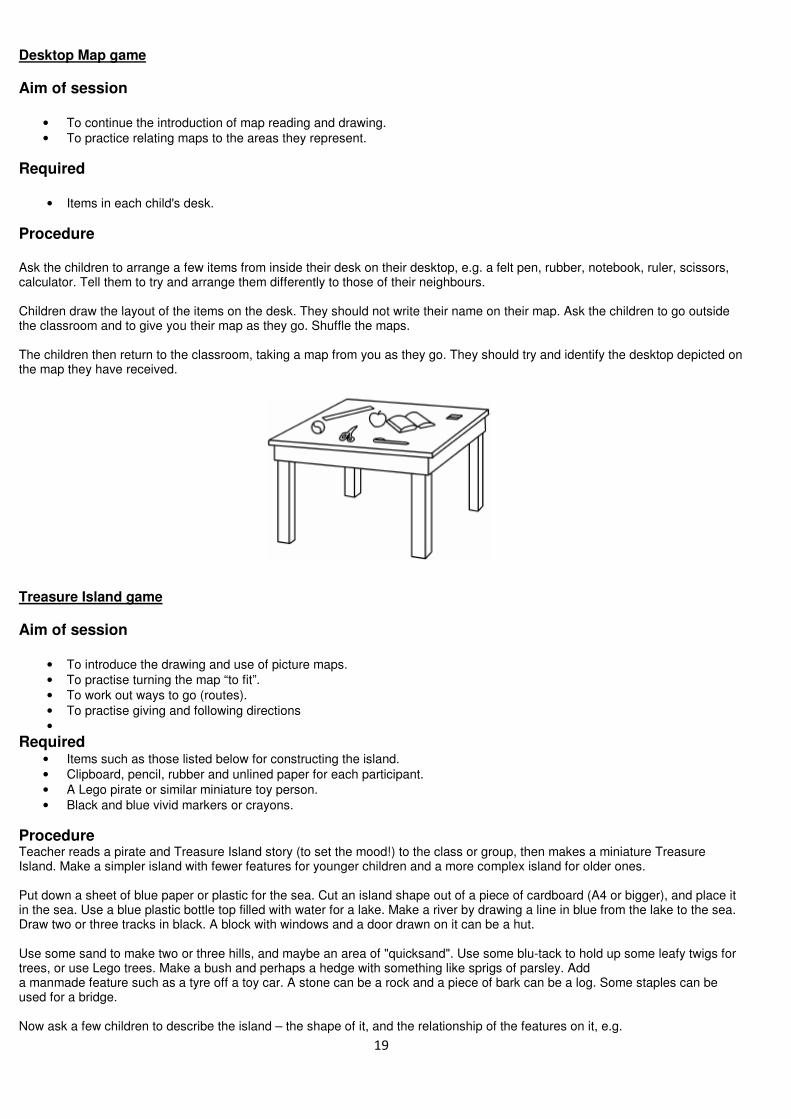
Procedure Ask the children to arrange a few items from inside their desk on their desktop, e.g. a felt pen, rubber, notebook, ruler, scissors, calculator. Tell them to try and arrange them differently to those of their neighbours. Children draw the layout of the items on the desk. They should not write their name on their map. Ask the children to go outside the classroom and to give you their map as they go. Shuffle the maps. The children then return to the classroom, taking a map from you as they go. They should try and identify the desktop depicted on the map they have received.
Treasure Island game
Aim of session
• To introduce the drawing and use of picture maps.
• To practise turning the map “to fit”.
• To work out ways to go (routes).
• To practise giving and following directions
•
Required • Items such as those listed below for constructing the island.
• Clipboard, pencil, rubber and unlined paper for each participant.
• A Lego pirate or similar miniature toy person.
• Black and blue vivid markers or crayons.
Procedure Teacher reads a pirate and Treasure Island story (to set the mood!) to the class or group, then makes a miniature Treasure Island. Make a simpler island with fewer features for younger children and a more complex island for older ones. Put down a sheet of blue paper or plastic for the sea. Cut an island shape out of a piece of cardboard (A4 or bigger), and place it in the sea. Use a blue plastic bottle top filled with water for a lake. Make a river by drawing a line in blue from the lake to the sea. Draw two or three tracks in black. A block with windows and a door drawn on it can be a hut. Use some sand to make two or three hills, and maybe an area of "quicksand". Use some blu-tack to hold up some leafy twigs for trees, or use Lego trees. Make a bush and perhaps a hedge with something like sprigs of parsley. Add a manmade feature such as a tyre off a toy car. A stone can be a rock and a piece of bark can be a log. Some staples can be used for a bridge. Now ask a few children to describe the island – the shape of it, and the relationship of the features on it, e.g.
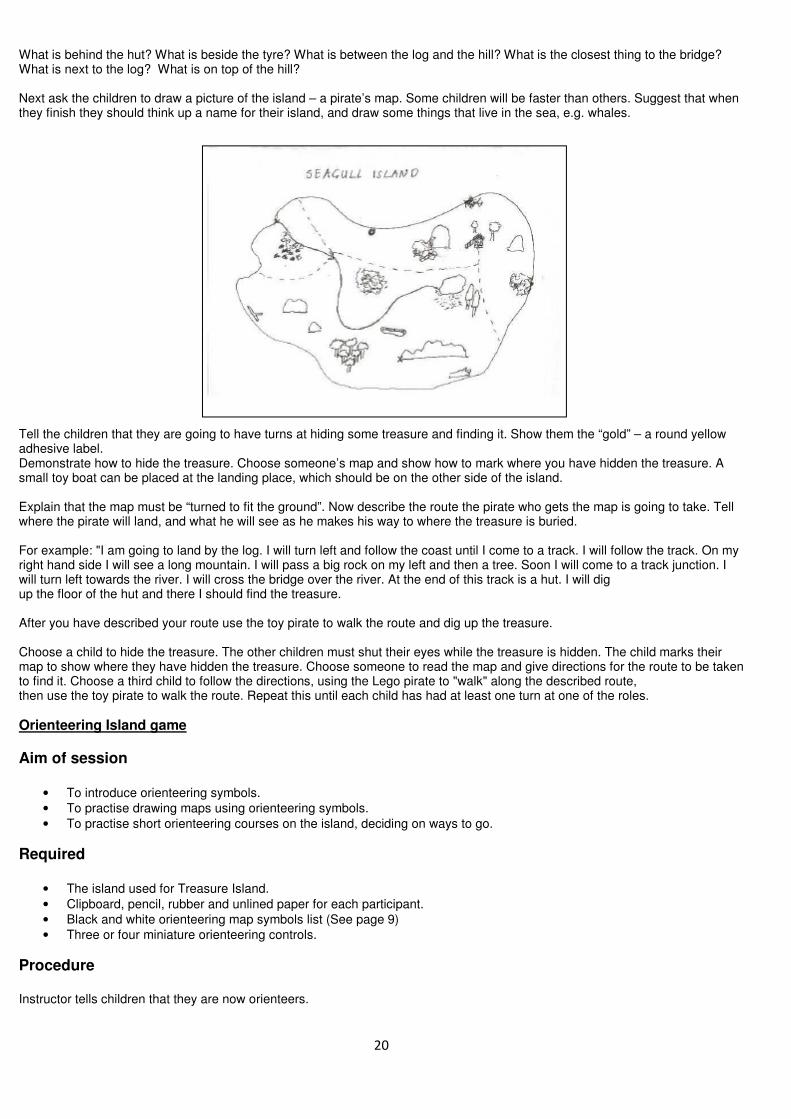
20
What is behind the hut? What is beside the tyre? What is between the log and the hill? What is the closest thing to the bridge? What is next to the log? What is on top of the hill? Next ask the children to draw a picture of the island – a pirate’s map. Some children will be faster than others. Suggest that when they finish they should think up a name for their island, and draw some things that live in the sea, e.g. whales.
Tell the children that they are going to have turns at hiding some treasure and finding it. Show them the “gold” – a round yellow adhesive label. Demonstrate how to hide the treasure. Choose someone’s map and show how to mark where you have hidden the treasure. A small toy boat can be placed at the landing place, which should be on the other side of the island. Explain that the map must be “turned to fit the ground”. Now describe the route the pirate who gets the map is going to take. Tell where the pirate will land, and what he will see as he makes his way to where the treasure is buried. For example: "I am going to land by the log. I will turn left and follow the coast until I come to a track. I will follow the track. On my right hand side I will see a long mountain. I will pass a big rock on my left and then a tree. Soon I will come to a track junction. I will turn left towards the river. I will cross the bridge over the river. At the end of this track is a hut. I will dig up the floor of the hut and there I should find the treasure. After you have described your route use the toy pirate to walk the route and dig up the treasure. Choose a child to hide the treasure. The other children must shut their eyes while the treasure is hidden. The child marks their map to show where they have hidden the treasure. Choose someone to read the map and give directions for the route to be taken to find it. Choose a third child to follow the directions, using the Lego pirate to "walk" along the described route, then use the toy pirate to walk the route. Repeat this until each child has had at least one turn at one of the roles.
Orienteering Island game
Aim of session
• To introduce orienteering symbols.
• To practise drawing maps using orienteering symbols.
• To practise short orienteering courses on the island, deciding on ways to go.
Required
• The island used for Treasure Island.
• Clipboard, pencil, rubber and unlined paper for each participant.
• Black and white orienteering map symbols list (See page 9)
• Three or four miniature orienteering controls.
Procedure Instructor tells children that they are now orienteers.
21
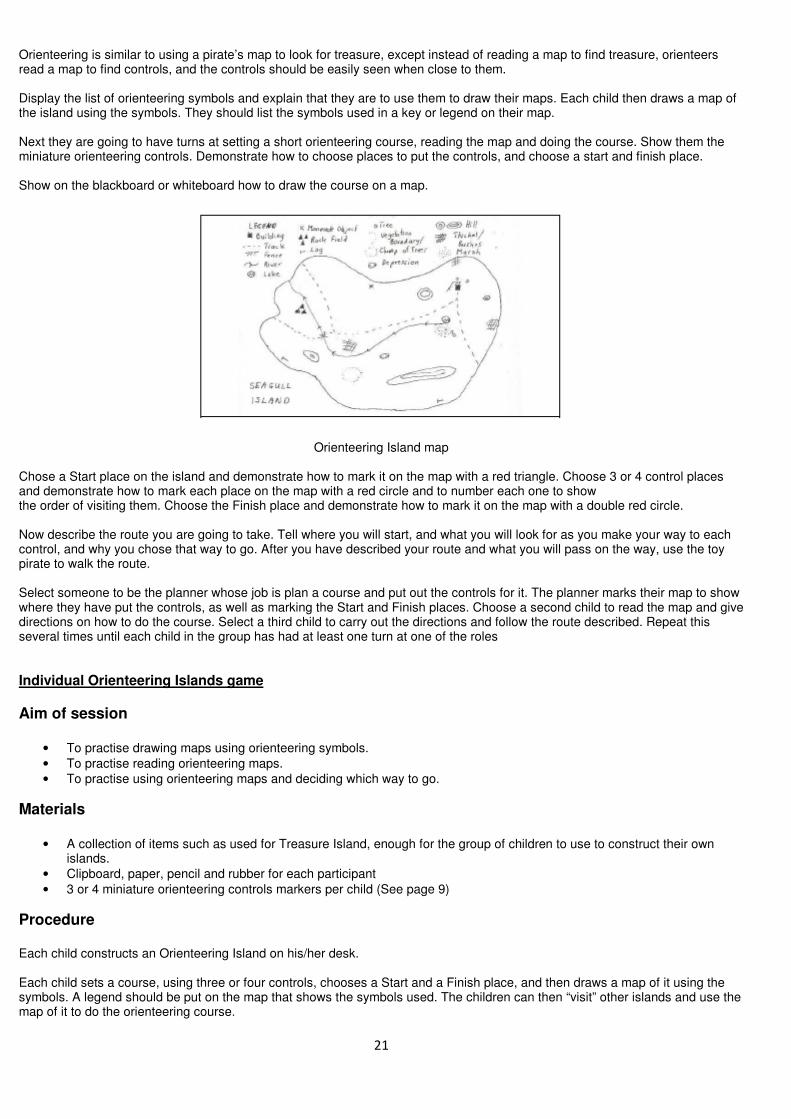
Orienteering is similar to using a pirate’s map to look for treasure, except instead of reading a map to find treasure, orienteers read a map to find controls, and the controls should be easily seen when close to them. Display the list of orienteering symbols and explain that they are to use them to draw their maps. Each child then draws a map of the island using the symbols. They should list the symbols used in a key or legend on their map. Next they are going to have turns at setting a short orienteering course, reading the map and doing the course. Show them the miniature orienteering controls. Demonstrate how to choose places to put the controls, and choose a start and finish place. Show on the blackboard or whiteboard how to draw the course on a map.
Orienteering Island map Chose a Start place on the island and demonstrate how to mark it on the map with a red triangle. Choose 3 or 4 control places and demonstrate how to mark each place on the map with a red circle and to number each one to show the order of visiting them. Choose the Finish place and demonstrate how to mark it on the map with a double red circle. Now describe the route you are going to take. Tell where you will start, and what you will look for as you make your way to each control, and why you chose that way to go. After you have described your route and what you will pass on the way, use the toy pirate to walk the route. Select someone to be the planner whose job is plan a course and put out the controls for it. The planner marks their map to show where they have put the controls, as well as marking the Start and Finish places. Choose a second child to read the map and give directions on how to do the course. Select a third child to carry out the directions and follow the route described. Repeat this several times until each child in the group has had at least one turn at one of the roles
Individual Orienteering Islands game
Aim of session
• To practise drawing maps using orienteering symbols.
• To practise reading orienteering maps.
• To practise using orienteering maps and deciding which way to go.
Materials
• A collection of items such as used for Treasure Island, enough for the group of children to use to construct their own islands.
• Clipboard, paper, pencil and rubber for each participant
• 3 or 4 miniature orienteering controls markers per child (See page 9)
Procedure Each child constructs an Orienteering Island on his/her desk. Each child sets a course, using three or four controls, chooses a Start and a Finish place, and then draws a map of it using the symbols. A legend should be put on the map that shows the symbols used. The children can then “visit” other islands and use the map of it to do the orienteering course.
22
The children can continue visiting other islands until they are competent at turning the map to fit the ground, recognising the symbols, matching them to the features, and doing the course on each map.
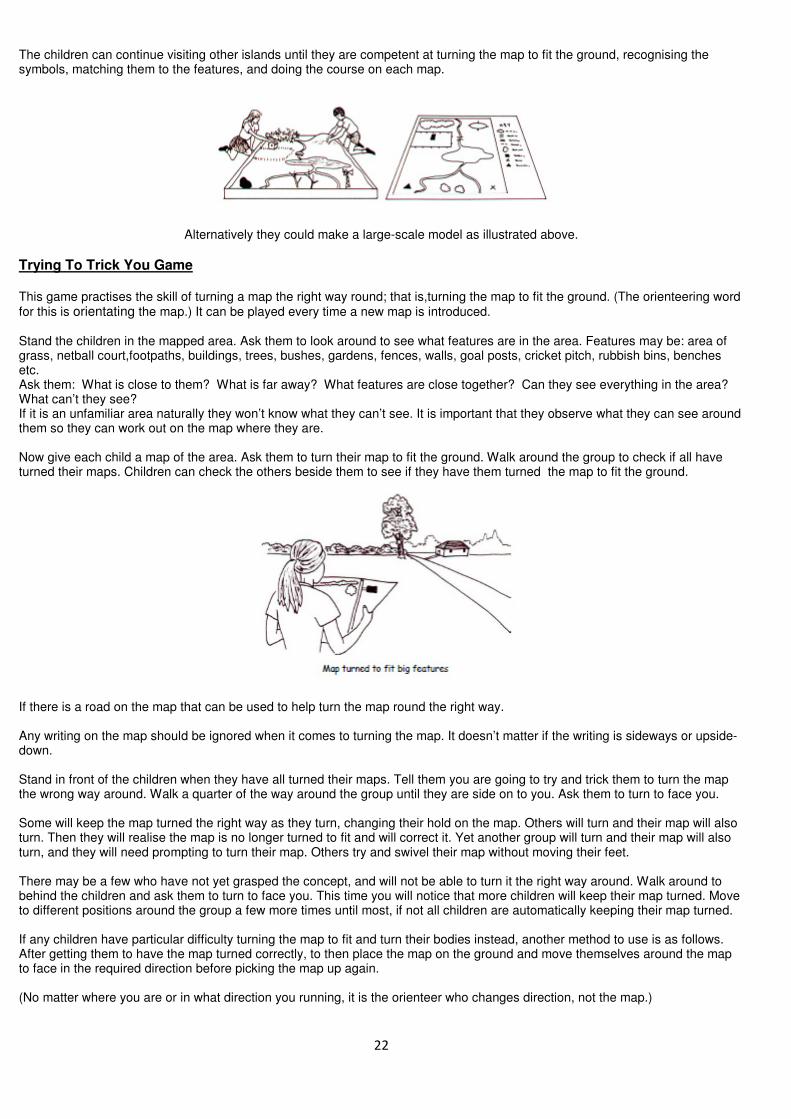
Alternatively they could make a large-scale model as illustrated above.
Trying To Trick You Game This game practises the skill of turning a map the right way round; that is,turning the map to fit the ground. (The orienteering word for this is orientating the map.) It can be played every time a new map is introduced. Stand the children in the mapped area. Ask them to look around to see what features are in the area. Features may be: area of grass, netball court,footpaths, buildings, trees, bushes, gardens, fences, walls, goal posts, cricket pitch, rubbish bins, benches etc. Ask them: What is close to them? What is far away? What features are close together? Can they see everything in the area? What can’t they see? If it is an unfamiliar area naturally they won’t know what they can’t see. It is important that they observe what they can see around them so they can work out on the map where they are. Now give each child a map of the area. Ask them to turn their map to fit the ground. Walk around the group to check if all have turned their maps. Children can check the others beside them to see if they have them turned the map to fit the ground.
If there is a road on the map that can be used to help turn the map round the right way. Any writing on the map should be ignored when it comes to turning the map. It doesn’t matter if the writing is sideways or upside-down. Stand in front of the children when they have all turned their maps. Tell them you are going to try and trick them to turn the map the wrong way around. Walk a quarter of the way around the group until they are side on to you. Ask them to turn to face you. Some will keep the map turned the right way as they turn, changing their hold on the map. Others will turn and their map will also turn. Then they will realise the map is no longer turned to fit and will correct it. Yet another group will turn and their map will also turn, and they will need prompting to turn their map. Others try and swivel their map without moving their feet. There may be a few who have not yet grasped the concept, and will not be able to turn it the right way around. Walk around to behind the children and ask them to turn to face you. This time you will notice that more children will keep their map turned. Move to different positions around the group a few more times until most, if not all children are automatically keeping their map turned. If any children have particular difficulty turning the map to fit and turn their bodies instead, another method to use is as follows. After getting them to have the map turned correctly, to then place the map on the ground and move themselves around the map to face in the required direction before picking the map up again. (No matter where you are or in what direction you running, it is the orienteer who changes direction, not the map.)

23
MAP MAKING The first maps used are simple maps, hand drawn by the children themselves. See Understanding maps on page 4 and Mini Maps on page 7. After that a school grounds map is used. Making a simple map of the school grounds is not particularly difficult. It has considerable value as an activity for able students. See the following section on Do-it-yourself maps. The children can progress from the school grounds to local parks. Alternatively, for a professional standard orienteering map of your school contact your local orienteering club. See Contacts on page 26. They may have a mapper who is prepared to map your school in colour for a nominal fee. Orienteering mappers use Ocad (software for orienteering computer aided design). An older version, Ocad 5 can be downloaded for free and used to draw school maps (see page 25).
Do-it-yourself maps Hand-drawn maps are quite acceptable for school grounds..
Required • The head's/council’s map of the school buildings or a google view of the school area.
• Alternatively, an aerial photograph of the school or other area.
• Tracing paper or (much better) draftsman’s drawing film.
• Pen or pencils of different colours for fieldwork.
• Fine felt tip pens of different colours or thicknesses for cartography.
• Laser printing for the title and the key.
Procedure Decide which part of the photograph or plan you wish to use. Reduce or enlarge that part until it roughly fits an A4 – A3 page. If your basemap is a copy of an aerial photograph, it may not photocopy well for reduction / enlargement. It is best to trace what you can see onto tracing paper of draftsman’s film, discard the original photograph and reduce / enlarge the tracing. Tape over your fieldwork yet another fresh piece of tracing paper or drafting film. Walk around the area drawing what you see onto the film. It is often best to completely re-draw (trace) everything you want to map, but sometimes you can just make careful corrections and additions.
Trace what you can see on the photograph to make your basemap.
24
If you have completely traced the basemap, remove the fieldwork tracing from the original basemap and discard the latter. Tape over your fieldwork yet another fresh piece of tracing paper or drafting film. Go over the tracing neatly with a ruler and pen. Consider using different thicknesses of black pen, or different colours. Add the title, the key, the date and your name.
What to map – the three principles
1. Map anything that might impede the orienteer’s progress, like bush, high fences or a creek. 2. Map anything that the orienteer might use to navigate by, such as a path across the sports fields. 3. Map anything that would be useful as a control site. (If you want to attach permanent control markers, make sure you
map wooden objects!)
What not to map Fine detail crammed into a small area is too hard to map. Just map the major features.
Prominence in Context Map what stands out; don’t map detail that is lost in the noise. A 50cm knoll in the bushes probably doesn’t stand out; such a knoll on the field does stand out, and should be mapped. Consider the child’s point of view. Drinking fountains stand out to them! Overhead structures are often too hard to include, unless you have only one or two to handle. If your school has many sheltered pathways, it may be best to ignore them and concentrate on what can be seen at ground level.
Benches can be ignored if there are dozens of them under the eaves of every building – they add little for the extra effort.
Buildings should be outlined at ground level – note that the aerial photograph will show eaves.
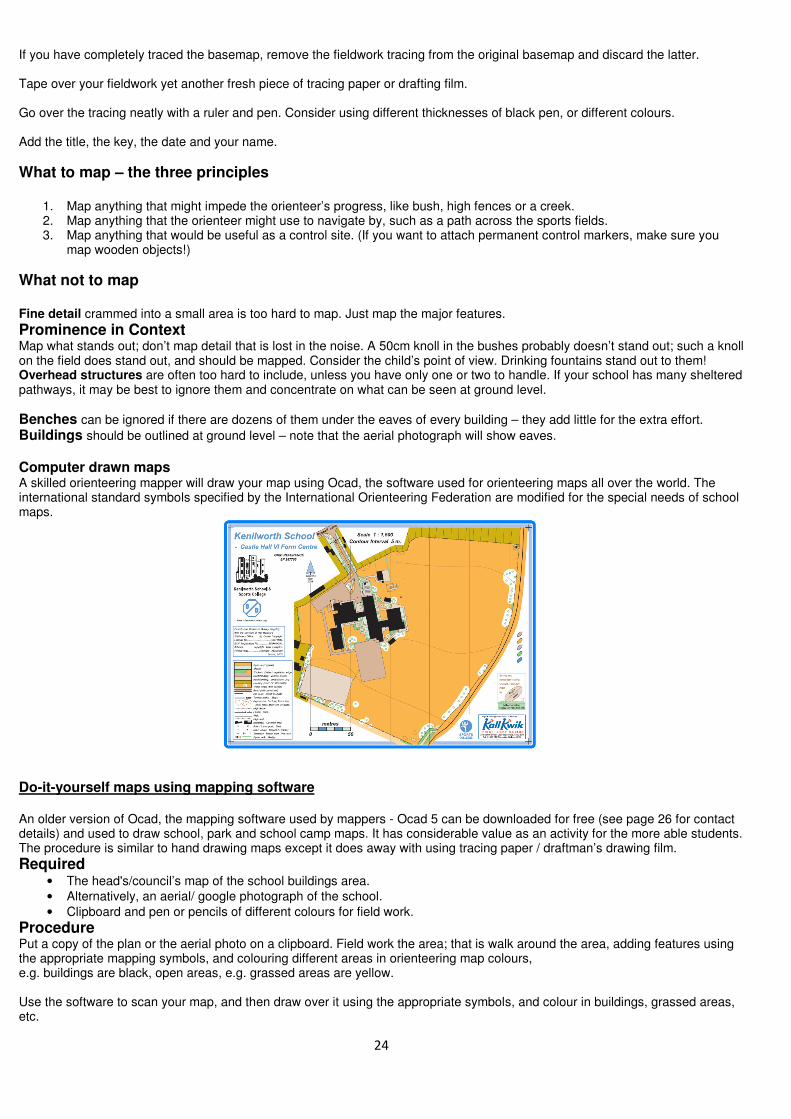
Computer drawn maps A skilled orienteering mapper will draw your map using Ocad, the software used for orienteering maps all over the world. The international standard symbols specified by the International Orienteering Federation are modified for the special needs of school maps.
Do-it-yourself maps using mapping software An older version of Ocad, the mapping software used by mappers - Ocad 5 can be downloaded for free (see page 26 for contact details) and used to draw school, park and school camp maps. It has considerable value as an activity for the more able students. The procedure is similar to hand drawing maps except it does away with using tracing paper / draftman’s drawing film.
Required • The head's/council’s map of the school buildings area.
• Alternatively, an aerial/ google photograph of the school.
• Clipboard and pen or pencils of different colours for field work.
Procedure Put a copy of the plan or the aerial photo on a clipboard. Field work the area; that is walk around the area, adding features using the appropriate mapping symbols, and colouring different areas in orienteering map colours, e.g. buildings are black, open areas, e.g. grassed areas are yellow. Use the software to scan your map, and then draw over it using the appropriate symbols, and colour in buildings, grassed areas, etc.
25
When the map is completed print it, and go around the area again checking for accuracy. Complete any corrections. Add a title, a legend showing what the symbols used stand for, the name of the mapper and date the map was completed. Make two disc copies of the map and store in different safe places. The map can be updated as required. Be sure to save the updated map on disc, and to write on it the date of the update.
Hiring a mapper Your local orienteering club may be able to put you into contact with a competent and willing orienteering mapper in your area. The mapper will probably ask you for the plan of your school. Ideally, it should be reasonably up-to-date, and should show the whole school grounds. It’s OK to provide two plans – one for the buildings and a second at a different scale for the grounds. Expect your mapper to do something like the following:
• Identify themselves to the Office on arrival at the school.
• Take possession of your Asset Plan and manipulate it using your photocopier to create a basemap.
• Alternatively, use google / go to the local council office to source an aerial photograph of the school to create the basemap.
• Fieldwork the school grounds by walking around with a clipboard.
(Note that the mapper will not use precision surveying equipment, but will rely upon his eyes and experience to survey the map.)
• Draw the map in Ocad and supply you a sample print in colour.
• Now it is your turn: check the map thoroughly, including a field check (walk around the mapped area comparing the map to the features in the area) if you possibly can. The mapper is only human and may have missed some details. Make any corrections you have noted on the sample map and return it to the mapper. The mapper will then
• Complete any corrections
• Arrange printing of a class set for you.
• Supply the Ocad file to you on disc. In addition, your mapper may be happy to:
• Help you choose control sites and to design courses.
Printing maps Some schools have laser colour printers these days. You can print the map from the disc the mapper supplies you with, or from your file, if you draw your own map using Ocad. You can download a demonstration version of Ocad 7 or 8 free of charge from the Ocad website. Look in Resources (page 26) for the address. It will run on a Windows PC only. The free version allows you to do most Ocad functions except for substantial changes to maps, so for instance you can’t use it to draw a map from scratch. It will allow you to print the map on your laser printer and you can do limited manipulation of courses and control sites. Consider using Ocad to print maps as and when you need them, instead of photocopying a master map, which always gives a poorer result. If your school does not have a laser colour printer your mapper may help you get the maps printed at the local copyshop, or the copyshop they use. Alternatively print one copy on an inkjet and then colour laser copy it at the local copyshop. Note: it is very expensive to print a class set on an inkjet. If a laser printer at your copyshop has an Internet connection you can email the map as an pdf file. Colour school maps come out well on a Black & White laser printer. Wood and forest maps rely upon colour tints to convey the runnability of the terrain,influencing route choice. This is rarely relevant in a school map.
A laminated class set of maps One option is to print a class set of maps in full colour and laminate them for frequent use. This has both advantages and disadvantages. Here are some suggestions and observations. Print more than you need – perhaps 40 – to allow for losses. Laminate them strongly with plenty of overlap – they will be used and abused in damp conditions, and a single pinprick will allow moisture to enter and destroy the map. Colour printed maps cost less than a pound each. This may be too expensive for a single use but cheap for a class set. Lamination adds to the cost.
26
Courses can be drawn on the laminated maps using a fine pointed permanent marker, which can be removed subsequently using methylated spirits. When laminating a class set, consider laminating onto the back, either the instructions, course combinations. Another option is to put each map in a resealable plastic bag. This will be cheaper than laminating, but the maps will not last as long. Ideally, your students will take their maps home to show their families. They can’t do this with a reusable map. School grounds change quickly so don’t expect your laminated class set to last more than (say) a couple of years without updating and reprinting
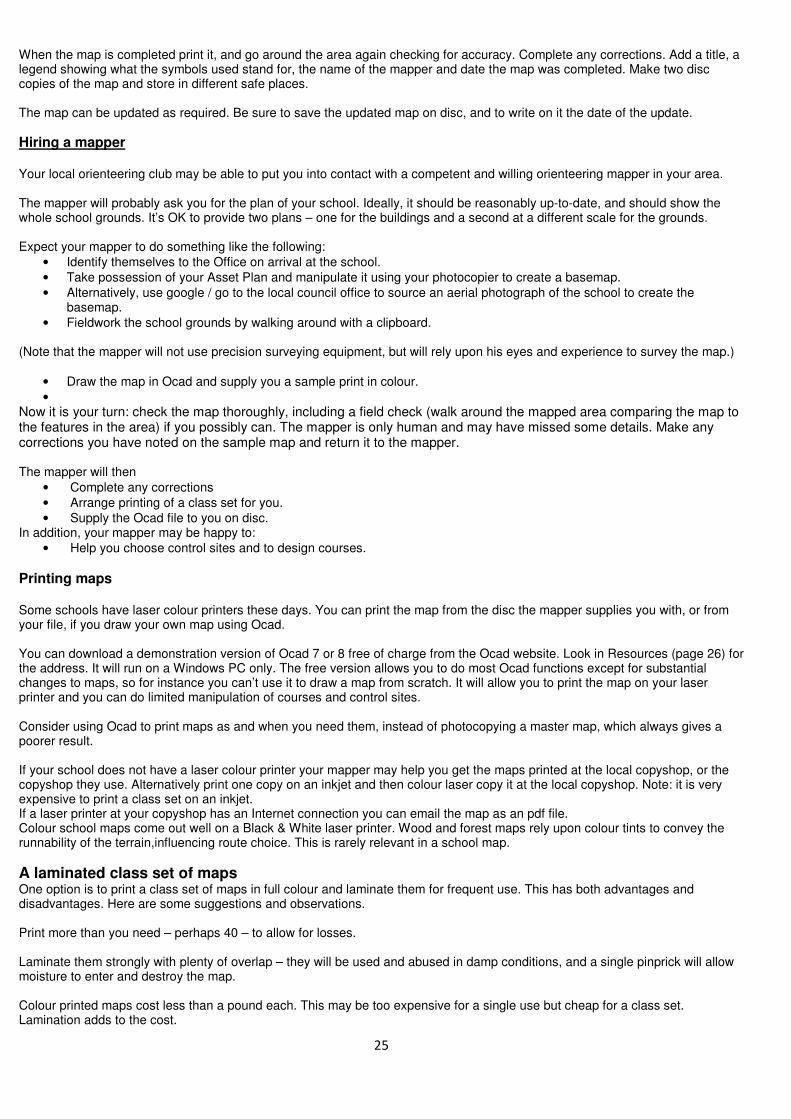
GENERAL INFORMATION & RESOURCES A range of different sized control markers, flags and clippers may be purchased from BSOA “Resources” . In addition we offer a range of compasses all at very competitive prices.
However it is very easy to make your own. Stickers of varying sorts can be used inside. Milk bottle and other coloured drink tops can be used inside and out. These work especially well for the mini map event where the child doing the course collects them as they go. Crayons can also be used inside and out and are used to colour in the matching circles on the map. Outdoors you can use plastic ice cream/milk or margarine containers with a distinguishing code printed on each one and attached with a string through the bottom to facilitate hanging. Traditionally, orienteering control markers have a red triangle emblem, which can be painted onto your control markers. A small card marked with a code and slipped into a plastic bag can be sellotaped or stapled to any suitable feature on the school grounds, will last for a week, and is no loss if removed. We also run an award scheme called the Explorer Challenge Award that you may like to consider using for your school – all the certificates can be printed with your school logo. This has been used successfully in many schools in order to encourage the children to take part in orienteering. Details can be found on our website under Incentive Schemes. Many areas have schools orienteering leagues and championships that are run annually. There are also two main British Schools Championships events run annually for any school wising to take part. See www.bsoa.org for more details of these national schools competitions. If you join BSOA then you will be sent details of these competitions and other relevant information if appropriate. Membership is free. Additionally you may like to register your school at www.britishorienteering.org.uk They will send you more information that will be of help. In addition they run Teachers’ Courses for those wanting to teach orienteering. There is also a wealth of information about orienteering on their website. You can also search for orienteering events that are being run in your area your local orienteering club will be able to advise you on what event is suitable for school children. Other contacts that may be of some assistance Your local orienteering club can be found by visiting www.britishorienteering.org.uk and searching for ‘ Find a Club’ under membership. Coach and Mapper Josh Jenner www.orienteeringcoach.com Orienteer and mapper Graham Gristwood www.grahamgristwood.co.uk/s
27
GLOSSARY Aiming off. Deliberately aiming to the left or to the right of a control on or near a line feature that lies across the
path of the orienteer. Attack point. A large easily found feature near a control. Catching feature A line feature that lies across the direction of travel.
Control circle A circle drawn around a feature on a map to indicate the site at which the control marker is located. The marker should be located at the exact centre of the circle. There should always be a readily identified and mapped feature at the control site.
Control card/ A convenient place to record control codes or clipper imprints as one visits controls, either on the clip recording sheet card / map or a separate piece of paper. . Control marker Stickers, ice cream containers, etc. A control maker and standard with a clipper (used to show that a
control has been visited) appears as illustrated. Children specially enjoy using clippers. Control master map A map with control circles marked to show the exact location of control markers
on the ground. Control master maps are vital to your orienteering programme. Once a map has been drawn,lots of control sites marked and controls placed, children can plan individual courses for a variety of activities.
Course First courses in unfamiliar parks should follow line features. Controls should be at turning places to reduce route choice to a minimum.
Finish symbol A double circle, or sometimes a triangle in a circle where the Start and Finish coincide. Following Following other competitors is regarded as unsporting. It is probably also unwise. Handrail Line features such as roads, tracks, fences, and streams that may be followed to assist in reaching a
destination. Orienteering skills
Observing features on map and terrain. Relating by distance and direction. Turning the map to fit the ground. Establishing direction of travel. Maintaining direction while travelling. Folding and thumbing the map. Locating and relocating oneself on the map. Recognising alternative routes and choosing between them. Copying control circles accurately from the master map. Finding and using handrails. Finding and using attack points. Finding and using catching features. Aiming off. Drawing a mini-map. Planning courses and putting out controls. Recording codes.
Safety Unmistakable features, for example roads and fences, should bound courses set in unfamiliar places. Boundaries should be explained at the start.
Start symbol A triangle, or a sometimes a triangle inside a circle marking the start and finish place when they coincide
28
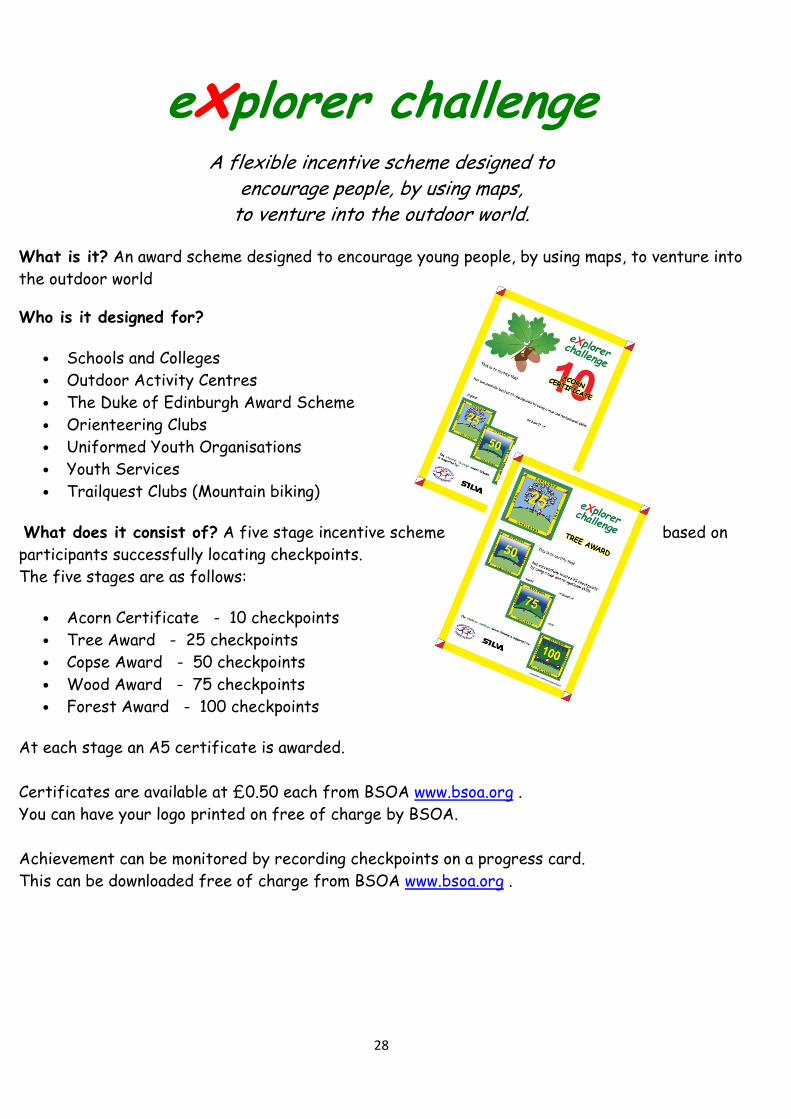
explorer challenge
A flexible incentive scheme designed to encourage people, by using maps, to venture into the outdoor world.
What is it? An award scheme designed to encourage young people, by using maps, to venture into
the outdoor world
Who is it designed for?
• Schools and Colleges
• Outdoor Activity Centres
• The Duke of Edinburgh Award Scheme
• Orienteering Clubs
• Uniformed Youth Organisations
• Youth Services
• Trailquest Clubs (Mountain biking)
What does it consist of? A five stage incentive scheme based on
participants successfully locating checkpoints.
The five stages are as follows:
• Acorn Certificate - 10 checkpoints
• Tree Award - 25 checkpoints
• Copse Award - 50 checkpoints
• Wood Award - 75 checkpoints
• Forest Award - 100 checkpoints
At each stage an A5 certificate is awarded.
Certificates are available at £0.50 each from BSOA www.bsoa.org .
You can have your logo printed on free of charge by BSOA.
Achievement can be monitored by recording checkpoints on a progress card.
This can be downloaded free of charge from BSOA www.bsoa.org .
29
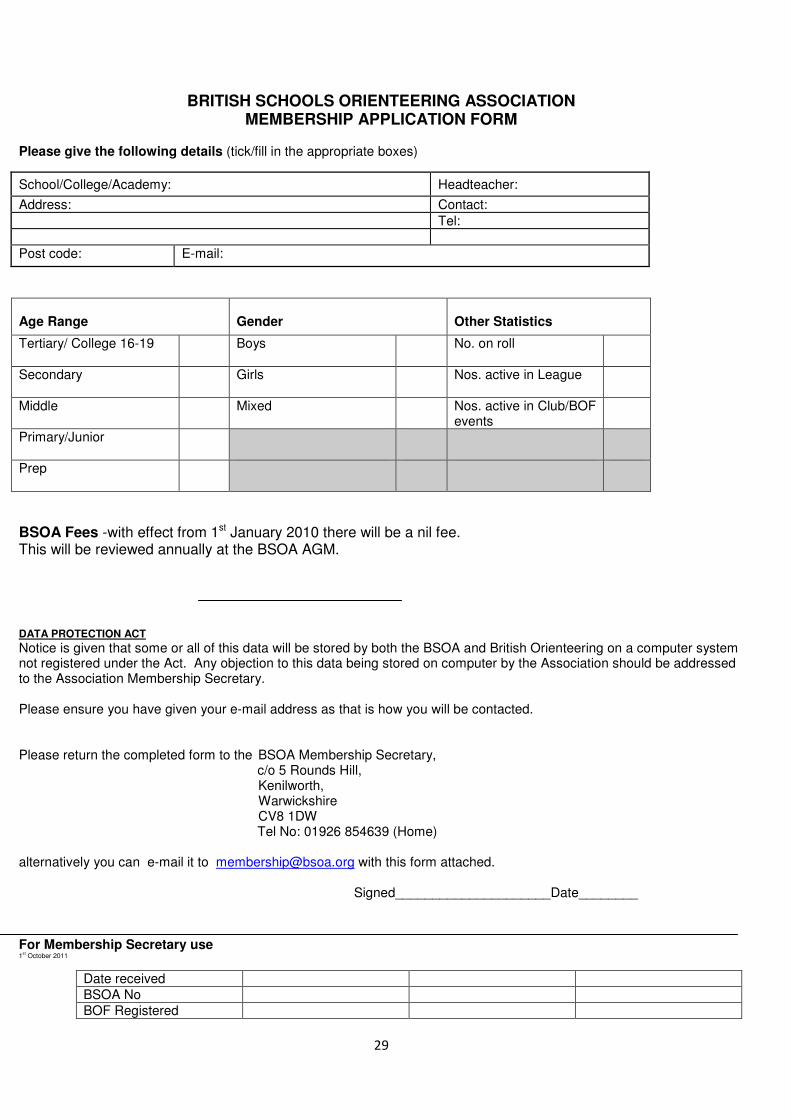
BRITISH SCHOOLS ORIENTEERING ASSOCIATION
MEMBERSHIP APPLICATION FORM Please give the following details (tick/fill in the appropriate boxes)
Age Range
Gender
Other Statistics
Tertiary/ College 16-19 Boys
No. on roll
Secondary Girls
Nos. active in League
Middle Mixed Nos. active in Club/BOF events
Primary/Junior
Prep
BSOA Fees -with effect from 1st January 2010 there will be a nil fee. This will be reviewed annually at the BSOA AGM. DATA PROTECTION ACT
Notice is given that some or all of this data will be stored by both the BSOA and British Orienteering on a computer system not registered under the Act. Any objection to this data being stored on computer by the Association should be addressed to the Association Membership Secretary. Please ensure you have given your e-mail address as that is how you will be contacted. Please return the completed form to the BSOA Membership Secretary, c/o 5 Rounds Hill, Kenilworth, Warwickshire CV8 1DW Tel No: 01926 854639 (Home) alternatively you can e-mail it to [email protected] with this form attached. Signed_____________________Date________
For Membership Secretary use 1
st October 2011
School/College/Academy: Headteacher:
Address: Contact:
Tel:
Post code: E-mail:
Date received
BSOA No
BOF Registered