oracle linux 7 · v preface the oracle® linux 7: installation guide provides information about how...
TRANSCRIPT

Oracle® Linux 7
Installation Guide
E54695-24September 2019
Oracle Legal Notices
Copyright © 2014, 2019, Oracle and/or its affiliates. All rights reserved.
This software and related documentation are provided under a license agreement containing restrictions on use and disclosure and are protectedby intellectual property laws. Except as expressly permitted in your license agreement or allowed by law, you may not use, copy, reproduce,translate, broadcast, modify, license, transmit, distribute, exhibit, perform, publish, or display any part, in any form, or by any means. Reverseengineering, disassembly, or decompilation of this software, unless required by law for interoperability, is prohibited.
The information contained herein is subject to change without notice and is not warranted to be error-free. If you find any errors, please report themto us in writing.
If this is software or related documentation that is delivered to the U.S. Government or anyone licensing it on behalf of the U.S. Government, thenthe following notice is applicable:
U.S. GOVERNMENT END USERS: Oracle programs, including any operating system, integrated software, any programs installed on the hardware,and/or documentation, delivered to U.S. Government end users are "commercial computer software" pursuant to the applicable Federal AcquisitionRegulation and agency-specific supplemental regulations. As such, use, duplication, disclosure, modification, and adaptation of the programs,including any operating system, integrated software, any programs installed on the hardware, and/or documentation, shall be subject to licenseterms and license restrictions applicable to the programs. No other rights are granted to the U.S. Government.
This software or hardware is developed for general use in a variety of information management applications. It is not developed or intended foruse in any inherently dangerous applications, including applications that may create a risk of personal injury. If you use this software or hardwarein dangerous applications, then you shall be responsible to take all appropriate fail-safe, backup, redundancy, and other measures to ensure itssafe use. Oracle Corporation and its affiliates disclaim any liability for any damages caused by use of this software or hardware in dangerousapplications.
Oracle and Java are registered trademarks of Oracle and/or its affiliates. Other names may be trademarks of their respective owners.
Intel and Intel Xeon are trademarks or registered trademarks of Intel Corporation. All SPARC trademarks are used under license and aretrademarks or registered trademarks of SPARC International, Inc. AMD, Opteron, the AMD logo, and the AMD Opteron logo are trademarks orregistered trademarks of Advanced Micro Devices. UNIX is a registered trademark of The Open Group.
This software or hardware and documentation may provide access to or information about content, products, and services from third parties.Oracle Corporation and its affiliates are not responsible for and expressly disclaim all warranties of any kind with respect to third-party content,products, and services unless otherwise set forth in an applicable agreement between you and Oracle. Oracle Corporation and its affiliates will notbe responsible for any loss, costs, or damages incurred due to your access to or use of third-party content, products, or services, except as setforth in an applicable agreement between you and Oracle.
Abstract
This manual provides information about how to install and upgrade Oracle Linux 7 systems.
Document generated on: 2019-09-18 (revision: 8372)

iii
Table of ContentsPreface .............................................................................................................................................. v1 Pre-installation Configuration ........................................................................................................... 1
1.1 System Requirements ........................................................................................................... 11.2 Obtaining and Preparing Installation Media ............................................................................ 1
1.2.1 Preparing CD or DVD Installation Media ..................................................................... 31.2.2 Preparing USB Installation Media ............................................................................... 31.2.3 Extracting the Contents of the Full Installation ISO Image ............................................ 4
1.3 Configuring a Network Installation Server .............................................................................. 41.3.1 Configuring an Existing NFS Server ........................................................................... 51.3.2 Configuring an Existing Apache HTTP Server ............................................................. 51.3.3 Configuring DHCP and TFTP Services to Support PXE Clients .................................... 61.3.4 Configuring Dnsmasq to Support PXE Clients ........................................................... 101.3.5 Boot Loader Configuration for BIOS-Based PXE Clients ............................................ 141.3.6 Boot Loader Configuration for UEFI-Based PXE Clients ............................................. 16
1.4 Planning an Installation ....................................................................................................... 172 Installing Oracle Linux Manually ..................................................................................................... 19
2.1 Starting the Installation ....................................................................................................... 192.2 Setting the System Time and Supporting Other Languages .................................................. 212.3 Selecting the Software to Install .......................................................................................... 242.4 Configuring System Storage and Networking ....................................................................... 262.5 Setting the Security Policy .................................................................................................. 312.6 Completing the Installation .................................................................................................. 32
3 Options for Installation ................................................................................................................... 373.1 Installation Boot Options ..................................................................................................... 373.2 Automated Installation Using Kickstart ................................................................................. 40
3.2.1 Creating a Kickstart File ........................................................................................... 403.2.2 Using a Kickstart File to Install a System .................................................................. 43
3.3 Text-Based Installations ...................................................................................................... 443.4 Installing a System With a Btrfs root File System ............................................................... 443.5 Using a Driver Update Disk ................................................................................................ 46
4 Upgrading an Oracle Linux System ................................................................................................ 494.1 Conditions for Performing an In-Place Upgrade .................................................................... 494.2 Performing an In-Place Upgrade ......................................................................................... 49
5 Post-Installation Configuration ........................................................................................................ 535.1 Registering with the Unbreakable Linux Network .................................................................. 535.2 Obtaining Errata and Updates from the Oracle Linux Yum Server ......................................... 535.3 Obtaining Packages from the Oracle Linux Installation Media ................................................ 545.4 Applying Updates ............................................................................................................... 545.5 Managing an Oracle Linux 7 System ................................................................................... 54
6 Troubleshooting Oracle Linux 7 Installations ................................................................................... 576.1 Troubleshooting Menu Options ............................................................................................ 576.2 Debug and Log Information ................................................................................................. 57

iv
v
PrefaceThe Oracle® Linux 7: Installation Guide provides information about how to install and upgrade Oracle Linux7 systems.
AudienceThis document is intended for administrators who need to install and configure Oracle Linux 7. Itis assumed that readers are familiar with web technologies and have a general understanding ofadministering the Linux operating system.
Document OrganizationThe document is organized as follows:
• Chapter 1, Pre-installation Configuration describes the system requirements for Oracle Linux 7, how toobtain the Oracle Linux 7 software, information that you require to install a system, and how to set up anetwork installation server.
• Chapter 2, Installing Oracle Linux Manually describes how to manually install Oracle Linux 7 from a bootimage that is available on a CD, DVD, USB memory stick, or hard drive. The packages used for theinstallation can be available locally or hosted on a network installation server.
• Chapter 3, Options for Installation describes some of the options you have for installing Oracle Linux7including the boot options that can be used to control the installation and how you can use kickstart toautomate the installation of Oracle Linux.
• Chapter 4, Upgrading an Oracle Linux System describes how you can upgrade from a previous OracleLinux release.
• Chapter 5, Post-Installation Configuration describes configuration changes that you might make to asystem after installation.
• Chapter 6, Troubleshooting Oracle Linux 7 Installations describes some options for troubleshootingOracle Linux installations.
Related DocumentsThe documentation for this product is available at:
Oracle® Linux 7 Documentation
ConventionsThe following text conventions are used in this document:
Convention Meaning
boldface Boldface type indicates graphical user interface elements associated with anaction, or terms defined in text or the glossary.
italic Italic type indicates book titles, emphasis, or placeholder variables for whichyou supply particular values.
monospace Monospace type indicates commands within a paragraph, URLs, code inexamples, text that appears on the screen, or text that you enter.

Documentation Accessibility
vi
Documentation Accessibility
For information about Oracle's commitment to accessibility, visit the Oracle Accessibility Program websiteathttp://www.oracle.com/pls/topic/lookup?ctx=acc&id=docacc.
Access to Oracle Support
Oracle customers that have purchased support have access to electronic support through My OracleSupport. For information, visithttp://www.oracle.com/pls/topic/lookup?ctx=acc&id=info or visit http://www.oracle.com/pls/topic/lookup?ctx=acc&id=trs if you are hearing impaired.
1
Chapter 1 Pre-installation Configuration
Table of Contents1.1 System Requirements ................................................................................................................... 11.2 Obtaining and Preparing Installation Media .................................................................................... 1
1.2.1 Preparing CD or DVD Installation Media ............................................................................. 31.2.2 Preparing USB Installation Media ....................................................................................... 31.2.3 Extracting the Contents of the Full Installation ISO Image .................................................... 4
1.3 Configuring a Network Installation Server ...................................................................................... 41.3.1 Configuring an Existing NFS Server ................................................................................... 51.3.2 Configuring an Existing Apache HTTP Server ..................................................................... 51.3.3 Configuring DHCP and TFTP Services to Support PXE Clients ............................................ 61.3.4 Configuring Dnsmasq to Support PXE Clients ................................................................... 101.3.5 Boot Loader Configuration for BIOS-Based PXE Clients .................................................... 141.3.6 Boot Loader Configuration for UEFI-Based PXE Clients ..................................................... 16
1.4 Planning an Installation ............................................................................................................... 17
This chapter describes the system requirements for Oracle Linux 7, how to obtain the software, how to setup a network installation server, and some general guidelines to help prepare for an installation.
1.1 System Requirements
Oracle Linux 7 includes both the Unbreakable Enterprise Kernel (UEK) and Red Hat Compatible Kernel(RHCK). You can install Oracle Linux 7 on x86-64 systems with up to 2048 logical CPUs and 64 TB ofmemory. The theoretical upper limit is 5120 logical CPUs and 64 TB of memory, but Oracle has not testedthis configuration. A minimum of 2 logical CPUs and 1 GB of memory per logical CPU is recommended.Although the minimum disk space required for installation is 1GB, a minimum of 5 GB is recommended.
If your system supports UEFI mode and you plan to boot and install Oracle Linux 7 in this mode, makesure that the target disk uses GPT (GUID Partition Table), as some UEFI firmwares do not allow UEFI/MBR boot.
For additional details about system requirements and any known installation issues, see the release notesfor your Oracle Linux 7 release and update level at Oracle® Linux 7 Documentation
For information about x86-based servers that are certified for Oracle Linux with UEK, see the HardwareCertification List for Oracle Linux and Oracle VM at https://linux.oracle.com/hardware-certifications.
For UEK system requirements and known issues, see the documentation for your UEK release atUnbreakable Enterprise Kernel Documentation
1.2 Obtaining and Preparing Installation Media
The Oracle Linux distribution is free to download, use, and distribute.
You can download the Oracle Linux installation media from the Oracle Software Delivery Cloud at https://edelivery.oracle.com/linux. After logging in, the Popular Downloads window containing a list of products isdisplayed.
To download the Oracle Linux 7 installation media, do the following:
Obtaining and Preparing Installation Media
2
1. Choose one of the following methods to obtain your product:
• If your product is included in the Popular Downloads window, then select that product to add it to thecart.
• If your product is not included in the Popular Downloads window, then do the following:
a. Type "Oracle Linux 7" in the search box, then click Search.
b. From the search results list, select the product you want to download to add it to the cart.
2. Click the Cart icon.
3. From the Platform/Languages drop-down list, select your system's platform, then continue.
4. On the next page, accept the terms of licenses, then continue.
5. On the last page that itemizes the contents of the Oracle Linux package that you selected, clickDownload.
The Media Pack contains the following ISO images:
• Oracle Linux 7 for x86_64 (64 bit)
This ISO image contains everything needed to boot a system and install Oracle Linux.
• Oracle Linux 7 Boot ISO image for x86_64 (64 bit)
This ISO image contains everything that is required to boot a system and start an installation. However,to complete the installation, you must specify the location of the packages, for example on a local disk oran NFS share. RHCK is used during the installation and both UEK and RHCK kernels are installed. Afterthe installation, the system boots the UEK kernel by default.
Note
When installing releases prior to Oracle Linux 7 Update 3, UnbreakableEnterprise Kernel Release 3 is used. From Oracle Linux 7 Update 3 on, thedefault kernel is Unbreakable Enterprise Kernel Release 4.
• Oracle Linux 7 UEK Boot ISO image for x86_64 (64 bit)
This ISO image contains everything that is required to boot a system and start an installation. However,to complete the installation, you must specify the location of the packages, for example on a local disk,an NFS share, or an HTTP resource like the base repository for an Oracle Linux release on the OracleLinux yum server. UEK is used during the installation and is the default kernel that is booted after aninstallation. Use this boot image if you have hardware that is only supported on UEK, or if you are havingtrouble with the installer when using the RHCK boot image. This ISO image is available in the MediaPack for Oracle Linux 7 Update 2 and later.
• Oracle Linux 7 Source DVD 1 and 2
These ISO images contain the source code for the software packages in the release.
You can use the full installation ISO image or the boot ISO image to do the following:
• Create a CD or DVD, see Section 1.2.1, “Preparing CD or DVD Installation Media”
• Create a bootable USB drive, see Section 1.2.2, “Preparing USB Installation Media”
Preparing CD or DVD Installation Media
3
The ISO images can be used in a virtual DVD-ROM drive to boot and install an Oracle VM or Oracle VMVirtualBox virtual machine (guest).
You can use the full installation ISO image to prepare a network location, such as an NFS share or HTTPserver directory, for use during an installation. This method is typically used when a boot image is used tostart an installation. See Section 1.3, “Configuring a Network Installation Server”.
Note that the media pack might contain additional content that may pertain to a particular release updateof Oracle Linux. Items such as Driver Update Disks may also be included. These items are described infurther detail in the release notes for the particular update release.
After installation, you can obtain Oracle Linux packages from the Unbreakable Linux Network (ULN) andthe Oracle Linux yum server. For more information, see Chapter 5, Post-Installation Configuration.
1.2.1 Preparing CD or DVD Installation Media
Only a recordable DVD has enough storage capacity for the full installation ISO image.
A recordable CD has enough storage capacity for the boot ISO image, but not for the full installation ISOimage.
To write an ISO image file to a CD or DVD, you can use a command such as cdrecord, for example:
# cdrecord -v -eject speed=16 dev=ATA:0,2,0 file_name.iso
You can use the cdrecord -scanbus command to display the SCSI subsystem and device thatcorresponds to the CD or DVD writer.
1.2.2 Preparing USB Installation Media
If a system's firmware supports booting from a USB drive, you can create a boot image on a USB driveand use this to install Oracle Linux. Depending on the capacity of the USB drive, you can use the fullinstallation ISO image or the boot ISO image to create the bootable USB drive.
To create a bootable USB drive, you can use the dd command or a separate utility that can write an ISOimage to a USB drive. The following steps describe how to use the dd command.
Caution
This procedure destroys any existing data on the drive. To avoid overwriting anexisting hard disk partition, ensure that you specify the correct device name for theUSB drive. The following procedure assumes that the USB drive is the /dev/sdb1device, which might not be the case on your system.
1. Insert a USB drive into an Oracle Linux system.
If the operating system mounts any file systems on the device, unmount these file systems, forexample:
# df /media/USBFilesystem 1K-blocks Used Available Use% Mounted on/dev/sdb1 35346 35346 0 100% /media/USB# umount /dev/sdb1
2. Use the dd command to write the contents of the ISO image file to the USB device.
# dd if=iso_file_name of=usb_device bs=bytes
For example:
Extracting the Contents of the Full Installation ISO Image
4
# dd if=./full_image.iso of=/dev/sdb bs=512k
Note that you must write the ISO contents directly to the USB device node, not to a partition on theUSB device. This helps to ensure that the device is bootable and the contents are found in the correctlocation.
You can now remove the USB drive and use it to boot a system.
1.2.3 Extracting the Contents of the Full Installation ISO Image
To extract the contents of the full Oracle Linux 7 installation ISO image:
1. Mount the full installation ISO image on a suitable mount point, for example /mnt:
# mount -t iso9660 -o loop full_image.iso /mnt
2. Extract the contents of the full installation ISO image.
Ensure that the command you use extracts the .treeinfo file at the root of the ISO image, forexample:
# cp -a -T mount_dir output_dir
For example, to extract the ISO image mounted on /mnt to an NFS share at /var/OSimage/OL7:
# cp -a -T /mnt /var/OSimage/OL7
For example, to extract the ISO image mounted on /mnt to a web server directory at /var/www/html/OSimage/OL7:
# cp -a -T /mnt /var/www/html/OSimage/OL7
3. Unmount the DVD image:
# umount mount_dir
1.3 Configuring a Network Installation ServerIf you use a boot ISO or the Preboot eXecution Environment (PXE) to install systems, you can set up anetwork installation server to host the RPM packages. This server must have sufficient storage space tohost the full Oracle Linux 7 installation DVD image (approximately 4.5 GB), and you must configure it touse either NFS or HTTP to serve the image files to the target systems on which you want to install OracleLinux 7.
To configure a network installation server:
1. Set up an NFS or HTTP server.
Instructions can be found in the Administrator's Guide for your Oracle Linux release:
• Oracle® Linux 7: Administrator's Guide
• Oracle® Linux 6: Administrator's Guide
2. Download the full Oracle Linux 7 installation ISO image.
See Section 1.2, “Obtaining and Preparing Installation Media”.
3. Configure the NFS or HTTP server to act as a network installation server.
Configuring an Existing NFS Server
5
• Section 1.3.1, “Configuring an Existing NFS Server”
• Section 1.3.2, “Configuring an Existing Apache HTTP Server”
4. (Optional) Configure support for installation on PXE clients.
In deployments where multiple systems are installed, it is common to perform a network-basedinstallation by configuring systems to load a PXE boot image from a Trivial File Transfer Protocol(TFTP) server that is configured on the same network. Dynamic Host Configuration Protocol (DHCP) isused to provide clients with the location of the boot files on the FTP server.
If you want to support PXE client installation, configure the Dynamic Host Configuration Protocol(DHCP) and Trivial File Transfer Protocol (TFTP) services. See Section 1.3.3, “Configuring DHCPand TFTP Services to Support PXE Clients” or Section 1.3.4, “Configuring Dnsmasq to Support PXEClients”.
1.3.1 Configuring an Existing NFS Server
The following instructions apply to configuring an NFS share on Oracle Linux 7 systems. For instructionson configuring NFS shares on Oracle Linux 6, see Oracle® Linux 6: Administrator's Guide
To configure an existing NFS server:
1. Create the directory you want to export as the NFS share, for example /var/OSimage/OL7:
# mkdir -p /var/OSimage/OL7
2. Copy the Oracle Linux 7 installation files to the NFS share.
When you copy the full installation ISO image to the NFS share, the installation program is able todetect that the installation source is the full installation ISO image and install from that file.
If you prefer, you can extract the contents of the full installation ISO image to the NFS share, seeSection 1.2.3, “Extracting the Contents of the Full Installation ISO Image”.
3. Use the exportfs command to export the directory.
# exportfs -i -o options client:export_dir
For example, to allow read-only access to the directory /var/OSimage/OL7 for any NFS client on the192.168.1 subnet:
# exportfs -i -o ro 192.168.1.0/24:/var/OSimage/OL7
Alternatively, edit the /etc/exports configuration file and add an entry for the directory, for example:
/var/OSimage/OL7 192.168.1.0/24(ro)
Then use the exportfs -ra command to reload the NFS shares defined in the /etc/exports file.
1.3.2 Configuring an Existing Apache HTTP Server
The instructions in this section are for configuring an HTTP directory on Oracle Linux 7 systems.For instructions on configuring HTTP directories on Oracle Linux 6 systems, see Oracle® Linux 6:Administrator's Guide.
To configure an existing Apache HTTP server:
1. Create the directory that will be used to store the contents of the full installation ISO image.
Configuring DHCP and TFTP Services to Support PXE Clients
6
Create the directory under the DocumentRoot hierarchy that is defined in the HTTP serverconfiguration file (/etc/httpd/conf/httpd.conf), for example /var/www/html/OSimage/OL7.
# mkdir -p /var/www/html/OSimage/OL7
2. Extract the contents of the full installation ISO image to the HTTP directory.
See Section 1.2.3, “Extracting the Contents of the Full Installation ISO Image”.
3. Edit the HTTP server configuration file, /etc/httpd/conf/httpd.conf, and add a <Directory>section.
For example:
<Directory "/var/www/html/OSimage/OL7"> Options Indexes FollowSymLinks AllowOverride None Order allow,deny Allow from all Require all granted</Directory>
Place this section after the closing </Directory> statement for the <Directory DocumentRoot>section.
The Indexes option is only required if you want to be able to browse the directory hierarchy, it is notrequired for installation.
4. If SELinux is enabled in enforcing mode and you extracted the ISO image to a directory that is notunder /var/www/html, use the semanage and restorecon commands to restore the SELinuxsecurity context on the extracted files.
The semanage and restorecon commands are provided by the policycoreutils-python andpolicycoreutils packages.
a. Use the semanage command to define the default file type of the directory hierarchy ashttpd_sys_content_t:
# /usr/sbin/semanage fcontext -a -t httpd_sys_content_t "/var/OSimage(/.*)?"
b. Use the restorecon command to apply the file type to the entire directory hierarchy.
# /sbin/restorecon -R -v /var/OSimage
See the httpd_selinux(8) manual page for more information.
1.3.3 Configuring DHCP and TFTP Services to Support PXE Clients
The DHCP and TFTP services required to install Oracle Linux 7 on PXE clients do not have to run on thesame host. If you configure separate DHCP and TFTP servers, the DHCP server must define the TFTPserver from which a client can download the boot loader, installation kernel, and initial ram-disk files.
The DHCP and TFTP servers do not have to host the installation packages, you can use a separatenetwork installation source. The TFTP server can define a network installation source from which a clientcan obtain the installation packages.
To configure the DHCP service for PXE client installation requests:
1. Install the dhcp package.
Configuring DHCP and TFTP Services to Support PXE Clients
7
# yum install dhcp
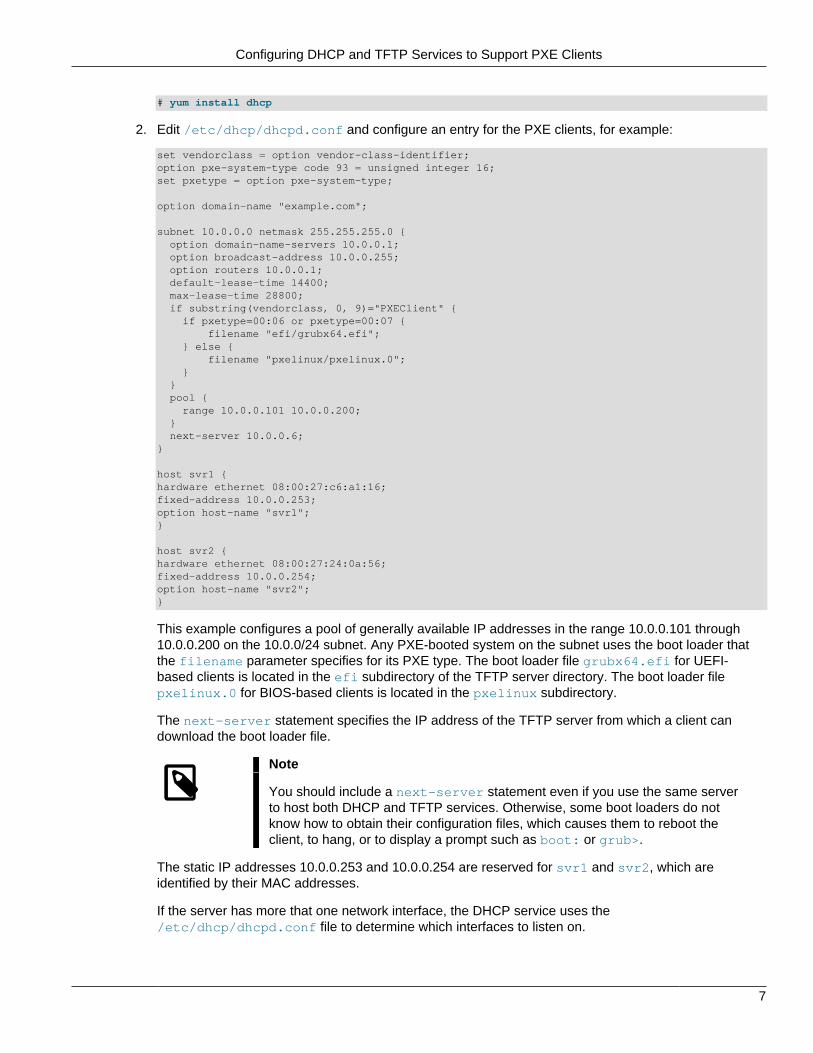
2. Edit /etc/dhcp/dhcpd.conf and configure an entry for the PXE clients, for example:
set vendorclass = option vendor-class-identifier;option pxe-system-type code 93 = unsigned integer 16;set pxetype = option pxe-system-type;
option domain-name "example.com";
subnet 10.0.0.0 netmask 255.255.255.0 { option domain-name-servers 10.0.0.1; option broadcast-address 10.0.0.255; option routers 10.0.0.1; default-lease-time 14400; max-lease-time 28800; if substring(vendorclass, 0, 9)="PXEClient" { if pxetype=00:06 or pxetype=00:07 { filename "efi/grubx64.efi"; } else { filename "pxelinux/pxelinux.0"; } } pool { range 10.0.0.101 10.0.0.200; } next-server 10.0.0.6;}
host svr1 {hardware ethernet 08:00:27:c6:a1:16;fixed-address 10.0.0.253;option host-name "svr1";}
host svr2 {hardware ethernet 08:00:27:24:0a:56;fixed-address 10.0.0.254;option host-name "svr2";}
This example configures a pool of generally available IP addresses in the range 10.0.0.101 through10.0.0.200 on the 10.0.0/24 subnet. Any PXE-booted system on the subnet uses the boot loader thatthe filename parameter specifies for its PXE type. The boot loader file grubx64.efi for UEFI-based clients is located in the efi subdirectory of the TFTP server directory. The boot loader filepxelinux.0 for BIOS-based clients is located in the pxelinux subdirectory.
The next-server statement specifies the IP address of the TFTP server from which a client candownload the boot loader file.
Note
You should include a next-server statement even if you use the same serverto host both DHCP and TFTP services. Otherwise, some boot loaders do notknow how to obtain their configuration files, which causes them to reboot theclient, to hang, or to display a prompt such as boot: or grub>.
The static IP addresses 10.0.0.253 and 10.0.0.254 are reserved for svr1 and svr2, which areidentified by their MAC addresses.
If the server has more that one network interface, the DHCP service uses the/etc/dhcp/dhcpd.conf file to determine which interfaces to listen on.
Configuring DHCP and TFTP Services to Support PXE Clients
8
3. Start the DHCP service, and configure it to start after a reboot.
# systemctl start dhcpd# systemctl enable dhcpd
If you make any changes to /etc/dhcp/dhcpd.conf, restart the dhcpd service.
4. Configure the firewall to accept DHCP requests, for example:
# firewall-cmd --zone=zone --add-port=67-68/udp# firewall-cmd --zone=zone --add-port=67-68/udp --permanent
To configure the TFTP service for PXE client installation requests:
1. Install the tftp-server package.
# yum install tftp-server
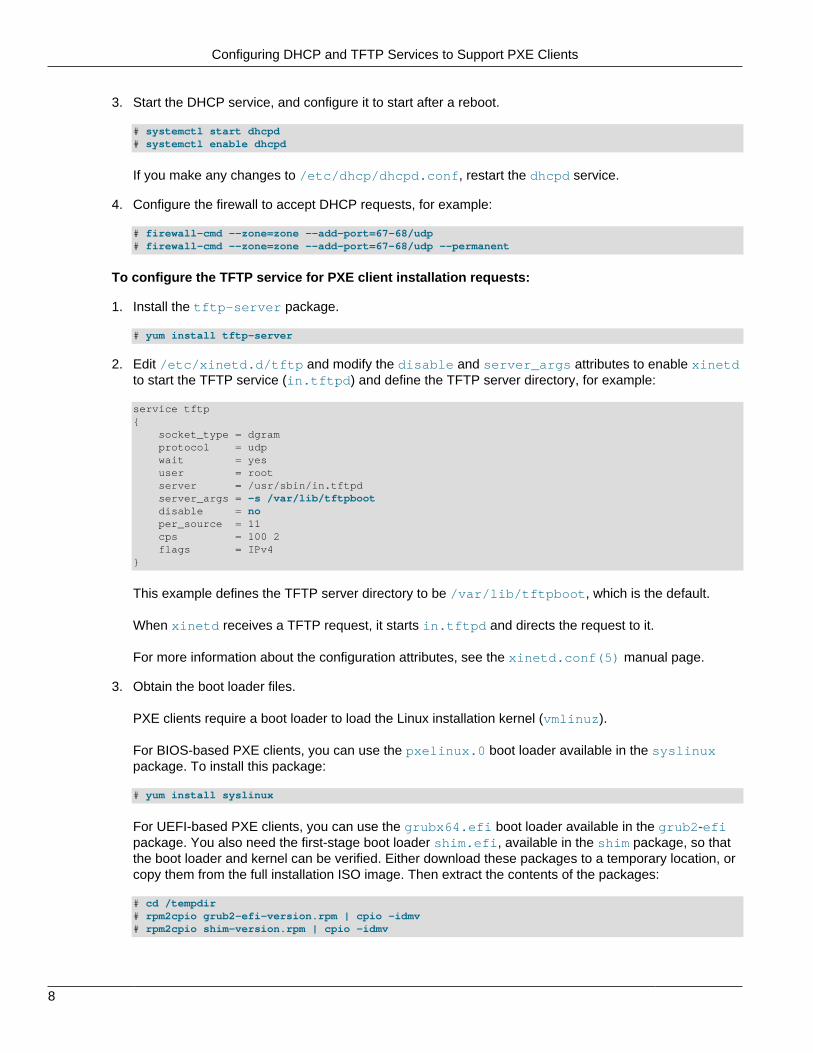
2. Edit /etc/xinetd.d/tftp and modify the disable and server_args attributes to enable xinetdto start the TFTP service (in.tftpd) and define the TFTP server directory, for example:
service tftp{ socket_type = dgram protocol = udp wait = yes user = root server = /usr/sbin/in.tftpd server_args = -s /var/lib/tftpboot disable = no per_source = 11 cps = 100 2 flags = IPv4}
This example defines the TFTP server directory to be /var/lib/tftpboot, which is the default.
When xinetd receives a TFTP request, it starts in.tftpd and directs the request to it.
For more information about the configuration attributes, see the xinetd.conf(5) manual page.
3. Obtain the boot loader files.
PXE clients require a boot loader to load the Linux installation kernel (vmlinuz).
For BIOS-based PXE clients, you can use the pxelinux.0 boot loader available in the syslinuxpackage. To install this package:
# yum install syslinux
For UEFI-based PXE clients, you can use the grubx64.efi boot loader available in the grub2‑efipackage. You also need the first-stage boot loader shim.efi, available in the shim package, so thatthe boot loader and kernel can be verified. Either download these packages to a temporary location, orcopy them from the full installation ISO image. Then extract the contents of the packages:
# cd /tempdir# rpm2cpio grub2-efi-version.rpm | cpio -idmv # rpm2cpio shim-version.rpm | cpio -idmv
Configuring DHCP and TFTP Services to Support PXE Clients
9
Note
Make sure you specify shim.efi as the boot loader in your DHCPconfiguration in /etc/dhcp/dhcpd.conf. The shim boot loader is required forSecure Boot, but if it is not used it simply initializes Grub without attempting tovalidate signatures.
4. Create the directories used to contain the boot loaders and their configuration files as subdirectories ofthe TFTP server directory.
For BIOS-based clients, create the pxelinux/pxelinux.cfg directories, for example:
# mkdir -p /var/lib/tftpboot/pxelinux/pxelinux.cfg
For UEFI-based clients, create the efi directory, for example:
# mkdir -p /var/lib/tftpboot/efi
5. Copy the boot loader files, the installation kernel (vmlinuz), and the ram-disk image file(initrd.img) to the TFTP server subdirectories.
For BIOS-based clients, copy the BIOS boot loader file, the installation kernel, and the ram-disk imagefile to the pxelinux directory:
# cp /usr/share/syslinux/pxelinux.0 /var/lib/tftpboot/pxelinux# wget http://10.0.0.11/OSimage/OL7/isolinux/vmlinuz -O /var/lib/tftpboot/pxelinux/vmlinuz# wget http://10.0.0.11/OSimage/OL7/isolinux/initrd.img -O /var/lib/tftpboot/pxelinux/initrd.img
For UEFI-based clients, copy the BIOS boot loader file, the installation kernel, and the ram-disk imagefile to the efi directory:
# cp /tempdir/boot/efi/EFI/redhat/grubx64.efi /var/lib/tftpboot/efi# cp /tempdir/boot/efi/EFI/redhat/shim.efi /var/lib/tftpboot/efi# cp /tempdir/boot/efi/EFI/redhat/MokManager.efi /var/lib/tftpboot/efi# wget http://10.0.0.11/OSimage/OL7/isolinux/vmlinuz -O /var/lib/tftpboot/efi/vmlinuz# wget http://10.0.0.11/OSimage/OL7/isolinux/initrd.img /var/lib/tftpboot/efi/initrd.img
Note
Copy the shim.efi and MokManager.efi files to support Secure Boot onclients. The MokManager.efi provides utilities for managing the keys used tosign EFI binaries.
The above examples use HTTP to obtain the installation kernel and ram-disk images files from aseparate network installation server. You could use a local copy of the files if the TFTP server alsohosts the installation packages.
To be able to install different operating system versions on PXE clients, you can rename the kernel andram-disk image files, for example to vmlinuz-ol7 and initrd-ol7.img. Alternatively, you couldcopy the kernel and ram-disk image files to subdirectories such as efi/ol7 and pxelinux/ol7.
6. Create the boot loader configuration files.
As a minimum, you should create the default boot loader configuration files:
pxelinux/pxelinux.cfg/default
Default boot loader configuration file for BIOS-based PXE clients.
Configuring Dnsmasq to Support PXE Clients
10
efi/grub.cfg
Default boot loader configuration file for UEFI-based PXE clients.
You can create additional client-specific boot loader configuration files in eitherpxelinux/pxelinux.cfg or efi, depending on whether the client is BIOS or UEFI-based. For moreinformation, see:
• Section 1.3.5, “Boot Loader Configuration for BIOS-Based PXE Clients”
• Section 1.3.6, “Boot Loader Configuration for UEFI-Based PXE Clients”
7. If SELinux is enabled in enforcing mode on your system and you configured a TFTP server directoryother than /var/lib/tftpboot, use the semanage command to define the default file type of theTFTP server directory hierarchy as tftpdir_t and then use the restorecon command to apply thefile type to the entire directory hierarchy, for example:
# /usr/sbin/semanage fcontext -a -t tftpdir_t "/var/tftpboot(/.*)?"# /sbin/restorecon -R -v /var/tftpboot
See the tftpd_selinux(8) manual page for more information.
Note
The semanage and restorecon commands are provided by thepolicycoreutils-python and policycoreutils packages.
8. Enable the TFTP network socket, and configure it to start after a reboot.
# systemctl start tftp.socket# systemctl enable tftp.socket
You do not need to restart the TFTP service if you change the content of boot loader configuration files.
9. Configure the firewall to accept TFTP requests, for example:
# firewall-cmd --zone=zone --add-service=tftp# firewall-cmd --zone=zone --add-service=tftp --permanent
1.3.4 Configuring Dnsmasq to Support PXE Clients
Dnsmasq is designed to act as a DNS forwarder, DHCP server, and TFTP server for small networks.You can use dnsmasq as an alternative to configuring separate DHCP and TFTP services. For moreinformation about dnsmasq, see the dnsmasq(8) manual page, /usr/share/doc/dnsmasq-version,and http://www.thekelleys.org.uk/dnsmasq/doc.html.
The dnsmasq server does not have to host the installation packages, you can use a separate networkinstallation source.
To configure dnsmasq for PXE client installation requests:
1. Install the dnsmasq package.
# yum install dnsmasq
2. Edit /etc/dnsmasq.conf and configure entries for PXE clients and other systems on the network, forexample:
interface=em1dhcp-range=10.0.0.101,10.0.0.200,6h

Configuring Dnsmasq to Support PXE Clients
11
dhcp-host=80:00:27:c6:a1:16,10.0.0.253,svr1,infinitedhcp-boot=pxelinux/pxelinux.0dhcp-match=set:efi-x86_64,option:client-arch,7dhcp-boot=tag:efi-x86_64,grubx64.efienable-tftptftp-root=/var/lib/tftpboot
The lines in the sample configuration file do the following:
interface=em1
Listen for incoming client requests on interface em1 only.
dhcp-range=10.0.0.101,10.0.0.200,6h
Reserve a pool of generally available IP addresses in the range 10.0.0.101 through 10.0.0.200 onthe 10.0.0/24 subnet with a six-hour lease.
Note
A dhcp-range setting is required to enable the DHCP service provided bydnsmasq. If you want to configure static addresses but not an address pool,specify a static network address and the keywords static and infinite,for example:
dhcp-range=10.0.0.253,static,infinite
dhcp-host=80:00:27:c6:a1:16,10.0.0.253,svr1,infinite
Reserve the IP address 10.0.0.253 with infinite lease time for svr1, which is identified by the MACaddress 08:00:27:c6:a1:16.
dhcp-boot=pxelinux/pxelinux.0
Specify the location of the boot loader file, in this case for BIOS-based PXE clients.
If you want to use a separate TFTP server instead of dnsmasq, specify its IP address after the bootloader path, for example:
dhcp-boot=pxelinux/pxelinux.0,10.0.0.11
dhcp-boot=tag:efi-x86_64,grubx64.efi
Specify the location of the boot loader file required by PXE clients identified with the tagefi‑x86_64, in this case UEFI-based PXE clients. The efi‑x86_64 tag is defined by thedhcp‑match=set:efi‑x86_64 line, which applies the tag to UEFI-based x86_64 clients(architecture code 7).
This example specifies the grubx64.efi boot loader. For UEFI clients, specify shim.efi as theboot loader.
If you want to use a separate TFTP server instead of dnsmasq, specify its IP address after the bootloader path, for example:
dhcp-boot=tag:efi-x86_64,grubx64.efi,10.0.0.11
enable-tftp
Enable the TFTP service provided by dnsmasq.

Configuring Dnsmasq to Support PXE Clients
12
tftp-root=/var/lib/tftpboot
Specify the root directory for files served by TFTP. To prevent clients from accessing any file on thehost, dnsmasq rejects requests that specify .. as a path element.
For information on how to configure a separate TFTP server, see Section 1.3.3, “Configuring DHCPand TFTP Services to Support PXE Clients”.
3. If you want dnsmasq to act as a caching-only name server, configure a name server entry for 127.0.0.1that precedes other name server entries.
Dnsmasq ignores the 127.0.0.1 entry and forwards DNS queries to the other listed name servers. If theNetworkManager service is enabled, you can configure name service entries by using the graphicalapplet, the nm-connection-editor utility, or the nm-tui utility. Otherwise, you can configure nameserver entries directly in /etc/resolv.conf, for example:
nameserver 127.0.0.1nameserver 10.0.0.8nameserver 10.0.0.4
4. Start the dnsmasq service, and configure it to start after a reboot.
# systemctl start dnsmasq# systemctl enable dnsmasq
If you make any changes to /etc/dnsmasq.conf, restart the dnsmasq service. You do not need torestart the service if you change the content of boot loader configuration files.
5. Configure the firewall.
• Configure the firewall to accept DHCP requests, for example:
# firewall-cmd --zone=zone --add-port=67-68/udp# firewall-cmd --zone=zone --add-port=67-68/udp --permanent
• If you enable the TFTP service in dnsmasq, configure the firewall to accept TFTP requests, forexample:
# firewall-cmd --zone=zone --add-service=tftp# firewall-cmd --zone=zone --add-service=tftp --permanent
• If you want dnsmasq to act as a caching-only name server, configure the firewall to accept DNSrequests:
# firewall-cmd --zone=zone --add-service=dns# firewall-cmd --zone=zone --add-service=dns --permanent
To configure the dnsmasq TFTP service for PXE client installation requests:
1. Obtain the boot loader files.
PXE clients require a boot loader to load the Linux installation kernel (vmlinuz).
For BIOS-based PXE clients, you can use the pxelinux.0 boot loader available in the syslinuxpackage. To install this package:
# yum install syslinux

Configuring Dnsmasq to Support PXE Clients
13
For UEFI-based PXE clients, you can use the grubx64.efi boot loader available in the grub2‑efipackage. You also need the first-stage boot loader shim.efi, available in the shim package, so thatthe boot loader and kernel can be verified. Either download these packages to a temporary location, orcopy them from the full installation ISO image. Then extract the contents of the packages:
# cd /tempdir# rpm2cpio grub2-efi-version.rpm | cpio -idmv # rpm2cpio shim-version.rpm | cpio -idmv
Note
Make sure you specify shim.efi as the boot loader in your DHCPconfiguration in /etc/dnsmasq.conf. The shim boot loader is required forSecure Boot, but if it is not used it simply initializes Grub without attempting tovalidate signatures.
2. Create the directories used to contain the boot loaders and their configuration files as subdirectories ofthe TFTP server directory.
For BIOS-based clients, create the pxelinux/pxelinux.cfg directories, for example:
# mkdir -p /var/lib/tftpboot/pxelinux/pxelinux.cfg
For UEFI-based clients, the dnsmasq TFTP server expects the boot loaders and configuration filesto be in the root directory, for example /var/lib/tftpboot. You should ensure that this directoryexists.
3. Copy the boot loader files, the installation kernel (vmlinuz), and the ram-disk image file(initrd.img) to the TFTP server subdirectories.
For BIOS-based clients, copy the BIOS boot loader file, the installation kernel, and the ram-disk imagefile to the pxelinux directory:
# cp /usr/share/syslinux/pxelinux.0 /var/lib/tftpboot/pxelinux# wget http://10.0.0.11/OSimage/OL7/isolinux/vmlinuz -O /var/lib/tftpboot/pxelinux/vmlinuz# wget http://10.0.0.11/OSimage/OL7/isolinux/initrd.img -O /var/lib/tftpboot/pxelinux/initrd.img
For UEFI-based clients, copy the UEFI boot loader files, the installation kernel, and the ram-disk imagefile to the root directory of the TFTP server:
# cp /tempdir/boot/efi/EFI/redhat/grubx64.efi /var/lib/tftpboot# cp /tempdir/boot/efi/EFI/redhat/shim.efi /var/lib/tftpboot# cp /tempdir/boot/efi/EFI/redhat/MokManager.efi /var/lib/tftpboot# wget http://10.0.0.11/OSimage/OL7/isolinux/vmlinuz -O /var/lib/tftpboot/vmlinuz# wget http://10.0.0.11/OSimage/OL7/isolinux/initrd.img /var/lib/tftpboot/initrd.img
Note
Copy the shim.efi and MokManager.efi files. The MokManager.efiprovides utilities for managing the keys used to sign EFI binaries, andshim.efi will validate signatures if Secure Boot is enabled. Depending on yourGrub 2 configuration, you could copy the installation kernel, and the ram-diskimage file to a subdirectory.
The above examples use HTTP to obtain the installation kernel and ram-disk images files from aseparate network installation server. You could use a local copy of the files if the dnsmasq server alsohosts the installation packages.
Boot Loader Configuration for BIOS-Based PXE Clients
14
To be able to install different operating system versions on PXE clients, you can rename the kernel andram-disk image files, for example to vmlinuz-ol7 and initrd-ol7.img. Alternatively, you couldcopy the kernel and ram-disk image files to subdirectories such as efi/ol7 and pxelinux/ol7.
4. Create the boot loader configuration files.
As a minimum, you should create the default boot loader configuration files:
pxelinux/pxelinux.cfg/default
Default boot loader configuration file for BIOS-based PXE clients.
grub.cfg
Default boot loader configuration file for UEFI-based PXE clients.
You can create additional client-specific boot loader configuration files in either pxelinux/pxelinux.cfg or to the root directory of the TFTP server, depending on whether the client is BIOS orUEFI-based. For more information, see:
• Section 1.3.5, “Boot Loader Configuration for BIOS-Based PXE Clients”
• Section 1.3.6, “Boot Loader Configuration for UEFI-Based PXE Clients”
5. If SELinux is enabled in enforcing mode on your system and you configured a TFTP server directoryother than /var/lib/tftpboot, use the semanage command to define the default file type of theTFTP server directory hierarchy as tftpdir_t and then use the restorecon command to apply thefile type to the entire directory hierarchy, for example:
# /usr/sbin/semanage fcontext -a -t tftpdir_t "/var/tftpboot(/.*)?"# /sbin/restorecon -R -v /var/tftpboot
Note
The semanage and restorecon commands are provided by thepolicycoreutils-python and policycoreutils packages.
1.3.5 Boot Loader Configuration for BIOS-Based PXE Clients
The default file is the default boot loader configuration file for BIOS-based PXE clients and uses pxelinuxconfiguration settings, for example:
prompt 0default ol7timeout 0
label ol7kernel vmlinuzappend initrd=initrd.img inst.repo=http://10.0.0.11/OSimage/OL7 inst.ks.sendmac \inst.ks=http://10.0.0.11/ksfiles/ol7_cfg.ks
To allow the boot: prompt to be displayed, change the value of prompt to 1. To display the prompt, pressShift or Alt at the console.
The default directive identifies the default boot entry by its label value, ol7.
Pxelinux boots the client using the default boot entry after timeout/10 seconds.
Boot Loader Configuration for BIOS-Based PXE Clients
15
The kernel directive defines the name of the kernel executable and the append directive defines anyparameters that should be appended when loading the kernel, such as the name of the ram-disk imageand the location of a kickstart file.
The kernel and ram-disk image file paths are assumed to be relative to the subdirectory that contains theboot loader, for example pxelinux. If you place the vmlinuz and initrd.img files in a subdirectorysuch as pxelinux/OL7, ensure you have the correct relative paths.
If you want to display the boot loader configuration as a menu on the screen, you can use the menu.c32module. To do this:
1. Copy the menu.c32 module to the boot loader directory:
# cp /usr/share/syslinux/menu.c32 /var/lib/tftpboot/pxelinux
2. Edit the boot loader configuration to use the module, for example:
default menu.c32timeout 0
menu title Install Oracle Linuxlabel Install Oracle Linux 7kernel vmlinuzappend initrd=initrd.img inst.repo=http://10.0.0.11/OSimage/OL7 inst.ks.sendmac \inst.ks=http://10.0.0.11/ksfiles/ol7_cfg.ks
To support different types of client, you can create a configuration file named for:
• A client's UUID (for example, a8943708-c6f6-51b9-611e-74e6ac80b93d).
• A client's MAC address prefixed by 01-, which represents the ARP hardware type for Ethernet, andusing dashes to separate each byte value instead of colons (for example, 01-80-00-27-c6-a1-16).
Note
The file name must use lowercase characters for the MAC address.
• A client's IP address expressed in hexadecimal without any leading 0x (for example, 0A0000FDrepresents the IP address 10.0.0.253).
To reduce the number of configuration files, you can group clients by IP address range, for example0A0000E represents the IP address range 10.0.0.224 through 10.0.0.239.
Place the configuration files in pxelinux/pxelinux.cfg.
The boot loader looks for a configuration file in the following order until it finds a matching file name:
• UUID (for example, a8943708-c6f6-51b9-611e-74e6ac80b93d)
• 01-MAC_address (for example, 01-80-00-27-c6-a1-16)
• Full 32 bits of the IP address (for example, 0A0000FD)
• Most significant 28 bits of the IP address (for example, 0A0000F)
• Most significant 24 bits of the IP address (for example, 0A0000)
• Most significant 20 bits of the IP address (for example, 0A000)
• Most significant 16 bits of the IP address (for example, 0A00)
Boot Loader Configuration for UEFI-Based PXE Clients
16
• Most significant 12 bits of the IP address (for example, 0A0)
• Most significant 8 bits of the IP address (for example, 0A)
• Most significant 4 bits of the IP address (for example, 0)
• default (the default configuration file)
If several configuration files have identical content, you can use the ln command to link the files to amaster copy, for example:
# ln master-ol7 0A0000FC# ln master-ol7 0A0000FD# ln master-ol7 0A0000FE
For more information about pxelinux, see http://www.syslinux.org/wiki/index.php/PXELINUX.
For information about configuring and using kickstart to perform automated installation, see Section 3.2,“Automated Installation Using Kickstart”.
1.3.6 Boot Loader Configuration for UEFI-Based PXE Clients
The grub.cfg file is the default boot loader configuration file for UEFI-based PXE clients and uses GRUB2 configuration settings:
set default 0set timeout=10
menuentry 'ol7' { echo "Loading efi/vmlinuz" linuxefi efi/vmlinuz inst.repo=http://10.0.0.11/OSimage/OL7 inst.ks.sendmac \ inst.ks=http://10.0.0.11/ksfiles/ol7_cfg.ks echo "Loading efi/initrd.img" initrdefi efi/initrd.img echo "Booting installation kernel"}
The linuxefi directive defines the name of the kernel executable and defines any parameters thatshould be appended when loading the kernel, such as the location of the installation packages, and howto access these packages. This example uses HTTP to install the packages from the specified URL. Theinitrdefi directive defines the name of the ram-disk image.
The kernel and ram-disk image file paths are assumed to be relative to the subdirectory that contains theboot loader, for example efi. If you place the vmlinuz and initrd.img files in a subdirectory such asefi/OL7, ensure you have the correct relative paths.
By default, GRUB 2 does not provide any indication that is transferring the kernel and ram-disk imagesfiles. The echo statements in the example above provide a simple indication of progress.
To support different types of client, you can create a configuration file named grub2.cfg-client-IDwhere client-ID is one of the following:
• A client's MAC address prefixed by 01-, which represents the ARP hardware type for Ethernet, andusing dashes to separate each byte value instead of colons (for example, 01-80-00-27-c6-a1-16).
Note
The file name must use lowercase characters for the MAC address.
Planning an Installation
17
• A client's IP address expressed in hexadecimal without any leading 0x (for example, 0A0000FDrepresents the IP address 10.0.0.253).
To reduce the number of configuration files, you can group clients by IP address range, for example0A0000E represents the IP address range 10.0.0.224 through 10.0.0.239.
Place the configuration files in the same directory as the boot loader files, for example efi.
The boot loader looks for a configuration file in the following order until it finds a matching file name:
• 01-MAC_address (for example, grub.cfg-01-80-00-27-c6-a1-16)
• Full 32 bits of the IP address (for example, grub.cfg-0A0000FD)
• Most significant 28 bits of the IP address (for example, grub.cfg-0A0000F)
• Most significant 24 bits of the IP address (for example, grub.cfg-0A0000)
• Most significant 20 bits of the IP address (for example, grub.cfg-0A000)
• Most significant 16 bits of the IP address (for example, grub.cfg-0A00)
• Most significant 12 bits of the IP address (for example, grub.cfg-0A0)
• Most significant 8 bits of the IP address (for example, grub.cfg-0A)
• Most significant 4 bits of the IP address (for example, grub.cfg-0)
• grub.cfg (the default configuration file)
If several configuration files have identical content, you can use the ln command to link the files to amaster copy, for example:
# ln master-ol7 grub.cfg-0A0000FC# ln master-ol7 grub.cfg-0A0000FD# ln master-ol7 grub.cfg-0A0000FE
For more information about GRUB 2, enter the info grub command to access the GRUB 2 manual.
For information about configuring and using kickstart to perform automated installation, see Section 3.2,“Automated Installation Using Kickstart”.
1.4 Planning an InstallationPlanning for an installation helps to ensure that the resulting system is ready for its intended use. Usethe information in Chapter 2, Installing Oracle Linux Manually to familiarize yourself with the installationprocess.
The following are the main considerations when planning to install a system:
Storage
The storage devices on which you intend to install the operating system, such as a local hard disk. Ifthe storage devices are already partitioned, identify the partitions that can be used for the installation.The installation program indicates how much disk space is required, and warns you if there isinsufficient space.
The layout of the storage devices on which the operating system's file systems will be installed,including any provision for logical volume management or RAID configuration.

Planning an Installation
18
The amount of space required for each file system (/, /boot, /home, /var/tmp, and so on), the filesystem type, and whether the block device underlying each file system should be encrypted.
For iSCSI or FCoE connections, the WWID or the port, target, and LUN to be used.
Network
The network interface to use for installation (if any), and its IP address, netmask, and gateway settingsif you do not use DHCP.
The fully qualified domain name of the system, or just the host name if you intend to use DHCP toprovide network settings.
Any other network interface to be configured during installation, and their IP address, netmask, andgateway settings if you do not use DHCP.
Any specialized network interfaces to be configured during installation, such as VLANs and bonds.
Software
The software packages that should be installed on the system as determined by the system's intendedpurpose, such as a web server.
The URLs of any additional repositories and the proxy settings to be used to install packages.
19
Chapter 2 Installing Oracle Linux Manually
Table of Contents2.1 Starting the Installation ............................................................................................................... 192.2 Setting the System Time and Supporting Other Languages .......................................................... 212.3 Selecting the Software to Install .................................................................................................. 242.4 Configuring System Storage and Networking ............................................................................... 262.5 Setting the Security Policy .......................................................................................................... 312.6 Completing the Installation .......................................................................................................... 32
This chapter describes how to perform a basic Oracle Linux installation by using a CD, DVD, or a USBdrive.
2.1 Starting the Installation
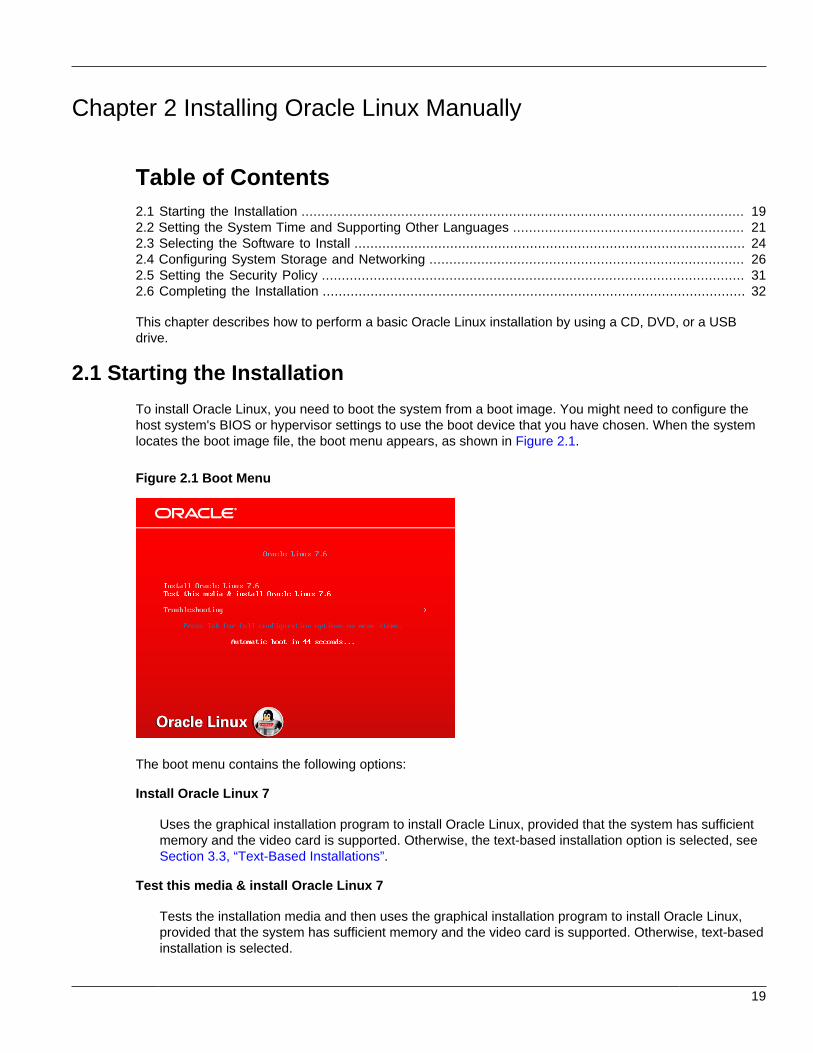
To install Oracle Linux, you need to boot the system from a boot image. You might need to configure thehost system's BIOS or hypervisor settings to use the boot device that you have chosen. When the systemlocates the boot image file, the boot menu appears, as shown in Figure 2.1.
Figure 2.1 Boot Menu
The boot menu contains the following options:
Install Oracle Linux 7
Uses the graphical installation program to install Oracle Linux, provided that the system has sufficientmemory and the video card is supported. Otherwise, the text-based installation option is selected, seeSection 3.3, “Text-Based Installations”.
Test this media & install Oracle Linux 7
Tests the installation media and then uses the graphical installation program to install Oracle Linux,provided that the system has sufficient memory and the video card is supported. Otherwise, text-basedinstallation is selected.
Starting the Installation
20
This is the default option.
Troubleshooting
Provides access to a separate menu which contains options for resolving issues with installing orbooting an Oracle Linux 7 system, see Section 6.1, “Troubleshooting Menu Options”.
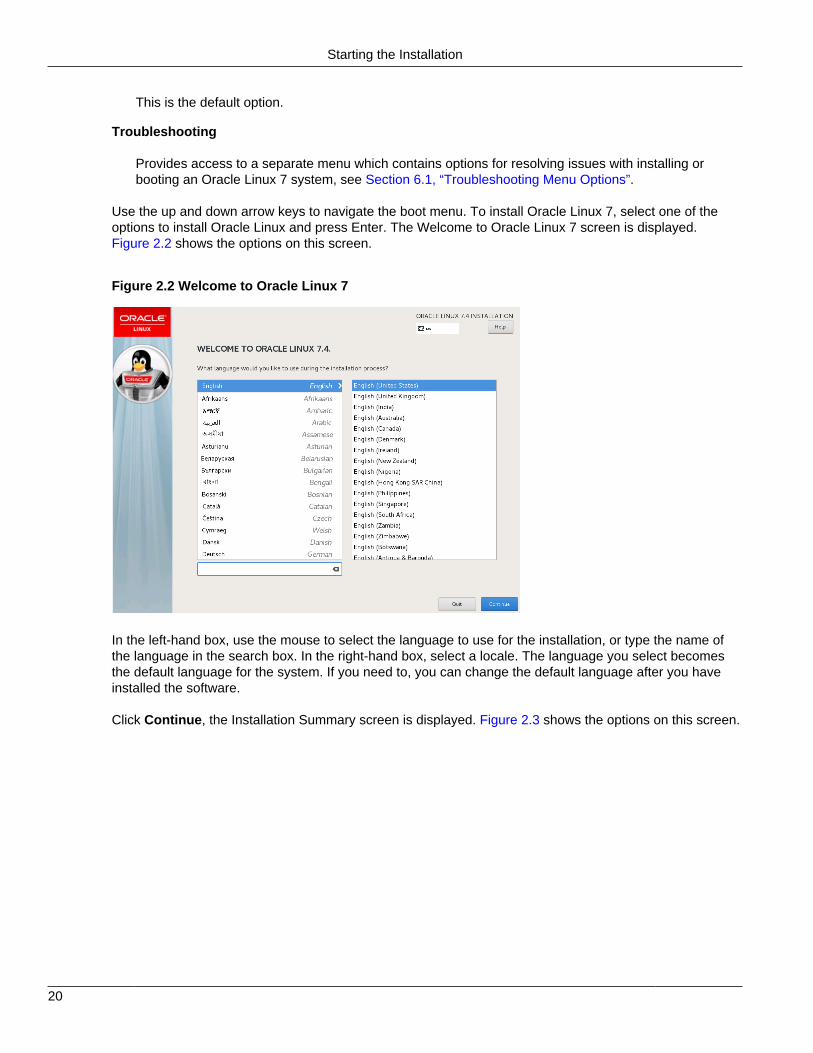
Use the up and down arrow keys to navigate the boot menu. To install Oracle Linux 7, select one of theoptions to install Oracle Linux and press Enter. The Welcome to Oracle Linux 7 screen is displayed.Figure 2.2 shows the options on this screen.
Figure 2.2 Welcome to Oracle Linux 7
In the left-hand box, use the mouse to select the language to use for the installation, or type the name ofthe language in the search box. In the right-hand box, select a locale. The language you select becomesthe default language for the system. If you need to, you can change the default language after you haveinstalled the software.
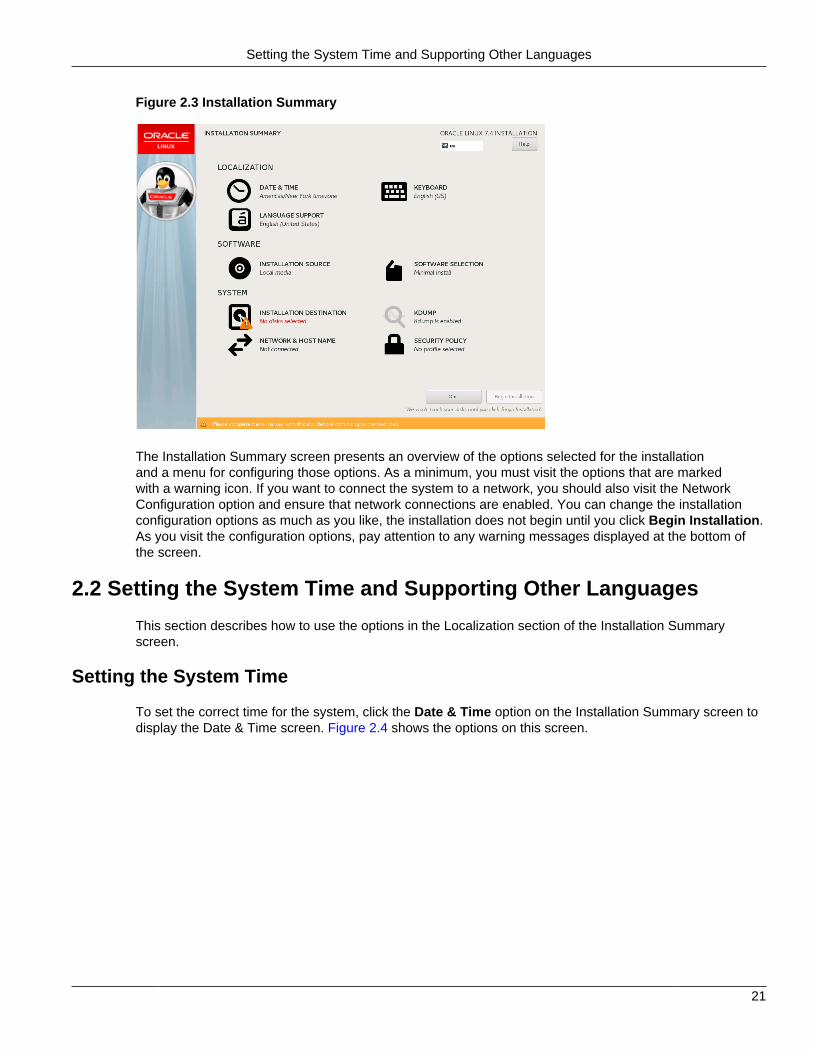
Click Continue, the Installation Summary screen is displayed. Figure 2.3 shows the options on this screen.
Setting the System Time and Supporting Other Languages
21
Figure 2.3 Installation Summary
The Installation Summary screen presents an overview of the options selected for the installationand a menu for configuring those options. As a minimum, you must visit the options that are markedwith a warning icon. If you want to connect the system to a network, you should also visit the NetworkConfiguration option and ensure that network connections are enabled. You can change the installationconfiguration options as much as you like, the installation does not begin until you click Begin Installation.As you visit the configuration options, pay attention to any warning messages displayed at the bottom ofthe screen.
2.2 Setting the System Time and Supporting Other Languages
This section describes how to use the options in the Localization section of the Installation Summaryscreen.
Setting the System Time
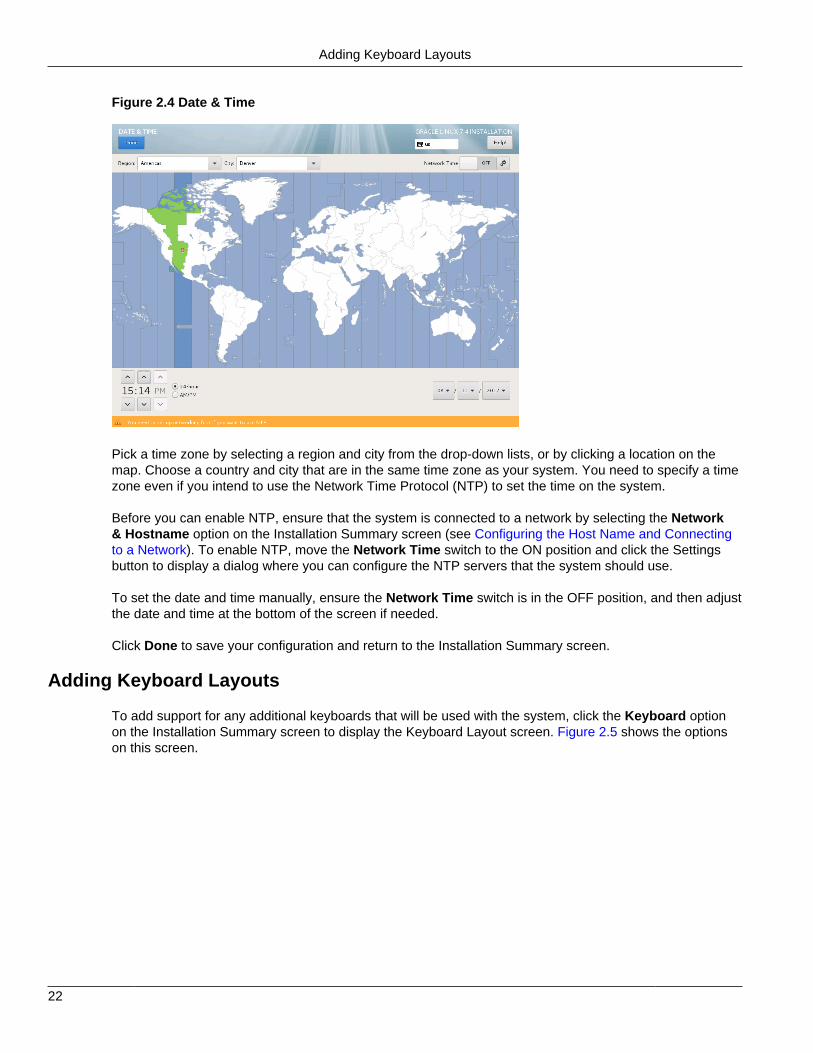
To set the correct time for the system, click the Date & Time option on the Installation Summary screen todisplay the Date & Time screen. Figure 2.4 shows the options on this screen.
Adding Keyboard Layouts
22
Figure 2.4 Date & Time
Pick a time zone by selecting a region and city from the drop-down lists, or by clicking a location on themap. Choose a country and city that are in the same time zone as your system. You need to specify a timezone even if you intend to use the Network Time Protocol (NTP) to set the time on the system.
Before you can enable NTP, ensure that the system is connected to a network by selecting the Network& Hostname option on the Installation Summary screen (see Configuring the Host Name and Connectingto a Network). To enable NTP, move the Network Time switch to the ON position and click the Settingsbutton to display a dialog where you can configure the NTP servers that the system should use.
To set the date and time manually, ensure the Network Time switch is in the OFF position, and then adjustthe date and time at the bottom of the screen if needed.
Click Done to save your configuration and return to the Installation Summary screen.
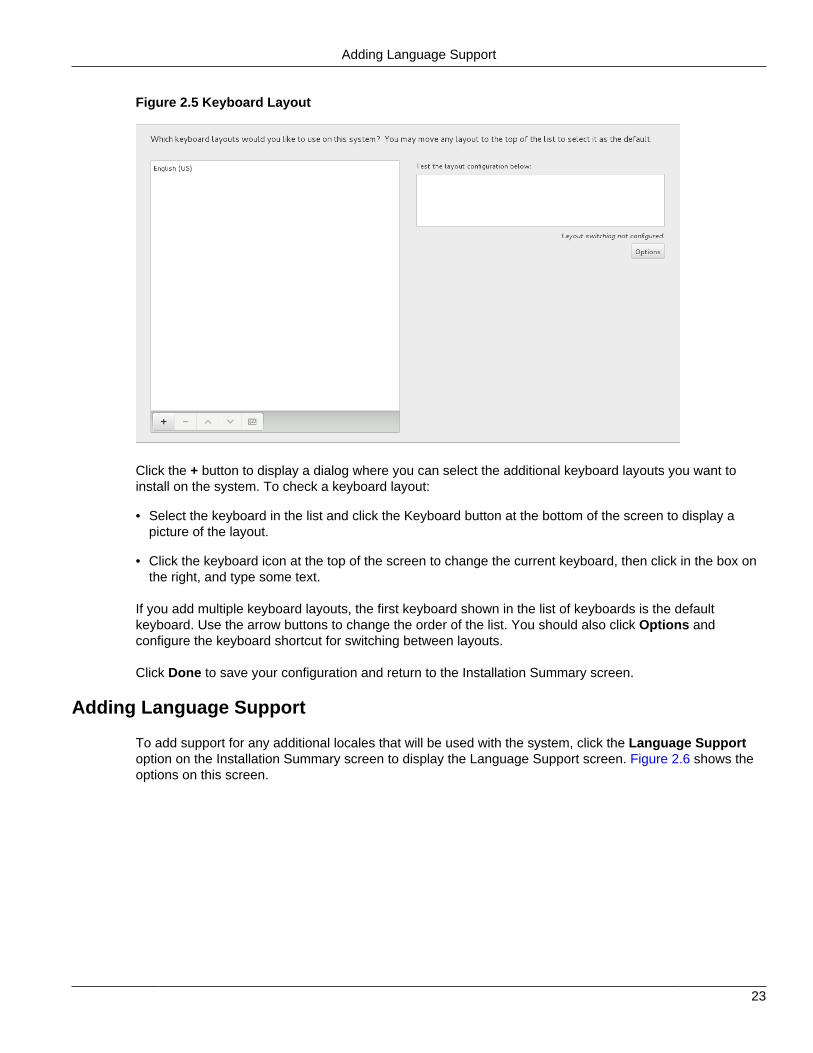
Adding Keyboard Layouts
To add support for any additional keyboards that will be used with the system, click the Keyboard optionon the Installation Summary screen to display the Keyboard Layout screen. Figure 2.5 shows the optionson this screen.
Adding Language Support
23
Figure 2.5 Keyboard Layout
Click the + button to display a dialog where you can select the additional keyboard layouts you want toinstall on the system. To check a keyboard layout:
• Select the keyboard in the list and click the Keyboard button at the bottom of the screen to display apicture of the layout.
• Click the keyboard icon at the top of the screen to change the current keyboard, then click in the box onthe right, and type some text.
If you add multiple keyboard layouts, the first keyboard shown in the list of keyboards is the defaultkeyboard. Use the arrow buttons to change the order of the list. You should also click Options andconfigure the keyboard shortcut for switching between layouts.
Click Done to save your configuration and return to the Installation Summary screen.
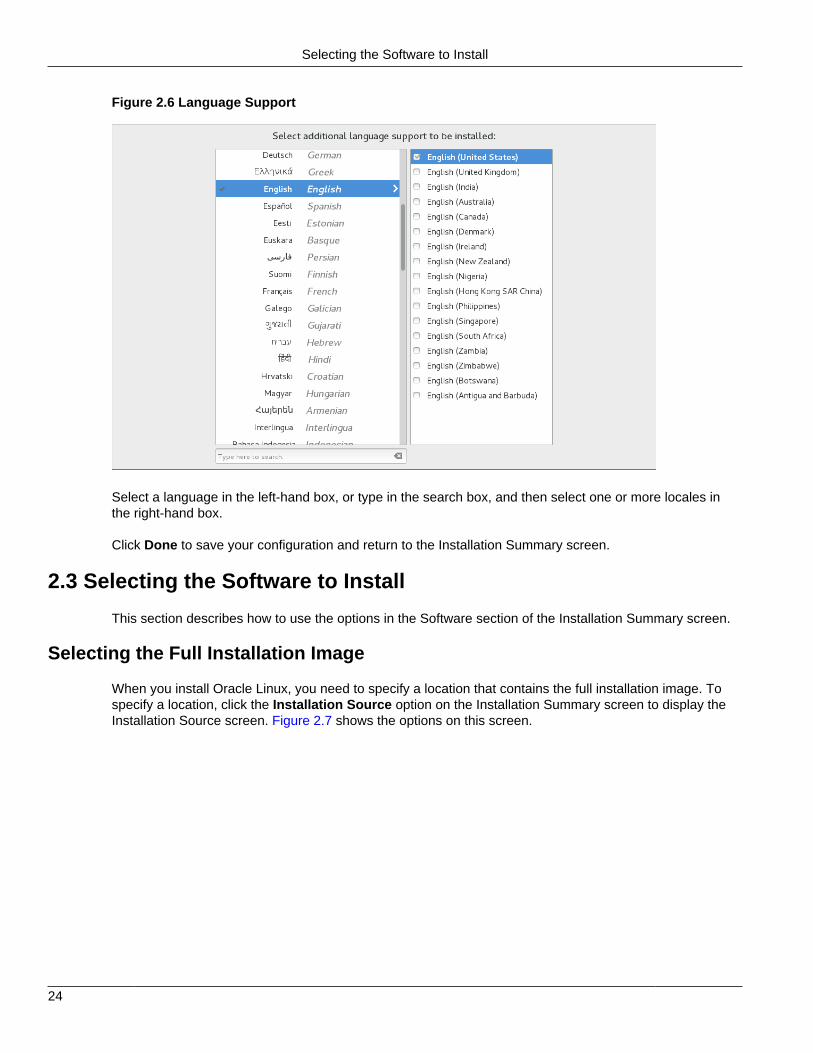
Adding Language Support
To add support for any additional locales that will be used with the system, click the Language Supportoption on the Installation Summary screen to display the Language Support screen. Figure 2.6 shows theoptions on this screen.
Selecting the Software to Install
24
Figure 2.6 Language Support
Select a language in the left-hand box, or type in the search box, and then select one or more locales inthe right-hand box.
Click Done to save your configuration and return to the Installation Summary screen.
2.3 Selecting the Software to Install
This section describes how to use the options in the Software section of the Installation Summary screen.
Selecting the Full Installation Image
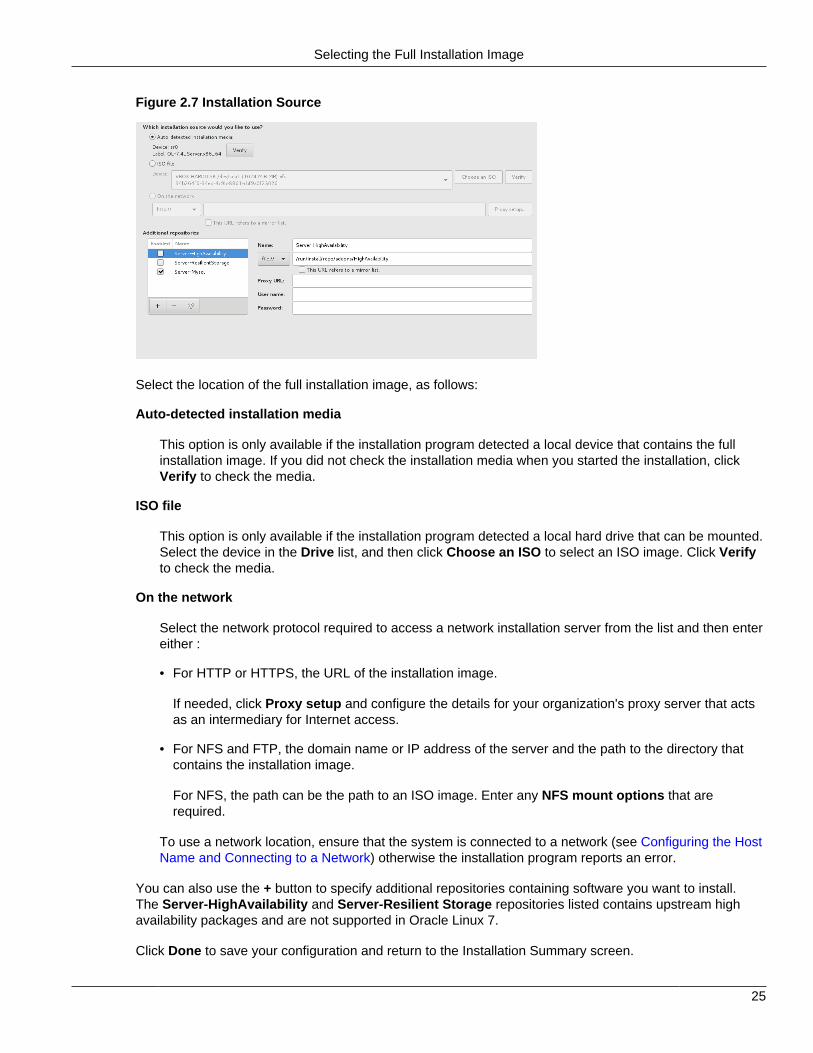
When you install Oracle Linux, you need to specify a location that contains the full installation image. Tospecify a location, click the Installation Source option on the Installation Summary screen to display theInstallation Source screen. Figure 2.7 shows the options on this screen.
Selecting the Full Installation Image
25
Figure 2.7 Installation Source
Select the location of the full installation image, as follows:
Auto-detected installation media
This option is only available if the installation program detected a local device that contains the fullinstallation image. If you did not check the installation media when you started the installation, clickVerify to check the media.
ISO file
This option is only available if the installation program detected a local hard drive that can be mounted.Select the device in the Drive list, and then click Choose an ISO to select an ISO image. Click Verifyto check the media.
On the network
Select the network protocol required to access a network installation server from the list and then entereither :
• For HTTP or HTTPS, the URL of the installation image.
If needed, click Proxy setup and configure the details for your organization's proxy server that actsas an intermediary for Internet access.
• For NFS and FTP, the domain name or IP address of the server and the path to the directory thatcontains the installation image.
For NFS, the path can be the path to an ISO image. Enter any NFS mount options that arerequired.
To use a network location, ensure that the system is connected to a network (see Configuring the HostName and Connecting to a Network) otherwise the installation program reports an error.
You can also use the + button to specify additional repositories containing software you want to install.The Server-HighAvailability and Server-Resilient Storage repositories listed contains upstream highavailability packages and are not supported in Oracle Linux 7.
Click Done to save your configuration and return to the Installation Summary screen.
Selecting the Software to Install
26
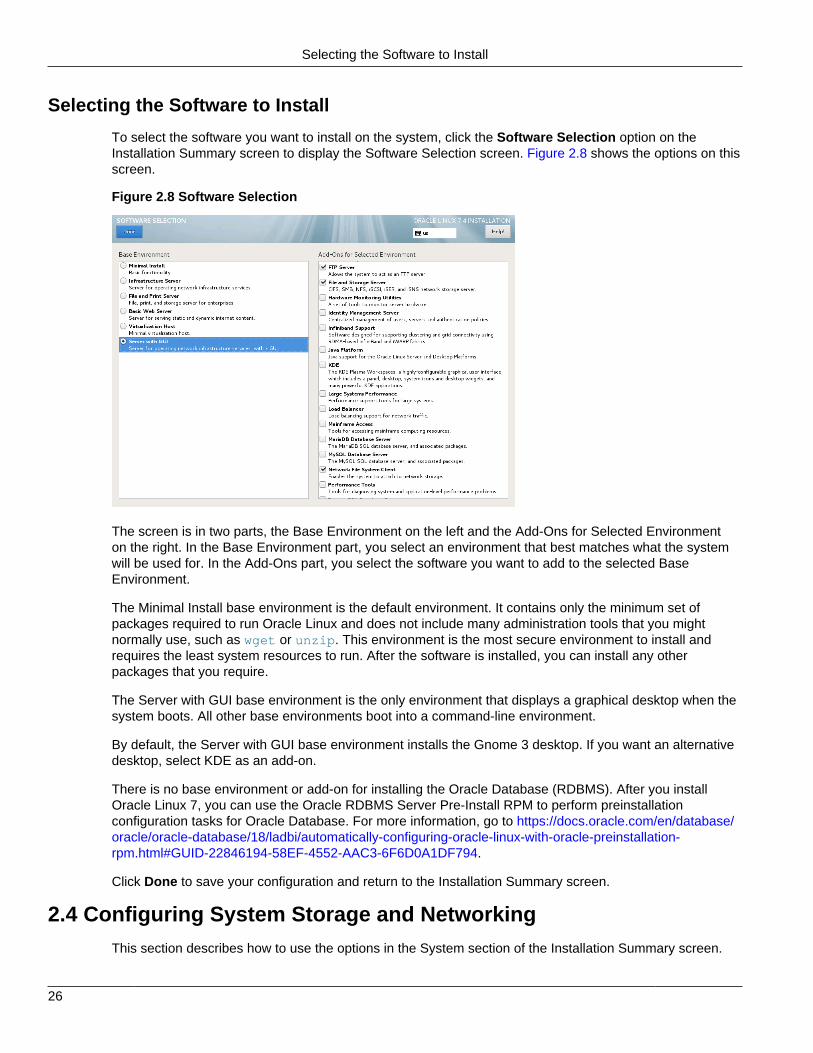
Selecting the Software to Install
To select the software you want to install on the system, click the Software Selection option on theInstallation Summary screen to display the Software Selection screen. Figure 2.8 shows the options on thisscreen.
Figure 2.8 Software Selection
The screen is in two parts, the Base Environment on the left and the Add-Ons for Selected Environmenton the right. In the Base Environment part, you select an environment that best matches what the systemwill be used for. In the Add-Ons part, you select the software you want to add to the selected BaseEnvironment.
The Minimal Install base environment is the default environment. It contains only the minimum set ofpackages required to run Oracle Linux and does not include many administration tools that you mightnormally use, such as wget or unzip. This environment is the most secure environment to install andrequires the least system resources to run. After the software is installed, you can install any otherpackages that you require.
The Server with GUI base environment is the only environment that displays a graphical desktop when thesystem boots. All other base environments boot into a command-line environment.
By default, the Server with GUI base environment installs the Gnome 3 desktop. If you want an alternativedesktop, select KDE as an add-on.
There is no base environment or add-on for installing the Oracle Database (RDBMS). After you installOracle Linux 7, you can use the Oracle RDBMS Server Pre-Install RPM to perform preinstallationconfiguration tasks for Oracle Database. For more information, go to https://docs.oracle.com/en/database/oracle/oracle-database/18/ladbi/automatically-configuring-oracle-linux-with-oracle-preinstallation-rpm.html#GUID-22846194-58EF-4552-AAC3-6F6D0A1DF794.
Click Done to save your configuration and return to the Installation Summary screen.
2.4 Configuring System Storage and NetworkingThis section describes how to use the options in the System section of the Installation Summary screen.

Choosing Where to Install the Software and Configuring Storage
27
Choosing Where to Install the Software and Configuring Storage
To choose where to install the software and to configure the storage, click the Installation Destinationoption on the Installation Summary screen to display the Installation Destination screen. Figure 2.9 showsthe options on this screen.
Figure 2.9 Installation Destination
On this screen, you select the local disks and other storage you want to use for the installation, andconfigure the partitioning and file system types you want to use. The installation program does not makeany changes to any of the disks and storage until you click Begin Installation on the Installation Summaryscreen.
First, choose the devices on which you want to install Oracle Linux:
• In the Local Standard Disks section, select the local disks you want to use for the installation by clickingon them. A Tick icon is displayed next to the disks you have selected.
• In the Specialist & Network Disks section, you can select hardware RAID, iSCSI or Fibre Channel overEthernet (FCoE) storage devices. Click Add Disk to display the options for adding and configuring thesedevice types.
Next, select how you want to partition the selected disks automatically or manually. By default, theAutomatically configure partitioning option is selected. Automatic disk partitioning creates the followinglayout on the selected disks:
• A standard partition for an XFS file system mounted at /boot. This partition is sized to 500 MiB bydefault, or 1 GiB on systems running Oracle Linux 7 Update 3 or later.
• A 200 MiB EFI system partition mounted at /boot/efi (UEFI-based systems only).
• A partition in the remaining disk space configured as a Logical Volume Manager (LVM) physical volumefor an LVM volume group that contains:
• A logical volume for an XFS file system for the root file system (/).
• A logical volume for an XFS file system for the /home file system (if the selected disks are larger than50 GiB in total).
Choosing Where to Install the Software and Configuring Storage
28
• A logical volume for a swap partition.
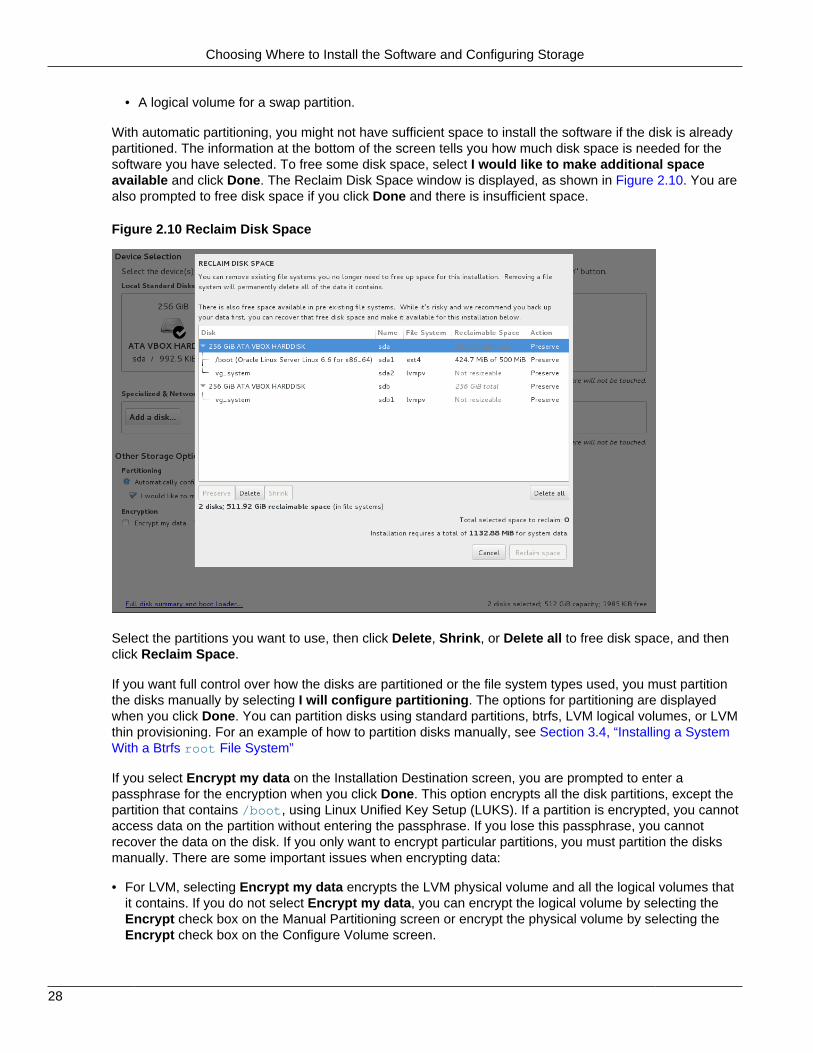
With automatic partitioning, you might not have sufficient space to install the software if the disk is alreadypartitioned. The information at the bottom of the screen tells you how much disk space is needed for thesoftware you have selected. To free some disk space, select I would like to make additional spaceavailable and click Done. The Reclaim Disk Space window is displayed, as shown in Figure 2.10. You arealso prompted to free disk space if you click Done and there is insufficient space.
Figure 2.10 Reclaim Disk Space
Select the partitions you want to use, then click Delete, Shrink, or Delete all to free disk space, and thenclick Reclaim Space.
If you want full control over how the disks are partitioned or the file system types used, you must partitionthe disks manually by selecting I will configure partitioning. The options for partitioning are displayedwhen you click Done. You can partition disks using standard partitions, btrfs, LVM logical volumes, or LVMthin provisioning. For an example of how to partition disks manually, see Section 3.4, “Installing a SystemWith a Btrfs root File System”
If you select Encrypt my data on the Installation Destination screen, you are prompted to enter apassphrase for the encryption when you click Done. This option encrypts all the disk partitions, except thepartition that contains /boot, using Linux Unified Key Setup (LUKS). If a partition is encrypted, you cannotaccess data on the partition without entering the passphrase. If you lose this passphrase, you cannotrecover the data on the disk. If you only want to encrypt particular partitions, you must partition the disksmanually. There are some important issues when encrypting data:
• For LVM, selecting Encrypt my data encrypts the LVM physical volume and all the logical volumes thatit contains. If you do not select Encrypt my data, you can encrypt the logical volume by selecting theEncrypt check box on the Manual Partitioning screen or encrypt the physical volume by selecting theEncrypt check box on the Configure Volume screen.
Configuring Kdump
29
• For btrfs, encryption can only be applied to the block device that contains the file system, includingits subvolumes. For example, enabling encryption for the /home subvolume of a btrfs root file systemimplicitly enables encryption for the root file system itself. You can only select the Encrypt check box onthe Configure Volume screen. Because btrfs does not support encryption at the file-system level, youcannot select the Encrypt check box on the Manual Partitioning screen for a btrfs file system.
• Do not select the Encrypt check box or a BTRFS, LVM, or LVM Thin Provisioning device type for the/boot file system. The /boot file system must be configured on a standard partition and should be ofthe type, ext4 or XFS.
Oracle Linux uses the Grand Unified Bootloader version 2 (GRUB 2) boot loader as the default boot loader.The boot loader runs when the system starts and loads the kernel, without the need for boot media. Bydefault, GRUB 2 is installed in either the master boot record (MBR) or the GUID partition table of thedevice that contains the root (/) file system. Click Full disk summary and bootloader to change thelocation of GRUB 2 or to prevent its installation. For UEFI-based systems, the GPT is always used. ForBIOS-based systems (including UEFI-based systems in legacy BIOS mode), by default the MBR is used ifthe disk size is less than 2 TiB, otherwise the GPT is used.
Click Done to save your configuration and return to the Installation Summary screen.
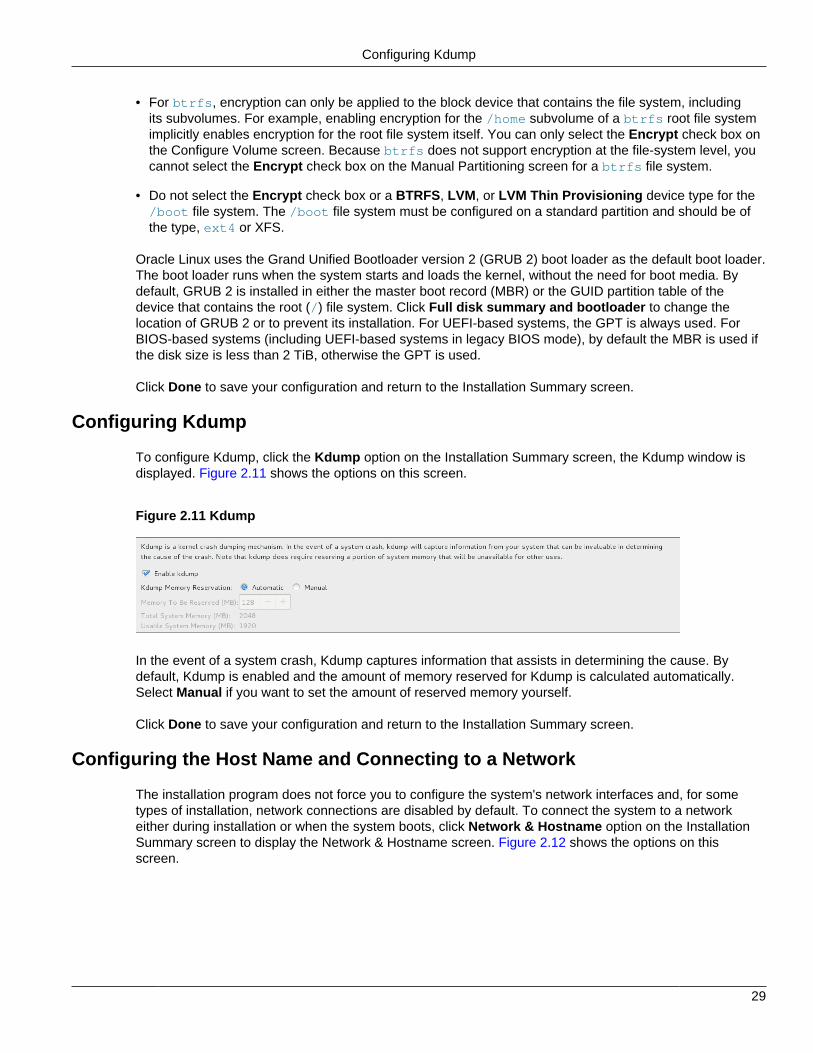
Configuring Kdump
To configure Kdump, click the Kdump option on the Installation Summary screen, the Kdump window isdisplayed. Figure 2.11 shows the options on this screen.
Figure 2.11 Kdump
In the event of a system crash, Kdump captures information that assists in determining the cause. Bydefault, Kdump is enabled and the amount of memory reserved for Kdump is calculated automatically.Select Manual if you want to set the amount of reserved memory yourself.
Click Done to save your configuration and return to the Installation Summary screen.
Configuring the Host Name and Connecting to a Network
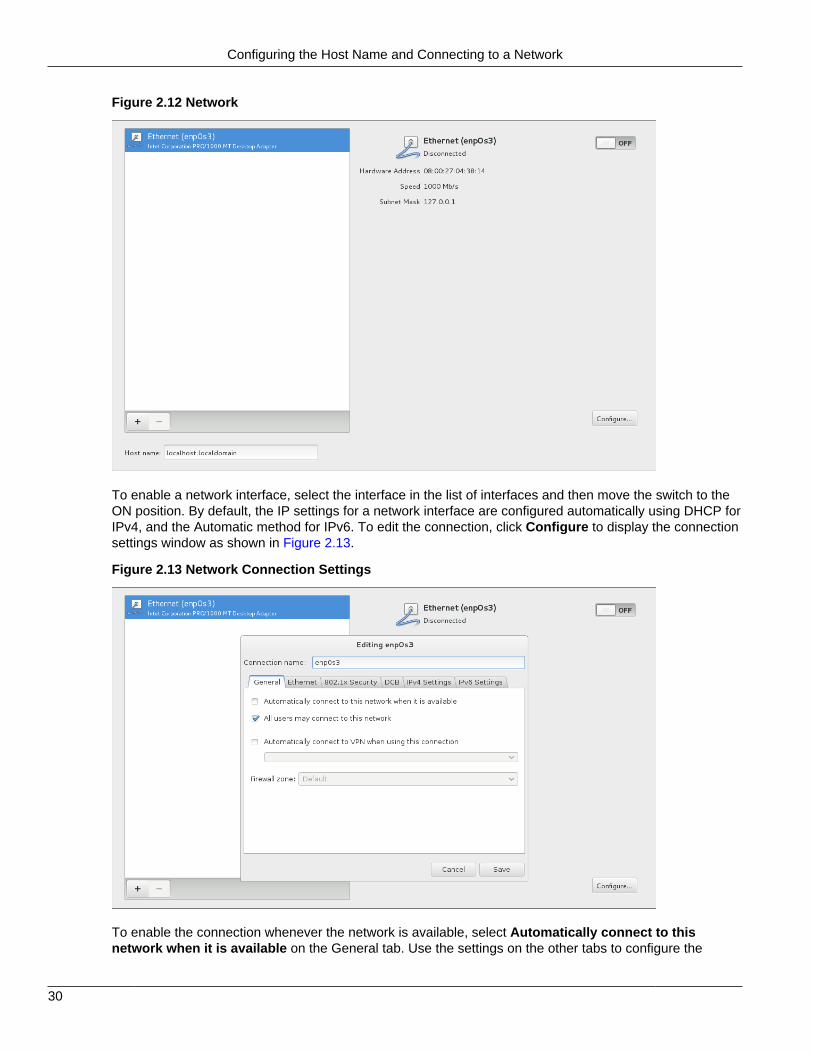
The installation program does not force you to configure the system's network interfaces and, for sometypes of installation, network connections are disabled by default. To connect the system to a networkeither during installation or when the system boots, click Network & Hostname option on the InstallationSummary screen to display the Network & Hostname screen. Figure 2.12 shows the options on thisscreen.
Configuring the Host Name and Connecting to a Network
30
Figure 2.12 Network
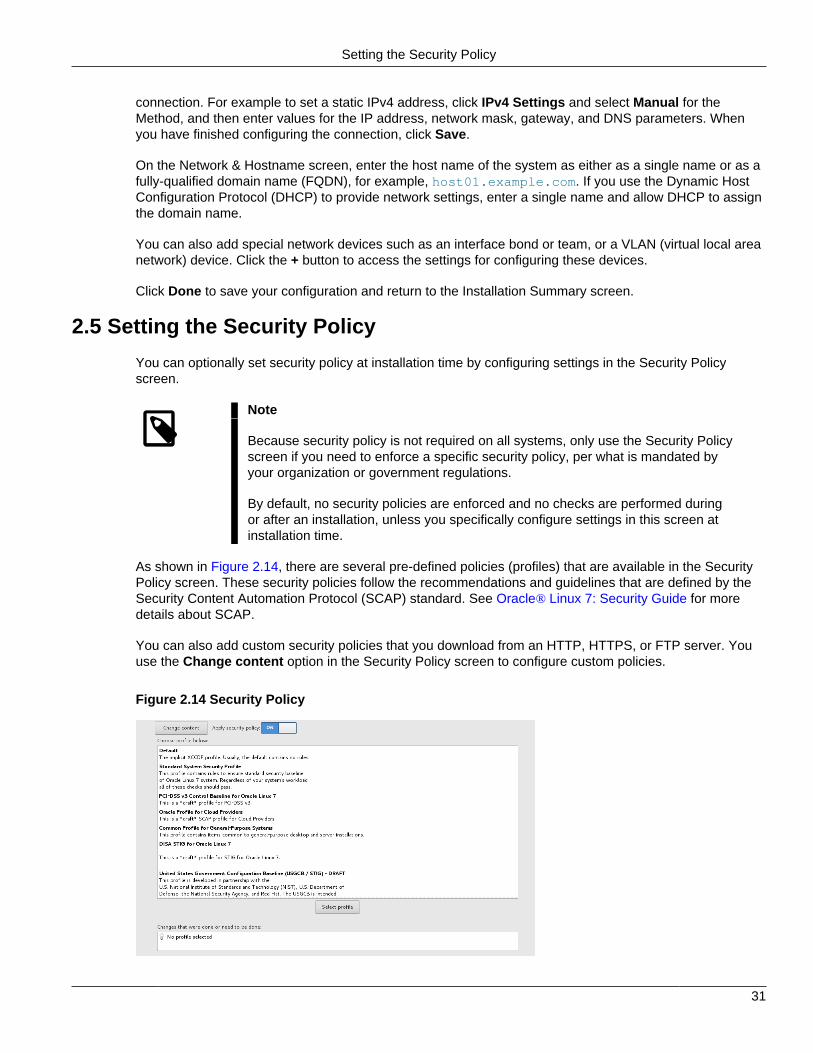
To enable a network interface, select the interface in the list of interfaces and then move the switch to theON position. By default, the IP settings for a network interface are configured automatically using DHCP forIPv4, and the Automatic method for IPv6. To edit the connection, click Configure to display the connectionsettings window as shown in Figure 2.13.
Figure 2.13 Network Connection Settings
To enable the connection whenever the network is available, select Automatically connect to thisnetwork when it is available on the General tab. Use the settings on the other tabs to configure the
Setting the Security Policy
31
connection. For example to set a static IPv4 address, click IPv4 Settings and select Manual for theMethod, and then enter values for the IP address, network mask, gateway, and DNS parameters. Whenyou have finished configuring the connection, click Save.
On the Network & Hostname screen, enter the host name of the system as either as a single name or as afully-qualified domain name (FQDN), for example, host01.example.com. If you use the Dynamic HostConfiguration Protocol (DHCP) to provide network settings, enter a single name and allow DHCP to assignthe domain name.
You can also add special network devices such as an interface bond or team, or a VLAN (virtual local areanetwork) device. Click the + button to access the settings for configuring these devices.
Click Done to save your configuration and return to the Installation Summary screen.
2.5 Setting the Security Policy
You can optionally set security policy at installation time by configuring settings in the Security Policyscreen.
Note
Because security policy is not required on all systems, only use the Security Policyscreen if you need to enforce a specific security policy, per what is mandated byyour organization or government regulations.
By default, no security policies are enforced and no checks are performed duringor after an installation, unless you specifically configure settings in this screen atinstallation time.
As shown in Figure 2.14, there are several pre-defined policies (profiles) that are available in the SecurityPolicy screen. These security policies follow the recommendations and guidelines that are defined by theSecurity Content Automation Protocol (SCAP) standard. See Oracle® Linux 7: Security Guide for moredetails about SCAP.
You can also add custom security policies that you download from an HTTP, HTTPS, or FTP server. Youuse the Change content option in the Security Policy screen to configure custom policies.
Figure 2.14 Security Policy
Completing the Installation
32
To set security policy in the Security Policy screen, begin by toggling the Apply security policy switch toOn. This switch is located at the top of the screen.
Note
If the Apply security policy switch is set to Off, you cannot configure any of thesettings in this screen. The switch can be set to Off if you are not setting securitypolicy during the installation.
Select a profile from the list of profiles that is displayed in the top window of the screen. Click the Selectprofile button. A message confirming the selection is displayed in the Changes that were done or needto be done: field that is located in the bottom window of the screen. A checkmark is displayed next to theselected profile on the right of the window.
Click Done to save the changes and return to the Installation Summary screen.
You use the same screen to configure custom security settings. You can download the custom profilefrom an HTTP, HTTPS, or FTP server. Note that you must have an active network connection so that youcan download the custom profile prior to using this option. You also might need to perform certain pre-installation tasks.
To use a custom profile, click the Change content button that is located in the top left corner of the screen.Clicking this button opens another window, where you type the URL to the download location of the customprofile.
Note
You must use the complete address, including the protocol, for the location of thecustom profile, for example, http://.
Click Fetch to download the custom security profile. Alternately, click Use SCAP Security Guide to returnto the default policy selection window.
Check that the Changes that were done or need to be done: field shows the changes to be made. Then,click Done to save the changes.
During the installation, the security policy that you applied is installed according to the restrictions andrecommendations that are defined in the specified profile. In addition, the openscap-scanner packageis added to the packages that are installed. This package provides a tool for compliance and vulnerabilityscanning.
When the installation has completed, the system is automatically scanned to verify compliance, and theresults are saved to the /root/openscap_data directory on the system.
2.6 Completing the Installation
Once you have selected all your installation configuration options, click Begin Installation on theInstallation Summary screen to start the installation. The Configuration screen is displayed. Figure 2.15shows the options on this screen.
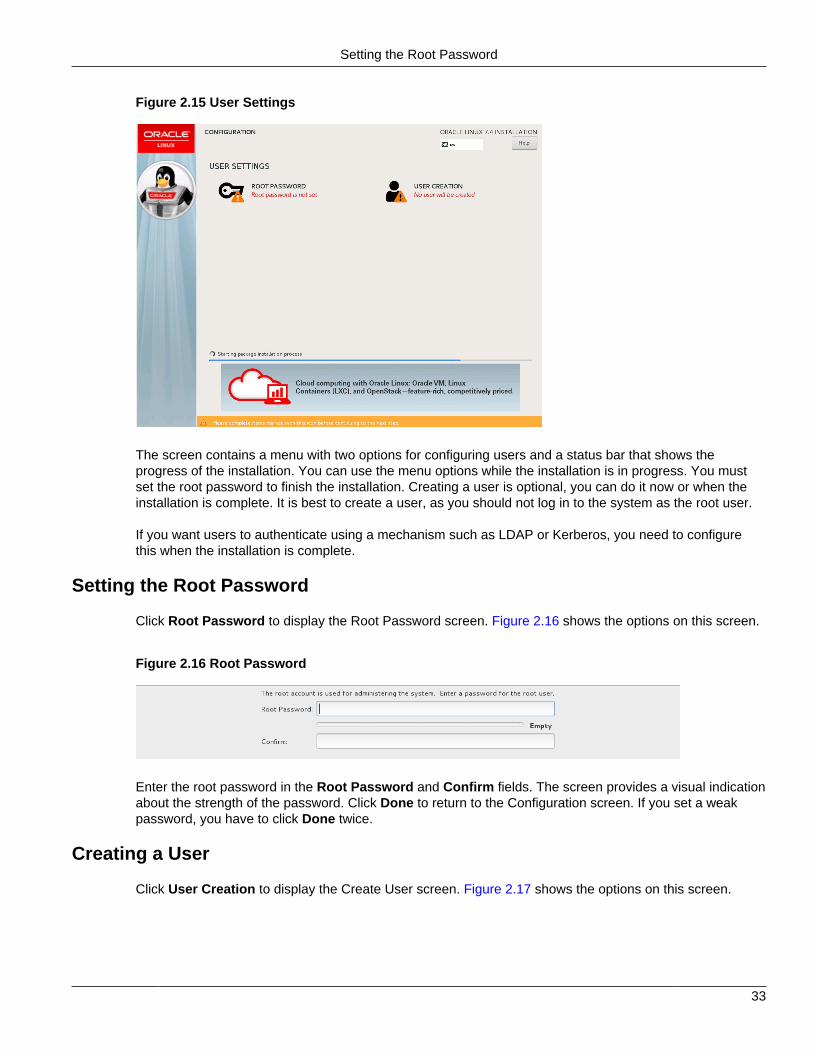
Setting the Root Password
33
Figure 2.15 User Settings
The screen contains a menu with two options for configuring users and a status bar that shows theprogress of the installation. You can use the menu options while the installation is in progress. You mustset the root password to finish the installation. Creating a user is optional, you can do it now or when theinstallation is complete. It is best to create a user, as you should not log in to the system as the root user.
If you want users to authenticate using a mechanism such as LDAP or Kerberos, you need to configurethis when the installation is complete.
Setting the Root Password
Click Root Password to display the Root Password screen. Figure 2.16 shows the options on this screen.
Figure 2.16 Root Password
Enter the root password in the Root Password and Confirm fields. The screen provides a visual indicationabout the strength of the password. Click Done to return to the Configuration screen. If you set a weakpassword, you have to click Done twice.
Creating a User
Click User Creation to display the Create User screen. Figure 2.17 shows the options on this screen.

Rebooting and Initial Setup
34
Figure 2.17 Create User
Enter the details of the local user account you want to create. Again there is a visual indication about thestrength of the password.
Select Make this user administrator if you want the user to be able to administer the system. Selectingthis option adds the user to the wheel user group, which enables them to run administrative tools usingthe sudo command.
If you want more control over how the user is configured, for example to specify the user's home directoryor user ID, click Advanced.
Once you have configured the user, click Done to return to the Configuration screen. If you set a weakpassword, you have to click Done twice.
Rebooting and Initial Setup
Once you have completed the user configuration, click Finish Configuration. When the packages areinstalled, click Reboot.
If you installed a base environment other than the Server with GUI environment, the system reboots as anon-graphical system and displays a login prompt. Once you log in, you can review the license agreementat /usr/share/oraclelinux-release/EULA.
If you installed the Server with GUI environment, the system reboots and the Initial Setup screen isdisplayed. Figure 2.18 shows the options on this screen.
Figure 2.18 Initial Setup
You must select the License Information option and accept the license agreement. The User Creationoption is only displayed if you did not create a user during installation. If you create a user here, the optionsfor creating a user are the same as during the installation.
Click Finish Configuration, the Set Up Software Updates window is displayed, as shown in Figure 2.19.
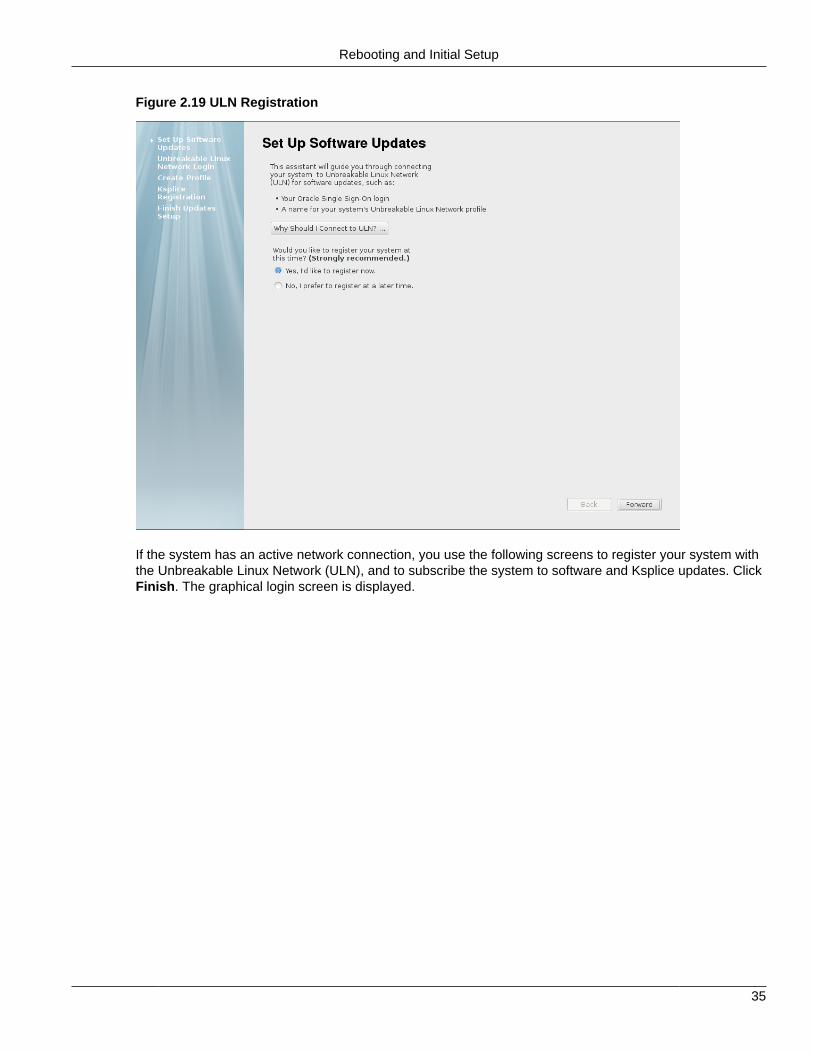
Rebooting and Initial Setup
35
Figure 2.19 ULN Registration
If the system has an active network connection, you use the following screens to register your system withthe Unbreakable Linux Network (ULN), and to subscribe the system to software and Ksplice updates. ClickFinish. The graphical login screen is displayed.

36
37
Chapter 3 Options for Installation
Table of Contents3.1 Installation Boot Options ............................................................................................................. 373.2 Automated Installation Using Kickstart ......................................................................................... 40
3.2.1 Creating a Kickstart File ................................................................................................... 403.2.2 Using a Kickstart File to Install a System .......................................................................... 43
3.3 Text-Based Installations .............................................................................................................. 443.4 Installing a System With a Btrfs root File System ....................................................................... 443.5 Using a Driver Update Disk ........................................................................................................ 46
This chapter describes some of the options you have for installing Oracle Linux 7.
3.1 Installation Boot OptionsYou can specify options for an installation by editing the boot command line, for example to specify thenetwork settings. You access the boot command line by selecting an installation option in the boot menuand then pressing either the E key (UEFI-based systems) or the Tab key (BIOS-based systems). A promptis displayed, which enables you to edit the boot options that are already defined and add your own options.
Note
On BIOS-based systems, you can press the Esc key instead of the E key to displaythe boot: prompt, which does not contain any predefined boot options. You mustenter linux to load the predefined boot options before appending with your ownoptions.
When you edit the boot command line, separate each boot option with a space. Some options haveparameters, which must be specified with the option=parameter syntax.
To discard your changes and return to the boot menu, press Esc. To start the installation using thecustomized boot options, press either Ctrl+X (UEFI-based systems) or Return (BIOS-based systems).
In the following example, boot options are used to specify that the installation should use the full installationISO image stored on an NFS share, that the installation should be automated using a kickstart file storedon an NFS share, and that the network interfaces should be configured using DHCP:
inst.repo=nfs:nfs.example.com:/ISOs/OL7/full_image.iso \inst.ks=nfs:nfs.example.com:/kickstart/OL7/server-ks.cfg ip=dhcp
For a list of the available boot options, see the following:
• Installation program boot options: https://rhinstaller.github.io/anaconda/boot-options.html.
• Dracut kernel command line options: see the dracut.cmdline(7) manual page.
Note
If you are upgrading from a previous release, check the above documentation forremoved and deprecated boot options. Starting with the Oracle Linux 7 release, aninst. prefix has been added to the installation program boot options, but the prefixis currently not enforced.
The following are some of the most commonly used boot options:
Installation Boot Options
38
Boot Options for Specifying the Installation Type
inst.graphical
Specifies a graphical-based installation.
inst.text
Specifies a text-based installation, see Section 3.3, “Text-Based Installations”.
Boot Options for Specifying the Installation Source
inst.repo=cdrom[:device]
Specifies a CD or DVD drive as the location that contains everything needed to install the software.
The installation program searches all the system's CD or DVD drives, unless a device is specified.
If access to a network is required and no network boot options are specified, the installation programenables DHCP on all available network devices.
inst.repo=ftp://user:password@FTP_server/path
Specifies an FTP server as the location that contains everything needed to install the software.
If access to a network is required and no network boot options are specified, the installation programenables DHCP on all available network devices.
inst.repo=hd:device:path
Specifies a local disk as the location that contains everything needed to install the software.
You can specify the device by its device name (sdb2), label (LABEL=label), or UUID (UUID=uuid).
inst.repo=[http:|https:]//HTTP_server/path
Specifies a web server as the location that contains everything needed to install the software. If yoursystem has access to the Internet, you can use the base repository on the Oracle Linux yum server forthe Oracle Linux release that you are installing. For example, you could set this value to https://yum.oracle.com/repo/OracleLinux/OL7/6/base/x86_64
inst.repo=nfs:[options:]NFS_server:path
Specifies an NFS share as the location that contains everything needed to install the software.
Use options to specify a comma-separated list of NFS mount options.
The NFS share can be the path to an ISO image or a directory.
inst.stage2=[installation_source]
Specifies the location to fetch the installer runtime image; packages are ignored. If this option is notspecified, inst.repo is used instead. The path specified for installation_source can match anyof the protocol and path options used for inst.repo.
The directory path specified for the installation_source should contain a valid .treeinfo filethat specifies the location of the runtime image. If a .treeinfo file is not present at the source, theinstaller uses LiveOS/squashfs.img as the default location at the specified source.
Note that when specifying a remote runtime image using the inst.stage2 option while performinga network boot using the Unbreakable Enterprise Kernel boot and installation ISO, you must use thesame ISO for the installation repository. Do not attempt to use the standard Oracle Linux 7 ISO image
Installation Boot Options
39
for x86_64 (64 bit) as the installation repository when using the runtime image from the Oracle Linux7 UEK Boot ISO image for x86_64 (64 bit) .
Boot Options for Configuring the Network
ip=[interface:]dhcp|dhcp6|auto6|ibft
Specifies a network automatic configuration method. If interface is not specified, all interfaces areconfigured. Use ibft to use the MAC address of the interface specified by the iSCSI Boot FirmwareTable (iBFT) in the system BIOS or firmware.
ip=ip::gateway:netmask:hostname:interface:none
Specifies a static IP configuration for interface. Enclose IPv6 addresses in square brackets, forexample [2509:f0d0:1001::0004].
nameserver=IP
Specifies the IP address of a DNS server to use during installation. Multiple nameserver options canbe used.
bootdev=interface
Specifies the primary network interface. Required if you use more than one ip option.
inst.dhcpclass
Specifies a vendor class identifier to DHCP.
Boot Options for Kickstart Installations
inst.ks=cdrom[:device]/path
Specifies a kickstart file on a CD or DVD drive.
inst.ks=ftp://user:password@FTP_server/path
Specifies a kickstart file on an FTP server.
inst.ks=hd:device:path
Specifies a kickstart file a local disk.
You can specify the device by its device name (sdb2), label (LABEL=label) or UUID (UUID=uuid).
inst.ks=[http:|https:]//HTTP_server/path
Specifies a kickstart file on a web server.
inst.ks=nfs:[options:]NFS_server:path
Specifies a kickstart file on an NFS share.
Use options to specify a comma-separated list of NFS mount options.
Boot Options for Remote Installations
inst.vnc
Enables remote graphical-based installation by starting a VNC server.
A VNC client can connect by using a command such as vncviewer server:port , where serveris the IP address of the system being installed.
Automated Installation Using Kickstart
40
After installation, the system starts in text mode even if a graphical desktop environment is selected asthe base environment.
inst.vncconnect=client[:port]
Specifies the VNC client and optional port that is listening for connections from a VNC server(vncviewer -listen). The default port is 5900.
inst.vncpassword=password
Specifies the password for client connections using VNC.
Miscellaneous Boot Options
inst.keymap=layout
Specifies the keyboard layout for installation.
inst.lang=language
Specifies the language for installation.
loglevel=level
Specifies the logging level for installation: critical, debug, error, info, or warning. The defaultlevel is info.
3.2 Automated Installation Using KickstartThis section describes how you can use kickstart to automate the installation of Oracle Linux.
3.2.1 Creating a Kickstart File
A kickstart configuration file contains all the information that kickstart requires to perform an automatedinstallation. Every Oracle Linux installation creates a kickstart file, /root/anaconda-ks.cfg. You canuse this file to repeat an installation, or you can customize the settings in this file for different systemconfigurations. The file is also useful for troubleshooting a boot-time problem with an installed system.
The following sections describe the structure of a kickstart file and demonstrate some of the availableconfiguration options. Documentation for kickstart is included in the pykickstart package and can befound at /usr/share/doc/pykickstart-version/kickstart-docs.rst.
If you are upgrading from a previous Oracle Linux release, use the ksverdiff command (included in thepykickstart package) to check for removed and deprecated kickstart options. Starting with Oracle Linux7, network interface device names have changed and are now based on information that is derived fromthe system BIOS, from a device's firmware, system path, or MAC address.
When you have prepared a kickstart configuration file, use the ksvalidator utility, which is included inthe pykickstart package, to check that the syntax of the file is correct.
3.2.1.1 Installation Options Section
The first part of a kickstart file defines the installation options and their associated values, and it defineshow to configure the system storage, for example:
#platform=x86, AMD64, or Intel EM64T#version=DEVEL# Firewall configurationfirewall --enabled --service=ssh
Creating a Kickstart File
41
# Install OS instead of upgradeinstall
# Use CDROM installation mediacdrom
# System authorization informationauth --useshadow --passalgo=sha512
# Root passwordrootpw --iscrypted SHA512_password_hash
# Use graphical installgraphicalfirstboot --disable
# System keyboardkeyboard --vckeymap=us --xlayouts='us'
# System languagelang en_US.UTF-8
# SELinux configurationselinux --enforcing
# Installation logging levellogging --level=info
# System timezonetimezone America/Los_Angeles
# Network informationnetwork --bootproto=dhcp --device=em1 --onboot=yes --hostname=hostname
# System bootloader configurationbootloader --append="rhgb crashkernel=auto quiet" --location=mbr --driveorder="sda"
# Non-administrative useruser --name=user --homedir=/home/user --password=SHA512_password_hash --iscrypted
# Partition information
clearpart --all --drives=sda
part /boot --fstype=ext4 --size=500part pv.008002 --grow --size=1
volgroup vg_hostname --pesize=4096 pv.008002logvol / --fstype=ext4 --name=lv_root --vgname=vg_hostname --grow --size=1024 --maxsize=51200logvol swap --name=lv_swap --vgname=vg_hostname --grow --size=2016 --maxsize=4032
Comments in the kickstart file begin with a # character.
PXE cannot bring up the network interface unless you include a line such as the following:
network --bootproto=dhcp --device=em1 --onboot=yes
3.2.1.2 Packages Section
The %packages section defines the packages to be installed on the system, for example:
%packages@base@core@desktop-debugging@dial-up
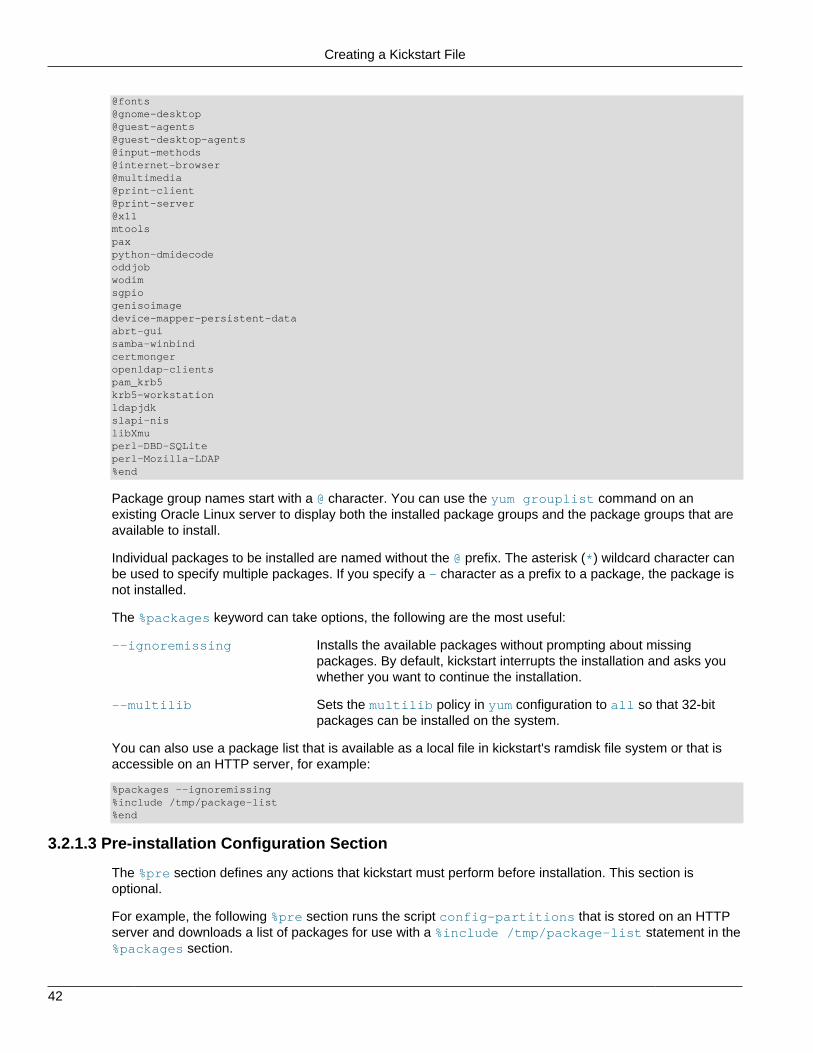
Creating a Kickstart File
42
@fonts@gnome-desktop@guest-agents@guest-desktop-agents@input-methods@internet-browser@multimedia@print-client@print-server@x11mtoolspaxpython-dmidecodeoddjobwodimsgpiogenisoimagedevice-mapper-persistent-dataabrt-guisamba-winbindcertmongeropenldap-clientspam_krb5krb5-workstationldapjdkslapi-nislibXmuperl-DBD-SQLiteperl-Mozilla-LDAP%end
Package group names start with a @ character. You can use the yum grouplist command on anexisting Oracle Linux server to display both the installed package groups and the package groups that areavailable to install.
Individual packages to be installed are named without the @ prefix. The asterisk (*) wildcard character canbe used to specify multiple packages. If you specify a - character as a prefix to a package, the package isnot installed.
The %packages keyword can take options, the following are the most useful:
--ignoremissing Installs the available packages without prompting about missingpackages. By default, kickstart interrupts the installation and asks youwhether you want to continue the installation.
--multilib Sets the multilib policy in yum configuration to all so that 32-bitpackages can be installed on the system.
You can also use a package list that is available as a local file in kickstart's ramdisk file system or that isaccessible on an HTTP server, for example:
%packages --ignoremissing%include /tmp/package-list%end
3.2.1.3 Pre-installation Configuration Section
The %pre section defines any actions that kickstart must perform before installation. This section isoptional.
For example, the following %pre section runs the script config-partitions that is stored on an HTTPserver and downloads a list of packages for use with a %include /tmp/package-list statement in the%packages section.
Using a Kickstart File to Install a System
43
%pre%include http://192.168.1.100/scripts/config-partitionswget -q -O- http://192.168.1.100/scripts/package-list > /tmp/package-list%end
In this example, the wget command saves the package list in kickstart's file system, which exists as aramdisk in memory.
An included script or file must be accessible at the specified path or URL.
As the name service is not available before installation, you must use IP addresses instead of domainnames in the %pre section or in any script that it includes.
3.2.1.4 Post-installation Configuration Section
The %post section defines any actions that kickstart must perform after installation. This section isoptional.
By default, kickstart runs post-installation tasks in a chroot environment that is based on the rootfile system of the newly installed system. If you need to access any files that are outside the chrootenvironment, specify the --nochroot option to %post. You can then access files in the kickstart filesystem with the newly installed system's root file system being mounted at /mnt/sysimage.
For example, the following %post section runs the script /tmp/post-config in kickstart's file system:
%post --nochroot%include /tmp/post-config%end
If you configure the installed system's network interface to obtain its settings using DHCP, you must eitheruse IP addresses instead of domain names or set up a temporary resolv.conf file, for example:
%postwget -q -O- http://192.168.1.100/scripts/resolv.conf > /etc/resolv.conf%include http://instsvr.mydom.com/scripts/post-config...%end
3.2.2 Using a Kickstart File to Install a System
A kickstart installation requires access to the full installation media which can be on a local CD-ROM drive,USB drive or hard drive, or on a network installation server that is accessible using HTTP or NFS.
To use a kickstart file to install a system:
1. Boot the system using local boot media.
2. Selecting an installation option in the boot menu and then press either the E key (UEFI-based systems)or the Tab key (BIOS-based systems) to access the boot prompt.
3. Use the inst.ks boot option to specify the location of the kickstart file.
If the kickstart file is located on an NFS server, you might use a boot command such as the following:
ip=em1:dhcp inst.ks=nfs:192.168.1.100:/ksfiles/ks.cfg
where ip=em1:dhcp specifies that DHCP should be used to configure the em1 network interface.
If access to a network is required and no network configuration is specified either on the boot prompt orin the kickstart configuration, the installation program enables DHCP on all available network devices.
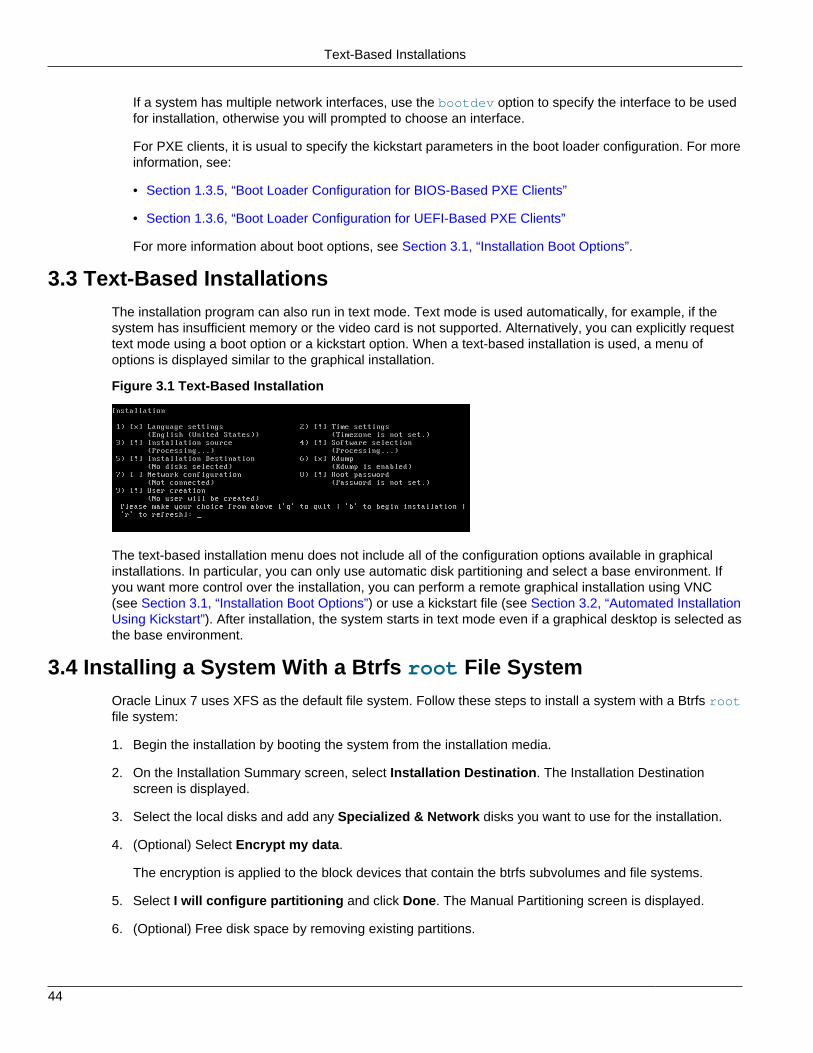
Text-Based Installations
44
If a system has multiple network interfaces, use the bootdev option to specify the interface to be usedfor installation, otherwise you will prompted to choose an interface.
For PXE clients, it is usual to specify the kickstart parameters in the boot loader configuration. For moreinformation, see:
• Section 1.3.5, “Boot Loader Configuration for BIOS-Based PXE Clients”
• Section 1.3.6, “Boot Loader Configuration for UEFI-Based PXE Clients”
For more information about boot options, see Section 3.1, “Installation Boot Options”.
3.3 Text-Based InstallationsThe installation program can also run in text mode. Text mode is used automatically, for example, if thesystem has insufficient memory or the video card is not supported. Alternatively, you can explicitly requesttext mode using a boot option or a kickstart option. When a text-based installation is used, a menu ofoptions is displayed similar to the graphical installation.
Figure 3.1 Text-Based Installation
The text-based installation menu does not include all of the configuration options available in graphicalinstallations. In particular, you can only use automatic disk partitioning and select a base environment. Ifyou want more control over the installation, you can perform a remote graphical installation using VNC(see Section 3.1, “Installation Boot Options”) or use a kickstart file (see Section 3.2, “Automated InstallationUsing Kickstart”). After installation, the system starts in text mode even if a graphical desktop is selected asthe base environment.
3.4 Installing a System With a Btrfs root File SystemOracle Linux 7 uses XFS as the default file system. Follow these steps to install a system with a Btrfs rootfile system:
1. Begin the installation by booting the system from the installation media.
2. On the Installation Summary screen, select Installation Destination. The Installation Destinationscreen is displayed.
3. Select the local disks and add any Specialized & Network disks you want to use for the installation.
4. (Optional) Select Encrypt my data.
The encryption is applied to the block devices that contain the btrfs subvolumes and file systems.
5. Select I will configure partitioning and click Done. The Manual Partitioning screen is displayed.
6. (Optional) Free disk space by removing existing partitions.
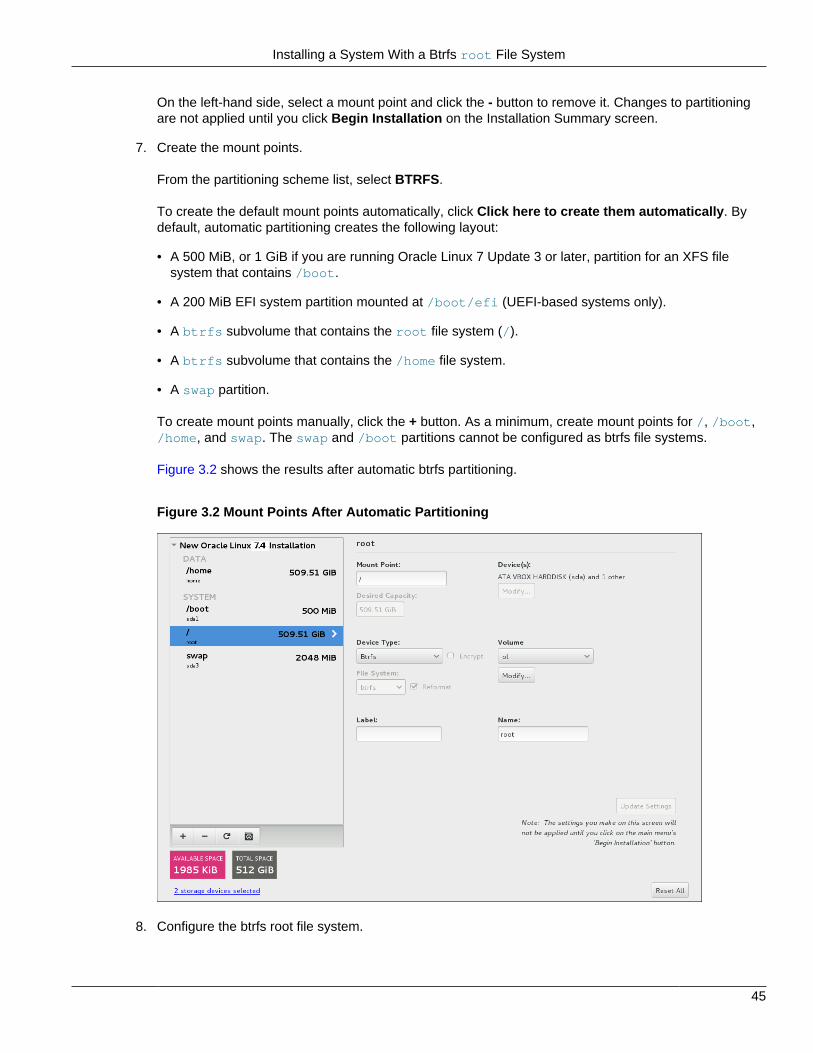
Installing a System With a Btrfs root File System
45
On the left-hand side, select a mount point and click the - button to remove it. Changes to partitioningare not applied until you click Begin Installation on the Installation Summary screen.
7. Create the mount points.
From the partitioning scheme list, select BTRFS.
To create the default mount points automatically, click Click here to create them automatically. Bydefault, automatic partitioning creates the following layout:
• A 500 MiB, or 1 GiB if you are running Oracle Linux 7 Update 3 or later, partition for an XFS filesystem that contains /boot.
• A 200 MiB EFI system partition mounted at /boot/efi (UEFI-based systems only).
• A btrfs subvolume that contains the root file system (/).
• A btrfs subvolume that contains the /home file system.
• A swap partition.
To create mount points manually, click the + button. As a minimum, create mount points for /, /boot,/home, and swap. The swap and /boot partitions cannot be configured as btrfs file systems.
Figure 3.2 shows the results after automatic btrfs partitioning.
Figure 3.2 Mount Points After Automatic Partitioning
8. Configure the btrfs root file system.
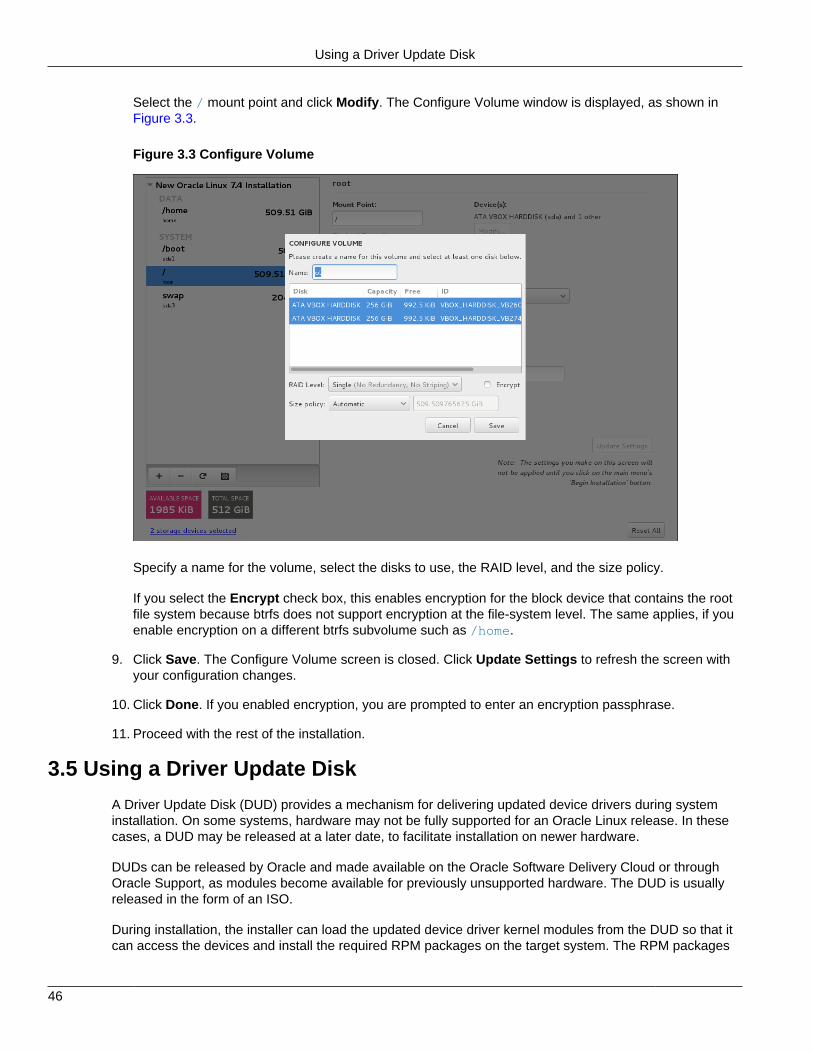
Using a Driver Update Disk
46
Select the / mount point and click Modify. The Configure Volume window is displayed, as shown inFigure 3.3.
Figure 3.3 Configure Volume
Specify a name for the volume, select the disks to use, the RAID level, and the size policy.
If you select the Encrypt check box, this enables encryption for the block device that contains the rootfile system because btrfs does not support encryption at the file-system level. The same applies, if youenable encryption on a different btrfs subvolume such as /home.
9. Click Save. The Configure Volume screen is closed. Click Update Settings to refresh the screen withyour configuration changes.
10. Click Done. If you enabled encryption, you are prompted to enter an encryption passphrase.
11. Proceed with the rest of the installation.
3.5 Using a Driver Update Disk
A Driver Update Disk (DUD) provides a mechanism for delivering updated device drivers during systeminstallation. On some systems, hardware may not be fully supported for an Oracle Linux release. In thesecases, a DUD may be released at a later date, to facilitate installation on newer hardware.
DUDs can be released by Oracle and made available on the Oracle Software Delivery Cloud or throughOracle Support, as modules become available for previously unsupported hardware. The DUD is usuallyreleased in the form of an ISO.
During installation, the installer can load the updated device driver kernel modules from the DUD so that itcan access the devices and install the required RPM packages on the target system. The RPM packages
Preparing to use a Driver Update Disk image
47
also contain alternate device drivers. This process allows the installation to proceed smoothly on systemswith hardware that might not have been initially supported at the time of the Oracle Linux release.
Preparing to use a Driver Update Disk image
Warning
Writing the DUD ISO to the wrong device may result in data loss. Check that youreference the correct device node when you copy the image. Use the lsblk utilityto help you to identify the different disks block devices on your system.
Use the dd command line utility to transfer the DUD image to an alternate storage device:
# dd if=/path/to/DUD.iso of=/dev/sdX
Replace /path/to/DUD.iso with the path to access the DUD ISO file. Replace /dev/sdX with thedevice node that belongs to the storage media that you intend to use for the DUD. Typically, you might usea USB disk for this purpose.
Using the Driver Update Disk during installation
To use the DUD during an installation, boot from the standard Oracle Linux installation media as younormally would, but also attach the media that contains the DUD image before the installer starts. Theinstaller should automatically recognize the DUD and use it. You might be prompted to select which driversto install.
Note
Some versions of BIOS may fail to identify the installation media when multiple USBstorage devices are connected. Therefore, it is recommended that you insert theDUD USB media once the boot process started. For example, attach the disk whilethe system is at the GRUB boot prompt.
The kernel used by the installer, may not include support for USB 3.0. When usingthe DUD on USB media, ensure that you use a USB 2.0 compatible port whenconnecting the USB media to the system.
It is also possible to manually specify the location of the DUD before the installer actually boots. Thismakes it possible to host the ISO at an alternate location, such as a web server or an NFS server, andhelps to facilitate kickstart installations where the DUD may be required. To specify the location of the DUDmanually, edit the boot parameters to include inst.dd=location, where location is the URL or pathto the device where the DUD can be accessed.
To access the boot parameters in the boot menu when you are running the installation manually, presseither the E key (UEFI-based systems) or the Tab key (BIOS-based systems). A prompt is displayedwhich enables you to edit the boot options already defined and add your own options. See Section 3.1,“Installation Boot Options” for more information.
If you intend to use a DUD during a kickstart installation, use the driverdisk installation option in yourkickstart file to specify the location of the disk. For example, to install from an attached block device, usethe following:
driverdisk /dev/sdb1
Alternately, to install from a network location, use the --source switch:
driverdisk --source=http://www.example.com/dd.iso

Using the Driver Update Disk during installation
48
The installer supports the use of HTTP, FTP and NFS as sources for network hosted DUD images.
49
Chapter 4 Upgrading an Oracle Linux System
Table of Contents4.1 Conditions for Performing an In-Place Upgrade ............................................................................ 494.2 Performing an In-Place Upgrade ................................................................................................. 49
Typically, you upgrade an Oracle Linux system by performing a fresh installation. However, starting withOracle Linux 7, there is support for in-place upgrades. This chapter describes the conditions and methodfor performing an in-place upgrade.
4.1 Conditions for Performing an In-Place Upgrade
In-place upgrades are supported for systems that run Oracle Linux 6 Update 5 or later only. The followingconditions must also be met:
• The system to be upgraded must meet the minimum installation requirements for Oracle Linux 7, seeSection 1.1, “System Requirements”.
• The Oracle Linux 6 system has been completely updated from the ol6_x86_64_latest channel or theol6_latest repository.
• Either the Unbreakable Enterprise Kernel Release 3 (UEK R3) or the Unbreakable Enterprise KernelRelease 4 (UEK R4) release must be installed on the system and it must be the default boot kernel.Upgrading from Unbreakable Enterprise Kernel Release 2 is not supported.
• The Oracle Linux 6 system must have been installed with the Minimal set of software.
• No Oracle product stack is present on the system.
If the RHCK is installed, it is upgraded as part of the process, but it must not be set as the default bootkernel.
If the system to be upgraded contains valuable data, make a backup or snapshot of the system so that youcan recover it to its previous state if the upgrade fails.
Before you upgrade, check the release notes for any known issues with upgrades. See Oracle® Linux 7Documentation and Unbreakable Enterprise Kernel Documentation.
To perform an in-place upgrade you must install some additional packages and their dependencies. Thesystem should have access to the Unbreakable Linux Network (ULN), Oracle Linux yum server, or a localyum server.
4.2 Performing an In-Place Upgrade
1. If the system is registered with ULN, make sure that it is subscribed to the ol6_x86_64_latest andol6_x86_64_addons channels.
If the system is using the Oracle Linux yum server or a local mirror, make sure that the ol6_latestand ol6_addons repositories are enabled.
2. Use the yum update command to update the system to the latest Oracle Linux 6 release.
Performing an In-Place Upgrade
50
3. Install the latest versions of the following required packages:
• openscap
• preupgrade-assistant
• preupgrade-assistant-el6toel7
• preupgrade-assistant-el6toel7-data
• preupgrade-assistant-ui
• preupgrade-assistant-tools
• redhat-upgrade-tool
For example:
# yum install redhat-upgrade-tool preupgrade-assistant \ preupgrade-assistant-el6toel7 preupgrade-assistant-el6toel7-data-0 \ preupgrade-assistant-tools preupgrade-assistant-ui openscap
4. If the system is registered with ULN, delete the system from ULN and disable yum plugins.
You can only delete a system if it is registered to your user name on ULN.
a. Log in to https://linux.oracle.com with your ULN user name and password.
b. On the Systems tab, click the link for the system in the list of registered machines.
c. On the System Details page, click Delete.
d. When prompted to confirm the deletion, click OK.
e. On the system, edit the yum configuration file /etc/yum.conf file and disable yum plugins bysetting plugins=0.
5. Run the preupg command to perform an upgrade assessment:
# preupg
6. Examine the upgrade assessment results file /root/preupgrade/result.html.
If the assessment reports any fail, needs_action, or needs_inspection issues, read theremediation instructions for these issues and perform any required actions before proceeding with theupgrade.
You might also need to perform some actions after performing the upgrade.
You can run the preupg command as often as you like to check the system's readiness for upgrading.A backup of each assessment is stored in the /root/preupgrade-results directory. You mightwant to back up this directory before performing the upgrade.
The /root/preupgrade directory (and its contents) must be present for the upgrade to proceed.
7. Run the redhat-upgrade-tool-cli command to perform the upgrade.
For example, to upgrade using an Oracle Linux 7 installation ISO, you might use the followingcommand:
Performing an In-Place Upgrade
51
# redhat-upgrade-tool-cli --iso=OL7_ISO \--debuglog=/tmp/upgrade.log --cleanup-post
Substitute OL7_ISO with the path to the installation ISO. Alternately, use the --device option to pointto a burned media copy of the installation ISO. For example:
# redhat-upgrade-tool-cli --device=/dev/cdrom \--debuglog=/tmp/upgrade.log --cleanup-post
Substitute /dev/cdrom with the device where the installation media is accessible.
If you wish to use a network-based resource to perform the upgrade, you can use the --networkoption in conjunction with the --instrepo to specify the URL where the ISO contents are located. Forexample:
# redhat-upgrade-tool-cli --network=7.5 --instrepo=OL7_repo_url \--debuglog=/tmp/upgrade.log --cleanup-post
Substitute OL7_repo_url with the URL where the installation media is accessible. Note that aninstallation repository must contain a .treeinfo file that provides metadata for the installation.Currently, you cannot use the standard yum repositories exposed on the Oracle Linux yum serverdirectly. If you wish to install from a network resource, you can copy the contents of an installation ISOto a locally hosted web server.
The --cleanup-post option ensures that there are no Oracle Linux 6 packages remaining onthe system after the upgrade. If you do not use this option, check the system after the upgrade andmanually remove any Oracle Linux 6 packages, for example, by using the yum remove `rpm -qa |grep el6`.
For more information, use the --help option with the redhat-upgrade-tool-cli command.
If you require use of a proxy server to access a network resource where your installation repository islocated, set the appropriate command line variables before running the command. For example:
# export http_proxy="http://USER:PASSWORD@PROXY_SERVER:PORT"
8. Reboot the system to start the upgrade.
After the reboot, the upgrade tool installs the required packages, reconfigures the system, and thenreboots. Depending on the number of packages, this may take some time.
After the upgrade completes, perform any post-upgrade actions identified by the upgrade assessment.
9. If the system was previously registered with ULN, check that yum plugins are enabled and re-registerthe system with ULN.
a. On the system, edit the yum configuration file /etc/yum.conf file and enable yum plugins bysetting plugins=1.
b. Run the uln_register command.
# uln_register
Alternatively, if you use the GNOME graphical user desktop, select Applications, System Tools,and then ULN Registration.
c. When prompted, enter your ULN user name, password, and customer support identifier (CSI).

52
53
Chapter 5 Post-Installation Configuration
Table of Contents5.1 Registering with the Unbreakable Linux Network .......................................................................... 535.2 Obtaining Errata and Updates from the Oracle Linux Yum Server ................................................. 535.3 Obtaining Packages from the Oracle Linux Installation Media ....................................................... 545.4 Applying Updates ....................................................................................................................... 545.5 Managing an Oracle Linux 7 System ........................................................................................... 54
This chapter describes system configuration changes that you might make after an installation.
5.1 Registering with the Unbreakable Linux NetworkWhen you install Oracle Linux 7 on a system, you have the option of registering the system with theUnbreakable Linux Network (ULN). To register with ULN after installation, you can use the uln_registercommand. Or,from the desktop menu, you can select System Tools under the Applications menu, thenselect the ULN Registration option.
To obtain Oracle Linux updates from ULN, you must have an Oracle Linux support subscription. For moreinformation, see https://linux.oracle.com.
During the ULN registration, your server is automatically registered with the latest channels for the baserepository and the Unbreakable Enterprise Kernel Release 5.
ULN also provides channels for Oracle-specific software packages such as Oracle's ASMlib user spacepackage and the Oracle Instant Client. To enable access to these packages, log in to ULN and subscribeyour system to the Oracle Software for Oracle Linux 7 channel.
If you have an Oracle Linux Premier Support account, you can opt to use Oracle Ksplice, which enablesyou to keep your systems secure and highly available by automatically updating them with the latest kernelsecurity errata and other critical updates. If you choose to use Ksplice, you can subscribe your systems tothe Ksplice for Oracle Linux channel and install the Ksplice on them. After the registration is complete, youcan use the yum command to install the Ksplice Uptrack package. The Ksplice Uptrack client downloadsthe access key from ULN and automatically configures itself so that your system can immediately begin touse Ksplice Uptrack. For more information about Ksplice, see Oracle® Linux: Ksplice User's Guide
5.2 Obtaining Errata and Updates from the Oracle Linux Yum ServerOracle also provides all errata and updates for Oracle Linux through the Oracle Linux yum server, whichincludes updates to the base distribution, but does not include Oracle-specific software. You do not requirean Oracle Linux support subscription to use this service. For more information on how to obtain updatesfrom the Oracle Linux yum server, see https://yum.oracle.com.
By default, all new installations of Oracle Linux 7 are automatically configured to use the Oracle Linux yumserver. If you subsequently register the system with ULN, any configuration for using the Oracle Linux yumserver is automatically disabled.
The configuration files that control access to repositories hosted on the the Oracle Linux yum server arelocated in /etc/yum.repos.d/.
Oracle revised how repository configuration files for the Oracle Linux yum server are distributed andupdated in January 2019. Older implementations may use a consolidated configuration file available in
Obtaining Packages from the Oracle Linux Installation Media
54
/etc/yum.repos.d/public-yum-ol7.repo. If your system is still configured in this way, considerupdating and running the /usr/bin/ol_yum_configure.sh script to complete the transition to use themodular yum configuration files managed through yum itself.
Core repositories such as ol7_latest are enabled by default at installation. These repositories allowyou to install base software required to run Oracle Linux 7. They also allow you to install the packagesthat provide the Oracle Linux yum server repository configurations that enable repositories where othersoftware may be available. You can get a listing of the available repository configuration packages byrunning:
# yum list *release-el7*
See the Oracle Linux 7 Administrator's Guide for more information.
5.3 Obtaining Packages from the Oracle Linux Installation MediaAfter installation, following these steps to configure yum to use the full installation ISO image as arepository for installing packages:
1. Mount the full installation ISO image on a suitable mount point, such as /mnt:
# mount -t iso9660 -o loop full_image.iso /mnt
2. Create the file /etc/yum.repos.d/Media.repo that contains entries similar to the following:
[ol7_base_media]name=Oracle Linux 7 Base Mediabaseurl=file:///mntgpgkey=file:///etc/pki/rpm-gpg/RPM-GPG-KEY-oraclegpgcheck=1enabled=1
Adjust the value of the baseurl and gpgkey parameters to match the mount point of the ISO imageon your system.
3. Use the yum repolist command to check the repository configuration.
5.4 Applying UpdatesWhen you have set up the ULN channels, Oracle Linux yum server repositories, or installation mediarepositories that yum should use, you can update all of the installed packages as follows:
# yum update
This command upgrades your system to the latest available update of Oracle Linux 7.
Use the following command to install or update a specific package:
# yum update package
For example, to install or update the Z-shell package (zsh), you would enter:
# yum update zsh
For more information, see the yum(8) man page.
5.5 Managing an Oracle Linux 7 SystemThe following are some common tasks for managing an Oracle Linux 7 system after an installation:
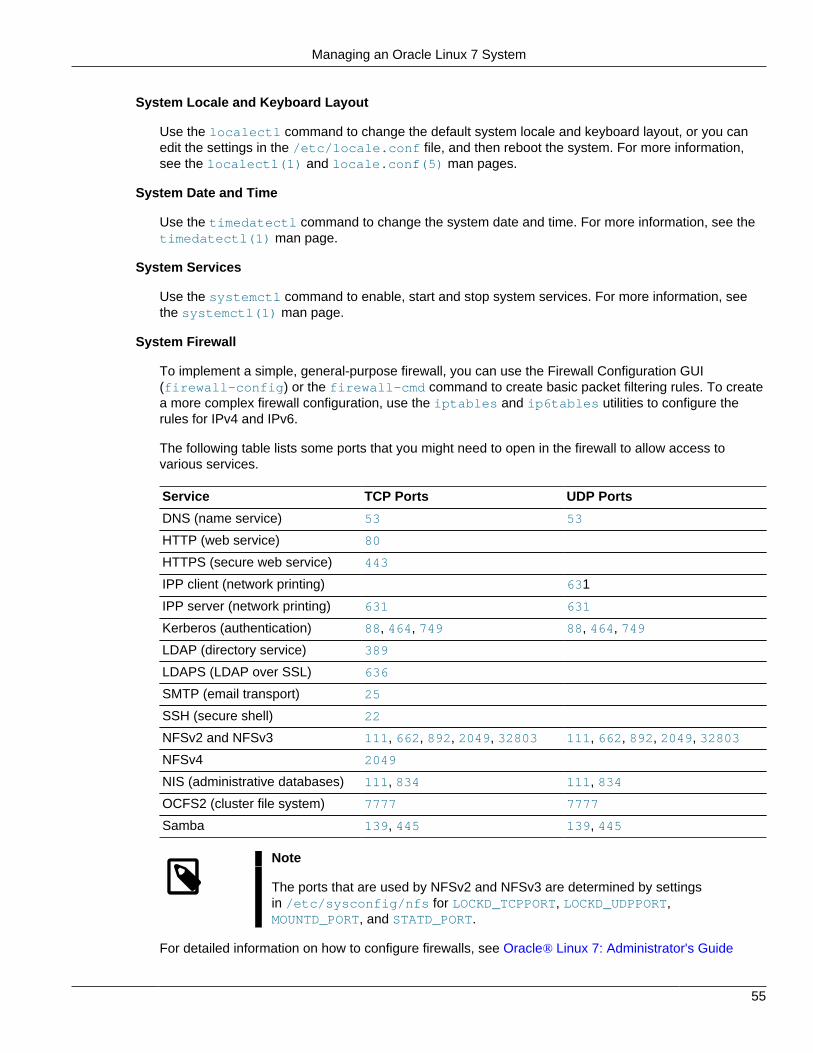
Managing an Oracle Linux 7 System
55
System Locale and Keyboard Layout
Use the localectl command to change the default system locale and keyboard layout, or you canedit the settings in the /etc/locale.conf file, and then reboot the system. For more information,see the localectl(1) and locale.conf(5) man pages.
System Date and Time
Use the timedatectl command to change the system date and time. For more information, see thetimedatectl(1) man page.
System Services
Use the systemctl command to enable, start and stop system services. For more information, seethe systemctl(1) man page.
System Firewall
To implement a simple, general-purpose firewall, you can use the Firewall Configuration GUI(firewall-config) or the firewall-cmd command to create basic packet filtering rules. To createa more complex firewall configuration, use the iptables and ip6tables utilities to configure therules for IPv4 and IPv6.
The following table lists some ports that you might need to open in the firewall to allow access tovarious services.
Service TCP Ports UDP Ports
DNS (name service) 53 53
HTTP (web service) 80
HTTPS (secure web service) 443
IPP client (network printing) 631
IPP server (network printing) 631 631
Kerberos (authentication) 88, 464, 749 88, 464, 749
LDAP (directory service) 389
LDAPS (LDAP over SSL) 636
SMTP (email transport) 25
SSH (secure shell) 22
NFSv2 and NFSv3 111, 662, 892, 2049, 32803 111, 662, 892, 2049, 32803
NFSv4 2049
NIS (administrative databases) 111, 834 111, 834
OCFS2 (cluster file system) 7777 7777
Samba 139, 445 139, 445
Note
The ports that are used by NFSv2 and NFSv3 are determined by settingsin /etc/sysconfig/nfs for LOCKD_TCPPORT, LOCKD_UDPPORT,MOUNTD_PORT, and STATD_PORT.
For detailed information on how to configure firewalls, see Oracle® Linux 7: Administrator's Guide
Managing an Oracle Linux 7 System
56
System State
Use the systemctl command to change the run state of the system. For more information, see thesystemectl(1) man page.
To change the default system state and switch to the multi-user graphical environment (run level 5 inprevious Oracle Linux releases):
# systemctl set-default graphical.target# systemctl isolate graphical.target
To change the default system state and switch to the multi-user command-line environment (run level 3in previous Oracle Linux releases):
# systemctl set-default multi-user.target# systemctl isolate multi-user.target
To reboot an Oracle Linux 7 system:
# systemctl reboot
To shut down and power off the system:
# systemctl poweroff
57
Chapter 6 Troubleshooting Oracle Linux 7 Installations
Table of Contents6.1 Troubleshooting Menu Options .................................................................................................... 576.2 Debug and Log Information ......................................................................................................... 57
This chapter describes some options for troubleshooting Oracle Linux 7 installations. Also check therelease notes in Oracle® Linux 7 Documentation for any known installation issues that pertain to therelease you are running.
For known hardware issues, see the release notes for your UEK release in Unbreakable Enterprise KernelDocumentation
6.1 Troubleshooting Menu Options
The boot menu on the Oracle Linux 7 installation media contains a Troubleshooting option with thefollowing options:
Install Oracle Linux 7 in basic graphics mode
Use this option if the screen goes blank or appears distorted when you try to install Oracle Linux ingraphical mode.
Rescue a Oracle Linux system
Use this option to boot an installed system in a mode that enables you to edit partitions or configurationfiles to fix a variety of boot problems.
Run a memory test
Use this option to run the memtest86 utility, which verifies the integrity of the system's RAM.
Boot from local drive
Use this option to boot an installed system from the hard disk.
6.2 Debug and Log Information
During an installation, you can press the Ctrl+Alt+F1 keys to display the virtual console for the installationprogram. This console contains messages and debugging information output for the installation program.Additional virtual consoles are available to display log information from different sources, as described inthe following section. Press Ctrl+b, and then press either n (for next) or b (for back) to switch between thevirtual consoles. To return to the graphical installation program, press Ctrl+Alt+F6.
During an installation, several log files are generated, which capture messages from the following sources:
Anaconda program
The /tmp/anaconda.log file contains Anaconda logs relating to the installation.
During the installation you can access the messages stored in this log by pressing Ctrl+Alt+F1 todisplay the virtual console, then press Ctrl+b, and then press 3.
Debug and Log Information
58
If the installation succeeds, the log file is copied to /var/log/anaconda/anaconda.log.
Hardware detection and configuration
The /tmp/syslog file contains messages relating to the system hardware.
If the installation succeeds, the log file is copied to /var/log/anaconda/syslog.
Kickstart
The /tmp/ks-name.log file contains logs from kickstart installations.
If the installation succeeds, the log file is copied to /var/log/anaconda/ks-script-name.log.
Network detection and configuration
The /tmp/ifcfg.log file contains logs relating to network configuration.
If the installation succeeds, the log file is copied to /var/log/anaconda/anaconda.ifcfg.log.
Other programs
The /tmp/program.log file contains logs from all other programs used during the installation.
During the installation you can view the messages stored in this log by pressing Ctrl+Alt+F1 to displaythe virtual console, then press Ctrl+b, and then press 5.
If the installation succeeds, the log file is copied to /var/log/anaconda/anaconda.program.log.
Package installation
The /tmp/packaging.log file contains package installation messages output by the yum and rpmcommands.
If the installation succeeds, the log file is copied to /var/log/anaconda/anaconda.packaging.log.
Storage detection and configuration
The /tmp/storage.log file contains logs from the storage modules.
During the installation you can view the messages stored in this log by pressing Ctrl+Alt+F1 to displaythe virtual console, then press Ctrl+b, and then press 4.
If the installation succeeds, the log file is copied to /var/log/anaconda/anaconda.storage.log.
If the installation fails, the messages from these log files are combined into a single log file at /tmp/anaconda-tb-name.
To access a shell prompt as the root user during the installation, press Ctrl+Alt+F1 to display the virtualconsole. Then, press Ctrl+b, followed by pressing the number 2. You can use the shell prompt to accessthe log files and to copy them to a local storage device such as a USB device. Or, you can copy the logfiles to a network location by using the scp command.