oracle® insurance policy administration installer for ... · oracle® insurance policy...
TRANSCRIPT

Oracle® Insurance Policy Administration Installer for Oracle Weblogic and MS-SQLServer
Version 10.1.1.0 Document Part Number: E55503-01
August, 2014

Release 10.1.1.0 Oracle Installer 2 of 12 Revised: 07/10/14
Copyright © 2009, 2014, Oracle and/or its affiliates. All rights reserved.
Trademark Notice
Oracle and Java are registered trademarks of Oracle and/or its affiliates. Other names may be trademarks of their respective owners.
License Restrictions
Warranty/Consequential Damages Disclaimer
This software and related documentation are provided under a license agreement containing restrictions on use and disclosure and are protected by intellectual property laws. Except as expressly permitted in your license agreement or allowed by law, you may not use, copy, reproduce, translate, broadcast, modify, license, transmit, distribute, exhibit, perform, publish or display any part, in any form, or by any means. Reverse engineering, disassembly, or decompilation of this software, unless required by law for interoperability, is prohibited.
Warranty Disclaimer
The information contained herein is subject to change without notice and is not warranted to be error-free. If you find any errors, please report them to us in writing.
Restricted Rights Notice
If this is software or related documentation that is delivered to the U.S. Government or anyone licensing it on behalf of the U.S. Government, the following notice is applicable:
U.S. GOVERNMENT END USERS: Oracle programs, including any operating system, integrated software, any programs installed on the hardware, and/or documentation, delivered to U.S. Government end users are “commercial computer software” pursuant to the applicable Federal Acquisition Regulation and agency-specific supplemental regulations. As such, use, duplication, disclosure, modification, and adaptation of the programs, including any operating system, integrated software, any programs installed on the hardware, and/or documentation, shall be subject to license terms and license restrictions applicable to the programs. No other rights are granted to the U.S. Government.
Hazardous Applications Notice
This software or hardware is developed for general use in a variety of information management applications. It is not developed or intended for use in any inherently dangerous applications, including applications that may create a risk of personal injury. If you use this software or hardware in dangerous applications, then you shall be responsible to take all appropriate failsafe, backup, redundancy, and other measures to ensure its safe use. Oracle Corporation and its affiliates disclaim any liability for any damages caused by use of this software or hardware in dangerous applications.
Third Party Content, Products, and Services Disclaimer
This software or hardware and documentation may provide access to or information on content, products and services from third parties. Oracle Corporation and its affiliates are not responsible for and expressly disclaim all warranties of any kind with respect to third-party content, products, and services. Oracle Corporation and its affiliates will not be responsible for any loss, costs, or damages incurred due to your access to or use of third-party content, products, or services.

Release 10.1.1.0 Oracle Installer 3 of 12 Revised: 07/10/14
Table of Contents
INTRODUCTION................................................................................................................................................. 4
Customer Support ................................................................................................................................... 4
PREREQUISITES ............................................................................................................................................... 5
Technical Requirements ......................................................................................................................... 5
Additional Requirements ......................................................................................................................... 5
JDBC Driver Setup for Weblogic with JTDS ..................................................................................... 5
PRE-INSTALLATION STEPS ............................................................................................................................... 6
Xconnection Check ................................................................................................................................. 6
Launch Utility ........................................................................................................................................... 7
Installing the OIPA Database in SQLServer ........................................................................................... 8
Post-Database Installation Checks................................................................................................... 8
Installing OIPA, OIRP, Cycle Agent and Cycle Client ............................................................................. 9
Post-OIPA Installation Checks ....................................................................................................... 10
Log in to OIPA and the Web Application Utility .............................................................................. 11
DATA INTAKE SETUP ...................................................................................................................................... 11
PLEASE FOLLOW THE DATA INTAKE SETUP DOCUMENT. ................................................................................... 11
RULES PALETTE IDE SETUP .......................................................................................................................... 11
DOCUMENTATION FOR DETAILS. ...................................................................................................................... 11
UNINSTALL PROCESS ..................................................................................................................................... 12
Uninstall OIPA, OIRP and Cycle ........................................................................................................... 12
Uninstall Database ................................................................................................................................ 12
Release 10.1.1.0 Oracle Installer 4 of 12 Revised: 07/10/14
INTRODUCTION
Oracle Installer is an installation application that automates the installation of Oracle Insurance Policy
Administration (OIPA), Oracle Insurance Rules Palette (OIRP), Oracle cycle agent, Oracle cycle client and
OIPA database schemas in an Oracle database.
Customer Support
If you have any questions about the installation or use of our products, please visit the My Oracle Support
website: https://support.oracle.com, or call (800) 223-1711.
Oracle customers have access to electronic support through My Oracle Support. For information, visit
http://www.oracle.com/pls/topic/lookup?ctx=acc&id=info or visit
http://www.oracle.com/pls/topic/lookup?ctx=acc&id=trs if you are hearing impaired.

Release 10.1.1.0 Oracle Installer 5 of 12 Revised: 07/10/14
PREREQUISITES
Oracle Installer needs a number of prerequisites in order to execute successfully.
Technical Requirements
OEL Enterprise Linux 5.9 64-bit
Microsoft SQLServer 2008 R2 on Windows Server
Oracle WebLogic Server 10.3.6
Sun Java SE 1.6.0_41 or later and 500MB of hard disk space
Additional Requirements
The Oracle Installer uses an active X Window system. If installing remotely, make sure the environment
you are installing from is setup to display X Window.
The installer can only be launched by a user other than the root user.
When performing the database installation, the installation user must be able to execute sqlcmd in cmd-
dos, and should be the owner of the SQLServer Instance.
When installing the OIPA Application and the Web Application Utility, the installation user must be
owner of the Weblogic .
The installation user must have access to JDK.
Set DomainRegistrationEnabled to true in nodemanager.properties before running the WebLogic
NodeManager.
Make sure that associated group owner of Oracle inventory folder should be shared with Weblogic
user. Also group users should have write permissions on oracle inventory folder.
JDBC Driver Setup for Weblogic with JTDS
1. Download jtds-1.2.2.jar from http://sourceforge.net/projects/jtds/files/jtds/1.2.2/
2. Update WEBLOGIC_CLASSPATH entry. Open file and add the entry for jtds jar as shown below for the file
${WL_HOME}/common/bin/commEnv.sh
WEBLOGIC_CLASSPATH="${JAVA_HOME}/lib/tools.jar${CLASSPATHSEP}${WL_HOME}/server/lib/weblogi
c_sp.jar${CLASSPATHSEP}${WL_HOME}/server/lib/weblogic.jar${CLASSPATHSEP}${FEATURES_DIR}/we
blogic.server.modules_10.3.6.0.jar${CLASSPATHSEP}${WL_HOME}/server/lib/webservices.jar${CL
ASSPATHSEP}${ANT_HOME}/lib/ant-all.jar${CLASSPATHSEP}${ANT_CONTRIB}/lib/ant-
contrib.jar${CLASSPATHSEP}${WL_HOME}/server/lib/jtds-1.2.2.jar"
Once updated. Kill if any existing weblogic process and set the environment by running
${WL_HOME}/server/bin/setWLSEnv.sh . You should see the new entry in the class path.

Release 10.1.1.0 Oracle Installer 6 of 12 Revised: 07/10/14
PRE-INSTALLATION STEPS
The following checks are required before any applications can be installed.
Xconnection Check
Note: This check is not required when the log in user and the install user are the same
An Xconnection check is required before installing any applications. Without this check, the Installer Wizard will
not open.
To check the Xconnection configuration, execute the xclock command at the install user prompt. If xclock does
not execute successfully, then execute the following steps:
Go to the log in user prompt and run the following commands.
1. xauth extract - :`echo $DISPLAY |awk -F: '{print $2}'` | sudo su - <user> -c "xauth merge -"
Here replace <user> with the respective user from where you want to run the installer
For Example: $ xauth extract - :`echo $DISPLAY |awk -F: '{print $2}'` | sudo su - gbuora -c "xauth
merge -"
2. Log in to the respective user and run the xclock command to check the configuration done properly
Release 10.1.1.0 Oracle Installer 7 of 12 Revised: 07/10/14
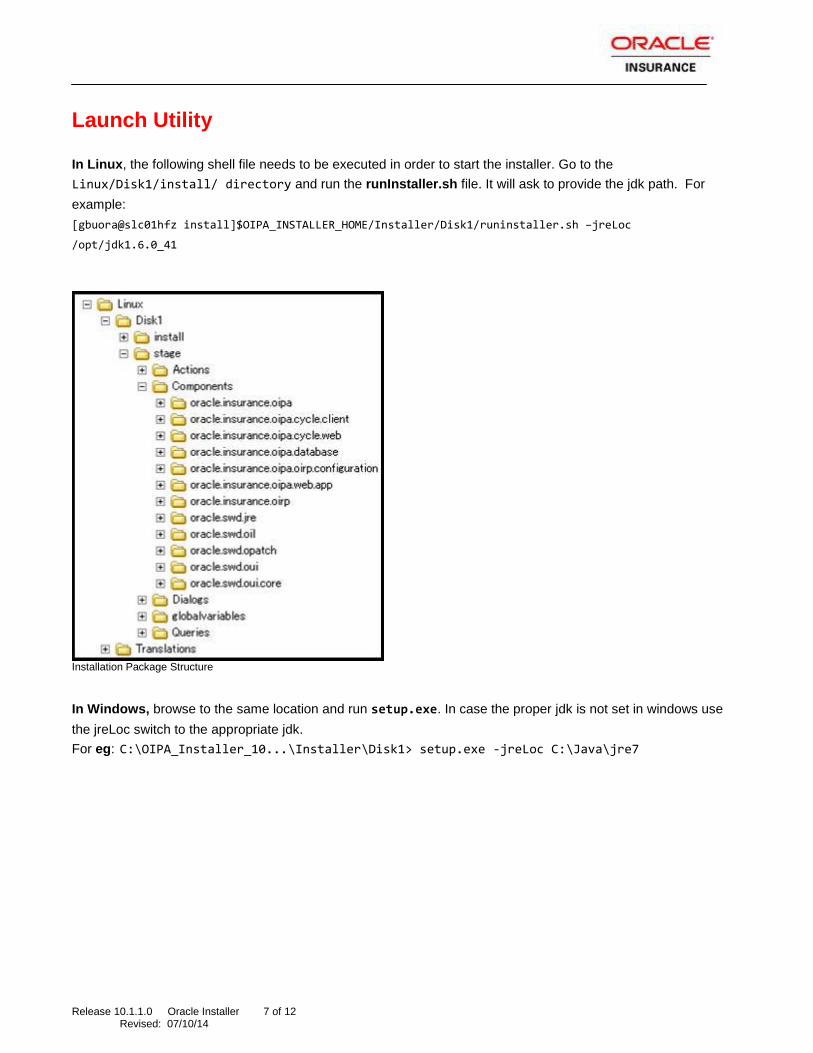
Launch Utility
In Linux, the following shell file needs to be executed in order to start the installer. Go to the
Linux/Disk1/install/ directory and run the runInstaller.sh file. It will ask to provide the jdk path. For
example:
[gbuora@slc01hfz install]$OIPA_INSTALLER_HOME/Installer/Disk1/runinstaller.sh –jreLoc
/opt/jdk1.6.0_41
Installation Package Structure
In Windows, browse to the same location and run setup.exe. In case the proper jdk is not set in windows use
the jreLoc switch to the appropriate jdk.
For eg: C:\OIPA_Installer_10...\Installer\Disk1> setup.exe -jreLoc C:\Java\jre7

Release 10.1.1.0 Oracle Installer 8 of 12 Revised: 07/10/14
INSTALLATION PROCESS
The following sections will walk through the installation process.
Note: Click on each field on the screen to get more information in the message window at down.
Installing the OIPA Database in SQLServer
1. On the Installer’s Welcome page, click Next.
2. Select Install OIPA Database , make sure that drop down has MS_SQLServer entry and click Next.
3. Enter or select the Database Home installation and inventory paths. Click Next.
4. Enter the SQLServer Instance name, DBA user credentials, Database name for OIPA database. Click
Next.
5. Specify the OIPA db owner and OIPA Read-only user credentials and click Next.
6. Specify the IVS user credentials, database name and click Next
7. Review the information on the Summary page.
8. Click Install to begin the installation.
Post-Database Installation Checks
Follow these steps to check that the installer successfully installed the required tables, etc in the database:
1. Open MS-SQLServer Management Studio.
2. Login to the instance used for the installation using the credentials provided in the installer.
3. Navigate to Databases > OIPA_DB > Tables.
4. Run the SQL query to check the populated data the tables. Example: SELECT * FROM ASCODE;
5. You can also check users created and their permissions under Security > Logins after logging in from the
Instance admin user.

Release 10.1.1.0 Oracle Installer 9 of 12 Revised: 07/10/14
Installing OIPA, OIRP, Cycle Agent and Cycle Client
Before starting the OIPA, OIRP and cycle installation, make sure to manually check the following node manager
settings: Note: Click on each field on the screen to get more information in the message window at down
In the node manager properties file,
/opt/Middleware/Home_11G/wlserver_10.3/common/nodemanager/nodemanager.properties,
change the value of DomainRegistrationEnabled to true.
Start the node manager by executing the following command:
$ /opt/Middleware/Home_11G/wlserver_10.3/server/bin/startNodeManager.sh
Launch the Installer wizard (see the Launch Utility section).
On the Installer’s Welcome page, click Next.
Select Install OIPA application on Server , make sure that drop down has Weblogic Server and click
Next.
Enter or select the OIPA installation path. Click Next.
View the applications to be installed and click Next.
Enter or select the path to the WebLogic home directory. Click Next.
Enter the domain name, WebLogic Admin Port, OIPA Listening Port and WebLogic user
credentials. Click Next.
Choose MS-SQLServer from the database type dropdown.
Enter the database server name, port, and SID, as well as the OIPA, OIPA Read-only, OIPA
search user credentials. Click Next.
Make any necessary updates to the PAS.properties file. There are five pages in total relating to this
file.
Make any necessary updates to the Coherence configuration and click Next.
Make any necessary updates to the cycle.properties file of the cycle agent. There are four
pages in total relating to this file.
Make any necessary updates to the cycle agent Coherence configuration and click Next.
Make any necessary updates to the cycle.properties file of the cycle client and click Next.
Make any necessary updates to the cycle client Coherence configuration and click Next.
Review the information on the Summary page.
Click Install to begin the installation.
Release 10.1.1.0 Oracle Installer 10 of 12 Revised: 07/10/14
Post-OIPA Installation Checks
Before following the steps below, log in to the WebLogic administration console using the location specified
during installation. For example: http://localhost:7001/console). Use the WebLogic credentials specified during
installation.
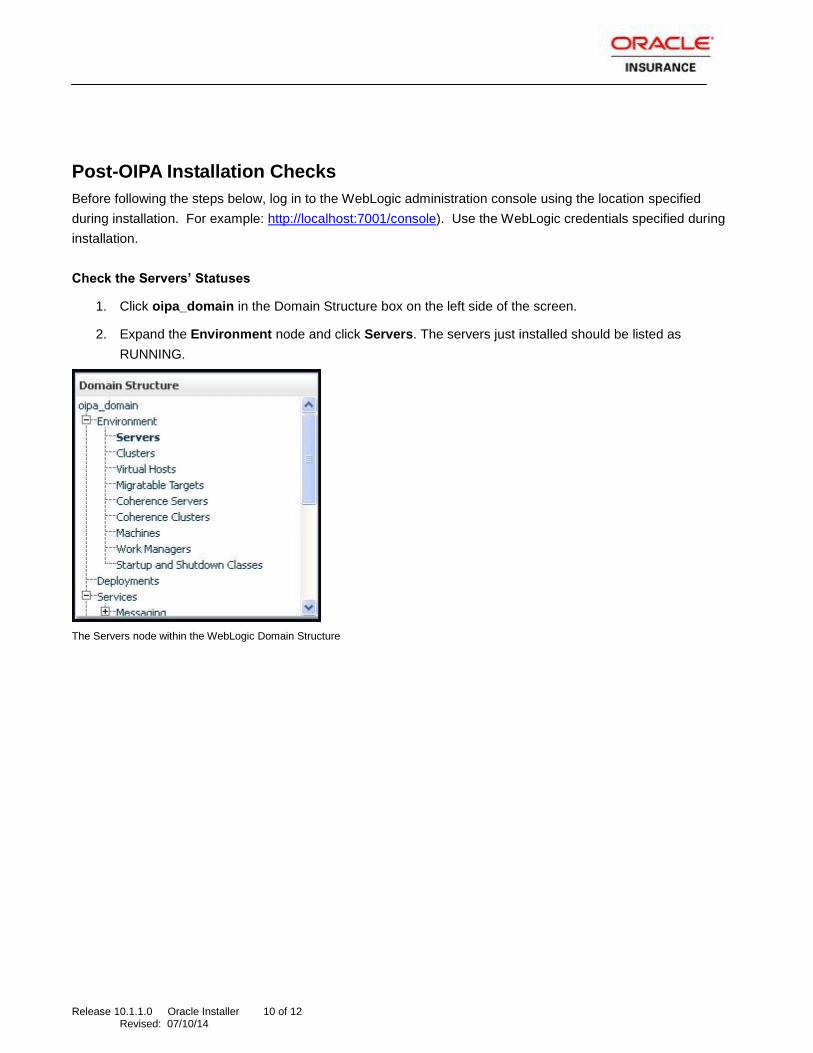
Check the Servers’ Statuses
1. Click oipa_domain in the Domain Structure box on the left side of the screen.
2. Expand the Environment node and click Servers. The servers just installed should be listed as
RUNNING.
The Servers node within the WebLogic Domain Structure

Release 10.1.1.0 Oracle Installer 11 of 12 Revised: 07/10/14
Check the Deployed Applications’ Statuses
Click oipa_domain in the Domain Structure box on the left side of the screen.
Expand the Environment node and click Deployments. The applications just installed should have a
state of Active.
Deployments node within the WebLogic Domain Structure
To check cycle, ensure that run.sh (located in the /usr/oipa/OIPA_Home/CycleClient/bin/ folder)
executes successfully from the cycle client.
Log in to OIPA and the Web Application Utility
For OIPA, go to http://localhost:10000/PASJava/ in Internet Explorer.
For the Web Application Utility, go to http://localhost:11000/PaletteConfig in Internet
Explorer.
Note: In the above URLs, remember to substitute the server name and port number for those that were specified during installation.
Data Intake Setup
Please follow the data Intake setup document.
Rules Palette IDE Setup
The Installer will place OIRP_10.1.1.0.zip at OIPA_HOME/OIRP OIRP location. It will be also available for
download from the PaletteWeb application once it is configured. Follow the Rules Palette documentation
for details.
Release 10.1.1.0 Oracle Installer 12 of 12 Revised: 07/10/14
UNINSTALL PROCESS
To uninstall the applications and/or the OIPA database follow the steps below.
Uninstall OIPA, OIRP and Cycle
Run the de-installer using weblogic owner. Go to oui/bin directory of OIPA home (where application was
installed) directory and execute runInstaller –deinstall
Example: [wlsuser@slc01hfz install]$OIPA_HOME/oui/bin/runinstaller.sh –deinstall –jreLoc
/opt/jdk1.6.0_41
On the installer’s Welcome page, click Next
OIPA Home path details will be displayed, click Deinstall to de-install the OIPA application
A warning message will be displayed, click on ‘Yes” for complete de-installation
De-installation complete page will be displayed once the de-installation is done, click Finish
Uninstall Database
Note: Ensure Application is un-installed first before proceeding with database un-install.
Login to SQLServer Management Studio with Instance and Admin user (Eg: sa).
Right Click on the installed databases under Databases > OIPA_DB and select Delete.
Do the same for created users in Security > Login