oracle human resources north american user's guide
TRANSCRIPT

Oracle Human Resources
North American User’sGuideRELEASE 11VOLUME 1
March 1998

Oracle Human Resources North American User’s GuideRelease 11
Part No. A58334–01
Copyright � July 1994, March 1998 Oracle Corporation
All rights reserved. Printed in the U.S.A.
Primary Authors: John Cafolla, Juliette Fleming, Kevin Kelley
Contributors: Keith Ekiss, Janet McCandless, Michael O’Shea, Louise Raffo,Robert Rose, John Woodward
The Programs (which include both the software and documentation) containproprietary information of Oracle Corporation; they are provided under a licenseagreement containing restrictions on use and disclosure and are also protected bycopyright, patent and other intellectual property law. Reverse engineering of thePrograms is prohibited.
The information contained in this document is subject to change without notice. If youfind any problems in the documentation, please report them to us in writing. OracleCorporation does not warrant that this document is error–free. No part of this documentmay be reproduced or transmitted in any form or by any means, electronic or mechanical,for any purpose, without the express written permission of Oracle Corporation.
Restricted Rights LegendPrograms delivered subject to the DOD FAR Supplement are ’commercial computersoftware’ and use, duplication and disclosure of the Programs shall be subject to thelicensing restrictions set forth in the applicable Oracle license agreement. Otherwise,Programs delivered subject to the Federal Acquisition Regulations are ’restrictedcomputer software’ and use, duplication and disclosure of the Programs shall be subject tothe restrictions in FAR 52.227–14, Rights in Data –– General, including Alternate III (June1987). Oracle Corporation, 500 Oracle Parkway, Redwood City, CA 94065.
The Programs are not intended for use in any nuclear, aviation, mass transit, medical, orother inherently dangerous applications. It shall be licensee’s responsibility to take allappropriate fail–safe, back–up, redundancy and other measures to ensure the safe use ofsuch applications if the Programs are used for such purposes, and Oracle disclaimsliability for any damages caused by such use of the Programs.
ORACLE, Oracle Alert, Oracle Financials, SQL*Calc, SQL*Forms, SQL*Loader,SQL*Menu, SQL*Net, SQL*Plus, SQL*Report, and Oracle Reports are registeredtrademarks of Oracle Corporation.
Oracle Application Object Library, ORACLE7, Oracle Applications, Oracle Applicationsfor the Web, Oracle Applications Window Manager, Oracle Assets, Oracle Data Query,Oracle EDI Gateway, Oracle General Ledger, Oracle Government Financials, OracleHuman Resources, Oracle Inventory, Oracle Master Scheduling/MRP, Oracle Payroll,Oracle Payables, Oracle Personnel, Oracle Projects, Oracle Purchasing, Oracle Receivables,Oracle Workflow, and are trademarks of Oracle Corporation.
All other company or product names are mentioned for identification purposes only, andmay be trademarks of their respective owners.

iContents
Contents
VOLUME 1Volume 1 i. . . . . . . . . . . . . . . . . . . . . . . . . .
Preface Preface i. . . . . . . . . . . . . . . . . . . . . . . . . . . . . . . . . . . . . . . . . . . . . . . . .
Chapter 1 Introduction 1 – 1. . . . . . . . . . . . . . . . . . . . . . . . . . . . . . . . . . . . . . . . . . . . Human Resource Management 1 – 2. . . . . . . . . . . . . . . . . . . . . . . . . . . .
Separate v. Integrated HRMS Systems 1 – 3. . . . . . . . . . . . . . . . . . . . . Human Resources and Payroll Activity Cycles 1 – 4. . . . . . . . . . . . .
Introduction to the HRMS Model 1 – 6. . . . . . . . . . . . . . . . . . . . . . . . . . Managing Change Over Time 1 – 9. . . . . . . . . . . . . . . . . . . . . . . . . . . . . .
Dated Information and Hierarchy Versions 1 – 10. . . . . . . . . . . . . . . . DateTrack 1 – 10. . . . . . . . . . . . . . . . . . . . . . . . . . . . . . . . . . . . . . . . . . . . . Setting Your Effective Date 1 – 11. . . . . . . . . . . . . . . . . . . . . . . . . . . . . . . To set your effective date: 1 – 11. . . . . . . . . . . . . . . . . . . . . . . . . . . . . . . . .
Viewing Datetracked Information and History 1 – 13. . . . . . . . . . . . . To view DateTrack History: 1 – 13. . . . . . . . . . . . . . . . . . . . . . . . . . . . . . .
Updating and Correcting Datetracked Information 1 – 14. . . . . . . . . . Deleting Datetracked Information 1 – 15. . . . . . . . . . . . . . . . . . . . . . . . To remove an end date: 1 – 16. . . . . . . . . . . . . . . . . . . . . . . . . . . . . . . . . . .
Work Structures and Key Flexfields 1 – 17. . . . . . . . . . . . . . . . . . . . . . . .
Chapter 2 The Employer and Other Organizations 2 – 1. . . . . . . . . . . . . . . . . . . Site Locations 2 – 2. . . . . . . . . . . . . . . . . . . . . . . . . . . . . . . . . . . . . . . . . . .

ii Oracle Payroll US User’s Guide
Setting Up Site Locations 2 – 2. . . . . . . . . . . . . . . . . . . . . . . . . . . . . . . . To enter a work location and its address: 2 – 3. . . . . . . . . . . . . . . . . . . . . To remove an address from the Location list: 2 – 3. . . . . . . . . . . . . . . . . .
Representing the Employer: The Business Group 2 – 4. . . . . . . . . . . . Key Flexfields for the Business Group 2 – 4. . . . . . . . . . . . . . . . . . . . . Single or Multiple Business Groups 2 – 6. . . . . . . . . . . . . . . . . . . . . . . Defaults for the Business Group 2 – 7. . . . . . . . . . . . . . . . . . . . . . . . . .
Representing the Employer: GREs 2 – 9. . . . . . . . . . . . . . . . . . . . . . . . . Enterprises with One GRE 2 – 10. . . . . . . . . . . . . . . . . . . . . . . . . . . . . . . Enterprises with Multiple GREs 2 – 10. . . . . . . . . . . . . . . . . . . . . . . . . . GREs and Tax Groups 2 – 12. . . . . . . . . . . . . . . . . . . . . . . . . . . . . . . . . . .
Representing Organizations 2 – 14. . . . . . . . . . . . . . . . . . . . . . . . . . . . . . . Levels of Internal Organizations 2 – 14. . . . . . . . . . . . . . . . . . . . . . . . . . Internal Organizations and Cost Centers 2 – 16. . . . . . . . . . . . . . . . . . . External Organizations 2 – 17. . . . . . . . . . . . . . . . . . . . . . . . . . . . . . . . . .
Employer and Organization Setup 2 – 18. . . . . . . . . . . . . . . . . . . . . . . . . Accessing Business Groups 2 – 18. . . . . . . . . . . . . . . . . . . . . . . . . . . . . . To define a ”view–all” responsibility: 2 – 18. . . . . . . . . . . . . . . . . . . . . . .
Creating an Organization 2 – 20. . . . . . . . . . . . . . . . . . . . . . . . . . . . . . . . . To create a new organization: 2 – 22. . . . . . . . . . . . . . . . . . . . . . . . . . . . . . To enter additional information: 2 – 24. . . . . . . . . . . . . . . . . . . . . . . . . . .
Additional Information for Business Groups 2 – 24. . . . . . . . . . . . . . . To enter basic, required information for the Business Group: 2 – 24. . . . . To enter defaults for human resource budget values: 2 – 24. . . . . . . . . . . . To enter defaults for work day start and end times: 2 – 24. . . . . . . . . . . . . To register Reporting Categories and Statuses: 2 – 24. . . . . . . . . . . . . . . . To enter training default values for Oracle
Training Administration: 2 – 24. . . . . . . . . . . . . . . . . . . . . . . . . . . . . Additional Information for GREs 2 – 25. . . . . . . . . . . . . . . . . . . . . . . . . To enter the unique IRS identification number (EIN): 2 – 25. . . . . . . . . . To enter data for EEO, VETS and New Hire reporting: 2 – 25. . . . . . . . . To enter tax rules: 2 – 25. . . . . . . . . . . . . . . . . . . . . . . . . . . . . . . . . . . . . . . To enter data for wage and tax reporting: 2 – 25. . . . . . . . . . . . . . . . . . . . To enter data for NACHA tapes: 2 – 25. . . . . . . . . . . . . . . . . . . . . . . . . . .
Additional Information for HR Organizations 2 – 25. . . . . . . . . . . . . . To enter cost codes for collection of costing information: 2 – 25. . . . . . . . To place the organization in hierarchies : 2 – 25. . . . . . . . . . . . . . . . . . . . . To enter default work day start and end times. 2 – 25. . . . . . . . . . . . . . . . To enter a default work schedule: 2 – 26. . . . . . . . . . . . . . . . . . . . . . . . . . .
Additional Information for Reporting Establishments 2 – 26. . . . . . . To enter filing data for EEO and VETS reports: 2 – 26. . . . . . . . . . . . . . . To place Reporting Establishments in hierarchies: 2 – 26. . . . . . . . . . . . .
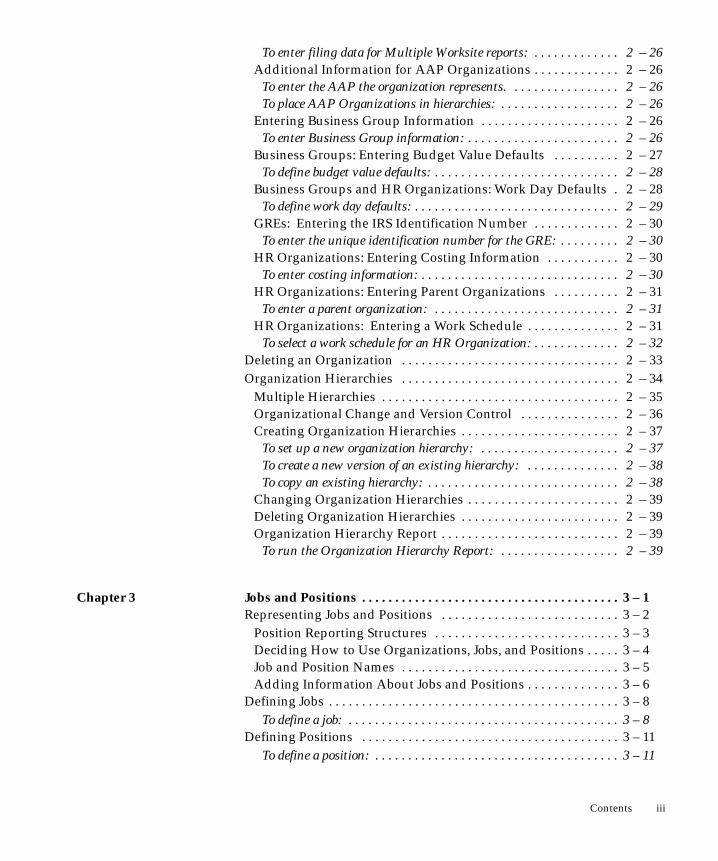
iiiContents
To enter filing data for Multiple Worksite reports: 2 – 26. . . . . . . . . . . . . Additional Information for AAP Organizations 2 – 26. . . . . . . . . . . . . To enter the AAP the organization represents. 2 – 26. . . . . . . . . . . . . . . . To place AAP Organizations in hierarchies: 2 – 26. . . . . . . . . . . . . . . . . .
Entering Business Group Information 2 – 26. . . . . . . . . . . . . . . . . . . . . To enter Business Group information: 2 – 26. . . . . . . . . . . . . . . . . . . . . . .
Business Groups: Entering Budget Value Defaults 2 – 27. . . . . . . . . . To define budget value defaults: 2 – 28. . . . . . . . . . . . . . . . . . . . . . . . . . . .
Business Groups and HR Organizations: Work Day Defaults 2 – 28. To define work day defaults: 2 – 29. . . . . . . . . . . . . . . . . . . . . . . . . . . . . . .
GREs: Entering the IRS Identification Number 2 – 30. . . . . . . . . . . . . To enter the unique identification number for the GRE: 2 – 30. . . . . . . . .
HR Organizations: Entering Costing Information 2 – 30. . . . . . . . . . . To enter costing information: 2 – 30. . . . . . . . . . . . . . . . . . . . . . . . . . . . . .
HR Organizations: Entering Parent Organizations 2 – 31. . . . . . . . . . To enter a parent organization: 2 – 31. . . . . . . . . . . . . . . . . . . . . . . . . . . .
HR Organizations: Entering a Work Schedule 2 – 31. . . . . . . . . . . . . . To select a work schedule for an HR Organization: 2 – 32. . . . . . . . . . . . .
Deleting an Organization 2 – 33. . . . . . . . . . . . . . . . . . . . . . . . . . . . . . . . . Organization Hierarchies 2 – 34. . . . . . . . . . . . . . . . . . . . . . . . . . . . . . . . .
Multiple Hierarchies 2 – 35. . . . . . . . . . . . . . . . . . . . . . . . . . . . . . . . . . . . Organizational Change and Version Control 2 – 36. . . . . . . . . . . . . . . Creating Organization Hierarchies 2 – 37. . . . . . . . . . . . . . . . . . . . . . . . To set up a new organization hierarchy: 2 – 37. . . . . . . . . . . . . . . . . . . . . To create a new version of an existing hierarchy: 2 – 38. . . . . . . . . . . . . . To copy an existing hierarchy: 2 – 38. . . . . . . . . . . . . . . . . . . . . . . . . . . . .
Changing Organization Hierarchies 2 – 39. . . . . . . . . . . . . . . . . . . . . . . Deleting Organization Hierarchies 2 – 39. . . . . . . . . . . . . . . . . . . . . . . . Organization Hierarchy Report 2 – 39. . . . . . . . . . . . . . . . . . . . . . . . . . . To run the Organization Hierarchy Report: 2 – 39. . . . . . . . . . . . . . . . . .
Chapter 3 Jobs and Positions 3 – 1. . . . . . . . . . . . . . . . . . . . . . . . . . . . . . . . . . . . . . . Representing Jobs and Positions 3 – 2. . . . . . . . . . . . . . . . . . . . . . . . . . .
Position Reporting Structures 3 – 3. . . . . . . . . . . . . . . . . . . . . . . . . . . . Deciding How to Use Organizations, Jobs, and Positions 3 – 4. . . . . Job and Position Names 3 – 5. . . . . . . . . . . . . . . . . . . . . . . . . . . . . . . . . Adding Information About Jobs and Positions 3 – 6. . . . . . . . . . . . . .
Defining Jobs 3 – 8. . . . . . . . . . . . . . . . . . . . . . . . . . . . . . . . . . . . . . . . . . . . To define a job: 3 – 8. . . . . . . . . . . . . . . . . . . . . . . . . . . . . . . . . . . . . . . . .
Defining Positions 3 – 11. . . . . . . . . . . . . . . . . . . . . . . . . . . . . . . . . . . . . . . To define a position: 3 – 11. . . . . . . . . . . . . . . . . . . . . . . . . . . . . . . . . . . . .

iv Oracle Payroll US User’s Guide
Evaluating Jobs and Positions 3 – 14. . . . . . . . . . . . . . . . . . . . . . . . . . . . . Setting Up an Evaluation System 3 – 14. . . . . . . . . . . . . . . . . . . . . . . . . To set up an evaluation system: 3 – 14. . . . . . . . . . . . . . . . . . . . . . . . . . . .
Entering Evaluation Information 3 – 15. . . . . . . . . . . . . . . . . . . . . . . . . To enter a job or position evaluation: 3 – 15. . . . . . . . . . . . . . . . . . . . . . . .
Valid Grades 3 – 16. . . . . . . . . . . . . . . . . . . . . . . . . . . . . . . . . . . . . . . . . . . To enter valid grades: 3 – 16. . . . . . . . . . . . . . . . . . . . . . . . . . . . . . . . . . . .
Entering Job and Position Requirements 3 – 17. . . . . . . . . . . . . . . . . . . To enter job or position requirements: 3 – 17. . . . . . . . . . . . . . . . . . . . . . .
Entering Work Choices for a Job or Position 3 – 18. . . . . . . . . . . . . . . . To enter work choices for a job or position: 3 – 18. . . . . . . . . . . . . . . . . . .
Viewing Position Occupancy 3 – 20. . . . . . . . . . . . . . . . . . . . . . . . . . . . . To view occupants of a position: 3 – 20. . . . . . . . . . . . . . . . . . . . . . . . . . . . To see further details of occupants or applicants: 3 – 20. . . . . . . . . . . . . . .
Creating Position Hierarchies 3 – 21. . . . . . . . . . . . . . . . . . . . . . . . . . . . . . To create a new position hierarchy: 3 – 21. . . . . . . . . . . . . . . . . . . . . . . . . To create a new version of an existing hierarchy: 3 – 22. . . . . . . . . . . . . . To copy an existing hierarchy: 3 – 23. . . . . . . . . . . . . . . . . . . . . . . . . . . . .
Changing Position Hierarchies 3 – 23. . . . . . . . . . . . . . . . . . . . . . . . . . . Deleting Position Hierarchies 3 – 23. . . . . . . . . . . . . . . . . . . . . . . . . . . . Position Hierarchy Report 3 – 24. . . . . . . . . . . . . . . . . . . . . . . . . . . . . . . To run the Position Hierarchy Report: 3 – 24. . . . . . . . . . . . . . . . . . . . . . .
Making Mass Updates 3 – 25. . . . . . . . . . . . . . . . . . . . . . . . . . . . . . . . . . . . Preparing for Your Mass Move 3 – 26. . . . . . . . . . . . . . . . . . . . . . . . . . . . . Performing Mass Move Tasks 3 – 28. . . . . . . . . . . . . . . . . . . . . . . . . . . . . .
Describing Your Mass Move 3 – 28. . . . . . . . . . . . . . . . . . . . . . . . . . . . . To describe your mass move: 3 – 28. . . . . . . . . . . . . . . . . . . . . . . . . . . . . .
Identifying Your Source Positions 3 – 29. . . . . . . . . . . . . . . . . . . . . . . . . To identify your source positions: 3 – 29. . . . . . . . . . . . . . . . . . . . . . . . . .
Identifying Your Target Positions 3 – 30. . . . . . . . . . . . . . . . . . . . . . . . . To identify your target positions: 3 – 30. . . . . . . . . . . . . . . . . . . . . . . . . . .
Verifying Transferring Assignments for Each Source Position 3 – 31. To verify transferring assignments for each source position: 3 – 31. . . . . .
Verifying or Adding Valid Grades for Each Target Position 3 – 33. . . Executing the Mass Move 3 – 33. . . . . . . . . . . . . . . . . . . . . . . . . . . . . . . . Reviewing the Mass Move 3 – 34. . . . . . . . . . . . . . . . . . . . . . . . . . . . . . . To review the mass move: 3 – 34. . . . . . . . . . . . . . . . . . . . . . . . . . . . . . . . .
Resolving Problems and Reexecuting a Mass Move 3 – 34. . . . . . . . . To reexecute a mass move: 3 – 35. . . . . . . . . . . . . . . . . . . . . . . . . . . . . . . .
Managing Your Mass Move Collection 3 – 35. . . . . . . . . . . . . . . . . . . .

vContents
Chapter 4 Grades and Their Relationship to Pay 4 – 1. . . . . . . . . . . . . . . . . . . . . Representing Grade Structures 4 – 2. . . . . . . . . . . . . . . . . . . . . . . . . . . . .
Using Grades 4 – 3. . . . . . . . . . . . . . . . . . . . . . . . . . . . . . . . . . . . . . . . . . Defining Grades 4 – 4. . . . . . . . . . . . . . . . . . . . . . . . . . . . . . . . . . . . . . . . To define a grade: 4 – 4. . . . . . . . . . . . . . . . . . . . . . . . . . . . . . . . . . . . . . .
Deleting Grades 4 – 5. . . . . . . . . . . . . . . . . . . . . . . . . . . . . . . . . . . . . . . . Grade Relationships to Compensation and Benefits 4 – 6. . . . . . . . . . . Relating Pay to Grades Directly: Using Grade Rates 4 – 8. . . . . . . . . .
Defining Grade Rates 4 – 9. . . . . . . . . . . . . . . . . . . . . . . . . . . . . . . . . . . To define grade rates: 4 – 9. . . . . . . . . . . . . . . . . . . . . . . . . . . . . . . . . . . .
Viewing Grade Comparatios 4 – 10. . . . . . . . . . . . . . . . . . . . . . . . . . . . . To view employee grade comparatio values: 4 – 10. . . . . . . . . . . . . . . . . . .
Relating Pay to Grades Indirectly: Using Pay Scales 4 – 12. . . . . . . . . . To set up a pay scale: 4 – 12. . . . . . . . . . . . . . . . . . . . . . . . . . . . . . . . . . . .
Defining a Pay Scale 4 – 13. . . . . . . . . . . . . . . . . . . . . . . . . . . . . . . . . . . . To define a pay scale: 4 – 13. . . . . . . . . . . . . . . . . . . . . . . . . . . . . . . . . . . .
Defining Scale Rates 4 – 14. . . . . . . . . . . . . . . . . . . . . . . . . . . . . . . . . . . . To create a scale rate: 4 – 15. . . . . . . . . . . . . . . . . . . . . . . . . . . . . . . . . . . .
Relating Grades to Progression Points 4 – 15. . . . . . . . . . . . . . . . . . . . . To create a grade scale: 4 – 16. . . . . . . . . . . . . . . . . . . . . . . . . . . . . . . . . . .
Placing an Employee on a Grade Step 4 – 16. . . . . . . . . . . . . . . . . . . . . To place an employee on a grade step: 4 – 17. . . . . . . . . . . . . . . . . . . . . . .
Incrementing Grade Step Placements 4 – 18. . . . . . . . . . . . . . . . . . . . . . To run the Increment Progression Points process: 4 – 18. . . . . . . . . . . . . .
Current and Projected Progression Point Values Report 4 – 18. . . . . . To run the Points Values Report: 4 – 18. . . . . . . . . . . . . . . . . . . . . . . . . . .
Employee Increment Results Report 4 – 19. . . . . . . . . . . . . . . . . . . . . . To run the Employee Increment Results Report: 4 – 19. . . . . . . . . . . . . . .
Chapter 5 Payrolls and Other Employee Groups 5 – 1. . . . . . . . . . . . . . . . . . . . . Representing Payrolls 5 – 2. . . . . . . . . . . . . . . . . . . . . . . . . . . . . . . . . . . . Payroll Setup Steps 5 – 3. . . . . . . . . . . . . . . . . . . . . . . . . . . . . . . . . . . . . . .
Defining Payment Methods for the Enterprise 5 – 3. . . . . . . . . . . . . . To define a payment method: 5 – 4. . . . . . . . . . . . . . . . . . . . . . . . . . . . . .
Entering NACHA Tape Data for GREs 5 – 5. . . . . . . . . . . . . . . . . . . . To enter NACHA rules for a GRE: 5 – 5. . . . . . . . . . . . . . . . . . . . . . . . .
Defining a Payroll 5 – 6. . . . . . . . . . . . . . . . . . . . . . . . . . . . . . . . . . . . . . To create a new payroll: 5 – 7. . . . . . . . . . . . . . . . . . . . . . . . . . . . . . . . . .
Representing Other Employee Groups 5 – 10. . . . . . . . . . . . . . . . . . . . . . Setting Up the People Group Flexfield 5 – 10. . . . . . . . . . . . . . . . . . . . .

vi Oracle Payroll US User’s Guide
Chapter 6 HRMS Implementations and Enterprise Culture 6 – 1. . . . . . . . . . . . Project Based Enterprises 6 – 2. . . . . . . . . . . . . . . . . . . . . . . . . . . . . . . . . Rule Based Enterprises 6 – 6. . . . . . . . . . . . . . . . . . . . . . . . . . . . . . . . . . . Hybrid Enterprise Structures 6 – 10. . . . . . . . . . . . . . . . . . . . . . . . . . . . . . Contract Staff and Other Non–standard Assignments 6 – 12. . . . . . . . .
Chapter 7 Elements: Foundation of Compensation and Benefits 7 – 1. . . . . . . Overview of Elements 7 – 2. . . . . . . . . . . . . . . . . . . . . . . . . . . . . . . . . . . .
The Structure of Elements 7 – 3. . . . . . . . . . . . . . . . . . . . . . . . . . . . . . . Creation of Elements: Definition or Initiation 7 – 4. . . . . . . . . . . . . . Using Elements 7 – 6. . . . . . . . . . . . . . . . . . . . . . . . . . . . . . . . . . . . . . . .
Element Classifications and Categories 7 – 8. . . . . . . . . . . . . . . . . . . . . Survey of the Classifications 7 – 10. . . . . . . . . . . . . . . . . . . . . . . . . . . . . Classifications and Payroll Run Processing Priorities 7 – 14. . . . . . . .
Element Input Values 7 – 16. . . . . . . . . . . . . . . . . . . . . . . . . . . . . . . . . . . . . Validation for Input Value Entries 7 – 16. . . . . . . . . . . . . . . . . . . . . . . . Default Entries for Input Values 7 – 17. . . . . . . . . . . . . . . . . . . . . . . . . . Pay Values and Payroll Run Processing 7 – 19. . . . . . . . . . . . . . . . . . . .
Elements and Formulas 7 – 21. . . . . . . . . . . . . . . . . . . . . . . . . . . . . . . . . . . Oracle FastFormula 7 – 21. . . . . . . . . . . . . . . . . . . . . . . . . . . . . . . . . . . . .
Element Processing Types 7 – 23. . . . . . . . . . . . . . . . . . . . . . . . . . . . . . . . . Element Links and Employee Eligibility Rules 7 – 25. . . . . . . . . . . . . . . Element Entries for Eligible Employees 7 – 27. . . . . . . . . . . . . . . . . . . . .
Manual Element Entry for Individual Employees 7 – 27. . . . . . . . . . . Automatic Entry of Elements and Default Values 7 – 27. . . . . . . . . . . Batch Element Entry Using MIX Facilities 7 – 29. . . . . . . . . . . . . . . . . . Entry as an Indirect Result of Payroll Processing 7 – 29. . . . . . . . . . . .
Element Definition 7 – 31. . . . . . . . . . . . . . . . . . . . . . . . . . . . . . . . . . . . . . . Defining an Element to Hold Information 7 – 32. . . . . . . . . . . . . . . . . . To identify and classify the element: 7 – 33. . . . . . . . . . . . . . . . . . . . . . . . To enter processing information: 7 – 33. . . . . . . . . . . . . . . . . . . . . . . . . . . To establish currencies and qualifying conditions: 7 – 34. . . . . . . . . . . . . To enter a category and benefits carrier 7 – 34. . . . . . . . . . . . . . . . . . . . . . To set up input values for the element: 7 – 35. . . . . . . . . . . . . . . . . . . . . . To enter an element–level default for an input value: 7 – 35. . . . . . . . . . . To establish validation for input value entries: 7 – 35. . . . . . . . . . . . . . . .
Deleting an Element Entry 7 – 35. . . . . . . . . . . . . . . . . . . . . . . . . . . . . . . To delete an element entry: 7 – 35. . . . . . . . . . . . . . . . . . . . . . . . . . . . . . . .
Deleting an Element 7 – 36. . . . . . . . . . . . . . . . . . . . . . . . . . . . . . . . . . . . To delete an element: 7 – 36. . . . . . . . . . . . . . . . . . . . . . . . . . . . . . . . . . . .

viiContents
Defining Element Links 7 – 37. . . . . . . . . . . . . . . . . . . . . . . . . . . . . . . . . . . To define an element link: 7 – 37. . . . . . . . . . . . . . . . . . . . . . . . . . . . . . . . . To enter costing information for the link: 7 – 38. . . . . . . . . . . . . . . . . . . . To enter qualifying conditions for the link: 7 – 39. . . . . . . . . . . . . . . . . . .
Reviewing Element Links 7 – 39. . . . . . . . . . . . . . . . . . . . . . . . . . . . . . . . To obtain the Element Link Details Report: 7 – 39. . . . . . . . . . . . . . . . . . .
Deleting an Element Link 7 – 40. . . . . . . . . . . . . . . . . . . . . . . . . . . . . . . . To delete an element link: 7 – 40. . . . . . . . . . . . . . . . . . . . . . . . . . . . . . . . .
Making Manual Element Entries 7 – 41. . . . . . . . . . . . . . . . . . . . . . . . . . . To inquire on an element entry: 7 – 42. . . . . . . . . . . . . . . . . . . . . . . . . . . . To enter an element for an employee: 7 – 42. . . . . . . . . . . . . . . . . . . . . . . .
Reviewing Element Entries 7 – 44. . . . . . . . . . . . . . . . . . . . . . . . . . . . . . . . Viewing Element Entry History 7 – 44. . . . . . . . . . . . . . . . . . . . . . . . . . To view element entry history for an employee: 7 – 44. . . . . . . . . . . . . . . .
Listing Employees by Element 7 – 45. . . . . . . . . . . . . . . . . . . . . . . . . . . To view a list of employees receiving an element: 7 – 45. . . . . . . . . . . . . .
Chapter 8 Batch Element Entry 8 – 1. . . . . . . . . . . . . . . . . . . . . . . . . . . . . . . . . . . . . MIX Facilities for Batch Element Entry 8 – 2. . . . . . . . . . . . . . . . . . . . . . Making Non–Payroll Batch Entries Using BEE 8 – 3. . . . . . . . . . . . . . .
Creating and Updating Batches of Element Entries 8 – 4. . . . . . . . . . To enter a batch header and control totals: 8 – 5. . . . . . . . . . . . . . . . . . . . To enter batch lines for an assignment set: 8 – 7. . . . . . . . . . . . . . . . . . . To enter batch lines manually: 8 – 7. . . . . . . . . . . . . . . . . . . . . . . . . . . . . To retrieve existing batch lines: 8 – 8. . . . . . . . . . . . . . . . . . . . . . . . . . . .
Validating a BEE Batch 8 – 8. . . . . . . . . . . . . . . . . . . . . . . . . . . . . . . . . . To validate a batch: 8 – 9. . . . . . . . . . . . . . . . . . . . . . . . . . . . . . . . . . . . . .
Transferring a BEE Batch 8 – 9. . . . . . . . . . . . . . . . . . . . . . . . . . . . . . . . To transfer a batch: 8 – 9. . . . . . . . . . . . . . . . . . . . . . . . . . . . . . . . . . . . . .
Purging a Batch From the BEE Tables 8 – 10. . . . . . . . . . . . . . . . . . . . . . To purge a batch: 8 – 10. . . . . . . . . . . . . . . . . . . . . . . . . . . . . . . . . . . . . . .
Rolling Back a MIX Process 8 – 10. . . . . . . . . . . . . . . . . . . . . . . . . . . . . . To roll back a MIX process: 8 – 10. . . . . . . . . . . . . . . . . . . . . . . . . . . . . . .
PayMIX for Payroll Batch Entry 8 – 12. . . . . . . . . . . . . . . . . . . . . . . . . . . . PayMIX Timecard Entries 8 – 14. . . . . . . . . . . . . . . . . . . . . . . . . . . . . . . . .
Dates of Time Entry Batch Lines 8 – 15. . . . . . . . . . . . . . . . . . . . . . . . . . One–Time Batch Entries for Earnings and Deductions 8 – 17. . . . . . . . .
Additional Information for Earnings or Deductions Entries 8 – 18. . Dates of Earnings and Deductions Entry Batch Lines 8 – 19. . . . . . . .
PayMIX Scheduling and Statuses 8 – 21. . . . . . . . . . . . . . . . . . . . . . . . . . .

viii Oracle Payroll US User’s Guide
Batch Statuses Error, Warning 8 – 21. . . . . . . . . . . . . . . . . . . . . . . . . . . . Batch Statuses Hold, Ready, Validated, Transferred 8 – 21. . . . . . . . .
Completing Batch Element Entries Using PayMIX 8 – 23. . . . . . . . . . . . Identifying PayMIX Batches and Entering Defaults 8 – 23. . . . . . . . . To identify a batch and enter user counts and totals: 8 – 24. . . . . . . . . . . To provide default entries for the batch: 8 – 25. . . . . . . . . . . . . . . . . . . . . .
Entering Batches of Timecard Data 8 – 26. . . . . . . . . . . . . . . . . . . . . . . . To make time entries from timecards: 8 – 26. . . . . . . . . . . . . . . . . . . . . . . .
Making Batch Entries for Earnings Types 8 – 27. . . . . . . . . . . . . . . . . . To make one–time entries or changes to an earnings type: 8 – 27. . . . . . .
Making Batch Entries for Deductions 8 – 28. . . . . . . . . . . . . . . . . . . . . . To make one–time entries or changes to a deduction: 8 – 28. . . . . . . . . . .
Running the PayMIX Batch Process 8 – 29. . . . . . . . . . . . . . . . . . . . . . . Reviewing and Correcting PayMIX Process Results 8 – 31. . . . . . . . . . .
To review and correct PayMIX entries: 8 – 31. . . . . . . . . . . . . . . . . . . . . .
Chapter 9 Salary Administration and Budgeting 9 – 1. . . . . . . . . . . . . . . . . . . . . Salary Administration and Performance Reviews 9 – 2. . . . . . . . . . . .
Reviewing Current Salaries 9 – 2. . . . . . . . . . . . . . . . . . . . . . . . . . . . . . Setting Up Salary Administration 9 – 4. . . . . . . . . . . . . . . . . . . . . . . . . To set up salary administration: 9 – 5. . . . . . . . . . . . . . . . . . . . . . . . . . .
Defining Salary Bases 9 – 6. . . . . . . . . . . . . . . . . . . . . . . . . . . . . . . . . . . To define a salary basis: 9 – 6. . . . . . . . . . . . . . . . . . . . . . . . . . . . . . . . . .
Changing Salary Components 9 – 7. . . . . . . . . . . . . . . . . . . . . . . . . . . . To create new salary components to display in the folder: 9 – 8. . . . . . . .
Entering Salaries and Salary Changes 9 – 8. . . . . . . . . . . . . . . . . . . . . Using the Salary Administration Window 9 – 9. . . . . . . . . . . . . . . . . To enter a salary for a new employee, or one assigned to a new
salary basis: 9 – 9. . . . . . . . . . . . . . . . . . . . . . . . . . . . . . . . . . . . . . . To propose a salary change: 9 – 10. . . . . . . . . . . . . . . . . . . . . . . . . . . . . . . To approve a salary change: 9 – 11. . . . . . . . . . . . . . . . . . . . . . . . . . . . . . .
Using the Salary Management Folder 9 – 11. . . . . . . . . . . . . . . . . . . . . To manipulate salary proposals in a spreadsheet: 9 – 12. . . . . . . . . . . . . . To approve multiple salary proposals: 9 – 13. . . . . . . . . . . . . . . . . . . . . . .
Correcting a Salary Entry 9 – 13. . . . . . . . . . . . . . . . . . . . . . . . . . . . . . . . To correct a salary proposal: 9 – 13. . . . . . . . . . . . . . . . . . . . . . . . . . . . . . . To correct an approved salary: 9 – 13. . . . . . . . . . . . . . . . . . . . . . . . . . . . .
Viewing Salary History 9 – 14. . . . . . . . . . . . . . . . . . . . . . . . . . . . . . . . . . Salary Review Report 9 – 15. . . . . . . . . . . . . . . . . . . . . . . . . . . . . . . . . . . To run the Salary Review Report: 9 – 15. . . . . . . . . . . . . . . . . . . . . . . . . .
Salary Budgeting 9 – 16. . . . . . . . . . . . . . . . . . . . . . . . . . . . . . . . . . . . . . . .

ixContents
Chapter 10 Benefits Administration 10 – 1. . . . . . . . . . . . . . . . . . . . . . . . . . . . . . . . . . Benefits Administration Overview 10 – 2. . . . . . . . . . . . . . . . . . . . . . . . .
Benefits Classifications 10 – 3. . . . . . . . . . . . . . . . . . . . . . . . . . . . . . . . . . Benefits Enrollment 10 – 3. . . . . . . . . . . . . . . . . . . . . . . . . . . . . . . . . . . . .
Creation of Elements for Benefits 10 – 5. . . . . . . . . . . . . . . . . . . . . . . . . . . Initiation of Benefit Deductions with Oracle Payroll 10 – 5. . . . . . . . . Definition of Benefit Elements at Sites with HR Only 10 – 6. . . . . . . . Benefits Table Entries for Health Care Plans 10 – 7. . . . . . . . . . . . . . . .
Defining Benefit Plan Elements at Sites with HR Only 10 – 8. . . . . . . . To identify and classify the element: 10 – 9. . . . . . . . . . . . . . . . . . . . . . . . To enter processing information: 10 – 9. . . . . . . . . . . . . . . . . . . . . . . . . . . To establish currencies and qualifying conditions: 10 – 10. . . . . . . . . . . . . To identify the benefit carrier and contribution frequency: 10 – 10. . . . . . . To determine the units of input values created for the element: 10 – 10. . . To create additional input values for the element: 10 – 11. . . . . . . . . . . . . . To enter a default for an additional input value: 10 – 11. . . . . . . . . . . . . . . To set up validation for entries to additional input values: 10 – 11. . . . . . .
Establishing Plan Coverage and Default Contributions 10 – 12. . . . . . To enter plan coverage levels and contribution amounts: 10 – 12. . . . . . . .
Enrolling Employees in a Health Care Benefit Plan 10 – 14. . . . . . . . . . . To enroll an employee in a benefit plan: 10 – 14. . . . . . . . . . . . . . . . . . . . . .
Reviewing Employee Enrollment in Benefit Plans 10 – 14. . . . . . . . . . . Reports on Health Care Plan Eligibility and Enrollment 10 – 15. . . . . . To run the Eligibility Listing or Enrollment Register: 10 – 15. . . . . . . . . .
Establishing Benefit Coverage for Dependents 10 – 16. . . . . . . . . . . . . . . To establish benefit coverage for a dependent: 10 – 16. . . . . . . . . . . . . . . . .
Stopping Employee and Dependent Coverage 10 – 17. . . . . . . . . . . . . . Stopping Dependent Coverage Only 10 – 18. . . . . . . . . . . . . . . . . . . . . . To stop dependent coverage: 10 – 18. . . . . . . . . . . . . . . . . . . . . . . . . . . . . . .
Recording Beneficiaries for Benefits 10 – 20. . . . . . . . . . . . . . . . . . . . . . . . To record a beneficiary for a benefit: 10 – 21. . . . . . . . . . . . . . . . . . . . . . . . .
Removing Beneficiaries When Employee Benefits Stop 10 – 22. . . . . . Removing Beneficiaries When Employee Benefits Continue 10 – 22. . To remove a beneficiary while maintaining coverage: 10 – 22. . . . . . . . . . .
Management of COBRA–Eligible Benefits 10 – 24. . . . . . . . . . . . . . . . . . . Employer Responsibilities under COBRA 10 – 24. . . . . . . . . . . . . . . . . .
Administering COBRA 10 – 27. . . . . . . . . . . . . . . . . . . . . . . . . . . . . . . . . . . Recording Qualifying Events 10 – 28. . . . . . . . . . . . . . . . . . . . . . . . . . . . . To record a qualifying event and its date: 10 – 28. . . . . . . . . . . . . . . . . . . .
Changing Coverage Statuses 10 – 29. . . . . . . . . . . . . . . . . . . . . . . . . . . . . To make changes to the status of COBRA coverage: 10 – 29. . . . . . . . . . . .

x Oracle Payroll US User’s Guide
Setting Up Continued Coverage under COBRA 10 – 30. . . . . . . . . . . . . To set up continued coverage under COBRA 10 – 30. . . . . . . . . . . . . . . . .
Establishing a Payments Schedule and Recording Receipts 10 – 31. . . To schedule premium payments and record receipts: 10 – 31. . . . . . . . . . .
Obtaining COBRA Reports and Standard Letters 10 – 32. . . . . . . . . . . To run the COBRA Coverage or Payments report: 10 – 32. . . . . . . . . . . . . To obtain a COBRA standard letter: 10 – 32. . . . . . . . . . . . . . . . . . . . . . . .
Chapter 11 Labor Costs 11 – 1. . . . . . . . . . . . . . . . . . . . . . . . . . . . . . . . . . . . . . . . . . . . . Labor Costs in Oracle HRMS 11 – 2. . . . . . . . . . . . . . . . . . . . . . . . . . . . . .
The Oracle HRMS Cost Allocation Key Flexfield 11 – 2. . . . . . . . . . . . Use of the Cost Allocation Key Flexfield 11 – 5. . . . . . . . . . . . . . . . . . . .
Costing Data at the Payroll Level 11 – 6. . . . . . . . . . . . . . . . . . . . . . . . . Costing Data at the Element Link Level 11 – 7. . . . . . . . . . . . . . . . . . . . Costing Data at the Organization and Assignment Levels 11 – 9. . . . Costing Data at the Element Entry Level 11 – 10. . . . . . . . . . . . . . . . . . .
Setting Up the Cost Allocation Key Flexfield 11 – 11. . . . . . . . . . . . . . . . . Controlling the Display of Flexfield Segments 11 – 11. . . . . . . . . . . . . .
Costing for Taxes 11 – 14. . . . . . . . . . . . . . . . . . . . . . . . . . . . . . . . . . . . . . . . Costing All Taxes by Tax Type 11 – 15. . . . . . . . . . . . . . . . . . . . . . . . . . . . Costing State and Local Taxes by Jurisdiction 11 – 15. . . . . . . . . . . . . . .
Accumulation and Transfer of Payroll Costs 11 – 17. . . . . . . . . . . . . . . . . Example of Labor Cost Allocation 11 – 18. . . . . . . . . . . . . . . . . . . . . . . . Example of Employer Charge Distribution 11 – 19. . . . . . . . . . . . . . . . .
Running the Costing Processes 11 – 22. . . . . . . . . . . . . . . . . . . . . . . . . . . . To run the Costing process: 11 – 22. . . . . . . . . . . . . . . . . . . . . . . . . . . . . . .
Reviewing Costing Process Results 11 – 22. . . . . . . . . . . . . . . . . . . . . . . To run a Cost Breakdown Summary report: 11 – 23. . . . . . . . . . . . . . . . . .
Transferring Costs to Oracle General Ledger 11 – 24. . . . . . . . . . . . . . . . . To map Cost Allocation to Accounting flexfield segments: 11 – 24. . . . . . . To run the Transfer to GL process: 11 – 25. . . . . . . . . . . . . . . . . . . . . . . . . .
Chapter 12 Human Resource Budgets 12 – 1. . . . . . . . . . . . . . . . . . . . . . . . . . . . . . . . Human Resource Budgets 12 – 2. . . . . . . . . . . . . . . . . . . . . . . . . . . . . . . . .
Entering Actual Values Against Budgets 12 – 2. . . . . . . . . . . . . . . . . . . To override the default for an assignment: 12 – 3. . . . . . . . . . . . . . . . . . . .
Setting Up Budgets 12 – 3. . . . . . . . . . . . . . . . . . . . . . . . . . . . . . . . . . . . . To set up a human resource budget: 12 – 3. . . . . . . . . . . . . . . . . . . . . . . . .
Salary Review Report 12 – 4. . . . . . . . . . . . . . . . . . . . . . . . . . . . . . . . . . . To run the Salary Review Report: 12 – 4. . . . . . . . . . . . . . . . . . . . . . . . . .

xiContents
Salary Budgeting 12 – 5. . . . . . . . . . . . . . . . . . . . . . . . . . . . . . . . . . . . . . . . Reviewing and Renaming Period Types 12 – 6. . . . . . . . . . . . . . . . . . . Defining Calendars 12 – 7. . . . . . . . . . . . . . . . . . . . . . . . . . . . . . . . . . . . . To define a budgetary calendar: 12 – 7. . . . . . . . . . . . . . . . . . . . . . . . . . . .
Defining Human Resource Budgets 12 – 8. . . . . . . . . . . . . . . . . . . . . . . To define a budget: 12 – 8. . . . . . . . . . . . . . . . . . . . . . . . . . . . . . . . . . . . . .
Viewing and Reporting Budget Variances 12 – 9. . . . . . . . . . . . . . . . . . List Position Budget Variance 12 – 9. . . . . . . . . . . . . . . . . . . . . . . . . . . . To view position variances within a hierarchy: 12 – 9. . . . . . . . . . . . . . . .
List Budget Variance by Organization 12 – 10. . . . . . . . . . . . . . . . . . . . . To view position variances within an organization: 12 – 10. . . . . . . . . . . .
Staffing Budget Details Report 12 – 11. . . . . . . . . . . . . . . . . . . . . . . . . . . To run the Staffing Budget Details report: 12 – 11. . . . . . . . . . . . . . . . . . .
Chapter 13 Personal Information 13 – 1. . . . . . . . . . . . . . . . . . . . . . . . . . . . . . . . . . . . Displaying Personal Information 13 – 2. . . . . . . . . . . . . . . . . . . . . . . . . . .
Using the Find Person Window 13 – 2. . . . . . . . . . . . . . . . . . . . . . . . . . . To query a person using the Find Person window: 13 – 2. . . . . . . . . . . . .
People Folders 13 – 3. . . . . . . . . . . . . . . . . . . . . . . . . . . . . . . . . . . . . . . . . Entering Personal Information 13 – 4. . . . . . . . . . . . . . . . . . . . . . . . . . . . .
Entering New People 13 – 5. . . . . . . . . . . . . . . . . . . . . . . . . . . . . . . . . . . To enter a new person: 13 – 5. . . . . . . . . . . . . . . . . . . . . . . . . . . . . . . . . . . To enter employment information for an employee: 13 – 6. . . . . . . . . . . . . To enter office location information for a new hire or an
existing employee: 13 – 8. . . . . . . . . . . . . . . . . . . . . . . . . . . . . . . . . . To enter information for an applicant : 13 – 8. . . . . . . . . . . . . . . . . . . . . . To enter information concerning the background check for
an employee: 13 – 8. . . . . . . . . . . . . . . . . . . . . . . . . . . . . . . . . . . . . . . To enter rehire recommendation information for an applicant who
was a former employee: 13 – 8. . . . . . . . . . . . . . . . . . . . . . . . . . . . . . . To enter further name information: 13 – 9. . . . . . . . . . . . . . . . . . . . . . . . . To enter medical information for an employee: 13 – 9. . . . . . . . . . . . . . . . To enter other information for a person: 13 – 9. . . . . . . . . . . . . . . . . . . . .
Hiring 13 – 10. . . . . . . . . . . . . . . . . . . . . . . . . . . . . . . . . . . . . . . . . . . . . . . . To hire an employee: 13 – 10. . . . . . . . . . . . . . . . . . . . . . . . . . . . . . . . . . . . . To hire an applicant: 13 – 10. . . . . . . . . . . . . . . . . . . . . . . . . . . . . . . . . . . . . To rehire an ex–employee: 13 – 10. . . . . . . . . . . . . . . . . . . . . . . . . . . . . . . . . To cancel a hire: 13 – 10. . . . . . . . . . . . . . . . . . . . . . . . . . . . . . . . . . . . . . . .
Entering People’s Addresses at Sites without Oracle Payroll 13 – 11. . To enter a generic address: 13 – 11. . . . . . . . . . . . . . . . . . . . . . . . . . . . . . . .
Entering People’s Addresses at Sites with Oracle Payroll 13 – 12. . . . .
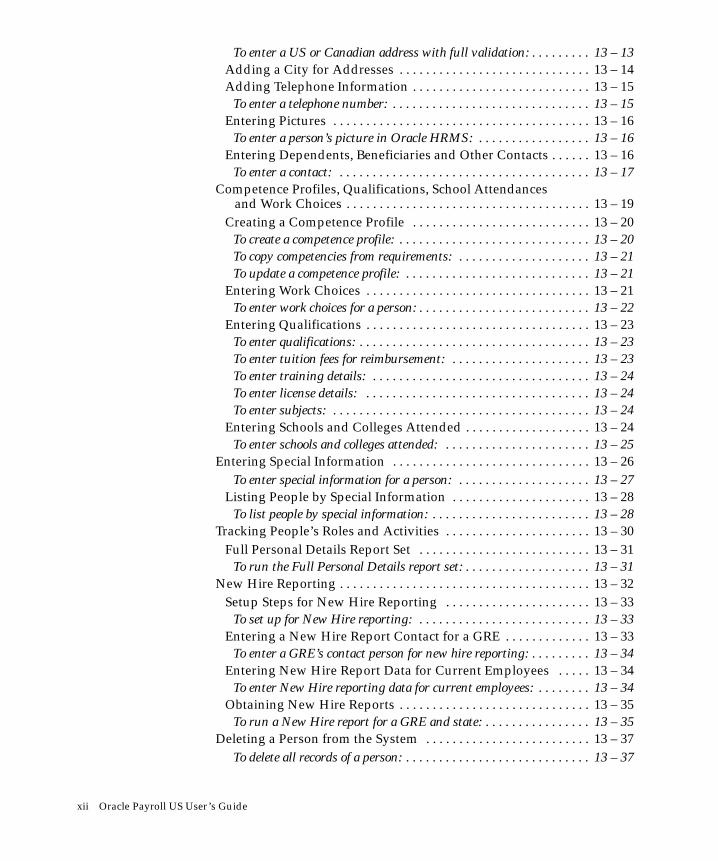
xii Oracle Payroll US User’s Guide
To enter a US or Canadian address with full validation: 13 – 13. . . . . . . . . Adding a City for Addresses 13 – 14. . . . . . . . . . . . . . . . . . . . . . . . . . . . . Adding Telephone Information 13 – 15. . . . . . . . . . . . . . . . . . . . . . . . . . . To enter a telephone number: 13 – 15. . . . . . . . . . . . . . . . . . . . . . . . . . . . . .
Entering Pictures 13 – 16. . . . . . . . . . . . . . . . . . . . . . . . . . . . . . . . . . . . . . . To enter a person’s picture in Oracle HRMS: 13 – 16. . . . . . . . . . . . . . . . .
Entering Dependents, Beneficiaries and Other Contacts 13 – 16. . . . . . To enter a contact: 13 – 17. . . . . . . . . . . . . . . . . . . . . . . . . . . . . . . . . . . . . .
Competence Profiles, Qualifications, School Attendances and Work Choices 13 – 19. . . . . . . . . . . . . . . . . . . . . . . . . . . . . . . . . . . . .
Creating a Competence Profile 13 – 20. . . . . . . . . . . . . . . . . . . . . . . . . . . To create a competence profile: 13 – 20. . . . . . . . . . . . . . . . . . . . . . . . . . . . . To copy competencies from requirements: 13 – 21. . . . . . . . . . . . . . . . . . . . To update a competence profile: 13 – 21. . . . . . . . . . . . . . . . . . . . . . . . . . . .
Entering Work Choices 13 – 21. . . . . . . . . . . . . . . . . . . . . . . . . . . . . . . . . . To enter work choices for a person: 13 – 22. . . . . . . . . . . . . . . . . . . . . . . . . .
Entering Qualifications 13 – 23. . . . . . . . . . . . . . . . . . . . . . . . . . . . . . . . . . To enter qualifications: 13 – 23. . . . . . . . . . . . . . . . . . . . . . . . . . . . . . . . . . . To enter tuition fees for reimbursement: 13 – 23. . . . . . . . . . . . . . . . . . . . . To enter training details: 13 – 24. . . . . . . . . . . . . . . . . . . . . . . . . . . . . . . . . To enter license details: 13 – 24. . . . . . . . . . . . . . . . . . . . . . . . . . . . . . . . . . To enter subjects: 13 – 24. . . . . . . . . . . . . . . . . . . . . . . . . . . . . . . . . . . . . . .
Entering Schools and Colleges Attended 13 – 24. . . . . . . . . . . . . . . . . . . To enter schools and colleges attended: 13 – 25. . . . . . . . . . . . . . . . . . . . . .
Entering Special Information 13 – 26. . . . . . . . . . . . . . . . . . . . . . . . . . . . . . To enter special information for a person: 13 – 27. . . . . . . . . . . . . . . . . . . .
Listing People by Special Information 13 – 28. . . . . . . . . . . . . . . . . . . . . To list people by special information: 13 – 28. . . . . . . . . . . . . . . . . . . . . . . .
Tracking People’s Roles and Activities 13 – 30. . . . . . . . . . . . . . . . . . . . . . Full Personal Details Report Set 13 – 31. . . . . . . . . . . . . . . . . . . . . . . . . . To run the Full Personal Details report set: 13 – 31. . . . . . . . . . . . . . . . . . .
New Hire Reporting 13 – 32. . . . . . . . . . . . . . . . . . . . . . . . . . . . . . . . . . . . . . Setup Steps for New Hire Reporting 13 – 33. . . . . . . . . . . . . . . . . . . . . . To set up for New Hire reporting: 13 – 33. . . . . . . . . . . . . . . . . . . . . . . . . .
Entering a New Hire Report Contact for a GRE 13 – 33. . . . . . . . . . . . . To enter a GRE’s contact person for new hire reporting: 13 – 34. . . . . . . . .
Entering New Hire Report Data for Current Employees 13 – 34. . . . . To enter New Hire reporting data for current employees: 13 – 34. . . . . . . .
Obtaining New Hire Reports 13 – 35. . . . . . . . . . . . . . . . . . . . . . . . . . . . . To run a New Hire report for a GRE and state: 13 – 35. . . . . . . . . . . . . . . .
Deleting a Person from the System 13 – 37. . . . . . . . . . . . . . . . . . . . . . . . . To delete all records of a person: 13 – 37. . . . . . . . . . . . . . . . . . . . . . . . . . . .

xiiiContents
Chapter 14 Employment Information 14 – 1. . . . . . . . . . . . . . . . . . . . . . . . . . . . . . . . Managing Employment Information 14 – 2. . . . . . . . . . . . . . . . . . . . . . . . The Employee Assignment 14 – 4. . . . . . . . . . . . . . . . . . . . . . . . . . . . . . . .
Components of the Assignment 14 – 5. . . . . . . . . . . . . . . . . . . . . . . . . . Using Multiple Assignments 14 – 6. . . . . . . . . . . . . . . . . . . . . . . . . . . . . Identifying Employees and Assignments 14 – 7. . . . . . . . . . . . . . . . . . Entering a New Assignment 14 – 9. . . . . . . . . . . . . . . . . . . . . . . . . . . . . To enter a new assignment: 14 – 9. . . . . . . . . . . . . . . . . . . . . . . . . . . . . . . To enter information in the window GREs and Other Data: 14 – 10. . . . .
Changing Assignment Information 14 – 14. . . . . . . . . . . . . . . . . . . . . . . To change a primary assignment: 14 – 15. . . . . . . . . . . . . . . . . . . . . . . . . .
Ending an Assignment 14 – 16. . . . . . . . . . . . . . . . . . . . . . . . . . . . . . . . . . To end one of many assignments: 14 – 16. . . . . . . . . . . . . . . . . . . . . . . . . . .
Ending Employment 14 – 17. . . . . . . . . . . . . . . . . . . . . . . . . . . . . . . . . . . . To terminate an employee: 14 – 17. . . . . . . . . . . . . . . . . . . . . . . . . . . . . . . .
Cancelling a Termination 14 – 18. . . . . . . . . . . . . . . . . . . . . . . . . . . . . . . . To cancel a termination: 14 – 18. . . . . . . . . . . . . . . . . . . . . . . . . . . . . . . . . . To change the termination date: 14 – 18. . . . . . . . . . . . . . . . . . . . . . . . . . . .
Terminations Report 14 – 19. . . . . . . . . . . . . . . . . . . . . . . . . . . . . . . . . . . . To run the Terminations Report: 14 – 19. . . . . . . . . . . . . . . . . . . . . . . . . . .
Additional Employment Information 14 – 20. . . . . . . . . . . . . . . . . . . . . . . Entering Payment Methods for an Employee Assignment 14 – 22. . . . To enter a personal payment method for remuneration: 14 – 23. . . . . . . . . To enter a third party payment method: 14 – 24. . . . . . . . . . . . . . . . . . . . .
Entering Secondary Assignment Statuses 14 – 24. . . . . . . . . . . . . . . . . . To give a secondary status to an assignment: 14 – 25. . . . . . . . . . . . . . . . .
Inquiring and Reporting on Employment Information 14 – 26. . . . . . . . Listing Assignments 14 – 26. . . . . . . . . . . . . . . . . . . . . . . . . . . . . . . . . . . . To produce lists of assignments: 14 – 28. . . . . . . . . . . . . . . . . . . . . . . . . . . .
Listing Employees by Organization 14 – 29. . . . . . . . . . . . . . . . . . . . . . . To list employees in several organizations: 14 – 29. . . . . . . . . . . . . . . . . . . To list employees in one organization only: 14 – 29. . . . . . . . . . . . . . . . . . .
Listing Employees by Position 14 – 31. . . . . . . . . . . . . . . . . . . . . . . . . . . To view employee names by position: 14 – 31. . . . . . . . . . . . . . . . . . . . . . . . To view lists of positions within a position hierarchy: 14 – 32. . . . . . . . . . .
Assignment Status Report 14 – 33. . . . . . . . . . . . . . . . . . . . . . . . . . . . . . . To run the Assignment Status Report: 14 – 33. . . . . . . . . . . . . . . . . . . . . .
Employee Summary Report 14 – 34. . . . . . . . . . . . . . . . . . . . . . . . . . . . . . To run the Employee Summary Report: 14 – 34. . . . . . . . . . . . . . . . . . . . . .
Employee Movements Report 14 – 34. . . . . . . . . . . . . . . . . . . . . . . . . . . . To run the Employee Organization Movements Report: 14 – 34. . . . . . . . .

xiv Oracle Payroll US User’s Guide
To run the Employee Payroll Movements Report: 14 – 35. . . . . . . . . . . . . . Assignment History 14 – 36. . . . . . . . . . . . . . . . . . . . . . . . . . . . . . . . . . . . To view an employee’s assignment history: 14 – 36. . . . . . . . . . . . . . . . . . .
Chapter 15 Recruitment 15 – 1. . . . . . . . . . . . . . . . . . . . . . . . . . . . . . . . . . . . . . . . . . . . The Recruitment Cycle 15 – 2. . . . . . . . . . . . . . . . . . . . . . . . . . . . . . . . . . . . Recruitment Preparation 15 – 4. . . . . . . . . . . . . . . . . . . . . . . . . . . . . . . . . .
Raising Requisitions for Vacancies 15 – 7. . . . . . . . . . . . . . . . . . . . . . . . To create a requisition and vacancy: 15 – 7. . . . . . . . . . . . . . . . . . . . . . . .
Defining Recruitment Activities 15 – 8. . . . . . . . . . . . . . . . . . . . . . . . . . To define recruitment activities: 15 – 8. . . . . . . . . . . . . . . . . . . . . . . . . . . .
Viewing Vacancies 15 – 9. . . . . . . . . . . . . . . . . . . . . . . . . . . . . . . . . . . . . . To view vacancies: 15 – 9. . . . . . . . . . . . . . . . . . . . . . . . . . . . . . . . . . . . . .
Selection Processing 15 – 10. . . . . . . . . . . . . . . . . . . . . . . . . . . . . . . . . . . . . . Making Quick Applicant Entries 15 – 11. . . . . . . . . . . . . . . . . . . . . . . . . . To record an application quickly: 15 – 11. . . . . . . . . . . . . . . . . . . . . . . . . . .
Entering Full Application Information 15 – 12. . . . . . . . . . . . . . . . . . . . . To enter an application: 15 – 13. . . . . . . . . . . . . . . . . . . . . . . . . . . . . . . . . .
Tracking Applicant Progress 15 – 15. . . . . . . . . . . . . . . . . . . . . . . . . . . . . Interviewing Applicants 15 – 17. . . . . . . . . . . . . . . . . . . . . . . . . . . . . . . . . To schedule applicant interviews: 15 – 17. . . . . . . . . . . . . . . . . . . . . . . . . .
Mass Update of Applicants 15 – 19. . . . . . . . . . . . . . . . . . . . . . . . . . . . . . To update a group of applicant assignments: 15 – 19. . . . . . . . . . . . . . . . . .
Hiring Applicants 15 – 19. . . . . . . . . . . . . . . . . . . . . . . . . . . . . . . . . . . . . . Ending Applications 15 – 21. . . . . . . . . . . . . . . . . . . . . . . . . . . . . . . . . . . . To terminate an applicant: 15 – 21. . . . . . . . . . . . . . . . . . . . . . . . . . . . . . . .
Requisition Summary Report 15 – 22. . . . . . . . . . . . . . . . . . . . . . . . . . . . To run the Requisition Summary Report: 15 – 22. . . . . . . . . . . . . . . . . . . .
Chapter 16 Overview of Government–Mandated HR Reporting 16 – 1. . . . . . . . . Government–Required HR Reporting 16 – 2. . . . . . . . . . . . . . . . . . . . . . .
Reporting Categories and Statuses 16 – 3. . . . . . . . . . . . . . . . . . . . . . . . Reporting Organizations 16 – 3. . . . . . . . . . . . . . . . . . . . . . . . . . . . . . . . Establishment Hierarchies 16 – 4. . . . . . . . . . . . . . . . . . . . . . . . . . . . . . .
Varieties of Establishment Hierarchies 16 – 6. . . . . . . . . . . . . . . . . . . . . . The Single–Establishment Hierarchy 16 – 6. . . . . . . . . . . . . . . . . . . . . . Multi–Establishment Hierarchies 16 – 7. . . . . . . . . . . . . . . . . . . . . . . . . The Headquarters Hierarchy 16 – 10. . . . . . . . . . . . . . . . . . . . . . . . . . . . .
Preparing for Government–Mandated HR Reporting 16 – 12. . . . . . . . . Registering Reporting Categories and Statuses 16 – 13. . . . . . . . . . . . . . .

xvContents
To register reporting categories for the Business Group: 16 – 13. . . . . . . . . To register reporting statuses for the Business Group: 16 – 14. . . . . . . . . .
Setting Up Reporting Organizations 16 – 15. . . . . . . . . . . . . . . . . . . . . . . . Setting Up Reporting Establishments 16 – 15. . . . . . . . . . . . . . . . . . . . . . To define a Reporting Establishment: for EEO reporting. 16 – 15. . . . . . . . To define a Reporting Establishment for VETS reporting: 16 – 16. . . . . . . To define a corporate headquarters: 16 – 18. . . . . . . . . . . . . . . . . . . . . . . . .
Setting Up AAP Organizations 16 – 18. . . . . . . . . . . . . . . . . . . . . . . . . . . To define an AAP organization: 16 – 18. . . . . . . . . . . . . . . . . . . . . . . . . . . .
Putting Subordinate Reporting Organizations in Hierarchies 16 – 19. To put a reporting organization in a hierarchy: 16 – 19. . . . . . . . . . . . . . . .
Setting Up Establishment Hierarchies 16 – 21. . . . . . . . . . . . . . . . . . . . . . . To create a single–establishment hierarchy: 16 – 22. . . . . . . . . . . . . . . . . . . To create a multi–establishment hierarchy: 16 – 22. . . . . . . . . . . . . . . . . . . To create a headquarters hierarchy: 16 – 22. . . . . . . . . . . . . . . . . . . . . . . . . To create an AAP establishment hierarchy: 16 – 22. . . . . . . . . . . . . . . . . . .
Entering Establishment Overrides 16 – 23. . . . . . . . . . . . . . . . . . . . . . . . To enter an establishment override for an employee: 16 – 24. . . . . . . . . . . .
Chapter 17 Production of Government– Mandated HR Reports 17 – 1. . . . . . . . . EEO–1 (Equal Employment Opportunity) Reporting 17 – 2. . . . . . . . . .
Data for EEO–1 Reporting 17 – 3. . . . . . . . . . . . . . . . . . . . . . . . . . . . . . . Setup Steps for EEO–1 Reporting 17 – 5. . . . . . . . . . . . . . . . . . . . . . . . . .
Entering EEO–1 Information for a GRE 17 – 5. . . . . . . . . . . . . . . . . . . . To enter information for a GRE for EEO reporting: 17 – 6. . . . . . . . . . . .
Associating Jobs with EEO Job Categories 17 – 6. . . . . . . . . . . . . . . . . To associate a job with an EEO job category: 17 – 7. . . . . . . . . . . . . . . . . .
Obtaining EEO–1 Reports 17 – 8. . . . . . . . . . . . . . . . . . . . . . . . . . . . . . . . . To run a Single–Establishment Employer Report: 17 – 8. . . . . . . . . . . . . To run a Headquarters Report: 17 – 9. . . . . . . . . . . . . . . . . . . . . . . . . . . . To run an Individual Establishment Report: 17 – 9. . . . . . . . . . . . . . . . . . To run a Consolidated Report: 17 – 10. . . . . . . . . . . . . . . . . . . . . . . . . . . . . To run an Establishment Employment Listing Report: 17 – 10. . . . . . . . . .
AAP (Affirmative Action Plan) Reporting 17 – 12. . . . . . . . . . . . . . . . . . . AAP Organizations 17 – 13. . . . . . . . . . . . . . . . . . . . . . . . . . . . . . . . . . . . . AAP Hierarchies 17 – 13. . . . . . . . . . . . . . . . . . . . . . . . . . . . . . . . . . . . . . . Data for AAP Reporting 17 – 15. . . . . . . . . . . . . . . . . . . . . . . . . . . . . . . . .
Setup Steps for AAP Reporting 17 – 16. . . . . . . . . . . . . . . . . . . . . . . . . . . . Defining Lines of Progression for Jobs 17 – 17. . . . . . . . . . . . . . . . . . . . . To define lines of progression: 17 – 17. . . . . . . . . . . . . . . . . . . . . . . . . . . . .

xvi Oracle Payroll US User’s Guide
Associating Jobs with AAP Reporting Information 17 – 18. . . . . . . . . . To associate jobs with AAP reporting information: 17 – 19. . . . . . . . . . . . .
Obtaining AAP Reports 17 – 19. . . . . . . . . . . . . . . . . . . . . . . . . . . . . . . . . To run the AAP–Workforce Analysis report: 17 – 19. . . . . . . . . . . . . . . . . . To run the AAP–Job Group Analysis report: 17 – 20. . . . . . . . . . . . . . . . . .
VETS–100 Reporting 17 – 21. . . . . . . . . . . . . . . . . . . . . . . . . . . . . . . . . . . . . Data for VETS–100 Reports 17 – 21. . . . . . . . . . . . . . . . . . . . . . . . . . . . . .
Setup Steps for VETS–100 Reporting 17 – 23. . . . . . . . . . . . . . . . . . . . . . . . Entering VETS–100 Information for a GRE 17 – 23. . . . . . . . . . . . . . . . . To enter information for a GRE for EEO reporting: 17 – 24. . . . . . . . . . . .
Obtaining VETS–100 Reports 17 – 25. . . . . . . . . . . . . . . . . . . . . . . . . . . . . . To run a report for a single hiring location: 17 – 25. . . . . . . . . . . . . . . . . . . To run a headquarters report for multiple hiring locations: 17 – 26. . . . . . To run reports for locations with 50 or more employees: 17 – 26. . . . . . . . . To run a listing of locations with less than 50 employees: 17 – 27. . . . . . . .
ADA (Americans with Disabilities Act) Reporting 17 – 28. . . . . . . . . . . . Information for ADA Reporting 17 – 28. . . . . . . . . . . . . . . . . . . . . . . . . .
Setup Steps for ADA Reporting 17 – 30. . . . . . . . . . . . . . . . . . . . . . . . . . . . Registering Employees as Disabled 17 – 31. . . . . . . . . . . . . . . . . . . . . . . Entering Information about Disabilities 17 – 31. . . . . . . . . . . . . . . . . . . . To enter information about a person’s disability type: 17 – 31. . . . . . . . . . .
Entering Requests for Disability Accommodation 17 – 31. . . . . . . . . . . To enter information about accommodation requests: 17 – 32. . . . . . . . . . .
Obtaining ADA Reports 17 – 32. . . . . . . . . . . . . . . . . . . . . . . . . . . . . . . . . To run an ADA report: 17 – 32. . . . . . . . . . . . . . . . . . . . . . . . . . . . . . . . . .
OSHA (Occupational Safety and Health Act) Reporting 17 – 34. . . . . . . OSHA Data 17 – 34. . . . . . . . . . . . . . . . . . . . . . . . . . . . . . . . . . . . . . . . . . . .
Setup Steps for OSHA Reporting 17 – 36. . . . . . . . . . . . . . . . . . . . . . . . . . . Entering Information about Work–related Injury or Illness 17 – 36. . . To enter data on an OSHA–reportable incident: 17 – 36. . . . . . . . . . . . . . .
OSHA Categories of Illness 17 – 37. . . . . . . . . . . . . . . . . . . . . . . . . . . . . . Obtaining OSHA Reports 17 – 38. . . . . . . . . . . . . . . . . . . . . . . . . . . . . . . . To run OSHA Form 200 or Form 101 Reports: 17 – 39. . . . . . . . . . . . . . .
Index

xviiContents
VOLUME 2Volume 2 i. . . . . . . . . . . . . . . . . . . . . . . . . .
Chapter 18 Introducing Career Management Activities 18 – 1. . . . . . . . . . . . . . . . . Introducing Career Management Activities 18 – 2. . . . . . . . . . . . . . . . . .
Advantages of the Common Competence Framework 18 – 2. . . . . . . Career Management – A Fully Tailorable, Proactive
Management Tool 18 – 3. . . . . . . . . . . . . . . . . . . . . . . . . . . . . . . . . Web and Workflow Access (LMDA and EDA) 18 – 4. . . . . . . . . . . . . . Which Activities are Available Using Windows,
LMDA and EDA? 18 – 5. . . . . . . . . . . . . . . . . . . . . . . . . . . . . . . . . Configurable Web Interface 18 – 7. . . . . . . . . . . . . . . . . . . . . . . . . . . . . .
Defining Your Competence–Based Operation 18 – 8. . . . . . . . . . . . . . . . Identifying Your Business Goals Before Implementing the
Competence Approach 18 – 9. . . . . . . . . . . . . . . . . . . . . . . . . . . . Defining Your Enterprises Competencies 18 – 10. . . . . . . . . . . . . . . . . . Defining Your Competence Requirements 18 – 10. . . . . . . . . . . . . . . . . Designing Your Methods of Measurement 18 – 11. . . . . . . . . . . . . . . . . Assessments and Appraisals 18 – 12. . . . . . . . . . . . . . . . . . . . . . . . . . . . . Describing and Assessing Measurable Behavior 18 – 13. . . . . . . . . . . . Identifying Qualifications and Delivering Competencies 18 – 14. . . . . Career and Succession Planning 18 – 14. . . . . . . . . . . . . . . . . . . . . . . . . . Career Management Extensible and User–Defined
QuickCodes 18 – 15. . . . . . . . . . . . . . . . . . . . . . . . . . . . . . . . . . . . . . Understanding The Business Cycle 18 – 17. . . . . . . . . . . . . . . . . . . . . . . . .
Chapter 19 Designing Methods of Measurement and Creating Competencies . . . . 19 – 1Designing Your Methods of Measurement and
Creating Competencies 19 – 2. . . . . . . . . . . . . . . . . . . . . . . . . . . . . . . . What Are Competencies? 19 – 2. . . . . . . . . . . . . . . . . . . . . . . . . . . . . . . . Competencies, Proficiency Levels and Indicators 19 – 2. . . . . . . . . . . Structuring Your Competencies 19 – 4. . . . . . . . . . . . . . . . . . . . . . . . . . . Which Method Should You Use? 19 – 6. . . . . . . . . . . . . . . . . . . . . . . . . . General Rating Scales 19 – 7. . . . . . . . . . . . . . . . . . . . . . . . . . . . . . . . . . . Different Rating Scales 19 – 7. . . . . . . . . . . . . . . . . . . . . . . . . . . . . . . . . . Creating Rating Scales 19 – 8. . . . . . . . . . . . . . . . . . . . . . . . . . . . . . . . . . To create rating scales: 19 – 8. . . . . . . . . . . . . . . . . . . . . . . . . . . . . . . . . . .
Competencies 19 – 10. . . . . . . . . . . . . . . . . . . . . . . . . . . . . . . . . . . . . . . . . . Creating Competencies 19 – 11. . . . . . . . . . . . . . . . . . . . . . . . . . . . . . . . . . To create competencies: 19 – 11. . . . . . . . . . . . . . . . . . . . . . . . . . . . . . . . . . . To Enter a Rating Scale 19 – 11. . . . . . . . . . . . . . . . . . . . . . . . . . . . . . . . . .

xviii Oracle Payroll US User’s Guide
To enter Proficiency Levels 19 – 12. . . . . . . . . . . . . . . . . . . . . . . . . . . . . . . . To enter Competence Details 19 – 12. . . . . . . . . . . . . . . . . . . . . . . . . . . . . . To query a competence using the Find Competence window: 19 – 13. . . . .
Competence Types and Groupings 19 – 14. . . . . . . . . . . . . . . . . . . . . . . . Grouping Competencies is Useful 19 – 14. . . . . . . . . . . . . . . . . . . . . . . . Grouping Competencies into Types 19 – 17. . . . . . . . . . . . . . . . . . . . . . . To group competencies into types: 19 – 17. . . . . . . . . . . . . . . . . . . . . . . . . .
Chapter 20 Defining Competence Requirements 20 – 1. . . . . . . . . . . . . . . . . . . . . . Competence Requirements 20 – 2. . . . . . . . . . . . . . . . . . . . . . . . . . . . . . Why Define Competence Requirements? 20 – 3. . . . . . . . . . . . . . . . . . Can You Copy Competencies? 20 – 4. . . . . . . . . . . . . . . . . . . . . . . . . . . . Defining Competence Requirements – Core or
Generic Competencies 20 – 5. . . . . . . . . . . . . . . . . . . . . . . . . . . . . To define competence requirements (with core or
generic competencies) 20 – 5. . . . . . . . . . . . . . . . . . . . . . . . . . . . . . . . Copying Existing Competencies from an Organization,
Job or Position 20 – 7. . . . . . . . . . . . . . . . . . . . . . . . . . . . . . . . . . . . Copying the competencies from an organization, job or position 20 – 7. .
Defining Competence Requirements – No Core Competencies 20 – 8 To define competence requirements (no core competencies) 20 – 8. . . . . . .
Viewing Competencies at Organization, Job or Position 20 – 10. . . . . . To view competencies held at organization, job or position level: 20 – 10. .
Chapter 21 Identifying Qualifications and Delivering Competencies 21 – 1. . . . Identifying Qualifications and Delivering Competencies 21 – 2. . . . . .
Creating Qualification Types 21 – 3. . . . . . . . . . . . . . . . . . . . . . . . . . . . . To create qualification types: 21 – 3. . . . . . . . . . . . . . . . . . . . . . . . . . . . . .
Creating Schools and Colleges 21 – 5. . . . . . . . . . . . . . . . . . . . . . . . . . . . To create establishments: 21 – 5. . . . . . . . . . . . . . . . . . . . . . . . . . . . . . . . .
Chapter 22 Assessing and Appraising People 22 – 1. . . . . . . . . . . . . . . . . . . . . . . . . Assessing and Appraising People 22 – 2. . . . . . . . . . . . . . . . . . . . . . . . . . Competence–Based Assessments 22 – 3. . . . . . . . . . . . . . . . . . . . . . . . . . .
Why is Measurement Useful? 22 – 3. . . . . . . . . . . . . . . . . . . . . . . . . . . . Templates for Different Assessments 22 – 4. . . . . . . . . . . . . . . . . . . . . . What Type of Assessment do you Want to Perform? 22 – 4. . . . . . . . . Identifying Proficiency Levels in the Assessment Template 22 – 6. . . Identifying Competence Types and Competencies in
the Assessment Template 22 – 6. . . . . . . . . . . . . . . . . . . . . . . . . .

xixContents
Calculating Scores in the Assessment Template 22 – 8. . . . . . . . . . . . . Calculating the Total Score 22 – 9. . . . . . . . . . . . . . . . . . . . . . . . . . . . . . . Changing or Deleting an Assessment Template 22 – 9. . . . . . . . . . . . . Creating Templates for Competence–Based Assessments 22 – 10. . . . To create an assessment template: 22 – 10. . . . . . . . . . . . . . . . . . . . . . . . . .
Appraisals 22 – 14. . . . . . . . . . . . . . . . . . . . . . . . . . . . . . . . . . . . . . . . . . . . . . Appraisal Templates and Questionnaire Pages 22 – 14. . . . . . . . . . . . .
Create Your Appraisal Questionnaire Pages 22 – 18. . . . . . . . . . . . . . . . . Questions and Your Answer Format 22 – 20. . . . . . . . . . . . . . . . . . . . . . Creating the Questionnaire 22 – 23. . . . . . . . . . . . . . . . . . . . . . . . . . . . . . To create the questionnaire: 22 – 24. . . . . . . . . . . . . . . . . . . . . . . . . . . . . . .
Creating Categories 22 – 24. . . . . . . . . . . . . . . . . . . . . . . . . . . . . . . . . . . . . To create categories: 22 – 24. . . . . . . . . . . . . . . . . . . . . . . . . . . . . . . . . . . . .
Assembling the Categories Within the Questionnaire 22 – 25. . . . . . . . To assemble categories within the questionnaire: 22 – 25. . . . . . . . . . . . . . . To enter further categories: 22 – 25. . . . . . . . . . . . . . . . . . . . . . . . . . . . . . . To enter sub–categories: 22 – 26. . . . . . . . . . . . . . . . . . . . . . . . . . . . . . . . . .
Defining Answer Layout and Creating Questions 22 – 27. . . . . . . . . . . To define an answer layout: 22 – 27. . . . . . . . . . . . . . . . . . . . . . . . . . . . . . . To create text areas: 22 – 28. . . . . . . . . . . . . . . . . . . . . . . . . . . . . . . . . . . . . To create text: 22 – 28. . . . . . . . . . . . . . . . . . . . . . . . . . . . . . . . . . . . . . . . . . To create checkboxes: 22 – 29. . . . . . . . . . . . . . . . . . . . . . . . . . . . . . . . . . . . To create options with lists: 22 – 29. . . . . . . . . . . . . . . . . . . . . . . . . . . . . . . To create questions: 22 – 30. . . . . . . . . . . . . . . . . . . . . . . . . . . . . . . . . . . . .
Creating or Changing an Appraisal Template 22 – 31. . . . . . . . . . . . . . To create an appraisal template: 22 – 32. . . . . . . . . . . . . . . . . . . . . . . . . . . .
Chapter 23 Mapping Career Paths 23 – 1. . . . . . . . . . . . . . . . . . . . . . . . . . . . . . . . . . . Career and Succession Planning 23 – 2. . . . . . . . . . . . . . . . . . . . . . . . . . .
Modelling Career and Succession Plans 23 – 2. . . . . . . . . . . . . . . . . . . . Career Paths 23 – 3. . . . . . . . . . . . . . . . . . . . . . . . . . . . . . . . . . . . . . . . . . . Modelling Career and Succession Planning Based on Jobs 23 – 4. . . . To model career and succession planning based on jobs: 23 – 5. . . . . . . . .
Modelling Career and Succession Planning Based on Positions 23 – 6. . . . . . . . . . . . . . . . . . . . . . . . . . . . . . . . . . . . . .
To model career and succession planning based on positions: 23 – 7. . . . . Defining Career Paths 23 – 7. . . . . . . . . . . . . . . . . . . . . . . . . . . . . . . . . . . To define a career path: 23 – 8. . . . . . . . . . . . . . . . . . . . . . . . . . . . . . . . . . .
Lines of Progression for AAP Reporting 23 – 9. . . . . . . . . . . . . . . . . . .

xx Oracle Payroll US User’s Guide
Chapter 24 Matching People to Posts and Vacancies 24 – 1. . . . . . . . . . . . . . . . . . . Matching People Using Web–Based Access 24 – 2. . . . . . . . . . . . . . . . . .
Viewing the Results of Suitability Matches 24 – 2. . . . . . . . . . . . . . . . .
Chapter 25 Using Special Information Types for Skills Information 25 – 1. . . . . The Special Information Approach to Skills Matching 25 – 2. . . . . . . Viewing and Reporting Skills Matching Information 25 – 5. . . . . . . . Skills Matching Report 25 – 5. . . . . . . . . . . . . . . . . . . . . . . . . . . . . . . . . . To run the Skills Matching Report: 25 – 5. . . . . . . . . . . . . . . . . . . . . . . . .
Chapter 26 Absence Management and PTO Accruals 26 – 1. . . . . . . . . . . . . . . . . . Absence Management 26 – 2. . . . . . . . . . . . . . . . . . . . . . . . . . . . . . . . . . . . Absence Types 26 – 3. . . . . . . . . . . . . . . . . . . . . . . . . . . . . . . . . . . . . . . . . . .
Setup of Absence Types 26 – 4. . . . . . . . . . . . . . . . . . . . . . . . . . . . . . . . . Absence Elements 26 – 5. . . . . . . . . . . . . . . . . . . . . . . . . . . . . . . . . . . . . . Absence Recording 26 – 7. . . . . . . . . . . . . . . . . . . . . . . . . . . . . . . . . . . . .
Absence Management Setup Steps 26 – 9. . . . . . . . . . . . . . . . . . . . . . . . . To set up absence recording: 26 – 9. . . . . . . . . . . . . . . . . . . . . . . . . . . . . . .
Defining and Linking an Absence Element 26 – 9. . . . . . . . . . . . . . . . . To define an absence element: 26 – 9. . . . . . . . . . . . . . . . . . . . . . . . . . . . . . To link the absence element: 26 – 11. . . . . . . . . . . . . . . . . . . . . . . . . . . . . . .
Defining an Absence Type 26 – 11. . . . . . . . . . . . . . . . . . . . . . . . . . . . . . . To define an absence type: 26 – 12. . . . . . . . . . . . . . . . . . . . . . . . . . . . . . . .
Entering Absences 26 – 14. . . . . . . . . . . . . . . . . . . . . . . . . . . . . . . . . . . . . . . To enter absences for an employee: 26 – 14. . . . . . . . . . . . . . . . . . . . . . . . . .
Viewing and Reporting on Absence Information 26 – 16. . . . . . . . . . . . . Viewing Absence History 26 – 16. . . . . . . . . . . . . . . . . . . . . . . . . . . . . . . . To view absences for an employee: 26 – 16. . . . . . . . . . . . . . . . . . . . . . . . . .
Listing Employees by Absence Type 26 – 17. . . . . . . . . . . . . . . . . . . . . . To list employees by absence type: 26 – 17. . . . . . . . . . . . . . . . . . . . . . . . . .
Absences Report 26 – 18. . . . . . . . . . . . . . . . . . . . . . . . . . . . . . . . . . . . . . . To run the Absences Report: 26 – 18. . . . . . . . . . . . . . . . . . . . . . . . . . . . . .
Plans for Accrual of PTO 26 – 19. . . . . . . . . . . . . . . . . . . . . . . . . . . . . . . . . . Accrual Start Rules 26 – 20. . . . . . . . . . . . . . . . . . . . . . . . . . . . . . . . . . . . . Length of Service and Accrual Amount Rules 26 – 21. . . . . . . . . . . . . .
Accrual Plan Setup Steps 26 – 24. . . . . . . . . . . . . . . . . . . . . . . . . . . . . . . . . . To set up a PTO accrual plans: 26 – 24. . . . . . . . . . . . . . . . . . . . . . . . . . . .
Defining a PTO Accrual Plan 26 – 24. . . . . . . . . . . . . . . . . . . . . . . . . . . . . To define a PTO accrual plan: 26 – 25. . . . . . . . . . . . . . . . . . . . . . . . . . . . .
Setting Up Length of Service Bands 26 – 26. . . . . . . . . . . . . . . . . . . . . . .

xxiContents
To set up length of service bands for a PTO plan: 26 – 26. . . . . . . . . . . . . . Reviewing or Changing Net Accrual Calculations 26 – 27. . . . . . . . . . . Linking the Accrual Plan Elements 26 – 29. . . . . . . . . . . . . . . . . . . . . . . . To link the accrual plan elements: 26 – 29. . . . . . . . . . . . . . . . . . . . . . . . . .
Maintaining PTO Plan Records 26 – 30. . . . . . . . . . . . . . . . . . . . . . . . . . . . Enrolling Employees in PTO Accrual Plans 26 – 30. . . . . . . . . . . . . . . . To enroll participants in a PTO accrual plan: 26 – 30. . . . . . . . . . . . . . . . . To override the date for calculating length of service: 26 – 30. . . . . . . . . . .
Recording Accrued Time Taken 26 – 30. . . . . . . . . . . . . . . . . . . . . . . . . . Running the PTO Carry Over Process 26 – 31. . . . . . . . . . . . . . . . . . . . . To run the PTO Carry Over process: 26 – 31. . . . . . . . . . . . . . . . . . . . . . . .
Reviewing Employees’ PTO Accruals 26 – 33. . . . . . . . . . . . . . . . . . . . . . . To view an employee’s net PTO accrual: 26 – 33. . . . . . . . . . . . . . . . . . . . .
Chapter 27 Administering Events and Attendance 27 – 1. . . . . . . . . . . . . . . . . . . . . Setting Up Events 27 – 2. . . . . . . . . . . . . . . . . . . . . . . . . . . . . . . . . . . . . . . .
To create an event: 27 – 3. . . . . . . . . . . . . . . . . . . . . . . . . . . . . . . . . . . . . . Managing Bookings and Attendance 27 – 3. . . . . . . . . . . . . . . . . . . . . .
Employee Reviews 27 – 4. . . . . . . . . . . . . . . . . . . . . . . . . . . . . . . . . . . . . . . Entering an Employee Review 27 – 4. . . . . . . . . . . . . . . . . . . . . . . . . . . To enter a review for an employee: 27 – 5. . . . . . . . . . . . . . . . . . . . . . . . . .
Entering Performance Ratings 27 – 5. . . . . . . . . . . . . . . . . . . . . . . . . . . . To enter a performance rating: 27 – 6. . . . . . . . . . . . . . . . . . . . . . . . . . . . .
Chapter 28 Setup for Personal and Assignment Information 28 – 1. . . . . . . . . . . . Person Types 28 – 2. . . . . . . . . . . . . . . . . . . . . . . . . . . . . . . . . . . . . . . . . . . .
Defining Person Types 28 – 3. . . . . . . . . . . . . . . . . . . . . . . . . . . . . . . . . . To change a user name for a person type: 28 – 3. . . . . . . . . . . . . . . . . . . . . To map other user names to a person-type system name: 28 – 3. . . . . . . .
Person Types and Information Management 28 – 3. . . . . . . . . . . . . . . Assignment Statuses 28 – 5. . . . . . . . . . . . . . . . . . . . . . . . . . . . . . . . . . . . .
Defining Assignment Statuses 28 – 7. . . . . . . . . . . . . . . . . . . . . . . . . . . . To rename a user status: 28 – 7. . . . . . . . . . . . . . . . . . . . . . . . . . . . . . . . . . To supply additional user statuses for a system status: 28 – 7. . . . . . . . . . To create a secondary status: 28 – 8. . . . . . . . . . . . . . . . . . . . . . . . . . . . . .
Setup To Allow Processing After Termination 28 – 8. . . . . . . . . . . . . . Defining Special Information Types 28 – 10. . . . . . . . . . . . . . . . . . . . . . . .
To set up Special Information Types: 28 – 10. . . . . . . . . . . . . . . . . . . . . . . . Enabling Special Information Types 28 – 11. . . . . . . . . . . . . . . . . . . . . . . To enable Special Information Types: 28 – 11. . . . . . . . . . . . . . . . . . . . . . . .
xxii Oracle Payroll US User’s Guide
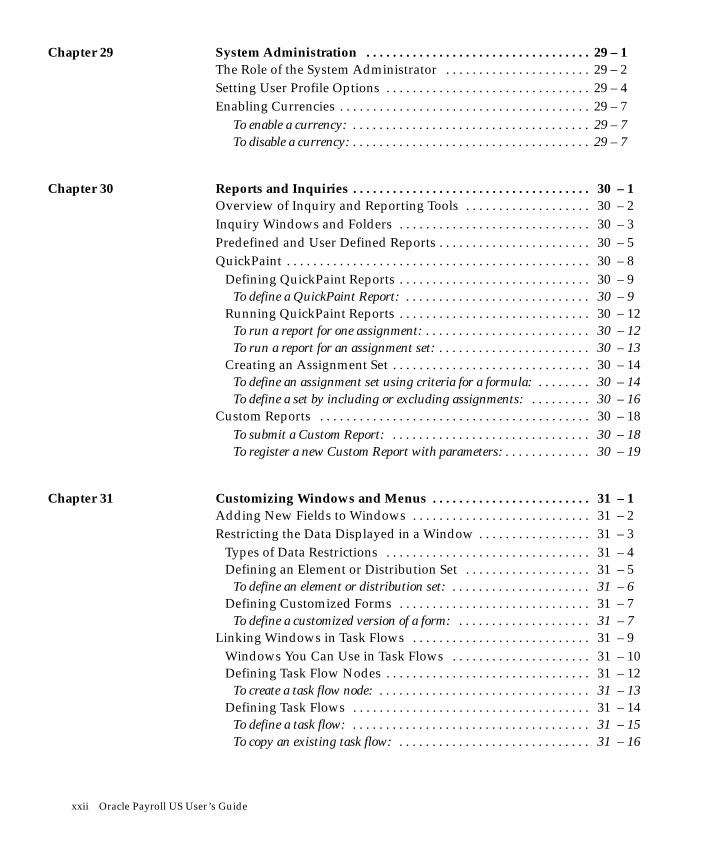
Chapter 29 System Administration 29 – 1. . . . . . . . . . . . . . . . . . . . . . . . . . . . . . . . . . The Role of the System Administrator 29 – 2. . . . . . . . . . . . . . . . . . . . . . Setting User Profile Options 29 – 4. . . . . . . . . . . . . . . . . . . . . . . . . . . . . . . Enabling Currencies 29 – 7. . . . . . . . . . . . . . . . . . . . . . . . . . . . . . . . . . . . . .
To enable a currency: 29 – 7. . . . . . . . . . . . . . . . . . . . . . . . . . . . . . . . . . . . To disable a currency: 29 – 7. . . . . . . . . . . . . . . . . . . . . . . . . . . . . . . . . . . .
Chapter 30 Reports and Inquiries 30 – 1. . . . . . . . . . . . . . . . . . . . . . . . . . . . . . . . . . . . Overview of Inquiry and Reporting Tools 30 – 2. . . . . . . . . . . . . . . . . . . Inquiry Windows and Folders 30 – 3. . . . . . . . . . . . . . . . . . . . . . . . . . . . . Predefined and User Defined Reports 30 – 5. . . . . . . . . . . . . . . . . . . . . . . QuickPaint 30 – 8. . . . . . . . . . . . . . . . . . . . . . . . . . . . . . . . . . . . . . . . . . . . . .
Defining QuickPaint Reports 30 – 9. . . . . . . . . . . . . . . . . . . . . . . . . . . . . To define a QuickPaint Report: 30 – 9. . . . . . . . . . . . . . . . . . . . . . . . . . . .
Running QuickPaint Reports 30 – 12. . . . . . . . . . . . . . . . . . . . . . . . . . . . . To run a report for one assignment: 30 – 12. . . . . . . . . . . . . . . . . . . . . . . . . To run a report for an assignment set: 30 – 13. . . . . . . . . . . . . . . . . . . . . . .
Creating an Assignment Set 30 – 14. . . . . . . . . . . . . . . . . . . . . . . . . . . . . . To define an assignment set using criteria for a formula: 30 – 14. . . . . . . . To define a set by including or excluding assignments: 30 – 16. . . . . . . . .
Custom Reports 30 – 18. . . . . . . . . . . . . . . . . . . . . . . . . . . . . . . . . . . . . . . . . To submit a Custom Report: 30 – 18. . . . . . . . . . . . . . . . . . . . . . . . . . . . . . To register a new Custom Report with parameters: 30 – 19. . . . . . . . . . . . .
Chapter 31 Customizing Windows and Menus 31 – 1. . . . . . . . . . . . . . . . . . . . . . . . Adding New Fields to Windows 31 – 2. . . . . . . . . . . . . . . . . . . . . . . . . . . Restricting the Data Displayed in a Window 31 – 3. . . . . . . . . . . . . . . . .
Types of Data Restrictions 31 – 4. . . . . . . . . . . . . . . . . . . . . . . . . . . . . . . Defining an Element or Distribution Set 31 – 5. . . . . . . . . . . . . . . . . . . To define an element or distribution set: 31 – 6. . . . . . . . . . . . . . . . . . . . .
Defining Customized Forms 31 – 7. . . . . . . . . . . . . . . . . . . . . . . . . . . . . To define a customized version of a form: 31 – 7. . . . . . . . . . . . . . . . . . . .
Linking Windows in Task Flows 31 – 9. . . . . . . . . . . . . . . . . . . . . . . . . . . Windows You Can Use in Task Flows 31 – 10. . . . . . . . . . . . . . . . . . . . . Defining Task Flow Nodes 31 – 12. . . . . . . . . . . . . . . . . . . . . . . . . . . . . . . To create a task flow node: 31 – 13. . . . . . . . . . . . . . . . . . . . . . . . . . . . . . . .
Defining Task Flows 31 – 14. . . . . . . . . . . . . . . . . . . . . . . . . . . . . . . . . . . . To define a task flow: 31 – 15. . . . . . . . . . . . . . . . . . . . . . . . . . . . . . . . . . . . To copy an existing task flow: 31 – 16. . . . . . . . . . . . . . . . . . . . . . . . . . . . .
xxiiiContents
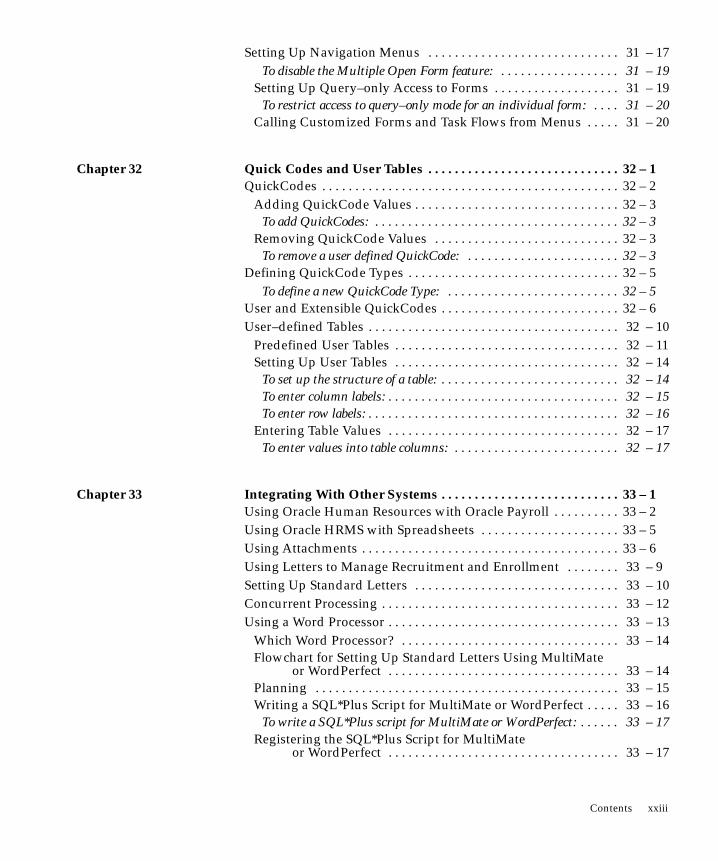
Setting Up Navigation Menus 31 – 17. . . . . . . . . . . . . . . . . . . . . . . . . . . . . To disable the Multiple Open Form feature: 31 – 19. . . . . . . . . . . . . . . . . .
Setting Up Query–only Access to Forms 31 – 19. . . . . . . . . . . . . . . . . . . To restrict access to query–only mode for an individual form: 31 – 20. . . .
Calling Customized Forms and Task Flows from Menus 31 – 20. . . . .
Chapter 32 Quick Codes and User Tables 32 – 1. . . . . . . . . . . . . . . . . . . . . . . . . . . . . QuickCodes 32 – 2. . . . . . . . . . . . . . . . . . . . . . . . . . . . . . . . . . . . . . . . . . . . .
Adding QuickCode Values 32 – 3. . . . . . . . . . . . . . . . . . . . . . . . . . . . . . . To add QuickCodes: 32 – 3. . . . . . . . . . . . . . . . . . . . . . . . . . . . . . . . . . . . .
Removing QuickCode Values 32 – 3. . . . . . . . . . . . . . . . . . . . . . . . . . . . To remove a user defined QuickCode: 32 – 3. . . . . . . . . . . . . . . . . . . . . . .
Defining QuickCode Types 32 – 5. . . . . . . . . . . . . . . . . . . . . . . . . . . . . . . . To define a new QuickCode Type: 32 – 5. . . . . . . . . . . . . . . . . . . . . . . . . .
User and Extensible QuickCodes 32 – 6. . . . . . . . . . . . . . . . . . . . . . . . . . . User–defined Tables 32 – 10. . . . . . . . . . . . . . . . . . . . . . . . . . . . . . . . . . . . . .
Predefined User Tables 32 – 11. . . . . . . . . . . . . . . . . . . . . . . . . . . . . . . . . . Setting Up User Tables 32 – 14. . . . . . . . . . . . . . . . . . . . . . . . . . . . . . . . . . To set up the structure of a table: 32 – 14. . . . . . . . . . . . . . . . . . . . . . . . . . . To enter column labels: 32 – 15. . . . . . . . . . . . . . . . . . . . . . . . . . . . . . . . . . . To enter row labels: 32 – 16. . . . . . . . . . . . . . . . . . . . . . . . . . . . . . . . . . . . . .
Entering Table Values 32 – 17. . . . . . . . . . . . . . . . . . . . . . . . . . . . . . . . . . . To enter values into table columns: 32 – 17. . . . . . . . . . . . . . . . . . . . . . . . .
Chapter 33 Integrating With Other Systems 33 – 1. . . . . . . . . . . . . . . . . . . . . . . . . . . Using Oracle Human Resources with Oracle Payroll 33 – 2. . . . . . . . . . Using Oracle HRMS with Spreadsheets 33 – 5. . . . . . . . . . . . . . . . . . . . . Using Attachments 33 – 6. . . . . . . . . . . . . . . . . . . . . . . . . . . . . . . . . . . . . . . Using Letters to Manage Recruitment and Enrollment 33 – 9. . . . . . . . Setting Up Standard Letters 33 – 10. . . . . . . . . . . . . . . . . . . . . . . . . . . . . . . Concurrent Processing 33 – 12. . . . . . . . . . . . . . . . . . . . . . . . . . . . . . . . . . . . Using a Word Processor 33 – 13. . . . . . . . . . . . . . . . . . . . . . . . . . . . . . . . . . .
Which Word Processor? 33 – 14. . . . . . . . . . . . . . . . . . . . . . . . . . . . . . . . . Flowchart for Setting Up Standard Letters Using MultiMate
or WordPerfect 33 – 14. . . . . . . . . . . . . . . . . . . . . . . . . . . . . . . . . . . Planning 33 – 15. . . . . . . . . . . . . . . . . . . . . . . . . . . . . . . . . . . . . . . . . . . . . . Writing a SQL*Plus Script for MultiMate or WordPerfect 33 – 16. . . . . To write a SQL*Plus script for MultiMate or WordPerfect: 33 – 17. . . . . .
Registering the SQL*Plus Script for MultiMate or WordPerfect 33 – 17. . . . . . . . . . . . . . . . . . . . . . . . . . . . . . . . . . .

xxiv Oracle Payroll US User’s Guide
Linking the SQL*Plus Script With a Letter for MultiMate or WordPerfect 33 – 17. . . . . . . . . . . . . . . . . . . . . . . . . . . . . . . . . . .
To define a standard letter type: 33 – 18. . . . . . . . . . . . . . . . . . . . . . . . . . . . Writing a Skeleton Letter 33 – 18. . . . . . . . . . . . . . . . . . . . . . . . . . . . . . . . Requesting Letters for MultiMate or WordPerfect 33 – 19. . . . . . . . . . . To submit an automatic letter request: 33 – 20. . . . . . . . . . . . . . . . . . . . . . . To create a manual letter request: 33 – 20. . . . . . . . . . . . . . . . . . . . . . . . . . .
Merging the Data File With the Standard Letter MultiMate or WordPerfect 33 – 21. . . . . . . . . . . . . . . . . . . . . . . . . . . . . . . . . . .
Flowchart for Setting Up Standard Letters Using Microsoft Word 33 – 22. . . . . . . . . . . . . . . . . . . . . . . . . . . . . . . . . . .
Writing a SQL*Plus Script for Microsoft Word 33 – 23. . . . . . . . . . . . . . To write a SQL*Plus script for Microsoft Word: 33 – 24. . . . . . . . . . . . . . .
Generating a Microsoft Word Letter 33 – 25. . . . . . . . . . . . . . . . . . . . . . . To generate and merge a Microsoft Word document: 33 – 25. . . . . . . . . . .
Using Oracle Reports 33 – 27. . . . . . . . . . . . . . . . . . . . . . . . . . . . . . . . . . . . . Planning the Content and Layout 33 – 27. . . . . . . . . . . . . . . . . . . . . . . . . Writing the Report 33 – 28. . . . . . . . . . . . . . . . . . . . . . . . . . . . . . . . . . . . . . Registering the Report 33 – 28. . . . . . . . . . . . . . . . . . . . . . . . . . . . . . . . . . Linking the Report With a Letter 33 – 28. . . . . . . . . . . . . . . . . . . . . . . . . . To define a standard letter type: 33 – 29. . . . . . . . . . . . . . . . . . . . . . . . . . . .
Running the Report 33 – 29. . . . . . . . . . . . . . . . . . . . . . . . . . . . . . . . . . . . . To submit an automatic letter request: 33 – 30. . . . . . . . . . . . . . . . . . . . . . . To create a manual letter request: 33 – 30. . . . . . . . . . . . . . . . . . . . . . . . . . .
Chapter 34 Security and Control 34 – 1. . . . . . . . . . . . . . . . . . . . . . . . . . . . . . . . . . . . . Security in Oracle HRMS 34 – 2. . . . . . . . . . . . . . . . . . . . . . . . . . . . . . . . . .
Access Control through User Responsibilities 34 – 2. . . . . . . . . . . . . . Security Profiles 34 – 4. . . . . . . . . . . . . . . . . . . . . . . . . . . . . . . . . . . . . . . . Database Access Without Online Access 34 – 8. . . . . . . . . . . . . . . . . . . Menu Structures 34 – 8. . . . . . . . . . . . . . . . . . . . . . . . . . . . . . . . . . . . . . . . Security Groups 34 – 9. . . . . . . . . . . . . . . . . . . . . . . . . . . . . . . . . . . . . . . .
Setting Up Security in Oracle HRMS 34 – 10. . . . . . . . . . . . . . . . . . . . . . . . To set up a new responsibility for Oracle HRMS: 34 – 11. . . . . . . . . . . . . . To set up a new reporting user: 34 – 11. . . . . . . . . . . . . . . . . . . . . . . . . . . .
Defining Security Profiles 34 – 13. . . . . . . . . . . . . . . . . . . . . . . . . . . . . . . . To define a security profile: 34 – 13. . . . . . . . . . . . . . . . . . . . . . . . . . . . . . .
Running the HRMS Security Processes 34 – 15. . . . . . . . . . . . . . . . . . . .
Chapter 35 Audit 35 – 1. . . . . . . . . . . . . . . . . . . . . . . . . . . . . . . . . . . . . . . . . . . . . . . . . . AuditTrail 35 – 2. . . . . . . . . . . . . . . . . . . . . . . . . . . . . . . . . . . . . . . . . . . . . . .

xxvContents
Setting Up AuditTrail 35 – 2. . . . . . . . . . . . . . . . . . . . . . . . . . . . . . . . . . . To set up AuditTrail: 35 – 2. . . . . . . . . . . . . . . . . . . . . . . . . . . . . . . . . . . .
Reporting on Audit Information 35 – 4. . . . . . . . . . . . . . . . . . . . . . . . . . To run the predefined audit report: 35 – 5. . . . . . . . . . . . . . . . . . . . . . . . .
Designing Your Own Audit Report 35 – 6. . . . . . . . . . . . . . . . . . . . . . .
Appendix A Default Menus A – 1. . . . . . . . . . . . . . . . . . . . . . . . . . . . . . . . . . . . . . . . . . Default Navigation Menus for HR with Payroll Responsibility A – 2. Windows and their Navigation Paths A – 10. . . . . . . . . . . . . . . . . . . . . . .
Appendix B Key and Descriptive Flexfields B – 1. . . . . . . . . . . . . . . . . . . . . . . . . . . . User Definable Key Flexfields B – 2. . . . . . . . . . . . . . . . . . . . . . . . . . . . . User Definable Descriptive Flexfields B – 5. . . . . . . . . . . . . . . . . . . . . . .
List of Descriptive Flexfields B – 6. . . . . . . . . . . . . . . . . . . . . . . . . . . . . Descriptive Flexfields with Startup Data B – 9. . . . . . . . . . . . . . . . . . . .
Changing Address Styles B – 9. . . . . . . . . . . . . . . . . . . . . . . . . . . . . . . . Protected Flexfields B – 10. . . . . . . . . . . . . . . . . . . . . . . . . . . . . . . . . . . . . .
Appendix C Database Items C – 1. . . . . . . . . . . . . . . . . . . . . . . . . . . . . . . . . . . . . . . . . . Static Database Items C – 2. . . . . . . . . . . . . . . . . . . . . . . . . . . . . . . . . . . . .
Applicant Information C – 2. . . . . . . . . . . . . . . . . . . . . . . . . . . . . . . . . . Employee Assignment Information C – 2. . . . . . . . . . . . . . . . . . . . . . . Contact Addresses C – 7. . . . . . . . . . . . . . . . . . . . . . . . . . . . . . . . . . . . . . Contact Information C – 8. . . . . . . . . . . . . . . . . . . . . . . . . . . . . . . . . . . . Employee Hire Information C – 10. . . . . . . . . . . . . . . . . . . . . . . . . . . . . . Location Details C – 10. . . . . . . . . . . . . . . . . . . . . . . . . . . . . . . . . . . . . . . . Payroll Details C – 12. . . . . . . . . . . . . . . . . . . . . . . . . . . . . . . . . . . . . . . . . People Addresses C – 13. . . . . . . . . . . . . . . . . . . . . . . . . . . . . . . . . . . . . . . People Information C – 15. . . . . . . . . . . . . . . . . . . . . . . . . . . . . . . . . . . . . Recruiter Information C – 17. . . . . . . . . . . . . . . . . . . . . . . . . . . . . . . . . . . Supervisor Information C – 18. . . . . . . . . . . . . . . . . . . . . . . . . . . . . . . . . . Date Information C – 18. . . . . . . . . . . . . . . . . . . . . . . . . . . . . . . . . . . . . . .
Dynamic Database Items C – 19. . . . . . . . . . . . . . . . . . . . . . . . . . . . . . . . . . Element Database Items C – 19. . . . . . . . . . . . . . . . . . . . . . . . . . . . . . . . . Grade Rate Database Items C – 22. . . . . . . . . . . . . . . . . . . . . . . . . . . . . . Pay Scale Rate Database Items C – 22. . . . . . . . . . . . . . . . . . . . . . . . . . . . Descriptive Flexfield Database Items C – 23. . . . . . . . . . . . . . . . . . . . . . Key Flexfield Database Items C – 25. . . . . . . . . . . . . . . . . . . . . . . . . . . . . Absence Database Items C – 26. . . . . . . . . . . . . . . . . . . . . . . . . . . . . . . . .

xxvi Oracle Payroll US User’s Guide
Appendix D Template SQL*Plus Scripts D – 1. . . . . . . . . . . . . . . . . . . . . . . . . . . . . . . Template SQL*Plus PERWPOUK D – 2. . . . . . . . . . . . . . . . . . . . . . . . . Template SQL*Plus Script PERWPWUK D – 6. . . . . . . . . . . . . . . . . . . OTA SQL*Plus Script to Produce Confirmation Letters D – 8. . . . . .
Index

iPreface
Comment: Master copy of generic Preface passed to Kevin 13 Jan. MO
Preface
Welcome to the Oracle� Human Resources North American User’s Guide,Release 11.
This guide includes the information you need to set up Oracle HumanResources to meet the requirements of your enterprise. It describeshow you can represent your enterprise structures, policies and peopleon the system and use this information to manage your payroll. Itcontains detailed information about the following:
• Overview and reference information
• Oracle Human Resources implementation suggestions
• Specific tasks you can accomplish using Oracle HumanResources
• How to use Oracle Human Resources forms and windows
• Oracle Human Resources programs, reports, and listings
• Oracle Human Resources functions and features
This preface explains how this user’s guide is organized and introducesother sources of information that can help you.

ii Oracle Human Resources North American User’s Guide
About This User’s Guide
The first part of this guide explains how you can set up Oracle HumanResources to represent your enterprise structures and policies, and howyou relate these to the people in your system.
• Chapter 1 describes the requirements of human resource andpayroll management, and the processes they involve. Thisprovides the context for the information model you can constructin Oracle HRMS.
• Chapters 2 through 5 explain how to represent your enterprisestructures, including organizations, jobs and positions, grades,and payrolls.
• Chapter 6 describes three models appropriate to three differenttypes of enterprise It covers the set up of each of thesestructures. explains how to set up the system to collect costinginformation during a payroll run.
• Chapters 7 through 9 explain how you can represent yourcompensation and benefit policies in the system and enter andreport on compensation and benefit information for youremployees.
Once you have set up this key information in the system, you canconsider how to use Oracle Human Resources to help you with themain HR management tasks.
• Chapters 10 through 12 cover setting up and using salaryadministration, cost control and human resource budgets.
• Chapters 13 and 14 explain how you can enter people on thesystem, assign them to work structures, and hold various kindsof information about them. These chapters also introduce you tothe basics of hiring, redeploying, and termination ofemployment.
• Chapters 15 through 25 cover the key management processesand how you might use Oracle HRMS to support them. Theseinclude:
– Absence and attendance
– Manpower planning and budgeting
– Cost control
– Recruitment
– Training administration and other special information

iiiPreface
– Skills matching
– Succession planning
– Career planning
– Job evaluation
– Government Mandated HR Reporting
The final chapters of the guide focus on tasks for the systemadministrator and setup team.
• Chapter 28 explains how to set up person types and assignmentstatuses, and how to define special information types.
• Chapter 29 describes the role of the System Administrator.
• Chapters 30 and 31 explain how you can customize the wayinformation is entered and extracted from the system. Thisincludes:
– customizing inquiry windows and writing reports
– using batch input
– customizing the user interface
– adding your own fields to windows
• Chapter 32 explains how to set up QuickCodes and user tables toadd lists and tables of valid values to the system.
• Chapters 33 through 35 look at how you can integrate OracleHuman Resources with Oracle Payroll, and use it with othersoftware such as word processors and spreadsheets. Thesechapters also consider how you control security of access, set upsecurity, and set up an audit trail.
The Appendixes provide a reference source about the default menus,and about flexfields and database items in Oracle HRMS. Appendix Dprovides a template SQL*Plus script for use with standard letters.
Audience for this Guide
This guide assumes you have a working knowledge of the following:
• the principles and customary practices of your business area
• Oracle Human Resources

iv Oracle Human Resources North American User’s Guide
If you have not yet used Oracle Human Resources we suggestyou attend one or more of the training classes for this productavailable through Oracle Education.
• the Oracle Applications graphical user interface.
To learn more about this, read the Oracle Applications User’sGuide.
See Other Information Sources below for further details of OracleApplications product information.
Do Not Use Database Tools to Modify Oracle Applications Data
Oracle provides powerful tools you can use to create, store, change,retrieve and maintain information in an Oracle database. But if you useOracle tools like SQL*Plus to modify Oracle Applications data, you riskdestroying the integrity of your data and you lose the ability to auditchanges to your data.
Because Oracle Applications tables are interrelated, any change youmake using an Oracle Applications form can update many tables atonce. But when you modify Oracle Applications data using anythingother than Oracle Applications forms, you may change a row in onetable without making corresponding changes in related tables. If yourtables get out of synchronization with each other, you risk retrievingerroneous information and you risk unpredictable results throughoutOracle Applications.
When you use Oracle Applications forms to modify your data, OracleApplications automatically checks that your changes are valid. OracleApplications also keeps track of who changes information. But, if youenter information into database tables using database tools, you maystore invalid information. You also lose the ability to track who haschanged your information because SQL*Plus and other database toolsdo not keep a record of changes.
Consequently, we STRONGLY RECOMMEND that you never useSQL*Plus, Oracle Data Browser, database triggers, or any other tool tomodify Oracle Applications tables, unless we tell you to do so in ourmanuals.

vPreface
Other Information Sources
You can choose from many sources of information, includingdocumentation, training, and support services, to increase yourknowledge and understanding of Oracle Human Resources.
Online Documentation
All Oracle Applications user’s guides are available online, in bothHTML and Adobe Acrobat format. Most other Oracle Applicationsdocumentation is available in Adobe Acrobat format.
The paper and online versions of this manual have identical content,and you can use whichever format is more convenient.
The HTML version of this book is optimized for on–screen reading,and lets you follow hypertext links for easy access to books across ourentire library. You can also search for words and phrases if yournational language is supported by Oracle’s Information Navigator.The HTML documentation is available from the Oracle Applicationstoolbar, or from a URL provided by your system administrator. Notethat the HTML documentation is translated into over twentylanguages.
You can order an Oracle Applications Documentation Library CDcontaining Adobe Acrobat versions of each manual in the OracleApplications documentation set. Using this CD, you can search forinformation, read it on–screen, and print individual pages, sections, orentire books. When you print from Adobe Acrobat, the resultingprintouts look just like pages from an Oracle Applications hardcopymanual.
Most Oracle Applications documentation is available in Adobe Acrobatformat on the Oracle Applications Documentation Library CD. We supplythis CD with every software shipment.
If this guide refers you to other Oracle Applications documentation,use only the Release 11 versions of those books unless we specifyotherwise.
Related User’s Guides
Oracle Human Resources shares business and setup information withother Oracle Applications products. Even if you have not installedthem as separate products, your Oracle Human Resources applicationincludes some forms and functionality from other Oracle Applications.

vi Oracle Human Resources North American User’s Guide
Therefore, you may want to refer to other user’s guides when you setup and use Oracle Human Resources.
If you do not have the hardcopy versions of these manuals, you canread them by choosing Library from the Help menu, or by readingfrom the Oracle Applications Document Library CD, or by using a webbrowser with a URL that your system administrator provides.
Oracle Payroll User’s Guide
This guide is aimed at Payroll managers and explains how to set upand use Oracle Payroll to pay your employees and meet necessarylegislative requirements.
Oracle Human Resources User’s Guide
This guide is aimed at HR managers and explains how to set up anduse Oracle Human Resources to meet the requirements of yourenterprise. It describes how you can represent your enterprisestructures, policies, and people on the system and use this informationto manage your human resources.
Oracle Training Administration User’s Guide
This guide explains how you can use OTA with Oracle HR to supporteach part of your enterprise’s training cycle.
Application Data Export User’s Guide
This guide is aimed at end–users, system administrators andconsultants. It describes how you can use ADE to export data fromOracle Human Resources into either a spreadsheet or mail mergeapplication. It also contains information on how to install ADE.
Oracle HRMS Implementation Guide
This guide includes modular implementation flowcharts and checkliststo assist with your project planning. It contains a summary of thesequence of recommended steps for implementing Oracle HumanResources and Oracle Payroll. Full instructions for eachimplementation step are contained in the User’s Guide.

viiPreface
Oracle Applications User’s Guide
This guide explains how to navigate, enter data, query, run reports, andintroduces other basic features of the graphical user interface (GUI)available with this release of Oracle Applications. It also includesinformation on setting user profiles, as well as running and reviewingreports and concurrent requests.
You can access this guide online by choosing ”Getting Started withOracle Applications” from any Oracle Applications help file.
Oracle Applications Flexfields Guide
This guide provides flexfields planning, setup, and referenceinformation for your implementation team, as well as for usersresponsible for the ongoing maintenance of Oracle Applicationsproduct data. This guide also provides information on creating customreports on flexfields data.
Oracle Workflow Guide
This manual explains how to define new workflow business processesas well as customize existing Oracle Applications–embedded workflowprocesses. You also use this guide to complete the setup stepsnecessary for any Oracle Applications product that includesworkflow–enabled processes.
Oracle Alert User’s Guide
Use this manual to define periodic and event alerts that monitor thestatus of your Oracle Applications data.
Country–Specific Manuals
Use these manuals to meet statutory requirements and commonbusiness practices in your country or region. They also describeadditional features added to Oracle Human Resources to meet thoserequirements. Look for a User’s Guide appropriate to your country.For example, Oracle user’s guides for Japanese users exist in theJapanese language.
Oracle Applications Implementation Wizard User’s Guide
If you are implementing more than one Oracle product, you can use theOracle Applications Implementation Wizard to coordinate your setupactivities. This guide describes how to use the wizard.

viii Oracle Human Resources North American User’s Guide
Oracle Applications Developer’s Guide
This guide contains the coding standards followed by the OracleApplications development staff. It describes the Oracle ApplicationObject Library components needed to implement the OracleApplications user interface described in the Oracle Applications UserInterface Standards. It also provides information to help you build yourcustom Developer/2000 forms so that they integrate with OracleApplications.
Oracle Applications User Interface Standards
This manual contains the user interface (UI) standards followed by theOracle Applications development staff. It describes the UI for theOracle Applications products and how to apply this UI to the design ofan application built by using Oracle Forms 4.5.
Installation and System Administration
Oracle Applications Installation Manual
This manual and the accompanying release notes provide informationyou need to successfully install Oracle Financials, Oracle GovernmentFinancials, Oracle Manufacturing, or Oracle Human Resources in yourspecific hardware and operating system software environment.
Oracle Applications Upgrade Manual
This manual explains how to prepare your Oracle Applicationsproducts for an upgrade. It also contains information on finishing theupgrade procedure for each product. Refer to this manual and theOracle Applications Installation Manual when you plan to upgrade yourproducts.
Oracle Applications System Administrator’s Guide
This manual provides planning and reference information for theOracle Applications System Administrator. It contains information onhow to define security, customize menus and online help, and manageprocessing.
Oracle HRMS Technical Reference Manual
This manual contains database diagrams and a description of OracleHRMS database tables, forms, reports, and programs. This information

ixPreface
helps you convert data from your existing applications, integrateOracle HRMS with other non–Oracle applications, and write customreports.
You can order a technical reference manual for any product you havelicensed. Technical reference manuals are available in paper formatonly.
Other Information
Training
Oracle Education offers a complete set of training courses to help youand your staff master Oracle Applications. We can help you develop atraining plan that provides thorough training for both your projectteam and your end users. We will work with you to organize coursesappropriate to your job or area of responsibility.
Training professionals can show you how to plan your trainingthroughout the implementation process so that the right amount ofinformation is delivered to key people when they need it the most. Youcan attend courses at any one of our many Educational Centers, or youcan arrange for our trainers to teach at your facility. In addition, wecan tailor standard courses or develop custom courses to meet yourneeds.
Support
From on–site support to central support, our team of experiencedprofessionals provides the help and information you need to keepOracle Human Resources working for you. This team includes yourTechnical Representative, Account Manager, and Oracle’s large staff ofconsultants and support specialists with expertise in your businessarea, managing an Oracle server, and your hardware and softwareenvironment.
Finding the Latest Information
For information about any new features that were not available whenthis user’s guide was printed, look at the What’s New? section on themain Help menu. This information is updated for each new release ofOracle Human Resources HTML Help.

x Oracle Human Resources North American User’s Guide
About Oracle
Oracle develops and markets an integrated line of software productsfor database management, applications development, decision support,and office automation, as well as a complete family of financial,manufacturing, and human resource applications.
Oracle products are available for mainframes, minicomputers, personalcomputers, network computers, and personal digital assistants,allowing organizations to integrate different computers, differentoperating systems, different networks, and even different databasemanagement systems, into a single, unified computing and informationresource.
Oracle offers its products, along with related consulting, education, andsupport services, in over 140 countries around the world. OracleCorporation is the world’s leading supplier of software for informationmanagement, and is the world’s second largest software company.
Thank You
Thank you for using Oracle Human Resources and this user’s guide.
We value your comments and feedback. At the end of this manual is aReader’s Comment Form you can use to explain what you like ordislike about Oracle Human Resources or this user’s guide. Mail yourcomments to the following address or call us directly at (650) 506–7000.
Oracle Applications Documentation ManagerOracle Corporation500 Oracle ParkwayRedwood Shores, CA 94065U.S.A.
Or, send electronic mail to [email protected].

C H A P T E R
1O
1 – 1Introduction
Introduction
racle Human Resource Management Systems is the family namefor an integrated group of applications that support the management ofpeople. This chapter reviews the business needs of human resourcemanagement and how they are met by Oracle HRMS. It provides anintroduction to key components and special features of the system.

1 – 2 Oracle Human Resources North American User’s Guide
Human Resource ManagementThe term Human Resource Management owes much to the view thatemployees are an asset to be managed in the same way as other,non–human, assets.
When the emphasis is on Resource Management, then in the formalaccounts of any enterprise, people appear only as costs. However, theycan also be thought of as assets in the sense that they are a productiveresource, requiring proper maintenance and renewal.
People Management
The management of people within any enterprise involves a complexand dynamic inter–relationship of management and personal skills.This complexity results in a unique set of structures and policies withineach enterprise.
This unique identity is often referred to as the culture of the enterprise,and as the enterprise develops so does its unique culture.
Company Culture
The organizational structures of an enterprise, the ways in which itsemployees work, and its compensation policies all reflect its uniqueculture. This culture is also evident in more subtle ways, includingenterprise policies on information sharing and decision making.
The cultural diversity of enterprises is reflected in their implementationand use of information systems. It is generally true that all companiesneed a human resource information system. However, the informationthey require, its structure, and the means by which they obtain it,produce a different system in every case.
Packaged systems solutions like Oracle HRMS provide a core system,which each enterprise customizes to meet its own needs.Customization involves the definition of special informationrequirements, structures, and processes. It also involves analysis of theworking practices associated with day–to–day maintenance and use ofthe system.
Changing Role of Human Resource Management
Human resource management was originally an administrative andwelfare role within an enterprise. This often included recruitment andrecord–keeping functions.
This role was primarily reactive in nature. Human Resources respondedto the needs of both managers and employees, but did not anticipatethem.

1 – 3Introduction
In the last few decades, human resource management has evolved andassumed a more proactive role. This reflects the recognition of theimportance of managing people in the successful achievement ofenterprise objectives.
The result now is that this function within many enterprisesencompasses responsibilities that include a wide ranging spectrum ofactivities.
Payroll Management
In contrast, payroll management has traditionally been a function of theFinance Group in most enterprises. It has been responsible for thecorrect payment of employees in line with local and national legislationas well as company policy.
Often this has been a reactive and operational role in which payrollstaff responded to the needs of both line managers and employees.
Separate v. Integrated HRMS Systems
Traditionally, Human Resources and Payroll groups have both beenresponsible for holding and managing human resource information –often in separate systems.
There is growing acknowledgement of the importance of complete,accurate, and timely information about the people within an enterprise.This has led to a greater demand for information derived from bothHuman Resources and Payroll sources.
Historically this was achieved by the development of Interface products,which allowed technical specialists to transfer data between the twosystems.
Many systems attempt to simplify the transfer of data between twosystems. Oracle HRMS is one of the first to provide a truly integratedsystem, which both functions can genuinely share. At the same time, itis flexible enough to be implemented for use in a human resources onlyor a payroll only environment. In each case you have access to the fullrange of functionality associated with human resources or payroll.
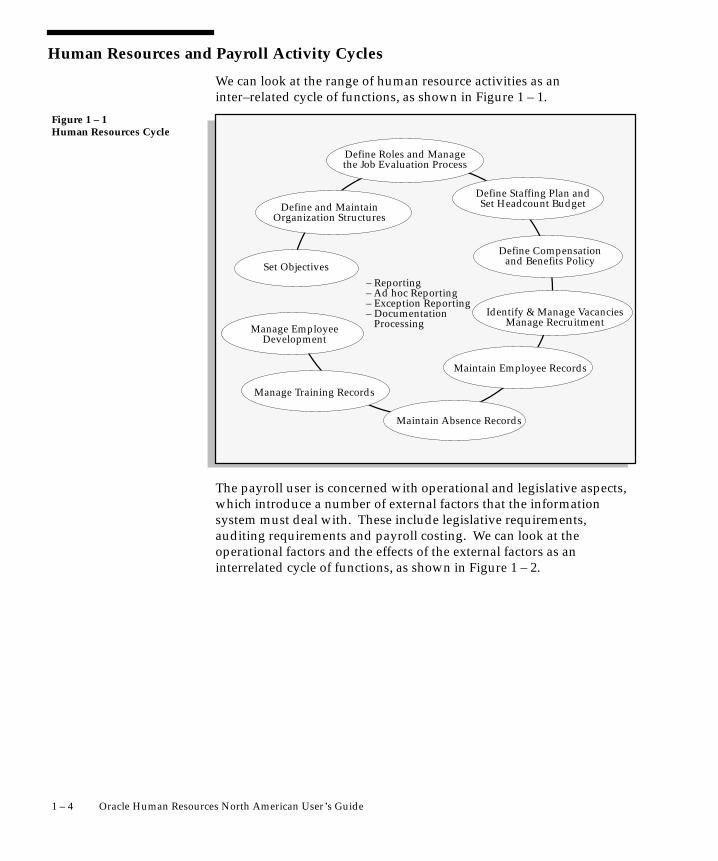
1 – 4 Oracle Human Resources North American User’s Guide
Human Resources and Payroll Activity Cycles
We can look at the range of human resource activities as aninter–related cycle of functions, as shown in Figure 1 – 1.
Figure 1 – 1Human Resources Cycle
Set Objectives
Define and MaintainOrganization Structures
Define Roles and Managethe Job Evaluation Process
Define Staffing Plan andSet Headcount Budget
Define Compensationand Benefits Policy
Maintain Employee Records
Identify & Manage VacanciesManage Recruitment
Maintain Absence Records
Manage Training Records
Manage EmployeeDevelopment
– Reporting– Ad hoc Reporting– Exception Reporting– Documentation Processing
The payroll user is concerned with operational and legislative aspects,which introduce a number of external factors that the informationsystem must deal with. These include legislative requirements,auditing requirements and payroll costing. We can look at theoperational factors and the effects of the external factors as aninterrelated cycle of functions, as shown in Figure 1 – 2.

1 – 5Introduction
Figure 1 – 2The Payroll Cycle
Set Objectives
Define and MaintainOrganization Structures
Maintain Employee Records
Define and AdministerPayrolls
Define and AdministerEarnings & Deductions
Process Payrolls
Reconcile PayrollsCost Payroll Transactions
and Transfer toExternal Systems
– Legislation: Tax and Insurance– Statutory Reporting– Auditing– Ad hoc Reporting

1 – 6 Oracle Human Resources North American User’s Guide
Introduction to the HRMS ModelWith Oracle HRMS you can define your own human resource model toreflect your own enterprise structures and policies. This informationmodel lets you record the personal, work, and pay information for allthe people you want to hold and process.
The model is both flexible and adaptable. It is flexible, so that you canreflect the needs of different companies, or different groups within thesame company. It is adaptable, so that you can easily change the basicmodel as your enterprise changes.
See: Managing Change Over Time: page 1 – 9
ÉÉÉÉÉÉÉÉÉÉÉÉÉÉÉÉÉÉÉÉÉÉÉÉÉÉÉÉÉÉÉÉÉÉÉÉÉÉÉÉÉÉÉÉÉÉÉÉÉÉÉÉÉÉÉÉ
ÁÁÁÁÁÁÁÁÁÁÁÁÁÁÁÁÁÁÁÁÁÁÁÁÁÁÁÁÁÁÁÁÁÁÁÁÁÁÁÁÁÁÁÁÁÁÁÁÁÁÁÁÁÁÁÁ
ASSIGNMENT
PEOPLE
WORKSTRUCTURES
COMPENSATIONAND
BENEFITS
Figure 1 – 3Modelling Human ResourceInformation
Employee and Applicant Assignment History
EmployeeCompensation and
Benefits History
CompensationEntitlement, Rules,
and Conditions
People
In Oracle HRMS, you can hold information about current and formeremployees, applicants, external contacts such as contractors, andemployee contacts such as relatives and dependents.

1 – 7Introduction
In addition to standard information such as addresses, nationality,interview records, qualifications, and absence information, you candefine any other special information you need to hold for people. Forexample, you can define what information to hold on medical history,previous employment, or outside interests.
See:
Entering Personal Information: page 13 – 4
Entering Special Information: page 13 – 26
Work Structures
Work structures represent the different ways in which employees canwork within your enterprise. They provide the framework for definingthe work assignments of your employees. They also enable you tomanage the information about your enterprise that is independent ofyour employees.
The work structures include your internal organizations (such asdepartments or divisions), payrolls, jobs or positions, gradingstructures, and any special employee groupings that you use in yourenterprise.
See:
Representing the Employer: Business Groups: page 2 – 4
Representing the Employer: GREs: page 2 – 9
Representing Organizations: page 2 – 14
Representing Jobs and Positions: page 3 – 2
Representing Grade Structures: page 4 – 2
Representing Payrolls: page 5 – 2
Representing Other Employee Groups: page 5 – 10
Compensation and Benefits
In Oracle HRMS you can define your own types of compensation andbenefits, and the business rules you want to apply to them. As youchange policies, move people within your enterprise, and adjust theirindividual remuneration packages, the system maintains theircompensation and benefit history.
For example, suppose you want to define a special type of paymentand make this available only to employees who work at a particularlocation. In Oracle HRMS you use a compensation element to represent

1 – 8 Oracle Human Resources North American User’s Guide
the payment. You define the business rule as a link between theelement and the specific location. Then when you assign employees tothe location, they automatically become eligible for the payment.
See:
Overview of Elements: page 7 – 2
Using Elements: page 7 – 6
Grade Relationships to Compensation and Benefits: page 4 – 6
Salary Administration and Performance Reviews: page 9 – 2
Assignments
In Oracle HRMS, the assignment describes employees’ places withinthe enterprise: the organization for which they work, their role, grade,location, and so on. As you change the assignment information for anemployee, you automatically build up his or her work history.
Your compensation eligibility rules link compensation and benefits towork structures, such as jobs or grades. The assignment placesemployees within the work structures of the enterprise. In this way, anemployee’s assignment determines his or her eligibility forcompensation and benefits.
You can use assignments to identify major employee groups within theenterprise for management, for reporting and costing, and forcompensation and benefit planning and administration.
See: The Employee Assignment: page 14 – 4

1 – 9Introduction
Managing Change Over Time
A key requirement for any enterprise is the ability to manage changeconfidently and effectively. Typical enterprise changes includecorporate restructuring, departmental reorganization, mergers andde–mergers of companies, centralization or decentralization of controland decision making, employee development and turnover.
In Oracle HRMS, you can change each of the major parts of yourenterprise model without having to redefine the other parts.
Work Structures
You can attach dates to your work structures to manage differentversions over time. You retain previous versions for historicalinformation and you can create future–dated versions to prepare forreorganization in advance.
You can also set up in advance the business rules, includingcompensation and benefits, associated with the new structures. Thesebecome effective on the date you specify, avoiding a workload peak.
People, Assignments, and Compensation and Benefits
In contrast to work structures, which are simply dated, other keydynamic information in Oracle HRMS is datetracked. This includesinformation on employees, assignments, and compensation andbenefits. DateTrack allows you to maintain a continuous history of theinformation over time.
When reviewing, entering, changing or deleting datetracked data, youcan set an effective date in the past or future. The system uses onlyinformation in effect as of that date for whatever you do. When youmake a change, you can choose whether it is a correction to the lastupdate or a new update to be recorded in the history of the record.You can use DateTrack History to view a report of every update evermade to a record.
You can identify windows containing datetracked, rather than dated,information by the presence of a region labelled Effective Dates.
1 – 10 Oracle Human Resources North American User’s Guide
Dated Information and Hierarchy Versions
The information in Oracle HRMS about your locations, organizations,jobs, positions, grades, payrolls and other work structures is datedinformation. All dated information has From and To dates, that is,dates from and to which it is in effect in your enterprise. For example,when defining a position, you enter a date from which it starts. Toclose it down, you give it a date to which it remains valid.
Oracle HRMS does not permit you to assign employees to structures ondates earlier than their Date From, or later than their Date To.Similarly, the system protects you from building eligibility rules forcompensation and benefits based on work structures that have not yetgone into effect, or are out of date.
Suggestion: Consider using a fixed date, such as01–JAN–1901 as the start date for all your initial workstructures. By choosing a date like this you can immediatelyidentify all of your implementation definitions. You should useaccurate dates for all subsequent definitions.
Dated Versions of Hierarchies
You can structure the organizations and positions you enter in OracleHRMS into organization or position hierarchies that serve variouspurposes. Reporting hierarchies, for example, reflect reporting lineswithin your enterprise.
You maintain both dates and version numbers for these hierarchies, tokeep a history of your hierarchies as they change over time.
To build a new version of a hierarchy, you can copy an existing one andmake the necessary changes to it. When you save the new version thesystem automatically gives the previous version an end date.
DateTrack
All important dynamic information in Oracle HRMS is datetracked,including information about people, assignments, payrolls, andcompensation and benefits.
You can enter datetracked information or make changes to it at anytime. When you set an effective date for your work, DateTrack ensuresthat only information effective on that day is used for any processing,validation, and reporting you carry out. You can view a history ofevery change made to datetracked information.

1 – 11Introduction
Setting Your Effective Date
When you log on to Oracle HRMS, your effective date is always today’sdate. To view information current at another date, or to makeretrospective or future–dated changes, you need to change youreffective date.
There is a DateTrack:Date Security user profile option, whichdetermines whether you can change your effective date. Your systemadministrator sets this profile option. You can check its value on thePersonal Profile Values window. There are four possible values:
• All: You can change to any other effective date.
• Future: You can change between today’s date and any futuredates.
• Past: You can change between today’s date and any past dates.
• Present: You cannot change to a date other than today.
� To set your effective date:
1. Save any outstanding information you have entered or changed,then choose the Alter Effective Date icon from the Toolbar.
The Alter Effective Date window opens.
2. Enter a new effective date and choose OK.
If your current window is a ”top–level” window (one called directlyfrom the Navigator), your new effective date remains in place until youreset it or exit Oracle HRMS. If your current window is not a top–levelwindow, your new effective date only applies while you are working inthe current window and any windows subsidiary to it. When youreturn to a top–level window, your effective date is reset to its previousvalue.
Note: In certain special cases, when you change your effectivedate on a subsidiary window, Oracle HRMS returns you to theprevious window, and you may have to requery the records

1 – 12 Oracle Human Resources North American User’s Guide
you want to view or update. This protects the integrity ofthese records.
So long as your effective date remains different from today’s date, it isdisplayed in the title bar of every window.
Effective Date Reminder
When you are new to DateTrack, you may find it useful to be remindedof your effective date whenever you open a window that containsdatetracked information. The reminder appears in a Decision windowand asks whether you want to change your effective date. If youchoose Yes, the Alter Effective Date window displays.
There is a user profile option called DateTrack:Reminder thatdetermines when the Decision window appears. There are threepossible values for this profile option:
• Always
• Never
• Not Today
The Not Today value causes the reminder to appear when you navigateto a datetracked window and your effective date is not today’s date.
You can set the value of this profile option in the Personal ProfileValues window.

1 – 13Introduction
Viewing Datetracked Information and History
Oracle HRMS maintains a continuous record of changes made todatetracked information. When you view a record in a datetrackedwindow, it shows you a snapshot of the information on your effectivedate. The Effective Dates region on the datetracked window showsyou the dates between which the snapshot is valid.
Suppose you are viewing an assignment with an effective start date of01–JAN–1987 and no effective end date. This means that theassignment was created or last changed on 1 January 1987, and thesnapshot information you are viewing is still valid. There have been nochanges to the assignment since 1 January 1987, and there are no futuredated changes.
To find out whether the assignment existed before 1 January 1987, youshould use DateTrack History.
If there is an effective end date, you know that the record was eitherdeleted or changed on the next day. To find out whether the recordcontinues to exist, you can set your effective date to the day after thisend date, or use DateTrack History.
Viewing the History of Datetracked Information
To see all the changes made to a datetracked record over time, useDateTrack History.
� To view DateTrack History:
1. Choose the DateTrack History icon from the Toolbar.
The DateTrack History Change Field Summary window opens.Each row shows which fields were changed on the From date.
2. Choose the Full History button if you want to open a DateTrackHistory folder showing the value of each field between the effective

1 – 14 Oracle Human Resources North American User’s Guide
dates. The row for the current snapshot (corresponding to youreffective date) is highlighted.
You can use the Folder menu to select the fields to view in thefolder.
Note: It is possible to customize the information displayed inthe Folder by modifying the DateTrack History view for theunderlying table.
See: How To Create and Modify DateTrack History Views,(Oracle HRMS Implementation Guide)
Updating and Correcting Datetracked Information
When you update datetracked information, you are prompted tochoose between Update and Correction.
If you choose Update, Oracle HRMS changes the record as from youreffective date, but preserves the previous information. If you chooseCorrection, Oracle HRMS overrides the previous information withyour new changes. The start and end dates of the snapshot you havecorrected remain the same.
Example
Suppose you hire two new employees, Jack Lee and Julie Summers. Afew weeks later Julie gets married. At the same time you discover anerror in Jack’s record relating to his nationality.
You update Julie’s information by setting your effective date to the dateof her wedding and entering her new married status, her change ofname, and new next of kin information. Her previous personalinformation, which was valid until her wedding, remains in her record.
You correct Jack’s wrong nationality by setting your effective date to hishire date and entering the correct nationality. By choosing Correction,you put the record right, from the beginning. You should checkwhether there is an end date in the Effective Dates region of Jack’srecord. If there is, you have only corrected the first snapshot of therecord. Set your effective date to the day after the end date, and makethe correction again. Continue in this way until the To field is blank,indicating that you have reached the last snapshot of this record.
Updating a New Record
You cannot create a record and then update it on the same day. If youtry to do this, Oracle HRMS warns you that the old record will be

1 – 15Introduction
overridden, and then changes Update to Correction. This is becauseDateTrack maintains records for a minimum of a day at a time.
Future Updates
Using DateTrack, you can make future updates. For example, supposeyou are relocating an employee, with six months notice. You decide toenter the relocation on the system straight away. So you set youreffective date to the first day when the employee will be at the newlocation, and change the location on the assignment.
Later that month you promote the employee to a new grade. So youset your effective date to today’s date and change the grade on theassignment. Oracle HRMS checks to see whether the record has afuture update scheduled. It finds that the location changes in thefuture and prompts you for the type of update you now want to make.You have two choices:
• Insert: This simply inserts the change before the next scheduledchange. This is the correct choice for the example. Theemployee would be promoted from today. The future–datedrelocation still takes place in six months time.
• Replace: This change replaces all future–dated changes. In theexample, the employee would be promoted from today.However, the record of the relocation would be completelyremoved from the system.
Deleting Datetracked Information
When you delete datetracked information, Oracle HRMS prompts youwith the following options:
• End Date: This ends the record on your effective date. Whenyou requery the record, this end date displays in the To field.
• Purge: This totally removes the record from your database.
If there are any future updates to the record after your effective date,Oracle HRMS may prompt you with another two options:
• All: This removes all future updates to the record. The currentsnapshot is valid until you make another change.
• Next: This removes the next future update to the record. It thenresets the current snapshot’s end date to the end date of thedeleted update.

1 – 16 Oracle Human Resources North American User’s Guide
Note: You do not always see all of these options when youchoose to delete. Some windows do not allow all fouroperations.
Removing an End Date
If you have mistakenly set an end date on a datetracked record, youcan remove it.
� To remove an end date:
1. Set your effective date to the day the record ends.
2. Choose Delete Record from the Edit menu.
3. Choose the DateTrack delete option Next. This removes the nextchange to the record, which is the end date. Save your work.

1 – 17Introduction
Work Structures and Key Flexfields
Before you begin defining your enterprise’s work structures, you set upsome key flexfields.
Key flexfields are a special feature of Oracle Applications. They help youcustomize applications, by holding particular information yourenterprise needs where you need it. A key flexfield can hold as manyas 30 separate segments of information. You can determine exactlywhat information to hold and how it must be entered.
Oracle HRMS includes six user–definable key flexfields. These areespecially useful in helping you build information on work structuresthat suit the mission and culture of your enterprise.
Job and Position Name
Using these key flexfields, you determine the number of segments inyour job and position names or codes, and the valid values for eachsegment.
For example, you may want names that are simple titles using oneflexfield segment only, such as Account Manager or Programmer. Or,you may want multiple–segment names that convey more information,such as Senior.Account Manager or Part–time.Trainee.Programmer.
See: Representing Jobs and Positions: page 3 – 2
Personal Analysis
The Personal Analysis key flexfield is for holding information about:
• the various requirements for your jobs and positions, such aseducational attainment, certification or license types and levels,or language skills
• the educational levels, qualifications, skills and other personalattributes of your employees or applicants, which match your jobor position requirements
• a wide range of other types of information you need to keep onrecord for your workforce, for example, company car usage,workplace accidents, and immunizations for communicablediseases.
You can define up to 30 instances of the Personal Analysis flexfieldstructure, each holding one special information type.
See: Defining Special Information Types: page 28 – 10

1 – 18 Oracle Human Resources North American User’s Guide
Grade Name
You may want to use simple, single–segment grade names (A, B, C), ormore complex grade names (Manual.A.1, Manual.A.2, Clerical.C.1,Clerical.C.2).
See: Representing Grade Structures: page 4 – 2
People Group
The People Group key flexfield is for setting up special groupings ofemployees. For example, you can set up a segment of this flexfield tohold all the unions present at your enterprise. When you give anemployee an assignment, you can use this segment to record his or herunion membership.
As another example, you can set up a segment as Company, holding alist of the companies comprising your enterprise. You can then use thisgroup to assign each employee to a company.
See: Representing Other Employee Groups: page 5 – 10
Cost Allocation
The Cost Allocation key flexfield is for maintaining data needed totransfer information on employee costs from your payrolls to thegeneral ledger, and to labor distribution systems.
For example, you might define one segment of the Cost Allocationflexfield to hold a list of your cost centers, another to hold GL accountcodes, and a third to hold labor distribution codes.
You would then make choices from these lists to tell the system how tocollect payroll costs. For example, when you enter a department intoOracle HRMS, you could select the cost center against which to collectthe employee costs of the department.
If you are using Oracle General Ledger, you can map segments of theCost Allocation flexfield to segments of the GL Accounting flexfield.
See: Costing in Oracle HRMS: page 11 – 2
See Also
Oracle Applications Flexfields Guide
C H A P T E R
2T
2 – 1The Employer and Other Organizations
The Employer andOther Organizations
his chapter explains how to represent your enterprise in OracleHRMS, and how to set up default information applicable across theenterprise.
It further explains how to represent:
• the physical work locations of your employees
• organizations internal to your enterprise, such as companies,departments, divisions, units, and if needed, retirementorganizations
• external organizations of importance to human resourcemanagement, such as recruitment agencies, insurance providersand tax authorities
• reporting lines and other relationships among theseorganizations. You represent these relationships by buildingorganization hierarchies.

2 – 2 Oracle Human Resources North American User’s Guide
Site Locations
In Oracle HRMS, you set up each physical site where your employeeswork as a separate location. Similarly, you enter the addresses ofexternal organizations that you want to maintain in your system, such asemployment agencies, tax authorities, and insurance or benefits carriers.When setting up internal or external organizations, you pick from a listof these locations.
This approach has these advantages:
• You enter information about each location only once, therebysaving data entry time.
• Central maintenance of locations ensures consistency of addressstandards.
• Your work sites exist as separate structures identifiable forreporting purposes, and for use in the rules that determineemployee eligibility for various types of compensation andbenefits.
Setting Up Site Locations
Enter site addresses in the Location window.
Locations are shared across Business Groups in Oracle HRMS and withtwo other Oracle applications: Inventory and Purchasing. Oracle HRMSdoes not use some of the fields in the Location window. These fields aredisabled for HRMS users.

2 – 3The Employer and Other Organizations
� To enter a work location and its address:
1. Enter the name of the location, and a description if required.
2. Select a national address style from the list.
A window opens with the address format for the country you select.
3. Enter address information in this window and choose the OKbutton.
Additional Information: Default address styles are predefinedfor many countries. You can add address styles for othercountries, if required.
Removing Site Locations
You cannot delete locations, but you can make them inactive.
� To remove an address from the Location list:
� Enter an inactive date from which the location is no longer in use inyour enterprise.

2 – 4 Oracle Human Resources North American User’s Guide
Representing the Employer: The Business GroupThe largest organizational unit you set up in Oracle HRMS to representyour enterprise as an employer is the Business Group. A Business Groupmay correspond to a company or corporation, or in large enterprises, toa holding or parent company or corporation.
By default, all employees you enter in Oracle HRMS receive anassignment to their Business Group. When you give them assignmentsto internal organizations such as divisions or departments, these replacethe default assignment, but their records continue to exist within theBusiness Group.
Within a Business Group, you set up one or more Government ReportingEntities (GREs). A GRE represents an employer the federal governmentrecognizes as being responsible for paying employees and for filing avariety of reports government agencies require, and is distinguished byhaving a unique IRS (Internal Revenue Service) identification number).
A Business Group with companies or divisions that have their own IRSidentification numbers includes a GRE for each one. However all theseGREs use the body of information on work structures and employees,and the single set of key flexfields, established for the entire BusinessGroup.
Representing the Employer: Government Reporting Entities (GREs):page 2 – 9
Key Flexfields for the Business Group
Key flexfields are a special feature of Oracle Applications. Unlike regularinformation fields that hold just one unit of information, key flexfieldscan hold as many as 30 separate units, or segments, of information. Theability to hold multiple segments of information in a field is one of thefeatures of Oracle Applications that facilitates localization of thesoftware in different countries, and customization of the software at foreach enterprise using it. Oracle HRMS includes six key flexfields:
• Job, Position, and Grade
• People Group
• Personal Analysis
• Cost Allocation.
Key Flexfields for Job, Position, and Grade Names
These three key flexfields give you the option of using either simple(single segment) or more complex (multiple segment) names for jobs,

2 – 5The Employer and Other Organizations
positions, and grades, depending on the particular requirements andpolicies of your Business Group.
For example, you can decide on names for your jobs or positions such asProgrammer and Machinist, or on names incorporating additionalinformation, such as Machinist.Certified.Level3 or Programmer.Trainee.Likewise, you can use grade names such as A, B, and C, or namesproviding more information, such as Manual.A.1, Manual.A.2,Clerical.C.1, Clerical.C.2.
See:
Job and Position Names: page 3 – 5
Representing Grade Structures: page 4 – 2
The People Group Key Flexfield
This key flexfield provides an easy way to set up whatever specialgroupings of employees the Business Group requires. For example, asegment of this flexfield can hold all the unions employees belong to.When you give employees assignments, you can select their union fromthis segment.
Similarly, a segment of this flexfield can hold a list of the companies in amulti–company Business Group. You select from this segment eachemployee’s company, which can in turn control the employee’seligibility for elements of compensation and benefits.
See: Setting Up the People Group Flexfield: page 5 – 10
The Personal Analysis Key Flexfield
This key flexfield holds special types of information about:
• the Business Group’s employees or applicants, as for exampletheir educational levels, qualifications, and skills that may matchjob or position requirements
• requirements for the Business Group’s jobs and positions, forexample, educational attainment, certification or license types andlevels, and foreign language ability
• a wide range of other matters on record for the Business Group’sworkforce, for example, information on company cars, workplaceaccidents, and employee requests for accommodations fordisabilities.
The Personal Analysis flexfield structure can hold as many as 30different information topics.

2 – 6 Oracle Human Resources North American User’s Guide
See:
Defining Special Information Types: page 28 – 10
Entering Special Information: page 13 – 26
Entering Job and Position Skill Requirements: page 3 – 17
The Cost Allocation Key Flexfield
This key flexfield is used to collect information on labor costs within aBusiness Group. For example, an enterprise can define segments of thisflexfield as follows:
• one segment to hold cost center codes, such as Sls (Sales), Eng(Engineering), and Prd (Production).
• another segment to hold GL account codes, for accounts such asWages, Production Bonus or Union Dues Deduction.
• a third segment to hold codes used in a labor distribution system,such as 31, 32, and 33 (for product lines 31, 32, and 33).
After this flexfield is set up, you can access it at a number of points inthe system. For example, when entering a department into OracleHRMS as an internal organization, you can select from the flexfield thecost center to which the employee costs of the department go. Whengiving employees their assignments, you have the option of selectingfrom the flexfield the product lines they work on, and entering thepercentage of time on each.
At installations including Oracle Payroll, the payroll run collects laborcosts using the codes in the Cost Allocation key flexfield, for transfer tothe general ledger and labor distribution or project managementsystems. Enterprises using both Oracle Payroll and Oracle GeneralLedger can map segments of the Cost Allocation flexfield to segments ofthe GL Accounting flexfield.
See: The Oracle HRMS Cost Allocation Key Flexfield: page 11 – 2
See: Costing in Oracle HRMS: page 11 – 2
See Also
User Definable Key Flexfields: page B – 2
Oracle Applications Flexfields Guide
Single or Multiple Business Groups
Each Business Group can have just one particular set of segmentsdefined for its Job, Position, Grade, Employee Group and Cost

2 – 7The Employer and Other Organizations
Allocation key flexfields. You set up the key flexfields for a BusinessGroup before setting up the Business Group itself.
Many enterprises decide to use a single Business Group to hold ’live’information, so they can display, report and manage information fromall parts of the enterprise at the same time.
Note: You cannot view information online for more than oneBusiness Group at a time.
However, there are reasons for setting up multiple Business Groups inthe same installation, such as the following:
• You want to have a copy of your live system with examplerecords for training or testing purposes.
• You are a holding company or a corporation with a number ofsubsidiary companies. Each subsidiary has its own structures,employees, and compensation and benefit policies. If yoursubsidiaries are in different countries you also have to deal withlocal legislative requirements.
• You are acquiring a company or merging with another company,and you want to maintain separate structures and compensationand benefits during the transition process.
The Startup Business Group
Oracle HRMS comes with one Business Group supplied as startup data.You can use this Business Group and its default definitions as thestarting point for your own Business Group, or you can create a newBusiness Group.
If you create a new Business Group, you must create a newresponsibility (or edit the default responsibility) to allow access to it,before beginning to create other work structures.
See Also
Accessing Business Groups: page 2 – 18
Defaults for the Business Group
You can enter certain types of information for the Business Group toappear as defaults throughout your enterprise structures:
• You can select a default currency.

2 – 8 Oracle Human Resources North American User’s Guide
• You can enter a default for the value each assignment contributestowards each staffing budget that you define. For example, bydefault an assignment may count as one for a headcount budget.
• You can enter default working hours for all the employees in theBusiness Group. You can override these defaults at organization,position, and assignment levels.
• For certain HR reporting purposes you can register for theBusiness Group, Reporting Categories and Reporting Statuses. Theseinclude employment categories such as Full Time or Part Timethat cover employees who are not temporary workers, andassignment statuses such as Active or Paid Leave that coveremployees who are not at a terminated status.
• You can register for the Business Group, the names of thesegments of its Cost Allocation key flexfield that hold cost centerand labor distribution codes. This customizes the names thatappear as field prompts in your PayMIX Windows.
Employee and Applicant Identification Numbers
When defining a Business Group, you choose a method of creatingidentifying numbers for its employees and applicants. The choices are:
• automatic number generation
• manual entry
• for employees only, automatic use of a national identifier, such asthe US social security number or the UK National Insurancenumber.
Note: Once you save an automatic number generation method,you can later change only to manual entry.

☞
2 – 9The Employer and Other Organizations
Representing the Employer: GREsAfter defining one or more Business Groups for your enterprise, you setup one or more Government Reporting Entities (GREs) within eachBusiness Group. The GRE is the organization that federal, state andlocal governments recognize as the employer who:
• issues pay to employees
• withholds taxes from employees’ pay and is liable for employertaxes and tax reporting
• provides other government–mandated reporting, such as EEO–1,OSHA, and New Hire reports.
Each GRE has a unique 9–digit number (sometimes called the employeridentification number or taxpayer identification number) issued by the IRS.Your enterprise may have just one such number, in which case yourBusiness Group and GRE are the same organization.
Large enterprises may include a number of different divisions orcompanies each with its own identification number from the IRS, inwhich case you set up a GRE for each. You can associate several GREstogether as a Tax Group, for which one of the GREs can serve as thecommon paymaster.
See: GREs, Tax Groups, and Common Paymasters: page 2 – 12
Information for Taxes, NACHA, and Reporting
Because a GRE is responsible for paying employees and withholdingtheir taxes, you enter for it basic rules affecting calculation of federal,state and local taxes, and information for tax reporting. Also, each GREholds information required for labelling NACHA tapes used to payemployees by direct deposit into their bank accounts.
Because a GRE also functions as a reporting unit for governmentmandated reporting on matters such as employees’ work–relatedinjuries, equal employment opportunities, and obligations to pay childsupport, you enter for it certain information required for submission ofthese types of reports.
Attention: The GRE in the Oracle HRMS products is the sameorganization as the Legal Entity that appears in the OracleFinancials products, holding the taxpayer identification number.For this reason, the GRE may appear as GRE/Legal Entity onpick lists.
Enterprises using Oracle HRMS and Oracle Financials productsshould define only one GRE/Legal Entity to represent eachemployer organization with a unique IRS identification number.

2 – 10 Oracle Human Resources North American User’s Guide
See Also
Additional Information for GREs: page 2 – 25
Enterprises with One GRE
Enterprises with only one identification number from the IRS need onlyone GRE in which to place all employees. In Oracle HRMS, the BusinessGroup and the GRE are the same organization. Appearing below is anexample organization chart for a Business Group with one GRE.
CompanyBusiness Group
GREHR Organization
Dept. AHR Organization
Dept. BHR Organization
Dept. CHR Organization
ManagementGroup
HR OrganizationGroup A2
HR Organization
Figure 2 – 1Single Company Business Group/GRE
Dept. DHR Organization
Group A1HR Organization
In a company like this, some employees can have assignments to theBusiness Group organization itself, if it also has the classification HROrganization. Most have an assignment to one of the various HROrganizations subordinate to the Business Group. All employeesbelong to the same GRE, which pays them, withholds their taxes, andprovides reports on various matters concerning them to governmentagencies.
Enterprises with Multiple GREs
For large enterprises that include several different employers with theirown IRS identification numbers, all the employees in each companymay be paid by that company, and hence all require an assignment to a
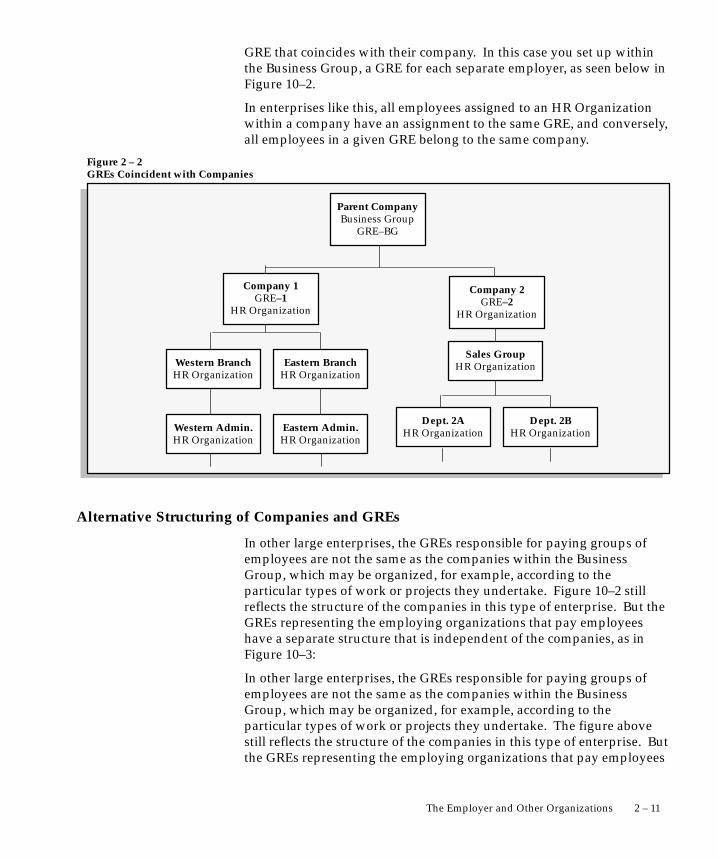
2 – 11The Employer and Other Organizations
GRE that coincides with their company. In this case you set up withinthe Business Group, a GRE for each separate employer, as seen below inFigure 10–2.
In enterprises like this, all employees assigned to an HR Organizationwithin a company have an assignment to the same GRE, and conversely,all employees in a given GRE belong to the same company.
Parent CompanyBusiness Group
GRE–BG
Company 1GRE–1
HR Organization
Western Admin.HR Organization
Sales GroupHR Organization
Dept. 2AHR Organization
Dept. 2BHR OrganizationEastern Admin.
HR Organization
Eastern BranchHR Organization
Figure 2 – 2GREs Coincident with Companies
Company 2GRE–2
HR Organization
Western BranchHR Organization
Alternative Structuring of Companies and GREs
In other large enterprises, the GREs responsible for paying groups ofemployees are not the same as the companies within the BusinessGroup, which may be organized, for example, according to theparticular types of work or projects they undertake. Figure 10–2 stillreflects the structure of the companies in this type of enterprise. But theGREs representing the employing organizations that pay employeeshave a separate structure that is independent of the companies, as inFigure 10–3:
In other large enterprises, the GREs responsible for paying groups ofemployees are not the same as the companies within the BusinessGroup, which may be organized, for example, according to theparticular types of work or projects they undertake. The figure abovestill reflects the structure of the companies in this type of enterprise. Butthe GREs representing the employing organizations that pay employees

☞
2 – 12 Oracle Human Resources North American User’s Guide
have a separate structure that is independent of the companies, as in thefigure below.
Parent CompanyBusiness Group
HR Organization
GRE A GRE B GRE C
Figure 2 – 3GREs Independent of Companies
GRE D
In this type of enterprise, employees assigned to a particular GRE canhave a work assignment to any of the different companies constitutingthe enterprise, and a particular company can include employeesassigned to several different GREs.
In enterprises like this, employees are clear about which company theyare working in, but may be unaware of their membership in a separateGRE. Because the functions of GREs relate to payroll administrationand governmental reporting, they have little direct impact onemployees’ daily lives at work.
Business Groups with multiple GREs often associate some GREstogether in a Tax Group with a common paymaster
GREs and Tax Groups
Enterprises with multiple GREs can place certain GREs together in TaxGroups. The Tax Group takes the name you give it
Attention: The Tax Group name must be consistent in spellingand case for all GREs to be included. For example, “My TaxGroup” is not the same as “my tax group.”
When multiple GREs are included in a tax group, the taxable limits forFUTA and SS are maintained at a Tax Group Level.
Using tax groups allows employers to give employees moving withinGREs credit towards their Social Security, and Federal UnemploymentTax Act (FUTA) taxes.
At the same time that you enter federal tax rules for a GRE, you canplace the GRE in a Tax Group.

2 – 13The Employer and Other Organizations
See Also
Additional Information for GREs: page 2 – 25

2 – 14 Oracle Human Resources North American User’s Guide
Representing OrganizationsIn Oracle HRMS, the organizations you set up to represent yourenterprise as an employer are the Business Group, and one or moreGREs within the Business Group.
Below this level, you represent the groupings in which employees work,such as branches, departments or sections, by means of internalorganizations. To enable the assignment of employees to an internalorganization, you classify it as an HR Organization.
You also maintain information in the system about various types ofexternal organizations relevant to human resources and payrollmanagement and administration. You can never assign employees toexternal organizations, even those classified as HR Organizations.
Organization Types
When setting up an organization you can give it an organization type. The type may, for example, identify the function an organizationperforms, such as Administration or Service, or the level of eachorganization in your enterprise, such as Division, Department or CostCenter.
You create the organization types you require by entering values for theQuickCode Type ORG_TYPE.
Levels of Internal Organizations
You decide for yourself the level of organization detail your enterpriseneeds in Oracle HRMS.
At one extreme, a Business Group/GRE can be the only organizationdefined in the system. However this will severely limit your ability tomanage and report on employee assignment and payroll information,and to control access to HRMS records. At the other extreme, you candefine an organization for every grouping of employees, however small.But the costs of maintaining organizations at this level will probablyoutweigh the benefits.
When thinking about the internal organizations to set up for yourenterprise in Oracle HRMS, consider what your current managerialgroupings are. Then you can adjust up or down to determine the bestlevel or organizational detail for your enterprise to maintain.
See Also
Organization Hierarchies: page 2 – 34

2 – 15The Employer and Other Organizations
Representing Companies in Multi–Company Business Groups
When the configuration of your enterprise warrants, you can use bothinternal organizations and the People Group key flexfield to representthe entities appearing on your organization chart. For example, supposeyour enterprise includes two companies, each with its own internalgroupings and compensation and benefits policies:
Parent CompanyBusiness Group
GRE–BG
Company 1GRE–1
HR Organization
Western Admin.HR Organization
Sales GroupHR Organization
Dept. 2AHR Organization
Dept. 2BHR OrganizationEastern Admin.
HR Organization
Eastern BranchHR Organization
Figure 2 – 4A Multi–Company Enterprise
Company 2GRE–2
HR Organization
Western BranchHR Organization
When you set up both the companies and the subordinate organizationswithin each company as entities to which you can assign employees,you can create rules governing eligibility for compensation and benefitsusing both the companies and their subordinate organizations.
To represent the branches, administrative and sales groups, anddepartments within the companies in Oracle HRMS, you can defineinternal organizations. To represent the companies, you can use thePeople Group key flexfield, defining a segment of this flexfield asCompany, and listing your companies in it:
People Group Key Flexfield
Segment 1: Company
Company 1
Company 2
This setup permits you to assign each employee both to a company anda subordinate organization within the company, and hence to control his

2 – 16 Oracle Human Resources North American User’s Guide
or her eligibility for elements of compensation and benefits both bycompany, and by organization within the company.
See Also
Setting Up the People Group Flexfield: page 5 – 10
Using Elements: page 7 – 6
Internal Organizations and Cost Centers
Depending on the structure of your enterprise and your decisions aboutwhich organizations to represent in Oracle HRMS, there may not be aone–to–one correspondence between your cost centers and theorganizations you enter.
When defining an internal organization, you can identify one cost centeragainst which the payroll costs of the employees assigned to theorganization should be collected. You simply select the cost center froma list in a segment of the Cost Allocation key flexfield.
For example, suppose you are defining in Oracle HRMS theorganization Product Assembly, whose employee payroll costs go to thecost center Production. When entering the organization ProductAssembly, you select Production from the list of cost centers in the CostAllocation flexfield:
Cost Allocation Key Flexfield
Segment 1: Cost Center
410–Accounting
425–Production
503–Public Relations
Note: If employees’ costs are charged to cost centers other thanthose of their organizations, or if they work in an organizationonly part time, you can enter other cost centers, and thepercentage of time to be charged to each, on their employeeassignments. Costing information entered for employeeassignments overrides that entered for organizations.
See Also
Setting Up the Cost Allocation Key Flexfield: page 11 – 11

☞
2 – 17The Employer and Other Organizations
External Organizations
Oracle HRMS can hold basic information on organizations not part ofyour own enterprise, such as training vendors, tax offices, benefitscarriers or certification bodies.
You define external organizations in the same way as internalorganizations. External organizations can appear in your organizationhierarchies together with internal organizations.
Attention: The main difference in the system between internaland external organizations is that you cannot assign people toan external organization.
2 – 18 Oracle Human Resources North American User’s Guide
Employer and Organization SetupUse the Organization window to set up:
• Business Groups
• GREs (Government Reporting Entities)
• internal organizations
• external organizations
The nature of each organization is determined by the classification youselect for it. The setup information you enter for an organizationdepends in large part on its classification.
You must create a Business Group and a responsibility to allow access toit, before you create other organizations.
Accessing Business Groups
You access the startup Business Group using the default ’Oracle HumanResources’ responsibility. A responsibility is linked to a security profile,which determines which records you can see. The default Oracle HRMSresponsibilities allow you to see all the records for the startup BusinessGroup.
You can adapt the startup Business Group or create a new one for yourenterprise.
If you are creating a new Business Group, your system administratormust create a new responsibility for it after you save it, but before youuse it. This responsibility must give access to all the records in theBusiness Group. Alternatively, the system administrator can simplyupdate the default Oracle Human Resources responsibility by changingthe HR:Security Profile user profile option to the name of the view–allsecurity profile generated for the new Business Group (see steps 8 to 10below).
� To define a ”view–all” responsibility:
1. Navigate to the Responsibilities window.
2. Enter a Name for the responsibility and select the application forwhich you are defining it (such as Oracle Human Resources) in theApplication field.
3. In the Menu field, select F4 HRMS Top Menu.
4. In the Report Group field, select one of the seeded report groups(such as US HRMS Reports and Processes).

2 – 19The Employer and Other Organizations
5. Save your work.
6. Navigate to the System Profile Values window.
7. Select your new responsibility and query the HR:Security Profileoption.
8. Enter the name of the view–all security profile for your newBusiness Group. By default this is the name of your BusinessGroup.
9. Save your work.
See Also
Access Control Through User Responsibilities: page 34 – 2

2 – 20 Oracle Human Resources North American User’s Guide
Creating an Organization• retirement organizations for retiree processing
To determine the purpose and uses in the system of each organizationyou create, you give it one or more classifications:
• For Business Groups and GREs, you use the classificationsBusiness Group and Government Reporting Entity.
• For internal organizations such as departments, sections, andproject teams to which employees have assignments, you use theclassification HR Organization.
• To make organizations available for use in certain types ofreporting, you use the classifications Reporting Establishment,Corporate Headquarters, and AAP Organization.
• So that you can query or select certain external organizations atappropriate points in the system, you use the classificationsWorkers Compensation Carrier, Benefits Carrier, BeneficiaryOrganization, and Payee Organization.
To set up an organization, use the Organization window.
Prerequisites for All Organizations
❑ Enter the names and addresses of your work sites in the Locationwindow.
If you are using Oracle Payroll, every organization to whichemployees can have assignments, including Business Groups, musthave on record a location with a complete address. This is becausethe system uses the location of the organization of the employee’sprimary assignment to determine employee work locations for taxpurposes.
Note: This does not apply to GREs, because the assignment to aGRE exists in addition to the assignment to an organization.
See: Setting Up Site Locations: page 2 – 2
❑ Enter organization types you need in the QuickCodes window, forthe QuickCode Type ORG_TYPE.
See: Adding QuickCode Values: page 32 – 3
Prerequisites for Business Groups
❑ Enable the currencies you need. Normally your systemadministrator does this.
See: Enabling Currencies: page 29 – 7

2 – 21The Employer and Other Organizations
Note: Oracle Payroll is capable of paying employees working inother countries in the currencies of these countries, but does notprovide the formulas needed to process taxes for employeespaid in foreign currencies under other national legislations. Youcan write your own formulas in Oracle FastFormula, or contractwith local third party vendors for the installation of tax routines.
❑ Define the structures for the Job, Position and Grade Name keyflexfields, and define the structures and at least one segment for thePeople Group and Cost Allocation key flexfields.
See: Key Flexfields for the Business Group: page 2 – 4
❑ Make entries for the QuickCode Types FREQUENCY andBUDGET_MEASUREMENT_TYPE in the QuickCodes window.
See: Adding QuickCode Values: page 32 – 3
Prerequisite for GREs
❑ Enterprises with multiple GREs often associate some together in TaxGroups. Plan in advance which GREs will constitute each TaxGroup, and which GRE will be the tax group leader.
See: GREs and Tax Groups: page 2 – 12
Prerequisites for HR Organizations
❑ To enter cost codes for these organizations, check that the CostAllocation key flexfield includes a cost code segment, with aqualifier of Organization. This qualifier must be present for thesegment to appear in the Organization window.
See: Setting Up the Cost Allocation Key Flexfield: page 11 – 11
❑ In the Table Structure window, query the table COMPANY WORKSCHEDULES, and check whether the work schedules supplied withthe system meet your requirements.
Work schedules show the number of working hours scheduled eachday of the week for employees, starting with Monday. For example,775 means a scheduled work day of 7 hours and 45 minutes. If youneed additional work schedules, you can create them in the TableStructures window.
See: Setting Up User Tables: page 32 – 14
Prerequisites for Reporting Establishments, Corporate Headquarters,and AAP Organizations
See:

2 – 22 Oracle Human Resources North American User’s Guide
Setting Up Reporting Establishments: page 16 – 15
MWS Reporting on Magnetic Tape (Oracle Payroll User’s Guide)
Setting Up a Corporate Headquarters Reporting Establishment:page 16 – 17
Setting Up AAP Organizations: page 16 – 18
� To create a new organization:
1. Enter a name that is unique within the Business Group, andoptionally select an organization type.
Note: All Oracle applications you install share the informationentered in the Organization window. Therefore organizationnames must be unique within a Business Group, and BusinessGroup names must be unique across your applications network.
2. Enter a start date early enough for any historical information youmust enter.
You cannot assign an employee to an organization before the startdate of the organization.
3. Select a location to record the site address, if one exists. You can alsoenter an internal address to add more details such as a floor or officenumber.
4. Select Internal or External. You cannot assign people to an externalorganization.
Examples of external organizations that may require entry arebenefits carriers, Workers Compensation insurance carriers,

☞
2 – 23The Employer and Other Organizations
organizations employees name as beneficiaries of certain employeebenefits, and organizations that are recipients of third partypayments from employees’ pay.
5. Save the organization. Then select at least one classification andenable it.
Note: Your system administrator can limit the classifications yousee to those relevant at your installation.
• Select Business Group to define a Business Group.
Attention: Classifying an organization as a Business Group isnot reversible. Employees, organizations, and other data arepartitioned by Business Group. Each Business Group must beviewed using a separate responsibility.
• Select Government Reporting Entity to define a GRE.
• Select HR Organization for all organizations (including BusinessGroups and GREs) to which you intend to assign employees.
• Select Reporting Establishment, Corporate Headquarters orAAP Organization when defining reporting organizations, thatis, organizations required for the production of certain reports forgovernment agencies.
See: Reporting Organizations: page 16 – 3
• Select Benefits Carrier, Workers Compensation Carrier, orBeneficiary Organization when defining an external organizationbelonging in one of these classifications. You can then select theorganization when defining a benefit, entering information forWorkers Compensation calculations, or recording beneficiariesemployees have named for certain benefits.
See:
Benefits Administration Overview: page 10 – 2
Setup Steps for Workers Compensation Calculations (OraclePayroll User’s Guide)
Recording Beneficiaries for Benefits: page 10 – 20
• Select Payee Organization when defining an externalorganization that is the recipient of a third party payment from anemployee, for example a court–ordered payment. You can thenselect this organization on the Personal Payment Method windowwhen entering a third party payment method.
See: Entering Payment Methods for an Employee Assignment:page 14 – 22

2 – 24 Oracle Human Resources North American User’s Guide
6. Save all enabled classifications for this organization.
� To enter additional information:
Note: There is no additional information to add from theOrganization window for the classification CorporateHeadquarters, or for external organizations with theclassifications Payee Organization, Benefits Carrier, WorkersCompensation Carrier, or Beneficiary Organization.
1. In the Organization window, query the organization if it does notalready appear there. In the Organization Classifications region,select the classification for which to enter additional information,and choose the Others button to open the Additional OrganizationInformation window.
2. This window displays the entry options available for the selectedclassification. Choose the option you want. Another AdditionalOrganization Information window opens. Click in a field of thiswindow to open a window for information entry.
3. Enter additional information for the classification.
Additional Information for Business Groups
� To enter basic, required information for the Business Group:
See: Entering Business Group Information: page 2 – 26
� To enter defaults for human resource budget values:
See: Business Groups: Entering Budget Value Defaults: page 2 – 27
� To enter defaults for work day start and end times:
See: Business Groups and HR Organizations: Work Day Defaults:page 2 – 28
� To register Reporting Categories and Statuses:
� To enter training default values for Oracle Training Administration:
See: Creating a Business Group for Oracle Training Administration,Oracle Training Administration User’s Guide.
2 – 25The Employer and Other Organizations
Additional Information for GREs
� To enter the unique IRS identification number (EIN):
See: GREs: Entering the IRS Identification Number: page 2 – 30
� To enter data for EEO, VETS and New Hire reporting:
See:
Entering EEO–1 Information for a GRE: page 17 – 5
Entering VETS–100 Information for a GRE: page 17 – 23
Entering a New Hire Report Contact for a GRE: page 13 – 33
� To enter tax rules:
See: Entering Federal State and Local Tax Rules for GREs (OraclePayroll User’s Guide)
� To enter data for wage and tax reporting:
See:
MWS (Multiple Worksite) Reporting on Magnetic Tape (OraclePayroll User’s Guide)
State Quarterly Wage Listings (SQWL) Reporting on Magnetic Tape(Oracle Payroll User’s Guide)
W–2 Reporting on Magnetic Tape (Oracle Payroll User’s Guide)
� To enter data for NACHA tapes:
See: Entering NACHA Tape Data for GREs: page 5 – 5
Additional Information for HR Organizations
� To enter cost codes for collection of costing information:
See: HR Organizations: Entering Costing Information: page 2 – 30
� To place the organization in hierarchies :
See: HR Organizations: Entering Parent Organizations: page 2 – 31
� To enter default work day start and end times.
See: Business Groups and HR Organizations: Work Day Defaults:page 2 – 28

2 – 26 Oracle Human Resources North American User’s Guide
� To enter a default work schedule:
See: HR Organizations: Entering a Work Schedule: page 2 – 31
Additional Information for Reporting Establishments
� To enter filing data for EEO and VETS reports:
See: Setting Up Reporting Establishments: page 16 – 15
� To place Reporting Establishments in hierarchies:
See: Placing Subordinate Reporting Organizations in Hierarchies:page 16 – 19
� To enter filing data for Multiple Worksite reports:
See: MWS Reporting on Magnetic Tape (Oracle Payroll User’s Guide)
Additional Information for AAP Organizations
� To enter the AAP the organization represents.
See: Setting Up AAP Organizations: page 16 – 18
� To place AAP Organizations in hierarchies:
See: Placing Subordinate Reporting Organizations in Hierarchies:page 16 – 19
Entering Business Group Information
� To enter Business Group information:
1. In the Organization window, query the Business Group if it does notalready appear there. In the Organization Classifications region,select Business Group, choose the Others button, and select BusinessGroup Information.
2. Click in a field of the Additional Organization Information windowto open the Business Group Information window.

☞
☞
2 – 27The Employer and Other Organizations
3. You can enter a short name for the Business Group. Release 10 doesnot use this name. It is provided for compatibility with earlierreleases, where it appeared in the header line of each form.
4. Select the method of creating identifying numbers for employeesand applicants. The choices are:
• automatic number generation
• manual entry
• automatic use of the national identifier (for example, the socialsecurity number in the US, and the NI number in the UK). Thisoption is available for employees only.
Attention: Once you save your method, you cannot later change toeither of the automatic options. You can only change to manualentry.
5. Select the names of the key flexfield structures you want to use inthis Business Group.
6. Select the appropriate Legislation Code and default currency.
The Legislation Code determines the startup data you can accessand the contents of some legislation–specific windows.
Attention: Selecting the correct legislation code is essential for thecorrect functioning of Oracle HRMS. You cannot change thelegislation code after entering employees against the BusinessGroup.
7. To maintain fiscal year balances in Oracle Payroll if your fiscal yearis different from the calendar year, enter the fiscal year start date.
8. You can enter a Minimum and Maximum Working Age for theBusiness Group. When you enter or hire employees, you receive awarning if the person’s age is outside this range.
9. Save your work.
Business Groups: Entering Budget Value Defaults
You can set up budgets for non–monetary measures such as headcountor full–time equivalent. When you enter employee assignments todefine the work an employee does for your enterprise, you can specifythe value of the assignment towards these budgets. For example, allassignments typically count as one for headcount budgets, but maycount as less than one for full–time equivalent budgets.
To remove the requirement to enter these values for every assignment,you can enter defaults for the whole Business Group. You can overridethe defaults for individual assignments.

2 – 28 Oracle Human Resources North American User’s Guide
Prerequisites
❑ Define units of measure (such as Headcount) by adding values tothe QuickCode Type BUDGET_MEASUREMENT_TYPE in theQuickCodes window.
� To define budget value defaults:
1. In the Organization window, query the Business Group if it does notalready appear there. In the Organization Classifications region,select Business Group, choose the Others button, and select BudgetValue Defaults.
2. Click in a field of the Additional Organization Information windowto open the Budget Value Defaults window.
3. In the Units field, select a measurement type, such as Full TimeEquivalent or Headcount.
4. Enter a default value in the Value field.
You can enter a default value for as many budgetary units as youplan to use for the Business Group.
See Also
Human Resource Budgets: page 12 – 2
Business Groups and HR Organizations: Work Day Defaults
You can set up default working hours for all employees in the BusinessGroup or in an HR Organization, saving data entry at lower levels.

2 – 29The Employer and Other Organizations
When necessary, you can override the defaults at lower levels, forexample, for individual positions or employees.
The Salary Administration process uses working hours information toprorate the salary values against which it validates any salary proposals.
� To define work day defaults:
1. In the Organization window, query the Business Group if it does notalready appear there. In the Organization Classifications region,select Business Group, choose the Others button, and select WorkDay Information.
2. Click in a field of the Additional Organization Information windowto open the Work Day Information window.
3. Enter the normal start and end times in 24 hour format. Forexample, for 5.30 p.m., enter 17:30.
4. Enter a number in the Working Hours field, and select thecorresponding period of time in the Frequency field. For example,enter 40 and select Week.
You can add to the list of available frequencies by making entries forthe QuickCode Type FREQUENCY, using the QuickCodes window.

2 – 30 Oracle Human Resources North American User’s Guide
GREs: Entering the IRS Identification Number
� To enter the unique identification number for the GRE:
1. In the Organization window, query the GRE if it does not alreadyappear there. In the Organization Classifications region, selectGovernment Reporting Entity, choose the Others button, and selectEmployer Identification.
2. Click in a field of the Additional Organization Information windowto open the Employer Identification window.
3. Enter the identification number the IRS has issued for the GRE.
Note: A Retirement Organization may have the same EmployerIdentification Number as an existing GRE, if required.
HR Organizations: Entering Costing Information
� To enter costing information:
1. In the Organization window, query the HR Organization if it doesnot already appear there. In the Organization Classifications region,select HR Organizations, choose Others, and select CostingInformation.
2. Click in the Additional Information window to display the segmentsof the Cost Allocation flexfield set up with the qualifier ofOrganization.
3. Select the appropriate cost code in each segment.
For individual employees, you can override theseorganization–level codes by entering costing information on theirassignments.

2 – 31The Employer and Other Organizations
See: Costing Information at the Organization and AssignmentLevels: page 11 – 9
HR Organizations: Entering Parent Organizations
After you set up organization hierarchies, use the Parent Organizationwindow to place a subordinate organization in hierarchies by naming itsimmediate parent in each hierarchy.
� To enter a parent organization:
1. In the Organization window, query the HR Organization if it doesnot already appear there. In the Organization Classifications region,select HR Organization, choose Others, and select ParentOrganization to open the Parent Organization window.
2. Select the hierarchy name.
3. Select the name of the parent organization to which the HROrganization is subordinate in this hierarchy.
4. To enter the HR Organization in another hierarchy, repeat steps 2and 3.
See Also
Organization Hierarchies: page 2 – 34
HR Organizations: Entering a Work Schedule
Work schedules show the number of working hours scheduled each dayof the week for employees, starting with Monday. For example, for an

2 – 32 Oracle Human Resources North American User’s Guide
employee who works 7 hours and 45 minutes each day Sunday throughThursday, with Friday and Saturday off, the work schedule is:775–775–775–775–0–0–775.
Oracle Payroll uses work schedules to prorate pay for employees whodo not submit timecards. The startup data you receive with OraclePayroll includes several work schedules in common use, entered in thetable COMPANY WORK SCHEDULES.
� To select a work schedule for an HR Organization:
1. In the Organization window, query the organization if it does notalready appear there. In the Organization Classifications region,select HR Organization, choose the Others button, and select WorkSchedule.
2. Click in a field in the Additional Organization Information windowto open the Work Schedule window.
3. Select the default work schedule for the organization.
You can override this default for individual employees on theirassignments.
If the work schedule you need is not on the list, go to the Table Structurewindow, query the table COMPANY WORK SCHEDULES, and enterthe new work schedule.
See Also
User–defined Tables: page 32 – 10

2 – 33The Employer and Other Organizations
Deleting an Organization
To remove an organization from the list of organizations available foremployee assignments, enter an end date (Date To) on the organizationrecord.
To entirely delete an organization from the system, you must first:
• remove any employee assignments to the organization
• remove the organization from any hierarchies
• disable its organization classifications in the Organizationwindow.

2 – 34 Oracle Human Resources North American User’s Guide
Organization Hierarchies
In Oracle HRMS, organization hierarchies show reporting lines andother hierarchical relationships among the organizations in yourenterprise.
You set up a primary reporting hierarchy reflecting the main reportinglines in your enterprise, as established in the organization chart of yourenterprise. Below is an example of an organization chart showing thereporting lines of a single–company enterprise.
Figure 2 – 5Chart Showing Primary Reporting Lines
Company Services Production Sales
Assembly
Maintenance
Testing
Inventory
R & D
HR
Sales East
Sales West
Facilities
Finance
Company HR
MIS
Global Industries Executive

2 – 35The Employer and Other Organizations
Multiple Hierarchies
In addition to the primary reporting hierarchy, you can set up in OracleHRMS as many other organization hierarchies as you need.
Hierarchies for Matrix Management
Your enterprise may have a matrix management structure in whichorganizations have more than one reporting line. For example, lookingat the organization chart in Figure 2 – 5, the HR organization underProduction may have a dotted–line reporting relationship to theorganization Company HR. You can set up additional hierarchies toreflect secondary reporting relationships within your enterprise.
Security Hierarchies
As well as constructing hierarchies to reflect reporting lines, in OracleHRMS you use hierarchies to control access to information. Forexample, in a decentralized enterprise you might want to give eachregional manager access to the records of the employees in theorganizations in his or her region.
Looking again at the organization chart in Figure 2 – 5, you wantmanagers in the Sales East office to have access to the records of allemployees in the eastern region sales groups. You can do this bybuilding a geographical hierarchy of your regions and the organizationsin each.
See: Security Profiles: page 34 – 4
Hierarchies for Reporting
When you run some of the Oracle HRMS standard reports, you canspecify an organization hierarchy to determine which organizations andemployees the report covers. You can also use this approach in yourown standard or ad hoc reports. You can create additional organizationhierarchies just for analysis and inquiry purposes.
To produce reporting for government authorities, for example EEO–1and VETS–100 reports, you build special establishment hierarchies toobtain the correct coverage of employees.
See Also
Establishment Hierarchies: page 16 – 4

2 – 36 Oracle Human Resources North American User’s Guide
Organizational Change and Version Control
Changing your hierarchies to reflect simple changes in reporting lines isnot difficult. You create a new version of your existing hierarchy andmodify parts of its structure. The system retains earlier versions ofhierarchies for historical information.
However when you experience a major restructuring, it is often best tocreate new work structures, including new organizations and reportinglines.
Suggestion: You can create future–dated versions of yourorganization structures and use these to prepare forreorganization in advance. You retain previous versions of yourhierarchies for historical information.
See Also
Dated Information and Hierarchy Versions: page 1 – 10

2 – 37The Employer and Other Organizations
Creating Organization Hierarchies
You can create all types of organization hierarchies in two ways:
• using the Organization Hierarchy window
• using the Organization Hierarchy Diagrammer
The Hierarchy Diagrammer, included with Oracle HRMS, enables youto create your organization hierarchies graphically and make intuitivedrag–and–drop changes to them.
See: Hierarchy Diagrammers Online Help
This topic explains how to use the Organization Hierarchy window.Always define hierarchies from the top organization down.
Prerequisites
❑ Define the top organization in the hierarchy, and at least oneorganization subordinate to it.
� To set up a new organization hierarchy:
1. Enter a unique name, and check Primary if it is your main reportinghierarchy.
2. Enter the version number and start date for the hierarchy.

☞
2 – 38 Oracle Human Resources North American User’s Guide
You can copy an existing hierarchy. See: To copy an existinghierarchy, below.
3. Query the top organization name into the Organization block.
4. In the Subordinates block, select the immediate subordinates for thetop organization.
5. To add organizations below one of these immediate subordinates,check the Down check box for the organization.
The Organization block now displays the organization you selected.You can add subordinates to this organization. To return to theprevious level, check the Up check box.
Attention: The list of organizations from which you can selectin the Subordinates block includes organizations that arealready in the hierarchy. If you select such an organization, youwill move it and all its subordinates within the hierarchy.See: Changing Organization Hierarchies: page 2 – 39
� To create a new version of an existing hierarchy:
1. Query the name of the hierarchy.
2. In the Version field, use the Down Arrow to move through existingversions of the hierarchy until you reach a version number forwhich no other data appears. Enter the start date for the newversion.
Note: Overlapping versions of a hierarchy cannot exist. Wheneveryou enter a new version of a hierarchy, the system automaticallygives an end date to the existing version. Oracle HRMS retains therecords of obsolete hierarchies so you do not lose historicalinformation you may need.
You can copy an existing hierarchy. See: To copy an existinghierarchy, below.
3. Query the top organization name into the Organization block.
4. In the Subordinates block, select the immediate subordinates for thetop organization.
5. To add organizations below one of these immediate subordinates,select the Down check box for the organization.
The Organization block now displays the organization you selected.You can add subordinates to this organization. To return to theprevious level, select the Up check box.
� To copy an existing hierarchy:
1. Enter or query the name and number of your new hierarchy versionand choose the Copy Hierarchy button.

2 – 39The Employer and Other Organizations
2. Select the name and version number of the hierarchy you want tocopy.
Details of this hierarchy then appear in the Organization andSubordinates blocks. You can change these.
Changing Organization Hierarchies
To add new organizations to an existing hierarchy, query the hierarchyand version you want to change, query the parent organization for theone you are adding, and select the new organization in the Subordinatesblock.
To change the top organization of an existing hierarchy, query thehierarchy and version you want to change, query the new toporganization, and select the previous top organization in theSubordinates block.
You can move an organization and all of its subordinates within ahierarchy. To move an organization, query the hierarchy and versionyou want to change, query the new parent organization for the one youwant to move, and select the organization to move in the Subordinatesblock.
Deleting Organization Hierarchies
To delete an organization hierarchy, you must first remove thesubordinate organizations from the hierarchy, starting at the lowestlevel. You cannot delete an organization hierarchy if other versionsexist, or a security profile uses it.
Organization Hierarchy Report
Oracle HRMS includes a standard Organization Hierarchy Report todisplay the relationships between organizations in a hierarchy.
You run reports from the Submit Requests window.
� To run the Organization Hierarchy Report:
1. In the Name field, select Organization Hierarchy.
2. Enter the Parameters field to open the Parameters window.

2 – 40 Oracle Human Resources North American User’s Guide
3. Enter the effective date for which you want to see the report.
4. In the Organization Structure field, select the hierarchy. If there aremultiple versions, select a version.
If the effective date lies between the version’s start and end dates,the report shows information for the effective date. If it lies outsidethese dates, the report shows information for the start date of theversion.
5. In the Parent Organization field, select the highest organization inthe hierarchy that you want to see on the report.
6. Enter Yes in the Managers Shown field to see managers’ names.
If there are more than ten managers, you see the number ofmanagers only.
7. Choose the Submit button.
C H A P T E R
3T
3 – 1Jobs and Positions
Jobs and Positions
his chapter explains the concepts of jobs and positions in OracleHRMS and how you can use these work structures to represent the rolesof your employees.
It further explains how to:
• use the Job Name and Position Name key flexfields to identifygroups of employees in your enterprise
• hold information associated with jobs and positions, such as jobdescriptions, and standard working hours for positions
• represent the reporting lines and other relationships amongpositions. You represent these relationships by building positionhierarchies
• reorganize jobs, positions and assignments within your BusinessGroup.

3 – 2 Oracle Human Resources North American User’s Guide
Representing Jobs and Positions
In many enterprises the basic management units are roles, notindividuals. In theory at least, organizations are able to continue inunchanged existence, in spite of frequent changes in staff. However, thedefinition of a ’role’ varies from one enterprise to another. Likeorganization structures, it reflects the culture of the enterprise.
You define roles to represent the ways that different groups ofemployees work. In Oracle HRMS you can use jobs or positions, or acombination, to define roles.
A job is a generic role within a Business Group,which is independent of any single organization.For example, the jobs ’Manager’ and ’Consultant’can occur in many organizations.
A position is a specific occurrence of one job, fixedwithin one organization. For example, the position’Finance Manager’ would be an instance of the jobof ’Manager’ in the ’Finance’ organization. Theposition belongs to the organization. There may beone, many, or no holders of a position at any time.
Example
In a large structured organization, you may have a permanentestablishment of positions for most of your employees.
However, you may also have groups of employees hired to performspecific tasks. This can be on a temporary or a permanent basis. Staff inthis category can include agency workers, consultants and contractors.For these staff, you can define the role more flexibly as a job.
Job
Position

3 – 3Jobs and Positions
Position Reporting Structures
If you use positions to define roles, you can define position hierarchies toshow the detailed line management reporting in each organization orthroughout the enterprise.
Position hierarchies are very like organization hierarchies. You can setup a primary hierarchy and multiple secondary hierarchies to showreporting lines, including ’dotted line’ reporting, and to control access toinformation.
Position hierarchies are dated, so you can create future–dated versionsto prepare for reorganization in advance, and can retain previousversions for historical information.
ManagingDirector
David Anderson
Finance Director
AlasdairMacIntosh
Director, Salesand
Marketing
Duncan McDonald
Director,Research andDevelopment
PhilippaWilkinson
Plant PersonnelManager
Sheelagh Campbell
Plant Manager
Wendy Rawlins
DepartmentHead
** 2 Holders **
ProductionEngineering
Manager
Charles Adams
Plant Info.Systems Manager
Kaz Raghu
Director,ManagementInformation
** No Holders **
Figure 3 – 1Position Hierarchies
ProductionDirector
MichaelFeingold
Director ofPersonnel
Geoffrey Cox

3 – 4 Oracle Human Resources North American User’s Guide
See Also
Creating Position Hierarchies: page 3 – 21
Dated Information and Hierarchy Versions: page 1 – 10
Organization Hierarchies: page 2 – 34
Deciding How to Use Organizations, Jobs, and Positions
When you plan how to model your organizations and roles, consider thefollowing points:
• Positions are normally used in role–based enterprise structureswhere clearly defined rules largely determine the waysemployees work, and the compensation and benefits they receive.
• To manage fixed establishments of posts that exist independentlyof the employee assignment, it is best to use positions.
If you decide to use positions to represent your enterprise structures youneed to consider carefully how to use organizations.
Positions provide you with a finer degree of structural definition andcontrol than organizations on their own. You can use both organizationsand positions to represent your reporting structures. However, if youdefine both, you must also maintain both over time. This may lead youinto duplication of effort and information.
Suggestion: If you decide to use positions to represent howpeople work in your enterprise, it is best to define most of thedetail at the level of the position. Do not duplicate this detail inorganization structures.
Use organizations to show your highest level of departments ordivisions. Use positions and position hierarchies to show thereporting groups existing in your enterprise.
See Also
Rule Based Enterprises: page 6 – 6
3 – 5Jobs and Positions
Job and Position Names
Before you define your jobs and positions, decide whether you want touse simple names and codes, or multi–segment job and position namesto hold more information.
The name can be a title only, as for example:
• Director
• Analyst
• Training Manager
You can add another segment to categorize the jobs or positions. In thisway, you can use segments to identify subgroups of employees withinyour enterprise. For example, a job name can comprise a title and a jobtype, such as:
• Director of Finance.Director
• Assistant Director of Finance.Director
• Finance Officer.Professional
Similarly, a position name can comprise a title, a position number, andan indicator showing whether the position is part–time. For example:
• Training Manager.020001.F/T
• Secretary to the Training Manager.020013.P/T
You define the segments of the job and position names and their validvalues by setting up the Job Name key flexfield and the Position Name keyflexfield. Normally your system administrator does this.
See Also
User Definable Key Flexfields: page B – 2

3 – 6 Oracle Human Resources North American User’s Guide
Adding Information About Jobs and Positions
As you define roles in your enterprise, you can describe theirresponsibilities, requirements, and working conditions. There are anumber of ways to add information about a role:
• For positions, you can enter in standard fields, the location,probation period, and working hours. Entering location andworking hours for an organization provides a default for allpositions within that organization.
• You can attach documents (such as word processed documents,spreadsheets, or simple text comments) to each job or positionrecord. For example, you might attach text describing theobjectives and tasks of the job or position.
See: Using Attachments: page 33 – 6
• You can add up to twenty additional fields to each window tohold extra information you require. These fields can be global(they always appear), or context–sensitive (they appear onlywhen triggered by another piece of information).
For example, these fields can record the health and safetyrequirements of a position, or its suitability for job share. Theadditional fields appear in a descriptive flexfield.
See: Adding New Fields to Windows: page 31 – 2
• You may need to add other information, such as requiredqualifications or valid experience, to help match people to roles.You define the sorts of Special Information Types you want tohold and set them up using a special field called the PersonalAnalysis key flexfield. For each job or position, you select therequirements from your Special Information Types relevant tothat role.
See: Matching People to Vacancies: page 25 – 2
Comparing and Relating Roles
You may also want to relate roles to each other and define the relativegrading of the roles. You can relate roles in the following ways:
• By forming multiple hierarchies of positions to show reportingrelationships or career paths.
See: Creating Position Hierarchies: page 3 – 21
• By linking jobs into multiple career paths to show suggestedprogression paths.

3 – 7Jobs and Positions
See: Defining Career Paths: page 23 – 7
• By recording successor positions and relief positions (to cover inthe case of absence) against each position.
See: Defining Positions: page 3 – 11
• By recording the grades that are valid for each job and position.
See: Valid Grades: page 3 – 16
• If you use an evaluation system (such as the Hay EvaluationSystem) to compare roles, you can set up fields to hold evaluationinformation and an overall score for each job and position.
See: Evaluating Jobs and Positions: page 3 – 14

3 – 8 Oracle Human Resources North American User’s Guide
Defining JobsYou use the Job window to define jobs, the skills that jobholders require,and the grades to which they can be assigned. You can also enter jobevaluation scores, if you have set up a job evaluation system.
Additionally, you can enter in the Further Information field of the Jobwindow:
• an FLSA (Fair Labor Standards Act) code indicating whether thejob is exempt from payment for overtime work
• an EEO job category, needed for production of EEO–1, AAP, andVETS–100 reports, and a job group, line of progression and salarycode, needed for AAP reports
• information relating to the use of a job as a survey benchmark.
Prerequisites
❑ Define all the segments of the Job Name key flexfield that you wantto use for the job name.
❑ If there are one or more valid grades to enter for this job, check thatthese grades are defined.
� To define a job:
1. Enter a start date early enough to handle any historical informationyou want to enter.
2. Enter a unique name for the job. If there is more than one segmentin the Job Name flexfield, a window opens when you enter theName field. You must enter a unique combination of segments in thiswindow.

3 – 9Jobs and Positions
3. Click in the Further Information field to open the Further JobInformation window. Here you can:
• mark the job for use as a survey benchmark
• select an FLSA code of Exempt or Nonexempt
See The Earnings Type Overtime (Oracle Payroll User’s Guide)
• select an EEO code for the job
See: Associating Jobs with EEO Job Categories: page 17 – 6
• select a job group, line of progression, and salary code for the job
See: Data for AAP Reporting: page 17 – 15
4. Save the job.
5. Choose the Evaluation button to enter evaluation information andan overall evaluation score for the job.
6. Choose the Requirements button to enter job requirements, such asrequired qualifications or valid experience, to help you matchpeople to roles.
Note: Check with your HR manager or system administratorwhether this is the right window for entering job requirements.You use this window if requirements were defined using SpecialInformation Types. You use the Competency Requirementswindow if you have implemented Career Management.
7. Choose the Valid Grades button to enter the grades to whichjobholders can be assigned.
Note: For calculation of the Workers Compensation liability ofyour enterprise, you must associate this job with the workclassification code of one or more states.
See Jobs and WC State Codes and Rates (Oracle Payroll User’sGuide)

3 – 10 Oracle Human Resources North American User’s Guide
See Also
Entering Evaluation Information: page 3 – 15
Entering Job and Position Skill Requirements: page 3 – 17
Valid Grades: page 3 – 16
Entering Work Choices for a Job or Position: page 3 – 18

3 – 11Jobs and Positions
Defining PositionsYou use the Position window to define positions within yourorganizations and to add them to position hierarchies. You can alsoenter the skills that position holders require and the grades to whichthey can be assigned. You can enter position evaluation scores, if youhave set up a position evaluation system.
Prerequisites
❑ Define all the segments of the Position Name key flexfield that youwant to use for the position name.
❑ Define the organizations for the Business Group.
❑ Define the jobs for the Business Group.
❑ If you want to hold probation periods for positions, enter the unitsin which you measure probation periods as values for theQuickCode Type QUALIFYING_UNITS.
❑ If you want to add the position to a position hierarchy, define thehierarchy in the Position Hierarchy window.
� To define a position:
1. Enter a start date early enough to handle any historical informationyou want to enter.
2. Enter a unique name for the position.
If there is more than one segment in the Position Name flexfield, awindow opens when you enter the Name field. You must enter aunique combination of segments in this window.

☞
3 – 12 Oracle Human Resources North American User’s Guide
3. Select the organization and job for this position. They must have astart date on or before the start date of this position.
Attention: You cannot change the organization or job once youhave saved the definition.
You can set up several positions that have the same job in the sameorganization. Each position name must be unique.
4. Optionally, select a status for the position. If the status is Valid orblank, employees can be assigned to the position. If the status isInvalid or any other status defined at your site, employees cannot beassigned to the position.
5. Location and Standard Conditions default from the organization,but you can override the defaults.
6. If there is a probation period for this position, you can enter itslength in the Probation Period alternative region.
7. In the Absence alternative region, select Yes in the ReplacementRequired field if you want users to be warned that they should enterthe name of a replacement when they enter an absence for a holderof this position. You might want to do this for positions where it isessential that a person is ’in charge’ at all times.
You can select the position that should be held by the person tocover as relief in case of absence.
8. In the Planned Successor alternative region, you can select theposition from which a successor will to move to fill this position.
9. Save your position.
10. If you want to add the position to one or more position hierarchies,choose the Reporting To button. Select a hierarchy and the name ofthe position to which this position reports.
11. Choose the Evaluation button to enter evaluation information andan overall evaluation score for the position.
12. Choose the Requirements button to enter position requirements,such as required qualifications or valid experience, to help youmatch people to roles.
Note: Check with your HR manager or system administratorwhether this is the right window for entering positionrequirements. You use this window if requirements weredefined using Special Information Types. You use theCompetency Requirements window if you have implementedCareer Management.
13. Choose the Valid Grades button to enter the grades to whichposition holders can be assigned.

3 – 13Jobs and Positions
See Also
Entering Evaluation Information: page 3 – 15
Valid Grades: page 3 – 16
Entering Work Choices for a Job or Position: page 3 – 18

3 – 14 Oracle Human Resources North American User’s Guide
Evaluating Jobs and PositionsEvaluation systems are common in large enterprises, which compare theresponsibilities of roles to help in the definition of grades. Directly orindirectly, the evaluation can also contribute to setting compensationlevels. The UK’s Local Government Scheme and the Hay EvaluationSystem, used internationally, are examples of evaluation systems.
Evaluation systems normally use a set of formal and systematicprocedures to perform a comparison of roles. As such, evaluation isprimarily concerned with the definition of the relative status of a role,and not with a set of absolutes. The objective of all evaluation systems isto place a role in a grading or salary structure.
There are two main types of evaluation system:
Key roles are examined factor by factor and a rankcomparison order produced for each factor. Acomplex comparison of weighted factors thenfollows.
A wider range of factors is used. Each factor isweighted and has a numerical scoring system. Thetotal points scored determines the placement of therole in a grade or salary structure.
These systems might incorporate benchmarking, where a few key rolesdetermine the rank of all the others. Grades and compensation levelsare determined after the evaluation and ranking of the jobs.
Setting Up an Evaluation System
� To set up an evaluation system:
1. Decide whether to hold the evaluation information for jobs or forpositions, depending on your own definitions of employees’ roleswithin the enterprise model.
2. Define values for the QuickCodes Types EVAL_SYSTEM (evaluationsystem name) and EVAL_SYSTEM_MEAS (the units in which tomeasure the evaluation). If you use more than one system, you candefine multiple values to provide a list of values in the JobEvaluation and Position Evaluation windows.
See: Adding QuickCode Values: page 32 – 3
3. Define the structure and segments of the Additional EvaluationDetails descriptive flexfield, which holds the evaluation
Factor
Points Rating

3 – 15Jobs and Positions
information. This descriptive flexfield displays on the JobEvaluation and Position Evaluation windows.
For example, you could define the following segments:
• Responsibility
• Problem Solving
• Know How
• Related Grade
If you are using more than one evaluation system in your enterprise,you should make the flexfield segments context sensitive to theevaluation system. Context sensitive segments ensure that eachsystem has its own distinct set of evaluation information.
Your system administrator usually carries out this task as it requiresaccess to parts of the system that control how Oracle HumanResources works.
Entering Evaluation Information
Enter evaluation scores and details in the Job Evaluation or PositionEvaluation window.
Prerequisites
❑ An evaluation system must be implemented.
� To enter a job or position evaluation:
1. Select the evaluation system used to evaluate this job or position.
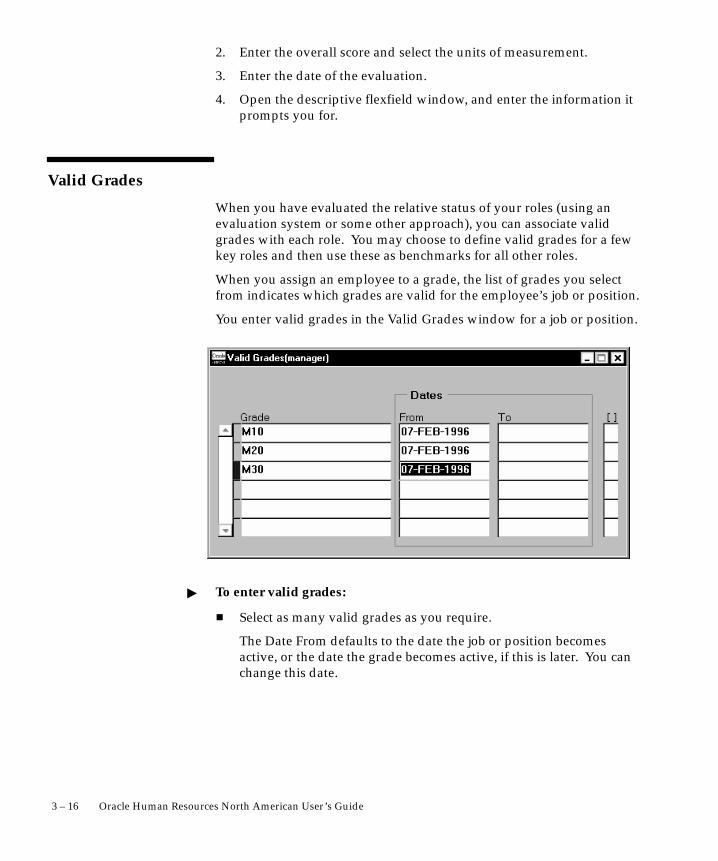
3 – 16 Oracle Human Resources North American User’s Guide
2. Enter the overall score and select the units of measurement.
3. Enter the date of the evaluation.
4. Open the descriptive flexfield window, and enter the information itprompts you for.
Valid Grades
When you have evaluated the relative status of your roles (using anevaluation system or some other approach), you can associate validgrades with each role. You may choose to define valid grades for a fewkey roles and then use these as benchmarks for all other roles.
When you assign an employee to a grade, the list of grades you selectfrom indicates which grades are valid for the employee’s job or position.
You enter valid grades in the Valid Grades window for a job or position.
� To enter valid grades:
� Select as many valid grades as you require.
The Date From defaults to the date the job or position becomesactive, or the date the grade becomes active, if this is later. You canchange this date.

3 – 17Jobs and Positions
Entering Job and Position Requirements
Using the Job Requirements window and Position Requirementswindow, you can store any personal attributes or experience required bya job or position. You can then use this information to list employees orapplicants who might be suitable to hold the job or position.
Note: If you are using Career Management for suitabilitymatching, enter competence requirements for jobs and positionsin the Competence Requirements window.
❑ The implementation team at your site must set up one or morespecial information types to hold the requirements information.
See: Defining Special Information Types: page 28 – 10
� To enter job or position requirements:
1. Select the name of a special information type.
2. Enter the Requirements field to open the window corresponding tothis special information type.
3. In this window, enter the precise requirement of the job or positionand choose OK.
4. If the requirement is essential to the job or position, check theEssential check box. This information is used in the Skills MatchingReport.
5. Save the requirements.
3 – 18 Oracle Human Resources North American User’s Guide
See Also
Entering Work Choices for a Job or Position
You can enter work choices that can affect an employee’s, applicant’s,contractor’s, or ex–employee’s capacity to be deployed within yourenterprise (or a customer’s). Work Choices include willingness to travel,willingness to relocate, and preferred working hours and workschedule. You can enter work choices for a job or position, and comparethese with the personal work choices entered for people.
You enter this information in the Work Choices window, accessed fromthe Job or Position window.
Prerequisites
You need to enter enter the following QuickCodes for work factors:
❑ Define time scales as values for the QuickCode TypePER_TIME_SCALES.
❑ Define work schedules as values for the QuickCode TypePER_WORK_SCHEDULE.
❑ Define working hours as values for the QuickCode TypePER_WORK_HOURS.
❑ Define the full time equivalents as values for the QuickCode TypePER_FTE_CAPACITY.
❑ Define relocation preferences as values for the QuickCode TypePER_RELOCATION_PREFERENCES.
❑ Define lengths of service as values for the QuickCode TypePER_LENGTHS_OF_SERVICE.
� To enter work choices for a job or position:
1. Check the relevant work requirements boxes if the job or positionrequires the holder to:
• work in all locations
• relocate
• be willing to relocate
• travel
3 – 19Jobs and Positions
• hold a passport
2. Enter the length of time the jobholder must perform the job orposition, for example, indefinite or two years.
3. Enter the normal working hours (for example, 9.00 to 5.30), thework schedule (the working days in the week or pattern of shifts),the proportion of full time hours required, and the minimum lengthof service required.
4. Check the relevant international deployment boxes if the job orposition requires the jobholder to:
• work in all countries
• be willing to relocate
5. Select the countries to which the jobholder might be relocated.
6. Select the locations to which the jobholder might be relocated.
7. Enter any further job or position requirements, if required.
See Also
Entering Work Choices (Person): page 13 – 21

3 – 20 Oracle Human Resources North American User’s Guide
Viewing Position Occupancy
The Position Occupancy folder lists all those people who have held aselected position or who are applying for it, and the dates of theiroccupancy. This information could be relevant for selecting people withthe necessary skills for similar positions.
Note: As supplied, this folder displays employees who haveheld the selected position or who are scheduled to hold it. Yoursystem administrator can create a customized version of theform to display applicants who are currently applying for theposition.
The supplied folder also contains a button to open the Peoplewindow to see further details of an occupant. Your systemadministrator can change the buttons displayed on this window.
� To view occupants of a position:
� In the Position window, query a position and choose the Occupancybutton.
Occupants are listed in reverse date order. Where a person hasoccupied the same position at different times, a separate record iscreated for each occupancy.
� To see further details of occupants or applicants:
� Select the person’s record in the Position Occupancy folder andchoose the Person button.
Note: There is no restriction on the assignments you can viewin the Position Occupancy folder. However, you cannot viewfurther details if you do not have clearance to view that person’srecords.

3 – 21Jobs and Positions
Creating Position HierarchiesYou can create and maintain your reporting structures in two ways:
• using the Position Hierarchy window
• using the Position Hierarchy Diagrammer
The Hierarchy Diagrammer, included with Oracle HRMS, enables youto create your position hierarchies graphically, and make intuitivedrag–and–drop changes to them.
See: Hierarchy Diagrammers Online Help
This topic explains how to use the Position Hierarchy window. Alwaysdefine hierarchies from the top position down.
Prerequisites
❑ Define the top position in the hierarchy, and at least one positionsubordinate to it.
� To create a new position hierarchy:
1. Enter a unique name, and check Primary if it is your main reportinghierarchy.
2. Enter the version number and start date for the hierarchy.
You can copy an existing hierarchy. See: To copy an existinghierarchy, below.
☞
3 – 22 Oracle Human Resources North American User’s Guide
3. Query the top position name into the Position block.
The Holder field displays the name of the employee who holds thisposition. If there is more than one holder, this field displays thenumber of holders. You can choose the List icon from the toolbar todisplay the list of holders.
4. In the Subordinates block, select the immediate subordinates for thetop position.
5. To add organizations below one of these immediate subordinates,check the Down check box for the position.
The Position block now displays the position you selected. You canadd subordinates to this position. To return to the previous level,check the Up check box.
Attention: The list of positions from which you can select inthe Subordinates block includes positions that are already in thehierarchy. If you select such a position, you will move it and allits subordinates within the hierarchy.
See: Changing Position Hierarchies: page 3 – 23
� To create a new version of an existing hierarchy:
1. Query the name of the hierarchy.
2. In the Version field, use the Down Arrow to move through existingversions of the hierarchy until you reach a version number forwhich no other data appears. Enter the start date for the newversion.
Note: Overlapping versions of a hierarchy cannot exist. Wheneveryou enter a new version of a hierarchy, the system automaticallygives an end date to the existing version. Oracle HRMS retains therecords of obsolete hierarchies so you do not lose historicalinformation you may need.
You can copy an existing hierarchy. See: To copy an existinghierarchy, below.
3. Query the top position name into the Position block.
4. In the Subordinates block, select the immediate subordinates for thetop position.
5. To add positions below one of these immediate subordinates, checkthe Down check box for the position.
The Position block now displays the position you selected. You canadd subordinates to this position. To return to the previous level,check the Up check box.
3 – 23Jobs and Positions
� To copy an existing hierarchy:
1. Enter or query the name and number of your new hierarchy versionand choose the Copy Hierarchy button.
2. Select the name and version number of the hierarchy you want tocopy.
Details of this hierarchy then appear in the Position andSubordinates blocks. You can change these.
See Also
Dated Information and Hierarchy Versions: page 1 – 10
Changing Position Hierarchies
To add new positions to an existing hierarchy, query the hierarchy andversion you want to change, query the parent position for the one youwant to add, and select the new position in the Subordinates block.
To change the top position in an existing hierarchy, query the hierarchyand version you want to change, query the new top position, and selectthe previous top position in the Subordinates block.
You can move a position and all of its subordinates within a hierarchy.To move a position, query the hierarchy and version you want tochange, query the new parent position for the one you want to move,and select the position to move in the Subordinates block.
Deleting Position Hierarchies
To delete a position hierarchy, you must first remove the subordinatepositions from the hierarchy, starting at the lowest level. You cannotdelete a position hierarchy if other versions exist, or if a security profileuses it.

3 – 24 Oracle Human Resources North American User’s Guide
Position Hierarchy Report
Oracle HRMS includes a standard Position Hierarchy Report to displaythe relationship between the positions in a hierarchy. The report alsolists the current holders of each position in the hierarchy.
You run reports in the Submit Requests window.
� To run the Position Hierarchy Report:
1. In the Name field, select Position Hierarchy.
2. Enter the Parameters field to open the Parameters window.
3. Enter the effective date for which you want to see the report.
4. In the Position Structure field, select the hierarchy. If there aremultiple versions, select a version.
If the effective date lies between the version’s start and end dates,the report shows information for the effective date. If it lies outsidethese dates, the report shows information for the start date of theversion.
5. In the Parent Position field, select the highest position in thehierarchy that you want to see on the report.
6. Enter Yes in the Holders Shown field to see holders’ names.
If there are more than ten holders, you see the number of holdersonly.
7. Choose the Submit button.

3 – 25Jobs and Positions
Making Mass Updates
You can use the Mass Move feature to reorganize your Business Group,either within an organization or between organizations.
You can move assignments between existing positions, create newpositions in which to move assignments, and change the grade,GRE/Legal Entity, or location and standard conditions of anassignment.
Business Group reorganizations often entail changing many employeerecords in the same way. Because Mass Move allows you to modifymultiple employee records at once, you can make such changesconveniently.
These topics are covered:
• Preparing for your mass move: page 3 – 26
• Performing tasks to complete your mass move: page 3 – 28
• Managing your collection of mass moves: page 3 – 35

3 – 26 Oracle Human Resources North American User’s Guide
Preparing for Your Mass MoveTo prepare for your mass move, you must make certain decisions andensure that certain prerequisites are in place.
Making Decisions for Your Mass Move
• What is my source organization? (The mass move transfersassignments from the source organization.)
• What is my target organization? (The mass move transfersassignments to the target organization. The target organizationcan differ from or be the same as the source organization.)
• What is the effective date for the mass move?
• What are the source position(s)? (The mass move transfersassignments from the source position(s) within the sourceorganization).
• Do you want to deactivate the source position?
• What are my target position(s)?
• If my target position(s) are new, will their location and standardconditions be copied from the source position, targetorganization, or Business Group?
• What grades are valid for the target position(s)?
• Which assignment(s) will transfer from my source position(s) tomy target position(s).
• Will the grade of any transferring assignment change during themass move?
• Will the GRE/Legal Entity of any transferring assignment changeduring the mass move?
• Will the location and standard conditions of any transferringassignment change during the mass move?
Prerequisites for Your Mass Move
To prepare for your mass move:
❑ Make sure you have access to a responsibility linked to the BusinessGroup within which the mass move will take place.
See: Accessing Business Groups: page 2 – 18
❑ Check that the source and target organizations for your mass movealready exist in the HRMS database.
See: Creating an Organization: page 2 – 20

3 – 27Jobs and Positions
See Also
Performing Mass Move Tasks: page 3 – 28

3 – 28 Oracle Human Resources North American User’s Guide
Performing Mass Move TasksExecuting a mass move includes the following tasks:
1. Describe your mass move: page 3 – 28
2. Identify your source position(s): page 3 – 29
3. Identify your target position(s): page 3 – 30
4. For each source position, verify the transferring assignments: page3 – 31
5. For each target position, verify or add valid grades: page 3 – 33
6. Execute the mass move: page 3 – 33
7. Review the mass move: page 3 – 34
8. If necessary, resolve any problems and then reexecute the massmove: page 3 – 34
Describing Your Mass Move
To define your mass move, the first task involves entering a description,determining the source and target organizations for the mass move, andspecifying the date on which the mass move will take effect.
� To describe your mass move:
1. Navigate to the Mass Move window.
2. Enter a description of the mass move you want to perform.
You can change this description at any time before the mass move isprocessed.
3. Select the source and target organizations for the mass move.
The source and target organizations can differ or be the same. Thelists includes organizations that have been defined for the BusinessGroup.
Note: You cannot create a target organization ”on the fly.”
You can change the source and target organizations for this massmove at any time until you choose the Find button on the FindPositions window. These definitions then become part of thepermanent definition of the mass move and cannot be changed.
Status is a display field that indicates whether the mass move hasnot yet been executed (Unprocessed), successfully executed without

☞
3 – 29Jobs and Positions
errors or warnings (Complete), successfully executed without errorsbut with warnings (Complete with Warnings), or unsuccessfullyexecuted with no changes made (In Error).
4. If necessary, adjust the effective date of the mass move.
You can adjust the effective date at any time before the mass move isprocessed.
5. Save your work.
Identifying Your Source Positions
After describing your mass move, you must identify source position(s)to be moved.
� To identify your source positions:
1. In the Mass Move window, choose the Positions button.
2. In the resulting Find Positions window, select source job(s) and thesource position(s) associated with those job(s).
You can select from a list of existing job(s) and position(s) in thesource organization, or you can use generic search criteria(wildcards) to identify a pool of source jobs and source positionsfrom which you will select your source positions in Step 3.
3. Choose the Find button.
When the Mass Move – Positions window is populated withinformation, the source and target organizations you defined in theMass Move window appear in display fields.
4. If you used search criteria to identify a pool of source jobs andpositions, make sure that the list includes all of the source jobs andpositions you want to include in this mass move.
Attention: If you want to add source jobs or positions to this list,you must delete this mass move and define a new mass move;source job(s) and position(s) cannot be added to this list.
5. In the move check boxes, check each of the source positions youwant to move.
Assignments associated with unchecked source positions will not beaffected by the mass move in any way.
6. If you want to deactivate any source position on the effective datefor the mass move, check the Deactivate Old Position check boxwhen that position is selected.

☞
3 – 30 Oracle Human Resources North American User’s Guide
Selected: Deactivating a source position does not delete it from theHRMS database, but enters the mass move effective date as the enddate for the position.
Unselected: Leaving this check box unchecked allows assignmentsto be assigned to this source position after the effective date of themass move, even though the source position may have noassignments immediately following the mass move.
Attention: Unchecking the Move check box for a record restoresthe original values for that record.
See Also
Defining Positions: page 3 – 11
Managing Your Mass Move Collection: page 3 – 35
Identifying Your Target Positions
Now that you have identified the source position(s) for your mass move,you are ready to identify its target position(s). For each of the targetpositions you will define, perform the following steps:
� To identify your target positions:
1. On the Mass Move – Positions window, select one source positionfor your mass move.
2. Select a target job to correspond with that source position.
The list includes existing jobs within the Business Group.
Note: You cannot create a target job ”on the fly.”
3. Choose Edit Field to enter a new target position, or select a targetposition.
The list includes existing positions in the target organization.
Note: Each source position can only have one target position.However you can use the same target position for multiple sourcepositions.
4. Select the location and standard conditions for this target position.
If this target position is a new position, you can enter location andstandard conditions as follows:
Source Position: Indicates that the location and standard conditionsof the source position will be applied to the new target positionwhen the mass move takes effect.

☞
3 – 31Jobs and Positions
Target Organization: Indicates that the location and standardconditions of the target organization will be applied to the newtarget position when the mass move takes effect.
Business Group: Indicates that the location and standard conditionsof the Business Group will be applied to the new target positionwhen the mass move takes effect.
Attention: Unchecking the Move check box for a record restoresthe original values for that record.
5. When you have identified each of your source and target positions,choose the Assignments button.
See Also
Verifying Transferring Assignments for Each Source Position: page3 – 31
Defining Positions: page 3 – 11
Verifying Transferring Assignments for Each Source Position
The content of the Mass Move – Assignments window depends on thesource position you last selected in the Mass Move – Positions window.The Mass Move – Assignments window displays that selected sourceposition, and its corresponding source organization and source job. Italso displays the target position you have entered for this selectedsource position, and the target organization and job associated with thistarget position.
All of the (applicant as well as employee) assignments associated withthe source position you selected in the Mass Move – Positions windoware also displayed.
As the Move check boxes show, by default all assignments associatedwith this source position are selected to move to the target position. TheMass Move – Assignments window allows you to verify theseassignments, indicate which ones, if any, will not be moving to the targetposition, and change the grade, GRE/Legal Entity, location andstandard conditions for any of the assignments to be moved.
� To verify transferring assignments for each source position:
1. If you want to prevent any of these assignments from moving to thetarget position, uncheck the appropriate Move check boxes.

☞
3 – 32 Oracle Human Resources North American User’s Guide
2. If you want to change the grade for any transferring assignment,select the assignment, and then select another grade for thatassignment.
3. If you want to change the GRE/Legal Entity for any transferringassignment, select the assignment, and then select anotherGRE/Legal Entity for that assignment.
4. If you want to copy location and standard conditions for atransferring assignment from an entity other than the currentassignment (default), select the assignment, and then select the newlocation and standard conditions for that assignment. The optionsfollow:
Current Assignment: Indicates that the transferring assignment willmaintain its current location and standard conditions when themass move takes effect.
Source Position: Indicates that the location and standard conditionsof the source position will be applied to the transferring assignmentwhen the mass move takes effect.
Target Organization: Indicates that the location and standardconditions of the target organization will be applied to thetransferring assignment when the mass move takes effect.
Business Group: Indicates that the location and standard conditionsof the Business Group will be applied to the transferring assignmentwhen the mass move takes effect.
Attention: Unchecking the Move check box for a record restoresthe original values for that record.
5. To save your work and then return to the Mass Move – Positionswindow, close the Mass Move – Assignment window.
When the Mass Move – Positions window reappears, you can repeatthe above steps for any other source positions whose transferringassignments you choose to verify. Otherwise, you are ready to verifyor add valid grades for any target(s) jobs/positions.
See Also
Entering a New Assignment: page 14 – 9
Representing the Employer: GREs: page 2 – 9
Site Locations: page 2 – 2

3 – 33Jobs and Positions
Verifying or Adding Valid Grades for Each Target Position
Because it is possible for the grade of a transferring assignment to beoutside the bounds of the valid grades for the target job or targetposition, you can use Mass Move to add valid grades to the targetposition.
1. On the Mass Move – Positions window, choose the Valid Gradesbutton.
The resulting Mass Move – Valid Grades window displaysinformation for the source position you last selected in the MassMoves – Positions window. It displays the valid grades for thetarget position:
• A newly–created target position has the same valid grades as thesource position.
• An existing target position retains its existing valid grades andMass Move adds any other grades that are valid for the sourceposition.
Thus Mass Move accommodates the grade(s) of the transferringassignment(s). You cannot delete any of the valid grades.
2. Optionally, select additional valid grades for the target position.
3. To save your work and then return to the Mass Move – Positionswindow, close the Mass Move – Valid Grade window.
When the Mass Move – Positions window reappears, you can selectany other records, to verify or add valid grades for that targetposition.
See Also
Valid Grades: page 3 – 16
Executing the Mass Move
1. Close the Mass Move – Positions window.
2. Save your work when prompted to do so.
3. On the Mass Move window, choose the Execute button.
If the number of changes being made is large, executing the massmove may take some time.

☞
3 – 34 Oracle Human Resources North American User’s Guide
Reviewing the Mass MoveAfter you have chosen the Execute button on the Mass Move window,you are ready to review the results.
� To review the mass move:
1. On the Mass Move window, review the contents of the Status field.
Unprocessed: Indicates that you have not yet executed the massmove.
Complete: Indicates that the mass move completed successfullywithout errors. For historical purposes, completed mass moves areautomatically archived and cannot be modified.
Complete with Warnings: Indicates that the mass move completedsuccessfully. Nevertheless, you should still review any warningmessages the mass move generates. It is possible for a mass move toexecute with Status=Complete with Warnings, yet without allassignments moving as you intended.
In Error: Indicates that the mass move did not complete successfullyand that no changes took effect. You must first resolve the offendingconditions before you can successfully reexecute the mass move.
Attention: If the Status field shows In Error or Complete withWarnings, the Message button appears next to the Positions button.
2. If the Message button is displayed, review the messages.
The Message window that appears includes the following fields:
Type: Type of message; Warning or Error.
Row Information: If this field displays a position name, themessage applies to a source position. If this field displays the nameof a person, this field applies to the assignment associated with thatperson.
Message: Text of the message.
Note: The Explain button on the Message window is disabled if noadditional information is available.
3. If the Status field shows Complete or Complete with Warnings,navigate to the Mass Move – Assignments window and verify thatthe mass move changes you wanted to make did in fact take effect.Then navigate back to the Mass Move window.
Resolving Problems and Reexecuting a Mass MoveIf the Status field on the Mass Move window shows In Error, you needto resolve the problems and reexecute the mass move until the Status

☞
3 – 35Jobs and Positions
field shows Complete or Complete with Warnings. If the Status fieldshows Complete with Warnings, you will want to investigate thoseWarnings, and then determine whether you want to resolve the warningconditions and reexecute the mass move to eliminate the warnings.(However, it is important to remember that a mass move complete withwarnings has in fact executed successfully.)
Resolving problems may require that you exit Mass Move. For example,an applicant assignment associated with a vacancy will not move duringa mass move. To move that assignment to the target position, you wouldneed to use the Assignment window to disassociate this applicantassignment from the source position, and then assign this applicant to atarget position.
� To reexecute a mass move:
1. Navigate to the Mass Move window.
2. Query the mass move that you previously saved and want toreexecute.
3. After the Mass Move window is populated with data, makewhatever changes you need to make to correct the mass movedefinition.
Attention: Since assignments are datetracked, you may onlyupdate a given assignment once a day. To bypass this rule, you canalter the mass move effective date.
If you query a previously saved mass move and then choose thePositions button, the Find Positions window is not displayed.Instead, the Mass Move – Assignments window immediatelyappears and is populated with data.
4. Choose the Re–execute button.
5. Review your mass move in the standard manner.
Managing Your Mass Move Collection
As you reorganize your Business Group over time, you will develop anhistorical archive of mass moves. This archive consists of:
• All executed mass moves for which Status=Complete
• Any executed mass moves for which Status=Complete withWarnings
• Any saved but unexecuted mass moves (Status=Unprocessed orStatus=In Error) that you have not deleted

3 – 36 Oracle Human Resources North American User’s Guide
Because it is important to maintain an historical record of BusinessGroup reorganizations, you cannot delete a mass move when its statusis Complete or Complete with Warnings. However, you can delete anyunexecuted mass moves you chose to save but which have a status ofUnprocessed or In Error.
Reexecuting a mass move overwrites its original contents. Thus, only thelatest reexecution of that mass move would appear in the historicalarchive.

C H A P T E R
4T
4 – 1Grades and Their Relationship to Pay
Grades and TheirRelationship to Pay
his chapter explains how to represent the grade structures used inyour enterprise and how to relate compensation to grades. You canrelate compensation to grades directly, using grade rates, or indirectly,using grade scales.

4 – 2 Oracle Human Resources North American User’s Guide
Representing Grade StructuresGrades can have different levels of complexity, which need to berepresented in the overall structure of the grade.
Figure 4 – 1Grades
Grades
Pay
C.3
A.1
M.1
D.1
G.1
In its simplest form, a grade can be a single character, or number, in alogical sequence. For example:
• grade A
• grade B
• grade C
By adding a second segment to the grade name, you can identifysub–grades, such as:
• grades A.1, A.2, A.3, and A.4
• grades B.1 and B.2
• grades C.1, C.2, and C.3
A more complex structure could be used to distinguish grades fordifferent staff groups, such as:
• Manual.A.1, Manual.A.2, and Manual.G.1
• Clerical.C.1 and Clerical.C.2
In this example, there are three segments in the grade name. A grade isthe combination of segments you define. You set up the segments andtheir valid values using the Grade Name Key Flexfield. Normally thisis done by the system administrator.

☞
4 – 3Grades and Their Relationship to Pay
See Also
User Definable Key Flexfields: page B – 2
Using Grades
Grades are normally used to record the relative status of employeeassignments and to determine compensation and benefits, such assalary, overtime rates, and company car.
Using Grades to Compare Roles
You can define one or more valid grades for each job or position. Youenter this information in the Valid Grades window, which opens fromthe Job window or the Position window.
When you enter a grade assignment, the list of grades shows whichones are valid for the job or position you select.
See: Valid Grades: page 3 – 16
Associating Grades with Compensation and Benefits
You can associate compensation and benefits with your grades. Forexample, you can record a minimum or maximum salary for a grade.There are two approaches:
• Using grade rates, you can either enter a fixed value for eachgrade, or you can enter a minimum, maximum, and mid–pointvalues for each grade.
• Using grade scales, you can associate each grade with severalpoints on a pay scale, and enter compensation values for thesepoints.
Attention: The compensation information can changeindependently of the grade. Therefore, you should not define itas part of the grade name. Instead you should relate it to thegrade, either directly or indirectly.

4 – 4 Oracle Human Resources North American User’s Guide
Defining Grades
Prerequisites
❑ Define all the segments of the Grade Name key flexfield that youwant to use for the grade name.
� To define a grade:
1. Enter your grades in sequence number order.
The sequence number can be any number from 1 upwards. Thenumber indicates the rank order of the grade; 1 indicates thehighest grade.
This is the sequence in which the grades appear to users in lists ofvalues.
Consider sequencing each grade at intervals of 10 or more, toaccommodate any future changes to grades.
2. Enter a unique name for the grade. If there is more than onesegment in the grade name structure, a window opens when youenter the Name field. You must enter a unique combination ofsegments.
3. Enter a start date early enough to handle any historical informationyou want to enter.
4. Save your work.

4 – 5Grades and Their Relationship to Pay
Deleting Grades
To remove a grade from the list of grades to which employees can beassigned, enter an end date against the grade.
To delete a grade entirely from the system, you must first reassignanyone assigned to the grade. If you have historical records using thegrade, you cannot delete it. Instead, enter an end date.
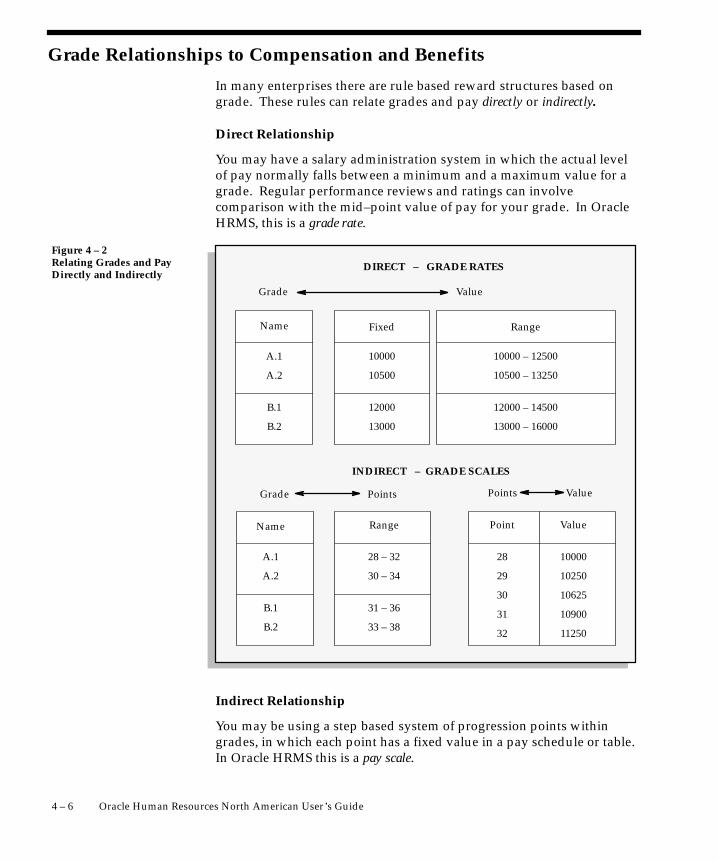
4 – 6 Oracle Human Resources North American User’s Guide
Grade Relationships to Compensation and Benefits
In many enterprises there are rule based reward structures based ongrade. These rules can relate grades and pay directly or indirectly.
Direct Relationship
You may have a salary administration system in which the actual levelof pay normally falls between a minimum and a maximum value for agrade. Regular performance reviews and ratings can involvecomparison with the mid–point value of pay for your grade. In OracleHRMS, this is a grade rate.
Figure 4 – 2Relating Grades and PayDirectly and Indirectly
RangeFixedName
A.1
B.1
B.2
A.2
Grade
10000
12000
13000
10500
Value
12000 – 14500
13000 – 16000
10000 – 12500
10500 – 13250
DIRECT – GRADE RATES
INDIRECT – GRADE SCALES
Points ValueGrade
Name
A.1
B.1
B.2
A.2
28 – 32
31 – 36
33 – 38
30 – 34
Range Point
Points
28
31
32
30
29
10000
10250
10625
10900
11250
Value
Indirect Relationship
You may be using a step based system of progression points withingrades, in which each point has a fixed value in a pay schedule or table.In Oracle HRMS this is a pay scale.

4 – 7Grades and Their Relationship to Pay
Relating pay to grades indirectly is common in government, educationand health enterprises. It is also common in large commercialenterprises that negotiate pay levels with staff or union representatives.

4 – 8 Oracle Human Resources North American User’s Guide
Relating Pay to Grades Directly: Using Grade RatesIn Oracle HRMS, you can set up a table of values related to each grade.These are called grade rates. You can enter a fixed value or a range ofvalid values for each grade.
For example, you might define a salary rate and an overtime rate ofpay for every grade, with minimum, maximum, and midpoint values.Both rates would be in monetary units. However, you can also definerates with non–monetary units, such as days, hours, or numbers.
Figure 4 – 3Grade Rates
DateTrack
ÈÈ
Basic Rate Pay
Name
A.1A.2
B.1B.2
9493
01–JAN–1995 to 31–DEC–1995
10500 – 13250
Range
10000 – 12500
12000 – 1325013000 – 16000
Name Fixed
Maximum Hours Rate
01–JAN–1995 to 31–DEC–1995
A.1B.1
37.560
9493
Grade rates are datetracked and this means that you can keep thehistory of the actual values you use. You can also set up rate values ata future date and be sure that this information will automatically takeeffect on the date you set, and not before.
You can use your grade rate values:
• as part of a QuickPaint report or inquiry
• to validate salary proposals
• to validate other compensation entries you make for employees
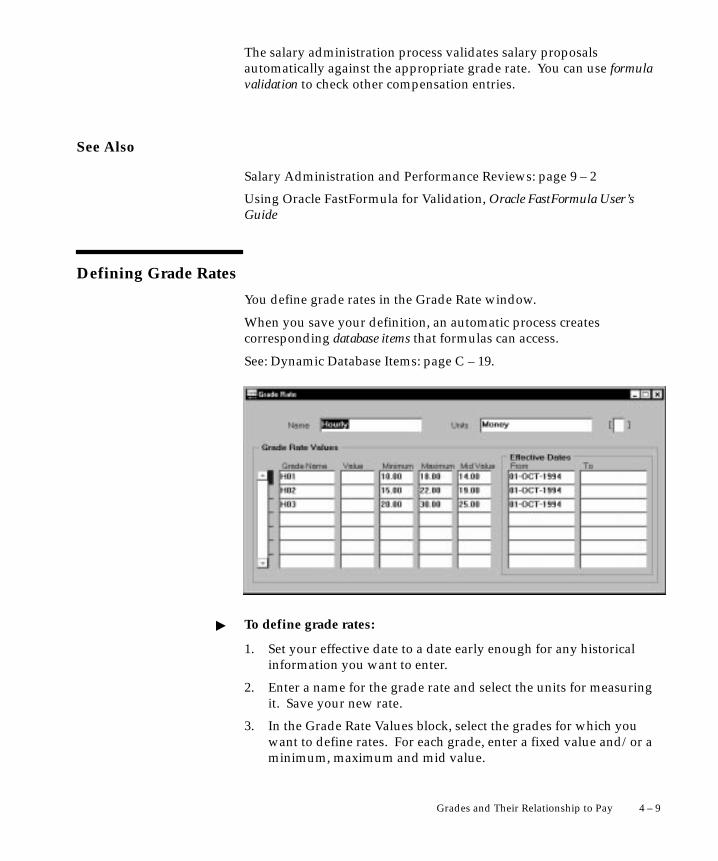
4 – 9Grades and Their Relationship to Pay
The salary administration process validates salary proposalsautomatically against the appropriate grade rate. You can use formulavalidation to check other compensation entries.
See Also
Salary Administration and Performance Reviews: page 9 – 2
Using Oracle FastFormula for Validation, Oracle FastFormula User’sGuide
Defining Grade Rates
You define grade rates in the Grade Rate window.
When you save your definition, an automatic process createscorresponding database items that formulas can access.
See: Dynamic Database Items: page C – 19.
� To define grade rates:
1. Set your effective date to a date early enough for any historicalinformation you want to enter.
2. Enter a name for the grade rate and select the units for measuringit. Save your new rate.
3. In the Grade Rate Values block, select the grades for which youwant to define rates. For each grade, enter a fixed value and/or aminimum, maximum and mid value.

4 – 10 Oracle Human Resources North American User’s Guide
To use this grade rate to validate salary proposals entered in theSalary Administration window, you must enter a minimum andmaximum value.
To view comparatio values using this grade rate, you must enter amid value.
See Also
Viewing Grade Comparatios
The View Employee Grade Comparatio window compares thecompensation values you enter for employees with the minimum,maximum, and mid values you define for their grades.
Prerequisites
❑ Define a grade rate and enter minimum, maximum, and midvalues for each grade.
❑ Enter salary or other compensation values for your employees.
� To view employee grade comparatio values:
1. Select an element, an input value, and a grade.
The inquiry finds assignments that are on this grade and that havean entry for this input value.

4 – 11Grades and Their Relationship to Pay
2. Select a grade rate for which you have defined a range of validvalues.
The inquiry compares the minimum, maximum, and mid values foryour chosen grade with the element entries of the list ofassignments.
3. Choose the Find button to run the inquiry.
The folder in the lower part of the window lists the assignmentsthat match your selection criteria:
• The value is the element entry value for each assignment.
• The comparatio shows the assignment’s element entry as apercentage of the mid–value defined for the grade rate.
• The percent of range shows the position of the assignment’selement entry between the minimum value for the grade rate(0%) and the maximum value (100%).
Part Time Employees
Employee are part time if the hours on their assignment’s standardconditions are less than the work day hours entered for theirorganization. For part time employees, the system prorates theminimum, maximum, and mid grade rate values before calculating thecomparatio and percent of range.

4 – 12 Oracle Human Resources North American User’s Guide
Relating Pay to Grades Indirectly: Using Pay Scales
If you are involved in negotiating pay levels with staff or union groups,you may be using a system of grade steps or points with specific valuesof pay for each step, or point. For example, you may have negotiateddifferent pay scales with different union groups. Or, you may havenegotiated a single set of pay points for all of your employees.
Typically, employees are placed on a step within their grade. Theymove up the steps for the grade by a periodic incrementing process.This process might run automatically at a fixed time each year or itmight be based on a review process specific to the employee.
In Oracle HRMS you set up a pay scale to show the separate points andthe value negotiated for each point. You can set up any number of payscales, for example for negotiated pay scales with different unions.
Setting Up Pay Scales
� To set up a pay scale:
1. Create the pay scale itself, which is a set of progression points.
2. Define one or more rates associated with the pay scale, entering avalue for each progression point.
3. Define your grade scales, which are the points of the pay scale thatare valid for each grade.
You can define the rates before or after you define the grade scales.
Using Pay Scales
You manually place an employee on the appropriate grade step. Youcan use a process to automate the periodic incrementing of the gradestep placements for some or all employees.
See Also
Incrementing Grade Step Placements: page 4 – 18
Placing an Employee on a Grade Step: page 4 – 16
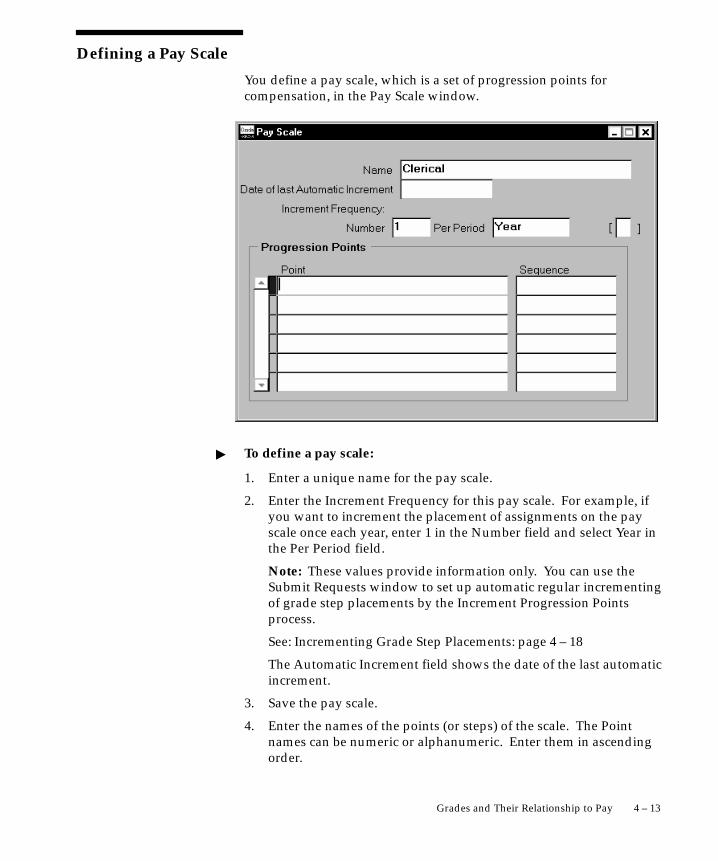
4 – 13Grades and Their Relationship to Pay
Defining a Pay Scale
You define a pay scale, which is a set of progression points forcompensation, in the Pay Scale window.
� To define a pay scale:
1. Enter a unique name for the pay scale.
2. Enter the Increment Frequency for this pay scale. For example, ifyou want to increment the placement of assignments on the payscale once each year, enter 1 in the Number field and select Year inthe Per Period field.
Note: These values provide information only. You can use theSubmit Requests window to set up automatic regular incrementingof grade step placements by the Increment Progression Pointsprocess.
See: Incrementing Grade Step Placements: page 4 – 18
The Automatic Increment field shows the date of the last automaticincrement.
3. Save the pay scale.
4. Enter the names of the points (or steps) of the scale. The Pointnames can be numeric or alphanumeric. Enter them in ascendingorder.

4 – 14 Oracle Human Resources North American User’s Guide
5. Enter a sequence number, in ascending order, for each point. Thesequence determines the progression order for the incrementingprocess. Then save the scale again.
Suggestion: Enter sequence numbers in multiples of 5 or 10,for example 5, 10, 15, 20. This makes it easier to enter newpoints between existing points in the sequence if you need to inthe future.
Defining Scale Rates
In the Scale Rate window, you can create a rate and enter a fixed valuefor each progression point on a pay scale. You can create as many ratesas you require, such as one for a shift allowance, and another forovertime. Notice that, unlike grade rates, you can only enter a fixedvalue for each point; you cannot enter a range of valid values.
The values are datetracked so that you can keep the history of theactual values you use. You can also set up rate values at a future dateand be sure that this information will automatically take effect on thedate you set, and not before.
The rates can be defined in monetary units, or as integers, numbers,days, or hours, in various formats. For example, you could define arate in hours to specify the maximum number of overtime hours thatcan be worked per week.
When you define rates, an automatic process creates correspondingdatabase items that formulas can access.
See: Dynamic Database Items: page C – 19

4 – 15Grades and Their Relationship to Pay
� To create a scale rate:
1. Set your effective date early enough to handle any historicalinformation you want to enter.
2. Enter a unique Name for the rate.
3. Select the Units for measuring the rate, such as hours, money, orinteger.
4. Select the Pay Scale for which you are defining the rate.
5. Save the rate.
6. In the Progression Point Values block, select the points for whichyou want to define rates. For each point, enter a fixed value. Savethe rate again.
Relating Grades to Progression Points
A pay scale defines a complete set of progression points. You canassociate a subset of these points with each grade.
The group of points valid for a grade is called a grade scale. Each pointin the grade scale is called a step because it represents the steps forincrementing an employee’s pay. The steps must follow the sequenceof points on the pay scale but they can jump several points, ifappropriate to the specific grade.
Figure 4 – 4Grade Scales
10000
10250
10625
10900
11250
Value
Pay Scale
Point
10
20
30
40
50
60
70
80
12000
12250
12325
Steps forGrade A
Steps forGrade B

4 – 16 Oracle Human Resources North American User’s Guide
� To create a grade scale:
1. Set your effective date early enough to handle any historicalinformation you want to enter.
2. Select a grade, and select the pay scale from which you want tochoose progression points.
3. Select the highest point (or ceiling) to which employees on thisgrade can be automatically incremented by the IncrementProgression Points process. Save the grade scale.
You can override this ceiling for individual employee assignments.
4. In the Grade Steps block, select the points you want to include onthis grade scale.
When you save, the system sorts the points into ascending order bytheir sequence numbers (defined in the Pay Scale window).
Placing an Employee on a Grade StepIf you include a grade as part of an employee’s assignment, you canplace the employee on a step on the associated grade scale.
You place an employee using the Grade Step Placement window.When you open this window, information about the grade and scale

4 – 17Grades and Their Relationship to Pay
appears automatically. By default, the ceiling point is the one youdefined for the grade. However, you can enter a special ceiling pointfor individual employees in the Assignment window.
� To place an employee on a grade step:
1. Set your effective date to the date when the placement should comeinto effect.
2. Select the point or step on which to place the employee assignment.
3. If you want the employee’s placement to increment automaticallywhen you run the Increment Progression Points Process, checkAuto–Increment.
4. You can select a reason for manually entering a placement. You canadd values to the list of valid reasons by defining values for theQuickCode Type PLACEMENT_REASON.
5. Save your work.
The Progression Point Values block displays the rates you havedefined for the pay scale, and the values corresponding to theselected progression point.

☞
4 – 18 Oracle Human Resources North American User’s Guide
Incrementing Grade Step Placements
You can increment grade step placements manually, using the GradeStep Placement window, or automatically, by running the IncrementProgression Points process.
� To run the Increment Progression Points process:
1. Navigate to the Submit Requests window.
2. In the Name field, select Increment Progression Points.
3. Enter the Parameters field to open the Parameters window.
4. Enter the name of the pay scale.
5. Enter the date on which the increment becomes effective.
6. You can also enter values for some or all of the segments of yourPeople Group Flexfield. This restricts the assignments incrementedby the process to those in the group matching the values you enter.
Attention: An assignment’s grade step placement is incrementedautomatically only if:
• it is still below the ceiling point, and
• the automatic increment check box on the Grade Step Placementwindow is checked for the assignment, and
• there are no future changes or deletions to the assignment’sgrade step placement, or to the assignment itself, or to the gradescale for the assignment’s grade, or to the new grade step for theassignment.
Oracle HRMS supplies two predefined reports to help you predict andcheck the results of the Increment Progression Points process.
Current and Projected Progression Point Values Report
Run this report before running the Increment Progression Pointsprocess, to assess its effects. The report shows what changes would bemade by the process and how much it would cost for a particular scalerate, such as salary, or for all rates.
You run reports in the Submit Requests window.
� To run the Points Values Report:
1. In the Name field, select Current and Projected Progression PointsValues Report.

4 – 19Grades and Their Relationship to Pay
2. Enter the Parameters field to open the Parameters window.
3. Select a Pay Scale and enter the date on which the increment wouldbecome effective.
4. You can also select an organization, a group, and a rate, to reducethe scope of the report.
5. Choose the Submit button.
Employee Increment Results Report
Run this report after running the Increment Progression Points process.This report shows the results of the process.
You run reports in the Submit Requests window.
� To run the Employee Increment Results Report:
1. In the Name field, select Employee Increment Results Report.
2. Enter the Parameters field to open the Parameters window.
3. Select a Pay Scale and the increment process run for which youwant to see the results.
4. You can also select an organization, a group, and a rate, to reducethe scope of the report.
5. Choose the Submit button.

4 – 20 Oracle Human Resources North American User’s Guide

C H A P T E R
5T
5 – 1Payrolls and Other Employee Groups
Payrolls and OtherEmployee Groups
his chapter explains how to set up payrolls to pay your employeesand to define groups of employees who are eligible to receive particularcompensation and benefit elements. It also explains how to definepayment methods for paying employees and making third partypayments.
Using all the work structures you set up, you can identify groups ofemployees by organization, job, position, grade, employment category,salary basis, or payroll. Additionally, you may need to set up your owngroups, for example to identify employees within a trade union, or apension group. This chapter explains how you can set up your owngroups using the People Group Key Flexfield.
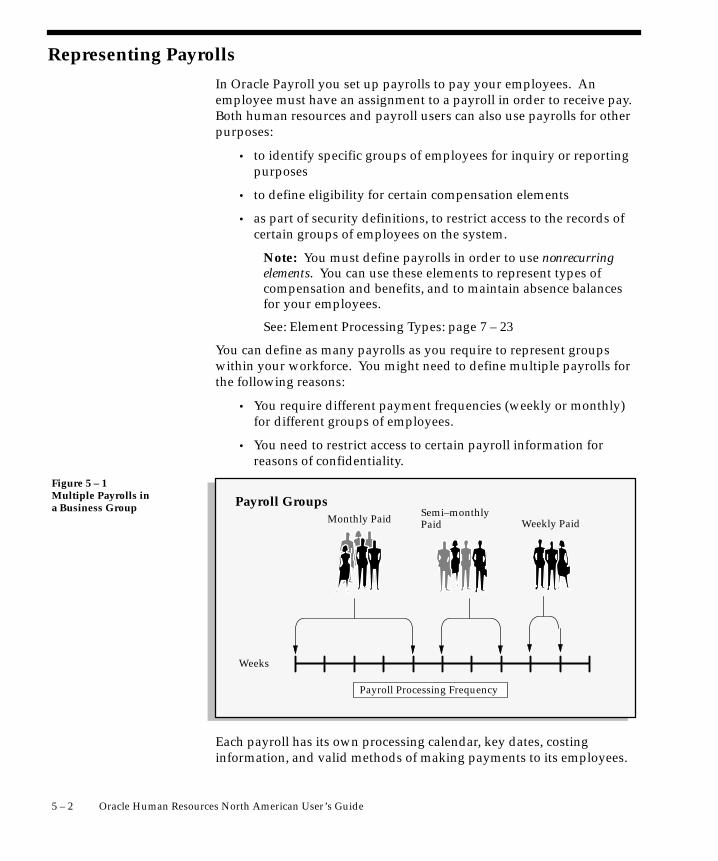
5 – 2 Oracle Human Resources North American User’s Guide
Representing Payrolls
In Oracle Payroll you set up payrolls to pay your employees. Anemployee must have an assignment to a payroll in order to receive pay.Both human resources and payroll users can also use payrolls for otherpurposes:
• to identify specific groups of employees for inquiry or reportingpurposes
• to define eligibility for certain compensation elements
• as part of security definitions, to restrict access to the records ofcertain groups of employees on the system.
Note: You must define payrolls in order to use nonrecurringelements. You can use these elements to represent types ofcompensation and benefits, and to maintain absence balancesfor your employees.
See: Element Processing Types: page 7 – 23
You can define as many payrolls as you require to represent groupswithin your workforce. You might need to define multiple payrolls forthe following reasons:
• You require different payment frequencies (weekly or monthly)for different groups of employees.
• You need to restrict access to certain payroll information forreasons of confidentiality.
Figure 5 – 1Multiple Payrolls ina Business Group
Monthly Paid Semi–monthlyPaid Weekly Paid
Payroll Processing Frequency
Weeks
Payroll Groups
Each payroll has its own processing calendar, key dates, costinginformation, and valid methods of making payments to its employees.

5 – 3Payrolls and Other Employee Groups
Payroll Setup Steps
1. Define the various payment methods in use in your GREs.
See: Defining Payment Methods for the Enterprise: page 5 – 3
2. For GREs using payrolls with payment methods of the typeNACHA to pay employees, enter data for the NACHA tape batchheaders.
See: Entering NACHA Tape Data for GREs: page 5 – 5
3. Define the payrolls in use in your GREs.
See: Defining a Payroll: page 5 – 6
Defining Payment Methods for the Enterprise
Each payment method has a type of either check, NACHA, or cash.
Within these payment method types, you can define as many paymentmethods as you require for your enterprise. When you create a payrollyou can select which of these methods are valid for employees assignedto that payroll. You select one of these methods as the default methodfor the payroll.
Employees can be paid by one or more of the valid methods for theirpayroll. You select the appropriate methods and enter bank accountinformation, if required, in the Personal Payment Method window. Ifyou do not enter any personal payment methods, the employee is paidusing the default method for his or her payroll.
You can also define payment methods for third party payments, such ascourt–ordered wage attachments. Third party payments are alwaysmade by check, so methods for these payments must have the typeCheck.

5 – 4 Oracle Human Resources North American User’s Guide
Define payment methods for the enterprise in the OrganizationalPayment Method window.
� To define a payment method:
1. Set your effective date to the date you want to begin using thepayment method.
2. Enter a name for the payment method, and select its type.
You can create as many payment methods for each type as yourequire. For example, if you have different source bank accounts fordifferent payrolls, you must create separate payment methods.
For a third party payment method, select the type Check.
3. The base currency for the Business Group appears. For somepayment methods, you can select another currency.
4. To define a third party payment method, for example for agarnishment or a payments to a benefits carrier, check the ThirdParty Payment box.
5. Enter the Bank Details field to open the Bank Details window. Enterinformation about the account from which payments are coming.
Note: The Further Information field is not activated for USinstallations, so you cannot make entries in it.
6. Save your work.
See Also
Entering Payment Methods for an Employee Assignment: page 14 – 22

5 – 5Payrolls and Other Employee Groups
Entering NACHA Tape Data for GREs
For GREs using payrolls with payment methods of the type NACHA,enter information for the NACHA tape batch headers in the NACHARules window.
� To enter NACHA rules for a GRE:
1. In the Organization window, query the GRE if it does not alreadyappear there. In the Organization Classifications region, place thecursor on Government Reporting Entity, choose the Others button,and select NACHA Rules to open the NACHA Rules window.
2. Enter the Company Name, which is the name of the GRE makingthis batch of direct deposit payments to employees.
3. Select Mixed Debit and Credit Entries, Debit Entries Only or CreditEntries Only in the Service Class Code field.
4. Select either Cash Concentration and Disbursement or PrearrangedPayment and Deposit Entry in the NACHA Standard Entry ClassCode field.
5. Enter the Company Identification number of the GRE making thisbatch of payments.
6. In the Company Discretionary Data field, you can enter codes ofsignificance to you, to enable special handling of all subsequententries in the batch. This field has no standard interpretation.
7. In the Message Authentication Code, you can enter an 8–charactercode you derive, whose purpose is to validate the authenticity ofAutomated Clearing House (ACH) entries. This field has nostandard interpretation.

5 – 6 Oracle Human Resources North American User’s Guide
Defining a Payroll
A payroll is a set of employees whose pay you process with a singlefrequency, for example, weekly or monthly. You can define as manypayrolls as you require to meet the pay policies of your enterprise. Youput an employee on a payroll by assigning him or her to the payroll.
Use the Payroll window to define a payroll, including its calendar andvalid payment methods.
Period Types and Calendars
Since a payroll has only one pay frequency, you must define at least onepayroll for each pay frequency you use. Table 5 – 1 shows the validperiod types for pay frequency.
Payroll Period Types Periods per Year
Year 1
Semi–Year 2
Quarter 4
Bi–Month 6
Calendar Month 12
Lunar Month 13
Semi–Month 24
Bi–Week 26
Week 52
Table 5 – 1 Payroll Period Types
Prerequisites
❑ Define the payment methods available for your employees.
See: Defining Payment Methods for the Enterprise

5 – 7Payrolls and Other Employee Groups
� To create a new payroll:
1. Set your effective date to a date early enough to handle anyhistorical information you want to enter. Your effective date mustbe on or before the first period start date of the payroll calendar.
2. Enter the payroll’s name and select its period type from the list.
3. Enter the end date of the payroll’s first period, and the number ofyears for which the system should initially generate the payroll’scalendar. You can increase this number later to generate additionalyears.
When you enter the First Period End Date, make sure that thecorresponding start date of the first period is after the start date ofthe payroll.
4. In the Date Offset region, you can change the zero default to anegative or positive number of days before or after the period enddate. For example, for a semi–monthly payroll, the Cut Off date canbe 3 days before the period end date (–3), while the Scheduled Runand Check dates can be 5 and 7 days after this date, respectively.
• The Check Date, sometimes called Pay Date, is the date ofconstructive receipt of pay, on which paychecks becomenegotiable.
• The Scheduled Run Date is the date scheduled for the Regularrun of this payroll each period.
See Regular and Supplemental Runs (Oracle Payroll User’s Guide)
• The Cut Off date, included for your reference, is the final date forentering or changing payroll information before a run.

☞
5 – 8 Oracle Human Resources North American User’s Guide
These offsets are the defaults for the calendar. You can manuallymake date changes in the calendar, for example when an offset datefalls on a weekend or holiday, by choosing the Period Dates button.
5. Select a default payment method for employees who have no validpersonal payment method. You cannot select a method usingmagnetic tape because this requires information about employees’bank accounts.
6. Select a default consolidation set for this payroll. One consolidationset is created automatically when you define your Business Group.Oracle Payroll users can create other consolidation sets for payrollprocessing.
See: Consolidating Payroll Information (Oracle Payroll User’s Guide)
7. In the Costing region, you can enter information about the set ofbooks and suspense account holding costing information for thispayroll.
The information you enter here depends on the setup of your CostAllocation key flexfield.
See: Setting Up the Cost Allocation Key Flexfield: page 11 – 11
8. Save your work.
9. Choose the Period Dates button to view the calendar generated foryour payroll. In the Period Dates window:
• You can view the default offset dates for every period, and youcan manually override any of these dates in any record.
• You can change the payroll’s default Open status in any period toClosed to prevent further element entries. You can also reopen theperiod if necessary.
Attention: Use this feature with caution. When you performcertain important tasks in Oracle HRMS, the system mayautomatically create or delete element entries. These tasks includehiring and terminating people, and updating assignments. Youcannot change any element entries that span a closed payroll period,and so you may be prevented from performing these tasks.
10. Choose the Valid Payment Methods button to add valid paymentmethods for this payroll.
In the Valid Payment Methods window, the default paymentmethod for the payroll appears automatically. You can add othermethods. First set your effective date to the date you want themethod to become valid.
Note: An employee assigned to this payroll can have any numberof personal payment methods chosen from those you enter here forthe payroll.

5 – 9Payrolls and Other Employee Groups
See: Entering Payment Methods for an Employee Assignment: page14 – 22
Deleting Payrolls
You can delete a payroll if there are no active employee assignments orelement links to it. However, if you have run processing for a payroll itis not advisable to delete it. If necessary, define a new payroll andsimply discontinue use of the old payroll.
5 – 10 Oracle Human Resources North American User’s Guide
Representing Other Employee Groups
All the work structures provide ways of defining groups of employeesat your enterprise, such as groups working at a particular location, or ona certain grade, or in a department. You create the groups by assigningemployees to the work structures in the Assignment window.
You can also assign people to:
• an employment category: full-time – regular, full-time –temporary, part time – regular, or part time – temporary
• a salary basis, such as weekly or annual, which defines theduration for which the employee’s salary is quoted
See: Components of the Assignment: page 14 – 5
Oracle HRMS provides a special structure you can use to define anyother special groupings of employees your enterprise requires. Thisstructure is called the People Group. Just as with payrolls and otherwork structures, you can assign employees to these groups, and usethem to define employee eligibility for compensation and benefitselements.
Examples of group definitions might be:
• the companies to which employees belong in multi–companyenterprises
• members of a union
• members of a pension plan.
Setting Up the People Group Flexfield
The People Group is a key flexfield, like Job Name, Position Name, andGrade Name. As with these other key flexfields, you can define up to 30segments to hold information you use to identify employee groups inyour enterprise.
Using the People Group key flexfield to define your groups is apowerful mechanism because you can:
• link elements to Group flexfield segments so that only employeeswithin the group are eligible for the elements
• inquire and report on individual segments in Inquiry windowsand in reports
• use DateTrack to build up a history of the group information

☞
5 – 11Payrolls and Other Employee Groups
If your enterprise uses pay scales to relate compensation levels to gradesindirectly, you can use a People Group segment to specify whichemployees are processed by the Increment Progression Points process.
Once you decide how to define the Group key flexfield structure andsegments, it is the responsibility of the System Administrator to set upthis and the other key flexfields. At least one segment of this flexfieldmust be set up before you can begin entering employee assignments.
Attention: If you make any of the People Group segmentsrequired, they are required in the Element Link window, as wellas the Assignment window. This means that you may have tocreate multiple element links if you want to use a People Groupsegment in the eligibility criteria for a link.
For example, suppose you have defined two segments: aYes/No segment called Fast Track, which is required, and asegment called Pension Plan, which is not required. You wantto make an element available only to members of a certainpension plan. However, you must create two element links: onefor members of the pension plan who are on the Fast Track, andanother for members who are not on the Fast Track.
If there are many possible values for the required segment, themaintenance of multiple links can become a burden so becautious in making segments of this flexfield required.
See Also
Oracle Applications Flexfield Guide

5 – 12 Oracle Human Resources North American User’s Guide

C H A P T E R
6
E
6 – 1HRMS Implementations and Enterprise Culture
HRMSImplementations andEnterprise Culture
ach enterprise has its own unique ’culture’, which is reflected in theorganization of work and in the management of people within theenterprise. Culture also affects the reward systems in operation and thecontrol systems that are required. Although each enterprise is unique, itis possible to identify some common types of enterprise.
This chapter describes three typical enterprise models and suggests howyou might implement Oracle HRMS for each of these.
These suggestions are not intended to provide a blueprint for your ownimplementation, but they should help you to see how you canimplement and use different combinations of organizations and jobs, orpositions in your own situation.

6 – 2 Oracle Human Resources North American User’s Guide
Project Based Enterprises
Project based enterprises are typically service based industries in whichflexibility and organizational change is a key feature. Examples of thistype of enterprise are consultancy or construction companies, or smallmanufacturing or software companies.
At its simplest level, an employee is assigned to work on a single projectfor a given period of time. For example, an engineer working on a largescale construction project might be assigned to the project for a period ofsix months. All of his or her work, and costs, are associated with thisone project. When this is complete the employee moves on to perform asimilar role in another project. In this example you would expect theemployee to have a single assignment, with 100% of the assignmentcosts allocated to a single project. The employee assignment might alsocontain project specific information, such as location or groupinformation.
In a different situation, an employee might be assigned to a number ofprojects at the same time. For example, consider an ApplicationsConsultant working for Oracle Corporation. This person is employed asa consultant by a specific organization within Oracle but the projectwork is undertaken outside Oracle. The consultant performs similartasks in different implementation projects, and costs are allocated on thebasis of actual time spent working on each project. In this example youwould expect the consultant to have a single assignment in OracleHRMS and the project allocation and costs to be entered as timecardinformation.
In both of these examples, employees perform specific roles, but theywork on different tasks or projects at different times. Project basedenterprises normally have a fluid organization structure with regularlychanging reporting and management lines. This fluidity provides theflexibility required to compete in rapidly changing markets.
Organizations can be formed or transformed at short notice as differentprojects or management groups are formed. Employees can be assignedand reassigned to these organizations, also at short notice, although theynormally retain their basic role, or job.
Representing Organizations and Jobs
In both of the examples given, you need the ability to define and changeorganization structures easily and quickly. You also must be able tomove employees between organizations while keeping the same job.For both of these reasons, you would probably use organizations andjobs to show how people are assigned and managed.

6 – 3HRMS Implementations and Enterprise Culture
Jobs are independent of organizations. In the Assignment window, youcan change the assignment organization or job independently.
Figure 6 – 1Project based assignments
Assignment
Organization
JobEmployee
Typically, you would not define Positions to show this type of working.Positions require additional definition and maintenance, and do notreflect the sort of flexible working environment found in this type ofenterprise.
Working with organizations and jobs as the basis of the employeeassignment, you can also consider how you would reflect theassignment of the employee to individual projects. There are a numberof possible options to consider.
• Use organizations to show actual projects, and assign employeesto projects.
– Useful for single projects. For multiple project assignmentsyou would need to use multiple assignments.
• Use a People Group flexfield segment to hold the project code.
– An alternative for single projects, where you want to use theorganization to show internal management structures.However, for multiple project assignments you would stillneed to use multiple assignments.
• Use a Cost Allocation Flexfield segment to hold the project code.
– Useful for both single and multiple project assignments. Youcan collect project cost information at the work assignmentor the timecard entry level.
Organization Structures
You should define organizations down to the level of individualmanagers, and use the manager flag on the Assignment window toidentify the manager of each organization. Also, define your primaryorganization hierarchy to show the detailed management reporting linesamong organizations and managers. In this way you can show thatemployees assigned to an organization are managed by theorganization’s manager.

☞
6 – 4 Oracle Human Resources North American User’s Guide
Attention: It is best not to use the Supervisor field of theassignment window to identify managers for individualemployees. This field is used to identify a personal supervisorfor an employee and is not updated if the supervisor moves toanother job or organization.
Job Structures
In this type of environment, jobs show the specific roles employeesperform. Therefore, you are likely to have multi–segment job names todistinguish different types and different levels of jobs in the enterprise.For example, you might define a three segment job name with Job Group,Title, and Job Level. An actual job combination might then be’Applications.Consultant.Senior’.
Project Allocation and Costing
With this type of implementation, you would probably use theassignment to identify management type reporting. You would identifyproject–working using a segment of the Cost Allocation flexfield toshow Project Code for each assignment.
If you set the qualifier Assignment to Yes for this segment, you couldenter percentage costs for the assignment to different project codes. Ifyou set the qualifier Element Entry to Yes for this segment, you coulduse a timecard element to record and cost the actual hours worked oneach project.
See: Costing Information at the Organization and Assignment Levels:page 11 – 9
Other Management Issues
When you consider this environment there are other areas yourdecisions may affect:
Individual compensation and benefits are oftenbased on personal negotiation, or performancereviews. Therefore you will probably have fewerrules to determine policy and more consideration ofthe actual values entered for an employee.
Typically grades and jobs are very closely linked.For example, the name Senior Consultant mayidentify both the role of an employee and his or herrelative status and eligibility for compensation andbenefits.
RemunerationPolicies
Grades and Jobs

6 – 5HRMS Implementations and Enterprise Culture
You may decide to set up the same structures forboth the job and the grade. This will be true if youwant to set up rates of pay with minimum andmaximum values associated with your grades.
Headcount budgets are usually allocated at thelevel of the organization, or to the combination oforganization and job.
You can calculate your salary budgets from thedefinition of organization and job headcountbudgets, combined with valid grades and graderate information.
Actual salary costs in an HR environment can becalculated from the actual salaries of assignedemployees.
Actual salary costs in an environment includingOracle Payroll can be calculated directly frompayroll results.
See: Salary Budgeting: page 9 – 16
Vacancies are not created by default whenever anemployee leaves. Managers often have the freedomto decide if they want to replace an employee, or torecruit to a different role.
The recruitment process is often informal andallows for recruitment by resume, or cv. Individualmanagers are usually responsible for interviewingand selecting candidates. This may be on aone–to–one basis.
The need for individual career planning anddevelopment is matched by the need to identifyskilled employees for specific projects.
Using Special Information Types you can easily defineexperience, education, qualifications or skillsrequirements for different jobs. Using these saneinformation types you can enter information underthese headings for individual employees. OracleHRMS includes a skills matching report.
Budgets
Vacancies andRecruitment
Career Planningand Development

6 – 6 Oracle Human Resources North American User’s Guide
Rule Based Enterprises
The rule–based enterprise is typically a highly structured environmentin which all aspects of work and remuneration are well organized andregulated. Common examples of this type of enterprise are found ingovernment, education, health and other public sector industries. A keyfeature of this type of enterprise is the concern with managing positions,or posts. Positions exist, and are managed independently of people inpost.
You can picture the role type organization as a ’Greek temple’, whichrests its strength in its pillars. These pillars are the specialist functionsor departments that exist within the enterprise. They are strong andalmost independent organizations. For example, the Financedepartment would have very little involvement in the working of theHR department.
Coordination between the groups takes place at the top of the structureby a narrow band of senior management – the pediment. In thisenvironment it is assumed that this should be the only personalcoordination needed. ”If the separate pillars do their job, as laid downby the rules and procedures, the ultimate result will be predictable.”
Roles are usually more important than individuals. People are selectedfor satisfactory performance of a role, which is described so that a rangeof individuals could fill it. Reward systems are likely to be role orrule–based.
Often, clearly defined procedures exist for every task and process withinthe enterprise. For example, job descriptions and job evaluationprocedures define individual roles and positions of authority. Also, it iscommon to find that procedures exist to govern communications, suchas colored and numbered forms, committee reports, and so forth.
Representing Positions
’Positions’ are most appropriate for this type of enterprise and providethe finer detail on work structure and line management that is needed ina fixed establishment. Employees are assigned to a position, and bydefinition to the organization and job for that position.

6 – 7HRMS Implementations and Enterprise Culture
Figure 6 – 2Position based assignments
Employee
Organization
Job
PositionAssignment
Because you are focussing on the use of positions and positionhierarchies you define organizations to show only the major divisions inyour enterprise. You can model the details of these departments andsections using your position hierarchies. (If you also define detailedorganizations and hierarchies, you are defining the same structuralinformation twice.)
In this situation, jobs provide an additional level of information forpositions, which is independent of any specific organization. Forexample, you might want to define job types of ’Managerial’, ’Executive’or ’Clerical’ so that you can identify skill requirements and levels ofbenefits for each job.
Position Name
In this environment you should consider using the segments of theposition name to hold other key information about the position. Forexample you might want to consider using the following as segmentvalues:
• Cost Code
You might want to show the cost center, or a cost code for eachposition in your establishment. Using the segment of the keyflexfield you could use the same list of cost codes as your generalledger.
• Funding Organization.
You might have funding for a position from an external source.For example, government funding.
• Multiple assignments allowed – Y/N?
In Oracle HRMS a position can have any number of holders. Youcan set headcount budget values to track any variance on budget,or you could use this type of segment to prompt users.

6 – 8 Oracle Human Resources North American User’s Guide
• Current status.
As part of your position control procedures you may need tomark the status of a position for reporting or managementpurposes. For example, you can label a position as ’Frozen’,’Vacant’ or ’Active’.
Note: You can use the Additional Position Details descriptiveflexfield to hold this type of information about positions if youdo not want the information to be visible to all users.
Management Reporting Lines
You can define a primary position hierarchy to show the managementreporting lines for all of your positions. You should find that most ofyour security and reporting needs are based on this primary hierarchy.Groups are identified by selecting a manager and all the positions thatreport to it in this hierarchy.
Other Management Issues
When you consider this environment there are other areas yourdecisions may affect:
Individual compensation and benefits are oftenregulated, or based on union negotiatedagreements.
Reward systems are usually based on the roleperformed rather than on personal or performanceassessment. This may mean that you have to definedetailed eligibility rules for compensation andbenefits.
Valid grades are defined for positions and it iscommon to use grade steps and progression points.
National or union pay scales establish actual ratesof pay for a grade and this is independent ofperformance. An employee is paid the rate for hisor her grade and step. Incrementing rules, whichdetermine progression to the next step, are usuallypart of the plan and are often time–based.
Job evaluation methods exist to compare rolesacross the industry with agreed grading structuresand rates of pay.
Headcount or full–time equivalent budgets areusually set for each position.
RemunerationPolicies
ComparativeGrades andPositions
Budgeting

6 – 9HRMS Implementations and Enterprise Culture
You can calculate your Salary budgets from theposition budgets, combined with valid grades andprogression point information.
In an HR environment you would calculate actualsalary costs, at any time, from the current salaries ofassigned employees.
In an environment including Oracle Payroll, youwould calculate actual salary costs directly frompayroll run results.
See: Salary Budgeting: page 9 – 16
There is an automatic vacancy when an employeeterminates employment. The position exists evenwhen there are no holders.
The stages of the recruitment process and theprocedures surrounding these are probably welldefined and regulated.
Standard letters for each stage of the process arealso likely to be well established.
In this environment people are recruited for theirability to perform a role. You would hold jobdescriptions and skill requirements for eachposition using attachments for text and the SpecialInformation Type for structured data.
Typically there is a well defined set of standardreports needed in this environment. Often these arerequired by government.
Vacancies andRecruitment
Standard Reports

6 – 10 Oracle Human Resources North American User’s Guide
Hybrid Enterprise StructuresMany enterprises combine different types of structure for differentgroups of employees. Typical of these hybrid types are largemanufacturing or corporate enterprises where management andadministrative roles are fixed into specific organizations, but other rolesare managed in a more flexible manner.
In Oracle HRMS you would set up this type of hybrid enterprise usingpositions for some groups of employees, and organization and jobs forothers. For example, in one factory organization you might define aposition for the Production Manager, and one job for all production lineworkers.
Figure 6 – 3Hybrid enterprise assignments
Assignment
Production
Line WorkerWorker
Manager
Production
Director
ProductionDirectorAssignment
Employee Assignments
In this type of enterprise most of your workers would be assigned to anorganization and a job. However you would define managementpositions because they have the characteristics of fixed roles withinspecific organizations, including the idea of automatic vacancy ontermination of the assignment. In each organization you would haveonly one position. This would be the manager, and by default, any otheremployee who works in the organization would report to the manager.
Other Management Issues
Other issues for managing groups of employees by position, or byorganization and job are the same as for the previous examples.
6 – 11HRMS Implementations and Enterprise Culture
Employees working in unionized jobs participate innegotiated rates of pay and conditions. You woulddefine grade rates or progression points to dealwith negotiated pay rates for workers in jobs.
Employees in management positions are morelikely to have their salary administered personallyand be reviewed on their performance. You definegrade rates and salary bases to deal with salaryadministration for employees in positions.
RemunerationPolicy
SalaryAdministration
☞
6 – 12 Oracle Human Resources North American User’s Guide
Contract Staff and Other Non–standard Assignments
It is common to find individuals working within an enterprise who donot fit into the general definition of work structures. For example, youmay have agency or contract staff working temporarily to cover avacancy, or you may have external contract staff working as part of aproject team.
The way in which you record information for these individuals dependson how you manage them:
• You can treat the assignment for this type of employee in exactlythe same way as any regular employee.
• Alternatively, you could set up a different person type todistinguish this type of employee.
• You could define your own types of employment category todistinguish different ways of working at the assignment level.
• You could define and use your own assignment statuses to identifydifferent ways of working in a particular job or position.
However, you might decide that the person does not work in apredefined role, but is simply working in a particular organization for aset period of time. To do this you would assign the employee to anorganization only, and focus on the other assignment information forfurther information.
Attention: A basic rule in Oracle HRMS is that an employeemust have an assignment. The minimum work structurerequired for an assignment is the Business Group.

C H A P T E R
7
7 – 1Elements: Foundation of Compensation and Benefits
Elements: Foundationof Compensation andBenefits
Elements are special information structures that Oracle HRMS uses to:
• represent the various types of compensation and benefits thatmake up your employees’ remuneration packages
• represent tangible items distributed to employees, such asuniforms or company cars
• maintain information on employee absences, and represent plansfor accrual of paid time off
• build the earnings types, deductions, non–payroll payments andother items that the payroll run processes
This chapter discusses the creation and use of elements in OracleHRMS.
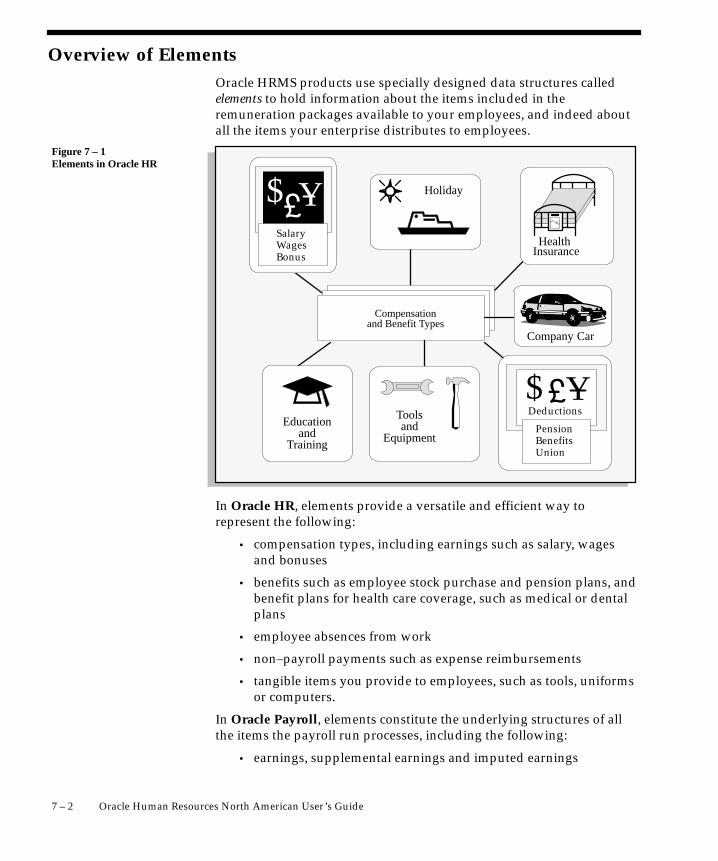
7 – 2 Oracle Human Resources North American User’s Guide
Overview of ElementsOracle HRMS products use specially designed data structures calledelements to hold information about the items included in theremuneration packages available to your employees, and indeed aboutall the items your enterprise distributes to employees.
Figure 7 – 1Elements in Oracle HR
�SalaryWagesBonus
Holiday
Company Car
HealthInsurance
Educationand
Training
Toolsand
Equipment
$ Y
�PensionBenefitsUnion
$ YDeductions
Compensationand Benefit Types
In Oracle HR, elements provide a versatile and efficient way torepresent the following:
• compensation types, including earnings such as salary, wagesand bonuses
• benefits such as employee stock purchase and pension plans, andbenefit plans for health care coverage, such as medical or dentalplans
• employee absences from work
• non–payroll payments such as expense reimbursements
• tangible items you provide to employees, such as tools, uniformsor computers.
In Oracle Payroll, elements constitute the underlying structures of allthe items the payroll run processes, including the following:
• earnings, supplemental earnings and imputed earnings

7 – 3Elements: Foundation of Compensation and Benefits
• tax credits and non–payroll payments
• voluntary and involuntary deductions, as well as pre–tax and taxdeductions
• employer taxes and other employer liabilities.
Features of Elements
Each element has a classification such as Earnings, Voluntary Deductionor Information that determines its particular use. It has input valuesinto which you enter values that can feed into formulas which can, forexample, prescribe payroll run calculations for the element. It has aprocessing type that controls whether it needs new entries in a payrollperiod to process in that period. Additionally, you supply other rulesthat determine whether, when and how the element can process, and towhom it can apply.
The remainder of this chapter provides all the basic information youneed to understand the use of elements in Oracle HRMS.
The Structure of Elements
To meet the needs of all Oracle HRMS users, elements include thefollowing structural features:
• Classification and category. Every element has a primaryclassification that determines whether it represents some type ofearnings, deduction, payment, benefit or accrual plan, or holdsinformation about tangible items such as company–provideduniforms or tools.
Elements representing benefits additionally have a benefitsclassification, to indicate the type of benefit they stand for.
Within many primary classifications there are subgroups calledcategories. Categories further define an element’s purpose, andcan help to determine applicable processing or tax rules.
See: Element Classifications and Categories: page 7 – 8
• Input values. An element’s input values exist to receive entries ofrelevant data for the employees eligible for the element.
For example, the element Annual Salary would likely have aninput value Amount, for entries of employees’ yearly salaryamounts, while the element Wages would have the input valueHours Worked, for entry of employees’ hours worked each
7 – 4 Oracle Human Resources North American User’s Guide
period. The element Company Car could have the input valuesMake, Model, Year and Registration Number.
See: Element Input Values: page 7 – 16
• Formulas. In Oracle Payroll, entries to an element’s input valuescan feed into one or more formulas attached to the element,which prescribe calculations for the payroll run to perform. Forexample, entries of hours worked can feed into a formula thatmultiplies them by a wage rate, so the payroll run can produceemployees’ wages.
See: Elements and Formulas: page 7 – 21
• Processing types. Every element has a processing type, to indicatethe duration of its entries. An element’s entries for employeesmay last for one pay period only, such as entries from timecardsof hours worked in a week, or entries of the amounts of aone–time bonus. In this case, the processing type is nonrecurring.
Alternatively, an element’s entries may last through many payperiods until they are changed or ended. Examples are entries ofannual salary, or of company car make and model. Elementswith entries like this have the processing type recurring.
See: Element Processing Types: page 7 – 23
• Other rules. In addition to the above, elements can have anumber of rules that determine a range of matters, such as:
– whether the element can process in the payroll run
– whether it can accept multiple entries in a pay period
– whether employees must complete a specified length ofservice before receiving entries of the element.
Creation of Elements: Definition or Initiation
• when Oracle HRMS users manually define them
• when Oracle Payroll generates them in response to users’ initiationof earnings types, deductions, non–payroll payments madethrough payroll, or other items that process in payroll runs.
Element Definition
At Oracle HRMS installations either with or without Oracle Payroll,users define elements that do not process in the payroll run, but do

7 – 5Elements: Foundation of Compensation and Benefits
hold information on things like compensation and benefits, employees’hours or days absent, and tangible items distributed to employees.
To define an element, use the Element window to perform these basicsteps:
• selecting the element classification, and category, if any
• selecting the processing type, and the particular rules applicableto the element.
• setting up each input value the element requires.
See:
Defining an Element to Hold Information: page 7 – 32
Defining Benefit Plan Elements at Sites with HR Only: page 10 – 8
Defining and Linking an Absence Element: page 26 – 9
System Generation
In some circumstances the system generates elements, so that users donot need to define them. To set up a plan for employee accrual of PTO(paid time off), the system generates elements needed for planadministration, in response to entry of certain information about theplan.
At installations including Oracle Payroll, the system generates all theelements that process in the payroll run, in response to users’ initiationof the earnings, non–payroll payments and non–tax deductions theirenterprise requires. On the basis of information entered in the Earningsor Deduction window, the system generates both the element and otheressential components of an earnings, payment or deduction.Altogether, the generated components include:
• the element for the earnings, payment or deduction, with itsnecessary input values, processing type and rules, and balancefeeds already in place
• a basic formula for the element, together with the formulaprocessing rules.
If necessary, a generated element or formula can be modified to exactlymeet user requirements.
Elements Included in Oracle HRMS
Users at Oracle HRMS installations without Oracle Payroll have twoelements already generated for them, Regular Salary and Regular

7 – 6 Oracle Human Resources North American User’s Guide
Wages. These elements are available to use with the salaryadministration features of Oracle HRMS.
See: Setting Up Salary Administration: page 9 – 4
Installations with Oracle Payroll include not only Regular Salary andRegular Wages, but also Overtime, Shift Pay, GTL Imputed Income,and Company Car, as well as some basic deductions for garnishments,already generated and available for use.
Using Elements
Once an element exists, whether by definition or by generation, youprepare it for use by setting up links for it, to specify the eligibility rulesthat determine which employees in your database can receive entries ofit. After its links are in place, you can make entries to the element’sinput values for eligible employees.
Figure 7 – 2Element Utilization
DateTrack
ÈÈ
Link
Elements
Entry
classification and category
processing types and rules
input values, and formulas forpayroll processing
eligibility rules
Structure
manual, automatic
batch entry via MIX or PayMIX
in payroll runs, entry ofindirect results of formulas
Links for Eligibility Rules
While an element may occasionally represent a compensation type,benefit, piece of equipment or deduction available to every one of theemployees in your enterprise, many of your elements are likelyavailable only to certain groupings of employees. For example, aholiday bonus may be payable just to those employees who work fulltime. Or, your enterprise may provide company cars only toemployees in the Sales Department.

7 – 7Elements: Foundation of Compensation and Benefits
To determine which employee groupings are eligible for an element,you build links to the assignment components employees must have toreceive entries for the element. For example, the Holiday Bonuselement can have a link to the employment category Full Time, or aRadiation Badge element, to the organization Operations Group. Linksrule out the possibility of employees getting element entries by mistake.
See: Element Links and Employee Eligibility Rules: page 7 – 25
Element Entries
After an element is created and linked, its input values can receiveentries for the employees eligible for it. Various ways to make theseentries are available. You can manually enter input values forindividual employees, or in certain cases set up automatic elemententry for all eligible employees. Additionally, the payroll run can itselfenter an indirect result of one element’s formula to an input value ofanother element.
For batch element entry, Oracle HRMS MIX (Mass InformationExchange) provides two facilities:
• the BEE facility, for elements that do not process in the payrollrun
• the PayMIX facility, for elements the payroll run processes.
See: Element Entries for Eligible Employees: page 7 – 27

7 – 8 Oracle Human Resources North American User’s Guide
Element Classifications and Categories
Every element has a primary classification, to establish what itrepresents. Your Oracle HRMS installation includes a set ofclassifications developed in accordance with US legislativerequirements. You cannot add or make changes to this classificationset. The table below lists the US element classifications. There is nolimit to the number of different elements you can have in any givenclassification, and no limit on the total number of elements you can useat an installation.
You see that most US classifications are subdivided into severalcategories. Categories go further than the classifications in determininga particular element’s function. They are also useful for determininghow certain rules, such as tax rules, apply to elements within aclassification.
See: Maintaining Taxability Rules (Oracle Payroll User’s Guide)
You can make your own additions to the list of available categories asyou require.
Classification Categories
Earnings Regular
Overtime
Shift Pay
Supplemental Earnings Dismissal Payments
Educational Assistance
Deferred Compensation Plans
Jury Duty Pay
Moving Expense Reimbursement
Pensions/Annuities
Awards and Prizes
Bonuses
Commissions
Cafeteria Plans
Deceased Employee Wages
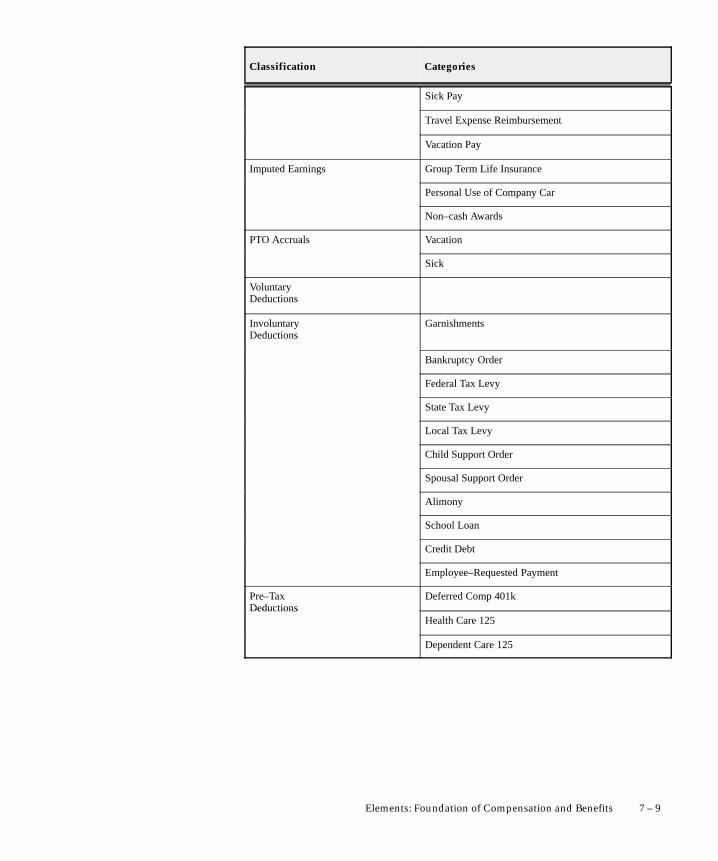
7 – 9Elements: Foundation of Compensation and Benefits
CategoriesClassification
Sick Pay
Travel Expense Reimbursement
Vacation Pay
Imputed Earnings Group Term Life Insurance
Personal Use of Company Car
Non–cash Awards
PTO Accruals Vacation
Sick
VoluntaryDeductions
InvoluntaryDeductions
Garnishments
Bankruptcy Order
Federal Tax Levy
State Tax Levy
Local Tax Levy
Child Support Order
Spousal Support Order
Alimony
School Loan
Credit Debt
Employee–Requested Payment
Pre–TaxDeductions
Deferred Comp 401kDeductions
Health Care 125
Dependent Care 125

7 – 10 Oracle Human Resources North American User’s Guide
CategoriesClassification
Tax Deductions Federal
State
Local
Employer Taxes Federal
State
Local
Employer Liabilities Benefits
Overhead
Tax Credit
Non–PayrollPayments
Expense Reimbursement
Information Absence Hours
Straight–Time Overtime Hours
Tax Balance
Labor Hours
Regular Hours
Table 7 – 1
Table of Element Classification and Categories
Survey of the Classifications
Each classification, and category within the classification, holdselements with a distinct function.
Earnings, Supplemental Earnings, Imputed Earnings
There are three classifications of earnings types: Earnings,Supplemental Earnings and Imputed Earnings.
Earnings classification elements represent earnings for time worked, asfor example salary and hourly wages. The Supplemental Earningsclassification includes a variety of special earnings paid in addition toearnings for time worked, as for example bonuses or sick pay.

7 – 11Elements: Foundation of Compensation and Benefits
Elements in the classification Imputed Earnings are for non–cashremuneration such as personal use of a company–provided car, orcompany–paid premiums for group term life insurance.
Paid Time Off (PTO) Accruals
Elements the system generates to represent plans for accrual of PTO forvacation or sick leave have the classification PTO Accruals, and thecategory of either Vacation or Sick. You use these elements to enrollemployees in the accrual plans. The system also generates elements(with the classification Information) to hold accrued time thatemployees can carry over to the new year, and accrued time theycannot carry over.
See: Defining a PTO Accrual Plan: page 26 – 24
For entry of amounts of accrued time employees take for vacation orsick leave, you define for each accrual plan an absence element with theclassification Information.
See: Defining and Linking an Absence Element: page 26 – 9
Pre–Tax and After Tax Deductions
Elements for deductions taken before taxes, as for example deductionsfor 401(k) plans or for health care or dependent care reimbursement,fall into the classification Pre–Tax Deductions.
Other non–tax deduction elements fall into one of two classifications,either Voluntary Deductions or Involuntary Deductions. Loanrepayments, credit union deductions, insurance premiums andcharitable contributions are examples of voluntary deductions.Deductions for court–ordered wage attachments, as for example for taxlevies, child or spousal support, or bankruptcy orders, fall into theclassification Involuntary Deductions.
Non–Payroll Payments
Elements in this classification produce payments made to employeesthrough the payroll system that are not true earnings. For example, theExpense Reimbursement category of this classification coversnon–taxable expense reimbursements.
Because payments in this classification are not earnings, they are neversubject to taxes and never feed balances of taxable pay. Paymentsresulting from the processing of Non–Payroll Payments elementsalways appear separately from earnings in reports and balance totals.

7 – 12 Oracle Human Resources North American User’s Guide
Tax Deductions, Tax Credits, Employer Taxes
Deductions for employee tax withholding fall into the classification TaxDeductions. Oracle Payroll includes elements representing deductionsfor the following federal taxes:
• Federal Income Tax (FIT)
• Federal Unemployment Tax Act taxes (FUTA)
• Social Security (FICA–OASDI)
• Medicare (FICA–HI)
At the state level, Oracle Payroll includes elements representingdeductions for:
• State Income Tax (SIT)
• State Unemployment Insurance (SUI)
• State Disability Insurance (SDI)
• Workers Compensation (WC).
At the local level, Oracle Payroll includes elements for:
• city tax
• county tax
• school district tax
• head tax.
Tax credits you pay to employees belong in the Tax Creditsclassification. These are, for example, payments of credits due inaccordance with the Earned Income Credit (EIC) plan.
For employer payments for Social Security and Medicare, and forWorkers Compensation, SUI and SDI, Oracle Payroll uses elements inthe classification Employer Taxes.
Oracle Payroll comes with all the necessary elements and calculationsfor tax deductions, tax credits and employer taxes already in place. Astax information changes, you receive the necessary updates. Oracle hasconcluded an agreement with Vertex Inc. making Vertex the supplier ofall tax calculations and updates for Oracle Payroll.
See: Tax Balances (Oracle Payroll User’s Guide)
Employer–paid Benefits and Employer Overhead
Elements producing non–tax payments employers make on behalf oftheir employees belong in the classification Employer Liabilities. The

7 – 13Elements: Foundation of Compensation and Benefits
category Benefits within this classification covers employer paymentstoward employee benefits such as health insurance or pension plans.
The category Overhead covers charges employers incur for employeesapart from benefits payments. For example, an element in thisclassification can represent the cost of required employee safetyequipment.
Information Elements
Many elements may not belong in any of the classifications describedabove, but nonetheless hold many different types of information youneed. These elements belong in the classification Information.
This classification is especially useful for elements that do not processin Oracle Payroll. Such elements might, for example, hold informationabout tangible items issued to employees, such as cellular phones,identification badges or company cars. Sites that do not include OraclePayroll use elements in this classification to hold information aboutemployee compensation and benefits.
See: Defining an Element to Hold Information: page 7 – 32
Absence Category
Elements in the Absence Hours category of the Informationclassification hold hours of time that employees are absent from work.
Straight–time Overtime Hours Category
Elements in the Straight Time Portion of Overtime Pay category holdamounts of straight time pay needed in some states for the calculationof Workers Compensation premiums.
See: Data for Calculation of WC Premiums (Oracle Payroll User’s Guide)
Tax Balance Figures
Elements in this category hold figures resulting from tax calculations.Oracle Payroll uses these figures to feed various tax balances thatappear in inquiry windows and on reports.
See: Viewing Tax Balances (Oracle Payroll User’s Guide)
Labor Hours and Regular Hours Categories
The category Labor Hours exists for the predefined element LaborRecording, used to receive entries of salaried employees’ hours workedon a project, when you require this information for transfer to a projectaccounting or labor distribution system.

7 – 14 Oracle Human Resources North American User’s Guide
The category Regular Hours exists for the predefined element RegularHours Worked, which receives information on employees’ hoursworked during the payroll run, for use in reports.
See: The Earnings Types Regular Salary and Regular Wages (OraclePayroll User’s Guide)
Classifications and Payroll Run Processing Priorities
An element’s primary classification provides a default processingpriority for the element in payroll runs. The default priorities for theelement classifications appear in the table below. Lower prioritynumbers process first.
You can overwrite an element’s default processing priority withanother number, when you need to establish the order in which theelement processes with respect to other elements. However, because oftheir special processing requirements, elements in the classificationsTax Deductions, Employer Taxes, and Tax Credits all have the samepriority number, which you cannot change.
Sometimes you must prioritize the processing of certain elements for anindividual employee. For example, you may need to determine theprecise order in which deductions taken for wage attachments processfor an employee. You can change the priority numbers of elementsentered for an employee using the Entry Values window (accessiblefrom the Element Entries window).
Table of Classification Priorities
Classification Priority Default
Information 0 – 500 250
Non–payroll 501 – 1000 750
PTO Accruals 1001 – 1500 1250
Earnings 1501 – 2000 1750
Supplemental Earnings 2001 – 3000 2500
Imputed Earnings 3001 – 3500 3250
Pre–Tax Deductions 3501 – 4000 3750
Tax Deductions (no range) 4250
Employer Taxes (no range) 4250

7 – 15Elements: Foundation of Compensation and Benefits
DefaultPriorityClassification
Tax Credits (no range) 4250
Involuntary Deductions 5001 – 5500 5250
Voluntary Deductions 5501 – 6000 5750
Employer Liabilities 6001 – 7000 6500

7 – 16 Oracle Human Resources North American User’s Guide
Element Input ValuesTo hold information, elements can have as many as 15 different inputvalues. The particular type of information an input value can accept isdetermined when it is set up. An input value can accept informationwith any one of these units of measure:
• alphabetic characters or words
• integers or numbers
• money
• hours and minutes
• date, day or time.
For example, an element to maintain information about company carscan have input values for entries of the car make, model and year, itsregistration state, the date of its issue to the employee, and its mileagewhen issued to an employee:
Input Value Unit Measure
Make Character
Model Character
Year Integer
Registration State Character
Date of Issue MM–DD–YY
Mileage at Issue Number
Example Car Element
Validation for Input Value Entries
To ensure that an input value does not receive incorrect entries, itssetup can include one of these ways of validating its entries:
• entry of minimum and maximum values within which entriesmust fall
• provision of a lookup, that is, a list of values from which an entrymust come
• provision of a validation formula that validates entries, writtenusing Oracle FastFormula. For example, for entries of the

7 – 17Elements: Foundation of Compensation and Benefits
amount of a bonus, the formula could check amounts enteredagainst each employee’s length of service and current salary.
For the Company Car element, you can establish validation for inputvalues as in this example:
For the Government Car element, you can establish validation for inputvalues as in this example:
Input Value Unit of Measure Validation
Make Character Lookup
Model Character Lookup
Year Integer Lookup
Registration State Character Lookup
Date of Issue MM–DD–YY
Mileage at Issue Number Minimum/Maximum
Example Input Values Validation for Government Car Element
Example Input Values Validation for Company Car Element
Example Input Values Validation for Government Car Elements
Default Entries for Input Values
The setup of an input value can include entry of a default for the inputvalue. For example, suppose that for most of the employees eligible forcompany cars, the make is Ford and the Registration State isMassachusetts.
On the Company Car element’s setup, you can enter defaults for itsinput values as follows:
Input Value Unit of Measure Validation Default Entry
Make Character Lookup Ford
Model Character Lookup
Year Integer Lookup
Registration State Character Lookup MA
Example Default Entries for Input Values
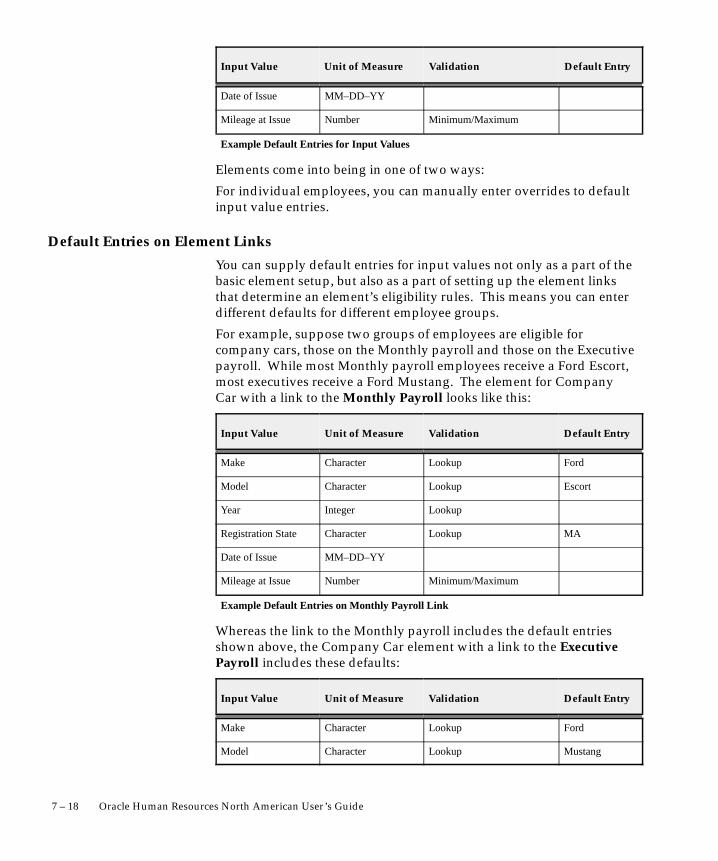
7 – 18 Oracle Human Resources North American User’s Guide
Default EntryValidationUnit of MeasureInput Value
Date of Issue MM–DD–YY
Mileage at Issue Number Minimum/Maximum
Example Default Entries for Input Values
Elements come into being in one of two ways:
For individual employees, you can manually enter overrides to defaultinput value entries.
Default Entries on Element Links
You can supply default entries for input values not only as a part of thebasic element setup, but also as a part of setting up the element linksthat determine an element’s eligibility rules. This means you can enterdifferent defaults for different employee groups.
For example, suppose two groups of employees are eligible forcompany cars, those on the Monthly payroll and those on the Executivepayroll. While most Monthly payroll employees receive a Ford Escort,most executives receive a Ford Mustang. The element for CompanyCar with a link to the Monthly Payroll looks like this:
Input Value Unit of Measure Validation Default Entry
Make Character Lookup Ford
Model Character Lookup Escort
Year Integer Lookup
Registration State Character Lookup MA
Date of Issue MM–DD–YY
Mileage at Issue Number Minimum/Maximum
Example Default Entries on Monthly Payroll Link
Whereas the link to the Monthly payroll includes the default entriesshown above, the Company Car element with a link to the ExecutivePayroll includes these defaults:
Input Value Unit of Measure Validation Default Entry
Make Character Lookup Ford
Model Character Lookup Mustang

7 – 19Elements: Foundation of Compensation and Benefits
Default EntryValidationUnit of MeasureInput Value
Year Integer Lookup
Registration State Character Lookup MA
Date of Issue MM–DD–YY
Mileage at Issue Number Minimum/Maximum
Example Default Entries on Executive Payroll Link
You also enter costing information on a link. For example, if thecompany car costs for executives are chargeable to a different costcenter than the car costs for the Monthly Payroll employees, you canenter the correct cost center on each link.
See Also
Making Changes to Links: page 7 – 39
Pay Values and Payroll Run Processing
When you have occasion to look at the structure of an element online,you may see an input value named Pay Value at the top of its inputvalue listing. Although the Pay Value appears as an input value, it isdifferent from other input values.
The essential purpose of the Pay Value is to store an element’s runresult. For example, suppose the formula for the Wages element is:Wages = Hours Worked x Wage Rate
If an employee whose wage rate is $10/hour works 40 hours in a week,the payroll run produces a run result of $400 for him or her. It storesthis result in the element’s Pay Value. After the run, you see 400.00 asthe Pay Value for Wages.
However, if you give an entry to a Pay Value before a run, during therun this entry becomes the element’s run result. For example, supposeyou enter 40 in the Time Worked input value of the Wages element foran employee who earns $10/hour, but also enter $100 in the element’sPay Value. The run ignores the entry of hours worked and the Wagesformula, and simply produces a run result of $100 for this employee.
Enterable and Non–Enterable Pay Values
Pay Values sometimes appear as the first input value for elementshaving the rule Process in Run, providing a place to store run results.

7 – 20 Oracle Human Resources North American User’s Guide
For some elements with the Process in Run rule the Pay Value may beenterable, so you can put in it a run result amount when the elementhas no formula, or when you do not want its formula to process.
However for generated elements, the Pay Value is usually notenterable. This is because Oracle Payroll provides other ways for youto supply run result amounts for these elements when formulas areunnecessary, or when you need to add to, subtract from or replacecalculated run results.
See: Changes to Earnings or Deductions Before a Run (Oracle PayrollUser’s Guide)

7 – 21Elements: Foundation of Compensation and Benefits
Elements and Formulas
In Oracle Payroll, you can associate elements with formulas that specifyhow the payroll run should perform calculations for the element. Forexample, this is a basic formula for the calculation for the elementWages:
Wages = Hours Worked in Week x Wage Rate
To do their work, formulas must have data inputs. The simple wagesformula above needs two inputs for each employee, the employee’shours worked in the week, and his or her wage rate.
Formula Inputs from Input Values or Database Items
Formulas obtain some of the data they need from entries to theirelement’s input values. The Wages formula, for example, could locateeach employee’s hours worked as an entry to the input value Hours ofthe Wages element.
As well as getting inputs from input values, formulas can obtaininformation from database items. These are information items held inthe Oracle HRMS database in such a way that formulas can locate anduse them. Much database information, including extensive informationon employees and their assignments, is available in this form. Forexample, the Wages formula can locate each employee’s wage rate as adatabase item.
Oracle FastFormula
The tool for developing Oracle HRMS formulas is Oracle FastFormula.This is a sophisticated product capable of producing all the calculationspayrolls require, as for example the calculation of shift differentials orcomplex overtime payments.
Conditional Logic
Formulas written using Oracle FastFormula can employ conditionallogic, so they can produce different run results for different employeesor employee groups depending on characteristics of the employees orgroups. For example, a formula could determine employees’ pay ratesby accessing the database items for their job class and length of service.
See: Oracle FastFormula User’s Guide

7 – 22 Oracle Human Resources North American User’s Guide
Formulas for Different Employee Statuses
An element can have several associated formulas, whose applicabilitydepends on the particular status of an employee. For example, theearnings Salary can have a formula that processes for employees whosestatus is Active, and a different formula for employees with a status ofOn Leave who are not receiving their full pay. A formula’s processingrules determine the employee statuses for which the formula canprocess.
See: Defining Formula Processing and Result Rules (Oracle PayrollUser’s Guide)
Types of Formula Results
Formulas can produce different types of run results. The direct result isthe amount of an earnings or deduction, for example, the dollaramount of wages an employee has earned this week. As well as directresults, a formula can also produce indirect results, updates, and stops.The payroll run sends indirect results or updates as entries to the inputvalues of other elements for their formulas to use. It sends stops toother elements to prevent their processing in the run.
Another type of formula result is a message. For example, you can writea formula that checks the length of a text string, and have it issue amessage for payroll users if the string is too short or too long. You setup formula result rules to determine the type of each result, and thenames and input values of any other elements the result may affect.
See: Defining Formula Processing and Result Rules (Oracle PayrollUser’s Guide)
Formulas Included in Oracle Payroll Startup Data
Oracle Payroll comes with formulas already written for most types ofearnings and deductions; you select the appropriate one wheninitiating a particular earnings or deduction.
The system also comes with the calculations for employee taxwithholding and employer taxes already in place. When there arechanges to taxes, you receive updates. You never need to write ormodify tax formulas.
See: Earnings and Deductions Overview (Oracle Payroll User’s Guide)

7 – 23Elements: Foundation of Compensation and Benefits
Element Processing TypesEntries for some elements remain valid until you change them or theyreach their end date. For example, if your employees usually get salaryincreases once a year, entries to the input value Amount of the elementAnnual Salary are usually good for a year. Entries to the input valuesMake and Model of the element Company Car remain valid as long asan employee has the same car.
Elements with entries that can remain valid over a number of payperiods, whether the periods are weekly, monthly, or some other lengthof time, have the processing type recurring.
For other elements, entries are good for one pay period only. Thesecould be, for example, entries of regular hours worked in a period tothe Hours Worked input value of the Wages element, or entries ofovertime hours worked to the Hours Worked input value of theOvertime element. Entries to these elements should process once only,to produce employees’ wages or overtime pay for a period.
Elements with entries that are valid in one period only have theprocessing type nonrecurring.
All elements require a processing type of either recurring ornonrecurring.
Figure 7 – 3Element Entry ValidityAcross Pay Periods DateTrack
ÈÈÈÈ
Calendar Time–Periods
Recurring Values
Nonrecurring Values
0 1 2 3 4 5 6 7 8 9 10 11 12
0 1 2 3 4 5 6 7 8 9 10 11 12
Salary
Overtime
Frequency Rules for Recurring Deductions
In addition to a processing type, certain elements that process inpayroll runs may require frequency rules. These rules are needed for

7 – 24 Oracle Human Resources North American User’s Guide
recurring deductions that should process at regular intervals, but not inevery pay period.
For example, you may need to take a recurring deduction for medicalinsurance just once each month for employees on the Weekly payroll.In this case you give the deduction a frequency rule specifying for thispayroll, which period in a month the recurring deduction elementshould process.
See: Deduction Frequency Rules (Oracle Payroll User’s Guide)

7 – 25Elements: Foundation of Compensation and Benefits
Element Links and Employee Eligibility RulesSome elements representing earnings, deductions or benefits may beapplicable to all your employees, but it is likely that many are availableonly to certain groupings of employees. To set eligibility rules forelements, you build element links. A link lists one or more assignmentcomponents that must be included in an employee’s assignment forhim or her to be eligible for the element.
You can build several links for an element, but Oracle HRMS enforcesthe rule that you cannot build links making employees eligible for anelement more than once. For example, if you link the Wages element tothe Weekly payroll, the system stops you from building a second linkfor Wages to the Production Department, because this link would allowProduction Department employees on the Weekly payroll to be eligiblefor Wages twice.
Note: During the installation of Oracle Payroll at yourenterprise, creation of links to the Vertex tax elements and tothe Workers Compensation elements occurs.
Eligibility Criteria
The assignment components to which you can link elements are:
• the employee’s payroll. If employees on all your payrolls areeligible for an element, you can link it to all payrolls.
• the employee’s salary basis, which establishes the period oftime, often hours or months, for which you quote the employee’ssalary or wages.
• the employment category, for example, Full Time–Regular orPart Time–Temporary.
• the organization, for example department or section, in whichemployees work.
• employees’ work location.
• the employee’s job, for example, Associate Professor orSecretary.
• his or her grade.
• one or more groups to which the employee belongs. You set upall the groups that are appropriate for your enterprise. Forexample, you could decide to group employees by companywithin a multi–company enterprise, and by union membership.
• employees’ positions. A position is a class of job performed in aparticular organization, for example, Associate Professor ofChemistry, or Finance Department Secretary.

7 – 26 Oracle Human Resources North American User’s Guide
Default Input Value Entries and Costing Information on Links
When you build a link for an element, you can make entries of defaultvalues to the element’s input values, and you also enter costinginformation on the link. When necessary you can make changes to theinput values or costing information of existing links.
See Also
Default Entries on Element Links: page 7 – 18
Making Changes to Links: page 7 – 39
7 – 27Elements: Foundation of Compensation and Benefits
Element Entries for Eligible EmployeesAn element’s links establish which employees it can apply to, but donot necessarily determine the employees it actually does apply to. Forelements to actually apply to employees, they must receive entries tothe element’s input values. Oracle HRMS includes several differentways to make element entries.
Manual Element Entry for Individual Employees
Oracle HR and Oracle Payroll users with access to an employee’srecord can use the Element Entries window at any time to make entriesto the input values of the elements for which this employee is eligible.
Entries made for elements with the processing type Nonrecurring arevalid only for the pay period in which you enter them. Entries forelements with the processing type Recurring remain in effect until youchange them, or until they reach their effective end date. To supply anend date for an entry, you delete the entry as of the end date.
See: Deleting Datetracked Information: page 1 – 15
For entry and maintenance of employees’ regular salaries or wagerates, you use the Oracle HRMS feature salary administration. You canenter both starting salaries or wages, and proposals for pay increases(or decreases) using the Salary Administration window. This windowgives you the option of coordinating proposed pay changes with theresults of performance reviews.
See:
Making Manual Element Entries: page 7 – 41
Salary Administration and Performance Reviews: page 9 – 2
Automatic Entry of Elements and Default Values
For elements with the processing type of recurring, a special type ofelement link is available to both Oracle HR and Oracle Payroll users,the standard link. The standard link makes element entry automatic forall eligible employees. With this link, the element and all its defaultinput value entries automatically go on record for all eligible employeesnow and in the future.
For recurring elements that should process for all eligible employees,and that have default input value entries applicable to all or almost allof these employees, standard links save time and help avoid errors.
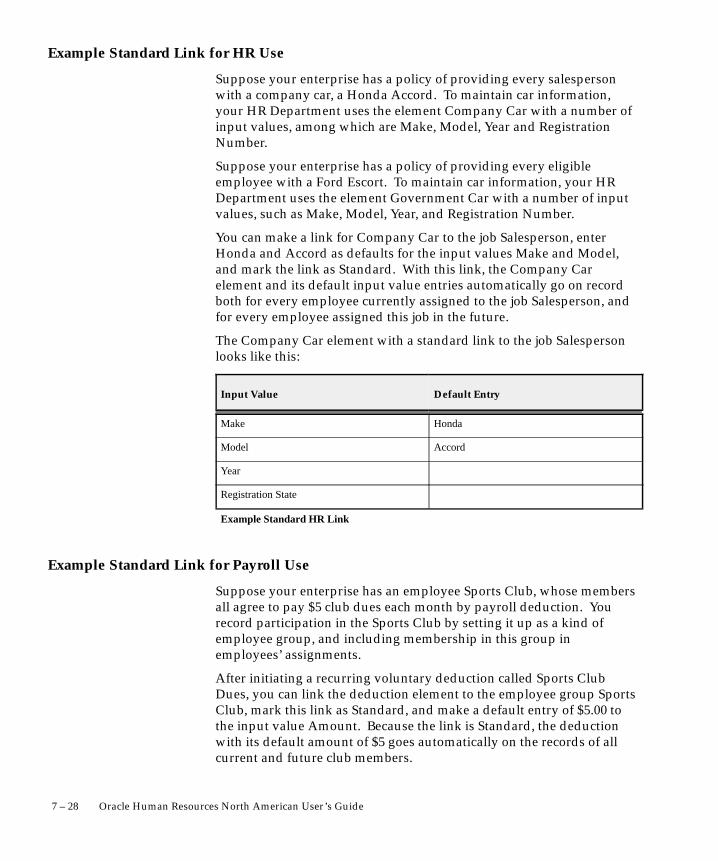
7 – 28 Oracle Human Resources North American User’s Guide
Example Standard Link for HR Use
Suppose your enterprise has a policy of providing every salespersonwith a company car, a Honda Accord. To maintain car information,your HR Department uses the element Company Car with a number ofinput values, among which are Make, Model, Year and RegistrationNumber.
Suppose your enterprise has a policy of providing every eligibleemployee with a Ford Escort. To maintain car information, your HRDepartment uses the element Government Car with a number of inputvalues, such as Make, Model, Year, and Registration Number.
You can make a link for Company Car to the job Salesperson, enterHonda and Accord as defaults for the input values Make and Model,and mark the link as Standard. With this link, the Company Carelement and its default input value entries automatically go on recordboth for every employee currently assigned to the job Salesperson, andfor every employee assigned this job in the future.
The Company Car element with a standard link to the job Salespersonlooks like this:
Input Value Default Entry
Make Honda
Model Accord
Year
Registration State
Example Standard HR Link
Example Standard Link for Payroll Use
Suppose your enterprise has an employee Sports Club, whose membersall agree to pay $5 club dues each month by payroll deduction. Yourecord participation in the Sports Club by setting it up as a kind ofemployee group, and including membership in this group inemployees’ assignments.
After initiating a recurring voluntary deduction called Sports ClubDues, you can link the deduction element to the employee group SportsClub, mark this link as Standard, and make a default entry of $5.00 tothe input value Amount. Because the link is Standard, the deductionwith its default amount of $5 goes automatically on the records of allcurrent and future club members.

7 – 29Elements: Foundation of Compensation and Benefits
The Sports Club Dues element with a standard link to the group SportsClub looks like this:
Input Value Default Entry
Amount $5.00
Example Standard Payroll Link
Batch Element Entry Using MIX Facilities
For a number of different purposes, you need a way to rapidly makeentries to elements for many employees at once. Oracle HRMS MIXincludes the BEE (Batch Element Entry) and PayMIX facilities for batchelement entry. BEE is used for non–payroll element entries, forexample, entries that serve to enroll employees in benefits or accrualplans. PayMIX is available for Oracle Payroll users for batch entry of:
• timecard data
• amounts for a nonrecurring earnings or deduction
• changes to existing entries of a recurring earnings or deduction.
PayMIX entries can include entry of information needed for thetransfer of payroll costing information to the general ledger and tolabor distribution systems.
Data typed into a BEE or PayMIX entry window goes to a special table.There you can validate it, make corrections, and validate again, beforetransferring the data to the HRMS database. After the transfer, you cansee the entries in the HRMS database using Element Entries window.
See Also
MIX Facilities for Batch Element Entries: page 8 – 2
Entry as an Indirect Result of Payroll Processing
For nonrecurring elements that process in the payroll run, input valueentry can occur during processing. When payroll runs, these elementscan receive entries to their input values as indirect results of theprocessing of other elements.
For example, when the payroll run processes the formula for theearnings types Regular Salary, it sends entries of an employee’s hours

7 – 30 Oracle Human Resources North American User’s Guide
worked in a period to the element Regular Hours Worked as anindirect result.
Then when the report processes for the statement of earnings and theEarnings Audit run, they can go to the Regular Hours Worked elementto find employees’ regular hours worked each period.
You mark formula results as indirect, and specify the element inputvalue to which an indirect result should go, using the Formula ResultRules window.
See Also
Formula Results: page 7 – 22
Regular Salary and Regular Wages (Oracle Payroll User’s Guide)

7 – 31Elements: Foundation of Compensation and Benefits
Element Definition
The types of element definition you do depends to some extent on thenature of your Oracle HRMS installation.
Installations without Oracle Payroll
Users at these installations use the Element window to define all theelements they need to hold information on the following:
• employee compensation and benefits
• medical, dental and vision benefit plans
• employee absences
• tangible items distributed to employees, such as tools oruniforms.
At these installations, users obviously have no need for elements forOracle Payroll to process in payroll runs.
Installations including Oracle Payroll
Users at these sites similarly define elements to hold information onemployee absences and on tangible items distributed to employees.However these sites also use elements that process in the payroll run torepresent:
• compensation types
• non–payroll payments such as reimbursements
• benefits toward whose cost employees and employers maycontribute
• other employee deductions and employer liabilities.
The system generates these elements, together with the necessarybalances, formulas, and formula result rules, when users initiateearnings, other payments and deductions using the Earnings orDeduction window.
See Also
Definition of Benefit Elements at Sites with HR Only page 10 – 6
Defining and Linking an Absence Element: page 26 – 9

☞
7 – 32 Oracle Human Resources North American User’s Guide
Defining an Element to Hold Information
Use the procedure below to define most elements that hold informationbut do not process in payroll runs.
Note: To define information elements for health care benefitplans (elements with the benefit classification Medical, Dentalor Vision), or elements for absence types, use differentprocedures.
See:
Definition of Benefit Plan Elements at Sites with HR Only: page10 – 8
Defining and Linking an Absence Element: page 26 – 9
To define an element, use the Element window.
Attention: The version of the Element window you seedepends on your HR User Type profile option. With the profileoption HR User, you see and access only those fields needed todefine elements that hold information or represent benefitplans or absence types. With the profile options Payroll Userand HR with Payroll User, you see and access all available fields.
Prerequisites
❑ Decide what validation you need for entries to the element’s inputvalues.
• To restrict entries to a list of valid values, use the QuickCodeTypes window to define a new lookup. Then enter the validvalues for this lookup in the QuickCodes window.
• To validate values using formulas, write the validation formulasusing the Formulas window.
See: Oracle FastFormula User’s Guide
❑ If you need a new category within the Information classification forthis element, add it in the QuickCodes window for the QuickCodetype US_INFORMATION.
See: Information Elements: page 7 – 13
❑ If this element represents a benefit for which you want to enter acarrier, set up the carrier as an external organization with theclassification Benefits Carrier.
See: Creating an Organization: page 2 – 20
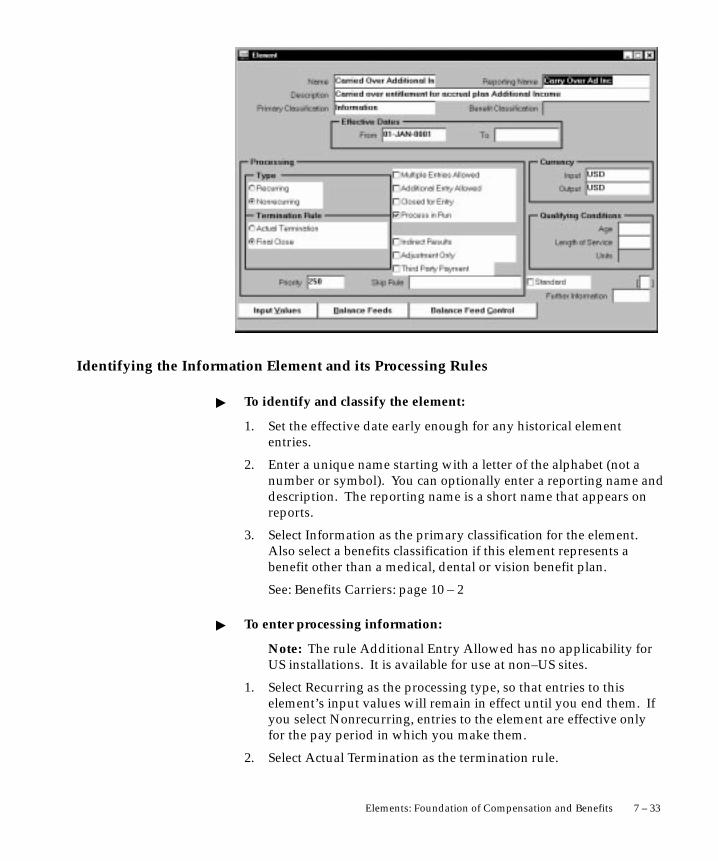
7 – 33Elements: Foundation of Compensation and Benefits
Identifying the Information Element and its Processing Rules
� To identify and classify the element:
1. Set the effective date early enough for any historical elemententries.
2. Enter a unique name starting with a letter of the alphabet (not anumber or symbol). You can optionally enter a reporting name anddescription. The reporting name is a short name that appears onreports.
3. Select Information as the primary classification for the element.Also select a benefits classification if this element represents abenefit other than a medical, dental or vision benefit plan.
See: Benefits Carriers: page 10 – 2
� To enter processing information:
Note: The rule Additional Entry Allowed has no applicability forUS installations. It is available for use at non–US sites.
1. Select Recurring as the processing type, so that entries to thiselement’s input values will remain in effect until you end them. Ifyou select Nonrecurring, entries to the element are effective onlyfor the pay period in which you make them.
2. Select Actual Termination as the termination rule.

7 – 34 Oracle Human Resources North American User’s Guide
3. For the element to receive more than one entry at the same time,check the Multiple Entries Allowed box.
4. If at some time you need to prevent the element from accepting anynew entries, either temporarily or permanently, check the Closedfor Entry box. This does not affect any existing element entries.
� To establish currencies and qualifying conditions:
1. The Input and Output Currencies appear as USD (US dollars) andyou cannot change these defaults.
2. If there is a minimum age for employees to receive the element,enter it in the Age field.
3. If employees must complete a minimum length of service beforereceiving the element, enter a number in the Length of Service fieldand select a unit of measure (such as months or years) in the Unitsfield.
4. For the system to automatically enter the element and its defaultvalues for all eligible employees, check the Standard box.
See: Automatic Entry of Default Values: page 7 – 27
5. Save the element definition.
� To enter a category and benefits carrier
1. Click in the Further Information field to open the Further ElementInformation window. In the Category field, select a category.
2. For an element representing a benefit that does not have the benefitclassification Medical, Dental or Vision, you can select a benefitscarrier in the Benefits Carrier field.
3. Complete the definition of the element by setting up its inputvalues.
Establishing the Information Element’s Input Values

7 – 35Elements: Foundation of Compensation and Benefits
� To set up input values for the element:
1. Enter a name for the input value and select a unit of measure for it(money, hours, character, date, number or time).
2. You can enter number in the Sequence field to designate the orderin which the Element Entries window displays the input values.
3. If the input value must have an entry, check the Required box.
� To enter an element–level default for an input value:
1. Make the entry in the Default field.
2. For automatic update of existing entries of a default whenever youchange the default, check the Hot Default box. Hot defaults appearin the Element Entries window in quotation marks.
Warning: If you override a hot default appearing as an entryfor an employee, any further changes to the element’s defaultvalue do not affect this entry. For this reason, it is best to makechanges to a default value for large groups of employees usinga MIX batch entry facility rather than the hot default feature.
� To establish validation for input value entries:
1. Choose one of these approaches:
• Enter maximum and minimum values for the entry
• Select a QuickCode Type to act as a lookup for an input valuewhose type is Character
• Select a formula to validate entries. Formulas can returnmessages about the success or failure of the validation.
2. Choose Warning for the system to warn of an invalid entry, orError if it should not save a valid entry. You cannot select Warningor Error when using a lookup for validation, because in this case aninvalid entry is impossible.
3. Choose Done when you are finished. Your definition of an elementto hold information is complete.
Deleting an Element Entry
Perform this task from the Element Entries window.
� To delete an element entry:
1. Query the element entry in the Element Entries window.

7 – 36 Oracle Human Resources North American User’s Guide
2. Select Delete Record.
3. Select the Save icon to save this change.
Deleting an Element
Before you delete an element, you must ensure that no employees havethe element in their record and that no links to the element exist in theLink window. If either of these conditions exist, you must first deletethe element entry and the element link before you can delete theelement itself.
See Also:
Deleting an Element Link: page 7 – 40
Deleting an Element Entry: page 7 – 35
Once there are no links or element entries you can delete an element.
Use the following process to delete an element that was defined in anyof the following windows:
• Element Description window,
• Earnings window
• Deduction window
� To delete an element:
1. Query the element in the appropriate window.
2. Select Delete Record.
The system prompts you to either End Date the element or Purge it.
Note: Select End Date if you want the element to remain in thesystem but be effective through a certain date. Select Purge ifyou made a mistake defining the element and you want todelete it from the system altogether.
3. Select Save to save this change.

7 – 37Elements: Foundation of Compensation and Benefits
Defining Element LinksTo determine the groups of employees eligible for an element, youdefine links for the element in the Element Link window.
Prerequisite
❑ If the link should have Distributed as its costable type, define theset of earnings types (the distribution set) over which the systemshould distribute the element’s payroll costs.
See: Costing Information at the Element Link Level: page 11 – 7
� To define an element link:
1. In the Element Name field, select the element for which you aredefining a link.
2. Check the Standard box only if you want automatic entry of theelement and its default entries for all eligible employees. Standardlinks are possible for recurring elements that do not have the ruleMultiple Entries Allowed.
3. In the Eligibility Criteria region, select the assignment componentsthat constitute this eligibility rule.
You can link to all payrolls or to a specific payroll:
• Leave the Payroll field blank and check the Link to all Payrollsbox if you want employees assigned to any payroll to be eligible.This rule excludes employees with no payroll assignment.

7 – 38 Oracle Human Resources North American User’s Guide
• Select the name of a specific payroll to make employees assignedto that payroll eligible for the element.
Costing Information
� To enter costing information for the link:
1. Select the Costable Type. The default is Not Costed, meaning thatthe system maintains no costing information for the element.
• To allow entry of costing information for this element at alllevels, including the assignment and element entry levels, selectCosted. This is the appropriate selection for most elementsrepresenting earnings types.
• To allow entry of costing information for this element at thepayroll, element link and organization levels only, select FixedCosted. This is the appropriate selection for most elementsrepresenting deductions.
• Select Distributed to have the element’s costs distributedproportionally over a specified set of earnings types. ThisPayrollUser and HR with Payroll Use selection is appropriate forelements representing various types of employer charges andliabilities. For a link with the costable type Distributed, selectthe distribution set in the Distribution Set field.
See: Costing Information at the Element Link Level: page 11 – 7
2. If the payroll run results from this link should be transferred to thegeneral ledger, check the Transfer to GL box.
3. In the Costing field, select a GL account code and if present,account codes of labor distribution or other systems in which tocollect the run results of this element.
Use the Balancing field to select the code for the GL account thatbalances the GL account selected in the Costing field.
To select costing and balancing GL accounts for an element in theclassification Pre–Tax Deduction, Voluntary Deduction orInvoluntary Deduction:
• Select the code for the GL account to credit in the Costing field,and the code for the account to debit in the Balancing field.
To select costing and balancing GL accounts for elements in allother classifications:
• Select the code for the GL account code to debit in the Costingfield, and the code for the account to credit in the Balancingfield.
7 – 39Elements: Foundation of Compensation and Benefits
Qualifying Conditions
� To enter qualifying conditions for the link:
� Go to the Qualifying Conditions alternative region. Here you canadd or change age or length of service requirements for thisparticular eligibility rule.
Link Level Changes to Input Values
Use the Link Input Values window.
You can:
• enter a new default or change one entered at the element level
• check the Costed box to maintain costing information for aninput value
• change the maximum, minimum or both for an input value.Logically, the new values should be within the range you definedfor the element as a whole. However the system does notenforce this.
Reviewing Element Links
The Element Link Details Report is available for reviewing elementlinks. To obtain the report you select an element classification, and canfurther select only recurring or nonrecurring elements in theclassification, or just a single element. You can choose whether to seeonly standard or non–standard links, and only active or inactive links.Further, you can choose whether to see links for payrolls or a job ororganization.
Run reports from the Run Requests window.
� To obtain the Element Link Details Report:
1. In the Name field, select Element Link Details Report. Theparameters window opens.
2. Enter the effective date for the report.
3. Select the element classification to report on. Optionally, select anelement processing type (recurring or nonrecurring) or anindividual element to report on.
4. To report only on standard links, select Yes in the Standard Linkfield. Select No to report only on non–standard links. Leave blankto report on all links.

7 – 40 Oracle Human Resources North American User’s Guide
5. Select a link status to report only on links that are either active orinactive as of the report’s effective date.
6. To report on links to payrolls:
• For links to one payroll only, select No in the All Payrolls fieldand select the payroll in the Payroll field.
• For links to all payrolls, select Yes in the All Payrolls field andleave the Payroll field blank.
• To see links irrespective of their payroll criteria, select No in theAll Payrolls field and leave the Payroll field blank.
7. To report on links to a particular job or organization, select the jobor organization.
8. Choose the Submit button.
Deleting an Element Link
Perform this task from the Element Link window.
� To delete an element link:
1. Query the element link in the Element Link window.
2. Select Delete Record.
3. Select the Save icon to save this change.

7 – 41Elements: Foundation of Compensation and Benefits
Making Manual Element Entries
You use the Element Entries window to make and review manualentries to element input values for individual employees.
Customizing the Element Entries Window
Your system administrator can create customized versions of theElement Entries window to restrict the elements that particular userscan enter. Reducing the elements available for entry in this windowenhances speed, usability, and security for specific data entry scenarios.
You can restrict element entry by:
• element set (a group of elements that you define)
• element type (recurring or nonrecurring)
• element classification.
Your system administrator can include several versions of the ElementEntries window in your menus.
See: Restricting the Data Displayed in a Window: page 31 – 3

7 – 42 Oracle Human Resources North American User’s Guide
Completing or Inquiring on Entries
To manually enter elements for an employee, and to inquire on existingentries, use the Element Entries window.
� To inquire on an element entry:
� You can use the Period field, Classification field, and ProcessingTypes option buttons to view the entries for the employee in anyone pay period.
� To enter an element for an employee:
1. If necessary, change your effective date to the correct date formaking the element entry.
If the pay period is closed at your effective date, you cannot makeany nonrecurring entries of elements that process in payroll runs.
2. To reduce the list of element to choose from, select a classification,a processing type, or both in the first region.
3. In the Element Name field, select an element.
Note: Elements this employee is eligible for by means of astandard link appear automatically.
The system displays a warning message if the employee fails tomeet any qualifying conditions for the element of age or length ofservice.
4. If the Costing field is enterable, you can enter cost codes, forexample to indicate the cost center the employee’s time should becharged to.
See: Costing Information at the Element Entry Level: page 11 – 10
5. You can select a reason for an element entry you make or update.As part of your system setup, you can enter valid reasons for theQuickCode Type ELE_ENTRY_REASON.
Note: There is no use for the Override, Additional, or ShowAdjustment check boxes at US installations.
6. Choose the Entry Values button to open the Entry Values window.
7. Make entries in the Entry Value fields. Notice that:
• some fields may not be enterable.
• Some fields may be required.
• Some fields may have a list of values; others may be validated asyou leave the field. You receive a message if your entry is notvalid.

☞
7 – 43Elements: Foundation of Compensation and Benefits
• Some fields may contain default values. If the default value is inquotation marks, it is a ”hot default”.
Attention: You should consider carefully before overriding a hotdefault. If you override it, then any subsequent changes to thedefault value on the element or element link definition will notaffect this element entry.
8. To establish an earned date for an earnings element that is outsideof the current payroll period, make a selection in the Date Earnedfield.
9. To enter information about a third party recipient of a paymentresulting from a deduction element, select in the Payee Detailsfield, the name of the third party payment method set up for thispayment.
See: Defining Payment Methods for the Enterprise: page 5 – 3
10. To change the default processing priority of this element in thepayroll run, enter a new priority number in the Processing Priorityfield. Lower priority numbers process first.
See Also
Reviewing Element Entries: page 7 – 44

7 – 44 Oracle Human Resources North American User’s Guide
Reviewing Element EntriesIn the View Element Entry History window, you can see a history ofentries for an employee, and in the List Employees by Elementwindow, you can see a list of employees receiving entries to an elementin a time period you set.
You can use the Element Entries window to review existing entries foran employee in a specified pay period.
Viewing Element Entry History
In the View Element Entry History window you can see a history ofentries for an employee for:
• one element
• all recurring elements, all nonrecurring elements, or both
• elements from a selected classification
� To view element entry history for an employee:
1. Enter your selection criteria. You can:
• Select a classification.

7 – 45Elements: Foundation of Compensation and Benefits
• Select a processing type.
• Enter a date range. The end date defaults to your effective date.
2. Run the query.
The window displays all entries of the types of element youselected within the time period, including datetracked updates toentries. New entries are shown in bold to contrast withdatetracked updates, which are listed under the initial entry.
3. Select an entry and choose the Entry Values button to view theentry values.
Listing Employees by Element
In the List Employees by Element window, you can view a list of theemployees with entries to an element in any period of time you choose.You can also see the last entry value for each assignment.
� To view a list of employees receiving an element:
1. Select an element.
2. Select Current Employees, Ex–employees, or both.
3. You can also enter a date range. Both date fields default to youreffective date.

7 – 46 Oracle Human Resources North American User’s Guide
4. You can enter additional query criteria in the Element Entriesregion.
5. Run the query.
The Element Entries region displays all entries of the element foremployees of the type you selected in the chosen time period.
Note: This window does not display datetracked updates torecurring element entries. You only see the latest value (withinyour chosen time period) of each element entry. The date ofthe last datetracked update may vary from employee toemployee.

C H A P T E R
8F
8 – 1Batch Element Entry
Batch Element Entry
or batch entry of information held in element input values orelsewhere on elements, Oracle HRMS MIX (Mass InformationExchange) provides special facilities. Using BEE (Batch Element Entry)for elements that do not process in payroll runs, or PayMIX forelements that do process in runs, users can:
• rapidly enter batches of information for entry to elements into atemporary table
• validate, correct, and update the information in this table
• transfer validated information from this table to elements in theHRMS database.
This chapter explains how to use BEE and PayMIX for batch elemententry.

8 – 2 Oracle Human Resources North American User’s Guide
MIX Facilities for Batch Element Entry
At many enterprises, Oracle Payroll users must make batch elemententries in each payroll period, in order to:
• record timecard data needed for regular pay processing, such ashours worked, location or shift worked, and costing or labordistribution data
• enter special nonrecurring earnings or deductions to beprocessed in the period
• enter one–time changes to recurring earnings or deductions.
For batch element entry in Oracle Payroll, Oracle HRMS MIX ) includesthe PayMIX facility.
Non–payroll users of Oracle HRMS may also require the ability tomake element entries in batch mode, as for example:
• staff responsible for absence management, who must makeentries to elements representing absence types to recordemployees’ hours or days absent
• benefits administrators, who must make entries to elementsrepresenting benefits, such as stock purchase plans, 401(k) plansand health care plans, in order to enroll employees in thesebenefits
• salary administrators at installations without Oracle Payroll,who must make entries to elements representing salary, bonuses,commissions, and other types of earnings to maintaininformation about employee compensation.
For non–payroll users, MIX includes the BEE (Batch Element Entry)facility.
See Also
Making Non–Payroll Batch Entries Using BEE: page 8 – 3
PayMIX for Payroll Batch Entry: page 8 – 12

8 – 3Batch Element Entry
Making Non–Payroll Batch Entries Using BEE
For element entries that record absence information, enroll employeesin benefits, maintain compensation information, or perform othernon–payroll functions, you use the Batch Header and Batch Lineswindows of BEE.
Information batches entered using BEE can include as many elementsand assignments as necessary. To speed entry, you can supply defaultsfor any value, changing defaults as necessary when working through abatch. Use the Batch Lines window to choose the input values todisplay.
Validation of Batch Entries
To validate a batch after saving it, you run the BEE validation processfrom the Batch Header window. This process checks the header andeach line of the batch. For example, it checks that each assignmentnumber exists in the database, and that you have specified values forall required input values.
You can add your own validation procedures to the standard process.For example, you can set up control types, such as record counts, andwrite a validation procedure to check that the batch matches the controltotals you enter for each type. You can also add any businessvalidation you require, for example to check that amounts entered for abonus do not exceed a maximum, or that an assignment’s paid time offentitlement is sufficient to cover time taken.
When the batch is ready for transfer to the database, you run the BEEtransfer process from the Batch Header window. This process firstperforms the same checks as the validation process. If it finds noerrors, it transfers the element entries from the temporary tables to theEntries table in Oracle HRMS.
You can choose whether the transfer process automatically purges theentries from the temporary tables after transfer. You can also run aseparate purge process.
Batch Statuses
The Batch Status depends on the status of the batch header, all thebatch lines, and any control totals specified for the batch. On the BatchHeader window, you can see the following status values:
All of the lines, control totals, and headerare valid.
Valid

8 – 4 Oracle Human Resources North American User’s Guide
All of the lines, control totals, and headerhave been transferred.
At least one line, control total, or theheader is unprocessed.
At least one line, control total, or theheader is in error.
The combination of statuses in the header,lines, and batch is not consistent. Forexample, it is inconsistent for some, but notall, of the lines to have the statusTransferred.
Note: A status mismatch is not possible if you always use theBatch Header and Batch Lines windows to enter and maintaina batch.
Creating and Updating Batches of Element Entries
You can enter batches of element entries in the Batch Header and BatchLines windows.
Prerequisites
❑ You can create additional validation procedures for checking thebatch header and lines, and for validating the batch against controltotals.
❑ If you want to use control totals to validate the batch, enter valuesfor the QuickCode Type CONTROL_TYPE.
Entering a Batch Header
The header identifies the batch and determines what happens if any ofthe batch lines duplicate existing element entries.
Transferred
Unprocessed
Error
Status Mismatch

8 – 5Batch Element Entry
� To enter a batch header and control totals:
1. Set your effective date to the date when you want the entries totake effect.
2. Enter a name for the batch, and enter a reference number and thesource of the batch, if you require these for your own reference.
3. Select what action the process should take if one of the batch linesmatches an existing element entry for an assignment at the effectivedate.
• Create New Entry – The process creates a new entry if multipleentries of the element are allowed by the element definition. Ifmultiple entries are not allowed, the process sets the status of thebatch line to Error.
• Reject Entry – The process sets the status of the batch line toError.
• Change Existing Entry – The process corrects or updates theexisting entry. If there is more than one existing entry, theprocess sets the status of the batch line to Error.
The Undefined option is display–only (for batches created usingSQL*Plus or a similar tool).
4. If you selected Change Existing Entry, select the type of dateeffective change to be made to recurring entries:
• Update – The process changes the existing entry from theeffective date, but preserves the previous information. If thereare future–dated changes to the existing entry, the process insertsthe change before the next scheduled change.

8 – 6 Oracle Human Resources North American User’s Guide
• Correct – The process corrects the existing entry from its startdate through to its end date. Any future–dated changes areunaffected.
• Override – The process changes the existing entry from theeffective date, but preserves the previous information. If thereare future–dated changes to the existing entry, the processreplaces all future–dated changes with the batch line.
Notice that if you select this option, you cannot check the Rejectif Future Changes check box.
The Undefined option is display–only (for batches created usingSQL*Plus or a similar tool).
5. If you want to reject batch lines that match entries that start in thefuture or for which future changes are scheduled, check the Rejectif Future Changes check box.
Notice that if you check this box, you cannot select the Overrideoption.
6. If you want the batch to be purged from the temporary tables aftersuccessful transfer to Oracle HRMS, check the Purge After Transfercheck box.
7. If you have set up control types to validate the batch beforetransfer, choose the Totals button. Select a batch control type andenter the total for the batch. You can enter as many types andtotals as you require.
Entering Batch Lines
A batch line is one element entry for an assignment.
Use the Create Batch Lines window to create identical lines for allassignments identified by an assignment set. This is a quick way tocreate many lines for an element. If the input values need to varybetween assignments, you can leave these blank and add them laterusing the Batch Lines window.
In the Batch Lines window, you can enter new lines for individualassignments, and you can view and edit lines created automatically foran assignment set. You can speed up entry of new lines by enteringdefault input values
Note: A batch can contain lines for as many elements as yourequire. Lines within a batch can have different effective dates.
To navigate to these windows, first create and save a batch header inthe Batch Header window. Then choose the Create Lines button (for

8 – 7Batch Element Entry
the Create Batch Lines window) or the Lines button (for the Batch Lineswindow).
� To enter batch lines for an assignment set:
1. Select the assignment set and payroll which identify the employeesyou want to create lines for.
2. Select the element for the batch lines and enter input values asappropriate.
3. Change the effective date if required.
4. Choose the Process button to submit a concurrent process calledCreate Batches. Confirm that you want the system to create thelines.
The Batch Lines window now closes, taking you back to the BatchHeader window.
5. Choose the Create Lines button again if you want to add lines foranother element. Requery your batch and choose the Lines buttonif you want to view and edit the lines created by the process.
� To enter batch lines manually:
1. Choose the Lines button.
2. Select the element for which you want to make entries.

8 – 8 Oracle Human Resources North American User’s Guide
3. To enter default values to speed up the data entry, choose theDefaults button. The Defaults window displays the input valuesfor the selected element.
4. Enter default values in any of the fields in the Defaults window.These defaults apply to all new entries in the batch, but not to anyentries you have already made. You can change the defaults at anytime during your data entry.
5. Uncheck the Display check box for any field that you do not wantto display in the Lines window. You might want to hide any fieldsfor which the default is correct for every entry.
6. In the Lines window, enter the data required for the batch. Lists ofvalues are available on some fields, but no validation is enforcedduring data entry.
You can override the Effective Date for any line. This is theeffective start date for a new entry or the effective date of anupdate.
7. Save your entries. If you want to make entries for another element,select the element, enter new defaults, enter the lines, then saveagain.
Retrieving Existing Batch Lines
Use the Batch Lines window to view existing batch lines.
� To retrieve existing batch lines:
1. Do one of the following:
• Select the element in the Element field.
• Check the Unknown Elements check box if you are queryingbatch lines entered for an invalid element (or no element) bySQL*Plus or another tool.
2. Choose the Find button.
Updating a Batch
You can update a batch at any time before you transfer it. If you makeany changes to a batch with the status Validated or Error, the batchstatus changes to Unprocessed.
Validating a BEE Batch
You can validate a batch with the status Unprocessed, Error, or Valid.The validation process tests each batch line against certain predefined

8 – 9Batch Element Entry
rules about element entries, and also against your own rules if youhave created additional validation procedures.
� To validate a batch:
1. Query the batch in the Batch Header window, and choose theProcess button.
2. Select Validate, and choose Start. The system displays theconcurrent request ID so that you can query it on the Requestswindow.
3. When the concurrent request is completed, query the batch in theBatch Header window.
If the Batch Status is Valid, the validation was successful. If theBatch Status is Error, at least one line, control total, or the header isin error.
4. To view the status of individual lines in the batch, choose the Linesbutton. In the Batch Lines window, select an element and chooseFind.
5. If you entered control totals for the batch, choose the Totals buttonon the Batch Header window to view the status for each controltype.
6. To view messages for the whole batch, or all lines, or control totals,choose the Messages button. Use the option group at the top of theMessages window to control which messages are displayed.
Transferring a BEE Batch
A batch exists in the temporary BEE tables only until you run thetransfer process to create element entries in the Oracle HRMS Entriestable.
� To transfer a batch:
1. Query the batch in the Batch Header window, and choose theProcess button.
2. Select Transfer, and choose Start. The system displays theconcurrent request ID so that you can query it on the Requestswindow.
3. When the concurrent request is completed, query the batch in theBatch Header window.

8 – 10 Oracle Human Resources North American User’s Guide
If the Batch Status is Transferred, there were no errors in the batchand the process has created the element entries. The process mayhave issued messages associated with the batch header, lines, orcontrol totals.
If the Batch Status is Error, the process has set the status of at leastone line, or control total to Error. Check the status fields in theBatch Lines window and the Control Totals window, and reviewthe messages issued by the process.
Purging a Batch From the BEE Tables
If the Purge After Transfer check box on the Batch Header window ischecked when you run the transfer process, the batch is deleted fromthe MIX tables automatically after the transfer. If the box is notchecked, you can purge the batch by running a separate process.
You can purge a batch with any status.
� To purge a batch:
1. Query the batch in the Batch Header window, and choose theProcess button.
2. Select Purge, and choose Start. The system displays the concurrentrequest ID so that you can query it on the Requests window.
When the concurrent request is completed, the batch is purged.
Rolling Back a MIX Process
You can roll back a MIX process if you want to completely remove itafter it successfully completes. You have a choice of deleting the batchheader as well or of keeping the header after the rollback.
The process interlock rule (which prevents you rolling back a payrollprocess if any further processing has taken place) does not apply toMIX Rollback. You can still perform the rollback even if run resultsfrom payroll processing exist for any of the lines.
You run the MIX Rollback process from the Submit Requests window.
� To roll back a MIX process:
1. Select the batch header name of the process you want to roll back.

8 – 11Batch Element Entry
2. Enter Yes to cancel the rollback process if the system detects runresults for any of the batch lines. Enter No if you want the systemto complete the rollback even though run results exist.
3. Enter Yes to keep the batch after the rollback. Enter No to deletethe batch after the rollback.

8 – 12 Oracle Human Resources North American User’s Guide
PayMIX for Payroll Batch EntryOracle Payroll’s PayMIX facility provides for rapid entry of these typesof data batches:
• timecard data showing hours worked, and possibly otherinformation, for a period
• data for a one–time earnings or deduction entry or change
A unique number identifies each separate batch of data you enter. Thisnumber increments automatically.
Heads Down Data Entry
To facilitate rapid data entry, PayMIX lets you provide as manydefaults as possible each information batch. Defaults appear as entriesfor every line in the batch entry window. You can overwrite themwhen necessary. For example, if the hours worked entered on most ofthe timecards in a batch is 40, you can enter a default of 40 for Hours.
Another way that PayMIX supports rapid data entry is by deferring allvalidation until entry is complete. After saving a batch you can bothcheck it against batch totals, and run a validation process for it.
Balancing to Batch Totals
Your enterprise may check data totals and line counts for a batchagainst externally determined totals and counts. For example, you mayknow that the total of hours entered on a batch of timecards is 500, orthat the total of amounts entered for a bonus is $35,000. You cansupply user totals and line counts for a batch when you identify it.
The system displays batch totals and counts when you save a batch,together with any discrepancies to the user totals and counts. You canthen make and save changes to line information. PayMIXautomatically adjusts its system–generated totals and counts.
Validating Batch Entries
After saving an information batch in PayMIX, you launch a validationprocess to check whether the entries are correct, and mark any that arein error. For each batch line, this process verifies that:
• there are no outstanding discrepancies between external andsystem–generated totals
• the employee’s assignment number exists in the database
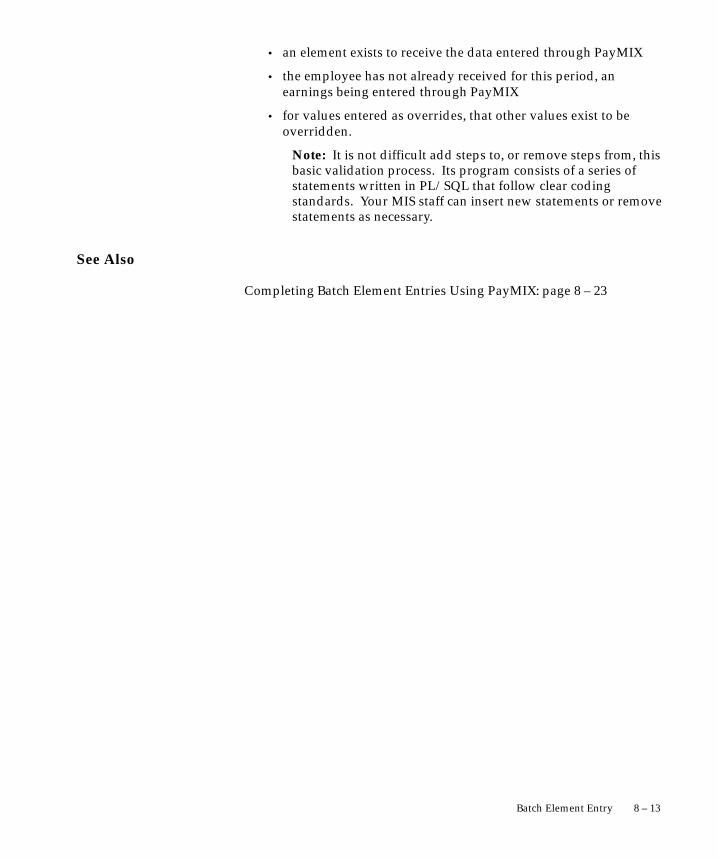
8 – 13Batch Element Entry
• an element exists to receive the data entered through PayMIX
• the employee has not already received for this period, anearnings being entered through PayMIX
• for values entered as overrides, that other values exist to beoverridden.
Note: It is not difficult add steps to, or remove steps from, thisbasic validation process. Its program consists of a series ofstatements written in PL/SQL that follow clear codingstandards. Your MIS staff can insert new statements or removestatements as necessary.
See Also
Completing Batch Element Entries Using PayMIX: page 8 – 23

8 – 14 Oracle Human Resources North American User’s Guide
PayMIX Timecard EntriesEach batch line entered from timecards has an entry of:
• an employee’s assignment number
• the number of hours
• the type of hours being entered. This entry determines theelement to which the line’s entries go. The element must benonrecurring, have an input value Hours, and be marked toaccept PayMIX entries.
For example, to process the predefined earnings Regular Wages foremployees, you can make entries through PayMIX to the Time EntryWages element. To track accounting and labor distribution informationfor employees receiving Regular Salary, you make entries to theelement Labor Recording. You can also use PayMIX to enter absenceelements set up to record the use of sick or vacation time accruedunder a PTO accrual plan.
See:
The Earnings Types Regular Salary and Regular Wages (Oracle PayrollUser’s Guide)
Defining and Linking an Absence Element: page 26 – 9
Recording Accrued Time Taken: page 26 – 30
Additional Timecard Information
PayMIX can also accept entry of extra timecard data employees supplyto ensure correct calculation of pay and taxes, or accurate recording oflabor distribution and cost center information.
Field in Time EntryWindows Entry Goes To
Labor Distribution Code Cost Allocation key flexfield, segment for labor distribution codes.
See: Use of the Cost Allocation Key Flexfield: page 11 – 5
Rate Code Input value Rate Code (as on the earnings Time EntryWages, Overtime, Shift Pay). A rate code entry gives theelement’s formula a code by which to locate a rate in theWage Rates table.
Hourly Rate Input value Rate (as on Time Entry Wages, Overtime, ShiftPay). Entry of a rate overrides an existing rate code entry.
Table 8 – 1 Additional Information for PayMIX Time Entry

8 – 15Batch Element Entry
Entry Goes ToField in Time EntryWindows
Shift Input value Shift (as on Time Entry Wages, Labor Recording, Shift Pay) for locating shift differential in theShift Differentials table, if no entry exists for Rate or RateCode.
Amount Pay Value of Time Entry Wages element, which feeds itdirectly into the Regular Pay balance for the employee.Useful for paying someone a fixed dollar amount regardless of time worked.
See: Pay Values and Payroll Run Processing: page 7 – 19
Multiple Input value Multiple (as on Overtime). An entry heregives the element’s formula a rate or other multiple.
Separate Check Input value Separate Check (on all earnings). Check thisbox for payment of this earnings type by separate check.
See: Input Value for Payments by Separate Check (OraclePayroll User’s Guide)
Tax Rule Input value Deduction Processing (on all earnings). Possible entries are Tax and Pretax Only or Tax Only.
See: Input Values to Control Deduction Processing (OraclePayroll User’s Guide)
Location The table of jurisdiction codes, and sends the correct codefor the location to the input value Jurisdiction (as on TimeEntry Wages, Overtime, Shift Pay). An entry here overrides the jurisdiction code of the employee’s regularwork location.
Cost Center Code Cost Allocation key flexfield, segment for cost centercodes.
See: Use of the Cost Allocation Key Flexfield: page 11 – 5
From The beginning date of the pay period for the time cardentry.
To Input value Date Earned (as on Time Entry Wages, Overtime, Shift Pay). This should be in the same pay peri-od as indicated in the From field.
Table 8 – 1 Additional Information for PayMIX Time Entry
Dates of Time Entry Batch Lines
Timecard entries of a To date (or From and To dates) signal that thecard’s information is for a period other than the current one. Whenyou enter a To date in a PayMIX Time Entry batch line, the systemgives this line the end date of the period in which the Date Earned falls.For lines with no Date Earned entry, the system supplies one when yourun the Validation or Transfer process. The date supplied is the end

8 – 16 Oracle Human Resources North American User’s Guide
date of the period in which the effective date of the Validation orTransfer process falls.

8 – 17Batch Element Entry
One–Time Batch Entries for Earnings and DeductionsUsing the PayMIX Earnings Entry and Deductions Entry windows, youcan make new entries for nonrecurring earnings and deductions, orentries to change the run results of recurring earnings and deductions.
New Entries for Nonrecurring Earnings or Deductions
When entering an amount for a nonrecurring earnings or deductionthrough PayMIX, the calculation or amount rule of the earnings ordeduction determines the input value this amount should go to.Possible input values for receiving the amount are Amount, Percentage,or Pay Value. PayMIX routes the amount entry as follows:
• If the earnings or deduction has the input value Amount, theamount entered goes here. All earnings and deductions with thecalculation or amount rule Flat Amount have an input valueAmount.
• If the earnings or deduction does not have the input valueAmount but does have the input value Percentage, the amountentered goes here. All earnings and deductions with the rulePercentage have an input value Percentage.
• If the earnings or deduction does not have the input valuesAmount or Percentage, the amount entered goes to the PayValue.
See:
Earnings or Payments with the Calculation Rule Flat Amount(Oracle Payroll User’s Guide)
Earnings with the Calculation Rule Percentage of Earnings (OraclePayroll User’s Guide)
When you make a new entry to an input value of a nonrecurringearnings or deduction through PayMIX, the system considers that youare replacing a null entry, and calls the action a replacement. You canselect Replace in the Action field of the PayMIX entry window, but it isnot necessary to do so because the default action is Replacement.
Changes to Recurring Earnings or Deduction Results
Suppose that for this quarter only, some employees will receiveadditions to their regular, recurring quarterly bonuses, while otherswill receive lump sum payments instead of a percentage of theirregular pay. A few employees will suffer a reduction of the bonusamount. You can rapidly enter all these changes to a recurring elementusing the PayMIX Earnings Entry window.
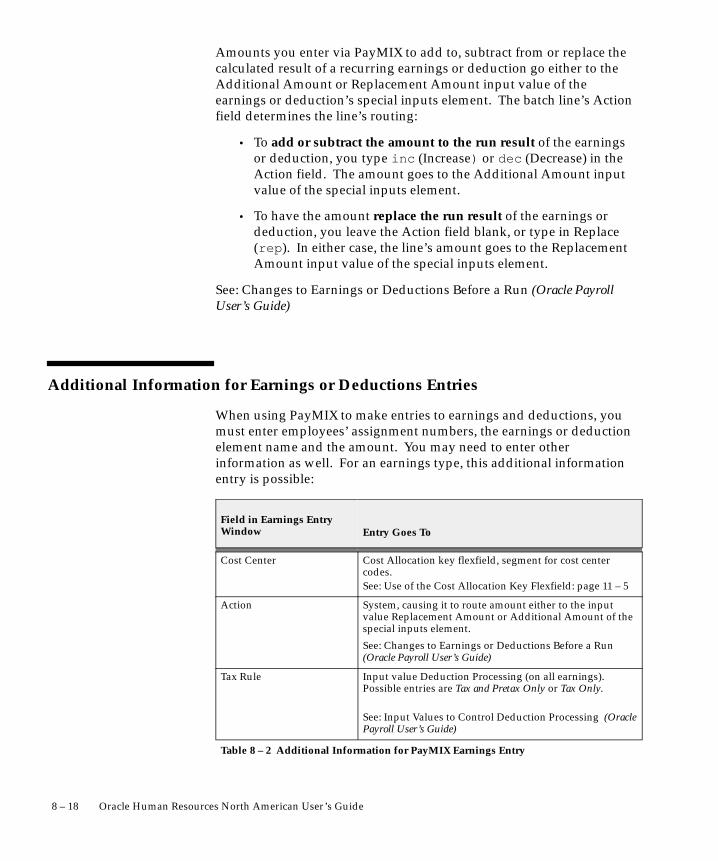
8 – 18 Oracle Human Resources North American User’s Guide
Amounts you enter via PayMIX to add to, subtract from or replace thecalculated result of a recurring earnings or deduction go either to theAdditional Amount or Replacement Amount input value of theearnings or deduction’s special inputs element. The batch line’s Actionfield determines the line’s routing:
• To add or subtract the amount to the run result of the earningsor deduction, you type inc (Increase) or dec (Decrease) in theAction field. The amount goes to the Additional Amount inputvalue of the special inputs element.
• To have the amount replace the run result of the earnings ordeduction, you leave the Action field blank, or type in Replace(rep ). In either case, the line’s amount goes to the ReplacementAmount input value of the special inputs element.
See: Changes to Earnings or Deductions Before a Run (Oracle PayrollUser’s Guide)
Additional Information for Earnings or Deductions Entries
When using PayMIX to make entries to earnings and deductions, youmust enter employees’ assignment numbers, the earnings or deductionelement name and the amount. You may need to enter otherinformation as well. For an earnings type, this additional informationentry is possible:
Field in Earnings EntryWindow Entry Goes To
Cost Center Cost Allocation key flexfield, segment for cost centercodes.See: Use of the Cost Allocation Key Flexfield: page 11 – 5
Action System, causing it to route amount either to the input value Replacement Amount or Additional Amount of thespecial inputs element.
See: Changes to Earnings or Deductions Before a Run(Oracle Payroll User’s Guide)
Tax Rule Input value Deduction Processing (on all earnings). Possible entries are Tax and Pretax Only or Tax Only.
See: Input Values to Control Deduction Processing (OraclePayroll User’s Guide)
Table 8 – 2 Additional Information for PayMIX Earnings Entry
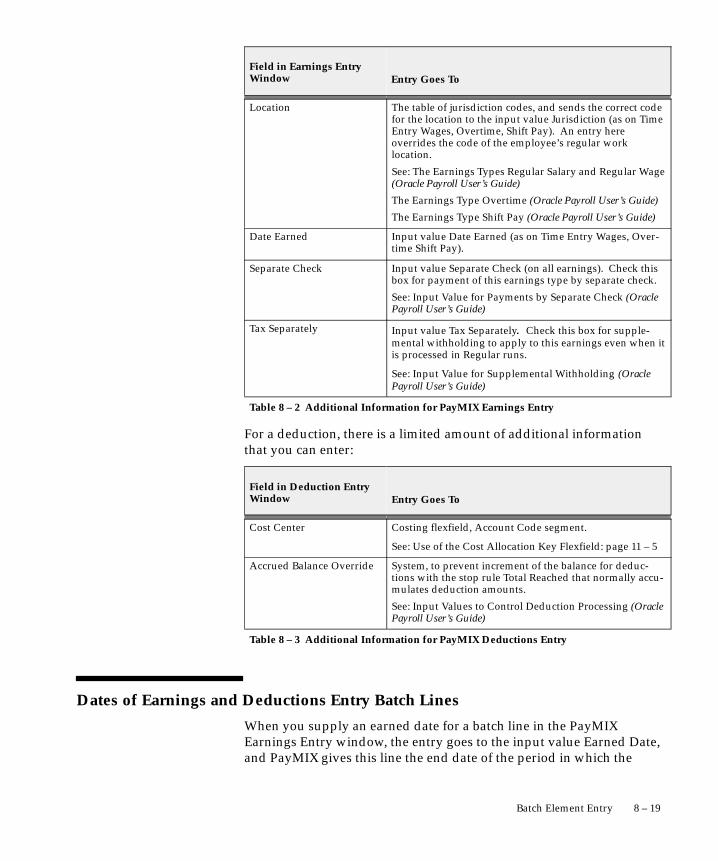
8 – 19Batch Element Entry
Entry Goes ToField in Earnings EntryWindow
Location The table of jurisdiction codes, and sends the correct codefor the location to the input value Jurisdiction (as on TimeEntry Wages, Overtime, Shift Pay). An entry here overrides the code of the employee’s regular work location.
See: The Earnings Types Regular Salary and Regular Wage(Oracle Payroll User’s Guide)
The Earnings Type Overtime (Oracle Payroll User’s Guide)
The Earnings Type Shift Pay (Oracle Payroll User’s Guide)
Date Earned Input value Date Earned (as on Time Entry Wages, Over-time Shift Pay).
Separate Check Input value Separate Check (on all earnings). Check thisbox for payment of this earnings type by separate check.
See: Input Value for Payments by Separate Check (OraclePayroll User’s Guide)
Tax Separately Input value Tax Separately. Check this box for supple-mental withholding to apply to this earnings even when itis processed in Regular runs.
See: Input Value for Supplemental Withholding (OraclePayroll User’s Guide)
Table 8 – 2 Additional Information for PayMIX Earnings Entry
For a deduction, there is a limited amount of additional informationthat you can enter:
Field in Deduction EntryWindow Entry Goes To
Cost Center Costing flexfield, Account Code segment.
See: Use of the Cost Allocation Key Flexfield: page 11 – 5
Accrued Balance Override System, to prevent increment of the balance for deduc-tions with the stop rule Total Reached that normally accu-mulates deduction amounts.
See: Input Values to Control Deduction Processing (OraclePayroll User’s Guide)
Table 8 – 3 Additional Information for PayMIX Deductions Entry
Dates of Earnings and Deductions Entry Batch Lines
When you supply an earned date for a batch line in the PayMIXEarnings Entry window, the entry goes to the input value Earned Date,and PayMIX gives this line the end date of the period in which the

8 – 20 Oracle Human Resources North American User’s Guide
Earned Date falls. For lines in the Earnings Entry window with noEarned Date entry, and for all lines in the Deductions Entry window,the system supplies a date when you run the validation or transferprocess. This date is the end date of the period in which the effectivedate of the process falls.

8 – 21Batch Element Entry
PayMIX Scheduling and Statuses
You can use PayMIX to enter, validate and correct information batchesin a payroll period until you reach the payroll cutoff date, which can bejust one or two days before the payroll run date.
Between the cutoff date and the run date, you can transfer all validatedinformation batches into the HRMS database. Since the data is alreadyvalidated, you can anticipate few if any transfer process failures.
The ability to validate, correct and again validate batches before thepayroll run date can help even out the payroll department’s workload.
Batch Statuses Error, Warning
When the validation process finds problems in batch lines, it gives thelines a status of either Error or Warning. When any line’s status is Error,the status for the whole batch goes to Error. An Error status signals thepresence of one or more major errors you must correct before you cantransfer the batch. You cannot override the Error status and transferthe batch with lines marked Error still uncorrected.
When the validation process gives some lines a status of Warning, butnone a status of Error, the batch status goes to Warning. If necessary,you can change a Warning status to Ready and transfer the batch to thedatabase before correcting the conditions causing the warnings. In thiscase, the transferred batch has the status Transferred with Warnings.
It is of course always preferable to correct all problems beforetransferring data and initiating a payroll run. If you transfer batcheswith warnings uncorrected, you risk getting errors on the payroll run.After a transfer, it is no longer possible to make any corrections tobatch data using PayMIX windows.
You decide which types of problems warrant an Error or Warningstatus at your installation.
Batch Statuses Hold, Ready, Validated, Transferred
At entry, a batch’s status is Hold, meaning it is not yet ready for furtherprocessing. When a batch is either completely entered and ready forvalidation, or validated and ready for transfer, you change its status toReady. You can initiate the PayMIX Batch Process in either the Validatemode or the Transfer mode for batches at Ready status.
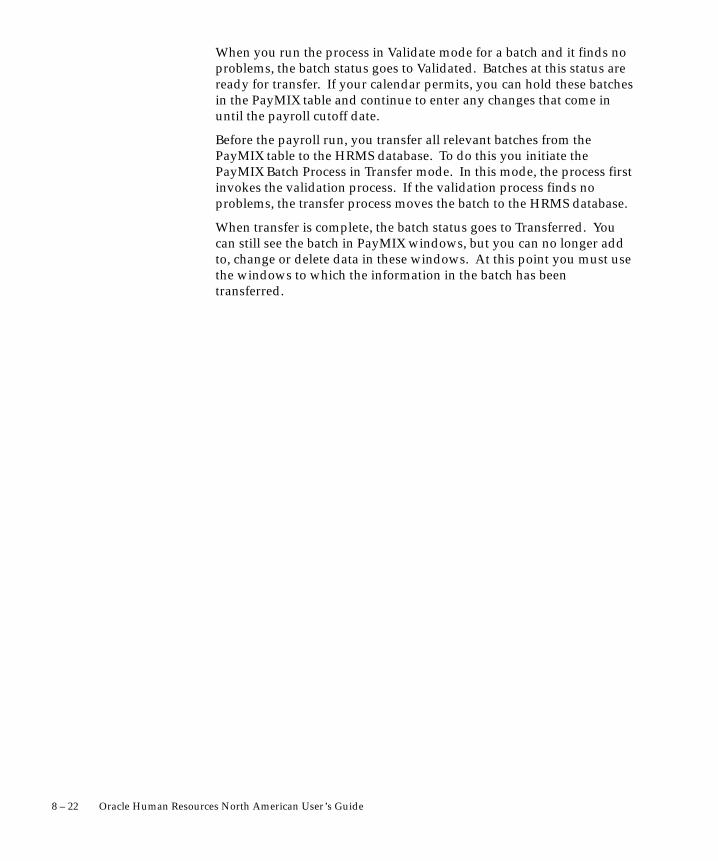
8 – 22 Oracle Human Resources North American User’s Guide
When you run the process in Validate mode for a batch and it finds noproblems, the batch status goes to Validated. Batches at this status areready for transfer. If your calendar permits, you can hold these batchesin the PayMIX table and continue to enter any changes that come inuntil the payroll cutoff date.
Before the payroll run, you transfer all relevant batches from thePayMIX table to the HRMS database. To do this you initiate thePayMIX Batch Process in Transfer mode. In this mode, the process firstinvokes the validation process. If the validation process finds noproblems, the transfer process moves the batch to the HRMS database.
When transfer is complete, the batch status goes to Transferred. Youcan still see the batch in PayMIX windows, but you can no longer addto, change or delete data in these windows. At this point you must usethe windows to which the information in the batch has beentransferred.
8 – 23Batch Element Entry
Completing Batch Element Entries Using PayMIX
To make batch element entries for Oracle Payroll, this is the overallprocedure:
1. Identify each batch, supply any external totals against which tobalance it, and enter any defaults for it.
See: Identifying PayMIX Batches and Entering Defaults: page 8 – 23
2. Enter the batch.
See:
Entering Batches of Timecard Data: page 8 – 26
Making Batch Entries for Earnings Types: page 8 – 27
Making Batch Entries for Deductions: page 8 – 28
3. Run the PayMIX Batch Process in Validate mode to validate thebatch.
See: Running the PayMIX Batch Process: page 8 – 29
4. Review the results of this process and correct any lines with astatus of Error. If time permits, also correct lines with a status ofWarning.
5. Run the PayMIX Batch Process in Transfer mode to validate andtransfer the batch.
Identifying PayMIX Batches and Entering Defaults
To enter a batch of information for payroll processing, start with thePayMIX Batch Information window to do the following:
• identify the batch you are entering
• supply any external totals you are using to validate these entries
• provide default values for the batch.
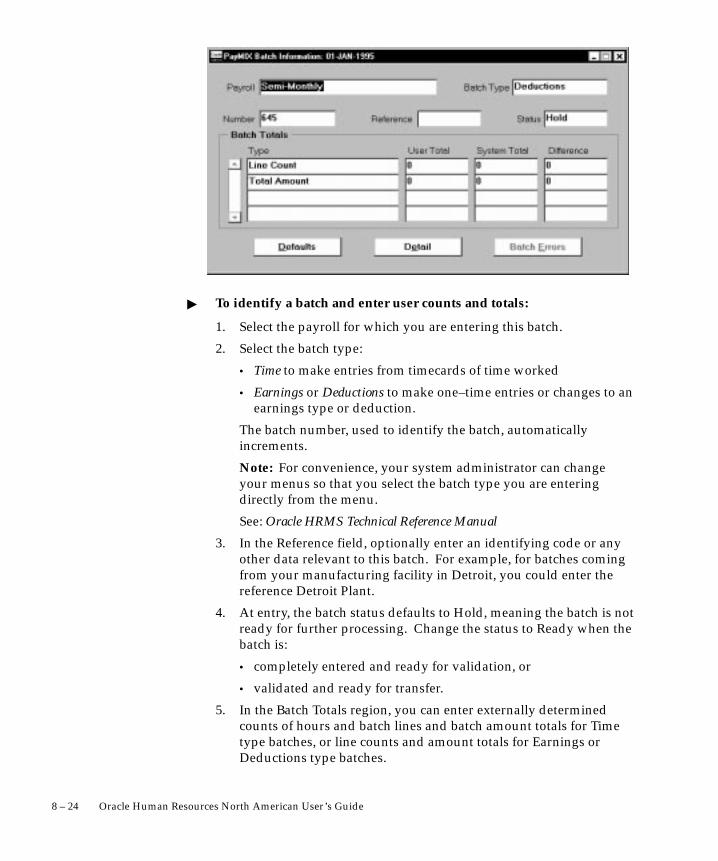
8 – 24 Oracle Human Resources North American User’s Guide
� To identify a batch and enter user counts and totals:
1. Select the payroll for which you are entering this batch.
2. Select the batch type:
• Time to make entries from timecards of time worked
• Earnings or Deductions to make one–time entries or changes to anearnings type or deduction.
The batch number, used to identify the batch, automaticallyincrements.
Note: For convenience, your system administrator can changeyour menus so that you select the batch type you are enteringdirectly from the menu.
See: Oracle HRMS Technical Reference Manual
3. In the Reference field, optionally enter an identifying code or anyother data relevant to this batch. For example, for batches comingfrom your manufacturing facility in Detroit, you could enter thereference Detroit Plant.
4. At entry, the batch status defaults to Hold, meaning the batch is notready for further processing. Change the status to Ready when thebatch is:
• completely entered and ready for validation, or
• validated and ready for transfer.
5. In the Batch Totals region, you can enter externally determinedcounts of hours and batch lines and batch amount totals for Timetype batches, or line counts and amount totals for Earnings orDeductions type batches.

8 – 25Batch Element Entry
When you complete entry of the batch and save it, this regiondisplays the corresponding system totals and any differencesbetween the user and system totals.
Entering Default Values for a Batch
Choose the Defaults button to open the Batch Entry Default Valueswindow, in which you can enter defaults for the batch. If there areno defaults to enter for this batch, choose the Detail button to openthe Time Entry, Earnings Entry or Deductions Entry window.
� To provide default entries for the batch:
1. In the Batch Entry Default Values window, select the payroll for thebatch, and the batch type of Time, Earnings or Deductions for thelarge alternative region in this window.
2. In the alternative region, enter any default values appropriate forall or most of the lines in this batch.
For example, to make Time entries for a batch of timecards most ofwhich have 40 as the entry for Hours, enter 40 as a default in theHours field. You can overwrite the default on any batch line.

8 – 26 Oracle Human Resources North American User’s Guide
3. Return to the PayMIX Batch Information window and choose theDetail button to open the Time Entry, Earnings Entry or DeductionEntry window.
Entering Batches of Timecard Data
To enter timecard data via PayMIX for payroll processing, use the TimeEntry window.
� To make time entries from timecards:
1. Make these entries on each line:
• the employee assignment number, in the Assignment field
• the name of the element to which the line’s entries are going, inthe Hours Type field. For example, to enter hours taken as sickor vacation time, the element might be Sick Hours Taken orVacation Hours Taken
Note: If you are making an entry of hours worked for anemployee to receive the predefined earnings types RegularWages or Regular Salary, you make the entry to the elementTime Entry Wages.
See: The Earnings Types Regular Salary and Regular Wages(Oracle Payroll User’s Guide)
• the number of hours in the Hours field.

8 – 27Batch Element Entry
2. If a timecard contains additional information about these hours, asfor example a rate code or rate for these hours or a location wherethey were worked, enter this information in the AdditionalInformation region.
3. To remove all unsaved entries and return to the PayMIX BatchInformation window, choose Cancel.
4. When entry is complete, save the batch, and change its status toReady in the PayMIX Batch Information window. To stop enteringa batch partway through, save the existing entries but keep thestatus at Hold. You can then query this batch and make furtherentries later.
Making Batch Entries for Earnings Types
To enter batch data via PayMIX for one–time processing of an earningstype, use the Earnings Entry window.
� To make one–time entries or changes to an earnings type:
1. Make these entries on each line:
• the employee assignment number, in the Assignment field
• the name of the element to which the line’s entries are going, inthe Earnings Name field
2. To enter a replacement for an existing entry, a null entry, or acalculated amount, enter the replacement amount in the Amount

8 – 28 Oracle Human Resources North American User’s Guide
field. By default, this amount replaces an existing or null entry, ora calculated amount.
OR
To enter an addition to or subtraction from an existing orcalculated amount, enter the amount to add or subtract in theAmount field, and enter inc (Increase) or dec (Decrease) in theAction field of the Additional Information region.
3. Enter any further information required for this earnings type, as forexample an indication to pay the earnings by a separate check, inthe Additional Information region.
Note: To remove any unsaved entries and return to thePayMIX Batch Information window, choose Cancel.
4. When entry is complete, choose OK. Save the batch, and change itsstatus to Ready in the PayMIX Batch Information window. To stopentering a batch partway through, choose OK and save the existingentries but keep the status at Hold. You can then query this batchand make further entries later.
Making Batch Entries for Deductions
To enter batch data via PayMIX for one–time processing of a deduction,use the Deductions Entry window.
� To make one–time entries or changes to a deduction:
1. Make these entries on each line:

8 – 29Batch Element Entry
• the employee assignment number, in the Assignment field
• the name of the element to which the line’s entries are going, inthe Deduction Name field
2. To enter a replacement for an existing entry, a null entry, or acalculated amount, enter the replacement amount in the Amountfield. By default, this amount replaces an existing or null entry, ora calculated amount.
OR
To enter an addition to or subtraction from an existing orcalculated amount, enter the amount to add or subtract in theAmount field, and enter inc (Increase) or dec (Decrease) in theAction field of the Additional Information region.
3. If further information is required for this deduction, as for examplea cost center override, enter this information.
Note: To remove all unsaved entries and return to the PayMIXBatch Information window, choose Cancel.
4. When entry is complete, choose OK. Save the batch, and change itsstatus to Ready in the PayMIX Batch Information window. To stopentering a batch partway through, choose OK and save the existingentries but keep the status at Hold. You can then query this batchand make further entries later.
Running the PayMIX Batch Process
Prerequisites
❑ Save the batches for which you are running the process, and ifnecessary, reconcile the user and system totals appearing in theBatch Totals region.
❑ Change the status of the batches to Ready, and save this change.
Run this process from the Submit Requests window.
1. In the Name field, select PayMIX Batch Process. If the Parametersbox does not appear automatically, click in the Parameters field.
2. Select the payroll for which you are validating or transferringbatches.
3. Enter the starting and ending numbers of the range of batches toprocess. To process just one batch, enter its number in the StartingBatch Number field.

8 – 30 Oracle Human Resources North American User’s Guide
4. Select the status, either Ready or Validated, of the batches toprocess.
5. Optionally enter a reference to further identify the batches toprocess.
For example, to validate all the batches from numbers 50 through70 coming from your Detroit facility, enter 50 and 70 as the startingand ending batch numbers, and Detroit Plant as the batchreference.
6. Choose the process mode of either Validate or Transfer. ChooseValidate for the process to validate but not transfer the batchesidentified. Choose Transfer for the process to validate the batchesand then immediately transfer all those passing validation.
7. Choose Submit.

8 – 31Batch Element Entry
Reviewing and Correcting PayMIX Process Results To review the results of the PayMIX Batch Process run, use the PayMIXBatch Summary window. To view batch line error messages, use thePayMIX Batch Line Errors window.
� To review and correct PayMIX entries:
1. In the PayMIX Batch Summary window, query a processed batchusing its batch number, and check its status. To review a batchwith a status of Error or Warning, choose the View Batch button toopen the PayMIX Batch Information window.
2. Information for the batch displays in the PayMIX BatchInformation window. To see errors for this batch, choose the BatchErrors button. If there is an error affecting the entire batch, thePayMIX Batch Header Errors window opens and displays the errormessage.
For batch line errors, the batch entry window opens. For each linewith a problem, the line status is marked E (Error) or W (Warning),and the line displays in a contrasting color.
3. If the problem with a line is obvious, correct it and save thecorrection. If it is not obvious, choose Show Error. This opens thePayMIX Batch Line Errors window and displays the appropriateerror messages. Make the necessary corrections and save them.
4. Run the PayMIX Batch Process again as needed.

8 – 32 Oracle Human Resources North American User’s Guide

C H A P T E R
9T
9 – 1Salary Administration and Budgeting
Salary Administrationand Budgeting
his chapter explains how to set up your system for salaryadministration and budgeting. It also explains how to enter andapprove salary proposals for individual employees, and how to reviewsalaries for groups of employees.

9 – 2 Oracle Human Resources North American User’s Guide
Salary Administration and Performance Reviews
In Oracle HRMS you use salary administration to:
• enter salary amounts or wage rates for newly hired employees.
• enter and approve proposals for salary or wage increases (ordecreases) for current employees. You can associate a salarychange with the result of a performance review
Oracle HRMS includes the earnings elements Regular Salary andRegular Wages, which you set up for entry of salary amounts usingsalary administration.
To administer salaries for employees, you first assign them to a salarybasis. This determines the duration for which their salaries are quoted,such as hourly or monthly. Then for new employees, you enter startingsalary amounts, which receive approval automatically.
For current employees, you enter proposed salary changes, expressedeither as a new amount or a change amount or percentage. If necessary,you can break down a salary change into two or more components, toreflect different reasons for the change. For example, you might definecomponents for Cost of Living and Merit. You can approve eachcomponent of the proposal separately. When all components areapproved, you can approve the proposal as a whole. Proposals do nottake effect until they receive approval.
Optionally, you can select a performance review to associate with asalary change. When you set up salary administration, you can entergrade rate ranges against which the system validates salary proposals.
See Also
Grade Relationships to Compensation and Benefits: page 4 – 6
Reviewing Current Salaries
Before entering salary proposals, you can review the current salaries ofcomparable groups of employees. There are a number of ways to dothis:
• Query a list of assignments in the Salary Management folder toview their current salaries and any existing salary proposals. Youcan view up to ten salary components (such as Cost of Living,Location Adjustment, or Promotion) for each proposal.

9 – 3Salary Administration and Budgeting
See: Using the Salary Management Folder: page 9 – 11
• Query lists of assignments receiving a particular salary elementon the List Employees by Element window. This shows the latestapproved salary for each assignment in the date range you select.
• Run the Salary Review Report to view current and previoussalaries for all employees, or for employees assigned to a selectedorganization, job, position, and/or grade.
See: Salary Review Report: page 9 – 15
• Query a list of assignments in the Assignments folder then viewthe salary history for each assignment in the list, individually,using the Salary History window. This window displays thedates, reasons, and amounts of each approved salary change, andof any new salary proposal.
See: Viewing Salary History: page 9 – 14
• If you use grade rates, you can view the salaries of all employeeson a certain grade receiving a particular salary element, using theView Employee Grade Comparatio window. This window alsodisplays each employee’s salary as a percentage of the midpointdefined for the grade.
See: Viewing Grade Comparatios: page 4 – 10
• If you use pay scale rates for salaries, you can report on thesalaries of all employees or a group of employees using theEmployee Increment Results report.
See: Employee Increment Results Report: page 4 – 19
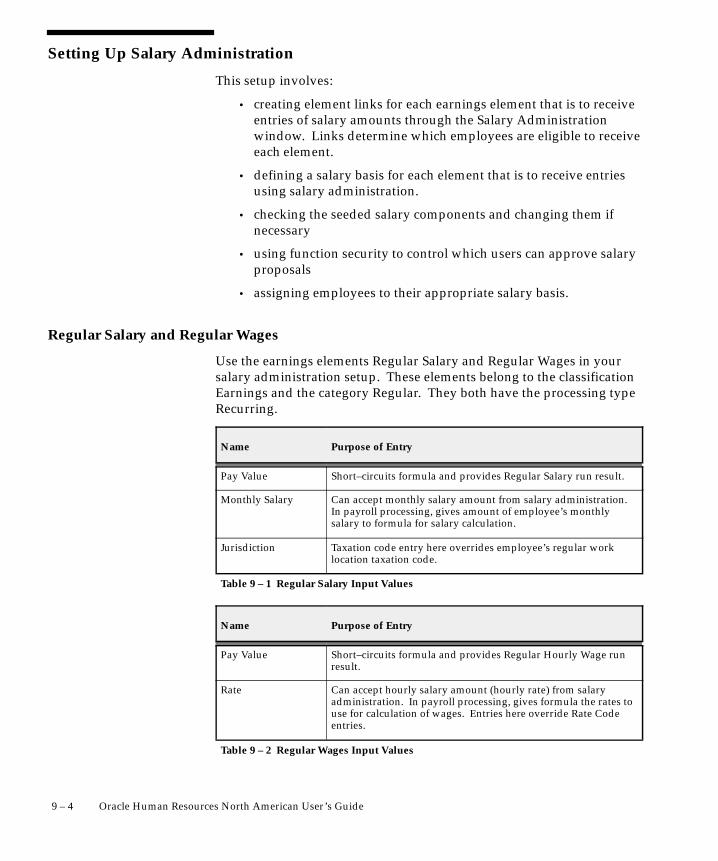
9 – 4 Oracle Human Resources North American User’s Guide
Setting Up Salary Administration
This setup involves:
• creating element links for each earnings element that is to receiveentries of salary amounts through the Salary Administrationwindow. Links determine which employees are eligible to receiveeach element.
• defining a salary basis for each element that is to receive entriesusing salary administration.
• checking the seeded salary components and changing them ifnecessary
• using function security to control which users can approve salaryproposals
• assigning employees to their appropriate salary basis.
Regular Salary and Regular Wages
Use the earnings elements Regular Salary and Regular Wages in yoursalary administration setup. These elements belong to the classificationEarnings and the category Regular. They both have the processing typeRecurring.
Name Purpose of Entry
Pay Value Short–circuits formula and provides Regular Salary run result.
Monthly Salary Can accept monthly salary amount from salary administration.In payroll processing, gives amount of employee’s monthlysalary to formula for salary calculation.
Jurisdiction Taxation code entry here overrides employee’s regular worklocation taxation code.
Table 9 – 1 Regular Salary Input Values
Name Purpose of Entry
Pay Value Short–circuits formula and provides Regular Hourly Wage runresult.
Rate Can accept hourly salary amount (hourly rate) from salary administration. In payroll processing, gives formula the rates touse for calculation of wages. Entries here override Rate Codeentries.
Table 9 – 2 Regular Wages Input Values

☞
9 – 5Salary Administration and Budgeting
Purpose of EntryName
Monthly Salary In payroll processing, gives formula for calculation of wages, thecodes by which to locate rates in the Wage Rates table.
Jurisdiction Taxation code entry here overrides employee’s regular worklocation taxation code.
Table 9 – 2 Regular Wages Input Values
If you need additional elements to enter annual salary amounts oramounts based on a pay period such as bi–weekly or semi–monthly,create them using the Regular Salary element as a model.
See: Creation of Elements: page 7 – 4
Setup Steps
Before entering salaries for new hires and salary proposals for currentemployees using salary administration, complete the following setupsteps.
� To set up salary administration:
1. Establish employee eligibility rules for Regular Salary, RegularWages, and any other elements created for use in salaryadministration. You do this by building links for them using theElement Link window. Notice that you do not need to link theelements to a salary basis; all link components are optional.
Attention: Do not check the Standard box for these element links.
Eligible employees receive entries for these elements only when youenter salary amounts or wage rates for them using the SalaryAdministration window.
2. Define a salary basis for Regular Salary and Regular Wages elements,and any other elements intended for use in salary administration.
3. Review the seeded salary components, which are defined as valuesfor the QuickCode Type PROPOSAL_REASON. If necessary, createyour own salary components.
Note: If you want your new components to be displayed in theSalary Management folder, you must also change a view.
See: Changing Salary Components: page 9 – 7
4. If you want to record performance ratings such as Outstanding,Superior and Average, enter them in the QuickCodes window forthe QuickCode Type PERFORMANCE_RATING.
9 – 6 Oracle Human Resources North American User’s Guide
5. Add the function Salary Administration: Approve to the menu ofresponsibilities that should be able to approve salary proposals.Without this function, users can enter salary proposals but theycannot approve them.
6. Assign employees to a salary basis using the Salary Informationregion of the Assignment window. Also assign employees to agrade, if you have associated a grade rate with the salary basis.
See Also
Entering a New Assignment: page 14 – 9
Defining Salary Bases
The salary basis establishes the duration for which a salary is quoted, forexample, hourly, monthly or annually. Notice that an employee’s salarybasis is not necessarily the same as the pay periods of his or her payroll.For example, an employee with an hourly pay rate has the salary basisHourly Salary, but can have an assignment to a weekly payroll.
You associate Regular Salary, Regular Wages, and any other elementsyou are using in salary administration, with just one salary basis each.After completing its salary basis definition, you can make entries to oneof these elements using the Salary Administration window.
Note: You cannot use the Element Entries window or PayMIXfacility to make entries to any elements associated with salarybases.
You define a salary basis in the Salary Basis window.
� To define a salary basis:
1. For the element Regular Salary, enter a salary basis name and selectthe basis Monthly Salary. For the element Regular Wages, enter adifferent salary basis name and select the basis Hourly Salary. Forany other elements created for use in salary administration, enter asalary basis name and select the salary basis Annual Salary orPeriod Salary.
2. In the Element region, select the element Regular Salary and theinput value Monthly Salary, or the element Regular Wages and theinput value Rate.
When you enter a monthly salary amount in the SalaryAdministration window for an employee receiving the earnings

9 – 7Salary Administration and Budgeting
Regular Salary, the entry goes to the input value Monthly Salary.When you enter an hourly wage amount in this window forsomeone receiving the earnings Regular Wages, the entry goes to theinput value Rate.
If you have created other elements that are to receive entriesthrough salary administration, you can also select one of them here,together with the input value that is to receive entries using salaryadministration.
3. Optionally, select a grade rate to associate with the salary basis.
Oracle HRMS uses the grade rate to validate your salary proposals.You receive a warning if the salary you enter for an employee is notwithin the grade rate range defined for the employee’s grade.
In doing this check, the system takes account of the hours in theemployee’s regular workweek. It looks at the hours on theemployee’s work schedule, or if there is none, at the regularworking hours per week entered on the employee’s assignment, andcompares them with those entered for his or her organization.
If the employee works fewer than the standard hours per week forthe organization, the system prorates the permissible minimum andmaximum grade rate values before validating the salary.
4. If you selected a grade rate, select the Basis (Hourly, Monthly,Annual, or Period) for the rate. For example, if your grade ratespecifies the valid monthly salary ranges for each grade, selectMonthly Salary in the Grade Rate Basis field.
5. If either the Basis or the Grade Rate Basis is Hourly Salary (but notboth), you must enter a value in the Annualized Hours field. Thisrecords the number of working hours in a year (and hence in amonth). The system uses this figure to convert salary entries andgrade rate values to the same basis when it validates a new salaryentry.
Changing Salary Components
Salary changes can be broken down into two or more components, toreflect different reasons for the change. You can approve eachcomponent of the proposal separately.
Ten salary components are predefined, as shown in Table 9 – 3. You cancreate as many additional components as you require. However, onlyten components can be displayed in the Salary Management folder. Ifyou want your new components to be displayed in the folder instead ofthe default components, you must update a view.

9 – 8 Oracle Human Resources North American User’s Guide
This task is for system administrators.
Predefined Salary Component QuickCode
Cost of Living COL
Job Evaluation JOEV
Location Adjustment LOAD
Market Adjustment MKAD
New Hire NEWH
Performance PERF
Periodic Review PERE
Progression PROG
Promotion PROM
Transfer Adjustment TRAD
Table 9 – 3 Predefined Salary Components
� To create new salary components to display in the folder:
1. Query the QuickCode Type PROPOSAL_REASON in theQuickCodes window and add a new code for each new component.
2. In a text editor, open the View file peupl01v.sql.
3. Go to the component reason list and replace the default QuickCodeswith the new codes you have created.
Note: There are two places in the file where you need to changethese codes.
4. Go into SQL*Plus as hr user and run the edited script.
5. Change the column names in the Salary Management folder bychoosing Change Prompts from the Folder menu.
Entering Salaries and Salary Changes
Use the Salary Administration window to enter a salary amount for anew employee, to propose a salary change for a current employee, or toapprove a salary proposal.
Use the Salary Management folder to approve multiple salary proposalsor to download salary information to a spreadsheet. In the spreadsheet

9 – 9Salary Administration and Budgeting
you can enter new proposals, edit existing proposals, and approvesalary components. Then you can upload your changes to the database.
If you want to hold multiple reasons for a salary change, you can breakdown a proposal into two or more components. Each componentrepresents a different reason for changing the salary. You can define asmany reasons as you require using the QuickCode TypePROPOSAL_REASON. Examples might be Merit Award and Cost ofLiving.
From the Salary Administration window, you can open the Performancewindow. You can associate a salary proposal with a performance reviewin two ways:
• You can simply enter the date of the review and a performancerating in the Performance window.
• If you use the Employee Review window to schedule and recordperformance reviews, you can select a review by type in thePerformance window.
To review the history of an employee’s salary and performance reviews,use the Salary History window.
Using the Salary Administration Window
Use the Salary Administration window to enter a salary amount for anew employee, to propose a salary change for a current employee, or toapprove a salary proposal.
Entering an Approved New Salary
Use the procedure below to enter:
• a starting salary amount for a newly hired employee, or
• a salary amount for a current employee assigned to a new salarybasis. This could be, for example, an employee moving from anhourly wage to a monthly salary.
Notice that you cannot enter multiple components of a starting salaryfor a newly hired employee or one assigned to a new salary basis.
� To enter a salary for a new employee, or one assigned to a new salarybasis:
1. Enter the start date for the salary. For a new hire, this is usually thehire date.
9 – 10 Oracle Human Resources North American User’s Guide
2. Enter the amount of the salary in the New Amount field.
3. You can select a reason.
4. Save the new salary. Its approval is automatic.
Entering a Salary Proposal
You can propose a salary change for someone at any time. If youentered intervals for regular salary reviews in the Salary Informationregion of the Assignment window, Oracle HRMS uses this informationto display the date of the next scheduled salary review. However, youcan override this date, provided that the date you enter is after the dateof the last approved salary.
If there is an unapproved salary proposal recorded for the assignment,you must approve or delete this proposal before you can enter a newproposal.
You can enter a salary proposal as a new amount, a single changeamount or percentage, or multiple change amounts or percentages(reflecting different reasons, such as a merit award and a cost of livingcomponent).
� To propose a salary change:
1. In the Salary region, enter the date when the new salary shouldcome into effect.
2. If you want to hold multiple reasons for a salary change, check theUse Multiple Components check box.
3. Do one of the following:
• If you did not check the Use Multiple Components box, enter thesalary change in the Salary region. You can enter a new salaryamount, or the amount or percentage of the proposed change.
• If you did check the Use Multiple Components box, use theComponents region. Select the reason for each component of theproposal and the amount or percentage of each proposed change.
Notice that each percentage is applied to the last approved salary.For example, if the last approved salary is 3000 and there are twocomponents of 10% and 5%, the new amount is 3000 + 300 + 150.
To effect a salary decrease, enter a negative number in the ChangeAmount or Change Percent field.
4. You can select a reason for the overall salary change.
5. If you entered a time period for regular salary reviews in the SalaryInformation region of the Assignment window, the date of the nextreview appears automatically. You can change this date.

9 – 11Salary Administration and Budgeting
6. To associate the salary change with a performance review, choosethe Performance button. Enter the date of the review and select aperformance rating. In the Interview region, you can select a reviewthat was recorded in the Employee Review window.
7. If you entered a time period for regular performance reviews in theSalary Information region of the Assignment window, the date ofthe next review appears automatically. You can change this date.
8. Save your proposal.
Approving a Salary Change
A salary proposal does not go into effect until it receives approval. Ifyou have recorded multiple components of a salary proposal, you canapprove each component independently. However, none of them goesinto effect until you approve the overall proposal.
When you approve a proposal, Oracle HRMS makes or updates an entryto the Monthly Amount input value of the Regular Salary element, tothe Rate input value of the Regular Wages element, or to a designatedinput value of any other element you have created and associated with asalary basis.
Note: You may not be able to approve salaries. This iscontrolled by a menu function set up by your systemadministrator.
� To approve a salary change:
� Query the proposal, check the Approved box, and save. If someindividual components were not already approved, you are warnedand they are automatically approved if you continue.
Using the Salary Management Folder
Using the Salary Management Folder, you can select sets of assignmentsfor which you want to enter or approve salary proposals. For eachassignment, the folder can display the current approved salary andproposed new salary, including up to ten salary components.
Using Application Data Export (ADE), you can download thisinformation from the folder to a spreadsheet. Here you can manipulatethe data to create new salary proposals or to modify existing proposals.You can then upload your revised salary information to the database. Ifyour responsibility permits, you can approve all or selected proposals inthe folder.
9 – 12 Oracle Human Resources North American User’s Guide
Manipulating Salary Information in a Spreadsheet
You can use a spreadsheet application to enter or update salaryproposals for groups of employees. The changes you make in thespreadsheet are checked when you upload them to the database. Tominimize errors, follow these rules:
• Do not enter components for a first salary (for example, for a newhire). Enter a proposed amount and change date only.
• Enter changes for the full salary or for components but not forboth.
• If you enter components, make sure you enter a value (Y or N) inthe Approved field for each component.
• Do not alter a Change Date that was downloaded from thedatabase.
• Do not enter information in the grey fields (except for ChangeDate).
• Note that the Change Amount is given precedence over theChange Percentage. If you enter inconsistent values, the uploadprocess records the new change amount and adjusts thepercentage to match. If you want to record a percentage change,clear the amount field.
• If you want to delete a component, clear both the change amountand percentage fields for that component.
� To manipulate salary proposals in a spreadsheet:
1. In the Salary Management folder, query the assignments you wantto process.
2. Click on the ADE icon on the Oracle HRMS tool bar.
3. In the ADE Fetch Data window, select the style Salary Proposals andselect the action Spreadsheet. Choose Start.
This launches your spreadsheet application and iconizes ADE.
4. Edit the data in the spreadsheet, following the rules outlined above.Save the spreadsheet with a new name (to prevent it beingoverwritten the next time ADE is run).
5. Exit your spreadsheet application.
6. In ADE, choose the Upload button.
Note: If the Upload button is not available, ask your systemadministrator to create the function HR_HRIO_ENABLE_UPLOADand add it to your menu.
9 – 13Salary Administration and Budgeting
7. Choose Load and select the spreadsheet that you saved.
You can review your changes in the built–in ADE spreadsheet. TheStatus column shows which rows have been updated.
8. Choose Upload.
The updated information is uploaded to the database. The Statuscolumn records any errors encountered during the upload.
9. To view your new proposals in the Salary Management folder,requery the data.
Approving Multiple Salary Proposals
If the Approve button is displayed in the Salary Management folder,you can select multiple assignments in the folder and approve them.
Note: If the Approve button is not displayed, you cannotapprove salaries. This is controlled by a menu function set upby your system administrator.
When you approve a proposal, Oracle HRMS makes or updates an entryto the Monthly Amount input value of the Regular Salary element, tothe Rate input value of the Regular Wages element, or to a designatedinput value of any other element you have created and associated with asalary basis.
� To approve multiple salary proposals:
1. In the Salary Management folder, query the assignments you wantto process.
2. Select the assignments you want to approve and choose theApprove button. To select multiple assignments, hold down theCTRL key and click on the assignment records you want to select.
Correcting a Salary Entry
You enter and approve salary proposals in the Salary Administrationwindow. You can also correct salary entries in this window.
� To correct a salary proposal:
� Enter the correct value in the New Amount field.
� To correct an approved salary:
1. Delete the salary record and enter a new one.

9 – 14 Oracle Human Resources North American User’s Guide
2. If you discover an error in a proposal approved in the past, afterwhich more recent approved proposals are on record, you mustdelete and reenter every proposal from the one last approved backthrough the incorrect one.
3. When you delete an approved proposal that the payroll run hasprocessed, you receive a warning message. You can continue todelete the record, but you must of course correct the processing.
Viewing Salary History
Oracle HRMS maintains a complete history of approved salary changesfor an employee, along with associated performance reviews. In theSalary History window, you can view the dates, reasons, and amountsof each approved salary change, and of any new salary proposal.
The Salary History window contains a folder. You can enter a query inthe folder to reduce the list of salary changes displayed. You canremove, rearrange, add, or resize fields in the folder if you have accessto the folder menu.
The Change field shows the amount of the salary change, and theActual field shows the new salary effective from the Change Date. TheHourly, Monthly, Annual, and Payroll fields show the salary proratedto these periods. The Mid, Minimum, and Maximum fields showvalues from the grade rate for the employee’s grade. The Comparatiofield shows the salary as a percentage of the midpoint defined for thegrade rate.

9 – 15Salary Administration and Budgeting
Salary Review Report
Use this report to see current and past salaries, and salary proposals, forsome or all of your employees. You can restrict the employees to thoseassigned to a selected organization, job, position, or grade. You can alsorestrict the report to showing only employees receiving the maximumsalary for their grade (defined by the grade rate). You can use the reportto show all salaries (approved and proposed) or to show unapprovedsalary proposals only.
You run reports from the Submit Requests window.
� To run the Salary Review Report:
1. In the Name field, select Salary Review Report.
2. Enter the Parameters field to open the Parameters window.
3. Enter the effective date for which you want to see the report.
4. Optionally select an organization, job, position, and/or grade torestrict the scope of the report to employees assigned to thesecomponents.
5. If you want to restrict the report to showing salary proposals, selectYes in the Unapproved Proposals Only field.
6. If you want to restrict the report to showing employees receiving themaximum salary for their grade (defined by the grade rate), or ahigher salary, select Yes in the Grade Rate Maximum Only field.
7. Choose the Submit button.

9 – 16 Oracle Human Resources North American User’s Guide
Salary BudgetingUsing Oracle Human Resources, you can set up human resourcebudgets for headcounts and full time equivalents at various levels of theorganization.
See: Human Resource Budgets: page 12 – 2
See: Human Resource Budgets (Oracle Human Resources User’s Guide)
Most enterprises need to add salary estimates to these headcountbudgets to provide salary budgets. Oracle Human Resources providesyou with the key information you require to define your salary budgets:
• headcount or FTE budget for a defined period of time
• valid grades for jobs and positions
• grade rates or pay scale rates to show salary values
However, the detailed process of salary budgeting varies from oneenterprise to another according to the enterprise size, type, and culture.This topic looks at three types of enterprise to suggest different ways inwhich you could use the information held in Oracle Human Resourcesto derive your salary budgets.
Note: The calculation of actual salary values happens duringthe payroll run. To help you compare planned versus actualspending, Oracle Payroll provides the following information:
– actual pay values for each assignment in the payroll run
– balances to show to date totals
– costs accumulated to the cost centers and project codes youset up in the Cost Allocation Flexfield
Budgeting Approach in a Government Agency
A typical government agency has a rule–based structure based onorganizations, positions, and grading structures. In this type ofenterprise, salary budgets are usually set for each position, then rolledup to the organization level.
Starting from the position definition, you can extract the list of validgrades and the grade rate values for each of these grades. If you usegrade scales, you can use the midpoint value from the range defined foreach grade.
To calculate the salary budget for each position, you multiply theposition headcount by one of the values for the grade. Typically youwould use the value for the middle grade. However, you might choose
9 – 17Salary Administration and Budgeting
the lowest grade if you are making entry–level assignments to newpositions.
When you have established the relationship between these various itemsin the database, you can automate the budgeting through the creation ofa standard reporting view, using SQL*Plus.
Budgeting Approach in a Centralized Management Company
The company with a centralized management structure has a moreflexible approach to roles, frequently using jobs rather than positions.There is more emphasis on recruiting the ’right people’ and onindividual responsibility and initiative. Reward systems are usuallyperformance related.
Salary budgets are typically set for each organization, based on aheadcount budget for jobs and organizations. The budget for eachorganization is calculated from the midpoint grade rate value for thevalid grades for each job multiplied by the planned headcount for eachorganization and job combination.
Budgeting Approach in a Devolved Management Company
In this type of enterprise, local managers are expected to decide on thecomposition of their own workforce in response to market requirements,and to set their staff’s compensation levels, within an overall budget.Control is exercised through the allocation of a budget, butadministration of the budget is left to the discretion of the local manager.
Current expenditure in each organization is used as the starting pointfor budgeting. This cost is projected on the basis of plans for expansionor reduction, with some inflationary factor added.
One approach to budgeting in this environment is to download currentsalary values from Oracle Human Resources to a spreadsheet. You canuse Oracle Glue to create an interface from Oracle Human Resources toyour spreadsheet system. The spreadsheet facilities are well suited tothe application of various percentages to try out salary and headcountchange proposals.
See Also
Using Oracle HRMS with Spreadsheets: page 33 – 5

9 – 18 Oracle Human Resources North American User’s Guide

C H A P T E R
10T
10 – 1Benefits Administration
Benefits Administration
he administration of a variety of employee benefits, such aspension plans, stock purchase plans, and plans providing health carecoverage, is a major concern of human resource management.
Also significant in this area is the management of COBRA–eligiblebenefit plans. These are plans for which employees and dependentscan obtain continued coverage after employee termination, or certainother changes.
This chapter explains how to administer benefits in Oracle HRMS.

10 – 2 Oracle Human Resources North American User’s Guide
Benefits Administration Overview
In Oracle HRMS you use elements to represent the various benefitsavailable to your employees. Elements can represent benefits rangingfrom tangible items such as lunch vouchers and company cars, toperquisites such as company stock purchase or life insurance, to healthcare coverage plans for employees and their dependents.
Elements representing benefits have a benefits classification, in additionto their primary classification.
Eligibility for Benefits
You establish employee eligibility for benefits in the same way that youset eligibility rules for any element, that is, by building element links.Links define the components that must be present in employees’assignments for the employees to be eligible for entries to the element.For example, if group life insurance is available only to employees whowork full time, you can build a link for the element for this benefit tothe employment category Full Time.
See: Element Links and Employee Eligibility Rules: page 7 – 25
To enroll employees in benefits, you make entries to the benefitselements to which their assignments have links.
Benefits Carriers
Using the Organization window, you enter benefits carriers into thedatabase as external organizations with the classification BenefitsCarrier. You can then associate the appropriate carrier with an elementrepresenting a benefit or benefit plan, by selecting the carrier from a listwhen you create the benefit element.
See:
Creating an Organization: page 2 – 20
Identifying the Information Element and Its Processing Rules: page7 – 33
See Also
Creation of Elements for Benefits
Management of COBRA–Eligible Benefits

10 – 3Benefits Administration
Benefits Classifications
Oracle HRMS comes with these classifications available for elementsrepresenting benefits that are not tangible items:
• Medical, Dental, Vision. These three classifications are forhealth care insurance plans that can include dependent as well asemployee coverage. Employees and employers usually share thecosts. Plans may offer employee pre–tax contributions underSection 125 of the Internal Revenue Code.
Note: Oracle HRMS automatically marks as COBRA–eligible,plans with a benefits classification of Medical, Dental or Vision.
See: Management of COBRA–Eligible Benefits: page 10 – 24
• 401(k). For employer–sponsored Defined Contribution plans forretirement savings, in which employees can participate usingpre–tax earnings. Can also have employer contributions.
• Profit Sharing. For plans under which the employer sets aside apercentage of profits for distribution to employees, forretirement savings. May be included within a 401(k) plan.
• Pension. For Defined Benefit pension plans for employees,usually fully funded by the employer.
• Stock Purchase. For plans under which employees can purchasestock in the enterprise, often at a discount, usually withoutbrokers’ fees.
• Vacation Purchase. For plans under which the employerpurchases accrued but unused vacation time from employees, oremployees purchase additional vacation time from the employer.
• Life. For group life insurance plans that are oftenemployer–paid, but can have employee contributions. Someplans permit employees to purchase policies for dependents.
• AD&D. For plans frequently offered in conjunction with lifeinsurance, to insure against accidental death or dismemberment.Often employer–paid, but can have employee contributions.
• LTD. For plans to insure against long–term disability. Oftenemployer–paid, but can have employee contributions.
• Other. For any benefits not covered by other classifications.
Benefits Enrollment
To enroll eligible employees in a benefit, you make entries for them tothe benefit element’s input values. For example, for insurance plans

10 – 4 Oracle Human Resources North American User’s Guide
providing coverage for medical, dental or vision care, enrollmentoccurs when you make an entry for an employee to the plan’s inputvalue Coverage Level (employee only, employee and family etc.). Otherclassifications of benefits require entries to other input values.
See:
Entering Elements for Eligible Employees: page 7 – 27
Enrolling Employees in a Health Care Benefit Plan: page 10 – 14
Deleting Datetracked Information: page 1 – 15
Dependent Coverage
After enrolling an employee in a benefit that provides dependentcoverage, you set up coverage as appropriate for his or her dependents.Before setting up this coverage, you enter the dependents into thedatabase as contacts of the employee.
See: Establishing Benefit Coverage for Dependents: page 10 – 16
Beneficiaries of Benefits
After enrolling someone in a benefit for which there can bebeneficiaries, you record the employee’s named beneficiaries.Employees can name both individuals and organizations asbeneficiaries. Further, they can specify a benefit percentage for eachbeneficiary, and name both primary beneficiaries and those at lowerlevels.
You enter individuals named as beneficiaries into the database ascontacts of the employee, and organizations or institutions named asbeneficiaries as organizations with the classification BeneficiaryOrganization.
See: Recording Beneficiaries for Benefits: page 10 – 20

10 – 5Benefits Administration
Creation of Elements for BenefitsThe method used to create elements representing benefits depends onwhether your Oracle HRMS installation includes Oracle Payroll, or is asite with Oracle HR only.
Regardless of the way the elements representing your benefits arecreated, you always link the benefits elements to establish theireligibility rules, and enroll employees in a benefit by making entries forthe employees to the input values of the benefit element.
Initiation of Benefit Deductions with Oracle Payroll
At Oracle HRMS installations including Oracle Payroll, the systemgenerates elements representing benefits when you initiate deductionsfor payments toward the cost of benefits. To initiate a deduction for abenefit that is not a plan for health care coverage, you enter in theDeductions window:
• the primary classification Voluntary Deductions
• the benefits classification
• the rule for the deduction amount:
– Flat Amount
– % of Earnings
– Payroll Table
The system then generates an element that represents the benefit andthe deduction, together with an associated formula.
Deductions for Health Care Plans
To initiate a deduction for benefit plans offering coverage for healthcare at installations with Oracle Payroll, you follow a special procedure,entering in the Deductions window:
• the primary classification Voluntary Deductions
• the benefits classification Medical, Dental or Vision
• the amount rule Benefits Table.
The element the system generates to represent the plan always includesthese three input values:
• Coverage, to hold plan coverage levels such as Employee Only,Employee and Spouse, Employee and Family

10 – 6 Oracle Human Resources North American User’s Guide
• EE Contr and ER Contr (Employee and Employer Contribution),to hold either default dollar amounts or percentages, as youchoose, for employee deductions and/or employer payments ata given coverage level taken to pay for the plan.
If necessary, you can make modifications to the generated element andformula.
See Also
Input Values for the Amount Rule Benefits Table (Oracle Payroll User’sGuide)
Benefits Table Entries for Health Care Plans: page 10 – 7
Definition of Benefit Elements at Sites with HR Only
At Oracle HRMS sites that do not include Oracle Payroll but maintaininformation on benefits and benefit plans in Oracle HR, you defineelements to represent benefits and benefit plans using the Elementwindow.
For elements representing most classifications of benefits, you followthe procedure for defining any element that holds information, givingthese elements:
• the primary classification Information
• the appropriate benefits classification.
See: Defining an Element to Hold Information: page 7 – 32
Defining Elements for Health Care Plans
To define elements representing benefit plans for health care coverage,you follow a special procedure, entering in the Element window:
• the primary classification Information
• the benefits classification Medical, Dental or Vision.
The system then automatically creates the element with the inputvalues Coverage, EE Contr and ER Contr:
• Coverage, to hold plan coverage levels such as Employee Only,Employee and Spouse, Employee and Family
• EE Contr and ER Contr (Employee and Employer Contribution),to hold default values, either dollar amounts or percentages, for

10 – 7Benefits Administration
employee deductions and/or employer payments at a givencoverage level taken to pay for the plan.
Notice that these automatically generated input values are not subjectto change or deletion. However you can define additional input valuesfor the element if you require them.
See Also
Defining Benefit Plan Elements at Sites with HR Only: page 10 – 8
Benefits Table Entries for Health Care Plans
All Oracle HRMS installations, with or without Oracle Payroll, use theBenefit Contributions window to enter health care plan informationinto the Oracle HRMS Benefits Table. For each plan, this table holds:
• the list of coverage levels available for the plan
• for each coverage level, the default employee and employercontributions toward the plan’s cost (which can, in either case, bezero).
Once coverage levels and default contributions exist in the BenefitsTable, you enroll an employee in a medical, dental or vision benefitplan by selecting a coverage level for him or her, in the Coverage inputvalue of the element representing the plan.
Note: You cannot make or change default entries to the inputvalues Coverage, ER Contr and EE Contr using the InputValues windows that are available from the Element andElement Link windows.
See Also
Establishing Health Care Benefit Coverage and Default Contributions

10 – 8 Oracle Human Resources North American User’s Guide
Defining Benefit Plan Elements at Sites with HR Only
At HR installations that do not include Oracle Payroll, use theprocedure below to define elements representing medical, dental orvision benefit plans. To define other types of benefits at theseinstallations, use the procedure for defining elements to holdinformation.
See: Defining an Element to Hold Information: page 7 – 32
Note: To create elements for benefits at installations thatinclude Oracle Payroll, initiate deductions for the benefit.
See: Initiation of Benefit Deductions with Oracle Payroll: page10 – 5
To define benefit plan elements, use the Element window.
Prerequisites
❑ If a plan element you are defining needs input values in addition toCoverage, Employee Contribution and Employer Contribution,decide whether and how to validate entries to the additional inputvalues.
• To restrict their entries to a list of valid values, use theQuickCode Types window to define a new lookup. Then enterthe valid values for this lookup in the QuickCodes window.
See: Defining QuickCode Types: page 32 – 5
• To validate values using formulas, write the validation formulasusing the Formulas window.
See: Using Oracle FastFormula for Validation, Oracle FastFormulaUser’s Guide.

10 – 9Benefits Administration
Note: As this type of element definition occurs only at OracleHRMS installations without Oracle Payroll, users carrying outthis definition likely have the HR User Type profile option HRUser. With this option, you do not see or have access to fieldsin the Element window needed to define elements forprocessing in payroll runs.
Identifying the Element and Entering Processing Rules
� To identify and classify the element:
1. Set the effective date early enough for any historical elemententries.
2. Enter a unique name starting with a letter of the alphabet (not anumber or symbol). You can optionally enter a reporting name anddescription. The reporting name is a short name that appears onreports, and on the statement of earnings if the element processesin the payroll run.
3. Select Information as the primary classification for the element, andMedical, Dental or Vision as its benefit classification.
� To enter processing information:
Note: The rule Additional Entry Allowed has no applicability forUS installations. It is available for use at non–US sites.
10 – 10 Oracle Human Resources North American User’s Guide
1. Select Recurring as the element’s processing type.
2. Select Final Close as the termination rule.
� To establish currencies and qualifying conditions:
1. The Input and Output Currencies appear as USD (US dollars) andyou cannot change these defaults.
2. If there is a minimum age for employees to receive the element,enter it in the Age field.
3. If employees must complete a minimum length of service beforereceiving the element, enter a number in the Length of Service fieldand select a unit of measure (such as months or years) in the Unitsfield.
4. Save the element definition.
Note: As elements representing health care benefit plans cannothave standard links, the system does not allow you to check theStandard box.
� To identify the benefit carrier and contribution frequency:
1. Click in the Further Information field to open the Further ElementInformation window.
2. In the Benefits Carrier field, select the name of the carrier for thisplan.
3. In the Period Type field, select a period type to identify thefrequency of employee contributions to the plan.
For example, many health care plans require monthly contributionsfrom employees. In this case, select the period type CalendarMonth.
4. Save these entries. You can now set up the element’s input values.
Setting Up Health Care Plan Input Values
� To determine the units of input values created for the element:
1. Choose the Input Values button.
2. You see that the system has created for this element, the inputvalues Coverage, ER Contr and EE Contr. The unit of measure forthe input values ER Contr (Employer Contribution) and EE Contr(Employee Contribution) is Money.

10 – 11Benefits Administration
If this element needs additional input values, you can put them innow, in accordance with the procedures following Step 3.
If the element does not need additional input values:
3. Save your work. If it is not necessary to create any additional inputvalues for the element, you are ready to enter coverage levels anddefault contributions for the plan and then enroll employees in theplan.
If you do need to create additional input values for the element,continue with the following procedure.
Creating Additional Input Values
� To create additional input values for the element:
1. Enter a name for the input value and select a unit of measure for it(money, hours, character, date, number or time).
2. You can enter number in the Sequence field to designate the orderin which the Element Entries window displays the additional inputvalues. The input values Coverage, ER Contr and EE Contr havethe sequence numbers 1, 2 and 3, respectively, and you cannotchange them.
3. If the input value must have an entry, check the Required box.
� To enter a default for an additional input value:
Note: The system does not allow you to make new entries ofdefaults for the input values Coverage, ER Contr and EE Contrusing the Input Values windows available from the Element andElement Link windows. However you can use these windows tooverwrite existing defaults.
1. Make the entry in the Default field.
2. For automatic update of existing entries of a default whenever youchange the default, check the Hot Default box. Hot defaults appearin the Element Entries window in quotation marks.
Warning: If you override a hot default appearing as an entryfor an employee, any further changes to the element’s defaultvalue do not affect this entry. For this reason, it is best to makechanges to a default value for large groups of employees usingthe BEE facility rather than the hot default feature.
� To set up validation for entries to additional input values:
1. Choose one of these approaches:
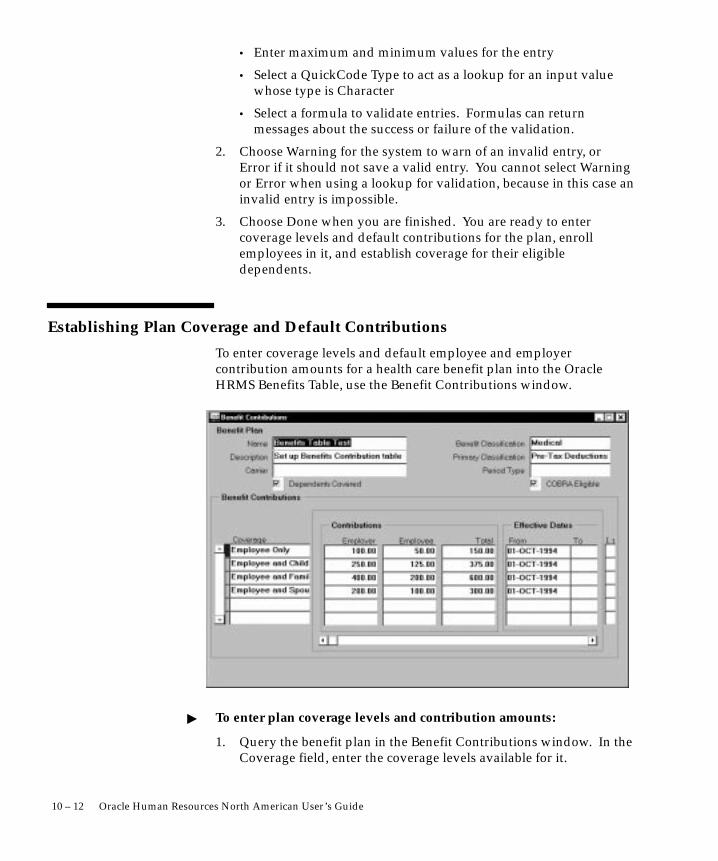
10 – 12 Oracle Human Resources North American User’s Guide
• Enter maximum and minimum values for the entry
• Select a QuickCode Type to act as a lookup for an input valuewhose type is Character
• Select a formula to validate entries. Formulas can returnmessages about the success or failure of the validation.
2. Choose Warning for the system to warn of an invalid entry, orError if it should not save a valid entry. You cannot select Warningor Error when using a lookup for validation, because in this case aninvalid entry is impossible.
3. Choose Done when you are finished. You are ready to entercoverage levels and default contributions for the plan, enrollemployees in it, and establish coverage for their eligibledependents.
Establishing Plan Coverage and Default Contributions
To enter coverage levels and default employee and employercontribution amounts for a health care benefit plan into the OracleHRMS Benefits Table, use the Benefit Contributions window.
� To enter plan coverage levels and contribution amounts:
1. Query the benefit plan in the Benefit Contributions window. In theCoverage field, enter the coverage levels available for it.

10 – 13Benefits Administration
2. For each coverage level, enter an employee and an employercontribution amount. Enter an amount of zero when a plan has nocontribution from the employer or from the employee.
3. Save your work. You are now ready to enroll employees in thisplan.

10 – 14 Oracle Human Resources North American User’s Guide
Enrolling Employees in a Health Care Benefit PlanThe information entered in the Benefit Contributions windowregarding the coverage levels and contribution amounts of a health carebenefit plan goes into the Oracle HRMS Benefits table. Oracle HRMSaccesses this information when you enroll an employee in the plan. Todo this enrollment for individual employees, use the Element Entrieswindow. For batch enrollments, use the BEE facility of Oracle HRMSMIX.
After you complete the enrollment of employees in health care plans,you can set up plan coverage for their eligible dependents.
� To enroll an employee in a benefit plan:
1. Query the element representing the benefit plan.
2. Select the correct coverage level for the employee from the listavailable for the Coverage input value of the plan.
After you enroll an employee by entering his or her coverage level,the plan deduction’s input values Employer and EmployeeContributions automatically receive entries of the defaultcontribution amounts entered for the level in the Benefits Table.You can overwrite these defaults for individual employees.
After you enroll an employee by entering the plan deduction’sinput values. Employer and Employee Contributionsautomatically receive entries of the default contribution amountsentered for the level in the Benefits Table. You can overwrite thesedefaults for individual employees.
To enroll a batch of employees in a benefit plan, you can use the BEEfacility.
See Also
Making Non–Payroll Batch Entries Using BEE: page 8 – 3
Reviewing Employee Enrollment in Benefit Plans
You can review an employee’s enrollment in health care benefit plansusing the View Employee Dental, Medical and Vision Benefits window.You select the employee assignment to view from the Assignmentsfolder. You can then see for this employee the plan name, benefitclassification and COBRA eligibility for each plan in which he or sheis enrolled.

10 – 15Benefits Administration
For each plan you see as well, the coverage level, the employer andemployee contributions at this level, the total contribution, and theunit of measure for the contributions, which is usually money.
Note: To review coverage of an employee’s dependents in ahealth care plan, use the Covered Dependents window.
See: Establishing Benefit Coverage for Dependents: page10 – 16
Reports on Health Care Plan Eligibility and Enrollment
Reports are available listing the employees eligible for enrollment in ahealth care benefit plan, and showing those actually enrolled in abenefit plan. These are the Employee Benefit Eligibility Listing andthe Employee Benefit Enrollment Register.
Request reports from the Submit Requests window.
� To run the Eligibility Listing or Enrollment Register:
1. In the Name field, select the report name. Click in the Parametersfield to open the Parameters window if it does not openautomatically.
2. In the Organization Structure and Version fields, select the nameand version of the organization hierarchy you are using todetermine the employees for the report to cover. In the ParentOrganization field, select the organization in the hierarchy that isthe highest one whose employees the report should cover.
3. In the Benefit Classification and Benefit Plan fields, select theclassification and name of the plan for which you are running thereport. Choose OK when you finish your entries. Then chooseSubmit.

10 – 16 Oracle Human Resources North American User’s Guide
Establishing Benefit Coverage for Dependents Benefits in the following five benefits classifications can providecoverage both to employees and their dependents:
• Medical, Dental, Vision (health care coverage)
• Life (insurance coverage)
• AD&D (insurance coverage for accidental death ordismemberment)
After enrolling an employee in one of these benefits by making entriesto the benefit element’s input values, you establish coverage for theemployee’s dependents using the Covered Dependents window. Youaccess this window from the Element Entries window.
See:
Entering Elements for Eligible Employees: page 7 – 27
Enrolling Employees in a Health Care Benefit Plan: page 10 – 14
To establish benefit coverage for dependents, start from the ElementEntries window.
Prerequisite
❑ Enter the employee’s dependents into the system using the Contactwindow. Be sure to check the Dependent box for each person, andto enter his or her gender, birth date, social security number, andaddress.
See: Entering Dependents, Beneficiaries, and Other Contacts: page13 – 16
Note: Entering someone as a dependent in the Contactwindow does not establish any benefit coverage for thedependent. For each separate benefit of an employee thatoffers dependent coverage, you must establish coverage for theemployee’s dependents using the Covered Dependentswindow.
� To establish benefit coverage for a dependent:
1. Set your effective date to the date this insurance coverage beginsfor the dependent.
2. In the Element Entries window for the employee’s primaryassignment, select the element representing the benefit for whichyou are entering dependent coverage. Choose the Others buttonand select Dependent Coverage to open the Covered Dependentswindow.

10 – 17Benefits Administration
3. In the Full Name field of the Covered Dependents window, selectthe dependent’s name. The social security number, relationship,and coverage start date all display.
Note: The name of a dependent who already has coverage in effectas of the effective date does not appear on the list. The name of adependent with coverage scheduled to begin on a future date doesappear. You receive a message about the previously scheduledcoverage when saving your entries in this window.
4. To establish coverage under this benefit for another dependent ofthe employee, repeat step 3.
5. Save your work.
Note: To purge a dependent from the database, you must firstpurge his or her record as a covered dependent, and then purgehim or her as a contact.
Stopping Employee and Dependent Coverage
To stop a particular benefit for an employee, you place an end date onthe element entry enrolling the employee in the benefit. To accomplishthis you delete the entry as of the end date. This end date thenautomatically applies to the coverage of the employee’s dependentsunder this benefit, and appears in the Covered Dependents window.
For example, if you put in an end date for an element entry that enrollsan employee in Dental Plan A, coverage of the employee’s dependentsunder this plan automatically receives this end date also. This ensuresthat when the employee’s benefit coverage ends, the coverage of his orher dependents also automatically ends. However a record of thedependent remains in the database.
If you must later change or remove an end date placed on theemployee’s element entry, perhaps to correct an error, the change orremoval automatically applies to the coverage of the employee’sdependents. So, if you later remove the end date from the employee’selement entry for Dental Plan A, the system automatically removes anyend dates it finds for coverage of the employee’s dependents underDental Plan A.
This means that if you must correct or remove an end date of anelement entry that enrolls an employee in a benefit, and must for otherreasons end the coverage of one or more dependents of the employee,you should complete the work on the element entry before endingcoverage for individual dependents.

☞
10 – 18 Oracle Human Resources North American User’s Guide
See:
Deleting Datetracked Information: page 1 – 15
Updating and Correcting Datetracked Information: page 1 – 14
Attention: Whenever coverage stops for a benefit for whichemployees and/or dependents may obtain continued coverageunder COBRA, most employers are legally obligated to informthem of this option.
See: Management of COBRA–Eligible Benefits: page 10 – 24
Stopping Dependent Coverage Only
To stop benefit coverage for a dependent while the employee’scoverage remains in effect, you must use the Covered Dependentswindow. Unchecking the Dependent box in the Contact window for adependent with existing dependent coverage prevents this person fromreceiving new dependent coverage, but is not sufficient to stop existingcoverage.
� To stop dependent coverage:
1. Enter or query the employee in question, and select the Assignmentbutton.
2. Set the effective date to the stop date of the dependent’s coverage.
3. In the Element Entries window for the employee’s primaryassignment, select the element representing the benefit for whichyou are stopping dependent coverage. Choose the Others buttonand select Dependent Coverage to open the Covered Dependentswindow.
4. Query the dependent whose coverage is stopping and choose Edit– Delete Record.
See: Deleting Datetracked Information: page 1 – 15
5. To retain a record of this person in the database as a dependent,choose End Date and save. If he or she is no longer a dependent ofthe employee, go to the Contact window, uncheck the Dependentbox, and save.
Note: The person must remain in the database as a contact if anyof the following apply:
• he or she is still covered as a dependent under other benefits orthe employee, or is eligible for, or receiving, continued benefitcoverage under COBRA

10 – 19Benefits Administration
• he or she is the recipient of a garnishment payment or otherpayment from the employee
• he or she is named as a beneficiary for one or more of theemployee’s benefits
• he or she is a primary contact of the employee.

10 – 20 Oracle Human Resources North American User’s Guide
Recording Beneficiaries for Benefits Employees may name beneficiaries for benefits in these classifications:
• AD&D (insurance coverage for accidental death ordismemberment)
• Life (insurance coverage)
• 401(k) (Defined Contribution plans for retirement savings)
• Pension (Defined Benefit pension plan)
• Profit Sharing (plan distributing a percentage of profits toemployees for retirement savings)
• Stock Purchase (plan for employee purchase of company stock)
After enrolling employees in one of these benefits by making entries forthem to the benefit element, you record in the Beneficiaries window,information about the beneficiaries each employee has named for thebenefit.
See:
Entering Elements for Eligible Employees: page 7 – 27
Enrolling Employees in a Health Care Benefit Plan: page 10 – 14
Employees may name as their beneficiaries both individuals andorganizations, such as charities, hospitals, and educational or religiousinstitutions. To record beneficiaries, start from the Element Entrieswindow.
Prerequisites
❑ Enter individuals who are beneficiaries into the system using theContact window. Be sure to check the Beneficiaries box for eachperson, and to enter his or her gender, birth date, social securitynumber, and address.
See: Entering Dependents, Beneficiaries, and Other Contacts: page13 – 16
❑ Enter organizations that are beneficiaries into the system using theOrganization window, giving them the classification BeneficiaryOrganization. Be sure to enter a location with an address for theorganization.
See: Creating an Organization: page 2 – 20
Note: Marking people or organizations as beneficiaries doesnot make them beneficiaries for any particular benefit. Youmust list in the Beneficiaries window, the employee’s namedbeneficiaries for each of his or her benefits.

10 – 21Benefits Administration
� To record a beneficiary for a benefit:
1. Set your effective date to the date the person or organizationbecomes a beneficiary of the benefit.
2. In the Element Entries window for the employee’s primaryassignment, select the element representing the benefit. Choose theOthers button and select Beneficiaries to open the Beneficiarieswindow.
3. In the Level field, select Primary, Second, Third, or Fourth as thelevel of the beneficiary you are entering. All primary–levelbeneficiaries who survive the employee become the actualbeneficiaries of the benefit.
If no primary beneficiaries survive the employee, the second–levelbeneficiaries become the actual beneficiaries, and so forth throughlevels three and four. There is no limit on the number ofbeneficiaries you can enter at a level.
4. In the Name field, select the name of the beneficiary. The listincludes all contacts marked as beneficiaries for this employee, andall organizations with the classification Beneficiary Organization.The system displays the beneficiary’s type (contact or organization)and start date.
Note: A beneficiary already on record as of the current effectivedate for this benefit of the employee does not appear on the list. Abeneficiary already entered to go into effect on a future date doesappear. You receive a message about the previously enteredbeneficiary when saving your entries in this window.
5. In the Percentage field, enter to two decimal places the percentageof the benefit to which this beneficiary is entitled. For example, for33.34% enter 33.34. If the total of percentages entered forbeneficiaries at a level does not equal 100.00 as of the currenteffective date, you receive an error message.
If you enter a percentage that causes the total for beneficiaries atthis level to be greater or less than 100.00 as of another date, thesystem notifies you of the date but permits you to save the entry.Change your effective date to this date, and make the necessaryadjustments.
Note: If some but not all of the beneficiaries at a level predeceasethe employee and he or she does not specify an adjustment of thepercentages for the remaining beneficiaries, such adjustment mustbe done off line.
6. To list additional beneficiaries for this benefit, repeat steps 3through 5.

10 – 22 Oracle Human Resources North American User’s Guide
7. Save your work.
Note: To purge a beneficiary from the database, you must firstpurge the record of the person or organization as a beneficiary,and then purge the entry of a contact or an organization.
Removing Beneficiaries When Employee Benefits Stop
To stop a benefit for an employee, you place an end date on the elemententry enrolling the employee in the benefit. To accomplish this youdelete the entry as of the end date. This end date then automaticallyapplies to the beneficiaries for this benefit named in the Beneficiarieswindow. If you later change or remove the end date placed on theemployee’s element entry, perhaps to correct an error, the change orremoval automatically applies as well to end dates existing for thebeneficiaries.
The automatic entry, change or removal of the beneficiaries’ end dateensures that people and organizations do not remain in the system asbeneficiaries of benefits that no longer cover the employee.
If you must correct or remove an end date of an element entry thatenrolls an employee in a benefit, and must for other reasons supply anend date for one or more beneficiaries named for the benefit, youshould complete the work on the element entry before providing enddates for the beneficiaries.
See:
Deleting Datetracked Information: page 1 – 15
Updating and Correcting Datetracked Information: page 1 – 14
Removing Beneficiaries When Employee Benefits Continue
To remove a beneficiary while a benefit remains in effect for theemployee, you must use the Beneficiaries window. Unchecking theBeneficiary box in the Contact window prevents a person from beingnamed as a beneficiary in the future, and removing the classificationBeneficiary Organization prevents an organization from being namedas a beneficiary in the future. However these actions are not sufficientto remove the person or organization as a currently–named beneficiary.
� To remove a beneficiary while maintaining coverage:
1. Enter or query the employee, and choose the Assignment button.

10 – 23Benefits Administration
2. Set your effective date to the end date for the beneficiary.
3. In the Element Entries window for the employee’s primaryassignment, select the element representing the benefit for whichyou are removing the beneficiary. Choose the Others button andselect Beneficiaries to open the Beneficiaries window.
4. Query the beneficiary to be removed, choose Edit – Delete Record,and save.
See: Deleting Datetracked Information: page 1 – 15
5. To retain a historical record of the removed beneficiary, select EndDate and save.
6. If the removed beneficiary is no longer a beneficiary of any of theemployee’s benefits, go to the Contact window, uncheck theBeneficiary box, and save.
Note: A contact removed as a beneficiary of a benefit must remainin the database as a contact if any of the following apply:
• he or she is currently receiving benefit coverage as a dependentof the employee, or is eligible for, or is receiving, continuedbenefit coverage under COBRA
• he or she is the recipient of a garnishment payment or otherpayment from the employee
• he or she is named as a beneficiary for any other benefits of theemployee
• he or she is a primary contact of the employee.

10 – 24 Oracle Human Resources North American User’s Guide
Management of COBRA–Eligible BenefitsCOBRA is the term commonly used to reference the ConsolidatedOmnibus Budget Reconciliation Act of 1985. Under this federallegislation, most employers who provide health insurance plans toemployees must offer continued access to this insurance when certainchanges (qualifying events) occur to the status of employees or theirdependents.
Under COBRA, employers must offer continued access to group healthinsurance in accordance with these rules:
• Employees and their dependents must be offered continuedaccess for 18 months after:
– the employees’ hours are reduced, or
– they become unemployed for any reason other than grossmisconduct.
• Continued access for 36 months must be offered to
– the dependents of deceased employees
– an employee’s former spouse following divorce or legalseparation
– dependent children after they cease to be dependent
– active employees who become entitled to Medicare.
If one of these qualifying events occurs, each qualified beneficiary mustbe offered an opportunity to elect to continue to receive the grouphealth plan coverage that he or she received immediately before thequalifying event. If the plan has a core/noncore feature, the beneficiarymay elect core coverage only. At the end of the 18– or 36–month period,employers must offer conversion to an individual policy if the groupplan permits conversion.
To cover their administrative costs, employers can require employeesand dependents electing continued coverage to pay up to 102% of theinsurance premiums. In addition, employers can require disabledemployees to pay up to 150% of the insurance premiums. after the first18 months of COBRA coverage.
COBRA does not affect employers with fewer than 20 employees orthose with church plans. Nor does it apply to plans maintained by USfederal, state or local governments.
Employer Responsibilities under COBRATo administer continued health plan coverage under COBRA, you dothe following:

10 – 25Benefits Administration
• identify which of your benefit plans are COBRA–eligible
• enter and maintain information about employees’ dependents
• record the events that qualify employees or dependents forcontinued coverage as they occur, and the qualifying dates
• notify employees, former employees and dependents of theireligibility for continued insurance coverage, and record theiracceptance or rejection of such coverage. Oracle HR includes astandard COBRA notification letter you can use.
Employees and dependents have 60 days from their qualifying date orthe date they receive their notification letter, whichever is later, inwhich to elect continued coverage. For those who make this choice,you must:
• determine and schedule the premium payments to be made forcontinued coverage, and record the receipt of these payments.
• record the eventual termination of their continued coverage.
Standard Letters for COBRA Notification and Termination
Oracle HR provides standard letters for informing employees ordependents of their eligibility for continued coverage, or of pendingtermination of this coverage. You can modify these letters as you wishusing SQL*ReportWriter 2.0. The standard letters are:
• The COBRA Notification Letter, informing people of theireligibility for continued coverage under COBRA.
• The COBRA Grace Period Expiration Letter, informing peopleelecting continued coverage that a premium payment is overdue,and that nonpayment will result in termination of the continuedcoverage.
• The COBRA Expiration Letter, informing people electingcontinued coverage that this coverage will terminate soon,because the time period over which it was available (18 or 36months) is ending.
See: Obtaining COBRA Reports and Standard Letters: page 10 – 32
Standard COBRA Reports
The COBRA Coverage Report
This report shows information about the employees and dependentseligible for continued coverage under COBRA whom you have entered

10 – 26 Oracle Human Resources North American User’s Guide
into the system. This report shows employees’ names and assignmentnumbers, or dependents’ names and relationships, as well as theirqualifying events and dates, their notification date and their COBRAstatus.
For those who elect continued coverage, it shows the start and enddates of the coverage period, the benefit plan names, and the premiumamounts charged.
The COBRA Payments Report
This report shows information about COBRA payments due andpayments received, after you have entered this information into thesystem. As well as the name and assignment number or relationship ofcovered employees and dependents, it displays their qualifying eventsand dates, their amounts due and due dates, and dates of paymentreceipts, amounts received and amounts outstanding.
See: Obtaining COBRA Reports and Standard Letters: page 10 – 32

10 – 27Benefits Administration
Administering COBRA
To administer COBRA–eligible benefit plans, you start from theCOBRA Coverage window to do the following:
• Record qualifying events
• Change COBRA coverage statuses to track notification ofeligibility for continued coverage, acceptance or rejection of thiscoverage, and eventual termination of accepted coverage
• Set up continued coverage, establish payment schedules, andrecord receipts.
Prerequisites
❑ Create your COBRA–eligible benefit plans. The systemautomatically identifies as COBRA–eligible, plans with one of thesebenefit classifications:
• Medical
• Dental
• Vision
Installations including Oracle Payroll create these plans in adifferent way from those without Oracle Payroll.
See: Creation of Elements for Benefits: page 10 – 5
❑ Enroll employees and their eligible dependents in the plans.
See:
Enrolling Employees in a Health Care Benefit Plan: page 10 – 14
Establishing Benefit Coverage for Dependents: page 10 – 16
❑ If necessary, make additions to the list of reasons for terminatingcontinued coverage under COBRA. Oracle HRMS includes tworeasons:
• End of Coverage. The maximum period of coverage (18 or 36months) has been reached.
• Non–Payment. The employee or dependent has failed to pay thecoverage premium.
Use the QuickCodes window to enter more reasons for theQuickCode type US_COBRA_TERM_REASON.
See: Adding QuickCode Values: page 32 – 3

10 – 28 Oracle Human Resources North American User’s Guide
Recording Qualifying Events
� To record a qualifying event and its date:
1. For all qualifying events except termination, set your effective dateto the qualifying date. This is the day after the date of thequalifying event, that is, the day on which current benefit coveragewould cease.
After terminating an employee using the Termination window, youcan navigate directly to the COBRA Coverage window. Thequalifying date automatically defaults to the day after thetermination date.
2. In the COBRA Coverage window, select the qualifying event fromthe list. The following events require you to offer continuedcoverage of COBRA–eligible benefit plans to employees, togetherwith any dependents previously included in their coverage:
• Medicare entitlement
• Reduced work hours which result in the loss of coverage
• Termination
When selecting one of these events, do not enter a dependent’sname or relationship.

10 – 29Benefits Administration
Note: For the events Reduced Hours and Termination, thesystem checks for a reduction in the employee’s standardworking hours or for a termination. If it finds no hoursreduction or termination, it issues an error message.
The following events require you to offer continued coverage todependents:
• Death of Employee
• Divorce or Legal Separation
• No Longer Dependent
For one of these events, select also the name and relationship of thedependent responsible for electing and paying for any continuedcoverage, for example, the spouse of a deceased employee. If it isunclear which dependent to select, for example if all thedependents of a deceased employee are minor children, consultyour Benefits Administrator.
3. The status of COBRA coverage resulting from entry of thequalifying event defaults to Awaiting Notification, as of theeffective date. Save your work at this status. After sending outnotification of eligibility for continued coverage, and when thiscoverage is rejected or accepted, enter status changes.
Changing Coverage Statuses
After notifying employees or dependents of eligibility for continuedcoverage, change the COBRA coverage status from AwaitingNotification to Notified. Depending on what people choose to do, thenext status change is to Rejected or Elected.
When elected coverage terminates, either because the maximum timeperiod allowed (18 or 36 months) is up or because of failure to paypremiums, change the coverage status to Terminated and select areason for this change.
You can quickly change a status in the COBRA Coverage window. Tosee a history of COBRA status changes for an employee or dependentwhen making a status change, use the COBRA Statuses window.
� To make changes to the status of COBRA coverage:
1. To quickly enter a status change without reviewing previouschanges, use the COBRA Coverage window. Set the effective date,choose the Notify, Elect, Reject or Terminate button, and save the

10 – 30 Oracle Human Resources North American User’s Guide
change. For a change to the status Terminated, entry of a reason isrequired.
2. To see a history of previous status changes for this coverage,choose the Statuses button to go to the COBRA Statuses window.After reviewing the changes to date, you can select another changefrom the list, enter the effective date and save your work.
3. After recording a status change indicating election of continuedcoverage, set up continued coverage for the employee ordependent.
Setting Up Continued Coverage under COBRA
To do this, start from the COBRA Coverage window and then go to theCOBRA Benefits window.
� To set up continued coverage under COBRA
1. For an employee or dependent who elects continued coverage,enter in the COBRA Coverage window the Period Start Date fromwhich the coverage will continue. The system automaticallysupplies the end date of the continued coverage period (either 18 or36 months after the period start date).
2. In the COBRA Coverage window, choose the Benefits button to goto the COBRA Benefits window, which displays all the benefitplans eligible for continued coverage in which the employee wasenrolled before the COBRA qualifying date.
The Basic column of the Costs region displays each plan’s basiccost, that is, the total of employee and employer contributionstoward the plan.

10 – 31Benefits Administration
3. Check the Accepted box for each plan for which the employee ordependent is electing continued coverage. Under Coverage, selectthe level of the continued coverage, which must be equal to orlower than the employee’s original coverage.
4. Under COBRA in the Costs region, enter the premium forcontinued coverage of this plan. If the amount entered exceeds102% of the basic cost of the plan, you receive a warning message,which you can override. Save your work.
5. When you finish setting up continued coverage, establish apayment schedule for the coverage. Then use this schedule torecord payments as you receive them.
Establishing a Payments Schedule and Recording Receipts
To set up the payments schedule, use the COBRA Coverage window.To review the generated schedule and enter payments, go to theCOBRA Payments window.
� To schedule premium payments and record receipts:
1. Go to the Payment region of the COBRA Coverage window. In theAmount Charged field of this region, the system displays the totalamount required to pay the premiums for the continued coverageelected. In the First Due Date field in this region, enter the duedate of the first premium payment.
2. In the Grace Period field of the Payment region, enter themaximum number of days that can elapse after the due date beforeyou receive the premium payment.
3. Save your work.

10 – 32 Oracle Human Resources North American User’s Guide
4. Choose the Payments button to go to the COBRA Paymentswindow. Use this window to review the generated schedule of duedates, premium amounts and grace dates, and to enter premiumamounts and dates received.
Obtaining COBRA Reports and Standard Letters
To obtain these reports and letters, use the Submit Requests window.
Prerequisite
❑ Before running a COBRA report or letter, ensure that theinformation needed in the report or letter is entered in OracleHRMS.
� To run the COBRA Coverage or Payments report:
1. In the Name field of the Submit Requests window, choose thereport name. If the Parameters window does not automaticallyopen, click in the Parameters field.
2. Control the list of employees and dependents the report covers bythe report parameters. For example, if Termination is theparameter for Qualifying Event, the report lists only thoseemployees and dependents eligible for continued coverage underCOBRA whose qualifying event is employee termination.
� To obtain a COBRA standard letter:
1. In the Name field of the Submit Requests window, choose the lettertype. The available types are:
• COBRA Notification Letter

10 – 33Benefits Administration
• COBRA Grace Period Expiration Letter
• COBRA Expiration Letter
If the Parameters window does not automatically open, click in theParameters field.
2. Enter the appropriate parameters for the letter and choose Submit.The letter prints out just as a report does. These letters do notinclude address information for employees or dependents.

10 – 34 Oracle Human Resources North American User’s Guide
C H A P T E R
11Y
11 – 1Labor Costs
Labor Costs
ou must be able to enter and maintain information relating to thelabor costs associated with your employees. In Oracle HRMS, you setup segments of the Cost Allocation key flexfield to identify the workstructures that constitute your cost centers and the GL account codes touse for entry of labor costs.
Installations including Oracle Payroll use post–payroll run processes toaccumulate information on payroll costs by cost center, GL accountcode, and labor distribution codes, and to transfer information to OracleGeneral Ledger.
This chapter explains the setup for collection of labor costs in OracleHRMS, and the Oracle Payroll processes for accumulating andtransferring these costs.

11 – 2 Oracle Human Resources North American User’s Guide
Labor Costs in Oracle HRMSAt all installations of Oracle HR, you can allocate employee costs to costcenters, GL codes and labor distribution codes. If your installation doesnot include Oracle Payroll or Oracle General Ledger, you must considerhow to relate information on labor costs entered in Oracle HumanResources to your payroll and financial systems.
If your installation includes Oracle Payroll, you use a post–payroll runprocess to accumulate payroll costs by cost center, GL account code, andthe labor distribution codes in use at your enterprise. For installationsthat also include Oracle General Ledger, another post–payroll runprocess is available to facilitate the transfer of information on payrolltransactions to Oracle General Ledger.
For the allocation of labor costs, all installations of Oracle HRMS, use theCost Allocation key flexfield.
The Oracle HRMS Cost Allocation Key Flexfield
In this flexfield you set up as many segments as you need to identify:
• the companies or sets of books for which your enterprise collectslabor costs
• the work structures, such as departments, sections, or projectsthat constitute the cost centers of your enterprise
• the GL codes and labor distribution codes against which youcollect labor costs.
Example Cost Allocation Flexfields
To construct a simple example of a Cost Allocation flexfield, supposethat the departments of a hypothetical enterprise each constitutes a costcenter, and the general ledger accounts receiving labor costs are Salaries,Wages, Overtime, Bonuses, Union Dues Liability and Clearing.
Note: The Clearing account in this example represents a singleaccount set up for entry of:
– credits, in order to balance debits to accounts for earningstypes, for example Salaries, Wages, Overtime and Bonuses
– debits, in order to balance credits to accounts for deductions,for example Union Dues Liability.
After running payroll and the Costing process, you can makejournal entries to credit or debit each individual balancing

11 – 3Labor Costs
account, making corresponding debits or credits to the Clearingaccount.
This example enterprise must transfer to the general ledger, informationsuch as the following:
• the totals of salaries and wages paid in its departments/costcenters, to go as debits to the Salaries and Wages accounts, and asbalancing credits to the Clearing account
• the total of bonuses paid to employees, to go as a debit to theaccount Bonuses, and as a balancing credit to the Clearing account
• the total deducted from employees in Production and QualityControl to pay their union dues, to go as a credit to the DuesLiability account, and as a balancing debit to the Clearing account.
To collect information for transfer to the general ledger, this enterprisecan construct a Cost Allocation flexfield with two segments, one foridentifying cost centers and one for GL costing and balancing codes, asfollows:
Seg. 1 Cost Center Seg. 2 GL Code
Accounting Salaries
Production Wages
Public Relations Overtime
Quality Control Bonuses
Sales Dues Liability
Clearing
Table 11 – 1 Example Cost Allocation Flexfield
Now suppose that for labor distribution purposes, this enterpriseaccumulates labor costs not just by cost center and GL account, but alsoby its product lines, represented by the labor distribution codes H201,H202, H305, H307 and H310. The enterprise requires product linecosting information such as the following:
• total wages paid to produce product line H201, and to check itsquality
• total paid for overtime to produce product line H201
• total paid for salaries and bonuses to sell product line H201
Since this enterprise uses its GL codes for labor distribution, it does notneed another segment to hold a separate list of codes. However, it mustadd another segment to hold product line codes, as follows:

11 – 4 Oracle Human Resources North American User’s Guide
Seg. 1 Cost Center Seg. 2 GL Code Seg. 3 Labor Dist. Code
Accounting Salaries H201
Production Wages H202
Public Relations Overtime H305
Quality Control Bonuses H307
Sales Dues Liability H307
Clearing
Table 11 – 2 Example Cost Allocation Flexfield
Similarly, if this enterprise needed to identify for each of its payrolls aparticular company or set of books to which all the information on laborcosts should go, it could define another segment of the Cost Allocationflexfield such as Company or Set of Books, to contain a list of theappropriate codes.
Note: Installations including both Oracle HRMS and OracleGeneral Ledger should take the GL codes for the Oracle HRMSCost Allocation flexfield and for the Oracle General LedgerAccounting flexfield from the same table. Installations withoutOracle GL can set up their own tables of GL codes, possiblypopulating these tables from their existing financial systems.
See: User–defined Tables: page 32 – 10

11 – 5Labor Costs
Use of the Cost Allocation Key FlexfieldWhen implementing and using Oracle HRMS, you make selections fromthe lists in the Cost Allocation flexfield segments as follows:
• When defining a payroll, you can select a code for the companyor set of books holding the labor costs from the payroll.
• When linking an element representing an earnings type such asRegular Salary, a deduction such as Union Dues, or an employercharge such as a benefit plan contribution, you select a GL codethat the element’s results should debit or credit, and a code for thebalancing GL account to credit or debit.
Note: As well as making entries to the Cost Allocation flexfieldat the element link level, you also enter on each link, essentialinformation about the type of costing the system should do forthe link. Available types include Costed, Fixed Costed, andDistributed.
See: Costing Information at the Element Link Level: page 11 – 7
• When defining an internal organization or entering anemployee assignment, you can select codes for the cost centers,product lines or other structures for which to collect the laborcosts of the organization or assignment.
• When entering timecard data in Oracle Payroll, you can selectcodes for accounts, cost centers, product lines and other itemslisted in the flexfield segments to show how to collect labor costsfor particular hours worked.
The different points at which you can make entries to segments of theCost Allocation flexfield exist as related entry levels. Ranging from top tobottom, the five entry levels are these:
Entry Level Windows Purpose of Entry
Payroll Payroll Identifies company or set of books to which all costsfrom this payroll should go.
Link Element Link Identifies a GL account to debit and a balancing account to credit, or for deductions, an account tocredit and a balancing account to debit. Other entriescan identify any other accounts into which run resultsof the element should go.
Organization Organization Identifies structures such as cost centers againstwhich to charge the payroll costs of employees in the organization.
Table 11 – 3 Cost Allocation Flexfield Entry Levels

11 – 6 Oracle Human Resources North American User’s Guide
Purpose of EntryWindowsEntry Level
Assignment AssignmentCosting
Identifies structures such as cost centers and productlines against which to regularly charge payroll costsof this assignment.
Element Entry PayMIX TimeEntry, Element Entries
Identifies structures such as cost centers and productlines against which to charge payroll costs of an employee assignment for a period. Entries often taken from timecards.
Table 11 – 3 Cost Allocation Flexfield Entry Levels
Note: You enable a qualifier for each segment of your CostAllocation flexfield to control whether it appears at a givenentry level. For example for the Cost Center segment of yourflexfield, which receives entries only at the organization,assignment and element entry levels, you enable only theOrganization, Assignment and Element Entry qualifiers. Thissegment then appears only at these levels.
See: Setting Up the Cost Allocation Key Flexfield: page 11 – 11
Cost Allocation Flexfield Entry Overrides
A key feature of the Cost Allocation flexfield is that entries made to itssegments at lower levels, override any entries at higher levels. Thus,entries from timecards made in a particular segment at the ElementEntry level override any entries to this segment made at the employeeassignment, organization, link and payroll levels.
This helps to keep your costing information accurate. For example, ifemployees temporarily work at cost centers or on product lines differentfrom those entered for their organizations or assignments, they can enterthe cost center or product line codes together with their time worked ontheir timecards. On receipt of this costing information at the elemententry level, the system correctly charges their time for the period, usingthis information rather than any entered at the organization orassignment levels.
Costing Data at the Payroll Level
Sometimes the labor costs from a payroll should all be charged to aparticular company within your enterprise, or all be entered in aparticular set of books. In this case, you select the code for the companyor set of books from the appropriate segment of the Cost Allocationflexfield when defining the payroll.

11 – 7Labor Costs
Also at the payroll level, you can select codes for suspense accounts. Asuspense account is one that collects costs from the payroll if segmententries at lower levels are missing. For example, if an employee receivesa Special Production Bonus but no GL code for this earnings type todebit in the Cost Allocation flexfield, the cost of the bonus goes into thesuspense account.
Entries of sums in a suspense account alert you to missing codes, andprovide a way to hold unallocated costs until you can make manualjournal entries to the correct accounts. Since codes entered in the CostAllocation flexfield at levels below the payroll level override anyentered at the payroll level, costs go to a suspense account only whenthe correct account codes are not entered at the element link level.
See Also
Defining a Payroll: page 5 – 6
Costing Data at the Element Link Level
You enter the important costing information for an element on its links.This means that all elements for which you must maintain costinginformation must have at least one link, even those that receive entriesduring the payroll run as indirect results of the processing of otherelements.
See: Entry as an Indirect Result of Formula Processing: page 7 – 29
When defining a link for an element, you select a costable type thatdetermines whether the payroll run should collect the results of this linkfor costing purposes. By default, a link’s costable type is Not Costed. Forthe results of elements that process in payroll runs to be collected foraccumulation and transfer, you must change this default to a costabletype of either Costed, Fixed Costed or Distributed.
Costable Type: Costed and Fixed Costed
When processing an element for an employee with a link markedCosted, the payroll run checks for Cost Allocation flexfield entriesaffecting the employee at every level––payroll, organization,assignment, and element entry. Since earnings types may well receiveoverride entries of information for labor distribution purposes at thelower levels of Assignment or Element Entry, the costable type Costed islikely to be best for the links of elements representing earnings.

11 – 8 Oracle Human Resources North American User’s Guide
however, deduction amounts are usually irrelevant to labor distributionanalyses, so elements representing deductions seldom receive lowerlevel entries of costing information. Accordingly, the costable type FixedCosting may be best for these elements’ links. When processingelements marked for Fixed Costing, the system looks for costinginformation at the payroll, element link and organization levels only, notthe assignment or element entry levels.
Costable Type: Distributed
For labor distribution analysis, you can distribute employer charges,such as employer payments for FUTA, Social Security, or employeebenefits, as overhead costs to be added to employees’ earnings. Thelinks of elements representing employer charges you want to distributein this way require the costing type Distributed.
For each employee, Oracle Payroll distributes the run results of elementswith this costable type proportionally over a set of earnings types youspecify. This distribution set of earnings types could include, forexample, Wages, Overtime and Shift Pay. When you select Distributedas the costable type of a link, you must also enter the name of thedistribution set of earnings over which the run results of the link are tobe distributed.
See: Defining an Element or Distribution Set: page 31 – 5
Costing and Balancing GL Accounts
For element links whose run results should go to the general ledger, youenter in the Costing field of the link, the GL account to debit or credit,and in the Balancing field, the account to correspondingly credit ordebit.
For earnings types and non–payroll payments, the GL account to debit(for example, Salaries) goes in the Costing field, and the account to credit(for example, Clearing) goes in the Balancing field. For deductions, theaccount to credit (for example, Clearing) goes in the Costing field, andthe account to debit (for example, Union Dues Liabilities) goes in theBalancing field.
See Also
Defining Element Links: page 7 – 37
Example of Employer Charge Distribution: page 11 – 19
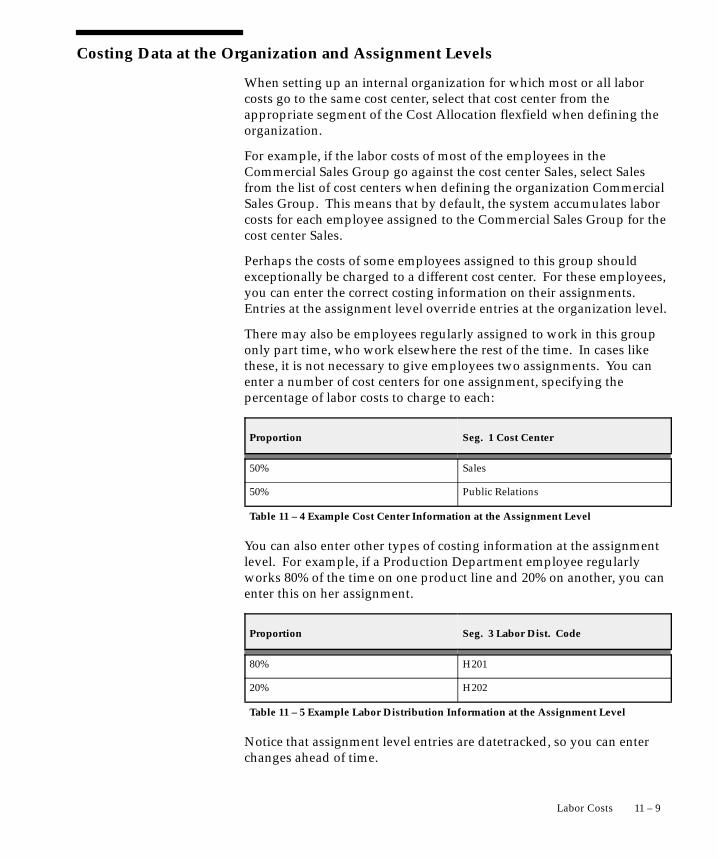
11 – 9Labor Costs
Costing Data at the Organization and Assignment Levels
When setting up an internal organization for which most or all laborcosts go to the same cost center, select that cost center from theappropriate segment of the Cost Allocation flexfield when defining theorganization.
For example, if the labor costs of most of the employees in theCommercial Sales Group go against the cost center Sales, select Salesfrom the list of cost centers when defining the organization CommercialSales Group. This means that by default, the system accumulates laborcosts for each employee assigned to the Commercial Sales Group for thecost center Sales.
Perhaps the costs of some employees assigned to this group shouldexceptionally be charged to a different cost center. For these employees,you can enter the correct costing information on their assignments.Entries at the assignment level override entries at the organization level.
There may also be employees regularly assigned to work in this grouponly part time, who work elsewhere the rest of the time. In cases likethese, it is not necessary to give employees two assignments. You canenter a number of cost centers for one assignment, specifying thepercentage of labor costs to charge to each:
Proportion Seg. 1 Cost Center
50% Sales
50% Public Relations
Table 11 – 4 Example Cost Center Information at the Assignment Level
You can also enter other types of costing information at the assignmentlevel. For example, if a Production Department employee regularlyworks 80% of the time on one product line and 20% on another, you canenter this on her assignment.
Proportion Seg. 3 Labor Dist. Code
80% H201
20% H202
Table 11 – 5 Example Labor Distribution Information at the Assignment Level
Notice that assignment level entries are datetracked, so you can enterchanges ahead of time.

11 – 10 Oracle Human Resources North American User’s Guide
See Also
HR Organizations: Entering Costing Information: page 2 – 30
Costing Data at the Element Entry Level
When you make entries to elements with links marked as Costed forindividual employees using the Element Entries window, or for manyemployees at once using the PayMIX windows, you can at the same timesupply costing information.
Information entered at this level overrides any information entered atother levels. For example, if an employee has costing information onrecord in a Cost Allocation flexfield segment at the organization orassignment level, an entry of timecard information in this segment at theelement entry level overrides the organization or assignment–levelinformation.
See Also
Making Manual Element Entries: page 7 – 41
PayMIX Timecard Entries: page 8 – 14

11 – 11Labor Costs
Setting Up the Cost Allocation Key FlexfieldYou must define at least one segment of the Cost Allocation keyflexfield; you may define as many as 30 segments. To set up thisflexfield, consult the explanations and procedures given in the OracleApplications Flexfields Manual.
You can control which segments of the Cost Allocation flexfield appearin each of the windows from which users can make entries to thisflexfield.
Controlling the Display of Flexfield Segments
Oracle HRMS implementors and users make selections from the lists inthe Cost Allocation flexfield’s segments at different levels, that is, inseveral different Oracle HRMS windows. However in a particularwindow, they usually need to access only certain segments of theflexfield.
For example, when defining a payroll you need only the segmentcontaining the companies or sets of books to which a payroll’s laborcosts should go. When defining a link for an earnings or deductionelement, you may need only the segment containing the list of thecosting and balancing GL codes. You likely need the segmentcontaining the list of cost centers only when defining an organization oremployee assignment, or making an element entry.
You control the appearance of a Cost Allocation flexfield segment in aparticular window by enabling qualifiers for the segment. When youenable a particular qualifier for a segment, this causes the segment toappear and be available for entry in a particular window, as follows:
Qualifier Enables Segment’s Appearance in
Element Element Link window
Balancing Element Link window
Payroll Payroll window
Organization Organization window
Assignment Assignment Costing window
Element Entry Element Entries window
Table 11 – 6 Qualifiers for Cost Allocation Flexfield Segments
You can enable as many qualifiers as necessary for a particular segment.Consider this example:

11 – 12 Oracle Human Resources North American User’s Guide
Seg. 1 Cost Center Seg. 2 GL Code Seg. 3 Labor Dist. Code
Accounting Salaries H201
Production Wages H202
Public Relations Overtime H305
Quality Control Bonuses H307
Sales Dues Liability H310
Clearing
Table 11 – 7 Example Cost Allocation Flexfield
For the segments of this flexfield, qualifiers would likely be enabled asfollows:
Segment Qualifiers Enabled Windows Displayed in
1. Cost Center Organization Organization
Assignment Assignment Costing
Element Entry Element Entries
2. GL Code Element Element Link
Balancing
3. Labor Dist. Code Organization Organization
Assignment Assignment Costing
Element Entry Element Entries
Table 11 – 8 Qualifiers for Example Cost Allocation Flexfield
Enabling the qualifiers Organization, Assignment and Element Entry forthe Cost Center segment and the Labor Distribution Code segmentcauses these segments to appear in the Organization, AssignmentCosting and Element Entries windows, but not in the Payroll or ElementLink windows.
Enabling the qualifiers Element and Balancing for the GL Code segmentcauses this segment to appear in the Costing and Balancing fields of theElement Link window, but not in the Payroll, Organization, AssignmentCosting or Element Entry windows.
Note: Since this example Cost Allocation flexfield has nosegments set up to hold payroll–level information such as sets

11 – 13Labor Costs
of books, there is no need to enable the qualifier Payroll for asegment of this flexfield.

11 – 14 Oracle Human Resources North American User’s Guide
Costing for TaxesThe setup for maintaining costing information on employer andemployee federal tax liabilities is straightforward. However, the setupfor costing state and local taxes depends on the way your general ledgerholds this information.
On the one hand, just as you enter a total into a GL account for a federaltax type, your enterprise may enter a total into a GL account for one ormore state or local tax types, regardless of the states or localities levyingthe taxes. For example, you enter a single total for amounts withheld foremployees’ federal income tax (FIT), and may similarly enter a singletotal for amounts withheld for employees’ state income tax (SIT),regardless of the states in which these taxes are owed.
Alternatively, you may make entries for state and local taxes for eachstate, or state and locality, in which these taxes are owed. In this case,your setup for costing these taxes will differ from that used for federaltaxes.
Elements for Taxes
Oracle Payroll comes with the elements for the following taxes alreadydefined (EE = employee tax, ER = employer tax):
Federal taxes
• Federal Income Tax (FIT) – EE
• Federal Unemployment Tax Act (FUTA) – ER
• Social Security (SS) – EE and ER
• Medicare – EE and ER
• Earned Income Credit (EIC) – EE
State taxes
• State Income Tax (SIT) – EE
• State Unemployment Insurance (SUI) – ER, EE in some states
• State Disability Insurance (SDI) – EE, ER in some states
Local taxes
• City Tax – EE. Includes coverage of Head Tax – ER.
• County Tax – EE. Includes coverage of School District Tax – EE
Links to all payrolls for the elements for each of these taxes are usuallycreated during the implementation of Oracle HRMS for your enterprise.

11 – 15Labor Costs
See Also
Tax Balances (Oracle Payroll User’s Guide)
Costing All Taxes by Tax Type
You maintain costing for federal taxes by the tax type, and can similarlyhold costing information for state and local taxes by type only (not bythe state or locality to which they are payable). To do this you enter onthe link for the tax type’s element the code for the general ledgeraccount to which amounts of the tax should go.
For example, suppose that:
• the segment of the Cost Allocation key flexfield that holds GLcodes has the name GL Code
• all amounts withheld for FIT should go to the GL account code123fit, and all amounts for SIT, should go to 123sit.
To collect costing information for both these taxes, you do the following:
• ensure that links to all payrolls exist for the elements FIT and SIT.These are usually created during implementation of OraclePayroll.
• if the possible entries to the GL Code segment exist in value setsvalidated by entries existing in a table or on a predefined list,ensure that the codes 123sit and 123fit appear in the table or list.
See: Values and Value Sets (Oracle Applications Flexfields Guide)
• Query the FIT or SIT element in the Element Link window. In theCosting region, choose the tax type Fixed Costed. The Transfer toGL box is automatically checked.
• For the FIT element, select in the Costing field, the account code123fit. For the SIT element, select the code 123sit.
With this setup, when the Costing process runs, it will collect allamounts withheld for FIT and SIT under the GL codes 123fit and 123sit.
Costing State and Local Taxes by Jurisdiction
If your general ledger maintains tax totals by state, or by state andlocality, you follow a different setup procedure for costing these taxes.You still must ensure that links to all payrolls exist for the tax elements.

☞
11 – 16 Oracle Human Resources North American User’s Guide
Additionally, you must set up one or more special segments of the CostAllocation key flexfield to collect the required jurisdiction information.These special segments must be named as follows:
• State Code. If your requirement is to collect state and local taxcosts by state but not locality, set up only this segment.
• County Code, City Code, School District Code. Set up thesethree segments if you must collect tax amounts not only by state,but also by locality.
Attention: In setting up these segments, do not mark them asrequired. Also, do not enable any qualifiers for them, as theyshould not appear in any Oracle HRMS windows.
See: Controlling the Display of Flexfield Segments: page 11 – 11
These segments are special in that you never make any entries in themat any of the entry levels (Payroll, Element Link, Organization,Assignment, or Element Entry). Instead, these segments receive entriesdirectly from the payroll run.
Payroll runs enter the appropriate jurisdiction code for each of the stateand local taxes it processes:
• into the State Code segment, if the other segments are notdefined, or
• into the State Code, County Code, City Code, and School DistrictCode, if these are all defined.
When the Costing process runs, it collects the amounts for each stateand local tax under the jurisdiction code of the state or locality. Forexample, the jurisdiction code of the state of Illinois is 14, for KaneCounty in this state the code is 089, and for the town of Geneva in thiscounty the code is 1110.
It is your responsibility to set up matches between your GL accountcodes and the jurisdiction codes the Costing process uses, and todevelop a process for transferring Costing process results to theappropriate accounts in your general ledger. A complete listing of USjurisdiction codes used in Oracle HRMS is available in the GeoCoderMaster List from Vertex Inc.

11 – 17Labor Costs
Accumulation and Transfer of Payroll Costs
At installations including Oracle Payroll, you initiate the post–runprocess Costing following payroll runs to accumulate costing results fortransfer to the GL and other systems. This process sorts the run resultsby company or set of books, cost center, and GL and labor distributionaccounts, in accordance with the information you have selected from theCost Allocation flexfield at all levels.
The sections that follow contain examples of the cost allocation ofpayroll results, and of the distribution of employer charges over selectedemployee earnings.
If your installation also includes Oracle General Ledger, following theCosting process you can run the process Transfer to GL, to facilitate thetransfer of the results from the Costing process to Oracle GeneralLedger.
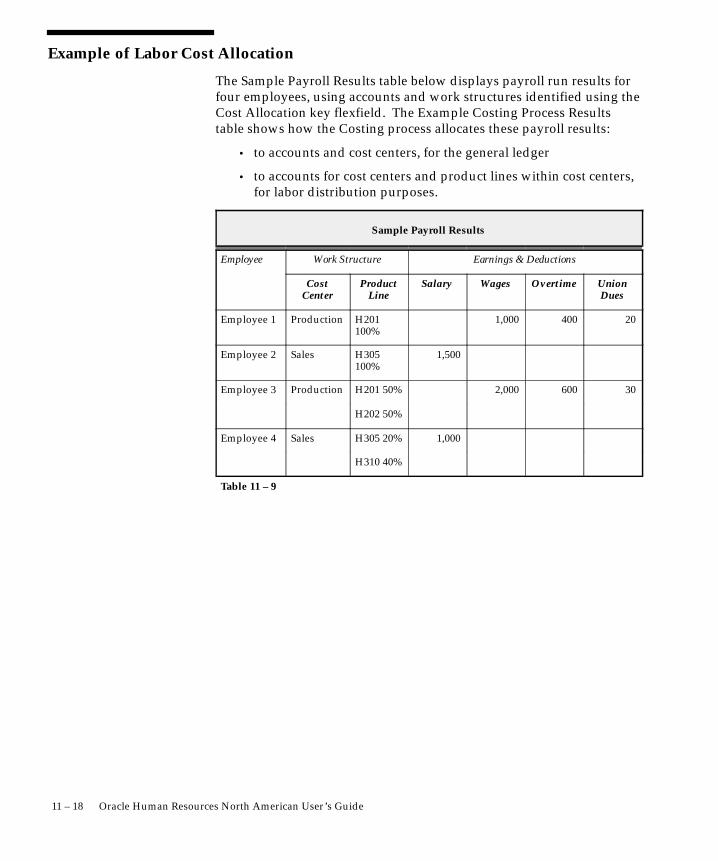
11 – 18 Oracle Human Resources North American User’s Guide
Example of Labor Cost Allocation
The Sample Payroll Results table below displays payroll run results forfour employees, using accounts and work structures identified using theCost Allocation key flexfield. The Example Costing Process Resultstable shows how the Costing process allocates these payroll results:
• to accounts and cost centers, for the general ledger
• to accounts for cost centers and product lines within cost centers,for labor distribution purposes.
Sample Payroll Results
Employee Work Structure Earnings & Deductions
CostCenter
ProductLine
Salary Wages Overtime UnionDues
Employee 1 Production H201100%
1,000 400 20
Employee 2 Sales H305100%
1,500
Employee 3 Production H201 50% 2,000 600 30
H202 50%
Employee 4 Sales H305 20% 1,000
H310 40%
Table 11 – 9

11 – 19Labor Costs
The table below shows the allocation of costs from the sample runresults displayed above.
Example Costing Process Results
Account Cost Center Product LineCode
Production Sales H201 H202 H305 H307 H310
Salaries 2,500 1,700 400 400
Wages 3,000 2,000 1,000
Overtime 1,000 700 300
UnionDuesLiability
50
Clearing (Account contains balancing credits for earnings Salary, Wages and Over-time, and balancing debit for deduction Union Dues.)
Table 11 – 10
Example of Employer Charge Distribution
When you give links for elements representing employer charges thecostable type Distributed, the Costing process distributes the employercharges as overhead for each employee, over a set of employees’earnings.
See: Costing Information at the Element Link Level: page 11 – 7
This example shows how employer payments totalling $100 aredistributed over a set of earnings including wages and overtime, for thecost center Production and the product lines H201 and H202.
Overhead Distribution for the Production Cost Center
Total paid to Production Cost Center as Wages run result:
$3,000.00
Total paid to Production Cost Center as Overtime run result:
$1,000.00
Total for Earnings types specified for distribution: $4,000.00
Ratio for Wages distribution, Production Cost Center = 3000/4000 =
.75
Wages overhead = Pension Charge $100 x .75 = $75.00

11 – 20 Oracle Human Resources North American User’s Guide
Ratio for Overtime distribution, Production Cost Center =
1000/4000 = .25
Overtime overhead = Pension Charge $100 x .25 = $25.00
Overhead Distribution for Product Lines H210 and H202
Total paid for Product Line H201 as Wages run result: $2,000.00
Total paid for Product Line H202 as Wages run result: $1,000.00
Total paid for Product Lines 201 and 202 for Wages: $3,000.00
Ratio for Wages distribution, Product Line H201 = 2000/3000 =
0.6667
Product Line H201 overhead = Total Wages overhead $75 x .6667 =
$50.00
Ratio for Wages distribution, Product Line H202 = 1000/3000 =
.3334
Product Line H202 overhead = Total Wages overhead $75 x .3334 =
$25.00
Total paid for Product Line H201 as Overtime run result: $700.00
Total paid for Product Line H202 as Overtime run result: $300.00
Total paid for Product Lines H201 and H202 as Overtime: $1,000.00
Ratio for Overhead distribution, Product Line H201 = 700/1000 = .7
Product Line H201 overhead = Total Overtime overhead $25 x .7 =
$17.50
Ratio for Overhead distribution, Product Line H202 = 300/1000 = .3
Product Line H202 overhead = Total Overtime overhead $25 x .3 =
$7.50

11 – 21Labor Costs
Distribution of Overhead over Cost Center and Product Line Totals
Account Code Cost Center Product Line
Production H201 H202
Wages 3,000 2,000 1,000
Employer Liability Distribution 75 50 25
Overtime 1,000 700 300
Employer Liability Distribution 25 17.50 7.50
Table 11 – 11

11 – 22 Oracle Human Resources North American User’s Guide
Running the Costing ProcessesRun the Costing process from the Submit Requests window.
� To run the Costing process:
1. Select Costing in the Name field. If the Parameters window doesnot open automatically, click in the Parameters field.
2. In the Parameters window, select the payroll or consolidation set forwhich you are running the Costing process. If you select a payroll,the name of its consolidation set appears in the Consolidation Setfield.
3. In the Start and End Date fields, enter the start and end dates of theperiod of time for which you want to see costing results. ChooseSubmit.
Reviewing Costing Process Results
To review these results online, use the Costing Breakdown window andthe Costing window. Standard reports on these results include CostingBreakdown Summary, Costing Breakdown for Costing Run, and CostingBreakdown for Date Range.
Online Results
The Costing Breakdown window summarizes the results of a run of theCosting process.
See: Reviewing Process–Level Results (Oracle Payroll User’s Guide)
The Costing window displays complete results of the Costing processfor an individual employee assignment.
See: Reviewing Assignment–Level Result (Oracle Payroll User’s Guide)

11 – 23Labor Costs
The Cost Breakdown Summary Reports
The Cost Breakdown Summary reports are Cost Breakdown Report forCosting Run and Cost Breakdown Report for Date Range. They showfor a payroll, a consolidation set, a GRE, or all GREs, summarized totalseither from one run of the Costing process, or from all the Costingprocesses run during a specified date range. For GL accounts, debitsand credits appear separately.
Run this report from the Submit Requests window.
� To run a Cost Breakdown Summary report:
1. In the Name field, select either Cost Breakdown Report for CostingRun or Cost Breakdown Report for Date Range. Click in theParameters field if a window containing the parameters for thisreport does not appear.
2. For the Cost Breakdown for Costing Run report, select the CostingProcess. To see results from this process for a single GRE only, selectthis GRE in the GRE field. Choose OK, then Submit.
3. For the Cost Breakdown for Date Range report, enter the start andend dates of the date range. To see results from processes run in thisrange for a single consolidation set, payroll, or GRE, select the GRE,consolidation set or payroll. Otherwise, the report covers all GREs’results for the date range. Choose OK, then Submit.
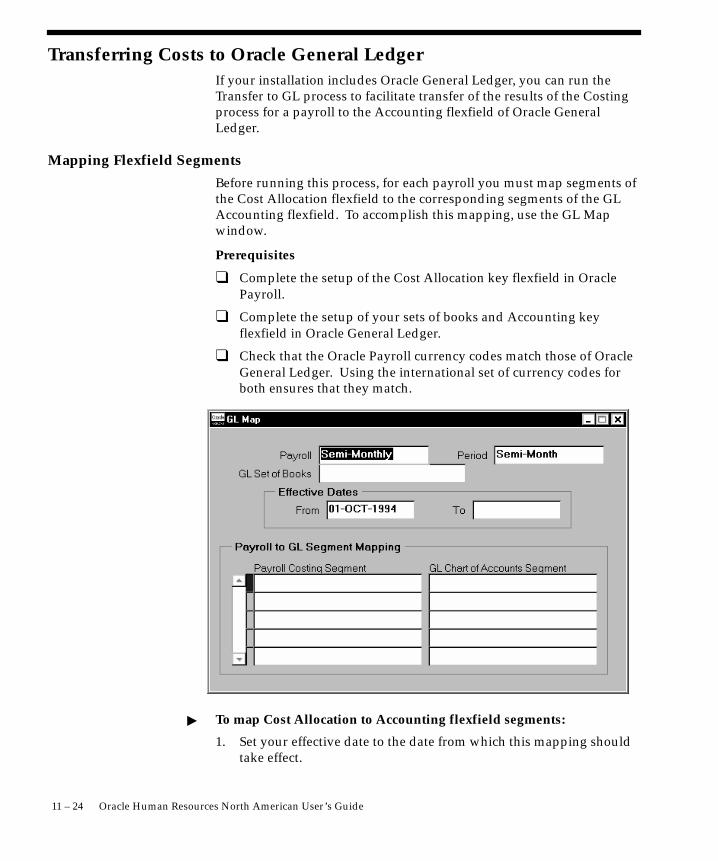
11 – 24 Oracle Human Resources North American User’s Guide
Transferring Costs to Oracle General Ledger If your installation includes Oracle General Ledger, you can run theTransfer to GL process to facilitate transfer of the results of the Costingprocess for a payroll to the Accounting flexfield of Oracle GeneralLedger.
Mapping Flexfield Segments
Before running this process, for each payroll you must map segments ofthe Cost Allocation flexfield to the corresponding segments of the GLAccounting flexfield. To accomplish this mapping, use the GL Mapwindow.
Prerequisites
❑ Complete the setup of the Cost Allocation key flexfield in OraclePayroll.
❑ Complete the setup of your sets of books and Accounting keyflexfield in Oracle General Ledger.
❑ Check that the Oracle Payroll currency codes match those of OracleGeneral Ledger. Using the international set of currency codes forboth ensures that they match.
� To map Cost Allocation to Accounting flexfield segments:
1. Set your effective date to the date from which this mapping shouldtake effect.

11 – 25Labor Costs
2. Query the payroll for which you are performing the mapping. Itsperiod type appears in the Period field.
3. Select the set of books for whose Accounting flexfield you areperforming the mapping. Costing information from a payroll cango to only one set of books. The payroll and set of books must havethe same currency code.
4. Select the name of a Cost Allocation flexfield segment in the PayrollCosting Segment field for which a corresponding segment exists inthe Accounting flexfield. Select the name of the correspondingsegment in the GL Chart of Accounts Segment field. Repeat thisprocess for all the Cost Allocation flexfield segments for which thereis a corresponding segment in the Accounting flexfield.
5. Save your entries.
Running the Transfer to GL Process
Run this process from the Submit Requests window.
� To run the Transfer to GL process:
1. Select Transfer to GL in the Name field. If the Parameters windowdoes not open automatically, click in the Parameters field.
2. In the Parameters window, select the payroll or consolidation set forwhich you are running the Transfer to GL process. If you select apayroll, the name of its consolidation set appears in theConsolidation Set field.
3. In the Start and End Date fields, enter the start and end dates of theperiod of time for which you want to see costing results. ChooseSubmit.

11 – 26 Oracle Human Resources North American User’s Guide

C H A P T E R
12 I
12 – 1Human Resource Budgets
Human ResourceBudgets
n Oracle Human Resources, you can define non–monetarybudgets, such as headcount or full–time equivalents, that are based onyour work structures. This chapter explains how to set up budgets andto report on budget variances.

12 – 2 Oracle Human Resources North American User’s Guide
Human Resource Budgets
In Oracle Human Resources, you can define non–monetary budgets,such as headcount or full–time equivalents, that are based on yourwork structures.
You can define budgets against an organization, job, grade, position, orany combination of these. You can monitor the budgets by comparingthe budget values with actual values derived from employeeassignments.
For example, you might define a headcount budget of two for theposition Marketing Manager. The variance of the actual value from thebudget value depends on the number of employees assigned to thatposition at any time. A negative variance indicates a vacancy.
Entering Actual Values Against Budgets
You can monitor human resource budgets by comparing the budgetvalues with actual values derived from employee assignments.
In the calculation of actual values, an assignment does not alwayscount as one. For example, if an assignment is part–time, it shouldcount as less than one for a Full Time Equivalent type of budget. At theBusiness Group level, you can enter the default value of an assignmentfor each budget type. Then you can override the default for particularassignments in the Assignment Budget Values window.

☞
12 – 3Human Resource Budgets
� To override the default for an assignment:
� Select a budget type in the Units field and enter the value of theassignment for this budget in the Value field.
Attention: If you do not enter a default value at the BusinessGroup level, you must be careful to enter a value for everyassignment. If there is no value entered in the AssignmentBudget Values window, that assignment is not counted whencalculating actual values for the budget.
Setting Up Budgets
� To set up a human resource budget:
1. Define values for the QuickCode TypeBUDGET_MEASUREMENT_TYPE in the QuickCodes window.
2. Review the period types defined on the system. You can renamethem to match the names you use in your enterprise.
3. Define calendars to determine the start date and period type ofyour budgets.
4. Define your budgets.

12 – 4 Oracle Human Resources North American User’s Guide
Salary Review Report
Use this report to see current and past salaries, and salary proposals,for some or all of your employees. You can restrict the employees tothose assigned to a selected organization, job, position, or grade. Youcan also restrict the report to showing only employees receiving themaximum salary for their grade (defined by the grade rate). You canuse the report to show all salaries (approved and proposed) or to showunapproved salary proposals only.
You run reports from the Submit Requests window.
� To run the Salary Review Report:
1. In the Name field, select Salary Review Report.
2. Enter the Parameters field to open the Parameters window.
3. Enter the effective date for which you want to see the report.
4. Optionally select an organization, job, position, and/or grade torestrict the scope of the report to employees assigned to thesecomponents.
5. If you want to restrict the report to showing salary proposals, selectYes in the Unapproved Proposals Only field.
6. If you want to restrict the report to showing employees receivingthe maximum salary for their grade (defined by the grade rate), ora higher salary, select Yes in the Grade Rate Maximum Only field.
7. Choose the Submit button.

12 – 5Human Resource Budgets
Salary BudgetingUsing Oracle Human Resources, you can set up human resourcebudgets for headcounts and full time equivalents at various levels ofthe organization.
See: Human Resource Budgets: page 12 – 2
See: Human Resource Budgets (Oracle Human Resources User’s Guide)
Most enterprises need to add salary estimates to these headcountbudgets to provide salary budgets. Oracle Human Resources providesyou with the key information you require to define your salarybudgets:
• headcount or FTE budget for a defined period of time
• valid grades for jobs and positions
• grade rates or pay scale rates to show salary values
However, the detailed process of salary budgeting varies from oneenterprise to another according to the enterprise size, type, and culture.This topic looks at three types of enterprise to suggest different ways inwhich you could use the information held in Oracle Human Resourcesto derive your salary budgets.
Note: The calculation of actual salary values happens duringthe payroll run. To help you compare planned versus actualspending, Oracle Payroll provides the following information:
– actual pay values for each assignment in the payroll run
– balances to show to date totals
– costs accumulated to the cost centers and project codes youset up in the Cost Allocation Flexfield
Budgeting Approach in a Government Agency
A typical government agency has a rule–based structure based onorganizations, positions, and grading structures. In this type ofenterprise, salary budgets are usually set for each position, then rolledup to the organization level.
Starting from the position definition, you can extract the list of validgrades and the grade rate values for each of these grades. If you usegrade scales, you can use the midpoint value from the range definedfor each grade.
To calculate the salary budget for each position, you multiply theposition headcount by one of the values for the grade. Typically you

12 – 6 Oracle Human Resources North American User’s Guide
would use the value for the middle grade. However, you might choosethe lowest grade if you are making entry–level assignments to newpositions.
Reviewing and Renaming Period Types
Budgetary calendars and payroll calendars are based on a period, suchas a Quarter or a Year. Standard period types are seeded with thesystem. If you want to use a different name for a period type, enter thename in the Period Types window.
You cannot remove the names that are already defined, but you caninsert a new record and select the appropriate Number Per Year.

12 – 7Human Resource Budgets
Defining Calendars
You can define calendars for human resource budgets in the BudgetaryCalendar window.
� To define a budgetary calendar:
1. Enter the name, and start date for your calendar.
Check that the start date year is early enough to cope with yourhistoric data. Once you define the calendar, you cannot change thestart date.
2. Select a period type. If you select Semi–monthly, enter a valuebetween 1 and 28 in the Midpoint Offset field to determine the startdate of the second time period each month. For example, if youenter the value 15, the second time period each month begins onthe 16th.
3. Save the calendar.
The system automatically creates the time period details. You canalter the default names for each time period.
4. If you want to add years to, or delete years from, the end of thecalendar, choose the Change Calendar button.
5. When you have defined your calendars, you are ready to defineyour budgets.

12 – 8 Oracle Human Resources North American User’s Guide
Defining Human Resource Budgets
You define human resource budgets in the Budget window.
During the time period of the budget, it may be necessary to adjust thebudget values as a result of organizational or financial change. You cancreate multiple versions of a single budget for comparison purposes.
� To define a budget:
1. Enter the name of the budget, and select a measurement type andcalendar. Save the budget.
2. Enter a version number and start date for this budget version.Save the new version.
3. Select the components for which you want to produce budgetelement information, and save your work.
You can enter any combination of organization, job, position, andgrade. You must select a value for at least one of the fields.
4. In the Budget Values block, select a specific time period from yourcalendar. Enter a numeric budget value for your selected budgetelement for that period.
The system automatically gets the actual values and calculates theVariance as an absolute value and a percentage value.

12 – 9Human Resource Budgets
5. Select other time periods for this budget element, as you require,and enter your budget values. Save your values.
6. Repeat steps 3 and 4 as necessary for other budget elements. Saveyour work.
Viewing and Reporting Budget Variances
You can view the variance for any budgets in the Budget window. Ifyou are using positions, you can view the variance between yourbudget and the actual values for positions using two other windows:
• List Position Budget Variance
• List Budget Variance by Organization.
You can report on variances using the Staffing Budget Details report.
List Position Budget Variance
� To view position variances within a hierarchy:
1. In the List Position Budget Variance window, select a positionhierarchy and a position from the hierarchy.

12 – 10 Oracle Human Resources North American User’s Guide
The inquiry will return the budget variance for this position and itssubordinates in the hierarchy.
2. Select a budget and the budget period for which you want to viewvariances. Choose the Find button.
The folder displays the actual number of holders at the start andend of the period, the number of new starters and leavers duringthe period, and the variance between the budget value and theactual value at the period end.
List Budget Variance by Organization
� To view position variances within an organization:
1. In the List Budget Variance by Organization window, do one of thefollowing:
• Select an organization hierarchy and an organization from thehierarchy. The inquiry returns the budget variance for allpositions within this organization and its subordinates in thehierarchy.
• Select an organization. The inquiry returns the budget variancefor all positions within this organization.

12 – 11Human Resource Budgets
2. Select a budget and the budget period for which you want to viewvariances. Choose the Find button.
The folder displays the actual number of holders at the start andend of the period, the number of new starters and leavers duringthe period, and the variance between the budget value and theactual value at the period end.
Staffing Budget Details Report
You can use the standard Staffing Budget Details report to compareyour actual staffing levels with budgeted levels for a specified range ofperiods.
You run reports in the Submit Requests window.
� To run the Staffing Budget Details report:
1. In the Name field, select Staffing Budget Details report.
2. Enter the Parameters field to open the Parameters window.
3. Enter the effective date for which you want to see the report.
4. Select the budget and version.
5. Select the start and end periods to include in the report.
6. Choose the Submit button.

12 – 12 Oracle Human Resources North American User’s Guide

C H A P T E R
13T
13 – 1Personal Information
Personal Information
his chapter focuses on how to enter people and personalinformation on the system. You can choose to hold a wide range ofpersonal information, such as medical details, work schedule, andpreferred language for correspondance, as well as the basics such asdate of birth, employee number, and addresses.
It also explains how to hire people, how to enter personal contacts,including dependents and beneficiaries, and how to inquire and reporton the people held in the system.
For people who are your employees, there is assignment informationand other information to hold. Chapter 14 Employment Informationlooks at information to record specifically for employees.

13 – 2 Oracle Human Resources North American User’s Guide
Displaying Personal InformationThere are lots of ways to view information about people held in OracleHRMS. For example, you can:
• use Employee Direct Access to view and update your ownpersonal details using a web browser
• use Line Manager Direct Access to view information aboutpeople in your organization
• use the Find Person window or a People folder to display thepeople who interest you, then ’drill down’. by clicking onbuttons, to the information you need
• use an inquiry window to view specific information about aperson, such as employment or absence history
• use QuickPaint to design a report incorporating personal,assignment, application, or compensation information
See Also
Web and Workflow Access: page 18 – 4
Inquiry Windows and Folders: page 30 – 3
QuickPaint: page 30 – 8
Using the Find Person Window
When you navigate to the People window, the Find Person windowautomatically displays in front of it.
� To query a person using the Find Person window:
1. Do one or both of the following:
• Enter a full or partial query on the person’s name. Where aprefix has been defined for the person, a full name query shouldbe in the format ’Maddox, Miss Julie’.
• If relevant, enter a query on employee number, applicant numberor social security number.
2. Choose the Find button.
The person or people found by the query are displayed in thePeople window. If the query found more than one person, you can

13 – 3Personal Information
use the [Down Arrow] key or choose Next Record from the Gomenu to display the next person.
People Folders
Using the People Folder window, you can enter inquiries about thepeople held on Oracle HRMS. You select the fields of personalinformation you want to see, and position them in the order you prefer.For example, you can produce an alphabetical listing of all applicantsand their gender, nationality, and disability registration.
The system saves your inquiry and field formatting as a folder so youcan rerun the inquiry at any time. You can make this folder available toall users, or save it as a private folder.
Note: The system administrator can create customizedversions of the People Folder window so that you use eachversion for one person type only.

13 – 4 Oracle Human Resources North American User’s Guide
Entering Personal Information
Every enterprise must be able to record personal information for itsemployees, applicants, and contacts. Some of this information isstandard, including basic information such as name, address, birthdate, hire date, and nationality.
Oracle HRMS enables you to enter and update this information for allperson types on one form – the People window. You can also use thiswindow to update people’s statuses, for example, from applicant toemployee.
Note: The system administrator can create customizedversions of the People window so that you use each version forcertain person types only or for certain functions only (enteringemployees, entering applicants, or hiring applicants).

13 – 5Personal Information
Entering New People
Use the People window to enter and maintain basic personalinformation for all person types, including employees.
The minimum information to enter for all categories of people is nameand type. In addition, for employees you must enter gender, employeenumber and date of birth (for assignment to a payroll). All otherpersonal information is optional.
� To enter a new person:
1. If the Find Person window opens, choose New.
2. Set your effective date to the appropriate date for adding theperson to the system. If you are entering an employee, this shouldbe his or her hire date.
Note: Before making a change to a hire date already entered for anemployee, ensure that the start date of the employee’s primaryaddress is the same as or earlier than the new hire date. Thispreserves the integrity of the employee’s tax records.
3. Enter the person’s name and other details in the Name region.
Only the last name is required.
• You can use the Title field to enter a title such as Mrs. or Doctorfor the person.
• You can use the Prefix field to enter the first part of the person’sname, such as Van or De. This field allows you to sort by themain part of the last name, Zee instead of van der Zee, if youchoose to do so.
• You can use the Suffix field to hold part of the last name, such asJunior or II. This enables the suffix to be reported on separately,as required in some government–mandated reports.
4. For an employee, you must select the gender, Male, Female orUnknown Gender, from the list.
5. Select a type. If you select Employee, the Hire Date field displaysyour effective date. You can change the hire date, and this changesthe employee’s effective start date.
6. Enter the person’s identification information in the Identificationregion.
If your enterprise uses manual number entry, use the Employee orApplicant fields to enter an employee or applicant number asappropriate. If your enterprise uses automatic number generation,

13 – 6 Oracle Human Resources North American User’s Guide
the employee or applicant number automatically displays whenyou save your entries in this window.
7. Enter details for the person as required in the Personal Informationregion:
• To assign an employee to a payroll, you must enter his or herdate of birth.
• In the Mail To field, select Home or Office to indicate theperson’s preferred mail destination
• In the Date Last Verified field, you can enter the date the personlast checked this personal information for accuracy.
• In the Status field, select the person’s marital status
• In the Email field, enter the person’s email ID
8. At the request of an applicant or employee, you can register him orher as disabled by checking the Has Disability box. The Americanswith Disabilities Act (ADA) Report includes employees registeredas disabled in its listing of disabled employees.
See: ADA (Americans with Disabilities Act) Reporting: page 17 – 28
Optionally, you can enter additional information for people in thealternative regions described in the following steps.
� To enter employment information for an employee:
Prerequisite
❑ The system comes with these reasons for excluding a newly hiredemployee from the New Hire report:
• Age less than state minimum
• Wages less than state minimum
• Hours worked less than state minimum
If you require other reasons, enter them for the QuickCode typeUS_NEW_HIRE_EXCEPTIONS.
See: Adding QuickCode Values: page 32 – 3
1. Choose the Employment Information alternative region.
2. Select an ethnic origin. For accurate EEO–1 and AAP reporting, itis essential to select an ethnic origin for employees.
See: Data for EEO–1 Reporting: page 17 – 3
3. Check the I–9 box when the Employment Eligibility Form I–9 forthe employee is completed. Under the US Immigration and

13 – 7Personal Information
Control Act of 1986, this must occur within three days of hire, orwithin 90 days for employees who have applied for the necessarydocumentation and are awaiting its receipt.
Note: By signing Form I–9, employees attest they are eligible foremployment in the US. The employer also must sign the form,listing documents presented to verify the employee’s eligibility as aUS citizen, a lawful permanent resident alien, or an alien otherwiseauthorized to work in the US.
4. Enter an I–9 Expiration Date if the employee’s eligibility to work inthe US ends at a certain date, given in his or her documents.
5. For someone not a US citizen, select a visa type.
6. Select the person’s veteran status in the Veteran Status field.
To identify employees for inclusion in VETS–100 reporting, it isessential to select Disabled Veteran, Vietnam Veteran or DisabledVietnam Veteran for each employee qualifying for one of thesestatuses.
See: VETS–100 (Federal Contractor Veterans Employment)Reporting: page 17 – 21
7. To identify an employee as a student, check the Student box.
8. To enter data for the New Hire report:
• The New Hire Status field defaults to Include in New HireReport, so that the next run of the New Hire report for theemployee’s GRE will include this employee.
• If the New Hire report should not cover this employee, selectExclude from New Hire Reporting. Optionally, select a reasonfor this exclusion in the Exception Reason field.
• If this employee is currently obliged to pay child support, checkthe Child Support Obligation box.
Note: After a run of the New Hire report that includes theemployee, the entry in the New Hire Status field automaticallychanges to Already Reported.
See: New Hire Reporting: page 13 – 32
9. After saving your entries in the Employment Informationalternative region, enter a primary address for the employee. Thewindow available for entering this address depends on whether ornot your installation includes Oracle Payroll.
Note: In Oracle HRMS, every employee must have a primaryaddress on record at all times. At sites using Oracle Payroll, the

13 – 8 Oracle Human Resources North American User’s Guide
start date of this address cannot be later than the hire date of theemployee.
See Also
Entering People’s Addresses at Sites without Oracle Payroll: page13 – 11
Entering People’s Addresses at Sites with Oracle Payroll: page 13 – 12
� To enter office location information for a new hire or an existingemployee:
1. Choose the Office Location Information alternative region.
2. Enter the office number for this office.
3. Enter the internal location of this office.
4. Enter the office identifier for internal mail.
� To enter information for an applicant :
1. Choose the Applicant Information alternative region.
2. If the applicant’s resume is on file, check the Exists check box.
3. If the applicant’s resume is on file, select the date indicating whenthe resume was last updated.
4. Select the date up to which a file is to be maintained for thisapplicant.
� To enter information concerning the background check for anemployee:
1. Choose the Background Information alternative region.
2. Check whether the employee’s background check has beenperformed.
3. Select the date on which the background check was performed.
� To enter rehire recommendation information for an applicant whowas a former employee:
1. Choose the Rehire Information alternative region.
2. Check whether the former manager has recommended theapplicant for rehire.

13 – 9Personal Information
3. Select the reason for this recommendation.
� To enter further name information:
1. Choose the Further Name Information alternative region.
2. Enter one or more honors/degrees (BA, MBA, or JD, for example)which the employee has earned.
3. Enter the name (perhaps a nickname) by which the employeeprefers to be known.
4. If the employee previously was known by a different last name,enter the previous last name.
� To enter medical information for an employee:
1. Choose the Medical Information alternative region.
2. Select the employee’s blood type.
You cannot change this value once you enter it.
3. Select the date of this employee’s last medical test.
4. Enter the name of the physician who performed this test.
� To enter other information for a person:
1. Choose the Other Information alternative region.
2. Select the type of schedule the employee will work.
3. Select the current status of the student.
4. Enter the person’s current full time/part time availability to workwith your company.
5. Select the language the person prefers for correspondence.
This language can differ from the person’s native language,depending on the nature of the correspondence.
6. Check the Military Service check box if the person is employed in amilitary service in some capacity.
The value of this field can impact benefits calculations.
7. Check the Second Passport Exists check box if the person possessesmultiple passports.
Note: The Background Information, Medical Information andRehire Information alternative regions appear only if yoursystem administrator has enabled them for you.

13 – 10 Oracle Human Resources North American User’s Guide
Hiring
� To hire an employee:
� When you enter a new person as an employee, he or she isautomatically hired as of your effective date.
� To hire an applicant:
1. Update the applicant assignment status to Accepted in theApplication window.
2. Set your effective date to the applicant’s hire date and query theapplicant in the People window.
3. In the Type field, select Employee. The Hire Date field displaysyour effective date.
4. Save your work.
Note: You cannot update the applicant assignment status toAccepted and change the Person Type to Employee on the samedate, since these are both datetracked changes.
� To rehire an ex–employee:
1. Set your effective date to the new hire date and query theex–employee in the People window.
2. In the Type field, select Employee. The Hire Date field displaysyour effective date.
3. Save your work.
� To cancel a hire:
� Query the employee in the People window and clear the Hire Datefield. Then save.
The system warns you that any changes made to the person’srecords after their hire date will be lost. You can choose whether tocontinue or cancel.
You cannot cancel a hire if:
• Oracle Payroll has processed the employee in a payroll run.
• The person’s type has changed since the hire date.
• New assignments have been created for the person after the hiredate.

13 – 11Personal Information
• The person was initially entered on the system as an employeeand therefore has no previous history as an applicant or contact.In this case you must delete the person’s records from the systemusing the Delete Person window.
See: Deleting a Person from the System: page 13 – 37
See Also
New Hire Reporting: page 13 – 32
Note: Telephone numbers you enter here are held separately fromthe numbers you enter in the Phone Numbers window. You haveto enter and maintain them separately.
4. Save your work.
Entering People’s Addresses at Sites without Oracle Payroll
All employees must have one (and only one) primary address onrecord at any point in time, but can have an unlimited number ofsecondary addresses (such as Summer or Weekend).
To enter all primary and secondary addresses for employees and theircontacts at Oracle HR sites that do not include Oracle Payroll, you usethe generic Address window. This window permits you to selectaddress styles appropriate both for the US and Canada, and otherforeign countries as well.
It does standard validation of field entries (for example, for zip codelength), but at sites without Oracle Payroll, no special validation of cityor county names, zip codes, or other address elements.
Prerequisite
❑ Set up the address types you require, such as Summer or Weekend,as QuickCodes for the QuickCode Type ADDRESS_TYPE.
See: Adding QuickCode Values: page 32 – 3
� To enter a generic address:
1. Select a national address style.
A window opens with the address format for the country youselect.
Note: Default address styles are predefined for many countries.You can change these defaults and can create address styles forother countries.

13 – 12 Oracle Human Resources North American User’s Guide
See: Changing Address Styles: page B – 9
2. Enter address information in this window and choose the OKbutton to return to the Assignment window.
The first address entered for someone is by default, the primaryaddress. Employees must have one (and only one) primaryaddress at all times, but can have any number of secondaryaddresses. However, they cannot have two secondary addresseswith the same name at the same time.
3. Select an address type, such as Summer or Weekend.
4. To identify the person’s main address, check Primary. By default,the first address you enter is the Primary address.
At any time, only one address can be a primary address.
Entering People’s Addresses at Sites with Oracle Payroll
Oracle Payroll uses employees’ primary addresses to maintain federal,state and local tax rules for employees subject to US taxes. Therefore,these employees must have on record at all times, one and only onecorrect, primary US address with an open end date, that includes avalid city, state, zip code and county. This means that sites includingOracle Payroll must enter a new employee’s primary address using adate no later than the employee’s hire date.
The US–specific address window appearing on the menu at sitesincluding Oracle Payroll accepts and fully validates entries of city,state, zip code and county for US addresses, and entries of city,province and post code for Canadian addresses. It is very convenientto use, because entry of only a zip or post code automatically brings upthe city, county and state, or city and province, to which the zip or postcode applies.
By default, the first address you enter for someone becomes theprimary address. Employees must have one (and only one) primaryaddress in effect at all times. There is no limit on the number ofsecondary addresses, such as weekend or summer addresses, you canenter for a person. However, a person cannot have two secondaryaddresses with the same name at the same time.
Foreign Secondary Address Entry
If you often enter foreign secondary addresses, ask your systemadministrator to add the generic address window to your menus. This

13 – 13Personal Information
window permits you to select the correct address style for any countrywhen making entries.
See: Entering People’s Addresses at Sites without Oracle Payroll: page13 – 11
Note: At sites with Oracle Payroll, the generic addresswindow does only standard validation for all but one nationaladdress style. For the US address style, it does the same fullvalidation as entries made in the US–specific address window.However, it is more efficient for users at sites with OraclePayroll to use the US–specific Address window to enter US andCanadian addresses.
US and Canadian Address Entry
When entering US or Canadian addresses for employees and theircontacts, use the US–specific Address window.
Prerequisites
❑ Set up the secondary address types you require, such as Summer orWeekend, as QuickCodes for the QuickCode TypeADDRESS_TYPE.
See: Adding QuickCode Values: page 32 – 3
❑ Cities or towns with populations of 200 or less may not be includedon the lists for US and Canadian address validation; if not, youmust enter them in the database. To check whether a city or townname is in the database, query it in the Cities window.
See: Adding a City for Addresses: page 13 – 14
� To enter a US or Canadian address with full validation:
1. Set the effective date to the date the address takes effect.
2. In the Address lines, enter the street name and number, and anyrelated information such as building name or apartment number.
3. If you know the US zip code or Canadian post code, enter it in theZip Code field. For US addresses, this restricts the listing of cities,states, and counties to those valid for the zip code. For Canadianaddresses, this restricts the listing of cities and provinces to thosevalid for the post code. You can then select this additional addressinformation from short lists.
Note: For Canadian addresses, CN (for Canada) always appears inthe State field, the province name appears in the County field, andthe post code appears in the Zip Code field.

13 – 14 Oracle Human Resources North American User’s Guide
4. If you are unsure of the zip or post code, enter the city name. ForUS addresses, this restricts the lists of states, counties and zipcodes to those valid for the city. For Canadian addresses, thisrestricts the lists of provinces and post codes to those valid for thecity. You can then select this additional address information fromshort lists.
5. If you are unsure of both a zip or post code and the city name, for aUS address enter the two–letter state abbreviation. This restrictsthe city, zip code and county lists to those valid for the state. For aCanadian address, enter CN in the State field. This restricts thecity, post code and province lists to Canadian entries. Then selectthe additional address information.
6. Optionally, enter telephone numbers and select the address type.Check or uncheck the Primary box as required. Notice that aperson must have a primary address on record before you canenter any secondary addresses for him or her.
7. If you know the last date this address will be effective for theperson, enter it in the Date To field.
8. Save your work.
Adding a City for Addresses
A US or Canadian city or town with a population of less than 250 maynot be entered in the HRMS database. Before entering the address ofsomeone living in a city or town not in the database, you must add thecity or town to the database using the Cities window.
1. In the State Name field, select the name of the state or territory inwhich the city is located. For Canadian cities, select Canada in thisfield.
2. In the County name field, select the county in which the city islocated. For Canadian cities, select in this field the province inwhich the city is located.
3. Enter the city name in the City Name field.
4. If there is a single zip or post code for the city, enter it in the ZipStart field and leave the Zip End field blank.
5. If a range of zip or post codes applies to the city, enter the first codeof the range in the Zip Start field, and the last code of the range inthe Zip End field.
6. Save your work.

13 – 15Personal Information
Adding Telephone Information
You can enter multiple telephone numbers for people in the HRMSdatabase. To enter telephone information for a person, use the PhoneNumbers window.
� To enter a telephone number:
1. In the Type field, select the type of the telephone device.
2. In the Phone Number field, enter the telephone number.
Any format is allowed.
3. In the From field, select the start date for the telephone number.
4. In the To field, optionally select the date when the telephonenumber is no longer valid.
5. In the last field, optionally add the extension number.
6. Save your work.
Note: If you want to maintain a history of telephone numbersfor this person, be sure to add a new entry for the newtelephone number and enter an end date for the existingexisting telephone number. If you do not want to maintain sucha history, simply update the record for the existing telephonenumber.

13 – 16 Oracle Human Resources North American User’s Guide
Entering Pictures
You can store a picture associated with each person on your system,perhaps holding a photograph or digitized image of the person’ssignature. These may be useful for approval or identification purposes.You must digitize the image and save it in one of the following fileformats:
• BMP
• JFIF
• JPEG
• PCX
• PICT
• TIFF
You enter pictures in Oracle HRMS in the Picture window.
� To enter a person’s picture in Oracle HRMS:
1. In the Picture window, choose the Load Picture button.
2. Enter the file path to locate the directory in which you saved thegraphic file.
3. Highlight the filename and choose the OK button. The graphic isloaded in the format indicated by the filename. For example, a filecalled image.bmp would be loaded as a BMP file.
Entering Dependents, Beneficiaries and Other Contacts
Use the Contact window to hold information about an employee’scontacts, for example:
• people to contact in an emergency
• dependents
• beneficiaries of benefits such as insurance policies or stockpurchase plans
• individuals receiving payment of a wage attachment deductedfrom the employee’s salary
A person entered as a contact can be one, some, or all of the above.
Prerequisite
❑ Set up any relationship types (such as spouse, child, or friend) youwant to use as values for the QuickCode Type CONTACT.

13 – 17Personal Information
See: Adding QuickCode Values: page 32 – 3
� To enter a contact:
1. Do one of the following:
• Enter the name of a new person.
• Select from a list of people already entered on the system.
2. If this contact is a dependent of the employee, a named beneficiaryof the employee, or a recipient of the payment of a wageattachment from the employee, ensure that his or her socialsecurity number, gender, and birth date are all on record.
3. Optionally, select a relationship type for the contact.
4. If this contact is receiving a payment from the employee such as acourt–ordered wage attachment, check the Payments Recipient box.
This allows you to select this person on the Personal PaymentMethod window when entering a third party payment method forthe employee.
See: Making Payments for Wage Attachments (Oracle Payroll User’sGuide)
5. If this contact is a dependent of the employee, check the Dependentbox. You can then establish dependent coverage for this personunder one or more of the employee’s benefits that providedependent coverage.
See: Establishing Benefit Coverage for Dependents: page 10 – 16

13 – 18 Oracle Human Resources North American User’s Guide
6. If this contact is named as a beneficiary for one or more of theemployee’s benefits, check the Beneficiary box. You can thenrecord this person as a beneficiary for these benefits.
See: Recording Beneficiaries for Benefits: page 10 – 20
7. Save your work.
8. To enter addresses for the contact, choose the Address button.
Entering People’s Addresses at Sites with Oracle HR Only: page13 – 11
Entering People’s Addresses at Sites with Oracle Payroll: page13 – 12

13 – 19Personal Information
Competence Profiles, Qualifications, School Attendances and WorkChoices
As you recruit new people and develop existing employees, you needto track their competencies and work preferences. This enables you tomatch them to projects and vacancies, develop succession plans, andorganize further training and certification. In Oracle HRMS, you canrecord the following information:
• A competence profile – this is a list of the competencies held by aperson and their level of proficiency in each competence.
• Qualifications, including details of individual subjects, grades,licenses, status of ongoing training and tuition fees.
• Attendances at educational establishments, such as schools andcolleges.
• Work choices, including willingness to travel and relocate;preferred working hours, work schedule, and duration withinpost and preferred countries for international relocation.
You can enter this information when an employee first joins theenterprise, taking the details from their resume or from tests orinterviews. You might update it after the employee successfullycompletes a training course, and after periodic assessments orappraisals.
You can either enter this information using standard Oracle HRMSwindows or using the web–based Line Manager Direct Access.
Copying Core or Primary Assignment Competencies
Some competencies are important for all employees throughout yourenterprise; others are required for particular jobs, positions, ororganizations. If competencies have been entered as core competenciesfor your enterprise or as requirements against a person’s job, position,or organization, you can copy them to the person’s competence profile.Copying competencies not only saves you time from having to enterthe details yourself, but it also ensures that you do not miss enteringrelevant competencies.
To assist you in entering applicants and evaluating employees againstvacancies, you can also copy competencies from a vacancy. The systemchecks all the competence requirements of the organization, job and/orposition for which the vacancy is defined. It enters these against theperson so that you can record the person’s proficiency in eachcompetence and then compare applicants against the vacancy’srequirements.

13 – 20 Oracle Human Resources North American User’s Guide
Managing Competencies Over Time
You can make changes to the competencies and proficiency levels youremployees possess over time, enabling you to see both the latest andhistorical information. When you view a competence profile, you canchoose whether to see just the current profile or all historicalinformation, if you want to see changes in proficiency levels over time.
Use Oracle Alert’s automatic mail notification to keep you informedwhen an employee’s competencies need certification and renewal. Thisfrees your time for more essential tasks. For example, use thecompetence Renewal Period to drive Oracle Alert—it compares therenewal period date with the date on the person’s Competence Profile,or the last training class delivering the skill.
See Oracle Alert Reference Manual.
Creating a Competence Profile
Use the Competence Profile window to create and update a personalcompetence profile.
When you open this window, you will see all competencies, past andpresent, held by the person. If you want to see only currentcompetencies and proficiency levels, check the Current Competenciesbox.
� To create a competence profile:
1. Select the first competence this person possesses.
You can also automatically enter all competencies required for theperson’s primary assignment or a vacancy, or the enterprise’s corecompetencies. See: To copy competencies from requirements: page13 – 21.
2. Select the proficiency level at which the person performs thecompetence.
3. Enter the date from which the person possesses the competence atthis level. For example, if the person gained the competencethrough a qualification, enter the date the qualification was gained.You can enter a date when the competence expires, if required.
4. In the Source of Proficiency Rating field, you can select the methodby which the person gained the competence, such as trainingcourse or previous experience.
5. Select the method of certifying that the person attained thecompetence at the recorded level, such as by examination.
13 – 21Personal Information
6. Enter the date when the person’s proficiency in this competenceshould be reviewed.
7. Continue to enter the competencies the person possesses, then saveyour changes.
� To copy competencies from requirements:
1. Choose the Copy Competencies button. A Copy Competencieswindow appears.
2. Do one of the following:
• Check the Core Competencies box to copy all the competenciesrequired throughout your enterprise.
• Check the Primary Assignment Competencies box to copy all thecompetencies required in the organization, job and position towhich the person is assigned.
• Select a vacancy to copy all the competencies required in theorganization, job and position for which the vacancy is defined.
3. Enter the dates between which the competencies are valid (youmust have a From date, but you can leave the To date blank).
4. Choose the Copy button.
You can now enter proficiency levels, certification methods, and soon for each of these competencies held by the person.
� To update a competence profile:
1. Check the current check box if you want to see only the currentcompetencies the person possesses, otherwise leave this box blank.
2. Enter new competencies for this person, or update proficiencylevels and other details for existing competencies.
Note: If you update a proficiency level, enter the date whenthe new level was attained. Then, when you save yourchanges, you will see that the system keeps a record of the oldproficiency level, ending the day before the start date of thenew level.
3. Save your changes.
Entering Work Choices
You can a person’s work choices, such as their willingness to travel orrelocate, their preferred working hours and work schedule, and the

13 – 22 Oracle Human Resources North American User’s Guide
length of time they would like to stay in their next post. You can thencompare these choices with the work requirements of jobs or positionswhen you are planning redeployment.
You enter personal deployment choices in the Work Choices window,accessed from the People window.
� To enter work choices for a person:
1. Check the relevant work capabilities boxes if the person is:
• willing to work in all locations
• willing to relocate
• willing to travel
• prepared to work in their current location only
• willing to visit internationally
2. Select the length of time the person wants to stay in a role, forexample, indefinite or two years.
3. Select the person’s preferred working hours (for example, 9.00 to5.30), work schedule (the working days in the week or pattern ofshifts), the proportion of full time hours available and anyrelocation preferences (for example, with family).
4. Check the relevant international deployment boxes if the person iswilling to:
• work in all countries
• relocate
5. Select the countries in which the person prefers to work, and anycountries in which they are not prepared to work.
6. Save your work.

13 – 23Personal Information
Entering Qualifications
You can enter an employee’s qualifications when they first join theenterprise, and then update them after periodic assessments orappraisals or after completion of a training course.
Use the Qualifications window, accessed from the People window, toenter and update qualifications.
� To enter qualifications:
1. Select the type of qualification this person possesses and the title ofthe qualification.
2. Select the status of the qualification, for example, whether trainingis ongoing or completed.
3. Enter the grade at which the person holds the qualification, ifappropriate.
4. Select the establishment at which the person gained thequalification.
5. Enter the awarding body which bestowed the qualification, if youwant.
6. Enter the dates between which the qualification is gained You mustenter a Start date but you can leave the End date blank (if thequalification is still incomplete).
7. Enter the date the qualification was awarded, if you want.
8. Enter the projected completion date the qualification is awarded, ifrelevant.
9. Enter the ranked position within the class, if relevant.
10. Enter any comments, for example, what percentage of the awardwas course work or examination, if you want.
11. Save your work.
� To enter tuition fees for reimbursement:
1. In the Tuition Details alternative region, enter the amount andselect the currency to reimburse the person
2. Select the method of tuition, for example, day release.
3. Enter the method of reimbursement, for example, bank transfer tobe paid when qualification is awarded.
4. Save your changes.

13 – 24 Oracle Human Resources North American User’s Guide
� To enter training details:
1. Choose the Training Details alternative region.
2. Enter the amount of training completed. For example, enter 30 dayscompleted of a training program that lasts 60 days.
3. Enter the total amount of training required to deliver thequalification.
4. Enter the units in which the training is measured, for example,days.
� To enter license details:
1. Choose the License Details alternative region.
2. Enter the licence number, for example, a driving licence number.
3. Enter any restrictions, for example, licence not valid in certainstates.
4. Enter the licence expiry date.
� To enter subjects:
1. Enter the first subject the qualification comprises.
2. Select the status at which the subject is awarded, for example,whether training in the subject is ongoing.
3. Enter the dates between which the subject is studied. You mustenter a Start date but you can leave the End date blank (if thesubject is still incomplete).
4. If the subject forms a major part of the qualification, check theMajor box.
5. Enter the grade at which the subject is studied, if you want.
6. Continue to enter further subjects until you have entered them allfor the qualification, then save your changes.
See Also
Entering Schools and Colleges Attended
You can enter the school or college at which the person gained aqualification.

13 – 25Personal Information
Use the School and College Attendances window, accessed from thePeople window, to enter attendance at an establishment.
� To enter schools and colleges attended:
1. Select the name of the school or college that the person attended.
2. Enter the dates of the attendance. You must enter a Start date butyou can leave the End date blank (if the attendance is ongoing).
3. If attendance is full time at the school or college, check the FullTime box.
4. Continue to enter schools or colleges, if required, then save yourchanges.
See Also

13 – 26 Oracle Human Resources North American User’s Guide
Entering Special Information
Basic personnel information is handled in a fairly standard way fromenterprise to enterprise. However, other types of information arerecorded and used in quite different ways. Examples include trainingrecords, disciplinary records, competence, and medical records. OracleHRMS does not restrict you to any predefined format for holding thisinformation. You can set up your own user–defined fields forrecording, analyzing, and reporting on whatever special informationyou require.
You set up each area of information that you want to handle separatelyas a Special Information Type. For example, you might define specialinformation types for medical details and disciplinary records. You canenter a person’s information under these sorts of headings in theSpecial Information window.
For entry of information needed for ADA and OSHA reporting, OracleHRMS comes with the following three special information typesalready set up:
• ADA Disabilities
• ADA Disability Accommodations
• OSHA–Reportable Incident.
See:
ADA (Americans with Disabilities Act) Reporting: page 17 – 28
OSHA (Occupational Safety and Health Act) Reporting: page 17 – 34
Note: Your system administrator can create customizedversions of the Special Information window, for entry ofinformation for only one or a selected set of information types.
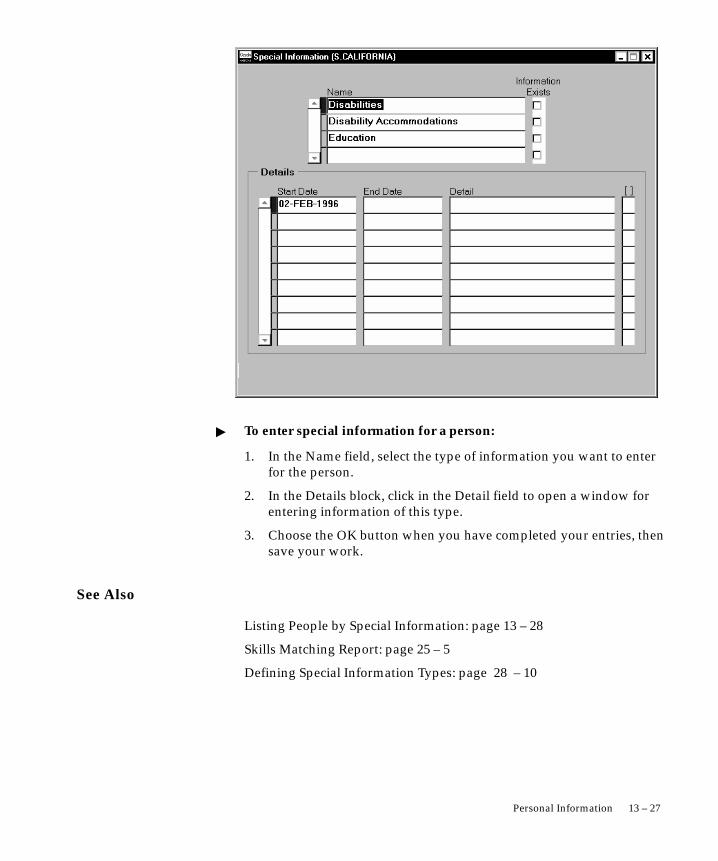
13 – 27Personal Information
� To enter special information for a person:
1. In the Name field, select the type of information you want to enterfor the person.
2. In the Details block, click in the Detail field to open a window forentering information of this type.
3. Choose the OK button when you have completed your entries, thensave your work.
See Also
Listing People by Special Information: page 13 – 28
Skills Matching Report: page 25 – 5
Defining Special Information Types: page 28 – 10

13 – 28 Oracle Human Resources North American User’s Guide
Listing People by Special Information
To view a list of people who match a particular profile for one SpecialInformation Type, use the List People By Special Information window.
Note: The system administrator can create customizedversions of the List People By Special Information window sothat you use each version for one information type only. Forexample, one version could be called List People By TechnicalSkills.
� To list people by special information:
1. Select a Special Information Type.
2. Click in the Details field. A window opens prompting you for thedetails you have defined for this information type.
3. Enter values in the fields against which you want to match people,then choose OK. If you leave a field blank, it is not used in thematching process.
4. Choose the Find button.

13 – 29Personal Information
Employees and applicants who match your selection criteria arelisted in the folder in the lower part of the window. You can enter aquery here to further restrict the list of people. If you have accessto the Folder menu you can remove, rearrange, or resize the fieldsdisplayed.

13 – 30 Oracle Human Resources North American User’s Guide
Tracking People’s Roles and Activities
Table 13 – 1 lists the windows you can use to track the roles andactivities of employees and applicants. These windows are describedin context in other topics, as listed in the table.
You can also use the web–based Line Manager Direct Access to entersome information, such as assessments and appraisals, and to view awide range of employee data, including employment history, roles(who they manage, supervise etc.) and absence history.
See: Web and Workflow Access: page 18 – 4
Window Used For See
Assignment describing the work role of anemployee
The Employee Assignment:page 14 – 4
Application describing the vacancy for which anapplicant has applied
Entering Full ApplicationInformation: page 15 – 12
Entering Full ApplicationInformation (Oracle HumanResources User’s Guide)
Absence Detail recording an employee’s absencefrom work
Entering Absences:page 26 – 14
Book Events recording that an employee orapplicant will attend an event. Theevent must be already defined in theEvent Bookings window.
Managing Bookings andAttendance: page 27 – 3
Employee Review scheduling and recording details ofan employee’s review or otherinterview type
Employee Reviews:page 27 – 4
ApplicantInterview
scheduling and recording details ofan applicant’s interviews
Interviewing Applicants:page 15 – 17
Table 13 – 1 Other Windows for Personal Information
You can enter other work–related information for employees, such assalary and payment methods, after entering the employee’sassignment.
See Also
Managing Employment Information: page 14 – 2
13 – 31Personal Information
Full Personal Details Report Set
To create printed reports of the personal information held for oneperson, you can run the Full Personal Details report set. It comprisesfour reports that meet employees’ rights to view their own personaldetails under data protection legislation:
• Full Person Details 1 reports on addresses and informationentered in the People window, such as name, date of birth,nationality, and work telephone number.
• Full Person Details 2 reports on applications and applicantinterviews.
• Full Person Details 3 reports on assignment informationincluding periods of service, payment methods, and elemententries.
• Full Person Details 4 reports on miscellaneous work information,including special information, absences, recruitment activities,and contacts.
If you do not need to see all this information for the employee, you canrun individual reports rather than the report set. The Full PersonDetails report, Full Assignment Details report, and Full Work Detailsreport are equivalent to reports 1, 3, and 4 in the report set,respectively. The Full Applicant Details report is equivalent to report 2in the report set, but you can only run this as a separate report for anapplicant, not an employee.
You run report sets from the Submit Request Set window.
� To run the Full Personal Details report set:
1. In the Request Set field, select Full Personal Details.
2. Enter the Parameters field to open the Parameters window.
3. Enter the effective date for which you want to see the reports.
4. Enter the name of the person for whom you want to print thereports.
5. Choose the Submit Request button.
See Also
Employee Summary Report: page 14 – 34

13 – 32 Oracle Human Resources North American User’s Guide
New Hire Reporting
At present, many states require some or all employers to submit NewHire reports covering newly hired or rehired employees. Other statesand Canadian provinces have already announced plans to implementnew hire reporting programs, or are considering such plans.
A primary purpose of New Hire reports is to ensure that individualslegally responsible for making child support payments are in factmaking these payments by means of pay garnishments. Some statesalso use new hire reporting to help in detecting abuse of assistanceprograms such Workers Compensation and unemployment insurance.
Because garnishment administration is a responsibility of the payrolldepartment, and because submission of copies of form W–4,Employee’s Withholding Allowance Certificate is often a part of newhire reporting, payroll departments usually are responsible forsubmitting the New Hire reports for the GREs in their enterprise. Inmost states, they must submit these reports within a certain number ofdays (ranging from 5 to 35) after a new employee’s start date.Employers failing to do so may be liable for penalties.
Report Coverage
States have different rules regarding the employees that new hirereporting must cover. Some states do not require coverage ofemployees who are below a minimum age, or whose pay or normalworking hours in a specified time period fall below a stated minimum.
Data for New Hire Reports
In all states, these reports must display for each newly hired or rehiredemployee, the full name, social security number, and hire date. Somestates require additional information, such as:
• employee addresses and dates of birth
• their jobs, salaries, hours normally worked per week, and full orpart time employment category
• the availability to the employees, and their dependents, ofemployer–provided health care insurance plans
• whether employees currently have child support obligations.
To identify each GRE submitting New Hire reports, states require (inaddition to the GRE’s name and address) its federal identificationnumber (issued by the IRS), or its SUI identification number, or both

13 – 33Personal Information
numbers. Entry of one or both of these numbers often occurs when theGRE is set up.
New Hire reports must also include the name, job and telephonenumber of the employee serving as the GRE’s contact for new hirereporting.
Setup Steps for New Hire Reporting
� To set up for New Hire reporting:
1. Ensure that a federal identification number and a SUI identificationnumber, if appropriate, is on record for each GRE that submitsNew Hire reports.
See:
GREs: Entering the IRS Identification Number: page 2 – 30
Entering Federal, State, and Local Tax Rules for GREs (OraclePayroll User’s Guide)
2. Enter the name of each GRE’s contact person for new hirereporting.
See: Entering a New Hire Report Contact for a GRE: page 13 – 33
3. When hiring or rehiring employees, indicate whether they
• are to be included in or excluded from new hire reporting
• have a legal obligation to pay child support.
See: Entering New Hire Report Information for Employees: page13 – 34
4. To obtain a report, run the New Hire Report process.
See: Obtaining New Hire Reports: page 13 – 35
Entering a New Hire Report Contact for a GRE
For each GRE, you can maintain information about the contact personfor New Hire reporting. Start this information entry from theOrganization window.
Prerequisite
❑ Set up the GRE in your system.

13 – 34 Oracle Human Resources North American User’s Guide
See: Creating an Organization: page 2 – 20
� To enter a GRE’s contact person for new hire reporting:
1. In the Organization window, query the GRE if it does not alreadyappear there. With the cursor in Government Reporting Entity inthe Organization Classifications region, choose the Others buttonand select New Hire Reporting.
2. Click in the field that appears in the Additional OrganizationInformation window to open the New Hire Reporting window.
3. Select the name of the employee serving as the GRE’s contact fornew hire reporting. The New Hire Report process finds thisemployee’s job title and work telephone number in the databaseand prints the contact name, title and phone number on the report.
Entering New Hire Report Data for Current Employees
Use the People window to start this information entry.
Prerequisite
❑ The system comes with these reasons for excluding a newly hiredemployee from the New Hire report:
• Age less than state minimum
• Wages less than state minimum
• Hours worked less than state minimum
If you require other reasons, enter them for the QuickCode typeUS_NEW_HIRE_EXCEPTIONS.
See: Adding QuickCode Values: page 32 – 3
� To enter New Hire reporting data for current employees:
1. Query the employee in the People window if he or she does notalready appear there. Select the Employment Informationalternative region.
2. The New Hire Status field defaults to null (no entry). If new hirereporting should cover the employee, select Include in New HireReport, so that the next run of the New Hire report for theemployee’s GRE will include this employee. If the report shouldnot cover this employee, select Exclude from New Hire Reporting,and optionally select the reason for this exception.

☞
13 – 35Personal Information
After a run of the New Hire report includes the employee, theentry in the New Hire Status field automatically changes toAlready Reported.
Note: When you implement Oracle HRMS and load your currentemployees into the database, the New Hire Status field defaults tonull for them. The first run of the New Hire report for the stateand GRE of current employees will include these employees unlessyou enter a value of Already Reported or Exclude from New HireReporting in the New Hire Status field for them.
These entries can be accomplished either manually or by means ofa script your MIS staff or Oracle consultant can write in accordancewith your specifications.
3. If this employee is currently obliged to pay child support, check theChild Support Obligation box.
4. Save your work.
Obtaining New Hire Reports
For these reports, states have varying data requirements andformatting requirements. The New Hire reports in Oracle HRMS areset up to meet each state’s data and formatting specifications.
Attention: All states except Tennessee permit submission ofthese reports as computer printouts. For Tennessee, you mustcopy the report information onto the state’s Form DES 230.11C.
Run New Hire reports from the Submit Requests window.
Prerequisite
❑ Complete the setup steps for new hire reporting.
See: Setup Steps for New Hire Reporting: page 13 – 33
� To run a New Hire report for a GRE and state:
1. In the Name field of the Submit Requests window, select New HireReport. If the Parameters window does not open automatically,click in the Parameters field.
2. The As Of date that appears on the report defaults to the effectivedate. Change this default if necessary.
3. Select the GRE and state for which to produce the report.
If the state is Iowa or Texas, also make entries in the fieldsDependent Health Insurance and Waiting Period (Days).

13 – 36 Oracle Human Resources North American User’s Guide
4. For Iowa and Texas, enter Yes in the Dependent Health Insurancefield if the employer offers health care insurance coverage toemployees’ dependents, or No if coverage is not available todependents.
5. For Iowa and Texas, if health care insurance is available todependents, enter in the Waiting Period field the number of daysafter the employee’s hire date that dependents must wait beforeobtaining coverage. This field defaults to zero.
6. Choose Submit.
See Also
New Hire Reporting: page 13 – 32
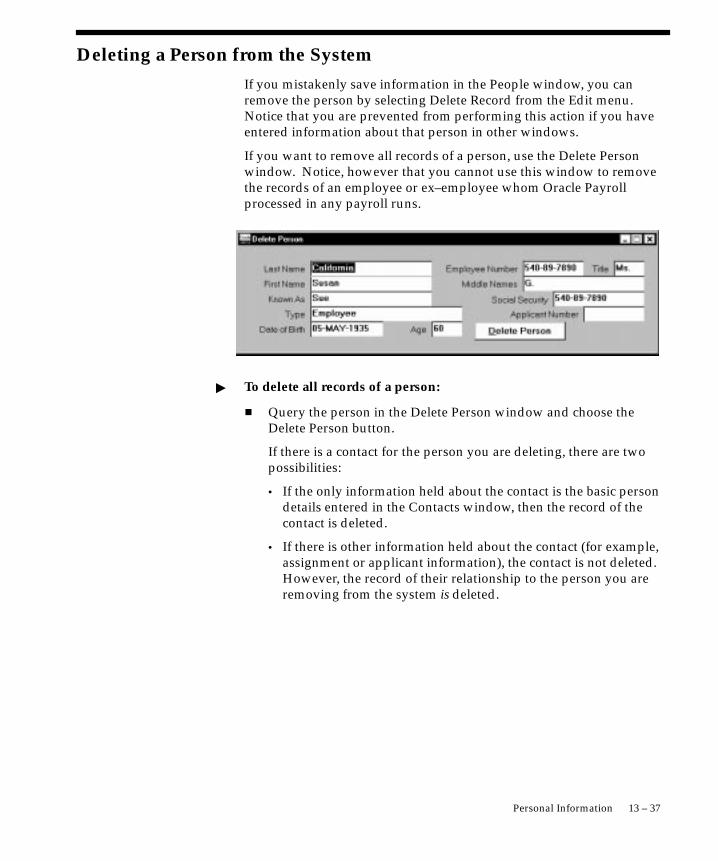
13 – 37Personal Information
Deleting a Person from the System
If you mistakenly save information in the People window, you canremove the person by selecting Delete Record from the Edit menu.Notice that you are prevented from performing this action if you haveentered information about that person in other windows.
If you want to remove all records of a person, use the Delete Personwindow. Notice, however that you cannot use this window to removethe records of an employee or ex–employee whom Oracle Payrollprocessed in any payroll runs.
� To delete all records of a person:
� Query the person in the Delete Person window and choose theDelete Person button.
If there is a contact for the person you are deleting, there are twopossibilities:
• If the only information held about the contact is the basic persondetails entered in the Contacts window, then the record of thecontact is deleted.
• If there is other information held about the contact (for example,assignment or applicant information), the contact is not deleted.However, the record of their relationship to the person you areremoving from the system is deleted.

13 – 38 Oracle Human Resources North American User’s Guide
C H A P T E R
14T
14 – 1Employment Information
EmploymentInformation
he previous chapter focussed on the personal information youhold for all types of people. Employees require additional informationon where they fit into your enterprise, and on their compensation andbenefits.
This chapter describes the key types of employment information, howyou hold them in Oracle HRMS, how you track changes in employmentfor employees, and how you can report and inquire about employmentinformation.

14 – 2 Oracle Human Resources North American User’s Guide
Managing Employment Information
Table 14 – 1 below summarizes the information typically held for anemployee, and how you can hold this information in Oracle HRMS.
Information How to set it up
Job Title or Position Assign the employee to work structures in thenment n o
DepartmentAssignment window.
Location
Grade
Grade Step Placement Enter in the Grade Step Placement window; enter anyspecial ceiling in the Assignment window.
Name of manager orposition to report to
Use a position hierarchy or enter supervisor name in theAssignment window.
Salary Assign to a salary basis in the Assignment window; enteramount in the Salary Administration window.
Medical, Dental and VisionBenefit Plans (without Oracle Payroll)
Define elements or initiate; enter coverage levels plusdefault employer and employee contributions for eachlevel into Benefits Table; link elements; enroll employeesby selecting their coverage levels in the Element Entrieswindow.
Medical, Dental and VisionBenefit Plans (with Oracle Payroll)
Initiate plan deductions using amount rule Benefits Table;enter coverage levels plus default employer and employeecontributions for each level into Benefits Table; linkelements; enroll employees as above.
Other Benefits (without Oracle Payroll)
Define and link elements; make input value entries usingthe Element Entries window or MIX batch entry.
Other Benefits (with Oracle Payroll)
Initiate deductions to pay for benefits; link elements;make input value entries using the Element Entrieswindow or PayMIX batch entry.
Pay Frequency Assign to a payroll in the Assignment window.
Pay Method Accept the default from the Payroll to which the employeeis assigned or select a method in the Personal PaymentMethod window.
Full time/part time status Assign to an employment category.
Standard Work Day Enter in the Assignment window or accept the defaultfrom the organization or position to which the employeeis assigned.
Table 14 – 1 Employment Information

14 – 3Employment Information
How to set it upInformation
Work Schedule Enter in the Miscellaneous alternative region of theAssignment window, or accept the default schedule of theorganization the employee is assigned to.
Accrual of Paid Time Offfor Vacation or Illness
Enroll employee in appropriate accrual plans.
Notice Period You should hold full text procedures and regulationsoutside the system, perhaps using Oracle Book to hold then o m t on onl ne Yo n o te o p o people
Disciplinary procedureinformation online. You can associate groups of peoplewith different rules or procedures using the People Groupkey flexfield.
Costing Enter cost codes for the assignment in the Costingwindow, or accept the default from the organization towhich the employee is assigned.
Costing (with Oracle Payroll)
Enter cost codes together with timecard information usingPayMIX batch entry, or accept the defaults from theemployee’s assignment or organization.
Probation Period Enter in the Assignment window.
Table 14 – 1 Employment Information
Every enterprise needs to track the changes in employment informationfor each employee over the lifetime of their employment:
• Where a change affects a group, the human resource systemmust be able to effect that change for every individual in thegroup according to a set of rules.
• Where a change affects only a few individuals, the system mustallow entry of changes for those individuals.
In Oracle HRMS, you manage these changes through the employeeassignment:
• The assignment connects employees to your enterprise’s workstructures and policies, so that changes to the structures andpolicies are reflected in the employee’s records.
• You can query groups of employees with similar assignments(such as all assignments on grade C2) and make changes for eachemployee in these groups.
• The assignment is datetracked to maintain a work history as theemployee moves through your enterprise.

14 – 4 Oracle Human Resources North American User’s Guide
The Employee Assignment
The assignment is the central concept that relates employees to thestructures in which they work, and the compensation and benefits forwhich they are eligible.
In Oracle HRMS, many of the activities you undertake in humanresource management, such as vacancy management and budgetplanning, are based around assignments and not people. In particular,you enter all earnings, deductions, and other pay–related elements forthe employee assignment, rather than the employee. This makes itpossible to give an employee two or more assignments when this isnecessary.
Figure 14 – 1Employee Assignment
ElementEntries
ÈÈÈÈ
DateTrack
Organization Job Position
Group Grade
Location
Work Assignment
STATUS
Work Structures
Payroll
Employment Category
PayMethod
Costing Reviews GradeStep
Budgets
An employee must have a current assignment at all times. You recordrelocations, promotions, transfers and so on as changes to the existingassignment. These changes are datetracked so that you can view thehistory of changes to an assignment, and can make future–datedchanges in advance.
14 – 5Employment Information
Components of the Assignment
You can use the assignment to define more precisely the place of theemployee in the enterprise, including his or her job, position,organization, location, grade, and supervisor. You can also assign theemployee to any of the employee groups you set up using the PeopleGroup key flexfield, such as pension groups or unions.
You can assign employees to an employment category, such as PartTime – Regular or Full Time – Temporary. Your startup data includesfour categories, and you can add others for the QuickCode TypeEMP_CAT.
You can assign employees to a salary basis and maintain their salaries orwages using the Salary Administration procedure.
Requirements for Payroll Processing
At installations using Oracle Payroll to pay employees, eachemployee’s assignment must include these components:
• a GRE
• an organization with a physical location that is entered in theHRMS database
See: Setting Up Site Locations: page 2 – 2
• a payroll
• an employment category
Additionally, there must be on record for each assignment:
• W–4 and other tax information
• a salary basis and an approved salary entry
Notice that a prerequisite for the establishment of employee taxinformation is entry of a primary US or Canadian residence address forthe employee, and assignment of the employee to an organizationhaving a location with a complete address.
See:
Entering US and Canadian Addresses: page 13 – 13
Setting Up Site Locations: page 2 – 2
See Also
W–4 and Other Tax Data for Employees (Oracle Payroll User’s Guide)

14 – 6 Oracle Human Resources North American User’s Guide
Setting Up Salary Administration: page 9 – 4
Contract Staff and Other Non–Standard Assignments: page 6 – 12
Using Multiple Assignments
Relocations, transfers, promotions and so on go on record asdatetracked changes to employees’ existing assignments; you do notenter new assignments for changes like these.
However if your enterprise permits employees to work in two or moredifferent capacities at once and thereby become eligible for differentbenefits, you can enter additional assignments for them.
For example, if a university professor of history also coaches thebaseball team, receiving additional pay but retaining the same benefits,there is no reason to give him a second assignment. But if he becomeseligible for different benefits as a coach, it is best to give him a separateassignment for this work.
You can maintain multiple assignments for any employee. OracleHRMS separately manages each assignment, together with itsassociated compensation and benefits. When as employee has morethan one assignment, one must be designated as the primaryassignment. By default, this is the first assignment the employeereceives. You can change this default using the Miscellaneousalternative region of the Assignment window.
You can end all assignments except the primary assignment by enteringa status change in the Assignment window. However to end anemployee’s primary assignment you must terminate the employee,using the Terminate window.
To show that an assignment is part time, you use the employmentcategories Part Time – Regular or Part Time – Temporary. You couldalso set up a Full Time Equivalent budget, and weight each assignmentas a fraction of a full time equivalent for the calculation of actualvalues.
Notice that when employees split their time between two departmentsperforming the same job, or fulfill two different roles in oneorganization, you do not need to define two separate assignments tomaintain accurate costing records. You can set up cost allocation todistribute proportions of one assignment’s payroll costs to differentcost centers.
See Also
Human Resource Budgets: page 12 – 2

14 – 7Employment Information
Costing Information at the Organization and Assignment Levels: page11 – 9
Identifying Employees and Assignments
Oracle HRMS uses two unique identifiers for employees:
• Employee Number
• Employee Assignment Number
Employee Number
The Employee Number uniquely identifies every employee in yourBusiness Group.
An employee can have only one Employee Number. You decide howthis number is to be generated when you define your Business Group:
• Automatic
• Manual
• National Identifier (for example, the US Social Security Numberor the UK National Insurance Number)
If you choose automatic or national identifier number generation, theemployee number, by default, remains the same for an employee whohas multiple periods of service. If you choose manual number entry,you can update the number at any time.
The employee name and number appear together in people informationwindows, such as the People window and View Absence Historywindow. In these windows you can select an employee by name or byemployee number.
Employee Assignment Number
The employee assignment number uniquely identifies everyassignment that exists within your Business Group. An employee canhave one or more than one assignment, and therefore more than oneassignment number.
The system automatically generates the assignment number, which isthe same as the employee number by default. You can manuallyoverride the default assignment numbers the system generates. Forexample, you might want to use this number to store a payroll code.

14 – 8 Oracle Human Resources North American User’s Guide
If an employee has a second current assignment, the system alsogenerates the second Assignment Number by default from theEmployee Number, as in the following example:
Samantha Green
1012
1012
1012–02
Employee Name
Employee Number
1st Assignment Number
2nd Assignment Number

☞
14 – 9Employment Information
Entering a New AssignmentEnter new assignments in the Assignment window. You must hireapplicants before you can create an employee assignment for them.The details of the employee assignment default from their acceptedapplication.
� To enter a new assignment:
1. Set your effective date to the start date of the new assignment.
2. Select the organization to which you want to assign the employee.By default, the employee has an assignment either to the BusinessGroup organization, or to the organization to which he or she wasan applicant. If a location is defined for the Business Group orother organization, it also appears as a default.
Note: If you are using Oracle Payroll, the organizations to whichemployees have assignments must have on record, a location witha complete address including a city and state. The system uses thisaddress to determine employees’ work locations for tax purposes.
See: Setting Up Site Locations: page 2 – 2
Attention: If you overwrite a new employee’s defaultassignment to an organization, a window appears asking if thechange is an update or a correction. Select Correction. If youare using Oracle Payroll, it is especially important to selectCorrection, so that the work location for the employee’s taxrecords is correctly recorded.
3. Select a payroll if you are paying the employee using OraclePayroll, or if you intend to record for the employee certain types of

14 – 10 Oracle Human Resources North American User’s Guide
compensation and benefits (represented on the system bynonrecurring elements).
Note: If Oracle Payroll is installed and you are an HR User, youcannot assign employees to payrolls. Ask your systemadministrator to change your HR:User Type profile option if youneed to assign employees to payrolls.
4. Select a grade if you use grade rates or grade scales to determinethe appropriate compensation levels for employees.
5. Select any other components included in this employee’sassignment (job, position, groups, employment category). If youare using Oracle Payroll to pay the employee, the assignment mustinclude an employment category.
6. Select a Status for the assignment. By default a new assignmenthas the status Active Assignment (or an equivalent user statusdefined on your system).
See: Assignment Statuses: page 28 – 5
7. Enter an Assignment Number to uniquely identify the assignment.By default, this number is the same as the Employee Number, forthe employee’s first assignment.
8. Enter the information you want to hold in the alternative regions.
By default, the first assignment entered for an employee is theprimary assignment. To change this default for an employee withmore than one assignment, select the Primary check box in theMiscellaneous alternative region.
Note: You must associate all employee assignments (except anyunpaid voluntary assignments) with a GRE, using the alternativeregion GREs and Other Data.
GREs & Other Data Region
Use the GREs and Other Data alternative region to place the employeeassignment in a GRE, and enter other information.
� To enter information in the window GREs and Other Data:
1. Select the GRE (Government Reporting Entity) for the assignment.
The GRE is the organization holding a federal EmployerIdentification Number (EIN) that is responsible for payingemployees, withholding their taxes, and issuing the Form W–2,Wage and Tax Statement. Additionally, the GRE is responsible forproviding certain government–mandated reporting, such as EEO–1and VETS–100 reports.

14 – 11Employment Information
2. If the employee must submit a timecard, select Yes in the TimecardRequired field and select the name of the employee approving thetimecard.
Oracle Payroll does not process pay for employees required tosubmit timecards who fail to do so.
3. You can select a work schedule for the assignment. This field maydisplay a default work schedule for the employee’s organization.
Oracle Payroll uses the work schedule to prorate pay for theemployee. By scanning the work schedule, the payroll run detectsmid–period assignment start or end dates, and mid–period payincreases or decreases.
4. If this employee assignment is for shift work, select the shiftregularly worked.
5. You can enter the spouse’s salary, which can be a state requirementfor married couples to qualify for reduced rates if they are filingjointly.
6. Select Yes in the Legal Representative field if you send the W–2,Wage and Tax Statement form for this employee to his or her legalrepresentative. A legal representative can be, for example, theemployee’s custodian, parent, or attorney.
7. To override the usual Workers Compensation job code for theassignment, select the override code in the WC Override Codefield.
See: Entering a WC Override Code (Oracle Payroll User’s Guide)
8. Entries in the remaining fields in this window (except ReportingEstablishment) are required at sites with Oracle Payroll that areusing Oracle Payroll to produce state quarterly wage listings.
See: Entering S Record Data for Employees (Oracle Payroll User’sGuide)
Supervisor Region
Enter the name and employee number of the employee’s personalsupervisor.
Note: This information shows the personal supervisor for anemployee and is not updated by the system. Use organizationand position hierarchies to show management reporting lines.
Note: The Auto WGI uses this information.

☞
14 – 12 Oracle Human Resources North American User’s Guide
Probation Period and Standard Conditions Regions
The probation period and standard work day information default fromthe employee’s position. If standard conditions are not defined for theposition, they may default from the employee’s organization orBusiness Group.
Miscellaneous Region
The Internal Address adds address details (such as the floor or officenumber) to the location address.
You can select a reason for adding or changing the assignment. Youdefine valid reasons as values for the QuickCode TypeEMP_ASSIGN_REASON.
Check the Manager check box if the assignment is at the level ofmanager.
Check the Primary check box if it is the employee’s only assignment ormain assignment.
Special Ceiling Region
A special ceiling progression point is the highest point to which theIncrement Progression Points process can automatically progress theemployee.
You can enter a special ceiling if the employee is assigned to a grade,and a grade scale is defined for this grade. This special ceilingoverrides the ceiling defined for the grade scale.
Salary Information Region
Using the Salary Administration window, you can enter a proposedsalary change for an employee, associate this change with aperformance review, and accept or revise the change later. Toadminister an employee’s salary in this way, you first assign theemployee to a salary basis in the Salary Information region.
You can also enter the frequency of salary and performance reviews.
Attention: If you change an employee’s salary basis to a basisthat uses a different salary element, the employee’s existingsalary element entry will be ended. Using the SalaryAdministration window, you should make a new salary entryfor the employee, effective from the date of the salary basischange.

14 – 13Employment Information
See Also
Salary Administration and Performance Reviews: page 9 – 2
Additional Employment Information: page 14 – 20

14 – 14 Oracle Human Resources North American User’s Guide
Changing Assignment InformationWhen an employee experiences changes such as a promotion, transfer,or move from full time to part time, you change a component of theassignment. A change to any of the assignment components producesthe DateTrack prompt.
• If you choose Correction, Oracle HRMS overwrites the existingassignment information.
• If you choose Update, Oracle HRMS records the date and change,and retains the original information.
By changing your effective date on the system, you can see theemployee’s assignment at any point in time. You can also view thechanges made to the assignment over time using DateTrack History.
DateTrack History shows the changes made to one assignment. Usethe Assignment History window to view the history of all theemployee’s assignments, both currently and in any previous periods ofservice.
Effects of Changing an Assignment
Changing any assignment component can have the following effects:
• The employee may lose eligibility for some compensation types,benefits or deductions, and gain eligibility for others. Youreceive a warning that the system automatically ends anyunprocessed element entries for which the employee is no longereligible.
• The employee may have a different level of access to OracleHRMS, since the system’s security is based on assignment towork structures.
• If you change the employee’s grade when a grade step placementexists for the assignment, you receive a warning message that theplacement will be date effectively ended and any futureplacements will be deleted. Also, the special ceiling point field iscleared.
Note: If an assignment change causes the system to changeelement entries, you may not be able to save the change if acurrent or future pay period is closed. You must reopen theperiod or change your effective date to make the change.
Changing Primary Assignments
Over time, a secondary assignment may need to be elevated to aprimary assignment. Most companies have requirements to show thehistory of changes in an employee’s record.

14 – 15Employment Information
This process will create two historical records: one showing asecondary assignment that lasted from x day to y date, and the othershowing that the primary assignment started as one set of componentsand then changed to another set of components (which are the same asthe secondary assignment) as of a particular date.
� To change a primary assignment:
1. Create a new assignment “B” as a secondary assignment.
See Entering a New Assignment: page 14 – 9
2. Set an effective date for the assignment to become the employee’sprimary assignment.
3. Change Assignment “B” to be the primary assignment by selectingthe Primary checkbox in the Miscellaneous alternative region.
See Also
Assignment History: page 14 – 36
Viewing Datetracked Information and History: page 1 – 13
Updating and Correcting Datetracked Information: page 1 – 14

14 – 16 Oracle Human Resources North American User’s Guide
Ending an Assignment
Oracle HRMS does not permit an employee to exist in the systemwithout an active assignment. That is, an employee must always haveat least one active assignment at any point in time. This means that foran employee with just one active assignment, the only way to end theassignment is to terminate the employee, using the Terminate window.
See: Ending Employment: page 14 – 17
For employees with more than one active assignment, you can end allbut one of their assignments by selecting an assignment status of Endor Terminate in the Assignment window. Sites not using Oracle Payrollcan use these two statuses to provide information. For example, Endmay mean that further pay processing cannot occur for the assignment,while Terminate may mean that further processing can occur.Alternatively, these sites can simply use the status End.
At sites using Oracle Payroll, the choice of End or Terminate controlsthe ability to include the assignment in a payroll run after the date theassignment ends, as explained in the procedure below.
� To end one of many assignments:
1. Set your effective date to the actual termination date for theassignment.
2. Update the assignment status to End or Terminate ProcessAssignment (or the equivalent user status on your system):
• Use Terminate Process Assignment (with a Payroll system status ofProcess) if further pay processing of the assignment is requiredafter the date the assignment ends. This leaves the assignment’sfinal processing date open so that further processing can occur.
It is often best to use this status, so that you can process anynecessary adjustments to the final pay for the assignment.
• Use End (with a Payroll system status of Do Not Process) if all payprocessing for the assignment is finished. This makes youreffective date the assignment’s final processing date, after whichno further processing for the assignment can occur.
Note: The End status is not recorded on the assignment; it causesthe assignment to end as of the effective date of entry of this status.
• To temporarily prevent pay processing for this assignment, usethe status Terminate Assignment (with a Payroll system status ofDo Not Process). When no further processing is required and youare ready to set a final processing date, update the status to End.

14 – 17Employment Information
Ending Employment
If an employee is leaving your enterprise, you terminate him or her.This changes the person type to ex–employee and ends all assignments.
If an employee is leaving your agency, you terminate him or her. Thischanges the person type to ex–employee and ends all assignments.
The ex–employee’s records remain in the database. You can reinstate,or rehire, the person to create a new period of service.
Since terminating ends all assignments, the system does not permit youto terminate an employee who has future–dated assignments.
Note: If you have mistakenly added someone to the databaseor you want to remove all records for an ex–employee, you candelete the person in the Delete Person window. You cannotdelete an employee whom Oracle Payroll has processed in apayroll run.
See: Deleting a Person from the System: page 13 – 37
If you mistakenly hired an applicant, you can cancel the hire inthe Person window.
See: Hiring: page 13 – 10
Terminating an Employee
You end employment in the Terminate window.
� To terminate an employee:
1. Optionally, enter the reason for the termination. You can definevalid reasons as values for the QuickCode Type LEAV_REAS.

14 – 18 Oracle Human Resources North American User’s Guide
If you use Oracle Payroll and the employee is deceased, you mustselect the reason Deceased, for recording on the W–2 Wage and TaxStatement.
2. Enter the termination dates. Only the Actual date is required. Thisis the date when the employee’s person type changes toEx–employee. The Notified and Projected dates are for informationonly. The Final Process date is a date after which no further payprocessing for the employee can occur, if you are using OraclePayroll.
At sites including Oracle Payroll, it is best to leave the Final Processdate blank, so that you can make corrections to the final paymentor make other payments to the employee in the future if this isnecessary.
3. When the information is complete, choose the Terminate button tocomplete the termination.
Setup To Allow Processing After Termination
Cancelling a Termination
If the employee decides not to leave, or the date of leaving changes,you can cancel a termination. You can cancel a termination at any timeprovided that you have not rehired the employee. (You rehire anemployee by changing his or her person type to Employee in thePerson window.)
Oracle HRMS reopens the assignments previously closed down andgives each assignment the status it had before termination. It alsorestores other information to its state before termination. For example,it removes the end date put on recurring element entries for theassignment.
Notice, however, that any nonrecurring element entries that weredeleted for processing periods after the termination date cannot beautomatically restored. You must act to reenter these entries.
� To cancel a termination:
� Choose the Reverse Termination button in the Terminate window.
� To change the termination date:
1. Cancel the termination by choosing the Reverse Terminationbutton.
2. Enter a new Actual date and choose the Terminate button.

14 – 19Employment Information
Terminations Report
Oracle HRMS includes a standard report showing the reasons whyemployees left your organization within a specified period.
You run reports from the Submit Requests window.
� To run the Terminations Report:
1. In the Name field, select Terminations.
2. Enter the Parameters field to open the Parameters window.
3. Enter the effective date for which you want to see the report.
4. In the Organization Structure field, select an organization hierarchyname, if you want to see terminations in a number of subordinateorganizations. If there are multiple versions, select a version.
5. In the Parent Organization field, select the parent organizationwithin the hierarchy whose subordinate organizations you want tosee in the report.
If you have not selected an organization hierarchy, use the ParentOrganization field to enter the name of the organization for whichyou want to view terminations.
6. Enter the start and end dates defining the period in which you areinterested.
7. Select at least one termination reason to include in the report.
8. Choose the Submit button.
See Also
Employee Movements Report: page 14 – 34

14 – 20 Oracle Human Resources North American User’s Guide
Additional Employment InformationJust as you can record additional information about people, such astheir addresses, contacts, and skills, you can also record additionalinformation associated with each employee assignment. The mainitems of information are as follows:
• If you are using Oracle Payroll, use the Tax Rules window tomaintain W–4 and other required tax information.
See: Tax Information for an Employee Assignment (Oracle PayrollUser’s Guide)
• You can propose or approve a salary change in the SalaryAdministration window.
Note: To pay employees using Oracle Payroll, they must havean approved salary on record.
See: Entering Salaries and Salary Changes: page 9 – 8
• You can make entries to the earnings, deductions, benefits andother elements the employee is eligible for, using the ElementEntries window.
See: Making Manual Element Entries: page 7 – 41
• If you use a pay scale and progression point system, you canplace the assignment on a pay scale using the Grade StepPlacement window.
See: Placing an Employee on a Grade Step: page 4 – 16
• You can select the cost centers or accounts to which the costs ofthe assignment should be allocated, using the Costing window.
See: Costing Data at the Organization and Assignment Levels:page 11 – 9
• You can use the Assignment Budget Values window to specifythe value of the assignment in terms of headcount, full timeequivalent (FTE), or any other budgets you have defined.
See: Human Resource Budgets: page 12 – 2
• For employees who have assignments to payrolls, you can selectthe methods by which the employee wants to receive pay for thisassignment in the Personal Payment Method window.
See: Entering Payment Methods for an Employee Assignment:page 14 – 22
• You can enter secondary assignment statuses for analysis andreporting, if these have been defined on your system.

14 – 21Employment Information
See: Entering Secondary Assignment Statuses: page 14 – 24

14 – 22 Oracle Human Resources North American User’s Guide
Entering Payment Methods for an Employee Assignment
Your enterprise may pay employees by check, by direct deposit offunds into their bank accounts through the National AutomatedClearing House Association (NACHA), or by a combination of thesepayment types.
Depending on the policies of your enterprise, you may enter severalpayment methods for an employee assignment, so long as these arevalid methods for the assignment’s payroll. For example an employeemay request that you use direct deposit to send 80% of her pay to achecking account, 10% to a savings account, and 10% to a credit union.
Employees with no personal payment method on record receive pay bythe default payment method of their payrolls.
You enter payment methods for employee assignments in the PersonalPayment Method window. You can also use this window to enter thepayee for third party payments.
Note: As the GRE (Government Reporting Entity) is theorganization that pays employees and withholds their taxes,you must associate every employee assignment with a GRE.
See: GREs and Other Data Region: page 14 – 10
Prerequisites
❑ Define all the payment methods available in your Business Groupusing the Organizational Payment Method window.
See: Defining Payment Methods for the Enterprise: page 5 – 3
❑ Select at least one valid payment method for each payroll youdefine in the Payroll window.
See: Defining a Payroll: page 5 – 6
❑ Assign the employee to a payroll.
❑ For third party payment methods, define the payee in theOrganization window (using the classification Payee Organization)or the Contact window (using the relationship PaymentsRecipient).

14 – 23Employment Information
� To enter a personal payment method for remuneration:
1. Set your effective date to the date on which to begin paying theemployee by this method.
2. In the Name field, select a payment method.
3. Enter a number in the Priority field to determine the order forOracle Payroll to use each payment method. It uses the methodwith the lowest number first.
If an employee with two assignments requests the same paymentmethod for both, give them different priority numbers to determinetheir order of use.
4. Enter either the amount or percentage of the assignment’s pay to bepaid by this method.
If the total of the amounts you allocate to payment methods is lessthan the amount to be paid, Oracle Payroll uses the paymentmethod with the highest priority number to pay the excess.
5. The Type field displays Cash, Check or NACHA. If the type isNACHA, open the Bank Details window for entry of informationabout the employee’s bank account.
NACHA Prenote Information for Oracle Payroll
For someone currently employed in your enterprise whose bankinformation NACHA has already verified, enter the verification date inthe Prenote Information region. Oracle Payroll automatically checksthe Issued box, and immediately uses this payment method to routepayments through NACHA.
For a new employee with unverified bank information, leave the Issuedand Date fields blank. Oracle Payroll pays the employee by check

14 – 24 Oracle Human Resources North American User’s Guide
when it next processes pay for the employee, and sends a zero paymentthrough NACHA. It enters this payment date in the Date field andchecks the Issued box.
For a 10–day waiting period, it makes all further payments to thisemployee by check. If during this time the bank informs you oferroneous information, you correct the information and clear the Issuedbox. Then when next processing the employee, Oracle Payroll sendsanother zero payment through NACHA to restart the verificationprocess.
When the 10–day waiting period passes with no notification of errorsand no manual clearing of the Issued box, Oracle Payroll automaticallystarts making regular payments to the employee through NACHA.
� To enter a third party payment method:
1. Set your effective date to the date on which to begin makingpayments using this method.
2. In the Name field, select a third party payment method.
Third party payment methods automatically receive priority 1 (thehighest priority) and you cannot change this. You cannot split athird party payment between different payment methods; thePercentage field always displays 100%.
3. In the Payee region, select an organization or a person.
4. Save your work.
You can select this third party payment method in the Payee Detailsentry value when you enter a deduction to be paid as a third partypayment.
Entering Secondary Assignment Statuses
Your implementation team may have created secondary assignmentstatuses for analysis and reporting of employee or applicantassignments.
For example, suppose your primary status Maternity Leave applies toemployees both when a child is born and when one is adopted, andyou want to study its use in these two cases. To accomplish this youcan set up the secondary statuses Maternity Birth and MaternityAdopt, and enter them for employees taking maternity leave.
You enter secondary statuses for an employee assignment or anapplicant assignment in the Secondary Statuses window.

14 – 25Employment Information
� To give a secondary status to an assignment:
1. Select the status and enter a start date.
2. You can also select a reason for giving the new status.
When a status no longer applies, simply enter an end date.
See Also
Assignment Statuses: page 28 – 5

14 – 26 Oracle Human Resources North American User’s Guide
Inquiring and Reporting on Employment InformationOracle HRMS provides a number of predefined inquiry windows andreports for employment information. You can also create your owninquiries and reports using QuickPaint or other reporting tools.
Listing Assignments
There are three predefined inquiry windows for producing lists ofassignments that match criteria you enter:
• Assignments Folder
• List Assignments
• List People by Assignment
Assignments Folder
Using the Assignments Folder window, you can query lists of currentassignments, past assignments, or both. You select the fields ofassignment information you want to see, and position them in theorder you prefer. For example, you can produce a listing of all currentemployees ordered by organization, and by grade within organization.
The system saves your inquiry and field formatting as a folder so youcan rerun the inquiry at any time. You can make this folder available toall users, or save it as a private folder.

14 – 27Employment Information
Note: The system administrator can create customizedversions of the Assignments Folder window so that you useeach version for one person type only.
The system administrator can also link this window in a taskflow so that you use it to access other windows of employmentinformation. Notice that if you select a past assignment in thefolder, you cannot open other windows of employmentinformation.
List Assignments Window
In this window, you can view current employees and applicants. If youenter the Job, Position, Grade, or Group fields, a window opensprompting you for individual segments of the flexfield. You can enterselection criteria in one or more segments. This means that you cansearch on parts of the job name, for example.

14 – 28 Oracle Human Resources North American User’s Guide
List People by Assignment Window
In this window you can choose whether to view current or formeremployees/applicants, or both. However, you must search on a wholeJob, Position, or Grade name, not on segments of these flexfields.
� To produce lists of assignments:
1. Select values in one or more fields in the top part of the window,and choose the Find button.
The folder in the lower part of the window lists the assignmentsthat match the selection criteria you entered.
2. You can enter a query in the folder to reduce further the list ofassignments displayed. For example, you could run the query”C%” in the Full Name field to view the assignments of peoplewhose names begin with C.
3. You can remove, rearrange, add, or resize fields in the folder if youhave access to the Folder menu.

14 – 29Employment Information
Listing Employees by Organization
In the List Employees by Organization window, you can view lists ofemployees within one organization or within all organizations below aspecified level in a hierarchy you select.
� To list employees in several organizations:
� Select an organization hierarchy and select the highest organizationin this hierarchy for which you want to list employees. Choose theFind button.
� To list employees in one organization only:
� Leave the Organization Hierarchy field blank and select anorganization. Choose the Find button.
You can enter a query in the Employees block to further restrict thelist of employees to be displayed.
Manager Field
The Manager field identifies any employee for whom the Managercheck box is checked in the Miscellaneous region of the Assignmentwindow.
If there is more than one manager in the organization you select, theManager field displays the number of managers. You can view thenames of these managers by choosing the List icon from the Toolbar.

14 – 30 Oracle Human Resources North American User’s Guide
Organization Field
If an employee belongs to more than one organization within thehierarchy you selected, the number of organizations appears in theOrganization field. You can view the names of these organizations bychoosing the List icon from the Toolbar.

14 – 31Employment Information
Listing Employees by Position
There are two windows for viewing lists of employees by position:
• List Employees by Position
• List Employees by Position Hierarchy
List Employees by Position Window
To view employees in a single position, or in all positionscorresponding to a job or organization, use the List Employees byPosition window.
� To view employee names by position:
1. Select any combination of an organization, job, or position.
2. Choose the Find button.
The folder displays the positions that match your selection criteria,together with the holder’s name and employee number.
If there is more than one holder for a position, the number ofholders is displayed in the Holder Name field. You can view thenames of these holders by choosing the List icon from the Toolbar.
Note: You can enter a query in the folder to reduce further the listof positions displayed. You can remove, rearrange, add, or resizefields in the folder if you have access to the Folder menu.

14 – 32 Oracle Human Resources North American User’s Guide
List Employees by Position Hierarchy Window
To view lists of employees in a number of positions within a hierarchy,use the List Employees by Position Hierarchy window.
� To view lists of positions within a position hierarchy:
1. Select a position hierarchy and the highest position in the hierarchyfor which you want to list employees.
2. Choose the Find button.
The folder displays all positions below the one you selected in thehierarchy. It also lists the employees who hold these positions.
If there is more than one holder for a position, the number ofholders appears in the Holder Name field. You can view the namesof these holders by choosing the List icon from the Toolbar.
Note: You can enter a query in the folder to reduce further the listof positions displayed. You can remove, rearrange, add, or resizefields in the folder if you have access to the Folder menu.

14 – 33Employment Information
Assignment Status Report
Use this report to see a list of people assigned to particularorganizations, jobs, positions and grades, with specific assignmentstatuses. If you select both applicants and employees as person types,the report prints out in two sections. Otherwise it prints for the typeyou select.
Run reports from the Submit Requests window.
� To run the Assignment Status Report:
1. In the Name field, select Assignment Status Report.
2. Enter the Parameters field to open the Parameters window.
3. Enter the effective date for which you want to see the report.
4. Leave the Organization Structure field blank to see informationabout all organizations. Select an organization hierarchy name tosee assignment statuses in a number of subordinate organizations.
5. If there are multiple versions, select a version.
If the effective date lies between the version’s start and end dates,the report is effective as of this date. If it lies outside these dates,the report is effective as of the start date of the version you select.
6. Leave the Parent Organization field blank to see information aboutall organizations. Select a name in this field to see information onall subordinate organizations in the hierarchy.
Note: You must enter a value in this field if you have entered avalue in the Organization Structure field, and you must leave thisfield blank if you left that field blank.
7. Make entries in the Group, Job, Position, Grade and Payroll fieldsas required.
If you leave all segments of the Group flexfield blank, you seeinformation about employees in any groups. If you leave onesegment blank you see employees with any value for that segment.
8. Enter Yes in the Primary field if you want to report on primaryassignments only. Leave blank to include all assignments.
9. Select Employee, Applicant or Both in the Person Type field. Thisdetermines which sections of the report are printed.
10. Select up to four assignment statuses, or leave blank to listemployees and/or applicants with any assignment status.
11. Choose the Submit button.

14 – 34 Oracle Human Resources North American User’s Guide
Employee Summary Report
This report is a current summary of information for an employee,covering addresses, contacts, period of service, assignments, specialinformation, personal payment methods, and element entries.
Run reports from the Submit Requests window.
� To run the Employee Summary Report:
1. In the Name field, select Employee Summary.
2. Enter the Parameters field to open the Parameters window.
3. Enter the effective date for which you want to see the report.
4. Enter the name of the employee whose summary you want to see.
5. Choose the Submit button.
See Also
Full Personal Details Report Set: page 13 – 31
Employee Movements Report
There are two versions of the Employee Movements Report:
• Employee Organization Movements Report shows employeemovements into and out of a particular organization orhierarchy.
• Employee Payroll Movements Report shows employeeassignment changes to and from a particular payroll.
Both versions list the following movements: New Hires, Terminations,Transfers In, and Transfers Out. You can use this information tomonitor employee assignment changes for turnover analysis.
Run reports from the Submit Requests window.
� To run the Employee Organization Movements Report:
1. In the Name field, select Employee Organization MovementsReport.
2. Enter the Parameters field to open the Parameters window.
3. Do one of the following:

14 – 35Employment Information
• If you want to see information for a whole organizationhierarchy, select the Organization Hierarchy name and versionnumber, and leave Parent Organization blank.
• If you want to see information for one organization, select theorganization name in the Parent Organization field, and leaveOrganization Hierarchy name and version number blank.
• If you want to see information for an organization and itssubordinates in a particular hierarchy, select the name of theorganization and the name and version of the organizationhierarchy to which it belongs.
4. Select the period for which you want to see the information.
5. In the Employee Detail field, do one of the following:
• Select Summary Only to see total numbers for each category ofchange.
• Select Order by Assignment Number or Order by EmployeeName to see a full listing of employee assignments for NewHires, Terminations, Transfers In, and Transfers Out. Thisinformation will be listed in the order you select.
6. Choose the Submit button.
� To run the Employee Payroll Movements Report:
1. In the Name field, select Employee Payroll Movements Report.
2. Enter the Parameters field to open the Parameters window.
3. Select the payroll and payroll period for which you want to see theinformation.
4. In the Employee Detail field, do one of the following:
• Select Summary Only to see total numbers for each category ofchange.
• Select Order by Assignment Number or Order by EmployeeName to see a full listing of employee assignments for NewHires, Terminations, Transfers In, and Transfers Out. Thisinformation will be listed in the order you select.
5. Choose the Submit button.
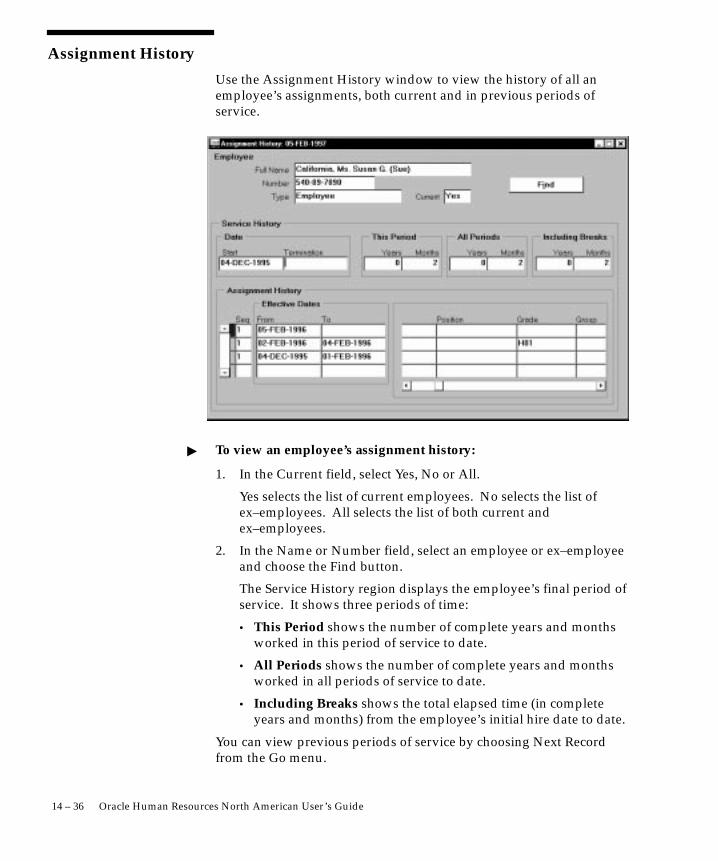
14 – 36 Oracle Human Resources North American User’s Guide
Assignment History
Use the Assignment History window to view the history of all anemployee’s assignments, both current and in previous periods ofservice.
� To view an employee’s assignment history:
1. In the Current field, select Yes, No or All.
Yes selects the list of current employees. No selects the list ofex–employees. All selects the list of both current andex–employees.
2. In the Name or Number field, select an employee or ex–employeeand choose the Find button.
The Service History region displays the employee’s final period ofservice. It shows three periods of time:
• This Period shows the number of complete years and monthsworked in this period of service to date.
• All Periods shows the number of complete years and monthsworked in all periods of service to date.
• Including Breaks shows the total elapsed time (in completeyears and months) from the employee’s initial hire date to date.
You can view previous periods of service by choosing Next Recordfrom the Go menu.

C H A P T E R
15O
15 – 1Recruitment
Recruitment
racle Human Resources provides a comprehensive recruitmentmodule enabling you to integrate all your recruitment processes, fromidentifying vacancies to hiring new employees.
Using Oracle Human Resources, you can set up your recruitmentprocedures exactly as your enterprise requires. In particular, you haveflexible control over the following key areas:
• recruitment and selection procedures
• security of applicant information
• handling of bulk applications
• generation of standard letters to applicants at different stages ofthe recruitment process

15 – 2 Oracle Human Resources North American User’s Guide
The Recruitment CycleWithin any recruitment function, there is a common cycle of tasks,illustrated in Figure 15 – 1. There are three main areas: preparation,selection, and appointment, supported throughout by the production ofstandard letters and reports.
Figure 15 – 1The Recruitment Cycle
Identify
Appoint NewEmployee
Issue
and Reports
StaffingRequirements
RunRecruitment
Activities
EnterApplicants
TrackApplicantProgress
Offeror
Reject
Preparation Selection
Standard LettersRaiseRequisitionsfor Vacancies
• Preparation is concerned with the identification of a vacancy, theauthorization to take some action, and running one or morerecruitment activities.
• Selection begins with the receipt of applications and ends withthe issuing of offer or rejection letters. You define your ownstages of the selection process and track applicants through thestages.
• Appointment takes the applicant from the recruitment process toemployee administration where the initial tasks include enteringterms and conditions and payroll information. Oracle HRMSmakes this simple since recruitment, human resourceadministration, and payroll management can all be handled fromthe same personal records.
• Each task in the cycle is supported by automation of thestandard paperwork that accompanies any recruitment process.
An analysis of your own detailed working practices will help you todecide whether to use Oracle Human Resources at a basic or an

15 – 3Recruitment
advanced level within each area. At the same time, you should identifythe sequence of tasks performed by your users, from which you canderive one or more Recruitment task flows.
See Also
Recruitment Preparation: page 15 – 4
Selection Processing: page 15 – 10
Using Letters to Manage Recruitment and Enrollment: page 33 – 9
Linking Windows in Task Flows: page 31 – 9

15 – 4 Oracle Human Resources North American User’s Guide
Recruitment Preparation
Selecting applicants for recruitment is an extended process. You haveto plan and coordinate a series of steps from identifying vacancies toorganizing recruitment events.
Figure 15 – 2Recruitment Preparation
Estimated Cost
Action to be taken
Actual Cost
Work Structures
Makes a speculative
Application
Vacancy
Leadingto a
Results in
Part ofanother
RecruitmentActivity
Identification of a
Appliesfor a
Raised aspart of a
Requisition
NameRaised byVacancies
Action to be taken
Estimated costActual cost Recruitment
Activity
Action to be taken
Estimated costActual cost
Applicant
Identifying Staffing Requirements
Using Oracle Human Resources, you can define budgets to reveal theheadcount requirements within your enterprise, and then raiserequisitions for the vacancies you require. You might have priorauthorization to maintain your headcount or you might need to getauthorization when you identify the vacancy.
15 – 5Recruitment
Oracle Human Resources lets you record and use the information youneed to raise a requisition at the time you need it. This can beparticularly useful where an applicant takes the initiative by making aspeculative approach. Your authorized vacancy list is clear and up todate at all times.
You can view lists of vacancies of a particular status, or a selectedorganization, location, job, position, grade, group, recruiter, orrecruitment activity.
Skill Requirements and Specifications
If you want to match applicants with skill requirements in the selectionprocess, you can enter competency requirements for jobs, positions andorganizations. You can then use the web–based suitability search tocompare the competency profiles of your applicants against therequirements of the vacancy. You can also enter deployment factors(such as relocation and willingness to travel) against jobs and positions.In the same way, you can record the deployment choices of yourapplicants.
You can hold a person specification or a job description on the systemas attachments or using user–defined fields (called descriptive flexfieldsegments). As with requirements, these can be held at both job andposition level.
Running Recruitment Activities
The authorization to recruit normally results in a specific recruitmentactivity, such as an advertisement. This might be part of some sharedrecruitment activity, such as an advertisement for more than onevacancy. The shared activity, in turn, might be part of anotherrecruitment activity, such as a Graduate Recruitment Campaign.

15 – 6 Oracle Human Resources North American User’s Guide
OrganizationJob Position
Grade
Recruiting forDates
Contacts
Recruitment Campaign94/95
Planned Cost
Actual Cost
Figure 15 – 3Recruitment Activities
OrganizationJob Position
Grade
Recruiting forOrganization
Job PositionGrade
Recruiting for
OrganizationJob Position
Grade
Recruiting forOrganization
Job PositionGrade
Recruiting forDates
Contacts
Newspaper
Planned Cost
Actual Cost
Dates
Contacts
Advertising
Planned Cost
Actual Cost
Dates
Contacts
Graduate Intake
Planned Cost
Actual Cost
Dates
Contacts
College Event
Planned Cost
Actual Cost

15 – 7Recruitment
Raising Requisitions for Vacancies
Use the Requisition and Vacancy window to record requisitions,vacancies, and openings within your enterprise. Notice that arequisition can be for one or more vacancies, and a vacancy can haveone or more openings.
Prerequisites
❑ Use the QuickCode Type VACANCY_STATUS to define the stagesthrough which vacancies pass from being first raised to being filled.Examples might be Authorized, Advertised, and Shortlisted.
� To create a requisition and vacancy:
1. Enter the requisition and save it before beginning to define thevacancy.
2. Enter a name and number of openings for the vacancy.
3. Optionally enter a description and select a status.
4. You can select one or more assignment components to define thevacancy.
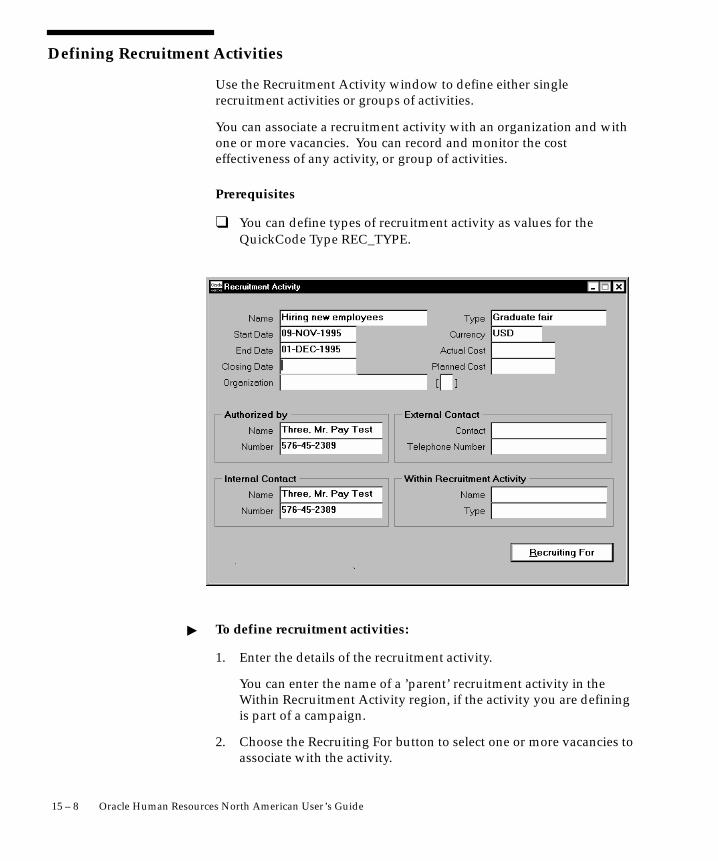
15 – 8 Oracle Human Resources North American User’s Guide
Defining Recruitment Activities
Use the Recruitment Activity window to define either singlerecruitment activities or groups of activities.
You can associate a recruitment activity with an organization and withone or more vacancies. You can record and monitor the costeffectiveness of any activity, or group of activities.
Prerequisites
❑ You can define types of recruitment activity as values for theQuickCode Type REC_TYPE.
� To define recruitment activities:
1. Enter the details of the recruitment activity.
You can enter the name of a ’parent’ recruitment activity in theWithin Recruitment Activity region, if the activity you are definingis part of a campaign.
2. Choose the Recruiting For button to select one or more vacancies toassociate with the activity.

15 – 9Recruitment
Viewing Vacancies
Use the View Vacancies window to see lists of vacancies for anorganization, location, job, position, grade, group, recruiter, orrecruitment activity. You can also see all vacancies of a particularstatus.
� To view vacancies:
1. Enter selection criteria in any of the fields in the top half of thewindow.
Leave all these fields blank to see all vacancies in your BusinessGroup.
2. Choose the Find button to see the vacancies that correspond to thecriteria you have entered.
In the folder you can enter a query to further restrict the vacanciesdisplayed. If you have access to the Folder menu, you can alsorename, resize, and reorder the fields displayed.
See Also
Requisition Summary Report: page 15 – 22

15 – 10 Oracle Human Resources North American User’s Guide
Selection Processing
The selection process begins with the receipt of applications and endseither with the hiring of applicants into the vacancies to which theyhave applied, or the terminating of their applicant assignments.During the process applicants move through a number of stages, eachof which is monitored, controlled, and documented as required.
Entering Applicants
Oracle Human Resources lets you record addresses, personal details,application information, competencies, qualifications, school andcollege attendances, and work choices for all applicants. Notice thatyou track an application as one or more assignments for the applicant,similar to employee assignments. This has several advantages:
• It speeds up hiring the successful applicant since most of theimportant information is already on the system.
• It makes it easy to track several applications from one applicantas separate assignments.
• It enables you to enter an application from an existing employee:you update the Person Type to Employee and Applicant (or youruser name equivalent) and enter the application as an applicantassignment.
Reporting on Application Information
To get a comprehensive report about an applicant, you can run the FullApplicant Details report from the Submit Requests window.
To see the applicants who have applied for a particular vacancy, orgroup of vacancies, run the Requisition Summary Report.
See Also
Requisition Summary Report: page 15 – 22

15 – 11Recruitment
Making Quick Applicant Entries
Use the Applicant Entry window to enter basic person information anda single assignment for an applicant. To make this window quick andeasy to use, you can only enter one address and one assignment for theapplicant. If you need to update this information or add furtherinformation, use the Person and Application windows.
� To record an application quickly:
1. Enter the applicant’s name and an identifying number recognizedby the system.
Note: If your Business Group uses automatic number generation,the applicant number automatically displays when you save yourentries in this window.
2. Select a status for the application. By default a new application hasthe status Active Application (or an equivalent user status definedon your system). All other fields are optional.
3. In the Further Information field, you can enter Ethnic Origin, VisaType (for non–citizens eligible for employment in the US), I–9information and Veteran Status.
4. To enter an address, select a national address Style.
A window opens with the address format for the country youselect. Enter the address lines and choose OK.
15 – 12 Oracle Human Resources North American User’s Guide
5. The Date Received defaults to your effective date, but you canchange it. This is the date the applicant’s record will begin.
6. You can enter the name of the applicant’s current employer.
7. You can select a recruitment activity. If there is only one vacancyfor the activity, the vacancy details appear automatically.
8. If you select a vacancy, applicant assignment information isdisplayed from the vacancy record. You can add to thisinformation or change it. However, if you change it, the vacancyfield clears.
9. If you do not select a vacancy, you can enter assignmentinformation in the Vacancy Applied For region. If you do not enteran Organization, it defaults to the Business Group.
Entering Full Application Information
Use the People window and the Application window to enter anapplication if you need to do any of the following:
• record multiple assignments for an applicant
• enter Government Extra Information
• record more than one address for an applicant
• update applicant information
For other applications, you can use the Applicant Entry window.
Prerequisites
❑ If you want to use your own status names to record the stages ofyour selection process, enter user statuses for the predefinedapplicant assignment statuses.
See: Tracking Applicant Progress: page 15 – 15
❑ If you want to hold reasons for giving a status to an applicantassignment, enter the valid reasons as values for the QuickCodeType APL_ASSIGN_REASON.
See: Adding QuickCode Values: page 32 – 3

15 – 13Recruitment
� To enter an application:
1. Set your effective date to the date you want the applicantassignment to begin, such as the closing date for applications.
2. Enter personal information for the applicant in the People window.
See: Entering a New Person: page 13 – 5
3. Open the Application window. If you change the Date Received,this changes the effective start date for the applicant. You can enterthe date you expect to hire the new recruit.
You cannot enter a Termination date in this window. You must usethe Terminate Applicant window.
4. You can enter the name of the applicant’s current employer.
5. If the application is for a specific vacancy, select the recruitmentactivity and vacancy. Assignment information from the vacancy isdisplayed. You can add more assignment details.
6. Select an applicant assignment status and the reason for giving thisstatus. The applicant assignment status is the key to processing theapplication.
7. Optionally you can enter information, in the alternative regions,about:
• the recruiter who is responsible for handling the application

15 – 14 Oracle Human Resources North American User’s Guide
• the supervisor of the assignment
• the standard conditions and probation period for the assignment
• the source of the application, such as the type of recruitmentactivity, or the organization that recommended the applicant, orthe employee who referred the application
Additional Application Information
If you want to hold further details of the applicant’s skills, experience,or current situation, you can choose how to do this when youimplement Oracle Human Resources. For example:
• Enter qualifications, deployment choices, and a personalcompetence profile for applicants. You can then performsuitability matches on these people using the web–basedSuitability Match option (part of Line Manager Direct Access).
See: Competence Profiles, Qualifications, Schools Attendancesand Work Choices: page 13 – 19
• Use attachments to hold free text information.
• Set up segments of the Additional Application Detailsdescriptive flexfield to hold the information you require.
See: Adding New Fields to Windows: page 31 – 2

15 – 15Recruitment
Tracking Applicant Progress
The progress of all applicants through the selection process iscontrolled by applicant assignment statuses. Each stage of the selectionprocess is identified by a single assignment status. It is by changing thestatus that you can record the progress of any applicant assignment.
Figure 15 – 4The Applicant Assignmentand its Status
Organization Job Position
Group Grade
Location
Applicant Assignment
Applicant
First InterviewSecond Interview
Ability TestProvisional Offer
OfferAcceptedRejected
Withdrawn
STATUS
DocumentationReports
Standard LettersInterview Lists
Statistics
Actionto beTaken
Applicant Assignment Statuses
As with employee assignment statuses, there is a set of system statusesthat are used in various internal processes:
• Active Application: This is the normal status of an application as itprogresses through the selection stages.
• Offer: Use this status for your preferred candidate when an offerhas been made.
• Accepted: Update the preferred candidate’s assignment toAccepted status when you are ready to hire him or her in thePerson window.

15 – 16 Oracle Human Resources North American User’s Guide
• Terminate Application. Use this status to end an applicantassignment. If there is only one assignment for the applicant,you cannot change the status to Terminate Application. Youmust make the applicant an ex–applicant in the TerminateApplicant window.
Note: The Terminate Application status is not recorded on theapplicant assignment; it causes the assignment to end.
On your system, you can give these statuses different names (calledUser Statuses), appropriate to your enterprise.
See: Defining Assignment Statuses: page 28 – 7
Using Primary Applicant Assignment Statuses
These statuses are Primary because they determine how the assignmentis processed and handled by the system. An assignment must haveone, and only one, primary status.
You can update an applicant assignment status in the followingwindows:
• Application
• Applicant Interview
• Terminate Applicant
When you change the status, you can enter a reason for the change.Define valid reasons as values for the QuickCode TypeAPL_ASSIGN_REASON.
You can also change the status of a group of applicants in the MassUpdate of Applicants window. For example, if you want to call 20applicants to a selection test and to reject all other applicants for thevacancy, you can do this in the Mass Update of Applicants window.
Changing a primary applicant assignment status can trigger thegeneration of a standard letter.
Using Secondary Applicant Assignment Statuses
There may also be Secondary statuses set up on your system. You canuse secondary statuses for analysis and reporting, but they are not usedfor processing.
See: Defining Secondary Statuses: page 28 – 8
You can give an assignment multiple secondary statuses. You entersecondary statuses in the Secondary Statuses window.
See: Secondary Statuses: page 28 – 6

15 – 17Recruitment
Interviewing Applicants
Typically, you track applicant progress through a series of interviewsand update the status of the application after each interview. You candefine different types of interview (such as First Interview, or SelectionTest) as values for the QuickCode Type APL_INTERVIEW_TYPE.
You can schedule these interviews and update the applicant assignmentstatus using the Applicant Interview window.
You can report on applicants and their interview schedules using theRequisition Summary Report.
� To schedule applicant interviews:
1. Select an interview type, and enter the date of the interview in theStart Date field.
You can also select a location and enter times and an end date.
2. If you want to associate an applicant assignment status changewith the interview, enter it in the New Status field. This creates adatetracked update to the applicant assignment.
You cannot enter a status when:
• there are future changes to the assignment
• the interview date is the date when the active application statusbegan

15 – 18 Oracle Human Resources North American User’s Guide
• you are updating an existing interview record
Other Events Windows
You can also manage events attended by multiple applicants, such astests or presentations. Define types of applicant event as values for theQuickCode Type APL_EVENT_TYPE. Create the events and bookapplicants onto them using the Event Bookings window.
See: Setting Up Events: page 27 – 2
You can view all the events an applicant has attended or is scheduledto attend by querying the applicant in the Person window and openingthe Book Events window. You can also enter new bookings here.
See: Managing Bookings and Attendance: page 27 – 3

15 – 19Recruitment
Mass Update of Applicants
The Mass Update of Applicants window contains a folder in which youcan view all applicants and their assignment components and status.You can query groups of applicant assignments and update them as agroup. There are two types of mass update you can perform:
• You can refer a group of applicants from one recruiter to another.The recruiter is the person responsible for handling theapplication.
• You can change the status of the applicant assignments.
Note: If you use the RPA to process an appointment for anapplicant, you must change the applicant’s status to Accepted.The effective date of an applicant must be a least one day priorto the RPA Appointment Effective Date.
� To update a group of applicant assignments:
1. Select Find from the Query menu to open the Find Applicationswindow. Enter selection criteria for the group of applicants youwant to update and choose the Find button.
2. Do one of the following:
• If you want to update all or most of these applicant assignments,choose the Select All button. Then uncheck the Mark check boxfor any assignments that you do not want to update.
• If you want to update less than half of this group of assignments,check the Mark check box for each assignment you want toupdate.
3. Choose the Update button.
4. In the Update window:
• If you want to update the status of the selected assignments,select the new status.
• If you want to refer these applicants to a new recruiter, select thename of the Recruiter.
5. Choose OK to effect the update.
Hiring Applicants
When you have made a job offer to an applicant and they haveaccepted, you update the applicant assignment status to Accepted. You

15 – 20 Oracle Human Resources North American User’s Guide
can change your effective date to the date you plan to hire theapplicant, and change their person type to Employee. You changeperson type in the People window.
See Also
Hiring: page 13 – 10

15 – 21Recruitment
Ending Applications
If you have rejected an applicant assignment, you can update its statusto Terminate Application. However, an applicant must be left with oneactive assignment. To reject an applicant’s last assignment, you mustterminate the applicant. This updates their person type toEx–applicant.
You terminate an applicant in the Terminate Applicant window.
Prerequisites
❑ If you want to hold reasons for rejecting applicants, enter the validreasons as values for the QuickCode Type TERM_APL_REASON.
� To terminate an applicant:
1. Enter the termination date.
2. Enter the status Terminate Application, or your User Statusequivalent.
This is not required, but you might use it to trigger generation of arejection letter.
See: Using Standard Letters to Manage Recruitment andEnrollment: page 33 – 9
Note: This status is not recorded on the applicant assignment, so itis not displayed if you requery the termination.
3. If you want to record the reasons for rejecting applicants, select areason.
4. Choose the Terminate button.

15 – 22 Oracle Human Resources North American User’s Guide
Cancelling a Termination
If you have terminated an applicant in error, you can cancel thetermination in the Terminate Applicant window. Simply choose theReverse Termination button.
Note: You cannot cancel a termination if there are any futurechanges to the applicant’s personal record.
Requisition Summary Report
Use this report to see lists of applicants and their interview schedulesfor:
• all vacancies in a requisition, or
• all vacancies associated with a recruitment activity, or
• vacancies in a particular organization, location, job, position,grade, and/or group, and vacancies of a selected status
You can further restrict the applicants listed in the report by specifyingstart and end dates for the applicant assignments, and by selecting anapplicant assignment status.
Each page of the report lists the applicants for one vacancy. This isdefined as a unique combination of assignment components(organization, location, job, position, grade, and group). The vacancyhas a name if you have set up vacancies on the system using theRequisition and Vacancy window, but this is not essential for runningthe report.
You run reports from the Submit Requests window.
� To run the Requisition Summary Report:
1. In the Name field, select Requisition Summary Report.
2. Enter the Parameters field to open the Parameters window.
3. Enter the effective date for which you want to see the report.
4. Optionally enter start and end dates to restrict the applicantassignments shown in the report.
5. To further restrict the scope of the report, you can select values inany of the other fields defining the vacancies to report on. Noticethat you can select values for individual segments of the PeopleGroup key flexfield.
6. Choose the Submit button.

C H A P T E R
16
T
16 – 1Overview of Government–Mandated HR Reporting
Overview ofGovernment–MandatedHR Reporting
oday an increasingly important responsibility of the HumanResources function is the maintenance of information for andproduction of government–mandated HR reporting, such as EEO–1and OSHA reporting.
This chapter presents an overview of the facilities available in OracleHuman Resources for producing these reports. The following chapterexplains how to set up and produce specific reports.

16 – 2 Oracle Human Resources North American User’s Guide
Government–Required HR ReportingToday employers must prepare a number of reports about theiremployees for submission to various government authorities, or forinternal use to ensure legislative compliance. The purpose of several ofthese reports is to measure the extent to which various identifiablegroups of people are obtaining and advancing in employment:
• Equal Employment Opportunity (EEO) and Affirmative ActionPlan (AAP) reporting focuses on the employment andadvancement of employees by their gender and ethnic origin
• Federal Contractor Veterans Employment (VETS–100) reportingis concerned with the employment and advancementopportunities of disabled and Vietnam era veterans
• Americans with Disabilities Act (ADA) reporting is concernedwith employment opportunities for people with various types ofdisabilities, and employers’ provision of reasonableaccommodations enabling these people to perform the essentialfunctions of jobs or positions.
Other federal–level reporting, mandated by the Occupational Safetyand Health Administration (OSHA), is concerned with the extent andseverity of work–related injuries and illnesses affecting employees.
To satisfy the requirements for these different reports, HR departmentsneed the ability to maintain specialized information about employeesand their jobs, and to group employees in different ways, for example,by their work location or establishment, or by their affirmative actionplan.
Oracle Human Resources provides the means to organize and maintainthe information needed for government–mandated HR reporting, andto produce EEO–1, AAP, VETS–100, ADA, and OSHA reports.
Note: Many states now require employers to submit New Hirereports, primarily to ensure that employees meet court–orderedchild support obligations by deductions from their pay. Newhire reporting is normally the responsibility of the payrolldepartment.
See: New Hire Reporting: page 13 – 32
See Also
EEO–1 (Equal Employment Opportunity) Reporting: page 17 – 2
AAP (Affirmative Action Plan) Reporting: page 17 – 12
VETS–100 (Federal Contractor Veterans Employment) Reporting: page17 – 21

16 – 3Overview of Government–Mandated HR Reporting
ADA (Americans with Disabilities Act) Reporting: page 17 – 28
OSHA (Occupational Safety and Health Administration) Reporting:page 17 – 34
Reporting Categories and Statuses
Some reporting places no restrictions on the employment category orassignment status of the employees to be covered. However otherreporting, such as that for VETS–100 and ADA, must cover onlynon–temporary, full time or part time employees at a non–terminatedassignment status.
As a means to identify these employees, you register for the BusinessGroup as Reporting Categories, your employment categories that includenon–temporary, full time or part time employees. You register asReporting Statuses, your assignment statuses that includenon–terminated employees.
See Also
Registering Reporting Categories and Statuses: page 16 – 13
Reporting Organizations
You often must issue separate reporting for each GRE in your BusinessGroup. Sometimes you must further break down data for a GRE by theestablishments (hiring locations, units, or work sites) where itsemployees are based. A GRE can include employees working inseveral different establishments, and conversely, a given establishmentcan include employees in several different GREs.
For reporting purposes, an establishment may be a single physicallocation, a complex of work sites in a locality, or even all the sitesincluded in a relatively large geographic area. For OSHA reporting,there may be two or more separate establishments at one physical worklocation if distinctly different types of operations are carried out at thelocation. To represent establishments for reporting, you giveorganizations the classification Reporting Establishment.
A GRE whose employees all work at the same establishment issimultaneously a GRE and a Reporting Establishment. For GREs withemployees at different establishments you define a number of separate

16 – 4 Oracle Human Resources North American User’s Guide
Reporting Establishments. To identify the establishment serving as theheadquarters organization, you give a Reporting Establishment theadditional classification of Corporate Headquarters.
AAP reporting requires breakdowns of employees by the affirmativeaction plans covering them, instead of breakdowns by establishment.To meet this requirement, you give organizations the classification AAPOrganization, to represent individual affirmative action plans.
See Also
Setting Up Reporting Organizations: page 16 – 15
OSHA Establishments: page 17 – 35
Establishment Hierarchies
To determine for reporting purposes which employees belong to aparticular GRE and reporting organization, you construct establishmenthierarchies, and supply them as parameters to the processes thatproduce particular reports.
A typical establishment hierarchy has a GRE at the top, ReportingEstablishments at the next level, and HR Organizations subordinate tothe Reporting Establishments. Report processes normally countemployees as belonging to the Reporting Establishment to which theirHR Organizations are subordinate in an establishment hierarchy.
Figure 16 – 1Example Establishment Hierarchy Thurso Inc.
Business GroupGRE
Thurso Mfg.Reporting
Establishment
(HR Orgs.)(HR Orgs.)
Thurso DenverReporting
Establishment
(HR Orgs.)

16 – 5Overview of Government–Mandated HR Reporting
Looking at the example establishment hierarchy above, a report processwith this hierarchy as a parameter counts the employees in the HROrganizations subordinate to the Thurso Mfg. ReportingEstablishment as based at that establishment, and those in HROrganizations subordinate to Thurso Denver as based at thatestablishment.
Establishment Overrides
Report processes using establishment hierarchies can take exceptionalcases into account. You can enter an override Reporting Establishmentfor any employee. When a process finds an override, it counts theemployee as part of the override Reporting Establishment.
For example, if reports should include an employee in the count forThurso Denver, even though he is currently assigned to an organizationsubordinate to Thurso Mfg, you simply enter Thurso Denver as hisoverride establishment.
Note: The establishment override functionality does not applyto AAP reporting. This is because the fundamental units ofAAP reporting are affirmative action plans, not ReportingEstablishments.
See Also
Entering Establishment Overrides: page 16 – 23

16 – 6 Oracle Human Resources North American User’s Guide
Varieties of Establishment HierarchiesFor most government–mandated HR reporting, you set up for a givenGRE either a single–establishment hierarchy, or multiple–establishmenthierarchies. If you have multiple establishments, you may also need aheadquarters hierarchy for the establishment representing your enterpriseheadquarters.
The same basic rule applies to all the establishment hierarchies youbuild (but not to the AAP hierarchies used for AAP reporting). Thisrule is:
In a non–AAP establishment hierarchy, an organization classified asa Reporting Establishment can never be subordinate to anotherorganization classified as a Reporting Establishment.
This means that in an establishment hierarchy, a GRE/ReportingEstablishment can be the top organization, or Reporting Establishmentscan be subordinate to a GRE (and optionally to HR Organizations). Buta Reporting Establishment cannot be subordinate to another ReportingEstablishment.
AAP Establishment Hierarchies
Establishment hierarchies constructed for AAP reporting areexceptional because this reporting is based on the affirmative actionplans existing within a GRE. This means that in AAP establishmenthierarchies:
• establishments appear as subordinates of AAP Organizationsrepresenting the affirmative action plans
• AAP Organizations (which may also be ReportingEstablishments) can appear at various levels in the hierarchy, andcan be subordinate to other AAP Organizations (which may alsobe Reporting Establishments).
See: AAP Hierarchies: page 17 – 13
See Also
Setting Up Establishment Hierarchies: page 16 – 21
The Single–Establishment Hierarchy
In some cases, all the employees of a Business Group/GRE or a GREwork at, or from, a single establishment, and you use a
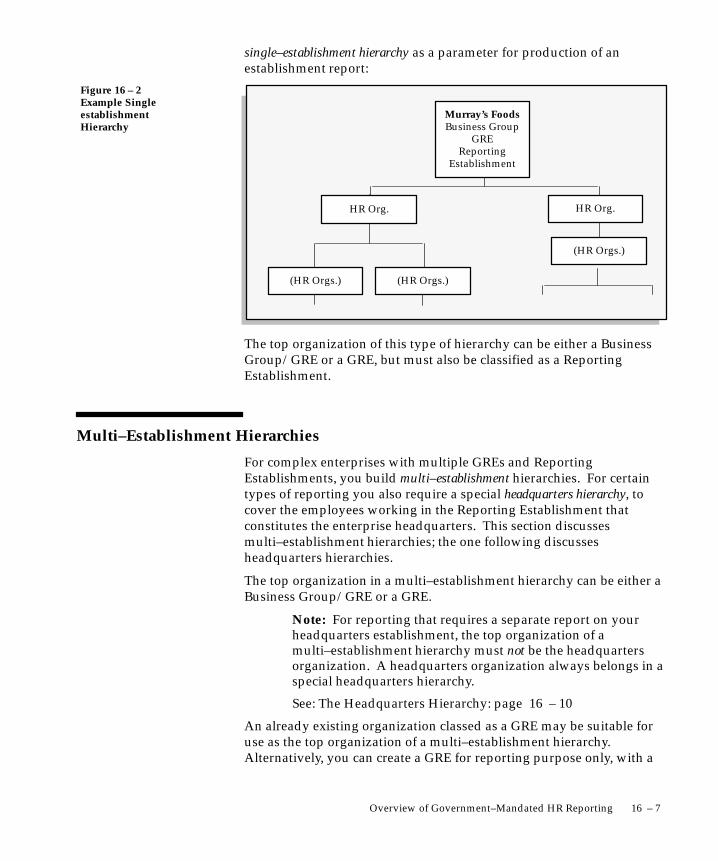
16 – 7Overview of Government–Mandated HR Reporting
single–establishment hierarchy as a parameter for production of anestablishment report:
Murray’s FoodsBusiness Group
GREReporting
Establishment
HR Org.
(HR Orgs.)
(HR Orgs.)
Figure 16 – 2Example Singleestablishment Hierarchy
HR Org.
(HR Orgs.)
The top organization of this type of hierarchy can be either a BusinessGroup/GRE or a GRE, but must also be classified as a ReportingEstablishment.
Multi–Establishment Hierarchies
For complex enterprises with multiple GREs and ReportingEstablishments, you build multi–establishment hierarchies. For certaintypes of reporting you also require a special headquarters hierarchy, tocover the employees working in the Reporting Establishment thatconstitutes the enterprise headquarters. This section discussesmulti–establishment hierarchies; the one following discussesheadquarters hierarchies.
The top organization in a multi–establishment hierarchy can be either aBusiness Group/GRE or a GRE.
Note: For reporting that requires a separate report on yourheadquarters establishment, the top organization of amulti–establishment hierarchy must not be the headquartersorganization. A headquarters organization always belongs in aspecial headquarters hierarchy.
See: The Headquarters Hierarchy: page 16 – 10
An already existing organization classed as a GRE may be suitable foruse as the top organization of a multi–establishment hierarchy.Alternatively, you can create a GRE for reporting purpose only, with a

16 – 8 Oracle Human Resources North American User’s Guide
name similar to that of an operational GRE, and the same IRSidentification number as the operational GRE.
Example Multi–Establishment Hierarchies
For examples of multi–establishment hierarchies, we can look at thehypothetical corporation Swanson Inc. Its Business Group includestwo GREs, the parent company Swanson Inc. and a subsidiary, MSDistributors Detroit. The enterprise employs workers at four separateestablishments:
• company headquarters in Cleveland, Ohio
• one factory in a Cleveland suburb and another in Dayton, Ohio
• the MS Distributors warehouse and shipping center in Detroit,Michigan.
This table summarizes the distribution of the 4,000 employees ofSwanson Inc., by GRE and Reporting Establishment:
Reporting Establishment Swanson Inc. GREMS DistributorsDetroit GRE
Swanson Inc. Headquarters 500
Swanson Mfg. 1,500
MS Distributors Detroit 955
Swanson Dayton 1,000 45
Table 16 – 1 Swanson Inc. Employee Distribution
For reporting purposes, this enterprise needs two multi–establishmenthierarchies, and requires a headquarters hierarchy. Themulti–establishment hierarchies required are these:

16 – 9Overview of Government–Mandated HR Reporting
Figure 16 – 3Multi–establishment Hierarchy 1 Swanson Inc.
GRE
Swanson Mfg.Reporting
Establishment
(HR Orgs.)(HR Orgs.)
Swanson DaytonReporting
Establishment
(HR Orgs.)
Figure 16 – 4Multi–establishmentHierarchy 2 MS Distributors
GRE
MS DistributorsDetroit
ReportingEstablishment
HR Org.(HR Orgs.)
Swanson DaytonReporting
Establishment
(HR Orgs.)
When you run a report giving one of these hierarchies as a parameter,the report process includes as belonging in a particular ReportingEstablishment, any employees assigned to that establishment, plus allthe employees assigned to the HR Organizations subordinate to thatestablishment. The only employees in these organizations that are notcovered are any that have establishment overrides entered for the otherReporting Establishment in the hierarchy.
Counting Establishment Employees
A report process can count of the number of employees in a particularReporting Establishment, and alter its treatment of the establishment

16 – 10 Oracle Human Resources North American User’s Guide
depending on the results of this count. For example, EEO–1 andVETS–100 reporting for establishments with fewer than 50 employees isdifferent from that for larger establishments.
Looking at the example hierarchy above for MS Distributors, reportprocesses with this hierarchy as a parameter are able to determine thatthe MS Distributors Detroit Reporting Establishment has fewer than 50employees, and to produce the appropriate reporting for thisestablishment.
The Headquarters Hierarchy
For some reporting, such as EEO–1 and VETS–100 reporting, it is arequirement that multi–establishment enterprises identify oneestablishment as their headquarters establishment.
The headquarters of a multi–establishment enterprise is from areporting standpoint, a special type of Reporting Establishment. Ifyour headquarters establishment is a simple one that you can representby a single organization, use this organization as a parameter for theHeadquarters Report, and do not build a headquarters hierarchy.
However, if your headquarters consists of a number of organizations,you can build a headquarters hierarchy. The top organization of aheadquarters hierarchy must:
• be classified as a GRE and a Reporting Establishment
• additionally have the classification Corporate Headquarters.
The top organization can also be an HR Organization to whichemployees have assignments, or you can create an organization for useonly at the top of the headquarters hierarchy. Within a Business Groupthere is normally just one organization classified as the corporateheadquarters.

16 – 11Overview of Government–Mandated HR Reporting
Swanson HQGRE
ReportingEstablishmentCorporate HQ
Corp. FinanceHR Organization
CEO OfficeHR Organization
CIO OfficeHR Organization
(HR Orgs.)
(HR Orgs.)
Figure 16 – 5Example Headquarters Hierarchy
Corp. HRHR Organization
(HR Orgs.)
When you give the headquarters hierarchy as a parameter for a reportprocess, the report covers all the employees assigned to the HRorganizations in the hierarchy.

16 – 12 Oracle Human Resources North American User’s Guide
Preparing for Government–Mandated HR Reporting
• In preparation for running the VETS–100 and ADA reports, youmust register Reporting Categories and Reporting Statuses forthe Business Group.
See: Registering Reporting Categories and Statuses: page 16 – 13
• In preparation for all government–mandated HR reporting, youmust set up one or more types of reporting organizations. Theseinclude:
– Reporting Establishments
– Corporate Headquarters
– AAP Organizations
See:
Setting Up Reporting Organizations: page 16 – 15
• After setting up the reporting organizations you need, you canbuild establishment hierarchies and AAP establishmenthierarchies that include these reporting organizations.
See:
Setting Up Establishment Hierarchies: page 16 – 21
• Before running EEO–1, VETS–100, ADA, or OSHA reports, youenter establishment overrides for individual employees asnecessary.
See: Entering Establishment Overrides: page 16 – 23
See Also
Setup Steps for EEO–1 Reporting: page 17 – 5
Setup Steps for AAP Reporting: page 17 – 16
Setup Steps for VETS–100 Reporting: page 17 – 23
Setup Steps for ADA Reporting: page 17 – 30
Setup Steps for OSHA Reporting: page 17 – 36

16 – 13Overview of Government–Mandated HR Reporting
Registering Reporting Categories and StatusesYou must limit the coverage of VETS–100 and ADA reports toemployees who work either full or part time but are not temporaryworkers, and who have a non–terminated employment status as of theend date of the reporting period.
To establish the employment categories and assignment statuses of theemployees that VETS–100 and ADA reporting must cover, you registerReporting Categories and Reporting Statuses for the Business Group:
• Reporting Categories are the employment categories includingemployees who work full or part time on a non–temporary basis.
• Reporting Statuses are the assignment statuses applicable toemployees at a non–terminated status.
Start the registration of Reporting Categories and Statuses from theOrganization window.
Prerequisites
❑ Define the operational Business Group of your enterprise.
See: Creating an Organization: page 2 – 20
❑ Set up on the system the employment categories and assignmentstatuses of your enterprise.
See:
Components of the Assignment: page 14 – 5
Defining Primary User Statuses: page 28 – 7
� To register reporting categories for the Business Group:
1. In the Organization window, query the Business Group if it doesnot already appear there. With the cursor on Business Group in theOrganization Classification region, choose the Others button.Select Reporting Categories.
2. Click in the first blank field in the Additional Information windowto open the Reporting Categories window. Select an employmentcategory to register that covers employees who are non–temporary,full time or part time workers. Choose OK to transfer yourselection to the Additional Information window.
3. To register another employment category, repeat step one.
4. When you finish registering categories, save your work. ChooseOK to close the Reporting Categories window and the AdditionalInformation window.

16 – 14 Oracle Human Resources North American User’s Guide
� To register reporting statuses for the Business Group:
1. In the Organization window, query the Business Group if it doesnot already appear there. With the cursor on Business Group in theOrganization Classification region, choose the Others button.Select Reporting Statuses.
2. Click in the first blank field in the Additional Information windowto open the Reporting Statuses window. Select a status to registerthat covers employees at a non–terminated status. Choose OK totransfer your selection to the Additional Information window.
3. To register another assignment status, repeat step one.
4. When you finish registering statuses, save your work. Choose OKto close the Reporting Statuses window and the AdditionalInformation window.
See Also
Data for VETS–100 Reports: page 17 – 21
Data for ADA Reporting: page 17 – 28

16 – 15Overview of Government–Mandated HR Reporting
Setting Up Reporting OrganizationsA reporting organization is an organization that has, in addition to anyother classifications, one or more of these classifications:
• Reporting Establishment
• Corporate Headquarters
• AAP Organization
Before defining reporting organizations, determine the establishmenthierarchies your enterprise needs for government–mandated HRreporting. This will in turn determine the particular reportingorganizations you must set up.
See: Varieties of Establishment Hierarchies: page 16 – 6
Reporting organizations that do not have the classification CorporateHeadquarters may be subordinate to other organizations inestablishment hierarchies. You can quickly place a subordinatereporting organization in a hierarchy by entering its parentorganization as additional information for its classification.
Note: When a reporting organization is the top organization inan establishment hierarchy, you always place it in the hierarchywhen creating the hierarchy in the Organization Hierarchywindow.
See: Setting Up Establishment Hierarchies: page 16 – 21
Setting Up Reporting Establishments
Reporting Establishments for EEO–1 Reporting
Prerequisite
❑ Determine the establishment hierarchies and ReportingEstablishments required for EEO–1 reporting.
See: EEO–1 Reporting: page 17 – 2
� To define a Reporting Establishment: for EEO reporting.
1. Using the Organization window, either query an existing internalorganization or create an internal organization with the appropriatename and location for this Reporting Establishment.
2. In the Organization Classifications region, select the classificationReporting Establishment for the organization and enable it. Saveyour work.
16 – 16 Oracle Human Resources North American User’s Guide
Note: The organization can have other classifications as well. If itdoes, add information for these classifications as necessary.
3. With the cursor on Reporting Establishment in the OrganizationClassifications region, choose the Others button and selectEstablishment EEO–1 Filing. Click in the Additional OrganizationInformation field to open the Establishment EEO–1 Filing window.
4. Enter the unit number, which is the number the EEOC assigns toorganizations that function as EEO–1 corporate headquarters orestablishments. For new establishments of existing companies,leave this blank.
5. Enter the EEO–1 reporting name.
6. Enter the Standard Industrial Classification (SIC) code for thisestablishment. Until the EEOC assigns a 4–digit code to theestablishment, add a zero after the third digit of the 3–digit code.
7. In Activity Lines 1 – 4, enter a brief descriptions of theestablishment’s major business activities.
8. Enter Yes if this establishment employs apprentices, and Yes if thisis a new establishment for which you have not previouslysubmitted EEO–1 reporting.
9. Save your work. If this EEO–1 Reporting Establishment occurs as asubordinate organization in one or more establishment hierarchies,place it in these hierarchies using the Parent Organization window.
See: Putting Subordinate Reporting Organizations in Hierarchies:page 16 – 19
Reporting Establishments for VETS–100 Reporting
Prerequisite
❑ Determine the establishment hierarchies and ReportingEstablishments required for VETS–100 reporting.
See: VETS–100 Reporting: page 17 – 21
� To define a Reporting Establishment for VETS reporting:
1. Using the Organization window, either query an existing internalorganization or create an internal organization with the appropriatename and location for this Reporting Establishment.
See: Creating an Organization: page 2 – 20
2. In the Organization Classifications region, select the classificationReporting Establishment for the organization and enable it. Saveyour work.

16 – 17Overview of Government–Mandated HR Reporting
Note: The organization can have other classifications as well. If itdoes, add information for these classifications as necessary.
3. With the cursor on Reporting Establishment in the OrganizationClassifications region, choose the Others button and selectEstablishment VETS–100 Filing. Click in the AdditionalOrganization Information field to open the EstablishmentVETS–100 Filing window.
4. Enter the unit number the US Department of Labor has assigned tothis establishment for this reporting, and the name used for thisestablishment for VETS–100 reporting.
5. Save your work. If this Reporting Establishment occurs as asubordinate organization in one or more establishment hierarchies,place it in these hierarchies using the Parent Organization window.
See: Putting Subordinate Reporting Organizations in Hierarchies:page 16 – 19
Reporting Establishments to Represent Corporate Headquarters
When using multi–establishment hierarchies for reporting purposes,you may need to identify a particular Reporting Establishment as theheadquarters establishment of your enterprise. To do this you set up aCorporate Headquarters organization, for use as the top organizationin a headquarters hierarchy.
You normally classify only one reporting organization within aBusiness Group as the Corporate Headquarters organization.
Note: An organization classified as a Corporate Headquartersshould also have the classifications GRE and ReportingEstablishment. It can have other classifications as well.
See: The Headquarters Hierarchy: page 16 – 10
Prerequisites
❑ Determine whether you require a Reporting Establishment that isalso identified as a corporate headquarters.
See:
EEO–1 (Equal Employment Opportunity) Reporting: page 17 – 2
VETS–100 (Federal Contractor Veterans Employment) Reporting:page 17 – 21
❑ Define an organization with the classifications GRE and ReportingEstablishment that you can also use to represent your corporateheadquarters in a headquarters hierarchy.

16 – 18 Oracle Human Resources North American User’s Guide
See: Creating an Organization: page 2 – 20
� To define a corporate headquarters:
1. Using the Organization window, query the organization to beclassified as a corporate headquarters, if it does not already appearthere.
Note: This organization always has other classifications as well, forwhich entry of additional information is necessary
See: Creating an Organization: page 2 – 20
2. In the Organization Classifications region, select the classificationCorporate Headquarters for the organization and enable it.
There is no additional information to add for the CorporateHeadquarters classification. The Corporate Headquartersorganization is always at the top of a headquarters hierarchy, soyou place it in this hierarchy when defining the hierarchy.
See: Setting Up Establishment Hierarchies: page 16 – 21
Setting Up AAP Organizations
The hierarchies you build for AAP reporting must include AAPOrganizations, to represent the affirmative action plans in effect in yourenterprise.
See: AAP Organizations: page 17 – 13
� To define an AAP organization:
1. Using the Organization window, either query an existing internalorganization or create an internal organization with the appropriatename and location for this AAP Organization.
See: Creating an Organization: page 2 – 20
2. In the Organization Classifications region, select the classificationAAP Organization for the organization and enable it. Save yourwork.
3. Select the classification AAP organization in the OrganizationClassifications region. Choose the Others button and select AAPOrganization. Click in the Additional Organization Informationfield to open the AAP Organization window. Enter the name of theaffirmative action plan this organization represents.

16 – 19Overview of Government–Mandated HR Reporting
Note: The organization can have other classifications as well. If itdoes, add information for these classifications as necessary.
See: Creating an Organization: page 2 – 20
4. Save your work. If this AAP Organization occurs as a subordinateorganization in one or more AAP establishment hierarchies, place itin these hierarchies using the Parent Organization window.
Putting Subordinate Reporting Organizations in Hierarchies
Reporting organizations with the classification Reporting Establishmentand/or AAP Organization may exist in subordinate positions inestablishment hierarchies. There is a convenient way to place theseorganizations in hierarchies when you set them up. You can name thehierarchies and parent organizations of the reporting organization inthe Parent Organization window, accessible from the Organizationwindow.
Prerequisite
❑ Set up the establishment hierarchies in which to place the reportingorganizations, and include in them the appropriate parentorganizations.
See: Setting Up Establishment Hierarchies: page 16 – 21
� To put a reporting organization in a hierarchy:
1. In the Organization window, query the reporting organization if itdoes not already appear there. Select Reporting Establishment orAAP Organization in the Organization Classifications region,choose the Others button, and select Parent Organization to openthe Parent Organization window.

16 – 20 Oracle Human Resources North American User’s Guide
2. Select the hierarchy name.
3. Select the name of the parent organization to which the reportingorganization is subordinate in this hierarchy.
4. To place the reporting organization in another hierarchy, repeatsteps 2 and 3.
5. Save your work.

16 – 21Overview of Government–Mandated HR Reporting
Setting Up Establishment Hierarchies
Establishment hierarchies include:
• single–establishment hierarchies
• multi–establishment hierarchies
• headquarters hierarchies
• AAP establishment hierarchies.
To create an establishment hierarchy, use the Organization Hierarchywindow.
See: Creating Organization Hierarchies: page 2 – 37
Prerequisite
❑ Set up the top organization for the establishment hierarchy. Theclassifications required for this organization vary depending on thehierarchy type.
See:
Varieties of Establishment Hierarchies: page 16 – 6
16 – 22 Oracle Human Resources North American User’s Guide
Single–Establishment Hierarchies
� To create a single–establishment hierarchy:
1. Determine the top organization of the hierarchy. It must be a GREand a Reporting Establishment. It may be a Business Group/GRE.
2. Build the hierarchy by placing all the HR Organizations in theBusiness Group/GRE or GRE at the second and lower levels underthe top organization.
See: The Single–Establishment Hierarchy: page 16 – 6
Multi–Establishment Hierarchies
� To create a multi–establishment hierarchy:
1. Determine the top organization of the hierarchy. It can be aBusiness Group/GRE or a GRE. It cannot be a ReportingEstablishment or an HR Organization, and should not have theclassification Corporate Headquarters.
2. Build the hierarchy by placing the appropriate establishments andthe HR Organizations subordinate to the establishments at lowerlevels.
See: Multi–Establishment Hierarchies: page 16 – 7
Headquarters Hierarchies
� To create a headquarters hierarchy:
1. The top organization is that classified as Corporate Headquarters.It must also have the classifications GRE and ReportingEstablishment.
2. Build the hierarchy by placing all the HR Organizations in theheadquarters organization at the second and lower levels under thetop organization.
See: The Headquarters Hierarchy: page 16 – 10
AAP Establishment Hierarchies
� To create an AAP establishment hierarchy:
1. Determine how best to place in the hierarchy your affirmativeaction plans, represented by AAP Organizations, and theorganizations under each plan.

16 – 23Overview of Government–Mandated HR Reporting
If the hierarchy is for one affirmative action plan only, the AAPOrganization representing this plan should be the top organization.If the hierarchy covers two or more plans, the AAP Organizationsfor these plans can appear at any level of the hierarchy.
2. Build the hierarchy by placing all the organizations with jobscovered by an affirmative action plan, below the AAP Organizationrepresenting that plan
See: Example AAP Hierarchy: page 17 – 13
Entering Establishment Overrides
Use establishment overrides when employees who would normally becounted in one Reporting Establishment, should actually be counted asbelonging to another in the same establishment hierarchy. Reportprocesses with establishment hierarchies as parameters check whetherReporting Establishment overrides exist for the employees thehierarchies cover. If it finds overrides, it counts the employees asbelonging to the override Reporting Establishments.
Note: Because the basic unit of AAP reporting within a GRE isits affirmative action plans (AAP Organizations), not itsReporting Establishments, you cannot enter establishmentoverrides for AAP reporting.
See: AAP Hierarchies: page 17 – 13
To enter an establishment override for an employee, use the windowGREs and Other Data.

16 – 24 Oracle Human Resources North American User’s Guide
Prerequisites
❑ Decide which organizations you must define to your Oracle HRMSdatabase as Reporting Establishments, and complete their setup.
See: Setting Up Reporting Organizations: page 16 – 15
❑ Set up the establishment hierarchies you require.
See: Setting Up Establishment Hierarchies: page 16 – 21
� To enter an establishment override for an employee:
� Select the override establishment in the Establishment field.

C H A P T E R
17
T
17 – 1Production of Government– Mandated HR Reports
Production ofGovernment–Mandated HR Reports
his chapter discusses the data requirements, setup steps andprocedures for production of:
• EEO–1 (Equal Employment Opportunity) reports
• AAP (Affirmative Action Plan) reports
• VETS–100 (Federal Contractor Veterans Employment) reports
• ADA (Americans with Disabilities Act) reports
• OSHA (Occupational Safety and Health Administration) reports.

17 – 2 Oracle Human Resources North American User’s Guide
EEO–1 (Equal Employment Opportunity) ReportingMost private employers in the US must provide EEO–1 reports to theJoint Reporting Committee, in accordance with the Civil Rights Act of1964, as amended by the Equal Employment Opportunity Act of 1972.Each GRE within an enterprise submits EEO–1 reporting for eachestablishment where it has employees.
Under EEOC (Equal Employment Opportunity Commission) rules, anestablishment for EEO reporting is an economic unit, such as an office,factory, store, or mine, that produces goods or services at a singlephysical location. However, notice that establishments are relativelypermanent locations from which employees who may work elsewhereare supervised, or from which they operate. If a GRE’s employeeswork at many different, relatively temporary sites, as in construction ortransportation, each site is not necessarily an establishment.
The particular EEO–1 reports submitted for a GRE depend on whetherit is a single–establishment or multi–establishment employer. To representestablishments for EEO–1 reporting you define ReportingEstablishments. For multi–establishment enterprises, you also define aspecial type of Reporting Establishment, the Corporate Headquarters.
See:
Entering EEO–1 Information for the GRE: page 17 – 5
Setting Up Reporting Organizations: page 16 – 15
Single–Establishment Reporting
A single–establishment employer, that is, a GRE whose employees allwork at or from the same establishment, needs to file only one reporttype, The Single–Establishment Employer Report (EEO–1 report type1), which must be entered on Standard Form 100. You build asingle–establishment hierarchy to use as a parameter for this report.
Multi–Establishment Reporting
Multi–establishment employers must submit a Consolidated Reportentered on Standard Form 100, which summarizes EEO information forall employees in the enterprise. Multi–establishment employers cansubmit the other EEO–1 report types for which they are responsible ascomputer printouts, provided they exactly conform to EEOCformatting standards. These report types are:
• the Individual Establishment Report, required for eachestablishment having 50 or more employees.

17 – 3Production of Government– Mandated HR Reports
• the Headquarters Report, required for the establishmentidentified as the headquarters of the enterprise. For a BusinessGroup with more than one GRE, the Headquarters Report coversthe employees in the GRE that functions as the parentcorporation or holding company.
• the Establishment Employment Listing, showing the name,address, total employment and major activity of eachestablishment with fewer than 50 employees. Required if suchsmall establishments exist.
You build multi–establishment and headquarters establishmenthierarchies to use as parameters for these report types.
See Also
Varieties of Establishment Hierarchies: page 16 – 6
Data for EEO–1 Reporting
For this reporting, you must maintain certain personal information foremployees, and EEO job categories for your jobs.
Employee Gender and Ethnic Origin
EEO–1 reports show by gender and ethnic origin, the number ofemployees working in each of nine job categories in a specified payrollperiod. So for EEO–1 reporting purposes, you must keep on recordboth the gender and the ethnic origin of your employees.
These are the relevant categories of ethnic origin:
• White (not of Hispanic origin)
• Black (not of Hispanic origin)
• Hispanic
• Asian or Pacific Islander
• American Indian or Alaskan Native
AAP reporting also uses these categories of ethnic origin.
EEO Job Categories
Each of your jobs must be associated with one of nine EEO jobcategories, and all your employees have assignments to jobs. AAP andVETS–100 reports also use these job categories.

17 – 4 Oracle Human Resources North American User’s Guide
The EEO job categories are:
1. Officials and Managers
2. Professionals
3. Technicians
4. Sales Workers
5. Office and Clerical
6. Craft Workers (Skilled)
7. Operatives (Semi–Skilled)
8. Laborers (Unskilled)
9. Service Workers

17 – 5Production of Government– Mandated HR Reports
Setup Steps for EEO–1 Reporting1. For each GRE, enter information necessary for submission of
EEO–1 reports.
See: Entering EEO–1 Information for a GRE: page 17 – 5
2. Enter an EEO job category for each job in your enterprise.
See: Associating Jobs with EEO Job Categories: page 17 – 6
3. Ensure that each employee has a gender and ethnic origin onrecord, and has an assignment to a GRE and a job.
See:
Data for EEO Reporting: page 17 – 3
Entering a New Assignment: page 14 – 9
4. Identify the types of EEO–1 reporting each GRE must submit.
See: EEO–1 (Equal Employment Opportunity) Reporting: page17 – 2
5. Determine the establishment hierarchies required for your EEO–1reporting, and then identify and define the reporting organizationsnecessary for production of your EEO–1 reports.
See:
Varieties of Establishment Hierarchies: page 16 – 6
Setting Up Reporting Establishments: page 16 – 15
Setting Up Corporate Headquarters: page 16 – 17
6. Build the establishment hierarchies necessary for production ofyour EEO–1 reports.
See: Setting Up Establishment Hierarchies: page 16 – 21
7. Manually enter any necessary establishment overrides foremployees.
See: Entering Establishment Overrides: page 16 – 23
8. Run the EEO–1 report processes.
See: Obtaining EEO–1 Reports: page 17 – 8
Entering EEO–1 Information for a GRE
For each GRE, you maintain certain basic information for EEO–1reporting. Start this information entry from the Organization window.
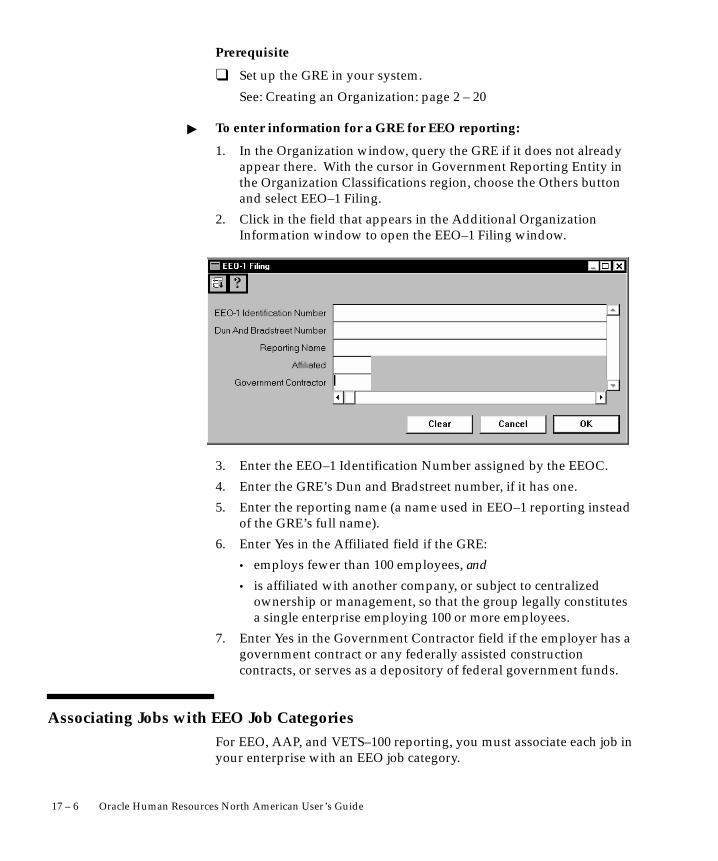
17 – 6 Oracle Human Resources North American User’s Guide
Prerequisite
❑ Set up the GRE in your system.
See: Creating an Organization: page 2 – 20
� To enter information for a GRE for EEO reporting:
1. In the Organization window, query the GRE if it does not alreadyappear there. With the cursor in Government Reporting Entity inthe Organization Classifications region, choose the Others buttonand select EEO–1 Filing.
2. Click in the field that appears in the Additional OrganizationInformation window to open the EEO–1 Filing window.
3. Enter the EEO–1 Identification Number assigned by the EEOC.
4. Enter the GRE’s Dun and Bradstreet number, if it has one.
5. Enter the reporting name (a name used in EEO–1 reporting insteadof the GRE’s full name).
6. Enter Yes in the Affiliated field if the GRE:
• employs fewer than 100 employees, and
• is affiliated with another company, or subject to centralizedownership or management, so that the group legally constitutesa single enterprise employing 100 or more employees.
7. Enter Yes in the Government Contractor field if the employer has agovernment contract or any federally assisted constructioncontracts, or serves as a depository of federal government funds.
Associating Jobs with EEO Job CategoriesFor EEO, AAP, and VETS–100 reporting, you must associate each job inyour enterprise with an EEO job category.

17 – 7Production of Government– Mandated HR Reports
To associate a job with an EEO category, start from the Job window.
Prerequisite
❑ Define the jobs that EEO–1 reporting covers.
See: Defining Jobs: page 3 – 8
� To associate a job with an EEO job category:
1. Query the job in the Name field if it does not already appear there.Click in the Further Information field to open the Further JobInformation window.
2. In the EEO Category field, select the category for this job.

17 – 8 Oracle Human Resources North American User’s Guide
Obtaining EEO–1 Reports To obtain information for entry of the Single–establishment EmployerReport on Standard Form 100, run the EEO Individual Establishmentand Headquarters Report. To obtain information for entry on this formof the Consolidated Report, run the EEO Consolidated Report.
Multi–establishment employers can submit the Headquarters Unit,Individual Establishment, and Establishment Employment Listingreports as computer printouts, if these printouts are formatted in exactaccordance with the formatting rules of the EEOC. To ensure correctformatting, the EEOC requires submission of test printouts for reviewand written verification of acceptability. Oracle HR EEO–1 reports areall designed to accord with current EEOC formatting standards.
Direct questions on computerized reports to:
The EEO–1 Coordinator, EEOC – Surveys
PRINTSRP
1801 L Street, NW – Suite 9604
Washington, DC 20507
Telephone: 202–663–4985
Run EEO reports from the Submit Requests window.
Prerequisite
❑ Ensure that you have entered all information necessary for EEO–1reporting.
See: Setup Steps for EEO–1 Reporting: page 17 – 5
� To run a Single–Establishment Employer Report:
1. In the Name field of the Submit Requests window, select the nameEEO Individual Establishment and Headquarters Report. If theParameters window does not open automatically, click in theParameters field.
2. For the Payroll Period Date, enter the effective date for which thereport process should collect employee data.
3. In the EEO–1 Report Type field, select Single EstablishmentEmployer Report – Type 1.
4. For the Organization parameter, a list appears of all theorganizations in the Business Group that do not have theclassification Corporate Headquarters. Select the organizationwhose name should appear on this report.

17 – 9Production of Government– Mandated HR Reports
5. For the Organization Hierarchy parameter, a list appears of all thehierarchies existing in the Business Group. Select the one to use forthis report.
6. Enter the Payroll Period Date of the last report you submitted asthe Previous Audit Date. Choose OK, then Submit.
7. For report submission, copy the report results onto EEO StandardForm 100.
� To run a Headquarters Report:
1. In the Name field of the Submit Requests window, choose the nameEEO Individual Establishment and Headquarters Report. If theParameters window does not open automatically, click in theParameters field.
2. For the Payroll Period Date, enter the effective date for which thereport process should collect employee data.
3. In the EEO–1 Report Type field, select Headquarters Report – Type3.
4. For the Organization parameter, a list appears to validate theorganization in the Business Group that has the classificationCorporate Headquarters. Normally there is only one organizationwith this classification in a Business Group.
5. For the Organization Hierarchy parameter, a list appears of all thehierarchies existing in the Business Group. If you have built ahierarchy to represent your headquarters, select it from the list.
6. Enter the Payroll Period Date of the last Consolidated Report yousubmitted as the Previous Audit Date.
7. Choose OK, then Submit.
� To run an Individual Establishment Report:
1. In the Name field of the Submit Requests window, choose the nameEEO Individual Establishment and Headquarters Report. If theParameters window does not open automatically, click in theParameters field.
2. For the Payroll Period Date, enter the effective date for which thereport process should collect employee data.
3. In the EEO–1 Report Type field, select Establishment Report – Type4.
4. For the Organization parameter, a list appears of all theorganizations in the Business Group that do not have the

17 – 10 Oracle Human Resources North American User’s Guide
classification Corporate Headquarters. Select the organizationwhose name should appear on this report.
5. For the Organization Hierarchy parameter, a list appears of all thehierarchies existing in the Business Group. Select the one to use forthis report.
6. Enter the Payroll Period Date of the last Consolidated Report yousubmitted as the Previous Audit Date.
7. Choose OK, then Submit.
� To run a Consolidated Report:
1. In the Name field of the Submit Requests window, choose the nameEEO Consolidated Report. If the Parameters window does notopen automatically, click in the Parameters field.
2. For the Payroll Period Date, enter the effective date for which thereport process should collect employee data.
3. For the Organization parameter, a list appears of all theorganizations in the Business Group that do not have theclassification Corporate Headquarters. Select the organizationname to appear on the Consolidated Report printout.
4. Enter the Payroll Period Date of the last Consolidated Report yousubmitted as the Previous Audit Date. Choose Submit.
5. For report submission, copy the report results onto EEO StandardForm 100.
� To run an Establishment Employment Listing Report:
1. In the Name field of the Submit Requests window, choose the nameEEO Establishment Employment Listing. If the Parameterswindow does not open automatically, click in the Parameters field.
2. For the Payroll Period Date, enter the effective date for which thereport process should collect employee data.
3. For the Organization parameter, a list appears of all theorganizations in the Business Group that do not have theclassification Corporate Headquarters. Select the organizationwhose name should appear on this report.
4. For the Organization Hierarchy parameter, a list appears of all thehierarchies existing in the Business Group. Select the one to use forthis report.
5. The entry in the Maximum Number of Employees field defaults to49, which means the report will cover all establishments with 49 orfewer employees. You can change this default if necessary.

17 – 11Production of Government– Mandated HR Reports
6. Choose OK, then Submit.

17 – 12 Oracle Human Resources North American User’s Guide
AAP (Affirmative Action Plan) Reporting
The US Federal Executive Order 11246 requires enterprises who aregovernment contractors or subcontractors and have 50 or moreemployees, to establish affirmative action plans (AAPs) for women andethnic minorities. The Office of Federal Contract Compliance Programs(OFCCP) of the US Labor Department, responsible for enforcingaffirmative action laws, requires these enterprises to measure theeffectiveness of their affirmative action plans by implementation ofinternal reporting.
To assist you with affirmative action reporting, Oracle HR providestwo reports for your AAP plans:
• AAP–Workforce Analysis
• AAP–Job Group Analysis
These reports both display for each job an affirmative action plancovers, the EEO job category and a salary code indicating the job’srelative compensation level. Also the reports display for each job, thenumber and percentage of employees in the job by gender and byethnicity (White / Black / Asian / Native American / Hispanic).
Workforce Analysis Report
This report shows by their line of progression, the jobs in theorganizations an affirmative action plan covers. A line of progressionis a set of related jobs, ordered from the lowest to the highest paid.This is an example line of progression for jobs in Sales:
Sales Assistant –> Salesperson –> Sales Team Leader –> Sales District Manager–> Sales Regional Manager –> Vice–president of Sales
The Workforce Analysis report displays the current totals of allemployees and of ethnic minorities for each organization and for theentire affirmative action plan. It also shows the totals for eachorganization as a percentage of the plan totals.
Job Group Analysis Report
This report organizes the jobs an affirmative action plan covers by theirjob groups. A job group is a set of jobs related by virtue of similar levelsof responsibility, compensation and opportunities for advancement.For example, the Regional Manager Job Group could include these jobs:
Sales Regional Manager – Regional Director, Human Resources – Regional Head,Finance – Production Manager – MIS Regional Manager

17 – 13Production of Government– Mandated HR Reports
For each job group, the report displays the current totals of allemployees and of ethnic minorities in its jobs. It also displays thesetotals for the entire affirmative action plan, and shows the jobs, andshows each job group’s totals as percentages of the plan totals.
AAP Organizations
AAP reporting differs from other types of government–mandated HRreporting in that the reports are issued for each affirmative action planwithin a GRE, instead of the establishments within a GRE. While it canhappen that an affirmative action plan covers all employees in one orseveral Reporting Establishments, plan coverage does not necessarilyfollow these boundaries.
For example, a plan may cover employees based in many differentReporting Establishments who all work in the same functional area,such as customer service or human resources. Another plan may covera variety of employees based at different sites who all have the samejob classification, such as Registered Nurse, Technician, or Machinist.
To represent the affirmative action plans in your enterprise, you set uporganizations classified as AAP Organizations, entering for each thename of its plan. An AAP Organization can also be (but is notnecessarily) a GRE, Reporting Establishment, and HR Organization.After defining AAP Organizations you place them in AAPestablishment hierarchies.
AAP Hierarchies
AAP hierarchies differ from other establishment hierarchies in oneimportant respect. Whereas in other establishment hierarchies oneReporting Establishment cannot be subordinate to another, in AAPhierarchies an AAP Organization, which can also be a ReportingEstablishment, can occur at any level.
In other words, AAP Organizations can appear below other AAPOrganizations in an AAP establishment hierarchy when this representsthe reality of your enterprise, even if both organizations are alsoReporting Establishments.
Example AAP Hierarchy
The following diagram is an example AAP Hierarchy.

17 – 14 Oracle Human Resources North American User’s Guide
Figure 17 – 1Example AAP Hierarchy
MS DistributorsGRE
Swanson DaytonReporting Establishment
AAP OrganizationPlan: Swanson Dayton
HR Orgs.
MS DistributorsReporting Establishment
HR OrganizationAAP OrganizationPlan: Management
WarehouseManagement
HR Org
Whse. OperatorsAAP
OrganizationPlan: Warehouse
HR Orgs. HR Orgs. HR Orgs.
Admin. OfficeHR Orgs.
Loading DockHR Organization
AAP OrganizationPlan: Dock Crews
Shipping Mgt.HR Org
This example AAP hierarchy includes these affirmative action plans:
• the Swanson Dayton plan, covering all the employees who workin the Swanson Dayton factory
• the Management plan, covering the employees who work in MSDistributors, Warehouse Management, Shipping Management,and Shipping’s administration
• The Warehouse plan, covering the employees in warehouseorganizations below the management level

17 – 15Production of Government– Mandated HR Reports
• The Dock Crews plan, covering the laborers that work on theloading docks.
To obtain the AAP reporting for one of these plans, you supply thehierarchy name and the particular plan name as report parameters.
Data for AAP Reporting
For this reporting you maintain the same information as that requiredfor EEO–1 reports:
• employee gender and ethnic type
• EEO job categories for jobs
See: Data for EEO–1 Reporting: page 17 – 3
Additionally, for AAP reporting you jobs must have:
• salary codes, for which you use pay grades
• lines of progression. You determine and set up your lines ofprogression, and then associate the appropriate jobs with them.
• job groups. You determine your job group names, set them up,and then associate each job with its group.

17 – 16 Oracle Human Resources North American User’s Guide
Setup Steps for AAP Reporting
1. Ensure that each employee has an gender and ethnic origin onrecord, and has an assignment to a GRE and a job.
See:
Entering a New Person: page 13 – 5
Entering a New Assignment: page 14 – 9
2. Determine salary codes for your jobs by selecting a grade torepresent each salary code. If necessary, define grades to use assalary codes.
See: Defining Grades: page 4 – 4
Note: The purpose of the salary code is to indicate for AAPreporting purposes the relative average salary of a job. Salarycodes do not determine the pay that employees receive.
3. Define lines of progression for the jobs your affirmative actionplans cover.
See: Defining Lines of Progression for Jobs: page 17 – 17
4. Determine the job groups that the jobs in your affirmative actionplans belong to, and enter the job group names for the QuickCodetype US_JOB_GROUPS.
A job group consists of jobs with similar levels of responsibility,compensation, and opportunities for advancement.
See: Adding QuickCode Values: page 32 – 3
5. Associate each job your affirmative action plans cover with an EEOcategory, if they are not already so associated. Also associate thesejobs with a salary code, line of progression, and job group.
See:
Associating Jobs with EEO Job Categories: page 17 – 6
Associating Jobs with AAP Reporting Information: page 17 – 18
6. Define an AAP Organization to represent each of your AA plans.
See: Setting Up AAP Organizations: page 16 – 18
7. Determine the AAP hierarchies you require, and build them.
See:
AAP Hierarchies: page 17 – 13
Setting Up Establishment Hierarchies: page 16 – 21
17 – 17Production of Government– Mandated HR Reports
8. Run the AAP report processes.
See: Obtaining AAP Reports: page 17 – 19
Note: Because AAP reports cover individual AA plans rather thanestablishments, the Reporting Establishment override functionalityavailable for EEO–1 and VETS–100 reporting does not apply toAAP reporting.
Defining Lines of Progression for Jobs
To define a line of progression for a series of jobs, you build entitiescalled career paths in Oracle HRMS. Career paths are also useful forBuilding a line of progression, or career path, involves these two steps:
• entering the name of the line of progression into the system as acareer path name, using the Career Path Names window
• entering the jobs comprising the line of progression, startingfrom the job with highest status and remuneration and workingdown, using the Map Career Path window.
A job can appear only once in any line of progression.
Prerequisites
❑ Define all the jobs for which you are building lines of progression.
See: Defining Jobs: page 3 – 8
❑ Determine the lines of progression into which your jobs fall.
� To define lines of progression:
1. In the Career Path Names window, enter and save the names of thelines of progression you have determined for your enterprise.
2. Open the Map Career Path window. In the Name field, select thetop job in a line of progression.

17 – 18 Oracle Human Resources North American User’s Guide
3. In the Career Path Name field, select the name of this line ofprogression.
4. In the Job Progression From block, select the job that is one leveldown from the job appearing in the Name field. Check the Downbox. The window redisplays with the selected job now appearingin the Name field.
5. Repeat Step 4 until you have entered all the jobs in the line ofprogression.
To move back up the line of jobs, check the Up box.
6. Save your work.
Associating Jobs with AAP Reporting Information
To associate your jobs with salary codes, lines of progression, and jobgroups, start from the Job window.
Prerequisite
❑ Define all the jobs covered by your affirmative action plans.
See: Defining Jobs: page 3 – 8

17 – 19Production of Government– Mandated HR Reports
� To associate jobs with AAP reporting information:
1. In the Job window, query the job in the Name field if it does notalready appear there. Click in the Further Information field to openthe Further Job Information window.
2. Select for this job its job group name, line of progression, and gradeused for its salary code, in the Job Group, Line of Progression, andSalary Code fields, respectively.
Obtaining AAP Reports
Run report requests from the Submit Requests window.
Prerequisite
❑ Complete the setup steps for AAP reporting.
See: Setup Steps for AAP Reporting: page 17 – 16
� To run the AAP–Workforce Analysis report:
1. In the Name field, select AAP–Workforce Analysis Report. Click inthe Parameters field if the Parameters window does notautomatically open.
2. Enter the effective date of the report. This date defaults to yoursession date.

17 – 20 Oracle Human Resources North American User’s Guide
3. Select the name of the affirmative action plan on which to report,and the AAP hierarchy to use.
4. For the report to cover only one organization, select its name in theOrganization field.
5. For the report to cover only one line of progression, select its namein the Line of Progression field.
6. Choose Submit.
� To run the AAP–Job Group Analysis report:
1. In the Name field, select AAP–Job Group Analysis Report. Click inthe Parameters field if the Parameters window does not openautomatically.
2. Enter the effective date of the report. This date defaults to yoursession date.
3. Select the name of the affirmative action plan on which to report,and the AAP hierarchy to use.
4. For the report to cover the jobs and employees in just one jobgroup, enter its name in the Job Group field.
5. Choose Submit.

17 – 21Production of Government– Mandated HR Reports
VETS–100 ReportingEmployers who fall under certain legislative guidelines must each yearfile VETS–100 reporting (the Federal Contractor Veterans EmploymentReport), to cover a one–year period. Its purpose is to help the USDepartment of Labor determine whether Vietnam–era veterans anddisabled veterans from the Vietnam era and other periods, arebenefiting from affirmative action in obtaining and advancing inemployment.
You submit VETS–100 reporting for each GRE in your enterprise,broken down by the hiring locations within each GRE. To representhiring locations you use Reporting Establishments and when necessary,Corporate Headquarters organizations.
If your enterprise includes just one hiring location you file one reportfor your entire Business Group/GRE, building a single–establishmenthierarchy to use as a parameter for this report.
If you have multiple hiring locations, you file these reports:
• a headquarters report covering employees in the ParentCompany, or headquarters organization, of your enterprise.
• hiring location reports covering your other hiring locations with50 or more employees These include:
• consolidated reports listing by state, information about its hiringlocations with fewer than 50 employees.
You build a headquarters hierarchy to use as a parameter for theheadquarters report, and multi–establishment hierarchies, for thehiring location reports.
See: Varieties of Establishment Hierarchies: page 16 – 6
Report Contents
For the hiring locations in your enterprise, VETS–100 reporting shows:
• the numbers of Special Disabled and Vietnam Era Veterans youemploy in each of nine job categories. These are the EEO jobcategories also used for EEO–1 and AAP reporting.
• the total number of new hires in the reporting period in each jobcategory, together with the number of the new hires in eachcategory who qualify as Special Disabled Veterans and VietnamEra Veterans.
Data for VETS–100 ReportsVETS–100 reporting covers those veterans you employ at each hiringlocation in a GRE who meet these criteria:

17 – 22 Oracle Human Resources North American User’s Guide
• They qualify as Special Disabled Veterans or Vietnam EraVeterans, in accordance with the legal definitions of thesecategories.
• They work on a non–temporary, full time or part time basis.
• They have a non–terminated employment status as of the enddate of the report period.
To record the veteran status of your employees, you select a veteranstatus when entering other personal information for them. Todetermine which of your employment categories cover non–temporaryfull time or part time workers, and which assignment statuses count asnon–terminated, you register them as Reporting Categories andReporting Statuses.
Special Disabled and Vietnam Era Veterans
A Special Disabled Veteran is one who, under laws administrated bythe Department of Veteran Affairs:
• is entitled to compensation for a disability rated at 30% or more,or
• is entitled to compensation for a disability rated at 10% or 20%and has been determined to have a serious employmenthandicap, or
• has been discharged or released from active duty because of aservice–connected disability.
A Vietnam Era Veteran is one who served more than 180 days of activemilitary, naval, or air service, any part of which fell between 5 August,1964 and 7 May, 1975, and:
• who was discharged or released with other than an dishonorabledischarge, or
• was discharged or released from active duty because of aservice–connected disability.

17 – 23Production of Government– Mandated HR Reports
Setup Steps for VETS–100 Reporting1. Ensure that Reporting Categories and Statuses are registered for
your Business Group.
Reporting Categories are those employment categories that covernon–temporary, full time or part time work. Reporting Statuses arethose assignment statuses that cover non–terminated statuses.
See: Registering Reporting Categories and Statuses: page 16 – 13
2. For each GRE, enter the information necessary for submission ofVETS–100 reports.
See: Entering VETS–100 Information for a GRE: page 17 – 23
3. Ensure that EEO job categories are on record for your jobs.
See: Associating Jobs with EEO Job Categories: page 17 – 6
4. Ensure that all employees qualifying as Special Disabled Veteransor Veterans of the Vietnam Era have a veteran status of VietnamVeteran, Disabled Vietnam Veteran, or Disabled Veteran, and havean assignment to a job, an employment category, and a GRE.
See:
Entering a New Person: page 13 – 5
Entering a New Assignment: page 14 – 9
5. Determine the establishment hierarchies required for yourVETS–100 reporting, and then identify and define the reportingorganizations necessary for production of your VETS–100 reports.
See:
Varieties of Establishment Hierarchies: page 16 – 6
Setting Up Reporting Organizations: page 16 – 15
6. Build the establishment hierarchies you need to obtain VETS–100reporting for your enterprise.
See: Setting Up Establishment Hierarchies: page 16 – 21
7. Manually enter any necessary establishment overrides foremployees.
See: Entering Establishment Overrides: page 16 – 23
8. Run the VETS–100 report processes.
See: Obtaining VETS–100 Reports: page 17 – 25
Entering VETS–100 Information for a GREFor each GRE, you must maintain certain basic information forVETS–100 reporting. Start this information entry from theOrganization window.

17 – 24 Oracle Human Resources North American User’s Guide
Prerequisite
❑ Set up the GRE in your system.
See: Creating an Organization: page 2 – 20
� To enter information for a GRE for EEO reporting:
1. In the Organization window, query the GRE if it does not alreadyappear there. With the cursor in Government Reporting Entity inthe Organization Classifications region, choose the Others buttonand select VETS–100 Filing.
2. Click in the Additional Organization Information field to open theVETS–100 Filing window.
3. Enter the company number the US Department of Labor hasprovided to identify this GRE.
4. Enter the company name used for this GRE for VETS–100reporting.

17 – 25Production of Government– Mandated HR Reports
Obtaining VETS–100 Reports Computer–generated reports are acceptable so long as they conformexactly to the formatting standards of the Office of Veterans’Employment and Training. The Oracle HR VETS–100 reports aredesigned to accord with current formatting standards. To ensure thecorrectness of the VETS–100 report formatting, mail or fax a samplecopy to this office in advance:
US Department of Labor, Office of Veterans’ Employment and Training
VETS–100 Reporting
649 Monroe St.
Montgomery, AL 36131–2446
Telephone: 1–800–535–2446, Fax: 205–242–0744
Run report requests from the Submit Requests window.
Prerequisite
❑ Ensure that you have entered all information necessary forVETS–100 reporting.
See: Setup Steps for VETS–100 Reporting: page 17 – 23
� To run a report for a single hiring location:
1. In the Name field of the Submit Requests window, select VETS–100Veterans Employment Report. Click in the Parameters field if theParameters window does not automatically open.
2. Enter the start and end dates of the period this report covers.
3. Select Single Establishment Employer Report as the report type.
4. Select the name of the hierarchy to use for this report. If there ismore than one version of this hierarchy, select the correct versionnumber.
5. For the Organization parameter, select the name of the organizationin the hierarchy that is the top organization of the portion of thehierarchy that this report should cover. The name and address ofthis organization appear on the report as the hiring location.
For the Single Establishment Employer Report, this is likely theBusiness Group, and the top organization of the entire hierarchy.
6. The Display Totals and Display New Hires fields default to Yes.You can change one or both to No to prevent the display of totalsand new hire information on the report.

17 – 26 Oracle Human Resources North American User’s Guide
7. Choose OK, then Submit.
� To run a headquarters report for multiple hiring locations:
1. In the Name field of the Submit Requests window, select VETS–100Veterans Employment Report. Click in the Parameters field if theParameters window does not automatically open.
2. Enter the start and end dates of the period this report covers.
3. Select Headquarters Report as the report type.
4. Select the name of the establishment hierarchy to use for thisreport. If there is more than one version of this hierarchy, select thecorrect version number.
5. For the Organization parameter, select the top organization in thehierarchy. This organization should have the classificationsReporting Establishment and Corporate Headquarters (and oftenhas other classifications as well).
Note: For enterprises with more than one hiring location, theParent Company name and address that appears on all theVETS–100 reports is always that of the organization classified asthe corporate headquarters.
6. The Display Totals and Display New Hires fields default to Yes.You can change one or both to No to prevent the display of totalsand new hire information on the report.
7. Choose OK, then Submit.
� To run reports for locations with 50 or more employees:
1. In the Name field of the Submit Requests window, select VETS–100Veterans Employment Report. Click in the Parameters field if theParameters window does not automatically open.
2. Enter the start and end dates of the period this report covers.
3. Select Establishment Report as the report type.
4. Select the name of the establishment hierarchy to use for thisreport. If there is more than one version of this hierarchy, select thecorrect version number.
5. For the Organization parameter, select the name of the organizationin the hierarchy that is the top organization of the portion of thehierarchy that this report should cover. The name and address ofthis organization appear on the report as the hiring location.
6. The Display Totals and Display New Hires fields default to Yes.You can change one or both to No to prevent the display of totalsand new hire information on the report.

17 – 27Production of Government– Mandated HR Reports
7. Choose OK, then Submit.
� To run a listing of locations with less than 50 employees:
1. In the Name field of the Submit Requests window, select VETS–100Consolidated Veterans Employment Report. Click in theParameters field if the Parameters window does not automaticallyopen.
2. Enter the start and end dates of the period this report covers.
3. For the Hierarchy parameter, select the name of themulti–establishment hierarchy to use for this report. If there ismore than one version of this hierarchy, select the correct versionnumber.
4. For the Organization parameter, select the name of the organizationin the hierarchy that is the top organization of the portion of thehierarchy that this report should cover.
5. Select the state for which to produce the report, or leave blank forthe report to print for each state with one or more establishmentswith less than 50 employees.
6. The Display Totals and Display New Hires fields default to Yes.You can change one or both of them to No.

17 – 28 Oracle Human Resources North American User’s Guide
ADA (Americans with Disabilities Act) ReportingThe Americans with Disabilities Act (ADA) became law on 26 July1990. It prohibits employers from discriminating against employees orapplicants with disabilities who can perform the essential functions of ajob with reasonable accommodation. Under ADA, people withdisabilities are those:
• who have a physical or mental impairment that substantiallylimits one or more major life activities, or
• who have a record of such an impairment, or
• who are regarded as having such an impairment.
The ADA Report shows how your enterprise is responding to therequests of employees with disabilities for reasonable accommodationsto permit them to carry out the essential functions of their jobs, withoutundue hardship to you as their employer.
Report Coverage
The ADA report covers those employees in each of your establishmentswho work on a non–temporary, full or part time basis, have anon–terminated assignment status as of the report period end date, andhave taken one or more of the following actions:
• requested registration as a disabled person.
• provided information about a type of disability they have.
• requested accommodation for a disability.
To determine which of your employment categories covernon–temporary full time or part time workers, and which assignmentstatuses count as non–terminated, you use the Reporting Categoriesand Reporting Statuses registered for your Business Group.
Information for ADA Reporting
The report provides basic information (name, number, organizationand job) about employees who have identified themselves as having adisability. You can register employees as disabled when entering otherbasic personal information about them.
When employees submit information about particular types ofdisabilities, you maintain this information using the ADA Disabilitieswindow. The report presents this information, including anyinformation in the form of comments.

17 – 29Production of Government– Mandated HR Reports
Requests for Accommodations
Because the Americans with Disabilities Act encourages employers tomake reasonable accommodations permitting employers withdisabilities to work, Oracle HR provides the DisabilitiesAccommodations window for recording information about employees’requests for such accommodations.
The ADA Report lists these requests with their request dates,reviewers, review dates and status (requested, approved, or denied). Italso lists the cost of each approved accommodation, and the total costof approved accommodations for each establishment.
Essential Functions of Jobs or Positions
The report can optionally display for each employee with a disability,the essential requirements of his or her job or position, providing thatyou maintain these requirements in the database.
See: Entering Job and Position Skill Requirements: page 3 – 17

17 – 30 Oracle Human Resources North American User’s Guide
Setup Steps for ADA Reporting1. Ensure that Reporting Categories and Statuses are registered for
your Business Group.
Reporting Categories are those employment categories that covernon–temporary, full time or part time work. Reporting Statuses arethose assignment statuses that cover non–terminated statuses.
See: Registering Reporting Categories and Statuses: page 16 – 13
2. Ensure that registration of employees as disabled, and that entry ofinformation about disability types and requests for disabilityaccommodation, is complete. Registration of someone as disabledis accomplished by checking the Disabled box when you enterpersonal information about him or her.
See:
Entering a New Person (step 9): page 13 – 5
Entering Information about Disabilities: page 17 – 31
Entering Requests for Disability Accommodation: page 17 – 31
3. Ensure that each employee who is registered as disabled, who hasprovided information about a disability type, or who has requesteda disability accommodation has an assignment to a GRE, a job orposition, and an employment category.
See: Entering a New Assignment: page 14 – 9
4. Identify the establishments within each GRE that you need forADA reporting, and ensure that they are defined as ReportingEstablishments.
See: Setting Up Reporting Establishments: page 16 – 15
5. Determine and build, if necessary, the establishment hierarchiesyou need to obtain ADA reporting.
See: Setting Up Establishment Hierarchies: page 16 – 21
6. To include information about essential job or position requirementsin ADA reporting, ensure that you have entered these requirementsfor your jobs or positions.
See: Entering Job and Position Skill Requirements: page 3 – 17
7. Manually enter any necessary establishment overrides foremployees.
See: Entering Establishment Overrides: page 16 – 23
8. Run the ADA report process.

17 – 31Production of Government– Mandated HR Reports
See: Obtaining ADA Reports: page 17 – 32
Registering Employees as Disabled
When employees request registration as disabled, effect thisregistration by checking the Disabled box in the Person window whenentering them in the system. They will then be listed on the ADAReport.
See: Entering a New Person: page 13 – 5
Entering Information about Disabilities
When employees provide information about a type of disability theyhave, enter this information in the ADA Disabilities window. Start thisentry from the Person window.
� To enter information about a person’s disability type:
1. Query the person in the Person window if he or she does notalready appear there. Choose the Special Info button to open theSpecial Information window.
2. In the Name field, select Disabilities. In the Details block, click inthe Detail field to open the Disabilities window.
3. In the Type field, enter a brief description of the nature of thedisability.
4. Optionally, enter more detailed information, such as the expectedduration of the disability or the results of medical reviews, in theComments window. To open this window, click on the paper clipicon in the toolbar.
5. Choose the OK button when you complete the entry, and save yourwork.
On the ADA Report, the information entered for employeesappears under the heading Disability. Any comments entered alsoappear on the report.
Entering Requests for Disability Accommodation
When employees with disabilities request accommodations to helpthem perform the essential functions of their jobs, enter information

17 – 32 Oracle Human Resources North American User’s Guide
about these requests in the Disability Accommodations window. Startthis entry from the Person window.
� To enter information about accommodation requests:
1. Query the person in the Person window if he or she does notalready appear there. Choose the Others button, and select SpecialInfo to open the Special Information window.
2. In the Name field, select ADA Disability Accommodations. In theDetails block, click in the Detail field to open the ADA DisabilityAccommodations window.
3. In the Description field, briefly enter the accommodationrequested, for example, Wheelchair ramp or Widened door. TheDate Requested field defaults to the effective date.
4. In the Status field, select Requested, Approved or Denied to trackthe request status.
5. Optionally, enter the name of the reviewer of the request, and thedate reviewed, in the Confirmed By and Date Confirmed fields.
6. For approved requests, enter the date of providing theaccommodation, and its cost.
7. Optionally, add comments regarding the request using theComments window. Click on the paper clip icon to open thiswindow.
8. Choose the OK button when you complete data entry, and saveyour work. The information entered for employees, including anycomments, appears on the ADA Report.
Obtaining ADA Reports
As ADA reporting is for your own use, there are no requiredformatting standards.
Run report requests from the Submit Requests window.
Prerequisite
❑ Ensure that you have entered all information necessary for ADAreports.
See: Setup Steps for ADA Reporting: page 17 – 30
� To run an ADA report:
1. In the Name field, select ADA Report. A window containing theparameters for this report appears.

17 – 33Production of Government– Mandated HR Reports
2. The effective date will be the date of the report.
3. For the Organization Hierarchy parameter, select the name of theestablishment hierarchy to use for this report.
4. To obtain the report for a particular employee, select his or hername or employee number.
5. To obtain the report for employees in a particular job and/orlocation, select the job or location name, or both.
6. Select Yes for the report to include a listing of the essentialrequirements for the jobs or positions of employees withdisabilities.
7. Select Yes for the View Registered Disabled Only parameter for thereport to include only those employees with disabilities whosepersonal information includes registration as disabled.
8. For the Sort By parameter, select Employee to sort by employee lastname. Select Assignment to sort by job name, location, grade,position and employee name, in that order.
9. Choose OK, then Submit.

17 – 34 Oracle Human Resources North American User’s Guide
OSHA (Occupational Safety and Health Act) Reporting
The Occupational Safety and Health Act of 1970 and Title 29 of the Codeof Federal Regulations, Part 1904 (29CFR Part 1904) require employers incertain industries to record and report on employees’ work–relatedinjuries and illnesses. The Bureau of Labor Statistics (BLS) administersthis record keeping and reporting, often in cooperation with stateagencies. Employers must consult with these agencies to determine ifthey are subject to additional state–level recording and reportingobligations.
Employers in relatively high–risk industries such as construction,manufacturing, and health services, must keep OSHA records for eachindividual establishment on an ongoing basis, if they have a combinedtotal of 11 or more employees working at one or more establishments.
Employers in other industries that normally are not required to keepOSHA records, must maintain these records when selected toparticipate in the Annual Survey of Occupational Injuries and Illnesses.The purpose of this survey is to produce national estimates ofoccupational injuries and illnesses for all employers.
For a full list of industries required to maintain and report on OSHAinformation, and detailed instructions about OHSA record keeping,consult the document A Brief Guide to Recordkeeping Requirements forOccupational Injuries and Illnesses. To obtain copies of this publication,contact your regional office of the Bureau of Labor Statistics or write to:
Bureau of Labor Statistics
Division of Management Systems (1220–0029)
Washington, DC 20212
OSHA Data
Information needed for OSHA reporting includes a description of eachwork–related injury or illness and the date, place and circumstances ofits occurrence or onset, as well as information on its physical effectsand its outcome. For a nonfatal incident, you also maintain datashowing its effects on the employee’s ability to work.
The OSHA Form 200 report, Log and Summary of OccupationalInjuries and Illnesses, is the vehicle for logging information aboutwork–related injuries and illnesses during the year, and for presentinga summary of these injuries and illnesses at year end. An additionalreport, OSHA Form 101, Supplementary Record of Occupational

17 – 35Production of Government– Mandated HR Reports
Injuries and Illnesses, provides further information about the caseslogged.
OSHA Establishments
GREs with more than one establishment must maintain separate sets ofOSHA records and reporting for each establishment. To representthese establishments and the employees within them, you useReporting Establishments and establishment hierarchies.
Notice that for OSHA record keeping and reporting, clearly separateactivities performed at the same physical location require treatment asseparate Reporting Establishments. For example, if an enterprise hasmanufacturing facilities and sales offices in the same building, eachactivity constitutes a distinct establishment.
See Also
OSHA Categories of Illness: page 17 – 37

17 – 36 Oracle Human Resources North American User’s Guide
Setup Steps for OSHA Reporting1. Ensure that entry of information on each incident of work–related
injury or illness is complete.
See: Entering Information about Work–Related Injury or Illness:page 17 – 36
2. Identify the establishments within each GRE that you need forOSHA reporting, and ensure that they are defined as ReportingEstablishments.
See:
OSHA Data and Reporting: page 17 – 34
Setting Up Reporting Establishments: page 16 – 15
3. Determine and build, if necessary, the establishment hierarchiesyou need to obtain OSHA reporting.
See: Setting Up Establishment Hierarchies: page 16 – 21
4. Manually enter any necessary establishment overrides foremployees.
See: Entering Establishment Overrides: page 16 – 23
5. Run the OSHA report processes.
See: Obtaining OSHA Reports: page 17 – 38
Entering Information about Work–related Injury or Illness
When employees suffer work–related injuries or illnesses, recordinformation about these incidents in the OSHA–Reportable Incidentwindow. Start this entry from the Person window.
� To enter data on an OSHA–reportable incident:
1. Query the employee suffering the injury or illness in the Personwindow, if he or she does not already appear here. Choose theOthers button, and select Special Info to open the SpecialInformation window.
2. In the Name field, select OSHA–Reportable Incident. In the Detailsblock, click in the Detail field to open the OSHA–ReportableIncident window.
3. For incidents of work–related injury, you must select the categoryInjury. Otherwise select the category appropriate for awork–related illness.

17 – 37Production of Government– Mandated HR Reports
See: OSHA Categories of Illness: page 17 – 37
4. Enter a brief description of the injury or illness, for example:Amputation of 1st joint right forefinger; Strain of lower back;Electrocution––body.
5. Enter the incident date, and address including the number andstreet, city or town, state, zip code. Enter whether the incidentoccurred on the employer’s premises.
The employer’s premises include rest rooms, hallways andcafeterias, but not parking facilities or recreational facilities such asgyms, pools or ball fields, unless the employee was engaged inwork–related activity there.
6. In the Activity field, describe what the employee was doing wheninjured or taken ill. In the Objects/Substances Involved field, listany tools, equipment or materials being used or handled.
7. Use the Comments window to enter a description of how theaccident or exposure to illness occurred. To open this window,click on the paper clip icon.
8. In the Body Parts Affected field, enter the injury or illness and thebody part, for example, Fracture of ribs; Dermatitis of left hand;Lead poisoning.
9. Indicate if the incident caused the termination or permanenttransfer of the employee. If it caused missed work or restrictedactivity, enter the number of days missed or restricted.
Do not include the day of injury or onset of illness, or days theemployee would not have worked in any case. For employeeswithout regular work schedules, estimate the number of misseddays.
10. If the injury or illness caused the employee’s death, you must enterthe date of death. Entry of a date in the Date Deceased field signalsthat the injury or illness was fatal, and must be reported as such.
11. Enter the name and address of the physician attending theemployee, and if he or she was hospitalized, the name and addressof the hospital.
12. Choose the OK button when you complete data entry, and saveyour work. When you run the OSHA No. 200 and OSHA No. 101reports, information entered in this window appears on one or bothof these reports.
OSHA Categories of IllnessOSHA recognizes these categories of occupational illness:

17 – 38 Oracle Human Resources North American User’s Guide
• Occupational skin diseases or disorders. Examples are eczema,oil acne, chrome ulcers, chemical burns, etc.
• Dust diseases of the lungs. Examples are silicosis, asbestosis andother asbestos–related diseases, varieties of pneumoconioses, etc.
• Respiratory conditions due to toxic agents. Examples arepneumonitis, pharyngitis, rhinitis, acute congestion due tochemicals, dusts, gases or fumes, etc.
• Poisoning (systemic effects of toxic materials). Examples arepoisoning by lead, mercury, cadmium, arsenic or other metals;by carbon monoxide, hydrogen sulfide or other gases; by benzol,carbon tetrachloride or other organic solvents; by insecticidesprays; by other chemicals such as formaldehyde, plastics, resins;etc.
• Disorders due to physical agents (other than toxic materials).Examples are heatstroke and other effects of environmental heat;frostbite and other effects of exposure to low temperatures;effects of ionizing radiation (isotopes, X–rays, radium); effects ofnonionizing radiation (welding flash, microwaves); etc.
• Disorders associated with repeated trauma. Examples arenoise–induced hearing loss; synovitis, tenosynovitis, bursitis;Raynaud’s phenomena; other conditions due to repeated motion,vibration or pressure.
• All other occupational illnesses. Examples are anthrax,brucellosis, infectious hepatitis, malignant and benign tumors,food poisoning, histoplasmosis, etc.
Obtaining OSHA Reports
Computer–generated versions of the forms OSHA No. 200 and OSHANo. 101 are acceptable, so long as they contain the same informationand are as readable and comprehensible as the OSHA forms. The BLSadvises employers using computer–generated forms to submit asample report for review, to ensure compliance with BLS regulations.
Run report requests from the Submit Requests window.
Prerequisite
❑ Ensure that all information needed for OSHA reporting has beenentered.
See: Setup Steps for OSHA Reporting: page 17 – 36

17 – 39Production of Government– Mandated HR Reports
� To run OSHA Form 200 or Form 101 Reports:
1. In the Name field, select OSHA Form 200 Report or OSHA Form101 Report. A window containing the parameters for the reportappears.
2. For the parameter GRE, select the name of the GRE for which youare running the report.
3. For the Organization Hierarchy parameter, select the name of theestablishment hierarchy to use for this report.
4. Enter the start and end dates of the period this report covers. Theperiod end date is the date that appears on the report.

17 – 40 Oracle Human Resources North American User’s Guide

C H A P T E R
18T
18 – 1Introducing Career Management Activities
Introducing CareerManagement Activities
his chapter describes how you can use the Career Managementmodules provided by Oracle Human Resources to develop thecompetence approach within your enterprise.

18 – 2 Oracle Human Resources North American User’s Guide
Introducing Career Management Activities
Oracle Human Resources is a radically different human resourceapplication. Using conventional applications, performance managementactivities are often carried inconsistently across the enterprise. Forexample, the recruitment function may perform psychometric tests thatdefine personal skills and behavior in one way, while the appraisalscheme uses an internally agreed but different definition of skills, andtraining classes record licenses and qualifications in another. Not only isthis costly to your enterprise, but it also means that your humanresource activities are carried out inconsistently.
What distinguishes Oracle Human Resources is that it’s built upon theemerging disciplines of performance management and the competenceapproach. This gives a single, unified model and language fortraditionally different activities (such as appraisals, assessment,recording accomplishments, and such). By using this one approach, youcan:
• operate more effectively at work
• perform key human resource management processes consistentlyacross the enterprise
• achieve clearly defined business goals within a commonframework
In this section, you’ll learn about the competence approach, and otherkey concepts and terms. Once you have an understanding of theconcepts, you’ll be able to take full advantage of Oracle HumanResources easy–to–use tools to improve the capacity of your humanresources to meet enterprise goals and objectives.
Advantages of the Common Competence Framework
A common framework for describing and assessing competenciesspeeds the deployment process within your enterprise. This is bothcost–effective and desirable. Imagine how quickly your managers canrespond to new challenges when they can identify and select employeesand applicants on a common basis—they can also match employees andapplicants with opportunities that arise across the whole enterprise. Thisability to perform global deployment effectively, through a ’virtual jobmarket’, provides your enterprise with the competitive edge withdeployment. Consider being able to create opportunities in the US andrecruit globally using common terminology to build up teams withcomplementary skills.

18 – 3Introducing Career Management Activities
Improving employee development and motivating employees are otherimportant aspects of cost–effective human resource management. Bysurfacing enterprise goals and commonly valued skills and behaviors,you can ensure that employees develop not only technical andjob–specific skills, but also broader skills that ensure they continue to bemarketable within the enterprise.
Assessing the applicant or contractor pool is another key area where acommon framework helps your enterprise to cut costs. With OracleHuman Resources, you can assess on an enterprise–wide basis, ensuringthat an able candidate is not rejected because of a mismatch for onevacancy when other suitable vacancies exist, reducing recruitmentoverheads.
If your enterprise is ’knowledge–based’ rather than skills–based (such asfinancial services or a software provider), a common approach alsoenables you to assess and use the competencies your employees possessto gain a competitive edge.
Attention: This software should not be used as the sole method ofassessment for making judgements about hiring, performance ordeployment. Your company may be held liable if you rely on incorrectcomputer data or computerized rules to make such judgements.
It is the customer’s responsibility to take all appropriate measures tocomply with the Data Protection and Privacy laws of the countries inwhich they operate.
All personal information that you store or use with this software mustbe up to date, accurate and relevant. You should confirm the details ofthe restrictions that apply to the computerized storage and use ofpersonal information with your own legal department orrepresentative.
Career Management – A Fully Tailorable, Proactive Management Tool
Now that you have chosen Oracle Human Resources, you can takeadvantage of a fully tailorable, sophisticated and proactive managementtool to handle your human resources activities. From assessments toappraisals, employee profiling and career development, you can findpowerful and easy–to–use features that let you take control of youremployee processes using the web, and intuitive graphical tools.
Information Infrastructure
Oracle Human Resources provides you with the advantages of aninformation infrastructure for common systems of performance

18 – 4 Oracle Human Resources North American User’s Guide
management across the enterprise. By providing a repository for allyour employee and applicant competence and performance information,everyone within your enterprise can enter, review and integrate theinformation with that of other computerised applications, quickly andeasily. Using the integrated Oracle Applications suite, you are able toanswer such questions as ”Did the introduction of the new incentiveprogramme coincide with positive changes in manufacturing output?”,”Has the gap between required skills and accomplishments changed insalespeople, and has the change affected revenue?” and ”How muchdid we spend per head on training, and how does this relate toimproved performance?”.
Web and Workflow Access (LMDA and EDA)
Oracle Human Resources provides you with web and workflow–basedaccess for many line manager and employee end–user activities throughan intuitive, easy–to–use interface. Alternatively, you can perform manyactivities using standard Oracle HRMS windows.
We’ve looked hard at the administrative aspects of collecting, approvingand acting on assessment and appraisal information and sought toautomate these processes using Oracle Workflow. Our graphicalWorkflow designer enables you to change these processes to match yourown requirements, and to change them at will to ensure that youradministration is streamlined.
For a full description of all web and workflow–based access, and how toconfigure the application for the web, see: Oracle HRMS Applications forthe Web Configuration Guide.
Line Manager Direct Access (LMDA)
Line Manager Direct Access (LMDA) enables line managers to performsophisticated searches to identify people by skills, personalcharacteristics, applicant or employee information. The ‘person list’generated from the search is used for processes such as graphicalcomparisons, group ranking, appraisals and assessments. Managers cansave the list and use it many times, enabling them to easily access thepeople they deal with frequently.
Managers can perform a number of view and update activities on thegroup of people for whom they have secure access. This securitymechanism is shared with the client server HRMS Application, andincludes organization, position and payroll–based security.

18 – 5Introducing Career Management Activities
Providing Views
Line managers can view information that can include a number of drilldown stages. This enables line mangers to view:
• graphical matches of competencies for a person compared withthe requirements of an organization, job, position or other ad hocchoice
• graphical matches of a group of people for a given competence
• appraisal and assessment reviews
• ranked candidate lists matched against the requirements of anorganization, job or position
• candidate application histories
• employment histories with drill down views to assignmentdetails
• vacation balances
• contact and dependent details
• salary history information
• roles performed by a person: who they manage, supervise etc.
• absence histories
• employee movements by organization
• absences by organization.
Employee Direct Access (EDA)
Employee Direct Access (EDA) enables employees to access their owninformation and the relevant details for their contacts or dependents.For example, it enables employees to change their address or changetheir competence profile.
Which Activities are Available Using Windows, LMDA and EDA?
The following tables illustrate which setup and ongoing activities youcan perform using standard Oracle HRMS windows, and whichactivities you can perform using Line Manager and Employee DirectAccess. For some activities, you can use windows, LMDA and EDA.
Available Using:
Setup Activities Windows LMDA EDA

18 – 6 Oracle Human Resources North American User’s Guide
Create Rating Scales ✓
Create Competencies ✓
Group Competencies ✓
Define Competence Requirements ✓
Use Competencies (with Oracle Training Administration installed) ✓
Create Qualification Types ✓
Create Schools and Colleges ✓
Create Assessment Template ✓
Create Appraisal Questionnaire ✓
Create or Modify Appraisal Template ✓
Available Using:
Ongoing Activities Windows LMDA EDA
Create a Person List (perform sophisticated searches to identify peopleby skills, personal characteristics, applicant or employee information)
✓
Create and review appraisals and competence–based assessments, andtransfer them to other participants using Oracle Workflow. Employeescan perform self assessment and appraisal
✓ ✓
Enter succession plan options for a person ✓
Complete suitability matching (skills profiling) ✓
Manage deployment constraints and requests expressed by employees,such as requests to relocate, or travel internationally. Employees canupdate their own work choices
✓ ✓ ✓
Manage and update work choices for a job and position ✓ ✓
Create and update competence profile. Employees can update theirown competence profile
✓ ✓ ✓
Enter, review and update qualifications, education, licenses and awards ✓ ✓ ✓
Enter, review and update schools and colleges attended ✓ ✓ ✓
View summary personal and employee data ✓ ✓

18 – 7Introducing Career Management Activities
Configurable Web Interface
Our highly configurable web interface enables you to create templatesfor your appraisal and assessments to meet your unique needs. You caninclude your own questions, the competencies that are assessed and themethod your users make ratings and weightings of competencies orobjectives. So, although you are using a common language, you cantailor appraisals and assessments for different parts of your enterprise toensure that competencies that apply to to small populations are assessedas well as ’core’ competencies.
Most web pages supplied can be configured to change help text, pagetitles, corporate logos and navigation buttons, and so on. You canchange pages to fit your corporate style and include your own pagesalongside the supplied pages to provide a complete HR informationrepository for your employees.
Where it is essential to be able to define the fields included on a webpage to customize it for your organization, such as defining an offertemplate for hiring candidates that includes questions about terms andconditions, Oracle Web Employees provides facilities to configure pagesto your exact needs.
For more information, see: Oracle HRMS Applications for the WebConfiguration Guide.

18 – 8 Oracle Human Resources North American User’s Guide
Defining Your Competence–Based Operation
The main reason Oracle Human Resources provides you with so muchflexibility is that it has a highly configurable framework. This enablesyou to define all the components of a performance management systemto meet the needs of your enterprise, and to change them at will. Youcan define competencies, behavioral descriptions, performance ratings,appraisal and assessment forms, multiple types of assessment, andorganization, job and position requirements.
Because of this, you can set up the application to mirror exactly howyour enterprise handles its human resource activities now, or in thefuture to meet new market opportunities, go through mergers or expandinto new countries. To enable you to take full advantage of thisflexibility, it is worth spending some time before you start to use OracleHuman Resources in identifying how you want drive your humanresource operation.

18 – 9Introducing Career Management Activities
Figure 18 – 1Controlling Your Operation
IdentifyBusinessGoals
Define and Group EnterpriseCompetencies
Define CompetenceRequirements
Create CompetenceProfiles
Design Methods ofMeasurement
Assess andAppraise
Match bySuitability
Analyse CompetenceGap
Identify Qualificationsand DeliverCompetencies
PerformSuccessionand CareerPlanning
Identifying Your Business Goals Before Implementing the CompetenceApproach
We suggest that the first thing you do before you set up the applicationis to produce an action plan. This helps you identify your enterprise’sstrategic business goals and objectives you want the competenceapproach to address. It also helps you identify the processes required tomeet and achieve those goals.
Business goals or objectives take many forms, but they usually definewhat has to be done within the enterprise. For example, ’to build an oil
18 – 10 Oracle Human Resources North American User’s Guide
rig’, ’to improve the quality of the product’ or to ’gain greaterpenetration in the applications market’.
Once you have identified your business goals and objectives, OracleHuman Resources enables you to develop a competence approach thatbest supports your enterprise’s goals.
You enter your business goals quickly and easily using SpecialInformation Types that are shared throughout the application.
Defining Your Enterprises Competencies
We, at Oracle, recognise that you will want to develop competencies thatbest meet the needs of your own enterprise. So, rather than providingyou with pre–defined competencies that may be too prescriptive or toogeneral, we enable you to develop your own. You might want to ’pilot’a small number of easily definable and measurable competencies first(for example, anything that requires physical effort such as digging aditch or typing a letter), ensuring that the definitions are meaningfuland relevant before rolling them out widely within the enterprise. Onceyou have developed these first competencies, you can go on to definecompetencies that are much more complex and difficult to observe andmeasure (for example, anything that includes cooperation with otherpeople). You can, of course, have a mixture of both.
Because you might want to group related competencies together (forexample, all your core competencies), Oracle Human Resources enablesyou to create competence types. These groups of related competenciesare useful, for instance, if you want to include all competencies in a jobadvertisement (because they are ’hireable’), or which can be ’delivered’ byformal training.
Defining Your Competence Requirements
To ensure your enterprise meets its current and future goals, you‘ll needto identify your competence requirements. For example, if yourenterprise’s goal is ’to gain greater penetration in the applications market’,Oracle Human Resources enables you to quickly and easily identify thecompetencies that people within your enterprise need to possess andexhibit to meet that goal.
Defining your core (or management or leadership) competencies might bethe first stage in developing a competence approach. These corecompetencies are identified as being required by every person to enable

18 – 11Introducing Career Management Activities
your enterprise to meet its goals. In our example, the core competenciesrequired to meet the goal greater penetration in the applications market,might include strategic thinking, quality orientation and customerawareness. With Oracle Human Resources flexibility, you can definethese core competencies at the business group or organization level.
Then, once you have identified your enterprise’s core competencies, youmight want to define individual job and position competencies later, forexample, C++ programming, SQL*Plus, and such. The positionautomatically inherits the core competencies defined for theorganization, saving you from having to enter them yourself!
The competence requirements held at business group, organization, joband position level are dated. With all this information at your fingertips,you can set them up for future requirements to perform analysis orresource projections for your enterprise. You can also project the impactof changes, such as reorganising and restructuring, and change themover time.
Using Competence Profiles
Using Oracle Human Resources to develop your core, job and positioncompetence requirements enables you to compare what competenciesthe people within your enterprise possess, against those that arerequired. You need to do this as comparison is the main driver for mostHR activities, whether deployment, reward, incentives, successionplanning, and so on.
By having a profile of competence requirements, you can devise anappropriate assessment procedure, and assess individuals against thecompetencies for selection, qualification or training and developmentpurposes.
See: Competence Requirements: page 20 – 2
Designing Your Methods of Measurement
Because of the flexibility of Oracle Human Resources, you are able tostructure your competencies to design your methods of measurement tomeet the needs of your enterprise. If most of the competencies withinyour enterprise are comprised of proficiency levels unique to individualcompetencies, you might want to create competencies with their uniqueproficiency levels. You would therefore have a number of equivalentsystems for measuring performance. Alternatively, you can use thegeneral method of measurement. Here, you do not hold the proficiency

18 – 12 Oracle Human Resources North American User’s Guide
level at the competence level, but you use a general rating scale and textto describe the competence in a general way. You can, of course, use amixture of both.
Imagine the flexibility of being able to use a general method to measureyour core competencies, for example, and an individual method tomeasure specific job and position competencies throughout your globalenterprise.
Not only do we provide you with the flexibility to use different methodsof measurement, but we also provide you with the flexibility to calculatethe assessment scores in a variety of ways. For example, you might wantto calculate the scores just by taking performance against thecompetencies into consideration. Alternatively, you might want tocalculate the scores by taking performance, proficiency and weightinginto consideration, and to apply the weighting to proficiency. WithOracle Human Resources, the choice is yours.
See: Creating Your Methods of Measurement and CreatingCompetencies: page 19 – 2
Assessments and Appraisals
Assessing and appraising your enterprise’s employees are key areas ofhuman resources management. To ensure you have the right people inplace at the right time, you’ll want to find out what competencies youremployees possess, and at what level they demonstrate them.
You’ll also want to find out their aspirations, and set their short– andlong–term objectives, for example, what an employee is expected toachieve in the next six months. These objectives not only prepareemployees for their next position within a career plan, but they alsotranslate enterprise objectives into individual performance andimprovement goals and measures.
The reason you describe and assess measurable behavior is that much ofit is amenable to change by outside intervention. You can affect certaincompetencies by recruiting them, others by practical or theoreticaltraining. You can remove practical obstacles to competence byimproving processes, resources or equipment. You can affect motivationby various types of incentive, whether monetary or opportunity based.
Assessment scores in Oracle Human Resources enable you to analysevisually which competencies a person (or group of people) possess, andwhich competencies are required by jobs or positions now, or in the nearfuture. You can use the results of the Competence Gap processes toidentify areas where you need to recruit or train employees, remove

18 – 13Introducing Career Management Activities
practical obstacles to competence by improving processes, resources orequipment. You can also affect motivation by various types of incentive,whether monetary– or opportunity–based.
See: Assessing and Appraising Employees: page 22 – 2
Describing and Assessing Measureable Behavior
One of the major features of Oracle Human Resources is the ability tohold the accomplishments of your people, enabling you to comparethem against the competence profile for job and position requirements.It also enables you to match them to projects, develop succession plans,and organize further training and certification.
See: Creating a Competence Profile: page 13 – 20
You measure and record a score of how the person has performedagainst each competence during assessment. This provides clear andaccessible performance measures (Is the person demonstrating thespecified behavior at the level defined? Does the person have theknowledge or skills required to operate effectively?). You hold applicantand employee accomplishments in a person’s Competence Profile. Youcan then use the assessment results to analyse what is required to get thepeople with the right competencies in place. You can do this by hiringpeople, developing or training them.
By measuring competencies grouped into an assessment (for example, aManagerial or Engineering assessment), you focus attention on thebehaviors and proficiency or performance of individuals and their abilityto get things done. (Do not worry about proficiency or performancehere, we describe both in What Type of Assessment do you Want toPerform?: page 22 – 4).
See: Assessing and Appraising Employees: page 22 – 2
Suitability Matching
You might use assessment scores during a suitability search to fill a jobor position. You can use powerful Suitability Search tools to search forand match the most suitable person to a job or position. This might beperformed during recruitment, succession planning, and so on. You cansearch by:
• people
• jobs or positions
See: Suitability Matching: page 24 – 2

18 – 14 Oracle Human Resources North American User’s Guide
Perform Competence Gap Analysis
In future releases, assessments scores will be used by the CompetenceGap processes. This will enable you to analyse visually whichcompetencies a person (or group of people) possess, and whichcompetencies are required by jobs or positions. You can analyse whichcompetencies are required now, or in the near future.
The Competence Gap module graphically represents (by line or barchart) the gap between a person’s, or group of people’s, competenciesand what the enterprise requires.
Identifying Qualifications and Delivering Competencies
Competencies can have identified evaluation methods, such as a license,test or qualification. You can set up the qualifications that yourenterprise recognises to include only the ones that you want in aperson’s Competence Profile. You need to identify establishments thatdeliver the qualifications your enterprise recognises. These are thenused to record where a person gained the qualification. Again, bykeeping up–to–date and complete information, you are able to betterforecast present and future requirements.
See: Creating Qualification Types: page 21 – 3
See: Creating Schools and Colleges: page 21 – 5
You can deliver competencies at a specific proficiency level throughtraining activities your enterprise (or an outside supplier) provides. Atraining activity is an abstract term for any planned undertaking thatimproves a student’s competencies (qualifications, experience, and soon).
You can enter the competencies and proficiency levels that your trainingactivities are expected to deliver using the Delivered Competencieswindow. You can then update a person’s Competence Profile after theyhave successfully gained the competence.
Note: You must purchase Oracle Training Administration(OTA) separately to use this functionality.
See: Using Competencies or Skills, (Oracle Training Administration User’sGuide).
Career and Succession Planning
Once you have found out your employees aspirations, and set theirshort– and long–term objectives, you’ll want to prepare them for their
18 – 15Introducing Career Management Activities
next position within a career plan. After all, now you have motivatedyour employees through your performance management system, you’llwant to keep them motivated by linking their own career aspirations toenterprise aspirations. By planning succession, you enable employees tosee their future role within the enterprise, keeping them motivated, andyou from lengthy and costly recruitment.
Not only does succession planning enable you to keep and retain yourhigh–flyers, it also enables you to highlight, for example, roles requiringscarce technical or commercial skills. By being able to identify theseearly, you can develop these scarce skills within your enterprise andreplace current employees in these positions, as required.
See: Career and Succession Planning: page 23 – 2
Work Choices
Using work factors, you can track an employee’s, applicant’s,contractor’s or ex–employee’s capacity to be deployed within theenterprise.
You can a person’s work choices, such as their willingness to travel orrelocate, their preferred working hours and work schedule, and thelength of time they would like to stay in their next post. You can thencompare these choices with the work requirements of jobs or positionswhen you are planning redeployment.
See: Entering Work Choices for a Job or Position: page 3 – 18
See: Entering Work Choices: page 13 – 21
Career Management Extensible and User–Defined QuickCodes
You can add, disable, or change the meaning of QuickCode for use incareer management activities.
See: User and Extensible QuickCodes: page 32 – 6
The QuickCodes specific to career management activities include:
Competence Types
Define the competence types as values for the QuickCode TypeCOMPETENCE_TYPE.
Qualification Types
Define the types of qualifications as values for the QuickCode TypePER_CATEGORIES.

18 – 16 Oracle Human Resources North American User’s Guide
Appraisal Web Page
❑ Define appraisal statuses as values for the QuickCode TypeAPPRAISAL_ASSESSMENT_STATUS.
❑ Define appraisal types as values for the QuickCode TypeAPPRAISAL_TYPE.
Competencies
Define the competence evaluation methods as values for the QuickCodeType COMPETENCE_EVAL_TYPE.
Work Choices
❑ Define time scales as values for the QuickCode TypePER_TIME_SCALES.
❑ Define work schedules as values for the QuickCode TypePER_WORK_SCHEDULE.
❑ Define working hours as values for the QuickCode TypePER_WORK_HOURS.
❑ Define the full time equivalents as values for the QuickCode TypePER_FTE_CAPACITY.
❑ Define relocation preferences as values for the QuickCode TypePER_RELOCATION_PREFERENCES.
❑ Define lengths of service as values for the QuickCode TypePER_LENGTHS_OF_SERVICE.
Qualifixations
❑ Define subject statuses as values for the QuickCode TypePER_SUBJECT_STATUSES.
❑ Define subjects as values for the QuickCode Type PER_SUBJECTS.
❑ Define tuition methods as values for the QuickCode TypePER_TUITION_METHODS.
Competence Profile
❑ Define certification methods as values for the QuickCode TypeCERTIFICATION_METHOD.
❑ Define proficiency sources as values for the QuickCode TypePROFICIENCY_SOURCE.

18 – 17Introducing Career Management Activities
Understanding The Business Cycle
The HR activities that use the competence approach within an enterprisecan be depicted as a cycle such as the one shown in Figure 18 – 2. Themain stages in the cycle are as follows:
Figure 18 – 2The Competence Approach
Assess PersonsCompetenciesDefine Business
Goals
DefineCompetencies
Perform Skills GapAnalysis
Propose Action toClose Skills Gap
Agree ActionsWith Employee
Evaluate, ReviewAppraisal
Decide Where toHold
Competencies inthe Enterprise
Structure
Plan Career andSuccession
1. Define business goals.
2. Define competencies needed to meet those goals.
3. Decide where you want to hold competencies in the enterprisestructure (organization, job or position).
4. Assess person’s current level of competencies (perform multipleproficiency assessments) and update competence profile.
5. Perform skills gap analysis against current or future org, job orposition requirements for:
• filling existing jobs
• succession planning
• effective deployment
6. Propose action to close skills gap (training, qualifications, licenses,awards) – see which training delivers competencies.

18 – 18 Oracle Human Resources North American User’s Guide
7. Agree actions with employee (during appraisal):
• set goals and objectives
• sets expectations about proficiency levels and behavior
• confirms steps to close skills gap – training, qualifications,licenses, awards
8. Evaluate – review appraisal.
Sets performance – whether has met expected standard, goals, andobjectives – overall performance.
Next Steps:
• rewards
• incentives
• career options
9. Plan Careers and Succession.
Prepare employees for next position within a career plan.

C H A P T E R
19
T
19 – 1Designing Methods of Measurement and Creating Competencies
Designing Methods ofMeasurement andCreating Competencies
his chapter explains how you design your methods ofmeasurement and develop competencies as part of your performancemanagement system.

19 – 2 Oracle Human Resources North American User’s Guide
Designing Your Methods of Measurement and Creating Competencies
Developing competencies as part of your performance managementsystem enables you to evolve definitions that match the culture andneeds of your enterprise, without different parts of the enterpriseexpending time and effort in evolving similar definitions.
A common framework for describing and assessing competenciesspeeds up markedly the deployment process within your enterprise.This is both cost–effective and desirable. Look at how quickly yourmanagers can respond to new challenges when they can identify andselect employees and applicants on a common basis. They can alsomatch employees and applicants with opportunities that arise across thewhole enterprise. The ability to perform global deployment effectivelythrough a ’virtual job market’ provides your enterprise with thecompetitive edge with deployment.
What Are Competencies?
Oracle Human Resources defines the term ’competence’ as measurablebehavior, specifically ”any measurable behavior required by an organization,job or position that a person may demonstrate in the work context”. So, acompetence can be:
• a piece of knowledge (such as the names of all the rivers in China)
• a skill (such as an interpersonal skill, widget turning, soldering ajoint)
• an attitude (such as a proactive approach to work)
• an attribute (such as absence of color blindness or perfect pitch)
By defining measurable behavior, you can indicate what a person (forexample, an employee, contractor, applicant) within an enterprise cando. Identifying how a competence is exhibited in the work contextensures your approach is objective rather than subjective, adding toemployee understanding of what is expected of them. It also ensuresfairness and equality of employment. Competencies clarify what isneeded from both teams and individuals, especially when a majorchange within the enterprise is going on.
Competencies, Proficiency Levels and Indicators
Examples of competencies exhibited in the work context might be’communication skills’, ’erecting and dismantling scaffolding’ or

19 – 3Designing Methods of Measurement and Creating Competencies
’typing’. On their own though, these competencies do not give you thefull picture. For example, a person may be able to demonstrate thecompetence erecting and dismantling scaffolding, but that does not tellyou how proficient a person is in that competence. For example, do theyerect and dismantle scaffolding as a beginner, or as an expert? Otherareas of ambiguity might include exactly what behavior is beingmeasured. For example, the competence communication skills mightmean that a person has technical, oral and written skills, or that theyhave the ability to communicate well.
Because of the flexibility of Oracle Human Resources, you are able tostructure your competencies to design your methods of measurement tomeet the needs of your enterprise. If most of the competencies withinyour enterprise are comprised of proficiency levels unique to individualcompetencies, you might want to create competencies with their uniqueproficiency levels. You would therefore have a number of equivalentsystems for measuring performance. Alternatively, you can use thegeneral method of measurement. Here, you do not hold the proficiencylevel at the competence level, but you use a general rating scale and textto describe the competence in a general way. You can, of course, use amixture of both.
Proficiency
To enable you to fully express how a competence is exhibited in thework context, Oracle Human Resources enables you to identify theproficiency at which a competence is performed, and the associatedbehavioral characteristics displayed (known as behavioral indicators). Youcan use behavioral indicators for any description that tells you or othermanagers what to look for in the work context. The text description caninclude what tests to use, what behaviors to detect, what questions toask (for example, in a critical incident interview), when to review, and soon.
Figure 19 – 1 illustrates the descriptions, proficiency level andbehavioral indicators for the competence Communication Skills.

19 – 4 Oracle Human Resources North American User’s Guide
Figure 19 – 1Competencies, levels andindicators
Communication Skills: the ability to communicate well
Writes technical reports understood bypeers
Competence Description
Expert – Can write complex requirement specifications and liaise with developers.
Advanced – Technical oral and written skills.
Can present results of technicaltesting
Intermediate – Can.........Writes.....
ProficiencyLevel
BehavioralIndicators
Structuring Your Competencies
Oracle Human Resources enables you to structure your competencies intwo ways:
• individual method
You can attach the individual proficiency levels to eachcompetence
• general method
You can use a general proficiency scale, and enter text to describethe competence in a general way
Individual Method
Figure 19 – 2 illustrates the competence Erecting and DismantlingScaffolding using the individual method to structure your competencies.Notice the unique proficiency levels and behavioral indicators.

19 – 5Designing Methods of Measurement and Creating Competencies
Figure 19 – 2Individual Method
1 – Novice: Can provide assistance, asa member of a team, in the generalfetching and carrying of scaffoldingcomponents
Competence (Erecting andDismantlingScaffolding)
Individual Methodwith its Proficiency Levels(and Behavioral Indicators)
2 – Beginner: Can, as a member of ateam, erect and dismantle basic scaf-folds constructed from preformed alu-minum components
3 – Intermediate: Can, as a member ofa team, erect and dismantle scaffoldsconstructed from preformed steelcomponents
4 – Advanced: Can, as a member of ateam, erect and dismantle basic tubeand clip scaffolds
5 Expert: Can, as a member of a team,erect and dismantle advanced tubeand clip scaffolds
General Method
Alternatively, you can use the general method of measurement tostructure your competencies. For example, you might decide to use ageneral method of measuring ’expertise‘, such as Expert, Intermediateand Novice. To do this, you could create a general rating scale, calledExpertise, and hold the generic proficiency levels here. Figure 19 – 3illustrates a general rating scale with generic proficiency levels defined.

19 – 6 Oracle Human Resources North American User’s Guide
Figure 19 – 3General Method General Rating Scale for Expertise
1 = Novice
High
Low
2 = Beginner
3 = Intermediate
4 = Advanced
5 = Expert
Which Method Should You Use?
We suggest you employ the following strategy. Use the individualmethod if most of the competencies within your enterprise comprise ofproficiency levels unique to individual competencies. Then, you cancreate competencies with their unique proficiency levels, providing yourenterprise with a number of equivalent systems for measuringperformance. Alternatively, use a general rating scale if a number ofcompetencies within your enterprise have a common set of proficiencylevels. You can then ensure consistency between measurements.
You can, of course, use a mixture of both, but whatever method you use,ensure that you give high numbers to high ratings (and low numbers tolow ratings). You need to do this, for example, to ensure any bar chartsyou produce while performing competence gap analysis are useful.
Imagine the flexibility of being able to use a general method to measureyour core competencies, for example, and an individual method tomeasure specific job and position competencies throughout your globalenterprise.

19 – 7Designing Methods of Measurement and Creating Competencies
General Rating Scales
Create general rating scales if you want to describe your enterprise’scompetencies in a general way. With a general method, you do not holdthe proficiency level at the competence level. Instead, you use a ratingscale and text to describe the competence in a general way. Look at thebenefits provided by this level of consistency of measurement duringassessment and appraisal across your whole enterprise!
The Relationship Between a Common System of Measurement
Figure 19 – 4 illustrates the relationship between competencies, and ageneral proficiency rating scale in a common system of measurement.
Figure 19 – 4Common System ofMeasurement
Behavioral IndicatorsBehavioral IndicatorsBehavioral IndicatorsBehavioral Indicators
Common System of Measurement
Competencies
ProficiencyRating Scale
We suggest that you use the same rating scale measurementsthroughout, if you decide to use the common system of measurement inyour enterprise. For example, if you use rating levels of 1 to 3 for onerating scale, stick to this scale if you set up many scales with differentproficiency levels.
Different Rating Scales
You can create general rating scales for:
• proficiency
• performance
• weighting (level of importance)
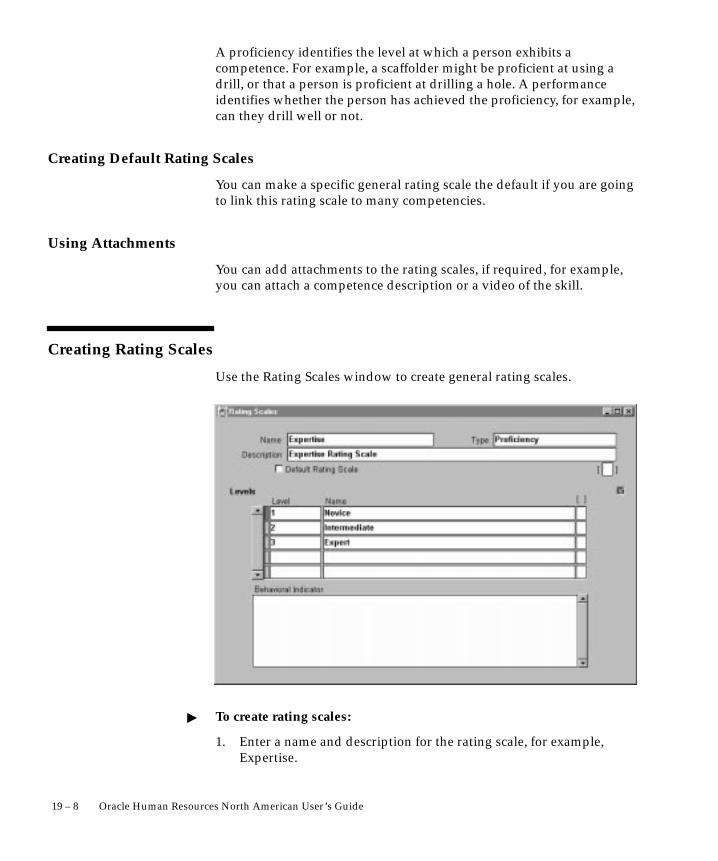
19 – 8 Oracle Human Resources North American User’s Guide
A proficiency identifies the level at which a person exhibits acompetence. For example, a scaffolder might be proficient at using adrill, or that a person is proficient at drilling a hole. A performanceidentifies whether the person has achieved the proficiency, for example,can they drill well or not.
Creating Default Rating Scales
You can make a specific general rating scale the default if you are goingto link this rating scale to many competencies.
Using Attachments
You can add attachments to the rating scales, if required, for example,you can attach a competence description or a video of the skill.
Creating Rating Scales
Use the Rating Scales window to create general rating scales.
� To create rating scales:
1. Enter a name and description for the rating scale, for example,Expertise.

19 – 9Designing Methods of Measurement and Creating Competencies
2. Select the type of rating scale to create, for example, performance,proficiency or weighting.
3. Click the Default Rating Scale box if you want to make this ratingscale the default, otherwise leave this box blank.
4. Enter the first level and description for the rating scale. For example,enter 1 in the Level field and Novice in the Name field.
5. Enter the behavioral indicator for that level. For example, Meetsexpectations.
You can enter up to 2000 characters for each behavioral indicator.
6. You can add attachments to the rating scales, if required, forexample, you can attach a competence description or a video of theskill.
7. Continue to enter levels and description for the rating scale thensave your changes.

19 – 10 Oracle Human Resources North American User’s Guide
Competencies
We recognise that you’ll want to develop competencies that best meetthe needs of your own enterprise. So, rather than providing you withpredefined competencies that may be too prescriptive or too general, weenable you to develop your own. You might want to ’pilot’ a smallnumber of easily definable and measurable competencies first (forexample, anything that requires physical effort such as digging a ditchor typing a letter), ensuring that the definitions are meaningful andrelevant before rolling them out widely within the enterprise. Once youhave developed these first competencies, you can go on to definecompetencies that are much more complex and difficult to observe andmeasure (for example, anything that includes cooperation with otherpeople). You can, of course, have a mixture of both.
All competencies are held at the person level, in the Competence Profile.
Some enterprises also group competencies by the methods used toimprove them, such as hireable or trainable competencies, and still othersby their use in the enterprise, for example, core or technical.
You will have previously identified how you want to structure yourcompetencies; if you are using the individual method, you need to setup the proficiency levels for each competence you create.
Retrieving the Right Proficiency Levels
Once you set up proficiency levels for a competence, Oracle HumanResources retrieves the right proficiency levels for you when you (orother users) perform any of the following tasks:
• set up competence requirements
• create or update a Competence Profile
• perform an assessment
This not only saves you time, but also ensures that you always select theright proficiency level for the task you are performing
Driving Alerts
Use Oracle Alert’s automatic mail notification to keep you informedwhen an employee’s competencies need certification and renewal. Thisfrees your time for more essential tasks. For example, use thecompetence Renewal Period to drive Oracle Alert—it compares therenewal period date with the date on the person’s Competence Profile,or the last training class delivering the skill.
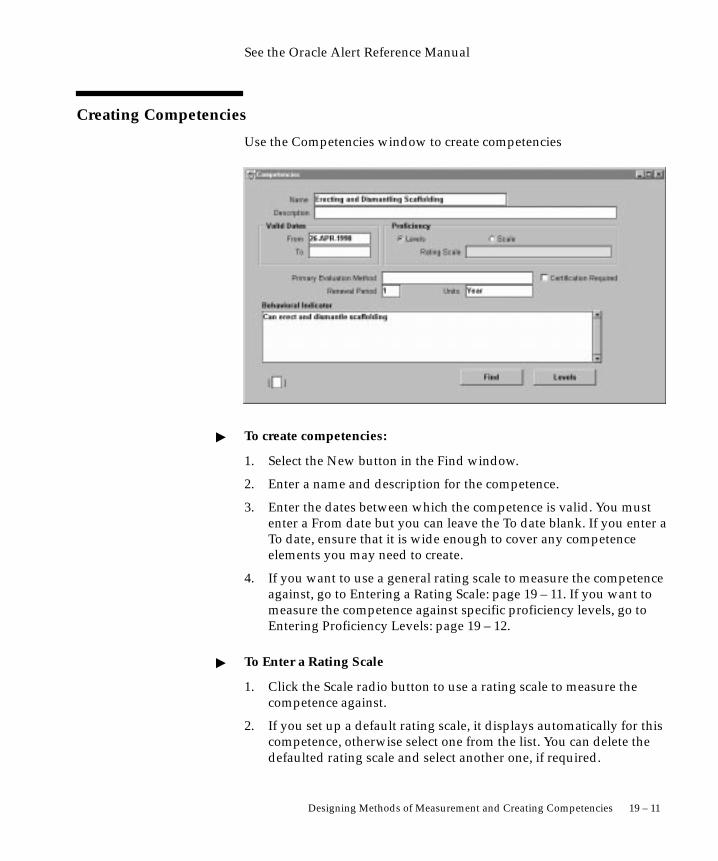
19 – 11Designing Methods of Measurement and Creating Competencies
See the Oracle Alert Reference Manual
Creating Competencies
Use the Competencies window to create competencies
� To create competencies:
1. Select the New button in the Find window.
2. Enter a name and description for the competence.
3. Enter the dates between which the competence is valid. You mustenter a From date but you can leave the To date blank. If you enter aTo date, ensure that it is wide enough to cover any competenceelements you may need to create.
4. If you want to use a general rating scale to measure the competenceagainst, go to Entering a Rating Scale: page 19 – 11. If you want tomeasure the competence against specific proficiency levels, go toEntering Proficiency Levels: page 19 – 12.
� To Enter a Rating Scale
1. Click the Scale radio button to use a rating scale to measure thecompetence against.
2. If you set up a default rating scale, it displays automatically for thiscompetence, otherwise select one from the list. You can delete thedefaulted rating scale and select another one, if required.

19 – 12 Oracle Human Resources North American User’s Guide
3. Select the Levels box if you want to check the proficiency levels forthat rating scale, otherwise go straight to Entering CompetenceDetails: page 19 – 12.
� To enter Proficiency Levels
1. Click the Levels radio button to enter proficiency levels andbehavioral indicators for the competence.
2. Select the Levels button and enter the first proficiency level anddescription. For example, enter 0 in the Level field and No Skill inthe Name field.
3. Enter the behavioral indicator for that level, for example, ’Noknowledge/expertise of scaffolding’. You can enter up to 2000characters for each behavioral indicator.
4. Continue to enter proficiency levels and behavioral indicators, thengo to Entering Competence Details: page 19 – 12.
� To enter Competence Details
1. Select the main method of evaluating the competence, for example,written examination or observation.
2. Enter how often you need to evaluate the competence. For example,enter 5 if you have to evaluate the competence every 5 years.
3. Select the measure to identify how often you need to evaluate thecompetence. For example, select Year if you evaluate thecompetence every 5 years.

19 – 13Designing Methods of Measurement and Creating Competencies
4. Click the Certification Required box if you need a certificate toconfirm possession of the competence, for example, if you needproof of a driving license.
If you click this box, when you or another user later indicates that aperson possesses this competence (using the Competence Profile),you must enter the certification method and date.
5. Save your changes.
Querying a Competence Using the Find Competencies Window
When you navigate to the Competencies window, the FindCompetencies window automatically displays in front of it.
� To query a competence using the Find Competence window:
1. Do one or both of the following:
• Enter a full or partial query on the competence name.
2. Choose the Find button.
Oracle Human Resources displays the competence for you to check.

19 – 14 Oracle Human Resources North American User’s Guide
Competence Types and Groupings
Because you might want to group related competencies together, OracleHuman Resources enables you to create competence types. Thisflexibility enables you to create competencies displaying complexbehaviors, for example, management skills, or you can splitmanagement skills into several competencies, such as communicationskills, presentation skills and oral skills. The degree to whichcompetencies are grouped in this way is up to you!
Note: If you do not group competencies into types, OracleHuman Resources groups them under the type of Others foryou.
Once you have grouped your competencies into types (or OracleHuman Resources groups them under the type of Others), you use themon the assessment template, by indicating which competence types andrelated competencies you want to include in specific assessments.
Grouping Competencies is Useful
Grouping competencies is also useful, for:
• advertising a vacancy and you want to include all ’hireable’competencies on a job advertisement
• competencies for a team
• reporting purposes
• enabling easier access to particular competencies
You measure and evaluate behavior that a person demonstrates at thecompetence level, and not at the competence type level.
Figure 19 – 5 illustrates related competencies grouped by typeManagement Skills.

19 – 15Designing Methods of Measurement and Creating Competencies
Figure 19 – 5Grouping Competencies into Types
Competence Type(Complex Behaviors)
Competencies(Simple Behaviors)
CommunicationSkills
PresentationSkills
OralSkills
ManagementSkills
You can also group a competence into more than one competence type.For example, the competence Oral Skills can be grouped into both theManagement Skills and the Interpersonal Relationships competencetype.
Figure 19 – 6Competencies Belonging to more than one Type
CommunicationSkills
PresentationSkills
OralSkills
ManagementSkills
InterpersonalRelationships

19 – 16 Oracle Human Resources North American User’s Guide
Where Do You Create Competence Types?
You create the competence types using the QuickCodeCOMPETENCE_TYPE, then you group competencies into types usingthe Competence Type window.
Deleting or Adding Competencies into Types
Once you have used a competence type in HRMS (in an assessment, forexample), you can query back and view it, but you cannot delete or addcompetencies to that type. This ensures that you cannot accidentallydelete or add competencies to groups in use.

19 – 17Designing Methods of Measurement and Creating Competencies
Grouping Competencies into Types
Use the Competence Types window to group competencies
Prerequisite
� Ensure that you have created the competence types you requireusing the QuickCode COMPETENCE_TYPE.
� To group competencies into types:
1. Query back the competence type under which you want to groupcompetencies.
2. Select the first competence to group within the competence type.
3. Continue to enter competencies to group within the competencetype, then save your changes.

19 – 18 Oracle Human Resources North American User’s Guide

C H A P T E R
20T
20 – 1Defining Competence Requirements
Defining CompetenceRequirements
his chapter describes how you can define your competencerequirements to enable your enterprise to meets its current and futuregoals.

20 – 2 Oracle Human Resources North American User’s Guide
Competence Requirements
To ensure your enterprise meets its current and future goals, you’ll needto identify your competence requirements. For example, if your goal is’to gain greater penetration in the applications market’, Oracle HumanResources enables you to quickly and easily identify the competenciesthat people within your enterprise need to possess and exhibit to meetthat goal.
Defining your core (or management or leadership) competencies might bethe first stage in developing a competence approach. These corecompetencies are identified as being required by every person to enableyour enterprise to meet its goals. In our example, the core competenciesrequired to meet the goal greater penetration in the applications market,might include strategic thinking, quality orientation and customerawareness. With Oracle Human Resources flexibility, you can definethese core competencies at the business group or organization level.
Once you have identified your enterprise’s core competencies, youmight want to define individual job and position competencies later, forexample, C++ programming, SQL*Plus, and such. You can then copy thecore competencies (with or without proficiency levels) to yourorganizations, jobs and positions. You can also copy requiredcompetencies to and from organizations, jobs and positions, saving youfrom having to enter them yourself!
The competence requirements held at business group, organization, joband position level are dated. With all this information at your fingertips,you can set them up for future requirements to perform analysis orresource projections for your enterprise. You can also project the impactof changes, such as reorganisation and restructuring, and change themover time.
One–Time Profiles for Suitability Matching
Not only can you create profiles for organizations, jobs and positions,but you can also create one–time profiles for many purposes. Forexample, you can create one–time profiles for a variety of activities suchas for team building using the Suitability Matching Web page. You cansearch for and rank candidates using this functionality.

20 – 3Defining Competence Requirements
Why Define Competence Requirements?
You can define your enterprise’s competence requirements at thefollowing levels:
• business group
• organization
• job
• position
• one–time profiles (for suitability matching)
You define your core and job and position competence requirements toenable you to compare what competencies the people within yourenterprise possess, with those that are required. You need to do this ascomparison is the main driver for most HR activities, whetherdeployment, reward, incentives, succession planning, and so on.
By having a profile of competence requirements, you can devise anappropriate assessment procedure, and assess individuals against thecompetencies for selection, qualification or training and developmentpurposes.
By having a template of required competencies, you are able to matchand assess people against these requirements. As the requiredcompetencies are only the default, you use these as a starting point inthe search, and can change them to widen or narrow down the search.
Retrieving Relevant Competencies
If you group all competencies required at business group ororganization level, then each time you select a specific organization orjob, the relevant competencies automatically display, saving you fromhaving to select them each time.
You can hold competencies at position level, within the context of anorganization and job. Then, when you later select a position, the relevantcompetencies for the organization, job and position are inherited anddisplayed. Alternatively, you can hold competencies at position levelonly, not within the context of an organization or job.
This is one of the important implementation decisions – whether to holdcompetencies at organization or job level, or to repeat them at positionlevel.
If you need more information about identifying competencerequirements, see Competence Types and Groupings: page 19 – 14.

20 – 4 Oracle Human Resources North American User’s Guide
Can You Copy Competencies?
You can copy the core competencies and proficiency levels to theorganization, job or position, saving you time. You can then makechanges to the competencies, if required, for example, change theproficiency levels, enter a grade, or change the dates between which thecompetence is valid.
You can also copy competencies and proficiency levels fromorganizations, jobs or positions to other organizations, jobs or positions.This enables you to quickly and easily to define your enterprise’scompetence requirements.
Retrieving the Correct Proficiency Levels
When you are setting up your competence requirements for anorganization, job or position, Oracle Human Resources retrieves thecorrect proficiency levels (defined when you created the competence).This ensures that you always select the right proficiency level for thecompetence.
Defining Essential Competencies and Different Grades
You can identify whether a competence is essential by an organization,job or position, or whether is optional. If you indicate that a competenceis essential, when you later perform suitability matching, only thepeople who possess the competence at the specified proficiency level areretrieved in the search.
You can also identify different competencies for different grades, eachwith their accompanying proficiency levels. This enables you to keep ahistory of the competencies for an organization, job, position or gradeover time.

20 – 5Defining Competence Requirements
Defining Competence Requirements – Core or Generic Competencies
Use the Competence Requirements window to define your competencerequirements with core or generic competencies.
� To define competence requirements (with core or genericcompetencies)
1. Select the business group for which you want to create competencerequirements.
2. Select the Find button. Oracle Human Resources retrievescompetencies if you have previously defined them as required forthe business group, otherwise it retrieves nothing.
3. Press Clear Record after you have looked at the existingcompetencies.
4. You can now do the following:
• Create Competence Requirements for the Business Group: page20 – 5
• Copy Existing Core Competencies to an Organization, Job orPosition: page 20 – 6
Create Competence Requirements for the Business Group
1. Select the first competence.
2. Select the highest and lowest proficiency levels at which thecompetence is acceptable, if required.

20 – 6 Oracle Human Resources North American User’s Guide
If you are going to copy these requirements to an organization, jobor position, you can choose not to copy these proficiency levels over.
3. Check the Essential check box if the competence is essential for thisbusiness group, otherwise, leave the box unchecked.
Note: Only enter a grade if you are creating competencerequirements for a job or position.
4. Enter the dates between which the competence is valid for thisbusiness group. You must enter a From date but you can leave theTo date blank.
5. Continue to enter competencies for the business group, then saveyour changes.
Copy Existing Core Competencies to an Organization, Job or Position
1. Clear the details from the Business group before you copy thecompetencies.
2. Select the organization, job or position to which you want to copythe core competencies and press the Find button.
3. Select the Copy Competencies button. A Copy Competencieswindow appears.
4. Leave the Core Competencies box checked.
5. If you want to copy the proficiency levels, leave the Copy Levels boxchecked, and enter the dates between which the competence is valid(you must enter a From date but you can leave the To date blank). Ifyou do not want to copy the proficiency levels, uncheck the box.
6. Select the Copy button, and Oracle Human Resources copies thecompetencies to the organization, job or position.
7. You can make changes to the competencies copied over, if needed,such as:
• deleting any of the core competencies that are not required by theorganization, job or position
• changing the proficiency levels
• checking or unchecking the Required check box
• entering a grade (for a job or position only)
• changing the dates between which the competence is valid
8. Save your changes.
9. You can now add further competencies for the organization, job orposition, see Create Competence Requirements for the BusinessGroup: page 20 – 5.

20 – 7Defining Competence Requirements
Copying Existing Competencies from an Organization, Job or Position
Use the Competence Requirements window to copy competencies froman organization, job or position.
� Copying the competencies from an organization, job or position
1. Select the organization or job to which you want to copy thecompetencies. If you are copying competencies to a position, youmust also select the organization and job to which the positionbelongs.
2. Select the Find button.
Oracle Human Resources retrieves any competence requirementspreviously created.
3. Select the Copy Competencies button. A Copy Competencieswindow appears.
4. Uncheck the Core Competencies box. The organization, job andposition fields are now active.
5. Select the organization, job or position from which you want to copythe competencies.
6. If you want to copy the proficiency levels, leave the Copy Levels boxchecked, and enter the dates between which the competencies arevalid (you must enter a From date but you can leave the To dateblank). If you do not want to copy the proficiency levels, uncheckthe box.
7. Select the Copy button, and Oracle Human Resources copies thecompetencies.
8. You can make changes to the competencies copied over, if needed,such as:
• deleting any of the core competencies that are not required by theorganization, job or position
• changing the proficiency levels
• checking or unchecking the Required check box
• entering a grade (for a job or position only)
• changing the dates between which the competence is valid
9. Save your changes.
10. You can now add further competencies for the organization, seeCreate Competence Requirements for the Business Group: page20 – 5.
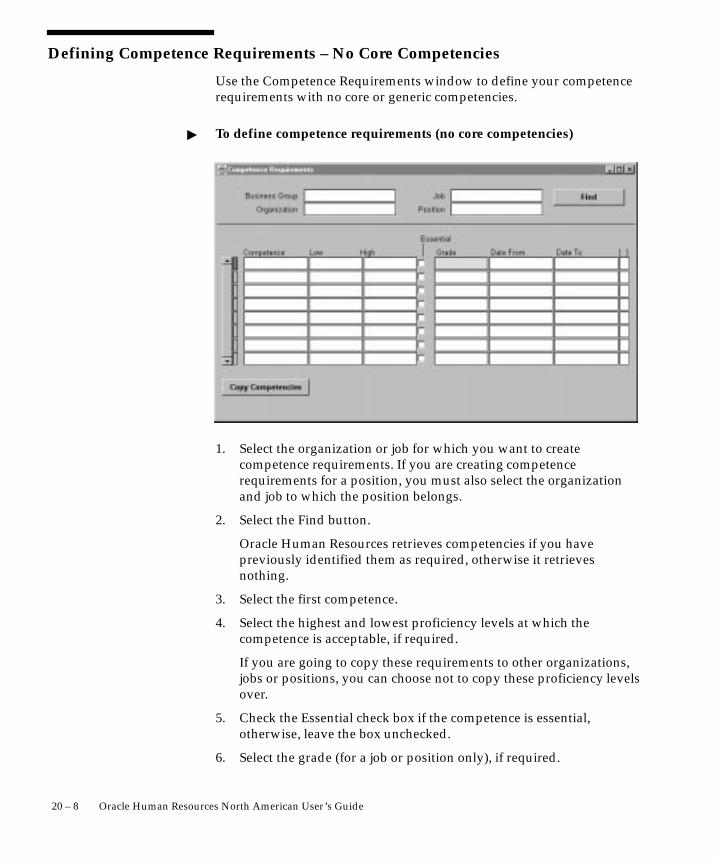
20 – 8 Oracle Human Resources North American User’s Guide
Defining Competence Requirements – No Core Competencies
Use the Competence Requirements window to define your competencerequirements with no core or generic competencies.
� To define competence requirements (no core competencies)
1. Select the organization or job for which you want to createcompetence requirements. If you are creating competencerequirements for a position, you must also select the organizationand job to which the position belongs.
2. Select the Find button.
Oracle Human Resources retrieves competencies if you havepreviously identified them as required, otherwise it retrievesnothing.
3. Select the first competence.
4. Select the highest and lowest proficiency levels at which thecompetence is acceptable, if required.
If you are going to copy these requirements to other organizations,jobs or positions, you can choose not to copy these proficiency levelsover.
5. Check the Essential check box if the competence is essential,otherwise, leave the box unchecked.
6. Select the grade (for a job or position only), if required.

20 – 9Defining Competence Requirements
7. Enter the dates between which the competence is valid. You mustenter a From date but you can leave the To date blank.
8. Continue to add further competencies for the organization, job orposition, if required.

20 – 10 Oracle Human Resources North American User’s Guide
Viewing Competencies at Organization, Job or Position
Use the Competence Requirements window to view competencies heldat organization, job or position level.
� To view competencies held at organization, job or position level:
1. Select the business group, organization, job or position for whichyou want to view competencies,
2. Click the Find button.

C H A P T E R
21
T
21 – 1Identifying Qualifications and Delivering Competencies
IdentifyingQualifications andDeliveringCompetencies
his chapter explains how you can deliver competencies at a specificproficiency level through training activities your enterprise (or anoutside supplier) provides. It also describes how you can recordqualification methods, such as a license or a test, and enter thequalifications that your enterprise recognises.

21 – 2 Oracle Human Resources North American User’s Guide
Identifying Qualifications and Delivering Competencies
Competencies can have identified qualification methods, such as alicense or a test. You can enter the qualifications that your enterpriserecognises to include only the ones that you want in a person’sCompetence Profile.
Delivering Competences Through Training Activities (Oracle Training Administration)
You can deliver competencies at a specific proficiency level throughtraining activities your enterprise (or an outside supplier) provides. Atraining activity is an abstract term for any planned undertaking thatimproves a student’s competencies (qualifications, experience, and soon).
You can enter the competencies and proficiency levels that your trainingactivities are expected to deliver using the Delivered Competencieswindow. You can then update a person’s Competence Profile after theyhave successfully gained the competence.
Note: You must purchase Oracle Training Administration(OTA) separately to use this functionality.
See: Using Competencies or Skills, (Oracle Training Administration User’sGuide).

21 – 3Identifying Qualifications and Delivering Competencies
Creating Qualification Types Competencies can have identified qualification methods, such as alicense or a test, for example, a life–saving qualification or a degree. Youcan enter all the ones your enterprise recognises, this includes:
• all educational qualifications
• licenses
• awards
• honors
Not only can you enter different types of qualifications, but you can alsorank them, if required. For example, you could rank a masters degree as1, a degree as 2, ’A’ levels as 3, and so on. You can also rank equivalentqualifications at the same level. For example, you can rank a degree anda BTEC Higher as level 2. This is useful, for example, if you later want todo an ad hoc query and find all people within the category of Education,with a qualification of 2 or above.
Prerequisites
You’ll need to enter enter the following QuickCode:
❑ Define the types of qualifications as values for the QuickCode TypePER_CATEGORIES.
Use the Qualification Types window to create your qualifications.
� To create qualification types:
1. Enter the name of the qualification, for example, a Masters degree.
2. Select the type of qualification, for example, educational, honorary.

21 – 4 Oracle Human Resources North American User’s Guide
3. Rank the qualification, for example, 1 for a Masters degree, ifrequired.
4. Continue to enter and rank qualifications, then save your changes.

21 – 5Identifying Qualifications and Delivering Competencies
Creating Schools and Colleges You need to identify schools and colleges that deliver the qualificationsyour enterprise recognises. These are then used to record where aperson gained the qualification. If you have not automatically loadedthese schools and colleges into Oracle Human Resources, you can enterthem manually.
You can also record the different sites or locations that comprise anestablishment. This is useful, for example, where an establishment hasseveral sites, colleges, campuses or locations.
Note: Schools and colleges you enter are available to allBusiness Groups you create, therefore only load or enter themonce.
Use the Schools and Colleges window to enter your establishments.
� To create establishments:
1. Enter the name of the establishment.
2. Enter the name of the location.
3. Continue to enter establishments, then save your changes.

21 – 6 Oracle Human Resources North American User’s Guide

C H A P T E R
22T
22 – 1Assessing and Appraising People
Assessing andAppraising People
his chapter explains how you set up Oracle Human Resources toenable you to assess and appraise your enterprise’s employees.
22 – 2 Oracle Human Resources North American User’s Guide
Assessing and Appraising People
An assessment is an information gathering exercise, from one or manysources, to evaluate a person’s ability to do a job. An appraisal is a’superset’ of recording opinions and setting and achieving objectives,plans, and so on.
Assessing and appraising your enterprise’s employees are key areas ofhuman resources management. To ensure you have the right people inplace at the right time, you’ll want to find out what competencies youremployees (applicants, and so on) possess, and at what level theydemonstrate them. This provides a snapshot that allows study, analysis,and evaluation,
By tightly integrating assessment and appraisal with the performancemanagement process, both individual and enterprise performance arestrengthened. You’ll find that your employees are more willing tochange their behaviors as they feel committed to, and understand howtheir efforts make an impact on the big picture. So, using Oracle HumanResources, assessment and performance appraisal produces informed,motivated employees, committed to improving the effectiveness of theirperformance—in short, improving their productivity.

22 – 3Assessing and Appraising People
Competence–Based AssessmentsAn assessment is an information gathering exercise, from one or manysources, to evaluate a person’s ability to do a job. Through the web andworkflow–based access, managers and employees can measure andrecord a score of how the person has performed against eachcompetence. This provides clear and accessible measures, for example,’Is the person demonstrating the specified behavior at the level defined?‘or ’Does the person have the knowledge or skills required to operateeffectively?’
Some assessments will simply ask one or more people to rate a personaccording to some agreed scale, in other cases, questionnaires may bedevised that ask about different aspects of the of the person’s work.
Proficiency– and Performance–Based Assessments
In Oracle Human Resources, we use the term proficiency–basedassessment to express the perceived level of expertise of a person, in theopinion of the assessor, over a given period. For example, a person maydemonstrate communication skills at Expert level. We use the termperformance–based assessment, however, to measure an expectation of”normal” performance of a competence over a given period. Forexample, a person may exceed performance expectation in thecommunication competence.
Why is Measurement Useful?
Once you have measured how people have performed against eachcompetence, and at what level, you are ready to record applicant andemployee accomplishments in the Competence Profile. You can keep theprofile up–to–date by entering results when an employee first joins theenterprise, and then after each assessment or appraisal. Through theweb and workflow–based access, employees are involved in the processof planning, managing and reviewing their own progress.
Once your employee competencies and proficiency levels are held inCompetence Profiles (and job requirements in their own profile), youcan use the information to analyse visually which competencies aperson (or group of people) possess, and which competencies arerequired by jobs or positions now, or in the near future. You can use theresults of the Competence Gap processes to identify areas where youneed to recruit or train employees, and so on. You can also affectmotivation by various types of incentive, whether monetary– oropportunity–based.
22 – 4 Oracle Human Resources North American User’s Guide
Once you have assessed measurable behavior, you can change it!
Templates for Different Assessments
To enable you and other users to perform assessments using the web,Oracle Human Resources enables you to create assessment templates forall the different assessments your enterprise performs. Examples of thetypes of assessment you might want to perform include:
• 360 Degree (where a manager, direct or indirect reports, peers andcustomers provide feedback on aspects of a person’sperformance)
• self–assessment (by employee or applicant)
• peer or team assessment
• job skills assessments (for example, Engineer Grade 1, JuniorTypist, and so on)
Once you have created assessment templates, assessors can work onlinethrough Line Manager Direct Access to identify employee performanceor proficiency. They can enter or update assessments, without yourintervention or involvement being required.
Tailoring the Layout
Not only can you create templates for the different assessments, but youcan also tailor the actual layout of the assessment page to meet the needsof your enterprise. For example, you can identify:
• the type of assessment you are performing, for example,performance or proficiency
• the competence types and competencies against which to assess,and the sequence in which you want them to appear.
• the instructions to be displayed to the assessor(s) or approver(s)
• how you want to calculate the total scores
What Type of Assessment do you Want to Perform?
You can set up assessment templates for each type of assessment youwant to perform, for example, job skill assessments for Scaffolders,Engineers at Grade 1, Junior Typist, and so on. By measuring
22 – 5Assessing and Appraising People
competencies grouped into an assessment (for example, a Managerial orEngineering assessment), you focus attention on behaviors and theability of an individual to get things done.
Another decision that you need to take is whether you want to performproficiency or performance assessments. A proficiency assessmentmeasures the expectation of the level to which a person exhibits acompetence. For example, in an Engineering Grade 1 assessment youmight assess that a person is proficient at using a drill, or that a personis proficient at drilling a hole. You also set future expectations, forexample, that within the next 6 months, they will have achievedproficiency in milling. A performance assessment measures whether theperson has achieved the proficiency, for example, can they drill well ornot. You can also rank performance, for example, on a scale of 1–5.
You can create assessment templates for:
• Proficiency
• Proficiency and Performance
• Proficiency and Performance, with Weighting applied toPerformance
• Proficiency and Performance, with Weighting applied toproficiency
• Proficiency with Weighting applied to proficiency
• Performance
• Performance with Weighting applied to performance
Because some enterprises will want to carry out performanceassessments only (just rating that a person has achieved a specificcompetence), while other enterprises will want to carry out two stepprocesses (proficiency assessments to set expectations first beforeassessing performance), Oracle Human Resources enables you to assessproficiency and performance, in a two stage process.
What Do You See?
By identifying the type of assessment you are performing in thetemplate, users of the Web assessment pages only get the headings andfields to complete appropriate to that type of assessment. For example, ifyou want to create an assessment template for a Scaffolder, of the typeProficiency, they might get the following headings and fields tocomplete on the assessment Web page:

22 – 6 Oracle Human Resources North American User’s Guide
Figure 22 – 1Example of Assessment Web Page for Proficiency with Weighting Erecting and Dismantling
Scaffolding
Proficiency Score
Slinging and Lifting
Use of Climbing Harness
If you want to create an assessment template for a Scaffolder, of the typeProficiency and Performance, with Weighting applied to Performance,users might get the following headings and fields to complete:
Figure 22 – 2Example of Assessment Web Page for Proficiency and Performance with Weighting
Erecting and Dismantling Scaffolding
Performance Weighting Score
Slinging and Lifting
Use of Climbing Harness
Proficiency
Identifying Proficiency Levels in the Assessment Template
When you are setting up templates for any type of proficiency–basedassessment, you have previously identified the proficiency levels or arating scale with which to measure competencies. So you do not need toidentify the performance scale, Oracle Human Resources already knowsit. If you are setting up templates for any type of performance–basedassessment, you need to indicate the performance scale to use in theassessment.
Entering Instructions
You can also enter the instructions to be displayed to the assessor(s) orapprover(s) completing the assessment on the web page.
You can format the text to appear exactly as you want it. You can enterup to 2000 characters for each assessment type.
Identifying Competence Types and Competencies in the Assessment Template
Once you identify the type of assessment you are performing, you’llwant to identify the competence types and competencies against which

22 – 7Assessing and Appraising People
to assess. When you are first setting up your assessment templates, allthe competence types and competencies you previously created withinyour enterprise are available for you to select from.
Not only can you identify which competence types and relatedcompetencies to include in the assessment, but you can also indicate thesequence in which you want them to appear on the assessment page.This gives you complete control over the layout. (If you do not sequencethe competencies or types, they appear on the assessment Web page inthe order they appear in the template).

22 – 8 Oracle Human Resources North American User’s Guide
Calculating Scores in the Assessment Template
When you perform an assessment for a person, you record a scoreagainst each competence (within the framework of a job or position).Oracle Human Resources gives you the freedom to calculate the scoresin a variety of ways to fully meet the needs of your enterprise. Forexample, you might want to calculate the scores just by takingperformance against the competencies into consideration, or you mightwant to calculate the scores by taking performance, proficiency andweighting into consideration, and to apply the weighting to proficiency.(You can of course, only apply weighting to performance or proficiency,not to both.)
To make it easier for you, we provide several assessment types for youto choose from. These are:
Assessment Type Calculates Score By
Performance Performance
Proficiency Proficiency
Proficiency and Performance Proficiency x Performance
Proficiency and Performance, withWeighting applied to Performance
Performance x Weighting
Proficiency and Performance, withWeighting applied to proficiency
Proficiency x Weighting
Performance with Weighting applied toperformance
Performance x Weighting
Proficiency with Weighting applied toproficiency
Proficiency x Weighting
We provide you with a couple of examples to illustrate how the scoresvary, depending upon how you calculate them.
Example 1: Proficiency with Weighting Applied to Proficiency
Figure 22 – 3 illustrates the scores where an assessment based onproficiency, with weighting applied to proficiency.
Figure 22 – 3Proficiency with Weighting Applied to Proficiency Communication Skills
Proficiency Weighting
5
Score
Presentation Skills
Oral Skills
5
3
5
2
1
25
3
10

22 – 9Assessing and Appraising People
Example 2: Proficiency and Performance with Weighting Applied toPerformance
Figure 22 – 4 illustrates an assessment based on proficiency andperformance, with weighting applied to performance.
Figure 22 – 4Proficiency and Performancewith Weighting Applied to Performance Communication Skills
Proficiency Performance Weighting Score
Presentation Skills
Oral Skills
5
5
3
2
3
3
5
2
1
10
3
6
Calculating the Total Score
You can choose one of two methods to calculate the total score for theassessment. You can also use these total scores to rank groups ofcandidates, for use in compensation.
You can choose to calculate the total score by:
• sum total
• average total
Figure 22 – 5 illustrates an assessment based on proficiency, withweighting applied to proficiency. The total score is calculated as a sumtotal.
If you calculated the total score as an average total instead (25 + 10 + 3,divided by 3), the total score would be 16 rather than 38.
Figure 22 – 5Calculating the Total Score
Communication Skills
Proficiency Weighting Score
Presentation Skills
Oral Skills
Total Score
5
5
3
5
2
1
25
3
10
38
Changing or Deleting an Assessment Template
If a template is not yet in use, you can delete it, or you can make anychanges to it that you require. For example, you might want to changethe dates, or to include more competence types and competencies.
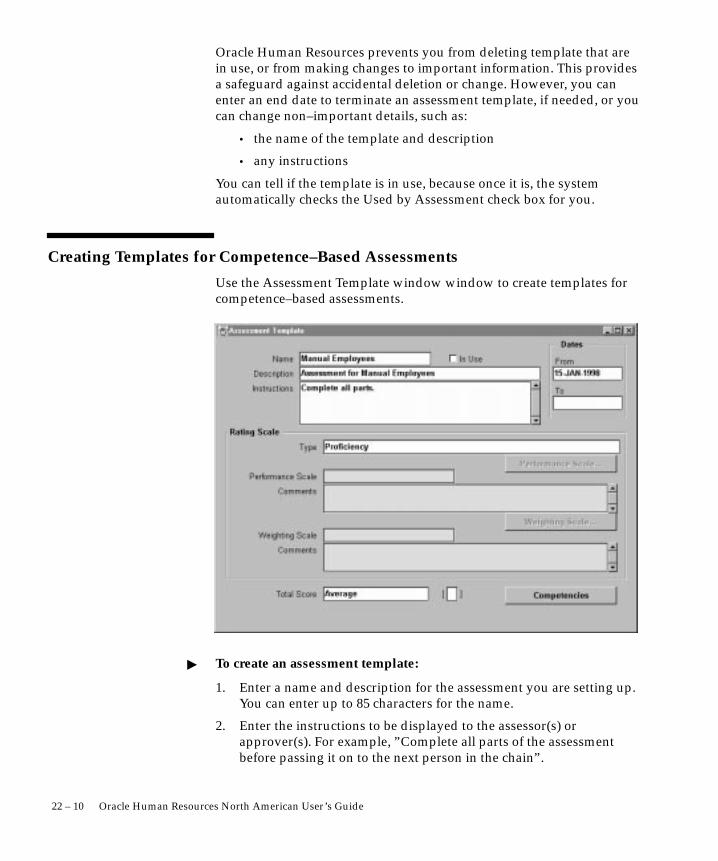
22 – 10 Oracle Human Resources North American User’s Guide
Oracle Human Resources prevents you from deleting template that arein use, or from making changes to important information. This providesa safeguard against accidental deletion or change. However, you canenter an end date to terminate an assessment template, if needed, or youcan change non–important details, such as:
• the name of the template and description
• any instructions
You can tell if the template is in use, because once it is, the systemautomatically checks the Used by Assessment check box for you.
Creating Templates for Competence–Based Assessments
Use the Assessment Template window window to create templates forcompetence–based assessments.
� To create an assessment template:
1. Enter a name and description for the assessment you are setting up.You can enter up to 85 characters for the name.
2. Enter the instructions to be displayed to the assessor(s) orapprover(s). For example, ”Complete all parts of the assessmentbefore passing it on to the next person in the chain”.

22 – 11Assessing and Appraising People
You can format the text to appear exactly as you want it. (Do youwrite in HTML?) You can enter up to 2000 characters for eachassessment type.
3. Enter the dates between which the assessment template is valid. Youmust enter a From date but you can leave the Until date blank.
4. Select the type of assessment template you are creating, for example,proficiency with weighting applied.
When you are setting up templates for proficiency–basedassessments, as you have previously identified the proficiency levelsor a rating scale with which to measure competencies, OracleHuman Resources already knows it, so it greys out the PerformanceScale fields. If you are setting up templates for any type ofperformance–based assessment, however, you need to indicate theperformance scale to use in the assessment.
5. For any type of performance–based assessment, select theperformance scale for use in the assessment.
You can click the Performance Scale button to see the proficiencylevels for that scale, if required.
6. Enter any comments in the Comments field, if required.
7. For all type of assessment, select the weighting scale for use in theassessment, if required.
You can click the Weighting Scale button to see the level ofimportance, if required.
8. Enter any comments in the Comments field, if required.
9. Select the method for calculating the total score, by sum or averagetotal.
10. Save your changes.
11. You can now select your competence types and competencies.

22 – 12 Oracle Human Resources North American User’s Guide
Selecting Your Competence Types and Competencies
1. Click the Competencies button to select the competency types andcompetencies to include in the assessment.
Query back all competency types and competencies for you to selectfrom.
2. With the first competence type displayed in the Competence Typefield, scroll through them until the first competence type you wantto include appears, then click the Used box.
3. You can also indicate the sequence in which you want thecompetence type to appear on the assessment in the Sequence field.(If you do not sequence the competence types, they appear on theassessment Web page in the order they appear here).
4. Continue to scroll through the competence types, indicating thesequence in which you want the competence type to appear untilyou have selected all the ones you want to include.
Suggestion: We suggest that you select all the competencetypes you want to include first, before you select thecompetencies.
5. Click the Saved Competence Types Only box to retrieve in futureonly the competence types you are using. We suggest that you do

22 – 13Assessing and Appraising People
this, otherwise, you will have to scroll through all the competencetypes from which to select the competencies.
6. Save your changes, and requery the competence types you haveselected. Only the competence types you have selected are nowdisplayed.
7. With the first competence type and competencies for that typedisplayed, click the Used box for each competence you want toinclude in the assessment.
8. You can also indicate the sequence in which you want thecompetencies to appear on the assessment in the Sequence field. (Ifyou do not sequence the competencies, they appear on theassessment Web page in the order they appear here).
9. Save your changes.
10. Continue to scroll through the competence types, selecting andsaving competencies, and indicating the sequence, until you haveselected them all.
11. You can click the Saved Competencies Only box to display only thecompetencies you have selected in future, otherwise leave this boxunchecked.
12. You can leave the Saved Competence Types Only box checked todisplay only the competence types you have included in theassessment the next time you use this window, or you can uncheckthe box to display all competence types.

22 – 14 Oracle Human Resources North American User’s Guide
Appraisals
In Oracle Human Resources, an appraisal is the part of the performancemanagement process where the enterprise translates its corporateobjectives into individual performance and improvement goals andmeasures. An appraisal is the whole process where a manager andperson jointly evaluate the person’s performance, in terms ofcompetencies, against the work they have been doing, as well as settingobjectives and actions.
An appraisal links:
• into precise job definitions and enterprise objective setting
• training recommendations
• individual development plans for competence improvements anddeployment preferences
• the pay system, in terms of making performance ratings whichcan be used as the basis for pay
An appraisal enables you to hold any additional data, such as a person’sstrengths and weaknesses or any comments, to meet your enterprise’sneeds.
Appraisals set the following:
• goals in terms of new work to be performed and new goals forexisting work
• new performance criteria against which to appraise during thenext review period
• action plans to improve the competencies required to carry outwork (where the work has both required and desirablecompetencies to meet the performance criteria)
An appraisal can be linked to an assessment, or to many assessments, aspart of the appraisal exercise.
Appraisal Templates and Questionnaire Pages
Oracle provides you with a Web–based interface for performingappraisals, and with a number of example appraisal templates that youcan modify. We also provide you with an easy to use method ofdesigning and formatting your own questionnaire pages for theappraisal. You can identify the questions to use in the appraisal, and thenumber, size and type of boxes in which to record the answers. You can

22 – 15Assessing and Appraising People
create as many different appraisal questionnaire pages as yourenterprise requires.
You can create new pages directly or by copying questions from existingpages. For example, if you created an appraisal questionnaire page forjunior grades within your group, you can copy these to a questionnairefor more senior grades, and just add the extra questions. This saves youtime, and ensures that you don’t make mistakes.
Appraisal Template
You’ll also want to create your enterprise’s appraisal templates. You usethe template to:
• provide instructions to appraisers about completing the appraisal,for example, what the reviewers should do
• identify which questionnaire (and questions) belong to whichappraisal
• identify which performance rating scale to use
You can use one of the example appraisal templates we provide andmodify them to suit your own needs, or you can create your own.
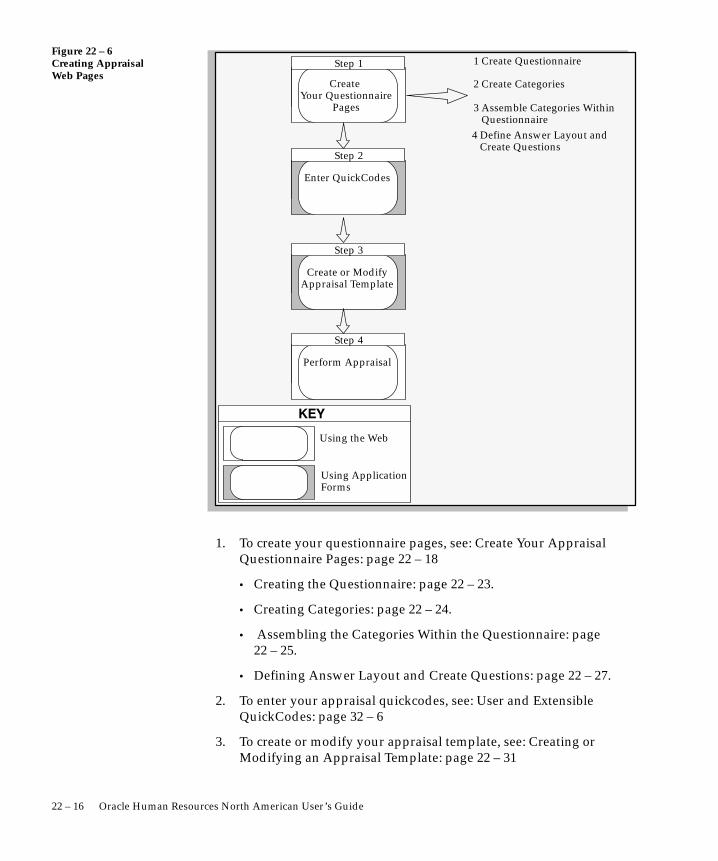
22 – 16 Oracle Human Resources North American User’s Guide
Figure 22 – 6Creating Appraisal Web Pages
Create Your Questionnaire
Pages
Step 1
Step 2
Perform Appraisal
Step 4
Using ApplicationForms
Using the Web
���
1 Create Questionnaire
2 Create Categories
3 Assemble Categories Within Questionnaire4 Define Answer Layout and Create Questions
Enter QuickCodes
Step 3
Create or ModifyAppraisal Template
1. To create your questionnaire pages, see: Create Your AppraisalQuestionnaire Pages: page 22 – 18
• Creating the Questionnaire: page 22 – 23.
• Creating Categories: page 22 – 24.
• Assembling the Categories Within the Questionnaire: page22 – 25.
• Defining Answer Layout and Create Questions: page 22 – 27.
2. To enter your appraisal quickcodes, see: User and ExtensibleQuickCodes: page 32 – 6
3. To create or modify your appraisal template, see: Creating orModifying an Appraisal Template: page 22 – 31

22 – 17Assessing and Appraising People
4. To perform an appraisal, see the online help on the Appraisal Webpage.

22 – 18 Oracle Human Resources North American User’s Guide
Create Your Appraisal Questionnaire Pages
We suggest that you first identify the text headings and questions thatyou want to appear on the questionnaire. You can sketch them out onsome paper, playing around with the positions and formats before youenter them into the application. You can also identify how you want torecord the answers. For example, do you want to record the answers astext or as ticks in checkboxes?
Example Appraisal Questionnaire Page
Figure 22 – 7 provides an example appraisal questionnaire showing textheadings, questions and areas in which you might want to recordanswers.

22 – 19Assessing and Appraising People
Figure 22 – 7Questionnaire
Overall Assessment
Header Details Objectives Reviewers Instructions
Areas for Development and ImprovementStrengths and Improvement Areas
Questions
(Within next 6 months)
Development Actions Resultingfrom Performance Review
Categories
Once you identify how you want the text, questions and answer areasspecified, you are ready to create your appraisal questionnaire page.
For example, if you want the heading text Overall Assessment, Areas forDevelopment and Improvement, Strengths and Improvement Areas and

22 – 20 Oracle Human Resources North American User’s Guide
Development Actions Resulting From Performance Review to appear on aquestionnaire, you identify them as categories.
Notice that the text Strengths and Improvement Areas and DevelopmentActions Resulting From Performance Review are minor headings underAreas for Development and Improvement. Although the four pieces of textare all headings (categories), you can treat these smaller, minor headingsas sub–categories in Oracle Human Resources. Any category can act as aparent for child categories, which means that you can create headingswith several levels.
The example below shows how categories and sub–categories (minorheadings) are entered in the application to create the questions pageillustrated in Figure 22 – 7.
Example
Questionnaire General Appraisal
First Category Overall Assessment
Second Category Areas for Development andImprovement
FirstSub–Category:
Strengths and Improvement Areas
SecondSub–Category:
Development Actions Resulting fromPerformance Review
You can also enter helpful text alongside the category or sub–category, ifyou want. For example, you might want the text ’(Within next sixmonths) to appear alongside the category Areas for Development andImprovement. This type of text is known as a sub–heading.
Questions and Your Answer Format
You’ll need to create the questions to use in appraisals. You can createdefault questions that you can use in lots of different questionnaires, forexample, ’Please summarise your views of the appraisee’s performanceagainst objectives’, or you can create unique questions to use in aspecific questionnaire, for example, ’Does the person relate well tocustomers?’. You can, of course, have a mixture of both types ofquestions.
If you are creating default questions, you specify default text that youcan make more specific for particular questionnaire you are using.

22 – 21Assessing and Appraising People
You’ll also want to define your answer format. By defining your format,you indicate how you want the answers to be recorded on thequestionnaire. You have four choices:
• text
• text area
• checkbox
• options (a list of values)
Figure 22 – 8 illustrates the four different layouts you can choose. torecord your answers. You can mix layouts, and you can size andposition your answers to suit your enterprise’s needs.
You can also include a help button next to the answer—then, when theappraiser clicks the help button, help text you define displays.
Note: If you want to use lists to record answers, you can use alookup table to display the list of values, or your systemadministrator must enter a SQL Select statement to retrieve thelist.

22 – 22 Oracle Human Resources North American User’s Guide
Figure 22 – 8Questionnaire – Showing Questions andAnswer Layouts
Header Details Objectives Reviewers Instructions
Please summarise your viewsof the appraisee’s perfor-mance against objectives
Questions
Text AreaOverall Assessment
Areas for Development and ImprovementImprovement over the last 6months?
Which areas need to improve?
Which areas need to improve?
Which areas need to improve?
Question
Checkbox
Text
Option
Text withField Help
The Questionnaire
The categories, sub–categories, sub–headings, questions and answersare all held in a container called the questionnaire. It is thisquestionnaire that you link to the appraisal template.
Figure 22 – 9 shows an example questionnaire using text (categories andsub–categories ), sub–headings, questions and answers.

22 – 23Assessing and Appraising People
Figure 22 – 9Questionnaire
Overall Assessment
Header Details Objectives Reviewers Instructions
Please summarise your viewsof the appraisee’s perfor-mance against objectives
Areas for Development and Improvement
Overall Enterprise Objectives
Strengths and Improvement Areas
Business Unit Objectives
Categories
CategoryQuestions
Text Area
Text Area
Text Area
Text Area
Questions
SubHeading
(Within next 6 months)
Development Actions Resultingfrom Performance Review
Creating the Questionnaire
Use the Define Questionnaire page to create the questionnaire whichcontains the categories, sub–categories, sub–headings, questions andanswer layouts.
22 – 24 Oracle Human Resources North American User’s Guide
For an overview of creating appraisal questionnaires, see: Create YourQuestionnaire Pages: page 22 – 18.
� To create the questionnaire:
1. In the main menu, choose Define Questionnaire.
2. Click the New button to create the questionnaire.
Entry fields display for up to three questionnaires.
3. Enter the questionnaire name and description.
In our example, enter General Appraisal, and General appraisal forall employees.
4. If you previously created a questionnaire containing similarcategories and questions, you can copy the categories and questionsto the new questionnaire. Select the questionnaire from the CopyFrom field and click the Save button.
5. When you’re done, click the Save button.
Creating Categories
Use the Manage Categories and Questions page to create and maintainthe heading text you want to appear on your appraisal questionnaire.
For an overview of creating appraisal questionnaires, see: Create YourQuestionnaire Pages: page 22 – 18.
� To create categories:
1. In the main menu, choose Manage Categories and Questions.
2. Click the New button to create the categories (heading text andsub–headings).
Suggestion: You can only create up to three categories at atime. Once you have entered the third category, click the Savebutton and click the New button again to enter furthercategories.
3. Enter the categories to include on the questionnaire.
In our example, this is Areas for Development and Improvement,Overall Assessment, Strengths and Improvement Areas, andDevelopment Actions Resulting From Performance Review.
4. Enter any special details or conditions in the Heading Text fieldalongside the category where you want it to appear.

22 – 25Assessing and Appraising People
In our example, ’within 6 months’ appears alongside the categoryAreas for Development and Improvement.
5. When you’ve done, click the Save button.
Assembling the Categories Within the Questionnaire
Use the Assemble Questionnaire page to assemble the categories withinthe questionnaire. You can update the questionnaire, if required.
For an overview of creating appraisal questionnaires, see: Create YourQuestionnaire Pages: page 22 – 18.
� To assemble categories within the questionnaire:
1. Select Assemble Questionnaire from the main menu.
2. Select the questionnaire you created within which you want toassemble the categories.
3. Click the New button to assemble the new categories.
4. Select the first category you want to display on the questionnaire inthe Category Name field.
In our example, this is Overall Assessment.
Note: Do not enter a category in the Parent Category fieldunless you are entering minor headings (sub–categories ). If youwant to enter minor headings, see Entering Minor Headings:page 22 – 26.
5. Enter 1 in the Parent Display Order field if you want this category tobe the first one displayed on the questionnaire.
6. Enter 1 in the Category Display Order field if you want this categoryto be the first one displayed on the questionnaire.
7. Leave the Display Category Header set to Yes if you want thecategory to be displayed on the questionnaire.
8. When you have assembled up to three categories, click the Savebutton.
� To enter further categories:
1. Click the New button again after assembling the previous threecategories.
2. Enter details of further categories in the same way as before.

22 – 26 Oracle Human Resources North American User’s Guide
3. Increment the number in the Parent Display Order field by one toindicate the order in which you want the category to display on thequestionnaire.
For example, enter 2 in the Parent Display Order field if you wantthe category to display second, enter 3 if you want it to displaythird, and so on. Enter 1 in the Category Display Order field as youwant this category to be the first displayed for the second category.
In our example, select Areas for Development and Improvement (inthe Category Name field), enter 2 (in the Parent Display Orderfield), enter 1 (in the Category Display Order field) and Leave theDisplay Category Header set to Yes.
4. Click the Save button when you have entered all the categories youwant.
5. Click the Layout button to see all the categories for thisquestionnaire.
� To enter sub–categories:
1. To enter minor headings (sub–categories), move to the next blankline and select the parent category under which you want to displaythe heading in the Parent Category Name field.
In our example, select Areas for Development and Improvement(because this is the category under which you want to displayStrengths and Improvement Areas and Development ActionsResulting from Performance Review).
2. Select the sub–category you want to display beneath the parentcategory in the Category Name field
In our example, select Strengths and Improvement Areas.
3. Leave the Parent Display Order field blank.
4. Enter the order in which this sub–category displays under theparent category.
In our example, enter 2 in the Category Display Order field. This isbecause the parent category (Areas for Development andImprovement) is the main heading and Strengths and ImprovementAreas is second.
5. Leave the Display Category Header set to Yes.
If you have other sub–categories to include in the questionnaire,continue to enter them as described above, but continue to leave theParent Display Order field blank, and increment the CategoryDisplay Order field by one.

22 – 27Assessing and Appraising People
In our example, select Areas for Development and Improvement inthe Parent Category Name field then select Development ActionsResulting from Performance Review in the Category Name field.Leave the Parent Display Order field blank and enter 3 in theCategory Display Order field. Leave the Display Category Headerset to Yes.
6. Click the Save button when you have entered all the categories youwant.
7. Click the Layout button to see all the categories for thisquestionnaire.
Defining Answer Layout and Creating Questions
Use the Define Answer Layout page to name your questions and todefine how you want the answers to questions to be recorded. Forexample, you can create text answer boxes, checkboxes, and such. Onceyou have named your questions and defined your answer layout, youcan create your questions.
For an overview of creating appraisal questionnaires, see: Create YourQuestionnaire Pages: page 22 – 18.
� To define an answer layout:
1. In the main menu, choose Define Answer Layout.
2. Click the New button to name your questions and to define theanswer layout.
3. Enter the name of a question in the Question Name field. You canname them anything you like, but we suggest that you make themsomething meaningful.
In our example, we named the questions:
• HR1PLEASSUM (for ’Please summarise your views of .......”
• HR2OVERENTOBJ (for ’Overall Enterprise Objectives”
• HR3BUSUNTOBJ (for ’Business Unit Objectives”
4. Enter the question in the Text field only if you are creating a defaultquestion, otherwise enter your questions later (described in CreatingQuestions: page 22 – 30).
5. Specify how you want answers to be recorded by creating any or allof the following:

22 – 28 Oracle Human Resources North American User’s Guide
• Text Areas: see page 22 – 28
• Text: see page 22 – 28
• Checkboxes: see page 22 – 29
• Options: see page 22 – 29
6. When you have finished defining your answer layout, see: To createquestions: page 22 – 30
� To create text areas:
If you want text areas for recording answers:
1. Select Text Area as the HTML Type.
2. Enter the width and height of the text area. These are columns (inour example, we used a width of 60 and height of 5).
3. Select whether you the answer box to align to the left or right handside of the questionnaire (select right for our example).
4. Optionally, you can enter any heading text that you want to displayabove the question in the Heading Text field.
5. Enter any field level help you want made available for the user.
6. Continue to enter any further text area boxes and click the Savebutton.
7. Continue defining your answer layout at Step 4: page 22 – 27 Whenyou have finished defining your answer layout, create questions foryour questionnaire.
See: To create questions: page 22 – 30
� To create text:
If you want text for recording answers:
1. Select Text as the HTML Type.
2. Enter the width and height of the text box (a width of 15 and heightof 1 is a good default)
3. Select whether you want the text box to align to the left or righthand side of the questionnaire.
4. Optionally, you can enter any heading text that you want to displayabove the question in the Heading Text field.
5. Continue to enter any further text boxes and click the Save button.
6. Enter any field level help you want made available for the user.

22 – 29Assessing and Appraising People
7. Continue defining your answer layout at Step 4: page 22 – 27 Whenyou have finished defining your answer layout, create questions foryour questionnaire.
See: To create questions: page 22 – 30
� To create checkboxes:
If you want checkboxes for recording answers:
1. Select Checkbox as the HTML Type.
2. Leave the width and height fields blank.
3. Select whether you the answer box to align to the left or right handside of the questionnaire.
4. Enter any field level help you want made available for the user.
5. Continue to enter any further checkboxes and click the Save button.
6. Continue defining your answer layout at Step 4: page 22 – 27 Whenyou have finished defining your answer layout, create questions foryour questionnaire.
See: To create questions: page 22 – 30
� To create options with lists:
If you want to use lists to record answers, you can either use a lookuptable to display the list of values, or you must enter a SQL Selectstatement to retrieve the list. You can also use the list of values to link aperson’s career path into the appraisal process. You do this by creating alist that contains the alternative career paths that can be selected for theperson during their appraisal.
Using a lookup table
1. Select Option as the HTML Type.
2. Leave the width and height fields blank.
3. Select whether you the answer to align to the left or right hand sideof the questionnaire.
4. If the question has a default value that is not defaulted from the listof values, enter a value.
5. If the question has a default value, select either the type of Value touse the value entered in the Default Value field. Alternatively, selectSQL to use the value defaulted from a list of values and enter aSelect statement to select the value in the Find field..

22 – 30 Oracle Human Resources North American User’s Guide
6. Enter any field level help you want made available for the user. inthe Field Level Help field.
7. Continue defining your answer layout at Step 4: page 22 – 27 Whenyou have finished defining your answer layout, create questions foryour questionnaire.
See: To create questions: page 22 – 30
Using a SQL select statement
1. Enter the Select statement in the SQL Text field to retrieve the list ofvalues. Enter the SQL
2. If you are using a lookup table to display the list of values, enter itin the Lookup Type field.
3. If you are using SQL to use the value defaulted from a list of values,enter a Select statement to select the value in the Find field..
4. Continue to enter any further options and click the Save button.
5. Continue defining your answer layout at Step 4: page 22 – 27 Whenyou have finished defining your answer layout, create questions foryour questionnaire.
See: To create questions: page 22 – 30
Creating Questions
� To create questions:
1. Select Assemble Questionnaire from the menu and and select thequestionnaire you previously created.
2. Click the Show Categories button to see the categories youassembled for that questionnaire.
Note: You can click the Show Layout button to see thequestionnaire layout at any time.
3. Click the Questions hypertext link alongside the category to add thefirst question. In our example, the question is HR1PLEASSUM.
4. You get a message to say that there are no questions associated withthis category, so click the New button.
5. Select the first question.
6. If you are creating a unique question or overwriting the defaultquestion, enter the question text in the Text field.
In our example, select HR1PLEASSUM, and enter the question text”Please summarise your views of the appraisee’s performanceagainst objectives”

22 – 31Assessing and Appraising People
7. Select whether you want the question to align to the left or righthand side of the questions page.
In our example, the answer box is aligned to the right, so align thequestion left.
Note: Any text you enter in the Text field appears to the left ofthe answer box, whereas any textyou enter in the Heading Textfield appears above the answer area.
8. Return to the Update Profile Categories page and click theQuestions hypertext link alongside the next category to create thequestion.
9. Click the New button.
10. Continue to enter questions as described, then press the Save buttonwhen you have finished.
11. Click the Show Layout button to check that you are happy with thequestionnaire layout before you associate the questionnaire with thetemplate.
Creating or Changing an Appraisal Template
Use the Appraisal Template window to create or modify an appraisaltemplate.
You’ll need to enter enter the following QuickCodes for appraisals:
❑ Define appraisal statuses as values for the QuickCode TypeAPPRAISAL_ASSESSMENT_STATUS.
❑ Define appraisal types as values for the QuickCode TypeAPPRAISAL_TYPE.
If you do not want to use appraisal statuses or types in the appraisal, donot enter values for these QuickCodes. Users can ignore these fields onthe appraisal web page.
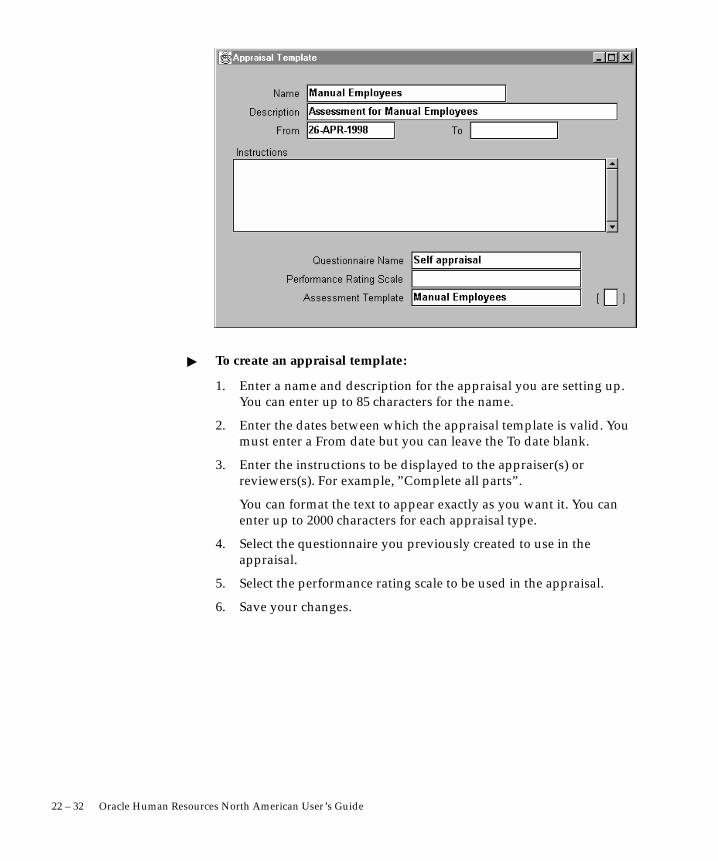
22 – 32 Oracle Human Resources North American User’s Guide
� To create an appraisal template:
1. Enter a name and description for the appraisal you are setting up.You can enter up to 85 characters for the name.
2. Enter the dates between which the appraisal template is valid. Youmust enter a From date but you can leave the To date blank.
3. Enter the instructions to be displayed to the appraiser(s) orreviewers(s). For example, ”Complete all parts”.
You can format the text to appear exactly as you want it. You canenter up to 2000 characters for each appraisal type.
4. Select the questionnaire you previously created to use in theappraisal.
5. Select the performance rating scale to be used in the appraisal.
6. Save your changes.

C H A P T E R
23T
23 – 1Mapping Career Paths
Mapping Career Paths
his chapter explains the different methods of handling yourenterprise’s career and succession plans. It also explains how you cancreate and use career paths in career and succession plans.
23 – 2 Oracle Human Resources North American User’s Guide
Career and Succession Planning
Once you have found out your employees aspirations, and set theirshort– and long–term objectives, you’ll want to prepare them for theirnext position within a career plan. After all, now you have motivatedyour employees through your performance management system, you’llwant to keep them motivated by linking their own career aspirations toenterprise aspirations. By planning careers and identifying succession,you enable employees to see their future role within the enterprise,keeping them motivated, and you from lengthy and costly recruitment.
Not only does career and succession planning enable you to keep andretain your high–flyers, it also enables you to highlight, for example,roles requiring scarce technical or commercial skills. By being able toidentify these early, you can develop these scarce skills within yourenterprise and replace current employees in these positions, asrequired.
Modelling Career and Succession Plans
The flexibility provided by Oracle Human Resources means that youcan handle your enterprise’s career and succession plans using one oftwo basic models. You can either base career progression on jobs orpositions. If you are using the Web–based Line Manager Direct Access,you have additional features for holding succession plan information.
Figure 23 – 1 illustrates the different models you can select from.

23 – 3Mapping Career Paths
Figure 23 – 1Career and Succession Planning Options
Job Position
Web onlyselect career path inappraisal
Career and Succession Planning Options
Career Pathsuse Map CareerPath window
PersonalProgression
entercareerchoices
use SpecialInformation Typesor attachments
PersonalProgression
Web onlyuse SuccessionPlanning
Career Pathsuse Position Hierar-chies
Career Paths
A career path shows a possible progression to one job or position fromany number of other jobs or positions (see Figure 23 – 2). Career pathsmust be based on either job progression or position progression. Youcannot mix the two.
You can define as many career paths as you require, perhaps reflectingan individual’s career priorities (such as a Management Path and aTechnical Path). You build career paths from the top down. You canonly enter a job or position once in any career path.

23 – 4 Oracle Human Resources North American User’s Guide
Figure 23 – 2Career Paths
DepartmentManager
SeniorProgrammer
ApplicationsSpecialist
Programmer
GraduateTrainee
PrincipalConsultant
TechnicalSpecialist
JuniorProgrammer
Career paths based on job progression are built using the Map CareerPath window. See: Defining Career Paths: page 23 – 7
Career paths based on position progression are built using positionhierarchies. See: Creating Position Hierarchies: page 3 – 21
Modelling Career and Succession Planning Based on Jobs
If your enterprise’s career and succession planning is based upon jobs,you can use career paths to show possible progressions to one job fromany number of other jobs.
Career paths are based on the structures of your enterprise rather thanthe people you employ. You may also want to record personalaspirations and progression paths for individual employees. There areseveral ways to do this.

23 – 5Mapping Career Paths
Work Choices
You can use work choices to help identify a person’s career plan. Workchoices indicate a person’s preference and capacity for work within theenterprise. The information you enter indicates availability for transfer,for working in other locations, and acceptable work day patterns. Youcan hold similar deployment information as requirements against jobs.
Appraisals on the Web
If you are using the Web–based Line Manager Direct Access, you canselect a career path for a person as part of the appraisal process. Whenyou create the appraisal questionnaire, you create a list of values thatcontains the alternative career paths that can be selected for a personduring an appraisal.
Special Information or Attachments
If you are not using Line Manager Direct Access, there are other waysto hold information about successor jobs against a person. Forexample:
• You can define a special information type to hold time intervals(such as immediate, three years, five years) and job names. Youcan also use the Job Requirements window to record people’snames against each job for each time interval.
• An alternative approach is simply to record this information astext in comments or a word processed document attached toeach employee’s record.
� To model career and succession planning based on jobs:
1. Create the career paths and map career paths.
See: Defining Career Paths: page 23 – 7
Once you have created your career paths, you can derive personalprogression from the person’s assignment to a job, and the job’splace within career paths.
2. Optionally, enter work requirements against jobs and enterpersonal work choices for your employees.
See: Entering Work Choices for a Job or Position: page 3 – 18
See: Entering Work Choices: page 13 – 21
3. Create your appraisal questionnaire and perform appraisals foremployees (Line Manager Direct Access users only).

23 – 6 Oracle Human Resources North American User’s Guide
See: Creating Your Appraisal Questionnaire Pages: page 22 – 18
4. If you are not doing step 3, consider holding succession planinformation against people as attachments or using a specialinformation type.
See: Defining Special Information Types: page 28 – 10
Modelling Career and Succession Planning Based on Positions
If your enterprise’s career and succession planning is based uponpositions, you can create additional position hierarchies to show anytype of progression. These might represent existing line managementstructures, or even cut across departmental or job–type boundaries.
Career paths are based on the structures of your enterprise rather thanthe people you employ. You may also want to record personalaspirations and progression paths for individual employees. There areseveral ways to do this.
Work Choices
You can use work choices to help identify a person’s career plan. Workchoices indicate a person’s preference and capacity for work within theenterprise. The information you enter indicates availability for transfer,for working in other locations, and acceptable work day patterns. Youcan hold similar deployment information as requirements againstpositions.
Succession Planning on the Web
If you are using Line Manager Direct Access, you can use theSuccession Planning option on the Web. You can select a person’s nextposition(s), or view their current position and see who is to succeed tothat position. See the online help for Line Manager Direct Access forfurther details.
Special Information or Attachments
If you are not using Line Manager Direct Access, there are other waysto hold information about successor positions against a person. Forexample:
• You can define a special information type to hold time intervals(such as immediate, three years, five years) and position names
23 – 7Mapping Career Paths
against an employee. You can also use the PositionRequirements window to record people’s names against eachposition for each time interval.
• An alternative approach is simply to record this information astext in comments or a word processed document attached toeach employee’s record.
� To model career and succession planning based on positions:
1. Optionally, create position hierarchies to show career paths, if youwant to show typical career progression.
See: Creating Position Hierarchies: page 3 – 21
Once you have created the hierarchies, you can derive personalprogression from the person’s assignment to a position, and theposition’s place within the hierarchies.
2. Optionally, enter work choices against positions and enter personalwork choices for your employees.
See: Entering Work Choices for a Job or Position: page 3 – 18
See: Entering Work Choices: page 13 – 21
3. If you use Line Manager Direct Access, use the Succession Planningoption to record one or more next positions for each employee.
Note: This option does not require you to have set up careerpaths using position hierarchies.
4. If you are not doing step 3, consider holding succession planinformation against people as attachments or using a specialinformation type.
See: Defining Special Information Types: page 28 – 10
Defining Career Paths
You define career paths in the Career Path Names window and theMap Career Path window.

23 – 8 Oracle Human Resources North American User’s Guide
� To define a career path:
1. Enter the names of the career paths you want to define in theCareer Path Names window. Save the names.
2. Open the Map Career Path window. In the Name field, select thetop job in the career path you are mapping.
3. Select the name of the career path in the Career Path Name field.
4. In the Job Progression From block, select all the jobs that are onelevel down from the top job in this career path.

23 – 9Mapping Career Paths
5. To extend the career path from any one of these jobs, check thecorresponding Down check box.
The window is redisplayed with your selected job now showing inthe Name field.
You can move back up the career path by checking the Up checkbox.
6. Save your work.
Lines of Progression for AAP Reporting
Oracle HR includes a special use of career paths based on jobs. For theAAP–Workforce Analysis report, you build career paths for jobs toconstitute the lines of progression this report requires. You define thesecareer paths just as you would any others based on jobs.
See: AAP Reporting: page 17 – 12

23 – 10 Oracle Human Resources North American User’s Guide

C H A P T E R
24T
24 – 1Matching People to Posts and Vacancies
Matching People toPosts and Vacancies
his chapter explains how you use Oracle Human Resources tomatch your employees to posts and vacancies.

24 – 2 Oracle Human Resources North American User’s Guide
Matching People Using Web–Based AccessCareer Management provides you with web–based access for many linemanager and employee end–user processes. You can use the powerfulweb based tool ’Suitability Search’ to search for and match the mostsuitable person to a job or position. This might be performed duringrecruitment, succession planning, and so on. You can search by:
• personal characteristics
• assignment characteristics and competencies
• a combination
In your search, you can identify which competencies are required andwhich are optional. You can also search for people with a proficiencylevel in a specific competence, at a required level and above (or below).Suitability Search then produces a list of all people who possess therequired and optional competencies, at the level defined. For example, ifyou asked for people proficient in a competence at level 3 and above, thesearch will not include people below 3 in that competence in the search.
You can also rank any of the optional competencies, and the SuitabilitySearch Match module then produces a list of all people (or jobs andpositions) who possess the required competencies, and ranks thoseaccording to the rating given to the optional competencies.
In future releases, you’ll be able to include work choices in your search.These are factors that can affect an employee’s, applicant’s, contractor’sor ex–employee’s capacity to be deployed within the enterprise (or tocustomers). You can hold work choices at both job and position or atperson level. Look at the flexibility Career Management provides byenabling you to identify, for example, that a specific job or positionrequires the incumbent to be able to work in any country, and the searchreturns only people who match that criterion.
Suitability searching also enables you to:
• match and rank people against a specific organization, job orposition, for example, to fill a vacancy or to deploy a person
• match and rank people against a set of competencies, for example,to fill a vacancy or project
• match a person against organizations, jobs or positions, and rankthem, for example, to define a person’s career path
Viewing the Results of Suitability Matches
You can view the results of the matching in three different ways:

24 – 3Matching People to Posts and Vacancies
• by rank order of matches for the whole group
• by individual results for each person
• by comparative results for each competence
How Suitability Matching Works
In the Competence Match Criteria window, you set the range of levelsand the matching type for each competence.
Range of Levels
The range of levels determines whether a match can be made. You havethree main choices in setting this range:
• to set both a low and a high level
• to set a low level but not a high level, or to set a high level but nota low level
• not to set a level at all
Setting both a high and a low level establishes an exact range for thematch. If the person’s competence level is within the range this countsas a match. If it is either above or below the range there is no match.
To set just a low level for the competence means that any competence ator above this level counts as a match. To set a high level only means thatany competence at or below this level counts as a match.
To set no level at all means that any score for this competence counts asa match.
Matching Type
The type of match you select can determine what effect a match or anon–match has on the person’s score as a whole.
If you select essential for any competence, a person who fails to score amatch for this competence over the range you set will not appear in theranked list at all. Even if the person scores matches for othercompetencies, the failure to score a match in this essential competencerules him or her out of the list.
If you select desirable, a person who fails to score a match for thiscompetence and range will still be ranked if he or she scores matches inother competencies. If the person scores matches in no competencies heor she will not be listed.
If you select not required, the competence itself does not count for thecompetence matching exercise. For example, a person scores matches

24 – 4 Oracle Human Resources North American User’s Guide
with four competencies in the list. One of these competencies is marked’not required’. The person’s score is shown as three.

C H A P T E R
25
I
25 – 1Using Special Information Types for Skills Information
Using SpecialInformation Types forSkills Information
f you choose not to develop the competency approach to careermanagement, you can, instead, hold skills information using SpecialInformation Types. This was the recommended approach in earlierreleases of Oracle Human Resource Management Systems.
This chapter explains how to use Special Information Types to hold andmatch skills information.

25 – 2 Oracle Human Resources North American User’s Guide
The Special Information Approach to Skills Matching
From Release 11, the recommended appraoch to holding and matchingskills information is to define a framework of competencies. Theseprovide the common language for a wide range of human resourceactivities including assessments, appraisals, employee profiling, careerdevelopment, and recruitment. You can build up a wealth of skillsinformation that can be maintained and used by employees and linemanagers themselves, using the web Direct Access interface.
However, Oracle HRMS continues to support the earlier approach tohandling skills information, using Special Information Types. This is analternative to the new competency approach.
Special Information Types are a flexible way to hold any additionalinformation you require about people and, if necessary, to compare thisinformation with the requirements of jobs or positions. For eachSpecial Information Type you can define up to thirty fields to holddetails of competences, professional qualifications, education, andvalid experience. For each person, job, or position, you can makemultiple entries for each Special Information Type.
For example, suppose you want to store details of technical skills. Youcould set up the following fields:
• Skills – with a list of valid values to control the vocabulary usedto describe the skills
• Years Experience – to hold the number of years of experience inusing the skills
You can display the fields you define in one or more of the followingwindows:
• Special Information, to record skills or experience for anemployee or applicant
• Job Requirements, to hold skill requirements for a job
• Position Requirements, to hold skill requirements for a position
• Skill Provisions. to record the skills or qualifications provided bytraining activities in Oracle Training Administration.
Using views and reports, you can then match people to posts,according to their skills or other attributes.

25 – 3Using Special Information Types for Skills Information
Figure 25 – 1Matching Skill Requirements to Special Information
Language
Fluency
Language Skills
SpecialInformation
Details
SkillsRequirements
Analyst
Employee
Tips for Defining Special Information Types to Hold Skills Information
• If you want to give different sets of people access to differentcategories of skills information, define each category as aseparate Special Information Type. You can customize theSpecial Information window to display just one SpecialInformation Type.
• If you want to match on a range of skills levels, it is easier to usenumeric values. Use a description field to provide the meaningfor each level. The description appears automatically when thenumber is chosen.
• You can use cross–validation to ensure that users enter correctcombinations of segments. For example, you could ensure thatwhen a language skill is entered, a fluency level is also selected.
• You can speed up data entry and minimize errors by defining an’Alias’ for common combinations of segment values. For
25 – 4 Oracle Human Resources North American User’s Guide
example, completion of a course might always give a specificcertificate from a particular licensing body. A user could enterall of these values with a single Alias.
• If you want users to enter the precise title of a qualification(perhaps read from a resume), you cannot supply a list of values.However, consider providing additional fields with lists ofvalues using broad terms such as ’degree–level’ or ’science’ tohelp users searching for information.
Unstructured Information
You may want to hold some skills information, such as resumes, asunstructured, free text information. You can store this information asattachments to the People and Special Information windows.
See Also
Entering Special Information: page 13 – 26
Entering Job and Position Requirements: page 3 – 17
Defining Special Information Types: page 28 – 10
Using Attachments: page 33 – 6

25 – 5Using Special Information Types for Skills Information
Viewing and Reporting Skills Matching Information
There is a standard skills matching report supplied with Oracle HumanResources. This report matches people against all the requirements youhave entered for one job or position (held in Special InformationTypes).
The List People By Special Information window displays a list ofpeople who match a particular profile for one Special Information Type.
See Also
Listing People by Special Information: page 13 – 28
Skills Matching Report
Using this report, you can match employees, applicants, or both againstthe requirements of one job or position (held in Special InformationTypes). You can select the closeness of the match you require.
You run reports in the Submit Requests window.
� To run the Skills Matching Report:
1. In the Name field, select Job and Position Skills Matching Report.
2. Enter the Parameters field to open the Parameters window.
3. Select the Job or Position to which you want to match people.
4. In the Person Type field, select who you want to match:
• applicants, or
• employees, or
• both
5. Select the closeness of match you require from one of the followinglevels:
• one or more essential skills
• all essential skills
• all essential and one or more desirable skills
6. Choose the Submit button.

25 – 6 Oracle Human Resources North American User’s Guide

C H A P T E R
26
26 – 1Absence Management and PTO Accruals
Absence Managementand PTO Accruals
To manage your employees’ absences from work, you must be able to:
• identify the types of absence your enterprise recognizes
• record the reasons, dates and times for projected and actualabsences, and maintain records of time taken for each absencetype
• group related absence types together for reporting and analysis
• set up and administer PTO accrual plans, whereby employeescan accrue time off for vacation or sick leave as they put in timeat work.
This chapter explains how to set up an effective absence recordingsystem in Oracle HRMS, how to enter and obtain information aboutemployee absences, and how to set up, maintain and report on plansfor accrual of paid time off.

26 – 2 Oracle Human Resources North American User’s Guide
Absence Management
Employees take paid or unpaid time off from work for a variety ofpurposes, such as illness or injury, vacation, medical appointments,childbirth, death of a close relative, jury duty, labor representation, andprofessional activities. Maintaining information on employee absencesfor reporting and analysis is an important aspect of human resourcemanagement.
Many enterprises permit employees to accrue hours or days of PTO(paid time off) as they work, to use for sick or vacation leave. In suchenterprises, setting up and maintaining PTO plans is another part ofabsence management.
See Also
Absence Types: page 26 – 3
Plans for Accrual of PTO: page 26 – 19
Absence Management Setup Steps: page 26 – 9
Entering Absences: page 26 – 14
Viewing and Reporting on Absence Information: page 26 – 16

26 – 3Absence Management and PTO Accruals
Absence Types
Oracle HRMS provides a convenient way to maintain informationabout the various absence types your enterprise recognizes. Tofacilitate reporting and analysis of employee absences, you candistinguish between absence types and absence categories. An absencecategory is a group of related absence types, as for example:
Absence Category Absence Type
Medical Leave Illness or Injury
Work–related Injury
Work–related Illness
Medical Appointment
Family Leave Paid Maternity/Paternity
Unpaid Maternity/Paternity
Dependent Care
Personal Leave Compassionate Leave
Personal Business
Professional Leave Certification Classes
Meeting Attendance
Table 26 – 1 Example Absence Categories and Types
Also to assist with absence reporting and analysis, you can providereasons to select from when recording employees’ time taken for anabsence type. For example, if you need information to analyze theparticular family–related responsibilities that cause employees to misswork, you can define reasons for absence types as follows:
Absence Category Absence Type Absence Reasons
Family Leave Paid Maternity/Paternity Birth of a child
Adoption of a child
Dependent Care Child Care
Table 26 – 2 Example Absence Category, Types and Reasons
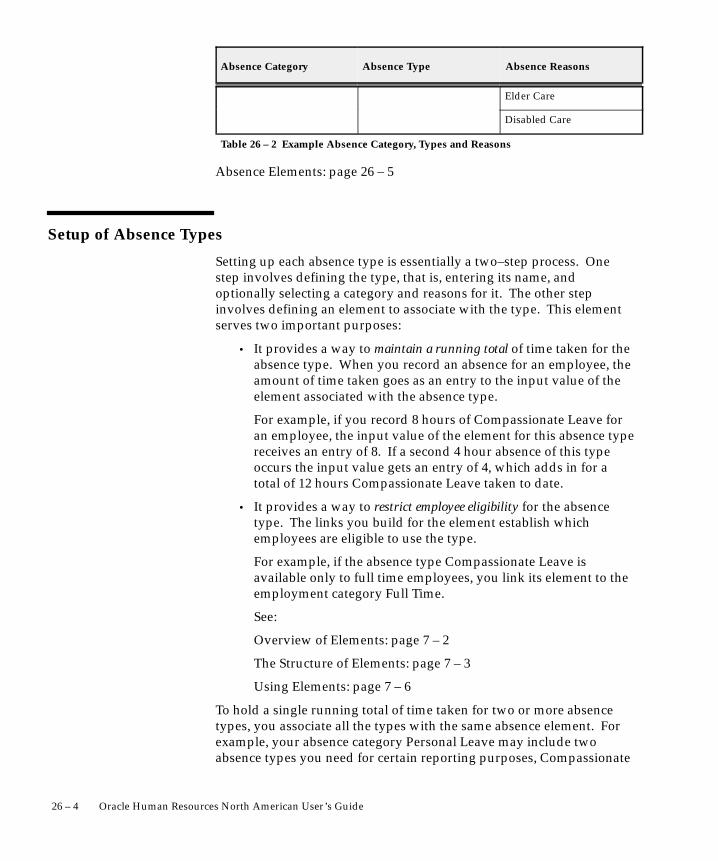
26 – 4 Oracle Human Resources North American User’s Guide
Absence ReasonsAbsence TypeAbsence Category
Elder Care
Disabled Care
Table 26 – 2 Example Absence Category, Types and Reasons
Absence Elements: page 26 – 5
Setup of Absence Types
Setting up each absence type is essentially a two–step process. Onestep involves defining the type, that is, entering its name, andoptionally selecting a category and reasons for it. The other stepinvolves defining an element to associate with the type. This elementserves two important purposes:
• It provides a way to maintain a running total of time taken for theabsence type. When you record an absence for an employee, theamount of time taken goes as an entry to the input value of theelement associated with the absence type.
For example, if you record 8 hours of Compassionate Leave foran employee, the input value of the element for this absence typereceives an entry of 8. If a second 4 hour absence of this typeoccurs the input value gets an entry of 4, which adds in for atotal of 12 hours Compassionate Leave taken to date.
• It provides a way to restrict employee eligibility for the absencetype. The links you build for the element establish whichemployees are eligible to use the type.
For example, if the absence type Compassionate Leave isavailable only to full time employees, you link its element to theemployment category Full Time.
See:
Overview of Elements: page 7 – 2
The Structure of Elements: page 7 – 3
Using Elements: page 7 – 6
To hold a single running total of time taken for two or more absencetypes, you associate all the types with the same absence element. Forexample, your absence category Personal Leave may include twoabsence types you need for certain reporting purposes, Compassionate
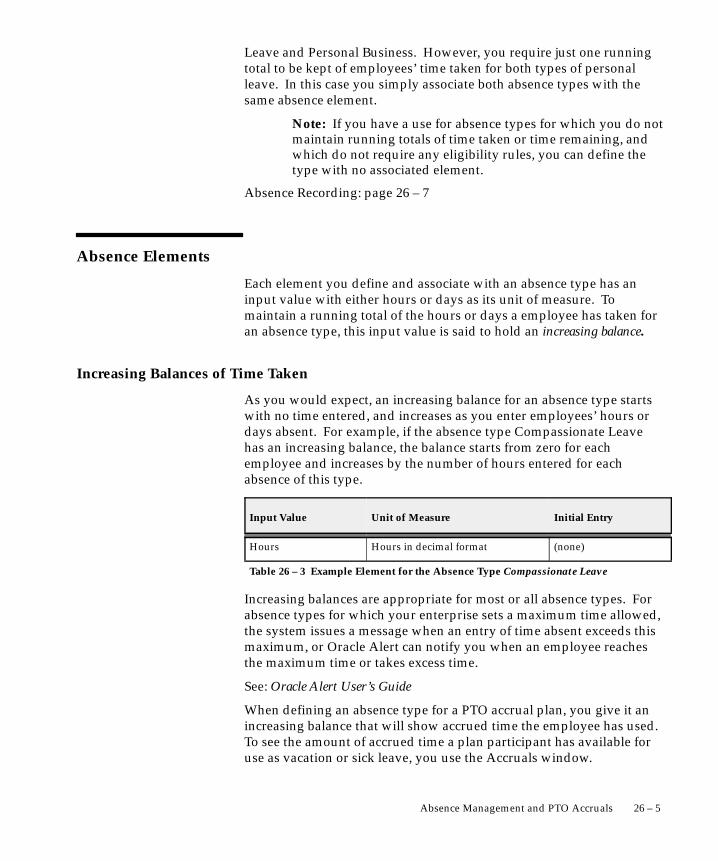
26 – 5Absence Management and PTO Accruals
Leave and Personal Business. However, you require just one runningtotal to be kept of employees’ time taken for both types of personalleave. In this case you simply associate both absence types with thesame absence element.
Note: If you have a use for absence types for which you do notmaintain running totals of time taken or time remaining, andwhich do not require any eligibility rules, you can define thetype with no associated element.
Absence Recording: page 26 – 7
Absence Elements
Each element you define and associate with an absence type has aninput value with either hours or days as its unit of measure. Tomaintain a running total of the hours or days a employee has taken foran absence type, this input value is said to hold an increasing balance.
Increasing Balances of Time Taken
As you would expect, an increasing balance for an absence type startswith no time entered, and increases as you enter employees’ hours ordays absent. For example, if the absence type Compassionate Leavehas an increasing balance, the balance starts from zero for eachemployee and increases by the number of hours entered for eachabsence of this type.
Input Value Unit of Measure Initial Entry
Hours Hours in decimal format (none)
Table 26 – 3 Example Element for the Absence Type Compassionate Leave
Increasing balances are appropriate for most or all absence types. Forabsence types for which your enterprise sets a maximum time allowed,the system issues a message when an entry of time absent exceeds thismaximum, or Oracle Alert can notify you when an employee reachesthe maximum time or takes excess time.
See: Oracle Alert User’s Guide
When defining an absence type for a PTO accrual plan, you give it anincreasing balance that will show accrued time the employee has used.To see the amount of accrued time a plan participant has available foruse as vacation or sick leave, you use the Accruals window.

26 – 6 Oracle Human Resources North American User’s Guide
See: Reviewing Employees’ PTO Accruals: page 26 – 33
Decreasing Balances of Time Remaining
If your enterprise sets a maximum time allowed for an absence typethat is not connected to a PTO accrual plan, you have the option ofsetting up a decreasing balance for this type, instead of an increasingbalance.
For example, suppose your enterprise allows certain employees 32hours leave per year for professional development. The ProfessionalLeave absence element can have a decreasing balance, and an initialentry of 32 hours.
Input Value Unit of Measure Initial Entry
Amount Hours in decimal format 32
Table 26 – 4 Example Element for the Absence Type Professional Leave
If you record an employee absence of 4 hours for this absence type, thedecreasing balance shows 28 hours still available to be taken.
Decreasing absence balances require more maintenance than increasingbalances. They need a prorated initial balance entry for all eligible newhires throughout the year, and require resetting each year for all eligibleemployees.
Notice that an absence element cannot have both a decreasing and anincreasing balance; it has one or the other.
Initializing an Absence Balance
Oracle HRMS provides two ways to initialize both increasing anddecreasing absence balances at the year’s start, and to enter initialamounts of any decreasing balances:
• the Element Entries window, for individual employees
• the MIX batch entry facility, for batches of employees.
Alternatively, users can develop their own processes for resettingabsence balances in a new year, and entering initial values fordecreasing balances.
See:
Making Manual Element Entries: page 7 – 41
Making Non–Payroll Batch Entries Using MIX: page 8 – 3

26 – 7Absence Management and PTO Accruals
Referencing Absent Time in Payroll Runs
You can reference absence time taken (amount of an increasing balance)or absence time remaining (amount of a decreasing balance) for absencetypes in formulas for earnings, deductions, or other items OraclePayroll processes in payroll runs. When defining the input value tohold the absence balance for an absence type’s element, you can checkthe Database Item box. Entries to this input value then becomedatabase items that formulas for payroll calculations can access.
See: Elements and Formulas: page 7 – 21
Absence Recording
When you record an absence for an employee using the Absence Detailwindow, you must always select an absence type. This ensures thatyou always have on record, information about the nature of andreasons for the absence.
Dates and Times
In the Absence Detail window you can conveniently record for anemployee either a projected or an actual start and end dates and timesof a particular type of absence, as well as the date you receivenotification of the absence. When an actual absence occurs inaccordance with projected absence information already entered, yourecord this by simply clicking a button.
The system records an employee’s absences using the same calendarupon which the employee’s payroll is based. This means that allemployees for whom you record absence information must have apayroll component in their assignments.
See: Components of the Assignment: page 14 – 5
Authorization and Replacement
When recording a projected or actual absence in the Absence Detailwindow, you can select both the name of an employee authorizing theabsence, and of an employee replacing the absent worker.
Batch Entry of Accrued Time Taken
When employees report accrued sick or vacation time taken on theirtimecards, you can use PayMIX ,instead of the Absence Detail window,to enter sick or vacation time taken together with other timecard data.

26 – 8 Oracle Human Resources North American User’s Guide
See: Recording Accrued Time Taken: page 26 – 31

26 – 9Absence Management and PTO Accruals
Absence Management Setup Steps
� To set up absence recording:
1. Define a nonrecurring absence element, with the Termination RuleActual Termination and with at least one input value, for eachabsence type. Link this element.
See: Defining and Linking an Absence Element: page 26 – 9
Note: To set up an absence type for which you do not need tomaintain a running total of time taken or remaining, and do notneed eligibility rules, omit this step.
To keep a single record of employees’ time taken for two ormore different absence types, you can define one element onlyto associate with all the types.
See: Setup of Absence Types: page 26 – 4
2. Define categories of absence types as values for the QuickCodeType ABSENCE_CATEGORY, and your absence reasons as valuesfor the QuickCode Type ABSENCE_REASON.
You can select the same reason for different absence types.
See: Adding QuickCode Values: page 32 – 3
3. Define each absence type, associating with the type its absenceelement.
See: Defining an Absence Type: page 26 – 11
4. For an absence type with a decreasing balance, use the ElementEntries window or the MIX batch facility to make initial elemententries for employees eligible for the type.
See:
Making Manual Element Entries: page 7 – 41
Making Non–Payroll Batch Entries Using BEE: page 8 – 3
Defining and Linking an Absence Element
Define an absence element in the Element window.
� To define an absence element:
1. Set your effective date to a day on or before the start of the firstpayroll period for which you want to enter absences.

☞
26 – 10 Oracle Human Resources North American User’s Guide
2. Enter a name for the element, and select the classificationInformation.
Suggestion: Give the absence element and its absence type thesame name, or coordinate the element name with the typename. For example, for the absence type CompassionateLeave, name the element Compassionate Leave orCompassionate Leave Absence.
3. Select the processing type Nonrecurring, and the termination ruleActual Termination.
4. Check the Multiple Entries Allowed box to enable employees tohave several instances of this type of absence in a pay period.
5. If this is an absence element for a PTO accruals plan, do not selectProcess in Run. Uncheck this box if necessary.
6. If employees must be a certain age or have served for a certainnumber of years to be allowed this absence, enter this informationin the Qualifying Conditions region.
Note: If this is an absence element for a PTO accrual plan, theplan setup relates length of service to accrued time off. Do notmake an entry here for length of service.
7. If this is an absence element for a PTO accrual plan for which youmay make batch entries using PayMIX, you must mark it so that itcan accept these entries. To do this, click in the FurtherInformation field and select a PayMIX category of Time for theelement.
This does not affect your ability to make manual entries to theelement.
8. Save the element, then choose the Input Values button.
9. In the Input Values window, create an input value to hold theamount of time taken. Select units of Day, Hours in ”HH” format,or Hours in Decimal Format (to one, two, or three decimal places).
Attention: If this is an absence element for a PTO accrualplan, give the input value the name Hours or Days, to accordwith the unit of measure of the plan. When you define the planusing the Accrual Plan window, this input value name appearsin the Units field of the Absence Information region.
For a PTO accrual plan whose units are Hours, the units youselect for the input value Hours must be:
– Hours in ”HH” format, or
– Hours in Decimal format (1, 2 or 3 places).
26 – 11Absence Management and PTO Accruals
For an accrual plan whose units are Days, the units you selectfor the input value Days must be: Day.
Additionally, if you may make batch entries to this elementusing PayMIX, you must create an input value named DateEarned for the element, with units in the formatDD–MON–YYYY. When you make entries to this elementusing PayMIX, the system supplies a date in this field.
The existence of this input value does not affect your ability tomake manual entries to the element. When making manualentries, you leave this field blank.
See: PayMIX Timecard Entries: page 8 – 14
10. You can define minimum and maximum days or hours that can beentered in an absence record. If you do this, select what happens ifthese limits are breached:
• Select Warning for the system to warn users but allow them tobreach the limits.
• Select Error for the system to issue an error message and preventusers from saving an entry that breaches the limits.
11. Save your work.
� To link the absence element:
1. Set your effective date to a day on or before the start of the firstpayroll period for which you want to enter absences.
2. In the Element Link window, select the absence element.
See: Defining Element Links: page 7 – 37
3. Select eligibility criteria for this absence element. If you want tomake the element available to all employees, do not select anycriteria.
4. Save the link. Then define the absence type associated with thisabsence element.
See Also
Defining an Absence Type
Use the Absence Attendance Type window to define an absence typefor association with the nonrecurring element representing an absence.
Prerequisites
❑ Define and link the element for the absence type.

26 – 12 Oracle Human Resources North American User’s Guide
See: Defining and Linking an Absence Element: page 26 – 9
❑ Define categories of absence types as values for the QuickCodeType ABSENCE_CATEGORY, and define your absence reasons asvalues for the QuickCode Type ABSENCE_REASON.
You can select the same reason for different absence types.
See: Adding QuickCode Values: page 32 – 3
� To define an absence type:
1. Enter a name and category for the absence type.
Suggestion: Give the absence type and its associated elementthe same name, or coordinate the type name with its elementname. For example, name the absence type for a PTO accrualplan Salaried Sick PTO Plan, and its associated element,Salaried Sick PTO Absence.
2. In the Associated Element region, select the element defined forthis absence type. The name of the element’s input value that holdsthe time taken or time remaining for this absence type appears inthe Input Value field, and the unit of measure for the input valueappears in the Units region.
3. In the Balance region, select Increasing for each entry to the absenceelement’s input value to add to a running total of time taken to

26 – 13Absence Management and PTO Accruals
date for this absence type. Select increasing balances for absencetypes for PTO accrual plans, and for most other absence types.
For absence types that have a set maximum amount of hours ordays allowed, you may select Decreasing. In this case, each absencerecorded reduces an initial balance entered for the absence type, toshow time remaining to be taken for the type.
Decreasing balances require more maintenance. You must enter aninitial balance amount for each new hire eligible for the absencetype, and must initialize the balance for all eligible employees atthe start of each year.
4. Optionally, select reasons that are valid for entries of this type ofabsence.
5. Save the absence type.
Absences Taken and Time Remaining for Accrued PTO
An employee’s net accrual of accrued time as of a given date, togetherwith a record of accrued time used this year and unused time carriedover from the previous year, is always available for review in theAccruals window.
See: Reviewing Employees’ PTO Accruals: page 26 – 33

26 – 14 Oracle Human Resources North American User’s Guide
Entering Absences
To enter projected or actual absences for an employee, use the AbsenceDetail window.
See: Absence Recording: page 26 – 7
Prerequisites
❑ Because the calendar holding absence records for an employee isthe same as that of the employee’s payroll, the assignments ofemployees for whom you enter absence information must includean assignment to a payroll. The effective date of this assignmentmust be no later than the start of the current payroll period.
See: Entering a New Assignment: page 14 – 9
❑ Similarly, the definition and linking of the element associated withthe absence type must have occurred on or before the start of thecurrent payroll period.
See: Defining and Linking an Absence Element: page 26 – 11
� To enter absences for an employee:
1. Select the absence type. The following information appears:
• The category of the type.

26 – 15Absence Management and PTO Accruals
• The occurrence of the new absence record you are entering. Forexample, if the employee has already incurred two absences ofthis type, the occurrence of the new record is 3.
• The running total of hours or days absent for the absence type.For absence types with increasing balances, this is the number ofdays or hours absent already recorded (in the past or future).For any types with decreasing balances, this is or the number ofhours or days remaining to be taken.
• The number of days absence recorded for the absence type in thecurrent calendar year.
• The name of the element that maintains each employee’s timetaken or time remaining for this absence type.
2. Do one of the following:
• Enter projected dates for the absence. You can later copy them tothe Actual Date fields by choosing the Confirm Projected Datesbutton.
• Enter actual dates and duration as days or hours, according tothe units of the balance. For a duration in hours, you must enterstart and end times, as well as start and end dates.
3. You can also select:
• reasons for the absence
• the employee authorizing the absence
• the employee who replaces the absent employee for the durationof the absence
4. Save your work.

26 – 16 Oracle Human Resources North American User’s Guide
Viewing and Reporting on Absence InformationFor monitoring and analyzing recorded employee absencesunconnected with a PTO accrual plan, use:
• the View Absence History window: page 26 – 16
• the List Employees by Absence Type window: page 26 – 17
• the Absences Report: page 26 – 18
For reviewing PTO plan participants’ accrued time earned and taken,use the Accruals window.
See: Reviewing Employees’ PTO Accruals: page 26 – 33
Viewing Absence History
Use the View Absence History window to view all absences for anemployee.
� To view absences for an employee:
� Select an employee then choose the Find button.

26 – 17Absence Management and PTO Accruals
The absences appear in the lower part of the window. Use thestandard Folder features to select a subset of these absence records,and to choose the fields to see.
Listing Employees by Absence Type
Use the List Employees by Absence Type window to see all the absencerecords for a particular absence type, or category of types.
� To list employees by absence type:
� Enter any combination of absence type, category, and start and enddates to define the absences to view. Choose the Find button.
The absences appear in the lower part of the window. Use thestandard Folder features to select a subset of these absence records,and to choose the fields to see.

26 – 18 Oracle Human Resources North American User’s Guide
Absences Report
The Absences Report shows information about employee absencesduring a specified period. It can show absences:
• for an individual employee, or for all the employees in anorganization
• for all types of absence, or as many as 10 selected types.
The report summarizes the information as totals for each absence typesince the employee was first hired.
Run reports in the Submit Requests window.
� To run the Absences Report:
1. In the Name field, select Absences Report.
2. Enter the Parameters field to open the Parameters window.
3. Enter the effective date for which you want to see the report.
4. Select either an organization or an employee.
5. Enter the start and end dates of the period for which you want toreport absences.
6. You can choose up to 10 absence types for the report. To report onall types, leave the absence type fields blank. Choose OK.
7. Choose the Submit button.
26 – 19Absence Management and PTO Accruals
Plans for Accrual of PTOAccrual plans permit eligible employees to accrue PTO (paid time off)each year as they work, to use for vacation or sick leave. Oracle HRMShas no restrictions on the number of plans you can set up, each with itsown units of accrued time (hours or days) and its own rules.
The system calculates accruals for all plans on a calendar year basis.That is, on 1 January of each year, accruals for that year begin.Accruals for new hires can begin on their hire date, six months aftertheir hire date, or at the beginning of the next calendar year.
For all plans, participants’ payroll periods determine the frequencywith which they accrue PTO. Employees on a monthly payroll accruetime each month, employees on semi–monthly payrolls accrue timetwice each month, and so on. PTO accrual occurs automatically foreach eligible plan participant on the last day of his or her pay period,independently of any payroll run.
For example, if employees on a semi–monthly payroll participate in avacation PTO plan permitting the accrual of 84 hours per year, theyaccrue 3.5 hours on the last day of the year’s first pay period, say 15January. They then accrue another 3.5 hours on 31 January, another 3.5hours on 14 February and so forth.
Because accrual plans use employees’ payroll calendars to scheduleaccruals, the assignment of every employee participating in an accrualplan must include an assignment to a payroll.
Accrual Plan Structure
Just as elements constitute the underlying structure of absence types, sothey provide the structure of accrual plans. To set up an accrual plan,you first set up absence recording for the plan, including an element tohold information about absences taken under the plan.
See: Absence Management Setup Steps: page 26 – 9
With absence recording in place, you can then enter information forsetup of the accrual plan itself. This information includes:
• a start rule, to determine when employees can begin to accruePTO under the plan
• length of service bands, which establish how PTO accrued underthe plan increases with employees’ length of service.
In response to the information entered for plan setup, the systemgenerates three elements for the plan:
• an element representing the plan (classification: PTO Accruals).You use this element to enroll participants in the plan.

26 – 20 Oracle Human Resources North American User’s Guide
• an element (classification: Information) to hold participants’unused PTO that is available for carryover to the next year
• an element (classification: Information) to hold residual PTO,that is, unused PTO not available for carryover under plan rules.
Accrual Start Rules
Accrual plans differ with respect to the date from which they permitplan participants to start accruing PTO. In Oracle HRMS, the accrualstart rule determines this date for a plan. The system includes theseaccrual start rules:
• Hire Date
• Beginning of Calendar Year
• Six Months after Hire Date
Enterprises have many different rules governing their accrual starts, soyou may need start rules other than the three provided. You can eithermodify the existing rules, or add new ones.
Start Rule: Hire Date
For plans with this rule, participants’ accruals begin from the first fullperiod following their hire date. For example, if the hire date of aparticipant on a semi–monthly payroll falls on the first day of either thefirst or second period in the month, PTO accrual starts as of that date.
If the hire date falls sometime after the first of the month but before theend of the first period, accruals start in the second period of the month.If the hire date falls after the first day of the second period but beforeits end, accruals start with the first period in the next month.
Start Rule: Beginning of Calendar Year
With this start rule, participants’ accruals begin from the start of theyear following the year in which they are hired. This means that aparticipant with a hire date of 2 January 1996 and another with a hiredate of 31 December 1996 both start to accrue time as of 1 January 1997.
Notice that the amount of PTO each accrues may not be the same, asaccrual amounts often depend on employees’ length of service.
Period of Ineligibility
Plans with the start rule Hire Date or Beginning of Year can requireparticipants to work for a period of time, perhaps three or six months,

26 – 21Absence Management and PTO Accruals
before they are eligible to accrue PTO. If plan participants in fact takevacation or sick leave during this period, the system does not acceptentry of this time against the accrual plan. Many enterprises set up anabsence type for ”approved but unpaid leave” to use for absences takenduring periods of ineligibility.
The period of ineligibility is not applicable to plans with the start ruleSix Months After Hire.
Start Rule: Six Months After Hire
For plans with this start rule, participants’ accruals do not begin untilthe first full pay period after the six–month anniversary of their hiredate. For example, someone on a semi–monthly payroll who is hiredon 5 February 1996, completes six months of service on 5 August 1996,and starts to accrue PTO in the second period in August.
Notice that if people are hired on the first day of a period, theiraccruals begin with the pay period of the six–month anniversary oftheir hire date. For example, someone on a semi–monthly payroll whois hired on 1 February 1996 completes six months of service on 1August 1996, and hence starts to accrue PTO in the first period inAugust.
Length of Service and Accrual Amount Rules
In Oracle HRMS, the first day of the month of an employee’s hire dateis the default date from which his or her length of service is calculatedfor accrual purposes. For example, someone hired on 18 January 1997completes one year of service on 1 January 1997, and someone hired on31 December 1996 completes one year of service on 1 December 1997.
Length of Service Override
For individual accrual plan participants, you can override the defaultdate from which a plan starts its length of service calculations. This isuseful for managing exceptional cases that arise when, for example,employees who already have accumulated periods of service in yourenterprise transfer from one place to another. You enter the dateoverride when enrolling a participant in a plan.
See: Enrolling Employees in PTO Accrual Plans: page 26 – 30
Length of Service Bands
For many accrual plans, the time off that plan participants can accrueincreases with their length of service. That is, length of service bands
26 – 22 Oracle Human Resources North American User’s Guide
determine accrual amounts. In addition, these bands can determineceiling and maximum carryover amounts for plans that have these rules.
For each accrual plan in Oracle HRMS, you set up one or more lengthof service bands, supplying for each the hours or days of PTO thatparticipants can accrue each year, together with any ceiling andmaximum carryover of accrued time.
Ceiling Rules
The ceiling rule, found in some vacation accrual plans, sets a maximumamount of PTO an employee can hold at any time. When aparticipant’s accrued PTO reaches the ceiling, no additional timeaccrues. Accruals begin again only after the participant uses someaccrued time.
Maximum Carryover Rules
Maximum carryover rules, found in both vacation and sick leave plans,set the maximum amount of unused PTO a participant can carry overfrom one year to the next.
Carried Over and Residual PTO
To manage the carryover to a new calendar year of employees’ unusedPTO, you run the PTO Carry Over process at year end. This processfirst calculates participants’ net PTO as of the last day of the year’s lastpay period. This calculation insures that this period’s accruals do notexceed any plan ceilings that may exist. The process then checks themaximum carryover permitted, to determine for each participant boththe amount to carry over, and the amount of any residual PTO thatcannot be carried over.
For employees with unused, accrued time to carry over, it enters thistime on the element generated to hold carried over time for the plan.Similarly, for employees with unused, accrued time they cannot carryover, it enters this time on the element generated for the plan to holdresidual time.

26 – 23Absence Management and PTO Accruals
PTO Sale or Purchase
Your enterprise may have policies permitting accrual plan participants,under certain circumstances, to sell back PTO they have accrued butnot used. You may also permit them to purchase additional PTO.Because such policies and rules are not standard across enterprises,Oracle HRMS has no method in place for managing PTO sale orpurchase. However, you can design a method and define elements fordoing this, customized to your own requirements.
See: Reviewing or Changing Net Accrual Calculations: page 26 – 27

26 – 24 Oracle Human Resources North American User’s Guide
Accrual Plan Setup Steps
� To set up a PTO accrual plans:
1. Define and link an element for the plan’s absence type.
See: Defining and Linking an Absence Element: page 26 – 9
2. If you expect to record accrued time taken under the plan using theAbsence Detail window, define an absence type for the plan,associating its absence element with this type.
If you expect to record accrued time taken using only PayMIX orthe Element Entries window, it is not essential that you define anabsence type for the plan.
See: Defining an Absence Type: page 26 – 11
3. Define the accrual plan.
See: Defining a PTO Accrual Plan: page 26 – 24
4. Set up length of service bands for the plan.
See: Setting Up Length of Service Bands: page 26 – 26
Defining a PTO Accrual Plan
Use the Accrual Plan window to define an accrual plan.
Prerequisite
❑ Before setting up the plan, set up a way to track absences takenunder the plan. To do this you define and link an element forrecording accrued time taken under this plan, and optionally,associate this element with absence type information.
See: Absence Management Setup Steps: page 26 – 9

26 – 25Absence Management and PTO Accruals
� To define a PTO accrual plan:
1. Enter the plan name, and select an accrual category of either Sick orVacation for it.
Suggestion: Coordinate the names of the accrual plan, theplan’s absence type if any, and the element used to recordabsences taken under the plan. For example, for the HrlyVacation PTO Plan for your hourly workers, you could namethe absence type and its element Hrly Vacation PTO Absence.
2. Select the start rule for the plan in the Accrual Start field. This ruledetermines the date on which a plan participant begins to accruePTO.
See: Accrual Start Rules: page 26 – 20
3. Select Days or Hours in the Accrual Units field. This selectionmust accord with the input value units selected for the element thatrecords accrued time taken under this plan.
See: Defining an Absence Type: page 26 – 11
4. In the Name field of the Absence Information region, select theelement associated with the plan’s absence type. The name of theelement’s input value that holds the entries or hours or days absentappears in the Units field.

26 – 26 Oracle Human Resources North American User’s Guide
5. If the start rule for this plan is Hire Date or Beginning of Year youcan enter a period of ineligibility, during which a plan participantcan accrue PTO but cannot use accrued PTO. For example, enter 3in the Length field and select Calendar Month in the next field.See: Period of Ineligibility: page 26 – 20
6. Save your work, and then set up length of service bands for theplan. Choose the Accrual Bands button to go to the Accrual Bandswindow.Choose the Net Calculation Rules button to view or change therules for calculating employees’ net PTO.
Setting Up Length of Service Bands Use the Accrual Bands window to define length of service bands for anaccrual plan.
Prerequisite
❑ Define the accrual plan for which you are entering length of servicebands.
� To set up length of service bands for a PTO plan:
1. For each length of service band applicable to this plan, establish theband’s duration by making an entry in the To field. The first band

26 – 27Absence Management and PTO Accruals
starts from zero years of service. If it extends for five years, enter 5in the To field. The system then sets the From field for the secondband at 5, as the second band starts after five years of service.
For the last band you enter, in order to cover all participants withany length of service beyond the band’s From entry, enter 99 in theTo field. For example, if your bands cover service of 0–5 years,5–10 years and 10+ years, the third band’s From and To entriesshould be 10 and 99.
If length of service is not relevant for this plan, define one bandonly for it, with a From entry of 0 and a To entry of 99.
2. For each band, enter In the Yearly Accrual field the number ofhours or days that participants whose length of service falls intothis band can accrue each year. For example, if plan participantsaccrue 80 hours of vacation per year during their first five years ofservice (band 0 – 5), enter 80 in the Yearly Accrual field.
3. If a band does not permit participants to carry unused accruedtime over to the next year, leave the Accrual Carryover field blank.Otherwise, enter in this field the maximum number of accrued,unused hours or days that participants at this band may carryforward.
See: Length of Service and Accrual Amount Rules: page 26 – 21
4. If a band has no ceiling that limits the total number of hours ordays participants at this band can accrue at any one time, leave theCeiling field blank. Otherwise, enter the ceiling number for theband.
5. Save your work.
When you do this, the system generates three new elements for theplan, one to represent the plan and one each to hold carried overand residual amounts of accrued, unused PTO. Define for theseelements, the same links as those of the plan’s absence element.
Reviewing or Changing Net Accrual Calculations
The rules for automatic calculation of employees’ net PTO appear inthe Net Calculation Rules window. Here the system displays the rulesthat carried over time adds to net PTO, and hours or days absentsubtract from the net. You enter this window by choosing the NetCalculation Rules button in the Accrual Plan window.

26 – 28 Oracle Human Resources North American User’s Guide
The Net Accrual Calculation for Net Entitlement of PTO
The calculation dynamically adds up a plan participant’s regularaccruals to date. Then it adds in any carried over PTO from theprevious year, obtained from the plan’s Carried Over element, toproduce the gross accrual to date.
The calculation next adds up all PTO taken to date, obtained from theentries in each period to the element of the plan’s absence type. It thensubtracts the amount of time taken to date from the gross accrual todate, to obtain the net accrual to date.
Gross PTO accrual = Accrued PTO + PTO carried over
Net PTO accrual = Gross PTO accrual – PTO taken this year
If your enterprise allows employees to purchase additional PTO or sellunused PTO, you can define elements to record information aboutpurchased or sold amounts, query them in the Net Calculation Ruleswindow, and select for the elements’ input values, rules governing theiraddition or subtraction in the net accruals calculation.
Residual PTO
Notice that the system does no automatic processing of the entries ofemployees’ residual PTO. Your enterprise may want to use theseentries to inform employees of accrued but unused time they mayforfeit, or to make payments for part or all of this time.
26 – 29Absence Management and PTO Accruals
Linking the Accrual Plan Elements
When you save your entries in the Accrual Bands window, the systemcreates three elements:
• An element (classification: PTO Accruals) representing the planthat has the plan name, for example, Hrly Vacation PTO Plan.Use this element to enroll employees in the plan.
• An element (classification: Information) to hold for each planparticipant, any accrued, unused hours or days that can becarried over to the next year.
• An element (classification: Information) to hold eachparticipant’s residual time, that is, any accrued, unused hours ordays that cannot be carried over.
The Carried Over and Residual elements each have an input valueHours or Days (depending on the plan’s units), which automaticallyreceive entries when you run the PTO Carryover process at year end.
For the three elements generated for each PTO accrual plan, you mustbuild links that are the same as those of the plan’s absence element,whose name appears in the Absence Information region of the AccrualPlan window.
� To link the accrual plan elements:
1. Set your effective date to the date the accrual plan goes into effect.
2. In the Element Link window, select one of the following:
• the element representing the plan (for example, Hrly VacationPTO Plan)
• the plan’s Carried Over element (for example, Carried Over HrlyVacation PTO Plan)
• the plan’s Residual element (for example, Residual Hrly VacationPTO Plan)
3. Select the same eligibility criteria for the element as those selectedfor the plan’s absence element. If you save a link without selectingany criteria, the element is available to all employees.
4. Save the link.
You are now ready to enroll employees in the plan, and record absencesfor plan participants when they use time they have accrued.
26 – 30 Oracle Human Resources North American User’s Guide
Maintaining PTO Plan RecordsWhen a PTO accrual plan setup is complete, you enroll employees intheir plans, and record their accrued time taken. At year end, you runthe PTO Carry Over process to clear down each employee’s balance ofunused accrued time, recording both unused time available forcarryover, and residual time unavailable for carryover.
The net accrual calculation produces for an employee, his or heramount of accrued PTO at a given point in time. The results of thiscalculation are always available for review.
Enrolling Employees in PTO Accrual PlansEnroll individual participants in an accrual plan by entering for themthe element generated to represent the plan.
� To enroll participants in a PTO accrual plan:
� Do one of the following:
• For enrollment of an individual employee, perhaps as a part ofthe hiring process, enter the element representing the plan forhim or her using the Element Entries window.
See: Making Manual Element Entries: page 7 – 41
• For enrollment of a batch of employees in a plan, perhaps anewly–developed plan, use the MIX batch entry facility.
See: Making Non–Payroll Batch Entries Using MIX: page 8 – 3
If an accrual plan should calculate a participant’s length of service froma date other than the default date deriving from the plan’s start rule,give the plan a date to use for this participant when enrolling him orher.
See: Length of Service Override: page 26 – 21
� To override the date for calculating length of service:
� When enrolling the participant, enter the override date in the inputvalue Continuous Service Date of the element representing theplan. This entry overrides the default date derived from the plan’saccrual start rule.
Recording Accrued Time TakenFor PTO accrual plans associated with an absence type, you can use theAbsence Detail window to record a plan participant’s accrued timetaken.

26 – 31Absence Management and PTO Accruals
See: Entering Absences: page 26 – 14
For plans not associated with an absence type, you can make entries forindividual participants directly to the plan’s absence element, using theElement Entries window.
See: Making Manual Element Entries: page 7 – 41
If you are using Oracle Payroll you can make batch entries of hours ofaccrued sick or vacation time that employees have taken and noted ontheir timecards.
See: PayMIX Timecard Entries: page 8 – 14
Note: If you are using PayMIX to make entries from timecardsof accrued time taken, ensure that standard links to all payrollsare in place for the elements Vacation Pay and Sick Pay. Theseelements are included in the system, and should receivestandard links during the implementation of Oracle Payroll atyour site.
Recording PTO Sold or Purchased
If your enterprise pays employees for time they have accrued but notused, or if you permit employees to buy additional time, you maydecide to define your own PTO–related elements to record informationabout these transactions. In this case, you can enter these elements andselect the rules governing the subtraction or addition of sold orpurchased PTO in the Net Calculation Rules window.
Running the PTO Carry Over Process
Run this process at year end for each PTO accrual plan, to clear downparticipants’ balances of unused, accrued time. For each participant,the process stores time available for carryover to the new year on theplan’s Carried Over <plan name> element, and stores time they cannotcarry over on the plan’s Residual <plan name> element.
Run the PTO Carry Over process from the Submit Requests window.
� To run the PTO Carry Over process:
1. Select PTO Carry Over in the Name field. If the Parameterswindow does not open automatically, click in the Parameters field.
2. The date in the PTO Year Earned field defaults to the year beforethe current year. You can enter a different year.
26 – 32 Oracle Human Resources North American User’s Guide
3. Select the name and category of the accrual plan for which you arerunning the process.
4. The Reprocess All Participants field defaults to No, so that theprocess affects only those plan participants not previouslyprocessed for this year. To process all participants regardless ofany previous processing, select Yes in this field.
5. When the entry of parameters is complete, choose OK. ChooseSubmit to submit the request.
The net accrual calculation for PTO includes carried over PTO indetermining an employee’s accrued PTO to date. To set the netcalculation rules, use the Net Calculation Rules window. To review anemployee’s carryover of accrued time, use the Accruals window.
See Also
Reviewing or Changing Net Accrual Calculations: page 26 – 27

☞
26 – 33Absence Management and PTO Accruals
Reviewing Employees’ PTO Accruals
To view information on employees’ accrued PTO, use the Accrualswindow.
� To view an employee’s net PTO accrual:
1. In the Assignments Folder, query the employee’s name. Choosethe Accruals button to go to the Accruals window.
2. Query the accrual plan in the Name window. The field NetEntitlement displays the net accrued days or hours as of theeffective dates that appear. If you allow maintenance of negativebalances of accrued time at your installation and an employee’stime absent exceeds time accrued, the net entitlement appears as anegative number.
The Entitlement Details region shows the amounts of currentaccrued time, the accrued time carried over and accrued timetaken used in the calculation of the net PTO accrual.
Attention: When reviewing employee accruals at year end,remember that:
– the last day of the final period of the current calendar yearmay fall between a date in late December and one in earlyJanuary

26 – 34 Oracle Human Resources North American User’s Guide
– accruals for the new calendar year do not go on record untilthe last day of the first period of the new year
– carried over and residual PTO appear only after the PTOCarry Over process is run.
C H A P T E R
27 O
27 – 1Administering Events and Attendance
Administering Eventsand Attendance
racle Human Resource Management Systems provides a fullfeatured event management system in the form of Oracle TrainingAdministration. However, Oracle Human Resources itself provides asimple way to record attendance at events and to schedule employeereviews. This chapter explains how to:
• set up events
• book employees and applicants onto events
• record information about employee interviews, such asdisciplinary hearings and performance reviews

27 – 2 Oracle Human Resources North American User’s Guide
Setting Up Events
Oracle Training Administration provides all the power and flexibilityyou need to schedule, administer and track training events. Forexample, you can:
• control enrollments throughout the lifecycle of an event usingevent statuses, such as Planned, Full, and Closed
• manage waiting lists and allocate places by enrollment date,priority, status, or by organization or customer
• restrict enrollments to employees in specified jobs, positions ororganizations
• group events into programs for coordinated enrollment andattendance tracking
See: Overview of Oracle Training Administration, Oracle TrainingAdministration User’s Guide
In Oracle Human Resources, you can create events for employees orapplicants in the Event Bookings window. While this window does notprovide the powerful scheduling and enrollment features of OracleTraining Administration, it is useful for recording attendance at events.
Note: The system administrator can create customizedversions of the Event Bookings window so that you use oneversion for employees and another version for applicants.
Prerequisites
❑ Define types of event, such as departmental meeting or marketingpresentation, as values for the QuickCode TypesEMP_EVENT_TYPE and APL_EVENT_TYPE.
Suggestion: You could set up the Additional Event Detailsdescriptive flexfield to record booking statuses (such as WaitListed, Confirmed, and Attended). This descriptive flexfielddisplays on the Event Bookings window, the Employee Reviewwindow, and the Applicant Interview window.

27 – 3Administering Events and Attendance
� To create an event:
1. Select the type of event then enter the date, time, supplyingorganization, location, and contact name.
2. Save the event.
3. You can select attendees by name or number in the Bookings blockof this window.
Managing Bookings and Attendance
You can view all the events a person has attended or is scheduled toattend in the Book Events window. You can also enter new bookingshere.

27 – 4 Oracle Human Resources North American User’s Guide
Employee Reviews
You can use the Employee Review window to record information aboutany employee interview, such as a performance review, disciplinaryhearing, or medical test.
To prepare for a performance review, you can view the employee’s:
• career history, using the Assignment History window
See: Assignment History: page 14 – 36
• personal competence profile, using the Personal CompetenceProfile window if you are using Career Management, or theSpecial Information window, if you are recording skillsinformation using Special Information Types
See: Entering a Personal Competence Profile,
See: Entering Special Information: page 13 – 26
• likely career paths or succession plans
See: Career and Succession Planning: page 23 – 2
Line managers can use the web Direct Access interface to CareerManagement to complete assessment and appraisal templates for theiremployees.
Entering an Employee Review
You can record details of a review event using the Employee Reviewwindow.
Prerequisites
❑ Define the different types of employee interview you want torecord, such as disciplinary hearings and performance reviews, asvalues for the QuickCode Type EMP_INTERVIEW_TYPE.

27 – 5Administering Events and Attendance
� To enter a review for an employee:
1. Select an interview type, and enter a start date. The other fields areoptional.
2. Save the review.
3. You can select reviewers by name or employee number. Save yourwork.
4. If you want to enter a performance rating for the employeeassociated with this review, navigate to the Salary Administrationwindow.
Entering Performance Ratings
You can carry forward details from the Employee Review window tothe Performance window (which opens from the Salary Administrationwindow). In this window, you can enter performance ratings, schedulethe next performance review, and, optionally, associate a salary changewith a performance review.
Prerequisites
❑ Define a list of performance ratings as values for the QuickCodeType PERFORMANCE_RATING.

27 – 6 Oracle Human Resources North American User’s Guide
� To enter a performance rating:
1. Select an existing review or enter a new review and its date.
2. Select a rating.
3. If you entered a time period for regular performance reviews in theSalary Information region of the Assignment window, the date ofthe next review appears automatically. You can change this date.
See Also
Entering Salaries and Salary Changes: page 9 – 8

C H A P T E R
28
T
28 – 1Setup for Personal and Assignment Information
Setup for Personal andAssignmentInformation
his chapter focuses on three aspects of setup that affect how yourecord and track people in your system:
• Person Types – choosing the types of people you need to identifyand the sorts of information you want to hold about each type
• Assignment Statuses – choosing statuses to track temporary orpermanent departures of employees from your enterprise
• Special Information Types – designing fields to hold any specialinformation, not provided by the main system, you want to holdabout people, jobs and positions, and training activities

28 – 2 Oracle Human Resources North American User’s Guide
Person TypesIn any enterprise there is a need to identify different groups of people.For each group that exists in your enterprise there may be differenttypes of information you need to keep. You may also want to controlaccess to the records of different groups of people.
There are three basic types of people for whom you maintaininformation in your human resource system. These are:
• Employees, both current and ex–employees
• Applicants, both current and ex–applicants
• External people
A special category of the External type is contact. A contact is someoneassociated with an employee or an applicant.
For example, people who are dependents of employees, people whomemployees name as beneficiaries of certain benefits, and people whomemployees list as their contacts in case of emergency are all entered ascontacts.
Using Person Types
Oracle HRMS comes with a set of Person Types. You can change thenames of these types when you install the system, and you can addyour own subgroups of Person Types. For example, you might havetwo types of employee in your enterprise:
• Regular Employee
• Contractor
You can define these as subgroups of the Employee person type to:
• enable fast identification of these groups
• manage different kinds of personal information for each group
• change employees from Contractor to Regular Employee,without changing current work information
Note: Each employee’s assignment can be described by anemployment category such as Full Time – Regular orPart Time – Temporary. So you do not use Person Types todistinguish the category of assignment.
In another example, you might want to distinguish between internaland external applicants for vacancies. You may also be involved in aredundancy program or a program of staff layoffs, and need to identifyemployees as preferred candidates for any vacancies. You can do thiswith the following subgroups of applicant:

28 – 3Setup for Personal and Assignment Information
• Internal Candidate
• External Candidate
• Preferred
Defining Person Types
There are eight Person Types recognized by the system, and identifiedby a system name. For each, there is a predefined user name. You canchange the predefined name and you can enter other user names.
One user name must be the default. This is the name the system entersin certain circumstances if you do not select a Person Type manually.For example, when you hire an applicant, the system automaticallyupdates the Person Type to the default user name for the system name’Employee’.
You enter user names for person types in the Person Types window.
First consider whether the existing user names are meaningful in yourenterprise.
� To change a user name for a person type:
� Delete the contents of the User Name field and type in yourpreferred name.
� To map other user names to a person-type system name:
1. Select New Record from the Edit menu.
2. Enter a unique User Name and select the System Name you wantto map on to.
Deactivating User Names
You cannot delete user names in use in the system, but you candeactivate them by unchecking the Active check box. Notice that youcannot deactivate a default User Name. You must first select anotheruser name as the default.
Person Types and Information Management
The system uses its Person Types to control the type of information youcan enter. For example, you cannot enter earnings or deductions for anapplicant. You can use Person Types in the following ways:

28 – 4 Oracle Human Resources North American User’s Guide
• To control access to people’s records on the system, according totheir Person Type. For example, you might give all managers ina department access to employee records, but only giverecruitment officers access to records of applicants andex–employees.
Your system administrator can achieve this by creatingcustomized versions of the People window.
See: Restricting the Data Displayed in a Window: page 31 – 3
• When you set up your own fields to hold additional information,you can tie them to particular Person Types. For example, youmight want a user–defined field holding visa information forforeign workers to appear for employees and applicants, but notfor other people.
You can do this by setting up the descriptive flexfield on thePeople window.
See: Adding New Fields to Windows: page 31 – 2
Suggestion: If you want to define rules of eligibility for acompensation or benefits element based on the type ofemployee, you cannot use the Person Type directly. However,you can use Person Type in a formula to validate the valuesentered for an employee.
Also, consider whether you can meet your needs using theassignment status and employment category to controleligibility for compensation and benefits.
See: Components of the Assignment: page 14 – 5

28 – 5Setup for Personal and Assignment Information
Assignment StatusesYou use assignment statuses to track temporary or permanentdepartures of employees from your enterprise. Temporary departuresinclude paid or unpaid leaves of absence that you may allowemployees to take for a number of reasons.
Primary Statuses
There are four system statuses for employee assignments:
• Active Assignment, used to show that the employee is workingin accordance with his or her usual conditions of employment
• Suspend Assignment, used to show that the employee is on leaveof absence, but remains an employee of your enterprise
• Terminate Assignment, used to show that your enterprise nolonger employs the person in that assignment. It can still bepossible to make payments through Oracle Payroll forassignments at this status.
• End, used to end any assignment except the primary assignmentfor an employee with multiple assignments. This status causes asecondary assignment to end but is not recorded on theassignment.
On your system, you may give these statuses different user statusesappropriate to your enterprise. Each system status can have severaluser statuses related to it. For example, for the system status SuspendAssignment, you can have the user statuses Maternity Leave, PaternityLeave, and Military Leave.
These statuses are primary because they determine how the systemprocesses and manages the assignment. An assignment must have one,and only one, primary status at a given time. You enter this status inthe Assignment window.
See: Entering a New Assignment: page 14 – 9
Using Assignment Statuses to Control Compensation
When you define user statuses, consider how you will use them inreports, inquiries, and processing.
When you use a validation formula to validate entries to element inputvalues, you can make the valid values for an entry dependent on theassignment status.
To use the statuses to control whether the payroll run processes anemployee assignment, you choose a payroll status of Process or Do not

28 – 6 Oracle Human Resources North American User’s Guide
Process for each user status. Additionally, in Oracle Payroll you can setup your pay calculation formulas so that a status change also changesthe formula used to calculate the employee’s pay. For example, anemployee might receive half pay while on Military Leave.
See: Using Oracle FastFormula for Validation, Oracle FastFormula User’sGuide
Additional Information: Refer to your Oracle Payroll manualfor information on the use of assignment statuses in theFormula Result Rules window to control the payroll formulathat processes for an employee.
Secondary Assignment Statuses
For analysis and reporting purposes, you can set up and use secondaryassignment statuses, for both employee and applicant assignments.These statuses have no effect on assignment processing.
For example, suppose your primary status Maternity Leave applies toemployees both when a child is born and when one is adopted, andyou want to study its use in these two cases. To accomplish this youcan set up the secondary statuses Maternity Birth and MaternityAdopt, and enter them for employees taking maternity leave.
You enter secondary statuses for an employee assignment or anapplicant assignment in the Secondary Statuses window.
To enter reasons for giving secondary statuses to assignments, definevalid reasons as values for the QuickCode TypeEMP_SEC_ASSIGN_REASON (for employee assignments) andAPL_SEC_ASSIGN_REASON (for applicant assignments).

28 – 7Setup for Personal and Assignment Information
Defining Assignment Statuses
You define both primary and secondary user statuses your enterpriseuses for employee and applicant assignments in the AssignmentStatuses window.
Defining Primary User Statuses
You can give your own user status names to the predefined systemstatuses. For example, for applicants you could use the user status”Rejected” for the system status ”Terminate Application”. OracleHRMS users see user statuses only.
You can also supply more than one user status for each system status.For example, for employees you can define several different userstatuses for the system status Suspend Assignment, such as MaternityLeave, Paternity Leave, Disability Leave, Military Leave or EducationLeave.
For applicants, you can track the stages of your selection process bymeans of user statuses. You can define user statuses such asApplication Received, Application Acknowledged, First Interview, andSecond Interview for the system status Active Application. Thesestatuses can trigger production of standard letters.
See: Tracking Applicant Progress: page 15 – 15
� To rename a user status:
� Delete the contents of the User Status field and type in yourpreferred name.
� To supply additional user statuses for a system status:
1. Select New Record from the Edit menu.

28 – 8 Oracle Human Resources North American User’s Guide
2. Type in your user status, and select an HR System Status.
3. For an employee assignment status, also select a Payroll SystemStatus. The payroll system status controls whether Oracle Payrollprocesses the assignment in a payroll run.
4. Save the new status.
Note: For each HR System Status, you must have one default userstatus. The system automatically uses the default in certainsituations. For example, when you create a new employeeassignment, it automatically has the default user statuscorresponding to the system status ’Active Assignment’. You canoverride this default.
You cannot delete a user status, but you can prevent its use bydeactivating it. To deactivate a user status, uncheck the Active checkbox.
Defining Secondary Statuses
A user status associated with a system status is called a primary statusbecause it determines how the system processes the assignment. Youcan also define secondary statuses not associated with a system status.You use secondary statuses for analysis and reporting, but not tocontrol pay processing for assignments.
� To create a secondary status:
1. Select New Record from the Edit menu in the Assignment Statuseswindow.
2. Type in a user status and do not select a system status.
The Type field displays Secondary.
Setup To Allow Processing After Termination
To enable payroll processing for employees after they leave yourenterprise, in your system setup you must do the following:
• Use the Assignment Statuses window to make sure your systemhas a user status that corresponds to:
the HR system status of Terminate Assignment
the Payroll system status of Process
Your startup data includes the user status Terminate ProcessAssignment, which matches this definition. Use this status (or

28 – 9Setup for Personal and Assignment Information
your own equivalent status) when you terminate employment orend an assignment.
28 – 10 Oracle Human Resources North American User’s Guide
Defining Special Information TypesIn Oracle HRMS, you use the Personal Analysis key flexfield to define anyspecial information not provided by the main system that you want tohold about people, jobs and positions, and training activities.
You can define any number of instances of the Personal Analysis keyflexfield. Each instance is called a Special Information Type. Forexample, you might set up types to hold performance reviews ormedical details.
Each Special Information Type can have up to thirty fields (where eachfield is a segment of the flexfield). You can set up cross–validation toensure that users enter correct combinations of segments. You can alsospeed up data entry and minimize errors by defining an ’Alias’ forcommon combinations of segment values.
When you enable Special Information Types for your Business Group,you select how you plan to use each type.
In Oracle Human Resources, you can use Special Information Types for:
• job requirements
• position requirements
• personal information
• OSHA and ADA reporting
In Oracle Training Administration, you can use Special InformationTypes for:
• skills provided by training activities
Each Special Information Type can be used for one or more of thesepurposes. The options you select control the windows in which eachSpecial Information Type appears.
In Oracle Human Resources, you can also customize the windows thathandle Special Information Types to restrict them to just one Type, suchas medical records. This is useful if you want to restrict access toparticular types of information for security reasons, or to aid users’efficiency by giving them access to just the information they require fora particular task.
Special Information Setup Steps
� To set up Special Information Types:
1. Define each Special Information Type as an instance of the PersonalAnalysis key flexfield.
28 – 11Setup for Personal and Assignment Information
See: Oracle Applications Flexfields Guide
2. Enable the Special Information Types you want to use in yourBusiness Group and select how you want to use them.
3. Consider whether you want to create customized versions of thewindows in which you can enter and display Special Information.These are the Special Information window and the List People bySpecial Information window.
See: Restricting the Data Displayed in a Window: page 31 – 3
4. Design the task flows for entering personal information, whichshould include the Special Information window.
See: Linking Windows in Task Flows: page 31 – 9
5. Design your navigation menus, including the List People by SpecialInformation window (or your customized versions of it) and thepersonal information task flows.
See: Setting Up Navigation Menus: page 31 – 17
6. Consider your special information reporting requirements. Astandard Skills Matching report is supplied. This compares thespecial information, such as skills, held by employees andapplicants with the requirements of a job or position.
See: Viewing and Reporting Skills Matching Information: page25 – 5
See Also
The Special Information Approach to Skills Matching: page 25 – 2
Enabling Special Information Types
Use the Special Information Types window to enable SpecialInformation Types for the Business Group, and to select how you wantto use them.
� To enable Special Information Types:
1. Select the Special Information Types you want to use in yourBusiness Group.
2. Enable each Type by checking the Enabled check box.
3. Check the other boxes to specify how you plan to use the SpecialInformation Type. This makes it available in the list of values inother windows as follows:

28 – 12 Oracle Human Resources North American User’s Guide
• Job: in the Job Requirements window
• Position: in the Position Requirements window
• Other: in the Special Information window
• Skill: in the Skill Provisions and Search for Event windows inOracle Training Administration
The information types ADA Disabilities, ADA DisabilityAccommodations, and OSHA–Reportable Incident are alreadyenabled when you receive Oracle Human Resources, and ready touse for ADA and OSHA reporting.
See: OSHA Reporting: page 17 – 34

C H A P T E R
29T
29 – 1System Administration
System Administration
he HRMS system administrator looks after the day to dayadministration of the system. This chapter summarises the tasksperformed by the system administrator and explains how to:
• set user profiles to predefine aspects of your users’ workenvironment
• enable the currencies used in your Business Group

29 – 2 Oracle Human Resources North American User’s Guide
The Role of the System Administrator
The system administrator takes responsibility for the day to dayadministration of one or more Oracle Applications.
Many jobs are more efficiently performed by one designated person.For example, the system administrator defines printers, and balancesthe system’s processing workload between online data entry andbackground processing, such as report generation.
A database management system can be conceptually divided into twoparts: user applications and their underlying data structures. Thisdivision lends itself to two job categories: database administrator(DBA), and system administrator.
• An Oracle Applications System Administrator administers theuser interface or applications side of the database managementsystem.
• An Oracle Database Administrator or DBA administers the datathe various applications enter, update, delete, and use forcompany business.
Ideally the system administrator should be someone from within theuser group who knows how the system has been defined and can act asthe first level of support for the application users. The systemadministrator role is clearly defined with a specific set of practical tasksto be carried out.
The HRMS System Administrator
For Oracle HRMS these practical tasks normally include:
• customizing the application, including setting up Key andDescriptive Flexfields. See:
User Definable Key Flexfields: page B – 2
User Definable Descriptive Flexfields: page B – 5
• imposing limits on what users can access through menus,security profiles, and responsibilities
See: Setting up Security in Oracle HRMS: page 34 – 10
• defining audit requirements
See: Setting Up AuditTrail: page 35 – 2
• setting up user profiles
See: Setting User Profile Options: page 29 – 4

29 – 3System Administration
• defining the formats for displaying currency amounts
See: Enabling Currencies: page 29 – 7
• setting up and maintaining QuickCode types and values
See: Defining QuickCode Types: page 32 – 5 and: AddingQuickCode Values: page 32 – 3
• installing printers and managing concurrent processing
See: Oracle Applications System Administrator’s Guide

29 – 4 Oracle Human Resources North American User’s Guide
Setting User Profile Options
A user profile is a set of changeable options that affect the way yourapplication runs. The system administrator can set user profiles atdifferent levels:
These settings apply to all users at an installationsite.
These settings apply to all users of anyresponsibility associated with the application.
These settings apply to all users currently signedon under the responsibility.
These settings apply to an individual user,identified by their application username.
Values set at a higher level cascade as defaults to the lower levels.Values set at a lower level override any default from a higher level.
Figure 29 – 1Levels for SettingUser Profile Options
DefaultingOrder
Order of precedence
Oracle HR
HR Manager
Robert Calder
Application
Site
Responsibility
User
Suggestion: Set site–level options first to ensure that alloptions have a default. If a profile option does not have adefault value, it might cause errors when you use windows,run reports, or run concurrent requests.
You use the System Profile Values window to set profile options at eachlevel for your user community. If you change a user profile optionvalue, your change takes effect as soon as your users log on again orchange responsibilities.
Site level
Application level
Responsibilitylevel
User level

29 – 5System Administration
Application users can the Personal Profile Values window to set theirown profile options at the user level. Not all profile options are visibleto users, and some profile options, while visible, cannot be updated byend users. Any changes a user makes to his or her personal profileoptions take effect immediately.
List of User Profile Options
There are a number of User Profile Options that are of specificimportance to HRMS system administrators. These are listed inTable 29 – 1 and Table 29 – 2. The only one of these options that a usercan change is DateTrack:Reminder.
HR Option Purpose
HR:Business Group Business Group that is linked to the security profilefor a responsibility. This option is used online tocontrol access to records that are not related toorganization, position, or payroll.
This option is seeded at Site level with the start–upBusiness Group. It is view only. Values are derivedfrom the HR:Security Profile user profile option.
HR:Security Profile Restricts access to the organizations, positions, andpayrolls defined in the security profile. This optionis seeded at Site level with the view–all securityprofile created for the Startup Business Group.
HR:User Type Limits field access on windows shared betweenOracle Human Resources and Oracle Payroll. Ifyou do not use Oracle Payroll, it must be set to HRUser for all responsibilities.
If you do use Oracle Payroll, you can give eachResponsibility one of the following user types,depending on the work role of the holders of theresponsibility: HR User, HR with Payroll User, Payroll User
HR:Query Only Mode Restricts access to view–only for all HR and Payrollforms on a menu.
HR:Use Standard Attachments Disables the facility to attach short text commentsto records. Enables the attachment of multipleitems of various types including OLE objects, Webpages, images, and word processed documents.
Table 29 – 1 HR User Profile Options

29 – 6 Oracle Human Resources North American User’s Guide
DateTrack Option Purpose
DateTrack:Date Security Controls the way users can change their effectivedate: All (users can change to any date), Past (users can change to dates in the past only), Present (users cannot change their effective date), Future (users can change to dates in the futureonly)
DateTrack:Reminder Determines whether the Decision window appearswhen a datetracked window opens: Always (the window always appears), Never (the window never appears), Not Today (the window appears only if theeffective date is not the system date)
Table 29 – 2 DateTrack User Profile Options
See Also
Oracle Applications System Administrator’s Guide

29 – 7System Administration
Enabling Currencies
Oracle HRMS allows you to use multiple currencies for enteringinformation about employee compensation and benefits. You can alsorecord your payment methods to employees in different currencies.
For example, if you have employees living and working temporarily inother countries, you might want to record specific earnings ordeductions for these employees in local currencies. You might alsowant to pay these employees a fixed amount into a bank account intheir home currency. The remainder you would pay in a local currency.
Your startup data includes the definitions of all world currencies.These definitions are shared by all Oracle Applications and arecontrolled by the system administrator responsibility. You enable thosecurrencies you want to use in the Currencies window.
Note: You must enable at least one currency as the defaultcurrency for all information related to money in your system.This default is known as the Base Currency for your BusinessGroup.
� To enable a currency:
� Query the currency you want to enable and check the Enabledcheck box. Save your choice to enable the currency.
You can never delete a currency, but you can disable it.
� To disable a currency:
� Uncheck Enabled, or enter an End Date for the currency.

29 – 8 Oracle Human Resources North American User’s Guide
C H A P T E R
30 T
30 – 1Reports and Inquiries
Reports and Inquiries
his chapter introduces the inquiry and reporting tools you can usewith Oracle HRMS. It summarizes the reports and inquiry windowsthat are supplied with Oracle Human Resources and Oracle Payroll. Italso explains how you can create and run your own QuickPaint reportsfor fast online reporting on people and assignments.

30 – 2 Oracle Human Resources North American User’s Guide
Overview of Inquiry and Reporting Tools
Oracle HRMS provides a range of inquiry and reporting mechanisms tomeet the needs of different users:
• inquiry windows (including folders)
• predefined reports that can be scheduled and grouped forperiodic processing
• DateTrack History, to view the changes to datetrackedinformation over time
• QuickPaint, to create your own online inquiries and reportsabout people and assignments
In addition, you can use Oracle Reports or other tools to write yourown reports. You can register these with the system so that they can berun in the same way as the predefined reports.
You can extract mail merge information from the human resourcedatabase to send to your word processing system. For example, youmight want to produce standard letters for applicants as part of yourrecruitment process.
It is also possible to download information from the human resourcedatabase to other tools for reporting or editing. For example, you canuse Oracle Application Data Export (ADE) to download information toa spreadsheet.
See Also
Viewing DateTracked Information and History: page 1 – 13
Using Oracle HRMS with Spreadsheets: page 33 – 5
Using a Word Processor: page 33 – 13

30 – 3Reports and Inquiries
Inquiry Windows and Folders
Oracle HRMS includes some inquiry windows to meet the mostcommon online reporting requirements. In these windows, youtypically enter selection criteria in the first block then choose the Findbutton to view a list of people, assignments, or other entities that matchyour criteria. Some of these windows use folders to display theinformation retrieved by your criteria.
Folders are online views that you can customize. By default, the folderblock in an inquiry window displays all records matching your inquiryand all fields available within the folder. However, you can create yourown folders to display a subset of these records and fields. You canalso choose the field labels, their size and order, and the sort sequenceof the retrieved records.
For example, in the Assignment Folder window, you could create afolder called Sales Employees by Grade. This folder has the querycriteria Organization = ’Sales’, and it is sorted by grade.
You can define public folders, which all users can view, as well asprivate folders for your own use.
Inquiry Window Information Provided
Assignments Folder Lists of assignments in a folder
Employee AssignmentProcesses (Oracle Payroll)
All the assignment processes for one employee assignment,which you can view, retry or roll back, with furtherinformation on run messages, run results, balances,payment details and costing
Payroll Processes (OraclePayroll)
All the payroll processes for one payroll for a specifiedperiod, which you can view, retry or roll back, with furtherdetails on assignment processes, run messages and costing
People Folder Lists of people in a folder
Salary ManagementFolder
List of assignments with their current approved salary andproposed new salary
Position OccupancyFolder
Lists of people who have held a selected position, or areapplying for it, and the dates of their occupancy
List Assignments Assignments that match the assignment components youspecify for current applicants, employees, or both
List People byAssignment
People whose assignments match the assignmentcomponents you specify for current or former applicants,employees, or both
Table 30 – 1 Inquiry Windows in Oracle HRMS

30 – 4 Oracle Human Resources North American User’s Guide
Information ProvidedInquiry Window
List Employees byOrganization
All employees assigned to one organization and, optionally,to all organizations below it in a specified hierarchy
Assignment History The dates of assignments and periods of service for anemployee who has had more than one assignment NOTE: use DateTrack History on the Assignment windowto see historical changes to one assignment
List Employees byPosition
All employees assigned to a specified position ororganization and job
List Employees byPosition Hierarchy
Current holders of positions at and below a specifiedposition in a position hierarchy
View Employee GradeComparatio
The amount employees receive for a specified element as apercentage of the mid–value of their grade rate range
List Employees byAbsence Type
All absences of a particular absence type or categorywithin, optionally, a specified time period
View Employee AbsenceHistory
Periods of absence for a specified employee
List People by SpecialInformation
All people for whom you have entered details about aspecified special information type
List Employees byElement
All employee assignments receiving a specifiedcompensation element within a given time period
View Element EntryHistory for Employee
The history of entries of one or more elements for anemployee assignment
List Position BudgetVariance
Variances between the number of actual position holdersand the values entered in a specified budget for positionsbelow a chosen position in a hierarchy
List Budget Variance byOrganization
Variances between the number of actual position holdersand the values entered in a specified budget for allpositions in organizations at and below a chosenorganization in a hierarchy
View Employee Benefits View benefit plans on which an employee is enrolled andthe coverage level and contributions for each plan
View Vacancies Vacancies matching assignment components and othercriteria you select
Table 30 – 1 Inquiry Windows in Oracle HRMS

30 – 5Reports and Inquiries
Predefined and User Defined Reports
There are a number of predefined reports that you can use immediatelywithout any further set up (see Table 30 – 2). They have a predefinedformat but you can choose which records to view by entering a set ofparameters when you submit the report.
These reports run in batch mode: you submit them for processing in theSubmit Requests window and can view their progress using the ViewRequests window. The requests are handled by a concurrent manager soyou can continue working online while your request is processed.
You can schedule the reports to run regularly and you can group themwith other reports and processes to run as a set. You can also controlaccess to the reports and control their printing. For example, thesystem administrator might want to ensure that users in one locationalways print their reports on a local printer.
Report Name Information Provided
Absences Absence details for an employee or organization, for someor all absence types
Assignment Status All employees, applicants, or both assigned to selectedwork structures
Current and ProjectedProgression Point Values
The expected results of running the Increment ProgressionPoints process, that is, the projected point and valuechanges for a group of employees
Element Link Details The eligibility criteria for an element or a group of elements
Element Result Listing(Oracle Payroll)
Run results processed for a particular element over adefined period, and run results for selected input values ofeach employee’s last assignment process
Employee IncrementResults
The actual results of running the Increment ProgressionPoints process, that is, progression point and value changesfor a group of employees
Employee OrganizationMovements
New hires, terminations, transfers in and transfer out of aselected organization, or organization hierarchy
Employee PayrollMovements
New hires, terminations, transfers in and transfer out of aselected payroll
Employee Summary Addresses, contacts, period of service, assignments, specialinformation, personal payment methods, and elemententries for a selected employee
Full Applicant Details Applications and applicant interviews for one applicant
Table 30 – 2 Standard Reports in Oracle HRMS

30 – 6 Oracle Human Resources North American User’s Guide
Information Provided Report Name
Full Assignment Details Assignment information including periods of service,payment methods, and element entries for one employee
Full Personal DetailsReport Set
Person details, applicant details, assignment details, andwork details for one employee
Full Person Details Addresses and information entered in the Person window,such as name, date of birth, nationality, and work telephonenumber for one employee
Full Work Details Miscellaneous work information, including specialinformation, absences, recruitment activities, and contactsfor one employee
Job and Position SkillsMatching
Lists of employees, applicants, or both that meet some or allskill requirements of a job or position
Organization Hierarchy The organizations (and optionally their managers) below aselected organization in a particular hierarchy
Position Hierarchy The positions (and optionally their holders) below aselected position in a particular hierarchy
Requisition Summary Applicants and their interview schedules for a selection ofvacancies
Salary Review Current, past, and proposed salaries for a selected list ofemployees
Staffing Budget Details Actual staffing level with budgeted levels over a specifiedperiod
Terminations The number of employees from selected organizationsleaving your enterprise within a particular period, and thereasons for leaving
Table 30 – 2 Standard Reports in Oracle HRMS
You can create your own reports using Oracle Reports or SQL*Plus oranother tool of your choice. You can register them with ApplicationObject Library. This means you can run them from the standardSubmit Requests window, and you can schedule them in report setswith other reports and processes.
See Also
Assignment Status Report: page 14 – 33
Employee Summary Report: page 14 – 34
Employee Movements Report: page 14 – 34
Terminations Report: page 14 – 19

30 – 7Reports and Inquiries
Employee Increment Results Report: page 4 – 19
Current and Projected Progression Point Values Report: page 4 – 18
Organization Hierarchy Report: page 2 – 39
Position Hierarchy Report: page 3 – 24
Salary Review Report: page 9 – 15
Absences Report: page 26 – 18
Reviewing Element Links: page 7 – 39
Tax Reporting (Oracle Payroll User’s Guide)
Reports on Pay Processing (Oracle Payroll User’s Guide)
Submitting a Request (Oracle Applications User’s Guide)
Oracle Application Object Library Reference Manual

30 – 8 Oracle Human Resources North American User’s Guide
QuickPaint
QuickPaint is a powerful and flexible tool to design reports aboutassignments in the format you require. You can include the followingsorts of information in a QuickPaint report:
• Personal information
• Contact information
• Assignment information
• Application information
• Compensation and benefit information
• Descriptive Flexfield information
Once you have designed a QuickPaint report, you and other users canrun the report online for any assignment or set of assignments. You canview the results online or print them.

30 – 9Reports and Inquiries
Defining QuickPaint Reports
You can design QuickPaint reports in the Define QuickPaint Reportwindow.
In the Report Definition area, you can enter free text to introduce thereport and to label the information that the report extracts from thedatabase. You can also select database items, which are tags representingthe information to be extracted from the database. When you run thereport, the database item names are replaced by the appropriate datafor the assignment or set of assignments for which the report is run.
You must be careful how you position the database items so thatQuickPaint interprets them correctly and formats the report in thelayout you require.
� To define a QuickPaint Report:
1. Enter a name, and optionally a description, of the report.
The Protected field is display only; some reports provided bylocalization teams are protected against edits.

30 – 10 Oracle Human Resources North American User’s Guide
2. In the Report Definition area, enter free text exactly as you want itto appear on the report.
3. To select database items, choose the Show Items button and run aquery to display a list of database items, then select and copy itemsto the Report Definition area.
Notice that the database item name must begin with an ampersand(&). Names without an ampersand are treated as free text.
4. Save the report definition.
Positioning Items
If you want to add free text immediately after a database item, youmust separate it from the database item with at least one space.Otherwise QuickPaint reads the database item as free text.
Both free text and database items appear in the report results on theline on which you painted them in the Report Definition area. Theyalso generally appear in the column in which you painted them.However, it might be that the data replacing a database item name islong enough to push later items on the same line to the right.
For example, if you paint database items and free text like this:
&ASG_JOB in &ASG_ORG
the report results print like this:
Technician in Biochemistry
Scientific Officer in Biochemistry
Notice that, in the second result, the free text ’in’ is pushed to the rightand one space is entered before it.
If you know the number of the column in which you want text or adatabase item to appear, you can enter it like this:
&ASG_JOB &32in &ASG_ORG
However, the text ’in’ will still be pushed to the right if the precedingdatabase item (&ASG_JOB) extends beyond column 32. If you wouldprefer the preceding database item to be truncated, paint the line asfollows:
&ASG_JOB &&32in &ASG_ORG
The report results will look like this:
Technician in Biochemistry
Scientific Off in Biochemistry

☞
30 – 11Reports and Inquiries
If you want one space between two database items or between adatabase item and text, then paint them separated by a single space.The single space is always preserved. For example, this definition:
&EMP_FIRST_NAME &EMP_LAST_NAME
gives the following report results:
Alice Hollister
Ray Garcia
Adding Conditions or Calculations to QuickPaint Reports
When you save a report definition, QuickPaint generates a formula toextract the information required by the report. You can view thisformula in the Formulas window. To query the formula, enter thename of your QuickPaint report preceded by the prefix QP_.
Formulas generated from QuickPaint definitions do not containconditional logic or mathematical computations. If you need thesefeatures, query the formula in the Formulas window and copy it. Editthe copy to add the logic you require.
Attention: You should not edit the original QuickPaintformula. Always edit a copy. Any edits of the original formulaare overwritten if you change the report definition in theQuickPaint Report window.
See Also
Static Database Items: page C – 2
Dynamic Database Items: page C – 19
Using Oracle FastFormula to Define QuickPaint Reports, OracleFastFormula User’s Guide

30 – 12 Oracle Human Resources North American User’s Guide
Running QuickPaint Reports
You run QuickPaint reports from the Run QuickPaint Report window.You can run a report for one assignment or for a group of assignments.
Prerequisites
❑ To run a QuickPaint report for a group of assignments, you mustfirst define an assignment set.
� To run a report for one assignment:
1. Select the type Assignment.
2. In the Assignment region, select the assignment for which youwant to run the report.
3. In the Report field, select the report you want to run.
4. Choose the Run Report button.
The message line tells you when the report is complete.
5. Choose the View Report button to see the report results.
When you run a QuickPaint report, the system runs the formulaassociated with the report. The first time you run a report, the
30 – 13Reports and Inquiries
system may take several seconds to identify all of the related dataand bring it back to the screen. All subsequent inquiries for otheremployees or applicants will run very quickly.
� To run a report for an assignment set:
1. Select the type Assignment Set.
2. In the Assignment Set region, select the assignment set for whichyou want to run the report.
3. In the Report field, select the report you want to run.
4. Choose the Run Report button.
The message line tells you when the report is complete.
5. Choose the View Report button to see the report results.
Customizing the Run QuickPaint Reports Window
Using the standard QuickPaint Report window, you can run the reportfor an assignment or an assignment set. The assignments can be heldby current employees or applicants.
Your system administrator can create customized versions of thiswindow to restrict the reports you can run and the people you canreport on. A customized version might be subject to one or more of thefollowing restrictions:
• report on one person type only (employees OR applicants)
• run one report only
• report on single assignments only, or report on assignment setsonly
If the window is subject to the third type of restriction, it will lookdifferent to the standard version since it will contain either theassignment region or the assignment set region, but not both.
See Also
Restricting the Data Displayed in a Window: page 31 – 3

30 – 14 Oracle Human Resources North American User’s Guide
Creating an Assignment Set
There are two uses of assignment sets in Oracle HRMS:
• You can run a QuickPaint report for a set of assignments, ratherthan individual assignments.
• In Oracle Payroll, you can process subsets of the employeesassigned to a payroll. Normally you initiate payroll runs andother post–run processes for one or more payrolls at a time.However, if you need to process smaller groups within a singlepayroll, you define an assignment set.
There are three ways to define the set:
• You can enter selection criteria, which the system generates intoa formula. When you use the assignment set, OracleFastFormula runs the formula to find the assignments that matchthe criteria. It checks all the assignments in the Business Groupor, if you select a payroll when you define the set, all theassignments to that payroll. When you define the set you canalso include or exclude individual assignments to modify the setcreated by the formula.
• You can select individually all the assignments you want toinclude in the set.
• You can start from a full set of all the employees in the BusinessGroup or all the employees assigned to a selected payroll. Thenyou can exclude individual assignments from the set.
Use the Assignment Set window to define your set.
� To define an assignment set using criteria for a formula:
1. Enter a unique name for the set.
2. Do one of the following:
• If you are defining an assignment set for payroll processing, youmust select a payroll. You cannot process an assignment setdrawn from more than one payroll.

30 – 15Reports and Inquiries
• If you are defining an assignment set for other purposes,selecting a payroll is optional. If you select a payroll, the formulagenerated from your selection criteria will select assignmentsfrom this payroll only. If you do not select a payroll, the formulawill select assignments from the whole Business Group.
3. Save the new set and choose the Criteria button.
4. In the Assignment Criteria window, enter one criterion in each row,and join the criteria with AND or OR in the Condition field. Fielddetails are as follows:
No.: The sequence number of each condition in your rule. If youuse sequence numbers that are multiples of 10, it will be easier toinsert new conditions later.
Condition: Leave the first row blank. Enter AND or OR forsecond and subsequent rows.
Database Item: Select database items as variables for yourdefinition. All database items are prefixed by an ampersand [&].
Operator: Select operators to determine relationships betweendatabase items or values. The list of operators is shown inTable 30 – 4.
Value/Database Item: Select database items for the secondvariable. Alternatively, you can enter a fixed value of the sametype as the database item. Enter text values in single quotes.
As an example, here is a definition for an assignment set ofemployees with salaries between 16,000 and 24,000:
No. Condition Database Item Operator
Value/DatabaseItem
10 &SALARY_PAY_VALUE_ENTRY_VALUE >= 16000
20 AND &SALARY_PAY_VALUE_ENTRY_VALUE <= 24000
Table 30 – 3 Assignment Set Criteria
5. Save your criteria and choose the Generate button to generate theformula.
You can view and edit the formula in the Formula window. Itsname is the same as the assignment set name.
See: Using Oracle FastFormula to Define Assignment Sets, OracleFastFormula User’s Guide
6. If you want to include or exclude individual assignments from theset defined by your criteria, choose the Amendment button. Selectthe assignments you want to include or exclude from the set.

30 – 16 Oracle Human Resources North American User’s Guide
Note: The list of assignments you see in this window is either allthe assignments in the Business Group or, if you selected a payroll,all the assignments to that payroll. It does not show theassignments matching your criteria since these are identifieddynamically each time the formula runs.
7. Save the set.
Operator Symbols Meaning
Equals = The condition is true if both expressions haveexactly the same value. For text, the case ofthe expression must be the same. So, forexample, ’Smith’ is not equal to ’SMITH’.
Not Equal != The condition is true if the result of the firstexpression does NOT have the same value asthe result of the second expression.
Greater than > The condition is true if the first expression isalphabetically after, or has a numericallygreater value, or a later date than the secondexpression.
Less than < The condition is true if the first expression isalphabetically before, or has a numericallysmaller value, or an earlier date than thesecond expression.
Greater than or equal to >= The condition is true if either the greater thanOR the equal to operator returns a true result.
Less than or equal to <= The condition is true if either the less than ORthe equal to operator returns a true result.
Table 30 – 4 Values in Operator Field
� To define a set by including or excluding assignments:
1. Enter a unique name for the set.
2. If you are defining a set for payroll processing, select a Payroll.
3. Save the new set.
4. Choose the Amendment button.
5. Do one of the following:
• If you want to create a small set of assignments, select Include inthe Inc/Exc field and select all the assignments for the set.
• If you want to start from the full set of assignments for thepayroll or Business Group, select Exclude in the Inc/Exc fieldand select assignments to remove from the set.

☞
30 – 17Reports and Inquiries
Attention: Do not create a mixture of Include and Exclude rows ifyou have not entered criteria and generated a formula.
6. Save your set.

☞
30 – 18 Oracle Human Resources North American User’s Guide
Custom Reports The Custom Reports function provides a generic reporting capabilitythat makes use of a single report to print out a custom definition. Thisreport is called PERGENRP.
The report is registered as a concurrent process and prints, in landscapeformat, the contents of the temporary tablePER_GENERIC_OUTPUT_REPORT.
This table contains the individual components of a custom report and ispopulated by the PL/SQL package PERGENRP.pkb, stored in$PER_TOP/admin/sql. This package is executed when you select theGenerate Report button on the Custom Reports window.
� To submit a Custom Report:
1. Navigate to the Custom Reports window.
2. Select the report by name.
3. Enter any parameters for this report.
Attention: Parameter values are not validated until you choosethe Generate Report button.
4. Choose the Generate Report button
The default for the report is to print the output automatically. It isa System Administrator task to set default printers for all users, orto reset this option on the Concurrent Program window.
Creating New Report Formats
A special feature of Custom Reports is that you do not need to createmultiple reports. You modify the generic package (PERGENRP.pkb)and report to provide additional formats and parameters.
Three sample report formats are provided, each with a different set ofparameters:
• PERCS001 – Custom Report 1
There is one parameter: Vacancy. The format in PERGENRP isFull Name of Applicant and Gender.
• PERCS002 – Custom Report 2
Parameters are Vacancy and Gender. The format in PERGENRPis Full Name of Applicant in uppercase.
• PERCS003 Custom Report 3

☞
30 – 19Reports and Inquiries
Parameters are Vacancy, Gender and Marital Status. The formatin PERGENRP is Full Name of Applicant, Gender and then FullName in uppercase.
You can edit the generic package to change:
• Report Title Page
• Header
• Footer
• Body Text
After you have modified the package, you need to register a newcustom report, with the parameter set for that report. This is a task forthe System Administrator.
� To register a new Custom Report with parameters:
1. Navigate to the Concurrent Programs window.
2. Enter the name of the Custom Report as the Program.
3. Enter a short name for the Custom Report.
Attention: You must start the short name with PERCS. Thiswill limit the list of values available to users in the CustomReport window.

30 – 20 Oracle Human Resources North American User’s Guide

C H A P T E R
31 A
31 – 1Customizing Windows and Menus
Customizing Windowsand Menus
s part of your implementation plan, you identify who will useOracle HRMS, what information they require, and how they will use it.You can group together users with similar requirements and give themthe same view of the system. For each group, you can:
• set up menus using structures and names that make sense to theusers
• link windows into flows that the users follow to complete a task
• restrict the data they can view and edit in certain windows, sothey only see what they need to see
These customizations provide security for your data and an efficientinterface designed for your users’ needs.
In addition to these customizations for groups of users, you cancustomize windows for all users by adding data fields to holdadditional information required by your enterprise.

☞
31 – 2 Oracle Human Resources North American User’s Guide
Adding New Fields to WindowsThe predefined fields in Oracle HRMS windows are designed to meetyour core information requirements. However, like all enterprises, youmay have special requirements that are best met by fields that youdesign yourself. Oracle HRMS provides a flexible mechanism calleddescriptive flexfields to enable you to add fields to windows.
Figure 31 – 1 illustrates the distinctive appearance of descriptiveflexfields. When users click in a flexfield that you have set up, awindow opens, displaying up to 20 segments that you have defined.
Figure 31 – 1
Defining Segments
For each segment, you can define its prompt, the type of data it cancontain, and the values a user can enter. You can provide a list or rangeof valid values. You also control the size and display characteristics ofeach segment and the order in which the segments appear.
You can define two types of descriptive flexfield segments:
• Global segments, which always appear in the flexfield window
• Context sensitive segments, which appear only when a definedcontext exists. You can prompt the user to provide the context,or you can provide the context automatically from a referencefield in the same zone.
For example, a segment to hold details of an employee’sdisability might display only when the Disabled field containsthe value Yes.
Attention: Some descriptive flexfields appear in more thanone window. For example, the Additional Evaluation Detailsflexfield appears in the Job Evaluation window and thePosition Evaluation window.
Check all of the windows that use a descriptive flexfield beforeyou define any of the segments. This is especially important ifyou intend to make the flexfield context sensitive to anotherfield. You must ensure that the reference field is present in allof the windows that use the flexfield.
See Also
List of Descriptive Flexfields: page B – 6
Oracle Applications Flexfields Guide

31 – 3Customizing Windows and Menus
Restricting the Data Displayed in a Window
Many of the standard Oracle HRMS forms are multipurpose. Forexample, in the Person form, you can enter or view details ofemployees, applicants, contacts, or other person types that you havedefined. In the Element Entries form, you can make entries for all theelements you have defined.
You may prefer to have multiple versions of these forms, each versionbeing used for just one purpose. This approach restricts the list ofvalues on certain fields and therefore provides for faster data entry. Italso allows you to limit access to certain types of information.
For example, you might create a customized version of the ViewElement Entry History for Employee form that does not display theearnings elements representing salary, bonus, and commission. Mostusers’ menus would only give them access to this customized versionof the form. For the small group of people authorized to view salary,bonus, and commission figures, your system administrator can define amenu function to allow access to the uncustomized form.
Table 31 – 1 lists the forms you can customize and the criteria you canuse to restrict access to information.
Form Restrict By Values
Adjust Balanceo o m
Element Set User defined(Oracle Payroll form)
Element Processing Type Recurring, Nonrecurring
Assignment Folder Person Type User defined
Define User Values Table Name User defined
Element Entries Element Set User defined
Element Processing Type Recurring, Nonrecurring
Entry Type Override
Event Bookings Employee or Applicant Employee, Applicant
List Employees by Element Element Set User defined
Element Processing Type Recurring, Nonrecurring
Table 31 – 1 List of Customizable Forms

31 – 4 Oracle Human Resources North American User’s Guide
ValuesRestrict ByForm
List People by SpecialInformation
Employee or Applicant Employee, Applicant
Special Information Type User defined
Person Type User defined
Organization Organization Classification List of OrganizationClassifications
Payroll and AssignmentProcesses(Oracle Payroll form)
Action Type List of Action Types(e.g. Run,Pre–payments,Reversal)
People Folder Person Type User defined
People (PERWSEPI),People and Assignment(PERWSHRG)
Person Function Enter Employee, Enter Applicant, Hire people alreadyon system
Person Type User defined
Position Occupancy Folder Employee or Applicant Employee, Applicant
n ic in ui int nqui s inRun QuickPaint Report QuickPaint Inquiry User defined
Person Type User defined
Assignments Assignment Sets, Assignments
Special Information Special Information Type User defined
View Element Entry Historyf
Element Set User definedfor Employee
Element Processing Type Recurring, Nonrecurring
Table 31 – 1 List of Customizable Forms
Types of Data Restrictions
You can restrict the information that appears in a customized form bythe following sorts of criteria:
• element type (recurring or nonrecurring)
• element set (user defined)

31 – 5Customizing Windows and Menus
• person function (enter employee, enter applicant, hire someoneon system)
• person type (user defined)
• special information type (user defined)
• organization classification
• employee or applicant
• QuickPaint Report (user defined)
If you want to restrict the data by a user defined information type, youmust create it first:
• To restrict by element set, create the set in the Element andDistribution Set window.
• To restrict by QuickPaint Report, create the report in the DefineQuickPaint Report window.
See: Defining QuickPaint Reports: page 30 – 9
• To restrict by Special Information Type, define your informationtype as an instance of the Personal Analysis key flexfield.
See: Defining Special Information Types: page 28 – 10
• To restrict by person types, define your user person types in thePerson Types window.
See: Defining Person Types: page 28 – 3
Defining an Element or Distribution Set
In the Element and Distribution Set window, you can select elementclassifications or individual elements to define a set. There are threetypes of set:
• Customization set: You can use a Customization set to restrictthe elements that can be entered or viewed on a customizedversion of the Element Entries window.
• Run set: Oracle Payroll users can use a Run set to specify theelements to be processed in a payroll run.
• Distribution set: Oracle Payroll users can use a Distribution setto define the elements over which the costs of other elements areto be distributed.

31 – 6 Oracle Human Resources North American User’s Guide
� To define an element or distribution set:
1. Enter a unique name for the set and select the Type: Distribution,Run, or Customization. Save your new set.
2. If you want to include all elements in a classification, choose theClassification Rules button.
• In the Classification Rules window, select one or moreclassifications to include. Save the set and close this window.
The elements in the classifications you choose are now listed inthe Elements region.
• If you want to exclude individual elements, place your cursor inthe element’s row and choose the Exclude Element button.
3. If you want to include particular elements from otherclassifications, choose the Include Element button.
• In the Elements window, select the element you want to includeand choose the OK button.
Note: After you include a particular element, you cannot go to theClassification Rules window and include the classification to whichthis element belongs.
4. Save your set.
5. If you want to see a list of the individual elements you haveincluded or excluded from the set, choose the Element Rulesbutton. The Element Rules window is view–only.

31 – 7Customizing Windows and Menus
Defining Customized Forms
You can define customized versions of certain forms in the FormCustomization window.
See: Table 31 – 1 List of Customizable Forms: page 31 – 4
Note: If you want to restrict access to query–only for a form,you do not need to create a customized version. Instead youcreate a new form function, setting the QUERY_ONLYparameter to YES.
See: Setting Up Query–only Access to Forms: page 31 – 19
� To define a customized version of a form:
1. Select the name of the standard form in the Form to be customizedfield. All GUI Smart Client form names are prefixed by F4.
2. Enter the name of your new version in the Name field. This nameis used when defining menus but it is not seen by users.
3. Select Enabled if you want the restrictions to come into effect. Ifyou do not select this option, the customized version of the formbehaves the same way as the standard version.
4. Enter the titles to appear in the new version of the form:
• In the Standard Title field, enter the window title to be seen byusers who can use the form for data entry and editing.

31 – 8 Oracle Human Resources North American User’s Guide
• In the Query Title field, enter the window title to be seen byusers who have view–only access to the form.
5. Save your new version.
6. In the Restrictions block, select the Type and Value of the restrictionyou want to define. The types and values available depend on theform you are customizing.
Adding the Customized Form to a Menu or Task Flow
If you want to add the customized form to a task flow, you must createa Task Flow Node for it.
If the customized form is called directly from the Navigator window,your System Administrator must define a menu function to call theform with the customization. The System Administrator can add thisfunction to any menu.
Note: If you want to use a customized version of the Peopleform, People Folder, or Assignment Folder to start a task flow,you should define a new customized task flow node and thendefine a menu function to call the task flow.
See Also
Calling Customized Forms and Task Flows from Menus: page 31 – 20
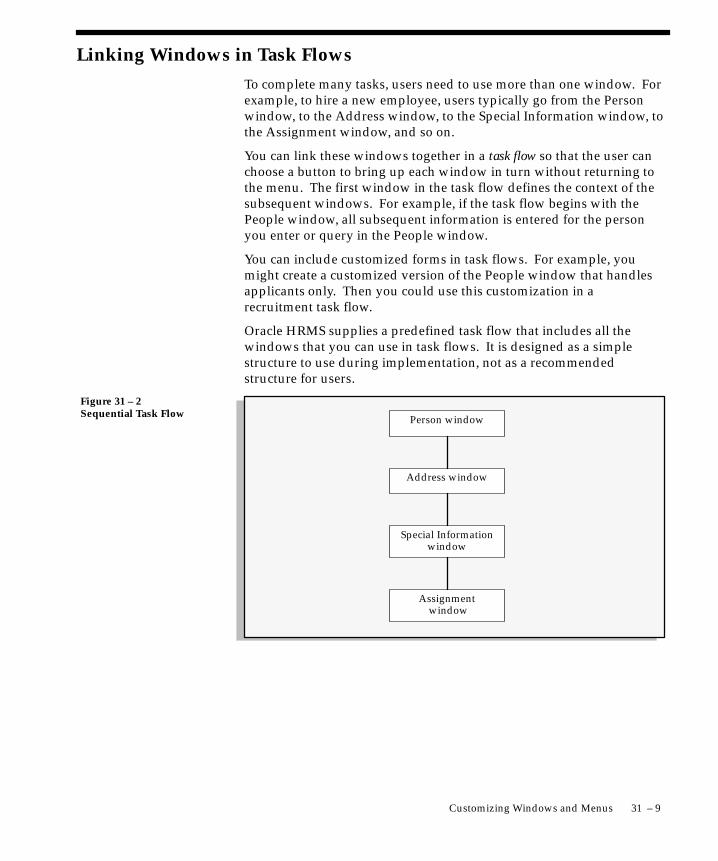
31 – 9Customizing Windows and Menus
Linking Windows in Task Flows
To complete many tasks, users need to use more than one window. Forexample, to hire a new employee, users typically go from the Personwindow, to the Address window, to the Special Information window, tothe Assignment window, and so on.
You can link these windows together in a task flow so that the user canchoose a button to bring up each window in turn without returning tothe menu. The first window in the task flow defines the context of thesubsequent windows. For example, if the task flow begins with thePeople window, all subsequent information is entered for the personyou enter or query in the People window.
You can include customized forms in task flows. For example, youmight create a customized version of the People window that handlesapplicants only. Then you could use this customization in arecruitment task flow.
Oracle HRMS supplies a predefined task flow that includes all thewindows that you can use in task flows. It is designed as a simplestructure to use during implementation, not as a recommendedstructure for users.
Figure 31 – 2Sequential Task Flow Person window
Address window
Special Informationwindow
Assignment window

☞
31 – 10 Oracle Human Resources North American User’s Guide
Figure 31 – 3Branched Task Flow Assignment Folder
Assignment window
Costing window Element Entry window
Assignment BudgetValues window
Windows You Can Use in Task FlowsYou can create your own task flows using the windows listed inTable 31 – 2, or customized versions of them. Some of these windowsrequire the context of an assignment. This means that either theAssignment window or the Assignments Folder window or theApplication window (for applicant assignments) must appear abovethem in the task flow.
All task flows must begin with one of the following forms:
• People and Assignment (PERWSHRG)
• People (PERWSEPI)
• People Folder (PERWSFPE)
• Assignments Folder (PERWSFAS)
• Job (PERWSDJT)
• Position (PERWSDPO)
Attention: Using the combined People and Assignment form(PERWSHRG), rather than the separate forms (PERWSEPI andPERWSEMA), the Assignment window opens more quicklyfrom the People window. We therefore recommend that youuse the combined form in any taskflow that requires bothwindows. The seeded taskflows use the combined form.
Window Context Required
Absence Detail Person (employee)
Address Person

31 – 11Customizing Windows and Menus
Context RequiredWindow
Adjust Balances (Oracle Payroll) Assignment (employee)
Applicant Interview Assignment (applicant)
Application Person (applicant)
Assignment Person (employee)
Assignment Budget Values Assignment
Assignments Folder None
Beneficiaries Element entry
Book Events Person (employee orapplicant)
Competence Profile Person
Contact Person
Costing Assignment (employee)
Covered Dependents Element entry
Element Entries Assignment (employee)
Employee Review Assignment (employee)
Employee Tax Rules (Oracle Payroll) Assignment (employee)
External/Manual Payments (Oracle Payroll) Assignment (employee)
Grade Step Placement Assignment (employee)
People Folder None
People None
Personal Payment Method Assignment (employee)
Phone Numbers Person
Picture Person
Position None
Position Occupancy Position
Qualifications Person
QuickPay (Oracle Payroll) Assignment (employee)
Reverse Payroll Run (Oracle Payroll) Assignment (employee)
Table 31 – 2 Windows You Can Use in Task Flows

31 – 12 Oracle Human Resources North American User’s Guide
Context RequiredWindow
Salary Administration Assignment (employee)
Salary History Assignment (employee)
Schools and Colleges (EstablishmentAttandances)
Person
Secondary Statuses Assignment
Special Information Person
Terminate Person (employee)
Terminate Applicant Person (applicant)
View Element Entry History Assignment (employee)
Work Choices (Job or Position) Job or Position
Work Choices (Person) Person
View Employee Accruals Assignment (employee)
View Employee Benefits Assignment (employee)
View Employee Earnings & Deduction Balances(Oracle Payroll)
Assignment (employee)
View Employee Tax Balances (Oracle Payroll) Assignment (employee)
View SOE (Oracle Payroll) Assignment (employee)
Table 31 – 2 Windows You Can Use in Task Flows
Defining Task Flow Nodes
Each form in a task flow is a node. There are predefined nodes forevery form that you can include in a task flow. However, if you createa customization of one of these forms, you must create a node for thecustomization before you can include it in a task flow.
You create nodes in the Define Task Flow Nodes window.

31 – 13Customizing Windows and Menus
� To create a task flow node:
1. Enter a name for the node. You select this name when you create atask flow containing the node. It is not visible to users.
2. Select the form that you customized. Leave the Block field blank.
3. Select the customization that you created.
4. Save the new node.

☞
31 – 14 Oracle Human Resources North American User’s Guide
Defining Task Flows
You define task flows in the Define Task Flow window. If there is asimilar existing task flow, you can copy it to form the basis of your newflow.
Including the Assignment Window in Taskflows
Using the combined People and Assignment form (PERWSHRG),rather than the separate forms (PERWSEPI and PERWSEMA), meansthe Assignment window opens more quickly from the People window.
Attention: We therefore recommend that you use thecombined form in any taskflow that requires both windows.The seeded taskflows use the combined form.
When users move down a task flow from the combined form, theAssignment window remains visible in the background. They canreturn to the Assignment window by closing their current window.Therefore you should not define a button to call the Assignmentwindow.
However, if you are defining a task flow to the Assignment windowfrom any window except the People window, you should use theAssignment form (PERWSEMA). In this case you may wish to add anAssignment button to any forms below the Assignment window in thetaskflow. This allows users to return to the Assignment windowwithout going back to the top window.
Prerequisites
❑ First create nodes for any form customizations you want to includein the task flow.

31 – 15Customizing Windows and Menus
� To define a task flow:
1. Enter a name for the task flow and save it.
2. In the Node block, select the name of the node that you want to bethe first form in the task flow.
3. For this node, select the Top Node check box.
4. Create a new record in the Node block and select another node.You must create all the nodes for the task flow before you can beginentering the navigation paths between them.
5. In the Navigation Options region, for each node, select the othernodes to which you can navigate.
6. Enter a sequence number to determine the order in which thenavigation options appear as buttons (from left to right) along thebase of the window or as options in a navigation list.
7. Select the Button check box for the navigation options that shouldappear as buttons. There is a limit on the number of buttons thatcan appear on each form. This number varies from form to form.
The other options are displayed in a navigation list when the userchooses a button labelled Others. Or, if there is only one otheroption, this form displays when the user chooses a button labelledNext.
8. There is a default label that appears on buttons or in the navigationlist for every form. You can override this with your own label.

31 – 16 Oracle Human Resources North American User’s Guide
If the label in the Define Taskflow window appears blue, this is thedefault value. It is a dynamic default: if the seeded value changes(for example, as the result of an upgrade), the label will be updatedautomatically in all task flows where it has not been overridden.
If the label appears black, the default value has been overridden.To re–inherit the default label, clear the field.
9. To define an access key (or keyboard shortcut) for a navigationoption, precede the appropriate letter in the label with anampersand (&). For example, to use ALT+P (in the MicrosoftWindows environment) as the access key for the Picture window,enter the label &Picture.
Note: Do not use the following letters since they are used on theOracle Applications menu: A, E, F, G, H, Q, S, W.
There is no validation to prevent the same letter being used morethan once for a group of buttons.
10. Save the task flow.
� To copy an existing task flow:
1. Query the existing flow and choose the Copy To button.
2. Enter the name of the new task flow and choose OK.
3. Query your new task flow and edit it as required.
See Also
Calling Customized Forms and Task Flows from Menus: page 31 – 20

31 – 17Customizing Windows and Menus
Setting Up Navigation Menus
Users access standard windows, customized windows, and the firstwindow in a task flow through the menu structure displayed in theNavigator window. Each responsibility is associated with a single menustructure. Using Function Security System Administrators can furtherrestrict access to individual menu options.
By defining menus with function security for groups of users, you can:
• limit the range of information users can access for the applicantand employee records available to them
• improve users’ efficiency in using the system by reducing menuchoices
• restrict users to query–only access to some or all windows
Each responsibility you define must be linked to one root menu, whichis the list of menu options displayed when the Navigator window firstopens.

31 – 18 Oracle Human Resources North American User’s Guide
The Default Menu Structure
The AutoInstall program creates a default menu structure for yourHRMS product. This menu structure lets you access all of the windowsfor your system. Normally, only a System Administrator has access tothe full default menu structure.
Using function security you can use this default menu for any numberof responsibilities and restrict access to the default menu options. Youcan also define any number of new functions and menus to restrict theaccess of other users. To view the hierarchy of menus you havedefined, you can run the Menu Structures Report.
The supplied menus give you access to all of the available submenus.However, a number of seeded functions are not enabled on thesemenus. You need to add them for the responsibilities that should haveaccess to these functions:
• HR View Medical
This function causes the Medical Information alternative regionto display in the People window.
• HR View Background
This function causes the Background Information alternativeregion to display in the People window.
• HR View Rehire
This function causes the Rehire Information alternative region todisplay in the People window.
• Salary Administration: Approve
This function enables the user to approve salary proposals in theSalary Administration window and the Salary Managementfolder.
Suggestions for Structuring Menus
Menus can be structured in different ways:
• following a sequence of tasks, such as:
1. Define a Requisition and Vacancy
2. Define a Recruitment Activity
3. Enter Applicant Information
• by type, such as inquiry windows, in which case the grouping isimportant but the sequence is not

☞
31 – 19Customizing Windows and Menus
When you define a new menu you should start by drawing it out onpaper. This will help you to decide the best structure and the bestprompts and descriptions. Work from the lowest level of sub–menu tothe highest and define the root menu as the last step in the sequence.
You can define as many submenus as you require under each menuoption. We recommend that you restrict the number of menu levels tothree because a menu structure with more levels is cumbersome to use.
Opening Multiple Forms
In most Oracle Applications, you can open multiple forms from theNavigator window without closing the form you already have open.
Attention: You must disable this feature on a menu structurethat accesses Oracle HRMS task flows. To prevent theconfusion of working with multiple effective dates, you shouldalso disable this feature if your menu structure accesses OracleHRMS datetracked forms.
� To disable the Multiple Open Form feature:
1. Add a Function type menu entry to the top–level menu referencedby your new responsibility.
2. Select the function whose User Function Name and Function Nameare:
• Disable Multiform, Multisession
• FND_FNDSCSGN_DISABLE_MULTIFORM
3. Save your changes.
See Also
Default Navigation Menus for HR with Payroll Responsibility: pageA – 2
Menus Oracle Applications System Administrator’s Guide
Menu Report Oracle Applications System Administrator’s Guide
Setting Up Query–only Access to Forms
You can restrict access to query–only for all HR and Payroll forms on amenu by setting the user profile option HR:Query Only Mode to Yes.

31 – 20 Oracle Human Resources North American User’s Guide
You can set this profile for individual responsibilities or users, or at thesite or application level.
If you want to give query–only access to some forms and full access toother forms, set the HR:Query Only Mode profile to No and use theparameter QUERY_ONLY=YES at form function level to restrict accessto individual forms.
Note: You can set the parameter QUERY_ONLY=YES for aform function that also launches a task flow. In this case,specify two parameters in the Form Function window:
QUERY_ONLY=YES
WORKFLOW_NAME=”taskflow name”
The entire task flow will be query–only, not just the first form.
� To restrict access to query–only mode for an individual form:
1. In the Form Functions window, select the form and specify theparameter QUERY_ONLY=YES. If you want to specify otherparameters for this form function, separate them with a space.
2. Enter a user function name to identify your new function, and saveit.
3. In the Menus window, select your new function instead of thesupplied form function.
Calling Customized Forms and Task Flows from Menus
For certain options you must define menu functions that include aparameter in the Parameters field of the Form Functions window, asfollows:
• If the menu entry calls a customized form, use the followingparameter:
HR_CUSTOMIZATION = ”customization name”
• If the menu entry calls the first form in a task flow, use thefollowing parameter:
WORKFLOW_NAME = ”task flow name”
• If the menu entry calls a form in query–only mode, use thefollowing parameter:
QUERY_ONLY=YES
• If the menu entry calls the Define Rate form (PAYWSGEV), usethe following parameter:

31 – 21Customizing Windows and Menus
FORM_MODE = ”grade” (for the Grade Rate window)
FORM_MODE = ”spine” (for the Scale Rate window)
• If the menu entry calls the Payroll and Assignment Processesform (PAYWSACT – used in Oracle Payroll), use the followingparameter:
FORM_MODE = ”assignment” (for the Assignment Processeswindow)
FORM_MODE = ”payroll” (for the Payroll Processes window)
If you need to specify more than one parameter for a form function,separate the parameters with a space.

31 – 22 Oracle Human Resources North American User’s Guide

C H A P T E R
32Q
32 – 1Quick Codes and User Tables
Quick Codes and UserTables
uickCodes provide lists of valid values on certain fieldsthroughout the system. For many types of code you can add your ownvalues and change the values that are predefined. You can also set upyour own types of QuickCode.
You can set up user tables to provide matrixes of valid values that varyaccording to a factor such as age, or job, or number of years service.You can access these values from formulas, or your own forms orreports, using a supplied function.
This chapter explains how to set up QuickCode Types and how to addvalues to predefined QuickCodes. It lists the predefined QuickCodesto which you can add values. It also explains how to set up user tablesand enter values for the rows and columns you define.

32 – 2 Oracle Human Resources North American User’s Guide
QuickCodes
Providing lists of valid values for certain items of information has twokey advantages:
• It ensures that all users use the same terminology, which makesit easier to inquire and report on the information.
• It speeds up data entry because you can enter just enough toidentify the value, and the system completes the entry.
In Oracle HRMS, a list of values is called a QuickCode Type. Eachvalue comprises a code and a meaning. For example:
QuickCode Type Code Meaning
YES_NO Y Yes
N No
The codes are used internally; users do not see them. There is amaximum of 250 QuickCodes for each QuickCode Type.
Predefined QuickCode Types
A number of QuickCode Types are included in Oracle HRMS. Somecontain codes as startup data. You can never delete these codes, butyou can change their meaning. For some QuickCode Types, you canalso disable the codes that are supplied. Your ability to disable codesand add new codes is determined by the access level of the QuickCodeType:
You can add codes and you can disable suppliedcodes.
You can add new codes, but you cannot disablesupplied codes because the system uses them.
You can neither add codes nor disable suppliedcodes. You can only change the meaning ordescription of supplied codes.
Table 32 – 1 lists the predefined QuickCode Types with an access levelof User or Extensible.
You can also create your own QuickCode Types in the QuickCode Typewindow. These all have an access level of User.
User
Extensible
System

32 – 3Quick Codes and User Tables
Adding QuickCode Values
To add, disable, or change the meaning of a QuickCode, use theQuickCodes window.
� To add QuickCodes:
1. Query the QuickCode Type to which you want add a value.
You cannot add values if the Access Level is System.
2. Enter a code and meaning. Optionally, enter a start and end date.
If you do not enter a start date, the new QuickCode is validimmediately. If you do not enter an end date, the new QuickCodeis valid indefinitely.
Removing QuickCode Values
You cannot delete QuickCodes after saving them, but you can stopthem appearing in lists of values.
� To remove a user defined QuickCode:
� In the QuickCodes window, do one of the following:
• Disable the code by unchecking the Enabled check box if youwant to prevent users selecting this value on any date.
• Enter an end date if you want to prevent users selecting thisvalue after a certain date.

32 – 4 Oracle Human Resources North American User’s Guide
• Change the meaning and description to create a replacementQuickCode.
If you disable the QuickCode or set an end date, users cannot selectthis value when they create new records. However, they can continueto see the value when they query records that contain it.
If you add, disable, or change the meaning of a QuickCode, users mustlog out and log back in again for your changes to take effect.

32 – 5Quick Codes and User Tables
Defining QuickCode Types
You can create your own QuickCode Types to provide lists of values,for example to validate element entries.
Define the new type in the QuickCode Types window, then query it inthe QuickCodes window to define the values that appear in lists.
� To define a new QuickCode Type:
1. Enter the name and meaning of your new type.
2. Save your work.
3. Optionally, choose the Usages button and select other OracleApplications in which you want to use this new QuickCode Type.

32 – 6 Oracle Human Resources North American User’s Guide
User and Extensible QuickCodes
Field QuickCodes
Category (absence) ABSENCE_CATEGORY
Reason (for absence) ABSENCE_REASON
Account Type (for bank details) ACC_TYPE
Address Type ADDRESS_TYPE
Reason (for application assignment status) APL_ASSIGN_REASON
Type (event type for applicant) APL_EVENT_TYPE
Type (interview type for applicant) APL_INTERVIEW_TYPE
Reason (for secondary assignment status) APL_SEC_ASSIGN_REASON
Appraisal and Assessment Status (Appraisal andAssesment on the Web)
APPRAISAL_ASSESSMENT_STA-TUS
Appraisal and Assessment Type (Appraisal andAssesment on the Web)
APPRAISAL_TYPE
State (Australian addresses) AU_STATE
Blood Type BLOOD_TYPE
Measurement Type (for budget) BUDGET_MEASUREMENT_TYPE
Cash Analysis (for a cash payment) CASH_ANALYSIS
Census Metropolitan Area (Canada) CA_CMA
Province (Canadian addresses) CA_PROVINCE
Method CERTIFICATION_METHOD
User friendly names for cheque–ordering SQLstatement
CHEQUE_PROCEDURE
User friendly names for cheque–writing SRW2reports.
CHEQUE_REPORT
Primary Evaluation Method COMPETENCE_EVAL_TYPE
Competence Type COMPETENCE_TYPE
Type (relationship of one person to another) CONTACT
Type (of MIX batch control total) CONTROL_TYPE
Table 32 – 1 User and Extensible QuickCodes

32 – 7Quick Codes and User Tables
QuickCodesField
Reason (for element entry) ELE_ENTRY_REASON
Reason (for employee assignment) EMP_ASSIGN_REASON
Employment Category EMP_CAT
Type (of employee event) EMP_EVENT_TYPE
Type (of interview for employee) EMP_INTERVIEW_TYPE
Reason (for secondary assignment status) EMP_SEC_ASSIGN_REASON
Ethnic Origin ETH_TYPE
System (job or position evaluation system) EVAL_SYSTEM
Measurement In (type for EVAL SYSTEM) EVAL_SYSTEM_MEAS
Type (of formula) FORMULA_TYPE
Authority (for PAYE details) GB_AUTHORITY
Bank Name GB_BANKS
Certificate (for element NI) GB_CERTIFICATE
Cheque Style GB_CHEQUE_REPORT
County (UK addresses) GB_COUNTY
GB_PAY_DAY_TYPE
Pension GB_PENSION
Sequence (for the BACS process) GB_SORT_SEQUENCE
Reason (for leaving) LEAV_REAS
Marital Status MAR_STATUS
Nationality NATIONALITY
Name (of organization classification) ORG_CLASS
Organization Type ORG_TYPE
PAY_PDT_DED_CKSUM
PAY_PDT_EARN_CKSUM
PAY_PDT_TIME_CKSUM
Category PER_CATEGORIES
Table 32 – 1 User and Extensible QuickCodes
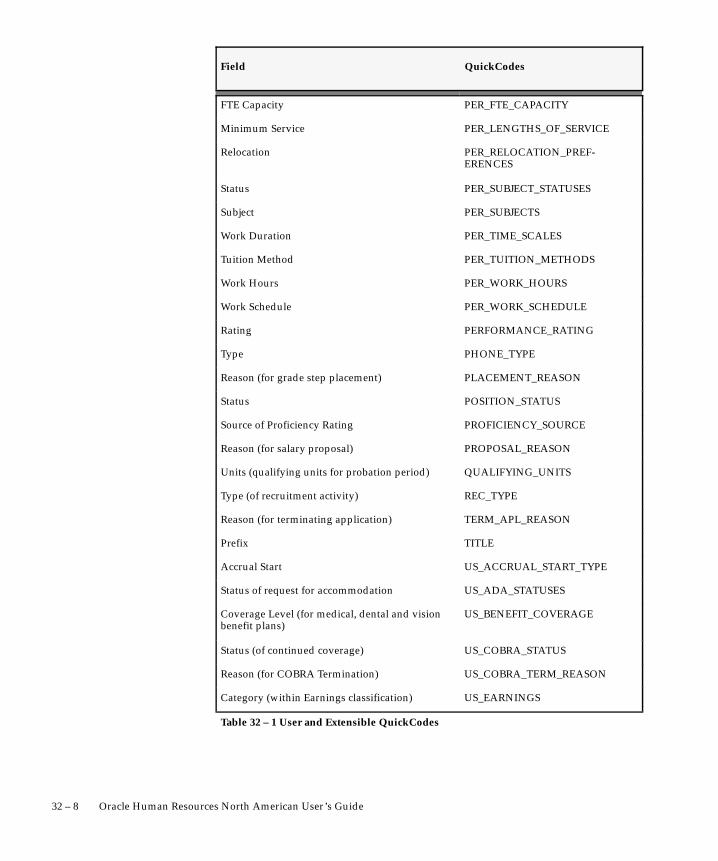
32 – 8 Oracle Human Resources North American User’s Guide
QuickCodesField
FTE Capacity PER_FTE_CAPACITY
Minimum Service PER_LENGTHS_OF_SERVICE
Relocation PER_RELOCATION_PREF-ERENCES
Status PER_SUBJECT_STATUSES
Subject PER_SUBJECTS
Work Duration PER_TIME_SCALES
Tuition Method PER_TUITION_METHODS
Work Hours PER_WORK_HOURS
Work Schedule PER_WORK_SCHEDULE
Rating PERFORMANCE_RATING
Type PHONE_TYPE
Reason (for grade step placement) PLACEMENT_REASON
Status POSITION_STATUS
Source of Proficiency Rating PROFICIENCY_SOURCE
Reason (for salary proposal) PROPOSAL_REASON
Units (qualifying units for probation period) QUALIFYING_UNITS
Type (of recruitment activity) REC_TYPE
Reason (for terminating application) TERM_APL_REASON
Prefix TITLE
Accrual Start US_ACCRUAL_START_TYPE
Status of request for accommodation US_ADA_STATUSES
Coverage Level (for medical, dental and visionbenefit plans)
US_BENEFIT_COVERAGE
Status (of continued coverage) US_COBRA_STATUS
Reason (for COBRA Termination) US_COBRA_TERM_REASON
Category (within Earnings classification) US_EARNINGS
Table 32 – 1 User and Extensible QuickCodes

32 – 9Quick Codes and User Tables
QuickCodesField
Category (within Imputed Earningsclassification)
US_IMPUTED_EARNINGS
Category (within Information classification) US_INFORMATION
Category (within Involuntary Deductionsclassification)
US_INVOLUNTARY_DEDUC-TIONS
US_JOB_GROUPS
Filing Status for local income tax US_LIT_FILING_STATUS
Exemption Reason (for excluding employee fromNew Hire report)
US_NEW_HIRE_EXCEPTIONS
Category (within Nonpayroll Paymentsclassification)
US_PAYMENT
Category (of accrual plan) US_PTO_ACCRUAL
Filing Status for state income tax US_SIT_FILING_STATUS
State (US addresses) US_STATE
Category (within Supplemental Earningsclassification)
US_SUPPLEMENTAL_EARNINGS
Row Type (for Payroll Tables) US_TABLE_ROW_TYPES
US_TAX_REPORT
Category (within Voluntary Deductionsclassification)
US_VOLUNTARY_DEDUCTIONS
Position of WC surcharge (after experiencemodifications and after premium discount)
US_WC_SURCHARGE_POSITION
Status (of a vacancy) VACANCY_STATUS
Availability Schedule WORK_SCHEDULE
Table 32 – 1 User and Extensible QuickCodes

☞
32 – 10 Oracle Human Resources North American User’s Guide
User–defined TablesYou may need to set up your own tables in your Oracle HRMS system,to hold data such as wage codes, shift differentials, or the amounts ofcertain deductions. You can set up all the tables you require using theTable Structure window. Using Oracle FastFormula, you can writesimple formulas for validating entries made in table columns.
Your Oracle HRMS startup data includes some predefined user tablesthat are either ready to receive entries, or that already have someentries.
Attention: You do not use the Table Structure window to setup tables holding information on medical, dental or visionbenefit plans (benefits with the benefits classification Medical,Dental or Vision).
The Oracle HRMS database includes a special table, theBenefits Table, already set up to hold information on benefitplans with coverage levels, and the employee and employercontributions at each level. To enter information into this tableyou use the Benefit Contributions window.
See: Establishing Health Care Benefit Coverage and DefaultContributions: page 10 – 12
See: Setting Up Benefit Plans for Health Care Coverage (OraclePayroll User’s Guide)
Notice that the Oracle HRMS user–defined tables are different from thedatabase tables of the Oracle Relational Database Management System.When you set up a user table, you define the rows as well as thecolumns, like a matrix. For example, you could set up a table showingbonus amounts (the column) against years of service (the rows).
Entering and Accessing Table Values
To enter values in tables, you use the Table Values window. Tableentries and rows are both datetracked, so you can delete existingentries or rows, and add new ones, as of an effective date.
Oracle HRMS provides the GET_TABLE_VALUE function to accesstable values. You can yourself write formulas that include calls to thisfunction, perhaps for QuickPaint inquiries. Also, it is easy for MISpersonnel to write PL/SQL statements that call this function, to includein the code for a form or report process, for example.
The formulas for the predefined earnings types Regular Wages,Overtime, Shift Pay and GTL Imputed Income all include calls to thisfunction, as do the formulas the system generates for deductions withthe amount rule Payroll Table.
32 – 11Quick Codes and User Tables
Row Types for Payroll Tables
Tables set up to hold deduction amounts are called payroll tables. Youneed a payroll table when the amount of a deduction varies inaccordance with a factor such as employee age, pay or job class.
To initiate a deduction with the amount rule Payroll Table, you mustestablish a row type. The formula for the deduction uses the row typeto help determine which row of the table to go to for each employee’sdeduction amount. Your startup data includes three predefined rowtypes: Age Range, Salary Range and Job Class. You can set up anyadditional types you require.
See Also
Setting Up Row Types for Payroll Tables, Oracle Payroll User’s Guide
Functions, Oracle FastFormula User’s Guide
Predefined User Tables
Oracle HRMS supplies the following tables, already defined using theTable Structure window:
COMPANY WORK SCHEDULES Table
This table has several commonly–used work schedules already enteredin it, and you can add more. A work schedule shows the hoursemployees normally work each day from Monday through Sunday. Forexample, employees with the schedule 10–10–10–10–0–0–0 work 10hours each day Monday through Thursday, and have Friday, Saturdayand Sunday off.
Each column in this table holds a separate schedule, with each rowholding the hours worked each day of the week for the schedule. Forconvenience, each column header names the schedule held in thecolumn. For example, the header for the column holding the firstschedule is 1 Schedule: 8–8–8–8–8–0–0.
GTL PREMIUMS Table
For use in Oracle Payroll, this table holds the cost of Group Term Lifeinsurance premiums per $1,000 of coverage by age range, asmaintained in the IRS Uniform Premiums table. The table rows hold

32 – 12 Oracle Human Resources North American User’s Guide
age ranges, and its single column holds the premium for each $1,000 ofcoverage for each age range.
Oracle Corporation provides you with updates to the GTL Premiumstable, which your system administrator applies.
The predefined imputed earnings GTL Imputed Income references thistable in its processing.
SHIFT DIFFERENTIALS Table
This table has no data already in it, but is ready for your data entry. Itsrows hold the shift designators Day, Eve, Night and Split, representingthe normal shifts employees work, and its columns have the sameheadings, for entry of differentials. You can add to or change the shiftdesignators as necessary.
To look at examples of differentials entries, suppose day shiftemployees receive one and one–half times their regular pay whentemporarily working the evening shift, twice their regular pay for thenight shift, and three times their regular pay for the split shift. Youenter 1.5, 2.0 and 3.0 as the differentials for day shift workers.
Example Shift Differentials Table
D E N S
Day –– 1.5 2.0 3.0
The predefined earnings types Regular Wages and Shift Pay referencethis table in their processing in Oracle Payroll.
WAGE RATES Table
This table has no data in it when you receive your system, but is readyfor your data entry. Its rows hold rate codes, and its single columnholds the rate matching each code. This example holds codes for ratesassociated with the operation of different types of equipment:
Example Wage Rates Table
Rate Code Rate
FL (forklift) 6.80
A3 (crane A3) 8.20
A7 (crane A7) 9.00
Oracle Payroll’s predefined earnings types Regular Wages, Overtime,and Shift Pay reference this table in their processing.

32 – 13Quick Codes and User Tables
See Also
Setting Up User Tables: page 32 – 14

32 – 14 Oracle Human Resources North American User’s Guide
Setting Up User Tables
You set up user tables in the Table Structure window.
Prerequisites
❑ Plan what your table rows and columns will contain, and whetheryou will use formulas to validate table column entries.
❑ If you plan to use formulas to validate entries into the tablecolumns, write these formulas and enter them in your database.
See: Using Oracle FastFormula for Validation, Oracle FastFormulaUser’s Guide
❑ If you are setting up a payroll table holding amounts of adeduction, check whether you need to set up a row type for thetable.
See: Setting Up Row Types for Payroll Tables, Oracle Payroll USUser’s Guide
� To set up the structure of a table:
1. Set your effective date to the date from which you want the table’srow labels to take effect.
2. Enter the table name.
3. For the table’s match type, select Match or Range. Select Match ifeach row is for one item, such as one job or one code. Select Rangeif each row is for a range of numeric values, such as an age range ora pay range.
4. If the match type is Match, select Date, Number or Text as the KeyUnits of Measure, depending on whether entries in the rows aredates (DD–MON–YYYY), numbers, or alphanumeric text.
If the table’s match type is Range, the Key Units of Measureautomatically becomes Number.

32 – 15Quick Codes and User Tables
5. Enter the row label as the Row Title.
For example, if the table rows refer to rate codes, an appropriaterow title would be Rate Code. If the rows refer to age ranges, youmight use the title Age Range.
6. Save your work, and choose the Columns button to go to theColumns window.
� To enter column labels:
1. Enter labels for the table columns in the Name field. To add a newcolumn to a table that already exists, place the cursor on the nameof the column after which you want to enter the new column name,and choose Insert Record from the Edit menu to obtain a clear field.
2. If you are using formula validation for a column’s entries, select thename of the validation formula for the column.
3. Save your work and close the window. In the Table Structurewindow, choose the Rows button to go to the Rows window.

32 – 16 Oracle Human Resources North American User’s Guide
� To enter row labels:
1. If the match type of the table is Match, enter the label for each tablerow in the fields under the heading Exact.
If the match type of the table is Range, enter numbers representingthe lower and upper boundary of each row’s range.
2. In the Sequence fields, you can optionally enter a number for eachrow label to determine the order in which it appears on a list in theTable Values window. Logical sequencing of row labels helps usersenter table values rapidly and accurately.
3. When you are finished, save your work and close the window.Your table is now set up and ready to receive entries into itscolumns.

32 – 17Quick Codes and User Tables
Entering Table Values
If you have set up user–defined tables, you can enter and maintainvalues in the Table Values window.
Note: The system administrator can create customizedversions of the Table Values window so that you use eachversion for one user table only.
Prerequisite
❑ Before you can enter values into a table’s columns, the table withits columns and rows must be completely set up.
� To enter values into table columns:
1. Set your effective date to the date from which you want the entriesto take effect.
2. Query the table name.
3. With the cursor in the Column Name field, use the up and downarrows to locate the name of the column in which you want tomake entries.
4. In the Values region, select each row for which you want to makean entry. You select rows in the Exact field or the Lower Boundfield, depending on the match type of the table.
5. For each row, make the appropriate entry in the Value field.
6. Save your work.

32 – 18 Oracle Human Resources North American User’s Guide

C H A P T E R
33O
33 – 1Integrating With Other Systems
Integrating With OtherSystems
racle Human Resources can be integrated with a number of Oracleand third party products. This chapter explains how to set up OracleHuman Resources to integrate with the following products.
• Oracle Payroll
• spreadsheets
It also explains how to attach text, images, OLE objects, and Web pagesto individual records.

33 – 2 Oracle Human Resources North American User’s Guide
Using Oracle Human Resources with Oracle PayrollOracle Human Resources and Oracle Payroll are available for purchasetogether as the components of a closely integrated human resourcesmanagement system. This system combines Oracle Human Resourcesand Oracle Payroll windows under a single menu structure, sharingwindows and underlying tables wherever possible to eliminateredundant data entry, maintenance and storage.
For Oracle Human Resources or Oracle Payroll, you enter and maintainthe same fundamental human resource information about yourstructure and operations, your employees and their assignments, andemployee compensation and benefits. You then add the specializedinformation you need specifically for human resources or payrollmanagement and administration.
Shared Information in Oracle HRMS
The common core of fundamental information used by both humanresources and payroll managers and staff includes:
• Your operational basics:
– payrolls with their calendars and pay periods
– the currencies and methods of payment you use
• Your organizational structure:
– internal organizations, such as companies, divisions,departments, work groups, or production team
– external organizations of key importance to you, such asemployment agencies, tax authorities, or unionheadquarters
– organization location information, including addresses andtelephone numbers
– hierarchies showing the relationships between yourorganizations
– any grade and grade scale structures you use
• Your employees’ essential personal information, such as:
– name and address
– marital status
– birth date
– nationality

33 – 3Integrating With Other Systems
– ethnic origin
• Your employees’ current work statuses, such as:
– active assignment
– on maternity leave
– terminated
• Your employees’ assignments to:
– internal organizations
– grades, or grades and grade steps
– groups having a compensation–related factor in common,such as membership in an insurance or pension plan orparticipation in an employee stock purchase plan
– jobs, or jobs and positions
– payrolls
• Elements of your employees’ pay and benefits:
– earnings such as salary, wages, commissions, bonuses,allowances
– employer charges such as employer contributions tolegislatively–mandated or private insurance or pensionplans
– deductions such as contributions for union dues or employeestock purchase plans
– nonpayment benefits such as vacation time or a company car
Shared Windows in Oracle HRMS
While many of the windows in your system relate exclusively to thehuman resources or payroll function, some include informationrelevant to both functions. These latter windows are shared windows.
Shared windows can include some information fields relevant to bothhuman resources and payroll users, and other fields for informationspecific to either human resources or payroll users but not both.
Using Shared Windows
You can control the use of fields on shared windows by the value yoursystem administrator gives to each user or responsibility for theHR:User Type profile option. The three valid values are:

33 – 4 Oracle Human Resources North American User’s Guide
• HR with Payroll User
• HR User
• Payroll User
Users with an HR User profile are restricted in their use of fields oncertain windows. In particular:
• they do not see certain fields on the Element window, which areonly required if you are processing elements
• they cannot assign employees to a payroll if both Oracle Payrolland Oracle Human Resources are installed

33 – 5Integrating With Other Systems
Using Oracle HRMS with Spreadsheets
Spreadsheets are commonly used in many enterprises to providemanagers and other users with a powerful modelling and analysis tool.Often it is the ability to represent complex numeric data in a simplegraphical format that makes them so popular.
You can use Oracle Application Data Export (ADE) to downloadinformation from the HRMS database to a spreadsheet for analysis andmanipulation. For example, you can download data on current andproposed salaries for a group of employees. You can adjust the salaryproposals in the spreadsheet, or enter new ones, and upload therevised data to the database. The ADE upload process reports anyerrors and ensures that only valid data is saved in the database.
To download information from a form to a spreadsheet using ADE,your system administrator needs to create a style in ADE. The styledefines the form it is used for, the responsibilities that can use it, andthe columns (or fields) to be downloaded. You determine whichrecords are downloaded by running a query in the form beforelaunching ADE.
A style for downloading salary proposals is predefined.
See Also
Application Data Export Online Help

33 – 6 Oracle Human Resources North American User’s Guide
Using Attachments
You can attach short comments, word processed documents, images,video, OLE objects, or Web pages to many records in Oracle HRMS.For example, you could attach a resume to an applicant record and aposition description to a position record.
Each record can have one or more attachments, and you can copyattachments from one record to another. You can store the attachmentsin the database or in your file system.
You view or add new attachments by clicking the Attachments icon.By default, clicking the attachments icon displays a Comments windowwhere you can enter text up to 2000 characters. This is the Commentsfacility available in earlier releases of Oracle HRMS. If you want toreplace this facility with the ability to attach multiple items, ask yoursystem administrator to set your user profile option HR:Use StandardAttachments to Yes.
The HRMS entities that support attachments are as follows:
• Absence
• Absence Type
• Address
• Application
• Assignment
• Balance (Oracle Payroll)
• Batch Header
• Benefit
• Booking
• Budgets
• Budget Version
• Calendar
• Career Path
• Cobra Coverage Status
• Cobra Enrollment
• Cobra Payment
• Consolidation Set (Oracle Payroll)
• Contact Relationship

33 – 7Integrating With Other Systems
• Customization
• Element
• Element Entry
• Element Link
• Element Set
• Event
• Grade
• Grade Rate
• Job
• Job Evaluation
• Job Requirement
• Letter Type
• Monetary Unit (Oracle Payroll)
• Organization
• Organization Payment Method
• Organization Hierarchy
• Pay Scale
• Payroll Process (Oracle Payroll)
• Period of Service
• Person
• Person Analysis/Special Information
• Personal Payment Method
• Position
• Position Hierarchy
• Recruitment Activity
• Requisition
• Salary Basis
• Salary Proposal
• Salary Proposal Component
• Secondary Assignment Status
• Special Information Type
33 – 8 Oracle Human Resources North American User’s Guide
• Status Processing Rules (Oracle Payroll)
• Vacancy
• Valid Grade
• WC Fund
See Also
Working With AttachmentsOracle Applications User’s Guide
Setting User Profile Options: page 29 – 4

33 – 9Integrating With Other Systems
Using Letters to Manage Recruitment and Enrollment
You can use standard letters to help you to manage your enterprise’srecruitment or enrollment activities. You do this by issuing standardletters to applicants (Oracle Human Resources) or to students (OracleTraining Administration), triggered by changes in assignment orenrollment status. For example, you can set up a standard enrollmentconfirmation letter that is triggered when a student’s enrollment statusis set to Placed or you can set up a rejection letter that is triggeredwhen an applicant’s assignment status is set to Rejected.
Here are a few examples of letters you can set up to help you tomanage your enterprise’s recruitment or enrollment activities:
Oracle Human Resources Oracle Training Administration
Acknowledgement letters (for all active applications)
Acknowledgement letters (for all requested enrollments)
Confirmation letters(for interviews)
Confirmation letters (for placed enrollments, includingevent joining instructions basedon the date, venue, and trainers)
Reports for interviewers andschedules
Reports for trainers (listing the students to attend anevent)
Offer and Rejection letters (for applicants)
Chase–up letters (for non–response or non–pay-ment)
Acknowledgement letters (for cancellations)
Certificates (of successful course completion)

33 – 10 Oracle Human Resources North American User’s Guide
Setting Up Standard LettersOracle HRMS provides you with two different methods to createstandard letters:
• Concurrent Processing
• Online:
– using Oracle Application Data Export (ADE)
– using Object Linking and Embedding (OLE) to generateMicrosoft Word letters only
Which Method Should You Use?
Use the online method, ADE or OLE, if you want to generate andreview your letters immediately.
Alternatively, you can use the concurrent processing method to set upyour standard letters. With concurrent processing, you can generateand review your letters without interfering with the other work youperform at your terminal. You can control when a concurrent processruns and schedule long–running processes to run at times when thesystem is lightly loaded. Another advantage of using concurrentprocessing is that you do not need Windows 95, Excel or Lotus 123installed.
See: Concurrent Processing: page 33 – 12
Using ADE
You can use ADE to generate standard letters and reports. ADEretrieves data and exports it to a data file that is merged with astandard word processed document. The word processed documentincludes all the merge fields required to merge the data and thestandard text for the letter. ADE is fully compatible with MicrosoftWord 6.
You can use ADE to generate standard letters for recruitment orenrollment by performing a mail merge from the Request Letterwindow in your application.
If you want to use ADE to set up your standard letters instead of usingthe concurrent processing method, refer to the ADE documentation.
See: Application Data Export (ADE) Online Help
Using OLE
You can use Object Linking and Embedding (OLE) to generateMicrosoft Word letters instead of using ADE, if required.

☞
33 – 11Integrating With Other Systems
Attention: In future releases of Oracle HRMS, generatingMicrosoft Word letters using Object Linking and Embedding(OLE) will be replaced by ADE.
See: Flowchart for Setting Up Standard Letters Using Microsoft Word:page 33 – 22

33 – 12 Oracle Human Resources North American User’s Guide
Concurrent Processing
There are two methods of using concurrent processing to set up yourstandard letters:
• Using word processors
• Using Oracle reports
Using Word Processors
You can use any word processor to produce standard letters fromOracle HRMS. If you use a word processor, you can submit aconcurrent request in the Letter Request window to generate the mailmerge file. When the concurrent request is complete, you can use yourword processor’s mail merge facilities to create the merged letters.
See: Using a Word Processor: page 33 – 13
Using Oracle Reports
As an alternative to using a word processor to produce standardletters, you can use the Standard Letter and Label features of OracleReports. Use this method if you do not want to use word processors toprint your letters (or if you do not have word processors).
See: Using Oracle Reports: page 33 – 27

33 – 13Integrating With Other Systems
Using a Word Processor
To create standard letters using a word processor, you need to extractthe data you want to include in the letters from the Oracle HRMSdatabase. To do this, you create a program, such as a SQL*Plus script,to extract the data, which is then stored in a Data file. You also writeskeleton standard letters using your word processor.
Each time you run your SQL*Plus script, it extracts data to the Datafile. You then use the mail merge features of your word processor tomerge this data with the skeleton standard letters you previouslyprepared. This merging process creates the actual letters that you sendout to students and applicants.
An overview of creating standard letters using a word processor isillustrated in Figure 33 – 1.
Oracle HRMS Database
Word Processor
DataFile
SQL*Plus Script
StandardLetter
MergedLetter
Figure 33 – 1Using a Word Processor

33 – 14 Oracle Human Resources North American User’s Guide
Which Word Processor?
Oracle HRMS supplies SQL*Plus script templates for use withMultiMate, WordPerfect and Microsoft Word. It also supplies twosample Microsoft Word documents containing merge codes for theSQL*Plus scripts. You can copy the SQL*Plus script templates (orWord documents) and modify them to create the standard letters yourequire.
If you use Microsoft Word as your word processor, not only can youuse the concurrent processing method to produce your standard letters,but you can also generate letters online. You can generate MicrosoftWord letters using OLE or Oracle Application Data Export (ADE). See:Setting Up Standard Letters: page 33 – 10.
If you are setting up standard letters using the concurrent processingmethod with MultiMate or WordPerfect (or if you are using theconcurrent processing method with Microsoft Word), see Flowchart forSetting Up Standard Letters Using MultiMate or WordPerfect: page33 – 14
If you are setting up standard letters to be generated online forMicrosoft Word, see Flowchart for Setting Up Standard Letters UsingMicrosoft Word: page 33 – 22
Flowchart for Setting Up Standard Letters Using MultiMate or WordPerfect
Figure 33 – 2 illustrates the sequence in which you set up standardletters using the concurrent processing method with MultiMate orWordPerfect (or if you are using the concurrent processing methodwith Microsoft Word).

33 – 15Integrating With Other Systems
Figure 33 – 2Using MultiMate and WordPerfect
Writing a SQL*PlusScript
Step 2
Registering theSQL*Plus Script
Step 3
Writing Skeleton Letters
Step 5
Merging the DataFiles
Step 7
System Administrator
������
HRMSManager
Planning
Step 1
Linking theSQL*Plus Script
With a Letter
Step 4
Requesting Letters
Step 6
Planning
One of the first tasks you need to perform is to identify which data youwant to extract from the database to include in your standard letters.You need to identify the select statements to use to provide you withthe data as the content of your letters. Oracle HRMS supplies you with
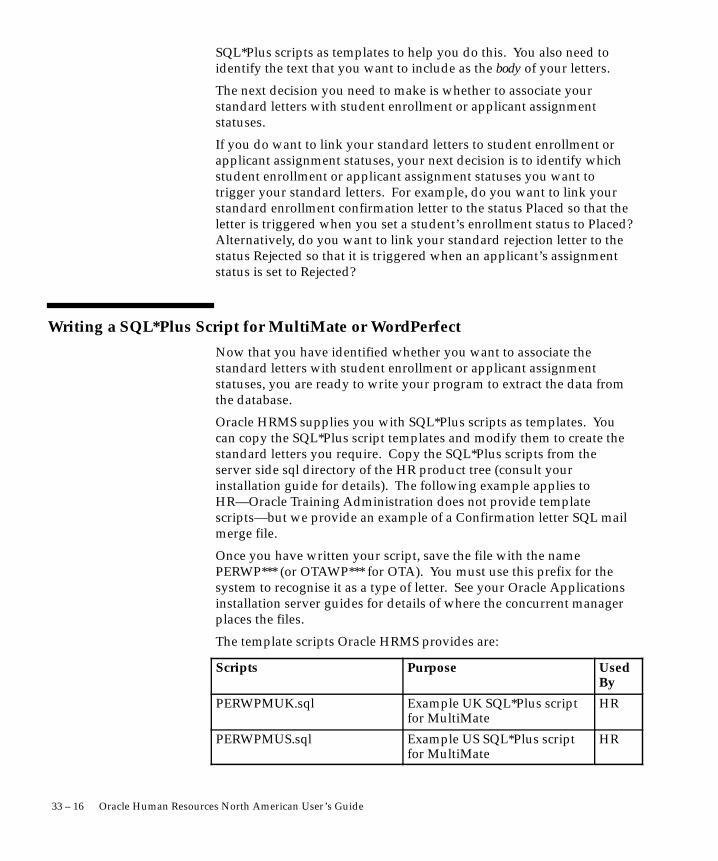
33 – 16 Oracle Human Resources North American User’s Guide
SQL*Plus scripts as templates to help you do this. You also need toidentify the text that you want to include as the body of your letters.
The next decision you need to make is whether to associate yourstandard letters with student enrollment or applicant assignmentstatuses.
If you do want to link your standard letters to student enrollment orapplicant assignment statuses, your next decision is to identify whichstudent enrollment or applicant assignment statuses you want totrigger your standard letters. For example, do you want to link yourstandard enrollment confirmation letter to the status Placed so that theletter is triggered when you set a student’s enrollment status to Placed?Alternatively, do you want to link your standard rejection letter to thestatus Rejected so that it is triggered when an applicant’s assignmentstatus is set to Rejected?
Writing a SQL*Plus Script for MultiMate or WordPerfect
Now that you have identified whether you want to associate thestandard letters with student enrollment or applicant assignmentstatuses, you are ready to write your program to extract the data fromthe database.
Oracle HRMS supplies you with SQL*Plus scripts as templates. Youcan copy the SQL*Plus script templates and modify them to create thestandard letters you require. Copy the SQL*Plus scripts from theserver side sql directory of the HR product tree (consult yourinstallation guide for details). The following example applies toHR—Oracle Training Administration does not provide templatescripts—but we provide an example of a Confirmation letter SQL mailmerge file.
Once you have written your script, save the file with the namePERWP*** (or OTAWP*** for OTA). You must use this prefix for thesystem to recognise it as a type of letter. See your Oracle Applicationsinstallation server guides for details of where the concurrent managerplaces the files.
The template scripts Oracle HRMS provides are:
Scripts Purpose UsedBy
PERWPMUK.sql Example UK SQL*Plus scriptfor MultiMate
HR
PERWPMUS.sql Example US SQL*Plus scriptfor MultiMate
HR

33 – 17Integrating With Other Systems
PERWPWUK.sql Example US SQL*Plus scriptfor WordPerfect
HR
PERWPWUS.sql Example US SQL*Plus scriptfor WordPerfect
HR
� To write a SQL*Plus script for MultiMate or WordPerfect:
1. Write a SQL*Plus script to select data from the database in a formatyour word processor can read and that is compatible with thestandard letter.
2. Name the program PERWP*** (or OTAWP*** for OTA).
3. Save the program. (Consult your installation guide for details).
Registering the SQL*Plus Script for MultiMate or WordPerfect
You now need to register your SQL*Plus program with Oracle HRMS.You register your program so that you can run it as a concurrentprogram. Name the file PERWP*** (or OTAWP***). You must use thisprefix for the system to recognise it as a type of letter.
You use the Concurrent Programs window to register your program(using a system administrator responsibility).
See: Concurrent Programs Window, Oracle Applications SystemAdministrator’s Guide
Linking the SQL*Plus Script With a Letter for MultiMate or WordPerfect
You need to link your SQL*Plus script with a letter and one or morestatuses. In Oracle Human Resources, you can link one or moreapplicant assignment statuses with each recruitment letter. A requestfor the letter is then created automatically when an applicant is givenan associated assignment status. For example, you can link yourstandard recruitment rejection letter to the status Rejected so that theletter is triggered when you set an applicant’s assignment status toRejected.
In Oracle Training Administration, you can link one or more enrollmentstatuses with each enrollment letter. A request for the letter is thencreated automatically when an enrollment is given an associated status.

33 – 18 Oracle Human Resources North American User’s Guide
Define your standard letter types in the Letter window.
� To define a standard letter type:
1. Enter a name for the letter in the Name field.
2. Select the Concurrent Program Name assigned by your SystemAdministrator to the SQL*Plus script.
For Oracle Human Resources:
3. Select one or more applicant assignment statuses to create letterrequests automatically for applicants, and check the Enabled box.
When an applicant is given one of these statuses, a pending requestfor this letter type is created automatically. If a pending letterrequest already exists, the applicant is added to the list of people toreceive the letter when you submit the request.
For Oracle Training Administration:
4. Select one or more enrollment statuses to create letter requestsautomatically for enrollments, and check the Enabled box.
When an enrollment is given one of these statuses, a pendingrequest for this letter type is created automatically. If a pendingletter request already exists, the enrollment is added to the list ofpeople to receive the letter when you submit the request.
Writing a Skeleton Letter
You now need to write a skeleton letter using your word processor.Include the appropriate merge codes from the data source for the wordprocessor you are using.
The mail merge feature of any word processor enables you to mergetext from the data file you create into a standard letter. Each line in thedata file contains the text to merge into one standard letter for onerecipient.
Within the program, you can format the data and include thecharacters that are recognized as separators by your word processor.
A standard letter comprises standard text with a number of embeddedvariables in it. When you print the letter, the variables are replacedwith specific items of data, such as name and address details fordifferent people.

33 – 19Integrating With Other Systems
Figure 33 – 3Merging Data with Standard Letters
Data File
&Business&Addr1&Addr2&Post&DateRef : &Reference
Dear &Title &Last Name
Thank you for your application for the positionof &Position
After careful consideration of your applicationI regret to inform you that we will not be shortlisting you for interview.
&Business,&Addr1,&Addr2,&Post,&Date,&Reference,&Title,&LastName,&Position
&Business,&Addr1,&Addr2,&Post,&Date,&Reference,&Title,&LastName,&Position
&Business,&Addr1,&Addr2,&Post,&Date,&Reference,&Title,&LastName,&Position
&Business,&Addr1,&Addr2,&Post,&Date,&Reference,&Title,&LastName,&Position
&Business,&Addr1,&Addr2,&Post,&Date,&Reference,&Title,&LastName,&Position
Merge CodesSkeleton
Letter
Requesting Letters for MultiMate or WordPerfect
When you, or other users, set the status for an applicant or enrollmentthat triggers your standard letters, Oracle HRMS creates a letterrequest automatically, with the status of Pending. It also adds theapplicant’s or student’s name to the request. You can view the pendingrequest and names through the Request Letter window.
Then, when you change the letter request from Pending to Requested,Oracle HRMS runs the SQL*Plus script that you previously wrote andcreates the data file for mail merge. (Consult your installation guidefor details of the location Concurrent Manager places the output file).

33 – 20 Oracle Human Resources North American User’s Guide
You can add further names to the list manually, if required. Forexample, you might have a last minute acknowledgement letter tosend.
You can also create manual letter requests. If you do, enter the status ofPending yourself, then enter all the recipients of the letter beforechanging the status of the letter to Requested.
� To submit an automatic letter request:
1. Query the letter you require in the Letter Name field.
2. Ensure that the method is Automatic.
3. Move to the Requested for block to query the applicants, events orstudents which have been entered automatically on this request,according to their status. You can add further names manually.
4. Update the status from Pending to Requested.
5. Save your changes.
A concurrent request ID number appears in the ConcurrentRequest field. When the Concurrent Manager has processed therequest it changes the status to Completed.
6. You can query the request ID in the Concurrent Requests windowand monitor its progress.
Note: Consult your installation guide for details of the locationConcurrent Manager places the output file.
� To create a manual letter request:
1. Select the Letter Name for the letter type you want to request.
2. Ensure that the method is Manual.
3. Leave the status of the request as Pending.
4. Save the changes.
Adding the Names
5. Select the names to add:
• Select employees or applicants (for Oracle Human Resources) toreceive the letter in the Requested For region.
The Assignment field displays the organization to which theperson is assigned. You can view the other components of theassignment by choosing List of Values from the Edit menu.
• Select events or students or both (For Oracle TrainingAdministration) in the Requested For region.

33 – 21Integrating With Other Systems
This depends on how the letter has been set up on your system.For example, an enrollment confirmation letter might be definedso that it is sent to all students with the status Confirmed whoare enrolled on the event selected in the Requested For region.
6. Save the changes.
Changing the Status
7. Update the status from Pending to Requested.
8. Save the changes.
A concurrent request ID number appears in the ConcurrentRequest field. When the Concurrent Manager has processed therequest it changes the status to Completed.
9. You can query the request ID in the Concurrent Requests windowand monitor its progress.
Note: Consult your installation guide for details of the locationConcurrent Manager places the output file.
Merging the Data File With the Standard Letter MultiMate or WordPerfect
The last step is to merge the data in the Data File with your skeletonletters to create your standard letters. The merging of text and data filesis normally carried out using the mail merge features of your wordprocessor.
If you do not have access to the directory where the Data File resides(consult your installation guide for details of the location ConcurrentManager places the file), you need to transfer the mail merge filescreated by the concurrent process to your word processor before youcan merge the data file with the skeleton letters.
Saving the Letters You Generate
If you are using a word processor to merge the data file, you need tosave the merged letters you generate. If you do not save the mergedletters, when you exit the word processor you lose the letters. You donot lose the data file or the skeleton letter, however.
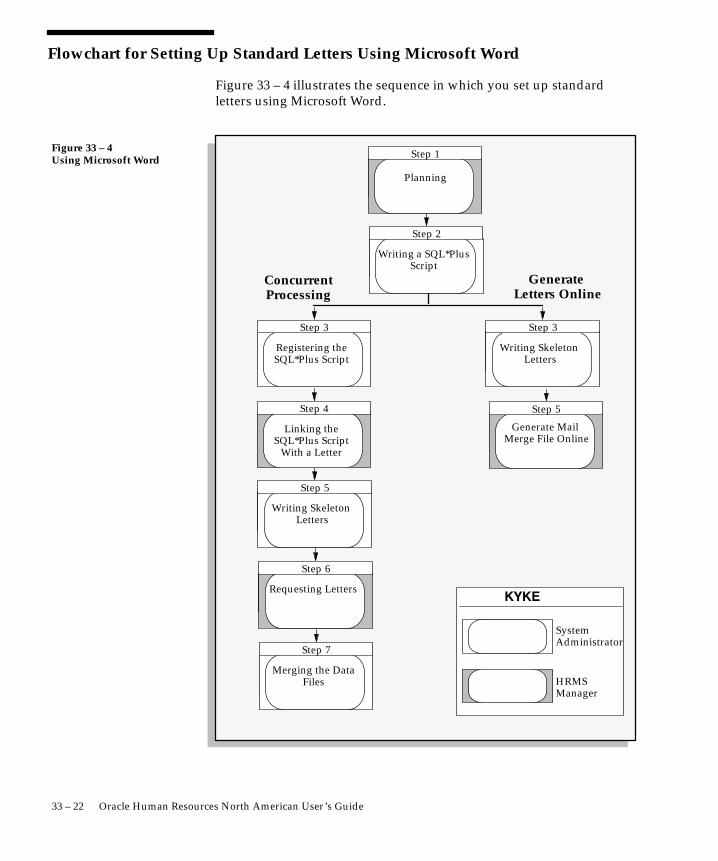
33 – 22 Oracle Human Resources North American User’s Guide
Flowchart for Setting Up Standard Letters Using Microsoft Word
Figure 33 – 4 illustrates the sequence in which you set up standardletters using Microsoft Word.
Figure 33 – 4Using Microsoft Word
Writing a SQL*PlusScript
Step 2
Registering theSQL*Plus Script
Step 3
Writing Skeleton Letters
Step 5
Merging the DataFiles
Step 7
Planning
Step 1
Linking theSQL*Plus Script
With a Letter
Step 4
Requesting Letters
Step 6
Generate Mail Merge File Online
Step 5
Writing Skeleton Letters
Step 3
ConcurrentProcessing
Generate Letters Online
System Administrator
������
HRMSManager

☞
33 – 23Integrating With Other Systems
If you use Microsoft Word as your word processor, not only can youuse the concurrent processing method to produce your standard letters,but you can also generate letters online.
You can use either one of two methods:
• Generate Microsoft Word letters using Object Linking andEmbedding (OLE)
• Application Data Export (ADE)
Attention: In future releases of Oracle HRMS, generatingMicrosoft Word letters using Object Linking and Embedding(OLE) will be replaced by ADE.
See: Application Data Export (ADE) Online Help
If you are setting up standard letters using the concurrent processingmethod, follow the same sequence as for MultiMate or WordPerfect.See: Flowchart for Setting Up Standard Letters Using MultiMate orWordPerfect: page 33 – 14
If you are generating Microsoft Word letters using Object Linking andEmbedding (OLE), see Writing a SQL*Plus Script for Microsoft Word:page 33 – 23
Writing a SQL*Plus Script for Microsoft WordNow that you have identified whether you want to associate thestandard letters with student enrollment or applicant assignmentstatuses, you are ready to identify which data you want to extract fromthe database.
Oracle HRMS supplies SQL*Plus script templates. It also supplies twosample Microsoft Word documents containing merge codes for theSQL*Plus scripts. You can copy the SQL*Plus scripts from the serverside sql directory of the HR or product tree. (Consult your installationguide for details).
You can copy the word documents from the client–side directory[APPL_TOP]\PER76\LETGEN.
You can run the scripts on the server side and make them accessible toother users across the network, or you must copy them to a directorywhich is accessible from the PC, such as a network drive. You mustalso make the Microsoft Word documents accessible to other usersacross the network, or you must copy them to each PC.
Templates Provided
The template scripts and Microsoft Word documents Oracle HRMSprovides are:

33 – 24 Oracle Human Resources North American User’s Guide
Scripts and Documents Purpose UsedBy
PERWPOUS.sql Example US Offer letter SQLmail merge file
HR
PERWPOUK.sql Example UK Offer letter SQLmail merge file
HR
PERWPIUS.sql Example US Interview letterSQL mail merge file
HR
PERWPIUK.sql Example UK Interview letterSQL mail merge file
HR
PERWPOUS.doc Example US Offer MS Worddocument
HR
PERWPOUK.doc Example UK Offer MS Worddocument
HR
PERWPIUS.doc Example US Interview MSWord document
HR
PERWPIUK.doc Example UK Interview MSWord document
HR
� To write a SQL*Plus script for Microsoft Word:
1. Write a SQL*Plus script to select data from the database in a formatyour word processor can read and is compatible with the standardletter.
2. Name the program PERWP*** (or OTAWP***).
3. Save the program. (Consult your installation guide for details).

33 – 25Integrating With Other Systems
Generating a Microsoft Word Letter
You can generate the Microsoft Word letter online using the LetterGeneration window. This window uses Object Linking and Embedding(OLE) to display the Microsoft Word letter. When you start MicrosoftWord from this window, your standard letter is automatically loadedand ready to be merged with the mail merge file.
� To generate and merge a Microsoft Word document:
1. Select one of the following in the Letter region:
• Request if you want to process a pending letter request that thesystem has created automatically for applicants, or that you havecreated manually in the Request Letter window. Select the nameof the letter request.
• Custom if you want to process a custom program that is notassociated with a letter type.
2. Position the cursor in the Document field and choose the Browsebutton.
3. Select the Microsoft Word document that is your skeleton letter.
4. Position the cursor in the Merge field and choose the Browsebutton.
5. Select the extract program (such as a SQL script) that extracts datafrom the database to create the mail merge file.
You can run the scripts on the server side (consult your installationguide for details). Make them accessible to other users across thenetwork, or copy them to each PC. You must also make theMicrosoft Word documents accessible to other users across thenetwork, or you must copy them to each PC.
6. Check View Generated Merge File if you want to examine thegenerated mail merge file before activating the Microsoft Worddocument then choose the Generate button to create the mail mergefile.
If the View Generated Merge File check box is checked, the filedisplays in the Windows Notepad application.
7. Double click on the document in the Document Preview andActivation block to open Microsoft Word with your standard letterdisplayed.
The document displays in the Document Preview and Activationblock.

33 – 26 Oracle Human Resources North American User’s Guide
8. Merge the data with the document.
If the Microsoft Word document already contains mail merge fields,the mail merge file you have generated is automatically loaded inMicrosoft Word.
9. You must open the merge file as the Data Source and insert themerge fields in your document if the document does not yetcontain mail merge fields.
10. Save the document using the filename of your mail merge file, witha .doc extension.
Note: If you do not save the merged letters when you exit theword processor you lose them.

33 – 27Integrating With Other Systems
Using Oracle ReportsYou can create a report for each letter using Oracle Reports, or anothertool of your choice. The report contains the skeleton letter text andSelect statements specifying the data to be extracted from the Oracledatabase.
Figure 33 – 5 illustrates the sequence in which you set up standardletters using Oracle Reports.
Figure 33 – 5Using Oracle Reports
Writing the Report
Step 2
Registering the Report
Step 3
System Administrator
������
HRMSManager
Planning the Content and Layout
Step 1
Linking the ReportWith a Letter
Step 4
Running the Report
Step 5
Planning the Content and LayoutOne of the first tasks you need to perform is to identify which data youwant to extract from the database to include in your standard letters.You need to identify the select statements to use to provide you withthe data as the content of your letters. You also need to identify the textthat you want to include as the body of your letters.

33 – 28 Oracle Human Resources North American User’s Guide
The next decision you need to make is whether you want to associateyour standard letters with student enrollment or applicant assignmentstatuses.
If you do want to link your standard letters to student enrollment orapplicant assignment statuses, your next decision is to identify whichstudent enrollment or applicant assignment statuses you want totrigger your standard letters. For example, do you want to link yourstandard enrollment confirmation letter to the status Placed so that theletter is triggered when you set a student’s enrollment status to Placed?Alternatively, do you want to link your standard rejection letter to thestatus Rejected so that it is triggered when an applicant’s assignmentstatus is set to Rejected?
Writing the Report
Now that you have identified whether you want to associate thestandard letters with student enrollment or applicant assignmentstatuses, you are ready to identify which data you want to extract fromthe database.
Write your skeleton letter text and Select statements specifying the datato be extracted from the Oracle database
Registering the Report
You now need to register your report with Oracle HRMS. You registeryour report so that you can run it as a concurrent program. Name thefile PERWP*** (or OTAWP*** for OTA). You must use this prefix for thesystem to recognise it.
You use the Concurrent Programs window to register your report(using a system administrator responsibility).
See: Concurrent Programs Window, Oracle Applications SystemAdministrator’s Guide
Linking the Report With a Letter
You need to link your report with a letter and one or more statuses. InOracle Human Resources, you can link one or more applicantassignment statuses with each recruitment letter. A request for the

33 – 29Integrating With Other Systems
letter is then created automatically when an applicant is given anassociated assignment status. In Oracle Training Administration, youcan link one or more enrollment statuses with each enrollment letter. Arequest for the letter is then created automatically when an enrollmentis given an associated status.
For example, you can link your standard recruitment rejection letter tothe status Rejected so that the letter is triggered when you set anapplicant’s assignment status to Rejected.
Define your standard letter types in the Letter window.
� To define a standard letter type:
1. Enter a name for the letter in the Name field.
2. Select the Concurrent Program Name assigned by your SystemAdministrator to the report.
3. Select one or more applicant assignment statuses to create letterrequests automatically for applicants, and check the Enabled box.
When an applicant is given one of these statuses, a pending requestfor this letter type is created automatically. If a pending letterrequest already exists, the applicant is added to the list of people toreceive the letter when you submit the request.
4. Select one or more enrollment statuses to create letter requestsautomatically for enrollments, and check the Enabled box.
When an enrollment is given one of these statuses, a pendingrequest for this letter type is created automatically. If a pendingletter request already exists, the enrollment is added to the list ofpeople to receive the letter when you submit the request.
Running the Report
When you, or other users, set the status for an applicant or enrollmentthat triggers your standard letters. Oracle HRMS creates a letterrequest automatically, with the status of Pending. It also adds theapplicant’s or student’s name to the request. You can view the pendingrequest and names through the Request Letter window.
Then, when you change the letter request from Pending to Requested,Oracle HRMS runs the report that you created.
You can add further names to the list manually, if required. Forexample, you might have a last minute acknowledgement letter tosend.

33 – 30 Oracle Human Resources North American User’s Guide
You can also create manual letter requests. If you do, enter the status ofPending yourself, then enter all the recipients of the letter beforechanging the status of the letter to Requested.
� To submit an automatic letter request:
1. Query the letter you require in the Letter Name field.
2. Ensure that the method is Automatic.
3. Move to the Requested for block to query the applicants, events orstudents which have been entered on this request automatically,according to their status. You can add further names manually.
4. Update the status from Pending to Requested.
5. Save your changes.
A concurrent request ID number appears in the ConcurrentRequest field. When the Concurrent Manager has processed therequest it changes the status to Completed.
6. You can query the request ID in the Concurrent Requests windowand monitor its progress.
Note: Oracle HRMS saves the data file (consult yourinstallation guide for details).
� To create a manual letter request:
1. Select the Letter Name for the letter type you want to request.
2. Ensure that the method is Manual.
3. Leave the status of the request as Pending.
4. Save the changes.
Adding the Names
5. Select the names to add:
• Select employees or applicants (for Oracle Human Resources) toreceive the letter in the Requested For region.
The Assignment field displays the organization to which theperson is assigned. You can view the other components of theassignment by choosing List of Values from the Edit menu.
• Select events or students or both (For Oracle TrainingAdministration) in the Requested For region.
This depends on how the letter has been set up on your system.For example, an enrollment confirmation letter might be defined

33 – 31Integrating With Other Systems
so that it is sent to all students with the status Confirmed whoare enrolled on the event selected in the Requested For region.
6. Save the changes.
Changing the Status
7. Update the status from Pending to Requested.
8. Save the changes.
A concurrent request ID number appears in the ConcurrentRequest field. When the Concurrent Manager has processed therequest it changes the status to Completed.
9. You can query the request ID in the Concurrent Requests windowand monitor its progress.
Note: Oracle HRMS saves the data file, consult yourinstallation guide for details.

33 – 32 Oracle Human Resources North American User’s Guide
C H A P T E R
34E
34 – 1Security and Control
Security and Control
mployees’ personal and pay–related information is highlysensitive. You must be able to reliably secure this information fromunauthorized access by users of your Oracle Applications.
Oracle HRMS gives you a flexible approach to controlling access torecords, windows, and functions. This means you can suit eachemployee’s level of access to his or her work responsibilities. You canpartition data by organization, position, or payroll.
Management of security is normally part of the system administrator’srole. This chapter explains how to secure information in Oracle HRMS.

34 – 2 Oracle Human Resources North American User’s Guide
Security in Oracle HRMSYou can control users’ access to human resources information byrecord, window, and function.
You can restrict access to records of applicants and employees assignedto certain work structures. For example, you can give departmentmanagers access only to the records of the employees in their owndepartment.
Further, within a given department, you can control access to recordsof employees at or above a certain level. For example, you can give adepartment’s administrator access to all department employee recordsexcept those of the manager and assistant manager. You do this bydefining security profiles.
You can use the same security profiles to restrict the records accessedby a reporting user, who runs reports against the system but does nothave online access through the Oracle HRMS forms.
You can also restrict access to certain information types. For example,you can create customized versions of some windows to restrict accessto certain elements and person types.
Another important area of security is control over information change.For each group of employees sharing a responsibility, you can set up amenu controlling the windows to which they have access. If it isimportant to know who makes changes to information in certainwindows, you can enable full data auditing for these windows.
You can specify which processes and reports a user can use by settingup security groups.
Access Control through User Responsibilities
You control access to Oracle HRMS through responsibilities that youcreate and assign to users of the system. Users can sign on to OracleHRMS only through the responsibilities you give them. So theirresponsibilities control what they can see and do in the system.
A responsibility always includes a security profile and a menu structure.It may also include a security group. Optionally, you can restrict accessto specific sub–menus or functions in your chosen menu.
• Security profiles determine the organizations, positions andpayrolls whose applicant and employee records responsibilityholders can access.
• Menu structures and functions control:

34 – 3Security and Control
– the particular windows a responsibility holder can access
– whether he or she can perform data entry, change or deletionon these windows
You can produce customized versions of some Oracle HRMSwindows. Each customized version allows access to a subset ofcertain types of information, such as person types, specialinformation types, or elements. You define additional menufunctions to call customized windows or task flows, and thenyou add these functions to a menu structure, which is linked to aresponsibility.
• Security groups determine the group of processes and reports aresponsibility holder can initiate. A security group is an optionalcomponent of a responsibility. If holders of a responsibilityshould not initiate any reports or processes, you do not include asecurity group in the responsibility.
Figure 34 – 1Access Control through Responsibility Security Profile
Menu Structure
Security Group(Optional)
Responsibility
For each responsibility, you must also define two user profile options:
• HR:Security Profile
• HR:User Type

34 – 4 Oracle Human Resources North American User’s Guide
Single and Multiple Responsibilities
You can develop as many different responsibilities as your enterpriserequires. Typically, most employees need one responsibility only.However you can assign multiple responsibilities to users who need to:
• access applicant and employee records from two or moresecurity profiles.
• use more than one menu structure to view or make changes tothe records they can access.
• use more than one Oracle Application. For example, somepeople may use windows in both Oracle HRMS and OracleGeneral Ledger.
• access records for more than one Business Group. For example,an enterprise with international operations may have a US–basedBusiness Group and a UK–based Business Group. A few of youremployees might need access to both.
See Also
Setting User Profile Options: page 29 – 4
Security Profiles
The security profile attached to a responsibility determines whichapplicant and employee records are available to holders of thatresponsibility. You associate a security profile with work structures.The records of employees and applicants assigned to these workstructures are then accessible to holders of the responsibility.
The work structures you can name in security profiles are:
• internal organizations and organization hierarchies. Organizationsinclude structures like departments, sections, groups and teams.Each security profile allows access to one Business Group only.
• positions and position hierarchies. Positions are jobs performedwithin specified organizations, such as:
– Clerk, Accounting Section (organization is AccountingSection and job is clerk)
– Quality Control Technician (organization is Quality ControlGroup and job is technician)
• payrolls, such as Weekly Payroll, Monthly Payroll, or SalesPayroll.

34 – 5Security and Control
Organizations and Organization Hierarchy
To set up a security profile that permits access to employee records ofcertain organizations only, you make use of organization hierarchies.You can build any number of additional hierarchies to meet yoursecurity requirements.
For example, suppose you build this Sales Organization hierarchy:
Figure 34 – 2Sales Organization Hierarchy
Sales Department
Eastern Region Sales Western Region Sales
Southwest Sales Area
NW Sales District 1 NW Sales District 2
Northwest Sales Area
NW Sales District 3
You can create a security profile that permits access to employeerecords throughout the sales organization. This profile references theSales Organization hierarchy. It names the Sales Department as thehighest organization in the hierarchy through which profile holdershave access to employee records.
Next, you want the directors of the two sales regions to have access toall employee records in their region only. You create Eastern andWestern Sales Director security profiles. These profiles also referencethe Sales hierarchy. But, they name the Eastern and Western Regions,respectively, as the top organizations for these profiles’ access toemployee records.
When you name an organization as the top organization, you specifywhether it is inclusive or not. You must include the top organization if

34 – 6 Oracle Human Resources North American User’s Guide
you want holders of the profile to access records of people assigned tothe top organization.
Positions and Position Hierarchies
After establishing limits on record access using organizationhierarchies, you can further restrict access by means of positionhierarchies.
Suppose, for example, within the Sales Department, you want to givethe Sales Research Director access to her subordinates’ records only.You can start by building the following Sales Positions Hierarchy:
Figure 34 – 3Sales Positions Hierarchy
Associate Vice–President of Sales
Vice–President of Sales
Regional Sales Director
Sales Research Technical Support
Staff
Sales Research Specialists
Associate Sales Research Director
Sales Research Director
Now you create the Sales Research Director security profile. Thisprofile references the Sales Positions hierarchy and names the SalesResearch Director as the top position for access to employee records.

34 – 7Security and Control
Security Profile: SALES RESEARCH DIRECTOR
Organization Hierarchy: Sales Organization
Top Organization: Sales Department
Position Hierarchy: Sales Positions
Top Position: Sales Research Director
Include Top Position: Yes
When you give the Sales Research Director a responsibility includingthis security profile, she can access the records of her subordinates.But, she cannot access records of:
• the VP or Associate VP of Sales
• the Regional Sales Director
• the Regional Sales Director’s subordinates.
As with organization hierarchies, you can specify that profiles do notinclude access to the top position.
Payrolls
The third way to restrict access to employee records is by payroll. Forexample, you can give payroll staff who work on the Sales payrollaccess to records of employees on this payroll only.
Controlling security by payroll assignment limits the employee recordsusers can see and update on employee–related windows, such as thosefor employee information, and element entry.
Of course, if an employee assignment does not include a payroll,payroll security cannot apply to this assignment. Payroll security neverapplies to applicant records since applicants are not assigned topayrolls.
The windows for compensation definition are unrelated to anyparticular employee records or payroll assignments. Therefore limitingaccess by payroll does not affect users’ access to these windows.
See Also
Defining Security Profiles: page 34 – 13

34 – 8 Oracle Human Resources North American User’s Guide
Database Access Without Online Access
You may need to set up access restrictions for employees who neveruse Oracle HRMS windows and do not change database information,but do access the database. These individuals are reporting users. Areporting user can use Oracle reporting tools to access databaseinformation for reports. A reporting user can report on, or query, theinformation in the HRMS database, but cannot insert, update, or deletethat information.
You can make any of your security profiles available not only forregular Oracle HRMS users, but also for reporting users. The securityprofile restricts a reporting user’s access to employee records in exactlythe same way as it limits regular users’ access.
Menu Structures
Each responsibility includes a security profile to restrict users’ access toemployee records. It also includes a menu structure to restrict thewindows users can access, and what they can do on these windows.
By using different menu structures and functions for groups of users,you can:
• limit the range of information users can access for the applicantand employee records available to them
• improve users’ efficiency in using the system by reducing menuchoices
Menu functions can include:
• standard windows, displayed in edit or view–only mode
• customized windows, on which you have restricted the range ofdata that can be displayed
• the first window in task flows that link a number of windowsthat are used in sequence to complete a task
The AutoInstall program creates the default menu structure for yourOracle HRMS product. You can run a report to produce a listing of thisstructure.
The default menu structure lets you access all of the windows for yoursystem. Normally, only a System Administrator has access to the fulldefault menus. You can define any number of new functions andmenus to restrict the access of other users.

34 – 9Security and Control
See Also
Setting Up Navigation Menus: page 31 – 17
Security Groups
When you build a responsibility for employees who must initiatereports or processes, you can attach a security group to theresponsibility. The security group lists a group of processes and reportsits holders can run. Holders of responsibilities with no security groupscannot run any processes or reports.
The seeded groups US/UK HRMS Reports and Processes give access toall predefined reports and processes.

34 – 10 Oracle Human Resources North American User’s Guide
Setting Up Security in Oracle HRMS
Figure 34 – 4 depicts the relationship between the security items youdefine when you set up security for Oracle HRMS.
The key definition is the responsibility, which allows access to therecords specified by the security profile, using the windows specifiedby the menu structure, and the reports and processes specified by thereport security group.
At most, one responsibility can see all records for one Business Group.When you create a new Business Group, a view–all security profile isautomatically created. It provides access to all employee records, andall applicant records in the Business Group. The system administratorcreates a responsibility that includes this view–all security profile, thenassigns this responsibility to the users who are setting up the system.They in turn can set up security profiles for other users.
Figure 34 – 4Security Definitions
Windows
Customizations
Menus
RestrictedSecurityProfile
UsernameApplication
Password
Who? What?
Responsibility
Task Flows
Reports and Processes
User Profile Option:HR:Security Profile

34 – 11Security and Control
� To set up a new responsibility for Oracle HRMS:
1. Using a view–all responsibility, define a security profile in theSecurity Profile window.
2. Set up any new functions or menus required for the responsibility.
For menu functions calling customized forms or task flows, youmust enter a parameter in the Parameter field of the FormFunctions window.
See: Setting Up Navigation Menus: page 31 – 17
3. Define the new responsibility.
4. Create usernames and passwords related to the new responsibility.
A username can be related to more than one responsibility.
5. Set the HR User Profile Options for the new responsibility. Theoptions you must set are:
• HR:Security Profile
• HR:User Type
You can set other User Profile Options.
6. Run the HRMS security processes
See: Running the HRMS Security Processes: page 34 – 15
Security for Reporting Users
Reporting users do not have online access to the database throughOracle HRMS forms. They use Oracle reporting tools to preparereports on the information to which their security profiles grant access.
All secure users connect to the APPS ORACLE ID. This is createdwhen the system is installed. However, for reporting users, you shouldcreate one or more new reporting user ORACLE IDs and associate eachwith a restricted security profile.
The first step in this procedure is the job of the ORACLE databaseadministrator. The other steps are normally done by the systemadministrator.
� To set up a new reporting user:
1. Create a new reporting user ORACLE ID.
2. Register the new ORACLE ID with Application Object Library.
3. Using a view–all responsibility, define a security profile in theSecurity Profile window for the new ORACLE ID.

34 – 12 Oracle Human Resources North American User’s Guide
4. Run the HRMS security processes
See: Running the HRMS Security Processes: page 34 – 15

34 – 13Security and Control
Defining Security Profiles
Using a view–all responsibility, you can define security profiles in theSecurity Profile window.
Prerequisites
❑ If you want to associate a reporting user with the new securityprofile, the ORACLE database administrator must create a newreporting user ORACLE ID. The system administrator mustregister the new ORACLE IDs with the Application Object Library.
� To define a security profile:
1. Enter a name for the security profile and select a Business Group.This does not need to be the Business Group you are logged on to.
2. If you want reporting users to be able to use this security profile,select the Reporting User name for the ID set up by the databaseadministrator.
3. Uncheck the View All Employees and View All Applicants checkboxes if you want to restrict access to these person types byorganizations, positions, or payrolls.
4. To restrict access by organization, uncheck the View AllOrganizations check box. Select an organization hierarchy, and a

34 – 14 Oracle Human Resources North American User’s Guide
top organization. Check the Include Top Organization check box ifyou want to allow access to this organization.
5. To restrict access by position, uncheck the View All Positions checkbox. Select a position hierarchy, and a top position. Check theInclude Top Position check box if you want to allow access to thisposition.
6. In the Payroll Security alternative region:
• To give access to many payrolls, check the View All Payrollscheck box, and uncheck the Include check box. Select thepayrolls you want to exclude.
• To give access to a small number of payrolls, uncheck the ViewAll Payrolls check box, and check the Include check box. Selectthe payrolls to include.
7. Save your work.

34 – 15Security and Control
Running the HRMS Security Processes
There are three HRMS security processes:
• Run the Grant Permissions To Roles process when you installOracle HRMS, or when you upgrade the system.
• Run the Generate Secure User process when you create a newsecurity profile that references a reporting user.
• Run the Security List Maintenance process every night.
You run these processes using a system administrator responsibilityfrom the Submit Requests window.
Grant Permissions To Roles Process (ROLEGEN)
All reporting users in Oracle HRMS share access to a set of synonymsfor tables. The synonyms are created by the Autoinstall process. Youmust run the Grant Permissions To Roles process to create the publicgrants to make those synonyms usable.
Run this process when you install Oracle HRMS, or when you upgradethe system. You must run this process before you run the GenerateSecure User Process for the first time.
The process grants SELECT permissions to the role”hr_reporting_user”. Permissions are not granted on the securedtables, but only on the secure views of those tables. All permissionspreviously granted to the role are revoked.
Generate Secure User Process (SECGEN)
This process grants permissions to new reporting users. It grants the”hr_reporting_user” role to the REPORTING_ORACLE_USERNAMEspecified in the security profile.
Run this process when you have created a new security profile thatreferences a reporting user. In the Submit Requests window, select thename of the new security profile. This is the only parameter to theprocess.
Security List Maintenance Process (LISTGEN)
This process maintains the lists of organizations, positions, payrolls,employees and applicants that security profile holders can access. Youshould schedule it to run every night to take account of changes madeduring the day. If a disruption, such as a power cut, occurs while the

☞
34 – 16 Oracle Human Resources North American User’s Guide
process is running, you can manually restart it from the SubmitRequests window.
There is one required parameter for this process: Effective Date, whichshould normally be set to SYSDATE. You can also enter a securityprofile name to generate list entries for that security profile only.
Attention: LISTGEN should normally run when there are nousers logged on to Oracle HRMS. Users attached whileLISTGEN is running may experience unexpected results; forexample, additional employees may become visible orpreviously visible employees may disappear from view.

C H A P T E R
35 A
35 – 1Audit
Audit
uditTrail provides a flexible approach to tracking the changes toyour data. You can choose which data to audit and how long to keepthe audit data. You can use the supplied audit report or design yourown.
This chapter explains how to set up AuditTrail and how to report onaudit data.

35 – 2 Oracle Human Resources North American User’s Guide
AuditTrailAuditTrail lets you keep a history of changes to your important data:what changed, who changed it, and when. With AuditTrail, you caneasily determine how any data row or element obtained its currentvalue. You can track information on most types of fields, includingcharacter, number and date fields.
You enable auditing for audit groups. These are groups of tables andcolumns you want to audit, where you do not necessarily need toinclude all the columns in a given table. You typically group togetherthose tables that belong to the same business process, such as employeecompensation tables.
During implementation you need to decide:
• which tables and columns you want to audit
• how you plan to report on the audit data
• how long you want to keep the audit data active
Setting Up AuditTrail
Setting up AuditTrail is normally a task for the system administrator.
The first four steps must be done to enable auditing of any OracleApplications table. They are explained in more detail in the OracleApplications System Administrator’s Guide. The fifth step is required onlyfor tables in the HR account.
� To set up AuditTrail:
1. Have your database administrator grant SELECT privileges onSYS.DBA_TABLES to the APPLSYS account. Normally this stepwould already have been done as part of your installation orupgrade.
2. Select the tables you want to audit in the Audit Groups window,and select which columns in these tables you want to audit in theAudit Tables window.
Note: You cannot audit LONG, RAW, or LONG RAW columns.
3. Select the registered ORACLE IDs you want to audit in the AuditInstallations window.
4. Run the Audit Trail Update Tables process. You do this in theSubmit Requests window for a System Administratorresponsibility. This process:

☞
35 – 3Audit
• creates database triggers on your audited tables
• creates one shadow table for each audited table, to contain theaudit information
• builds special views on non–datetracked tables, which you canuse to retrieve your audit data for reporting
5. Run the Audit Trail Update Datetracked Tables process. You dothis in the Submit Requests window for an HRMS responsibility.For each datetracked table, this process:
• creates an index on the shadow table
• creates the function <tablesname>_TT and the procedure<tablename>_VP, which extracts information from the shadowtable when you run the predefined audit report
Attention: You must rerun these processes any time you updateany of your audit definitions.
Disabling AuditTrail
You can disable the auditing of an audit group at any time by selectinga Disable state in the Audit Groups window.
Suggestion: If you are planning high volume transactions onan audited table, such as loading a batch of information fromanother system, consider disabling auditing for the table’saudit group. This will enable the batch loading to completemore quickly.
Before you restart auditing, you should archive your audit data,according to your business needs, and purge the shadow tables. Youpurge the tables by setting the audit group to Disable – Purge Table andrunning the Audit Trail Update Tables report. To restart auditing, youset the audit group to Enable Requested and rerun the Audit TrailUpdate Tables process and the Audit Trail Update Datetracked Tablesprocess.
See Also
Setting Up Release 10 AuditTrailOracle Applications System Administrator’s Guide
Disabling AuditTrail and Archiving Audit DataOracle Applications System Administrator’s Guide

35 – 4 Oracle Human Resources North American User’s Guide
Reporting on Audit Information
For any non–datetracked tables, you can write a report that uses theviews on the shadow tables to access the audit data. However, fordatetracked tables, the information from the shadow tables must beextracted and written to the HR_AUDITS table and theHR_AUDIT_COLUMNS table before you can report on it.
The Oracle HRMS audit report performs this additional processing.You can use it as supplied or as an example of how to report on auditinformation. It can report on both datetracked and non–datetrackedtables that have a numeric primary key.
Note: It can report on up to approximately 90 columns indatetracked tables and 80 columns in non–datetracked tables.
The report lists every change made to the table you select in the timeperiod you specify when you run the report. You can restrict thereported changes to those made by a specified username. The changesare listed by date and time of the change. For each change, the reportshows:
• the date and time of the change
• the user id who made the change
• the type of change
• the fields that changed and either their old values, or their newvalues, or both, depending on the type of change
Table 35 – 1 lists the 12 types of change and what information is shownin the audit report for each type.
Type of Change Field Values Shown in the Report
Normal Insert(creates a non–datetracked record)
The non–null values in the new record.
Normal Update(updates a non–datetracked record)
The old and new values for all fields thatchanged.
Normal Delete(deletes a non–datetracked record)
The non–null values in the record that wasdeleted.
DT First Insert(creates a datetracked record)
The non–null values in the new record.
DT Update(date–effectively ends the last row ona datetracked record and creates anew row)
The old and new values of all fields thatchanged, and the new effective end date on theold row.
Table 35 – 1 Transaction Types in the Audit Report

35 – 5Audit
Field Values Shown in the ReportType of Change
DT Correction(corrects a row of a datetracked recordand does not change the effectivedates)
The old and new values of all fields thatchanged, and the effective dates of thecorrected row.
DT Replace(creates a new row on a datetrackedrecord that replaces all rows that startafter its start date)
The non–null values in the rows that weredeleted, the new effective end date on the rowpreceding the new row, and the old and newvalues of all fields that changed.
DT Insert(creates a new row on a datetrackedrecord that ends on the old effectiveend date of the preceding row)
The old and new values of all fields thatchanged, and the new effective end date on therow preceding the new row.
DT Purge(deletes all rows of a datetrackedrecord)
The non–null values in all rows of the recordthat was deleted.
DT End Date(adds an effective end date to the lastrow of a datetracked record)
The new effective end date of the row.
DT All(sets a new effective end date on a rowof a datetracked record and deletes allfollowing rows)
The non–null values in the rows that weredeleted, and the new effective end date on thelast row.
DT Next(deletes a row of a datetracked recordand uses its effective end date to set annew end date on the preceding row)
The non–null values in the row that wasdeleted, and the old and new effective enddates on the preceding row.
Table 35 – 1 Transaction Types in the Audit Report
� To run the predefined audit report:
1. In the Submit Requests window, select Audit Report in the Namefield.
2. Enter the Parameters field to open the Parameters window.
3. Select an audited table (that is, one in an audit group).
4. Select a value for the Initialization parameter:
• Yes means that the report removes obsolete data related to yourselected table from the HR_AUDITS table and theHR_AUDIT_COLUMNS table. It populate the tables with newvalues, then reports on these.
• No means that the report runs on the existing data in theHR_AUDITS table and the HR_AUDIT_COLUMNS table.

35 – 6 Oracle Human Resources North American User’s Guide
• Refresh means that the report removes all obsolete data from theHR_AUDITS table and the HR_AUDIT_COLUMNS table. Itpopulate the tables with new values, then reports on these.
5. If you only want to report on the changes made by one user, enterthe username.
6. Enter start and end dates to limit the time period for reportingaudit information.
7. Choose the Submit button.
You can use the View Requests window to check the progress of thereport.
Designing Your Own Audit Report
If you want to design your own audit report, you can copy thesupplied report and use it as the basis of your own version. Thesupplied report uses a dynamic SQL structure to retrieve informationfor the report, and an Oracle Report to format it.
Dynamic SQL Structure
For a non–datetracked table, the dynamic SQL structure retrievesinformation and uses a private procedure to retrieve the new values foran update.
For a datetracked table, the dynamic SQL structure retrievesinformation from the function and procedure created for eachdatetracked table by the Audit Trail Update Datetracked Tablesprocess:
• The <tablesname>_TT function identifies the type of datetrackedtransaction represented by each row of the shadow table.
• The <tablename>_VP procedure gets new values from theshadow table for update and insert transactions. It writes theseto the HR_AUDITS and HR_AUDIT_COLUMNS tables.
The dynamic SQL structure comprises several character strings, whichare concatenated into one long string, then parsed and executed usingthe dynamic SQL generator. If you change a string, you must ensurethat you do not exceed the text space allocated to it, as listed in thepackage header.
The structure is built up by identifying the audited table columninformation, which is retrieved from the FND_AUDIT_COLUMNStable. The logic varies depending on the data type being audited.
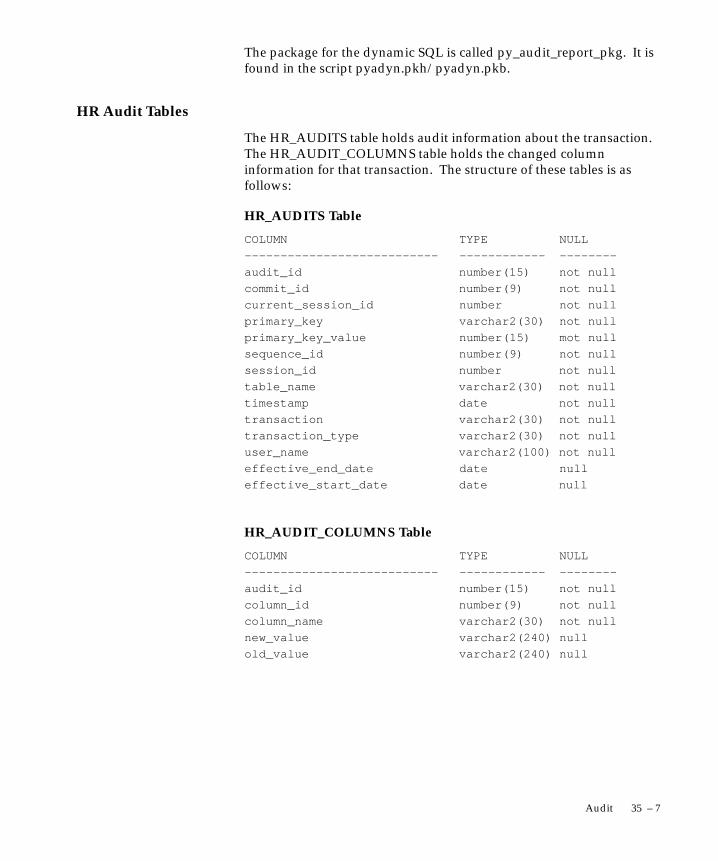
35 – 7Audit
The package for the dynamic SQL is called py_audit_report_pkg. It isfound in the script pyadyn.pkh/pyadyn.pkb.
HR Audit Tables
The HR_AUDITS table holds audit information about the transaction.The HR_AUDIT_COLUMNS table holds the changed columninformation for that transaction. The structure of these tables is asfollows:
HR_AUDITS Table
COLUMN TYPE NULL
––––––––––––––––––––––––––– –––––––––––– ––––––––
audit_id number(15) not null
commit_id number(9) not null
current_session_id number not null
primary_key varchar2(30) not null
primary_key_value number(15) mot null
sequence_id number(9) not null
session_id number not null
table_name varchar2(30) not null
timestamp date not null
transaction varchar2(30) not null
transaction_type varchar2(30) not null
user_name varchar2(100) not null
effective_end_date date null
effective_start_date date null
HR_AUDIT_COLUMNS Table
COLUMN TYPE NULL
––––––––––––––––––––––––––– –––––––––––– ––––––––
audit_id number(15) not null
column_id number(9) not null
column_name varchar2(30) not null
new_value varchar2(240) null
old_value varchar2(240) null

35 – 8 Oracle Human Resources North American User’s Guide

A P P E N D I X
AT
A – 1Default Menus
Default Menus
his appendix shows you the default menu path for every windowin Oracle Human Resources and Oracle Payroll. Refer to Chapter
31 Customizing Windows and Menus for information about setting upyour own menu structures.
The first two sections show the structure of the default menus for thedefault responsibilities. The third section is arranged alphabetically bywindow title and shows how to find each window.
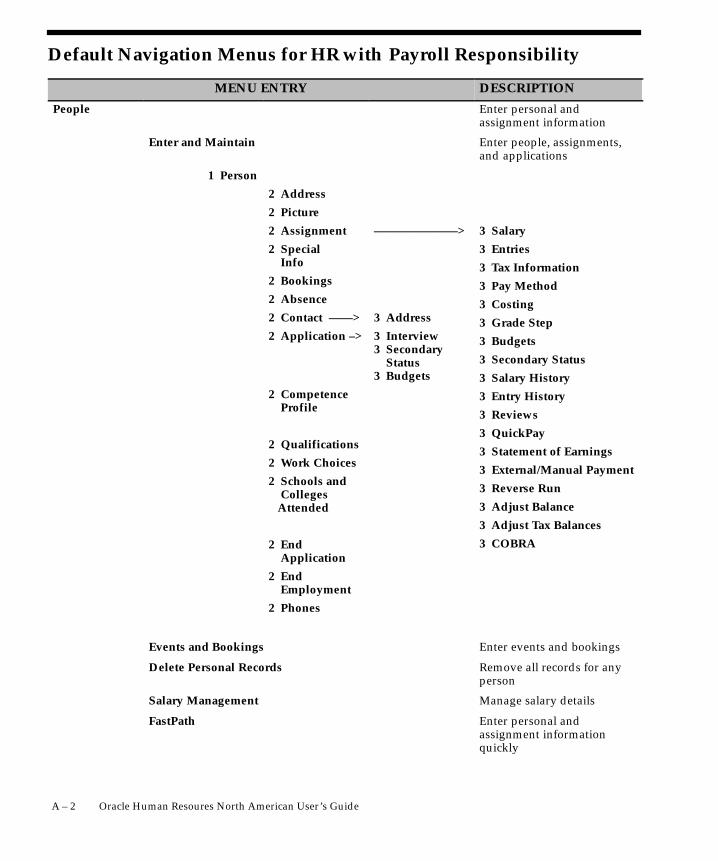
A – 2 Oracle Human Resoures North American User’s Guide
Default Navigation Menus for HR with Payroll Responsibility
MENU ENTRY DESCRIPTION
People Enter personal andassignment information
Enter and Maintain Enter people, assignments,and applications
1 Person
2 Address
2 Picture
2 Assignment
2 Special Info
2 Bookings
2 Absence
2 Contact ––––>
2 Application –>
2 Competence Profile
2 Qualifications
2 Work Choices
2 Schools and Colleges Attended
2 End Application
2 End Employment
2 Phones
––––––––––––––>
3 Address
3 Interview3 Secondary Status3 Budgets
3 Salary
3 Entries
3 Tax Information
3 Pay Method
3 Costing
3 Grade Step
3 Budgets
3 Secondary Status
3 Salary History
3 Entry History
3 Reviews
3 QuickPay
3 Statement of Earnings
3 External/Manual Payment
3 Reverse Run
3 Adjust Balance
3 Adjust Tax Balances
3 COBRA
Events and Bookings Enter events and bookings
Delete Personal Records Remove all records for anyperson
Salary Management Manage salary details
FastPath Enter personal andassignment informationquickly

A – 3Default Menus
DESCRIPTIONMENU ENTRY
Address Enter address details
US Address Enter address details
Picture Enter pictures for a person
Special Information Enter special information
Contact Information Enter contact information
Event for Person Book a training event
Phone Numbers Enter phone numbers
Absence Information Enter absence information
Application Enter application details
End Application End a person’s application
Assignment Enter a person’s assignmentdetails
Assignment Costing Enter costing for anassignment
Assignment Budget Values Enter budget values for anassignment
Grade Step Placement Enter grade step placementdetails
Secondary Status Enter a person’s secondarystatus
Pay Method Enter a pay method
End Employment End a person’s employment
Employee Review Perform an employee review
Salary Review Perform a Salary Review
Salary History View a person’s salaryhistory
Element Entry Enter compensation andbenefits for employeeassignment
Benefits View benefits details
Accruals View net accruals to date
US Tax View tax history
US Statement of Earnings View statement of earnings
Employee Balance View employee balances
Adjust Balances Adjust balances
Taxes View taxes
QuickPay Run QuickPay

A – 4 Oracle Human Resoures North American User’s Guide
DESCRIPTIONMENU ENTRY
Reverse PayrollRun
Run a reverse payroll
External ManualPayments
Enter external or manualpayments
Recruitment Manage recruiting
Requisition and Vacancy Enter a requisition and anyvacancies
Recruitment Activity Enter a recruitment activity
Applicant Quick Entry Quick entry of personal andapplication information
Mass Update of Applicants Mass Update of Applicants
Request Recruitment Letter Request a mailmerge file or astandard letter
Career Management Career Management
Rating Scales Define general methods ofmeasuring competencies
Competencies Define competencies
Competence Types Group competencies intotypes
Competence Requirements Define requirements forenterprise, organizations,jobs and positions
Schools & Colleges Define name and location oftraining establishments
Qualification Types Define, categorize and rankqualifications
Assessment Template Select competencies andrating scale for anassessment
Appraisal Template Select questionnaire andrating scale for an appraisal
Work Structures Enter work structures
Location Enter locations
Organization Enter organizationalinformation
Description Enter information for anorganization
Hierarchy Structure organizations intohierarchies
Job Enter job–related information

A – 5Default Menus
DESCRIPTIONMENU ENTRY
Description Enter job names
Path Name Enter names for job careerpaths
Career Path Enter career paths for jobs
Workers Compensation Codes Enter WC codes for jobs
Workers Compensation Rates Enter rates for WC codes
Position Enter position–relatedinformation
Description Enter position names
Hierarchy Structure positions intohierarchies
Mass Move Enter details of a mass move
Grade Enter grade–relatedinformation
Description Enter grade names
Grade Rate Enter rates and values forgrades
Pay Scale Create a pay scale of fixedprogression points
Point Values Enter values for progressionpoints
Grade Steps and Points Enter grade steps and fixedpoint values for each step
Salary Basis Enter available salary basesfor salary administration
Budget Calendar Define calendars forheadcount and positionbudgets
Budget Enter headcount andposition budgets
Status Define employee andapplicant assignmentstatuses
Recruitment Letter Type Associate letter types withapplicant statuses
Payroll Enter information forpayrolls
Description Enter payroll groups
Consolidation Define consolidation sets forpayroll run results

A – 6 Oracle Human Resoures North American User’s Guide
DESCRIPTIONMENU ENTRY
Payment Methods Define available paymentmethods
GL Flexfield Map Map payroll costing toOracle GL flexfield segments
Update PayrollRun
Update consolidation set orpay advice date
Assignment Set Define employee assignmentsets
Element Set Define element anddistribution sets
RetroPay Set Define retropay sets usingbalances and elements
Exchange Rates Enter exchange rates for yourbase currency
Monetary Units Enter monetary units forcash analysis anddistribution
Compensation and Benefits Enter information oncompensation and benefits
Earnings Activate and review earningstypes
Tax Withholding Rules Enter withholding rules forearnings
Deductions Activate and reviewdeductions
Element Description Enter compensation andbenefit information
Link Enter eligibility rules forcompensations and benefits
Benefit Contributions Enter benefit contributionlevels and values
Absence Types Define absence types
Accrual Plans Enter accrual plans
Write Formulas Enter and modify formulas
Formula Results Define what happens toformula results
Global Values Enter global values for use informulas
Balance Enter balances with feedsand dimensions

A – 7Default Menus
DESCRIPTIONMENU ENTRY
Classification Define additional elementclassifications
Wage Attachment Earnings Rules Define Wage AttachmentsEarnings rules
View View HRMS information
Histories
Employee Assignment Employee assignmenthistory
Absence Employee absence historyfolder
Run Results Employee run result history
Salary
1 AssignmentFolder
––––> 2 SalaryHistory
Salary history for anemployee assignment
Entries
1 AssignmentFolder
––––> 2 EntryHistory
Entry history for anemployee assignment
Lists
People Folder People folder
Assignment Folder Assignment folder
People by Assignment List people by assignmentfolder
Assignments List assignments folder
Employees by Organization List employees byorganization folder
Employees by Position List employees by positionfolder
Emps by Position Hierarchy List employees by positionhierarchy folder
Employees by Element List employees by element
Employees by Absence Type List employees by absencetype folder
People by Special Information List people by specialinformation folder
Vacancies View vacancies folder
Organization Budgets View organization budgetvariance folder
Position Budgets View position budgetvariance folder

A – 8 Oracle Human Resoures North American User’s Guide
DESCRIPTIONMENU ENTRY
Grade Comparatio View employee gradecomparatio folder
Employee Benefits
1 AssignmentFolder
––––> 2 Benefits
View benefits for anemployee assignment
Employee Accruals
1 AssignmentFolder
––––> 2 Accruals
View net accruals to date
Employee Balances
1 AssignmentFolder
––––> 2 Balances
View employee balances forearnings and deductions
Tax Information
Tax Balances
1 AssignmentFolder
––––> 2 TaxBalances
View Employee Tax Balances
Form 941 Information View Form 941 Information
Payroll Process Results View process results for apayroll
Assignment Process Results View process results for anemployee assignment
System Messages View system level messages
Wage Attachment View Wage Attachment
Exemption Rules Define Wage AttachmentsExemption Rules
Limit Rules Define Wage AttachmentsLimit Rules
Processes and Reports
Submit Processes and Reports Submit processes or runstandard reports
View Requests View any requests submittedfor processing
View Reports View reports online
Workflow Notifications Workflow NotificationsIn–Box
Define a QuickPaint Report Set up the report layout
Run a QuickPaint Report View or print the report for aset of people
Generate MS Word Letter Generate MS Word Letter
Submit Custom Reports Submit custom reports

A – 9Default Menus
DESCRIPTIONMENU ENTRY
Mass Information eXchange: MIX Enter timecard and otherinformation batches
Batch Element Entry Enter, validate, and transferelement entry batches.
PayMIX Entry PayMIX batch entry
PayMIX Summary PayMix batch summary
Other Definitions Other Definitions
Person Types Enter names for types ofemployees, applicants andother people
QuickCode Values Enter values and meaningsfor QuickCode types
QuickCode Types Define your own QuickCodetypes
Special Information Types Join special informationtypes to the current businessgroup
Table Structure Set up tables you require
Table Values Enter table values
Time Periods Define time period types foruse in budget calendars
User Profile Options Review your personal profileoptions
Formula Functions Register your user definedfunctions
Security Define security restrictions
Profile Define security profiles torestrict record access
CustomForm Define customizations torestrict information access inwindows
Report Sets Define sets to restrict reportand process access
Task Flow Nodes Define task flow nodes andcustomizations
Task Flow Definitions Define task flows

A – 10 Oracle Human Resoures North American User’s Guide
Windows and their Navigation Paths
This topic shows the default navigation paths for all the windows inOracle HRMS, as they are supplied. You can use taskflow windowsdirectly from the menu, or from the People and Assignment windows.
The responsibility that you use determines which of these windows youcan use and how you access them. Your system administrator sets upnavigation menus and task flows for your responsibility. They may alsocreate customized versions of some of these windows using differentwindow titles.
AAP Organization
1. Choose Work Structures –> Organization –> Description in theNavigator.
2. Enter or query an AAP Organization.
3. Choose the Others button and select AAP Organization.
Absence Detail
Do one of the following:
1. Choose People –> Enter and Maintain in the Navigator.
2. Choose the Others button and select Absence.
Or:
1. Choose People –> Fastpath –> Absence Information in theNavigator.
2. In the resulting Find window, query the person.
Absence Attendance Type
� Choose Compensation and Benefits –> Absence Types in theNavigator.
Accrual Bands
1. Choose Compensation and Benefits –> Accrual Plans in theNavigator.
2. Enter or query an accrual plan name.
3. Choose the Accrual Bands button.
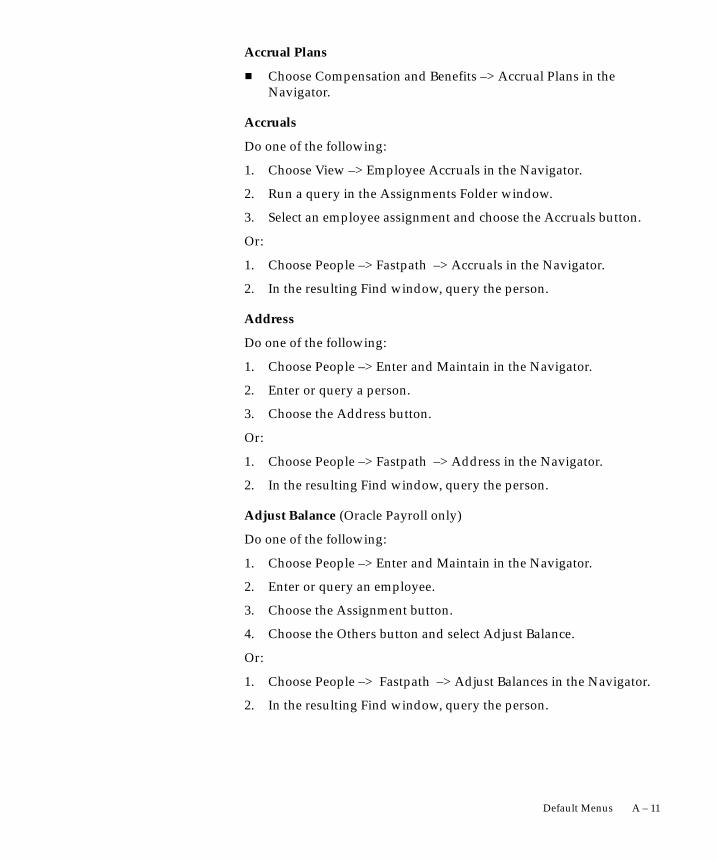
A – 11Default Menus
Accrual Plans
� Choose Compensation and Benefits –> Accrual Plans in theNavigator.
Accruals
Do one of the following:
1. Choose View –> Employee Accruals in the Navigator.
2. Run a query in the Assignments Folder window.
3. Select an employee assignment and choose the Accruals button.
Or:
1. Choose People –> Fastpath –> Accruals in the Navigator.
2. In the resulting Find window, query the person.
Address
Do one of the following:
1. Choose People –> Enter and Maintain in the Navigator.
2. Enter or query a person.
3. Choose the Address button.
Or:
1. Choose People –> Fastpath –> Address in the Navigator.
2. In the resulting Find window, query the person.
Adjust Balance (Oracle Payroll only)
Do one of the following:
1. Choose People –> Enter and Maintain in the Navigator.
2. Enter or query an employee.
3. Choose the Assignment button.
4. Choose the Others button and select Adjust Balance.
Or:
1. Choose People –> Fastpath –> Adjust Balances in the Navigator.
2. In the resulting Find window, query the person.

A – 12 Oracle Human Resoures North American User’s Guide
Adjust Tax Balances (Oracle Payroll only)
1. Choose People –> Enter and Maintain in the Navigator.
2. Enter or query an employee.
3. Choose the Assignment button.
4. Choose the Others button and select Adjust Tax Balances.
Alter Effective Date
� Choose the Alter Effective Date icon from the toolbar.
Applicant Entry
� Choose Recruitment –> Applicant Quick Entry in the Navigator.
Applicant Interview
1. Choose People –> Enter and Maintain in the Navigator.
2. Enter or query an applicant.
3. Choose the Others button and select Application.
4. Choose the Interview button.
Application
Do one of the following:
1. Choose People –> Enter and Maintain in the Navigator.
2. Enter or query an applicant.
3. Choose the Others button and select Application.
Or:
1. Choose People –> Fastpath –> Application in the Navigator.
2. In the resulting Find window, query the person.
Appraisal Template
� Choose Career Management –> Appraisal Template in theNavigator.
Assessment Template
� Choose Career Management –> Assessment Template in theNavigator.

A – 13Default Menus
Assignment
Do one of the following:
1. Choose People –> Enter and Maintain in the Navigator.
2. Enter or query an employee.
3. Choose the Assignment button.
Or:
1. Choose People –> Fastpath –> Assignment in the Navigator.
2. In the resulting Find window, query the person.
Assignment Budget Values
Do one of the following:
1. Choose People –> Enter and Maintain in the Navigator.
2. Enter or query an applicant or an employee.
3. Do one of the following:
For an applicant:
• Choose the Others button and select Application.
• Choose the Budgets button.
For an employee:
• Choose the Assignment button.
• Choose the Others button and select Budgets.
Or:
1. Choose People –> Fastpath –> Assignment Budget Values in theNavigator.
2. In the resulting Find window, query the person.
Assignment Criteria
1. Choose Payroll –> Assignment Set in the Navigator.
2. Enter or query an assignment set.
3. Choose the Criteria button.
Assignment History
� Choose View –> Histories –> Employee Assignment in theNavigator.

A – 14 Oracle Human Resoures North American User’s Guide
Assignment Processes
1. Choose View –> Payroll Process Results in the Navigator.
2. Enter or query a payroll process.
3. Choose the Assignment Process button.
Assignment Set
� Choose Payroll –> Assignment Set in the Navigator.
Assignment Statuses
� Choose Work Structures –> Status in the Navigator.
Assignments Folder
� Choose View –> Lists –> Assignments Folder in the Navigator.
Balance (Oracle Payroll only)
� Choose Compensation and Benefits –> Balance in the Navigator.
Balance Classifications (Oracle Payroll only)
1. Choose Compensation and Benefits –> Balance in the Navigator.
2. Enter or query a balance.
3. Choose the Classifications button.
Balance Dimensions (Oracle Payroll only)
1. Choose Compensation and Benefits –> Balance in the Navigator.
2. Enter or query a balance.
3. Choose the Dimensions button.
Balance Feed Control (Oracle Payroll only)
1. Choose Compensation and Benefits –> Element Description in theNavigator.
2. Enter or query an element.
3. Choose the Balance Feed Control button.
Balance Feeds (Oracle Payroll only)
Note: This instance of the Balance Feeds window lets you selectmore than one element to feed the balance.
1. Choose Compensation and Benefits –> Balance in the Navigator.

A – 15Default Menus
2. Enter or query a balance.
3. Choose the Feeds button.
Balance Feeds (Oracle Payroll only)
Note: This instance of the Balance Feeds window lets you selectmore than one balance for the element to feed.
1. Choose Compensation and Benefits –> Element in the Navigator.
2. Enter or query an element.
3. Choose the Feeds button.
Batch Entry Default Values (Oracle Payroll only)
1. Choose Mass Information eXchange: MIX –> PayMIX Entry in theNavigator.
2. Choose the Defaults button.
Batch Header
� Choose Mass Information eXchange: MIX –> Batch Element Entry inthe Navigator.
Batch Lines
1. Choose Mass Information eXchange: MIX –> Batch Element Entry inthe Navigator.
2. Choose the Lines button.
Beneficiaries
1. Choose People –> Enter and Maintain in the Navigator.
2. Enter or query an employee or applicant.
3. Choose the Others button and select Contact.
4. Chose the Entries button.
5. Select the element representing the benefit for which you areentering a beneficiary.
6. Choose the Others button and select Beneficiary.
Benefit Contributions
� Choose Compensation and Benefits –> Benefit Contributions in theNavigator.

A – 16 Oracle Human Resoures North American User’s Guide
Book Events
1. Choose People –> Enter and Maintain in the Navigator.
2. Enter or query an employee or applicant.
3. Choose the Others button and select Bookings.
Budget
� Choose Work Structures –> Budget in the Navigator.
Budget Value Defaults
1. Choose Work Structures –> Organization –> Description in theNavigator.
2. Enter or query a Business Group.
3. Choose the Others button and select Budget Value Defaults.
Budgetary Calendar
� Choose Work Structures –> Budget Calendar in the Navigator.
Business Group Information
1. Choose Work Structures –> Organization –> Description in theNavigator.
2. Enter or query a Business Group.
3. Choose the Others button and select Business Group Information.
Career Path Names
� Choose Work Structures –> Job –> Path Name in the Navigator.
Cities
� Choose Other Definitions –>Cities in the Navigator.
City Tax Rules <Employee>
1. Choose People –> Enter and Maintain in the Navigator.
2. Enter or query an employee or applicant.
3. Chose the Tax Information button.
4. Choose the Tax information button from the Federal Tax Rules<Employee> window.
5. Choose the Tax information button from the State Tax Rules<Employee> window.

A – 17Default Menus
6. Choose the Tax information button from the County Tax Rules<Employee> window.
COBRA Benefits
1. Choose People –> Enter and Maintain in the Navigator.
2. Enter or query an employee.
3. Choose the Assignment button.
4. Choose the Others button and select COBRA.
5. Enter or query a qualifying event.
6. Choose the Benefits button.
COBRA Coverage
1. Choose People –> Enter and Maintain in the Navigator.
2. Enter or query an employee.
3. Choose the Assignment button.
4. Choose the Others button and select COBRA.
COBRA Payments
1. Choose People –> Enter and Maintain in the Navigator.
2. Enter or query an employee.
3. Choose the Assignment button.
4. Choose the Others button and select COBRA.
5. Enter or query a qualifying event.
6. Choose the Payments button.
COBRA Statuses
1. Choose People –> Enter and Maintain in the Navigator.
2. Enter or query an employee.
3. Choose the Assignment button.
4. Choose the Others button and select COBRA.
5. Enter or query a qualifying event.
6. Choose the Statuses button.

A – 18 Oracle Human Resoures North American User’s Guide
Columns
1. Choose Other Definitions –> Table Structure in the Navigator.
2. Enter or query a table.
3. Choose the Columns button.
Competence Profile
1. Choose People –> Enter and Maintain in the Navigator.
2. Enter or query a person.
3. Choose the Others button and select Competence Profile.
Competence Requirements
� Choose Career Management –> Competence Requirements in theNavigator.
Competence Types
� Choose Career Management –> Competence Types in the Navigator.
Competencies
� Choose Career Management –> Competencies in the Navigator.
Concurrent Requests
� Choose Processes and Reports –> View Requests in the Navigator.
Consolidation Sets (Oracle Payroll only)
� Choose Payroll –> Consolidation in the Navigator.
Contact
Do one of the following:
1. Choose People –> Enter and Maintain in the Navigator.
2. Enter or query an employee or applicant.
3. Choose the Others button and select Contact.
Or:
1. Choose People –> Fastpath –> Contact Information in theNavigator.
2. In the resulting Find window, query the person.

A – 19Default Menus
Control Totals
1. Choose Mass Information eXchange: MIX –> Batch Element Entry inthe Navigator.
2. Choose the Totals button.
Costing
Do one of the following:
1. Choose People –> Enter and Maintain in the Navigator.
2. Enter or query an employee.
3. Choose the Assignment button.
4. Choose the Others button and select Costing.
Or:
1. Choose People –> Fastpath –> Costing in the Navigator.
2. In the resulting Find window, query the person.
Costing Information
1. Choose Work Structures –> Organization –> Description in theNavigator.
2. Enter or query an organization.
3. Choose the Others button and select Costing Information.
County Tax Rules <Employee>
1. Choose People –> Enter and Maintain in the Navigator.
2. Enter or query an employee or applicant.
3. Chose the Tax Information button.
4. Choose the Tax information button from the Federal Tax Rules<Employee> window.
5. Choose the Tax information button from the State Tax Rules<Employee> window.
Covered Dependents
1. Choose People –> Enter and Maintain in the Navigator.
2. Enter or query an employee or applicant.
3. Choose the Others button and select Contact.

A – 20 Oracle Human Resoures North American User’s Guide
4. Chose the Entries button.
5. Select the element representing the benefit for which you areentering a dependent.
6. Choose the Others button and select Dependents.
Custom Reports
� Choose Processes and Reports –> Submit Custom Reports in theNavigator.
Database Items
1. Choose Compensation and Benefits –> Write Formulas in theNavigator.
2. Enter or query a formula.
3. Choose the Show Items button.
DateTrack History Change Field Summary
� Choose the DateTrack History icon from the toolbar.
Deduction (Oracle Payroll only)
� Choose Compensation and Benefits –> Deductions in the Navigator.
Define Function
� Choose Other Definitions –> Formula Functions in the Navigator.
Define QuickPaint Report
� Choose Processes and Reports –> Define a QuickPaint Report in theNavigator.
Define Task Flow
� Choose Security –> Task Flow Definitions in the Navigator.
Define Task Flow Nodes
� Choose Security –> Task Flow Nodes in the Navigator.
Delete Person
� Choose People –> Delete Personal Records in the Navigator.
Earnings (Oracle Payroll only)
� Choose Compensation and Benefits –> Earnings in the Navigator.

A – 21Default Menus
Earnings Entry (Oracle Payroll only)
1. Choose Mass Information eXchange: MIX –> PayMIX Entry in theNavigator.
2. Enter or query batch totals.
3. Choose the Details button.
Edit Formula
1. Choose Compensation and Benefits –> Write Formulas in theNavigator.
2. Enter or query a formula.
3. Choose the Edit button.
EEO–1 Filing
1. Choose Work Structures –> Organization –> Description in theNavigator.
2. Enter or query a Government Reporting Entity (GRE).
3. Choose the Others button and select EEO–1 Filing.
Element
� Choose Compensation and Benefits –> Element Description in theNavigator.
Element and Distribution Set
� Choose Payroll –> Element Set in the Navigator.
Element Classifications (Oracle Payroll only)
� Choose Compensation and Benefits –> Classification in theNavigator.
Element Entries
Do one of the following:
1. Choose People –> Enter and Maintain in the Navigator.
2. Enter or query an employee.
3. Choose the Assignment button.
4. Choose the Entries button.
Or:

A – 22 Oracle Human Resoures North American User’s Guide
1. Choose People –> Fastpath –> Element Entries in the Navigator.
2. In the resulting Find window, query the person.
Element Link
� Choose Compensation and Benefits –> Link in the Navigator.
Employee Assignment Processes (Oracle Payroll only)
� Choose View –> Assignment Process Results in the Navigator.
Employee Review
Do one of the following:
1. Choose People –> Enter and Maintain in the Navigator.
2. Enter or query an employee.
3. Choose the Assignment button.
4. Choose the Others button and select Reviews.
Or:
1. Choose People –> Fastpath –> Employee Review in the Navigator.
2. In the resulting Find window, query the person.
Employee Run Result History (Oracle Payroll only)
� Choose View –> Histories –> Run Results in the Navigator.
Employer Identification
1. Choose Work Structures –> Organization –> Description in theNavigator.
2. Enter or query a Government Reporting Entity (GRE).
3. Choose the Others button and select Employer Identification
End Application
1. Choose People –> Enter and Maintain in the Navigator.
2. Enter or query an employee.
3. Choose the Others button and select End Application.
Or:
1. Choose People –> Fastpath –> End Application in the Navigator.
2. In the resulting Find window, query the person.

A – 23Default Menus
End Employment
Do one of the following:
1. Choose People –> Enter and Maintain in the Navigator.
2. Enter or query an employee.
3. Choose the Others button and select End Employment.
Or:
1. Choose People –> Fastpath –> End Employment in the Navigator.
2. In the resulting Find window, query the person.
Entry Values
1. Choose People –> Enter and Maintain in the Navigator.
2. Enter or query an employee.
3. Choose the Assignment button.
4. Choose the Entries button.
5. Select an entry and choose the Entry Values button.
Establishment EEO–1 Filing
1. Choose Work Structures –> Organization –> Description in theNavigator.
2. Enter or query a Reporting Establishment.
3. Choose the Others button and select Establishment EEO–1 Filing.
Establishment VETS–100 Filing
1. Choose Work Structures –> Organization –> Description in theNavigator.
2. Enter or query a Reporting Establishment.
3. Choose the Others button and select Establishment VETS–100 Filing.
Event Bookings
Do one of the following:
� Choose People –> Events and Bookings in the Navigator.
Or:
1. Choose People –> Fastpath –> Event for Person in the Navigator.
2. In the resulting Find window, query the person.

A – 24 Oracle Human Resoures North American User’s Guide
Exchange Rates (Oracle Payroll only)
� Choose Payroll –> Exchange Rates in the Navigator.
Exemption Rules (Oracle Payroll only)
� Choose View –> Wage Attachments–> Exemption Rules
External/Manual Payments (Oracle Payroll only)
Do one of the following:
1. Choose People –> Enter and Maintain in the Navigator.
2. Enter or query an employee.
3. Choose the Assignment button.
4. Choose the Others button and select External Pay.
Or:
1. Choose People –> Fastpath –> External/Manual Payments in theNavigator.
2. In the resulting Find window, query the person.
Federal Tax Rules
1. Choose Work Structures –> Organization –> Description in theNavigator.
2. Enter or query a Government Reporting Entity (GRE).
3. Choose the Others button and select Federal Tax Rules
Federal Tax Rules <Employee>
1. Choose People –> Enter and Maintain in the Navigator.
2. Enter or query an employee or applicant.
3. Chose the Tax Information button.
Form 941 Information
� Choose View –> Tax Information –> Form 941 Information in theNavigator.
Form Customization
� Choose Security –> CustomForm in the Navigator.

A – 25Default Menus
Formula
� Choose Compensation and Benefits –> Write Formulas in theNavigator.
Formula Result Rules (Oracle Payroll only)
� Choose Compensation and Benefits –> Formula Results in theNavigator.
Frequency Rules
1. Choose Compensation and Benefits –> Deductions in theNavigator.
2. Enter or query a deduction.
3. Choose the Frequency Rules button.
GL Map (Oracle Payroll only)
� Choose Payroll –> GL Flexfield Map in the Navigator.
Globals
� Choose Compensation and Benefits –> Global Values in theNavigator.
Grade Rate
� Choose Work Structures –> Grade –> Grade Rate in the Navigator.
Grade Scale
� Choose Work Structures –> Grade –> Grade Steps and Points in theNavigator.
Grade Step Placement
Do one of the following:
1. Choose People –> Enter and Maintain in the Navigator.
2. Enter or query an employee.
3. Choose the Assignment button.
4. Choose the Others button and select Grade Step.
Or:
1. Choose People –> Fastpath –> Grade Step Placement in theNavigator.

A – 26 Oracle Human Resoures North American User’s Guide
2. In the resulting Find window, query the person.
Grades
� Choose Work Structures –> Grade –> Description in the Navigator.
Input Values
1. Choose Compensation and Benefits –> Element Description in theNavigator.
2. Enter or query an element.
3. Choose the Input Values button.
Job
� Choose Work Structures –> Job –> Description in the Navigator.
Job Evaluation
1. Choose Work Structures –> Job –> Description in the Navigator.
2. Enter or query a job.
3. Choose the Evaluation button.
Job Requirements
1. Choose Work Structures –> Job –> Description in the Navigator.
2. Enter or query a job.
3. Choose the Requirements button.
Letter
� Choose Work Structures –> Recruitment Letter Type in theNavigator.
Limit Rules (Oracle Payroll Only)
� View –> Wage Attachments –> Limit Rules
Link Input Values
1. Choose Compensation and Benefits –> Link in the Navigator.
2. Enter or query an element.
3. Choose the Input Values button.

A – 27Default Menus
List Assignments
� Choose View –> Lists –> Assignments in the Navigator.
List Budget Variance by Organization
� Choose View –> Organization Budgets in the Navigator.
List Employees by Absence Type
� Choose View –> Lists –> Employees by Absence Type in theNavigator.
List Employees by Element
� Choose View –> Lists –> Employees by Element in the Navigator.
List Employees by Organization
� Choose View –> Lists –> Employees by Organization in theNavigator.
List Employees by Position
� Choose View –> Lists –> Employees by Position in the Navigator.
List Employees by Position Hierarchy
� Choose View –> Lists –> Emps by Position Hierarchy in theNavigator.
List People by Assignment
� Choose View –> Lists –> People by Assignment in the Navigator.
List People by Special Information
� Choose View –> Lists –> People by Special Information in theNavigator.
List Position Budget Variance
� Choose View –> Position Budgets in the Navigator.
Local Tax Rules
1. Choose Work Structures –> Organization –> Description in theNavigator.
2. Enter or query a Government Reporting Entity (GRE).
3. Choose the Others button and select Local Tax Rules.

A – 28 Oracle Human Resoures North American User’s Guide
Location
� Choose Work Structures –> Location in the Navigator.
Map Career Path
� Choose Work Structures –> Job –> Career Path in the Navigator.
Mass Move
� Choose Work Structures –> Mass Update in the Navigator.
Mass Move – Assignments
1. Choose Work Structures –> Position –> Mass Move in the Navigator.
2. Complete the Mass Move window and save your work.
3. Choose the Positions button.
4. Complete the Find Positions window.
5. Choose the Find button.
6. Complete the Mass Move – Positions window.
7. Choose the Assignments button.
Mass Move – Messages
1. Choose Work Structures –> Position –> Mass Move in the Navigator.
2. Complete the Mass Move window and save your work.
3. Choose the Positions button.
4. Complete the Find Positions window and choose the Find button.
5. Complete the Mass Move – Positions window and choose theAssignments button.
6. Complete the Mass Move – Assignments window and close it.
7. From the Mass Move – Positions window, choose the Valid Gradesbutton.
8. Complete the Valid Grades window and close it.
9. Close the Mass Move – Positions window.
10. From the Mass Move window, choose the Execute button.
11. If the Status field shows In Error or Complete with Warnings, aMessage button appears.

A – 29Default Menus
12. If the Message button appears, choose it to view messages in theMass Move – Messages window.
Note: Alternatively, you can view messages for saved (but not yetsuccessfully executed) mass moves as follows:
1. Choose Work Structures –> Position –> Mass Move in the Navigator.
2. Enter the name of the saved mass move in the Description field.
3. When the Mass Move window is populated with data and theMessage button appears, choose the Message button .
Mass Move – Positions
1. Choose Work Structures –> Position –> Mass Move in the Navigator.
2. Complete the Mass Move window.
3. Save your work.
4. Choose the Positions button.
5. In the resulting Find Positions window, select or enter a Source Joband Source Position.
6. Choose the Find button.
Mass Move – Valid Grades
1. Choose Work Structures –> Position –> Mass Move in the Navigator.
2. Complete the Mass Move window and save your work.
3. Choose the Positions button.
4. Complete the Find Positions window.
5. Choose the Find button.
6. Complete the Mass Move – Positions window.
7. Choose the Valid Grades button.
Mass Update of Applicants
� Choose Recruitment –> Mass Update of Applicants in theNavigator.
Messages
1. Choose Mass Information eXchange: MIX –> Batch Element Entry inthe Navigator.
2. Choose the Messages button.

A – 30 Oracle Human Resoures North American User’s Guide
MIX Batch Entry Default Values (Oracle Payroll only)
1. Choose Mass Information eXchange: MIX –> PayMIX Entry in theNavigator.
2. Choose the Defaults button.
MIX Batch Header
� Choose Mass Information eXchange: MIX –> Batch Element Entry inthe Navigator.
MIX Batch Lines
1. Choose Mass Information eXchange: MIX –> Batch Element Entry inthe Navigator.
2. Choose the Lines button.
Multiple Worksite Reporting
1. Choose Work Structures –> Organization –> Description in theNavigator.
2. Enter or query a Government Reporting Entity (GRE).
3. Choose the Others button and select Multiple Worksite Reporting
NACHA Rules
1. Choose Work Structures –> Organization –> Description in theNavigator.
2. Enter or query a Government Reporting Entity (GRE).
3. Choose the Others button and select NACHA Rules
Net Calculation Rules
1. Choose Compensation and Benefits –> Accrual Plans in theNavigator.
2. Enter or query an accrual plan name.
3. Choose the Net Calculation Rules button.
New Hire Reporting
1. Choose Work Structures –> Organization –> Description in theNavigator.
2. Enter or query a GRE.
3. Choose the Others button.

A – 31Default Menus
4. Select New Hire Reporting
5. Click in the Additional Organization Information field.
Organization
� Choose Work Structures –> Organization –> Description in theNavigator.
Organization Hierarchy
� Choose Work Structures –> Organization –> Hierarchy in theNavigator.
Organizational Payment Method
� Choose Payroll –> Payment Methods in the Navigator.
Parent Organization
1. Choose Work Structures –> Organization –> Description in theNavigator.
2. Enter or query an organization.
3. Choose the Others button and select Parent Organization.
Pay Scale
� Choose Work Structures –> Grade –> Pay Scale in the Navigator.
PayMIX Batch Information (Oracle Payroll only)
� Choose Mass Information eXchange: MIX –> PayMIX Entry in theNavigator.
PayMIX Batch Summary (Oracle Payroll only)
� Choose Mass Information eXchange: MIX –> PayMIX Summary inthe Navigator.
PayMIX Information (Oracle Payroll only)
1. Choose Work Structures –> Organization –> Description in theNavigator.
2. Enter or query a Business Group.
3. Choose the Others button and select PayMIX Information.
Payroll
� Choose Payroll –> Description in the Navigator.

A – 32 Oracle Human Resoures North American User’s Guide
Payroll Processes (Oracle Payroll only)
� Choose View –> Payroll Process Results in the Navigator.
People
� Choose People –> Enter and Maintain in the Navigator.
People Folder
� Choose View –> Lists –> People Folder in the Navigator.
Percentage
1. Choose People –> Enter and Maintain in the Navigator.
2. Enter or query an employee, and choose the Assignment button.
3. Choose the Tax Information button.
4. Choose the Percentage button.
Performance
1. Choose People –> Enter and Maintain in the Navigator.
2. Enter or query an employee, and choose the Assignment button.
3. Choose the Salary button.
4. Choose the Performance button.
Period Dates
1. Choose Payroll –> Description in the Navigator.
2. Enter or query a payroll.
3. Choose the Period Dates button.
Period Types
� Choose Other Definitions –> Time Periods in the Navigator.
Person Types
� Choose Other Definitions –> Person Types in the Navigator.
Personal Payment Method
Do one of the following:
1. Choose People –> Enter and Maintain in the Navigator.
2. Enter or query an employee.

A – 33Default Menus
3. Choose the Assignment button.
4. Choose the Pay Method button, or choose the Others button andselect Pay Method.
Or:
1. Choose People –> Fastpath –> Pay Method in the Navigator.
2. In the resulting Find window, query the person.
Personal Profile Values
� Choose Other Definitions –> User Profile Options in the Navigator.
Phone Numbers
Do one of the following:
1. Choose People –> Enter and Maintain in the Navigator.
2. Enter or query an employee.
3. Choose the Others button.
4. Choose Phones.
Or:
1. Choose People –> Fastpath –> Phone Numbers in the Navigator.
2. In the resulting Find window, query the person.
Picture
Do one of the following:
1. Choose People –> Enter and Maintain in the Navigator
2. Enter or query a person.
3. Choose the Picture button.
Or:
1. Choose People –> Fastpath –> Picture in the Navigator.
2. In the resulting Find window, query the person.
Position
� Choose Work Structures –> Position –> Description in theNavigator.

A – 34 Oracle Human Resoures North American User’s Guide
Position Evaluation
1. Choose Work Structures –> Position –> Description in theNavigator.
2. Enter or query a position.
3. Choose the Evaluation button.
Position Hierarchy
� Choose Work Structures –> Position –> Hierarchy in the Navigator.
Position Occupancy Folder
1. Choose Work Structures –> Position –> Description in theNavigator.
2. Query a position.
3. Choose the Occupancy button.
Position Reporting To
1. Choose Work Structures –> Position –> Description in theNavigator.
2. Enter or query a position.
3. Choose the Reporting To button.
Position Requirements
1. Choose Work Structures –> Position –> Description in theNavigator.
2. Enter or query a position.
3. Choose the Requirements button.
Qualifications
1. Choose People –> Enter and Maintain in the Navigator.
2. Enter or query a person.
3. Choose the Others button and select Qualifications.
Qualification Types
� Choose Career Management –> Qualification Types in theNavigator.
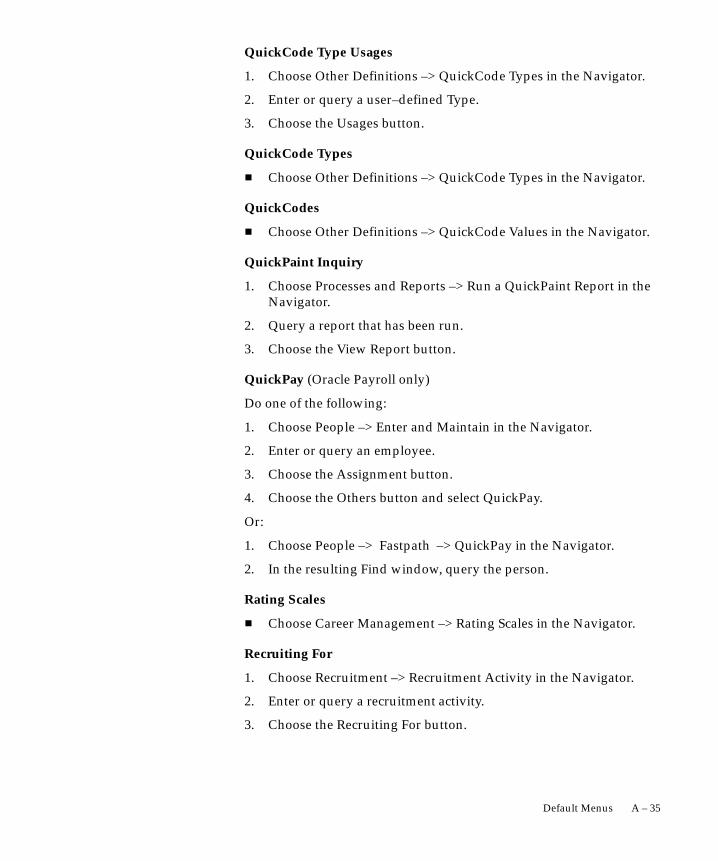
A – 35Default Menus
QuickCode Type Usages
1. Choose Other Definitions –> QuickCode Types in the Navigator.
2. Enter or query a user–defined Type.
3. Choose the Usages button.
QuickCode Types
� Choose Other Definitions –> QuickCode Types in the Navigator.
QuickCodes
� Choose Other Definitions –> QuickCode Values in the Navigator.
QuickPaint Inquiry
1. Choose Processes and Reports –> Run a QuickPaint Report in theNavigator.
2. Query a report that has been run.
3. Choose the View Report button.
QuickPay (Oracle Payroll only)
Do one of the following:
1. Choose People –> Enter and Maintain in the Navigator.
2. Enter or query an employee.
3. Choose the Assignment button.
4. Choose the Others button and select QuickPay.
Or:
1. Choose People –> Fastpath –> QuickPay in the Navigator.
2. In the resulting Find window, query the person.
Rating Scales
� Choose Career Management –> Rating Scales in the Navigator.
Recruiting For
1. Choose Recruitment –> Recruitment Activity in the Navigator.
2. Enter or query a recruitment activity.
3. Choose the Recruiting For button.

A – 36 Oracle Human Resoures North American User’s Guide
Recruitment Activity
� Choose Recruitment –> Recruitment Activity in the Navigator.
Reporting Categories
1. Choose Work Structures –> Organization –> Description in theNavigator.
2. Enter or query a Business Group.
3. Choose the Others button and select Reporting Categories.
Reporting Statuses
1. Choose Work Structures –> Organization –> Description in theNavigator.
2. Enter or query a Business Group.
3. Choose the Others button and select Reporting Statuses.
Request Letter
� Choose Recruitment –> Request Recruitment Letter in theNavigator.
Request Set
� Choose Security –> Report Sets in the Navigator.
Requisition and Vacancy
� Choose Recruitment –> Requisition and Vacancy in the Navigator.
RetroPay Set (Oracle Payroll only)
� Choose Payroll –> RetroPay Set in the Navigator.
Reverse Payroll Run (Oracle Payroll only)
Do one of the following:
1. Choose People –> Enter and Maintain in the Navigator.
2. Enter or query an employee.
3. Choose the Assignment button.
4. Choose the Others button and select Reverse Run.
Or:
1. Choose People –> Fastpath –> Reverse Payroll Run in theNavigator.

A – 37Default Menus
2. In the resulting Find window, query the person.
Rows
1. Choose Other Definitions –> Table Structure in the Navigator.
2. Enter or query a table.
3. Choose the Rows button.
Run QuickPaint Report
� Choose Processes and Reports –> Run a QuickPaint Report in theNavigator.
Salary Administration
Do one of the following:
1. Choose People –> Enter and Maintain in the Navigator.
2. Enter or query an employee.
3. Choose the Assignment button.
4. Choose the Salary button.
Or:
1. Choose People –> Fastpath –> Salary Administration in theNavigator.
2. In the resulting Find window, query the person.
Salary Basis
� Choose Work Structures –> Salary Basis in the Navigator.
Salary History
Do one of the following:
1. Choose View –> Histories –> Salary in the Navigator.
2. Run a query in the Assignments Folder window.
3. Select an employee assignment and choose the Salary Historybutton.
Or:
1. Choose People –> Fastpath –> Salary History in the Navigator.
2. In the resulting Find window, query the person.

A – 38 Oracle Human Resoures North American User’s Guide
Salary Management Folder
� Choose People –> Salary Management in the Navigator.
Scale Rate
� Choose Work Structures –> Grade –> Point Values in the Navigator.
Schools and Colleges
� Choose Career Management –> Schools and Colleges in theNavigator.
Schools and Colleges (Attended)
1. Choose People –> Enter and Maintain in the Navigator.
2. Enter or query a person.
3. Choose the Others button and select Schools/Colleges.
Secondary Statuses
Do one of the following:
1. Choose People –> Enter and Maintain in the Navigator.
2. Enter or query an applicant or employee.
3. Do one of the following:
For an applicant:
• Choose the Others button and select Application.
• Choose the Secondary Status button.
For an employee:
• Choose the Assignment button.
• Choose the Others button and select Secondary Status.
Or:
1. Choose People –> Fastpath –> Secondary Status in the Navigator.
2. In the resulting Find window, query the person.
Security Profile
� Choose Security –> Profile in the Navigator.
Special Information
Do one of the following:

A – 39Default Menus
1. Choose People –> Enter and Maintain in the Navigator.
2. Enter or query a person.
3. Choose the Special Info button.
Or:
1. Choose People –> Fastpath –> Special Information in the Navigator.
2. In the resulting Find window, query the person.
Special Information Types
� Choose Other Definitions –> Special Information Types in theNavigator.
SQWL Employer Rules (1) (Oracle Payroll only)
1. Choose Work Structures –> Organization –> Description in theNavigator.
2. Enter or query a Government Reporting Entity (GRE).
3. Choose the Others button and select SQWL Employer Rules (1)
SQWL Employer Rules (2) (Oracle Payroll only)
1. Choose Work Structures –> Organization –> Description in theNavigator.
2. Enter or query a Government Reporting Entity (GRE).
3. Choose the Others button and select SQWL Employer Rules (2)
SQWL Generic Transmitter Rules (Oracle Payroll only)
1. Choose Work Structures –> Organization –> Description in theNavigator.
2. Enter or query a Government Reporting Entity (GRE).
3. Choose the Others button and select SQWL Generic TransmitterRules
SQWL State-Specific Transmitter Rules (Oracle Payroll only)
1. Choose Work Structures –> Organization –> Description in theNavigator.
2. Enter or query a Government Reporting Entity (GRE).
3. Choose the Others button and select SQWL State Transmitter Rules
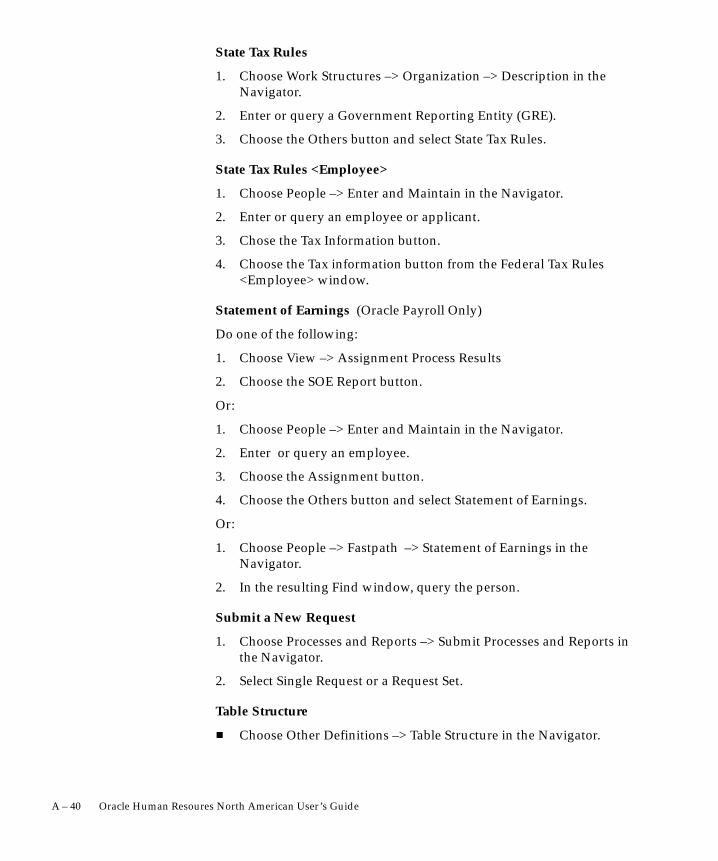
A – 40 Oracle Human Resoures North American User’s Guide
State Tax Rules
1. Choose Work Structures –> Organization –> Description in theNavigator.
2. Enter or query a Government Reporting Entity (GRE).
3. Choose the Others button and select State Tax Rules.
State Tax Rules <Employee>
1. Choose People –> Enter and Maintain in the Navigator.
2. Enter or query an employee or applicant.
3. Chose the Tax Information button.
4. Choose the Tax information button from the Federal Tax Rules<Employee> window.
Statement of Earnings (Oracle Payroll Only)
Do one of the following:
1. Choose View –> Assignment Process Results
2. Choose the SOE Report button.
Or:
1. Choose People –> Enter and Maintain in the Navigator.
2. Enter or query an employee.
3. Choose the Assignment button.
4. Choose the Others button and select Statement of Earnings.
Or:
1. Choose People –> Fastpath –> Statement of Earnings in theNavigator.
2. In the resulting Find window, query the person.
Submit a New Request
1. Choose Processes and Reports –> Submit Processes and Reports inthe Navigator.
2. Select Single Request or a Request Set.
Table Structure
� Choose Other Definitions –> Table Structure in the Navigator.
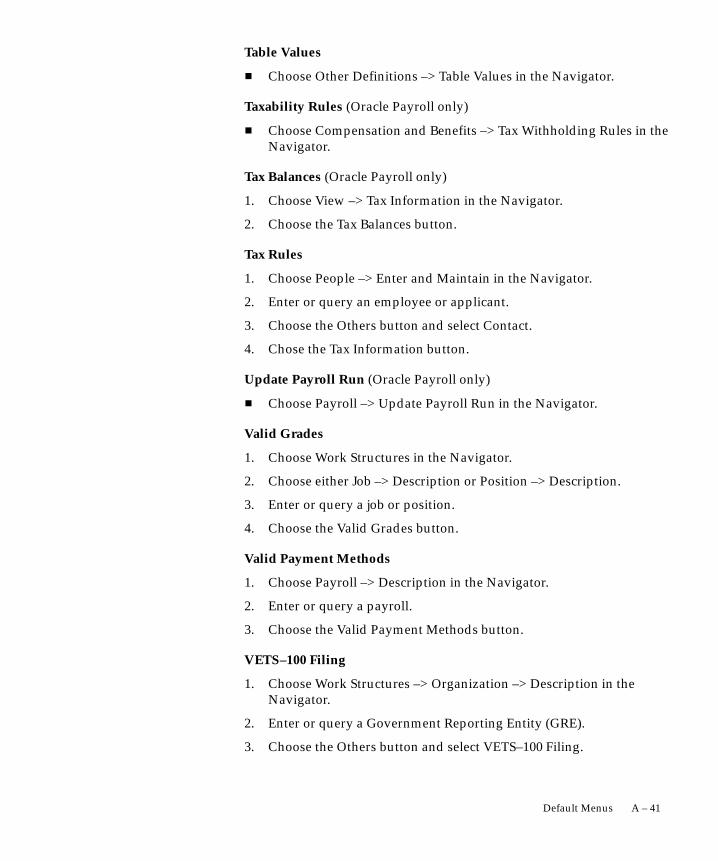
A – 41Default Menus
Table Values
� Choose Other Definitions –> Table Values in the Navigator.
Taxability Rules (Oracle Payroll only)
� Choose Compensation and Benefits –> Tax Withholding Rules in theNavigator.
Tax Balances (Oracle Payroll only)
1. Choose View –> Tax Information in the Navigator.
2. Choose the Tax Balances button.
Tax Rules
1. Choose People –> Enter and Maintain in the Navigator.
2. Enter or query an employee or applicant.
3. Choose the Others button and select Contact.
4. Chose the Tax Information button.
Update Payroll Run (Oracle Payroll only)
� Choose Payroll –> Update Payroll Run in the Navigator.
Valid Grades
1. Choose Work Structures in the Navigator.
2. Choose either Job –> Description or Position –> Description.
3. Enter or query a job or position.
4. Choose the Valid Grades button.
Valid Payment Methods
1. Choose Payroll –> Description in the Navigator.
2. Enter or query a payroll.
3. Choose the Valid Payment Methods button.
VETS–100 Filing
1. Choose Work Structures –> Organization –> Description in theNavigator.
2. Enter or query a Government Reporting Entity (GRE).
3. Choose the Others button and select VETS–100 Filing.

A – 42 Oracle Human Resoures North American User’s Guide
View Absence History
� Choose View –> Histories –> Absence in the Navigator.
View Earnings and Deductions Balances
Do one of the following:
1. Choose View –> Employee Balances in the Navigator.
2. Select an employee assignment and choose the Balances button.
Or:
1. Choose People –> Fastpath –> Employee Balances in the Navigator.
2. In the resulting Find window, query the person.
View Element Entry History for Employee
1. Choose View –> Histories –> Entries in the Navigator.
2. Run a query in the Assignments Folder window.
3. Select an employee assignment and choose the Entry Historybutton.
View Employee Dental, Medical and Vision Benefits
1. Choose View –> Employee Benefits in the Navigator.
2. Run a query in the Assignments Folder window.
3. Select an employee assignment and choose the View Benefits button.
View Employee Grade Comparatio
� Choose View –> Grade Comparatio in the Navigator.
View Run Messages (Oracle Payroll only)
� Choose View –> System Messages in the Navigator.
View Tax Balances
Do one of the following:
1. Choose View –> Tax Information –> Tax Balances in the Navigator.
2. Select an employee assignment and choose the Balances button.
Or:
1. Choose People –> Fastpath –> Tax Balances in the Navigator.
2. In the resulting Find window, query the person.

A – 43Default Menus
View Vacancies
� Choose View –> Vacancies in the Navigator.
W2 Reporting Rules
1. Choose Work Structures –> Organization –> Description in theNavigator.
2. Enter or query a Government Reporting Entity (GRE).
3. Choose the Others button and select W2 Reporting Rules.
W941 (Oracle Payroll only)
� Choose View –> Tax Information–> Form 941 Information in theNavigator
WC Codes and Rates
� Choose Work Structures –> Job –> Workers Compensation Rates inthe Navigator
Wage Attachment Earnings Rules
� Choose Compensation and Benefits –> Wage Attachments EarningsRules in the Navigator.
Wage Attachment Exemption Rules
� Choose View –> Wage Attachment –> Exemption Rules in theNavigator.
Wage Attachment Limit Rules
� Choose View –> Wage Attachment –> Limit Rules in the Navigator.
Work Choices (Job or Position)
1. Choose Work Structures –>Job or Position –> Description in theNavigator.
2. Enter or query a job or position.
3. Choose the Work Choices button.
Work Choices (Person)
1. Choose People –> Enter and Maintain in the Navigator.
2. Enter or query a person.
3. Choose the Others button and select Work Choices.

A – 44 Oracle Human Resoures North American User’s Guide
Work Day Information
1. Choose Work Structures –> Organization –> Description in theNavigator.
2. Enter or query an organization.
3. Choose the Others button and select Work Day Information.
Work Schedule
1. Choose Work Structures –> Organization –> Description in theNavigator.
2. Enter or query an organization.
3. Choose the Others button and select Work Schedule.
Work Site Filing
1. Choose Work Structures –> Organization –> Description in theNavigator.
2. Enter or query a Reporting Establishment.
3. Choose the Others button and select Work Site Filing.
Worker’s Compensation
� Choose Work Structures –> Job –> Workers Compensation Codes inthe Navigator
Workflow Notifications
� Choose Processes and Reports–> Workflow Notifications in theNavigator

A P P E N D I X
B
A
B – 1Key and Descriptive Flexfields
Key and DescriptiveFlexfields
flexfield is a flexible field that allows you to customize and extendOracle Applications. Each flexfield has the characteristics of
separate fields known as segments. There are two types of flexfield:
• Descriptive flexfields allow you to define additional informationyou want to record in the windows.
• Key flexfields are the mechanism by which you customize someimportant parts of the system.
Both types of flexfield have also been used by localization teams tocustomize Oracle HRMS for your legislation.
This chapter lists the flexfields in Oracle HRMS and summarizes whatyou need to set up.

B – 2 Oracle Human Resoures North American User’s Guide
User Definable Key Flexfields
In Oracle HRMS there are six user definable key flexfields, for each ofwhich you can define up to 30 segments:
• Job
• Position
• Grade
• People Group
• Personal Analysis
• Cost Allocation
The Personal Analysis key flexfield is different from the others. Youcan set up an unlimited number of structures for this flexfield. Eachseparate structure can have up to 30 segments.
How the Key Flexfields Are Used
Oracle HRMS uses key flexfields in a number of distinct ways:
Unique Identifiers
The Job, Position, and Grade Name flexfields let you create a uniquename, which is a combination of separate components or segments.You use these flexfields when you are defining the work structures thatexist in your enterprise.
Suggestion: When you are defining your requirements forthese key flexfields you should consider the following points.
The task of defining the segment combinations is normallyrestricted to one or two users only. Therefore, you may notneed to use value sets, or cross validation rule options tocontrol the values that can be entered.
The names that users see are made up of a combination ofsegment values. The segment values are displayed, not themeanings.
Avoid segments containing information that may changeregularly. There is no history of changes to the combinationsyou create. For example, do not define minimum andmaximum values for grades as segments of the Grade flexfield.

B – 3Key and Descriptive Flexfields
Analysis Information
The People Group and Personal Analysis flexfields let you add keyinformation to records of employee assignments and people. You canuse the individual segments of these flexfields to identify or report onspecific groups of people.
Payroll Costing
The Cost Allocation key flexfield is used to collect and to accumulatecosts associated with running a payroll.
What You Must Set Up
The key flexfields are central to Oracle HRMS, therefore you mustcreate certain definitions before you can set up your Business Group.
Job, Position, And Grade Key Flexfields
• You can only define one structure per Business Group for each ofthese flexfields.
• You can define up to 30 segments within the structure.
• Use of these flexfields is optional, but almost all Oracle HRMSinstallations use job and grade. Positions are used most often inlarge, highly structured enterprises, such as those in the areas ofgovernment, education, and health care.
• You must define a structure name for these three flexfields beforeyou can define a Business Group.
• You associate these structures with a Business Group in theBusiness Group Information window, which opens from theOrganization window.
People Group Key Flexfield
• You can only define one structure per Business Group for thisflexfield.
• You can define up to 30 segments within the structure.
• You do not create separate combinations of segments for thePeople Group flexfield. You enter values for each employee aspart of the employee assignment.
• You must define a structure name for this flexfield before youcan define a Business Group.

B – 4 Oracle Human Resoures North American User’s Guide
• You must define at least one segment for the People Groupflexfield in order to be able to use the Assignment window.
Personal Analysis Key Flexfield
• You can create any number of structures per Business Group forthis flexfield. Each one represents a Special Information Type.
• You can define up to 30 segments within each structure.
• You do not need to define any structures for the PersonalAnalysis flexfield before you can use Oracle HRMS.
• You link each structure to a Business Group in the SpecialInformation Types window while you are logged on to thatBusiness Group.
• You can customize windows to restrict access to specificInformation Types, such as medical or disciplinary information.
Cost Allocation Key Flexfield
• You can only define one structure per Business Group for thisflexfield.
• You can define up to 30 segments within the structure.
• You can control the levels at which users can enter costinformation by using the flexfield qualifiers.
• You must define a structure name for this flexfield before youcan define a Business Group.
• A number of windows in Oracle HRMS check for the existenceof a valid flexfield structure for Cost Allocation. You mustdefine at least one segment for your Cost Allocation flexfield.
Creating Key Flexfield Database Items
The Create Key Flexfield DB Items process turns data in key flexfieldsinto database items that Oracle FastFormula can access. It is essentialto run this process whenever you create or change the Grade, Job,Position, or People Group key flexfield definitions. Submit the processfrom the Submit Requests window.
See Also
Oracle Applications Flexfields Guide

☞
B – 5Key and Descriptive Flexfields
User Definable Descriptive Flexfields
All window blocks in which you can enter information contain a userdefinable descriptive flexfield. You decide in which blocks you want torecord additional information. Each user definable descriptive flexfieldhas 20 segments that you can define. After you define a descriptiveflexfield, Oracle HRMS treats the segments as part of the window.
For each segment, you can define its prompt, the type of data it cancontain, and the values a user can enter. You can provide a list or rangeof valid values. You also control the size and display characteristics ofeach segment and the order in which the segments appear.
You can define two types of descriptive flexfield segments:
• Global segments, which always appear in the window.
• Context sensitive segments, that appear only when a definedcontext exists. You can prompt the user to provide the context,or you can provide the context automatically from a referencefield in the same block.
For example, a segment to hold information about an employee’sdisability might appear only when the Disabled field is checked.
Attention: Some descriptive flexfields appear in more thanone window. For example, the Additional Evaluation Detailsflexfield appears in the Job Evaluation window and thePosition Evaluation window.
Check all of the windows that use a descriptive flexfield beforeyou define any of the segments. This is especially important ifyou intend to make the flexfield context sensitive to anotherfield. You must ensure that the reference field is present in allof the windows that use the flexfield.
Refer to Table B – 1 for a full list of descriptive flexfields in OracleHRMS.
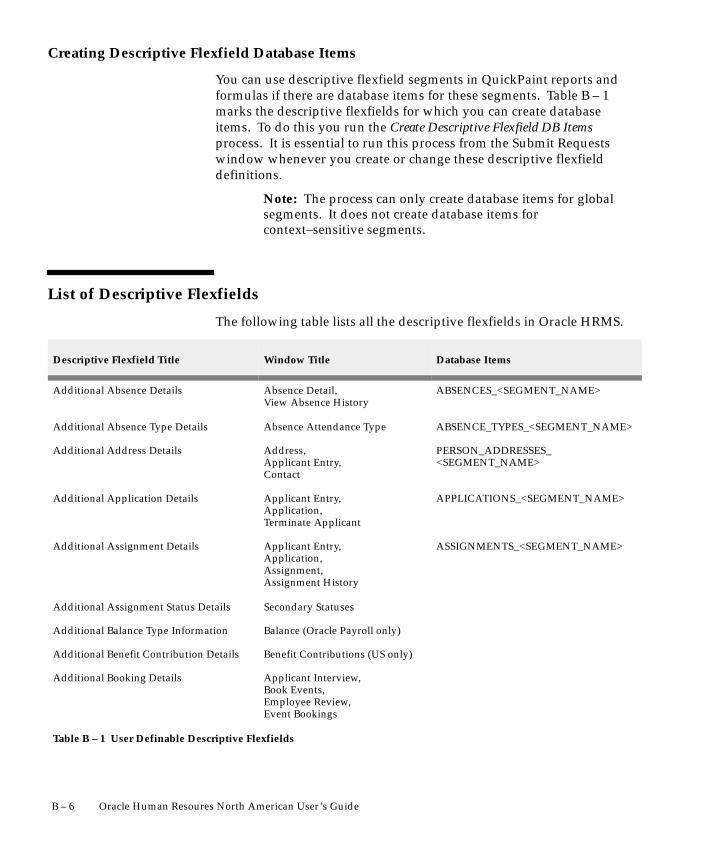
B – 6 Oracle Human Resoures North American User’s Guide
Creating Descriptive Flexfield Database Items
You can use descriptive flexfield segments in QuickPaint reports andformulas if there are database items for these segments. Table B – 1marks the descriptive flexfields for which you can create databaseitems. To do this you run the Create Descriptive Flexfield DB Itemsprocess. It is essential to run this process from the Submit Requestswindow whenever you create or change these descriptive flexfielddefinitions.
Note: The process can only create database items for globalsegments. It does not create database items forcontext–sensitive segments.
List of Descriptive Flexfields
The following table lists all the descriptive flexfields in Oracle HRMS.
Descriptive Flexfield Title Window Title Database Items
Additional Absence Details Absence Detail, View Absence History
ABSENCES_<SEGMENT_NAME>
Additional Absence Type Details Absence Attendance Type ABSENCE_TYPES_<SEGMENT_NAME>
Additional Address Details Address, Applicant Entry, Contact
PERSON_ADDRESSES_<SEGMENT_NAME>
Additional Application Details Applicant Entry, Application, Terminate Applicant
APPLICATIONS_<SEGMENT_NAME>
Additional Assignment Details Applicant Entry, Application, Assignment, Assignment History
ASSIGNMENTS_<SEGMENT_NAME>
Additional Assignment Status Details Secondary Statuses
Additional Balance Type Information Balance (Oracle Payroll only)
Additional Benefit Contribution Details Benefit Contributions (US only)
Additional Booking Details Applicant Interview, Book Events, Employee Review, Event Bookings
Table B – 1 User Definable Descriptive Flexfields

B – 7Key and Descriptive Flexfields
Database ItemsWindow TitleDescriptive Flexfield Title
Additional Budget Details Budget
Additional Budget Version Details Budget
Additional Calendar Information Budgetary Calendar
Additional Career Path Details Career Path Names
Additional COBRA Benefit Details COBRA Benefits (US only)
Additional COBRA Coverage Details COBRA Coverage (US only)
Additional COBRA Payment Details COBRA Payment (US only)
Additional COBRA Status Details COBRA Status (US only)
Additional Contact Relationship Details Contact CONTACTS_<SEGMENT_NAME>
Additional Element Entry Information Adjust Balance (Oracle Payrollonly), Element Entries, View Element Entry History forEmployee
Additional Element Link Information Element Link
Additional Element Type Details Element
Additional Evaluation Details Job, Position
Additional Event Details Applicant Interview, Employee Review, Event Bookings
EVENTS_<SEGMENT_NAME>
Additional Grade Details Grade GRADES_<SEGMENT_NAME>
Additional Job Details Job JOBS_<SEGMENT_NAME>
Additional Letter Details Letter
Additional Location Details Location
Additional Organization Information Organization
Additional Organization Payment MethodDetails
Organizational Payment Method
Additional Organization Structure Detail Organization Hierarchy
Additional Organization Unit Details Organization ORGANIZATION_<SEGMENT_NAME>
Additional Pay Scale Information Pay Scale
Table B – 1 User Definable Descriptive Flexfields

B – 8 Oracle Human Resoures North American User’s Guide
Database ItemsWindow TitleDescriptive Flexfield Title
Additional Pay Rate Details Grade Rate, Scale Rate
Additional Payroll Details Payroll PAYROLLS_<SEGMENT_NAME>
Additional Period Information Budgetary Calendar, Period Dates (Payroll form)
Additional Period of Service Details Terminate PERIODS_OF_SERVICE_<SEGMENT_NAME>
Additional Period Type Information Period Types
Additional Person Analysis Details Special Information, List People By Special Information
Additional Personal Details Applicant Entry, Contact, People, People Folder
PEOPLE_<SEGMENT_NAME>
Additional Personal Payment Method Details
Personal Payment Method
Additional Position Details Position, Find Positions (Mass Move form)
POSITION_<SEGMENT_NAME>
Additional Position Structure Details Position Hierarchy
Additional Recruitment Activity Details Recruitment Activity RECRUITMENT_ACTIVITIES_<SEGMENT_NAME>
Additional Requirement Details Job, Position
Additional Requisition Details Requisition and Vacancy
Additional Salary Administration Details Salary Administration
Additional Salary Basis Information Salary Basis
Additional Telephone Number Details Phone Numbers
Additional Vacancy Details Requisition and Vacancy
Additional Valid Grade Details Job, Position
Additional Year Information Budgetary Calendar
Table B – 1 User Definable Descriptive Flexfields

☞
B – 9Key and Descriptive Flexfields
Descriptive Flexfields with Startup Data
Oracle HRMS supplies two predefined descriptive flexfields to holdaddress information in different styles for different countries. Theseare the Personal Address Information descriptive flexfield and theLocation Address descriptive flexfield.
You can use these descriptive flexfields to add new address styles or tochange the styles included in Oracle HRMS.
Attention: If you change the predefined styles, your changeswill be overwritten when you upgrade Oracle HRMS. If youadd new styles, your changes may be overwritten if newstartup data contains address styles for these countries.
Changing Address Styles
Address styles vary between countries, so Oracle HRMS provides twodescriptive flexfields that use context sensitive segments to hold eachline of an address.
Title Table Name Window Title
Personal AddressInformation
PER_ADDRESSES Address, Applicant Entry
Location Address HR_LOCATIONS Location, Organization
Table B – 2 Address Styles in Oracle HRMS
The available address styles are defined as the contexts for theseflexfields. The values used are the territory codes. These codes can befound in the FND_TERRITORIES table. You can have only oneAddress Style for each Territory in the FND_TERRITORIES table.
Address styles are provided as startup data in these flexfields. If yourequire additional address styles, you need to define a new context andsegments.
To change the address style for any country, disable those segmentsyou do not want to use. Then define new segments to record your owninformation. However, these changes will be overwritten when youupgrade Oracle HRMS.

B – 10 Oracle Human Resoures North American User’s Guide
Protected Flexfields
Oracle HRMS supplies two key flexfields and six descriptive flexfieldsthat are predefined and protected. Your localization team defines theseflexfields to meet the specific legislative and reporting needs of yourcountry.
The protected key flexfields are the Soft Coded Legislation key flexfieldand the Bank Details key flexfield.
Table B – 3 lists the protected descriptive flexfields.
Title Table Name Window Title
Further Element Information PAY_ELEMENT_TYPES_F Element
Further Assignment Information PER_ASSIGNMENT_EXTRA_INFO Assignment
Further Payment MethodInformation
PAY_ORG_PAYMENT_METHODS_F Organizational Payment Method
Further Person Information(Datetracked)
PER_PEOPLE_F People, Applicant Entry
Further Person Information PER_PEOPLE_EXTRA_INFO People
Further Job Information PER_JOB_EXTRA_INFO Job
Further Position Information PER_POSITION_EXTRA_INFO Position
Further Organization Information HR_ORGANIZATION_INFORMATION Organization
Further Location Information HR_LOCATION_EXTRA_INFO Location
Table B – 3 Protected Descriptive Flexfields in Oracle HRMS
Your localization team determines which of these flexfields are requiredfor your legislation, and what segments they should contain. Ensurethat you select the appropriate legislation code when you define yourBusiness Group so that you can see these flexfields.
Warning: Do not attempt to alter the definitions of theseprotected flexfields. These definitions are a fundamental partof Oracle HRMS. Any change to them may lead to errors in theoperating of the system.
It is possible that Oracle HRMS will use other segments ofthese flexfields in the future. Therefore, do not add segmentsto any protected flexfield. This can affect your ability toupgrade your system in the future.

B – 11Key and Descriptive Flexfields
Soft Coded Legislation Key Flexfield
This key flexfield holds legislation–specific information. The legislationof your Business Group determines the flexfield structure that you see.
Each localization team defines a flexfield structure and uses qualifiersto define the level at which each segment is visible. Therefore, you maybe able to enter information specific to your legislation at one or moreof the following levels:
• Business Group – Organization window
• Payroll – Payroll window
• Employee Assignment – Assignment window
Bank Details Key Flexfield
This flexfield holds legislation–specific bank account information. Thelegislation of your Business Group determines the flexfield structurethat you see. Each localization team defines a flexfield structure thatallows you to record the bank account information relevant to yourlegislation. You enter this information in the Organizational PaymentMethod window and Personal Payment Method window.

B – 12 Oracle Human Resoures North American User’s Guide
A P P E N D I X
CT
C – 1Database Items
Database Items
his appendix lists the database items available to you in OracleHuman Resources for writing formulas and defining QuickPaintreports. The database items are grouped into two listings:
• Static Database Items
• Dynamic Database Items
Static database items are shipped with the system and you cannotmodify them. Dynamic database items are created by Oracle HumanResources processes whenever you define new elements or otherrelated entities.

C – 2 Oracle Human Resources North American User’s Guide
Static Database ItemsStatic database items are shipped with the system and you cannotmodify them.
Applicant Information
Database item Description
APL_DATE_END The date the application ended
APL_DATE_RECEIVED The date the application was received
Table C – 1
Employee Assignment Information
Database item Description
ASG_ASSIGNMENT_SEQUENCE This is used as a default for assignment number
ASG_DATE_FROM The date from which thisassignment information is effective
ASG_DATE_TO The date to which thisassignment information is effective
ASG_EMPLOYMENT_CATEGORY The employment category for theassignment
ASG_END_TIME The standard end time for theassignment
ASG_FREQ The frequency for which theassignment working hours aremeasured
ASG_GRADE The employee’s grade
ASG_GRADE_DATE_FROM The date from which thisassignment grade information iseffective
ASG_GRADE_DATE_TO The date to which this assignmentgrade information is effective
Table C – 2

C – 3Database Items
DescriptionDatabase item
ASG_GROUP The employee’s group
ASG_HOURS The standard number of workinghours for the assignment
ASG_INT_ADDR_LINE The internal address of theassignment
ASG_JOB The employee’s job
ASG_JOB_DATE_FROM The date from which thisassignment job information iseffective
ASG_JOB_DATE_TO The date to which this assignmentjob information is effective
ASG_LAST_CHANGE_REASON The reason the salary was changed
ASG_LAST_PERFORMANCE_DATE Last performance review date
ASG_LAST_PERFORMANCE_LOCATION Last performance review location
ASG_LAST_PERFORMANCE_RATING Last performance review rating
ASG_LAST_PERFORMANCE_TYPE Last performance review type
ASG_LAST_PROC_PAYROLL_NAME The payroll name the assignmentwas last processed
ASG_LAST_PROC_PERIOD_ID The time period ID the assignmentwas last processed
ASG_LAST_PROC_PERIOD_NAME The period name the assignmentwas last processed
ASG_LAST_PROC_PERIOD_NUMBER The period number the assignmentwas last processed
ASG_LAST_PROPOSED_SALARY_CHANGE The proposed salary chage
ASG_LAST_PROPOSED_SALARY_PERCENT The proposed salary change as apercentage
ASG_LAST_SALARY_CHANGE_APPROVED Whether the last proposed salarychange has been approved
ASG_LAST_SALARY_DATE The last salary change date
ASG_LOCATION The employee’s location
ASG_LOC_INACTIVE_DATE The date to which the locationinformation is effective
Table C – 2

C – 4 Oracle Human Resources North American User’s Guide
DescriptionDatabase item
ASG_MANAGER Whether the assignment is amanagerial assignment (yes/no)
ASG_NEXT_PERFORMANCE_DATE Next performance review date
ASG_NEXT_SALARY_DATE The date of the next salary change
ASG_NUMBER The assignment number
ASG_ORG The employee’s organization
ASG_ORG_DATE_FROM The date from which assignmentorganization information iseffective
ASG_ORG_DATE_TO The date to which assignmentorganization information iseffective
ASG_PAYROLL The employee’s payroll
ASG_PERFORMANCE_REVIEW_FREQUENCY The performance review frequencyfor the assignment
ASG_PERFORMANCE_REVIEW_PERIOD The performance review frequencyfor the assignment
ASG_PER_STATUS_DP Personal status for the assignment(as of Date Paid)
ASG_POSITION The employee’s position
ASG_POS_DATE_FROM The date from which thisassignment position information iseffective
ASG_POS_DATE_TO The date to which this assignmentposition information is effective
ASG_POS_END_TIME The standard end time for theassignment position
ASG_POS_FREQ The frequency for which theassignment position’s hours ismeasured
ASG_POS_HOURS The standard number of workinghours for the position
ASG_POS_PROB_PERIOD The probation period for theassignment position
Table C – 2

C – 5Database Items
DescriptionDatabase item
ASG_POS_START_TIME The standard start time for theassignment position
ASG_PRIMARY Whether this is the employee’sprimary assignment (yes/no)
ASG_PROB_END_DATE The probation period end date
ASG_PROB_PERIOD The assignment’s probation period
ASG_PROB_UNITS The units of the assignment’sprobation period
ASG_REC_FULL_NAME The full name for the recruiter
ASG_RELIEF The relief position if the currentposition holder is absent
ASG_SALARY The current salary for an employee
ASG_SALARY_BASIS The payment basis (i.e. frequency)for the assignment, e.g. monthly
ASG_SALARY_BASIS_CODE The payment basis lookup code forthe assignment
ASG_SALARY_BASIS_NAME The salary basis name for the assignment
ASG_SALARY_ELEMENT The display element name
ASG_SALARY_ELEMENT_VALUE_NAME The display input value name
ASG_SALARY_GRADE_RATE The display rate name
ASG_SALARY_RATE_BASIS The salary rate basis
ASG_SALARY_REVIEW_FREQUENCY The salary review frequency forthe assignment
ASG_SALARY_REVIEW_PERIOD The salary review period for theassignment
ASG_START_DATE The start date of the assignment
ASG_START_TIME The standard start time for the assignment
ASG_STATUS The primary status for the assignment
ASG_SUCCESSOR The position name that willsucceed into this position
Table C – 2

C – 6 Oracle Human Resources North American User’s Guide
DescriptionDatabase item
ASG_SUP_FULL_NAME The full name for the supervisor
ASG_TYPE Whether this is an employee or applicant assignment
ASG_VACANCY The name of the vacancy appliedfor
Table C – 2

C – 7Database Items
Contact Addresses
Database item Description
CON_ADR_CITY The name of the contact’s town orcity
CON_ADR_COUNTRY The name of the contact’s country
CON_ADR_DATE_FROM The first date on which the contactcan be contacted
CON_ADR_DATE_TO The last date on which the contactcan be contacted
CON_ADR_LINE_1 The first line of the contact’saddress
CON_ADR_LINE_2 The second line of the contact’saddress
CON_ADR_LINE_3 The third line of the contact’saddress
CON_ADR_PHONE_1 The contact’s first telephonenumber
CON_ADR_PHONE_2 The contact’s second telephonenumber
CON_ADR_PHONE_3 The contact’s third telephonenumber
CON_ADR_POSTAL_CODE The contact’s postal code
CON_ADR_REGION_1 The first line of the contact’s region
CON_ADR_REGION_2 The second line of the contact’sregion
CON_ADR_REGION_3 The third line of the contact’sregion
Table C – 3

C – 8 Oracle Human Resources North American User’s Guide
Contact Information
Database item Description
CON_AGE The contact’s age
CON_APP_NUMBER The contact’s applicant number
CON_CURRENT_APP Whether the contact is a currentapplicant (yes/no)
CON_CURRENT_EMP Whether the contact is a currentemployee (yes/no)
CON_DATE_OF_BIRTH The contact’s date of birth
CON_DISABLED Whether the contact is disabled(yes/no)
CON_EMP_NUMBER The contact’s employee number
CON_END_DATE The date to which this contactinformation is effective
CON_FIRST_NAME The contact’s first name
CON_FULL_NAME The contact’s full name
CON_KNOWN_AS The contact’s preferred name
CON_LAST_NAME The contact’s last name
CON_MARITAL_STATUS The contact’s marital status
CON_MIDDLE_NAMES The contact’s middle names
CON_NATIONALITY The contact’s nationality
CON_PERSON_TYPE The contact’s person type – employee or applicant, for example
CON_RELATIONSHIP The relationship of the contact tothe employee
CON_SEX The contact’s sex
CON_START_DATE The date from which this contactinformation is effective
Table C – 4

C – 9Database Items
DescriptionDatabase item
CON_TITLE The contact’s title
CON_WORK_PHONE The contact’s work telephonenumber
Table C – 4
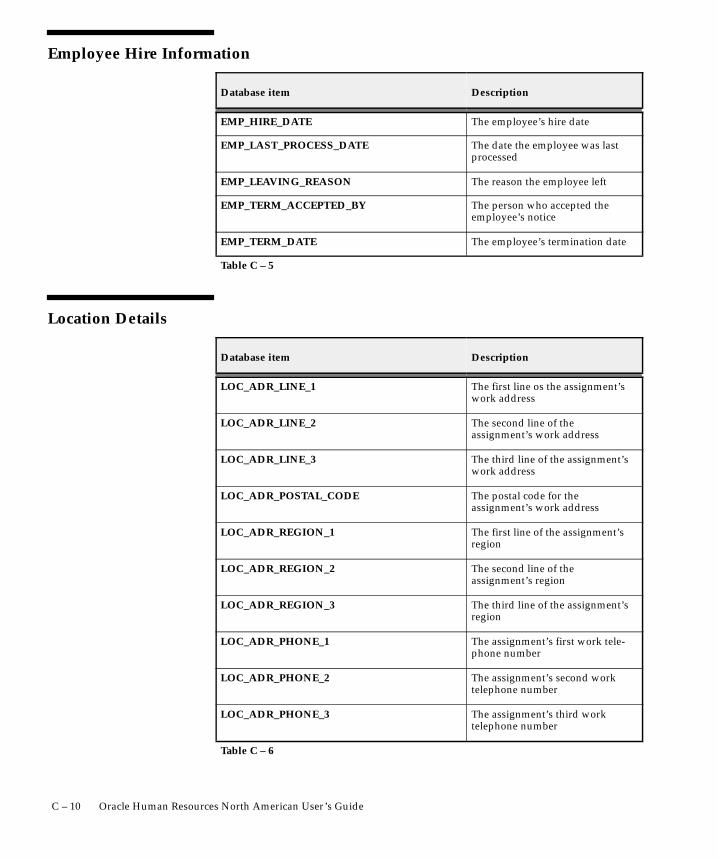
C – 10 Oracle Human Resources North American User’s Guide
Employee Hire Information
Database item Description
EMP_HIRE_DATE The employee’s hire date
EMP_LAST_PROCESS_DATE The date the employee was lastprocessed
EMP_LEAVING_REASON The reason the employee left
EMP_TERM_ACCEPTED_BY The person who accepted theemployee’s notice
EMP_TERM_DATE The employee’s termination date
Table C – 5
Location Details
Database item Description
LOC_ADR_LINE_1 The first line os the assignment’swork address
LOC_ADR_LINE_2 The second line of the assignment’s work address
LOC_ADR_LINE_3 The third line of the assignment’swork address
LOC_ADR_POSTAL_CODE The postal code for the assignment’s work address
LOC_ADR_REGION_1 The first line of the assignment’sregion
LOC_ADR_REGION_2 The second line of the assignment’s region
LOC_ADR_REGION_3 The third line of the assignment’sregion
LOC_ADR_PHONE_1 The assignment’s first work tele-phone number
LOC_ADR_PHONE_2 The assignment’s second worktelephone number
LOC_ADR_PHONE_3 The assignment’s third work telephone number
Table C – 6

C – 11Database Items
DescriptionDatabase item
LOC_ADR_CITY The town or city where the assignment works
LOC_ADR_COUNTRY The country where the assignmentworks
Table C – 6
Work Address Details (US only)
Database item Description
LOC_ADR_US_COUNTY The assignment’s work county (USonly)
LOC_ADR_US_STATE The assignment’s work state (USonly)
LOC_ADR_US_STATE_CODE The assignment’s work state code(US only)
Table C – 7
Work Address Details (UK only)
Database item Description
LOC_ADR_UK_COUNTY The assignment’s work county (UKonly)
Table C – 8

C – 12 Oracle Human Resources North American User’s Guide
Payroll Details
Database item Description
PAY_PERIODS_PER_YEAR The number of pay periods in theyear
PAY_PROC_PERIOD_CUT_OFF_DATE The cut off date for the payroll period
PAY_PROC_PERIOD_DATE_PAID The date the payroll was paid
PAY_PROC_PERIOD_DIRECT_DEPOSIT_DATE The direct deposit date for the payroll period
PAY_PROC_PERIOD_END_DATE The end date of the payroll period
PAY_PROC_PERIOD_ID The ID of the time period for thepayroll
PAY_PROC_PERIOD_NAME The period name for the payroll
PAY_PROC_PERIOD_NUMBER The current period number for thepayroll
PAY_PROC_PERIOD_PAY_ADVICE_DATE The pay advice date for the payrollperiod
PAY_PROC_PERIOD_START_DATE The start date of the payroll period
Table C – 9

C – 13Database Items
People Addresses
Database item Description
PER_ADR_CITY The name of the person’s town orcity
PER_ADR_COUNTRY The name of the person’s country
PER_ADR_DATE_FROM The first date on which the personcan be contacted at this address
PER_ADR_DATE_TO The last date on which the personcan be contacted at this address
PER_ADR_LINE_1 The first line of the person’saddress
PER_ADR_LINE_2 The second line of the person’saddress
PER_ADR_LINE_3 The third line of the person’saddress
PER_ADR_PHONE_1 The person’s first contact number
PER_ADR_PHONE_2 The person’s second contactnumber
PER_ADR_PHONE_3 The person’s third contact number
PER_ADR_POSTAL_CODE The person’s postal code
PER_ADR_REGION_1 The first line of the person’s region
PER_ADR_REGION_2 The second line of the person’sregion
PER_ADR_REGION_3 The third line of the person’sregion
Table C – 10
Home Address Details (US only)
Database item Description
PER_ADR_US_COUNTY The person’s county (US only)
PER_ADR_US_STATE The person’s state (US only)
PER_ADR_US_STATE_CODE The person’s state code (US only)
Table C – 11

C – 14 Oracle Human Resources North American User’s Guide
Home Address Details (UK only)
Database item Description
PER_ADR_UK_COUNTY The person’s home county (UKonly)
Table C – 12

C – 15Database Items
People Information
Database item Description
PER_AGE The person’s age
PER_APPLICANT_NUMBER The person’s applicant number
PER_CURRENT_APP Whether the person is a currentapplicant (yes/no)
PER_CURRENT_EMP Whether the person is a currentemployee (yes/no)
PER_DATE_OF_BIRTH The person’s date of birth
PER_DATE_VERIFIED The date the employee last verifiedhis or her personal data
PER_DISABLED Whether the person is disabled(yes/no)
PER_EMP_NUMBER The person’s employee number
PER_FIRST_NAME The person’s first name
PER_FULL_NAME The person’s full name
PER_KNOWN_AS The person’s preferred name
PER_LAST_NAME The person’s last name
PER_MAIL_DESTINATION The person’s mail destination
PER_MARITAL_STATUS The person’s marital status
PER_MIDDLE_NAMES The person’s middle names
PER_NATIONALITY The person’s nationality
PER_NATIONAL_IDENTIFIER The person’s national identifier
PER_PERSON_TYPE Type of person – employee or applicant, for example
PER_PREV_LAST_NAME The person’s previous last name
PER_SEND_EXPENSES Where to send the person’sexpenses (home/office)
PER_SEX The person’s sex
Table C – 13

C – 16 Oracle Human Resources North American User’s Guide
DescriptionDatabase item
PER_TITLE The person’s title
PER_WORK_PHONE The person’s work telephonenumber
Table C – 13

C – 17Database Items
Recruiter Information
Database item Description
REC_CURRENT_APP Whether the recruiter is a currentapplicant (yes/no)
REC_CURRENT_EMP Whether the recruiter is a currentemployee (yes/no)
REC_EMP_NUMBER The recruiter’s employee number
REC_GRADE The recruiter’s grade
REC_INT_ADDR_LINE The recruiter’s internal address
REC_JOB The recruiter’s job
REC_LOCATION The recruiter’s work location
REC_MANAGER Whether the assignment is a managerial assignment (yes/no)
REC_ORG The name of the recruiter’s organization
REC_PERSON_TYPE The recruiter’s person type – employee or applicant, for example
REC_POSITION The recruiter’s position
REC_WORK_PHONE The recruiter’s work telephonenumber
Table C – 14

C – 18 Oracle Human Resources North American User’s Guide
Supervisor Information
Database item Description
SUP_CURRENT_EMP Whether the supervisor is acurrent employee (yes/no)
SUP_DATE_FROM The date from which thissupervisor information is effective
SUP_DATE_TO The date to which this supervisorinformation is effective
SUP_EMP_NUMBER The supervisor’s employee number
SUP_GRADE The supervisor’s grade
SUP_INT_ADDR_LINE The supervisor’s internal address
SUP_JOB The supervisor’s job
SUP_LOCATION The supervisor’s work location
SUP_MANAGER Whether the assignment is amanagerial assignment (yes/no)
SUP_ORG The supervisor’s organization
SUP_PERSON_TYPE The supervisor’s person type
SUP_POSITION The supervisor’s position
SUP_WORK_PHONE The supervisor’s work telephonenumber
Table C – 15
Date Information
Database item Description
SESSION_DATE The effective date fromFND_SESSIONS
SYSDATE The system date
Table C – 16

C – 19Database Items
Dynamic Database ItemsDynamic database items are created by Oracle Human Resourcesprocesses whenever you define new elements or other related entities.
Element Database Items
When you define a new element, Oracle Human Resources runs aprocess to create a number of related database items for it. To ensureeasy recognition of these items, the process adds the element name<ENAME> to each one. It also creates further database items for eachpay and input value you use <INAME>.
Here is a list of database items created each time you define an elementusing the Element window:
Database item Description
<ENAME>_BEN_CLASS The element’s benefit classification
<ENAME>_CLASSIFICATION The element’s classification
<ENAME>_CLOSED_FOR_ENTRY Yes/no flag: if yes, the element’s entries cannot be modified
<ENAME>_CLOSED_FOR_ENTRY_CODE Yes/no flag: if yes, the element’s entries cannot be modified
<ENAME>_COSTABLE_TYPE The element’s costable type(from lookup table)
<ENAME>_COSTABLE_TYPE_CODE The element’s costable type(code values)
<ENAME>_COUNT The element entry count
<ENAME>_END_DATE The date to which this elementis effective
<ENAME>_INPUT_CURRENCY_CODE The element’s input currencycode
<ENAME>_LENGTH_OF_SERVICE The element’s qualifyinglength of service
<ENAME>_OUTPUT_CURRENCY_CODE The element’s output currencycode
Table C – 17
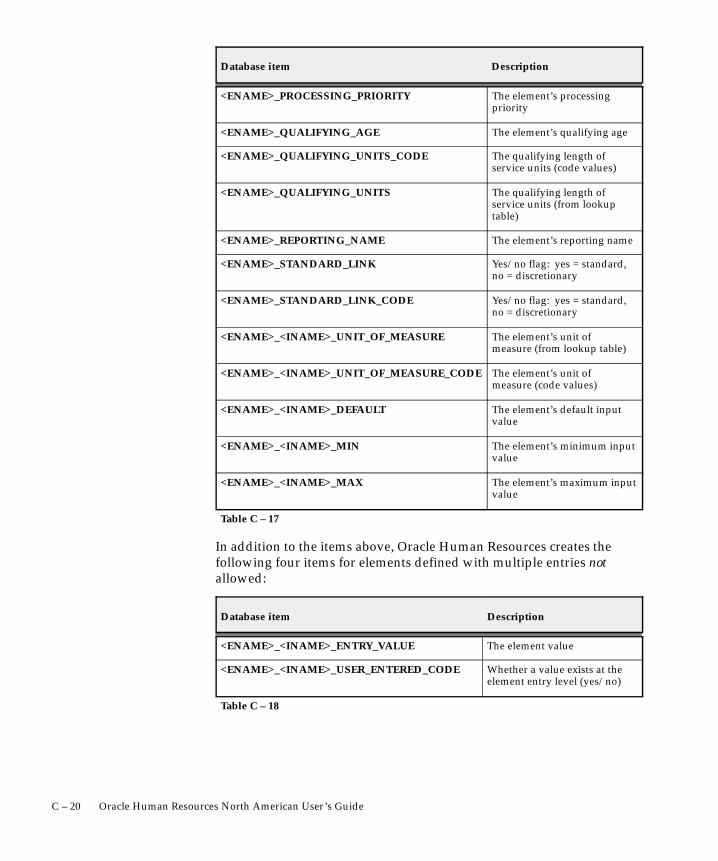
C – 20 Oracle Human Resources North American User’s Guide
DescriptionDatabase item
<ENAME>_PROCESSING_PRIORITY The element’s processing priority
<ENAME>_QUALIFYING_AGE The element’s qualifying age
<ENAME>_QUALIFYING_UNITS_CODE The qualifying length of service units (code values)
<ENAME>_QUALIFYING_UNITS The qualifying length of service units (from lookuptable)
<ENAME>_REPORTING_NAME The element’s reporting name
<ENAME>_STANDARD_LINK Yes/no flag: yes = standard,no = discretionary
<ENAME>_STANDARD_LINK_CODE Yes/no flag: yes = standard,no = discretionary
<ENAME>_<INAME>_UNIT_OF_MEASURE The element’s unit of measure (from lookup table)
<ENAME>_<INAME>_UNIT_OF_MEASURE_CODE The element’s unit of measure (code values)
<ENAME>_<INAME>_DEFAULT The element’s default inputvalue
<ENAME>_<INAME>_MIN The element’s minimum inputvalue
<ENAME>_<INAME>_MAX The element’s maximum inputvalue
Table C – 17
In addition to the items above, Oracle Human Resources creates thefollowing four items for elements defined with multiple entries notallowed:
Database item Description
<ENAME>_<INAME>_ENTRY_VALUE The element value
<ENAME>_<INAME>_USER_ENTERED_CODE Whether a value exists at theelement entry level (yes/no)
Table C – 18

C – 21Database Items
DescriptionDatabase item
<ENAME>_<INAME>_START_DATE The start date of element
<ENAME>_<INAME>_END_DATE The end date of element
Table C – 18
In addition to the common list above, Oracle Human Resources createsthe following item for elements defined with multiple entries allowedwhose input values are numeric (that is, hours, integer, money ornumber).
Database item Description
<ENAME>_<INAME>_ENTRY_VALUE The summed element values forthe multiple entries
Table C – 19
The units for ’<ENAME> <INAME> ENTRY VALUE’ are generatedfor both recurring and nonrecurring elements and are user–definable.Oracle Human Resources modifies the definition text to retrieve theentry value in the unit of measure as specified in the’pay_input_values_f’ table.

C – 22 Oracle Human Resources North American User’s Guide
Grade Rate Database Items
When you define a grade rate, Oracle Human Resources runs a processto create a number of related database items for it. To ensure easyrecognition of these items, the process adds the grade rate name<NAME> to each one.
Here is a list of database items created each time you define a graderate using the Grade Rate window:
Database item Description
GRADE_<NAME>_VALUE The grade rate’s value
GRADE_<NAME>_MINIMUM The grade rate’s minimum value
GRADE_<NAME>_MAXIMUM The grade rate’s maximum value
Table C – 20
Pay Scale Rate Database Items
When you define a pay scale rate, Oracle Human Resources runs aprocess to create the following database item for it. To ensure easyrecognition of this item, the process adds the rate name <NAME> to it.
Database item Description
SPINE_<NAME>_VALUE The pay scale rates value
Table C – 21

C – 23Database Items
Descriptive Flexfield Database Items
When you define descriptive flexfield segments you make themavailable for use in QuickPaint by running the Create DescriptiveFlexfield DB Items process from the Submit Requests window. Thisprocess creates database items for each of the descriptive flexfieldslisted below.
To ensure easy recognition of these items, the process adds thedescriptive flexfield segment name <SEGMENT_NAME> to each one.
Database item Description
PEOPLE_<SEGMENT_NAME> People descriptive flexfielddatabase items
PAYROLLS_<SEGMENT_NAME> Payroll descriptive flexfielddatabase items
ASSIGNMENTS_<SEGMENT_NAME> Assignment descriptive flexfield database items
GRADES_<SEGMENT_NAME> Grade descriptive flexfielddatabase items
ABSENCES_<SEGMENT_NAME> Absence descriptive flexfielddatabase items
ABSENCE_TYPES_<SEGMENT_NAME> Absence type descriptive flexfield database items
PERSON_ADDRESSES_<SEGMENT_NAME> Person Address descriptiveflexfield database items
EVENTS_<SEGMENT_NAME> Events descriptive flexfielddatabase items
JOBS_<SEGMENT_NAME> Jobs descriptive flexfield da-tabase items
CONTACTS_<SEGMENT_NAME> Contacts descriptive flexfielddatabase items
PERIODS_OF_SERVICE_<SEGMENT_NAME> Periods of Service descriptiveflexfield database items
RECRUITMENT_ACTIVITIES_<SEGMENT_NAME> Recruitment Activities descriptive flexfield databaseitems
POSITION_<SEGMENT_NAME> Position descriptive flexfielddatabase items
Table C – 22

C – 24 Oracle Human Resources North American User’s Guide
DescriptionDatabase item
APPLICATIONS_<SEGMENT_NAME Applications descriptive flexfield database items
ORGANIZATION_<SEGMENT_NAME> Organization descriptive flexfield database items
Table C – 22

C – 25Database Items
Key Flexfield Database Items
When you define key flexfield segments you make them available foruse in QuickPaint by running the Create Key Flexfield DB Itemsprocess from the Submit Requests window. This process createsdatabase items for each of the key flexfields listed below.
To ensure easy recognition of these items, the process adds the keyflexfield segment name <SEGMENT_NAME> to each one.
Run this process for each of your Business Groups. If you definecontext–dependent key flexfield structures usingBUSINESS_GROUP_ID as the reference field, the process createsdatabase items for those flexfield segments as well.BUSINESS_GROUP_ID is the only reference field that the Create KeyFlexfield DB Items process supports.
Database item Description
GRADE_KF_<SEGMENT_NAME> Grade key flexfield database items
JOB_KF_<SEGMENT_NAME> Job key flexfield database items
POS_KF_<SEGMENT_NAME> Position key flexfield databaseitems
GROUP_KF_<SEGMENT_NAME> Group key flexfield database items
Table C – 23

C – 26 Oracle Human Resources North American User’s Guide
Absence Database Items
When you define an absence type, Oracle Human Resources runs aprocess to create the following database item for it. To ensure easyrecognition of this item, the process adds the absence type name<ABSENCE_NAME> to it.
Database item Description
<ABSENCE_NAME>_CUM_BALANCE The cumulative balance for anabsence type
Table C – 24
A P P E N D I X
DT
D – 1Template SQL*Plus Scripts
Template SQL*PlusScripts
his appendix provides template SQL*Plus scripts to extract data toinclude in standard letters.

D – 2 Oracle Human Resources North American User’s Guide
Template SQL*Plus PERWPOUK
PERWPOUK.sql Purpose
WHENEVER SQLERROR EXIT FAILURE ROLLBACKREM Define the MS Word mail merge recordseparatorDEFINE ch=”’%’”REM Define the column width for returningquery resultsCOLUMN L1 FORMAT A2000SET PAUSE OFFSET FEEDBACK OFFSET RECSEP OFFSET HEADING OFFSET VERIFY OFFSET TERMOUT OFFSET PAGESIZE 0
This section definesthe required SQL*Plusenvironment settings.You should producethis section exactly asyou see it when youdefine your mailmerge file.
REM Insert session rowinsert into fnd_sessions(session_id,effective_date)
select userenv(’SESSIONID’), to_date(’&2’,’DD–MON–YYYY’)from sys.dual
This section creates arow in theApplication ObjectLibrary table (AOL)FND_SESSIONS. Thisenables the datetracksecurity views to beaccessed for thesession.The &2 argumentcontains the currentSQL*Forms sessiondate.You should producethis section exactly asyou see it when youdefine your mailmerge file.

D – 3Template SQL*Plus Scripts
/REM Set length of the headerSET LINESIZE 220
REM Create the mail merge ’header’ recordfor MS WordREM Note: SPOOL command commented out forconcurrent manager.REM PC based solution required theSPOOL command.REM spool perwpouk.txt
This section has twofunctions:1) To set the mailmerge header linesize.This is dependant onthe character length ofall the mail mergeitems you want touse. In the example,the header linesizeequatesapproximately to 220characters.2) To enable thespooling of the SQLresults. You must remove theREM keyword fromthe line that spoolsoutput to a file for theMicrosoft Mailmerge.If you use concurrentprocessing to generatethe data source file,Concurrent Managercreates the output file.
select ’address_line1’ ||&ch|| ’address_line2’ ||&ch|| ’address_line3’ ||&ch|| ’town_or_city’ ||&ch|| ’country’ ||&ch|| ’postal_code’ ||&ch|| ’applicant_title’ ||&ch|| ’applicant_last_name’ ||&ch|| ’position_name’ ||&ch|| ’organization_name’ ||&ch|| ’grade_name’ ||&ch|| ’projected_hire_date’ ||&ch|| ’recruiter_title’ ||&ch|| ’recruiter_last_name’ ||&chfrom sys.dual/
This section definesthe mail merge headerinformation. Theseare the mail mergefields you integratewith your wordprocessed letter. Eachmail merge field isdelimited by thepre–defined &chcharacter. Ensure thatthe field size does notexceed 40 charactersand that the fieldname does notinclude white spaces.Do not forget that thelength in characters ofthis selected row fromsys.dual is theLINESIZE value youspecified above.
REM re–initialise the linesize to themaximum 2000 varchar2 lengthSET LINESIZE 2000
After selecting yourmail merge headerinformation, youmust re–set theLINESIZE to themaximum toVARCHAR2 sizewhich is 2000.

D – 4 Oracle Human Resources North American User’s Guide
REM Mail merge interview queryselect rpad( nvl(pa.address_line1,’ ’) ||&ch| nvl(pa.address_line2,’ ’) ||&ch| nvl(pa.address_line3,’ ’) ||&ch| nvl(pa.town_or_city,’ ’) ||&ch| nvl(ft.territory_short_name, ’ ’) ||&ch| nvl(pa.postal_code,’ ’) ||&ch| nvl(hl1.meaning, ’ ’) ||&ch| nvl(pp1.last_name, ’ ’) ||&ch| nvl(pos.name, ’ ’) ||&ch| pou.name ||&ch| nvl(pg.name, ’ ’) ||&ch| nvl(to_char(pappl.projected_hire_date,
’fmDay fmddth”of” fmMonth YYYY’), ’ ’) ||&ch| nvl(hl2.meaning, ’ ’) ||&ch| nvl(pp2.last_name, ’ ’) ||&ch, 2000, ’#’) L1
This section is themain SQL*Plus querythat generates themail merge fieldinformation. Notethat the columns aremerged togetherusing the &chcharacter as the fielddelimiter.The RPAD functionpads out the row ofinformation with #for all white spaces.Without this function,mail merge cannotdistinguish when arow/record hasended.The SQL*Plus queryin this example isgenerated from letterrequests. Thereforethe &1 argument isused to identifywhichletter_request_id isbeing generated.
from per_addresses pa, fnd_territories ft, hr_lookups hl1, hr_lookups hl2, hr_all_organization_units pou, per_positions pos, per_grades pg, per_applications pappl, per_all_people pp1, per_all_people pp2, per_all_assignments pasg1, per_letter_request_lines plr

D – 5Template SQL*Plus Scripts
where plr.letter_request_id = &1and pp1.person_id = plr.person_idand pa.primary_flag(+) = ’Y’and pa.person_id(+) = pp1.person_idand ft.territory_code(+) = pa.countryand hl1.lookup_code(+) = pp1.titleand hl1.lookup_type(+) = ’TITLE’and pasg1.assignment_id(+) = plr.assignment_idand pos.position_id(+) = pasg1.position_idand pou.organization_id(+) = pasg1.organization_idand pg.grade_id(+) = pasg1.grade_idand pappl.application_id(+) = pasg1.application_idand pp2.person_id(+) = pasg1.recruiter_idand hl2.lookup_code(+) = pp2.titleand hl2.lookup_type(+) = ’TITLE’/REM Note: SPOOL command commented out forconcurrent manager.REM PC based solution required theSPOOL command.REM spool off
REM update the letter request_status fromPENDING to COMPLETEupdate per_letter_requests plrset plr.request_status = ’COMPLETE’where plr.letter_request_id = &1and plr.request_status = ’PENDING’/
This section updatesthe the letter requestfrom Pending toComplete (as theexample is for letterrequests).
REM delete the session row createddelete from fnd_sessions fswhere fs.session_id = userenv(’sessionid’)and fs.effective_date =to_date(’&2’,’DD–MON–YYYY’)
This section deletesthe row inserted intoFND_SESSIONS.
/
REM commit the changescommit/
exit
This section commitsthe changes and exitsthe SQL*Plus session.

D – 6 Oracle Human Resources North American User’s Guide
Template SQL*Plus Script PERWPWUK
PERWPWUK.sql PurposeREMDEFINE line_size=80DEFINE field_size= &line_size–1DEFINE ch=”’%’”SET PAGESIZE 0SET LINESIZE &line_sizeBREAK ON L1 SKIP PAGECOLUMN L1 FORMAT A&line_size COLUMN L2 FORMAT A&line_size COLUMN L3 FORMAT A&line_size COLUMN L4 FORMAT A&line_size COLUMN L5 FORMAT A&line_size COLUMN L6 FORMAT A&line_size COLUMN L7 FORMAT A&line_size COLUMN L8 FORMAT A&line_size COLUMN L9 FORMAT A&line_size SET FEEDBACK OFFSET RECSEP OFFSET HEADING OFFSET VERIFY OFFSET TERMOUT OFF
This section definesthe required SQL*Plusenvironment settings.You should producethis section exactly asyou see it when youdefine your mailmerge file.
insert into fnd_sessions(session_id ,effective_date)select userenv(’SESSIONID’), to_date(’&2’,’DD–MON–YYYY’)from sys.dual
This section creates arow in theApplication ObjectLibrary table (AOL)FND_SESSIONS. The&2 argument containsthe currentSQL*Forms sessiondate.You should producethis section exactly asyou see it when youdefine your mailmerge file.
REM re–initialise the linesize to themaximum 2000 varchar2 lengthSET LINESIZE 2000
After selecting yourmail merge headerinformation, youmust re–set theLINESIZE to themaximum toVARCHAR2 sizewhich is 2000.
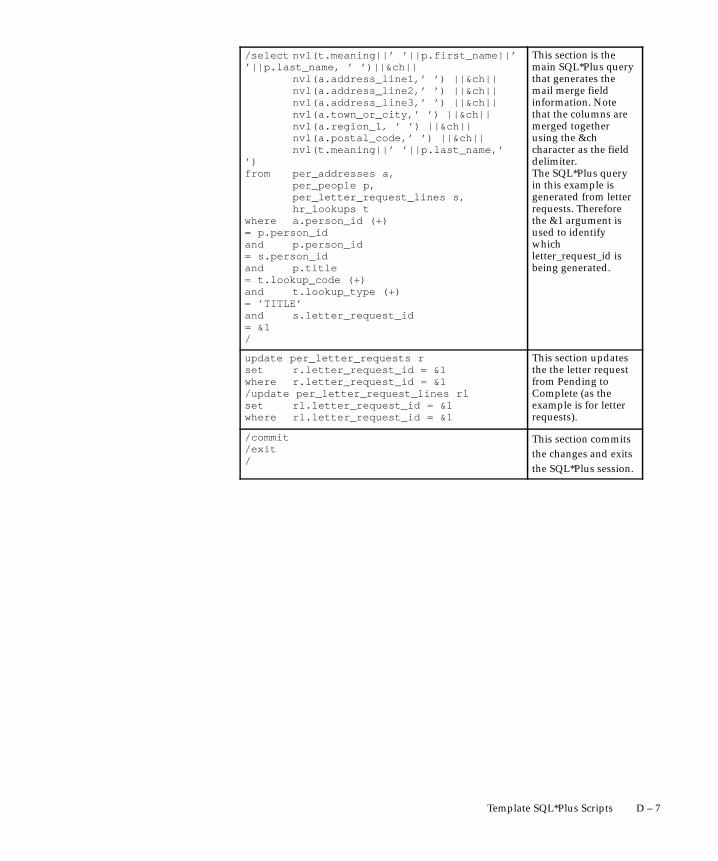
D – 7Template SQL*Plus Scripts
/select nvl(t.meaning||’ ’||p.first_name||’’||p.last_name, ’ ’)||&ch||
nvl(a.address_line1,’ ’) ||&ch||nvl(a.address_line2,’ ’) ||&ch||nvl(a.address_line3,’ ’) ||&ch||nvl(a.town_or_city,’ ’) ||&ch||nvl(a.region_1, ’ ’) ||&ch||nvl(a.postal_code,’ ’) ||&ch||nvl(t.meaning||’ ’||p.last_name,’
’) from per_addresses a,
per_people p,per_letter_request_lines s,hr_lookups t
where a.person_id (+) = p.person_idand p.person_id = s.person_idand p.title = t.lookup_code (+)and t.lookup_type (+) = ’TITLE’and s.letter_request_id = &1/
This section is themain SQL*Plus querythat generates themail merge fieldinformation. Notethat the columns aremerged togetherusing the &chcharacter as the fielddelimiter.The SQL*Plus queryin this example isgenerated from letterrequests. Thereforethe &1 argument isused to identifywhichletter_request_id isbeing generated.
update per_letter_requests rset r.letter_request_id = &1where r.letter_request_id = &1/update per_letter_request_lines rlset rl.letter_request_id = &1where rl.letter_request_id = &1
This section updatesthe the letter requestfrom Pending toComplete (as theexample is for letterrequests).
/commit/exit/
This section commitsthe changes and exitsthe SQL*Plus session.

D – 8 Oracle Human Resources North American User’s Guide
OTA SQL*Plus Script to Produce Confirmation Letters
OTA.sql PurposeWHENEVER SQLERROR EXIT FAILURE ROLLBACKREMDefine the MS Word mail merge recordseparatorDEFINE ch=”’%’”REM Define the column widthfor returning query resultsCOLUMN L1 FORMAT A2000SET PAUSE OFFSET FEEDBACK OFFSET RECSEP OFFSET HEADING OFFSET VERIFY OFFSET TERMOUT OFFSET PAGESIZE 0
This section definesthe required SQL*Plusenvironment settings.You should producethis section exactly asyou see it when youdefine your mailmerge file.
REM Insert session row
insert into fnd_sessions(session_id
,effective_date)
select userenv(’SESSIONID’),
to_date(’&2’,’DD–MON–YYYY’)
from sys.dual
/
This section creates arow in theApplication ObjectLibrary table (AOL)FND_SESSIONS. Thisenables the datetracksecurity views to beaccessed for thesession.The &2 argumentcontains the currentSQL*Forms sessiondate.You should producethis section exactly asyou see it when youdefine your mailmerge file.

D – 9Template SQL*Plus Scripts
REM Set length of the header
SET LINESIZE 200REM Create the mail merge
’header’ record for MS Word
REM Note: SPOOL command commented out for
concurrent manager.
REM PC based solution required the
SPOOL command.spool xxxxx.txt
This section has twofunctions:1) To set the mailmerge header linesize.This is dependant onthe character length ofall the mail mergeitems you want touse. In the example,the header linesizeequates approximate-ly to 220 characters.2) To enable the spool-ing of the SQL results.The spool file shouldmatch the name of theSQL file you are writ-ing, but with a textfile extension.
select ’student_title’
||&ch||
’student_first_name’ ||&ch||
’student_last_name’
||&ch||
’event_name’ ||&ch||
’event_code’
||&ch||
’event_end_date’
||&ch
from sys.dual
/
This section definesthe mail merge headerinformation. Theseare the mail mergefields you integratewith your word pro-cessed letter. Eachmail merge field is de-limited by the pre–de-fined &ch character.Ensure that the fieldsize does not exceed40 characters and thatthe field name doesnot include whitespaces. Do not forgetthat the length incharacters of this se-lected row fromsys.dual is the LINE-SIZE value you speci-fied above.

D – 10 Oracle Human Resources North American User’s Guide
REM re–initialise the linesize to the maxi-
mum 2000 varchar2 length
SET LINESIZE 2000
After selecting yourmail merge header in-formation, you mustre–set the LINESIZEto the maximum toVARCHAR2 sizewhich is 2000.
REM Mail merge confirmation query
select rpad(
initcap(nvl(d.delegate_title_mean-
ing,’ ’ )) ||&ch||
nvl(d.delegate_first_name,’ ’)
||&ch||
nvl(d.delegate_last_name,’ ’ )
||&ch||
nvl(v.description,’ ’)
||&ch||
nvl(d.event_activity_version_name,’
’ ) ||&ch||
to_char(d.course_end_date, ’DD
fmMonth YYYY’) ||&ch,
2000, ’#’)
L1
from ota_delegate_bookings_v
d,
ota_activity_versions
v,
per_letter_request_lines
plr
where plr.letter_request_id
= &1
and (plr.ota_booking_id
= d.booking_id
or plr.ota_event_id
= d.event_id)
and d.activity_version_id
= v.activity_version_id
/
This section is themain SQL*Plus querythat generates themail merge field in-formation. Note thatthe columns aremerged together us-ing the &ch characteras the field delimiter.The RPAD functionpads out the row ofinformation with #for all white spaces.Without this function,mail merge cannotdistinguish when arow/record has en-ded.The SQL*Plus queryin this example is gen-erated from letter re-quests. Therefore the&1 argument is usedto identify which let-ter_request_id is be-ing generated.
REM Note: SPOOL command commented out for
concurrent manager.
REM PC based solution required the
SPOOL command.
spool off

D – 11Template SQL*Plus Scripts
REM Update the letter request_status from
PENDING to COMPLETE
update per_letter_requests
plr
set plr.request_status
=’COMPLETE’
where plr.letter_request_id
=&1
and plr.request_status
=’PENDING’
/
This section updatesthe the letter requestfrom Pending to Com-plete (as the exampleis for letter requests).
REM delete the session row created
delete from fnd_sessions
fs
where fs.session_id
= userenv(’sessionid’)
and fs.effective_date
= to_date(’&2’,’DD–MON–YYYY’)
/
This section deletesthe row inserted intoFND_SESSIONS.
REM commit the changes
commit
/
exit
/
This section commitsthe changes and exitsthe SQL*Plus session

D – 12 Oracle Human Resources North American User’s Guide

Glossary – 1
Glossary
AAbsence Types Categories of absence, such as
medical leave or vacation leave, that youdefine for use in absence windows.
Alternative Regions Parts of a window thatappear in a stack so that only one is visibleat any time. You click on the name of theregion to pop up a list of the other regionsin the stack. Select the name of a region tobring it to the top of the stack.
Applicant A candidate for employment in aBusiness Group.
Appraisal A ’superset’ of recording opinionsand setting and achieving objectives, plansand so on. See also: Assessment.
Assessment An information gatheringexercise, from one or many sources, toevaluate a person’s ability to do a job. Seealso: Appraisal.
Assignment An employee’s assignmentidentifies his or her role and payroll withina Business Group. The assignment is madeup of a number of assignment components.Of these, organization is mandatory, andpayroll is a required component forpayment purposes.
Assignment Number A number that uniquelyidentifies an employee’s assignment. Anemployee with multiple assignments hasmultiple assignment numbers.
Assignment Set A grouping of employeesand/or applicants that you define forrunning QuickPaint reports and processingpayrolls. See also: QuickPaint Report
Assignment Status For employees, used totrack their permanent or temporarydepartures from your enterprise, and tocontrol the remuneration they receive. Forapplicants, used to track the progress oftheir applications.
Base Currency The currency in which OraclePayroll performs all payroll calculations foryour Business Group. If you payemployees in different currencies to this,Oracle Payroll calculates the amounts basedon exchange rates defined on the system.
Behavioral Indicators Characteristics thatidentify how a competence is exhibited inthe work context. See also: Proficiency Level

Glossary – 2 Oracle Human Resources US User’s Guide
Benefit Any part of an employee’sremuneration package that is not pay.Vacation time, employer–paid medicalinsurance and stock options are allexamples of benefits. See also: Elements
Block The largest subordinate unit of awindow, containing information for aspecific business function or entity. Everywindow consists of at least one block.Blocks contain fields and, optionally,regions. They are delineated by a bevellededge. You must save your entries in oneblock before navigating to the next. Seealso: Region, Field
Budget Value In Oracle Human Resourcesyou can enter staffing budget values andactual values for each assignment tomeasure variances between actual andplanned staffing levels in an organization orhierarchy.
Business Group The highest levelorganization in the Oracle HRMS system.A Business Group may correspond to thewhole of your enterprise or to a majorgrouping such as a subsidiary or operatingdivision. Each Business Group mustcorrespond to a separate implementation ofOracle HRMS.
CCalendars In Oracle Human Resources you
define calendars that determine the startand end dates for budgetary years, quartersand periods. For each calendar you select abasic period type.
Career Map A plan showing the expectedroutes by which employees can progressfrom one job to another within the BusinessGroup.
Cash Analysis A specification of the differentcurrency denominations required forpaying your employees in cash. Unioncontracts may require you to follow certaincash analysis rules.
Compensation The pay you give toemployees, including wages or salary, andbonuses. See also: Elements
Competence Any measurable behaviorrequired by an organization, job or positionthat a person may demonstrate in the workcontext. A competence can be a piece ofknowledge, a skill, an attitude or anattribute.
Competence Profile Where you recordapplicant and employee accomplishments,for example, proficiency in a competence.
Competence Requirements Competenciesrequired by an organization, job or position.See also: Competence, Core Competencies
Competence Type A group of relatedcompetencies
Consolidation Set A grouping of payroll runswithin the same time period for which youcan schedule reporting, costing, andpost–run processing.
Contact A person who has a relationship to anemployee that you want to record.Contacts can be dependents, relatives,partners or persons to contact in anemergency.
Core Competencies Competencies requiredby every person to enable the enterprise tomeet its goals. See also: Competence

Glossary – 3
Costable Type A feature that determines theprocessing an element receives foraccounting and costing purposes. There arefour costable types in Oracle HRMS:costed, distributed costing, fixed costing,and not costed.
Costing Recording the costs of an assignmentfor accounting or reporting purposes.Using Oracle Payroll, you can calculate andtransfer costing information to your generalledger and into systems for projectmanagement or labor distribution.
Customizable Forms Forms that your systemadministrator can modify for ease of use orsecurity purposes by means of CustomForm restrictions. The Form Customizationwindow lists the forms and their methodsof customization.
DDatabase Item An item of information in
Oracle HRMS that has specialprogramming attached, enabling OracleFastFormula to locate and retrieve it for usein formulas.
Date To and Date From These fields are usedin windows not subject to DateTrack. Theperiod you enter in these fields remainsfixed until you change the values in eitherfield. See also: DateTrack, Effective Date
DateTrack When you change your effectivedate (either to past or future), DateTrackenables you to enter information that takeseffect on your new effective date, and toreview information as of the new date. Seealso: Effective Date
Deployment Factors See: Work Choices
Descriptive Flexfield A field that yourorganization can customize to captureadditional information required by yourbusiness but not otherwise tracked byOracle Applications. See also: Key Flexfield
EEffective Date The date for which you are
entering and viewing information. You setyour effective date in the Alter EffectiveDate window. See also: DateTrack
Elements Components in the calculation ofemployee pay. Each element represents acompensation or benefit type, such assalary, wages, stock purchase plans, andpension contributions.
Element Classifications These control theorder in which elements are processed andthe balances they feed. Primary elementclassifications and some secondaryclassifications are predefined by OraclePayroll. Other secondary classifications canbe created by users.
Element Entry The record controlling anemployee’s receipt of an element, includingthe period of time for which the employeereceives the element and its value. See also:Recurring Elements, Nonrecurring Elements
Element Link The association of an element toone or more components of an employeeassignment. The link establishes employeeeligibility for that element. Employeeswhose assignment components match thecomponents of the link are eligible for theelement. See also: Standard Link

Glossary – 4 Oracle Human Resources US User’s Guide
Element Set A group of elements that youdefine to process in a payroll run, or tocontrol access to compensation informationfrom a customized form, or for distributingcosts.
Employment Category A component of theemployee assignment. Four categories aredefined: Full Time – Regular, Full Time –Temporary, Part Time – Regular, and PartTime – Temporary.
Event An activity such as a training day,review, or meeting, for employees orapplicants.
FField A view or entry area in a window where
you enter, view, update, or deleteinformation. See also: Block, Region
Form A predefined grouping of functions,called from a menu and displayed, ifnecessary, on several windows. Formshave blocks, regions and fields as theircomponents. See also: Block, Region, Field
GGlobal Value A value you define for any
formula to use. Global values can be dates,numbers or text.
Grade A component of an employee’sassignment that defines their level and canbe used to control the value of their salaryand other compensation elements.
Grade Comparatio A comparison of theamount of compensation an employeereceives with the mid–point of the validvalues defined for his or her grade.
Grade Rate A value or range of valuesdefined as valid for a given grade. Usedfor validating employee compensationentries.
Grade Scale A sequence of steps valid for agrade, where each step corresponds to onepoint on a pay scale. You can place eachemployee on a point of their grade scaleand automatically increment all placementseach year, or as required. See also: Pay Scale
Grade Step An increment on a grade scale.Each grade step corresponds to one pointon a pay scale. See also: Grade Scale
Group A component that you define, usingthe People Group key flexfield, to assignemployees to special groups such aspension plans or unions. You can usegroups to determine employees’ eligibilityfor certain elements, and to regulate accessto payrolls.
HHierarchy An organization or position
structure showing reporting lines or otherrelationships. You can use hierarchies forreporting and for controlling access toOracle HRMS information.
IInput Values Values you define to hold
information about elements. In OraclePayroll, input values are processed byformulas to calculate the element’s runresult. You can define up to fifteen inputvalues for an element.

Glossary – 5
KKey Flexfield A flexible data field made up of
segments. Each segment has a name youdefine and a set of valid values you specify.Used as the key to uniquely identify anentity, such as jobs, positions, grades, costcodes, and employee groups. See also:Descriptive Flexfield
Leaver’s Statement Records details ofStatutory Sick Pay (SSP) paid during aprevious employment (issued as formSSP1L) which is used to calculate a newemployee’s entitlement to SSP. If a newemployee falls sick, and the last date thatSSP was paid for under the previousemployment is less than eight calendarweeks before the first day of the PIW forthe current sickness, the maximum liabilityfor SSP is reduced by the number of weeksof SSP shown on the statement.
MMenus You set up your own navigation
menus, to suit the needs of different users.
NNACHA National Automated Clearing House
Association. This is the US system formaking direct deposit payments toemployees.
Nonrecurring Elements Elements that processfor one payroll period only unless youmake a new entry for an employee. Seealso: Recurring Elements
O
Oracle FastFormula An Oracle tool thatallows you to write Oracle HRMS formulaswithout using a programming language.
Organization A required component ofemployee assignments. You can define asmany organizations as you want withinyour Business Group. Organizations can beinternal, such as departments, or external,such as recruitment agencies. You canstructure your organizations intoorganizational hierarchies for reportingpurposes and for system access control.
PPay Scale A set of progression points, which
can be related to one or more rates of pay.Employee’s are placed on a particular pointon the scale according to their grade and,usually, work experience. See also: GradeScale
Payment Type There are three standardpayment types for paying employees:check, cash and direct deposit. You candefine your own payment methodscorresponding to these types.
Payroll A group of employees that OraclePayroll processes together with the sameprocessing frequency, for example, weekly,monthly or bimonthly. Within a BusinessGroup, you can set up as many payrolls asyou need.
Performance (within Assessment) Anexpectation of ”normal” performance of acompetence over a given period. Forexample, a person may exceed performanceexpectation in the communicationcompetence. See also: Proficiency (withinAssessment), Competence, Assessment

Glossary – 6 Oracle Human Resources US User’s Guide
Period Type A time division in a budgetarycalendar, such as week, month, or quarter.
Person Type There are eight system persontypes in Oracle HRMS. Seven of these arecombinations of employees, ex–employees,applicants, and ex–applicants. The eighthcategory is ’External’. You can create yourown user person types based on the eightsystem types.
Position A specific role within the BusinessGroup derived from an organization and ajob. For example, you may have a positionof Shipping Clerk associated with theorganization Shipping and the job Clerk.
Proficiency (within Assessment) Theperceived level of expertise of a person in acompetence, in the opinion of the assessor,over a given period. For example, a personmay demonstrate the communicationcompetence at Expert level. See also:Performance (within Assessment), Competence,Assessment
Proficiency Level A system for expressing andmeasuring how a competence is exhibitedin the work context. See also: BehavioralIndicators.
Progression Point A pay scale is calibrated inprogression points, which form a sequencefor the progression of employees up the payscale. See also: Pay Scale
Glossary – 7
QQualification Type An identified
qualification method of achievingproficiency in a competence, such as anaward, educational qualification, a licenseor a test. See: Competence
QuickCode Types Categories of information,such as nationality, address type and taxtype, that have a limited list of valid values.You can define your own QuickCode Types,and you can add values to some predefinedQuickCode Types.
QuickPaint Report A method of reporting onemployee and applicant assignmentinformation. You can select items ofinformation, paint them on a report layout,add explanatory text, and save the reportdefinition to run whenever you want. Seealso: Assignment Set
RRates A set of values for employee grades or
progression points. For example, you candefine salary rates and overtime rates.
Rating Scale Used to describe an enterprise’scompetencies in a general way. You do nothold the proficiency level at the competencelevel. See also: Proficiency Level
Recruitment Activity An event or program toattract applications for employment.Newspaper advertisements, career fairsand recruitment evenings are all examplesof recruitment activities. You can groupseveral recruitment activities togetherwithin an overall activity.
Recurring Elements Elements that processregularly at a predefined frequency.Recurring element entries exist from thetime you create them until you delete them,or the employee ceases to be eligible for theelement. Recurring elements can havestandard links. See also: NonrecurringElements, Standard Link
Region A collection of logically related fieldsin a window, set apart from other fields bya rectangular box or a horizontal line acrossthe window. See also: Block, Field
Report Parameters Inputs you make whensubmitting a report to control the sorting,formatting, selection, and summarizing ofinformation in the report.
Report Security Group A list of reports andprocesses that can be submitted by holdersof a particular responsibility. See also:Responsibility
Report Set A group of reports and concurrentprocesses that you specify to run together.
Requisition The statement of a requirementfor a vacancy or group of vacancies.
Responsibility A level of authority in anapplication. Each responsibility lets youaccess a specific set of Oracle Applicationsforms, menus, reports, and data to fulfillyour business role. Several users can sharea responsibility, and a single user can havemultiple responsibilities. See also: SecurityProfile, User Profile Options, Report SecurityGroup

Glossary – 8 Oracle Human Resources US User’s Guide
Retry Method of correcting a payroll run orother process before any post–runprocessing takes place. The original runresults are deleted and the process is runagain.
Reversal Method of correcting payroll runs orQuickPay runs after post–run processinghas taken place. The system replacespositive run result values with negativeones, and negative run result values withpositive ones. Both old and new valuesremain on the database.
Rollback Method of removing a payroll runor other process before any post–runprocessing takes place. All assignmentsand run results are deleted.
SSalary Basis The period of time for which an
employee’s salary is quoted, such as hourlyor annually. Defines a group of employeesassigned to the same salary basis andreceiving the same salary element.
Security Profile Security profiles controlaccess to organizations, positions andemployee and applicant records within theBusiness Group. System administrators usethem in defining users’ responsibilities. Seealso: Responsibility, User Profile Options
Special Information Types Categories ofpersonal information, such as skills, thatyou define in the Personal Analysis keyflexfield.
Standard Link Recurring elements withstandard links have their element entriesautomatically created for all employeeswhose assignment components match thelink. See also: Element Link, RecurringElements
TTask Flows A sequence of windows linked by
buttons to take you through the stepsrequired to complete a task, such as hiring anew recruit. System administrators cancreate task flows to meet the needs ofgroups of users.
Terminating Employees You terminate anemployee when he or she leaves yourorganization. Information about theemployee remains on the system but allcurrent assignments are ended.
Termination Rule Specifies when entries of anelement should close down for an employeewho leaves your enterprise. You can definethat entries end on the employee’s actualtermination date or remain open until afinal processing date.
UUser Profile Options Features that allow
system administrators and users to tailorOracle HRMS to their exact requirements.See also: Responsibility, Security Profile
VWork Choices Also known as Deployment or
Work Factors. These can affect a person’scapacity to be deployed within anenterprise, such willingness to travel orrelocate. You can hold work choices at bothjob and position, or at person level.
Work Structures The fundamental definitionsof organizations, jobs, positions, grades,payrolls and other employee groups withinyour enterprise that provide the frameworkfor defining the work assignments of youremployees.

Index – 1
Index
AAAP reporting
data for, 17 – 15hierarchies for, 17 – 13organizations for, 16 – 18, 17 – 13overview of, 17 – 12 to 17 – 14setup steps for, 17 – 16
Absence categories, for absence types, 26 – 2 to26 – 4
Absence elementsbalances for, 26 – 5 to 26 – 7definition and linking of, 26 – 9 to 26 – 11
Absence typesdatabase items, C – 26definition of, 26 – 11 to 26 – 16listing by, 26 – 17
ABSENCE_CATEGORY, 26 – 9, 26 – 12ABSENCE_REASON, 26 – 9, 26 – 12Absences
authorization of and replacements for, 26 – 7batch entry of, 26 – 7, 26 – 30defining and linking elements for, 26 – 9defining types of, 26 – 11 to 26 – 16elements for, 26 – 4 to 26 – 7employee’s history of, 26 – 16initializing balances for, 26 – 6recording of, 26 – 7 to 26 – 8, 26 – 14 to 26 –
15referencing in payroll runs, 26 – 7relief position, 3 – 12reporting for, 26 – 18reviewing, 26 – 16 to 26 – 18setup for recording, 26 – 9 to 26 – 13
types, categories and reasons, 26 – 2 to 26 – 4Accepted assignment status, 15 – 15Accrual plans. See PTO accrual plansAccrued PTO. See PTOActive application assignment status, 15 – 15Active assignment status, 28 – 5ADA reporting
information for, 13 – 26, 17 – 28 to 17 – 31overview of, 17 – 28registering employees with disabilities, 13 –
6setup steps for, 17 – 30
Address styles, B – 9ADDRESS_TYPE, 13 – 11, 13 – 13Addresses
floor or office numbers, 14 – 12for work sites, 2 – 2 to 2 – 3generic, for people, 13 – 11validated, for people, 13 – 12
Affirmative action plans. See AAP reportingAlerts, competencies, 19 – 10APL_ASSIGN_REASON, 15 – 12, 15 – 16APL_EVENT_TYPE, 15 – 18, 27 – 2APL_INTERVIEW_TYPE, 15 – 17Applicant assignment statuses, 15 – 15 to 15 –
18mass update of, 15 – 19reporting on, 14 – 33secondary statuses, 15 – 16user statuses for, 28 – 7
Applicant assignments, 15 – 10

Index – 2 Oracle Human Resources North American User’sGuide
Applicant Details Report, 13 – 31Applicant information, 13 – 8Applicant number, 13 – 5Applicants
entering, 15 – 10hiring, 15 – 19interviewing, 15 – 17listing, 13 – 3mass update of status, 15 – 19referring to another recruiter, 15 – 19reporting on, 15 – 10, 15 – 22skills matching, 15 – 5terminating, 15 – 21tracking progress of, 15 – 15 to 15 – 16
Application Data Export, 33 – 5Appraisal
overview, 22 – 14questionnaire, 22 – 14
creating, 22 – 18, 22 – 23template, 22 – 15
creating or changing, 22 – 31Appraisals, 18 – 12, 27 – 4
See also Performance reviewsAssessment
competence–based, 22 – 3measuring competencies, 22 – 3template, 22 – 4
calculating scores, 22 – 8changing or deleting, 22 – 9different types, 22 – 4proficiency levels, 22 – 6
Assessments, 18 – 12Assignment components
and element eligibility rules, 7 – 25and element links, 7 – 6and pay processing requirements, 14 – 5
Assignment Details Report, 13 – 31Assignment reporting
Assignment Status Report, 14 – 33Assignments Folder, 14 – 26
Assignment sets, 30 – 14Assignments
See also Employee assignmentsfor applicants, 15 – 10for employees, 14 – 4verifying for a mass move, 3 – 31
Attachments, 33 – 6Audit groups, 35 – 2AuditTrail, 35 – 2
setting up audit groups, 35 – 2Automatic element entry
HR example of, 7 – 28payroll example of, 7 – 28standard links for, 7 – 27
BBackground check information, 13 – 8Balances, fiscal year, 2 – 27Bank account information, B – 11Bank information, for employees, 14 – 23Base currency, 29 – 7Batch element entry
BEE facility for, 8 – 3 to 8 – 11PayMIX facility for, 8 – 12 to 8 – 13
Batch processing, generating letters, 33 – 12 to33 – 15
BEEfor batch element entry, 8 – 2, 8 – 3 to 8 – 11procedures for, 8 – 4
Behavioral indicators, competencies, 19 – 2Beneficiaries
entering organizations as, 2 – 23entry of, 13 – 16 to 13 – 20recording, 10 – 20 to 10 – 23
Benefit plans for health careCOBRA–eligible, 10 – 24defining elements for, 10 – 6 to 10 – 8dependent coverage under, 10 – 14enrolling employees in, 10 – 14initiating deductions for, 10 – 5 to 10 – 7reviewing enrollment in, 10 – 14
Benefitsbeneficiaries for, 10 – 4, 10 – 20classifications for, 10 – 3defining carriers of, 2 – 23, 10 – 2defining elements for, 10 – 6 to 10 – 7dependent coverage under, 10 – 16 to 10 – 19enrolling employees in, 10 – 3establishing eligibility for, 10 – 2initiating deductions for, 10 – 5 to 10 – 6

Index – 3
overview of, 10 – 2using elements to represent, 10 – 2 to 10 – 4
Benefits classificationsfor COBRA–eligible benefits, 10 – 3for elements representing benefits, 7 – 3list of, 10 – 3
Benefits creation, 10 – 5with Oracle Payroll, 10 – 5 to 10 – 6without Oracle Payroll, 10 – 6
Benefits Table, entries for, 10 – 7, 10 – 12Blood type, entry of, 13 – 9Booking events, 15 – 18, 27 – 3Budget value defaults, 2 – 27BUDGET_MEASUREMENT_TYPE, 2 – 28,
12 – 3Budgets
for people, 12 – 2 to 12 – 11for salaries, 9 – 16 to 9 – 17, 12 – 5 to 12 –
11in centralized management enterprises, 9 –
17in devolved management enterprises, 9 – 17in project based enterprises, 6 – 5in rule based enterprises, 6 – 8, 9 – 16, 12 – 5viewing variances, 12 – 9
Business Groupsadditional information for, 2 – 24defaults for, 2 – 27 to 2 – 28defining, 2 – 20 to 2 – 24key flexfields for, 2 – 4 to 2 – 6representing companies in, 2 – 15 to 2 – 17startup data, 2 – 7
CCalendars
for budgets, 12 – 7for employee absences, 26 – 7for payrolls, 5 – 8for PTO accrual plans, 26 – 19
Career Management, defining your enterprisecompetencies, 18 – 10
Career pathsdefining, 23 – 8naming, 23 – 5, 23 – 7, 23 – 8
Career planning, 18 – 14, 23 – 2 to 23 – 10Careers, planning, 23 – 2Categories of elements, 7 – 3
listing of, 7 – 8 to 7 – 15Classifications of elements
See also Element classificationsfor benefits, 10 – 3 to 10 – 5primary, 7 – 8primary and benefits, 7 – 3
Classifying organizations. See Organizations,classifications for
COBRACoverage Report, 10 – 32Expiration Letter, 10 – 32Grace Period Expiration Letter, 10 – 32Notification Letter, 10 – 32Payments Report, 10 – 32
COBRA continued coveragepremium payment schedules for, 10 – 31receipt of premium payments for, 10 – 31setting up, 10 – 30standard letters relating to, 10 – 25
COBRA qualifying eventsfor employees and dependents, 10 – 24recording of, 10 – 28
COBRA reportsCOBRA Coverage, 10 – 25 to 10 – 34COBRA Payments, 10 – 26
COBRA termination reasonsadding to list of, 10 – 27in startup data, 10 – 27
COBRA–eligible benefit plansadministration of, 10 – 24changing coverage status of, 10 – 29employer responsibilities for, 10 – 24recording qualifying events for, 10 – 28
College attendances, 13 – 19Comments, 33 – 6Common framework, competence approach,
advantages, 18 – 2Common paymaster, 2 – 21Comparatio values for grades, 4 – 10Comparing with accomplishments, require-
ments, competence approach, 20 – 3

Index – 4 Oracle Human Resources North American User’sGuide
Compensation and benefitsrelating grades to, 4 – 3, 4 – 6salary administration, 9 – 2 to 9 – 15using elements to represent, 7 – 2 to 7 – 4
Competence approachcommon framework, advantages, 18 – 2controlling your operation, 18 – 8identifying your business goals, 18 – 9
Competence gap analysis, 18 – 14Competence profile, copying competencies, 13
– 19Competence profiles, 13 – 19Competence requirements
creating, 20 – 2overview, 18 – 10
Competence typescreating, 19 – 16deleting, 19 – 16
Competenciesa definition, 19 – 2alerts, 19 – 10behavioral indicators, 19 – 2certification, 19 – 13copying, competence profile, 13 – 19core, 20 – 2creating, 19 – 10essential, 20 – 4grouping, 19 – 14leadership, 20 – 2proficiency levels, 19 – 2structuring, 19 – 4
general method, 19 – 5individual method, 19 – 4which method, 19 – 6
Competencies and OTA, 18 – 14setting up Career Management, 21 – 2
Concurrent managers, 30 – 5CONTACT, 13 – 16Contacts, 28 – 2
entry of, 13 – 16 to 13 – 20Contract staff, 6 – 12CONTROL_TYPE, 8 – 4Controlling your operation, Career Manage-
ment, 18 – 8Copying competencies, competence profile, 13
– 19
Core competencies, creating, 20 – 2Corporate Headquarters
See also Reporting Organizationsdefining, 2 – 23hierarchies for, 16 – 10 to 16 – 15Reporting Establishment for, 16 – 17 to 16
– 19Cost Allocation key flexfield, 2 – 6, B – 4
cost centers in, 11 – 2 to 11 – 6customizing segment names of, 2 – 8entry overrides, 11 – 6examples of, 11 – 2 to 11 – 6qualifiers for, 11 – 11 to 11 – 13setup of, 11 – 11 to 11 – 13use of, 11 – 5 to 11 – 6
Cost centersdefining organizations as, 11 – 9example of cost allocation to, 11 – 18 to 11 –
19for organizations, 2 – 16in the Cost Allocation flexfield, 11 – 2 to 11 –
6Costable types
for costing information, 11 – 7for element links, 7 – 38
Costingfor organizations, 2 – 30for payrolls, 5 – 8salary budgeting, 9 – 16 to 9 – 17, 12 – 5 to
12 – 11Costing information
examples of, 11 – 18 to 11 – 21for assignments, 11 – 9 to 11 – 10for element entries, 11 – 10 to 11 – 12for element links, 11 – 7 to 11 – 9for GL debits and credits, 11 – 8for organizations and assignments, 11 – 9 to
11 – 11for payrolls, 11 – 6for projects, 6 – 4for taxes, 11 – 14 to 11 – 16PayMIX entry for, 8 – 14, 8 – 18process for accumulating, 11 – 17 to 11 – 19transfer to Oracle GL, 11 – 24 to 11 – 26
Country–specific featuresaddress styles, B – 9in key flexfields, B – 10

Index – 5
Currencies, enabling, 29 – 7Current and Projected Progression Point Val-
ues Report, 4 – 18Customizing
Event Bookings window, 27 – 2List People by Special Information window,
13 – 28menu structures, 31 – 17 to 31 – 19People Folder window, 13 – 3People window, 13 – 4QuickPaint Report window, 30 – 13Special Information window, 13 – 26Table Values window, 32 – 17windows, 31 – 2, 31 – 3 to 31 – 8
DDatabase items
and payroll formula inputs, 7 – 21in QuickPaint reports, 30 – 10list of dynamic items, C – 19list of static items, C – 2
Date earnedfor PayMIX entries of PTO taken, 26 – 11of PayMIX entries, 8 – 15, 8 – 19 to 8 – 25
DateTrack, 1 – 9, 1 – 10 to 1 – 19changing datetracked information, 1 – 14 to
1 – 15Date Security user profile option, 1 – 11deleting datetracked information, 1 – 15Reminder user profile option, 1 – 12
DateTrack History, 1 – 13DateTrack:Date Security, 29 – 6DateTrack:Reminder, 29 – 6Deductions
batch entry for, 8 – 17 to 8 – 18classifications for, 7 – 11frequency rules for, 7 – 23 to 7 – 25
Deductions taken against a particular earnings,PayMIX entry to control, 8 – 14, 8 – 18
Deductions, pre–tax. See Pre–tax deductionsDefine Rate form, modes, 31 – 20Defining a health care plan element
entry of processing information, 10 – 9 to 10– 11
ER and EE contributions, 10 – 10
identifying the benefit carrier, 10 – 10prerequisites and steps for, 10 – 8 to 10 – 13setting up input values for, 10 – 10termination rule for, 10 – 10
Defining an element to hold informationinput value validation, 7 – 32processing rules, 7 – 33 to 7 – 35termination rule selection, 7 – 33
Dependentsbenefits coverage for, 10 – 3, 10 – 16entry of, 13 – 16 to 13 – 20stopping coverage for, 10 – 17 to 10 – 22
Descriptive flexfieldscreating database items, B – 6defining segments of, 31 – 2 to 31 – 4explained, 31 – 2, B – 5for address styles, B – 9list of user definable, B – 6 to B – 9protected, B – 10
DisabilitiesSee also ADA reportingaccommodation requests for, 17 – 31 to 17 –
32recording types of, 17 – 31registration of, 17 – 31
Disability leave, 28 – 7Distributed costing
example of, 11 – 19 to 11 – 26for employer charges, as overhead, 11 – 8 to
11 – 10Distribution set, for distributed costing, 11 – 8Distribution sets, 31 – 5
EEarnings and deductions, initiation and gen-
eration of, 7 – 5Earnings types
batch entry for, 8 – 17 to 8 – 18classifications and categories for, 7 – 10Regular Salary, 9 – 2 to 9 – 6Regular Wages, 9 – 2
Education leave, 28 – 7EEO job categories, 17 – 3 to 17 – 5
Index – 6 Oracle Human Resources North American User’sGuide
EEO–1 reportingethnic categories for, 17 – 3job categories for, 17 – 3overview of, 17 – 2 to 17 – 4setup steps for, 17 – 5
Effective dates, 1 – 9, 1 – 11Element categories. See Categories of elementsElement classifications
and processing priorities, 7 – 14 to 7 – 16for earnings types, 7 – 10for employer liabilities, 7 – 12for non–payroll payments, 7 – 11for non–tax deductions, 7 – 11for PTO accruals, 7 – 11for tangible items, 7 – 13for taxes, 7 – 12Information, 7 – 13table of, 7 – 8 to 7 – 11
Element definition, 7 – 4 to 7 – 6See also Element generation
Element entriesautomatic, using standard links, 7 – 27batch entry using BEE or PayMIX, 7 – 29 to 7
– 31for eligible employees, 7 – 27indirect formula results for, 7 – 29manual, for individual employees, 7 – 27, 7 –
41 to 7 – 43reviewing, 7 – 44standard links for automatic, 7 – 27supplying end dates for, 7 – 27, 10 – 3using salary administration, 7 – 27viewing a history of, 7 – 44viewing list of employees with, 7 – 45
Element generation by Oracle Payroll, initia-tion of, 7 – 5
Element linksSee also Linksand eligibility rules, 7 – 25 to 7 – 27components of, 7 – 25costing information on, 11 – 7 to 11 – 8defining, 7 – 37 to 7 – 40report for reviewing, 7 – 39 to 7 – 40
Element processing priority, default values for,7 – 14
Element sets, 31 – 5
ElementsSee also Element links, element entriesbatch entry of, 8 – 2classifications and categories of, 7 – 3, 7 – 8
to 7 – 15costing information for, 11 – 7 to 11 – 9creation of, 7 – 4database items, C – 19defining, for absence types, 26 – 9 to 26 – 11defining, for health care plans, 10 – 8defining, to hold information, 7 – 32 to 7 – 35eligibility rules for, 7 – 25 to 7 – 27entry of, 7 – 7formulas for, 7 – 4, 7 – 21 to 7 – 23generated, for PTO accrual plans, 26 – 19 to
26 – 20included in Oracle HRMS, 7 – 5input values of, 7 – 3, 7 – 16 to 7 – 20linking of, 7 – 6, 7 – 37 to 7 – 40manual entry of, 7 – 41 to 7 – 43nonrecurring, 5 – 2Oracle HR uses for, 7 – 2Oracle Payroll uses for, 7 – 2 to 7 – 4processing types of, 7 – 4, 7 – 23 to 7 – 25
Eligibility rulesand element links, 7 – 6criteria used in, 7 – 25 to 7 – 27
Email ID information, entry of, 13 – 6EMP_ASSIGN_REASON, 14 – 12EMP_EVENT_TYPE, 27 – 2EMP_INTERVIEW_TYPE, 27 – 4Employee assignment number, 14 – 10Employee assignment statuses, 28 – 5 to 28 –
6and payroll processing, 28 – 5element entries valid for, 28 – 5reporting on, 14 – 33secondary statuses, 28 – 6
Employee assignmentsallocation of costs for, 14 – 6and work structures, 14 – 4 to 14 – 19changes to, and DateTrack, 14 – 14components of, 14 – 5defining as primary, 14 – 12definition, 14 – 4ending all, 14 – 17 to 14 – 18

Index – 7
ending one of multiple, 14 – 16entering, 14 – 9 to 14 – 13history, 14 – 36inquiring and reporting on, 14 – 26 to 14 – 36manager–level, 14 – 12numbers for, 14 – 7payment methods for, 14 – 22 to 14 – 24placing in GREs, 14 – 10position based, 6 – 6primary assignments, 14 – 6project based, 6 – 2 to 6 – 6using multiple assignments, 14 – 6
Employee groups, 5 – 10People Group flexfield for, 2 – 5
Employee Increment Results Report, 4 – 19Employee lists
by absence type, 26 – 17by assignment components, 14 – 26by assignment statuses, 14 – 33by organization, 14 – 29by personal information, 13 – 3by position, 14 – 31by position hierarchy, 14 – 32by special information type, 13 – 28
Employee numbers, 13 – 5, 14 – 7Employee Organization Movements Report, 14
– 34Employee Payroll Movements Report, 14 – 34Employee statuses, formulas for different, 7 –
22Employee Summary Report, 14 – 34Employer
charges, distribution of, 11 – 8liabilities, classification for, 7 – 12taxes, classification for, 7 – 12
Employmenthiring, 13 – 10history, 14 – 36
Employment categoriesadding new, 14 – 5assigning employees to, 14 – 10full time and part time, 14 – 5in startup data, 14 – 5
Employment informationmaking changes to, 14 – 3table of, 14 – 2
End assignment status, 14 – 16, 28 – 5End Dates, removing, 1 – 16Enterprise competencies, Career Management,
18 – 10Entries. See Element entriesEssential, competencies, 20 – 4Establishment hierarchies
and Reporting Establishments, 16 – 4example of, 16 – 5, 16 – 6, 16 – 8for AAP reports, 16 – 6, 16 – 22for headquarters organizations, 16 – 10 to
16 – 15for multi–establishment GREs, 16 – 7 to 16
– 10for single–establishment GREs, 16 – 6rule for, 16 – 6setup of, 16 – 21 to 16 – 23varieties of, 16 – 6
EstablishmentsSee also Reporting organizationsfor government reporting, 16 – 3 to 16 – 4for OSHA reports, 16 – 3, 17 – 35
Ethnic origincategories for, 17 – 3entry of, 13 – 6
EVAL_SYSTEM, 3 – 14EVAL_SYSTEM_MEAS, 3 – 14Evaluation systems, 3 – 14Event management, 15 – 18, 27 – 2External organizations, 2 – 14, 2 – 17
classifications for, 2 – 23defining, 2 – 20
FFiscal year, balances for, 2 – 27Folders, 30 – 3 to 30 – 8FORM_MODE, 31 – 21Formulas
and employee statuses, 7 – 22and Oracle FastFormula, 7 – 21conditional logic in, 7 – 21 to 7 – 23for element processing, 7 – 21 to 7 – 23for payroll calculations, 7 – 21
Index – 8 Oracle Human Resources North American User’sGuide
for tax calculations, 7 – 22for validation, 28 – 4in payroll startup data, 7 – 22indirect results and element entry, 7 – 29processing rules for, 7 – 22result rules for, 7 – 22
Free text information, 25 – 4FREQUENCY, 2 – 29Frequency rules, for recurring deductions, 7 –
23Full Applicant Details Report, 15 – 10Full Personal Details Report Set, 13 – 31Further name information, 13 – 9
GGender information, entry of, 13 – 5General ledger. See GL codesGenerate Secure User process, 34 – 15Generated elements, pay values of, 7 – 19 to 7 –
21Generating letters, batch processing, 33 – 12
to 33 – 15GL codes
costs transfer to Oracle GL, 11 – 24 to 11 – 26example of cost allocation to, 11 – 18 to 11 –
19for federal taxes, 11 – 15for state and local taxes, 11 – 15 to 11 – 17in the Cost Allocation flexfield, 11 – 2 to 11 –
6Government Reporting Entities. See GREsGovernment–mandated HR reports
overview of, 16 – 2preparations for, 16 – 12Reporting Categories and Statuses for, 16 –
3reporting organizations for, 16 – 3
Grade Name key flexfield, 2 – 4, 4 – 2, B – 3Grade rates, 4 – 8 to 4 – 10
for salary proposal validation, 9 – 7Grade scales, 4 – 12Grade steps, 4 – 15
incrementing placements, 4 – 18placing employees on, 4 – 16
Grades, 4 – 2 to 4 – 5assigning an employee to, 14 – 10comparatio values, 4 – 10defining, 4 – 4 to 4 – 6relating to progression points, 4 – 15valid grades for jobs and positions, 3 – 16, 4
– 3Grant Permissions To Roles process, 34 – 15Graphics, 13 – 16GREs
additional information for, 2 – 25and common paymasters, 2 – 9and Legal Entities, 2 – 9and tax groups, 2 – 12defining, 2 – 20, 2 – 23functions of, 2 – 9identification number for, 2 – 9, 2 – 30NACHA information for, 5 – 5placing employee assignments in, 14 – 10
Group Term Life premiums, predefined tablefor, 32 – 11
Grouping competencies, 19 – 14
HHeadcount, 12 – 2 to 12 – 11, 15 – 4Health and safety requirements, for jobs or
positions, 3 – 6Hiring people, 13 – 10, 15 – 19
New Hire reports, 13 – 32 to 13 – 36History, of assignments, 14 – 36Honors, entry of, 13 – 9Hot defaults
consequences of overriding, 7 – 35, 7 – 43, 10– 11
for automatic updating, 7 – 35, 10 – 11Hours of work, 14 – 12
entering defaults for, 2 – 8, 2 – 28 to 2 –29
work schedules for, 2 – 31 to 2 – 33HR Organizations
additional information for, 2 – 25classification for, 2 – 20
HR User, profile option, 10 – 9HR User Type, 33 – 3

Index – 9
HR:Business Group, 29 – 5HR:Query Only Mode, 29 – 5HR:Security Profile, 29 – 5HR:Use Standard Attachments, 29 – 5HR:User Type, 29 – 5HR_CUSTOMIZATION, 31 – 20Human resource management
budgeting, 12 – 2 to 12 – 11career planning, 23 – 2 to 23 – 10cycle of functions, 1 – 4employee reviews, 27 – 4 to 27 – 7evaluating jobs and positions, 3 – 14 to 3 – 17integrating with payroll management, 1 – 3salary administration and performance re-
views, 9 – 2 to 9 – 15
II–9 information, 13 – 7
entry of, 13 – 6Identifying your business goals, competence
approach, 18 – 9Implementation of HRMS
in hybrid enterprise structures, 6 – 10 to 6 –12
in project based enterprises, 6 – 2 to 6 – 6in rule based enterprises, 6 – 6 to 6 – 13
Increment Progression Points process, 4 – 18Indirect results, costing elements with entries
of, 11 – 7 to 11 – 9Information infrastructure, 18 – 3Input value entries
element level defaults for, 7 – 17hot defaults for, 7 – 35, 7 – 43, 10 – 11link level defaults for, 7 – 18, 7 – 26units of measure for, 7 – 16validation for, 7 – 16 to 7 – 18
Input valuesand formula inputs, 7 – 21default entries for, 7 – 17 to 7 – 19establishing, for Information elements, 7 – 34
Inquiry windows, list of, 30 – 3Insurance carriers, defining, 2 – 22
International relocation, employee preferences,13 – 21
Interviewswith applicants, 15 – 17with employees, 27 – 4
JJob and Position Skills Matching Report, 25 – 5Job codes, 3 – 5Job Name key flexfield, 2 – 4, 3 – 5, B – 3Jobs
assigning an employee to, 14 – 10career paths, 23 – 7contrasted with positions, 3 – 2defining, 3 – 8entering valid grades, 3 – 16evaluating, 3 – 14in project based enterprises, 6 – 4lines of progression for, 17 – 17 to 17 – 18representing jobs and positions, 3 – 2 to 3 – 7skill requirements of, 3 – 17work choices, 3 – 18
Jurisdiction, and PayMIX entry of location, 8– 14 to 8 – 17, 8 – 18
KKey flexfields, 1 – 17
Bank Details, B – 11Cost Allocation, 11 – 2 to 11 – 10creating database items, B – 4for country–specific information, B – 10 to B
– 12Grade Name, 4 – 2in Oracle HRMS, 2 – 4 to 2 – 6Job Name, 3 – 5People Group, 5 – 10Personal Analysis, 2 – 5 to 2 – 6, 28 – 10Position Name, 3 – 5protected, B – 10setting up, B – 3Soft Coded Legislation, B – 11uses of, B – 2

Index – 10 Oracle Human Resources North American User’sGuide
LLabor costs
See also Costing informationand the Cost Allocation flexfield, 11 – 2example allocation of, 11 – 18 to 11 – 19
Leadership competencies, creating, 20 – 2Legal entities. See GREsLegislation Code, 2 – 27Length of service bands
for PTO accrual plans, 26 – 21setup of, 26 – 26 to 26 – 27
LetterCOBRA Expiration, 10 – 32COBRA Grace Period Expiration, 10 – 32COBRA Notification, 10 – 32
Letter generation, 33 – 9 to 33 – 13Letters
generating, batch processing, 33 – 12 to 33– 15
setting up, 33 – 10Link definition, 7 – 37 to 7 – 40
entering costing information, 7 – 38entering qualifying conditions, 7 – 39link level input value changes, 7 – 39
LinksSee also Element linkscomponents of, 7 – 25for employee eligibility rules, 7 – 25for tax deductions, 7 – 25reviewing, for an element, 7 – 39 to 7 – 40rule for building, 7 – 25standard, for automatic entry, 7 – 27
LISTGEN, 34 – 15Location, entering for an office, 13 – 9Locations, 2 – 2 to 2 – 3
assigning an employee to, 14 – 9Lookups, 32 – 2
MMail location information, entry of, 13 – 6Mail merge, 33 – 9 to 33 – 13, 33 – 21Mailstop, entry of, 13 – 8, 13 – 9Manager–level assignments, 14 – 29
Managing change, 1 – 9Manual element entries, completion of, 7 – 41
to 7 – 43Marital Status information, entry of, 13 – 6Mass Move, 3 – 25
deleting, 3 – 35describing, 3 – 28executing, 3 – 33making decisions for, 3 – 26managing your collection of, 3 – 35preparing for, 3 – 26 to 3 – 28prerequisites for, 3 – 26 to 3 – 28reexecuting, 3 – 34reviewing the results of, 3 – 34status of, 3 – 34summary of tasks, 3 – 28
Maternity leave, 28 – 7Matrix management, hierarchies for, 2 – 35Medical information, 13 – 9, 13 – 26, 28 – 10Menu Structures Report, 31 – 18Menus
default menu paths, A – 1defining, 31 – 17 to 31 – 22for security, 34 – 2, 34 – 8query–only access, 31 – 19
Methods of measurementoverview, Career Management, 18 – 11setting up Career Management, 19 – 3
Microsoft Word, 33 – 9 to 33 – 13Military leave, 28 – 7MIX facilities, for batch element entry, 8 – 2Multiple Worksite reporting
filing information for, 2 – 26GRE transmitter for, 2 – 25
NNACHA
personal payment methods using, 14 – 22 to14 – 24
prenote information for, 14 – 23Name, entry of additional name information
for an employee, 13 – 9Net Accrual Calculation, 26 – 27 to 26 – 28
Index – 11
New hire reporting, 13 – 32employee information for, 13 – 34 to 13 – 35GRE contact for, 13 – 33 to 13 – 34obtaining, 13 – 35 to 13 – 37setup steps for, 13 – 33
Nonrecurring elements, 5 – 2See also Processing typePayMIX for entries to, 8 – 17
OOffer assignment status, 15 – 15Office location, entry of, 13 – 8Office number, entry of, 13 – 8, 13 – 9Oracle FastFormula. See FormulasOracle Human Resources
using with Oracle Payroll, 33 – 2 to 33 – 5using with spreadsheets, 33 – 5
ORACLE IDs, 34 – 11Oracle Payroll, 33 – 2ORG_TYPE, 2 – 14Organization hierarchies, 2 – 34 to 2 – 41
adding to, 2 – 31, 16 – 19 to 16 – 23creating, 2 – 37 to 2 – 41for matrix management, 2 – 35in security profiles, 34 – 5versions of, 2 – 36
Organization Hierarchy Report, 2 – 39Organizations, 2 – 14 to 2 – 17
adding to hierarchies, 2 – 25, 2 – 26, 2 –31, 16 – 19 to 16 – 23
additional information for, 2 – 24assigning an employee to, 14 – 9classifications for, 2 – 20, 2 – 23cost centers for, 2 – 16defining, 2 – 20 to 2 – 24deleting, 2 – 33entering site addresses for, 2 – 2external, 2 – 17, 2 – 20in project based enterprises, 6 – 3levels of internal, 2 – 14 to 2 – 16listing employees assigned to, 14 – 29used with position control, 3 – 4
OSHAForm 101 Report, 17 – 38
Form 200 Report, 17 – 38OSHA reporting
establishments for, 17 – 35for fatalities, 17 – 37information for, 13 – 26, 17 – 34 to 17 – 36overview of, 17 – 34setup steps for, 17 – 36
OTAcompetencies, 18 – 14SQL*Plus script, D – 8 to D – 11
Other information, entering for an employee,13 – 9
Overhead labor costs, distribution of, 11 – 19 to11 – 25
PParent organizations, 2 – 31, 16 – 19 to 16 –
23Part time assignments, 12 – 2Part time employment category, 14 – 6Paternity leave, 28 – 7Pay periods, selecting, 5 – 7Pay scales, 4 – 12
defining, 4 – 13defining rates for, 4 – 14
Pay valuesand generated elements, 7 – 20enterable and non–enterable, 7 – 19 to 7 – 21purpose of, 7 – 19setup of, 7 – 35to hold run results, 7 – 19
Payee organization, defining, 2 – 23Payment methods
for a payroll, 5 – 8for employee assignments, 14 – 22 to 14 – 24for the enterprise, 5 – 3
PayMIXbatch line dates, 8 – 19 to 8 – 21customizing segment names for, 2 – 8for batch element entry, 8 – 2for earnings and deductions entries, 8 – 17
to 8 – 18for entry of accrued time taken, 26 – 31
Index – 12 Oracle Human Resources North American User’sGuide
for payroll batch entry, 8 – 12 to 8 – 13procedures for, 8 – 23 to 8 – 30process for validation and transfer, 8 – 29 to
8 – 32process review and correction, 8 – 31routing to input values, 8 – 17 to 8 – 19statuses for, 8 – 21
Payroll code number, 14 – 7Payroll costs. See Costing informationPayroll formulas
See also Formulasfor element processing, 7 – 21 to 7 – 22
Payroll management, 1 – 3cycle of functions, 1 – 4
Payroll runs, employee setup for, 14 – 5Payroll tables, row types for, 32 – 11Payrolls
assigning employees to, 14 – 9check date, 5 – 7cut off date, 5 – 7defining, 5 – 6 to 5 – 11deleting, 5 – 9in security profiles, 34 – 7scheduled run date, 5 – 7using in HRMS, 5 – 2
Pension groups, 5 – 10People folders, 13 – 3People Group key flexfield, 2 – 5, B – 3
setting up, 5 – 10to represent companies, 2 – 15 to 2 – 17, 5
– 10People groups, assigning employees to, 14 – 10Performance ratings, 27 – 5Performance reviews, and salary proposals, 9 –
9 to 9 – 11PERFORMANCE_RATING, 27 – 5Period of service, 14 – 36Person Details Report, 13 – 31Person types, 28 – 2 to 28 – 4Personal Analysis key flexfield, 2 – 5, 28 –
10, B – 4Personal information
deleting, 13 – 37entering, 13 – 4entering special information, 13 – 26
entering unstructured information, 25 – 4I–9, veteran, ethnic origin, 13 – 6inquiring and reporting on, 13 – 3, 13 – 31office location, mailstop, 13 – 8tracking roles and activities, 13 – 30
Personal payment methods, NACHA or pay-check, 14 – 22
PERWPOUK, SQL*Plus script, D – 2 to D – 5PERWPWUk, SQL*Plus script, D – 6 to D – 9Physician’s name, entry of, 13 – 9Pictures, 13 – 16PLACEMENT_REASON, 4 – 17Planning succession, 23 – 2Position hierarchies, 3 – 3
adding a new position, 3 – 12creating, 3 – 21 to 3 – 36creating new versions, 3 – 22in security profiles, 34 – 6
Position Hierarchy Report, 3 – 24Position Name key flexfield, 2 – 4, 3 – 5, B – 3Positions
assigning an employee to, 14 – 10contrasted with jobs, 3 – 2defining, 3 – 11 to 3 – 14entering valid grades, 3 – 16evaluating, 3 – 14in rule based enterprises, 6 – 6listing employees assigned to, 14 – 31representing jobs and positions, 3 – 2 to 3 – 7salary budgets, 9 – 16, 12 – 5skill requirements of, 3 – 17source, 3 – 29target, 3 – 30viewing budget variance, 12 – 9viewing occupancy, 3 – 20work choices, 3 – 18
Pre–tax deductions, classification and catego-ries for, 7 – 11
Predefined user tables, 32 – 11Company Work Schedules, 32 – 11GTL Premiums, 32 – 11Shift Differentials, 32 – 12Wage Rates, 32 – 12
Prefix information, entry of, 13 – 5

Index – 13
Prenote information, for NACHA payments,14 – 23
Primary applicant assignment statuses, 15 – 16Primary assignment statuses, for employees,
14 – 6 to 14 – 7, 28 – 5Primary element classifications, 7 – 8 to 7 – 15Primary reporting hierarchy, 2 – 34Probation period, 3 – 11, 3 – 12
entering on assignments, 14 – 12Processes
Costing, 11 – 22 to 11 – 24Create Descriptive Flexfield DB Items, B – 6,
C – 23Create Key Flexfield DB Items, B – 4, C – 25Generate Secure User, 34 – 15Grant Permissions To Roles, 34 – 15PayMIX Batch, 8 – 29PTO Carry Over, 26 – 22, 26 – 31Security List Maintenance, 34 – 15security of, 34 – 9Transfer to GL, 11 – 24 to 11 – 26
Processing typeof elements, 7 – 4recurring and nonrecurring, 7 – 4, 7 – 23
Proficiency levels, competencies, 19 – 2Progression points
defining, 4 – 13entering special ceiling for, 14 – 12relating to grades, 4 – 15
Project based enterprises, 6 – 2 to 6 – 6Promotions, recording information about, 14 –
4 to 14 – 6, 14 – 14PROPOSAL_REASON, 9 – 5Proration of pay, work schedules for, 14 – 11PTO (paid time off)
calculation of net accrued, 26 – 28carry over process for, 26 – 31 to 26 – 35manual or batch entry of time taken, 26 – 30
to 26 – 31residual and carried over, 26 – 22review of net time accrued, 26 – 33 to 26 –
35sale or purchase of, 26 – 23, 26 – 31
PTO accrual planselements for, 26 – 19 to 26 – 20enrollment in, 26 – 30
length of service factors, 26 – 21 to 26 – 24maintenance of, 26 – 30operation and structure of, 26 – 19 to 26 –
23period of ineligibility under, 26 – 20setup steps for, 26 – 24 to 26 – 29start rule options for, 26 – 20 to 26 – 21
Public sector, implementation in, 6 – 6 to 6 –13, 9 – 16, 12 – 5
Purge, 1 – 15
QQualifications, 13 – 19Qualifiers, for the Cost Allocation key flexfield,
11 – 11 to 11 – 13Qualifying conditions, failure to meet, 7 – 42QUALIFYING_UNITS, 3 – 11Query–only access to windows, 31 – 19QuickCodes
access levels, 32 – 2creating QuickCode values, 32 – 3defining QuickCode types, 32 – 5list of predefined types, 32 – 6 to 32 – 8removing QuickCode values, 32 – 3
QuickPaint reports, 30 – 8customizing, 30 – 13defining, 30 – 9 to 30 – 11running, 30 – 12 to 30 – 13
RRate codes, PayMIX entries for, 8 – 14 to 8 –
17Rates
for grades, 4 – 8for pay scales, 4 – 14PayMIX entries for, 8 – 14
Rating scales, creating, 19 – 7Re–hiring an employee, 13 – 10REC_TYPE, 15 – 8Recruitment
entering applicants, 15 – 10identifying vacancies, 15 – 4recruitment cycle, 15 – 2 to 15 – 3
Index – 14 Oracle Human Resources North American User’sGuide
running recruitment activities, 15 – 5tracking applicant progress, 15 – 15
Recurring elementsSee also Processing typePayMIX for changes to, 8 – 17 to 8 – 20
Reference information, for a rehire applicant,13 – 8
Regular, earnings, 7 – 10Regular runs, scheduled date of, 5 – 7Rehire information, 13 – 8Reimbursements, classification for, 7 – 11Relief position, to cover absence, 3 – 12Relocation, employee preferences, 13 – 19Reorganizing, positions and assignments, 3 –
25Report
COBRA Coverage, 10 – 32COBRA Payment, 10 – 32
Reporting Categories and Statuses, 16 – 3registering, 2 – 8, 2 – 24, 16 – 13 to 16 –
15Reporting Establishments
See also Reporting Organizationsadditional information for, 2 – 26 to 2 – 33for corporate headquarters, 16 – 17 to 16 –
18for EEO–1 reporting, 16 – 15 to 16 – 18for government reports, 16 – 3 to 16 – 4for VETS–100 reporting, 16 – 16overrides for, 16 – 5, 16 – 23 to 16 – 25
Reporting lines, 2 – 35, 3 – 3, 3 – 21Reporting organizations
additional information for, 2 – 26 to 2 – 28defining, 2 – 23overview of, 16 – 3 to 16 – 5setup of, 16 – 15
Reporting users, 34 – 8Reports
AAP Job Group Analysis, 17 – 20AAP Workforce Analysis, 17 – 19Absences, 26 – 18ADA, 17 – 32 to 17 – 34Assignment Status, 14 – 33COBRA Coverage, 10 – 25 to 10 – 27COBRA Payments, 10 – 26
Cost Breakdown Summary, 11 – 22, 11 – 23Current and Projected Progression Point Val-
ues, 4 – 18defining, 30 – 6EEO–1 Consolidated, 17 – 10EEO–1 Establishment Employment Listing,
17 – 10 to 17 – 12EEO–1 Headquarters, 17 – 9 to 17 – 11EEO–1 Individual Establishment, 17 – 9EEO–1 Single Establishment, 17 – 8Element Link Details, 7 – 39Employee Benefit Eligibility Listing, 10 – 15Employee Benefit Enrollment Register, 10 –
15Employee Increment Results, 4 – 19Employee Organization Movements, 14 – 34Employee Payroll Movements, 14 – 34Employee Summary, 14 – 34Full Applicant Details, 15 – 10Full Personal Details, 13 – 31list of, 30 – 5 to 30 – 7Menu Structure, 31 – 18New Hire, 13 – 32 to 13 – 36Organization Hierarchy, 2 – 39OSHA No. 200 and No. 101, 17 – 38Position Hierarchy, 3 – 24QuickPaint, 30 – 9 to 30 – 17Requisition Summary, 15 – 22Salary Review, 9 – 15, 12 – 4security of, 34 – 9Skills Matching, 25 – 5Staffing Budget Details, 12 – 11Terminations, 14 – 19Vets–100 Consolidated, 17 – 27VETS–100 Veterans Employment, 17 – 25 to
17 – 27Requirements, comparing with accomplish-
ments, competence approach, 20 – 3Requisition Summary Report, 15 – 22Requisitions, 15 – 7Responsibilities, 31 – 17, 34 – 2
defining, 34 – 11Restricting access to records
by menu structures, 31 – 17, 34 – 8by organization hierarchy, 34 – 5by payroll, 34 – 7by position hierarchy, 34 – 6

Index – 15
by Responsibilities, 34 – 2 to 34 – 4by security profiles, 34 – 4from other tools, 34 – 8
Resumes, 25 – 4entry of status information on, 13 – 8
Reviewsof employee performance, 9 – 2 to 9 – 15, 14
– 12, 27 – 4, 27 – 5of salaries, 14 – 12
ROLEGEN, 34 – 15Rule based enterprises, 6 – 6 to 6 – 13
budgeting, 9 – 16, 12 – 5Run results, and Oracle FastFormula, 7 – 21 to
7 – 27
SSalary
relating to grades, 4 – 3reporting on, 9 – 15, 12 – 4ways to review, 9 – 2 to 9 – 4
Salary administrationfor element entry, 7 – 27for entry of salaries and wage rates, 9 – 2 to 9
– 15setup of, 9 – 4 to 9 – 6
Salary bases, 9 – 5Salary basis
assigning an employee to, 14 – 12definition of, 9 – 6 to 9 – 7for salary administration, 9 – 2
Salary budgets, 9 – 16 to 9 – 17, 12 – 5 to 12 –11
Salary proposals, 9 – 2approving, 9 – 11correcting, 9 – 13entry of, 9 – 8 to 9 – 9, 9 – 10 to 9 – 11grade rates for validation of, 9 – 7
Scale rates, 4 – 14School attendances, 13 – 19SECGEN, 34 – 15Secondary applicant assignment statuses, 15 –
16Secondary assignment statuses, 28 – 6
adding reasons for, 28 – 6
Secondary statusesdefining, 28 – 7, 28 – 8entering for employees or applicants, 14 – 24
Security, 34 – 2 to 34 – 9creating Oracle IDs, 34 – 11enabling currencies, 29 – 7list of user profile options, 29 – 5 to 29 – 8of reports and processes, 34 – 3, 34 – 9restrictions by HR:User Type, 33 – 4setting up, 34 – 10 to 34 – 12setting user profile options, 29 – 4
Security groups, 34 – 3, 34 – 9Security List Maintenance process, 34 – 15Security profiles, 34 – 2, 34 – 4 to 34 – 7
defining, 34 – 13 to 34 – 15Separate check payments, PayMIX entry for, 8
– 14 to 8 – 17, 8 – 18 to 8 – 25Setting up
appraisals, 18 – 12assessments, 18 – 12standard letters, 33 – 10
Setting up Career Managementcompetencies and OTA, 21 – 2methods of measurement, 19 – 3suitability searching, 24 – 2
Shift differentialsPayMIX entry for, 8 – 14 to 8 – 17predefined table for, 32 – 12
Shift worked, entry of regular, 14 – 11Skills information, 13 – 26, 25 – 2Skills matching, 15 – 5, 25 – 2 to 25 – 3Skills Matching Report, 25 – 5Social security number, as employee number,
14 – 7Soft coded legislation, B – 11Source positions, identifying, 3 – 29Special ceiling points, 14 – 12Special information types
enabling, 28 – 11entering, 13 – 26for ADA and OSHA reporting, 13 – 26for disability information, 17 – 31for OSHA–reportable incidents, 17 – 36 to 17
– 37setting up, 25 – 2, 28 – 10 to 28 – 12

Index – 16 Oracle Human Resources North American User’sGuide
Special inputs elements, PayMIX entries for, 8– 17 to 8 – 25
Spreadsheets, 9 – 17, 33 – 5SQL*Plus script
OTA – for confirmation letters, D – 8 toD – 11
PERWPOUK, D – 2 to D – 5PERWPWUK, D – 6 to D – 9
Staffing Budget Details Report, 12 – 11Staffing budgets, 12 – 2 to 12 – 11, 15 – 4Standard element links
See also Automatic element entryexamples of, 7 – 28 to 7 – 30
Standard letters, 33 – 9Standard work day, 14 – 12Status, of assignments, 28 – 5Statuses, for letter generation, 33 – 9Structuring competencies, general method, 19
– 5Structuring your competencies, 19 – 4
individual method, 19 – 4which method to use, 19 – 6
Subsidiaries, as Business Groups, 2 – 7Succession planning, 3 – 12, 18 – 14, 23 – 2, 23 –
6Suffix information, entry of, 13 – 5Suitability searching
overview, 18 – 13setting up Career Management, 24 – 2
Supervisor, entering on assignments, 14 – 11Supplemental, earnings, 7 – 10Suspended assignment status, 28 – 5Suspense account, 11 – 6 to 11 – 7System administrator, role of in OHR, 29 – 2
TTables, user–defined, 32 – 10
accessing values in, 32 – 10entering values into, 32 – 17payroll tables for deduction amounts, 32 –
11setting up, 32 – 14 to 32 – 16
Target positions, identifying, 3 – 30 to 3 – 32
Task flows, 31 – 9 to 31 – 16adding to a menu, 31 – 20defining nodes, 31 – 12
Tax deductionsand Vertex Inc., 7 – 12classifications and categories for, 7 – 12 to 7 –
14links and entries for, 7 – 25
Taxescosting, by jurisdiction, 11 – 15costing, by tax type, 11 – 15element classifications for, 7 – 12federal, state and local, 7 – 12maintaining information for, 2 – 9, 2 – 25
TemplatePERWPOUK, D – 2 to D – 5PERWPWUK, D – 6 to D – 9
Temporary cover, 3 – 12TERM_APL_REASON, 15 – 21Terminate application assignment status, 15 –
16, 15 – 21Terminate assignment status, 14 – 16, 28 – 5Terminating applicants, 15 – 21
cancelling a termination, 15 – 22Terminating employees
adding to reasons for, 14 – 17cancelling a termination, 14 – 18procedure for, 14 – 17 to 14 – 18processing pay after, 28 – 8reporting on, 14 – 19 to 14 – 21
Termination, of employees, 14 – 17 to 14 – 18Termination dates, 14 – 18Termination rules, selection of, 10 – 10Terminations Report, 14 – 19Third party payments
defining a personal payment method, 14 – 24payee organizations for, 2 – 23
Time Entry Wages element, for PayMIX time-card entry, 8 – 14
Timecard, entry of requirement for, 14 – 11Timecards, using PayMIX to enter, 8 – 14 to 8
– 15Title information, entry of, 13 – 5Total Owed input value. See Total Reached
stop rule
Index – 17
Training information, 13 – 26, 27 – 2 to 27 – 3Transfers or relocations, recording information
on, 14 – 4 to 14 – 6, 14 – 14Turnover, reporting on, 14 – 34 to 14 – 35
UUnion membership, 5 – 10Union pay scales, 4 – 12University attendances, 13 – 19User profile options, 33 – 4, 34 – 3, 34 – 11User statuses
defining, 28 – 7for applicant assignments, 15 – 15for employee assignments, 28 – 7renaming, 28 – 7
User tables, 32 – 10 to 32 – 11See also Predefined user tables
User type profile options, HR User, 10 – 9User–initiated deductions. See DeductionsUsers, creating, 34 – 11
VVacancies
creating, 15 – 7entering applications, 15 – 13reporting on, 15 – 22viewing, 15 – 9
VACANCY_STATUS, 15 – 7Valid grades, 3 – 16Vertex Inc., tax calculations from, 7 – 12Veteran status, entry of, 13 – 7VETS–100 reporting
data for, 17 – 21 to 17 – 23identifying employees for, 13 – 7overview of, 17 – 21setup steps for, 17 – 23
Views, list of, 30 – 3Visa information, entry of, 13 – 7
WWage rates, predefined table for, 32 – 12Web access, 24 – 2
career management, 18 – 4Web interface, configurable, Career Manage-
ment, 18 – 7Windows
Absence Attendance Type, 26 – 11Absence Detail, 26 – 14Accrual Bands, 26 – 26Accrual Plan, 26 – 24Accruals, 26 – 33 to 26 – 35ADA Disabilities, 17 – 31Address (for Oracle Payroll), 13 – 13Address (generic), 13 – 11Alter Effective Date, 1 – 11Applicant Entry, 15 – 11Applicant Interview, 15 – 17Application, 15 – 12Appraisal Template, 22 – 31Assignment, 14 – 9Assignment Budget Values, 12 – 2Assignment Criteria, 30 – 15Assignment History, 14 – 36Assignment Set, 30 – 14Assignment Statuses, 28 – 7Assignments Folder, 14 – 26Batch Entry Default Values, 8 – 25Batch Header, 8 – 4Batch Lines, 8 – 4Beneficiaries, 10 – 20Book Events, 15 – 18, 27 – 3Budget, 12 – 8Budgetary Calendar, 12 – 7Bulk Status Change, 15 – 16Career Path Name, 17 – 17, 23 – 5, 23 – 7, 23
– 8COBRA Benefits, 10 – 30COBRA Coverage, 10 – 27COBRA Payments, 10 – 32COBRA Statuses, 10 – 30Columns, 32 – 15Competence Profile, 13 – 20

Index – 18 Oracle Human Resources North American User’sGuide
Competence Requirements (Core or Gener-ic), 20 – 5
Competence Requirements (No Core or Ge-neric), 20 – 8
Competence Types, 19 – 17Competencies, 19 – 11Costing, 11 – 22Costing Breakdown, 11 – 22Covered Dependents, 10 – 16DateTrack History Change Field Summary, 1
– 13Deductions Entry, 8 – 28default navigation paths, A – 10Define Task Flow, 31 – 14Define Task Flow Nodes, 31 – 12Delete Person, 13 – 37Disability Accommodations, 17 – 32Earnings Entry, 8 – 27Element, 7 – 32, 10 – 8Element and Distribution Set, 31 – 5Element Entries, 7 – 42Element Link, 7 – 37Employee Review, 27 – 4Entry Values, 7 – 42Establishment EEO–1 Filing, 16 – 16Establishments, 21 – 5Event Bookings, 15 – 18, 27 – 2Find Competence, 19 – 13Find Person, 13 – 2Find Positions, 3 – 29Form Customization, 31 – 7Grade Rate, 4 – 9, 31 – 20Grade Scale, 4 – 15Grade Step Placement, 4 – 16Grades, 4 – 4GREs and Other Data, 16 – 23Job, 3 – 8Job Evaluation, 3 – 15Job Requirements, 3 – 17Letter, 33 – 17List Assignments, 14 – 27List Budget Variance by Organization, 12 –
10List Employees by Absence Type, 26 – 17List Employees by Element, 7 – 45List Employees by Organization, 14 – 29List Employees by Position, 14 – 31List Employees by Position Hierarchy, 14 –
32
List People by Assignment, 14 – 28List People by Special Information, 13 – 28List Position Budget Variance, 12 – 9Location, 2 – 3Map Career Path, 17 – 17, 23 – 8Mass Move, 3 – 28Mass Move – Assignments, 3 – 31Mass Move – Positions, 3 – 30Mass Move – Valid Grades, 3 – 33Mass Update of Applicants, 15 – 19Menu, 31 – 18Net Calculation Rules, 26 – 27Organization, 2 – 20Organization Hierarchy, 2 – 37Organizational Payment Method, 5 – 3OSHA–reportable Incident, 17 – 36Parent Organization, 2 – 31Pay Scale, 4 – 13PayMIX Batch Information, 8 – 23PayMIX Batch Summary, 8 – 31Payroll, 5 – 7People, 13 – 5People Folder, 13 – 3Period Dates, 5 – 8Period Types, 12 – 6Person Types, 28 – 3Personal Payment Method, 14 – 22Picture, 13 – 16Position, 3 – 11Position Evaluation, 3 – 15Position Hierarchy, 3 – 21Position Occupancy, 3 – 20Position Requirements, 3 – 17Qualification Types, 21 – 3Qualifications, 13 – 23QuickCode Types, 32 – 5QuickCodes, 32 – 3QuickPaint Inquiry, 30 – 12QuickPaint Report, 30 – 9Rating Scales, 19 – 8Recruitment Activity, 15 – 8Request Letter, 33 – 19Requisition and Vacancy, 15 – 7Rows, 32 – 15Salary Administration, 9 – 8, 27 – 5Salary Basis, 9 – 6Salary Management Folder, 9 – 11Scale Rate, 4 – 14, 31 – 20Schools and Colleges Attended, 13 – 24

Index – 19
Secondary Statuses, 14 – 24Security Profile, 34 – 13Special Information, 13 – 26Special Information Types, 28 – 11Submit Requests, 30 – 5Table Structure, 32 – 14Table Values, 32 – 17Terminate, 14 – 17Time Entry, 8 – 26Valid Grades, 3 – 16Valid Payment Methods, 5 – 8View Absence History, 26 – 16View Element Entry History, 7 – 44View Employee Dental, Medical and Vision
Benefits, 10 – 14View Employee Grade Comparatio, 4 – 10View Requests, 30 – 5View Vacancies, 15 – 9Work Choices (Job or Position), 3 – 18Work Choices (Person), 13 – 21Work Day Information, 2 – 28Work Schedule, 2 – 31
Word processors, 33 – 12
Work choices, 13 – 19employee preferences, 13 – 21jobs and positions, 3 – 18
Work day information, 2 – 28, 14 – 12Work Details Report, 13 – 31Work schedules, 2 – 31
and pay proration, 9 – 7employee preferences, 13 – 19entry for employee assignments, 14 – 11predefined table for, 32 – 11selecting for an employee, 13 – 9
Work structures, 1 – 7and key flexfields, 1 – 17dates, 1 – 9, 1 – 10setup examples, 6 – 1 to 6 – 14
Workers Compensationinsurance carriers for, 2 – 23override code for, 14 – 11
Workflow access, 24 – 2career management, 18 – 4
WORKFLOW_NAME, 31 – 20

Index – 20 Oracle Human Resources North American User’sGuide

Reader’s Comment Form
Oracle Human Resources North American User’s GuideA58334–01
Oracle Corporation welcomes your comments and suggestions on the quality and usefulnessof this publication. Your input is an important part of the information we use for revision.
• Did you find any errors?
• Is the information clearly presented?
• Do you need more information? If so, where?
• Are the examples correct? Do you need more examples?
• What features did you like most about this manual? What did you like least about it?
If you find any errors or have any other suggestions for improvement, please indicate the topic, chapter,and page number below:
Please send your comments to:
Oracle Applications Documentation ManagerOracle Corporation500 Oracle ParkwayRedwood Shores, CA 94065Phone: (415) 506–7000 Fax: (415) 506–7200
If you would like a reply, please give your name, address, and telephone number below:
Thank you for helping us improve our documentation.
