oracle® governance, risk, and compliance controls · pdf filepreface: upgrading grc...
TRANSCRIPT
Oracle® Governance, Risk, and Compliance Controls Suite
Upgrade Guide
Release 7.2.3
June 2008

Oracle Governance, Risk, and Compliance Controls Suite Installation Guide
Copyright © 2007, 2008 Oracle Corporation and/or its affiliates. All rights reserved.
Primary Author: David Christie
The Programs (which include both the software and the documentation) contain proprietary information; they are provided under a license agreement containing restrictions on use and disclosure and are also protected by copyright, patent, and other intellectual and industrial property laws. Reverse engineering, disassembly, or decompilation of the Programs, except to the extent required to obtain interoperability with other independently created software or as specified by law, is prohibited.
The information contained in this document is subject to change without notice. If you find any problems in the documentation, please report them to us in writing. This document is not warranted to be error-free. Except as may be expressly permitted in your license agreement for these Programs, no part of these Programs may be reproduced or transmitted in any form or by any means, electronic or mechanical, for any purpose.
If the Programs are delivered to the United States Government or anyone licensing or using the Programs on behalf of the United States Government, the following notice is applicable.
U.S. GOVERNMENT RIGHTS
Programs, software, databases, and related documentation and technical data delivered to U.S. Government customers are “commercial computer software” or “commercial technical data” pursuant to the applicable Federal Acquisition Regulation and agency-specific supplemental regulations. As such, use, duplication, disclosure, modification, and adaptation of the Programs, including documentation and technical data, shall be subject to the licensing restrictions set forth in the applicable Oracle license agreement, and, to the extent applicable, the additional rights set forth in FAR 52.227-19, Commercial Computer Software—Restricted Rights (June 1987). Oracle Corporation, 500 Oracle Parkway, Redwood City, CA 94065.
The Programs are not intended for use in any nuclear, aviation, mass transit, medical or other inherently dangerous applications. It shall be the licensee’s responsibility to take all appropriate fail-safe, backup, redundancy and other measures to ensure the safe use of such applications if the Programs are used for such purposes, and we disclaim liability for any damages caused by such use of the Programs.
The Programs may provide links to Web sites and access to content, products, and services from third parties. Oracle is not responsible for the availability of, or any content provided on, third-party Web sites. You bear all risks associated with the use of such content. If you choose to purchase any products or services from a third party, the relationship is directly between you and the third party. Oracle is not responsible for: (a) the quality of third-party products or services; or (b) fulfilling any of the terms of the agreement with the third party, including delivery of products or services and warranty obligations related to purchased products or services. Oracle is not responsible for any loss or damage of any sort that you may incur from dealing with any third party.
Oracle is a registered trademark of Oracle Corporation and/or its affiliates. Other names may be trademarks of their respective owners.
The license for this program includes a limited use license for the Internal Control Manager program. Such limited use license means that the Internal Controls program shall only be used for financial compliance or IT governance related operations.
Contents iii
Contents
Preface: Upgrading GRC Controls Suite ............................ vii
1 Embedded Agents Upgrade Overview
Preparatory Procedures .................................................................. 1-2
Sizing Considerations...................................................................... 1-3
Software Requirements ................................................................... 1-3
Obtaining Installation Files .............................................................. 1-4
Preparing Properties Files ............................................................... 1-4
2 Upgrading Embedded Agents
Upgrading Concurrent Manager Server Components ..................... 2-1
Upgrading Forms Server Components ............................................ 2-6
CUSTOM.pll Modifications........................................................ 2-9
Servlet Mode........................................................................... 2-10
Configuring the Remote Compilation............................................. 2-11
Bouncing the Servers .................................................................... 2-13
Running an AACG Script............................................................... 2-13
Postinstallation Tasks.................................................................... 2-13
SQL Rule Compilation............................................................. 2-13
Associate a GRC Controls Function ....................................... 2-14
Preventive Controls Governor................................................. 2-15
Oracle E-Business Suite Version 11.5.8 ................................. 2-15
Oracle E-Business Suite Version 11.5.10.2 ............................ 2-15
Audit Rules.............................................................................. 2-16
Different Hosts ........................................................................ 2-18
Oracle On-Demand................................................................. 2-19
iv Oracle Governance, Risk, and Compliance Controls Suite Upgrade Guide
3 Validation
Installation History............................................................................ 3-5
4 Platform Upgrade Overview
Supported Operating Systems ......................................................... 4-1
Hardware Requirements .................................................................. 4-4
Software Requirements.................................................................... 4-4
5 Upgrading Linux/UNIX Server Components
Preparing to Upgrade....................................................................... 5-1
Sourcing the Environment................................................................ 5-2
Loading Files in the Staging Directory.............................................. 5-3
Upgrading the GRC Controls Suite Schema .................................... 5-3
Setting Up Business Objects ..................................................... 5-3
Copying and Editing GRC Controls Suite Files.......................... 5-4
Preparing Schema Installation Files .......................................... 5-5
Completing the Schema Upgrade.............................................. 5-7
Running a Reporting Script ....................................................... 5-7
Setting Up the GRC Controls Suite Log .................................... 5-8
6 Upgrading Windows Server Components
Preparing to Upgrade....................................................................... 6-1
Loading Files in the Staging Folder.................................................. 6-2
Upgrading the GRC Controls Suite Schema .................................... 6-2
Setting Up Business Objects ..................................................... 6-3
Copying and Editing GRC Controls Suite Files.......................... 6-3
Preparing Schema Installation Files .......................................... 6-5
Completing the Schema Installation .......................................... 6-6
Running a Reporting Script ....................................................... 6-7
Setting Up the GRC Controls Suite Log .................................... 6-7
7 Deploying Reports
Backing Up Reports ......................................................................... 7-1
Importing Business Views................................................................ 7-2
Establishing Data Connections ........................................................ 7-3
Publishing Reports........................................................................... 7-6
Configuring Access to Reports......................................................... 7-7
Contents v
Configuration for AACG 8.0............................................................. 7-8
Restarting Services ......................................................................... 7-8
8 Configuring the GRC Controls Suite Platform
Configuring Licenses ....................................................................... 8-1
Setting Properties............................................................................ 8-2
Configuring Data Sources ............................................................... 8-4

vi Oracle Governance, Risk, and Compliance Controls Suite Upgrade Guide
Preface: Upgrading GRC Controls Suite vii
Preface: Upgrading GRC Controls Suite
Oracle Governance, Risk, and Compliance Controls Suite implements business con-trols, enabling users to demonstrate regulatory compliance and to promote operational efficiency. Two GRC Controls Suite applications — Transaction Controls Governor and Preventive Controls Governor — run in a common platform and in “Embedded Agents” that enable the platform to apply controls in the Oracle E-Business Suite. GRC Controls Suite may connect to multiple instances of Oracle EBS, each running its own instance of the Embedded Agents.
A third application, Application Access Controls Governor, runs in its own platform if you use version 8.0 or later, but runs in the GRC Controls Suite common platform if you use an earlier version. Version 7.2.3 is designed to accommodate version 8.0 or later of Application Access Controls Governor by removing the earlier version of the application from the common platform.
The common platform also incorporates Business Objects Enterprise XI R2, a third-party software package that provides its reporting capability. An implementation also requires installation of the Tomcat application server.
(A fourth GRC Controls Suite application — Configuration Controls Governor — runs independently of the other three. For information on its installation or upgrade, see the Configuration Controls Governor Installation Guide.)
From time to time, Oracle issues “point” releases of GRC Controls Suite, to add or enhance features, or to address problems with existing features. To upgrade from an earlier release to a later one, you must do the following
• For each instance of Oracle E-Business Suite that is to be subject to control by GRC Controls Suite, upgrade the Embedded Agents
• Upgrade GRC Controls Suite components
• “Publish” a new set of reports
• If you are upgrading to version 7.2.3 and intend to use version 8.0 or later of Application Access Controls Governor, install that appliacation. (See the Appli-cation Access Controls Governor Installation Guide for version 8.0 or later.)
However, the new release of the common platform would continue to use existing Business Objects software and Tomcat application server. There would be no need to upgrade or reinstall these components.
viii Oracle Governance, Risk, and Compliance Controls Suite Upgrade Guide
Moreover, each instance of the Embedded Agents has its own database — typically, a distinct schema in the Oracle database used by the “companion” E-Business Suite instance. Each of the GRC Controls Suite platform and Business Objects also requires its own Oracle database schema. As you upgrade from one 7.2 release to another, the later release continues to use the databases already set up for the earlier releases.
This guide is intended for readers qualified to perform system-administration operations such as configuration change at the operating-system level, the creation of users, the granting of permissions to users and directories, or the installation of operating system patches on the machines that host GRC Controls Suite and the Embedded Agents.
Embedded Agents Upgrade Overview 1-1
1
Embedded Agents Upgrade Overview
Embedded Agents are a set of applications that run within the Oracle E-Business suite environment in support of Governance, Risk, and Compliance Controls Suite. One agent serves as an engine for versions of Application Access Controls Gover-nor earlier than 8.0, and would not be used directly. The others are elements of Pre-ventive Controls Governor, and include the following:
• A Change Control application applies change control to Oracle EBS fields. It can monitor change, require a reason for a change, or require approval for a change.
• A Form Rules application modifies the security, navigation, field, and data properties of Oracle EBS forms.
• A Flow Rules application defines and implements business processes.
• An Audit Rules application tracks changes to the values of fields in database tables and displays reports that present information about changes to each field.
These applications are installed on the forms and concurrent manager servers on which Oracle EBS runs. The installation process implements the following architecture:
• Database Schema: As you upgrade, use the database schema created for your earlier 7.2 Embedded Agents installation. Known as the “GRC Controls schema,” its recommended user name is XXLAAPPS.
• Tablespace: The instance requires a tablespsce for indexes used by Embedded Agent database objects. As you upgrade, you will use the tablespace created for your earlier 7.2 installation.
• Database Objects: Embedded Agents make use of database tables, packages, sequences, and workflows, which are placed in the XXLAAPPS.
• Application Server Objects: Embedded Agents use custom forms, which are in-stalled on the application server. Custom forms are located in the $XXLAAPPS_ TOP/ forms/US directory.
• Program Executables: Embedded Agents use program executables to report on, migrate, and compile business rules. The following objects are installed on the concurrent manager server (typically the database server): reports, programs, and Java files. Custom programs are located in the $XXLAAPPS_TOP/forms/US

1-2 Oracle Governance, Risk, and Compliance Controls Suite Upgrade Guide
directory; some executable programs may also reside in the $XXLAAPPS_TOP/bin directory.
Two comprehensive Installer programs place Embedded Agents applications on the concurrent manager and forms servers. (They also install a rules engine that provides functionality to the applications.) Each Installer may be run in any of three modes:
• GUI: The Installer programs present a series of windows that prompt for infor-mation necessary for the installation. Each window also provides access to a help window. As you progress through the windows, you can return to windows you had completed earlier in order to review or change the entries in them. (The Installers retain any entry you don’t change, even if you return to a step earlier than the one in which such an entry was made.) GUI mode is the default.
• Console: The Installer programs present a series of prompts in a command con-sole, in response to which you provide information necessary for the installa-tion. Console mode prompts for the same information as GUI mode, but does not enable you to return to earlier prompts and does not provide help screens.
• Silent: The Installer programs read parameters from properties files, and then run without user interaction.
To run each Installer program, you would type its name — ladbinstall.bin or lafrminstall.bin — at the command prompt. The name alone launches GUI mode if no properties files are present, or silent mode if properties files are present; the name along with the argument -i console launches the console mode.
Preparatory Procedures
Although the following preparatory procedures were most likely completed during your installation of an earlier relase of version 7.2, you may wish to confirm that they have been completed as you upgrade to a higher 7.2 release:
• Grant the following APPS schema objects the execute privilege to the GRC Controls schema:
– FND_FILE — Package Spec and Body
– FND_PROFILE — Package Spec and Body
• Confirm that Java is in your path. Type the following at the command prompt:
which java
• Verify that you use Java version 1.3 or higher. Type the following at the command prompt:
java -version
If more than one copy of Java exists on your system, verify the version of the copy in the opt directory (for example, /usr/opt1.3/bin/java).
• Each of your database server, forms server, and concurrent manager server may run on its own host machine. If so, complete the following tasks to confirm that the host machines communicate properly:
– Send a file via FTP from the database server to the concurrent manager server, and from the concurrent manager server to the forms server.
Embedded Agents Upgrade Overview 1-3
– Perform a remote execution of the shell file, by any of the following methods: Enable rsh (remote shell), enable ssh (secured shell), have a common mount point, manual.
Sizing Considerations
Ensure that your forms server has 100 megabytes (MB) of disk space for Embedded Agents files, and that the concurrent manager server has 100 MB of disk space for Embedded Agents executable files.
Moreover, the GRC Controls schema requires the following amounts of disk space:
• 100 MB for most Embedded Agents database tables.
• An additional 1 gigabyte (GB) for two temp tables used in Audit Rules processing — LAAD_AUDIT_KEYS and LAAD_AUDIT_VALUES.
• An additional amount for two tables that hold Access Governor “user conflicts.” The space requirement varies according to the number of conflicts a system may generate. The first table, LAA_USER_CONFLICT_ENTITIES, holds the most recent “snapshot,” or set of conflicts; the other, LAA_USER_CONFLICT_ENTITIES_H, is a history table that holds archived snapshots. So one would, in effect, want to allow for double the number of conflicts that may be generated. The largest clients gen-erate approximately 5,000,000 conflicts and so need to allow for 10,000,000, and 2 GB of disk space meets this requirement.
The GRC Controls schema (XXLAAPPS or user-specified) requires space to encompass shadow tables used by Audit Rules — one-third of the space taken by each audited table.
Software Requirements
Each instance of the Embedded Agents runs with an instance of Oracle E-Business Suite. Versions 11.5.9 and 11.5.10 of Oracle are preferred, but versions 11.5.7 (FND patch H) and 11.5.8 are also supported. For version 7.2.2 and above, Oracle version 12 is also supported.
The following operating systems are preferred for the Embedded Agents:
• Red Hat Linux AS/ES 3.0
• Red Hat Linux AS/ES 4.0
• Solaris 8/9/10
The following operating systems are also supported:
• Suse Linux Enterprise Server 9.0
• AIX
• HP-UX
Each instance of the Embedded Agents requires an Oracle 9i (or later) database.
1-4 Oracle Governance, Risk, and Compliance Controls Suite Upgrade Guide
Obtaining Installation Files
In your Oracle media pack, locate the Governance, Risk, and Compliance Controls Suite Disk 1. In its dist directory, locate the file ag_723_oracle_ebs_agent_os.zip, in which the placeholder os is replaced by the name of the operating system on which you are upgrading. Copy the file to a temporary directory on your local system. From it, extract the two files — ladbinstall.bin and lafrminstall.bin — you will run for con-current manager and forms installation. If you intend to use the silent installation mode, also extract the two files from which the Installers will read parameters — ladbinstall.properties and lafrminstall.properties. (If you used silent more for the installation of an earlier 7.2 release, you can reuse the properties files you edited for that installation.)
Preparing Properties Files
If you intend to run the Installer programs in silent mode, and you do not intend to reuse properties files already edited for an earlier 7.2 installation, you need to edit the two properties files you extracted from ag_723_oracle_ebs_agent_os.zip, insert-ing information specific to your installation. (If you intend to use GUI or console mode, you don’t need the properties files, and you can ignore this section.)
To insert values in the files, use a text editor such as vi. Each file consists of a series of name-value statements, each of which sets a parameter name equal to a value and each of which is preceded by an explanatory comment. (Each comment begins with a # symbol.) In each statement, edit information to the right of an equals sign; do not (with one exception, discussed below) modify text to the left of the equals sign.
You insert into the files exactly the same information as you would supply in response to prompts if you were to run the Installers in GUI mode. For detailed descriptions of that information, see Chapter 2, “Upgrading Embedded Agents.”
The two properties files — ladbinstall.properties (concurrent manager) and lafrminstall.properties (forms) — share many parameters, which correspond as follows to the GUI prompts discussed in Chapter 2:
• CUST_NAME and LICENSE_KEY: Prompts in the License Key window, step 1 on page 2-2 (concurrent manager), or step 1 on page 2-6 (forms).
• #STAGE_DIR: Prompt in the Staging window, step 2 on page 2-3 (concurrent manager), or step 2 on page 2-7 (forms).
This statement is the exception, noted above, to the rule that you should leave parameter names (to the left of the equals sign) intact. In the assumption you will want the Installers to set default staging directories, this statement is commented out in the properties file. To use the statement, you must not only supply a staging directory path to the right of the equals sign, but also delete the # symbol at the beginning of the statement.
• DB_HOST_NAME, DB_SID, and DB_PORT: Prompts in the Database Host window, step 3 on page 2-3 (concurrent manager), or step 3 on page 2-7 (forms).
• DB_XXLAAPPS_SCHEMA_NAME, DB_XXLAAPPS_PASS, DB_APPS_SCHEMA_ NAME, and DB_APPS_PASS: Prompts in the Database Schema window, step 4 on page 2-4 (concurrent manager), or step 4 on page 2-7 (forms).
Embedded Agents Upgrade Overview 1-5
Another exception: The database-installation window does not prompt for the Oracle EBS schema name, although the forms-installation window does. The properties file requires it (typically APPS) as the value for the DB_APPS_ SCHEMA_NAME parameter.
• XXLAAPPS_SHORT_NAME and APPL_TOP: Prompts in the Application TOP win-dow, step 5 on page 2-4 (concurrent manager), or step 5 on page 2-7 (forms).
• ENVFILE and ADOVARS: Prompts in the Environment window, step 6 on page 2-5 (concurrent manager), or step 6 on page 2-8 (forms).
The ladbinstall.properties file contains one parameter — INDEX_TABLESPACE — that does not appear in lafrminstall.properties. This parameter corresponds to the Index Table Space prompt in step 4 on page 2-4.
The lafrminstall.properties file contains two parameters that do not appear in the ladbinstall.properties file. These two parameters correspond as follows to the GUI prompts discussed in Chapter 2:
• APPSORA: The final prompt in the Environment window, step 6 on page 2-8.
• CUSTOM_CHOICE: The prompt in the CUSTOM.pll window, step 7 on page 2-8. In the properties file, any value other than No (case-sensitive) is equivalent to Yes.
Finally, both files contain a parameter that does not correspond to any GUI prompt. For you to run the Installers in silent mode, an INSTALLER_UI parameter must be set to the value silent. This is the default; don’t change it.

1-6 Oracle Governance, Risk, and Compliance Controls Suite Upgrade Guide
Upgrading Embedded Agents 2-1
2
Upgrading Embedded Agents
In broad terms, the Embedded Agents upgrade involves four steps:
1. Determine the names of the tablespace for Embedded Agent indexes, the Embedded agent database user/schema, and the database password established for the earlier release of version 7.2. (Conventionally, the database user name is XXLAAPPS.)
2. Run the Installer that places Embedded Agent elements on the concurrent manager server. This installation must precede the forms server installation.
3. Run the Installer program to place Embedded Agent forms on the forms server.
4. Run a remote compilation feature, which makes libraries resident on the concurrent server available to the forms server.
Upgrading Concurrent Manager Server Components
To upgrade Embedded Agents concurrent manager server components, run the file ladbinstall.bin. (Although the Installer displays windows labeled “GRC Controls Database Install,” it actually places files on the concurrent manager server.)
1. Transfer the ladbinstall.bin file to the concurrent manager server, via FTP in binary mode. Use the applmgr account.
2. Use applmgr to log in to the concurrent manager server. Ensure that the user (login ID) has write and read privileges on $APPL_TOP.
3. Execute the environment file, if it is not included in the profile:
$. $APPL_TOP/$APPLFENV
4. Set the execute permission on ladbinstall:
$ chmod +x ladbinstall.bin
5. Execute ladbinstall.bin:
• To run in GUI or console mode, ensure that ladbinstall.properties is absent from the directory where ladbinstall.bin resides. To run in silent mode, be sure that both files are in the same directory.
2-2 Oracle Governance, Risk, and Compliance Controls Suite Upgrade Guide
• Use the name ladbinstall.bin as the command to run in GUI or silent mode. Add the argument -i console to run in console mode.
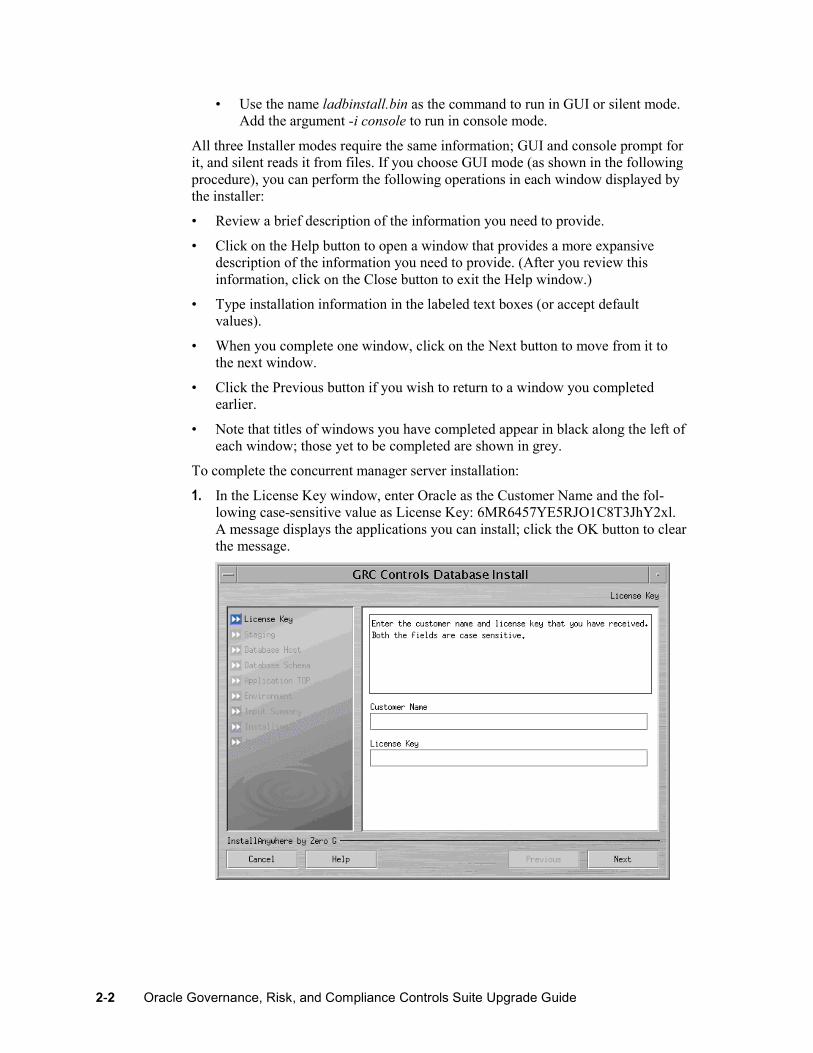
All three Installer modes require the same information; GUI and console prompt for it, and silent reads it from files. If you choose GUI mode (as shown in the following procedure), you can perform the following operations in each window displayed by the installer:
• Review a brief description of the information you need to provide.
• Click on the Help button to open a window that provides a more expansive description of the information you need to provide. (After you review this information, click on the Close button to exit the Help window.)
• Type installation information in the labeled text boxes (or accept default values).
• When you complete one window, click on the Next button to move from it to the next window.
• Click the Previous button if you wish to return to a window you completed earlier.
• Note that titles of windows you have completed appear in black along the left of each window; those yet to be completed are shown in grey.
To complete the concurrent manager server installation:
1. In the License Key window, enter Oracle as the Customer Name and the fol-lowing case-sensitive value as License Key: 6MR6457YE5RJO1C8T3JhY2xl. A message displays the applications you can install; click the OK button to clear the message.
Upgrading Embedded Agents 2-3
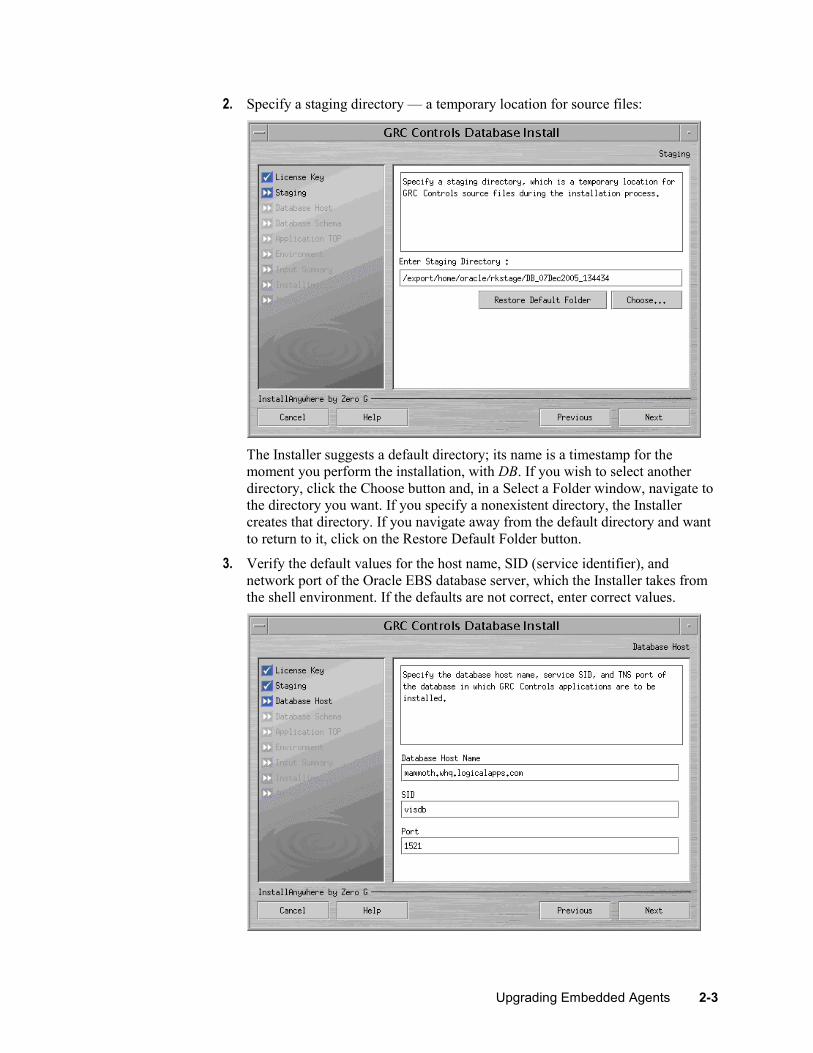
2. Specify a staging directory — a temporary location for source files:
The Installer suggests a default directory; its name is a timestamp for the moment you perform the installation, with DB. If you wish to select another directory, click the Choose button and, in a Select a Folder window, navigate to the directory you want. If you specify a nonexistent directory, the Installer creates that directory. If you navigate away from the default directory and want to return to it, click on the Restore Default Folder button.
3. Verify the default values for the host name, SID (service identifier), and network port of the Oracle EBS database server, which the Installer takes from the shell environment. If the defaults are not correct, enter correct values.
2-4 Oracle Governance, Risk, and Compliance Controls Suite Upgrade Guide
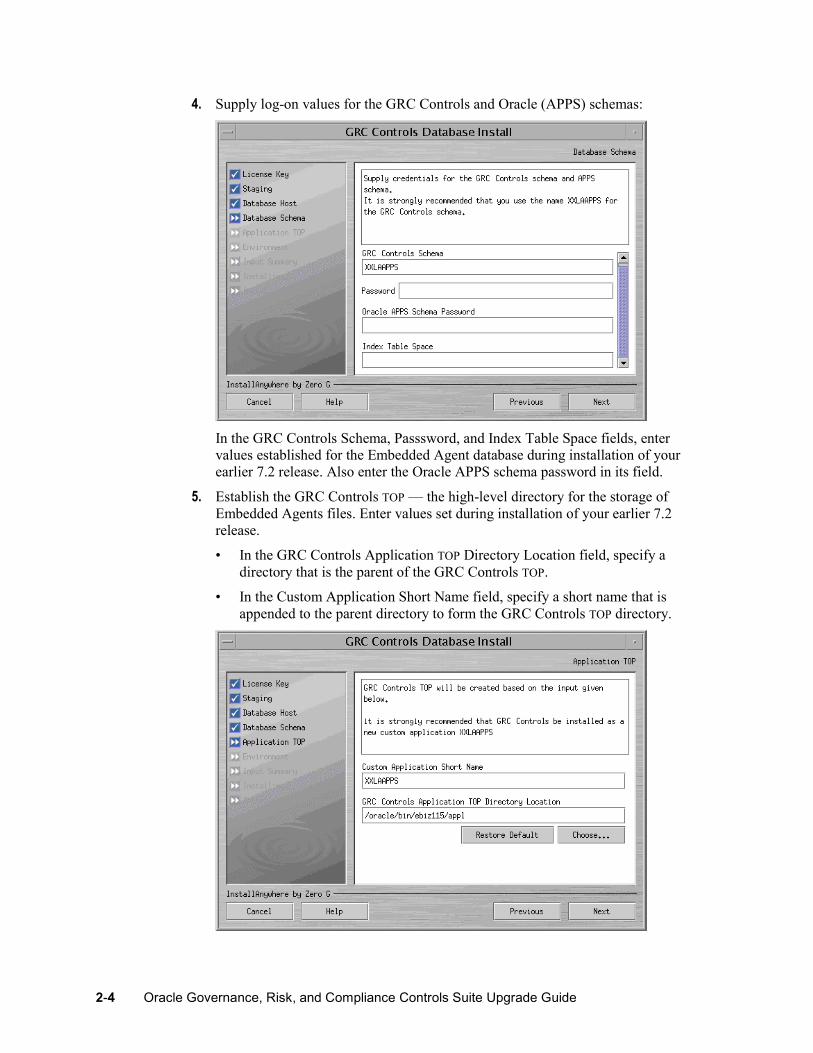
4. Supply log-on values for the GRC Controls and Oracle (APPS) schemas:
In the GRC Controls Schema, Passsword, and Index Table Space fields, enter values established for the Embedded Agent database during installation of your earlier 7.2 release. Also enter the Oracle APPS schema password in its field.
5. Establish the GRC Controls TOP — the high-level directory for the storage of Embedded Agents files. Enter values set during installation of your earlier 7.2 release.
• In the GRC Controls Application TOP Directory Location field, specify a directory that is the parent of the GRC Controls TOP.
• In the Custom Application Short Name field, specify a short name that is appended to the parent directory to form the GRC Controls TOP directory.
Upgrading Embedded Agents 2-5
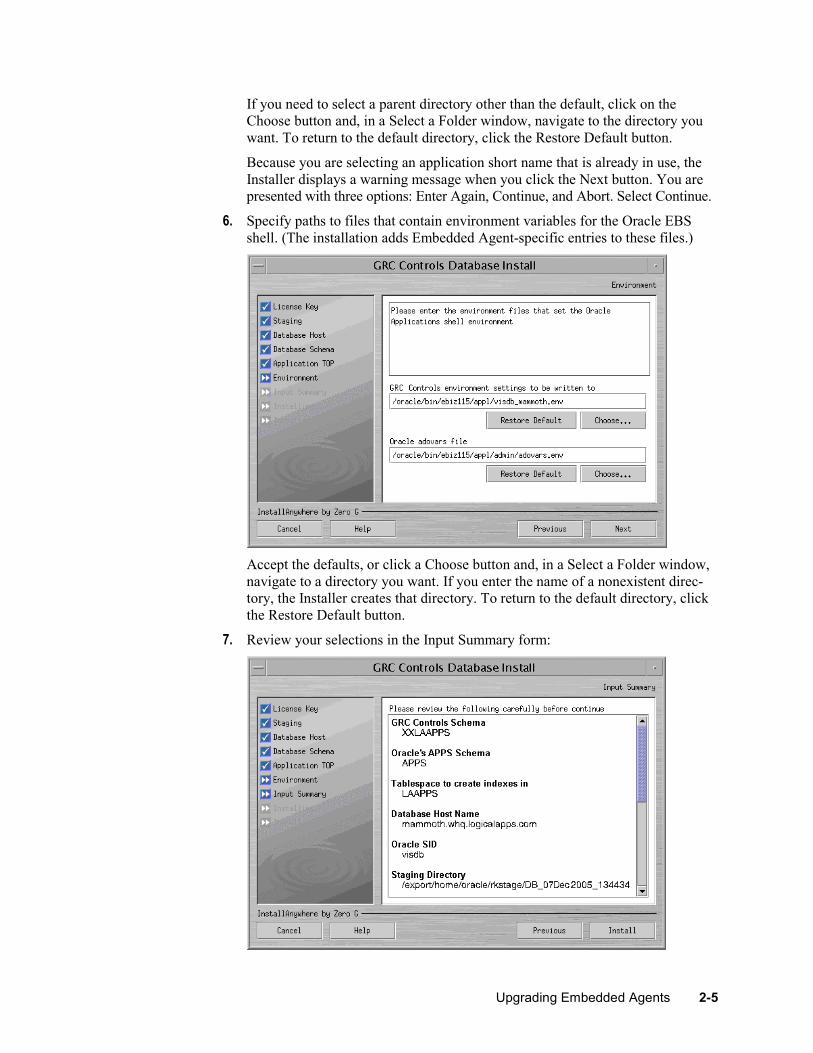
If you need to select a parent directory other than the default, click on the Choose button and, in a Select a Folder window, navigate to the directory you want. To return to the default directory, click the Restore Default button.
Because you are selecting an application short name that is already in use, the Installer displays a warning message when you click the Next button. You are presented with three options: Enter Again, Continue, and Abort. Select Continue.
6. Specify paths to files that contain environment variables for the Oracle EBS shell. (The installation adds Embedded Agent-specific entries to these files.)
Accept the defaults, or click a Choose button and, in a Select a Folder window, navigate to a directory you want. If you enter the name of a nonexistent direc-tory, the Installer creates that directory. To return to the default directory, click the Restore Default button.
7. Review your selections in the Input Summary form:

2-6 Oracle Governance, Risk, and Compliance Controls Suite Upgrade Guide
If you determine that any entry is inappropriate, you can click on the Previous button until you reach the form in which you selected the entry, and change it. (The Installer retains any entries you don’t change, even if you pass by them as you return to an earlier step in the installation process.)
8. In the Input Summary form, the label for the button at the lower right has changed from Next to Install. When you are satisfied with your selections in earlier forms, click on the Install button to complete the concurrent manager server installation.
The Installer displays error messages (if any are warranted) upon completing the upgrade of each Embedded Agents application, and overall status upon completing the upgrade of all products. If the overall status is Success, the upgrade has finished with no errors.
Errors or overall status may be classified as Warning, Nonfatal, or Fatal. The Installer recovers (restores the system to its state prior to the upgrade) only for Fatal errors. For details about errors and the upgrade process, navigate to the directory from which the Installer ran and review two log files: LADB_LOG_timestamp.log and LADB_ERROR_ timestamp.log, where timestamp is the date and time at which the Installer ran.
Upgrading Forms Server Components
To upgrade Embedded Agents forms server components, run lafrminstall.bin:
1. If the concurrent manager and forms servers run on the same host, re-source the environment by opening a new shell.
2. Transfer the lafrminstall.bin file to the forms server, via FTP in binary mode. Use the applmgr account.
3. Use applmgr to log in to the forms server. Ensure that the user (login ID) has write and read privileges on $APPL_TOP.
4. Execute the environment file, if it is not included in the profile:
$. $APPL_TOP/$APPLFENV
5. Set the execute permission on lafrminstall:
$ chmod +x lafrminstall.bin
6. Execute lafrminstall.bin:
• To run in GUI or console mode, ensure that lafrminstall.properties is absent from the directory where lafrminstall.bin resides. To run in silent mode, be sure both files are in the same directory.
• Use the name lafrminstall.bin as the command to run in GUI or silent mode. Add the argument -i console to run in console mode.
Most windows (or console prompts) for the forms installation are identical to those for the concurrent manager installation. If you select GUI mode, you perform the same operations in each window as you did in the concurrent-manager-server Installer.
To complete the forms server installation:
1. In the License Key window, enter Oracle as the Customer Name and the fol-lowing case-sensitive value as License Key: 6MR6457YE5RJO1C8T3JhY2xl.
Upgrading Embedded Agents 2-7
(These are the same as the values for concurrent-manager-server installation.) A message displays the applications you can install; click the OK button to clear it.
2. In the Staging form, once again select a directory for the temporary placement of source files. The Installer once again suggests a default — its name a time-stamp for the moment you perform the installation, along with FRM (for forms).
If you wish to select another directory, click on the Choose button. In a Select a Folder window, navigate to the directory you want. If you specify a nonexistent directory, the Installer creates that directory. If you navigate away from the default directory and want to return to it, click on the Restore Default Folder button.
3. In the Database Host form, select the database host name used where the database installation has been run, and the appropriate SID and port values.
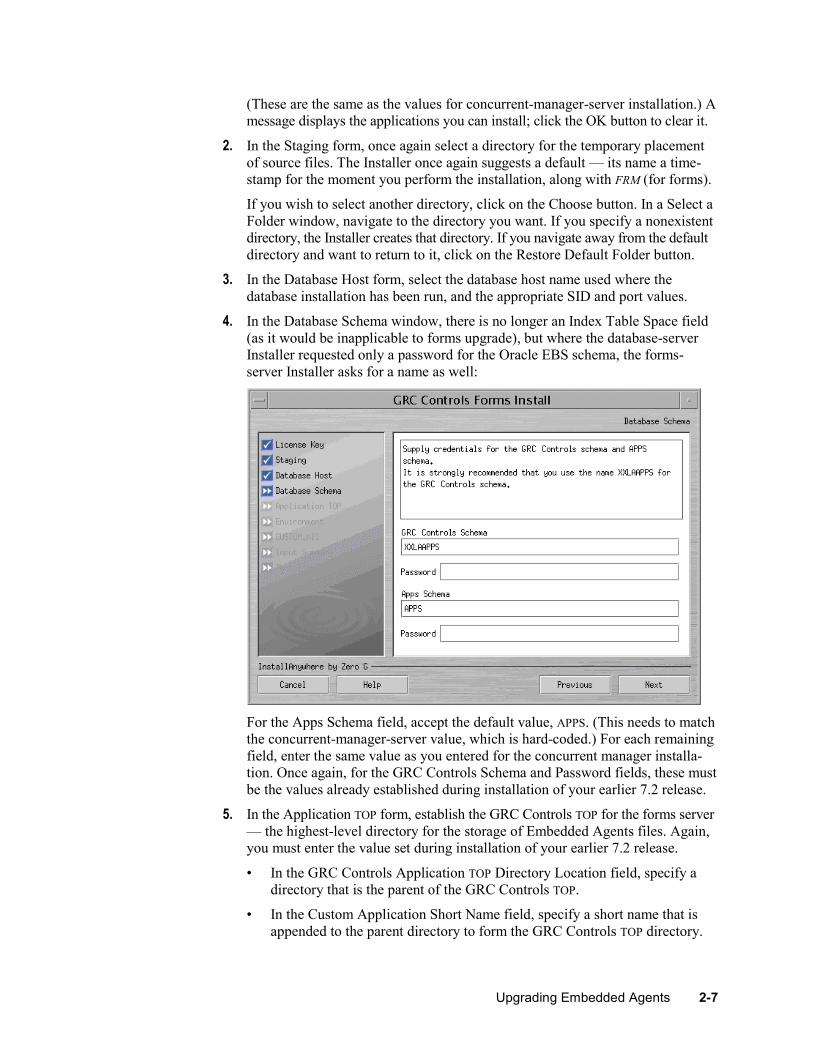
4. In the Database Schema window, there is no longer an Index Table Space field (as it would be inapplicable to forms upgrade), but where the database-server Installer requested only a password for the Oracle EBS schema, the forms-server Installer asks for a name as well:
For the Apps Schema field, accept the default value, APPS. (This needs to match the concurrent-manager-server value, which is hard-coded.) For each remaining field, enter the same value as you entered for the concurrent manager installa-tion. Once again, for the GRC Controls Schema and Password fields, these must be the values already established during installation of your earlier 7.2 release.
5. In the Application TOP form, establish the GRC Controls TOP for the forms server — the highest-level directory for the storage of Embedded Agents files. Again, you must enter the value set during installation of your earlier 7.2 release.
• In the GRC Controls Application TOP Directory Location field, specify a directory that is the parent of the GRC Controls TOP.
• In the Custom Application Short Name field, specify a short name that is appended to the parent directory to form the GRC Controls TOP directory.
2-8 Oracle Governance, Risk, and Compliance Controls Suite Upgrade Guide
The short name for the forms server must be the same as the short name for the concurrent manager server.
If you need to select a parent directory other than the default, click on the Choose button and, in a Select a Folder window, navigate to the directory you want. To return to the default directory, click the Restore Default button.
Because you are selecting an application short name that is already in use, the Installer displays a warning message when you click the Next button. You are presented with three options: Enter Again, Continue, and Abort. Select Continue.
6. In the Environment form, specify paths to files that contain environment variables for the Oracle EBS shell (the first two prompts) and for forms paths (the APPSORA prompt). Accept the defaults, or click a Choose button and, in a Select a Folder window, navigate to a directory you want. If you enter the name of a nonexistent directory, the Installer creates that directory. To return to the default directory, click the Restore Default button. In any case select values that are appropriate for the forms server.
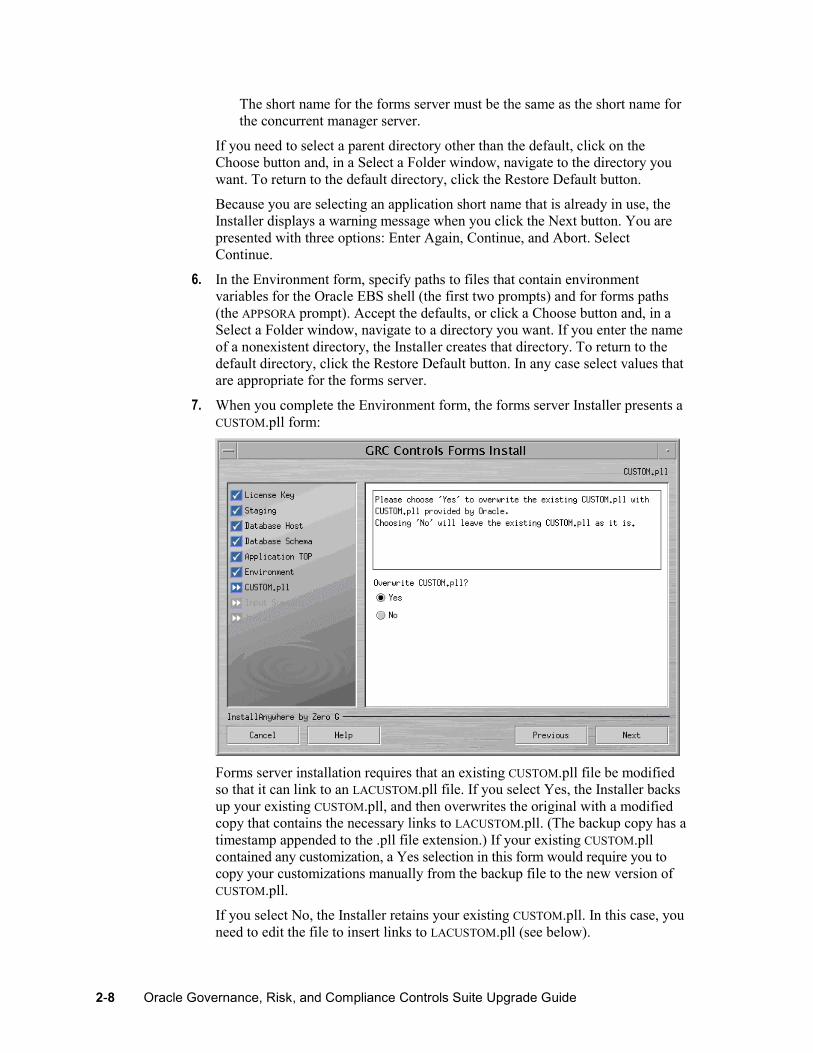
7. When you complete the Environment form, the forms server Installer presents a CUSTOM.pll form:
Forms server installation requires that an existing CUSTOM.pll file be modified so that it can link to an LACUSTOM.pll file. If you select Yes, the Installer backs up your existing CUSTOM.pll, and then overwrites the original with a modified copy that contains the necessary links to LACUSTOM.pll. (The backup copy has a timestamp appended to the .pll file extension.) If your existing CUSTOM.pll contained any customization, a Yes selection in this form would require you to copy your customizations manually from the backup file to the new version of CUSTOM.pll.
If you select No, the Installer retains your existing CUSTOM.pll. In this case, you need to edit the file to insert links to LACUSTOM.pll (see below).
Upgrading Embedded Agents 2-9
8. In the Input Summary form, review the selections you have made. If you determine that any entry is inappropriate, you can click on the Previous button until you reach the form in which you selected the entry, and change it. (The Installer retains any entries you don’t change, even if you pass by them as you return to an earlier step in the installation process.)
9. When you are satisfied with the selections you have made in preceding forms, click on the Install button in the Input Summary form to complete the forms server installation.
The Installer displays error messages (if any are warranted) upon completing the upgrade of each Embedded Agents application, and overall status upon completing the upgrade of all products. If the overall status is Success, the upgrade has finished with no errors.
Errors or overall status may be classified as Warning, Nonfatal, or Fatal. The Installer recovers (restores the system to its state prior to the upgrade) only for Fatal errors. For details about errors and the upgrade process, navigate to the directory from which the Installer ran and review two log files: LAFRM_LOG_timestamp.log and LAFRM_ERROR_ timestamp.log, where timestamp is the date and time at which the Installer ran.
CUSTOM.pll Modifications
If you chose (in step 7) not to overwrite your CUSTOM.pll file, edit the new CUSTOM.pll file. (If you selected Yes in step 7, ignore this section and skip ahead to “Servlet Mode.”)
1. In place of the existing code for Procedure Event(event_name varchar2), substitute the following:
PROCEDURE event(event_name varchar2) is
form_name varchar2(30) := name_in('system.current_form'); block_name varchar2(30) := name_in('system.cursor_block'); field_name varchar2(30) := name_in('system.current_item'); function_name varchar2(30); parameters varchar2(2000);
begin if (event_name = 'ZOOM') then la_enhncmtmgr_pkg.la_zooms(form_name,block_name, function_name,parameters); if function_name is not NULL then if parameters is null then fnd_function.execute(function_name,'Y','N'); elsif 'ZOOMSPECIAL' = substr(parameters,1,11) then lacustom.event('ZOOMSPECIAL'); -----new code 081903 else parameters := lazoom.zoom_event(parameters); fnd_function.execute(function_name,'Y','N',parameters); end if; end if;
2-10 Oracle Governance, Risk, and Compliance Controls Suite Upgrade Guide
-----------------------------------WNF elsif (event_name='WHEN-NEW-FORM-INSTANCE') then lacustom.event('WNF'); ---------------------------WNB elsif (event_name = 'WHEN-NEW-BLOCK-INSTANCE') then lacustom.event('WNB'); ------------------------------WNI elsif (event_name = 'WHEN-NEW-ITEM-INSTANCE') then lacustom.event('WNI'); ------------------------WNR elsif (event_name = 'WHEN-NEW-RECORD-INSTANCE') then lacustom.event('WNR'); ------------------------WNV elsif (event_name = 'WHEN-VALIDATE-RECORD') then lacustom.event('WVR'); ------------------------ elsif (substr(event_name,1,7) = 'SPECIAL') then execute_menu(event_name); -------------------------------------------- else lacustom.event(event_name); --put other events here end if; end event;
2. In place of the code for Function zoom_available, substitute the following:
FUNCTION zoom_available return boolean is v_enabled varchar2(20); begin --x v_enabled := lazoom.zoom_enabled; IF v_enabled = 'TRUE' THEN return TRUE; else return FALSE; end if; RETURN NULL; end zoom_available;
3. Attach the following libraries. (Remove the path when attaching the libraries.)
• LACUSTOM.pll
• LABRSQL.pll
4. Compile the file and ensure there are no compilation errors.
Servlet Mode
If the forms server runs in servlet mode, you must edit a file to enable Oracle to recognize the GRC Controls TOP you selected during installation (see step 5 on page 2-7).
To determine whether the forms server runs in servlet mode, identify the file set by the Oracle environment variable $FORMS60_WEB_CONFIG_FILE. Open that file and search for its serverURL entry. If that entry is set to the value /forms/formservlet, the forms server runs in servlet mode. If the entry is blank, the forms server runs in socket mode, in which case you need not complete the following procedure.
Upgrading Embedded Agents 2-11
If the forms server runs in servlet mode:
1. Using a text editor, open a file called formservlet.ini. The file is located either in $APACHE_TOP/Jserv/etc or in $IAS_ORACLE_HOME/Apache/Jserv/etc.
2. In the formservlet.ini file, look for a block of entries bounded by the lines #Begin Customization and #End Customization.
3. Add the following entry anywhere between the Begin and End Customization lines:
XXLAAPPS_TOP=$APPL_TOP/xxlaapps/11.5.0
Note, however, that the value XXLAAPPS is correct in this entry only if you have accepted the default application short name during installation. If not, then in each of the two places that the value XXLAAPPS appears in this entry (whether in upper or lower case), substitute the short name you created in step 5 on page 2-7.
4. Save and close the file.
Configuring the Remote Compilation
To finish the installation, you must configure a remote compilation feature, which makes libraries resident on the concurrent server available to the forms server.
1. Log on to the concurrent manager server.
2. Source out the Oracle EBS shell environment.
3. Navigate to the $XXLAAPPS_TOP/bin directory (a subdirectory, called bin, of the GRC Controls TOP directory, which you established in step 5 of the concurrent manager installation process, on page 2-4).
4. Grant the execute permission on a file called laconfig.sh:
$ chmod +x laconfig.sh
5. Run the laconfig.sh file:
$ laconfig.sh
Running the laconfig.sh file produces a series of command-line prompts. Respond to them as follows:
1. You are prompted to enter the GRC Controls application short name. If that name is other than XXLAAPPS, type it and press the Enter key. (Case is not significant.) If the short name is XXLAAPPS, press the enter key in response to the prompt.
2. A prompt displays a path to a Java executable; you must confirm that this is the path to the Java executable used by Oracle EBS. It is, if you sourced out the Oracle EBS shell environment before running the laconfig.sh file (no matter how many Java executables reside on your system). It may not be, if you did not source out the Oracle EBS shell environment and have more than one Java executable on your system.
If the prompt displays the path to the Oracle EBS Java executable, type Y (for yes) and press the Enter key. If not, type N (for no) and press the Enter key, then type the full path to the Java executable used by Oracle EBS and press the Enter key again.
2-12 Oracle Governance, Risk, and Compliance Controls Suite Upgrade Guide
3. A prompt displays a path for a file that sets the Oracle EBS environment; confirm that it is correct. The default value is taken from the shell as $APPL_TOP/$APPLFENV, and this selection is always safe; to accept it, press Y (for yes) and press the Enter key. But what’s really at issue is the file that sets the GRC Controls TOP, which is a subsidiary file of $APPLFENV. You may wish to specify it instead; if so, type N (for no), then type the full path to the appropriate file and press the Enter key.
4. The following prompt appears:
Choose your node configuration from below: 1. All servers (CM/Forms) share the same application top directory 2. Forms server has different application top file system than concurrent managers 3. Exit Program
Enter 1 if all database, forms, and concurrent servers exist under a single application TOP, or 2 if each exists under its own application TOP (regardless of whether they reside on a single machine or more than one).
5. You are prompted to enter the number of distinct application TOPs used by forms servers. Type the number and press the Enter key.
6. For each of the application TOPs you include in the count in step 5, you are prompted to select a method for transferring files to the application TOP direc-tory. Enter one of the following and press the Enter key:
• 1 for secured shell (ssh)
• 2 for remote execution (rexec)
• 3 for telnet
• 4 for local file system (copy)
• 5 for manual
7. For each application TOP, you are prompted for supporting information if you have selected any of the first four access methods. (Method 5, manual, requires no supporting information.)
• Server host name if you selected option 1, 2, 3, or 4
• Full path to Embedded Agents binary files if you selected option 1, 2, 3, or 4
• User ID if you selected option 1, 2, or 3
• Password if you selected option 3
Entries are validated, so that if you enter incorrect supporting information you are prompted to try again.
Once you have finished executing the laconfig.sh file, verify that the following files exist:
• Concurrent manager server (under $XXLAAPPS_TOP/bin): LAGENLIB.prog,
LAMIGRATE.prog, LAIMPORT.prog
• Forms server: LAFORMSGEN.prog
Upgrading Embedded Agents 2-13
Finally, if you want to enable migration (the ability to port Embedded Agents configurations from one instance to another) with password security:
1. Navigate to \\System Administrator Responsibility\Profile\System.
2. Query for the LAAPPS: Enable Migration Security profile option.
3. Set the value to Yes at site level. (This can be controlled further at the responsibility and user levels.)
Bouncing the Servers
When you finish configuring the remote compilation feature, bounce both the form server and the concurrent manager server.
Running an AACG Script
If you are installing version 8.0 or later of Application Access Controls Governor, you need to complete the following procedure. If you are installing an earlier version of Application Access Controls Governor, skip this section and proceed to “Postinstallation Tasks” (page 2-13).
1. In step 2 of the concurrent-manager-server installation procedure, you created a staging directory (see page 2-3). Navigate to the following subdirectory of that staging directory:
AppsCore\db\plsql
2. Using a SQL tool, connect to the Embedded Agents database, supplying the username and password for its user. For example, if the tool were SQLPlus:
connect xxlaapps/xxlaapps
3. Run the script Hide_722_AppsAccess.sql.
Postinstallation Tasks
Once the installation is complete, you must perform additional tasks. Some are required in any case, and others only if you run particular versions of Oracle E-Business Suite or if other special circumstances apply.
SQL Rule Compilation
From within Embedded Agents, you must run an option to compile SQL rules:
1. Log on to the GRC Controls responsibility in Oracle E-Business Suite. In that responsibility, select Form Rules.
2. A GRC Controls-Oracle Rules form opens. Ensure that its Form Rules tab is selected.
3. Click on Tools in the menu bar, and then Oracle Form Rules Compile All Active SQL Rules in the Tools menu.
2-14 Oracle Governance, Risk, and Compliance Controls Suite Upgrade Guide
4. A pop-up message informs you of an ID number for the concurrent request that executes the SQL rule compilation. Make a note of the number, and then click on the OK button to close the message.
5. Optionally, verify that the request has been completed successfully.
a Click on View in the menu bar, then on Requests in the View menu.
b A Find Requests form opens. In it, click on the Specific Request radio button. Type the ID number of your concurrent request in the Request ID field, and click on the Find button.
c A Requests form opens. In the row displaying information about your request, ensure that the entry in the Phase field is Completed (you may need to click the Refresh Data button), and the entry in the Status field is Normal.
d Click on the × symbol in the upper right corner of the Requests form to close it.
Associate a GRC Controls Function
Application Access Controls Governor inserts an Activate Responsibilities option in the Actions menu of the Oracle Users form. (This option permits SOD rules to be evaluated when a user’s responsibilities are modified in the Users form.) To activate this menu option, associate a function called GRC Controls Activate Responsibilities with either responsibilities or menus from which administrators open the Users form:
1. In the GRC Controls-Oracle Rules form, ensure that either the Form Rules or Flow Rules tab is selected.
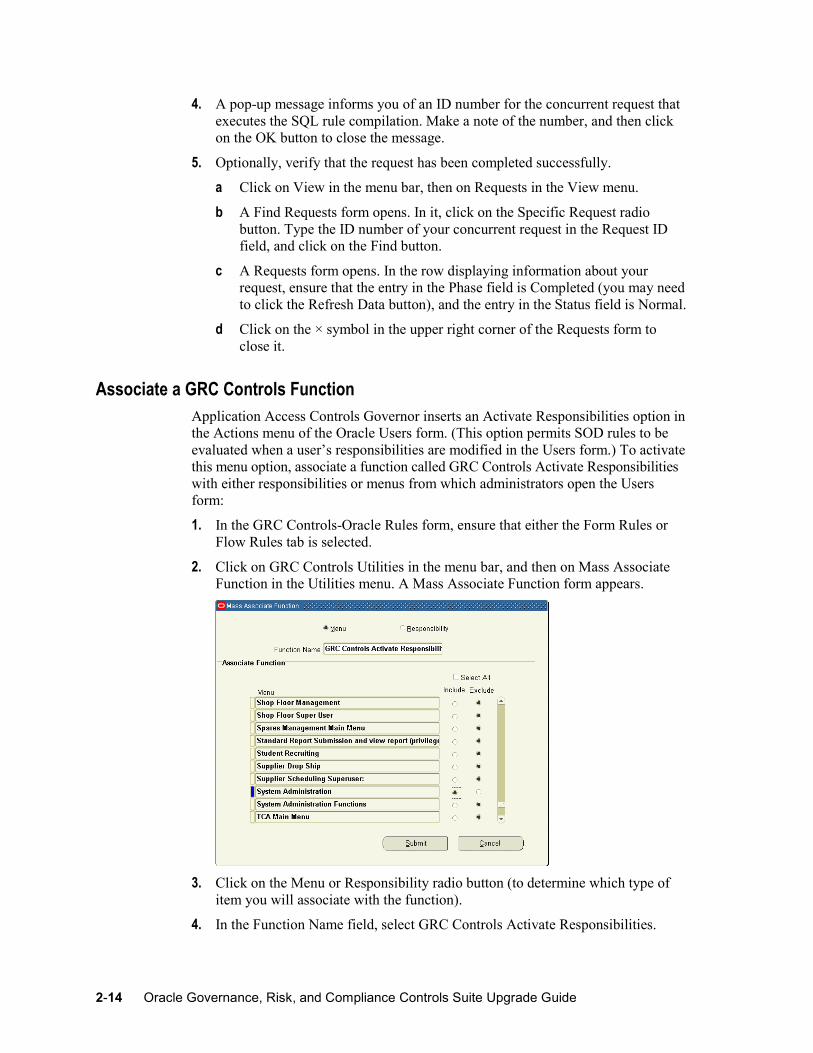
2. Click on GRC Controls Utilities in the menu bar, and then on Mass Associate Function in the Utilities menu. A Mass Associate Function form appears.
3. Click on the Menu or Responsibility radio button (to determine which type of item you will associate with the function).
4. In the Function Name field, select GRC Controls Activate Responsibilities.
Upgrading Embedded Agents 2-15
5. Select the Include radio button for each menu or responsibility you want to associate with the function you’ve selected. By default, the Include radio button is selected for all items in the Associate Function list. You can:
• Deselect or select all menus or responsibilities. Click on the Select All check box so that it changes to read “Deselect All.” Then click on it again; this selects all the Exclude radio buttons and clears all the Include radio buttons, and it changes the check box label back to “Select All.” Click on it once again; this selects all the Include radio buttons and clears all the Exclude radio buttons, and it changes the check box label back to “Deselect All.”
• Deselect individual included menus or responsibilities by clicking on the Exclude radio button for each.
• Select individual excluded menus or responsibilities by clicking on the Include radio button for each.
6. When you are satisfied with your selection, click on the Submit button.
Preventive Controls Governor
In Preventive Controls Governor, a Change Control Wizard enables users to write rules that impose change control on Oracle E-Business Suite fields. In order for the Wizard to be used, you must run a Create Audit Rules Objects option:
1. In the GRC Controls-Oracle Rules form, ensure that either the Form Rules or Audit Rules tab is selected.
2. Click on GRC Controls Utilities in the menu bar, and then Create Audit Rules Objects in the GRC Controls Utilities menu.
3. A pop-up message indicates that a concurrent request has been run. Make a note of its number, and then click on the OK button to close the message.
4. Optionally, verify that the request has been completed successfully. (See step 5 on page 2-14.)
Oracle E-Business Suite Version 11.5.8
If you run Oracle E-Business Suite version 11.5.8, you may regularly run a concur-rent program called “Synchronize WF LOCAL Tables” to coordinate aspects of the Oracle workflow. If this is the case, you are advised to run this concurrent program immediately after upgrading Embedded Agents so that the Flow Rules application is properly synchronized with Oracle workflow.
This applies only to version 11.5.8 of Oracle E-Business Suite at certain patch levels; other versions are able to perform this synchronization automatically. If your Oracle configuration does not require you to run the Synchronize WF LOCAL Tables program regularly, then omit this step as you install the Embedded Agents.
Oracle E-Business Suite Version 11.5.10.2
If you run Oracle E-Business Suite version 11.5.10.2, you need to edit an .xml file known as a “context file” in order for Oracle EBS to source the Embedded Agents environment correctly. (This sourcing is done through the use of a .env file, and the context file serves as a template for the generation of the .env file. In earlier versions,
2-16 Oracle Governance, Risk, and Compliance Controls Suite Upgrade Guide
a shell script served as the template; the Embedded Agents installer was able to work with the shell script to set values automatically. Thus, complete the following proce-dure if you run Oracle EBS 11.5.10.2 or later; omit it if you run an earlier version.)
1. Using an xml editor, open the file $APPL_TOP/admin/sid_host.xml. In this file name, replace sid with the system identifier for the APPS database and host with the host name of the machine on which the APPS database resides.
2. In the file, search for the value ZX_TOP.
3. Add the following line immediately beneath the ZX_TOP row.
<XXLAAPPS_TOP oa_var="s_xxlaappstop" oa_type="PROD_TOP" oa_enabled="FALSE">$APPL_TOP/xxlaapps/11.5.0</XXLAAPPS_TOP>
Note the following:
• The value XXLAAPPS is correct in this line only if you accepted the default GRC Controls application short name during installation. If not, then in each of the four places that the value XXLAAPPS appears in this line (whether in upper or lower case), substitute the short name you created in step 5 on page 2-4.
• In place of the value $APPL_TOP, supply the actual full path to the Oracle EBS TOP directory.
4. Save the file.
Audit Rules
Audit Rules provides database-auditing capability not only directly to users, but also to other applications that depend upon it. These include Preventive Controls Gover-nor, which provides Oracle field-level change control, and Access Monitoring, which audits the activities of users granted temporary access to duties they do not ordinarily fulfill. To prepare the auditing functionality for use, complete the following tasks.
For your earlier release of Embedded Agents version 7.2, the AuditTrail:Activate profile option should have been set to Yes. To confirm that the setting is correct:
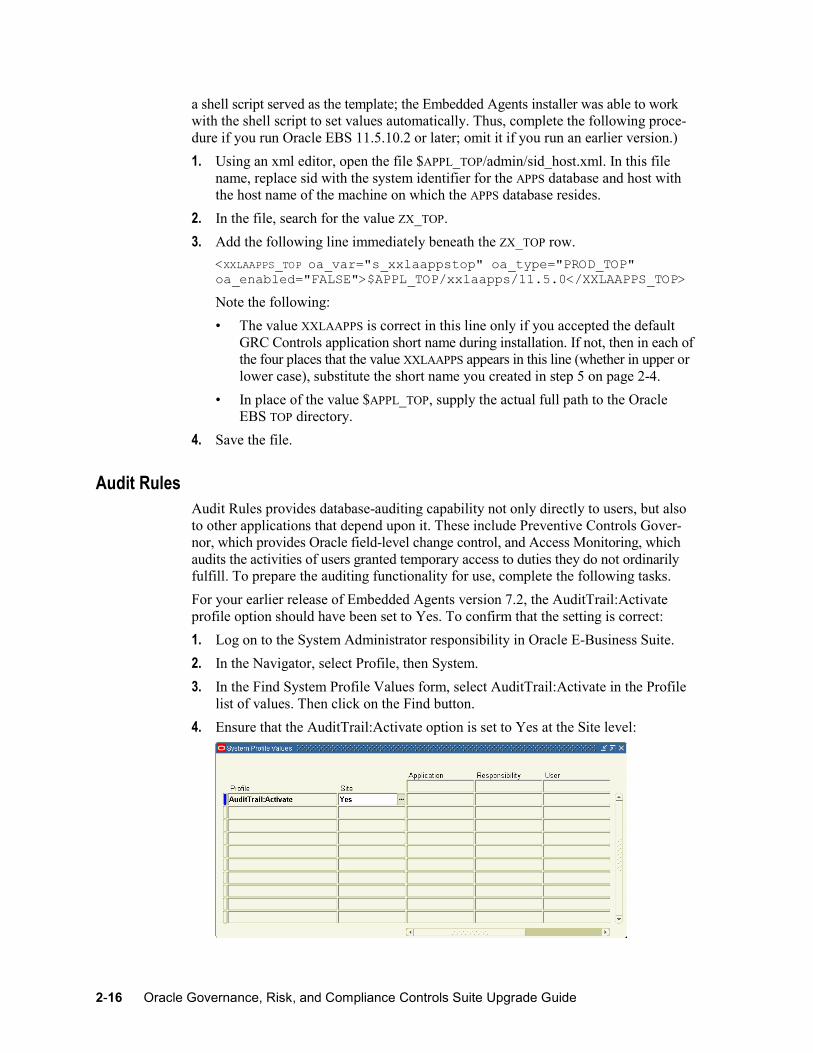
1. Log on to the System Administrator responsibility in Oracle E-Business Suite.
2. In the Navigator, select Profile, then System.
3. In the Find System Profile Values form, select AuditTrail:Activate in the Profile list of values. Then click on the Find button.
4. Ensure that the AuditTrail:Activate option is set to Yes at the Site level:
Upgrading Embedded Agents 2-17
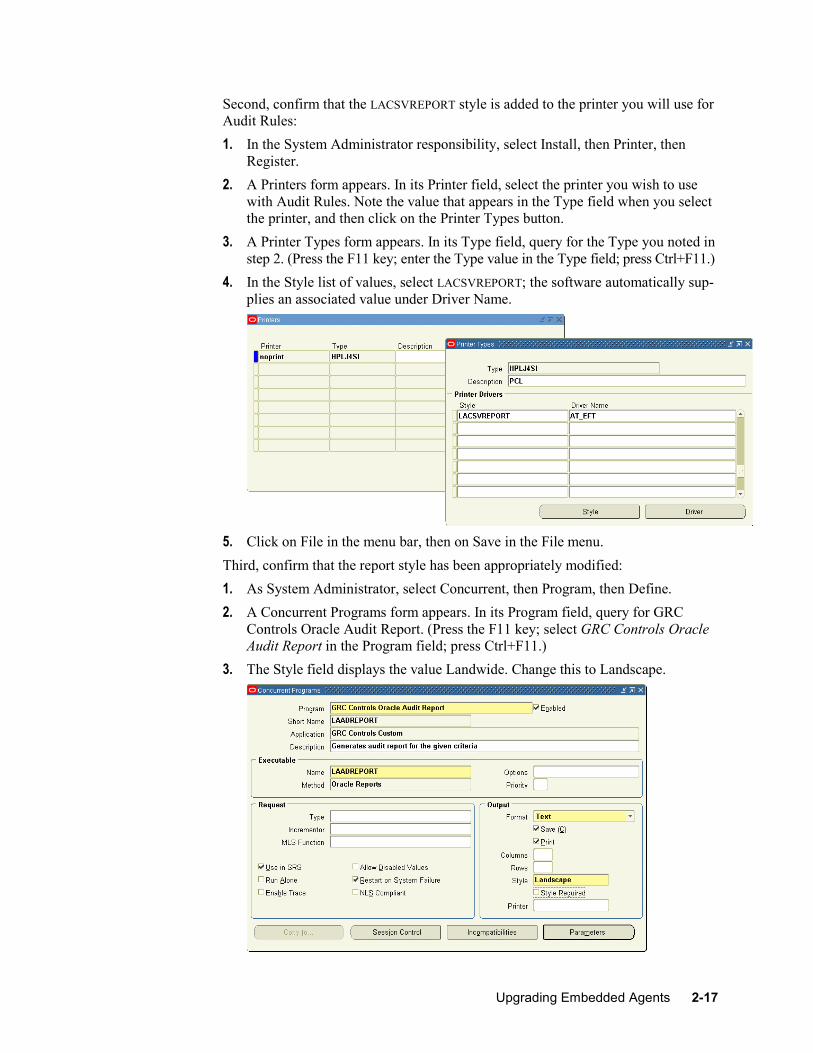
Second, confirm that the LACSVREPORT style is added to the printer you will use for Audit Rules:
1. In the System Administrator responsibility, select Install, then Printer, then Register.
2. A Printers form appears. In its Printer field, select the printer you wish to use with Audit Rules. Note the value that appears in the Type field when you select the printer, and then click on the Printer Types button.
3. A Printer Types form appears. In its Type field, query for the Type you noted in step 2. (Press the F11 key; enter the Type value in the Type field; press Ctrl+F11.)
4. In the Style list of values, select LACSVREPORT; the software automatically sup-plies an associated value under Driver Name.
5. Click on File in the menu bar, then on Save in the File menu.
Third, confirm that the report style has been appropriately modified:
1. As System Administrator, select Concurrent, then Program, then Define.
2. A Concurrent Programs form appears. In its Program field, query for GRC Controls Oracle Audit Report. (Press the F11 key; select GRC Controls Oracle Audit Report in the Program field; press Ctrl+F11.)
3. The Style field displays the value Landwide. Change this to Landscape.
2-18 Oracle Governance, Risk, and Compliance Controls Suite Upgrade Guide
4. Click on File in the menu bar, then on Save in the File menu.
Last, schedule a concurrent-request program called Audit: Dequeue Process to run periodically. (Do this even if it had been done for your earlier version-7.2 release.) This enables auditing, change-control, and Access Monitoring reports to display cur-rent data, so the period at which you schedule the running of this concurrent program depends upon the frequency with which you expect to run these reports. To schedule the program:
1. Switch to the GRC Controls responsibility. (Use the Switch Responsibility icon, sixth from the left on the tool bar.)
2. In the Navigator, select Requests: Run under the Administration heading.
3. In the Submit a New Request form, select Single Request and click the OK button.
4. In the Submit Request form, select Audit: Dequeue Process in the Name field (the program takes no parameters). Then click on the Schedule button.
5. In the Schedule form, select the Periodically radio button. In related fields, select values appropriate for the schedule you want to set. Click on the OK button.
6. In the Submit Request form, click on the Submit button.
Different Hosts
If the database server and concurrent manager server are on different hosts, make the following changes to the Tkprof script (LATKPROF.prog), which is located in the Embedded Agents binary directory on the concurrent manager server. (The changed lines are shown in boldface.) The value <db_login> is the database server name, and the value <db_hostname> is the user name to log on to the database server.
#!/bin/sh oracle_login=$1 tempfile=$$latkprof.txt temptrc=$$latkprof.trc echo Temp file $tempfile echo tkprof directory "$5" pwd tkfiles='ssh <db_login>@<db_hostname> ls $5' for i in $tkfiles do echo processing $i scp <db_login>@<db_hostname>:$i /tmp/$temptrc tkprof /tmp/$temptrc /tmp/$tempfile explain=$1 cat /tmp/$tempfile rm /tmp/$tempfile rm /tmp/$temptrc done
If you have multiple APPS schemas, the LA_ENHNCMTMGR_PKG must be created as a synonym under each schema. To perform this operation, run the following command:
create synonym LA_ENHNCMTMGR_PKG for apps.LA_ENHNCMTMGR_PKG
If this is not set, the following error message appears when a user attempts to log on to a read-only or MRC (multiple reporting currency) responsibility:
la_enhncmtmgr_pkg not declared
Upgrading Embedded Agents 2-19
Oracle On-Demand
The Embedded Agents require access to various database objects on the APPS schema. Oracle On-Demand, however, does not allow custom objects to refer directly to the APPS schema. If you use Oracle On-Demand, you can create a custom APPS schema with read-only permissions (customarily referred to as the APPSREADONLY schema). To do so, run the following scripts, which the Installer has placed on your system. (If you do not use Oracle On-Demand, you do not need to run these scripts.)
• laa_rd_custom_tab_grants_to_apps.sql: This script is executed from XXLAAPPS. It contains the grants having “WITH GRANT OPTION” for XXLAAPPS custom objects.
• laa_rd_apps_views_syn_to_schema.sql: This script is executed from APPS. It gives grants and creates synonyms in the destination schema for the identified Oracle APPS tables.
• laa_rd_apps_packages_to_schema.sql: This script is executed from APPS. It gives grants and creates synonyms in destination schema for the identified Oracle APPS packages.
• laa_rd_custom_packages_to_schema.sql: This script is executed from APPS. It gives grants and creates synonyms in the destination schema for custom pack-ages for the GRCC Suite.
• laa_rd_custom_tab_to_schema.sql: This script is executed from APPS. It gives grants and creates synonyms in destination schema for the custom tables for the GRCC Suite. This script need not be run if the destination schema is XXLAAPPS.
• laa_rd_custom_views_to_schema.sql: This is script is executed from APPS. It gives grants and creates synonyms in the destination schema for the custom views for the GRCC Suite.
• laa_rd_cm_apps_tables_grants.sql: This script is executed from APPS. It gives SELECT grants to the destination schema for Oracle APPS tables accessed by GRCC control monitors.
• laa_rd_cm_apps_tab_synonyms.sql: This script is executed from the destination schema. It creates synonyms for Oracle APPS tables accessed by GRCC control monitors in the destination schema.

2-20 Oracle Governance, Risk, and Compliance Controls Suite Upgrade Guide
Validation 3-1
3
Validation
As a part of the installation process, the Installer programs complete several “behind-the-scenes” tasks. Open Oracle E-Business Suite forms to confirm that these tasks have been completed.
As you perform these validation steps, you may be instructed to “query for” a value. If so, press the F11 key, type the specified value in a specified field, and then press Ctrl+F11.
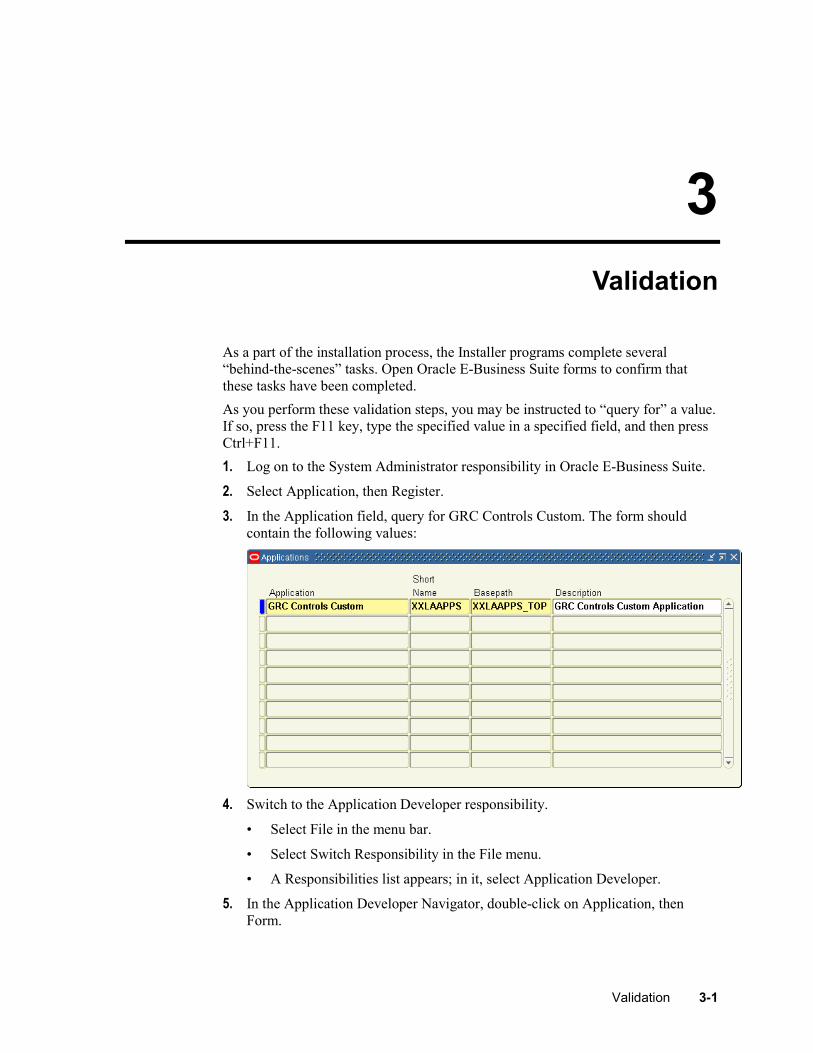
1. Log on to the System Administrator responsibility in Oracle E-Business Suite.
2. Select Application, then Register.
3. In the Application field, query for GRC Controls Custom. The form should contain the following values:
4. Switch to the Application Developer responsibility.
• Select File in the menu bar.
• Select Switch Responsibility in the File menu.
• A Responsibilities list appears; in it, select Application Developer.
5. In the Application Developer Navigator, double-click on Application, then Form.
3-2 Oracle Governance, Risk, and Compliance Controls Suite Upgrade Guide
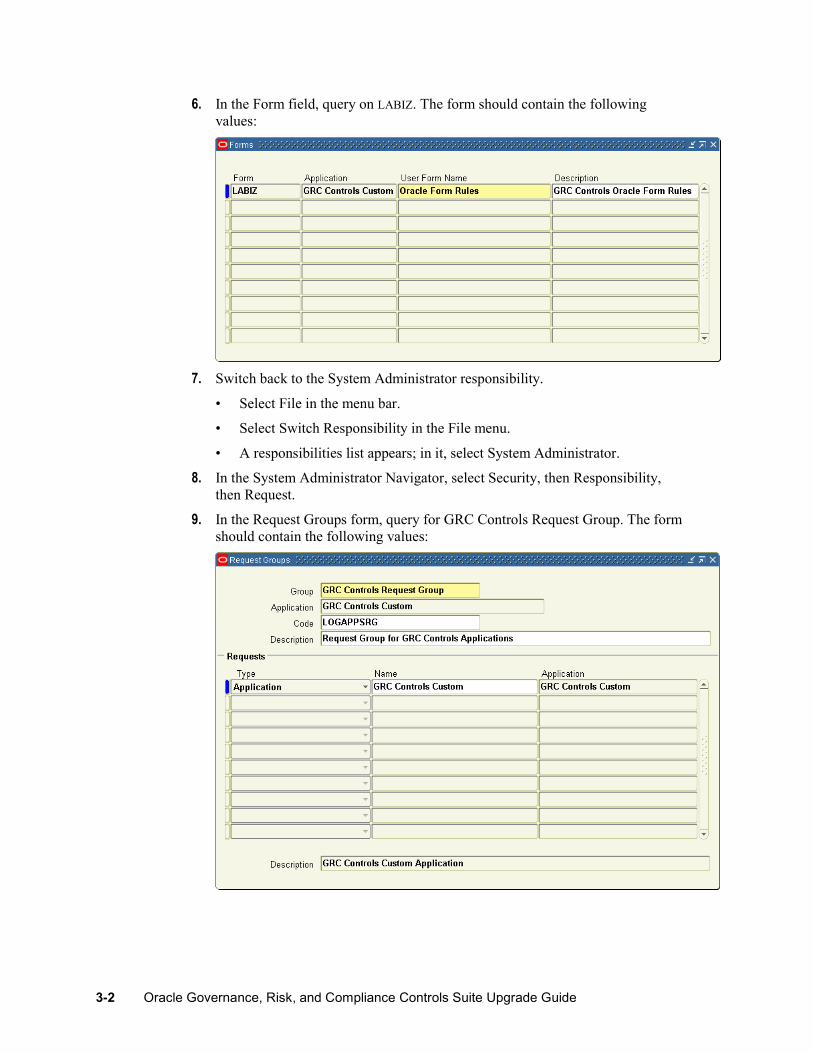
6. In the Form field, query on LABIZ. The form should contain the following values:
7. Switch back to the System Administrator responsibility.
• Select File in the menu bar.
• Select Switch Responsibility in the File menu.
• A responsibilities list appears; in it, select System Administrator.
8. In the System Administrator Navigator, select Security, then Responsibility, then Request.
9. In the Request Groups form, query for GRC Controls Request Group. The form should contain the following values:
Validation 3-3
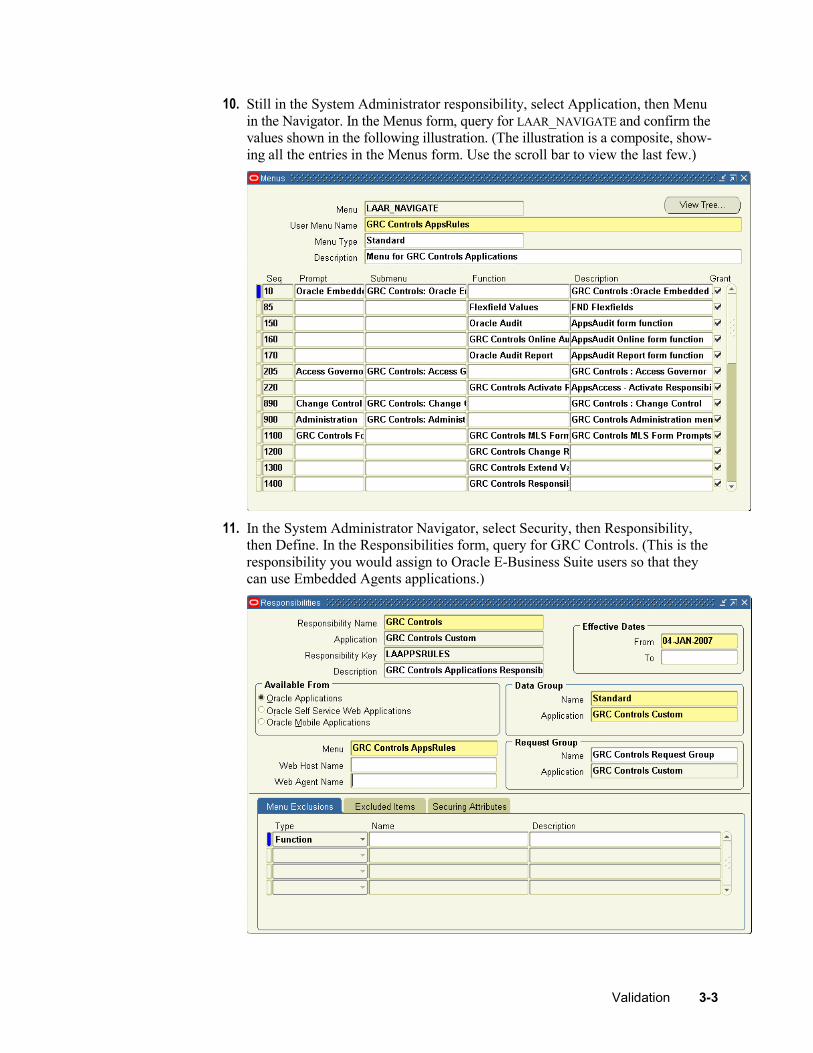
10. Still in the System Administrator responsibility, select Application, then Menu in the Navigator. In the Menus form, query for LAAR_NAVIGATE and confirm the values shown in the following illustration. (The illustration is a composite, show-ing all the entries in the Menus form. Use the scroll bar to view the last few.)
11. In the System Administrator Navigator, select Security, then Responsibility, then Define. In the Responsibilities form, query for GRC Controls. (This is the responsibility you would assign to Oracle E-Business Suite users so that they can use Embedded Agents applications.)
3-4 Oracle Governance, Risk, and Compliance Controls Suite Upgrade Guide
Switch to the GRC Controls responsibility and, in its Navigator, select Oracle Embedded Agent, and then Form Rules. Then do the following:
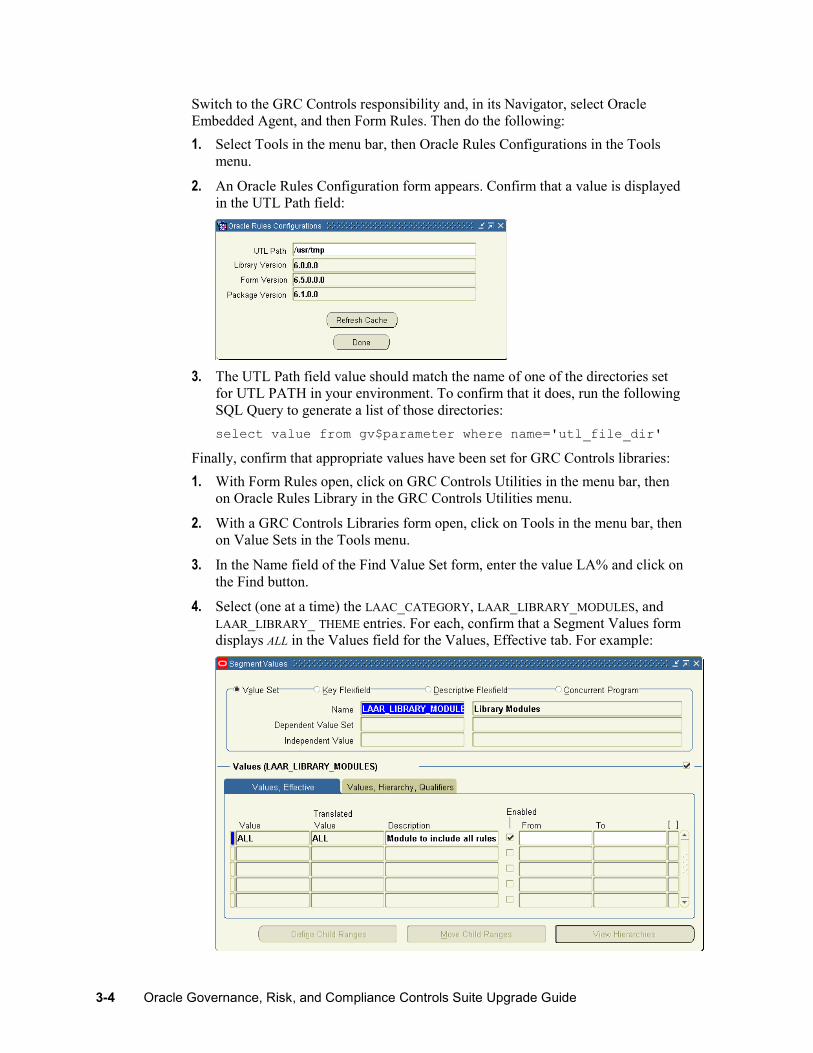
1. Select Tools in the menu bar, then Oracle Rules Configurations in the Tools menu.
2. An Oracle Rules Configuration form appears. Confirm that a value is displayed in the UTL Path field:
3. The UTL Path field value should match the name of one of the directories set for UTL PATH in your environment. To confirm that it does, run the following SQL Query to generate a list of those directories:
select value from gv$parameter where name='utl_file_dir'
Finally, confirm that appropriate values have been set for GRC Controls libraries:
1. With Form Rules open, click on GRC Controls Utilities in the menu bar, then on Oracle Rules Library in the GRC Controls Utilities menu.
2. With a GRC Controls Libraries form open, click on Tools in the menu bar, then on Value Sets in the Tools menu.
3. In the Name field of the Find Value Set form, enter the value LA% and click on the Find button.
4. Select (one at a time) the LAAC_CATEGORY, LAAR_LIBRARY_MODULES, and LAAR_LIBRARY_ THEME entries. For each, confirm that a Segment Values form displays ALL in the Values field for the Values, Effective tab. For example:
Validation 3-5
Installation History
You can review information about the installation of files for your Embedded Agents implementation. To do so:
1. Log on to the GRC Controls responsibility in Oracle E-Business Suite.
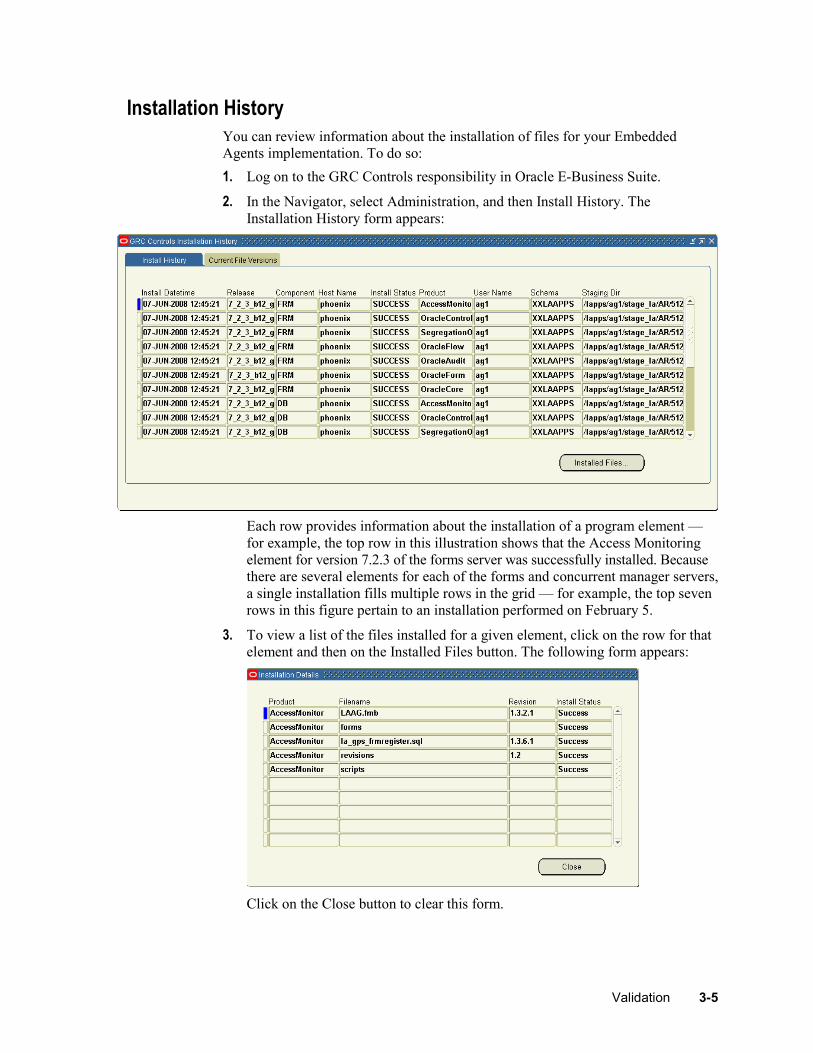
2. In the Navigator, select Administration, and then Install History. The Installation History form appears:
Each row provides information about the installation of a program element — for example, the top row in this illustration shows that the Access Monitoring element for version 7.2.3 of the forms server was successfully installed. Because there are several elements for each of the forms and concurrent manager servers, a single installation fills multiple rows in the grid — for example, the top seven rows in this figure pertain to an installation performed on February 5.
3. To view a list of the files installed for a given element, click on the row for that element and then on the Installed Files button. The following form appears:
Click on the Close button to clear this form.
3-6 Oracle Governance, Risk, and Compliance Controls Suite Upgrade Guide
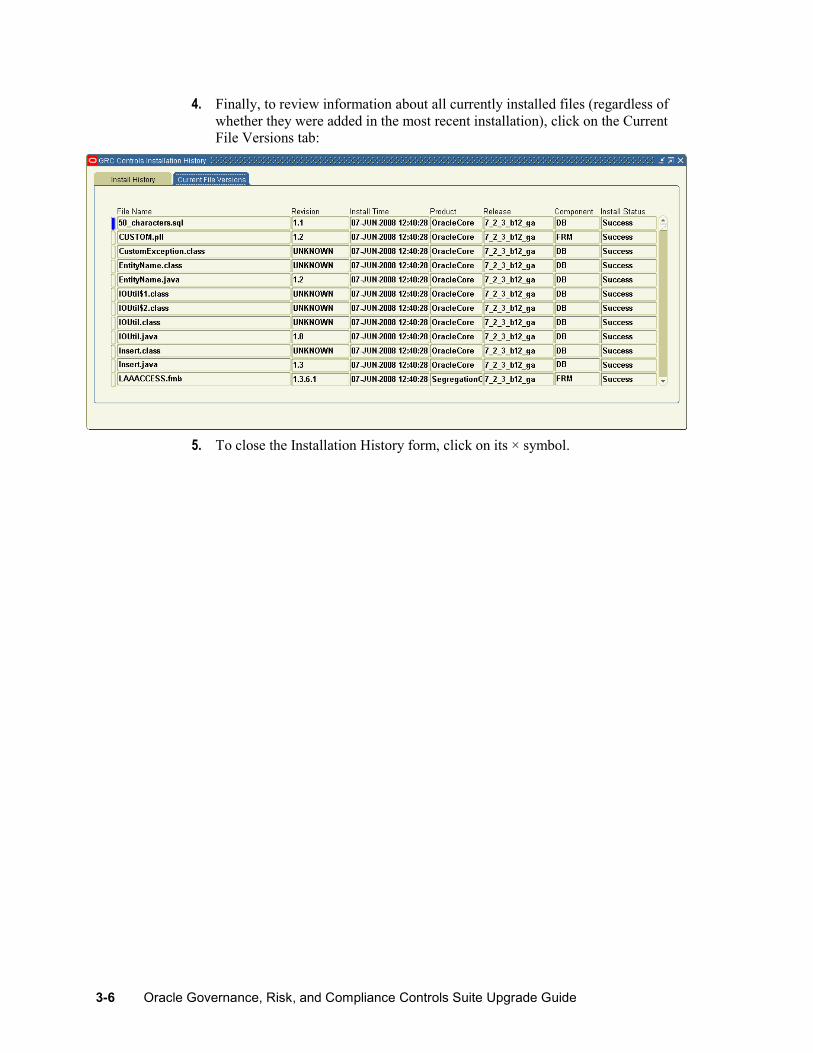
4. Finally, to review information about all currently installed files (regardless of whether they were added in the most recent installation), click on the Current File Versions tab:
5. To close the Installation History form, click on its × symbol.
Platform Upgrade Overview 4-1
4
Platform Upgrade Overview
You may have installed the common platform for the Governance, Risk, and Compliance Controls Suite on a Linux, UNIX, or Windows server (see “Supported Operating Systems,” below). The procedure for upgrading to a later release of version 7.2 varies somewhat depending upon the operating system you choose.
You begin by preparing your system for the upgrade, loading files to a staging directory, and upgrading GRC Controls components. (Business Objects and Tomcat application server components, already installed for your earlier release of 7.2, need not be upgraded.) If you use a Linux or UNIX operaing system, follow directions in Chatper 5 to complete these tasks, and skip Chapter 6. If you use Windows, follow directions in Chapter 6 and skip Chapter 5.
No matter what operating system you use, continue the upgrade by backing up report history and “publishing” reports; see Chapter 7. The upgraded instance of Grovernance, Risk, and Compliance Controls Suite inherits configuration settings from the prior instance, but you may wish to modify them; if so, see Chapter 8.
Supported Operating Systems
The GRC Controls Suite platform runs under any of the following operating systems:
Windows 2000 Server with Service Pack 4.
Windows 2003 Server with Service Pack 1.
Red Hat Enterprise Linux 4.0. Minimum operating system installation.
Red Hat Advanced Server 4.0. Minimum operating system installation.
SUSE Linux Enterprise Server 9.0. Minimum operating system installation plus XFree86-4.3.99.902-43.22.i586.rpm, XFree86-libs-4.3.99.902-43.22.i586.rpm. Higher patches are supported.
Solaris 8. Minimum operating system installation plus the following packages:
• SUNWgzip
• SUNWzlib
• SUNWscpu

4-2 Oracle Governance, Risk, and Compliance Controls Suite Upgrade Guide
• SUNWbash
• SUNWbcp
• SUNWxcu4 (XCU4 Utilities)
• SUNWxwfnt
• SUNWxwplt
• SUNWlibC
• SUNWeuluf (UTF-8 L10N For Language Environment User Files)
• SUNWuiu8 (Iconv modules for UTF-8 Locale)
• SUNWulcf (UTF-8 Locale Environment Common Files)
• SUNWmfrun
• SUNWxwice
• Solaris 8 Recommended Patch Cluster including:
– kernel patch, 108528-24 or higher
– C++ run-time, 108434-13 or higher
– linker patch, 109147-26 or higher
– Misc loc have errors in CTYPE and lv colln monetary, 109778-13 or higher
– gzip patch, 112668-01 or higher
– libz patch, 112611-02 or higher
– tar patch, 110951-04 or higher
– sh family patch, 109324-05 or higher
– en_UTF-8 patch, 114059-02 or higher
• Additionally, thread, c and other library patch, 108993-32 or higher. Note that patch 108993-32 require the following to be installed first:
– mntfs patch 111023-03
– init patch 111317-05
– mount patch 113648-03
– netstrategy patch 115827-01
– uadmin patch 116602-01
Solaris 9. Minimum operating system installation plus the following packages:
• SUNWgzip
• SUNWzlib
• SUNWscpu
• SUNWbash
• SUNWbcp
• SUNWxcu4(XCU4 Utilities)
Platform Upgrade Overview 4-3
• SUNWxwfnt
• SUNWxwplt
• SUNWlibC
• SUNWeu8os (American English/UTF-8 L10N For OS User Files)
• SUNWeuluf (UTF-8 L10N For Language Environment User Files)
• SUNWuiu8 (Iconv modules for UTF-8 Locale)
• SUNWulcf (UTF-8 Locale Environment Common Files)
• SUNWmfrun
• SUNWxwice
• Solaris 9 Recommended Patch Cluster including:
– kernel patch, 112233-11 or higher
– libc, 112874-16 or higher
– C++ run-time, 111711-06 or higher
– linker patch, 112963-10 or higher
– zlib patch, 115754-02 or higher
– Higher patches are supported.
– November 2003 C++ Runtime PTF => xlC.aix50.rte 6.0.0.10 (This PTF requires Runtime of Level 6.0.0.0 to be installed prior to installing the PTF)
– Higher patches are supported
Solaris 10. Minimum operating system installation plus the following packages. (Higher patches are also supported.)
• SUNWgzip
• SUNWzlib
• SUNWscpu
• SUNWbash
• SUNWbcp
• SUNWxcu4 XCU4 Utilities
• SUNWxwfnt
• SUNWxwplt
• SUNWlibC
• SUNWeu8os American English/UTF-8 L10N For OS Environment User Files
• SUNWeuluf UTF-8 L10N For Language Environment User Files
• SUNWuiu8 Iconv modules for UTF-8 Locale
• SUNWulcf UTF-8 Locale Environment Common Files
• SUNWmfrun
• SUNWxwice
4-4 Oracle Governance, Risk, and Compliance Controls Suite Upgrade Guide
Hardware Requirements
A Solaris, Linux, or Windows server should meet the following requirements to run the GRC Controls Suite platform and Business Objects:
• Random-access memory (RAM): 3 gigabytes (GB)
• Hard-disk space: For a single-node installation, 40 GB of space on mirrored SCSI disks — 8 GB for a staging directory, 4 GB for an platform web tier, 26 GB for a Business Objects reports tier, and 2 GB for database metadata.
If you use Red Hat Enterprise Linux 4.0 or SUSE Linux Enterprise Server 9.0, your system must have at least Dual CPU (Xeon preferred), 2.5 GHz or faster.
If you use Solaris 8, 9, or 10, your system must have at least SPARC v8plus.
Requirements for the application server and database include:
• Database: At least 1.5 GB of storage for tables for the GRC Controls platform schema.
• 2 GB of disk space reserved for temporary data generated by segregation-of-duties analytics. (This is in addition to the 40 GB of space noted above. It is space shared by all databases that run on a server, so you may already have allowed for it.)
Software Requirements
Version 7.2.3 of Governance, Risk, and Compliance Controls Suite supports Oracle E-Business Suite Release 12, releases 11.5.9 and 11.5.10 (preferred), and 11.5.7 (FND Patch H) and 11.5.8 (also supported).
Oracle Client version 9.2.0.1 or greater is required for connectivity among various Oracle databases.
Each of the GRC Controls Suite platform and Business Objects requires an Oracle 9i (or later) database.
Apache Tomcat 5.0 is the only supported application server. It is bundled with the Business Objects installation.
Internet Explorer 5.5, 6.0, or 7.0 can display the GRC Controls Suite platform.
Upgrading Linux/UNIX Server Components 5-1
5
Upgrading Linux/UNIX Server Components
If you are upgrading the Governance, Risk, and Compliance Controls Suite platform on a Linux or UNIX server, complete the procedures in this chapter, and omit Chap-ter 6. (If you are upgrading on Windows, omit this chapter and skip ahead to Chapter 6.) Once server components are installed, proceed to Chapter 7.
Ensure that the Embedded Agents are installed in at least one instance of Oracle E-Business Suite. Then:
• Complete preparatory steps.
• Load upgrade files to a staging directory.
• Upgrade the GRC Controls Suite program files and schema.
Preparing to Upgrade
Before upgrading, complete the following steps:
1. You will use Oracle databases, one each for GRC Controls Suite and Business Objects, created for your earlier release of version 7.2. The recommended data-base user names are XXLAAPPS_AG and XXLAAPPS_BO, respectively. Confirm that both the database users have the CONNECT and RESOURCE roles, both set to DEFAULT, and that the XXLAAPPS_AG user has the CREATE VIEW and CREATE SYSONYM privileges, as well as access privileges to the v$instance table.
2. Determine the following values, which you will need during the upgrade:
• The host name of the SMTP server your company uses for sending email.
• The host name, port number, SID, user (schema) name, and password for each of databases used by the GRC Controls Suite platform and Business Objects, and for the database used by an Oracle E-Business Suite instance in which the Embedded Agents have been installed to run.
• The password for your Business Objects Administrator user. This password was created during installation of your earlier release of GRC Controls Suite 7.2; if necessary, you can look it up in the Properties panel of the GRC Controls Suite platform (see “Setting Properties” on page 8-2).
3. Oracle Client 9.2.0.1 or greater must be installed on the server that hosts GRC Controls Suite; you are assumed to have completed this installation, as it was
5-2 Oracle Governance, Risk, and Compliance Controls Suite Upgrade Guide
needed for your earlier release of version 7.2 as well. The file ORACLE_HOME/ network/admin/tnsnames.ora contains an entry for each of the GRC Controls Suite, Embedded Agent, and Business Objects databases, specifying the host, dbport, and dbsid. Confirm that these entries remain correct.
4. Ensure that a GRC Controls Suite user exists on the host Linux or UNIX operat-ing system. (This user should have been created during installation of your ear-lier release of version 7.2.) The recommended name is lapps. The user need not belong to any group. As you complete the prodedures in this chapter, log on as this user.
5. For installation of your earlier release of 7.2, certain standard directories were created. Of them, reuse the following for the upgrade:
• A base directory. In this document, $LAPPS_BASE represents the full path to this directory (for example, /opt/lapps).
• A home directory, which is an immediate subdirectory of $LAPPS_BASE. GRC Controls Suite and Business Objects are installed in, and run from, this direc-tory and subdirectories of it. In this document, the name $LAPPS_AG_HOME represents the full path to this directory (for example, /opt/lapps/ag).
• Temporary directories: $LAPPS_BASE/tmp and $LAPPS_BASE/tmpdir. These could be links to any designated temporary directory on the host.
Create a new version of a staging directory, which should be an immedate subdirectory of $LAPPS_BASE. In this document, $LAPPS_STAGE represents the full path to this directory (for example, /opt/lapps72/stage723).
Sourcing the Environment
When your earlier release of GRC Controls Suite 7.2 was installed, an environment file, ag.env, was edited and copied to the $LAPPS_AG_HOME directory. Re-edit the file so that one of its entries points to the newly created staging directory for the upgrade release of version 7.2, and then run the file:
1. Navigate to the home directory. (In the following command, substitute the actual path to the home directory for the environment variable).
cd $LAPPS_AG_HOME
2. Using a text editor, open ag.env. In it, locate the LAPPS_STAGE entry and set it to the full path to the newly created staging directory for the upgrade release of version 7.2. The path ends in a semicolon, which is followed by a phrase consist-ing of the word export, the environment-variable name, and another semicolon. Be sure to retain these elements. For example, if the staging directory is /opt /lapps72/stage723, the staging directory entry in the ag.env file would read:
LAPPS_STAGE=/opt/lapps72/stage723; export LAPPS_STAGE;
You may wish to confirm that entries for LAPPS_BASE and LAPPS_HOME point correctly to the base and home directories, and that an ORACLE_HOME entry points to the directory in which Oracle Client is installed. Because these entries carry over from the earlier release of GRC Controls Suite 7.2, they should not need to be changed.
Upgrading Linux/UNIX Server Components 5-3
3. Save and close the file.
4. Run the file:
. ag.env
Loading Files in the Staging Directory
To prepare the files you will use to upgrade the GRC Controls Suite platform:
1. Locate the Governance, Risk, and Compliance Controls Suite Disk 1 in your Oracle media pack. In its dist directory, locate the file ag_723_server.zip, copy the file to your $LAPPS_STAGE directory.
2. Extract the contents of ag_723_server.zip into $LAPPS_STAGE.
3. Certain open-architecture files are required. To acquire them, download files from the following sites to your $LAPPS_STAGE/lib_stage directory.
http://downloads.sourceforge.net/hibernate/hibernate-3.0.5.zip ?modtime=1117034763&big mirror=1
http://team.andromda.org/maven2/org/jbpm/jbpm/3.0/jbpm-3.0.jar
http://team.andromda.org/maven2/org/jbpm/jbpm-identity/3.0/ jbpm-identity-3.0.jar
http://downloads.sourceforge.net/junit/junit3.8.1.zip?modtime=1031097600&big mirror=0
http://www.ibiblio.org/maven/mule/dependencies/xpp3/1.1.3.4d_ b4_min/xpp3-1.1.3.4d_b4_min.jar
After downloading these files, run the script preinstall.sh from your $LAPPS_STAGE directory.
Upgrading the GRC Controls Suite Schema
To create schema objects and seeded data for the GRC Controls Suite platform, complete some additional Business Objects setup. Then copy and edit GRC Controls Suite files. Extract and configure schema-installation files for the GRC Controls Suite platform, and then actually execute the schema installation.
Setting Up Business Objects
To configure Business Objects setup properties:
1. Navigate to a bo_setup subdirectory of your staging directory:
cd $LAPPS_STAGE/bo_setup
2. Using a text editor, open the file BusinessObjectsConfiguration.properties. The file contains the following prompts; set each to the indicated value.
• businessObjects.server: Supply the host name for the GRC Controls Suite platform server.
• businessObjects.serverPort: Use 6400 if you accepted default port values during installation. Otherwise, supply the value set for CMS_PORT during installation of the eariler release of GRC Controls Suite.
5-4 Oracle Governance, Risk, and Compliance Controls Suite Upgrade Guide
• businessObjects.username: Use the value Administrator.
• businessObjects.password: Supply the password you set for the Business Objects Administrator user.
• businessObjects.home: Supply the directory in which Business Objects is installed, which is $LAPPS_AG_HOME/bobje/enterprise115. As you enter this value, replace the environment variable with the full path to the directory you created as $LAPPS_AG_HOME (see page 5-2).
• businessObjects.commit: For the time being, set this value to false.
3. Save and close the file.
4. Set execution permissions on a removeAuthenticationRestrictions.sh file, and run the file:
chmod +x removeAuthenticationRestrictions.sh ./removeAuthenticationRestrictions.sh
5. If there are no exceptions, reopen the BusinessObjectsConfiguration.properties file and reset the businessObjects.commit property to true. Save and close that file, and then rerun removeAuthenticationRestrictions.sh.
Copying and Editing GRC Controls Suite Files
Put GRC Controls Suite platform files in place and prepare them:
1. Shut down the Tomcat application server:
$LAPPS_AG_HOME/bobje/tomcatshutdown.sh
2. Copy files from subdirectories of the staging directory to subdirectories of the home directory. Execute the following commands. (In the second command, a .war file name contains italicized placeholders that stand for version, schema, and build numbers. Replace these with the actual numbers, which you can determine by viewing a directory listing for the staging directory.)
rm -rf $LAPPS_AG_HOME/bobje/tomcat/webapps/ags
cp $LAPPS_STAGE/ags_7_2_n_snn_bnn_ga.war $LAPPS_AG_HOME/bobje/tomcat/webapps/ags.war
cp $LAPPS_STAGE/ags_infrastructure/post-install/ags.xml
$LAPPS_AG_HOME/bobje/tomcat/conf/Catalina/localhost
cp $LAPPS_STAGE/ags_infrastructure/post-install/*.jar $LAPPS_AG_HOME/bobje/tomcat/common/lib/
3. Navigate to the directory containing the ags.xml file:
cd $LAPPS_AG_HOME/bobje/tomcat/conf/Catalina/localhost
4. Using an xml editor, open ags.xml and perform the following edits. Each entry goes between <value> and </value> tags corresponding to each parameter.
• Locate the section headed <ResourceParams name=“mail/Session”>. In it, locate the mail.smtp.host parameter and, for its value, insert the host name of the SMTP server your company uses for sending email.
Upgrading Linux/UNIX Server Components 5-5
• Locate the section headed <ResourceParams name=“jdbc/onecenterDS”>. In it, locate the following parameters and supply these values for them:
driverClassName parameter. Insert the following string: oracle.jdbc.driver.OracleDriver
url parameter. Insert the following string. In place of Hostname, Port, and SID, use actual values for the database used by the GRC Controls Suite platform. jdbc:oracle:thin:@Hostname:Port:SID
username parameter. Supply the user name for the GRC Controls Suite plat-form database. It must match the name you created in step 1 on page 5-1.
password parameter. Supply the password for the GRC Controls Suite platform database user identified by the username parameter.
• Locate the section headed <ResourceParams name=“jdbc/appsaccessDS”>. In it, locate the following parameters and supply these values for them:
driverClassName parameter. Insert the following string: oracle.jdbc.driver.OracleDriver
url parameter. Insert the following string. In place of the Hostname, Port, and SID placeholders, insert actual values for the database used by an Oracle EBS instance in which Embedded Agents have been installed to run: jdbc:oracle:thin:@Hostname:Port:SID
username parameter. Supply the user name for the database used by the Oracle EBS instance in which Embedded Agents have been installed to run. (Conventionally, this is APPS.)
password parameter. Supply the password for the database used by the Oracle EBS instance in which Embedded Agents have been installed to run.
5. Save and close the file.
Preparing Schema Installation Files
To configure schema installation properties:
1. Navigate to an installation subdirectory of your $LAPPS_STAGE directory, and set permissions within it:
cd $LAPPS_STAGE/ags_install chmod +x permissions.sh ./permissions.sh
2. Navigate to a configuration subdirectory of the installation directory. In it, create a copy of a generic properties file so that the copy can be customized. (In the second command, replace the value host with the host name for the server on which you are upgrading the GRC Controls Suite platform.)
cd config cp filters-bundle-oracle.properties filters-host.properties
5-6 Oracle Governance, Risk, and Compliance Controls Suite Upgrade Guide
3. Using a text editor, open the filters-host.properties file and edit the following. (Accept default values for all properties not listed here.)
• hibernate.connection.url: Supply the connect string that the GRC Controls Suite platform will use to connect to its database. Use the following, but provide actual values for the Host, Port, and SID placeholders.
jdbc:oracle:thin:@Host:Port:SID
• hibernate.connection.username: Supply the user name for the GRC Controls Suite platform database. It must match the name created in step 1 on page 5-1.
• hibernate.connection.password: Supply the password for the GRC Controls Suite platform database.
• businessObjects.server: Supply the host name of the GRC Controls Suite platform server.
• businessObjects.serverPort: Use 6400 if you accepted default port values during installation. Otherwise, supply the value you set for CMS_PORT during installation of the earlier release of GRC Controls Suite 7.2.
• businessObjects.username: Use the value Administrator.
• businessObjects.password: Supply the password set for the Business Objects Administrator user.
• log4j.filepath: Supply the value ags.log, with no path. This is a log file that records errors in processing during installation.
• appserver.hostname: Enter the host name and port number for the GRC Controls Suite platform server, separated by a colon. If you accepted default port values during installation, the port value here is 8080; if not, supply the value you set for TOMCAT_PORT during installation of the earlier release of GRC Controlsl Suite 7.2.
• callbackhost: Enter the following value. In place of the host and port place-holders, substitute the same host name and port values as you used for the appserver.hostname value:
http://host:port/ags
4. Save and close the file.
5. Navigate back to the installation directory:
cd $LAPPS_STAGE/ags_install
6. Using a text editor, open the build.properties file. In its first line — config=bundle — replace bundle with the same host name you used when you edited the filters-host.properties file (step 3). Save and close the file.
7. Navigate to a migration subdirectory of $LAPPS_STAGE:
cd $LAPPS_STAGE/ags_migration
8. Using a text editor, open the file hibernate.cfg.xml and edit the following entries:
• connection.url: Supply the connect string that the GRC Controls Suite platform will use to connect to its database. Use the following, but provide actual values for the Host, Port, and SID placeholders.
jdbc:oracle:thin:@Host:Port:SID
Upgrading Linux/UNIX Server Components 5-7
• connection.username: Supply the user name for the GRC Controls Suite database (see steps 1 and 2 on page 5-1).
• connection.password: Supply the GRC Controls Suite database password.
Completing the Schema Upgrade
To complete the schema upgrade for the GRC Controls Suite platform:
1. If you have not yet shut down the Tomcat application server, do so:
$LAPPS_AG_HOME/bobje/tomcatshutdown.sh
Even if you have, you should confirm that Tomcat is not running. Execute the following command; Tomcat is not running if it produces no results:
run ps -ef | grep tomcat
2. Run the schema upgrade script without COMMIT to uncover potential errors. Execute the following commands:
cd $LAPPS_STAGE/ags_migration chmod +x run.sh ./run.sh | tee run.log
3. Review run.log for any errors. Assuming there are none, proceed to step 4.
4. Run the schema upgrade script with commit to upgrade the schema. Still at the $LAPPS_STAGE/ags_migration command prompt, execute the following command:
./run.sh COMMIT | tee run_commit.log
5. Review run_commit.log for any errors. Assuming there are none, proceed to step 6.
6. Populate schema objects. Execute the following commands:
cd $LAPPS_STAGE/ags_install ./populateAccessObjects.sh ./populateEmailTemplate.sh
7. If you are installing version 8.0 or later of Application Acces Controls Governor, use a SQL tool to run the script sod_tabs_updates.sql against the database for the GRC Controls Suite platform (XXLAAPPS_AG by convention). The script is located in a dubdirectory of your staging directory: $LAAPS_STAGE/ags_install.
If you intend to use an earlier version of Application Access Controls Governor, skip this step.
8. When the scripts finish running, restart the Tomcat application server. Execute the following command:
$LAPPS_AG_HOME/bobje/tomcatstartup.sh
Running a Reporting Script
The proper installation of Access Monitoring reports requires that a script be run against the XXLAAPPS_AG schema. The script is called AccessMonitorReports_ Script.SQL, and is located in the $LAPPS_STAGE/ags_install/Schema directory.
5-8 Oracle Governance, Risk, and Compliance Controls Suite Upgrade Guide
Setting Up the GRC Controls Suite Log
Finally, create a log, maintained by Tomcat, that records errors in processing by the GRC Controls Suite platform:
1. Copy a logging properties file from your staging directory to a directory on your server. Execute this command:
cp $LAPPS_STAGE/ags_infrastructure/post-install/log4j.properties $LAPPS_AG_HOME/bobje/tomcat/webapps/ags/WEB-INF/classes
2. Navigate to the directory containing the log4j.properties file:
cd $LAPPS_AG_HOME/bobje/tomcat/webapps/ags/WEB-INF/classes
3. Using a text editor, open log4j.properties. In it, locate a property called log4j.appender.file.File. Set it equal to the following path and file name:
$LAPPS_AG_HOME/bobje/tomcat/logs/ags.log
4. Optionally, also set a series of log4j.logger.com.logicalapps.onecenter proper-ties to values that determine the level of detail in log entries. From least to greatest, options are ERROR, WARN, INFO, and DEBUG (the default).
At any time, you can execute the following command to look for errors in the ags.log file:
grep -i ERR $LAPPS_AG_HOME/bobje/tomcat/logs/ags.log
Upgrading Windows Server Components 6-1
6
Upgrading Windows Server Components
If you are upgrading the Governance, Risk, and Compliance Controls Suite platform on a Windows server, complete the procedures in this chapter and then proceed to Chapter 7; you should have omitted Chapter 5. (If you are upgrading on Linux or UNIX, this chapter does not apply to you; see Chapter 5.)
Ensure that the Embedded Agents are installed in at least one instance of Oracle E-Business Suite. Then:
• Complete preparatory steps.
• Download files to a staging directory.
• Upgrade the GRC Controls Suite program files and schema.
Preparing to Upgrade
Before upgrading, complete the following steps:
1. You will use Oracle databases, one each for GRC Controls Suite and Business Objects, created for your earlier release of version 7.2. The recommended data-base user names are XXLAAPPS_AG and XXLAAPPS_BO, respectively. Confirm that both the database users have the CONNECT and RESOURCE roles, both set to DEFAULT, and that the XXLAAPPS_AG user has the CREATE VIEW and CREATE SYSONYM privileges, as well as access privileges to the v$instance table.
2. Determine the following values, which you will need during the upgrade:
• The host name of the SMTP server your company uses for sending email.
• The host name, port number, SID, user (schema) name, and password for each of databases used by the platform and Business Objects, and for the database used by an Oracle E-Business Suite instance in which the Embedded Agents have been installed to run.
• The password for your Business Objects Administrator user. This password was created during installation of your earlier 7.2 release of the GRC Con-trols Suite platform; if necessary, you can look it up in the Properties panel of the GRC Controls Suite platform (see “Setting Properties” on page 8-2).

6-2 Oracle Governance, Risk, and Compliance Controls Suite Upgrade Guide
3. Oracle Client 9.2.0.1 or greater must be installed on the server that hosts the GRC Controls Suite platform; you are assumed to have completed this during installation, as it was needed for your earlier release of version 7.2 as well. The file ORACLE_HOME/ network/admin/tnsnames.ora contains an entry for each of the GRC Controls Suite, Embedded Agent, and Business Objects databases, specifying the host, dbport, and dbsid. Confirm that these entries remain correct.
4. Ensure that a GRC Controls Suite user with Administrator privileges exists on the host Windows operating system. The recommended name is lapps. As you complete the prodedures in this chapter, log on as this user.
5. For installation of your earlier release of version 7.2, a home folder and a stag-ing folder were created:
• The version 7.2 upgrade reuses the home folder. The GRC Controls Suite platform and Business Objects are installed in, and run from, this folder and subfolders of it. Determine the actual path to the home folder established for your earlier release of version 7.2.
• For the version 7.2 upgrade, create a new instance of the staging folder, into which you will download files to be used in the upgrade. Specify any folder you wish (for example, C:\GrcStage\723).
Loading Files in the Staging Folder
To prepare the files you will use to install the GRC Controls Suite platform:
1. Locate the Governance, Risk, and Compliance Controls Suite Disk 1 in your Oracle media pack. In its dist folder, locate the file ag_723_server.zip, copy the file to your staging folder.
2. Using a tools such as the Extraction Wizard or the unzip command, extracte the contents of ag_723_server.zip into your staging folder.
3. Certain open-architecture files are required. To acquire them, download files from the following sites to lib_stage subfolder of your staging folder.
http://downloads.sourceforge.net/hibernate/hibernate-3.0.5.zip ?modtime=1117034763&big mirror=1
http://team.andromda.org/maven2/org/jbpm/jbpm/3.0/jbpm-3.0.jar
http://team.andromda.org/maven2/org/jbpm/jbpm-identity/3.0/ jbpm-identity-3.0.jar
http://downloads.sourceforge.net/junit/junit3.8.1.zip?modtime=1031097600&big mirror=0
http://www.ibiblio.org/maven/mule/dependencies/xpp3/1.1.3.4d_ b4_min/xpp3-1.1.3.4d_b4_min.jar
4. After downloading these files, run the file preinstall.bat from your staging folder.
Upgrading the GRC Controls Suite Schema
To create schema objects and seeded data for the GRC Controls Suite platform, complete some Business Objects setup. Then copy and edit GRC Controls Suite
Upgrading Windows Server Components 6-3
files. Extract and configure schema-installation files, and then execute the schema installation. As you complete the next several sections:
• Replace the term GrcHome in commands with the full path to your GRC Controls Suite home folder.
• Replace the term GrcStage in commands with the full path to the GRC Controls Suite staging folder that you created for this upgrade.
• Recognize that although commands are written to be executed in the Command Prompt window, you can use Windows Explorer instead to complete tasks.
Setting Up Business Objects
To configure Business Objects setup properties:
1. Navigate to a bo_setup subfolder of your staging folder:
cd GrcStage/bo_setup
2. Using a text editor, open the file BusinessObjectsConfiguration.properties. The file contains the following prompts; set each to the indicated value.
• businessObjects.server: Supply the host name for the GRC Controls Suite platform server.
• businessObjects.serverPort: Assuming you have accepted default port values during installation, use 6400.
• businessObjects.username: Use the value Administrator.
• businessObjects.password: Supply the password for the Business Objects Administrator user.
• businessObjects.home: Supply the folder in which Business Objects is installed, — a \bobje\enterprise subfolder of your GRC Controls Suite home folder. As you enter this value, supply the full path to the folder, and use two backslashes wherever a Windows path would ordinarily use one. For example:
C:\\Program Files\\GrcSuite\\bobje\\enterprise\\
• businessObjects.commit: For the time being, set this value to false.
3. Save and close the file.
4. From the \bo_setup subfolder of your staging folder, run a file called removeAuthenticationRestrictions.bat — double-click on it in Windows Explorer, or type its name and press the Enter key in the Command Prompt window.
5. If there are no exceptions (if the Command Prompt window displays “Authenti-cation restrictions removed”), reopen the BusinessObjectsConfiguration.properties file and reset the businessObjects.commit property to true. Save and close that file, and then rerun removeAuthenticationRestrictions.bat.
Copying and Editing GRC Controls Suite Files
Put GRC Controls Suite platform files in place and prepare them:
1. Shut down the Tomcat application server by running a shutdown.bat file:
GrcHome\bobje\tomcat\bin\shutdown.bat
6-4 Oracle Governance, Risk, and Compliance Controls Suite Upgrade Guide
2. An ags subfolder may be located several levels below your GRC Controls Suite home folder. If so, remove it and its contents.
rmdir /s GrcHome\bobje\tomcat\webapps\ags
3. Copy files from subfolders of the staging folder to subfolders of the home folder. (In the second command, a .war file name contains italicized placehold-ers that stand for version, schema, and build numbers. Replace these with the actual numbers, which you can determine by viewing a directory listing for the staging directory.)
copy GrcStage\ags_7_2_n_snn_bnn_ga.war GrcHome\bobje\tomcat\webapps\ags.war
copy GrcStage\ags_infrastructure\post-install\ags.xml GrcHome\bobje\tomcat\conf\Catalina\localhost
copy GrcStage\ags_infrastructure\post-install\*.jar GrcHome\bobje\tomcat\common\lib\
4. Navigate to the folder containing the ags.xml file:
cd GrcHome\bobje\tomcat\conf\Catalina\localhost
5. Using an xml editor, open ags.xml and perform the following edits. Each entry goes between <value> and </value> tags corresponding to each parameter.
• Locate the section headed <ResourceParams name=“mail/Session”>. In it, locate the mail.smtp.host parameter and, for its value, insert the host name of the SMTP server your company uses for sending email.
• Locate the section headed <ResourceParams name=“jdbc/onecenterDS”>. In it, locate the following parameters and supply these values for them:
driverClassName parameter. Insert the following string: oracle.jdbc.driver.OracleDriver
url parameter. Insert the following string. In place of Hostname, Port, and SID, insert actual values for the database used by the GRC Controls Suite platform. jdbc:oracle:thin:@Hostname:Port:SID
username parameter. Supply the user name for the GRC Controls Suite plat-form database. It must match the name you created in step 1 on page 6-1.
password parameter. Supply the password for the GRC Controls Suite platform database user identified by the username parameter.
• Locate the section headed <ResourceParams name="jdbc/appsaccessDS">. In it, locate the following parameters and supply these values for them:
driverClassName parameter. Insert the following string: oracle.jdbc.driver.OracleDriver
url parameter. Insert the following string. In place of the Hostname, Port, and SID placeholders, insert actual values for the database used by an Oracle EBS instance in which Embedded Agents have been installed to run: jdbc:oracle:thin:@Hostname:Port:SID
username parameter. Supply the user name for the database used by the Oracle Applications instance in which Embedded Agents have been installed to run. (Conventionally, this is APPS.)
Upgrading Windows Server Components 6-5
password parameter. Supply the password for the database used by the Oracle EBS instance in which Embedded Agents have been installed to run.
6. Save and close the file.
Preparing Schema Installation Files
To configure schema installation properties:
1. Navigate to an installation configuration subfolder of your staging folder:
cd GrcStage\ags_install\config
2. Make a copy of a generic properties file, called filters-bundle-oracle.properties. Call the copy filters-host.properties, replacing the value host with the host name for your GRC Controls Suite platform server.
3. Using a text editor, open the filters-host.properties file and edit the following. (Accept default values for all properties not listed here.)
• hibernate.connection.url: Supply the connect string that the GRC Controls Suite platform will use to connect to its database. Use the following, but provide actual values for the Host, Port, and SID placeholders.
jdbc:oracle:thin:@Host:Port:SID
• hibernate.connection.username: Supply the user name for the GRC Controls Suite platform database. It must match the name created in step 1 on page 6-1.
• hibernate.connection.password: Supply the password for the GRC Controls Suite platform database.
• businessObjects.server: Supply the host name of the GRC Controls Suite platform server.
• businessObjects.serverPort: Assuming you have accepted default port values during installation, use 6400.
• businessObjects.username: Use the value Administrator.
• businessObjects.password: Supply the password you set for the Business Objects Administrator user.
• log4j.filepath: Supply the value ags.log, with no path. This is a log file that records errors in processing during installation.
• appserver.hostname: Enter the host name and port number for the GRC Controls Suite platform server, separated by a colon. If you accepted default port values during installation, the port value here is 8080; if not, supply the value set for the connection port during installation of the earlier release of GRC Controls Suite 7.2.
• callbackhost: Enter the following value. In place of the host and port placeholders, substitute the same host name and port values as you used for the appserver.hostname value:
http://host:port/ags
4. Save and close the file.
6-6 Oracle Governance, Risk, and Compliance Controls Suite Upgrade Guide
5. Navigate back to the ags_install folder (the parent of the folder in which you are currently working):
cd..
6. Using a text editor, open the build.properties file. In its first line — config=bundle — replace bundle with the same host name you used when you edited the filters-host.properties file (step 3). Save and close the file.
7. Navigate to a migration subdirectory of your staging directory:
cd C:\GrcStage\ags_migration
8. Using a text editor, open the file hibernate.cfg.xml and edit the following entries:
• connection.url: Supply the connect string that GRC Controls Suite will use to connect to its database. Use the following, but provide actual values for the Host, Port, and SID placeholders.
jdbc:oracle:thin:@Host:Port:SID
• connection.username: Supply the user name for the GRC Controls Suite database (see steps 1 and 2 on page 6-1).
• connection.password: Supply the GRC Controls Suite database password.
Completing the Schema Installation
To complete schema installation for the GRC Controls Suite platform:
1. If you have not yet shut down the Tomcat application server, do so:
GrcHome\bobje\tomcat\bin\shutdown.bat
2. Run the schema upgrade script without COMMIT to uncover potential errors. Use the Command Prompt window to execute the following command:
GrcStage\ags_migration\run.bat
3. Review thext generated in the Command Prompt window for errors. Assuming there are none, proceed to step 4.
4. Run the schema upgrade script with COMMIT to upgrade the schema. Use the Command Prompt window to execute the following command:
GrcStage\ags_migration\run.bat COMMIT
5. Review text generated in the Command Prompt window for errors. Assuming there are none, proceed to step 6.
6. Populate schema objects. Execute the following commands:
cd GrcStage\ags_install post-migrate.bat
7. If you are installing version 8.0 or later of Application Acces Controls Governor, use a SQL tool to run the script sod_tabs_updates.sql against the database for the GRC Controls Suite platform (XXLAAPPS_AG by convention). The script is located in a dubdirectory of your staging directory: GrcStage/ags_install.
If you intend to use an earlier version of Application Access Controls Governor, skip this step.
Upgrading Windows Server Components 6-7
8. When the batch file finishes running, restart the Tomcat application server. Execute the following command:
GrcHome\bobje\tomcat\bin\startup.bat
Running a Reporting Script
The proper installation of Access Monitoring reports requires that a script be run against the XXLAAPPS_AG schema. The script is called AccessMonitorReports_ Script.SQL, and is located in the GrcStage\ags_install\Schema directory.
Setting Up the GRC Controls Suite Log
Finally, create a log, maintained by Tomcat, that records errors in processing by the GRC Controls Suite platform:
1. Copy a logging properties file from your staging directory to a directory on your server. Execute this command:
copy GrcStage\ags_infrastructure\post-install\log4j.properties GrcHome\bobje\tomcat\webapps\ags\WEB-INF\classes
2. Navigate to a folder containing the log4j.properties file:
cd GrcHome\bobje\tomcat\webapps\ags\WEB-INF\classes
3. Using a text editor, open log4j.properties. In it, locate a log4j.appender.file.File property, and set it equal to the following path and file name. (Be sure to replace the term GrcHome with the full path to your home folder, and to include two backslashes wherever a Windows path would ordinarily require one.)
GrcHome\\bobje\\tomcat\\logs\\ags.log
4. Optionally, also set a series of log4j.logger.com.logicalapps.onecenter properties to values that determine the level of detail in log entries. From least to greatest, options are ERROR, WARN, INFO, and DEBUG (the default).
At any time, you can open the ags.log file to look for errors or other information. The log is located at a path you established earlier:
GrcHome\bobje\tomcat\logs\ags.log

6-8 Oracle Governance, Risk, and Compliance Controls Suite Upgrade Guide
Deploying Reports 7-1
7
Deploying Reports
To deploy GRC Controls Suite reports and “business views” that support them, use Business Objects tools run from a Windows client system. One of these tools is Busi-ness View Manager, which should have been installed on your Windows client during the earlier GRC Controls Suite 7.2 installation from which you are now upgrading. If the Business View Manager does not exist on your Windows client, see the Govern-ance, Risk,and Compliance Controls Suite Installation Guide for version 7.2.3.
Backing Up Reports
Use the Business Objects Central Management Console (CMC) to rename the Report Center folder for your earlier release of version 7.2. This backs up the reports so that they can be viewed in the Reports browser of the GRC Controls Suite platform, but be unaffected by any change to reports in the later release of version 7.2.
1. Open a web browser and enter the following URL:
http://host:8080/businessobjects/enterprise115/admin/en/ admin.cwr
Replace host with the name of the host on which you installed the GRC Controls Suite platform. If you chose a substitute for port 8080, change the value 8080 in the URL to the port number you selected for TOMCAT_PORT (on a Linux or UNIX server) or connection port (on a Windows server).
2. A log-in form appears.
• In the User Name field, enter Administrator.
• In the password field, enter the password your company has created for the Business Objects Administrator user.
• A read-only System field is set to the host name you specified in step 1.
• Accept the default value, Enterprise, for Authentication Type.
Click the Log On button.
3. In the Home panel of the Central Management Console, in a section labeled Organize, click on Folders.

7-2 Oracle Governance, Risk, and Compliance Controls Suite Upgrade Guide
4. A Top Level Folders panel appears. Click on its entry for Report Center. A Report Center panel opens; click on its Properties tab.
5. A Folder Name field contains the entry “Report Center.” Replace that name with a new one (such as “7.2.x Report History,” in which x represents the “third-level” number of the earlier release you are backing up).
6. Click on the Update button.
7. Log off the Central Management Console.
Importing Business Views
Use a Business View Manager to import “business views” — a set of .xml files:
1. In your Oracle media pack, locate the Governance, Risk, and Compliance Con-trols Suite Disk 1. From its dist directory, copy the file ag_723_report_center.zip to a local directory. Extract the contents of the file. This creates a Reports Center folder and, beneath it, a Business Views folder and other folders containing reports.
2. Open Business View Manager from a Business Objects folder under Windows Start. As you log on, supply these values, and then click the OK button:
• System: The host name and CMS_PORT number of the GRC Controls Suite platform server, separated by a colon. Omit the port number (and delimiting colon) if you use the default value, 6400, for CMS_PORT.
• User Name: Use the value Administrator.
• Password: The password created for the Business Objects Administrator user.
• Authentication: The value Enterprise.
3. In the Repository Explorer pane, delete the existing Report Center folder.
4. Click on Tools in the Business View Manager menu bar, and then on Import in the Tools menu. An Import dialog appears.
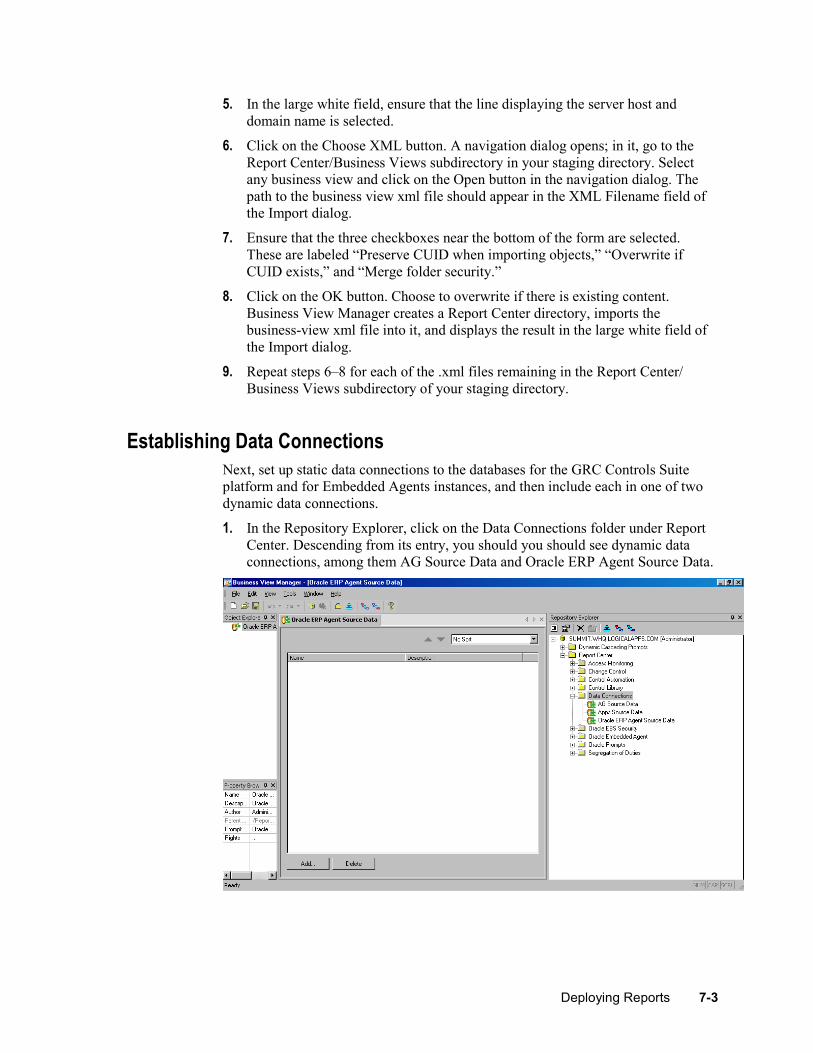
Deploying Reports 7-3
5. In the large white field, ensure that the line displaying the server host and domain name is selected.
6. Click on the Choose XML button. A navigation dialog opens; in it, go to the Report Center/Business Views subdirectory in your staging directory. Select any business view and click on the Open button in the navigation dialog. The path to the business view xml file should appear in the XML Filename field of the Import dialog.
7. Ensure that the three checkboxes near the bottom of the form are selected. These are labeled “Preserve CUID when importing objects,” “Overwrite if CUID exists,” and “Merge folder security.”
8. Click on the OK button. Choose to overwrite if there is existing content. Business View Manager creates a Report Center directory, imports the business-view xml file into it, and displays the result in the large white field of the Import dialog.
9. Repeat steps 6–8 for each of the .xml files remaining in the Report Center/ Business Views subdirectory of your staging directory.
Establishing Data Connections
Next, set up static data connections to the databases for the GRC Controls Suite platform and for Embedded Agents instances, and then include each in one of two dynamic data connections.
1. In the Repository Explorer, click on the Data Connections folder under Report Center. Descending from its entry, you should you should see dynamic data connections, among them AG Source Data and Oracle ERP Agent Source Data.
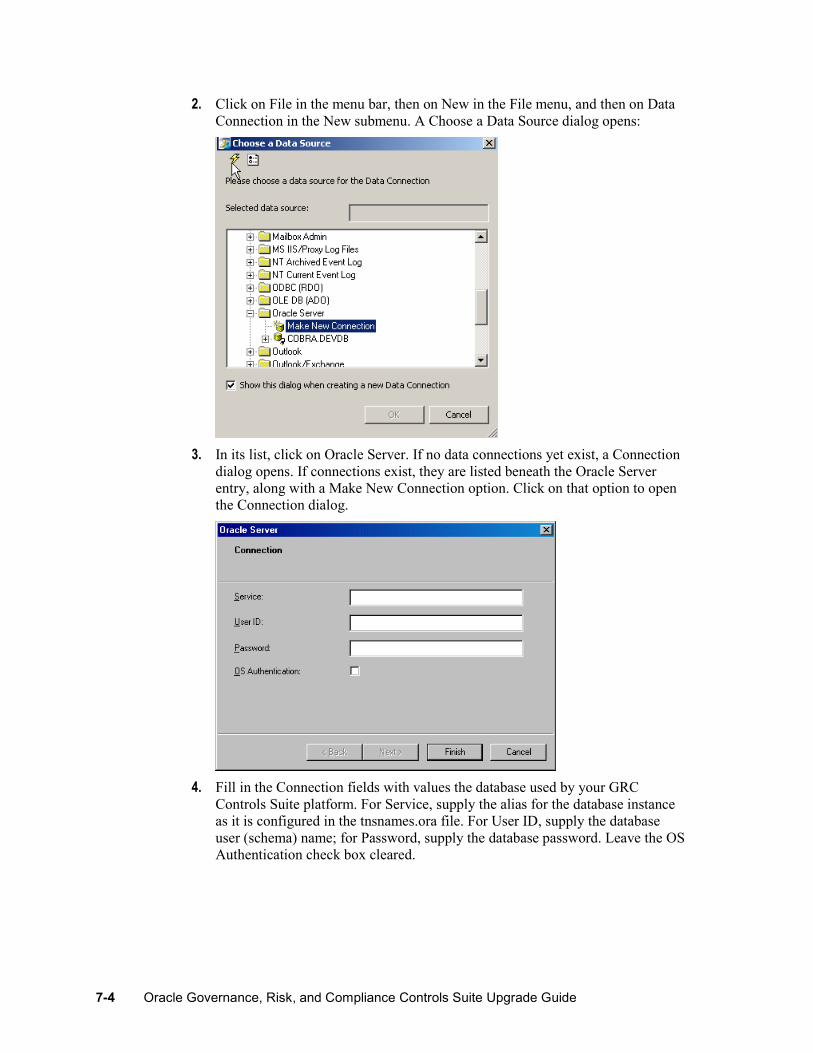
7-4 Oracle Governance, Risk, and Compliance Controls Suite Upgrade Guide
2. Click on File in the menu bar, then on New in the File menu, and then on Data Connection in the New submenu. A Choose a Data Source dialog opens:
3. In its list, click on Oracle Server. If no data connections yet exist, a Connection dialog opens. If connections exist, they are listed beneath the Oracle Server entry, along with a Make New Connection option. Click on that option to open the Connection dialog.
4. Fill in the Connection fields with values the database used by your GRC Controls Suite platform. For Service, supply the alias for the database instance as it is configured in the tnsnames.ora file. For User ID, supply the database user (schema) name; for Password, supply the database password. Leave the OS Authentication check box cleared.
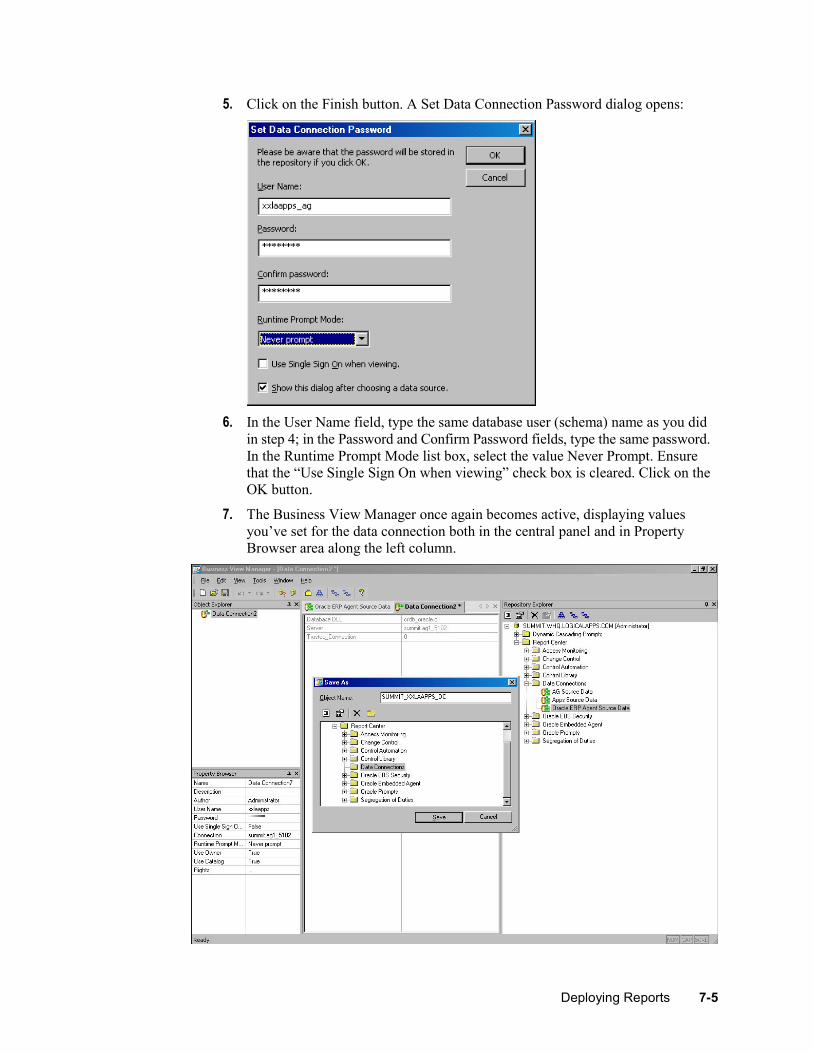
Deploying Reports 7-5
5. Click on the Finish button. A Set Data Connection Password dialog opens:
6. In the User Name field, type the same database user (schema) name as you did in step 4; in the Password and Confirm Password fields, type the same password. In the Runtime Prompt Mode list box, select the value Never Prompt. Ensure that the “Use Single Sign On when viewing” check box is cleared. Click on the OK button.
7. The Business View Manager once again becomes active, displaying values you’ve set for the data connection both in the central panel and in Property Browser area along the left column.
7-6 Oracle Governance, Risk, and Compliance Controls Suite Upgrade Guide
8. Save the data connection: Click on File in the menu bar and then Save in the file menu. A Save As dialog appears. In it, enter a name for the data connection in the Object Name field, and in the larger white field click on the Data Connections folder beneath the Report Center folder. Click on the Save button.
The Repository Explorer displays an entry for the static data connection you’ve configured, descending from the Data Connections folder. (To distinguish a static connection from a dynamic one, look at their icons. One green pipe symbol indicates a static connection, and two indicate a dynamic connection.)
9. Repeat steps 2–8 to create static data connections for Embedded Agent data sources. There should be one connection for each of the Embedded Agent instances with which GRC Controls Suite is to work.
10. Associate the static data connections with the appropriate dynamic data connections.
Under Data Connections in the Repository Explorer, double click on the AG Source Data dynamic connection. A window for that connection opens in the central panel of the Business View Manager. Drag the data connection you configured for the GRC Controls Suite platform from the Repository Explorer to the central panel. Click on File in the menu bar and then on Save in the File menu.
Then, under Data Connections in the Repository Explorer, double click on the Oracle ERP Agent Source Data dynamic connection. A window for that connection opens in the central panel of the Business View Manager. Drag each of the Embedded Agents data connections you configured from the Repository Explorer to the central panel. Click on File in the menu bar and then on Save in the File menu.
Publishing Reports
To publish reports, use a Publishing Wizard, which is accessible from the Business Objects folder under Windows Start.
1. From the initial Publishing Wizard screen, click on the Next button.
2. Enter the following logon values, then click on the OK button.
• System: The host name and CMS_PORT number of the GRC Controls Suite platform server, separated by a colon. Omit the port number (and delimiting colon) if you accepted the default value, 6400, for CMS_PORT.
• User Name: The value Administrator.
• Password: The password for the Business Objects Administrator user.
• Authentication: The value Enterprise.
3. A Select Files panel of the Publishing Wizard opens. Click its Add Folder button.
This opens a Browse for Folder dialog; in its “Choose folder...” field, navigate to and click on the Report Center directory, which is a subdirectory of your staging directory. Select the Include Subfolders check box (click on it so that a check mark appears). Confirm that the list box near the bottom of the dialog displays the value Report (*.rpt), which should be the default. Click the OK btton.
Deploying Reports 7-7
This closes the Browse for Folder dialog, and the Select Files panel once again becomes active, displaying a list of reports from the folders you’ve selected. Click on its Next button.
4. A Specify Location panel of the Publishing Wizard opens. In it, a large field displays the name of your GRC Controls Suite instance. (The Publishing Wizard uses the values you entered in step 2 to point to this instance.) Click on this value, and then on the New Folder icon (the leftmost of three above the large field; it looks like a folder). A New Folder entry appears, in editable mode, below the entry for your GRC Controls Suite instance; change its name to Report Center. Click on the Next button.
5. A Specify Folder Hierarchy panel of the Publishing Wizard opens. In it ensure that the radio button labeled Duplicate the folder hierarchy is selected. In the list box near the bottom of the panel, select the value include none. Click on the Next button.
6. A Confirm Location panel of the Publishing Wizard opens. It displays the file names below the folder in which they will be published. Confirm that the values are correct, and click on the Next button.
7. In the next several Publishing Wizard panels, you need do nothing. Click on the Next button in each until you reach the Specify Repository Refresh panel. That panel lists the reports you are publishing; in it, click on the Enable All button. Then click on the Next button.
8. In the next several Publishing Wizard panels, you need do nothing. Click on the Next button in each until you reach the Reading Files panel. When the Wizard finishes reading files, another panel lists the reports you are publishing. Click on the Next button. This commits the objects; finally, click on the Finish button.
Configuring Access to Reports
Each GRC Controls Suite user is assigned a “primary application role” and any number of “reporting roles.” Each of the reporting roles specifies a selection of reports the user is able to open and review. After publishing a new set of reports, you must correlate each report to its reporting roles by completing the following steps on the server for the GRC Controls Suite platform:
1. If you have a Linux or UNIX server, source the GRC Controls Suite environ-ment. Navigate to the home directory, which contains the ag.env file. Ensure the file has been edited correctly (see “Sourcing the Environment” on page 5-2), and then run it. (If you have a Windows server, this step does not apply.)
2. Navigate to the bo_setup subdirectory of the staging directory on the server for the GRC Controls Suite platform.
3. Using a text editor, open the BusinessObjectsConfiguration.properties file. In it, ensure that the businessObjects.commit property is set to true. Save the file and close it.
4. Execute a file called loadAccessRights.sh (on a Linux or UNIX server) or loadAccessRights.bat (on a Windows server). The file is also located in the bo_setup subdirectory. If you have a Linux or UNIX server, first use the chmod command with the +x switch to set execute permissions on the file.
7-8 Oracle Governance, Risk, and Compliance Controls Suite Upgrade Guide
Configuration for AACG 8.0
If you are installing version 8.0 or later of Application Access Controls Governor, complete this procedure. If you intend to run an earlier version, omit this section.
1. Log on the the Central Management Console (see page 7-1).
2. From the Home panel, click on Report Center in the Folders section.
3. Check the box next to the Segregation of Duties folder and press Delete.
4. Log off the CMC.
Restarting Services
To activate the newly updated GRC Controls Suite platform and Business Objects components, you must stop and then restart services. Use the stop- and start-services procedures appropriate for your operating system.
For a Linux or UNIX server:
1. Stop the services by executing the following commands on the host server:
$LAPPS_AG_HOME/bobje/tomcatshutdown.sh $LAPPS_AG_HOME/bobje/stopservers
At this point, pause a few minutes to allow Business Objects services to stop. Then run the following command to ensure that they have:
ps -ef | grep bobje
The grep process should be the only one with “bobje” in it. If any other processes are returned, rerun the stopservers command, pause again, and rerun the ps command to ensure that servers have stopped.
2. To restart the services, execute the following commands:
$LAPPS_AG_HOME/bobje/startservers $LAPPS_AG_HOME/bobje/tomcatstartup.sh
For a Windows server, use the Central Configuration Manager (CCM), which can be opened from the Business Objects folder on the Windows Start menu.
Deploying Reports 7-9
The CCM presents a list of servers, in which the entry for each server displays an icon. A server is running if its icon displays an upward-pointing green arrow, is stopped if its icon displays a downward-pointing red arrow, or is disabled (regard-less of whether it is running or stopped) if its icon displays a red circle containing a white dash.
To stop servers:
1. Select all the servers whose icons display upward-pointing green arrows. Typically, all do, and to select them you click on the first, hold down the shift key, and click on the last.
2. Click on the stop icon, a square located sixth from the left in the tool bar near the top of the window. After a moment, all the servers stop — the arrows in the icons that accompany them turn red and point downward.
To restart the servers:
1. Select them all again.
2. Click on the start icon, a rightward-pointing triangle located fifth from the left in the tool bar. After a moment, all the services start running, and their icons once again display upward-pointing green arrows.

7-10 Oracle Governance, Risk, and Compliance Controls Suite Upgrade Guide
Configuring the GRC Controls Suite Platform 8-1
8
Configuring the GRC Controls Suite Platform
Because you are performing an upgrade, your GRC Controls Suite instance inherits most configuration settings from the prior release.
One exception is report schedules. If, for the earlier release, you set schedules on which reports would run, those schedules must be reset for the upgrade release.
Generally, however, the following procedures do not need to be performed as a part of your upgrade from one release of version 7.2 to another. They are included here for reference, to allow for the possibility that you will want to change settings over time.
Configuring Licenses
To run GRC Controls Suite applications, you need to install license files. These include not only a licence for the GRC Controls Suite platform, but also licenses for Application Access Controls Governor, Transaction Controls Governor, and Preventive Controls Governor.
To implement these licenses:
1. Log on to the GRC Controls Suite platform. Use the following URL:
http://Host:Port/ags
Replace Host with the host name of your GRC Controls Suite platform server. Replace Port with the value 8080 if you accepted default port values during installation. Otherwise, supply the value you set for TOMCAT_PORT on a Linux or UNIX server or connection port on a Windows server.
2. Log on as a System Administrator, for which the user name and password are both admin.
3. Click on the Administration tab and, in the Administration Home page, the Manage Licenses link.
4. In the Organization Name field, type Oracle.
5. In your Oracle media pack, locate the Governance, Risk, and Compliance Controls Suite Disk 1. Insert it in the drive of the computer from which you are working.
8-2 Oracle Governance, Risk, and Compliance Controls Suite Upgrade Guide
6. For each license you choose to implement, enter the path and name for the license file in the appropriate License Information field. License files are located in the licenses directory of the Governance, Risk, and Compliance Controls Suite disk. Their names are as follows:
• platform.lic for the GRC Controls Suite platform
• accessGovernor.lic for Application Access Controls Governor
• dataGovernor.lic for Preventive Controls Governor
• policyGovernor.lic for Transaction Controls Governor
You can either type the path and name for each license file, or select the Browse button and navigate to the file.
7. Click on the Save button.
Setting Properties
From the Administration tab of the platform, you can also select a Manage Configu-ration Properties link to view or set properties for the application. Generally, you can accept default values, but you may choose to confirm that values are set cor-rectly, or reset some values.
The first several properties are set automatically during sever installation. You need not change them. These include the following:
• adminUser
• appserver.hostname
• businessObjects.enterpriseDirectoryName
• businessObjects.InfoViewPath
• businessObjects.reportSecurity
• businessObjects.server
• businessObjects.serverPort
• businessObjects.username
• callbackhost
The following properties can take the following values:
• businessObjects.password: This property defaults to the Business Objects Administrator password created during installation. If you do not change that password, do not chage the setting of this property. You can use the Central Management Console to change this password; if you do, you must also set this property to the new value.
• datasources.connection.pool.min.size and datasources.connection.pool.size: These two properties combine to designate the number of simultaneous connections that the platform opens to its database. The number of connections is always at least the number set by the “min.size” property. Additional connections open on demand, up to the number set by the “size” property (and so it must always be set to a larger number than the “min.size” value).
Configuring the GRC Controls Suite Platform 8-3
In effect, these properties set the number of users who retrieve data from or save data at once to the database used by the platform, each using a connection only for the brief time required to complete one of those operations. The number of users employing connections at a given moment is much smaller than the number logged on to the platform. The default values — 3 for the “min.size” property and 10 for the “size” property — typically need not be changed.
• email.returnAddress: This sets the “from” address used in email messages sent by the GRC Controls Suite workflow system to users notifying them that approval tasks have been assigned to them.
• exception.link.show: This determines whether error messages contain a link that activates a display of detailed information about database errors. Valid values are true (the default) and false.
• Licensee: This must be set to the same value as the Organization Name field on the Manage Licenses panel. (See the preceding section, “Configuring Licenses.”)
• pagination.show.all: The platform presents lists of items in grids, the footer row of which contains a Show Results list box that determines how many rows a grid displays at once. (The grid entries are divided into pages, each of which consists of the number of rows chosen for display.) In the Show Results list box, one can choose the value All. Because an attempt to display all records, no matter how many, in a single page can harm performance, the pagination.show.all parameter sets a limit on the number of records returned when a user selects the Show All Results option in a list. The default value is 1,000.
8. suspect.query.timeout: This property sets the amount of time a control monitor may run before it times out. If control monitors fail to return suspects, try setting a larger value for suspect.query.timeout — its unit of measurement is seconds, and its default value is 3600.
The platform contains tabs that activate panels in which users work with various features. The remaining properties determine which tabs are available for selection. Valid values are true (the default for each), which presents the tab to all users, and false, which hides the tab from all users.
If you intend to use Application Access Controls Governor 8.0 or later, a tab.sod.visible property (which controls a Segregation of Duites tab appropriate for earlier versions) must be set to false. In this case, an Administration tab (in which you are working) is visible, but properties for others are initially set to false. You must reset these properties (other than tab.sod.visible) to make their tabs available for use:
• tab.accessmonitor.visible: Access Monitoring
• tab.controlmonitor.visible: Control Automation
• tab.controls.visible: Control Library
• tab.home.visible: Home
• tab.reports.visible: Reporting
If you intend to use an earlier version of Application Access Controls Governor, all tab properties are initially set to true and all tabs are initially visible. You would reset these properties only if you want to hide any tabs from use.
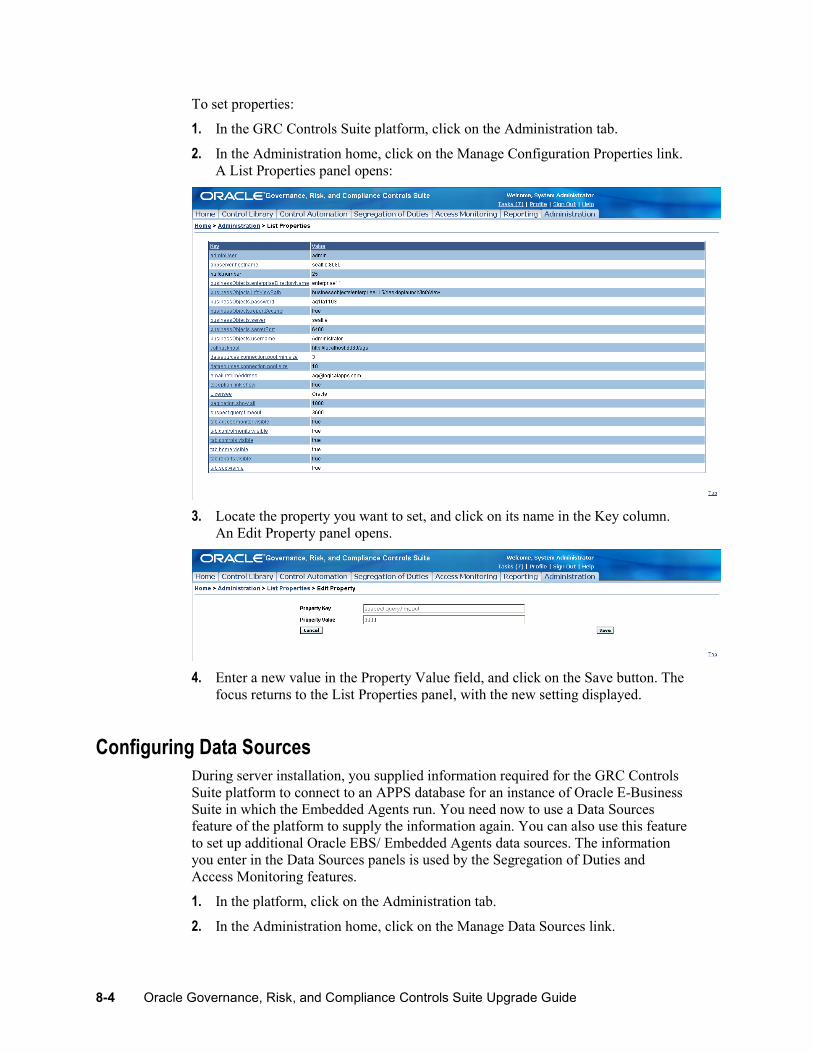
8-4 Oracle Governance, Risk, and Compliance Controls Suite Upgrade Guide
To set properties:
1. In the GRC Controls Suite platform, click on the Administration tab.
2. In the Administration home, click on the Manage Configuration Properties link. A List Properties panel opens:
3. Locate the property you want to set, and click on its name in the Key column. An Edit Property panel opens.
4. Enter a new value in the Property Value field, and click on the Save button. The focus returns to the List Properties panel, with the new setting displayed.
Configuring Data Sources
During server installation, you supplied information required for the GRC Controls Suite platform to connect to an APPS database for an instance of Oracle E-Business Suite in which the Embedded Agents run. You need now to use a Data Sources feature of the platform to supply the information again. You can also use this feature to set up additional Oracle EBS/ Embedded Agents data sources. The information you enter in the Data Sources panels is used by the Segregation of Duties and Access Monitoring features.
1. In the platform, click on the Administration tab.
2. In the Administration home, click on the Manage Data Sources link.

Configuring the GRC Controls Suite Platform 8-5
3. A Data Sources panel opens. To create a new data source, click on the Add Data Source button; an Add Data Source panel (shown below) opens. To edit an ex-isting data source, click on its name; a View Data Source panel opens, in which you would click on an Edit Data Source button. An Edit Data Source panel opens; it’s identical to the Add Data Source panel, except that it displays current values for the selected data source.
4. Supply these values:
• Label and Description. Provide entries that name and describe the data source. The label will appear in a list box from which users can select data sources when they use the Segregation of Duties and Access Monitoring features.
• Type of Provider. Accept the default:
JDBC Provider (for relational databases)
• JDBC Driver. Always supply the following value:
oracle.jdbc.driver.OracleDriver
• Default Schema. Provide the schema name of the APPS database for the instance of Oracle Applications in which the Embedded Agents run. Because this would be an Oracle database, this value should be the same as the value you will supply in the Username field (see below), and is conventionally APPS.
• Database URL. Provide the JDBC connect string that GRC Controls Suite will use to connect to the APPS database for an instance of Oracle EBS in which the Embedded Agents run. This entry takes the following form, with actual values replacing the Hostname, Port, and SID placeholders:
jdbc:oracle:thin:@Hostname:Port:SID
• Username. Supply the user name for the APPS database cited in the Database URL field. Conventionally, this value is APPS.
• Password and Confirm Password. Supply the password configured for the database user identified by the Username entry.
5. Click on the Save button. The focus shifts to the View Data Source panel, which displays the values you’ve saved. In that panel, click on the Test Data Source button. A message either reports that the test is successful or reports errors; in the latter case, click on the Edit Data Source button to correct the errors.

8-6 Oracle Governance, Risk, and Compliance Controls Suite Upgrade Guide