oracle financial services regulatory reporting egypt
TRANSCRIPT

Oracle Financial Services Regulatory ReportingEgypt Suspicious Transaction Report User Guide
Release 8.0.2.0.0 February 2016

Oracle Financial Services Regulatory ReportingEgypt Suspicious Transaction Report User Guide
Release 8.0.2.0.0February 2016
Document Control Number: 9MN11-2.5-01-05Document Number: UG-15-RR-005-2.5-01
Oracle Financial Services Software, Inc.1900 Oracle Way Reston, VA 20190

Document Number: UG-15-RR-005-2.5-01First Edition (February 2016)
Copyright © 2016, Oracle and/or its affiliates. All rights reserved.Printed in U.S.A. No part of this publication may be reproduced, stored in a retrieval system, or transmitted in any form or by any means, electronic, mechanical, photocopying, recording, or otherwise without the prior written permission.
TrademarksOracle is a registered trademark of Oracle Corporation and/or its affiliates.Other names may be trademarks of their respective owners.
Oracle Financial Services Software, Inc.1900 Oracle WayReston, VA 20190Phone: (703) 478-9000Fax: (703) 318-6340Internet: www.oracle.com/financialservices

Contents
List of Figures .................................................................................................................. v
List of Tables.................................................................................................................. viiWho Should Use this Guide ...............................................................................................................................................ixHow this Guide is Organized ..............................................................................................................................................xWhere to Find More Information ......................................................................................................................................xConventions Used in this Guide ........................................................................................................................................xi
CHAPTER 1 About Compliance Regulatory Reporting ..................................... 1
Introduction of Compliance Regulatory Reporting .........................................................................................................1About Oracle Financial Services Compliance Regulatory Reporting Application ......................................................1
CHAPTER 2 Getting Started ................................................................................. 3
User Roles ...............................................................................................................................................................................3User Access ............................................................................................................................................................................4Logging in to Compliance Regulatory Reporting.............................................................................................................5Accessing Compliance Regulatory Reporting from OFSFCCM....................................................................................6
CHAPTER 3 Managing Compliance Regulatory Reporting............................... 9
Compliance Regulatory Reporting Workflow ...................................................................................................................9Life Cycle of a Suspicious Transaction Report ...............................................................................................................11Creating a New STR............................................................................................................................................................14
Creating a New STR from OFSFCCM ....................................................................................................................14Sending Acknowledgement to OFSFCCM from Compliance Regulatory Reporting....................................................17
Creating a New STR from OFSCRR........................................................................................................................18Searching STRs ....................................................................................................................................................................20
Searching Reports Using Basic Search......................................................................................................................20Searching Reports Using Advanced Search .............................................................................................................21Searching Reports Using Pre-defined Views ...........................................................................................................26
Submitting an STR for Approval ......................................................................................................................................28Entering Report Details ..............................................................................................................................................28
Report Context .........................................................................................................................................................29Managing Reporting Bank Tab.................................................................................................................................29Managing Customer Tab...........................................................................................................................................32
Viewing Customer Details......................................................................................................................................................................33Adding a New Customer of Type Legal Person.......................................................................................................................................36Editing an Existing Customer................................................................................................................................................................39Cloning an STR.....................................................................................................................................................................................39
Managing Transactions .............................................................................................................................................40
Oracle Financial Services Compliance Regulatory Reporting 8.0.1 User Guide EGSTR iii

Contents
Viewing or Editing Transaction Details .................................................................................................................................................44Editing Transactions Summary...............................................................................................................................................................44Removing Transactions ...........................................................................................................................................................................46
Attaching and Removing Documents .........................................................................................................................46Editing the Logical File Name and Document Description of an Added Document.................................................................................47
Viewing Audit Information.......................................................................................................................................48Actions...................................................................................................................................................................................................48Comments...............................................................................................................................................................................................49
Requesting the Report Details for Approval ...........................................................................................................50Recommending the Report Details for Approval ...................................................................................................51Setting Due Date of an STR.......................................................................................................................................52Requesting the Cancellation of STR .........................................................................................................................54
Performing Approve/Rework/Cancel Filing/Reject Cancellation Request on STRs ..............................................55Approving Reports ......................................................................................................................................................55Sending Reports to Rework........................................................................................................................................56Cancelling the Filing of STR ......................................................................................................................................57Rejecting the Cancel Request of an STR ..................................................................................................................58
Marking an STR as Submitted ...........................................................................................................................................59Reopening an STR...............................................................................................................................................................61Adding Comments to an STR ...........................................................................................................................................63Viewing an STR Excel ........................................................................................................................................................64Exporting the STR List to Excel.......................................................................................................................................65
iv Oracle Financial Services Compliance Regulatory Reporting 8.0.1 User Guide EGSTR

List of Figures
Figure 1. OFSAAI Login Page....................................................................................................................................................6Figure 2. OFSAAI Home Page...................................................................................................................................................7Figure 3. RR Search and List page in OFSFCCM ...................................................................................................................7Figure 4. Compliance Regulatory Reporting Workflow for Analyst, Reviewer and Supervisor .....................................10Figure 5. Alerts Search and List Page.......................................................................................................................................14Figure 6. Alerts Advanced Search ...........................................................................................................................................15Figure 7. Monitoring Actions Window....................................................................................................................................15Figure 8. Cases AML/Fraud Search and List Page................................................................................................................16Figure 9. Investigation Action Window...................................................................................................................................16Figure 10. Create New Report ..................................................................................................................................................18Figure 11. Searching Reports with Search Components.......................................................................................................20Figure 12. Advanced Search ......................................................................................................................................................21Figure 13. Report Context ........................................................................................................................................................29Figure 14. Reporting Bank Information in Final STR ..........................................................................................................29Figure 15. Reporting Bank Tab.................................................................................................................................................30Figure 16. Customer Information in Final STR.....................................................................................................................32Figure 17. Customer Tab ...........................................................................................................................................................33Figure 18. Viewing Customer Details ......................................................................................................................................33Figure 19. Add Customer ..........................................................................................................................................................34Figure 20. Adding a Natural Customer with Focal Customer Role ....................................................................................34Figure 21. .....................................................................................................................................................................................36Figure 22. Adding a New Customer with Beneficiary Role .................................................................................................38Figure 23. Transactions Tab ......................................................................................................................................................41Figure 24. Transaction Summary Information in Final STR Excel ....................................................................................42Figure 25. Add Transaction .......................................................................................................................................................43Figure 26. Viewing/Editing Transaction Record ...................................................................................................................44Figure 27. Editing Transaction Summary................................................................................................................................45Figure 28. Adding Documents to STR....................................................................................................................................47Figure 29. Editing the Logical File Name and Document Description of an Added Document..................................47Figure 30. Audit Tab...................................................................................................................................................................48Figure 31. Request for Approval Action Pop-up Window...................................................................................................50Figure 32. Request for Approval Action Pop-up Window...................................................................................................51Figure 33. Set Due Date Pop-up Window from Report Details Page ................................................................................52Figure 34. Set Due Date from RR Search and List Page ......................................................................................................53Figure 35. Request Cancellation Action Pop-up Window ....................................................................................................54Figure 36. Approve Action Pop-up Window..........................................................................................................................55Figure 37. Rework Action Pop-up Window............................................................................................................................56Figure 38. Cancel Filing Action Pop-up Window..................................................................................................................57Figure 39. Cancel Filing Action Pop-up Window..................................................................................................................58
Oracle Financial Services Compliance Regulatory Reporting 8.0.1 User Guide EGSTR v

List of Figures
Figure 40. Mark as Submitted Pop-up Window from Report Details Page.......................................................................59Figure 41. Mark as Submitted Pop-up Window from Search and List Page .....................................................................60Figure 42. Reopen Action Pop-up Window from Report Details Page .............................................................................61Figure 43. Reopen Action Pop-up Window from Search and List Page ............................................................................62Figure 44. Add Comments Action Pop-up Window.............................................................................................................63Figure 45. Export Properties Dialog Box ...............................................................................................................................65
vi Oracle Financial Services Compliance Regulatory Reporting 8.0.1 User Guide EGSTR

List of Tables
Table 1. Conventions Used in this Guide ...............................................................................................................................xiTable 2. User Access....................................................................................................................................................................4Table 3. Menus Accessible by OFSCRR Users .......................................................................................................................8Table 4. Report Status - Action Mapping...............................................................................................................................12Table 5. Status Role-Viewing Report ......................................................................................................................................13Table 6. Status Role-Editing Report........................................................................................................................................13Table 7. Creating New Report .................................................................................................................................................18Table 8. Components of RR Search Bar ................................................................................................................................22Table 9. Pre-defined Views.......................................................................................................................................................26Table 10. Editing Report Details - Status Role Mapping.....................................................................................................28Table 11. Reporting Entity Information ................................................................................................................................30Table 12. Add New Customer - Natural Person Field Descriptions .................................................................................35Table 13. Add New Customer - Natural Person Field Descriptions .................................................................................36Table 14. Add New Customer - New Customer with Beneficiary Role Field Descriptions..........................................39Table 15. Add New Transaction Field Descriptions ............................................................................................................43Table 16. Editing Transaction Summary ................................................................................................................................45Table 17. Actions Section Field Descriptions........................................................................................................................48Table 18. Comments Section Field Descriptions..................................................................................................................49
Oracle Financial Services Compliance Regulatory Reporting 8.0.1 User Guide EGSTR vii

List of Tables
viii Oracle Financial Services Compliance Regulatory Reporting 8.0.1 User Guide EGSTR

About This Guide
The Oracle Financial Services Compliance Regulatory Reporting User Guide explains the concepts behind the Oracle Financial Services Compliance Regulatory Reporting application and provides step-by-step instructions for navigating through the application.
This chapter discusses the following topics:
Who Should Use this Guide
How this Guide is Organized
Where to Find More Information
Conventions Used in this Guide
Who Should Use this Guide
The Oracle Financial Services Compliance Regulatory Reporting User Guide Egypt STR, Release 2.5 is designed for use by various users. Their roles and responsibilities, as they operate within the Oracle Financial Services Compliance Regulatory Reporting application, include the following:
Analyst: This user can create new reports, edit report details, add comments to the report, request for approval, request for cancellation and also clone an STR.
Reviewer: This user can create new reports, edit report details, recommend reports for approval, rework on reports, request for cancellation, add comments, view final reports, mark reports as submitted, reopen cancelled reports, reopen submitted reports, and clone an STR.
Supervisor: In addition to all the tasks performed by an analyst and reviewer user, this user can take action on the reports such as approve, rework, reject cancellation request, and cancel filing.
System Administrator: This user is responsible for managing the static data used in the application, creating application users, mapping users to user groups, and configuring the various parameters used in the application.
Oracle Financial Services Regulatory Reporting 2.5 User Guide EGSTR

About this Guide
How this Guide is Organized
The Oracle Financial Services Compliance Regulatory Reporting User Guide EG STR, Release 2.5, includes the following topics:
Chapter 1, About Compliance Regulatory Reporting, provides an overview of the Oracle Financial Services Compliance Regulatory Reporting application.
Chapter 2, Getting Started, explains the steps to login to the Oracle Financial Services Compliance Regulatory Reporting application and provides a brief overview of the various users and their roles in the Compliance Regulatory Reporting application.
Chapter 3, Managing Compliance Regulatory Reporting, explains the workflow of regulatory reports.
Where to Find More Information
For additional information about the Oracle Financial Services Compliance Regulatory Reporting, refer to the following documents:
Oracle Financial Services Compliance Regulatory Reporting Data Model Reference Guide: Release 2.5 This guide explains the structure of the entities in the RR data model and provides in-depth information on managing the data in the Compliance Regulatory Reporting application.
Oracle Financial Services Compliance Regulatory Reporting Webservice Guide: Release 2.5 - This guide explains how and in what format the source business data is provided to the Compliance Regulatory Reporting application through a web service for the report type.
Oracle Financial Services Compliance Regulatory Reporting Installation Guide: Release 2.5 - This guide provides step-by-step instructions for installing the Oracle Financial Services Compliance Regulatory Reporting application on an existing Oracle Financial Services Behavior Detection Framework hosted in Windows environment.
Oracle Financial Services Compliance Regulatory Reporting Administration Guide: Release 2.5 - This guide describes comprehensive activities to be done by the Administrator in the Oracle Financial Services Compliance Regulatory Reporting application. This guide details the Compliance Regulatory Reporting application and provides information about configuring and maintaining users and static data.
To find additional information about how Oracle Financial Services solves real business problems, see our website at www.oracle.com/financialservices.
x Oracle Financial Services Regulatory Reporting 2.5 User Guide EGSTR

About this Guide
Conventions Used in this Guide
Table 1 lists the conventions used in this guide.
Table 1. Conventions Used in this Guide
Convention Meaning
Italics Names of books, chapters, and sections as references
Emphasis
Bold Object of an action (menu names, field names, options, button names) in a step-by-step procedure
Commands typed at a prompt
User input
Monospace Directories and subdirectories
File names and extensions
Process names
Code sample, including keywords and variables within text and as separate paragraphs, and user-defined pro-gram elements within text
<Variable> Substitute input value
Oracle Financial Services Regulatory Reporting 2.5 User Guide EGSTR xi

About this Guide
xii Oracle Financial Services Regulatory Reporting 2.5 User Guide EGSTR

CHAPTER 1 About Compliance Regulatory Reporting
This chapter provides an overview of the Oracle Financial Services Compliance Regulatory Reporting application.
This chapter discusses the following topics:
Introduction of Compliance Regulatory Reporting
About Oracle Financial Services Compliance Regulatory Reporting Application
Introduction of Compliance Regulatory Reporting
As a part of regulations and compliances, a Financial Services Organization must perform appropriate analysis and report any suspicious activities that may lead to fraud and money laundering to the regulatory authorities. These regulatory bodies are responsible for safeguarding financial institutions and consumers from abuse, providing transparency in the country's financial system, enhancing that country's security, and deterring and detecting criminal activity in the financial system.
Financial institutions are required to provide data regarding suspicious activities to their geographic region's regulatory authority. This data is delivered to the regulatory bodies through regulatory reports. These reports, depending on the regulatory geographic region, can be delivered in a paper format or in an electronic format.
About Oracle Financial Services Compliance Regulatory Reporting Application
The Oracle Financial Services Compliance Regulatory Reporting (OFSCRR) application supports the management, delivery, and resolution of regulatory reports across multiple geographic regions and across multiple financial lines of business. The Compliance Regulatory Reporting application supports the generation of Suspicious Transaction Reports (STR) for various countries such as The United States of America Suspicious Activity Reports (US SAR), Nigeria (NG STR), Pakistan (PK STR), Malaysia (MY STR), Singapore (SG STR), New Zealand (NZ STR), Bahamas (BS STR), and Egypt (EG STR). Since there are several differences in requirements for paper-based formats versus electronic formats, between different geographic regions, and the data elements that are required on these STRs, the approach to satisfy the end goal is to provide a Compliance Regulatory Reporting framework that is configured to support paper-based and electronic formats for different geographic regions and to generate and file different types of reports.
The Compliance Regulatory Reporting application is integrated with Oracle Financial Services Financial Crime and Compliance (OFSFCCM) and allows users to Generate EG STR from within OFSFCCM. When a report is created in the Compliance Regulatory Reporting application through OFSFCCM, the report details are auto-populated with information from the alert or case which triggered the action to generate the draft STR. You can also manually create a new STR from OFSCRR.
Oracle Financial Services Compliance Regulatory Reporting 8.0.1 User Guide EG STR 1
About Oracle Financial Services Compliance Regulatory Reporting ApplicationChapter 1–About Compliance Regulatory Reporting
Users mapped to appropriate roles can update the report information and submit the report details for approval to the Supervisor. The Supervisor can approve, rework, cancel the filing or reject the cancellation request of the report. Once the STRs are approved, they can be filed with the regulators.
For more information on the workflow of regulatory reports, refer to Table 2 on page 4.
2 Oracle Financial Services Compliance Regulatory Reporting 8.0.1 User Guide EG STR

CHAPTER 2 Getting Started
This chapter explains the steps to login to the Oracle Financial Services Compliance Regulatory Reporting (OFSCRR) application and provides a brief overview of the various users and their roles in the Compliance Regulatory Reporting application.
This chapter explains the following topics:
User Roles
User Access
Logging in to Compliance Regulatory Reporting
Accessing Compliance Regulatory Reporting from OFSFCCM
User Roles
The following user roles are defined in the Compliance Regulatory Reporting application:
Analyst: This user can create new reports, edit report details, add comments to the report, request for approval, request for cancellation and also clone an STR.
Reviewer: This user can create new reports, edit report details, recommend reports for approval, rework on
reports, request for cancellation, add comments, view final reports, mark reports as submitted, reopen cancelled reports, reopen submitted reports, and clone an STR.Supervisor: In addition to all the tasks performed by an analyst and reviewer user, this user can take action on the reports such as approve, rework, reject cancellation request, and cancel filing.
System Administrator: This user is responsible for managing the static data used in the application, creating application users, mapping users to user groups, and configuring the various parameters used in the application.
Oracle Financial Services Compliance Regulatory Reporting 8.0.1 User Guide EG STR 3

User AccessChapter 2–Getting Started
User Access
The following table explains the tasks that can be performed by various user roles in the Compliance Regulatory Reporting application.
Table 2. User Access
Function Analyst Reviewer Supervisor System Administrator
Create New STR x x xRequest for Approval xRecommend Approval xApprove xRework x xRequest Cancellation x xReject Cancellation Request xCancel Filing xAdd Comments x x xView/Save Final Report x xMark as Submitted x xReopen Cancelled Reports x xReopen Submitted STR x xClone STR x x xView / Edit Configuration x
4 Oracle Financial Services Compliance Regulatory Reporting 8.0.1 User Guide EG STR

Logging in to Compliance Regulatory ReportingChapter 2–Getting Started
Logging in to Compliance Regulatory Reporting
To access the Compliance Regulatory Reporting application, follow these steps:
1. Go to the OFSAAI Login page.
2. Select the Language for the application.
3. Enter your User ID.
4. Enter your Password.
5. Click Login. The Oracle Financial Services Analytical Applications Infrastructure page is displayed with a link to either RRS or FCCM.
Note:
If you've installed the OFSCRR without the OFSFCCM, the Oracle Financial Services Analytical Applications Infrastructure page will display the RRS link under Home menu. Clicking the RRS link will navigate you to the RR search and List page.
If you've installed the OFSCRR with the OFSFCCM, the Oracle Financial Services Analytical Applications Infrastructure page will display the FCCM link under Home menu. Clicking the FCCM link will navigate you to the FCCM home page depending upon your roles and access rights.
Oracle Financial Services Compliance Regulatory Reporting 8.0.1 User Guide EG STR 5

Accessing Compliance Regulatory Reporting from OFSFCCMChapter 2–Getting Started
Accessing Compliance Regulatory Reporting from OFSFCCM
To access OFSCRR from OFSFCCM, follow these steps:
1. Go to the OFSAAI Login page.
Figure 1. OFSAAI Login Page
2. Select the Language for the application.
3. Enter your User ID.
4. Enter your Password.
5. Click Login. The OFSAAI home page is displayed.
6 Oracle Financial Services Compliance Regulatory Reporting 8.0.1 User Guide EG STR

Accessing Compliance Regulatory Reporting from OFSFCCMChapter 2–Getting Started
Figure 2. OFSAAI Home Page
6. Click FCCM. The OFSFCCM Home page is displayed depending upon the user roles and their access permissions.
7. Click Egypt STR from Compliance Regulatory Reporting tab. The RR Search and List page opens.
Figure 3. RR Search and List page in OFSFCCM
Note: OFSCRR can be configured and accessed from within the OFSFCCM. For more information, refer to the Oracle Financial Services Compliance Regulatory Reporting Installation Guide and the Administration Guide: Release 6.2.
The menus displayed in the OFSFCCM page depend on the roles mapped to the user. In the above example, the user is mapped to OFSFCCM and OFSCRR. The Compliance Regulatory Reporting link is enabled only for users who have access to the OFSCRR. Based on user roles access permission, the Compliance Regulatory Reporting application displays the following links.
Compliance Regulatory Reporting
Oracle Financial Services Compliance Regulatory Reporting 8.0.1 User Guide EG STR 7

Accessing Compliance Regulatory Reporting from OFSFCCMChapter 2–Getting Started
Administration
The Compliance Regulatory Reporting menu displays the Egypt STR primary menu. The Administration menu displays the following sub menus:
User Attributes: This menu allows you to map and maintain the security attributes for each user role.
RR Webservice User ID/Password Reset: This menu allows you to reset the Webservice password. For more information on resetting the User ID and Password, refer to the Oracle Financial Services Compliance Regulatory Reporting Administration Guide: Release 2.5.
The following table provides an overview of the menus that are accessible to OFSCRR users.
Table 3. Menus Accessible by OFSCRR Users
Menus
Roles
Analyst Reviewer Supervisor System Administrator
Compliance Regulatory Reporting x x xAdministration x
8 Oracle Financial Services Compliance Regulatory Reporting 8.0.1 User Guide EG STR

CHAPTER 3 Managing Compliance Regulatory Reporting
This chapter provides step-by-step instructions to manage Oracle Financial Services Compliance Regulatory Reporting (OFSCRR) and includes following topics:
Compliance Regulatory Reporting Workflow
Life Cycle of a Suspicious Transaction Report
Creating a New STR
Searching STRs
Submitting an STR for Approval
Performing Approve/Rework/Cancel Filing/Reject Cancellation Request on STRs
Marking an STR as Submitted
Reopening an STR
Adding Comments to an STR
Viewing an STR Excel
Exporting the STR List to Excel
Compliance Regulatory Reporting Workflow
This section explains the workflow of regulatory reports for users mapped to the role of Analyst, Reviewer, and Supervisor. The following figure depicts the workflow involved in Compliance Regulatory Reporting application
Oracle Financial Services Compliance Regulatory Reporting 8.0.1 User Guide EG STR 9

Compliance Regulatory Reporting WorkflowChapter 3–Managing OFSRR
Figure 4. Compliance Regulatory Reporting Workflow for Analyst, Reviewer and Supervisor
10 Oracle Financial Services Compliance Regulatory Reporting 8.0.1 User Guide EG STR

Life Cycle of a Suspicious Transaction ReportChapter 3–Managing OFSRR
Life Cycle of a Suspicious Transaction Report
An STR is created in the Compliance Regulatory Reporting application as a result of taking an action to Generate EG STR from within OFSFCCM or manually creating a report from OFSCRR. When an STR is created in the Compliance Regulatory Reporting application through OFSFCCM, the report details are auto-populated with information from the alert or case which triggered the action to generate the STR. Users mapped to the role of Analyst and Reviewer can update the report in Open status and submit the report details for approval. Supervisor can also edit and approve report details directly if needed in Open, Requested for Approval and Recommended for Approval status. During the edit and review process, the STR is available to view as a draft Excel report.
To know the complete list of actions an Analyst, Reviewer, and Supervisor can perform on various report statuses, refer to “Table 4. Report Status - Action Mapping.” for more information.
A Supervisor user can approve, rework, cancel filing or reject cancel request an STR once the Analyst and Reviewer user have requested for approval and recommended for approval respectively.
If the STR is approved by the Supervisor, the Compliance Regulatory Reporting application generates the STR in final Excel format after all the necessary validations. The STR is then manually submitted with the regulatory authorities. Submission to the regulator occurs outside of OFSCRR. The STR can then be marked as Submitted in the Compliance Regulatory Reporting application. The status of the STR changes to Submitted. For more information on marking STR as Submitted refer to section, Marking an STR as Submitted, on page 59.
A Reviewer can take rework action on a report when it is in Requested for Approval status whereas a Supervisor can take rework action in Requested for Approval and Recommended for Approval status. If a report is sent for rework, an Analyst or a Reviewer must rework on the report and request/recommend the report again for approval. This process continues until the report is approved or cancelled. For more information on rework STRs, refer to section, Performing Approve/Rework/Cancel Filing/Reject Cancellation Request on STRs, on page 55.
If an Analyst or a Reviewer user determines that an STR should not be filed, they can request the Supervisor for cancellation of the report. An Analyst can initiate the Request Cancellation action when the report is in Open and Rework statuses whereas a Reviewer can initiate the Request Cancellation action when the report is in Open, Reopened, Requested for Approval, Approved, and Rework.The status of the report then changes to Requested for Cancellation. Subsequently, a Supervisor can either cancel the filing of STR or reject the cancellation request. If a report is cancelled, the status of the report changes to Cancelled. When the Supervisor rejects the cancellation request of STR, the status of the report changes to the previous status prior to the Request Cancellation. For more information on cancelling the STRs, refer to section, Performing Approve/Rework/Cancel Filing/Reject Cancellation Request on STRs, on page 55.
An Analyst or a Reviewer user can work on the reopened STR and request the report for approval/recommend for approval. This process continues until the STR is approved or cancelled. For more information on re-opening STRs, refer to section, Reopening an STR, on page 61.
For more information on user roles, refer to Table 2 on page 4.
An STR has a life cycle which begins with the Open status and ends when it is in Submitted status.
The report is in View mode (read only) in the following statuses:
Approved
Submitted
Requested for Cancellation
Cancelled
Note: You cannot edit report details when the report is in View Only mode. You can add comments to an STR in all the statuses.
Oracle Financial Services Compliance Regulatory Reporting 8.0.1 User Guide EG STR 11

Life Cycle of a Suspicious Transaction ReportChapter 3–Managing OFSRR
To view the report details, click the report name in the RR Search and List page.
If the report is already opened by another user, the following message is displayed: This report is currently locked by another user. You will not be able to edit/take action on the report. Do you wish to open report details in read only mode?
Table 4. Report Status - Action Mapping
Report Status Possible Actions Who can PerformReport Status Changes To
Open
Request for Approval Analyst Requested for Approval
Recommend Approval Reviewer Recommended for Approval
Approve Supervisor Approved
Cancel Filing Supervisor Cancelled
Request Cancellation Analyst, Reviewer Requested for Cancellation
Reopened
Recommend Approval Reviewer Recommended for Approval
Approve Supervisor Approved
Cancel Filing Supervisor Cancelled
Request Cancellation Reviewer Requested for Cancellation
Requested for Approval
Approve Supervisor Approved
Rework Reviewer, Supervisor Rework
Recommend Approval Reviewer Recommended for Approval
Cancel Filing Supervisor Cancelled
Request Cancellation Reviewer Requested for Cancellation
Approved
Submitted Reviewer, Supervisor Submitted
Cancel Filing Supervisor Cancelled
Request Cancellation Reviewer Requested for Cancellation
Rework
Request for Approval Analyst Requested for Approval
Cancel Filing Supervisor Cancelled
Recommend Approval Reviewer Recommended for Approval
Request Cancellation Analyst, Reviewer Requested for Cancellation
Approve Supervisor Approved
Submitted Reopen Reviewer, Supervisor Reopened
Cancelled Reopen Reviewer, Supervisor Reopened
Recommended for Approval
Approve Supervisor Approved
Rework Supervisor Rework
Cancel Filing Supervisor Cancelled
Create New ReportAnalyst, Reviewer, Supervisor
Open
12 Oracle Financial Services Compliance Regulatory Reporting 8.0.1 User Guide EG STR

Life Cycle of a Suspicious Transaction ReportChapter 3–Managing OFSRR
The following table explains in which statuses an Analyst, Reviewer and Supervisor user can view the report details.
Table 5. Status Role-Viewing Report
The following table explains in which statuses an Analyst, Reviewer and Supervisor user can edit the report details.
Table 6. Status Role-Editing Report
Requested for Cancellation
Cancel Filing Supervisor Cancelled
Reject Cancel Request Supervisor *Previous Status
Note: Previous Status is the status prior to Request Cancellation.
Status
View Report Details
Analyst Reviewer Supervisor
Open X X X
Reopened X X
Requested for Approval X X
Approved X X
Rework X X X
Submitted X X
Requested for Cancellation X X
Recommended for Approval X X
Cancelled X X
Status
Edit Report Details
Analyst Reviewer Supervisor
Open X X X
Reopened X X
Requested for Approval X X
Rework X X X
Recommended for Approval X
Report Status Possible Actions Who can PerformReport Status Changes To
Oracle Financial Services Compliance Regulatory Reporting 8.0.1 User Guide EG STR 13

Creating a New STRChapter 3–Managing OFSRR
Creating a New STR
You can create a new STR either by manually creating a new report from OFSCRR or through OFSFCCM by selecting the Generate EG STR action on an Alert or a Case.
This section covers the following topics:
Creating a New STR from OFSFCCM
Creating a New STR from OFSCRR
Creating a New STR from OFSFCCM
When a user with appropriate access permission performs the Generate EG STR action on an alert or a case from OFSFCCM, the data is passed to the OFSCRR through the web service and a new STR is created in the OFSCRR.
To create an STR on an alert from OFSFCCM, follow these steps:
1. From OFSFCCM home page, select Alerts from the Monitoring menu.
Figure 5. Alerts Search and List Page
2. Click Advanced Search. Select FR (Fraud), ML (Money laundering), or IML (Institutional Money Laundering) in the Scenario Class drop-down. Options for selecting a scenario class will depend on your current installation and user access to scenarios.
14 Oracle Financial Services Compliance Regulatory Reporting 8.0.1 User Guide EG STR

Creating a New STRChapter 3–Managing OFSRR
3. Select AC (Account), and CU (Customer) in the Focus drop-down. Options for selecting a Focus type will depend on your current installation and user access to scenarios. Select any additional desired filters, including modifying the Created From and To dates as needed.
Figure 6. Alerts Advanced Search
4. Click Go.
5. Select the required alerts from the Alert Search and List page and click Reg Reporting in the Action bar.
6. Select Generate EG STR from the Choose Action drop-down list in the Monitoring Actions Window and enter the comments.
Figure 7. Monitoring Actions Window
7. Click Save. The following confirmation message is displayed: Would you like to save these actions?
Oracle Financial Services Compliance Regulatory Reporting 8.0.1 User Guide EG STR 15

Creating a New STRChapter 3–Managing OFSRR
8. Click OK. A success message is displayed along with the alert ID. Click OK.
9. Navigate to the RR Search and List page. The latest alert on which Generate EG STR action was taken is displayed in the RR Search and List page.
Note: You can also perform Generate EG STR on multiple alerts from the Alert Search and List page.
To create an STR on a case from OFSFCCM, follow these steps:
1. From OFSFCCM home page, select Cases - AML/Fraud under the Investigation menu.
Figure 8. Cases AML/Fraud Search and List Page
2. Select one or more cases in New statuses from the Search & Case List page using the check boxes, and click the Resolution action category.
3. Select Generate EG STR from the Select an Action drop-down list in the Investigation Actions Window and enter the comments.
Figure 9. Investigation Action Window
4. Click Save. The following confirmation message is displayed: Would you like to save these actions?
5. Click OK. A success message is displayed along with the Case ID. Click OK.
16 Oracle Financial Services Compliance Regulatory Reporting 8.0.1 User Guide EG STR

Creating a New STRChapter 3–Managing OFSRR
6. Navigate to the RR Search and List page. The latest case on which Generate EGSTR action was taken is displayed in the RR Search and List page.
Note: You can also perform the Generate EG STR action from the Case Details page of a case.
Sending Acknowledgement to OFSFCCM from Compliance Regulatory Reporting
OFSRR sends a positive acknowledgment to OFSFCCM when all the mandatory information verification is completed successfully.
By default, the ECM STATUS UPDATE FLAG is set to Y. If the status is set to Y, then the OFSCRR application will send all the status updates to OFSFCCM application. If the status is set to N, then the OFSCRR application will not send any status updates to the OFSFCCM application
The following information is sent as a part of the positive acknowledgment:
Alert/Case ID (Alert/Case ID)
Acknowledgment Code – 0 (Meaning successful)
Report ID (System Generated)
Report Status
If there are any errors, the Compliance Regulatory Reporting application sends a negative acknowledgment to OFSFCCM. The error may be due to the following reasons:
User ID failure
Unsuccessful mandatory information verification
System/Application Error
The negative acknowledgment sent to OFSFCCM contains the following details:
Alert/Case ID
Acknowledgment Code
1 stands for Invalid User ID
2 stands for Mandatory Information Missing
3 stands for Format Failure
4 stands for System/Application Error
Error Description
Note: If an alert or case fails to successfully complete the generate EG STR action, then the failure is recorded in the alert or case audit history.
Oracle Financial Services Compliance Regulatory Reporting 8.0.1 User Guide EG STR 17
Creating a New STRChapter 3–Managing OFSRR
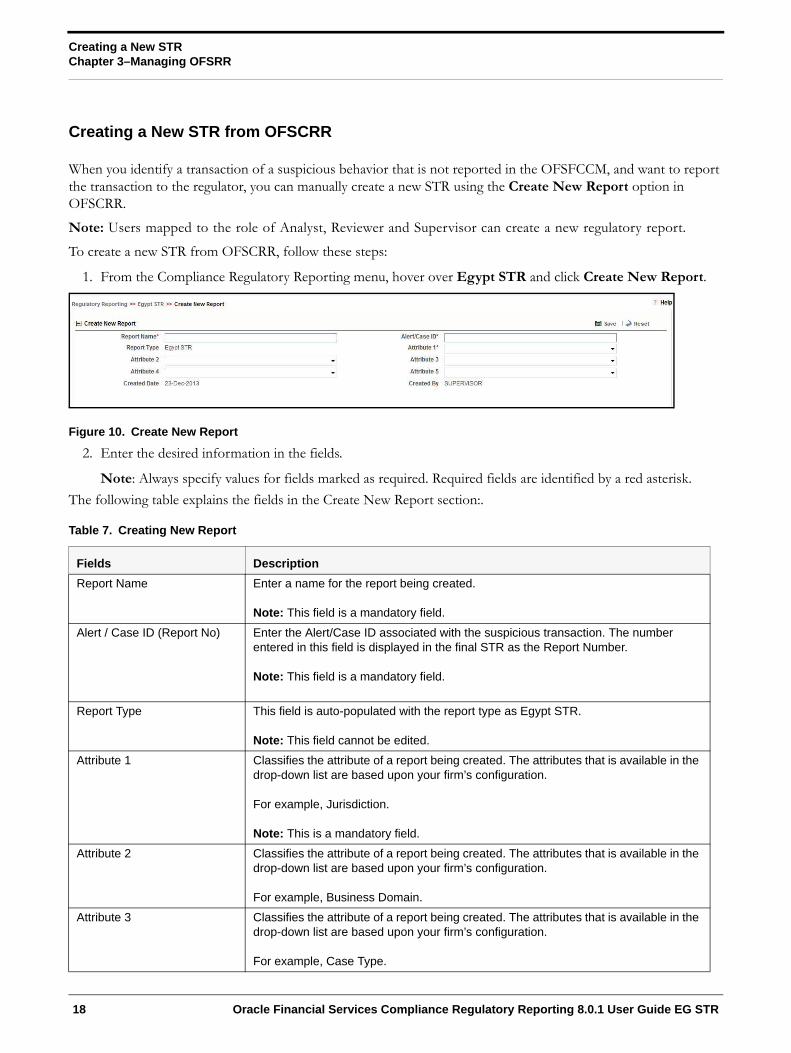
Creating a New STR from OFSCRR
When you identify a transaction of a suspicious behavior that is not reported in the OFSFCCM, and want to report the transaction to the regulator, you can manually create a new STR using the Create New Report option in OFSCRR.
Note: Users mapped to the role of Analyst, Reviewer and Supervisor can create a new regulatory report.
To create a new STR from OFSCRR, follow these steps:
1. From the Compliance Regulatory Reporting menu, hover over Egypt STR and click Create New Report.
Figure 10. Create New Report
2. Enter the desired information in the fields.
Note: Always specify values for fields marked as required. Required fields are identified by a red asterisk.
The following table explains the fields in the Create New Report section:.
Table 7. Creating New Report
Fields Description
Report Name Enter a name for the report being created.
Note: This field is a mandatory field.
Alert / Case ID (Report No) Enter the Alert/Case ID associated with the suspicious transaction. The number entered in this field is displayed in the final STR as the Report Number.
Note: This field is a mandatory field.
Report Type This field is auto-populated with the report type as Egypt STR.
Note: This field cannot be edited.
Attribute 1 Classifies the attribute of a report being created. The attributes that is available in the drop-down list are based upon your firm’s configuration.
For example, Jurisdiction.
Note: This is a mandatory field.
Attribute 2 Classifies the attribute of a report being created. The attributes that is available in the drop-down list are based upon your firm’s configuration.
For example, Business Domain.
Attribute 3 Classifies the attribute of a report being created. The attributes that is available in the drop-down list are based upon your firm’s configuration.
For example, Case Type.
18 Oracle Financial Services Compliance Regulatory Reporting 8.0.1 User Guide EG STR

Creating a New STRChapter 3–Managing OFSRR
3. Click Save. The following confirmation message is displayed: <> Report created successfully. Click Ok to view the report details or Cancel to create more reports.
4. Click OK. The Report Details page is displayed.
A new STR is created and the due date is set as per the number of days configured by your administrator in the static data table. The status of the new STR is set to Open.
Note: The report details of the manually created STR are not sent to OFSFCCM.
Attribute 4 Classifies the attribute of a report being created. The attributes that is available in the drop-down list are based upon your firm’s configuration.
For example, Sub Type.
Attribute 5 Classifies the attribute of a report being created. The attributes that is available in the drop-down list are based upon your firm’s configuration.
For example, Organization.
Created Date This field is auto-populated with the current system date.
Note: This field cannot be edited.
Created By This field is auto-populated with the logged in user’s name.
Note: This field cannot be edited.
Fields Description
Oracle Financial Services Compliance Regulatory Reporting 8.0.1 User Guide EG STR 19

Searching STRsChapter 3–Managing OFSRR
Searching STRs
The Compliance Regulatory Reporting Search and List page enables you to filter the list of reports that you want to view and analyze. The Compliance Regulatory Reporting search bar supports three types of search namely, Views, Search, and Advanced Search.
The Reports List displays the list of reports that meet the criteria specified on the Compliance Regulatory Reporting Search bar.
This section explains the following topics:
Searching Reports Using Basic Search
Searching Reports Using Advanced Search
Searching Reports Using Pre-defined Views
Searching Reports Using Basic Search
This search is based on limited set of search components and helps to retrieve the required reports details.
To search for reports using the search components, follow these steps:
1. Navigate to the Compliance Regulatory Reporting Search and List page.
Figure 11. Searching Reports with Search Components
Note: By default, the basic Search option is selected.
2. Enter the details in the relevant search fields to retrieve the list of reports. For detailed descriptions of search fields, refer “Table 8. Components of RR Search Bar.”.
3. Click Go. The relevant search list is displayed.
Note: If there is no match for the entered search criteria, the application displays No Data Found message.
20 Oracle Financial Services Compliance Regulatory Reporting 8.0.1 User Guide EG STR
Searching STRsChapter 3–Managing OFSRR
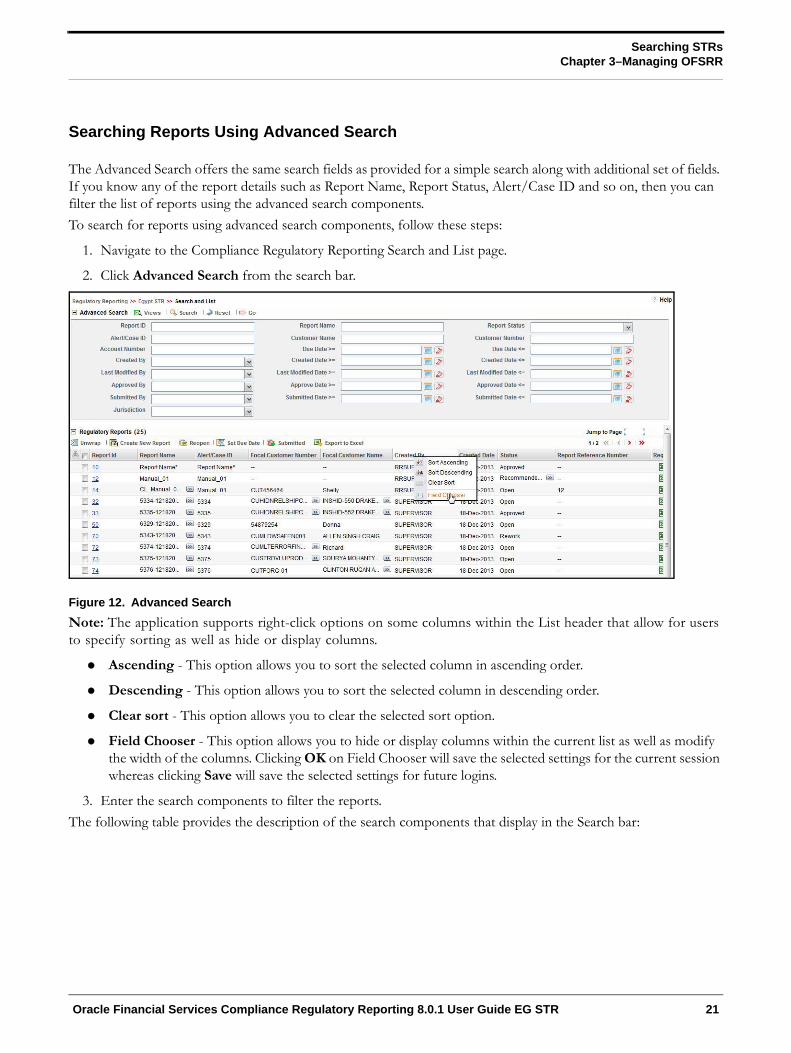
Searching Reports Using Advanced Search
The Advanced Search offers the same search fields as provided for a simple search along with additional set of fields. If you know any of the report details such as Report Name, Report Status, Alert/Case ID and so on, then you can filter the list of reports using the advanced search components.
To search for reports using advanced search components, follow these steps:
1. Navigate to the Compliance Regulatory Reporting Search and List page.
2. Click Advanced Search from the search bar.
Figure 12. Advanced Search
Note: The application supports right-click options on some columns within the List header that allow for users to specify sorting as well as hide or display columns.
Ascending - This option allows you to sort the selected column in ascending order.
Descending - This option allows you to sort the selected column in descending order.
Clear sort - This option allows you to clear the selected sort option.
Field Chooser - This option allows you to hide or display columns within the current list as well as modify the width of the columns. Clicking OK on Field Chooser will save the selected settings for the current session whereas clicking Save will save the selected settings for future logins.
3. Enter the search components to filter the reports.
The following table provides the description of the search components that display in the Search bar:
Oracle Financial Services Compliance Regulatory Reporting 8.0.1 User Guide EG STR 21
Searching STRsChapter 3–Managing OFSRR
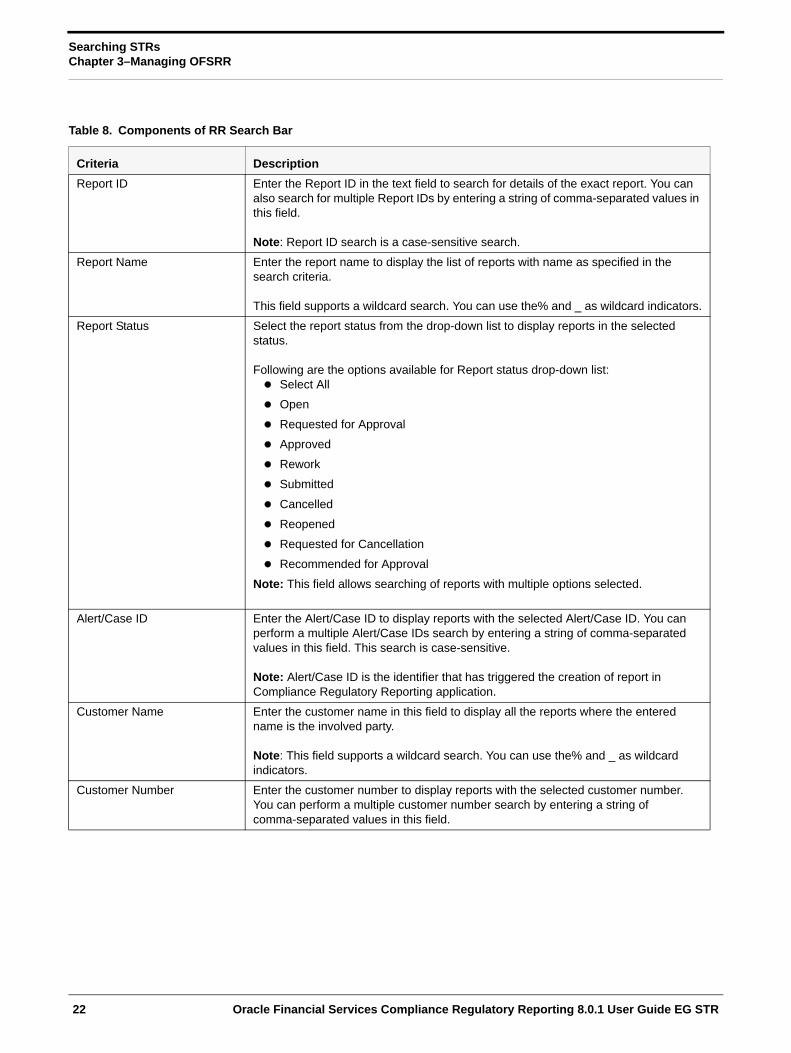
Table 8. Components of RR Search Bar
Criteria Description
Report ID Enter the Report ID in the text field to search for details of the exact report. You can also search for multiple Report IDs by entering a string of comma-separated values in this field.
Note: Report ID search is a case-sensitive search.
Report Name Enter the report name to display the list of reports with name as specified in the search criteria.
This field supports a wildcard search. You can use the% and _ as wildcard indicators.
Report Status Select the report status from the drop-down list to display reports in the selected status.
Following are the options available for Report status drop-down list: Select All
Open
Requested for Approval
Approved
Rework
Submitted
Cancelled
Reopened
Requested for Cancellation
Recommended for Approval
Note: This field allows searching of reports with multiple options selected.
Alert/Case ID Enter the Alert/Case ID to display reports with the selected Alert/Case ID. You can perform a multiple Alert/Case IDs search by entering a string of comma-separated values in this field. This search is case-sensitive.
Note: Alert/Case ID is the identifier that has triggered the creation of report in Compliance Regulatory Reporting application.
Customer Name Enter the customer name in this field to display all the reports where the entered name is the involved party.
Note: This field supports a wildcard search. You can use the% and _ as wildcard indicators.
Customer Number Enter the customer number to display reports with the selected customer number. You can perform a multiple customer number search by entering a string of comma-separated values in this field.
22 Oracle Financial Services Compliance Regulatory Reporting 8.0.1 User Guide EG STR

Searching STRsChapter 3–Managing OFSRR
Due Date>= Select the due date from the calendar to display reports having a due date greater than or equal to the specified date.
When the Generate EG STR action is taken from OFSFCCM, each report is assigned a filling time of 3 days by default. A due date is set based on the filling time. You can use this field to search for reports based on their due dates.
While taking reopen action, the application will set a default due-date of 3 business days.
Note: You can configure the default due date. Refer to Oracle Financial Services Compliance Regulatory Reporting Administration Guide for more information.
Due Date<= Select the due date from the calendar to display reports having a due date lesser than or equal to the specified date.
Validations:
1. While performing a range search, if you enter a value in ‘Due date <=’ less than ‘Due date >=’, the application displays the following message: Please enter a 'Due Date <=' which is equal to or greater than 'Due Date >='.
Created By Select the user who has created the report from the drop-down list.
Note: This field allows searching of reports with multiple options selected.
Created Date >= Select the created date from the calendar to display reports having a created date greater than or equal to the specified date.
Note: You can either perform a range search using ‘Created Date >=’ and ‘Created <=’ or use them independently.
Created Date <= Select the created date from the calendar to display reports having a created date lesser than or equal to the specified date.
Validations:
1. While performing a range search, if you enter a value in ‘Created Date <=’ less than ‘Created Date >=’, the application displays the following message: Please enter a 'Created Date <=' which is equal to or greater than 'Created Date >='.
2. If you enter a value in created date <= greater than the system date, the application displays the following message: Please enter a 'Created Date <=' which is earlier than or equal to sysdate.
Last Modified By Select the user who has last modified the report from the drop-down list.
Note: This field allows searching of reports with multiple options selected.
Last Modified Date >= Select the last modified date from the calendar to display reports having a last modified date greater than or equal to the specified date.
Note: You can either perform a range search using ‘Last Modified Date >=’ and ‘Last Modified Date <=’ or use them independently.
Criteria Description
Oracle Financial Services Compliance Regulatory Reporting 8.0.1 User Guide EG STR 23

Searching STRsChapter 3–Managing OFSRR
Last Modified Date <= Select the Last Modified Date from the calendar to display reports having a last modified date lesser than or equal to the specified date.Validations:
1. While performing a range search, if you enter a value in ‘Last Modified Date <=’ less than ‘Last Modified Date >=’, the application displays the following message: Please enter a 'Last Modified Date <=' which is equal to or greater than 'Last Modified Date >='.
2. If you enter a value in ‘Last Modified Date <=’ greater than the system date, the application displays the following message: Please enter a 'Last Modified Date <=' which is earlier than or equal to sysdate.
Approved By Select the name of the approver to search for reports approved by the selected user.
Note: This field allows searching of reports with multiple options selected.
Approved Date >= Select the approved date from the calendar to display reports having an approved date greater than or equal to the specified date.
Approved Date <= Select the approved date from the calendar to display reports having an approved date lesser than or equal to the specified date.
Validations:
1. While performing a range search, if you enter a value in ‘Approved Date <=’ less than ‘Approved Date >=’, the application displays the following message: Please enter a 'Approved Date <=' which is equal to or greater than Approved Date >=.
2. If you enter a value in ‘Approved Date <=’ greater than the system date, the application displays the following message: Please enter a 'Approved Date <=' which is earlier than or equal to sysdate.
Submitted By Select the name of the user from the drop-down list options to search for reports submitted by the selected user.
Note: This field allows searching of reports with multiple options selected.
Submitted Date >= Select the submitted date from the calendar to display reports having a submitted date greater than or equal to the specified date.
Criteria Description
24 Oracle Financial Services Compliance Regulatory Reporting 8.0.1 User Guide EG STR

Searching STRsChapter 3–Managing OFSRR
3. Click Go. The relevant search list is displayed.
Note: If there is no match for the entered search criteria, the application displays the following message: No Data Found.
Submitted Date <= Select the submitted date from the calendar to display reports having a submitted date lesser than or equal to the specified date.
Validations:
1. While performing a range search, if you enter a value in ‘Submitted Date <=’ less than ‘Submitted Date >=’, the application displays the following message: Please enter a 'Submitted Date <=' which is equal to or greater than "Submitted Date >='.
2. If you enter a value in ‘Submitted Date <=’ greater than the system date, the application displays the following message: Please enter a 'Submitted Date <=' which is earlier than or equal to sysdate.
Jurisdiction Select the jurisdiction from the drop-down list to display reports mapped to the selected jurisdiction. Jurisdictions are defined by your institution.
Every report is associated with a jurisdiction. When an STR is created from an alert or case, the STR inherits the jurisdiction that was associated to that alert or case.
Each user has access to a set of jurisdictions. Every STR is associated with a single jurisdiction. A user has access to any report where the user's jurisdictions intersect with the STR's jurisdiction.
Criteria Description
Oracle Financial Services Compliance Regulatory Reporting 8.0.1 User Guide EG STR 25

Searching STRsChapter 3–Managing OFSRR
Searching Reports Using Pre-defined Views
Views search helps you to quickly filter the reports based on the pre-defined search queries.
To search for reports using pre-defined views, follow these steps:
1. Navigate to the Compliance Regulatory Reporting Search and List page.
Note: By default, the Compliance Regulatory Reporting Search and List page displays all the records.
2. Click Views from the search bar.
3. Select any of the pre-defined views from the Views drop-down list. The list page refreshes to show results matching the View criteria.
The following table explains the different types of pre-defined views available.
Table 9. Pre-defined Views
Views Description
Open/ Reopened - Reports Last Modified by Me
Select Open/ Reopened - Reports Last Modified by Me from the drop-down list to display the list of reports in Open or Reopened status for which the logged in user is the last modifier.
Note: This option is the default view for an Analyst and a Reviewer user.
Reports Awaiting Approval Select Reports Awaiting Approval from the drop-down list to display the list of reports in Request for Approval, Recommended for Approval and Requested for Cancellation status.
Note: This option is the default view for a Supervisor user.
Reports Nearly Due Select Reports Nearly Due from the drop-down list to display the list of reports that are approaching their due dates.
Note: The Nearly Due date is defined as 1 day from the due date. Reports which are nearly due are highlighted Yellow color.
Reports Overdue Select Reports Overdue from the drop-down list to display the list of reports that have exceeded their due dates.
When an STR is past its due date or when the due date is same as the system date, the STRs in the reports list are highlighted in Red color.
Reports Submitted in Last 3 Months
Select Reports Submitted in Last 3 Months from the drop-down list to display the list of reports that were submitted in the last three months.
Note: The reports are displayed in ascending order of the Submitted Date.
26 Oracle Financial Services Compliance Regulatory Reporting 8.0.1 User Guide EG STR

Searching STRsChapter 3–Managing OFSRR
Reports Cloned in Last 3 Months
Select Reports Cloned in Last 3 Months from the drop-down list to display the list of reports that were cloned in the last three months.
Note: The reports are displayed in ascending order of the Cloned Date.
Primary Reports - Generated in Last 3 Months
Select Primary Reports - Generated in Last 3 Months from the drop-down list to display the list of reports that were generated either through OFSFCCM or created manually in OFSCRR in the last three months. Subsequently, you can perform the clone action.
Table 9. Pre-defined Views
Views Description
Oracle Financial Services Compliance Regulatory Reporting 8.0.1 User Guide EG STR 27

Submitting an STR for ApprovalChapter 3–Managing OFSRR
Submitting an STR for Approval
This process involves the following steps:
Entering Report Details
Requesting the Report Details for Approval
Recommending the Report Details for Approval
Setting Due Date of an STR
Requesting the Cancellation of STR
Entering Report Details
The Report Details page allows users mapped to the role of Analyst, Reviewer, and Supervisor to enter or update report information depending upon the report status.
The following table describe the various statuses in which a respective user role can edit a report.
Table 10. Editing Report Details - Status Role Mapping
Click the report name in the RR Search and List page to navigate to the Report Details page.
The Report Details page allows you to manage following sections:
Report Context
Managing Reporting Bank Tab
Managing Customer Tab
Managing Transactions
Attaching and Removing Documents
Viewing Audit Information
Menus
Roles
Analyst Reviewer Supervisor
Open x x xReopened x xRequested for Approval x xRework x x xRecommended for Approval x
28 Oracle Financial Services Compliance Regulatory Reporting 8.0.1 User Guide EG STR

Submitting an STR for ApprovalChapter 3–Managing OFSRR
Report Context
The Report Context section in the Compliance Regulatory Reporting (RR) Details page displays information about the report and is non-editable. It contains minimize and maximize buttons that allow you to expand and collapse the details in the Report Context. By default, the report context container is minimized.
Figure 13. Report Context
The report context includes the following information:
Report ID
Report Name
Report Status
Alert/Case ID
Report Reference Number
Due Date
Created By
Last Modified By
Approved By
Created Date
Last Modified Date
Approved Date
Managing Reporting Bank Tab
This tab refers to the Reporting Bank section (shown below) in the Final STR.
Figure 14. Reporting Bank Information in Final STR
The Reporting Bank tab is the default tab selected when you navigate to the Report Details page. This tab details the information about the bank reporting the STR and includes:
Bank’s Name
Oracle Financial Services Compliance Regulatory Reporting 8.0.1 User Guide EG STR 29
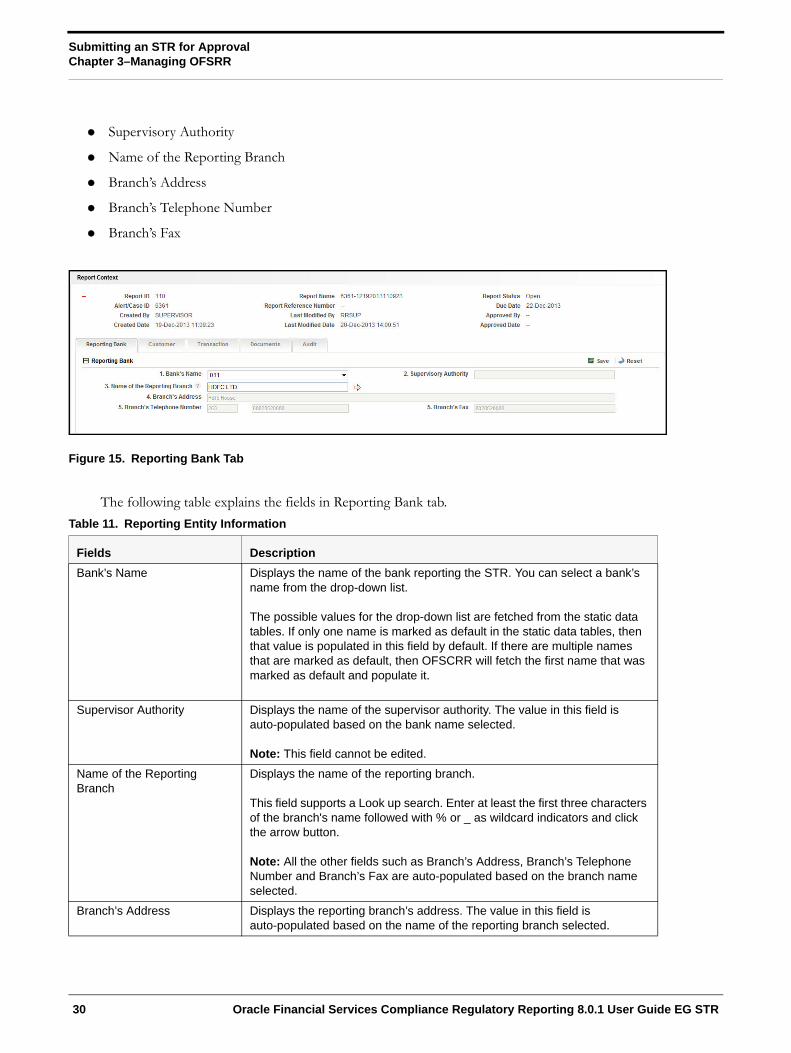
Submitting an STR for ApprovalChapter 3–Managing OFSRR
Supervisory Authority
Name of the Reporting Branch
Branch’s Address
Branch’s Telephone Number
Branch’s Fax
Figure 15. Reporting Bank Tab
The following table explains the fields in Reporting Bank tab.
Table 11. Reporting Entity Information
Fields Description
Bank’s Name Displays the name of the bank reporting the STR. You can select a bank’s name from the drop-down list.
The possible values for the drop-down list are fetched from the static data tables. If only one name is marked as default in the static data tables, then that value is populated in this field by default. If there are multiple names that are marked as default, then OFSCRR will fetch the first name that was marked as default and populate it.
Supervisor Authority Displays the name of the supervisor authority. The value in this field is auto-populated based on the bank name selected.
Note: This field cannot be edited.
Name of the Reporting Branch
Displays the name of the reporting branch.
This field supports a Look up search. Enter at least the first three characters of the branch's name followed with % or _ as wildcard indicators and click the arrow button.
Note: All the other fields such as Branch’s Address, Branch’s Telephone Number and Branch’s Fax are auto-populated based on the branch name selected.
Branch’s Address Displays the reporting branch’s address. The value in this field is auto-populated based on the name of the reporting branch selected.
30 Oracle Financial Services Compliance Regulatory Reporting 8.0.1 User Guide EG STR

Submitting an STR for ApprovalChapter 3–Managing OFSRR
Branch’s Telephone Number Displays the telephone number of the reporting branch. The value in this field is auto-populated based on the name of the reporting branch selected.
Branch’s Fax Displays the fax number of the reporting branch. The value in this field is auto-populated based on the name of the reporting branch selected.
Table 11. Reporting Entity Information
Fields Description
Oracle Financial Services Compliance Regulatory Reporting 8.0.1 User Guide EG STR 31

Submitting an STR for ApprovalChapter 3–Managing OFSRR
Managing Customer Tab
This tab refers to the Customer information (shown below) in the Final STR Excel.
Figure 16. Customer Information in Final STR
32 Oracle Financial Services Compliance Regulatory Reporting 8.0.1 User Guide EG STR

Submitting an STR for ApprovalChapter 3–Managing OFSRR
The Customer tab displays all the customer details along with the involved party details as fetched from an alert or a case. A Customer can be classified into two types namely, Legal Person and Natural Person. A customer role can be of three types namely, Blank (Non-Focal Customer and Non-Beneficiary), Beneficiary and Focal Customer.
In this tab, you can add new customers, update customer details, and clone an STR. Users mapped to the role of Analyst, Reviewer and Supervisor can identify the role of the customers either as Blank, Beneficiary or Focal Customer..
Figure 17. Customer Tab
Viewing Customer Details
To view a customer involved in the report, follow these steps:
1. Navigate to the Report Details page.
2. Click the Customer tab.
The list of customers with type Natural Person and Legal Person involved in the report are displayed.
3. Select the check box at the beginning of a customer record row or click anywhere in the row to view the customer record details.
Figure 18. Viewing Customer Details
Note: You can edit a customer record while viewing and save the changes. Also, you can define the role of the customers in the report either as Blank, Focal Customer or Beneficiary
Oracle Financial Services Compliance Regulatory Reporting 8.0.1 User Guide EG STR 33

Submitting an STR for ApprovalChapter 3–Managing OFSRR
Adding a New Customer of Type Natural PersonTo add a new customer of type natural person, follow these steps:
1. Navigate to the Report Details page.
2. Click the Customer tab.
3. Click Add from the Customers section. The Add Customer section is displayed.
Figure 19. Add Customer
4. Select Natural Person as the Customer Type from the Add Customer section.
Note: By default, the Role in the Report is selected as Blank. You can select the role in the report as either Blank, Beneficiary or Focal Customer. An STR must include at least one customer as the Focal Customer. If an Analyst user performs Request for Approval action without specifying a focal customer, the following warn-ing message is displayed: You have not specified Focal Customer. Cannot generate report without Focal Customer.
5. Select the role in the report as Focal Customer.
Figure 20. Adding a Natural Customer with Focal Customer Role
6. Enter the required information. The following table explains the fields displayed in Add Customer section for Customer Type as Natural Person and the Role as Blank/Focal Customer.
34 Oracle Financial Services Compliance Regulatory Reporting 8.0.1 User Guide EG STR

Submitting an STR for ApprovalChapter 3–Managing OFSRR
The following table explains the fields in Add New Customer.
Table 12. Add New Customer - Natural Person Field Descriptions
Fields Description
Name Enter the name of the new customer.
Customer Number Enter the customer number in this field.
Sex Select the sex of the customer from the drop-down list.
Nationality Select the nationality of the customer from the drop-down list.
Profession Enter the profession of the customer.
Institution Enter the name of the institution.
Date of Birth Select the date of birth of the customer from the calender.
Place of Birth Enter the place of birth of the customer.
Customer Relationship Start Date
Enter the date when the customer started his/her relationship with the financial institution.
Address according to Identification Document
Address Enter the address of the customer as specified in the identification document.
Quarter Enter the quarter of the customer.
City Enter the name of the city where the customer resides.
Governate Enter the name of the governate.
Other Address Details
Residential Address (Egypt) Enter the customer’s residential address in Egypt.
Residential Address (Abroad) Enter the customer’s residential address in aborad.
Telephone Numbers
Home Enter the customer’s home phone number.
Business Enter the customer’s business phone number.
Mobile Enter the customer’s mobile number.
Identification Details
Type of Identification Select an identification type of the customer from the drop-down option.
Note: If you select Other, you need to specify the type of identification in the text field.
Personal Identification Data
Date of Issuance Enter the date of issuance of the personal identification.
Number Enter the personal identification number.
Place of Issuance Enter the name of the place where the personal identification was issued.
Expiry Date Enter the expiry date of the personal identification.
Registration Number Enter the registration number of the personal identification.
Place of Registration Enter the name of the place where the personal identification was registered.
Printed Number If Any Enter the printed number if any.
Oracle Financial Services Compliance Regulatory Reporting 8.0.1 User Guide EG STR 35

Submitting an STR for ApprovalChapter 3–Managing OFSRR
7. Click Save. The following message is displayed: Update Operation Successful.
8. Click OK. A new customer record is added in the Customers section.
Note: If you click Reset, the unsaved data is reset to the last saved value in the Customer tab. You cannot edit the report details when the report is in View mode.
Adding a New Customer of Type Legal Person
To add a new customer of type legal person, follow these steps:
1. Navigate to the Report Details page.
2. Click the Customer tab.
3. Click Add from the Customers section. The Add Customer section is displayed.
4. Select Legal Person as the Customer Type from the Add Customer section.
Note: By default, the Role in the Report is selected as Blank. You can select the role in the report as either Blank, Beneficiary or Focal Customer. An STR must include at least one customer as the Focal Customer
5. Select the role of customer as Focal Customer.
Figure 21.
6. Enter the required information. The following table explains the fields displayed in Add Customer section for Customer Type as Legal Person and the Role as Blank/Focal Customer.
The following table explains the fields in Add New Customer - Legal Person.
Table 13. Add New Customer - Natural Person Field Descriptions
Fields Description
Name Enter the name of the new customer.
Customer Number Enter the customer number in this field.
Legal Form Select a legal form of the legal person from the drop-down list.
Note: If you select Other, you need to specify the legal form in the text field.
Date of Institutionalization Enter the date of Institutionalization of the legal person.
36 Oracle Financial Services Compliance Regulatory Reporting 8.0.1 User Guide EG STR

Submitting an STR for ApprovalChapter 3–Managing OFSRR
Paid up Capital Value Select an appropriate currency from the drop-down list and enter the amount of paid up capital of the legal person.
The drop-down list displays the following currencies: Egyptian pound
U.S. dollars
Sterling Pounds
Euros
Swiss Franc
Type of Activity According to the Commercial Register
Enter the type of activity according to the commercial register.
Registration Number Enter the registration number of the legal person.
Registration Date Enter the registration date of the legal person.
Registration Place Enter the name of the place where the legal person was registration.
Taxation Card Number Enter the taxation card number of the legal person.
Type Enter the type.
Customer Relationship Start Date
Enter the date when the customer started his/her relationship with the financial institution.
Address of Head quarters
Address Enter the address of the legal person’s headquarters.
Quarter Enter the quarter of the legal person’s headquarters
City Enter the city of the legal person’s headquarters.
Governate Enter the governate of the legal person’s headquarters
Natural Person Authorized to sign for the Legal Person
Name Enter the name of the natural person authorized to sign for the legal person.
Sex Enter the sex of the natural person.
Nationality Enter the nationality of the natural person.
Profession Enter the profession of the natural person.
Institution Enter the institution of the natural person.
Nature of the Relation with the Legal Person
Enter the nature of the relationship with the legal person.
Date of Birth Enter the date of birth of the natural person.
Place of Birth Enter the place of birth of the natural person.
Address according to Identification Document
Address Enter the address of the customer as specified in the identification document.
Quarter Enter the quarter of the customer.
City Enter the name of the city where the customer resides.
Governate Enter the name of the governate.
Permanent Residential Address
Residential Address (Egypt) Enter the customer’s residential address in Egypt.
Table 13. Add New Customer - Natural Person Field Descriptions
Fields Description
Oracle Financial Services Compliance Regulatory Reporting 8.0.1 User Guide EG STR 37

Submitting an STR for ApprovalChapter 3–Managing OFSRR
7. Click Save. The following message is displayed: Update Operation Successful.
8. Click OK. A new customer record is added in the Customers section.
Note: If you click Reset, the unsaved data is reset to the last saved value in the Customer tab. You cannot edit the report details when the report is in View mode.
Adding a New Customer with Beneficiary RoleTo add a new customer with beneficiary role, follow these steps:
1. Navigate to the Report Details page.
2. Click the Customer tab.
3. Click Add from the Customers section. The Add Customer section is displayed.
4. Select a Customer Type.
5. Select the role of the customer in the report as Beneficiary from the drop-down options.
Figure 22. Adding a New Customer with Beneficiary Role
Residential Address (Abroad) Enter the customer’s residential address in aborad.
Telephone Numbers
Home Enter the customer’s home phone number.
Business Enter the customer’s business phone number.
Mobile Enter the customer’s mobile number.
Identification Details
Type of Identification Select an identification type of the customer from the drop-down option.
Note: If you select Other, you need to specify the type of identification in the text field.
Personal Identification Data
Date of Issuance Enter the date of issuance of the personal identification.
Number Enter the personal identification number.
Place of Issuance Enter the name of the place where the personal identification was issued.
Expiry Date Enter the expiry date of the personal identification.
Registration Number Enter the registration number of the personal identification.
Place of Registration Enter the name of the place where the personal identification was registered.
Printed Number If Any Enter the printed number if any.
Table 13. Add New Customer - Natural Person Field Descriptions
Fields Description
38 Oracle Financial Services Compliance Regulatory Reporting 8.0.1 User Guide EG STR

Submitting an STR for ApprovalChapter 3–Managing OFSRR
6. Enter the required information. The following table explains the fields displayed in Add Customer section for Customer Type as Legal Person or Natural Person and the Role as Beneficiary.
The following table explains the fields in New Customer with Beneficiary Role.
7. Click Save. The following message is displayed: Update Operation Successful.
8. Click OK. A new customer record is added in the Customers section.
Note: You can mark only one customer with beneficiary role in an STR. If you try to mark a second benefi-ciary customer in an STR, the following message is displayed: <Customer Name> - CUstomer has alrady been identi-fied as Beneficiary. Only one CUstomer can be marked as Beneficiary. Click OK to make the current customer Beneficiary or click Cancel to return to previous page.
Editing an Existing Customer
An Analyst, Reviewer and a Supervisor user can edit a report in various statuses. Refer “Table 6. Status Role-Editing Report.” for more information.
While editing a report you can modify the Customer Type and the Role in the Report information for a customer. When you change the Customer Type and the Role of a customer, all the common customer information are retained. When you edit the role of a Natural customer from Beneficiary to Focal Customer/Blank or vice versa, then the Customer Name and Customer Number are retained and the beneficiary's address is mapped to the Natural Person's Residential Address. Similarly, when you edit the role of Legal Person from Beneficiary to Focal Customer/Blank or vice versa, then the Customer Name and Customer Number are retained.
To edit an existing customer, follow these steps:
1. Navigate to the Report Details page.
2. Click the Customer tab.
This list of customers associated with the report are displayed in the Customers section.
3. Select the check box at the beginning of a customer record row or click anywhere in the row.
The customer details are displayed in the Customer Details section. You can view and edit the details as required.
Cloning an STR
Cloning an STR will create a new report with the selected customer. When you clone an STR, all the data related to reporting bank, transaction, beneficiary, and documents will be copied to the new report. Users mapped to the role Analyst, Reviewer and Supervisor can perform Clone STR action on customer records that are having the role as Blank.
Table 14. Add New Customer - New Customer with Beneficiary Role Field Descriptions
Fields Description
Beneficiary’s Name Enter the beneficiary’s name.
Address Enter the address of the beneficiary customer.
Nationality Select a nationality of the beneficiary from the drop-down list.
Name of the Beneficiary’s Bank
Enter the name of the beneficiary’s bank.
Beneficiary’s Account Number
Enter the beneficiary’s account number.
Oracle Financial Services Compliance Regulatory Reporting 8.0.1 User Guide EG STR 39

Submitting an STR for ApprovalChapter 3–Managing OFSRR
An Analyst, Reviewer and Supervisor users can clone an STR when it is in Open, Reopen, Request for Approval, Rework, Recommend Approval, Requested Cancellation and Cancelled status. You cannot clone an STR when in Approved status. For more information, refer to “Table 4. Report Status - Action Mapping.”.
Note: You can clone only the primary report and cannot perform the clone action on an already cloned report.
To clone an STR, follow these steps:
1. Navigate to the Report Details page.
2. Click the Customer tab.
3. Select the check box at the beginning of a customer record row or click anywhere in the row that you want to clone.
4. Click Clone STR.
Note: If you try to perform a clone action on an STR where the customer's role in the report is either Benefi-ciary or Focal Customer: the following message is displayed: Clone STR action cannot be taken against Beneficiary or Focal Customer. Cloned reports can only be created for Non-Focal Customer who is not a Beneficiary.
5. If the cloning is successful, the following message is displayed: <Report ID> Cloned report created successfully.
6. Click OK.
Note:
When you clone an STR, the beneficiary customer from the primary STR is also copied to the cloned STR and thereby becomes the beneficiary customer of the cloned STR.
When you clone a report, an entry is added in the Audit tab with the Report ID of the new STR along with the details of the customer record that was selected for cloning.
Removing a CustomerTo remove a Customer record, follow these steps:
1. Navigate to the Report Details page.
2. Click the Customer tab.
The list of customer records are displayed in the Customers section.
3. Select the check box at the beginning of an customer record row or click anywhere in the row.
4. Click Remove. The following message is displayed: Are you sure you want to delete this record?
5. Click OK. The following message is displayed: Record Removed Sucessfully.
6. Click OK. The customer record is removed from the Customers section.
When you perform add, update, or remove action, an entry is added in the Audit tab.
Managing Transactions
The Transaction tab in the Report Details page displays all involved transactions and their details as received from OFSFCCM or added directly to the STR that are specific to the current report. From this tab you can add, update, and delete transactions to an STR.
40 Oracle Financial Services Compliance Regulatory Reporting 8.0.1 User Guide EG STR
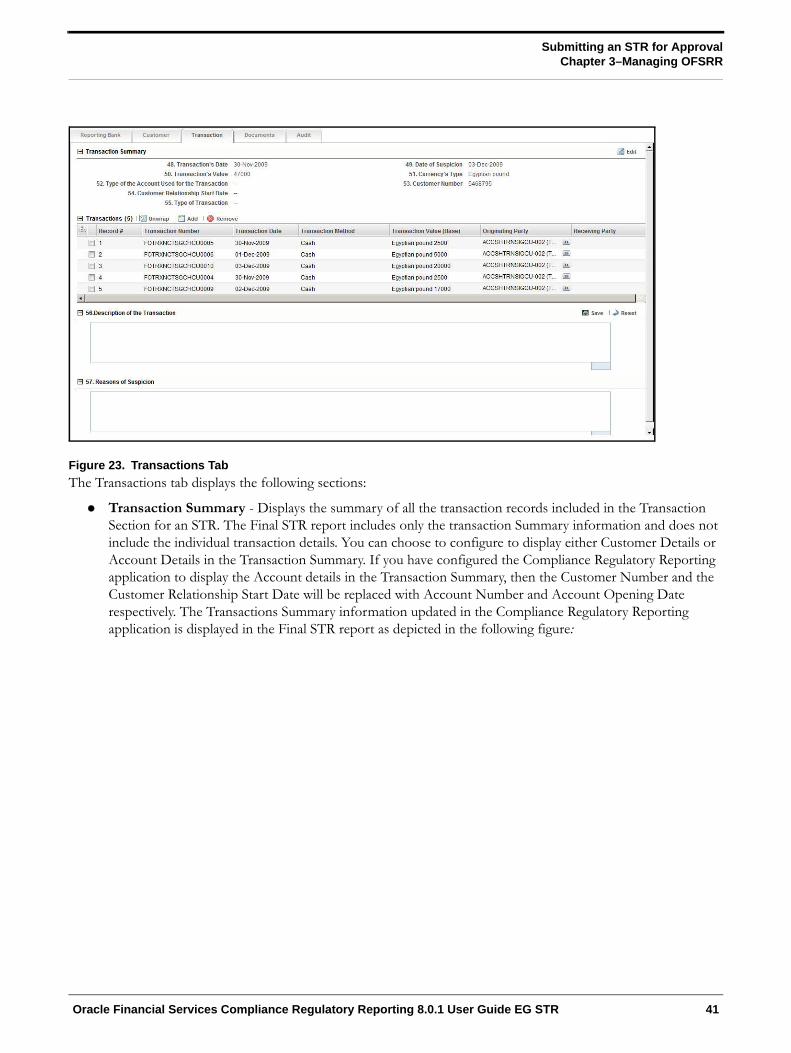
Submitting an STR for ApprovalChapter 3–Managing OFSRR
Figure 23. Transactions Tab
The Transactions tab displays the following sections:
Transaction Summary - Displays the summary of all the transaction records included in the Transaction Section for an STR. The Final STR report includes only the transaction Summary information and does not include the individual transaction details. You can choose to configure to display either Customer Details or Account Details in the Transaction Summary. If you have configured the Compliance Regulatory Reporting application to display the Account details in the Transaction Summary, then the Customer Number and the Customer Relationship Start Date will be replaced with Account Number and Account Opening Date respectively. The Transactions Summary information updated in the Compliance Regulatory Reporting application is displayed in the Final STR report as depicted in the following figure:
Oracle Financial Services Compliance Regulatory Reporting 8.0.1 User Guide EG STR 41

Submitting an STR for ApprovalChapter 3–Managing OFSRR
Figure 24. Transaction Summary Information in Final STR Excel
The Transaction Summary section displays the following fields:
Transaction Date
Date of Suspicion
Transaction’s Value
Currency’s Type
Type of Account Used for the Transaction
Customer Number / Account Number
Customer Relationship Start Date / Account Opening Date
Type of Transaction
Transactions - Captures specific information related to the transaction such as transaction identifiers, date of transaction, type of transaction, base amount of the transaction, originator name of the transaction, debit or a credit transaction and so on. The Transactions section displays the following columns:
Record
Transaction Number
Transaction Date
Transaction Method
Transaction Value (Base)
Originating Party
Receiving Party
42 Oracle Financial Services Compliance Regulatory Reporting 8.0.1 User Guide EG STR

Submitting an STR for ApprovalChapter 3–Managing OFSRR
Note: The value in the Record column is a system generated number that helps to distinguish a unique transaction while viewing the validation messages. You cannot add, or edit this field.
By default, the application displays the list of all transactions records associated with the STR. To view or edit the transaction details, either select the check box at the beginning of a transaction row or click anywhere in the row. The selected record gets highlighted and the details of that particular transaction display below the transaction section.
Adding a Transaction To add transactions to the report, follow these steps:
1. Navigate to the Report Details page.
2. Click the Transactions tab.
The list of transaction records in the report are displayed in the Transactions section if any.
3. Click Add. The Add Transaction section is displayed.
Figure 25. Add Transaction
4. Enter the required information.
The following table explains the fields in the Add Transaction section.
Table 15. Add New Transaction Field Descriptions
Fields Description
Transaction Number Enter the unique identifier for the transaction
Transaction Date Select a date from the calender icon specifying the occurrence of the transaction.
Transaction’s Value Select an appropriate currency from the drop-down list and enter the amount of transaction’s value.
The drop-down list displays the following currencies: Egyptian pound
Euros
Pounds
Swiss Franc
U.S. dollars
Transaction Method Enter the method of the transaction or the type as per Alert Management. This information is used to determine the Transaction Type in the Transaction Summary.
Originator Account Number Enter the account number of originator of the transaction.
Receiver Account Number Enter the account number of the receiver of the transaction.
Originator Account Type Enter the account type of the originator of the transaction.
Receiver Account Type Enter the account type of the receiver of the transaction.
Oracle Financial Services Compliance Regulatory Reporting 8.0.1 User Guide EG STR 43

Submitting an STR for ApprovalChapter 3–Managing OFSRR
Viewing or Editing Transaction Details
To view or edit the details of transactions, click anywhere on a transaction row. You can edit information about the transaction in the Transaction Details section.
To view or edit a transaction record for the report, follow these steps:
1. Navigate to the Report Details page.
2. Click the Transactions tab.
The list of transaction records associated with the report are displayed in the Transaction section.
3. Select the check box at the beginning of an transaction record row or click anywhere in the row.
The transaction details are displayed in the Transaction Details section. You can view and edit the details as required.
Figure 26. Viewing/Editing Transaction Record
Editing Transactions Summary
To edit the transaction summary, follow these steps:
Originator Account Opening Date
Enter the originator date of opening the account.
Receiver Account Opening Date
Enter the receiver date of opening the account.
Originator Name Enter the name of the person or organization who acts as the originator.
Receiver Name Enter the name of the person or organization who acts as the receiver.
Table 15. Add New Transaction Field Descriptions
Fields Description
44 Oracle Financial Services Compliance Regulatory Reporting 8.0.1 User Guide EG STR

Submitting an STR for ApprovalChapter 3–Managing OFSRR
1. Navigate to the Transactions tab of the report. The list of transactions associated with the record is displayed in the Transactions section.
2. Click Edit. The Transaction Summary details become editable.
Figure 27. Editing Transaction Summary
3. Edit the required field. The following table explains the fields in the Transaction Summary section.
The following table explains the fields in the Editing Transaction section.
Table 16. Editing Transaction Summary
Fields Description
Transaction Date If there is only a single date involved in the transactions, then that date is displayed by default. If there are one or more transactions with different transaction dates, then this field displays the earliest date of all the transactions records.
You edit this field by selecting a date from the calender icon.
Date of Suspicion Displays the date of the most recent transaction.
Transaction’s Value Displays the sum of all the transaction amounts.
Currency’s Type If there is only one currency involved in all the transactions, then that currency is displayed by default. If there are multiple currencies involved in the transaction records, then this field will display as blank.
Type of the Account Used for the Transaction
Enter the type of the account used in the transactions.
Customer Number This field will be displayed in the Transaction Summary if you have configured to display the Customer Details. By default, this field will display the customer number of the focal customer selected for the STR.
Note: This field is not editable.
Oracle Financial Services Compliance Regulatory Reporting 8.0.1 User Guide EG STR 45

Submitting an STR for ApprovalChapter 3–Managing OFSRR
4. Click Save. The Transaction Summary section displays the updated summary information.
Note: You can also click Cancel to turn the Transaction Summary into non-editable mode.
Removing Transactions
To remove a transaction, follow these steps:
1. Navigate to the Transactions tab of the report. The list of transactions associated with the record is displayed in the Transactions section.
2. Select the check box of the transaction record you want to remove.
3. Click Remove. The following message is displayed: Are you sure you want to delete this record? Deleting transactions may update the Transaction Summary and any user filled data may get lost. Click OK to proceed or Cancel to abort.
4. Click OK. The following message is displayed: Record Removed successfully.
5. Click OK. The application refreshes and displays the Transactions section.
Attaching and Removing Documents
The Documents tab allows you to attach and remove documents related to an STR. While filing the STR with the regulatory authorities, you must also send any added documents. The process of sending added documents to the regulatory authorities occurs outside of the application.
Users mapped to the role of an Analyst, Reviewer and Supervisor can attach and delete documents in all statuses except when the report is in View Only mode.
To attach a document, follow these steps:
1. Navigate to the Report Details page.
2. Click Documents. The Documents section is displayed.
3. Click Add. The Add Document pop-up window is displayed.
Customer Relationship Start Date
This field will be displayed in the Transaction Summary if you have configured to display the Customer Details. By default, this field will display the customer relationship start date of the focal customer selected for the STR.
Note: This field is not editable.
Account Number This field will be displayed in the Transaction Summary if you have configured to display the Account Details. By default, this field will display a blank value.
Date of Opening the Account This field will be displayed in the Transaction Summary if you have configured to display the Account Details. By default, this field will display a blank value.
Type of Transaction If there is only a single transaction type involved in the transactions, then that type is displayed by default. If there are multiple types of transactions involved, then this field displays a blank value.
Table 16. Editing Transaction Summary
Fields Description
46 Oracle Financial Services Compliance Regulatory Reporting 8.0.1 User Guide EG STR

Submitting an STR for ApprovalChapter 3–Managing OFSRR
Figure 28. Adding Documents to STR
4. Enter the Document Description and the Logical File Name.
5. Click Browse to choose a file from your machine.
6. Click Attach File. The following message is displayed: Add Operation Successfull.
7. Click OK. The file is attached and you are navigated back to the Add Document pop-up window.
You can click Close to navigate back the Report Details page or can attach additional documents.
Editing the Logical File Name and Document Description of an Added Document
The Reports Details page allows you to edit the logical file name and the document description of an added document.
To edit the logical file name and the document description, follow these steps:
1. Navigate to the Report Details page.
2. Click the Documents tab.
The list of added documents associated with the report are displayed in the Documents section.
3. Select the check box at the beginning of an added document row or click anywhere in the row.
The document record changes into an editable mode.
Figure 29. Editing the Logical File Name and Document Description of an Added Document
4. Edit the Logical File Name or/and the Document Description.
5. Click Save. The following message is displayed: Update Operation Successfull.
6. Click OK. The document is updated in the Documents section.
Oracle Financial Services Compliance Regulatory Reporting 8.0.1 User Guide EG STR 47

Submitting an STR for ApprovalChapter 3–Managing OFSRR
Viewing Audit Information
The Audit tab displays actions taken on the report. This tab contains the Actions and the Comments section.
Figure 30. Audit Tab
The Audit tab displays the following sections:
Actions
Comments
Actions
The Actions section displays all the actions taken on the regulatory report. This section displays the following fields
Table 17. Actions Section Field Descriptions
Fields Description
Date Displays the date on which the action occurred.
Action By Displays the name of the user who performed the action.
48 Oracle Financial Services Compliance Regulatory Reporting 8.0.1 User Guide EG STR

Submitting an STR for ApprovalChapter 3–Managing OFSRR
You can also export the list of actions to an excel format using the Export to Excel option. Refer to Exporting the STR List to Excel, on page 65 for more information.
Comments
The Comments section displays the comments entered while performing the Add Comments action from the Report Details page of an STR. The Comments section displays the following fields:
Action Displays a short description of the action.
OFSCRR captures the following actions in the Audit tab:
Created From Alert/Case
Created Manually
Created Through Cloning.
Reporting Bank Information Modified
Added New Customer
Removed Customer
Modified Customer Details
Modified Transaction Summary
Added New Transaction
Modified Transaction Details
Removed Transaction
Added New Document
Modified Document
Removed Document
Report Cloned for Customer Number
Reason for Suspicion/ Transaction Description Edited
Comments Displays the comments entered by the user while performing an action.
Previous Report Displays the previous final STR Excel submitted to the regulatory authorities.
Table 18. Comments Section Field Descriptions
Fields Description
Date Displays the date on which the comment was recorded.
By Displays the name of the user who has given that comment.
Comments Displays the comments added to the report by the user.
Table 17. Actions Section Field Descriptions
Fields Description
Oracle Financial Services Compliance Regulatory Reporting 8.0.1 User Guide EG STR 49
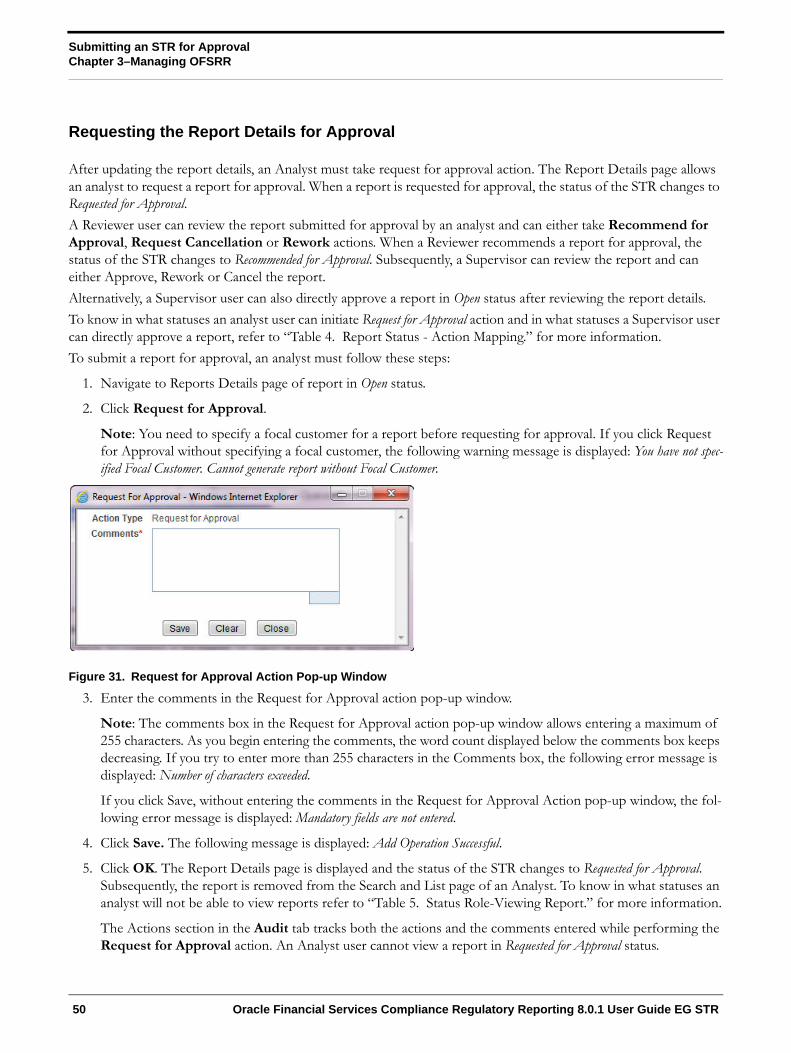
Submitting an STR for ApprovalChapter 3–Managing OFSRR
Requesting the Report Details for Approval
After updating the report details, an Analyst must take request for approval action. The Report Details page allows an analyst to request a report for approval. When a report is requested for approval, the status of the STR changes to Requested for Approval.
A Reviewer user can review the report submitted for approval by an analyst and can either take Recommend for Approval, Request Cancellation or Rework actions. When a Reviewer recommends a report for approval, the status of the STR changes to Recommended for Approval. Subsequently, a Supervisor can review the report and can either Approve, Rework or Cancel the report.
Alternatively, a Supervisor user can also directly approve a report in Open status after reviewing the report details.
To know in what statuses an analyst user can initiate Request for Approval action and in what statuses a Supervisor user can directly approve a report, refer to “Table 4. Report Status - Action Mapping.” for more information.
To submit a report for approval, an analyst must follow these steps:
1. Navigate to Reports Details page of report in Open status.
2. Click Request for Approval.
Note: You need to specify a focal customer for a report before requesting for approval. If you click Request for Approval without specifying a focal customer, the following warning message is displayed: You have not spec-ified Focal Customer. Cannot generate report without Focal Customer.
Figure 31. Request for Approval Action Pop-up Window
3. Enter the comments in the Request for Approval action pop-up window.
Note: The comments box in the Request for Approval action pop-up window allows entering a maximum of 255 characters. As you begin entering the comments, the word count displayed below the comments box keeps decreasing. If you try to enter more than 255 characters in the Comments box, the following error message is displayed: Number of characters exceeded.
If you click Save, without entering the comments in the Request for Approval Action pop-up window, the fol-lowing error message is displayed: Mandatory fields are not entered.
4. Click Save. The following message is displayed: Add Operation Successful.
5. Click OK. The Report Details page is displayed and the status of the STR changes to Requested for Approval. Subsequently, the report is removed from the Search and List page of an Analyst. To know in what statuses an analyst will not be able to view reports refer to “Table 5. Status Role-Viewing Report.” for more information.
The Actions section in the Audit tab tracks both the actions and the comments entered while performing the Request for Approval action. An Analyst user cannot view a report in Requested for Approval status.
50 Oracle Financial Services Compliance Regulatory Reporting 8.0.1 User Guide EG STR
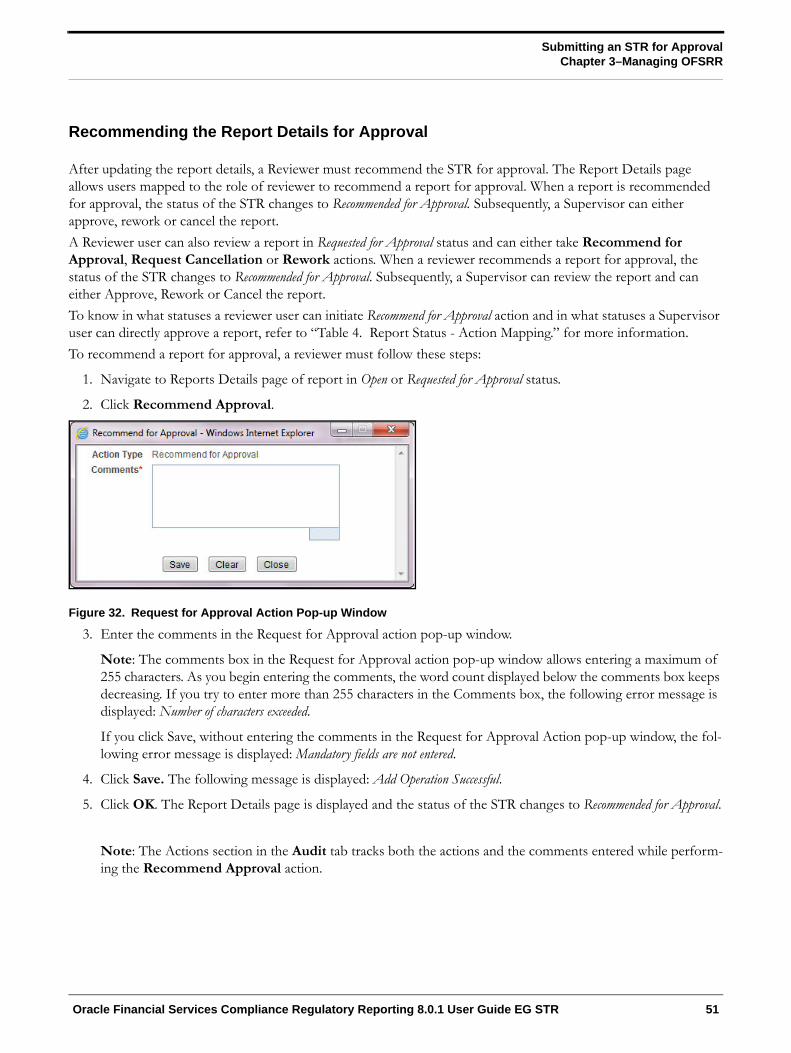
Submitting an STR for ApprovalChapter 3–Managing OFSRR
Recommending the Report Details for Approval
After updating the report details, a Reviewer must recommend the STR for approval. The Report Details page allows users mapped to the role of reviewer to recommend a report for approval. When a report is recommended for approval, the status of the STR changes to Recommended for Approval. Subsequently, a Supervisor can either approve, rework or cancel the report.
A Reviewer user can also review a report in Requested for Approval status and can either take Recommend for Approval, Request Cancellation or Rework actions. When a reviewer recommends a report for approval, the status of the STR changes to Recommended for Approval. Subsequently, a Supervisor can review the report and can either Approve, Rework or Cancel the report.
To know in what statuses a reviewer user can initiate Recommend for Approval action and in what statuses a Supervisor user can directly approve a report, refer to “Table 4. Report Status - Action Mapping.” for more information.
To recommend a report for approval, a reviewer must follow these steps:
1. Navigate to Reports Details page of report in Open or Requested for Approval status.
2. Click Recommend Approval.
Figure 32. Request for Approval Action Pop-up Window
3. Enter the comments in the Request for Approval action pop-up window.
Note: The comments box in the Request for Approval action pop-up window allows entering a maximum of 255 characters. As you begin entering the comments, the word count displayed below the comments box keeps decreasing. If you try to enter more than 255 characters in the Comments box, the following error message is displayed: Number of characters exceeded.
If you click Save, without entering the comments in the Request for Approval Action pop-up window, the fol-lowing error message is displayed: Mandatory fields are not entered.
4. Click Save. The following message is displayed: Add Operation Successful.
5. Click OK. The Report Details page is displayed and the status of the STR changes to Recommended for Approval.
Note: The Actions section in the Audit tab tracks both the actions and the comments entered while perform-ing the Recommend Approval action.
Oracle Financial Services Compliance Regulatory Reporting 8.0.1 User Guide EG STR 51

Submitting an STR for ApprovalChapter 3–Managing OFSRR
Setting Due Date of an STR
Set Due Date action will allow Analyst, Reviewer and Supervisor users to set a due date or modify an existing due date of an STR.
Note: The Set Due Date action is available in the Compliance Regulatory Reporting application only when you set the Edit Due Date Flag attribute to Y in the Application Parameters table.
The following table explains the various statuses where the Analyst, Reviewer and Supervisor users can perform the Set Due Date action:
To set due date of an STR from the Report Details page, follow these steps:
1. Navigate to the Report Details page of a report.
2. Click Set Due Date. The Set Due Date Action pop-up window is displayed.
Figure 33. Set Due Date Pop-up Window from Report Details Page
3. To set a due date, select a date from the calender icon.
Note: This field is a mandatory field.
4. Enter the comments in the Set Due Date action pop-up window.
Note: The comments box in the Set Due Date action pop-up window allows entering a maximum of 255 characters. As you begin entering the comments, the word count displayed below the comments box keeps decreasing. If you try to enter more than 255 characters in the Comments box, the following message is dis-played: Number of characters exceeded.
Menus
Roles
Analyst Reviewer Supervisor
Open X X X
Reopened X X
Requested for Approval X X
Recommended for Approval X
Rework X X X
Approved X X
52 Oracle Financial Services Compliance Regulatory Reporting 8.0.1 User Guide EG STR

Submitting an STR for ApprovalChapter 3–Managing OFSRR
If you click Save without entering the Set Due Date and Comments, in the Set Due Date Action pop-up win-dow, the following error message is displayed: Mandatory fields are not entered.
5. Click Save. The following message is displayed: Update Operation Successful.
6. Click OK. The Report Details page is displayed.
Note: The Actions section in the Audit tab tracks both the actions and the comments entered while perform-ing the Set Due Date action.
To set due date of an STR from RR Search and List page, follow these steps:
1. Navigate to RR Search and List page.
2. Select the check box of the report you want to set due date.
3. Click Set Due Date in the Action bar. The Set Due Date window is displayed.
Figure 34. Set Due Date from RR Search and List Page
Note: If the selected report already has a due date set, then the existing due date can be edited. While setting a due date if you include reports that are in Submitted or Cancelled status, the following warning message is dis-played: Some of the reports are in Submitted, Requested for Cancellation or Cancelled state. Due date cannot be set on these reports. Please deselect those reports and try again.
4. To set a due date, select a date from the calender icon.
Note: This field is a mandatory field.
5. Enter the comments in the Set Due Date action pop-up window.
Note: The comments box in the Set Due Date action pop-up window allows entering a maximum of 255 characters. As you begin entering the comments, the word count displayed below the comments box keeps decreasing. If you try to enter more than 255 characters in the Comments box, the following message is dis-played: Number of characters exceeded.
If you click Save without entering the Set Due Date and Comments, in the Set Due Date Action pop-up win-dow, the following error message is displayed: Mandatory fields are not entered.
6. Click Save. The following message is displayed: Update Operation Successful.
7. Click OK. The RR Search and List page is displayed.
Note: The Actions section in the Audit tab tracks both the actions and the comments entered while perform-ing the Set Due Date action.
Oracle Financial Services Compliance Regulatory Reporting 8.0.1 User Guide EG STR 53

Submitting an STR for ApprovalChapter 3–Managing OFSRR
Requesting the Cancellation of STR
If an Analyst or a Reviewer user determines that an STR should not be filed, they can request the Supervisor for cancellation of the report.
Users mapped to the role of Analyst can initiate the Request Cancellation action when the report is in Open and Rework statuses whereas a Reviewer can initiate the Request Cancellation action when the report is in Open, Reopened, Requested for Approval, Approved, and Rework. For more information, refer to “Table 4. Report Status - Action Mapping.”.
Once the report is in Requested for Cancellation status, you cannot edit the report details and the report changes to View Only mode.
Note: A Supervisor can either take Cancel Filing or Reject Cancellation Request action on a report in Requested for Cancellation status.
To request the cancellation of an STR, follow these steps:
1. Navigate to Reports Details page of report.
2. Click Request Cancellation.
Figure 35. Request Cancellation Action Pop-up Window
3. Enter the comments in the Request for Approval action pop-up window.
Note: The comments box in the Request for Approval action pop-up window allows entering a maximum of 255 characters. As you begin entering the comments, the word count displayed below the comments box keeps decreasing. If you try to enter more than 255 characters in the Comments box, the following error message is displayed: Number of characters exceeded.
If you click Save, without entering the comments in the Request for Approval Action pop-up window, the fol-lowing error message is displayed: Mandatory fields are not entered.
4. Click Save. The following message is displayed: Update Operation Successful.
5. Click OK. The Search and List page is displayed and the status of the STR changes to Requested for Cancellation.
Note: The Actions section in the Audit tab tracks both the actions and the comments entered while perform-ing the Request Cancellation action.
54 Oracle Financial Services Compliance Regulatory Reporting 8.0.1 User Guide EG STR

Performing Approve/Rework/Cancel Filing/Reject Cancellation Request on STRsChapter 3–Managing OFSRR
Performing Approve/Rework/Cancel Filing/Reject Cancellation Request on STRs
The Report Details page allows users mapped to the role of Supervisor to approve, rework, cancel filing or reject cancel request of the regulatory reports.
This section covers the following topics:
Approving Reports
Sending Reports to Rework
Cancelling the Filing of STR
Rejecting the Cancel Request of an STR
Approving Reports
Users mapped to the role of Supervisor can approve a report when it is in Open, Reopened, Requested for Approval, Rework, and Recommended for Approval status. For more information, refer to “Table 4. Report Status - Action Mapping.”.
To approve an STR, follow these steps:
1. Navigate to the Report Details page of a report in Open, Reopened, Requested for Approval, Rework, and Recommended for Approval status
2. Click Approve.
Figure 36. Approve Action Pop-up Window
3. Enter the comments in the Approve action pop-up window.
Note: The comments box in the Approve action pop-up window allows entering a maximum of 255 charac-ters. As you begin entering the comments, the word count displayed below the comments box keeps decreasing. If you try to enter more than 255 characters in the Comments box, the following message is dis-played: Number of characters exceeded.
If you click Save, without entering the comments in the Approve Action pop-up window, the following mes-sage is displayed: Mandatory fields are not entered.
4. Click Save. The following message is displayed: Update Operation Successful.
5. Click OK. The Report Details page is displayed and the status of the report changes to Approved.
Oracle Financial Services Compliance Regulatory Reporting 8.0.1 User Guide EG STR 55

Performing Approve/Rework/Cancel Filing/Reject Cancellation Request on STRsChapter 3–Managing OFSRR
Note: Once the STR is approved, Compliance Regulatory Reporting application will generate the final STR excel file containing the required information to be submitted to the regulatory authority. Also, the Actions section in the Audit tab tracks both the actions and the comments entered while performing the Approve action.
Sending Reports to Rework
A Reviewer or a Supervisor user can choose to rework a report for incomplete, inaccurate information, or additional investigation. The Report Details page allows a Reviewer and Supervisor to take Rework action on reports.
A Reviewer can take rework action on a report when it is in Requested for Approval status whereas a Supervisor can take rework action in Requested for Approval and Recommended for Approval status. If a report is sent for rework, an Analyst or a Reviewer must rework on the report and request/recommend the report again for approval. This process continues until the report is approved or cancelled.
To send a report to rework, follow these steps:
1. Navigate to the Report Details page.
2. Click Rework. The Rework Action pop-up window is displayed.
Figure 37. Rework Action Pop-up Window
3. Enter the comments in the Rework action pop-up window.
Note: The comments box in the Rework action pop-up window allows entering a maximum of 255 characters. As you begin entering the comments, the word count displayed below the comments box keeps decreasing. If you try to enter more than 255 characters in the Comments box, the following message is displayed: Number of characters exceeded.
If you click Save, without entering the comments in the Reject Action pop-up window, the following message is displayed: Mandatory fields are not entered.
4. Click Save The following message is displayed: Update Operation Successful.
5. Click OK. The Report Details page is displayed and the status of the STR changes to Rework.
Note: The Actions section in the Audit tab tracks both the actions and the comments entered while perform-ing the Rework action.
56 Oracle Financial Services Compliance Regulatory Reporting 8.0.1 User Guide EG STR

Performing Approve/Rework/Cancel Filing/Reject Cancellation Request on STRsChapter 3–Managing OFSRR
Cancelling the Filing of STR
If a Supervisor user determine that an STR report should not be filed they can cancel it.
A Supervisor can initiate Cancel Filing action when the report is in Open, Reopened, Requested for Approval, Approved, Rework, Recommended for Approval, and Requested for Cancellation status. For more information, refer to “Table 4. Report Status - Action Mapping.”.
Once the report is cancelled, you cannot edit the report details and the report changes into View Only mode.
Note: A canceled report can be reopened by a Reviewer and Supervisor.
To cancel the filing of a report, follow these steps:
1. Navigate to Report Details page.
2. Click Cancel Filing. The Cancel Action pop-up window is displayed.
Figure 38. Cancel Filing Action Pop-up Window
3. Enter the comments in the Cancel Filing action pop-up window.
Note: The comments box in the Cancel action pop-up window allows entering a maximum of 255 charac-ters. As you begin entering the comments, the word count displayed below the comments box keeps decreasing. If you try to enter more than 255 characters in the Comments box, the following message is dis-played: Number of characters exceeded.
If you click Save without entering the comments in the Cancel Action pop-up window, the following message is displayed: Mandatory fields are not entered.
4. Click Save. The following message is displayed: Update Operation Successful.
5. Click OK. The Report Details page is displayed and the status of the STR changes to Cancelled. The due date of the report is deleted on taking cancelled action
Note: The Actions section in the Audit tab tracks both the actions and the comments entered while perform-ing the Cancel action.
Oracle Financial Services Compliance Regulatory Reporting 8.0.1 User Guide EG STR 57

Performing Approve/Rework/Cancel Filing/Reject Cancellation Request on STRsChapter 3–Managing OFSRR
Rejecting the Cancel Request of an STR
A Supervisor user can choose to reject the cancellation request initiated by Analyst or Reviewer user.
An Analyst can initiate the Request Cancellation action when the report is in Open, and Rework status whereas a Reviewer can initiate in Open, Reopened, Requested for Approval, Approved, Rework, and Recommended for Approval status. For more information, refer to “Table 4. Report Status - Action Mapping.”.
Once the Supervisor rejects the cancellation request, the status of the report changes to the previous status prior to the Request Cancellation action.
The following scenario shows the work flow for Rejecting a Cancellation Request:
1. When an Analyst initiates a Cancel Filing request on an Open status, the status changes from Open to Requested for Cancellation.
2. Following this step, if the Supervisor rejects the cancellation request, the status of the STR changes back to Open from Requested for Cancellation
Note: A canceled report can be reopened by a Reviewer and Supervisor.
To reject the cancel request of a report, follow these steps:
1. Navigate to Report Details page.
2. Click Reject Cancel Request. The Reject Cancellation Request Action pop-up window is displayed.
Figure 39. Cancel Filing Action Pop-up Window
3. Enter the comments in the Reject Cancellation Request action pop-up window.
Note: The comments box in the Cancel action pop-up window allows entering a maximum of 255 charac-ters. As you begin entering the comments, the word count displayed below the comments box keeps decreasing. If you try to enter more than 255 characters in the Comments box, the following message is dis-played: Number of characters exceeded.
If you click Save without entering the comments in the Cancel Action pop-up window, the following message is displayed: Mandatory fields are not entered.
4. Click Save. The following message is displayed: Update Operation Successful.
5. Click OK. The Report Details page is displayed and the status of the STR changes to previous status prior to the Request Cancellation action.
Note: The Actions section in the Audit tab tracks both the actions and the comments entered while perform-ing the Cancel action.
58 Oracle Financial Services Compliance Regulatory Reporting 8.0.1 User Guide EG STR

Marking an STR as SubmittedChapter 3–Managing OFSRR
Marking an STR as Submitted
Once a report is approved, you must file the STR with the Regulatory authorities. The process of filing STRs with regulatory authority occurs outside of the application.
For tracking and reporting purposes, the application allows you to mark the reports that are filed with the regulatory authorities as Submitted once the STR Excel has been sent to the regulatory authorities, or whenever is defined as appropriate per your institution’s business practices.
When the report is submitted, the due date gets deleted.
Users mapped to the role of Reviewer and Supervisor can mark the reports filed with the regulatory authorities as submitted. This action can be performed only when the report is in Approved status.
If you select records from RR Search and List page which are not in Approved status and click on Submitted button, the application displays the following message: Some reports are not in Approved status. Submitted action can only be taken on Approved reports. Please deselect those reports and try again.
The Report Details page and RR Search and List page allows both Reviewer and Supervisor to submit approved reports.
To mark a report as submitted from the Report Details page, follow these steps:
1. Navigate to the Report Details page of a report in Approved status.
Figure 40. Mark as Submitted Pop-up Window from Report Details Page
2. Enter the comments in the Submitted action pop-up window.
Note: The comments box in the Submitted action pop-up window allows entering a maximum of 255 char-acters. As you begin entering the comments, the word count displayed below the comments box keeps decreasing. If you try to enter more than 255 characters in the Comments box, the following message is dis-played: Number of characters exceeded.
If you click Save without entering the comments in the Mark as Submitted Action pop-up window, the follow-ing error message is displayed: Mandatory fields are not entered.
3. Click Save. The following message is displayed: Update Operation Successful.
4. Click OK. The Report Details page is displayed and the status of the report changes to Submitted..
Note: The Actions section in the Audit tab tracks both the actions and the comments entered while perform-ing the Mark as Submitted action.
To mark a report as submitted from RR Search and List page, follow these steps:
1. Navigate to the RR Search and List page.
Oracle Financial Services Compliance Regulatory Reporting 8.0.1 User Guide EG STR 59

Marking an STR as SubmittedChapter 3–Managing OFSRR
2. Select the check box of the report(s) you want to submit.
Note: You can select multiple reports from the search and list page and collectively mark them as submitted.
3. Click Submitted. The Submit Reports window is displayed.
Figure 41. Mark as Submitted Pop-up Window from Search and List Page
4. Select the report details in the Submission Window and enter the comments.
5. Click Save. The following message is displayed: Update Operation Successful.
6. Click OK. The RR Search and List page is displayed.
Note: The Actions section in the Audit tab tracks both the actions and the comments entered while perform-ing the Mark as Submitted action.
60 Oracle Financial Services Compliance Regulatory Reporting 8.0.1 User Guide EG STR

Reopening an STRChapter 3–Managing OFSRR
Reopening an STR
Users mapped to the role of Reviewer and Supervisor can initiate reopen action on a report in Cancelled or Submitted status. A Reviewer and Supervisor can reopen a report from the Report Details page or from RR Search and List page. For more information, refer to “Table 4. Report Status - Action Mapping.”.
To reopen a report from Report Details page, follow these steps:
1. Navigate to the Report Details page of a report in Cancelled or Submitted status.
2. Click Reopen. The Reopen Action pop-up window is displayed.
Figure 42. Reopen Action Pop-up Window from Report Details Page
3. Set the due date and enter the comments in the Reopen action pop-up window. If you set the Due Date Required Flag attribute to Y, you must enter a due date. If you set the Due Date Required Flag attribute to N, you can optionally enter a due date.
Note: The comments box in the Reopen action pop-up window allows entering a maximum of 255 charac-ters. As you begin entering the comments, the word count displayed below the comments box keeps decreasing. If you try to enter more than 255 characters in the Comments box, the following message is dis-played: Number of characters exceeded.
If you click Save without entering the comments in the Reopen Action pop-up window, the following error message is displayed: Mandatory fields are not entered.
4. Click Save. The following message is displayed: Update Operation Successful.
5. Click OK. The Report Details page is displayed and the status of the report changes to Reopened.
The Actions section in the Audit tab tracks both the Actions and the Comments entered while performing the Reopen action.
To reopen a report from RR Search and List page, follow these steps:
1. Navigate to the RR Search and List page.
2. Select the check box of the report(s) you want to reopen.
Note: You can select multiple reports from the search and list page and collectively reopen them. If you try to perform reopen action on reports other than in Cancelled/Submitted status, the application displays the following message: Some reports are not in Cancelled or Submitted state. Reopen action can only be taken on Cancelled or Submitted reports. Please deselect those reports and try again.
3. Click Reopen. The Reopen Action pop-up window is displayed.
Oracle Financial Services Compliance Regulatory Reporting 8.0.1 User Guide EG STR 61

Reopening an STRChapter 3–Managing OFSRR
Figure 43. Reopen Action Pop-up Window from Search and List Page
4. Enter your comments in the Reopen reports window.
Note: The comments box in the Reopen report window allows entering a maximum of 255 characters. As you begin entering the comments, the word count displayed below the comments box keeps decreasing. If you try to enter more than 255 characters in the Comments box, the following message is displayed: Number of characters exceeded.
If you click Save without entering the comments in the Reopen report window, the following error message is displayed: Mandatory fields are not entered.
5. Click Save. The following message is displayed: Update Operation Successful.
6. Click OK. The RR Search and List page is displayed and the status of the report changes to Reopen.
Note: If you try to perform reopen action on reports other than in Cancelled/Submitted status, the application displays the following message: Some reports are not in Cancelled or Submitted state. Reopen action can only be taken on Cancelled or Submitted reports. Please deselect those reports and try again.
62 Oracle Financial Services Compliance Regulatory Reporting 8.0.1 User Guide EG STR

Adding Comments to an STRChapter 3–Managing OFSRR
Adding Comments to an STR
The Report Details page allows users mapped to the role of Analyst, Reviewer, and Supervisor to add comments to a report. You can add comments to a report in any status.
To add comments to a report, follow these steps:
1. Navigate to the Report Details page of a report.
2. Click Add Comments. The Add Comments Action pop-up window is displayed.
Figure 44. Add Comments Action Pop-up Window
3. Enter the comments in the Action pop-up window.
The comments box in the Action pop-up window allows entering a maximum of 255 characters. As you begin entering the comments, the word count displayed below the comments box keeps decreasing. If you try to enter more than 255 characters in the Comments box, the following error message is displayed: Number of char-acters exceeded.
If you click Save, without entering the comments in the Action pop-up window, the following error message is displayed: Mandatory fields are not entered.
4. Click Save. The following message is displayed: Update Operation Successful.
5. Click OK. The Action pop-up window closes and displays the Report Details page.
Note: The Actions and the Comments section in the Audit tab tracks both the actions and the comments entered while performing the Add Comments action.
Oracle Financial Services Compliance Regulatory Reporting 8.0.1 User Guide EG STR 63

Viewing an STR ExcelChapter 3–Managing OFSRR
Viewing an STR Excel
When a report is created either directly from OFSCRR or through OFSFCCM, a draft Excel is created for the STR. Users mapped to the role of Analyst, Reviewer and Supervisor can view and save the report. Once the Supervisor approves the STR, the draft STR Excel is replaced with the final STR Excel.
Both draft STR Excel and final STR Excel can be viewed either from RR Search and List page or from Report Details page.
To view an STR Excel from Report Details page, follow these steps:
1. Navigate to the Report Details page of a report.
2. Click View/ Save Report. The File Download pop up window is displayed.
3. Click Open to view the STR Excel. You can also click Save to save the report in your machine.
To view an STR Excel from RR Search and List page, follow these steps:
1. Navigate to the RR Search and List page.
2. From Reports List, click in the Regulatory Report column of an STR record. The File Download pop up window is displayed.
3. Click Open to view the STR Excel. You can also click Save to save the report in your machine.
64 Oracle Financial Services Compliance Regulatory Reporting 8.0.1 User Guide EG STR

Exporting the STR List to ExcelChapter 3–Managing OFSRR
Exporting the STR List to Excel
The RR Search and List page allows you to export the report list into an Excel template.
To export the report details into an Excel template, follow these steps:
1. Navigate to the RR Search and List page.
2. Click Export to Excel. The Export Properties dialog box is displayed.
All the reports in the RR Search and List page are exported into an Excel template. You cannot export individ-ual reports into Excel.
3. Set Document Type as Excel and select Form Data/Grid Data as Grid Data.
Figure 45. Export Properties Dialog Box
4. Click Export in the Export Properties dialog box.
When processing is complete, the data is displayed in an IE window with a dialog box.
5. Click Save from the dialog box. The Save As dialog box is displayed.
6. Select a directory location where you want to save the file.
7. Enter a new name in the File Name field or the application automatically generates a name for the file to accept.
8. Click Save.
The application saves your file to the specified location.
Note: Open the file in Microsoft Excel to edit as needed.
Oracle Financial Services Compliance Regulatory Reporting 8.0.1 User Guide EG STR 65

Exporting the STR List to ExcelChapter 3–Managing OFSRR
66 Oracle Financial Services Compliance Regulatory Reporting 8.0.1 User Guide EG STR

