oracle daybreak lease origination setup guide 11.5 · 2013-12-31 · ca oracle financial services...
TRANSCRIPT

CA
Oracle Financial Services Software Confidential - Restricted
SD
Setup Guide - Consumer Lease Origination Version : 11.6.0.0
9SS18 -Daybreak 11.6.0.0.REL.0.0.ALL.0 Oracle Daybreak
March, 2010
Oracle Part Number E51563-01

Oracle Financial Services Software Confidential - Restricted
Document Control
Author: Documentation Team Group: BPD
Created on : February 01, 2010 Revision No : Final
Updated by : Documentation Team
Reviewed by : Development/Testing teams
Approved by: Software Quality Assurance Team
Updated on :March 10, 2010 Reviewed on : March 10, 2010 Approved on : March 10, 2010

TABLE OF CONTENTS
CHAPTER 1 : ADMINISTRATION (SYSTEM) FORM Parameters tab . . . . . . . . . . . . . . . . . . . . . . . . . . . . . . . . . . . . . . . . . . . . . . . . . . . . . . . . . . . . . . . 1-2Parameters tab (System page). . . . . . . . . . . . . . . . . . . . . . . . . . . . . . . . . . . . . . . . . . . . . . . . . . . 1-3Parameters tab (Organization page) . . . . . . . . . . . . . . . . . . . . . . . . . . . . . . . . . . . . . . . . . . . . . . 1-4Parameters tab (Company page) . . . . . . . . . . . . . . . . . . . . . . . . . . . . . . . . . . . . . . . . . . . . . . . . . 1-6Lookups tab (Lookups page) . . . . . . . . . . . . . . . . . . . . . . . . . . . . . . . . . . . . . . . . . . . . . . . . . . . . 1-8User Defined Tables tab (User Defined Tables page) . . . . . . . . . . . . . . . . . . . . . . . . . . . . . . . . 1-11Audit Tables tab (Audits page) . . . . . . . . . . . . . . . . . . . . . . . . . . . . . . . . . . . . . . . . . . . . . . . . . . 1-14User Defined Defaults tab (Applications Defaults page) . . . . . . . . . . . . . . . . . . . . . . . . . . . . . . 1-16Txn Codes tab (Txn Codes page) . . . . . . . . . . . . . . . . . . . . . . . . . . . . . . . . . . . . . . . . . . . . . . . 1-20
Txn Codes sub pages. . . . . . . . . . . . . . . . . . . . . . . . . . . . . . . . . . . . . . . . . . . . . . . . . . . . . . . . . . . . . 1-23Data Files tab (File Definitions page) . . . . . . . . . . . . . . . . . . . . . . . . . . . . . . . . . . . . . . . . . . . . . 1-29Error Messages tab (Error Messages page) . . . . . . . . . . . . . . . . . . . . . . . . . . . . . . . . . . . . . . . 1-32Translation tab (Setup Translation page) . . . . . . . . . . . . . . . . . . . . . . . . . . . . . . . . . . . . . . . . . . 1-33
Translation tab (Message Translation page) . . . . . . . . . . . . . . . . . . . . . . . . . . . . . . . . . . . . . . . . . 1-35
CHAPTER 2 : ADMINISTRATION (USER) FORMOrganization tab (Organization page) . . . . . . . . . . . . . . . . . . . . . . . . . . . . . . . . . . . . . . . . . . . . . 2-2Companies tab (Companies page). . . . . . . . . . . . . . . . . . . . . . . . . . . . . . . . . . . . . . . . . . . . . . . . 2-6Access tab (Data page) . . . . . . . . . . . . . . . . . . . . . . . . . . . . . . . . . . . . . . . . . . . . . . . . . . . . . . . 2-10
Access tab (Menu page) . . . . . . . . . . . . . . . . . . . . . . . . . . . . . . . . . . . . . . . . . . . . . . . . . . . . . . . . . . 2-12Access tab (Screen page) . . . . . . . . . . . . . . . . . . . . . . . . . . . . . . . . . . . . . . . . . . . . . . . . . . . . . . . . . 2-13Access tab (Correspondence page). . . . . . . . . . . . . . . . . . . . . . . . . . . . . . . . . . . . . . . . . . . . . . . . . 2-15Access tab (Setup Security page) . . . . . . . . . . . . . . . . . . . . . . . . . . . . . . . . . . . . . . . . . . . . . . . . . . 2-16Access tab (Transaction page) . . . . . . . . . . . . . . . . . . . . . . . . . . . . . . . . . . . . . . . . . . . . . . . . . . . . . 2-17
Users tab (Users page) . . . . . . . . . . . . . . . . . . . . . . . . . . . . . . . . . . . . . . . . . . . . . . . . . . . . . . . 2-19Printers tab (Printers page) . . . . . . . . . . . . . . . . . . . . . . . . . . . . . . . . . . . . . . . . . . . . . . . . . . . . 2-24Bank Details tab (Bank Details page). . . . . . . . . . . . . . . . . . . . . . . . . . . . . . . . . . . . . . . . . . . . . 2-26Standard Payees tab (Standard Payees page) . . . . . . . . . . . . . . . . . . . . . . . . . . . . . . . . . . . . . 2-28Check Details tab (Check Details page). . . . . . . . . . . . . . . . . . . . . . . . . . . . . . . . . . . . . . . . . . . 2-30
CHAPTER 3 : PRODUCT SETUP FORMSetup master tab . . . . . . . . . . . . . . . . . . . . . . . . . . . . . . . . . . . . . . . . . . . . . . . . . . . . . . . . . . . . . 3-2Assets tab (Assets page) . . . . . . . . . . . . . . . . . . . . . . . . . . . . . . . . . . . . . . . . . . . . . . . . . . . . . . . 3-2Scoring Parameters tab (Scoring Parameters page) . . . . . . . . . . . . . . . . . . . . . . . . . . . . . . . . . . 3-6Index Rates tab (Index Rates page). . . . . . . . . . . . . . . . . . . . . . . . . . . . . . . . . . . . . . . . . . . . . . . 3-9
Oracle Financial Services Software Confidential - Restricted i

CHAPTER 4 : PRODUCT LEASE SETUPProducts tab (Lease Products page) . . . . . . . . . . . . . . . . . . . . . . . . . . . . . . . . . . . . . . . . . . . . . . 4-2Pricing tab (Lease Pricing page) . . . . . . . . . . . . . . . . . . . . . . . . . . . . . . . . . . . . . . . . . . . . . . . . . 4-4Edits tab (Edits page) . . . . . . . . . . . . . . . . . . . . . . . . . . . . . . . . . . . . . . . . . . . . . . . . . . . . . . . . . . 4-8Cycles master tab (Cycles page) . . . . . . . . . . . . . . . . . . . . . . . . . . . . . . . . . . . . . . . . . . . . . . . . 4-13Scoring tab (Scoring Models page) . . . . . . . . . . . . . . . . . . . . . . . . . . . . . . . . . . . . . . . . . . . . . . 4-18
Grades sub page . . . . . . . . . . . . . . . . . . . . . . . . . . . . . . . . . . . . . . . . . . . . . . . . . . . . . . . . . . . . . . . . . 4-21Scoring tab (Behavioral Scoring Models page) . . . . . . . . . . . . . . . . . . . . . . . . . . . . . . . . . . . . . 4-23Contract tab (Lease Contract page) . . . . . . . . . . . . . . . . . . . . . . . . . . . . . . . . . . . . . . . . . . . . . . 4-27
Balances sub page . . . . . . . . . . . . . . . . . . . . . . . . . . . . . . . . . . . . . . . . . . . . . . . . . . . . . . . . . . . . . . . 4-31Amortize Balances sub page. . . . . . . . . . . . . . . . . . . . . . . . . . . . . . . . . . . . . . . . . . . . . . . . . . . . . . . 4-32Itemization sub page. . . . . . . . . . . . . . . . . . . . . . . . . . . . . . . . . . . . . . . . . . . . . . . . . . . . . . . . . . . . . . 4-33Fees sub page . . . . . . . . . . . . . . . . . . . . . . . . . . . . . . . . . . . . . . . . . . . . . . . . . . . . . . . . . . . . . . . . . . . 4-35
Fees tab (Fee page) . . . . . . . . . . . . . . . . . . . . . . . . . . . . . . . . . . . . . . . . . . . . . . . . . . . . . . . . . . 4-37Compensation tab (Lease Compensation Plans page) . . . . . . . . . . . . . . . . . . . . . . . . . . . . . . . 4-39Checklists tab (Checklists page) . . . . . . . . . . . . . . . . . . . . . . . . . . . . . . . . . . . . . . . . . . . . . . . . 4-43Org. Fees tab (Lease Origination Fees page) . . . . . . . . . . . . . . . . . . . . . . . . . . . . . . . . . . . . . . 4-46Stipulations tab (Lease Stipulations page) . . . . . . . . . . . . . . . . . . . . . . . . . . . . . . . . . . . . . . . . . 4-48Spreads tab (Spreads page) . . . . . . . . . . . . . . . . . . . . . . . . . . . . . . . . . . . . . . . . . . . . . . . . . . . 4-49Statement tab (Messages page) . . . . . . . . . . . . . . . . . . . . . . . . . . . . . . . . . . . . . . . . . . . . . . . . 4-51Letters tab (Letters page) . . . . . . . . . . . . . . . . . . . . . . . . . . . . . . . . . . . . . . . . . . . . . . . . . . . . . . 4-53
CHAPTER 5 : QUEUE SETUP FORMOrigination tab (Origination page) . . . . . . . . . . . . . . . . . . . . . . . . . . . . . . . . . . . . . . . . . . . . . . . . 5-2
CHAPTER 6 : EVENTS FORMSetup tab (Setup page) . . . . . . . . . . . . . . . . . . . . . . . . . . . . . . . . . . . . . . . . . . . . . . . . . . . . . . . . 6-1Online tab (Online page) . . . . . . . . . . . . . . . . . . . . . . . . . . . . . . . . . . . . . . . . . . . . . . . . . . . . . . . 6-3
Criteria Details sub page . . . . . . . . . . . . . . . . . . . . . . . . . . . . . . . . . . . . . . . . . . . . . . . . . . . . . . . . . . . 6-4Action sub page . . . . . . . . . . . . . . . . . . . . . . . . . . . . . . . . . . . . . . . . . . . . . . . . . . . . . . . . . . . . . . . . . . . 6-4
Batch tab (Batch page). . . . . . . . . . . . . . . . . . . . . . . . . . . . . . . . . . . . . . . . . . . . . . . . . . . . . . . . . 6-6Criteria Details sub page . . . . . . . . . . . . . . . . . . . . . . . . . . . . . . . . . . . . . . . . . . . . . . . . . . . . . . . . . . . 6-7Actions sub page . . . . . . . . . . . . . . . . . . . . . . . . . . . . . . . . . . . . . . . . . . . . . . . . . . . . . . . . . . . . . . . . . . 6-8Monitoring events . . . . . . . . . . . . . . . . . . . . . . . . . . . . . . . . . . . . . . . . . . . . . . . . . . . . . . . . . . . . . . . . . 6-9
CHAPTER 7 : CREDIT BUREAU SETUP FORMCredit Bureau Setup details . . . . . . . . . . . . . . . . . . . . . . . . . . . . . . . . . . . . . . . . . . . . . . . . . . . . . 7-1
Preparing to use Experian credit reports . . . . . . . . . . . . . . . . . . . . . . . . . . . . . . . . . . . . . . . . . . . . . . 7-2Preparing to use Equifax credit reports . . . . . . . . . . . . . . . . . . . . . . . . . . . . . . . . . . . . . . . . . . . . . . . 7-3Preparing to use TransUnion credit reports . . . . . . . . . . . . . . . . . . . . . . . . . . . . . . . . . . . . . . . . . . . 7-4Preparing to use CSC credit reports . . . . . . . . . . . . . . . . . . . . . . . . . . . . . . . . . . . . . . . . . . . . . . . . . 7-4Preparing to use Credco credit reports . . . . . . . . . . . . . . . . . . . . . . . . . . . . . . . . . . . . . . . . . . . . . . . 7-5
Request master tab . . . . . . . . . . . . . . . . . . . . . . . . . . . . . . . . . . . . . . . . . . . . . . . . . . . . . . . . . . . 7-6Report Formats page . . . . . . . . . . . . . . . . . . . . . . . . . . . . . . . . . . . . . . . . . . . . . . . . . . . . . . . . . . 7-6Connections page. . . . . . . . . . . . . . . . . . . . . . . . . . . . . . . . . . . . . . . . . . . . . . . . . . . . . . . . . . . . 7-10Zip Matrix page. . . . . . . . . . . . . . . . . . . . . . . . . . . . . . . . . . . . . . . . . . . . . . . . . . . . . . . . . . . . . . 7-13Parameters page . . . . . . . . . . . . . . . . . . . . . . . . . . . . . . . . . . . . . . . . . . . . . . . . . . . . . . . . . . . . 7-15Score Reasons page . . . . . . . . . . . . . . . . . . . . . . . . . . . . . . . . . . . . . . . . . . . . . . . . . . . . . . . . . 7-16Reporting master tab (Reporting page) . . . . . . . . . . . . . . . . . . . . . . . . . . . . . . . . . . . . . . . . . . . 7-17
ii Oracle Financial Services Software Confidential - Restricted

Special Metro II Code reporting . . . . . . . . . . . . . . . . . . . . . . . . . . . . . . . . . . . . . . . . . . . . . . . . . 7-18Oracle Wallet Manager setup . . . . . . . . . . . . . . . . . . . . . . . . . . . . . . . . . . . . . . . . . . . . . . . . . . . 7-20Oracle JVM Security setup . . . . . . . . . . . . . . . . . . . . . . . . . . . . . . . . . . . . . . . . . . . . . . . . . . . . . 7-22Importing a trusted certificate into an Oracle Wallet . . . . . . . . . . . . . . . . . . . . . . . . . . . . . . . . . . 7-22Importing the Certificates into an Oracle Wallet . . . . . . . . . . . . . . . . . . . . . . . . . . . . . . . . . . . . . 7-24De-duping Credit Bureau data . . . . . . . . . . . . . . . . . . . . . . . . . . . . . . . . . . . . . . . . . . . . . . . . . . 7-26
CHAPTER 8 : UTILITIES FORMSetup tab (Batch Job page) . . . . . . . . . . . . . . . . . . . . . . . . . . . . . . . . . . . . . . . . . . . . . . . . . . . . . 8-1Setup tab (Job Holidays page) . . . . . . . . . . . . . . . . . . . . . . . . . . . . . . . . . . . . . . . . . . . . . . . . . . . 8-4Monitor Batch Jobs tab (Match Batch Jobs page) . . . . . . . . . . . . . . . . . . . . . . . . . . . . . . . . . . . . 8-5Monitor Jobs tab (Monitor Jobs page) . . . . . . . . . . . . . . . . . . . . . . . . . . . . . . . . . . . . . . . . . . . . . 8-8Monitor Users tab (Monitor Users page) . . . . . . . . . . . . . . . . . . . . . . . . . . . . . . . . . . . . . . . . . . 8-10Services tab (Services page) . . . . . . . . . . . . . . . . . . . . . . . . . . . . . . . . . . . . . . . . . . . . . . . . . . . 8-11Log Files tab (Log Files page) . . . . . . . . . . . . . . . . . . . . . . . . . . . . . . . . . . . . . . . . . . . . . . . . . . 8-12
CHAPTER 9 : PRODUCER MANAGEMENT FORMSet up tab (Cycles page) . . . . . . . . . . . . . . . . . . . . . . . . . . . . . . . . . . . . . . . . . . . . . . . . . . . . . . . 9-3Producer tab (Producers page) . . . . . . . . . . . . . . . . . . . . . . . . . . . . . . . . . . . . . . . . . . . . . . . . . . 9-5
Payment Details sub page . . . . . . . . . . . . . . . . . . . . . . . . . . . . . . . . . . . . . . . . . . . . . . . . . . . . . . . . . . 9-7Compensation sub page . . . . . . . . . . . . . . . . . . . . . . . . . . . . . . . . . . . . . . . . . . . . . . . . . . . . . . . . . . . 9-8Subvention sub page . . . . . . . . . . . . . . . . . . . . . . . . . . . . . . . . . . . . . . . . . . . . . . . . . . . . . . . . . . . . . 9-10Transactions sub page . . . . . . . . . . . . . . . . . . . . . . . . . . . . . . . . . . . . . . . . . . . . . . . . . . . . . . . . . . . . 9-12Tracking Attributes sub page. . . . . . . . . . . . . . . . . . . . . . . . . . . . . . . . . . . . . . . . . . . . . . . . . . . . . . . 9-13Statements sub page . . . . . . . . . . . . . . . . . . . . . . . . . . . . . . . . . . . . . . . . . . . . . . . . . . . . . . . . . . . . . 9-14Contacts sub page . . . . . . . . . . . . . . . . . . . . . . . . . . . . . . . . . . . . . . . . . . . . . . . . . . . . . . . . . . . . . . . 9-15Comments sub page. . . . . . . . . . . . . . . . . . . . . . . . . . . . . . . . . . . . . . . . . . . . . . . . . . . . . . . . . . . . . . 9-16
CHAPTER 10 : VENDOR MANAGEMENT FORMSetup tab (Vendor Services page) . . . . . . . . . . . . . . . . . . . . . . . . . . . . . . . . . . . . . . . . . . . . . . . 10-1Setup tab (Cycles page) . . . . . . . . . . . . . . . . . . . . . . . . . . . . . . . . . . . . . . . . . . . . . . . . . . . . . . . 10-2Vendors tab (Vendors page) . . . . . . . . . . . . . . . . . . . . . . . . . . . . . . . . . . . . . . . . . . . . . . . . . . . 10-4
Vendors tab (Vendors Groups sub page) . . . . . . . . . . . . . . . . . . . . . . . . . . . . . . . . . . . . . . . . . . . . 10-5Vendors tab (ACH sub page) . . . . . . . . . . . . . . . . . . . . . . . . . . . . . . . . . . . . . . . . . . . . . . . . . . . . . . 10-6
Work Orders tab (Work Orders page) . . . . . . . . . . . . . . . . . . . . . . . . . . . . . . . . . . . . . . . . . . . . 10-7Work Orders tab (Follow-up page) . . . . . . . . . . . . . . . . . . . . . . . . . . . . . . . . . . . . . . . . . . . . . . . 10-9Invoices tab (Invoices page). . . . . . . . . . . . . . . . . . . . . . . . . . . . . . . . . . . . . . . . . . . . . . . . . . . 10-11
CHAPTER 11 : SUBVENTION FORMLease Subvention page . . . . . . . . . . . . . . . . . . . . . . . . . . . . . . . . . . . . . . . . . . . . . . . . . . . . . . . 11-3
CHAPTER 12 : CORRESPONDENCE FORMSetup master tab . . . . . . . . . . . . . . . . . . . . . . . . . . . . . . . . . . . . . . . . . . . . . . . . . . . . . . . . . . . . 12-2Functions tab (System Functions page) . . . . . . . . . . . . . . . . . . . . . . . . . . . . . . . . . . . . . . . . . . . 12-2Elements tab (Elements page) . . . . . . . . . . . . . . . . . . . . . . . . . . . . . . . . . . . . . . . . . . . . . . . . . . 12-3Elements tab (E-Forms Elements page) . . . . . . . . . . . . . . . . . . . . . . . . . . . . . . . . . . . . . . . . . . 12-4Document tab (Documents page). . . . . . . . . . . . . . . . . . . . . . . . . . . . . . . . . . . . . . . . . . . . . . . . 12-5
Oracle Financial Services Software Confidential - Restricted iii

Document tab (Elements sub page) . . . . . . . . . . . . . . . . . . . . . . . . . . . . . . . . . . . . . . . . . . . . . . 12-6Document tab (Templates sub page) . . . . . . . . . . . . . . . . . . . . . . . . . . . . . . . . . . . . . . . . . . . . . 12-7Correspondence tab (Correspondence page) . . . . . . . . . . . . . . . . . . . . . . . . . . . . . . . . . . . . . . 12-8
CHAPTER 13 : ACCOUNT DOCUMENT TRACKING FORMSet Up. . . . . . . . . . . . . . . . . . . . . . . . . . . . . . . . . . . . . . . . . . . . . . . . . . . . . . . . . . . . . . . . . . . . . 13-1
Lookup types . . . . . . . . . . . . . . . . . . . . . . . . . . . . . . . . . . . . . . . . . . . . . . . . . . . . . . . . . . . . . . . . . . . . 13-2
APPENDIX A : SUMMARY OF DLS SCORING PARAMETERSGlossary . . . . . . . . . . . . . . . . . . . . . . . . . . . . . . . . . . . . . . . . . . . . . . . . . . . . . . . . . . . . . . . . . . . . . . . . . A-1
Scoring Parameters by Category . . . . . . . . . . . . . . . . . . . . . . . . . . . . . . . . . . . . . . . . . . . . . . . . A-21. Applicant Details / Debt Ratios . . . . . . . . . . . . . . . . . . . . . . . . . . . . . . . . . . . . . . . . . . . . . . . . . . . . A-22. Loan Details . . . . . . . . . . . . . . . . . . . . . . . . . . . . . . . . . . . . . . . . . . . . . . . . . . . . . . . . . . . . . . . . . . . . A-43. Auto Trades / Inquiries . . . . . . . . . . . . . . . . . . . . . . . . . . . . . . . . . . . . . . . . . . . . . . . . . . . . . . . . . . . A-44. Bank Trades / Inquiries . . . . . . . . . . . . . . . . . . . . . . . . . . . . . . . . . . . . . . . . . . . . . . . . . . . . . . . . . . A-55. Card Trades / Inquiries. . . . . . . . . . . . . . . . . . . . . . . . . . . . . . . . . . . . . . . . . . . . . . . . . . . . . . . . . . . A-76. Installment Trades / Inquiries . . . . . . . . . . . . . . . . . . . . . . . . . . . . . . . . . . . . . . . . . . . . . . . . . . . . . A-87. Loan Finance Trades / Inquiries . . . . . . . . . . . . . . . . . . . . . . . . . . . . . . . . . . . . . . . . . . . . . . . . . . . A-98. Mortgage Trades / Inquiries . . . . . . . . . . . . . . . . . . . . . . . . . . . . . . . . . . . . . . . . . . . . . . . . . . . . . A-109. Retail Trades / Inquiries . . . . . . . . . . . . . . . . . . . . . . . . . . . . . . . . . . . . . . . . . . . . . . . . . . . . . . . . . A-1110. Revolving Trades . . . . . . . . . . . . . . . . . . . . . . . . . . . . . . . . . . . . . . . . . . . . . . . . . . . . . . . . . . . . . A-1211. Sales Finance Trades / Inquiries . . . . . . . . . . . . . . . . . . . . . . . . . . . . . . . . . . . . . . . . . . . . . . . . A-1312. Other Trades . . . . . . . . . . . . . . . . . . . . . . . . . . . . . . . . . . . . . . . . . . . . . . . . . . . . . . . . . . . . . . . . . A-1413. Bankruptcy information . . . . . . . . . . . . . . . . . . . . . . . . . . . . . . . . . . . . . . . . . . . . . . . . . . . . . . . . A-1814. Delinquency Information . . . . . . . . . . . . . . . . . . . . . . . . . . . . . . . . . . . . . . . . . . . . . . . . . . . . . . . A-1915. Derogatory Trade Information. . . . . . . . . . . . . . . . . . . . . . . . . . . . . . . . . . . . . . . . . . . . . . . . . . . A-20
APPENDIX B : ROUNDING AMOUNTS AND RATE ATTRIBUTES
APPENDIX C : REPORT DATABASE FORMSetting up RDH . . . . . . . . . . . . . . . . . . . . . . . . . . . . . . . . . . . . . . . . . . . . . . . . . . . . . . . . . . . . . . . . . . . C-7
RDH Tables page . . . . . . . . . . . . . . . . . . . . . . . . . . . . . . . . . . . . . . . . . . . . . . . . . . . . . . . . . . . . C-7Business Views page . . . . . . . . . . . . . . . . . . . . . . . . . . . . . . . . . . . . . . . . . . . . . . . . . . . . . . . . . C-9
iv Oracle Financial Services Software Confidential - Restricted

CHAPTER 1: ADMINISTRATION (SYSTEM) FORM
The Administration (System) master tab and its pages contain setup data related to the Oracle Daybreak’s overall functionality and performance. This data affects the mechanics of the system: how Oracle Daybreak processes work and where it looks for files when completing tasks.
The Administration form’s System master tab contains the following tabs:
• Parameters• Lookups• User Defined Tables• Audit Tables• User Defined Defaults• Txn Codes• Data Files• Error Messages• Translation
All System tabs allow you to control the behavior of the system from a technical perspec-tive; for example, determine values in List of Values dialog boxes, define what informa-tion is audited, and record default values. i-flex solutions provides default values on all these pages.
1-1 Setup Guide - Consumer Lease Origination

Parameters tabSystem parameters define information or values used throughout Oracle Daybreak. They act as switches that control the manner in which a function is implemented, or whether or not Oracle Daybreak performs a particular task. Parameters are used throughout Oracle Daybreak to control everything from user access to what information is stored on any given form. Parameters also define configuration data, such as the location of Oracle Day-break system files, the URLs for the report and image servers, and other administration controlled data. Some of the system parameters are setup when Oracle Daybreak is installed, but the values associated with the parameters will need to be reviewed and main-tained.
There are three types of parameters in Oracle Daybreak, divided what part of the Oracle Daybreak system they affect:
Type of paramter: Paramter range:
System parameters These parameters apply to the entire system.Examples: batch processes, archiving, aging, and so on.
Organization parameters These parameters apply to the organization, divi-sion, and user responsibility.Examples: User login control, password expira-tion.
Company parameters These parameters apply to the company and branch.Examples: decision fax control, scoring model and so on.
As a result, the Parameters tab contains the following three pages:
• System page• Organization page• Company page
Many parameter values are restricted based on a system lookup (see the Lookups page section in this chapter for more information). Please refer to the Excel file Appendix_Lookups for the definition and function of individual parameters.
1-2 Setup Guide - Consumer Lease Origination
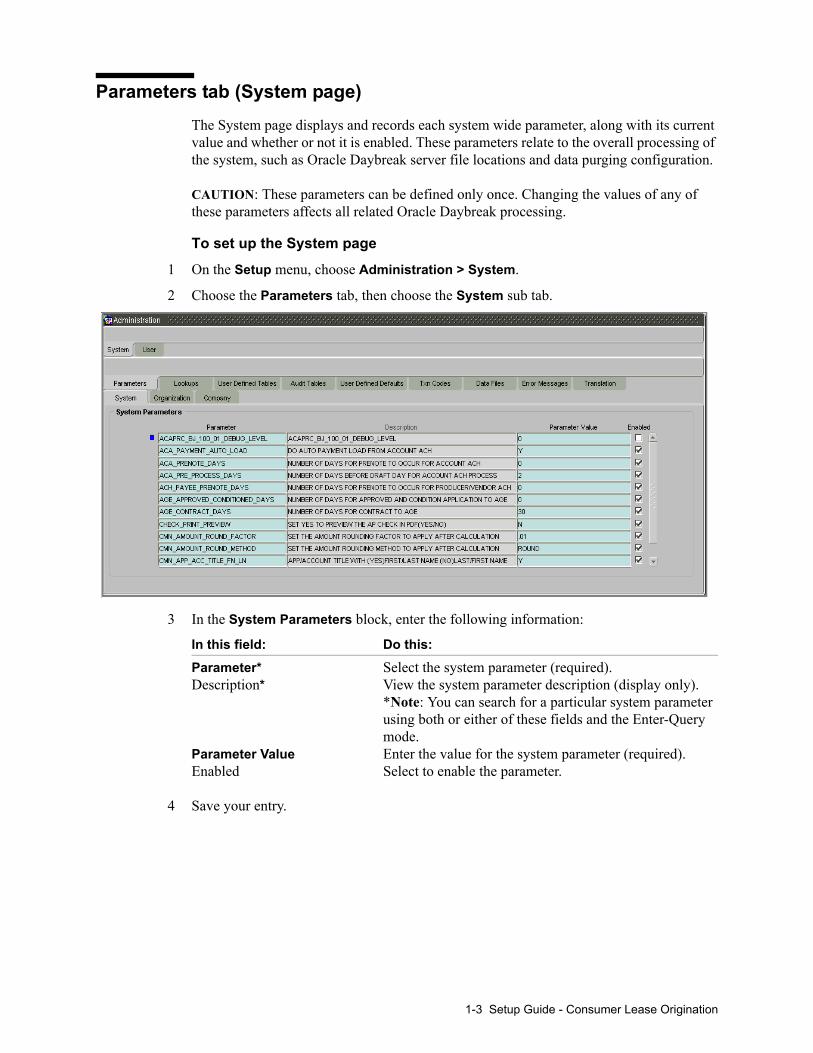
Parameters tab (System page)The System page displays and records each system wide parameter, along with its current value and whether or not it is enabled. These parameters relate to the overall processing of the system, such as Oracle Daybreak server file locations and data purging configuration.
CAUTION: These parameters can be defined only once. Changing the values of any of these parameters affects all related Oracle Daybreak processing.
To set up the System page
1 On the Setup menu, choose Administration > System.
2 Choose the Parameters tab, then choose the System sub tab.
3 In the System Parameters block, enter the following information:
In this field: Do this:
Parameter* Select the system parameter (required).Description* View the system parameter description (display only).
*Note: You can search for a particular system parameter using both or either of these fields and the Enter-Query mode.
Parameter Value Enter the value for the system parameter (required).Enabled Select to enable the parameter.
4 Save your entry.
1-3 Setup Guide - Consumer Lease Origination
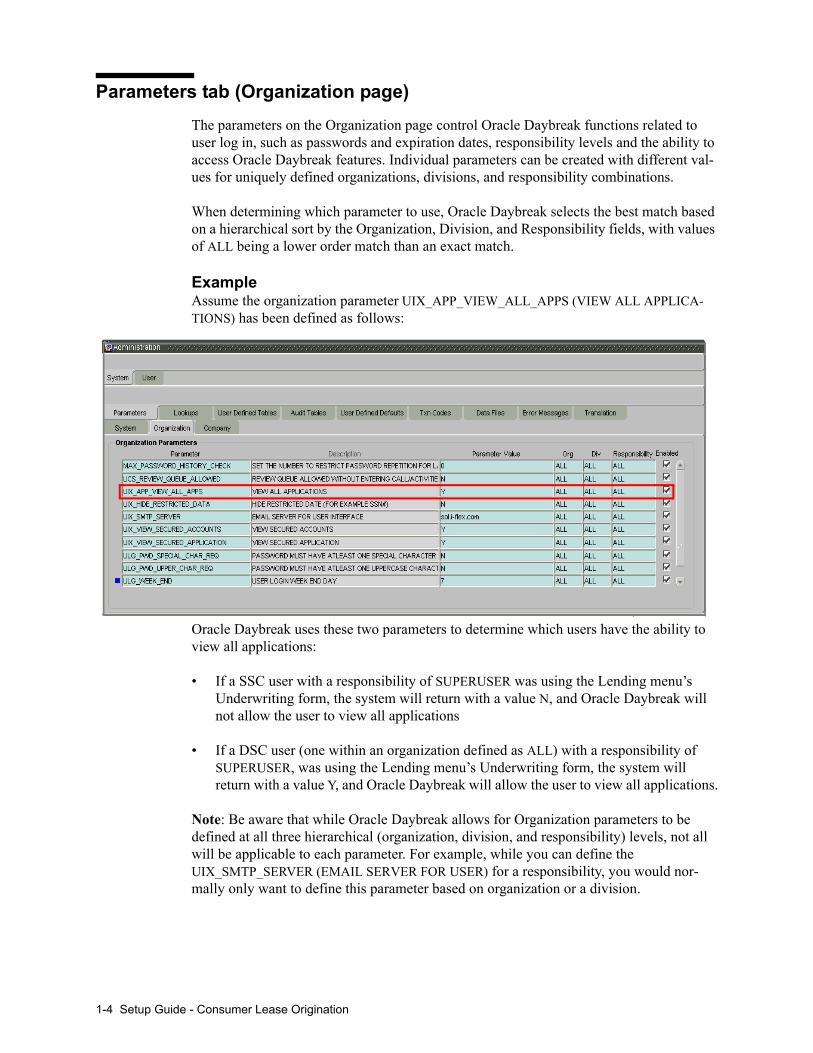
Parameters tab (Organization page)The parameters on the Organization page control Oracle Daybreak functions related to user log in, such as passwords and expiration dates, responsibility levels and the ability to access Oracle Daybreak features. Individual parameters can be created with different val-ues for uniquely defined organizations, divisions, and responsibility combinations.
When determining which parameter to use, Oracle Daybreak selects the best match based on a hierarchical sort by the Organization, Division, and Responsibility fields, with values of ALL being a lower order match than an exact match.
ExampleAssume the organization parameter UIX_APP_VIEW_ALL_APPS (VIEW ALL APPLICA-TIONS) has been defined as follows:
Oracle Daybreak uses these two parameters to determine which users have the ability to view all applications:
• If a SSC user with a responsibility of SUPERUSER was using the Lending menu’s Underwriting form, the system will return with a value N, and Oracle Daybreak will not allow the user to view all applications
• If a DSC user (one within an organization defined as ALL) with a responsibility of SUPERUSER, was using the Lending menu’s Underwriting form, the system will return with a value Y, and Oracle Daybreak will allow the user to view all applications.
Note: Be aware that while Oracle Daybreak allows for Organization parameters to be defined at all three hierarchical (organization, division, and responsibility) levels, not all will be applicable to each parameter. For example, while you can define the UIX_SMTP_SERVER (EMAIL SERVER FOR USER) for a responsibility, you would nor-mally only want to define this parameter based on organization or a division.
1-4 Setup Guide - Consumer Lease Origination

To set up the Organization page
1 On the Setup menu, choose Administration > System.
2 Choose the Parameters tab, then choose the Organization sub tab.
3 In the Organization Parameters block, enter the following information:
In this field: Do this:
Parameter* Select the system parameter (required).Description* View system parameter description (display only).
*Note: You can search for a particular organization parameter using both or either of these fields and the Enter-Query mode.
Parameter Value Enter the value for the system parameter (required).Org Select the organization for which the parameter will be
valid (required).Div Select the department for which the parameter will be
valid (required).Responsibility Select the responsibility for which the parameter will be
valid (required).
IMPORTANT: In selecting which organization parameter to use, Oracle Daybreak searches for a best match using the following attributes:
1 Organization2 Division3 Responsibility
For this reason, i-flex solutions recommends creating one version of each organization parameter where ALL is these fields.
Enabled Select to enable the parameter.
4 Save your entry.
1-5 Setup Guide - Consumer Lease Origination

Parameters tab (Company page)The parameters on the Company page control Oracle Daybreak processes associated with functions that may vary for different companies or branches. These parameters address credit scoring, credit bureau interfaces, fax services, and fax generation. Individual param-eters may be set up with different values for uniquely defined company and branch combi-nations.
When these parameters values are requested by the system, Oracle Daybreak responds with the “best” match based on a hierarchical sort ordered on company and branch fields, with values of ALL being a lower order match than an exact match.
ExampleAssume the company parameter UIX_RUN_AAI_ACT (ONLINE ACCOUNT CREATION AND ACTIVATION) has been defined as:
Oracle Daybreak uses these two parameters to determine whether to create and activate an account online.
• When processing items for the company SSFC, Oracle Daybreak will return a value N and not create and activate an account online.
• When processing items for the company DCC, a company within the value ALL, Ora-cle Daybreak will return with a value Y and create and activate an account online.
1-6 Setup Guide - Consumer Lease Origination

To set up the Company page
1 On the Setup menu, choose Administration > System.
2 Choose the Parameters tab, then choose the Company sub tab.
3 In the Company Parameters block, enter the following information:
In this field: Do this:
Parameter* Select the system parameter (required).Description* View the system parameter description (display only).
*Note: You can search for a particular company parame-ter using both or either of these fields and the Enter-Query mode.
Parameter Value Enter the value for the system parameter (required).Company Select the portfolio company for which the parameter
will be valid (required).Branch Select the portfolio branch for which the parameter will
be valid (required).
IMPORTANT: In selecting which company parameter to use, Oracle Daybreak searches for a best match using the following attributes:
1 Company2 Branch
For this reason, i-flex solutions recommends creating one version of each company parameter where ALL is the value in these fields.
Enabled Select to enable the parameter.
4 Save your entry.
1-7 Setup Guide - Consumer Lease Origination

Lookups tab (Lookups page)The Lookups page defines the contents in many of the Lists of Values (LOV) dialog boxes used throughout Oracle Daybreak. Fields that make use of a List of Values will only accept entries that are stored on this page.
Note: Data-related List of Value dialog boxes (for example, LOVs containing account numbers or vendor numbers) do not use the Lookups page. If a field has a LOV with a lookup file attached to it, Oracle Daybreak displays the file name in a yellow hint box when you position the mouse cursor over the field. In the example below, the lookup file for the Class field is APL_CUS_CLASS_TYPE_CD.
Please refer to the Excel file Appendix_lookup for the definition and function of individ-ual lookup types.
The Lookups page contains two blocks: Lookup Types and Lookup Codes. Lookup types and codes can be system-defined or user-defined. The lookup types describe the function of the related lookup codes.
For system-defined lookup types, only the Description field may be changed.
1-8 Setup Guide - Consumer Lease Origination

A system-defined lookup type (Lookup Type block, System Defined Yes) is one that is critical to Oracle Daybreak and can not be changed. However, you can still modify the lookup type description and the lookup code description on the Lookups page.
A user-defined lookup type (Lookup Type block, System Defined No) is one that can be modified, depending on a user's business needs. You cannot modify the lookup type, lookup code, and system indicator. If a lookup type is user-defined, the lookup code belonging to that lookup type can either be system-defined or user-defined.
A system-defined lookup code (Lookup Code block, System Defined Yes) is one on which Oracle Daybreak processing is dependent. Without this lookup code, the process produces incorrect results or fails.
A user-defined lookup code (Lookup Code block, System Defined No) is one that can be defined or altered by a user.
WARNING: System-defined lookup types are required by Oracle Daybreak. The related lookup codes will also be system defined. If you update and save a system-defined lookup type as a user-defined-lookup type (that is, change the System Defined button from Yes to a No in the Lookup Type block), Oracle Daybreak will not allow you to change the lookup type back to system-defined in the future.
Note: Lookup codes cannot be deleted, as they may have been used in the past, and the display and processing of that data is still dependent on the existing setup.
Typically, the Oracle Daybreak Administrator would modify the descriptions of lookup codes and add new lookup codes to the existing lookup types as needed.
1-9 Setup Guide - Consumer Lease Origination

To set up the Lookups page
1 On the Setup menu, choose Administration > System.
2 Choose the Lookups tab.
3 In the Lookup Types block, enter the following information:
In this field: Do this:
Lookup Type Enter the lookup type (required).Description Enter the description for the lookup type (required).System Defined? Yes No Select “Yes” if the lookup type is system defined.Enabled Select to enable the lookup type.
4 In the Lookup Code block, enter the individual values that a field or process using the related lookup type may have.
In this field: Do this:
Lookup Code Enter the lookup code. These are solely dependent on the function of the Lookup Type (required).
Description Enter the lookup code description. This may be changed as required by your business (required).
Sort Enter the sort order for the lookup code. This determines the order these lookup codes are displayed or processed. (required).
Sub Code Enter the sub code for the lookup code (optional).System Defined? Yes No If Yes is selected, the lookup type is system defined. Sys-
tem defined lookup codes cannot be modified, other than to change the Description or Sort fields. If No is selected, the lookup type is not system defined and the code can be be modified.
Enabled Select to enable the lookup code.
5 Save your entry.
1-10 Setup Guide - Consumer Lease Origination

User Defined Tables tab (User Defined Tables page)The User Defined Tables page allows you to maintain user-defined tables, such as the data attributes Oracle Daybreak uses on its Search pages.
To set up a user-defined table, you must:
1. Define the fields on the table.
2. Join the related tables.
3. Assign the table a lookup type. You can create tables for different product, funding, and collateral types.
1-11 Setup Guide - Consumer Lease Origination

After the creating the user-defined tables, Oracle Daybreak sorts the attributes to make using the system easier. These details are used with different functions of Oracle Day-break, including:
• Searching of applications• Tracking of follow-up items• Creating details in bankruptcy, foreclosure/repossession, and deficiency.
Note: Many of these tables, (ASSET TRACKING ATTRIBUTES for example) may be con-figured during the initial setup of the application to provide for your specific business needs. Others, such as APPLICATION SEARCH, may be changed whenever your business needs change. Still others should not be changed without consulting i-flex solutions, as changing them would require changes to existing code for the expected results to be implemented. As a rule of thumb, it’s better to add or disable information on the User Defined Tables page than to edit existing entries.
To set up the User Defined Tables page
1 On the Setup menu, choose Administration > System.
2 Choose the User Defined Tables tab.
3 In the User Defined Tables block, enter the following information:
In this field: Do this:
Table Enter the user-defined table name (required).User table Type Select the user-defined table type. This determines where
and how the related data is being used (required).Description Enter the description for user-defined table (required).View Name Enter the view name. (Consult your implementation
coordinator as to use) (required).Product Type Select the product for the user-defined table (required).SQL Statement Enter the SQL version of the statement (required).Funding Type Select the funding type associated with the user-defined
table (required).
1-12 Setup Guide - Consumer Lease Origination

Collateral Type Select the collateral type associated with the user-defined table (required).
Sort Enter the sort order for the user-defined table relative to other tables of the same type (required).
System Defined? Yes No If Yes is selected, the entry is system defined. System defined entries cannot be modified. If No is selected, the entry is not system defined and it can be modified.
Enabled Select to enable the user-defined table (optional).
4 In the User Defined Table Attributes block, enter the following information:
In this field: Do this:
Attribute Enter the user-defined table attribute (required).Description Enter the description for the user-defined table attribute
(required).Sub Attribute Enter the sub-attribute for the attribute (sub attributes are
used to associate related attributes) (optional).Data Type Select the data type for the attribute (CHARACTER,
NUMBER, or DATE) (required).Length Enter the maximum length of the user-defined table
attribute (required).LOV Type Select the list of value (LOV) type for the user-defined
table attribute (optional).LOV Validation Ind Select to enable LOV validation of the user-defined table
attribute (This indicates whether the data must come from the LOV) (optional).
Lookup Type Enter the lookup type of the LOV associated with the user-defined table attribute (optional).
Sort Enter the sort order of the user-defined table attribute. If the sort order is changed it will only affect new instances of the User Defined Table, and will not affect existing data (required).
System Defined? Yes No If Yes is selected, the entry is system defined. System defined entries cannot be modified. If No is selected, the entry is not system defined and it can be modified.
Enabled Select to enable the user-defined table attribute so the attribute will be considered when creating new instances of the User Defined Table (optional).
Default Value Enter the default value for the user-defined table attribute (optional).
Operator Select the operator for the user-defined table attribute (required).
1-13 Setup Guide - Consumer Lease Origination

Audit Tables tab (Audits page)Oracle Daybreak allows you to track changes in the database during lease origination on the Underwriting and Funding forms. This includes the tracking of:
• Application status history• Audit history of specified fields.
The Audit Tables tab (Audit page) records the tables and columns requiring an audit. Ora-cle Daybreak stores the following details for the fields you want to audit for changes:
• Current value in field• New value field • Oracle Daybreak user who changed the field’s content• Date and time the change was made
Based on the Audits page setup, the changes can be tracked on the Verification (9) master tab’s Audits page on the Underwriting and Funding form.
Oracle Daybreak automatically generates scripts when you choose Generate on the Audit Tables tab (Audit page). This needs to be done only once at the time of setup. Once you determine which tables and columns to audit, choosing Generate creates database triggers, which when applied to the database will capture the data. The data is available on the lease origination forms.
To set up the Audit Table page
1 On the Setup menu, choose Administration > System.
2 Choose the Audit Tables tab.
1-14 Setup Guide - Consumer Lease Origination

3 In the Audit Tables block, select the auditable table from the following information:
In this field: Do this:
Table View the table name on which audit trigger needs to be created (Oracle Daybreak table being audited) (display only).
Description Enter the table description (required).Primary Key 1 View the table primary key column 1 (These columns
define how to access the data in the table) (display only).Primary Key 2 View the table primary key column 2 (display only).Primary Key 3 View the table primary key column 3 (display only).Primary Key 4 View the table primary key column 4 (display only).Display Description Enter the column description to be displayed on audit
screen (required).Display Column Enter the table column to be displayed on audit screen
(required).Enabled Select to enabled the audit table so it will be considered
when generating the database triggers.
4 In the Audit Columns block, select the auditable column from the following information:
In this field: Do this:
Column Enter the column name on which audit needs to be cre-ated (Column in the table being audited) (required).
Description Enter the column description (description of the data con-tained in the column) (required).
Data Type View the data type for the attribute (display only).Enabled Select to enable the audit column.
5 Choose Generate to create auditing trigger scripts.
6 Save your entry.
1-15 Setup Guide - Consumer Lease Origination

User Defined Defaults tab (Applications Defaults page)The Applications Defaults page allows you to set up default values to automatically popu-late in frequently used fields on the Application Entry form. This streamlines the data entry process when entering an application.
1-16 Setup Guide - Consumer Lease Origination

To set up the Application Defaults page
1 On the Setup menu, choose Administration > System.
2 Choose the User Defined Defaults tab.
3 In the Organization block, enter the following information:
In this field: Do this:
Org Select the organization for which these defaults are appli-cable (required).
Division Select the division for which these defaults are applicable (required).
4 In the Applications Defaults block, enter the following information:
In this field: Do this:
Company Select the company (optional).Branch Select the branch (optional).Priority Select the priority (optional).Channel Select the channel (optional).Producer Type Select the producer type (optional).Purpose Select the purpose (optional).Product Select the product (optional).
5 In the Applicant Defaults block, enter the following information:
In this field: Do this:
Relation Type Select the applicant relation type (optional).Gender Select the applicant gender (optional).Marital Status Select the applicant marital status (optional).Language Select the applicant language (optional).Ecoa Select the applicant ecoa (optional).
1-17 Setup Guide - Consumer Lease Origination

Class Type Select the applicant class type (optional).Race National Origin Select the applicant race or national origin (optional).Privacy Opt-Out Select the check box to indicate that the applicant has
elected to refrain from the non-public sharing of informa-tion (optional).
6 In the Address Defaults block, enter the following information:
In this field: Do this:
Address Type Select the address type (optional).Postal Type Select the postal address type (optional).Street Pre Type Select the street pre type (optional).Street Type Select the street type (optional).Street Post Type Select the street post type (optional).Country Select the country (optional).Stated Frequency Select the stated frequency (optional).Actual Frequency Select the actual frequency (optional).Ownership Select the ownership type (optional).
7 In the Employment Defaults block, enter the following information:
In this field: Do this:
Type Select the employment type (optional).Occupation Select the occupation (optional).Country Select the country (optional).Stated Frequency Select the stated frequency (optional).Actual Frequency Select the actual frequency (optional).
8 In the Income Defaults block, enter the following information:
In this field: Do this:
Income Type Select the income type (optional).Frequency Select the frequency (optional).
9 In the Liability Defaults block, enter the following information:
In this field: Do this:
Liability Type Select the liability type (optional).Frequency Select the frequency (optional).
10 In the Asset Defaults block, enter the following information:
In this field: Do this:
Status Select the asset status (optional).Condition Select the asset condition (optional).Country Select the country (optional).
11 In the Vehicle Defaults block, enter the following information:
In this field: Do this:
Asset Type Select asset type (optional).Sub Type Select asset sub type (optional).Class Select the asset class (optional).Valuation Source Select the asset valuation source (optional).
1-18 Setup Guide - Consumer Lease Origination

12 In the Home Defaults block, enter the following information:
In this field: Do this:
Asset Type Select asset type (optional).Sub Type Select asset sub type (optional).Class Select the asset class (optional).Occupancy Select the occupancy type (optional).Valuation Source Select the asset valuation source (optional).
13 In the Other Defaults block, enter the following information:
In this field: Do this:
Asset Type Select asset type (optional).Sub Type Select asset sub type (optional).Class Select the asset class (optional).Valuation Source Select the asset valuation source (optional).
14 In the Comment Defaults block, enter the following information:
In this field: Do this:
Comment Type Select the comment type (optional).Comment Sub Type Select the comment sub type (optional).
15 Save your entry.
1-19 Setup Guide - Consumer Lease Origination

Txn Codes tab (Txn Codes page)Oracle Daybreak uses transaction codes to define the actions and tasks it can perform; for example, activating an account, changing a due date, applying a late fee, and charging off an account. The Txn (Transaction) Codes page catalogs and defines these core Oracle Daybreak actions.
Oracle Daybreak organizes transaction codes in “super groups.” All transaction codes within a particular super group are processed in a similar manner. The transaction super groups in Oracle Daybreak are as follows:
Super Group Type: Description:TAM AMORTIZATION TXN
These transaction codes affect the amortized balances of the accounts in Oracle Daybreak.
PRO PRODUCER MONETARY TXN These transaction codes relate to the monetary transac-tions that apply to the Oracle Daybreak producers (or “dealers”).
ITM ITEMIZATION TXNThese transaction codes affect the itemization of applica-tions and accounts within Oracle Daybreak.
FUN FUNDING TXNThese transaction codes affect the funding of applications and accounts within Oracle Daybreak.
MEN MENU ITEMThese transaction codes control a user’s access to Oracle Daybreak menus, forms, and first level tabs.
SEC SECURITIZATION TXN These transaction codes affect the pools of securitized loans within a pool of securitized loans.
COR CORRESPONDENCES These transaction codes relate to Oracle Daybreak corre-spondences.
LUL SETUP LOCK/UNLOCK These transaction codes limit a user’s ability to change the existing setup data, even if they are allowed access to the form, by restricting access to the Lock/Unlock Record icon on the Oracle Daybreak tool bar.
TEM ESCROW MONETARY TRANSACTIONS These transaction codes affect the monetary value of escrow accounts in Oracle Daybreak; for example, dis-bursing escrow to a customer, disbursing escrow to insur-ance, and receiving payment.
1-20 Setup Guide - Consumer Lease Origination

TEN ESCROW NON MONETARY TRANSACTIONS These transaction codes do not have a direct affect on the monetary value of an escrow account, but are used in maintaining account information, such as changing insur-ance maturity date and adding new escrow tax details.
FST FEE ASSESSMENTS These transactions codes determine if fees are to be applied, such as nonsufficient funds fees or membership fees.
TES ESCROW ANALYSIS AND DISBURSEMENTSThese transaction codes allow for reviewing and approv-ing escrow analysis, stopping an escrow override, and posting escrow disbursement.
The Transaction Code block records the following about each transaction in a super group.
• Is the transaction monetary or nonmonetary?• Does Oracle Daybreak complete the transaction in real time or later as a batch pro-
cess?• Does Oracle Daybreak perform this transaction automatically or can a user complete
the transaction manually (Is the transaction available on the Maintenance (3) master tab on the Customer Service form?)
• Is the transaction to appear on customer statements?• Does the transaction effect the general ledger?• Is the transaction in use (enabled)?
Three sub pages, Parameters, Access Grid, and Products, record any additional informa-tion required to perform a transaction, the user types that can perform the transaction, and the product type to which the transaction codes apply.
1-21 Setup Guide - Consumer Lease Origination

To set up the Txn Codes page
1 On the Setup menu, choose Administration > System.
2 Choose the Txn Codes tab.
3 In the Transaction Super Group block, select the Super Group.
4 In the Transaction Codes block, enter the following information:
In this field: Do this:
Txn Code Enter the transaction code (required).Description Enter the description for the transaction (required).Group Select the transaction group (the group within the Trans-
action Super Group that the transaction code belongs to) (required).
Txn/Bal Type Select the transaction / balance type affected by the Transaction (required).
Statement Txn Type Select the statement transaction type (how the transaction should appear on the customer statement) (required).
Action Select the action type code for the transaction (what action will take place when the transaction occurs) (required).
5 If the transaction is a monetary transaction, select Monetary. If the transaction is a non-monetary transaction, clear this box.
6 If the transaction is to be performed in a batch process, select Batch.
7 If the transaction is a manual transaction (available through the Maintenance tab), select Manual. If you define a transaction as manual, i-flex solutions recommends that the trans-action that reverses it also be defined as manual.
8 If the transaction is to be printed on customer statements, select Stmt Print.
9 If the transaction is a general ledger transaction, select GL.
1-22 Setup Guide - Consumer Lease Origination

10 If the System Defined? Yes is selected, the entry is system defined. System defined entries cannot be modified. If the System Defined? No is selected, the entry is not system defined and it can be modified.
11 Select Enabled to enable the transaction.
12 Save your entry.
Txn Codes sub pagesThe Txn Codes page contains three sub pages: Parameters sub page, Access Grid sub page, and Products sub page.
IMPORTANT: Please contact your Implementation Manager before making any changes in these sub pages.
Parameters sub pageThe Parameters sub page allows you to define the parameter information for the associated transaction. The Parameters sub page applies exclusively to these super groups:
• SECURITIZATION TXN • ESCROW MONETARY TRANSACTIONS • ESCROW NON MONETARY TRANSACTIONS
(For manual transactions, these are the parameters loaded when you choose Load Param-eters on the Maintenance page on the Customer Service form.)
CAUTION: Please treat the Parameters sub page as containing view only information. This is very sensitive data and should not be changed without first consulting i-flex solu-tions.
1-23 Setup Guide - Consumer Lease Origination
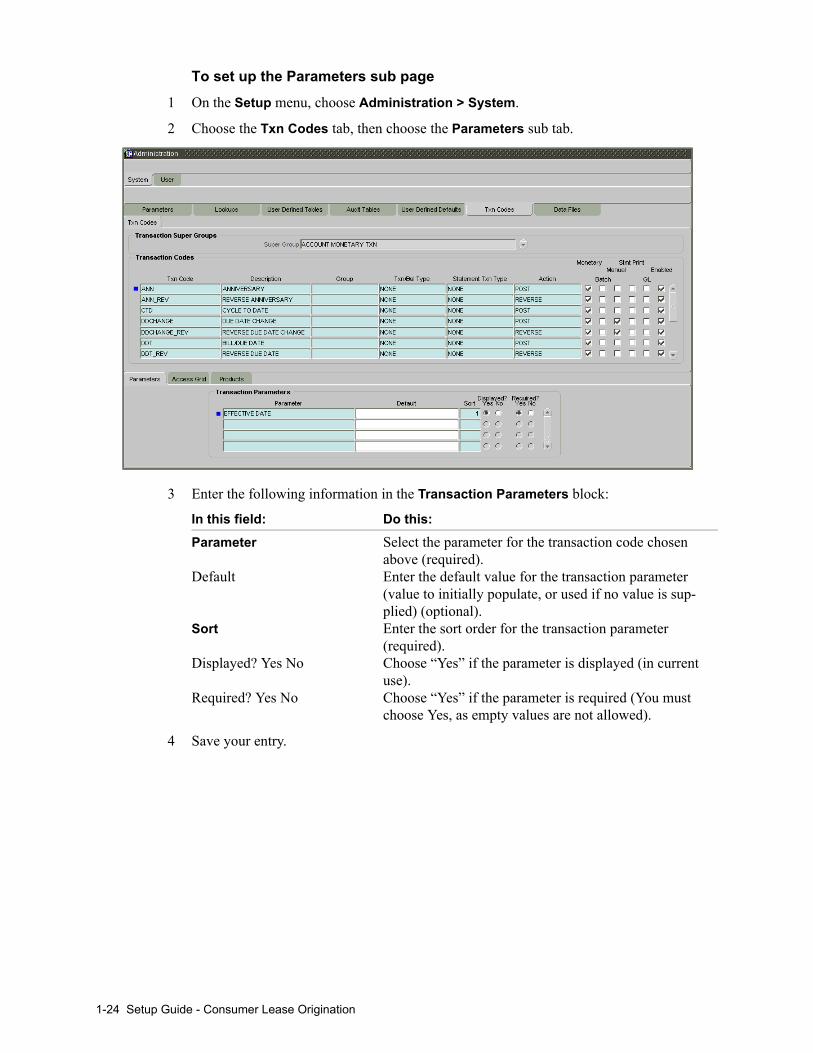
To set up the Parameters sub page
1 On the Setup menu, choose Administration > System.
2 Choose the Txn Codes tab, then choose the Parameters sub tab.
3 Enter the following information in the Transaction Parameters block:
In this field: Do this:
Parameter Select the parameter for the transaction code chosen above (required).
Default Enter the default value for the transaction parameter (value to initially populate, or used if no value is sup-plied) (optional).
Sort Enter the sort order for the transaction parameter (required).
Displayed? Yes No Choose “Yes” if the parameter is displayed (in current use).
Required? Yes No Choose “Yes” if the parameter is required (You must choose Yes, as empty values are not allowed).
4 Save your entry.
1-24 Setup Guide - Consumer Lease Origination

Access Grid sub pageThe Access Grid sub page allows you to control access to each transaction according to user responsibility, account status, and account condition. It allows the administrator to control when these transactions may be conducted. Normally, you would create or modify the access based on either the user responsibility or account condition. Account status access is left unchanged.
To set up the Access Grid sub page
1 On the Setup menu, choose Administration > System.
2 Choose the Txn Codes tab, then choose the Access Grid sub tab.
3 Enter the following information in the Transaction User Access Definition block:
In this field: Do this:
Access Type Select the access grid function type (RESPONSIBILITY, ACCOUNT CONDITION, or ACCOUNT STATUS) that is being used to control the creation of the associated trans-action (required).
Access Value Select the access function grid value (based on a lookup associated with the Access Type. Multiple entries for each access type may be created as long as each has a dif-ferent access value) (required).
Allowed? Yes No Choose “Yes” if the access is allowed (indicates whether the current Access Type / Access Value may create the associated transaction).
System Defined? Yes No If Yes is selected, the entry is system defined. System defined entries cannot be modified. If No is selected, the entry is not system defined and it can be modified.
4 Save your entry.
1-25 Setup Guide - Consumer Lease Origination

Products sub pageThe Products sub page allows you to define the products to which the transaction codes apply. It allows the administrator to control if the associated transaction code will be avail-able for use for specific product types and or funding types.
Normally, an Access Value of ALL is defined for one or more Access Types with a given Allowed (Yes or No) value. Additional Access Values are then defined for the same Access Types with the opposite Allowed (Yes or No) value. This controls access to the associated transaction.
To set up the Products sub page
1 On the Setup menu, choose Administration > System.
2 Choose the Txn Codes tab, then choose the Products sub tab.
3 In the Transaction Product Definition block, enter the following information.
In this field: Do this:
Product Type Select the product type associated with the transaction code chosen above (LEASE).
Funding Type Select the funding type associated with the transaction code chosen above (OPEN ENDED, CLOSE ENDED or ALL).
Allowed? Yes No Choose “Yes” if the transaction is allowed (indicates whether the current Access Type / Access Value may cre-ate the associated transaction).
4 Save your entry.
1-26 Setup Guide - Consumer Lease Origination

24 x 7 AccessibilityOracle Daybreak allows continuous access to the Oracle Daybreak system, 24-hours-a-day, 7-days-a-week (24 x 7). You can continue working in Oracle Daybreak and posting most transactions during batch processing. When you post a transaction on the Customer Service form’s Maintenance page and the transaction posting is deferred or cannot be posted at the present time, “SYSTEM UNDER MAINTENANCE. TRANSACTION POSTING DEFERRED” appears in the Results block.
If transaction posting is deferred, Oracle Daybreak automatically posts the transactions once it completes batch processing. Otherwise, Oracle Daybreak displays a message advising to post the transaction later.
24 x 7 accessibility is controlled by the following system parameter on the Administration form’s System page:
Parameter: Description:CMN_SYSTEM_UNDER_MAINTENANCE SYSTEM UNDER MAINTENANCE
Oracle Daybreak uses two batch job sets to handle end of day (EOD) and beginning of day (BOD) processing.
1-27 Setup Guide - Consumer Lease Origination

SET-EOD: This is the first job to run in the nightly batch jobs at the end of the day. It marks Oracle Daybreak as being in “maintenance” mode, indicating that batch processing has started. Any transaction posted after the SET-EOD batch job starts will be either deferred or not allowed to be posted at the present time.
SET-BOD: This will be the fist batch job to run at the beginning of next day. It marks Ora-cle Daybreak as being “available,” indicating that batch processing has completed. Oracle Daybreak will then return to all held transactions and post them in the chronological order in which they were entered.
1-28 Setup Guide - Consumer Lease Origination

Data Files tab (File Definitions page)The File Definitions page organizes information pertaining to the various output data files that Oracle Daybreak can generate. Oracle Daybreak uses the File Definition page to out-line the file layouts of each data file produced within the system, including the length and data type of each column name.
These files are typically produced during the nightly process.
One major advantage for the system-defined data files is the format mask of each column name within each data file. A format mask is like a stencil that forces data input to be of the same format before accepting the data. The list of the data files is described below:
File Name: Description:CUSTOMER_ACH CUSTOMER ACHPRODUCER_ACH PRODUCER ACHVENDOR_ACH VENDOR ACHCUSTOMER_STATEMENT CUSTOMER STATEMENTPRODUCER_STATEMENT PRODUCER STATEMENTFORM_1098 IRS INTEREST REPORTING FORM 1098FORM_HMDA HMDAFORM_1099A IRS ACQUISITION OR ABANDONMENT OF SECURED
PROPERTY FORM 1099 AFORM_1099C IRS CANCELLATION OF DEBT FORM 1099 CCOUPON_BOOK COUPON BOOK ORDERPAYEE_ACH PAYEE ACH
You can change the order in which the fields are displayed in the file.
Note: Any addition or removal of a field or change in the data type length will require i-flex solutions involvement.
To set up the File Definitions page
1 On the Setup menu, choose Administration > System.
2 Choose the Data Files tab.
The Data File Definitions block defines specific data files. Each is associated with a spe-cific Output Data Definition (ODD) batch job that gathers the data the file will contain. While new Data File Definitions may be created they will have no use unless a batch job is also created to populate the data.
1-29 Setup Guide - Consumer Lease Origination

3 Complete the Data File Definitions block with the following information:
In this field: Do this:
Name Enter data file type (name of data file definition) (required).
Description Enter data file description (required).File Name Enter data file name. Prefix used for files generated for
this Data File. This is the only field in the Data File Defi-nitions block that can or should be modified by your Administrator. The generated file name will be in the form of <FILE NAME>_<COMPANY ID>_<BRANCH ID>_<MMDDYYYY>_<PROCESS ID>.DAT. The inclu-sion of _<COMPANY ID> and _<BRANCH ID> depends entirely on the associated batch process (required).
Directory Path Enter the location of the data file (required).System Defined? Yes No If Yes is selected, the entry is system defined. System
defined entries cannot be modified. If No is selected, the entry is not system defined and it can be modified.
Enabled Select to enable the data file definition.
Each Data File Definition is made up of one or more Record Definitions. These define organization of the data. The associated batch file determines how these records are used. The order in which the data is populated determines the order in which those records will appear in the output file. This is generally related to the order the records appear in the Data File Definition.
4 Complete the Record Definitions block with the following information:
In this field: Do this:
Record Type Enter the type of record being defined (required).Description Enter record description (required).
1-30 Setup Guide - Consumer Lease Origination

Record Format Select the format of output data (FIXED, VARIABLE) (required).
Delimiter Enter the delimiter (column separator used with VARI-ABLE format) (required).
Terminator Select the record terminator code (how the end of each record is indicated within the file -- CARRIAGE RETURN, LINEFEED, or CARRIAGE RETURN AND LINEFEED) (required).
Each Record Definition is made up of one or more Column Definitions. These define the output the output of the data. Much of this data is informational; it indicates what data is being provided by the associated batch job. Unless otherwise noted, the data should not be changed without changing the associated batch job.
5 Complete the Column Definitions block with the following information:
In this field: Do this:
Seq Enter the sequence of how the output data will process the columns (required).
Column Name Enter name/description of the column name (informa-tional only) (display only).
Data Type Select the data type. This describes the type of data the column is expected to contain (CHARACTER, DATE, or NUMBER). This effects how the ODD process handles the data, and should not be changed (display only).
Format Mask Select the format mask for the column. For DATE or NUMBER columns, this field defines the output format of the data. For example, Date fields may be entered using the MM/DD/YYYY format, and Number fields may be entered as decimal numbers with varying degrees of pre-cision. Other formats for each data type are available (required).
Length Enter the column length. The number of characters of the data contained in the output data to be included in the output file. Each output data details column may contain up to 240 characters of data. If the output data details col-umn contains more data than the length value the data will be truncated. For VARIABLE records the length should be set to “-1” or a Delimited file will be created with FIXED LENGTH columns (required).
Data Column Enter the data column sequence. This is the column that will be used to select the data that is being output. This should not be changed (required).
Output Column Enter the output column sequence. This is the column that will appear in Output File. The Output Data Dump process allows for the output of 250 columns of data per record. No output column should be repeated in the setup for a record (required).
6 Save your entry.
1-31 Setup Guide - Consumer Lease Origination

Error Messages tab (Error Messages page)With the Error Messages tab’s Error Messages page, you can translate or modify the text of error messages. Oracle Daybreak displays all messages as they appear to Oracle Day-break users in the Error Message block’s Message field.
New messages created with the Error Messages page can then be translated with the Translation tab’s Message Translation page.
To set up the Error Messages page
1 On the Setup menu, choose Administration > System.
2 Choose the Error Messages tab.
3 In the Error Type block, use the Error Type field to select the error type. These are the cat-egories of error messages available for creating or editing.
The error messages associated with the error type you selected appear in the Error Mes-sage block.
4 In the Error Message block, select the message you want to modify or insert a new record to create a new error message.
5 Edit or complete the record in the Error Message block the following information:
In this field: Do this:
Region Enter the region code (required).Country Enter the country code (required).Customer Enter the customer code (required).Engine Enter the engine code (required).Error Code Enter the error code (required).
1-32 Setup Guide - Consumer Lease Origination

System Defined (Yes/No) Displays whether or not the record is system defined. Message Enter the error message (required).Enabled Select to enable the data error message.
6 Save your entry.
Translation tab (Setup Translation page)With the Translation tab’s Setup Translation page, you can translate the contents of a pre-defined list of setup description fields into a different language.
After you translate an entry in the Translation Data block, Oracle Daybreak adds the new data to the setup form.
To set up the Setup Translation page
1 On the Setup menu, choose Administration > System.
2 Choose the Translation tab, then choose the Setup Translation tab.
3 In the Language block, select the language for which the translation needs to be done.
Note: For more information, see Language setup at the end of this chapter.
4 In the Source Type block’s Source Type field, select the source (or location in Oracle Daybreak) of the item you want to translate.
1-33 Setup Guide - Consumer Lease Origination

5 In the View Translation block, choose:
• All to view all the records (both translated and un-translated) in the Translation Data block-or-
• Translated to view all the translated records in the Translation Data block.-or-
• Un Translated to view all the un-translated records in the Translation Data block.
6 Choose Populate Details in the Source Type block and Oracle Daybreaks loads the setup data descriptions in the Translation Data block for the source type in the Source Type block.-or-Choose Populate All in the Language block and Oracle Daybreak loads the setup data description in the Translation Data block for all setup items for translation.
Note: If new records are added to setup (for example, new pricing strings added to the Product Management form’s Pricing page), the next time you choose Populate Details in the Source Type block, the new records (in this case, the new pricing strings) appear in the Translation Data block. These new entries have no impact on the previously translated data, they simply appear as additional entries available for translation.
The next time you choose Populate Details in the Source Type block, the new entry appears in the Translation Data block with no impact to the previously translated data.
If you are unsure as to which setup items have been updated since the last translation, choosing Populate All loads the additional data for all items with no impact to the previ-ously translated data for any of the entries.
7 To work with an individual record in the Translation Data block, choose the Lock/Unlock Record button in the Oracle Daybreak tool bar -or To work with multiple records in the Translation Data block, choose the Unlock All com-mand button.
When you choose Unlock All, Oracle Daybreak displays a Forms dialog box with the message “Changing setup may cause data inconsistency, Do you want to continue?” If you choose Yes, Oracle Daybreak allows you and changes the Unlock All button to the Lock All button.
8 In the Translation Data block, select the record you want to modify.
9 Edit the record in the Translation Data block with the following information:
In this field: Do this:
Key 1 View the first reference key value (display only).Key 2 View the second reference key value (display only).Key 3 View the third reference key value (display only).Key 4 View the fourth reference key value (display only).Key 5 View the fifth reference key value (display only).Key 6 View the sixth reference key value (display only).System Defined (Yes/No) Displays whether or not the record is system defined. Enabled If selected, indicates the record is active.Desc 1 (English) View the first English description (display only).Desc 2 (English) View the second English description (display only).Desc 3 (English) View the third English description (display only).
1-34 Setup Guide - Consumer Lease Origination

Desc 4 (English) View the fourth English description (display only).Translation Desc 1 Enter the first translated description (required).Translation Desc 2 Enter the second translated description (optional).Translation Desc 3 Enter the third translated description (optional).Translation Desc 4 Enter the fourth translated description (optional).
10 If you changed an individual record in the Translation Data block, choose the Lock/Unlock Record button in the Oracle Daybreak tool bar -or If you changed multiple records in the Translation Data block, choose the Lock All com-mand button.
11 Save your entry.
Translation tab (Message Translation page)With the Translation tab’s Message Translation page, you can translate the contents of a predefined list of error messages into a different language.
After you translate an entry in the Error Message block, Oracle Daybreak adds the new data to the error message.
To set up the Message Translation page
1 On the Setup menu, choose Administration > System.
2 Choose the Translation tab, then choose the Message Translation tab.
3 In the Language block, select the language for which the translation needs to be done.
Note: For more information, see Language setup at the end of this chapter.
1-35 Setup Guide - Consumer Lease Origination

4 In the Error Type block’s Error Type field, select the type of error message you want to translate.
5 In the View Translation block, choose:
• All to view all the records (both translated and un-translated) in the Error Message block-or-
• Translated to view all the translated records in the Error Message block.-or-
• Un Translated to view all the un-translated records in the Error Message block.
6 Choose Populate Details in the Error Type block and Oracle Daybreaks loads the error messages in the Error Message block for the selected error type in the Error Type block.-or-Choose Populate All in the Language block and Oracle Daybreak loads the error mes-sages in the Error Message block for all error types for translation.
Note: If new error messages are added to setup, the next time you choose Populate Details in the Error Type block, the new records appear in the Translation Data block. These new entries have no impact on the previously translated data, they simply appear as additional entries available for translation.
The next time you choose Populate Details in the Source Type block, the new entry appears in the Translation Data block with no impact to the previously translated data.
If you are unsure as to which error messages have been updated since the last translation, choosing Populate All loads the additional data for all items with no impact to the previ-ously translated data for any of the entries.
7 To work with an individual record in the Error Message block, choose the Lock/Unlock Record button in the Oracle Daybreak tool bar -or To work with multiple records in the Error Message block, choose the Unlock All com-mand button.
When you choose Unlock All, Oracle Daybreak displays a Forms dialog box with the message “Changing setup may cause data inconsistency, Do you want to continue?” If you choose Yes, Oracle Daybreak allows you and changes the Unlock All button to the Lock All button.
8 In the Error Message block, select the record you want to modify.
9 Edit the record in the Error Message block with the following information:
In this field: Do this:
Region View the region code (display only).Country View the country code (display only).Customer View the customer code (display only).Engine View the engine name (display only).Error Code View the error code (display only).System Defined (Yes/No) Displays whether or not the record is system defined. Enabled If selected, indicates the record is active.Message (English) View the error message (display only).Message (Translation) Enter the translated description (required).
1-36 Setup Guide - Consumer Lease Origination

10 If you changed an individual record in the Error Message block, choose the Lock/Unlock Record button in the Oracle Daybreak tool bar -or If you changed multiple records in the Error Message block, choose the Lock All com-mand button.
11 Save your entry.
Language setupOn the Administration form’s Lookups page, you can add other languages to the TRD_LANGUAGE_CD lookup type and perform translations for those languages.
However, translated data only appears in one language, which is defined by the User Lan-guage parameter. This parameter can be defined in a Oracle Daybreak configuration file, typically named DBKWEB.CFG, which defines the parameter as:
Parameter: otherparams=ORA_USER=<schema_name> USR_LANG=<native language>
Note: <native language> should match lookup codes in the TRD_LANGUAGE_CD lookup type on the Administration form’s Lookups page.
1-37 Setup Guide - Consumer Lease Origination

Oracle Daybreak supports the following pre-defined list of setup items for translation:
1. Asset Sub Types2. Asset Types3. Assignments4. Audit Table Columns5. Audit Tables6. Call Action Result Types7. Call Action Types8. Checklist Action Types9. Checklist Types10. Commission Plans11. Companies12. Company Branch Departments13. Company Branches14. Compensation Plans15. Credit Bureau Score Reasons16. Credit Models17. Credit Scoring Parameters18. Edits19. Escrow Disburse Rules20. Escrow Sub Types21. Flex Table Attributes22. Flex Tables23. GL Transaction Types24. GL Translators25. Job Sets26. Jobs27. Lookup Codes28. Lookup Types29. Portfolio Companies30. Portfolio Company Branches31. Producers32. Product Instruments33. Product Insurances34. Product Pricings35. Products36. Promotions37. Spreads38. Standard Correspondences39. Standard Document Definitions40. Standard Element Definitions41. Standard Function Definitions42. Transaction Codes43. Error Messages44 Org. Fees
1-38 Setup Guide - Consumer Lease Origination

1-39 Setup Guide - Consumer Lease Origination

CHAPTER 2 : ADMINISTRATION (USER) FORM
The Administration form’s User master tab and its pages contain setup data that defines your organization structure and its users. Information on the User master tab is more “data” related, whereas the information stored on the System master tab functions more like switches that control system behavior.
The Administration form’s User master tab contains the following tabs:
• Organization• Companies• Access• Users• Printers• Bank Details• Standard Payees• Check Details
2-1 Setup Guide - Consumer Lease Origination

Organization tab (Organization page)The Organization page records the operational hierarchy of your business in terms of peo-ple. It groups the human resources of your business in three categories: organization, divi-sion, and department. Oracle Daybreak uses this data to control who has access to which applications. (The Companies page allows you to set up where those applications are located.)
Please note that in completing the Organization page, there is can be only one active orga-nization, so use the Organization Definition block to define your organization at its highest level.
Divisions are groups within your organization that will have access to the same applica-tions. Larger organizations often define their divisions by region. Smaller organizations may define division as branch offices or even departments, and might only have one divi-sion defined.
Departments are smaller units within a division. They expand on who is in the correspond-ing Division Definition block. Oracle Daybreak uses this block, for example, when setting up the Services page on the Utility form (Monitor > System > Services) and the Printers page on the Administration form (Setup > Administration > User). At least one depart-ment must be defined for each division.
As an example of an organization setup, i-flex solutions Corp. might be defined as:
Organization: O-0001 ABC Corp. ABCC
Division: OD-001 Central Region C01
Department: ODD-01 Origination ORGDepartment: ODD-02 Funding FUNDepartment: ODD-03 Servicing SER
Division: OD-002 Eastern Region E01
Department: ODD-11 Servicing SERDepartment: ODD-12 Collection COL
Note: The Short Name field on the Organization page allows you to create the ID that Ora-cle Daybreak will use when referring to the organization, division, and department throughout the system.
2-2 Setup Guide - Consumer Lease Origination

To set up the Organization page
1 On the Setup menu, choose Administration > User.
2 Choose the Organization tab.
3 Enter the following information in the Organization Definition block. There can be only one active entry, so use this block to define your organization at its highest level.
In this field: Do this:
Organization Enter the organization ID. (The ID is the unique identifier used internally by Oracle Daybreak to represent your organization). Note: Do not edit this field (required).
Organization Name Enter the organization name (required).Short Name Enter the short name for the organization (Note: This is
the ID that appears throughout Oracle Daybreak to repre-sent this organization) (required).
Address Enter the address line 1 for the organization (required).Address 2 (unlabeled) Enter the address line 2 for the organization (optional).Zip Select the zip code where the organization is located
(required).City Enter the city where the organization is located (required)St Select the state where the organization is located
[STATE_CD] (required).Zip Extension (unlabeled) Enter the zip extension where the organization is located
(optional).Country Select the country where the organization is located
[COUNTRY_CD] (required).Phone Enter the primary phone number for the organization
(required).Ext Enter the phone extension for the primary phone number
(optional).
2-3 Setup Guide - Consumer Lease Origination

Fax Enter the primary fax number for the organization (required).
Phone Enter the alternate phone number for the organization (optional).
Ext Enter the phone extension for the alternate phone number (optional).
Fax Enter the alternate fax number for the organization (optional).
License Key Enter software license key (unique license key for Oracle Daybreak that determines the organization’s access to the system) (CAUTION: Do not touch!) (required).
4 Select Enabled to enable the organization. Note: Only one enabled organization is cur-rently allowed by Oracle Daybreak.
5 In the Division Definition block, record the groups within your organization that will have access to the same applications:
In this field: Do this:
Division Enter the division id. (The ID is the unique identifier used internally by Oracle Daybreak to represent the divi-sion within the organization). Note: Do not edit this field (required).
Division Name Enter the division name (required).Short Name Enter the short name for the division (Note: This is the
ID that appears throughout Oracle Daybreak to represent this division) (required)
Address Enter the address line 1 for the division (required).Address 2 (unlabeled) Enter the address line 2 for the division (optional).Zip Select the zip code where the division is located
(required).City Enter the city where the division is located (required).St Select the state where the division is located
[STATE_CD] (required).Zip Extension (unlabeled) Enter the zip extension where the division is located
(optional).Country Select the country where the division is located
[COUNTRY_CD] (required).Phone Enter the primary phone number for the division
(required).Ext Enter the phone extension for the primary phone number
(optional).Phone Enter the alternate phone number for the division
(optional).Ext Enter the phone extension for the alternate phone number
(optional).Fax Enter the primary fax number for the division (required).Fax Enter the alternate fax number for the division (optional).
6 Select Enabled to enable the division.
2-4 Setup Guide - Consumer Lease Origination

7 In the Department Definition block, enter the following information:
In this field: Do this:
Department Enter the department ID. (The ID is the unique identifier used internally by Oracle Daybreak to represent the department within the division) (required).
Department Name Enter the department name (required).Short Name Enter the short name for the department (Note: This is
the ID that appears throughout Oracle Daybreak to repre-sent this department) (required)
Address Enter the address line 1 for the department (required).Address 2 (unlabeled) Enter the address line 2 for the department (optional).Zip Select the zip code where the department is located
(required).City Enter the city where the department is located (required).St Select the state where the department is located
[STATE_CD] (required).Zip Extension (unlabeled) Enter the zip extension where the department is located
(optional).Country Select the country where the department is located
[COUNTRY_CD] (required).Phone Enter the primary phone number for the department
(required).Ext Enter the phone extension for the primary phone number
(optional).Phone Enter the alternate phone number for the department
(optional).Ext Enter the phone extension for the alternate phone number
(optional).Fax Enter the primary fax number for the department
(required).Fax Enter the alternate fax number for the department
(optional).
8 Select Enabled to enable the department.
9 Save your entry.
2-5 Setup Guide - Consumer Lease Origination

Companies tab (Companies page)The Companies page records the hierarchical structure of your portfolio companies and their branches. Just as Oracle Daybreak uses the Organization page to determine the loca-tion of people, it uses the information on the Companies page to determine the location of applications. In completing the Companies page, there can be more than one company, and each company can have more than one branch.
Applications can be sorted down to the branch level. For this reasons, branches are set up to reflect differing business practices. You would set up different branches if, for example:
• The General Ledger (GL) differs between branches• The branches work with different accounts• There is a difference between branches in terms of the tasks they perform (lease origi-
nation, servicing, collections, and so on)
As an example of the companies setup, i-flex solutions Corp. might have the following companies and branches defined as:
Company: C-0001 TrustOne Financial Corp TOFC
Branch: CB-01 TOFC - Headquarters HQBranch: CB-02 Kennedy Plaza KP
Company: C-0002 Credtyme Credit Corp CCC
Branch: CB-11 CCC - Headquarters HQBranch: CB-12 CCC - Missoula MT
Note: Oracle Daybreak does not limit the number of companies or associated branches with the company you can enter.
2-6 Setup Guide - Consumer Lease Origination

Note: The Short Name field in the on the Companies page allows you to create the ID that Oracle Daybreak will use when referring to the company and branch throughout the sys-tem.
KEY CONCEPT: Please note the difference between the Company page and the Organiza-tion page:
• On the Organization page, Oracle Daybreak users belong to an organization, divi-sion, and department.
• On the Companies page, credit applications belong to a company and branch.
As you will see in the following Access page section, the information on the Organization and Companies pages define the operational hierarchy of your companies in terms of which Oracle Daybreak users will have access to which applications.
To set up the Companies page
1 On the Setup menu, choose Administration > User.
2 Choose the Companies tab.
3 The Company Definition block defines entities within your organization that originate lease. Enter the following information in the Company Definition block:
In this field: Do this:
Company Enter the portfolio company ID. (The ID is the unique identifier used internally by Oracle Daybreak to represent the company) (required).
Name Enter the name of the portfolio company (required).
2-7 Setup Guide - Consumer Lease Origination

Short Name Enter the short name for the portfolio company (ID dis-played to represent the company) (required).
Address Enter the address line 1 for the portfolio company (required).
Address 2 (unlabeled) Enter the address line 2 for the portfolio company (optional).
Zip Select the zip code where the portfolio company is located (required).
City Enter the city where the portfolio company is located (required).
St Select the state where the portfolio company is located [STATE_CD] (required).
Zip Extension (unlabeled) Enter the zip extension where the portfolio company is located (optional).
Country Select the country where the portfolio company is located [COUNTRY_CD] (required).
Contact Enter the contact information about the portfolio com-pany (required).
Phone Enter the primary phone number for the portfolio com-pany (required).
Ext Enter the phone extension for the primary phone number (optional).
Fax Enter the primary fax number for the portfolio company (required).
Phone Enter the alternate phone number for the portfolio com-pany (optional).
Ext Enter the phone extension for the alternate phone number (optional).
Fax Enter the alternate fax number for the portfolio company (optional).
TCC Enter the transmitter control code for the portfolio com-pany (1098 Electronic Filing) (required).
Tax Id Enter the tax identification number for the portfolio com-pany (required).
Remittance Address Enter the remittance address line 1 (may be different from the company address). This address is included as the remittance address on statements (required).
Remittance Address 2 Enter the remittance address line 2 (optional).(unlabeled)Zip Select the zip code (required).City Enter the remittance address city (required).St Select the remittance address state [STATE_CD]
(required).Zip Extension (unlabeled) Enter the remittance address zip extension (optional).Country Select the remittance address country [COUNTRY_CD]
(required).HMDA Select the HMDA agency (Home Mortgage Disclosure
Act reporting agency for the company) [HMDA_AGENCY_CD] (required).
Coupon Order Code If you are using coupons, enter the coupon order code to be used by a third party printing the coupons for billing statements (required).
2-8 Setup Guide - Consumer Lease Origination
4 Select Enabled to enable the portfolio company.
5 In the Branch Definition block, enter the following information:
In this field: Do this:
Branch Enter the portfolio branch id. (The ID is the unique iden-tifier used internally by Oracle Daybreak to represent the branch within your company) (required).
Name Enter the name of the portfolio branch (required).Short Name Enter the short name for the portfolio branch (ID dis-
played to represent the branch) (required).Address Enter the address line 1 for the portfolio branch
(required).Address 2 (unlabeled) Enter the address line 2 for the portfolio branch
(optional).Zip Select the zip code where the portfolio branch is located
(required).City Enter the city where the portfolio branch is located
(required).St Select the state [STATE_CD] (required).Zip Extension (unlabeled) Enter the zip extension where the portfolio branch is
located (optional).Country Select the country [COUNTRY_CD] (required).Phone Enter the primary phone number for the portfolio branch
(required).Ext Enter the phone extension for the primary phone number
(optional).Fax Enter the primary fax number for the portfolio branch
(required).Phone Enter the alternate phone number for the portfolio branch
(optional).Ext Enter the phone extension for the alternate phone number
(optional).Fax Enter the alternate fax number for the portfolio branch
(optional).
6 Select Enabled to enable the portfolio branch.
7 Save your entry.
2-9 Setup Guide - Consumer Lease Origination

Access tab (Data page)Using the organizations, divisions, companies, and branches created on the Organization and Companies pages, Oracle Daybreak allows you to control which users have access to which applications. The Data page is where you define which organization/division (Ora-cle Daybreak users) can gain access to which company/branch (applications) locations.
Normally, for each division within the one organization, you would define a record with Company value of ALL and a Branch value of ALL, then select the Allowed box. You then define other records for the same Organization and Division for other Company and Branch combinations with the Allowed box cleared to restrict access.
2-10 Setup Guide - Consumer Lease Origination

To set up the Data page
1 On the Setup menu, choose Administration > User.
2 Choose the Access tab, then choose the Data tab.
3 Enter the following information on the Data page.
In this field: Do this:
Access Grid block:Organization Select the organization for which you are defining access
privileges (required).Division Select the division within the organization for which you
are defining Access privileges (required).Company Select the portfolio company to which you are defining
access privileges for the organization and division speci-fied (required).
Branch Select the portfolio branch of the company to which you are defining access privileges for the organization and division specified (required).
Allowed Select to indicate whether access to the data pertaining to the company and branch is allowed for the organization and division specified.
4 Save your entry.
2-11 Setup Guide - Consumer Lease Origination

Access tab (Menu page)The Menu page allows you to restrict access to menus and commands on the Oracle Day-break menu bar. If your responsibility does not have access to the menu or command, the menu item appears dimmed and inoperable.
To set up the Menu page
1 On the Setup menu, choose Administration > User.
2 Choose the Access tab, then choose the Menu tab.
3 Enter the following information on the Menu page.
In this field: Do this:
Menu block:Menu Code View the menu code (display only).Description View the description for the menu code (display only).Enabled If selected, indicates that the menu code is enabled.
Menu User Access Definition block:Access Type Enter the access grid function type (required).Access Value Enter the access function grid value (required).Allowed? Yes/No Select Yes to allow access or No to restrict access to the
menu code in the Menu block based on the access type and value.
System Defined Yes/No If Yes is selected, the menu user access definition entry is system defined.If Yes is selected, the menu user access definition entry is manually defined.
4 Save your entry.
2-12 Setup Guide - Consumer Lease Origination

Access tab (Screen page)The Screen page allows you to restrict access to tabs and sub tabs on Oracle Daybreak forms. If you do not have the responsibility to access to particular tab on a Oracle Daybreak form, the tab with be unavailable (dimmed).
If you do not have the responsibility to access to all the tabs at particular level, then special “No Access” tab appears on that level with the message “Sorry, you do not have access to view this information.”
To set up the Screen page
1 On the Setup menu, choose Administration > User.
2 Choose the Access tab, then choose the Screen tab.
3 Enter the following information on the Screen page.
In this field: Do this:
Screen block:Screen Name Search for and view the form you want to work with (dis-
play only).
Screen Details block:Tab Name Search for and view the object name you want to work
with (display only).Parent Tab Name View the parent object name (display only).Enabled If selected, indicates the selected screen detail entry is
enabled.
Screen User Access Definition block:Access Type* Enter the access grid function type (required).Access Value* Enter the access function grid value (required).
2-13 Setup Guide - Consumer Lease Origination

Allowed? Yes/No Select Yes to allow access or No to restrict access to the object in the Screen Details block based on the access type and value.
System Defined Yes/No If Yes is selected, the screen user access definition entry is system defined.If Yes is selected, the screen user access definition entry is manually defined.
4 Save your entry.
* Rules for Access Type and Access Value fields:Rule 1Let’s say there are two access types in the Screen User Access Definition block for TAB A in the Screen Details block. These two access types are RESPONSIBILITY and APPLICA-TION STATUS. RESPONSIBILITY has the Allowed Yes option button selected, while APPLICATION STATUS has the Allowed No option button selected. In this case TAB A is unavailable when form is open by a user responsibility defined by the RESPONSIBILITY entry’s Access Value and the APPLICATION STATUS entry’s Access Value.
Rule 2Assume a sub tab has two parent tabs; for example, the Address sub page one the Under-writing form has two parent tabs, Primary and Others. If Address tab is restricted for Pri-mary (Allowed? No) but allowed for Others (Allowed? Yes), then the Address sub tab is unavailable for both.
2-14 Setup Guide - Consumer Lease Origination

Access tab (Correspondence page)The Correspondence page allows you to restrict access to different correspondence com-mands on the Letters menu, thus restricting your ability to generate certain correspon-dence.
If you do not have the responsibility to create to type of correspondence, the correspond-ing command on the Letters menu is unavailable (dimmed).
To set up the Correspondence page
1 On the Setup menu, choose Administration > User.
2 Choose the Access tab, then choose the Correspondence tab.
3 Enter the following information on the Correspondence page.
In this field: Do this:
Correspondence Codes block:Code Search for and view the correspondence code name you
want to work with (display only).Description View the description for the correspondence code (dis-
play only).Enabled If selected, indicates the selected correspondence code
entry is enabled.
Correspondence User Access Definition block:Access Type Enter the access grid function type (required).Access Value Enter the access function grid value (required).Allowed? Yes/No Select Yes to allow access or No to restrict access to the
entry in the Correspondence Codes block based on the access type and value.
System Defined Yes/No If Yes is selected, the correspondence user access defini-tion entry is system defined.If Yes is selected, the correspondence user access defini-tion entry is manually defined.
4 Save your entry.
2-15 Setup Guide - Consumer Lease Origination

Access tab (Setup Security page)The Setup Security page allows you to restrict access to the Lock/Unlock Record icon on the Oracle Daybreak tool bar, thus restricting your ability to edit fields on various pages and sub pages.
If you do not have the responsibility to lock/unlock based on the information on the Setup Security page, Oracle Daybreak displays a Forms dialog box with the message “User responsibility not allowed to lock/unlock” on the Letters menu is unavailable (dimmed).
To set up the Setup Security page
1 On the Setup menu, choose Administration > User.
2 Choose the Access tab, then choose the Setup Security tab.
3 Enter the following information on the Setup Security page.
In this field: Do this:
Lock/Unlock Codes block:Code Search for and view the lock/unlock code you want to
work with (display only).Description View the description for the lock/unlock code (display
only).Enabled If selected, indicates the selected lock/unlock code entry
is enabled.
Lock/Unlock User Access Definition block:Access Type Enter the access grid function type (required).Access Value Enter the access function grid value (required).Allowed? Yes/No Select Yes to allow access or No to restrict access to the
entry in the Lock/Unlock Codes block based on the access type and value.
System Defined Yes/No If Yes is selected, the lock/unlock user access definition entry is system defined.If Yes is selected, the lock/unlock user access definition entry is manually defined.
4 Save your entry.
2-16 Setup Guide - Consumer Lease Origination

Access tab (Transaction page)The Transaction page allows you to restrict access to the following types of monetary and nonmonetary transactions:
• PRODUCER MONETARY TXN• SECURITIZATION TXN• ESCROW MONETARY TRANSACTIONS• ESCROW NON MONETARY TRANSACTIONS• FEE ASSESSMENTS• ESCROW ANALYSIS AND DISBURSEMENTS
To set up the Transaction page
1 On the Setup menu, choose Administration > User.
2 Choose the Access tab, then choose the Transaction tab.
3 Enter the following information on the Transaction page.
In this field: Do this:
Transaction Super Group block:Super Group Search for and view the transaction supergroup you want
to work with (display only).
Transaction Codes block:Txn Name Search for and view the transaction code you want to
work with (display only).Description View the description for the transaction (display only).Authorize Select if you want the transaction to be verified by a sec-
ond Oracle Daybreak user on the Transaction Authoriza-tion form’s Authorization page.In the Transaction User Access Definition block, use the Access Type RESPONSIBILITY to define the user type
2-17 Setup Guide - Consumer Lease Origination

the authorization restriction applies to when entering the transaction.
Note: If the Authorization check box is cleared, the exist-ing transaction posting process on the Maintenance (3) master block will apply; the transaction will be posted and the authorization process is by-passed.For more information, please see the Memo Transaction Posting (Maker-Checker) chapter in the Oracle Day-break User Guide.
Enabled If selected, indicates the transaction codes entry is enabled.
Transaction User Access Definition block:Access Type Enter the access grid function type (required).Access Value Enter the access function grid value (required).Allowed? Yes/No Select Yes to allow access or No to restrict access to the
entry in the Transaction Codes block based on the access type and value.
System Defined Yes/No If Yes is selected, the transaction user access definition entry is system defined.If Yes is selected, the transaction user access definition entry is manually defined.
4 Save your entry.
2-18 Setup Guide - Consumer Lease Origination

Users tab (Users page)The Users page allows you to create and set up each Oracle Daybreak user. In the User Definition block, you assign a user an identification name and password to log on to Ora-cle Daybreak. You also assign the organization, division, and department where each user is located. Additional fields allow you to record information for contacting the user. You can also define the time frame within which a user has access to the system to ensure com-pliance to the company’s schedule. This is a very useful feature to prevent logins during scheduled maintenance.
The Responsibility field records the job function of the user and defines the level of access that user has within the system; in particular:
• What menu items does the user have access to?• Can the user click the Lock/Unlock Record button on the Oracle Daybreak toolbar?• What transactions can the user perform on the Maintenance (3) master tab on the Cus-
tomer Service form?• What edits can the user perform on the Verification (9) master tab during lease origi-
nation?
Note: The Oracle Daybreak SUPERUSER responsibility grants access to the entire Oracle Daybreak system. Please give careful consideration to the number and type of users who receive this responsibility.
To set up the Users page
1 On the Setup menu, choose Administration > User.
2 Choose the Users tab.
2-19 Setup Guide - Consumer Lease Origination

3 In the User Definition block, enter the following information for each user:
In this field: Do this:
User Id Enter the user id. Note: This field is a unique indicator and cannot be updated, edited, or deleted once saved (required).
First Name Enter the first name of the user (required).MI Enter the middle initial of the user (optional).Last Name Enter the last name of the user (required).Organization Select the organization to which the user belongs
(required).Division Select the division to which the user belongs (required).Department Select the department to which the user belongs
(required).Start Dt Enter the start date for the user (required).End Dt Enter the end date for the user (required).System Defined? Yes No If Yes is selected, the entry is system defined. System
defined entries cannot be modified. If No is selected, the entry is not system defined and it can be modified.
Responsibility Select the responsibility for the user [RESPONSIBILITY_CD] (required).
Password Enter the password for the user. (The password must be within the parameters defined on the Administration form’s System > Parameters > Organization page) (required).
Phone Enter the user’s primary phone number (required).Phone Extension (unlabeled) Enter the phone extension for the primary phone number
(optional).Fax Enter the user’s primary fax number (required).Email Enter user’s email address (optional).Type Select the user type [USR_TYPE_CD] (required).Reference # Enter the reference number. This is a free form field that
allows you to further categorize users as you choose (required).
Phone Enter the user’s alternate phone number (optional).Phone Extension (unlabeled) Enter the phone extension for the alternate phone number
(optional).Fax Enter the user’s alternate fax number (optional).Replacement User* Select the user id of the replacement user (optional).Dt* Enter the date from when the replacement is effective
(optional).*Note: These two allow you to create a replacement user for the current user. This is particularly useful when a new employee assumes the duties of a former. By com-pleting the Replacement User and Dt field, Oracle Day-break recognizes the replacement user as the current user on the effective date. For more information, see the fol-lowing section, Replacement Users.
4 Select Enabled to enable the user.
5 Save your entry.
2-20 Setup Guide - Consumer Lease Origination
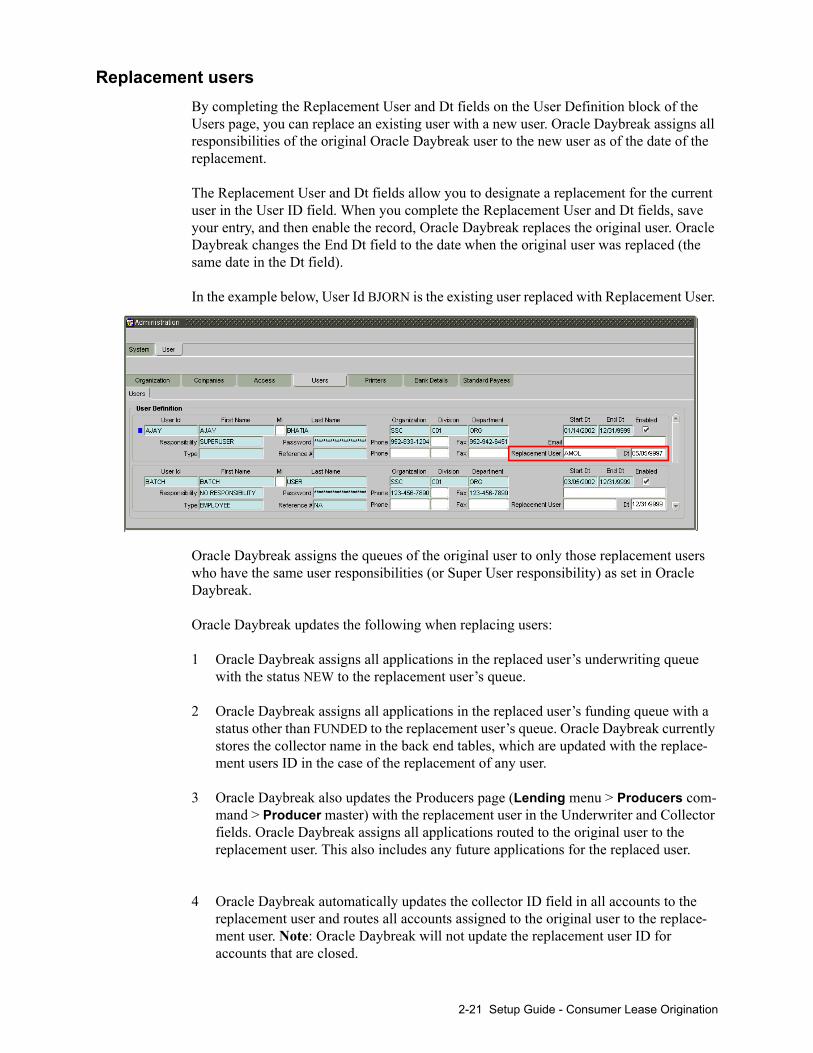
Replacement usersBy completing the Replacement User and Dt fields on the User Definition block of the Users page, you can replace an existing user with a new user. Oracle Daybreak assigns all responsibilities of the original Oracle Daybreak user to the new user as of the date of the replacement.
The Replacement User and Dt fields allow you to designate a replacement for the current user in the User ID field. When you complete the Replacement User and Dt fields, save your entry, and then enable the record, Oracle Daybreak replaces the original user. Oracle Daybreak changes the End Dt field to the date when the original user was replaced (the same date in the Dt field).
In the example below, User Id BJORN is the existing user replaced with Replacement User.
Oracle Daybreak assigns the queues of the original user to only those replacement users who have the same user responsibilities (or Super User responsibility) as set in Oracle Daybreak.
Oracle Daybreak updates the following when replacing users:
1 Oracle Daybreak assigns all applications in the replaced user’s underwriting queue with the status NEW to the replacement user’s queue.
2 Oracle Daybreak assigns all applications in the replaced user’s funding queue with a
status other than FUNDED to the replacement user’s queue. Oracle Daybreak currently stores the collector name in the back end tables, which are updated with the replace-ment users ID in the case of the replacement of any user.
3 Oracle Daybreak also updates the Producers page (Lending menu > Producers com-mand > Producer master) with the replacement user in the Underwriter and Collector fields. Oracle Daybreak assigns all applications routed to the original user to the replacement user. This also includes any future applications for the replaced user.
4 Oracle Daybreak automatically updates the collector ID field in all accounts to the replacement user and routes all accounts assigned to the original user to the replace-ment user. Note: Oracle Daybreak will not update the replacement user ID for accounts that are closed.
2-21 Setup Guide - Consumer Lease Origination

5 On the Queue Setup form’s Responsibilities and Users sub-page, the record for the original user will be disabled and a new record will be created for the replacement user. If the replacement user already exists in the setup, Oracle Daybreak will not cre-ate a new record. Oracle Daybreak updates the user ID and routes all accounts that were assigned to the original user, based on the account condition, to the replacement user.
Enhanced password protectionCustomer data is always vulnerable when passwords are simple enough for hackers to guess. This can happen in the absence of strict password rules. Oracle Daybreak supports flexible and more secured password rules with a set of additional organizational level password parameters. Setting all password parameters to Y enforces the strictest password complexity.
These organization level password parameters are as follows:
Parameter DescriptionULG_PWD_CASE_SENSITIVE_REQ PASSWORD SHOULD BE CASE SENSITIVE (Y/
N) (SET NO TO STORE PASSWORD IN UPPER-CASE)
If the Parameter Value is set to N, the password will be treated as if entered in uppercase.
ULG_PWD_LOWER_CHAR_REQ PASSWORD MUST HAVE AT LEAST ONE LOW-ERCASE CHARACTER (YES/NO)
If the Parameter Value is set to Y, at least one lowercase character is required in the password.
ULG_PWD_UPPER_CHAR_REQ PASSWORD MUST HAVE AT LEAST ONE UPPERCASE CHARACTER (YES/NO)
If the Parameter Value is set to Y, at least one uppercase character is required in the password.
2-22 Setup Guide - Consumer Lease Origination

ULG_PWD_NBR_REQ PASSWORD MUST HAVE AT LEAST ONE NUMERIC CHARACTER (0-9) (YES/NO)
If the Parameter Value is set to Y, at least one numeric character is required in the password.
ULG_PWD_SPECIAL_CHAR_REQ PASSWORD MUST HAVE AT LEAST ONE SPE-CIAL CHARACTER ($#@ ETC) (YES/NO)
If the Parameter Value is set to Y, at least one special character is required in the password.
Note: IF THE ULG_PWD_CASE_SENSITIVE_REQ parameter is set to N, then the ULG_PWD_LOWER_CHAR_REQ parameter should also be set to N.
Password security is a top priority for any organization to secure its customer data. In addition to the existing Oracle Daybreak security features, the encryption algorithm DES3 makes it even tougher for hackers to break the encrypted password.
Password encryption can be done with the following methods:
1. DES (data encryption standard)2. DES3 (triple data encryption standard)
A technical note about DES and DES3: DES is a symmetric key cipher (encryption algorithm); that is, the same key is used to encrypt data as well as decrypt data. DES encrypts data in 64-bit blocks using a 56-bit key. The banking industry has adopted DES based standards for transactions between private financial institutions, and between pri-vate financial institutions and a private individual.
Triple DES (DES3) is a far stronger cipher than DES. The resulting encrypted data is much harder to break using exhaustive search 2**168 attempts as compared to 2**56 attempts (in the case of DES).
You can specify the encryption type to use with your Oracle Daybreak system using the following system parameter.
Parameter DescriptionPASSWORD_ENCRYPTION_TYPE PASSWORD ENCRYPTION TYPE
2-23 Setup Guide - Consumer Lease Origination

Printers tab (Printers page)The Printers page allows you to set up an unlimited number of network printers and fax devices to be used with the system server. Oracle Daybreak will use the information on this page when selecting a printer when the printing process involves a batch job or use a job scheduler. Examples include printing reports and correspondence.
The printers and fax devices can be set up at each organization, division, or department to promote efficient printing of documents, and reports. Oracle Daybreak uses this informa-tion during product setup and on the Letters page in the Batch Printer field.
Special printer namesThe following printer names are predefined and have specific functions within Oracle Daybreak:
UNDEFINED Indicates that the document to be printed is to be previewed in your browser instead of actually printing the document.
ARCHIVE Instead of sending an item to the printer, Oracle Daybreak gener-ates a PDF document and saves it in the archive directory on your server.
EMAIL For lease origination correspondences that can be faxed, Oracle Daybreak will e-mail the document as a PDF attachment to the consumer for direct loans or to the producer in the case of in-direct leases.
FAX For lease origination correspondences that can be faxed, Oracle Daybreak generates a PDF document it will send to the fax server defined in System Parameters.
Additionally, you may set up composite entries in the Printer Name field to perform two or more functions at the same time. This can be done by defining a printer name with the fol-lowing format:
PRINTER NAME = <PRINTER_NAME1> + <PRINTER_NAME2>
For example, if a printer named JET4050 was previously defined, as were the special printer names listed above, then the following additional printers could be defined:
JET4050+ARCHIVE Prints the document with the jet4050 printer and archives the document.
FAX+ARCHIVE Faxes and archives the document.EMAIL+ARCHIVE+JET4050 E-mails, archives, and prints the document with
the jet4050 printer.
2-24 Setup Guide - Consumer Lease Origination

To set up the Printers page
1 On the Setup menu, choose Administration > User.
2 Choose the Printers tab.
3 In the Printer Definition block on the Printers page, enter the following information:
In this field: Do this:
Printer Name Enter the printer name. The name of the printer as defined by the server. For a UNIX server, the name might be JET4050, while to access the same printer from a Win-dows server the name would be: \\server-name\jet4050 (required).
Description Enter the description for the printer (required).Organization Select the organization to which the printer belongs
(required).Division Select the division to which the printer belongs
(required).Department Select the department to which the printer belongs
(required).
IMPORTANT: In selecting which printer to use, Oracle Daybreak searches for a best match using the following attributes:
1 Organization2 Division3 Department
For this reason, i-flex solutions recommends creating one version of each edit where ALL is the value in these fields.
It is also recommended that you define a default printer for an Organization, Division and Department.
4 Select the Default box on one entry to indicate that this printer is a default printer.
5 Select Enabled to enable the printer and indicate that the printer is active.
IMPORTANT: Never disable the UNDEFINED printer. This is a required entry.
6 Save your entry.
2-25 Setup Guide - Consumer Lease Origination

Bank Details tab (Bank Details page)The Bank Details page defines the banks a company/branch uses for processing automatic clearing house (ACH) and lock box payments.
Note: This is “behind the scenes” information that Oracle Daybreak uses for payments and doesn’t appear on any other Oracle Daybreak forms.
To set up the Bank Details page
1 On the Setup menu, choose Administration > User.
2 Choose the Bank Details tab.
3 In the Bank Definition block, enter the following information pertaining to the financial institutions used by your organization.
In this field: Do this:
Code Enter the bank code (ID used internally by Oracle Day-break to represent the bank) (required).
Name Enter the bank name (required).Short Name Enter the short name for the bank (ID displayed to repre-
sent the bank. This may be included in any output files) (required).
Account # Enter the account number used for banking transactions with the bank. Note: If the organizational parameter UIX_HIDE_RESTRICTED_DATA is set to Y, this appears as a masked number; for example, XXXXX1234 (required).
ACH Format Select the ACH format accepted by this bank [ACH_FORMAT_CD] (required).
Routing # Enter the routing number for the bank (required).Address Enter the address line 1 for the bank (required).Address 2 (unlabeled) Enter the address line 2 for the bank (optional).Zip Enter the zip code where the bank is located (required).City Enter the city where the bank is located (required).
2-26 Setup Guide - Consumer Lease Origination

St Select the state where the bank is located [STATE_CD] (required).
Zip Extension (unlabeled) Enter the zip extension where the bank is located (optional).
Country Select the country where the bank is located [COUNTRY_CD] (required).
Phone Enter the primary phone number of the bank (required).Ext Enter the phone extension for the primary phone number
(optional).Phone Enter the alternate phone number for the bank (optional).Ext Enter the phone extension for the alternate phone number
(optional).Fax Enter the primary fax number for the bank (required).Fax Enter the alternate fax number for the bank (optional).Enabled Select box to enable the bank and indicate this is an
active bank.
4 Save your entry.
5 Use the ACH Definition block on the ACH sub page to enter the following information used to create ACH files for the bank listed in the Bank Definition block.
In this field: Do this:
Company Select the portfolio company (required).Branch Select the portfolio branch (required).ACH Identifier Enter the ACH Id (provided by the bank). (This field is
used in the ACH files to identify the bank). (required)Enabled Select box to enable the ACH and indicate this is an
active ACH identifier.
6 Save your entry.
7 Use the Lock Box sub page to enter the following details to create Lock Box files related to this bank.
In this field: Do this:
Lockbox Identifier Enter the lock box id (provided by bank). This field is used in the lock box files to identify the bank (required).
Company Select the portfolio company (required).Branch Select the portfolio branch (required).Enabled Select to enable the lock box.
8 Save your entry.
2-27 Setup Guide - Consumer Lease Origination

Standard Payees tab (Standard Payees page)The Standard Payees page defines third parties that are frequently the payees for checks issued within your organization. These payees are then available on the Consumer Lend-ing (Advance and Payment) form. When you select the Payee # in the Advance Allocation block, Oracle Daybreak completes the remaining fields in this block with information from the Standard Payees page.
Note: The Payee # field on the Advance Payment forms is a non-validated LOV. This allows you to select an entry or enter one of your own.
To set up the Standard Payees page
1 On the Setup menu, choose Administration > User.
2 Choose the Standard Payees tab.
3 In the Payee Definition block, enter the following information:
In this field: Do this:
Payee # Select the payee number (Identifier for the payee) (required).
Name Enter the payee name (required).Pmt Mode Select the payee payment mode - the payment method for
the payee; for example, ACH, INSTITUTIONAL DRAFT [PAYEE_PMT_MODE_CD] (required).
Start Dt View the payment mode start date - the date the current payment method was implemented (defaults on Pmt Mode change) (display only).
Enabled View if payee is enabled (optional).Address Enter the address line 1 for the payee (optional).Address 2 (unlabeled) Enter the address line 2 for the payee (optional).
2-28 Setup Guide - Consumer Lease Origination

Zip Select the zip code where the payee is located (optional).City Enter the city where the payee is located (optional).St Select the state where the payee is located [STATE_CD]
(optional).Zip Extension (unlabeled) Enter the zip extension where the payee is located
(optional).Country Select the country where the payee is located
[COUNTRY_CD] (required).Bank Name Enter the payee ACH bank name used by the standard
payee (optional).Routing # Enter the payee ACH bank routing number of bank used
by the standard payee (optional).Account Type Enter the payee type of ACH bank account maintained by
the Standard Payee [ACH_ACCOUNT_TYPE_CD] (optional).
ACH Account # Enter the payee ACH bank account number. Note: If the organizational parameter UIX_HIDE_RESTRICTED_DATA is set to Y, this appears as a masked number; for example, XXXXX1234 (optional).
Comment Enter a comment for this advance allocations. This is the default comment to include with payments to this Payee (optional).
Phone 1 Enter the primary phone number for the payee (optional).Phone 2 Enter the alternate phone number for the payee
(optional).
4 Save your entry.
2-29 Setup Guide - Consumer Lease Origination
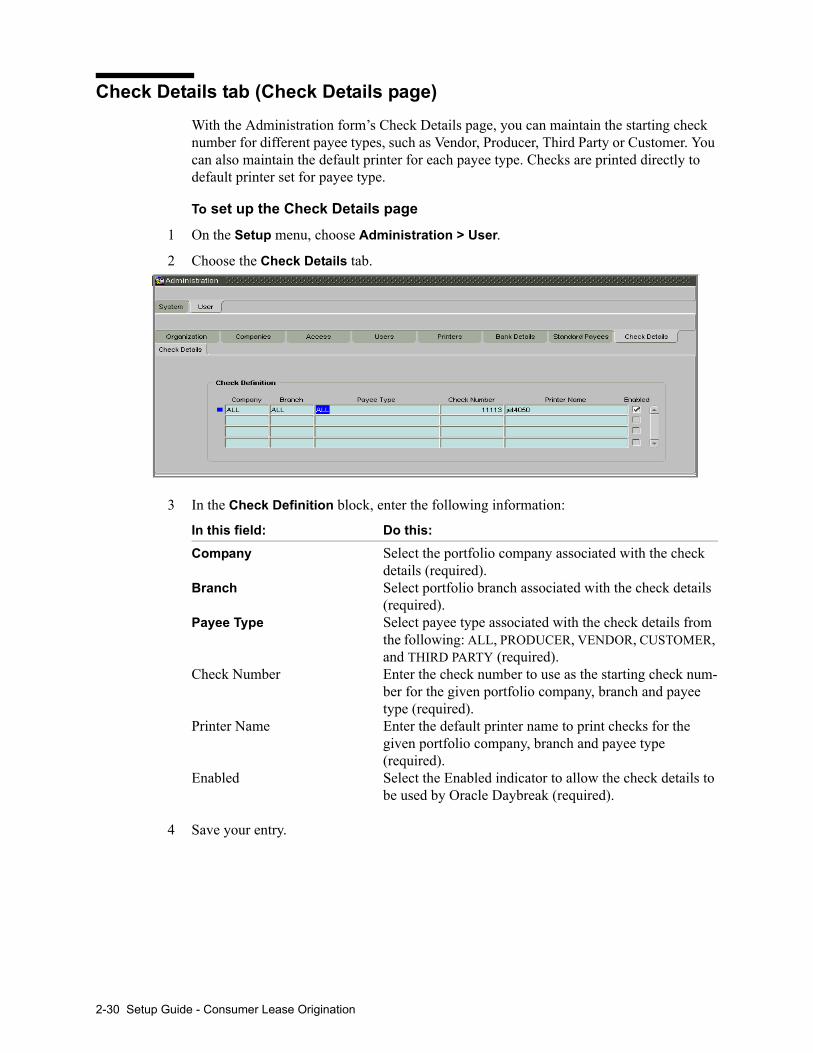
Check Details tab (Check Details page)With the Administration form’s Check Details page, you can maintain the starting check number for different payee types, such as Vendor, Producer, Third Party or Customer. You can also maintain the default printer for each payee type. Checks are printed directly to default printer set for payee type.
To set up the Check Details page
1 On the Setup menu, choose Administration > User.
2 Choose the Check Details tab.
3 In the Check Definition block, enter the following information:
In this field: Do this:
Company Select the portfolio company associated with the check details (required).
Branch Select portfolio branch associated with the check details (required).
Payee Type Select payee type associated with the check details from the following: ALL, PRODUCER, VENDOR, CUSTOMER, and THIRD PARTY (required).
Check Number Enter the check number to use as the starting check num-ber for the given portfolio company, branch and payee type (required).
Printer Name Enter the default printer name to print checks for the given portfolio company, branch and payee type (required).
Enabled Select the Enabled indicator to allow the check details to be used by Oracle Daybreak (required).
4 Save your entry.
2-30 Setup Guide - Consumer Lease Origination

CHAPTER 3 : PRODUCT SETUP FORM The Product Setup form enables you to configure the basic business guidelines necessary to support one or more products (leases) in Oracle Daybreak. This includes defining the types of collateral your company supports, creating lending instruments, and determining what is included in credit bureau reporting. Setting up the Products form requires a thor-ough understanding of the current rules of your business and must be completed before you can use Oracle Daybreak.
The Products form contains the following four master tabs:
Master tab: Purpose:
Setup Records data that is common to leases supported by Oracle Daybreak.
Lease Allows you to set up the closed ended leases your company offers.
This chapter explains how to set up the Product Setup form’s Setup master tab, informa-tion common to leases:
• Assets tab (Assets page)• Scoring Parameters tab (Scoring Parameters page)• Index Rates tab (Index Rates page)
Chapter 3 :-1 Setup Guide - Consumer Lease Origination

Setup master tabThe Setup master tab records data that is common to leases products supported by Oracle Daybreak and contains the following pages: Assets, Scoring Parameters, and Index Rates.
Assets tab (Assets page)The Assets page allows you to set up the asset types that can serve as an application’s col-lateral.
The information on the Asset Type block is used by Oracle Daybreak to automatically display the appropriate collateral page (Vehicle, Home, or Other) on the Application Entry, Underwriting, Funding, Customer Service, and account boarding forms.
Oracle Daybreak recognizes the following four types of collateral:
Collateral Type Description
Home collateral Homes, manufactured housing, or any real estate collat-eral.
Vehicle collateral All vehicle types, such as cars, trucks, and motorcycles.Unsecured collateral All unsecured lending instruments. (This collateral type
makes the collateral tabs on Oracle Daybreak forms unavailable.)
Household goods and All other collateral types not defined as home, vehicle, or other collateral unsecured; for example, household items such as water
heaters, televisions, and vacuums.
The Asset Sub Type block allows you to further categorize an asset; for example, the asset type VEHICLE might be categorized as CAR, TRUCK, or VAN.
The Attributes/Addons and Makes and Models sub pages continue to further detail the asset both in description and value. For example, a VEHICLE asset might include addons such as LEATHER SEATS and CRUISE CONTROL.
Note: Neither asset types nor asset sub types can be deleted. As they may have been used in the past, the display and processing of that data is still dependent on the existing setup.
Chapter 3 :-2 Setup Guide - Consumer Lease Origination

To set up the Assets page
1 On the Setup menu, choose Products > Setup.
2 Choose the Assets tab.
3 In the Asset Type block, enter the following information:
In this field: Do this:
Asset Type Enter the asset type (required).Description Enter the description for the asset. (This is the asset type
as it will appear throughout Oracle Daybreak) (required).Example
Collateral Type Select the collateral type (the general category that the asset type falls within) [COLLATERAL_TYPE_CD]. Note: There is no need to define an asset for UNSE-CURED COLLATERAL, as by definition there is no asset on such loans. (required).
Company Select the portfolio company to which the asset type belongs. These are the companies within your organiza-tion that can make loans using this asset type. This may be ALL or a specific company (Setup > Administration > User > Companies) (required).
Branch Select the portfolio branch to which the asset type belongs. This is the branch within the selected company that can make loans using this asset type. This may be ALL or a specific branch (Setup > Administration > User > Companies). This must be ALL if in the Com-pany field you selected ALL (required).
Chapter 3 :-3 Setup Guide - Consumer Lease Origination

IMPORTANT: In selecting which asset type to use, Ora-cle Daybreak searches for a best match using the follow-ing attributes:
1 Company2 Branch
For this reason, i-flex solutions recommends creating one version of each asset type where ALL is the value in these fields.
Enabled Select to enable the asset type and indicate that the asset type is currently in use.
4 In the Asset Sub Type block, enter the following information:
In this field: Do this:
Asset Sub Type Enter the asset sub type (required).Description Enter the description for the asset sub type. (This is the
asset sub type as it appears throughout Oracle Daybreak) (required).Example
Asset Property Type Select the asset property type. This field allows for prop-erty type reporting [ASB_PROPERTY_TYPE_CD] (required).
Enabled Select to enable the asset sub type and indicate that the asset sub type is currently in use.
5 Choose the Attribute/Addons sub tab.
6 In the Asset Attributes block, enter the following information:
In this field: Do this:
Attribute/Addon View the asset attribute or addon name for the selected asset (display only).
Description Select the description for the asset attribute/addon [ASSET_ATTRIBUTE_TYPES_CD_OTHER] (required).
Default Enter the default text to be copied or displayed when the asset attributes and addons fields are completed on an application for this asset (optional).
Value $ Enter the default monetary value (in US $) to be copied or displayed when the asset attributes and addons fields are completed on an application for this asset (required).
Enabled Select to enable the asset attribute and indicate that it is available for this type of asset.
7 Choose the Makes and Models sub tab.
Chapter 3 :-4 Setup Guide - Consumer Lease Origination

8 In the Makes and Models block, enter the following information:
In this field: Do this:
Make Enter asset make (required).Model Enter asset model (required).Style Enter asset style type (optional).Enabled Select to enable the asset make and model and indicate
that it is included on LOVs for this asset type.
9 Save your entry.
Chapter 3 :-5 Setup Guide - Consumer Lease Origination

Scoring Parameters tab (Scoring Parameters page)With the Scoring Parameters page, you can define the scoring parameters of a company’s credit scorecard and behavior scoring.
Credit ScoringParameters define the factors that can be used when scoring an application on the Under-writing form and generating an initial decision on whether you wish to fund a loan. The combination of the flexible definition of these parameters, along with the scoring set up on the Scoring Models page (Setup menu > Products command > Lease sub command > Scoring tab) allows you to automate much of the initial decision process in underwriting leases.
The Formula Definition block on the Scoring Parameters page allows you to build a math-ematical expression to express the scoring parameter, test its validity, and locate specific information with the resulting scoring parameters. Oracle Daybreak calculates scoring parameters using application data, credit bureau information, and applicant details.
Note: You may wish to review the user-defined table attributes for the SCR_CRED_SUMMARY: SCORING PARAMETERS (Setup > Administration > System > User Defined Table) and create parameters for most, if not all, entries.
The Show Expression button displays the mathematical expression of the Formula Defini-tion block (in sequential order) in the Formula Expression block.
Chapter 3 :-6 Setup Guide - Consumer Lease Origination

To set up the Scoring Parameters page
1 On the Setup menu, choose Products > Setup.
2 Choose the Scoring Parameters tab.
3 In the Parameters block, enter the following information:
In this field: Do this:
Parameter Enter the name of the scoring parameter. i-flex solutions recommends entering a name that in some way reflects how the parameter is used; for example, use FICO_SCORE instead of PARAMETER_1. (required).
Description Enter a description of the parameter. Again, enter a name that reflects how the parameter is used; for example, use FICO SCORE and WEIGHTED FICO SCORE instead of FICO SCORE NUMBER 1 and FICO SCORE NUMBER 2 (required).
Data Type Select the data type of the scoring parameter being defined - this determines how Oracle Daybreak handles the values. (While DATE and CHARACTER are available data types, generally only NUMBER should be used when defining a Scoring parameter [DATA_TYPE_CD] (required).
Scoring Type Select the scoring type: CREDIT SCORING or BEHAV-IORAL SCORING (required).
Enabled Select to enable and indicate that the scoring parameter is available.
Chapter 3 :-7 Setup Guide - Consumer Lease Origination

4 Use the Formula Definition block to define a mathematical expression of the scoring parameter you want to define. The expression may consist of one or more sequenced entries. All arithmetic rules apply to the formula definition. If errors exist in the formula definition, Oracle Daybreak displays an error message in this block when you choose Show Expression.
When creating a behavior scoring formula in the Scoring Parameters page’s Formula Def-inition block, use variables regarding account information (account variables begin with ACC_).
In this field: Do this:
Seq Enter the sequence number (the order in which the for-mula definition variable will be assembled and evalu-ated) (required).
( Enter a left bracket if you need to group part of your for-mula definition (optional).
Variable Select variable from a validated LOV based on the user-defined table SCR_CRED_SUMMARY: SCORING PARAMETERS (optional).
Constant Enter constant value (optional).Mathematical Operator Select math operator to be used on the adjacent formula
definition rows [MATH_OPERATOR_CD] (optional).) Enter a right bracket if you are grouping part of your for-
mula definition (optional).Enabled Select to enable the formula and indicate this it is
included when building a definition for the scoring parameter.
5 Choose Show Expression.
The Variable Description field and Formula Expression block populate.
6 Save your entry.
Chapter 3 :-8 Setup Guide - Consumer Lease Origination

Index Rates tab (Index Rates page)The Index Rates page maintains your organization’s history of periodic changes in index rates. It allows you to define index rates to support variable rate lines of credit. The index rate provides the base rate for a credit line where:
interest rate = index rate + margin rate.
The Index block displays the currently defined indexes on the Lookups page (Lookup type: INDEX_TYPE_CD Description: INDEX TYPE CODES). You may create additional user-defined lookup codes for this lookup type as needed.
Note: You cannot tie an index rate to a product rate.
You can also record any index rate change on the Index Rates page. During nightly batch processing, all the loan accounts with that index type are included when posting the RATE CHANGE transaction. After Oracle Daybreak processes the batch, the interest rate of the loan account is changed. Oracle Daybreak will use this new interest rate when computing all future interest calculations.
To set up index rate
1 On the Setup menu, choose Products > Setup.
2 Choose the Index Rates tab.
The Index Details block allows you to define multiple index values using the Start Dt and Rate fields.
Note: The history appears in descending order, with the most current record at the top.
Chapter 3 :-9 Setup Guide - Consumer Lease Origination
3 Use the Index Type and Index Details blocks to create the new index type.
In this field: Do this:
Index blockIndex Type Select the index, PRIME RATE or FLAT RATE
[INDEX_TYPE_CD] (required).Short Description Enter a short description of the index (required).Description Enter the index description (required).
Index Details blockStart Dt Enter the effective start date for the index rate (required).Rate Enter the new index rate effective from above mentioned
date as a percentage (required).Note: For the FLAT RATE index there should be only one entry with a Start Dt. = 01/01/1900 and a RATE = 0.0000.
Enabled Select the Enabled check box to indicate the index rate effective from start date mentioned above (required).
4 Save your entry.
Note: Variable rate loans functionality is not extended to Pre-Compute loans.
Chapter 3 :-10 Setup Guide - Consumer Lease Origination

CHAPTER 4 : PRODUCT LEASE SETUP
The Product Setup form’s Lease master tab and its pages allow you to set up the closed ended s your company offers.The following tabs are available on the Lease master tab:
• Products • Pricing• Edits• Cycles• Scoring• Contract• Compensation• Checklists• Org. Fees• Stipulations• Spreads• Statement• Letters
This chapter explains how to setup the pages associated with each one.
Chapter 4 :-1 Setup Guide - Consumer Lease Origination

Products tab (Lease Products page)The Products page defines the lease products your organization offers, such as lease vehi-cles. The information on this page is the base for defining additional product information.
A lease product is based on the following attributes:
• The collateral type and sub type• The billing cycle• Whether the lease is paid directly or indirectly to the customer
The Product Definition block records details about the lease product, such as the descrip-tion, collateral type and sub type, credit bureau reporting attributes, and billing cycle.
The Product Itemization block is used to define itemized entries for a lease product. This information is used on the Itemization sub pages of the Application Entry form, Fund-ing form, Underwriting form, and Conversion forms.
To set up the Products page
1 On the Setup menu, choose Products > Lease.
2 Choose the Products tab.
3 In the Product Definition block, enter the following information:
In this field: Do this:
Product Enter the product code as defined by your organization (in other words, how you want to differentiate the lease products). For example, lease products can be differenti-ated along asset lines (LEASE-VE for a vehicle). The product code, or name, is unique (required).
Description Enter the description of the product; for example, LEASE VEHICLE. (This is the product description as it appears throughout Oracle Daybreak) (required).Example
Chapter 4 :-2 Setup Guide - Consumer Lease Origination

Collateral Type Select the collateral type for the product. This field iden-tifies what type of collateral is associated with the lease and assists Oracle Daybreak in identifying the correct page(s) to display [COLLATERAL_TYPE_CD] (required).
Collateral Sub Type Select the collateral sub type for the product [COLLATERAL_SUB_TYPE_CD] (required).
Credit Bureau Portfolio Type* Select the credit bureau portfolio type for the product [CRB_PORTFOLIO_TYPE_CD] (required).
Credit Bureau Account Type* Select the account type for the product [CRB_ACC_TYPE_CD] (required).*Note: The Credit Bureau Portfolio Type and Credit Bureau Account Type fields determine how the portfolio is reported back to the credit bureaus (required).
Billing Cycle Select the billing cycle for the product [LEASE_BILL_CYCLE_CD] (required).
Category Select the category for the product. This serves to group products for reporting purposes (user-defined). [PRODUCT_CATEGORY_CD] (optional).
Start Dt Enter the start date for the product (required).End Dt Enter the end date for the product (required).
4 Select the Direct box if the product can be originated directly to customer. (In this case, the compliancy state is the state listed in the customer’s current mailing address.)-or-Clear the Direct box if the product is an indirect lending product; that is, payment is made to the producer. (In this case, the compliancy state is the state listed in the producer’s address.)
5 Select the Enable box to activate the product.
6 In the Product Itemization block, enter the following information:
In this field: Do this:
Itemization Select the itemization type (required).Sort Enter the sort order (required).Pos (+) Select for a positive number.Neg (-) Select for a negative number.
Note: The Pos and Neg buttons determine whether the values will increase or decrease the itemization total for the lease based on the selected lease product. Together the contents of the Product Itemization block, positive and negative, add up to the lease amount.
7 Select the Enabled box to indicate that this product itemization is currently available.
8 Save your entry.
Chapter 4 :-3 Setup Guide - Consumer Lease Origination

Pricing tab (Lease Pricing page)The Lease Pricing page records pricing information related to your lease products. Oracle Daybreak uses the information in the Lease Pricing Definition block to identify the correct pricing for an application, depending upon the product and the specific application param-eters. Oracle Daybreak will always search for a unique match.
When you choose the Select Pricing button on the Decision page on the Underwriting form, Oracle Daybreak displays the best match and completes the Pricing and Approved blocks. The information in the Approved block cite the minimum amounts for the lease, though the Oracle Daybreak user can edit these figures.
Oracle Daybreak determines the best match by looking at all enabled lease pricing strings on the Pricing page that meet the following criteria:
• Exactly match the application values for the Promotion and Billing Cycle fields.
• Are less than or equal to the application values for the Term, Amount, Age, and Start Date fields.
• Match either the application value or ALL for all other criteria. The hierarchy of selec-tion criteria is as follows:
1 Billing Cycle2 Start Date3 Company4 Branch5 Product6 State7 Producer Group8 Producer Type9 Producer10 Grade11 Amount 12 Term13 Asset Class14 Asset Type15 SubType14 Asset Make16 Asset Model17 Age 18 Subvention19 Down Payment20 Start Date21 End Date
Exact matches for each field are given a higher weight than matches of ALL. The returned rows are then ranked based on the weighted values and the hierarchical position of the field (see above). They are then ranked by start date. Oracle Daybreak recognizes the first row returned as the best match.
Note: You should set up a default pricing for each billing cycle and pricing that Oracle Daybreak can select to ensure error-free performance. i-flex solutions recommends creat-ing one version of each edit type where ALL is the value in the selection criteria fields
Chapter 4 :-4 Setup Guide - Consumer Lease Origination

listed above. If Oracle Daybreak cannot find a pricing match, it will display a dialog box indicating that no match was found.
Note: Oracle Daybreak supports the bulk uploading of product pricing setup data. This allows you to upload multiple setup data, avoid reentering setup data, and more impor-tantly, reduce data entry mistakes. Oracle Daybreak currently supports uploading using a fixed-length format only, where each data is at a pre-fixed position only. You can run batch jobs with the Set Code SET-BLK to upload pricing and GL data.
To set up the Lease Pricing page
1 On the Setup menu, choose Products > Lease.
2 Choose the Pricing tab.
3 In the Lease Pricing Definition block, enter the following information:
In this field: Do this:
Pricing* Enter the code for the pricing string (required).Description* Enter the description for the pricing string (required).
* Together these two fields define the name of the lease pricing.
Residual% From Enter the minimum residual percentage valid with this pricing string (required).
To Enter the maximum residual percentage applicable with the pricing string (required).
Rate Enter the minimum rate (required).To Enter the maximum rate allowed for leases using this
pricing (required).Buy Rate Enter the buy rate (required).Buy Rent Factor View the buy rent factor (display only).
Chapter 4 :-5 Setup Guide - Consumer Lease Origination

Rent Factor From View the minimum money factor valid with this pricing string (display only).
To Enter the maximum money factor valid with this pricing string (required).
Maximum Capital Cost Enter the maximum capital cost valid for this pricing string (required).
Maximum Term Enter the maximum term financed for this pricing string (required).
4 The selection criteria defined in the center block (the Company field to the Promotion field) allow you to specify pricing at different levels and determine how Oracle Daybreak matches specific lease pricing to the applicant’s lease request.
Complete the following fields:
In this field: Do this:
Company Select the portfolio company for this pricing. This may be ALL or a specific company (Setup > Administration > User > Companies) (required).
Branch Select the portfolio branch for this pricing. This may be ALL or a specific branch (Setup > Administration > User > Companies). This must be ALL if in the Com-pany field you selected ALL) (required).
Billing Cycle Select the billing cycle for this pricing [LEASE_BILL_CYCLE_CD] (required).
Product Select the product for this pricing. This may be ALL or a specific product. The available values come from a vali-dated LOV based on the selected billing cycle and the lease product setup (required).
State Select the state for this pricing. This may be ALL or a specific state [STATE_CD] (required).
Pro Group Select the producer group for this pricing. This may be ALL or a specific producer group [PRO_GROUP_CD] (required).
Pro Type Select the producer type for this pricing. This may be ALL or a specific producer type [PRO_TYPE_CD] (required).
Producer Select the producer. This may be ALL or a specific pro-ducer. The available values come from a validated LOV based on the product group and product type (required).
Grade Select the credit grade for this pricing. This may be ALL or a specific grade [CR_GRADE_CD] (required).
Capital Cost Enter the minimum capital cost which is valid for this pricing string (required).
Term Enter the minimum lease term for this pricing (required).Asset Class Select the asset class. This may be ALL or a specific asset
class. The available values come from a validated LOV based on the collateral type. You may create additional user-defined lookup codes for these lookup types [HOME_ASSET_CLASS_CD, OTHER_ASSET_CLASS_CD, VEHICLE_ASSET_CLASS_CD] as needed (required).
Chapter 4 :-6 Setup Guide - Consumer Lease Origination

Asset Type Select the asset type. This may be ALL or a specific asset type. The available values come from a validated LOV based your assets setup (required).
SubType Select the asset sub type. This may be ALL or a specific asset sub type. The available values come from a vali-dated LOV based your assets setup, and is linked to the selected asset type (required).
Asset Make Select the asset make. The available values come from a validated LOV based your assets setup (Setup > Prod-ucts > Assets) and is restricted based on the selected Asset Type and Asset Sub Type. If ALL was selected for either Asset Type or Asset Sub Type, then ALL will be the only available selection for the asset make (required).
Asset Model View the asset model. The available values come from a validated LOV based your assets setup, and is restricted based on the selected Asset Type and Asset Sub Type. If ALL was selected for either Asset Type or Asset Sub Type, then ALL will be the only available selection for the asset model (display only).
Age Enter the asset age (minimum age for the selected pric-ing) Note: If your entry in this field is based on the num-ber of years of age of the asset, not the actual year of make, you will need to update this entry annually to ensure that the proper pricing string is available (required).
Subvention Select the subvention plan if pricing is specific for any subvention plan (required).
Start Dt Enter the start date for this pricing string (required).End Dt Enter the end date for this pricing string (required)
5 Select Enabled to select this box to enable the pricing.
6 Save your entry.
Chapter 4 :-7 Setup Guide - Consumer Lease Origination

Edits tab (Edits page)You can configure your Oracle Daybreak system so that during the lease origination pro-cess, at each change to an application’s status, Oracle Daybreak will perform a set of edits on the Verification master tab (found on the Application Entry, Underwriting, Funding, and Account Conversion forms).
Edits ensure your organization’s guidelines are properly followed and that all exceptions are sent to the appropriate personnel for to review. If the edits check fails, Oracle Day-break will not allow the status to change, and the application will remain in its current sta-tus. The Edits page allows you to define the validations Oracle Daybreak performs on the Verification master tab as an application moves from one status to another.
There are two types edits: Origination edits and API edits. Origination edits are used to validate applications entered through the standard Application Entry, Underwriting, and Funding forms, as well as conversion applications. API edits are used to validate applica-tions that are loaded through the Application Program Interface, or entered as conversion accounts.
The Edits pages contains two blocks, the Edit Type Definition block and the Edit Sub Type Definition block.
Using the Description field of the Edit Type Definition block, you can define when you want the edits check to occur by selecting from the following list of edit types:
Edit type: Description:
APP ENTRY EDITS Edits that normally run on Application Entry form.
APP PRESCREENING EDITS Edits that run between application entry and the pulling of a credit bureau. These edits determine whether the application should be reviewed further, and a whether a credit bureau should be pulled.
APP AUTOMATIC Edits that run after a credit bureau has been pulled andAPPROVAL EDITS scored. These edits determine whether an application
should be automatically approved or declined.
APP APPROVAL EDITS Edits that run whenever an application is manually changed to a status/sub status that indicates the applica-
tion (in its current state) should be approved.
APP DECLINE EDITS Edits that run whenever an application is manually changed to a status/sub status that indicates the applica-tion (in its current state) should be declined.
APP CONTRACT EDITS Edits that run whenever an APPROVED or CONDI-TIONED-APPROVED application is about to be funded. These edits ensure the validity of the contract data.
CONVERSION ACCOUNTS (Only available if you choose API) Edits that run whenEDITS an application is being boarded into Oracle Daybreak
from another application, either manually with the Accounts form, or loaded in bulk through the API.
Chapter 4 :-8 Setup Guide - Consumer Lease Origination

Each entry in the Edit Sub Type field is grouped into the following categories (The avail-able values depend on whether you choose Origination or API in the Edit Type Definition block):
Origination edit sub types:ORIGINATION APPLICANT Edits that pertain to data entered for an applicant on anEDITS application.
ORIGINATION APPLICATION Edits that pertain to data entered for the requested lease.EDITS
ORIGINATION ASSET EDITS Edits that pertain to data entered for asset entered on the application.
ORIGINATION CONTRACT Edits that pertain to data entered for the contract on theEDITS application.
ORIGINATION CREDIT Edits that pertain to data gathered from the credit bureauBUREAU EDITS reports for the applicants on the application.
ORIGINATION DECISION Edits that pertain to data required to make a decisionEDITS on the application.
Each entry in the Edit Sub Type field can be set up with more than one entry in the Edit field. The purpose of specific edits fall into the following types:
Description starts with: (Edit Category) Description of Edit Category:
CHD: (RECORD POPULATION EDITS) Check for the existence of an entire data record.
DUPLICATE: (DUPLICATION EDITS) Check for duplication of existing data.
RANGE: (VALUE RANGE/TOLERANCE EDITS) Check to deter-mine whether data entered for a specific data field is within the specific tolerance.
REQUIRED: (REQUIRED FIELD EDITS) Check to determine whether a specific data field has been populated within a data record.
FLK: (LOOKUP VALUE EDIT) Check API entered data against the existence of that value in the related lookup types lookup codes.
XVL: (CROSS VALIDATION EDIT) Check to determine whether specific field, or set of fields, value corresponds to a value obtained by calculating them from another field or set of fields (for example, Total Payments = Terms * Standard payment amount).
An Edits check can produce one of three results: an ERROR, a WARNING, or an OVER-RIDE
Edit type: Results:
ERROR Oracle Daybreak will prevent you from proceeding when an edits check fails. The only option in this case is to
Chapter 4 :-9 Setup Guide - Consumer Lease Origination

change the source data. The application will revert to its previous status/sub status. The user will be directed to correct the specific error. Until the edits that return an ERROR value are addressed, the user cannot continue processing the application.
WARNING When an edits check fails in these cases, Oracle Day-break allows the process to continue. Warnings serve as informational messages and can be ignored. The user will be notified that an edit failed, but the failure need not stop the current processing of the application. The user can either ignore the error, or have the application revert to its previous status/sub status and address the error before processing the application further.
OVERRIDE The edit check has failed; however, Oracle Daybreak allows users with the responsibility specified in the Over-ride Responsibility field to continue. Multiple override levels can be setup depending upon the resulting value of the edit. If the user has override responsibility, the appli-cation will process as if the edit had not failed. If the user does not have override responsibility, the application will revert to its previous status/sub status and the sub status changes to OVERRIDE REQUIRED. Oracle Daybreak will direct the application to a user with the authority to pro-cess the application. (See the Queues chapter for more information)
Notes: 1. Do not set the Result field to Override for credit application edits.
2. The actual rank of the Override Responsibility is determined by the setup of the RESPONSIBILITY_CD. The lookup sub code for each responsibility lookup code indicates the Override Responsibility level.
Chapter 4 :-10 Setup Guide - Consumer Lease Origination

To set up the Edits page
1 On the Setup menu, choose Products > Lease.
2 Choose the Edits tab.
3 In the Edit Type Definition block, choose Origination or Open Interface.
4 In the Edit Type Definition block, enter the following information:
In this field: Do this:
Edit Enter the edit name (required).Description Enter the description for the edit (required).Edit Type Select the edit type code [EDIT_TYPE_CD] (required).Company Select the portfolio company associated with this edit.
This may be ALL or a specific company (Setup > Administration > User > Companies) (required).
Branch Select the portfolio branch within the company associ-ated with this edit. This may be ALL or a specific branch (Setup > Administration > User > Companies). This must be ALL if in the Company field you selected ALL (required).
Product Select the product associated with this edit. This may be ALL or a specific product (required).
State Select the state associated with this edit. This may be ALL or a specific state [STATE_CD] (required).
IMPORTANT: In selecting which edits type to use, Ora-cle Daybreak searches for a best match using the follow-ing attributes:
1 Company2 Branch3 Product4 State
Chapter 4 :-11 Setup Guide - Consumer Lease Origination
For this reason, i-flex solutions recommends creating one version of each edit type where ALL is the value in these fields.
System Defined? Yes No If Yes is selected, the entry is system defined. System defined entries cannot be modified. If No is selected, the entry is not system defined and it can be modified.
Enabled Select to enable the edit.EnabledSelect to enable the edit.
5 In the Edit Sub Type Definition block, enter the following information:
In this field: Do this:
Edit Sub Type Select the edit sub type for the edit [EDIT_SUB_TYPE_CD] (required).
Edit Select the edit based on the edit sub type (required). Value Enter the expected value for the edit. The Value field
records the threshold value for the edit. The actual func-tion of the entered value is dependent on the edit category (required).
Result This determines what action Oracle Daybreak will per-form when the edit fails. Select one of the following result options for each result: ERROR, WARNING, or OVERRIDE.(See the Queues chapter for more informa-tion)Note: Do not set the Result field to Override for credit application edits [EDIT_RESULT_CD] (required).
Override Responsibility Select the responsibility that can override the edit, if the edit result is an override. Designates the user responsibil-ity level required to continue processing applications that fail the edit based on the Value field. You may define the same edit multiple times with a Result = OVERRIDE and different Value and Override Responsibility combina-tions to encompass various results [RESPONSIBILITY_CD] (required).
System Defined? Yes No If Yes is selected, the entry is system defined. System defined entries cannot be modified. If No is selected, the entry is not system defined and it can be modified.
Enabled Select to enable the edit.
6 Save your entry.
Chapter 4 :-12 Setup Guide - Consumer Lease Origination

Cycles master tab (Cycles page)The Cycle page allows you to define the lease origination workflow process of your orga-nization. As you delineate the steps in the origination process, you will also define:
The user responsibilities that have access to perform the stepsAny edits you want Oracle Daybreak to perform between changes in status/sub status.
The following diagram displays the general concept of workflow:
Cycle code definitions drive the lease application cycle. The following pairs of status/sub status define status/sub statuses that have system defined meanings and should be included in your origination workflow, if they are not already included.
Note: The Oracle Daybreak status and sub status lists are predefined (Setup > Adminis-tration > System > Lookups >Lookup Type APP_STATUS_CD and APP_SUB_STAUS_CD) and cannot be changed by the Oracle Daybreak administrator. If you require additional sub status codes please contact i-flex solutions to determine whether they can be added.
Status/Sub status: Description:
NEW-BLANK This is the status/sub status of applications during data entry. Applications remain NEW-BLANK until you choose the Next Application button on the Application Entry form and Oracle Daybreak successfully performs the application edits check.
NEW-PRECREEN Oracle Daybreak is processing the prescreen edits to determine whether a credit report should be pulled for this application.
NEW-PRESCREEN Applications in this status/sub status have passed the prescreenAPPROVED edits. Oracle Daybreak will now request a credit bureau pull.
Chapter 4 :-13 Setup Guide - Consumer Lease Origination

REJECTED- Applications in this status/sub status failed the prescreen edits.PRESCREEN These applications will receive no further processing. The REJECTED producer will be sent a decision fax and the consumer will receive
an adverse action letter.
NEW- REVIEW Either based on the scoring of the application’s credit bureau(s)REQUIRED pull, or the fact that a credit bureau report was not successfully
obtained, the application needs to be reviewed by an underwriter.
NEW- RECOMMEND Based on the scoring of the application’s credit bureau(s) pull, theAPPROVAL application should be reviewed by an underwriter. However,
based on the current setup, Oracle Daybreak recommends approving this application.
NEW- RECOMMEND Based on the scoring of the application’s credit bureau(s) pull, theREJECTION application should be reviewed by an underwriter. However,
based on the current setup, Oracle Daybreak recommends reject-ing this application.
APPROVED-AUTO Based on the scoring of the application’s credit bureau(s) pull, APPROVED Oracle Daybreak automatically approved the application. The
producer will be sent a decision fax, and the application will be passed to funding.
REJECTED-AUTO Based on the scoring of the application’s credit bureau(s) pull, REJECTED Oracle Daybreak automatically rejected the application. The pro-
ducer will be sent a decision fax and the consumer will receive an adverse action letter.
APPROVED-BLANK Application has been manually approved. Normally this occurs when an application is in the NEW- RECOMMEND APPROVAL, NEW- RECOMMEND APPROVAL status/sub status, or less often in the NEW- RECOMMEND REJECTION status/sub status. Any cycle code definition with next values of APPROVED-BLANK should have an EDIT_TYPE_CD lookup value of APP APPROVAL EDITS to ensure that all of the required data has been gathered in making the decision to approve the application (unless the appli-cation is currently in a status/sub status that assures the APP APPROVAL EDITS have been run).
NEW-OVERRIDE A user without sufficient override authority attempted toREQUIRED approve an application, which, based on setup, required a higher
over-ride authority to approve.
APPROVED- A user places the application in this status to indicate the VERIFYING contract has been received from the producer.
Chapter 4 :-14 Setup Guide - Consumer Lease Origination

APPROVED-FINAL The contract has been reviewed and the data is correct. NormallyDOCUMENT CHECK this occurs when an application is in APPROVED-FINAL DOCU-
MENT CHECK OR CONDITIONED-FINAL DOCUMENT CHECK status/sub status. Any cycle code definition with next values of APPROVED-FINAL DOCUMENT CHECK or CONDITIONED-FINAL DOCUMENT CHECK should have an EDIT_TYPE_CD value of APP CONTRACT EDITS to ensure that all of the required data has been gathered in making the decision to approve the application, unless the application is currently in a status/sub sta-tus that assures the APP CONTRACT EDITS have run.
APPROVED-VERIFIED The application has been processed and is awaiting funding.
APPROVED-FUNDED The application has been funded, and a check requisition has been created. If Oracle Daybreak’s Customer Service form is being used, then an account is also created at this time.
REJECTED-BLANK The application for whatever reason is being manually rejected regardless of its current status/sub status. Any cycle code defini-tion with Next values of REJECTED-BLANK should have an EDIT_TYPE_CD lookup value of APP DECLINE EDITS to ensure that all of the required data has been gathered in making the deci-sion to approve the application (unless the application is currently in a status/sub status that assures the APP DECLINE EDITS have run).
WITHDRAWN-BLANK The applicants have indicated that they are no longer pursuing this lease.
CONDITIONED-<ANY> These status/sub status pairs are analogous to the corresponding APPROVED-<ANY> pair and indicate that the application has had additional conditions placed on its approval.
<ANY>- These OVERRIDE sub statuses indicate that the application<ANY OVERRIDE> required OVERRIDE approval. The meaning of the sub status is
analogous to the corresponding OVERRIDE sub status, and may require that specific EDITS run before proceeding.
<ANY>-AGED These applications have been decisioned but no contract has beenAPPLICATION received after a period of time determined by setup. If not acted
on, these applications will become VOID.
<ANY>-AGED Contracts have been received after a period of time determined byCONTRACT setup. If not acted on these applications will become VOID.
<ANY>-VOID Indicate application previously had a sub status of AGED CON-TRACT or AGED APPLICATION. These applications have not been completed and were made VOID after another period of time had passed.
Chapter 4 :-15 Setup Guide - Consumer Lease Origination

Using these status and sub status, let’s reexamine the early workflow diagram in this sec-tion.
Note: It is extremely important that the APP CONTRACT EDITS run prior to an application being funded. All cycle code definitions should be reviewed to ensure that there are no paths through the origination cycle that bypass this EDIT type.
To set up the Cycles page
1 On the Setup menu, choose Products > Lease.
2 Choose the Cycles tab.
Chapter 4 :-16 Setup Guide - Consumer Lease Origination

3 The Cycle Definition block displays what Oracle Daybreak cycle is being defined.
In this field: View this:
Cycle CN_LN_CE_ORG -- Code indicating that the setup is for consumer s.
Type ORIGINATION CYCLE -- Origination cycle for consumer lease [CYC_TYPE_CD].
4 An application’s status/sub status determines where in the Origination process the applica-tion currently is, and what actions are needed to allow the application to continue through the process.
In the Cycle Code Definition block, use the Current Code, Current Sub Code, Next Code, and Next Sub Code fields to specify the status of the application in the workflow. With a few exceptions, the codes are user-definable.
In this field: Do this:
Current Code Select the current code (status) to transition FROM (cur-rent status of the application) [APP_STATUS_CD] (required).
Current Sub Code Select the current sub code (sub status) to transition FROM (current sub status of the application) [APP_SUB_STATUS_CD] (required).
Next Code Select the current code (status) to transition TO (status the application can be assigned to based on the current status/sub status) [APP_STATUS_CD] (required).
Next Sub Code Select the sub code (sub status) to transition TO (sub sta-tus the application can be assigned to based on the cur-rent status/sub status) [APP_SUB_STATUS_CD] (required).
Edit Type Cd Along with each combination of Current Code/ Current Sub Code and Next Code/Next Sub Code, an edit can be associated with the step in the EDIT_TYPE_CD field. This ensures that Oracle Daybreak performs the set of checks before the next status/sub status is assigned.Select the edit type to verify when the transition occurs (If the edit set fails the status/sub status of the application will remain as it is. If the edit set requires an OVERRIDE, the status of the application will remain as it is, but the sub status will be changed to OVERRIDE REQUIRED) [EDIT_TYPE_CD] (required).
5 Use the Cycle Code Responsibility Definitions block to define the user groups that are provided or denied access to perform the step.
In this field: Do this:
Responsibility Code Select the responsibility that can change a status/sub sta-tus change. (There can be more than one responsibility for each code.) [RESPONSIBILITY_CD] (required).
6 Choose Allowed (Yes or No) to determines whether the responsibility is allowed to change to the next status/sub status.
7 Save your entry.
Chapter 4 :-17 Setup Guide - Consumer Lease Origination

Scoring tab (Scoring Models page)The Scoring Models page allows you to setup individual and multiple scoring models. You can define different scoring models by company, branch and product. Scoring models are used to automate the decisioning process on the Underwriting form and grade applica-tions.
When you choose Next Application on the Application Entry form after entering an appli-cation, Oracle Daybreak determines which scoring model to use by finding a best match. Oracle Daybreak searches the Company, Branch, and Product fields of all enabled scoring models that contain either the exact value on the application or ALL. (Exact matches for each field are given a higher weight than matches to ALL.) Oracle Daybreak then ranks the returned matches in descending order based on the weighted values and the hierarchical position of the field, then by Start Date. Oracle Daybreak recognizes the first row returned as the best match. This scoring model information is then used to determine the next status and sub status of the application.
If you use a standard bureau score as a scoring model, you can set up Oracle Daybreak to use the adverse action reasons provided by the standard bureau score on the Stipulations sub page.
To set up the Scoring Models page
1 On the Setup menu, choose Products > Lease.
2 Choose the Scoring tab, then choose the Scoring Models tab.
3 On the Scoring Models page, complete the following fields:
In this field: Do this:
Model Enter the code for the scoring model (required).Description Enter a description of the scoring model (required).Max Score Enter the maximum score allowed. (This is normally the
sum of the Max Value fields within the scoring parame-ters.) (required).
Company Select the company for the scoring model. This may be ALL or a specific company [PTC_COMPANY] (required).
Chapter 4 :-18 Setup Guide - Consumer Lease Origination

Branch Select branch within the company for the scoring model. This may be ALL or a specific branch [PCB_BRANCH]. This must be ALL if in the Company field you selected ALL) (required).
Product Select the product for the scoring model. This may be ALL or a specific product (Setup > Product >Lease > Products) (required).
Start Dt Enter the start date for the scoring model (required).End Dt Enter the end date for the scoring model (required).
4 Select the Bureau Score Reasons box to use the score reasons supplied by the credit bureau. If not selected, automatically rejected applications scored using this scoring model display the Adverse Action Reasons from the Parameters sub page.
5 Select the Auto Decision box to assign an application a status/sub status based on the grade associated with the score returned for this scoring model. If not selected, Oracle Daybreak assigns applications scored using this scoring model a status/sub status of NEW-REVIEW REQUIRED.
6 Select the Enabled box to enable the scoring model.
7 Save your entry.
Parameters sub pageThe Parameters sub page records the parameters used to determine the score calculated by the scoring model. You can define multiple parameters and adverse action reason associ-ated with each parameter in a scoring model. Each scoring parameter can have maximum values set. The score range is based upon the information in the Range Definition block on the Parameters sub page.
Oracle Daybreak calculates a final score by adding the score for each parameter in the scoring model. A parameter weighted value is used to find the four adverse action reasons, if bureau reasons are not used.
Note: A character parameter range definition should contain the exact value of the param-eter.
If the scoring parameter and range definitions were defined as below, then:
If the Value returned was: Then:
>= 0 & < 1000 Calculated values in this range would be translated into 0% of the Max Value (in this case 1000) for this parame-ter, which is 0.
>= 1000 & < 3000 Calculated values in this range would be translated into 25% of the calculated value for this parameter. A param-eter value of 1000 would result in a final value of 250. A parameter value of 2999 would result in a final value of 749.75.
Chapter 4 :-19 Setup Guide - Consumer Lease Origination

>= 3000 & < 5000 Calculated values in this range would be translated into 50% of the calculated value for this parameter. A param-eter value of 3000 would result in a final value of 1500. A parameter value of 4999 would result in a final value of 2499.5.
>= 5000 & < 10000 Calculated values in this range would be translated into 75% of the calculated value for this parameter. A param-eter value of 5000 would result in a final value of 3750. A parameter value of 9999 would result in a final value of 7499.25.
>= 1000 Calculated values in this range would be translated into 100% of the calculated value for this parameter. This would return the calculated value.
Note: Each scoring parameter should have range definitions defined that encompass all of the values that might result.
To set up the Parameters sub page for the auto-decisioning process
1 On the Setup menu, choose Products > Lease.
2 Choose the Scoring tab, then choose the Parameters sub tab.
3 In the Parameters block, enter the following information:
In this field: Do this:
Parameter Select the parameter from the LOV (required).Max Value Enter the maximum value allowed for the selected
parameter (required).Adverse Action Reason Select the adverse action reason from the LOV
[ADV_ACTION_APP_REASON_CD]. (If, on the Scoring Models page, the Bureau Screen Reasons box is selected for the scoring model, you cannot update this field) (optional).
Weighted Value Enter the adverse action weighted value. This indicates the priority of this parameter when determining which adverse action reasons to use on the application. The top ten adverse action reasons based on the weighted value of the parameter will be populated (required).
4 The Range Definition block allows you to translate the calculated value for a scoring parameter into the value to be used, depending on the returned value of the parameter.
In the Range Definition block, use the Value From field to enter the lowest calculated value to apply the specific translation. The ceiling of the range definition is based on the range definition with the next highest Value From or the Max Value of the scoring param-eter (which ever is less) (required).
Chapter 4 :-20 Setup Guide - Consumer Lease Origination

5 Choose one of these options to determine how values for a scoring parameters are trans-lated:
If you choose: Then:
% Max Value Calculated values within the range definition receives a value based on a percentage of the Max Value of the scor-ing parameter.
% Param Calculated values within the range definition receives a value based on a percentage of the calculated value of the scoring parameter.
Value Calculated values with in the range definition receives a specific value.
6 In the Percent / Value field, enter the percent or value to be used in the translation of the calculated value of the scoring parameter.
7 If you select the Enabled box, Oracle Daybreak will consider this range definition when translating values for this scoring parameter.
8 Save your entry.
Grades sub pageThe Grades sub page defines how Oracle Daybreak translates the scoring model scores into your organization’s grade. Oracle Daybreak uses these grades in the auto-decisioning process. Each grade has a specific status/sub status that informs Oracle Daybreak what to do with the application of a particular grade as it continues through the origination cycle.
Note: Each scoring model should have grade definitions defined that encompass all of the values that might result.
To set up the Grades sub page for the auto-decisioning process
1 On the Setup menu, choose Products > Lease.
2 Choose the Scoring tab, then choose the Grades sub tab.
Chapter 4 :-21 Setup Guide - Consumer Lease Origination

3 In the Grade Definition block, enter the following information:
In this field: Do this:
Score Enter the score the application receives (required).Credit Grade Select the grade to assign to an application
[CR_GRADE_CD] (required).Application Status Select the status to assign to applications with a score
starting with the value of this grade definition [APP_STATUS_CD_AUTO] (required).
Sub Status Select the sub status to assign to applications with a score starting with the value of this grade definition.Credit scoring only allows for only the following status/sub status pairs:APPROVED - AUTO APPROVEDREJECTED - AUTO REJECTEDNEW - REVIEW REQUIREDNEW - RECOMMEND APPROVALNEW - RECOMMEND REJECTION[APP_SUB_STATUS_CD](required).
4 Select Enabled to indicate that this grade definition will be considered when grading an application using this scoring model.
5 Save your entry.
Chapter 4 :-22 Setup Guide - Consumer Lease Origination

Scoring tab (Behavioral Scoring Models page)Behavior scoring examines the repayment trends during the life of the account and pro-vides a current analysis of the customer. This logical and systematic method identifies which accounts are more likely to perform favorably versus accounts where poorer perfor-mance is probable. This is useful when determining which other lease products a customer may qualify for.
This information appears on the Customer Service form in the Customer Service (2) master tab’s Account Details page in the Activity block’s Behavior Score field.
The Behavioral Scoring Models page allows you to setup individual and multiple behavior scoring models. Completing the Behavioral Scoring Models page is similar to completing the existing Scoring Parameters page, although new parameters have been added for behavioral scoring. You can define multiple behavior scoring models and depending upon the market situation and customer account behavior, enable only the models you want Oracle Daybreak to use.
Oracle Daybreak calculates behavior scores in a manner similar to how it calculates the Oracle Daybreak credit score during lease origination.
While Oracle Daybreak pricing scores apply to applications and are based on information recorded during lease origination, behavior scoring applies to accounts and is based on account history attributes and performed on a monthly basis.
Chapter 4 :-23 Setup Guide - Consumer Lease Origination

To set up the Behavioral Scoring Models page
1 On the Setup menu, choose Products > Lease.
2 Choose the Scoring tab.
3 On the Behavioral Scoring Models page, complete the following fields:
In this field: Do this:
Model Enter the model for the behavior score (required).Description Enter the description of the model (required).Max Score Enter the maximum score value for the behavior score.
(This is normally the sum of the Max Value fields within the scoring parameters.) (required).
Company Select the company which uses this behavior score. This may be ALL or a specific company [PTC_COMPANY] (required
Branch Select the branch corresponding to the company. This may be ALL or a specific branch [PCB_BRANCH]. This must be ALL if in the Company field you selected ALL) (required).
Product Enter the product to which the behavior score applies. This may be ALL or a specific product (Setup > Product > Lease > Products) (required).
Start Date Enter the start date for the behavior scoring model (required).
End Date Enter the end date for the behavior scoring model (required).
4 Select the Enabled box to enable the behavior scoring model.
5 Save your entry
Chapter 4 :-24 Setup Guide - Consumer Lease Origination

Parameters sub pageThe Parameters sub page records the parameters used to determine the score calculated by the behavior scoring model. The score behavior range is based upon the information in the Range Definition block on the Parameters sub page.
Oracle Daybreak calculates a final score by adding the score for each parameter in the scoring model. A parameter weighted value is used to find the four adverse action reasons, if bureau reasons are not used.
Note: A character parameter range definition should contain the exact value of the param-eter.
If the behavior scoring parameter and range definitions were defined as in the example above, then:
If the Value returned was: Then:
>= 0 & < 30 If the account was delinquent between 0 and 29 days, the behavior scoring model value would be 0.
>= 30 & < 60 If the account was delinquent between 30 and 59 days, the behavior scoring model value would be 200.
>= 60 & < 90 If the account was delinquent between 60 and 89 days, the behavior scoring model value would be 300.
>= 90 If the account was delinquent over 90 days, the behavior scoring model value would be 400.
Note: Each scoring parameter should have range definitions defined that encompass all of the values that might result.
Chapter 4 :-25 Setup Guide - Consumer Lease Origination

To set up the Parameters sub page for behavior scores
1 On the Setup menu, choose Products > lease.
2 Choose the Scoring tab, then choose the Behavioral Scoring Models tab.
3 Choose the Parameters sub tab.
4 In the Parameters block on the Parameters sub page, enter the following information:
In this field: Do this:
Parameter Select the parameter from the LOV (required).Max Value Enter the maximum value allowed for the selected
parameter (required).Enabled Select to enable the parameter.
5 The Range Definition block allows you to translate the calculated value for a behavior scoring parameter into the value to be used, depending on the returned value of the param-eter.
In the Range Definition block, use the Value From field to enter the lowest calculated value to apply the specific translation. The ceiling of the range definition is based on the range definition with the next highest Value From or the Max Value of the behavior scor-ing parameter (which ever is less) (required).
6 Choose one of these options to determine how values for a behavior scoring parameter are translated:
If you choose: Then:
% Max Value Calculated values within the range definition receives a value based on a percentage of the Max Value of the behavior scoring parameter.
% Param Calculated values within the range definition receives a value based on a percentage of the calculated value of the behavior scoring parameter.
Value Calculated values with in the range definition receives a specific value.
7 In the Percent / Value field, enter the percent or value to be used in the translation of the calculated value of the behavior scoring parameter.
8 If you select the Enabled box, Oracle Daybreak will consider this range definition when translating values for this behavior scoring parameter.
9 Save your entry.
Chapter 4 :-26 Setup Guide - Consumer Lease Origination

Contract tab (Lease Contract page)The Lease Contract page allows you to define the lease instruments used within your Ora-cle Daybreak system. A lease instrument is a contract used by a financial organization with specific rules tied to it. When processing an application, an instrument associated with the application informs Oracle Daybreak of the type of contract being used for the approved lease. This ensures that all parameters tied to the instrument are setup for the account as it is booked - without requiring you to do it.
Items defined in the contract are “locked in” when you choose Select Instrument on the Funding form’s Contract (5) page. These values cannot be changed on the Customer Ser-vice form’s Contract (5) master tab after the lease has been booked and funded.
The Contract Definition block’s Instrument and Description fields allow you to enter the financial instrument’s name and description, for example; INS-: VEHICLE - FIXED RATE.
Instruments can be setup at different levels:
• Company• Branch• Product• Application state
The following groups of parameters are setup at the instrument level (Each has its own block on the Lease Contract block):
• Accrual• Other• Billing• Extensions• Scheduled dues• Delinquency
Chapter 4 :-27 Setup Guide - Consumer Lease Origination

To set up the Contract page
1 On the Setup menu, choose Products > Lease.
2 Choose the Contract tab, then choose the Lease Contract tab.
3 In the Contract Definition block, enter the following information:
In this field: Do this:
Instrument Enter the code identifying the lease instrument (required).
Description Enter the description of the lease instrument being defined.
Company Select the company for the lease instrument. This may be ALL or a specific company (Setup > Administration > User > Companies) (required).
Branch Select the branch within the company for the lease instru-ment. This may be ALL or a specific branch (Setup > Administration > User > Companies). This must be ALL if in the Company field you selected ALL) (required).
Billing Cycle Select the billing cycle selected [_BILL_CYCLE_CD] (required).
Product Select the product for the lease instrument. This may be ALL or a specific product (required).
State Select the state in which the loan instrument is used. This may be ALL or a specific state [STATE_CD] (required).
Start Dt Enter the start date for the loan instrument (required).End Dt Enter the end date for the loan instrument (required).
IMPORTANT: In selecting which lease type to use, Ora-cle Daybreak searches for a best match using the follow-ing attributes:
1 Billing Cycle
Chapter 4 :-28 Setup Guide - Consumer Lease Origination

2 Start Date3 Company4 Branch5 Product6 State
For this reason, i-flex solutions recommends creating one version of each lease type where ALL is the value in these fields.
4 Choose Enabled and Oracle Daybreak will consider this contract definition when select-ing a lease instrument for an application.
5 In the Billing block, enter the following information:
In this field: Do this:
Billing Type Select the billing type [LEASE_BILL_TYPE_CD] (required).
Billing Mthd Select the billing method [LEASE_BILL_TYPE_CD] (required).
Prebill Days Enter the pre bill days (required).Spread Select the default payment spread (required).
6 In the Other block, enter the following information:
In this field: Do this:
Lease Type Select the lease type [LEASE_TYPE_CD] (required).Refund Tolerance Enter the refund tolerance amount (required).Pmt Tolerance Enter the payment tolerance amount (required).% Enter the payment tolerance percentage (required).Writeoff Tolerance Amt Enter the writeoff tolerance amount (required).Refund Allowed Select this check box if refunds are allowed for this lease
instrument (required).Int Amortization Freq Select the interest amortization frequency:
DAILY-or-MONTHLY (MONTHS END)[AMORTIZE_FREQ_CD] (required).
7 In the Scheduled Dues block, enter the following information:
In this field: Do this:
Max Due Day Chg Days Enter the maximum days allowed (required). Due Day Min Enter the minimum due day allowed (required).(Due Day) Max Enter the maximum due day allowed (required).Max # Due Day Changes - Enter the maximum number of due day changes allowedYear in a year (required).(Max # Due Day Changes) Enter the maximum number of due day changes allowedLife in the life of the lease (required).
8 In the Tax block, enter the following information:
In this field: Do this:
Sales Tax Mode Select the sales tax mode [SALES_TAX_METHOD_CD] (required).
Chapter 4 :-29 Setup Guide - Consumer Lease Origination
Sales Tax Mthd Select the sales tax method [SALES_TAX_METHOD_CD] (required).
9 In the Delinquency block, enter the following information to define how delinquencies are handled for leases using this lease instrument.
In this field: Do this:
Late Charge Grace Days Enter the number of grace days allowed for the payment of a due date before a late charge is assessed on the account (required).
Delq Grace Days Enter the number of grace days allowed for the payment of a due date before an account is considered delinquent. This affects DELQ Queues, Oracle Daybreak reporting, and the generation of collection letters (required).
Delq Category Method Select the delinquency category method to determine the how Oracle Daybreak populates delinquency counters on the Customer Service form. Note: This value does not affect credit bureau reporting [DLQ_CATEGORY_METHOD_CD] (required).
10 Save your entry.
Chapter 4 :-30 Setup Guide - Consumer Lease Origination
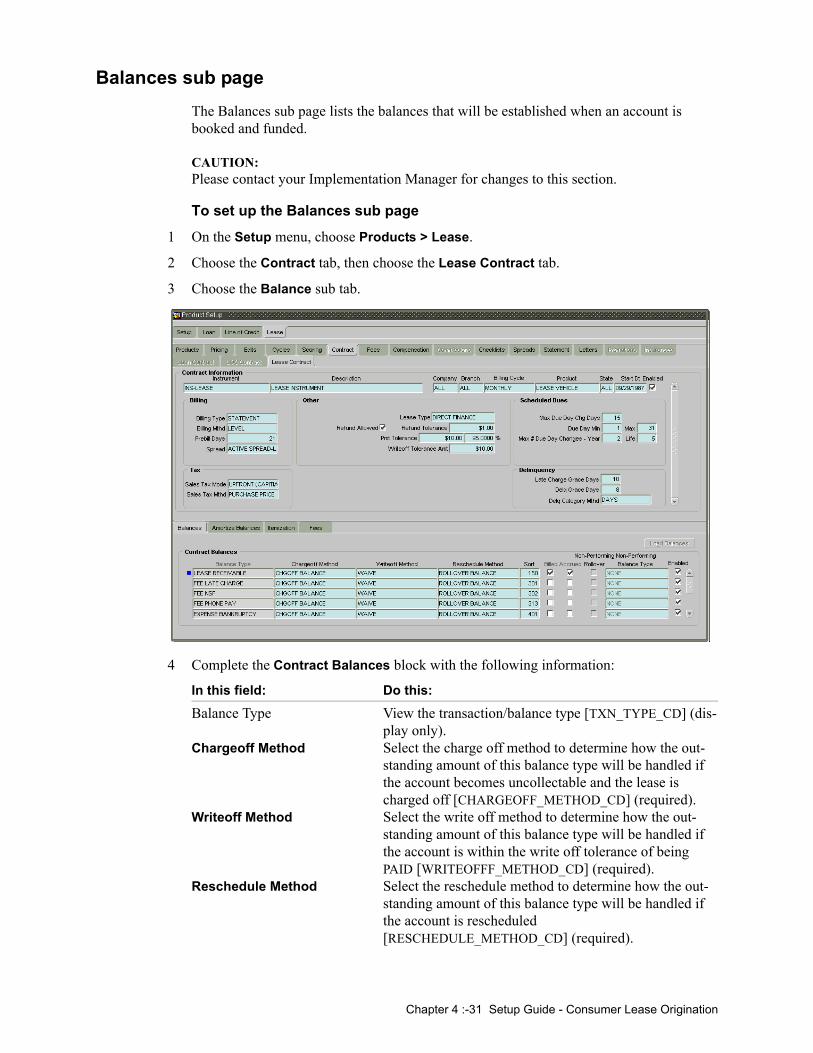
Balances sub pageThe Balances sub page lists the balances that will be established when an account is booked and funded.
CAUTION:Please contact your Implementation Manager for changes to this section.
To set up the Balances sub page
1 On the Setup menu, choose Products > Lease.
2 Choose the Contract tab, then choose the Lease Contract tab.
3 Choose the Balance sub tab.
4 Complete the Contract Balances block with the following information:
In this field: Do this:
Balance Type View the transaction/balance type [TXN_TYPE_CD] (dis-play only).
Chargeoff Method Select the charge off method to determine how the out-standing amount of this balance type will be handled if the account becomes uncollectable and the lease is charged off [CHARGEOFF_METHOD_CD] (required).
Writeoff Method Select the write off method to determine how the out-standing amount of this balance type will be handled if the account is within the write off tolerance of being PAID [WRITEOFFF_METHOD_CD] (required).
Reschedule Method Select the reschedule method to determine how the out-standing amount of this balance type will be handled if the account is rescheduled [RESCHEDULE_METHOD_CD] (required).
Chapter 4 :-31 Setup Guide - Consumer Lease Origination

Sort Enter the sort order of how account balances will appear on the Customer Service form’s Balance page (required).
5 If the balance can be billed, select the Billed box. This indicates that outstanding amounts for this balance type are considered a part of the billed amount. This also determines whether payments applied to this balance type are considered when satisfying outstanding amounts due.
6 If the interest is accrued on the balance type, select the Accrued box. This indicates that outstanding amounts for this balance type will be included when interest is accrued against the account.
7 The Non-Performing Rollover box does not apply to leases and is dormant.
8 The Non-Performing Balance Type field does not apply to leases and will contain the default entry of NONE.
9 Select the Enabled box to indicate that this balance type will be created when the account is booked and funded.
When defining a balance type, you must choose the Load Balances button. Once the bal-ance definitions have been loaded, you may update entries on Contract Balance block, but you may not load them again.
10 Choose Load Balances.
Oracle Daybreak loads the currently defined balances for accounts.
Amortize Balances sub pageWith the Amortize Balances sub page, you can select one or more balances to be amor-tized over the life of the lease. You can also define the amortization method.
Note: Interest is automatically amortized, so there is no need to manually set it up.
To set up the Amortize Balances sub page
1 On the Setup menu, choose Products > Lease.
2 Choose the Contract tab, then choose the Lease Contract tab.
Chapter 4 :-32 Setup Guide - Consumer Lease Origination

3 Choose the Amortize Balances sub tab.
4 Complete the Amortization Balances block with the following information:
In this field: Do this:
Amortize Balance Type Select the amortize transaction type [AMORTIZE_TXN_TYPE_CD] (required).
Amortization Method Select the amortization method used to calculate the net amortization amount [AMORTIZE_CALC_METHOD_CD] (required).
Cost/Fee Method Select the amortization fee method [AMORTIZE_FEE_METHOD_CD] (required).
Sort Enter the sort sequence to define the order of the amor-tize balances (required).
5 Select Enabled to enable the amortize balance to be created when the account is booked and funded.
6 Save your entry.
Itemization sub pageOn the Itemization sub page, you can define the itemized components for each type of contract, indicate if it is required, and determine whether it has a positive or negative bear-ing on the contract itemization math. You can establish the following groups of itemiza-tion transactions:
Advance Total amount that is not a part of financed fees; in other words, the total amount the customer requested to be advanced.
Financed Fees Finances Fees is not available for leases.Pre-paid Fees Fees that are paid by the consumer prior to the funding of the line
of credit. These fees are not rolled into the balance of the line of
Chapter 4 :-33 Setup Guide - Consumer Lease Origination

credit but are considered as part of the finance charge and are included in the calculation of the APR.
Producer Fees that are paid to or by the producer of the line of credit; for example, a fee that is being charged to the producer. These trans-actions will affect proceeds.
Escrow Escrow is not available for leases.
To set up the Itemization sub page
1 On the Setup menu, choose Products > Lease.
2 Choose the Contract tab, then choose the Lease Contract tab.
3 Choose the Itemization sub tab.
4 Choose the option button to indicate the type of itemization you are defining: Advance, Financed Fees, Pre-Paid Fees, Producer, or Escrow.
5 Complete the Contract Itemization block with the following information:
In this field: Do this:
Itemization Select the itemization type (required).Transaction Select the funding transaction type (required).Amortize Balance Select the amortize balance affected by this itemization
transaction. Note: Advance itemizations do not affect amortize balances (required).
Refund Allowed Select to indicate refund is allowed for this itemization.Refund Method Select refund calculation method (required).Escrow Select the escrow (required).Required Escrow If this is an escrow account, select this box to signal an
escrow is required during the application process (though at that time the user can choose Opt Out to decline.)
Chapter 4 :-34 Setup Guide - Consumer Lease Origination

Sort Enter the sort order to define the order of the itemization transactions (required).
6 If the itemized transaction increases the group balance, choose Pos.-or- If the itemized transaction decreases the group balance, choose Neg.
7 Select the Taxable box if the itemization type is taxable.
8 In the Itemization Formula field, select the itemization formula description (required).
9 In the Itemization Type field, select the itemization (required).
10 In the Disc. Rate field, enter the discount rate for the itemization (optional).
11 Select Enabled to enable the itemization and indicate that this itemization transaction will be created when the account is booked and funded.
12 Save your entry.
Fees sub pageAny fees that are defined in the contract are set up on the Fees sub page. Oracle Daybreak currently supports the following contract fees:
• Late charges• Non sufficient funds• Extensions
The Fees sub page allows you to define those fees whose value and method of calculation are set at the time of the lease. As these amounts cannot be change after the lease is booked and funded, you should only set up fees here that will not change over the life of the lease. Individual contract fee types may be defined multiple times in order to create graduated fees.
Note: Certain fees, like late fees, can be set up at contract, as well as state level. In such cases, the contract fee, if present, is used first.
Assume the above contract fee definitions are a part of the same lease instrument.
If the outstanding Transaction Amount was: Then:
>= $0.00 & < $500.00 Oracle Daybreak would assess a fee of $10.00 when a payment was not received within the late charge grace days of the due date.
>= $500.00 & < $1000.00 Oracle Daybreak would assess a fee of between $10.00 and $30.00 based on 5.5% of the outstanding payment amount when a payment was not received within the late charge grace days of the due date.
>= $1000.00 Oracle Daybreak would assess a fee between $35.00 and $150.00 based on 4.5% of the outstanding payment
Chapter 4 :-35 Setup Guide - Consumer Lease Origination

amount when a payment was not received within the late charge grace days of the due date.
To set up the Fee sub page
1 On the Setup menu, choose Products >Lease.
2 Choose the Contract tab, then choose the Lease Contract tab.
3 Choose the Fees sub tab.
4 Complete the Contract Fees block with the following information:
In this field: Do this:
Type Select the fee type (required).Txn Amt From Enter the lowest transaction amount or balance amount
against which this contract fee definition may be applied (required).
Method Select the method of calculating the fee to be assessed [FEE_CALC_METHOD_CD] (required).
Min Amount Enter the minimum fee amount to be assessed (required).Max Amount Enter the maximum fee amount to be assessed. If you
entered FLAT in the Method field, then this field is not used and is normally populated as $0.00 (required).
Percent Enter the fee percentage of the outstanding transaction amount to be assessed as a fee. This amount will be adjusted to fall within the Min Amount and the Max Amount.
5 Select Enabled and this contract fee will be created when the account is booked and funded.
6 Save your entry.
Chapter 4 :-36 Setup Guide - Consumer Lease Origination
Fees tab (Fee page)The Fee page allows you to define fees that may be automatically assessed by Oracle Day-break. The Fee Definitions block records fees not defined within the Contract page’s Fees sub page.
The following fee types are currently supported for automatic assessment:
• Late charges• Non sufficient funds• Extensions
Fees can be calculated as either a flat amount or a percentage of payment due based on fee type.
You can specify minimums and maximums for fee amounts in the Min Amt and Max Amt fields. Different fee rules can be setup at the company/branch level.
When Fees are assessed, Oracle Daybreak determines the best match using all enabled fee definitions for that meet the following criteria:
• Exactly match the fee type being assessed.• Have an effective date that is greater than or equal to the start date.• Have a Txn Amt From that is greater than or equal to the outstanding amount related
to the fee assessment.• Match either the value or ALL for all other criteria (Exact matches for each field are
given a higher weight than matches to ALL.)
The returned rows are then given a descending rank based on the weighted values and the hierarchical position of the following criteria:
1 Company2 Branch3 Product4 Application state5 Transaction amountt6 Start Date.
On the ranked rows - the first row is returned as the best match.
Note: Certain fees, like late fees, can be set up at contract, as well as state level. In such cases, the contract fee, if present, is used first. Only if the contract fee is not present is the state fee used.
To set up the Fees page
1 On the Setup menu, choose Products > Lease.
Chapter 4 :-37 Setup Guide - Consumer Lease Origination

2 Choose the Fees tab.
3 The Fee Definition block defines the individual fees. Complete the Fee Definition block with the following information:
In this field: Do this:
Fee Rule Enter the fee rule used to identify the particular fee defi-nition (required).
Fee Type Select the fee type (required).Calc Method Select the method of calculating the fee
[FEE_CALC_METHOD_CD] (required).Min Amt Enter the minimum amount for the fee (required).Max Amt Enter the maximum amount for the fee. If you selected
FLAT AMOUNT in the Calc Method field, then this field is not used and is normally populated as $0.00 (required).
Percent Enter the percentage value of the outstanding transaction amount to be assessed as a fee. This amount will be adjusted to fall within the Min Amount and the Max Amount (required).
Company Select the portfolio company. This may be ALL or a spe-cific company (Setup > Administration > User > Com-panies) (required).
Branch Select the portfolio branch. This may be ALL or a spe-cific branch (Setup > Administration > User > Compa-nies). This must be ALL if in the Company field you selected ALL) (required).
Product Select the product. This may be ALL or a specific prod-uct. The available values come from a validated LOV based on the selected Billing Cycle setup and the Lease Product setup (required).
State Select the state for this fee. This may be ALL or a specific state [STATE_CD] (required).
Txn Amt From Enter the transaction or balance amount. The fee is calcu-lated using the specifications of this record only if the transaction amount is greater than the value specified in this field (and less than this field in another record for the same fee) (required).
Start Dt Enter the start date (required).End Dt Enter the end date (required).
IMPORTANT: In selecting which fee to use, Oracle Day-break searches for a best match using the following attributes:
Chapter 4 :-38 Setup Guide - Consumer Lease Origination
1 Company2 Branch3 Product4 State5 Amount (Txn Amt From)6 Effective/start date (Start Dt)
For this reason, i-flex solutions recommends creating one version of each fee where ALL is the value in the these fields.
It is also recommended that you define a default printer for an Organization, Division and Department.
4 Select Enabled to enable the fee.
5 Save your entry.
Compensation tab (Lease Compensation Plans page)With the Lease Compensation Plans page, you can define compensation plans for produc-ers who supply the financial institution with applications. These compensation plans can be set up at various levels depending upon your organization’s needs.
This information is used on the Compensation sub page on the Contract (5) master tab of the Funding form. When you choose Load on the Compensation sub page, Oracle Day-break displays a Compensation Plans dialog box containing the compensation plans that best match the selection criteria from the Lease Compensation Plans page.
Compensation can be paid to a producer in a number of ways:
Payment calculation method: Description:
AS EARNED The compensation amount is paid out in pieces over the life of the lease based upon the interest earned.
PAY AS U GO The compensation amount is paid out in pieces over the life of the lease based upon the interest received by virtue of the payment.
UPFRONT The entire compensation amount is paid at the time of booking the lease.
UPFRONT MONTH END The entire compensation amount is paid at the month-end of booking the lease.
UPFRONT MONTH END The amount financed will be amortized at a rate(AMORTIZE SPREAD FORMULA) equal to the difference between the contract rate
and buy rate. The finance charge thus derived would be considered the base compensation amount. Oracle Daybreak then allows this base compensation to be split into two components:
Chapter 4 :-39 Setup Guide - Consumer Lease Origination
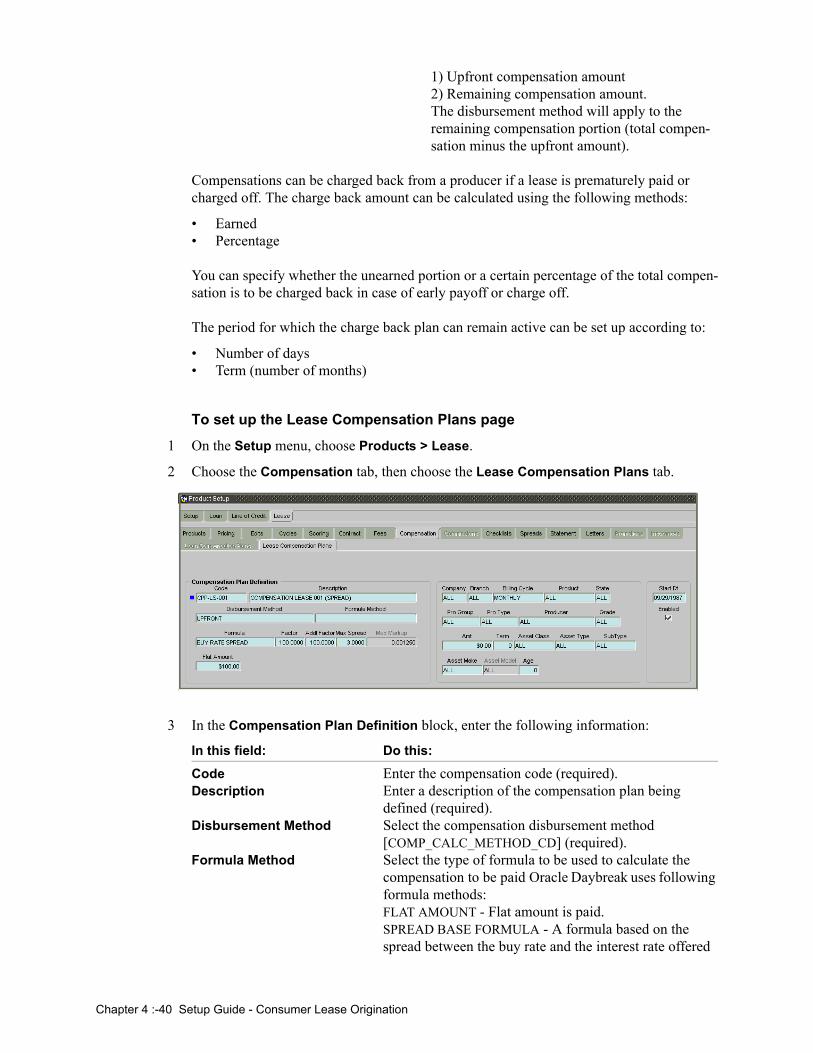
1) Upfront compensation amount 2) Remaining compensation amount.The disbursement method will apply to the remaining compensation portion (total compen-sation minus the upfront amount).
Compensations can be charged back from a producer if a lease is prematurely paid or charged off. The charge back amount can be calculated using the following methods:
• Earned• Percentage
You can specify whether the unearned portion or a certain percentage of the total compen-sation is to be charged back in case of early payoff or charge off.
The period for which the charge back plan can remain active can be set up according to:
• Number of days• Term (number of months)
To set up the Lease Compensation Plans page
1 On the Setup menu, choose Products > Lease.
2 Choose the Compensation tab, then choose the Lease Compensation Plans tab.
3 In the Compensation Plan Definition block, enter the following information:
In this field: Do this:
Code Enter the compensation code (required).Description Enter a description of the compensation plan being
defined (required).Disbursement Method Select the compensation disbursement method
[COMP_CALC_METHOD_CD] (required).Formula Method Select the type of formula to be used to calculate the
compensation to be paid Oracle Daybreak uses following formula methods:FLAT AMOUNT - Flat amount is paid.SPREAD BASE FORMULA - A formula based on the spread between the buy rate and the interest rate offered
Chapter 4 :-40 Setup Guide - Consumer Lease Origination

to the consumer is used [COMP_FORMULA_METHOD_CD] (required).
Formula Select the spread formula to be used to calculate Com-pensation [COMP_SPREAD_FORMULA _CD] (required).
Factor Enter the compensation factor; that is, the percentage applied to the compensation to be paid. If this value is not 100.00, it will reduce the compensation amount (required).
Addl Factor Enter the additional compensation factor. If this value is not 100.00, it will further reduce the compensation amount (required).
Max Spread Enter the maximum compensation spread. This limits the spread on which compensation will be paid. Spreads exceeding this value will be treated as if the spread was the specified value (required).
Max Markup View the maximum compensation markup (display onlyFlat Amount Enter the flat compensation amount (required).
4 In the unnamed block, enter the following information:
In this field: Do this:
Company Select the portfolio company. This may be ALL or a spe-cific company (Setup > Administration > User > Com-panies) (required).
Branch Select the portfolio branch within the company for the selected compensation plan. This may be ALL or a spe-cific branch (Setup > Administration > User > Compa-nies). This must be ALL if in the Company field you selected ALL (required).
Billing Cycle Select the billing cycle for the compensation plan [LEASE_BILL_CYCLE_CD] (required).
Product Select the product for the selected compensation plan. This may be ALL or a specific product. The available val-ues come from a validated LOV based on the selected Billing Cycle setup and the Lease Product setup (required).
State Select the state for the selected compensation plan. This may be ALL or a specific state [STATE_CD] (required).
Pro Group Select the producer group for the compensation plan. This may be ALL or a specific producer group [PRO_GROUP_CD] (required).
Pro Type Select the producer type for the compensation plan. This may be ALL or a specific producer type [PRO_TYPE_CD] (required).
Producer Select the producer for the compensation plan. This may be ALL or a specific producer. The available values come from a validated LOV based on the Pro Group and Pro Type. (Setup > Producers) (required).
Grade Select the credit grade for this compensation plan. This may be ALL or a specific grade [CR_GRADE_CD] (required).
Chapter 4 :-41 Setup Guide - Consumer Lease Origination

Amount Enter the minimum amount financed for the compensa-tion plan (required).
Term Enter the minimum term for the compensation plan (required).
Asset Class Select the asset class for the compensation plan. This may be ALL or a specific asset class. The available values come from a validated LOV based on the Collateral Type [HOME_ASSET_CLASS_CD, OTHER_ASSET_CLASS_CD, VEHICLE_ASSET_CLASS_CD] (required).
Asset Type Select asset type for the compensation plan. This may be ALL or a specific asset type. The available values come from a validated LOV based on you assets setup (Setup >Administration > System > Lookups) (required).
SubType Select the asset sub type for this compensation plan. This may be ALL or a specific asset sub type. The available values come from a validated LOV based on you assets setup (Setup >Administration > System > Lookups) (required).
Asset Make Enter the asset make. If ALL was selected for either Asset Type or Asset Sub Type, then ALL will be the only avail-able selection for the asset make (required).
Asset Model Enter the asset model. If ALL was selected for either Asset Type or Asset Sub Type, then ALL will be the only available selection for the asset model (required).
Age Enter the asset age (required).Start Dt Enter the start date for the compensation plan (required).End Dt Enter the end date for the compensation plan (required).
IMPORTANT: In selecting which compensation to use, Oracle Daybreak searches for a best match using the fol-lowing attributes:
1 Billing cycle2 Start date3 Company4 Branch5 Product6 State7 Producer group8 Producer type9 Producer/dealer10 Grade11 Amount12 Term13 Asset class14 Asset type15 Asset sub type
16 Asset make17 Asset model18 Asset age
Chapter 4 :-42 Setup Guide - Consumer Lease Origination

5 Select Enabled and Oracle Daybreak will consider this entry when selecting a compensa-tion plan.
6 Save your entry.
Checklists tab (Checklists page)A checklist is an optional set of steps to follow when completing a form in Oracle Day-break, such as the Underwriting form, the Funding form, or completing a page involving collections on the Customer Service form. Checklists can be used as guidelines to help ensure that Oracle Daybreak users follow your business’s standard operating procedures and enter all required data. Some checklists are optional, but others such as those related to application decisions or contract verification, may be required depending on the edit sets defined in your Oracle Daybreak system. Checklists page allows you to specify the con-tents of the checklist.
The following checklists are built in to the origination workflow and can be viewed when edits are checked:
• DECISION VERIFICATION CHECKLIST.• CONTRACT VERIFICATION CHECKLIST.
The following checklists are built in to the Customer Service form and can be viewed dur-ing collection tasks:
• BANKRUPTCY CHECKLIST• CHARGE-OFF CHECKLIST • REPOSSESSION/FORECLOSURE CHECKLIST
You can define additional checklists for your organization. You can set up multiple check-lists for a single type of checklist. These checklists can be differentiated by:
• Company • Branch• Product• Application state
Chapter 4 :-43 Setup Guide - Consumer Lease Origination

To set up the Lease Checklist page
1 On the Setup menu, choose Products > Lease.
2 Choose the Checklists tab.
3 Complete the Checklist Type Definition block with the following information:
In this field: Do this:
Checklist Code Enter the checklist code that identifies checklist being defined (required).
Description Enter the description for the checklist (required).Checklist Type Select the checklist type to define where the specific
checklist will be available in Oracle Daybreak [CHECKLIST_TYPE_CD] (required).
Company Select the portfolio company associated with the check-list. This may be ALL or a specific company (Setup > Administration > User > Companies) (required).
Branch Select the portfolio branch associated with the checklist. This may be ALL or a specific branch (Setup > Adminis-tration > User > Companies). This must be ALL if in the Company field you selected ALL) (required).
Product Select the product associated with the checklist. This may be ALL or a specific product. The available values come from a validated LOV based on the selected Billing Cycle setup and the Lease Product setup (required).
State Select the state associated with the checklist type. This may be ALL or a specific state [STATE_CD] (required).
IMPORTANT: In selecting which edits type to use, Ora-cle Daybreak searches for a best match using the follow-ing attributes:
1 Company2 Branch3 Product4 State
Chapter 4 :-44 Setup Guide - Consumer Lease Origination
For this reason, i-flex solutions recommends creating one version of each checklist type where ALL is the value in these fields.
Enabled Select to enable the checklist.
4 Checklist actions are steps (a set of one or more tasks) related to the checklist you are cre-ating. They are loaded on the Checklist sub page.
Complete the Checklist Action Definition block with the following information:
In this field: Do this:
Action Code Enter the action code for the checklist (required).Description Enter the description for the action type (required).Sort Enter the sort order to define the placement of the action
type on the Checklist sub page (required).
5 Select Enabled to include this action in the checklist.
6 Save your entry.
Chapter 4 :-45 Setup Guide - Consumer Lease Origination

Org. Fees tab (Lease Origination Fees page)Oracle Daybreak supports the auto computation of origination itemized fees. System administrators can define and maintain the itemization formula on the Lease Origination Fees page.
An itemization formula can be set up as a computation of other itemizations (such as add-ing or subtracting one itemization from another) and can consist of multiple itemizations. An itemization formula will have a minimum and maximum value. You can set up a for-mula value range to be used as the final value.
Itemizations are linked to a product with Product Setup form’s Lease Products page.
After you set up the itemization formula on the Product Setup form’s Lease Origination Fees page, you can attach it to an itemization on the Product Setup form’s Itemization sub page (Setup menu > Products command > Lease command > Contract tab > Lease Contract tab > Itemization sub tab).
One itemization can be based on one formula, while the same formula can be attached to multiple itemizations. If a formula is attached to a contract itemization and that formula requires an itemization not present Lease Origination Fee page, Oracle Daybreak displays an error message.
Oracle Daybreak will search for any “circular dependency” at the time the contract is enabled. An example of a circular dependency is when Itemization1 has Formula1 attached requiring Itemization2 for computation and Itemization2 has Formula2 attached requiring Itemization1 for computation.
To set up the Lease Origination Fees page
1 On the Setup menu, choose Products > Lease.
2 Choose the Org. Fees tab, then choose the Lease Origination Fees tab.
Chapter 4 :-46 Setup Guide - Consumer Lease Origination

3 Complete the Lease Origination Fees page with the following information:
In this field: Do this:
Itemization Formula Definition block:Itemization Formula Enter the formula code to define computation (required).Description Enter the description for the formula (required).Min Enter the minimum value that should be considered to
compute the final value of formula (required).Max Enter the maximum value that should be considered to
compute the final value of formula (required).Enabled Select the Enabled indicator to allow the stipulations to
be used by Oracle Daybreak (required).
Itemization Details block:Itemization Select the itemization based on which the itemization for-
mula will derive its computed value (required).Percent Enter the percentage value that should be considered
while computing value for itemization formula (required).
Sort Enter the sort sequence for the itemization to be consid-ered while computing the value of the itemization for-mula (required).
Pos. (+)/Neg. (-) Select the positive or negative sign that needs to be con-sidered between two itemizations for computing the value of the itemization formula (required).
Enabled Select the Enabled indicator to allow the itemization details to be used by Oracle Daybreak (required).
Range Details block:Amt From Enter the value up to which the percentage of final value
of the itemization formula to be considered for the final value of itemization formula (required).
Percent Enter the percentage value that should be considered while computing the value for the final value of the item-ization formula (required).
Enabled Select the Enabled indicator to allow the range details to be used by Oracle Daybreak (required).
4 Save your entry.
Chapter 4 :-47 Setup Guide - Consumer Lease Origination

Stipulations tab (Lease Stipulations page)Oracle Daybreak supports the automatic generation of default stipulations for lines of credit on the Underwriting form’s Stipulations sub page. The default stipulations can be maintained by company, branch, product, state, application status and application sub-sta-tus on the Product Setup form’s LoC Stipulations page.
To set up the Lease Stipulations page
1 On the Setup menu, choose Products > Lease.
2 Choose the Stipulations tab, then choose the Lease Stipulations tab.
3 Complete the Lease Stipulations page with the following information:
In this field: Do this:
Stipulation Setup block:Company Select the portfolio company associated with the default
stipulations (required).Branch Select the portfolio branch associated with the default
stipulations (required).Product Select the product associated with the default stipulations
(required).State Select the state associated with the default stipulations
(required).Application Status Select the application status associated with the default
stipulations (required).Application Sub-Status Select the application sub status associated with the
default stipulations (required).Enabled Select the Enabled indicator to allow the default stipula-
tions to be used Oracle Daybreak (required).Stipulation Details block:Stipulations Select the stipulation (required).Sort Enter the sort sequence for the stipulation (required).Enabled Select the Enabled indicator to allow the stipulations
details to be used by Oracle Daybreak (required).
4 Save your entry.
Chapter 4 :-48 Setup Guide - Consumer Lease Origination

Spreads tab (Spreads page)The Spreads page allows you to define the payment allocation strategy used by your busi-ness while applying payments to accounts. Spreads are selected on the Payment Entry (and Payment Maintenance) pages. The payment to the account according to the spread can be viewed on the Transaction page on the Customer Service form.
The Spread Definition block is used to define individual spreads. Many common spreads have already been defined. With each spread, you can define the due date advancement method to use, BRING CURRENT, FUTURE, or NONE.
The Spread Transaction Definitions block records the order in which balances are satisfied when a payment is applied to an account. (Unless someone indicates otherwise, payments will be applied against each balance type, in sort order, until either there is no remaining balance, or the payment has been completely allocated.)
To open the Spreads page
1 On the Setup menu, choose Products > Lease.
2 Choose the Spreads tab.
3 In the Spread Definition block, enter the following information:
In this field: Do this:
Spread Enter the code identifying the spread (required).Description Enter the description for the spread. (This usually reflects
when this spread is used.) (required).Due Dt Adv Select the due date advancement code that determines
how payments applied using this spread will affect due amounts. Oracle Daybreak uses the following predefined Due Dt Adv Codes:
Chapter 4 :-49 Setup Guide - Consumer Lease Origination

BRING CURRENT - The payment allocations for transac-tions against an account’s outstanding balances that make up the billed balances. This will be applied against billed due amounts.FUTURE - The payment allocations for transactions against an accounts outstanding balances that make up the billed balances. This will be applied against billed due amounts. Any remaining amount allocated against billed balances will be accumulated and applied against future due amounts. [DUE_DT_ADVANCEMENT_CD] (required).NONE - Payments applied using this spread will not affect the due amounts of the account in any way.
Enabled Select box to enable the spread.
4 In the Spread Transaction Definition block, enter the following information:
In this field: Do this:
Balance Type Select the balance type to allocate a portion of the received payment against (required).
Note: i-flex solutions recommends that you always setup an ADVANCE/PRINCIPAL balance type for each spread.
Cycle Enter the balance cycle during which to apply payments. This collects payment on bad (unpaid) cycles. You can only go back five cycles. Cycle will have a value of 0 for s (required).
Sort Enter the sort order in which the balance type has pay-ments allocated against it (required).
5 Select Enabled and Oracle Daybreak will consider this spread transaction when allocating payments.
6 Choose Load Details.
Oracle Daybreak loads the spread transaction definitions for newly created spread defini-tions to ensures that all balance types related to payment allocation will be included in a spread.
7 Save your entry.
Chapter 4 :-50 Setup Guide - Consumer Lease Origination

Statement tab (Messages page)The Messages page allows you to set up messages that appear on account statements sent to customers. You can set up statement messages for different products. When Oracle Daybreak generates a statement for an account, all statement messages matching the selec-tion criteria are included in the statement file for that account.
Oracle Daybreak inserts the message in the Text field into the statement file produced dur-ing the nightly batch job for the appropriate consumers.
A record of an account’s statement history, including the messages included in the state-ment, appears on the Statements page on the Customer Service form.
To set up the Statements (Messages) page
1 On the Setup menu, choose Products > Lease.
2 Choose the Statement tab.
3 In the Statement Messages block on the Messages page, enter the following informa-tion:
In this field: Do this:
Seq Enter the sort sequence of how the statement message should be printed (required).
Code Enter the message code identifying the statement mes-sage (required).
Text Enter the text of the statement message (required).Company Select the company for the statement message. This may
be ALL or a specific company (Setup > Administration > User > Companies) (required).
Branch Select the branch within the company for the statement message. This may be ALL or a specific branch (Setup >
Chapter 4 :-51 Setup Guide - Consumer Lease Origination
Administration > User > Companies). This must be ALL if in the Company field you selected ALL (required).
Product Select the product for which this statement message will be used. This may be ALL or a specific product (required).
IMPORTANT: In selecting which message to use, Oracle Daybreak searches for a best match using the following attributes:
1 Company2 Branch3 Product4 Producer
For this reason, i-flex solutions recommends creating one version of each edit type where ALL is the value in these fields.
Producer Select the producer for the statement message. This may be ALL or a specific producer. The available values come from a validated LOV based on the Pro Group and Pro Type (required).
Start Dt Enter the first date the statement message is available (required).
End Dt Enter the last date the statement message is available (required).
4 Select Enabled to enable the message.
5 Save your entry.
Chapter 4 :-52 Setup Guide - Consumer Lease Origination

Letters tab (Letters page)The Letters page allows you to define letters that Oracle Daybreak automatically generates when the application or the account meets certain conditions, or “trigger events.” Each let-ter has its own trigger event. For example, you can configure Oracle Daybreak to automat-ically send a welcome letter when an application becomes an account or send a collection letters when an account becomes delinquent.
Oracle Daybreak supports the following types of letters:
Type of letter: Definition:
CONDITIONAL ADVERSE Generated in nightly batch jobs for applications that wereACTION LETTER declined. This letter is sent to the consumer to indicate
the reasons why the application was declined. This letter also indicates steps that the consumer may take to gain approval of the lease application.
ADVERSE_ACTION LETTER Generated in nightly batch jobs for applications that were declined. This letter is sent to the consumer to indicate the reasons why the application was declined.
CONTRACT FUNDING Generated when an application is APPROVED: FUNDEDFAX/EMAIL or CONDITIONED: FUNDED. This letter is sent to the
producer.
DECISION FAX/EMAIL Generated when an application is APPROVED, CONDI-TIONED, or REJECTED. This letter is sent to the con-sumer or producer, depending on whether the lease is a direct or in-direct lease.
WELCOME LETTER Generated when an application is APPROVED: FUNDED. This letter is sent to the consumer.
When Oracle Daybreak generates letters, it searches the Letters page for letter definitions that meet the following criteria:
• Definition is enabled.• Definition is an exact match of the letter code being generated.• Definition is a match of either the application/account value or ALL for all other crite-
ria.
Exact matches for each field are given a higher weight than matches to ALL.
The returned rows are then given a descending rank based on the weighted values and the hierarchical position of these fields:
1 Company2 Branch3 Product4 State5 Channel
On the ranked rows, the first row is returned as the best match.
Chapter 4 :-53 Setup Guide - Consumer Lease Origination

To set up the Letters page
1 On the Setup menu, choose Products > Lease.
2 Choose the Letters tab.
3 In the Letters Definition block on the Lease Letters page, enter the following informa-tion:
In this field: Do this:
Letter Code Enter the code for the letter (required).File Name Enter the file name of the Oracle report used to generate
the letter. The file should be named <File Name>.rep on your server (required).
Batch Printer Select the batch printer being used to generate the letter (Setup > Administration > User > Printers) (required).
Batch User Select the Oracle Daybreak user who will submit this let-ter. This will normally be set to BATCH (Setup > Admin-istration > User > Users) (required).
Letter Type Select the type of letter you want to generate [CORRESPONDENCE_TYPE_CD] (required).
Company Select the portfolio company for which this letter will be used. This may be ALL or a specific company (Setup > Administration > User > Companies) (required).
Branch Select the portfolio branch for which this letter will be used. This may be ALL or a specific branch (Setup > Administration > User > Companies). This must be ALL if in the Company field you selected ALL) (required).
Product Select the product for which this letter will be used. This may be ALL or a specific product (required).
State Select the state for which this letter will be used. This may be ALL or a specific state [STATE_CD] (required).
Channel Select the application source (channel) for the letter. This may be ALL or a specific channel [APP_SOURCE_CD] (required).
4 Select Enabled to enable this letter definition.
5 Save your entry.
Chapter 4 :-54 Setup Guide - Consumer Lease Origination
CHAPTER 5 : QUEUE SETUP FORM
When processing an application, various Oracle Daybreak users might work on the appli-cation to complete different tasks. A data entry person might complete the Application Entry form before an underwriter works on the application using the Underwriting form. Later, another Oracle Daybreak user might work on the application using the Funding form.
The application processing workflow facilitates the movement of the application from one person to another with queues. Queues create a work list of applications waiting for a par-ticular and common task to be performed, such as application entry or verification. Oracle Daybreak’s powerful queuing module automates this otherwise manual process. The Queue Setup form allows you to manage workflow and work assignments on a daily basis and ensure that all applications are in the queues of the appropriate users at all times. Any time an application’s status is changed, Oracle Daybreak checks whether the application is in the right queue.
Oracle Daybreak will sort queues based on an application’s status and sub status.
Oracle Daybreak distinguishes between two types of queues: Origination Queues and Cus-tomer Service Queues.
Origination QueuesThe Origination page on the Queue Setup form allows you to set up queues that direct applications to Oracle Daybreak users during the lease origination cycle. Origination queues are based on an application’s status and sub status. Whenever an application changes its status/sub status, the Oracle Daybreak moves the application to a queue based on the information on this page.
You can define the lease origination queues and the corresponding selection criteria based on:
• Application status• Application sub status• Product type• Funding type• Product• Underwriter• State• Channel• Producer type• Producer
With lease origination queues set up, the applications in your work queue automatically appear on the Results page when you open the Underwriting or Funding form. The queue to which you are assigned appears in the Queue Name field. You would then begin pro-cessing the applications in the order of which they are listed, double-clicking the applica-tion at the top of the list to load it.
Chapter 5 :-1 Setup Guide - Consumer Lease Origination

Origination tab (Origination page)The Origination page allows you to determine how applications are directed to users who process applications. Whenever applications change status or sub status, the application is placed in a queue based on the information on this page.
To set up the Queue Setup form’s Origination page
1 On the Setup menu, choose Queues > Origination.
2 On the Origination page, complete the following fields:
In this field: Do this:
Queue Name Enter queue name (required).Queue Description Enter queue description. Note: Oracle Daybreak uses this
entry when referring to the queue on other forms (see the example on the previous page) (required).
Override Responsibility Select an override responsibility code, if an override queue. Note: Oracle Daybreak uses the data in the Over-ride Responsibility field to determine which queue to assign an application, if an application triggers an “over-ride” edit. (required).
Priority Enter the priority number. Oracle Daybreak sorts applica-tions by the higher number, so an application with a pri-ority of 5 will be sorted as a higher priority than one with a 3 (required).
Company Select company (required).Branch Select branch (required).Enabled Select to enable the queue (required).
3 The Selection Criteria block on the Selection Criteria sub page allows you to further filter the applications in a particular queue. This block is generally used by organizations pro-cessing over 2,000 applications a day.
On the Selection Criteria sub page’s Application Status block, use the Status and Sub Status fields to define the credit application status/sub status combinations that should be considered for the queue.
In this field: Do this:
Status Select application status (required)Sub Status Select application sub status (required)
Chapter 5 :-2 Setup Guide - Consumer Lease Origination

4 In the Selection Criteria block, complete the following fields to define the other selection criteria for the queue.
Note: All is the default value for each field.
In this field: Do this:
Product Type Select product type (required).Funding Type Select funding type (required).Product Select product (required).Underwriter Select underwriter (required).State Select state (required).Channel Select channel (required).Producer Type Select producer type (required).Producer Select producer (required).
5 Choose the Responsibilities and Users sub tab.
6 In the Responsibilities block, use the Responsibility field to define the users by respon-sibly that are authorized to work on the queue.
7 Select Enabled to enable the responsibility.
8 In the Users block, use the User field to define the users who are authorized to work on the queue.
In this field: Do this:
User Select user (required).Name View the user name (display only).Enabled Select to enable.
9 Save your entry.
Chapter 5 :-3 Setup Guide - Consumer Lease Origination

Chapter 5 :-4 Setup Guide - Consumer Lease Origination

CHAPTER 6 : EVENTS FORM
The Events form gives you the ability to set up “trigger events” with associated actions which Oracle Daybreak performs during lease origination. The fields on this form are both system and user defined.
During lease origination, when an application moves from one status/sub status to another, or changes condition, Oracle Daybreak can trigger an event and perform the associated event actions. This can occur either online or in batch mode. There are three pages on the Events form to set up and maintain these events:
• Setup page• Online page• Batch page
Note: Only predefined events and actions can be set up on the Events form. You cannot create new event types or actions types.
As processing events and associated actions require additional processing at the server level, the performance of the transactions, for which the events are set up, may be adversely affected dependent upon your specific configuration.
Setup tab (Setup page)The Setup page contains two predefined blocks of information, the Event Types block and the Event Action Types blocks. This page and its two blocks provide a master table for set-ting up the online and batch events. This setup triggers the event, which in turn triggers the event’s associated actions during application entry.
To set up the Setup page
1 On the Setup menu, choose Events.
2 Select the Lease product to which the event applies.
Chapter 6 :-1 Setup Guide - Consumer Lease Origination

3 The Event Types block is system defined and lists the event type codes supported in Ora-cle Daybreak.
In this field: Do this:
Event Type Code Enter the event type code (required).Description Enter the event description (required).Process Type Enter the process type (BATCH or ONLINE)
[EVENT_PROCESS_TYPE_CD] (required).Entity Type Enter the entity type (APPLICATIONS)
[EVENT_ENTITY_TYPE_CD] (required).Engine Type Enter the engine type (MONETRARY TRANSACTIONS
PROCESSING, NON-MONETRAY TRANSACTION PRO-CESSING, CONDITION/ASSIGNMENT PROCESSING, APPLICATION STATUS CHANGE, CREDIT BUREAU PROCESSING, or CORRESPONDENCE) [EVENT_ENGINE_TYPE_CD] (required).
4 Select or clear the Enabled box to activate or disable the event type.
5 System is a display only check box. If selected, it indicates that the event type is system define. If cleared, it indicates that the event type is user defined.
6 The Event Action Types block is system defined and lists the action codes supported in Oracle Daybreak.
In this field: Do this:
Action Code Enter the action code (required).Description Enter the action description (required)Process Type Enter the process type (BATCH or ONLINE)
[EVENT_PROCESS_TYPE_CD] (required)Entity Type Enter the entity type (APPLICATIONS)
[EVENT_ENTITY_TYPE_CD] (required)Engine Type Enter the engine type (MONETRARY TRANSACTIONS
PROCESSING, NON-MONETRAY TRANSACTION PRO-CESSING, CONDITION/ASSIGNMENT PROCESSING, APPLICATION STATUS CHANGE, CREDIT BUREAU PROCESSING, or CORRESPONDENCE) [EVENT_ENGINE_TYPE_CD] (required).
7 Select or clear the Enabled box to activate or disable the action.
8 System is a display only check box. If selected, it indicates that the action is system define. If cleared, it indicates that the action is user defined.
9 Save your entry.
Chapter 6 :-2 Setup Guide - Consumer Lease Origination

Online tab (Online page)The Online page allows you to set up the events performed online by Oracle Daybreak. Oracle Daybreak supports the following online events:
1 The change in application status / sub status to APPROVED – REHASHING.
The events that can be performed online after each of the events listed above are as fol-lows:
• Generate correspondence for an application• Send a credit bureau request for an application.
The Online page allows you to set up the online events by defining all online events and the event criteria actions.
To set up the Online page
1 On the Setup menu, choose Events.
2 Select the Lease product to which the event applies.
3 Select the Online tab.
4 In the Events block, enter the following information:
In this field: Do this:
Event Code Enter the event code (required).Event Type Enter the event type (required).Frequency Enter the event frequency
[EVENT_FREQUENCY_TYPE_CD] (required).
5 Select the Synchronous box to set the event as synchronous (any failure in triggering the event will fail to trigger the entire transaction).
-or- Clear the Synchronous box to set the event as asynchronous (any failure in the event will
Chapter 6 :-3 Setup Guide - Consumer Lease Origination

not affect the transaction, which will be successfully completed).
6 Select or clear the Enabled box to activate or disable the event type.
7 The Events Criteria block allows you to name and describe the query for an event, as well as enable or disable the query. Use this block to enter the following information:
In this field: Do this:
Query Name Enter the query name (required).Description Enter the query description (required).
8 Select or clear the Enabled box to activate or disable the event criteria.
Criteria Details sub pageThe Criteria Details sub page allows you to define the selection criteria for the event. The event engine uses these criteria to determine which application to include in the event action.
To set up the Criteria Details sub page
1 On the Setup menu, choose Events.
2 Select the Lease product to which the event applies.
3 Select the Online tab.
4 Select the Criteria Details sub tab.
5 In the Criteria block, define the event selection criteria with the following fields:
In this field: Do this:
Seq Enter sequence numbers (required).( Enter left bracket (optional).Parameter Select the parameter (required).Comparison Select comparison operator
[COMPARISON_OPERATOR_CD] (required).Criteria Value Enter criteria value (required).) Enter right bracket (optional).Logical Enter logical operator (optional).
6 Save your entry.
Action sub page
Chapter 6 :-4 Setup Guide - Consumer Lease Origination

The Actions sub page records the actions Oracle Daybreak performs after the event is triggered.
To set up the Action sub page
1 On the Setup menu, choose Events.
2 Select the Lease product to which the event applies.
3 Select the Online tab.
4 Select the Action sub tab.
5 In the Actions block, define the action you want Oracle Daybreak to perform for the event by entering the following information. (You can set up more than one event action for a particular event, then use the Seq field to define the order in which the events will occur):
In this field: Do this:
Event Action Enter the event action (required).Seq Enter sequence numbers (required).
6 For each event action, use the Action Parameters block to set up the required action parameters and values.
In this field: Do this:
Parameter Enter the event action (required).Value Enter sequence numbers (required).
7 Select or clear the Enabled box in the Actions block to activate or disable the event action.
8 Save your entry.
Chapter 6 :-5 Setup Guide - Consumer Lease Origination

Batch tab (Batch page) The Batch page allows you to set up the events performed as a batch transaction by Oracle Daybreak. Oracle Daybreak supports the following predefined batch events for applica-tion. (These batch events are listed in the Events Types block on the Setup page):
• APPLICATION LEVEL BATCH EVENT #01• APPLICATION LEVEL BATCH EVENT #02• APPLICATION LEVEL BATCH EVENT #03• APPLICATION LEVEL BATCH EVENT #04• APPLICATION LEVEL BATCH EVENT #05• APPLICATION LEVEL BATCH EVENT #06• APPLICATION LEVEL BATCH EVENT #07• APPLICATION LEVEL BATCH EVENT #08• APPLICATION LEVEL BATCH EVENT #09• APPLICATION LEVEL BATCH EVENT #10
To set up the Batch page
1 On the Setup menu, choose Events.
2 Select the Lease product to which the event applies.
3 Select the Batch tab.
4 On the Batch page, use the Events block to enter the following information:
In this field: Do this:
Event Code Enter the event code (required).Event Type Enter the event type (required).Frequency Enter the event frequency
[EVENT_FREQUENCY_TYPE_CD] (required).
5 The Synchronous box is cleared as all batch events are set as asynchronous; any failure in the event will not affect the transaction, which will be successfully completed.
6 Select or clear the Enabled box to activate or disable the event type.
Chapter 6 :-6 Setup Guide - Consumer Lease Origination
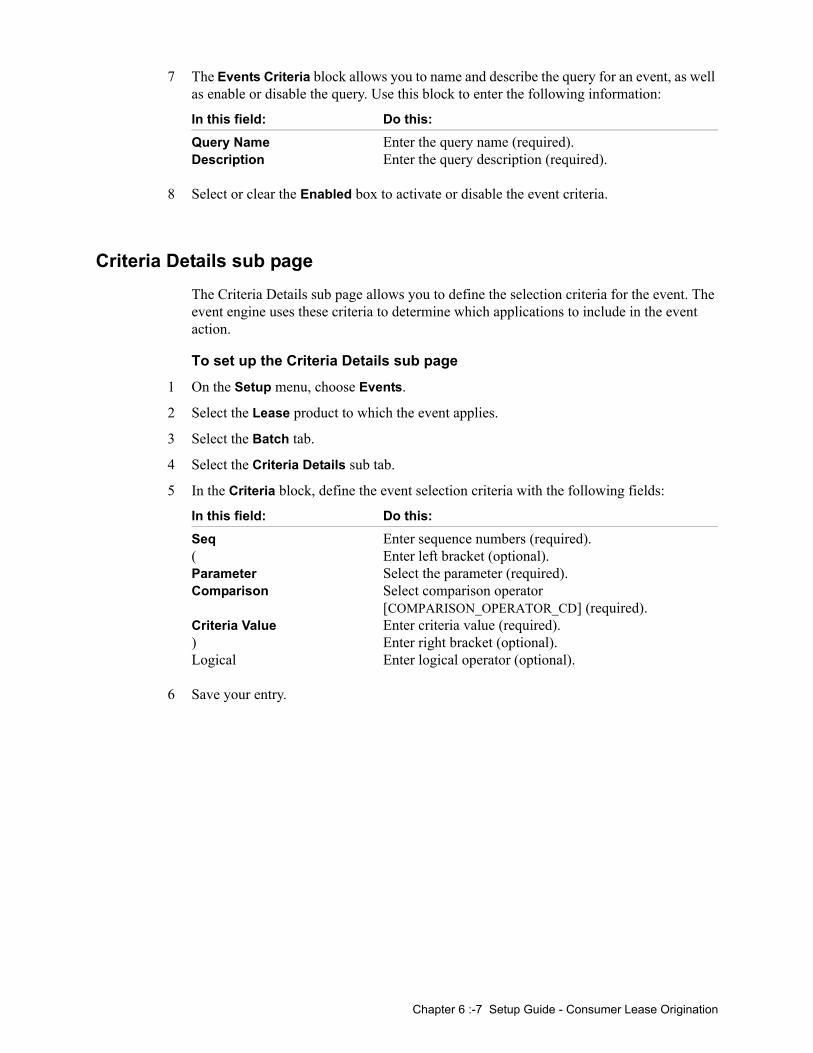
7 The Events Criteria block allows you to name and describe the query for an event, as well as enable or disable the query. Use this block to enter the following information:
In this field: Do this:
Query Name Enter the query name (required).Description Enter the query description (required).
8 Select or clear the Enabled box to activate or disable the event criteria.
Criteria Details sub pageThe Criteria Details sub page allows you to define the selection criteria for the event. The event engine uses these criteria to determine which applications to include in the event action.
To set up the Criteria Details sub page
1 On the Setup menu, choose Events.
2 Select the Lease product to which the event applies.
3 Select the Batch tab.
4 Select the Criteria Details sub tab.
5 In the Criteria block, define the event selection criteria with the following fields:
In this field: Do this:
Seq Enter sequence numbers (required).( Enter left bracket (optional).Parameter Select the parameter (required).Comparison Select comparison operator
[COMPARISON_OPERATOR_CD] (required).Criteria Value Enter criteria value (required).) Enter right bracket (optional).Logical Enter logical operator (optional).
6 Save your entry.
Chapter 6 :-7 Setup Guide - Consumer Lease Origination

Actions sub pageThe Action sub page allows you to define the actions performed in the batch event. Oracle Daybreak supports the following batch event actions:
• Send letter for an application • Generate correspondence for an application.
To set up Action sub page
1 On the Setup menu, choose Events.
2 Select the Lease product to which the event applies.
3 Select the Batch tab.
4 Select the Action sub tab.
5 In the Actions block, define the action you want Oracle Daybreak to perform for the event by entering the following information. (You can set up more than one event action for a particular event, then use the Seq field to define the order in which the events will occur):
In this field: Do this:
Event Action Enter the event action (required).Seq Enter sequence numbers (required).
6 For each event action, use the Action Parameters block to set up the required action parameters and values.
In this field: Do this:
Parameter Enter the event action (required).Value Enter sequence numbers (required).
7 Select or clear the Enabled box in the Actions block to activate or disable the event action.
8 Save your entry.
Chapter 6 :-8 Setup Guide - Consumer Lease Origination

Monitoring eventsYou can verify the status of events and event actions on the Monitor Jobs page of the Util-ities form.
To monitor events
1 On the Monitor menu, choose System > Jobs.
2 On the Monitor Jobs block, choose Back Ground in the Job Type block.
Oracle Daybreak displays the status for all asynchronous events that have been completed or failed for an application.
Chapter 6 :-9 Setup Guide - Consumer Lease Origination

Chapter 6 :-10 Setup Guide - Consumer Lease Origination

CHAPTER 7 : CREDIT BUREAU SETUP FORM
In Oracle Daybreak, an important part of the origination process is pulling a credit report from a credit bureau and scoring that information against a user-defined risk model. These credit reports can be pulled both automatically and manually.
After you enter an application, Oracle Daybreak compares its contents against prescreen criteria. If the application passes a prescreen edits check, Oracle Daybreak advances the status of the application and automatically pulls a credit report.
You can manually request a credit report for an applicant or any other party included on the application, such as cosigners and spouses by selecting the bureau from which you want to pull the report. If more than one report type is defined for the selected bureau, you can indicate the type of report you want to pull.
The Oracle Daybreak credit bureau service has been enhanced to support the Experian Net Connect and Equifax Internet System to System interfaces. Experian Net Connect and Internet System to System are client/host gateways designed to allow access to credit bureau agency systems through the public Internet. With this enhancement, the Oracle Daybreak credit bureau service can access Experian and Equifax systems using any one of three methods -dial-up modem, frame relay, and now the Internet. Experian has announced that they are de-supporting dial-up access as of May 31, 2004. The Oracle Daybreak credit bureau service will not be immediately modified to remove support for Experian dial-up connections, but after May 31, 2004 the credit bureau service will effectively only support two connectivity methods for accessing Experian systems. Current Oracle Daybreak cus-tomers accessing Experian through dial-up will need to choose between frame relay and Net Connect before May 31, 2004 to avoid a disruption of service.
Credit Bureau Setup details• The credit bureau from which the report is pulled is determined by the applicant’s zip
code. The credit bureau interface searches the information in the Credit Bureau Zip Matrix tab and matches the applicant’s zip code to determine the bureau(s) from which to request a report.
• The number of credit reports automatically pulled per applicant is controlled through the credit request parameter CRB_MAX_BUREAU_PULL. If this parameter is set to 1, a credit bureau request will be made for the Bureau1 credit bureau from the zip code matrix. Likewise, if this parameter is set to 2, a credit bureau request will be made for the Bureau1 and the Bureau2 credit bureaus from the zip code matrix.
• Oracle Daybreak automatically pulls credit reports for only the primary applicant and the primary applicant's spouse (for joint applications) unless the CRB_ALL_APL_BUREAU_PULL credit request parameter is set to Y. However, if the parameter is set to Y, Oracle Daybreak pulls credit reports for all applicants on the loan, regardless of their relationship to the primary borrower.
• Passwords, default report formats, and other required information from the credit bureaus are set up in the Report Formats page.
Chapter 7 :-1 Setup Guide - Consumer Lease Origination

Preparing to use Experian credit reportsContact an Experian sales representative for information about pulling Experian credit reports. After the proper agreements are completed, and depending on the access method chosen, Experian will provide you with the necessary information needed to set up the credit bureau service in Oracle Daybreak. On Oracle Daybreak’s Credit Bureau Setup form, on the Report Format page, the Credit Bureau Setup block uses generic terms for the data needed for credit bureau access. Some of the fields are not always required, and Experian employees may use different names in conversation when discussing these fields.
The following table summarizes the data needed for each Experian access method:
There should be no need to get new member codes and passwords when switching credit bureau access methods (moving from dial-up to Net Connect). The member codes and passwords are not dependent on the connection method used to access the bureau.
Frame relay access is from the database server to the Experian host though a TCP/IP socket connection. The connection is outbound only and it is to a specific port (699 or 700) on the Experian host.
The Oracle Daybreak credit bureau service will be accessing Experian Net Connect ser-vice through HTTP to the ECALS URL supplied by Experian as well as by the HTTPS to the URL returned as a response to the ECALS URL inquiry (the credit request URL). This access is from the database server (not the iAS server) and access through a proxy server is not supported. The connections are outbound only and they connect to the standard ports at Experian (80 for the ECALS URL, 443 for the credit request URL).
Chapter 7 :-2 Setup Guide - Consumer Lease Origination

Preparing to use Equifax credit reportsContact an Equifax sales representative for information about pulling Equifax credit reports. After the proper agreements are completed, and depending on the access method chosen, Equifax will provide you with the necessary information needed to setup the credit bureau service in Oracle Daybreak. On Oracle Daybreak’s Credit Bureau Setup form, on the Report Format page, the Credit Bureau Setup block uses generic terms for the data needed for credit bureau access. Some of the fields are not always required, and Equifax employees may use different names in conversation when discussing these fields.
The following table summarizes the data needed for each Equifax access method.
There should be no need to get new member codes and passwords when switching credit bureau access methods (moving from dial-up to Internet System to System), the member codes and passwords are not dependent on the connection method used to access the bureau.
Frame relay access is from the database server to the Equifax host through a TCP/IP socket connection. The connection is outbound only and it is to a specific port (6091) on the Equifax host.
The Oracle Daybreak credit bureau service will be accessing the Equifax Internet System to System service through HTTPS to the URL supplied by Equifax. This access is from the database server (not the iAS server) and access through a proxy server is not sup-ported. The connections are outbound only and they connect to the standard HTTPS port at Equifax (443).
Chapter 7 :-3 Setup Guide - Consumer Lease Origination

Preparing to use TransUnion credit reportsContact an TransUnion sales representative for information about pulling TransUnion credit reports. After the proper agreements are completed, and depending on the access method chosen, TransUnion will provide you with the necessary information needed to setup the credit bureau service in Oracle Daybreak. On Oracle Daybreak’s Credit Bureau Setup form, on the Report Format page, the Credit Bureau Setup block uses generic terms for the data needed for credit bureau access. Some of the fields are not always required, and TransUnion employees may use different names in conversation when discussing these fields.
The following table summarizes the data needed for each TransUnion access method.
There should be no need to get new member codes and passwords when switching credit bureau access methods (moving from dial-up to frame relay), the member codes and pass-words are not dependent on the connection method used to access the bureau. Frame relay access is from the database server to the TransUnion host through a TCP/IP socket connection. The connection is outbound only and it is to a specific port (10001) on the TransUnion host.
Preparing to use CSC credit reportsContact an CSC sales representative for information about pulling CSC Tri-Merge credit reports. After the proper agreements are completed, and depending on the access method chosen, CSC will provide you with the necessary information needed to setup the credit bureau service in Oracle Daybreak. On Oracle Daybreak’s Credit Bureau Setup form, on the Report Format page, the Credit Bureau Setup block uses generic terms for the data needed for credit bureau access. Some of the fields are not always required, and CSC employees may use different names in conversation when discussing these fields.
The following table summarizes the data needed for each CSC access method.
The Oracle Daybreak credit bureau service will be accessing CSC Tri-Merge via HTTPS to the URL supplied by CSC. This access is from the database server (not the iAS server) and access through a proxy server is not supported. The connections are outbound only and they connect to the standard HTTPS port at CSC (443).
Chapter 7 :-4 Setup Guide - Consumer Lease Origination

Preparing to use Credco credit reportsContact a First American Credco sales representative for information about pulling Credco credit reports. First American Credco offers many different products and services. Oracle Daybreak supports pulling merged credit reports from the CredcoConnect interface operating in a server to server mode. After the proper agreements are completed, Credco will provide you with the necessary information needed to set up the credit bureau service in Oracle Daybreak. On Oracle Daybreak's Credit Bureau Setup form's Report Format page, the Credit Bureau Setup block uses generic terms for the data needed for credit bureau access. Some of the fields are not always required, and Credco employees may use different names in conversation when discussing these fields.
The following table summarizes the data needed for each CSC access method.
The Oracle Daybreak credit bureau service will be accessing CredcoConnect via HTTPS to the URL supplied by Credco. This access is from the database server (not the iAS server) and access through a proxy server is not supported. The connections are outbound only and they connect to the standard HTTPS port at Credco (443).
In addition to the member code, password, origin code, and URL, you will also need a cli-ent certificate file and public key from Credco. The certificate and key are used to authen-ticate the connection between Oracle Daybreak and CredcoConnect. Request the client certificate in Windows PFX format. The Oracle Daybreak Lending Suite interface will ultimately use the file in PKCS12 format, but it is easier to install if it starts out as a PFX file. (See the later section on Oracle Wallet Manager setup for instructions on what to do with the certificate file.)
Chapter 7 :-5 Setup Guide - Consumer Lease Origination

Request master tabThe Credit Bureau Setup form’s Request master tab contains the following pages:
• Report Formats• Connections• Zip Matrix• Parameters• Score Reasons
Report Formats pageThe Reports Formats page captures and tracks the attributes related to the multiple types of reports offered by the credit bureau agencies. When a company enlists the service of a credit bureau, the credit bureau provides a membership code and password. This informa-tion needs to be entered on the Reports Formats page before you can request a credit report. You must define at least one report for each credit bureau from which you want to pull reports.
The information on the Report Formats page is location-specific. If the business requires different membership codes for each location, be it a company or branch, then individual records must be set up.
The Score Type, Additional Product, and Inquiry Limit fields on the Credit Report Setup block are optional. They may not apply to all credit bureau types and even if they do apply, you may want to leave them blank and rely on a default value set up at the credit bureau.
To set up the Report Formats page
1 On the Setup menu, choose Credit Bureau > Request.
2 Choose the Report Formats tab.
Chapter 7 :-6 Setup Guide - Consumer Lease Origination

3 In the Credit Bureau block, enter the following information:
In this field: Do this:
Bureau Name Enter the name of the credit bureau company (required).Short Name Enter the abbreviated or short name for the bureau
(required).Source Select the credit bureau source (required).Address Enter the address line 1 for the credit bureau (required).Address 2 (unlabeled) Enter the address line 2 for the credit bureau (optional).City Enter the city for the credit bureau address (required).St Select the state of the credit bureau address (required).Zip Select the zip code for the credit bureau address
(required).Zip Extension (unlabeled) Enter the zip extension for the credit bureau address
(optional).Country Select the country of the credit bureau address (required).Phone Enter the primary phone number for the credit bureau
(required).Phone extension (unlabeled) Enter the phone extension for the primary phone number
(optional).Phone Enter the alternate phone number for the credit bureau
(optional).Phone extension (unlabeled) Enter the phone extension for the alternate phone number
(optional).Fax Enter the primary fax number for the credit bureau
(required).Fax Enter the alternate fax number for the credit bureau
(optional).4 In the Credit Bureau Setup block, enter the following information:
In this field: Do this:
Company Select the portfolio company that will be using the above credit bureau (required).
Branch Select the portfolio branch from the company that will be using the above credit bureau (required).
Description Enter the credit report format description (required).Member Code Enter the credit bureau member code (assigned by
bureau) (required).Password Enter the credit bureau password (assigned by bureau)
(required).Customer Code Enter the customer code. The customer code is not used
for the Experian interface, but it is used for the Equifax interface. Enter the customer code provided to you by Equifax (optional).
Auth User Id* Displays the authorization user id (display only).Auth Password* Displays the authorization password (display only).
* The user id and password fields are not displayed to the user and they are also encrypted before being stored in the database.
Auth Password Charge Dt Displays the last authorization password change date. The Experian Net Connect product requires that the Auth Password (or SSP Password in Experian jargon) be changed every 90 days (or sooner). Equifax may have
Chapter 7 :-7 Setup Guide - Consumer Lease Origination

similar requirements, but they were not known at the time of this writing. Use the date displayed in this field to identify when the password needs to be changed.Note: The password needs to be changed both in Oracle Daybreak and at the credit bureau. Changing the pass-word in Oracle Daybreak does not initiate or perform a change at the bureau. Changing the password at the bureau must be done outside of Oracle Daybreak. Con-tact the credit bureau for the procedure for changing the password (display only).
5 In the Change Authorization User Id/Password block, complete the New Auth User ID and New Auth User Password fields to create or modify the Auth User Id and Auth Password fields in the Credit Bureau Setup block.
6 In the Change Authorization User Id/Password block, enter the following information:
In this field: Do this:
New Auth User Id Enter the new authorization id (optional).New Auth User Password Enter the new authorization password (optional).
7 After entering the values in the Change Authorization User Id/Password block, choose Change.
Oracle Daybreak encrypts the values and store them in the database. The values are asso-ciated with each company/branch that is setup in the Credit Bureau Setup block.
In the following example screen shot, the Auth User ID and Auth Password would have to be entered in twice, once for the company/branch SSFC/ALL and once for DCC/ALL.
8 In the TransUnion Details block, enter the following information (Note: This is only applicable for TransUnion):
In this field: Do this:
Market Enter the TransUnion market id (optional).Sub Market Enter the TransUnion Sub Market id (optional).Industry Enter the TransUnion Industry code (optional).
9 In the Experian Details block, enter the following information (Note: This is only appli-cable for Experian):
In this field: Do this:
Preamble Enter the Experian preamble code (optional).Host Id Enter the Experian host id (optional).UIC Enter the Experian UIC (optional).
10 In the Equifax Details block, enter the following information (Note: This is only applica-ble for Equifax):
In this field: Do this:
Service Name Enter the equifax service name. The service name will be provided to you by Equifax when your company's Inter-net System to System account is created. Possible values for pulling credit reports are acrotest (for access to the
Chapter 7 :-8 Setup Guide - Consumer Lease Origination

test system) and acro (for access to the production sys-tem) (optional).
11 In the Credco Details block, enter the following information (Note: This is only applica-ble for Credco):
In this field: Do this:
Origin Code Enter the credco origin code (optional).
12 In the Credit Report Setup block, enter the following information:
In this field: Do this:
Report Enter the report name to be accessed from the credit bureau (required).
Report Type Select the report type of the credit bureau report (required).
Score Type Select the credit score type (optional).Additional Product Select the product code (optional).Inquiry Limit Select the inquiry limit for the credit report (optional).Default Select if the report is used as default.
13 Save your entry.
Note: The Utilities form’s Service page (Setup > Batch Jobs > Services) must be restarted for changes made on the Reports Formats page to go into effect.
Chapter 7 :-9 Setup Guide - Consumer Lease Origination

Connections pageThe Connections page records and supports various connections to the credit bureau to receive reports from the agencies. Oracle Daybreak supports connections to the bureaus through one or more modems attached to the database server, network accessed modem server, or direct network connection (usually frame relay).
For modem-based connections, multiple credit bureaus can be accessed over the same modem. If there are multiple requests in the queue, the order in which the bureaus are listed determines the order in which the requests are processed.
If the credit bureau service checks the submitted credit requests and finds three Experian, one Equifax, and two TransUnion credit requests and the connections setup is Bureau1=TUC, Bureau2=EFX, and Bureau3=EXP, the two TransUnion requests will be processed first, the Equifax request next, and then the three Experian requests.
Note: For this above example, adding two more modems and assigning a specific bureau to each one would help to avoid the delay caused by queuing all requests through a single modem.
IMPORTANT:Direct network connections must be set up for only one bureau.
Like the Credit Bureau block on the Report Formats page, the data fields used on the Con-nections page are generic and not all fields are used for all access methods. The following table summarizes the data needed for each access method:
For frame relay access, specify the IP address provided by the bureau followed by a space and then the port number (for example, 192.168.36.2.700).
Chapter 7 :-10 Setup Guide - Consumer Lease Origination

Experian Net ConnectAt the time of this writing, the Experian product ECALS URL is:
http://www.experian.com/lookupServlet1?lookupServiceName=AccessPoint&lookupServiceVersion=1.0&serviceName=NetConnect&serviceVersion=2.0&responseType=text/plain
Note: The above URL is one continuous string. This can be verified by entering the URL with a browser. The displayed value will be an HTTPS URL.
Enter the entire ECALS URL provided by Experian into the Device field. Notice that this URL does not start with https. The ECALS URL is a URL used by the Oracle Daybreak credit bureau service to request the HTTPS URL. The HTTPS URL is not displayed on any setup screen and is only known to the credit bureau interface at runtime.
Equifax Internet System to SystemAt the time of this writing, the Equifax Internet System to System URL is:
https://transport5.ec.equifax.com/servlet/stspost
CSC Tri-MergeAt the time of this writing, the CSC URL is:
https://www.emortgage.Equifax.com/cgi-bin/emspop.exe
CredcoConnectAt the time of this writing, the Credco URL is:
https://www.credcoconnect.com/CGI-BIN/CCListener.exe
To set up the Connections page
1 On the Setup menu, choose Credit Bureau > Request.
2 Choose the Connections tab.
3 Complete the Credit Bureau Connections block with the following information:
In this field: Do this:
Name Enter connection name (required).Bureau 1 Select first credit bureau (required).Bureau 2 Select 2nd credit bureau (optional).Bureau 3 Select 3rd credit bureau (optional).
Chapter 7 :-11 Setup Guide - Consumer Lease Origination

Note: The Bureau1, Bureau2, and Bureau3 fields in the Credit Bureau Connections block are for specifying which bureau types can be accessed over the connection.
Device Enter the connection device name. The Device field lists the physical device name for a modem, or the IP address for a network accessed connection. (required).
Device Speed Select the connection device speed. The Device Speed field is only applicable to server-attached modems. It is used to specify the communications speed between the server and the modem (required).
Enabled Select to enable the connection (required).
4 Save your entry.
Note: The Utilities form’s Service page (Setup > Batch Jobs > Services) must be restarted for changes made on the Connections page to go into effect.
Chapter 7 :-12 Setup Guide - Consumer Lease Origination

Zip Matrix pageOracle Daybreak uses the zip code of the applicant’s current home address to determine which credit bureau to use when automatically pulling a report. The Zip Matrix page allows you to record the credit bureau from which a report is pulled based on a range of zip codes, as well as the company, branch and country of the account.
When searching for a zip code match, Oracle Daybreak:
1) Reads the first credit bureau defined in the matrix
2) Reads the credit report format to get the appropriate membership code and password for the user’s location
3) Requests a credit report.
If Oracle Daybreak cannot pull a report from the first bureau, it pulls one from the second. If the zip code you entered does not fall in the matrix setup, Oracle Daybreak uses a default zip matrix (0000000000 to 0000000000) to select the required bureau.
To set up the Zip Matrix page
1 On the Setup menu, choose Credit Bureau > Request.
2 Choose the Zip Matrix tab.
3 Complete the Credit Bureau Zip Code Matrix block with the following information:
In this field: Do this:
Company Select the portfolio company (required).Branch Select the portfolio branch (required).Country Select the country (required).From Zip Enter the starting zip code (From) (required).To Zip Enter the ending zip code (To) (required).
Chapter 7 :-13 Setup Guide - Consumer Lease Origination

Bureau 1 Select the preferred bureau #1 (first bureau pulled) You must enter at least one credit bureau in the Bureau 1 field for each zip code range. The bureau entered in the Bureau 1 field for each range is the primary bureau. For any given range, do not list the same credit bureau in more than one field (required).
Bureau 2 Select the preferred bureau #2 (second bureau pulled) (required).
Bureau 3 Select the preferred bureau 3 (third bureau pulled) (required).
4 Save your entry.
Chapter 7 :-14 Setup Guide - Consumer Lease Origination

Parameters pageThe Parameters page records parameters specifically dealing with credit bureau informa-tion. These parameters are divided into three groups:
• Parsing parameters• Request parameters• Configuration parameters
Parameters can be defined at the company or branch level. Please note that the following credit bureau parameters are configured during the installation:
PARSING PARAMETERS FOR CREDIT BUREAU SERVICECONFIGURATION PARAMETERS FOR CREDIT BUREAU SERVICE
To set up the Parameters page
1 On the Setup menu, choose Credit Bureau > Request.
2 Choose the Parameters tab.
3 Complete the Credit Bureau Parameters block with the following information:
In this field: Do this:
Company Select the portfolio company (required).Branch Select the portfolio branch (required).Parameter Group Select the credit bureau parameter group (required).Parameter Select the credit bureau parameter (required).Parameter Value Enter the credit bureau parameter value (required).Description View the credit bureau parameter description (display
only).
4 Select the Enabled box to enable the credit bureau parameter.
5 Save your entry.
Chapter 7 :-15 Setup Guide - Consumer Lease Origination

Score Reasons pageThe Score Reasons page allows you to define or modify the scoring reason codes and descriptions for the predefined scoring models used by the credit bureau agencies.
Note: This information is not associated with the user-defined scores determined by the internal Oracle Daybreak model during product setup.
To view score models the Score Reasons page
1 On the Setup menu, choose Credit Bureau > Request.
2 Choose the Score Reasons tab.
3 In the Scoring Models block, choose the credit bureau scoring model for which you want to view the score reasons.
4 In the Score Reasons block, view the reason code and description for the selected scor-ing model.
Chapter 7 :-16 Setup Guide - Consumer Lease Origination

Reporting master tab (Reporting page)Oracle Daybreak reports to the credit bureau agencies in the Metro 2 format with the pay-ment and account status information of each account holder. The Reporting page contains the program identifier to be reported to the bureaus.
To create a credit bureau reporting program
1 On the Setup menu, choose Credit Bureau > Reporting.
2 Choose the Reporting tab.
3 Complete the Credit Bureau Reporting block with the following information:
In this field: Do this:
Company Select the portfolio company (required).Bureau Select the bureau (required).Program Identifier Enter the program identifier. The customer receives this
from the bureau and uses it to identify itself to that bureau. You will need to update this information (required).
4 Select Enabled to enable the program.
5 Save your entry.
Chapter 7 :-17 Setup Guide - Consumer Lease Origination

Special Metro II Code reportingOracle Daybreak allows you to report the following special Metro II segments to the credit bureau output file:
• Consumer Information Indicator Code (CIIC)• Compliance Condition Code (CCCD)• Special Comment Code (SPCC).
Oracle Daybreak users will need to use call Action/Results and Reason fields on the Call Activities sub page of the Customer Service form (Lending > Customer Service > Cus-tomer Service (2) master tab > Account Details tab > Call Activities sub tab) to place spe-cific account conditions where these Metro II segments are to be reported. The specific segment reported for a given condition will be based on the account condition and call activity reason codes.
Note: It is the responsibility of the Oracle Daybreak Administrator or individual user to setup Special Metro II Code reporting functionality.
When users open one of the following conditions:
CIIC CONSUMER INFORMATION INDICATOR CODE (METRO2 - FCRA)CCCD COMPLIANCE CONDITION CODE (METRO2)SPCC SPECIAL COMMENT CODE (METRO2)
Oracle Daybreak recognizes the condition, processes the selected Metro II reporting call activity reason code, and generates the Metro II reporting segment in the Metro II report-ing output file.
Note: You (the Oracle Daybreak user) are responsible for selecting the correct Metro II reporting segment reason code to be reported. If you do not select a Metro II reporting seg-ment reason code, Oracle Daybreak will not generate information to Metro II output file. If you select an incorrect (wrong) Metro II reporting segment reason code, Oracle Day-break will report the selected Metro II reporting segment. Oracle Daybreak does not vali-date the contents of the Reason field with the contents of the Condition field.
To end the reported Special Metro II Special Code, close the open Special Metro II Condi-tion (no reason code needed). Oracle Daybreak recognizes the closing of the open Special Metro II Condition and will not create a Metro II reporting segment in the output file.
IMPORTANT: The CBU_FILE_FREQUENCY (METRO 2 FILE FREQUENCY) Company system parameter determines if output file is generated and created daily or output file is written with daily data and output monthly.
Chapter 7 :-18 Setup Guide - Consumer Lease Origination

To set up Metro II Code reporting
1 On the Setup menu, choose Queues > Setup.
2 In the Call Actions and Call Results blocks, set up to open and close the following sys-tem defined condition codes to open and close:
Action Code DescriptionCIIC CONSUMER INFORMATION INDICATOR CODE (METRO2 - FCRA)CCCD COMPLIANCE CONDITION CODE (METRO2)SPCC SPECIAL COMMENT CODE (METRO2)
When setup is completed, you can open and close Special Metro II code conditions.
Note: Opening and closing Special Metro II Code reporting is a manual process.
The CBU_FILE_FREQUENCY (METRO 2 FILE FREQUENCY) Company system parameter determines if output file is generated and created daily or output file is written with daily data and output monthly.
Chapter 7 :-19 Setup Guide - Consumer Lease Origination

Oracle Wallet Manager setupThe Experian Net Connect, Equifax Internet System to System, and CSC interfaces within the Oracle Daybreak credit bureau service use functionality provided by the Oracle Wallet feature. Use the Oracle Wallet Manager on the database server to create and export a wal-let for use by the Oracle Daybreak credit bureau service.
Note: All of the above mentioned interfaces use the same Oracle wallet. If a wallet already exists and is in use by one of the credit bureau interfaces, there is no need to create another wallet. Due to differing certificate requirements, there may be a need to import additional trusted certificates into the wallet, but there will not be a need to create a new one. The Oracle Daybreak credit bureau parameter ORA_WALLET_PATH contains the location of the Oracle Wallet used by the Oracle Daybreak credit bureau service.
To create and export a wallet suitable for use by the Oracle Daybreak credit bureau
Please refer to the Oracle documentation for more detailed instructions on how to use the Oracle Wallet Manager to create and manage a wallet):
1 If one does not already exist, create a wallet somewhere on the database server. The loca-tion must be readable and writable by the Oracle user. Make a note of the full path where the wallet is stored (for example, /etc/ORACLE/WALLETS/oracle or C:\ora-cle\WALLETS).
2 The wallet needs to contain the public key for the certificate authority that issued the server certificate for each HTTPS web site that will be connected to by the credit bureau interface. At the time of this document, those sites are:
https://ss1.experian.com Experianhttps://transport5.ec.equifax.com Equifaxhttps://www.emortgage.Equifax.com CSChttps://www.credcoconnect.com Credco
This list may change. Use the URL provided to you by the credit bureau when they set up your service. To get the proper Experian HTTPS URL, enter the ECALS URL that was provided by Experian into a web browser. The response returned to the browser is the HTTPS URL that will be used to communicate with Experian.
3 Import the necessary certificate authority’s certificate files into the Oracle wallet that was created in Step 1. See the appendix of this chapter for detailed instructions of how to download and install a trusted certificate.
4 Test the wallet by connecting to each web site with a simple command issued from SQL-Plus.
SQL> select utl_http.request('https://ss1.experian.com', NULL, 'file:/etc/ORACLE/WALLETS/oracle', 'password') from dual;
Replace the URL in the above command with each HTTPS URL given to you for use by the credit bureaus. Also replace the wallet path with the path to your wallet and your wal-let password. The output from the command is not important, what is important is that it runs without displaying an Oracle error. If there is an Oracle error, then something is wrong with the contents of the wallet, the path to the wallet, and/or the wallet password.
Chapter 7 :-20 Setup Guide - Consumer Lease Origination

5 When the wallet contains all of the required trusted certificates, export the wallet to a text file. On the Operations menu on the Oracle Wallet Manager, choose Export All Trusted Certificates. The text file MUST be located in the same directory as the wallet and the filename MUST be default.txt. Anytime a change is made to the trusted certificates in the wallet, the wallet must be re-exported to the same text file.
6 From Oracle Daybreaks Setup menu, choose Credit Bureau > Request > Parameters tab within and set the ORA_WALLET_PATH and ORA_WALLET_PASSWORD parameters.
To create and a client certificate wallet suitable for use by the CredcoConnect interface
The CredcoConnect interface requires another wallet file in addition to the default wallet file. This additional wallet file contains the client certificate and certificate chain issued to your company by First American Credco when your account is created.
1 Save the client certificate file sent to you by First American on your local PC.
2 Open Microsoft Internet Explorer. Go to the Tools > Internet Options > Content > Cer-tificates screen.
3 Click the Import button. Choose Next and the locate the PFX file you saved in Step 1. Choose Next and enter the password provided to you by Credco for the certificate file. Select the Enable string private key protection and Mark the private key as export-able check boxes. Choose the default selections on the following screens until the import is successful.
4 On the Certificate Manager screen, select the First American Corporation certificate and click the Export button.
5 Choose Next, Yes, export the private key, Next, PKCS12 format, include all certificates in the certification path, and enable strong protection and Next.
6 Set the password for the certificate to be the same password as your Oracle wallet.
7 Choose Next and save the file as credco.p12.
8 Copy the credco.p12 file to your database server and into the same directory where the existing Oracle wallet in use by Oracle Daybreak is located.
Chapter 7 :-21 Setup Guide - Consumer Lease Origination

Oracle JVM Security setupThe Experian Net Connect interface within the Oracle Daybreak credit bureau service requires the use of the Oracle Java Virtual Machine (JVM) that is resident in the Oracle database. Furthermore, specific permissions must be granted to the Java classes used by the credit bureau service. These permissions have been added to the set_java_perms.sql script that is part of the Oracle Daybreak Lending Suite distribution. This script (as well as many other useful SQL scripts) is available from the i-flex solutions technical support Oracle Daybreak Lending Suite patches web site at http://support.supersolu-tion.com/LSPatches/ patch_installation_utilities.zip.
The set_java_perms.sql script needs to run as the SYS user (or a user with SYS privi-leges). The script will prompt for SYS user id and password. Be prepared to provide it when prompted. Also, the script will select the value of the ORA_WALLET_PATH parame-ter from the credit bureau parameters table. Make sure that it has been updated with the proper wallet path before running the set_java_perms.sql script (although the script can be safely run again if necessary).
Credit Bureau Service operationThe basic operation of the credit bureau service has not changed. Once setup, there is no operational difference between accessing the credit bureaus via dial-up, frame relay, or the Internet.
Importing a trusted certificate into an Oracle WalletThe HTTPS servers used by Experian, Equifax, and CSC for their Internet based credit report services (as well as all HTTPS servers) contain a site certificate signed by a trusted Certificate Authority (CA). The CA is an entity that guarantees the identity of the HTTPS server. If the client trusts the CA, and the CA says that the HTTPS server is who they say they are, then the client inherently trusts the HTTPS server. Normally, a client tool such as Microsoft Internet Explorer has a large store of trusted CA certificates which makes secure communication between a client and a trusted HTTPS server relatively seamless and uneventful. Unfortunately, the store of CA certificates in the default Oracle wallet is rather small and it is likely that it will not contain the certificate of the CA that is certify-ing one or more of the credit bureau web sites. This means that the CA certificate must be imported into the wallet. To do this, the certificates must first be exported from a browser and then imported into the Oracle wallet using the Oracle Wallet Manager.
Using Microsoft Internet Explorer to Export a Certificate
1 Use Microsoft Internet Explorer and connect to one of the HTTPS URLs referenced in the Oracle Wallet Manager Setup section of this document.
If the web site asks for a user id and password, cancel the dialog box and remain on the top-level HTTPS page.
2 Once connected, from the browser’s File menu, choose Properties.
3 Choose the Certificates button.
Chapter 7 :-22 Setup Guide - Consumer Lease Origination

4 Choose the Certification Path tab. The bottom-most certificate is the one generated by the host itself. We are not interested in that one, we are interested in the one or more certifi-cates above the bottom-most one. The screen shot below displays a web site with two CAs (an intermediate, and a primary). Whether it is an intermediate CA or a primary one, the steps are the same for saving the certificate as a text file.
5 Choose the first certificate above the bottom-most certificate (it may be the only certificate above the bottom-most certificate).
6 Choose the View Certificate button.
7 Choose the Details tab.
8 Choose the Copy to File button.
9 Choose the Next button.
10 Choose the Base 64 encoded format.
11 Choose the Next button.
12 Enter a filename and location for the file.
13 Choose the Next button.
14 Choose the Finish button.
15 Repeat steps 5 through 14 for the next certificate in the certification path (if any).
Chapter 7 :-23 Setup Guide - Consumer Lease Origination

Importing the Certificates into an Oracle Wallet1 Copy the certificates exported and saved during the process described above onto the data-
base server (not the iAS server).
2 As the Oracle user (or Administrator on Windows), start the Oracle Wallet Manager.
3 Open the wallet that will be used by the Oracle Daybreak credit bureau service. Create a new wallet if one does not already exist.
4 View the list of Trusted Certificates in the wallet.
5 Check the list of certificates against the list of certificates that are in use on the HTTPS servers used by the credit bureaus (and that were exported and saved during the export process described above).
6 Click the Trusted Certificates heading in the left list box of the Oracle Wallet Manager.
7 Use Microsoft Internet Explorer to view the certificate details for the HTTPS web sites (File > Properties > Certificates > Certification Path > View Certificate > General) that will be contacted by the credit bureau service. Look through the list of certificates shown in the right panel of the Oracle Wallet Manager and look for a match between the Issued To and Valid To dates shown in the Internet Explorer View Certificate Window.
Chapter 7 :-24 Setup Guide - Consumer Lease Origination

The screen shot below shows a certificate that is already in the wallet’s list of trusted cer-tificates (see the last entry for the www.verisign.com/CPS certificate).
8 On the Operations menu, choose Import Trusted Certificate and follow the prompts for locating and loading the files that were copied onto the database server in step 1 for any certificate not already stored in the wallet.
9 On the Wallet menu, choose Save when finished loading certificates.
Chapter 7 :-25 Setup Guide - Consumer Lease Origination

De-duping Credit Bureau dataOracle Daybreak allows you to remove duplicate (“de-dupe”) liabilities data from the credit bureau information.
De-duping logicThe de-duping logic is based on a number of parameters that Oracle Daybreak compares among tradelines (only) to determine if they are duplicates. The following fields are used to determine if two tradelines are duplicates:
Field: Description:
Account # The account number of the consumer with the lender for the particular account.
Open Date The date the account was opened.
Member Code The subscriber code of the lender with the respective credit bureau. Note: Since member codes for the same lender differ across bureaus, this field is used only for tradelines reported by the same bureau. Since reports obtained from CSC can have tradelines from different bureaus, this field is only for reports pulled from the credit bureaus.
All available bureau reports pulled later than DEDUP_CRB_EXPIRATION_DAYS days old will be used.
The following system parameters will be set up to provide switches to allow the function-ality to be turned on and off:
Whenever two (or more) items are identified as duplicates, Oracle Daybreak uses the fol-lowing hierarchy to pick one of the items as the “correct” one:
1 Last Reported Date: The row that has been reported most recently is used.
2 Owner: In case of a tie on the last reported date, one of the tradelines is picked in the descending order of priority depending on who the tradeline belongs to: Primary, Spouse, then Secondary.
Chapter 7 :-26 Setup Guide - Consumer Lease Origination
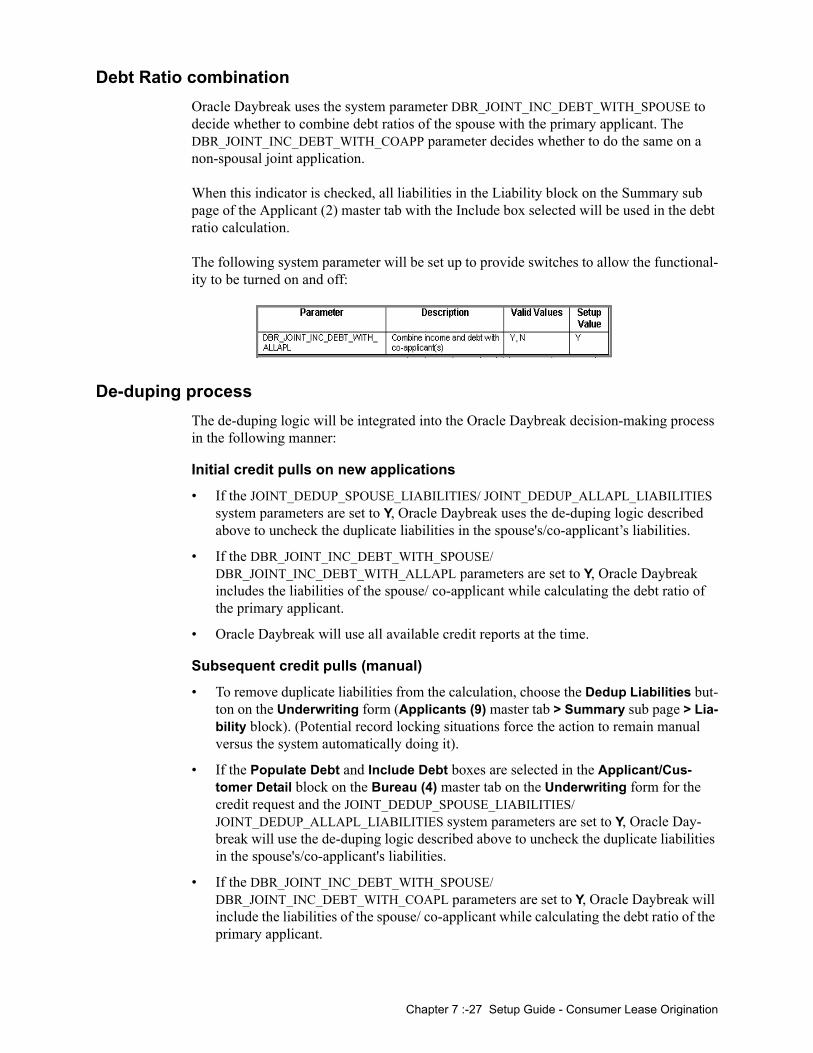
Debt Ratio combinationOracle Daybreak uses the system parameter DBR_JOINT_INC_DEBT_WITH_SPOUSE to decide whether to combine debt ratios of the spouse with the primary applicant. The DBR_JOINT_INC_DEBT_WITH_COAPP parameter decides whether to do the same on a non-spousal joint application.
When this indicator is checked, all liabilities in the Liability block on the Summary sub page of the Applicant (2) master tab with the Include box selected will be used in the debt ratio calculation.
The following system parameter will be set up to provide switches to allow the functional-ity to be turned on and off:
De-duping processThe de-duping logic will be integrated into the Oracle Daybreak decision-making process in the following manner:
Initial credit pulls on new applications
• If the JOINT_DEDUP_SPOUSE_LIABILITIES/ JOINT_DEDUP_ALLAPL_LIABILITIES system parameters are set to Y, Oracle Daybreak uses the de-duping logic described above to uncheck the duplicate liabilities in the spouse's/co-applicant’s liabilities.
• If the DBR_JOINT_INC_DEBT_WITH_SPOUSE/ DBR_JOINT_INC_DEBT_WITH_ALLAPL parameters are set to Y, Oracle Daybreak includes the liabilities of the spouse/ co-applicant while calculating the debt ratio of the primary applicant.
• Oracle Daybreak will use all available credit reports at the time.
Subsequent credit pulls (manual)
• To remove duplicate liabilities from the calculation, choose the Dedup Liabilities but-ton on the Underwriting form (Applicants (9) master tab > Summary sub page > Lia-bility block). (Potential record locking situations force the action to remain manual versus the system automatically doing it).
• If the Populate Debt and Include Debt boxes are selected in the Applicant/Cus-tomer Detail block on the Bureau (4) master tab on the Underwriting form for the credit request and the JOINT_DEDUP_SPOUSE_LIABILITIES/ JOINT_DEDUP_ALLAPL_LIABILITIES system parameters are set to Y, Oracle Day-break will use the de-duping logic described above to uncheck the duplicate liabilities in the spouse's/co-applicant's liabilities.
• If the DBR_JOINT_INC_DEBT_WITH_SPOUSE/ DBR_JOINT_INC_DEBT_WITH_COAPL parameters are set to Y, Oracle Daybreak will include the liabilities of the spouse/ co-applicant while calculating the debt ratio of the primary applicant.
Chapter 7 :-27 Setup Guide - Consumer Lease Origination

• Oracle Daybreak will use all available credit reports at the time of the request that have been requested within the number of days specified in the DEDUP_CRB_EXPIRATION_DAYS parameter.
RestrictionsThe de-duping logic will be limited based upon the discussion above. If Oracle Daybreak cannot identify two tradelines as duplicates based upon the logic mentioned above, the individual tradelines will be retained. In such circumstances, both tradelines will be used in the debt ratio calculation and it will be the user’s responsibility to disregard one of them by clearing the Include check box.
Chapter 7 :-28 Setup Guide - Consumer Lease Origination

CHAPTER 8 : UTILITIES FORM
“Batch jobs” refer to back-end processes that automatically run at a certain time. There are two types of batch jobs:
• Business processes (such as billing and delinquency processing)• Housekeeping tasks (such as application aging and application purging)
The Utilities form allows you to set up, monitor, and maintain batch jobs in Oracle Day-break.
Batch jobs can be set up to be performed on a daily, weekly, monthly, and ad-hoc basis. Batch jobs can also be configured to trigger an e-mail or phone message if a batch job should fail.
Critical batch jobs control job flow and system date rollover to allow recovery during errors. Errors are instances where a process did not successfully complete. Failures indi-cate that a particular job encountered errors that require remedial action. The number of errors allowed before failure is defined for each job. Some errors automatically result in a failure.
The Log Files page allows you to view errors and failures.
The Utilities form Setup tab contains the following pages:
• Batch Job page• Job Holiday page
Setup tab (Batch Job page)The Utilities form’s Batch Job page allows you to track and maintain of all batch processes within the Oracle Daybreak system. Using this form, the system administrator can config-ure the frequency and start time of each batch process, as well as set the number of threads to improve performance.
“Threading” allows a specific job to be separated into smaller units that are processed at the same time. This allows Oracle Daybreak to complete the job in less time.
You can set up multiple batch jobs within a batch set. In the Batch Job Sets block, each process is listed with the last run date (Last Run Dt field) and the next scheduled process date (Next Run Dt field). In the Freq Code and Freq Value fields, you can determine the frequency of each batch set, such as daily, weekly and monthly. You can also set up batch sets to incorporate a dependency on another batch set. This way, if the initial batch fails, the dependent set will not be processed.
In the Batch Jobs block, you can configure the process to run on weekends and holidays using the respective option boxes.
Chapter 8 :-1 Setup Guide - Consumer Lease Origination
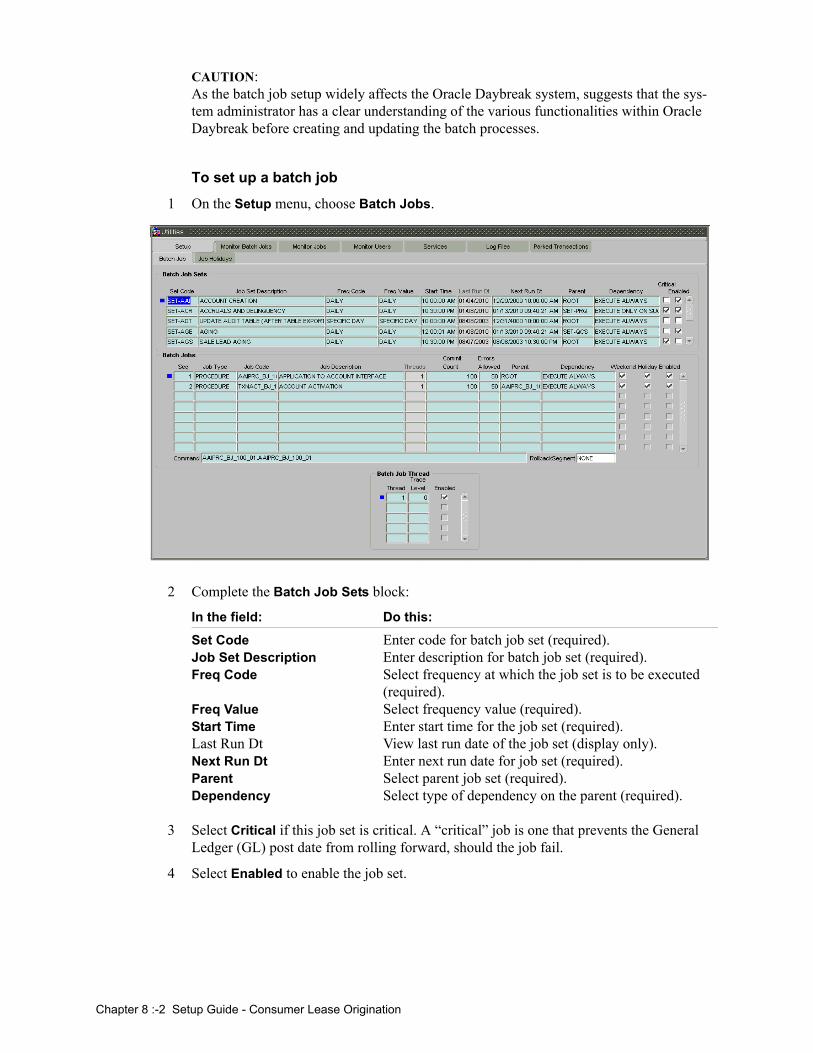
CAUTION:As the batch job setup widely affects the Oracle Daybreak system, suggests that the sys-tem administrator has a clear understanding of the various functionalities within Oracle Daybreak before creating and updating the batch processes.
To set up a batch job
1 On the Setup menu, choose Batch Jobs.
2 Complete the Batch Job Sets block:
In the field: Do this:
Set Code Enter code for batch job set (required).Job Set Description Enter description for batch job set (required).Freq Code Select frequency at which the job set is to be executed
(required).Freq Value Select frequency value (required).Start Time Enter start time for the job set (required).Last Run Dt View last run date of the job set (display only).Next Run Dt Enter next run date for job set (required).Parent Select parent job set (required).Dependency Select type of dependency on the parent (required).
3 Select Critical if this job set is critical. A “critical” job is one that prevents the General Ledger (GL) post date from rolling forward, should the job fail.
4 Select Enabled to enable the job set.
Chapter 8 :-2 Setup Guide - Consumer Lease Origination

5 Complete the Batch Jobs block:
In the field: Do this:
Seq Enter batch job sequence number.Note: Within a job set jobs are executed sequentially based on the seq number assigned.(required).
Job Type Select batch job request type (required).Job Code Enter batch job request code (required).Job Description Enter batch job description (required).Threads View the number of threads used by the job (display
only).Commit Count Enter number of rows after which auto-commit is trig-
gered (required).Errors Allowed Enter number of errors allowed (required).Parent Select parent job (required).Dependency Select type of dependency on the parent (required).
6 Select the Weekend box to perform batch jobs on weekend.
7 Select the Holiday box to perform batch jobs on a holidays. (Holidays are defined on the Job Holidays page.)
8 Select the Enabled box to enable the batch job.
9 In the Command field, enter command line for the job.
10 If you choose, use the RollbackSegment field to enter rollback segment for job.
11 Complete the Batch Jobs block:
In the field: Do this:
Thread Enter name of thread (required).Trace Enter SQL trace level (0, 1, 4, 8, 12) The higher the num-
ber, the more activities Oracle Daybreak can trace (required).
12 Select Enabled box to enable the thread.
13 Save your entry.
Chapter 8 :-3 Setup Guide - Consumer Lease Origination

Setup tab (Job Holidays page)Oracle Daybreak allows you to define holidays within the company on Job Holidays page. You can then use the Batch Jobs page to set up whether or not you want Oracle Daybreak to perform batch jobs on these days using with the Batch Jobs block Holiday box.
To define job holidays
1 On the Setup menu, choose Batch Jobs.
2 Choose the Job Holidays tab.
3 Complete the Job Holidays block:
In the field: Do this:
Holiday Dt Enter the date of the job holiday (required).Description Enter the job holiday description (required).
4 Select Enabled to enable the holiday.
5 Save your entry.
Chapter 8 :-4 Setup Guide - Consumer Lease Origination

Monitor Batch Jobs tab (Match Batch Jobs page) Oracle Daybreak tracks the success of each batch process on the Monitor Batch Job page. If either a set of batch jobs or specific batch job should fail, you can resubmit it on this page and review the results in the Request Details block.
To use the Monitor Batch Job page
1 On the Setup menu, choose Batch Jobs, then choose the Monitor Batch Jobs tab.
-or-
Choose the Monitor menu, then choose System > Batch Jobs.
The Monitor Batch Jobs page is a display only page that contains the following blocks:
• Batch Job Sets• Batch Jobs• Batch Jobs Threads• Request Details• Request Results
Chapter 8 :-5 Setup Guide - Consumer Lease Origination

Batch Job Sets blockThe Batch Job Sets block lists the batch job sets defined on the Batch Job page. The runt-imes, the status, and frequencies appear for each job set.
In this field: View this:
Set Code The code for batch job set.Job Set Description The description for batch job set.Status The job set status.Freq Code The frequency at which the job set is to be executed.Freq Value The value of the frequency code chosen for the job set.Start Time The start time for the job set.Last Run Dt The date of last run of the job set.Next Run Dt The next run date for job set.Enabled If selected, the job set is enabled.Critical If selected, this job set is critical.Parent The preceding job set.Dependency The type of dependency on predecessor.
To resubmit a batch job set
Whenever a batch job set fails, it is best to resubmit it after correcting the errors that caused the failure. Errors can be viewed on this form’s Log Files page and in this page’s Monitor Page Jobs page Request Details block. Resubmitting a set causes Oracle Day-break to re-perform the batch job set and dependent batch jobs.
1 In the Batch Job Sets block, choose the batch job set to resubmit. (Only a batch job set with a status of FAILED can be resubmitted).
2 Choose Resubmit Job Set.
Batch Jobs blockThe Batch Jobs block lists the batch jobs within a job set. The status, threads, commit count, dependencies, enabled indicator and the holiday and weekend runtime indicators are shown for each job.
In this field: View this:
Seq The batch job sequence number.Job Type The batch job request type.Job Code The batch job request code.Status The job status.Job Description The batch job description.Threads The number of threads used by the job.Commit Count The number of rows after which auto-commit is trig-
gered.Errors Allowed The number of errors allowed.Parent The preceding job.Dependency The type of dependency on predecessor.Weekend If selected, it batch job will execute job on weekend.Holiday If selected, it batch job will execute job on a holiday.Enabled The job enabled indicator.Command The command line for the job.Rollback Segment The rollback segment for job.
Chapter 8 :-6 Setup Guide - Consumer Lease Origination

To resubmit a batch job
Whenever a batch job fails, it is best to resubmit it after correcting the errors that caused the failure. Resubmitting a set will cause Oracle Daybreak to re-perform the batch job.
1 In the Batch Jobs block, choose the batch job to resubmit. (Only a batch job with a status of FAILED can be resubmitted).
2 Choose Resubmit Job Set.
Batch Jobs Threads blockThe Batch Job Threads block displays the status of the individual threads.
In this field: View this:
Thread The name of thread.Status The status of thread.Errors The number of errors in the thread.Records The number of records in the thread.Trace Level The SQL trace level (0, 1, 4, 8, 12).Enabled The thread enabled indicator.
Request Details blockThe Request Details block displays the status and the runtimes for each time the selected job ran. In this field: View this:
Request Type The job request type.Status The job request status.Start Dt The job request is valid from this date and time.End Dt The job request is valid till this date.Run Start Dt The date and time on which the job run started.Run End Dt The date and time at which the job run ended.Description The job request description.Process Dt The transaction is posted with this General Ledger effec-
tive date.
Request Results blockIf a particular job requires that a result message be created, then that message appears in the Requests Results block. A message is usually created in the event of an error.
In this field: View this:
Request Result The result of the job request.Description The result details.
Chapter 8 :-7 Setup Guide - Consumer Lease Origination

Monitor Jobs tab (Monitor Jobs page)The Monitor Jobs page provides another view of monitoring all system processes, includ-ing credit bureau requests and payment posting. This page displays the data in reverse chronological order of the Run Start Date/Time, where as the Monitor Batch Jobs page provides the historical data about each job and job set.
To view the Monitor Job page
1 On the Setup menu, choose Batch Jobs, then choose the Monitor Jobs tab.-or-Choose the Monitor menu, then choose System > Jobs.
2 In the Job Type block, select the type of jobs you want to view in the Job Details block
If you select: Oracle Daybreak displays:
Batch Batch jobs (used primarily for the nightly processes).Back Ground User submitted requests, such as reports and payment
posting.Credit Request Credit bureau requests.
3 In the View Last block, select the time frame of the contents of the Job Details block.
If you select: Oracle Daybreak displays:
1 Day All the types of jobs selected in the Jobs Type block of the last one-day.
2 Days All the types of jobs selected in the Jobs Type block of the last two days.
5 Days All the types of jobs selected in the Jobs Type block of the last five days.
All Days All the types of jobs selected in the Jobs Type block.
4 If you select View Failed in the Failed block, Oracle Daybreak displays the failed jobs on the type and time frame you have selected.
Chapter 8 :-8 Setup Guide - Consumer Lease Origination

5 In the Job Details block, view the following information about the jobs matching the con-tents of the Job Type, View Last, and Failed boxes:
In this field: View this:
Request Type The job request type.Status The job request status.Job Set The job set code.Job The job description.Thread The job thread.Errors The number of errors.Records The number of records processed by the job.Run Start Date/Time The job run start date time.Run End Date/Time The job run end date time.Description The job request description.Process Dt The job process date.Valid Execution Period The job start date/time.Start Date/TimeEnd Date/Time The job end date time.
6 In the Job Details block, select the job you want to view in detail.
7 In the Job Results block, view the following details:
In this field: View this:
Request Result The result of job request.Description The job request result details.
Chapter 8 :-9 Setup Guide - Consumer Lease Origination

Monitor Users tab (Monitor Users page)The Monitor Users page allows you to view all users who have logged on to Oracle Day-break, along with the log on time stamp and logout time stamp. The information appears in reverse chronological order of the log on time stamp.
To monitor users who have logged on to Oracle Daybreak
1 On the Setup menu, choose Batch Jobs, then choose the Monitor Users tab.-or-Choose the Monitor menu, then choose Users > Logins.
2 In the User Logins block, view the following information:
In this field: View this:
User Id The user id.User Name The user name.Login Date and Time The login date time for the user.Logout Date and Time The logout date time for the user.
Hint: By pressing F7, entering a keyword to search on in either the User Id or User Name field, and pressing F8, you can search for and view the history of a particular user.
Chapter 8 :-10 Setup Guide - Consumer Lease Origination

Services tab (Services page)The Services page allows you to track and maintain Oracle Daybreak’s processing ser-vices, including credit bureaus, fax-in, and batch job scheduler. The system administrator can start or stop the service on this page by using the command buttons in the Action block.
To stop, start, or refresh a processing service
1 On the Setup menu, choose Batch Jobs, then choose the Services tab.-or-Choose the Monitor menu, then choose System > Services.
2 In the Services block, view the following information about Oracle Daybreak’s process-ing services:
In this field: View this:
Service The service name.Company The service company.Branch The service branch.Description The service description.Status The service status.
3 In the Services block, select the processing service you want to work with and choose one of the following commands in the Action block.
If you choose: Oracle Daybreak:
Status Refreshes, or updates, the status of the service. The Ser-vice page does not update the status in real time. You must choose Status after choosing Start or Stop to per-form that command.
Start Starts the job service.Stop Stops the job service.
Chapter 8 :-11 Setup Guide - Consumer Lease Origination

Log Files tab (Log Files page)Various processes in Oracle Daybreak create reports in different log file with regards to what tasks they performed and what they encountered (for example, errors, failures, erro-neous data, and so on.) The Log Files page lists and describes all such log files within Ora-cle Daybreak.
To view a log file
1 On the Setup menu, choose Batch Jobs, then choose the Log Files tab.-or-Choose the Monitor menu, then choose System > Log Files.
2 In the Log Files block, choose List Files.
3 View the following information in the Log Files block:
In this field: View this:
File Name The name of the file.Type The type of the file.Size The size of the file.Time The time stamp of the file.
4 Use the Sort By block to arrange the contents in the Log Files block
If you select: Oracle Daybreak sorts the list by:
File name File name.Time Time stamp.Ascending Ascending order.Descending Descending order.
5 In the Log Files block, select the file you want to view.
6 In the # of Lines field, enter the number of lines you want to view.
7 Select the Beginning or End button to indicate whether you want to see the lines from the beginning of the file or the end.
8 Choose Show File.
The contents of the file appear in the File block.
Chapter 8 :-12 Setup Guide - Consumer Lease Origination

CHAPTER 9 : PRODUCER MANAGEMENT FORM
Oracle Daybreak can manage both direct and indirect loans. While direct loans are paid directly to the customer, indirect loans are paid through a third party. In Oracle Daybreak, these third parties (dealerships, agents, and so on) are managed using the Producer Man-agement form.
Applications are sent to financial institutions indirectly through producers (or “dealers”) on behalf of the customer. Oracle Daybreak associates a credit application with the pro-ducer who sent it.
When the credit application is approved and funded, Oracle Daybreak associates the account with the producer.
Oracle Daybreak allows for a variety of producers, such as dealers and agents. Producers can have three different statuses:
• Active (producers can fund an application) • Inactive (producers cannot fund an application) • Temporary (producers can review but not fund an application)
The producers are paid for their participation, either:
• Up front during funding -or-
• Up front on a monthly basis-or-
• When the interest is earned-or-
• When the payment is received from the customer based on the set up compensation plans.
The Producer Management form allows you to maintain and administer producer compen-sation, compensation payments, charge back plans, and chargeback parameters. The Pro-ducer Management form also records information regarding a default underwriting and collector which Oracle Daybreak uses in choosing queues during workflow.
The Producer Management form has two purposes; it allows you to:
• Set up the producers with whom you make indirect loans• Work with these producers as a Oracle Daybreak user to make compensations, post
transactions, view statements, view and maintain contact information, and record additional comments.
As a result, the Producer Management form can be opened from two locations.
Chapter 9 :-1 Setup Guide - Consumer Lease Origination

To open the Producer Manager form for set up
• On the Setup menu, choose Producers.
In setting up the Producer Management form, you will need to complete the Cycles page on the Setup Master tab, as well as the Producers page and Payment Details sub page on the Producer master tab.
To open the Producer Manager form as a Oracle Daybreak user
• On the Lending menu, choose Producers.
In working with the Producer Management form, you will primarily use the Compensa-tion, Subvention, Transactions, Tracking Attributes, Statements, Contracts, and Comments sub page on the Producer master tab. The Producers page, completed during set up, can be use to view and maintain producer details.
Chapter 9 :-2 Setup Guide - Consumer Lease Origination
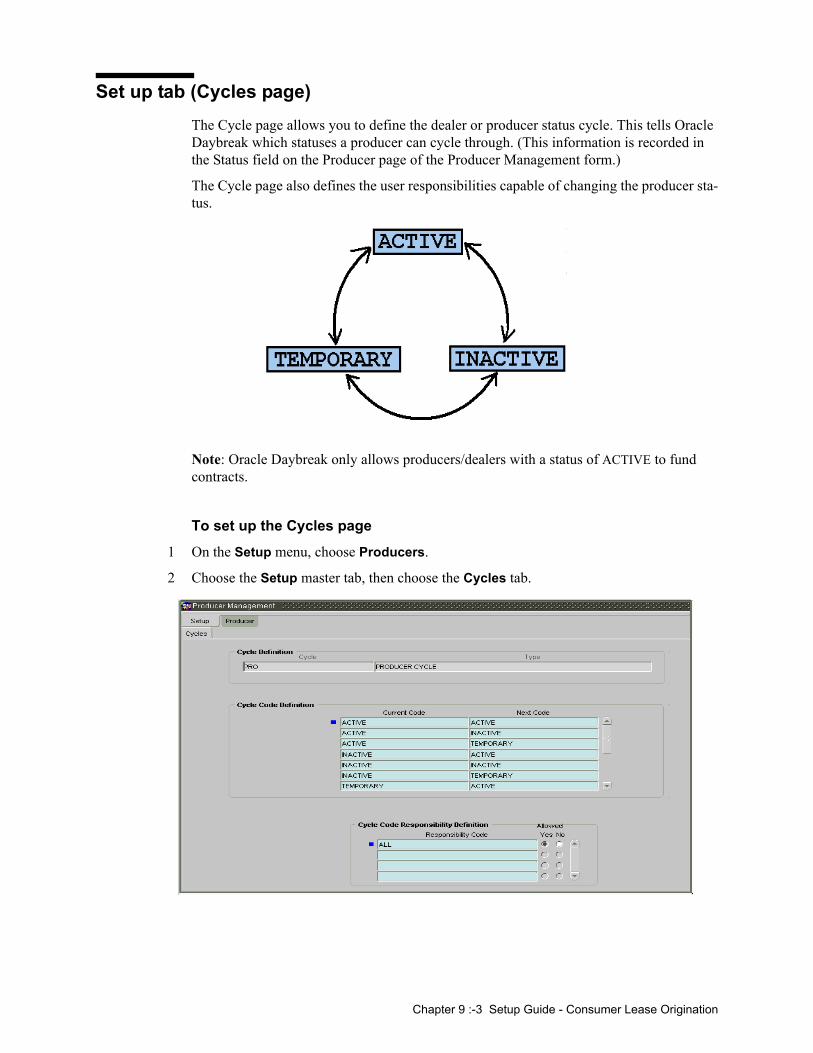
Set up tab (Cycles page)The Cycle page allows you to define the dealer or producer status cycle. This tells Oracle Daybreak which statuses a producer can cycle through. (This information is recorded in the Status field on the Producer page of the Producer Management form.)
The Cycle page also defines the user responsibilities capable of changing the producer sta-tus.
Note: Oracle Daybreak only allows producers/dealers with a status of ACTIVE to fund contracts.
To set up the Cycles page
1 On the Setup menu, choose Producers.
2 Choose the Setup master tab, then choose the Cycles tab.
Chapter 9 :-3 Setup Guide - Consumer Lease Origination

3 In the Cycle Definition block, view the following information:
In this field: Do this:
Cycle Enter the cycle name.Type Select the cycle type [CYC_TYPE_CD].
4 In the Cycle Code Definition block, enter the following information:
In this field: Do this:
Current Code Select the current code to transition FROM [PRO_STATUS_CD] (required).
Next Code Select the code to transition TO [PRO_STATUS_CD] (required).
5 In the Cycle Code Responsibility Definition block, enter the following information:
In this field: Do this:
Responsibility Code Select the responsibility that will be capable of executing this transition [RESPONSIBILITY_CD] (required).
Allowed? Yes No Select “Yes” to allow the responsibility execute the tran-sition (required).
6 Save your entry.
Chapter 9 :-4 Setup Guide - Consumer Lease Origination
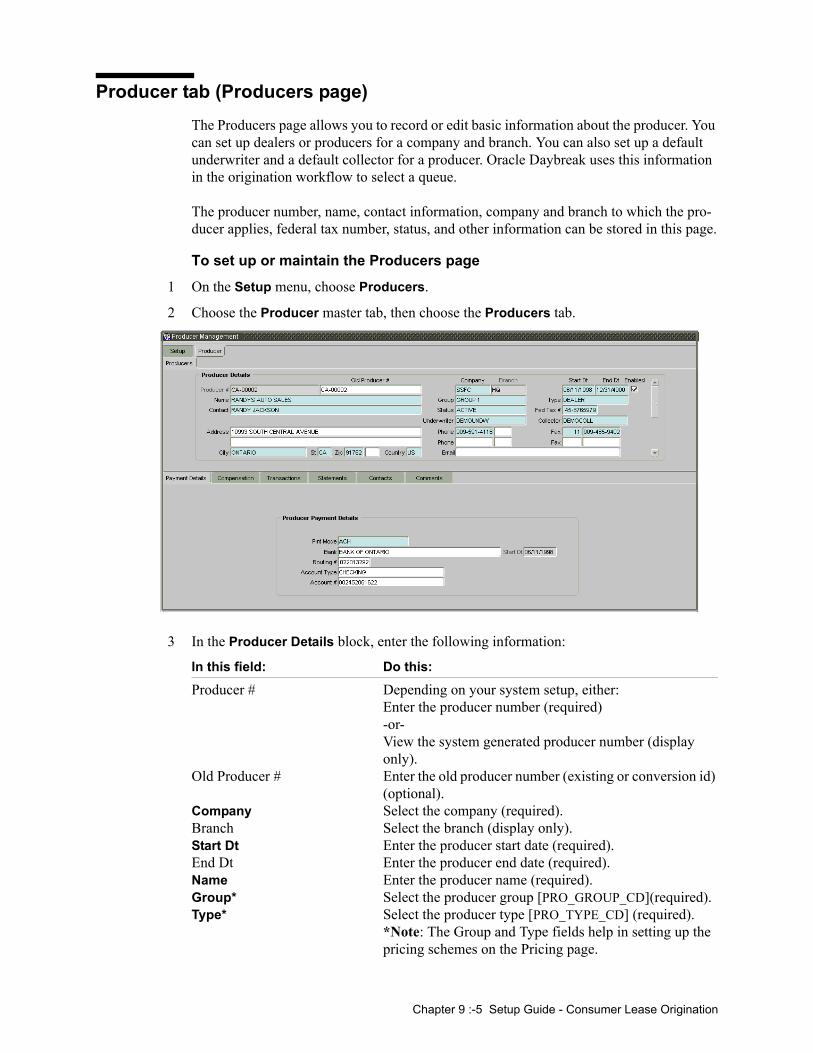
Producer tab (Producers page)The Producers page allows you to record or edit basic information about the producer. You can set up dealers or producers for a company and branch. You can also set up a default underwriter and a default collector for a producer. Oracle Daybreak uses this information in the origination workflow to select a queue.
The producer number, name, contact information, company and branch to which the pro-ducer applies, federal tax number, status, and other information can be stored in this page.
To set up or maintain the Producers page
1 On the Setup menu, choose Producers.
2 Choose the Producer master tab, then choose the Producers tab.
3 In the Producer Details block, enter the following information:
In this field: Do this:
Producer # Depending on your system setup, either:Enter the producer number (required)-or-View the system generated producer number (display only).
Old Producer # Enter the old producer number (existing or conversion id) (optional).
Company Select the company (required).Branch Select the branch (display only).Start Dt Enter the producer start date (required).End Dt Enter the producer end date (required).Name Enter the producer name (required).Group* Select the producer group [PRO_GROUP_CD](required).Type* Select the producer type [PRO_TYPE_CD] (required).
*Note: The Group and Type fields help in setting up the pricing schemes on the Pricing page.
Chapter 9 :-5 Setup Guide - Consumer Lease Origination

Contact Enter the producer contact (required).Status Activate, temporarily activate, or de-activate the pro-
ducer by selecting the appropriate status. Note: The con-tents of this field can be linked to edits in the loan origination cycle so that only producers with a status of the ACTIVE can be funded (required),
Fed Tax # Enter the federal tax identification number. Note: If the organizational parameter UIX_HIDE_RESTRICTED_DATA is set to Y, this appears as a masked number; for example, XXXXX1234 (required).
Underwriter Enter the default underwriter assigned to this producer. (This will appear in the Underwriter field on the Applica-tion Entry form.) Note: Only users with a responsibility for an UNDERWRITER can be designated as underwriters for producers (required).
Collector Enter the default collector or agent assigned to this pro-ducer. (This will appear in the Collector field in the Delinquency Information block of the Account Details page on the Customer Service form) (required).
Address Enter address line 1 (optional).Address 2 (unlabeled) Enter address line 2 (optional).Zip Select the zip code (required).City Enter the city (required).St Select the state [STATE_CD] (required).Zip Extension Enter the zip extension (optional).Country Select the country code [COUNTRY_CD] (required).Phone Enter phone number 1 (required).Phone 1 Extension (unlabeled) Enter phone number 1 extension (optional).Fax* (prefix) Select fax prefix number 1 [PHONE_FAX_PREFIX_CD]
(required).Fax* (number) (unlabeled) Enter fax number 1 (required).Phone Enter phone number 2 (optional).Phone Extension (unlabeled) Enter phone number 2 extension (optional).Fax (prefix) Select fax prefix number 2 [PHONE_FAX_PREFIX_CD]
(optional).Fax (number) (unlabeled) Enter fax number 2 (optional).Sales Agent Select the sales agent assigned to this producer. (This will
appear in the Sales Agent field in the master block of the Underwriting and Funding form) [SALES_LEADER] (required).
Email Enter the producer mail address (optional).
4 Select Enabled to enabled this entry (optional).
5 Save your entry.
Chapter 9 :-6 Setup Guide - Consumer Lease Origination
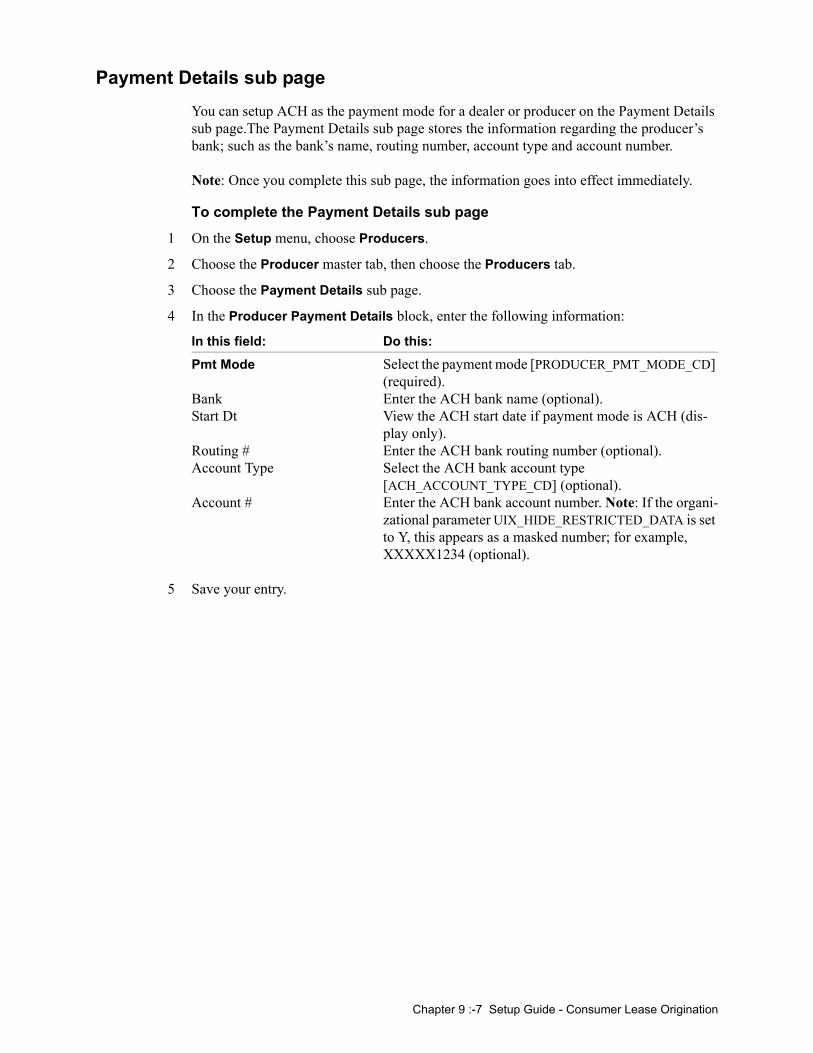
Payment Details sub pageYou can setup ACH as the payment mode for a dealer or producer on the Payment Details sub page.The Payment Details sub page stores the information regarding the producer’s bank; such as the bank’s name, routing number, account type and account number.
Note: Once you complete this sub page, the information goes into effect immediately.
To complete the Payment Details sub page
1 On the Setup menu, choose Producers.
2 Choose the Producer master tab, then choose the Producers tab.
3 Choose the Payment Details sub page.
4 In the Producer Payment Details block, enter the following information:
In this field: Do this:
Pmt Mode Select the payment mode [PRODUCER_PMT_MODE_CD] (required).
Bank Enter the ACH bank name (optional).Start Dt View the ACH start date if payment mode is ACH (dis-
play only).Routing # Enter the ACH bank routing number (optional).Account Type Select the ACH bank account type
[ACH_ACCOUNT_TYPE_CD] (optional).Account # Enter the ACH bank account number. Note: If the organi-
zational parameter UIX_HIDE_RESTRICTED_DATA is set to Y, this appears as a masked number; for example, XXXXX1234 (optional).
5 Save your entry.
Chapter 9 :-7 Setup Guide - Consumer Lease Origination
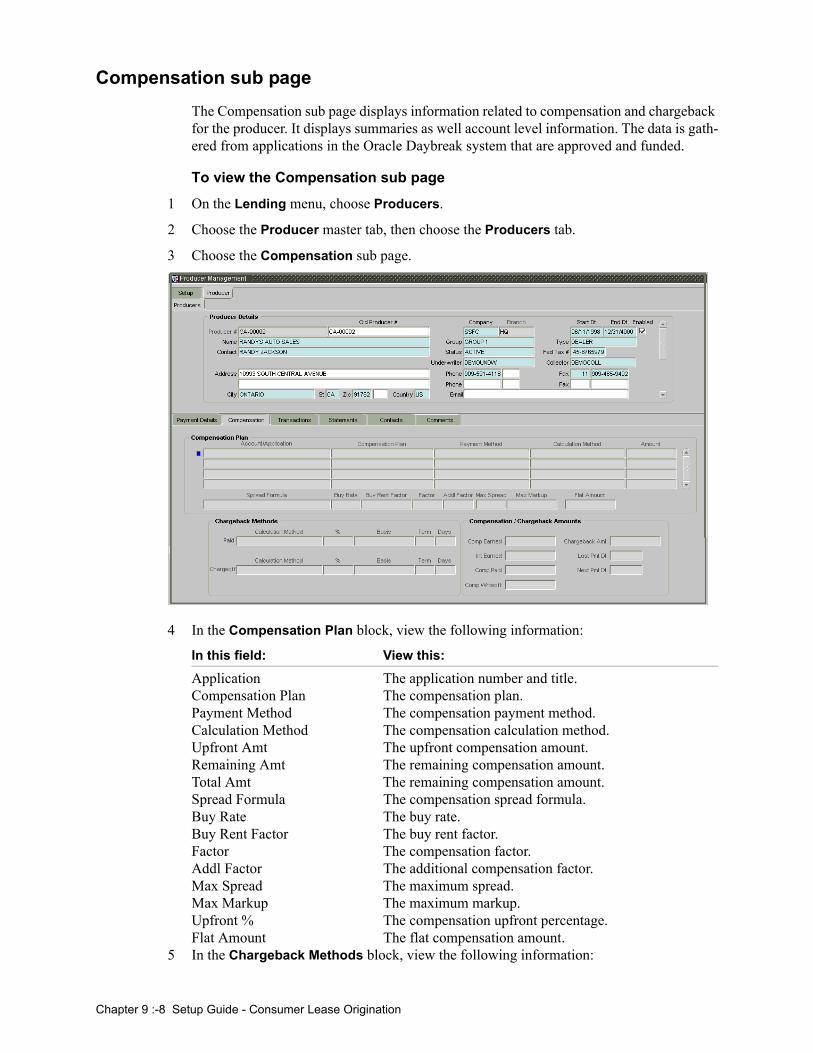
Compensation sub pageThe Compensation sub page displays information related to compensation and chargeback for the producer. It displays summaries as well account level information. The data is gath-ered from applications in the Oracle Daybreak system that are approved and funded.
To view the Compensation sub page
1 On the Lending menu, choose Producers.
2 Choose the Producer master tab, then choose the Producers tab.
3 Choose the Compensation sub page.
4 In the Compensation Plan block, view the following information:
In this field: View this:
Application The application number and title.Compensation Plan The compensation plan.Payment Method The compensation payment method.Calculation Method The compensation calculation method.Upfront Amt The upfront compensation amount.Remaining Amt The remaining compensation amount.Total Amt The remaining compensation amount.Spread Formula The compensation spread formula.Buy Rate The buy rate.Buy Rent Factor The buy rent factor.Factor The compensation factor.Addl Factor The additional compensation factor.Max Spread The maximum spread.Max Markup The maximum markup.Upfront % The compensation upfront percentage.Flat Amount The flat compensation amount.
5 In the Chargeback Methods block, view the following information:
Chapter 9 :-8 Setup Guide - Consumer Lease Origination

In this field: View this:
(Paid) Calculation Method The chargeback calculation method in case of early pay-off.
(Paid) % The chargeback percentage in case of early payoffs.(Paid) Basis The chargeback basis in case of early payoff.(Paid) Term The term in case of early payoff.(Paid) Days The days in case of early payoff.(Charge off) Calculation The chargeback calculation method in case of chargeoffs.Method(Charge off) % The chargeback percentage in case of chargeoffs.(Charge off) Basis The chargeback basis in case of chargeoffs.(Charge off) Term The term in case of chargeoffs.(Charge off) Days The days in case of chargeoffs.
6 In the Compensation/Chargeback Amounts block, view the following information:
In this field: View this:
Comp Earned The compensation earned.Int Earned The interest earned.Comp Paid The compensation paid.Comp Writeoff The compensation writeoff.Chargeback Amt The chargeback amount.Last Pmt Dt The last compensation payment date.Next Pmt Dt The next compensation payment date.
Chapter 9 :-9 Setup Guide - Consumer Lease Origination

Subvention sub pageThe Subvention sub page displays information related to subvention for the producer, such as subvention participation, subvention receivables, and subvention details.
To complete the Subvention sub page
1 On the Lending menu, choose Producers.
2 Choose the Producer master tab, then choose the Producers tab.
3 Choose the Subvention sub page.
4 In the Subvention Participation block, enter the following information:
In this field: Do this:
Subvention Participant Select if the producer is a subvention participant.Collection Type Select the collection type: STATEMENT or INTRA COM-
PANY ENTRY.STATEMENT – The producer will receive the statement at a set frequency and make the payment through check or ACH.INTRA COMPANY ENTRY – The producer will receive the statement at a set frequency but no payment is due. If the manual indicator for INTRA COMPANY transaction is set to No, Oracle Daybreak automatically posts an intra-company entry transaction to net out the outstanding receivable when a statement is generated (required).
Collection Frequency Select the collection frequency: MONTHLY or QUAR-TERLY (required).
Refund Disbursement Select the refund disbursement method: NONE,Method ADJUSTED TO RECEIVABLE, or PAYABLE TO PRO-
DUCER.
Chapter 9 :-10 Setup Guide - Consumer Lease Origination

ADJUSTED TO RECEIVABLE – The refund amount will be netted to any outstanding receivable.PAYABLE TO PRODUCER – The refund will not be adjusted against any outstanding receivable and this amount needs to be paid to the producer through check or ACH (required).
5 In the Subvention Receivables block, view the following information:
In this field: View this:
Receivable Amt (Open) The opening balance of the outstanding receivable amount for the current statement period (display only).
Receivable Amt (Current) The receivable amount added during the current state-ment period (display only).
Received Amt The payments received from producers during the current statement period (display only).
Netted Refund Amt The refunds processed during the current statement period. Oracle Daybreak completes this field only when the Refund Disbursement Method field is ADJUSTED TO RECEIVABLE (display only).
Net Receivable Amt The net outstanding receivable amount for the current statement period (display only).
Payable Refund Amt The refunds processed during the current statement period. Oracle Daybreak completes this field only when the Refund Disbursement Method field is PAYABLE TO PRODUCER (display only).
6 In the Subvention Details block, view the following information:
In this field: View this:
Application The application number (display only).Subvention Plan The subvention plan description (display only).Subvention Sub-Plan The subvention sub plan description (display only).Subvention Type The subvention type (display only).Collection Type The collection type (display only).Subvention Am The subvention amount (display only).Refund Amt The refund amount (display only).
7 Save your entry.
Chapter 9 :-11 Setup Guide - Consumer Lease Origination

Transactions sub pageOn the Transactions sub page, the Transaction Entry, Posted Transactions, Proceed Hold-Back, and Loss Reserve blocks display the details of the transactions posted for the pro-ducer. The Transaction Entry block allows you to post a transaction for the producer. Linking to an account is not mandatory -- you can create a transaction to a producer that is not related to a specific account.
To complete the Transactions sub page
1 On the Lending menu, choose Producers.
2 Choose the Producer master tab, then choose the Producers tab.
3 Choose the Transactions sub page.
4 In the View block, choose the type of transaction you want to view, Subvention or Oth-ers.
5 In the Transaction Entry block, enter the following information:
In this field: Do this:
Effective Dt Enter transaction date (required).Transaction Select transaction to be posted (HOLDBACK FROM PRO-
DUCER, PAYMENT FROM PRODUCER, or PAYMENT TO PRODUCER) (required).
Amount Enter transaction amount (required).Reference Enter transaction reference (optional).Account # Select account number (optional).Account title (unlabeled) View the account title (display only).Comment Enter transaction comment (optional).
6 Choose Post.
Chapter 9 :-12 Setup Guide - Consumer Lease Origination

7 In the Posted Transactions block, view the following information:
In this field: View this:
Effective Dt The transaction date.Transaction The transaction.Account The account number.Amount The transaction amount.Reference The transaction reference.Post Dt The transaction post date.Comment The transaction comment.
8 In the Proceed HoldBack block, view the following information:
In this field: View this:
Account The account number and titleHoldBack Amt The proceed holdback amount.
9 In the Loss Reserve block, view the loss reserve amount.
Tracking Attributes sub pageThe Tracking Attributes sub page allows you to link information to an producer that is not tracked by default in the Oracle Daybreak system, but is part of your company’s business practices.
To complete the Tracking Attributes sub page
1 On the Lending menu, choose Producers.
2 Choose the Producer master tab, then choose the Producers tab.
3 Choose the Tracking Attributes sub page.
Chapter 9 :-13 Setup Guide - Consumer Lease Origination

4 Choose Create Tracking.
Oracle Daybreak loads the tracking parameters.
5 If you want to reduce the list of parameters, select a sub-attribute in the Sub Attribute field.
If your system has been configured to use the Sub Attribute field, only attributes in a par-ticular group appear in the Parameter display.
6 Complete the Tracking block by entering the parameter(s) in the Value field(s).
7 Save any changes you made to the account.
Statements sub pageThe Statements sub page displays a history of all the statements the producer has pro-cessed. The transaction level details are visible in the lower list box.
To view the Statements sub page
1 On the Lending menu, choose Producers.
2 Choose the Producer master tab, then choose the Producers tab.
3 Choose the Statements sub page.
4 In the View block, choose the type of statements you want to view, Subvention or Oth-ers.
5 In the Statements block, view the following information:
In this field: View this:
Closing Dt The statement closing date.Generated Dt The statement generation date.Opening Balance The previous statement balance amount.Closing Balance The current statement balance amount.Effective Dt The statement transaction date.
Chapter 9 :-14 Setup Guide - Consumer Lease Origination

Transaction The statement transaction.Account The statement account number.Debit Amt The statement debit amount.Credit Amt The statement credit amount.
Contacts sub pageThe Contacts sub page allows you to record information regarding contacts associated with a producer, such as employees at a dealership.
To use the Contacts sub page
1 On the Lending menu, choose Producers.
2 Choose the Producer master tab, then choose the Producers tab.
3 Choose the Contract sub page.
4 In the Producer Contacts block, enter the following information:
In this field: View this:
Contact Type Select the producer contact type (required).Name Select/Enter the producer contact name (required).Phone Enter producer contact phone number (optional).Extn Enter phone number extension (optional).Fax Enter producer contact fax number (optional).
5 Select Enabled to indicate this is a current contact.
6 Save your entry.
Chapter 9 :-15 Setup Guide - Consumer Lease Origination

Comments sub pageThe Comments sub page allows you to view and enter comments regarding the producer.
To enter a comment on the Comments sub page
1 On the Lending menu, choose Producers.
2 Choose the Producer master tab, then choose the Producers tab.
3 Choose the Comments sub page.
4 In the Producer Comments block, view the following information:
In this field: Do this:
Comments Enter comment (required).User View user id (system generated).Date View comment date (system generated).
5 Save your entry.
Chapter 9 :-16 Setup Guide - Consumer Lease Origination

CHAPTER 10 : VENDOR MANAGEMENT FORM
During the life of an account, a financial institution might require the use of specialized services of a vendor for various purposes; for example, repossessing a vehicle, retaining an attorney for bankruptcy court proceedings, or making field calls. With Oracle Day-break’s Vendor Management form, you can:
• Maintain vendor information• Maintain services offered by the vendor• Assign tasks to the vendors and subsequently track and process those tasks• Charge vendor expenses to customers• Enter and update invoices raised by the vendors• Post vendor transactions• Process vendor payments.
Once an invoice has been presented for a service performed by a vendor, you can enter the information on the Vendor Management form and create a monetary transaction. You can then choose if the customer should pay any particular expense or not.
Setup tab (Vendor Services page)The Vendor Services page enables you to establish the links between the service type, ven-dor group, and the work order type. It records which vendor groups can provide which types of services and which service types belong to which work order types.
For each service type (Service Type field), there can be multiple vendor groups. Each ven-dor (Group field) can belong to one or multiple vendor group(s). The list of values for the vendor group is managed in the lookup. Each work order type (Work Order Type field) can be linked to one or multiple work order type(s). The list of values for the work order types is managed with the VENDOR_ASG_TYPE_CD lookup.
To set up the Vendor Services page
1 On the Setup menu, choose Vendors.
2 Choose the Setup master tab, then choose the Vendor Services tab.
Chapter 10 :-1 Setup Guide - Consumer Lease Origination

3 The Services block, choose the service type you want to link to a vendor group(s) and work order type(s) [VENDOR_SERVICE_TYPE_CD].
4 In the Vendor Groups block, use the Group field to select the vendor group that will pro-vide this service [VENDOR_TYPE_CD].
5 In the Work Order Types block, enter the following information:
In this field: View this:
Work Order Type Select the work order type (required) [VENDOR_ASG_TYPE_CD].
Transaction Select the associated transaction for the service type (required).
6 Save your entry.
Setup tab (Cycles page)The Cycles page allows you to define the various vendor cycles and the responsibilities that can gain access to the various transactions in each cycle.
You can define vendor status cycle and restrict the status change based on responsibility.
You can define vendor assignment status cycle and restrict the status change based on responsibility.
You can define vendor invoice status cycle and restrict the status change based on respon-sibility.
You can define vendor invoice payment status cycle and restrict the status change based on responsibility.
To set up the cycles page
1 On the Setup menu, choose Vendors.
Chapter 10 :-2 Setup Guide - Consumer Lease Origination

2 Choose the Setup master tab, then choose the Cycles tab.
3 The Status Cycle block displays the four vendor-related cycles:
Cycle TypeVEN_VENDOR_ASG_STATUS VENDOR ASSIGNMENT STATUS CYCLEVEN_INVOICE_PMT_STATUS VENDOR INVOICE PAYMENTS STATUS CYCLEVEN_INVOICE_STATUS VENDOR INVOICE STATUS CYCLEVEN_VENDOR_STATUS VENDOR STATUS CYCLE
• Select the cycle code and type you want to work with.
4 In the Current/Next Status block, select the current code to transition from in the Current Status field.
5 Select the current code to transition to in the Next Status field.
6 In the Status Change Responsibilities block, select the responsibility that will be capa-ble of executing this transition (from current code to the next code) [RESPONSIBILITY_CD].
7 Choose Yes to allow this responsibility.
8 Save your entry.
Chapter 10 :-3 Setup Guide - Consumer Lease Origination

Vendors tab (Vendors page)The Vendors page allows you to set up vendor information. If the vendor receives escrow disbursement at an address different from the current business address, enter this informa-tion in the Remittance block.This Remittance block also allows you to enter the number of days prior to the due date by which the payment to the vendor must be processed.
Note: The contents of this block defaults to the vendor’s current address, but can be modi-fied.
To enter or edit vendor information
1 On the Lending menu, choose Vendors > Vendors.-or-On the Setup menu, choose Vendors, then on the Vendor Management form, choose the Vendors master tab.
2 In the Vendor block, enter the following information:
In this field: Do this:
Vendor # View the vendor number. Oracle Daybreak automatically generates the vendor number (display only).
Name Enter the vendor name (required).Contact Person Enter the vendor contact name (required).Address Enter address line 1 (required).Address 2 (unlabeled) Enter address line 2 (optional).Zip Enter the zip (required).City Enter the city (required).St Enter the state (required).Zip Extension (unlabeled) Enter the zip extension (optional).Country Select the country code (optional).Phone Enter phone number 1 (optional).Ext Enter phone number 1 extension (optional).Fax Enter the fax number 1 (optional).Phone Enter phone number 2 (optional).Ext Enter phone number 2 extension (optional).
Chapter 10 :-4 Setup Guide - Consumer Lease Origination

Fax Enter fax number 2 (optional).Email Address Enter the vendor email address (optional).Status Select the vendor status - ACTIVE of INACTIVE
(required).Company Select the vendor portfolio company (required).Branch View the vendor portfolio branch (display only).Start Dt Enter the vendor start date (required).End Dt Enter the vendor end date (required).Enabled Select if the vendor is enabled (optional).Pmt Mode Select the vendor default payment mode (ACH or INSTI-
TUTION DRAFT/CHECK; if you select ACH, complete the ACH block -- see step 3) (required).
Fed Tax # If available, enter the vendor federal tax identification number. Note: If the organizational parameter UIX_HIDE_RESTRICTED_DATA is set to Y, this appears as a masked number; for example, XXXXX1234. (optional).
Credit Days Enter the credit days for the vendor invoice. This number is used to check that the Invoice Due Date is not more than the credit days from the Invoice Date. (required).
Phone Enter phone number 1 (optional).Ext Enter phone number 1 extension (optional).Fax Enter the fax number 1 (optional).Phone (2) Enter phone number 2 (optional).Ext (2) Enter phone number 2 extension (optional).Fax (2) Enter the fax number 2 (optional).
3 Save your entry.
Vendors tab (Vendors Groups sub page)The Vendors Groups sub page allows you to set up vendor groups.
To enter or edit vendor group information
1 On the Lending menu, choose Vendors > Vendors.-or-On the Setup menu, choose Vendors, then on the Vendor Management form, choose the Vendors master tab.
2 Choose the Vendor Groups sub tab.
3 In the Vendor Groups block, enter the following information:
In this field: Do this:
Sort Enter sort sequence (required).Group Select the vendor type to which the vendor belongs based
on the services provided by the vendor (required).Enabled Select to enable the vendor service.
4 Save your entry.
Chapter 10 :-5 Setup Guide - Consumer Lease Origination

Vendors tab (ACH sub page)The ACH sub page allows you to set up automatic clearing house information for vendors.
To enter or edit vendor ACH information
1 On the Lending menu, choose Vendors > Vendors.-or-On the Setup menu, choose Vendors, then on the Vendor Management form, choose the Vendors master tab.
2 Choose the ACH sub tab.
3 In the ACH sub page, enter the following information:
In this field: Do this:
Remittance blockAddress Enter address line 1 (required).Address (unlabeled) Enter address line 2 (optional).Zip Enter zip (required).City Enter city (required).St Enter state (required).Zip extension (unlabeled) Enter zip extension (optional).Country Select the country code (optional).Pre-Process Days Enter the remittance preprocess days. This is the number
of days prior to the due date by which the payment to the vendor must be processed (required).
ACH blockBank Enter the ACH bank (optional).Start Dt View ACH start date (display only).Routing # Enter the bank routing number (optional).Account Type Select the account type (optional).Account # Enter the account number. Note: If the organizational
parameter UIX_HIDE_RESTRICTED_DATA is set to Y, this appears as a masked number; for example, XXXXX1234 (optional).
4 Save your entry.
Chapter 10 :-6 Setup Guide - Consumer Lease Origination

Work Orders tab (Work Orders page)The Work Orders page allows you to assign an account to a vendor for a service that the vendor provides.
To set up the Work Orders page
1 On the Lending menu, choose Vendors > Work Orders.-or-On the Setup menu, choose Vendors, then on the Vendor Management form, choose the Work Orders master tab.
2 In the Work Order block, enter the following information:
In this field: View this:
Work Order # The work order number.Dt The work order date.Estimated The estimated amount for the work order.Billed The amount billed by the vendor for the work order.Paid The amount paid to the vendor for the work order.
3 In the Account Information block, enter the following information:
In this field: Do this:
Account Select the account number for the work order (required).Collateral Select the asset associated with the work order (optional).Type Select the work order type (required).Reference # Enter the vendor reference (optional).Status Select the work order status (required).Status Dt View the last work order status change date (display
only).Assigned By View the user who created the work order (display only).Followup Dt Enter the next follow-up date (optional).
Chapter 10 :-7 Setup Guide - Consumer Lease Origination

4 In the Vendor block, enter the following information:
In this field: Do this:
Vendor Select the vendor who will service the work order (required).
Company View the vendor company (display only).Branch View the vendor branch (display only).Contact Enter the vendor contact for the work order (optional).Phone Enter the vendor contact phone for the work order
(optional).Ext Enter the vendor contact phone extension for the work
order (optional).Fax Enter the vendor contact fax for the work order
(optional).Comment Enter comment (optional).
5 In the Services block, enter the following information:
In this field: Do this:
Service Select the service type (required).Fee Type Select the vendor fee type (optional).Estimated Enter the estimated amount for the service (required).Billed View the amount billed by the vendor for the service (dis-
play only).Paid View the amount paid to the vendor for the service (dis-
play only).Status Select the service status (required).Status Dt View the last service status change date (display only).
6 Save your entry
Chapter 10 :-8 Setup Guide - Consumer Lease Origination

Work Orders tab (Follow-up page)The Follow-up page lists the work orders that are not complete and hence require follow-up.
To set up the Follow-up pages
1 On the Lending menu, choose Vendors > Work Orders.-or-On the Setup menu, choose Vendors, then on the Vendor Management form, choose the Work Orders master tab.
2 Choose the Follow-up tab.
3 In the Work Order Follow-up block, enter the following information:
In this field: Do this:
Company View the vendor company (display only).Branch View the vendor branch (display only).Followup Dt Enter the next follow-up date (optional).Work Order # View the work order number (display only).Dt View the work order date (display only).Assignment Type View the work order type (display only).Account View the account associated with the work order (display
only).Vendor View the vendor associated with the work order (display
only).Status Select the work order status (required).Status Dt View the last work order status change date (display
only).Estimated View the estimated amount for the work order (display
only).Billed View the amount billed by the vendor for the work order
(display only).Paid View the amount paid to the vendor for the work order
(display only).Contact View the vendor contact name (display only).Phone View the vendor contact phone number (display only).
Chapter 10 :-9 Setup Guide - Consumer Lease Origination

Ext (unlabeled) View the vendor contact phone extension (display only).Comment Enter a comment (optional).
4 In the Assigned Service block, enter the following information:
In this field: Do this:
Services View the service provided by the vendor (display only).Estimated View the estimated amount for the service (display only).Billed View the amount billed by the vendor for the service (dis-
play only).Paid View the amount paid to the vendor for the service (dis-
play only).Status Select the service status (required).Status Dt View the last service status change date (display only).
5 Save your entry.
Chapter 10 :-10 Setup Guide - Consumer Lease Origination
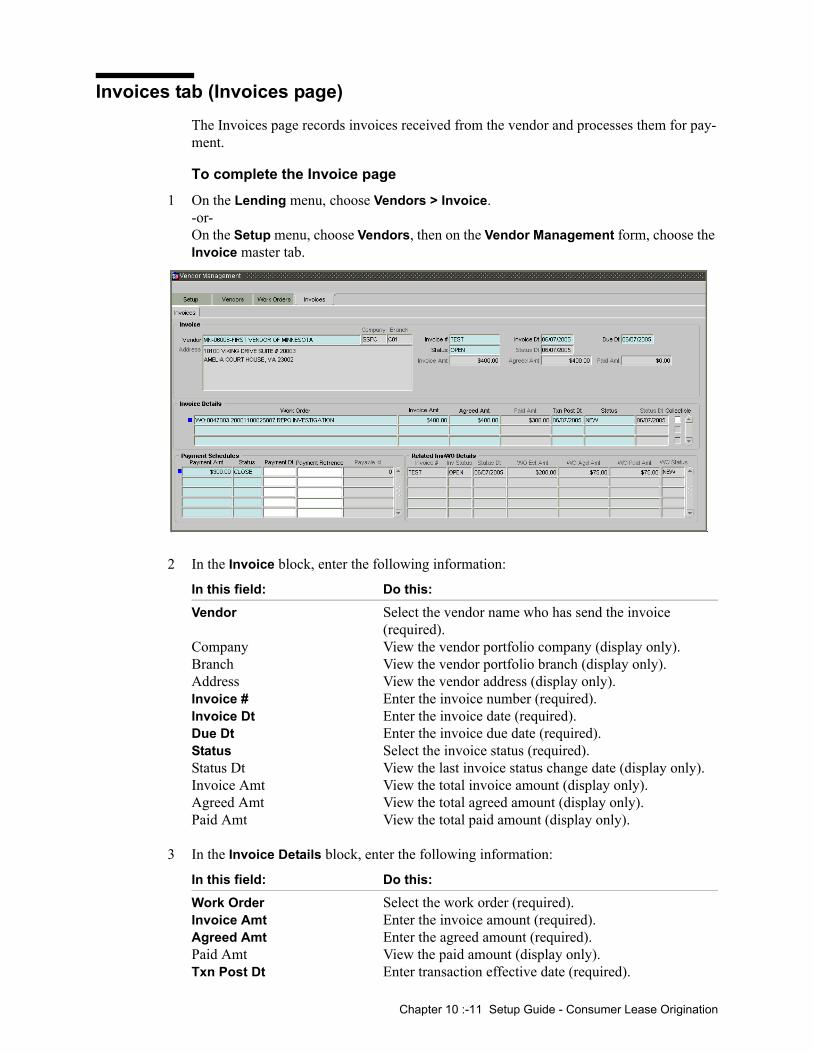
Invoices tab (Invoices page)The Invoices page records invoices received from the vendor and processes them for pay-ment.
To complete the Invoice page
1 On the Lending menu, choose Vendors > Invoice.-or-On the Setup menu, choose Vendors, then on the Vendor Management form, choose the Invoice master tab.
2 In the Invoice block, enter the following information:
In this field: Do this:
Vendor Select the vendor name who has send the invoice (required).
Company View the vendor portfolio company (display only).Branch View the vendor portfolio branch (display only).Address View the vendor address (display only).Invoice # Enter the invoice number (required).Invoice Dt Enter the invoice date (required).Due Dt Enter the invoice due date (required).Status Select the invoice status (required).Status Dt View the last invoice status change date (display only).Invoice Amt View the total invoice amount (display only).Agreed Amt View the total agreed amount (display only).Paid Amt View the total paid amount (display only).
3 In the Invoice Details block, enter the following information:
In this field: Do this:
Work Order Select the work order (required).Invoice Amt Enter the invoice amount (required).Agreed Amt Enter the agreed amount (required).Paid Amt View the paid amount (display only).Txn Post Dt Enter transaction effective date (required).
Chapter 10 :-11 Setup Guide - Consumer Lease Origination

Status Select the status (required).Status Dt View the last status change date (display only).Collectible Select if the agreed amount can be collected from the
customer.
4 In the Payment Schedules block, enter the following information:
In this field: Do this:
Payment Amt Enter the payment amount (required).Status Select the payment status (required).Payment Dt Enter the payment date (optional).Payment Reference Enter the payment reference (optional).Payable Id View payable requisition Id (display only).
5 In the Related Inv/WO Details block, view the following display only information:
In this field: View this:
Invoice # The invoice number.Inv Status The invoice status.Status Dt The invoice status date.WO Est Amt The work order estimated amount.WO Agd Amt The work order agreed amount.WO Paid Amt The work order paid amount.WO Status The work order status.
6 Save your entry.
Chapter 10 :-12 Setup Guide - Consumer Lease Origination

CHAPTER 11 : SUBVENTION FORM
The Subvention form allows you to set up lease subvention plans for producers (groups or individuals). Multiple producers may contribute to one subvention plan or a plan can be set for a specific producer.
Subvention TypesSubvention can be offered in many forms for vehicle leases. The most common formats are the rent factor for vehicle leases. Rate/rent factor subvention involves sharing the finance charge (interest) by the participant (most frequently with the manufacturer). The finance company sets its buy rate (the minimum cost to the company to extend the loan to a customer). If the customer rate is less than this buy rate, then the amount equivalent to the interest amount for the difference (the buy rate minus the customer rate) is paid by the participant as the subvention amount.
Currently Oracle Daybreak supports the following subvention type:
Lease subvention types:
1 Rent factor2 Residual3 Deposit waiver4 Cash bonus5 Buy down
Subvention plans can be defined for one participant (for example, a manufacturer or a par-ticular dealer) or group of participants (such as a dealer association). One subvention plan could have multiple sub plans and multiple participants could participate to each sub plan.
Subvention plan:
• “Summer Special Event”
Subvention sub-plans for above plan:
• 1.9% for 36 months - or -• 2.99% for 48 months - or -• 3.99% for 60 months - or -• $1500.00 cash bonus
Chapter 11 :-1 Setup Guide - Consumer Lease Origination

Multiple participants may participate in each sub plan. For example, for the 1.9% rate, 1% might be shared by the manufacturer and 0.9% might be shared by the dealer. Similarly for the $1,500 cash bonus, $1,000 might be shared by the manufacturer and $500 by the dealer. Or, the complete $1,500 might be covered by the manufacturer.
Collection of subvention amounts can be set for each participant in the subvention plan with the Collection Method.
Oracle Daybreak supports following collection methods:
UPFRONT The entire subvention amount is collected at the booking of the loan from the producer proceed.
UPFRONT STATEMENT The entire subvention amount is collected at the time of the subvention statement.
PAY AS U GO The subvention amount is billed to the producer when the customer pays the loan payment. The producer is due for the amount at each statement.
Subvention RefundThere are times when a loan is either paid-off early or gets charged off and the finance company refunds the unearned subvention amount back to the producer. The refund is available only when the subvention amount is collected from the producer proceeds (UPFRONT) or the whole amount is billed in the first statement (UPFRONT STATEMENT).
You can set up Oracle Daybreak to allow refunds only for a certain period and not beyond that. The period can be set differently for charge offs and paid offs and can be based on two methods:
1 Days 2 Term
Oracle Daybreak provides the following methods for refund amount calculation:
1 Earned 2 Percentage
The earned method is used to refund the unearned portion of the collected subvention amount. The percentage method is used to refund a certain percentage of the subvention amount collected.
Chapter 11 :-2 Setup Guide - Consumer Lease Origination

Lease Subvention pageThe Lease Subvention Plans page allows you to set up subventions for leases.
To set up the Lease Subvention Plans page
1 On the Setup menu, choose Subvention, then choose Lease.
2 On the Lease Subvention Plans page, enter the following information:
In this field: View this:
Plan Definition block:Code Enter the subvention plan code (required).Description Enter the subvention plan description (required)Company Enter the company name (required).Branch Enter the branch name (required).Bill Cycle Select billing cycle (required).Product Select the product (required).State Select the state (required).Asset Class Select the asset class (required).Asset Type Select the asset type (required).Sub Type Select asset sub type (required).Asset Make Select asset make (required).Asset Mode View the asset model (display only).Age Enter the asset age (required).Start Date Enter the start date for the subvention plan (required).End Date Enter the end date for the subvention plan. (required).Enabled If selected indicates the record is active.
Sub Plan Definition block:Code Enter the subvention sub plan code. (required).Description Enter the subvention sub plan description (required)State Select the state (required).
Chapter 11 :-3 Setup Guide - Consumer Lease Origination

Producer Group Select the producer group (required).Producer Type Select the producer type (required).Producer Select the producer (required).Grade Enter the grade (required).Amount Enter the amount (required).Term Enter the term (required).Asset Type Select the asset type (required).Sub Type Select asset sub type (required).Asset Make Select asset make (required).Asset Model View the asset model (display only)Age Enter asset age (required).Start Date Enter start date for the subvention plan (required).End Date Enter the end date for the subvention plan (required).Enabled If selected indicates the record is active.
Plan Details block:Participant Select the participant (required).Collection Method Select the collection method for the subvention plan
(required).Transaction Select the transaction code (required).Rate Enter the subvention rate (required).Override Select to allow overriding the rate at the time of under-
writing / funding (required).
Calculation block:Method Select the subvention calculation method (required).Max Spread Enter the max subvention spread value (required).Factor Enter the subvention factor (required).
Flat Amount Enter the flat amount (required).Maximum Amount Enter the maximum subvention amount (required).Max Spread Enter the max spread value (required).
Refund block:Method (Paid off) Select the method if the account is paid-off early
(required).Basis (Paid off) Select the basis if the account is paid-off earl (required).Days (Paid off) Enter the number of days in which the subvention can be
refunded to the producer if the account is paid-off early (required).
Term (Paid off) Enter the number of terms in which the subvention can be refunded to the producer (required).
Percent (Paid off) Enter the refund percentage if the account is charged-off (required).Method (Charge off) Select the method if the account is charged-off
(required).Basis (Charge off) Select the basis if the account is charged-off (required).Days (Charge off) Enter the number of days in which the subvention can be
refunded to the producer if the account is early paid-off (required).
Term (Charge off) Enter the number of terms in which the subvention will be refunded to the producer (required).
Percent (Charge off) Enter the refund percentage if the account is charged-off (required).
Chapter 11 :-4 Setup Guide - Consumer Lease Origination

Amortization block:Balance Type Select the amortize balance type (required).Method Select the amortize method (required).Frequency Select the amortize frequency (required).Cost / Fee Method Select the cost / fee (required).Enabled If selected indicates the record is active.
Chapter 11 :-5 Setup Guide - Consumer Lease Origination

Chapter 11 :-6 Setup Guide - Consumer Lease Origination

CHAPTER 12 : CORRESPONDENCE FORM
The Oracle Daybreak system provides two types of correspondence: predefined and ad hoc. The following chart provides a quick summary of both:
This chapter explains how to set up ad hoc correspondence with the Correspondence form.
The Correspondence form is a cost-effective and easy to use way to build custom docu-ments that draw information from the Oracle Daybreak database without additional pro-gramming. You can choose what to include in a letter, create a template, and then use this template to produce a letter.
The core of the Correspondence module is the document element -- the information stored in the database merged into the correspondence. Oracle Daybreak has document elements defined for commonly used data elements in correspondence, such as account numbers, account balances, customer addresses, telephone numbers, and due dates.
Correspondence consists of a document file with text of your choice and the document ele-ments from the Oracle Daybreak database.
You can create a correspondence set that consists of one or more documents. If a corre-spondence set consists of more than one documents, such as the account details letter and a payment overdue letter, it prints both documents every time Oracle Daybreak generates correspondence for a customer.
The Correspondence module creates the following standard ad hoc correspondence:
• Microsoft Word (RTF)• Adobe Acrobat (PDF/XFDF)
Note: In this document and in the Oracle Daybreak system, the term BANKERS SYSTEM is synonymous with Adobe Acrobat.
Chapter 12 :-1 Setup Guide - Consumer Lease Origination

Setup master tabOn the Corresponding form, the Setup master tab branches to two tabs: Common and Lease. Which one of these two tabs you choose determines which product the correspon-dence set up will affect.
• Choose Common to make changes to all correspondence regarding leases.• Choose Lease to make changes to all correspondence regarding leases.
Functions tab (System Functions page)The Correspondence form’s System Function page allows you to view the predefined functions for the appropriate Lease product in Oracle Daybreak. These are attributes from the database.
Functions define how Oracle Daybreak retrieves data to include in correspondence. The data is retrieved as elements which are either specific database columns or calculated val-ues. Elements are recorded on the Elements page.
To view the predefined functions
1 On the Setup menu, choose Correspondence.
2 Choose the Setup tab, then choose the product associated with the correspondence (Com-mon or Lease).
3 Choose the Functions tab, then choose the System Functions sub tab.
4 In the Functions Definition block, view the following:
In this field: View this:
Name The function name.Description The function description.Function Type The function type.Source Program The source program.
Chapter 12 :-2 Setup Guide - Consumer Lease Origination

5 In the Functions Parameters block, view the following:
In this field: View this:
Position The parameter position.Parameter The function parameter.Description The function parameter description.
Elements tab (Elements page)The Elements page displays the predefined document elements retrieved from the data-base when Oracle Daybreak generates a correspondence.
In the Element Definitions block, only the Description field may be edited or updated.
To view the document elements
1 On the Setup menu, choose Correspondence.
2 Choose the Setup tab, then choose the product associated with the correspondence (Com-mon or Lease).
3 Choose the Elements tab, then choose the Elements sub tab.
4 In the Element Definitions block, view the following information:
In this field: Do this:
Level0 Type The element Level0 type.Name The element name.Element The element type.Description Enter the element description (required).Data Type The element data type.Source Function The element function.
Chapter 12 :-3 Setup Guide - Consumer Lease Origination

5 Select the Enabled box to enable the element.
6 Save any changes you made to the entry.
Elements tab (E-Forms Elements page)The E-forms Elements page defines elements included when Oracle Daybreak generates online correspondence with a browser. The E-forms page is only set up for PDF elements using the XFDF format.These definitions translate the external element required by the vendor to a Oracle Daybreak correspondence element.
ExampleVendor Element AllBorrowers.FullNameStreetCityStateZip
(Contains names of all borrowers with address of primary customer)
Oracle Daybreak Elements PRIM_APL_NAMESPOUSE_APL_NAME PRIM_APA_ADDRESS1PRIM_APA_ADDRESS2PRIM_APA_ADDRESS3
Translation:PRIM_APL_NAME || ', ' || SPOUSE_APL_NAME || ', ' || PRIM_APA_ADDRESS1 || '; ' ||PRIM_APA_ADDRESS2 || '; ' || PRIM_APA_ADDRESS3
To set up the E-forms Elements page
1 On the Setup menu, choose Correspondence.
2 Choose the Setup tab, then choose the product associated with the correspondence (Com-mon or Lease).
3 Choose the Elements tab, then choose the E-forms Elements sub tab.
4 In the E-form Element Definitions block, enter the following information:
In this field: View this:
Level0 Type Enter the element Level0 type (APPLICATION) (required).
Chapter 12 :-4 Setup Guide - Consumer Lease Origination

E-Form Source Enter the element e-form source. (Select ORACLE DAY-BREAK for Microsoft Word correspondence or BANKER SYSTEMS INC. for XFDF format) (required).
Name Enter the element name (the name used in the external form) (required).
Description Enter the element description (required).Data Type Select the element data type (DATE, NUMBER, or CHAR-
ACTER) (required).Translation Enter the translation for the e-form element (SQL state-
ment fragment defining the element data) (required).
5 Choose the Enabled block to enable the e-form element.
6 Save your entry.
Document tab (Documents page)The Documents page allows you to set up the various documents and the data fields that Oracle Daybreak compiles together when creating a correspondence. Oracle Daybreak provides two different document formats: Word or XFDF: XML-based form.
To set up documents to be compiled in correspondence
1 On the Setup menu, choose Correspondence.
2 Choose the Setup tab, then choose the product associated with the correspondence (Com-mon or Lease).
3 Choose the Documents tab.
4 In the Document Definition block of the Documents page, enter the following informa-tion:
In this field: View this:
Code Enter the document code to define the name for the new document (required).
Chapter 12 :-5 Setup Guide - Consumer Lease Origination
Description Enter the document description for the new document. This entry appears in the Correspondence block on the Request page when you generate an ad hoc correspon-dence (required).
File Name Enter the document file name for the resulting file (Word or XFDF document) (required).
Level0 Type Select the level0 type (APPLICATION) (required).E-form Source Enter the element e-form source. (Select ORACLE DAY-
BREAK for Microsoft Word correspondence or BANKER SYSTEMS INC. for XFDF format) (required).
Product Select the document product (required).Source Select the document source type (WORD DOCUMENT or
XFDF: XML-BASED FORM DOCUMENT FORMAT) (required).
5 Select Enabled to enable the document definition.
6 Save your entry.
Document tab (Elements sub page)The Elements sub page records the Oracle Daybreak application information that appears in the ad hoc correspondence.
To set up the elements compiled in correspondence
1 On the Setup menu, choose Correspondence.
2 Choose the Setup tab, then choose the product associated with the correspondence (Com-mon or Lease).
3 Choose the Documents tab, then choose the Elements sub tab.
In the Document Elements block, enter the following information
In this field: View this:
Seq Enter the sequence number to order the document ele-ments (required).
Type Select element type from the following (required):S System-defined. If you select S, the value is supplied by Oracle Daybreak and cannot be changed in the Corre-spondence Request page.C Constant.UD User Defined Element. If you select UD, you can choose the value and change it in the Correspondence Request screen.UC User Defined Constant. If you choose UC, you can choose the value, but you cannot change it in the Corre-spondence Request screen.T Translated Element. If a document contains an e-form element and you do not select T, the value will not be translated.
Element Name Select/Enter the element name (required).
Chapter 12 :-6 Setup Guide - Consumer Lease Origination

Description Enter element description. Enter a description that is informative and easy to understand for the new element you create. (Check that the element name does not have blank spaces or special characters, such as the forward slash “/” or backward slash “\”.) Note: If the element is system-defined, Oracle Daybreak will automatically complete this field. (required).
Data Type Select the element data type (required).Format Mask Select the element format mask (required).Default Value Enter the element default value (if appropriate).
4 If you want to include the element in the document, select Enabled.
5 Save your entry.
Document tab (Templates sub page)The Templates sub page records the PDF template Oracle Daybreak will use to generate the ad hoc correspondence. You must update the Templates sub page every time you update the PDF template.
Note: The Templates sub page is only available for the XFDF: XML-BASED FORM DOCU-MENT FORMAT.
To set up document template for XFDF correspondence
1 On the Setup menu, choose Correspondence.
2 Choose the Setup tab, then choose the product associated with the correspondence (Com-mon or Lease).
3 Choose the Documents tab, then choose the Templates sub tab.
In the Document Elements block, enter the following information
In this field: View this:
Filename Enter the template file name as it appears in the /DOC_TEMPLATES. Make sure to include the .pdf exten-sion (required).
Product Select the product type this template is valid for (required).
Customer St Select the applicant/customer state this template is valid for (required).
Producer St Select the producer state this template is valid for (required).
App/Acc St Select the application state this template is valid for (required).
New Template If selected, indicates that the document template is new.Loaded If selected, indicates that the document template is
loaded.Enabled If selected, indicates that the document template is
enabled.4 On the Documents page, choose Load Template
Chapter 12 :-7 Setup Guide - Consumer Lease Origination

5 Save your entry.
6 Press F8 to refresh the current page.
On the Templates sub page, the Loaded and Enabled boxes are selected for the pdf file you entered in the Filename field.
Correspondence tab (Correspondence page)The Correspondence page allows you to define who will receive the documents you cre-ated on the Documents page by creating correspondence sets. Each document must belong to a set, and a set can have more than one document.
To set up a correspondence set
1 On the Setup menu, choose Correspondence.
2 Choose the Setup tab, then choose the product associated with the correspondence (Lease).
3 Choose the Correspondence tab, then choose the Correspondence sub tab.
4 In the Correspondence block, enter the following information:
In this field: Do this:
Code Enter the correspondence code (required).Description Enter the correspondence description (required).Print Schedule Enter the correspondence output schedule type
(required).Level Enter the correspondence level0 type (required).Group Select correspondence group (required).
Note: The correspondence group is maintained through the Correspondence transaction code setup as shown below.
Company Select the correspondence company (required).Branch View the correspondence branch (display only).Product Select the correspondence product (required).
Chapter 12 :-8 Setup Guide - Consumer Lease Origination

5 Select the Enabled block to enable the correspondence.
6 In the Documents block, enter the following information:
In this field: Do this:
Document Select the correspondence document (required).Recipients Select the recipients for the document (required).
7 Select the Include box to include the recipient selected.
8 In the Functions block, enter the following information to define the functions that should be executed before or after correspondence is generated. (Note: Creating custom functions requires programming at set up.)
In this field: Do this:
Function Select the correspondence functions (required).Exe When? Select when to execute the correspondence function
(required).
9 Save your entry.
Chapter 12 :-9 Setup Guide - Consumer Lease Origination

Chapter 12 :-10 Setup Guide - Consumer Lease Origination

CHAPTER 13 : ACCOUNT DOCUMENT TRACKING FORM
The Account Document Tracking form allows you to view documents that have been attached to an account in the form of GIF files, PDF files, DOC files, XLS files, and TXT files. Any documents that were attached to the account when it was still an application, such the application received as a fax and saved as a GIF file, appear on the Account Doc-ument Tracking form.
Set UpDocuments of the following format can be attached to an account:
• GIF• PDF• DOC• XKL• TXT
To attach an document to an account
1 Save the document you want to attach to an account with the following format:
<ACCOUNT_NBR>.<DOCUMENT TYPE CD>.<DOCUMENT SUB TYPE CD>.<PAGE NUMBER>.<FILETYPE>
The delimiter between account number, document type, sub type and page number is “.”. File extension tells the file type.
Example: 20001000010483.APP.APP_IMG_PAGE.1.GIF 20001000010483.CON.CON_DOC.1.PDF
2 Save the document to attach in the following file:
$CMN_SERVER_HOME/acct_doc_load/
-or-
$CMN_SERVER_HOME\acct_doc_load
3 The batch job set code SET_DOT reads the directory for new files to be loaded in the data-base. It inserts records in account documents and documents details table and will move the file to the directory specified in the system parameter DOT_STORAGE_DIRECTORY.
Chapter 13 :-1 Setup Guide - Consumer Lease Origination

Lookup typesThe Account Document Tracking form uses the following look up types:
DOCUMENT_FILE_TYPE_CDDOCUMENT_SUB_FILE_TYPE_CDDOCUMENT_TYPE_CD
Note: Many parameter values are restricted based on system lookups. For more informa-tion, see the Lookup page section in the Administration chapter.
Please refer to the Excel file Appendix_Lookups for further definitions and functions of individual parameters.
Chapter 13 :-2 Setup Guide - Consumer Lease Origination

APPENDIX A : SUMMARY OF DLS SCORING PARAMETERS
GlossaryTerm Description
DEROG / DEROGATORY Account has had chargeoffs, collections, bank-ruptcy, or repossession.
MINOR DELINQUENCY Less than or equal to 60 days delinquent.
MAJOR DELINQUENCY Greater than 60 days delinquent.
DEBT RATIO Debt / Available credit.
DEBT TO INCOME RATIO Debt / Income.
“APPLICANT STATED” Parameter is pulling information stated or in any other way provided by the applicant on the appli-cation on the Application Entry form in Oracle Daybreak.
“APPLICANT CREDIT BUREAU” Parameter is pulling information from the credit bureau, as opposed to another source, such as the Application Entry form.
LOAN FINANCE Refers to companies that provide the loan but are not selling the actual object financed, if any. Example: An independent auto finance com-pany.
SALES FINANCE Refers to companies that provide the object being financed in addition to the financing. Example: Marshall Fields card.
Appendix A :-1 Setup Guide - Consumer Lease Origination

Scoring Parameters by Category
1. Applicant Details / Debt Ratios1.1. APPLICANT CREDIT BUREAU AUTO DEBT RATIO
This is the sum of all automobile type loan balances and the sum of all automobile type credit limits. For installment loans, the credit limit is normally equal to the original loan amount. This applies to open tradelines only.
1.2. APPLICANT CREDIT BUREAU BANK DEBT RATIOThis is the sum of all bank type loan balances and the sum of all bank type credit limits. For installment loans, the credit limit is normally equal to the original loan amount. This applies to open tradelines only.
1.3. APPLICANT CREDIT BUREAU CARD DEBT RATIOThis is the sum of all travel card type loan balances and the sum of all travel card type credit limits. This applies to open tradelines only.
1.4. APPLICANT CREDIT BUREAU DEBT RATIOThis parameter provides a value for all debt divided by all available credit as shown on the bureau.
1.5. APPLICANT CREDIT BUREAU FICO SCOREThis is the FICO score provided for the applicant in the bureau pull. There are usually sev-eral different types of FICO scores available at the bureau. The different score models are set up to give certain attributes different weighting based on if the person is buying a car, or a house, and so on. The type of FICO score pulled is based on credit bureau setup.
1.6. APPLICANT CREDIT BUREAU INST DEBT RATIOThis is the sum of all installment loan balances and the sum of all installment loan credit limits. For installment loans, the credit limit is normally equal to the original loan amount. This applies to open tradelines only.
1.7. APPLICANT CREDIT BUREAU LOAN FIN DEBT RATIOThis is the sum of all loan finance type loan balances and the sum of all loan finance type credit limits. For installment loans, the credit limit is normally equal to the original loan amount. This applies to open tradelines only.
1.8. APPLICANT CREDIT BUREAU MORTGAGE DEBT RATIOThis is the sum of all mortgage type loan balances and the sum of all mortgage type credit limits. For installment loans, the credit limit is normally equal to the original loan amount. This applies to open tradelines only.
1.9. APPLICANT CREDIT BUREAU OPEN PUBLIC RECORDSThis parameter indicates if there are any open public records in the credit bureau associ-ated with the applicant. This is a numeric counter covering the full period of time available in the bureau.
1.10. APPLICANT CREDIT BUREAU PUBLIC RECORDSThis parameter indicates if there are any public records, open or closed, in the credit bureau associated with the applicant. This is a numeric counter covering the full period of time available in the bureau.
Appendix A :-2 Setup Guide - Consumer Lease Origination

1.11. APPLICANT CREDIT BUREAU RETAIL DEBT RATIOThis is the sum of all retail type loan balances divided by the sum of all retail type credit limits. For installment loans, the credit limit is normally equal to the original loan amount. This applies to open tradelines only. This is expressed as a percent: 50% shows as 50.
1.12. APPLICANT CREDIT BUREAU REV DEBT RATIOThis is the sum of all revolving type loan balances and the sum of all revolving type credit limits. This applies to open tradelines only. This is expressed as a percent: 50% shows as 50.
1.13. APPLICANT CREDIT BUREAU SALES FIN DEBT RATIOThis is the sum of all sales finance type loan balances and the sum of all sales finance type credit limits. For installment loans, the credit limit is normally equal to the original loan amount. This applies to open tradelines only. This is expressed as a percent: 50% shows as 50.
1.14. APPLICANT DEBT RATIO STATED AFTER REQUESTED LOANThis is the debt divided by available credit based on the values stated by the applicant after factoring in the requested loan amount- this information is not taken from the bureau. This is expressed as a percent: 50% shows as 50.
1.15. APPLICANT DEBT RATIO STATED BEFORE REQUESTED LOANThis is the debt divided by available credit based on the values stated by the applicant before factoring in the requested loan amount- this information is not taken from the bureau. This is expressed as a percent: 50% shows as 50.
1.16. APPLICANT DEBT TO INCOME RATIO STATED AFTER REQUESTED LOANThis is the debt divided by income based on the values stated by the applicant after factor-ing in the requested loan amount- this information is not taken from the bureau. This is expressed as a percent: 50% shows as 50.
1.17. APPLICANT DEBT TO INCOME RATIO STATED BEFORE REQUESTED LOANThis is the debt divided by income based on the values stated by the applicant before fac-toring in the requested loan amount- this information is not taken from the bureau. This is expressed as a percent: 50% shows as 50.
1.18. APPLICANT PAYMENT TO INCOME RATIO STATEDThis is the total amount of all monthly payments divided by monthly income. These val-ues are stated by the applicant and not taken from the bureau. This is expressed as a per-cent: 50% shows as 50.
1.19. APPLICANT PRIOR CUSTOMERThis parameter indicates whether the applicant is a prior customer. It is populated when the application is passed to Underwriting for a decision. If the SSN given by the applicant already exists then the applicant is marked as a prior customer and the parameter value is Y (Yes).
1.20. APPLICANT REVOLVING DEBT RATIO STATEDThis is the sum of all revolving type loan balances / sum of all revolving type credit limits. This applies to open tradelines only. This is expressed as a percent: 50% shows as 50.
Appendix A :-3 Setup Guide - Consumer Lease Origination

5.1.21. APPLICANT STATED EMPLOYMENT PERIOD (IN MONTHS)This parameter looks at the number of months of stated employment for the most recently entered current employment.
Example: The applicant states that she has been working at her current place of employ-ment for 3 years and 5 months. This parameter would be populated with (3years * 12 months/year) + 5 months which calculates to 41 stated months. If the applicant enters another current employment and enters 1 year and 2 months then this parameter will be populated with 14 months, even though the other employment is still current.
1.22. APPLICANT STATED MONTHLY INCOMEThis is the monthly income stated by the applicant on the application. It combines the income for all employment marked as “current” in Oracle Daybreak. If the income is stated as anything other than monthly, the income will be converted to monthly for this parameter.
Example: The applicant states that he is paid $50,000 with a frequency of ANNUALLY. This parameter is populated with $50,000/12, which calculates to $4166.67 stated monthly income.
1.23. APPLICANT STATED MONTHLY LIABILITYThis is the stated monthly liability as provided by the applicant on the Application Entry screen.
1.24. APPLICANT STATED RESIDENCE PERIOD (IN MONTHS)This parameter looks at the stated residence period for the most recent current address.
2. Loan Details2.1. APPROXIMATE CASH PRICE
This is the Approximate Cash price taken from the “Approx Price” field on the Applica-tion Entry form’s Loan page in Oracle Daybreak.
2.2. REQUESTED ADVANCE AMOUNTThis is the Requested Advance Amount value taken from the Application Entry form’s Loan page in Oracle Daybreak.
3. Auto Trades / Inquiries3.1. APPLICANT CREDIT BUREAU 6MONTH AUTO TRADES
This is the number of auto trades that have been opened in the last 6 months. Note that these trades may now be open or closed, paid as agreed, delinquent, or derogatory, and so on.
3.2. APPLICANT CREDIT BUREAU 12MONTH AUTO TRADESThis is the number of auto trades that have been opened in the last 12 months. Note that these trades may now be open or closed, paid as agreed, delinquent, or derogatory, and so on.
3.3. APPLICANT CREDIT BUREAU 24MONTH AUTO TRADESThis is the number of auto trades that have been opened in the last 24 months. Note that these trades may now be open or closed, paid as agreed, delinquent, or derogatory, and so on.
Appendix A :-4 Setup Guide - Consumer Lease Origination

3.4. APPLICANT CREDIT BUREAU AUTO INQURIESThis is the number of automobile-related credit inquiries the have been made to the bureau.
3.5. APPLICANT CREDIT BUREAU AUTO TRADESThis is the number of auto trades, both open and closed. Note that these trades may be paid as agreed, delinquent, derogatory, and so on. The parameter makes no distinction.
3.6. APPLICANT CREDIT BUREAU CURRENT AUTO TRADESTotal number of auto trades that are paid on time right now. These trades may or may not have been delinquent in the past.
3.7. APPLICANT CREDIT BUREAU OPEN AUTO TRADESThis is the number of open auto trades on the account. Note that these trades may be paid as agreed, delinquent, derogatory, and so on. The parameter makes no distinction.
3.8. APPLICANT CREDIT BUREAU SATISFACTORY AUTOTotal number of auto trades paid as agreed (no delinquencies) for the entire life of the trade. This could be a few months or several years- the parameter makes no distinction.
3.9. APPLICANT CREDIT BUREAU WORST AUTO TRADEThe rating code used for this parameter is the same rating code system displayed for the tradelines. The different bureaus use different systems so Oracle Daybreak changes them to a common format that is used in the scoring:
1 = current2 = 30-59 days late3 = 60-89 days late4 = 90-119 days late5 = 120-149 days late6 = 150- days late7 = involved in a bankruptcy8 = repossession, foreclosure9 = charge-off
4. Bank Trades / Inquiries4.1. APPLICANT CREDIT BUREAU 12MONTH BANK TRADES
This is the number of bank trades that have been opened in the last 12 months. Note that these trades may now be open or closed, paid as agreed, delinquent, or derogatory, and so on.
4.2. APPLICANT CREDIT BUREAU 24MONTH BANK TRADESThis is the number of bank trades that have been opened in the last 24 months. Note that these trades may now be open or closed, paid as agreed, delinquent, or derogatory, and so on.
4.3. APPLICANT CREDIT BUREAU 6MONTH BANK TRADESThis is the number of bank trades that have been opened in the last 6 months. Note that these trades may now be open or closed, paid as agreed, delinquent, or derogatory, and so on.
Appendix A :-5 Setup Guide - Consumer Lease Origination

4.4. APPLICANT CREDIT BUREAU BANK INQUIRIESThis is the number of bank inquiries against the bureau in the applicant's recorded bureau history.
4.5. PPLICANT CREDIT BUREAU BANK TRADESThis is the number of open bank trades on the account. Note that bank trades can be con-sidered a sub type to installment, mortgage, and / or revolving loans.
4.6. APPLICANT CREDIT BUREAU CURRENT BANK TRADESTotal number of bank trades that are paid on time right now. These trades may or may not have been delinquent in the past.
4.7. APPLICANT CREDIT BUREAU OPEN BANK TRADESThis is the number of bank trades that are open right now. Note that these trades may now be open or closed, paid as agreed, delinquent, or derogatory, and so on.
4.8. APPLICANT CREDIT BUREAU REV BANK BALANCEThis parameter shows the “current” revolving bank balance. If the revolving credit is owned by a bank, then it will show up here.
4.9. APPLICANT CREDIT BUREAU REV BANK HIGH BALANCEThis parameter shows the highest cumulative balance among all revolving bank credit over the bureau history. NOTE: If the applicant had $5,000 on one account 2 years ago and $10,000 on another account 4 years ago, this parameter would return $15,000. The parameter is of question-able utility in many situations.
4.10. APPLICANT CREDIT BUREAU SATISFACTORY BANKTotal number of bank trades paid as agreed (no delinquencies) for the entire life of the trade. This could be a few months or several years- the parameter makes no distinction.
4.11. APPLICANT CREDIT BUREAU WORST BANK TRADEThe rating code used for this parameter is the same rating code system displayed for the tradelines. The different bureaus use different systems so Oracle Daybreak changes them to a common format that is used in the scoring:
1 = current2 = 30-59 days late3 = 60-89 days late4 = 90-119 days late5 = 120-149 days late6 = 150- days late7 = involved in a bankruptcy8 = repossession, foreclosure9 = charge-off
Appendix A :-6 Setup Guide - Consumer Lease Origination

5. Card Trades / Inquiries5.1. APPLICANT CREDIT BUREAU 12MONTH CARD TRADES
This is the number of card trades that have been opened in the last 12 months. Note that these trades may now be open or closed, paid as agreed, delinquent, or derogatory, and so on.
5.2. APPLICANT CREDIT BUREAU 24MONTH CARD TRADESThis is the number of card trades that have been opened in the last 24 months. Note that these trades may now be open or closed, paid as agreed, delinquent, or derogatory, and so on.
5.3. APPLICANT CREDIT BUREAU 6MONTH CARD TRADESThis is the number of card trades that have been opened in the last 6 months. Note that these trades may now be open or closed, paid as agreed, delinquent, or derogatory, and so on.
5.4. APPLICANT CREDIT BUREAU CARD INQUIRIESThis is the number of card inquiries that have been made against the bureau for the appli-cant in the bureau's recorded history.
5.5. APPLICANT CREDIT BUREAU CARD TRADESThis is the number of card trades, both open and closed, in the bureau history. Note that these trades may be paid as agreed, delinquent, derogatory, and so on. The parameter makes no distinction.
5.6. APPLICANT CREDIT BUREAU CURRENT CARD TRADESTotal number of card trades that are paid on time right now. These trades may or may not have been delinquent in the past.
5.7. APPLICANT CREDIT BUREAU OPEN CARD TRADESThis is the number of open card trades on the account. Note that these trades may be paid as agreed, delinquent, derogatory, and so on. The parameter makes no distinction.
5.8. APPLICANT CREDIT BUREAU SATISFACTORY CARDTotal number of card trades paid as agreed (no delinquencies) for the entire life of the trade. This could be a few months or several years- the parameter makes no distinction.
5.9. APPLICANT CREDIT BUREAU WORST CARD TRADEThe rating code used for this parameter is the same rating code system displayed for the tradelines. The different bureaus use different systems so Oracle Daybreak changes them to a common format that is used in the scoring:
1 = current2 = 30-59 days late3 = 60-89 days late4 = 90-119 days late5 = 120-149 days late6 = 150- days late7 = involved in a bankruptcy8 = repossession, foreclosure9 = charge-off
Appendix A :-7 Setup Guide - Consumer Lease Origination

6. Installment Trades / Inquiries6.1. APPLICANT CREDIT BUREAU 12MONTH INST TRADES
This is the number of installment trades that have been opened in the last 12 months. Note that these trades may now be open or closed, paid as agreed, delinquent, or derogatory, and so on.
6.2. APPLICANT CREDIT BUREAU 24MONTH INST TRADESThis is the number of installment trades that have been opened in the last 24 months. Note that these trades may now be open or closed, paid as agreed, delinquent, or derogatory, and so on.
6.3. APPLICANT CREDIT BUREAU 6MONTH INST TRADESThis is the number of installment trades that have been opened in the last 6 months. Note that these trades may now be open or closed, paid as agreed, delinquent, or derogatory, and so on.
6.4. APPLICANT CREDIT BUREAU CURRENT INST TRADESTotal number of installment trades that are paid on time right now. These trades may or may not have been delinquent in the past.
6.5. APPLICANT CREDIT BUREAU INST TRADESThis is the number of installment trades, both open and closed. Note that these trades may be paid as agreed, delinquent, derogatory, and so on. The parameter makes no distinction.
6.6. APPLICANT CREDIT BUREAU OPEN INST TRADESThis is the number of open installment trades on the account. Note that these trades may be paid as agreed, delinquent, derogatory, and so on. The parameter makes no distinction.
6.7. APPLICANT CREDIT BUREAU SATISFACTORY INST TRADESTotal number of installment trades paid as agreed (no delinquencies) for the entire life of the trade. This could be a few months or several years- the parameter makes no distinction.
6.8. APPLICANT CREDIT BUREAU WORST INST TRADEThe rating code used for this parameter is the same rating code system displayed for the tradelines. The different bureaus use different systems so Oracle Daybreak changes them to a common format that is used in the scoring:
1 = current2 = 30-59 days late3 = 60-89 days late4 = 90-119 days late5 = 120-149 days late6 = 150- days late7 = involved in a bankruptcy8 = repossession, foreclosure9 = charge-off
Appendix A :-8 Setup Guide - Consumer Lease Origination

7. Loan Finance Trades / Inquiries7.1. APPLICANT CREDIT BUREAU 12MONTH LOAN FIN TRADES
This is the number of loan finance trades that have been opened in the last 12 months. Note that these trades may now be open or closed, paid as agreed, delinquent, or deroga-tory, and so on.
7.2. APPLICANT CREDIT BUREAU 24MONTH LOAN FIN TRADESThis is the number of loan finance trades that have been opened in the last 24 months. Note that these trades may now be open or closed, paid as agreed, delinquent, or deroga-tory, and so on.
7.3. APPLICANT CREDIT BUREAU 6MONTH LOAN FIN TRADESThis is the number of loan finance trades that have been opened in the last 6 months. Note that these trades may now be open or closed, paid as agreed, delinquent, or derogatory, and so on.
7.4. APPLICANT CREDIT BUREAU CURRENT LOAN FIN TRADESTotal number of loan finance trades that are paid on time right now. These trades may or may not have been delinquent in the past.
7.5. APPLICANT CREDIT BUREAU LOAN FIN TRADESThis is the number of loan finance trades, both open and closed. Note that these trades may be paid as agreed, delinquent, derogatory, and so on. The parameter makes no distinction.
7.6. APPLICANT CREDIT BUREAU LOAN FINANCE INQUIRIESThis is the number of loan finance inquires listed on the credit report. The bureaus have their own limits as to how long they keep an inquiry on the credit report, but this parame-ter will show whatever total is shown for that bureau.
7.7. APPLICANT CREDIT BUREAU OPEN LOAN FINANCE TRADESThis is the number of open loan finance trades on the account. Note that these trades may be paid as agreed, delinquent, derogatory, and so on. The parameter makes no distinction.
7.8. APPLICANT CREDIT BUREAU SATISFACTORY LOAN FINTotal number of loan finance trades paid as agreed (no delinquencies) for the entire life of the trade. This could be a few months or several years- the parameter makes no distinction.
7.9. APPLICANT CREDIT BUREAU WORST LOAN FIN TRADEThe rating code used for this parameter is the same rating code system displayed for the tradelines. The different bureaus use different systems so Oracle Daybreak changes them to a common format that is used in the scoring:
1 = current2 = 30-59 days late3 = 60-89 days late4 = 90-119 days late5 = 120-149 days late6 = 150- days late7 = involved in a bankruptcy8 = repossession, foreclosure9 = charge-off
Appendix A :-9 Setup Guide - Consumer Lease Origination

8. Mortgage Trades / Inquiries8.1. APPLICANT CREDIT BUREAU 12MONTH MORTGAGE TRADES
This is the number of mortgage trades that have been opened in the last 12 months. Note that these trades may now be open or closed, paid as agreed, delinquent, or derogatory, and so on.
8.2. APPLICANT CREDIT BUREAU 24MONTH MORTGAGE TRADESThis is the number of mortgage trades that have been opened in the last 24 months. Note that these trades may now be open or closed, paid as agreed, delinquent, or derogatory, and so on.
8.3. APPLICANT CREDIT BUREAU 6MONTH MORTGAGE TRADESThis is the number of mortgage trades that have been opened in the last 6 months. Note that these trades may now be open or closed, paid as agreed, delinquent, or derogatory, and so on.
8.4. APPLICANT CREDIT BUREAU CURRENT MORTGAGE TRADESTotal number of mortgage trades that are paid on time right now. These trades may or may not have been delinquent in the past.
8.5. APPLICANT CREDIT BUREAU MORTGAGE TRADESThis is the total number of mortgage trades, both open and closed. Note that these trades may be paid as agreed, delinquent, derogatory, and so on. The parameter makes no distinc-tion.
8.6. APPLICANT CREDIT BUREAU OPEN MORTGAGE TRADESThis is the number of open mortgage trades on the account. Note that these trades may be paid as agreed, delinquent, derogatory, and so on. The parameter makes no distinction.
8.7. APPLICANT CREDIT BUREAU SATISFACTORY MORTGAGETotal number of mortgage trades paid as agreed (no delinquencies) for the entire life of the trade. This could be a few months or several years- the parameter makes no distinction.
8.8. APPLICANT CREDIT BUREAU WORST MORTGAGE TRADEThe rating code used for this parameter is the same rating code system displayed for the tradelines. The different bureaus use different systems so Oracle Daybreak changes them to a common format that is used in the scoring:
1 = current2 = 30-59 days late3 = 60-89 days late4 = 90-119 days late5 = 120-149 days late6 = 150- days late7 = involved in a bankruptcy8 = repossession, foreclosure9 = charge-off
Appendix A :-10 Setup Guide - Consumer Lease Origination

9. Retail Trades / Inquiries9.1. APPLICANT CREDIT BUREAU 12MONTH RETAIL TRADES
This is the number of retail trades that have been opened in the last 12 months. Note that these trades may now be open or closed, paid as agreed, delinquent, or derogatory, and so on.
9.2. APPLICANT CREDIT BUREAU 24MONTH RETAIL TRADESThis is the number of retail trades that have been opened in the last 24 months. Note that these trades may now be open or closed, paid as agreed, delinquent, or derogatory, and so on.
9.3. APPLICANT CREDIT BUREAU 6MONTH RETAIL TRADESThis is the number of retail trades that have been opened in the last 6 months. Note that these trades may now be open or closed, paid as agreed, delinquent, or derogatory, and so on.
9.4. APPLICANT CREDIT BUREAU CURRENT RETAIL TRADESTotal number of retail trades that are paid on time right now. These trades may or may not have been delinquent in the past.
9.5. APPLICANT CREDIT BUREAU OPEN RETAIL TRADESThis is the number of open retail trades on the account. Note that these trades may be paid as agreed, delinquent, derogatory, and so on. The parameter makes no distinction.
9.6. APPLICANT CREDIT BUREAU RETAIL INQUIRIESThis is the number of retail inquires listed on the credit report. The bureaus have their own limits as to how long they keep an inquiry on the credit report, but this parameter will show whatever total is shown for that bureau.
9.7. APPLICANT CREDIT BUREAU RETAIL TRADESThis is the number of retail trades, both open and closed. Note that these trades may be paid as agreed, delinquent, derogatory, and so on. The parameter makes no distinction.
9.8. APPLICANT CREDIT BUREAU SATISFACTORY RETAILTotal number of retail trades paid as agreed (no delinquencies) for the entire life of the trade. This could be a few months or several years- the parameter makes no distinction.
9.9. APPLICANT CREDIT BUREAU WORST RETAIL TRADEThe rating code used for this parameter is the same rating code system displayed for the tradelines. The different bureaus use different systems so Oracle Daybreak changes them to a common format that is used in the scoring:
1 = current2 = 30-59 days late3 = 60-89 days late4 = 90-119 days late5 = 120-149 days late6 = 150- days late7 = involved in a bankruptcy8 = repossession, foreclosure9 = charge-off
Appendix A :-11 Setup Guide - Consumer Lease Origination

10. Revolving Trades10.1. APPLICANT CREDIT BUREAU 12MONTH REV TRADES
This is the number of revolving trades that have been opened in the last 12 months. Note that these trades may now be open or closed, paid as agreed, delinquent, or derogatory, and so on.
10.2. APPLICANT CREDIT BUREAU 24MONTH REV TRADESThis is the number of revolving trades that have been opened in the last 24 months. Note that these trades may now be open or closed, paid as agreed, delinquent, or derogatory, and so on.
10.3. APPLICANT CREDIT BUREAU 6MONTH REV TRADESThis is the number of revolving trades that have been opened in the last 6 months. Note that these trades may now be open or closed, paid as agreed, delinquent, or derogatory, and so on.
10.4. APPLICANT CREDIT BUREAU CURRENT REV TRADESTotal number of revolving trades that are paid on time right now. These trades may or may not have been delinquent in the past.
10.5. APPLICANT CREDIT BUREAU OPEN REV TRADESThis is the number of open revolving trades on the account. Note that these trades may be paid as agreed, delinquent, derogatory, and so on. The parameter makes no distinction.
10.6. APPLICANT CREDIT BUREAU REV BALANCEThis is the total revolving credit balance shown on the applicant's credit bureau. This applies to all open revolving trades.
10.7. APPLICANT CREDIT BUREAU REV HIGH BALANCEThis parameter shows the highest cumulative balance among all revolving credit over the bureau history. NOTE: If the applicant had $5,000 on one account 2 years ago and $10,000 on another account 4 years ago, this parameter would return $15,000. The parameter is of question-able utility in many situations.
10.8. APPLICANT CREDIT BUREAU REV RETAIL BALANCEThis is the current revolving retail trade balance shown on the applicant's credit bureau. This applies to all open retail trades. It shows current, not historical, information.
10.9. APPLICANT CREDIT BUREAU REV RETAIL HIGH BALANCEThis parameter shows the highest cumulative balance among all revolving retail credit over the bureau history. NOTE: If the applicant had $5,000 on one account 2 years ago and $10,000 on another account 4 years ago, this parameter would return $15,000. The parameter is of question-able utility in many situations.
10.10. APPLICANT CREDIT BUREAU REV TRADESThis is the number of revolving trades, both open and closed. Note that these trades may be paid as agreed, delinquent, derogatory, and so on. The parameter makes no distinction.
Appendix A :-12 Setup Guide - Consumer Lease Origination

10.11. APPLICANT CREDIT BUREAU SATISFACTORY REV TRADESTotal number of revolving trades paid as agreed (no delinquencies) for the entire life of the trade. This could be a few months or several years- the parameter makes no distinction.
10.12. APPLICANT CREDIT BUREAU WORST REV TRADEThe rating code used for this parameter is the same rating code system displayed for the tradelines. The different bureaus use different systems so Oracle Daybreak changes them to a common format that is used in the scoring:
1 = current2 = 30-59 days late3 = 60-89 days late4 = 90-119 days late5 = 120-149 days late6 = 150- days late7 = involved in a bankruptcy8 = repossession, foreclosure9 = charge-off
11. Sales Finance Trades / Inquiries11.1. APPLICANT CREDIT BUREAU 12MONTH SALES FIN TRADES
This is the number of sales finance trades that have been opened in the last 12 months. Note that these trades may now be open or closed, paid as agreed, delinquent, or deroga-tory, and so on.
11.2. APPLICANT CREDIT BUREAU 24MONTH SALES FIN TRADESThis is the number of sales finance trades that have been opened in the last 24 months. Note that these trades may now be open or closed, paid as agreed, delinquent, or deroga-tory, and so on.
11.3. APPLICANT CREDIT BUREAU 6MONTH SALES FIN TRADESThis is the number of sales finance trades that have been opened in the last 6 months. Note that these trades may now be open or closed, paid as agreed, delinquent, or derogatory, and so on.
11.4. APPLICANT CREDIT BUREAU CURRENT SALES FIN TRADESTotal number of sales finance trades that are paid on time right now. These trades may or may not have been delinquent in the past.
11.5. APPLICANT CREDIT BUREAU OPEN SALES FINANCE TRADESThis is the number of open sales finance trades on the account. Note that these trades may be paid as agreed, delinquent, derogatory, and so on. The parameter makes no distinction.
11.6. APPLICANT CREDIT BUREAU SALES FIN TRADESThis is the number of sales finance trades, both open and closed. Note that these trades may be paid as agreed, delinquent, derogatory, and so on. The parameter makes no distinc-tion.
11.7. APPLICANT CREDIT BUREAU SALES FINANCE INQUIRIESThis is a count of the number of sales finance inquiries that have been made against the Applicant's bureau information in the bureau history.
Appendix A :-13 Setup Guide - Consumer Lease Origination

11.8. APPLICANT CREDIT BUREAU SATISFACTORY SALES FINTotal number of sales finance trades paid as agreed (no delinquencies) for the entire life of the trade. This could be a few months or several years- the parameter makes no distinction.
11.9. APPLICANT CREDIT BUREAU WORST SALES FIN TRADEThe rating code used for this parameter is the same rating code system displayed for the tradelines. The different bureaus use different systems so Oracle Daybreak changes them to a common format that is used in the scoring:
1 = current2 = 30-59 days late3 = 60-89 days late4 = 90-119 days late5 = 120-149 days late6 = 150- days late7 = involved in a bankruptcy8 = repossession, foreclosure9 = charge-off
12. Other Trades12.1. APPLICANT CREDIT BUREAU 12MONTH TRADES
This is the number of all trades that have been opened in the last 12 months. Note that these trades may now be open or closed, paid as agreed, delinquent, or derogatory, and so on.
12.2. APPLICANT CREDIT BUREAU 24MONTH TRADESThis is the number of all trades that have been opened in the last 24 months. Note that these trades may now be open or closed, paid as agreed, delinquent, or derogatory, and so on.
12.3. APPLICANT CREDIT BUREAU 6MONTH TRADESThis is the number of all trades that have been opened in the last 6 months. Note that these trades may now be open or closed, paid as agreed, delinquent, or derogatory, and so on.
12.4. APPLICANT CREDIT BUREAU AVG OPEN TRADE AGEThis is the average trade age in months as calculated using all open trades in the bureau. This is based on taking all of the open tradelines, then dividing by the age.
12.5. APPLICANT CREDIT BUREAU AVG TRADE AGEThis is the average trade age in months as calculated using all trades, open and closed, in the bureau.
12.6. APPLICANT CREDIT BUREAU CHARGEOFF TRADESThis parameter is a count of the total number of charged off trades for that applicant in the bureau.
12.7. APPLICANT CREDIT BUREAU COLLECTIONSThis is the total number of trades in collections for that applicant in the credit bureau. This refers to accounts assigned to collections agencies.
Appendix A :-14 Setup Guide - Consumer Lease Origination

12.8. APPLICANT CREDIT BUREAU CURRENT TRADESThis is the total number of trades that are paid on time right now. These trades may or may not have been delinquent in the past.
12.9. APPLICANT CREDIT BUREAU INQUIRIESThis is the number of inquires listed on the credit report. The bureaus have their own lim-its as to how long they keep an inquiry on the credit report, but this parameter will show whatever total is shown for that bureau.
12.10. APPLICANT CREDIT BUREAU INQUIRIES 12MThis is the total number of inquiries that have been made against the credit bureau for that applicant in the last 12 months
12.11. APPLICANT CREDIT BUREAU INQUIRIES 24MThis is the total number of inquiries that have been made against the credit bureau for that applicant in the last 24 months
12.12. APPLICANT CREDIT BUREAU INQUIRIES 6MThis is the total number of inquiries that have been made against the credit bureau for that applicant in the last 6 months
12.13. APPLICANT CREDIT BUREAU JUDGMENTSThis is a count of the number of judgments against the applicant in the credit bureau.
12.14. APPLICANT CREDIT BUREAU LIENSThis is the total number of liens shown for the applicant in the credit bureau for that appli-cant.
12.15. APPLICANT CREDIT BUREAU NEWEST INQUIRYThis is the number of months since the most recent inquiry in the credit bureau for that applicant. This of course excludes the pull from the immediate past used to do the scoring in this particular situation in Oracle Daybreak.
12.16. APPLICANT CREDIT BUREAU NEWEST TRADEThis is the number of months between now and the newest trade in the bureau for that applicant.
12.17. APPLICANT CREDIT BUREAU OLDEST INQUIRYThis is the number of months between now and the oldest inquiry in the bureau for that applicant.
12.18. APPLICANT CREDIT BUREAU OLDEST TRADEThis is the number of months between now and the oldest trade in the bureau for that applicant. Oldest is determined by looking at the oldest date on any tradeline, and then showing that.
12.19. APPLICANT CREDIT BUREAU OPEN COLLECTION TRADESThis is the number of open trades in collections shown in the bureau for that applicant. This refers to any accounts assigned to in-house collections departments (as compared to 5.12.7).
12.20. APPLICANT CREDIT BUREAU OPEN COLLECTIONSThis is the number of open collections in the bureau for that applicant.
Appendix A :-15 Setup Guide - Consumer Lease Origination

12.21. APPLICANT CREDIT BUREAU OPEN JUDGMENTSThis is the total number of open (unsatisfied) judgments against the applicant as indicated in the bureau for that applicant.
12.22. APPLICANT CREDIT BUREAU OPEN LIENSThis is the total number of open liens against the applicant as indicated in the bureau for that applicant.
12.23. APPLICANT CREDIT BUREAU OPEN TRADESThis is the number of all open auto trades on the account. Note that these trades may be paid as agreed, delinquent, derogatory, and so on. The parameter makes no distinction.
12.24. APPLICANT CREDIT BUREAU PAST DUE 30This is the number of trades that have been 30 or more days past due at some point in the recorded history of the bureau. Note that these trades may be delinquent, derogatory, and so on. The parameter makes no distinction.
12.25. APPLICANT CREDIT BUREAU PAST DUE 30 12MThis is the number of trades that have been more than 30 days past due in the last 12 months. The past dues could be for the same or different trades. If one trade has been late 3 times, this parameter would show 1 if there are no other trades.
12.26. APPLICANT CREDIT BUREAU PAST DUE 30 24MThis is the number of times the applicant has been more than 30 days past due in the last 24 months. The past dues could be for the same or different trades. If one trade has been late 3 times, this parameter would show 1 if there are no other trades.
12.27. APPLICANT CREDIT BUREAU PAST DUE 60This is the number of times the applicant has been more than 60 days past due in the recorded history of the bureau. The past dues could be for the same or different trades. If one trade has been late 3 times, this parameter would show 1 if there are no other trades.
12.28. APPLICANT CREDIT BUREAU PAST DUE 60 12MThis is the number of times the applicant has been more than 60 days past due in the last 12 months. The past dues could be for the same or different trades. If one trade has been late 3 times, this parameter would show 1 if there are no other trades.
12.29. APPLICANT CREDIT BUREAU PAST DUE 60 24MThis is the number of times the applicant has been more than 60 days past due in the last 24 months. The past dues could be for the same or different trades. If one trade has been late 3 times, this parameter would show 1 if there are no other trades.
12.30. APPLICANT CREDIT BUREAU PAST DUE 90This is the number of trades that are 90 or more days past due in the recorded history of the bureau. Note that these trades may be delinquent, derogatory, and so on. The parameter makes no distinction that one trade has been late 3 times; this parameter would show 1 if there are no other trades. If one trade has been late 3 times, this parameter would show 1 if there are no other trades.
12.31. APPLICANT CREDIT BUREAU PAST DUE 90 12MThis is the number of times the applicant has been more than 90 days past due in the last 12 months. The past dues could be for the same or different trades. If one trade has been late 3 times, this parameter would show 1 if there are no other trades.
Appendix A :-16 Setup Guide - Consumer Lease Origination

12.32. APPLICANT CREDIT BUREAU PAST DUE 90 24MThis is the number of times the applicant has been more than 90 days past due in the last 24 months. The past dues could be for the same or different trades. If one trade has been late 3 times, this parameter would show 1 if there are no other trades.
12.33. APPLICANT CREDIT BUREAU PAST DUE NOWThis is the number of trades on which the applicant is currently past due, according to the bureau.
12.34. APPLICANT CREDIT BUREAU REPOSSESSIONSThis is the number of repossessions shown on the bureau for the applicant in the history of the bureau.
12.35. APPLICANT CREDIT BUREAU SATISFACTORY TRADESThis is the total number of trades of all types, paid as agreed (no delinquencies) for the entire life of the trade. This could be a few months or several years- the parameter makes no distinction.
12.36. APPLICANT CREDIT BUREAU TOO NEW TRADESThis shows the number of trades that have been reported where a lender is reporting a brand new account, but has not even billed the applicant yet.
12.37. APPLICANT CREDIT BUREAU TRADE COLLECTIONSThis is the number of trades in collections assigned to collections agencies shown on the bureau for the applicant in the history of the bureau.
12.38. APPLICANT CREDIT BUREAU TRADESThis is the number of trades in the history of the credit bureau for that applicant. Note that different bureaus store information for varying amounts of time.
12.39. APPLICANT CREDIT BUREAU WORST TRADESThe rating code used for this parameter is the same rating code system displayed for the tradelines. The different bureaus use different systems so Oracle Daybreak changes them to a common format that is used in the scoring:
1 = current2 = 30-59 days late3 = 60-89 days late4 = 90-119 days late5 = 120-149 days late6 = 150- days late7 = involved in a bankruptcy8 = repossession, foreclosure9 = charge-off
Appendix A :-17 Setup Guide - Consumer Lease Origination

13. Bankruptcy information13.1. APPLICANT CREDIT BUREAU 11 BANKRUPTCIES
This parameter provides a count of the number of Chapter 11 Bankruptcies the applicant has filed in the stored history of the bureau.
13.2. APPLICANT CREDIT BUREAU 13 BANKRUPTCIESThis parameter provides a count of the number of Chapter 13 Bankruptcies the applicant has filed in the stored history of the bureau.
13.3. APPLICANT CREDIT BUREAU 7 BANKRUPTCIESThis parameter provides a count of the number of Chapter 7 Bankruptcies the applicant has filed in the stored history of the bureau.
13.4. APPLICANT CREDIT BUREAU BANKRUPTCIESThis parameter provides a count of the number of bankruptcies of any type the applicant has filed in the stored history of the bureau.
13.5. APPLICANT CREDIT BUREAU BKRP SCOREThe bureaus offer two basic types of scores, a FICO type, and a bankruptcy type. The term FICO score is sometimes used as a generic term for a credit score, but it is supposed to mean that the score is based on an algorithm purchased or licensed from Fair Isaac Corp. In Oracle Daybreak, if a score is listed as a FICO score, it is based on a Fair Isaac model. A bankruptcy score is a score that is used to predict the likelihood of a consumer to file bankruptcy. It is provided much like a FICO score.
13.6. APPLICANT CREDIT BUREAU OPEN 11 BANKRUPTCIESThis parameter provides a count of the number of open Chapter 11 Bankruptcies associ-ated with the applicant in the bureau.
13.7. APPLICANT CREDIT BUREAU OPEN 13 BANKRUPTCIESThis parameter provides a count of the number of open Chapter 13 Bankruptcies associ-ated with the applicant in the bureau.
13.8. APPLICANT CREDIT BUREAU OPEN 7 BANKRUPTCIESThis parameter provides a count of the number of open Chapter 7 Bankruptcies associated with the applicant in the bureau.
13.9. APPLICANT CREDIT BUREAU OPEN BANKRUPTCIESThis parameter provides a count of the number of bankruptcies of any type the applicant X has open currently.
13.10. APPLICANT CREDIT BUREAU RECENT 11 BANKRUPTCYFor this parameter, “Recent” refers to the number of months since the subject's most recent bankruptcy filing. One would use this parameter to determine if the subject has filed for Chapter 11 bankruptcy in the last X months.
13.11. APPLICANT CREDIT BUREAU RECENT 13 BANKRUPTCYFor this parameter, “Recent” refers to the number of months since the subject's most recent bankruptcy filing. One would use this parameter to determine if the subject has filed for Chapter 13 bankruptcy in the last X months.
Appendix A :-18 Setup Guide - Consumer Lease Origination

13.12. APPLICANT CREDIT BUREAU RECENT 7 BANKRUPTCYFor this parameter, “Recent” refers to the number of months since the subject's most recent bankruptcy filing. One would use this parameter to determine if the subject has filed for Chapter 7 bankruptcy in the last X months.
13.13. APPLICANT CREDIT BUREAU RECENT BANKRUPTCYFor this parameter, “Recent” refers to the number of months since the subject's most recent bankruptcy filing. One would use this parameter to determine if the subject has filed for any kind of bankruptcy in the last X months.
13.14. APPLICANT HAS A PRIOR BANKRUPTCYThis parameter tracks whether the applicant has indicated a prior bankruptcy based on the checkbox in the Oracle Daybreak Origination module. The prior bankruptcy is set to Y if the checkbox is checked otherwise it has a value of N.
14. Delinquency Information14.1. APPLICANT CREDIT BUREAU LONGEST SINCE MAJOR
This parameter reflects the longest period (in months) a tradeline has been open since the last derog.
14.2. APPLICANT CREDIT BUREAU LONGEST SINCE MINORThis parameter reflects the longest period (in months) a tradeline has been open since the last minor delinquency.
14.3. APPLICANT CREDIT BUREAU OPEN LONGEST SINCE MAJORThis parameter considers the greatest amount of time (in months) between now and the corresponding major delinquency for all of the open parameters with major delinquencies, and reflects the greatest value returned.
14.4. APPLICANT CREDIT BUREAU OPEN LONGEST SINCE MINORThis parameter considers the greatest amount of time (in months) between now and the corresponding minor delinquency for all of the open parameters with minor delinquencies, and reflects the greatest value returned.
14.5. APPLICANT CREDIT BUREAU OPEN SHORTEST SINCE MAJORThis parameter considers the least amount of time (in months) between now and the corre-sponding major delinquency for all of the open parameters with major delinquencies, and reflects the least value returned.
14.6. APPLICANT CREDIT BUREAU OPEN SHORTEST SINCE MINORThis parameter considers the least amount of time (in months) between now and the corre-sponding minor delinquency for all of the open parameters with minor delinquencies, and reflects the least value returned.
14.7. APPLICANT CREDIT BUREAU SHORTEST SINCE MAJORThis parameter considers the least amount of time (in months) between now and the corre-sponding major delinquency for all of the parameters (open and closed) with major delin-quencies, and reflects the least value returned.
Appendix A :-19 Setup Guide - Consumer Lease Origination

14.8. APPLICANT CREDIT BUREAU SHORTEST SINCE MINORThis parameter considers the least amount of time (in months) between now and the corre-sponding minor delinquency for all of the parameters (open and closed) with minor delin-quencies, and reflects the least value returned.
15. Derogatory Trade Information15.1. APPLICANT CREDIT BUREAU DEROG 12M TRADES
Provides the number of trades that were derogatory in the last 12 months. This includes open and closed trades. These trades may or may not be derogatory now.
15.2. APPLICANT CREDIT BUREAU DEROG 24M TRADESProvides the number of trades that were derogatory in the last 24 months. This includes open and closed trades. These trades may or may not be derogatory now.
15.3. APPLICANT CREDIT BUREAU DEROG NOW TRADESProvides the number of trades that are derogatory right now. Does this include closed trades?
15.4. APPLICANT CREDIT BUREAU DEROG TRADESThis parameter addresses the number of derogatory trades associated with the applicant. This includes open and closed trades.
15.5. APPLICANT CREDIT BUREAU LONGEST SINCE DEROGThis parameter covers the longest period (in months) since last derog.
15.6. APPLICANT CREDIT BUREAU OPEN LONGEST SINCE DEROGThis parameter covers the longest period (in months) a tradeline has been open since the last derog.
15.7. APPLICANT CREDIT BUREAU OPEN SHORTEST SINCE DEROGThis parameter considers the least amount of time (in months) between now and the corre-sponding derog for all of the open parameters with derogs, and reflects the least value returned.
15.8. APPLICANT CREDIT BUREAU SHORTEST SINCE DEROGThis parameter considers the least amount of time (in months) between now and the corre-sponding derog for all of the parameters (open and closed) with derogs, and reflects the least value returned.
Appendix A :-20 Setup Guide - Consumer Lease Origination

APPENDIX B : ROUNDING AMOUNTS AND RATE ATTRIBUTES
Rounding AmountsGenerally in the lending industry, computed amounts (interest, fees, costs, and so on) are rounded to the second decimal place. However, there are occasions where the rounding of the computed amounts has to be carried out using different methods. Oracle Daybreak supports the rounding, raising of, or cutting off calculated amounts.
Rounding will increase the resulting amount to the next number up to the second decimal, based on the value of third decimal.
Raising will always increase the resulting amount to the next number up to the second decimal.
Cutting off will always cut the number after the second decimal.
You can choose the rounding method you want to use by setting the parameter value for the system parameter CMN_AMOUNT_ROUND_METHOD on the Administration form (Setup menu > Administration command > System command > Parameters tab > System tab).
You can choose the rounding factor you want to use by setting the parameter value for the system parameter CMN_AMOUNT_ROUND_FACTOR on the Administration form. Cur-rently, Oracle Daybreak supports rounding up to two decimals only.
Examples of how resulting amounts differ by RAISE, ROUND, and CUTOFF:
Example 1: Amount: 234.136
Method Result
Round 234.14Raise 234.14Cutoff 234.13
Example 2: Amount: 234.134
Method Result
Round 234.13Raise 234.14Cutoff 234.13
Appendix B :-1 Setup Guide - Consumer Lease Origination

Example 3: Amount: 234.1319999
Method Result
Round 234.13Raise 234.14Cutoff 234.13
Note: Oracle Daybreak only rounds calculated amounts (calculated fees, calculated pay-ment, and so on) and not user-entered amounts.
Rate AttributesOracle Daybreak supports the rounding of the index rate to keep the rate calculation as simple as possible for the customers. The general practice is to round the rate to nearest eighth(1/8th) (to keep the index rate in the multiple of .125) or fourth (1/4th) (to keep the index rate in the multiple of .25). Oracle Daybreak rounds only the index rate and not the margin or final rate. You can define the index rounding method on the Product Setup form’s Loan Products page for variable rate loans and Loc Products page in the Index Rounding field.
Note: Index rounding does not apply to fixed rate loans and leases; hence, the Index Rounding field is absent on the Product Setup form’s Loan Products page for fixed rate loans and Lease Products pages.
Oracle Daybreak currently supports the following rounding of methods.
1. NO ROUNDING TO INDEX RATE2. INDEX RATE ROUNDED TO NEAREST .253. INDEX RATE ROUNDED TO NEAREST .125
NO ROUNDING TO INDEX RATE: Select this method for no rounding.
INDEX RATE ROUNDED TO NEAREST .25: Select this method to round up to 1/4th (to keep the index rate in the multiple of .25).
Examples: Current rate: 5.125Round of rate: 5.25
Current rate: 5.124Round of rate: 5.00
INDEX RATE ROUNDED TO NEAREST .125: Select this method to round up to 1/8th (to keep the index rate in the multiple of .125).
Examples: Current rate: 5.325Rate rounded to: 5.375
Current rate: 5.312Rate rounded to: 5.250
Appendix B :-2 Setup Guide - Consumer Lease Origination

APPENDIX C : REPORT DATABASE FORM
Oracle Daybreak can create a reporting “data hub” for the major database elements within the Oracle Daybreak system. The reporting data hub (RDH) is available in a separate inde-pendent application. This application will have its own login screen and setup screens.
Appendix C :-1 Setup Guide - Consumer Lease Origination

Report Data Hub window componentsThis section presents an overview of the components found on Report Data Hub applica-tion’s Oracle Daybreak window, as well as their use.
Window title bar A horizontal bar containing the name of the window. The active window has a different colored title bar to distinguish it from other inactive windows.
The title bar also contains the Minimize, Maximize, and Close buttons.
The Minimize button reduces the Oracle Daybreak LS applica-tion to a taskbar button on your desktop’s status bar.
The Maximize button allows you to resize Oracle Daybreak’s window on your desktop. (Note: You may have to choose the Maximize button to ensure Oracle Daybreak’s window is not cov-ered by your desktop’s status bar.)
The Close button will quit Oracle Daybreak without logging off. (Note: Do not use the Close button to end a Oracle Daybreak ses-sion.)
Menu bar The horizontal bar containing the menu names. The menu bar is located beneath the title bar and contains commands that allow you to open, view, and maintain a form.
Note: You view the contents of a menu by clicking it or pressing ALT + [THE UNDERLINED LETTER IN THE MENU NAME]. For example, ALT + R opens the Reports menu. Commands can be selected using the mouse or by pressing the key of the under-lined letter in the command name.
The following menus are available from the Oracle Daybreak menu bar.
File Contains the following commands: Save - Records the current data on a form in the database.Re-Logon - Closes the current Oracle Daybreak session and refreshes the Login form, allowing you to re-log on to Oracle Daybreak without leaving the system.Change Responsibility - Allows you to change your Oracle Daybreak responsibility. Responsi-bilities determine what Oracle Daybreak features are available.Change Password - Allows you to change your Oracle Daybreak password.Clear Form - Clears the active form of its unsaved data.
Appendix C :-2 Setup Guide - Consumer Lease Origination

Print - Prints the contents of an active form.Exit - Closes the Login form and ends your cur-rent Oracle Daybreak session.
Edit Contains the following commands:Cut - Removes selected text from a form and stores it in the clipboard buffer.Copy - Copies selected text from a form and stores it in the clipboard buffer.Paste - Moves data from the clipboard buffer to a selected field on a form.Edit Field - Opens the Editor dialog box with the contents of a selected field. List of Values - Opens a field’s List of Values dialog box, if one exists.
Query Contains the following commands:Enter - Changes Oracle Daybreak to Enter-Query mode. This allows you to search the data-base.Execute - Performs the query entered during Enter-Query mode.Cancel - Changes Oracle Daybreak back to user mode.Last Criteria - Repeats the most recently per-formed query entered in Enter-Query mode.Count Hits - Displays the number of records the current query produced in the message line.Get Next Set - Retrieves the next set of records using the most recent query entered while in Enter-Query mode.
Navigation Contains the following commands:Block - Allows you to navigate to the previous or next block, or clear the current block.Record - Allows you to navigate between the previous and next record, scroll up and down between records, insert or remove a record, or duplicate or clear a record.Field - Allows you to navigate between the pre-vious and next field, as well as clear or duplicate a field.
Monitor Contains the following commands:System - Allows you to open the Utilities form at the Monitor Batch Jobs, Monitor Jobs, Moni-tor Users, Services, or Log Files tab.
Setup Contains the following commands:Administration - Allows you to open the Administration form at the System or User mas-ter tab.
Appendix C :-3 Setup Guide - Consumer Lease Origination

The System command opens the Parameters tab and System page, which allows you to set up sys-tem parameters for the Report Data Hub. Note: For more information, see the Parameters tab (System page) section in Chapter 1: Adminis-tration (System) Form of the Oracle Daybreak Lending Suite System Setup Guide.The Users command opens the Users tab and Users page, which allows you to set up users for the Report Data Hub. Note: For more informa-tion, see the User tab (User page) section in Chapter 2: Administration (User) Form of the Oracle Daybreak Lending Suite System Setup Guide.Reporting Data Hub - Opens the Reporting Data Hub, which allows you to access the RDH Tables and Business Views.
Window Contains the following commands:Cascade - Arranges the open forms on your screen so that they overlap, with the active form on top.Tile Horizontally - Arranges the open forms on your screen so that they appear one on top of another.Tile Vertically - Arranges the open forms on your screen so that they appear one next to another.Note: The lower portion of the menu displays the Oracle Daybreak forms you have opened. You can use this menu to move between forms by selecting a specific form.
Help Contains the following commands:Keys - Opens the Keys dialog box, containing a listing of all the hot keys available for the current form in use. Hot keys are shortcuts that perform Oracle Daybreak tasks with a minimum of key-strokes.Display Error - Displays information about recently encountered Oracle errors. (i-flex solu-tions Corp. requests that you create a screen shot of this information and send it to us when you have a system error.)Oracle Daybreak Help - (This command is cur-rently unavailable.)Oracle Daybreak On the Web - Allows you to open the i-flex solutions home page and report to Technical Support department when you encoun-ter an error.About Oracle Daybreak and Audit - Opens the About Oracle Daybreak dialog box, displaying version and audit information such as object data
Appendix C :-4 Setup Guide - Consumer Lease Origination

and recent updates. It also allows you access the column audit.
Oracle Daybreak toolbar The row beneath the menu bar containing 19 icon buttons used to perform tasks and carry out commands. The tool-bar buttons are labeled with the action they perform. To view the label, use the mouse to place the mouse pointer on the button without clicking and the label appears.
If you choose: (hot key) Oracle Daybreak will:
[A] Save Changes (F10) Save any pending changes on the form.
[B] Print (SHIFT + F8) Print the current screen.[C] Exit (CTRL + E) Close the current form or exits the
application.[D] Cut (CTRL+X) Remove selected text and stores it
on the clipboard.[E] Copy (CTRL+C) Copy selected text and stores in on
the clipboard.[F] Paste (CTRL+V) Insert text stored on the clipboard
in a selected field.[G] Enter Query (F7) Change Oracle Daybreak to Enter-
Query mode.[H] Execute Query (F8) Perform the query entered while in
Query mode.[I] Cancel Query (CTRL+Q) Change Oracle Daybreak back to
user mode.[J] First Record Display the first record.[K] Previous Record (SHIFT + UP) Display the previous record.[L] Next Record (SHIFT + DOWN) Display the next record.[M] Last Record Display the last record.[N] Insert Record (F6) Create a new record.[O] Remove Record Delete the current record from the
database.[P] Clear Record (SHIFT+F4) Clear the current record from the
form. [Q] Lock/Unlock Record Lock and unlocks a record.[R] Copy with Details Record Copy the selected record to the
clipboard.[S] Help (CTRL + H) Display help for the selected item.
Note: Depending on the context of the selected field, some toolbar buttons may not be available. For example, if you select a field that does not allow a query, the Enter Query button is unavailable.
Appendix C :-5 Setup Guide - Consumer Lease Origination

Message line The message line is located in the lower left corner of the Oracle Daybreak window and displays field prompts, error messages, or additional details about a field. In the illustration below, the mes-sage line contains the error message: “Query caused no records to be retrieved.”
Status line The status line appears below the message line and displays status information about the current form or field. A status line can con-tain the following indicators:
Enter-Query Indicates that Oracle Daybreak is in Enter-Query mode, allowing you to specify search criteria for a query.
List of Values Appears when a List of Values (LOV) is avail-able for the selected field.
Using RDH you can define and generate reports using external reporting tools. You can run the batch jobs responsible for transferring the date from DLS tables to RDH temporary tables and then from RDH temporary tables to RDH tables. Reports can be generated from RDH tables.
RDH tables may exist in the:
• same schema• same database/different schema • different databases
Reporting Data Hub will have two separate Job-Sets to operate the batch jobs.
PurposeMost of the time, Oracle Daybreak stores application data in a database to support busi-ness reports. You cannot use external reporting tools to generate reports because the underline structure of data base is often unknown. The Reporting Database form displays this information in simplified form, allowing you to create your own business views with this simplified information. These business views can then be used to generate reports using an external/third party reporting tool.
DLS moves the data from DLS database to RDH database.
Business ViewsBusiness views are nothing but a simplified view of the database tables. You can name the technical columns with easy to understand names. More than one business view can be defined based on a single database table. This allows you to define multiple views as required for reporting.
Appendix C :-6 Setup Guide - Consumer Lease Origination

What needs to be done from DLS:
SET-RDB1 This job set handles batch jobs responsible for transfer-ring the data from DLS tables to RDH temporary tables.
You are required to run batch jobs from the SET-RDB1 job set to transfer the data from DLS tables temporary RDH temporary tables. Once the data is in the RDH temp tables, then the rest can be handled from RDH applica-tion.
What needs to be done from Reporting data hub application:
SET-RDB2 This job set handles batch jobs responsible for transfer-ring the data from RDH temporary tables to RDH main tables. Any sort of derivation is taken care by these set of batch jobs. SET-RDB2 batch jobs can be run using a sep-arate independent application user interface.
Setting up RDHReporting data hub setup is available through an independent application. You can login to and maintain the RDH setup with the Reporting Database form. The Reporting Database form’s Setup master tab contains two tabs:
• RDH Tables• Business Views
RDH Tables pageThe RDH Tables page contains the following fields:
To set up the RDH Tables page
1 On the Setup menu, choose Reporitng Data Hub, then choose the RDH Tables tab.
Appendix C :-7 Setup Guide - Consumer Lease Origination

2 On the RDB Tables block, enter the following information:
In this field: Do this:
Table View the RDH table (optional).Description Enter the RDH table description (required).Type View the RDH table type (optional).Primary Key View the table primary key (optional).Enabled Select to enable the RDB table and indicate that
it is currently in use.
3 On the Columns block, enter the following information:
In this field: Do this:
Column View the column name (optional).DESCRIPTION Enter the column description (required).Data Type View the column data type (optional).Length View the column length (optional).Enabled Select to enable the column and indicate that it is
currently in use.
4 On the Products block, enter the following information:
In this field: Do this:
Product Type Select the product type associated with the col-umn chosen above (required).
Funding Type Select the funding type associated with the col-umn chosen above (required).
Yes/No Select yes or no (optional).Enabled Select to enable the product and indicate that it is
currently in use.
Appendix C :-8 Setup Guide - Consumer Lease Origination

Business Views pageThe Business Views page contains the following information:
To set up the Business Views page
1 On the Setup menu, choose Reporitng Data Hub, then choose the Business Views tab.
2 On the Business Views block, enter the following information:
In this field: Do this:
View Enter the business view name (required).Description Enter the business view description (required).Table Type Select the table type for the business view
(required).Product Type Select the product type associated with the busi-
ness view (required).Funding Type Select the funding type associated with the busi-
ness view (required).Enabled Select to enable the view and indicate that it is
currently in use.
3 On the Columns block, enter the following information:
In this field: Do this:
Table View the business view column table (display only).
Column Enter the business view column (required).Column Name Alias Enter the column name alias (optional).Format Mask Enter the column format mask (required).Seq Enter the column sequence number (required).Enabled Select to enable the column and indicate that it is
currently in use.
4 In the Views block, choose Create View Sc....
Appendix C :-9 Setup Guide - Consumer Lease Origination

Oracle Financial Services Software Confidential - Restricted
Setup Guide - Consumer Lease OriginationMarch 2010 Version 1.0 Oracle Corporation World Headquarters 500 Oracle Parkway Redwood Shores, CA 94065 U.S.A. Worldwide Inquiries: Phone: +1.650.506.7000 Fax: +1.650.506.7200 www.oracle.com/ financial_services/ Copyright © 2009 – 2010 Oracle Financial Services Software Limited. All rights reserved. No part of this work may be reproduced, stored in a retrieval system, adopted ortransmitted in any form or by any means, electronic, mechanical, photographic, graphic,optic recording or otherwise, translated in any language or computer language, withoutthe prior written permission of Oracle Financial Services Software Limited.
Due care has been taken to make this Setup Guide - Consumer Lease Origination and accompanying software package as accurate as possible. However, Oracle Financial Services Software Limited makes no representation or warranties with respect to thecontents hereof and shall not be responsible for any loss or damage caused to the userby the direct or indirect use of this Setup Guide - Consumer Lease Origination and the accompanying Software System. Furthermore, Oracle Financial Services SoftwareLimited reserves the right to alter, modify or otherwise change in any manner the content hereof, without obligation of Oracle Financial Services Software Limited to notifyany person of such revision or changes. All company and product names are trademarks of the respective companies with whichthey are associated.