oracle clinical adminstrator's guide - oracle documentation
TRANSCRIPT

Oracle® ClinicalAdministrator's Guide
Release 4.6.2
E18818-02
December 2011
This guide has been revised to reflect the support of a Windows database.

Oracle Clinical Administrator's Guide, Release 4.6.2
E18818-02
Copyright © 1996, 2011, Oracle and/or its affiliates. All rights reserved.
This software and related documentation are provided under a license agreement containing restrictions on use and disclosure and are protected by intellectual property laws. Except as expressly permitted in your license agreement or allowed by law, you may not use, copy, reproduce, translate, broadcast, modify, license, transmit, distribute, exhibit, perform, publish, or display any part, in any form, or by any means. Reverse engineering, disassembly, or decompilation of this software, unless required by law for interoperability, is prohibited.
The information contained herein is subject to change without notice and is not warranted to be error-free. If you find any errors, please report them to us in writing.
If this is software or related documentation that is delivered to the U.S. Government or anyone licensing it on behalf of the U.S. Government, the following notice is applicable:
U.S. GOVERNMENT RIGHTS Programs, software, databases, and related documentation and technical data delivered to U.S. Government customers are "commercial computer software" or "commercial technical data" pursuant to the applicable Federal Acquisition Regulation and agency-specific supplemental regulations. As such, the use, duplication, disclosure, modification, and adaptation shall be subject to the restrictions and license terms set forth in the applicable Government contract, and, to the extent applicable by the terms of the Government contract, the additional rights set forth in FAR 52.227-19, Commercial Computer Software License (December 2007). Oracle America, Inc., 500 Oracle Parkway, Redwood City, CA 94065.
This software or hardware is developed for general use in a variety of information management applications. It is not developed or intended for use in any inherently dangerous applications, including applications that may create a risk of personal injury. If you use this software or hardware in dangerous applications, then you shall be responsible to take all appropriate fail-safe, backup, redundancy, and other measures to ensure its safe use. Oracle Corporation and its affiliates disclaim any liability for any damages caused by use of this software or hardware in dangerous applications.
Oracle and Java are registered trademarks of Oracle and/or its affiliates. Other names may be trademarks of their respective owners.
Intel and Intel Xeon are trademarks or registered trademarks of Intel Corporation. All SPARC trademarks are used under license and are trademarks or registered trademarks of SPARC International, Inc. AMD, Opteron, the AMD logo, and the AMD Opteron logo are trademarks or registered trademarks of Advanced Micro Devices. UNIX is a registered trademark of The Open Group.
This software or hardware and documentation may provide access to or information on content, products, and services from third parties. Oracle Corporation and its affiliates are not responsible for and expressly disclaim all warranties of any kind with respect to third-party content, products, and services. Oracle Corporation and its affiliates will not be responsible for any loss, costs, or damages incurred due to your access to or use of third-party content, products, or services.

iii
Contents
Preface ............................................................................................................................................................... xv
Audience..................................................................................................................................................... xvDocumentation Accessibility ................................................................................................................... xviFinding Information and Patches on My Oracle Support ................................................................... xviFinding Oracle Documentation............................................................................................................. xviiiRelated Documents ................................................................................................................................. xviiiConventions ............................................................................................................................................. xviii
Part I Configuration Tasks
1 Setting Up User Accounts
Creating an Administrator User Account ............................................................................................ 1-1Setting Up Required Accounts and Directories ................................................................................. 1-2
Setting Up a Reports Server Log Directory .................................................................................... 1-2Creating an Operating System Account ......................................................................................... 1-3Creating a PSUB Log Directory........................................................................................................ 1-3Ensuring PSUB Execution Permission (UNIX Only) .................................................................... 1-4Modifying the RXCPROD Account's Profile ................................................................................ 1-5
Running the Add User Script .............................................................................................................. 1-5About the Add User Script ............................................................................................................... 1-5Running the Add User Script in UNIX ........................................................................................... 1-6Running the Add User Script in Windows .................................................................................... 1-6Required Parameters ......................................................................................................................... 1-7Optional Parameters .......................................................................................................................... 1-8
Maintaining Oracle User and Group User Accounts ........................................................................ 1-9Adding a User to a Group User Account .................................................................................... 1-11
Granting Data Access to User and Group User Accounts ............................................................. 1-11Granting Data Access to Programs and Projects ........................................................................ 1-12Granting Data Access to a Study .................................................................................................. 1-12Superuser and Study Access Interaction ..................................................................................... 1-13Revoking User Access ................................................................................................................... 1-13
Granting Data Access to RDC Users ................................................................................................. 1-14Granting Automatic Access in RDC to Studies Granted in Oracle Clinical ........................... 1-14Configuring Study and Site Security Privileges ......................................................................... 1-14Changing the Default Access to DCIs .......................................................................................... 1-14

iv
Granting Additional Database Roles to User Accounts ................................................................ 1-16Additional Database Roles for RDC Users.................................................................................. 1-16Additional Database Roles for Oracle Clinical Users ................................................................ 1-17
Setting Up Data Extract Users ............................................................................................................. 1-17Creating an Operating System Account on the SAS Server...................................................... 1-17Adding User to the OCLSASCR User Group ............................................................................ 1-17Creating a Queries Table for a Data Extract User ...................................................................... 1-18
Setting Up Power Users ....................................................................................................................... 1-18UNIX ................................................................................................................................................. 1-19Windows........................................................................................................................................... 1-19
Setting Up Passwords ........................................................................................................................... 1-19Changing the Password for a Schema or Role .......................................................................... 1-19Changing the Password for a User ............................................................................................... 1-20Enforcing Password Security ........................................................................................................ 1-21Auditing Passwords ....................................................................................................................... 1-21Operating System Passwords........................................................................................................ 1-21
Creating Profiles for Users .................................................................................................................. 1-22
2 Oracle Clinical Menu-Based Security
Predefined Database Roles..................................................................................................................... 2-2Creating and Modifying Database Roles ............................................................................................ 2-3
Viewing Menu-Role Associations.................................................................................................... 2-3Modifying Menu-Role Associations................................................................................................ 2-6Creating Custom Database Roles..................................................................................................... 2-6Associating Roles with Menus ........................................................................................................ 2-8Adding a Custom Role to OPA_MENU_ROLES .......................................................................... 2-8Granting a Custom Role Access to a Custom Module ................................................................. 2-8
Adding Menu Items to Oracle Clinical................................................................................................ 2-8
3 Configuring Discrepancy Management
Mapping Database Roles to User Roles............................................................................................... 3-1Specifying User Roles for the Oracle Clinical Discrepancy Database ........................................ 3-2Assigning Function Privileges and Layouts .................................................................................. 3-3
Customizing Layout Definitions ........................................................................................................ 3-4Customizing Profiles ............................................................................................................................... 3-5
Toggling Between View Modes in the Profile Administration Window................................... 3-6Specifying Default Profile Criteria .................................................................................................. 3-6Locking Profile Criteria ..................................................................................................................... 3-6Adding SQL Statements.................................................................................................................... 3-7Filtering Profile Views by Review Status ....................................................................................... 3-8Updating Status Codes ..................................................................................................................... 3-8Filtering Profile Views by Discrepancy Field ................................................................................ 3-8
Customizing Flexfields ........................................................................................................................... 3-9DISC_FLEX1 and DISC_FLEX2..................................................................................................... 3-10DISC_FLEX1_VALUES and DISC_FLEX2_VALUES ................................................................ 3-10Example ............................................................................................................................................ 3-11
Defining Reason Codes for Discrepancies....................................................................................... 3-11

v
Reason Codes and Descriptions for Manual Discrepancies ..................................................... 3-11Reason Codes and Descriptions for Univariate Discrepancies ................................................ 3-13Reason Codes and Descriptions for Multivariate Discrepancies ............................................. 3-14
Defining the Possible Review Statuses for Discrepancies ........................................................... 3-14Default Entries for the DISCREPANCY REV STATUS CODE Codelist ................................. 3-15Rules for the DISCREPANCY REV STATUS CODE Codelist.................................................. 3-16
Defining Resolution Reasons for Discrepancies ........................................................................... 3-17Setting Values in the OCL_STATE Local Reference Codelist .................................................... 3-18Configuring Role-Specific Discrepancy Management for RDC ................................................. 3-18
Configuring Discrepancy Display by User Role......................................................................... 3-18Configuring the Actions Allowed on Discrepancies ................................................................ 3-24Preventing Update to OTHER Discrepancies ............................................................................. 3-26Adding Reference Codelists for Custom Roles........................................................................... 3-27
Configuring Study and Site Security for Discrepancy Management ......................................... 3-27Updating a Discrepancy................................................................................................................. 3-29Navigating to Data Entry............................................................................................................... 3-29
Setting Up Data Clarification Forms (DCFs) .................................................................................. 3-30Defining DCF Statuses and their Behavior.................................................................................. 3-30Laying Out the DCF........................................................................................................................ 3-31
Creating Reusable Standard Text for Discrepancies and DCFs ................................................... 3-35Creating New Standard Text......................................................................................................... 3-36Inserting Replacement Parameters .............................................................................................. 3-37Customizing Default Standard Text Entries ............................................................................... 3-37
4 Configuring the Mass Changes Utility
Creating and Assigning Mass Changes Roles .................................................................................... 4-1Customizing Mass Changes Local Codelists ...................................................................................... 4-1Customizing the Field Display on the Candidate Data Set Form .................................................. 4-2
5 Configuring Data Entry and User Preferences
Customizing Data Entry Behavior ........................................................................................................ 5-1Define Data Entry Configuration Settings...................................................................................... 5-1Configuring Additional Data Entry User Preferences.................................................................. 5-5Configuring Privileged Update ...................................................................................................... 5-6
Customizing the Oracle Clinical Log-in Window Layout ................................................................ 5-7Using the Log-in Layout Editor ....................................................................................................... 5-8Modifying the Received DCI Window ........................................................................................... 5-8Modifying the Received DCM Window ......................................................................................... 5-9Modifying the Smart Received DCM Window........................................................................... 5-10
Setting DCI Form Default Values for RDC Data Entry and Patient Data Reports .................. 5-11Setting and Enforcing Values ........................................................................................................ 5-12Settings.............................................................................................................................................. 5-12
Customizing Flex Fields for DCI Forms ........................................................................................... 5-21How Flex Fields Work.................................................................................................................... 5-22Flex Field Components................................................................................................................... 5-22
Customizing CRF Column Headers in the RDC Classic............................................................... 5-24

vi
Default Behavior.............................................................................................................................. 5-24Functions Used to Modify CRF Column Headers .................................................................... 5-25Functions .......................................................................................................................................... 5-25
Customizing Online Help ................................................................................................................... 5-26Modifying Calls to Online Help Topic Files ............................................................................... 5-26Copying Xhelp Topic Files............................................................................................................. 5-27Creating Custom Help Files .......................................................................................................... 5-28
Viewing Xhelp Without Oracle Clinical ........................................................................................... 5-28
6 Configuring Data Extract
Configuring Default Installation Data Extract Settings ................................................................... 6-1Setting Values in Data Extract-Related Reference Codelists ........................................................... 6-5Creating Tablespaces for Data Extract Tables and Indexes .............................................................. 6-5
Creating Tablespaces ......................................................................................................................... 6-5Entering Tablespace Names in Reference Codelists ..................................................................... 6-6Creating Data Extract Access Accounts Using Local Tablespaces.............................................. 6-6
Customizing Data Extract Views .......................................................................................................... 6-7Generating Data Extract Views........................................................................................................... 6-10
Running gen_views on UNIX Platforms ..................................................................................... 6-11Running gen_views on Windows................................................................................................. 6-11
Enabling the View Builder and Converting Views ........................................................................ 6-12Converting Views............................................................................................................................ 6-12Enabling the View Builder in a Study ......................................................................................... 6-12
Controlling Access to Data Extract Views ........................................................................................ 6-12
7 Reference Codelists
Overview of Reference Codelists.......................................................................................................... 7-1Working in the Maintain or Query Reference Codelists Windows............................................ 7-2Adding a Value to a Reference Codelist ......................................................................................... 7-5Modifying a Value in a Reference Codelist .................................................................................... 7-6Running the Reference Codelists Report........................................................................................ 7-6
Local Reference Codelists....................................................................................................................... 7-7BATCH QUEUE NAME Local Codelist ......................................................................................... 7-7DB_LINKS Local Codelist................................................................................................................. 7-7DCF COMMENT TEXT Local Codelist ......................................................................................... 7-8DCF DEFAULT FOOTERS Local Codelist ..................................................................................... 7-8DCF DEFAULT HEADERS Local Codelist .................................................................................. 7-8DCF REPORT LABELS Local Codelist ......................................................................................... 7-8DISC COLS Local Codelist ............................................................................................................. 7-8DISC_FLEX1 and DISC_FLEX2 Local Codelists............................................................................ 7-8DISC_FLEX1_VALUES and DISC_FLEX2_VALUES Local Codelists ....................................... 7-8FLD RXCMCMCD RDCI DELETE Local Codelist .................................................................... 7-8FLD RXCMCMCD RDCI KEY Local Codelist ............................................................................. 7-8FLD RXCMCMCD RDCM KEY Local Codelist ........................................................................... 7-8FLD RXCMCMCD RESPONSE Local Codelist ........................................................................... 7-9IND DISC COLS Local Codelist....................................................................................................... 7-9MAN DISC COLS Local Codelist .................................................................................................... 7-9

vii
MANHD DISC COLS Local Codelist.............................................................................................. 7-9MC CDS SORT ORDER Local Codelist .......................................................................................... 7-9MC COLUMNS Local Codelist ........................................................................................................ 7-9MULTI DISC COLS Local Codelist ................................................................................................. 7-9NLS_CONFIG Local Codelist........................................................................................................... 7-9OCL_DE_CONFIG Local Codelist................................................................................................... 7-9OCL_DE_PREFS Local Codelist .................................................................................................. 7-13OCL_JOB_PREF Local Codelist .................................................................................................... 7-14OCL MC PREFS Local Codelist ................................................................................................... 7-15OCL_MENU_ACCESS Local Codelist ....................................................................................... 7-15OCL_STATE Local Codelist ........................................................................................................ 7-15PRINT QUEUE NAME Local Codelist ...................................................................................... 7-19PUBLIC_DB_LINKS Local Codelist ........................................................................................... 7-19RDC CONFIGURATION Role Local Codelists ........................................................................... 7-19REPORT_SERVER Local Codelist ............................................................................................... 7-20SAS_QUEUE Local Codelist.......................................................................................................... 7-20SQL FUNCTIONS Local Codelist................................................................................................. 7-20TMS_DSI Local Codelist................................................................................................................. 7-20TMS_OPTIONS Local Codelist ..................................................................................................... 7-20UNI DISC COLS Local Codelist.................................................................................................... 7-20WEB_DOCUMENT_CONFIG Local Codelist ............................................................................ 7-20WEB_DOCUMENT_GROUPS Local Codelist............................................................................ 7-20
Installation Reference Codelists ........................................................................................................ 7-20APPLICATION AREA CODE Installation Codelist .................................................................. 7-21APPLICATION SYSTEM NAME Installation Codelist............................................................. 7-21APPROVE VERIFY RETAIN CODE Installation Codelist ....................................................... 7-21APPROVE VERIFY REVERSE CODE Installation Codelist ..................................................... 7-21BLIND TYPE CODE Installation Codelist ................................................................................. 7-21CLINICAL PHASE Installation Codelist .................................................................................... 7-21COUNTRIES Installation Codelist................................................................................................ 7-21CRF PAGE NUMBERING SCHEME Installation Codelist....................................................... 7-22CRF PAGE STATUS CODES Installation Codelist .................................................................... 7-22CRF PAGE STATUS QUERY Installation Codelist.................................................................... 7-22DATA CHANGE REASON TYPE CODE Installation Codelist............................................... 7-22DATA CHANGE REASON2 TYPE CODE Installation Codelist............................................. 7-23DCF LOCK CONDITIONS Installation Codelist ....................................................................... 7-23DCF OPTIONAL STATUS CODES Installation Codelist ......................................................... 7-23DCF STATUS CODES Installation Codelist ................................................................................ 7-23DCIF CHECKBOX SIZE Installation Codelist ............................................................................ 7-23DCIF FONT TYPESIZE Installation Codelist.............................................................................. 7-24DCIF PAGE DEFINITION Installation Codelist ........................................................................ 7-24DCM DCI QG TYPE CODE Installation Codelist ...................................................................... 7-24DISCREPANCY ACTIONS ROLE Installation Codelist ........................................................... 7-24DISCREPANCY MESSAGES Installation Codelist .................................................................... 7-24DISCREPANCY NO OTHER UPDATE Installation Codelist .................................................. 7-24DISCREPANCY RESOLU TYPE CODE Installation Codelist.................................................. 7-24DISCREPANCY REV STATUS CODE Installation Codelist .................................................... 7-25

viii
DISCREPANCY STATUS ROLE Installation Codelists............................................................. 7-25DISCRETE VAL GRP TYPE CODE Installation Codelist ........................................................ 7-25DISC_STDST_VALUES Installation Codelist ............................................................................. 7-25DOSE FORM TYPE CODE Installation Codelist ........................................................................ 7-25DOSE FREQUENCY TYPE CODE Installation Codelist........................................................... 7-25DX_CONFIG Installation Codelist ............................................................................................... 7-25DX_EXTENDED_ATTRIBUTES Installation Codelist............................................................... 7-26DX_INDEX_TABLESPACE Installation Codelist....................................................................... 7-27DX_KEY_NAME Installation Codelist......................................................................................... 7-27DX_ROLES Installation Codelist .................................................................................................. 7-27DX_VIEW_TABLESPACE Installation Codelist......................................................................... 7-27EXP DESIGN TYPE CODE Installation Codelist........................................................................ 7-28EXTERNAL_TRANS_TYPE Installation Codelist...................................................................... 7-28LAB RANGE SUBSET CODE Installation Codelist ................................................................... 7-28MANUAL SOURCE TYPE CODE Installation Codelist ........................................................... 7-28MAPPING_TYPE Installation Codelist........................................................................................ 7-28MEDICAL EVAL TYPE CODE Installation Codelist................................................................. 7-28OBJECTIVE TYPE CODE Installation Codelist .......................................................................... 7-28OCL_DOMAINS Installation Codelist......................................................................................... 7-29OCL_INSTALLATION Installation Codelist .............................................................................. 7-29OCL_OPTIONS_TYPE_CODE Installation Codelist ................................................................. 7-29OPA_MENU_ROLES Installation Codelist................................................................................. 7-29PATIENT STATUS CODE Installation Codelist......................................................................... 7-29PLAN STUDY INT TYPE CODE Installation Codelist.............................................................. 7-29PROCEDURE TYPE CODE Installation Codelist....................................................................... 7-29QUESTION CATEGORY TYPE CODE Installation Codelist ................................................... 7-29RDCI CHANGE REASON TYPE CODE Installation Codelist................................................. 7-30RDCI CHANGE REASON2 TYPE CODE Installation Codelist............................................... 7-31REGION TYPE CODE Installation Codelist................................................................................ 7-31RETIREMENT REASON TYPE CODE Installation Codelist.................................................... 7-31ROUTE OF ADMIN TYPE CODE Installation Codelist............................................................ 7-31SAS_FORMATS Installation Codelist .......................................................................................... 7-31SINGLE DCI TYPES Installation Codelist ................................................................................... 7-31SOURCE LOCATION CODE Installation Codelist ................................................................... 7-32STANDARDS AFFIL TYPE CODE Installation Codelist .......................................................... 7-32STUDY STATUS TYPE CODE Installation Codelist.................................................................. 7-32TMS_CONFIGURATION Installation Codelist.......................................................................... 7-32TMS_LANGUAGES Installation Codelist ................................................................................... 7-32TMS_QUERY_TYPE Installation Codelist................................................................................... 7-32TMS_SOURCE_MAT_VIEWS Installation Codelist .............................................................. 7-32TMS_TAL_POOL_CONFIGURATION Installation Codelist .................................................. 7-33TMS_X_SEARCH Installation Codelist ....................................................................................... 7-33TREAT CHG REASON TYPE CODE Installation Codelist ...................................................... 7-33UNITS_OF_MEASURE_TYPE_CODE Installation Codelist .................................................... 7-33USER GROUP ROLES Installation Codelist ............................................................................. 7-33USER GROUPS Installation Codelist ........................................................................................... 7-33VALIDATION FAILURE TYPE CODE Installation Codelist................................................... 7-33

ix
Design Installation Reference Codelists .......................................................................................... 7-33System Reference Codelists ................................................................................................................ 7-34
Part II Oracle Clinical Administration Tasks
8 Managing Batch Jobs
User Account Requirements for Batch Jobs ........................................................................................ 8-1How PSUB Handles a Request .............................................................................................................. 8-2
Asynchronous PSUB Requests ......................................................................................................... 8-2Blocking and Nonblocking Jobs....................................................................................................... 8-2Checking a Nonblocking Batch Job ................................................................................................. 8-3
Starting and Stopping PSUB.................................................................................................................. 8-3Starting and Stopping PSUB Manually in UNIX........................................................................... 8-3Starting and Stopping PSUB Automatically in UNIX .................................................................. 8-4Starting and Stopping PSUB Manually in Windows .................................................................... 8-6Starting PSUB Automatically in Windows..................................................................................... 8-7
Managing the PSUB Process .................................................................................................................. 8-9Changing PSUB Job Number Sequencing ...................................................................................... 8-9Viewing the Status of a Submitted Batch Job.............................................................................. 8-10Removing the PSUB Service .......................................................................................................... 8-10Viewing Log and Output Files on the Screen ............................................................................. 8-11Using Job Sets to Control Execution Order ................................................................................. 8-12Tracking PSUB Processes ............................................................................................................... 8-13
Batch Job Reference Codelists ............................................................................................................ 8-13
9 Partitioning and Indexing
Introduction............................................................................................................................................... 9-1Timing Considerations and Deferral of Index or Partition Upgrade ......................................... 9-2About Partitioning ............................................................................................................................. 9-4
Planning for Partitioning Upgrade ....................................................................................................... 9-5Pre-upgrade Steps .............................................................................................................................. 9-6
Partitioning the Responses Table....................................................................................................... 9-10Step 1. Back Up the Database ........................................................................................................ 9-10Step 2. Export the Responses Table .............................................................................................. 9-11Step 3. Prepare the Database ......................................................................................................... 9-11Step 4. Import Responses Data...................................................................................................... 9-12Step 5. Compute Statistics on the Responses Table.................................................................... 9-12Step 6. Create Indexes on Partitioned Responses Table ............................................................ 9-13Step 7. Compile Invalid Objects and Restore Database Trigger .............................................. 9-13Step 8. Back Up the Database ........................................................................................................ 9-13Step 9. Regenerate Procedures and Data Extract Views............................................................ 9-13Step 10. Back Up the Database ...................................................................................................... 9-14Partition Maintenance .................................................................................................................... 9-14
Upgrading Indexes ................................................................................................................................ 9-18Index Upgrade Process................................................................................................................... 9-18Resizing the Storage Clause for Indexes...................................................................................... 9-18

x
Response Index Upgrade ............................................................................................................... 9-19ResponsesT (Test Database) Index Upgrade............................................................................... 9-20RECEIVED_DCI and RECEIVED_DCM Index Upgrades ........................................................ 9-20
Query Tuning Guidelines .................................................................................................................... 9-20
10 Utilities
Computing the Validation Status of All Responses ....................................................................... 10-1Running cnvstatus on UNIX ......................................................................................................... 10-1Running cnvstatus on Windows................................................................................................... 10-2
Generating Validation Procedures .................................................................................................... 10-2Running gen_procs on UNIX Systems......................................................................................... 10-3Running gen_procs on Windows Systems .................................................................................. 10-3
Deleting Inactive Procedures .............................................................................................................. 10-4
11 Setting Up File Viewing
Overview of the Process to Set Up File Viewing ............................................................................ 11-1Changing the Default Protocol for File Viewing ............................................................................ 11-2
Editing formsweb.cfg to Specify the File Viewing Protocol ..................................................... 11-2Setting the Oracle Entries in the System Registry for SFTP or FTP ........................................ 11-3Setting Up the Directory Mappings for HTTPS and HTTP ...................................................... 11-4
Setting Up Image Viewing for DCI and DCM Form Layouts HTML Preview......................... 11-5
12 Enabling Image Viewing
Setting Up a Central Image Repository ............................................................................................ 12-1Setting Up a Network User to Run the Oracle Process Manager Service............................... 12-2Setting Up Image Viewing During Data Entry........................................................................... 12-2
Copying Image Files to All Installations .......................................................................................... 12-3
13 Conducting Studies in a Distributed Environment
Distributed Study Environments and Replication ......................................................................... 13-1Locations in a Distributed Study Environment Installation ..................................................... 13-2What Types of Oracle Clinical Objects Can You Replicate? ..................................................... 13-3What Methods of Replication Does Oracle Clinical Support?.................................................. 13-3
Prerequisites to Setting Up Replication............................................................................................ 13-4Oracle Accounts for Replication ................................................................................................... 13-4Tables that Store Replication Information................................................................................... 13-6Seed Numbers for Databases Involved in Replication .............................................................. 13-6
Setting Up Replication ......................................................................................................................... 13-6Configuring the SOURCE LOCATION CODE Installation Codelist for Replication........... 13-6Configuring the OCL_INSTALLATION Installation Reference Codelist for Replication ... 13-7Configuring the OCL_STATE Local Reference Codelist for Replication................................ 13-9Creating and Setting Up the Database Links for Standard Replication.................................. 13-9
Creating the Study Design Replication Packages......................................................................... 13-12Using the rxasrall.sql Script ......................................................................................................... 13-12Creating the Views and Synonyms Required to Replicate Study Design ............................ 13-13Creating the Package for Replicating Investigators and Sites ................................................ 13-14

xi
Setting Up Symmetric Replication .................................................................................................. 13-15Setting Up Symmetric Replication.............................................................................................. 13-15Enabling Symmetric Replication................................................................................................. 13-19Reconciling Data............................................................................................................................ 13-19Troubleshooting Symmetric Replication ................................................................................... 13-22
14 Using Replication
Example of an Oracle Clinical Distributed Study .......................................................................... 14-1Operating from the Study-Owning Location .................................................................................. 14-3
Changing Ownership and Replicating Patient Positions.......................................................... 14-3Maintaining Investigators and Sites ............................................................................................. 14-5Constraints at the Study-Owning Location................................................................................. 14-5Replicating Data at a Study-Owning Location ........................................................................... 14-6
Operating from a Sharing Location ................................................................................................... 14-6Study Design at a Sharing Location ............................................................................................. 14-6Study Definition at a Sharing Location........................................................................................ 14-7Study Conduct at a Study-Sharing Location............................................................................... 14-7Data Replication at a Study-Sharing Location ............................................................................ 14-7Replication of Labs and Lab Ranges at a Sharing Location ...................................................... 14-8Error if Flexible Study Setting Mismatch Between Locations .................................................. 14-8
Enabling a Study for Replication ....................................................................................................... 14-8Using Standard Replication ................................................................................................................ 14-9
Review of Setting Up Standard Replication................................................................................ 14-9Replicating a Global Library........................................................................................................ 14-10Replicating Study Designs ........................................................................................................... 14-10Replicating a Study Definition .................................................................................................... 14-11Replicating Data ............................................................................................................................ 14-12Replicating Lab Information........................................................................................................ 14-15Replication and Frequency .......................................................................................................... 14-17
Using Disconnected Replication ...................................................................................................... 14-17Overview of Disconnected Replication...................................................................................... 14-17Review of Setting Up Disconnected Replication ...................................................................... 14-19Extracting Source Data to an Export File................................................................................... 14-19Defining the Extract Data Parameters........................................................................................ 14-20Loading Data from the Export File into a Target Location ..................................................... 14-22
Changing Study Ownership ............................................................................................................. 14-23Replicated Tables................................................................................................................................. 14-24
Part III Appendixes
A Environment Variables and Registry Settings
Summary of the Oracle Clinical Setup ............................................................................................... A-1Editing opa_settings.bat................................................................................................................... A-2Setting Up UNIX Environments ..................................................................................................... A-3Changing Configuration Settings on UNIX Database Servers ................................................... A-4Changing Environment Variables on Windows........................................................................... A-7

xii
Settings that Affect Back-End Job Execution................................................................................. A-7Windows Registry Settings ................................................................................................................. A-11
OPA Front End ................................................................................................................................ A-11Online Help...................................................................................................................................... A-12Oracle Clinical Front End............................................................................................................... A-12RDC Front End ................................................................................................................................ A-13RDC Plugin ...................................................................................................................................... A-14OCN Front End................................................................................................................................ A-14Reports Server.................................................................................................................................. A-15Registry Keys ................................................................................................................................... A-16Variables ........................................................................................................................................... A-20
B SAS_VIEW Directory Tree
C Troubleshooting
Managing High Sequence Numbers ................................................................................................... C-1Assessing Sequence Sizes................................................................................................................. C-1Reseeding Sequences ....................................................................................................................... C-3
Error Messages ......................................................................................................................................... C-5Message: Not Using Named Package ........................................................................................... C-5Message: ORA-12223 ....................................................................................................................... C-5Message: ORA-04020 ....................................................................................................................... C-5Message: Unable to Change Mode ................................................................................................. C-6
System Malfunction: GPF Occurs During Data Entry ..................................................................... C-6Situation: $ulimit unlimited............................................................................................................. C-6
PSUB Jobs ................................................................................................................................................. C-7Check the Failure Text in the Submitted Batch Jobs Window.................................................... C-7Check the PSUB Log Files ................................................................................................................ C-8If Batch Jobs Hang and the Batch Queue Is Full ........................................................................... C-9Determining if PSUB Is Running for a Database........................................................................ C-10Troubleshooting PSUB Based on the Batch Job's Execution Status ......................................... C-11Handling PSUB Failures that Return "Fatal two-task communication protocol" Error ....... C-14Handling PSUB Failure that Returns "Illegal use of PSLAUNCH…" Error........................... C-14Tracking Previous PSUB Process Connections ........................................................................... C-15If PSUB Fails to Start ....................................................................................................................... C-15
Database Trace ....................................................................................................................................... C-16
D Routine Server Administration
Recreating Symbolic Links—UNIX Only .......................................................................................... D-1Relinking Server Code—UNIX Only ................................................................................................. D-1Relocating Oracle Clinical ..................................................................................................................... D-2Updating Oracle Clinical Seed Data.................................................................................................... D-2Collecting Statistics for Optimization................................................................................................. D-3

xiii
E Oracle Clinical Tablespaces
Glossary
Index

xiv

xv
Preface
This Oracle Clinical Administrator's Guide describes activities that may be required of a system or database administrator to maintain an Oracle Clinical site. For installation and one-time tasks, see the Oracle Clinical Installation Guide. For information on configuring Remote Data Capture Onsite (RDC Onsite), see the Oracle Clinical Remote Data Capture Onsite Administrator's Guide.
This preface contains the following topics:
■ Audience on page xv
■ Documentation Accessibility on page xvi
■ Finding Information and Patches on My Oracle Support on page xvi
■ Finding Oracle Documentation on page xviii
■ Related Documents on page xviii
■ Conventions on page xviii
AudienceTo administer an Oracle Clinical installation you need to be able to carry out the tasks listed below. If you lack the necessary skills, one alternative is to engage Oracle Consulting.
Oracle Database AdministratorsTo perform Oracle Clinical database tasks, you should have a level of knowledge equivalent to what is taught in Oracle's DBA Architecture and Administration course. You must be able to read, edit, and run SQL scripts and review log files. For ongoing administration, additional DBA training is essential.
System AdministratorsA general understanding of the operating system and networking is required, including:
■ For UNIX:
– Creating and managing user accounts and groups
– Installing Oracle RDBMS software and patches
– Identifying space on a file system for Oracle database tablespaces
– Setting and using environment variables
■ For Microsoft Windows:

xvi
– Creating and managing user accounts and groups
– Creating and managing services
– Installing Oracle software
– Managing settings through the Control Panel applets
– Adding network printers
Documentation AccessibilityFor information about Oracle's commitment to accessibility, visit the Oracle Accessibility Program website at http://www.oracle.com/pls/topic/lookup?ctx=acc&id=docacc.
Access to Oracle SupportOracle customers have access to electronic support through My Oracle Support. For information, visit http://www.oracle.com/pls/topic/lookup?ctx=acc&id=info or visit http://www.oracle.com/pls/topic/lookup?ctx=acc&id=trs if you are hearing impaired.
Finding Information and Patches on My Oracle SupportYour source for the latest information about Oracle Clinical is Oracle Support's self-service Web site My Oracle Support (formerly MetaLink).
Before you install and use Oracle Clinical, always visit the My Oracle Support Web site for the latest information, including alerts, White Papers, installation verification (smoke) tests, bulletins, and patches.
Creating a My Oracle Support AccountYou must register at My Oracle Support to obtain a user name and password account before you can enter the Web site.
To register for My Oracle Support:
1. Open a Web browser to https://support.oracle.com.
2. Click the Register link to create a My Oracle Support account.
3. Follow the instructions on the registration page.
Signing In to My Oracle SupportTo sign in to My Oracle Support:
1. Open a Web browser to https://support.oracle.com.
2. Click Sign In.
3. Enter your user name and password.
4. Click Go to open the My Oracle Support home page.
Finding Information on My Oracle SupportThere are many ways to find information on My Oracle Support.

xvii
Searching by Article IDThe fastest way to search for information, including alerts, White Papers, installation verification (smoke) tests, and bulletins is by the article ID number, if you know it.
To search by article ID:
1. Sign in to My Oracle Support at https://support.oracle.com.
2. Locate the Search box in the upper right corner of the My Oracle Support page.
3. Click the sources icon to the left of the search box, and then select Article ID from the list.
4. Enter the article ID number in the text box.
5. Click the magnifying glass icon to the right of the search box (or press the Enter key) to execute your search.
The Knowledge page displays the results of your search. If the article is found, click the link to view the abstract, text, attachments, and related products.
Searching by Product and TopicYou can use the following My Oracle Support tools to browse and search the knowledge base:
■ Product Focus — On the Knowledge page under Select Product, type part of the product name and the system immediately filters the product list by the letters you have typed. (You do not need to type "Oracle.") Select the product you want from the filtered list and then use other search or browse tools to find the information you need.
■ Advanced Search — You can specify one or more search criteria, such as source, exact phrase, and related product, to find information. This option is available from the Advanced link on almost all pages.
Finding Patches on My Oracle SupportBe sure to check My Oracle Support for the latest patches, if any, for your product. You can search for patches by patch ID or number, or by product or family.
To locate and download a patch:
1. Sign in to My Oracle Support at https://support.oracle.com.
2. Click the Patches & Updates tab. The Patches & Updates page opens and displays the Patch Search region. You have the following options:
■ In the Patch Name or Number field, enter the number of the patch you want. (This number is the same as the primary bug number fixed by the patch.) This option is useful if you already know the patch number.
■ To find a patch by product name, release, and platform, click the Product or Family link to enter one or more search criteria.
3. Click Search to execute your query. The Patch Search Results page opens.
4. Click the patch ID number. The system displays details about the patch. In addition, you can view the Read Me file before downloading the patch.
5. Click Download. Follow the instructions on the screen to download, save, and install the patch files.

xviii
Finding Oracle DocumentationThe Oracle Web site contains links to all Oracle user and reference documentation. You can view or download a single document or an entire product library.
Finding Oracle Health Sciences DocumentationTo get user documentation for Oracle Health Sciences applications, go to the Oracle Health Sciences documentation page at:
http://www.oracle.com/technetwork/documentation/hsgbu-clinical-407519.html
Finding Other Oracle DocumentationTo get user documentation for other Oracle products:
1. Go to the following Web page:
http://www.oracle.com/technology/documentation/index.html
Alternatively, you can go to http://www.oracle.com, point to the Support tab, and then click Documentation.
2. Scroll to the product you need and click the link.
3. Click the link for the documentation you need.
Related DocumentsThis section lists the documents in the Oracle Clinical documentation set, followed by their part number. The most recent version of each guide is posted on the Oracle Web site; see "Finding Oracle Health Sciences Documentation" on page xviii.
■ Oracle Clinical Installation Guide (Part E18817)
■ Oracle Clinical Administrator's Guide (Part E18818)
■ Oracle Clinical Getting Started (Part E18819)
■ Oracle Clinical Creating a Study (Part E18820)
■ Oracle Clinical Conducting a Study (Part E18821)
■ Oracle Clinical Application Programming Interface Guide (Part E18866)
■ Oracle Clinical Remote Data Capture Onsite Administrator's Guide (Part E18823)
■ Oracle Clinical Remote Data Capture Onsite User's Guide (Part E18822)
■ Oracle Clinical Remote Data Capture Classic Data Entry User's Guide (Part E18824)
The release notes and the release content document are also posted in the Oracle Health Sciences documentation library.
In addition, Oracle Clinical customers can request a copy of the Oracle Clinical Stable Interface Technical Reference Manual from Oracle Support.
ConventionsThe following text conventions are used in this document:
Note: Always check the Oracle Health Sciences Documentation page to ensure you have the latest updates to the documentation.

xix
Convention Meaning
boldface Boldface type indicates graphical user interface elements associated with an action, or terms defined in text or the glossary.
italic Italic type indicates book titles, emphasis, or placeholder variables for which you supply particular values.
monospace Monospace type indicates commands within a paragraph, URLs, code in examples, text that appears on the screen, or text that you enter.

xx

Part IPart I Configuration Tasks
This section includes tasks that you perform when you install Oracle Clinical or the Remote Data Capture option.
■ Chapter 1, "Setting Up User Accounts"
■ Chapter 2, "Oracle Clinical Menu-Based Security"
■ Chapter 3, "Configuring Discrepancy Management"
■ Chapter 4, "Configuring the Mass Changes Utility"
■ Chapter 5, "Configuring Data Entry and User Preferences"
■ Chapter 6, "Configuring Data Extract"
■ Chapter 7, "Reference Codelists"


1
Setting Up User Accounts 1-1
1Setting Up User Accounts
This section contains the following topics:
■ Creating an Administrator User Account on page 1-1
■ Setting Up Required Accounts and Directories on page 1-2
■ Running the Add User Script on page 1-5
■ Maintaining Oracle User and Group User Accounts on page 1-9
■ Granting Data Access to User and Group User Accounts on page 1-11
■ Granting Data Access to RDC Users on page 1-14
■ Granting Additional Database Roles to User Accounts on page 1-16
■ Setting Up Data Extract Users on page 1-17
■ Setting Up Power Users on page 1-18
■ Setting Up Passwords on page 1-19
■ Creating Profiles for Users on page 1-22
Creating an Administrator User AccountTo create an administrator user account with which you can perform all the functions under the Oracle Clinical Admin menu:
1. Log on to SQL*Plus as SYSTEM and run the Add User script; see "Running the Add User Script" on page 1-5.
2. Add one of the following database roles; see "Granting Additional Database Roles to User Accounts" on page 1-16. By default, these roles provide the following menu access:
■ RXC_ADMIN: Provides access to all Admin menu items.
■ RXC_SUPER: Provides access to all menu items.
■ RXC_SUPER_NOGL: Provides access to all menu items except the Global Library.
■ RXC_DES: Provides access to the RDC Administration tool as well as Oracle Clinical Design menu items.
■ RXC_DMGR: Provides access to the RDC Administration tool as well as Oracle Clinical Definition and Conduct menu items.
3. Add privileges, if required; see "Setting Up Power Users" on page 1-18.

Setting Up Required Accounts and Directories
1-2 Oracle Clinical Administrator's Guide
Setting Up Required Accounts and DirectoriesTo add a user account to Oracle Clinical, you run the Add User script. In that script you are prompted to supply information about the servers, queues, and directories the user will use. You must either set these up in advance and enter the correct information as you run the script, or enter the information in the script and do the required setup afterward.
■ Set up the Reports Server; see the Oracle Clinical Installation Guide for instructions.
■ Setting Up a Reports Server Log Directory on page 1-2.
■ Determine which database roles the user needs; see Chapter 2, "Oracle Clinical Menu-Based Security."
■ Set up Parameterized Submission (PSUB) user requirements. The following are required only for users who need to use the PSUB utility; see "Who Needs PSUB?" on page 1-2:
– Creating an Operating System Account on page 1-3
– Creating a PSUB Log Directory on page 1-3
– Ensuring PSUB Execution Permission (UNIX Only) on page 1-4
– Modifying the RXCPROD Account's Profile on page 1-5
Who Needs PSUB? Some of the user setup tasks are required only if the user needs to be able to run Oracle Clinical's Parameterized Submission (PSUB) batch utility. PSUB is required to:
■ Run batch data load
■ Run batch data delete
■ Run batch validation
■ Generate a default, character-based DCM layout
■ Run the following reports: Randomization Report by Treatment, Patient DCI/DCM Matrix, Generate Study Report, Missing and Overdue DCMs, Investigator Corrs & Missing Pgs, Study/Investigator DCM Summary Matrix, Display Treatment Assignments
■ Run Validate Study or Validate Site in RDC—the only RDC users who need PSUB
PSUB is not required to:
■ Perform basic data entry in either Oracle Clinical or RDC
■ Generate graphic layouts and DCI forms
■ Run most reports, including the Patient Data and Audit History reports
PSUB initiates batch jobs on the operating system of the database server through the account of a dedicated user, RXCPROD. This account places the logs and output of the PSUB job into a directory that is accessible to the user who submits the job. Oracle Clinical users must therefore have operating system accounts on the database server.
Setting Up a Reports Server Log DirectoryDuring Oracle Clinical installation you create a Reports Server root directory (see the Oracle Clinical Installation Guide for instructions). You can either use the root directory for all users' report output, or you can create a separate subdirectory for each user under the root directory. In either case, a user's access is restricted to the reports

Setting Up Required Accounts and Directories
Setting Up User Accounts 1-3
generated by that user in Oracle Clinical or RDC—regardless of whether or not there is a user-specific subdirectory.
To allow users to view reports through Oracle Clinical and RDC, enter the full path to the root directory or user-specific subdirectory when you execute the Add User script or in the Oracle Accounts window.
Creating an Operating System AccountUsers who need to run PSUB (see "Who Needs PSUB?" on page 1-2) need an operating system account on the database server. Users who want to run Data Extract jobs and SAS must also have an account on the server that runs SAS, if it is a different machine from the PSUB server.
For setting the password for a user, see "Changing the Password for a User" on page 1-20.
PSUB Account Must Use C ShellAny user account that will run PSUB jobs must use the C Shell (csh). The default shell gets set up when you create the user account.
Accounts on UNIX SystemsWhen you create a user account, ensure that the path to the user's login directory does not contain uppercase characters. PSUB changes all path specifications to lowercase on UNIX platforms.
If you must have uppercase characters in the path, you can provide lowercase and uppercase versions of the paths by using symbolic links, as needed.
For example, if the standard path to user bsmith's account is:
/usr1/home/Clinical/bsmith
You can create this link:
% cd /usr1/home% ln -s Clinical clinical
Accounts on Windows SystemsFor security reasons, when you set up local accounts for users on the Windows database server, do not use the same password as the user's domain account.
Creating a PSUB Log DirectoryCreate a PSUB root directory on the database server and user-specific log subdirectories for users who need PSUB. When a PSUB batch job runs, the system writes the log and output files associated with the job to the log directory of the user who ran the job.
UNIX On UNIX servers, Oracle suggests you create a directory named log as a subdirectory of each user's home directory. For example, for user bsmith
/u01/home/bsmith/log
Note: The full path cannot exceed 35 characters.

Setting Up Required Accounts and Directories
1-4 Oracle Clinical Administrator's Guide
Windows On Windows servers, Oracle suggests you create a directory named oc_users, and beneath that create a subdirectory for each user, which is named for that user. In each user-specific directory, create a log subdirectory.
You must give each user read/write access to their directory.
For example, for user bsmith:
d:\oc_users\bsmith\log
Making the PSUB Root Directory AccessibleEach user has a PSUB log directory under the PSUB root directory. Therefore, the root directory must be accessible to all users. In the previous examples, the shared PSUB root directories are "/u01/home" (UNIX) and "d:\users" (Windows).
In addition, you must make the PSUB root directory accessible to the Oracle Clinical application tier:
■ SFTP or FTP: If you are using either SFTP or FTP as the file viewing protocol, you can skip this step.
■ UNC: If you are using UNC as the file viewing protocol, you must create a UNC for the PSUB root directory and make the PSUB root directory readable by the network domain account used to start the application server.
■ HTTP: If you are using HTTP as the file viewing protocol, you must set up the PSUB root directory as a virtual directory on the Web Server. Generally, you would set up that Web Server on the same computer as the PSUB root directory. Oracle Database ships with an Oracle HTTP Server that you can use as a Web Server.
Ensuring PSUB Execution Permission (UNIX Only)On UNIX database servers, the PSUB utility works by having one operating system account, RXCPROD, use Secure Secure (ssh) to submit batch jobs on behalf of the actual user's operating system account. To submit these jobs on the user's behalf, RXCPROD must have permission to access the user's account. You can grant this permission either through an entry in /etc/hosts.equiv, which grants RXCPROD the permission for all users, including new users as they come to be created, or through an entry in each account's .rhosts file.
■ For all users at once: If the database server has an /etc/hosts.equiv file, add official_host_name rxcprod as a line in the file. This grants RXCPROD the permission for all users, including new user accounts as they are created.
■ For each user individually: Create a file named rhosts in the user's login directory and include official_host_name rxcprod as a line in the file.
where official_host_name is the official name of the computer on which you are installing Oracle Clinical. You must use the official name — not an alias — for the server. The official name is the first listing after the IP address in the /etc/hosts file.
Modifying the RXCPROD Account's Profile RXCPROD is the dedicated PSUB account. Enable RXCPROD to find the programs that PSUB runs by doing the following:
Note: See "Setting Up File Viewing" on page 11-1 for additional information.

Running the Add User Script
Setting Up User Accounts 1-5
Open the RXCPROD account's .profile file and edit the PATH command:
PATH=$PATH:opapps_home/bin:oracle_home/bin
where oracle_home is the path of the Oracle home directory and opapps_home is the path of the Oracle Clinical home directory.
Running the Add User Script Create a database account for the user in each database instance to which the user connects by running the script ocl_add_user.sql in SQL*Plus.
This section contains the following topics:
■ About the Add User Script
■ Running the Add User Script in UNIX
■ Running the Add User Script in Windows
■ Required Parameters
■ Optional Parameters
About the Add User ScriptThe ocl_add_user.sql script performs the following tasks:
■ Creates an Oracle database account for the user, with the specified password
■ Sets the user's temporary tablespace to "temp" and default tablespace to "users"
■ Grants default Oracle Clinical database roles to the user; you can edit the script to assign additional database roles
■ Grants the RXC_SUPER role for data access to all studies, if specified
■ Grants RXC_RDC and RDC_ACCESS if access to RDC is required
■ Makes the RXCLIN_MOD role a non-default role
■ Creates a record in the Oracle Clinical table ORACLE_ACCOUNTS
Note: If you use SQL*Plus to create a Oracle Clinical database account, do not use the IDENTIFIED EXTERNALLY clause; rather, assign an explicit password.
Note: You can copy and customize this script, or create different versions of it for different types of users. For example, you can change temporary and default tablespaces, provide default values for some parameters instead of entering a value for each user at a prompt. You can add a call to crusrq.sql to create the USER_QUERIES table (see "Creating a Queries Table for a Data Extract User" on page 1-18).
However, if you decide to customize the script, it is important not to modify the line: alter user &&ops_id default role all except rxclin_mod;

Running the Add User Script
1-6 Oracle Clinical Administrator's Guide
Running the Add User Script in UNIX1. Log on with your UNIX account.
2. Set the environment.
For UNIX servers, C shell, enter the following:
opa_setup database_instance_name code_environment_designation
For example: %opa_setup burlma9 22
For UNIX servers, Bourne shell, enter the following:
p1 = database_instance_namep2 = code_environment_designationopa_setup
3. Change to the RXC_TOOLS directory:
cd $RXC_TOOLS
4. Connect to SQL*Plus as system:
sqlplus system
5. Run the Add User script:
start ocl_add_user.sql
See Table 1–1, " Add User Script Required Parameters" and Table 1–2, " Add User Script Optional Parameters" for a description of the prompts output by the Add User script, valid entries, and examples.
Running the Add User Script in Windows1. Log on with your local account.
2. Open an MS-DOS window.
3. Set the server environment:
set p1=db_nameset p2=code_envopa_setup
where db_name is a database instance name and code_env is a code environment designation.
4. Change to the RXC_TOOLS directory:
cd %RXC_TOOLS%
5. Connect to SQL*Plus as system:
sqlplus system
6. Run the Add User script:
start ocl_add_user.sql
Note: You can give users additional database roles directly in SQL*Plus; see "Granting Additional Database Roles to User Accounts" on page 1-16.

Running the Add User Script
Setting Up User Accounts 1-7
Required ParametersTable 1–1 describes the required Add User script parameters.
Table 1–1 Add User Script Required Parameters
Prompt/Equivalent in Oracle Accounts Window Description Rules and Examples
User ID, starting with OPS$
/Account Name
Defines the login name for the user. Names are not case sensitive.
OPS$ is required at the beginning of the account name if the user needs to run PSUB processes in Oracle Clinical; see "Who Needs PSUB?" on page 1-2. The letters after OPS$ (if OPS$ is included) must be identical to the user's operating system account name on the database server.
If OPS$ is not included, the user ID you enter here must be identical to the user's operating system account name on the database server.
OPS$bsmithbsmith
Password
Not in the Oracle Accounts window
Defines the login password for the user. Passwords are not case sensitive. See "Changing the Password for a User" on page 1-20.
farrier
Last Name
/Last Name
Specifies the user's surname (family name). Names are not case sensitive; names are automatically capitalized.
Smith
First Name
First Name
Specifies the user's given name. Names are not case sensitive; names are automatically capitalized.
William
PSUB Log Directory
/PSUB Directory
Specifies the directory where PSUB places output and log files from PSUB jobs.
See "Who Needs PSUB?" on page 1-2. RDC users need a PSUB log directory only if they run Validate Study or Validate Site.
You create the root directory during installation.
UNIX: /users/bsmith/log
Windows (use UNC): \users\bsmith\log
Report Server Log Directory
/Report Server Directory
Specifies the designated location for saving output from the Report Server. Required for generating and viewing Patient Data Reports and most Oracle Clinical reports.
You create the directory as part of setting up the Report Server during Oracle Clinical installation.
Must be specified in UNC format.
String length cannot exceed 35 characters.
\\oc_srvr\users\bsmith

Running the Add User Script
1-8 Oracle Clinical Administrator's Guide
Optional ParametersTable 1–2 describes the optional parameters for the Add User script. In addition, you can use the Maintain Oracle Accounts form to manage these optional parameters; see "Maintaining Oracle User and Group User Accounts" on page 1-9.
Grant RXC_Super Menu Role (Y/N)
Not in the Oracle Accounts window
Specifies whether to grant superuser menu privileges to this user. With this privilege, the user can access all Oracle Clinical menus. In general, Oracle recommends that you restrict the RXC_SUPER role to system administrators.
This setting does not correspond to a field in the Oracle Clinical accounts table.
Y — Gives superuser menu privileges to this user.
N — Does not give superuser menu privileges to this user. You should always answer N for non-Oracle Clinical users.
Grant Super-User Status to access all studies (Y/N)
/Super User?
Specifies whether to grant superuser status to this user. With this privilege, the user can access all clinical studies in the database, in both Test and Production modes.
This setting corresponds to the Super User? check box in the Oracle Clinical accounts table. You can change this setting and grant access to programs, projects, and studies in the Oracle Accounts window; see "Granting Data Access to User and Group User Accounts" on page 1-11.
Y — Allows this user to access all clinical studies.
N — By default, the user does not have access to any studies. You must explicitly grant access to particular studies, projects, or programs.
Does user require access to RDC (Y/N)
Not in the Oracle Accounts window
Specifies whether this user can log in to and use the RDC Onsite application.
A Y value grants the RDC_ACCESS and RXC_RDC roles to the user. The RDC_ACCESS role lets the user initiate an RDC Onsite session and the RXC_RDC role lets the user enter and modify data (subject to study- and site-level security privileges).
Y — Lets this user access the RDC Onsite application.
N — Denies access to the RDC Onsite application for this user.
Table 1–2 Add User Script Optional Parameters
Prompt/Equivalent in Oracle Accounts Window Description Rules and Examples
Custom Doc Dir
/Custom Help Directory
Specifies the location of your site-specific context-sensitive HTML help files.
Printer for PSUB
/Default PSUB Printer
The printer to which PSUB print jobs are routed, in uppercase. This response must match the Short Value of an active entry in the PRINT QUEUE NAME Local Codelist.
Required for RDC users only if they run Validate Study or Validate Site.
RXC_PRINTER (This is the default value for the database shipped in the OCL_JOB_PREF Local Codelist.)
Queue
/Default PSUB Queue
The designation for the queue in which PSUB batch jobs are executed. This response must match the Short Value of an active entry in the BATCH QUEUE NAME Local Codelist. Must be entered in uppercase.
Required for RDC users only if they run Validate Study or Validate Site.
RXC_BATCH_QUEUE (This is the default value for the database shipped in the OCL_JOB_PREF Local Codelist.)
Table 1–1 (Cont.) Add User Script Required Parameters
Prompt/Equivalent in Oracle Accounts Window Description Rules and Examples

Maintaining Oracle User and Group User Accounts
Setting Up User Accounts 1-9
Maintaining Oracle User and Group User AccountsAfter you create a user with the Add User script, the user account appears in the Oracle Accounts window. Use this window to:
■ Create group user accounts for users who should have access to the same set of studies, programs, or projects in order to assign data access to all the users at the same time1. A user can belong to multiple group user accounts.
■ View and modify settings for individual user accounts
Do not use this window to create new individual user accounts because you cannot assign database roles to users here. Use the Add User script.
You can access other windows from Oracle Accounts to do the following tasks:
■ Adding a User to a Group User Account on page 1-11; use this window to assign a user to a group user account. You can then grant data access to all the users assigned to the group user account at the same time.
■ Granting Data Access to a Study; use this window to grant access to one study at a time to a single user or group user account
■ Granting Data Access to Programs and Projects on page 1-12; use this window to grant a access to all the studies in a program or project at the same time to a single user or group user account
To create a group user account:
1. From the Data menu, select Insert Record.
2. Enter values in the fields.
Printer for the Report Server
/Default RS Printer
The printer to which print output from a report server job is routed. This response must match the Short Value of an active entry in the PRINT QUEUE NAME Local Codelist. Must be entered in uppercase.
RXC_PRINTER (This is the default value for the database shipped in the OCL_JOB_PREF Local Codelist.)
Report Server
/Default Report Server
Specify a value if you want to override the system default for a specific user. When the user prepares to submit a report request, this response specifies which report server is offered as the default. This response must match the Short Value of an active entry in the REPORT_SERVER Local Codelist.
REPORT_SERVER (This is the default value for the database shipped in the OCL_JOB_PREF Local Codelist.)
Job Set Report Server
/Default Job Set Server
When the user prepares to submit a job set request, this response specifies which report server is offered as the default. This response must match the Short Value of an active entry in the REPORT_SERVER Local Codelist.
Required for RDC users only if they run Validate Study or Validate Site.
REPORT_SERVER (This is the default value for the database shipped in the OCL_JOB_PREF Local Codelist.)
PSUB Scheduler Report Server
/Default PSUB Scheduler Report Server
When the user prepares to submit a scheduled PSUB job request, this response specifies which report server is offered as the default. This response must match the Short Value of an active entry in the REPORT_SERVER Local Codelist.
Required for RDC users only if they run Validate Study or Validate Site.
REPORT_SERVER (This is the default value for the database shipped in the OCL_JOB_PREF Local Codelist.)
Table 1–2 (Cont.) Add User Script Optional Parameters
Prompt/Equivalent in Oracle Accounts Window Description Rules and Examples

Maintaining Oracle User and Group User Accounts
1-10 Oracle Clinical Administrator's Guide
The window contains the following fields:
Account Type If set to Oracle, the record is an individual user account. To create a group user account, set to Group.
Account Name For an individual user account, the user ID; for a group user account, its name.
Last Name Family name or surname of the user with the individual user account; not required for group user accounts.
First Name Given name of the user with the individual user account; not required for group accounts.
Super User? If checked, the user or group user account has superuser status and can see data in all studies on the database. If not checked, the user or group user account can see data only for studies to which they are explicitly allowed access; see "Granting Data Access to User and Group User Accounts" on page 1-11.
PSUB Directory Location for log and output files from Parameterized Submission jobs; see "Creating a PSUB Log Directory" on page 1-3.
Report Server Directory Location for log and output files from Oracle Clinical reports jobs; see "Setting Up a Reports Server Log Directory" on page 1-2.
Custom Help Directory Location of company-specific context-sensitive html files, if any.
Default PSUB Printer The printer to which PSUB print jobs are routed, in uppercase. This response must match the Short Value of an active entry in the PRINT QUEUE NAME local reference codelist.
Default RS Printer The printer to which print output from a report server job is routed. This response must match the Short Value of an active entry in the PRINT QUEUE NAME local reference codelist. Must be entered in uppercase.
Default PSUB Queue The designation for the queue in which PSUB batch jobs are executed. This response must match the Short Value of an active entry in the BATCH_QUEUE_NAME local reference codelist. Must be entered in uppercase.
Default Report Server When the user prepares to submit a report request, this response specifies which report server is offered as the default. This response must match the Short Value of an active entry in the REPORT_SERVER local reference codelist.
Default Job Set Report Server When the user prepares to submit a job set request, this response specifies which report server is offered as the default. This response must match the Short Value of an active entry in the REPORT_SERVER local reference codelist. See "Using Job Sets to Control Execution Order" on page 8-12 for information on job sets.
Note: The location designation for any report server log directory, whether directory path or UNC, cannot exceed 35 characters

Granting Data Access to User and Group User Accounts
Setting Up User Accounts 1-11
Default PSUB Scheduler Report Server When the user prepares to submit a scheduled PSUB job request, this response specifies which report server is offered as the default. This response must match the Short Value of an active entry in the REPORT_SERVER local reference codelist.
Adding a User to a Group User AccountYou can add all the users who should have access to the same set of studies, programs, or projects to the same group user account and assign data access to all the users at the same time through the group user account. An individual user can belong to multiple group user accounts.
To add a user to a user group:
1. Navigate to Admin, Users, and then Oracle Accounts. The system opens the Oracle Accounts window.
2. Query for the individual user you want to add to a user group.
3. Click Group Membership. The system displays the Group Membership window.
4. From the Group Membership field's list of values, select the group to which you want to assign the user. If you want to assign the user to multiple user groups, use multiple rows.
5. Save your work.
Granting Data Access to User and Group User AccountsYou must explicitly give users access to study data, either by granting them Superuser status, which allows access to all studies, or explicitly granting access to specific studies or groups of studies (programs and projects). For RDC users, you can use either the Oracle Accounts window or the Study and Site Security windows; see "Granting Data Access to RDC Users" on page 1-14.
To allow an Oracle Clinical or RDC user—even a user who will work exclusively in RDC—to view study data, you must grant study or superuser access in Oracle Clinical. You can grant data access to a user or group user account in several ways:
■ Grant access to data in all studies by granting the user or group user account superuser status, either in the Oracle Accounts window or, for individual users, when you run the Add User script.
■ If the user or group user accounts does not have superuser status, you can grant access to data in one or more studies, either to one study at a time or to all studies in a program or project.
You can grant data access at several levels:
■ Granting Data Access to Programs and Projects on page 1-12
■ Granting Data Access to a Study on page 1-12
See also "Superuser and Study Access Interaction" on page 1-13 and "Revoking User Access" on page 1-13.
Note: The location designation for any report server log directory, whether directory path or UNC, cannot exceed 35 characters.

Granting Data Access to User and Group User Accounts
1-12 Oracle Clinical Administrator's Guide
Granting Data Access to Programs and ProjectsAssigning program or project access to a user or group user account enables either the individual user or the set of users in the group to have access to all studies associated with the program or project.
1. Navigate to Admin, Users, and then select Oracle Accounts. The system opens the Oracle Accounts window.
2. Query for the account with which you want to work.
3. Click Programs/Projects. The Programs window displays.
4. In the Program field, from the list of values select the name of the program to which you want the user or user group to have access.
5. In the Project field, from the list of values select the program to which the user will have access. If the user should have access to all projects within a program, enter a percent sign (%) in the project field.
If you want to assign multiple programs to the account, or multiple (but not all) projects within a program, use multiple rows. There is no limit to the number of programs to which the user can have access.
6. Save your work.
Granting Data Access to a StudyTo assign study data access to a user or user group:
1. Navigate to Admin, Users, and then Oracle Accounts. The system opens the Maintain Oracle Accounts window.
2. Query for the account with which you want to work.
3. Click Studies. The Studies window displays.
4. In the Study field, from the list of values select a study to which you want the user or user group to have access. If you want to assign multiple studies to the account, use multiple rows. There is no limit to the number of studies you can specify.
5. Save your work.
Note: You cannot assign project or program access to a user or user group whose Super User? flag is checked. That account already has access to all programs and projects.
Note: You cannot assign study access to a user or user group whose Super User flag is checked. That account already has access to all studies.
Note: If a user creates a new study and does not have access to it through the project and/or program it belongs to, the system automatically gives the user access to the study he or she has just created.

Granting Data Access to RDC Users
Setting Up User Accounts 1-13
Superuser and Study Access InteractionYou cannot assign project or program access to a user or user group whose Super User? flag is checked. That account already has access to all programs and projects.
However, if you assign access to programs, projects, or studies to a user whose Super User? flag is not checked, and then check that user's Super User? flag, the superuser status overrides the existing specific privileges, but the existing privileges are still displayed in the Projects, Programs, and Studies windows.
If an RDC user has superuser status in the Oracle Accounts window and has access to only a subset of RDC studies in the Study Security window, the superuser status overrides the study-specific privileges and the user has access to all studies. However, you can use the Study Security window to limit the type of access to a particular study. See the Oracle Clinical Remote Data Capture Onsite Administrator's Guide for information.
Revoking User Access
To revoke a user's study, user group, project, or program access:
1. Navigate to Admin, Users, and then select Oracle Accounts. The system displays the Oracle Accounts window.
2. Query for the account with which you want to work.
3. Click either Studies, Programs/Projects, or Group Membership.
4. Select the study, program/project combination, or user group from which you want to remove the user.
5. From the Data menu, select Delete Record.
6. Save your work.
Granting Data Access to RDC UsersThis section contains the following topics:
■ Granting Automatic Access in RDC to Studies Granted in Oracle Clinical on page 1-14
■ Configuring Study and Site Security Privileges on page 1-14
■ Changing the Default Access to DCIs on page 1-14
Granting Automatic Access in RDC to Studies Granted in Oracle ClinicalYou can use a reference codelist setting to determine whether users who have access to data for a particular study in Oracle Clinical automatically have access to the study in RDC.
In the OCL_STATE local reference codelist, set the DMGR RDC ACCESS short value as follows:
Note: If a user has both superuser status and access to specific studies defined, you must revoke the superuser status before you can revoke his/her access to a specific study.
When you revoke access to a program, you revoke access to all projects within that program.

Granting Data Access to RDC Users
1-14 Oracle Clinical Administrator's Guide
■ When set to YES, a user with no study privileges defined for RDC but with study access defined in Oracle Clinical is automatically given RDC Onsite access to the study as well, in both Test and Production modes. The user has all RDC privileges except APPROVE and VERIFY. UPD_LOCK_OC, an Oracle Clinical-specific privilege, is also excluded. You can restrict such a user's access to RDC Onsite by limiting privileges at the study or site level; see the Oracle Clinical Remote Data Capture Onsite Administrator's Guide for further information.
■ When set to NO, a user granted access to a study in Oracle Clinical does not automatically have access to that study in RDC Onsite. You can use the Study Security form to assign specific privileges to the user; see the Oracle Clinical Remote Data Capture Onsite Administrator's Guide for further information.
Users with the Super User? flag selected in the Oracle Accounts form in Oracle Clinical have access to all studies in both Oracle Clinical and RDC, and in both Test and Production modes.
Configuring Study and Site Security PrivilegesYou can give RDC users specific privileges for particular studies and sites in the Study and Site Security windows, which are included in both Oracle Clinical and in the RDC Onsite Administrator's Tool; see "Configuring Study and Site Security for Discrepancy Management" on page 3-27.
Changing the Default Access to DCIsRDC Onsite includes a predefined set of user roles. By default, these roles have UNRESTRICTED access to all DCIs. You can change the default access for any role to RESTRICTED.
■ Users assigned to a role with UNRESTRICTED access to DCIs can access any DCI in RDC Onsite unless access has been denied to a particular DCI in a particular study through the DCI Access window in the Oracle Clinical Definition menu; see Oracle Clinical Creating a Study for study-level information.
■ Users assigned to a role with RESTRICTED access to DCIs cannot access any DCIs in RDC Onsite unless access has been granted to a particular DCI in a particular study.
You may want to create custom database roles specifically for the purpose of restricting access to certain DCIs to smaller groups of people (see "Creating Custom Database Roles" on page 2-6 for more information and an example). If you do, you must add the new role in the Maintain DCI Access by Role window and specify a default access of RESTRICTED or UNRESTRICTED for it.
Before you can change the default DCI access for a user, the user role must exist (must be valid). You cannot change the default DCI access if the user role does not exist.
To define the DCI access for a user role:
Caution: If you create a new user role but do not specify a default value for DCI access, users assigned to that role cannot log in to RDC Onsite. You must define the default access to DCIs for every user role you plan to assign.
If you assign a user to more than one role, and those roles have conflicting DCI access, the user cannot log it to RDC Onsite.

Granting Additional Database Roles to User Accounts
Setting Up User Accounts 1-15
1. Open Oracle Clinical.
2. Navigate to Admin and then select Users and Roles.
3. Select Default DCI Access by Role.
Alternatively, you can select one of the following menu options depending upon your administrator privileges and current task:
■ Select Test Default DCI Access if you want to try out DCI access before implementing the feature in a live study.
■ Select Query Default DCI Access by Role if you only want to view the current settings but make no changes.
4. Enter a valid user role in the User Role field. You can:
■ Type the name of a valid user role into the field.
■ Click the List of Values button, and then select a user role from the list. The list includes all the user roles currently defined in the USER GROUP ROLES installation reference codelist.
5. Enter the default DCI access for the selected user role. Valid entries are:
■ UNRESTRICTED — Allows study/site access to all DCIs unless otherwise restricted in the DCI Access form for the study.
■ RESTRICTED — Does not allow access to any DCIs unless you specify exceptions in the DCI Access form for the study.
You can type a valid entry directly into the field. Alternatively, you can click the List of Values button, and then select from the list.
6. Continue to enter each user role and the type of DCI access allowed.
7. Save your changes.
For each record in the Maintain Default DCI Access by Role form, Oracle Clinical creates and maintain an audit trail.
Upon initial entry to the form, Oracle Clinical populates the form with all the user roles defined in the USER GROUP ROLES reference codelist. For each user role, the Default DCI Access field is set to UNRESTRICTED. You must add any new user roles that you create.
Granting Additional Database Roles to User AccountsThis section contains the following topics:
■ Additional Database Roles for RDC Users on page 1-16
■ Additional Database Roles for RDC Users on page 1-16
The Add User script grants the minimum database roles required for a user to access Oracle Clinical and, if you specify that RDC access is required, RDC.
■ Oracle Clinical default database roles: CONNECT, RESOURCE, RXCLIN_READ, RXC_ANY, AND OCL_ACCESS
■ RDC default database roles: RXC_RDC and RDC_ACCESS
Users require additional database roles to do meaningful work in either Oracle Clinical or RDC. If you want a user to have read-only access, grant them RXC_ANY only.
To grant one or more database roles to a user:

Setting Up Data Extract Users
1-16 Oracle Clinical Administrator's Guide
1. Log in to SQL*Plus as SYSTEM.
2. Grant a role to a user:
grant database_role to user_name
For example: grant rxc_site to BSMITH
Additional Database Roles for RDC UsersYou must explicitly grant every RDC Onsite user at least one database role. You can use the predefined database roles listed in Table 1–3, selecting the role that matches the user's job function, or define additional database roles if you need to further fine-tune security privileges; see "Creating and Modifying Database Roles" on page 2-3.
These database roles are mapped to user roles in the USER_GROUP_ROLES installation reference codelist. Those user roles are used to define security privileges and to customize various aspects of the user interface. See Chapter 3, "Configuring Discrepancy Management" for further information.
Additional Database Roles for Oracle Clinical UsersThe database roles assigned to a user determine which tasks a user can perform by controlling which menu paths the user can see in the user interface—for example, Study Design, Data Entry, or Administration—and within those areas, finer distinctions such as whether the user can make changes or only view existing data. Oracle Clinical includes many predefined database roles for this purpose. You can also define your own database roles; see Chapter 2, "Oracle Clinical Menu-Based Security" for more information.
The roles in Table 1–3 apply to the Oracle Clinical discrepancy management system as well as to RDC. Give one of the above roles to each user who has one of the corresponding job functions and who will be working with discrepancies in Oracle Clinical's Maintain Discrepancy Database window.
Setting Up Data Extract UsersOracle Clinical users who need to generate Data Extract views and write macros require additional setup:
■ Creating an Operating System Account on the SAS Server on page 1-17
■ Adding User to the OCLSASCR User Group on page 1-17
■ Creating a Queries Table for a Data Extract User on page 1-18
Table 1–3 Default Database Roles Defined for RDC Users
Database Role Typical User Profile
RXC_DMGR Data manager
RXC_SUPER Data manager
RXC_CRA Clinical Research Associate (CRA)
RXC_SITE Site user, study coordinator, or other person at the remote site responsible for entering patient data
RXC_INV Investigator at the remote site who can approve CRFs

Setting Up Power Users
Setting Up User Accounts 1-17
Creating an Operating System Account on the SAS ServerUser who need to generate SAS Data Extract view need an operating system account on the SAS server. If they do not already have one, create one; see instructions in "Creating an Operating System Account" on page 1-3.
Adding User to the OCLSASCR User Group Add the user to the OCLSASCR user group to give the user access to the RXC_USER directories that hold the SAS Data Extract Views. The OCLSASCR user group is created as part of the Oracle Clinical installation and has all the privileges required to use SAS. See the Oracle Clinical Installation Guide for instructions on creating the OCLSASCR group.
UNIX To add the user to the OCLSASCR user group in UNIX:
■ Use the usermod command, or
■ Edit the /etc/group and /etc/logingroup files, if these files are not linked; if these files are linked, it is only necessary to modify the /etc/group file.
Windows You can add the user to the OCLSASCR user group in Windows by:
1. From the Start menu, navigate to Administrative Tools, then Computer Management, then Local Users and Groups, then Groups.
2. Right-click oclsascr and select Add to Group.
3. Click Add. The Select Users window opens.
4. Enter the the username and click OK.
Creating a Queries Table for a Data Extract UserOracle provides a script, crusrq.sql, that creates a table called USER_QUERIES in an individual user's schema. The table provides a location to save the SQL code the user creates using data extract functions. Run the script for each user who will write data extract functions.
To create this table:
1. Change directories to the RXC_INSTALL directory.
2. Run this command:
sqlplus @crusrq
Alternatively, you can modify the Add User script to create the USER_QUERIES table automatically by adding these lines:
connect &&ops_id/&&pwd@rxc_install:crusrq.sql
Setting Up Power UsersMost end users do not require additions to a login script for Oracle Clinical purposes. Only power users who want to run opa_setup from the command line (to condition their environment to point to a particular database, or a code environment, or both), must add commands to a login script on that machine to configure their environments.
A power user might use opa_setup to set environment variables for such tasks as:

Setting Up Passwords
1-18 Oracle Clinical Administrator's Guide
■ Running client applications other than Oracle Clinical (such as SQL*Plus, SAS, or a reporting program) against an Oracle Clinical database
■ Installing patches to Oracle Clinical server code or databases
■ Running Oracle Clinical administrative SQL scripts
For users who will perform these tasks, commands must be added to the login scripts that:
■ Define RXC_LOG
■ Add SAS
■ Add source (on C shell).
UNIX
Bourne/Korn shell Edit the user's .profile file. In the following example, SAS_home is the directory where the SAS executable is located.
# Include OPA directoriesPATH=$PATH:/opa_home/bin:/sas_home; export PATH# Define RXC_LOG for command line utilitiesRXC_LOG=$HOME/log; export RXC_LOG
C shell Edit the user's .cshrc file. For example:
# Include OPA directories set path=( $path /opa_home/bin /sas_home ) # Define RXC_LOG for command line utilities setenv RXC_LOG $HOME/log # Create alias for opa_setup source /opa_home/bin/copa_setup_alias
WindowsNo changes to a login script are required. To run opa_setup, ensure that opapps_home/bin is in the PATH environment variable.
Setting Up PasswordsChanging passwords depends on whether they are for a schema, a role, or for a user.
This section contains the following topics:
■ Changing the Password for a Schema or Role on page 1-19
■ Changing the Password for a User on page 1-20
■ Enforcing Password Security on page 1-21
■ Auditing Passwords on page 1-21
■ Operating System Passwords on page 1-21
Note: Passwords cannot contain these characters: { | } @ ;

Setting Up Passwords
Setting Up User Accounts 1-19
Changing the Password for a Schema or Role Table 1–4 describes the Oracle Clinical database objects that are protected by password.
Encrypted versions of the passwords associated with these objects are stored in the following locations:
■ An Oracle dictionary table
■ An Oracle Clinical passwords table
If you want to change any of these passwords, you must change the encrypted value in both locations.
To change the passwords in both places at once with the SET_PWD utility:
1. Log on to the database server using an account that is set up to run Oracle Clinical back end jobs.
2. Set environment variables for the database and code environment. For example, for database test and code environment 462:
a. UNIX: opa_setup test 462
b. Windows:
set p1=testset p2=462opa_setup
3. Enter a command in the following format:
set_pwd rxc/rxc_password db_object_name db_object_password
where rxc_password is the password for the rxc account, db_object_name is the name of the database object from Table 1–4, " Password-Protected Database Objects", and db_object_password is the new password for that object. For example:
set_pwd rxc/password rxclin_mod r2d2c3po
Changing the Password for a UserUsers can change their own database passwords either in SQL*Plus or with the Oracle Clinical menu by choosing Admin, then Users, and then Database Password.
Table 1–4 Password-Protected Database Objects
Name Type Description
RXC_MAA Schema Required for Data Extract.
RXC_PD Schema Required for Procedure generation.
RXC_REP Schema Required for replication.
RXC_DISC_REP Schema Required for disconnected replication.
RXCLIN_MOD Role Enables Oracle Clinical users to write to the database. This role is set for users when they log in through the application.
RXC_SERVLETSP Schema Used for accessing study data from Data Entry window in Production mode.
RXC_SERVLETST Schema Used for accessing study data from Data Entry window in Test mode.

Setting Up Passwords
1-20 Oracle Clinical Administrator's Guide
In the Oracle Database Password window:
1. Type your password in Enter Password text box.
2. Type it again in the Confirm Password text box.
3. Click OK.
Administrators can change the password for an Oracle Clinical user in SQL*Plus as usual:
1. In SQL*Plus, connect to the database as the SYSTEM user.
2. Reset the password for the user:
alter user user identified by user_password;
Enforcing Password SecurityOracle enables a database administrator to enforce various rules about passwords at the database level, including setting a password lifetime, after which users must set a new password; disallowing reuse of previous passwords; locking an account after a user attempts to logon a specified number of times; and creating complexity rules for passwords through a PL/SQL function.
All rules that you set at the database level apply when a user connects through Oracle Clinical. If the password has expired, a dialog box that prompts the user for a new password automatically appears. For further details, see your Oracle Administrator's Guide.
Auditing PasswordsOracle recommends that you turn on the auditing system for roles. For information on the AUDIT command, see the Oracle SQL Reference manual.
To track failed attempts to create, alter, drop, or set a role, issue the following statement:
audit role by access whenever not successful
Operating System PasswordsA system-level account must exist on the database server computer for Oracle Clinical users to run PSUB jobs. On UNIX, you can choose whether to allow users to store their UNIX account passwords in the Oracle Clinical database in an encrypted format. On Windows, users must store their passwords to be able to run any PSUB job.
You use the Operating System Password window to change whether your system password is stored in Oracle Clinical. This window is accessible either:
■ By selecting Admin, then Users, and OS Password, or
■ By selecting the Server OS Password button in the Submission Details window.
The Operating System Password window consists of an Enter password text box and a check box entitled, Save encrypted password in the database?
The behavior of the check box depends on your operating system and is described in the following subsections:
■ UNIX Passwords on page 1-21
■ Windows Passwords on page 1-22

Creating Profiles for Users
Setting Up User Accounts 1-21
UNIX PasswordsOn UNIX servers, you control the Save encrypted password in the database? check box with the Short Value of the USR_SAVE_OSPASS entry in the OCL_STATE Local Codelist. The default value of USR_SAVE_OS_PASS is "N" (No). In this case, the check box the system displays in the Operating System Password window is clear and not updateable. If you change the value of USR_SAVE_OS_PASS to "Y" (Yes), the check box is still clear, but it is updateable, which allows the user to select it.
Windows PasswordsOn Windows servers, a stored password is required for any PSUB server-side job. When end users see the Server OS Password dialog box, the Save encrypted password in the database? check box is selected and cannot be updated. The first time a user runs a PSUB job, the system prompts for a password if it has not already been stored in the database.
Creating Profiles for UsersYou can establish a password management policy and then build that policy into the database so that all Oracle Clincal passwords are set according to your policy. Oracle Database uses profiles to enforce password policy. A profile is a named set of resource limits and password parameters that restrict database usage and instance resources for a user. By default, every Oracle Clinical or RDC user is assigned the DEFAULT profile, which has no limitations on resources or password use.
You can assign a separate profile to each user or user role by which passwords are validated. Each user can have only one profile, and creating a new one supersedes any earlier one.
Using the CREATE PROFILE CommandYou use the CREATE PROFILE command to define a profile and configure the available parameters that correlate to your password policy.
Example 1–1 shows the SQL statements that create the OCL_USER_PROF profile and define the following password policies:
■ Password life time — Sets the number of days the same password can be used for authentication to 60 days.
■ Password grace time — Sets the time between expiration and lockout to 10 days.
■ Password reuse time and password reuse max — Indicates that the user can never reuse a password.
■ Failed login attempts — Allows 3 failed login attempts before locking the account.
■ Password lock time — Locks the account for 2 days if there are 3 failed login attempts.
Note: If the PSUB server belongs to a Windows domain, users' local accounts on that server must match the passwords of their domain accounts. In this way, the correct authentication is passed to the server and access is allowed to the domain resources. Otherwise, users' PSUB jobs do not print.

Creating Profiles for Users
1-22 Oracle Clinical Administrator's Guide
Example 1–1 Sample Profile for Password Management
CREATE PROFILE OCL_USER_PROF LIMITPASSWORD_LIFE_TIME 60PASSWORD_GRACE_TIME 10PASSWORD_REUSE_TIME 1200PASSWORD_REUSE_MAX UNLIMITEDFAILED_LOGIN_ATTEMPTS 3PASSWORD_LOCK_TIME 2
Assigning the Profile to a UserOnce you create a profile, you can assign the profile to a specific Oracle Clinical user. For example:
alter user ops$jjsmith profile ocl_user_prof
You can easily set up profiles for different levels of users and assign them to the appropriate users based on their roles.
Getting More InformationFor more information about how to use password management and protection, see the following document available on Oracle Technology Network:
Oracle® Database Security Guide11g Release 2 (11.2)Part Number E16543-04
Note: Enforcing password management for DEFAULT profile is not recommended by Oracle Clinical.

2
Oracle Clinical Menu-Based Security 2-1
2Oracle Clinical Menu-Based Security
This section includes the following topics:
■ Creating and Modifying Database Roles on page 2-3
■ Adding Menu Items to Oracle Clinical on page 2-8
You control which users have access to which menu items in the Oracle Clinical Navigator (see Figure 2–1) by assigning database roles to users.
Oracle Clinical includes a set of predefined database roles that allow access to a predefined set of Oracle Clinical menu items, including second- and third-level menu items (see Figure 2–2). You can enforce security by assigning users only the database roles they need to do their work, preventing them from seeing other parts of the system and taking actions they are not authorized to take.
If necessary, you can modify the menu items associated with the predefined database roles or create entirely new database roles.
Figure 2–1 Oracle Clinical Navigator with Top-Level Menu Items Displayed
Although each company distributes Oracle Clinical tasks differently among its personnel, following is a guideline for which users need which menu items:
■ Administrators need some or all of the Admin menu.
■ Study designers need some of the Admin menu and the Plan, Design, and Definition menus. They may also need Glib (Global Library), or you may have people who use only the Global Library.

Predefined Database Roles
2-2 Oracle Clinical Administrator's Guide
■ Data Managers need the Conduct, Data Entry, and Labs menus. They may also need some or all of the Definition menu.
■ Data entry operators need the Data Entry menu.
■ Programmers who write validation and derivation Procedures and data extract macros need parts of the Definition menu.
For information about the tasks in each menu, see the following Oracle Clinical user documentation:
■ The Oracle Clinical Administrator's Guide has information on the Admin menu.
■ Oracle Clinical Creating a Study has information on the Plan, Design, Global Library, Definition, and Labs menus.
■ Oracle Clinical Conducting a Study has information on the Conduct, Data Entry, and Labs menus.
In many cases, there are two menu items for the same form associated with different database roles. In this way you control user's privileges through menu access. Menu items based on the same form may differ as follows:
■ Query and Read-Write Versions: One menu item allows read-only privileges and the other allows write privileges as well. If a user has access only to the Query version of the form, he or she cannot view the data there but cannot make any changes.
■ Provisional and Active Definitions. Definitional objects can have a status of Provisional or Active. Some menu items allow the user read and write access only to Provisional objects, while a different version of the same form allows access to Active objects, which may be currently in production use, as well.
■ Test and Production Patient Data. One menu items allows read and write access to test data and the other allows read and write access to production data.
Figure 2–2 Oracle Clinical Navigator with the Definition DCIs Menu Displayed
Predefined Database RolesTo see a complete list of the predefined database roles and the menu items to which they allow access, run the Menu Roles report in the Developer's Toolkit.

Creating and Modifying Database Roles
Oracle Clinical Menu-Based Security 2-3
To run the Menu Roles report, navigate to DTK, then Menu Roles. To see the Developer's Toolkit (DTK menu item) you must have the DTK_ADMIN database role. See "Granting Additional Database Roles to User Accounts" on page 1-16.
If you create custom roles for your Oracle Clinical database and set up menu security for these roles, you can run the Menu Roles report to confirm that you have set up these roles correctly. The Menu Roles report describes, for both default and custom roles, the menu items to which each role gives a user access. This report applies to the current database only.
Creating and Modifying Database RolesTo modify menu security, you must access the Developer's Toolkit (DTK) menu in the Oracle Pharmaceutical Applications Navigator window. Entries on the DTK menu are accessible only to those database accounts granted the DTK_ADMIN role. The DBA should grant this role to those accounts with the responsibility for maintaining Oracle Clinical roles. This section assumes that your account has the DTK_ADMIN role.
This section includes the following topics:
■ Viewing Menu-Role Associations on page 2-3
■ Modifying Menu-Role Associations on page 2-6
■ Creating Custom Database Roles on page 2-6
■ Associating Roles with Menus on page 2-8
■ Adding a Custom Role to OPA_MENU_ROLES on page 2-8
■ Granting a Custom Role Access to a Custom Module on page 2-8
Viewing Menu-Role AssociationsThis section includes the following topics:
■ Organization of the Menu Module Tree on page 2-3
■ Navigating the Menu Modules on page 2-5
To view the activities covered by a particular database role, from the Navigator, expand Developer's Toolkit and select Maintain Menu Modules. In the form, press the Query by Role button for a list of values. Choosing a role causes a display of all activities associated with that role. A complete list of database roles and their relation to menu items can be generated by running the Menu Roles report from the Developer's Toolkit.
Organization of the Menu Module TreeThis section describes the internal structure of the Navigator's menus, and the roles and role associations provided by Oracle Clinical.
Internal Menu Module Structure All activities accessible through the Navigator are organized in a tree, with the root "OPA". Descending from OPA, a node exists for each installed application. For your installation, there will, at a minimum, be nodes for OCL
Note: If the Menu Roles report does not show a custom role you have defined, you may not have defined a record for that role in the OPA_MENU_ROLES codelist. See "Adding a Custom Role to OPA_MENU_ROLES" on page 2-8.

Creating and Modifying Database Roles
2-4 Oracle Clinical Administrator's Guide
(for Oracle Clinical activities), OPA (for menus and activities generic to all products of Oracle Health Sciences, formerly known as Oracle Pharmaceutical Applications), and DTK (for the Developer's Toolkit). In turn, each of node is the parent of other menu nodes, and ultimately of leaf nodes, which correspond to executable modules.
Figure 2–3 Maintain Menu Modules Window
Many executable modules can perform more than one task, so to completely define an activity, there is also a task name and a query-only flag. For instance, the same form module, RXCRCMAI, performs both query and maintenance of local, installation, and system reference codelists. Consequently, there are six leaf nodes for this module — one for each combination.
The concatenation of nodes, starting at OPA, ending at the leaf node, and including the task and the query mode, is the internal analog of the Navigator menu path to the activity. For instance, the menu path OC, then Data Entry, and Initial Log-In, plus Entry corresponds to the series of nodes OPA:OCL:OCL_DATA_ENTRY:RXCDEMLI, plus the task name INITIAL LOG-IN AND FIRST-PASS ENTRY, and a clear ("no") query-only flag.
Role Association Structure The access an application user has to each node in the menu-module tree is determined by the database role. Each node of the menu tree has associated with it one or more database roles that are allowed access to that node. A user that is not associated with the appropriate role cannot view its corresponding menu or module. The following examples illustrate how the role associated with a user account affects the access the user is given to different menus:
■ To view the OCL application menu, a user's Oracle account must be granted the OCL_ACCESS role. This is typically an automatic grant when an Oracle Clinical account is created, along with CONNECT, RESOURCE, RXCLIN_READ, RXCLIN_MOD, and RXC_ANY.
■ When Oracle-defined menu-role associations have not been modified, to see the Data Entry menu option of OCL your account must have one of these roles: RXC_DE; RXC_DE2; RXC_DMGR; RXC_SUPER; or RXC_SUPER_NOGL.
■ The Initial Log-In and Entry activity requires the same roles, according to the module-role association created in the database by Oracle. Therefore, to run Initial Log-In and Data Entry, your account needs at least two roles: OCL_ACCESS, and one of: RXC_DE, RXC_DE2, RXC_DMGR, RXC_SUPER, RXC_SUPER_NOGL.

Creating and Modifying Database Roles
Oracle Clinical Menu-Based Security 2-5
Figure 2–4 Menu Entries for Module Window
Navigating the Menu ModulesTo view or modify the roles permitted access to the Oracle Clinical menus and activities, navigate to DTK, then Maintain Menu Modules. A Maintain Menu Modules window opens, as shown in Figure 2–4, "Menu Entries for Module Window", with one entry per top-level menu node in the OPA Navigator menu. The record with a blue mark to its left has focus. Change focus by clicking once anywhere on the record of the node you want to examine.
To drill down into the menu nodes from the currently selected node, click Menu Entries, or double-click anywhere in the node's record. Doing this from

Creating and Modifying Database Roles
2-6 Oracle Clinical Administrator's Guide
Figure 2–5 Security for Task Dialog Box
The Maintain Menu Modules window brings up a new window, as in Figure 2–4, with a title bar naming the parent node, and with records describing the child nodes of that parent. You can continue to drill down within this window until you reach a leaf. If the record that has focus is a module, you have reached a leaf of the tree and the Menu entries button is disabled, as in Figure 2–5.
Modifying Menu-Role AssociationsAt any node of the menu-module tree, you can see or modify the database roles associated with the node by pressing the Roles button. This button brings up a Security for task dialog box where the roles enabling access to this node are listed and can be modified. Figure 2–5, "Security for Task Dialog Box" illustrates this process for Initial Log-In and Entry.
You can also query the nodes accessible via a role through the Query by Role button, available in the Maintain Menu Modules and Menu Entries for module windows. If you click on this button, you are prompted for a role (an list of values is available). When you enter a role, all menu-module tree nodes accessible via that role are displayed. The Query Top Menus button returns you to a list of the application menu nodes (Figure 2–5).
Creating Custom Database RolesThis section describes how to create a new database role. This may be required if the database roles that are supplied as part of installation do not fit or cannot be modified to fit your business model.

Creating and Modifying Database Roles
Oracle Clinical Menu-Based Security 2-7
After you create a new database role, grant it access to menu items (see "Modifying Menu-Role Associations" on page 2-6) and add it to a reference codelist (see "Adding a Custom Role to OPA_MENU_ROLES" on page 2-8).
Menu and module access role names must start with the three-letter designator of the application to which they will apply. Table 2–1 list the valid prefixes for the available applications.
Examples of valid role names are OCL_CRA, RXCBROWSER, and DTK_HELP. The Oracle Clinical Remote Data Capture module has no special prefix; its role names are preceded by RXC.
To create a new database role, you must create the role in the database and explicitly grant all the database privileges required for users with the role to do the tasks you intend, including privileges on the related Oracle Clinical tables.
Log in to SQL*Plus as SYSTEM and enter the following:
create role role_name;grant privilege on table to role_name;
For information on Oracle Clinical tables, see the Oracle Clinical Stable Interface Technical Reference Manual.
Creating Custom Roles for Restricting DCI AccessYou may want to create additional database roles to use in restricting access to DCIs. There is only one predefined role for investigators: RXC_INV. If you want to hide one investigator's observations from another's you need more than one investigator role, for example Neurologist (RXC_NEUR, for example) and Oncologist (RXC_ONC, for example). You can create these two roles, create CRFs that are specific to each of those types of observations, and allow one investigator role access to the DCI corresponding to one CRF and the other investigator role access to the other.
Note the following additional tasks required:
■ Define default DCI Access for the role; see "Changing the Default Access to DCIs" on page 1-14. You must do this before any users assigned the role try to log in to RDC.
■ Assign the roles to users; see "Granting Additional Database Roles to User Accounts" on page 1-16. Be careful not to assign roles with conflicting DCI access to the same user.
Associating Roles with Menus Once a new database role has been created and is accessible, select the Maintain Menu Modules option of the DTK menu to identify those menus and activities to which the role gives a user access.
Table 2–1 Prefixes for Role Name, by Application
Prefix Application
DTK Developer's Toolkit
OCL or RXC Oracle Clinical
OPA Oracle Pharmaceutical Applications
TMS Thesaurus Management System

Adding Menu Items to Oracle Clinical
2-8 Oracle Clinical Administrator's Guide
Navigate to each node in the menu-module tree (see "Modifying Menu-Role Associations" on page 2-6) to which this role should give access, then click the Roles button. This brings up a dialog box where the roles that enable access to the node are listed. Add the new role to the list.
Adding a Custom Role to OPA_MENU_ROLESCustom roles do not appear in the Menu Roles report until you add them to the OPA_MENU_ROLES installation reference codelist.
To add a custom role to this codelist:
1. Choose DTK, then Maintain all Codelists.
2. Query for the OPA_MENU_ROLES codelist.
3. Insert a new record, and define the short value and long value of the codelist. The long value must match the full name of the new database role exactly, and the short name must be three characters or fewer, and unique in that database. The system uses the short name of the role when it generates the Menu Roles report.
Granting a Custom Role Access to a Custom ModuleUse these instructions if you are assigning a custom role to a custom module; see "Adding Menu Items to Oracle Clinical" on page 2-8. This procedure allows you to grant the role access to the module as well as to the individual menu items.
1. Open the appropriate menu module file in Oracle Developer 10g Forms Builder.
2. Connect to the database as RXC.
3. In the Object Navigator, highlight the RXCUSER module (not the menu).
4. In the Menu Security property, add the new role. Use the same name as in the database.
5. Assign your new role to the appropriate menu items as described elsewhere in this section.
6. Save, compile, and distribute the resulting .mmx file.
Adding Menu Items to Oracle ClinicalYou can add your own menu items (Developer modules) to the Users and Roles menu, thus extending the functionality of Oracle Clinical. Since you control the Users and Roles menu, you can preserve changes to it across releases of Oracle Clinical. See the Oracle Clinical Installation Guide for instructions.
Replace the files rxcuser.mmb and rxcuser.fmb with your own menu and form, which will be what is brought up by choosing Admin, and then Users and Roles.
Note: If you want to assign a new role to a standard Oracle Clinical module, see "Modifying Menu-Role Associations" on page 2-6.

3
Configuring Discrepancy Management 3-1
3Configuring Discrepancy Management
Both Oracle Clinical and the Remote Data Capture (RDC) option use the discrepancy system, which is described in Oracle Clinical Conducting a Study. This section describes the tasks for configuring the discrepancy management system:
■ Mapping Database Roles to User Roles on page 3-1 (Oracle Clinical and RDC)
■ Customizing Layout Definitions on page 3-4 (Oracle Clinical only)
■ Customizing Profiles on page 3-5 (Oracle Clinical only)
■ Customizing Flexfields on page 3-9 (Oracle Clinical only)
■ Defining Reason Codes for Discrepancies on page 3-11
■ Defining the Possible Review Statuses for Discrepancies on page 3-14
■ Defining Resolution Reasons for Discrepancies on page 3-17
■ Setting Values in the OCL_STATE Local Reference Codelist on page 3-18
■ Configuring Role-Specific Discrepancy Management for RDC on page 3-18 (RDC only)
■ Configuring Study and Site Security for Discrepancy Management on page 3-27 (Oracle Clinical and RDC)
■ Setting Up Data Clarification Forms (DCFs) on page 3-30 (Oracle Clinical only)
■ Creating Reusable Standard Text for Discrepancies and DCFs on page 3-35 (Oracle Clinical and RDC)
See the Oracle Clinical Remote Data Capture Onsite Administrator's Guide for information on setting up Study/Site discrepancy management privileges.
Mapping Database Roles to User RolesThis section applies to all RDC users and to Oracle Clinical users who need to work with discrepancies in Oracle Clinical's Maintain Discrepancy Database window.
User roles are important because:
■ RDC uses them to define access privileges; see the Oracle Clinical Remote Data Capture Onsite Administrator's Guide for more information.
■ You can customize RDC discrepancy management, news, and activities for different user roles; see the Oracle Clinical Remote Data Capture Onsite Administrator's Guide for more information.
■ You can customize the layout of the Maintain Discrepancy Database window for different roles; see "Customizing Layout Definitions" on page 3-4.

Mapping Database Roles to User Roles
3-2 Oracle Clinical Administrator's Guide
■ You can customize profiles for different roles; see"Customizing Profiles" on page 3-5.
For these customizations and access privileges to be available to a user, the user must have a database role that is mapped to the relevant user role in the User Group Roles installation reference codelist.
There are five default user roles. You can create additional roles if necessary, and map them in the User Group Roles reference codelist to make them available for customizing features in RDC and Oracle Clinical discrepancy management; see "Creating Custom Database Roles" on page 2-6.
Table 3–1 shows the default mapping of database roles to user group roles. The Long Value is not used.
Specifying User Roles for the Oracle Clinical Discrepancy DatabaseIn the USER GROUPS installation reference codelist, you specify which of the roles mapped to database roles in the USER GROUP ROLES reference codelist will be available for use in customizing aspects of the discrepancy management system in Oracle Clinical, including profiles and layouts for use in the Maintain Discrepancy Database window.
The position of a database role in the codelist is important if users have more than one database role. In the case of a user with more than one role, the system uses the database role closest to the top (seq=1) in the codelist as the default; for example, as the default profile when the user opens the Maintain Discrepancy Database window.
The long value is not used.
Table 3–1 Default Values for the USER GROUP ROLES Codelist
Database Role (Short Value)
User Group Name (Long Value) Description
RXC_DMGR DM Data management role
RXC_SUPER DM Data management role
RXC_CRA CRA CRA role
RXC_SITE SITE Site user
RXC_BIOS BIOSTAT Biostatistics role
RXC_QC QUALITY CONTROL Quality control role
RXC_INV INV Investigator
Note: The USER GROUPS reference codelist is used in Oracle Clinical discrepancy management only. It contains a subset of the User Group Roles in the USER GROUP ROLES reference codelist and determines which of them are available for use in Oracle Clinical discrepancy management; see Chapter 3, "Configuring Discrepancy Management."
Table 3–2 Default Values for the USER GROUPS Codelist
SeqShort Value (Database Role)
Long Value (User Group Name) Description
1 DM — Data managers

Mapping Database Roles to User Roles
Configuring Discrepancy Management 3-3
Assigning Function Privileges and LayoutsYou control user group discrepancy function privileges and layout definitions in the User Group Admin window. From the Admin menu, select Discrepancy Mgmt, then select User Group Administration.
The window displays a list of existing user group names and their mapped database roles. Select a user group name to view its defined function privileges and layouts.
Assigning and Removing Function PrivilegesIn the Function Privileges display, you can add or remove privileges for the selected user group. If a group lacks a particular privilege, the system prevents members of that group from performing the function. (The system reference codelist DISCREPANCY FUNCTIONS controls the list of values; you cannot modify it.)
To add a privilege:
1. Click in an empty row. An ellipsis (…) appears.
2. Click the ellipsis. The list of values appears.
3. Select a privilege and click OK. The system adds the privilege.
To remove a privilege, select it and then select Delete Record from the Data menu.
The following table describes the function privileges.
2 CRA — Clinical research associates
3 BIOSTAT — Biostatistics group
4 QUALITY CONTROL — Quality control department
Note: User groups is a misleading term here. This codelist is used only in discrepancy management (including data clarification forms). The term used for groups of users who have access to the same studies, programs, or projects is group user account.
Table 3–3 Function Privileges for Discrepancy Management
Name Privilege Granted and Method of Use
UPD DATA ENTRY
Enables the Update Patient Data Special menu item in the Discrepancy Database window, and allows updates while in the Data Entry subsystem.
BRWS DATA ENTRY
Enables the Browse Patient Data Special menu item in the Discrepancy Database window for read-only access to patient data.
MANUAL Enables the Add Manual button in the Maintain Discrepancy Database window, which allows users to create manual discrepancies and manual header discrepancies.
DCF PRINT DRAFT
Displays the Draft option in the DCF Print Options window; enables the user to print a draft version of a Data Clarification Form (DCF) report.
DCF PRINT COPY
Enables the Copy option in the DCF Print Options window; enables the user to print a copy of a DCF.
Table 3–2 (Cont.) Default Values for the USER GROUPS Codelist
SeqShort Value (Database Role)
Long Value (User Group Name) Description

Customizing Layout Definitions
3-4 Oracle Clinical Administrator's Guide
Assigning Custom LayoutsIf you define one or more custom layouts for the Discrepancy Database window (see "Customizing Layout Definitions" on page 3-4, assign it to a user group to allow the user group to use it. Users can select the layout they want to use from the User Group Layouts item in the Special menu of the Discrepancy Database window.
To assign a layout to a user group:
1. Click in an empty row. An ellipsis (…) appears.
2. Click the ellipsis. The list of values appears.
3. Select a layout and click OK. The system adds the layout.
To remove a layout, select it and then select Delete Record from the Data menu.
Customizing Layout Definitions This section applies to Oracle Clinical only; not RDC.
Oracle Clinical provides the Layout Definitions utility for creating different representations of the Maintain Discrepancy Database window for different user groups. You can then assign layouts to different user groups. A user group can have more than one layout, and a layout can be used by multiple user groups.
A layout definition specifies which discrepancy details appear in the Master, or upper section, of the Maintain Discrepancy Database window in multi-record view, and which appear in the Detail, or lower section. The layout also determines the display location of each discrepancy detail, relative to the others in the same section of the window.
The Master section of the Maintain Discrepancy Database window in multi-record view is displayed above all the discrepancies. The system populates the fields in the upper section with values from the discrepancy that is highlighted in the lower section. All the fields in the Master section are visible without scrolling.
Of the discrepancy details that remain in the lower section of the window, put those that are most useful at the top of the list, so that they are displayed farthest left in the window. They, too, will be visible without scrolling.
To open the Layout Definitions window, from the Admin menu, select Discrepancy Mgmt Admin, then select Layout Definitions. You can also open this form directly from the User Group Admin form by clicking the Layout Definitions button. Users can create their own temporary layout directly in the multi-record view of the Maintain Discrepancy Database window; see "Changing Discrepancy Display Layout and Filtering the Data Displayed" in Oracle Clinical Conducting a Study.
To view the definition of an existing layout, select its name in the top section, labeled "Layout."
DCF PRINT FINISH
Enables the Final option in the DCF Print Options window; enables the user to print a final version of a DCF report.
DCF REPRINT Enables the Reprint option in the DCF Print Options window; enables the user to reprint a final version of a DCF report.
CREATE DCF Enables the Create DCF option in the group selection menu in the Maintain Discrepancy Database form.
Table 3–3 (Cont.) Function Privileges for Discrepancy Management
Name Privilege Granted and Method of Use

Customizing Profiles
Configuring Discrepancy Management 3-5
To create a new layout:
1. Enter a name for the new Layout in the top section, labeled "Layout." If no line is available, select Data, then select Insert Record.
2. One by one, select the fields you want to move into the other section and move them, using the sideways arrows:
■ Use the Left arrow to move the selected field into the Master, or upper, section of the window in multi-record view.
The system allows only eight fields in the Master section, specifically: Patient, Visit, Subevent Number, DCM Name, Review Status, DCF ID, CRF Page, and Investigator. To maximize the number of fields visible without scrolling, put all eight fields into the Master section.
■ Use the Right arrow to move the selected field from the Master section into the Detail, or lower, section of the window.
3. Use the Up and Down arrows to adjust the display order of the items. The topmost item in either the Master or Details list appears farthest left in the appropriate section of the Maintain Discrepancy Database window. The second item from the top appears second to the left, and so on.
In the Details section, the display order determines which fields are visible without scrolling. The number of fields that are visible without scrolling depends on the size of the fields you select.
4. Click OK to save your changes or click Back to return without saving your changes.
Users have access to the same utility for customizing the layout of the Maintain Discrepancy Database form. For a more comprehensive description of this utility, see "Using the Maintain Discrepancy Database Window" in Oracle Clinical Conducting a Study.
Customizing ProfilesCustomizing profiles applies to Oracle Clinical only; not RDC.
To open the Maintain Discrepancy Database form, a user must have a user role with a defined profile. Profiles control access to discrepancy records and fields, review status codes, data entry, layout definitions, and printing and tracking Data Clarification Forms (DCFs).
You can create master profiles for different user roles; individual users can modify their profile when they open the Maintain Discrepancy Database form.
This section includes the following topics:
■ Toggling Between View Modes in the Profile Administration Window
■ Specifying Default Profile Criteria
■ Locking Profile Criteria
■ Adding SQL Statements
■ Filtering Profile Views by Review Status
■ Updating Status Codes
■ Filtering Profile Views by Discrepancy Field

Customizing Profiles
3-6 Oracle Clinical Administrator's Guide
For information about user roles, see "Mapping Database Roles to User Roles" on page 3-1.
Toggling Between View Modes in the Profile Administration WindowTo open the Profile Administration window:
1. Navigate to Admin, Discrepancy Mgmt Admin, and then select Profile Administration.
The Profile Administration window has two viewing modes: multi-view and single-view. The window opens in multi-view mode by default.
In multi-view mode, you can view all the profiles currently defined. In single-view mode, you view one profile at a time. In either mode, you can create new profiles and specify the criteria for each profile.
2. Click the View Mode button in the upper right corner of the form to toggle between multi-view and single-view mode.
Specifying Default Profile Criteria You can refine a profile group's view by specifying default profile criteria values in the Profile Administration form. Many of the fields have lists of values. If you do not specify a particular criterion, the system allows a user with that profile to query all possible values. If you do not lock a profile criterion (see the following section), users can override the Master profile's default settings.
Locking Profile CriteriaProfile users can customize their profiles, and thereby modify their views of the discrepancy database. You control the extent to which they can modify a profile by locking or unlocking each criterion. The locks are boxes that, in single-view mode reside between each criterion name and its field, and in multi-view mode reside to the right of each criterion's field. (See Figure 3–1 and Figure 3–2 for examples of each view mode, with diagonal arrows indicating the box positions.) The lock prevents users from modifying the default profile settings. If you do not lock a profile criterion, a profile user can override the profile's default setting.
In multi-view mode, for criteria like Accessible Data Only? where toggle boxes control viewing, the Lock box is to the right of the criteria names. (See Figure 3–1 on page 3-7.)
In single-view mode, for criteria like Accessible Data Only? where toggle boxes control viewing, the Lock box is to the left of each criterion's toggle box. (See Figure 3–2.)
Example 3–1 Profile Administration Form in Multi-View Mode
Figure 3–1 shows a region of the Profile Administration form in multi-view mode. (Many of the intervening criteria fields have been scrolled out of view to include the Accessible Data Only? column in the illustration.) The diagonal arrows point to the Lock box columns for the Creation Ts To column's Lock box, near the top-center of the capture, and the Accessible Data Only? Lock box on the right. The table following Figure 3–1 on page 3-7 describes how the settings in Figure 3–1 control profile criteria viewing for the four listed profiles.

Customizing Profiles
Configuring Discrepancy Management 3-7
Figure 3–1 Sample Multi-View Region of the Profile Administration Form
Example 3–2 Profile Administration Form in Multi-View Mode
Figure 3–2 shows a portion of the single-view Profile Administration window. The arrows point to the Lock boxes for, from left to right, the (Creation Ts) To criterion, the Last Modified By criterion, and the Accessible Data Only? criterion.
Figure 3–2 Sample Single-View Region of the Profile Administration Window
In single-view mode, for criteria like Accessible Data Only? where toggle boxes control viewing, the Lock box is to the left of the toggle box.
Adding SQL StatementsIn addition to defining access to discrepancy details in the Profile Criteria fields, you can further limit data access by entering SQL statements in the SQL Text section. To prevent users from bypassing the SQL statements, check the locking box for each entry. (In single-view mode, the locking box is to the right of the SQL Text label. In
Table 3–4 Legend for Figure 3–1
Profile NameCreation Ts To Access Criterion Access
Accessible Data Only? Criterion Access
BIOSTAT Master Profile Only records dated before 12-NOV-2003 appear by default, but users can change this date because it is not locked.
Because the left box is not selected, both data types appear by default. But users can limit their view to accessible data because the criterion is not locked (the Lock box to its right is not selected).
CRA Master Profile Only records dated before 12-NOV-2003 appear, and users cannot change this date because it is locked.
Because the left box is not selected, only accessible data appears by default. But users can include inaccessible data in their view because the criterion is not locked.
DM Master Profile All data appears, regardless of creation date, because the creation date is not specified. But because the criterion is not locked, users can filter by creation date if they choose.
Both data types appear by default, and because this setting is locked, users cannot change it.
QUALITY CONTROL Master Profile
All data appears, regardless of creation date, because the creation date is not specified. Because the criterion is locked, users cannot filter their view by creation date.
Only accessible data appears by default, and because this setting is locked, users cannot change it.

Customizing Profiles
3-8 Oracle Clinical Administrator's Guide
multi-view mode, the locking box is to the left of the SQL Text column's fields.) Your SQL statements have a size limit of 2000 characters.
Filtering Profile Views by Review StatusYou can limit a profile's view of discrepancy records according to the records' current review status classifications. Select a profile in the Profile Administration form, then click the Review Status button to open the Discrepancy Review Status Codes dialog box. (To define the codes you see in this box, see "Defining the Possible Review Statuses for Discrepancies" on page 3-14.) The dialog box contains rows with three columns: the Selected? box column, the Status Name column and the Locked? box column.
Each Selected? box controls a profile's default access to records that have that review status classification code. Select a code's Selected? box to include discrepancy records; deselect it to prevent viewing records with its code.
Users can override each of these settings in their personal profiles unless you lock them. If you lock a review status code, profile users cannot override the profile's default setting.
Table 3–5 describes the outcome for the four possible combinations of Selected? and Locked? boxes.
Updating Status Codes If the values in the DISCREPANCY REV STATUS CODE reference codelist change, you can update all profiles with the new values by clicking the Add Review Status button. (To edit the codelist, see "Defining the Possible Review Statuses for Discrepancies" on page 3-14.)
Filtering Profile Views by Discrepancy Field You can control a profile's access to discrepancy review status types and individual discrepancy fields by setting its privileges. By default, a new profile has no update privileges; you must add review status codes, and then discrepancy field values to each master profile. To open the Privileges for DM Master Profile window, from the Admin menu, select Discrepancy Mgmt Admin, and then select Profile Administration. Select a master profile, then click the Privileges button.
Adding Update Privileges by Review Status CodeIn the Update Discrepancy records… Review Status column, add the discrepancy record review status types that you want to be accessible by users of the currently selected profile. You can select from an list of values. (To define the review status codes that appear in this dialog box, see "Defining the Possible Review Statuses for Discrepancies" on page 3-14.)
Table 3–5 Selecting and Locking Review Status Profile Criteria
Selected? Locked? Result
Unchecked Unchecked Not viewed by default, but profile user can reveal it.
Checked Unchecked Viewed by default, but the profile user can hide it.
Unchecked Checked Not viewed by default, and profile user cannot reveal it.
Checked Checked Viewed by default, and profile user cannot hide it.

Customizing Flexfields
Configuring Discrepancy Management 3-9
Setting Update Privileges by Discrepancy Field In the Update Discrepancy Fields panel there are two columns: Field Name and Privilege. Add the field names for fields that users of this profile can update. You can select them from an list of values. In each corresponding Privilege field, add the type of privilege. If you do not add a field name, users of the profile cannot update the data in the Maintain Discrepancy Database form. You can select from lists of values for both fields. Table 3–6 shows the corresponding field names for each field status value. (The Update Discrepancy Fields section contains the list of fields the profile has access to change if the current discrepancy record's review status is on the Update Discrepancy Records list. The only allowable value for the Privilege field is Update.)
Setting Review Status Updating PrivilegesThe Can Change Review Status To section contains the allowable values for the review status if it can be updated. The Own Manual Only flag identifies allowable values for the Review Status field for manual discrepancy records owned by the same group as the current user. For example, you could specify that users of the CRA profile could only close discrepancies that they manually created.
Customizing FlexfieldsThe Maintain Discrepancy Database window includes two editable fields that have the default labels Flexfield1 and Flexfield2. You can use them to store information you need. You can change their labels, make the fields mandatory if you want, and create a dynamic or static list of values for each field:
■ Static List of Values. By default, the fields get their list of values from a database view that references the local reference codelists DISC_FLEX1_VALUES and
Note: Adding an update code does not make its discrepancy fields accessible. You must also specify each field. See the following section.
Table 3–6 Field Status Values
Field Status Value Field in the Maintain Discrepancy Database Form or Description
REVIEW STATUS Review Status
RESOLUTION STAT Resolution Status
COMMENT TEXT Comment Text
INT COMMENTS Internal Comments
RESOLUTION TEXT Resolution Text
ASSOCIATED ID Associate a discrepancy for passive review field
CRF PAGE NUMBER CRF Page Number
FLEXFIELD1 User-definable field (See "Customizing Flexfields" on page 3-9.)
FLEXFIELD2 User-definable field (See "Customizing Flexfields" on page 3-9.)
Note: If users can choose an IRRESOLVABLE status, they must also have access to the Resolution Status; whenever the status is Irresolvable, the Resolution Status is required. Otherwise users cannot enter a value for lack of privileges.

Customizing Flexfields
3-10 Oracle Clinical Administrator's Guide
DISC_FLEX2_VALUES. You can populate these reference codelists to create lists of values for the two fields.
■ Dynamic List of Values. Alternatively, you can reprogram the view to reference another Oracle Clinical table or even an Oracle table outside Oracle Clinical, such as an adverse event code maintained in a different Oracle system. In each field you can display any column value or concatenation of column values.
The views, DISCREP_FLEX1 and DISCREP_FLEX2, respectively, are created during installation as follows:
create or replace view discrep_flex1 asselect ref_codelist_value_short_val VALUE, long_value DESCRIPTIONfrom reference_codelist_valueswhere ref_codelist_name = 'DISC_FLEX1_VALUES'and active_flag='Y';
DISC_FLEX1 and DISC_FLEX2Use these local reference codelists to customize the label for Flexfield1 or Flexfield2, to enable the field, to make the field mandatory or not, and to specify whether or not there is a list of values for the field.
DISC_FLEX1_VALUES and DISC_FLEX2_VALUESIf you set LOV_VALIDATE to Y in DISC_FLEX1, you can create a static list of values by entering each allowed value in a row in this codelist. When a user displays the list of values in the Discrepancy Database window, the system displays the short value and description for each row you enter here. (Alternatively, create a dynamic list of values; see "Customizing Flexfields" on page 3-9.)
The long value is used as the description in the Flexfield1 (or 2) field's list of values. The short value is stored in the FLEX_FIELD1 (or 2) column in the DISCREPANCY_ENTRIES table in the database. The default value has no effect.
Table 3–7 DISC_FLEX1 and DISC_FLEX2 Settings
Short Value Long Values Description
ENABLED Y or N Set the long value to Y to allow users to enter values in the field. Set to N to prevent users from entering values in the field.
REQUIRED Y or N Set the long value to Y to require users to enter text in this field. Set to N to make the field optional.
PROMPT text Enter freeform text as the long value. This text becomes the field label in the Discrepancy Database window.
LOV_VALIDATE Y or N Set the long value to Y to require the system checks the entry against an list of values. An invalid entry triggers the system to display the associated list of values.
Table 3–8 DISC_FLEX1_VALUES and DISC_FLEX2_VALUES Codelists
Field Name Description
Seq Determines the order of the values in the list of values for the flexfield.
Short Value Is the stored value when the user selects the row from the list of values.

Defining Reason Codes for Discrepancies
Configuring Discrepancy Management 3-11
ExampleTo customize Flexfield1 to ask the creator of a manual discrepancy record if the record is finished, and test the response entry against a list of three values, you would set the flexfield1 codelist values to the values in the following two tables, with the three values defined in the second. (Values that differ from the default values are in italics.)
Defining Reason Codes for DiscrepanciesThis section includes the following topics:
■ Reason Codes and Descriptions for Manual Discrepancies
■ Reason Codes and Descriptions for Univariate Discrepancies
■ Reason Codes and Descriptions for Multivariate Discrepancies
You define reason codes to separate discrepancies into categories. Reasons provide an explanation of why the discrepancy exists.They are called Reasons in RDC and Category in Oracle Clinical.
Reason Codes and Descriptions for Manual DiscrepanciesWhen a user creates an Operator Comment (a manual field or section discrepancy in RDC Onsite), the system prompts the user to select a reason code from a list of reasons that is populated by the MANUAL SOURCE TYPE CODE reference codelist in Oracle Clinical. The user can also enter an additional explanation for the discrepancy.
You can add and remove values in the reference codelist (see Figure 3–3):
Long Value Can duplicate the short value; is not displayed in the list of values.
Active box Select the Active check box to have the entry appear in the list of values.
Default Identifies which value is the default value.
Description Provides additional information about the value; the information displays in the list of values.
Table 3–9 DISC_FLEX1 Settings to Make a Finished? Prompt
Seq Short Value Long Value Active Default Description
1 ENABLED Y Selected Flexfield1 Displayed
2 REQUIRED N Selected Flexfield1 Required
3 PROMPT Finished? Selected Flexfield1 Prompt
4 LOV_VALIDATE Y Selected Flexfield1 list of values Validate
Table 3–10 DISC_FLEX1_VALUES Settings for a Finished? List of Values
Seq Short Value Long Value Active Default Description
1 Y Yes Selected
2 N No Selected
3 U Undetermined Selected Selected
Table 3–8 (Cont.) DISC_FLEX1_VALUES and DISC_FLEX2_VALUES Codelists
Field Name Description

Defining Reason Codes for Discrepancies
3-12 Oracle Clinical Administrator's Guide
■ For each reason you add, enter a value in the Short Value field and the Description field.
■ Set one reason to Default. The first time the user creates a manual discrepancy during a login session, the system inserts the default reason. The user can select a different reason. For subsequent manual discrepancies, RDC Onsite displays the last entered reason. The user can always select a different reason.
Oracle Clinical stores the short value in the database.
Figure 3–3 Defining Reasons for a Manual Discrepancy
Reason Codes and Descriptions for Univariate DiscrepanciesThe system creates a univariate discrepancy when the data entered does not match the requirements defined in the underlying question, such as data type or length. You cannot change these underlying causes, but you can change the reason text or define more than one reason associated with a single underlying cause, from which the user can choose.
Table 3–11 Values for MANUAL SOURCE TYPE CODE Reference Codelist
Seq Short Value Long Value Description
1 STUDY ASSUMP Study assumption
2 CRA COMMENT CRA Correction, Investigator consulted
3 CDA COMMENT CRA Correction, Source Data consulted
4 DE COMMENT Data Entry Comment
5 SOURCE DATA REV
Source Data Review

Defining Reason Codes for Discrepancies
Configuring Discrepancy Management 3-13
The system automatically populates the reason code and description when it raises the discrepancy.
To define reason codes and descriptions for univariate discrepancies:
1. Open Oracle Clinical.
2. Select Admin, Discrepancy Mgmt Admin, and then select Standard Text Maintenance. See Figure 3–4.
You use the fields in the Standard Text Maintenance form to define descriptions for each type of univariate discrepancy as follows:
■ Text Type — Select COMMENT to specify descriptions for univariate discrepancies.
■ Sub Type — Select from the list of valid univariate discrepancy types. RDC Onsite uses the text in the Sub Type field to populate the Reason field when a discrepancy of that type is raised.
■ Standard Text Name — Ordinarily, you specify a name to match the Sub Type. However, if you want to specify more than one description for a discrepancy type, use this field to specify a unique identifier.
■ Default — If you choose to create a selection of multiple descriptions for a certain discrepancy type, select which description is the default value. RDC Onsite uses the default value the first time a discrepancy of that type is raised. The user can always select one of the alternative descriptions provided.
■ Standard Text — Specify the description that you want RDC Onsite to display for the discrepancy type raised. Note that you can use variables to include the data value of the discrepant response as well as the definitional components of the question; for example:
Value of \VALUE_TEXT\ for \SAS_LABEL\ is not a valid \DATA_TYPE\.
where VALUE_TEXT is the data response entered, SAS_LABEL is the SAS label defined for the Question, and DATA_TYPE is the data type defined for the Question.

Defining the Possible Review Statuses for Discrepancies
3-14 Oracle Clinical Administrator's Guide
Figure 3–4 Defining Descriptions for Univariate Discrepancies
Reason Codes and Descriptions for Multivariate DiscrepanciesOracle Clinical raises multivariate discrepancies when user-defined validation procedures detect invalid or inconsistent data. You specify the reason for multivariate discrepancies in the procedure definition; see Oracle Clinical Creating a Study for details. Oracle Clinical displays the reason; RDC Onsite does not.
Defining the Possible Review Statuses for DiscrepanciesWhen a user takes action on a discrepancy, the discrepancy goes to a new review status. For system-generated discrepancies (univariate and multivariate), the system assigns the default review status. For manual discrepancies, the user selects the review status.
Both the Oracle Clinical and RDC discrepancy management systems use the DISCREPANCY REV STATUS CODE installation reference codelist to define all the discrepancy statuses possible to use in your discrepancy management workflow.
RDC Onsite uses the text string in the Description field to display the status of a discrepancy in any discrepancy management-related window, form, page, or report. Oracle Clinical uses the text string in the Short Value field to display the status of a discrepancy.
You can edit the review status codes available and sequence the order in which they appear in lists of values. If you add a status, you must do the following as well:
■ In Oracle Clinical, update all profiles with the new status by clicking the Add Review Status button; see "Customizing Profiles" on page 3-5.

Defining the Possible Review Statuses for Discrepancies
Configuring Discrepancy Management 3-15
■ In RDC, add the new status' short value to each DISCREPANCY STATUS ROLE codelist. In addition, if you want users of a particular role to be able to route discrepancies to the status, add the status to the relevant DISCREPANCY ACTIONS ROLE codelist. See "Configuring Discrepancy Display by User Role" on page 3-18 and"Configuring the Actions Allowed on Discrepancies" on page 3-24.
Default Entries for the DISCREPANCY REV STATUS CODE CodelistTable 3–12 lists the entries in the DISCREPANCY REV STATUS CODE codelist following the initial installation of Oracle Clinical.
There are additional statuses that are not included in the reference codelist:
OBSOLETE: When the data is no longer discrepant—either because the data is updated or because the validation procedure or question attribute that flagged the data as discrepant is changed in such a way that the data is no longer discrepant—the system automatically updates the system status to OBSOLETE.
CLOSED: The system sets a discrepancy's status to Closed when it is resolved by either updating the data to a nondiscrepant value or changing the validation procedure or question attribute in such a way that the existing data is no longer discrepant. The discrepancy's system status changes to Obsolete and the discrepancy is removed from its DCF (if any) and no longer appears as current in discrepancy reports.
PASSIVE REVIEW is a status that allows you to reduce the number of
discrepancy queries and the number of discrepancies on a DCF by associating one or more discrepancies with a primary discrepancy. You can then include all the discrepancies in a single query. When you create the DCF, do not include discrepancies marked as Passive Review in the printed DCF.
Table 3–12 Default Entries for the DISCREPANCY REV STATUS CODE Codelist
Short Value Long Value Description
CRA REVIEW Null Under CRA Review
INV REVIEW Null Under Investigator Review
RESOLVED IRRESOLVABLE Not assigned to any person or process. Setting a discrepancy's status to RESOLVED does not cause the system to close the discrepancy. That happens only when the data is no longer discrepant, either because the data has been updated to a nondiscrepant value or because the validation procedure or question attribute that flagged the value as discrepant has been changed in such a way that the existing value is no longer considered discrepant.
IRRESOLVABLE IRRESOLVABLE Irresolvable (That is, closed. Cannot be resolved.)
TMS EVALUATION
TMS EVALUATION
TMS Evaluation
UNREVIEWED Null Not yet reviewed
TMS IN PROGRESS
TMS IN PROGRESS
TMS in Progress - Set/Reset by system
DM REVIEW Null Under DM Review
INT DM REV Null Internal - Under DM Review
INT CRA REV Null Internal - Under CRA Review

Defining Resolution Reasons for Discrepancies
3-16 Oracle Clinical Administrator's Guide
For example, if you have a page with three lab results and all three lab results are missing, you would have three discrepancies such as:
■ AST lab units missing, please provide.
■ ALT lab units missing, please provide.
■ RBC lab units missing, please provide.
You could send three queries, but to save time, money, and paper you could choose to send only one query such as: Page 7 all lab units are missing, please provide.
To do this, mark the second two discrepancies for passive review associated with the first discrepancy as the primary discrepancy. Then create a DCF, include all three discrepancies in the DCF, but mark the primary discrepancy's status as For Distribution and the other discrepancies' status as Not For Distribution. When you print the DCF, only the primary discrepancy appears, but all three are included in the electronic DCF. When the answer to the query returns, you can update the data for all three discrepancies.
Rules for the DISCREPANCY REV STATUS CODE CodelistWhen entering and modifying values in the DISCREPANCY REV STATUS CODE reference codelist, you must follow these rules:
■ The codelist must contain at least one short value entry with a long value of IRRESOLVABLE, which indicates that a user must specify a resolution reason when setting a discrepancy to this status. By default, the codelist contains the short values RESOLVED and IRRESOLVABLE, which are each assigned the long value IRRESOLVABLE.
■ The codelist must contain a short value entry of UNREVIEWED. The Active check box corresponding to the value must always be selected. The UNREVIEWED value is the system-coded default status of any newly created discrepancy, except multivariate discrepancies, whose initial review status is defined in the Details block of the Oracle Clinical validation procedure that generates the discrepancy.
■ The Description field must be entered for each short value. In RDC, the system uses this value to display the status of discrepancies in any discrepancy management-related windows, forms, tasks tabs, or reports. In Oracle Clinical, the system uses the short value to describe the status of a discrepancy.
■ The Active check box must be selected for each review status that you want to allow for a certain user role. In other words, if you set an entry in a DISCREPANCY STATUS role codelist to active, then you must also set the corresponding entry in the DISCREPANCY REV STATUS CODE codelist to active.
Conversely, if you set an entry in the DISCREPANCY REV STATUS CODE codelist to inactive, you must also set the corresponding entry in each DISCREPANCY STATUS role codelist to inactive. If not, users receive an error message that problems exist with the discrepancy management system.
Defining Resolution Reasons for Discrepancies Users can manually resolve discrepancies. When doing so, the user must also provide an explanation — a reason — for resolving the discrepancy. The user must select a resolution reason from the list that you define in the DISCREPANCY RESOLU TYPE CODE installation reference codelist.

Setting Values in the OCL_STATE Local Reference Codelist
Configuring Discrepancy Management 3-17
Enter values in the Description field and the Short Value field. The system displays the text string that you specify in the Description field to display the list of resolution reasons to the user. The corresponding short value is stored in the database.
Table 3–13 lists the default entries in the DISCREPANCY RESOLU TYPE CODE codelist.
If you add a value, select a long value from the following:
■ NULL: No value entered.
■ CONFIRMED
■ IRRESOLVABLE: Used for values which correspond to manually closed discepancies. This makes the RESOLUTIONTYPE CODE and COMMENT available when user selects an IRRESOLVABLE status.
■ NOT DISCREPANT. Used for manual discrepancies only; indicates that the discrepancy was raised for a comment, not because there was a problem with the data.
Setting Values in the OCL_STATE Local Reference Codelist The OCL_STATE local reference codelist includes several parameters that control discrepancy database and DCF functions, as well as many other parameters. The following table describes the discrepancy management parameters.
Note: Oracle reserves the CND BLK DELETED value as the resolution for a manual discrepancy associated with a conditional block that was deleted. The value is hard-coded. Do not add this value to the DISCREPANCY RESOLU TYPE CODE codelist.
Table 3–13 Values for the DISCREPANCY RESOLU TYPE CODE
Short Value Long Value Description
CRA VERIFY CONFIRMED CRA Correction
CRA VERIFY-INV CONFIRMED CRA Correction, Investigator consulted
CRA VERIFY-SRC CONFIRMED CRA Correction, Source Data consulted
INV VERIFY CONFIRMED Investigator Correction
STUDY ASSUMP CONFIRMED Study Assumption
NO ACTION REQD CONFIRMED No Action Required
ELIMINATED IRRESOLVABLE Data value changed. Disc no longer applicable.
OVERRULED NON DISCREPANT Disc not considered a validation error.
DATA MODIFIED IRRESOLVABLE Data value changed. Disc no longer applicable.
INV-NO INFO IRRESOLVEABLE Investigator queried. No further information available.

Configuring Role-Specific Discrepancy Management for RDC
3-18 Oracle Clinical Administrator's Guide
Configuring Role-Specific Discrepancy Management for RDC This section includes the following topics:
■ Configuring Discrepancy Display by User Role on page 3-18
■ Configuring the Actions Allowed on Discrepancies on page 3-24
■ Preventing Update to OTHER Discrepancies on page 3-26
■ Adding Reference Codelists for Custom Roles on page 3-27
You use the reference codelists in Oracle Clinical to define your discrepancy management system for both Oracle Clinical and RDC Onsite.
To configure most settings for your discrepancy management system, you use the installation reference codelists in Oracle Clinical.
To access the installation reference codelists:
1. Open Oracle Clinical.
2. Select Admin, Reference Codelists, and then select Installation Codelists.
See Chapter 7, "Reference Codelists" for general information on setting reference codelist values.
Configuring Discrepancy Display by User RoleThis section includes the following topics, which apply only to RDC:
■ How RDC Indicates Discrepancies in the User Interface on page 3-20
■ Rules for the DISCREPANCY STATUS role Codelists on page 3-20
■ Comparison of the Default Values for the DISCREPANCY STATUS role Codelists on page 3-21
■ DISCREPANCY STATUS CRA on page 3-22
■ DISCREPANCY STATUS DM on page 3-22
■ DISCREPANCY STATUS INV on page 3-23
■ DISCREPANCY STATUS SITE on page 3-23
RDC uses the DISCREPANCY STATUS role installation reference codelists to determine how discrepancies with a particular status are displayed for users with a particular role. There is a different reference codelist for each default user role: CRA,
Table 3–14 Settings in the OCL_STATE Codelist for Discrepancy Database Functions
Short Value (Parameter Name) Long Value (Settings) Description
DISC_DCM_PROMPT
DEFAULT_PROMPT or QUESTION_NAME or SAS_LABEL
The single-record mode of the Maintain Discrepancy Database form's Characteristics panel has a button that toggles the three long value settings. Choose the value to display by default.
DCF_TEXT_SYNC Y or N If set to Y, changes to comment and resolution text entries in DCFs automatically propagate to the discrepancy database
DISC_AUTO_HDFT Y or N The system does not use this setting.
DISC_AUTOR_CRFPG
Y or N If set to Y, the system automatically populates the CRF Page Number field of the Maintain Discrepancy Database form.

Configuring Role-Specific Discrepancy Management for RDC
Configuring Discrepancy Management 3-19
DM, INV, and SITE. You can create a DISCREPANCY STATUS reference codelist for additional roles; see "Adding Reference Codelists for Custom Roles" on page 3-27.
Use these codelists to ensure that discrepancies are displayed appropriately for users of different roles. For example, a discrepancy with a review status of Under CRA Review should appear as ACTIVE to a CRA, but as OTHER to an investigator.
Every status defined in the DISCREPANCY REV STATUS CODE codelist must be included in the DISCREPANCY STATUS role codelist for each role, with a long value that determines how the discrepancy is presented (or not) to the user. The possible long values are:
■ ACTIVE: (For open discrepancies) The current user can take action against this discrepancy.
■ OTHER: (For open discrepancies) The discrepancy is assigned to a user with a different role. For RDC Onsite, you can prevent users from taking action on OTHER discrepancies with the reference codelist DISCREPANCY NO OTHER UPDATE; see "Preventing Update to OTHER Discrepancies" on page 3-26.
■ CLOSED: (For closed discrepancies) System-closed discrepancies cannot be re-opened by users with any role. If the discrepancy was manually closed by a user, any user with UPDATE or UPD_DISCREP privilege can re-open the discrepancy.
■ HIDDEN: (For open discrepancies) The current user cannot view or take action against this discrepancy. This functionality is intended only for section-type discrepancies. If a user selects a univariate or multivariate discrepancy, the Action drop-down list excludes any action that would route the discrepancy to a status that is HIDDEN for any role.
There is another technique for hiding any type of discrepancy (section, univariate, multivariate) at a particular status (for example Internal DM Review) from a particular user role (for example SITE). In this example, simply uncheck the Active check box for the status Internal DM Review in the codelist DISCREPANCY STATUS SITE.
Note: These reference codelists do not determine what actions a user can perform on discrepancies or their underlying patient data. The DISCREPANCY ACTIONS role codelists determine what routing and resolution actions each user role can take on a discrepancy.
Note: If you create additional roles for use in discrepancy management you must create a new reference codelist called DISCREPANCY STATUS role for each of them and set it up the same way that these reference codelists are set up.
Note: If you change the long value to HIDDEN for a status that has already been applied to univariate or other types of discrepancies, these existing discrepancies are hidden to users with the relevant role, even though only section discrepancies are intended to allow hiding.
Note: Long values must be in uppercase.

Configuring Role-Specific Discrepancy Management for RDC
3-20 Oracle Clinical Administrator's Guide
How RDC Indicates Discrepancies in the User Interface RDC uses the settings of these codelists to indicate to the current user whether a CRF, patient, or individual response is associated with a discrepancy and if so, whether it is a discrepancy that requires action by the current user. The table below describes the colors that RDC uses for this purpose. RDC uses these colors to highlight the patient icon, the CRF icon, and the individual fields in a CRF that have one or more discrepancies.
Note that:
■ HIDDEN discrepancies are not highlighted in any color because they are not visible to particular user roles.
■ RDC uses green to highlight the fields in a CRF that have a discrepancy that was manually closed by the user. Fields with a system-closed discrepancy are not highlighted.
Rules for the DISCREPANCY STATUS role Codelists When entering and modifying values in a DISCREPANCY STATUS role codelist, you must follow these rules:
■ Each DISCREPANCY STATUS role codelist must include all short values that appear in the DISCREPANCY REV STATUS CODE codelist, and must not contain any values not in that codelist. When you add a short value to one codelist, you must add the same short value to the other codelist. (An exception is the CLOSED status, described below).
■ Each codelist must contain the short value CLOSED, which has a corresponding long value CLOSED. This is the status that is used for any system-resolved discrepancy, that is, a data discrepancy that was resolved as the result of an update to a non-discrepant value.
■ The RESOLVED and IRRESOLVABLE short values must have a long value of CLOSED for all roles.
■ If a review status is CLOSED for one user role it must be either CLOSED or HIDDEN for all other user roles. Note also that for any review status that appears as CLOSED in a DISCREPANCY STATUS role codelist, the DISCREPANCY REV STATUS CODE codelist must represent the review status with a long value of IRRESOLVABLE.
■ Do not change any long value with a default value of CLOSED.
Table 3–15 Colors Used to Indicate Discrepancy Access Status
Color Access Status Implication
Red ACTIVE The CRF contains at least one open discrepancy that requires attention by the user role to which the current user is assigned.
Yellow OTHER The CRF contains only open discrepancies that require the attention of a user role different from the one to which the current user is assigned.
White CLOSED The CRF contains no visible open discrepancies. Three conditions may be true for a white CRF or patient icon:
■ The CRF may contain discrepancies that are hidden from the current user's user role.
■ The CRF may have contained discrepancies at one time, but all discrepancies are closed or obsolete.
■ The CRF never had any discrepancies.

Configuring Role-Specific Discrepancy Management for RDC
Configuring Discrepancy Management 3-21
■ The setting of the Active check box determines whether discrepancies of that status are visible to users with the relevant role. If the Active check box is not selected, users with the role cannot see discrepancies of that status. If the Active check box is selected, users with the role can see discrepancies of that status. The way discrepant values are displayed depends on the long value.
■ If an entry in a DISCREPANCY STATUS role codelist is active, then the corresponding entry in the DISCREPANCY REV STATUS CODE codelist must also be active. If not, the discrepancy configuration is invalid. RDC Onsite will display an error message to alert users to the problem.
■ The Description field is optional for all entries.
■ The setting of the Default check box has no effect. The default status of a new discrepancy is always UNREVIEWED.
Comparison of the Default Values for the DISCREPANCY STATUS role CodelistsTable 3–16 provides a comparison of how each default discrepancy status is displayed by default for each user role.
Note: Both RDC Classic and RDC Onsite use these reference codelist values. RDC Classic does not support the CLOSED display status for any review status except RESOLVED and IRRESOLVABLE.
Note: Either disabling the Active check box or setting the long value to HIDDEN has the effect of hiding discrepancies of the relevant status from users with the relevant role. However, use of the text string 'HIDDEN' only works for hiding section discrepancies. The technique of unchecking the Active check box can be used to hide any type of discrepancy: section, manual field, univariate, or multivariate.
Table 3–16 User Roles and the Default RDC Onsite Discrepancy Access Statuses
Short Value – Oracle Clinical Discrepancy Review Status
Long Value – RDC Onsite Display
CRA DM INV SITE
UNREVIEWED ACTIVE ACTIVE ACTIVE ACTIVE
CRA REVIEW ACTIVE OTHER OTHER OTHER
INV REVIEW OTHER OTHER ACTIVE OTHER
DM REVIEW OTHER ACTIVE OTHER OTHER
TMS EVALUATION OTHER OTHER OTHER OTHER
TMS IN PROGRESS OTHER OTHER OTHER OTHER
RESOLVED CLOSED CLOSED CLOSED CLOSED
IRRESOLVABLE CLOSED CLOSED CLOSED CLOSED
CLOSED CLOSED CLOSED CLOSED CLOSED
INT CRA REV ACTIVE OTHER HIDDEN HIDDEN
INT DM REV OTHER ACTIVE HIDDEN HIDDEN
INT RESOLVED CLOSED N/A CLOSED CLOSED

Configuring Role-Specific Discrepancy Management for RDC
3-22 Oracle Clinical Administrator's Guide
DISCREPANCY STATUS CRAThis codelist contains discrepancy status groupings for the CRA role.
DISCREPANCY STATUS DM This codelist contains discrepancy status groupings for the Data Management role.
DISCREPANCY STATUS INVThis codelist contains discrepancy status groupings for the INVESTIGATOR role.
Table 3–17 Values for the DISCREPANCY STATUS CRA Reference Codelist
Seq Short Value Long Value Active Check Box
1 UNREVIEWED ACTIVE Y
2 CRA REVIEW ACTIVE Y
3 INV REVIEW OTHER Y
4 DM REVIEW OTHER Y
5 TMS EVALUATION OTHER Y
6 TMS IN PROGRESS OTHER Y
7 RESOLVED CLOSED Y
8 IRRESOLVABLE CLOSED Y
9 CLOSED CLOSED Y
10 INT CRA REV ACTIVE Y
11 INT DM REV OTHER Y
Table 3–18 Values for the DISCREPANCY STATUS DM Reference Codelist
Seq Short Value Long Value Active Check Box
1 UNREVIEWED ACTIVE Y
2 CRA REVIEW OTHER Y
3 INV REVIEW OTHER Y
4 DM REVIEW ACTIVE Y
5 TMS EVALUATION OTHER Y
6 TMS IN PROGRESS OTHER Y
7 RESOLVED CLOSED Y
8 IRRESOLVABLE CLOSED Y
9 CLOSED CLOSED Y
10 INT CRA REV OTHER Y
11 INT DM REV ACTIVE Y
Table 3–19 Values for the DISCREPANCY STATUS INV Reference Codelist
Seq Short Value Long Value Active Check Box
1 UNREVIEWED ACTIVE Y
2 CRA REVIEW OTHER Y

Configuring Role-Specific Discrepancy Management for RDC
Configuring Discrepancy Management 3-23
DISCREPANCY STATUS SITEThis codelist contains discrepancy status groupings for the SITE role.
Configuring the Actions Allowed on Discrepancies In RDC Onsite, a user changes the review status of a discrepancy by selecting an option from the list in the Action field. You use the DISCREPANCY ACTIONS role codelists to define the set of routing and resolution actions that each user role can take against discrepancies with a particular status.
Each DISCREPANCY ACTIONS role codelists specifies allowed actions for one of the default user roles:
■ DISCREPANCY ACTIONS CRA
■ DISCREPANCY ACTIONS DM
■ DISCREPANCY ACTIONS INV
3 INV REVIEW ACTIVE Y
4 DM REVIEW OTHER Y
5 TMS EVALUATION OTHER Y
6 TMS IN PROGRESS OTHER Y
7 RESOLVED CLOSED Y
8 IRRESOLVABLE CLOSED Y
9 CLOSED CLOSED Y
11 INT CRA REV HIDDEN Y
12 INT DM REV OTHER Y
11 INT RESOLVED CLOSED N
Table 3–20 Values for the DISCREPANCY STATUS SITE Reference Codelist
Seq Short Value Long Value Active Check Box
1 UNREVIEWED ACTIVE Y
2 CRA REVIEW OTHER Y
3 INV REVIEW OTHER Y
4 DM REVIEW OTHER Y
5 TMS EVALUATION OTHER Y
6 TMS IN PROGRESS OTHER Y
7 RESOLVED CLOSED Y
8 IRRESOLVABLE CLOSED Y
9 CLOSED CLOSED Y
10 INT CRA REV HIDDEN Y
11 INT DM REV HIDDEN Y
12 INT RESOLVED CLOSED N
Table 3–19 (Cont.) Values for the DISCREPANCY STATUS INV Reference Codelist
Seq Short Value Long Value Active Check Box

Configuring Role-Specific Discrepancy Management for RDC
3-24 Oracle Clinical Administrator's Guide
■ DISCREPANCY ACTIONS SITE
Only RDC uses the set of DISCREPANCY ACTIONS role codelists. You can create a DISCREPANCY ACTIONS reference codelist for additional roles; see "Adding Reference Codelists for Custom Roles" on page 3-27.
To enable users of the relevant role to route discrepancies to a particular status:
1. In the Short Value field, enter the name of the discrepancy status—as it appears in the DISCREPANCY REV STATUS CODE codelist—to which you want users of the role specified in the reference codelist name to be able to route discrepancies.
2. In the Long Value field, enter the Actions drop-down item text that should appear for users with the role.
3. Be sure the Active check box is checked.
The Description field is optional.
4. Save your work.
Rules for the DISCREPANCY ACTIONS role Codelists When entering and modifying values in a DISCREPANCY ACTIONS role reference codelist, you must follow these rules:
■ Each DISCREPANCY ACTIONS role codelist must contain a subset of the short values (the statuses) defined in the DISCREPANCY REV STATUS CODE codelist. The long value specifies an action that the user can take against a discrepancy. The corresponding short value, which must match a short value in the DISCREPANCY REV STATUS CODE codelist, identifies the status RDC Onsite assigns to the discrepancy when the user selects the action.
■ CLOSED should not appear as a short value in any DISCREPANCY ACTIONS role codelist.
■ You must specify text in the Long Value field. RDC Onsite displays this text in the Action drop-down list.
Note: RDC disallows routing of all but section discrepancies to a HIDDEN status as follows: at run time, if the user selects a univariate or multivariate discrepancy, the Action drop-down list excludes any action that would route the discrepancy to a status that is HIDDEN (that is, has a long value of HIDDEN in the DISCREPANCY STATUS role codelist) for any role.
However, the same restriction does not apply if you use the alternative method for hiding discrepancies from one or more user roles. That is, simply uncheck the Active check box in the DISCREPANCY STATUS role codelist for the 'blinded' user role.
Note: The codelist must contain one and only one row with 'CLOSED' as a short value.
Note: To remove the item from the Actions drop-down list, uncheck the Active check box.

Configuring Role-Specific Discrepancy Management for RDC
Configuring Discrepancy Management 3-25
DISCREPANCY ACTIONS CRAThis codelist contains discrepancy actions for the CRA role. The initial short and long values are:
DISCREPANCY ACTIONS DMThis codelist contains discrepancy actions for the DATA MANAGER role. The initial short and long values are:
DISCREPANCY ACTIONS INVThis codelist contains discrepancy actions for the INVESTIGATOR role. The initial value is:
■ DM REVIEW — Send to Data Mgt
DISCREPANCY ACTIONS SITEThis codelist contains discrepancy actions for the SITE role. The initial value is:
■ DM REVIEW — Send to Data Mgt
Preventing Update to OTHER DiscrepanciesOnly RDC Onsite uses the DISCREPANCY NO OTHER UPDATE installation codelist.
You can use the DISCREPANCY NO OTHER UPDATE codelist to specify which user roles do not have access to and cannot update discrepancies that appear to them with a status of OTHER; see "Configuring Discrepancy Display by User Role" on page 3-18.
By default, the DISCREPANCY NO OTHER UPDATE codelist has no values. All users can update discrepancies with a status of OTHER. To prevent users from updating OTHER discrepancies, you add one or more user roles to the codelist.
To prevent users with a particular role from updating OTHER discrepancies:
1. Open the DISCREPANCY NO OTHER UPDATE codelist.
Table 3–21 Values for the DISCREPANCY ACTIONS CRA Reference Codelist
Seq Short Value Long Value Description
1 DM REVIEW Null Send to Data Mgt
2 RESOLVED IRRESOLVABLE Closed - Resolved
3 IRRESOLVABLE IRRESOLVABLE Irresolvable
4 INT DM REV Null Internal Data Mgt review
Table 3–22 Values for DISCREPANCY ACTIONS DM Reference Codelist
Seq Short Value Long Value Description
1 INT REVIEW Null Send to site
2 TMS REVIEW Null Send for classification
3 RESOLVED IRRESOLVABLE Closed - Resolved
4 IRRESOLVABLE IRRESOLVABLE Irresolvable
5 INT CRA REV Null Internal CRA review

Configuring Study and Site Security for Discrepancy Management
3-26 Oracle Clinical Administrator's Guide
2. Enter the role name in the Short Value field. The value you enter must be exactly the same as one of the long values in the USER GROUP ROLES reference codelist. For example, CRA, INV, or SITE.
3. Select the Active check box. An active entry indicates the user role cannot update OTHER discrepancies.
4. Save your work.
The Seq, Long Value, Default, and Description fields are not used by RDC Onsite.
You can grant this privilege to any number of roles.
To allow the update of OTHER discrepancies for a role that you added to the DISCREPANCY NO OTHER UPDATE codelist, you can either:
■ Delete the record by using the command on the Data menu.
■ Make the value inactive by clearing its Active check box.
Adding Reference Codelists for Custom RolesOracle Clinical ships with Discrepancy Actions and Discrepancy Status reference codelists for these roles: DM, CRA, INV, and SITE. If you have defined additional roles, you can create additional Discrepancy Actions and Discrepancy Status reference codelists for these roles.
Log in to SQL*Plus as RXC and run a script that includes the following statements to create a new Discrepancy Actions and a new Discrepancy Status reference codelist for your custom role:
exec opa_install.insertrc('DISCREPANCY ACTIONS custom_user_group_role', 'Y','60','15','INSTALLATION','CHAR','Discrepancy actions for custom_user_group_role','','','RXC');
exec opa_install.insertrc('DISCREPANCY STATUS custom_user_group_role', 'Y','6','15','INSTALLATION','CHAR','Discrepancy status groupings for custom_user_group_role','','','RXC');
The new reference codelists then appear in the Oracle Clinical user interface and you can add appropriate values.
Configuring Study and Site Security for Discrepancy ManagementOnce you open either the Maintain Access to Studies form or the Maintain Access to Sites within a Study form, you can use the standard menu commands, toolbar icons, or shortcut keys to:
Caution: The system does not check the validity of your entries. You must be careful to specify only valid user roles. If the values do not match exactly, users with the role will still be able to update OTHER discrepancies.
Note: To create a custom role, create a new database role and map it to a User Group Role; see "Creating and Modifying Database Roles" on page 2-3 and "USER GROUP ROLES Installation Codelist" on page 7-33.

Configuring Study and Site Security for Discrepancy Management
Configuring Discrepancy Management 3-27
■ Query for one or more records. You can use the % sign as a wildcard search character.
■ Add a new record or update existing records.
■ Delete one or more records.
■ Switch to a different study or site.
For the Study field, Site field, and User field, you can type directly into the field. You can also open a list of valid values and select from the list.
To add or modify the privileges for an RDC Onsite user:
1. Open either RDC Administration or Oracle Clinical.
■ In RDC Administration, navigate to Maintain.
■ In Oracle Clinical, navigate to Admin, Users and Roles.
2. Open the correct form:
■ To grant privileges to a user for a particular study, select Study Security.
■ To grant privileges to a user for a particular site, select Site Security.
3. Query for a particular record or query all records and navigate to the record you want to update. Alternatively, press F6 to insert a blank row and add a new record.
4. Click the Privilege column for the user whose privileges you want to update. The dialog box for configuring privileges opens. See Figure 3–5.
5. Select the privileges to assign to the user:
■ To select one privilege, click that privilege.
■ To select several privileges, Ctrl-click each privilege. Ctrl-click also toggles the selection on and off.
■ To select a range, Shift-click the first and last privilege in the range.
6. Click OK to save the privileges for the selected user. Add or modify privileges for other users, as appropriate. Save your changes when finished.
Note: A user granted access to a study can see the study in RDC only if the study has at least one site with an investigator assigned and has at least one patient enrolled. Similarly, a user can see a site only if the site has an investigator and patient enrolled.
Table 3–23 Function Privileges for Discrepancy Management
Name Privilege Granted and Method of Use
UPD DATA ENTRY
Enables the Update Patient Data menu item under the Special menu, and allows updates while in the Data Entry subsystem.
BRWS DATA ENTRY
Enables the Browse Patient Data menu item under the Special menu for read-only access to patient data.
MANUAL Enables the Add Manual button in the Maintain Discrepancy Database window, which allows users to create manual discrepancies and manual header discrepancies.
DCF PRINT DRAFT
Displays the Draft option in the DCF Print Options window; enables the user to print a draft version of a Data Clarification Form (DCF) report.
DCF PRINT COPY
Enables the Copy option in the DCF Print Options window; enables the user to print a copy of a DCF.

Configuring Study and Site Security for Discrepancy Management
3-28 Oracle Clinical Administrator's Guide
Figure 3–5 Assigning Privileges to a User for a Particular Study
Updating a DiscrepancyFor a user with the requisite function profile privilege(s) assigned, the system permits the user to update the discrepancies under the following circumstances:
■ If there are no privileges assigned to any site and to the study, the user has the UPD_DISCREP privilege.
■ If any privilege is assigned to the user at the current site, then the UPDATE or UPD_DISCREP must be assigned to the user at the site level for the user to update a discrepancy.
■ If the user is not assigned any privileges at the current site-level, but is assigned one or more privileges at the study-level or another site within the study, then the user must be assigned the UPDATE or UPD_DISCREP at the study level.
DCF PRINT FINISH
Enables the Final option in the DCF Print Options window; enables the user to print a final version of a DCF report.
DCF REPRINT Enables the Reprint option in the DCF Print Options window; enables the user to reprint a final version of a DCF report.
CREATE DCF Enables the Create DCF option in the group selection menu in the Maintain Discrepancy Database form.
Table 3–23 (Cont.) Function Privileges for Discrepancy Management
Name Privilege Granted and Method of Use

Setting Up Data Clarification Forms (DCFs)
Configuring Discrepancy Management 3-29
Navigating to Data EntryFor a user with the requisite function profile privilege(s) assigned, the system permits that user to navigate to data entry and either browse data or update data under the following circumstances. If the user is not able to either browse or update data, the system does not permit navigation to data entry.
In contrast to other study- and site-level security settings, only the site-level BROWSE and/or UPDATE privileges, in conjunction with the function profile privileges, affect a user's ability to browse or update data.
■ To update data:
– UPDATE is assigned at the site-level and UPD DATA ENTRY is assigned as a function profile privilege
– no privileges are assigned at any site in the study and UPD DATA ENTRY is assigned as a function profile privilege
■ If update data is not permitted, to browse data:
– BROWSE is assigned at the site-level and either UPD DATA ENTRY or the BRWS DATA ENTRY is assigned as a function profile privilege
– UPDATE is assigned at the site-level and BRWS DATA ENTRY is assigned as a function profile privilege
– no privileges are assigned at any site in the study and BRWS DATA ENTRY is assigned as a function profile privilege
Setting Up Data Clarification Forms (DCFs) Oracle Clinical includes a utility for printing and tracking Data Clarification Forms (DCFs) as a way of resolving discrepancies in a clinical trial's response data. Setting up DCFs for your organization requires that you define DCF status codes and lay out the DCF report.
This section includes the following topics:
■ Defining DCF Statuses and their Behavior on page 3-30
■ Laying Out the DCF on page 3-31
Defining DCF Statuses and their BehaviorThere are several Installation Reference Codelists that affect DCF Statuses. You can modify them if you want to for your organization's needs.
DCF STATUS CODES The DCF Status reflects the stage in the review process of the DCF as a whole. Oracle Clinical comes with many review statuses defined in this reference codelist. You can make them inactive if you do not want to use them or create new ones, with the following limitations:
■ You cannot make these statuses inactive: Sent, Received, and Closed.
■ Do not make status Created inactive unless you also make it optional in the DCF OPTIONAL STATUS CODES reference codelist.
■ Do not make statuses Incomplete, Part Received, or Received inactive if you want the system to automatically update the DCF Status when users update the status of individual DCF Pages.

Setting Up Data Clarification Forms (DCFs)
3-30 Oracle Clinical Administrator's Guide
■ If you add a status, you must set its DISPLAY_SN, which determines the order in which the statuses can be set. If you adjust the DISPLAY_SN, you may need to adjust the DCF LOCK CONDITIONS and the DCF OPTIONAL STATUS CODES installation reference codelists, both of which refer to DCF Statuses by their number in the DCF STATUS CODES installation reference codelist.
DCF OPTIONAL STATUS CODES This installation reference codelist refers to the DCF Statuses listed in the DCF STATUS CODES reference codelist. The number in the Short Value column refers to the display number of the status in the DCF STATUS CODES codelist. (Note that the description is incorrect for numbers 7 and 8, which should be Incomplete and Part Received.)
All status codes referenced and active in this codelist are optional. All that are inactive or not entered here are mandatory, meaning that a DCF must be assigned to that status before it can be assigned a subsequent status, as defined in the Seq column. As shipped, only CREATED, SENT and CLOSED are mandatory (no rows exist with short values 2, 6, or 12).
To make a status mandatory if it is included in this reference codelist, uncheck its Active box.
DCF LOCK CONDITIONS This installation reference codelist determines what actions can be taken on discrepancies and DCFs where the DCF has a particular status. The Long Value refers to the number of the status in the DCF STATUS CODES codelist. As shipped, the codelist sets the following behavior, in order:
■ Discrepancies belonging to a DCF whose status is Final (#4) or higher cannot be deleted.
■ Discrepancies belonging to a DCF whose status is Ready (#5) or higher cannot be modified.
■ DCFs whose status is Ready (#5) or higher cannot be deleted (unless the status exceeds or equals a status with a DISPLAY_SN of 1000; see last point).
■ DCFs whose status is Ready (#5) or higher cannot be modified.
■ DCFs whose status is #1000 or higher cannot be closed. Oracle recommends that you do not change DCF_CLOSE.
To stop enforcing any of these rules, set the Long Value to a high value. To change the DCF Status that prevents any of the actions described in the Short Value column, change the number in the Long Value column to the number in the DCF STATUS CODES codelist of the status you prefer.
Laying Out the DCFLaying out the DCF's contents and arranging its fields includes the following tasks:
■ Replacing the DCF Placeholder Graphic on page 3-31
■ Modifying Codelist DCF REPORT LABELS on page 3-32
■ Modifying the DCF Views on page 3-32
■ Defining DCF Headers and Footers on page 3-34
See the "Default DCF Layout Diagram" on page 3-34 for a geographic representation of the DCF's default values and their placements.
OPA views dcf_rpt_master and dcf_rpt_detail control much of the content and the appearance of DCFs. Local codelist DCF REPORT LABELS controls the

Setting Up Data Clarification Forms (DCFs)
Configuring Discrepancy Management 3-31
report's label text. DCFs also include several unchangeable parameters, such as the Revision # and other values that print along the bottom of each DCF page.
Replacing the DCF Placeholder Graphic Oracle Clinical includes a placeholder graphic file located, typically, in your installation's ..\OPArelease_number\oc directory, and named rxcdcf.bmp. You can replace rxcdcf.bmp with your own graphic file, but you must name it rxcdcf.bmp. Oracle recommends that your graphic does not exceed 200 pixels in height.
Modifying Codelist DCF REPORT LABELS The labels for the value fields of the DCF views correspond to their position on the report. The following table describes each of the columns on the report. For field labels, it identifies the codelist member in the DCF REPORT LABELS local codelist and their default table and column values.
Table 3–24 DCF Labels and Field Mappings
Default Field Label from DCF_REPORT_LABELS Default Data Value from DCF_RPT_MASTER and DCF_RPT_DETAIL
Short Value Long Value Table.Column Description
line1_left To: ocl_sites.name Site name's short value
line3_left Date: sysdate Date of this DCF's creation: mm/dd/yyyy
line3_right Reviewer oracle_accounts.firstname (and) .lastname
Reviewer's initials
line2_left Investigator: ocl_investigators.first_name (and) .lastname
Investigator's first and last name.
line1_right Patient #: patient_positions.patient Patient position
line2_right Patient Initials: patient_positions.reported_first_name (and) .reported_last_name
Patient's initials
q_field1 Form Name/Visit Name:
dcms.description Mapped to view value qline1_1
q_field2 Page #: discrepancy_entries.crf_page_number CRF page number
Mapped to view value qline1_2
q_field3 Date: discrepancy_entries.creation_ts Discrepancy time stamp date: mm/dd/yyyy
Mapped to view value qline1_3
q_field4 Questions/Comments:
dcf_discrepancies.comment_text Mapped to view value qline1_4
q_field5 Resolution: dcf_discrepancies.resolution_text Mapped to view value qline1_5
mstr_sort_order1
1 Not a label
line1_right patient_positions.patient Controls the default sort order of view DCF_RPT_MASTER
dtl_sort_order1 q_line1_1 dcm.description Controls the default sort order of view DCF_RPT_DETAIL
rpt_orientation1
Landscape Landscape or Portrait
Controls the default action of the Print button in the DCF form.

Setting Up Data Clarification Forms (DCFs)
3-32 Oracle Clinical Administrator's Guide
Modifying the DCF ViewsTable 3–25 and Table 3–26 describe all of the parameters in the two DCF report views. The view scripts for the DCF are in file rxcviews.sql. You can map other discrepancy values to the DCF parameters, or comment out the parameters to remove them from the DCF output. Note that if you remap parameters, you may have to change their labels (See "Modifying Codelist DCF REPORT LABELS" on page 3-32.)
Table 3–26 describes the values of the DCF_RPT_DETAIL view, and its default data values. In DCF report printouts, the system draws a rectangular border around the output of this view, and may include more than one discrepancy's details.
Caution: Do not change parameter values that have a _DNC suffix.
Table 3–25 View DCF_RPT_MASTER Parameters
Parameter Default Data Value (Table.Column) Comments
dcf_id_dnc data_clarification_forms.dcf_id A system-generated number.
title1 clinical_studies.short_title Prints the study's title.
title2 'Data Clarification Form' Prints the text string Discrepancy Clarification Form.
line1_left ocl_sites.name Site name's short value
line3_left sysdate Date of this DCF's creation: MM/DD/YYYY
line3_right oracle_accounts.firstname and .lastname DCF creator's account name
line2_left ocl_investigators.first_name (and) .lastname Investigator's first and last name.
line1_right patient_positions.patient Patient position
line2_right patient_positions.reported_first_name (and) reported_last_name
Patient's initials
header_text header_text Prints the discrepancy's header text. Define header text in the Standard Text Maintenance form.
footer_text footer_text Prints the discrepancy's footer text. Define footer text in the Standard Text Maintenance form
clinical_study_id_dnc clinical_studies.clinical_study_id
current_status_dnc data_clarification_forms.current_status
site_id_dnc data_clarification_forms.site_id
investigator_id_dnc ocl_investigators.first_name (and) .last_name Investigator's initials
owning_user_dnc data_clarification_forms.owning_user
Table 3–26 View DCF_RPT_DETAIL Parameters
View Parameter Default Data Value (Table.Column) Comments
dcf_id_dnc data_clarification_forms.dcf_id
q_line1_1 dcms.description Value for q_field1 label
q_line1_2 discrepancy_entries.crf_page_number Value for q_field2 label

Setting Up Data Clarification Forms (DCFs)
Configuring Discrepancy Management 3-33
Defining DCF Headers and Footers You can define standard text headers and footers in the Standard Text Maintenance form (see "Creating New Standard Text" on page 3-36). You can define any number of standard headers and footers and designate one header and one footer as the default. When you create a DCF, the system assigns it the default header and footer. You can use the list of values in the Header and Footer fields to choose a different standard header or footer.
You can also modify the standard text of the header or footer by clicking the Text button in the main DCF screen and editing the displayed text.
Default DCF Layout Diagram The following diagram shows the relative position of the labels (in bold font), and the default data values of a default DCF printout. The section between the rxcdcf.bmp graphic and the ruled rectangle contains most of the data defined in the DCF_RPT_MASTER view. The DCF_RPT_DETAIL view populates the contents in the rectangle. A DCF can accommodate the descriptions of more than one discrepancy on each page. The legend for the DCF layout diagram precedes the diagram itself.
q_line1_3 received_dcms.dcm_date Value for q_field3label
q_line1_4 dcf_discrepancies.comment_text Value for q_field4label
q_line1_5 dcf_discrepancies.resolution_text Value for q_field5label
q_line2_1 clinical_planned_events.description
discrepancy_entry_id_dnc
discrepancy_entries.discrepancy_entries
status_dnc dcf_discrepancies.status
disc_type discrepancy_entries.de_sub_type_code
disc_rev discrepancy_entries.discrepancy_rev_status
Default field label>Default field label short value>
To: line1_left
ocl_sites.name <=Default data value for the field
rxcdcf.bmp
status_dncdcf_discrepancies.status
title1clinical_studies.short_title
title2
To: line1_left
ocl_sites.name Patient#: line1_right
patient_positions.patien
Investigator: line2_left
ocl_investigators.first_name (and) .lastname
Patient Initials: line2_right
patient_positions.reported_first_name (and) .reported_last_name
Table 3–26 (Cont.) View DCF_RPT_DETAIL Parameters
View Parameter Default Data Value (Table.Column) Comments

Creating Reusable Standard Text for Discrepancies and DCFs
3-34 Oracle Clinical Administrator's Guide
Creating Reusable Standard Text for Discrepancies and DCFsThis section includes the topics:
■ Creating New Standard Text on page 3-36
■ Inserting Replacement Parameters on page 3-37
■ Customizing Default Standard Text Entries on page 3-37
The standard text utility allows you to create uniform, reusable text for discrepancy comments and error messages and for DCF headers and footers. Using standard text saves time and promotes consistency. There are four types of standard text, used as follows by the system:
Date: line3_left
sysdate Reviewer: line3_right
oracle_accounts.firstname
(and) .lastname
header_text
Form Name/Visit Nameq_field1
Page #q_field2
Questions/Commentsq_field4
Resolutionq_field5
Dateq_field3
dcf_id_dncdata_clarification_forms.dcf_id
q_line1_2discrepancy_entries.crf_page_number
q_line1_4dcf_discrepancies.comment_text
q_line1_5dcf_discrepancies.resolution_text
q_line1_1dcms.description
q_line1_3received_dcms.dcm_date
Closed: status_dncdcf_discrepancies.status
Disc ID: discrepancy_entry_id_dncdiscrepancy_entries.discrepancy_entries
Type: disc_typediscrepancy_entries.de_sub_type_code
footer_text
Page x of x DCF ID: discrepancy_entry_id_dnc
discrepancy_entries.discrepancy_entries
Revision #: (0 for DRAFT and FINAL, and incremented for each reprint by the system)
status_dncdcf_discrepancies.status
title1clinical_studies.short_title

Creating Reusable Standard Text for Discrepancies and DCFs
Configuring Discrepancy Management 3-35
■ Comment. Displayed as an error message during Data Entry and Data Entry Update for univariate discrepant responses; also displayed in the Comment field in the Maintain Discrepancy Database window for univariate discrepancies. Oracle Clinical ships with a set of default univariate error messages, one for each type of univariate discrepancy. You can edit the existing default and/or create alternatives to be available for use in Data Entry, Data Entry Update, and discrepancy management; see "Customizing Default Standard Text Entries" on page 3-37.
Comment-type standard text is also available by pressing F9 in the Comment field of the Maintain Discrepancy Database window. Comment text is displayed in the Create DCF window List of Values to help the user choose which discrepancy to include in a DCF when creating a DCF by discrepancy number.
■ Internal Comment. In the Maintain Discrepancy Database window, users can enter an original comment in free form text or, by pressing F9 in the Inter Com field, choose from the internal comments you define here.
■ Resolution. In the Maintain Discrepancy Database window, users can enter an original comment in free form text when they resolve a discrepancy or, by pressing F9 in the Res Com field, choose from the resolution comments you define here.
■ Header and Footer Text on DCFs. The header and footer text you define appears on each page of a DCF. See "Defining DCF Headers and Footers" on page 3-34.
For each type of standard text definition, you can include replacement parameters, or variables. When the system displays the standard text, it substitutes the actual value of the parameter; see "Inserting Replacement Parameters" on page 3-37.
Creating New Standard TextTo create new standard text entries:
1. From the Admin menu, select Discrepancy Mgmt, then select Standard Text Maintenance.
The Standard Text Maintenance form opens, with columns for Text Type, Sub Type, Standard Text Name, a Default box, and a line for the standard text string.
2. Choose a text type. The text type identifies where the system uses the definition: In DCF headers or footers or discrepancy comments and Data Entry. The choices are: Comment, Footer, Header, Internal Comment, Resolution. For further information, see the introduction in "Creating Reusable Standard Text for Discrepancies and DCFs" on page 3-35.
3. Choose a subtype only if you are creating an alternative univariate error text (you must have chosen a Text Type of Comment as well). See "Customizing Default Standard Text Entries" on page 3-37. Choose the subtype corresponding to the univariate error type for which you are creating a standard text.
For discrepancy comments, internal comments, and resolution comments, and DCF headers and footers, do not enter a subtype. If you do, the text will not be available for use even though it is successfully saved.
4. Name the entry in the Standard Text Name field. Each standard text definition must have a unique name. Users see the name and the text definition in the list of values for Comments, Internal Comments, and Resolution Comments of the Maintain Discrepancy Database.
5. Toggle the Default box. For the COMMENT type, the box controls which standard text value the system displays during Data Entry and DE Update. For HEADER

Creating Reusable Standard Text for Discrepancies and DCFs
3-36 Oracle Clinical Administrator's Guide
and FOOTER types, a check identifies the default when a new DCF is created. Only one entry can be checked as default for each text type/subtype combination.
6. Write the text in the Standard Text field.
You can embed variables in your standard text that the system replaces with values from individual records. Press F9 to see the list of values, select and insert a variable. For further information, see "Inserting Replacement Parameters" on page 3-37 and, for examples of how the system replaces variables with actual values, Table 3–29, " Examples of Alternative Standard Text for Univariate Errors" on page 3-38.
Inserting Replacement Parameters Standard text definitions can contain standard replacement parameters, or variables. You can insert one of the replacement parameters shown in Table 3–27 into your standard text. When the system displays the standard text, it displays the actual value of the parameter. The replacement parameters are in UPPERCASE and are delimited by backslashes (\); for example, \SAS_LABEL\.
To insert a parameter in a standard text string, put your cursor in the location in the text where you want to insert the variable, press F9 or click the ellipsis (…) to display the list of values, and select it from the list of values. Table 3–27, " Replacement Parameters" describes each available variable and its source table or view and column.
Table 3–27 Replacement Parameters
Parameter Name Description Source
assoc_id Associated ID for the discrepancy discrepancy_management.associated_id
crf_page_no CRF Page number for the discrepancy discrepancy_management.crf_page_number
data_type Data Type of the question dcm_questions.question_data_type_code
date_time_format Precision for date and time dcm_questions.date_time_type_code
dcm_name DCM Name for the discrepancy discrepancy_management.name
dcm_prompt DCM Prompt of the question discrepancy_management.default_prompt
dcm_subset DCM Subset name for the discrepancy discrepancy_management.dcm_subset_sn
decimal_places Decimal places for a numeric question dcm_questions.decimal_places
descriptor1 First descriptor for question group dcm_question_groups.repeat_descr1_label
descriptor2 Second descriptor for question group dcm_question_groups.repeat_descr2_label
discrete_values Comma-delimited list of values discrete_values.discrete_value_value
dvg_name DVG Name of the question discrete_value_groups.name
length Length of the question dcm_questions.length
lower_bound Lower bound of the question dcm_questions.lower_bound
repeat_sn Repeat sequence number for the discrepancy
responses.repeat_sn
sas_label SAS Label of the question discrepancy_management.sas_label
sas_name SAS Name of the question dcm_questions. sas_name
upper_bound Upper Bound of the question dcm_questions.upper_bound
value_text Value Text of discrepancy responses. value_text or responses.exception_value_text

Creating Reusable Standard Text for Discrepancies and DCFs
Configuring Discrepancy Management 3-37
Customizing Default Standard Text EntriesYou can modify the default standard text in the Standard Text Maintenance form. From the Admin menu, select Discrepancy Mgmt Admin, then select Standard Text Maintenance. The window is populated with the default values for each type of univariate error message shipped with Oracle Clinical. Table 3–28 lists the default standard text definitions for Oracle Clinical.
Example 3–3 Standard Text
The following table illustrates how you can use standard text definitions with different replacement parameters to create appropriate alternative error messages for DVG univariate discrepancies.
The system generates a different error message from same standard text definition by populating the replacement parameters with values from the question definition and entered data. The first column contains standard text definitions using replacement parameters. The second column shows the error message that would appear during data entry if the operator entered "X" as a response to the question PATIENT_SEX, which has a DVG containing the values M(ale) and F(emale). The third column shows the error message that would result from the same standard text if an operator entered "X" for the question SMOKING, which has a DVG containing the values Y(es) and N(o).
Table 3–28 Default Univariate Discrepancy Messages
Discrepancy Type Default Text
data type Value of \VALUE_TEXT\ for \SAS_LABEL\ is not a valid \DATA_TYPE\
dvg Value of \VALUE_TEXT\ for \SAS_LABEL\ not found in \DISCRETE_VALUES\
dvg subset Value of \VALUE_TEXT\ for \SAS_LABEL\ not found in \DISCRETE_VALUES\
length Value of \VALUE_TEXT\ for \SAS_LABEL\ exceeds expected length of \LENGTH\
lowerbound Value of \VALUE_TEXT\ for \SAS_LABEL\ below the minimum value of \LOWER_BOUND\
mandatory Value for \SAS_LABEL\ has not been supplied
missing_pt Value of \VALUE_TEXT\ for \SAS_LABEL\ is awaiting classification
missing_sct Value of \VALUE_TEXT\ for \SAS_LABEL\ is awaiting classification
partial date Value of \VALUE_TEXT\ for \SAS_LABEL\ is an incomplete date or time
precision Value of \VALUE_TEXT\ for \SAS_LABEL\ exceeds \DECIMAL_PLACES\ decimal places
thesaurus Value of \VALUE_TEXT\ for \SAS_LABEL\ is not in the lookup thesaurus
upperbound Value of \VALUE_TEXT\ for \SAS_LABEL\ above the maximum value of \UPPER_BOUND\

Creating Reusable Standard Text for Discrepancies and DCFs
3-38 Oracle Clinical Administrator's Guide
Table 3–29 Examples of Alternative Standard Text for Univariate Errors
Standard Text Sex Example Smoking Example
Value '\VALUE_TEXT\' for question \SAS.LABEL\ is not in expected list '\DISCRETE_VALUES\.'
Value 'X' for question SEX is not in expected list 'M,F.'
Value 'X' for question\SMOKING\ is not in expected list 'Y,N.'
Value of \VALUE_TEXT\ does not exist in Discrete Value Group \DVG_NAME\.'
Value of X does not exist in Discrete Value Group PATIENT_SEX.
Value of X does not exist in Discrete Value Group Yes/No.
Value of \VALUE_TEXT\ for \SAS.LABEL\ is invalid.
Value of X for SEX is invalid. Value of X for SMOKING is invalid.

4
Configuring the Mass Changes Utility 4-1
4Configuring the Mass Changes Utility
Setting up the Mass Change Utility (MCU), which is described in Oracle Clinical Conducting a Study, requires performing the following general steps, each described in the following sections:
■ Creating and Assigning Mass Changes Roles on page 4-1
■ Customizing Mass Changes Local Codelists on page 4-1
■ Customizing the Field Display on the Candidate Data Set Form on page 4-2
Creating and Assigning Mass Changes RolesOracle Clinical supplies two default database roles for the Mass Changes Utility:
■ RXC_MC
■ RXC_MC_TEST
RXC_MC has access to all production mass change options and RXC_MC_TEST has access to the test mass change options only. Your organization can also choose to create your own roles.
Assign these roles to the users that work with the Mass Changes Utility.
Customizing Mass Changes Local CodelistsThe Mass Changes Utility uses the local reference codelists described in Table 4–1. You can modify them to suit your organization's needs. The affected tablename.columnname column indicates the database columns that are affected by or use each reference codelist. From the Admin menu, select Reference Codelists, then select Local Codelists and query the codelists named in the following table.
Table 4–1 Mass Changes Utility Reference Codelists
Name Description Affected Tablename.Columnname
MC CDS SORT
ORDER1 Default sort order for viewing and applying the candidate data set (CDS); the columns you can order.
mass_changes.order_by_cols
MC COLUMNS2 The list of columns that can be used in LHS or RHS of criteria, such as RDCI.SITE
mass_change_criteria.colmass_change_criteria.value
DISC COLS2 Columns available for the LHS and RHS of the CDS Criteria form, regardless of the discrepancy type specified, such as DE.CREATION_TS
mass_change_criteria.colmass_change_criteria.value
UNI DISC COLS2 Columns available for the LHS and RHS of the CDS Criteria form, where the discrepancy type specified is UNIVARIATE, such as DE.DISCREPANCY_TYPE_CODE
mass_change_criteria.colmass_change_criteria.value

Customizing the Field Display on the Candidate Data Set Form
4-2 Oracle Clinical Administrator's Guide
Customizing the Field Display on the Candidate Data Set FormThese local codelists control the display of fields on the Candidate Data Set form for the four Mass Changes Utility change types:
■ FLD RXCMCMCD RDCI KEY
■ FLD RXCMCMCD RDCM KEY
■ FLD RXCMCMCD RDCI DELETE
■ FLD RXCMCMCD RESPONSE
From the Admin menu, select Reference Codelists, then select Local Codelists, and query FLD% in the Name field. The following table describes how the codelist values control all four codelists:
IND DISC COLS2 Columns available for the LHS and RHS of the CDS Criteria form, where the discrepancy type specified is INDICATOR
mass_change_criteria.colmass_change_criteria.value
MULTI DISC COLS2 Columns available for the LHS and RHS of the CDS Criteria form, where the discrepancy type specified is MULTIVARIATE, such as PROCEDURES.NAME
mass_change_criteria.colmass_change_criteria.value
MANHD DISC COLS2 Columns available for the LHS and RHS of the CDS Criteria form, where the discrepancy type specified is MANUAL HEADER
mass_change_criteria.colmass_change_criteria.value
FLD RXCMCMCD RDCI KEY
Candidate Data Set fields to be displayed on the Candidate Data Set form when called for RDCI KEY changes, their order of display, width, and prompt.
N/A
FLD RXCMCMCD RDCM KEY
Candidate Data Set fields to be displayed on the Candidate Data Set form when called for RDCM KEY changes, their order of display, width, and prompt
N/A
FLD RXCMCMCD RDCI DELETE
Candidate Data Set fields to be displayed on the Candidate Data Set form when called for RDCI DELETE changes, their order of display, width, and prompt
N/A
FLD RXCMCMCD RESPONSE
Candidate Data Set fields to be displayed on the Candidate Data Set form when called for Responses changes, their order of display, width, and prompt
N/A
OCL MC PREFS3 Sets the default maximum number of records to change in a Candidate Data Set. Its initial long value is 1000.
mass_changes.max_cds_records
1 Only the display sequence and whether the field should be sorted in ascending or descending order should be changed. New fields should not be added and existing ones should not be removed.
2 The values in this reference codelist determine the contents of the list of values for mass change criteria. Additional values may be added to the reference codelist but they must be from one of the existing tables already defined for values, and they must use the alias provided for the table. No validation occurs against the values in this codelist. If a value is not in the list of values it can still be added as a criterion for specifying the candidate data set.
3 OCL MC PREFS currently has one value, MAX_CDS_RECORDS, which controls the default maximum number of records to include in a Candidate Data Set.
Table 4–2 CDS Display Codelist Fields
Codelist Field Name Description
Seq Sequence number: Orders each value's column position in either the fixed (the lowest numbers), or scrolling sections of the Mass Changes Utility form. (See Description, below)
Short Value The name of the field in the form. You must not change these values.
Long Value The display length for the field on the Candidate Data Set form.
Table 4–1 (Cont.) Mass Changes Utility Reference Codelists
Name Description Affected Tablename.Columnname

Customizing the Field Display on the Candidate Data Set Form
Configuring the Mass Changes Utility 4-3
Oracle Clinical has default values for these codelists that reflect the most likely scenario for displaying the Candidate Data Set. You can modify the default values. The following table lists all possible column values. You can add, remove, modify, or rearrange the display fields. Footnotes and a legend with descriptions of all of the table's symbols follows the table.
Active box Check a value's Active box to display to include its field on the Mass Changes Utility form.
Default box N/A
Description The value's assignment to the non-scrolling or scrolling sections of the Mass Changes Utility form, and its prompt label. The description field has the following syntax:
F:promptlabel orS:promptlabel
Where: F: locates the field in the left-side, non-scrolling section of the Candidate Data Set form.
S: locates the field on the scrolling, right-side section of the Candidate Data Set form.
promptlabel The field label on the Candidate Data Set form.
If all fields are non-scrolling, you must still use the F:promptlabel syntax.
For Response data and data comment fields, the prompt is the default prompt for the DCM question concatenated with promptlabel.
Table 4–3 Candidate Data Set Form Codelist Values
Column Value Short Name
Display Settings by Mass Changes Utility Change Type
Recom-mended
Set by Default
Can be Set
List of Values
Update-able
cdr_status_code cdr_status_code All All
validate_comment val_comment All All
change_reason_code1
(Must be valid in codelist)
c_reason_code All All All All
audit_comment audit_comment All All All
how_updated how_updated I, M, R I, M, R
received_dci_id received_dci_id All
document_number doc_number All All
document_number_new doc_number_new I I I
investigator investig I All
investigator_new investig_new I I I I
site site I All
site_new site_new I I I I
patient patient I All
patient_new patient_new I I I I
dci_short_name dci_sh_name I All
Table 4–2 (Cont.) CDS Display Codelist Fields
Codelist Field Name Description

Customizing the Field Display on the Candidate Data Set Form
4-4 Oracle Clinical Administrator's Guide
dci_short_name_new dci_sh_name_new I I I I
clin_plan_eve_name cpe_name I All
clin_plan_eve_name_new cpe_name_new I I, M I, M∗∗ I, M
visit_number vis_number I All
subevent_number sub_number I All
subevent_number_new sub_number_new I All I, M I, M
dci_date∗ dci_dt I I, D, M R
dci_date_new∗ dci_dt_new I I I
dci_time∗ dci_tm I I, D, M R
dci_time_new∗ dci_tm_new I I I
comment_text cm_txt I, M I, D, M R
comment_text_new cm_txt_new I, M I, M I, M
blank_flag blank_flag I, M I, D, M R
blank_flag_new blank_flag_new I, M I, M I, M I, M
received_dcm_id received_dcm_id M, R
rdci_clin_plan_eve_name
rdci_cpe_name M, R
rdci_visit_number rdci_vis_number M, R
rdci_subevent_number rdci_sub_number M, R
rdci_comment_text rdci_cm_txt M, R
rdci_blank_flag rdci_blank_flag M, R
dcm_name dcm_name M M, R
dcm_subset_name dcm_subset_name M R
dcm_layout_sn dcm_layout_sn M R
dcm_date* dcm_dt M M R
dcm_date_new* dcm_dt_new M M M
dcm_time* dcm_tm M M R
dcm_time_new* dcm_tm_new M M M
qualifying_value qual_value M M, R
qualifying_value_new qual_value_new M M M M
data_comment_text dta_cm_txt M M R
data_comment_text_new dta_cm_txt_new M M R M
repeat_sn repeat_sn R R
response_id1 response_id1 R
validation_status1 valid_status1 R
Table 4–3 (Cont.) Candidate Data Set Form Codelist Values
Column Value Short Name
Display Settings by Mass Changes Utility Change Type
Recom-mended
Set by Default
Can be Set
List of Values
Update-able

Customizing the Field Display on the Candidate Data Set Form
Configuring the Mass Changes Utility 4-5
exception_value_text1 e_val_txt1 R R‡
value_text1 val_txt1 R R∇
full_value_text1 f_val_txt1 R R R≡
full_value_text1_new2 f_val_txt1_new R R R≡ R
data_comment_text1 dta_cm_txt1 R R
data_comment_text1_new dta_cm_txt1_new R R R
response_id2 response_id2 R
validation_status2 valid_status2 R
exception_value_text2 e_val_txt2 R R‡
value_text2 val_txt2 R R∇
full_value_text2 f_val_txt2 R† R† R≡
full_value_text2_new2 f_val_txt2_new R† R† R≡, as per data entry
R
data_comment_text2 dta_cm_txt2 R† R†
data_comment_text2_new dta_cm_txt2_new R† R† R
response_id3 response_id3 R
validation_status3 valid_status3 R
exception_value_text3 e_val_txt3 R R‡
value_text3 val_txt3 R R∇
full_value_text3 f_val_txt3 R† R† R≡
full_value_text3_new f_val_txt3_new R† R† R≡, as per data entry
R
data_comment_text3 dta_cm_txt3 R† R†
data_comment_text3_new dta_cm_txt3_new R† R† R
response_id4 response_id4 R
validation_status4 valid_status4 R
exception_value_text4 e_val_txt4 R R‡
value_text4 val_txt4 R R∇
full_value_text4 f_val_txt4 R† R† R≡
full_value_text4_new f_val_txt4_new R† R† R≡, as per data entry
R
data_comment_text4 dta_cm_txt4 R† R†
data_comment_text4_new dta_cm_txt4_new R† R† R1 Validation issue: Value must be valid in the reference code list.2 Validation issue: Must pass field validation in data entry.
Table 4–3 (Cont.) Candidate Data Set Form Codelist Values
Column Value Short Name
Display Settings by Mass Changes Utility Change Type
Recom-mended
Set by Default
Can be Set
List of Values
Update-able

Customizing the Field Display on the Candidate Data Set Form
4-6 Oracle Clinical Administrator's Guide
Table 4–4 Legend for Table 4–3
Symbol Description
A blank cell indicates that the value does not qualify for any of the change types.
Ι RDCI KEY change type
D RDCI DELETE change type
M RDCM KEY change type
R RESPONSE change type
All Applies to all change type codes: RDCI KEY, RDCI DELETE, RDCM KEY, RESPONSE
∗ The system does not display this field. Instead a display field is used as with the Data Entry Log-in form. This field displays the data retrieved into the base table field in the appropriate format and translates the information entered into the new fields to the format needed by the base table fields. This field contains an list of values, or is update-able, pertains to the display field, with the update of the base table fields by the system. It is necessary for the reference codelist to have the display fields rather than the base table field. For these fields, the labels, Column value refers to the base table field and short name refers to the display field.
∗∗ The clin_plan_eve_name_new field list of values contains the visit number as well, for reference purposes only.
† Responses and associated old and new values are required and present by default, if they exist.
‡ An list of values is present for exception_value_text if an alpha data code discrete value group exists for the DCM question, and values from this group are part of the list of values.
∇ An list of values is present for value_text if a discrete value group exists for the DCM question, and values from this group will appear in the list of values
≡ There is an list of values for the full_value_text if any discrete value group exists for the DCM question, and values from these groups appear in the list of values.

5
Configuring Data Entry and User Preferences 5-1
5Configuring Data Entry and UserPreferences
This section includes the following topics:
■ Customizing Data Entry Behavior on page 5-1
■ Customizing the Oracle Clinical Log-in Window Layout on page 5-7
■ Setting DCI Form Default Values for RDC Data Entry and Patient Data Reports on page 5-11
■ Customizing Flex Fields for DCI Forms on page 5-21
■ Customizing CRF Column Headers in the RDC Classic on page 5-24
■ Customizing Online Help on page 5-26
■ Viewing Xhelp Without Oracle Clinical on page 5-28
Customizing Data Entry BehaviorA number of features, behaviors, and even the appearance of the Log-In and Data Entry screens can be configured depending on configuration settings, user preferences, and special layout editing tools. This section provides an overview of these features; more detail on each feature is available in later sections.
The features discussed in this section are:
■ Define Data Entry Configuration Settings on page 5-1
■ Configuring Additional Data Entry User Preferences on page 5-5
■ Configuring Privileged Update on page 5-6
Define Data Entry Configuration SettingsData entry configuration settings, such as whether univariate validation failures alert the First-Pass and Second-Pass data entry operators, can be set at the local database level, the study level, or the user level.
Data entry configuration settings can be set at the:
■ Database Level through the Maintain Installation Configuration window; see "Configure Database-Level Data Entry Settings" on page 5-2
■ Study Level through the Maintain Study Configuration window (via Maintain Clinical Study States window); see "Configure Study-Level Data Entry Settings" on page 5-4

Customizing Data Entry Behavior
5-2 Oracle Clinical Administrator's Guide
■ User Level through the Maintain Oracle Accounts window; see "Configure User-Level Data Entry Settings" on page 5-4
As the configuration level becomes more specific, from database to study to user, its settings usually take precedence over the more general level. At the local database level, each setting is either enabled or disabled. At the study and user levels, each setting is either enabled, disabled, or not set. If the value of a setting is "Not Set" it serves as a "pass-through" to the next higher level value for that setting. Initially, all values at the study- and user-level are set to "Not Set" so that the database level, which is set up during installation, is in effect until you modify the settings for a given study or user.
Study-level configuration settings affect all users who have access to that study, except when user-level configuration or Study/Site security settings are set up for a user. If a setting at this level has a value of Not Set, all users who access the study use the database-level setting, unless the value for the setting at the user level is Enabled or Disabled for a specific user.
Note that certain privileges that are assigned via the Study and/or Site Security windows take precedence over user-level data entry configuration settings.
The settings available at each level are identical; the only difference is the availability of the "Not Set" value at the study- and user-levels. See Table 5–1, " Local Database-Level Data Entry Configuration Settings" for a complete list of settings.
Configure Database-Level Data Entry SettingsLocal database configuration settings are maintained in the Maintain Installation Configuration window. You can customize the configuration settings for the local database by changing the default shipped values for the configuration settings.
At the local level, configuration settings are either enabled, disabled, or have a numeric value, as applicable. Table 5–1 describes each setting.
To change the local settings:
1. Navigate to Admin, DE Admin, and then select DE Config Settings. The Maintain Installation Configuration window opens.
2. Navigate to the configuration setting that you want to modify, and change its value. The default page height and width settings allow numeric values within upper and lower bounds. The other settings can be set to either enabled or disabled.
3. Click Save to commit changes.
Note: Study-level settings of configuration parameters are not replicated during study replication. Each local database defines its own configuration settings.

Customizing Data Entry Behavior
Configuring Data Entry and User Preferences 5-3
Table 5–1 Local Database-Level Data Entry Configuration Settings
Configuration Parameter Description Values
Default setting
Second-Pass Comparison Failure Alert
(Oracle Clinical only) Controls whether the data entry operator is notified when a first-pass/second-pass comparison error occurs. When this setting is not enabled, the operator is in "silent" mode during second-pass data entry, and any first/second pass comparison failures that occur must be resolved during comparison reconciliation.
Enabled/Disabled
Enabled
Manual Discrepancy in Browse
(Oracle Clinical only) Whether the data entry operator can create or modify a manual discrepancy (operator comment) in browse mode (only applicable if the user has access to Browse mode).
Enabled/Disabled
Enabled
Resolve Discrepancies in Data Entry
(Oracle Clinical and RDC) Whether the data entry operator has authority to resolve discrepancies during data entry, that is, the permission to set a discrepancy to closed status.
For RDC Classic, set this parameter to Enabled.
Enabled/Disabled
Enabled
Privileged Update (Oracle Clinical and RDC) Whether the data entry operator can perform the following while in update mode:
■ update data for locked RDCMs and RDCIs,
■ override protected repeating defaults, and
■ exceed the Maximum # of Repeats to a Repeating Question Group, even when Enforce Repeats is set (Oracle Clinical and RDC Classic only).
Enabled/Disabled
Disabled
List of Values for Thesaurus Questions
(Oracle Clinical only) Whether a list of values is available for thesaurus questions based on external dictionaries.
Enabled/Disabled
Disabled
Univariate Failure Alert (Oracle Clinical and RDC Classic) Whether the data entry operator is notified when a univariate validation error occurs. When this setting is disabled, the operator is in "silent" discrepancy mode. Univariate discrepancies are still created in "silent" mode, but the operator is not notified of their creation.
RDC Onsite does not use this setting. Instead, it uses a configuration setting in the RDC Administration tool, which can be over-ridden by the end user, if Preferences are made available
Enabled/Disabled
Enabled
Initiate DE session using DCI Book
(Oracle Clinical only) Whether DCI book sequencing is the default sequencing mode during log-in and data entry.
Enabled/Disabled
Enabled
Unenrolled patient alert (Oracle Clinical only) Whether the data entry operator is notified when a received DCI is logged in for a patient not enrolled in the study.
Enabled/Disabled
Enabled
Prevent Second-pass Entry by First-pass operator
(Oracle Clinical only) Whether Oracle Clinical prevents the data entry operator who did first-pass entry on a given RDCI from performing second-pass entry on the same RDCI.
Enabled/Disabled
Disabled
Browse accessible data only
(Oracle Clinical only) Determines if data entry operators can browse data.
Enabled/Disabled
Disabled

Customizing Data Entry Behavior
5-4 Oracle Clinical Administrator's Guide
Configure Study-Level Data Entry SettingsIf you require that a particular study have different data entry configuration settings from those set at the local database level, you can change the settings at the study level by modifying the Clinical Study State record for that study. Study-level configuration settings override local database-level configuration settings for that study.
The study-level configuration settings are identical to the local database-level data entry configuration settings, but at the study level, an additional value, "Not Set", is available for all configuration settings. If a setting is not set, it is not defined and the next higher configuration setting takes effect. Because study-level settings take precedence over database-level, by default, all study-level configuration settings are set to "Not Set", which results in the local-level settings taking effect. See Table 5–1, " Local Database-Level Data Entry Configuration Settings" for a listing of the settings.
Values for each non-numeric setting are available from the list of values and can be either "Enabled", "Disabled", or "Not Set". The default page height and width settings allow numeric values within upper and lower bounds.
To change a study-level data entry configuration setting:
1. Navigate to Conduct, Security, and then select Clinical Study States. The Maintain Study States window opens.
2. Query for the study you want to update.
3. Open the Special menu and select DE Configs. The Maintain Study Configuration window opens.
4. Make the necessary changes to the configuration settings that you want to modify.
5. Save the changes and click Back to return to the Maintain Clinical Study States window, or click Back without saving to abandon your changes.
Changes at this level affect all users working in the study, unless user-level data entry configuration settings are defined for a user. See "Configure User-Level Data Entry Settings" for information on modifying these settings.
Configure User-Level Data Entry SettingsUser-level settings affect all studies to which the user has access.
If you require that a user have different data entry configuration settings from those set at the study or the database level, you can change specific settings at the user level that supersede those higher level settings.
DCI and DCM Date Required
(Oracle Clinical and RDC) The data entry must enter the DCI and DCM Visit date.
Enabled/Disabled
Enabled
Default height for Data Entry page in DCM
(Oracle Clinical only) Default value for the Data Entry Page Height for DCMs. This setting determines only the value that is supplied as the default, which can be overridden during DCM definition.
Number between 10 and 60
22
Default width for Data Entry page in DCM
(Oracle Clinical only) The default value for the Data Entry Page Width for DCMs. This setting determines only the value that is supplied as the default, which can be overridden during DCM Definition.
Number between 10 and 240
80
Table 5–1 (Cont.) Local Database-Level Data Entry Configuration Settings
Configuration Parameter Description Values
Default setting

Customizing Data Entry Behavior
Configuring Data Entry and User Preferences 5-5
The user-level configuration settings are identical to the study- and database-level data entry configuration settings. As with the study level settings, an additional value of Not Set is available for all nonnumeric settings. If a setting is Not Set, the next higher configuration setting takes effect. Because user-level settings take precedence over database-level, by default they are set to Not Set, which results in the local-level settings taking effect. Table 5–1, " Local Database-Level Data Entry Configuration Settings" has a complete list of settings.
Values for each nonnumeric setting are available from the list of values and can be either Enabled, Disabled, or Not Set. The default page height and width settings allow numeric values within upper and lower bounds.
To change user-level data entry configuration settings, follow this procedure:
1. Navigate to Admin, Users, and then select Oracle Accounts. The Maintain Oracle Accounts multi-view window displays.
2. Query the user record you want to modify.
3. Open the Special menu and select DE Configs. The Maintain User Configuration window displays.
To define a user-level configuration setting, change the value of the configuration setting in this window to any value other than not set. You can change the value of a configuration setting without changing all of them.
4. Change any setting, as needed.
5. Save the changes and then click Back to return to the Maintain Oracle Accounts form, or click Back without saving to abandon your changes.
Configuring Additional Data Entry User PreferencesOracle Clinical supplies a set of default values for user preferences, which are displayed in Table 5–2. These preferences remain in effect for all data entry operators unless operators override the defaults and save their own values (see Chapters 3 and 4 in Oracle Clinical Conducting a Study).
To change the default values for user preferences:
1. Navigate to Admin, DE Admin, and then select DE User Prefs. The Maintain Installation Preferences window opens.
2. Navigate to the user preference that you want to modify, and change its value. Values for each user preference are represented either as check boxes or as a list of values.
3. Click Save as Default to save the changes, and then click Exit to close the window.
Note: The DCI and DCM Date Required setting is inactive at the user-level.

Customizing Data Entry Behavior
5-6 Oracle Clinical Administrator's Guide
Configuring Privileged Update This section includes the following topics:
Table 5–2 Local Data Entry User Preference Settings
User Preference Description Values
Default Setting
Auto Skip On fields that have been defined as Auto Skip fields in DCM definition, determines whether the cursor automatically skips to the next field when the current field is filled to its predefined length.
Enabled/Disabled Enabled
Auto Fill Applicable only for fields that have lists of values (DVG- or thesaurus-based). Determines whether entering a few unique characters of a valid value will result in the system's filling in the rest of the value upon navigation out of the field.
Enabled/Disabled Enabled
Univariate Beep
Determines whether an audible signal will accompany the Univariate validation failure pop-up window. Not applicable if the Univariate validation failure alert configuration setting is disabled.
Enabled/Disabled Enabled
Comparison Beep
Determines whether an audible signal accompanies the First-Pass/Second-Pass Comparison Failure pop-up window. Not applicable if the second-pass comparison failure alert configuration setting is disabled.
Enabled/Disabled Enabled
End of Form Beep
Determines whether you receive an audible beep when you reach the end of a form.
Enabled/Disabled Enabled
Data Entry Input Format
For all log-in and data entry tasks, for DCI and DCM dates and data entry fields of type date, determines how date formats are applied to interpreting data that is input to the field. Must be the same as data entry display format (see below), unless display format is standard. standard format (see below) is always accepted.
us (mm-dd-yyyy)
european (dd-mm-yyyy)
swedish (yyyy-mm-dd)
US
Data Entry Display Format
For DCI and DCM Dates, the Display Format configuration determines the date format used for displaying dates. For data entry fields, the format is controlled by the date order of the DCM, which is either DYNAMIC or is one of the four date formats (US, EUROPEAN, SWEDISH, or STANDARD).
If the DCM's date order is DYNAMIC, data entry fields that are dates are displayed using the same data entry configuration Display Format setting used for DCI and DCM dates. Otherwise, data entry fields are displayed using the format indicated by the Date Order for the DCM.
Additionally, whether the day and month portion of a data entry field date is displayed is controlled by the Date Time Format of the DCM question on which it is based. There are four possible Date Time Formats for a date field: DMY (day, month, and year are displayed), MY (day is not displayed), and Y (only year is displayed).
US (MM-DD-YYYY)
European (DD-MM-YYYY)
Swedish (YYYY-MM-DD)
Standard (DD-MON-YYYY)
US
RDCI Sort Order
For query sequencing, determines the ordering for the RDCIs retrieved by a query for data entry processing.
Document Number
Patient - Visit - DCI Name - DCI Date
Entry Order
Entry Order

Customizing the Oracle Clinical Log-in Window Layout
Configuring Data Entry and User Preferences 5-7
■ Set Privileged Update Using Configuration Settings on page 5-7—applies to Oracle Clinical and RDC
■ Set Privileged Update Using Study/Site Security on page 5-7—applies to Oracle Clinical only
Users with privileged update can perform the same tasks on a locked document that they can on an unlocked document. in all data entry modes: log in, first pass, second pass, update, reconciliation, and key changes.
Within RDC, enabling privileged update means that the user can take any action consistent with the study- or site-security privileges assigned to the user's name. For RDC purposes, privileged update can only be assigned through the data entry configuration settings.
In Oracle Clinical you can assign privileged update through data entry configuration settings and through study/site security.
■ If Privileged Update is not enabled for a user through the data entry configuration settings, you can use the UPD_LOCK_OC privilege to grant Privileged Update access to a user. The advantage of this approach is that you can grant the privilege for a specific site within a study, while the Data Entry Configuration settings allow specification only at the database, study, or user level.
■ If Privileged Update is enabled through the data entry configuration settings, the UPD_LOCK_OC privilege assigned through study/site security is not applicable.
Set Privileged Update Using Configuration SettingsBy default, privileged update is not enabled for a user. In most circumstances, you set the Privileged Update data entry configuration setting at the user level. To do this, see "Configure User-Level Data Entry Settings" on page 5-4.
■ To set privileged update at the study level, see "Configure Study-Level Data Entry Settings" on page 5-4.
■ To set privileged update at the local database level, see "Configure Database-Level Data Entry Settings" on page 5-2.
These settings apply to Oracle Clinical and RDC users.
Set Privileged Update Using Study/Site SecurityFor Oracle Clinical users only, when Privileged Update is not enabled for a user in the data entry configuration settings, you can grant Privilege Update access by assigning the user the UPD_LOCK_OC privilege for a particular study or site within a study.
Navigate to Admin, Users and Roles, Study Security or Site Security.
Customizing the Oracle Clinical Log-in Window LayoutOracle Clinical data entry operators use the log-in and data entry windows to enter and display the patient data defined by Study DCMs and DCIs (see Oracle Clinical Creating a Study). (Once entered, patient data, or documents, are called received DCIs (RDCIs) and received DCMs (RDCMs).) The appearance of these windows can be modified by the log-in layout editor tool to resemble the received DCI and DCM header information that appears on the CRF. You can change the header information field prompts, change the field sequences, or even hide fields after supplying them with default values.
This section includes the following topics:

Customizing the Oracle Clinical Log-in Window Layout
5-8 Oracle Clinical Administrator's Guide
■ Using the Log-in Layout Editor
■ Modifying the Received DCI Window
■ Modifying the Received DCM Window
■ Modifying the Smart Received DCM Window
Using the Log-in Layout EditorThe header information in CRFs is captured in the received DCI and received DCM windows. The Log-in Layout Editor allows you to match online screens with header information on the paper CRF that you may use for source data entry.
The log-in layout editor is a different tool from the DCM layout editor. You use the log-in layout editor to match the online Log-In windows with common CRF header information. You can change the header information field prompts, change the sequence of the fields, or hide fields that have default values.
"Customizing the Oracle Clinical Log-in Window Layout" on page 5-7 describes the log-in layout editor. Use the DCM layout editor to modify the appearance of the Data Entry windows (see "Laying out the data entry screen" in the Oracle Clinical Creating a Study).
The log-in layout editor can modify the following windows:
■ Received DCI (RDCI) window
■ Received DCM (RDCM) window
■ Smart Received DCM (Smart RDCM) window
During log-in and data entry, the Received DCI window is the first screen that the system presents to a data entry operator. In all modes, under normal navigation, the window displayed immediately after the Received DCI window is the Smart RDCM window. This window displays underneath the Received DCI window and shows only the received DCM information required for context. To view all received DCM information, the user must navigate to the Received DCM window by invoking the function [RDCM].
To access the Log-in Layout Editor, navigate to Admin, the DE Admin, and Log-in Layout Editor. The RDCI window displays. Note the drop-down list field in the bottom-left corner of your screen. Use this window selection field to navigate between the windows. When you click on the arrow to the right of the drop-down list field, the names of all the windows are displayed. To change to another window, select it from the drop-down list. If you have changes pending when you attempt to change to another window, you are prompted to save your changes, or you can discard them.
Modifying the Received DCI WindowTo modify the Received DCI window, select RDCI window from the drop-down list. The Received DCI window displays, showing all the received DCIs fields and their default prompts.
When you click on a field or on its prompt, the following information about the field or prompt is displayed to the right of the window selection window:
■ The prompt or field name (depending on whether you clicked on the field or on its prompt),
■ The X and Y coordinates for the field or prompt, and
■ The length of the prompt or field.

Customizing the Oracle Clinical Log-in Window Layout
Configuring Data Entry and User Preferences 5-9
These fields are display-only and cannot be updated.
You can change the length of a prompt or of a field by clicking on the prompt or on the field and then clicking on the Increase Width or Decrease Width buttons, which increase or decrease the length of the prompt or the field.
You can change the screen position of the field and its prompt by clicking on the prompt, selecting the Move button and entering new values for the X and Y co-ordinates. The field follows the prompt. If you click on field itself, select the Move button and enter new values for the X and Y co-ordinates, it moves separately from the prompt.
You can modify the prompt text by clicking on the prompt and then editing the text.
In the RDCI window, you are limited to six lines of vertical screen space, and 80 characters of horizontal space. In the data entry form, the window will only display the height of the screen occupied by fields or their prompts. For example, if you configure the RDCI window in the log-in layout editor such that you have fields and prompts on only the first four lines, only those four lines are displayed at data entry time, leaving more room for the data entry fields.
You can hide certain fields by clicking either the prompt or the field and then selecting the Hide button. This moves the prompt and field to the Items Not Displayed section of the form. This field is not visible to the data entry operator during normal data entry functioning. The following fields must be displayed: Patient, DCI Short Name, DCI Date, DCI Time, Event, Subevent number.
To make a field displayed again, select either the prompt or the field in the Items Not Displayed section of the form, select the Display button and enter values for the new X and Y co-ordinates of the prompt or field depending on which was selected. This moves both the prompt and the field
You can make a field non-updateable by the data entry operator by double-clicking on the field. When a field has been made non-updatable, it is displayed in red in the RDCI window. You can make it updateable by double-clicking on the field again.
Save pending changes by selecting Save. If you want to discard changes that you have made but have not yet saved, you can select Revert, which rolls back your changes to your last save. To close the form, select Exit.
To edit the layout of another window, click the arrow to the right of the Window Selection drop-down list field, and then select the window whose layout you next want to edit. If you have pending changes when you try to change windows, you are prompted to save your changes.
Modifying the Received DCM WindowThe RDCM window is displayed to the data entry operator when the [RDCM] function is invoked.
To modify the RDCM window, select RDCM Window from the window selection drop-down list. You can modify the information that is displayed for the received DCM in the RDCM window in the same way that you modified the information in the RDCI window. All navigation and other behavior is identical. The only difference is that for RDCMs, you have twelve lines to work with vertically, rather than the six lines allotted to RDCIs. The horizontal restriction remains 80 characters for rdcms, the same as for RDCIs.
Setting DCI Form Default Values for RDC Data Entry and Patient Data Reports
5-10 Oracle Clinical Administrator's Guide
Modifying the Smart Received DCM WindowIn all log-in and data entry modes, the Received DCI window is the first window the data entry operator sees. This window may be used to capture RDCI information in Log-In modes, or it may be used only to display RDCI information, as in the data entry modes.
Additional RDCM-level information may need to be captured, or displayed for context. For this purpose during log-in and data entry, instead of the entire RDCM window, the Smart Received DCM window is displayed underneath the Received DCI window. The Smart RDCM window contains only those RDCM fields that may require user input, or that provide minimal context for the user. In addition, page fields are displayed to indicate which RDCM of the parent RDCI is currently being displayed. Full RDCM information is available to the data entry operator by invoking the [RDCM] function.
To modify the Smart RDCM window, choose it in Window Selection drop-down list field. The Smart RDCM window is displayed.
The following fields are displayed in the Smart RDCM window:
■ Qualifying Value
■ Clinical Planned Event Name
■ Subevent Number
■ Visit Number
■ DCM Date
■ DCM Time
■ Lab Name
Because of the unique character of the Smart RDCM window, there are limitations on the changes that you can make to the fields in this window, as follows:
■ You cannot change any characteristics of the Qualifying Value field.
■ You cannot change the position of any of the fields.
■ You cannot choose not to display one of the fields.
For Smart RDCM window fields other than the Qualifying Value, you can change only the field prompt.
After you save your changes, the next time that a data entry operator performs a log-in function in that study, the changes that you made will be visible.
Setting DCI Form Default Values for RDC Data Entry and Patient Data Reports
This section includes the following topics:
■ Setting and Enforcing Values
■ Settings
– DCI Form Definition
– DCI Form Runtime
– General
– Graphic Layout Editor/Updater

Setting DCI Form Default Values for RDC Data Entry and Patient Data Reports
Configuring Data Entry and User Preferences 5-11
– Graphic Layout Generator - General
– Graphic Layout Generation - DCMS
– DCI Form Generation Defaults
– Default Settings for Showing DCM Header Fields
– Default DCM Header Field Prompts
– Version Migration
– Patient Data Report
– Validation
You set the default values for DCI Form and Graphic Layout settings for all studies in the current database in the DCI Form Local Database Settings window. These settings affect the appearance of data entry windows in RDC Onsite and the PDF output of the Patient Data Report and Blank Casebook Report in Oracle Clinical and RDC.
For each setting, you can choose to enforce the value across all studies or allow modification on the study level in the DCI Form Local Study Settings window (under Design).
By default the roles that have access to this form are RXC_USER, RXC_SUPER_NOGL, RXC_ADMIN. There is also a read-only Query version of this form (QRY Global Settings, in the same path). To query the form you must have either the RXC_SUPER or RXC_ANY role.
Access the window by navigating to Admin, then DCI Form Local Database Settings.
Settings are logically grouped, and when you open the window only the groups are displayed. To see individual settings, click the + node.
Figure 5–1 DCI Form Local Database Settings Window

Setting DCI Form Default Values for RDC Data Entry and Patient Data Reports
5-12 Oracle Clinical Administrator's Guide
Setting and Enforcing ValuesFor each individual setting you can choose to:
■ Change the default value
■ Select the Enforce Local DB Setting check box
If you select Enforce Local DB Setting here, study designers cannot change the value at the study level in the DCI Form Local Study Settings window. If you do not select Enforce Local DB Setting here, the value is modifiable at the study level.
For further information about the DCI Form Local Study Settings window, see the Oracle Clinical Creating a Study manual.
SettingsThis section describes the following groups of settings:
■ DCI Form Definition
■ DCI Form Runtime
■ General
■ Graphic Layout Editor/Updater
■ Graphic Layout Generator - General
■ Graphic Layout Generation - DCMS
■ DCI Form Generation Defaults
■ Default Settings for Showing DCM Header Fields
■ Default DCM Header Field Prompts
■ Version Migration
■ Patient Data Report
■ Validation
DCI Form Definition The settings for this category are:
■ DCI Form Definition Enabled If set to Y, DCI Form definition—the use of graphic layouts—is enabled by default for all studies in the database. The study-level setting is not in the DCI Form Local Study Settings window but in Clinical Study States (under Conduct, then Security). The Easy Study Design feature does not include an explicit setting for enabling DCI Form definition; if study designers want to change the default value, they can use the Clinical Study States form.
■ GLIB DCI Forms Definition Enabled If set to Y, DCI Forms can be defined in the Global Library (under Glib, then DCMs DCIs Procedures, then DCMs or DCIs). There is no corresponding study-level setting.
DCI Form RuntimeThe settings for this category are:
■ Label for Customizable Patient Identifier If you are using a customizable patient identifier and you would like to display a label other than Reference (the default) in RDC Onsite, enter the label text you prefer. The label appears next to the field in the Search screen of the Home and Casebooks pages. You can use this setting only

Setting DCI Form Default Values for RDC Data Entry and Patient Data Reports
Configuring Data Entry and User Preferences 5-13
if Use customizable patient identifier? is set to Y. See the Oracle Clinical Remote Data Capture Onsite Administrator's Guide for further information.
■ DCI Form Entry Enabled If set to Y, data entry in RDC Onsite is enabled. The study-level setting is not in the DCI Form Local Study Settings window but in the Clinical Study States window (under Conduct, then Security). The Easy Study Design feature does not include an explicit setting for enabling DCI Form definition; if study designers want to change the default value, they can use the Clinical Study States window.
■ DCI Form Field Length Restriction If set to Y, users cannot enter more characters in a field than specified by the Length attribute on the DCM Question definition for that field. If set to N and a user enters more characters than specified, the system creates a discrepancy. Overflow data that cannot be displayed on the output prints into an overflow section.
■ Display Label for DCM Question Select the source for the label of each field in the CRF; either the SAS label, the question name, or the default prompt of the corresponding question definition. The label is then used as a reference in the Discrepancies, Investigator Comments, and Audit History Navigators in the RDC Onsite data entry window.
■ Display Visit Owning Interval on MPC Page? If set to Y, the Casebooks page in RDC Onsite displays the interval—phase, period, or subperiod—to which the displayed visit belongs.
■ Enable Entry of Investigator Comments If set to Y, Investigator comments are allowed in RDC Onsite.
■ Page Labeling Compatible with Page Tracking? If set to Y, the page label in a physical page uses the same syntax as the page identification in the page tracking system. This setting applies only to studies that use Page Tracking; see Oracle Clinical Creating a Study for more information.
■ Represent Disabled Blocks as This setting applies to studies using conditional in-form branching. Select Greyed if you want conditional fields that are not expected for a patient to be displayed but grayed out. Select Hidden if you do not want such fields to be displayed at all. In this case, the next expected fields, if any, are displayed in the same area, so that there is no empty space in the middle of the page. The empty space appears at the end of the page.
■ Suppress Change Reason for new Responses If set to Y, the data entry user is not prompted for a Change Reason the first time a response is entered even if the CRF has been previously saved.
■ Suppress Change Reason Prompt for New Investigator Comment If set to Y, the Investigator is not prompted for a Change Reason the first time he or she enters a comment on a particular response.
■ Suppress Warning for Non-migrated CRFs If set to Y, the data entry user does not receive a warning when working on a CRF that was entered via another user interface—Oracle Clinical, RDC Classic, or Batch Data Load—and the CRF has not been migrated to a DCI Form version. In addition, see the Allow Migration of Classic RDCIs? setting under the Version Migration category.
Note: You cannot uncheck Enforced for this setting. There is no corresponding setting at the study level, so the value you set here is automatically enforced.

Setting DCI Form Default Values for RDC Data Entry and Patient Data Reports
5-14 Oracle Clinical Administrator's Guide
■ Use customizable patient identifier? If set to Y, the system allows you to customize an additional patient identifier field for Search purposes in RDC Onsite. Values determined by your customization are stored in the Reported Reference column of the Patient Positions column in Oracle Clinical. You can change the label for the field using the Label for Customizable Patient Identifier setting. See the Oracle Clinical Remote Data Capture Onsite Administrator's Guide for further information.
GeneralThe settings for this category are:
■ Default Unplanned Use Allowed for DCIs not in Book If set to Y, DCIs not included in a DCI Book are available for unplanned use; the default setting in the DCI Book Constraints window for the Unplanned Use Allowed if not listed below field is checked.
This setting has no effect on existing DCI Books or on DCIs already listed in the DCI Book Constraints window.
See the section on DCI Books in the Oracle Clinical Creating a Study manual for more information.
■ Layout Unit of Measurement Select the unit of measurement to be used when dimensions related to layouts are displayed. The options are: inches, centimeters, and points.
Graphic Layout Editor/UpdaterThis category has one setting: Enforce Length as Field Size. If set to Y, the system uses the character length defined for the question to set the minimum size of the field in the layout editor. When set to Y, if you increase the question's length in the Study DCM Questions window, the system sets the Needs Update flag to indicate the field width needs to be increased.
Graphic Layout Generator - GeneralThe settings in this category are:
■ Default Checkbox Check Style Select the default value for the Checkbox Style field in the startup dialog for the DCM Graphic Layout generator. which determines the symbol used in selected check boxes. The default options are: Check, Circle, Cross, and Square.
■ Default Checkbox Shape Select the default value for the Checkbox Shape field in the startup dialog for the DCM Graphic layout generator, which determines the check box shape. The options are: Circle and Square.
■ Default Checkbox Size Select the default point size for check boxes. The options are: 10, 12, 15, 20.
Note: This setting has no effect if the DCM Question Attribute for Determining Field Width setting, which a constituent of Graphic Layout Generation - DCMS is set to DISPLAY LENGTH.
Note: You can change the set of options by modifying the DCIF CHECKBOX SIZE Installation Codelist.

Setting DCI Form Default Values for RDC Data Entry and Patient Data Reports
Configuring Data Entry and User Preferences 5-15
■ Default Landscape Form Layout Template Select the default layout template that the system uses for horizontal layouts. The list of values is populated by the templates that are available in the database.
■ Default Portrait Form Layout Template Select the default layout template that the system uses for vertical layouts. The list of values is populated by the templates that are available in the database.
■ Field Font Size Select the default font point size for fields. The option are: 8, 9, 10, 11, 12, 14.
■ Field Font Typeface Select the default font for fields; must be a monospace font. This list is based on the DCIF Typefaces table, which is not modifiable. The list includes only Courier.
■ Prompt Font Size Select the default font point size for prompts. The option are: 8, 9, 10, 11, 12, 14.
■ Prompt Font Typeface Select the default font for prompts. The options are: Arial, Courier New, Symbol, and Times New Roman.
Graphic Layout Generation - DCMSThis category has one setting: DCM Question Attribute for Determining Field Width. Select the question attribute to use to determine the size of the field:
■ If set to Length, the display area accommodates the maximum number of characters allowed for the question, without scrolling. If the page is not wide enough to accommodate the field on one line, the layout generator changes it to a multi-line field.
■ If set to Display Length, the display area may not be large enough to see the full response at one time. If the page is not wide enough to accommodate the field, the layout generator will extend the field to the page margin, but will not change it to a multi-line field.
The user can scroll to view or edit the overflow of text that might occur. A Patient Data Report (PDR) that includes such a field displays the entire value in the Overflow Section of the report.
DCI Form Generation DefaultsThe settings in this category are:
■ Default Landscape Page Definition Select a default page size for horizontal pages: either US letter (OCL_USL_L) or A4 (OCL_A4_L).
■ Default Portrait Page Definition Select a default page size for vertical pages: either US letter (OCL_USL_P) or A4 (OCL_A4_P).
Note: You can change the set of options by modifying the DCIF FONT TYPESIZE Installation Codelist.
Note: You can change the set of options by modifying the DCIF FONT TYPESIZE Installation Codelist.
Note: See also the Enforce Length as Field Size setting.

Setting DCI Form Default Values for RDC Data Entry and Patient Data Reports
5-16 Oracle Clinical Administrator's Guide
Default Settings for Showing DCM Header FieldsThis category controls the default display of DCM header field definitions.
Note that you use next category, Default DCM Header Field Prompts, to define default text for these fields' labels.
The settings for this category are:
■ Default for Show Blank Flag? If set to Y, the DCM header includes a Blank Flag field.
■ Default for Show Comment? If set to Y, the DCM header includes a Comment field, also known as the DCM Internal Comment. The DCM header data comments are available only in the Oracle Clinical Data Entry subsystem. You cannot modify the field in RDC Data Entry. Set this option to Y only if you want to produce Patient Data Reports that show RDCM header comments entered in through Oracle Clinical Data Entry.
■ Default for Show Data Comment? If set to Y, the DCM header includes a Data Comment field. The DCM header data, which is the same as internal comments, is only available in the Oracle Clinical Data Entry subsystem. You cannot modify the field in RDC Data Entry. Set this option to Y only if you want to produce Patient Data Reports that show RDCM header data comments entered in through Oracle Clinical Data Entry.
■ Default for Show Lab? Set to Y to enable displaying and entering the lab for an RDCM by default if the lab has any lab questions. If there are no lab questions for a DCM, Show Lab is set to N regardless of this setting.
■ Default for Show Qualifying Value? Set to Y to display the qualifying value. If there is a qualifying question for the DCM but there is no default value, Show Qualifying Value has a value of Y even if this value is set to N. If there is no qualifying question for a DCM, Show Qualifying Value has a value of N for the DCI module record regardless the value of this setting.
■ Default Visit Display Code Select the way you want the DCM header to display visit information. The options are:
– NAME /SUB# - Visit Name, Subevent Displayed in separate fields
– NAME+ SUB# - Visit Name, Subevent both displayed in Visit field
– NAME ONLY - Visit Name
■ Hide Visit by Default? If set to Y, the DCM header does not include the visit identifier. The system sets Visit Display Code to HIDDEN by default, overriding the previous setting. Exceptions: if there is no defined clinical planned event, or the Use DCI Date setting is not selected, you cannot select value HIDDEN for the Visit Display for a DCM, and Visit Display Code defaults to the value you set for the previous setting.
Default DCM Header Field PromptsYou control the default display prompts of DCM header field definitions in this category. You control the display of these definitions in the previous category, see "Default Settings for Showing DCM Header Fields" on page 5-16.
Note: These settings have the same list of values, which is populated by the DCIF PAGE DEFINITION Installation Codelist. Be careful to select a landscape value for the landscape setting and a portrait value for the portrait setting.

Setting DCI Form Default Values for RDC Data Entry and Patient Data Reports
Configuring Data Entry and User Preferences 5-17
■ (Internal) Comment prompt Enter prompt text for an internal comment field.
■ Blank Flag prompt Enter prompt text to identify a header indicator that a DCM is blank.
■ Data Comment prompt Enter prompt text to identify a DCM header data comment field.
■ Date prompt Enter prompt text to identify a DCM header Date field.
■ Generate DCM Header Divider? If set to Y, the system generates a line between the DCM Header and the DCM.
■ Lab prompt Enter prompt text to identify a DCM header Lab identifier field.
■ Length for (Internal) Comment Prompt Enter a number to determine the maximum number of characters a comment field can hold.
■ Length for Data Comment Enter a number to determine the maximum number of characters a data comment field can hold.
■ Length of Visit Name Enter a number to determine the maximum number of characters a Visit Name field can hold.
■ Subevent Prompt Enter prompt text to identify a DCM subevent identifier field.
■ Time prompt Enter prompt text to identify a Time field.
■ Visit Name Prompt Enter prompt text to identify a Visit Name field.
■ Visit Name+Sub# Prompt Enter prompt text to identify the Visit Name and subevent identifier field combination.
Version MigrationIf the data definitions that comprise a DCI Form change after a study has gone into production, you need to create a new layout version. These settings control whether and how to allow existing data to be migrated.
■ Allow Migration of Approved Documents? If set to Y, approved RDCIs (collected patient data) are included whenever patient RDCIs are migrated to new DCI Form versions.
■ Allow Migration of Classic RDCIs? If set to Y, patient RDCIs entered in Oracle Clinical or RDC Classic data entry are included whenever RDCIs are migrated to new DCI Form version(s).
If set to N, such RDCIs are not included in the migration. There are two other settings dictating whether or not users can open non-migrated CRFs, and if they can, whether a warning message will be issued.
– Allow HTML data entry for non-migrated CRFs This setting is available in the RDC Administration form under RDC Configuration models. If set to N, non-migrated CRFs cannot be opened in HTML data entry.
Note: This field is misnamed. It is not the length of the prompt, but the length of the comment field itself.
Note: It is not necessary to migrate such RDCIs in order to open them in RDC HTML data entry.

Setting DCI Form Default Values for RDC Data Entry and Patient Data Reports
5-18 Oracle Clinical Administrator's Guide
– Suppress Warning for Non-migrated CRFs This setting is found under the category DCI Form Runtime. If set to N, whenever a user opens a non-migrated CRF in HTML data entry, a warning message is issued: "Please Note: The data displayed on this form was originally entered using another interface."
■ Allow Migration of Locked Documents? If set to Y, locked RDCIs (documents) are included whenever patient RDCIs are migrated to new DCI Form versions.
■ Default Reason to Retain Approval Verification Select the default reason to supply if approvals or verifications are retained during DCI Form version migration.
You must create the available values in the APPROVE VERIFY RETAIN CODE Installation Codelist.
■ Default Reason to Reverse Approval/Verification Select the default reason to supply if approvals or verifications are reversed during DCI Form version migration.
You must create the available values in the APPROVE VERIFY REVERSE CODE Installation Codelist.
■ Default Setting for Reverse Approval Status If set to Y, DCI Form version migration changes approved RDCIs' approval status to Unapproved. If set to N, DCI Form version migration keeps approved RDCIs' approval status as Approved.
■ Default Setting for Reverse Verification Status If set to Y, DCI Form version migration changes verified RDCIs' verification status to Unverified. If set to N, DCI Form version migration keeps verified RDCIs' approval status as Verified.
■ Last Migrateable Entry Status Specify the highest status at which CRFs are included in version migration. The possible statuses are, in order from lowest to highest, with the Oracle Clinical term given first and the RDC equivalent following:
– Received (Blank)
– (not applicable) (Created)
– Pass 1 Started (Entry Started)
– Pass 1 Complete (Entry Complete)
– Batch Loaded (not applicable)
– Pass 2 Pending (not applicable)
– Pass 2 Started (not applicable)
– Pass 2 Complete (not applicable)
In addition to these statuses, the keyword ALL allows RDCIs at any status to migrate, and the keyword NONE disallows any RDCI from migrating.
■ User Override to Reverse Approvals? If set to Y, the user running Form Version Migration can specify whether that particular execution of Form Version Migration should reverse the status of all approved RDCIs migrated and can select a different reason for the reversal, if another option is available.
If set to N, the user running the migration cannot change the setting you selected for Default Setting for Reverse Approval Status and cannot change the default reason you set in Default Reason to Retain Approval Verification or Default Reason to Reverse Approval/Verification.
■ User Override to Reverse Verifications? If set to Y, the user running Form Version Migration can specify whether that particular execution of Form Version

Setting DCI Form Default Values for RDC Data Entry and Patient Data Reports
Configuring Data Entry and User Preferences 5-19
Migration should reverse the status of all verified RDCIs migrated and can select a different reason for the reversal, if another option is available.
If set to N, the user running the migration cannot change the setting you selected for Default Setting for Reverse Approval Status and cannot change the default reason you set in Default Reason to Retain Approval Verification or Default Reason to Reverse Approval/Verification.
Patient Data ReportThe settings in this category are:
■ Bookmark Ancillary Data Section If set to Y, the system generates bookmarks for the Ancillary Data sections of the Patient Data Report (PDR).
■ Bookmark Subevents If Y, the system generates bookmarks for Visit Subevents in the PDR.
■ Bookmark Title for Ancillary Data Section Specify a title to be used for bookmarks to the ancillary data section for a CRF (if Bookmark Ancillary Data Section is set to Y). The default value is "Ancillary Data Section." In the bookmark, the system appends the word "for" followed by the bookmark label of the CRF to the value specified. Therefore with the default value the bookmark text is "Ancillary Data Section for CRF bookmark label."
■ Exclude Overflow for Hidden Protected Repeating Defaults The Patient Data report includes all default text for repeating questions in the ancillary pages. Set to Y if you do not want to include text for repeating default questions if they are hidden.
If set to Y and the CRF response field for a protected repeating default is less than one character long, the Overflow section of a Patient Data Report does not list the default values for the field. This setting provides support for a mechanism to hide certain fields in a CRF simply by restricting the field length to less than 1 character.
■ Include Approval Information If set to Y, approval information for the CRF is included in the ancillary data section. A line appears under the title of the report stating that the document was approved, who it was approved by and the date and time of approval. If the CRF is approved but has no other ancillary data, the ancillary data page is included with just the approval information.
■ Include Audit History for Fields Not Displayed in CRF This setting has effect only when Audit History is selected when the PDR is submitted. If set to Y, the audit history for CRF fields that are not displayed in the CRF is displayed at the end of the Ancillary Data Section. It is not attached to a superscript but lists all audit information for fields that are not displayed on the form—for example, if the blank flag was changed for a CRF but the blank_flag is not displayed in the form. If set to N, the audit history is not displayed for undisplayed fields.
■ Include TOC in Page Numbering If set to Y, the cover page and table of contents are counted when determining PDR page numbers. For example, if CONMED is the first domain, and the cover page and table of contents each consisted of one page, CONMED would begin on page 3 if Include TOC in Page Numbering is set to Y and on page 1 if it is set to N.
■ PDR Bookmark Data Domain Select DCI if you want Patient Data Report bookmarks to be at the DCI level, or DCM if you want bookmarks at the DCM level. See Oracle Clinical Creating a Study for information on DCIs and DCMs. Enforce Local DB Setting is checked and cannot be unchecked. The setting cannot be changed at the study level. The default value is DCI.

Customizing Flex Fields for DCI Forms
5-20 Oracle Clinical Administrator's Guide
ValidationThis category contains one setting:
Execute TMS validation during site/patient validation?
If set to Y, TMS processing is executed during site and patient validation. If a question is defined as a TMS parent question, the value is sent to TMS immediately and, if the value can be autoclassified in TMS, the derived responses are sent back. However, during patient validation TMS processing is always performed for the study as a whole, including for sites to which the current user may not have access, and the audit trail represents the changes as having been made by the user who invoked patient validation.
To avoid this, turn off TMS validation entirely in the context of patient validation by setting this parameter to N. TMS processing still occurs during batch validation.
A new setting, Execute TMS validation during site/patient validation, is available in OC under Admin->DCI Form Local Database Settings under the Validation category. This setting can be overwritten on a per study basis by going to Design->DCI Form Local Study settings.
If set to Y, TMS processing will continue to happen as part of Validate Site or Validate Patient.
If set to N, TMS will not be invoked and TMS derived questions will not be populated until the next batch validation. (Note that Validate Study in RDC invokes batch validation.) The TMS derived responses will then be created as the person running batch validation instead of the RDC user.
In RDC Onsite, you can only validate one or more patients. In RDC Classic, you can Validate Study (which runs batch validation), Validate Site, or Validate Patient. Therefore, this setting applies to Validate Patient in RDC Onsite and RDC Classic, and to Validate Site in RDC Classic.
Customizing Flex Fields for DCI FormsThe purpose of flex fields is to allow the CRF designer to include fields in the CRF header and/or footer that display data based on functions that you define. The input parameters to the function include data specific to the current document, such as document number and investigator ID, that let you include information based on these parameters in the document.
You add flex fields to your CRF design using the Form Layout Template (FLT) Layout Editor. The system allows you to define up to ten flex fields, any or all of which can be included in an FLT. See Oracle Clinical Creating a Study for information about the procedure to insert a flex field in a FLT.
This section describes the flex fields that are defined by default and outlines the procedure you use to customize and activate additional flex fields.
■ How Flex Fields Work on page 5-22
■ Flex Field Components on page 5-22
How Flex Fields WorkEach flex field is customized through the use of a function in the package rdcpb_client.sql. When the flex field is properly configured, it can be added to the header and/or footer, using the FLT layout editor.
The function is called by the FLT layout editor.

Customizing Flex Fields for DCI Forms
Configuring Data Entry and User Preferences 5-21
■ RDC Onsite runtime uses Flex Field Name (pKey) and Value (pValue).
■ The GLE uses the Flex Field Name (pKey) and Description (pDescription) parameters to populate the
At runtime, any flex fields that are in the DCI header or footer are displayed and are populated with the value returned by a call to the function that is associated with the field. By default, if there is an error in the function, the system returns NULL. No error message is provided. You can modify the program for debugging purposes so that if there is an error in the function, the system returns an error message, which it displays in the relevant flex field.
There is no separate audit history for flexfield values that change due to modifications of the underlying function call or as the result of changes to any data points upon which a function is based.
Flex Field ComponentsThe functions associated with flex fields are declared in rdcps_client.sql and are written in rdcpb_client.sql. These files are copied to the $RXC_INSTALL directory during the server installation. They are executed against the database when you upgrade or install it.
The flex field functions are defined as follows:
■ Function name is of the form "FLEX_FIELDn", where n is an integer from 1 to 10, inclusive
■ Flex field name is of the form "RDCI_FLEX_FIELDn, where n is an integer from 1 to 10, inclusive, and links the flex field name to the function name.
The parameters that are available in the flex field functions are listed and described in
Table 5–3 Flex Field Function Parameters
Parameter Description
pTestProd Describes the current mode; value is "P" if called from production mode, "T" if called from test mode. See the shipped functions for examples of usage.
pRdcPopulating Describes if the function is called during runtime or from the layout editor.
pUserId The Oracle account of the person logged in to the system.
pUserRole The RDC role of the user who is logged in to the system. If the user has multiple roles, it takes the first one on the list.
pStudy The name of the current study.
pStudyId The ID associated with the current study.
pStudyVerId The version of the live study.
pDocNum The document number of the CRF.
pBook The name of the book to which the CXRF is assigned.
pBookId The Book ID of the book to which the CRF is assigned.
pDci The name of the DCI for the CRF.
pDciId The DCI ID of the DCI for the CRF.
pSite The site of the CRF.
pSiteId The Site ID of the site for the CRF.

Customizing Flex Fields for DCI Forms
5-22 Oracle Clinical Administrator's Guide
pRdcPopulatingThis parameter returns "Y" if it is called from the runtime environment. It returns "N" if it is called from the layout editor. When it is set to "N", most of the other parameters are "NULL". The select statements that you use to return a flex field value should only be executed when the value of this parameter is "Y". SQL statements based on the parameters that process successfully during runtime (pRdcPopulating = 'Y') will generally fail when called from the layout editor (pRdcPopulating = 'N'). See FLEX_FIELD1 and FLEX_FIELD2 in rdcpb_clent.sql for examples of this parameter's usage.
Shipped FunctionsOracle Clinical ships with two "starter" functions and seven undefined functions:
1. FLEX_FIELD1 – Patient Initials
2. FLEX_FIELD2 – Investigator Name
3. FLEX_FIELD3 through FLEX_FIELD10 – Null
The purpose of the shipped functions is to give you an example of how to write the functions to return values based on input parameters that come from the current document. You can modify the undefined functions or the defined functions to create flex fields functions that match your particular business needs.
The functions are coded so that exceptions in the SQL statements are handled silently. This ensures that errors in flexfields do not prevent RDC data entry. For de-bugging, Oracle recommends that you use opa_trace.tableon, opa_trace.debugon, and opa_trace.debugmsg(msgstring) functions to record debug information in the opa_debug table.
The select statements used for deriving values based on the key parameters (from pStudy to pCpeName) are inside the 'IF' clause, "if pRdcPopulating='Y'". If you put the statements outside of this 'IF' clause, the function will fail when called from the layout editor when these values are null.
pInv The name of the investigator for the site.
pInvId The investigator ID of the investigator for the site.
pPatient The patient associated with the CRF.
pPatientId The patient ID of the patient associated with the CRF.
pCpeName The name associated with the clinical planned event (CPE) for the CRF.
pCpeId The CPE ID of the CPE for the CRF.
pSubNo The subevent number for the CPE.
pKey The name of the flex field, for example, "FLEX_FIELD1".
pValue The value that is displayed in the flex field. This is only applicable when
pDescription The prompt that is used to designate the flex field in the
Table 5–3 (Cont.) Flex Field Function Parameters
Parameter Description

Customizing CRF Column Headers in the RDC Classic
Configuring Data Entry and User Preferences 5-23
Customizing CRF Column Headers in the RDC ClassicYou can customize the three rows of information in the CRF Column Header in the RDC Spreadsheet using functions that are supplied.
■ Default Behavior on page 5-24
■ Functions Used to Modify CRF Column Headers on page 5-25
Figure 5–2 CRF Column Header for Planned and Unplanned CRFs
Default BehaviorThe CRF Column header consists of three lines of information, which, when taken together, uniquely identify a set of CRFs. When a column intersects a Patient row, it results in a CRF cell, which uniquely identifies a CRF for which data has been, or will be, collected for a specific patient.
By default, the information displayed in a CRF Column header is:
■ Line 1 – Visit name; if the visit is unplanned (such that the subevent is not zero), it also includes the subevent number, using dot notation
■ Line 2 – Page number
■ Line 3 – DCI/CRF name
The character width of Line 1 is 11 characters. If the display value is greater than 11 characters, it is truncated. If the display value is 11 characters or less and the font size and width of characters cause the value to extend beyond the physical length of 11 characters, the user must scroll to view the entire value.
Lines 2 and 3 are not truncated. If the value of either exceeds the physical width of the column header, it is wrapped to a new line.
Functions Used to Modify CRF Column Headers You have the option to modify any or all of the CRF Column Header lines using a separate set of functions.
FunctionsYou have the option to modify any or all of the CRF Column Header lines using a separate set of functions, which are included in the file rdcpb_client.sql. When you customize all three lines, the values are displayed in full and are not truncated. Wrapping may occur depending on the font, the font size, and the width of the
Note: Scrolling in this case refers to placing the insertion point in the row and using the arrow keys to move it to the right.

Customizing Online Help
5-24 Oracle Clinical Administrator's Guide
characters returned in the value. If wrapping occurs on either Line 1 or 2, the subsequent lines are displayed lower down in the CRF Column Header area. This may result in making all or part of the Line 3 value unviewable in the RDC Spreadsheet.
Although you have the option of customizing all three lines of the column header, if the combined length of text for the three values exceeds 50 characters, the system displays a warning message (number 988300) and the combined text is truncated at 50 characters. The RDC user will then have to exit the application.
The three functions that can be customized are:
1. GetReadableColumnHeaderLine1 – customize Line 1 (Visit Name)
2. GetReadableColumnHeaderLine2 – customize Line 2 (Page No)
3. GetReadableColumnHeaderLine3 – customizes Line 3 (DCI/CRF Name)
All three functions have the same input parameters, which are as follows:
Customizing Online HelpOracle Clinical provides utilities for implementing a customized version of the system's extended help (Xhelp), which is HTML-based and context-sensitive. By setting up custom help through the system, you can activate a button in Oracle Clinical's field help window that, when clicked by an end user, displays your information. The system determines the user's environment by determining the form, block, and task for the current focus. You can activate or deactivate both Oracle Clinical's help (the More button) and your own (the Custom Help button).
Oracle Clinical's help system has a three-frame HTML interface that has embedded Java script macros and XML metadata. However, the application should work with any file type that your computers recognize. You can write topic files to suit your needs and completely ignore our help system, or you can copy our system into a new directory, rewrite the topic files of your choice, and then configure calls to them.
■ Modifying Calls to Online Help Topic Files on page 5-26
Note: The GetReadableColumnHeaderLine1 function takes precedence over GetReadableVisitName. That is, if both functions are customized, the system displays the value returned by GetReadableColumnHeaderLine1.
vTabType Spreadsheet view tab type; like VISIT, STUDY or PHASE
vStudy The name of the study
vBook The name of the book
vVisit The name of the visit
vSubno The subevent number for the visit.
vPage The page number
vDciSName The short name of the DCI
bPlanned A boolean operator that indicates whether the CRF is planned or unplanned.
vDefault The default value for the line that would normally be displayed in the RDC Spreadsheet.

Customizing Online Help
Configuring Data Entry and User Preferences 5-25
■ Copying Xhelp Topic Files on page 5-27
■ Creating Custom Help Files on page 5-28
Modifying Calls to Online Help Topic FilesYou can create customized HTML online help files with a context sensitive call from any window in Oracle Clinical. To see your online help, user click Help and then Custom.
You must create your own HTML files, put them in an accessible location, and insert the URL for the Help for each window in the OCL_DOC_INDEX table in the Developer's Toolkit.
The Oracle Clinical Help engine determines which topic file to open by comparing the user's current environment to environments listed in table OCL_DOC_INDEX. The environment is the combination of module, task, and block values. You change these calls with the Document Index form. To access this form, you must have access to the Oracle Clinical Developer's Toolkit. Navigate to Admin, then Client Doc Index. The Maintain Client DOC Index window displays. It has these fields:
■ Module Name: The code module, or form name. You can find this value in any form by navigating to Action, then Environment.
■ Task Name: A case-sensitive string that often resembles the screen name. Many forms have task names that distinguish browse mode from write mode. You can find this value in any form by navigating to Action, then Environment.
■ Block Name: A subdivision within the form. Some forms have one block. Others have many. You can find this value in any form by navigating to Action, then Environment.
■ Field Name: You can make calls that are context sensitive to the field level. If you leave this field blank, the system drops through to the block level. You can find this value by invoking Help and reading the value from the field window.
■ Show Oracle Clinical Help: This check box controls the More button. If you un-check it, you deactivate Oracle Clinical's packaged help topic for the current environment.
■ Oracle Clinical Doc Name: This is Oracle Clinical's topic identifier. Our calls contain several parameters for invoking our help system. The Oracle Clinical Doc Name is the second half of a URL. The first half is the value of a Web Server registry variable. The help engine concatenates the two parts, invokes a new browser instance, and passes the URL to the browser.
■ Show Client Help: This check box activates the Custom button.
■ Client Doc Name: This is the value you enter to create a custom call to your help topic. The Client Doc Name is the second half of a URL. The first half is the value of Web Server registry variable OPA_CUSTOM_DOC_DIR.
■ Product: The value can be AERS, RXA, RXC, or TMS.
To modify a call to the Xhelp topic files:
Note: Context-sensitive calls to custom help is available from within Oracle Clinical only. There is no similar mechanism for RDC.

Viewing Xhelp Without Oracle Clinical
5-26 Oracle Clinical Administrator's Guide
1. Navigate to Admin and select Client Doc Index to open the Maintain Client DOC Index window.
2. Query the module, task, or block name field for the form with the help you want to modify. (This information is available by opening the form and choosing Environment in the Action menu to display the Environment window.)
3. Set the Show Oracle Clinical Help and Show Client Help check boxes as necessary for your system.
4. Enter your path/filename in the Client Document Name field, in the same row as the environment it references.
Copying Xhelp Topic FilesIf you copy the shipped Xhelp to a separate directory, you can customize the content in those files, yet retain their HTML hyperlinks. You then activate your system by setting your OPA_CUSTOM_DOC_DIR registry string value to point to the duplicate directory.
Creating Custom Help FilesThe Oracle Clinical Xhelp system provides flexibility to link to files that you create from within the online help. However, if you do create custom help files do not place them under the \html\xhelp directory. This directory may be over-written during product and/or documentation upgrades. Oracle suggests you create another directory under \html, for example, \html\custom_xhelp.
Viewing Xhelp Without Oracle ClinicalIn your browser, place a bookmark, or set as a favorite, the following URL:
http://computer_name.domain/opa46/xhelp/oc/index.html
The wwhelp.htm file provides links to all the Xhelp topics for Oracle Clinical. If you cannot find this file, contact your system administrator. Once you locate Xhelp, you can create a shortcut to the home page — or any other topic — for convenience.
Note:
■ Calls are case sensitive. Windows Explorer may not give an accurate view of the case of a filename, or a directory name.
■ Browsers use forward slashes (/) as directory separators. If a call displays the HTML file at the end of the file, the call probably contains a backslash (\).
Note: If you placed custom help files in the \html\xhelp\oc or the \html\xhelp\rdc directory trees in earlier versions of Oracle Clinical/RDC, you must create backups of these directories during the upgrade process.
Note: If you do not have Oracle Webcache set up in your environment, specify port number 7777 in the above URL.

6
Configuring Data Extract 6-1
6Configuring Data Extract
This section includes the following topics:
■ Configuring Default Installation Data Extract Settings on page 6-1
■ Setting Values in Data Extract-Related Reference Codelists on page 6-5
■ Creating Tablespaces for Data Extract Tables and Indexes on page 6-5
■ Customizing Data Extract Views on page 6-7
■ Generating Data Extract Views on page 6-10
■ Enabling the View Builder and Converting Views on page 6-12
■ Controlling Access to Data Extract Views on page 6-12
Configuring Default Installation Data Extract SettingsIn the DX Installation Configuration window, you determine the default settings for new studies. To launch the Data Extract Installation Configuration window, navigate to Admin and select DX Installation Configuration.
The DX_CONFIG installation reference codelist includes exactly the same settings. When you change a setting here, the change is reflected in the reference codelist. When you change a setting there, the change is reflected here.

Configuring Default Installation Data Extract Settings
6-2 Oracle Clinical Administrator's Guide
Figure 6–1 Data Extract Installation Configuration Window
You can enable or disable the attributes described in the upper part of the window by selecting or clearing the appropriate box. The lower part of the window enables you to reduce the size of comments and the DVG long value, and to choose the default Key Template and the default Key Template domain.
The settings in the Data Extract Installation Configuration window are:
Separate Oracle and SAS Names?When enabled, you can specify different names for Oracle and SAS view columns. Oracle views take the long name; SAS takes the short name. The default is deselected.
In earlier versions of SAS (such as version 6.12), the maximum length for variables (columns or views) was 8 characters, while Oracle names could be as long as 30 characters. If you wanted to keep the same names for the Oracle and SAS variables (for consistency or some other business need), you had to choose a name short enough to fit in the SAS variable length. If you wanted to have a longer Oracle name, the names had to be different. Data Extract creates the Oracle and SAS views based on the decision you make in this field.
DCM Default Views Are Linked to Source DCM as Default Condition?This setting controls whether a view definition is linked to its source DCM if the view definition's link mode is DEFAULT. If this setting is enabled, a view definition with DEFAULT link mode will be linked to its DCM, meaning that changes to the DCM will propagate to the view definition as well. If this setting is not enabled, these view definitions are not linked, so they will not change when the source DCM changes.

Configuring Default Installation Data Extract Settings
Configuring Data Extract 6-3
Enable Edit of Active Key Templates?Enable Edit of Active Extract Macros?Enable Edit of Active View Templates?Each of these settings enables you to choose whether users can modify one type of active component in a view definition. Your organization may want to freeze definitions like Key Templates, extract macros, and View Templates that are used across many view definitions in the global library.
Enable Selection of Aggregate, Nondefault Key Template?Choose this setting if you want to be able to choose alternative Key Templates for different view definitions within a study.
Include Validation Status in Default View Definition?Include DVG Sequence Number in Default View Definition?Include DVG Short Value in Default View Definition?Include DVG Long Value in Default View Definition?Include Thesaurus Term1 in Default View Definition?Include Thesaurus Term2 in Default View Definition?Include Thesaurus Term3 in Default View Definition?Include Full Value Text in Default View Definition?These settings all control attributes that you might want to include in the default view definition. All are part of what you can add through the Extended Attributes button when defining a simple question in the Global Library, or through the Template Attributes button when building a template in the Maintain View Templates window.
■ Validation Status is an attribute of the RESPONSES table. By choosing to display another attribute, you can tell how clean your data is. The default is deselected.
■ The DVG Sequence Number indicates the order the discrete values appear in the list of values for data entry. The DVG Short Value is the data as entered. The DVG Long Value is a longer form than the short value of the data as entered. You need at least one, but you may pick all, of the following: the DVG Long Value, the DVG Sequence Number, or data values for the DVG questions.
■ The Thesaurus Term configuration preferences involve the same kinds of choices as for the DVG, except that data can come from several different tables. You must still choose at least one term, and you may choose all three. The default is selected.
■ Oracle Clinical stores valid responses in the Value Text field, and invalid ones in the Exception Value Text field. When the response is valid, the Full Value Text field contains the Value Text; when it is invalid, Full Value Text contains the Exception Value Text.
Enable Update of SAS and Oracle Column Names?When you bring a question from the Global Library into a View Template, the SAS column names and Oracle column names in the View Template default to the names defined in the Global Library. If this option is selected, you can change the names at the View Template level; if not selected, you cannot modify the names from their Global Library-derived defaults. The default setting is deselected.
Enable View Builder as Default in New Studies?The View Builder enables you to automatically generate views of the data and metadata included in a single Data Collection Module (DCM). If this setting is enabled, the VB Enabled? setting in the Clinical Study States window is selected by default for new studies.

Configuring Default Installation Data Extract Settings
6-4 Oracle Clinical Administrator's Guide
Use DCM Question-Specific DVG Subset for DVG Attributes?This setting determines whether the Discrete Value Group (DVG) attributes that are included in the view come from the DVG subset that has been assigned to the DCM question or from the base DVG subset. Selecting this box makes the views include the DCM question DVG's subset information; clearing the box makes the views include the base subset information. For information on DVGs and DVG subsets, see the chapter on questions in Oracle Clinical Creating a Study.
Use DCM SAS Label as Seed for Attributes in Default View Definition?This setting determines which SAS labels the system uses for all the attribute columns of a default view definition. By default, this setting is not enabled, so the SAS labels of the attribute columns are created using the SAS label of the question attributes in the Global Library. However, when you enable this setting, the system creates the SAS labels of the attribute columns of the View Template within the context of a view definition by using the corresponding DCM question's SAS label as the seed when the View Template Question is mapped.
Max Length of Audit CommentThe default Audit Comment length is 200 characters. You can reduce this value if you typically use no more than a few characters for this comment.
Max length of Data CommentThe Oracle Clinical default Comment length is 200 characters. You can reduce this value if you typically use no more than a few characters for this comment.
Max Length of DVG Long ValueThe default DVG Long Value length is 200 characters. You can reduce this value if you typically use no more than a few characters for this comment.
You can also create the DVG Long Value column with a maximum width equal to the DVG values specified for a given question. This behavior is enabled when the maximum length of the DVG Long Value is set to zero.
Default Key TemplateThe default Key Template for custom and default view definitions. You can choose a new default Key Template from the list of values.
Data extract users can choose a non-default Key Template for their view definition only if the Enable Selection of Aggregate, Nondefault Key Template? box is selected.
Note that study-specific Key Templates achieve the same goal. You can supply a study-specific Key Template in the Clinical Study States window (from the Conduct menu, select Security, then select Clinical Study States).
Key Template DomainThe Key Template Domain indicates the Global Library domain in which the default Key Template is stored. You cannot assign or change the domain of the default Key Template in this window.
Build Fast Views?Fast views are created with a different structure from other data extract views. While functionally equivalent, the fast view structure provides better performance when querying the views, especially for queries against response values. If set to Y, the system builds fast views when possible but builds regular views if the view structure

Creating Tablespaces for Data Extract Tables and Indexes
Configuring Data Extract 6-5
is incompatible with the fast view approach. This is the case with cross-DCM views and with views based on key templates that aggregate across key columns such as patient, visit or received DCM. The system handles cross-DCM views automatically, but for aggregate views you must enter the text "AGGREGATE" in the Status Comment field of the key template. The system then successfully builds a regular view structure.
If you are encountering performance issues--queries are running for several minutes--when querying large data extract views, you should consider using fast views.
Setting Values in Data Extract-Related Reference CodelistsCheck the settings of the following reference codelists, described in Chapter 7, "Reference Codelists":
■ DX_CONFIG Installation Codelist
■ DX_EXTENDED_ATTRIBUTES Installation Codelist
■ DX_INDEX_TABLESPACE Installation Codelist
■ DX_KEY_NAME Installation Codelist
■ DX_ROLES Installation Codelist
■ DX_VIEW_TABLESPACE Installation Codelist
Creating Tablespaces for Data Extract Tables and IndexesThis section includes the following topics:
■ Creating Tablespaces on page 6-5
■ Entering Tablespace Names in Reference Codelists on page 6-6
■ Creating Data Extract Access Accounts Using Local Tablespaces on page 6-6
Creating TablespacesYou must create tablespaces to contain the tables and indexes required for data extract. Oracle recommends creating a separate tablespace for tables and for indexes, and for creating each tablespace:
■ as locally managed
■ with autoallocate on
■ with automatic segment space management
■ with a block size of 16 kb
Use the following command:
CREATE TABLESPACE dxtables DATAFILE '/u02/oracle/data/dxtables01.dbf' SIZE 500M EXTENT MANAGEMENT LOCAL AUTOALLOCATE SEGMENT SPACE MANAGEMENT AUTO;
For further information, see the Oracle Database Administrator's Guide.

Customizing Data Extract Views
6-6 Oracle Clinical Administrator's Guide
Entering Tablespace Names in Reference CodelistsTo enable users to create tables using the Data Extract View Builder, you must specify to which tablespace and tablespace index you want to add tables for each Study Access Account. You specify these tablespaces and index tablespaces in two installation reference codelists that store data extract tablespace information:
■ DX_INDEX_TABLESPACE Installation Codelist
■ DX_VIEW_TABLESPACE Installation Codelist
Creating Data Extract Access Accounts Using Local TablespacesYou must create a Data Extract Access Account (under Conduct, navigate to Data Extract, then Study Access Accounts) and specify a tablespace for the account's tables and for its indexes. When the tablespace is defined as locally managed, the View Builder creates tables and indexes for that account as follows:
■ The extract tables are created in a single step rather than the previous approach that created a temporary table and then, after determining the size of the table, a second permanent table. This feature capitalizes on the ability to use locally managed tablespaces with the AUTOALLOCATE feature that automatically sizes the table.
■ The tables are created using the Oracle database table compression feature. Since data extract tables tend to have many repeated keys and values, this should result in significantly less space usage and more efficient data access.
■ The indexes are created with leading key compression that results in significantly more compact and efficient indexes.
■ Index statistics are now computed as the indexes are created, which results in faster statistics calculation.
■ Repeated account maintenance of the ROLLSNAP account will take advantage of the more efficient space allocation method used in Locally Managed Tablespaces when it drops and recreates tables.
■ Tables are created with the NOLOGGING attribute. This reduces the table creation time significantly by avoiding writing to the redo logs. The price of this option is that recovery from database failure using redo logs will not recreate extract tables that have not been otherwise backed up and restored. Since the tables can be recreated from the extract views at any time by rerunning account maintenance in FULL, this trade-off is usually acceptable. However, if you do not want to use the NOLOGGING behavior, you can override it by creating the locally managed tablespace with the FORCE LOGGING attribute.
Customizing Data Extract Views Oracle Clinical ships with two scripts in the INSTALL directory that you can use to customize data extract views.
Note: You must also remove invalid values from the reference codelists to prevent users from selecting them for study access accounts. See "DX_INDEX_TABLESPACE Installation Codelist" on page 7-27 and "DX_VIEW_TABLESPACE Installation Codelist" on page 7-27 for information.

Customizing Data Extract Views
Configuring Data Extract 6-7
■ rxcptdxvb.sql populates the data extract tables EXTRACT_KEYS and EXTRACT_MACROS and creates the standard key template.
■ pop_vb_static_views.sql creates the standard view templates, which include views for responses and RDCMs.
For example, follow these instructions to make the investigator's last name available to an extract macro:
1. Back up the scripts in the directory $RXC_INSTALL that are used to customize data extract views:
■ pop_vb_static_views.sql
■ rxcptdxvb.sql
2. Bring up pop_vb_static_views.sql in a text editor.
3. Make the changes marked in bold:
… REM REM ORACLE TEXT FOR NEW STYLE RDCMS_VIEW REM DECLARE LTEXT long; BEGIN /* SPR24128 JRees 9/24/98 Adding hints to security checks */ LTEXT := 'create view \0.rdcms_view as select /*+ ORDERED USE_MERGE(css) INDEX(rdcm RECEIVED_DCM_DCM_CS_NFK_IDX\4) INDEX(css CLINICAL_STUDY_STATE_IDX) <- Remove '*/' from the end of this line. /* to add additional tables, add index hint for joining */ /* for example, for RDCIs add: */ /* (note that \4 adds the T for test mode) */ /* INDEX(RDCI RECEIVED_DCI_PK_IDX\4) */ /* for example, for OCL_Investigators, add: */ INDEX(INV OCL_INVESTIGATOR\4_PK_IDX) */ <- Remove '/*' from the start of this line. rdcm.received_dcm_id, rdcm.dcm_id, rdcm.dcm_subset_sn, rdcm.dcm_layout_sn, rdcm.actual_event_id, rdcm.dci_id, rdcm.received_dci_id, rdcm.received_dcm_entry_ts, rdcm.end_ts, rdcm.entered_by, rdcm.dcm_date, rdcm.dcm_time, rdcm.received_dcm_status_code, rdcm.qualifying_value, rdcm.accessible_ts, rdcm.log_in_ts, rdcm.last_data_change_ts, rdcm.data_lock_flag, rdcm.sn, rdcm.document_number, rdcm.modification_ts, rdcm.modified_by,

Customizing Data Extract Views
6-8 Oracle Clinical Administrator's Guide
rdcm.subevent_number, rdcm.investigator_id, rdcm.investigator, inv.last_name, <- Add this line. Remember the comma. rdcm.clin_plan_eve_id, rdcm.clin_plan_eve_name, rdcm.visit_number, rdcm.site_id, rdcm.site, rdcm.lab_id, rdcm.lab, rdcm.lab_range_subset_num, rdcm.LAB_ASSIGNMENT_TYPE_CODE, rdcm.patient_position_id, rdcm.patient, rdcm.clinical_study_id /* to add additional columns, add here, */ /* for example, for Received_DCIs, add: */ /* , RDCI.FIRST_BOOK_PAGE */ /* for example, for OCL_Investigators, add: */ /* , INV.COUNTRY */ \5 /* to customize, extend from list. */ /* for example, to add RDCIs add: */ /* note: the \4 adds the T for test account */ /* , RECEIVED_DCIS\4 RDCI */ /* for example, to add OCL_Investigators add: */ , OCL_INVESTIGATORS\4 INV <- Remove '/*' and '*/" from this line.WHERE \1 /* use \6 to access as_of_ts for account-specific */ /* time restriction, */ /* for example, to join RDCIS, add: */ /* AND RDCM.RECEIVED_DCI_ID = RDCI.RECEIVED_DCI_ID */ /* AND RDCI.END_TS > \6 */ /* AND RDCI.RECEIVED_DCI_ENTRY_TS <= \6 */ /* for example, to join OCL_Investigators, add: */ AND RDCM.INVESTIGATOR_ID = INV.INVESTIGATOR_ID <- Remove '/*' and '*/" from this line. and (exists /* account is super-user */ (select /*+ index(oa ORACLE_ACCOUNT_PK_IDX) */ …
4. Save the changes made to the pop_vb_static_views.sql file.
5. To add the column as an Extract Key, bring up rxcptdxvb.sql in a text editor.
6. Make the changes marked in bold:
delete from extract_keys where OC_INTERNAL_NAME in ( '/STUDY', 'DCMS.SUBSET_NAME', 'DCMS.SUBSET_NAME', 'DCMS.DCM_SUBSET_SN', 'RDCM.DOCUMENT_NUMBER', 'RDCM.SITE', 'RDCM.INVESTIGATOR', 'RDCM.LAST_NAME', <- Add this line. 'RDCM.PATIENT', 'RDCM.ACCESSIBLE_TS',

Customizing Data Extract Views
Configuring Data Extract 6-9
'RDCM.LOG_IN_TS', 'RDCM.LAST_DATA_CHANGE_TS', 'RDCM.DATA_LOCK_FLAG', 'RDCM.CLIN_PLAN_EVE_NAME', 'RDCM.DCM_DATE', 'RDCM.DCM_TIME', 'R.REPEAT_SN', …
7. Find the 'insert into extract_keys' statement for RDCM.DCM_DATE and duplicate it to create an insert statement for the RDCI.COMMENT_TEXT. Modify the new insert statement as shown in bold:
… /* adding Investigator's last name extract key */ <- Add this line. insert into extract_keys (EXTRACT_KEY_ID, OC_INTERNAL_NAME, ORACLE_NAME, SAS_NAME, SAS_LABEL, SAS_FORMAT, DATA_TYPE_CODE, LENGTH) values( extract_key_seq.nextval, 'RDCM.LAST_NAME', <- Change this line. 'INVNAME', <- Change this line. 'INVNAME', <- Change this line. 'INV Name', <- Change this line. ' $20.', <- Change this line. 'CHAR', 20); <- Change this line. …
8. Save the changes made to the rxcptdxvb.sql file.
9. To populate the data extract tables with the customised definitions, log in to SQL*Plus as RXC and run both scripts:
SQL> start pop_vb_static_views.sql SQL> start rxcptdxvb.sql
Note: The new key is added as RDCM.LAST_NAME and not INV.LAST_NAME. In this context RDCM is the alias for the RDCMS_VIEW view to which we added the new column by modifying pop_vb_static_view.sql.
The rxcptdxvb.sql file already contains the required modifications for adding FIRST_BOOK_PAGE from RECEIVED_DCIS and COUNTRY from OCL_INVESTIGATORS. No further modification of this file is therefore required for these columns if you have added them to pop_vb_static_view.sql.

Generating Data Extract Views
6-10 Oracle Clinical Administrator's Guide
10. To confirm that the INVNAME extract key and macro are now available for use, Log into Oracle Clinical and navigate to Glib, then Data Extract View Builder, then Extract Macros and press F8 to query. INVNAME should now be included.
11. To add the extract key and extract macro for the new column to a Key Template, . Query for the template to which
a. Navigate to Glib, then Data Extract View Builder, then Key Templates.
b. Query for the template to which you want to add the macro.
c. Click on Key Columns.
d. In an empty field, press F9 to see the list of values.
e. Select INVNAME from the list.
f. Save.
The investigator's last name will appear as column INVNAME in all data extract views created with this Key Template.
Generating Data Extract ViewsThe gen_views utility performs the same operations as the Maintain Data Extract Views batch job within Oracle Clinical (under Conduct select Data Extract and then Data Extract Views) for all accounts in FULL maintenance mode.
Use the gen_views utility to regenerate views for all accounts in one or all studies. For example, if a change is made to a key template, all views based on that template in that study must be regenerated for all the study access accounts.
The general sequence for this task is:
■ run opa_setup, which defines the RXC_TOOLS directory
■ change to the RXC_TOOLS directory
■ run gen_views.
Variables include:
■ study enter either the name of a study or ALL for all studies
■ sas_queue enter the name of the queue where SAS jobs execute or NULL (on Windows only)
■ view_creation_mode valid values are: DATA_ONLY, COMBINED_VIEW, or SEPARATE_VIEW.
Operating system-specific instructions follow:
Note: Note: If when running rxcptdxvb.sql you get ORA-0001: Unique constraint (RXC.EXTRACT_KEYS_ORA_UK_ID) violated then perform the following as RXC to clean up:
SQL> delete extract_keys;SQL> commit;
Re-execute rxcptdxvb.sql and continue with the next step.

Enabling the View Builder and Converting Views
Configuring Data Extract 6-11
Running gen_views on UNIX PlatformsTo run gen_views on a UNIX platform:
1. Log on to the server in your user account and set the environment:
where db_name is a database instance name and code_env is a code environment designation.
2. Change directories to $RXC_TOOLS.
3. Set the output directory:
4. Run the script. For example:
% gen_views ALL UNIX DATA_ONLY
Running gen_views on WindowsTo run gen_views on Windows:
1. Log on to the server using your local account.
2. In an MS-DOS window, set the server environment:
set p1=db_name
set p2=code_env
opa_setup
where db_name is a database instance name and code_env is a code environment designation.
3. Change directories to %RXC_TOOLS%
4. Set the output directory:
set rxc_log=user_log_folder
5. Run the command file. For example:
gen_views ALL NULL DATA_ONLY
Enabling the View Builder and Converting ViewsThe View Builder was an enhancement in Oracle Clinical Release 3.1. If you are still using pre-View Builder views, you can convert them to View Builder-style views by running two scripts, vb_pop_view and enable_vb, for each study.
Shell Command sequence
C Shell opa_setup db_name code_env
Bourne p1 = db_namep2 = code_env. opa_setup
Shell Command sequence
C Shell setenv RXC_LOG usr_log_dir
Bourne RXC_LOG=usr_log_direxport code_env

Controlling Access to Data Extract Views
6-12 Oracle Clinical Administrator's Guide
Converting ViewsRunning vb_pop_view converts a study's existing old-style data extract views to the new view builder style. For example:
cd $RXC_INSTALLsqlplus rxc/notrxcstart vb_pop_view
The script prompts you for the name of the study.
Enabling the View Builder in a Study To make view builder-style the default for future views in a study, use the enable_vb.sql script. For example:
cd $RXC_INSTALLsqlplus rxc/notrxc start enable_vb.sql
When you execute this script it performs the following actions:
■ prompts you for the name of the study.
■ updates the CLINICAL_STUDY_STATES table, setting VB_ENABLED to "Y".
■ sets the default key template in CLINICAL_STUDY_STATES to STANDARD.
After running enable_vb, commit the changes to the database, then rerun view creation.
You can also enable view builder interactively for individual studies within the Oracle Clinical interface. However, using the command line may be more convenient.
Controlling Access to Data Extract ViewsAccess to individual views at the access account level can be controlled by granting access via roles. You can create your own company-specific roles so that appropriate choices appear in the list of values in the View Definition window.
Do the following:
1. Create as many database roles as you need; see "Creating Custom Database Roles" on page 2-6.
2. Add these roles to the DX_ROLES Installation Codelist. All the roles in that reference codelist appear in the list of values in the View Definition window.
3. Grant the database roles to users who need them; see "Granting Additional Database Roles to User Accounts" on page 1-16.
Note: You can run vb_pop_view only once per study.

7
Reference Codelists 7-1
7Reference Codelists
This section, which describes Oracle Clinical reference codelists, includes the following topics:
■ Overview of Reference Codelists on page 7-1
– Working in the Maintain or Query Reference Codelists Windows on page 7-2
– Adding a Value to a Reference Codelist on page 7-5
– Modifying a Value in a Reference Codelist on page 7-6
– Running the Reference Codelists Report on page 7-6
■ Local Reference Codelists on page 7-7
■ Installation Reference Codelists on page 7-20
■ Design Installation Reference Codelists on page 7-33
■ System Reference Codelists on page 7-34
Overview of Reference CodelistsOracle Clinical uses reference codelists for a wide range of functionality. Certain codelists are used internally by the application, while others set the values the system presents to users performing various tasks in the application. There are different types of reference codelists that are used by different subsystems. Some types of codelists are set during the installation of the application and others are set by users during various tasks.
Although the values of certain codelists are listed and described in this section, you can quickly view the values of any codelist by running the Reference Codelist report. See "Running the Reference Codelists Report" on page 7-6 for instructions.
Depending on your assigned roles, you can perform the following types of reference codelist maintenance tasks:
■ Add a new value to a local, installation, or design installation codelist.
■ Activate or deactivate a codelist value for a local, installation, or design installation codelist.
Accessing and Modifying Reference CodelistsYou may have authority to access only some of the types of codelist values. In any case, you cannot create new codelists; you can only add values to existing codelists.
You may modify only the following types of codelists:

Overview of Reference Codelists
7-2 Oracle Clinical Administrator's Guide
■ Installation codelists, such as the type codes for clinical planned events, DCIs, DCMs, and question groups.
■ Design installation codelists, which are used to setup treatments and study designs, should be maintained by clinical (rather than system administration) personnel. The design installation codelists are actually a subset of the full set of installation codelists. If you choose, you can grant access to the design installation codelists for users to whom you would not grant access to the full set of installation codelists.
■ Local codelists specific to your site within the company, such as the codelist for batch and print queue names.
System codelists are used internally by Oracle Clinical, and cannot be modified.
Viewing Original Reference Codelist SettingsTo see the initial settings for a codelist shipped with Oracle Clinical, go into the Developer's Toolkit, Maintain All Codelists, and query for a codelist. You can access all types of codelists through this window, including local, installation, design, and system codelists.
Working in the Maintain or Query Reference Codelists WindowsWhen you query or maintain a codelist, the system displays the Reference Codelists window. Figure 7–1, "Maintain Reference Codelists Window" depicts a typical "maintain" reference codelist window, which allows you to modify the values in a codelist.
Figure 7–1 Maintain Reference Codelists Window

Overview of Reference Codelists
Reference Codelists 7-3
AccessYou access the reference codelist windows through the menu paths that are available under the Admin, Reference Codelists path. The available selections are:
■ Local Codelists
■ Qry Local Codelists
■ Installation Codelists
■ Qry Installation Codelists
■ Design Installation Codelists
■ Qry Design Installation Codelists
■ Qry System Codelists
The selections that are prefixed "Qry" open the window in query mode, that is, you can view the codelists only. The other selections open the window in maintenance mode, in which the system allows you to modify the codelist. Note that you can only open the System Reference Codelists in query mode because that set of codelists cannot be modified.
ComponentsThe reference codelist windows consist of two sections: an upper section that identifies the current codelist and provides information about it; and a lower section that lists the values associated with the current reference codelist. Table 7–1, " Components of the Reference Codelist Section" describes the components that comprise the upper section of the window.
The lower portion of the window contains the values that are associated with the current reference codelist. In the maintenance windows, you use this section to modify the values. Table 7–2, " Components of the Reference Codelist Values Section" describes the components in the lower portion of the window.
Table 7–1 Components of the Reference Codelist Section
Component Type Description
Name Field Displays the name of the current reference codelist. In addition, you can use this field to query for a specific codelist.
Active Check box Specifies if the codelist is active. You cannot update this component.
Default Field Lists the default value, which is the value for which the Default check box in the Values section is selected.
Description Field Displays a system-specified description of the current reference codelist.
Type Field Displays the type of current codelist.
Data Type Field Displays the data type for the values in the codelist.
Max Short Len Field Displays the maximum number of characters allowed for the Short Value of each reference codelist value.
Max Long Len Field Displays the maximum number of characters allowed for the Long Value of each reference codelist value.
Application Field Displays the subsystem with which the codelist is associated.

Overview of Reference Codelists
7-4 Oracle Clinical Administrator's Guide
UsageThis section provides instructions for basic tasks you can use the reference codelists windows.
Query a reference codelist To search for a specific reference codelist:
1. With focus in the Name field, press the F7 key. This puts the system in query mode.
2. Type the name of the codelist, using the wildcard ("%") as necessary, to construct the search string.
3. Press the F8 key. The system runs the query and displays the first codelist returned in the Name field.
Navigate a list of codelists If more than one codelist is returned, there are several methods you can use to navigate to a specific entry:
■ Use the Page Up/Page Down or the Up/Down arrow keys to move one entry up or down in the list.
■ Use the Move, then Last Record to move to the bottom of the list.
■ Use the Move, then First Record to move to the top of the list.
Add a value To add a value to the current reference codelist, you must be working in the Maintain Reference Codelist window.
1. Place focus in the row immediately above the location in which you want to add the value.
2. Select the Data, then Insert Record menu command. The system places a blank row below the current row.
3. Modify the fields for the row, as appropriate.
Adding a Value to a Reference CodelistTo add values to an existing local, installation, or design installation codelist:
1. Select Admin, and then Reference Codelists. Choose one option to display the Reference Codelists window for one of these codelist types:
Table 7–2 Components of the Reference Codelist Values Section
Component Type Description
Seq Field Displays the sequence number of the value
Short Value Field Displays the short value for the value
Long Value Field Displays the long value for the value
Active Check box Specifies if the value is active, that is, if it is included when the system accesses the reference codelist
Default Check box Specifies if the value is the default value for the reference codelist
Description Field A text explanation of the value
Exit Button Closes the window
Save Button Commits all pending changes to the database

Overview of Reference Codelists
Reference Codelists 7-5
■ Local Codelists
■ Installation Codelists
■ Design Installation Codelists
2. Find the reference codelist you want: start a query, enter query criteria in one or more enterable fields to define the search, and then execute the query. Use the arrow keys to scroll to the codelist you want.
3. Click Next Area to move to the Reference Codelist Values block.
If there are no records, the record lines are blank and you can go to Step 5.
If there are records, place focus in a field that is one row above the row you want to add. Select Data, then Insert Record.
4. Enter information about the new value in the following fields:
■ Seq – The order in which the value appears. Used for presentation and in reports.
■ Short Value – Shortened name of the value; used to fill in the application field when selected from a list of values.
■ Long Value – Complete name of the value; used if short value is truncated.
■ Active – For reference codelists that provide a list of values, only those entries whose Active check box is selected appear in the list.
■ Default – For reference codelists that provide a list of values, the entry whose Default box is checked may be highlighted when the list appears.
■ Description – Description of the value.
5. Click Save. The system adds the new value to the codelist.
Modifying a Value in a Reference CodelistYou cannot delete a value from a reference codelist. However, you can deactivate a value by clearing its Active check box. If a value if not active, Oracle Clinical does not display the value in a list of values, and does not include the value as an acceptable value during validation.
To modify an existing value in a reference codelist:
1. Perform Steps 1 through 3 in "Adding a Value to a Reference Codelist" on page 7-5 to select a reference codelist.
2. Place focus in the value record you want to change.
3. Make your changes. You cannot change the Short Value field. Changing the Active check box activates or deactivates the value. Only active values appear in the list of values for the relevant field and are used in field validation.
4. Click Save. Oracle Clinical modifies the changed codelist records in the database.
Running the Reference Codelists ReportOracle Clinical includes a large number of reference codelists, many of which you can modify. To obtain the current values in any codelist, or to view the codelist values at any point in time, run the Reference Codelist report. This report summarizes all of the values in one or more reference codelists. You use the Report Submission window, which is depicted in Figure 7–2, to set the values of four parameters and specify the information you want to include in the report.

Local Reference Codelists
7-6 Oracle Clinical Administrator's Guide
Figure 7–2 Report Submission Window for Reference Codelist Report
To run the Reference Codelists report:
1. Navigate to Admin, Admin Reports, and then Reference Codelists. The system opens that Report Submission window with a set of parameters specific to the Reference Codelists report.
2. In the list of parameters, set that values of the four parameters to setup the report you want to run. Only the Active Flag parameter value is mandatory.
a. the Modification Date parameter allows you to limit the report to include codelists modified on or after a certain date; use the "DD-MON-YYYY" date format for this field
b. use the Reference Codelist Name parameter to specify a codelist; the list of values allows you to select from the list of codelists
c. the Reference Codelist Type parameter allows you to limit the report to certain types of codelists
d. ensure that the Active Flag parameter is set to its default value of "Y".
3. Click Job Details. The system opens the Submission Details window.
4. In the Submission Details window:
a. Set the Output Type, Output Format, and Printer (if applicable) fields to appropriate values.
b. Ensure that the Mode of Execution and the Report Server fields are set correctly.
5. Click Submit Job.
Local Reference CodelistsLocal reference codelists control the behavior of some Oracle Clinical features in the selected database only. You can modify local codelists if your user role has one of the following schema: RXC_ADMIN, RXC_SUPER, or RXC_SUPER_NOGL.

Local Reference Codelists
Reference Codelists 7-7
BATCH QUEUE NAME Local CodelistThis codelist contains batch queue names to be used by the Parameterized Submission (PSUB) utility for this Oracle Clinical instance.
The reference codelist ships with a short value of RXC_BATCH_QUEUE, and a long value of a. This short value is in turn found in the OCL_JOB_PREF reference codelist, indicating that this is the default batch queue to be used by PSUB.
You can set a different default queue for a particular user by specifying any short value from the BATCH QUEUE NAME reference codelist when you create or modify the user's account. When adding entries, the short value specifies a symbolic name for the queue, and the long value specifies a single character queue like a, d, e. b and c are excluded, as these are reserved.
You can modify the long value for the RXC_BATCH_QUEUE entry in one of 2 ways:
■ change the value to another single-character queue name
■ enter the value RXC_BATCH_QUEUE
If you choose the latter option, PSUB interprets this as an environment variable, whose value is set in the opa_settings file; see Appendix A, "Environment Variables and Registry Settings."
DB_LINKS Local CodelistThis codelist contains the names of database links for standard replication.
Standard replication is a "pulling" operation; that is, the database location requesting the data must initiate the action. Each database in the installation maintains its own local DB_LINKS reference codelist. There should be an entry in the Short Value field for each of the other database locations in the installation. The Long Value contains the name of the private database link to that database, owned by the Oracle user RXC_REP.
DCF COMMENT TEXT Local Codelist This codelist contains values you can use as the initial text for the DCF comment field.
DCF DEFAULT FOOTERS Local CodelistThis codelist contains values you can use as the footer text to be inserted into the DCF Footer field. See "Defining DCF Headers and Footers" on page 3-34.
DCF DEFAULT HEADERS Local Codelist This codelist contains values you can use as the header text to be inserted into the DCF Header field. See "Defining DCF Headers and Footers" on page 3-34.
DCF REPORT LABELS Local Codelist This codelist contains user-configurable labels for the DCF Report.
DISC COLS Local Codelist This codelist contains the variables that can be specified for MCU CDS Discrepancy criteria; see "Customizing Mass Changes Local Codelists" on page 4-1.

Local Reference Codelists
7-8 Oracle Clinical Administrator's Guide
DISC_FLEX1 and DISC_FLEX2 Local CodelistsSee "Customizing Flexfields" on page 3-9 for information.
DISC_FLEX1_VALUES and DISC_FLEX2_VALUES Local CodelistsSee"Customizing Flexfields" on page 3-9 for information.
FLD RXCMCMCD RDCI DELETE Local Codelist This codelist contains the display and order of RDCI Delete Candidate Data Set fields; see "Customizing Mass Changes Local Codelists" on page 4-1.
FLD RXCMCMCD RDCI KEY Local Codelist This codelist contains the display and order of RDCI Key Change Candidate Data Set fields; see "Customizing Mass Changes Local Codelists" on page 4-1.
FLD RXCMCMCD RDCM KEY Local Codelist This codelist contains the display and order of RDCM Key Change Candidate Data Set fields; see "Customizing Mass Changes Local Codelists" on page 4-1.
FLD RXCMCMCD RESPONSE Local Codelist This codelist contains the display and order of response Candidate Data Set fields; see "Customizing Mass Changes Local Codelists" on page 4-1.
IND DISC COLS Local CodelistThis codelist contains variables that you can specify for MCU CDS Ind discrepancy criteria; see "Customizing Mass Changes Local Codelists" on page 4-1.
MAN DISC COLS Local CodelistThis codelist contains variables that you can specify for MCU CDS manual discrepancy criteria; see "Customizing Mass Changes Local Codelists" on page 4-1.
MANHD DISC COLS Local CodelistThis codelist contains variables that you can specify for MCU CDS manual header discrepancy criteria; see "Customizing Mass Changes Local Codelists" on page 4-1.
MC CDS SORT ORDER Local CodelistThis codelist contains the sort order of CDS fields; see "Customizing Mass Changes Local Codelists" on page 4-1 for information.
MC COLUMNS Local CodelistThis codelist contains variables that you can specify for MCU CDS criteria; see "Customizing Mass Changes Local Codelists" on page 4-1.

Local Reference Codelists
Reference Codelists 7-9
MULTI DISC COLS Local CodelistThis codelist contains variables that you can specify for MCU CDS multivariate discrepancy criteria; see "Customizing Mass Changes Local Codelists" on page 4-1.
NLS_CONFIG Local CodelistThis codelist contains settings that control behavior in Oracle Clinical with NLS Option. See the Oracle Clinical NLS Option User's Guide for details.
OCL_DE_CONFIG Local CodelistThis codelist controls Data Entry configuration settings. The entries for values are listed and described in Table 7–3 .
Note: The settings with sequence numbers 1-9, 12-14, and 17 are also updatable in the Maintain Installation Configuration window under Admin, DE Admin, DE Config Settings; see "Define Data Entry Configuration Settings" on page 5-1.
Table 7–3 Values for the OCL_DE_CONFIG Reference Codelist
Seq Short ValueLong Value Description
1 2ND PASS ALERT Y Determines if the alert for a 2nd Pass comparison failure is enabled.
2 DISC IN BROWSE Y Determines if the user is allowed to initiate a manual discrepancy when working in browse mode.
3 DISC RES IN DE Y Determines if the user is allowed to resolve discrepancies during data entry.
4 PRIV UPDATE N Determines if the privileged update is enabled at the database level.
5 THESAURUS list of values
Y Determines if the DVG, which populates the list of values, for thesaurus questions is enabled.
6 UNIVAR ALERT Y Determines if the univariate validation alert, which prompts the user to a validation error during data entry, in enabled.
7 USE DCI BOOK N Determines if the system initiates a data entry session using a DCI book.
8 UNENROLL ALERT Y Determines if the system alerts the user to a patient that has been unenrolled.
9 P2 NOT BY P1 N Determines if the system prevents a Pass 1 data entry operator from performing Pass 2 data entry.
10 OCL THES DISC N Determines if system alerts the user to OLC Thesaurus discrepancies during data entry.
11 OCL THES list of values N Determines if the lists of values for OCL Thesaurus questions are enabled.
12 BROWSE ACC ONLY N Determines if data in accessible documents is browse only.
13 DEF PAGE HEIGHT 22 Sets the default height of the DCM data entry page in points, pixels, inches, or centimeters, depending on the unit of measure selected in the Maintain Installation Configuration window under Admin, DE Admin, DE Config Settings; see "Define Data Entry Configuration Settings" on page 5-1. Applies only to Oracle Clinical and to RDC Classic.

Local Reference Codelists
7-10 Oracle Clinical Administrator's Guide
DVG List of Values STYLEThis value determines how the system displays the list of values for DVG and Alpha DVG questions. The options for this value are SEQ and SHORT.
14 DEF PAGE WIDTH 78 Sets the default height of the DCM data entry page in points, pixels, inches, or centimeters, depending on the unit of measure selected in the Maintain Installation Configuration window under Admin, DE Admin, DE Config Settings; see "Define Data Entry Configuration Settings" on page 5-1. Applies only to Oracle Clinical and to RDC Classic.
15 P2 ALWAYS ALERT Y Determines if the system alerts the user whenever Pass 2 data differs from the corresponding Pass 1 data. Note: The Long Value should be a maximum of 2 characters; longer values cause problems in Oracle Clinical data entry.
16 AUTO SEQ DFLT Y Sets the default auto sequence behavior; when a user presses tab in the last field of a DCM/CRF Section, the system opens the next DCM for data entry.
17 DCI DATE REQ Y Sets the default as to whether the DCI date is required in the Log-in form.
18 DVGSEQOVERALPHA N Used only when a question meets the following criteria:
■ An internal DVG and an alpha DVG are assigned.
■ An Enter By Sequence is enabled for the internal DVG.
■ The internal DVG and the alpha DVG have values with the same sequence number.
When the user enters a sequence number that exists in both DVGs, the system:
■ Records the internal DVG value if the DVGSEQOVERALPHA value is set to Y.
■ Records the alpha DVG value with the same sequence number if the DVGSEQOVERALPHA value is set to N.
19 DVG List of Values STYLE
SEQ Determines how the system displays the list of values for DVG and Alpha DVG questions. Note: The Long Value should be a maximum of 15 characters; longer values cause problems in Oracle Clinical data entry
20 COMMCHGREAS_REQ Y Determines if a change reason is required for updates to RDCI comments in accessible documents.
21 JUSTENTERP1TIME 0 Sets the time period (in minutes) during which a Pass 1 Complete RDCI/RDCM can be modified in Pass 1 mode.
22 JUSTENTERP2TIME 0 Sets the time period (in minutes) during which a Pass 2 Complete RDCI/RDCM can be modified in Pass 2 mode.
23 SEQUENCEBUFFER 1000000 Defines the sequence buffer used to prevent the sequence from reaching its maximum value. At this setting, when a sequence number is within 1,000,000 of 2,147,483,647, the system displays a warning message when a user attempts to use a relevant subsystem and the system exits the current screen.
24 RSTRCT LCKD CRF N Determines if some actions are permitted on a locked CRF. Applies to RDC Onsite only.
Table 7–3 (Cont.) Values for the OCL_DE_CONFIG Reference Codelist
Seq Short ValueLong Value Description

Local Reference Codelists
Reference Codelists 7-11
SEQ If the Long Value is set to "SEQ" and "Enter by Sequence" is selected in the DVG definition, the columns in the list of values are displayed in this order:
1. Display SN (prefixed with "A" if it is an Alpha DVG value)
2. Short Value, which is titled, "DVG value" in the list of values
3. Long Value, which is titled "Description" in the list of values.
The records are sorted by DVG sequence number.
SHORT If the Long Value is set to "SHORT" and "Enter by Sequence" is selected in the DVG definition, the columns in the list of values are displayed in this order:
1. Short Value, which is titled "DVG Value" in the list of values
2. Display SN (prefixed with "A" if it is an Alpha DVG value)
3. Long Value, which is title "Description" in the list of values.
The records are sorted by DVG sequence number.
COMMCHGREAS_REQThis value determines if the system requires a change reason when the RDCI comment is updated and the document is internally accessible. The options for this value are "Y" and "N". The default value is "Y", which causes the system to require a change reason for an update to the RDCI comment.
JUSTENTERP1TIMEThis value defines time period (in minutes) during which a user can modify or query a previously Pass 1 Complete RDCI/RDCM in Pass 1 mode.
The initial value of this entry is "0".
JUSTENTERP2TIMEThis value defines the time period (in minutes) during which a user can modify/query a previously Pass 2 Complete RDCI/RDCM in Pass 2 mode.
The initial value of this entry is "0".
Note: If "Enter by Sequence" is not selected in the DVG definition, this reference codelist setting (SEQ or SHORT) has no effect. The list of values does not display the sequence number, sorts records by the DVG value, and displays these columns in this order:
1. Short Value, which is titled "DVG Value" in the list of values
2. Alpha Column, which contains "A" if it is an Alpha DVG value or is null for all others
3. Long Value, which is titled "Description" in the list of values.
Note: The sequence number is displayed only if there is an alpha DVG associated with the question.

Local Reference Codelists
7-12 Oracle Clinical Administrator's Guide
RSTRCT LCKD CRFBy default, RDC Onsite restricts access to locked CRFs. You can use the RSTRCT LCKD CRF setting in the OCL_DE_CONFIG local reference codelist to allow some users to take actions on locked CRFs.
■ Y — Specifies that users cannot update discrepancies for a locked CRF, verify a locked CRF, or approve a locked CRF unless the CRF is specifically unlocked for them.
■ N — Specifies that any user with UPD_DISCREP privileges can work on discrepancies in a locked CRF, any user with VERIFY privileges can verify a locked CRF, and any user with APPROVE privileges can approve a locked CRF.
OCL_DE_PREFS Local Codelist This codelist enables you to set the default data entry preferences for this instance. The default entries are displayed and described in Table 7–4, " Values for the OCL_DE_PREF Reference Codelist". You can also set almost all of these values in the Maintain Installation Preferences under Admin, DE Admin, DE User Prefs. The exceptions, which you can set only here, are: AUTO NEXT FORM and AUTO SEQ DEFLT.
OCL_JOB_PREF Local CodelistThis codelist sets default values in the Oracle Clinical PSUB job window.
Oracle Clinical ships default system-wide values in the local reference codelist OCL_JOB_PREF. Each entry refers to a specific row in another reference codelist, which must be updated with correct values for your installation. The long value in this reference
Table 7–4 Values for the OCL_DE_PREF Reference Codelist
Seq Short Value Long Value Description
1 AUTO SKIP Y Determines if auto skip is enabled.
2 AUTO FILL Y Determines if auto fill is enabled.
3 UNIVAR BEEP Y Determines if the system sounds a beep when a recorded response value generates a validation error.
4 COMPARISON FAILURE
Y Determines if the system sounds a beep when a response value generates a comparison failure.
5 END FORM BEEP
Y Determines if the system sounds a beep when the user navigates from the last field in a form.
6 DATE ENTRY FMT
US Determines the default format for dates that the system assumes during data entry.
7 DATE DISPLAY FMT
STANDARD Determines the format the system uses to present dates in the display.
8 RDCI ORDER PATIENT The "order-by" the system uses for RDCI queries.
9 AUTO NEXT FORM
Y Determines if the system automatically displays the next data entry form in the sequence.
10 AUTO SEQ DEFLT
Y Determines if auto-sequence is set by default.

Local Reference Codelists
Reference Codelists 7-13
codelist is populated from the short value in the other reference codelist. Table 7–5 lists the defaults you can set.
For example, to set a printer as the default for reports at an installation:
1. Navigate to Admin, then Reference Codelists, and Local Codelists.
2. Insert a record in the PRINT QUEUE NAME Local Codelist:
Short Value – Name of the printer, for example, boston09Long Value – Printer specification, for example, \\ocldsn1\boston09Description – Information about the printer that may be helpful to the end user
(Note that all three values display in the Submission Details screens.)
3. In the OCL_JOB_PREF codelist, update the Long Value of the DFLT_RS_PRINTER entry with the Short Value of the printer from Step 2.
OCL MC PREFS Local Codelist This codelist's single value, MAX_CDS_RECORDS, sets the default maximum number of records to change using the Mass Changes utility. Its initial value is 1000; see "Customizing Mass Changes Local Codelists" on page 4-1.
OCL_MENU_ACCESS Local Codelist This codelist contains settings that support configuration of menu options.
Table 7–5 Entries in the OCL_JOB_PREF Reference Codelist
Short Value Description Refers to Reference Codelist
PSUB_PRINTER Default PSUB Printer PRINT QUEUE NAME Local Codelist
DFLT_PSUB_QUEUE Default PSUB Queue BATCH QUEUE NAME Local Codelist
DFLT_REPORT_RS Default Reports Server REPORT_SERVER Local Codelist
DFLT_JOBSET_RS Default Job Set Reports Server REPORT_SERVER Local Codelist
DFLT_PSUBSCH_RS Default for PSUB Scheduling, generating DCI Forms, and previewing
REPORT_SERVER Local Codelist
DFLT_RS_PRINTER Default Reports Server Printer PRINT QUEUE NAME Local Codelist
Table 7–6 OCL_MENU_ACCESS Default Values
Seq Short Value Long Value
1 PRPJ Y
2 ORUN Y
3 REGION Y
4 STUDY Y
5 FACTOR Y
6 STRATA Y
7 ACSU Y
8 DRUG Y
9 REGIMEN Y

Local Reference Codelists
7-14 Oracle Clinical Administrator's Guide
OCL_STATE Local Codelist OCL_STATE tracks information about the database, such as its name, operating system, and RDBMS version, which Oracle Clinical requires to complete certain processes. Some of the short values are described in more detail following the table.
10 SITES Y
11 INVEST Y
12 PATTEN Y
Table 7–7 Values for the OCL_STATE Reference Codelist
Seq Short Value Long Value Description
1 DB_NAME name of database
Name of the database.
2 SERVER_OS Server operating system
Indicates the operating system that the server is running. Valid entries are NT (to represent any supported version of Windows) or UNIX (to represent any supported version of UNIX).
3 LOCATION_CODE Client name for the current location.
4 PRINTER_TYPE Default type of printer used - ASCII.
5 DB_VERSION The database version, this is used by Data Extract to determine optimization.
6 INVOKE_IMAGE N
7 BDL_R_SE Specifies the rollback segment for Batch Data Load processes. Set to active and enter a long value of Y if you have created a database rollback segment for use in batch data load.
8 DFLT_PAGE_TRACK N Specifies the default value of the "Page Tracking Enabled" study level setting.
9 FILE_VIEWER Y Used by PSUB to view the log and output files.
10 SERVER_NAME Used by PSUB to open SFTP and FTP sessions.
11 DB_BLOCK_SIZE The database block size from init.ora.
12 TEMP_TABLES Temporary Tablespace for use in new account creation activities.
13 DM_PROMPT Prompt for the DM window.
14 INVOKE_WORKFLOW
N Used by the Login form to determine if a workflow system can be used.
15 USR_SAVE_OCPASS Y Determines if the user can save the OS password in the database; see "UNIX Passwords" on page 1-21.
Table 7–6 (Cont.) OCL_MENU_ACCESS Default Values
Seq Short Value Long Value

Local Reference Codelists
Reference Codelists 7-15
SERVER_OSMake sure the Long Value of the SERVER_OS entry in the OCL_STATE local reference codelist is correct for your operating system. You can enter one of the following values:
■ NT — Indicates the server is running one of the Windows operating systems currently supported by Oracle Clinical.
■ UNIX — Indicates the server is running the UNIX operating system.
16 PROC_LAB_ALIAS LAB The name of the lab variable for the standard Procedure question group prompt.
17 DISC_DCM_PROMPT QUESTION_NAME
The single-record mode of the Maintain Discrepancy Database form's Characteristics panel has a button that toggles the three long value settings. Choose the value to display by default: question_name (displays the name of the question associated with the discrepancy).
18 DCF_TEXT_SYNC N Edits comments and resolutions text DCFs propagates to disc mgmt.
19 DISC_AUTO_HDFT Y Auto Generation of Header/Footer Text.
20 DISC_AUTO_CRFPG Y Auto Generation of CRF Page Number.
21 BOOK_USAGE IGNORE (Applies only to RDC Classic) If set to IGNORE (the default) the system allows the user to use any book for the patient, regardless of the patient's book assignment. If set to PROMPT, the sytem allows the use of any book but gives a warning. If set to ENFORCE, the system does not allow using any book other than the one to which the patient is assigned.
23 BOOK_CHANGE ALLOW Change of DCI Book for patient: ALLOW, DISALLOW, or DISALLOW IF DATA.
25 BOOK_ASSIGN N Assign DCI book to patient on first data entry: Y or N.
25 TMS_FAIL_BV_ACT FAIL Determines whether Batch Validation continues when TMS derivation fails during Batch Validation: WARN or FAIL.
26 DB_HOST Host name for the database, as entered in tnsnames.ora file.
27 DB_PORT 1532 Port number for the database as entered in tnsnames.ora file.
28 DMGR RDC ACCESS YES "Granting Automatic Access in RDC to Studies Granted in Oracle Clinical" on page 1-14.
29 UPD_FV_INCREM N Y or N - Y means do only incremental PDR Templates and HTML Forms gen.
Table 7–7 (Cont.) Values for the OCL_STATE Reference Codelist
Seq Short Value Long Value Description

Local Reference Codelists
7-16 Oracle Clinical Administrator's Guide
LOCATION_CODEFor replication, the specific piece of information required is the LOCATION_CODE value, which is the client name for the current location. The system collects and stores this value during database creation.
SERVER_NAMESet the SERVER_NAME value in this codelist to the database/PSUB server.
On UNIX systems, the Long Value of the SERVER_NAME entry must be in lowercase letters.
DB_BLOCK_SIZEThis entry is used by the DX table code to obtain the block size, which is used for space calculations. It is used for the dictionary-managed tablespace algorithm.
TEMP_TABLESThis entry specifies the name of the temporary tablespace the system users when creating DX study_access_accounts.
DM_PROMPTThis entry is used by the Discrepancy Management form as the prompt to use for Study site.
PROC_LAB_ALIASThis entry is used during procedure generation to determine the alias of the standard RDCM Question LAB in the Procedure Question Group declarations. The system sets this to a default value of "LAB". This default value for the alias will conflict with the Question QGalias.LAB if you have a study question named "LAB."
If there is a conflict with the study question named LAB, you should redefine PROC_LAB_ALIAS to a different name, such as, "RDCM_LAB," to avoid errors during procedure generation. In this case, any references to the standard Received DCM Lab question must be changed to RDCM_LAB, or a generation error will occur. When you do this, procedure references to QGalias.LAB will relate to the study question LAB and references to QGalias.RDCM_LAB will relate to the standard Received DCM Lab.
DISC_DCM_PROMPTSpecifies the source of the question in a discrepancy. The options for the Long Value are:
■ DEFAULT_PROMPT
■ QUESTION_NAME
■ SAS_LABEL
BOOK_ASSIGNIf set to Y, the system automatically assigns the DCI Book defined as the default for the study (in DCI Books or Enhanced DCI Books, under Definition) to each patient when data is first entered for the patient.

Local Reference Codelists
Reference Codelists 7-17
TMS_FAIL_BV_ACTUse this entry to indicate whether batch validation should continue or stop after a TMS-related error is encountered. The two values are 'WARN' and 'FAIL,' which is the default value. It causes batch validation to fail when there is a TMS failure; for example, when either an invalid dictionary or an invalid domain is defined. Irrespective of the value for TMS_FAIL_BV_ACT, if a TMS-related error occurs, the batch validation status is always failure and batch validation completes the process with a TMS warning.
UPD_FV_INCREMThis setting pertains to the upgrade utility provided with Oracle Clinical/RDC 4.5.3 and above that allows you to migrate from PDF to HTML data entry forms. By default, the Upgrade utility generates the HTML data entry forms and the PDR templates for all DCI Form Versions in the study that have PDF data entry forms generated.
There may be times when you have problems with the form or template generation. For example, perhaps some images used in the form layout are no longer in the correct location so the Upgrade utility does not generate a few of the DCI Form versions. For such cases, you can temporarily change the utility to run in incremental mode. In incremental mode, the Upgrade utility only creates the HTML data entry forms and the PDR templates if they do not already exist.
Set the long value to Y or N:
■ Y — Forces the Upgrade utility to run in incremental mode. In incremental mode, the utility will not regenerate HTML data entry forms and PDR templates for form versions that already exist.
■ N (default) — Forces the Upgrade utility to generate all form versions.
This setting applies only to running the Upgrade utility for existing DCI Form versions.
PRINT QUEUE NAME Local Codelist This codelist populates the list of printers that you can use when you submit a batch job or a reports job and when you set up a user account.
Oracle Clinical users can select a printer name from a list of values when they submit a job. You specify that list by defining entries in this local reference codelist. Both the long and short values appear in the list of values.
The short value is a code or abbreviation for the printer. The long value of the printer name is the printer specification. You can use either an absolute path or an environment variable for the long value. For example:
■ \\opaprtsrv\waltprt9 where walprt9 is the printer name
■ %RXC_PRINTER% where RXC_PRINTER is the environment variable
The Default setting in the reference codelist has no effect. The OCL_JOB_PREF reference codelist determines the default printer. You can override the default when you set up a user account with any of the values in the PRINT QUEUE NAME
Note: Running the Upgrade utility in incremental mode is for resolving problems. Oracle recommends that you do not continue to run the utility in incremental mode. Be sure to change the UPD_FV_INCREM value back to N after you generate the forms you need

Local Reference Codelists
7-18 Oracle Clinical Administrator's Guide
reference codelist, and a user can override his or her own default when he or she submits a job.
PUBLIC_DB_LINKS Local Codelist This codelist provides a list of database links for replication; it is used by RXA_DES.
Each database in the installation maintains its own PUBLIC_DB_LINKS local reference codelist. There should be an entry in the Short Value field for each of the other database locations in the installation. The Long Value contains the name of the public database link to that database.
RDC CONFIGURATION Role Local CodelistsThis set of local codelists let you define the configuration settings for the Remote Data Capture application based on user role, such as CRA or investigator.
For more information about creating a configuration, defining its settings, and assigning the configuration to one or more users, see the Oracle Clinical Remote Data Capture Onsite User's Guide or the Oracle Clinical Remote Data Capture Classic Data Entry User's Guide.
REPORT_SERVER Local Codelist This codelist defines the list of reports servers from which the user can select when setting up to run a report.
SAS_QUEUE Local CodelistThis codelist specifies the value(s) in the BATCH QUEUE NAME Local Codelist that is required to run SAS.
SQL FUNCTIONS Local CodelistThis codelist provides a list SQL functions that you can then use when building queries.
TMS_DSI Local CodelistThis codelist defines settings specific to the Disconnected System Integration (DSI) feature for Oracle Thesaurus Management System. For details about this codelist, see the Oracle Thesaurus Management System User's Guide.
TMS_OPTIONS Local CodelistThis local codelist contains TMS-specific options. It is populated only if TMS is installed in the Oracle Clinical database. When TMS is installed, currently the only option defined is FIRST_REVIEW. If the Long Value for this option is set to Y, and the Review Before TMS flag is also set to Y in the question set, then the first review for a thesaurus omission happens in the Oracle Clinical discrepancy management system, rather than in TMS. For more information on the interaction between the Oracle Clinical discrepancy management system and TMS, see the "Defining a question set" topic in the Oracle Thesaurus Management System User's Guide.

Installation Reference Codelists
Reference Codelists 7-19
UNI DISC COLS Local CodelistThis codelist contains variables that you can specify for Mass Change Utility CDS Univariate Discrepancy criteria.
WEB_DOCUMENT_CONFIG Local CodelistTMS refers to the settings in this codelist to configure several aspects of the Document Repository searches in the TMS HTML Browser. For details about this codelist, see the Oracle Thesaurus Management System User's Guide.
WEB_DOCUMENT_GROUPS Local CodelistThis codelist lets you define categories for the documents you retrieve using Document Repository searches in the HTML Browser. For example, you might want to specify that all documents loaded from your internal servers be categorized as Internal documents. For details about this codelist, see the Oracle Thesaurus Management System User's Guide.
Installation Reference CodelistsInstallation codelists control Oracle Clinical behavior installation-wide; that is, across an installation of multiple Oracle Clinical databases. This section describes the purpose of and the settings in each installation codelist.
APPLICATION AREA CODE Installation CodelistThis codelist contains settings for areas on the body where the medication can be given.
APPLICATION SYSTEM NAME Installation CodelistThis codelist contains a list of application systems used by Oracle Clinical.
APPROVE VERIFY RETAIN CODE Installation Codelist Enter one or more reasons to supply if CRF approvals or verifications are retained during DCI Form version migration.
You can limit the options available in a particular study in the DCI Form Study Settings window. If User Override to Reverse Approvals? or User Override to Reverse Verifications? is set to N in the DCI Form Local Database Settings window, the user running the migration cannot change the default value.
1. In the row with the short value DFLT_RETAIN_R, enter the text you want to appear as the initial default value as the long value.
2. If you want to allow the user to select other reasons for retaining approvals, enter an appropriate short and long value for each reason. Both values appear in the list of values.
3. Set each value to Active.
APPROVE VERIFY REVERSE CODE Installation CodelistEnter one or more reasons to supply if CRF approvals or verifications are reversed during DCI Form version migration.

Installation Reference Codelists
7-20 Oracle Clinical Administrator's Guide
You can limit the options available in a particular study in the DCI Form Study Settings window. If User Override to Reverse Approvals? or User Override to Reverse Verifications? is set to N in the DCI Form Local Database Settings window, the user running the migration cannot change the default value.
1. In the row with the short value DFLT_REVERSE_R, enter the text you want to appear as the initial default value as the long value.
2. If you want to allow the user to select other reasons for retaining approvals, enter an appropriate short and long value for each reason. Both values appear in the list of values.
3. Set each value to Active.
BLIND TYPE CODE Installation Codelist This codelist contains a list of types of blinding that are available in a study.
CLINICAL PHASE Installation CodelistThis codelist list the clinical phases that are available in the design of a study.
COUNTRIES Installation CodelistThis codelist contains the list of valid countries.
CRF PAGE NUMBERING SCHEME Installation CodelistThis codelist contains the list of valid page tracking statuses that is used by the CRF Page Tracking feature.
CRF PAGE STATUS CODES Installation CodelistThis codelist contains the list of valid CRF page statuses that is used in Maintain Page Status Tracking form.
CRF PAGE STATUS QUERY Installation CodelistThis codelist contains the list of valid statuses for CRF page types that is used in Log-In Query window.
DATA CHANGE REASON TYPE CODE Installation CodelistThis codelist contains the list of valid data change reason type codes for data update. The system uses it to provide a default value and to validate user-supplied response change reasons for Oracle Clinical data entry and mass changes (response changes), RDC, and DCAPI.
The default value is presented initially in each user session. If the user selects a different change reason, the system presents the user's last selection as the default. Subsequent changes use the value that was selected last.
To set the default data change reason for a user group, put the group name in the Long Value field of that reason code (Short Value column). You can also put a comma-separated list of roles in a single field.
To prevent the reason from appearing at all in RDC Onsite HTML, enter NOTRDC as the long value.

Installation Reference Codelists
Reference Codelists 7-21
You can customize this codelist. However, the following values are reserved by the system and cannot be used as custom values: 'PASS1', 'PASS2', 'BATCH', 'UPDATE', 'REMOVED', 'TRANSLATION', 'KEY CHANGE', 'BROWSE', 'RECONCILIATION'.
DATA CHANGE REASON2 TYPE CODE Installation CodelistThis codelist is used to provide a default value and for validation in DCAPI. It works in conjunction with the DATA CHANGE REASON TYPE CODE Installation Codelist. It is not used by Oracle Clinical or RDC, but provides a method for you to provide an additional list of values of change reasons that are used by your external applications.
There are no default values for this codelist. Although you can customize this codelist, note that the following set of values are reserved by the system and cannot be used as custom values: PASS1, PASS2, BATCH, UPDATE, REMOVED, TRANSLATION, KEY CHANGE, BROWSE, and RECONCILIATION.
DCF LOCK CONDITIONS Installation CodelistThis codelist contains statuses that refer to particular actions that should be limited; see "DCF LOCK CONDITIONS" on page 3-31 for information.
Note: Changing the Long Value of a DATA CHANGE REASON TYPE CODE entry has no effect on data update in Oracle Clinical DE forms. This feature is affects RDC data entry only.
Table 7–8 Values for the DATA CHANGE REASON TYPE CODE Reference Codelist
Short Value Long Value Description
CRA CORR CRA Correction
DATA ENTRY ERR Error during data entry
BATCH Batch-loaded data
CRA CORR-INV CRA corrected, after consulting with the Investigator
CRA CORR-SRC CRA correction, after consulting the source data
INV CORR Investigator correction
STUDY ASSUM Study assumption
THES CLARIF Thesaurus clarification
ANALYSIS CORR Analysis correction
REMOVED RDCI removed
VAL STATUS CHG Validation status changed
DATA ENTRY MODE Data entry mode
Note: Set the LONG VALUE of one the reference codelist values in this list or in DATA CHANGE REASON2 TYPE CODE Installation Codelist, to "DCAPIDEL" and another to "DCAPIINV" (comma-separated, if there are other values in the LONG VALUE).

Installation Reference Codelists
7-22 Oracle Clinical Administrator's Guide
DCF OPTIONAL STATUS CODES Installation CodelistThis codelist contains optional status codes for DCFs; see "DCF OPTIONAL STATUS CODES" on page 3-30.
DCF STATUS CODES Installation CodelistThis codelist contains status codes for DCFs; see "DCF STATUS CODES" on page 3-30.
DCIF CHECKBOX SIZE Installation CodelistThis codelist controls the allowable sizes for check boxes in DCI Forms. These values are available in the DCI Form Local Database Settings window; see "Setting DCI Form Default Values for RDC Data Entry and Patient Data Reports" on page 5-11.
The values refer to point sizes. The values are:
10121520
DCIF FONT TYPESIZE Installation CodelistThis codelist contains the list of valid font type sizes that can be used in DCI Form graphic layouts in prompts and fields; see "Setting DCI Form Default Values for RDC Data Entry and Patient Data Reports" on page 5-11.
The default values refer to point sizes. The values are:
8910111214
DCIF PAGE DEFINITION Installation CodelistThis codelist contains the list of page definitions that can be used by the DCI form; see "Setting DCI Form Default Values for RDC Data Entry and Patient Data Reports" on page 5-11. The four values that are installed are:
US PortraitUS LandscapeA4 PortraitA4 Landscape
The long value specifies the height width, and binding offset. With 0 Binding offset, the form layout template appears in the middle of the page. If you specify a non-zero (positive or negative) offset, the FLT moves left/right (for portrait) or up/down (for landscape).
DCM DCI QG TYPE CODE Installation CodelistThis codelist contains the values you use to categorize DCMs, DCIs, and Question Groups. The values appear in the lists of values in the DCI Type field in the Maintain

Installation Reference Codelists
Reference Codelists 7-23
DCIs window, the Type field in the Maintain DCMs window, and the QG Type field of the Maintain Question Groups window.
DISCREPANCY ACTIONS ROLE Installation CodelistSee "Configuring the Actions Allowed on Discrepancies" on page 3-24 for information.
DISCREPANCY MESSAGES Installation CodelistThe function of this codelist has been replaced by the Standard Text Maintenance form under Admin, Discrepancy Mgmt Maintenance. See "Reason Codes and Descriptions for Univariate Discrepancies" on page 3-13 for information.
DISCREPANCY NO OTHER UPDATE Installation CodelistSee "Preventing Update to OTHER Discrepancies" on page 3-26 for information.
DISCREPANCY RESOLU TYPE CODE Installation CodelistSee"Defining Resolution Reasons for Discrepancies" on page 3-17 for information.
DISCREPANCY REV STATUS CODE Installation CodelistSee "Defining the Possible Review Statuses for Discrepancies" on page 3-14 for information.
DISCREPANCY STATUS ROLE Installation CodelistsSee "Configuring Discrepancy Display by User Role" on page 3-18 for information.
DISCRETE VAL GRP TYPE CODE Installation Codelist This codelist lists the severity codes for DVGs.
DISC_STDST_VALUES Installation CodelistThis codelist contains discrepancy Study Site Values.
DOSE FORM TYPE CODE Installation CodelistThis codelist contains Dosage Form Types.
DOSE FREQUENCY TYPE CODE Installation CodelistThis codelist contains frequencies of dose administration.
DX_CONFIG Installation CodelistThis codelist contains default settings for data extract.
The DX installation Configuration window includes exactly the same settings. When you change a setting here, the change is reflected there. When you change a setting there, the change is reflected here. For additional explanation of each setting, see "Configuring Default Installation Data Extract Settings" on page 6-1.

Installation Reference Codelists
7-24 Oracle Clinical Administrator's Guide
Table 7–9 Values for DX_CONFIG Reference Codelist
Seq Short Value Long Value Description
1 KEY_TEMPLATE STANDARD Default Key Template Name
2 DOMAIN STANDARD Domain of Default Key Template
3 SEPARATE_SAS_YN
N Separate Oracle and SAS names?
4 DCM_LINK_YN Y DCM default views are linked to source DCM as default conditions?
5 ACTIVE_KTEDT_YN
N Enable edit of active key templates?
6 ACTIVE_XMEDT_YN
Y Enable edit of active extract macros?
7 FREE_KT_SEL_YN N Enable selection of nonaggregate, nondefault key template?
8 INC_VALSTAT_YN N Include validation status in default view definition?
9 DVGDEFAULT_SN N Include DVG sequence number in default view definition?
10 DVGDEFAULT_SV Y Include DVG short value in default view definition?
11 DVGDEFAULT_LV N Include DVG long value in default view definition?
12 THESAURUS_TERM1
Y Include thesaurus term1 in default view definition?
13 THESAURUS_TERM2
Y Include thesaurus term2 in default view definition?
14 THESAURUS_TERM3
Y Include thesaurus term3 in default view definition?
15 SAS_ATTREDT_YN
N Enable update of SAS and Oracle column names?
15 INC_FULL_VALTXT
N Include Full Value Text in default view definition?
16 MAX_AUDIT_LEN 200 Maximum length of Audit Comment
17 MAX_DATCOM_LEN
200 Maximum length of Data Comment
18 DVG_LNG_LEN 200 Maximum length of DVG long value
19 ACTIVE_VTEDT_YN
N Enable edit of active view templates?
20 ENABLE_VB N Enable View Builder as default in new studies?
22 VB_DVG_SUBSET N Use DCM Question-specific DVG attributes?
23 USE_DCM_SAS N Use DCM SAS Label as seed for attributes in default view definition?
24 FAST_VIEWS N Build fast views?

Installation Reference Codelists
Reference Codelists 7-25
DX_EXTENDED_ATTRIBUTES Installation CodelistThis codelist contains settings for Global Library Questions extended attribute creation.
Oracle Clinical offers the option of enabling additional question or response attributes for use in building views and view templates. The extended attributes are enabled at database creation when this reference codelist is populated. Attributes whose long value is set to Y here can be used as extended attributes in data extract.
If you change the settings in this reference codelist, run the script vb_def_que_attr.sql again.
DX_INDEX_TABLESPACE Installation CodelistThis codelist contains a list of index tablespaces for use with the Data Extract View Builder. The long values appear in the list of values for the Index Tablespace field in the Maintain Study Access Accounts window under Conduct, then Data Extract.
You must:
■ Uncheck the Active check box for the long values RXC_APP_IDX_TSPA and RXC_DCD_IDX_TSPA. These values are not valid and should not be available to users.
■ Enter the names of each tablespace you create for the purpose of containing data extract indexes, and check its Active check box. See "Creating Tablespaces for Data Extract Tables and Indexes" on page 6-5 for more information.
DX_KEY_NAME Installation CodelistThis codelist contains the column alias for a data extract view keys
Table 7–10 Extended Attributes for Questions
Attribute Meaning
AUDIT_COMMENT_TEXT Audit comment text from the response.
DATA_CHANGE_REASON_TYPE_
CODE
Code value for the reason the data was changed.
DATA_COMMENT_TEXT Data comment text from the response.
DISCREPANCY_INDICATOR Discrepancy indicator for the response.
DVG_LONG_VALUE DVG long value, if this is a DVG question.
DVG_NUMBER DVG sequence number, if this is a DVG question.
DVG_SHORT_VALUEVALUE_TEXT
DVG short value, if this is a DVG question.Value of the response, if not.
EXCEPTION_VALUE_TEXT Exception value text for the response.
FULL_VALUE_TEXT Response value, or, if error, the exception text.
VALIDATION_STATUS Validation status of the response
TERM_COL1 Thesaurus DVG first term column
TERM_COL2 Thesaurus DVG second term column
TERM_COL3 Thesaurus DVG third term column

Installation Reference Codelists
7-26 Oracle Clinical Administrator's Guide
DX_ROLES Installation CodelistThis codelist contains the list of default roles for accessing data extract views. Values set here appear in a list of values in the View Definition window; users with the selected role have access to the view. You can add roles; see "Controlling Access to Data Extract Views" on page 6-12 for more information.
DX_VIEW_TABLESPACE Installation CodelistThis codelist contains a list of view tablespaces for use with the Data Extract View Builder. The long values appear in the list of values for the Tablespace field in the Maintain Study Access Accounts window under Conduct, Data Extract.
You must:
■ Uncheck the Active check box for the long values RXC_APP_TSPA and RXC_DCD_TSPA. These values are not valid and should not be available to users.
■ Enter the names of each tablespace you create for the purpose of containing data extract tables, and check its Active check box. See "Creating Tablespaces for Data Extract Tables and Indexes" on page 6-5 for more information.
EXP DESIGN TYPE CODE Installation CodelistThis codelist contains experimental design types for studies.
EXTERNAL_TRANS_TYPE Installation CodelistThis codelist provides transaction types for the Data Capture API function SetExternalContext.
LAB RANGE SUBSET CODE Installation CodelistThis codelist contains the set of Lab Range Subset Codes.
MANUAL SOURCE TYPE CODE Installation CodelistSee "Reason Codes and Descriptions for Manual Discrepancies" on page 3-11 for information.
MAPPING_TYPE Installation CodelistThis codelist contains the list of possible file transfer protocols that you allow for use in your Oracle Clinical installation. These values appear in the list of values for the Mapping Code field in the Maintain Directory Mappings window. See Chapter 11, "Setting Up File Viewing" for information on mapping directories.
Table 7–11 Values for MAPPING_TYPE Installation Codelist
Seq Short Value Long Value Description
1 HTTP HTTP Hypertext Transfer Protocol
2 FTP FTP File Transfer Protocol
3 HTTPS HTTPS Secure-socket layer HTTP
4 UNC UNC Universal Naming Convention protocol
5 SFTP SFTP Secure File Transfer Protocol

Installation Reference Codelists
Reference Codelists 7-27
MEDICAL EVAL TYPE CODE Installation CodelistThis codelist contains the values you use to categorize Questions. The values appear in the list of values for the Medical Evaluation Type field in the Maintain Questions window.
OBJECTIVE TYPE CODE Installation CodelistThis codelist contains the list of types of Clinical Planned Objective.
OCL_DOMAINS Installation CodelistThis codelist contains the installation-wide list of global library domains. For information, see Oracle Clinical Creating a Study.
OCL_INSTALLATION Installation CodelistThis codelist defines the location code of the database that owns the Global Library. The system requests and stores this value during database creation. Oracle Clinical checks the OCL_STATE Local Codelist to determine if the location code specified for the current database matches the one for the Global Library stored in OCL_INSTALLATION. If these values match, Oracle Clinical allows updates to the Global Library.
OCL_OPTIONS_TYPE_CODE Installation CodelistThis codelist contains a list of Optional Subsystems.
OPA_MENU_ROLES Installation CodelistThis codelist contains the list of menu roles available in your Oracle Clinical installation. Any custom roles you create are not available until you enter them in this reference codelist; see "Adding a Custom Role to OPA_MENU_ROLES" on page 2-8 for information.
PATIENT STATUS CODE Installation CodelistThis codelist describes patient statuses such as enrolled or terminated.
Table 7–12 Default Values for OCL_OPTIONS_TYPE_CODE Reference Codelist
Seq Short Value Long Value Description
1 TMO_INSTALLED Y TMO Installed (obsolete).
2 TMS_INSTALLED Y Set to Y if TMS installed; to N if not.
3 VAL_STATUS Y If set to Y, Batch Validation skips documents that have had a validation status change since the last validation and are currently open (locked) in OC data entry.
If set to NONE, Batch Validation processes such documents.
4 SR_INSTALLED Y Set to Y if Symmetric Replication installed.

Installation Reference Codelists
7-28 Oracle Clinical Administrator's Guide
PLAN STUDY INT TYPE CODE Installation CodelistThis codelist describes types of Planned Study Intervals, such as baseline, dosing, and qualifying.
PROCEDURE TYPE CODE Installation CodelistThis codelist contains the list of user code for PROCEDURES.
QUESTION CATEGORY TYPE CODE Installation CodelistThis codelist contains the list of user codes for QUESTION_CATEGORY_RELATIONS.
RDCI CHANGE REASON TYPE CODE Installation CodelistRDCI change reason code for Oracle Clinical data entry and mass changes (key changes and soft deletes), RDC, and DCAPI applications during key data update and when deleting an accessible CRF. Table 7–13 describes each values in this codelist.
This following subsystems use this installation codelist during processing to provide a change reason for audited changes:
1. Patient Transfer
2. Lab Assignment Criteria
3. Mass Changes
4. Data Entry Login
The user is always prompted for a change reason during items 1 through 3. During data entry login, the user is prompted for a change reason when the document is internally accessible. For each case in which a user-supplied change reason is required, the system prompts the user and presents the list of values in this codelist as the set of options from which the user chooses.
The initial set of values in this codelist are copied from the DATA CHANGE REASON TYPE CODE Installation Codelist.
You can choose which values should not appear in RDC HTML Data Entry by adding 'NOTRDC' as the long value. HTML Data Entry displays all active values in the reference codelist that do not have 'NOTRDC' specified as the long value.
Although you can customize this codelist, note that the following set of values are reserved by the system and cannot be used as custom values: 'PASS1', 'PASS2', 'BATCH', 'UPDATE', 'REMOVED', 'TRANSLATION', 'KEY CHANGE', 'BROWSE', 'RECONCILIATION'.
Table 7–13 Initial Values for the RDCI CHANGE REASON TYPE CODE Codelist
Short Value Long Value Description
CRA CORR CRA Correction
DATA ENTRY ERR Error during data entry
BATCH Batch-loaded data
CRA CORR-INV CRA corrected, after consulting with the Investigator
CRA CORR-SRC CRA correction, after consulting the source data
INV CORR Investigator correction

Installation Reference Codelists
Reference Codelists 7-29
RDCI CHANGE REASON2 TYPE CODE Installation CodelistAn additional set of RDCI change reason codes that are used by DCAPI. This codelist allows you to provide an additional list of valid change reason values that can be used by your external applications.
There are no default values for this codelist. Although you can customize this codelist, note that the following set of values are reserved by the system and cannot be used as custom values: 'PASS1', 'PASS2', 'BATCH', 'UPDATE', 'REMOVED', 'TRANSLATION', 'KEY CHANGE', 'BROWSE', 'RECONCILIATION'.
REGION TYPE CODE Installation CodelistThis codelist contains types of region such as state, country, or continents.
RETIREMENT REASON TYPE CODE Installation CodelistThis codelist contains the list of user codes for DCIS, DCMS, DVGS, PROCEDURES, QUES, QUES_GROUPS.
ROUTE OF ADMIN TYPE CODE Installation CodelistThis codelist contains routes of drug administration such as oral, intravenous, and inhalation.
SAS_FORMATS Installation CodelistThis codelist contains a list of optional subsystems.
SINGLE DCI TYPES Installation CodelistThis codelist contains DCI types that do not allow duplicates. That is, the user is not permitted to add DCIs in this codelist as unplanned pages to a visit. Also, if the user adds an unplanned visit to the study, only those DCIs that are not listed in this codelist are included in the new visit.
The short value must correspond to a short value in the DCM DCI QG TYPE CODE installation reference codelist because DCIs can only be created of DCI types defined in that codelist.
Table 7–14 lists the default values for the SINGLE DCI TYPES codelist.
STUDY ASSUM Study assumption
THES CLARIF Thesaurus clarification
ANALYSIS CORR Analysis correction
REMOVED RDCI removed
VAL STATUS CHG Validation status changed
DATA ENTRY MODE Data entry mode
Table 7–13 (Cont.) Initial Values for the RDCI CHANGE REASON TYPE CODE Codelist
Short Value Long Value Description

Installation Reference Codelists
7-30 Oracle Clinical Administrator's Guide
SOURCE LOCATION CODE Installation CodelistThis codelist contains the unique location code for each location in the installation.
The Global Library-owning location maintains this codelist. The Long Value field stores the offset in hours of that location from Greenwich Mean Time (GMT). Locations in a time zone east of Greenwich, England have a positive offset and those to the west have a negative offset. This reference codelist is replicated to the other locations as part of Global Library replication.
STANDARDS AFFIL TYPE CODE Installation CodelistThis codelist contains the user code for STANDARDS_AFFILIATIONS.
STUDY STATUS TYPE CODE Installation CodelistThis codelist contains types of Clinical Study Status.
TMS_CONFIGURATION Installation CodelistThis codelist contains settings that control various default behaviors in the Oracle Thesaurus Management System. See the Oracle Thesaurus Management System User's Guide for details.
TMS_LANGUAGES Installation CodelistThis codelist populates the Language field in the Define Dictionaries window for Oracle Thesaurus Management System. English is the default dictionary language. See the Oracle Thesaurus Management System User's Guide for details
TMS_QUERY_TYPE Installation CodelistThis codelist populates the Query fields in Oracle Thesaurus Management System with default choices for query type. See the Oracle Thesaurus Management System User's Guide for details.
TMS_SOURCE_MAT_VIEWS Installation Codelist This codelist controls whether Oracle Thesaurus Management System uses materialized views or regular views to populate the list of values for each external system value in the Filter window, which launches from Reclassify Verbatim Terms and Approve VTAs. See the Oracle Thesaurus Management System User's Guide for details.
TMS_TAL_POOL_CONFIGURATION Installation CodelistThis codelist configures the task allocation for omissions, unapproved VTAs, and unapproved Action assignments specific to Oracle Thesaurus Management System. See the Oracle Thesaurus Management System User's Guide for details.
Table 7–14 Default Values for the SINGLE DCI TYPES Codelist
Seq Short Value
1 DEMOGRAPHY
2 COMPLETION

Design Installation Reference Codelists
Reference Codelists 7-31
TMS_X_SEARCH Installation CodelistThis codelist populates the list of values for the Search Type field in Oracle Thesaurus Management System. It currently has only one value, Cross Search. See the Oracle Thesaurus Management System User's Guide for details.
TREAT CHG REASON TYPE CODE Installation CodelistThis codelist contains the list of valid Treatment Change Reason Type Codes.
UNITS_OF_MEASURE_TYPE_CODE Installation CodelistThis codelist contains units of measure that are available for use in studies in the database.
USER GROUP ROLES Installation Codelist See "Mapping Database Roles to User Roles" on page 3-1.
USER GROUPS Installation CodelistSee "Specifying User Roles for the Oracle Clinical Discrepancy Database" on page 3-2 for information on this reference codelist.
VALIDATION FAILURE TYPE CODE Installation CodelistThis codelist contains the user code for DCM_QUESTIONS, PROCEDURE_DETAILS, QUES, and QUES_GROUP_QUES.
Design Installation Reference CodelistsDesign Installation codelists are a subset of the Installation Reference Codelists relating to study design. Using a database role with access to the appropriate menu item, you can grant a study designer access to either of the Design Installation Codelists windows (Query or normal), and enable the designer to maintain this subset of the reference codelists without providing access to change all of the installation reference codelists.
Each of the design installation codelists is documented in the main Installation Codelists section:
■ APPLICATION AREA CODE Installation Codelist
■ BLIND TYPE CODE Installation Codelist
■ CLINICAL PHASE Installation Codelist
■ DOSE FORM TYPE CODE Installation Codelist
■ DOSE FREQUENCY TYPE CODE Installation Codelist
■ EXP DESIGN TYPE CODE Installation Codelist
■ OBJECTIVE TYPE CODE Installation Codelist
■ PLAN STUDY INT TYPE CODE Installation Codelist
■ REGION TYPE CODE Installation Codelist
■ ROUTE OF ADMIN TYPE CODE Installation Codelist
■ STUDY STATUS TYPE CODE Installation Codelist
System Reference Codelists
7-32 Oracle Clinical Administrator's Guide
■ TREAT CHG REASON TYPE CODE Installation Codelist
System Reference CodelistsSystem reference codelists provide values for Oracle Clinical's internal use only. You can browse or query for system codelist values, but you cannot change them. System codelists provide standard values across distributed environments.
To access the System codelists, navigate to Admin, Reference Codelists, and then Qry System Codelists. Alternatively, you can run a Reference Codelist report for one or all system codelists. See "Running the Reference Codelists Report" on page 7-6 for instructions.

Part IIPart II Oracle Clinical Administration Tasks
This section includes tasks involved in running Oracle Clinical:
■ Chapter 8, "Managing Batch Jobs"
■ Chapter 9, "Partitioning and Indexing"
■ Chapter 10, "Utilities"
■ Chapter 11, "Setting Up File Viewing"
■ Chapter 12, "Enabling Image Viewing"
■ Chapter 13, "Conducting Studies in a Distributed Environment"
■ Chapter 14, "Using Replication"


8
Managing Batch Jobs 8-1
8Managing Batch Jobs
This section includes the following topics:
■ User Account Requirements for Batch Jobs on page 8-1
■ How PSUB Handles a Request on page 8-2
■ Starting and Stopping PSUB on page 8-3
■ Managing the PSUB Process on page 8-9
■ Batch Job Reference Codelists on page 8-13
The Oracle Clinical parameterized job and report submission facility (PSUB) submits jobs to execute either on the Reports Server or on the back end server. Oracle Clinical uses Oracle Reports for reports, job sets and scheduling. The back end server, also called the PSUB server, handles only jobs implemented in PL/SQL or a third-generation language (3GL).
You cannot alter which server is used for a given job. When you take an action runs a report or PSUB job, the job submission form displays the type of job (either PSUB or Reports Server) at the top of the form.
For troubleshooting information, see "PSUB Jobs" on page C-7.
User Account Requirements for Batch JobsBefore submitting batch job requests, a user should have the following:
■ an OPS$ database account
■ an account on the PSUB server
■ a record in the Oracle Accounts table
■ a log directory on the PSUB server
■ a log directory for reports output
For instructions on setting up user accounts, see "Setting Up User Accounts" on page 1-1.
Note: For information on managing Oracle Reports jobs, see the Oracle Application Server Reports Queue Manager documentation.

How PSUB Handles a Request
8-2 Oracle Clinical Administrator's Guide
How PSUB Handles a RequestWhen a client issues a PSUB request to run a job or report, it sends a message, via a database pipe to the PSUB process, that includes the batch job ID and the primary key into the RXC.BATCH_JOBS table.
When the process receives this message from the database pipe, it reads the job information from the RXC.BATCH_JOBS table and submits the job on the user's behalf with the PSUB Launcher (PSLAUNCH).
In submitting the job, the process creates the following files, where nnnn represents the batch job ID reported to the user in a dialog box
The system creates these files in the user's RXC_LOG directory, which you can see in the Oracle Accounts form:
Asynchronous PSUB RequestsThe DBMS_PIPE mechanism is an asynchronous protocol, so messages remain in the pipe until read by the process. This means that if a user makes a PSUB request and the process is not running, the request is read when the process is started again. Also, the DBA can safely stop and restart the process in a production environment, provided the delay is not too long. All nonblocking requests are processed, and all blocking requests start when the process comes up or times out.
Blocking and Nonblocking JobsBlocking jobs are usually of short duration and run in a mode where the system does not allow the user to proceed before their completion. Job completion status (SUCCESS or FAILURE) can be reported to the user immediately after the job completes. Blocking jobs in Oracle Clinical include:
■ Default layout generation
■ Moving a data entry screen to production
■ Generating a Validation Procedure
Note: On Windows only:
■ All Oracle Clinical users must also have operating system-level accounts on the Windows server running the PSUB service.
■ The Windows server that runs the PSUB service must belong to the same domain as the Windows server that runs the Oracle database.
This Oracle database security feature prevents unauthorized users from logging in over a network connection. For information on database security, see the your Oracle database documentation.
Filename Format Description of File Contents
lnnnn.log Log file of a user's PSUB job. Note that the initial character is the letter L, not the number one.
onnnn.out Output from a report job.
pnnnn.log Log file for a print request from the Submitted Batch Jobs form.

Starting and Stopping PSUB
Managing Batch Jobs 8-3
When an application server submits a blocking job, it sends information through a common database pipe and then waits on an application server-specific receiving pipe for completion (execution) information, which it receives from PSUB. The pipe is maintained by the application and is named with a unique session name. Time-out on the receiving pipe for the application server occurs after 5 minutes, at which point the following message appears
Failed to get response from server - Batch Job ID nnnn
Timing out happens for a variety of reasons, including:
■ The rxcprod user is not set up properly.
■ Job execution is slow, so more than 5 minutes elapse before completion.
■ The PSUB process is not running.
■ Too many jobs in the batch queue cause the current job to be pending; or it started after the other jobs were completed.
■ The server machine is too slow for the current load.
■ The job is executing but is waiting for some resource.
■ The client is not connected to an OPS$ Oracle account; or the client does not have an operating system account on the server.
■ The queue is in a stopped state.
Nonblocking jobs include all reports, all jobs launched from the PSUB submission screen, and randomization.
Checking a Nonblocking Batch JobUsers are not notified when nonblocking batch jobs complete. To check the job's status, they can execute a query in the Submitted Batch Jobs form, accessible via:
■ the Job Status button in the Submission of module window
■ the Batch Jobs item from the Action in-form menu
■ this command, entered from the rxcprod or system manager account:
$ at -l
Starting and Stopping PSUBThis section includes the following topics:
■ Starting and Stopping PSUB Manually in UNIX on page 8-3
■ Starting and Stopping PSUB Automatically in UNIX on page 8-4
■ Starting and Stopping PSUB Manually in Windows on page 8-6
■ Starting PSUB Automatically in Windows on page 8-7
Starting and Stopping PSUB Manually in UNIXThis section includes the following topics:
■ Starting PSUB Manually in UNIX on page 8-4
■ Stopping PSUB Manually in UNIX on page 8-4

Starting and Stopping PSUB
8-4 Oracle Clinical Administrator's Guide
Starting PSUB Manually in UNIXTo start the process on UNIX:
1. Log on as rxcprod to the UNIX back end server computer.
2. Run the startup script.
The startup script has the following syntax:
start_psub instance environment verbose
where instance refers to a generic instance name, and environment to a code environment. This starts up PSUB in verbose mode, which means additional information is placed in the process log file to help in debugging PSUB problems.
Log in as rxcprod to start PSUB. For example:
$ start_psub prod 462 verbose
If the process is already running, the script exits with an error message.
The start_psub shell script is run interactively as part of the user's current shell. This script runs the executable rxcpsdps as a background process, which is the PSUB process. Creating the background process should take only a few seconds.
Search for an instance of the rxcpsdps process.
For example:
$ ps -ef | grep -i rxcpsdps rxcprod 0 12750 1 0 15:52:43 ? 0:00 rxcpsdps verbose dev 40 rxcprod 0 22142 1 0 18:50:39 ? 0:01 rxcpsdps verbose test 40
If the PSUB process fails to start, check for errors in rxcpsd_instance_environment_1.log and rxcpsd_instance_environment_2.log in the $RXC_CENTRAL_LOG directory.
Stopping PSUB Manually in UNIXThe preferred way to stop the PSUB process, because it ensures a graceful exit, is with the following utility, from either the opapps or rxcprod account, after setting the correct environment:
stop_psub instance environment rxc_password
Starting and Stopping PSUB Automatically in UNIXOn UNIX systems, you can automate the process of starting and stopping PSUB.
Starting PSUB Automatically in UNIXThe following example shell scripts for Sun Solaris show how to make the process start automatically at system startup:
# File: /etc/init.d/dboraORA_HOME=/u01/app/oracle/product/11.1.0.7.0 ORA_OWNER=oracle if [ ! -f $ORA_HOME/bin/dbstart -o ! -d $ORA_HOME ]then echo 'Oracle startup: cannot start' exitficase "$1" in'start')

Starting and Stopping PSUB
Managing Batch Jobs 8-5
echo 'Starting Oracle...'su - $ORA_OWNER -c $ORA_HOME/bin/dbstartsu - $ORA_OWNER -c "lsnrctl start"su - rxcprod -c start_psub;;'stop')echo 'Stopping Oracle...'su - rxcprod -c stop_psub su - $ORA_OWNER -c $ORA_HOME/bin/dbshut;;esac# File: start_psub# Start database 1start_psub venus 462# Start database 2start_psub pluto 462
Stopping PSUB Automatically in UNIX With an OPS$ Oracle account you can automate the shutdown of the PSUB process on UNIX so that it does not require the entry of a password. For example, you can grant the OPS$RXCPROD user access to shut down the PSUB process:
$ sqlplus rxc/passwordSQL> grant execute on stop_psub_daemon to ops$rxcprod
The PSUB process may then be shut down with the command:
$ rxcpstop.sh /
The entire process of starting up and shutting down Oracle Clinical instances can be automated. The following example shell scripts for Sun Solaris show how.
# File: /etc/init.d/dboraORA_HOME=/u01/app/oracle/product/11.1.0.7.0 ORA_OWNER=oracle if [ ! -f $ORA_HOME/bin/dbstart -o ! -d $ORA_HOME ]then echo 'Oracle startup: cannot start' exitficase "$1" in'start')echo 'Starting Oracle...'su - $ORA_OWNER -c $ORA_HOME/bin/dbstartsu - $ORA_OWNER -c "lsnrctl start"su - rxcprod -c start_psub;;'stop')echo 'Stopping Oracle...'su - rxcprod -c stop_psub su - $ORA_OWNER -c $ORA_HOME/bin/dbshut;;esac# File: stop_psub# Stop database 1stop_psub venus 462# Stop database 2stop_psub pluto 462

Starting and Stopping PSUB
8-6 Oracle Clinical Administrator's Guide
Starting and Stopping PSUB Manually in WindowsThis section includes the following topics:
■ Installing PSUB in Windows on page 8-6
■ Starting PSUB Manually in Windows on page 8-6
■ Stopping PSUB Manually in Windows on page 8-7
Installing PSUB in WindowsOn Windows, you must first install the PSUB process as a service:
1. Log in to the Windows server as Administrator or as a user with administrative privileges.
2. Open a Command Prompt window:
■ If you logged in as Administrator, click Start, then Run, then enter cmd.
■ If you logged in as a different user with administrative privileges, click Start, type cmd in the Start search box, then right-click cmd in the list and click Run as administrator.
3. Enter the following commands:
set p1=database-connect-stringset p2=code-environmentopa_setupcd %RXC_BIN%rxcpsdps -install database-connect-string database-instance-name
4. Navigate to Start, then Administrative Tools, then Services.
5. In the Services window, right-click on the PSUB service, then click Properties. The PSUB Service Properties window opens.
6. In the General tab, set the Startup Type to Manual.
7. In the Log On tab, select This Account, then click Browse.
8. Enter: rxcprod, then click Check Names. The system enters the relative location to rxcprod.
9. Click OK. The system returns to the PSUB Service Properties window.
10. Enter and confirm the rxcprod password, and click OK.
11. Log out from this Administrator session.
Starting PSUB Manually in WindowsAfter installing the PSUB service and setting its parameters as Administrator, you start it as rxcprod:
1. Log in as rxcprod.
2. Open the computer's Services control panel.
3. In the General tab window, select the PSUB Service and enter values for the Start Parameters as follows:
database-connect-string code-environment [verbose|noverbose] value-of-rxc_root
For example:

Starting and Stopping PSUB
Managing Batch Jobs 8-7
db2x2 462 verbose c:\\opapps\\oc\\462
Note that if you need a backslash (\) in the text box, you must double it (\\).
4. Click the Start button.
5. Click OK to close the PSUB Service Properties window.
Stopping PSUB Manually in WindowsDo not use Enterprise Manager to stop rxcprod sessions on Windows; instead, use the Control Panel on the appropriate local machines.
To stop the PSUB service:
1. Log in as rxcprod.
2. Open the Services control panel.
3. In the Services dialog box, select the PSUB service for the particular database and open the Properties window. The PSUB service for db2x2, for example, might appear as:
psub service db2x2
4. In the Properties window, click Stop.
Starting PSUB Automatically in WindowsThis section includes the following topics:
■ Creating a System Environment Variable on page 8-7
■ Creating a Batch File on page 8-8
■ Scheduling the Batch File and Testing the Setup on page 8-8
■ Adding a Shortcut on page 8-9
You must first install PSUB; see "Installing PSUB in Windows" on page 8-6.
The batch file is required in large databases that take so much time to come up during a server reboot so that the system tries to start PSUB before the database is fully up. In this case the PSUB process does not start and an error like the following appears in the PSUB log file (found in the drive:\opapps\oc\462\log directory):
ERROR:Daemon error while connecting:/@devocORA-1033: ORACLE initialization or shutdown in progress
Creating a System Environment VariableYou can specify that the PSUB service starts automatically when the Windows PSUB server re-boots. The service parameters are read from a system environment variable whose name concatenates PSUBSERVICE with the database name.
To create a system environment variable in Windows:
1. Navigate from Start to the Control Panel, then click on the System and Security link. The System and Security window opens.
2. Click the System link. The System window opens.
3. Click the Advanced System Settings link at the top left corner. The System Properties window opens.
4. Select the Advanced tab, then click Environment Variables.

Starting and Stopping PSUB
8-8 Oracle Clinical Administrator's Guide
5. Click New under System Variables in the lower portion of the window to define the variable.
For the variable name, enter the string PSUBSERVICE concatenated with the database name; for example, for the database sun6x2:
PSUBSERVICESUN6X2
For the variable value, use the format: database_id code_environment verbose RXC_ROOT; for example:
sun6x2 462 verbose t:\\opapps\\oc\\462
Creating a Batch FileCreate a batch file called 'psub_start1.bat' in the %RXC_ROOT%/log directory (for example, D:\opapps\oc\462\log) with the following contents.
cmd /c echo Current Date/time= %DATE% %TIME% > psub_start1.log cmd /c echo Starting Time Delay > psub_start1.logping localhost -n 180 > nul cmd /c net start "PSUB Service database_id" > psub_start1.log
Notes:
■ "PSUB Service database_id" is the PSUB service name that appears in the Services window (under Administrative Tools from the Control Panel).
■ You can repeat the following command for different databases if needed:
cmd /c net start "PSUB Service database_id" > psub_start1.log
■ The 'ping localhost' command introduces a time delay to ensure that the database is up before starting PSUB. You can increase this value—set to 180 seconds (3 minutes) in the example above—if required.
Scheduling the Batch File and Testing the SetupTo schedule batch file execution:
1. Navigate to Start, then Administrative Tools, then Services. Scroll down and make sure that the Task Scheduler service is started.
2. Navigate to Start, then Administrative Tools, then Task Scheduler. The Task Scheduler window opens.
3. Click the Create Basic Task link on the right. The Create Basic Task wizard appears.
4. Enter a Name and Description and click Next.
5. In the Task Trigger window, select When the computer starts and click Next. The Action window appears.
6. In the Action window select Start a program and click Next. The Start a Program window appears.
7. In the Start a Program window, click Browse. The Browse window appears.
8. In the Browse window, browse to the directory where psub_start1.bat is saved and then select psub_start1.bat. Leave the other boxes empty and click Next.
9. Select Open the Properties dialog for this task when I click Finish and click Finish. The Properties dialog box opens.

Managing the PSUB Process
Managing Batch Jobs 8-9
10. In the Properties dialog box, General tab, Security options section, click Change User or Group and select Administrator.
To test, shut down the service if necessary (see "Stopping PSUB Manually in Windows" on page 8-7) and double-click on file psub_start1.bat to test that it starts the PSUB service. Verify that the log file psub_start1.log is created in the same directory unless a different path was specified.
11. In the Services window under Administrative Tools in the Control Panel, right-click the PSUB Service, click Properties, and change its Startup Type to Manual.
To test, restart the computer and check the Services window to see if the PSUB service has started. If it has, submit a PSUB job such as Batch Validation and check if it runs.
Adding a ShortcutFor convenience add a shortcut for psub_start1.bat on the desktop to manually start PSUB by double-clicking the icon.
Managing the PSUB ProcessThis section includes the following topics:
■ Changing PSUB Job Number Sequencing on page 8-9
■ Viewing the Status of a Submitted Batch Job on page 8-10
■ Removing the PSUB Service on page 8-10
■ Viewing Log and Output Files on the Screen on page 8-11
■ Using Job Sets to Control Execution Order on page 8-12
■ Tracking PSUB Processes on page 8-13
Changing PSUB Job Number SequencingA sequence generator numbers Oracle Clinical submitted batch jobs. By default, at each submission the generator increments by 10 the database seed number you provide during back end installation. Change the default by running alter_psub_seq.sql, found in the INSTALL directory, which lists current settings and asks for:
■ start value – number to append to the initial job ID
■ increment – the value to add to the job ID for each subsequent job.
For example:
The value entered for the "start value" for the PSUB batch job number does not need to be the same as the database seed.
Tips: If users are accessing multiple databases, keep the batch job numbers generated by each database unique so that the log files do not collide.
Start Value Increment Job ID Numbers
1 10 1, 11, 21, 31…
21 100 21, 121, 221, 321…

Managing the PSUB Process
8-10 Oracle Clinical Administrator's Guide
Keep the increment of the batch job numbers as small as possible so that batch job numbers do not grow too large.
Viewing the Status of a Submitted Batch JobYou view the status of submitted batch jobs in the Submitted Batch Jobs window, which you access by selecting: Admin, then PSUB/Reports Jobs, and Batch Jobs. This window provides information about the batch jobs, including logs, output file names, and stop jobs you have submitted. The most recently submitted jobs are listed first.
You cannot use this window to update fields. If you are viewing this form while the job is executing, requery the form periodically to see the statuses change, or press the Auto Refresh button. Press the button again to turn off the auto query.
Batch job execution statuses:
■ ENTERED = User has requested submission of the job.
■ SUBMITTED = Job has been submitted to the batch queue.
■ SUBMIT_FAILED = Job failed to be submitted to the batch queue.
■ STARTED = Job is currently executing.
■ SUCCESS = Job has completed successfully.
■ FAILURE = Job has completed unsuccessfully. Reason displayed in Failure Text field.
■ STOPPED = Job has been stopped by the Stop button.
■ STOP_FAILED = Job has not responded to the Stop button.
Removing the PSUB ServiceOn Windows, you can remove (uninstall) the PSUB service as follows:
1. Log in to the Windows server as Administrator or as a user with administrative privileges.
2. Open a Command Prompt window:
■ If you logged in as Administrator, click Start, then Run, then enter cmd.
■ If you logged in as a different user with administrative privileges, click Start, type cmd in the Start search box, then right-click cmd in the list and click Run as administrator.
3. Enter the following commands:
set p1=database-connect-stringset p2=code-environmentopa_setupcd %RXC_BIN%rxcpsdps -remove database-connect-string database_instance_name
4. Log out from this Administrator session.
Viewing Log and Output Files on the ScreenThis section includes the following topics:
■ Viewing Logs that Concern Execution of PSUB Processes on page 8-11
■ Viewing Logs for Individual PSUB Jobs on page 8-11

Managing the PSUB Process
Managing Batch Jobs 8-11
■ Printing Output or Log Files on page 8-11
Viewing Logs that Concern Execution of PSUB ProcessesThe PSUB process writes to log files pointed to by the variable RXC_CENTRAL_LOG. RXC_CENTRAL_LOG is defined as $rxc_root/log (on UNIX), or %rxc_root%\log (on Windows). Do not redefine this variable to any other values.
However, the following file can be read while the PSUB process is running:
If the process is running in verbose mode more information is written to the log file. You cannot switch from non-verbose to verbose modes while the process is running; you must stop and restart the process to switch mode.
Viewing Logs for Individual PSUB JobsLog and output files are always placed in the log directory in your home directory on the server on which PSUB is running. You cannot update log and output file names. The names of the files are structured such that the unique batch job ID for the job is given an:
■ "l" prefix for the log file
■ "o" for the output file.
For example, a batch job ID of 12345 would have an output file name of $RXC_LOG/o12345.out (for UNIX), or %RXC_LOG%\o12345.out (for Windows), and a log file name of $RXC_LOG/l12345.log (for UNIX), or %RXC_LOG%\l12345.log (for Windows).
To view the output or log file on the screen, click the View Output or View Log button and enter the relevant information in the window.
Printing Output or Log FilesTo print the output or log file, press the Print Output or Print Log button. In the pop-up box, specify the printer.
For printing, PSUB uses the standard lp command (on UNIX) or print functions (on Windows). No other environment variables control printing.
Printing from PSUB jobs on a UNIX server to a Windows spooler is not supported.
Using Job Sets to Control Execution OrderYou can create a job set to control the execution order when you want jobs that depend on other jobs to execute only if the jobs on which they depend have successfully executed. If any of the jobs in a job set exits with a status of SUBMIT-FAILED or STOPPED, the whole job set aborts with a status of FAILURE. The basic steps are:
Note: On UNIX systems, you must stop the PSUB process to view the contents of this log file, because it will be locked.
Operating System Example Path and File Name for Log File
UNIX $RXC_CENTRAL_LOG/rxcpsd_instance_environment_1.log
Windows %RXC_CENTRAL_LOG%\rxcpsd_instance_environment_1.log

Managing the PSUB Process
8-12 Oracle Clinical Administrator's Guide
1. Create a Job Set
2. Submit a Job Set
Create a Job Set1. Save a parameter set for each job to be included in the job set, if that has not been
done already.
2. Select Admin, then PSUB Jobs, and Job Sets.
3. Enter a name for the job set (alphabetic characters only).
4. In the Job Label field, enter a short name for the first job in the sequence. You use this name in the fields under JOB LABEL to the right.
5. Enter the name of the saved parameter set for the job. list of values available.
6. Set the timeout limit for the job in minutes. Default: 720 (12 hours).
7. The next three fields set the execution order and conditional branching. Enter the job label for the job you want to run next if the current job runs successfully, fails, or times out. If you leave one of these fields blank, the entire job set will stop executing if the current job has the corresponding result. For example, if you leave the Failure field blank and the current job fails, Oracle Clinical stops executing the entire job set.
Oracle Clinical enters the task name for the parameter set you entered.
Repeat this process for each job in the job set.
Submit a Job Set1. Select Admin, then PSUB Jobs, and Submit Job Set.
2. Enter a job set name. An list of values is available.
3. Click Submit Job.
A job set controls the execution order for a specified set of jobs, so that jobs that depend on other jobs will execute only if the jobs on which they depend have been successfully executed. If any of the jobs in a job set exits with a status of SUBMIT-FAILED or STOPPED, the whole job set aborts with a status of FAILURE. You create job sets by selecting Admin, then PSUB, and Job Set.
Tracking PSUB ProcessesBefore starting a PSUB process, you may want to know the answer to such questions as, "Where was PSUB last running?", or "Where was PSUB running on such-and-such a
Note: All jobs included in a job set must have a saved parameter set. No job included in a job set can have a LOCAL_IMMEDIATE mode of execution
Note: No jobs included in a job set can have a LOCAL_IMMEDIATE mode of execution
Note: It is not necessary to wait until Oracle Clinical has executed one job before you submit another job.

Batch Job Reference Codelists
Managing Batch Jobs 8-13
date?" You can query the table RXC.PSUB_PROCESS_LOG to find out, for a given database, the instance, the environment, and the time a PSUB process was started and the time it was stopped.
For example, this query will give you the host and code environment of the last time PSUB was started against the database:
SQL> select start_ts, host, code_environment 2 from psub_process_log 3 where start_ts = ( 4 select max(start_ts) from psub_process_log);
This query will list all starts and stops, in time order:
SQL> select start_ts, stop_ts, host, code_environment 2 from psub_process_log 3 order by 1;
Batch Job Reference CodelistsOracle Clinical manages batch jobs through entries in these reference codelists. See Chapter 7, "Reference Codelists" for additional information:
■ BATCH QUEUE NAME Local Codelist on page 7-7
■ PRINT QUEUE NAME Local Codelist on page 7-19
■ OCL_JOB_PREF Local Codelist on page 7-14
■ REPORT_SERVER Local Codelist on page 7-20
■ SAS_QUEUE Local Codelist on page 7-20
Name Type Description
PSUB_PROCESS_LOG_ID NUMBER
HOST VARCHAR2(64)
SERVER_OS VARCHAR2(8) The type of operating system on the server where PSUB runs
START_TS DATE The time stamp when the PSUB process started
CODE_ENVIRONMENT VARCHAR2(20)
VERBOSE VARCHAR2(1)
STOP_TS DATE The time stamp when the PSUB process stopped

Batch Job Reference Codelists
8-14 Oracle Clinical Administrator's Guide

9
Partitioning and Indexing 9-1
9Partitioning and Indexing
Oracle Clinical modifies the required index structure for the Responses table (as well as several other tables), and enables the use of partitioning for the Responses table. The baseline Release 4.6.2 upgrade does not change the index or partition structure of the Responses table because these changes can be time-consuming and require additional planning. You decide when to upgrade to the new indexes, and whether and when to upgrade for partitioning.
This section includes the following topics:
■ Introduction on page 9-1
■ Planning for Partitioning Upgrade on page 9-5
■ Partitioning the Responses Table on page 9-10
■ Upgrading Indexes on page 9-18
■ Query Tuning Guidelines on page 9-20
This does not replace the Oracle technical documentation regarding partitioning or indexes. Oracle strongly recommends that the DBA in charge of the Oracle Clinical database be familiar with partitioning before attempting to convert an existing Oracle Clinical database to a partitioned Responses table.
For detailed and authoritative information on partitioning and on maintaining partitioned tables, see the Oracle database documentation, specifically the Concepts manual and the Administrator's Guide.
IntroductionThere are two basic sets of decisions you must make to plan the upgrade:
■ Whether and when to convert to a partitioned Responses table
■ If you are not partitioning, when and how to upgrade the index structure of the Responses table
These two decisions are inter-related — the conversion to partitioning subsumes the index upgrade. If you decide that you will be partitioning shortly after upgrading, you might want to skip the separate index upgrade. Conversely, if you are postponing partitioning you might want to do the separate index conversion soon after upgrade. If you are not converting to partitioning, you need to consider the path to index upgrade (see Figure 9–1).
If you have a fresh installation of Oracle Clinical, you do not need the index upgrade. You do need to decide about partitioning.

Introduction
9-2 Oracle Clinical Administrator's Guide
Timing Considerations and Deferral of Index or Partition UpgradeThe index upgrade and partitioning both require impact analysis in advance and both can take a significant amount of time to implement. Assuming that the impact analysis is done prior to upgrading and the upgrade path chosen, the primary consideration for when to upgrade is the elapsed time needed to perform the actual upgrades. While either could be done at the same time as the upgrade, deferring the index or partition upgrade to a separate time might reduce the risk and time pressure. The index upgrade is the least time-consuming and is easily performed overnight even on a large database. Partitioning is more time-consuming and, while it can easily be accomplished over a weekend on even the largest Oracle Clinical database, it needs more careful advanced planning.
If you decide to defer both partitioning and the index upgrade, you can force Oracle Clinical to continue to create validation and derivation procedures and data extract views that are optimized for the pre-4.0-style index structure (see "Enforcing Pre-Version 4.0 Optimization" on page 9-3).
The upgrade for Responsest should be done at the same time as either partitioning or the Responses table index upgrade.
See "Upgrading Indexes" on page 9-18 for more information. This upgrade can be done at any time that is convenient.

Introduction
Partitioning and Indexing 9-3
Figure 9–1 Partitioning and Indexing Decision Paths
Enforcing Pre-Version 4.0 OptimizationIf you decide to postpone both the partitioning and indexing upgrades, you can force Oracle Clinical to continue to create validation and derivation procedures and data extract views that are optimized for the pre-4.0-style index structure.
You do this by inserting a record in the local OCL_STATE reference codelist with the short value of USE RESP_DCMQG and a long value of YES.
Later, when you are ready to convert to the new index scheme or partitioning, change the long value to NO before you regenerate views and procedures. The absence of an entry is equivalent to NO.

Introduction
9-4 Oracle Clinical Administrator's Guide
About PartitioningPartitioning is an Oracle database capability that allows you to divide a single Oracle table into separate physical partitions, each with its own storage characteristics. The indexes on a table can be partitioned as well. When a table is partitioned, each partition functions physically like a separate table while the table, as a whole, can still be treated as a single table for purposes of data access through SQL. Partitions can be managed like independent tables. They can be reorganized, imported, exported, taken off line and even dropped.
This section provides an overview of partitioning as it has been used for the Responses table in Oracle Clinical. For complete information on partitioning, see the Oracle Concepts manual and Administrator's Guide.
How Has the Responses Table Been Partitioned?The response table is range partitioned on clinical_study_id. This means that the data is placed into partitions based upon ranges of the internal clinical_study_id identifier. The two remaining indexes on the Responses table are equipartitioned with the Responses table on clinical_study_id. This means they share the same partitioning scheme as defined for the Responses table. This equipartitioning guarantees partition independence, that is, operations on one partition or its indexes do not affect any other partition or its indexes. Equipartitioning also means that the index partitions are automatically maintained during most partition maintenance operations on the Response table partitions. It is important to note that the Response table partitions and the index partitions have separate storage specifications, so it is still possible to place the index partitions on separate tablespace/physical devices from the table partitions.
Why Partition?In Oracle Clinical Version 3.1, the Responses table together with its indexes is 20 times larger than the next largest table, Received DCMs. Partitioning the Responses table and reorganizing the indexes accomplish a number of goals:
■ Improves Database and System Management
■ Removes Single Point of Failure
■ Improves Performance
■ Reduces Space Requirements
Improves Database and System Management Partitioning improves database and system management in several ways. First, by dividing the Responses table into many physical segments, you can manage the physical growth and structure of the table at a finer level of granularity. Individual partition segments can be rebuilt independently to consolidate space and improve performance. Partition segments can be placed on separate tablespaces on separate physical devices to improve performance; for example, by moving studies that will be used for intensive reporting onto separate disks from studies with active entry. Studies that are no longer active can be periodically moved to a read-only tablespace on a physical device that need only be backed up after the periodic maintenance and not as part of nightly backups. Similarly, if table export is used as a backup mechanism, only active partitions need to be exported.
Removes Single Point of Failure Prior to partitioning, a single bad index block would require rebuilding the entire index and a bad data block might require rebuilding the entire responses table. Since all of the partitioned indexes are local indexes, with partitioning, a bad index only affects the particular partition and a bad data block only

Planning for Partitioning Upgrade
Partitioning and Indexing 9-5
requires the rebuild of that particular partition; the remaining partitions can remain in use while the one with problems is restored.
Improves Performance Both transactional and retrieval performance are improved by partitioning. Transactional performance is improved in two ways: by reducing contention for the data associated with a particular study and reducing transaction overhead. Contention is reduced by distributing inserts, updates, and deletes over different data blocks for each study and by allowing data blocks that are actively being accessed for reporting to be separated from those that are actively being modified by data entry.
Retrieval performance is improved in two ways as well: by physically grouping study data and by allowing physical reorganization on a study basis. By allowing data for each study to be stored their own data and index blocks instead of interspersed with data from many other studies, retrieval by study performs significantly less disk I/O and, in fact, a study can usually be buffered entirely in the SGA. This can produce dramatically improved extract view performance. In addition, when a study is about to be heavily accessed for reporting, the particular partition can be reorganized to consolidate space used by the index and data blocks, thus reducing I/O, and even to place the partition on a separate, perhaps faster, physical device to optimize access.
Reduces Space Requirements The most dramatic reduction in space requirements comes from the re-optimization of Oracle Clinical to do away with the need for three of the indexes on the Responses table. Combined with the Oracle database leading key compression on one of the remaining indexes, this drops the space required by the Responses table and its indexes by over 50%. This benefit can be realized whether or not you partition the Responses table. In addition, the ability to rebuild partitions individually means that space can be recovered from partitions that are no longer being modified by rebuilding them with reduced free space. Since freshly rebuilt indexes are frequently two-thirds the size of an actively growing index, and the free space requirement can be reduced by 10%, the net improvement over time could be an additional 30-40% reduction in space requirements.
Planning for Partitioning UpgradeBefore partitioning the Responses table you must decide how you want to partition it, both initially and on an ongoing basis. To do this, you need to understand how the partitioning is implemented and how this impacts your partition strategy.
Oracle recommends that you place all but the smallest active studies in separate partitions. Small studies that happen to have contiguous clinical_study_ids can share a single partition without impacting performance significantly. Inactive studies with contiguous clinical_study_ids can be merged into a single partition (see "Using Read-Only Partitions to Minimize Backup" on page 9-17).
Other partitioning schemes are possible and give differing degrees of performance and problem isolation benefits. One alternate approach is to segment the table into larger partitions that loosely correspond to time-slices based upon sequential clinical_study_id allocation. This approach minimizes partition maintenance and gives some problem isolation benefit, but is not likely to give much performance benefit because active studies will tend to share the same partitions.
Pre-upgrade StepsTo assist in the planning process, Oracle Clinical includes several listings and utilities to create the initial partitioning structure. A forms-based user interface is used to

Planning for Partitioning Upgrade
9-6 Oracle Clinical Administrator's Guide
perform the actual partition definition prior to generating the partitioned Response table creation script.
Decide Partitions NeededThe following SQL statement provides a listing of all studies with data, the number of responses per study, the most recent response creation in the study, and the flag that indicates whether the study is frozen:
SELECT /*+ ordered */ cs.study, cs.clinical_study_id, css.frozen_flag, a.resp_count, a.max_date FROM (SELECT count(*) resp_count, clinical_study_id, to_char(max(response_entry_ts), 'DD-MON-YYYY') max_date FROM responses GROUP BY clinical_study_id ORDER BY clinical_study_id) a, clinical_studies cs, clinical_study_states css WHERE a.clinical_study_id = cs.clinical_study_id AND cs.clinical_study_id = css.clinical_study_id AND css.current_flag = 'Y' ORDER BY clinical_study_id
Analyze the resulting list to determine which ranges of clinical_study_id can be combined into single partitions and which should be in their own partition. Among the issues to consider are:
1. Identify studies that will never have changes to their data and that are unlikely to have intensive reporting requirements in the future (see "Using Read-Only Partitions to Minimize Backup" on page 9-17).
Action: Consolidate as much as possible and locate in read-only tablespace (see "Using Read-Only Partitions to Minimize Backup" on page 9-17).
2. Identify studies that are complete, but may have continued reporting requirements.
Action: Keep in separate partitions, as appropriate by size, but allocate minimal free space. Consider placing tablespace on fast storage devices.
3. Identify contiguous ranges of small studies that will not grow to be large studies.
Action: Consider consolidating into single partitions. This is especially relevant if there are studies that were created but will never contain data.
Define Partition StructureOnce you are prepared to define the initial partition structure, you use the following script to populate the actual table:
SQL> @populate_part_map_table.sql log_file_name.log
This script populates the mapping table with one row per study with storage clauses based upon the number of responses. The storage clauses are designed to result in a range of 1 to 15 extents for a given table size.
Table 9–1 Default Storage for Oracle Clinical Responses Partitions
Partition Size Max Responses Table Extent Size Index Extent Size
Very Small <10K 256K 128K
Small <50K 512K 256K

Planning for Partitioning Upgrade
Partitioning and Indexing 9-7
Implement Partition StructureOnce you have executed the script, you can use the Maintain Partition Mapping Tables form, shown in Figure 9–2 (navigate to Admin, then Partition Admin), to implement the partitioning scheme determined above.
You can delete rows to merge partitions. You can edit the storage clauses to reflect consolidation or to adjust the storage because you are aware of factors that affect the size, such as planned rapid growth of a partition. Bear in mind that you can always rebuild a partition later, independent of the upgrade process.
Figure 9–2 Maintain Partition Mapping Tables Window
Generating Table and Index Creation SQLOnce you have completed modifying the partition mapping, you use the script:
Medium <100K 1M 512K
Large <500K 4M 2M
Very Large 500K+ 16M 8M
Note: You always specify the maximum clinical_study_id included in a partition. The minimum is implicitly one more than the maximum of the previous partition.
Table 9–1 (Cont.) Default Storage for Oracle Clinical Responses Partitions
Partition Size Max Responses Table Extent Size Index Extent Size
Planning for Partitioning Upgrade
9-8 Oracle Clinical Administrator's Guide
SQL> @gen_create_part_table.sql part_table_ddl.sql
to generate the partitioned table creation script (see Example 9–1) and:
SQL> @gen_create_part_index.sql part_index_ddl.sql
to generate a creation script for both partitioned indexes (see Example 9–2 and Example 9–3). Note that the CREATE statement for RESPONSE_RDCM_NFK_ID uses the index tablespace but the table storage clause (see "Sample Responses Foreign Key Index Creation Statement" on page 9-9), because this large concatenated index is approximately 70-80% as large as the data segment while RESPONSE_PK_IDX is 40-50% as large.
Example 9–1 Sample Responses Table Creation Statement
CREATE TABLE RESPONSES ( RESPONSE_ID NUMBER(10,0) NOT NULL, RESPONSE_ENTRY_TS DATE NOT NULL , ENTERED_BY VARCHAR2(30) NOT NULL , RECEIVED_DCM_ID NUMBER(10,0) NOT NULL , DCM_QUESTION_ID NUMBER(10,0) NOT NULL , DCM_QUESTION_GROUP_ID NUMBER(10,0) NOT NULL , CLINICAL_STUDY_ID NUMBER(10,0) NOT NULL , REPEAT_SN NUMBER(3,0) NOT NULL , END_TS DATE NOT NULL , VALIDATION_STATUS VARCHAR2(3) DEFAULT 'NNN' NOT NULL, SECOND_PASS_INDICATOR VARCHAR2(1) NULL , VALUE_TEXT VARCHAR2(200) NULL , DISCREPANCY_INDICATOR VARCHAR2(1) NULL , DATA_CHANGE_REASON_TYPE_CODE VARCHAR2(15) NULL , DATA_COMMENT_TEXT VARCHAR2(200) NULL , AUDIT_COMMENT_TEXT VARCHAR2(200) NULL , EXCEPTION_VALUE_TEXT VARCHAR2(200) NULL)TABLESPACE RXC_RESP_TSPA STORAGE (INITIAL 1M NEXT 1M MINEXTENTS 1 MAXEXTENTS 99 PCTINCREASE 0)PARTITION BY RANGE (CLINICAL_STUDY_ID) (PARTITION RESP_CSID_LE_1 VALUES LESS THAN (2)STORAGE (INITIAL 512K NEXT 512K MINEXTENTS 1 MAXEXTENTS 99 PCTINCREASE 0), PARTITION RESP_CSID_LE_101 VALUES LESS THAN (102)STORAGE (INITIAL 1M NEXT 1M MINEXTENTS 1 MAXEXTENTS 99 PCTINCREASE 0), PARTITION RESP_CSID_LE_1001 VALUES LESS THAN (1002)STORAGE (INITIAL 1M NEXT 1M MINEXTENTS 1 MAXEXTENTS 99 PCTINCREASE 0), PARTITION RESP_CSID_LE_1201 VALUES LESS THAN (1202)STORAGE (INITIAL 4M NEXT 4M MINEXTENTS 1 MAXEXTENTS 99 PCTINCREASE 0), PARTITION RESP_CSID_LE_10000802 VALUES LESS THAN (10000803)STORAGE (INITIAL 16M NEXT 16M MINEXTENTS 1 MAXEXTENTS 99 PCTINCREASE 0), PARTITION RESP_CSID_LE_10001202 VALUES LESS THAN (10001203)….…., PARTITION RESP_CSID_LE_10242201 VALUES LESS THAN (10242202)STORAGE (INITIAL 256K NEXT 256K MINEXTENTS 1 MAXEXTENTS 99 PCTINCREASE 0), PARTITION RESP_CSID_LE_9999999998 VALUES LESS THAN (9999999999)STORAGE (INITIAL 1M NEXT 1M MINEXTENTS 1 MAXEXTENTS 99 PCTINCREASE 0)) ENABLE ROW MOVEMENT;
Example 9–2 Sample Responses Primary Key Index Creation Script
CREATE UNIQUE INDEX RESPONSE_PK_IDX ON RESPONSES (RESPONSE_ID, RESPONSE_ENTRY_TS,CLINICAL_STUDY_ID)TABLESPACE RXC_RESP_IDX_TSPA

Planning for Partitioning Upgrade
Partitioning and Indexing 9-9
COMPUTE STATISTICSNOLOGGINGSTORAGE (INITIAL 1M NEXT 1M MINEXTENTS 1 MAXEXTENTS 99 PCTINCREASE 0)LOCAL (PARTITION RESP_CSID_LE_1 STORAGE (INITIAL 256K NEXT 256K MINEXTENTS 1 MAXEXTENTS 99 PCTINCREASE 0), PARTITION RESP_CSID_LE_101 STORAGE (INITIAL 512K NEXT 512K MINEXTENTS 1 MAXEXTENTS 99 PCTINCREASE 0), PARTITION RESP_CSID_LE_1001 STORAGE (INITIAL 512K NEXT 512K MINEXTENTS 1 MAXEXTENTS 99 PCTINCREASE 0), PARTITION RESP_CSID_LE_1201 STORAGE (INITIAL 2M NEXT 2M MINEXTENTS 1 MAXEXTENTS 99 PCTINCREASE 0)……, PARTITION RESP_CSID_LE_10242201 STORAGE (INITIAL 128K NEXT 128K MINEXTENTS 1 MAXEXTENTS 99 PCTINCREASE 0), PARTITION RESP_CSID_LE_9999999998 STORAGE (INITIAL 512K NEXT 512K MINEXTENTS 1 MAXEXTENTS 99 PCTINCREASE 0)) ;
Once these scripts are generated you should review them and manually make any changes that can not be made through the Maintain Partition Mapping Table form. For instance, if you want to modify the percent free default, for the table as a whole or for particular partitions, you must currently do this by editing the generated creation script. The script generation currently ignores the partition-specific tablespace specification, so you must manually amend the scripts to add this after the partition name and before the storage clause if you want to place a partition in a tablespace other than the one specified for the table or index as a whole.
In addition, you should amend the index creation scripts to add the clauses COMPUTE STATISTICS and NOLOGGING at the position indicated in bold in Examples 9–2 and 9–3. COMPUTE STATISTICS allows the cost-based statistics to be computed as the new indexes are created and avoids the time-consuming extra step of separately computing the statistics. NOLOGGING avoids the overhead of writing to the Oracle redo log file, which is unnecessary since the database will be backed up after the upgrade (see "Step 6. Create Indexes on Partitioned Responses Table" on page 9-13 and "Maintenance of Cost-Based Statistics" on page 9-16).
Example 9–3 Sample Responses Foreign Key Index Creation Statement
CREATE INDEX RESPONSE_RDCM_NFK_IDX ON RESPONSES (CLINICAL_STUDY_ID, RECEIVED_DCM_ID, DCM_QUESTION_GROUP_ID, DCM_QUESTION_ID, END_TS, RESPONSE_ENTRY_TS, REPEAT_SN, RESPONSE_ID, VALUE_TEXT, VALIDATION_STATUS, EXCEPTION_VALUE_TEXT, DATA_COMMENT_TEXT) TABLESPACE RXC_RESP_IDX_TSPACOMPUTE STATISTICSNOLOGGINGSTORAGE (INITIAL 1M NEXT 1M MINEXTENTS 1 MAXEXTENTS 99 PCTINCREASE 0)COMPRESS 6 LOCAL ( PARTITION RESP_CSID_LE_1 STORAGE (INITIAL 512K NEXT 512K MINEXTENTS 1 MAXEXTENTS 99 PCTINCREASE 0), PARTITION RESP_CSID_LE_101 STORAGE (INITIAL 1M NEXT 1M MINEXTENTS 1 MAXEXTENTS 99 PCTINCREASE 0) , PARTITION RESP_CSID_LE_1001 STORAGE (INITIAL 1M NEXT 1M MINEXTENTS 1 MAXEXTENTS 99 PCTINCREASE 0) , PARTITION RESP_CSID_LE_1201 STORAGE (INITIAL 4M NEXT 4M MINEXTENTS 1 MAXEXTENTS 99 PCTINCREASE 0) , PARTITION RESP_CSID_LE_10000802

Partitioning the Responses Table
9-10 Oracle Clinical Administrator's Guide
STORAGE (INITIAL 16M NEXT 16M MINEXTENTS 1 MAXEXTENTS 99 PCTINCREASE 0)……, PARTITION RESP_CSID_LE_10242201 STORAGE (INITIAL 256K NEXT 256K MINEXTENTS 1 MAXEXTENTS 99 PCTINCREASE 0), PARTITION RESP_CSID_LE_9999999998 STORAGE (INITIAL 1M NEXT 1M MINEXTENTS 1 MAXEXTENTS 99 PCTINCREASE 0) );
Partitioning the Responses TableOnce you have prepared the partition table and index creation scripts, you are ready to perform the partition upgrade. The upgrade consists of the following steps:
1. Back Up the Database.
2. Export the Responses Table.
3. Prepare the Database:
a. Drop Responses Table
b. Reorganize Tablespaces and System File Space
c. Create Partitioned Responses Table
4. Import Responses Data.
5. Compute Statistics on the Responses Table.
6. Compile Invalid Objects and Restore Database Trigger.
7. Back Up the Database (can be deferred to after Step 8).
8. Regenerate Procedures and Data Extract Views.
9. Back Up the Database. (Optional, can be deferred to normal backup schedule.)
Step 1. Back Up the DatabaseSince the upgrade process involves dropping and recreating the Responses table and since there is a finite chance that the export of the Responses table could be corrupted, Oracle highly recommends that you perform a full database backup before you start the upgrade.
Step 2. Export the Responses TableThe migration of data from the non-partitioned Responses table to a partitioned Responses table is done through the exporting of data into a dump file using the Oracle Export utility and then importing the data into the partitioned table using the Oracle Import utility. During this migration process the Responses table is not available to users.
The Export utility reads the data blocks or rows from non-partitioned Responses table and writes into a dump file (or files). It uses a parameter file exp_resp_param.dat which is shipped with Oracle Clinical and located in the tools directory. The DBA in
Note: Conduct all SQL activities while connected to the RXC account, from the tools directory for Oracle Clinical, unless otherwise specified.

Partitioning the Responses Table
Partitioning and Indexing 9-11
charge of migration at your location should review and make any changes to the parameters they feel are required.
Note that by default the export includes grants on the Responses table and that the import restores these grants. The upgrade process relies upon this to restore the grants on the newly reconstructed Responses table, so you should not modify the export or import to exclude grants.
exp rxc/password parfile=exp_resp_param.dat
The exp_resp_param.dat file contains the following information:
FILE=responses1.dmp,responses2.dmp,responses3.dmp,responses4.dmp FILESIZE=1G DIRECT=Y TABLES=(RXC.RESPONSES) COMPRESS=y CONSTRAINTS=N INDEXES=N LOG=exp_resp.log #RECORDLENGTH=64K STATISTICS=none
FILE The names of the files to create. Use multiple files, as shown, but extend or shorten this list to handle the maximum estimated size of your exported database.
FILESIZE As a rough guideline, test exports of a multi-gigabyte Responses table resulted in a total export size approximately 130% of the size of the unpartitioned Responses table's data segment.
For full information on Export and its parameters, see the Oracle Utilities manual.
Step 3. Prepare the DatabasePrior to creating the new Responses table, you should consider restarting the database specifying NOARCHIVELOG. Since you will back up the database at the completion of the upgrade and it is easier to restart a failed upgrade than to attempt to recover it from redo logs, there is no reason to pay the overhead of archiving the redo logs.
Drop Responses TableDrop the existing, unpartitioned Responses table and its indexes:
SQL> drop table responses;
Reorganize Tablespaces and System File SpaceIf you are changing the use of tablespaces, for instance, to allocate different partitions to different tablespaces, you might want to drop the existing RXC_RESP_TSPA and RXC_RESP_IDX_TSPA and associated database files and recreate the new tablespace structure for the partitioned response table and indexes. This is not required, however.
Create Partitioned Responses TableCreate an empty partitioned Responses table by executing the table creation script generated earlier (see Example 9–1, "Sample Responses Table Creation Statement" on page 9-8). Do not create the indexes.
SQL> @part_table_ddl.sql

Partitioning the Responses Table
9-12 Oracle Clinical Administrator's Guide
Step 4. Import Responses DataThe Import utility reads the dump file (or files) created by the export step and populates the partitioned Responses table. It uses a parameter file imp_resp_param.dat which is shipped with Oracle Clinical and located in the tools directory. The DBA in charge of migration at your location should review and make any changes to the parameters which they feel are required.
imp rxc/password PARFILE=imp_resp_param.dat
The imp_resp_param.dat file contains the following information:
FILE=responses1.dmp,responses2.dmp,responses3.dmp FILESIZE=1G IGNORE=Y ANALYZE=N#BUFFER COMMIT=Y TABLES=RESPONSES INDEXES=N LOG=imp_resp.log #RECORDLENGTH ANALYZE=N
FILE The names of the files to create. Make sure you edit this list to match the files created by the Export.
For full information on Import and its parameters, see the Oracle Utilities manual.
Step 5. Compute Statistics on the Responses TableOnce the import completes successfully, you should compute the statistics that are used by the cost-based optimizer by executing the ANALYZE command:
SQL> analyze table responses compute statistics;
While you can perform the analyze step with a small sample size, as illustrated below, the time saved here is relatively small. Because the indexes do not yet exist, the entire ANALYZE is performed by full scans of each partition, which are very efficient.
SQL> analyze table responses estimate statistics sample 5 percent;
See "Strategy for Ongoing Partition Maintenance" on page 9-14 for a discussion of the ongoing maintenance of cost-based statistics.
Step 6. Create Indexes on Partitioned Responses TableBefore creating the indexes on the Responses table, amend the index creation script to add the clauses COMPUTE STATISTICS and NOLOGGING, as shown in Examples 9–2 and 9–3, above.
Create the indexes by executing the index creation scripts generated and edited earlier (see "Generating Table and Index Creation SQL" on page 9-8).
SQL> @part_index_ddl.sql
These scripts take significant time to execute, proportionate to the size of the Responses table. You can monitor progress by querying the USER_SEGMENTS dictionary view from the RXC account because each index partition is committed separately.

Partitioning the Responses Table
Partitioning and Indexing 9-13
Step 7. Compile Invalid Objects and Restore Database Trigger Dropping and recreating Responses invalidates some packages and views. Execute the script compile_all_invalid.sql to compile all invalid objects in the database.
To run the compile_all_invalid.sql script:
1. Set up the environment to point to the correct database and code environment.
2. cd $RXC_INSTALL
3. Open a SQL*Plus session as system.
4. Run compile_all_invalid.sql:
SQL> start compile_all_invalid.sql
If you use pre-version 3.1 procedures and replicate study data using a database trigger on the Responses table to ensure that certain data changes occurring during batch validation are replicated, then execute the script resptrig.sql in the install directory.
SQL> @resptrig.sql
Step 8. Back Up the DatabaseAfter the upgrade is complete, perform your normal full database backup. Re-enable redo log archiving before releasing Oracle Clinical for production use. This backup is mandatory because logging was disabled during the index rebuild and archive logging disabled during the import. You can wait until after Step 8, if you do that immediately after Step 6 and before production use of the database.
Step 9. Regenerate Procedures and Data Extract ViewsOnce the Response table is partitioned, you must regenerate all procedures and data extract views for active studies. If you have disabled the generation of Version 4-style procedure and view optimization (see "Enforcing Pre-Version 4.0 Optimization" on page 9-3), you must enable it before regenerating procedures and views.
To regenerate procedures and views, follow the instructions in Chapter 10, "Utilities." For procedure regeneration you should select the parameters FULL, GENERATE and ALL. Note that in Releases 4.0 and above, procedure regeneration with GENERATE no longer causes discrepancies to be closed and reopened.
Step 10. Back Up the DatabaseIf you performed Step 7, you can defer this backup to your normal schedule.
If you skipped Step 7, do a full backup now. Remember to re-enable redo log archiving before releasing Oracle Clinical for production use.
Partition MaintenanceThis section includes the following topics:
■ Prospective Allocation of clinical_study_ids for Partitioning
■ Strategy for Ongoing Partition Maintenance
■ Instructions for Partition Maintenance
■ Rebuild Indexes after Partition Maintenance

Partitioning the Responses Table
9-14 Oracle Clinical Administrator's Guide
■ Using Read-Only Partitions to Minimize Backup
Prospective Allocation of clinical_study_ids for Partitioning1. Ensure that distributed studies do not intersperse clinical_study_ids arbitrarily.
If you intend to collapse studies into single partitions or to consolidate dormant studies into read-only partitions, you must ensure that new studies do not get created whose clinical_study_ids lie between existing studies. This can occur in distributed installations of Oracle Clinical when studies are created at multiple locations using database seeds that differ only in their trailing digits. To address this you should either share clinical_study_id sequence across locations by replicating OCL_STUDIES and creating studies centrally or, alternatively, you should ensure that sequences do not overlap by seeding at non-overlapping starting seed values, not just separate trailing digits. For instance, start location 1 at ID 101 and location 2 at ID 1000102 rather than 102.
2. Preallocate planned studies to achieve grouping of small studies.
If you want to consolidate small studies in single partitions, you should make sure that they have contiguous ranges. For instance, for a new project, create placeholder planned studies for all phase 1 and phase 2 studies so that they have contiguous IDs. This allows them to be grouped into a single partition.
Strategy for Ongoing Partition MaintenanceThere are three types of partition maintenance activities:
■ Activities that rebuild partitions
■ Activities that split or merge partitions
■ Activities that change ongoing characteristics of partitions
Activities that rebuild partitions must be performed manually. These include rebuilding the indexes on a partition, moving the data in a partition to a different tablespace, and restructuring the data in a partition to reduce the number of extents or change the PCTFREE storage parameter. See the Oracle documentation for instructions on how to carry out these activities.
Oracle Clinical includes the partition mapping form (see "Maintain Partition Mapping Tables Window" on page 9-7) and a utility script generator that support SPLIT and MERGE operations and changes to ongoing storage characteristics.
Note that all SQL activities are carried out while connected to the RXC account.
Rebuild Partitions Periodically, at weekly or monthly intervals depending on growth rate, review the current partition growth by querying the USER_SEGMENTS view:
SQL> select segment_name, partition_name, extentsSQL> from user_segments SQL> where extents > 20 SQL> and segment_name like 'RESPONSE%';
This shows you any partitions that might need to be rebuilt.
In addition, you might want to initiate a manual process for identifying studies that are about to enter periods of intense reporting. The partitions for these studies could then be rebuilt, both to coalesce index space by rebuilding the indexes and, perhaps, to decrease the PCTFREE storage parameter if data is no longer changing.
See Example 9–6 for instructions on rebuilding partition indexes.

Partitioning the Responses Table
Partitioning and Indexing 9-15
Managing New Studies Unless there is a study that will grow extremely rapidly, for instance, due to batch loading, there is no need to anticipate the creation of studies and preallocate their partitions. Since new studies are created with incrementally higher clinical_study_ids, they are automatically added to the maximum partition. As long as this partition has a storage clause with large enough space allocations, these studies can start there without significant performance impact. At planned intervals you should review this partition to determine how these studies should be partitioned and use the partition maintenance script ("Instructions for Partition Maintenance" on page 9-16) to split out the new partitions.
Use the script list_study_resp_cnt_part.sql to obtain a count by study of studies in a particular partition:
list_study_resp_cnt_part.sql partition_name spool_file_name
The following example lists the studies in the last partition, that is, the new ones:
SQL>@list_study_resp_cnt_part.sql RESP_CSID_LE_9999999998 new_studies.lis
Reviewing for Partitions that Need Splitting or Merging As with new studies, existing partitions that contain multiple studies should be periodically reviewed and split as needed.
You may also want to merge partitions for studies that become inactive or that did not grow as planned. In particular, you might want to use the approach of using read-only tablespaces for inactive studies discussed in "Using Read-Only Partitions to Minimize Backup" on page 9-17.
Maintenance of Cost-Based Statistics Whenever a partition is merged or split, or when the data volume in a partition has changed significantly, the cost-based statistics for that partition need to be refreshed. The command to refresh the statistics for a partition is:
ANALYZE TABLE Responses PARTITION (partition_name) COMPUTE STATISTICS;
If the partition is large, you can use the statistics estimation with a small sample size. However, since you do not need to analyze the whole table, but just partitions with changes, this may no longer be necessary:
SQL> analyze table responses partition (partition_name) SQL> estimate statistics sample 5 percent;
One approach to maintaining the statistics is to use a table to hold the partition statistics from the previous partition maintenance and then drive the creation of the analyze statements from that table and the current statistics. The code fragment in Example 9–4 illustrates this approach. It triggers the ANALYZE when the data volume in a partition increases by more than 50%.
Example 9–4 Using a Table to Compute Statistics
CREATE TABLE resp_part AS SELECT partition_name, bytes FROM user_segments WHERE segment_name = 'RESPONSES';
spool analyze_responses.sql
SELECT 'ANALYZE TABLE RESPONSES PARTITION ('|| u.partition_name||') COMPUTE STATISTICS' FROM resp_part r, user_segments u WHERE u.segment_name = 'RESPONSES' AND u.partition_name = r.partition_name

Partitioning the Responses Table
9-16 Oracle Clinical Administrator's Guide
AND u.bytes/1.5 > r.bytes UNION ALL SELECT 'ANALYZE TABLE RESPONSES PARTITION ('|| u.partition_name||') COMPUTE STATISTICS' FROM user_segments u WHERE u.segment_name = 'RESPONSES' AND not exists (select null from resp_part r where r.partition_name = u.partition_name)
Instructions for Partition Maintenance When you determine that you need to merge or split partitions, first use the Maintain Partition Mapping form (see Figure 9–2 on page 9-7). Insert records for partitions that are to be split or delete records for partitions that are to be merged. You can also alter the storage clauses for partitions, although this affects only new storage allocations — it does not rebuild the existing partition space.
You then use the utility script gen_alter_partition.sql to generate the SQL partition maintenance commands.
gen_alter_partition output_file.sql
For example:
SQL> @gen_alter_partition.sql alter.sql
The generation script compares the partition definition in the Oracle Clinical Partition Mapping table with the actual partition structure in the database. It then generates the SQL DDL statements to merge or split the partitions and to alter the storage clauses (see Example 9–5).
You should review the generated script and make any necessary modifications before you run it.
Example 9–5 Sample Output from the Partition Maintenance Script
REM Split case 4: Split RESP_CSID_LE_10002201 into RESP_CSID_LE_10001901 at 10001902ALTER TABLE responses SPLIT PARTITION RESP_CSID_LE_10002201 AT (10001902) INTO(PARTITION RESP_CSID_LE_10001901 , PARTITION RESP_CSID_LE_10002201STORAGE (INITIAL 4M NEXT 4M MINEXTENTS 1 MAXEXTENTS 99 PCTINCREASE 0));ALTER INDEX RESPONSE_PK_IDX MODIFY PARTITION RESP_CSID_LE_10001901STORAGE (NEXT 2M MINEXTENTS 1 MAXEXTENTS 99 PCTINCREASE 0);ALTER INDEX RESPONSE_RDCM_NFK_IDX MODIFY PARTITION RESP_CSID_LE_10001901STORAGE (NEXT 4M MINEXTENTS 1 MAXEXTENTS 99 PCTINCREASE 0) ; REM Merge case 2: Merge RESP_CSID_LE_10001102 into RESP_CSID_LE_10001202 ALTER TABLE responses MERGE PARTITIONS RESP_CSID_LE_10001102, RESP_CSID_LE_10001202 INTO PARTITIONRESP_CSID_LE_10001202; REM Merge case 2: Merge RESP_CSID_LE_10001101 into RESP_CSID_LE_10001202 ALTER TABLE responses MERGE PARTITIONS RESP_CSID_LE_10001101, RESP_CSID_LE_10001202 INTO PARTITION RESP_CSID_LE_10001202;
Rebuild Indexes after Partition Maintenance After you run the partition maintenance script (see Example 9–5), some of the associated index partitions may be unusable. Use the SQL code shown in Example 9–6

Upgrading Indexes
Partitioning and Indexing 9-17
to detect the affected partitions. It generates a script (rebuild.sql) that you run to rebuild the index partitions.
Example 9–6 SQL Code for Rebuilding Index Partitions
set pagesize 1000 set verify off set feedback off set heading off spool rebuild.sql select distinct 'ALTER TABLE RESPONSES MODIFY PARTITION '|| partition_name||' REBUILD UNUSABLE LOCAL INDEXES /' from all_ind_partitions where index_name in ('RESPONSE_PK_IDX', 'RESPONSE_RDCM_NFK_IDX') and status = 'UNUSABLE' / spool off set verify on set feedback on set heading on
Using Read-Only Partitions to Minimize BackupOracle enables you to designate tablespaces as read-only. If a tablespace is designated read-only, any attempt to modify data in that tablespace causes an Oracle error. Since the tablespace can not be modified, it can be created using data files on a separate physical device that only needs to be backed-up after maintenance activity during which the tablespace is modifiable. Over time, a significant portion of the Responses table data volume could be migrated to such read-only tablespaces, dramatically reducing the data volume that needs to be backed up by nightly backups.
To implement this strategy, you would set up the tablespace using data files on a separate physical device. A manual process of identifying studies that will no longer have modifications must be implemented. At periodic intervals, quarterly or semi-annually, you would perform partition maintenance to rebuild the partitions for those studies. During the maintenance, you alter the tablespace to make it writable. You move the data by exporting the partition, dropping the partition, and recreating the partition using the new tablespace. Once all studies have been moved, you alter the tablespace to be read-only once again and perform a backup of the device.
Upgrading IndexesOracle Clinical has been retuned to require only two indexes on the Responses table:
■ RESPONSE_PK_IDX – primary key index on RESPONSE_ID and RESPONSE_ENTRY_TS
■ RESPONSE_RDCM_NFK_IDX – an expanded, concatenated index on RECEIVED_DCM_ID
The following indexes are no longer required:
■ RESPONSE_CS_NFK_IDX – on CLINICAL_STUDY_ID
■ RESPONSE_DCMQG_NFK_IDX – on DCM_QUESTION_GROUP_ID
■ RESPONSE_UK_IDX – on DCM_QUESTION_ID
This, combined with the use of Oracle database leading key compression, results in up to 50% savings in space allocated to the Responses table and its indexes, and a

Upgrading Indexes
9-18 Oracle Clinical Administrator's Guide
significant reduction in runtime overhead to maintain the indexes. These savings occur whether you partition or not.
Index Upgrade ProcessTo upgrade the indexes you must modify and execute the script rebuild_resp_index_non_part.sql in the install directory while connected to the RXC account. You should modify the script to provide storage parameters appropriate for the size of your Responses table. The foreign key index is approximately 70% the size of the Responses table when created and the primary key index is approximately 40%. In addition, if you are dropping the obsolete indexes, you should un-comment the drop index statements and move them to before the index creation statements to ensure that their space is freed before the new indexes are created.
SQL> @rebuild_resp_index_non_part.sql
Resizing the Storage Clause for IndexesIf you upgraded without resizing (redefining) the storage clause of indexes using ocl46indexchg.sql, you can do it at any time by manually running the script. Modifying these indexes improves performance in queries executed from the RDC application.
To run ocl46indexchg.sql in UNIX, from the command line, enter:
opa_setup database 46cd $RXC_INSTALLsqlplus /nolog @ocl46indexchg.sql
To run ocl46indexchg.sql in Windows, from the command line, enter:
set p1=databaseset p2=46opa_setupcd %RXC_INSTALL%sqlplus /nolog @ocl46indexchg.sql
Response Index UpgradeIf you have other applications that directly access the Responses table, these may need to be retuned before you perform the index upgrade (due to the new leading CLINICAL_STUDY_ID key on the RESPONSE_RDCM_NFK_IDX) or before you drop the optional indexes (see "Query Tuning Guidelines" on page 9-20). If you are not partitioning you can retain one or more of these indexes until your other applications are retuned.
Note: Resizing the storage clause and running the script is an optional step in every upgrade path, including from 4.5.2 to 4.5.3, so you may not have done it yet.
Note: If you are partitioning, the new index structure is automatically created as part of the partitioning upgrade, so you should not do the upgrade described in this section.

Query Tuning Guidelines
Partitioning and Indexing 9-19
If you are partitioning and want to retain one or more of the old indexes, you have to manually recreate them as non-partitioned global indexes after the partitioning upgrade.
Before upgrading the indexes, you must analyze your disk space requirements if you are preserving the existing indexes. Due to leading key compression the new, concatenated RESPONSE_RDCM_NFK_IDX index is significantly smaller than the version 3.1 concatenated RESPONSE_DCMQG_NFK_IDX it functionally replaces. However, if you are preserving all pre-existing indexes, there is a small (20-30%) net increase in the size of the pre-existing RESPONSE_RDCM_NFK_IDX. Dropping any of the pre-existing indexes, including the largely superfluous RESPONSE_CS_NFK_IDX, releases at least that amount of space.
Even if you are not preserving existing indexes, since you will be dropping and recreating all of the indexes, the index upgrade is a good time to replan the use of physical storage for the Response table indexes. Placing the indexes on a tablespace on a separate physical device from the Responses table is a good practice.
Regenerate Procedures and Data Extract ViewsOnce the Response table indexes are rebuilt, you must regenerate all procedures and data extract views for active studies. If you have disabled the generation of Version 4-style procedure and view optimization (see "Enforcing Pre-Version 4.0 Optimization" on page 9-3), you must enable it before regenerating procedures and views.
To regenerate procedures and views, follow the instructions for using the procedure and view regeneration utilities documented in Chapter 10, "Utilities." For procedure regeneration you should select the parameters FULL, GENERATE and ALL.
ResponsesT (Test Database) Index UpgradeA script, rebuild_respt_index.sql in the install directory, rebuilds the indexes on the Responsest, or test database Responses table. This script should be run whether or not you are partitioning the Responses table. The upgrade for Responsest should be done at the same time as either partitioning or the Responses table index upgrade.
RECEIVED_DCI and RECEIVED_DCM Index UpgradesTo take advantage of the Oracle index compression feature, you can optionally rebuild selected indexes on the RECEIVED_DCMs and RECEIVED_DCIs tables. Since these can be large tables, this script is not automatically run as part of the upgrade to Oracle Clinical V4. The upgrade of the RECEIVED_DCMs and RECEIVED_DCIs indexes can be done at any time that is convenient, independently of either partitioning or Responses table index upgrade. This change reduces the size of these indexes and, therefore, improves performance due to fewer disk accesses.
To rebuild the indexes on the RECEIVED_DCMs and RECEIVED_DCIs tables, execute the script oclupg32to40opt5.sql in the install directory:
SQL> @oclupg32to40opt5.sql
Query Tuning GuidelinesFor both partitioning and index upgrade, Oracle Clinical has been retuned to use only the primary key index RESPONSES_PK_IDX with the Response ID leading key or the concatenated RESPONSES_RDCM_NFK_IDX with the clinical_study_id and RECEIVED_DCM_ID leading keys. You should review any applications that directly

Query Tuning Guidelines
9-20 Oracle Clinical Administrator's Guide
access the Responses table to ensure that they are correctly optimized for the new index structure.
The basic guidelines for re-optimization are:
1. Include clinical_study_id in all access to the Responses table.
There are two reasons for this. Primarily, because Responses are in a partition based on clinical_study_id, the query optimizer can restrict its search to the proper partition if the query contains clinical_study_id. This is called 'Partition Pruning'. In order of preference this reference to clinical_study_id can be a constant, a bind variable in an equi-join, or a join from another table.
Secondly, the concatenated index is prefixed with clinical_study_id to force Responses from different studies in the same partition to be physically grouped together and to optimize certain partition accesses.
2. Redirect all previous queries on DCM_QUESTION_ID or DCM_QUESTION_GROUP_ID to use a join through RECEIVED_DCMs so that they can use the concatenated index.
Since there are no longer indexes with DCM_QUESTION_ID or DCM_QUESTION_GROUP_ID as leading keys, these are no longer efficient access paths. Much of the access involving these keys is already done in the context of a RECEIVED_DCM, so the query tuning is usually minimal. In some cases, it might be necessary to add joins to DCM_QUESTIONS or DCM_QUESTION_GROUPS, then through RECEIVED_DCMs via DCM_ID. For instance, the query shown in Examples 9–7 and 9–8 selects responses to a particular Question where the patient position is owned locally.
Example 9–7 Query Before Redirection
SELECT response_id, to_char(response_entry_ts, 'DD-MON-YYYY HH24:MI:SS'), received_dcm_id FROM responses r WHERE r.dcm_question_id = :dcm_question_id AND EXISTS (SELECT NULL FROM received_dcms rd, patient_positions papo WHERE rd.patient_position_id = papo.patient_position_id AND papo.owning_location = :current_location AND rd.received_dcm_id = r.received_dcm_id)
Example 9–8 Query After Redirection
SELECT response_id, to_char(response_entry_ts, 'DD-MON-YYYY HH24:MI:SS'), received_dcm_id FROM responses r WHERE r.dcm_question_id = :dcm_question_id AND (clinical_study_id, received_dcm_id, dcm_question_group_id) IN(SELECT rd.clinical_study_id, rd.received_dcm_id, dq.dcm_question_group_id FROM received_dcms rd, patient_positions papo, dcm_questions dq WHERE dq.dcm_question_id = :dcm_question_id AND dq.dcm_que_dcm_subset_sn = 1 AND dq.dcm_que_dcm_layout_sn = 1 AND rd.dcm_id = dq.dcm_id AND rd.patient_position_id = papo.patient_position_id AND papo.owning_location = :current_location)

10
Utilities 10-1
10Utilities
Oracle Clinical provides a set of utilities for performing tasks that are easier to accomplish from a command line or that cannot be done from within the application. These utilities are described in this section. The activities covered by these utilities include:
■ Computing the Validation Status of All Responses on page 10-1
■ Generating Validation Procedures on page 10-2
■ Deleting Inactive Procedures on page 10-4
Information on using data extract within the Oracle Clinical application is available in the Oracle Clinical Creating a Study and Oracle Clinical Conducting a Study manuals. Information on Procedures is also in Oracle Clinical Creating a Study.
Computing the Validation Status of All ResponsesUse the cnvstatus utility to compute a validation status for all responses. The utility populates a column in the RESPONSES table that contains the validation status of each stored response. Before populating the response field VALIDATION_STATUS, you might want to add Discrepancy Resolution subtypes to distinguish various types of resolutions. You do this by entering values in the Long Value field of the reference codelist DISCREPANCY RESOLU TYPE CODE. This is an installation codelist you access from within Oracle Clinical which maintains user-defined discrepancy statuses.
You must select the values from the following list: NULL, CONFIRMED, IRRESOLVABLE, SUPERSEDED, or NOT DISCREPANT. The last two values are used only for manual discrepancies; they indicate that the discrepancy applied to a previous version of the response, or that the discrepancy was never really a problem with the data, but just a comment.
When the process is complete, examine the log, $RXC_LOG/cnvstatus.log, for errors.
Running cnvstatus on UNIXTo run cnvstatus on UNIX:
1. Log on to the server in your user account and change the directory to $RXC_TOOLS.
2. Set the environment:
Shell Command Sequence
C Shell opa_setup db_name code_env

Generating Validation Procedures
10-2 Oracle Clinical Administrator's Guide
where db_name is a database instance name and code_env is a code environment designation.
3. Set the output directory:
4. Run the script. For example:
% cnvstatus ALL | Study Name
Where "ALL" is all studies in the database and Study_Name is the name of one study.
Running cnvstatus on WindowsTo run cnvstatus on Windows:
1. Log on to the server using your local account.
2. Open a DOS window, change directory to %RXC_TOOLS, and set the server environment:
set p1=db_name
set p2=code_env
opa_setup
3. Set the output directory:
set rxc_log=user_log_folder
4. Run the command file. For example:
cnvstatus ALL | Study_Name
Where "ALL" is all studies in the database and Study_Name is the name of one study.
Generating Validation Procedures With the gen_procs utility you can convert existing Validation Procedures to 3.1-style, and regenerate them, on a per-study basis. Its use is not required, or necessarily recommended, for upgrades or new installations of Oracle Clinical.
This utility has the following syntax:
gen_procs { ALL | study_name } { FULL | INC } { CONVERT | GENERATE | PARSE } { 31 | 30 | ALL }
Choose one option from each set of qualifiers:
Bourne p1 = db_namep2 = code_env. opa_setup
Shell Command Sequence
C Shell setenv RXC_LOG usr_log_dir
Bourne RXC_LOG=usr_log_direxport code_env
Shell Command Sequence

Generating Validation Procedures
Utilities 10-3
ALL | study_name — specifies the study you want to apply to. Enter either an individual study name or ALL to include all studies. This qualifier is not case-sensitive.
FULL | INC — specifies whether to perform full or incremental replication. You select FULL when running from the command line. INC is used when replication runs this command. This qualifier is case-sensitive.
CONVERT | GENERATE | PARSE — specifies the action you want to take. CONVERT works only for pre-3.1 Procedures; it converts the Procedure to 3.1-style, as well as generating and parsing as part of processing. PARSE works only with 3.1-style Procedures; it parses and recreates the package. GENERATE works for 3.0, 3.1, or ALL procedures; it also parses each package. PARSE and GENERATE are used primarily when the utility is called for replication.
31 | 30 | ALL — specifies the version of the Procedures to process.
The system creates a file named ora_errors.err in the user's RXC_LOG directory.
Running gen_procs on UNIX SystemsTo run gen_procs on a UNIX platform:
1. Log on to the server as the opapps user or a user who has write permission.
2. Set the environment:
opa_setup db_name code_env
where db_name is a database instance name and code_env is a code environment designation.
3. Change the directory to $RXC_TOOLS.
4. Set the output directory:
setenv RXC_LOG usr_log_dir
5. Run the script. For example:
gen_procs ALL FULL GENERATE ALL > gen_procs.log
Oracle Clinical creates gen_procs.log in $RXC_TOOLS. Files ora_errors.err and genprocs.log are created in the RXC_LOG directory.
Running gen_procs on Windows SystemsTo run gen_procs on Windows:
1. Log on to the server using your local account.
2. Open a DOS window and set the server environment. Enter:
set p1=db_name
set p2=code_env
opa_setup
cd /d %RXC_BIN%
3. Set the output directory:
set RXC_LOG=user_log_folder
4. Run the command file. For example:
gen_procs ALL FULL GENERATE ALL > gen_procs.log

Deleting Inactive Procedures
10-4 Oracle Clinical Administrator's Guide
Oracle Clinical creates genprocs.log in the current directory (%RXC_BIN%). Files ora_errors.err and genprocs.log are created in the RXC_LOG directory.
Deleting Inactive ProceduresOracle Clinical lets you delete unneeded Procedures from within the application. However, this does not actually delete the database packages that contain the Procedures, which may cause unwanted Procedures to accumulate. To delete them, go to the RXC_TOOLS directory, log in as RXC_PD, and execute the SQL script rxcdelproc.

11
Setting Up File Viewing 11-1
11 Setting Up File Viewing
You need to set up file viewing in Oracle Clinical so that users can:
■ View report outputs and log files
■ View log files from Parameterized Submission (PSUB) batch jobs
■ View HTML previews of DCI Forms Layout definitions
This section includes the following topics:
■ Overview of the Process to Set Up File Viewing on page 11-1
■ Changing the Default Protocol for File Viewing on page 11-2
■ Setting Up Image Viewing for DCI and DCM Form Layouts HTML Preview on page 11-5
Overview of the Process to Set Up File ViewingTo set up file viewing:
1. Install Oracle Clinical. During the installation process, the Installer prompts for the protocol you want to use for file viewing. You can select SFTP or UNC:
■ If your system uses a UNIX Database Server, SFTP is the recommended protocol for file viewing.
■ If your system uses a Windows Database Server, Microsoft UNC is the recommended protocol for file viewing.
2. Complete the server setup required for the protocol you use:
■ For SFTP, see the Oracle Clinical Installation Guide for information about implementing SFTP for file viewing.
■ For FTP, set up an FTP server on your database server.
■ For UNC, set up a shared directory on the database server that is accessible from your WAN.
■ For HTTPS or HTTP, setup an HTTP server on the database server.
3. Install Oracle Clinical Reports Server and create a Reports Server root directory; see the Oracle Clinical Installation Guide for detailed instructions.
4. Create one or more log directories for report outputs; see "Setting Up a Reports Server Log Directory" on page 1-2.

Changing the Default Protocol for File Viewing
11-2 Oracle Clinical Administrator's Guide
5. Create one or more log directories for batch job (PSUB) outputs. In addition, you must set up the correct permissions if you are using UNC, HTTPS, or HTTP. See "Creating a PSUB Log Directory" on page 1-3.
6. Change the default protocol for file viewing, if necessary.
Depending on the protocol you want to use, you may need to edit the formsweb.cfg configuration file, modify variables in the Windows System Registry, and set up directory mappings. See "Changing the Default Protocol for File Viewing" on page 11-2 for information.
Changing the Default Protocol for File ViewingWhen you install Oracle Clinical, you can select SFTP or UNC as the default protocol for file viewing. Oracle Clinical also supports FTP, HTTP, and HTTPS for file viewing.
If you do not want to use the default protocol or if you want to switch between protocols, you must make the following modifications to your system configuration:
■ Edit the formsweb.cfg file to specify the file viewing protocol you want to use
■ Edit variables in the Windows System Registry (SFTP and FTP only)
■ Set up the Directory Mappings (HTTP and HTTPS only)
Editing formsweb.cfg to Specify the File Viewing ProtocolTo specify the file viewing protocol in the formsweb.cfg file :
1. Navigate to the following directory:
ORACLE_AS10gR2_HOME\forms\server
2. Open the formsweb.cfg configuration file with a text editor.
3. Locate the following line in the file:
opa_file_viewing=PSUBMAP=SFTP RSMAP=UNC
4. Set the PSUBMAP parameter to any of the supported protocols for your operating system:
■ SFTP
■ FTP
■ UNC
■ HTTP
■ HTTPS
5. Restart Oracle Clinical Forms Server.
6. Continue with the set up as follows:
■ If you are switching to SFTP or FTP, edit the PSUB_FTP_SECURE and PSUB_FTP_COMMAND variables in the Windows System Registry. See "Setting the Oracle Entries in the System Registry for SFTP or FTP" for details.
■ If you are switching to HTTP and HTTPS, set up the Directory Mappings. See "Setting Up the Directory Mappings for HTTPS and HTTP" for details.
Note: The RSMAP setting does not affect file viewing.

Changing the Default Protocol for File Viewing
Setting Up File Viewing 11-3
Setting the Oracle Entries in the System Registry for SFTP or FTP Oracle Clinical installation adds the following two variables into the Microsoft Windows System Registry for SFTP and FTP:
■ PSUB_FTP_SECURE
■ PSUB_FTP_COMMAND
To modify these entries:
1. Open the Windows Registry Editor.
2. Navigate to the following key:
HKEY_LOCAL_MACHINE\SOFTWARE\Wow6432Node\ORACLE
3. Update the PSUB_FTP_SECURE entry in the Windows Registry as follows:
■ For FTP, set the value to N or null (blank).
■ For SFTP, set the value to Y to enable the protocol. You must also define a value for PSUB_FTP_COMMAND.
4. Update the PSUB_FTP_COMMAND entry as follows:
■ For FTP, enter the command for FTP. If you want file viewing to use the default FTP command on your application tier server, set the PSUB_FTP_COMMAND value to null (blank).
■ For SFTP, enter the command for the SFTP application you are using for file transfer. Table 11–1 provides the command syntax and examples for WinSCP (Windows Secure CoPy) and PuTTY.
Table 11–1 WinSCP and PuTTY Commands for the PSUB_FTP_COMMAND Entry
SFTP Application Command Syntax and Examples
WinSCP "SFTP_HOME\WinSCP.com" /privatekey="SFTP_HOME\WinSCP\sftp_keys\PRIVATE_KEY" /script=SCRIPT_FILE
where:
SFTP_HOME is the complete directory path to the location where you installed the WinSCP application.
PRIVATE_KEY is the name for your private key (.ppk).
Note: SCRIPT_FILE is a placeholder for the script file that the File Viewing form generates dynamically prior to file transfer. The system deletes the file immediately after transfer.
For example:
"C:\ProgramFiles\WinSCP\WinSCP.com" /privatekey="C:\ProgramFiles\WinSCP\sftp_keys\b1z92cy.ppk" /script=SCRIPT_FILE
PuTTY "SFTP_HOME\psftp" -i "SFTP_HOME\PRIVATE_KEY" -b SCRIPT_FILE -be -batch
where:
SFTP_HOME is the complete directory path to the location where you installed the PuTTY application.
PRIVATE_KEY_FILE is the name for your private key (.ppk).
Note: SCRIPT_FILE is a placeholder for the script file that the File Viewing form generates dynamically prior to file transfer. The system deletes the file immediately after transfer.
For example:
"C:\Programs\putty\psftp" -i "C:\Programs\putty\b1z92cy.ppk" -b SCRIPT_FILE -be -batch

Changing the Default Protocol for File Viewing
11-4 Oracle Clinical Administrator's Guide
Ensuring Files Transfer in ASCII Mode with WinSCPTo ensure that files are transferred in ASCII mode:
1. Start the WinSCP application.
2. Open the Preferences dialog box.
3. Select the Transfer tab.
4. Select Text in the Transfer mode section.
5. Click OK to save your changes.
Setting Up the Directory Mappings for HTTPS and HTTPIf you are using HTTP or HTTPS for the file viewing protocol, you must map the PSUB log directory specified for each user to a format that can be used to enable the user to view PSUB output files on the database server.
You must complete this task only if you are using HTTP or HTTPS file viewing. You do not need to map directories if you are using SFTP, FTP, or UNC for file viewing.
To map file viewing specifications:
1. Navigate to Admin, Directory Mappings, and then select Directory Mappings. The system opens the Maintain Directory Mappings window.
2. Open the Query menu and select Execute Query to see all records. (Alternatively, you can press F8.)
3. In the Mapping Code field, select the file viewing protocol you are using on the database server.
(You can add or remove values for this list of values in the MAPPING_TYPE Installation Codelist.)

Setting Up Image Viewing for DCI and DCM Form Layouts HTML Preview
Setting Up File Viewing 11-5
4. In the Original Directory field, enter the root directory portion of the log directory for PSUB or the Reports Server, using the appropriate syntax for the operating system. For example:
■ For UNIX, enter user01/home/logs.
■ For Windows, enter E:\opa\users.
5. In the Mapped Directory field, enter the URL for the PSUB root directory. For example:
http://www.pharma.com/oc_output
Note that oc_output is a shared directory.
6. In the Description field, enter a brief comment about this mapping.
7. Save your changes.
Setting Up Image Viewing for DCI and DCM Form Layouts HTML PreviewIf your CRFs contain a company logo or other images that you want to be able to view using the HTML Preview feature of the Oracle Clinical DCI Forms Layout Editor, you must configure the J2EE application used in file viewing.
To configure the J2EE application used in file viewing:
1. Navigate to the following directory:
ORACLE_AS10gR3_HOME\j2ee\opa\application-deployments\ocrdcclassic\ ocrdcclassic
2. Back up the orion-web.xml file.
3. Open the original orion-web.xml file with a text editor.
4. Insert the following line:
<virtual-directory virtual-path="/crfimages" real-path="/drive:image_folder_path" />
For example, suppose your images folder is located in the following directory:
C:\opapps46\html\rdc\dcif_images
In this case, the file would have the following lines:
<?xml version="1.0"?><!DOCTYPE orion-web-app PUBLIC "-//ORACLE//DTD OC4J Web Application 9.04//EN" "http://xmlns.oracle.com/ias/dtds/orion-web-9_04.dtd"> <orion-web-app deployment-version="10.1.2.3.0" jsp-cache-directory="./persistence" jsp-cache-tlds="on" temporary-directory="./temp"> <!-- Uncomment this element to control web application class loader behavior. <web-app-class-loader search-local-classes-first="true" include-war-manifest-class-path="true" /> --> <virtual-directory virtual-path="/crfimages" real-path="/C:\opapps46\html\rdc\dcif_images"/> <web-app></web-app></orion-web-app>

Setting Up Image Viewing for DCI and DCM Form Layouts HTML Preview
11-6 Oracle Clinical Administrator's Guide
5. Save and close the file.
6. Log in as the network account you set up to start Oracle Process Manager Service.
7. Restart the rdc OC4J instance.
Note: The value for the real-path can be a network location. If it is, make sure Oracle Process Manager Service on the application tier is started up as a user with access to the specified network location. See "Setting Up a Network User to Run the Oracle Process Manager Service" on page 12-2 for more information.
If you have configured your Oracle Clinical and RDC installations to user a single repository for all images (see "Setting Up a Central Image Repository" on page 12-1), make sure that the path is to that location.
12
Enabling Image Viewing 12-1
12Enabling Image Viewing
This section includes the following topics:
■ Setting Up a Central Image Repository on page 12-1—applies to RDC data entry and to Oracle Clinical DCI and DCM layout HTML previews
■ Copying Image Files to All Installations on page 12-3—applies to RDC data entry only
To enable image viewing on CRFs during RDC data entry, you can choose either to set up a central repository or to copy images to all RDC Onsite installations.
Setting Up a Central Image RepositoryYou can configure your OC and RDC installations to use a single repository for all images. After the initial setup, this approach is more efficient because edited and added images do not need to be copied to all installations.
There are also disadvantages:
■ If the share location goes down for any reason, none of the links to the shared directory will work. The applications should continue to run, but the images will not appear on the data entry CRF or in the layout editor HTML preview.
■ If there is considerable network latency between the Oracle Clinical and RDC installations and the share location, performance may suffer.
To set up a single repository:
1. Create a shared directory on a computer that is accessible from all Oracle Clinical and RDC Onsite installations, and put the image files in the shared directory.
2. To use the central image repository in Oracle Clinical, add a line to orion-web.xml at each Oracle Clinical installation for virtual folder mapping to the central repository. See "Setting Up Image Viewing for DCI and DCM Form Layouts HTML Preview" on page 11-5.
3. To use the central image repository in RDC Onsite during data entry, add a line to orion-web.xml at each RDC Onsite installation for virtual folder mapping to the central repository. See "Setting Up Image Viewing During Data Entry" on page 12-2.
4. Repeat Step 2 on every Oracle Clinical installation and repeat Step 3 on every RDC Onsite installation.

Setting Up a Central Image Repository
12-2 Oracle Clinical Administrator's Guide
Setting Up a Network User to Run the Oracle Process Manager ServiceOn each Oracle Clinical and RDC installation, the Oracle Process Manager Service must be started up as a network user to allow access to shared image files on a network location.
1. Open Windows Service Manager.
2. Select Oracle AS Process Manager.
3. Right-click and select Properties.
4. Go to the Log On tab.
5. Select This Account.
6. Enter username/password of the network account and click OK.
7. Reboot the computer.
Setting Up Image Viewing During Data EntryIf your CRFs contain a company logo or other images that you want users to be able to see during data entry in RDC, you must configure the J2EE application used in file viewing.
To configure the J2EE application used in file viewing:
1. Navigate to the following directory:
ORACLE_AS10gR3_HOME\j2ee\rdc\application-deployments\olsardc\rdconsite\
2. Back up the orion-web.xml file.
3. Open the original orion-web.xml file with a text editor.
4. Insert the following lines:
<virtual-directory virtual-path="/de/crfimages" real-path="<shared folder path>"/>
For example, if your images folder is at \\sharemachine\images, the file would look like:
<orion-web-app deployment-version="10.1.2.3.0" jsp-cache-directory="./persistence" jsp-cache-tlds="on" temporary-directory="./temp"> <virtual-directory virtual-path="/de/crfimages" real-path="\\sharemachine\images" /> <!-- Uncomment this element to control web application class loader behavior. <web-app-class-loader search-local-classes-first="true" include-war-manifest-class-path="true" /> --> <web-app></web-app></orion-web-app>
5. Save and close the file.
6. Log in as the network account you set up to start the Oracle Process Manager Service.
7. Restart the rdc OC4J instance.

Copying Image Files to All Installations
Enabling Image Viewing 12-3
Copying Image Files to All InstallationsYou can create an images directory at every RDC installation and copy all image files to each installation. If the images are updated or if new ones are added, you must copy them to all installations.
Create an images directory at the following location at each installation:
ORACLE_AS10gR3_HOME\j2ee\rdc\applications\olsardc\rdconsite\de\crfimages
Note: If you choose to copy files to all RDC installations, do not edit RDC Onsite's orion-web.xml file.

Copying Image Files to All Installations
12-4 Oracle Clinical Administrator's Guide

13
Conducting Studies in a Distributed Environment 13-1
13Conducting Studies in aDistributed Environment
Oracle Clinical supports establishing a study—that is, designing and defining it—in one location, and then copying the study design and definition to other locations.
Each recipient, or sharing location, can conduct the study on its own set of patients. Data collected in sharing locations can be copied back to the location where the study originated, that is, the study-owning location. From there, data can be copied to any other location that has a copy of the study definition.
In this way, each location that participates in a study views an up-to-date set of collected data. Each location can modify only the data collected at its sites; all other data for this study is read-only. This process of distributing a read-only copy of study designs, definitions, and data to other locations in the environment is called replication.
This section includes the following topics:
■ Distributed Study Environments and Replication on page 13-1
■ Prerequisites to Setting Up Replication on page 13-4
■ Setting Up Replication on page 13-6
■ Creating the Study Design Replication Packages on page 13-12
■ Setting Up Symmetric Replication on page 13-15
Distributed Study Environments and ReplicationThe process of distributing a read-only copy of a study design, definition, and data to other locations in the environment is called replication.
This section describes the following replication concepts:
■ The locations in your installation and the responsibilities of each location
■ The types of Oracle Clinical objects, such as study design and study definition, that you can replicate
■ The various methods that you can use to replicate an Oracle Clinical study
Note: This section discusses the tasks required for a system administrator to prepare Oracle Clinical databases for replication. It does not describe the procedures for actually performing those replications. For those instructions, see Chapter 14, "Using Replication."

Distributed Study Environments and Replication
13-2 Oracle Clinical Administrator's Guide
Locations in a Distributed Study Environment InstallationReplication occurs among multiple database instances. Each database instance in your distributed installation must use the same release of Oracle Clinical.
Each included database instance is referred to as a location. The locations in an installation share Oracle Clinical data or dictionaries with other databases via Oracle Clinical replication capabilities. A location can refer to a separate database on the same computer or to a database in a different physical location.
This set of locations, which shares the same Global Library and can replicate study designs, definitions, and data, is referred to as an installation.
Within a distributed Oracle Clinical installation, you must identify the following locations:
■ Global Library-owning Location — Only one per installation.
■ Study-owning Location — One per study. Each study has one owning location, which can be different from the Global Library-owning location. An installation can have multiple study-owning locations, each for a different study.
■ Lab-owning Location — One or more per installation.
The following sections describe the role of each location.
Global Library-owning LocationThe Global Library-owning location, which is also referred to as the global management location, owns and manages all the objects that compose data collection definitions for clinical studies.
These objects include:
■ Global Library: questions, question groups, DVGs, standard affiliations, question categories, Global Library procedures, Global Library DCMs, and Global Library DCIs
■ Codelists: installation reference codelists
■ Global Lab: lab units and related information, lab panels, and textbook ranges
All other locations that are part of the distributed environment get read-only copies of information by replication. Keeping those copies up to date as things change in the Global Library-owning location requires planned follow-up replications.
Study-owning LocationThe study-owning location is the Oracle Clinical location where a particular study is designed and defined. Each study has only one owner. Different locations can be the study-owning locations for different studies.
The study-owning location:
■ Creates and modifies the study design and definition.
■ Controls the assignments of all patient positions to study-sharing locations.
■ Provides a central repository of all collected study data.
This repository includes data the study-owning location creates and data replicated from other study locations. Once data is centralized at the study-owning location, the data can then replicated to sharing locations.
If the study-owning location is not the Global Library-owning location, then the study-owning location must replicate the Global Library before beginning study

Distributed Study Environments and Replication
Conducting Studies in a Distributed Environment 13-3
definition. While creating and refining the study definition, the study-owning location can then perform Global Library replication at regular intervals to keep the Global Library up to date.
Lab-owning LocationA lab-owning location maintains information about the attributes and ranges of its lab. Each lab has only one owner. Lab names must be globally unique across the installation. Any location that uses lab data from a lab it does not own must first replicate the lab information from the lab-owning location.
What Types of Oracle Clinical Objects Can You Replicate?You can replicate the following Oracle Clinical objects:
■ Global Library
■ Study design
■ Study definition
■ Data
■ Global Lab information
■ Local labs and ranges
■ Study randomization
What Methods of Replication Does Oracle Clinical Support?Oracle Clinical supports the following methods of replication:
■ Standard replication
■ Disconnected replication
■ Symmetric replication
In your distributed study environment, you can use one method or a combination of methods to replicate data across all the locations in your installation.
Standard ReplicationStandard replication is a retrieving operation, that is, the location that requires the information must request it from the source location. In addition, standard replication uses a network connection to copy information from one location to another location.
Disconnected ReplicationDisconnected replication supports bi-directional replication between locations without relying on a network connection. Instead, disconnected replication creates an export file that contains the data from the source location to be transferred to the target location. You choose how to transport the export file to the target location. For example, you can choose disk media, tape media, E-mail, or local area network (LAN). The target location then imports (or loads) the data from the export file.
Symmetric ReplicationSymmetric replication copies only the supporting study design information (not study-specific information). In other words, symmetric replication replicates data related to study design, but not data specific to a study. However, with symmetric

Prerequisites to Setting Up Replication
13-4 Oracle Clinical Administrator's Guide
replication, the data replication happens automatically. You do not need to select any menu option.
Comparison of Standard and Disconnected ReplicationThe final result of a standard replication is indistinguishable from a disconnected replication. Table 13–1 lists the key differences between the standard replication process and the disconnected replication process.
Prerequisites to Setting Up ReplicationEach database instance in your distributed installation must use the same release of Oracle Clinical.
In addition, the following replication-specific objects must be in place before you can set up and use replication in your Oracle Clinical installation:
■ The Oracle accounts required to set up and perform replication.
■ The tables that record each type of replication. The replication types are Global Library, study design, study definition, data, Global Labs, and local labs and ranges.
■ The seed number (unique sequence generators).
You already set up these items as part of creating the database.
This section reviews the prerequisites so you can check that your system meets the requirements before you begin the actual replication setup activities.
Oracle Accounts for ReplicationWhen you install Oracle Clinical, the system creates the following accounts for managing and conducting studies in a distributed environment:
■ RXA_READ
■ RXC_REP
■ RXC_DISC_REP
Table 13–1 Comparison of Standard versus Disconnected Replication
Standard Replication Disconnected Replication
Requires a network connections to transfer information between locations.
Copies information between locations via file transfer. A network connection is not required.
The location requesting the data accesses the source database and copies the data.
The owner of the data is not aware that the data is being copied.
The source location extracts the data to an export file and determines when to transfer the file to target locations.
The owner of the data is actively involved in the process.
The study is marked as replicated only after the first replication successfully occurs.
The study is marked as replicated after the extract and export phase at the source location is complete, but before the import and load phase starts at the target locations.
Therefore, existing restrictions about what can be done to a study once it has been replicated are imposed after the extract and export phase.
Supports full and incremental replication. Supports full replication only.

Prerequisites to Setting Up Replication
Conducting Studies in a Distributed Environment 13-5
RXA_READ AccountOracle Clinical uses the RXA_READ account for various read-only operations for standard replication. As part of the setup for standard replication, you create a public database link that connects to each of the other database locations as the RXA_READ account.
The RXA_READ account has SELECT privilege on the study design tables and UPDATE privilege on the CLINICAL_STUDY_STATES table. The RXA_READ password is not encrypted.
RXC_REP AccountYou use the RXC_REP account to replicate the Global Library, study definitions, study design, data, and labs (Global lab, local labs, and ranges). The RXC_REP account has the following privileges:
■ SELECT on all the journal tables; INSERT, UPDATE, and DELETE on some journal tables
■ SELECT, INSERT, UPDATE, and DELETE on all replicated tables
■ SELECT, INSERT, UPDATE, and DELETE on the following tables:
– STUDY_REPLICATION_JOBS
– LAB_REPLICATION_JOBS
■ SELECT, INSERT, and UPDATE on the following tables:
– CLINICAL_STUDY_STATES
– REPLICATION_TAB
The password for the RXC_REP account is encrypted and stored in the RXC.ENCRYPTED_PASSWORDS table.
RXC_DISC_REP AccountOnly disconnected replication uses the RXC_DISC_REP account. The RXC_DISC_REP account has the following privileges:
■ SELECT on all the journal tables; INSERT, UPDATE, and DELETE on some journal tables
■ SELECT, INSERT, and DELETE on all replicated tables
■ SELECT, INSERT, UPDATE, and DELETE on the STUDY_REPLICATION_JOBS table
■ SELECT, INSERT, and UPDATE on the following tables:
– DESIGN_REPLICATION_JOBS
– LAB_REPLICATION_JOBS
– CLINICAL_STUDY_STATES
■ SELECT and INSERT on the REPLICATION_TAB table
Note: The password of the RXC_REP account is used when creating database links at other locations. If it is modified, you must recreate the database links at those remote sites.

Setting Up Replication
13-6 Oracle Clinical Administrator's Guide
The password for the RXC_DISC_REP account is encrypted and stored in the RXC.ENCRYPTED_PASSWORDS table.
Tables that Store Replication InformationTable 13–2 lists the tables that Oracle Clinical uses to record information about the execution of each type of replication. The information recorded, which varies from table to table, may include the date and time the replication started, the current status of the replication, and the date and time the replication completed.
Seed Numbers for Databases Involved in ReplicationEach database within an installation requires a unique start with value that seeds the internal numbers assigned to generated study objects (DCMs, Validation Procedures, and so on) so they are uniquely identified across all locations.
When you install Oracle Clinical, the Oracle Universal Installer prompts you for a unique starting number (from 1 to 99) for each database to be involved in replication. For information on the installation process, see the Oracle Clinical Installation Guide.
Setting Up ReplicationTable 13–3 lists the reference codelists that Oracle Clinical uses to manage each method of replication.
Configuring the SOURCE LOCATION CODE Installation Codelist for ReplicationThe SOURCE LOCATION CODE installation reference codelist contains a unique location code for each location in the Oracle Clinical installation.
Table 13–2 Oracle Clinical Tables that Store Information about Replication
Owner This Table… Stores Replication Information About…
RXC REPLICATION_TAB Global Library and study definition
RXC STUDY_REPLICATION_JOBS Data
RXA_DES DESIGN_REPLICATION_JOBS Study design
RXA_LR LAB_REPLICATION_JOBS Global labs, labs, and ranges
RXC_DISC_REP DISCONNECTED_REPL_JOBS Extracts and loads of the disconnected replication process
Table 13–3 Reference Codelists that Manage Replication
Codelist NameStandard Replication
Symmetric Replication
Disconnected Replication
SOURCE LOCATION CODE YES — YES
OCL_INSTALLATION YES — YES
OCL_STATE YES — YES
DB_LINKS YES — —
PUBLIC_DB_LINKS YES — —
OCL_OPTIONS_TYPE_CODE — YES —

Setting Up Replication
Conducting Studies in a Distributed Environment 13-7
You configure and maintain the SOURCE LOCATION CODE codelist at Global Library-owning location only. The SOURCE LOCATION CODE codelist is then replicated to the other locations as part of Global Library replication.
To configure the SOURCE LOCATION CODE installation reference codelist:
1. Make the following changes at the Global Library-owning location only.
2. Navigate to Admin, Reference Codelists, and then select Installation Codelists.
3. Query for the SOURCE LOCATION CODE installation codelist.
4. Complete the fields as follows.
a. In the Short Value field, enter the name of the other locations (instances) in the installation.
b. In the Long Value field, enter the offset from Greenwich Mean Time (GMT) for each location, where 0 represents the GMT time zone.
– Set the offset to a positive number if the location is in a time zone east of Greenwich, England.
– Set the offset to a negative number if the location is in a time zone west of Greenwich, England.
Configuring the OCL_INSTALLATION Installation Reference Codelist for ReplicationThe GLIB_LOCATION value in the OCL_INSTALLATION codelist defines the location code of the database that owns the Global Library. The system requests and stores this value when you create the database.
In addition, the OCL_INSTALLATION codelist defines whether to replicate all discrepancies and associated data clarification forms (DCFs). You set this value at the Global Library-owning location only.

Setting Up Replication
13-8 Oracle Clinical Administrator's Guide
To configure the OCL_INSTALLATION codelist:
1. Navigate to Admin, Reference Codelists, and then select Installation Codelists.
2. Query for the OCL_INSTALLATION installation codelist.
3. Verify that the Long Value for the GLIB_LOCATION has the correct name of the Global Library-owning location. In addition, make sure the value is in all uppercase letters. See Figure 13–1.
4. Specify the Long Value for the ALLOW_DISC_REPL parameter. Note that you set this value at the Global Library-owning location only.
■ Y — The system copies all discrepancies and all associated data clarification forms (DCFs) during study data replication.
■ N — The system does not copy discrepancies and DCFs during study data replication. If you execute the study replication with the Refresh All value set to Y, any previously replicated discrepancies and DCFs will be removed from the target database.
If you need to change the GLIB_LOCATION value in the OCL_INSTALLATION reference codelist, run the oclstate.sql script located in the Install directory.
Note: The value must be in uppercase even though the system does not enforce this requirement. Replication fails if the value is not in uppercase.
Note: If you specify page reference numbers for DCFs, the numbers must be unique in each database instance. Therefore, if you choose to replicate discrepancies and DCFs, you must ensure that the page reference numbers for DCFs are unique across all databases in the replicated installation.

Setting Up Replication
Conducting Studies in a Distributed Environment 13-9
Figure 13–1 OCL_INSTALLATION Reference Codelist
Configuring the OCL_STATE Local Reference Codelist for ReplicationThe long value for LOCATION_CODE in the OCL_STATE local reference codelist specifies the database name for the current location.
To configure the OCL_STATE codelist at each sharing location:
1. Navigate to Admin, Reference Codelists, and then select Local Codelists.
2. Query for the OCL_STATE installation codelist.
3. Verify that the Long Value for the LOCATION_CODE specifies the database name for the current location. In addition, verify that the value in all uppercase letters.
See "OCL_STATE Local Codelist" on page 7-15 for information about setting the other values in this reference codelist.
Creating and Setting Up the Database Links for Standard ReplicationStandard replication is a retrieving operation; that is, the database location requesting the data must initiate the action. In addition, standard replication uses a network connection to copy information from one location to another location. As a result, you need to create links between the locations in your installation. (Note that disconnected replication is done by export and load, and does not rely on database links or a network connection.)
Note: The value must be in uppercase even though the system does not enforce this requirement. Replication fails if the value is not in uppercase.

Setting Up Replication
13-10 Oracle Clinical Administrator's Guide
Configuring the DB_LINKS Codelist for Standard ReplicationEach database location in the installation maintains the DB_LINKS local reference codelist, which has an entry in the Short Value field for each of the other database locations in the installation. The Long Value contains the name of the private database link to that database, owned by the RXC_REP or RXA_DES user.
To configure the DB_LINKS codelist for standard replication:
1. Navigate to Admin, Reference Codelists, and then select Local Codelists.
2. Query for the DB_LINKS local codelist.
a. In the Short Value field, enter a name for each of the other locations (instances) in the installation. This name should be descriptive, such as "CRO-LONDON" or "HEADQUARTERS" or "PHILA-SITE."
b. In the Long Value field, enter the database link name of the private link to that database.
Note the name of the private link you specify in the DB_LINKS codelist. You will need this information when you create the private database links for the RXC_REP and RXA_DES accounts later in this section.
Configuring the PUBLIC_DB_LINKS Codelist for Standard ReplicationEach database in the installation also maintains the PUBLIC_DB_LINKS local reference codelist, which also has an entry in the Short Value field for each of the other database locations in the installation. The Long Value contains the name of the public database link to that database.
To configure the PUBLIC_DB_LINKS codelist for standard replication:
1. Navigate to Admin, Reference Codelists, and then select Local Codelists.
2. Query for the PUBLIC_DB_LINKS local reference codelist:
a. In the Short Value field, enter the name for each of the other locations in the installation.
b. In the Long Value field, enter the database link name of the public link to that database.
Note the name of the public link you specify in the PUBLIC_DB_LINKS codelist. You will need this information when you create the public database link for the RXA_READ account later in this section.
Creating the Private Database Links for the RXC_REP and RXA_DES Accounts After you set up the DB_LINKS and the PUBLIC_DB_LINKS local reference codelists, you need to create the database links to the other locations in your installation
To create the private database links required for standard replication:
1. Set the Oracle Clinical environment for the current database. For example:
opa_setup sunx5 462
Note: You use the password for the RXC_REP and RXA_DES accounts when creating database links at other locations. If you modify the password, you must recreate the database links at those other locations.

Setting Up Replication
Conducting Studies in a Distributed Environment 13-11
2. Create the private database link for the RXC_REP account:
a. Connect to SQL*Plus as RXC_REP.
b. Create a private database link to each of the other database locations:
create database link linkname connect to rxc_rep identified by password using 'connectstring' ;
where:
– linkname is the name specified for your private database link in the DB_LINKS reference codelist.
– password is the password of the RXC_REP account.
– connectstring is the appropriate SQL*Net connect string.
Make sure the connectstring has single quotes around it. Oracle recom-mends that the connectstring be the same as the linkname although it is pos-sible for them to be different.
c. Verify that you created the link correctly. The following command should return RXC_REP as the user:
SELECT username FROM user_users@linkname ;
3. Create the private database link for the RXA_DES account:
a. Connect to SQL*Plus as RXA_DES.
b. Create a private database link between the RXA_DES accounts in each instance:
create database link linkname connect to rxa_des identified by password using 'connectstring' ;
where:
– linkname is the name specified for your private database link in the DB_LINKS reference codelist (and also matches the linkname value used for the same database in the previous step).
– password is the password of the RXA_DES account.
– connectstring is the SQL*Net alias of the database to which the link connects.
Make sure the connectstring has single quotes around it.
c. Verify that you created the link correctly. The following command should return RXA_DES as the user:
SELECT username FROM user_users@linkname ;
4. Exit from SQL*Plus.
Creating the Public Database Link for RXA_READTo set up the public database link for standard replication:
1. Connect to SQL*Plus as SYS.
2. Create a public database link to each of the other database locations for the RXA_READ account:
create public database link linkname connect to rxa_read identified by password using 'connectstring' ;
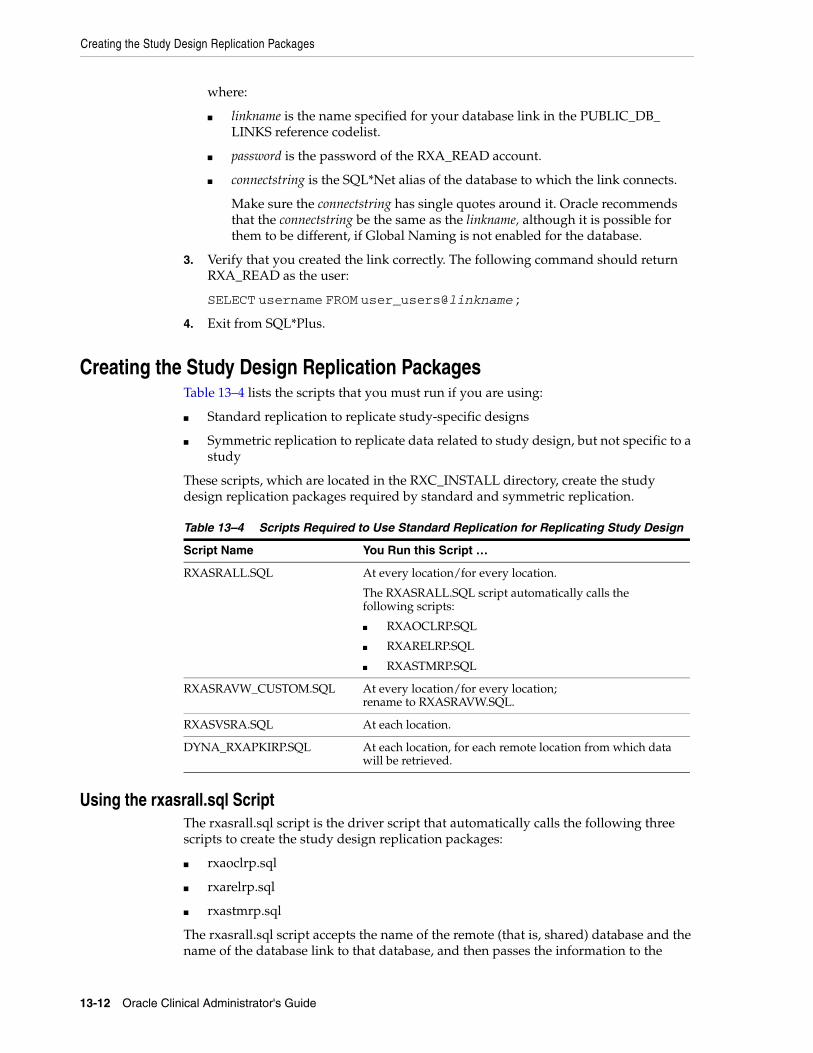
Creating the Study Design Replication Packages
13-12 Oracle Clinical Administrator's Guide
where:
■ linkname is the name specified for your database link in the PUBLIC_DB_LINKS reference codelist.
■ password is the password of the RXA_READ account.
■ connectstring is the SQL*Net alias of the database to which the link connects.
Make sure the connectstring has single quotes around it. Oracle recommends that the connectstring be the same as the linkname, although it is possible for them to be different, if Global Naming is not enabled for the database.
3. Verify that you created the link correctly. The following command should return RXA_READ as the user:
SELECT username FROM user_users@linkname ;
4. Exit from SQL*Plus.
Creating the Study Design Replication PackagesTable 13–4 lists the scripts that you must run if you are using:
■ Standard replication to replicate study-specific designs
■ Symmetric replication to replicate data related to study design, but not specific to a study
These scripts, which are located in the RXC_INSTALL directory, create the study design replication packages required by standard and symmetric replication.
Using the rxasrall.sql ScriptThe rxasrall.sql script is the driver script that automatically calls the following three scripts to create the study design replication packages:
■ rxaoclrp.sql
■ rxarelrp.sql
■ rxastmrp.sql
The rxasrall.sql script accepts the name of the remote (that is, shared) database and the name of the database link to that database, and then passes the information to the
Table 13–4 Scripts Required to Use Standard Replication for Replicating Study Design
Script Name You Run this Script …
RXASRALL.SQL At every location/for every location.
The RXASRALL.SQL script automatically calls the following scripts:
■ RXAOCLRP.SQL
■ RXARELRP.SQL
■ RXASTMRP.SQL
RXASRAVW_CUSTOM.SQL At every location/for every location; rename to RXASRAVW.SQL.
RXASVSRA.SQL At each location.
DYNA_RXAPKIRP.SQL At each location, for each remote location from which data will be retrieved.

Creating the Study Design Replication Packages
Conducting Studies in a Distributed Environment 13-13
other three scripts. The study design replication packages replicate all the study-specific design details for the selected study as well as study design supporting information.
About Running the rxasrall.sql Script for Each LocationYou run the rxasrall.sql script in each location, once for each of the remote (shared) locations in the installation. For example, if you have databases A, B, and C, you need to run the rxasrall.sql script six times:
■ First, you run the script on database A passing in the database name and database link for database B, and then you run the script again on database A passing in the database name and database link for database C.
■ Next, you run the script on database B passing in the database name and database link for database A, and then you run the script again on database B passing in the database name and database link for database C.
■ Finally, you run the script on database C passing in the database name and database link for database A, and then you run the script again on database C passing in the database name and database link for database B.
Running the rxasrall.sql ScriptTo run the rxasrall.sql script:
1. Change to the RXC_INSTALL directory.
2. Connect to SQL*Plus as RXA_DES.
3. Run the rxasrall.sql script in each location, once for each of the shared locations in the installation:
start rxasrallName of the Remote Oracle Clinical Database: location_codeName of db Link to Remote Oracle Clinical Database Name: db_link
where:
■ location_code is the identifying code stored for this database in the SOURCE LOCATION CODE reference codelist. If the location_code has spaces, replace them with underscores.
■ db_link is the database link stored for this database in the PUBLIC_DB_LINKS codelist.
4. Exit from SQL*Plus.
Creating the Views and Synonyms Required to Replicate Study DesignThe rxasravw_custom.sql script creates the ALL_name views on the design tables, and the AVAILABLE_CLINICAL_STUDIES view. The rxasvsra.sql script creates synonyms to all the views.
You need to run these scripts if you are using:
■ Standard replication to replicate study-specific designs
■ Symmetric replication to replicate data related to study design, but not specific to a study
To create the views and synonyms required for study design replication:

Creating the Study Design Replication Packages
13-14 Oracle Clinical Administrator's Guide
1. Copy the rxasravw_custom.sql script to the rxasravw.sql script, overwriting the default version. (The default version is for non-replicated installations only.) The custom version creates the views required for design replication.
The rxasravw.sql script assumes there are two locations remote from any given installation (total of three locations in your replication installation).
■ If you have three or fewer locations, you can use the script as is. Copy it to each of the other one or two locations and proceed to Step 2.
■ If you have more than three locations edit rxasravw.sql, adding a clause for each remote location. If your installation has n locations, your script should contain n-1 clauses. Copy your edited script to each location.
2. Connect to SQL*Plus as RXA_DES.
3. Run the rxasravw.sql script at each location. For example:
Name of the Current Oracle Clinical Database: hp3x4_mexicoName of Remote Oracle Clinical Database 1: sun1x5_jerseyName of db Link to Remote Oracle Clinical Database 1: to_sun1x5Name of Remote Oracle Clinical Database 2: dux2x6_yorkName of db Link to Remote Oracle Clinical Database 2: to_dux2x6
You do not need to replace spaces in the location codes with underscores.
4. Run the rxasvsra.sql script at each location. This script creates synonyms to all the views created by the rxasravw.sql script.
Creating the Package for Replicating Investigators and SitesThe dyna_rxapkirp.sql script creates the REPLINVSITE_remote_location package, which replicates the investigators and sites used in a study from the specified source location.
Only standard replication uses the REPLINVSITE_remote_location package. Therefore, you run the dyna_rxapkirp.sql script only if you are using standard replication.
As RXC_REP, you need to run the dyna_rxapkirp.sql script at each location, for each remote location from which data will be retrieved.
To run the dyna_rxapkirp.sql script:
1. Change to the RXC_INSTALL directory.
2. Connect to SQL*Plus as RXC_REP.
3. Run the dyna_rxapkirp.sql script at each location, once for each of the source locations in the installation:
start dyna_rxapkirp.sql
The script prompts for the following information:
Enter value for source_location: location_codeEnter value for link: database_link
Tip: If you have more than one environment in the same code area, save more than one copy of rxasravw.sql with a name that indicates the environment to which it applies. For example, rxasravw_prod for your production database.

Setting Up Symmetric Replication
Conducting Studies in a Distributed Environment 13-15
where:
■ location_code is the code for the remote location from which data will be retrieved to the current database. The value you specify should match the identifying code stored for this database in the SOURCE LOCATION CODE reference codelist. Be sure to replace any spaces in the location_code with underscores.
■ database_link is the name of the database link to the source database. The value you specify should match a record in the DB_LINKS reference codelist.
4. Exit from SQL*Plus.
Setting Up Symmetric ReplicationWith standard replication, study design replication copies the supporting design information (not study-specific information) as well as the study-specific design details. You must select a menu option to replicate data for a specific study. Only the data related to that study is replicated.
Symmetric replication copies only the supporting study design information (not study-specific information). In other words, symmetric replication replicates data related to study design, but not data specific to a study. However, with symmetric replication, all data potentially or actually related to study design is replicated automatically. You do not need to select any menu option.
Symmetric replication offers the following advantages:
■ Design elements are defined in one location then automatically replicated to other database locations, reducing input time and risk of error.
■ After initial replication, changes to design elements are automatically replicated to the other locations.
■ The database system checks for changes at regularly scheduled intervals of your choosing.
■ Self-referencing information is replicated: information about regions within regions, what strata are part of what combined strata, and what single treatment regimens are part of what combined treatment regimen.
To replicate study design elements between databases, Oracle Clinical requires that the databases share the same Global Library. That is, you must perform a full Global Library replication before you perform the first design replication at a sharing location.
Setting Up Symmetric ReplicationTo successfully complete symmetric replication, you should have a firm understanding of managing multi-master replicated databases. A complete description of this topic is beyond the scope of this documentation. If you choose to perform symmetric replication, see the following Oracle database manual for details about advanced replication and for references to related documentation:
Oracle Database Advanced Replication 11g Release 2 (11.2)Part Number: E10706-05

Setting Up Symmetric Replication
13-16 Oracle Clinical Administrator's Guide
Installing Symmetric ReplicationThis section describes the tasks that you must complete before you perform the Oracle Clinical-specific tasks described in the following sections. For detailed information about symmetric replication, see your Oracle documentation.
1. Install the database image with symmetric replication.
2. Check that the initdbname.ora file contains the following specifications:
■ JOB_QUEUE_PROCESSES — At least 10.
■ SHARED_POOL_SIZE — See Oracle Database Reference 11g Release 2 (11.2) for details on setting this parameter.
■ GLOBAL_NAMES — TRUE.
■ DISTRIBUTED_LOCK_TIMEOUT — At least 30.
■ OPEN_LINKS — Number of symmetrically replicated sites.
See Oracle Database Reference 11g Release 2 (11.2), Part Number E17110-05, for more information about these parameters.
Running the Symmetric Replication Scripts Required for Oracle ClinicalTable 13–5 lists the scripts that you run to set up Oracle Clinical to use symmetric replication. These scripts complete the appropriate setup activities for each of the locations.
Before you run these scripts, you must have installed symmetric replication. For details, see "Installing Symmetric Replication" on page 13-16.
Execute the following prepared scripts in the order listed after you have performed the general tasks described in the previous section.
Note: If you are using the Oracle Thesaurus Management System (TMS) with Oracle Clinical in a distributed environment, you must set up Oracle Clinical to run symmetric replication. Oracle Clinical handles symmetric replication for both itself and TMS.

Setting Up Symmetric Replication
Conducting Studies in a Distributed Environment 13-17

Setting Up Symmetric Replication
13-18 Oracle Clinical Administrator's Guide
Table 13–5 Scripts to Run to Set Up Symmetric Replication
Script Order
Run from Account Script Name Locations to Run Script Purpose, Parameters, and Notes
1 SYSTEM CATREP.SQL Run at each location. NOTE: This script is automatically executed when the Oracle database is created or upgraded. If it was run previously, you do not need to run the script again.
2 SYSTEM OPASRC01.SQL Run at each location. The OPASRC01.SQL script:
■ Creates REPSYS accounts and grants privileges required for replication.
■ Registers REPSYS as the replication propagator and receiver.
■ Schedules a job to purge pushed transactions from the deferred transaction queue.
This script prompts you to enter the:
■ Name of the local database (that is, the current location).
■ Name of the remote database. You can press Enter for this prompt. The OPASRC01.SQL script does not require the name of the remote database instance.
■ Password for local SYSTEM account.
■ Password for local REPSYS account.
Verify your progress at this point by entering the following SQL command:
SELECT * FROM [email protected]
The REPSYS account should be open.
3 SYSTEM OPASRC02.SQL Run at each location, for each remote location.
The OPASRC02.SQL script:
■ Creates public and private database links to the remote location.
■ Connects to remote location and schedules a job to push the deferred transaction queue to the master location.
This script prompts you to enter the:
■ Name of the local database (that is, the current location).
■ Name of the remote database (that is, the complete connect string for the remote database).
■ Password for local SYSTEM account.
■ Password for local REPSYS account.
■ Password for REPSYS account at remote location.
NOTE: When the script finishes processing, you will receive the error message:
ERROR at line 1: ORA-02011: duplicate database link name
Ignore this message. The public database link was already created when you set up standard replication.

Setting Up Symmetric Replication
Conducting Studies in a Distributed Environment 13-19
Verifying Data Is ReplicatingTo check whether data is replicating correctly:
1. Modify the description of a region at each location.
2. Verify that the change replicates to the other locations.
4 RXA_DES RXASRCPK.SQL Run at each location. Creates primary keys in each table.
CAUTION: If you have existing data, you must reconcile data in all tables symmetrically replicated at all locations before you go any farther. See "Reconciling Data" on page 13-19 for details.
5 SYSTEM COMPILE_ALL_INVALID.SQL
Run at each location. Compiles objects rendered invalid by the RXASRCPK.SQL script.
6 REPSYS RXASRC03.SQL Run at the master definition location.
Creates empty, quiesced master replication group RXA_DES.
7 REPSYS RXASRC03A.SQL Run at the master definition location.
Indicates that each object in the Design subsystem is a replicated object in the RXA_DES schema.
Makes column groups for conflict resolution.
8 REPSYS RXASRC04.SQL Run at the master definition location.
Sets update resolution to latest time-stamp method.
9 REPSYS RXASRC04A.SQL Run at the master definition location, for each remote location.
Adds each remote location to the replication environment as another master group.
This scripts prompts for the fully qualified database name of the remote location.
10 REPSYS RXASRC05.SQL Run at the master definition location.
Generates triggers and packages needed to support replication, at all locations.
Wait while the packages generate at all locations.
To monitor progress, enter the following SQL command from each location:
SELECT * FROM dba_repcatlog WHERE gname = 'RXA_DES';
When the generation process is done, the DBA_REPCATLOG has no records. Once the count is zero, enter the following SQL command from each location:
SELECT COUNT(*) FROM dba_repobject WHERE sname = 'RXA_DES';
The count should be 138.
11 REPSYS RXASRC06.SQL Run at the master definition location.
Resumes normal replication activity on RXA_DES (quiesced by the RXASRC03.SQL script).
Caution: Do not change the description of the same record at two different locations unless the first change is replicated. Otherwise, you may cause a data conflict. See "Problems During Installation of Symmetric Replication" on page 13-22 for more information.
Table 13–5 (Cont.) Scripts to Run to Set Up Symmetric Replication
Script Order
Run from Account Script Name Locations to Run Script Purpose, Parameters, and Notes

Setting Up Symmetric Replication
13-20 Oracle Clinical Administrator's Guide
Enabling Symmetric ReplicationTo activate symmetric replication in each location:
1. Log in at the Global Library-owning location.
2. Navigate to Admin, Reference Codelists, and then select Installation Codelists.
3. Query for the OCL_OPTIONS_TYPE_CODE installation codelist.
4. Set the Long Value of the SR_INSTALLED parameter to Y.
5. Save your changes.
6. Perform Global Library replication.
You cannot change this codelist setting manually at other sites.
Reconciling DataThis section outlines one approach for reconciling data at different locations. A description of Oracle Clinical's management of conflict resolution follows.
Execute all scripts from the RXA_DES account at the master definition location, with the current or default directory being the install directory.
To reconcile data:
1. Make sure that the database is active, but that no study design entries are being made.
2. Enter the following command from the SYS account of each database:
GRANT EXECUTE ON DBMS_RECTIFIER_DIFF TO RXA_DES;
3. Pick a reconciliation master location.
Once the reconciliation process is completed, all data will be copied from the master location to the remote location.
4. Set the SQL*Plus environment before running the scripts:
SET ARRAYSIZE 1
5. Make sure the RXA_DES account is assigned a default tablespace in which it has quota.
6. Log in as RXA_DES. Run the diffwsetup.sql script. This script creates the tables that will be populated when you run the diffwgo.sql script.
7. Run the command:
@diffremote.sql remote_db_link
where remote_db_link is the database link to the remote database. For example:
@diffremote hp73x1.world
8. Run the diffwgo.sql script. For each table, this script:
■ Empties DIFFtablename and DIFFRtablename.
Note: Use the OCL_MENU_ACCESS local reference codelist to specify which types of data can be maintained at each location. You can set this reference codelist at any time.

Setting Up Symmetric Replication
Conducting Studies in a Distributed Environment 13-21
■ Uses the Oracle DBMS_RECTIFIER_DIFF.DIFFERENCES function to compare the tablename table with the like table in the remote database and populates the DIFFtablename and DIFFRtablename tables based on the comparison.
These tables are used for later steps.
■ Inserts any records from the remote location that are missing at the master location into the master location.
■ Creates the COMPtablename comparison table.
This table contains two records for each record at the master location that matches a record in the remote location based on primary keys, but differs from the remote location on one or more field values.
■ Creates the COMP2 tablename comparison table similar to the COMP tablename table, but eliminates duplicate master location records when that same record is compared to multiple remote locations.
9. Look at the COMP2tablename tables created when you ran the diffwgo.sql script. The following tables will probably show differences:
COMP2OCL_INVESTIGATORSTCOMP2OCL_SITESTCOMP2TREATMENT_REGIMENS
COMP2OCL_INVESTIGATORST and COMP2OCL_SITEST will show differences for the XDUMMY1 investigator and site because of differences in the times these dummy records were created. These records are created at installation.
COMP2TREATMENT_REGIMENS will show differences for previously replicated treatment regimens because of differences in the PM_ID field. Before V3.1, the PM_ID field was not correctly replicated.
For values that are different, decide whether the value from the remote location or the master location is more accurate. If the value from the remote location is more accurate, update the table corresponding to that comparison table to have the appropriate value. If the master location is more accurate, no action is necessary. Delete all records from COMP2tablename (or only those that have reconciled, if you do not look at all of them).
10. Run the diffwpropagate.sql script.
This script propagates data involved in symmetric replication from the master location to the remote location. The script automatically uses the remote database link that you specified with the diffremote.sql command (Step 7).
11. Repeat Step 6 through Step 10 for each remote location.
12. Run diffwdrop.sql to drop all tables used for comparison.
Conflict ResolutionUpdates to the same record at more than one location before the updates are replicated creates a conflict. For example, if two locations tried to change the code associated
Caution: Before executing the diffwpropagate.sql script in the next step, back up your data. The script copies all tables involved in symmetric replication to the remote location. Set the SQL*Plus environment again (Step 4), if necessary.

Setting Up Symmetric Replication
13-22 Oracle Clinical Administrator's Guide
with a particular investigator this could cause a conflict when replication is invoked. Handling this type of conflict is one of the management tasks Oracle Clinical performs as part of the replication process. This section describes how Oracle Clinical manages this conflict resolution.
Oracle advanced replication offers several methods for resolving this conflict, while keeping the data synchronized and creating no additional entries in the error queue. Oracle Clinical implements the latest time-stamp method, that is, the update with the most recent time stamp overrides updates at other conflicting locations.
For example, an update to a record in New York has a time stamp of 10:00, Boston updates the same record with a time stamp of 10:02, and the updates are not propagated between the two updates. In this case, the Boston update overrides the New York update.
This does mean that in the case of update conflicts locations in a later (more eastern) time zone will usually prevail, as the latest time-stamp method is not sensitive to differences in time zones. However, these conflicts should occur rarely in Oracle Clinical because the data chosen to be symmetrically replicated is not updated frequently and the replication is scheduled to occur every 2 to 3 minutes.
Without an update conflict resolution method, when update conflicts occur an entry is added to the error queue and neither update is propagated. The error queue can be difficult to manage, so keeping it as clean as possible is important. Additionally, further updates to the same record would automatically create conflicts because symmetric replication requires the pre-update value of all fields exactly match.
Other types of conflicts can occur, such as two locations inserting exactly the same record or a record with the same key values. If some data that is symmetrically replicated is part of clinical study replication (which could occur if the data had not yet been symmetrically replicated), then when symmetric replication occurred, a unique key (insert) conflict would occur. However, having SR_INSTALLED set to Y in the OCL_OPTIONS_TYPE_CODE Installation Codelist avoids this type of conflict. When this option is enabled, symmetrically replicated data is not inserted when a user replicates a clinical study from the menu between symmetric replications.
Non-study-specific Tables ReplicatedTable 13–6 lists the set of tables containing non-study-specific information that is replicated between all locations when you run the RXASRALL.SQL script.
The OCL_MENU_ACCESS local reference codelist determines which of the non-study-specific tables can be updated at your site. When you set up this access, coordinate the sites. You probably do not want one site responsible for all updating, but if too many sites have update privileges, you risk creating conflicts. Other considerations include how frequently these tables are replicated and time zone differences.

Setting Up Symmetric Replication
Conducting Studies in a Distributed Environment 13-23
Troubleshooting Symmetric ReplicationSymmetric replication provides much desirable capability to sites using it, but it requires monitoring that takes some regular time and education. This section provides some guidelines to stay abreast of issues that affect the monitoring of Oracle Clinical on systems with symmetric replication enabled.
You should be familiar with Oracle Server advanced replication concepts. The most relevant items in the documentation set are the Replication and Replication API Reference manuals. Significant chapters include:
■ Using Multimaster Replication
■ Administering a Replicated Environment
■ Using Deferred Transactions
This section is not intended to be comprehensive, but offers some guidance in diagnosing symmetric replication problems. The first two sections cover the two stages when most problems arise: while installing Oracle Clinical with symmetric replication, and during routine use. The last section provides some ideas for disaster recovery.
Problems During Installation of Symmetric ReplicationIf problems arise in replication during the installation process, check the parameters listed in this section.
Parameters in the init.ora FileTable 13–7 lists the parameters in the init.ora file that:
■ Are used in testing Oracle Clinical and required at installation
■ Are known to have an impact on performance
Table 13–6 Non-study-specific Tables Replicated
CLINICAL_SUBJECTS OCL_PRODUCT_MASTERS PATTERNS
COMBINED_TREATMENT_COMPONENTS
OCL_PROGRAM_PRODUCT_MASTERS
REGION_COMPONENTS
DAILY_DOSES OCL_PROGRAMS REGIONS
FACTORS OCL_PROJECTS STRATA
OCL_DOSAGE_FORMS OCL_SITES STRATUM_COMPONENTS
OCL_INVESTIGATORS OCL_SITEST TITRATION_STEPS
OCL_INVESTIGATORST OCL_STUDIES TREATMENT_REGIMENS
OCL_ORGANIZATION_UNITS OCL_UOM_CONVERSIONS TREATMENT_REGIMEN_BY_RANGES
Table 13–7 Parameters to Check in the init.ora File for Symmetric Replication
Parameter Value These Parameters …
JOB_QUEUE_PROCESSES 1 Are used in testing Oracle Clinical and required at installationJOB_QUEUE_INTERVAL 600
SHARED_POOL_SIZE At least 60 MB
GLOBAL_NAMES TRUE

Setting Up Symmetric Replication
13-24 Oracle Clinical Administrator's Guide
Advanced Replication Option Is InstalledSELECT * FROM v$option;
The value of the Advanced replication parameter should be TRUE.
Invalid Replication ObjectsSELECT sname,oname FROM dba_repobject WHERE status != 'VALID'
DBA_REPCATLOG Is EmptySELECT timestamp, sname, oname, message FROM dba_repcatlog;
Problems During Routine Use of Symmetric ReplicationIf you encounter problems after you have successfully initiated symmetric replication, checking for the following situations may provide clues or answers.
Broken JobsSELECT job,broken,interval,what FROM user_jobs;
The PSUB job that executes symmetric replication is set to run every few minutes. After 16 consecutive failed attempts to connect to a location, its status becomes BROKEN. Broken job can occur, for example, if a database went down halfway through a replication.
You must stop and restart the broken jobs.
Scheduled Jobs ExecutingSELECT job,dblink,last_date FROM defschedule;
The last date should have a value for the job in question.
Unavailable QueuesIf you get an error message that a queue is not available for enqueueing, enter the following statement from the SYSTEM account in the master database:
EXECUTE dbms_aqadm.start_queue (queue_name => 'queue_name_from_message');
followed by a commit.
Errors in DEFERRORSELECT * FROM deferror;
DEFTRAN queue emptying after sufficient time has elapsedSELECT COUNT(*) FROM deftran;
Pending CallsSELECT * FROM defcall;
DISTRIBUTED_LOCK_TIMEOUT 30 or greater Are known to have an impact on performance
OPEN_LINKS Number of symmetrically replicated sites
Table 13–7 (Cont.) Parameters to Check in the init.ora File for Symmetric Replication
Parameter Value These Parameters …

Setting Up Symmetric Replication
Conducting Studies in a Distributed Environment 13-25
Invalid Objects in RXA_DES, SYS, SYSTEM, and REPSYSSELECT owner,object_name,object_type FROM dba_objects WHERE owner IN ('RXA_DES','SYS','SYSTEM');
Incorrect LinksSELECT username,global_name FROM user_users@link,global_name@link;
■ From SYS, the user name should be REPSYS.
■ From RXA_DES, the user name should be RXA_DES.
■ From RXC_REP, the user name should be RXC_REP.
■ From OPS$anyuser:, the user name should be RXA_READ.
Error and Transaction Queues Not Processing CorrectlyFirst, force the transactions to occur.
■ From location 1:
EXECUTE DBMS_DEFER_SYS.EXECUTE('location 2 link');
■ From location 2:
EXECUTE DMBS_JOB.EXECUTE('location 1 link');
Then, check the error queue and transaction queue. If these queues are working, the problem is probably the job scheduling.
Deadlocks or Other Database ErrorsExamine the Oracle trace files.
Differences in Data at Different LocationsSee "Reconciling Data" on page 13-19 and follow the procedure to see if there are differences in the data at disparate locations. You may want to eliminate the last step that propagates data from one location to another.
Problems after a Failure when Using Symmetric ReplicationOracle Clinical uses several different techniques to replicate data and the underlying database model is very complex. This section is not intended to be the definitive guide to data recovery; it provides some idea of the issues specific to Oracle Clinical replication.
With most failures, standard Oracle recovery methods are sufficient. For example, if there were an instance failure during replication, Oracle Clinical would recover cleanly and resume from where it left off (with the possible exception of "broken" jobs, see above). In the event of a disaster, the primary concern is the Global Library.
Following are some scenarios of possible disasters and how to recover from them. They assume that generic database recovery has been completed but was unable to fully restore the database. Recovering from a real disaster will probably involve several different scenarios.
Note: This section assumes you have already established a backup and recovery plan as described in the Oracle Backup and Recovery Guide.

Setting Up Symmetric Replication
13-26 Oracle Clinical Administrator's Guide
Damage to the Global Library at a Non-Global Library LocationOnce Oracle Clinical is available for normal use, you can recover the Global Library at a non-Global Library location by performing a full replication from the Global Library-owning location.
Damage to the Global Library at the Global Library-owning LocationTo repair damage to the Global Library at the Global Library-owning location:
1. Restore the Global Library-owning location.
a. Identify the most recent copy of the global library.
b. Open the OCL_INSTALLATION installation reference codelist.
c. Set the Long Value of the GLIB_LOCATION parameter to that site.
d. Perform a full replication at the Global Library-owning location.
e. Return to the OCL_INSTALLATION codelist and set GLIB_LOCATION back to its original Long Value.
2. Recover the data entered into the Global Library between the time of the original replication and the actual disaster. This orphaned data can exist only at the Global Library-owning location.
a. Test for Study Questions, Question Groups, DCMs, DCIs, and DVGs where the corresponding library object is missing.
b. Either delete the orphaned study records or reconstruct the Global Library records. This process requires altering internal IDs from SQL*Plus.
Note: The global library is a logical collection of data within Oracle Clinical. The actual tables also contain study definitions. Depending upon the cause of the disaster, you may also need to recover study definitions.

14
Using Replication 14-1
14Using Replication
This section describes how to use standard replication and disconnected replication in your Oracle Clinical distributed study installation.
The Oracle Clinical replication concepts that apply to standard replication apply to disconnected replication as well. This section assumes you are familiar with the terms and concepts required to conduct a clinical study in a distributed environment or installation. For more information, see Chapter 13, "Conducting Studies in a Distributed Environment."
This section includes the following topics:
■ Example of an Oracle Clinical Distributed Study on page 14-1
■ Operating from the Study-Owning Location on page 14-3
■ Operating from a Sharing Location on page 14-6
■ Enabling a Study for Replication on page 14-8
■ Using Standard Replication on page 14-9
■ Using Disconnected Replication on page 14-17
■ Changing Study Ownership on page 14-23
■ Replicated Tables on page 14-24
Example of an Oracle Clinical Distributed StudyFigure 14–1 illustrates a sample installation configuration for an Oracle Clinical study that is distributed over three physically separate locations.
In this installation:
■ One study is being conducted at the investigation sites, that is, Hospital A, Hospital B, Hospital C, and Hospital CA.
■ Location A is the Global Library-owning location.
■ Location C is the study-owning location.
■ Location A and Location B are study-sharing locations.
Location A Maintains Global InformationAs the Global Library-owning location, Location A is responsible for maintaining Global Library objects, and global lab information (lab units and panels).

Example of an Oracle Clinical Distributed Study
14-2 Oracle Clinical Administrator's Guide
Location C Replicates the Global LibraryLocation C, which is the study-owning location, is responsible for designing the study and defining study elements. Before beginning the study design and definitions, Location C must replicate the Global Library from Location A. To complete the study definition, Location C may need the global lab information as well. The heavy black arrow between Location C and Location A represents this replication task.
Sharing Locations Replicate Study Design and DefinitionsOnce Location C completes the study design and definitions, and makes the study available for replication, then the other locations (Location A and Location B) must replicate these study elements from Location C. The heavy gray arrows from Location C to both Location A and Location B represent this replication task.
Location A and Location B cannot modify any of the study design or definition elements. However, these locations must maintain certain local responsibilities such as assigning sites and investigators.
Local Processing and Lab ReplicationEach location in the installation deals with local facilities to conduct their part of the study.
Location A conducts investigations at Hospital A and processes results at Lab A. Likewise, Location B conducts investigations at Hospital B and processes results at Lab B. Each of these Oracle Clinical locations is a lab-owning location for its local lab.
Location C has two hospitals serving as investigation sites, but this setup has no ramifications for replication. However, the lab setup at Location C does have an effect on replication. Location C is the lab owner for Lab Central, which services Location C and also processes some tests for the other locations. As part of its lab owning responsibility, Location C maintains the lab ranges for Lab Central. Because the other locations (Location A and Location B) use Lab Central, they must replicate the ranges for Lab Central from Location C. The dotted-line arrows from Location C to both Location A and Location B represent this replication task.
Figure 14–1 Sample Installation with Three Physically Separate Locations

Operating from the Study-Owning Location
Using Replication 14-3
Table 14–1 summarizes the roles and responsibilities for each location (Location A, Location B, and Location C) in the sample Oracle Clinical distributed study.
Operating from the Study-Owning LocationA study-owning location has responsibility for the design and definition of a study. For the tasks involved in designing and defining a study, see Oracle Clinical Creating a Study.
This section describes the following elements of conducting a study that directly relate to replication:
■ Patient positions
■ Investigators
■ Sites
Changing Ownership and Replicating Patient PositionsDefining patient positions is part of defining a study. In defining patient positions, the study-owning location declares which location owns each patient position. You can change ownership later to a different location, as long as no data has been associated with the position.
The process of changing the location of patient positions has two parts:
■ The owning location must change the ownership.
Table 14–1 Summary of the Roles and Responsibilities for Each Location in the Sample Installation
Location Roles Responsibilities
Location A Global Library owner Maintain Global Library objects
Maintain global lab information—lab units and panels
Maintain textbook ranges
Lab owner (Lab A) Maintain lab units
Maintain ranges for this lab
Study-sharing location Replicate study design
Replicate study definition (initial)
Replication study definition (periodic)
Lab user (Central Lab) Replicate lab range information
Location B Non-Global Library owner Replicate Global Library (initial)
Replicate Global lab data (initial)
Replicate Global Library (periodic)
Replicate Global lab data (periodic)
Lab owner (Lab B) Maintain lab units
Maintain ranges for this lab
Study-sharing location Same as Location A
Lab user (Central Lab) Same as Location A
Location C Non-Global Library owner Same as Location B
Lab owner (Central Lab) Maintain lab units
Maintain ranges for this lab
Study-owning location Replicate Global Library (initial)
Replicate Global Library (periodic)

Operating from the Study-Owning Location
14-4 Oracle Clinical Administrator's Guide
■ The receiving location must replicate, or retrieve, the patient positions.
Changing the Ownership of Patient PositionsWhen you create patient positions, you can define the patient positions as screening, normal, or replacement.
To change the ownership of any type of patient position:
1. Navigate to Design, Patient Positions, and then select Change Ownership.
The system displays a list of all studies. Select the study for which you want to change patient positions.
2. Click Change Owning Location.
3. Complete the fields in the Change Patient Position Owner window as follows:
a. In the Location to own Patients field, enter the name of the location that is to receive ownership of the set of patient positions.
If you are not the study owner, you can only change ownership back to the study-owning location.
b. In each Number To Update field, enter the number of patient positions you want to process for each patient type. Note that you can process one, two, or all three types of patient positions (screening, normal, and replacement) by entering a number into the respective Number To Update field.
c. In the Start patient-position Patient fields, enter the patient number to start with when changing the ownership. You can enter a starting number for each type of patient position (screening, normal, and replacement).
4. Click Change Owning Location to change the ownership.
After the study design is next replicated, the new owner will have control of these patients. The owner will be able to maintain their details, assign them to study sites, and enter data for them.
Retrieving Patient PositionsIn a distributed study, the study-owning location controls the assignments of all patient positions. If a patient position currently owned by a sharing location must change ownership, the study-owning location must reclaim, or retrieve, ownership of the patient position first.
The study-owning location can reclaim ownership of a patient position from any sharing location provided no data has been entered for the patient.
To retrieve patient positions:
1. Navigate to Design, Patient Positions, and then select Retrieve Patients.
2. Complete the fields in the Replicate a Clinical Study window as follows:
a. In the Source Study Code field, select the study that currently owns the patient positions. The list of values includes only those studies that are available for replication and that are owned by the current location. If only one study is available, the system automatically populates the field for you.
Once you specify the source study code, the system automatically populates the Source Study Title field for you.

Operating from the Study-Owning Location
Using Replication 14-5
b. In the Retrieve Patient From field, select the source location. The available locations are based on the active locations defined in the SOURCE LOCATION CODE installation codelist.
3. Click Retrieve Patients.
Oracle Clinical processes and reclaims ownership of the specified patient positions provided no data has been entered for the patients.
Maintaining Investigators and SitesEach study-sharing location assigns sites to the study and assigns investigators to those study sites. You cannot collect patient data without a study site and an assigned investigator.
Investigator and site names must be unique across all locations in the installation. Investigator and site information is replicated as part of data replication.
Constraints at the Study-Owning LocationReplication imposes constraints on design activity at the study-owning location. Although a few exceptions exist (see sections below), you cannot delete the following once they have been replicated:
■ Patient positions
■ Clinical study
■ Clinical study versions
■ Clinical planned events
■ Treatment assignments
Exceptions for Patient PositionsThe study-owning location creates patient positions and assigns them to various sharing locations. In general, you cannot alter patient positions after they have been assigned to a sharing location, except in the following circumstances:
■ The study-owning location can reclaim ownership of a patient position from any sharing location provided no data has been entered for the patient.
■ Sharing locations cannot exchange patient positions with each other directly. However, the study-owning location can retrieve patient positions from one sharing location and then reassign those patients to another sharing location.
■ The study-owning location can delete a patient position if it owns the patient position and if no data has been entered for the patient.
■ After randomized patient positions have been replicated, you cannot re-randomize them, but you can expand the randomization. After a randomized study has been replicated, you cannot re-randomize the study.
Exceptions for Study Design ActivitiesThe study-owning location can perform all study design activities. Sharing locations can perform only the following study design activities:
■ Assign sites and investigators to the study
■ Assign patients owned by that sharing location to study sites
■ Break the blind for a patient

Operating from a Sharing Location
14-6 Oracle Clinical Administrator's Guide
■ Maintain personal details for a patient
These activities are managed by the owning location of the patient position. This location may be a sharing location or the study-owning location, depending on which one owns the patient position.
Replicating Data at a Study-Owning LocationThe study-owning location is the only location that can replicate study data directly from all sharing locations. As the study data repository, the study-owning location must schedule replications of data from the sharing locations for the study.
The sharing locations can replicate only from the study-owning location. So, at any point in the conduct of the study, the sharing locations have available to them only the data replicated by the study-owning location from the various sharing locations, plus the data collected at the study-owning location itself.
As a study-owning location, if you receive study data from a lab owned by another location, you must replicate that lab and its ranges into your database.
Operating from a Sharing LocationA sharing location takes its design and definition for the study from the study-owning location. It can conduct a study, but cannot modify the study design or definition. It can replicate, from the study-owning location, copies of data collected at other sharing locations for the study.
Study Design at a Sharing LocationSharing locations receive their study design from the study-owning location. Every replication results in a fresh copy of the study design, including all new patient positions assigned to the sharing location.
A location that shares a study may also own studies itself. Every location can see the creation and maintenance screens in study design, however; a location cannot access studies it does not own via those screens, only via the query screens.
In general, a sharing location cannot modify the study design. However, a few exceptions to modifying the study design exist. At a sharing location, you can alter the study design as follows:
■ You can:
– Assign sites to the study
– Assign investigators to study sites
– Assign patients owned by your sharing location to the appropriate study site
To perform any of these tasks, navigate to Design, Investigators and Sites, and then select Study Sites.
■ You can locally disclose the treatment pattern assigned to a patient and create a blind break.
To do this, navigate to Design, Randomization, Randomization Maintenance, and then select Disclose Patient Treatment Assignments.
■ You can locally maintain patient details using either of the following options:
– Navigate to Design, Patient Positions, and then select Patients.

Operating from a Sharing Location
Using Replication 14-7
– Navigate to Data Entry, and then select Patient Enrollment.
■ You can create and amend site plans for local study sites. To do this, navigate to Design, Studies, and then select Study and Site Plans.
Study Definition at a Sharing LocationThe study-owning location defines all the core elements of a study—DCMs, DCM question groups, DCIs, and so on. A sharing location receives these definitions by replicating the study design and definition from the study-owning location. Study definition replicated from the study-owning location is available to view read-only from the study-sharing locations.
If the study-owning location changes any definitions, a study-sharing location must perform an incremental replication of the study definition. Once the study-sharing location completes the replication, Oracle Clinical ensures that all changes to the study definition are automatically applied to the study data during the next batch validation. The same automatic re-validation and re-derivation that occur at the study-owning location occur at each study-sharing location.
Study Conduct at a Study-Sharing LocationThe study-sharing location can perform all study conduct activities, including:
■ Log in documents for those patients that it owns.
■ Do pass 1 entry, pass 2 entry, and update for its patients.
■ Run Batch Validation against locally collected data.
■ Do discrepancy management for locally collected data.
Data Replication at a Study-Sharing LocationAt a study-sharing location, you can replicate study data from the study-owning location, but you cannot replicate study data directly from other sharing locations. Therefore, at any point in the conduct of a study, you have available only the data that the study-owning location has replicated from the various study-sharing locations, plus the data that the study-owning location has collected itself.
At a study-sharing location, when you replicate study data, you can elect to replicate the available data from one participating location (either another study-sharing location or the study-owning location) or from all participating locations (all study-sharing locations plus the study-owning location).
Note: When performing any of these study design activities at a sharing location, you see only the patient positions assigned to your location since the last time you replicated the study design.
Note: After the first full replication of a study definition at a study-sharing location, the study-sharing location must insert a record into the CLINICAL_STUDY_STATES table for the study-sharing location.

Enabling a Study for Replication
14-8 Oracle Clinical Administrator's Guide
Replication of Labs and Lab Ranges at a Sharing LocationThe options for replicating labs and lab ranges at a study-sharing location are the same as those at the study-owning location.
Error if Flexible Study Setting Mismatch Between LocationsThe value of the Flex Study Enabled? setting at the source location must match the value of the Flex Study Enabled? setting at the target location. If a mismatch occurs, the replication job fails. Oracle Clinical reports the errors as follows:
■ If a mismatch occurs during either a full or an incremental replication of a single study, the replication job completes with FAILURE. The output file contains the following error message:
Error: Flex Study Enabled flags do not match between source and target for study: study_name
■ When you submit a replication job, you can use the % wildcard character to replicate all studies. If a mismatch occurs during either a full or an incremental replication of multiple studies and if the mismatch occurs with more than one study, the replication job completes with SUCCESS. The failure text in the Batch Jobs window displays the following message:
COMPLETED WITH WARNING DUE TO FLEXSTUDY FLAG MISMATCH
In addition, the output file contains the following warning message:
Warning: Flex Study Enabled flags do not match between source and target for one or more studies. Please check Clinical Study States form. The Job completed with Warnings.
■ If a mismatch occurs during data replication of a study, the replication job completes with FAILURE. The output file contains the following error message:
Error: Flex Study Enabled flags do not match between source and target for study: study_name
To resolve these issues:
1. Log in to Oracle Clinical at the source location.
2. Navigate to Conduct, Security, and then select Clinical Study States.
3. Verify the value of the Flex Study Enabled setting.
4. Update the value at each target location accordingly.
5. Save your changes.
Enabling a Study for ReplicationA study is available for replication only if its Ready to Repl check box is selected. In addition, only the study-owning location can designate when a study is ready for replication.
To enable a study to be available for replication:
1. Navigate to Design, Studies, and then select Clinical Studies.
2. Scroll to the right in the window.
3. Select the Ready to Repl? check box. See Figure 14–2.
4. Click Save.

Using Standard Replication
Using Replication 14-9
Figure 14–2 Enabling a Clinical Study for Replication
Using Standard ReplicationStandard replication is a retrieving operation, that is, the location that requires the information must request it from the study-owning location. In managing replication, you must make sure that specific replications occur at consistent intervals and that you inform people when particular information is updated.
Standard replication has two options:
■ Full replication — A full replication replaces the rows of the local tables with the current contents of the source location's table. For study definitions, only the rows for the replicated studies are replaced; for Global Library tables, all rows are replaced.
■ Incremental replication — When incremental replication occurs, all operations (inserts, updates, and deletes) that have occurred on the source location's tables since the last replication are applied to the local database. Because only new and changed information is transferred, this minimizes the amount of information that must be transferred between locations over a network.
Review of Setting Up Standard ReplicationTo set up standard replication, you must complete the following tasks:
■ Configure the SOURCE LOCATION CODE installation reference codelist
■ Configure the OCL_INSTALLATION installation reference codelist
■ Configure the OCL_STATE local reference codelist
■ Create and set up the private and public database links
■ Create the study design replication packages

Using Standard Replication
14-10 Oracle Clinical Administrator's Guide
For details about these installation tasks, see Chapter 13, "Conducting Studies in a Distributed Environment."
Replicating a Global LibraryStandard replication of a Global Library supports both full replication and incremental replication:
■ A full replication of a global library replaces all existing Global Library information at a sharing location with information from the tables at the Global Library-owning location.
■ An incremental replication of a global library applies to the Global Library-sharing location only those operations (inserts, updates, and deletes) that have occurred at the Global Library-owning location since the last Global Library replication was performed at the Global Library-sharing location.
When using standard replication to replicate a Global Library, Oracle recommends that you execute a full replication initially, and incremental replications thereafter. You need to repeat the full replication of the Global Library only if the target library is corrupted.
To use standard replication to replicate a global library:
1. Select one of the following options:
■ To execute a full replication of a global library, navigate to Admin, Replication, and then select Full Library.
■ To execute an incremental replication of a global library, navigate to Admin, Replication, and then select Incremental Library.
You do not need to specify any input parameters to replicate the Global Library.
2. Click Schedule to open the Schedule Jobs window.
3. Define when you want the replication to occur.
4. Click OK to save your changes.
5. Click Submit Job to submit the batch job.
6. Click Exit to return to the main menu.
Replicating Study DesignsWhen you use standard replication to replicate a study design, Oracle Clinical performs a full replication of the design information for a single study from the study-owning (source) location. Study design replication includes all design information except randomization and blinding information.
Because you might not want to make all study definitions available for replication— perhaps they are incomplete or intended only for local use—you must explicitly enable a study to be available for replication.
Replicating the Design of a Clinical StudyTo use standard replication to replicate a study design:
1. Navigate to Design, Studies, and then select Replicate Clinical Study.
2. Complete the following fields in the Replicate a Clinical Study window:

Using Standard Replication
Using Replication 14-11
a. In the Source Location field, select a location from which to replicate a study design. The list of values includes only the active location codes defined in the SOURCE LOCATION CODE installation codelist.
b. In the Source Study Code field, select from the studies owned by the selected source location that are available for replication. Note that the field lists only those studies that are owned by the location you specified in the Source Location field and that are designated as ready for replication. See "Enabling a Study for Replication" on page 14-8 for details.
Oracle Clinical automatically populates the Source Study Title field, the Target Study Code field, and the Target Study Title field.
3. Click Replicate Study. Oracle Clinical immediately begins the replication process.
Your terminal remains locked until the replication completes, which may take anywhere from a few minutes to several hours, depending on the size of the study design and the traffic on your network.
Creating a Local Configuration for the Replicated StudyEvery study, whether replicated or not, requires a record in the CLINICAL_STUDY_STATES table. Study design replication does not automatically create the record. Therefore, after you replicate a study design for the first time at a study-sharing location, you must manually create a record in the CLINICAL_STUDY_STATES table.
In addition, you can configure several study-level settings in the CLINICAL_STUDY_STATES table that control collection at the study-sharing location. When you save your changes, Oracle Clinical automatically creates study access accounts at the study-sharing location that are required to perform data extract.
To create the Clinical Study States record and configure the study-level settings:
1. Navigate to Conduct, Security, and then select Clinical Study States.
2. Select the study.
3. Select the configuration settings for this study.
4. Save your changes.
Replicating a Study DefinitionOnce the study-owning location makes a study available for replication, you can replicate the study definition to a sharing location. The study definition includes the DCIs, DCMs, and Procedures, but not the received DCIs, received DCMs, responses, and discrepancies.
When you replicate a study definition, Oracle Clinical automatically replicates the Global Library before replicating the study definition to ensure that all Global Library information is consistent with references from the replicated studies.
Standard replication of the study definitions supports both full replication and incremental replication:
■ A full replication of a study definition replaces all the existing study definitions being replicated with a copy of the information from the study definition tables at the study-owning location.
■ An incremental replication of a study definition applies all operations (inserts, updates, and deletes) that have been performed on study definition tables at the study-owning location since the last replication.

Using Standard Replication
14-12 Oracle Clinical Administrator's Guide
To use standard replication to replicate a study definition:
1. Select one of the following options:
■ To execute a full replication of a study definition, navigate to Admin, Replication, and then select Full Study.
■ To execute an incremental replication of a study definition, navigate to Admin, Replication, and then select Incremental Study.
2. Complete the Current Value field for each parameter as follows:
a. For the Source Location Code parameter, select the code for the study-owning location. The list displays the active location codes from the SOURCE LOCATION CODE installation reference codelist.
b. For the List of Study names to be replicated parameter, select the study that you want to replicate. The list displays only those studies that are owned by the location you specified for the Source Location Code parameter.
You can also use the % wildcard to replicate one, several, or all studies owned by the specified source location.
3. Click Schedule to open the Schedule Jobs window.
4. Define when you want the replication to occur.
5. Click OK to save your changes.
6. Click Submit Job to submit the batch job.
7. Click Exit to return to the main menu.
Replicating DataData replication includes investigators, sites, patient positions, and patient data. Optionally, data replication can include discrepancies and associated data clarification forms (DCFs).
This section includes the following topics:
■ What Does Oracle Clinical Include in Data Replication?
■ Tracking the Execution of Data Replication
■ Invoking Study Data Replication
■ Managing Data at Multiple Locations
What Does Oracle Clinical Include in Data Replication?When you initiate data replication, Oracle Clinical automatically:
■ Replicates data for all patients, including all data modifications since the last data replication.
Oracle Clinical moves, tracks, and commits the data one patient at a time to avoid single large transactions. This includes responses that change because a univariate validation criterion is modified, which causes the value to move from the exception value text to the response value text field.
■ Invocates incremental study definition replication, and if necessary, Global Library replication.

Using Standard Replication
Using Replication 14-13
■ Replicates investigator and site information to ensure that all referenced information is present at the receiving location. This includes investigators, sites, study sites, study site roles, and patient position information.
In addition, data replication includes discrepancies and associated DCFs if the ALLOW_DISC_REPL parameter in the OCL_INSTALLATION codelist is set to Y. You set the ALLOW_DISC_REPL parameter at the Global Library-owning location only. See "Configuring the OCL_INSTALLATION Installation Reference Codelist for Replication" on page 13-7 for more information.
Tracking the Execution of Data ReplicationOracle Clinical uses the STUDY_REPLICATION_JOBS table to track the execution of a replication, along with information about the timing and completion status of each data replication for a study.
Invoking Study Data ReplicationTo invoke study data replication:
1. Navigate to Admin, Replication, and then select Data.
2. Select the study that you want to replicate.
3. Complete the fields in the Replication of all the Study Data window as follows:
■ Source Location Code — Enter the name of the location that owns the study definition.
■ Data Location Code — Enter a percentage sign (%) to replicate all available data stored at the study-owning location; or enter the name of a single location participating in the study to replicate the data from that location currently available from the study-owning location. This name could be any sharing location or the study-owning location, unless you are replicating from the study-owning location itself.
■ Refresh all data? — Enter Y to have Oracle Clinical examine and refresh all data. Enter N to have Oracle Clinical refresh only data that has changed since the last replication. Selecting N results in a large reduction in data volume and consequently, reduces the likelihood of greatly degrading performance.
4. Click Schedule to open the Schedule Jobs window.
5. Define when you want replication to occur.
6. Click OK to save your changes.
7. Click Submit Job to submit the batch job.
8. Click Exit to return to the main menu.
Managing Data at Multiple LocationsOnly locally owned data can be modified at any given location, and changes to the study definition should be applied uniformly at each location.
Integrity Oracle Clinical enforces the integrity of distributed data by ensuring that each location can modify data and related information only for patients owned by that location. Oracle Clinical implements this integrity in the following activities:
■ Log-In — Only locally assigned patient positions can be entered or accessed.
■ Data Entry — Only locally assigned patient positions can be accessed, unless in browse mode.

Using Standard Replication
14-14 Oracle Clinical Administrator's Guide
■ Patient Enrollment — Only locally owned patient positions can be accessed.
■ Batch Data Load — Only locally owned patient positions can be loaded.
■ Discrepancy Management — A location has only its own discrepancies available in the local discrepancy database tables.
■ Data Freezing and Locking — A location can freeze and lock only locally assigned patients and their data and locally owned study sites. The study-owning location can freeze the study only after all locations with data stored at the study-owning location have frozen the study at their locations.
■ Batch Validation — Procedures and other validation activities are only applied to patients owned by the current location.
■ Investigator/Site — Each location maintains its own investigator and site assignments to the study; other locations can only view those assignments.
■ Site Plans — Each location creates and maintains its own site plans; the study-owning location maintains the study plan.
Consistency Data consistency means maintaining the correct relationship between the study definition and the data in the study. For example, data consistency guarantees that:
■ You cannot replicate data for a DCM question to a location that does not yet have the definition for that DCM question.
■ A modification to a DCM question's range at the study-owning location results in the re-validation of all data collected for that DCM question at all locations.
■ Making a Derivation Procedure provisional then active, after removing a derived question and placing its derivation in another Procedure, results in the correct sequence for deleting existing derived information and re-deriving the information at all locations.
To preserve this data consistency, Oracle Clinical:
■ Conducts an incremental replication to automatically update the study definition at the target location before replicating any data from the study-owning location.
■ Tracks and replicates information about changes to Procedures and derived information, and tracks the times of previous replications to ensure detection and application of changed definitions when batch validation is executed.
Consistency and Data Extract Data Extract poses the following special problems for distributed study data:
■ Data extract view maintenance does not correctly detect all changes to DCM definitions when run in incremental mode. Therefore, all sharing locations should run data extract view maintenance in full mode.
■ Stable and snapshot data extract views provide a consistent and unchanging view of data. However, when data from multiple locations is present in a study, you must be aware of these limitations:
– Replication of data entered at a local time prior to a snapshot, or prior to the batch validation run that defines a stable view, causes data to appear in the view. Therefore, a view is truly stable only after all data entered before the time stamp defining the view is moved to the location with the views.
– Replication of data whose own stable time stamp (Last Batch Run) is later than the local time stamp (which can arise due to time-zone differences) can cause

Using Standard Replication
Using Replication 14-15
data to be viewed where the derived information is inconsistent with entered information.
You can handle these limitations on a day-to-day basis by timing the replications. As long as you do not invoke replication during the day, stable views remain stable during the course of the day. Snapshot views will be stable as long as you ensure that all locations have been replicated before being used. As long as the local batch validation occurs later than the time stamp of the batch validation at the source location, no inconsistencies occur between entered and derived information in the stable views.
To ensure completely consistent and stable snapshot views—such as for interim analysis—you must ensure that following batch validation at each location serving as a source of data for the snapshot, no data is entered or modified for a time interval greater than or equal to the difference in time zones. A second batch validation run then establishes a second time stamp from which data modification activities can resume.
You can usually satisfy these constraints by scheduling the batch validation to run in the early evening and the replication to run in the middle of the night. You can then establish the second stability point by scheduling a second batch validation to run in the morning, prior to data entry resuming. The second batch validation does little processing because no data or definition changes need to be applied. This caution is necessary only if the data is to be accessed for reporting or other formal purposes through the stable or snapshot views.
Replicating Lab InformationLab information distribution includes the global definition of lab units, lab panels, and related information, as well as the ability to share lab definitions and lab ranges among locations processing tests at the same lab.
The lab range system consists of three sets of information with different relationships in a distributed environment. See Table 14–2 for details.
The globally maintained lab units and panels information is maintained at the same location that maintains the Global Library. At all other locations, you can access only the query versions of the forms.
Replicating the Global Lab InformationGlobal lab replication invokes full replication of the centrally maintained lab system information. No parameters are necessary to submit the replication batch job. Each time you execute global lab replication, Oracle Clinical copies to your location a fresh copy of all the information maintained in those tables from the location that maintains the global lab information.
To use standard replication to replicate global lab information:
Table 14–2 Lab Information and Management Location
Information Set Location Relationship
Lab units, lab panels, textbook ranges, and all related information
Maintained centrally at Global Library-owning location; replicated to all Global Library-sharing locations in the Oracle Clinical installation
Labs and lab ranges Maintained at the location responsible for lab; replicated to any location that has replicated study data referencing the lab
Lab assignment criteria Maintained separately at each location; not replicated

Using Standard Replication
14-16 Oracle Clinical Administrator's Guide
1. Navigate to Admin, Replication, and then select Global Lab Info.
Note that no parameters are necessary to submit the replication batch job.
2. Click Schedule to define when you want the replication to occur.
3. Click Submit Job to submit the batch job.
4. Click Exit to end the function and return to the main menu.
Replicating Labs and Lab RangesEach location maintains its labs and lab ranges. These labs and lab ranges can then be used by studies run locally or at locations that are part of a distributed study. Lab identifiers must be unique across all locations.
If a lab, such as a central lab, is shared by multiple locations, you can maintain the ranges for that lab at one location and replicate to other locations for their use. Alternatively, you can separately identify and maintain the lab at each location. You can only update lab and range information for labs owned by your location.
To use standard replication to replicate labs and lab ranges:
1. Navigate to Admin, Replication, and then select Labs and Ranges.
2. Select the name of the location that owns the lab, and then click Submit Job.
This process updates the list of labs that are available to you from that location. In addition, for those labs for which you have previously selected the Replicate? check box, this process updates the lab and lab ranges information for the labs owned by the site from which you replicate.
3. Navigate to Labs, Labs, and then select Labs to open the Maintain Labs window.
4. Query for all the labs owned by the source location.
5. Review the status of the Replicate? check box for each lab.
The Replicate? check box indicates whether to replicate its ranges the next time you run lab and ranges replication. Therefore, note that:
■ The first time you replicate labs from a lab-owning location, the Replicate? check box is not selected for those labs.
■ For any lab created by the lab-owning location since the last time you ran labs and ranges replication, the Replicate? check box is not selected.
6. Process each Replicate? check box as follows:
■ If you want the ranges for a lab that did not have the Replicate? check box enabled, select the check box and then select Admin, Replication, and Labs and Ranges again to replicate its lab ranges from the lab-owning location.
■ If, for some reason, you no longer want to replicate the ranges for a particular lab, clear the Replicate? check box. That lab's ranges will not be replicated again until you re-select the check box.
Note that you can use the information in the Last Replication field in the Maintain Labs window to determine when the lab ranges were replicated.
Replication and FrequencyYou will likely want to adjust the frequency of replications according to what activities are occurring. For example, while a study-owning location is creating and modifying

Using Disconnected Replication
Using Replication 14-17
the study definition, it must maintain a frequent schedule of replications of the Global Library to consistently have the most recent definitions.
When a study definition is replicated, Oracle Clinical automatically checks to ensure that the Global Library information is up to date. If the information is not up to date, Oracle Clinical automatically invokes incremental replication of the Global Library before proceeding.
In addition, you must consistently schedule data replication to ensure that all locations in the installation have access to all study data. For example, you could schedule the study-owning location to replicate data from each sharing location every evening, and then before work starts at each location the following day, you schedule a time for each sharing location to replicate data from the study-owning location. Because replication is a PSUB job, you can schedule each job to occur at a regularly scheduled time every day.
Using Disconnected ReplicationDisconnected replication supports bi-directional replication between locations without relying on a network connection. Instead of transferring data real-time via a Wide Area Network (WAN), disconnected replication transfers data between locations via file transfer.
This section includes the following topics:
■ Overview of Disconnected Replication on page 14-17
■ Review of Setting Up Disconnected Replication on page 14-19
■ Extracting Source Data to an Export File on page 14-19
■ Defining the Extract Data Parameters on page 14-20
■ Loading Data from the Export File into a Target Location on page 14-22
Overview of Disconnected ReplicationWith disconnected replication, you begin by exporting data to a file. When you export data to a file, you can choose to include the following type of information:
■ Global Library
■ Global Labs (textbook ranges and conversion tables)
■ Labs
■ Study designs
■ Study definitions
■ Patient data
■ Study randomizations
You can choose to replicate the Global Library, Global labs, labs, study designs, study definitions, and patient data either separately or as a single unit.
For each of these areas, all the existing functionality of the full replication mode is supported. With each selected type, all data is replicated.
Users Who Can Run Disconnected ReplicationAny user with the following privileges can run disconnected replication:

Using Disconnected Replication
14-18 Oracle Clinical Administrator's Guide
■ RXC_ADMIN
■ RXC_SUPER
■ RXC_SUPER_NOGL
Disconnected Replication Uses Full Replication OnlyDisconnected replication supports full replication only. It does not have an incremental option like standard replication. Instead, each time you initiate another disconnected replication, Oracle Clinical creates a new copy of the source data. When you import and load the new source data to the target location, Oracle Clinical overwrites the existing data at the target location with the new source data.
If your installations are set up for standard replication, you can, however, use disconnected replication in conjunction with standard replication. For example, you can choose to use disconnected replication to initially populate a study, and then use full or incremental standard replication at any time.
Advantages of Disconnected ReplicationThere are several circumstances where disconnected replication offers a valuable alternative to standard replication. Disconnected replication:
■ Enables a Contract Research Organization (CRO) to conduct clinical trials on behalf of an Oracle Clinical sponsor without requiring that the sponsor be able to communicate via a direct network connection.
■ Can perform the initial transfer of large studies or of the Global Library in a network environment. You can then use standard replication (full or incremental) to maintain the Global Library and studies over the network.
■ Can act as a backup to standard replication when a major network failure occurs.
■ Can transfer large volumes of patient data when a study is being consolidated for analysis.
Security Concerns with Disconnected ReplicationBecause the export file may contain confidential information, you should implement the following security measures:
■ Impose strict controls over who can access the file
■ Make read access to the file available only to authorized disconnected replication users
■ Encode the file if you intend to transfer the file over a public network
■ Control and restrict access to backup copies and to all physical media
Example of How Disconnected Replication Is Used in Distributed Studies In practice, a sponsor can use disconnected replication to transfer files to and from a Contract Research Organization (CRO) in the following manner:
■ The sponsor uses disconnected replication to export Global Library non-study data and the definition of a study to the CRO.
■ The CRO imports the information and begins to collect data to perform a study.
■ The CRO uses data replication to export the study data back to the sponsor.
■ The sponsor imports the study data from the CRO and refreshes the data in the Oracle Clinical database.

Using Disconnected Replication
Using Replication 14-19
Review of Setting Up Disconnected ReplicationTo set up disconnected replication, you configure or verify settings in the SOURCE LOCATION CODE, OCL_INSTALLATION, and OCL_STATE codelists. For details, see the following topics:
■ "Configuring the SOURCE LOCATION CODE Installation Codelist for Replication" on page 13-6
■ "Configuring the OCL_INSTALLATION Installation Reference Codelist for Replication" on page 13-7
■ "Configuring the OCL_STATE Local Reference Codelist for Replication" on page 13-9
In addition, see Chapter 13, "Conducting Studies in a Distributed Environment" for information about distributing a read-only copy of study designs, definitions, and data to other locations in your installation.
Extracting Source Data to an Export FileTo extract source data to an export file:
1. Navigate to Admin, Replication, and then select Disc Repl Export.
Oracle Clinical opens an Extract Data for Disconnected Replication window, which varies slightly depending on whether the location owns the Global Library for the selected database.
Note that the window includes the following parameters only if the location is the Global Library-owning location:
■ Include GLIB
■ Include GLIB Labs

Using Disconnected Replication
14-20 Oracle Clinical Administrator's Guide
2. Enter values for the parameters displayed in the Extract Data window. See "Defining the Extract Data Parameters" on page 14-20 for details.
3. Click Submit Job to send the replication job to the Parameterized Submission (PSUB) utility for processing.
Alternatively, you can click Schedule to schedule the job for a particular date and time.
For additional information about using the Parameterized Submission (PSUB) utility to submit jobs, see Oracle Clinical Getting Started.
Defining the Extract Data ParametersThis section describes the values that you can enter for each parameter displayed in the Extract Data window.
Target LocationSelect the name of a specific target location or select ALL. Note that the available target locations are based on the active values in the SOURCE LOCATION CODE installation reference codelist. See Figure 14–3.
The value you select depends on the type of data you are replicating:
■ For Global Library, Global labs (textbook ranges and conversion tables), or lab data, select ALL to extract data for replication to multiple sites. Select the name of one target location to extract data for replication to a single site.
■ For study design, study definition, or patient data, select the name of one target location to extract data for replication to a single site.
Figure 14–3 Available Target Locations based on SOURCE LOCATION CODE Installation Codelist
Include GLIBSet to Y to include Global Library information in the exported file. Note that the Include GLIB parameter is available only at the Global Library-owning location.

Using Disconnected Replication
Using Replication 14-21
Include GLIB LabsSet to Y to include textbook ranges and conversion tables in the exported file. The replicated data includes the following information:
■ Textbook Ranges
■ LAB_PANELS
■ LAB_PANEL_QUESTIONS
■ LAB_TEST_QUESTION_UNITS
■ LAB_UNITS
■ LAB_UNIT_CONVERSIONS
■ PREFERRED_LAB_UNITS
■ PREFERRED_LAB_UNIT_GROUPS
Note that the Include GLIB Labs parameter is available only at the Global Library-owning location.
Include LabsSet to Y to include lab information in the exported file.
Study CodeEnter the appropriate value depending on the type of data you are replicating:
■ For study design, study definition, or patient data, select the name of a study. When you select a specific study, you can use the exported file only at the one site specified in the Target location field.
Note that a study is available for replication only if its Ready to Repl check box is selected. See "Enabling a Study for Replication" on page 14-8 for details.
■ For Global Library data, enter N/A.
■ Studies previously owned by the current location and now being given to the target location.
Extract LevelEnter the level of data you want to replicate and export to the file. Valid values are:
■ DESIGN — Study design
■ DEFINITION — Study design and study definition
■ DATA — Study design, study definition, and data
■ N/A — Not applicable
Include RandomizationSet to Y to include randomized treatment assignments to patient positions.
Export FileEnter the name of the file to which Oracle Clinical exports the data. The directory path defaults to your home directory on the computer where the PSUB server is running. You can also specify a full directory path.

Using Disconnected Replication
14-22 Oracle Clinical Administrator's Guide
Loading Data from the Export File into a Target LocationAfter you create an export file that contains the data from the source location, you choose how to transport the export file to the target location. For example, you can choose disk media, tape media, E-mail, or local area network (LAN).
The target location then imports (or loads) the data from the export file.
Note that you can import study data only if, at the time of data extract, the Global Library at the target location is the same as, or more recent than, the Global Library at the source location.
To receive data from a source location:
1. Navigate to Admin, Replication, and then select Disc Repl Load. Oracle Clinical displays the Load Data for Disconnected Replication window.
2. Enter the name of the export file to load.
3. Click Submit Job to send the job to the Parameterized Submission (PSUB) utility for processing.
Alternatively, you can click Schedule to schedule the job for a particular date and time.
For additional information about using the Parameterized Submission (PSUB) utility to submit jobs, see Oracle Clinical Getting Started.
How Disconnected Replication Commits DataDisconnected replication commits data to the target location incrementally — completely committing the Global Library, for example, before staging the Global Library labs.
Commits occur in the following order:
■ Global Library
■ Global Library labs

Replicated Tables
Using Replication 14-23
■ Labs
■ Study design
■ Study definitions
■ Patient data, on a per patient basis
Changing Study OwnershipIt is possible to change the owner of a clinical study. To do this, the current owner updates the Owning Location field in the Maintain Clinical Studies form. Ownership actually transfers the next time the new owner initiates replication.
If the receiving location does not have an up-to-date copy of the study definition, an error message is issued when the owning location is changed. The new owner can not replicate the study until receiving an updated copy of the study definition.
The replication process that changes ownership also replicates the randomization in the study.
Replicated TablesTable 14–3 list the tables that are replicated as a part of standard replication and disconnected replication.
Note: The CLINICAL_STUDY_STATES table is not replicated as part of standard replication. Therefore, with standard replication, you must manually create a record in the CLINICAL_STUDY_STATES table. For more information, see "Creating a Local Configuration for the Replicated Study" on page 14-11.
The CLINICAL_STUDY_STATES table is replicated as part of disconnected replication.
Table 14–3 Replicated Tables
ACTUAL_EVENTS DCM_LAYOUT_TEXT QUERIES
BATCH_DCMQ_CHANGES DCM_QUESTIONS QUERY_DETAILS
BLIND_BREAKS DCM_QUESTION_GROUPS QUERY_KEY_COLS
BLOCK_DEFINITIONS DCM_QUES_REPEAT_DEFAULTS QUERY_WHERE
CLINICAL_PLANNED_EVENTS DCM_SCHEDULES QUERY_WHERE_COLS
CLINICAL_PLANNED_PROCESSES DISCREPANCY_ENTRIES QUESTIONS
CLINICAL_PROCEDURES DISCREPANCY_ENTRY_REVIEW_HIST
QUESTION_ATTRIBUTES
CLINICAL_STUDIES DISCRETE_VALUES QUESTION_CATEGORY_RELATIONS
CLINICAL_STUDY_HISTORY DISCRETE_VALUE_GROUPS QUESTION_GROUPS
CLINICAL_STUDY_OBJECTIVES ENROLLMENT_PLANS QUESTION_GROUP_QUESTIONS
CLINICAL_STUDY_STATES EXTRACT_MACROS QUESTION_SETS
CLINICAL_STUDY_VERSIONS EXTRACT_MACRO_PARAMETERS QUESTION_SET_QUESTIONS

Replicated Tables
14-24 Oracle Clinical Administrator's Guide
CLINICAL_STUDY_VERSION_SIZES FACTORS QUES_MEDICAL_EVAL_QUALIFIERS
CLINICAL_SUBJECTS FORMAT_MASKS RANDOMIZATIONS
CLIN_STUDY_ENROLLMENT_CRITERIA
FORMAT_MASK_COMPONENTS RANDOMIZATION_BLOCKS
CLIN_ST_TERMINATION_CRITERIA FORM_LAYOUT_TEMPLATES RANGES
COMBINED_TREATMENT_COMPONENTS
HTML_DCIF_FIELD_VALUES RDCI_HISTORY
COMPLEX_QUESTIONS INTERVAL_TREAT_REGIMEN_ASSIGN
RECEIVED_DCIS
COPY_GROUPS LABS RECEIVED_DCMS
COPY_GROUP_DETAILS LAB_PANELS RECEIVED_PAGES
CORRELATION_ITEMS LAB_PANEL_QUESTIONS RECEIVED_PAGE_HISTORY
DAILY_DOSES LAB_RANGE_SUBSETS REFERENCE_CODELISTS
DATA_CLARIFICATION_FORMS LAB_TEST_QUESTION_UNITS REFERENCE_CODELIST_VALUES
DATA_EXTRACT_VIEWS LAB_UNITS REGIONS
DCF_DISCREPANCIES LAB_UNIT_CONVERSIONS RESPONSES
DCF_DISCREPANCIES_HIST OCL_DOSAGE_FORMS RESPONSE_LOBS
DCF_PAGES OCL_INVESTIGATORS STANDARDS_AFFILIATIONS
DCF_PAGE_ENTRIES OCL_ORGANIZATION_UNITS STRATA
DCF_PRINT_STATUS OCL_PRODUCT_MASTERS STRATUM_COMPONENTS
DCF_STATUS_TRACKING OCL_PROGRAMS STRATUM_TREATMENT_PATTERNS
DCIS OCL_PROGRAM_PRODUCT_MASTERS
STUDY_COMMENTS
DCI_BK_RULE_TRG_DCIS_TGT_STAT
OCL_PROJECTS STUDY_REPLICATION_JOBS
DCI_BOOKS OCL_SITES STUDY_SITE_PATIENT_POSITIONS
DCI_BOOK_CPES OCL_STUDIES STUDY_STRATIFICATION_FACTORS
DCI_BOOK_DCI_CONSTRAINTS OCL_STUDY_REGIONS S_A_SET_ITEMS
DCI_BOOK_EXPLODED_RULES OCL_STUDY_SITES TEMPLATES
DCI_BOOK_INTERVALS OCL_STUDY_SITE_ROLES TEMPLATE_COLUMNS
DCI_BOOK_PAGES PATIENT_FLEX_TRACKING TEMPLATE_INDEXES
DCI_BOOK_PHYSICAL_PAGES PATIENT_POSITIONS TEMPLATE_INDEX_COLS
DCI_BOOK_RULES PATIENT_POSITIONS_HISTORY TITRATION_STEPS
DCI_BOOK_RULE_TGT_DCIS PATIENT_STATUSES TREATMENT_ASSIGNMENTS
DCI_BOOK_RULE_TGT_INTERVALS PATTERNS TREATMENT_PATTERNS
DCI_BOOK_RULE_TRG_DCIS_INST PLANNED_STUDY_INTERVALS TREATMENT_PATTERN_REGIMENS
DCI_BOOK_RULE_TRG_DCIS_STAT PP_EXPECTED_CPES TREATMENT_REGIMENS
Table 14–3 (Cont.) Replicated Tables

Replicated Tables
Using Replication 14-25
DCI_FORM_CONDITIONAL_BLOCKS
PP_EXPECTED_DCIS TREATMENT_REGIMEN_BY_RANGES
DCI_FORM_VERSIONS PP_EXPECTED_INTERVALS TREAT_PATT_BLOCK_DEFINITIONS
DCI_HTML_FORM_VERSIONS PREFERRED_LAB_UNITS UNIONS
DCI_MODULES PREFERRED_LAB_UNIT_GROUPS VALIDATION_REPORTED_VALUES
DCI_MODULE_PAGES PROCEDURES VIEW_QUESTION_MAPPINGS
DCI_USER_ROLE_PRIVS PROCEDURE_DETAILS VIEW_RESTRICTIONS
DCI_USER_ROLE_PRIVS_DCIS PROCEDURE_QUESTIONS VIEW_RESTRICTION_COLS
DCMS PROCEDURE_QUESTION_GROUPS
VIEW_TEMPLATE_QUESTIONS
DCM_CONDITIONAL_BRANCHES PROCEDURE_TEXTS XMLP_DCIF_FIELD_VALUES
DCM_LAYOUT_ABS_PAGES PROCEDURE_VARIABLES
DCM_LAYOUT_GRAPHICS PROC_DET_VAR_USAGE
Table 14–3 (Cont.) Replicated Tables

Replicated Tables
14-26 Oracle Clinical Administrator's Guide

Part IIIPart III Appendixes
This section includes reference information.
■ Appendix A, "Environment Variables and Registry Settings"
■ Appendix B, "SAS_VIEW Directory Tree"
■ Appendix C, "Troubleshooting"
■ Appendix D, "Routine Server Administration"
■ Appendix E, "Oracle Clinical Tablespaces"


A
Environment Variables and Registry Settings A-1
A Environment Variables andRegistry Settings
This appendix describes the environment variables and registry settings that Oracle Clinical uses to condition the environment on compute servers, and to condition a user's interactive environment to point at a particular database and code environment. These variables are created as part of the Oracle Clinical installation process; most are also set to a default value. Information is provided here so that you can set them up and modify them, if necessary.
This section discusses and describes the following topics:
■ Summary of the Oracle Clinical Setup on page A-1
■ Windows Registry Settings on page A-11
Summary of the Oracle Clinical SetupThe Oracle Clinical server environment definition and setup system, known as opa_setup, consists of a set of scripts (on UNIX systems) or command files (on Windows systems).
The four types of setup files are:
■ Definition – Edit this file, if necessary, to set or change values on a system-wide or database-specific level. The Oracle Universal Installer creates the file in drive:\opapps\bin.
■ opa_settings – UNIX
■ opa_settings.bat – Windows
■ Initialization (login) – This file is optional, edit it to set or change values for an individual user.
■ .profile – UNIX platforms, Bourne/Korn shells
■ .cshrc – UNIX platforms, C shell
■ .login – UNIX platforms, C shell
■ login.bat – Windows
■ Selection – Run this file to choose a configuration from among those defined in the settings file.
■ opa_setup – UNIX platforms, Bourne/Korn shells
■ copa_setup – UNIX platforms, C shell

Summary of the Oracle Clinical Setup
A-2 Oracle Clinical Administrator's Guide
■ opa_setup.bat – Windows
■ Supplemental – For compatibility with previous versions of Oracle Clinical; belongs in the user's home directory on the PSUB server machine.
■ .oclrc – UNIX platforms
■ oclrc.bat – Windows
You can edit and maintain the Definition scripts for your installations. However, do not modify the Selection scripts, which call the definition script. The selection script is used in the following contexts:
■ When you start or stop the PSUB process for a database, you log in to the operating system as RXCPROD. The selection script is called to set the environment to that database.
■ Each time a PSUB job is requested, PSUB executes the setup script to condition its environment to the correct version of the Oracle Clinical code, running against the correct database.
■ You may execute the selection script at the command line to define server environments for various purposes, such as connecting to a particular database or running SQL scripts under RXC_TOOLS.
Administrators are not required to create or modify users' installation scripts to enable users to submit back end jobs through the client interface. However, you must add entries to the initialization scripts of users who need to run opa_setup, SAS, or SQL*Plus from the back end command line. See "Setting Up Power Users" on page 1-18 for details.
Editing opa_settings.batDuring installation of the server code, the Installer creates the file opa_settings.bat, located in the opapps\bin directory. File opa_settings.bat contains the commands to set environment variables at startup and execution of the PSUB process. Edit this file, and change the following assignments (in bold type), if necessary:
set NLS_DATE_FORMAT=DD-MON-RRRRNLS_DATE_FORMAT determines the format in which client applications running on the Windows server transfer date information to and from the database. The format must specify the year as RRRR to be Year 2000 compliant.
set NLS_LANG=american_america.utf8NLS_LANG determines which language settings Oracle uses when it reads and writes values into the database. The NLS_LANG entry in your registry for your iSuites Oracle Home must be consistent with the NLS_LANG setting in the Oracle Home and your databases.
opa_settings must have the following setting for PSUB to work correctly for a UTF8 character set database. (If you install more than one Oracle Health Sciences product, you should review information on choosing a character set for combined Oracle Health Sciences products in the Oracle Clinical Installation Guide.)
If you don't have a UTF8 character set database, you can use these character sets:
american_america.us7ascii
american_america.we8iso8859p1

Summary of the Oracle Clinical Setup
Environment Variables and Registry Settings A-3
Setting Up UNIX EnvironmentsOn UNIX systems, you run the selection script, which checks the arguments you provide to define a configuration against the settings file. If the arguments are valid, the script applies the appropriate values to the corresponding environment variables in the current shell. The syntax for calling the selection script depends on whether you use the C shell or Bourne/Korn shells. For all shells, the selection script accepts at least one argument and an optional second:
Note that using a - (minus) for the first argument neither updates nor creates a database context.
■ In Bourne and Korn shells:
p1=databasep2=code_env. opa_setupFor example:
$ p1=test$ p2=400$ . opa_setup
■ In C shell:
copa_setup database code_env
For example:
%copa_setup test 46
Note: Do not create new databases with the default character set (AL32UTF8) by the Assistant.
Argument Description
database Indicates the database to be used. This can be:
■ the Oracle SID of a database on the PSUB server
■ connect string of a database instance on a machine other than the PSUB server
■ - (minus sign). The script sets the code environment, but preserves the existing database context, if any.
code_env Optional. An Oracle Clinical code environment designator that must refer to a code environment defined in the opa_settings file on the PSUB server.
Arguments Specified Resulting Behavior
database With no code_env specified, the script sets only Oracle-level environment variables needed for applications to access database.
- (minus) code_env With no database specified, the script sets only environment variables needed for jobs to run. That is, it sets PATH to include RXC_PSUB and RXC_BIN, and defines the RXC_* environment variables.
database code_env With both database and code_env specified, the script executes both sets of commands.

Summary of the Oracle Clinical Setup
A-4 Oracle Clinical Administrator's Guide
Changing Configuration Settings on UNIX Database ServersThe configurations are defined in the opa_settings file. The Oracle Universal Installer creates all necessary entries in this file during installation of software and creation or upgrade of databases. The most common reason to modify the opa_settings file is to customize the values set for various environment variables during execution of back end jobs. You may also need to modify the file to delete databases that are no longer available and enable the use of additional code environments against a database.
Each line in the file defines a particular type of environment information:
record_type_key:field_1[:field_2]...
Starting with an identifier of the type of information (record), the line also contains a colon (:) separator, followed by fields that contain the information for that record, each separated by colons. Table A–1 lists and describes each record type.
Table A–1 List and Description of the Records in the opa_settings File
Record Type Key Description Example
oratab_filespec Location of the file oratab on the server
Field 1: Fully specified path to the OPA directory
oratab_filespec:/etc/oratab
tnsnames_filespec Location of the file tnsnames.ora on this server. Ensure that this file has an entry for each connect string (that is, a reference to a remote database) that is required for OPA applications. The record provides information about accessing the database over the network.
Field 1: Fully specified path to the file tnsnames.ora
tnsnames_filespec:/etc/tnsnames.ora
opa_home Location of Oracle Health Sciences (formerly known as Oracle Pharmaceutical Applications) products on the server.
Field 1: Fully specified path to the OPA directory.
opa_home:/pharm/home/opapps
remote_db_home Location of an available remote database, to which ORACLE_HOME should be set.
Field 1: Net8 connect string of the remote database.
Field 2: ORACLE_HOME value that is used while accessing the current database
remote_db_home:hpx1:/u01/app/oracle/product/9.2.0

Summary of the Oracle Clinical Setup
Environment Variables and Registry Settings A-5
Defaulting, Adding, and Customizing ValuesUse db_env_setting entries to define the value you want environment variables to assume during execution of back end jobs. You can add an entry for any environment variable you want to define; the definition will be in effect for any database if you set field 1 to _DEFAULT_. If you want to limit the environment variable setting so that it affects only those jobs associated with a particular database, use the database's SID as the value for field 1.
The environment variable settings in opa_settings affect all users. If you want to set a value for an environment variable for just one user, place a statement in that user's .oclrc script—for example, RXC_DEBUG=TRUE; export RXC_DEBUG.
If you want an environment variable setting to affect all jobs that run against a particular database, add or modify a database-specific entry in opa_settings—for example, db_env_setting:test:SQL_TRACE:TRUE.
Finally, if you want the setting to affect all jobs run against any database, add or modify a _DEFAULT_ entry for that environment variable—for example, db_env_setting:_DEFAULT_:RXC_SAS_BATCH_QUEUE:b
code_environment Location of the code for a version of an OPA application.
Field 1: A code environment designator, for example, OC462 for the Oracle Clinical 4.6.2 code
Field 2: The fully specified path to the root directory for the version of the application software
code_env: oc462:/pharm/home/opapps/462
db_code_pair Indicates that a particular code environment can be used with a particular database.
Field 1: The system identifier (SID) of a local database instance, or the connect string of a remote database instance.
Field 2: A code environment designator
db_code_pair:prod:oc462
db_env_setting Provides either a default or database-specific setting for an environment variable. The following environment variables must have at least default settings:
NLS_DATE_FORMATNLS_LANGRXC_BATCH_QUEUERXC_NOW_STRINGSASORAThese settings are assigned default values at install time.
Field 1: The database SID, or connect string, if this is a database-specific setting for the environment variable; or _DEFAULT_, if this is a default setting across databases for this environment variable.
Field 2: Name of an environment variable
Field 3: Value to be assigned to the environment variable
db_env_setting:_DEFAULT_:SASORA:V9
db_env_setting:TEST:SASORA:V9
Table A–1 (Cont.) List and Description of the Records in the opa_settings File
Record Type Key Description Example

Summary of the Oracle Clinical Setup
A-6 Oracle Clinical Administrator's Guide
The last example in Table A–1 shows how to override a system-wide default setting with a database-specific setting.
Constraints on the opa_settings File Oracle recommends that you use the defaults where possible, and add overrides only as needed. In addition, note the following constraints if you edit this file.
■ In the opa_settings file, there should be exactly one each of these record types:
– opa_home
– oratab_filespec
– tnsnames_filespec
■ For each database instance appearing in a db_code_pair record, a value must be defined for each of the database environment settings (record type key db_env_setting). The setting may be made either through a generic _DEFAULT_ record, or through a database-specific record.
Checking for Errors in the opa_settings FileIf you modify the opa_settings file, run the script ~opapps/bin/check_opa_settings.sh to check the settings file for errors. The syntax is:
check_opa_settings.sh [-nowarn] settings-file-name
The script generates an error message if it finds any duplicate record_type key values. These would cause an error if present when opa_setup is run. (In fact, opa_setup calls check_opa_settings.sh to preclude this. However, opa_setup does not check for warnings. See below).
Unless the -nowarn argument is provided, check_opa_settings.sh will also generate a warning for multiple db_code_pair entries for a single database. While multiple db_code_pair entries are not invalid, they may represent a condition you do not want to allow. For instance, if you upgrade database 'x' from 4.5 to 4.6, opa_settings would include:
db_code_pair:x:45db_code_pair:x:46
In this case, check_opa_settings.sh warns you. Remove the line enabling the 3.2 code environment against the 4.0 database, so you don't mistakenly start up a PSUB process in that configuration.
You might also want to disregard other warnings. For example, if you had a code tree for testing patches, as well as a production code tree. Then opa_settings might have:
db_code_pair:x:46db_code_pair:x:46patchtest
You would disregard the warning check_opa_settings.sh would give, since both pairs are valid.
Note: The default settings for all databases or the specific settings for a particular database, such as NLS_LANG, must be correct in the opa_settings file.

Summary of the Oracle Clinical Setup
Environment Variables and Registry Settings A-7
Changing Environment Variables on WindowsOn Windows, the values to which you want environment variables to be set during back end job execution are maintained in opa_setup.bat. Below is a list of the Oracle Clinical environment variables that must be defined in opa_settings.bat.
■ NLS_DATE_FORMAT
■ NLS_LANG
■ RXC_MAA_TAB_SPACE
■ RXC_SAS_VIEW
■ RXC_SAS_CONNECT
To change or add environment variable settings active during back end job execution, edit the opa_settings.bat file with a text editor. Each line must be in the following format:
set variable_name=value
Settings that Affect Back-End Job ExecutionThis section lists environment variables that affect execution of jobs on back end servers. You can define values for the environment variables that apply to all back end jobs by defining their settings in opa_settings (UNIX) or in opa_settings.bat (Windows). On UNIX you can limit the scope of the environment variable setting to a single instance or to a single user. See "Defaulting, Adding, and Customizing Values" on page A-5 for details.
■ NLS_DATE_FORMAT – National Language Support
■ NLS_LANG – National Language Support
■ RXC_BATCH_QUEUE – Batch queue for non-blocking PSUB jobs (UNIX only)
■ RXC_BDL_DIR – Spool directory for batch data load
■ RXC_DEBUG_BUFFER_SIZE – Output buffer size for executing procedures
■ RXC_IMMED_QUEUE – Batch queue for blocking PSUB job (UNIX only)
■ RXC_LOG – Location for log files
■ RXC_MAA_TAB_SPACE – Data extract temporary tablespace
■ RXC_NOW_STRING – Time when PSUB job is executed (UNIX only)
■ RXC_PRINTER – Default printer for Oracle Clinical
■ RXC_SAS_BATCH_QUEUE – Default PSUB batch queue for SAS jobs (UNIX only)
■ RXC_SAS_CONNECT – SAS connect string
■ RXC_USER – Root directory for creating data extract files
■ TEMP – Default location for SFTP and FTP
■ USER_BV_JOB – Script run after batch validation (back end server)
NLS_DATE_FORMATThis variable specifies the format used for displaying dates and converting characters to dates. This is a Windows registry setting that the Installer sets.
The default value is "DD-MON-RRRR".

Summary of the Oracle Clinical Setup
A-8 Oracle Clinical Administrator's Guide
You can modify this variable using db_env_setting records in the opa_settings file.
NLS_LANGThis variable specifies the language setting used by Oracle RDBMS to read from and write to the database. Set NLS_LANG to the appropriate language and character set.
The default value for this variable is:
db_env_setting:_DEFAULT_:NLS_LANG:american_america.utf8
You can modify this variable using db_env_setting records in the opa_settings file.
RXC_BATCH_QUEUEThis the batch queue for nonblocking PSUB jobs, on UNIX only.
If you want PSUB to use a batch queue other than the default for running user requests, redefine the setting for rxc_batch_queue. You can define it globally for all users, or individually by placing the command in the user's login script.
Default is a.
RXC_BDL_DIRThis is the spool directory for batch data load.
When a user requests Prepare to Completion for a given data file group, and does not specify otherwise in the submission form, any resulting reloadable data files are written to the directory specified by RXC_BDL_DIR. If there are no reloadable files, the completed files are placed in RXC_LOG.
RXC_DEBUG_BUFFER_SIZEThis sets the output buffer size for executing procedures.
RXC_DEBUG_BUFFER_SIZE controls the size of the buffer space used for running a Validation or Derivation Procedure in debug mode. The installed default value is 200000; you may want to increase it to 1000000.
RXC_IMMED_QUEUEBatch queue for blocking PSUB jobs, on UNIX only
If you want PSUB to use a batch queue other than the default to process user requests for blocking jobs (such as default layout and generate procedure), redefine the setting for RXC_IMMED_QUEUE. It may be necessary to send blocking jobs to another batch queue so that they are not held up by other system activity, such as long-running reports.
Set this variable through db_env_setting records in the opa_settings file.
RXC_LOGThe directory where the system saves the log files of various processes.
Note: The default settings for all databases or the specific settings for a particular database, such as NLS_LANG, must be correct in the opa_settings file.

Summary of the Oracle Clinical Setup
Environment Variables and Registry Settings A-9
RXC_MAA_TAB_SPACEOracle Clinical's Data Extract functionality requires a privileged Oracle user so that Oracle schemas can be created to hold Data Extract Views. The Oracle account for this purpose is RXC_MAA (Maintain Access Accounts).
RXC_MAA_TAB_SPACE specifies the name of the Oracle tablespace defined by RXC_MAA as the temporary tablespace when these schemas are created. During installation RXC_MAA_TAB_SPACE is set to TEMP1 with a size of 10Mb.
Set through db_env_setting records in the opa_settings file.
RXC_NOW_STRINGDefines the string for "now" that is used by the at command in the local language environment. This is effective only for 3GL and PL/SQL jobs submitted in immediate mode to run on UNIX back end servers. Default value is "now". To see your current "now" string, enter:
% echo $LANGIf LANG is undefined or is equal to "C", you have finished. The RXC_NOW_STRING is simply "now". Otherwise, do this:
% cd /usr/lib/nls/$LANGdumpmsg at.cat
The string for "now" is the third item in the third set of output.
Set through db_env_setting records in the opa_settings file.
RXC_PRINTERThis is the environment variable to which PSUB refers when the user chooses RXC_PRINTER from the list of values for printing a PSUB job. It refers to the default printer for Oracle Clinical.
RXC_SAS_BATCH_QUEUEThis references to the default PSUB batch queue for SAS job, on UNIX only.
If you want PSUB to use a batch queue other than the default for running users' SAS requests, redefine the setting for RXC_SAS_BATCH_QUEUE, globally for all users, or individually by placing the command in the user's initialization file.
RXC_SAS_CONNECTRXC_SAS_CONNECT defines the Oracle connect string to connect SAS to an Oracle database. The following examples assume an environment pre-set for a particular database.
For more information on connect strings, see your operating system-specific installation manual for SQL*Net.
The example below assumes SAS connects though the pipe driver. This is only possible when SAS and Oracle are installed on the same computer.
Sites using TCP/IP to connect from SAS to Oracle would replace the @p with an @t.
UNIX Bourne shellRXC_SAS_CONNECT='oracle(path='"'"'@p:'"'"')'; \export RXC_SAS_CONNECT

Windows Registry Settings
A-10 Oracle Clinical Administrator's Guide
UNIX C shellsetenv RXC_SAS_CONNECT 'oracle(path='"'"'@p:'"'"')'
WindowsIn Windows, make sure that the following statement is in opa_settings.bat:
set RXC_SAS_CONNECT=oracle(path='%database%')
RXC_USERThis is the root directory for creating SAS files during data extract. For example, if RXC_USER is defined as /u01/oc, and ORACLE_SID is prod, then the data extract files go in /u01/oc/prod/… directory.
SASORAWhen SAS is installed on a UNIX database, this environment variable must be defined when you run SAS Access against an Oracle database. The default value shipped in opa_settings is V9.
When PSUB and the SAS server are both on Windows, you must comment out the setting of SASORA in opa_settings.bat:
rem set SASORA=V9
TEMPThis is the default temporary directory for SFTP and FTP processes.
USER_BV_JOBThis environment variable specifies the name and location of a user-defined script to be executed as the last step of batch validation.
For example:
UNIX (in .oclrc):USER_BV_JOB=/dir1/dir2/dir3/filenameexport USER_BV_JOB
The full pathname of the file must be specified.
At batch validation run time, the environment variable is evaluated and the corresponding script is submitted for execution via PSUB. The script is called with two arguments: clinical_study_id and clinical_study_version_id.
Windows Registry SettingsThis section lists the Windows registry settings used by Oracle Clinical. It describes the settings for the each of the following:
■ OPA Front End on page A-11
■ Online Help on page A-12
■ Oracle Clinical Front End on page A-12
Note: It is possible to set a different value for RXC_USER for each database, if you wish, overriding this default.

Windows Registry Settings
Environment Variables and Registry Settings A-11
■ RDC Front End on page A-13
■ OCN Front End on page A-14
■ Reports Server on page A-15
■ Registry Keys on page A-16
OPA Front EndThese registry variables apply across products and are located on the SOFTWARE\Wow6432Node\ORACLE branch of the registry. Each value is set by the Installer.
Online HelpThese registry variables are located on the SOFTWARE\Wow6432Node\ORACLE branch of the registry. Each value is set by the Installer.
Table A–2 OPA Front End Registry Variables and Example Values
Registry Variable Example Value Description
FORMS_PATH c:\opapps46\opa The path that is searched to find forms.
FORMS_TIMEOUT 10 The amount of time in elapsed minutes before the Form Services process is terminated when there is no client communication with the Form Services. To prevent the forms session's timing out due to inactivity, set the heartbeat value(defined in the formsweb.cfg file ) to less than the forms_timeout value. See article ID 549735.1 'Description List For Parameters Affect Timeout In Webforms' on My Oracle Support; see "Finding Information on My Oracle Support" on page xvi for more information.
OPA_CONFIG opa46 The OPA configuration name.
OPA_RQM_URL http://server.domain/dev60cgi/rwcgi60.exe
The URL for the Reports Queue Manager.
OPA_HOME c:\opapps46 The top-level OPA products directory.
OPA_HOME_DIR c:\opapps46\opa The Oracle Health Sciences product directory.
OPA_SERVER server.domain The full server name.
OPA_PORT This should be set to NULL, that is, "blank", to facilitate either HTTP or HTTPS operations.
OPA_JARS f60all_jinit.jar, opaicons.jar The names of the OPA jar files to be downloaded to the client. This is used by the OUI to coordinate between product changes to the opa46 config section in the formsweb.cfg file.
OPA_PHYSICAL_MAP c:\opapps46\html\repout The physical mapping to the repout directory.
OPA_VIRTUAL_MAP /OPA_REPOUT/ The virtual mapping to the repout directory.
OPA_DEV_VERSION 60 The version of Developer.

Windows Registry Settings
A-12 Oracle Clinical Administrator's Guide
Oracle Clinical Front EndThese registry variables are located on the SOFTWARE\Wow6432Node\ORACLE branch of the registry. Each value is set by the Installer.
RDC Front EndThese registry variables are located on the SOFTWARE\Wow6432Node\ORACLE branch of the registry on the application tier server where RDC is installed.
Table A–3 Xhelp Registry Variables and Example Values
Registry Variable Example Value Description
opa_doc_dir http://server.domain/opa46 The URL for standard online help and documentation location
opa_custom_doc_dir http://server.domain/opa46 The URL for custom online help and documentation
opa_xhelp_dir c:\opapps\html\xhelp The location of the online help directories
Table A–4 Oracle Clinical Front End Registry Variables and Example Values
Registry Variable Example Value Description
FORMS_PATH c:\opapps46\oc The Forms60 path that is searched to find forms
forms60_repformat HTML
forms60_userexits c:\opapps46\oc\f60xtb.dll; c:\oc\rxcde1.dll
User Exits referenced from Oracle Clinical/RDC
forms60_defaultfont MS Sans Serif 1.0 Oracle Clinical default font
oc_home_dir c:\opapps46\oc The Oracle Clinical top level directory
OC_DE_TEXTFONT Arial.8 The default font for data entry field prompts and boilerplate text
OC_DE_FIELDFONT Arial.8 The default font for response fields in data entry
OPA_JARS f60all_jinit.jar, opaicons.jar,oclicons.jar, pharmaocjle.jar, pharmaocgle.jar, xmlcomp.jar, xmlparserv2.jar, jle2-0-3.jar
The names of the OPA JAR files
OPA_XMLTEMP_HTTP http://server.domain/opa46/rdc/temp The URL to access the xmltemp directory
OPA_XMLTEMP_UNC Either:
\\appserver\rdc\temp
or
c:\opapps46\html\rdc\temp
The value that is passed to the report server that informs it how to access xmltemp.
If the forms and reports servers are on the same computer, the value is a directory.
If the forms and reports servers are on different computers, the value will be a UNC

Windows Registry Settings
Environment Variables and Registry Settings A-13
OCN Front EndThese registry variables are located on the SOFTWARE\Wow6432Node\ORACLE branch of the registry. Each value is set by the Installer.
Table A–5 RDC Front End Registry Variables and Example Values
Registry Variable Example Value Description
FORMS_PATH c:\opapps46\rdc The path that is searched to find forms
RDC_HOME_DIR c:\opapps46\rdc The location of the RDC directory
RDC_DCIF_IMAGES \\appserver\rdc\dcif_images
or
c:\opapps46\html\rdc\dcif_images
The location of the RDC directory images
OPA_LOCALHOST oclw2k16.us.oracle.com If the RDC installation is used by client computers other than the application server, use the fully qualified application server name.
If you plan to run the client locally on the application server computer, you can use the machine name e.g., oclw2k16.
OPA_XML_LOC OPA_HOME/temp
e.g.: c:\opapps46\temp
This is a folder where temporary files are created at runtime and deleted at the end. This can be anywhere. During installation, this is set to its default value: OPA_HOME/temp.
OPA_PJC_LISTENER_DEBUG_LEVEL
1 Sets the debug level for the Pluggable Java Component (PJC). There are three options for the value:
1. 0: no debug
2. 1: Low debug level
3. 2: High debug level
By default, it is set to "1" during installation.
OPA_PJC_PORT_STARTNUMBER
5567 The port number at which the PJC communicates with the PDF Data Entry Form. This is typically set to a random value of "5567".
OPA_PJC_PORT_NUMATTEMPTS
10 The number of attempt the PJC will make to open a listener port. With each attempt, the PJC increases the port number by one and continues until it has attempted to open the port a number equal to this value.
OPA_PDF_FILE_SOURCE
SERVER The setting that specifies whether the PDF files will be served from the application server computer or from the cache location on the client computer.
The valid values are 'CLIENT' or 'SERVER'. The default value will be 'SERVER'. You change this value to allow users to cache PDF files locally.
Table A–6 OCN Front End Registry Variables and Example Values
Registry Variable Example Value Description
FORMS_PATH c:\opapps46\oc The path that is searched to find forms
OCN_HOME_DIR c:\opapps46\oc The OCN Home directory

Windows Registry Settings
A-14 Oracle Clinical Administrator's Guide
Reports ServerThese registry variables are located on the SOFTWARE\Wow6432Node\ORACLE \HOME branch of the registry for the Reports Server installation. Each value is set by the Installer.
Table A–7 Report Server Registry Variables and Example Values
Registry Variable Example Value Description
REPORTS_PATH c:\opapps46\opa, c:\opapps46\oc, c:\winnt\fonts
The path the system searches to find reports
REPORTS_CLASSPATH c:\opapps46\lib\pdfappend.jar, c:\opapps46\lib\pdrgenerator.jar
The path Reports uses to find classes
NLS_DATE_FORMAT DD-MON-RRRR The date format when running reports for Oracle Clinical/RDC with the NLS option
OC_RSERVER_DIR c:\opapps46\oc The Reports Server directory
NLS_LANG american_america.utf8 The NLS language that is used when running Reports; supported values are: UTF8, US7ASCII, WE8IS08859P1, or any single byte character set
OC_PDF_REPORTS_TEMP_OC
c:\opapps46\temp The temporary directory that the system uses when you run reports.
OC_RPT_GRIDWIDTH 8 The default grid width for the report
OPA_HOME c:\opapps46\ The top level Oracle Health Sciences products directory. This is written to both the default and the specific branches of the registry.
REPORTS_ENABLE_FORM_FIELDS
YES Instructs Oracle Reports to include Acrobat form fields in DCI Form PDFs that include such instructions.
OC_DE_FIELDFONT Arial.8 The default font for response fields in data entry. "Arial.8" is the default value.
OC_DE_TEXTFONT Arial.8 The default font for data entry field prompts and boilerplate text. "Arial.8" is the default value.
OC_RPT_FIELDFONT Arial.8 The font for response field data in the Patient Data Report. This variable is not created by the Installer. If you need to differentiate the field font used for the PDR from the one used for data entry, add this registry variable and set it. If not specified, the system uses the value for OC_DE_FIELDFONT.
OC_RPT_TEXTFONT Arial.8 The font for CRF header field prompts, question prompts, and boilerplate text in the Patient Data Report. This variable is not created by the Installer. If you need to differentiate the text font used for the PDR from the one used for data entry, add this registry variable and set it. If not specified, the system uses the value for OC_DE_TEXTFONT.
RDC_DCIF_IMAGES c:\opapps46\rdc\dcif_images The location of images that are used for DCI Forms and PDR generation.
RDC_PDF_PRINT_TOOL
"C:\Program Files\Adobe\Acrobat 5.0\Acrobat\Acrobat.exe" /t
The path to the Adobe Acrobat or Reader application on the Report Server. Path must be in double-quotation marks and the "/t" must be included in the value.

Windows Registry Settings
Environment Variables and Registry Settings A-15
Registry KeysThis section provides details about some registry keys. Use this information if it becomes necessary to modify the value of a registry key due to configuration or hardware changes.
In general, the values assigned to the keys are set by the Oracle Universal Installer (OUI), during the installation of various Oracle Health Sciences (formerly known as Oracle Pharmaceutical Application—OPA) components, based on answers you provide during the information-collection phase of the installation.
These registry keys are described in the following sections:
■ FORMS_PATH
■ OPA_JARS
■ OPA_XMLTEMP_UNC
■ OPA_XMLTEMP_HTTP
■ RDC_DCIF_IMAGES
■ OC_DE_FIELDFONT
■ OC_DE_TEXTFONT
■ OC_RPT_FIELDFONT
■ OC_RPT_TEXTFONT
■ RDC_PDF_PRINT_TOOL
FORMS_PATHThe value that is assigned to this key is based on the Oracle Health Sciences products that are installed on the computer. As each component is installed, the OUI appends product-specific values to the existing value. For example, if the Thesaurus Management System (TMS) is installed on a system where Oracle Clinical and RDC are installed, the FORMS_PATH value would be:
c:\opapps46\opa;c:\opapps46\oc;c:\opapps46\rdc;c:\opapps46\tms
Table A–9, " Product-Specific Registry Values for the FORMS_PATH Key" lists the path string that each component contributes to the FORMS_PATH key value.
OPA_JARSThe value that is assigned to this key is based on the OPA products that are installed on the computer. As each component is installed, the OUI appends product-specific values to the existing value.
Table A–8 Product-Specific Registry Values for the FORMS_PATH Key
Product Addition to the FORMS60_PATH value
OPA Front End c:\opapps46\opa
Oracle Clinical Front End c:\opapps46\oc
RDC Front End c:\opapps46\rdc
TMS Front End c:\opapps46\tms
AERS Front End c:\opapps46\aers

Windows Registry Settings
A-16 Oracle Clinical Administrator's Guide
OPA_XMLTEMP_UNCThe value that is assigned to this key is the directory on the application server that Oracle Clinical uses to write temporary files during the DCI form generation process. When the Oracle Clinical client is installed, the Oracle Univeral Installer sets this value to:
drive:\opapps46\html\rdc
The Oracle Reports server also writes files to this directory during DCI form generation. If any reports server used for this task is located on a different computer than the application server, the directory must be shared, with read/write privileges, to the domain/account on the report server; see the Oracle Clinical Installation Guide. Also, the path specified in the value must use the Microsoft Universal Naming Convention (UNC) format.
For example, if, during initial installation, you reply to the Oracle Univeral Installer that there is a standalone report server, the Installer sets this the value of this key to:
\\appserver\rdc\temp
and requires that you share drive:\opapps46\html\rdc with the share name "rdc".
If the only report server that you use to generate DCI forms co-exists on the same computer with the application server, there is no need to share the xmltemp directory and the path specification can be a simple local directory name, such as, c:\opapps46\html\rdc\temp.
OPA_XMLTEMP_HTTPThe value that is assigned to this key must be a valid URL that points to the forms server directory to which Oracle Clinical writes temporary files during DCI form generation. When the Oracle Clinical client is installed, the OUI sets this value to:
drive:\opapps46\html\rdc\temp
This is the same directory specified by the OPA_XMLTEMP_UNC key.
In order for the system to use this directory, it must be supported by an HTTP virtual directory that can serve files from it.
For example, if the temp directory is c:\opapps46\html\rdc\temp on myOCSever, then a virtual directory must be associated with c:\opapps46\html:
alias /opa46/ "c:\opappas46\html\"
This allows a URL of http://myOCServer/opa46/rdc/temp/MYFILE.pdf to resolve and serve the file, c:\opapps46\html\rdc\temp\MYFILE.pdf.
RDC_DCIF_IMAGESThe value that is assigned to this key must be the path specification of the directory in which image files that are referenced in DCI forms are found; see "Setting Up Image Viewing for DCI and DCM Form Layouts HTML Preview" on page 11-5. However, the Patient Data Report generation subsystem uses its own registry variable to locate the path to the directory.
When the Oracle Clinical client is installed, the Installer sets this value to:
drive:\opapps46\html\rdc\dcif_images

Windows Registry Settings
Environment Variables and Registry Settings A-17
In a manner similar to OPA_XMLTEMP_UNC, the dcif_images directory specification must be one that can be resolved by any reports server that generates DCI forms.
If the only report server that you use to generate DCI forms co-exists on the same computer with the forms server, there is no need to share the images directory and the path specification can be a simple local directory name, such as, c:\opapps46\html\rdc\dcif_images.
If any reports server used for DCI forms generation is located on a different computer than the forms server, then:
■ The path specification used for the value of RDC_DCIF_IMAGES must use the UNC format.
■ The forms server images directory must be shared, so it can be accessed from other computers.
■ The domain/account_used_to_set_up_the_Reports_Server must have read/write privileges on the shared forms server directory.
For example, if, during initial installation, you reply to the Installer that there is a standalone report server, the Installer sets this the value of this key to:
\\appserver\rdc\dcif_images
and requires that you share drive:\opapps46\html\rdc with the share name "rdc".
OC_DE_FIELDFONTThe value assigned to this key regulates the font size of response values that are typed in response fields and displayed in data entry windows. This registry key is set as part of the Oracle Clinical Front End installation and the Oracle Clinical Report Server installation in the SOFTWARE\Wow6432Node\ORACLE\ORACLE_AS10gR2_KEY\ branch.
OC_DE_TEXTFONTThe value assigned to this key regulates the font size of the question prompts and boilerplate text in data entry windows. This registry key is present in:
■ the SOFTWARE\Wow6432Node\ORACLE branch, where it is set as part of the Oracle Clinical Front End installation
■ the SOFTWARE\Wow6432Node\ORACLE\9i_DatabaseServer branch, where it is set as part of the Oracle Clinical Report Server installation
The default value in both locations is Arial.8. If you change the value in one location, change it in the other too.
OC_RPT_FIELDFONTThe value assigned to this key regulates the font size of response value that are typed in response fields and displayed in the Patient Data Report (PDR). This registry key is present in:
■ the SOFTWARE\Wow6432Node\ORACLE branch
Note: If the Patient Data Report generation process cannot locate the path to the dcif_images directory, each CRF that contains an image in its layout is not printed in the report.

Windows Registry Settings
A-18 Oracle Clinical Administrator's Guide
■ the SOFTWARE\Wow6432Node\ORACLE\9i_DatabaseServer branch
If you do not enter a value in these locations, the system uses the value for OC_DE_FIELDFONT.
OC_RPT_TEXTFONTThe value assigned to this key regulates the font size of the question prompts and boilerplate text in the Patient Data Report (PDR). This registry key is present in:
■ the SOFTWARE\Wow6432Node\ORACLE branch,
■ the SOFTWARE\Wow6432Node\ORACLE\9i_DatabaseServer branch
If you do not enter a value in these locations, the system uses the value for OC_DE_TEXTFONT.
RDC_PDF_PRINT_TOOL The value assigned to this key determines the location of the Adobe Acrobat or Reader executable, which allows users to run PDF patient data reports with "PRINTER" specified as the output type. This value must be in the form:
"<acrobat-reader_path>" /t
Note that the double-quotation marks around the path and the "/t" switch are required. A typical example of a value is:
"C:\Program Files\Adobe\Acrobat 6.0\Acrobat\Acrobat.exe" /t
In addition to setting this key correctly, ensure that the Adobe Acrobat or Reader application is running on the Reports Server prior to users initiating this type of report job, that is, a job that specifies the output type as "PRINTER".

B
SAS_VIEW Directory Tree B-1
B SAS_VIEW Directory Tree
All Oracle Clinical data not stored in the database, such as SAS Views created with the Data Extract facility, is stored in the SAS_VIEW directory on the Back end server computer. The access restrictions enforced in the database must also be enforced at the file-system level. The structure of the SAS_VIEW directory tree is shown below, together with the associated permissions. Owner is not relevant; in fact, the owner is the user who created the file or directory through the use of the application.
The top-level directory, opapps, is set by the installer. Entries are indented to show the relative subdirectory nesting level.
Where db_name is the name of the database instance, study is the study code in Oracle Clinical, and account_type
is the data extract view account type (TEST, CURRENT, STABLE or SNAPSHOTn).
For example:
UNIX: /pharm/home/opapps/sas_view
Windows: \\opa-db1\sas_view
To change the location of the SAS_VIEW storage, change the appropriate environment settings for your platform, as shown below:
UNIX: db_env_setting:_DEFAULT_:RXC_USER:/u01/home/opappsdb_env_setting:_DEFAULT_:RXC_SAS_ROOT:/u01/home/opapps/sas_view
Windows: set RXC_SAS_ROOT=%oui_sas_root%\%database%
File Protections
Directory UNIX Windows
opapps (0775)
sas_view (2775, oclsascr) (oclsascr, FULL Control)
db_name (2775, oclsascr) (oclsascr, FULL Control)
study (0775, oclsascr) (oclsascr, FULL Control)
account_type (0775, oclsascr) (oclsascr, FULL Control)
*.sas (0664, oclsascr)
*.log (0664, oclsascr)
*.com (0775, oclsascr)

B-2 Oracle Clinical Administrator's Guide
To set the protections on your directory structure, run the appropriate script:
UNIX: $RXC_TOOLS/set_rxc_user.sh
Windows: %RXC_TOOLS%\set_rxc_user.bat
(These scripts are run automatically by the Installer.)
On UNIX Systems Only:The path to the SAS_VIEW directory must not contain uppercase characters (PSUB changes all path specifications to lowercase for UNIX). If your standard naming conventions require uppercase characters in the path, you can provide lowercase and uppercase versions of paths with symbolic links as needed. For example, if the standard path to the SAS_VIEW directory is
/usr1/home/Clinical/opapps/sas_view
you could create this link:
% cd /usr1/home% ln -s Clinical clinical
References to
/usr1/home/clinical/opapps/sas_view
would also work.

C
Troubleshooting C-1
C Troubleshooting
This section offers solutions to known Oracle Clinical issues in the following categories:
■ Managing High Sequence Numbers on page C-1
■ Error Messages on page C-5
■ System Malfunction: GPF Occurs During Data Entry on page C-6
■ PSUB Jobs on page C-7
■ Database Trace on page C-16
Managing High Sequence NumbersIf you upgraded to Oracle Clinical 4.6.2 from release 4.5.1, 4.5.2, 4.5.3, or 4.6, it is important to ensure that the internal identifier for each of the following does not exceed 2,147,483,647 (that is, (2^31-1)):
■ Received DCMs (RDCMs)
■ Received DCIs (RDCIs)
■ Discrepancies
When the internal identifier for these tables exceeds 2,147,483,647, the system incorrectly processes the identifiers in other tables, such as the Responses table. You can still view and update the responses, however batch validation, data extract, replication, and procedure execution operations fail or run incorrectly.
In Oracle Clinical 4.5.1 and after, there is code to prevent sequence numbers from exceeding 2,147,483,647. The OCL_DE_CONFIG Local Codelist includes a short value entry, "SEQUENCEBUFFER", which is assigned an initial long value of 1,000,000. At this setting, when a sequence number is within 1,000,000 of 2,147,483,647, the system displays a warning message when a user attempts to use a relevant subsystem and the system exits the current screen.
Assessing Sequence SizesPerform this test to determine if your database is nearing the point where this situation may occur. If the results of this test for the number of Received DCMs, Received DCIs, and discrepancies is well below 2,147,483,647, you do not have to perform the other tasks described in this section.
Assess the Number of RDCMsTo determine the sequence number for RDCMs in your system:

Managing High Sequence Numbers
C-2 Oracle Clinical Administrator's Guide
1. Connect to your database through SQL*Plus as RXC.
2. Issue this command to assess the number of Received DCMs:
SELECT received_dcm_seq.nextval FROM dual; The system returns a number.
3. Compare the number returned to 2,147,483,647:
■ If the internal identifier number is approaching 2,147,483,647, you should reseed the received_dcm_seq sequence after you complete this task.
■ If the number exceeds 2147483647, reseed received_dcm_seq, identify data errors, and repair data errors according to the instructions in the following sections.
■ If neither of the above conditions apply, run this command from SQL connected as RXC:
alter sequence received_dcm_seq maxvalue 2147483646;
Assess the Number of RDCIsTo determine the sequence number for RDCIs in your system:
1. Connect to your database through SQL*Plus as RXC.
2. Issue this command to assess the number of Received DCMs:
SELECT received_dci_seq.nextval FROM dual; The system returns a number.
3. Compare the number returned to 2,147,483,647:
■ If the internal identifier number is approaching 2,147,483,647, you should should reseed the received_dci_seq sequence after you complete this task.
■ If the number exceeds 2147483647, reseed received_dci_seq, using the instructions in the following sections. If you use RDC or DCAPI, contact Oracle Support.
■ If neither of the above conditions apply, run this command from SQL connected as RXC:
alter sequence received_dci_seq maxvalue 2147483646;
Assess the Number of DiscrepanciesTo determine the sequence number for discrepancies in your system:
1. Connect to your database through SQL*Plus as RXC.
2. Issue this command to assess the number of Received DCMs:
SELECT discrepancy_entry_seq.nextval FROM dual; The system returns a number.
3. Compare the number returned to 2,147,483,647:
■ If the internal identifier number is approaching 2147483647, you should reseed the discrepancy_entry_seq sequence after you complete this task.

Managing High Sequence Numbers
Troubleshooting C-3
■ If the number exceeds 2147483647, reseed the discrepancy_entry_seq sequence after you complete this task.
■ If neither of the above conditions apply, run this command from SQL connected as RXC:
alter sequence discrepancy_entry_seq maxvalue 2147483646;
Reseeding Sequences If any of your response numbers are approaching or exceed 2,147,483,647, you should reseed them.
Reseed RDCM Sequence NumbersTo reseed the Received DCM sequence:
1. Stop all Oracle Clinical activity on the database until this procedure completes.
2. Connect to the database through SQL*Plus as RXC.
3. To determine which seed numbers are in use, issue this command.
SELECT distinct mod(received_dcm_id,100) FROM received_dcms;
4. Choose a new starting seed number value between 0 and 99 (inclusive) that is not in the list returned by the above step.
5. Issue this command to drop the received_dcm_seq sequence:
DROP sequence received_dcm_seq ;
6. Issue this command to recreate the Received DCM sequence with this value as the new starting value (for example, SEQ_START_NO):
CREATE SEQUENCE received_dcm_seq INCREMENT BY 100 START WITH &SEQ_START_NO MAXVALUE 2147483646 MINVALUE 1 NOCYCLE CACHE 20 NOORDER;
7. Issue this command to grant access:
GRANT SELECT on received_dcm_seq to RXCLIN_MOD;
Reseed RDCI Sequence NumbersTo reseed the Received DCI sequence:
1. Stop all Oracle Clinical activity on the database until this procedure completes.
2. Connect to the database through SQL*Plus as RXC.
Note: If this is a replicated environment, run this command in all replicated instances.

Managing High Sequence Numbers
C-4 Oracle Clinical Administrator's Guide
3. To determine which seed numbers are in use, issue this command.
SELECT distinct mod(received_dci_id,100) FROM received_dcis;
4. Choose a new starting seed number value between 0 and 99 (inclusive) that is not in the list returned by the above step.
5. Issue this command to drop the received_dci_seq sequence:
DROP sequence received_dci_seq ;
6. Issue this command to recreate the Received DCI sequence with this value as the new starting value (for example, SEQ_START_NO):
CREATE SEQUENCE received_dci_seq INCREMENT BY 100 START WITH &SEQ_START_NO MAXVALUE 2147483646 MINVALUE 1 NOCYCLE CACHE 20 NOORDER;
7. Issue this command to grant access:
GRANT SELECT on received_dci_seq to RXCLIN_MOD;
Reseed Discrepancies Sequence NumbersTo reseed the discrepancies sequence:
1. Stop all Oracle Clinical activity on the database until this procedure completes.
2. Connect to the database through SQL*Plus as RXC.
3. To determine which seed numbers are in use, issue this command.
SELECT distinct mod(discrepancy_entry_id,100) FROM discrepancy_entries;
4. Choose a new starting seed number value between 0 and 99 (inclusive) that is not in the list returned by the above step.
5. Issue this command to drop the discrepancy_entry_seq sequence:
DROP sequence discrepancy_entry_seq ;
6. Issue this command to recreate the Discrepancy sequence with this value as the new starting value (for example, SEQ_START_NO):
CREATE SEQUENCE discrepancy_entry_seq
Note: If this is a replicated environment, run this command in all replicated instances.
Note: If this is a replicated environment, run this command in all replicated instances.

Error Messages
Troubleshooting C-5
INCREMENT BY 100 START WITH &SEQ_START_NO MAXVALUE 2147483646 MINVALUE 1 NOCYCLE CACHE 20 NOORDER;
7. Issue this command to grant access:
GRANT SELECT on discrepancy_entry_seq to RXCLIN_MOD;
Error MessagesThis section offers fixes or workarounds for the following error messages:
■ Message: Not Using Named Package on page C-5
■ Message: ORA-12223 on page C-5
■ Message: ORA-04020 on page C-5
■ Message: Unable to Change Mode on page C-6
Message: Not Using Named Package This message may appear in the .log file and is a data replication issue. Oracle Clinical expects to conduct data replication between two locations using named packages rather than synonyms.
Solution: The named packages should have been created during setup for replication by executing the dyna_rxapkirp.sql script. See "Creating the Package for Replicating Investigators and Sites" on page 13-14.
Message: ORA-12223 Full message text:
ORA-12223 TNS: internal limit restriction exceededThis message may appear in the .log file. Cause: This error can occur when you submit a job to the server while running the process invoked by selecting Conduct, then Data Extract, and Maintain Views.
Action: Increase the swap space on the PSUB server.
Message: ORA-04020 Full message text:
ORA-04020: Deadlock detected while trying to lock. Cause: This message may appear when batch validation is running and the user who submitted it switches between production and test modes.
Action: Create a separate test account for each user who needs to switch modes frequently. See Chapter 2, "Oracle Clinical Menu-Based Security" for instructions on modifying menu roles.
Message: Unable to Change Mode323600 Unable to change to test mode, another session may be connected.

System Malfunction: GPF Occurs During Data Entry
C-6 Oracle Clinical Administrator's Guide
323700 Unable to change to production mode, another session may be connected.
325700 Unable to change to test mode (\0), synonyms not created.
325800 Unable to change to production mode (\0), synonyms could not be dropped.
For each of the above error messages, Oracle Clinical users should check with the administrator. This problem could be due to an RXCSYN package error, missing grants to RXC, or synonym conflicts with your schema objects.
These messages may appear if you switch between production and test modes while having another session open under the same userid. It may also appear if a user submitted a reports job before switching modes, and the reports engine is still associated with that user. The system considers this to be another session by the same user.
To check if you are logged on to more than one session, from SQL, you can enter the command:
select username from v$session;If you do not have access to v$session, consult with a DBA.
In the case of reports jobs, you can prevent future problems by changing the MAXIDLE time of the Reports Server, which controls the length of time a user/engine session is kept open.
To change the MAXIDLE time of the Reports Server:
1. Open up the report queue manager and select the report queue of concern.
2. Select Options, then Privileges, and Administrator and log on as administrator.
3. Choose Queue, then Properties and change the maximum idle time to one minute or some reasonable smaller number (depending on the number of reports, users, and so forth on that queue).
In the case of a user switching modes, you can create a separate test account as described under ORA-04020, above.
System Malfunction: GPF Occurs During Data EntryWhen a general protection fault (GPF) occurs during data entry, the system creates file rxcdecde.dbg, which contains a description of the cause of the GPF. The file resides in the RXC_ROOT directory.
Situation: $ulimit unlimitedOn HP-UX and Compaq Tru64 UNIX, if the operating system parameter ulimit is set to unlimited, you get the following error when you run opa_setup or oraenv:
sh: unlimited: The specified number is not valid for this command
The workaround is to edit the oraenv shell script, adding a test for the word "unlimited." To modify this script:
1. Change your location to the bin directory:
% cd $ORACLE_HOME/bin
2. Make a backup copy of oraenv named oraenv.O
3. Use a text editor to add the two lines shown below in bold to the file oraenv.

PSUB Jobs
Troubleshooting C-7
if [ $? = 0 -a "$ULIMIT" != "unlimited" ]; then # added line
if [ $? = 0 -a "$ULIMIT" -lt 2113674 ] ; then
if [ -f $ORACLE_HOME/bin/osh ] ; then
exec $ORACLE_HOME/bin/osh
else
for D in 'echo $PATH | tr : " "'
do
if [ -f $D/osh ] ; then
exec $D/osh
fi
done
fi
fi
fi #added line
...
4. Save and exit the file oraenv
PSUB JobsThis section describes steps you should take, in order, when you troubleshoot PSUB problems.
To troubleshoot a PSUB job:
1. Check the Failure Text in the Submitted Batch Jobs Window on page C-7
2. Check the PSUB Log Files on page C-8
3. If Batch Jobs Hang and the Batch Queue Is Full on page C-9
4. Determining if PSUB Is Running for a Database on page C-10
5. Troubleshooting PSUB Based on the Batch Job's Execution Status on page C-11
6. Handling PSUB Failures that Return "Fatal two-task communication protocol" Error on page C-14
7. Handling PSUB Failure that Returns "Illegal use of PSLAUNCH…" Error on page C-14
8. Tracking Previous PSUB Process Connections on page C-15
See also "If PSUB Fails to Start" on page C-15.
Check the Failure Text in the Submitted Batch Jobs WindowIf a problem arises while you are running PSUB, you should first review the Failure Text field of the Submitted Batch Jobs window.
To check this field for your batch job:
1. Open the Submitted Batch Jobs window: select Admin, then PSUB/Reports Jobs, and then Batch Jobs.
PSUB Jobs
C-8 Oracle Clinical Administrator's Guide
2. Locate the relevant Batch Job ID number.
3. Check the Execution Status of the job. If there is an entry in the Failure Text field, make a note of its contents
If the failure text does not help you to resolve the problem, see "Check the PSUB Log Files" on page C-8. If your batch job is hanging because the batch queue is full, see "If Batch Jobs Hang and the Batch Queue Is Full" on page C-9.
Check the PSUB Log FilesThe PSUB process log files are cumulative, text-based descriptions of PSUB activity. These files are very helpful when you are troubleshooting problems with PSUB Process log files can include time stamped entries for:
■ Error messages returned by the PSUB process
■ All jobs submitted by the user; the entry may include each job's:
– Message ID
– Batch_job_ID
– User name
Naming ConventionOn both UNIX and Windows systems, PSUB process log file names are in the form:
rxcpsd_product_instance_code_environment_1.log
On UNIX systems, there is a second process log file. Whenever you examine the "*_1.log" process log file on UNIX systems, you should also check this second file to see if it contains relevant entries. Its name is identical to the first log file, except that it has an "_2" suffix, rather than "_1". So the second UNIX process log file name is in the form:
rxcpsd_product_instance_code_environment_2.log
The "*_2.log" process log files contain error and warning messages that are generated by certain UNIX commands that the PSUB process executes (e.g., non-background commands). These commands are not present in the PSUB service on Windows. Therefore, Windows systems only generate "*_1.log" process files.
Verbose vs. Nonverbose Mode The [verbose|nonverbose] argument must be included when the PSUB startup command, rxcpsdps, is executed. Oracle recommends that you start PSUB in verbose mode because the process logs that are generated:
■ Contribute to efficient troubleshooting
■ Do not pose significant disk space concerns
On UNIX systems, rxcpsdps is 'wrapped' in the OPA script start_psub. By default, the start_psub script executes rxcpsdps in verbose mode.
On Windows systems, the PSUB service requires that you explicitly provide the [verbose|nonverbose] argument. See "Managing the PSUB Process" on page 8-9.
If you cannot check the Failure text or the .out and .log files because the batch queue is hung, see "If Batch Jobs Hang and the Batch Queue Is Full" on page C-9.
Verify that the process log files for the relevant Batch Job ID exist.
Review the .out and .log files. The following table summarizes these files. Make a note of any error messages.

PSUB Jobs
Troubleshooting C-9
Check the job-specific log and output files first, then the central log file. In the central log file, search for the batch job ID number to find the relevant entry. See if the database and code environment settings are correct.
If Batch Jobs Hang and the Batch Queue Is FullIf all PSUB jobs hang (that is, they do not reach a completed execution status), and the batch queue is full, attempt to clear the queue and submit a single job to PSUB. If a problem then occurs with a single job, it may be clearer which area is causing the problem. The method for clearing the queue is either: stop all of the hung batch jobs (on UNIX systems) or stop the PSUB service (on Windows systems).
The queue may become full and PSUB jobs may hang under the following circumstances:
■ PSUB is waiting, either for an operating system resource, or a database resource
■ the operating system is overloaded, for example, a built-in limitation, such as maximum number of processes, is exceeded.
Stopping Batch Jobs on UNIX Systems This section describes how to stop batch jobs on UNIX systems. See also "Starting and Stopping PSUB Manually in UNIX" on page 8-3.
Stopping an Individual Job To stop an individual batch job:
1. Navigate to Admin, PSUB/Reports Jobs, and Batch Jobs).
2. Locate and select the row associated with the relevant Batch Job ID.
3. Click the Stop button.
Stopping all Jobs On UNIX servers, a series of hanging jobs can cause the batch queue to become full. When the queue fills and is backlogged with hanging jobs, all jobs are eventually given an execution status of SUBMIT_FAILED or SUBMITTED. If this type of problem occurs frequently, it may be advantageous to fine-tune the existing queues or add more queues.
Administrator-level Troubleshooting If, after trying all relevant solutions, you are unable to stop the jobs on a UNIX server, contact your Administrator so that she may use the solutions described here.
Only Administrator-level personnel should attempt to stop PSUB jobs using these solutions. Use these strategies, in the order they are listed, to stop PSUB jobs.
1. Use the stop_psub utility.
2. Identify and then stop the processes that are hanging:
a. To identify the process that is hanging, use either:
Name Description Directory
lbatch_job_id.log Log file of a specific job RXC_LOG
obatch_job_id.out Output file of a specific job RXC_LOG
*.log Log file of the PSUB process (see "Viewing Log and Output Files on the Screen" on page 8-11 for naming convention)
RXC_CENTRAL_LOG

PSUB Jobs
C-10 Oracle Clinical Administrator's Guide
ps -ef|grep rxcprod
or
ps -ef|grep userid
b. To stop all of the hanging processes that you identified in Step 2a, use this command:
kill -9 pid
3. Log in as rxcprod and, at a command prompt, enter:
at -l [-q]
This command lists all of the jobs that are currently in all of the queues. Each job has a unique ID number.
If there are jobs pending in the queue, the following command, which uses the unique ID number to remove specific jobs from the queue, may be of use:
at -r id
1. If you are able to stop all PSUB jobs, stop and then restart the PSUB process and submit one job. If it hangs, try to isolate whether one particular module is the cause or if any PSUB job hangs, regardless of module.
2. If you are unable to determine a module that is causing the problem and jobs are still hanging, the only recourse is to reboot the computer.
Stopping Batch Jobs on Windows On Windows systems, Oracle recommends that you:
1. Stop the PSUB service.
2. Shut down any databases, if any, that are on the computer.
3. Reboot the computer.
4. Start the PSUB service.
See "Starting and Stopping PSUB Manually in Windows" on page 8-6.
Determining if PSUB Is Running for a DatabaseTo find out if a PSUB process is listening to a particular database, and if it is, what code environment it is running in, enter this query:
SQL> select host, code_environment, stop_ts 2 from psub_process_log 3 where start_ts = ( 4 select max (start_ts) from psub_process_log;
This query returns the:
■ computer on which PSUB was last started against the database
■ code environment
■ state of the process:
– if stop_ts is null, the PSUB process is currently active
– if stop_ts is not null, the PSUB process is stopped.

PSUB Jobs
Troubleshooting C-11
What PSUB Processes Are Running on a Given UNIX Server? Use this command to find out if PSUB is running on particular UNIX server:
% ps -ef | grep -i rxcpsdps
The process search command, ps, returns descriptions of the PSUB processs that are currently running. Each row that is returned represents one PSUB process running on the server. Each process has a unique product_instance and code_environment pair. The format of the response to the process search command listed above is:
rxcpsdps [verbose|nonverbose]product_instance code_environment
Example C–1 Using the ps Command
Two examples of ps command usage:
rxcprod 15685 1 0 Apr 04 ? 0:00 rxcpsdps verbose sun3x8 ssuneja_oc40_sunrxcprod 4143 1 0 Apr 02 ? 0:00 rxcpsdps verbose sun1x40 40102_8163
Is PSUB Running on a Given Windows Server? Use this procedure to find out if the PSUB service is running on a given Windows server.
1. Open the Control Panel.
2. Double-click the Services icon.
3. In the Services window, note the status of the PSUB service with the relevant database name. The status will be "Started" if the service is running.
Troubleshooting PSUB Based on the Batch Job's Execution StatusExecution status as reported in the Submitted Batch Jobs form is shown below. You can take various actions depending on execution status.
Note: As an alternative, to find out on which computer PSUB is set up, query either the:
■ OCL_STATE local reference codelist, or
■ RXC.PSUB_PROCESS_LOG table
Use this information, in conjunction with the operating system-specific instructions, below, to determine if PSUB is running on a given computer.
Value Meaning
ENTERED The user has requested a job submission.
SUBMITTED The process submitted the job to the batch queue; it may be pending.
SUBMIT_FAILED The process attempted to submit the job to the batch queue but failed.
STARTED The job is executing on the batch queue.
SUCCESS The job completed with SUCCESS status.
FAILURE The job completed with FAILURE status. Look at the Failure Text in the Submitted Batch Jobs window for possible reasons.

PSUB Jobs
C-12 Oracle Clinical Administrator's Guide
Examine the Submitted Batch Jobs window, look for the Execution Status and Failure Text for your Batch Job ID, and take one of the following actions, depending on the circumstances.
ENTEREDIf the Execution Status of your batch job remains at ENTERED, perhaps:
■ The PSUB process is not running on the server, or it is not receiving the request from the client.
■ The corresponding Oracle user's operating system account does not exist.
SUBMITTEDIf the Execution Status of your batch job remains at SUBMITTED, perhaps:
■ The user is not connected through an OPS$USER Oracle account.
■ The job is pending in the batch queue, or the batch queue is stopped.
■ The PSUB process does not have Write permission for the user's RXC_LOG directory on the PSUB server.
■ A log file exists with the same number as the one for the submitted job. This is a rare situation. Delete the old log file and resubmit the job.
■ In the case of a PSUB job that stays in SUBMITTED status even though the PSUB process is up and running, if your .log file says:
ERROR:Error while connecting: ORA-01017: invalid username/password; logon denied
Exiting...
Edit sqlnet.ora (in drive:\app\oracle\product\11.2.0.2.0\NETWORK\ADMIN):
– UNIX: Comment out the following line (add # at the beginning of the line) and save.
# SQLNET.AUTHENTICATION_SERVICES = (NTS)
– Windows: Make sure the same line in sqlnet.ora is not commented out (if there is a pound sign (#) at the beginning of the line, remove it and save):
SQLNET.AUTHENTICATION_SERVICES = (NTS)
If the PSUB process is still running you can now resubmit the PSUB jobs. Otherwise, stop and then start the PSUB process.
SUBMIT_FAILEDIf the Execution Status of your batch job is SUBMIT_FAILED, examine the Failure Text. If this action gives no possible cause, perhaps:
■ The ssh command cannot be executed by the RXCPROD user. Check that the host name in the /etc/hosts.equiv file is the official name of the host as specified in /etc/hosts.
■ The user's password is not correct.
■ The batch queue does not exist. Check the Long Value of the BATCH QUEUE NAME local reference codelist.
■ The batch queue is in a stopped state.

PSUB Jobs
Troubleshooting C-13
STARTEDIf the Execution Status of your batch job remains at STARTED, perhaps:
■ The job is executing and waiting for some resource.
■ The job is hung.
FAILEDIf the Execution Status is FAILED, examine the Failure Text. If this action gives no possible cause, perhaps:
■ The report or command exited with error status.
■ The report or executable file does not exist.
■ The print command exited with failure status, because, for example, the specified print queue does not exist.
Other Items to CheckMake sure the Long Value of the SERVER_OS entry in the OCL_STATE local reference codelist is correct for your operating system. You can enter one of the following values:
■ NT — Indicates the server is running one of the Windows operating systems currently supported by Oracle Clinical.
■ UNIX — Indicates the server is running the UNIX operating system.
Check that the SERVER_NAME in OCL_STATE is set to the database/PSUB server.
Check that your RXC_LOG is correctly defined or modify the user's log directory via the menu path Admin, then Users, and Oracle Accounts.
Handling PSUB Failures that Return "Fatal two-task communication protocol" ErrorIf you submit a PSUB job that fails and returns a "Fatal two-task communication protocol" error (this failure is sometimes followed by the "End-of-communication-channel" in the core dump information on your console), you might have the environment variable NLS_LANG set inconsistently with the settings in the database.
To verify that the environment variable NLS_LANG matches the actual database settings:
1. Execute the following query:
SQL> select parameter, value from V$NLS_PARAMETERS where parameter in ('NLS_LANGUAGE','NLS_TERRITORY','NLS_CHARACTERSET');
Note: On UNIX systems, the Long Value of the SERVER_NAME entry (also in OCL_STATE) must be in lowercase letters.
Note: You may get an error message on the Windows server about the Kernel32.DLL initialization because of too many jobs running at the same time. Stop the unwanted processes, including cmd.exe and pslaunch.exe, using the Task Manager. If the error happens frequently, stop the PSUB service, reboot the Windows server, and restart the PSUB service. This should fix the problem.

PSUB Jobs
C-14 Oracle Clinical Administrator's Guide
2. Open opa_settings and search for the following string:
db_env_setting:database_name:NLS_LANG
a. If you do not find this string, add a line with the following syntax:
db_env_setting:database_name:NLS_LANG:NLS_LANGUAGE_NLS_TERRITORY.NLS_CHARACTERSET
where NLS_LANGUAGE_NLS_TERRITORY.NLS_CHARACTERSET are the values returned in Step 1.
b. If you find the string, correct the values to match the values in Step 1 in the following syntax:
db_env_setting:database_name:NLS_LANG:NLS_LANGUAGE_NLS_TERRITORY.NLS_CHARACTERSET
where NLS_LANGUAGE_NLS_TERRITORY.NLS_CHARACTERSET are the values returned in Step 1.
Handling PSUB Failure that Returns "Illegal use of PSLAUNCH…" ErrorIn a UNIX environment, you may see the following error when you submit a PSUB job (3GL or PLSQL):
Illegal use of PSLAUNCH by user. Job ID=batch_job_ID. Exiting...
Verify PSUB Account Uses C Shell This error can occur if the PSUB user is not using the C Shell (csh). The default shell gets set up when you create the user account. For example, on Linux, the bash shell is set by default.
Verify that all user accounts that run PSUB jobs are configured to use the C Shell (csh).
Modify launch.psIf the error continues to occur after you verify that PSUB account uses C Shell, modify $RXC_PSUB/launchps.sh as follows:
1. Log on to the UNIX computer on which the PSUB process is running, as owner of the file launchps.sh. (The owner is usually OPAPPS.)
2. Run opa_setup as appropriate for your shell environment.
3. Change to the $RXC_PSUB directory.
4. Edit launchps.sh by adding the following line immediately before the pslaunch command:
sleep 2 pslaunch $4 $5 $6 $7 $3 $8
This command introduces a 2-second delay before the system calls pslaunch. You may increase the delay if the error continues to occur.
Tracking Previous PSUB Process ConnectionsTo find out specific information about PSUB connections to a given database, query the table RXC.PSUB_PROCESS_LOG. This will return the:

PSUB Jobs
Troubleshooting C-15
■ instance
■ environment
■ time a PSUB process started
■ time a PSUB process stopped.
Example C–2 Host and Code Environment
This query will return the host and code environment for the last time PSUB was started against the database.
SQL> SELECT start_ts, host, code_environment, server_os 2 from psub_process_log 3 where start_ts= (select max(start_ts) from psub_process_log);
Example C–3 Start and Stop Time Stamps
This example lists, in chronological order, all start and stop time stamps of PSUB processes.
SQL> SELECT start_ts, stop_ts, host, code_environemnt 2 from psub_process_log order by 1;
If PSUB Fails to StartIf PSUB does not start , for example, after installing or upgrading:
1. Check one line in sqlnet.ora (in drive:\app\oracle\product\11.2.0.2.0\NETWORK\ADMIN):
■ UNIX: Edit sqlnet.ora by commenting out the following line (add # at the beginning of the line) and save it.
# SQLNET.AUTHENTICATION_SERVICES = (NTS)
■ Windows: Make sure the same line in sqlnet.ora is not commented out (if there is a pound sign (#) at the beginning of the line, remove it and save):
SQLNET.AUTHENTICATION_SERVICES = (NTS)
2. Locate and ensure that these lines in init.ora are not commented out and the values are as specified:
■ If SAS and PSUB reside on the same computer:
remote_os_authent=FALSE
os_authent_prefix="OPS$"
■ If SAS and PSUB reside on different computers:
remote_os_authent=TRUE
os_authent_prefix="OPS$"
See the Oracle Clinical Installation Guide for more information.
3. Shutdown the database.
4. Start the database.
5. Start PSUB.

Database Trace
C-16 Oracle Clinical Administrator's Guide
Database TraceYou can trace a session connected to the Oracle Clinical Database and generate a log file. The following example explains how to run a trace while in the Maintain DCM form.
1. Start a SQL*Plus session as SYS, or another user with the DBMS_SYSTEM role.
2. Find the session ID and serial number of the Oracle Clinical user working in the Maintain DCM form:
select sid, serial# FROM v$session where username = 'OPS$userid';
3. Assume that 8 and 12 are returned for sid and serial#, enable SQL trace for the user as follows:
exec dbms_system.set_sql_trace_in_session(8,12,TRUE)
4. Have user perform the operation that causes the error. After the error is returned disable SQL trace:
exec dbms_system.set_sql_trace_in_session(8,12,FALSE)
5. Find the trace file out in your USER_DUMP_DEST directory. For example,
select value from v$parameter where name = 'user_dump_dest';
where value is the path, something like, /ind/oraclelogs/maria/db/udump. The trace file is placed in this directory.

D
Routine Server Administration D-1
D Routine Server Administration
This appendix covers system administration tasks that arise from changes to the system hardware or software.
■ Recreating Symbolic Links—UNIX Only on page D-1
■ Relinking Server Code—UNIX Only on page D-1
■ Relocating Oracle Clinical on page D-2
■ Updating Oracle Clinical Seed Data on page D-2
■ Collecting Statistics for Optimization on page D-3
Recreating Symbolic Links—UNIX OnlyThe symbolic links to the Oracle Clinical executables are lost when you, for example, copy the installation directory to a new drive (see also "Relocating Oracle Clinical" on page D-2).
To recreate the symbolic links, use the relink_rxc.sh script as follows:
% ksh$ $RXC_TOOLS/relink_rxc.sh symbolic_links > $RXC_ROOT/relink_rxc.log 2>&1exit%
The parameter link tells the script to re-establish symbolic links to the current Oracle Clinical executables, not to be confused with relinking the server code (see the next section).
Relinking Server Code—UNIX OnlyWith UNIX servers, you need to relink Oracle Clinical code files after either of the following events:
■ a patch or upgrade to your operating system
■ a patch to your Oracle RDBMS
Use the opapps userid to link all the server code from the supplied object files and set the file protections.
1. Enter the following commands:
% ksh $ $RXC_TOOLS/relink_rxc.sh > $RXC_ROOT/relink_rxc.log 2>&1$ exit
2. Check for errors in the log file, relink_rxc.log, using the following command:

Relocating Oracle Clinical
D-2 Oracle Clinical Administrator's Guide
% grep -i error $RXC_ROOT/relink_rxc.log
Or, to find out whether a relink has been successful by using a utility, enter:
% ksh $RXC_TOOLS/rxcchkobj.sh progs relink.mk
If all executables are created successfully, the output shows a set of empty directory paths. Any executable that is not created is listed in the rxcchkobj output. For example:
Expected progs in =====> /u01/home/oppaps/bin/46/build/toolsgen_views: No such file or directory cnvstatus: No such file or directory
This indicates that two executables, gen_views and cnvstatus, were expected but not created.
You should investigate the cause of the listed executables not being created.
Relocating Oracle ClinicalShould you decide to move the Oracle Clinical installation, you will have to edit the location references in one or more files, according to your server platform.
UNIXIn the file oc/46/psub/launchps.sh, modify the directory reference in this section:
p1=$1; export p1;p2=$2; export p2;. /pharm/home/opapps/oc/46/bin/opa_setupUSERNAME=$5; export USERNAME;
In the file bin/opa_setup, modify the directory reference in this section:
if [ ${OPA_BIN:-0} = 0 ]then OPA_BIN=/pharm/home/opapps/oc/46/inst/binfi
WindowsEdit the file oc/46/psub/launchps.bat.
Updating Oracle Clinical Seed DataIf you run the Installer to create or upgrade an Oracle Clinical database, the Installer places the correct seed data in that database. If, however, you upgrade an existing Oracle Clinical database manually, you must also upgrade the seed data manually.
To upgrade Oracle Clinical seed data manually:
1. Set the environment variables as follows (for details, see Appendix A):
opa_setup database code_environment
Variable Description
ORACLE_SID set to the name of the database
ORACLE_HOME set to your desired Oracle home directory
PATH make sure oracle_home/bin is in your PATH variable

Collecting Statistics for Optimization
Routine Server Administration D-3
2. Collect the passwords for OPA and RXC.
3. From the install directory, run the script loadseed.sql:
SQLPLUS RXC/[email protected]
4. Enter responses for the loadseed.sql prompts:
Enter the password for OPA: opa_passwordEnter the password for RXC: rxc_passwordEnter product code (OC or TMS): OC
Collecting Statistics for OptimizationOracle Clinical provides SQL scripts that you can use to collect computed statistics on the data distribution and storage characteristics of certain tables, indexes, and partitions. These statistics are used by the Cost-based optimizer.
Table D–1 lists the schema for which each script gathers statistics. If you want computed statistics for customer-created tables, such as Thesaurus Management System tables, you must collect them yourself. The Oracle Clinical scripts are located in the RXC_INSTALL directory.
You must gather statistics on a regular basis to provide the optimizer with information about schema objects. How often you run these scripts depends on how quickly the data volumes in your Oracle Clinical tables increase.
During the initial use of Oracle Clinical you should run these scripts frequently since the data distribution changes rapidly. Once the database is populated, you should run statistics whenever the data volume changes by more than 20% or when some event, such as using a new feature, causes the data distribution to change measurably.
Table D–2, " Suggested Frequency for Analysis Scripts" gives a rough estimate on the frequency of running the analysis scripts.
Note: See the Oracle Database Performance Tuning Guide for information on optimization.
Table D–1 Scripts for Optimization Statistics
Schema Collection script
RXA_DES anadestab.sql
RXA_LR analrtab.sql
RXC anarxctab.sql
OPA anaopatab.sql
Table D–2 Suggested Frequency for Analysis Scripts
Number of Studies Frequency
Less than 10 For each new study
10 to 20 For every other study
20 to 100 For every 5 studies

Collecting Statistics for Optimization
D-4 Oracle Clinical Administrator's Guide
More than 100 For every 20 studies
Table D–2 (Cont.) Suggested Frequency for Analysis Scripts
Number of Studies Frequency

E
Oracle Clinical Tablespaces E-1
E Oracle Clinical Tablespaces
This appendix lists the tablespaces in an Oracle Clinical database. Names preceded by "d-" are created when the database is created. The remainder are created when the Installer is run to install Oracle Clinical in the database.
Name Oracle Clinical Use
DISC_REP_DATA Disconnected Replication tables
RBS To hold rollback segments
RXA_DES_DATA Design tables
RXA_DES_IDX Indexes for Design tables
RXA_LR_DATA Lab Ranges tables
RXA_LR_IDX Indexes for Lab Ranges tables
RXC_APP_IDX_TSPA Indexes for Application Definition tables
RXC_APP_TSPA Application Definition tables
RXC_DCD_IDX_TSPA Indexes for Data Collection Definition tables
RXC_DCD_TSPA Data Collection Definition tables
RXC_DCMQ_IDX_TSPA Indexes for Data Management tables
RXC_DCMQ_TSPA Data Management tables
RXC_DEF_IDX_TSPA Indexes for Definition tables
RXC_DEF_TSPA Definition tables
RXC_DISC_IDX_TSPA Indexes for Discrepancy Management tables
RXC_DISC_TSPA Discrepancy Management tables
RXC_GLIB_IDX_TSPA Indexes for Global Library tables
RXC_GLIB_TSPA Global Library tables
RXC_LI_IDX_TSPA Indexes for Log-In tables
RXC_LI_TSPA Log-In tables
RXC_RESP_IDX_TSPA Indexes for Responses table
RXC_RESP_TSPA Responses table
RXC_VRV_IDX_TSPA Indexes for Validation Reported Values table
RXC_VRV_TSPA Validation Reported Values table
d-SYSTEM Standard Oracle tables

E-2 Oracle Clinical Administrator's Guide
In addition, the Oracle Thesaurus Management System creates these tablespaces:
d-TEMP Standard Oracle tables
TEMP1 Temporary Data Extract tables
TEST_DATA Test tables
TEST_INDEX Indexes for Test tables
d-TOOLS Standard Oracle tables
d-USERS Standard Oracle tables
Name Oracle Thesaurus Management System Use
TMS_DATA Data tables
TMS_IDX Index tables
Name Oracle Clinical Use

Glossary-1
Glossary
A
access
A property of a user name which denotes that certain privileges have been granted to that user. The term is used in RDC documentation as a means to convey that a set of privileges have or have not been granted to a particular user. An example of typical usage is:
The Change Study button is displayed if you have access to more than one study.
access key
The keyboard key corresponds to the letter that is underlined in an item's on-screen title. The access key may be activated either singly or in combination with the ALT key.
See also: shortcut key
active
A discrepancy status that indicates the relevant discrepancy is actionable by members of your user group.
See also:
active mode
In PDF data entry mode, a status assigned to a CRF that allows the user (with appropriate privilege) to modify the CRF. Although multiple CRFs may be open in Only one CRF may is an instance that can be updated by users with appropriate privileges.
See also: browse mode, privilege, update
approval history
A record, or set of records, associated with a CRF that lists each change in approval status starting with the initial approval action.
approval status
A designation that describes the current state of approval for a CRF. In RDC, there are four approval statuses:
1. not approved
2. approved
3. approval undone
4. awaiting re-approval

approval undone
Glossary-2
See also: discrepancy status, entry status, verification status
approval undone
An approval status that indicates a user with the approve privilege has removed the approved status of a CRF via the Undo Approval action.
approve
A privilege assigned to a user name that allows the user to alter the approval status of a CRF or a group of CRFs. The privilege is assigned at the site level only.
approved
An approval status assigned to a CRF that indicates a user with the approve privilege certifies that the CRF is an accurate representation of the source data. In RDC, an approval is equivalent to an electronic signature.
audit history
The set of all audit records for a given data point.
See also: audit record, data point
audit record
A set of information that describes an instance of data update. Each audit record includes the following information:
■ Current value of the data point
■ Previous value of the data point
■ User name that changed the data point
■ Time stamp the data update occurred
■ Change reason
■ Optional comment
automatic progression
A feature of RDC that enhances user data entry, monitor verification, and investigator approval sessions. When automatic progression is enabled, as you complete work on the current CRF focus moves to the next CRF in a sequence specified by the settings in the Preferences window. The next CRF may be: within the current patient record, across Spreadsheet tabs; within the current patient, within the current event tab; or within the current CRF column.
Note that, based on system administrator settings, the Preferences window may not be available in your session.
awaiting re-approval
This is a system-generated approval status that indicates the CRF is approved, but that one or more response values were updated. A CRF in this approval status can be re-approved or the approval can be undone.
The CRF changes that cause the change in approval status include:
■ response value update
■ update to an investigator comment
■ initiation of a new investigator comment
■ update to a discrepancy

Boolean operator
Glossary-3
■ initiation of a new discrepancy
awaiting re-verification
This is a system-generated verification status that indicates the CRF is verified, but that one or more response values were updated. A CRF in this verification status can be re-verified or the verification can be undone.
The CRF changes that cause the change in verification status include:
■ response value update
■ update to an investigator comment
■ initiation of a new investigator comment
■ update to a discrepancy
■ initiation of a new discrepancy
B
batch loaded data
A designation that specifies response values were entered into a CRF by electronic means, as opposed to manually entered via a user performing data entry.
blank
An RDC entry status designation that is assigned to a CRF a user has defined as blank. A Blank CRF does not contain data, nor can data be collected while it is marked as blank.
blank flag
A check box GUI component used in the RDC Classic Data Entry window. The Blank Flag, or check box, is used to designate a CRF as blank. It is a standard item in the CRF Header area of a DE window and may also be present in the CRF Section, especially in multi-section CRFs.
book
A collection of phases, patients, visits, and CRFs within a study.
Boolean expression
In RDC, a statement that uses a Boolean operator to construct a search string by combining two or more search strings. For example, the Data Subsearch window, which is subcomponent of the RDC Search window, uses a Boolean operator to join two search phrases.
Boolean operator
A key word that is used to logically join two search strings in a Boolean expression. RDC accepts the following Boolean operators:
■ AND
■ OR

browse
Glossary-4
browse
1) A user action that entails reviewing existing data without adding new data or changing existing data.
2) A privilege, specific to manually entered CRFs, that provides the user with the ability to view existing data, but not to add new data or update existing data in CRFs. All RDC users must be assigned this privilege or a higher-level privilege that incorporates it.
browse batch
A privilege, specific to batch loaded CRFs, that provides the user with the ability to view existing data, but not to add new or update existing data in CRFs. This is the minimum privilege required for a user to view batch loaded CRFs.
browse mode
In PDF data entry mode, a status that allows the user to work with the CRF as read-only; that is, data entry or update is not permitted. More than one browse mode CRF can open simultaneously.
Two data entry window components allow you to quickly identify a CRF that is browse mode:
■ the watermark that is visible along the left-hand margin of the CRF
■ the CRF button bar, which differs significantly from the active mode version; in browse mode it contains three buttons:
1. Close button
2. Make Active
3. Help.
See also: active mode
C
cancel
A user action that halts the current process or action and reverts to the state of the application that immediately preceded the process or action, without changing the status of the system or data.
Cancel button
In a dialogue or pop-up window, a Cancel button causes the application to dismiss the window, disregard changes made in the window, and revert to conditions that existed before the window opened.
case book
See book.
case report form
A paper or electronic record associated with a patient in a clinical study. Its purpose is to facilitate accurate collection of clinical data. RDC, CRFs are depicted electronically, either through the classic data entry window or the PDF data entry window.
See also: CRF

criterion
Glossary-5
change history
A listing of the values that have been assigned to data or information. Each list item includes information that uniquely identifies it. Specifically, a time stamp and the user name of the person who made the change are recorded. In RDC, a change history can be associated with the following:
■ response value
■ investigator comment
■ discrepancy
change reason
A constituent of an audit record. A standardized entry that explains why a data point changed. The change reason can be supplied either automatically (system-provided) or manually (user-provided).
Classic mode
In RDC, one of two data entry modes that are available which enable users with appropriate privileges to create and update patient data. In classic mode, the CRF is presented as an Oracle Form in a window that overlays the Main Application window, with the header displayed at the top of the form and each section presented as its own tab within the form window.
see also: data entry mode, PDF mode
clinical planned event
An occurrence, usually a visit, that is scheduled as part of a protocol to collect clinical data for a patient. In RDC, visits appear in the context of a case book.
closed
A discrepancy status that indicates the relevant discrepancy is not actionable by any user group. The discrepancy has been resolved, either by a user or the system.
See also: discrepancy status, user group, active, other, obsolete, discrepancy state
CPE
An acronym for clinical planned event.
created
An RDC entry status designation that is assigned to a CRF when all required CRF header data has been entered and saved, and no other data, i.e., response data, has been entered.
This is used when your internal process involves an administration person who logs the paper as received in-house, but the data have not yet been entered by the DE staff.
CRF
See case report form
criterion
In reference to the RDC Search window, one of the components that can be altered so that a certain set of study data is retrieved to the Spreadsheet. Each criterion is comprised of a set of parameters that allow you to make choices about the data you wish to retrieve.
The Search window is comprised of seven criteria:

CRF header
Glossary-6
1. Book criterion
2. Site criterion
3. Patients Subsearch window
4. Visit/Page Range Subsearch window
5. CRF Status Subsearch window
6. CRF/Visit Dates Subsearch window
7. Data Subsearch window
Each criterion is comprised of a certain number of parameters. With the exception of the book criterion, all Search window criteria have a default setting that retrieves the maximum amount of data. (The default for the Site criterion, for example, is "All Sites").
You modify a criterion from its default by changing one or more of the parameters that comprise it.
■ The Book and Site criteria each have a single parameter, which you access and modify from the Search window.
■ All other criteria have multiple parameters, which you access and modify in the Subsearch window that is specific to each criterion.
CRF header
A component of a CRF as it is displayed in the Classic data entry window. It consists of one or more header fields, in which you collect information that uniquely describes and defines the current CRF.
RDC will not save a CRF to the study database until all required CRF header and CRF section header fields are collected.
CRF information
A field in a PDF mode CRF in which you collect information that uniquely describes and defines the current CRF. Based on the type of information it collects, the field may be required or optional. It correlates directly with a CRF header field.
RDC will not save a CRF to the study database until all required CRF information and CRF section information fields are collected.
CRF section
In RDC, a constituent of a CRF that is comprised of a set of related questions. Each CRF contains at least one section and may contain more than one. In Oracle Clinical terms, a section equates to a data collection module (DCM).
current
A discrepancy state that indicates action can be taken on the discrepancy – either by a user or by the system. It has not been made obsolete by the system.
See also: discrepancy state, obsolete, open, active, other, closed
current study
The data set that is active in RDC. The name of the current study is displayed in the title bar of the Main Application Window.

DCM
Glossary-7
D
data collection instrument (DCI)
(General) The Oracle Clinical term for an RDC CRF. A DCI is composed of one or more DCMs.
See also: case report form, data collection module (DCM), CRF
data collection module (DCM)
(General) The Oracle Clinical term for a CRF section.
(Oracle Clinical) A set of one or more related groups of questions that pertain to a single clinical study visit.
See also: section
data entry mode
In RDC, a designation that describes the method that is used to enter data into a CRF and save it to the study database. There are two modes that are available:
1. Classic mode
2. PDF mode
data entry status
A designation that describes the current state of data entry for a CRF. In RDC, there are four data entry statuses:
1. created
2. blank
3. entry started
4. entry complete
data field
A location in the Question area of the Data Entry window in which you type a value that is the response to a CRF question.
data point
A location in a form where a data value may be entered. In most cases, a data point corresponds to a field in the data entry window.
data update
In RDC, the process of changing a CRF that has been created and saved to the database by altering a data point and saving the new version of the CRF to the database.
see also: created, data point, CRF, initial data entry
DCAPI
An acronym for the Data Capture API system.
DCM
An acronym for data collection module (DCM).

default study
Glossary-8
default study
The preferred study associated with your user name. RDC automatically selects the default study when you initiate a session.
■ If you have access to one study, that is your default study.
■ If you have access to more than one study, the study that was active when you closed the previous session is the default study.
■ If you have access to more than study, but have not initiated a previous session in the current database, the system administrator can specify a default study.
■ If the a default study is not specified, the system presents the Change Study window when you logon, which allows you to choose a study from among those to which you have access.
discrepancy
Data that falls outside of an expected range of values or is otherwise 'flagged' during the edit check process.
See also: discrepancy management, manual discrepancy, multivariate discrepancy, univariate discrepancy
discrepancy action
A process that changes the status of a discrepancy. There are two types of actions:
1. Routing
2. Resolution
discrepancy change history
The listing associated with a discrepancy that provides details of each update that was made it. The specific components of the discrepancy change history that are available to RDC users are:
1. Time stamp of update
2. Error text
3. Discrepancy comment
4. Current status
5. Resolution
6. Resolution comment
7. Change by
discrepancy management
A process that systematically addresses discrepancies generated within a study. Discrepancy management attempts to identify the cause and assess the implications of each discrepancy and determine an appropriate action for the discrepancy. Its goal is to satisfactorily resolve all discrepancies associated with each CRF.
See also: discrepancy, multivariate discrepancy, univariate discrepancy, manual discrepancy
discrepancy record
An entry which is part of the study database that defines the pertinent aspects of a discrepancy, from its initial occurrence and through each action that is taken on it.

entry status
Glossary-9
discrepancy state
The highest level designation of a discrepancy. A discrepancy can be in one of two states:
1. current
2. obsolete
discrepancy status
1) A designation that describes a current discrepancy
A designation that describes the current state of a CRF with regard to discrepancies. In RDC there are four discrepancy statuses:
1. none
2. closed
3. active
4. other
discrete value group
(Oracle Clinical) A set of responses that are acceptable for a given question. A DVG constrains the responses to a question to a distinct set of values. It may also allow the same question to be used in multiple instances.
It is also possible for one DVG to be a subset of another DVG. In this case, the child DVG is made up of responses that are part of the parent.
document
In RDC, the equivalent of a CRF.
document number
A system-assigned unique identifier for a particular collected CRF.
DVG
(Oracle Clinical) An acronym for discrete value group.
E
entry complete
An entry status that is assigned to a CRF in which all required fields have been entered, including CRF header fields and Question area response data points.
entry started
An entry status that is assigned to a CRF in which data entry has been initiated but is not complete. CRFs that are assigned this entry status, some required data fields are complete, while some are not; the document has been saved in an incomplete status.
entry status
Formal stages of data entry, delineated in Oracle Clinical and RDC, that track the progression of a CRF from no data entered ("Created") through entry complete, to approved.

event page
Glossary-10
See also: blank, created, entry started, entry complete
event page
The Spreadsheet view that is associated with a given spreadsheet view tab. An event page may represent a study, phase, or visit event and includes all of the patient rows and visit-page columns that are in the currently retrieved data set.
F
focus
In RDC, where the cursor is currently active. Focus may change from window to window, as when the cursor moves from the Main Application window to the first data field in the Data Entry window when you click a CRF cell.
How focus changes is a consideration when you are modifying the settings on the Preferences window to enhance the efficiency of your data entry or verification/approval sessions.
frozen
A designation that is applied to a patient which indicates that all data has been received, entered, reviewed, and cleaned for the patient, CRF, or visit.
G
Graphical User Interface
The screen representation of a software application that uses graphical components, such as windows, icons, and menus, to effect user interaction, rather than typing command line entries.
GUI
An acronym for Graphical User Interface.
H
header field
A location in the CRF Header or the CRF Section Header in which you collect values that provide information about the CRF. A header field is either required or optional. All required header fields must be collected before the system permits a CRF to be saved to the study database.
In the CRF Header, the following header fields are available:
■ visit date
■ visit time
■ comment
■ blank flag

investigator comment
Glossary-11
In CRF Section Headers, the following fields are available:
■ date
■ time
■ blank flag
■ clinical planned event
■ lab
■ qualifying value
Note: The preceding lists are specific to RDC only.
I
indicator question
A question used with certain question groups that allows "branching" during data entry based on the response.
For example, in a Drug Allergy question group, an indicator question could be, "Allergic to any drug?"
■ If the response is "Yes", the remaining questions in the question group, such as "Drug Name" and "Type of Reaction", require responses.
■ If the response is "No", the rest of the question group is not collected.
initial data entry
The step in the RDC workflow during which the CRF is initially opened and created. During this process all required CRF and CRF section header information is collected. Response data may or may not be collected.
installation reference codelist
(Oracle Clinical) A reference codelist that is defined and populated upon initial installation of the application.
See also: reference codelist
internal
A discrepancy status that can be assigned to a section discrepancy through a routing action. This type of discrepancy can be configured so that it is "hidden" from one or more user groups.
investigator comment
A textual explanation that is written by the investigator. It provides the investigator with the opportunity to include additional information with a response value. Each investigator comment is saved as part of the response with which it is associated.
RDC provides visual cues to alert the user to the presence of an investigator comment associated with a data point:
■ the response field is displayed with a yellow background color
■ the data value is displayed in a green font

L
Glossary-12
■ when focus is in the relevant response field, the Data Entry window header includes an entry: <Inv>, to indicate the presence of the investigator comment.
L
list of values
A set of possible values for a data field. The list of values can generally be displayed by either clicking the button that is associated with list of value fields, pressing the List button or by pressing the F9 key.
Values that are defined for a discrete value group are displayed in a list of values.
See also: discrete value group
lock
a) a privilege that may be assigned that enables a user to lock a CRF or a set of CRFs
see also: privilege
b) A process that prevents subsequent update of a CRF. Under most circumstances, a locked CRF cannot be 'unlocked,' although administrators may permit, on a limited basis, a user to unlock a single CRF so that data may be updated.
locked
A status assigned to a CRF that indicates all data has been collected, approved, and verified. A locked CRF may be viewed in browse mode and may be included in PDRs, however, its data may not be updated under normal circumstances.
see also: PDR, status, browse mode, update mode, lock, unlock
lock status
A designation that describes the current state of a CRF, with regard to whether or not it may be updated. In RDC, there are two lock statuses:
■ locked
■ unlocked
M
mandatory response field
A response field in the question area of CRF section that should be completed before the CRF is saved in the Entry Complete status. Failure to do so results in the generation of a discrepancy, which is associated with the relevant response field.
Note that when RDC is in PDF-enabled mode, you may leave a mandatory field uncollected and save the CRF in the "Save Incomplete" status to avoid the initiation of a discrepancy.
mandatory field discrepancy
A discrepancy associated with a mandatory response field that is generated by the system when a CRF is saved. The discrepancy triggers when data for the field is not collected.

node
Glossary-13
manual discrepancy
A discrepancy that is generated by a user, rather than a data point value. In RDC, a manual discrepancy may be associated with an entire CRF, a CRF section header or a specific response in the question area of a CRF.
See also: discrepancy, discrepancy management, section discrepancy
menu bar
The section of the main application window that provides access to RDC commands.
menu command
Each menu command is displayed in either black or grey font. If the command is displayed in black font, it is available and may be invoked under the current application conditions. If the command is displayed in grey font, it is not available under the current application conditions. If you attempt to utilize a menu command that is displayed in grey font, the system does not respond.
menu item
Each label (e.g., "File" or "Insert") that is used to categorize commands that are available from the menu bar. When a menu is accessed, either by clicking the label or using its access key, it drops down to display the list of menu commands that are associated with it.
multivariate discrepancy
A discrepancy that is dependent on two or more data point values, which can be within a single CRF or across multiple CRFs and/or visits. A multivariate discrepancy is generated when a CRF is saved, which causes the system to run the validation procedures that locate this type of discrepancy.
See also: discrepancy, discrepancy management, manual discrepancy
N
Navigation pane
In the Activity List window, the section, or frame, that comprises the left-hand portion of the window and presents a hierarchical listing of the current study and, the sites to which you have access. When you click a Site node, all patients assigned to the site that you have access to are displayed under the site name.
See also: node, scope, Task pane
news item
A message that is communicated by the study sponsor to some portion of its RDC users. News items are displayed in the News window.
node
An item in the hierarchical tree in the Navigation pane of the Activity List window. When you select a node, the tasks that are associated with it are displayed in the Task pane.
Each node represents one of three scopes: Study, Site, or Patient. Within the Navigation pane, there is only one Study node displayed. However, depending on the security settings associated with your user name, there may be more than one Site node displayed under the Study node, and generally many Patient nodes listed under each Site node.

non-repeating question group
Glossary-14
non-repeating question group
A set of questions that are related, but for which there is not a single set of possible answers.
See also: question group, repeating question
not approved
An approval status assigned to a CRF that indicates the CRF has never been approved.
See also: approval status, approved, not approved, awaiting re-approval
not verified
A verification status that indicates the CRF has not yet been verified.
See also: verification status, verified, not verified, awaiting re-verification
O
obsolete
A system-generated discrepancy state assigned to a discrepancy that is associated with a response that is a constituent of a:
■ repeating question row that was deleted
■ a question that was deleted
■ a CRF section that was deleted
■ a CRF that was deleted.
A section discrepancy is made obsolete when its parent CRF is deleted or made blank. A data discrepancy is also made obsolete if the validation procedure upon which it is based is retired.
open
1) A designation for a discrepancy that indicates it is either in the active or other discrepancy status; that is, it is actionable by a user group.
2) A designation for a CRF that indicates it contains at least one active or other discrepancy.
optional CRF
A CRF that is planned in a visit, but which the protocol does not require to be collected. Optional CRFs are not included when the system determines whether there are missing pages. The information in the CRF Column Header of optional CRFs is displayed in italic font to distinguish each from required CRFs.
other
A discrepancy status that indicates the discrepancy is actionable by a user group other than yours.
See also:
P

PDF mode
Glossary-15
parameter
In reference to the Search window, a component of a criterion that you use to define a specific property of the data you wish to comprise the workset. A parameter may be comprised of settings that represent a value or range of values that, when combined with any other parameters in the same criterion, define specific data.
See also: criterion, setting, search phrase, workset
pass 2 complete
A data entry status that assigned to CRFs that originate in the Oracle Clinical data entry system. It indicates that two-pass data entry was required for the CRF and that the second pass is complete.
pass 2 started
A data entry status that assigned to CRFs that originate in the Oracle Clinical data entry system. It indicates that two-pass data entry was required for the CRF and that at least one response field has been recorded in the second pass.
patient
The data that represents a participant in a clinical study. This includes demographic information and clinical results.
patient data report
In Oracle Clinical or RDC, a patient data report (PDR) is a generated compilation of data that is presented in a PDF document.
patient list
The set of patients that contain at least one CRF which satisfies the search criteria.
patient number
A designation for a a set of patient data that is unique across a given study. Patient numbers are assigned to a study as part of the Oracle Clinical Design process. Alternative terms include: enrollment number, allocation number, and randomization number.
The following rules apply to all patient numbers:
1. Each patient number must always be assigned to a site.
2. Each patient number may not be assigned to more than one site at a time.
3. The first character in the patient number string may be a non-zero numeric or an alphabetic character.
4. If the first character in the patient number string is alphabetic, the second character must be a non-zero numeric character.
5. Only the first character may be alphabetic.
An acronym for Portable Document Format.
PDF mode
In RDC, one of two data entry modes, PDF data entry enable users to create, view, and update a CRF that is presented as a PDF electronic document.
See also: Classic mode, data entry mode

pending changes
Glossary-16
pending changes
Changes that are made to a CRF that have not yet been committed to the study database. The changes that may be pending are response value, investigator comments, or discrepancies. The save action commits pending changes to the database.
phase
An attibute of a book that denotes a stage of a study. Phases are used to divide the study into logical groupings of visits. Examples of phases include: Screening, Dosing, and Follow-up.
You can use the RDC Spreadsheet to view CRFs by phases. To do this, select the Phase Spreadsheet view from the Spreadsheet View drop-down list box.
Portable Document Format
A type of file format.
Portable Document Format is a universal file format published by Adobe Systems, Inc., that preserves all of the fonts, formatting, graphics, and color of a source document that is generated on with any application on any operating system.
see also: PDF
privilege
The ability for an RDC user to perform a certain task. Privileges are granted to users in the RDC Administration study and site maintenance windows by administrators. In general, users within a user group, that is, those that are given the same role, are assigned the same set of privileges.
The following privileges may be assigned to RDC users:
1. browse
2. Browse batch loaded data
3. Update data
4. Update batch data
5. Update discrepancies
6. Verify CRFs
7. Approve CRFs (on a site basis only)
8. Lock
9. Unlock (on a site basis only)
progression sequence
The order that RDC uses to navigate to and open CRFs. There are three different modes available in RDC:
1. By patient
2. By patient, within Spreadsheet view (Classic only)
3. By CRF column
The specific sequence that is employed at any time is defined by the Progression to next CRF setting in the Preferences window. In Classic mode, the system uses the progression sequence when other progression settings are selected. In PDF mode, the browse sequence is invoked when you use the Previous and Next buttons.

R
Glossary-17
Q
qualifying value question
A question that differentiates between sets of identical questions. In a multi-section CRF, where the same section, containing the same set of questions, is collected more than once, a qualifying question is used in each such section. The purpose of the qualifying question is to elicit a unique response, called a qualifying value, which allows differentiation of the responses in the sections.
When you respond to a qualifying value question, you select from a discrete set of values that are specified in the question definition.
An example of a qualifying question is a multi-section CRF that collects vital sign data multiple times in a single visit. Each set of vital sign data comprises a section. Each section is differentiated by "time post dose" question. The result is a set of vital signs collected at specific times.
qualifying value
The value assigned to a qualifying value question that is associated with a CRF section. For multi-section CRFs, where each section includes a qualifying question, the qualifying value is used to differentiate between the sections.
query
1) A procedure that is run against a database with the goal of returning a subset of a data that satisfy the query criteria.
2) An industry term that is a synonym for the Oracle Clinical term, discrepancy.
question definition
The set of information that delineates what data a question collects. Among the information is:
■ question name
■ data type
■ length
■ lower bound
■ upper bound
question group
A set of questions in a CRF that are related due to similarity or study protocol considerations.
An example of a question group is Demographics, which collects such data as: sex, race, and date of birth.
See also: non-repeating question group, repeating question
question name
The label that describes a question. It may be in the form of a question or it may simply be a word or phrase that serves as the prompt for a response.
R

repeating question
Glossary-18
repeating question
A question that usually consists of more than one response. The responses are generally situated in a single row and are referred to as a "repeating question row". For each response, there may be a default value, which is a system-provided value that entered automatically when you open the CRF. A repeating question is usually one of a set, each of which are distinguished by the initial response or by a question label.
An example is a question group titled, "Body Systems". Each repeating question row collects data about a different body system with three response values. The first response in each row identifies the part of the body, for instance, chest, or head. The next response in each row requires one of three values: "Normal", "Abnormal", or "Not Done". If the response to this question is "Abnormal", the third response, "Explanation", is required.
See also: question group, non-repeating question group
required CRF
A CRF that the protocol specifies as a planned CRF in a visit, for which data must be collected. Planned CRFs are analyzed when the system determines whether there are missing pages. The information in the CRF Column Header of optional CRFs is displayed in regular font to distinguish each from optional CRFs.
See also: CRF, optional CRF.
resolution
A type of discrepancy action that causes the status of the discrepancy to change from active to closed.
See also: discrepancy, discrepancy status, discrepancy action, routing, user role
resolution reason
A parameter associated with a discrepancy action that provides a sponsor-defined reason when a user closes a discrepancy.
response value
The value that is assigned to a data point. This term usually refers to fields in the Question area of a CRF.
See also: CRF, data point
role
See user role
routing
A type of discrepancy action that causes the status of the discrepancy to change from active to other for your user group and from other to active for a different user group.
See also: discrepancy, discrepancy status, discrepancy action, resolution, user role
S
save
An action that commits pending data changes to the study database.

section
Glossary-19
In Classic mode RDC, there are two modes of save action: explicit and implicit. The former is a result of user action, for example, clicking the Save button. The latter is the result of a system action.
In PDF mode RDC, all save actions are explicit, initiated by the user clicking the Save button or choosing to save pending changes through the Save Edits? window.
save complete
In PDF mode, a save action that causes RDC to assign the CRF to the entry complete data entry status.
save incomplete
In PDF mode, a save action that causes RDC to assign the CRF to the entry started data entry status.
scope
In the Activity List window, a category or classification of a set of tasks; there are three scope levels that are available in the Activity List window:
1. study
2. site
3. patient.
These are listed and identified in the Navigation pane. When you select an item in the Navigation pane, the tasks that are associated with its scope are listed in the Task pane. Because only one study can be active in RDC at any given time, the study scope is listed once. The site scope is listed once for each site to which you have access for the current study. The patient scope is listed once for each patient to which you have access for the site.
search criteria
The settings that determine the CRFs that comprise the workset. These settings can be defined directly, through the Search window, or indirectly, through the Activity List window.
search phrase
The group of settings that, when taken together, define a searchable property. An example is, "search all CRFs named 'Vitals' for systolic BP values that are greater than or equal to 120,". You use several drop-down lists in the Subsearch window to construct the search phrase.
Search window
A GUI component in RDC that allows a user to define directly the search criteria that is displayed in the RDC Spreadsheet. The Search window provides access to seven criteria, which are can be modified from default values, that the system combines to retrieves CRFs from the study database.
section
1) In RDC, a constituent of a CRF that is comprised of a set of related questions. Each CRF contains at least one section and may contain more than one. In Oracle Clinical terms, a section equates to a data collection module (DCM) (DCM).
2) In the Graphical User Interface - a part of a window or other informational feature that contains related information and/or data fields. It is often delineated by a descriptive label and a border that surrounds its related components.

section discrepancy
Glossary-20
For example, the different views that are available in the Summary Task tab are differentiated by the sections that comprise each view. In some cases, the sections are utilized in more than one view.
section discrepancy
A user-generated discrepancy that is associated with a CRF section. There can be multiple discrepancies associated with a CRF section. This is the only type of discrepancy can be routed as an internal discrepancy.
In PDF mode, the system displays a section discrepancy bar along the right-hand side of the CRF. The bar is colored according the highest discrepancy that is associated with the section and it is present along the extent of the CRF section.
In Classic mode, the system displays <Oper> as an indication of the presence of a section discrepancy in the title bar of the classic data entry window when focus is in the discrepant CRF section.
See also: discrepancy, CRF section
session
The period that starts when you successfully log in to RDC and ends when you exit RDC. This is also referred to as an RDC session. It is constricted by limitations that are imposed by the following conditions:
■ only one user name is granted access to a session
■ the role and privileges assigned to the user name determine the patient data and functionality that is available within a session
■ only one database can be accessed during a given session – if you want to access a different database, you must initiate a new RDC session
■ only one study can be open at a time during a session, however, unlike the restriction on the active database, you can change to another study within an RDC session – if you want to access a different study you must close the current study and select another.
■ only one book can be active at a given time, however, you can change to another book within an RDC session
■ one or more sites can be active during a given session and the privileges assigned to the user name may vary from site to site.
setting
The value of a parameter in the Search window, which is a contributor to a the value of a criterion. Usually, the default setting for a parameter is "ALL", which means that the parameter does not limit the data that is retrieved. When the value of a parameter is set to something other than "ALL", it generally limits the number of CRFs that are retrieved.
See also: criterion, parameter
sequence number
In the RDC Discrepancy task tab, the ordering number that is assigned to each discrepancy associated with the current CRF or CRF section (if the current CRF is multi-section). Discrepancies are listed in the List of discrepancies tab in numerical order, according to the sequence number. The number assigned to each discrepancy is not static. It is based on the following parameters: the current status, the time stamp, and the location of the response field within the CRF or section.

timepoint
Glossary-21
shortcut key
A key or key combination that allows you to implement a function in the application by using the keyboard.
See also: access key
site
A criterion that contributes to the generation of search criteria based on the sites to which the user has access. The criterion can have a value of either:
■ <ALL> – includes all sites to which the user has access
■ singe site – limits search criteria to one site to which the user has access.
spreadsheet view tab
In the RDC Spreadsheet, these determine how the system displays the workset data. There are three different tabs that each provide a different view of the workset:
■ Study
■ Phase
■ Visit
You select the type with the Spreadsheet view drop-down list that is located above the patient listings in the Spreadsheet. (Note that the presence of this component is dependent on a sponsor-specified configuration.)
subsearch window
A window that is accessed from the Search window that allows a user to change the values of parameters. Changes in the subsearch window affect a Search window criterion.
T
Task pane
In the Activity List window, the section, or frame, that comprises the right-hand portion of the window and presents a listing of activities, or tasks, associated with the currently selected node in the Navigation pane. When you click a task, RDC retrieves the data necessary to complete the task from the study database and displays it in the RDC Spreadsheet.
See also: node, scope, Navigation pane
test mode
A method of using RDC during study design, prior to the initiation of the protocol. Under normal circumstances, RDC runs with Production mode active. This mode mirrors the look and feel of production mode but uses a separate set of tables to store the data.
timepoint
A significant event in the history of a CRF. Used as criterion when viewing the Audit Trail tab. Examples of timepoints include:
■ creation date
■ verification dates

time stamp
Glossary-22
■ approval dates.
time stamp
A value assigned to a data point that provides a chronology for significant events during a study. Such events include: the date/time when a value was created, the date/time when a value was updated, etc.
U
Uniform Resource Locator
An Internet address that points to a specific resource on the World Wide Web by its location. The address is described in combinations of syntax and special characters that, when combined, represent a unique string. In general, URLs make-up a subset of URIs. Common URLs are those that point to Web pages or to FTP sites. The former are identified by an"https:" or "http:" prefix string; the latter are identified by an "ftp:" prefix string.
univariate discrepancy
A discrepancy that is dependent on the value of a single data point. This type of discrepancy is usually when the value recorded for a response does not meet certain criteria that is deemed acceptable by the study sponsor.
See also: discrepancy, discrepancy management, manual discrepancy, multivariate discrepancy
unlock
a) A privilege that is assigned to a user to unlock a CRF. The privilege can only be assigned at the site level.
see also: privilege, lock
b) A process that allows a user with unlock privilege to assign to another user the capability to update a CRF that is in the locked status.
unlocked
A lock status that indicates a CRF may be updated.
unplanned
A designation attributed to any event or CRF that was not part of the protocol schedule or which occurs at a time other than was originally specified in the protocol schedule.
See also: unplanned CRF, unplanned visit
unplanned CRF
A CRF collected at a visit at which it was not planned, that is, it is not part of the case book.
unplanned visit
A clinical event which occurs that was not scheduled by the protocol.
update
1) A process or condition in which CRF data or information, which has previously been saved, is changed.

validation
Glossary-23
2) A privilege that allows a user to initiate data entry, update data, initiate discrepancies, and update discrepancies.
update batch
A privilege that allows a user to initiate or update a discrepancy in CRFs that are batch-loaded.
update discrepancy
A privilege that allows a user to initiate or update a discrepancy in CRFs that are no batch-loaded.
URI
An acronym for Uniform Resource Identifier.
URL
An acronym for Uniform Resource Locator.
user group
A set of users that are assigned to the same user role. (RDC)
user role
A database role that is granted to a user or user group.
In RDC, there are five default user roles, however, any given study database may include some or all of these, and may include sponsor-specific roles. RDC allows privileges to be assigned independently of user role assignment.
The roles that RDC ships with are:
1. Super User (SU)
2. Data Manager (DM)
3. Clinical Research Associate (CRA)
4. Site Coordinator (SITE)
5. Site Investigator (INV)
See also: privilege, user group
V
validation
An action that entails the initiation and processing of sponsor-defined procedures, in the case of multiple data points, or edit checks, in the case of a single data point, that analyze collected data and return an query, or discrepancy, for each data point that does not meet the criteria defined in the procedure. Such a data-generated discrepancy is also referred to as a validation error.
Note: The RDC documentation uses this default set of user roles to describe various functionality that is dependent on certain sets of privileges.

validation error
Glossary-24
validation error
A condition associated with one or more data points that indicates the value does not meet the criteria defined in a question definition or validation procedure. It is equivalent to a data-generated discrepancy.
value
When used in the context of criteria and parameters, the choice that you assign to a parameter, which was chosen from a list of possible values.
verification history
A record, or set of records, associated with a CRF that lists each change in verification status starting with the initial verification action.
verification status
A designation that describes if a CRF has been verified. In RDC, there are four verification statuses:
1. not verified
2. verified
3. awaiting re-verification
4. verification undone
verification undone
A verification status that indicates the CRF was verified but subsequently the verification was undone. This status is equivalent to the not verified status, with the exception that a verification history exists for a CRF in verification undone status.
verified
A verification status that indicates the CRF has been verified by a user with the verify privilege.
verify
A privilege assigned to a user name that allows the user to alter the verification status of a CRF or a group of CRFs. The privilege can be assigned at the study level or the site level.
visit
A clinical event, which generally denotes the occurrence of a meeting between a patient and clinical staff at a study site. In the course of a visit, data related to the study is collected, which at some point is recorded and saved to the study database.
In RDC, a visit consists of one or more CRFs. By default, the system displays Spreadsheet Visit view in the RDC Workspace, which displays, for the current patient list, all of the CRFs collected for a single visit.
W

workset
Glossary-25
watermark
A visible feature that overlays a browse mode CRF in the PDF DEW. It displays the time stamp of the last modification and the words "BROWSE ONLY". The browse mode watermark is visible along the left-hand margin of each CRF page.
workset
The collection of patient data that is currently displayed in the RDC Spreadsheet. You use either the Search window or the Activity List window to select the data that you want to view in the Spreadsheet. This may include, but is not limited to, the following:
■ patients
■ CRFs, including entry, approval, verification, and lock statuses
■ response data
■ investigator comments
■ discrepancies
■ audit trail history
This term may also be called a dataset.

workset
Glossary-26

Index-1
Index
AAccessible Data Only? column, 3-6Accounts
RXA_READ, 13-5RXC_DISC_REP, 13-5
accountscreate OPS$, 1-5requirements for batch jobs, 8-1RXC_REP, 13-5
Add Review Status button, 3-8anadestab.sql, D-3anadestab.sql script, D-3analrtab.sql, D-3ANALYZE command, 9-12anaopatab.sql, D-3anarxctab.sql, D-3asynchronous PSUB jobs, 8-2attributes
extended, 7-27auto fill, 5-6auto skip, 5-6
Bbatch data load
and integrity of distributed data, 14-14batch jobs
execution status, C-12troubleshooting, C-7user accounts for, 8-1
batch validationand integrity of distributed data, 14-14
blind breakand distributed study conduct, 14-5creating, at a sharing location, 14-6
blocking jobs, 8-3Browse mode
access to, 5-3
CCDS
setting field display, 4-1, 4-2check_opa_settings script, A-6cnvstatus, 10-1
running on UNIX, 10-1running on Windows, 10-2
codelists, setting up in a discrepancy database, 3-18collection scripts
anadestab.sql, D-3analrtab.sql, D-3anaopatab.sql, D-3anarxctab.sql, D-3
commentoperator, 5-3
Comparison Beep, 5-6comparison failure, 5-6comparison reconciliation, 5-3compile_all_invalid.sql, 9-13COMPUTE STATISTICS clause, 9-9configuring data entry screens, 5-1cost-based optimization, D-3cost-based statistics, 9-9CRF information
defined, Glossary-6current study
defined, Glossary-7Custom button, 5-26
Ddata collection instrument (DCI)
defined, Glossary-7data entry
and integrity of distributed data, 14-14navigating during, 5-8
Data Entry Display Format, 5-6data entry operator
and privileges in Browse mode, 5-3for both first and second pass, 5-3hiding data from, 5-9in silent mode, 5-3notified of errors, 5-3notified of unenrolled patient, 5-3
data entry screen settings, 5-1and thesaurus questions, 5-3defaults for, 5-2levels for, 5-1list of, 5-2modifying, 5-2overriding, 5-2

Index-2
precedence of, 5-2, 5-4replication of, 5-2study-level, 5-2, 5-4undefined, 5-2user-level, 5-2
data entry user preferencesand date format, 5-6and non-updatable fields, 5-9defaults for, 5-5layout, 5-5list of, 5-6local database-level, 5-5
data extractand integrity of distributed data, 14-14 to 14-15enabling 3.1-style, 6-12
Data Extract ViewSnapshot, 14-14 to 14-15stable, 14-14 to 14-15
Data Extract View Maintenanceand integrity of distributed data, 14-14
data extract viewsgenerating, 6-10
databasesharing, 13-1
Database ServerWindows
opa_settings, A-2database trace session, C-16date
formats of, 5-6DCF
placeholder graphic, 3-31views, 3-32
DCF REPORT LABELS codelist, 3-31DCF STATUS CODES codelist, 3-30DCI Book
sequencing, 5-3using, in data entry, 5-3
deadlock detected, C-5Decrease Width button, 5-9default study
defined, Glossary-8DISC COLS2 codelist, 4-1DISC_FLEX1_VALUES codelist, 3-10DISC_FLEX2_VALUES codelist, 3-10discrepancies, 10-1
and integrity of distributed data, 14-14managing, at sharing location, 14-7resolution of, by data entry operator, 5-3
DISCREPANCY FUNCTIONS codelist, 3-3DISCREPANCY REV STATUS CODE codelist, 3-8,
3-14DISCREPANCY STATUS DM, 3-22DISCREPANCY STATUS SITE, 3-23discrete_val_grp_type_code, 7-25distributed study conduct
and data extract, 14-14 to 14-15and data integrity, definition, 14-14and lab definition, 14-15components of, 14-15
enforcing data integrity in, 14-13, 14-14planning, 14-16
EEnd of Form Beep, 5-6enrollment of patients
and integrity of distributed data, 14-14Enterprise Manager, 8-7environment variables, A-1 to A-7equipartitioned
defined, 9-4error messages, C-5 to C-6
Not using named package, C-5ORA-04020, C-5ORA-12223, C-5ORA-20009, C-6
execution statusbatch jobs, C-12
exp_resp_param.dat file, 9-11Export utility, 9-11
Ffield
non-updatable, in data entry, 5-9file viewing
configure application server, 11-2files
protection, B-1PSUB, 8-2
FLD RXCMCMCD RDCI DELETE codelist, 4-2FLD RXCMCMCD RDCI KEY codelist, 4-2FLD RXCMCMCD RDCM KEY codelist, 4-2FLD RXCMCMCD RESPONSE codelist, 4-2FORMS60_REPFORMAT registry setting, A-20FORMS60_USEREXITS registry setting, A-20freezing
and integrity of distributed data, 14-14full replication
Global Library, 14-10study definition, 14-11
function privilegesdefining, 3-3
Ggen_alter_partition script, 9-16gen_create_part_index script, 9-8gen_create_part_table script, 9-8gen_procs
syntax, 10-2gen_views, 6-10
running on UNIX, 6-11running on Windows, 6-11
genprocsrunning on UNIX, 10-3running on Windows, 10-3
Global Lab Replication menu, 14-15Global Library
and distributed study conduct, 14-16

Index-3
replication, 14-10, 14-16granting
program access, 1-12project access, 1-12
GRAPHICS60_PATH—, A-20
Iimp_resp_param.dat file, 9-12Import utility, 9-12Increase Width button, 5-9incremental replication
Global Library, 14-10study definition, 14-11
IND DISC COLS2 codelist, 4-2indexing, 9-1 to 9-21initialization error, C-13installation reference codelist
DISCREPANCY STATUS DM, 3-22DISCREPANCY STATUS SITE, 3-23
invalid objects, 13-24partitioning, 9-13
investigator assignmentand distributed study conduct, 14-5and integrity of distributed data, 14-14at a sharing location, 14-6
Items Not Displayed, 5-9
KKernel32.DLL error, C-13key templates
domain, 6-5
Llab assignment criteria (LAC)
and location relationship, 14-15Lab Panel
and location relationship, 14-15lab reference ranges
and distributed study conduct, 14-15, 14-16lab units
and location relationships, 14-15Labs and Ranges Replication menu, 14-16launchps.sh file, D-2layout
Log-Inediting function of, 5-7 to 5-8editing instructions, 5-9modifying RDCI window in, 5-8modifying RDCM window in, 5-9modifying Smart RDCM window in, 5-10
layout definitions, 3-4list_study_resp_cnt_part script, 9-15LOCAL registry setting, A-20location codes, 13-6location, in distributed study conduct
and lab information, 14-15sharing, 14-6 to 14-8
tasks, 14-7
study-owningtasks, 13-2
lockingand integrity of distributed data, 14-14profile criteria, 3-6
Log-Inand integrity of distributed data, 14-13at sharing location, 14-7navigating during, 5-8
Log-In Layout Editor menu option, 5-8
MMaintain Partition Mapping Tables window, 9-7MANHD DISC COLS2 codelist, 4-2Manual Discrepancy in Browse parameter, 5-3master profiles, 3-5MC CDS SORT ORDER codelist, 4-1MC COLUMNS codelist, 4-1menus
modifying, 2-8More button, 5-26MULTI DISC COLS2 codelist, 4-2
NNLS_DATE_FORMAT, A-2NLS_DATE_FORMAT environment variable, A-8NLS_DATE_FORMAT registry setting, A-21NLS_LANG, A-2NLS_LANG environment variable, A-8NOLOGGING clause, 9-9non-blocking PSUB jobs, 8-2
Oobjects
invalid, 13-24OC_DE_FIELDFONT registry setting, A-21OC_DE_TEXTFONT registry setting, A-21OC_PSUB_MAP_LOGDIR registry setting, A-21OC_RS_MAP_LOGDIR registry setting, A-21OCL MC PREFS codelist, 4-2ocl_add_user.sql script, 1-5OCL_DE_CONFIG, 7-9OCL_STATE codelist, 3-18OCL_STATE reference codelist, 9-3OCLSASCR user group
and SAS data extract views, 1-17oclupg32to40opt5.sql script, 9-20OPA_BROWSER registry setting, A-21OPA_CUSTOM_DOC registry setting, A-21OPA_DOC_DIR registry setting, A-21OPA_HTM_EDITOR registry setting, A-21OPA_PDF_EDITOR registry setting, A-21OPA_POSTSCRIPT_EDITOR registry setting, A-21OPA_RWCGI60_URL registry setting, A-21opa_settings
Windows back end, A-2opa_settings script, A-4
checking for errors, A-4

Index-4
opapps directory, B-1opapps userid, D-1operating system passwords, 1-21optimization, D-3Oracle accounts, 5-5
assign access, 1-12deleting, 1-13for studies, 1-12revoking, 1-13to Programs or Projects, 1-12
Ppage dimension, 5-2, 5-4partitioning, 9-1 to 9-21
compile_all_invalid.sql, 9-13cost-based statistics, 9-9database trigger, 9-13defined, 9-4disk space, 9-5invalid objects, 9-13merging, 9-7percent free, 9-9performance, 9-5preparing for, 9-11pruning, 9-20redo log file, 9-9storage clauses, 9-7tablespaces, 9-11, 9-17tuning, 9-20
passwordsauditing, 1-21characters allowed, 1-19operating system, 1-21schema or role, 1-19security, 1-21setting up, 1-19
Patient Positionsand integrity of distributed data, 14-13setting up for distributed study conduct, 14-4
patientspersonal details of in distributed study
conduct, 14-6planned events
in the Smart RDCM window, 5-10populate_part_map_table script, 9-6privileges
of data entry operator, 5-3procedures
deleting inactive, 10-4production mode, C-6.profile, 1-5.profile file, 1-19profile views, 3-6profiles, 3-5
criteria, 3-6locking criteria, 3-6setting up, 3-5 to 3-9
PSLAUNCH error, C-14PSUB
and character sets, on Windows, A-2and opa_settings on Windows, A-2asynchronous jobs, 8-2blocking jobs, 8-3create log directory, 1-3definition, 8-1execution permission, 1-4files created, 8-2non-blocking jobs, 8-2
checking, 8-3troubleshooting, C-7
PSUB jobsprinting on UNIX, 8-12
PSUB process, 8-9 to 8-13
QQuestion Groups
repeating, 5-3questions
attributes of, 7-27
RRDC
customize workspace, 5-25RDCI sort order, 5-6RDCM, 5-8, 5-9, 5-10RDCM window, 5-9rdcpb_client.sql
customize CRF Column Header, 5-25rebuild_respt_index script, 9-20Received DCMs
updating locked, 5-3record type key
code_environment, A-5db_code_pair, A-5db_env_setting, A-5opa_home, A-4oratab_filespec, A-4remote_db_home, A-4tnsnames_filespec, A-4
recreating symbolic links, D-1reference codelist
OCL_DE_CONFIG, 7-9reference codelists
design, 7-2installation, 7-2, 7-20
and distributed study conduct, 13-2local, 7-2OCL_STATE, 9-3SOURCE LOCATION CODE, 13-6system, 7-2TMS_SOURCE_MAT_VIEWS, 7-32
registry settings, A-11relink_rxc.log file, D-1relink_rxc.sh script, D-1relinking server code, D-1relocating Oracle Clinical, D-2repeat default, 5-3

Index-5
replacement parameters, and standard text, 3-37replication
conflict resolution, 13-20enabling studies for, 14-10Global Library, 14-10
incremental, 14-16reconciling data, 13-19scheduling, 14-15, 14-17scripts, 13-12setup requirements, 13-4setup tasks, 13-10source location code, 13-6study definition, 14-11study design, 13-15, 14-6, 14-10symmetric
troubleshooting, 13-22tables, 13-6, 13-21
REPORT_SERVER reference codelist, 1-9, 1-11resolution type codes
resolution, of discrepancies, 10-1RESPONSES table
validation status, 10-1Responses table, 9-1 to 9-21resptrig script, 9-13Revert button, 5-9review status codes
defining, 3-14roles
creating new, 2-6RXA_READ account, 13-5RXC_BATCH_QUEUE environment variable, A-8RXC_BDL_DIR environment variable, A-8RXC_DEBUG_BUFFER_SIZE environment
variable, A-8RXC_DISC_REP, 1-19RXC_DISC_REP account, 13-5RXC_DISC_REP schema, 1-19RXC_IMMED_QUEUE environment variable, A-8RXC_INSTALL
and USER_QUERIES table, 1-18RXC_LOG, A-9
and PSUB log directory, 1-3RXC_MAA, 1-19RXC_MAA schema, 1-19RXC_MAA_TAB_SPACE environment variable, A-9RXC_NOW_STRING environment variable, A-9RXC_PD, 1-19RXC_PD schema, 1-19RXC_PRINTER environment variable, A-9RXC_REP, 1-19RXC_REP account, 13-5RXC_REP schema, 1-19RXC_SAS_BATCH_QUEUE environment
variable, A-9RXC_SAS_CONNECT environment variable, A-9RXC_USER
location for SAS data extract views, 1-17rxc_user directory, 1-17RXC_USER environment variable, A-10rxcchkobj.sh utility, D-2
rxcdcf.bmp, 3-31rxcdelproc, 10-4RXCLIN_MOD, 1-19RXCLIN_MOD role, 1-19RXCPROD
and execution permission, 1-4using PSUB to create OS account, 1-2
RXCPROD accountPATH, 1-5
SSAS data extract views
adding users on UNIX, 1-17location, 1-17
SAS datasets, 1-17SAS_VIEW directory, B-1SASORA, A-10schema
RXC_DISC_REP, 1-19RXC_MAA, 1-19RXC_PD, 1-19RXC_REP, 1-19RXCLIN_MOD, 1-19
scriptlogin, 1-18
scriptsocl_add_user.sql, 1-5
Second-Pass comparison failure alert, 5-3seed data
updating manually, D-2seed number, 13-6sequence generator, 13-6sequencing
DCI Book, 5-3of RDCIs, 5-6
server coderelinking, D-1
set_pwd utility, 1-20site assignment
and distributed study conduct, 14-5and integrity of distributed data, 14-14at a sharing location, 14-6
site plansand integrity of distributed data, 14-14at a sharing location, 14-7
Smart RDCM window, 5-8, 5-10SOURCE LOCATION CODE reference codelist, 13-6SQL
adding to profiles, 3-7standard text
adding replacement parameters, 3-37creating, 3-35editing, 3-37setting up, 3-35
statistics, cost-based, 9-9studies
enabling for replication, 14-10study definition
and ownership, 14-6

Index-6
replication, 14-11study design
and ownership, 14-6replication, 13-15
study plan, and integrity of distributed data, 14-14STUDY_REPLICATION_JOBS table, 14-13Sub Type, and standard text, 3-36sub-event
number, in Smart RDCM window, 5-10symbolic links, D-1symmetric replication
enabling, 13-16system accounts, 1-3System malfunctions, C-6
Ttablespaces, E-1
partitioning, 9-17TEMP environment variable, A-10test mode, C-6text type, 3-36Thesaurus Management System
see also TMSTMS
tablespacesTMS_SOURCE_MAT_VIEWS reference
codelist, 7-32Treatment Change Reason Type Codes, 7-33tuning
partitions, 9-20type codes, 10-1
UUnenrolled Patient Alert parameter, 5-3UNI DISC COLS2 codelist, 4-1Univariate Beep, 5-6Univariate Failure Alert, 5-6Univariate Failure Alert parameter, 5-3UNIX passwords, 1-21Update mode, 5-3update privileges
and review status settings, 3-9setting for discrepancies, 3-8
user accountscreating on UNIX, 1-3creating on Windows, 1-3general, 1-3requirements, 8-1
user groupssetup, 3-2
User menu, 2-8USER_BV_JOB environment variable, A-10USER_QUERIES table
creating, 1-18
Vvalidation procedures
generating, 10-2
validation statuscomputing, 10-1
variables, and standard text, 3-37visit
number, in Smart RDCM window, 5-10
Wwildcards
to grant access to Programs and Projects, 1-12Windows passwords, 1-22
XXhelp, 5-26
topic files, 5-27