oracle advanced outboundoracle advanced outbound implementation guide release 11i august 2002 part...
TRANSCRIPT

Oracle Advanced Outbound
Implementation Guide
Release 11i
August 2002
Part No. B10176-01

Oracle Advanced Outbound Implementation Guide, Release 11i
Part No. B10176-01
Copyright © 1999, 2002, Oracle Corporation. All rights reserved.
The Programs (which include both the software and documentation) contain proprietary information of Oracle Corporation; they are provided under a license agreement containing restrictions on use and disclosure and are also protected by copyright, patent and other intellectual and industrial property laws. Reverse engineering, disassembly or decompilation of the Programs, except to the extent required to obtain interoperability with other independently created software or as specified by law, is prohibited.
The information contained in this document is subject to change without notice. If you find any problems in the documentation, please report them to us in writing. Oracle Corporation does not warrant that this document is error-free. Except as may be expressly permitted in your license agreement for these Programs, no part of these Programs may be reproduced or transmitted in any form or by any means, electronic or mechanical, for any purpose, without the express written permission of Oracle Corporation.
If the Programs are delivered to the U.S. Government or anyone licensing or using the programs on behalf of the U.S. Government, the following notice is applicable:
Restricted Rights Notice Programs delivered subject to the DOD FAR Supplement are "commercial computer software" and use, duplication, and disclosure of the Programs, including documentation, shall be subject to the licensing restrictions set forth in the applicable Oracle license agreement. Otherwise, Programs delivered subject to the Federal Acquisition Regulations are "restricted computer software" and use, duplication, and disclosure of the Programs shall be subject to the restrictions in FAR 52.227-19, Commercial Computer Software - Restricted Rights (June, 1987). Oracle Corporation, 500 Oracle Parkway, Redwood City, CA 94065.
The Programs are not intended for use in any nuclear, aviation, mass transit, medical, or other inherently dangerous applications. It shall be the licensee's responsibility to take all appropriate fail-safe, backup, redundancy, and other measures to ensure the safe use of such applications if the Programs are used for such purposes, and Oracle Corporation disclaims liability for any damages caused by such use of the Programs.
Oracle is a registered trademark of Oracle Corporation. Other names may be trademarks of their respective owners.

iii
Contents
Send Us Your Comments ................................................................................................................... xi
Preface........................................................................................................................................................... xiii
Audience for This Guide ..................................................................................................................... xiiiHow To Use This Guide ...................................................................................................................... xiiiOther Information Sources ................................................................................................................. xivDo Not Use Database Tools to Modify Oracle Applications Data ............................................... xixAbout Oracle ........................................................................................................................................ xix
1 Introduction
1.1 Oracle Interaction Center Overview................................................................................... 1-11.1.1 Oracle Advanced Inbound............................................................................................ 1-21.1.2 Oracle Advanced Outbound ........................................................................................ 1-31.1.3 Oracle eMail Center ....................................................................................................... 1-41.1.4 Oracle Scripting .............................................................................................................. 1-41.1.5 Oracle Interaction Center Intelligence ........................................................................ 1-51.2 Oracle Advanced Outbound Concepts .............................................................................. 1-61.2.1 Area Code Mapping ...................................................................................................... 1-71.2.2 Calling Calendars........................................................................................................... 1-81.2.3 Campaign Schedules ................................................................................................... 1-101.2.4 Campaigns .................................................................................................................... 1-101.2.5 Dialing Methods........................................................................................................... 1-111.2.6 Dialing Options ............................................................................................................ 1-121.2.7 Do Not Call (DNC) ...................................................................................................... 1-12

iv
1.2.8 Importing Lists.............................................................................................................. 1-121.2.9 List Entries..................................................................................................................... 1-121.2.10 Lists................................................................................................................................. 1-131.2.11 List Source Types.......................................................................................................... 1-131.2.12 Outcome, Result, and Reason Codes......................................................................... 1-151.2.13 Phone Formats .............................................................................................................. 1-181.2.14 Recycling........................................................................................................................ 1-191.2.15 Recycling Algorithms .................................................................................................. 1-211.2.16 Recycling Algorithm Actions Performed if no Sub-Condition Are Met .............. 1-221.2.17 Recycling Algorithm Conditions ............................................................................... 1-221.2.18 Recycling Algorithm Pre and Post-Processing Actions.......................................... 1-231.2.19 Recycling Algorithm Sub-Conditions ....................................................................... 1-241.2.20 Record Filter .................................................................................................................. 1-241.2.21 Release Priority ............................................................................................................. 1-251.2.22 Release Strategy............................................................................................................ 1-261.2.22.1 Quantum Release Strategy................................................................................... 1-261.2.22.2 Quota Release Strategy......................................................................................... 1-271.2.23 Generating Reports ...................................................................................................... 1-271.2.24 Server Groups ............................................................................................................... 1-291.2.25 Subsets............................................................................................................................ 1-291.2.26 Time Zone Management ............................................................................................. 1-311.2.27 Time Zone Mapping .................................................................................................... 1-311.2.28 Trading Community Architecture ............................................................................. 1-321.2.29 Validation Report ......................................................................................................... 1-361.2.30 Validation Rules ........................................................................................................... 1-361.2.31 VDU Configuration...................................................................................................... 1-391.2.32 Voice Messages ............................................................................................................. 1-40
2 Technology, Requirements, and Performance
2.1 Advanced Outbound Architectural Overview ................................................................. 2-12.1.1 Advanced Outbound Physical Architecture .............................................................. 2-12.1.1.1 Oracle Advanced Outbound Architecture Diagram.......................................... 2-22.1.2 Advanced Outbound Servers ....................................................................................... 2-42.1.2.1 The Advanced Outbound Central Server............................................................ 2-42.1.2.2 The Advanced Outbound Dial Server ................................................................. 2-7

v
2.1.3 Oracle Marketing Online Integration........................................................................ 2-102.1.3.1 List Integration ...................................................................................................... 2-102.1.3.2 Campaign Schedules ............................................................................................ 2-122.1.3.3 List Entries ............................................................................................................. 2-122.2 Minimum Software Requirements.................................................................................... 2-142.3 Minimum Hardware Requirements ................................................................................. 2-162.4 Sizing Parameters ................................................................................................................ 2-18
3 Dependency Requirements and Verification
3.1 Mandatory Dependencies .................................................................................................... 3-1
4 Implementation Overview
4.1 Implementation Planning .................................................................................................... 4-14.1.1 Collecting Information .................................................................................................. 4-14.1.2 Setup Planning................................................................................................................ 4-34.2 Implementation Prerequisites ............................................................................................. 4-74.3 Process Description ............................................................................................................. 4-11
5 Implementation Tasks
5.1 Creating and Configuring Advanced Outbound Users .................................................. 5-15.1.1 Creating an Employee in the Enterprise Database.................................................... 5-55.1.2 Creating a User and Linking the User to the Employee........................................... 5-65.1.3 Creating a Sales Group.................................................................................................. 5-85.1.4 Creating a Resource Group........................................................................................... 5-95.1.5 Importing a CRM Resource ........................................................................................ 5-105.1.6 Setting User Profile Options for Advanced Outbound Telephony ...................... 5-125.2 Splicing Advanced Outbound Into Your Database........................................................ 5-145.3 Installing and Configuring the CTI Middleware............................................................ 5-155.3.1 Installing the CTI Middleware ................................................................................... 5-155.3.2 Installing the CT-Connect Client ............................................................................... 5-165.3.3 Configuring the CTI Middleware .............................................................................. 5-175.4 Configuring TableSpaces in Your Database.................................................................... 5-195.5 Implementing the Advanced Outbound Servers ........................................................... 5-205.5.1 Creating the Telephony Adapter Server and Configuring its Parameters .......... 5-20

vi
5.5.2 Creating the AO Central Server and Configure its Parameters ............................ 5-235.5.3 Creating the AO Dial Server and Configure its Parameters .................................. 5-305.5.4 Starting and Stopping the Servers ............................................................................. 5-345.6 Installing the VDU Boards and the Dialogic Software................................................... 5-355.7 Setting up Oracle Interaction History............................................................................... 5-375.7.1 Defining Outcome Codes ............................................................................................ 5-375.7.2 Defining Result Codes ................................................................................................. 5-385.7.3 Defining Reason Codes ............................................................................................... 5-395.7.4 Mapping Outcome Codes to Result Codes .............................................................. 5-405.7.5 Mapping Result Codes to Reason Codes .................................................................. 5-405.8 Setting up Oracle Marketing Online................................................................................. 5-415.8.1 Refreshing Advanced Outbound Record Counts.................................................... 5-415.8.2 Defining Advanced Outbound List Source Types .................................................. 5-425.8.3 Creating a Custom Setup for Advanced Outbound Campaign Schedules ......... 5-455.8.4 Creating an OMO Campaign...................................................................................... 5-465.8.5 Creating an OMO Campaign Schedule..................................................................... 5-475.8.6 Invoking the Concurrent Processor for OMO List Generation ............................. 5-485.8.7 Configuring an OMO List ........................................................................................... 5-495.8.7.1 Creating a List in Oracle Marketing Online ...................................................... 5-505.8.7.2 Importing Record Sources Into Oracle Marketing Online .............................. 5-515.8.7.3 Adding Record Sources to the OMO List .......................................................... 5-525.8.7.4 Generating the OMO List..................................................................................... 5-545.8.8 Configuring an OMO Target Group.......................................................................... 5-555.8.8.1 Adding Generated Lists to the Target Group ................................................... 5-555.8.8.2 Generating the Target Group and Setting its State to “Locked”.................... 5-565.8.9 Associating a Call Script to a Campaign Schedule.................................................. 5-575.8.10 Associating Outcome Codes to the Campaign Schedule ....................................... 5-585.8.11 Performing the Agent — Campaign Schedule Assignment .................................. 5-595.8.11.1 Assigning Campaign Schedules to Agents ....................................................... 5-595.8.11.2 Assigning Agents to Campaign Schedules ....................................................... 5-605.8.11.3 Assigning Campaign Schedules to Resource Groups...................................... 5-615.8.11.4 Assigning Resource Groups to Campaign Schedules...................................... 5-625.9 Configuring Oracle Advanced Outbound ....................................................................... 5-645.9.1 Configuring the Logical VDUs................................................................................... 5-645.9.2 Setting the Server Time Zone ..................................................................................... 5-68

vii
5.9.3 Defining Area Code and Time Zone Mapping Data .............................................. 5-685.9.3.1 Creating Area Code Mappings ........................................................................... 5-695.9.3.2 Creating Time Zone Mappings ........................................................................... 5-705.9.4 Defining Calling Calendars ........................................................................................ 5-725.9.4.1 Creating Country Calendars ............................................................................... 5-735.9.4.2 Creating Holidays or Exceptions for Country Calendars ............................... 5-765.9.4.3 Creating Region Calendars.................................................................................. 5-785.9.4.4 Creating Holidays or Exceptions for Region Calendars ................................. 5-805.9.4.5 Creating User Defined Calendars....................................................................... 5-835.9.4.6 Creating Holidays or Exceptions for User Defined Calendars ...................... 5-865.9.5 Creating Recycling Algorithms.................................................................................. 5-895.9.5.1 Creating Recycling Algorithms by Copying an Existing Algorithm ............ 5-895.9.5.2 Creating Completely new Recycling Algorithms ............................................ 5-915.9.5.3 Using the Recycling Algorithm Shadow Feature............................................. 5-925.9.5.4 Adding Pre or Post-Processing Actions............................................................. 5-925.9.5.5 Adding Algorithm Conditions............................................................................ 5-945.9.6 Adding Actions Performed if no Sub-Conditions Are Met ................................... 5-965.9.7 Creating Record Filters................................................................................................ 5-985.9.8 Creating Validation Rules......................................................................................... 5-1005.9.9 Defining Campaign Schedule Parameters.............................................................. 5-1025.9.10 Defining Target Group Parameters ......................................................................... 5-1055.9.11 Defining Automated Messaging.............................................................................. 5-1085.10 Configuring Oracle Universal Work Queue.................................................................. 5-110
6 Diagnostics and Troubleshooting
6.1 Diagnostic Tools .................................................................................................................... 6-16.1.1 Using Oracle ICSM to Diagnose Issues....................................................................... 6-16.1.1.1 Starting and Stopping Servers With ICSM.......................................................... 6-26.1.1.2 Setting Server Log Levels With ICSM.................................................................. 6-26.1.1.3 Setting Trace File Options With ICSM................................................................. 6-36.1.1.4 Checking Server Log Messages With ICSM........................................................ 6-56.1.1.5 Checking Server Parameter Settings With ICSM ............................................... 6-66.1.2 Using the Advanced Outbound HTML Admin Console to Diagnose Issues ....... 6-66.1.2.1 Checking Campaign Schedule Parameters in Advanced Outbound.............. 6-76.1.2.2 Checking Target Group Parameters in Advanced Outbound ......................... 6-9

viii
6.1.3 Using the Oracle Marketing Online HTML Admin Console to Diagnose Issues.......... 6-12
6.1.3.1 Checking Campaign Schedule and Target Group Parameters....................... 6-126.1.3.2 Checking the Agent to Campaign Schedule Assignment ............................... 6-136.1.4 Using Java Console Logs to Diagnose Issues ........................................................... 6-136.2 Troubleshooting Advanced Outbound ............................................................................ 6-146.2.1 Servers Won’t Start....................................................................................................... 6-156.2.2 Validation Failed .......................................................................................................... 6-156.2.2.1 Quick Tips .............................................................................................................. 6-156.2.3 Validation Doesn’t Fail, but no Records are Returned ........................................... 6-176.2.4 Can’t See Advanced Outbound Telephony Media Node....................................... 6-176.2.5 No Campaign Schedules Appear............................................................................... 6-186.2.6 Queue Count Doesn’t Update .................................................................................... 6-186.2.7 Central Server Isn’t Pulling Records ......................................................................... 6-196.2.8 No More Callable Records for an Agent................................................................... 6-196.2.9 Agent Cannot Make Progressive Calls...................................................................... 6-206.2.10 Oracle Telephony Manager Cannot Get Media Items From Advanced Outbound......
6-206.2.11 Oracle Telephony Manager Received Two Media Items for the Same Advanced
Outbound Call 6-216.2.12 Media Items Were Not Closed ................................................................................... 6-216.2.13 Advanced Outbound Fails in the Dial Server, but no "Enabler Related Errors" Are
Generated 6-216.2.14 Predictive Call Fails in the Dial Server and Call Outcome is "no ringback", "no
dialtone", etc. 6-226.2.15 Predictive Call Goes Through, but Transfer to Agent Fails ................................... 6-226.3 Advanced Outbound Central Server Troubleshooting.................................................. 6-226.3.1 Cannot Start the Server................................................................................................ 6-226.3.2 AOCS Starts but Does not get Records ..................................................................... 6-236.4 Advanced Outbound Dial Server Troubleshooting ....................................................... 6-236.4.1 Server Does Not Start................................................................................................... 6-236.4.2 Agent Was Not Able to Login .................................................................................... 6-246.4.3 Agent Cannot Get Work.............................................................................................. 6-246.4.4 Dials Cannot be Placed................................................................................................ 6-246.4.5 Receiving Too Few Records for Target Group......................................................... 6-256.4.6 Receiving no Records................................................................................................... 6-25

ix
6.4.7 Failed Validation .......................................................................................................... 6-256.4.7.1 Quick Tips .............................................................................................................. 6-256.4.7.2 OMO source types do not exist or do not have the required columns. ........ 6-266.4.8 Target Group Stuck in Validating Status.................................................................. 6-276.4.9 No Longer Seeing IEO Log Messages ....................................................................... 6-27
A Seed Data
A.1 Adding Do Not Use Reason Codes .................................................................................... A-1A.2 Adding List Priority Values................................................................................................. A-2A.3 Setting the Positive Flag for Outcome and Result Codes................................................ A-3
Glossary

x

xi
Send Us Your Comments
Oracle Advanced Outbound Implementation Guide, Release 11i
Part No. B10176-01
Oracle Corporation welcomes your comments and suggestions on the quality and usefulness of this document. Your input is an important part of the information used for revision.
■ Did you find any errors?■ Is the information clearly presented?■ Do you need more information? If so, where?■ Are the examples correct? Do you need more examples?■ What features did you like most?
If you find any errors or have any other suggestions for improvement, please indicate the document title and part number, and the chapter, section, and page number (if available). You can send com-ments to us in the following ways:
■ Electronic mail: [email protected] ■ FAX: telephone number Attn: Oracle Your Product Name Here■ Postal service:
Oracle Corporation Oracle Your Product Name Here DocumentationStreet Address, MailstopCity, State Postal CodeCountry
If you would like a reply, please give your name, address, telephone number, and (optionally) elec-tronic mail address.
If you have problems with the software, please contact your local Oracle Support Services.

xii

xiii
Preface
Audience for This GuideWelcome to Release 11i of the Oracle Advanced Outbound Implementation Guide.
This guide assumes you have a working knowledge of the following:
■ The principles and customary practices of your business area.
■ Oracle Advanced Outbound
If you have never used Oracle Advanced Outbound, Oracle suggests you attend one or more of the Oracle Advanced Outbound training classes available through Oracle University.
■ The Oracle Applications graphical user interface.
To learn more about the Oracle Applications graphical user interface, read the Oracle Applications User’s Guide.
See Other Information Sources for more information about Oracle Applications product information.
How To Use This GuideThis guide contains the information you need to understand and use Oracle Advanced Outbound.
■ Chapter 1 - Provides an introduction to the Oracle Interaction Center suite of products and a list of important concepts for Oracle Advanced Outbound.
■ Chapter 2 - Provides Advanced Outbound architecture information, minimum software requirements, minimum hardware requirements, and sizing parameters.

xiv
■ Chapter 3 - Provides dependency requirements for Advanced Outbound.
■ Chapter 4 - Provides an overview of the implementation process.
■ Chapter 5 - Provides detailed steps for each implementation task mentioned in Chapter 4.
■ Glossary - Provides a list of the terms used in this guide and a definition for each.
Documentation Accessibility Our goal is to make Oracle products, services, and supporting documentation accessible, with good usability, to the disabled community. To that end, our documentation includes features that make information available to users of assistive technology. This documentation is available in HTML format, and contains markup to facilitate access by the disabled community. Standards will continue to evolve over time, and Oracle Corporation is actively engaged with other market-leading technology vendors to address technical obstacles so that our documentation can be accessible to all of our customers. For additional information, visit the Oracle Accessibility Program Web site at http://www.oracle.com/accessibility/.
Accessibility of Code Examples in Documentation JAWS, a Windows screen reader, may not always correctly read the code examples in this document. The conventions for writing code require that closing braces should appear on an otherwise empty line; however, JAWS may not always read a line of text that consists solely of a bracket or brace.
Accessibility of Links to External Web Sites in Documentation This documentation may contain links to Web sites of other companies or organizations that Oracle Corporation does not own or control. Oracle Corporation neither evaluates nor makes any representations regarding the accessibility of these Web sites.
Other Information SourcesYou can choose from many sources of information, including online documentation, training, and support services, to increase your knowledge and understanding of Oracle Advanced Outbound.
If this guide refers you to other Oracle Applications documentation, use only the Release 11i versions of those guides.

xv
Online DocumentationAll Oracle Applications documentation is available online (HTML or PDF). Online help patches are available on MetaLink.
Related DocumentationOracle Advanced Outbound shares business and setup information with other Oracle Applications products. Therefore, you may want to refer to other product documentation when you set up and use Oracle Advanced Outbound.
You can read the documents online by choosing Library from the expandable menu on your HTML help window, by reading from the Oracle Applications Document Library CD included in your media pack, or by using a Web browser with a URL that your system administrator provides.
If you require printed guides, you can purchase them online from the Oracle Store.
Documents Related to All Products
Oracle Applications User’s GuideThis guide explains how to enter data, query, run reports, and navigate using the graphical user interface (GUI) available with this release of Oracle Advanced Outbound (and any other Oracle Applications products). This guide also includes information on setting user profiles, as well as running and reviewing reports and concurrent processes.
You can access this user’s guide online by choosing ”Getting Started with Oracle Applications” from any Oracle Applications help file.
Documents Related to This ProductOracle Interaction Center Server Manager Implementation Guide
Oracle Interaction Center Concepts and Procedures Guide
Oracle Marketing Online Implementation Guide
Oracle Marketing Online Concepts and Procedures Guide
Oracle TeleSales Implementation Guide
Oracle TeleSales Concepts and Procedures Guide
Oracle Universal Work Queue Implementation Guide
Oracle Universal Work Queue Concepts and Procedures Guide

xvi
Installation and System Administration
Oracle Applications ConceptsThis guide provides an introduction to the concepts, features, technology stack, architecture, and terminology for Oracle Applications Release 11i. It provides a useful first book to read before an installation of Oracle Applications. This guide also introduces the concepts behind Applications-wide features such as Business Intelligence (BIS), languages and character sets, and Self-Service Web Applications.
Installing Oracle ApplicationsThis guide provides instructions for managing the installation of Oracle Applications products. In Release 11i, much of the installation process is handled using Oracle Rapid Install, which minimizes the time to install Oracle Applications, the Oracle8 technology stack, and the Oracle8i Server technology stack by automating many of the required steps. This guide contains instructions for using Oracle Rapid Install and lists the tasks you need to perform to finish your installation. You should use this guide in conjunction with individual product user’s guides and implementation guides.
Oracle Applications Supplemental CRM Installation StepsThis guide contains specific steps needed to complete installation of a few of the CRM products. The steps should be done immediately following that tasks given in the Installing Oracle Applications guide.
Upgrading Oracle ApplicationsRefer to this guide if you are upgrading your Oracle Applications Release 10.7 or Release 11.0 products to Release 11i. This guide describes the upgrade process and lists database and product-specific upgrade tasks. You must be either at Release 10.7 (NCA, SmartClient, or character mode) or Release 11.0, to upgrade to Release 11i. You cannot upgrade to Release 11i directly from releases prior to 10.7.
Maintaining Oracle ApplicationsUse this guide to help you run the various AD utilities, such as AutoUpgrade, AutoPatch, AD Administration, AD Controller, AD Relink, License Manager, and others. It contains how-to steps, screenshots, and other information that you need to run the AD utilities. This guide also provides information on maintaining the Oracle applications file system and database.

xvii
Oracle Applications System Administrator’s GuideThis guide provides planning and reference information for the Oracle Applications System Administrator. It contains information on how to define security, customize menus and online help, and manage concurrent processing.
Oracle Alert User’s GuideThis guide explains how to define periodic and event alerts to monitor the status of your Oracle Applications data.
Oracle Applications Developer’s GuideThis guide contains the coding standards followed by the Oracle Applications development staff. It describes the Oracle Application Object Library components needed to implement the Oracle Applications user interface described in the Oracle Applications User Interface Standards for Forms-Based Products. It also provides information to help you build your custom Oracle Forms Developer 6i forms so that they integrate with Oracle Applications.
Oracle Applications User Interface Standards for Forms-Based ProductsThis guide contains the user interface (UI) standards followed by the Oracle Applications development staff. It describes the UI for the Oracle Applications products and how to apply this UI to the design of an application built by using Oracle Forms.
Other Implementation Documentation
Oracle eTechnical Reference ManualsEach eTechnical Reference Manual (eTRM) contains database diagrams and a detailed description of database tables, forms, reports, and programs for a specific Oracle Applications product. This information helps you convert data from your existing applications, integrate Oracle Applications data with non-Oracle applications, and write custom reports for Oracle Applications products. Oracle eTRM is available on Metalink
Oracle Applications Message Reference ManualThis manual describes Oracle Applications messages. This manual is available in HTML format on the documentation CD-ROM for Release 11i.
xviii
Oracle CRM Application Foundation Implementation GuideMany CRM products use components from CRM Application Foundation. Use this guide to correctly implement CRM Application Foundation.
Training and Support
TrainingOracle offers training courses to help you and your staff master Oracle Advanced Outbound and reach full productivity quickly. You have a choice of educational environments. You can attend courses offered by Oracle University at any one of our many Education Centers, you can arrange for our trainers to teach at your facility, or you can use Oracle Learning Network (OLN), Oracle University's online education utility. In addition, Oracle training professionals can tailor standard courses or develop custom courses to meet your needs. For example, you may want to use your organization structure, terminology, and data as examples in a customized training session delivered at your own facility.
SupportFrom on-site support to central support, our team of experienced professionals provides the help and information you need to keep Oracle Advanced Outbound working for you. This team includes your Technical Representative, Account Manager, and Oracle’s large staff of consultants and support specialists with expertise in your business area, managing an Oracle8i server, and your hardware and software environment.
OracleMetaLinkOracleMetaLink is your self-service support connection with web, telephone menu, and e-mail alternatives. Oracle supplies these technologies for your convenience, available 24 hours a day, 7 days a week. With OracleMetaLink, you can obtain information and advice from technical libraries and forums, download patches, download the latest documentation, look at bug details, and create or update TARs. To use MetaLink, register at (http://metalink.oracle.com).
Alerts: You should check OracleMetaLink alerts before you begin to install or upgrade any of your Oracle Applications. Navigate t o t he Alerts page as follows: Technical Libraries/ERP Applications/Applications Installation and Upgrade/Alerts.
Self-Service Toolkit: You may also find information by navigating to the Self-Service Toolkit page as follows: Technical Libraries/ERP Applications/Applications Installation and Upgrade.

xix
Do Not Use Database Tools to Modify Oracle Applications DataOracle STRONGLY RECOMMENDS that you never use SQL*Plus, Oracle Data Browser, database triggers, or any other tool to modify Oracle Applications data unless otherwise instructed.
Oracle provides powerful tools you can use to create, store, change, retrieve, and maintain information in an Oracle database. But if you use Oracle tools such as SQL*Plus to modify Oracle Applications data, you risk destroying the integrity of your data and you lose the ability to audit changes to your data.
Because Oracle Applications tables are interrelated, any change you make using Oracle Applications can update many tables at once. But when you modify Oracle Applications data using anything other than Oracle Applications, you may change a row in one table without making corresponding changes in related tables. If your tables get out of synchronization with each other, you risk retrieving erroneous information and you risk unpredictable results throughout Oracle Applications.
When you use Oracle Applications to modify your data, Oracle Applications automatically checks that your changes are valid. Oracle Applications also keeps track of who changes information. If you enter information into database tables using database tools, you may store invalid information. You also lose the ability to track who has changed your information because SQL*Plus and other database tools do not keep a record of changes.
About OracleOracle Corporation develops and markets an integrated line of software products for database management, applications development, decision support, and office automation, as well as Oracle Applications, an integrated suite of more than 160 software modules for financial management, supply chain management, manufacturing, project systems, human resources and customer relationship management.
Oracle products are available for mainframes, minicomputers, personal computers, network computers and personal digital assistants, allowing organizations to integrate different computers, different operating systems, different networks, and even different database management systems, into a single, unified computing and information resource.
Oracle is the world’s leading supplier of software for information management, and the world’s second largest software company. Oracle offers its database, tools, and applications products, along with related consulting, education, and support services, in over 145 countries around the world.

xx

Introduction 1-1
1Introduction
This topic group includes:
■ An Overview of Oracle Interaction Center products
■ Oracle Advanced Outbound Concepts
1.1 Oracle Interaction Center OverviewEvery customer interaction — a telephone call, an e-mail message, or a Web chat conversation — presents an opportunity to win new business or improve customer satisfaction. The Oracle Interaction Center supports the management and processing of customer relationship activity across all channels of customer contact.
The Oracle Interaction Center integrates with several customer relationship business applications in the Oracle E-Business suite. The Oracle Interaction Center consists of several modules. The modules relating to inbound telephony and outbound telephony are bundled separately.
The Oracle Interaction Center allows access to centralized customer information and business application functionality. Oracle Interaction Center integrates with front office (known as Customer Relationship Management or CRM) and back office (Enterprise Relationship Planning or ERP) applications, thereby enabling a workflow powered, end-to-end strategic e-business solution.
The Oracle Interaction Center products include:
■ Oracle Advanced Inbound
■ Oracle Advanced Outbound
■ Oracle eMail Center
■ Oracle Scripting

Oracle Interaction Center Overview
1-2 Oracle Advanced Outbound Implementation Guide
■ Oracle Interaction Center Intelligence
1.1.1 Oracle Advanced InboundOracle Advanced Inbound is required to telephony enable business applications in the Oracle eBusiness suite. Telephony-enabled means that the product has the capability of communicating with a telephone system for inbound and or outbound calls via the CTI middleware that handles the messaging between a telephone switch and the user's application. Oracle Advanced Outbound provides the corresponding outbound telephony capability.
The Oracle Advanced Inbound bundle consists of the following products: Call Center Technology, Oracle Universal Work Queue, Oracle Telephony Manager, and Oracle Interaction Blending.
The Oracle Advanced Inbound solution consists of a three-layer server architecture outlined below.
■ Telephony platform layer consisting of the Oracle Telephony Adapter Server which provides support for ACD/PBX switches and CTI meddlers provided by third-party vendors
■ ACDs/PBXs: Alcatel 4400, Aspect Call Center, Avaya DEFINITY G3, Cisco® Call Manager (VoIP Agent), Ericsson MD110, Nortel Meridian 1 ACD, Nortel Symposium Call Center Server, Rockwell Spectrum, Siemens HiCom 300E and 330E
■ CTI middlewares: Cisco Intelligent Contact Management (ICM), Intel CT Connect
■ Oracle Advanced Inbound Server layer consisting of Oracle Advanced Inbound / Call Center Server processes
■ Oracle Interaction Center Server Manager
■ Oracle Interaction Queuing and Distribution
■ Oracle Telephony Manager
■ Oracle Routing Server
■ Oracle Inbound Telephony Server
■ Oracle Universal Work Queue
■ Oracle Interaction Blending
■ Business applications / agent desktop

Oracle Interaction Center Overview
Introduction 1-3
■ Oracle Universal Work Queue desktop (agent desktop work queue)
■ Oracle TeleService and/or Oracle TeleSales
■ Media Desktop (soft phone)
See Also■ Oracle Advanced Outbound
■ Oracle eMail Center
■ Oracle Scripting
■ Oracle Interaction Center Intelligence
1.1.2 Oracle Advanced OutboundOracle Advanced Outbound (AO) is another key part of the Oracle E-Business Suite of applications. It is the module of Oracle Interaction Center that addresses outbound telephony. AO consists of two main components:
■ A tactical list manager, which determines who to call and when to call them
■ An outbound dialing engine, which dials numbers and transfers live contacts to call center agents
Advanced Outbound integrates with and relies on Oracle Marketing Online (OMO) to create campaigns and lists to execute. AO serves as the execution arm for these marketing lists to maximize both outbound list penetration and agent productivity. AO also integrates with desktop applications like Oracle TeleSales and Oracle Collections to handle the actual customer interactions. Oracle Advanced Outbound can be used any time agents need to contact parties via the telephone.
AO also integrates with Oracle Interaction History to provide feedback that marketers can use to analyze and measure the success of the marketing campaign, thereby providing a closed-loop marketing process.
See Also■ Oracle Advanced Inbound
Note: Oracle Advanced Outbound does not include any other telephony management modules. Oracle Advanced Inbound is required to use Advanced Outbound.
Oracle Interaction Center Overview
1-4 Oracle Advanced Outbound Implementation Guide
■ Oracle eMail Center
■ Oracle Scripting
■ Oracle Interaction Center Intelligence
1.1.3 Oracle eMail CenterOracle eMail Center (eMC) is designed to satisfy requirements for inbound customer support, e-mail interaction management, and outbound sales and marketing e-mail message processing.
Oracle eMail Center helps your business respond to e-mail queries with clear and comprehensive replies in a much more efficient manner. eMC automatically generates suggested responses and scores them according to how closely they match the requirements.
See Also■ Oracle Advanced Inbound
■ Oracle Advanced Outbound
■ Oracle Scripting
■ Oracle Interaction Center Intelligence
1.1.4 Oracle ScriptingOracle Scripting is a set of tools to create and display information sequentially to end users. Oracle Scripting is composed of three components:
■ Script Author
■ Scripting Engine
■ Survey Component
Oracle Scripting end users include interaction center agents (for the Scripting Engine), and customers or prospects using a Web browser (using the Survey component). Other users include individuals who build the scripts (Script Author users) and administrators of scripting or survey campaigns. who may use the Oracle Scripting Survey Admin console.
Using the Script Author, trained script developers use a visual layout development environment to build scripts and survey questionnaires. Using the Script Author tool, developers insert objects into a script and associate properties with each object,

Oracle Interaction Center Overview
Introduction 1-5
including panels, groups and blocks. Panels contain specific prompts geared to the audience of the script (and contain the only elements that will display at runtime). Groups and blocks add code re-use capabilities and the ability to associate Java, PL/SQL, or other commands to a script. These objects control complicated processing and embed business rules that are evaluated at runtime. When completed, scripts are deployed to the Oracle Applications database.
The flow of a script in runtime can be fixed or dynamic, and is controlled by the business rules and on information provided upon script execution. Scripts are executed in a Java GUI in an interaction center (the Scripting Engine), or in a Web browser running JSP pages on a Web server (using the Survey component). Depending on the response to questions asked in the Scripting Engine GUI or the HTML page, the script developer can control the branching, or flow, from one panel to the next within the script. Custom commands can also affect flow of the script. This evaluation takes place in a manner transparent to the user.
The Survey component requires a survey campaign to be defined by an administrator using the Survey Admin console accessible from the eBusiness Center login. This console also provides several reports, which provide feedback to administrators regarding surveys and scripts that have been executed. For scripts, a Footprinting report can assist in tuning scripts by indicating every panel accessed, the order in which it was accessed, and how long the agent spent in each panel. For surveys, the administrator can review individual survey responses or summarized reports for a variety of information.
See Also■ Oracle Advanced Inbound
■ Oracle Advanced Outbound
■ Oracle eMail Center
■ Oracle Interaction Center Intelligence
1.1.5 Oracle Interaction Center Intelligence Oracle Interaction Center Intelligence is a Web-based reporting solution that provides intelligent reports that facilitate day-to-day operational and long-term strategic decisions.
The data is presented to the user in a easy-to-use portal format. This format gives the user a unified, role-based, easily customized view of Interaction Center information, including Oracle Universal Work Queue information, key performance measures relating to agent productivity, speed to answer, and abandon rate.

Oracle Advanced Outbound Concepts
1-6 Oracle Advanced Outbound Implementation Guide
The product is built on an Oracle proprietary Java-based technology stack (Oracle CRM Foundation, also known as JTF).Users of Interaction Center Intelligence require minimal training, and no additional software is needed on the user's machine other than a Web browser.
Oracle Interaction Center Intelligence is based on a three-tier architecture:
■ The front end (client) using the system via an Oracle Applications-compliant Web browser.
■ The middle tier, which contains the Apache Web server and application server, included as part of the installation of Oracle Applications release 11i.
■ The database tier, using an Oracle 8i or 9i database.
See Also■ Oracle Advanced Inbound
■ Oracle Advanced Outbound
■ Oracle eMail Center
■ Oracle Scripting
1.2 Oracle Advanced Outbound ConceptsArea Code Mapping
Calling Calendars
Campaign Schedules
Campaigns
Dialing Methods
Dialing Options
Do Not Call
Importing Lists
List Entries
Lists
List Source Types
Outcome, Result, and Reason Codes

Oracle Advanced Outbound Concepts
Introduction 1-7
Phone Formats
Recycling
Recycling Algorithms
Recycling Algorithm Actions if no Sub-Conditions Met
Recycling Algorithm Conditions
Recycling Algorithm Pre and Post-Processing Actions
Recycling Algorithm Sub-Conditions
Record Filter
Release Priority
Release Strategy
Reports
Server Groups
Subsets
Time Zone Management
Time Zone Mapping
Trading Community Architecture
Validation Report
Validation Rules
VDU Configuration
Voice Messages
1.2.1 Area Code MappingAn area code is defined as a 3-digit number that identifies each telephone service area in a country (such as the U.S. or Canada).
Area Code Mapping provides a way for Advanced Outbound to find the country to associate a phone number with.
Advanced Outbound provides area code mappings for the US (United States) and CA (Canada). However, if you are processing target groups containing numbers in other countries (whose phone country code does not map uniquely to a territory code), you will need to create the area code mappings for those countries. If your

Oracle Advanced Outbound Concepts
1-8 Oracle Advanced Outbound Implementation Guide
target group contains numbers in only one country, you can create rules defining the area code for the entire target group, and do not need to create these mappings. Additionally, these mappings are used to associate regions (states/provinces) with area codes so that regions can be associated with contact points and used in applying Region Calendars to determine when contact points can be called.
1.2.2 Calling CalendarsA calling calendar defines a set of callable times. Calendars can be associated to geographic locations (countries or regions) or marketing objects (campaign schedules and target groups). Advanced Outbound utilizes three types of calendars:
■ Country Calendar
■ Region Calendars
■ User Defined Calendar
Country CalendarA country calendar consists of a baseline callable time range for all seven days of the week, as well as any exceptions. Exceptions are most commonly used for holidays, and may be specified by specific date or by pattern (for example, third Friday of each month).
Country calendars are expected to be created based on country-specific laws and are required for Advanced Outbound. There may be cases where it is acceptable to call contact points outside of the range of these laws, user defined calendars allow you to do this.
Every target group entry has one to many contact points. Every contact point (telephone number) must have an associated country code and time zone. Every country code must have an associated calendar. This association creates the base set of callable times for every target group entry. Advanced Outbound ships with country codes for many countries; however, additional country codes can be created and added to the base product as necessary to meet your business needs.
Region CalendarRegion calendars can be used to solve the problem of when certain regions further restrict the callable times from the country they are in. For example, the United States sets the callable time parameters at 9am through 9pm; however, certain states further restrict those hours. These restrictions necessitate the creation of a regional calendar to address the more limited callable hours.

Oracle Advanced Outbound Concepts
Introduction 1-9
If there are conflicts between the regional calendar and the corresponding country calendar, the country calendar prevails (except when you select Yes from the drop-down list in the Override Country Calendar field).
User Defined CalendarUser defined calendars are optional calendars which can be associated with campaign schedules or target groups. These calendars are used to supplement information in the country calendar. If there are conflicts between the user defined calendar and the corresponding country calendar, the country calendar prevails (except when you select Yes from the drop-down list in the Override Country Calendar field).
For example, the default calling time in the country calendar you are using is 9AM to 9PM; however, you are only calling businesses and you know that nobody will be present after 6PM. You can create a user defined calendar that adjusts the call time accordingly.
Calendar Example:Advanced Outbound ships with a default U.S. calendar. It contains the following baseline callable ranges:
Sunday 10AM-8PM
Monday 9AM-9PM
Tuesday 9AM-9PM
Wednesday 9AM-9PM
Thursday 9AM-9PM
Friday 9AM-9PM
Saturday 9AM-8PM
In addition, it contains restricted calling hours for the standard U.S holidays. Note that the callable times are always specified in terms of the local time zone; no time zone specification is necessary. If you wish to prevent calling on a specific target group from 6PM to 8PM on a specific date (for example, Monday, June 4, 2001), you can create an user defined calendar with the following exception information:
06-04-2001 6PM-8PM: no calling
and apply it to the target group.

Oracle Advanced Outbound Concepts
1-10 Oracle Advanced Outbound Implementation Guide
1.2.3 Campaign SchedulesCampaign schedules are specified within Oracle Marketing Online (by a user with the Oracle Marketing Online Super User responsibility).
Campaign schedules support multiple channels of execution within a marketing campaign. A campaign schedule is the highest-level object associated with Advanced Outbound. target groups are associated to campaign schedules, as are agents. A campaign schedule has a start date and an end date. Multiple campaign schedules can be associated to one marketing campaign, where the campaign schedule is managed as a different execution channel.
The release strategy is executed at the campaign schedule level. When the campaign schedule is created in Oracle Marketing Online, the interaction center administrator designated for campaign schedule approval (via the Marketing Medium specification) will receive notification. The administrator must approve the campaign schedule before it can be executed. This approval process takes place in the Interaction Center Administrators’s Personal Homepage, where the workflow item must be approved.
Advanced Outbound only deals with the target groups targeted for outbound telephony execution. In order for Oracle Advanced Outbound to be able to use a campaign schedule from Oracle Marketing Online, the following conditions must be met in OMO:
■ The activity must be set to "Telemarketing". This is typically defined as part of the campaign schedule setup type (in the ‘Administration’ tab for the Oracle Marketing Super User responsibility in HTML applications).
■ The campaign schedule’s status code must be set to "active". This is set in the ‘Administration’ tab for the Oracle Marketing Super User responsibility in HTML applications.
1.2.4 CampaignsA campaign is the organizational unit of a focused marketing effort and campaigns define that marketing effort. Campaigns are a fundamental entity for Oracle Marketing and are never used directly by Advanced Outbound, although they
Note: The configuration of campaign schedules takes place both within Oracle Marketing Online and within the Advanced Outbound administration application.

Oracle Advanced Outbound Concepts
Introduction 1-11
contain the campaign schedules and target groups which are. One marketing campaign can have multiple campaign schedules associated with it and each of these campaign schedules can be targeted for different execution channels. For example a marketing campaign might have a campaign schedule associated with it that is targeted for email execution and another associated with it that is targeted for telephony execution.
1.2.5 Dialing MethodsA dialing method is the mode by which the system dials the customer telephone numbers as it passes the records to the agents. Automated dialing enhances productivity and list penetration because it dials the customer telephone numbers with a reduced chance for error.
Each campaign schedule can have a different dialing method. Advanced Outbound allows you to set up different campaign schedules and lists with different dialing methods. Within a single campaign schedule, different lists can also have different dialing methods. While dialing methods can be set at both the campaign schedule and list level, lists are set by default to use the dialing method of the parent campaign schedule. However, this default can be overridden at any time.
Oracle Advanced Outbound supports the following dialing methods:
■ Preview - In preview dialing, the list entry information is delivered to the agent-facing application. It is up to the application to initiate the dial programmatically, or for the agent to initiate the dial using the softphone.
■ Progressive - When progressive dialing is used, Advanced Outbound delivers the list entry information to the desktop application and simultaneously places the dial from the agent’s telephone. In the case of a non-connect outcome, it is up to the agent to classify the call.
■ Predictive - When predictive dialing is selected, Advanced Outbound runs a pacing algorithm, which places dials in advance of agent requests. Advanced Outbound attempts to predict or anticipate when agents will become available and then transfer only live contacts to them. This behavior is customizable through the use of dialing options.
■ Manual - With manual dialing, there is no CTI; therefore, the agent dials the call by hand.

Oracle Advanced Outbound Concepts
1-12 Oracle Advanced Outbound Implementation Guide
1.2.6 Dialing OptionsDialing options are used to customize the behavior of predictive dialing. They can be used to set things like:
■ The number of rings before a call is considered a ‘no answer’
■ The abandonment rate for calls
■ Answering machine detection level
■ The types of calls to transfer to agents
■ Whether to play a prerecorded message when an answering machine is detected
1.2.7 Do Not Call (DNC)In compliance with the Telephone Consumer Protection Act (TCPA), at the request of the call recipient, calls can be blocked so that they will not be dialed by Oracle Advanced Outbound or any other application.
Do not call information is used automatically by Advanced Outbound. TCA defines a flexible model for the specification of contact uses and contact restrictions. The data is actually maintained by applications like Telesales; there is no user interface within Advanced Outbound dealing with DNC information.
For more information on DNC lists, please refer to the specific Oracle business application’s documentation.
1.2.8 Importing ListsThe importing of target groups from various sources is an important part of using Advanced Outbound. target groups may be sourced internally, from the Trading Community Architecture database (TCA) or externally either through target group import or by use of Oracle Discoverer. Interaction centers and marketing organizations frequently purchase lists of contacts. This functionality is entirely owned by Oracle Marketing.
1.2.9 List EntriesA list entry is one row in a list. It is occasionally called a record. Currently, each list entry is associated with one party and has one to many contact points. The fields on each list entry are always the same within one list. They are determined by the list source type, which is associated with the list header.

Oracle Advanced Outbound Concepts
Introduction 1-13
List entries are created when Oracle Marketing generates a list. They contain all necessary denormalized data from other areas of the database with the exception of DNC information.
Oracle Advanced Outbound uses the list entry as the primary, permanent storage area for the record.
1.2.10 ListsA list is a data structure containing information about one or more customer records. A list does not reproduce the customer database; each record in the list points back to a real customer account in one of your customer databases. More specifically, each record in the list only reflects the subset of fields needed for a screen pop and to meet the list segmentation criteria.
The purpose of a list is to identify a particular segment of customer records. Once a segment has been identified, an administrator can control the conditions under which the records are called.
The term ‘list’ is also used to mean a specific group of list entries. As mentioned above, lists can be used with Advanced Outbound by associating them with the correct type of campaign schedule. Lists are owned by Oracle Marketing Online and are used for many purposes within marketing aside from outbound dialing.
Although different aspects of list headers are configurable from different GUI screens in Oracle Advanced Outbound, the list header structures are the same.
1.2.11 List Source TypesA list source type is a concept used by Oracle Marketing Online to define how fields from the database (typically TCA) map to the columns of a target group entry. A target group entry has several hundred generic columns; a specific list source type, for example, could state that the phone number will go into column 1 and the name will go into column 2. However, a different list source type could populate the first column with name and the second column with phone number.
Oracle Advanced Outbound recycling algorithms and record filters are directly associated to source types because they define which fields are present in a target group.
Oracle Marketing Online ships with two default list source types:
■ B to B - Business to Business (Organization Contacts)
■ B to C - Business to Consumer (Persons)

Oracle Advanced Outbound Concepts
1-14 Oracle Advanced Outbound Implementation Guide
Caution: While Oracle Marketing Online allows you to modify the source type fields, you MUST NOT remove or modify the following fields:
Per Customer - Oracle Advanced Outbound requires these fields for each customer. They are either used in the screen pop, or to check for DNC, release control, or the stop list.
■ PERSON_FIRST_NAME
■ PERSON_LAST_NAME
■ PERSON_NAME_SUFFIX
■ PERSON_TITLE
■ PIN_CODE
■ PARTY_NAME
■ PARTY_ID
■ SOURCE_CODE
■ SOURCE_CODE_FOR_ID
■ PARTY_SITE_ID
■ POSTAL_CODE
Per Phone Number - Oracle Advanced Outbound requires these fields for each phone number.
■ CONTACT_POINT_ID
■ TIME_ZONE
■ PHONE_COUNTRY_CODE
■ PHONE_AREA_CODE
■ PHONE_NUMBER
■ RAW_PHONE_NUMBER
■ REASON_CODE
Oracle Advanced Outbound Concepts
Introduction 1-15
1.2.12 Outcome, Result, and Reason CodesOutcome, result, and reason codes specify what happened on a dial attempt to contact a customer. These codes are seeded, but are also user-modifiable.
Outcome, results and reasons codes should always be enforced as a hierarchy. That is, the user must always select an outcome before you can select a result and they must select a result before they can select a reason.
If an outcome has no results associated with it, then the user should not be allowed to select a result for that outcome. Also, if an outcome/result combination has no reasons associated with it, then the user should not be allowed to select a reason for that outcome/result combination.
If the outcome selected is designated as requiring a result, then the user must select a result. If only one valid result is set-up for the outcome, then that value should be defaulted for the user. If the result selected is designated as requiring a reason, then the user must select a reason. If only one valid reason is set-up for the result, then that value should be defaulted for the user.
ExamplesOutcome Selected = "No Answer" or "Busy"
The result and reason fields remain disabled. The user cannot set them because no result values are associated to these outcome values.
Outcome selected = "Contact"
The result field is enabled because two possible results can be selected - "No Sale" or "Sale. The user MUST select a result.
Outcome selected = "Contact", Result selected = "No Sale"
The reason field is enabled because three possible reasons can be selected for a "No Sale" result - "No Money", "Too Expensive", "Out of Work". The User MUST select a reason.
Outcome selected = "Contact", result selected = "Sale"
The reason field remains disabled. The user cannot set a reason because no reason values are associated to a result of "Sale".
Call Outcome A consequence from a dial attempt to contact a customer. 'Outcome' reflects network connectivity (e.g. connect, busy, ring-no-answer, SIT, etc.); a list of system

Oracle Advanced Outbound Concepts
1-16 Oracle Advanced Outbound Implementation Guide
defined outcome codes are defined within Advanced Outbound, others may be user defined.
OUTCOME_ID OUTCOME_CODE SHORT_DESCRIPTION
1 No Ans No Answer
2 Busy Busy
3 Wrong Num Wrong Number
4 Not Avail Not Available
5 Bad Pnum Bad Phone Number
6 Ans Mach Answering Machine
7 Contact Contact
8 Decease Decease
9 Maint Maintenance
10 Req Proc Request Processed
11 Abandoned Abandoned
12 Bypass Bypass
13 Change Number Change Number
14 Delete Delete
15 Facsimile Tone Facsimile Tone
16 Incoming Incoming
17 Invalid for Calling Invalid for Calling
18 Modem Answer Tone Modem Answer Tone
19 Not Set Yet Not Set Yet
20 Priority Callback Priority Callback
21 Requeued Requeued
22 Sit Network Busy Sit Network Busy
23 Sit Operator Intercept Sit Operator Intercept
24 Sit Reorder Sit Reorder
25 Sit Vacant Sit Vacant
26 Unidentified Sit Tone Unidentified Sit Tone

Oracle Advanced Outbound Concepts
Introduction 1-17
Call ResultA consequence from a dial attempt to contact a customer. 'Result' reflects the results of a completed connection and is user/application defined. Examples of 'Results' could include: "Sale" or "No Sale" or "Wrong Party Contact".
27 Withdrawn During Network Time
Withdrawn During Network Time
28 Withdrawn During Ringing Withdrawn During Ringing
29 FHM Hangup FHM Hangup
30 FHM Customer Hangup FHM Customer Hangup
31 Flunked Stoplist Flunked Stoplist
32 Unknown Unknown
33 Dialer Error Dialer Error
34 Discarded Discarded
35 No ringback No ringback
36 No dial tone No dial tone
37 AO system AO system
38 Failed release control Failed release control
RESULT_ID RESULT_CODE SHORT_DESCRIPTION
1 NoSale No Sale
2 Sale Sale
3 Compl Customer Complaint
4 Cb Call Back
5 Multi Act Multiple Activities
6 Completed Completed Activity
7 Incompleted Incompleted Activity
8 Sent Message Sent
9 Not Sent Message Not Sent
OUTCOME_ID OUTCOME_CODE SHORT_DESCRIPTION

Oracle Advanced Outbound Concepts
1-18 Oracle Advanced Outbound Implementation Guide
Call ReasonA consequence from a dial attempt to contact a customer. 'Reason' codes are optional user/application defined. It is used to further detail the 'Result' of the call, such as "Too Expensive" or "Using Competitor's Product" or "No Interest"
These codes are owned and administered by Oracle Interaction History. Advanced Outbound references these codes in its recycling algorithms and record filters.
1.2.13 Phone FormatsPhone formats must be created for each country that you will be calling in your lists. Advanced Outbound ships with the phone formats for the United States and Canada. Additional phone formats can be created by logging into the Oracle Forms Application with the Trading Community Manager responsibility. For more information on creating phone formats, refer to the Creating Phone formats topic in the Oracle Advanced Outbound Implementation Guide.
Failed validation The record failed to be validated
11 Cache expiration The record expired in the cache
REASON_ID REASON_CODE SHORT_DESCRIPTION
1 No Money No Money
2 Already Gave Already Gave
3 Expense Too Expensive
4 No Work Out of Work
5 Gave Office Gave at the Office
6 Other Other Reason
7 Busy Too Busy
8 SP Handl Req Special Handling Required
RESULT_ID RESULT_CODE SHORT_DESCRIPTION

Oracle Advanced Outbound Concepts
Introduction 1-19
1.2.14 RecyclingRecycling is the process of determining how to process records that have been dialed. When a record is returned, a user-definable recycling algorithm is executed, which looks at the record, the call results, and previous calls to the record.
Recycling strategies are based on:
■ Call outcome
■ Date, day, and time of call
■ Number of call attempts
For example, if a call ends up with a status of “Busy,” you can assume that it’s likely that the decision maker is at home; therefore, you will probably want to call the customer back within a few minutes. Advanced Outbound can automatically schedule a record with a busy outcome to be attempted in 10 minutes. On the next attempt, if the line is still busy, Advanced Outbound can call back the customer in another 15 minutes.
Likewise, if there is a “No Answer” in the morning, Advanced Outbound may schedule the next call to be attempted during the afternoon of the same day.
Call recycling also occurs for target groups that have contact outcomes. For instance, some applications automatically schedule callbacks after a call has resulted in a literature request. The application may schedule a callback for five days in the future, giving the customer time to receive and review the mailing. After the five days have passed, Advanced Outbound automatically calls the customer back, allowing the agent to reinforce the information sent by mail and close the sale.
Oracle Advanced Outbound provides a GUI that allows you to create and modify recycling algorithms.
Recycling provides the following benefits:
■ Recycling ensures optimal list penetration and contact rates through intelligent scheduling of callbacks.
■ The recycling strategy can be modified using the user friendly GUI provided in Advanced Outbound.
■ Each list can have its own recycling strategy or share a recycling strategy.
Possible Actions for Recycling
■ Call back at date
■ Call back in interval

Oracle Advanced Outbound Concepts
1-20 Oracle Advanced Outbound Implementation Guide
■ Call back in n days
■ Call back next <day of week>
■ Call back next <day of week> at
■ Call back next month
■ Call back next month at
■ Call back next week
■ Call back next weekday
■ Call back next weekday at
■ Call back next weekend day
■ Call back next weekend day at
■ Call back next week at
■ Call back today at
■ Call back tomorrow
■ Call back tomorrow at
■ Do not use record
■ Move record to list
■ Use next phone number
Possible Conditional Check Commands
Condition Description
List field is Checks a field in the call record for a specific value
Call attempt is Checks the number of call attempts made on this record
Outcome of the nth previous call is
Checks n consecutive previous call attempts for a specific outcome
Outcome code is Checks value of the outcome code returned from the interaction
Result code is Checks the value of the result code returned from the interaction
Reason code is Checks the value of the reason code returned from the interaction

Oracle Advanced Outbound Concepts
Introduction 1-21
1.2.15 Recycling AlgorithmsRecycling is the process of determining how to process records that have been dialed. When a record is returned, a user-definable recycling algorithm is executed, which looks at the record, the call results, and previous calls to the record.
When creating a recycling algorithm, you must first decide whether you will use an existing algorithm as a model for your new one, or whether you want to create a completely new algorithm. If an existing algorithm contains relatively similar pre or post-processing actions, conditions or sub-conditions, you should use it as a basis for your new algorithm. The Advanced Outbound HTML Administration console allows you to do this by permitting you to copy existing algorithms. If your new algorithm will be significantly different from any existing ones, you should create a completely new algorithm.
You must then add or modify pre or post-processing actions (not required), or the conditions or sub-conditions for the algorithm. You then need to add an action for each condition or sub-condition. These actions will determine how the record is handled if the condition or sub-condition under which you add it is met.
Call attempt on current contact point is
Checks the value of current call attempt to this contact point
Consecutive outcome to current contact point is
Checks the value of the outcome of current call attempt to this contact point
The day of the week is... This condition allows you to recycle a record based on what day of the week it is or is not when the record is called.
The time of nth call is... This condition allows you to recycle a call based on what time of the day it was when a previous call attempt was made for this record. The specified number (n) stands for the number of calls ago. The number you specify for "n" must be within the last 20 calls. For example, if you have a calling plan that begins calling records on a Mon - Wed - Fri basis then switches to Tues - Thurs calling if no connects are achieved, you could use this algorithm to dictate when a record should shift from the Mon - Wed - Fri pattern to the Tues - Thurs pattern.
Condition Description

Oracle Advanced Outbound Concepts
1-22 Oracle Advanced Outbound Implementation Guide
1.2.16 Recycling Algorithm Actions Performed if no Sub-Condition Are MetActions if no sub-conditions are met are pre-seeded actions that you can add to the root level, a condition, or a sub-condition that establish a method of handling the record in the event the top level conditions or sub-conditions under that top level condition are not met. If a condition or sub-condition is met, it’s associated action will be utilized. However if no conditions or sub-conditions are met, none of their actions will be utilized; therefore, you must add an action if no sub-conditions are met to handle these occasions.
For example, if you had the following condition and sub-condition statement:
Condition 1: Outcome code equal to No Answer
Sub-condition 1: Call attempt equal to One
Sub-condition 2: Call attempt equal to Two
Sub-condition 3: Call attempt equal to Three
To each of these sub-conditions you can add an action which will determine what happens to the record if no sub-condition are met. For the first call attempt, you could add an action of Call back next Monday. For the second attempt, you could add an action of Call back next Saturday at 11:30. For the third call attempt, you could add an action of Call back next week. By adding an action for each sub-condition, you can set up different processing paths for each separate call attempt.
1.2.17 Recycling Algorithm ConditionsConditions determine how the algorithm processes records that have been dialed. Conditions are composed of three parts:
■ A condition
■ An operator
■ A value
To avoid confusion, since the first component of the condition is also called a condition, we refer to the entire statement (condition, operator, and value) as an expression. Expressions are structured in the following order: condition operator
Important: Each condition or sub-condition must have an associated action or you will receive an error.

Oracle Advanced Outbound Concepts
Introduction 1-23
value. For example: STATUS contains ACTIVE (where STATUS is the condition, contains is the operator, and ACTIVE is the value), or: HOUSEHOLD_SIZE greater than 3 (where HOUSEHOLD_SIZE is the condition, greater than is the operator, and 3 is the value).
The Oracle Advanced Outbound HTML Administration console displays conditions and their sub-conditions in a treeview model.
Example:Condition 1
Sub-condition 1
Sub-condition 2
Condition 2
Sub-condition 1
In the above example, Condition 1 and Condition 2 are top level conditions. If you want to have more than one expression in a single condition, it is very important how the expressions are joined (by AND or by OR).
If you want to have multiple top level conditions in your recycling algorithm, their order is very important. Once a condition is met, Oracle Advanced Outbound ignores all other conditions at the same level and only completes execution for the process within that condition block. In the above example, if Condition 1 is met, then Condition 2 (and Sub-condition 1 under Condition 2) will be ignored.
1.2.18 Recycling Algorithm Pre and Post-Processing ActionsRecycling algorithms utilize pre and post-processing actions to determine what happens to records before and after (respectively) the conditions apply.
Pre and post-processing actions are pre-seeded statements. The pre and post-processing areas in the Advanced Outbound HTML Administration console allow you to access and utilize these pre-seeded statements. These statements allow you to do virtually anything you want before or after (respectively) the conditions of the recycling algorithm - check for any condition you want and then take action based on the checked conditions, or initialize or clear variables needed during the recycling process.

Oracle Advanced Outbound Concepts
1-24 Oracle Advanced Outbound Implementation Guide
1.2.19 Recycling Algorithm Sub-ConditionsSub-conditions allow you to further refine how each condition in your algorithm handles dialed records. For example, you could have the following condition statement:
■ Outcome code equal to No Answer
For this condition statement you could add sub-conditions that further define how the condition processes dialed records. For example, you could add the following sub-conditions to the Outcome code equals No Answer condition:
■ Call attempt equal to One
■ Call attempt equal to Two
■ Call attempt equal to Three
By adding these sub-conditions, you can establish a different handling procedure for each calling attempt. Each of these sub-conditions will need an action added to it to determine how Advanced Outbound handles the call attempt if none of the sub-conditions are met. For more information on adding actions, refer to the Adding Actions if no Sub-Conditions are met topic.
1.2.20 Record FilterRecord filters are filters against which records are checked at the point of release. Record filters are created and applied to lists. They are able to check fields of list entries. Record filters check release fields to ensure they match defined parameters (STATE equal to Virginia). A match here will prevent the release of the record.
The record filter process occurs after a record is selected and provides a last minute means to filter records from being called. If a record does not pass the release checkpoint process, the record will be recycled according to the rules defined for recycling processing.
The release criterion should be defined in an SQL statement where any field(s) available in AMS_LIST_ENTRIES table may be used as a criterion.
Record filters utilize expressions in a similar manner as recycling algorithms. However, instead of being called conditions, they are called rules. They use the following three components:
■ Field
■ Operator
■ Value

Oracle Advanced Outbound Concepts
Introduction 1-25
Record filter rules are structured in the following order: field operator value. For example: PERSON_FIRST_NAME equal to James (where PERSON_FIRST_NAME is the field, equal to is the operator, and James is the value). The combination of these three elements (field, operator, and value) is called an expression.
The Oracle Advanced Outbound HTML Administration console displays rules in an alphanumeric hierarchy.
Example:Rule 1
PERSON_LAST_NAME begins with W OR PERSON_LAST_NAME begins with B
AND PERSON_FIRST_NAME equal to James
OR Rule 2
PARTY_ID greater than 1200 AND PARTY_ID less than 2500
OR Rule 3
CUSTOMER_KEY has a value
In the above example, the lines under each rule are conditions for that rule.You can have multiple expressions in a single condition (as seen under Rule 2) and you can have multiple conditions under a single rule (as seen in Rule 1). If you want to have more than one expression in a condition, or more than one condition in a rule, it is very important how the they are joined together (by AND or by OR).
Separate top level rules are only joined together by OR; however multiple expressions within a single condition, and multiple sub-conditions within a single rule can be joined by either AND or OR.
If you want to have multiple top level rules in your record filter, their order is very important. Once a rule is met, Oracle Advanced Outbound ignores all other rules at the same level and only completes execution for the process within that set of rules. In the above example, if Rule 1 is met, then Rule 2 and Rule 3 are ignored.
1.2.21 Release PriorityRelease priorities determine the relative priority of a list or subset in comparison to other lists and subsets. Advanced Outbound utilizes the AMS_list_priority lookup code for release priority.

Oracle Advanced Outbound Concepts
1-26 Oracle Advanced Outbound Implementation Guide
Every list and subset has a release priority. Priorities allow Advanced Outbound to distinguish between “high” priority lists and “low” priority lists. The priority selections Advanced Outbound supports are:
■ Highest (1)
■ High (25)
■ Medium (50)
■ Low (75)
■ Lowest (100)
Highest through Medium level priorities are preemptive; all lists with priorities in this range will be exhausted in priority sequence before the next priority level is used. Low and Lowest priorities are used in round-robin fashion; each of these lists will release its quantum of records, then the next list in the same priority level will be used.
Oracle often recommends that time-based lists (for example, the Busy and Priority Callback lists) have higher priorities, and that all other lists have lower priorities. This insures that records that need to be called back at specific dates and times are called before those that have no assigned callback dates and times. When Advanced Outbound sees that no records are available in the time-based lists (because they are scheduled for future callback), then it automatically begins the round-robin process among lists with lower priorities.
1.2.22 Release StrategyRelease strategy is a broad concept which describes how Advanced Outbound releases records from lists and subsets. Oracle Advanced Outbound supports the following types of release strategies:
■ Quantum
■ Quota
An additional factor affecting release strategy is priority. Both lists and subsets have priorities which influence release strategy.
1.2.22.1 Quantum Release StrategyThe quantum release strategy supports proportional calling across all lists and subsets associated with the campaign strategy and it is considered the baseline strategy for an Advanced Outbound service.

Oracle Advanced Outbound Concepts
Introduction 1-27
The list quantum controls the number of records that can be sequentially dispersed from a list or subset. This means that when Advanced Outbound is distributing customer records to agents, it releases a quantum number of records from each list or subset before it goes on to the next list or subset in the campaign.
Every list and subset has a quantum which you can dynamically adjust via Advanced Outbound. Usually, a list or subset's quantum is adjusted to reflect the proportion of customer records in that list or subset compared to other lists or subsets in the campaign.
Without the concept of a quantum, Advanced Outbound would read all records from one list or subset before moving on to another list or subset. This would exhaust each list or subset in order. While a strategy of this sort may be useful in some instances (for instances, in a Collections application, where you want all of the 60-day overdue customers called before the 30-day customers), you generally want a mix of records from different lists or subsets.
1.2.22.2 Quota Release StrategyThe Quota Release Strategy stops releasing records from a list or subset when a pre-defined limit has been reached.
This strategy disburses records from a list or subset based on the quota that is assigned to a list or subset. A quota represents the maximum number of records with a certain outcome or result that should be obtained from that list or subset during a pre-defined period of time (set by a Quota Reset Period value).
Quotas are reset at the end of a quota reset period (defined at the list or subset level), so that the list or subset is again available for calling. The raw values used to calculate the quota are dependent upon the outcome codes of each record and must be passed by the agent business applications to Advanced Outbound.
Due to its pre-defined limit, the Quota Release Strategy is useful for survey or appointment setting campaigns.
1.2.23 Generating ReportsCall centers are dynamic environments; being armed with real-time information is critical in decisions such as managing list depletion/exhaustion and managing the productivity of the interaction center agents.
Advanced Outbound logs information to two areas: Interaction History and Interaction Center Intelligence.

Oracle Advanced Outbound Concepts
1-28 Oracle Advanced Outbound Implementation Guide
Information logged into Interaction History contains only dial attempts made by Advanced Outbound that did not result in a call connect, therefore was not forwarded to an agent. The log entries in Interaction History from Advanced Outbound help to build a complete picture of calling efforts. Calls that were completed and transfer to an agent application will have log entries from the agent application. The combination of log entries from both sources will provide a complete view of the calling effort and its results.
Information logged into Interaction Center Intelligence (ICI) is for the purpose of providing some real-time reports on the dialing efforts. Information feed to CCI is done on an interval basis, and reflects up-to-date information on the interaction center performance such as: break down of the types of calls made, break down of call outcomes, limited agent information in terms of number of agents, and break down of records left to be dial.
Advanced Outbound allows you to generate the following reports:
Report Name Report Description
Agent Call Results Detail Provides call center administrators with a view of the distribution of call results among the agents for a given campaign that is currently active in the call center. Statistical data for the report only incorporates data since the specified beginning time period, where the maximum page is set at 24 hours. Data beyond the maximum period may be obtained through an Interaction Center Intelligence equivalent report.
Agent Performance Provides you with a view of the distribution of call results among lists and subsets for a given campaign that is currently active in the call center. Statistical data for the report only incorporates data since the specified beginning time period, where the maximum page is set at 24 hours. Data beyond the maximum period may be obtained through an Interaction Center Intelligence equivalent report.
Campaign Schedule Call Results Detail
Provides you with a view of the distribution of call results among lists and subsets for a given campaign that is currently active in the call center. Statistical data for the report only incorporates data since the specified beginning time period, where the maximum page is set at 24 hours. Data beyond the maximum period may be obtained through an Interaction Center Intelligence equivalent report.

Oracle Advanced Outbound Concepts
Introduction 1-29
1.2.24 Server GroupsA server group is also known as an interaction center. Interaction center servers (e.g. UWQ, OTM) typically belong to a server group. An exception to this is the Advanced Outbound Central Server, which exists one per CRM instance. A server group typically represents the concept of a call center, but this is not required.
Agents are assigned to server groups using Oracle CRM Resource Manager. Servers are assigned to server groups using the Interaction Center Server Manager (ICSM) interface, which requires the Call Center HTML Administrator responsibility.
1.2.25 SubsetsA subset is a set of entries within a list identified by field values. Subsets are dynamic, and can be created and deleted at will within the context of a list.
Campaign Schedule Dialing Statistics
Provides you with an ability to evaluate the efficiencies of a campaign schedule calling effort. Statistical data for the report only incorporates data since the specified beginning time period, where the maximum page is set at 24 hours. Data beyond the maximum period may be obtained through an Interaction Center Intelligence equivalent report.
Campaign Schedule Outcome Summary
Provides you with a view of the distribution of call outcomes and results for a given campaign that is currently active in the call center. Statistical data for the report only incorporates data since the specified beginning time period, where the maximum page is set at 24 hours. Data beyond the maximum period may be obtained through an Interaction Center Intelligence equivalent report.
Campaign Schedule Record Detail Statistics
Provides you with a detailed view of the distribution of records for one active campaign schedule. Statistical data for the report reflects back to when the campaign schedule has become active.
Campaign Schedule Record Summary Statistics
Provides you with a quick glance view of the distribution of records for all campaigns that are currently active in the call center. Statistical data for the report reflects back to when the campaign schedule has become active.
Campaign Schedule Time Zone Detail
Provides you with a detailed view of how many of the records in the selected campaign schedule fall in each time zone within the selected time zone range.
Report Name Report Description
Oracle Advanced Outbound Concepts
1-30 Oracle Advanced Outbound Implementation Guide
When subsets are used, a default subset is created that contains any list entries not contained in the user-defined subsets. List entries existing in subsets that overlap are available to all subsets until they are released.
You create list subsets by designating conditions. When records meet the designated conditions they are placed in the list subset. Conditions are composed of three parts:
■ A field
■ An operator
■ A field value
Conditions are structured in the following order: field operator field value.
Condition Structure ExampleADDRESS contains VA - where ADDRESS is the field, contains is the operator, and VA is the field value.
Subset ExampleA call center administrator has a list containing a generated score in the field called ‘SCORE.’ This contains values from 1 to 5. Additionally, a field called ‘STATE’ of the score value, the administrator would like to create the following subsets:
Subset 1: SCORE = 5
Subset 2: SCORE = 3 or SCORE = 4
The marketing campaign is expected to get much better results in New York, so an additional subset is created:
Subset 3: STATE = ‘NY’
The default subset at this point contains list entries that match:
■ scores that do not equal 5
■ scores that do not equal 3 or 4
■ all states except New York
Each of these subsets can be given its own priority, quantum, or quota value. If the interaction center administrator decides that there may be a possible difference in results between the score value of three and four, they can create a new subset:
Subset 4: SCORE = 4
and edit the existing subset 2:

Oracle Advanced Outbound Concepts
Introduction 1-31
Subset 2: SCORE = 3
1.2.26 Time Zone ManagementAdvanced Outbound manages time zones transparently to the call center administrator. As mentioned earlier, this is dependent on every contact point (telephone number) having an associated country code and time zone value. All of these items are owned by TCA. All countries represented in a calling list must be mapped to a time zone.
Time Zone MappingIf your data does not provide time zone information for your contact points, and you cannot use the validation rules to specify the time zone at the list level, then you will need to create time zone mappings in order to validate your lists.
There are three different types of time zone mappings.
■ Mapping a territory code to a time zone.
■ Mapping a territory code and area code to a time zone.
■ Mapping a territory code, area code, and postal code to a time zone.
Even if this type of mapping exists, postal codes cannot be used in determining the appropriate time zone unless a validation rule is created (and associated with desired list(s)) to enable such mapping lookups
In general, you should try to use the first type of mapping as it allows for the best validation performance and requires the least amount of effort to create. However, there are certain countries split among different time zones, and the second type of mapping is required to accurately determine the correct time zone. You should only create the third type of mapping when absolutely necessary as it leads to a large number of records in the time zone mapping table, reducing the performance of lookups.
1.2.27 Time Zone MappingAdvanced Outbound contains time zone mapping tables that must be defined. Many countries only occupy a single time zone, but others are spread across multiple time zones. If your interaction center plans to make calls throughout countries (for example: United States or Canada) where many states and provinces fall in different time zones, you may need to provide the state/region postal codes and area codes to determine that Advanced Outbound is using the correct time zone for the customer. There are database load utilities readily available within the

Oracle Advanced Outbound Concepts
1-32 Oracle Advanced Outbound Implementation Guide
database that can be used to upload purchased data into the Advanced Outbound Schema.
To ensure that customers are called at the appropriate times, Advanced Outbound must know where the person resides in relation to time zones. This way Advanced Outbound can follow the appropriate telemarketing laws that govern calling in their particular country, state, country or city.
The time zone mapping form is used as an easy entry point to provide Advanced Outbound with a method to call customers or contacts.
At a minimum, the country code and time zone must be entered for each country that an interaction center will contact. It is mandatory that all countries map their time zone with their country name.
For single time zone countries, no further information is needed.
For countries with more than one time zone, it is recommended that you map the appropriate time zone, country code, and optional area code, postal code, state/region information to assist Advanced Outbound during list validation time. By utilizing the address specific information, Advanced Outbound can match a customer record with the appropriate time zone and country if their customer record is incomplete.
This functionality is especially important in countries where there are multiple time zones. For example, the United States has eight time zones spanning from Saipan, Northern Mariana Islands, U.S.A. (Standard time zone: UTC/GMT +10 hours where daylight saving time currently not observed) and Honolulu, Hawaii, U.S.A. (Standard time zone: UTC/GMT -10 hours where daylight saving time currently not observed). In addition, there are many states who have either multiple time zones and may or may not participate in daylight savings time.
For example: the state of Indiana has up to three different time zones depending on the location in the state. To ensure we call the customer at the correct time, we need to know exactly where the customer is and follow the laws for their state. In this case, Advanced Outbound may need to go down to the postal code to ensure that the correct time zone is being used for the customer record.
1.2.28 Trading Community ArchitectureThe Trading Community Architecture (TCA) is a customer model designed to support complex trading communities. TCA strives to model all relationships within a trading community. For example, the trading community of an appliance manufacturer may include suppliers, distributors, resellers, retailers, service providers, business consumers, and end users. The appliance manufacturer not only

Oracle Advanced Outbound Concepts
Introduction 1-33
wishes to track relationships between itself and other entities within this trading community, it also takes an interest in relationships that other community members have with each other. The manufacturer may not even have direct relationships with all such members; nevertheless, it needs to know about them and how each relates to other entities within the community.
The TCA architecture is unique to the Oracle E-Business Suite and differentiates it from other products through the following capabilities:
Single Source of TruthBecause the entire Oracle E-Business Suite uses the TCA customer model, Oracle offers users a single source of truth for customer data. A customer record is exactly the same whether it is viewed through Oracle Sales Online, Oracle Marketing Online, Oracle Customer Care, Oracle Financials, or Oracle iStore.
The "Party" ConceptThe concept of party enables the customer model to treat all business entities equally. This means that each customer, regardless of type (organization, person, group, or relationship), is handled in the same way by the model.
Because all business entities are treated alike, the customer model can easily handle B2B, B2C, or mixed business models. Although the model tracks attributes for people different from those it tracks for organizations (e.g., date of birth, title, and gender for people; DUNS number, SIC code, and fiscal year end for organizations), both people and organizations are parties, and their records are therefore stored in the same physical table in the database. This in turn means that the same business relationships that can be formed with an organization can be formed with a person.
Any number of parties can be grouped into a single entity. This allows the modeling of complex business entities such as households and buying consortiums. A group can be viewed as a single entity; meanwhile, each of its members can still be viewed as a distinct entity.
The relationship between two parties may be viewed as a party in its own right. For example, if John works at Oracle, three parties could exist: John (party of type person), Oracle (party of type organization), and John@Oracle (party of type relationship). Because John@Oracle is a party in its own right, addresses, phone numbers, and customer accounts can be directly associated with the John@Oracle entity.
The customer models of other products typically treat organizations and people as entities of two distinct types, which makes dealing with mixed business models difficult. Many CRM products on the market today were originally designed to

Oracle Advanced Outbound Concepts
1-34 Oracle Advanced Outbound Implementation Guide
support only a B2B business model In a pure B2B environment, customers are always organizations and people are simply contacts for those organizations. For such models, it makes sense to distinguish organizations from people and to provide functionalities specific to each. For example, in a pure B2B environment, the data model would probably support associating leads, opportunities, and accounts with organizations but not with people (because people would be simply contacts for organizations, not customers).
As CRM vendors came to realize that their models needed to support B2C and mixed models as well, they began trying to reshape their existing B2B-only models. In many cases, the result is a data model designed for B2B with a few patches to support basic B2C functionality.
The "party" data is maintained by the Oracle business applications (TeleSales, Customer Care, etc.), and it is populated into a list by Oracle Marketing Online on a one "party" per list entry basis. Based on the source type, different data will be pulled into the list entry.
Many-to-Many RelationshipsThe customer model supports many-to-many relationships between parties and locations (i.e., addresses). Because an address can be associated with multiple parties, the address need not be duplicated; if it changes, it only has to be updated once.
Advanced Relationship ModelingThe customer model stores party relationships as distinct entities, allowing any party to be a member of any number of relationships. Additionally, because each relationship has a specific type (e.g., parent of, employee of, subsidiary of, reseller for), two parties can have multiple relationships with each other (e.g., John is the spouse of Mary, but John is also the business partner of Mary). Many other customer models hard-code relationships into person or organization entities; for example, the record for a person might have a Manager column to identify the person’s manager. This method of defining relationships is very rigid: it limits both the number of relationships that can be recorded for an entity and the number of types of such relationships. By contrast, the TCA customer model, though it comes with several seeded relationship types, allows customers to define any number of additional types.
The Oracle customer model also supports matrix hierarchies (relationship networks). This means that any party record may have one or more parent records. Additionally, the customer model supports non-hierarchical relationships such as spouse of and partner of. Other customer models tend to offer only simple
Oracle Advanced Outbound Concepts
Introduction 1-35
hierarchies in which each record may have only one parent and non-hierarchical relationships are not supported.
The Oracle customer model supports current and historical relationships. Because party relationships are stored in their own table, they can have their own attributes. The two key attributes for historical relationship information are start date and end date. When a party relationship ends, the application prompts the user to provide an end date for the relationship instead of deleting the relationship record.
Thus valuable relationship history may be maintained indefinitely. In many other customer models, contrariwise, relationships are hard-coded: this requires a new relationship to replace a prior one, with the loss of the associated historical information.
Separation of Party and Customer AccountThe Oracle customer model separates the business entity (party) from the business relationship (e.g., customer of). This allows each party to have multiple customer accounts (i.e., to have multiple business relationships with any other party). Additional parties (e.g., an authorized buyer or guarantor) can also be associated with any customer account.
Flexible Party ClassificationsThe customer model allows for any number of user-defined party classifications, which can be used for reporting and assignment purposes. A user may wish to stratify customers by industry, size, and buying behavior. The user decides not only these categories but also the classes (or values) within each category. Classes can then be broken down into subclasses, which allows for rollup and reporting at different class levels. Such structures can also facilitate assignments.
Contact PointThe contact point includes the telephone number and the phone type. This data is maintained by the Oracle business application (TeleSales, Customer Care, etc.). It is populated into the list by Oracle Marketing Online and dialed by Oracle Advanced Outbound.
Contact RestrictionContact restriction determines how the Do Not Call (DNC) list is implemented. This data is based on a per party basis nd it is checked by Oracle Advanced Outbound at the time of record release.
Oracle Advanced Outbound Concepts
1-36 Oracle Advanced Outbound Implementation Guide
Contact PreferenceContact preference is based on a per contact point basis. This data is maintained by the Oracle business application (TeleSales, Customer Care, etc.) and is checked by Oracle Advanced Outbound at the time or record release.
Time ZonesTime zones are seeded in TCA and are not maintained by any application.
Phone FormatsThe phone format defines the phone number format and area code length. This data is maintained by using the Trading Community Manager responsibility.
1.2.29 Validation ReportA View Report column has been added to the summary view table of existing lists on the Interaction Center Campaign Schedule Target Groups page. Clicking the View Report hyperlink provided in this column generates a report furnishing the following information:
1.2.30 Validation RulesValidation rules are composed of actions and these rules allow you to make exceptions to the automatic list validation process. For example, you can use validation rules when you don’t know the country code or timezone, but you know you will be dialing calls in a certain timezone. If the country code or timezone is not known these records will fail the list validation process and will not be dialed. You can set a validation rule to allow you to dial these records because you are confident of what is in the list. By doing this, you can prevent these calls from failing the list validation process, and thereby not being dialed.
Row/Column Name Description
Validation Status Shows whether or not the selected list is validated.
Number of Valid Records Shows the number of validated records within the selected list.
Number of Invalid Records
Shows the number of records that failed validation within the selected list.
Reason for Invalidity Provides a reason why each Number of Records column entry failed validation.

Oracle Advanced Outbound Concepts
Introduction 1-37
The order of these actions is very important. Advanced Outbound reads the actions from top to bottom. When the first action fails, the rest of the actions under it are ignored. Therefore, you should put the most generic actions at the top. This strategy will conserve processing time.
Validation Rule Actions
Rule Action Description
Specify Phone Country Code For Entire List
This action allows you to specify the phone country code at the list level. The phone country code refers to the country code used when dialing a number. For example, the phone country code for US and Canada is 1. This rule is useful when every number in a list uses the same phone country code, and that phone country code is not specified in the phone country code attribute of the contact point. A complete list of valid phone country codes can be found in the HZ_PHONE_COUNTRY_CODES table.
Specify Territory Code For Entire List
This action allows you to specify the territory code at the list level. The territory code refers to the ISO country code (i.e. ‘US’ for the United States and ‘CA’ for Canada). A complete list of valid territory codes can be found in the FND_TERRITORIES table. This rule is useful when every number in a list is within a single territory, and the corresponding phone country code is not specified in the phone country code attribute of the contact point.
Enable Incremental Parsing of Phone Area Codes
This rule allows you to enable incremental parsing of area codes from the phone number and raw phone number attributes. This allows validation to parse the area code from the phone number attribute, by iteratively comparing the area code digits to a list of valid area codes (in IEC_G_CC_AC_TC_MAPS) until the correct match is found. There must be entries for all of the potential area codes in IEC_G_CC_AC_TC_MAPS in order to successfully parse the area code. The US and CA area codes are provided.
Enable Incremental Parsing of Phone Country Codes
This rule allows you to enable incremental parsing of phone country codes from the raw phone number attributes. This allows validation to parse the phone country code from the raw phone number attribute, by iteratively comparing the phone country code digits to a list of valid phone country codes (in HZ_PHONE_COUNTRY_CODES) until the correct match is found. There must be entries for all of the potential phone country codes in HZ_PHONE_COUNTRY_CODES in order to successfully parse the phone country code. The data for most (if not all) countries is provided.

Oracle Advanced Outbound Concepts
1-38 Oracle Advanced Outbound Implementation Guide
Specify Time Zone For Entire List
This rule allows you to specify the time zone at the list level. This rule is useful if every contact point in the list belongs to the same time zone that is known by the administrator, and/or time zone data is not provided for the contact points. This option will also speed the validation process since less work will be done to determine the correct time zone.
Specify Time Zone Format For Entire List
This rule allows you to specify the format of the time zone data being provided for the contact points at the list level. The accepted formats are time zone id, time zone offset, and time zone descriptive name (i.e. EST, PST). Time zone id is the default format if this rule is not configured. This rule is generally to be used in conjunction with the Create Time Zone Offset/Name Mapping rule.
Create Time Zone Offset/Name Mapping
This rule allows you to create mappings to associate a time zone name/offset with a time zone id from HZ_TIMEZONES. When time zone data is being provided as either GMT offset or descriptive name, there are potentially many time zones mapping to a single offset/name (some of which recognize daylight savings time, and others that do not). In this situation, it is impossible to determine what the correct time zone is based on either the GMT offset or descriptive name. By creating a mapping for each GMT offset or descriptive name provided in the time zone attribute of the contact points, the correct time zone can be easily determined.
Enable Unconditional Use of Time Zone Mappings
This rule allows you to enable the unconditional use of time zone mappings at the list level. This allows the time zone mappings to over-ride time zone data provided in the contact point’s time zone attribute since the mappings are likely to be more accurate than specifying the time zone by either GMT offset or time zone name. This rule should not be created unless you have loaded the time zone mappings into IEC_G_TIMEZONE_MAPPINGS.
Enable Use of Postal Codes In Time Zone Mapping Lookup
This rule allows you to enable the use of postal codes while performing time zone mapping lookups. There are only a few cases when this data is necessary to determine the correct time zone, and this functionality will slow validation considerably.
Rule Action Description

Oracle Advanced Outbound Concepts
Introduction 1-39
Validation Rule Example:A contact point has a time zone equal to EST. Since EST corresponds to two different time zones (United States and Australia), you can set a validation rule to map this time zone name to a unique time zone.
1.2.31 VDU ConfigurationAdvanced Outbound utilizes Dialogic VDU hardware to do predictive dialing. These are physical hardware cards which must be placed into a server running pages NT or 2000. They allow Advanced Outbound to do voice detection and classification of non-contact calls.
VDU cards must be configured into the database using the Advanced Outbound administrative interface before they can be used.
The following Dialogic VDUs are supported by Oracle Advanced Outbound:
❏ Basic Operation (no message support)
■ DTI/481SC, which is an ISA card and supplies 2 T1s (48 ports)
■ DTI/241SC, which is an ISA card and supplies 1 T1 (24 ports)
■ DTI/601SC, which is an ISA card and supplies 2 E1s (60 ports)
■ DTI /301SC, which is an ISA card and supplies 1 E1 (30 ports)
■ LSI/161SC, which is an ISA card and supplies 16 analog ports
❏ Enhanced Operation (messaging support)
■ D/480SC - 2T1, which is an ISA card and supplies 2 T1s (48 ports)
Specify Region For Entire List
This action allows you to specify the region (state/province) at the list level. Regions are stored in the JTF_LOC_AREAS_VL and are created/updated in Oracle Marketing Online (Administration/Marketing/Geography). Advanced Outbound only recognizes locations of type STATE as regions. This rule is only useful when every phone number in a list is within a single region and the region is not specified via an Area Code Mapping.
Require that a Contact Point Have a Region to Pass Validation
This rule allows you to require that a contact point have a region to pass validation. This is recommended if the administrator only wants to call contact points for which a region calendar can be used to determine whether or not the contact point is callable.
Rule Action Description

Oracle Advanced Outbound Concepts
1-40 Oracle Advanced Outbound Implementation Guide
■ D480JCT - 2T1, which is a PCI card and supplies 2 T1s (48 ports)
■ D/240SC - T1, which is an ISA card and supplies 1 T1 (24 ports)
■ D240PCI - T1, which is a PCI card and supplies 1 T1 (24 ports)
■ D/600SC - 2E1, which is an ISA card and supplies 2 E1s (60 ports)
■ D600JCT - 2E1, which is a PCI card and supplies 2 E1s (60 ports)
■ D/300SC - E1, which is an ISA card and supplies 1 E1 (30 ports)
■ D/300PCI - E1, which is a PCI card and supplies 1 E1 (30 ports)
■ D/160SC - LS, which is an ISA card and supplies 16 analog ports
■ D120JCT - LS, which is a PCI card and supplies 16 analog ports
1.2.32 Voice MessagesAdvanced Outbound is able to play messages both for front hold (i.e. when an agent is not available) and when answering machines are detected. Messages must be recorded into a .wav or .vox file using an external utility (these programs come with all modern operating systems). They are then imported into the database using the Advanced Outbound administrative interface. Messages are associated to campaign schedules, and different messages can be specified for home and work telephone numbers.
Technology, Requirements, and Performance 2-1
2Technology, Requirements, and
Performance
2.1 Advanced Outbound Architectural OverviewThis topic group provides information on the servers that comprise Advanced Outbound, its other components, how they are configured to work together, how they integrate with Oracle Marketing Online, the minimum software and hardware requirements, and sizing parameters for Advanced Outbound.
This topic group covers the following topics:
Advanced Outbound Physical Architecture
Advanced Outbound Servers
Oracle Marketing Online Integration
Minimum Software Requirements
Minimum Hardware Requirements
Sizing Parameters
2.1.1 Advanced Outbound Physical ArchitectureThe Advanced Outbound product consists of three main components:
1. Schema - Advanced Outbound has schema objects (primarily tables and views), PL/SQL packages, as well as Java stored procedures. The Advanced Outbound schema stores:
■ Cached records
■ Returned records

Advanced Outbound Architectural Overview
2-2 Oracle Advanced Outbound Implementation Guide
■ Call history
■ Recycling algorithms
■ Record filters
■ Runtime information on cache load
■ Subset information
■ VDU configuration data
■ Voice messages
2. Administration GUIs - Advanced Outbound has a set of administration user interfaces to perform the following tasks:
■ Campaign schedule call center parameter setup
■ List call center parameter setup
■ Subset creation and maintenance
■ Record Filter creation and maintenance
■ Recycling creation and maintenance
■ VDU configuration
■ Voice messaging import and maintenance
■ Real time reporting
3. Java servers - Advanced Outbound has two Java server processes:
■ Advanced Outbound Central Server
■ Advanced Outbound Dial Server
These servers are discussed in greater detail in the Advanced Outbound Servers topic.
2.1.1.1 Oracle Advanced Outbound Architecture DiagramThe following diagram shows the Advanced Outbound components in the context of a complete system. Components which are actually part of the Advanced Outbound product are highlighted in gray.

Advanced Outbound Architectural Overview
Technology, Requirements, and Performance 2-3
Numbered areas on the physical architecture diagram are explained below.
1. The Advanced Outbound administration GUI is on the HTML stack. It uses the ‘Advanced Outbound Administrator’ responsibility and it is part of the Oracle Advanced Outbound product.
2. To implement and administer other dependent components, other screens in both the HTML and Forms interfaces will be required. Examples of responsibilities used in Forms are ‘Telesales Administrator’ and ‘CRM Administrator.’
3. Much of the Advanced Outbound functionality and integration happens through database schemas. There is an Oracle Advanced Outbound schema present in the CRM Instance and it is part of the Oracle Advanced Outbound product. Advanced Outbound is directly dependent on the schemas of the following:

Advanced Outbound Architectural Overview
2-4 Oracle Advanced Outbound Implementation Guide
■ OMO (AMS) - Oracle Marketing Online
■ TCA (HZ) - Trading Community Architecture
■ JTA - Oracle Foundation
■ JTT - Oracle Foundation
■ IEO - Server schema and Logger
4. The Advanced Outbound Dial Server removes records from Oracle Marketing lists indirectly through the central cache and returns these records through the return queue. This process is described in more detail in the Advanced Outbound Dial Server topic.
5. The agent desktop applications, such as UWQ, Telesales, and Collections, are primarily Forms applications. All desktop applications integrate to Advanced Outbound through UWQ.
6. Advanced Outbound integrates into UWQ through the Media Provider interface. An AO plugin exists in UWQ and is considered part of the Oracle Advanced Outbound product.
7. The Advanced Outbound Dial Server uses the Telephony Adapter Server for both CTI and VDU control.
8. The Advanced Outbound Central Server is a lightweight server which does cache management, time zone and calendar management, and recycling. Notice from the diagram that the two Advanced Outbound servers do not communicate directly. The Advanced Outbound Central Server is part of the Oracle Advanced Outbound product.
2.1.2 Advanced Outbound ServersThis topic group discusses the responsibilities and architecture of the Advanced Outbound servers in greater detail, including:
The Advanced Outbound Central Server
The Advanced Outbound Dial Server
2.1.2.1 The Advanced Outbound Central ServerThe Advanced Outbound Central Server is responsible for invoking the operations of Advanced Outbound that take place in the database. The Central Server does the following things:
■ Populates Advanced Outbound’s central cache from available lists.

Advanced Outbound Architectural Overview
Technology, Requirements, and Performance 2-5
■ Changes the status of campaign schedules and lists when necessary.
■ Periodically calculates callable time matrices based on time zone, country code, list and campaign schedule information.
■ Validates list entries.
■ Executes recycling, which also populates call history and Interaction History when necessary.
■ Cleans up the cache to find lost list entries (those taken by applications but never returned).
■ Rolls up reporting data.
The Central Server has the following design characteristics:
■ Because its functionality is implemented in the database, it is very lightweight.
■ Its tasks are broken up into plugins. A basic understanding of this is helpful for understanding the Central Server’s configuration.
The Central Server uses the Oracle Interaction Center Server Manager (ICSM) interface for configuration, for more information on ICSM please refer to the Oracle Applications Interaction Center Implementation Guide. A Central Server, as its name implies, exists once per instance. One Central Server performs all of the above tasks for all active campaign schedules and lists.
The following diagram depicts the Advanced Outbound Central Server, its responsibilities and it’s relation to the database:

Advanced Outbound Architectural Overview
2-6 Oracle Advanced Outbound Implementation Guide
The above diagram depicts the CRM instance and the Oracle Advanced Outbound Central Server. The AO Central Server is responsible for invoking the following procedures or "tasks":
■ Cache management
■ Recycling
■ Calendar and time zone management
■ Group callback management
■ Campaign schedule and list status updates
■ Validation
■ Reporting
■ Lost entry recovery
These procedures or "tasks" are plugins and exist as stored procedures in the schema on the CRM instance.

Advanced Outbound Architectural Overview
Technology, Requirements, and Performance 2-7
2.1.2.2 The Advanced Outbound Dial ServerThe Advanced Outbound Dial Server is responsible for the following functional areas:
■ Managing agent logins and agent state (via UWQ)
■ Retrieving records from the central cache
■ Delivering records through UWQ to desktop applications
■ Placing progressive and predictive dials
■ Predictive pacing
■ Receiving record status data via UWQ from desktop applications
■ Returning records to the database for processing by the recycling plugin
Unlike the Central Server, which resides alone in its own server group, Dial Servers belong to server groups in a similar manner to the other Interaction Center servers. For scalability purposes, multiple Dial Servers can be added to a single server group. Each Dial Server can support a large call center. When multiple Dial Servers are used, the Advanced Outbound UWQ Media Provider Plugin will automatically choose between them based on availability and load.
The following diagram provides a simple example layout of the Advanced Outbound servers, and illustrates the concept behind using server groups to set up distributed call centers:

Advanced Outbound Architectural Overview
2-8 Oracle Advanced Outbound Implementation Guide
The above diagram shows two interaction centers: one data center and one call center. The data center, which is located in Chicago, houses the CRM database instance and the Advanced Outbound Central Server. The call center, which is located in San Diego and has 200 agents, houses 1 instance of the Advanced Outbound Dial Server (SanDiegoAODS). In this example, the call center in San Diego uses a Nortel Meridian PBX.
The following diagram provides a complex example layout of the Advanced Outbound servers, and illustrates the concept behind using server groups to set up distributed call centers:
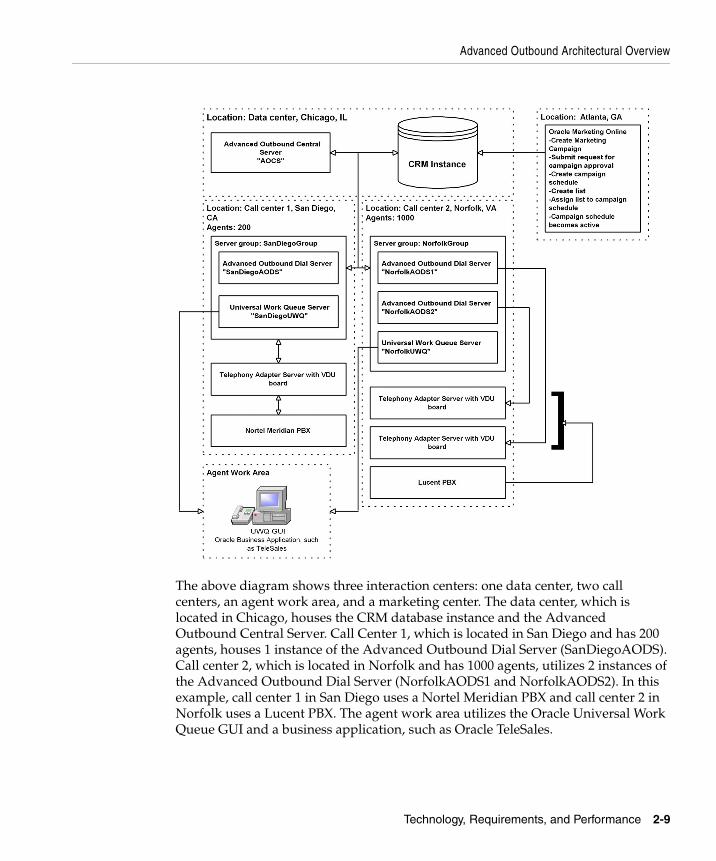
Advanced Outbound Architectural Overview
Technology, Requirements, and Performance 2-9
The above diagram shows three interaction centers: one data center, two call centers, an agent work area, and a marketing center. The data center, which is located in Chicago, houses the CRM database instance and the Advanced Outbound Central Server. Call Center 1, which is located in San Diego and has 200 agents, houses 1 instance of the Advanced Outbound Dial Server (SanDiegoAODS). Call center 2, which is located in Norfolk and has 1000 agents, utilizes 2 instances of the Advanced Outbound Dial Server (NorfolkAODS1 and NorfolkAODS2). In this example, call center 1 in San Diego uses a Nortel Meridian PBX and call center 2 in Norfolk uses a Lucent PBX. The agent work area utilizes the Oracle Universal Work Queue GUI and a business application, such as Oracle TeleSales.

Advanced Outbound Architectural Overview
2-10 Oracle Advanced Outbound Implementation Guide
The middleware setup, which defines the Telephony Adapter server and the CTI server, determines which Telephony Adapter server will be pointed to. When defining the Middleware via the Call Center HTML Admin, the flag 'Use Advanced Outbound’ will indicate that there are VDU cards housed in the telephony adapter server for AO. All the VDUs housed in the SAME server node MUST point to the same Dial Server. The association to the Dial Server occurs at the VDU board definition level.
2.1.3 Oracle Marketing Online IntegrationAdvanced Outbound is tightly integrated with and dependent on Oracle Marketing Online (OMO). As such, OMO is a prerequisite for Advanced Outbound. Integration with Oracle Marketing Online deals primarily with sharing schema objects such as:
■ lists
■ campaign schedules
■ list entries
2.1.3.1 List IntegrationList integration with Marketing is based around a shared state model. In some states (or statuses), Marketing owns a list and its state transitions. In some states, Advanced Outbound owns the list and its state transitions.
The following diagram shows the state transition model for lists (the list states and transitions shown in shaded area are owned by Advanced Outbound):

Advanced Outbound Architectural Overview
Technology, Requirements, and Performance 2-11
The above diagram depicts the various list state transitions. Only the validating, validated, and executing list states are owned by Advanced Outbound.
The list state begins as "locked", where it can be cancelled/expired or begin the validating process. If it is cancelled/expired, it will be archived. If it begins the validating process, it will be validated, and begin the executing process (all within Advanced Outbound). Once the execution process has completed, it will be cancelled/expired, then be archived.
Definitions of these states, as well as the key transition states, are as follows:
■ Locked (OMO). The list is manually placed into this state using the Oracle Marketing Online interface when no more changes will be made to it. Up to this point, it can be regenerated at will.
■ Validating (OAO). Lists are periodically checked by Advanced Outbound, and placed into this state when:
■ They are associated with a campaign schedule of the proper state
■ They are locked
At this point, they are validated, which is a relatively long-running process which checks each entry’s phone numbers, country codes, and time zone information.
■ Validated (OAO). When a list finishes the validation process, its state is changed to validated.

Advanced Outbound Architectural Overview
2-12 Oracle Advanced Outbound Implementation Guide
■ Executing (OAO). Advanced Outbound moves lists to the executing state when:
■ The current date is between the start date of the list’s campaign schedule and its end date
■ The list’s state is validated
■ The list’s call center ready flag is set to Y
■ Expired (OMO). Lists are moved to expired when the campaign schedule end date passes.
Records will only be released from lists which are in the executing state, and also have active schedules.
2.1.3.2 Campaign SchedulesSimilar to lists, the sharing of campaign schedules is based around a state model. However, the campaign schedule integration is simpler.
The following conditions must be true for Advanced Outbound to use a campaign schedule from Oracle Marketing (and display it in the IEC Admin GUI):
■ The activity is set to ‘Telemarketing.’
The following additional conditions must be true for Advanced Outbound to release records from lists within a campaign schedule:
■ The campaign schedule’s status code is active.
2.1.3.3 List EntriesA list entry is one row in a list. It is also called a record. The fields on each list entry are always the same within one list. The list source type determines what fields are present on each list entry. In Oracle Marketing Online, list source types have been consolidated down to B2C, or ‘Consumers,’ and B2B, or ‘Organization contacts.’
Regardless of the data present, the following diagram shows one release and return cycle for a record:

Advanced Outbound Architectural Overview
Technology, Requirements, and Performance 2-13
The numbered steps in the diagram are explained below:
1. Each list entry is created during Oracle Marketing Online list generation. They will be created based on data that exists either in TCA or tables that Marketing Online uses to store imported records.
2. The Central Server populates the cache. The cache population process intentionally checks out more records than it will need to make sure that there is not a cache miss, which is very expensive. Any extra records are periodically recycled with the ‘AO System’ outcome code. The records selected:
■ Will be restricted according to callable time ranges for their time zone, country code, list, and campaign schedule

Minimum Software Requirements
2-14 Oracle Advanced Outbound Implementation Guide
■ Will be restricted and ordered by callback times, if applicable
■ Will be ordered by list sort fields, if applicable
■ Are done so according to list and subset conditions, which are evaluated here
3. When the Dial Server pulls records from the central cache, it does the following:
■ Executes release strategy, taking into account things like quantum and priority. Release strategy is executed across lists in the context of a campaign schedule, as well as across subsets in the context of a list.
■ Checks do not call data.
■ Executes the list’s record filter, if present.
4. As agents request calls via Oracle Universal Work Queue (UWQ), the record data is delivered from the Dial Server to the Oracle Advanced Outbound (AO) plugin component. The AO plugin formats the record data in accordance with UWQ’s generic media interface and sends an event to UWQ. If predictive or progressive dialing is being used, AO will subsequently send an event to UWQ reporting on the status of either the dial (progressive) or the transfer (predictive).
5. UWQ sends an event to the application with the record data. The application retrieves the necessary additional data and begins the call.
6. When the call is complete, the application returns the record and status data to UWQ.
7. UWQ sends the record, through the AO plugin, back to the Dial Server.
8. The Dial Server returns each record, along with outcome, result, and reason code information, into the return queue.
9. Records are checked back into the Marketing list.
2.2 Minimum Software RequirementsTo successfully implement Oracle Advanced Outbound, the following software must be installed and configured prior to the implementation of Oracle Advanced Outbound:
Oracle software■ Oracle Applications release 11.5.6

Minimum Software Requirements
Technology, Requirements, and Performance 2-15
– The Oracle CRM system database must be installed and configured prior to the installation of Oracle Advanced Outbound. You must enter database information during installation and configuration steps. Oracle Advanced Outbound supports Oracle 8i database release 8.1.6 or later
– CRM Foundation components, including Interaction History and Resource Manager.
– The goal of Interaction History is to provide Oracle CRM applications with a common framework for capturing and accessing interaction information associated with every customer contact. IH is the central repository and provides a consistent API for tracking all automated or agent-based customer interactions. Oracle Interaction History is part or CRM Foundation and installed with Oracle Rapid Install 11i.
– Resource Manager provides the capability for sales managers to easily add and update sales agent and partner profiles. It enables the managers to import sales group hierarchy from Oracle Human Resources on the vendor side, and to create and maintain agent and group profile for vendor or partner
■ Oracle Marketing Online (OMO) 11.5.6
– Oracle Marketing Online is a complete marketing automation software application designed to effectively plan, manage, execute, and ultimately analyze and optimize overlapping customer-focused programs to assist companies in winning and retaining profitable customers. Advanced Outbound interconnects with Oracle Marketing Online, which creates campaigns and lists to execute. You must purchase and implement Oracle Marketing Online separately from Advanced Outbound.
– You also need Oracle Discoverer and Oracle Workflow for OMO
■ Oracle TeleSales or Oracle Collections (business application)
– Oracle Advanced Outbound 11i is supported by Oracle TeleSales and Oracle Collections as desktop applications and should be implemented at this time.
Note: Each of these products may have its own dependencies: Oracle Universal Work Queue requires Oracle Resource Manager and Oracle HRMS; Oracle Marketing Online requires Oracle Discoverer, and Oracle Workflow; etc.

Minimum Hardware Requirements
2-16 Oracle Advanced Outbound Implementation Guide
■ Oracle Universal Work Queue (UWQ)
– UWQ is required for both Oracle Advanced Outbound and Oracle TeleSales. UWQ provides a graphical user interface that serves as a work portal for the agent and delivers telephony metadata to the agent work area.
– Oracle HRMS for UWQ
– Oracle Resource Manager for UWQ
■ Oracle Advanced Inbound
– Oracle Telephony Manager (required)
– Oracle Telephony Media Controller (optional)
– Oracle Inbound Telephony Server (optional)
– Oracle Routing Server (optional)
– Server Monitor (optional)
Third Party Software■ Microsoft Windows NT 4.0, SP3 or Windows 2000
■ Oracle approved internet browser
– Netscape XXX
– Microsoft Internet Explorer 5.5
■ CTI Middleware
– CT-Connect Client 5.2 (if using CT-Connect as the CTI middleware)
– Cisco ICM (no client necessary for the Cisco ICM middleware)
2.3 Minimum Hardware RequirementsWhen implementing Oracle Advanced Outbound, you should consider the following when deciding on your minimum hardware requirements:
■ Advanced Inbound and CRM disk space and memory requirement guidelines
■ Advanced Outbound disk space and memory requirement guidelines
■ The number of agents in the call center
■ Call center volume

Minimum Hardware Requirements
Technology, Requirements, and Performance 2-17
Memory requirements vary with the number of CRM applications being used on a particular instance, the number of users using each of the applications, and the estimated volume of customer interactions and application use.
General Hardware RequirementsYou will need the following:
■ ACD/PBX, outbound telephony lines (trunks)
– The ACD/PBX must be installed and operational. It must also be configured by the vendor for computer telephony integration.
– Trunks are dependent upon call volume, call center size, and so on. Each agent must have 1 channel to go out and 1 channel for the dialer. Oracle recommends a 1 to 1 trunk to agent ratio in cases of high voice rate (when we expect a high percentage of dials to result in a live voice). However, if the voice rate is low (say 30%) or when live agents are expected to leave answering machine messages, a higher dialer-to-agent ratio is acceptable. This ratio should not be 2 to 1.
■ Telephony middleware server
– The telephony middleware server acts as the translator between the ACD/PBX and the Oracle Telephony Manager (OTM) and the Advanced Outbound Dial Server. Two choices are available, Dialogic CT-Connect and Cisco ICM.
– When Dialogic CT-Connect is used, the Advanced Outbound Dial Server connects through CT-Connect through the network. OTM uses the Telephony Adapter Server to reach CT-Connect. Both CT-Connect and ICM include server software that must be installed on an appropriate server machine. Consult respective Dialogic and Cisco documentation for details.
– When Cisco ICM is used, the call center services use a Cisco-provided API to connect to the ICM server. No client is necessary on the Telephony Adapter Server box(es).
■ Agent telephone set
– The agent, supervisor, and manager telephone set must be installed and operational. Each telephone set must be able to accept incoming calls from the ACD/PBX.
■ Call center server(s)

Sizing Parameters
2-18 Oracle Advanced Outbound Implementation Guide
– Oracle Advanced Outbound is dependent on several other Interaction Center Servers. These include:
– Oracle Telephony Manager (OTM)
– Universal Work Queue (UWQ)
■ VDU boards, as necessary
– The Advanced Outbound Dial Server utilizes Dialogic VDU hardware to do predictive dialing. These are physical hardware cards which must be placed into a server running Windows NT 4.0 or 2000. They allow Advanced Outbound to do voice detection and classification of non-contact calls. VDU cards must be configured into the database using the Advanced Outbound administrative interface before they can be used.
■ Oracle Telephony Adapter Server
– The Telephony Adapter Server component is crucially important to Advanced Outbound. There are, however, several additional AO-specific configuration steps to be done
– The Advanced Outbound Dial Server uses the Telephony Adapter Server for both CTI and VDU control. Telephony Adapter Server supports VDU operations, and the VDU hardware on it is considered part of the Oracle Advanced Outbound product.
2.4 Sizing ParametersThe Advanced Outbound services can be run on any approved CRM platform. However if you are using VDU boards in your Oracle Telephony Adapter Server, then OTAS can be run only on Windows NT 4.0 or Windows 2000 servers.
Sizing parameters for the servers:
■ The Advanced Outbound Dial Server is moderately memory intensive, however, it is heavily network intensive due to its communications with the UWQ agent and UWQ server, as well as the database. File system size is not a major factor.
■ The Advanced Outbound Central Server is not memory or server intensive, however, it does rely heavily upon the database. Therefore, when you are considering an AO implementation, ensure that you have allocated enough disk space, memory, and have a large enough CPU to handle all of the requirements that AO will place on it in the future.

Sizing Parameters
Technology, Requirements, and Performance 2-19
Factors that determine the hardware size:
■ Number of concurrent agents
■ Expected volume of calls
■ Network throughput
The number of services (one service = one running instance of the software) and servers varies, based on the needs of an individual call center. There will only be one Advanced Outbound Central Server needed per CRM instance, but you may need multiple Advanced Outbound Dial Servers (depending on your business needs).

Sizing Parameters
2-20 Oracle Advanced Outbound Implementation Guide

Dependency Requirements and Verification 3-1
3Dependency Requirements and Verification
This topic group provides information about the Oracle and non-Oracle products that are dependencies for Advanced Outbound.
3.1 Mandatory DependenciesThe dependencies for Oracle Advanced Outbound can be divided into two categories, including: Oracle products, and third party products.
Oracle ProductsThese products must be completely installed and configured prior to the installation and implementation of Oracle Advanced Outbound. For more information on installing these products, please refer to each product’s individual Installation and Implementation Guides. Each of these products may have its own prerequisites, for example TeleSales and UWQ require Oracle Resource Manager and can integrate with Oracle HRMS.
Oracle Advanced Outbound depends on the following Customer Relationship Management (CRM) products:
■ CRM Foundation, including Interaction History and Universal Work Queue (non media component)
■ Oracle Marketing Online
■ Campaign, Schedule, List
■ Prepare Campaigns/Schedules for AO
■ Oracle Universal Work Queue
■ Enables Media for AO

Mandatory Dependencies
3-2 Oracle Advanced Outbound Implementation Guide
■ Associates AO with appropriate Media Action
■ An Oracle business application (such as Oracle Telesales or Oracle Collections)
■ Oracle Advanced Inbound (unless using manual dialing)
– Oracle Telephony Manager
– Telephony Media Controller (optional)
– Inbound Telephony server (optional)
– Routing server (optional)
– Server Monitor (optional)
– UWQ server
Oracle Advanced Outbound integrates with Oracle Advanced Inbound in several ways:
■ The Advanced Outbound Dial Server must be added to the Interaction Center Server group which was created during the Advanced Inbound Implementation
■ The VDU boards which are used by the dialing server for Predictive dialing are housed on the Telephony Adapter Server.
Third Party Products■ Dialogic CT-Connect or Cisco ICM
These are middleware products that provide a command interface between computers and telephony -- computer-telephony integration (CTI). They enable Oracle Advanced Outbound to issue dialing commands to the PBX and to route successful calls to the agent desktop.
■ A web browser - Microsoft Internet Explorer (5.5 or above with Service Pack 2)
■ An ACD or PBX switch approved for use with Oracle Advanced Outbound

Mandatory Dependencies
Dependency Requirements and Verification 3-3
Important: Compatibility between Oracle Advanced Outbound and third party products, including Computer-Telephony Integration middleware and switches, is certified after testing with each release of these Oracle products. Each combination of a switch, the switch vendor's own software release, and each CTI middleware release, must be certified independently. While Cisco ICM and Dialogic CT-Connect are the two middleware products currently supported by Oracle Advanced Outbound, there are limitations on the certified combinations of phone switches, switch software, and CTI middleware with each version of these Oracle products.
The certification information changes with some frequency, as third parties add and drop products and versions, and as Oracle's certification process proceeds. Therefore, current certification information is maintained on a web site, accessible to Oracle sales and product development personnel and to Oracle partners.
Customers should always have their Oracle sales channel verify, from the web site, that the combination of phone switch, switch vendor software and version, switch configuration, CTI middleware software and version are compatible and supported, prior to making an implementation plan.

Mandatory Dependencies
3-4 Oracle Advanced Outbound Implementation Guide

Implementation Overview 4-1
4Implementation Overview
This topic group includes the following topics:
Planning the implementation
Implementation Prerequisites
Process Description
4.1 Implementation PlanningThere are two areas of consideration when planning an Oracle Advanced Outbound implementation. The first area includes collecting the information you need to implement the application. The second area involves system configuration planning (size, speed, number, etc.).
The planning process involves:
Collecting Information
Setup Planning
4.1.1 Collecting InformationUse the following list of questions to determine your implementation needs:
1. What type of Outbound Application will you be using? Oracle TeleSales? Oracle Collections?
2. What dialing strategy will you be using? Manual? Progressive? Predictive?
Depending on your dialing method, you may need to confirm the best way to handle the processing of the list. How many agents will be handling the

Implementation Planning
4-2 Oracle Advanced Outbound Implementation Guide
campaign schedule? If there are a few, you might want to run a progressive campaign, due to the complex algorithms that predictive dialing needs to run.
3. What is your PBX Name? PBX type? PBX server?
4. What Computer Telephony Integration will you be using? (Server, type, configuration, etc.).
5. What is your VDU type? VDU port name and extension assignments?
6. What are your agent extension numbers?
7. What will your outbound call volume be (calls/hr., average, low and peak usage)?
8. Do you have any special calling requirements and restrictions (restrictions on number of calls, call time, etc.)?
9. What will you be using for your test agent information?
10. What will you be using for your test data?
11. What validation information will you be using?
■ Area Code/Time Zone Mapping Data
12. How do you want to handle call outcome and recycle handling information?
■ Do you want to emphasize initial call attempts or emphasize persistent callbacks?
■ How do you want to handle wrong numbers and other special cases?
For every campaign schedule, you need to create recycling strategies that best correspond with the needs of the business. How do you plan to handle a record that is returned after it has been dialed for a non-connect? Do you really need to reach the client, or can the call wait a day. How do you plan to handle Special Information Tones (SIT)?
■ Drop records after sale or contact
■ Callback
■ Busy call handling
■ No answer call handling
■ Answer machine handling
■ Other call outcomes
■ Limits on call attempts

Implementation Planning
Implementation Overview 4-3
13. What Dialing Access Information will you need?
■ T1, E1 line control mode (Onhook/Offhook)
■ External line access (dial 9)
■ Local calls (same area code, different area code)
■ Long distance access code (same area code, different area code)
■ International access code
■ Area code information
■ Special dialing information for PBX (always dial all digits, etc.)
14. What are the sources of records to be dialed?
■ Existing customer data?
■ Imported prospect data?
■ Legacy systems?
4.1.2 Setup PlanningSetup planning involves matching your business requirements to the software and hardware components necessary to best satisfy those requirements. The list of questions in this topic will aid you in determining your hardware requirements, and the sizing parameters for the Advanced Outbound servers.
General QuestionsUse the following list of questions to help determine your system configuration:
1. What type of switch will you be using?
2. What type of telephone sets will your agents be using?
3. What type of VDU boards will you be using? T1? E1?
4. What middleware will you be using?
5. What are the extension numbers for the dialers?
Note: While there may be one or many original sources of business data, in Advanced Outbound 11i, all data come from Oracle Marketing Online and is thereby part of the Oracle TCA customer model.

Implementation Planning
4-4 Oracle Advanced Outbound Implementation Guide
6. What are your agent extension numbers?
System Sizing QuestionsUse the following list of questions to help determine your sizing needs:
1. How big will your call center be? How many agents will you have?
2. What call volume are you expecting in your call center?
3. Will your call center be single site or multi site?
Sizing Parameters for the Dial ServerThe Advanced Outbound Dial Server is moderately memory intensive, however, it is heavily network intensive due to its communications with the UWQ agent and UWQ server, as well as the database.
The following table provides sizing recommendations for the Advanced Outbound Dial Server:
Important: Compatibility between Oracle Advanced Outbound and third party products, including Computer-Telephony Integration middleware and switches, is certified after testing with each release of these Oracle products. Each combination of a switch, the switch vendor's own software release, and each CTI middleware release, must be certified independently. While Cisco ICM and Dialogic CT-Connect are the two middleware products currently supported by Oracle Advanced Outbound, there are limitations on the certified combinations of phone switches, switch software, and CTI middleware with each version of these Oracle products.
The certification information changes with some frequency, as third parties add and drop products and versions, and as Oracle's certification process proceeds. Therefore, current certification information is maintained on a web site, accessible to Oracle sales and product development personnel and to Oracle partners.
Customers should always have their Oracle sales channel verify, from the web site, that the combination of phone switch, switch vendor software and version, switch configuration, CTI middleware software and version are compatible and supported, prior to making an implementation plan.

Implementation Planning
Implementation Overview 4-5
The number of trunks is dependent upon call volume, call center size, and so on. Each agent must have 1 channel to go out and 1 channel for the dialer. Oracle recommends a 1 to 1 trunk to agent ratio in cases of high voice rate (when we expect a high percentage of dials to result in a live voice). However, if the voice rate is low (say 30%) or when live agents are expected to leave answering machine messages, a higher dialer-to-agent ratio is acceptable. This ratio should not be 2 to 1.
1. How many dial servers will you need?
2. To what server group will each dial server belong?
3. How do you want to set up your PBX, VDU, and Agent distributions?
4. What dialing scripts will you use?
Sizing parameters for the Central ServerThe Advanced Outbound Central Server is not memory or server intensive, however, it does rely heavily upon the database. Therefore, when you are considering an AO implementation, ensure that you have allocated enough disk space, memory, and have a large enough CPU to handle all of the requirements that AO will place on it in the future.
Most of the Central Server’s operation consists of scheduling the execution of PL/SQL on the database. However, it requires 20 or so database connections (problems will arise if the database connection (dbc) file has a low value for the number of connections (NUM_CONNECTIONS).
The amount of disk space is largely determined by the level of logging you want to utilize. Logging levels can be set from 0 to 4.
■ Oracle recommends that you use Output Level 1 in normal operations for moderate logging without slowing performance or taking up large amounts of disk space.
■ Level 0 returns no logging, but results in the fastest performance and takes up very little disk space.
# Agents Minimum Memory Maximum Memory Thread Count
1 - 100 128 Megs 256 Megs 300
101 - 250 256 Megs 512 Megs 500
251 - 500 512 Megs 1024 Megs 1000

Implementation Planning
4-6 Oracle Advanced Outbound Implementation Guide
■ Level 4 returns the most detailed logging, such as for troubleshooting, but results in slower performance and requires a large amount of disk space.
1. What calling calendars will you need?
2. What validation rules do you want to use?
3. What recycle rules do you want to use?
4. How do you want to handle callbacks, recovery, reporting?
5. What number of calls per month do you anticipate?
6. What is the maximum number of simultaneous outbound campaigns you want to execute?
System and User Information QuestionsUse the following list of questions to help determine the information about your server groups, system, and users:
1. What is the name of the server group you created when setting up Advanced Inbound?
Server groups are established by Interaction Center Server Manager (ICSM) as a conceptual means of associating various call center services with each other. Both the Advanced Outbound Dial Server and Advanced Outbound Central Server must be defined as part of a server group in order for ICSM to be able to communicate with AO. The Advanced Outbound Central Server must exist only once per instance. The number of Dial Servers depends on the size and volume of your interaction center.
Only servers within the same server group can communicate with each other. Each server can be a member of one and only one server group. Every call center agent is also associated with one and only one server group. This allows the agent to connect to the services provided by the servers from that server group.
You should link the Advanced Outbound Dial Server into the Server Group you created when setting up Oracle Advanced Inbound. Oracle Telephony Manager (OTM), a component of Oracle Advanced Inbound, must reside in the same server group as each Dial Server so that the teleset number of the agent’s physical phone can be mapped to the teleset extension in OTM.
2. Have you gathered all of the necessary user information for every user of Advanced Outbound?
This information should include:

Implementation Prerequisites
Implementation Overview 4-7
■ Employee type
■ Employee name
■ User ID
■ Password
■ Campaigns to which they will be assigned
3. Assign the correct responsibilities to the Advanced Outbound administrator user(s):
■ Oracle Marketing Super User - allows user to manage Oracle Marketing Operations.
■ Advanced Outbound Administrator - allows user to manage Advanced Outbound Operations.
■ Call Center HTML Administration - allows user to manage Call Center ICSM.
4.2 Implementation PrerequisitesBefore you can implement Oracle Advanced Outbound, you must ensure the following tasks have been performed:
1. Complete an administrative-tier installation of Oracle Applications.
2. Complete a web-tier installation of Oracle Applications on each machine identified.
3. Run Rapid Install.
Rapid Install installs the Oracle8i Enterprise Edition technology stack and the Oracle Applications file system. Rapid Install installs the following:
■ Oracle8i Enterprise Edition (8.1.6) with interMedia Text and Spatial
■ Oracle Forms Server, Oracle Reports Server, Oracle Graphics, and WebDB listener
■ Application servers WebDB and Apache, with JServ (Web tier)
■ JRE (Java run-time environment)
■ Selected Oracle applications
– Oracle CRM Foundation, including Resource Manager and Interaction History

Implementation Prerequisites
4-8 Oracle Advanced Outbound Implementation Guide
– Oracle Marketing Online (OMO)
– Desktop Application such as Oracle TeleSales or Oracle Collections
– Oracle ICSM (including all Advanced Inbound and Advanced Outbound servers)
■ JInitiator
– When you access certain parts of the system (for example, those based on Forms or Discoverer), you need JInitiator to supply the Java virtual machine. The latest version of JInitiator that was available at the time of the product release is on the Oracle Applications Rapid Install Server Technology CD, which can be found in the \util\jinitiator directory in the Common directory of your file system.
– Implemented as a plug-in (Netscape Communicator) or ActiveX component (Microsoft Internet Explorer), Oracle JInitiator allows you to specify the use of the Oracle Java Virtual Machine (JVM) on Web clients instead of having to use the default JVM of the browser.
– When it is needed, the browser attempts to load Oracle JInitiator. If Oracle JInitiator has not been previously installed, the browser downloads the necessary installation executable to the PC. Once installed, Oracle JInitiator runs the Oracle Forms Java applet and starts an Oracle Applications session.
4. Install an ACD or PBX switch and approved CTI middleware.
– CTI middleware - CT Connect or Cisco ICM
5. Implement Oracle Marketing Online.
Prerequisites for the OMO implementation include:
■ General Ledger (GL)
■ Human Resources (HRMS).
■ Oracle Discoverer
■ Oracle Workflow
Particular attention should be paid to the creation of marketing mediums as well. Marketing mediums are used in the integration with Advanced Outbound to determine which user receives the approval workflow for a given campaign schedule.

Implementation Prerequisites
Implementation Overview 4-9
To be compatible with Oracle Advanced Outbound, use the following Marketing source view types:
■ B to B - Business to Business (Organization Contacts)
■ B to C - Business to Consumer (Persons)

Implementation Prerequisites
4-10 Oracle Advanced Outbound Implementation Guide
6. Install and implement Oracle Advanced Inbound.
7. Implement Oracle Universal Work Queue.
Caution: While Oracle Marketing Online allows you to modify the source type fields, you MUST NOT remove or modify the following fields:
Per Customer - Oracle Advanced Outbound requires these fields for each customer. They are either used in the screen pop, or to check for DNC, release control, or the stop list.
■ PERSON_FIRST_NAME
■ PERSON_LAST_NAME
■ PERSON_NAME_SUFFIX
■ PERSON_TITLE
■ PIN_CODE
■ PARTY_NAME
■ PARTY_ID
■ SOURCE_CODE
■ SOURCE_CODE_FOR_ID
■ PARTY_SITE_ID
■ POSTAL_CODE
Per Phone Number - Oracle Advanced Outbound requires these fields for each phone number.
■ CONTACT_POINT_ID
■ TIME_ZONE
■ PHONE_COUNTRY_CODE
■ PHONE_AREA_CODE
■ PHONE_NUMBER
■ RAW_PHONE_NUMBER
■ REASON_CODE

Process Description
Implementation Overview 4-11
Implementation of UWQ should include the following steps:
■ Creation of server group(s), most likely one per call center.
■ Creation of UWQ classifications for the business applications implemented above.
8. Implement the business applications (Oracle TeleSales or Oracle Collections).
The business application(s) should be implemented at this point.
4.3 Process DescriptionOnce you have completed the tasks outlined in the Implementation Prerequisites topic, you can begin implementing Oracle Advanced Outbound.
This topic group provides high level implementation tasks necessary to implement Oracle Advanced Outbound.
1. Creating and Administering Advanced Outbound Users
2. Splicing Advanced Outbound Into Your Database
3. Installing and Configuring the CTI Middleware
4. Configuring Table Spaces in Your Database
5. Implementing the Advanced Outbound Servers
6. Installing the VDU Boards and Dialogic Software
7. Setting Up Interaction History
Note: IUWQ must be Media enabled to work with Advanced Outbound.
Use the Call Center HTML Administrator responsibility to associate the appropriate form with Advanced Outbound (under the UWQ Media Association tab).
Set the following system profile settings for AO to "Yes":
■ IEU: Media: Telephony
■ IEU: Queue Order: Advanced Outbound Telephony
■ IEU: Queue: Advanced Outbound Telephony

Process Description
4-12 Oracle Advanced Outbound Implementation Guide
8. Setting Up Marketing Online
9. Configuring Advanced Outbound
10. Configuring Universal Work Queue

Implementation Tasks 5-1
5Implementation Tasks
This topic group provides detailed steps to perform all of the necessary tasks to implement Oracle Advanced Outbound, including:
Creating and Administering Advanced Outbound Users
Splicing Advanced Outbound Into Your Database
Installing and Configuring the CTI Middleware
Configuring Table Spaces in Your Database
Implementing the Advanced Outbound Servers
Installing the VDU Boards and Dialogic Software
Setting Up Interaction History
Setting Up Marketing Online
Configuring Advanced Outbound
Configuring Universal Work Queue
5.1 Creating and Configuring Advanced Outbound Users
Users OverviewPrior to creating and administering users for Oracle Advanced Outbound, you must understand the types of users required.
From an Oracle Applications perspective, you must define users that can log into an Oracle Applications session, and assign each user with the appropriate responsibility or responsibilities to perform a particular set of functions.
At minimum, for each implementation, you will need to define three types of users:

Creating and Configuring Advanced Outbound Users
5-2 Oracle Advanced Outbound Implementation Guide
■ An administrator user
■ An interaction center agent user (typically an employee in the enterprise)
■ The IECAOUSER
Administrator UserAn administrator must have access to functions that the typical interaction center agent will not, and administers users and applications across the broad spectrum. For example, one function of an administrator is to create agent users. This necessitates the creation of an administrative user as the first step.
To successfully implement Oracle Advanced Outbound you must create at least one administrator user. If you do not want one user account to have access to multiple Oracle applications, you can create several administrator users and assign each the appropriate responsibility. To create your administrator user, you should use the seeded (usually "sysadmin") login to access the Self-Service Login URL, which is also referred to as the Forms Login.
The administrator user does not need to be an employee in the database. However, if the administrator user is an enterprise superuser that will perform work in CRM applications as well as administrative tasks with the same login, then the administrator user must also be created as an employee in the database.
For Advanced Outbound implementation, you will need to create an administrator user with all the following responsibilities (or separate administrator users for each of the following responsibilities):
■ System Administrator
– Create and administer Oracle Applications users
– Set and modify system profile options
– Assigning or changing roles
■ HRMS Manager
– Create employees in the enterprise database (if Oracle HRMS is installed)
■ CRM Resource Manager
– Create employees in the enterprise database (if Oracle HRMS is NOT installed)
– Import employees from the enterprise database as CRM resources
■ Call Center HTML Administration

Creating and Configuring Advanced Outbound Users
Implementation Tasks 5-3
– Manage multiple aspects of interaction center, including: ICSM, and UWQ Media Actions
■ Oracle Marketing Super User
– Manage Oracle Marketing operations
■ Advanced Outbound Administrator
– Manage Oracle Advanced Outbound operations
■ Advanced Outbound Concurrent Requests
– Configure and run concurrent processes to update queue count
■ Advanced Outbound Performance Monitor
– Monitor Call Center Performance
■ Interaction History
– Create outcome, result, and reason codes
■ Oracle Marketing Administration
– Create custom target group priority levels
As well, the administrator user must belong to a valid sales group to access certain tabs within the Oracle Marketing Online Application. The specifics of creating this group will be discussed in the Creating a Sales Group Topic.
Agent UserAgent users will typically have access to at least one Oracle business application, and many enterprises will require these users to be members of the enterprise database.
The Agent user must be assigned one or both of the following responsibilities:
■ TeleSales Agent
– Allows agent level access to Oracle TeleSales.
■ Collections Agent
– Allows agent level access to Oracle Collections
The agent user can be assigned to a resource group to eliminate the need to assign campaign schedules to agents on an agent-by-agent basis. Instead, you can assign the appropriate agents to a resource group, then assign a campaign schedule to the

Creating and Configuring Advanced Outbound Users
5-4 Oracle Advanced Outbound Implementation Guide
entire group. The specifics of creating a resource group are discussed in the Creating a Resource Group topic.
As well, there are specific agent user profile options that must be set before the agent can use either of the business applications. The configuration of these profile options is discussed in the Setting User Profile Options for Outbound Telephony topic.
IECAOUSERFor Advanced Outbound to be able to successfully log to Oracle Interaction History (IH) predictively dialed calls that do not result in a live connect, a user must be created and assigned the user name IECAOUSER. This user must also be created as an employee in your enterprise database, linked to the user, and imported as a CRM Resource. If the IECAOUSER is not created properly as an employee, user, and CRM Resource; a resource ID of 0 will be logged to Oracle Interaction History whenever a predictively dialed call does not result in a live connect. Interaction History will reject this resource ID, thus reporting information in Oracle Interaction History will not exist.
■ When creating this user as an employee in the database with Oracle HRMS (or CRM Resource Manager if Oracle HRMS is not installed), assign a first name of IECAO and a last name of USER.
■ When creating the user by logging into the Self Service Login URL with the System Administrator responsibility, assign the user name of IECAOUSER and link the user to the employee with a first name of IECAO and a last name of USER.
■ When importing the CRM Resource, ensure the user name is IECAOUSER.
There are five specific tasks associated with creating and administering users for Oracle Advanced Outbound:
■ Create employees in the enterprise database.
■ Create Oracle Applications user accounts and associate these user accounts with employees in the enterprise database.
■ Create groups and assign users to these groups
■ Create (import) employees as a CRM resource.
■ Set User Profile Options for Outbound Telephony

Creating and Configuring Advanced Outbound Users
Implementation Tasks 5-5
5.1.1 Creating an Employee in the Enterprise DatabaseEnterprises using Oracle Human Resources Management Systems (HRMS) must create employees with this application. For enterprises not using HRMS as their human resources application, employees must be created using CRM Resource Manager.
Use this procedure to create an employee in Oracle Human Resource Management
LoginSelf Service Login URL
Responsibility<country> HRMS Manager (for example US HRMS Manager if in the United States)
Steps1. Click People > Enter and Maintain.
The Find Person window appears.
2. Click New.
The People window appears.
3. Enter the information for the new person.
The following fields are required:
■ Last (Name)
■ Gender
■ Type (select Employee)
■ Date of Birth
■ Social Security Number (if using US HRMS)
■ Employee (Number) - If the Employee field is inactive, then Oracle HRMS is set up to automatically generate the employee number when the record is saved.
Other fields may be required depending on how your enterprise has set up Oracle HRMS. In addition, when you save the record, you may receive one or more messages that explain the consequences of leaving certain fields blank.
4. From the File menu, click Save.

Creating and Configuring Advanced Outbound Users
5-6 Oracle Advanced Outbound Implementation Guide
You may close the People window.
5.1.2 Creating a User and Linking the User to the EmployeeThe process of creating Oracle Applications users includes the following tasks:
■ Creating a user name - This user name will be used to log in to Oracle Applications (either the Self Service Login URL or the HTML Login URL).
■ Linking the user to the employee created in the Creating an Employee in the Enterprise Database topic.
■ Setting a password for the user - A password is required in addition to a user name when logging in to Oracle Applications. The password you set in this procedure must be changed the first time you log in as the user you create.
■ Assigning responsibilities to the user - The ability to perform tasks in the forms application depends on the responsibility you select. A responsibility is a level of authority in Oracle Applications that lets you access only those Oracle Applications functions and data appropriate to fulfill your role in an organization. In essence, a responsibility is a map that identifies a resource (user) and provides that resource with an association to specified functionality.
Each responsibility allows access to:
■ A specific Oracle application or group of Oracle applications.
■ A set of books, such as U.S. Operations or German Sales or an organization, such as New York Manufacturing or New York Distribution.
■ A restricted list of windows to which you can navigate.
■ A restricted list of functions you can perform. For example, two responsibilities may have access to the same window, but one responsibility’s window may have additional function buttons that the other responsibility’s window does not have.
■ Reports in a specific application; your system administrator can assign groups of reports to one or more responsibilities, so the responsibility you choose determines the reports you can submit.
Note: If the Employee field is inactive, then Oracle HRMS is set up to automatically generate the employee number when the record is saved.

Creating and Configuring Advanced Outbound Users
Implementation Tasks 5-7
Each user has at least one responsibility and several users can share the same responsibility.
Administrator Responsibility Matrix
Agent Responsibility Matrix
LoginSelf-Service Login URL (Forms)
ResponsibilitySystem Administrator
Steps1. Click Security > User > Define.
2. In the User Name field, type the name of the user.
3. Click in the Person field.
Responsibility Function
Advanced Outbound Administrator Manage Oracle Advanced Outbound operations
Oracle Marketing Super User Manage Oracle Marketing operations
Call Center HTML Administration Manage multiple aspects of interaction center, including: ICSM, and UWQ Media Actions.
Advanced Outbound Concurrent Requests
Configure and run concurrent processes to update queue count
Advanced Outbound Performance Monitor
Monitor Call Center Performance
Interaction History Create outcome, result, and reason codes
Oracle Marketing Administration Create custom target group priority levels
Responsibility Function
TeleSales Agent Permits agent level access to Oracle TeleSales
Collections Agent Permits agent level access to Oracle Collections

Creating and Configuring Advanced Outbound Users
5-8 Oracle Advanced Outbound Implementation Guide
The Person Names dialog box appears.
4. In the Find field, type the name of the employee you created in the Creating an Employee in the Enterprise Database topic and click Find.
The search results appear in the field below the Find field. Since wildcard (%) searches are allowed, you may receive a long list of names depending on what you typed in the Find field.
5. Click the employee name you want from the results list.
The Person field populates with the selected employee name.
6. In the Password field, type a password for the user account and then press Tab.
This password is temporary. When you sign on as this user for the first time, the message “Your password has expired” appears and you are prompted to set a new password.
7. Type the password again to verify it.
8. In the Responsibilities tab, add the following responsibilities, as appropriate.
■ System Administrator
■ <country> HRMS Manager (for example: US HRMS Manager)
■ CRM Resource Manager
■ Advanced Outbound Administrator
■ Oracle Marketing Super User
■ Call Center HTML Administrator
9. From the File menu, select Save.
5.1.3 Creating a Sales GroupTo access the tabs in Oracle Marketing Online, the administrator user to whom you want to grant OMO access must belong to a valid sales group. This sales group must be assigned the Sales Manager sales role and a usage of Sales and TeleSales.
Use this procedure to create a sales group.
LoginSelf-Service Login URL (Forms)

Creating and Configuring Advanced Outbound Users
Implementation Tasks 5-9
ResponsibilityCRM Resource Manager
Steps1. From the Navigator window, click Maintain Resources > Groups.
The Define Groups window appears.
2. In the Name field, type a name for the sales group you are creating.
3. On the Define Groups window, click the Roles tab.
4. From the list in the Role Type field, select Sales.
5. From the list in the Role field, select Sales Manager.
6. Click the Usages tab.
7. From the list in the Usage field, select Sales and TeleSales.
8. Click the Save icon.
5.1.4 Creating a Resource GroupUse this procedure to set up resource groups. Resource groups allow the assignment of multiple agents to a campaign schedule without having to assign each agent individually.
You can have multiple employees in one group. An employee in a group with the role of manager automatically becomes the manager of the other employees in that group and of the employees in the groups below in the hierarchy.
Use this procedure to create a resource group.
LoginSelf-Service Login URL (Forms)
ResponsibilityCRM Resource Manager
Note: You must not assign more than one employee with the role of Manager per group. Doing so will impact the reporting accuracy.
Creating and Configuring Advanced Outbound Users
5-10 Oracle Advanced Outbound Implementation Guide
Steps1. Click Maintain Resources > Groups.
The Define Groups page appears.
2. In the Group Name field, type a name for your resource group.
3. Click the Roles tab.
4. From the list in the Role Type field, select TeleSales and Collections if this is a resource group for Oracle Collections agents, or select TeleSales if this is a resource group for Oracle TeleSales agents.
5. From the list in the Role Type field, select TeleSales Agent and Collections Agent for use with Oracle Collections, or select TeleSales Agent for use with Oracle TeleSales.
6. Click the Usages tab.
7. From the list in the Usage field, select Sales and TeleSales and Collections if this is a resource group for Oracle Collections agents, or select Sales and TeleSales if this is a resource group for Oracle TeleSales agents.
8. Click the Save icon.
5.1.5 Importing a CRM ResourceUse the following procedure to import a CRM resource.
LoginSelf-Service Login URL (Forms)
ResponsibilityCRM Resource Manager
Steps1. Click Maintain Resources > Import Resources.
The Selection Criteria window appears.
2. In the Resource Category field, select Employee.
3. Enter any additional selection criteria.
For example, in the Name field, select the name of an employee.

Creating and Configuring Advanced Outbound Users
Implementation Tasks 5-11
4. Click Search.
Employees that meet the search criteria are listed in the Search Results area. The Select checkboxes for the matching employees are automatically selected.
5. Clear the Select checkboxes of the employees for whom you do not want to create a CRM resource.
6. Click Create Resource.
The Default Values window appears.
7. Click OK to accept the defaults.
The Selected Resources window appears. The Comments field indicates whether the resource is a new record, a duplicate record, or a duplicate record with a new role definition. The Select checkboxes are automatically selected.
8. Clear the Select checkboxes of the employees that you do not want to save as a resource.
9. To save the resources, click Save Resource.
A transaction number appears in the Transaction Number field. The transaction number is associated with each resource created during this transaction. More than one resource can have the same transaction number.
10. Click Details.
The Resource window appears. Verify the name of the resource (Name), the name of the employee (Source Name), and the user name (User Name) and note the resource number (Number).
11. From the Resource window, click the Roles tab (if it is not already displayed).
12. In the Role Type field, select Sales from the list of values.
13. In the Role field, select Sales Manager from the list of values.
14. Click the Save icon.
15. From the Resource window, click the Groups tab.
Important: Do not make any changes or add roles from this window. You can add or modify this information in the resource details later.

Creating and Configuring Advanced Outbound Users
5-12 Oracle Advanced Outbound Implementation Guide
16. In the Name field under Groups, select the group name you created in the Creating a Group topic.
17. Click in the Name field under Group Member Roles, and the field auto-populates with the Sales Manager role.
18. Click the Save icon.
5.1.6 Setting User Profile Options for Advanced Outbound TelephonyProfile options, in combination with the role and group to which each agent user is assigned, determine what information that user can view and modify.
This step only needs to be performed for agent users who will be logging in to Oracle E-Business applications, such as Oracle TeleSales and Oracle Collections.
Use the following procedure to set user profile options for outbound telephony.
LoginSelf-Service Login URL (Forms)
ResponsibilitySystem Administrator
Steps1. Click Profile > System.
2. Specify the level or levels at which you wish to view or set profile option values.
Typically, interaction center profile options are set for the Oracle Applications instance (for the purpose of profile options, this is also called the site). Then, if necessary, the profile options are modified for a user or a set of users working under a responsibility.
■ If you want to view or set profile options for all users at the installation site, select the Site box.
■ If you want to view or set profile options for users working under responsibilities owned by a specific application, select the Application box and then select an application from the Application list.

Creating and Configuring Advanced Outbound Users
Implementation Tasks 5-13
■ If you want to view or set profile options for users working under a specific responsibility, select the Responsibility box and then select a responsibility from the Responsibility list.
■ If you want to view or set profile options for a specific user, select the User box and then select a username from the User list.
3. If you want to display profile options that include a specific character string, type the characters in the Profile field.
You may search for profile options using character strings and the wildcard symbol (%). For example, to find profile options prefixed by "IEU", the product code for Oracle Universal Work Queue, enter IEU%.
4. Click Find.
The System Profile Values window appears, displaying all of the profile options beginning with the character string you typed in the Profile field.
5. Set the values for the profile options at one or more levels.
To use Oracle TeleSales as the business application, the following user profile options will need to be set to "Yes" if you want the user to have access to each of these queues:
– IEU: QUEUE: Advanced Outbound Telephony - allows user to log into the Advanced Outbound queue.
– IEU: QUEUE: Forecasts - allows user to view the Forecasts queue.
– IEU: QUEUE: Inbound Telephony - allows user to log into the Inbound queue to receive calls.
– IEU: QUEUE: Leads - allows users to view the Leads queue.
– IEU: QUEUE: Opportunities - allows users to view the Opportunities queue.
– IEU: QUEUE: Tasks - allows users to view the Tasks queue.
To use Oracle Collections as the business application, the following user profile options will need to be set to "Yes" if you want the user to have access to each of these queues:
– IEU: Queue: Delinquencies
– IEU: Queue: Dunning
– IEU: Queue: Promises

Splicing Advanced Outbound Into Your Database
5-14 Oracle Advanced Outbound Implementation Guide
– IEU: Queue: Quotes
6. When a profile option may be set at more than one level, the value entered at the Site level has the lowest priority. The value entered at the Site level is superseded by any value entered at the Application level value and the value entered at the Application level is superseded by any value entered at the Responsibility level. The value entered at the User level has the highest priority and overrides values entered at any other level.
7. From the File menu, click Save.
Your changes take effect as soon as the user signs on or changes responsibility. You may close the System Profile Values window.
5.2 Splicing Advanced Outbound Into Your DatabaseIf this is the first time you have applied IEC patches on this site, you should run ADSPLICE to apply the patch that contains the IEC product definitions in the database. ADSPLICE only needs to be run once for each set of products. If IEC product information is already defined in this site, you do not need to perform this task. If you are upgrading from an earlier version (that does not use the code IEC), you will still need to run ADSPLICE.
Use the steps below to splice Advanced Outbound into your database:
LoginNot applicable
ResponsibilityNot applicable
Steps1. Copy the following text files from 1932843/iec/admin to the admin directory
under your APPL_TOP.
■ iecprod.txt
■ iecterr.txt
■ newprods.txt
2. Change directories to the admin directory under your APPL_TOP.
Installing and Configuring the CTI Middleware
Implementation Tasks 5-15
3. Edit newprods.txt to reflect the tablespaces that the IEC user and schema should use.
4. Run adsplice from the admin directory under your APPL_TOP. When you are asked to enter the name of your AD Splicer control file, type newprods.txt.
AD Splicer will regenerate the environment file (e.g. APPLSYS.env under APPL_TOP) or registry. If you have made manual modifications to your environment file or your registry, you will need to apply those changes again. IEC_TOP must be defined. You can confirm this by using the echo command to display IEC_TOP.
5. From this new environment, use the AutoPatch utility to apply the patch driver (c1932843.drv).
This is the copy driver.
5.3 Installing and Configuring the CTI MiddlewareInstalling the CTI Middleware
Installing the CT-Connect Client
Configuring the CTI Middleware
5.3.1 Installing the CTI MiddlewareOracle Advanced Outbound supports two middleware products:
■ Intel CT-Connect or
■ Cisco ICM (Intelligent Call Manager)
The middleware configuration tells the Advanced Outbound Dial Server where the telephony adapter server is located and which Computer Telephony Integration (CTI) Server to use. The middleware also defines other telephony parameters used by the Dial Server (and Oracle Telephony Manager).
In most instances there will only be one CTI Server and one telephony adapter server in an interaction center environment, therefore only one middleware instance needs to be configured. However in a large interaction center, multiple telephony adapter servers are necessary for load balancing. Since it is not recommended to run multiple telephony adapter servers on the same machine, you will need a separate middleware configuration for each telephony adapter server.

Installing and Configuring the CTI Middleware
5-16 Oracle Advanced Outbound Implementation Guide
5.3.2 Installing the CT-Connect ClientCT-Connect client allows the Oracle Telephony Adapter Server to communicate with the CT-Connect Server for call control.
CT-Connect Client is easy to install by using its accompanying wizard. The field engineer performing the installation should know the name of the CT- Connect server.
Refer to the CT-Connect installation documentation for instructions on installing CT-Connect Client. You must have the same version of CT Connect for the server and the client.
Important: Compatibility between Oracle Advanced Outbound and third party products, including Computer-Telephony Integration middleware and switches, is certified after testing with each release of these Oracle products. Each combination of a switch, the switch vendor's own software release, and each CTI middleware release, must be certified independently. While Cisco ICM and Dialogic CT-Connect are the two middleware products currently supported by Oracle Advanced Outbound, there are limitations on the certified combinations of phone switches, switch software, and CTI middleware with each version of these Oracle products.
The certification information changes with some frequency, as third parties add and drop products and versions, and as Oracle's certification process proceeds. Therefore, current certification information is maintained on a web site, accessible to Oracle sales and product development personnel and to Oracle partners.
Customers should always have their Oracle sales channel verify, from the web site, that the combination of phone switch, switch vendor software and version, switch configuration, CTI middleware software and version are compatible and supported, prior to making an implementation plan.
Note: If you are using Cisco ICM as your middleware, you do not need to perform this task. There is no "client" with Cisco ICM.

Installing and Configuring the CTI Middleware
Implementation Tasks 5-17
5.3.3 Configuring the CTI MiddlewareThe middleware should be configured in a server group and should be shared by all the Dial Servers in that server group. While it is possible to have more than one server group in an interaction center environment, there will most likely only be one, since you cannot share resources between different server groups.
Use the steps below to configure the CTI middleware.
PrerequisitesIf there is only one telephony adapter server node, the middleware configuration should have already been accomplished in the Advanced Inbound installation and configuration process. Some parameters may have already been defined during the Advanced Inbound installation. However, additional Advanced Outbound parameters must be defined.
If there are multiple telephony adapter server nodes, then Middleware must be configured for each of the telephony adapter server nodes.
LoginHTML Login URL
ResponsibilityCall Center HTML Administration
Steps1. Click the Call Center tab.
2. Click the Middleware subtab.
3. In the Choose Server Group field, select the server group for which you want to configure middleware.
4. Click Create.
The Middleware Details page appears.
5. In the Middleware Name field, type a name for your middleware.
Record this name as you will need it when configuring the parameters for the Oracle Telephony Adapter Server.
6. From the list in the Middleware Type field, select Connectors for Cisco ICM or Connectors for CT-Connect.

Installing and Configuring the CTI Middleware
5-18 Oracle Advanced Outbound Implementation Guide
7. Click Update.
The Middleware Details page refreshes to display additional fields and a list of parameter fields for the middleware.
8. In the IP address field, type the IP address of the machine on which the telephony adapter server resides.
9. In the Port field, type the port number for your telephony adapter server.
10. In the provided parameter fields, enter the following parameters:
■ PBX Name - links logical identifier defined in CT Connect configuration to represent the CTI link between CT Connect and the switch.
■ PBX Type - PBX type. Choose:
– Avaya Definity
– Alcatel 4400
– Ericsson MD110
– Nortel Meridian or Symposium Call Center Server
– Rockwell Spectrum
– Siemens HICOM
■ CTI Enabler Service IP Address - IP address of the CT Connect server
■ Middleware Server Info 1 - 6 - Port numbers of the Cisco ICM CTI servers (Port A, B, C, etc.).
■ Domestic Dialing Prefix - Numeric prefix dialed when placing domestic calls.
■ International Dialing Prefix - Numeric prefix dialed for placing international calls.
■ Outgoing Prefix - Numeric prefix dialed to place an outside call. Check against the configuration of the PBX.
■ Site Area Code - The area code for the site where the PBX is located.
■ Site Country Code - The country code for the site where the PBX is located.
■ Site Internal Number Length - Sets the allowable number of digits for the internal number.

Configuring TableSpaces in Your Database
Implementation Tasks 5-19
■ Use Advanced Outbound - Indicates where the Oracle Telephony Adapter Server is being used for AO. This must be set whenever VDU boards are being housed on the node. (type Yes).
■ Predictive Answer Flag - Specifies how the predictive call will be answered. Should be set to either "Event" or "Time".
■ Predictive Transfer Flag - This indicates how the predictive call will be transferred. This should be set to "Event", "Single Step" or "Time".
■ Predictive Transfer Wait Time - If the Predictive Transfer Flag is set to "Time", then this field is used to specify the time before transferring.
■ Predictive answer wait time - If the Predictive Answer Flag is set to Time, then this field is used to specify the time before answering.
11. Click Update.
The CTI middleware is created and configured.
5.4 Configuring TableSpaces in Your DatabaseAdvanced Outbound generally requires larger tablespace sizes than the default values provide. Tablespace size is dependent on a number of factors, including: hard drive size, size of calling lists, system memory, and number of tablespaces defined. However, Oracle recommends utilizing around 100 megs per defined tablespace.
Note: Although "Time" is listed, it is currently not being implemented.
Note: Although "Time" is listed, it is currently not being implemented.
Note: "Time", is currently not being implemented.
Note: "Time", is currently not being implemented.
Implementing the Advanced Outbound Servers
5-20 Oracle Advanced Outbound Implementation Guide
When tablespace size is too small, several errors can occur, including:
■ If a target group stays in the 'Validating' status for an extended period of time, it is likely the case that validation has failed, but was unable to update the status to "Failed Validation". This usually occurs when there is a tablespace issue and the error message could not be logged. After the tablespace is increased, the target group will automatically resume validation.
■ If you stop seeing new error messages (beyond a specific date) in the IEO Log Viewer, it is very likely that you need to extend your tablespace. This is especially true if you are running into other errors that cannot be explained since other parts of the application may be failing, but are unable to log the errors due to the tablespace issues.
Contact your DBA to adjust your tablespace sizes for Advanced Outbound. Also, if your DBA will allow it, Oracle recommends utilizing the autoextend feature.
5.5 Implementing the Advanced Outbound ServersCreating the Telephony Adapter Server and Configuring its Parameters
Creating the Central Server and Configuring its Parameters
Creating the Dial Server and Configuring its Parameters
Starting and Stopping the Servers
5.5.1 Creating the Telephony Adapter Server and Configuring its ParametersOracle Telephony Adapter Server (OTAS) is the intermediary between the telephony platform (PBX/ACD and CTI Middleware) and Oracle Advanced Inbound. OTAS is installed as part of the standard E-Business installation.
Follow the steps below to create the telephony adapter server and configure its parameters for Advanced Outbound.
LoginHTML Login URL
ResponsibilityCall Center HTML Administration

Implementing the Advanced Outbound Servers
Implementation Tasks 5-21
Steps1. Click ICSM > Server Groups.
The Server Group List page appears.
2. From the list of server groups, click the server group to which you want to add the Oracle Telephony Adapter Server.
The Server Group Details page refreshes to display information for the selected server group.
3. Click Create.
The Server Details page appears.
4. In the Server Name field, type a name for the server you are creating.
5. From the list in the Server Type field, select Telephony Adapter Server.
6. From the list in the Member Server Group field, select the name of the server group where the Telephony Adapter Server will reside.
7. If this server group is part of a Super Group, select the super group name from the list in the Using Server Group field.
8. Click Save.
9. On the Server Details page, click Parameters.
The Server Details page refreshes to display parameters fields for the selected server.
10. In the Database Logging field, type the level you wish to use for database logs.
The following are valid levels:
– all – this will ensure that all requests to log (except "debug") are forwarded.
– debug – this will ensure that all requests to log are forwarded.
– info – this will forward all log requests except debug level logs.
– warn – this will forward all log requests except info and debug level logs.
– error – this will only forward error and fatal level logs.
– fatal – this will only forward fatal level logs.
– none – nothing is logged.
11. In the Middleware Configuration Name field, type the middleware name you used in the Configuring the CTI Middleware topic.

Implementing the Advanced Outbound Servers
5-22 Oracle Advanced Outbound Implementation Guide
12. In the Trace Level field, type the trace level you want to use.
The server trace function provides more detailed information about server activity.
13. Click Update.
14. On the Server Details page, click Advanced.
The Server Details page refreshes to display advanced parameter fields for the selected server.
15. In the Java Options field, the –ms and –mx VM parameters should be set depending on the number of agents you expect to service.
These are the minimum and maximum values for the Virtual Machine. These values cannot be changed dynamically; you will need to restart the server for changes to take effect. Refer to the Technology, Requirements, and Performance section of this guide, for information on what values to enter for these parameters.
16. In the Server Arguments field, type:
■ -logfile all - this traces through the startup steps until database logging starts, or
■ -logfile <path>/log.txt - this will generate a log.txt file in the designated location.
17. Click Done.
18. Once you have created the OTAS server, you must verify that you have two necessary .dll files in the ICSM/admin/scripts directory. This directory will be in the location you specified during ICSM installation.
The two files are:
■ iecvdu.dll.
■ the third party CTI middleware .dll for CT-Connect.
Important: This feature is very important for diagnosing issues and troubleshooting the server. Oracle recommends you set the trace level to all. For more information on trace file settings, refer to the Diagnostic and Troubleshooting section of this guide.

Implementing the Advanced Outbound Servers
Implementation Tasks 5-23
5.5.2 Creating the AO Central Server and Configure its ParametersFollow the steps below to create the AO Central Server (OCS) and configure its parameters.
PrerequisitesICSM must be installed and started, and you must have already defined a server group before you can create a Central Server or configure its parameters. These tasks should have been performed during the installation and implementation of Oracle ICSM. For more information, refer to the Oracle Applications Interaction Center Implementation Guide.
LoginHTML Login URL
ResponsibilityCall Center HTML Administration
Steps1. Click the ICSM tab.
The Server Group List page appears. This is the default page.
2. From the Server Group List page, select the server group in which the AO Central Server is defined.
3. In the Server section, click Create.
The Server Details page appears.
4. On the Server Details page, enter the server name, server type (use Advanced Outbound Central Server), location, description, member server group, using server group, and node assignment in the provided fields.
5. Click Save.
6. On the Server Details page, click Parameters.
Note: If the server group name is not listed, click the Next or Last hyperlinks located at the bottom of the page to view more server groups.

Implementing the Advanced Outbound Servers
5-24 Oracle Advanced Outbound Implementation Guide
The Server Details page refreshes to display parameter fields for the selected server.
7. Define the following parameters:
Server Parameters
AO Server Max Database Retries
The number of times the OCS server will attempt to connect to the data-base prior to stopping the server.
Default Value: 5
If a value is not given, then the server will default to 0.
AO Server Max Thread Count
The maximum number of threads the server will maintain in the thread pool. The number of threads can exceed this limit to 120% of this num-ber, but once the threads have been used they are then destroyed.
Default Value: 100
If a value is not given then the server will default to 100. Oracle recom-mends you set this parameter to at least 200.
OAO Log Level
The threshold value the logger will use to determine if a log request is forwarded to the log. Values for this parameter from least to most restrictive are:
– all – this will ensure that all requests to log (except "debug") are forwarded.
– debug – this will ensure that all requests to log are forwarded.
– info – this will forward all log requests except debug level logs.
– warn – this will forward all log requests except info and debug level logs.
– error – this will only forward error and fatal level logs.
– fatal – this will only forward fatal level logs.
– none – nothing is logged.
Default Value: info.
Implementing the Advanced Outbound Servers
Implementation Tasks 5-25
If a value is not given then the server will default to info.
OAO Server Version
Gives the current version of the OCS. This is given in the form of <major release>.<version>. At this time this is the level of specification.
Default value: 11.5
If a value is not given then the server will disregard.
AO Server Configuration Refresh Rate
The interval of time between OCS returning to the IEO schema to ensure that it is using the latest values for the server and plugin param-eters. This value is given in minutes.
Default value: 15
If a value is not given then the server will default to 15.
Trace Level
The level at which the server trace function will provide information about server activity. Oracle recommends you set this to all.
Retrieve ParametersRetrieve Execution Interval
The interval of time between the Retrieve Plugin attempting to prefetch entries into the cache (to fetch a certain number of records into the cache before these records are requested by the dial server).
Default Value: 5
If the parameter does not exist then the server will default to 5. If the value is set to 0 then the plugin will shutdown until the value is reset to a value above 0.
Retrieve Low Threshold Percentage
Important: This feature is very important for diagnosing issues and troubleshooting the server. Oracle recommends you set the trace level to all. For more information on trace file settings, refer to the Diagnostic and Troubleshooting section of this guide.

Implementing the Advanced Outbound Servers
5-26 Oracle Advanced Outbound Implementation Guide
The Retrieve Plugin uses an algorithm to determine how many entries are necessary to prefetch in order to keep up with the demand placed on it by its clients. The algorithm uses this value as a threshold to deter-mine if the state of the prefetch cache is extremely low and the number of entries to prefetch should be increased.
Default Value: 20
If a value is not given or the parameter does not exist then the server will default to 20.
Retrieve High Threshold Percentage
The Retrieve Plugin uses an algorithm to determine how many entries are necessary to prefetch in order to keep up with the demand placed on it by its clients. The algorithm uses this value as a threshold to deter-mine if the state of the prefetch cache is extremely high and the num-ber of entries to prefetch should be decreased.
Default Value: 80
If a value is not given or the parameter does not exist then the server will default to 80.
Retrieve List Increase Percentage
The Retrieve Plugin uses an algorithm to determine how many entries are necessary to prefetch in order to keep up with the demand placed on it by its clients. The algorithm used this value as the percentage to increase the number of prefetch entries.
Default Value: 25
If a value is not given or the parameter does not exist then the server will default to 25.
Retrieve Initial Cache Percentage
If the Retrieve Plugin determines that no entries have been previously prefetched for this list, it uses this value to determine the percentage of the list that should be used and the initial value of entries that need to be prefetched.
Default Value: 25
If a value is not given or the parameter does not exist then the server will default to 25.

Implementing the Advanced Outbound Servers
Implementation Tasks 5-27
Callback ParametersCallback Execution Interval
The interval of time between the Callback Plugin attempting to prefetch callback entries into the cache. This parameter can be used to tune OCS. In most situations the callback execution interval will be smaller than the retrieve callback execution interval. This value is given in minutes.
Default Value: 1
If the parameter does not exist then the server will default to 1. If the value is set to 0 then the plugin will shutdown until the value is reset to a value above 0.
Callable ParametersCallable Execution Interval
The interval of time between the Callable Plugin attempting to update the interval of time an entry is callable. This effects the determination of callable zones for a specific target group using the callable calendars. Because the calling calendars are specified in 30 minute intervals, the value for this parameter can be up to 30. However, setting the value this high could effect the interval of time prior to OCS adjusting to changes in the calling calendars. This parameter can be used to tune OCS. This value is given in minutes.
Default Value: 10
If the parameter does not exist then the server will default to 10. If the value is set to 0 then the plugin will shutdown until the value is reset to a value above 0.
Recover ParametersRecover Execution Interval
The interval of time between the Recover Plugin attempting to recover entries that have been determined to be lost in the system. This parame-ter can be used to tune OCS. This value is given in minutes.
Default Value: 60
If the parameter does not exist then the server will default to 60. If the value is set to 0 then the plugin will shutdown until the value is reset to a value above 0.
Recover Lost Interval

Implementing the Advanced Outbound Servers
5-28 Oracle Advanced Outbound Implementation Guide
The interval of time the recover plugin uses to determine if an entry should be considered to be lost in the system. When OCS prefetches an entry, it sets the time that the entry was checked out and a flag indicat-ing the entry was checked out. When OCS recycles an entry, it resets the flag to indicate that the entry is no longer checked out. If during the Recover Plugin’s execution cycle, it determines that an entry has been checked out for longer than the value of this parameter, it marks the entry as lost and recycles it. This value is given in minutes.
Default Value: 1440
If the value is not set or the parameter does not exist, then the server will default to 1440.
Report Parameters
Report Generation Execution Interval
The interval of time between the Report Plugin attempting to execute the reporting methods. This parameter can be used to tune OCS. This value is given in minutes.
Default Value: 15
If the parameter does not exist then the server will default to 15. If the value is set to 0 then the plugin will shutdown until the value is reset to a value above 0.
Refresh ParametersRefresh Execution Interval
The interval of time between the Refresh Plugin attempting to recover entries that have been determined to be stale in the cache. This parame-ter can be used to tune OCS. This value is given in minutes.
Default Value: 30
If the parameter does not exist then the server will default to 30. If the value is set to 0 then the plugin will shutdown until the value is reset to a value above 0.
Refresh Stale Interval
The interval of time the refresh plugin uses to determine if an entry should be considered to be stale in the system. When OCS prefects an entry, it sets the time that the entry was checked out and a flag indicat-ing the entry was checked out. When the target group management cli-

Implementing the Advanced Outbound Servers
Implementation Tasks 5-29
ent retrieves the entry, it effectively removes it from the cache. When OCS recycles an entry, it resets the flag to indicate that the entry is no longer checked out. If during the Refresh Plugin’s execution cycle, it determines that an entry has resided in the cache for longer than the value of this parameter, it marks the entry as stale and recycles it. This value is given in minutes.
Default Value: 60
If the value is not set or the parameter does not exist, then the server will default to 60.
Validation ParametersValidation Execution Interval
The interval of time between the Validation Plugin attempting to run the validation routines on target groups. This parameter can be used to tune OCS. This value is given in minutes.
Default Value: 15
If the parameter does not exist then the server will default to 15. If the value is set to 0 then the plugin will shutdown until the value is reset to a value above 0.
Recycle ParametersRecycle Execution Interval
The interval of time between the Recycle Plugin attempting to run the recycling routines on entries that have been marked in need of recy-cling. This parameter can be used to tune OCS. This value is given in minutes.
Default Value: 2
If the parameter does not exist then the server will default to 1. If the value is set to 0 then the plugin will shutdown until the value is reset to a value above 0.
Status ParametersStatus Execution Interval
The interval of time between the Status Plugin attempting to run the routines that maintain the correct statuses for target groups. This value will govern how quickly OCS adapts to target group and schedule sta-

Implementing the Advanced Outbound Servers
5-30 Oracle Advanced Outbound Implementation Guide
tus changes. This parameter can be used to tune OCS. This value is given in minutes.
Default Value: 5
If the parameter does not exist, then the server will default to 5. If the value is set to 0, then the plugin will shutdown until the value is reset to a value above 0.
8. Click Update.
9. On the Server Details page, click Advanced.
The Server Details page refreshes to display advanced parameters for the selected server.
10. In the Java Options field, the –ms and –mx VM parameters should be set depending on the number of agents you expect to service.
These are the minimum and maximum values for the Virtual Machine. These values cannot be changed dynamically; you will need to restart the server for changes to take effect.
Oracle recommends you set these parameters to -ms128m -mx256m. Refer to the Technology, Requirements, and Performance section of this guide, for information on what values to enter for these parameters.
11. In the Server Arguments field, type:
■ -logfile all - this traces through the startup steps until database logging starts
■ -logfile /<location>/log.txt - this will generate a log.txt file, and an OCS***.trace file (where *** is a time stamp) in the designated location.
12. Click Done.
5.5.3 Creating the AO Dial Server and Configure its ParametersUse the steps below to create the AO Dial Server (AODS) and configure its parameters.
PrerequisitesICSM must be installed and started, and you must have already defined a server group before you can create a Dial Server or configure its parameters. These tasks should have been performed during the installation and implementation of Oracle

Implementing the Advanced Outbound Servers
Implementation Tasks 5-31
ICSM. For more information, refer to the Oracle Applications Interaction Center Implementation Guide.
LoginHTML Login URL
ResponsibilityCall Center HTML Administration
Steps1. Click the ICSM tab.
The Server Group List page appears. This is the default page.
2. From the Server Group List page, select the server group in which the AO Dial Server is defined.
3. In the Server section, click Create.
The Server Details page appears.
4. On the Server Details page, enter the server name, server type (use Advanced Outbound Dial Server), location, description, member server group, using server group, and node assignment in the provided fields.
5. Click Save.
6. On the Server Details page, click Parameters.
The Server Details page refreshes to display parameter fields for the selected server.
7. Define the following parameters:
Server Parameters
AO Server Max Database Retries
Number of times AODS server will attempt to connect to the database. It then increases the wait time and tries again.
Default Value: 5
If a value is not given, then the server will default to 5.
AO Server Max Thread Count

Implementing the Advanced Outbound Servers
5-32 Oracle Advanced Outbound Implementation Guide
Maximum number of threads server will maintain in the thread pool.
Default Value: 100
If a value is not given then the server will default to 100.
Oracle recommends the following settings:
OAO Log Level
Threshold value logger will use to determine if a log request is for-warded to the log. Values for this parameter are:
– all – this will ensure that all requests to log (except "debug") are forwarded.
– debug – this will ensure that all requests to log are forwarded.
– info – this will forward all log requests except debug level logs.
– warn – this will forward all log requests except info and debug level logs.
– error – this will only forward error and fatal level logs.
– fatal – this will only forward fatal level logs.
– none – nothing is logged.
If a value is not given then the server will default to info.
OAO Server Version
Gives the current version of the AODS. This is given in the form of <major release>.<version>. At this time this is the level of specification.
Default value: 11.5
If a value is not given then the server will disregard.
AO Server Configuration Refresh Rate
Number of Agents Maximum Thread Count
50 or less 200
51 to 100 300
101 to 250 500
251 to 500 1000

Implementing the Advanced Outbound Servers
Implementation Tasks 5-33
This is time in minutes that the server will go back to the database to see if any of the following configuration has been changed:
– If the server configuration has itself been changed (mainly loglevel)
– If a campaigns configuration has changed (Predictive to a Non-Predictive case or vice-versa).
– If a new campaign schedule has now become active (and has at least one target group in executing state OR if a target group of this active campaign schedule is now executing)
Default value: 15
If a value is not given then the server will default to 15.
Trace Level
The level at which the server trace function will provide information about server activity. Oracle recommends you set this to all.
8. Click Update.
9. On the Server Details page, click Advanced.
The Server Details page refreshes to display advanced parameter fields for the selected server.
10. In the Java Options field, the –ms and –mx VM parameters should be set depending on the number of agents you expect to service.
These are the minimum and maximum values for the Virtual Machine. These values cannot be changed dynamically; you will need to restart the server for changes to take effect.
Important: This feature is very important for diagnosing issues and troubleshooting the server. Oracle recommends you set the trace level to all. For more information on trace file settings, refer to the Diagnostic and Troubleshooting section of this guide.
Number of Agents ms Setting mx Setting
50 or less -ms128m -mx256m
51 to 100 -ms128m -mx256m

Implementing the Advanced Outbound Servers
5-34 Oracle Advanced Outbound Implementation Guide
11. In the Server Arguments field, type:
■ -logfile all - this traces through the startup steps until database logging starts
■ -logfile /<location>/log.txt - this will generate a log.txt file, and a PRS***.trace file (where *** is a time stamp) in the designated location.
12. Click Done.
5.5.4 Starting and Stopping the Servers
Starting All Servers in a Server Group
LoginHTML Login URL
ResponsibilityCall Center HTML Administration
Steps1. Click ICSM > Server Groups.
2. From the list of server groups, click the server group name of the server group in which the servers you want to start reside.
The Server Group Details page appears.
3. In the Server Group Details area, select Start and then click Submit.
It may take several minutes to start the server processes. To view the current status during startup, refresh the browser several times.
As the server processes are starting up, "Starting" is displayed in the Stop/Start column. The status of each server process is displayed in the Servers area in the Status column.
101 to 250 -ms256m -mx512m
251 to 500 -ms512m -mx1024m
Number of Agents ms Setting mx Setting

Installing the VDU Boards and the Dialogic Software
Implementation Tasks 5-35
Stopping All Servers in a Server Group
LoginHTML Login URL
ResponsibilityCall Center HTML Administration
Steps1. Click ICSM > Server Groups.
2. From the list of server groups, click the server group name of the server group in which the servers you want to stop reside.
The Server Group Details page appears.
3. In the Server Group Details area, select Stop and then click Submit.
It may take several minutes to start the server processes. To view the current status during startup, refresh the browser several times.
As the server processes are starting up, "Stopping" is displayed in the Stop/Start column. The status of each server process is displayed in the Servers area in the Status column.
5.6 Installing the VDU Boards and the Dialogic Software
To install the VDU boards, refer to the installation instructions from the board manufacturer. You will need the assistance of a phone company engineer or an engineer from Dialogic to aid in providing information.
Servers housing VDU cards must run Windows NT or 2000. The extensions on the PBX should be allocated for use by Advanced Outbound, and a simple test using the tools shipped with the VDU hardware can be run.
Each dialogic VDU board has a rotary switch that allows you to determine the board order (if there will be more than one board installed in a single machine). Oracle Advanced Outbound supports up to sixteen boards on a single machine. If you are only installing one board, then you must set the rotary switch to 0. If you
Note: This is only necessary if predictive dialing will be used.

Installing the VDU Boards and the Dialogic Software
5-36 Oracle Advanced Outbound Implementation Guide
are installing multiple boards, then the rotary setting for the first board must be set to 0, the rotary switch for the second board must be set to 1, and so on.
Use the steps below to install the VDU software on the server housing the VDU card(s).
PrerequisitesBefore you can install the VDU software, the VDU board(s) must first be installed. Oracle Telephony Adapter Server must be installed and you must have an appropriate middleware configured in a server group.
Steps1. From your desktop, click Start > Programs > Dialogic System Software >
Dialogic Configuration Manager (DCM).
The Dialogic Configuration Manager page appears.
2. On the Dialogic Configuration Manager page, click Configuration Manager.
The Dialogic Configuration Manager automatically detects the VDU card and generates a list of VDU cards.
3. From the list of VDU cards, select the desired VDU card and click the green (Go) button.
Note: After installing the VDU card on the server, you need to reboot the system before you can install and configure the VDU software. This software must be installed on every server that will house VDU cards for Predictive dialing.
Important: You should note the board slot identification switch on the VDU board(s) as they are being installed. Each board dial setting on the same server node must be unique.
Note: If you highlight a card that is already running, a red (stop sign) is displayed. The green or red status determines whether or not the service is currently running.
Setting up Oracle Interaction History
Implementation Tasks 5-37
4. On the Dialogic Configuration Manager page, click Service, then Startup Mode.
The Startup Mode page appears.
5. Select Automatic.
6. Click Close.
5.7 Setting up Oracle Interaction HistoryOracle Interaction History contains many seeded outcome, result, and reason codes. However, you can also create your own custom outcome, result, and reason codes, as well as your own outcome - result, and result - reason mappings.
This topic group includes the following topics:
Defining Outcome Codes
Defining Result Codes
Defining Reason Codes
Mapping Outcome Codes to Result Codes
Mapping Result Codes to Reason Codes
5.7.1 Defining Outcome CodesThe outcome is the immediate response to an agent’s call, such as Contact, No Answer, or Busy. One outcome can be used by more than one campaign. To close an interaction, the agent must report an outcome.
Follow the steps below to define the outcome codes that an agent can use.
LoginSelf-Service Login URL (Forms)
ResponsibilityInteraction History
Steps1. Click Interaction History Administration.
The Interaction History Administration page appears.
Setting up Oracle Interaction History
5-38 Oracle Advanced Outbound Implementation Guide
2. Click the Outcomes tab.
3. For each outcome code you want to create, you must provide the following:
■ Outcome Code - name for your outcome code
■ Short Description - description of what the outcome code is
4. If you need to use Numeric Values, select the Telephony Related check box.
5. Select either Success option–Yes or No–and enter the appropriate Numeric Value.
Yes has a range of 1 to 100; No has a range of 101 to 255.
6. Click the Save icon to save the outcome definition.
5.7.2 Defining Result CodesA result of a transaction is the business-related consequence of the agent’s call, such as Sale, No Sale, or Complaint. While all transactions must have an outcome, a result is not mandatory. Perform the following steps to define a result.
Follow the steps below to define the result codes that an agent can use.
PrerequisitesNone
LoginSelf-Service Login URL (Forms)
ResponsibilityInteraction History
Note: Some telephony-related applications use Numeric Values, which are recorded as the Versatility Code in database tables. Versatility Codes are used by version 3i of the following applications: Oracle TeleBusiness for Telecom/Utilities, Oracle TeleBusiness for Financial Services, Oracle Integration Manager, and Oracle Campaign Plus. If you do not use these earlier applications, you do not need to use Numeric Values.

Setting up Oracle Interaction History
Implementation Tasks 5-39
Steps1. Click Interaction History Administration.
The Interaction History Administration page appears.
2. Click the Results tab.
3. For each result code you want to create, you must provide the following:
■ Result Code - name for your result code
■ Short Description - description of what the result code is
4. If the business rules of the enterprise require a Reason for every Result, select the Reason Required check box.
6. Click the Save icon to save the result definition.
5.7.3 Defining Reason CodesFollow the steps below to define the reason codes that an agent can use.
LoginSelf-Service Login URL (Forms)
ResponsibilityInteraction History
Steps1. Click Interaction History Administration.
The Interaction History Administration page appears.
2. Click the Reasons tab.
3. For each reason code you want to create, you must provide the following:
■ Reason Code - name for your reason code
■ Short Description - description of what the reason code is
6. Click the Save icon to save the reason definition.

Setting up Oracle Interaction History
5-40 Oracle Advanced Outbound Implementation Guide
5.7.4 Mapping Outcome Codes to Result CodesYou can create a new option by pairing an Outcome with a Result. Any Outcome may be paired with more than one Result. Each pair appears as one option on the agent’s screen.
Follow the steps below to pair an outcome with a result.
LoginSelf-Service Login URL (Forms)
ResponsibilityInteraction History
Steps1. Click Interaction History Administration.
The Interaction History Administration page appears.
2. Click the Outcome - Results tab.
3. Select a value from the Outcomes list.
4. Select a value from the Results list.
5. Click the Save icon to save the Outcome-Result pair.
5.7.5 Mapping Result Codes to Reason CodesYou can create a new option by pairing a Result with a Reason. Any Result may be paired with more than one Reason. Each pair appears as one option on the agent’s screen.
Follow the steps below to pair a result with a reason.
LoginSelf-Service Login URL (Forms)
ResponsibilityInteraction History
Steps1. Click Interaction History Administration.

Setting up Oracle Marketing Online
Implementation Tasks 5-41
The Interaction History Administration page appears.
2. Click the Result - Reasons tab.
3. Select a value from the Outcomes list.
4. Select a value from the Results list.
5. Click the Save icon to save the Outcome-Result pair.
5.8 Setting up Oracle Marketing OnlineThis topic group includes the following topics:
Refreshing Advanced Outbound Record Counts
Defining Advanced Outbound List Source Types
Creating a Custom Setup for Advanced Outbound Campaign Schedules
Creating an OMO Campaign
Creating an OMO Campaign Schedule
Invoking the Concurrent Processor for OMO List Generation
Configuring an OMO List
Configuring an OMO Target Group
Associating a Call Script to a Campaign Schedule
Associating Outcome Codes to the Campaign Schedule
Performing the Agent — Campaign Schedule Assignment
5.8.1 Refreshing Advanced Outbound Record CountsThe concurrent processor runs events in the database. The refreshing of Advanced Outbound record counts can be scheduled as a concurrent process. With the concurrent Processor, you can schedule these runs as a one time only event, or a regularly occurring event.
Follow the steps below to invoke the concurrent processor to refresh AO record counts.
LoginSelf Service Login URL

Setting up Oracle Marketing Online
5-42 Oracle Advanced Outbound Implementation Guide
ResponsibilityAdvanced Outbound Concurrent Requests
Steps1. Click Concurrent Requests > Run.
The Submit a New Request dialog box appears.
2. On the Submit a New Request dialog box, select Single Request, and click OK.
The Submit Request dialog box appears.
3. From the list in the Name field, select Advanced Outbound Refresh Available Records Count.
4. Click OK.
5. To schedule when the run will occur, click Schedule, select when to run the process, and click OK.
6. To schedule what actions to perform upon completion of the run, click Options, type the name of who you want to notify, or type the printer name where you want to send the results of the run to print, then click OK.
7. Click Submit to run the request.
5.8.2 Defining Advanced Outbound List Source TypesA list source type is a concept used by Oracle Marketing to define how fields from the database (typically AMS_LIST_ENTRIES) map to the columns of a target group entry. A target group entry has several hundred generic columns; the source type, for example, states that the phone number will go into column 1 and the name will go into column 2. Advanced Outbound utilizes two list source types:
■ Organization Contact List
■ Person List
Oracle Advanced Outbound recycling algorithms and record filters are directly associated to source types because they define which fields are present in a target group.

Setting up Oracle Marketing Online
Implementation Tasks 5-43
Follow the steps below to define the two required list source types for Advanced Outbound.
LoginHTML Login URL
ResponsibilityOracle Marketing Super User
Steps1. Click Administration > Marketing > Audience > Data Sources.
The List Source Type Overview page appears, displaying a summary view table of any existing source types.
2. From the list of source types, click Organization Contact List.
The List Source Types page appears, displaying a summary view table of all fields names defined for that source type.
3. Ensure that the following fields names are present:
Per customer – used in the screen pop, or to check for DNC, release control, or stop list.
■ PERSON_FIRST_NAME
■ PERSON_LAST_NAME
■ PERSON_NAME_SUFFIX
■ PERSON_TITLE
■ PIN_CODE
■ PARTY_NAME
■ PARTY_ID
■ SOURCE_CODE
Important: While both of these list source types are seeded in OMO, however, they are NOT defined in the database until this procedure is performed. It is crucial that you A missing source type view will cause a validation error.

Setting up Oracle Marketing Online
5-44 Oracle Advanced Outbound Implementation Guide
■ SOURCE_CODE_FOR_ID
■ PARTY_SITE_ID
■ POSTAL_CODE
Per phone number – required by AO for each phone number
■ CONTACT_POINT_ID
■ TIME_ZONE
■ PHONE_COUNTRY_CODE
■ PHONE_AREA_CODE
■ PHONE_NUMBER
■ RAW_PHONE_NUMBER
■ REASON_CODE
If all of these fields are not present, you can add them by using the utility at the bottom of the table.
4. Click Update.
5. Repeat steps 3 and 4 for Person List.
6. Click Update.
Verifying Your List Source Types are in the DatabaseYou can run a SQL query to check your list source types (this query should be executed in a sqlplus session):
SELECT VIEW_NAME
FROM ALL_VIEWS
Note: Clicking Update, defines the selected list source type in the database.
Important: While Oracle Marketing Online allows you to modify the source type fields or create your own custom source types, all the fields required by Advanced Outbound must be present and unmodified.

Setting up Oracle Marketing Online
Implementation Tasks 5-45
WHERE VIEW_NAME IN ('AMS_TAR_PERSON_LIST_V',
'AMS_TAR_ORGANIZATION_CONTACT_V')
AND OWNER = 'APPS';
We expect the following two rows to be returned:
AMS_TAR_ORGANIZATION_CONTACT_V
AMS_TAR_PERSON_LIST_V
If no rows are returned by this query, then the views do not exist in the database.
5.8.3 Creating a Custom Setup for Advanced Outbound Campaign SchedulesThis is an optional step that eliminates the need to approve every campaign schedule before the campaign schedule can be executed with Advanced Outbound.
When creating a campaign or campaign schedule, you must specify a setup type for the campaign/campaign schedule. Marketing Online seeds a setup type, called Direct Marketing – Telemarketing, for campaign schedules to be executed through the Advanced Outbound channel. By default, this setup type requires an approval process.
To bypass the approval process, it is recommended another custom setup type be created, similar to the seeded Direct Marketing – Telemarketing setup type. However, you should leave the Budget Approval Process boxes unchecked when creating this custom setup type, this will eliminate the budget approval workflow process from being started. This is not a mandatory procedure in the implementation process.
Login HTML Login URL
ResponsibilityOracle Marketing Super User
Steps1. Click Administration > Marketing > Setup > Custom Setup.
The Custom Setup page appears.
2. Click Create.

Setting up Oracle Marketing Online
5-46 Oracle Advanced Outbound Implementation Guide
The Create Custom Setup page appears.
3. In the Setup Name field, type a name for the custom setup.
4. In the Associated With field, select Campaign Schedule.
5. In the Activity Type field, select Direct Marketing.
6. In the Activity field, select Telemarketing.
7. Ensure the Active box in checked.
8. Click Create.
The Custom Setup Details page appears.
9. Ensure all of the boxes for Budget Approval are unchecked.
10. Click Update.
5.8.4 Creating an OMO CampaignCampaigns are the vehicle for putting information about the organization’s products, services, offers, and messages in front of customers and potential customers. Campaigns are a fundamental entity for Oracle Marketing and are never used directly by Advanced Outbound, although they contain the campaign schedules and target groups which are. One marketing campaign can have multiple campaign schedules associated with it and each of these campaign schedules can be targeted for different execution channels. For example a marketing campaign might have a campaign schedule associated with it that is targeted for email execution and another associated with it that is targeted for telephony execution.
Follow the steps below to create a campaign in Oracle Marketing Online.
LoginHTML Login URL
ResponsibilityOracle marketing Super User
Steps1. Click the Campaign tab.
The Campaigns page appears, displaying a summary view table of any existing campaigns.

Setting up Oracle Marketing Online
Implementation Tasks 5-47
2. Click Create.
The Create Campaign page appears.
3. In the Setup Type field, type Campaigns if you will be using Oracle TeleSales as your business application, or Collections if you will be using Oracle Collections as your business application.
4. In the Name field, type a name for the campaign.
5. In the Version field, type a version number for the campaign. This numbering prevents campaigns with the same name from being active at the same time.
6. In the Start Date and End Date fields, set the appropriate start and end dates for your campaign.
7. In the Currency field, select the appropriate currency for your campaign.
8. In the Owner field, ensure the correct person is listed as the campaign owner.
9. In the Country field, search for and select the appropriate country.
10. From the list in the Language field, select the desired language for your campaign.
11. Click Create.
5.8.5 Creating an OMO Campaign ScheduleFollow the steps below to create a campaign schedule in Oracle Marketing Online.
LoginHTML Login URL
ResponsibilityOracle Marketing Super User
Steps1. Click the Campaign tab.
The Campaigns page appears, displaying a summary view table of any existing campaigns.
2. Click the campaign for which you want to create a campaign schedule.
3. From the side navigation panel, click the Execution hyperlink.

Setting up Oracle Marketing Online
5-48 Oracle Advanced Outbound Implementation Guide
The Campaign Details – Campaign Schedule page appears.
4. Click Create.
The Campaign Schedule – Create page appears.
5. In the Setup Type field, select the Direct Marketing – Telemarketing setup, or select the name of the custom setup type you defined without the approval process step. The selection here will auto-populate the Activity Type and Activity fields.
6. In the Name field, type a name for your campaign schedule.
7. Select the Use Parent Source Code box if you want the campaign schedule to default to the source type set for the campaign (Person List or Organization List).
8. From the list in the Language field, select the desired language for your campaign.
9. In the Coordinator field, ensure the correct person is listed as the campaign schedule coordinator.
10. In the Currency field, select the appropriate currency for your campaign.
11. In the Time Zone field, select the appropriate time zone. The time zone you select here is the time zone for the geographic location where the schedule activity will be taking place.
12. In the Start Date field, select a starting date for the campaign schedule that is within the date parameters of the parent campaign.
13. Ensure the Do Not Use Trigger radio button is selected.
14. Click Create.
5.8.6 Invoking the Concurrent Processor for OMO List GenerationThis concurrent program needs to be running to generate Standard lists and change their list status to Available. Otherwise the list status will become stuck in Generating status. This process should only be performed once for each list.
Follow the steps below to invoke the concurrent processor to generate OMO lists.
LoginSelf Service Login URL

Setting up Oracle Marketing Online
Implementation Tasks 5-49
ResponsibilitySystem Administrator
Steps1. Click Concurrent > Requests.
The Find Requests dialog box appears.
2. On the Find Requests dialog box, click Submit a New Request.
The Submit a New Request dialog box appears.
3. On the Submit a New Request dialog box, select Single Request, and click OK.
The Submit Request dialog box appears.
4. From the list in the Name field, select Workflow Background Process, and click OK.
The Parameters dialog box appears.
5. In the Item Type field of the Parameters dialog box, select AMS: List Generation and click OK.
6. Select values for the Process Deferred, Process Timeout and Process Stuck fields, and click OK.
7. In the At these Times… field, set when you want to run the process by clicking Schedule, selecting the appropriate time, and clicking OK.
8. Click Submit.
9. Click Submit to run the request.
5.8.7 Configuring an OMO ListList configuration is a multi-step process that starts with the creation of a list in OMO, which results in a list object — an empty container awaiting records. Thereafter, you must identify a record source, add the records to the list, and generate the list.
This topic group includes the following topics:
Creating a List
Importing Record Sources Into OMO
Adding Record Sources to the List

Setting up Oracle Marketing Online
5-50 Oracle Advanced Outbound Implementation Guide
Generating the List
5.8.7.1 Creating a List in Oracle Marketing OnlineFollow the steps below to define a list in Oracle Marketing Online. Until record sources are subsequently defined for the list, it will remain in Draft status.
LoginHTML Login URL
ResponsibilityOracle Marketing Super User
Steps1. Click Audience > List.
The Lists page appears, displaying a summary view table of any existing lists.
2. Click Create.
The Create List page appears.
3. In the Name field, type a name for your list.
4. From the list in the Type field, select Standard.
5. From the list in the Source Type field, select the source type you want to use with your list. For AO, valid source types are Persons or Organization Contacts.
6. If the appropriate person is not populated in the Owner field, do the following:
a. Enter your search criteria in the Owner field and click Go.
■ You can use the % wildcard search character.
■ One-character searches are supported.
■ For exact title matches, enter search criteria using the syntax <Lastname>, <Title> <Firstname>. For example, to obtain the record Mr. George Washington, type Washington, Mr. George and click Go.
b. In the Resource Selector page, refine your search criteria if necessary.
c. From the resulting list on the Resource Selector page, click the name of the appropriate owner.
The Create List page refreshes, containing the selected value.

Setting up Oracle Marketing Online
Implementation Tasks 5-51
7. Click Create.
The list is created.
Guidelines■ List types are not enforced by all applications. Manual lists can have each list
entry manually designated from existing records. For all other lists, including lists that will be populated by Oracle Discoverer workbook, use Standard. Suppression lists contain list entries that other lists can use to filter out or suppress, effectively creating a stop-list mechanism that can be used for various other lists. Suppression lists are generally not used as lists of contacts to execute a campaign.
■ The two required source types for Advanced Outbound are Persons and Organization Contacts. A list source type is a concept used by Oracle Marketing Online to define how fields from the database (typically TCA) map to the columns of a target group entry. A target group entry has several hundred generic columns; a specific list source type, for example, could state that the phone number will go into column 1 and the name will go into column 2. However, a different list source type could populate the first column with name and the second column with phone number.
5.8.7.2 Importing Record Sources Into Oracle Marketing OnlineFollow the steps below to import record sources into Oracle Marketing Online.
LoginHTML Login URL
ResponsibilityOracle Marketing Super User
Steps1. Click Audience > Import.
The Import: Introduction page appears.
2. Click Next.
3. The Definition page appears.
4. In the Import Type field, select the type of record source you want to import.

Setting up Oracle Marketing Online
5-52 Oracle Advanced Outbound Implementation Guide
5. In the Name field, type a name for the record source you want to import.
6. In the Source File area, designate the location of the record source you want to import and provide details on how the record source is organized.
7. Click Next.
The Additional Details page appears.
8. In the provided fields, enter additional information about the record source you want to import.
9. Click Next.
The Mapping page appears.
10. Establish the correct mapping for the columns in your list by highlighting a field in the Source Fields list, highlighting the corresponding value in the Target Fields list, then click the right arrow to move the mapping over to the Mapping list.
11. Click Next.
The Review page appears.
12. If you want to automatically generate the list during the import process, click the Generate a List upon Import box, otherwise click Import.
The Confirmation page appears, displaying a confirmation note stating that the list has been submitted for processing.
13. If you want to import another record source, click New Import, otherwise click Finish.
5.8.7.3 Adding Record Sources to the OMO ListFollow the steps below to
LoginHTML Login URL
ResponsibilityOracle Marketing Super User
Steps1. Click Audience > List.

Setting up Oracle Marketing Online
Implementation Tasks 5-53
The Lists page appears, displaying a summary view table of all existing lists.
2. From the table, click the list to which you want to add your imported record sources.
The List – Main page appears.
3. From the side navigation panel, click Selections.
The List – Selection page appears.
4. For each list:
a. Specify the Order in which the record sources will be incorporated. The lowest numbered record source will be used first.
b. Select the Operation. Operations are Include, Exclude and Intersect:
– Include means to add all entries in the record source to the list. Include is a required operation for the first record source to be used.
– Exclude means that any entries in the record source will be removed from the list. Exclude is generally used to remove a set of entries from larger record source that was included in the list.
– Intersect means only entries that are in the intersected record source and the list (up to that point in the incorporation order), will remain on the list. Intersect can be used to create a list where the entries are selected for more than one reason (Example: a record source of people making over $100,000 intersected with a record source of people living in Montana will result in a list of people living in Montana who make more than $100,000).
c. Select the Type. Types are Import List, List, SQL, Schedule, Segment, or Workbook.
d. In the Name field, search for and select the name of the record source you want to add to the list.
e. In the Dedupe Rank field, type a deduplication rank for the record source. A deduplication rank determines which record to retain when a user removes duplicate records after the list has been generated. Deduplication occurs only during an Include operation.
5. Click Update.
The List – Selection page refreshes to display a confirmation message.

Setting up Oracle Marketing Online
5-54 Oracle Advanced Outbound Implementation Guide
Guidelines■ When designating an order for list selection, each record source in the list must
contain a unique number. The lowest numbered record source will be used first.
■ The first record source must be of type "include" so that records will be included in the list. Designate all record sources to include prior to designating record sources to exclude.
■ If one of the list sources is a suppression list or another list of type "exclude," designate this last in the list selection page, to ensure that records to be included will exist in the set from which exclusions are to occur.
5.8.7.4 Generating the OMO ListFollow the steps below to
LoginHTML Login URL
ResponsibilityOracle Marketing Super User
Steps1. Click Audience > List.
The Lists page appears, displaying a summary view table of all existing lists.
2. From the table, click the list you want to generate.
The List – Main page appears.
3. From the side navigation panel, click Generation.
The List – Generation page appears.
4. Click the Generate immediately radio button if you want to generate the list now, or click the Generate at a future time radio button if you want to generate the list later.
If you clicked the Generate at a future time radio button in the previous step, select the date, time and time zone for the generation.
5. In the Generation Type field, select the type of generation you want.
6. Click Update.

Setting up Oracle Marketing Online
Implementation Tasks 5-55
The List – Generation page refreshes to display a confirmation message.
5.8.8 Configuring an OMO Target GroupThe configuration process for target groups involves:
Adding Generated Lists to the Target Group
Generating the Target Group and Setting its State to “Locked”
5.8.8.1 Adding Generated Lists to the Target GroupFollow the steps below to add a generated list to a target group.
LoginHTML Login URL
ResponsibilityOracle Marketing Super User
Steps1. Click the Campaign tab.
The Campaigns page appears, displaying a summary view table of all existing campaigns.
2. From the table, select the campaign containing the campaign schedule under which your target group will reside.
The Campaign Details page appears.
3. From the side navigation panel on the Campaign Details page, click Execution.
The Campaign Details - Campaign Schedule page appears, displaying a summary view table of all campaign schedules associated with the selected campaign.
4. From the summary view table, click the campaign schedule under which your target group will reside.
The Campaign Schedule – Details page appears.
5. From the side navigation panel, click Execution > Target Group.
The Campaign Schedule Details - Target Group page appears

Setting up Oracle Marketing Online
5-56 Oracle Advanced Outbound Implementation Guide
6. From the Type field, select the type of list you are adding.
7. In the List Name field, search for and select the list you want to add.
8. Repeat the previous step for each list you want to add.
9. In the Target Group List Name field, type a name for your target group.
10. In the Source Type field, select a source type for your target group.
11. Click Update.
The selected lists are added to the target group.
5.8.8.2 Generating the Target Group and Setting its State to “Locked”Follow the steps below to generate the target group and set it’s list state to "Locked".
LoginHTML Login URL
ResponsibilityOracle Marketing Super User
Steps1. Click the Campaign tab.
The Campaigns page appears, displaying a summary view table of all existing campaigns.
2. From the table, select the campaign containing the campaign schedule under which your target group resides.
The Campaign Details page appears.
3. From the side navigation panel on the Campaign Details page, click Execution.
The Campaign Details - Campaign Schedule page appears, displaying a summary view table of all campaign schedules associated with the selected campaign.
4. From the summary view table, click the campaign schedule under which your target group resides.
The Campaign Schedule – Details page appears.
5. From the side navigation panel, click Execution > Target Group.

Setting up Oracle Marketing Online
Implementation Tasks 5-57
The Campaign Schedule Details - Target Group page appears
6. Click Generate Target Group.
The target group generates and is automatically associated with the selected campaign schedule.
7. Scroll down the page and in the Target Group List Name field, click the name of the target group you just generated.
The List –Entries page appears.
8. On the List –Entries page, click your target group name.
The List - Main page appears.
9. In the Status field, select Locked.
10. Click Update.
The selected target group list state is set to “Locked”.
5.8.9 Associating a Call Script to a Campaign ScheduleThis step is optional. You would only associate a call script with your campaign schedule if you wanted to use Oracle Scripting with your outbound telephony campaign.
Follow the steps below to associate a script to your campaign schedule.
LoginHTML Login URL
ResponsibilityOracle Marketing Super User
Steps1. Click the Campaign tab.
The Campaigns page appears, displaying a summary view table of all existing campaigns.
2. From the table, select the campaign containing the campaign schedule under which your target group resides.
The Campaign Details page appears.

Setting up Oracle Marketing Online
5-58 Oracle Advanced Outbound Implementation Guide
3. From the side navigation panel on the Campaign Details page, click Execution.
The Campaign Details - Campaign Schedule page appears, displaying a summary view table of all campaign schedules associated with the selected campaign.
4. From the summary view table, click the campaign schedule under which your target group resides.
The Campaign Schedule – Details page appears.
5. From the side navigation panel, click Collaboration.
The Campaign Schedule Details – Contact Point page appears, displaying a summary view table of any existing call scripts associated to the selected campaign schedule.
6. In the Type field, select Outbound Script.
7. In the Name field, search for and select the name of the specific call script you want to associate.
8. Click Update.
5.8.10 Associating Outcome Codes to the Campaign ScheduleFollow the steps below to associate outcome codes to your campaign schedule.
LoginHTML Login URL
ResponsibilityOracle Marketing Super User
Steps1. Click Administration > Sales > Outcome Assignments.
2. Click Go to the right of the Campaign Schedule field.
The Source Code window appears listing all of the available campaign schedules.
3. You can use the Keyword field to search for the campaign schedule of your choice:

Setting up Oracle Marketing Online
Implementation Tasks 5-59
a. Type a partial name in the Keyword field. You can use % sign to substitute for missing characters.
b. Click Search.
The Source Code page now lists only those campaign schedules matching your search criteria.
4. From the list, select the campaign schedule to which you want to associate outcome codes.
The Campaign Outcome Assignments page appears.
5. Click Add Outcome.
6. In the Outcome Code field, search for and select the outcome you want to associate with the selected campaign schedule. Repeat this step for each outcome you want to associate to the campaign schedule.
7. Click Update.
5.8.11 Performing the Agent — Campaign Schedule AssignmentBefore an Advanced Outbound campaign schedule may be executed by an Oracle TeleSales or Oracle Collections agent, the TeleSales or Collections agent must be assigned to the Campaign Schedule. This assignment allows the agent to view the campaign schedule as a node on the agent’s UWQ Outbound Telephony.
You can associate campaign schedules and agents in the following ways:
■ Assign campaign schedules to individual agents
■ Assign individual agents to campaign schedules
■ Assign campaign schedules to resource groups
■ Assign resource groups to campaign schedules
5.8.11.1 Assigning Campaign Schedules to AgentsUse this procedure to assign campaign schedules to agents.
Note: Agents will not be able to view the campaign schedule from UWQ, until the campaign schedule setup has been completed in Advanced Outbound and the campaign schedule has been set to an 'Active' state.

Setting up Oracle Marketing Online
5-60 Oracle Advanced Outbound Implementation Guide
LoginHTML Login URL
ResponsibilityOracle Marketing Super User
Steps1. From the Oracle Marketing Online homepage, click the Administration tab.
2. Click the Sales subtab.
3. From the side panel under Call Center, click the Campaign Assignments hyperlink.
4. Under the Assign to heading:
a. Select the Resource radio button.
b. In the text box, type the agent’s last name or a partial name. You can use the% sign to substitute for missing characters.
c. Click Go.
d. From the list, select the name of the agent you want to assign.
The Campaign Assignment window displays the agent’s name in the text box. Any campaign schedules already assigned to that agent appear listed below.
5. Click Add Campaign.
A new line appears under the Current Campaign Assignments heading.
6. Click Go.
The Valid Campaign Schedule list appears.
7. Select the name of the campaign schedule you wish to assign and click OK.
The schedule you selected displays on the Campaign Assignment window.
8. Click Update.
9. Repeat this procedure for each campaign schedule you want to assign.
5.8.11.2 Assigning Agents to Campaign SchedulesUse this procedure to assign agents to individual campaign schedules.

Setting up Oracle Marketing Online
Implementation Tasks 5-61
LoginHTML Login URL
ResponsibilityOracle Marketing Super User
Steps1. From the Oracle Marketing Online homepage, click the Administration tab.
2. Click the Sales subtab.
3. From the side panel under Call Center, click the Agent Assignments hyperlink.
The Resource Assignment window appears.
4. In the Campaign Name field, type the name or a partial name of the campaign schedule you want to assign. You can use the % sign to substitute for missing characters.
5. Click Go.
6. From the list, select the campaign schedule you want to assign and click OK.
The campaign schedule name populates the Campaign Name field.
7. Under the Assign to heading:
a. Select the Resource radio button.
b. Enter the agent’s last name or a partial name in the text box. You can use the % sign to substitute for missing characters.
c. Click Go.
d. Select the Agent’s name from the list.
8. Click Update.
9. Repeat this procedure for each campaign schedule you want to assign.
5.8.11.3 Assigning Campaign Schedules to Resource GroupsIf you have a campaign schedule that you want to assign to a large number of agents, you can create a resource group for the agents and assign the campaign schedule to the resource group. This eliminates the need to assign the campaign schedule to each individual agent.
Use this procedure to assign campaign schedules to resource groups.

Setting up Oracle Marketing Online
5-62 Oracle Advanced Outbound Implementation Guide
LoginHTML Login URL
ResponsibilityOracle Marketing Super User
Steps1. From the Oracle Marketing Online homepage, click the Administration tab.
2. Click the Sales subtab.
3. From the side panel under Call Center, click the Campaign Assignments hyperlink.
4. Under the Assign to heading:
a. Select the Resource Group radio button.
b. In the text box, type the a partial name for the resource group. You can use the % sign to substitute for missing characters.
c. Click Go.
d. From the list, select the name of the resource group you want to assign.
The Campaign Assignment window displays the resource group’s name in the text box. Any campaign schedules already assigned to that resource group appear listed below.
5. Click Add Campaign.
A new line appears under the Current Campaign Assignments heading.
6. Click Go.
The Valid Campaign Schedule list appears.
7. Select the name of the campaign schedule you wish to assign.
The schedule you selected displays on the Campaign Assignment window.
8. Click Update.
9. Repeat this procedure for each campaign schedule you want to assign.
5.8.11.4 Assigning Resource Groups to Campaign SchedulesIf you have a large number of agents that you want to assign to a campaign schedule, you can create a resource group for the agents and assign the group to a

Setting up Oracle Marketing Online
Implementation Tasks 5-63
particular campaign schedule. This eliminates the need to assign each individual agent to the campaign schedule.
Use this procedure to assign resource groups to campaign schedules.
LoginHTML Login URL
ResponsibilityOracle Marketing Super User
Steps1. From the Oracle Marketing Online homepage, click the Administration tab.
2. Click the Sales subtab.
3. From the side panel under Call Center, click the Agent Assignments hyperlink.
The Resource Assignment window appears.
4. In the Campaign Name field, type the name or a partial name of the campaign schedule you want to assign. You can use the % sign to substitute for missing characters.
5. Click Go.
6. From the list, select the campaign schedule you want to assign.
The campaign schedule name populates the Campaign Name field.
7. Under the Assign to heading:
a. Select the Resource Group radio button.
b. Enter a partial name for the resource group in the text box. You can use the % sign to substitute for missing characters.
c. Click Go.
d. Select the resource group’s name from the list.
8. Click Update.
9. Repeat this procedure for each resource group you want to assign.

Configuring Oracle Advanced Outbound
5-64 Oracle Advanced Outbound Implementation Guide
5.9 Configuring Oracle Advanced OutboundThis topic group includes the following topics:
Configuring the Logical VDUs
Setting the Server Time Zone
Defining Time Zone and Area Code Mapping Data
Defining Calling Calendars
Creating Recycling Algorithms
Using the Recycling Algorithm Shadow Feature
Creating Record Filters
Creating Validation Rules
Defining Campaign Schedule Parameters
Defining Target Group Parameters
Defining Automated Messaging
5.9.1 Configuring the Logical VDUsFollow the steps below to configure VDUs to be used by Advanced Outbound. During this configuration process, you will need to provide information in three main areas:
■ VDU information
■ Board information
■ Port information
PrerequisiteTo create voice detection units, your user account must be assigned the Advanced Outbound Administrator responsibility. The VDU board must already be installed on the machine. You must contact your PBX administrator for the VDU board port extension numbers.
LoginHTML Login URL

Configuring Oracle Advanced Outbound
Implementation Tasks 5-65
ResponsibilityAdvanced Outbound Administrator
Steps1. On the Campaign Schedules page, click the Telephony tab.
The Voice Detection Units page appears, displaying a summary view table of all existing VDUs. The Voice Detection Units page is the default view for the Telephony page.
2. On the Voice Detection Unit page, click Create VDU.
The Create VDU page appears.
3. In the VDU Name field on the Create VDU page, type a name for the VDU.
4. From the list in the VDU Board Name field, select the type of VDU board installed in your interaction center server group.
The Port Type and Number of Ports fields will automatically update to reflect the correct information for the selected VDU Card.
5. From the list in the Server Group field, select the name of the server group where your VDU card is installed.
The Middleware and Dial Server fields automatically update to reflect the possible middleware and dial server options for the selected server group.
6. If the middleware you want is not displayed in the Middleware field, select it from the list.
Note: VDU names have a 64 character limit and only the following characters are supported:
■ A-Z
■ 0-9
■ underscore, space, and hyphen
Note: The VDU board name is the manufacturers name for the particular VDU board. Only VDU board names that are supported by Oracle Advanced Outbound will appear in the drop down list.

Configuring Oracle Advanced Outbound
5-66 Oracle Advanced Outbound Implementation Guide
7. If the dial server you want is not displayed in the Dial Server field, select it from the list.
A particular VDU can only be used by one dial server. This field is where you make the association between VDU and dial server.
8. Click Next.
The VDU Board Information page appears, displaying the VDU name and VDU board name you supplied on the previous page.
9. From the list in the ROTARY SETTING field, select the rotary setting you want your VDU board to use.
10. Click Next.
The VDU Port Information page appears, displaying a summary view table for all the existing ports on the selected VDU board.
11. From the VDU Port Information page, click Auto Parameters.
The VDU Auto Generate Parameters page appears.
Note: Each Dialogic VDU board has a rotary switch that allows you to set a unique identifier for each board. This rotary setting is especially important when you have more than one board in machine. Dialogic supports up to 16 boards (rotary switch numbers 0 through 9, then A through F) in one machine. Rotary settings cannot carry a 2 digit setting number; therefore, any setting higher than 9 is assigned an alphabetic designation. Oracle Advanced Outbound require the rotary switch for the first board be set to 0, the rotary switch for the second board must be set to 1, etc. The rotary switch is set on the actual hardware board and the rotary setting you select in this step MUST correspond to that number. The selection you make in this step sets the rotary switch in the database.
Note: Steps 12-15 must be performed in the top set of fields on the VDU Auto Generate Parameters summary view table. Leaving the top set of fields blank will produce an error.
Configuring Oracle Advanced Outbound
Implementation Tasks 5-67
12. From the list in the Starting Port column of the summary view table, select the port number from which you want the auto-parameters utility to begin assigning extension numbers.
13. From the list in the Ending Port column of the summary view table, select the port number at which you want the auto-parameters utility to stop assigning extension numbers.
14. From the list in the Starting Value column of the summary view table, type the number your PBX Administrator assigned to the first port on your VDU board.
15. From the list in the Increase By column of the summary view table, type the value by which each port extension number increases.
16. Click Apply.
You return to the VDU Port Information page and the summary view table updates to display the port extensions you determined.
17. From the list in the status column for each port you want to be active, select Active.
18. Click Create VDU.
The Voice Detection Unit page appears, displaying a confirmation message that states your new VDU has been created and saved.
Note: Your PBX Administrator assigns the port extensions for each VDU board. You must contact the PBX Administrator to obtain these extensions. The port extensions will typically be in a set sequential order (growing by one or more in value per port extension).
Note: This number is typically one or two, but can be any sequence your PBX Administrator assigns.
Note: Active should be the default setting for the port status. If you want to change the port status for a particular port to inactive, select Inactive from the list for that port in the status column.

Configuring Oracle Advanced Outbound
5-68 Oracle Advanced Outbound Implementation Guide
5.9.2 Setting the Server Time Zone
LoginHTML Login URL
ResponsibilityAdvanced Outbound Administrator
Steps1. Click Administration > Server Properties.
The Server Properties page appears.
2. In the Server Time Zone field, search for and select the appropriate time zone.
This is the time zone in which your database resides.
3. Click Update.
5.9.3 Defining Area Code and Time Zone Mapping DataAll calling target groups are validated before records can be dialed from the target group. As part of the validation process, the records within the target group must be mapped to a time zone, otherwise the records will be flagged as Do Not Use and will not be dialed. There are three different types of time zone mappings:
■ Mapping a territory code to a time zone
■ Mapping a territory code and area code to a time zone
■ Mapping a territory code, area code and postal code to a time zone
As a rule, the use of territory code to time zone mapping requires the least amount of effort to create. However, certain countries are divided among different time zones, and therefore require area code, along w/ territory code to map to a time zone. If area code is insufficient, then postal code may also be used, however the postal code only needs to be defined when absolutely necessary in order to correctly determine a time zone.
Click the following links for detailed steps:
Creating Area Code Mappings
Creating Time Zone Mappings

Configuring Oracle Advanced Outbound
Implementation Tasks 5-69
5.9.3.1 Creating Area Code MappingsAn area code is defined as a 3-digit number that identifies each telephone service area in a country (such as the U.S. or Canada).
Area Code Mapping provides a way for Advanced Outbound to find the country to associate a phone number with.
Area code mappings for the US and CA are provided. However, if you are processing lists containing numbers in other countries (whose phone country code does not map uniquely to an area code code), you will need to create the area code mappings for those countries. If your list contains numbers in only one country, you can create rules defining the area code for the entire list, and do not need to create these mappings. Additionally, these mappings are used to associate regions (states/provinces) with area codes so that regions can be associated with contact points and used in applying Region Calling Calendars to determine when contact points can be called.
Use the steps below to create an area code mapping in Advanced Outbound.
Prerequisites:In order to create area code mappings, your user account must be assigned the Advanced Outbound Administrator responsibility.
LoginHTML Login URL
ResponsibilityAdvanced Outbound Administrator
Steps:1. Click the Administration tab.
The Administration tab appears, displaying the Server Properties subtab page. This is the default page for the Administration tab.
2. From the Server Properties page, click the Time Zone Mappings subtab.
The Area Code Mapping page appears, displaying a summary view table of all existing area code mappings.
3. On the Area Code Mapping page, click Create Area Code Mapping.
The Create Area Code Mapping page appears.

Configuring Oracle Advanced Outbound
5-70 Oracle Advanced Outbound Implementation Guide
4. In the Country Name field, click the flashlight icon.
The Select a Country Name page appears.
5. From the Select a Country Name page, select a country name from the list.
You return to the Area Code Mapping page. The selected Country Name appears in the Country Name field, and the Country Code field automatically populates with the pre-seeded country code for the selected country name.
6. In the Area Code field, enter an area code for the selected country.
7. Click Create.
The Area Code Mapping page updates to reflect the new area code mapping.
5.9.3.2 Creating Time Zone MappingsAdvanced Outbound contains time zone mapping tables that must be defined.
Many countries only occupy a single time zone, but others are spread across multiple time zones. If your interaction center plans to make calls throughout countries (for example: United States or Canada) where many states and provinces fall in different time zones, you may need to provide the state/region postal codes and area codes to determine that Advanced Outbound is using the correct time zone for the customer. There are standard database load utilities readily available within the database that can be used to upload purchased data into the Advanced Outbound Schema.
In order to ensure that customers are called at the appropriate times, Advanced Outbound must know where the person resides in relation to time zones. This way Advanced Outbound can follow the appropriate telemarketing laws that govern calling in their particular country, state, country or city.
The time zone mapping form is used as an easy entry point to provide Advanced Outbound with a method to call customers or contacts.
At a minimum, the country code and time zone must be entered for each country that an interaction center will contact. It is mandatory that all countries map their time zone with their country name.
Note: It is the responsibility of the implementation team to populate the appropriate data into these tables. While Advanced Outbound provides the structure and mechanism to utilize this data, the data itself can be purchased through third party vendors.

Configuring Oracle Advanced Outbound
Implementation Tasks 5-71
For single time zone countries, no further information is needed.
For countries with more than one time zone, it is recommended that you map the appropriate time zone, country code, and optional area code, postal code, state/region information to assist Advanced Outbound during list validation time. By utilizing the address specific information, Advanced Outbound can match a customer record with the appropriate time zone and country if their customer record is incomplete.
This functionality is especially important in countries where there are multiple time zones. For example, the United States has eight time zones spanning from Saipan, Northern Mariana Islands, U.S.A. (Standard time zone: UTC/GMT +10 hours where daylight savings time is currently not observed) to Honolulu, Hawaii, U.S.A. (Standard time zone: UTC/GMT -10 hours where daylight savings time is currently not observed). In addition, there are many states which have multiple time zones and may, or may not, participate in daylight savings time.
For example: the state of Indiana has up to three different time zones depending on the location in the state. In order to ensure we call the customer at the correct time, we need to know exactly where the customer is and follow the laws for their state. In this case, Advanced Outbound may need to go down to the postal code to ensure that the correct time zone is being used for the customer record.
Use the steps below to create a time zone mapping in Advanced Outbound.
Prerequisites:In order to create time zone mappings, your user account must be assigned the Advanced Outbound Administrator responsibility.
LoginHTML Login URL
ResponsibilityAdvanced Outbound Administrator
Steps:1. Click the Administration tab.
The Administration tab appears, displaying the Server Properties subtab page. This is the default page for the Administration tab.
2. From the Server Properties page, click the Time Zone Mappings subtab.

Configuring Oracle Advanced Outbound
5-72 Oracle Advanced Outbound Implementation Guide
The Area Code Mapping Detail page appears, displaying a summary view table of all existing area code mappings.
3. From the side navigation bar, click Time Zone Mapping.
The Time Zone Mapping page appears, displaying a summary view table of all existing time zone mappings.
4. On the Time Zone Mapping page, click Create Time Zone Mapping.
The Create Time Zone Mapping page appears.
5. In the Country Name field, click the flashlight icon.
The Select a Country Name page appears.
From the list of country names, select the country name to which you want to map a time zone.
6. From the drop-down list in the Area Code field, select an area code for the country name you selected in the previous step.
7. In the Postal Code field, type a postal code for the area code you selected in the previous step.
8. In the State/Region Field, type the appropriate state/region for the area code.
9. In the Time Zone field, click the flashlight icon.
The Select a Time Zone page appears, displaying a summary view table of all existing time zones.
10. From the Time Zone column of the summary view table, select the time zone to which you want to map the country code you selected.
11. Click Create.
The mapping between the selected country code and time zone is created.
5.9.4 Defining Calling CalendarsA calling calendar defines a set of callable times. Calendars can be associated to geographic locations (countries or regions) or marketing objects (campaign schedules and target groups). Advanced Outbound utilizes three types of calendars:
Note: The format for the state/region should be the entire state/region name with initial capitalization (for example, Nevada).

Configuring Oracle Advanced Outbound
Implementation Tasks 5-73
■ Country Calendar
■ Region Calendars
■ User Defined Calendar
This topic group contains the following topics:
Creating Country Calendars
Creating Holidays or Exceptions for Country Calendars
Creating Region Calendars
Creating Holidays or Exceptions for Region Calendars
Creating User Defined Calendars
Creating Holidays or Exceptions for User Defined Calendars
5.9.4.1 Creating Country CalendarsCountry calendars consist of a baseline callable time range for all seven days of the week. Country calendars are expected to be created based on country-specific laws and are required for Advanced Outbound. Every list entry has one to many contact points. Every contact point (telephone number) must have an associated country code and time zone. Every country code must have an associated calendar; thus, country calendars are applied at the individual record level. This association creates the base set of callable times for every list entry. Advanced Outbound ships with country calendars for many countries; however, additional country calendars can be created and added to the base product as necessary to meet your business needs.
Unlike user defined calendars, you cannot delete or remove country calendars. You can only create and modify country calendars.
Use the steps below to create country calendars for Oracle Advanced Outbound.
Prerequisite:In order to create country calendars, your user account must be assigned the Advanced Outbound Administrator responsibility.
LoginHTML Login URL
ResponsibilityAdvanced Outbound Administrator

Configuring Oracle Advanced Outbound
5-74 Oracle Advanced Outbound Implementation Guide
Steps:1. On the Campaign Schedules page, click the Calling Calendars tab.
The calling calendars page appears, displaying a list of all existing country calendars. The Country Calendars page is the default view for the calling calendars page.
2. On the Country Calendars page, click Create Calendar.
The Create Country Calendar page appears.
3. In the Calendar Name field on the Create Country Calendar page, type a name for the new country calendar.
4. From the drop-down list in the Country Name field, select the country you want to associate with the new country calendar.
5. You can create a country calendar by two different methods: you can copy and existing country calendar, or you can create a completely new country calendar. Click the appropriate radio button to select the method by which you will create the country calendar.
a. To create a country calendar by using an existing country calendar as a model, click the Copy Country Calendar radio button and select the country you want to use from the drop-down list in the field next to the radio button.
b. To create a completely new country calendar, click the Create New Calendar radio button.
6. Click Create.
The Country Calendar Details page appears.
7. From the calendar, click the calendar region corresponding to the time you want the calendar to begin calling on the day you want to start calling (example - Monday at 9:00).
Note: Calendar names have a 64 character limit and only the following characters are supported:
■ A-Z
■ 0-9
■ underscore, space, and hyphen

Configuring Oracle Advanced Outbound
Implementation Tasks 5-75
The Calendar Region Details page appears.
8. From the drop-down list in the Region Type field, select Callable if you want to add callable hours, select Not callable if you want to add non-callable hours, or click Not specified if you want to add regions that are not designated as callable or noncallable.
9. In the Start Time Hour and Minute fields, if the start time has not automatically defaulted to the time you want the country calendar to begin taking effect, click the drop-down arrows in each field and select the hour and minute from the respective lists.
10. In the End Time Hour and Minute fields, click the drop-down arrows in each field and select the hour and minute from the respective lists. The end time is the time at which your country calendar will terminate calling.
11. In the Copy To area, select the days of the week to which you wish to copy this calling schedule (if any).
12. Click Apply.
Note: To open to the Calendar Region Details page, you can click anywhere in the calendar; however, by clicking the day and time you want to begin calling, you automatically populate the week day and start time fields in the Calendar Region Details page. Also, by clicking the hyperlinked name of day, you can set the whole day for a single value, then copy this to any other day of the week.
Note: All times in the Hour field are displayed in 24 hour format (0:00 - 24:00). The Minute field allows you to select between 00 (on the hour) and 30 (on the half-hour) time increments.
Note: Copying the calling schedule in this way is not required; however, if your calling schedule will not vary greatly between days of the week, this method provides a quick means to populate a baseline calling calendar. You can always go back to the individual days and modify the specific calling times.

Configuring Oracle Advanced Outbound
5-76 Oracle Advanced Outbound Implementation Guide
The country calendar is created and you return to the Country Calendar Details page.
5.9.4.2 Creating Holidays or Exceptions for Country CalendarsUse the steps below to create holidays or exceptions for country calendars in Oracle Advanced Outbound.
PrerequisiteTo create holidays or exceptions for country calendars, your user account must be assigned the Advanced Outbound Administrator responsibility.
LoginHTML Login URL
ResponsibilityAdvanced Outbound Administrator
Steps1. On the Campaign Schedules page, click the Calling Calendars tab.
The Country Calendars page appears, displaying a list of all existing country calendars. The Country Calendars page is the default view for the Calling Calendars page.
2. From the Calendar Name column, click the calendar name of the country calendar to which you want to add a holiday or exception.
The Country Calendar Details page appears, displaying the calendar.
3. From the side panel on the Country Calendar Details page, click Exception List.
The Holidays and Exceptions page appears, displaying a list of all existing holidays and exceptions for the selected country calendar.
4. In the Holidays and Exceptions page, click Create Exception.
The Holiday and Exception Details page appears.
5. In the Exception Name field of the Holiday and Exception Details page, type a name for the holiday or exception you are creating.
6. In the Exception Type you can specify when you want the exception to occur. You can set an exception to happen on a given date each year, on a given date
Configuring Oracle Advanced Outbound
Implementation Tasks 5-77
once ever, or on a regularly occurring interval (example - first Monday in January).
c. To set the exception to occur on a specified date each year, click the top radio button, select the month from the list of months, and select the day from the list of days.
d. To set the exception to occur on a specified date once ever, click the middle radio button, select a month from the list of months, select a day from the list of days, and type a year in the final field.
e. To set the exception to happen at a regularly occurring interval, click the bottom radio button, select the interval time from the list in the first field, select the day of the week from the list in the middle field, and select the month from the list in the last field.
7. Click Create.
The exception is created and you return to the Holiday and Exception Details page.
8. If you only want the exception to override certain hours during the calling day, in the Exception Region area you can click the time region corresponding to the start time you want to set for the exception.
The Calendar Region Details page appears.
9. From the list in the Region Type field, select Callable if you want to make the exception time period callable hours, or select Not callable if you want to make the exception time period non-callable hours.
10. In the Start Time Hour and Minute fields, if the start time has not automatically defaulted to the time you want the exception to begin overriding the calendar, select the hour and minute from the respective lists.
Note: The Holiday and Exception Details page now displays an Exception Region area. You can use this area to define certain hours during the established calling calendar day you want the exception to override. The default is to override the entire day
Note: All times in the Hour field are displayed in 24 hour format (0:00 - 24:00). The Minute field allows you to select between 00 (on the hour) and 30 (on the half-hour) time increments.

Configuring Oracle Advanced Outbound
5-78 Oracle Advanced Outbound Implementation Guide
11. In the End Time Hour and Minute fields, select the hour and minute you want the exception to stop overriding the calendar.
12. Click Apply.
You return to the Holiday and Exception Details page and a confirmation note will appear at the top of the page.
5.9.4.3 Creating Region CalendarsUse the steps below to create region calendars in Oracle Advanced Outbound.
PrerequisiteThe regions you want to create in Oracle Advanced Outbound must already have been defined in Oracle Marketing Online. You must use the area code mapping feature in the Advanced Outbound HTML Administration Console’s Administration tab (Advanced Outbound Administrator responsibility) to map these regions to territory code/area code pairs.
LoginHTML Login URL
ResponsibilityAdvanced Outbound Administrator
Steps1. On the Campaign Schedules page, click the Calling Calendars tab.
The calling calendars page appears, displaying a list of all existing country calendars. The Country Calendars page is the default view for the calling calendars page.
2. On the Country Calendars page, click the Region Calendars subtab.
Note: To open the Calendar Region Details page, you can click any time region in the Exception Region area; however, by clicking the time you want the exception to begin overriding the calendar, you automatically populate the start time fields in the Calendar Region Details page.
Configuring Oracle Advanced Outbound
Implementation Tasks 5-79
The Region Calendars page appears, displaying a list of all existing region calendars.
3. On the Region Calendars page, click Create Calendar.
The Create Region Calendar page appears.
4. In the Calendar Name field, type a name for the new region calendar.
5. From the Region Name list, select the appropriate region.
6. You can create a user defined calendar by two different methods: you can copy an existing region calendar, or you can create a completely new region calendar.
a. To create a user defined calendar by using an existing region calendar as a model, click Copy region Calendar and select the region calendar you want to use from the provided list.
b. To create a completely new region calendar, click Create New Calendar.
7. Click Create.
The Region Calendar Details page appears, displaying a calendar table with days of the week columns and hours of the day rows.
8. From the calendar table, click the appropriate region corresponding to the time and day you want to start calling (example - Monday at 9:00).
The Calendar Region Details page appears.
9. From the list in the Region Type field, select Callable if you want to add callable hours, or select Not callable if you want to override a callable region.
10. In the Start Time Hour and Minute fields, if the start time has not automatically defaulted to the time you want the region calendar to begin taking effect, select the hour and minute from the respective lists.
Note: To open to the Calendar Region Details page, you can click anywhere in the calendar; however, by clicking the day and time you want to begin calling, you automatically populate the week day and start time fields in the Calendar Region Details page.
Note: All times in the Hour field are displayed in 24 hour format (0:00 - 24:00). The Minute field allows you to select between 00 (on the hour) and 30 (on the half-hour) time increments.
Configuring Oracle Advanced Outbound
5-80 Oracle Advanced Outbound Implementation Guide
11. In the End Time Hour and Minute fields, select the hour and minute from the respective lists. The end time is the time at which your region calendar will terminate and the default callable hours on the country calendar will resume.
12. In the Copy To area, select the days of the week to which you wish to copy this calling schedule (if any).
13. Click Apply.
The region calendar is created and you return to the Region Calendar Details page.
14. In the Override Country Calendar field, select Yes, or No from the list.
15. Click Update.
If you selected Yes, the Update Region Calendar Confirmation page appears, displaying a warning that overriding the country calendar will cause all users of this calendar to ignore any country specific restrictions, and you must click Apply to complete the override. If you selected No, The Region Calendar Details page refreshes with the selected calling schedule.
5.9.4.4 Creating Holidays or Exceptions for Region CalendarsUse the steps below to create holidays or exceptions for region calendars in Oracle Advanced Outbound.
PrerequisiteThe regions you want to create in Oracle Advanced Outbound must already have been defined in Oracle Marketing Online. You must use the area code mapping
Note: Copying the calling schedule in this way is not required; however, if your calling schedule will not vary greatly between days of the week, this method provides a quick means to populate a baseline calling calendar. You can always go back to the individual days and modify the specific calling times.
Note: You must select Yes to execute the region calendar. If you select No, the region calendar will still be created, but it will not alter or expand upon the calling hours of the existing country calendar.

Configuring Oracle Advanced Outbound
Implementation Tasks 5-81
feature in the Advanced Outbound HTML Administration Console’s Administration tab (Advanced Outbound Administrator responsibility) to map these regions to territory code/area code pairs.
LoginHTML Login URL
ResponsibilityAdvanced Outbound Administrator
Steps1. On the Campaign Schedules page, click the Calling Calendars tab.
The calling calendars page appears, displaying a list of all existing country calendars. The Country Calendars page is the default view for the calling calendars page.
2. On the Country Calendars page, click the Region Calendars subtab.
The Region Calendars page appears, displaying a list of all existing region calendars.
3. From the Calendar Name column, click the calendar name of the region calendar to which you want to add a holiday or exception.
The Region Calendar Details page appears, displaying the calendar.
4. From the side panel on the Region Calendar Details page, click Exception List.
The Holidays and Exceptions page appears, displaying a list of all existing holidays and exceptions already added to the selected region calendar (if any).
5. On the Holidays and Exceptions page, click Create Exception.
The Holiday and Exception Details page appears.
6. In the Exception Name field, type a name for the holiday or exception you are creating.
7. In the Exception Type area, you can specify when you want the exception to occur. You can set an exception to happen on a given date each year, on a given date once ever, or on a regularly occurring interval (example - first Monday in January).

Configuring Oracle Advanced Outbound
5-82 Oracle Advanced Outbound Implementation Guide
a. To set the exception to occur on a specified date each year, click the top radio button, select the month from the list of months, and select the day from the list of days.
b. To set the exception to occur on a specified date once ever, click the middle radio button, select a month from the list of months, select a day from the list of days, and type a year in the final field.
c. To set the exception to happen at a regularly occurring interval, click the bottom radio button, select the interval time from the list in the first field, select the day of the week from the list in the middle field, and select the month from the list in the last field.
8. Click Create.
The exception is created and you return to the Holiday and Exception Details page.
9. If you only want the exception to override certain hours during the calling day, in the Exception Region area you can click the time region corresponding to the start time you want to set for the exception.
The Exception Region Details page appears.
10. From the list in the Region Type field, select Not Callable.
11. In the Start Time Hour and Minute fields, if the start time has not automatically defaulted to the time you want the exception to begin overriding the calendar, select the hour and minute from the respective lists.
Note: The Holiday and Exception Details page now displays an Exception Region area. You can use this area to define certain hours during the established calling calendar day you want the exception to override. The default is to override the entire day
Note: All times in the Hour field are displayed in 24 hour format (0:00 - 24:00). The Minute field allows you to select between 00 (on the hour) and 30 (on the half-hour) time increments.

Configuring Oracle Advanced Outbound
Implementation Tasks 5-83
12. In the End Time Hour and Minute fields, select the hour and minute you want the exception to stop overriding the calendar.
13. Click Apply.
You return to the Holiday and Exception Details page and a confirmation note will appear at the top of the page.
5.9.4.5 Creating User Defined CalendarsUser Defined calendars are optional calendars which can be associated with either campaign schedules or lists. These calendars are used to override information in the country calendar; however, user defined calendars don’t automatically override country calendars. To begin overriding a country calendar, you must select Yes from the drop down list in the Override Country Calendar field on the User Defined Calendar Details page for the selected user defined calendar. These calendars allow you to specify calling times outside of the calling time parameters contained in the standard country calendar you are using.
For example, the default calling time in the country calendar you are using is 8AM to 9PM; however, you are only calling businesses and you know that nobody will be present after 6PM. You can create a User Defined calendar that adjusts the call time accordingly.
Use the steps below to create user defined calendars for Oracle Advanced Outbound.
Prerequisite:In order to create user defined calendars, your user account must be assigned the Advanced Outbound Administrator responsibility.
LoginHTML Login URL
Note: To open the Calendar Region Details page, you can click any time region in the Exception Region area; however, by clicking the time you want the exception to begin overriding the calendar, you automatically populate the start time fields in the Calendar Region Details page.

Configuring Oracle Advanced Outbound
5-84 Oracle Advanced Outbound Implementation Guide
ResponsibilityAdvanced Outbound Administrator
Steps:1. On the Campaign Schedules page, click the Calling Calendars tab.
The calling calendars page appears, displaying a list of all existing country calendars. The Country Calendars page is the default view for the calling calendars page.
2. On the Country Calendars page, click the User Defined Calendars subtab.
The User Defined Calendars page appears, displaying a list of all existing user defined calendars.
3. On the User Defined Calendars page, click Create Calendar.
The Create User Defined Calendar page appears.
4. On the Create User Defined Calendar page, type a name for the new user defined calendar.
5. You can create a user defined calendar by three different methods: you can copy and existing country calendar, you can copy and existing user defined calendar, or you can create a completely new user defined calendar. Click the appropriate radio button to select the method by which you will create the user defined calendar.
a. To create a user defined calendar by using an existing country calendar as a model, click the Copy Country Calendar radio button and select the country you want to use from the drop-down list in the field next to the radio button.
b. To create a user defined calendar by using an existing user defined calendar, click the Copy User Defined Calendar radio button and select which existing user defined calendar you want to use from the drop-down list in the field next to the radio button.
c. To create a completely new user defined calendar, click the Create New Calendar radio button.
6. Click Create.
The User Defined Calendar Details page appears.

Configuring Oracle Advanced Outbound
Implementation Tasks 5-85
7. From the calendar, click the calendar region corresponding to the time you want the calendar to begin calling on the day you want to start calling (example - Monday at 9:00).
The Calendar Region Details page appears.
8. From the drop-down list in the Region Type field, select Callable if you want to add callable hours to the default country calendar, select Not callable if you want to override a callable region on the country calendar, or click Not specified if you do not want to change the particular callable region on the country calendar.
9. In the Start Time Hour and Minute fields, if the start time has not automatically defaulted to the time you want the user defined calendar to begin taking effect, click the drop-down arrows in each field and select the hour and minute from the respective lists.
10. In the End Time Hour and Minute fields, click the drop-down arrows in each field and select the hour and minute from the respective lists. The end time is the time at which your user defined calendar will terminate and the default callable regions on the country calendar will resume.
11. In the Copy To area, select the days of the week to which you wish to copy this calling schedule (if any).
Note: To open to the Calendar Region Details page, you can click anywhere in the calendar; however, by clicking the day and time you want to begin calling, you automatically populate the week day and start time fields in the Calendar Region Details page.
Note: All times in the Hour field are displayed in 24 hour format (0:00 - 24:00). The Minute field allows you to select between 00 (on the hour) and 30 (on the half-hour) time increments.
Note: Copying the calling schedule in this way is not required; however, if your calling schedule will not vary greatly between days of the week, this method provides a quick means to populate a baseline calling calendar. You can always go back to the individual days and modify the specific calling times.

Configuring Oracle Advanced Outbound
5-86 Oracle Advanced Outbound Implementation Guide
12. Click Apply.
The user defined calendar is created and you return to the User Defined Calendar Details page.
13. In the Override Country Calendar field on the User Defined Calendar Details page, select Yes, or No from the drop-down list.
14. Click Update.
The Update User Defined Calendar Conformation page appears, warning you that overriding the country calendar will cause all users of this calendar to ignore any country specific restrictions.
15. Click Apply to override the country calendar with the user defined calendar.
The user defined calendar is created and you return to the User Defined Calendar Details page.
5.9.4.6 Creating Holidays or Exceptions for User Defined CalendarsUse the steps below to create holidays or exceptions for user defined calendars in Oracle Advanced Outbound.
PrerequisiteTo create holidays or exceptions for user defined calendars, your user account must be assigned the Advanced Outbound Administrator responsibility.
LoginHTML Login URL
ResponsibilityAdvanced Outbound Administrator
Steps1. On the Campaign Schedules page, click the Calling Calendars tab.
Note: You must select Yes to execute the user defined calendar. If you select No, the user defined calendar will still be created, but it will not alter or expand upon the calling hours of the existing country calendar.

Configuring Oracle Advanced Outbound
Implementation Tasks 5-87
The Country Calendars page appears, displaying a list of any existing country calendars. The Country Calendars page is the default view for the calling calendars tab.
2. On the Country Calendars page, click the User Defined Calendars subtab.
The User Defined Calendars page appears, displaying a summary view table of all existing user defined calendars.
3. From the Calendar Name column, click the calendar name of the user defined calendar to which you want to add a holiday or exception.
The User Defined Calendar Details page appears, displaying the calendar.
4. From the side panel on the User Defined Calendar Details page, click Exception List.
The Holidays and Exceptions page appears, displaying a list of all existing holidays and exceptions for the selected user defined calendar.
5. In the Holidays and Exceptions page, click Create Exception.
The Holiday and Exception Details page appears.
6. In the Exception Name field of the Holiday and Exception Details page, type a name for the holiday or exception you are creating.
7. In the Exception Type you can specify when you want the exception to occur. You can set an exception to happen on a given date each year, on a given date once ever, or on a regularly occurring interval (example - first Monday in January).
d. To set the exception to occur on a specified date each year, click the top radio button, select the month from the list of months, and select the day from the list of days.
e. To set the exception to occur on a specified date once ever, click the middle radio button, select a month from the list of months, select a day from the list of days, and type a year in the final field.
f. To set the exception to happen at a regularly occurring interval, click the bottom radio button, select the interval time from the list in the first field, select the day of the week from the list in the middle field, and select the month from the list in the last field.
8. Click Create.
The exception is created and you return to the Holiday and Exception Details page.

Configuring Oracle Advanced Outbound
5-88 Oracle Advanced Outbound Implementation Guide
9. If you only want the exception to override certain hours during the calling day, in the Exception Region area you can click the time region corresponding to the start time you want to set for the exception.
The Exception Region Details page appears.
10. From the list in the Region Type field, select Not Callable.
11. In the Start Time Hour and Minute fields, if the start time has not automatically defaulted to the time you want the exception to begin overriding the calendar, select the hour and minute from the respective lists.
12. In the End Time Hour and Minute fields, select the hour and minute you want the exception to stop overriding the calendar.
13. Click Apply.
You return to the Holiday and Exception Details page and a confirmation note will appear at the top of the page.
Note: The Holiday and Exception Details page now displays an Exception Region area. You can use this area to define certain hours during the established calling calendar day you want the exception to override. The default is to override the entire day
Note: All times in the Hour field are displayed in 24 hour format (0:00 - 24:00). The Minute field allows you to select between 00 (on the hour) and 30 (on the half-hour) time increments.
Note: To open the Calendar Region Details page, you can click any time region in the Exception Region area; however, by clicking the time you want the exception to begin overriding the calendar, you automatically populate the start time fields in the Calendar Region Details page.

Configuring Oracle Advanced Outbound
Implementation Tasks 5-89
5.9.5 Creating Recycling AlgorithmsRecycling is the process of determining how to process records that have been dialed. When a record is returned, a user-definable recycling algorithm is executed, which looks at the record, the call results, and previous calls to the record.
When creating a recycling algorithm, you must first decide whether you will use an existing algorithm as a model for your new one, or whether you want to create a completely new algorithm. If an existing algorithm contains relatively similar pre or post-processing actions, conditions or sub-conditions, you should use it as a basis for your new algorithm. The Advanced Outbound HTML Administration console allows you to do this by permitting you to copy existing algorithms. If your new algorithm will be significantly different from any existing ones, you should create a completely new algorithm.
You must then add or modify pre or post-processing actions (not required), or the conditions or sub-conditions for the algorithm. You then need to add an action for each condition or sub-condition. These actions will determine how the record is handled if the condition or sub-condition under which you add it is met.
There are two ways to create a recycling algorithm:
■ by copying an existing recycling algorithm
■ by creating a completely new recycling algorithm
You can also use the recycling shadow feature, add pre and post-processing actions, add conditions, or add actions performed if no sub-conditions are met to the algorithm:
Using the Recycling Algorithm Shadow Feature
Adding Pre or Post-Processing Actions
Adding Algorithm Conditions
Adding Actions Performed if No Sub-Conditions Are Met
5.9.5.1 Creating Recycling Algorithms by Copying an Existing AlgorithmUse the steps below to create recycling algorithms by copying existing algorithms in Oracle Advanced Outbound.
Important: Each condition or sub-condition must have an associated action or you will receive an error.

Configuring Oracle Advanced Outbound
5-90 Oracle Advanced Outbound Implementation Guide
Prerequisite:In order to create recycling algorithms, your user account must be assigned the Advanced Outbound Administrator responsibility.
LoginHTML Login URL
ResponsibilityAdvanced Outbound Administrator
Steps:1. On the Campaign Schedules page, click the Algorithms tab.
The Recycling Algorithms page appears, displaying a list of all existing recycling algorithms. The Recycling Algorithm page is the default view for the algorithms page.
2. On the Recycling Algorithms page, click Create Recycling Algorithm.
The Create Recycling Algorithm page appears.
3. On the Create Recycling Algorithm page, type a name for the new recycling algorithm in the Algorithm Name field.
4. Click the Copy From Existing Algorithms radio button and from the drop-down list in the provided field, select the existing algorithm you want to copy.
5. Click Create.
The new recycling algorithm is created.
The Recycling Algorithm page appears, displaying the summary view of the algorithm conditions.
Note: Algorithm names have a 64 character limit and only the following characters are supported:
■ A-Z
■ 0-9
■ underscore, space, and hyphen

Configuring Oracle Advanced Outbound
Implementation Tasks 5-91
5.9.5.2 Creating Completely new Recycling AlgorithmsUse the steps below to create completely new recycling algorithms in Oracle Advanced Outbound.
Prerequisite:In order to create recycling algorithms, your user account must be assigned the Advanced Outbound Administrator responsibility.
LoginHTML Login URL
ResponsibilityAdvanced Outbound Administrator
Steps1. On the Campaign Schedules page, click the Algorithms tab.
The Algorithms page appears, displaying a list of all existing recycling algorithms. The Recycling Algorithm page is the default view for the algorithms page.
2. On the Algorithms page, click Create Recycling Algorithms.
The Recycling Algorithm Creation page appears.
3. On the Recycling Algorithm Creation page, type a name for the new recycling algorithm in the Algorithm Name field.
4. Click the Create New Algorithm radio button and from the drop-down list in the Select Source Type field, select the source type you want to use.
Note: Algorithm names have a 64 character limit and only the following characters are supported:
■ A-Z
■ 0-9
■ underscore, space, and hyphen

Configuring Oracle Advanced Outbound
5-92 Oracle Advanced Outbound Implementation Guide
5. Click Create.
The new recycling algorithm is created.
The Recycling Algorithm Detail page appears, displaying the summary view of the algorithm conditions. Since this is a new algorithm, no existing pre or post-processing actions, or algorithm conditions should be displayed.
5.9.5.3 Using the Recycling Algorithm Shadow FeatureAdvanced Outbound automatically creates a duplicate, or shadow, version of each recycling algorithm. This shadow version is displayed to the right of the original or "live" version on the Recycling Algorithm Detail page. You can use the shadow version to make changes to or manipulate the recycling algorithm without affecting the original. Once you are satisfied with your changes, you can click Replace to apply the changes to the original version.
5.9.5.4 Adding Pre or Post-Processing ActionsRecycling algorithms utilize pre and post-processing actions to determine what happens to records before and after (respectively) the conditions apply.
Use the steps below to add pre or post-processing actions to existing recycling algorithms in Oracle Advanced Outbound.
Note: Source types define how fields from the database (typically TCA) map to the columns of a list entry.
Oracle Advanced Outbound recycling algorithms are directly associated to source types because they define which fields are present in a list.
Oracle Advanced Outbound supports two source types:
■ B to B - Business to Business (Organization Contacts)
■ B to C - Business to Consumer (Persons)
Caution: Before you click Replace, ensure your modified recycling algorithm is valid and will not generate errors. Once you click Replace and overwrite the original recycling algorithm, you cannot retrieve the original algorithm.

Configuring Oracle Advanced Outbound
Implementation Tasks 5-93
Prerequisite:In order to add pre or post-processing actions, your user account must be assigned the Advanced Outbound Administrator responsibility. You must also have an existing algorithm, to which you can add the pre or post-processing actions.
LoginHTML Login URL
ResponsibilityAdvanced Outbound Administrator
Steps:1. On the Campaign Schedules page, click the Algorithms tab.
The Algorithms page appears, displaying a list of all existing recycling algorithms. The Recycling Algorithm page is the default view for the algorithms page.
2. From the list of existing recycling algorithms, click the algorithm name of the algorithm to which you want to add pre or post-processing actions.
The Recycling Algorithm Detail page appears, displaying a summary view of all the existing pre and post-processing actions and all the existing conditions.
3. From the Recycling Algorithm Detail page, click Pre-Processing Action(s) to add pre-processing actions, or Post-Processing Action(s) to add post-processing actions.
The Edit Recycling Algorithm Action page appears, displaying a summary view table for pre or post-processing actions (depending on what you clicked in step 4).
4. From the Action column of the summary view table, click the drop-down arrow and select the action you want to add and click Update.
Note: Some actions require you to enter further information. The actions that require additional information have "..." after their name in the drop-down list. If the action you selected requires additional information, when you click Update, additional fields will appear, in which you need to enter information. Once you have entered the necessary additional information, click Update.

Configuring Oracle Advanced Outbound
5-94 Oracle Advanced Outbound Implementation Guide
The selected action is added and the summary view table updates to show the new action.
5.9.5.5 Adding Algorithm ConditionsConditions and sub-conditions determine how the algorithm processes records that have been dialed. Conditions and sub-conditions are composed of three parts:
■ A condition
■ An operator
■ A value
To avoid confusion, since the first component of the algorithm condition being added is also called a condition, we refer to the entire statement (condition, operator, and value) as a condition statement for the purposes of this guide. Condition statements are structured in the following order: condition operator value. For example: STATUS contains ACTIVE (where STATUS is the condition, contains is the operator, and ACTIVE is the value), or: HOUSEHOLD_SIZE greater than 3 (where HOUSEHOLD_SIZE is the condition, greater than is the operator, and 3 is the value).
The Oracle Advanced Outbound HTML Administration console displays conditions and their sub-conditions in a treeview model.
Example:Condition 1
Sub-condition 1
Sub-condition 2
Condition 2
Sub-condition 1
In the above example, Condition 1 and Condition 2 are top level conditions. If you want to have more than one expression in a single condition, it is very important how the expressions are joined (by AND or by OR).
If you want to have multiple top level conditions in your recycling algorithm, their order is very important. Once a condition is met, Oracle Advanced Outbound ignores all other conditions at the same level and only completes execution for the process within that condition block. In the above example, if Condition 1 is met, then Condition 2 (and Sub-condition 1 under Condition 2) will be ignored.

Configuring Oracle Advanced Outbound
Implementation Tasks 5-95
Use the steps below to add algorithm conditions (expressions) to existing recycling algorithms in Oracle Advanced Outbound.
Prerequisite:In order to add algorithm conditions, your user account must be assigned the Advanced Outbound Administrator responsibility. You must also have an existing algorithm, to which you can add the conditions.
LoginHTML Login URL
ResponsibilityAdvanced Outbound Administrator
Steps:1. On the Campaign Schedules page, click the Algorithms tab.
The Algorithms page appears, displaying a list of all existing recycling algorithms. The Recycling Algorithm page is the default view for the algorithms page.
2. From the list of existing recycling algorithms, click the algorithm name of the algorithm to which you want to add conditions.
The Recycling Algorithm Detail page appears, displaying a summary view of all the existing pre and post-processing actions and all the existing conditions.
3. From the Recycling Algorithm Detail page:
■ Click Root to add a top level condition.
■ Click Condition for the condition statement to which you want to add a sub-condition.
The Recycling Algorithm Condition Details page appears, displaying two areas:
■ a Sub-Conditions area
■ an Actions if no sub-condition met area
Note: If this is a new algorithm, the summary view will not contain any actions or conditions.

Configuring Oracle Advanced Outbound
5-96 Oracle Advanced Outbound Implementation Guide
4. Under the Sub-Conditions heading, click Insert Condition.
The Edit Recycling Algorithm Condition page appears, displaying a summary view table for algorithm conditions.
5. From the Expression column, click the drop-down arrow and select the condition you want from the list and click Update.
The Expression column expands with additional fields, to allow you to enter the operator and value for the condition.
6. From the drop-down field in the Expression column (directly after the condition statement), select the operator you want to use for your expression.
7. From the last drop-down field in the Expression column, select the value you want to use for your expression and click Update.
The summary view table updates to show your new expression.
5.9.6 Adding Actions Performed if no Sub-Conditions Are MetUse the steps below to add actions if no sub-conditions are met to existing algorithm conditions or sub-conditions in Oracle Advanced Outbound.
PrerequisiteTo add actions if no sub-condition is met, your user account must be assigned the Advanced Outbound Administrator responsibility. You must also have an existing algorithm, to which you can add the actions.
LoginHTML Login URL
Note: If you want to add multiple expressions to the condition statement, repeat steps 3-7 in the next set of fields below the ones for your current expression, but remember to select how you want the expressions joined from the drop-down list in the Expressions Joined By field before clicking Update.
Note: If you want to add additional conditions, repeat steps 5-7 for each additional condition.

Configuring Oracle Advanced Outbound
Implementation Tasks 5-97
ResponsibilityAdvanced Outbound Administrator
Steps1. On the Campaign Schedules page, click the Algorithms tab.
The Recycling Algorithms page appears, displaying a list of all existing recycling algorithms. The Recycling Algorithm page is the default view for the algorithms page.
2. From the list of existing recycling algorithms, click the algorithm name of the algorithm to which you want to add conditions.
The Recycling Algorithm Detail page appears, displaying a summary view of all the existing pre and post-processing actions and all the existing conditions.
3. From the Recycling Algorithm Details page, click Root (if you want to add actions to a top level condition), or click Condition: for the condition under which the sub-condition to which you want to add an action resides.
The Recycling Algorithm Condition Details page appears, displaying two areas:
■ a Sub-Conditions area
■ an Actions if no sub-condition met area
4. Under the Actions if no sub-condition met field, click Insert Action.
The Edit Recycling Algorithm Action page appears, displaying a summary view table for actions.
5. From the Action column of the summary view table, select the action you want to add and click Update.
Note: If this is a new algorithm, the summary view will not contain any actions or conditions.
Note: Some actions require you to enter further information. The actions that require additional information have "..." after their name in the list. If the action you selected requires additional information, when you click Update, additional fields will appear, in which you need to enter information. Once you have entered the necessary additional information, click Update.

Configuring Oracle Advanced Outbound
5-98 Oracle Advanced Outbound Implementation Guide
The selected action is added and the summary view table updates to show the new action.
5.9.7 Creating Record FiltersRecord filters are filters against which records are checked at the point of release. Record filters are created and applied to lists. They are able to check fields of list entries. Record filters check release fields to ensure they match defined parameters (STATE equal to Virginia). A match here will prevent the release of the record.
Use the steps below to create record filters in Oracle Advanced Outbound.
Prerequisite:In order to create record filters, your user account must be assigned the Advanced Outbound Administrator responsibility.
LoginHTML Login URL
ResponsibilityAdvanced Outbound Administrator
Steps:1. On the Campaign Schedules page, click the Algorithms tab.
The Algorithms page appears, displaying a list of all existing recycling algorithms. The Recycling Algorithm page is the default view for the algorithms page.
2. On the Algorithms page, click the Record Filters subtab.
The Record Filters page appears, displaying a list of the existing record filters.
3. On the Record Filters page, click Create Record Filter.
The Create New Record Filter page appears.
4. In the Name field, type a name for the new record filter.

Configuring Oracle Advanced Outbound
Implementation Tasks 5-99
5. In the Select Source Type field, click the drop-down arrow and select the source type you want to use.
6. Click Next.
The Record Filter Rules page appears.
7. On the Record Filter Rules page, click Insert Rule.
The Record Filter Create Rule page appears, displaying a summary view table for record filter conditions.
Note: Record filter names have a 64 character limit and only the following characters are supported:
■ A-Z
■ 0-9
■ underscore, space, and hyphen
Note: Source types define how fields from the database (typically TCA) map to the columns of a list entry.
Oracle Advanced Outbound recycling algorithms are directly associated to source types because they define which fields are present in a list.
Oracle Advanced Outbound supports two source types:
■ B to B - Business to Business (Organization Contacts)
■ B to C - Business to Consumer (Persons)
Note: You can click Clear to delete the algorithm name and selected source type.
Note: If this is a new record filter, the summary view will not contain any record filters.

Configuring Oracle Advanced Outbound
5-100 Oracle Advanced Outbound Implementation Guide
8. From the Field column, type the name of the record field against which you want to run the record filters.
9. From the Operator column, click the drop-down arrow and select the operator you want to use in your record filters from the list.
10. From the Value field, type the value you want to use for your record filters.
11. Click Create.
The Record Filter Edit Rule page updates to display a confirmation note, stating that the record filter rule was created successfully.
12. If you want to add additional expressions to the same condition: repeat steps 8-11 in the next set of fields below the current expression, and click Create.
13. If you want to add additional conditions to the same rule:
a. From the drop-down list in the Add field, select the number of additional conditions you want to add, and click Go.
The Record Filter Create Rule page updates to display a second summary view table, in which you can create additional conditions for the record filter rule.
b. Repeat steps 8-11 (in the new summary view table fields), and click Create.
14. Click Done.
The Record Filter Rules page appears, displaying the new rule(s).
5.9.8 Creating Validation RulesValidation rules allow you to make exceptions to the automatic list validation process. For example, you can use validation rules when you don’t know the country code or time zone, but you know you will be dialing calls in a certain time zone. If the country code or time zone is not known these records will fail the list validation process and will not be dialed. You can set a validation rule to allow you to dial these records because you are confident of what is in the list. By doing this, you can prevent these calls from failing the list validation process, and thereby not being dialed.
For a complete list of the current validation rules and a description for each, refer to the Validation Rules concept.
Use the steps below to create validation rules in Oracle Advanced Outbound.

Configuring Oracle Advanced Outbound
Implementation Tasks 5-101
Prerequisite:In order to create validation rules, your user account must be assigned the Advanced Outbound Administrator responsibility.
LoginHTML Login URL
ResponsibilityAdvanced Outbound Administrator
Steps:1. On the Campaign Schedules page, click the Algorithms tab.
The Algorithms page appears, displaying a list of all existing recycling algorithms. The Recycling Algorithm page is the default view for the algorithms page.
2. Click the Validation Rules subtab.
The Validation Rules page appears, displaying a summary view table of all existing validation rules.
3. Click Create.
The Create Validation Rule page appears.
4. On the Create Validation Rule page, type a name for the validation rule in the Rule Name field and click Create.
The Validation Rule Details page appears.
5. On the Validation Rule Details page, click Insert Action.
The Edit Validation Rule Actions page appears, displaying a summary view table of all existing validation actions.
Note: Rule names have a 64 character limit and only the following characters are supported:
■ A-Z
■ 0-9
■ underscore, space, and hyphen
Configuring Oracle Advanced Outbound
5-102 Oracle Advanced Outbound Implementation Guide
6. From the drop-down list in the action column, select the action you want to use for your validation rule, and click Update.
The selected action is added and the summary view table updates to show the new action.
5.9.9 Defining Campaign Schedule ParametersThe Campaign Schedule page displays a list of campaign schedules that have been targeted for executed in the interaction center. This process allows you to configure the call center specific parameters for the selected campaign schedule.
The column labeled Interaction Center Ready will indicate whether all the necessary parameters have been defined/setup for the campaign schedule in order to begin campaign schedule execution.
Use the steps below to configure campaign schedules for interaction center execution.
Prerequisite:In order to campaign schedules for interaction center execution, your user account must be assigned the Advanced Outbound Administrator responsibility.
Note: If this is a new validation rule, the summary view will not contain any actions.
Note: Some actions require you to enter further information. The actions that require additional information have "..." after their name in the drop-down list. If the action you selected requires additional information, when you click Update, additional fields will appear, in which you need to enter information. Once you have entered the necessary additional information, click Update.
Note: You can only configure parameters for campaign schedules you create.

Configuring Oracle Advanced Outbound
Implementation Tasks 5-103
It is assumed that the user identified in Marketing Online's Market Medium setup has logged in to his Personal Homepage and has 'Approved' the campaign for execution.
LoginHTML Login URL
ResponsibilityAdvanced Outbound Administrator
Steps:1. From the View field, select My Campaign Schedules to define the parameters
for a campaign schedule you created in Oracle Marketing Online.
2. From the Name column of the summary view table on the Campaign Schedules page, click the name of the campaign schedule you want to configure for interaction center execution.
The Call Center Campaign Schedule Details page appears, displaying a Call Center Parameters area and a Predictive Telephony Parameters area.
3. From the drop-down list in the Calendar field, select the user defined calendar you want to associate with the selected campaign schedule.
4. Click the CTI Disabled checkbox, if your Campaign Schedule is not CTI enabled.
Checking this box disables computer telephony for the selected campaign schedule. With CTI disabled, only manual dialing is allowed.
5. Click the On Hold checkbox, if you wish to place your Campaign Schedule on hold.
Note: If you do not see the desired campaign schedule displayed, check Oracle Marketing Online to ensure the campaign schedule is configured properly.
Note: If predictive dialing will not be used, click Update after selecting the user defined calendar.

Configuring Oracle Advanced Outbound
5-104 Oracle Advanced Outbound Implementation Guide
6. In the fields listed under the Predictive Telephony Parameters area, supply the following information:
a. In the Predictive Dialing Timeout field, type the number of seconds you want to wait before a predictive dial times out.
b. From the drop-down list in the Ring-No-Answer field, select the number of rings you want to allow before Advanced Outbound registers the call attempt as a RNA (Ring No Answer).
c. From the drop-down list in the Targeted Abandonment Rate field, select the maximum acceptable percentage for abandoned calls. If a dial is placed and a live voice is detected, but there is no agent available, the call is abandoned.
d. From the drop-down lists in the Special Intercept Tones summary view table, select whether to recycle or have the agent manually handle the following types of special intercept tones: Reorder Handling, Intercept Handling, Vacant Handling, and Network Busy Handling.
e. From the drop-down list in the Answering Machine Detection field, select the method by which the system detects answering machines, or select no answering machine detection.
Note: Only Campaign Schedules with a status of Active can be placed on hold.
Note: You only need to enter information in the Predictive Telephony Parameters fields if the campaign schedule will use predictive dialing.
Note: Valid values are between 15 and 45 seconds.
Note: Selecting No answer machine detection will cause Advanced Outbound to forward answering machine calls to agents as live connections.

Configuring Oracle Advanced Outbound
Implementation Tasks 5-105
f. From the drop-down list in the Answering Machine Handling field, select how you want the call attempt handled if an answering machine is detected.
g. If you selected Message in the previous step, select the phone type and the message you want to play from the drop-down fields on the summary view table under the Answering Machine Handling field. Otherwise go to step h.
h. From the drop-down list in the Front Hold Message field, select whether or not you want to enable or disable Front Hold Messages.
i. If you selected Enable in the previous step, select the phone type and message you want to play from the drop-down fields on the summary view table under the Front Hold Message field. Otherwise, go to step 7.
7. Click Update.
You return to the Call Center Campaign Schedule Details page and a confirmation note is displayed, stating that the configuration was successful.
5.9.10 Defining Target Group ParametersUse the steps below to define the parameters necessary to setup a target group for outbound calling.
Prerequisite:In order to modify the configuration of campaign schedules for interaction center execution, your user account must be assigned the Advanced Outbound Administrator responsibility.
LoginHTML Login URL
ResponsibilityAdvanced Outbound Administrator
Note: A front hold message is a message that is played when a live voice is detected, but an agent is not available to take a call. The message should persuade the customer to hold until an agent is available. Enabling front hold messaging will place the call on a front hold queue if no agents are available to take the call.

Configuring Oracle Advanced Outbound
5-106 Oracle Advanced Outbound Implementation Guide
Steps1. From the View field, select My Campaign Schedules to define the parameters
for a campaign schedule you created in Oracle Marketing Online.
2. From the Name column of the summary view table on the Campaign Schedules page, click the name of the campaign schedule containing the target group on which you want to modify the configuration.
The Call Center Campaign Schedule Details page appears, displaying a Call Center Parameters area and a Predictive Telephony Parameters area.
3. From the side navigation bar, click Campaign Schedule Target Groups.
The Interaction Center Campaign Schedule Target Groups page appears, displaying a summary view table of the target group associated to the selected campaign schedule.
4. From the Name column of the summary view table, click the name of the target group for which you want to configure dialing parameters.
The Interaction Center Campaign Schedule Target Group Details page appears.
5. From the drop-down list in the Dialing Method field, select the dialing method to use for the target group, or select to default to the campaign schedule’s dialing method.
6. From the drop-down list in the Target Group Priority field, select the priority you want to assign the target group.
7. From the drop-down list in the Recycling Algorithm field, select the recycling algorithm you want to use for the target group.
Note: Priorities determine the relative priority of a target group or subset in comparison to other target groups and subsets.
Highest through Medium level priorities are preemptive; all target groups with priorities in this range will be exhausted in priority sequence before the next priority level is used. Low and Lowest priorities are used in round-robin fashion; each of these target groups will release its quantum of records, then the next target group in the same priority level will be used.
At this time, Oracle Marketing Online does not support multiple target groups.

Configuring Oracle Advanced Outbound
Implementation Tasks 5-107
8. From the drop-down list in the Record Filter field, select a record filter rule to use with the target group.
9. From the drop-down list in the Validation Rule field, select a validation rule to use with the target group.
10. From the drop-down list in the Calendar field, select a user defined calendar to use with the target group.
11. From the drop-down list in the Release Strategy field, select a release strategy to use with the target group.
12. Depending on your selection in the previous step, type the number of records you want to set as your limit in either the Quantum or Quota field.
13. Click Update.
The Interaction Center Campaign Schedule Target Group Details pages updates to reflect the new dialing parameters and displays a confirmation stating that the dialing parameters have been configured successfully.
Note: The quantum release strategy supports proportional calling across all target groups and subsets associated with the campaign strategy and it is considered the baseline strategy for an Advanced Outbound service. This means that when Advanced Outbound is distributing customer records to agents, it releases a quantum number of records from each target group or subset before it goes on to the next target group or subset in the campaign.
The Quota Release Strategy stops releasing records from a target group or subset when a pre-defined limit has been reached. This strategy disburses records from a target group or subset based on the quota that is assigned to a target group or subset.
Note: If you selected Quota in step 11, you must select the hour and minute reset period from the drop-down list in each respective field. These fields specify the hours and minutes before the quota value is reset to zero (0).

Configuring Oracle Advanced Outbound
5-108 Oracle Advanced Outbound Implementation Guide
5.9.11 Defining Automated MessagingWhat you are actually doing in this topic is importing a pre-recorded message and configuring it for use by Advanced Outbound.
Use the steps below to create messages in Oracle Advanced Outbound.
PrerequisiteIn order to create messages, your user account must be assigned the Advanced Outbound Administrator responsibility.
LoginHTML Login URL
ResponsibilityAdvanced Outbound Administrator
Steps1. On the Administrator UI login screen, type your admin level User ID and
Password in the provided fields and click Go.
The Advanced Outbound Administration UI appears, displaying the Campaign Schedules page.
2. On the Campaign Schedules page, click the Telephony tab.
The Telephony page appears, displaying a summary view table of all existing VDUs. The Voice Detection Unit subtab page is the default view for the Telephony page.
3. On the Voice Detection Unit page, click the Voice Messages subtab.
The Voice Messages page appears, displaying a summary view table of all existing messages.
4. On the Voice Messages page, click Create Voice Message.
Note: Messages must be recorded into a .wav or .vox file using an external utility (these programs come with all modern operating systems). The messages are then imported into the database and associated to campaign schedules using the Advanced Outbound administrative interface.

Configuring Oracle Advanced Outbound
Implementation Tasks 5-109
The Create Voice Messages page appears.
5. In the Message Name field, type a name for the message.
6. In the description field, type a description of the message.
7. From the drop-down list in the Message Type field, select if the message will be an answering machine message or a front hold message.
8. From the drop-down list in the Format field, select the message format.
9. In the File Name field, click Browse.
A browse dialog box opens, allowing you to browse your local drives or the network to find the message file you want.
10. Once you have located the file, select it and click Open.
The selected file name appears in the File Name field.
11. Click Create.
The Voice Messages page appears displaying a confirmation message stating that the message has been created successfully and the new message is displayed in the summary view table.
Note: Message names have a 64 character limit and only the following characters are supported:
■ A-Z
■ 0-9
■ underscore, space, and hyphen
Note: Oracle Advanced Outbound supports the following message formats:
■ 11Khz, 8Bit wav files
■ 8Khz, 8Bit wav files
■ 6Khz, 8Bit wav files
■ vox files

Configuring Oracle Universal Work Queue
5-110 Oracle Advanced Outbound Implementation Guide
5.10 Configuring Oracle Universal Work QueueWhat you are doing in this task is configuring Oracle Universal Work Queue to launch the desired Oracle business applications desktop interface. To do so, you select seeded classifications. These classifications are mapped to an application window or interface based on a particular media type. When an agent is requests delivery of that media type, the mapped business application is launched.
This setup is necessary to configure the application that needs to be popped, or launched, for an outbound media item. To configure a media screen pop for the UWQ Desktop, you must configure the media actions for Advanced Outbound.
Use the steps below to configure the UWQ media actions for Advanced Outbound.
LoginHTML Login URL
ResponsibilityCall Center HTML Administration
Steps1. Click the UWQ Media Action tab.
The Media Classification Action Association page appears.
2. From the drop-down list in the Media Type column, select Advanced Outbound Telephony.
3. In the Classification column, type Campaign to associate to outbound TeleSales, or type Collections to associate to outbound Collections.
4. From the drop-down list in the Media Action column, select the Oracle application you want to launch.
■ If you typed Campaign in the Classification column (step 3), then select TeleSales Outbound Telephony function.
■ If you typed Collections in the Classification column (step 3), then select Outbound Collections Telephony function.
5. Click Update.
For more information and detailed steps setting up the media actions for Advanced Outbound, refer to the Oracle Universal Work Queue Implementation Guide.

Diagnostics and Troubleshooting 6-1
6Diagnostics and Troubleshooting
Use the information in this topic group to diagnose and troubleshoot your implementation of Oracle Advanced Outbound.
Diagnostic Tools
Troubleshooting
6.1 Diagnostic ToolsThere are a number of tools you can use to diagnose problems with Oracle Advanced Outbound, including:
Oracle Interaction Center Server Manager (ICSM)
The Advanced Outbound HTML Administration Console
The Marketing Online HTML Administration Console
Java Console Logs
6.1.1 Using Oracle ICSM to Diagnose IssuesWith Oracle Interaction Center Server Manager (ICSM), you can:
Start and Stop Servers
Set Server Log Levels
Set Trace File Options
Check Server Log Messages
Check Server Parameter Settings

Diagnostic Tools
6-2 Oracle Advanced Outbound Implementation Guide
6.1.1.1 Starting and Stopping Servers With ICSMFollow the steps below to start or stop your servers with Oracle ICSM.
LoginSelf-Service Login URL
ResponsibilityCall Center HTML Administration
Steps1. Click ICSM > Server Groups.
The Server Group List page appears.
2. Click a server group name.
The Server Group Details page appears, displaying a summary view table of all servers in that group.
3. From the list to the left of the Submit button:
a. Select Start to start the selected server
b. Select Stop to stop the selected server.
4. Click Submit.
It may take several minutes to start or stop the server processes. To view the current status during startup or shutdown, refresh the browser several times.
As the server processes are starting up, "Starting" is displayed in the Stop/Start column. As the server processes are shutting down up, “Stopping" is displayed in the Stop/Start column. The status of each server process is displayed in the Servers area in the Status column.
6.1.1.2 Setting Server Log Levels With ICSMYou can use the database logging function to obtain information about when servers are started or stopped, and the reasons why they started or stopped.
LoginHTML Login URL

Diagnostic Tools
Diagnostics and Troubleshooting 6-3
ResponsibilityCall Center HTML Administration
Steps1. Click ICSM > Server Groups.
The Server Group List page appears, displaying a summary view table of any existing server groups.
2. From the Server Group Name column, click the server group that contains the server on which you want to set log levels.
The Server Group Details page appears for the selected server group, displaying a summary view table of any servers in that server group.
3. From the Server Name column, click the server on which you want to set log levels.
The Server Details page appears for the selected server.
4. From the Server Details page, click the Parameters hyperlink.
The Server Details page refreshes to display a summary view table for parameter settings.
5. In the Parameter Value field for OAO_LOG_LEVEL, type one of the following levels:
■ error - shows server errors.
■ warn - shows server warnings and errors
■ info - shows events, warnings, and errors
■ all - shows all server activity
The log level can be changed while the server is running, but you must wait for the time period specified in the OAO_ REFRESH_INTERVAL parameter before the information in the log begins reflecting the new log level.
6. Click Update.
7. Click Done.
6.1.1.3 Setting Trace File Options With ICSMYou can use the server trace function to obtain detailed information about server activity. By default the trace function is not activated.

Diagnostic Tools
6-4 Oracle Advanced Outbound Implementation Guide
Use the steps below to activate the trace function.
LoginHTML Login URL
ResponsibilityCall Center HTML Administration
Steps1. From the Oracle Call Center Technology page, click the ICSM tab.
The Server Group List page appears, displaying a summary view table of any existing server groups.
2. From the Server Group Name column, click the server group that contains the server on which you want to run the tracing function.
The Server Group Details page appears for the selected server group, displaying a summary view table of any servers in that server group.
3. From the Server Name column, click the server on which you want to run the tracing function.
The Server Details page appears for the selected server.
4. From the Server Details page, click the Advanced hyperlink.
The Server Details page refreshes to display a Java Options field, a Server Arguments field, and a summary view table of any existing trace files for the selected server.
5. In the Server Arguments field:
a. Type -logfile all - this traces through the startup steps until database logging starts.
b. Type -logfile /tmp/log.txt - this will generate a /tmp/log.txt file, and either a /tmp/PRS***.trace file (for the dial server) or a /tmp/OCS***.trace file (for the central server).
6. Click Update.
Note: You will need to bounce the server to start or stop the tracing process.

Diagnostic Tools
Diagnostics and Troubleshooting 6-5
7. Click Done.
6.1.1.4 Checking Server Log Messages With ICSMFollow the steps below to check the server log messages.
LoginHTML Login URL
ResponsibilityCall Center HTML Administration
Steps1. Click ICSM > Logs > Summary Report.
The Summary Report for Servers page appears.
2. Click the Server Name, Server Type, or Server Group radio button and search for the server name, type, or group (respectively) in the provided field.
3. Click Go.
The Summary Report for Servers page refreshes to display a summary view table. This table contains a log message count for each level of logging for each server in the selected server, server type, or server group.
4. From the table, click the log count hyperlink for the severity level you want to view.
5. If you need to narrow your report findings, click Advanced Search.
The Search for Logging Messages page appears.
6. Select the desired server name, type, or group (respectively) in the provided field.
7. From the list in the User Filter field, select a filter to use with your search (if you have created any filters to use).
8. From the list in the Severity field, select the level of severity on which you want to search.
9. If you know a specific error code, type it in the Error Code field.
10. Use the From Date/Time and To Date/Time fields if you know approximately when the error occurred.

Diagnostic Tools
6-6 Oracle Advanced Outbound Implementation Guide
11. Click Summary Report, or Detailed Report to view the results of your search.
6.1.1.5 Checking Server Parameter Settings With ICSMFollow the steps below to check server parameter settings.
LoginHTML Login URL
ResponsibilityCall Center HTML Administration
Steps1. Click ICSM > Server Groups.
The Server Group List page appears, displaying a summary view table of any existing server groups.
2. From the Server Group Name column, click the server group that contains the server on which you want to set log levels.
The Server Group Details page appears for the selected server group, displaying a summary view table of any servers in that server group.
3. From the Server Name column, click the server on which you want to set log levels.
The Server Details page appears for the selected server.
4. From the Server Details page, click the Parameters hyperlink.
The Server Details page refreshes to display a summary view table of the parameter settings for the selected server.
5. Verify that the parameter settings are correct.
For a detailed list of the necessary parameters for Advanced Outbound servers, refer to the Implementing the Advanced Outbound Servers section.
6.1.2 Using the Advanced Outbound HTML Admin Console to Diagnose IssuesYou can use the Oracle Advanced Outbound HTML Administration console to:
Check Campaign Schedule Parameters
Check Target Group Parameters

Diagnostic Tools
Diagnostics and Troubleshooting 6-7
6.1.2.1 Checking Campaign Schedule Parameters in Advanced OutboundFollow the steps below to check campaign schedule parameters in the Advanced Outbound HTML Admin console.
LoginHTML Login URL
ResponsibilityAdvanced Outbound Administrator
Steps:1. From the View field, select My Campaign Schedules to check the parameters
for a campaign schedule you created in Oracle Marketing Online.
2. From the Name column of the summary view table on the Campaign Schedules page, click the name of the campaign schedule you want to check.
The Call Center Campaign Schedule Details page appears, displaying a Call Center Parameters area and a Predictive Telephony Parameters area.
3. In the Calendar field, verify the correct the user defined calendar is associated with the selected campaign schedule (if you want one to be).
4. Do you want the CTI Disabled checkbox selected?
Checking this box disables computer telephony for the selected campaign schedule. With CTI disabled, only manual dialing is allowed.
5. Is the On Hold checkbox selected?
Selecting the On Hold checkbox will place on hold a campaign schedule with a status of Active.
Note: If you do not see the desired campaign schedule displayed, check Oracle Marketing Online to ensure the campaign schedule is configured properly.
Note: If predictive dialing will not be used, click Update after selecting the user defined calendar.
Diagnostic Tools
6-8 Oracle Advanced Outbound Implementation Guide
6. In the fields listed under the Predictive Telephony Parameters area, verify the following information:
a. In the Predictive Dialing Time-out field, check the number of seconds you want to wait before a predictive dial times out.
b. From the drop-down list in the Ring-No-Answer field, verify the number of rings you want to allow before Advanced Outbound registers the call attempt as a RNA (Ring No Answer).
c. From the drop-down list in the Targeted Abandonment Rate field, check the maximum acceptable percentage for abandoned calls. If a dial is placed and a live voice is detected, but there is no agent available, the call is abandoned.
d. From the drop-down lists in the Special Intercept Tones summary view table, verify whether you want to recycle the call or have the agent manually handle the following types of special intercept tones: Reorder Handling, Intercept Handling, Vacant Handling, and Network Busy Handling.
e. From the drop-down list in the Answering Machine Detection field, check the level you want the system to detect answering machines, or whether you want no answering machine detection.
f. From the drop-down list in the Answering Machine Handling field, verify your selection for how you want the call attempt handled if an answering machine is detected.
Note: You only need to enter information in the Predictive Telephony Parameters fields if the campaign schedule will use predictive dialing.
Note: Valid values are between 15 and 45 seconds.
Note: Selecting No answer machine detection will cause Advanced Outbound to forward answering machine calls to agents as live connections.

Diagnostic Tools
Diagnostics and Troubleshooting 6-9
g. If you selected Message in the previous step, select the phone type and the message you want to play from the drop-down fields on the summary view table under the Answering Machine Handling field. Otherwise go to step h.
h. From the drop-down list in the Front Hold Message field, select whether or not you want to enable or disable Front Hold Messages.
i. If you selected Enable in the previous step, select the phone type and message you want to play from the drop-down fields on the summary view table under the Front Hold Message field. Otherwise, go to step 7.
7. Once you have made changes, click Update.
You return to the Call Center Campaign Schedule Details page and a confirmation note is displayed, stating that the configuration was successful.
For more information on how campaign schedule parameters should be set up for Advanced Outbound, refer to the Define Campaign Schedule Parameters topic in this guide.
6.1.2.2 Checking Target Group Parameters in Advanced OutboundFollow the steps below to check target group parameters in the Advanced Outbound HTML Admin console.
LoginHTML Login URL
ResponsibilityAdvanced Outbound Administrator
Steps1. From the View field, select My Campaign Schedules.
Note: A front hold message is a message that is played when a live voice is detected, but an agent is not available to take a call. The message should persuade the customer to hold until an agent is available. Enabling front hold messaging will place the call on a front hold queue if no agents are available to take the call.
Diagnostic Tools
6-10 Oracle Advanced Outbound Implementation Guide
2. From the Name column of the summary view table on the Campaign Schedules page, click the name of the campaign schedule containing the target group you want to check.
The Call Center Campaign Schedule Details page appears, displaying a Call Center Parameters area and a Predictive Telephony Parameters area.
3. From the side navigation bar, click Campaign Schedule Target Groups.
The Interaction Center Campaign Schedule Target Groups page appears, displaying a summary view table of the target group associated to the selected campaign schedule.
4. From the Name column of the summary view table, click the name of the target group for which you want to check parameters.
The Interaction Center Campaign Schedule Target Group Details page appears.
5. From the drop-down list in the Dialing Method field, verify your dialing method selection or select to default to the campaign schedule’s dialing method.
6. From the drop-down list in the Target Group Priority field, check the priority assigned to the target group.
7. From the drop-down list in the Recycling Algorithm field, verify you have selected the recycling algorithm you want to use for the target group.
8. From the drop-down list in the Record Filter field, check that you have selected the record filter rule you want to use with the target group.
Note: Priorities determine the relative priority of a target group or subset in comparison to other target groups and subsets.
Highest through Medium level priorities are preemptive; all target groups with priorities in this range will be exhausted in priority sequence before the next priority level is used. Low and Lowest priorities are used in round-robin fashion; each of these target groups will release its quantum of records, then the next target group in the same priority level will be used.
At this time, Oracle Marketing Online does not support multiple target groups.

Diagnostic Tools
Diagnostics and Troubleshooting 6-11
9. From the drop-down list in the Validation Rule field, check that you have selected the validation rule you want to use with the target group.
10. From the drop-down list in the Calendar field, verify that you have selected the user defined calendar you want to use with the target group (if you want to use one).
11. From the drop-down list in the Release Strategy field, verify you have selected the correct release strategy to use with the target group.
12. Check the number of records you set as your limit in either the Quantum or Quota field.
13. Once you have made your changes, click Update.
The Interaction Center Campaign Schedule Target Group Details pages updates to reflect the new dialing parameters and displays a confirmation stating that the dialing parameters have been configured successfully.
For more information on how target group parameters should be set up for Advanced Outbound, refer to the Define Target Group Parameters topic in this guide.
Note: The quantum release strategy supports proportional calling across all target groups and subsets associated with the campaign strategy and it is considered the baseline strategy for an Advanced Outbound service. This means that when Advanced Outbound is distributing customer records to agents, it releases a quantum number of records from each target group or subset before it goes on to the next target group or subset in the campaign.
The Quota Release Strategy stops releasing records from a target group or subset when a pre-defined limit has been reached. This strategy disburses records from a target group or subset based on the quota that is assigned to a target group or subset.
Note: If you selected Quota in step 11, you must select the hour and minute reset period from the drop-down list in each respective field. These fields specify the hours and minutes before the quota value is reset to zero (0).

Diagnostic Tools
6-12 Oracle Advanced Outbound Implementation Guide
6.1.3 Using the Oracle Marketing Online HTML Admin Console to Diagnose IssuesYou can use the Oracle Marketing Online HTML Administration console to:
Check Campaign Schedules and Target Group Parameters
Check the Agent to Campaign Assignment
6.1.3.1 Checking Campaign Schedule and Target Group ParametersFollow the steps below to check campaign schedule and target group parameters in OMO.
LoginHTML Login URL
ResponsibilityOracle Marketing Super User
Steps1. Click the Campaign tab.
The Campaigns page appears, displaying a summary view table of all existing campaigns.
2. From the table, select the campaign containing the campaign schedule in which you want to view parameters.
The Campaign Details page appears.
3. From the side navigation panel, click Execution.
The Campaign Details - Campaign Schedule page appears, displaying a summary view table of all campaign schedules associated with the selected campaign.
4. From the summary view table, click the campaign schedule in which you want to view parameters.
The Campaign Schedule – Details page appears.
5. Verify the campaign schedule parameters.
For more information on campaign schedule, refer to the Creating an OMO Campaign Schedule topic in this guide.
6. From the side navigation panel, click Execution > Target Group.

Diagnostic Tools
Diagnostics and Troubleshooting 6-13
The Campaign Schedule Details - Target Group page appears.
7. Verify the target group parameters.
For more information on target group parameters, refer to the Configuring an OMO List, and Configuring an OMO Target Group topics in this guide.
6.1.3.2 Checking the Agent to Campaign Schedule AssignmentFollow the steps below to check the agent to campaign schedule assignment in OMO.
LoginHTML Login URL
ResponsibilityOracle Marketing Super User
Steps1. From the Oracle Marketing Online homepage, click the Administration tab.
2. Click the Sales subtab.
3. From the side panel under Call Center, click the Agent Assignments hyperlink.
The Resource Assignment window appears.
4. In the Campaign Name field, type the name or a partial name of the appropriate campaign schedule. You can use the % sign to substitute for missing characters.
5. Click Go.
6. From the list, select the appropriate campaign schedule and click OK.
The campaign schedule name populates the Campaign Name field. and the Current Resource Assignments table refreshes to display all the agents currently assigned to the selected campaign schedule.
7. Verify that the correct agents are assigned.
6.1.4 Using Java Console Logs to Diagnose IssuesThe Java Console is a pop-up window that you can configure to appear whenever you launch an Oracle Forms session.

Troubleshooting Advanced Outbound
6-14 Oracle Advanced Outbound Implementation Guide
You can use the Java console logs to track application trace messages, to verify server information from the agent side, and to diagnose problems when dealing with multiple servers.
6.2 Troubleshooting Advanced OutboundThe following are the most commonly experienced errors with Advanced Outbound:
Servers Won’t Start
Validation Failed
Validation Doesn’t Fail, but no Records are Returned
Can’t See Advanced Outbound Telephony Media Node
No Campaign Schedules Appear
Queue Count Doesn’t Update
Central Server Isn’t Pulling Records
No More Callable Records for an Agent
Agent Cannot Make Progressive Calls
Oracle Telephony Manager Cannot Get Media Items From Advanced Outbound
Oracle Telephony Manager Received two Media Items for the Same Advanced Outbound Call
Media Items Were Not Closed
Advanced Outbound Fails in the Dial Server, but no "Enabler Related Errors" are Generated
Predictive Call Fails in the Dial Server and Call Outcome is "no ringback", "no dialtone", etc.
Predictive Call Goes Through, but Transfer to Agent Fails
Target Group Stuck in Validating Status
No Longer Seeing IEO Log Messages

Troubleshooting Advanced Outbound
Diagnostics and Troubleshooting 6-15
6.2.1 Servers Won’t Start
Reason:No database connection.
Check:Check the .dbc file. Make sure that NUM_CONNECTIONS in dbc file is set high enough.
Reason: ICSM setup is incorrect.
Check: Check server arguments (ICSM - Advanced link).
Reason: Server or plugin parameters are incorrect.
Check: Verify the server parameters are correct
Ensure the values set in ICSM (Advanced link) are correct
Ensure Java arguments set to at least “-ms256m mx256m”
Ensure server node is running (ICSM).
Start the server at the local node using a local script.
6.2.2 Validation Failed
6.2.2.1 Quick Tips■ Make sure your Central Server and Dial Server(s) are running and set your trace
level to All.
■ Make sure your OMO Campaign and Campaign Schedule are Active.
■ Make sure your OMO Target Group has a status of Locked.

Troubleshooting Advanced Outbound
6-16 Oracle Advanced Outbound Implementation Guide
■ Make sure the Interaction Center Ready column of your Advanced Outbound Campaign Schedule is set to Yes.
■ Make sure your Advanced Outbound Campaign Schedule Target Group parameters are correctly configured.
Reason:OMO Source Type does not exist or OMO Source Type does not have required columns
Check:Check the logs files for the following error messages:
■ Error messages titled ‘Validation Error’.
■ “ORA-00942: table or view does not exist”
■ “Source type view XXX has not been created in Oracle Marketing Online”
■ “ORA-00904: invalid column name”
■ “Source type view XXX is missing one or more columns.”
Solution:Create or update the OMO list source type. Ensure all the required fields are present.
Reason:Insufficient Table Space
Check:Check the log files the following error message:
■ “ORA-01654: unable to extend index IEC.IEC_G_RETURN_ENTRIES_N3 by 8195 in tablespace IECX”
Solution:Ask your DBA to extend the table space specified in the error message.

Troubleshooting Advanced Outbound
Diagnostics and Troubleshooting 6-17
6.2.3 Validation Doesn’t Fail, but no Records are Returned
Reason:■ Missing Time Zone Information
■ Missing country code or area code
■ Phone number contains invalid characters
Check:■ Check time zone and time in the user record
■ Check country code/area code in user record
■ Check user phone numbers
Solutions:■ Add missing data/correct error data
■ Create validation rules to insert time zone
■ Create validation rules to add country code/area code
6.2.4 Can’t See Advanced Outbound Telephony Media Node
Reason:The agent’s profile options are not set correctly
Check:The profile settings for the agent.
1. Self-Service Login URL (Forms).
2. Select System Administrator responsibility.
3. Click Profile > System.
4. Type agent’s user ID and click Find.
Solution:Ensure the following profile options are set:
■ “IEU: Media: Telephony” – set to “Yes”

Troubleshooting Advanced Outbound
6-18 Oracle Advanced Outbound Implementation Guide
■ “IEU: Queue Order: Advanced Outbound” – set to “1”
■ “IEU: Queue: Advanced Outbound” – set to “Yes”
6.2.5 No Campaign Schedules Appear
Reason:The agent, or group to which the agent belongs, is not assigned to a campaign schedule
Check:Ensure that the agent (or group that the agent belongs to) is assigned to a campaign schedule
Reason:The concurrent manager has not been started
Check:Ensure the concurrent manager is running
6.2.6 Queue Count Doesn’t Update
Reason:The concurrent manager is not running.
Check:Ensure the concurrent manager has been started.
Note: The queue count only changes when the concurrent manager is running. The count only reflects changes in:
■ the number of records that are set to “Do Not Use” (by recycling).
■ the number of records that are no longer calendar callable (fall outside the callable time parameters as defined in the calling calendar).

Troubleshooting Advanced Outbound
Diagnostics and Troubleshooting 6-19
6.2.7 Central Server Isn’t Pulling Records
Reason:Server Time Zone is not configured.
Check:Check the log messages for any error messages with title “Calendar Error”.
Solution:Configure Server Time Zone in the Advanced Outbound Administration console.
Reason:Country calendar does not exist.
Check:Check the country calendar in the Advanced Outbound Administration console.
Solution:Create the country calendar.
6.2.8 No More Callable Records for an Agent
Check:■ Check if the correct campaign shows up on the UWQ desktop for this agent.
■ Check the campaign record count.
■ Check if the status of the campaign is active.
■ Ensure the status of the corresponding target group is “Executing”.
■ Check the Campaign Record Details report to see if there are any records currently available.
■ Check the Timezone report to see if there are any callable records at this time.
■ Check if the Central Server is running. Wait for at least 2 * Retrieve interval and see if this happens again.
■ Check if a calling calendar has been assigned to the campaign.

Troubleshooting Advanced Outbound
6-20 Oracle Advanced Outbound Implementation Guide
■ Check if a calling calendar has been assigned to the target group.
■ Check if the release strategy and the corresponding value has been set.
■ Check Quantum - Quantum value and Quota - Quota value.
■ Check if the database server time zone has been set.
■ Check the refresh and recover parameter values on the central server.
6.2.9 Agent Cannot Make Progressive Calls
Reasons:■ Middleware configuration error.
■ CCC is not running.
Check:Check for these errors in dial server trace file:
■ “no middleware”
■ “cannot connect to proxy server …”
■ “cannot connect to cti server…”
■ “enabler related error …”
Solution:■ Check middleware IP address, port number, CTI server ID, PBX name, etc.
■ Ensure Call Center Connectors is running.
6.2.10 Oracle Telephony Manager Cannot Get Media Items From Advanced Outbound
Reason:Middleware configuration error.
Solution:If middleware is CT_CONNECT, make sure "enable server application data" in CT_CONNECT configuration is selected.

Troubleshooting Advanced Outbound
Diagnostics and Troubleshooting 6-21
6.2.11 Oracle Telephony Manager Received Two Media Items for the Same Advanced Outbound Call
Reason:Middleware configuration error.
Solution:If middleware is CT_CONNECT, make sure "enable server application data" in CT_CONNECT configuration is selected.
6.2.12 Media Items Were Not Closed
Reason:Middleware configuration error.
Solution:If middleware is CT_CONNECT, make sure "enable server application data" in CT_CONNECT configuration is selected.
6.2.13 Advanced Outbound Fails in the Dial Server, but no "Enabler Related Errors" Are Generated
Check:■ Examine the Call Center Connectors log (log level must be 4). Determine if the
number actually dialed has proper "prefix", (external access prefix, long distance prefix, etc...).
■ If no prefix, check middleware configuration, domestic dialing prefix, international dialing prefix, outgoing prefix, site area code, site country code, site overlay, site internal number length, site local number maximum length, etc...

Advanced Outbound Central Server Troubleshooting
6-22 Oracle Advanced Outbound Implementation Guide
6.2.14 Predictive Call Fails in the Dial Server and Call Outcome is "no ringback", "no dialtone", etc.
Check:Make sure the connect between the VDU board and the switch is correct.
6.2.15 Predictive Call Goes Through, but Transfer to Agent Fails
Check:Make sure the VDU port configuration and extension number are correct, and that they match the physics port on the switch.
Make sure the middleware configuration, predictive transfer flag, and predictive answer flag are set up correctly.
Ensure the switch is certified with Advanced Outbound.
6.3 Advanced Outbound Central Server TroubleshootingThis topic group contains information to help you resolve common problems with the AO Central Server.
The following topics are included:
Cannot Start the Server
AOCS starts but does not get records
6.3.1 Cannot Start the Server1. No database connection
Check the .dbc file, make sure that NUM_CONNECTIONS in dbc file is high enough.
2. ICSM setup is incorrectly
Check server arguments.
3. Server or plugin parameters are incorrect
– Check if the parameters have been added
– Check if the values set in ICSM (Advanced link) are correct

Advanced Outbound Dial Server Troubleshooting
Diagnostics and Troubleshooting 6-23
– Make sure the server node is running (ICSM). If the server is not running, try to start the server again from ICSM
– Try to start the server at the local node using a local script.
4. DB Server Time Zone is incorrect
Correct the DB Server Time Zone using the AO Administrator utility, under the Administration Tab.
5. Another OCS is running
Use ICSM to check/change server status.
6.3.2 AOCS Starts but Does not get Records1. Make sure the schedule has been marked for Telemarketing.
2. Make sure the schedule has a status of 'LOCKED'.
3. Make sure the target group has been generated for the schedule using lists that have been generated using one of the two supported source types.
4. Make sure the target group has a status of 'LOCKED' in order to validate target group.
5. Make sure that the list is executing
6.4 Advanced Outbound Dial Server TroubleshootingThis topic group contains information to help you resolve common problems with the AO Dial Server.
The following topics are included:
Server Does not Start
6.4.1 Server Does Not Start1. No database connection
Check the dbc file
2. ICSM setup is incorrect
Check server arguments
3. Server parameters are incorrect
Advanced Outbound Dial Server Troubleshooting
6-24 Oracle Advanced Outbound Implementation Guide
4. Another Dial Server is running with the same server id
Use ICSM to check/change server status
6.4.2 Agent Was Not Able to Login1. Make sure that the agent is assigned the System Profile for AO
Use the System Administrator Responsibility, and click System, then Profile. Set the AO profile parameters to “Yes”.
2. Make sure that the agent is assigned to one of the running campaign schedules.
3. Make sure that there are valid executing campaign schedules.
6.4.3 Agent Cannot Get Work1. Check if the agent/campaign schedule association is set.
2. Check if the campaign schedule/target group is in the correct state and that the calendar is callable.
3. Check the number of available records in this target group.
4. Records may not be in cache, check if Central Server has been started; check the execution interval of the Refresh plugin.
5. Wait and test again.
6.4.4 Dials Cannot be Placed1. Make sure that the correct extension was provided.
2. Make sure that the middlewares in your server group are configured correctly (use the Call Center HTML Administrator responsibility, "Middleware" tab).
Check the IP address and the port of Telephony Adapter Server.
Make sure that the middleware parameters are set for Advanced Outbound use (including setting the "Use with Advanced Outbound" parameter to Yes).
3. Make sure that the Telephony Adapter Server is up.
4. Make sure that VDUs are correctly configured (Advanced Outbound Administrator responsibility, "Telephony" Tab).
The status must be set to "ACTIVE".
The VDUs must be associated with correct middleware and dial server.

Advanced Outbound Dial Server Troubleshooting
Diagnostics and Troubleshooting 6-25
In the case of multiple VDUs per middleware, make sure rotary settings do not conflict.
Make sure that the port numbers/Extensions are correct.
6.4.5 Receiving Too Few Records for Target Group1. Check to ensure there is a country calendar defined for each country code used
in the target group.
2. Check to ensure each target groups source type matches the source type defined for the target group.
6.4.6 Receiving no Records1. Check to ensure the source type defined for the target group matches the source
type defined for the target groups.
2. If list validation fails, you should check the AO central server log files (via Oracle Call Center Technology Admin -- ICSM tab). If you see a message indicating that the database view is missing, you must go into the Oracle Marketing Online Admin (Administration > Marketing > Audience > Data Sources) and select data source types for Organization Contacts and Person List, then click Update. Selecting these data source types will create the OMO views used by AO.
6.4.7 Failed Validation
6.4.7.1 Quick Tips■ Make sure your Central Server and Dial Server(s) are running and set your trace
level to All.
■ Make sure your OMO Campaign and Campaign Schedule are Active.
■ Make sure your OMO Target Group has a status of Locked.
■ Make sure the Interaction Center Ready column of your Advanced Outbound Campaign Schedule is set to Yes.
■ Make sure your Advanced Outbound Campaign Schedule Target Group parameters are correctly configured.

Advanced Outbound Dial Server Troubleshooting
6-26 Oracle Advanced Outbound Implementation Guide
6.4.7.2 OMO source types do not exist or do not have the required columns.Use the steps below to diagnose this problem:
LoginHTML Login URL
ResponsibilityCall Center HTML Administration
Steps1. Click the ICSM tab.
The Server Group List page appears, displaying a summary view table os any existing server groups.
2. From the top bar, click Logs.
The Summary Report for Servers page appears, displaying a summary view table of all the servers in the group.
3. From the list of servers, locate the appropriate server and click the hyperlink to display the log error messages.
The Detail Report page appears, displaying a summary view table of all the error messages for the selected server.
4. In the Title column of the summary view table, search for error messages titled "Validation Error".
5. Click the Record ID hyperlink to display the error message in the Message Description text box.
6. Check for the following error messages:
■ ORA-00942: table or view does not exist
Source type view XXX has not been created in Oracle Marketing Online
■ Ora-00904: invalid column name
Source type view XXX is missing one or more columns
If you locate these error messages, you must create or update the OMO Source type view. Follow the steps in the Defining List Source Types topic to do so.

Advanced Outbound Dial Server Troubleshooting
Diagnostics and Troubleshooting 6-27
6.4.8 Target Group Stuck in Validating StatusIf a target group stays in the 'Validating' status for an extended period of time, it is likely the case that validation has failed, but was unable to update the status to "Failed Validation". This usually occurs when there is a tablespace issue and the error message could not be logged. After the tablespace is increased, the target group will automatically resume validation.
Check:
Check your table space sizes.
Solution:Although the exact tablespace configuration will depend on what applications are running in the database and needs to be reviewed by a dba, Oracle recommends the following sizes for a sytem configured exclusively for AO:
■ TEMP (500 MB)
■ USER_DATA and USER_IDX (300 MB)
6.4.9 No Longer Seeing IEO Log MessagesIf you stop seeing new error messages (beyond a specific date) in the IEO Log Viewer, it is very likely that you need to extend your tablespace. This is especially true if you are running into other errors that cannot be explained since other parts of the application may be failing, but are unable to log the errors due to the tablespace issues.
Check:
Check your table space sizes.
Solution:Although the exact tablespace configuration will depend on what applications are running in the database and needs to be reviewed by a dba, Oracle recommends the following sizes for a sytem configured exclusively for AO:
■ TEMP (500 MB)
■ USER_DATA and USER_IDX (300 MB)

Advanced Outbound Dial Server Troubleshooting
6-28 Oracle Advanced Outbound Implementation Guide

Seed Data A-1
ASeed Data
This topic group consists of topics providing information on how to add additional values to the seeded values shipped with Oracle Advanced Outbound.
The topics include:
■ Adding Do Not Use Reason Codes
■ Adding List Priority Values
■ Setting the Positive Flag for Outcome and Result Codes
A.1 Adding Do Not Use Reason CodesUse the steps below to create additional Do Not Use Reason Codes.
LoginSelf-Service Login URL (Forms)
ResponsibilityApplications Developer
Steps1. Click Applications, Lookups, then Common.
The Application Utilities Lookups window appears.
2. On the main toolbar of the Application Utilities Lookups window, click View, query by example, then enter.
3. Type IEC% in the query field.

Adding List Priority Values
A-2 Oracle Advanced Outbound Implementation Guide
4. On the main toolbar, click View, query by example, then run query.
5. From the list of returned values, locate the IEC_DNU_RESASON table.
6. Once you have located this table, you can create additional values by clicking the empty field directly below the last entry and typing in your values.
A.2 Adding List Priority Values Priorities determine the relative priority of a list or subset in comparison to other lists and subsets.
Highest through Medium level priorities are preemptive; all lists with priorities in this range will be exhausted in priority sequence before the next priority level is used. Low and Lowest priorities are used in round-robin fashion; each of these lists will release its quantum of records, then the next list in the same priority level will be used.
Use the steps below to create additional list priority values.
LoginSelf-Service Login URL (Forms)
ResponsibilityOracle Marketing Administrator
Steps1. Click Setups > Lookups.
The Oracle Marketing Lookups dialog box appears.
2. In the Type field, search for AMS_PRIORITY.
3. In the provided fields, you can add entries for custom list priorities.
4. Click Save.
Note: When you click an empty field, the Extensible radio button should automatically be selected. If not, be sure to select this radio button as it allows you to add values other than the seeded one.
Setting the Positive Flag for Outcome and Result Codes
Seed Data A-3
A.3 Setting the Positive Flag for Outcome and Result CodesUse the steps below to set the positive flag for outcome and result codes.
LoginSelf-Service Login URL (Forms)
ResponsibilityInteraction History
Steps1. Click Interaction History Administration.
A screen appears, displaying tabs for Outcome, Result and Reason codes.
2. Click the tab to which you want to add values (Outcome, Result, etc.)
3. On the window’s main toolbar, click View, query by example, then enter.
4. Type IEC% in the query field.
5. On the main toolbar, click View, query by example, then run query.
6. Use the up and down scroll arrows on your keyboard to scroll through the list of returned values.
7. Click the Positive Outcome flag checkbox for each value that has a positive outcome.
Note: You must enter a value in the Tag field for each list priority you define. Valid values are between 1 and 100, where 1 is highest and 100 is lowest priority.

Setting the Positive Flag for Outcome and Result Codes
A-4 Oracle Advanced Outbound Implementation Guide

Glossary-1
Glossary
Abandoned Calls
A call that was dialed by the predictive dialing server; however no agent was available when the call was connected, therefore the predictive server dropped the line. Also known as nuisance calls. The goal of Advanced Outbound is to reduce/eliminate these calls.
Automatic Call Distributor (ACD)
ACDs are automated systems that answer calls and attempt to route those calls as quickly as possible to the right person or agent. ACDs are used to uniformly distribute a large volume of incoming calls to a number of operators as soon as they have a free line and are often used by businesses with a large number of incoming calls such as airlines and insurance companies. Sometimes ACDs will prompt you to press a few touch-tone digits so that they can route your call more quickly.
Calendar
Specify dates and times when the list is accessible. Advanced Outbound utilizes two types of calendars, Country and User Defined.
Callback
A feature of Advanced Outbound that allows a call to recur at a specified interval if a live contact is not achieved on the first attempt.
Call Progress Detection
The process of listening for audible tones such as dial tone, SIT tones, busy signals, and ring-back tones to determine the state of a call through the network. When dialing in predictive mode, this process is done through the ISDN Network

Glossary-2
Interface boards. In non-predictive dialing modes (preview, and progressive), the agent will have the responsibility of determining the call progress.
Calling List
A collection of records containing a unique identifier, and possibly other information about a customer/contact/prospect. Calling lists are generated by Oracle Marketing Online and executed within Oracle Advanced Outbound.
Call Outcome
A consequence from a dial attempt to contact a customer. 'Outcome' reflects network connectivity (e.g. connect, busy, ring-no-answer, SIT, etc.); a list of system defined outcome codes are defined within Advanced Outbound, others may be user defined.
Call Result
A consequence from a dial attempt to contact a customer. 'Result' reflects the results of a completed connection and is user/application defined. Examples of 'Results' could include: "Sale" or "No Sale" or "Wrong Party Contact".
Call Reason
A consequence from a call result of a customer contact. 'Reason' codes are optional user/application defined. It is used to further detail the 'Result' of the call, such as "Too Expensive" or "Using Competitor's Product" or "No Interest"
Campaign
An organizational unit of a focused marketing effort.
Campaign Schedule
A time specification during which the campaign may execute.
Canonical Dialing Strings
A format string for representing a telephone dialing sequence.
Example: + CountryCode Space (AreaCode) Space SubscriberNumber
The components of this structure are given in the following:
+ It indicates that the number that follows it uses the canonical format.
CountryCode - A variably sized string containing one or more of the digits 0-9. The CountryCode is delimited by the following Space. It identifies the country in which the dial destination is located.

Glossary-3
Space Exactly one character. It is used to delimit the end of the CountryCode part of a dial string.
AreaCode A variably sized string containing zero or more of the digits 0-9. AreaCode is the long distance dialing information portion of the address and is optional. If the area code is present, it must be preceded by one left parenthesis, and followed by right parenthesis and one Space character.
SubscriberNumber A variably sized string containing one or more of the digits 0-9.
Computer Telephony (CT)
This term refers to technology that applies computer intelligence to making, receiving, and managing telephone calls. CT technology encompasses products such as voice and fax messaging, auto attendants, fax-on-demand, fax servers, and interactive voice response (such as automated order-entry systems). Core technologies include voice recognition, text-to-speech, and more recently, the Internet. In other words, CT systems automatically handle and process phone calls. These systems often let agents or call recipients control various aspects of the call using either a touch-tone phone or spoken commands.
Disconnect
The dissociation or release of a switched circuit between two stations.
Front hold Message
A message played when an agent is not available to take a call.
List Priority
The list manager will select records to be pulled based on the priority of the lists, where the lower the number assigned to a list, the higher the priority of the list. Lists with the same priority will be round-robined.
List Subset
A logical grouping of records within a list where members of the group must meet criteria defined for the group.
Marketing Medium
A marketing medium is the marketing channel for your marketing activity. It is the specific magazine or television station where you advertise or the telemarketing center executing your campaign.

Glossary-4
No Answer Ring Count
Specifies the number of rings before Advanced Outbound considers the call outcome to be “no answer”.
Node
Identifies the server (machine) on which the server process runs.
Oracle CRM Foundation
The CRM Foundation provides a variety of services that can be exploited, as appropriate, by any of the other applications of the Oracle CRM Suite. The CRM Foundation provides standard APIs for accessing and manipulating business objects such as customer, resource, and task records. In addition to these APIs, the Foundation also provides robust processing engines, such as Territory Manager and 1-to-1 Fulfillment. One of the most important components of the Oracle Foundation is the customer data model known as the Trading Community Architecture (TCA). This powerful model permits the capture of complex customer relationships and supports flexible business models across industries. Finally, the Foundation’s business APIs facilitate integration of the CRM suite with legacy or third-party applications in environments where that is essential.
Predictive dialing
Advanced placing of calls out to an automated dialer where the determination of when and how many calls are to be placed, is driven by an algorithm. The algorithm takes into consideration many factors (number of agents, agent talk time, connection rate, abandonment rate, etc.) and calculates the number of calls to place given the rate of agent availability.
Prefetch
Prefetch means that the Central Server fetches a certain number of records into its cache before they are requested by the Dial Server. The exact number of records is calculated by the server, based on requests from the Dial Server. The interval specifies how frequently this should be done by the server — to reduce making database trips on demand, and to reduce recycling unused records from the cache back to the database.
Preview dialing
A dialing method where agents are presented the record to be called, and the agents determine when the dial is to be placed.

Glossary-5
Private Branch eXchange (PBX)
A private internal phone system that services a number of extensions. A PBX is invariably connected to an external public telephone system.
Progressive dialing
A dialing method where the system simultaneously initiates the dialing of the record with that of displaying the record to an agent for review.
Quantum Release Strategy
The base release strategy of the list manager, where quantum applies to all the other strategies. The quantum strategy round-robins the release of records from the list based on the quanta number assigned to the list. Each list releases a set number of records—its quantum—each time it is accessed, provided that there are that many records available in the list at that time.
Quota Release Strategy
Quota release strategy modifies the quantum release strategy to only allow the completion of a certain number of records—the list's quota—from a list during a time period specified in the parameters for the list. At the beginning of each time period the quota for the list is reset.
Recycling
The process of executing business rules as defined by Advanced Outbound to determine if and when a customer record should be called again.
Record Filter Criteria
A boolean condition logic which, in the context of this guide, specifies conditions which a record must meet before the record is available to be dialed.
Special Information Tones (SIT)
Signals from the telephone network when certain error conditions are encountered. Standard SIT tones detected by Advanced Outbound include:
■ Reorder
■ Vacant
■ Busy
■ Intercept

Glossary-6
Switch
A piece of equipment that establishes and routes communication paths between separate extensions.
Trading Community Architecture (TCA)
The trading community architecture is an architecture concept designed to support complex trading communities. The goal of TCA is to provide the foundation for Oracle ERP, CRM, and E-Business applications (i.e. the entire E-Business Suite). To do this, TCA strives to model all relationships within a "Trading Community". This enables one data model to store B2B, B2B2C, B2C, B2C2C, and partner model data.
Unsuccessful Call
A call attempt that does not result in the establishment of a connection.
Voice Detection Unit (VDU)
These are physical hardware cards which must be placed into a server running Windows NT or 2000. They allow Advanced Outbound to do voice detection and classification of non-contact calls.