option stock manager installation and use - acfddev.com fileoption stock manager – settings...
TRANSCRIPT

Option Stock Manager Installation and Use
1. Go to Extensions -> Extension Installer and click the Upload button. Select the
option_stock_manager.ocmod.zip file you downloaded
2. Go to Extensions -> Modifications and click the Refresh button

3. Go to System -> Users -> User Groups and click the Edit button for the Administrator user group. Click
the Select All link for both access and modify. Save
4. Go to Extensions -> Modules. Scroll down to Option Stock Manager. If you are using OpenCart 3.x,
your screen will be a little different from the above. You will see Option Stock Manager – Dashboard
and Option Stock Manager – Settings. Click the Install button for both of these. For all OpenCart 2.x

versions, click the Install button for Option Stock Manager. After installed, click the Edit button for
Option Stock Manager – Settings (OpenCart 3.x) or Option Stock Manager (OpenCart 2.x) to setup the
module
5. There is only one setting for Option Stock Manager. This is where you define the columns that will
show up on the Option Stock Manager form. If you do not use the Low Stock Report module, you will
not see the Reorder Qty, Reorder Alarm, or Cost fields. These will only be there if you have Low Stock
Report installed as well. Check the checkboxes for the items you want to be able to edit on the Option
Stock Manager screen
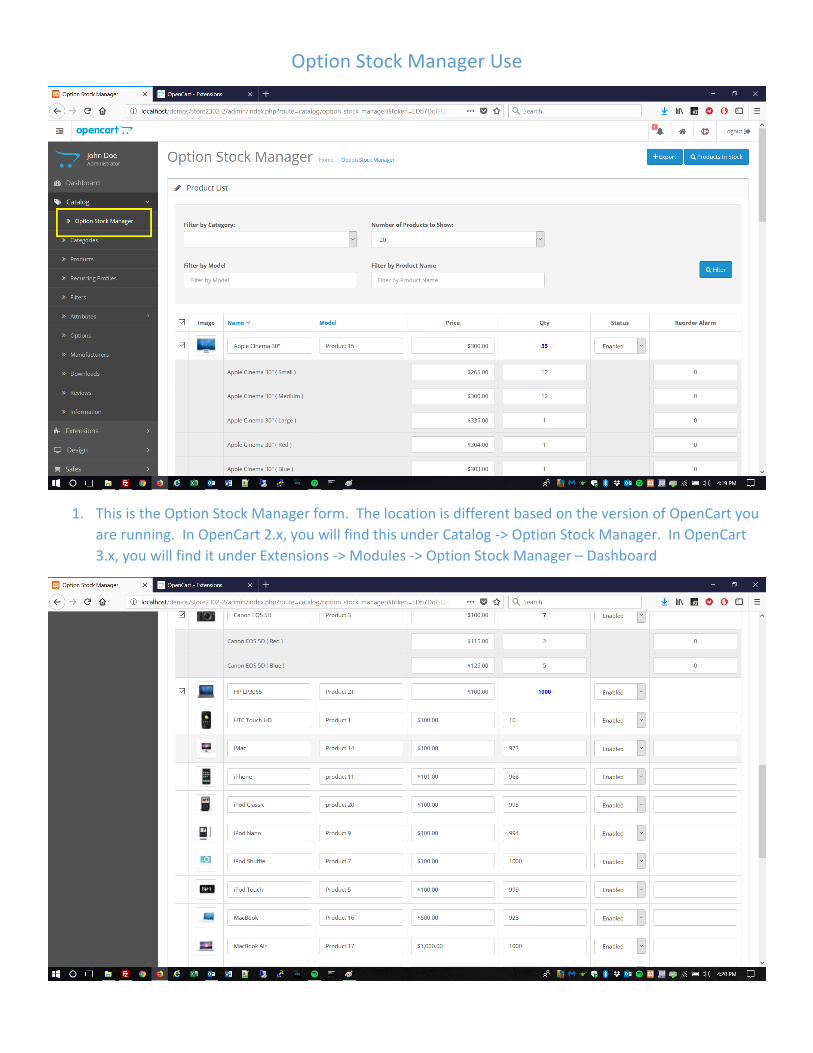
Option Stock Manager Use
1. This is the Option Stock Manager form. The location is different based on the version of OpenCart you
are running. In OpenCart 2.x, you will find this under Catalog -> Option Stock Manager. In OpenCart
3.x, you will find it under Extensions -> Modules -> Option Stock Manager – Dashboard

2. First, we will change the data of a product without options. We will be changing the HTC Touch HD
product
3. Notice, we changed the Name, Model, Price, Quantity, and Reorder Alarm. Remember, if you do not
use the Low Stock Report, the Reorder Alarm column will not be available. When you change a field
and click off the field, the data is updated at that point. If it is successful, your input field should turn
green as the above. If there is an error, it will turn red. This should usually not occur and indicates a
conflict of some sort most likely. Now we will edit a product with options as it works a little differently

4. We are going to be updating the Canon EOS 5D product. Note the current option prices and main
product quantity (7). The main product quantity for a product with options is not editable. It
calculates the total option quantities and uses that as its total quantity. You will see how this works in
the next screenshot

5. So, we updated the main product price and both option quantities. When you update the main
product price of a product with options, it also updates the option prices. Before we made the
changes, the main product price was $100.00. The “Red” option was $115.00. The “Blue” option was
$125.00. We changed the main product price to $125.00, an increase of $25.00. The option prices
updated accordingly. The “Red” option is now $140.00 and the “Blue” option is now $150.00. You can
also modify the option prices to change only the option price. The option price includes the main
product price. So in the case of the “Red” option, it would show up on your product form as +15.00
and the “Blue” option would show up as +25.00. So if you wanted to make the option price less than
your main product price, you would put in 90.00 which would then show up as -10.00. We already
touched on the quantity previous but now you can see it in action. We changed the “Red” option to a
quantity of 10 and the “Blue” option to a quantity of 10. This automatically updated the main product
quantity to 20
6. We will now use the Products in Stock button. The iPhone is currently out of stock. Now we will click
the Products in Stock button

7. Click the Products in Stock button
8. That will hide all products that have no stock. The iPhone is no longer showing up on the form. To
show all products again, click the same button which changed to All Products

9. Lastly, you can export the Option Stock Manager form. Click the Export button to get a CSV file with all
the details displayed on the form
This is the end of the Option Stock Manager Installation and Use documentation