opti - wet feet - ontario sailing · tine moberg-parker jenn grierson of written and illustrated...
TRANSCRIPT

Tine Moberg-Parker
Jenn Grierson ofWritten and Illustrated by:
Opti - Wet FeetInstructor Manual and Resources
Canadian Yachting Association
Association canadienne de yachting

ACKNOWLEDGEMENTS
e purpose of this manual is to help sailing instructors conduct a Learn to Sail Wet Feet program. e Wet Feet program was designed with the intent to help introduce young athletes to sailing. One of the main objectives of this program is to breakdown the fundamental skills required for sailing into their distinct components. is will help to reinforce proper form at a very young age, and help ensure that they don’t develop bad habits.
Development Team
Tine Moberg-Parker (2008), Executive Director of the British Columbia Sailing AssociationJenn Grierson (2008), Master Learning Facilitator, &Learn to Race Evaluator
Publisher: Canadian Yachting Association Portsmouth Olympic Harbour 53 Yonge Street Kingston, Ontario K7M 6G4 [email protected] www.sailing.ca ISBN 978-0-920232-41-5
Canadian Yachting Association
Association canadienne de yachting
Sailing for Gold
Sailing for LifeLong Term Athlete Development’s Fundamental Stage

TABLE OF CONTENTS
1. Introduction....................................................................................................................5 Preparing for the Session 5
Setting up the Learning Environment 5
2. Day 1..................................................................................................................................7 Getting to Know the Boats 7
Safety 7 This is Your Tiller 7 Sailing Fully Rigged 8 De-Rigging 8 Debrief 8 Reflection 8 Water Safety Lesson Plan 9 Steering Lesson Plan 11 Sculling Around Lesson Plan 13 Sheeting Lesson Plan 15 Terminology Lesson Plan 17 Resources for Activities 19
3. Day 2................................................................................................................................27 Parts of the Boat 27
Doubling Sheeting 27 Introduction to Tacking 27 On the Water 28 Debriefing 28 Terminology Lesson Plan 29 Sheeting the Sail 31 Steering Lesson Plan 33 Resources for Activities 35
4. Day 3................................................................................................................................39 Wind Direction and Sail Trim 39 Tacking 39 Wind Direction Lesson Plan 41 Sheeting Lesson Plan 43 Tacking Lesson Plan 45 Resources for Activities 47

5. Day 4................................................................................................................................51 The Complete Tack 51 Balance 51 Terminology Lesson Plan 52 Tacking Lesson Plan 54 Resources for Activities 57
6. Day 5................................................................................................................................61 Activities 61 Costumes 61 Loose Ends 61 Resources for Activities 63
7. After the Course..........................................................................................................69 Improving as a Coach 69 Learning Outcomes 69 Available Resources 69 No Wind Activities 69
8. No Wind Lessons.........................................................................................................71 Docking Lesson Plan (upwind) 73 Capsizing (bailing) 75 Docking (on a reach) 77 Docking (downwind) 79 Water Safety (clothing) 81 Water Safety (MOT equipment) 83
9. Additional Resources................................................................................................85 Introduction Letter for Course 87 Photography Consent Form 89 Suggested Art Box Supplies 91

5Optimist - Wet Feet
Introduction
The wet feet curriculum and course is designed to give a
young child (ages 5-8) a safe and purposeful first sailing
experience. It is based on a 12.5hour course usually con-
ducted over 5 days.
The curriculum is based on breaking down sailing skills
into their smaller components. The sailors can learn
these components quickly and later compile them, which
is necessary in the development of more complicated
skills such as roll tacking. Learning the basic components
of a skill at a young age will help to avoid bad habits once
these students develop as sailors.
This course covers the following learning objectives:
· Safety on and off the water
· Balance
· Steering
· Propulsion
· Proper tiller extension grip
· Double sheeting
· Tacking
· Stopping and acceleration
This binder will supply you with the following resources
to help with these learning objectives:
· Lesson plans
· Work sheets
· Progress card
Additional resources for no wind days include:
· Bailing
· Paddling
· Sprit pole paddling
· Boat parts vocabulary while in the boats
Our goal is that this binder will help you teach young
sailors through providing you with quality lesson plans,
worksheets and evaluation tools. Hopefully, this resource
will promote a positive learning experience for first time
sailors and their families.
Please feel free to adapt this resource to better suit your
needs as an instructor, or the needs of your students.
Also, any suggestions on how to improve this resource
would be greatly appreciated. Comments can be sent ei-
ther to BC Sailing ([email protected]) or the Canadian
Yachting Association ([email protected]).
Preparing for the Session
Prior to arriving for the first day, it is essential that the
sailors receive any pertinent information regarding the
course. A good way to accomplish this is to send a letter
to the parents/sailors, welcoming them to the course, in-
forming them about what to bring (lifejacket, clothing for
different weather conditions, drinks, food, sun-screen,
hat etc.), when to arrive, finishing times as well as how to
contact the club if the sailor will be late or absent. Most
sailing clubs and schools have a standard letter, however
if not, a sample letter has been included in the resource
material at the back of this book. Communicating course
objectives and expectations is also a good idea. This way
students and parents know what they are entering into,
and can properly prepare. Encourage parents with ques-
tions to show up early or stay later. This way you are not
spending time with parents while you should be instruct-

6
Canadian Yachting AssociationAssociation canadienne de yachting
Optimist - Wet Feet
ing students.
Taking pictures and distributing them to students is a
great way to finish off a course, however you should only
take pictures if you have written permission from every
sailors parents. Send out a permission form with the in-
troduction letter and ask them to bring it on the first day
of classes. Once you have this permission, you can take
pictures throughout the course and burn a CD for each
child; this is something many parents would love to have.
Volunteers are great for taking pictures throughout the
course. This ensures that you can remain focused on in-
structing.
Before the course starts is also the time to get your art
box ready. The art box contains all the art supplies you
might need for a session such as markers, crayons, scis-
sors, coloured paper, paper plates and glue. A list of sug-
gested items to include in your art box is in the resource
section of this book.
Setting up the learning environment
Rules and routine are an essential part of creating a safe
learning environment. Setting guidelines will help ensure
that the students feel safe and the parents are comfortable
leaving their children in your care. Important rules to lay
out include; always wear a life jacket on or around the
water (both students and instructors), wear appropriate
footwear, treat all other students and instructors respect-
fully, only one person speaks at a time during lessons, and
any other important rules you think warrant noting.
It is important that all students and instructors meet at
the same location every morning. This helps to make cer-
tain that everybody is present and organized right from
the start of the day. Unless a sailor has told the instruc-
tor they will be late, it is important to wait until all are
present. If a sailor mentions he/she is going to be late,
arrange with the parents to meet at a specific time and
place. A cell phone, radio or other means of communica-
tion can help instructors stay in contact with parents or
others while both on and off the water.
A good way to help prevent lost items is to have the stu-
dents wear nametags on their lifejackets. This will not
only help keep the sailors gear organized, it will also help
you learn their names at the beginning of the course.
The instructor and sailors work as a team to set up the
equipment and the instructor has to be involved in lifting,
tying and rigging while still supervising the whole group.
Having a volunteer can be very helpful during the rigging
and derigging of boats.
7Optimist - Wet Feet
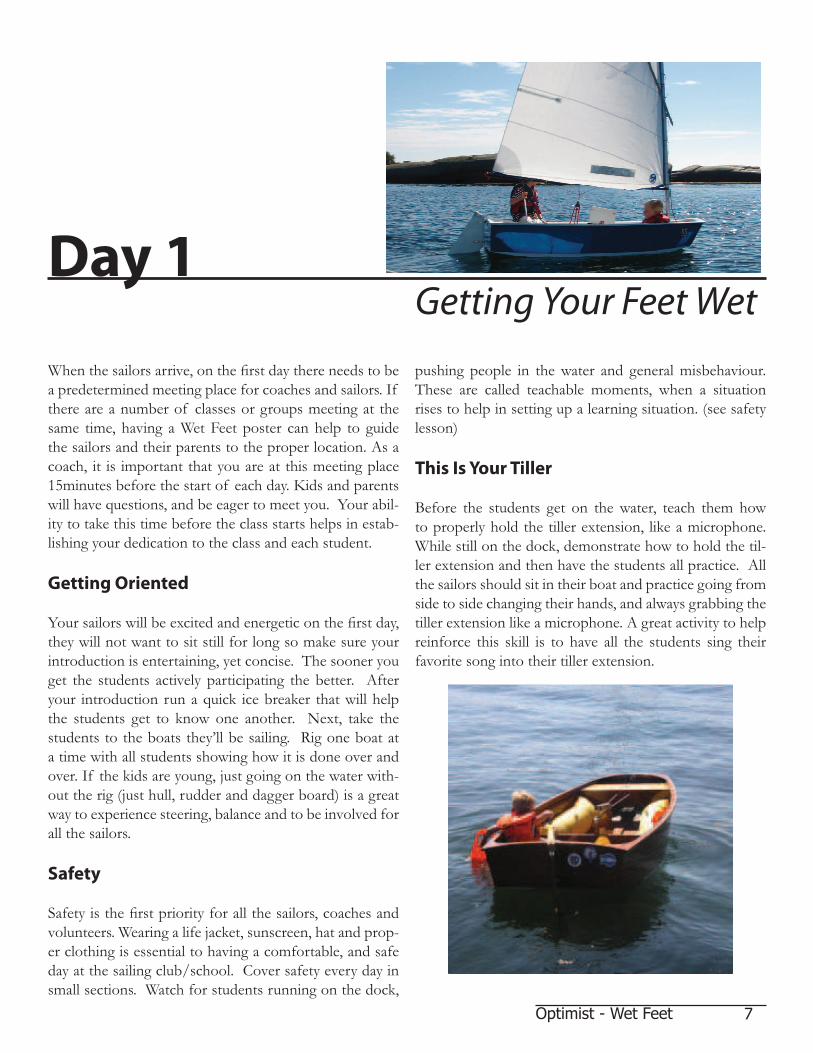
Day 1Getting Your Feet Wet
When the sailors arrive, on the first day there needs to be
a predetermined meeting place for coaches and sailors. If
there are a number of classes or groups meeting at the
same time, having a Wet Feet poster can help to guide
the sailors and their parents to the proper location. As a
coach, it is important that you are at this meeting place
15minutes before the start of each day. Kids and parents
will have questions, and be eager to meet you. Your abil-
ity to take this time before the class starts helps in estab-
lishing your dedication to the class and each student.
Getting Oriented
Your sailors will be excited and energetic on the first day,
they will not want to sit still for long so make sure your
introduction is entertaining, yet concise. The sooner you
get the students actively participating the better. After
your introduction run a quick ice breaker that will help
the students get to know one another. Next, take the
students to the boats they’ll be sailing. Rig one boat at
a time with all students showing how it is done over and
over. If the kids are young, just going on the water with-
out the rig (just hull, rudder and dagger board) is a great
way to experience steering, balance and to be involved for
all the sailors.
Safety
Safety is the first priority for all the sailors, coaches and
volunteers. Wearing a life jacket, sunscreen, hat and prop-
er clothing is essential to having a comfortable, and safe
day at the sailing club/school. Cover safety every day in
small sections. Watch for students running on the dock,
pushing people in the water and general misbehaviour.
These are called teachable moments, when a situation
rises to help in setting up a learning situation. (see safety
lesson)
This Is Your Tiller
Before the students get on the water, teach them how
to properly hold the tiller extension, like a microphone.
While still on the dock, demonstrate how to hold the til-
ler extension and then have the students all practice. All
the sailors should sit in their boat and practice going from
side to side changing their hands, and always grabbing the
tiller extension like a microphone. A great activity to help
reinforce this skill is to have all the students sing their
favorite song into their tiller extension.

8
Canadian Yachting AssociationAssociation canadienne de yachting
Optimist - Wet Feet
Now that the sailors have all been properly introduced to
their tillers, take them out on the water to scull around to
get a feel for the boat. Sculling around teaches the sailors
steering, propulsion and direction. While coaching, your
detection and correction should focus on the student’s
“microphone grip”.
Set a course, or area for them to stick too and have a rule
that if they hear 3 whistles, they are to all scull back to the
dock (or to you, depending on where you are).
If your sailors are really new and especially young, doing
a towing activity is a great way to get the sailors used to
steering at speed. Set up the towline and have the kids in
their boats without rigs. Remind them how to properly
hold their tiller extension and, while being towed, instruct
them on steering.
Sailing Fully Rigged
After the sailors have had their first experience on the wa-
ter, the boat’s rigs can be introduced. Many young sailors
do not want to sail by themselves; so sailing with two in
the boat is often ideal (one can steer while sitting in the
back while the other works the mainsheet and sits in front
of the daggerboard trunk).
Before any sailor goes on the water with a sail, there are
certain skills they need to know:
· How to hold the tiller extension (review)
· How to stop (let sail out)
· How to go (pull sail in)
· Ducking when the boom comes across the boat
When all the sailors comprehend how to start and stop
their boat, you can then take them onto the water fully
rigged. To make things easy at first, put the sailors on a
beam reach to beam reach course (2 marks set perpen-
dicular to the wind). There is no need to necessarily go
around the marks so long as they are sailing back and
fourth between them.
Remind the students how to properly hold the tiller, and
coach them through their tacks. Tacking is tricky at first
and they will need lots of instruction for the first few.
Try to pair students that have no sailing experience with
those that may have been in a boat before. This way the
students can help mentor one another while the coach is
busy with another crew.
Have the sailors follow you out to the 2 marks at the pre-
determined destination. If you need to fall back to help
coach a group of sailors, tell the others to keep their boats
pointed in the direction of the marks.
De-rigging
Ensure that all students are actively helping to derig their
boats. Organize the group and keep everyone on task.
If some students finish early, have them help others with
their boats. The students are usually quick and eager to
please, however most young sailors will have a very short
attention span. Remember that you as the coach are a role
model, the harder you work, the harder they will.
Debrief
At the end of every day, debriefing is a must. Ask the
sailors what their favourite part of the day was, what they
have learned, and whether they had fun. Debriefing is
also very important for the students internal processing.
Having them repeat what they have learned will help them
to consolidate the information. Give every student equal
attention and try to get all of them to speak about their
day. Be encouraging and constructive with your feed-
back. Remember the first two questions their parents will
ask them: Did you have fun and what did you learn? You
need to make sure they are prepared with the answers to
these questions. Asking students their favourite part of
the day will also help you to determine what the most
successful aspect of the day was so that you can improve
your own coaching abilities.
Re"ection
At the end of the day, take time to reflect on your own
performance. Use a journal to write down what went well
during the day, and what your plan is for the next. Also,
note the sailors who had difficulty throughout the day,
and develop a plan on how to differentiate your teaching
style to help these students tomorrow.

9Lesson Plans
Lesson Title: Water Safety Name:
Creative Theme: Total Time: 10min
Skill: Safety Rules Audience: Wet Feet Sailors
What do I want the sailor to know?
Important rules that must be followed during the Wet Feet program
Standard. By the end of the lesson, students will be able to:
Recite the rules every morning
Skill Breakdown. Step by step, what does the skill your teaching look like:
N/A
Teaching Methods (Try to use 3 as a minimum):
Lecture, Problem Solving, Game Playing
Time
3min
Whose
Talking
Me
Introduction (how will I grasp the sailors attention in the first 7sec?)
Questions:
“What do you think some good rules would be for around the water?”
“How about while you’re on the water?”
Skill Progression
Rules:
Lifejackets on all the time No pushing No running on the dock Don’t crash into other boats
One person speaks at a time Listen to your instructor
Wear shoes all the time Stay with the group
Use whistles only in an emergency

10 Optimist - Wet Feet
Time
5 min
1 min
1 min
Whose
Talking
Activity
Sailors
Me
Drills/Activities
Before class: Copy and cut out “Things we can do & things we can’t do” from the instructor resource material. Divide a poster board in half and title each half “Things we can do” and “Things we can’t do”. Put velcro pieces on the poster board. 6 on the yes side, 5 on the no side. Put the other half of the velcro on the back of each rule.
Have the students velcro each rule to the side they think it belongs.
Ensure you save the velcro and board so that you can reuse all your materials the next time you approach this lesson.
Lesson Check
Have sailors recite the rules they have learned
Conclusion/Debrief
Review the rules one more time, at this time also set consequences for breaking these rules.
Materials Needed
Poster board, velcro pieces, rules from resource material
Evaluation
Ensure that students are all abiding by the rules set out for them

11Lesson Plans
Lesson Title: Steering Name:
Creative Theme: Total Time: 15min
Skill: Holding the tiller like a microphone Audience: Wet Feet Sailors
What do I want the sailor to know?
How to properly hold the tiller extension
Standard. By the end of the lesson, students will be able to:
Always hold the tiller extension like a microphone while sitting on the gunwhale
Skill Breakdown. Step by step, what does the skill your teaching look like:
Tiller extension crossed in front of body, back hand holding the tiller extension with an overhand grip
Teaching Methods (Try to use 3 as a minimum):
Demonstration, Game Playing, Guided Discovery
Time
5min
Whose
Talking
Me and
Sailors
Introduction (how will I grasp the sailors attention in the first 7sec?)
Questions:
“Where is the tiller extension?”
“Can someone demonstrate how to hold it?”
Skill Progression
1. Sit in boat on dock holding tiller extension properly
2. On the water, holding tiller extension like a microphone

12 Optimist - Wet Feet
Time
5 min
2 min
3 min
Whose
Talking
Activity
Sailors
Me and
sailors
Drills/Activities
Bring speakers to the dock with a CD player or mp3 player and a well-known children’s song. Have sailors sit in their boats, holding the tiller extension like a microphone. Turn on the music, and sailors sing into the tiller extension, Pretending it’s a microphone.
Lesson Check
Have sailors demonstrate how to hold the tiller extension before they go sailing
Conclusion/Debrief
“Why do we hold our tiller extension like a microphone instead of like a frying pan?”
Answer: It’s easier to steer, especially when you have to change di-rection really fast to avoid a collision!
Materials Needed
Opti with rudder attached, speakers, music, CD or mp3 player
Evaluation
Watch for students sailing with the tiller extension held properly all the time

13Lesson Plans
Lesson Title: Sculling around (Steering) Name:
Creative Theme: Total Time: 25min
Skill: Sculling Audience: Wet Feet Sailors
What do I want the sailor to know?
How to propel the boat without a sail
Standard. By the end of the lesson, students will be able to:
Be able to scull around a small course
Skill Breakdown. Step by step, what does the skill your teaching look like:
Holding the tiller extension like a microphone, push and pull the tiller repeatedly. To turn, scull to one side of the boat without crossing the centre with the tiller.
Teaching Methods (Try to use 3 as a minimum):
Demonstration, Game Playing, Drill and Practice
Time
5min
Whose
Talking
Me and
Sailors
Introduction (how will I grasp the sailors attention in the first 7sec?)
Questions:
“We’re going to go out in the boats, but not use our sails. How are we going to get around?”
Skill Progression
1. Holding tiller like a microphone (Previous lesson)
2. Pushing and pulling the tiller repeatedly to go straight
3. Not crossing the centre to turn

14 Optimist - Wet Feet
Time
10 min
10 min
2 min
Whose
Talking
Activity
Activity
Me and
sailors
Drills/Activities
Course: Set two marks, fairly close to one another. Have sailors scull between the two marks. With two sailors in the boat, make sure they switch so everyone gets a chance to steer.
Sponge Tag: All of the sialors will be familiar with the game of tag, and so not a lot of explanation will be necessary. The boat that is “it” will have the sponge, or ball (something that won’t hurt if some-one gets hit), and they will scull around and try to throw it at another boat. If the sponge hits the boat, then that boat is it. Make sure to tell sailors that they have to stay within a certain area so they don’t wander off.
Lesson Check
Repeat these drills on days when the wind is too heavy or too light
Conclusion/Debrief
“We usually have sails when we go out in the boats. When would we need to know how to scull?”
Answer: Docking, avoiding other boats, when there’s no wind, get-ting out of irons.
Materials Needed
Boats rigged with their rudders
Evaluation
Observe students sculling in a practical setting. ie. docking

15Lesson Plans
Lesson Title: Sheeting Name:
Creative Theme: Total Time: 30min
Skill: Stopping and starting a sailboat Audience: Wet Feet Sailors
What do I want the sailor to know?
How to make the boat stop and go again
Standard. By the end of the lesson, students will be able to:
Be able to luff the sail and accelerate on command
Skill Breakdown. Step by step, what does the skill your teaching look like:
Stop: Let sail out by letting the mainsheet run
Go: Sheet in mainsheet until luffing stops
Teaching Methods (Try to use 3 as a minimum):
Brainstorming, Demonstration, Game Playing
Time
5min
Whose
Talking
Me and
Sailors
Introduction (how will I grasp the sailors attention in the first 7sec?)
“Do sailboats have motors?”
“What do you think powers up the boat and makes it move?”
“Guess at how you think a sail becomes powered or depowered.”
Skill Progression
1. Practice pulling in the mainsheet with two hands on the dock
2. Stopping on water: sailor in charge of mainsheet lets go of main-sheet and both sailors balance in their boat
3. Go on water: pulling in mainsheet with two hands
4. Stop and go on command
16 Optimist - Wet Feet
Time
5 min
10 min
1 min
Whose
Talking
Activity
Activity
Me and
sailors
Drills/Activities
With 2 sailors in each boat, one sailor will be steering and the other will be in charge of the mainsheet. Make certain sailors switch posi-tions throughout the day so each get to practice both skills.
On the dock:Have one sailor sit in the boat while on the dock, the other sailor will help push the sail out for the “stop” command. Instructor says “Go” and sailors have to pull in mainsheet with both hands, as if they were on the water. When instructor says “Stop” sailors have to let out mainsail.
Game: What time is it Mr. Wolf?Have sailors start by holding onto the dock (or make a start line between to marks) and have a mark or a finish line set. This course should be a short reach. Sailors say “What time is it Mr. Wolf?” and the instructor says a time (eg. 5 o’clock). Sailors have to pull in their sails and sail for that number of seconds (5 seconds). While all counting aloud. When done counting, sailors have to stop by letting out their sails. The game continues until one boat reaches the finish mark, or the instructor says “Lunch Time!” and all sailors have to sail back to the start line.
Lesson Check
In the future, periodically ask sailors to stop their boat on the water. ensure that they are taking the proper steps to stop and start their boats
Conclusion/Debrief
“What do we do when our boat starts tipping over in heavy winds?”
Answer: Stop by letting out our sails
Materials Needed
Rigged boats for each team of 2 sailors
Evaluation
Watch for how sailors stop at the dock

17Lesson Plans
Lesson Title: Terminology Name:
Creative Theme: Total Time: 30min
Skill: Rudder Parts Audience: Wet Feet Sailors
What do I want the sailor to know?
Parts of an Opti rudder
Standard. By the end of the lesson, students will be able to:
Point out all the different parts of an Opti rudder
Skill Breakdown. Step by step, what does the skill your teaching look like:
N/A
Teaching Methods (Try to use 3 as a minimum):
Guided Discovery, Game Playing, Problem Solving
Time
5min
Whose
Talking
Me and
Sailors
Introduction (how will I grasp the sailors attention in the first 7sec?)
“Who knows where the rudder is on their boat?”
“How many different sections or parts of the rudder can you count?”
“Do you think that each part has it’s own name?”
Skill Progression
Parts: Tiller, Rudder, Universal, tiller extension, pintels

18 Optimist - Wet Feet
Time
10 min
10 min
2 min
Whose
Talking
Activity
Activity
Me and
sailors
Drills/Activities
Colour Activity Sheets:Some sailors may not be able to read the activity sheets. There-fore, instructors need to explain to the students what it is they are to colour in. (eg. “The first word is tiller. Where is the tiller? We’ll colour it yellow!”
Lesson Check
On-water Simon Says:eg. “Simon says touch the universal” sailors have to stop sailing and touch the universal
This activity teaches balance, stop-go, as well as terminology
Conclusion/Debrief
Review rudder parts while derigging
Materials Needed
Whiteboard, pens, activity sheets, markers, and rigged boats on the water
Evaluation
Ensure students are using the correct terminology while on the water and around their boats

Day 1
Resources for Activities(Please photocopy these pages or print them from your resource CD)


21Resources
Have fun!
Sail!
Wear our PFDs
all the time
Rules Activity Cut-Outs

22 Optimist - Wet Feet
Running on
the dock
Blowing our whistles
when it’s not
an emergency

23Resources
Yelling when
the
instructor is talking
Wear our shoes
all the time
Pushing our
friends in
the water

24 Optimist - Wet Feet
Crashing into
other boats
Listening to
our instructor
Staying with
our class

25Resources
My
Rudder
Rudder
Tiller
Tiller Extension
Universal
Pintels


27Optimist - Wet Feet
Day 2Sail, Sail, Sail your Boat
The Meeting place for day 2 should be the same as Day
1. Use the same poster or sign, wear the same lifejacket,
and dress familiar. This will help to avoid confusion
amongst the students.
Again, it’s important to arrive early, as parents will
likely have questions for you. It is unfair to spend 15-
20 minutes talking to parents when the class should be
starting.
Topics covered today include vocabulary (boat parts),
and double sheeting (being able to stop and go by their
self, regardless of whether there is another student in
the boat.)
Parts Of The Boat
While rigging, go over the parts of the boat. Many sail-
ors can identify common parts such as boom, sail and
rudder (especially since you probably used many of
these words the previous day). Now is a great time to
go through the vocabulary in a bit more detail, building
upon what they have already learned. A good way to
evaluate the students is through question asking. For
example, say: “Right now I am touching something
starting with an S”, while you touch the sprit pole. If
they require additional help, try adding letters, and be-
gin sounding the word out. Also, Rig in groups where
each person on a team has a specific job such as getting
a rudder. This helps the students become familiar with
the new terminology.
Double Sheeting
Once the boats are rigged explain and demonstrate the
double sheeting technique using your fingers as “lob-
ster claws”. 3 fingers always stay on the tiller extension
while the thumb and index finger are the claws. Dem-
onstrate how to properly sheet in and out, and then let
the students practice.
Watch as all the sailors try (providing feedback and in-
struction) and then team up sailors into groups of two
and allow them to practice in their boats on the dock.
The first sailor practices, while the other watches, and
then they switch. This camaraderie is usually helpful,
as they will help to coach one another. Also, The sail-
or watching will help the boom out while his partner
sheets out. Even if the sailors are not sailing by them-
selves yet, it is essential that they learn the technique
correctly before they begin to develop bad habits.
Introduction To Tacking
Now is also a good time to explain the importance of
ducking when the boom comes across the boat. Show the
sailors by having a boat on the water while you hold onto
the bow. Have one sailor sit in the boat and push the tiller
extension while you turn the bow around. This is a great
way to help coach students through their first tack.

28
Canadian Yachting AssociationAssociation canadienne de yachting
Optimist - Wet Feet
On The Water
Set up another reaching course so that the sailors have
a defined space to stay within. Once all the sailors are
sailing the course you can use the commands of one
whistle stop, two whistles go (ensure you describe
these commands before getting on the water). This will
allow for all the sailors to practice their double sheet-
ing in a controlled setting. Your feedback should pri-
marily focus on sheeting and you will probably need to
re-demonstrate proper sheeting technique while on the
water. Having a mainsheet in your boat and a stick or
spare tiller extension will be useful to have so you can
show the sailors while you are in the coach boat.
A great stop and go drill is “What time is it Mr. Wolf?”
Most kids are familiar with this game, and it is eas-
ily adaptable to the water. Have all the sailors start be-
tween 2 marks or directly from the dock. The instruc-
tor is the wolf, and their coach boat should be set on a
reach about 8 boat lengths from the start. When all the
kids yell “what time is it Mr. Wolf?” you will say a time
(ie. “5 o’clock”). The sailors have to pull their sails in
to go, and count out loud to 5. When they get to 5 (or
whatever time you said), they have to let their sails out
to stop. This allows sailors to discover how fast it takes
for their boats to accelerate and stop, in a fun and inter-
active manner. This game is covered in the stop and go
lesson for Day 1.
Another drill you can do is “Follow the leader”. The
object of this game is to ensure that the sailors remain
behind you the whole time. You slow down and the sail-
ors slow down too. Also, the sailors are not allowed to
pass the boat in front of them (this keeps a nice line of
students all slowing and accelerating at the same rate).
After a few minutes, send the closest boat to you to the
end of the line. This allows for all the sailors to be right
behind you and receive individual attention.
While coaching your focus can go back to holding the
tiller extension like a microphone. Ensure that you are
only providing feedback on aspects of sailing that you
have already taught. It is unfair to start presenting new
information to the students while they are out on the
water trying to perfect what you have already taught
them.
While the sailors are playing “Follow the leader”, they
should begin steering without focusing on the tiller/rud-
der. Having to follow somebody will help the sailor by
taking his focus and attention outside of the boat. It is
important that the sailors all begin to steer and control
their boat almost subconsciously so they can concen-
trate on what is happening out on the water. After this
activity, it is a good time to talk about steering, as all the
sailors will have experienced what steering looks like,
feels like and sometimes sounds like. Basing the lesson
you teach on what the sailors already know is a great
way to ensure that the students relate with the material,
so that they can build upon it. You likely have noticed
that many sailors were having a difficult time steering
in a straight line because they did not have a specific
location to point towards. Teaching the sailors to have
a point to steer towards will help them to look forward
while sailing. As soon as the sailor looks down, the boat
often starts to zig-zag. Lessons on land can be walk-
ing in a straight line while looking forward, followed
by walking in a straight line while looking backwards
this is a fun way to help demonstrate the importance of
looking where you’re going.
Debrie#ng
Debriefing should again cover topics from the briefing
and focus on the specific lessons taught throughout the
day. You can introduce steering for discussion and have
a quick “brain storm” to help set the sailors up for what
is coming the following day. Again, focus on what the
sailors know, not what they will be learning in the fu-
ture. Remember the question: What did you learn/im-
prove upon today?

29Lesson Plans
Lesson Title: Terminology Name:
Creative Theme: Total Time: 30min
Skill: Boat Parts Audience: Wet Feet Sailors
What do I want the sailor to know?
Parts of an Opti
Standard. By the end of the lesson, students will be able to:
Identify all the different parts of an Opti
Skill Breakdown. Step by step, what does the skill your teaching look like:
N/A
Teaching Methods (Try to use 3 as a minimum):
Guided Discovery, Game Playing, Problem Solving
Time
1min
5min
Whose
Talking
Me and
Sailors
Me and the
Sailors
Introduction (how will I grasp the sailors attention in the first 7sec?)
“Who can tell me all the boat parts that they know”
“Perfect, do you think those are all the parts?”
“Let’s go over a few new ones”
Skill Progression
Parts: Sail, boom, mast, hull, daggerboard, sprit pole, wind indicator, tiller extension, rudder, tiller,
Bow, stern, port, starboard, hiking straps, airbags, tow line

30 Optimist - Wet Feet
Time
10 min
10 min
2 min
Whose
Talking
Activity
Activity
Me and
sailors
Drills/Activities
Colour Activity Sheets:Some sailors may not be able to read the activity sheets. Therefore, the instructor may need to guide the students through the differ-ent boat parts that they are colouring in (eg. “The first word is sail, where is the sail? Let’s colour it blue.”)
Lesson Check
On-water Simon Says:eg. “Simon says touch the bow” sailors have to stop sailing and touch the bow
This activity teaches balance, as the sailors will be up and mov-ing around their boat
Conclusion/Debrief
Ask students to name parts of the boat while rigging and derigging
Materials Needed
Whiteboard, pens, activity sheets, markers, and rigged boats on the water
Evaluation
Ensure students are using the correct terminology while on the water and around their boats

31Lesson Plans
Lesson Title: Sheeting the Sail Name:
Creative Theme: Total Time: 30min
Skill: Sheeting with Both Hands Audience: Wet Feet Sailors
What do I want the sailor to know?
How to sheet in using both of their hands
Standard. By the end of the lesson, students will be able to:
Consistently sheet in with both hands in under 7 knots of wind
Skill Breakdown. Step by step, what does the skill your teaching look like:
Holding tiller extension in back hand and mainsheet in front hand, bring sheet to tiller-hand. Pull on sheet with tiller hand while reaching down with other hand. Grab sheet with front hand and sheet in. Pass the sheet to tiller hand.
Teaching Methods (Try to use 3 as a minimum):
Demonstration, Guided Discovery, Drill &Practice
Time
1min
3min
3min
5min
Whose
Talking
Me and
Sailors
Me and the
Sailors
Introduction (how will I grasp the sailors attention in the first 7sec?)
“How do we sheet in our sail? Do we use one hand and wrap the sheet around it? Do we put the tiller between our knees and sheet with both hands? Use our teeth? No, we use two hands while still holding onto the tiller?”
Skill Progression
1. Sheeting with only the sheet (no tiller, and on land)
2. Hold tiller and pretend passing sheet to tiller hand (on land)
3. Use sheet and tiller together to sheet (on land, and then on water)

32 Optimist - Wet Feet
Time
10 min
2 min
1min
Whose
Talking
Activity
Activity
Me and
sailors
Drills/Activities
Crab Claw Stop and Go:Hold tiller with middle, ring, and pinky fingers. Index finger and thumb are the “crab claw” to grab onto the mainsheet when sheet-ing.
One whistle let go of sheet and luff, two whistles sheet in.
Lesson Check
Get sailors to demonstrate sheeting before sailing
Conclusion/Debrief
“Why do we sheet with both hands?”
“It’s faster and you remain capable of steering.”
Materials Needed
Rigged Opti, whistle
Evaluation
Watch for sheeting on the water. Ensure that sailors are using both hands properly.

33Lesson Plans
Lesson Title: Steering Name:
Creative Theme: Total Time: 30min
Skill: Steering to a Point Audience: Wet Feet Sailors
What do I want the sailor to know?
Be able to sail in a straight line
Standard. By the end of the lesson, students will be able to:
Sail in a relatively straight line to a given destination (eg. a mark)
Skill Breakdown. Step by step, what does the skill your teaching look like:
Find a sight either on shore or on water that is not moving. Steer towards that point on a given point of sail. moving the tiller as little as possible to stay in a somewhat straight line.
Teaching Methods (Try to use 3 as a minimum):
Drill &Practice
Time
1min
3min
3min
5min
Whose
Talking
Me and
Sailors
Me and the
Sailors
Introduction (how will I grasp the sailors attention in the first 7sec?)
“What is the fastest way to get to a destination?”
Draw a few different paths on the whiteboard and have students determine which is the fastest.
“Right! you want to travel in a straight line.”
Skill Progression
N/A

34 Optimist - Wet Feet
Time
10min
20min
1min
Whose
Talking
Activity
Activity
Me and
sailors
Drills/Activities
Set two marks on a beam reach course. Tell sailors to sail between the two marks. They don’t have to go around the marks, but have to change direction (tack or gybe, doesn’t matter) when they get close to the mark. If there are more advanced sailors in the class, they can go around the marks.
When on the water, find a point for the sailors to sail towards (keep to a close or beam reach angle). Tell all the sailors to sail towards that point. When they’ve been sailing for a few minutes in that direction, find a point in the opposite direction, and tell them to turn around and head back.
Lesson Check
Watch that students are sailing a straight course in the future
Conclusion/Debrief
“Why do we use a point on shore that’s not moving?”
“Because if it’s moving, we wouldn’t be able to sail in a straight line!”
Materials Needed
Rigged boats, two marks
Evaluation
Have sailors find their own point on land to sail to

Day 2
Resources for Activities(Please photocopy these pages or print them from your resource CD)


37Resources
Sail Daggerboard Rudder
Boom Sprit Pole Tiller
Mast Tiller Extension Hull
Parts Of My Boat

38 Optimist - Wet Feet
Parts of My
Boat
Stern Bow Thwart
Port Daggerboard Trunk Airbags
Starboard Hiking Straps

39Optimist - Wet Feet
Day 3Soaked Feet
After reflecting on the success of day 1 and 2, it is time
for the sailors to review what they have learned, while
continuing to build upon their sailing abilities. Allow-
ing the sailors to practice what they know, get comfort-
able with their new skills, while still expanding their
knowledge will help to build their confidence.
Two great activities for reviewing what has been taught
in the 2 days prior include on-water parts of the boat,
and sponge tag. Having the students get up and touch
certain parts of the boat while they are on the water is
a great way for you to see if they understand the termi-
nology. It is also a good activity to help teach the stu-
dents how to maintain their balance while on the water.
Sponge tag is another game that is excellent for prac-
ticing steering, balance and propulsion. This game is
played much like a game of tag but sponges are thrown
from boat to boat to determine who is “it”. The sailors
can also throw sponges at a mark or the coach boat for
various point amounts. This game is a lot of fun how-
ever some rules are necessary such as “no hitting other
boats” (loss of points), and “no hitting other students.”
Wind Direction and Sail Trim
Once a review has been completed, Wind direction
is a great topic to discuss with the sailors. This les-
son compliments what the students have learned with
regards to steering. Ask the students; how do we get
from point A to point B? Where does the wind come
from? How can we tell?
Also, start to introduce reaching, running and up-wind
sailing. Avoid teaching a points of sail lesson, which
is full of terminology and confusing for the younger
students. Provide a brief introduction to limited vo-
cabulary and teach where to keep the boom in relation
to the wind (at the corner up -wind, half way out on a
reach and all the way out downwind). Using a boat at
the dock, demonstrate these 3 points of sail, the boom
positioning and where the wind is coming from. The
sailors can then work in teams of two to replicate what
you have just demonstrated. To help accomplish this,
ask them to show you how to set their sails for up-
wind, downwind, and reaching.
For the students to practice trimming their sails a good
on-water activity is follow the leader. This way you
can ensure their boats are pointing upwind, downwind,
or on a reach. If this is too difficult for the sailors, set
a simple two, or three-mark course for them to sail
around. Make certain that the course covers the dif-
ferent points of sail that you have just taught them. A
course may be easier then follow the leader because it
allows you the opportunity to drive up beside boats to
provide individual coaching.
Tacking
By now the students have all conducted a number of
tacks. However these tacks have likely been highly
makeshift. Now is a good time to start teaching proper
form. To start, just ensure that all students are facing
forwards throughout the tack. Proper tacking is going
to be difficult for a lot of students at first, just getting
them to face forward will be a huge victory.


41Lesson Plans
Lesson Title: Wind Direction Name:
Creative Theme: Total Time: 25min
Skill: How to Find Where the Wind is Coming From Audience: Wet Feet Sailors
What do I want the sailor to know?
How to identify wind direction
Standard. By the end of the lesson, students will be able to:
Be able to list 3 ways to find and correctly identify wind direction
Skill Breakdown. Step by step, what does the skill your teaching look like:
N/A
Teaching Methods (Try to use 3 as a minimum):
Brainstorming, Guided Discovery, Discussion
Time
1min
10min
Whose
Talking
Me and
Sailors
Me and the
Sailors
Introduction (how will I grasp the sailors attention in the first 7sec?)
“Who can tell me where the wind is coming from today?”
“What clues did you use to help determine that?”
“Can you think of any other clues that could be used?”
Skill Progression
Ways to find wind direction:Flags, Wind Indicators, Waves, Luffing Sails, Trees, Grass, Hair, Feel on Face

42 Optimist - Wet Feet
Time
10min
2min
2min
Whose
Talking
Activity
Me
Me and
sailors
Drills/Activities
Have a map or chart of your sailing area for each sailor (allow them to colour it how they would like). Pin “wind arrows” to the centre of the map, loose enough to spin but tight enough that they’ll stay in place. Each day have the sailors identify where the wind is com-ing from and spin their arrow to show the direction. If your club has space, you can tape these up on a wall for all sailors in the program to see.
Lesson Check
On the dock, ask sailors to point out all the ways to find wind direc-tion, then identify the wind direction using those indicators.
Conclusion/Debrief
“How do we know where the wind is coming from? What are some ways we can find the wind direction?”
Provide hints for the students and try to involve as many of them as possible
Materials Needed
Whiteboard &Pens, flag, opti wind indicator, fan (if inside), map, markers, construction paper and pins for “wind arrows”
Evaluation
Identify wind direction on the water using wind indicators and their sails

43Lesson Plans
Lesson Title: Sheeting Name:
Creative Theme: Total Time: 30min
Skill: Where should the boom be? Audience: Wet Feet Sailors
What do I want the sailor to know?
Where their boom should be when sailing upwind, downwind, and on a reach
Standard. By the end of the lesson, students will be able to:
sheet their sail to the right position the majority of times
Skill Breakdown. Step by step, what does the skill your teaching look like:
Close Hauled - boom over the back cornerReach - boom halfway outDownwind - boom all the way out
Teaching Methods (Try to use 3 as a minimum):
Demonstration, Game Playing, Drill &Practice
Time
1min
10min
Whose
Talking
Me and
Sailors
Me and the
Sailors
Introduction (how will I grasp the sailors attention in the first 7sec?)
“While you are sailing around, are your sails always set at the exact same place?”
Skill Progression
1. Upwind - boom over the back corner
2. Reach - boom halfway out
3. Downwind - boom all the way out

44 Optimist - Wet Feet
Time
10min
10min
15min
1min
Whose
Talking
Activity
Activity
Activity
Me and
sailors
Drills/Activities
Go over each position separately at first. When sailors have grasped each concept, move onto games. When sailors are practicing, make sure they are using their double-handed sheeting knowledge. The other partner will help push the boom out
Sheeting Game:Split sailors into partners. One partner will sit in the boat, the other will help push the boom out. There are 4 commands:1. “Close Hauled!” - pull boom into the corner as if they were sailing upwind2. “Reach!” - have the boom halfway out as if you were sailing on a reach3. “Downwind!” - let the sail out all the way as if you were sailing downwind4. “Switch!” - sailors have to switch positions; the sailor who was pushing the boom out now sits in the boat, and the sailor who was in the boat now pushes the boom out.
On Water: Set a triangle course so sailors can use each of the three points of sail you have just taught them
Lesson Check
Check for proper sail trim while sailors are going around the course
Conclusion/Debrief
“Are these the only points of sail?”
“No, but they are 3 very important ones. You just need to make mi-nor adjustments for every other direction.”
Materials Needed
Rigged boats
Evaluation
Watch during all on-water drills that students are using correct sail trim.

45Lesson Plans
Lesson Title: Tacking Name:
Creative Theme: Total Time: 30min
Skill: Basic Steps to Tacking Audience: Wet Feet Sailors
What do I want the sailor to know?
How to perform a basic tack
Standard. By the end of the lesson, students will be able to:
Facing forward through the tack (can also work on staying on feet during tack)
Skill Breakdown. Step by step, what does the skill your teaching look like:
Look around to make sure there are no boats in the way; tell crew you are tacking; push the tiller; duck; straighten tiller when pointing to new direction; switch sides (back foot across first so always face forward); sit down; switch tiller and mainsheet hand (do not stress too much on this step as it is fairly complex); sail away
Teaching Methods (Try to use 3 as a minimum):
Guided Discovery, Demonstration, Drill & Practice
Time
1min
5min
5min
5min
Whose
Talking
Me and
Sailors
Me and the
Sailors
Introduction (how will I grasp the sailors attention in the first 7sec?)
“When we want to change direction and our sail switches sides, what is that called?”
Skill Progression
1. Performing skill on the deck
2. Doing a tack on the water, under coaches instruction
3. Performing a tack without instruction

46 Optimist - Wet Feet
Time
10min
5min
10min
1min
Whose
Talking
Activity
Activity
Activity
Me and
sailors
Drills/Activities
Instructor demonstrates the whole tack on the dock. If you have a volunteer, have them demonstrate the tack while you talk through it. Then, have each sailor try it while you talk them through it. After each sailor has had a turn, split them into pairs and have them try it with their partners in their own boats. Walk around and help out whoever is having problems.
When all the sailors are on the water, go beside each boat and talk every sailor through a tack. It is important to remain patient, some students may require more attention then others. Eventually every-one should be capable of performing an uninstructed tack.
Set two marks on a beam reach course and have the sailors tack around each mark.
Lesson Check
Watch each sailor perform a tack without talking them through it
Conclusion/Debrief
“When our bow goes through the wind it is called a tack. What about when we do the opposite & turn the stern of our boat through the wind?”
Materials Needed
Rigged boats, 2 marks
Evaluation
Consistant tacks on or off a set course. Differentiate between a tack and a gybe

Day 3
Resources for Activities(Please photocopy these pages or print them from your resource CD)


49Resources
Wind
Where shouldmy boom be?

51Optimist - Wet Feet
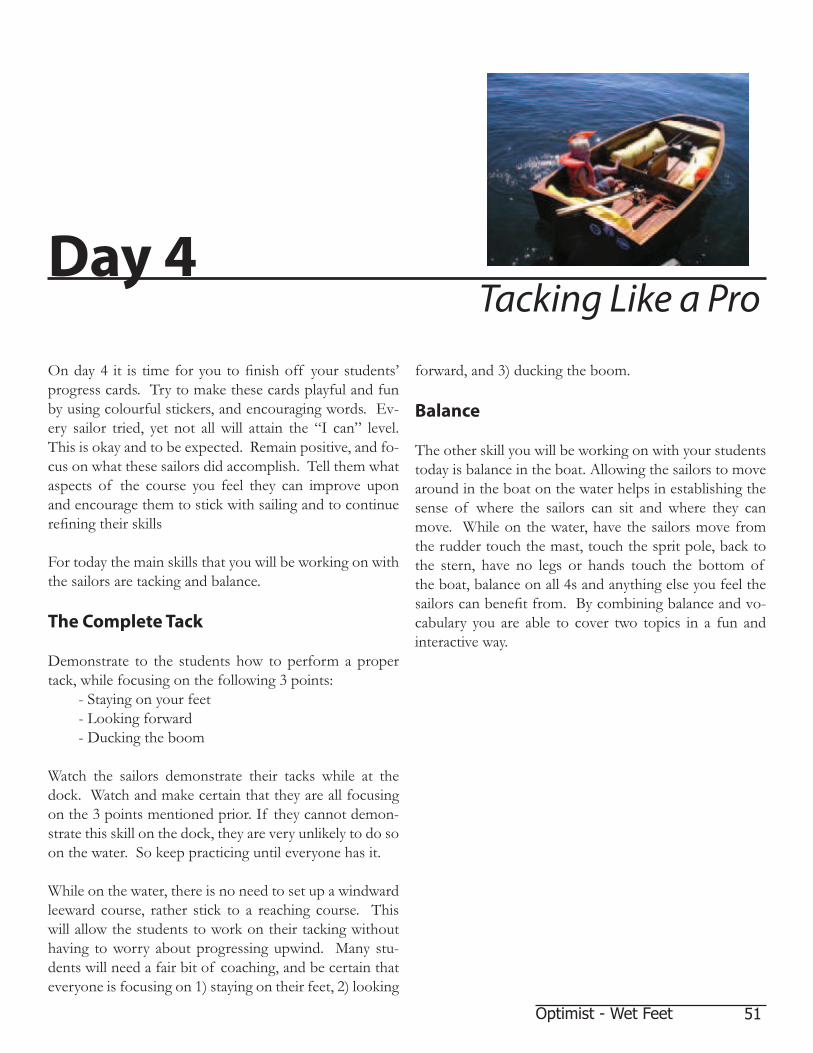
Day 4Tacking Like a Pro
On day 4 it is time for you to finish off your students’
progress cards. Try to make these cards playful and fun
by using colourful stickers, and encouraging words. Ev-
ery sailor tried, yet not all will attain the “I can” level.
This is okay and to be expected. Remain positive, and fo-
cus on what these sailors did accomplish. Tell them what
aspects of the course you feel they can improve upon
and encourage them to stick with sailing and to continue
refining their skills
For today the main skills that you will be working on with
the sailors are tacking and balance.
The Complete Tack
Demonstrate to the students how to perform a proper
tack, while focusing on the following 3 points:
- Staying on your feet
- Looking forward
- Ducking the boom
Watch the sailors demonstrate their tacks while at the
dock. Watch and make certain that they are all focusing
on the 3 points mentioned prior. If they cannot demon-
strate this skill on the dock, they are very unlikely to do so
on the water. So keep practicing until everyone has it.
While on the water, there is no need to set up a windward
leeward course, rather stick to a reaching course. This
will allow the students to work on their tacking without
having to worry about progressing upwind. Many stu-
dents will need a fair bit of coaching, and be certain that
everyone is focusing on 1) staying on their feet, 2) looking
forward, and 3) ducking the boom.
Balance
The other skill you will be working on with your students
today is balance in the boat. Allowing the sailors to move
around in the boat on the water helps in establishing the
sense of where the sailors can sit and where they can
move. While on the water, have the sailors move from
the rudder touch the mast, touch the sprit pole, back to
the stern, have no legs or hands touch the bottom of
the boat, balance on all 4s and anything else you feel the
sailors can benefit from. By combining balance and vo-
cabulary you are able to cover two topics in a fun and
interactive way.

52 Optimist - Wet Feet
Lesson Title: Terminology Name:
Creative Theme: Total Time: 30min
Skill: Sail Parts Audience: Wet Feet Sailors
What do I want the sailor to know?
Parts of a Sail
Standard. By the end of the lesson, students will be able to:
Be capable of listing/describing all the parts of an opti sail
Skill Breakdown. Step by step, what does the skill your teaching look like:
N/A
Teaching Methods (Try to use 3 as a minimum):
Guided Discovery, Game Playing, Problem Solving
Time
1min
5min
Whose
Talking
Me
Me and the
Sailors
Introduction (how will I grasp the sailors attention in the first 7sec?)
“How many parts of the sail are you able to name?”
“Excellent, now lets learn the remaining”
Skill Progression
Parts of the Sail:Boom, mast, battens, sail ties, tell-tales, wind indicator, outhaul, boom vang, sprit pole

53Lesson Plans
Time
10min
10min
5min
Whose
Talking
Activity
Activity
Sailors
Me and
Sailors
Drills/Activities
Colour Activity Sheets:Some Sailors may not be able to read the activity sheets. Therefore, instructors need to show sailors the word they are talking about (eg. “The first word is boom, where is the boom? We’ll colour it green.”)
Lesson Check
On Water - Simon Sayseg. “Simon says touch the bow” - sailors have to walk to the front of their
boat and touch the bow
“Simon says touch the sprit pole” - sailors have to stand and touch the sprit
pole
Conclusion/Debrief
Review the parts of the sail while derigging
Materials Needed
Whiteboard &pens, activity sheets, markers, and rigged boats
Evaluation
Identify parts when rigging

54 Optimist - Wet Feet
Lesson Title: Tacking Name:
Creative Theme: Total Time: 30min
Skill: Proper form through a tack Audience: Wet Feet Sailors
What do I want the sailor to know?
How to tack while using proper form
Standard. By the end of the lesson, students will be able to:
Tack a boat while looking forward, standing on their feet, and ducking the boom
Skill Breakdown. Step by step, what does the skill your teaching look like:
1) sailors push the tiller away from themselves 2) place back foot across to the other side of the boat 3) stand, looking forward 4) duck the boom as it swings across the boat 5) straighten the tiller 6) sit on the new side of the boat
Teaching Methods (Try to use 3 as a minimum):
Guided Discovery, Game Playing, Problem Solving
Time
1min
Whose
Talking
Me and the
Sailors
Introduction (how will I grasp the sailors attention in the first 7sec?)
“When you tack what are some important things to watch for?”
“Do you face backwards while switching sides?”
“Do you want to learn how to perform the PERFECT tack?”
Skill Progression
1) Explain step-by-step how to conduct a proper tack2) Demonstrate a tack at the dock in their boats3) Perform a tack on water with instruction4) Perform a tack on water without instruction

55Lesson Plans
Time
10min
10min
5min
Whose
Talking
Activity
Activity
Sailors
Me and
Sailors
Drills/Activities
Off Water:Set up 2 chairs facing each other and have the sailors simulate how they would switch sides of the boat through a tack. Bring in a tiller and a mainsheet for them to hold as well. As they switch sides have them duck a broom stick (simulating the boom).
On Water:1) have the students follow you upwind while tacking on the whistleor,2) set an upwind-downwind course with 2 marks. Tell the students they have to perform at least 5 tacks on the upwind leg
While performing their tacks in either drill, have them recite aloud; “Turn, Stand, Duck, Sit”. This will help to reinforce their learning and help them through their tacks.
Lesson Check
Watch for your students upwind sailing in the future. Make sure they are 1) Looking forward 2) Standing 3) Ducking the boom
Conclusion/Debrief
Congratulate students on how well they performed on the water.
Ask them where they think they could improve, or if they had trouble with anything in particular
Give them concise and necessary feedback
Reiterate the importance of Standing, ducking, and facing forward through a tack
Materials Needed
2 Chairs, Tiller, Mainsheet, rigged boats, 2 marks
Evaluation
Watch for proper tacks out on the water in future lessons

Day 4
Resources for Activities(Please photocopy these pages or print them from your resource CD)


59Resources
This is my sail
Boom Tell Tales Vang
Mast Wind Indicator Sprit Pole
Battens Outhaul


61Optimist - Wet Feet
Day 5A Pirate PaARRRty
The last day should be fun and focused on tying up
loose ends, and ensuring that the students leave the
camp happy and excited about sailing. Having a pirate
theme for the day is a great way to put a fun spin on ac-
tivities, and promote a fun environment for everyones
last day together.
Activities
Pirate activities could include: sponge tag (pretend can-
ons), a treasure hunt on or off the water (with a pirate
map), or a treasure hunt with a series of clues hidden
on different boat parts. A Kleenex box covered in alu-
minum foil works well as a treasure box. Treasures for
your treasure box can include whistles, coins, or any
other small, and cost effective prize.
If possible, sail your students to a new location for their
pirate activities. The new location will help add to the
excitement of the day. The students will take on their
pirate roll very seriously, being well organized with
your activities will help to ensure that they never have
to break character, thus maximizing their enjoyment.
Costumes
Have pirate hats for all the sailors, you can either make
some yourself out of black construction paper or have
the sailors create and decorate their own (see Build Your
Own Pirate Hat at the end of this chapter). Encourage
the students to come in full costume. Have some extra
pieces of clothing for the ones who have forgotten or
who did not have anything at home.
Loose Ends
It is important that while the students are sailing around
today that you still provide valuable coaching to them.
This is their last chance to prove to you that they are ca-
pable of accomplishing the required skills for this course.
Focussing your attention on those borderline students
may be the difference that helps a number of students
accomplish the goals of the Wet Feet program.


63Resources
Day 5
Resources for Activities(Please photocopy these pages or print them from your resource CD)


65Resources
Pirate Hats!The following steps illustrate how to create your own pirate hat. If you are uncer-tain whether the sailors will be able to make their own hats, prefold them and have your students decorate their own hats. Newspaper is a good material to use because of it’s size.
1.
Start with a flat sheet of paper
2.
Fold this sheet in half
3.
Fold the top corners down and to the middle
After folding, your hat should look lke this
4.
Fold up the front bottom half
5. 6.
Fold up the back bottom half
Here’s YARRRR hat
7.

67Resources
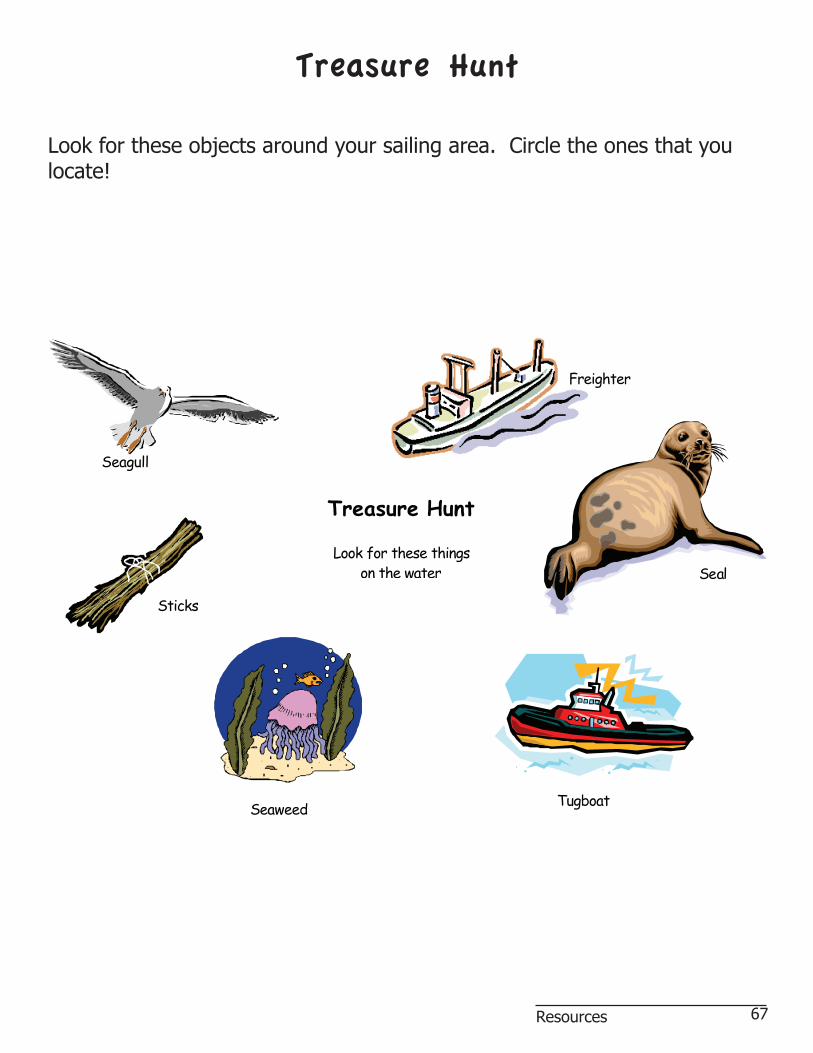
Freighter
Seal
Seagull
Sticks
SeaweedTugboat
Treasure Hunt
Look for these things
on the water
Treasure Hunt
Look for these objects around your sailing area. Circle the ones that you locate!


69Optimist - Wet Feet
After the CourseRe"ection
Improving As A Coach
In order to properly develop as an effective coach it is
important that you are always learning from, and evolv-
ing with every course you teach. Every course will be
different and provide you with unique opportunities to
better refine your instructing abilities. The better you
can adjust your teaching style and creativity, the bet-
ter the sailors will learn, making for a more fun learn-
ing environment. Keep a journal, every day write down
what went well with the day, what could have gone bet-
ter, and how you would do things differently next time.
If you do not write it down, it will slip your mind and
be wasted as a learning opportunity.
Learning Outcomes for a typical 5-day Wet
Feet program
By the end of this course the following objectives will
have been addressed:
• Safety
• Balance
• Steering
• Propulsion
• Proper tiller extension grip
• Double sheeting
• Tacking
• Stopping and acceleration
Resources available in this course package
and CD
• Lesson plans
• Work sheets
• Progress card
No Wind Activities
In addition to the lesson plans accompanying the indi-
vidual days, a number of lessons have been developed for
days where it is not possible to get on the water (ie. too
much wind, not enough wind, stormy conditions).
These lessons can be found after this chapter and in-
clude:
• Bailing
• Paddling
• Sprit pole paddling
• Boat parts vocabulary
• Towing
• Docking
• What to wear on the water
• What you need in a boat (MOT requirements)
• Knots
• Art projects


No Wind Lessons


73Lesson Plans
Lesson Title: Docking Name:
Creative Theme: Total Time: 25min
Skill: Docking Upwind Audience: Wet Feet Sailors
What do I want the sailor to know?
How to approach an upwind dock safely and in control
Standard. By the end of the lesson, students will be able to:
Be capable of safely bringing an Opti safely to an upwind dock in one attempt
Skill Breakdown. Step by step, what does the skill your teaching look like:
Sail up to about 2 boat lengths from dock (the distance will depend on the wind); let sail out completely so it’s luffing; drift into dock. Students may need to skull a bit to get to the dock.
Teaching Methods (Try to use 3 as a minimum):
Demonstration, Drill &Practice,
Time
1min
Whose
Talking
Me
Introduction (how will I grasp the sailors attention in the first 7sec?)
“When you come into dock, do you want to ram into it at full speed?”
“How is it that we normally slow down or stop our boat out on the water?”
“Can you explain how you think a safe way to come into dock would be?”
Skill Progression
1) Letting sail out when close to the dock2) Skulling3) Letting out sail then skulling slowly into dock

74 Optimist - Wet Feet
Time
10min
10min
5min
1min
Whose
Talking
Activity
Activity
Me and
Sailors
Me
Drills/Activities
Put a mark by the dock where you feel the students should begin to let their sails out. After a couple practices, take the mark away and see if sailors can judge where to let their sail out. This should be done in light wind!
Set a short course with two marks. Without sails in the boats (only rudder, and daggerboard in the hull), have sailors skull around the marks. Make sure this course is short so sailors can get around eas-ily, but large enough that there won’t be collisions. This excercise will help them refine their skulling skills.
Lesson Check
Make sure sailors are approaching the dock properly. Help them out if they are having difficulty.
Conclusion/Debrief
“If it is really really windy, do you think we should let our sails out earlier or later when approaching the dock?”
Materials Needed
Rigged boats, 2 marks
Evaluation
Watch for proper docking after every on-water session. Start to get the students thinking about how they should be approaching the dock from all wind directions.

75Lesson Plans
Lesson Title: Capsizing Name:
Creative Theme: Total Time: 25min
Skill: Bailing Audience: Wet Feet Sailors
What do I want the sailor to know?
How to properly bail a boat while sailing at the same time
Standard. By the end of the lesson, students will be able to:
Be capable of demonstrating how to properly hold a bailer while still steering the boat
Skill Breakdown. Step by step, what does the skill your teaching look like:
Hold bailer handle in forward (mainsheet) hand with pinky towards the top of the bail-er. Reach under the knees and scoop the bailer toward the front of the boat. Lift up bailer and dump the water over the side.
Teaching Methods (Try to use 3 as a minimum):
Demonstration, Drill &Practice, Game Playing
Time
2min
Whose
Talking
Me
Introduction (how will I grasp the sailors attention in the first 7sec?)
“Do you think you would sail faster or slower with water in your boat?”
“How would you get the water our of your boat to ensure you’re go-ing as fast as possible?”
Skill Progression
1) Hold bailer with pinky forward2) Scoop water from back to front3) Dump water over the side

76 Optimist - Wet Feet
Time
5min
10min
5min
Whose
Talking
Activity
Activity
Me
Me and
Sailors
Drills/Activities
Give each sailor their own bailer (they can share if there are not enough). Have students practice holding their bailers and also scooping water.
Bailing Race:Put sailors into teams of 2, and assign one boat to each team. Put the same amount of water in each boat, and give sailors a bailer each and have them get into their swamped boats. Next have a start signal (ie. whistle) and then have the students race to bail all of the water out of their boats. First team done, wins!
Lesson Check
Watch for sailors bailing out their boats on the water. Look for proper form.
Conclusion/Debrief
If you are struggling with bailing out the water and waves keep filling up your boat, should you continue to try and bail it out on your own, or ask for help from an instructor?
Materials Needed
One boat for every 2 sailors, one bailer for every sailor
Evaluation
Watch for proper form, next students will focus upon bailing while sailing.

77Lesson Plans
Lesson Title: Docking Name:
Creative Theme: Total Time: 25min
Skill: Docking On A Reach Audience: Wet Feet Sailors
What do I want the sailor to know?
How to safely dock on a reach
Standard. By the end of the lesson, students will be able to:
Be capable of safely bringing an Opti to dock on a reach
Skill Breakdown. Step by step, what does the skill your teaching look like:
Sail close to dock, about 2 boat lengths away; let sail out and drift slowly into the dock
Teaching Methods (Try to use 3 as a minimum):
Demonstration, Drill &Practice
Time
1min
Whose
Talking
Me
Introduction (how will I grasp the sailors attention in the first 7sec?)
“When you come into dock, do you want to ram into it at full speed?”
“How is it that we normally slow down or stop our boat out on the water?”
“Can you explain how you think a safe way to come into dock on a reach would be?”
Skill Progression
1) Letting sail out when close to the dock2) Letting out sail then drifting slowly into dock3) Skulling if needed
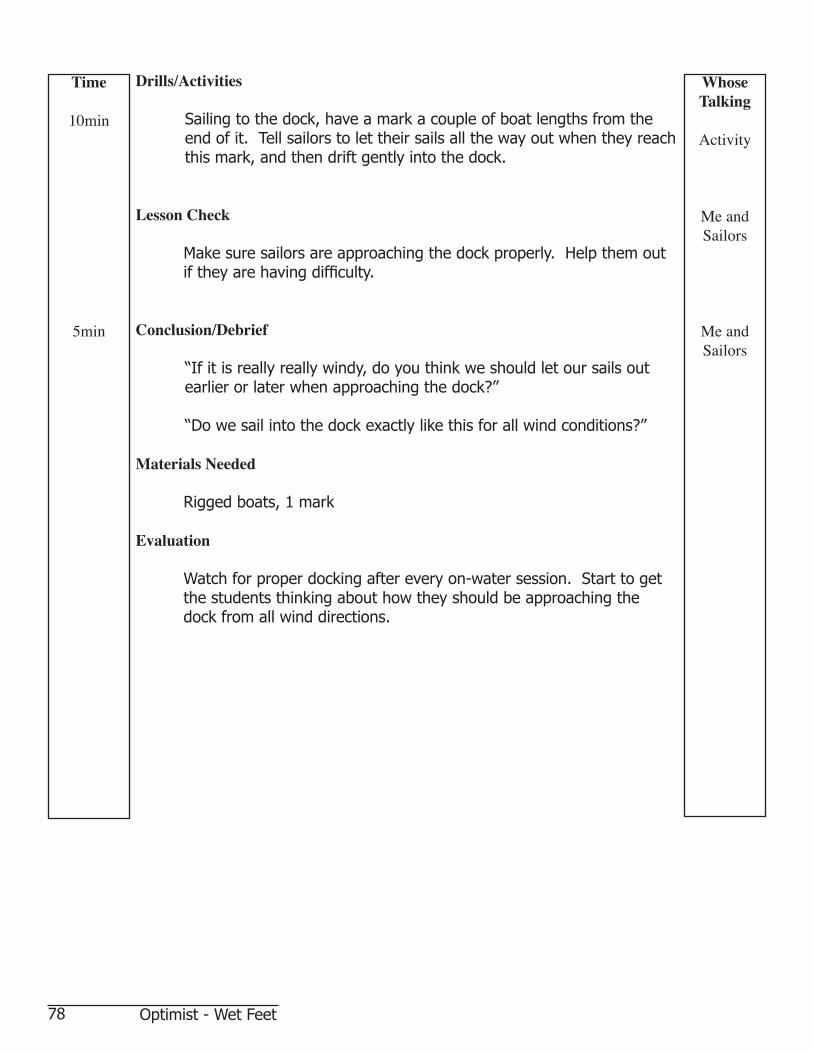
78 Optimist - Wet Feet
Time
10min
5min
Whose
Talking
Activity
Me and
Sailors
Me and
Sailors
Drills/Activities
Sailing to the dock, have a mark a couple of boat lengths from the end of it. Tell sailors to let their sails all the way out when they reach this mark, and then drift gently into the dock.
Lesson Check
Make sure sailors are approaching the dock properly. Help them out if they are having difficulty.
Conclusion/Debrief
“If it is really really windy, do you think we should let our sails out earlier or later when approaching the dock?”
“Do we sail into the dock exactly like this for all wind conditions?”
Materials Needed
Rigged boats, 1 mark
Evaluation
Watch for proper docking after every on-water session. Start to get the students thinking about how they should be approaching the dock from all wind directions.

79Lesson Plans
Lesson Title: Docking Name:
Creative Theme: Total Time: 30min
Skill: Docking Downwind Audience: Wet Feet Sailors
What do I want the sailor to know?
How to approach a downwind dock safely
Standard. By the end of the lesson, students will be able to:
Be capable of safely docking an opti at a downwind location
Skill Breakdown. Step by step, what does the skill your teaching look like:
Sail downwind until about 3 boat lengths from the dock; turn the boat head to wind and unclip the mainsheet (if more advanced, can unclip the mainsheet without heading to wind); drift and skull the boat into the dock
Teaching Methods (Try to use 3 as a minimum):
Demonstration, Drill &Practice
Time
1min
Whose
Talking
Me
Introduction (how will I grasp the sailors attention in the first 7sec?)
“How do you unclip your mainsheet?”
“When might it be helpful to unclip your mainsheet?”
“How could you luff your sail while still pointing downwind?”
Skill Progression
1) Turning up into irons2) Skulling3) Landing at a downwind dock safely

80 Optimist - Wet Feet
Time
10min
5min
Whose
Talking
Activity
Me and
Sailors
Me and
Sailors
Drills/Activities
Docking:Set a mark 3-4 boat lengths from the dock. Have sailors sail down-wind to this mark. When they reach it, have them turn up into irons. After a few successful dockings, take the mark away and have sailors judge when they should turn into irons on their own.
Skulling:If students require practice skulling; set up two marks and have them skull around the course without rigged sails.
or, set up a skulling race for the students to compete in. To do this, set up one mark away from the dock. Have students race from the dock, around the mark, and then back again.
Lesson Check
Make sure sailors are approaching the dock properly. Be near the dock as some may require assistance unhooking their mainsheets.
Conclusion/Debrief
“If it is really really windy, do you think we should unhook your main-sheets earlier or later?”
Materials Needed
Rigged boats, 2 marks
Evaluation
Watch for proper docking after every on-water session. Start to get the students thinking about how they should be approaching the dock from all wind directions.
81Lesson Plans
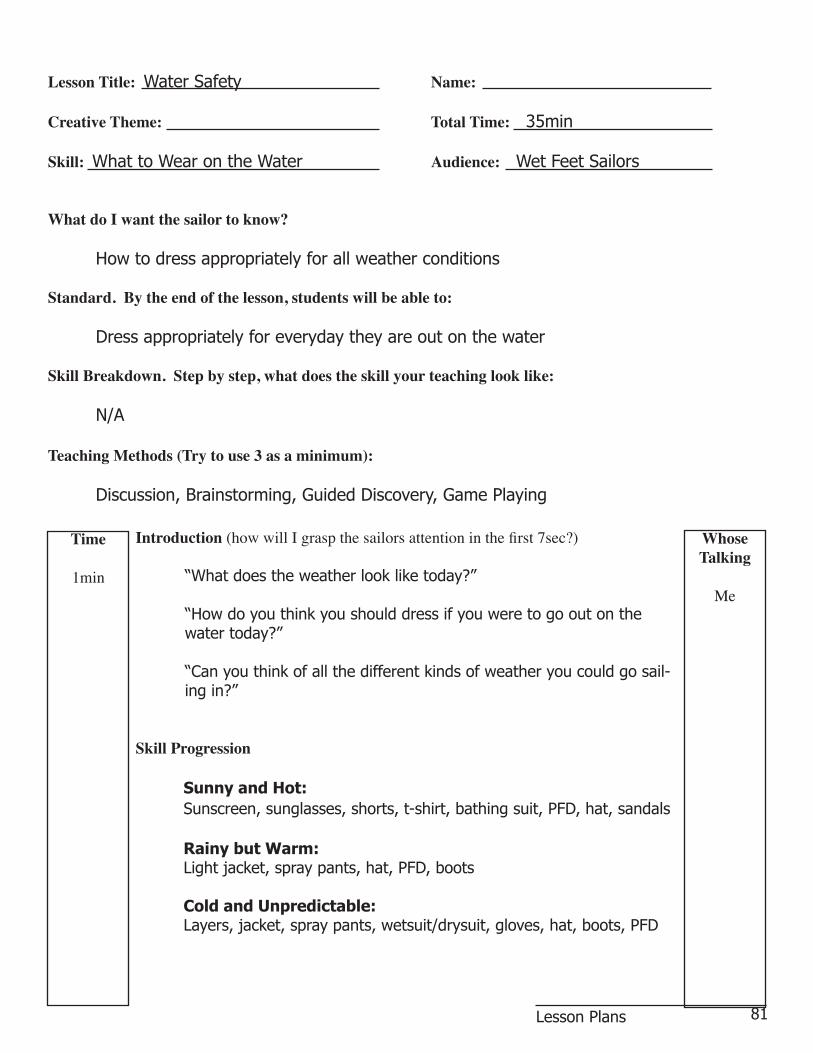
Lesson Title: Water Safety Name:
Creative Theme: Total Time: 35min
Skill: What to Wear on the Water Audience: Wet Feet Sailors
What do I want the sailor to know?
How to dress appropriately for all weather conditions
Standard. By the end of the lesson, students will be able to:
Dress appropriately for everyday they are out on the water
Skill Breakdown. Step by step, what does the skill your teaching look like:
N/A
Teaching Methods (Try to use 3 as a minimum):
Discussion, Brainstorming, Guided Discovery, Game Playing
Time
1min
Whose
Talking
Me
Introduction (how will I grasp the sailors attention in the first 7sec?)
“What does the weather look like today?”
“How do you think you should dress if you were to go out on the water today?”
“Can you think of all the different kinds of weather you could go sail-ing in?”
Skill Progression
Sunny and Hot:
Sunscreen, sunglasses, shorts, t-shirt, bathing suit, PFD, hat, sandals
Rainy but Warm:Light jacket, spray pants, hat, PFD, boots
Cold and Unpredictable:Layers, jacket, spray pants, wetsuit/drysuit, gloves, hat, boots, PFD

82 Optimist - Wet Feet
Time
10min
5min
Whose
Talking
Activity
Activity
Drills/Activities
Dress Up:Fill a box with all different kinds of clothing. Nominate 3 sailors to be sailing in 3 different weather conditions (sunny and hot, rainy, and cold). Have the remaining sailors appropriately dress the 3 nominat-ed sailors for their weather conditions using the clothing in the box.
Lesson Check
Draw a person on a whiteboard (or flipchart), and give a weather condition. Sailors have to shout out clothing that would be appropri-ate to wear for said condition. As answers are provided, draw them onto the cartoon individual.
Conclusion/Debrief
“What should you always wear regardless of the weather?”
“What would you wear on a day like today?”
Materials Needed
Whiteboard, Pens, Weather specific clothing in a box
Evaluation
Watch to ensure that students are dressing appropriately for the dif-ferent weather conditions.
Try to keep extra clothing at your program. Often students will not be properly dressed for the weather and require a sweater or jacket.

83Lesson Plans
Lesson Title: Water Safety Name:
Creative Theme: Total Time: 30min
Skill: MOT equipment requirements Audience: Wet Feet Sailors
What do I want the sailor to know?
How to equip a boat under 6m as outlined by the Ministry of Transportation
Standard. By the end of the lesson, students will be able to:
Identify the different objects required on a boat under 6m
Skill Breakdown. Step by step, what does the skill your teaching look like:
N/A
Teaching Methods (Try to use 3 as a minimum):
Brainstorming, Guided Discovery, Role Playing
Time
1min
Whose
Talking
Me
Introduction (how will I grasp the sailors attention in the first 7sec?)
“What do you think would be some handy things to keep with you while on the water incase you get into trouble?”
“Did you know that the Coast Guard has laws about specific things we need in our boats to keep us safe?”
Skill Progression
MOT Requirements:PFDs for everyone, 15m towline, paddle or anchor, bailer, flashlight, (or flares) whistle, navigation lights (if operating at night), fire extin-guisher (for boats with an inboard engine)

84 Optimist - Wet Feet
Time
10min
5min
2min
Whose
Talking
Activity
Me and
Sailors
Me and
Sailors
Drills/Activities
MOT Box:Have 2 boxes, each containing all of the MOT required equipment. as well as some equipment that might be a good idea (ie. VHF radio, duct tape, snacks, sunscreen, first aid kit, etc.). Divide the class into 2 teams and give each team a box. Each team has 5 minutes to di-vide all the contents of the box into required and non-required items.
Lesson Check
Have sailors point out the MOT equipment found in your coach boat
Conclusion/Debrief
“Why is it important to keep these items in our boat?”
“What do you think happens if the Coast Guard catches us without these items?”
Materials Needed
Whiteboard, Pens, Boxes with MOT equipment, Coast Guard booklet
Evaluation
Are students capable of describing to you the different items, how to use them, and their importance?

Additional Resources


87Resources
June 15, 2008
John Doe
1234 W 56 Ave
Vancouver, BC
A1B 2C3
Dear John,
This letter is to confirm your registration in Wet Feet for the session starting July 2 and ending
July 6. Your class will run from 1:00pm to 3:30pm each day, and we will be meeting each day on
the grassy area at the back of the clubhouse.
You are reminded that you must bring your own MOT-approved PFD each day. We have a limited
number of PFDs available to those who have forgotten, however you will not be able to go on the
water without one so please bring your own.
Please bring the following each day:
· At least one change of clothes with a towel
· Sunscreen and a hat
· A sweater, windbreaker or other lightweight jacket
· Soft-soled footwear with a fixed heal (no flip -flops please!)
Please note that wetsuits and drysuits are not required, however some sailors find wearing one
more comfortable. Snacks will be provided each day (juice, cookies, crackers), however you are
welcome to bring your own snack as well. Please let us know of any allergies or conditions (ie.
Diabetic, nut allergies) we should be aware of.
Parents: please fill out the attached photography consent form and bring it on the first day of
class.
We hope that you are excited about this coming summer and your time at the Yacht Club. If you
have any questions regarding your registration, please contact myself or the Head Instructor at
604.123.4567.
We are looking forward to seeing you on July 2!
Sincerely,
(Sailing Director or Head Instructor)

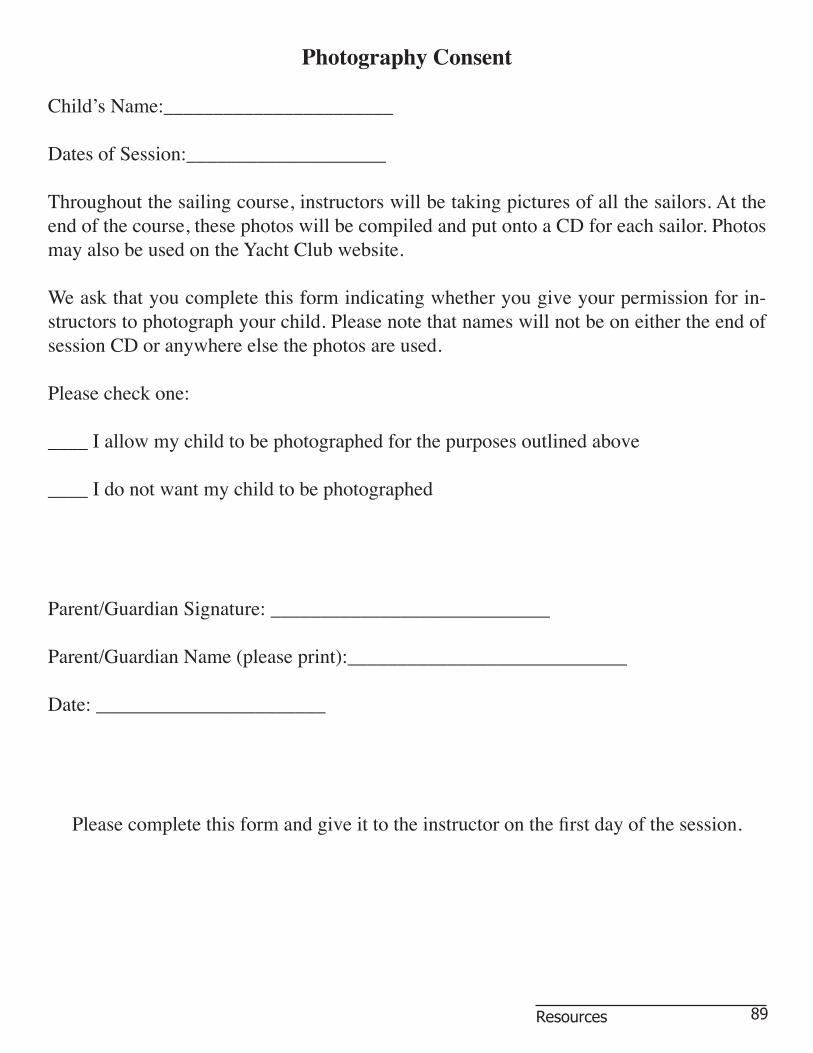
89Resources
Photography Consent
Child’s Name:_______________________
Dates of Session:____________________
Throughout the sailing course, instructors will be taking pictures of all the sailors. At the
end of the course, these photos will be compiled and put onto a CD for each sailor. Photos
may also be used on the Yacht Club website.
We ask that you complete this form indicating whether you give your permission for in-
structors to photograph your child. Please note that names will not be on either the end of
session CD or anywhere else the photos are used.
Please check one:
____ I allow my child to be photographed for the purposes outlined above
____ I do not want my child to be photographed
Parent/Guardian Signature: ____________________________
Parent/Guardian Name (please print):____________________________
Date: _______________________
Please complete this form and give it to the instructor on the first day of the session.


91Resources
Suggested Supplies for an Art Box
• Felt Markers
• Crayons
• Pens &Pencils
• Scissors
• Glue
• Tape
• Coloured Paper
• Coloured Construction Paper
• White Paper
• Poster Board
• Paints (water based)
• Paint Brushes
• Foam Stickers
• Coloured Foam Sheets
• Sponges
• Stencils
• Pipe Cleaners
• Rulers
• Paper Cups
• Paper Plates
All of this can be found at any art supply shop. This list is just a suggestion, you may
want more or less items depending on your class.