operator’s manual smart care twin machine - … · operator’s manual smart care® twin machine...
TRANSCRIPT

OPERATOR’S MANUAL
Smart Care® TWIN Machine
Carpet Cleaning Machine and Pile Lifter
Please read Operator’s Manual completely before using
the machine and pay close attention to the safety advice.
Photo of Machine 1
Assembly 2
Operation 3
Brush Selection and Removal/Replacement 3
Cleaning Instructions (Crystal Dry® Extra) 4
Maintenance 5
Troubleshooting 6
Technical Details 7
SAFETY ADVICE 7
Parts List Insert
Parts Drawing Insert
Limited Warranty Insert

1
6
3
10
5
11
12
2
4
9 8
13
7
14
Fig. 1-1
15 16
17
2
Please record identification numbers
below. You should provide these
numbers when ordering parts and
accessories to insure accuracy.
Date of Purchase
_______________________
Model No:
_______________________
Serial No.:
_______________________
All information, illustrations and specifications in
this manual are based on the latest information at
the time of publication. The right is reserved to
make changes at any time without notice.
COPYRIGHT © 2001-2008
1
1 – Handle – Top loop
2 – Handle – Side upright (2)
3 – H piece
4 – Snap lock knobs (2)
5 – Handle cone assembly
6 – Extension Cord hook – plastic (3)
7 – Identification Plate
8 – Motor Protector Breaker
9 – Removable Flap
10 – Large extension cord hook
11 – 4 ft power cord – from base
12 – 4 in transport wheels (2)
13 – Storage Tray
14 – Extension Cord Strain Reliever
15 – Gear Side Housing
16 – Electrical Side Housing
17 – Machine Base
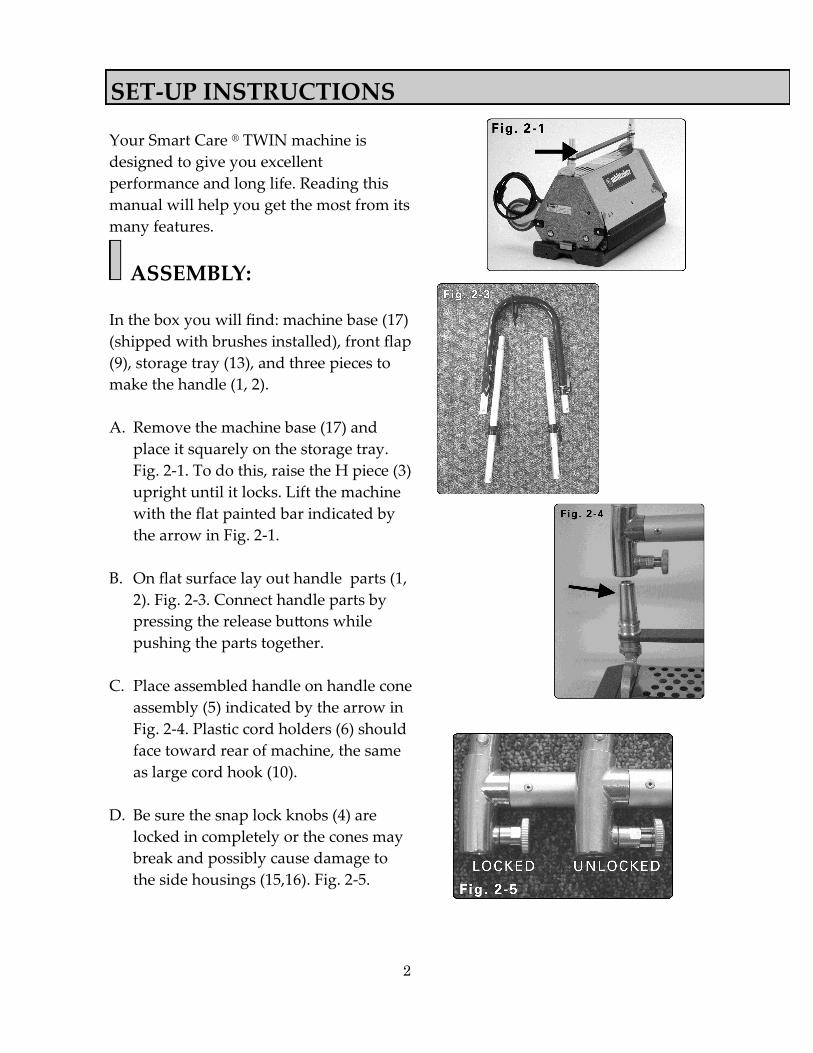
Your Smart Care ® TWIN machine is
designed to give you excellent
performance and long life. Reading this
manual will help you get the most from its
many features.
ASSEMBLY:
In the box you will find: machine base (17)
(shipped with brushes installed), front flap
(9), storage tray (13), and three pieces to
make the handle (1, 2).
A. Remove the machine base (17) and
place it squarely on the storage tray.
Fig. 2-1. To do this, raise the H piece (3)
upright until it locks. Lift the machine
with the flat painted bar indicated by
the arrow in Fig. 2-1.
B. On flat surface lay out handle parts (1,
2). Fig. 2-3. Connect handle parts by
pressing the release buttons while
pushing the parts together.
C. Place assembled handle on handle cone
assembly (5) indicated by the arrow in
Fig. 2-4. Plastic cord holders (6) should
face toward rear of machine, the same
as large cord hook (10).
D. Be sure the snap lock knobs (4) are
locked in completely or the cones may
break and possibly cause damage to
the side housings (15,16). Fig. 2-5.
SET-UP INSTRUCTIONS
2

3
A. Remove assembled machine from storage tray (13). Fig. 3-1.
B. Connect power cord (11) to grounded outlet.
C. Tilt machine toward foot pedal end of machine, press foot
pedal in with foot, and pull handle back. Brushes will revolve.
Fig. 3-2.
D. Slowly lower machine onto brushes – this reduces the initial
startup friction.
E. To turn off the machine, return the handle to its upright and
locked position.
BRUSH REMOVAL:
A. Unplug power cord.
B. Stand machine on its gear side housing (15) Fig. 3-3.
C. With a finger, push axles straight up and pull out. No tools are
required if machine is kept clean.
NOTE: Brushes should be removed and rotated end-to-end
regularly.
BRUSH SELECTION
Caution:
After a pass or two the carpet fibers have been fully agitated and pile lifted. If additional cleaning of an area is re-
quired, allow fibers to dry, vacuum then repeat process. Continuous passes over the same area with any brush may
damage the carpet fibers. Use with caution.
Even the softest brush can cause damage if operated repeatedly in one area. The best advise is to be safe. In heavily
matted/soiled areas, operate machine with overlapping passes, then operate at right-angle if possible. Do not use any
more than two passes in each direction in a single cleaning operation. Repeated operations over a few days or weeks
is sometimes necessary in situations where abuse and neglect (under cleaning or improper chemistry) have occurred.
It is not acceptable in any situation to ask more of the machine and process than is seen in two passes each direction.
COLOR DESIGNATION GENERALLY
RECOMMENDED FOR
CAN BE USED FOR CAUTIONARY
STATEMENT
WHITE SOFT RESIDENTIAL SOFT CUT
PILE, BERBERS, WOOL, ORI-
ENTAL, PERSIAN CARPETS
LIGHT TO MODERATE SOIL USE WITH
CAUTION
GRAY SEMI-SOFT RESIDENTIAL/COMMERCIAL LIGHT TO MODERATE SOIL USE WITH
CAUTION
BLUE SEMI-FIRM COMMERCIAL LIGHT TO MODERATE SOIL,
MATTED/CRUSHED
USE WITH
CAUTION
GREEN FIRM COMMERCIAL MODERATE TO HEAVY SOIL,
HEAVILY MATTED PILE
USE WITH
CAUTION
LOMAC® MACHINE OPERATION

1 SPRAY
Mix Crystal Dry® Extra solution according to instructions on bottle.
Spray a fine mist on carpeting. Fig. 4-1
Do not allow spray to dry before scrubbing.
2 AGITATE Scrub Crystal Dry® Extra in immediately – no waiting required.
Run Smart Care ® TWIN back and forth as you would a vacuum, or in
straight rows as you would a lawn mower. For heavily soiled areas,
run machine in 2 different directions (North/South then East/West).
Fig. 4-3 Continuous passes over the same area with any brush may dam-
age the carpet fibers. Use with caution
A small amount of foam appears on most fiber types for 3-5
seconds before disappearing.
For a groomed look slightly overlap each backward pass.
Note: After carpet is dry, in as little as 30 minutes, it may be vacuumed. However, there is no need to vacuum immediate-
ly. The carpet is left bright and clean looking, with no visible “crystals”. Dirt becomes encapsulated in the dry crystals and
is ready to be vacuumed at the next scheduled vacuuming. No residue is left to build up and clog carpets as with most
dry compounds.
Please remember all cleaning systems will be maximized with pre-vacuuming to remove larger dry particles of soil.
For optimum results we suggest vacuuming thoroughly prior to cleaning.
4
Moderate Soiling:
Two Passes
Like Vacuum
Light Soiling:
One Pass
Like Lawnmower
Heavy Soiling:
Multiple Passes
Like Vacuum in 2 Directions
Fig. 4-3
LOMAC® CLEANING INSTRUCTIONS

MAINTENANCE
Rotate brushes every 2-3 hours of operation.
This prolongs brush life and protects against
gear damage.
Do not lubricate axles—keep clean and dry. Never rest machine with brushes directly on
the floor. Place machine on storage tray when not in use
to prevent brush damage. Fig. 5-1.
After Each Use:
A. Unplug power cord (4) at wall outlet.
B. Tilt machine to its side onto the gear housing
(15) (opposite the power cord end of
machine).
C. Reach under with a finger and push axles up
and out. No tools are required if machine is
kept clean and brushes are rotated regularly.
D. Remove brushes. Inspect for wear. Use the
Brush Wear Indicator Card included with this
manual.
E. Wipe underside of machine with damp cloth.
Fig. 5-2.
F. Rotate the front brush end-to-end before
replacing and do the same with rear brush.
Storage:
Store machine upright in storage tray to protect
brushes on the machine. Fig. 5-1.
For the best protection of extra brushes when not in
use, invest in a Brush Caddy. Fig. 5-3. Two sets of 15”
or 20” brushes may be safely stored and transported.
5
During Operation:

Problem Solution
6
Machine does not start and makes no noise. Wait 30 seconds if machine is warm. Push mo-
tor protector reset button. Use a small object to
be sure to press it in far enough. (Fig. 6-1)
Check electrical cords and connections for
breaks.
If machine is equipped with the optional power
handle casing, be sure machine is plugged into
the receptacle on the right. (Fig. 6-2)
Machine does not start and makes grunting
noise.
Tilt machine toward the foot pedal side
and allow brushes to rotate at full speed
before lowering slowly onto the carpet.
Only one brush turns. One or more gears have stripped and need
replaced before use.
Machine turns on prematurely. Check foot pedal for wear and make sure
spring is inserted properly to keep the
handle in an upright position.
Machine bounces roughly when in use. Inspect brushes for directional set from
scrubbing in one direction too long.
Inspect axles and brush end caps to wear
which will cause a vibration.
HINT: To prevent directional set, rotate the
front brush end to end, and do the same with
the back brush. Do this at day’s end or after 2-
4 hours of continuous use.
TROUBLESHOOTING
TECHNICAL DETAILS
For servicing please contact our service technicians at the address or number below.
CAUTION – Safety Advice
Electrical:
Disconnect power cord at wall outlet before changing brushes, lifting machine off floor or servicing.
Keep away from water.
Inspect power cord prior to each use for abrasions or cuts – if cuts are found replace cord before use.
This machine has rotating brushes:
Do not run over electrical, telephone or computer cables.
Do not leave machine plugged in when unattended.
Keep children away.
Ensure handle is in upright position and lock is working correctly prior to connecting to power supply.
Do not run machine over loose carpet fibers or edges of rugs or carpet matting.
Always store machine in storage tray to protect brushes.
Always test clean an area when cleaning a different carpet or after changing to different brushes.
Continuous passes over the same area with any brush may damage the carpet fibers.
Use with caution
IT IS THE USER’S RESPONSIBILITY TO OPERATE THIS
7
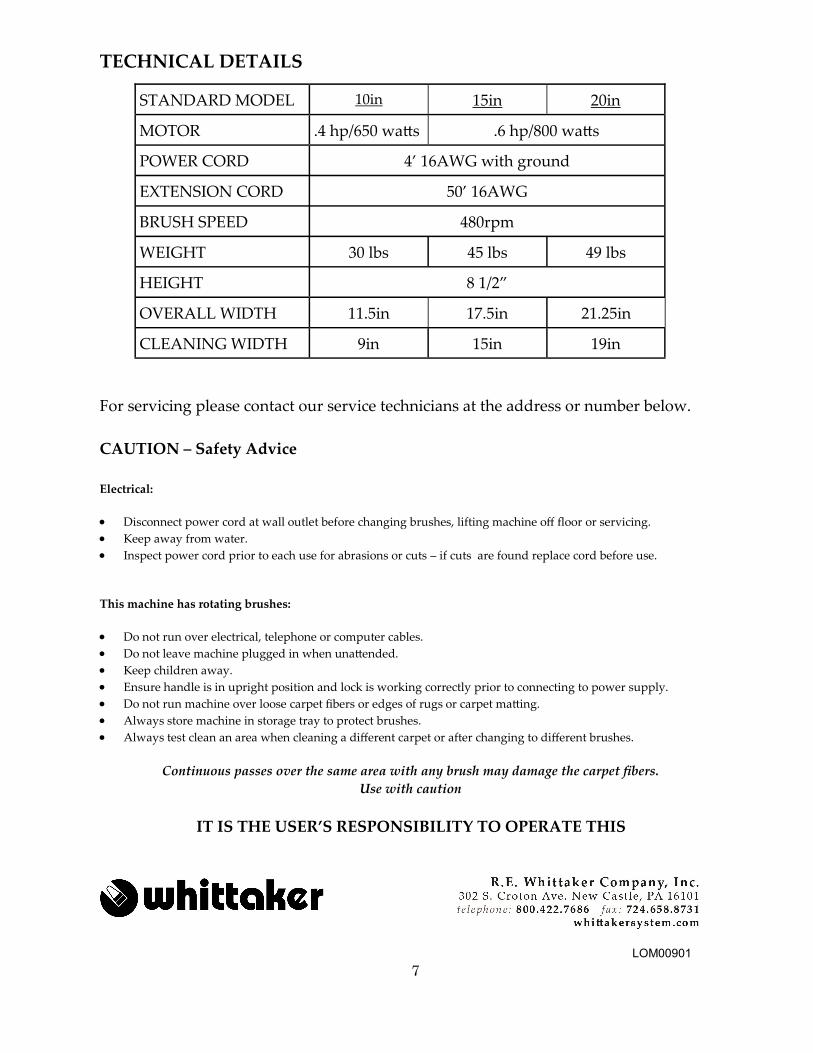
STANDARD MODEL 10in 15in 20in
MOTOR .4 hp/650 watts .6 hp/800 watts
POWER CORD 4’ 16AWG with ground
EXTENSION CORD 50’ 16AWG
BRUSH SPEED 480rpm
WEIGHT 30 lbs 45 lbs 49 lbs
HEIGHT 8 1/2”
OVERALL WIDTH 11.5in 17.5in 21.25in
CLEANING WIDTH 9in 15in 19in
LOM00901

Smart Care ® TWIN 15/20 MACHINE PARTS LIST
You can easily and securely order parts for your LOMAC Machine on our webstore at www.whittakersystem.com

Sm
art


LIMITED WARRANTY
What does this warranty cover? Any manufacturing defects in original material, including original parts and workman-
ship, under normal use and conditions.
For how long? For a period of one year from the date of original purchase in the U.S.
What will be done? We will provide machine repair service at no charge for labor and parts or replace it at our discre-
tion. Parts will be prorated according to wear.
How do you make a warranty claim? If it becomes necessary to repair your unit, you need to package the unit in a well-
padded heavy cardboard box. You must call us for an RMA # and enclose a paper with the following details—
Name
Company
Address
Phone
Fax
Description of the claim
Copy of invoice
Send to: R. E. Whittaker Co.
302 S. Croton Ave.
New Castle, PA 16101 USA
Freight must be prepaid to our facility. Insurance is recommended.
What does your warranty not cover? This warranty does not cover the following:
Damage from negligence, misuse, abuse, accident, or failure to follow operating instructions.
Changes or repairs by anyone other than R. E. Whittaker Co.
Unit on which the serial number has been defaced, modified or removed.
Ordinary adjustments, which you can perform as outlined in the operator’s manual.
Gear stripping.
What other limitations apply to this warranty? THIS WARRANTY IS NON-TRANSFERABLE AND APPLIES ONLY TO
THE ORIGINAL PURCHASER AND DOES NOT EXTEND TO SUBSEQUENT OWNERS OF THE PRODUCT. THIS
WARRANTY IS VALID ONLY IN THE UNITED STATES OF AMERICA. ANY APPLICABLE IMPLIED WARRAN-
TIES, INCLUDING THE WARRANTY OF MERCHANTABILITY, ARE LIMITED IN DURATION TO A PERIOD OF
THE EXPRESSED WARRANTY AS PROVIDED ABOVE BEGINNING WITH THE DATE OF ORIGINAL PUR-
CHASE AT RETAIL AND NO WARRANTIES, WHETHER EXPRESSED OR IMPLIED, SHALL APPLY TO THE
PRODUCT THEREAFTER. WE MAKE NO WARRANTY AS TO THE FITNESS OF THE PRODUCT FOR ANY PAR-
TICULAR PURPOSE OR USE.
THE EXTENT OF OUR LIABILITY UNDER THIS LIMITED WARRANTY IS THE REPAIR OR REPLACEMENT
PROVIDED ABOVE AND IN NO EVENT WILL OUR LIABILITY EXCEED THE PURCHASE PRICE PAID BY THE
PURCHASER OF THE PRODUCT. UNDER NO CIRCUMSTANCES WILL WE BE LIABLE FOR ANY LOSS, DI-
RECT, INDIRECT, INCIDENTAL, SPECIAL, OR CONSEQUENTIAL DAMAGE ARISING OUT OF OR IN CON-
NECTION WITH THE USE OF THIS PRODUCT.
How does state law apply to your warranty? THIS WARRANTY GIVES YOU SPECIFIC LEGAL RIGHTS, BUT YOU
MAY ALSO HAVE OTHER RIGHTS WHICH VARY FROM STATE TO STATE. SOME STATES DO NOT ALLOW
LIMITATIONS ON IMPLIED WARRANTIES OR EXCLUSION OR LIMITATION OF INCIDENTAL OR CONSE-
QUENTIAL DAMAGE, SO THESE RESTRICTIONS MAY NOT APPLY TO YOU

MANUAL DEL OPERADOR
Smart Care® TWIN Maquina
Maquina para limpiar alfombras y
levantar el pelo de la alfombra
Favor de leer el Manual del Operador en su totalidad antes de usar la má-
quina y preste mucha atención a los consejos de seguridad.
Fotografía de la máquina 1
Ensamble 2
Operación 3
Selección de cepillos y remoción / cambio 3
Instrucciones de limpieza (Crystal Dry® Extra) 4
Mantenimiento 5
Resolución de Problemas 6
Detalles técnicos 7
CONSEJOS DE SEGURIDAD 7
Lista de Refacciones Anexa
Las Partes que Dibujan Anexa
Garantía Limitada Anexa

Toda la información, ilustraciones y especificaciones
en este manual se basan en la información mas recien-
te al momento de la publicación. Nos reservamos el
derecho a hacer cambios sin previo aviso.
COPYRIGHT © 2001-2008
1
Las fotografías mostradas incluyen algunas
adiciones que usted puede o no tener en la
máquina que compró.
Consulte su lista de empaque.
1
6
3
10
5
11
12
2
4
9 8
13
7
14
Fig. 1-1
15 16 17
2
1 – Empuñadura
2 – Empuñadura - lado hacia arriba (2)
3 – Pieza H
4 – Perillas para aseguramiento (2)
5 – Ensamble del cono de la empuñadura
6 – Gancho del cable del cordón - plástico (3)
7 – Placa de identificación
8 – Interruptor de protección del motor
9 – Compuerta removible
10 – Gancho largo para colgar el cordón
11 – Cable tomacorriente de 4 pies de largo
desde la base
12 – 4 ruedas para transporte (2)
13 – Bandeja de almacenaje
14 – Aliviador de tensión sobre el cordón
15 – Caja de engranes
16 – Caja de partes eléctricas
17 – Base de la máquina
Favor de registrar los números
de identificación en la parte de
abajo. Debe de proporcionar es-
tos números cuando pida refac-
ciones y accesorios, para asegu-
rar que sean las partes adecua-
das.
Fecha de compra:
_______________________
Número de modelo:
_______________________
Número de serie:
_______________________

Su máquina Smart Care ® TWIN está dise-
ñada para darle un excelente desempeño y
una larga vida. El leer este manual le
ayudará a obtener los mejores resultados de
todas sus funciones.
Ensamble:
Usted encontrará en la caja: la base de la
máquina (17) (embarcada con los cepillos
instalados), la compuerta removible (9),
la bandeja de almacenaje (13) y 3 partes
para armar la empuñadura (1, 2).
A. Retire la base de la máquina (17) y
colóquela de forma cuadrada en la
bandeja de almacenaje. Fig. 2-1. Para
hacerlo, levante la pieza H (3) hacia
arriba hasta que atore. Levante la
máquina con la barra plana pintada
indicada por la flecha. Fig. 2-1.
B. En la superficie plana coloque las
partes de la empuñadura (1,2) Fig. 2-
3. Conecte las partes de la empu-
ñadura al presionar los botones de
liberación mientras une las partes.
C. Coloque la empuñadura armada so-
bre el cono de la empuñadura (5) in-
dicado con la flecha. Fig. 2-4. Los
ganchos de plástico del cordón (6)
deben de estar volteados hacia la
parte de atrás de la máquina, al igual
que el gancho grande del cordón (10).
D. Asegúrese que las perillas para
aseguramiento están completamente
aseguradas o los conos pueden romp-
erse y posiblemente dañar las cajas
laterales (15, 16). Fig. 2-5.
INSTRUCCIONES:
2
Bloqueado Abierto

3
A. Retire la máquina armada de la bandeja de almacenaje
(13). Fig. 3-1.
B. Conecte el cordón (11) al tomacorriente.
C. Incline la máquina hacia el lado del pedal, oprima el pe-
dal con el pie y jale la empuñadura hacia atrás. Los cepi-
llos darán vueltas. Fig. 3.2.
D. Lentamente baje la máquina hacia los cepillos - esto re-
duce la fricción inicial del encendido.
E. Para apagar la máquina, regrese la empuñadura a la
posición hacia arriba y cerrada.
REMOCIÓN DE LOS CEPILLOS:
A. Desconecte la máquina de la corriente.
B. Apoye la máquina sobre el lado de la caja de engranes
(15) Fig. 3-3
C. Con el dedo, empuje los ejes hacia arriba y jálelos hacia
afuera. no se necesita ninguna herramienta siempre y
cuando la máquina se mantenga limpia.
Nota: Los cepillos deben ser removidos y rotados
de lado a lado de manera frecuente.
BRUSH SELECTION:
OPERACIÓN DE LA MAQUINA LOMAC:
Precaución: Después de una o dos pasadas, las fibras de la alfombra han sido
agitadas y los pelos de la alfombra levantados por completo. Si un área necesita
más limpieza, permita que las fibras sequen primero, aspire y repita el proceso. Los
pases continuos sobre la misma área utilizando cualquier cepillo pueden llegar a da-
ñar las fibras de la alfombra. Úsese con precaución.
Aún el cepillo mas suave puede causar daño si se opera de manera repetida sobre la misma área, El mejor consejo es mantener
las cosas seguras. En áreas demasiado sucias, opere la máquina con pasadas solapadas, después opere hacia el ángulo derecho
si es posible. No utilice más de dos pases en cada dirección durante una sola operación de limpieza. Las operaciones repetidas
en un periodo corto de días o semanas son necesarias en algunas ocasiones cuando han habido casos de abuso o negligencia en
la limpieza o utilización inadecuada de productos químicos. No es aceptable en ninguna situación el esperar más de la máqui-
na y proceso que lo que se obtiene con dos pases en cada dirección.
COLOR
TIPO SE RECOMIENDA PARA PUEDE USARSE PARA
AVISOS DE
PRECAUCIÓN
BLANCO
SUAVE
ALFOMBRA RESIDENCIAL, DE FIBRA CORTA, BERBER, DE
LANA, ORIENTAL, PERSAS
MANCHAS LIGERAS A MODERADAS
USE CON PRECAUCIÓN
GRIS
SEMI-SUAVE
RESIDENCIAL / COMERCIAL
MANCHAS LIGERAS A MODERADAS
USE CON PRECAUCIÓN
AZUL
SEMI-DURO
COMERCIAL
MANCHAS LIGERAS A MODERADAS, ENTRELA-
ZADAS/APRETADAS
USE CON PRECAUCIÓN
VERDE
DURO
COMERCIAL
MANCHAS MODERADAS A PESADAS, PELO DE
ALFOMBRA MUY SUCIO Y ENTRELAZADO
USE CON PRECAUCIÓN

1 ATOMIZADOR
Mezcle la solución CRYSTAL DRY® en su aplicador de atomizador.
Agregue una botella de CRYSTAL DRY® a un galón de agua. Para ten-
er la mezcla CRYSTAL DRY® EXTRA mezcle una botella con dos
galones de agua.
Aplique una capa fina sobre la alfombra. Fig. 4-1 No permita que se se-
que la solución antes de tallar.
2 AGITE
Talle el CRYSTAL DRY® inmediatamente - no necesita esperar
Pase la LOMAC® hacia adelante y hacia atrás como si estuviera usando
la aspiradora, o en pases rectos como si estuviera usando una podadora
de césped. Para áreas muy sucias, pase la máquina en 2 direcciones dis-
tintas (Norte a Sur y después Este a Oeste). Fig. 4-3. Los pases continu-
os sobre la misma área con cualquier cepillo, pueden dañar las fibras de
la alfombra. Use con precaución.
Aparece una cantidad pequeña de espuma en la mayoría de tipos de fi-
bras durante 3-5 segundos antes de desaparecer.
Para un acabado mas “peinado” traslape las pasadas hacia atrás ligera-
mente.
Nota: Después que la alfombra haya secado, en un periodo tan corto como 30 minutos, puede ser aspirada. Sin em-
bargo, no hay necesidad de aspirar de inmediato. La alfombra queda limpia y brillante, sin cristales visibles. La
mugre queda encapsulada en los cristales secos y se aspira fácilmente la próxima vez que usted pase la aspiradora.
No quedan residuos que se vayan almacenando y que se adhieran a las alfombras como con la mayoría de los com-
puestos secos.
Por favor recuerde que todos los sistemas de limpieza se maximizan con un aspirado previo para re-
mover las partículas grandes de suciedad.
Para resultados óptimos, le sugerimos un aspirado profundo antes de la limpieza.
4
INSTRUCCIONES DE LIMPIEZA DE LA MAQUINA LOMAC®/CRYSTAL DRY®:
Sucio Moderado: Dos pases
Como aspirando
Ligeramente sucio:
Un pase
Como podadora
Muy Sucio:
Pases múltiples
Como aspirando en dos direcciones
Fig. 4-3

Rote los cepillos cada 2-3 horas de
operación. Esto prolonga la vida de los
cepillos y los protege contra el daño
debido a los engranes.
No lubrique los ejes - manténgalos lim-
pios y secos.
Nunca recargue o deje en descanso la
máquina con los cepillos directamente
hacia el piso.
Coloque la máquina en la bandeja de
almacenaje para prevenir el daño a los
cepillos. Fig. 5-1
Después de cada uso:
A. Desconecte el cordón (4) del tomacor-
riente.
B. Incline la máquina hacia un lado de la
caja de los engranes (15), el lado
opuesto al del cordón de la máquina.
C. Con un dedo busque y empuje los ejes
hacia arriba y hacia afuera. No se nece-
sitan herramientas si la máquina se
mantiene limpia y los cepillos se rotan
con frecuencia.
D. Retire los cepillos. Inspeccione el
desgaste. Use la tarjeta indicadora del
desgaste de los cepillos que se incluye
con este manual.
E. Limpie la parte interior inferior de la
máquina con un trapo húmedo. Fig. 5-2.
F. Rote el cepillo delantero de lado a lado
reemplazándolo y haga lo mismo con el
cepillo de atrás.
Almacenaje:
Guarde la máquina en posición vertical en
la bandeja de almacenaje para proteger los
cepillos. Fig. 5-1.
Para una mejor protección de los cepillos
adicionales que no se encuentren en uso,
compre una canasta para cepillos. Fig. 5-3.
Puede almacenar y transportar de
manera segura hasta 2 juegos de cepillos
de 15” y 20”.
MANTENIMIENTO:
5
Durante la operación:
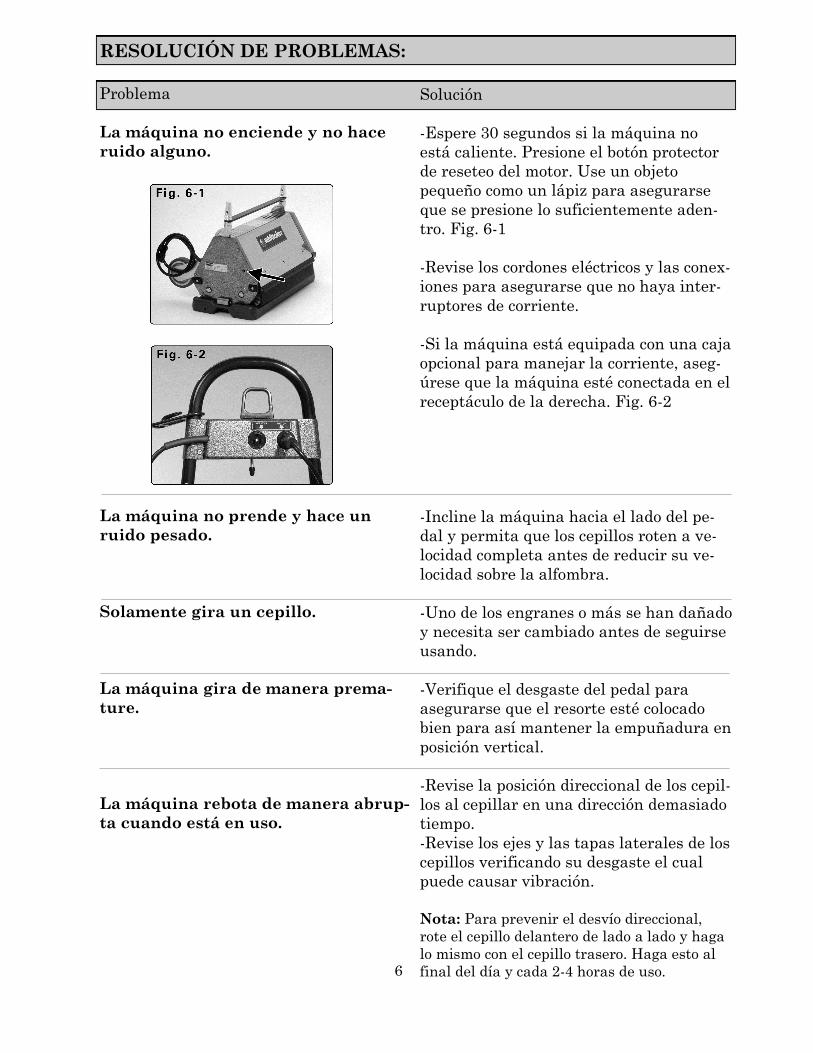
RESOLUCIÓN DE PROBLEMAS:
Problema
La máquina no enciende y no hace
ruido alguno.
La máquina no prende y hace un
ruido pesado.
Solamente gira un cepillo.
La máquina gira de manera prema-
ture.
La máquina rebota de manera abrup-
ta cuando está en uso.
Solución
-Espere 30 segundos si la máquina no
está caliente. Presione el botón protector
de reseteo del motor. Use un objeto
pequeño como un lápiz para asegurarse
que se presione lo suficientemente aden-
tro. Fig. 6-1
-Revise los cordones eléctricos y las conex-
iones para asegurarse que no haya inter-
ruptores de corriente.
-Si la máquina está equipada con una caja
opcional para manejar la corriente, aseg-
úrese que la máquina esté conectada en el
receptáculo de la derecha. Fig. 6-2
-Incline la máquina hacia el lado del pe-
dal y permita que los cepillos roten a ve-
locidad completa antes de reducir su ve-
locidad sobre la alfombra.
-Uno de los engranes o más se han dañado
y necesita ser cambiado antes de seguirse
usando.
-Verifique el desgaste del pedal para
asegurarse que el resorte esté colocado
bien para así mantener la empuñadura en
posición vertical.
-Revise la posición direccional de los cepil-
los al cepillar en una dirección demasiado
tiempo.
-Revise los ejes y las tapas laterales de los
cepillos verificando su desgaste el cual
puede causar vibración.
Nota: Para prevenir el desvío direccional,
rote el cepillo delantero de lado a lado y haga
lo mismo con el cepillo trasero. Haga esto al
final del día y cada 2-4 horas de uso. 6

DETALLES TÉCNICOS
Para recibir servicio favor de contactar a los técnicos de servicio en la dirección y te-
léfono indicados a continuación
PRECAUCIÓN - Avisos de seguridad
Eléctrico:
Desconecte el cordón del tomacorrientes en la pared antes de cambiar los cepillos, levantarla máquina del
piso o darle servicio.
Manténgase alejada del agua
Revise el cordón antes de cada uso para asegurarse que no tenga cortes o daño alguno - si tiene algún corte,
reemplace el cordón antes de usar la máquina.
Esta máquina tiene cepillos que rotan:
No la pase sobre cables eléctricos, telefónicos, o de computadora.
No deje la máquina conectada si no está siendo atendida.
Mantenga la máquina lejos de los niños.
Asegúrese que la empuñadura esté en posición vertical y que el seguro esté funcionando bien antes de que
se conecte a la electricidad.
No pase la máquina por encima de fibras sueltas de la alfombra o por las orillas de los tapetes.
Siempre haga pruebas de limpieza en un área cuando vaya a limpiar una alfombra diferente o después de
cambiar los cepillos.
Los pases continuos de la máquina sobre la misma área con un cepillo, pueden dañar las
fibras de la alfombra. Úsese con precaución.
ES RESPONSABILIDAD DEL USUARIO OPERAR ESTE APARATO CON
SEGURIDAD Y CUIDADO.
7
LOM00901
MODELO ESTANDER 10in 15in 20in
MOTOR .4 hp/650 watts .6 hp/800 watts
CORDÓN DE ELECTRICIDAD 4’ 16AWG a tierra
EXTENSIÓN 50’ 16AWG
VELOCIDAD DE CEPILLO 480rpm
PESO 30 libras 45 libras 49 libras
ALTURA 8 1/2”
ANCHO TOTAL 11.5” 17.5” 21.25”
ANCHO DE LIMPIEZA 9” 15” 19”