operator's manual - lowes holidaypdf.lowes.com/useandcareguides/037049935130_use.pdf ·...
TRANSCRIPT

OPERATOR'S MANUAL
46"SNOWBLADE
Model Numbers190-833-OEM
MTD PRODUCTS INC. P.O. BOX 368022 CLEVELAND, OHIO 44136-9722
IMPORTANT: READ SAFETY RULES AND INSTRUCTIONS CAREFULLY
PRINTED IN U.S.A. FORM NO. 48829 (REV. 7/03)

2
RULES FOR SAFE OPERATION
Any power equipment can cause injury if operated improperly or if the user does not understand how to operatethe equipment. Exercise caution at all times when operating equipment.
1. Read the tractor and snow blade owners manuals and know how to operate your tractor before using tractor with snowblade attachment.
2. Never operate tractor and snow blade without wearing proper clothing suited to weather conditions and operation ofcontrols.
3. Never allow children to operate tractor and snow blade, and do not allow adults to operate without proper instructions.
4. Always begin with transmission in first (low) gear and gradually increase speed as required.
CARTON CONTENTS
LOOK FOR THIS SYMBOL TO POINT OUTIMPORTANT SAFETY PRECAUTIONS. ITMEANS -- ATTENTION! BECOME ALERT! YOURSAFETY IS INVOLVED.
UNPACKING
Open carton. Remove parts and literature. Makecertain all parts and literature are removed before thecarton is discarded.
Lay out all parts according to the illustration below.
A 2 Frame BracketsB 1 Upper Lift HandleC 1 Lower Lift Handle AssemblyD 1 Blade AssemblyE 1 R.H. Hitch Bracket
A B
C
D
EF G
H
JK
L
O
M
N
I
F 1 L.H. Hitch BracketG 2 Angle BracketsH 1 Pivot Support BracketI 1 Channel Pivot PinJ 1 Angle Lock Bar (Long)
K 1 Angle Lock Bar (Short)L 1 Channel AssemblyM 1 Pivot ShaftN 1 Spring Mount RodO 1 Blade Adjust Spring

3
A 1 Hex Bolt, 3/8" x 3-1/2"B 1 Hex Bolt, 1/4" x 3-1/4"C 8 Hex Bolt, 3/8" x 1" Lg.D 6 Hex Bolt, 5/16" x 1" Lg.E 2 Hex Bolt, 1/4" x 1"F 2 Carriage Bolt, 3/8" x 1" Lg.G 2 Shoulder BoltH 3 Hex Lock Nut, 1/4"I 6 Nylock Nut, 5/16"J 1 Hex Nut, 3/8-16K 4 Hex Lock Nut, 3/8"L 8 Flange Nut, 3/8"M 4 Lock Washer, 5/16"
Key Qty Description
N 2 Lock Washer, 3/8"O 1 Flat Washer, 3/8"P 1 Flat Washer, 1/2"Q 2 Hairpin Cotter, 1/8" (large)R 3 Hairpin Cotter, 3/32" (small)S 2 Palnut, 3/8"T 1 Clevis Pin, 1/4" x 1-1/2"U 2 SpacerV 1 Plastic CapW 1 Angle Lock SpringX 1 KnobY 1 Handle Grip
Key Qty Description
CONTENTS OF HARDWARE PACK
A
IL
M
JK
B C D E F G
H
SHOWN FULL SIZE
NOT SHOWN FULL SIZE
N O P
QR
S
U V X Y
T
W
4
PREPARING THE LAWN TRACTOR
Figure 1CAUTION: Before beginning preparation,select a firm and level surface which is largeenough to accommodate the snow bladeattachment and tractor. Engage brake lock.
1. Allow engine, muffler and exhaust deflector to coolbefore beginning.
2. Disconnect the spark plug wire(s) from the sparkplug(s) and ground against the engine.
3. Remove the mowing deck as instructed in the beltremoval section of the owner's manual for the lawntractor.
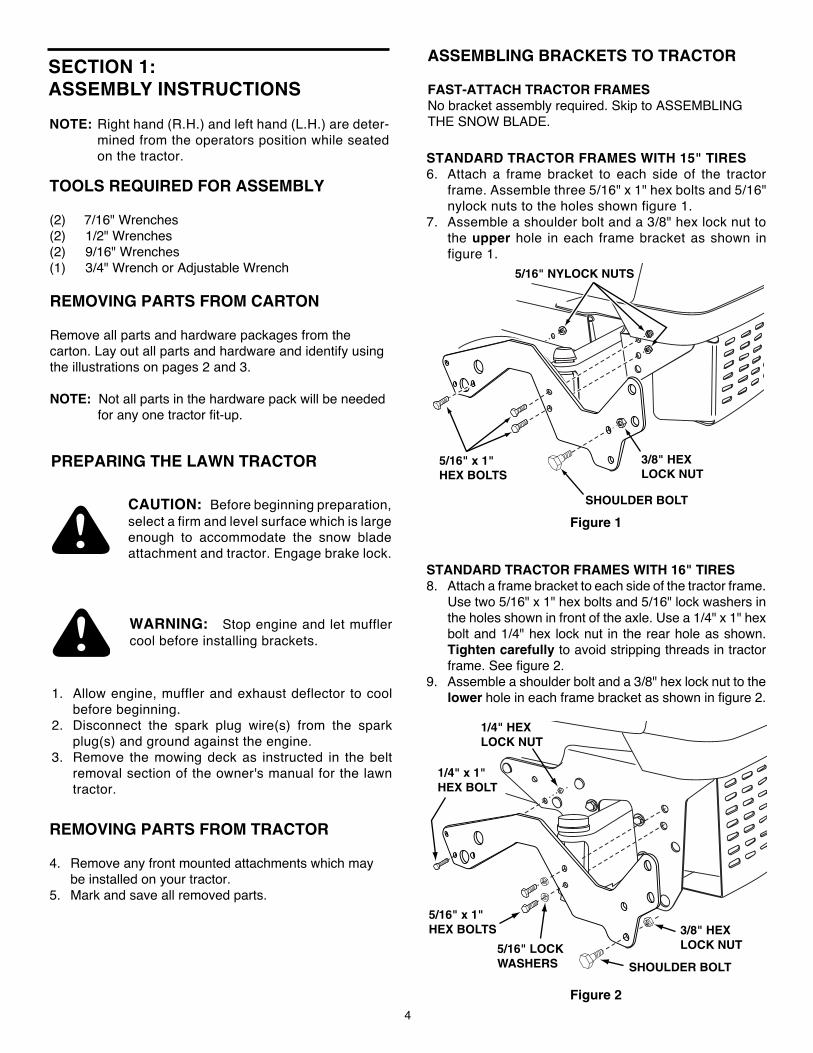
5/16" x 1"HEX BOLTS
5/16" NYLOCK NUTS
SHOULDER BOLT
3/8" HEXLOCK NUT
STANDARD TRACTOR FRAMES WITH 15" TIRES6. Attach a frame bracket to each side of the tractor
frame. Assemble three 5/16" x 1" hex bolts and 5/16"nylock nuts to the holes shown figure 1.
7. Assemble a shoulder bolt and a 3/8" hex lock nut tothe upper hole in each frame bracket as shown infigure 1.
TOOLS REQUIRED FOR ASSEMBLY
(2) 7/16" Wrenches(2) 1/2" Wrenches(2) 9/16" Wrenches(1) 3/4" Wrench or Adjustable Wrench
WARNING: Stop engine and let mufflercool before installing brackets.
STANDARD TRACTOR FRAMES WITH 16" TIRES8. Attach a frame bracket to each side of the tractor frame.
Use two 5/16" x 1" hex bolts and 5/16" lock washers inthe holes shown in front of the axle. Use a 1/4" x 1" hexbolt and 1/4" hex lock nut in the rear hole as shown.Tighten carefully to avoid stripping threads in tractorframe. See figure 2.
9. Assemble a shoulder bolt and a 3/8" hex lock nut to thelower hole in each frame bracket as shown in figure 2.
Figure 2
REMOVING PARTS FROM CARTON
Remove all parts and hardware packages from thecarton. Lay out all parts and hardware and identify usingthe illustrations on pages 2 and 3.
NOTE: Not all parts in the hardware pack will be neededfor any one tractor fit-up.
ASSEMBLING BRACKETS TO TRACTOR
FAST-ATTACH TRACTOR FRAMESNo bracket assembly required. Skip to ASSEMBLINGTHE SNOW BLADE.
REMOVING PARTS FROM TRACTOR
4. Remove any front mounted attachments which maybe installed on your tractor.
5. Mark and save all removed parts.
NOTE: Right hand (R.H.) and left hand (L.H.) are deter-mined from the operators position while seatedon the tractor.
SECTION 1:ASSEMBLY INSTRUCTIONS
5/16" x 1"HEX BOLTS
5/16" LOCKWASHERS
1/4" x 1"HEX BOLT
1/4" HEXLOCK NUT
SHOULDER BOLT
3/8" HEXLOCK NUT

5
Figure 5
3/8" PALNUT
PIVOTPLATE
SPRINGMOUNT
ROD
3/8" PALNUT
14.Using a hammer, assemble a 3/8" palnut onto oneend of the spring mount rod. Insert the other end ofthe rod through the rear set of holes in the pivotplate. Turn the pivot plate onto it's side on a block ofwood and hammer the remaining palnut onto theother end of the rod. See figure 5.
15. Insert the 3/8" x 3-1/2" hex bolt through the angle lockspring. Assemble a 3/8" hex nut about 1" onto the endof the bolt. See figure 6.
Figure 6
3/8" x 3-1/2"HEX BOLT
BLADEADJUSTSPRING
3/8" HEX NUT
Figure 4
Figure 3
3/8" x 1"CARRIAGE BOLT
3/8" LOCK WASHER
3/8" HEX LOCK NUT
ANGLE LOCK BAR (SHORT)ANGLE LOCK BAR (LONG)
ANGLE LOCK SPRING
10. Assemble the long and short angle lock bars togetherusing two 3/8" x 1" carriage bolts, 3/8" lock washersand 3/8" hex lock nuts. Make sure all holes arealigned. See figure 3.
11. Insert the straight hook end the angle lock spring intothe middle hole in the angle lock bars. The curvedhook on the other end of the spring should be facingup. See figure 3.
1/4" x 3-1/4"HEX BOLT
1" SPACERS (2)
1/4" HEXLOCK NUT
PIVOTPLATE
ANGLELOCKSPRING
BRACKET (A)
CHANNEL
12. Insert the curved hook of the angle lock spring upthrough the hole in bracket (A). See figure 4.
13. Insert the angle lock bars down through the slot in thechannel. Underneath the channel place spacers onboth sides of the angle lock bars and insert a 1/4" x3-1/4" hex bolt through the sides of the channel, thespacers and the angle lock bars. Secure the bolt witha 1/4" hex lock nut, tightening so that the angle lockbars still pivot freely. See figure 4.
ASSEMBLING THE SNOW BLADE

6
3/8" FLANGED NUT
3/8" x 1"HEX BOLT
18.Arrange the angle support brackets as shown infigure 8. Assemble the angle support brackets to thepivot support bracket using four 3/8" x 1" hex bolts and3/8" flanged nuts.
Figure 8
3/8" FLANGED NUT
3/8" x 1"HEX BOLT
Figure 9
19.Assemble the R.H. and L.H. hitch brackets to theangle support brackets using four 3/8" x 1" hex boltsand 3/8" flanged nuts. See figure 9.
PLASTICCAP
3/8"HEXNUT
BLADE
PIVOT SHAFT
SPRINGMOUNT
ROD
BLADEADJUSTSPRING
1/8" HAIRCOTTER
PIN
PIVOT PLATE
KNOB
HAIRPIN CLIP
3/8" x 3-1/2"HEX BOLT
3/8" FLATWASHER
16.To attach the channel assembly to the blade, alignthe pivot plate between the welded brackets on theback of the blade. Insert the pivot shaft through theholes in the pivot plate and the welded brackets.Secure the pivot shaft with two 1/8" hair cotter pins.See figure 7.
17.Hook the blade adjust spring over the spring mountrod as shown. Insert the bolt through the hole at thetop of the blade and assemble the 3/8" flat washerand the knob onto the bolt. Turn the knob until it istight. Place the plastic cap over the end of the bolt.See figure 7.
NOTE: The blade is now set at the lowest spring tension.To adjust the tension see the Adjustments section.
Figure 7
WASHER
CHANNELPIVOT
PIN
CHANNELASSEMBLY
3/32" HAIRCOTTER PIN
PIVOTSUPPORTBRACKET
20.Attach the channel assembly to the tractor by placingthe end of the channel inside the pivot support bracket.Assemble the 1/2" flat washer onto the channel pivotpin and insert the pin through the holes in the pivotsupport bracket and the channel. Secure with a 3/32"hair cotter pin. See figure 10.
Figure 10

7
21. Insert the end of the lower lift handle assembly throughthe notch in the pivot support bracket and through theholes in the channel. Align the lift link pin with the holein the welded bracket on the lower lift handle assem-bly. Insert the lift link pin through the hole in thebracket and secure it with a 3/32" hair cotter pin. Seefigure 11.
22.Assemble the handle grip onto the upper lift handle.See figure 12.
23.Place the upper lift handle onto the lower lift handleassembly. Align the holes and secure with the clevispin and a 3/32" hair cotter pin. See figure 12.
LOWER LIFTHANDLE ASSEMBLY
�WELDEDBRACKET
LIFTLINKPIN
3/32" HAIRCOTTER PIN
CHANNEL
Figure 11
Figure 12
CLEVIS PIN
UPPER LIFT HANDLE
LOWER LIFT HANDLEASSEMBLY
3/32" HAIRCOTTER PIN
HANDLE GRIP
SHOULDER BOLT
ATTACHMENT PIN
PIN IN THIS HOLEFOR 15" TIRES
Figure 14
SHOULDER BOLT
ATTACHMENT PIN
PIN IN THIS HOLEFOR 16" TIRES
SHOULDER BOLT
ATTACHMENT PIN
STANDARD TRACTOR FRAMES27.To attach the hitch assembly to the front of the tractor,
pull out on the attachment pins and swing the pinsdown away from the holes they were in. See figure 14.
28.Hook the hitch assembly onto the shoulder boltsassembled to the frame brackets. See figure 14.
29.Align the holes in the hitch assembly with the holes inthe frame brackets. Insert the attachment pins to lockthe hitch assembly in place. See figure 14.
Figure 13
ATTACHING SNOW BLADE TO TRACTOR
QUICK ATTACH TRACTOR FRAMES24.Pull out on the hitch assembly's attachment pins and
swing the pins down away from the holes they werein. See figure 13.
25.Hook the hitch assembly onto the shoulder bolts in thetractor frame. See figure 13.
26.Align the holes in the hitch assembly with the holes inthe tractor frame. Insert the attachment pins to lockthe hitch assembly in place. See figure 13.

8
SECTION 2: OPERATING THE BLADE SECTION 3: ADJUSTMENTS
CAUTION: Always lower blade to groundbefore leaving tractor.
The lift handle, located on the left side of the snow blade,is used to raise and lower the blade. Pulling the lift handleall the way back raises the snow blade. Move the lifthandle forward to lower the snow blade to the ground.The angle of the blade can be adjusted to the right or leftby pulling back on the angle lock bar, shown in figure 15,and repositioning the head of the blade to the right, left orcenter.
Always begin with the engine speed at the lowest pos-sible setting, and gradually increase speed as required.When working in a large area, do not attempt to move thesnow or dirt all in the same direction, causing an exces-sive buildup, which would become larger with each pass.
CAUTION: Know the terrain. Avoidexceptionally sharp slopes or drop offs whichmay be hidden by the snow. Never run thesnow blade into heavy material at high speed.
Figure 15
CAUTION: Inspect the area to be workedcarefully before operating the snow blade.Avoid pipes, roots, curbs or other heavyobstructions.
To Adjust Blade Spring
The blade adjust spring allows the blade to tilt forward tobypass solid obstructions. The normal adjustment is forthe spring bolt to extend 1" through the top of the blade.
To increase the spring tension loosen the knob, screwthe nut farther down onto the bolt and then retighten theknob.
To decrease the spring tension loosen the knob, screwthe nut farther out toward the end of the bolt and thenretighten the knob. Refer to figure 8 on page 6.
To Adjust Skid Shoes
The skid shoes at the ends of blade may be raised forclose work on smooth surfaces or lowered to raise theblade to work on rough or uneven areas. Make sure bothshoes are set evenly and that the nuts are retightenedsecurely.
ANGLELOCKBAR

9
NOTES

10
RE
PA
IR P
AR
TS
LIS
T F
OR
MO
DE
LS
190
-833
-OE
M 4
6" S
NO
W B
LA
DE
B
B A
A
3
8
10
35
35 3134
51
15 14
19
20
4437
43
24
25
11
21
17
13
12
26
454
4
76
6
6
50
C
52
2
1
22
4548
4933
38
24
18
30
46
3227
36
25
C
9
29
4747
40
23 25
9
28
3941
42
16
1657
57
53
55
5558
54
4856
5643

11
RE
F.
PA
RT
QT
Y.
DE
SC
RIP
TIO
NN
O.
NO
.
163
821
1B
lade
- 4
6"2
2452
41
Wea
r P
late
- 4
6"3
6298
01
Rei
nfor
cem
ent P
late
Ass
embl
y4
4308
08
Bol
t, C
arria
ge 5
/16-
18 x
3/4
"5
4432
62
Bol
t, C
arria
ge 5
/16-
18 x
1"
643
064
14H
ex L
ock
Nut
, 5/1
6-18
Thr
ead
743
081
4W
ashe
r, 5
/16"
824
690
2S
kid
Sho
e9
2452
02
Bra
cket
, Ang
le S
uppo
rt10
2434
71
Pus
h C
hann
el11
4326
21
Hex
Loc
k N
ut, 1
/2-1
3 T
hrea
d12
2313
11
Bol
t, S
peci
al P
ivot
1315
40-1
181
Was
her,
Fla
t 1/
2"14
2395
81
Pla
te, P
ivot
7 G
a.15
2313
01
Bra
cket
, Spr
ing
Mt.
1647
572
8F
lang
ed L
ock
Nut
, 3/8
-16
Thr
ead
1723
122
1S
haft,
Piv
ot18
4307
01
Was
her,
3/8
" S
TD
.19
9466
R1
Spr
ing,
Bla
de A
djus
t20
4407
11
Hex
Bol
t, 3/
8-16
x 3
-1/2
"21
4301
51
Hex
Nut
, 3/8
-16
Thr
ead
2244
074
1P
last
ic C
ap23
41-4
21
Pin
, Cle
vis
1/4
" x 1
-1/2
"24
4334
32
Pin
, Hai
r C
otte
r #4
(1/
8")
2543
055
3P
in, H
air
Cot
ter
#3 (
3/32
")26
4605
32
Spa
cer,
.28
ID x
1"
2763
283
1Li
ft H
andl
e A
ssem
bly,
Low
er28
2451
81
Hitc
h B
rack
et, R
.H.
2924
519
1H
itch
Bra
cket
, L.H
.
3024
023
1P
ivot
Sup
port
Bra
cket
3123
129
1A
ngle
Loc
k B
ar (
Long
)32
4655
31
Lift
Han
dle,
Upp
er33
2315
11
Ang
le L
ock
Bar
(S
hort
)34
2385
61
Spr
ing
Mou
nt R
od35
4491
72
Pal
nut,
3/8
"36
4301
01
Cot
ter
Pin
1/8
" x
1"37
4334
81
Ang
le L
ock
Spr
ing
3847
501
1K
nob
3947
553
2P
in, A
ttach
men
t40
4336
21
Han
dle,
Grip
4173
2-31
272
Spr
ing,
Com
pres
sion
4243
659
2P
in, S
prin
g 3
/16"
x 1
"43
4301
33
Hex
Loc
k N
ut, 1
/4-2
0 T
hrea
d44
4335
02
Car
riage
Bol
t, 3/
8-16
x 1
"45
4606
51
Cha
nnel
Piv
ot P
in46
6303
41
Lift
Link
Ass
embl
y47
4300
18
Hex
Bol
t, 3/
8-16
x 1
"48
4308
24
Hex
Loc
k N
ut, 3
/8-1
6 T
hrea
d49
4300
32
Lock
Was
her
3/8"
50R
1917
1616
1W
ashe
r51
4607
11
Hex
Bol
t, 1/
4-20
x 3
-1/4
" Lg
. Gr
552
4334
91
1/4"
x 1
" S
prin
g P
in53
4810
62
Sho
ulde
r B
olt,
3/8-
16 x
1/2
"54
4366
12
Hex
Bol
t, 1/
4-20
x 1
"55
4306
36
Hex
Bol
t, 5/
16-1
8 x
1"56
4781
06
Hex
Nut
, 5/1
6-18
Nyl
ock
5724
932
2F
ram
e B
rack
et58
4308
64
Lock
Was
her,
5/1
6"48
829
1O
wne
rs M
anua
l
RE
F.
PA
RT
QT
Y.
DE
SC
RIP
TIO
NN
O.
NO
.
RE
PA
IR P
AR
TS
LIS
T F
OR
MO
DE
L 1
90-8
33-O
EM
46"
SN
OW
BL
AD
E

1-800-800-7310
If you are having difficulty assembling this product or if you have anyquestion regarding the controls, operation or maintenance of this unit,please call the Customer Support Department. You can reach them bycalling: