operators manual for mi-t-m corona discharge ozone generators
TRANSCRIPT

Mi-T-M® Corona Discharge Ozone Generator Operator's Manual �
OPERATORS MANUAL FOR Mi-T-M®
CORONA DISCHARGE OZONE GENERATORS
©Copyright 2005, Mi-T-M Corporation® Form #37-0842-09�405
CAUTIONRISK OF INJURY!
READ MANUAL BEFORE OPERATING!This manual is an important part of the Corona Discharge Ozone Generator
and must remain with the unit when you sell it!

2 Mi-T-M® Corona Discharge Ozone Generator Operator's Manual
Table of Contents
INTRODUCTION ............................................................................................................................................................. 3SpeCIFICaTIONS ........................................................................................................................................................... 4IMpORTaNT SaFeTy WaRNINGS ............................................................................................................................. 5-6 RISK OF eLeCTRIC SHOCK OR eLeCTROCUTION ............................................................................................. 5 RISK OF eXpLOSION OR FIRe .............................................................................................................................. 6 RISK OF aSpHyXIaTION......................................................................................................................................... 6NOTeS ............................................................................................................................................................................ 7INSTaLLaTION ............................................................................................................................................................ 8-9 aTTIRe ..................................................................................................................................................................... 8 LOCaTION ................................................................................................................................................................ 8 MOUNTING ........................................................................................................................................................... 8-9 eLeCTRICaL ............................................................................................................................................................ 9OpeRaTION .................................................................................................................................................................. �0 STaRT-Up ............................................................................................................................................................... �0 OpeRaTION ........................................................................................................................................................... �0 SHUT-DOWN .......................................................................................................................................................... �0MaINTeNaNCe .............................................................................................................................................................�� SySTeM eLeCTRO-MeCHaNICaL OVeRVIeW ...................................................................................................�� SySTeM MaINTeNaNCe .......................................................................................................................................��SeRVICe ....................................................................................................................................................................... �2 GeNeRaTOR SeRVICING ..................................................................................................................................... �2TROUBLeSHOOTING .................................................................................................................................................. �3paRTS LIST ............................................................................................................................................................. �4-�8
STaTeMeNT OF WaRRaNTy ...................................................................................................................................... �9
Mi-T-M® Corona Discharge Ozone Generator Operator's Manual 3
Congratulations on the purchase of your new Mi-T-M Corona Discharge Ozone Generators! you can be assured your Mi-T-M Corona Discharge Ozone Generators was constructed and designed with quality and performance in mind. each component has been rigorously tested to ensure the highest level of acceptance.
This operator's manual was compiled for your benefit. By reading and following the simple safety, installation, operation, maintenance and troubleshooting steps described in this manual, you will receive years of trouble free operation from your new Mi-T-M Corona Discharge Ozone Generators. The contents of this manual are based on the latest product information available at the time of publication. Mi-T-M reserves the right to make changes in price, color, materials, equipment, specifications or models at any time without notice.
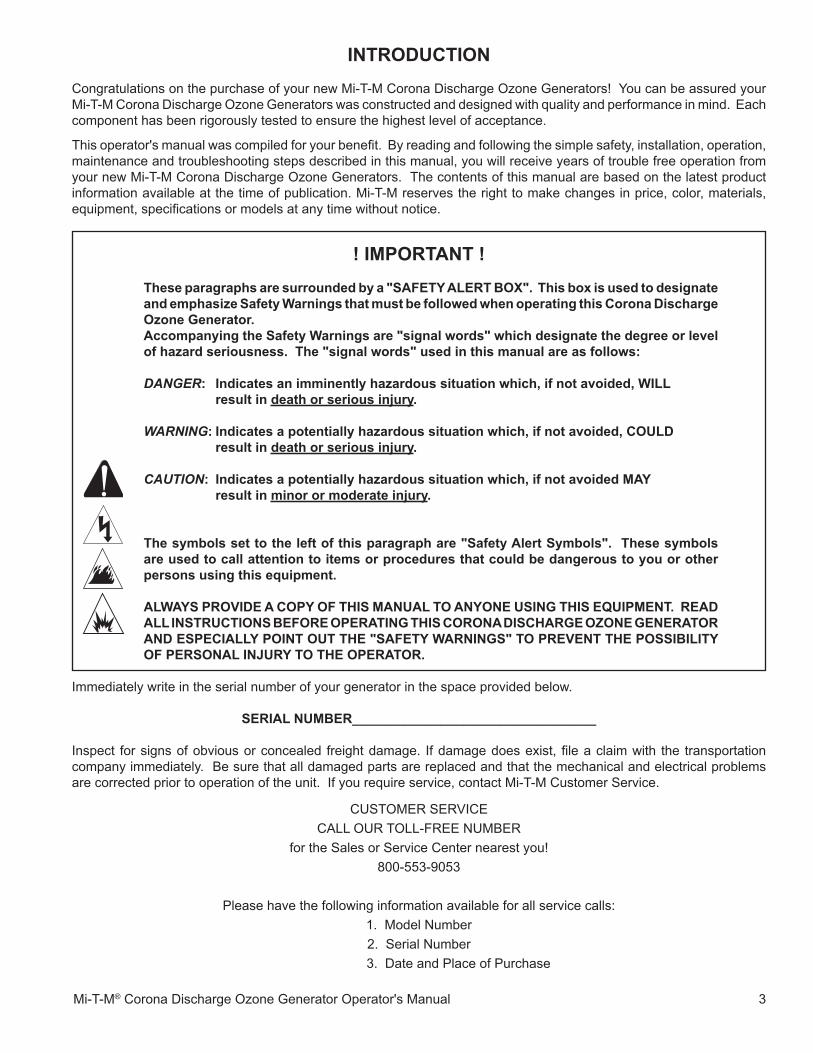
! imporTanT !These paragraphs are surrounded by a "SaFETY aLErT BoX". This box is used to designate and emphasize Safety Warnings that must be followed when operating this Corona Discharge ozone Generator. accompanying the Safety Warnings are "signal words" which designate the degree or level of hazard seriousness. The "signal words" used in this manual are as follows:
DANGER: indicates an imminently hazardous situation which, if not avoided, WiLL result in death or serious injury. WARNING: indicates a potentially hazardous situation which, if not avoided, CoULD result in death or serious injury. CAUTION: indicates a potentially hazardous situation which, if not avoided maY result in minor or moderate injury.
The symbols set to the left of this paragraph are "Safety alert Symbols". These symbols are used to call attention to items or procedures that could be dangerous to you or other persons using this equipment.
aLWaYS proViDE a CopY oF THiS manUaL To anYonE USinG THiS EQUipmEnT. rEaD aLL inSTrUCTionS BEForE opEraTinG THiS Corona DiSCHarGE ozonE GEnEraTor anD ESpECiaLLY poinT oUT THE "SaFETY WarninGS" To prEVEnT THE poSSiBiLiTY oF pErSonaL inJUrY To THE opEraTor.
Immediately write in the serial number of your generator in the space provided below.
SEriaL nUmBEr_________________________________
Inspect for signs of obvious or concealed freight damage. If damage does exist, file a claim with the transportation company immediately. Be sure that all damaged parts are replaced and that the mechanical and electrical problems are corrected prior to operation of the unit. If you require service, contact Mi-T-M Customer Service.
CUSTOMeR SeRVICeCaLL OUR TOLL-FRee NUMBeR
for the Sales or Service Center nearest you!800-553-9053
please have the following information available for all service calls:�. Model Number2. Serial Number
3. Date and place of purchase
inTroDUCTion

4 Mi-T-M® Corona Discharge Ozone Generator Operator's Manual
SpECiFiCaTionS
The Mi-T-M Corona Discharge Series Ozone Generators described in this manual are designed to provide the benefits of ozonated water in an environmentally safe and effective manner. The high quality, specially engineered components ensure efficient ozone output and reliable performance.
as a result of proper use of the Mi-T-M Corona Discharge Ozone Generators, unpleasant effects of traditional chemical use are virtually eliminated. The Mi-T-M Corona Discharge Ozone Generators are safe and harmless to your equipment when installed properly.
moDEL 32-0860 32-0861 32-0862 32-0863 32-0865 32-0866ozone output:
Ozone Output Medium Flow Medium Flow High Flow High Flow Low Flow Low FlowFlow Rate �5 scfh
power requirements:Domestic �20V, 60Hz,
�0, 0.�2 amp240V, 60Hz, �0, 0.06 amp
�20V, 60Hz, �0, 0.24 amp
240V, 60Hz, �0, 0.�2 amp
�20V, 60Hz, �0, 0.�2 amp
240V, 60Hz, �0, 0.06 amp
International - 240V, 50Hz, �0, 0.06 amp
- 240V, 50Hz, �0, 0.�2 amp
- 240V, 50Hz, �0, 0.06 amp
Shipping Weight:approximate (lbs / kg) 5.5 / 2.5 5.5 / 2.5 �0.5 / 4.8 �0.5 / 4.8 5.5 / 2.5 5.5 / 2.5
Location requirements:Mounting Wall mount in a clean, protected area.ambient Temp. 30° F - �20° F (0° C - 50° C)

Mi-T-M® Corona Discharge Ozone Generator Operator's Manual 5
imporTanT SaFETY WarninGSWaRNING: When using this product, basic precautions should always be observed, including the following:rEaD aLL SaFETY WarninGS BEForE USinG THE Corona DiSCHarGE ozonE GEnEraTor
poTEnTiaL ConSEQUEnCE prEVEnTionSerious injury or death could occur if the Corona Discharge Ozone Generator is not properly grounded. your Corona Discharge Ozone Generator is powered by electricity and may cause electric shock or electrocution if not installed properly.
Serious injury or death may occur if electrical repairs are attempted by unqualified persons.
Read this manual completely before attempting installation.
all permanent electrical connections should be made by a qualified electrician.
For cord and plug-connected units, connect to a grounded, grounding type receptacle only. If the Mi-T-M Corona Discharge Ozone Generator is connected to an independent electrical supply, then a G.F.C.I. must be installed between the generator and the electrical supply.
Do not bury cord.
To reduce the risk of electrical shock, replace damaged cord immediately.
a pressure wire connector is provided on the outside of the unit to permit connection to a minimum No. 8 aWG (8.4 mm2) solid bonding conductor between this point and any metal equipment, metal enclosures of electrical equipment, metal water pipes, or conduit within five (5) feet (1.5 m) of the unit as needed to comply with local requirements.
Install ozone generator no less than one (�) foot above maximum water level to prevent water from contacting electrical equipment. Install in accordance with the installation instructions.
Follow all applicable electrical codes.
The Mi-T-M Corona Discharge Ozone Generator must be installed in an outdoor location, or indoors in a forced air ventilated room, and installed so that the orientation is exactly as shown in the wall mounting section of this manual. Install to provide water drainage of generator to protect electrical components.
electric shock hazard. Be sure to turn power OFF and disconnect from power source before any service work is performed. Failure to do so could result in serious injury or death.
Never attempt any servicing while unit is wet.
plastic ozone supply tubing is supplied with the Mi-T-M Corona Discharge Ozone Generator. Never replace this tubing with metal tubing.
riSK oF ELECTriC SHoCK or ELECTroCUTion
HazarD

6 Mi-T-M® Corona Discharge Ozone Generator Operator's Manual
!SaVe THeSe INSTRUCTIONS!
poTEnTiaL ConSEQUEnCE prEVEnTion
imporTanT SaFETY WarninGSrEaD aLL SaFETY WarninGS BEForE USinG THE Corona DiSCHarGE ozonE GEnEraTor
riSK oF EXpLoSion or FirE Serious injury or death could occur from an explosion or fire caused by a system electric spark.
This unit must be placed in an area that is well ventilated, free of flammable vapors, combustible dust, gases or other combustible materials.
Do not store or use gasoline, chemicals or other flammable liquids or vapors near this or any other appliance.
HazarD
riSK oF aSpHYXiaTion Serious injury or death may occur from inhaling ozone gas.
Short-term inhalation of high concentrations of ozone and long term inhalation of low concentrations of ozone can cause serious harmful physiological effects.
DO NOT inhale ozone gas produced by this device.

Mi-T-M® Corona Discharge Ozone Generator Operator's Manual 7
noTES

8 Mi-T-M® Corona Discharge Ozone Generator Operator's Manual
LoCaTion:
The Mi-T-M Corona Discharge Ozone Generator units are designed for wall or tank mounting. �. Mount generator in a clean, protected area, either indoors or outdoors.
Locate generator out of reach of sprinklers or drainage spouts. 2. Allow sufficient access for maintenance and all tubing and electrical
wires.3. Ozone generator must be installed no less than one foot above the maximum
water level.
moUnTinG:TaNK MOUNTRefer to the following diagrams for the respective system mounting procedures:- BIO-Units: Refer to Figure �.- WLp/WOS-Units: Refer to Figure 2.- WCp-Units: Refer to Figure 3.
BIO-UNITS (Fig. �): Loosely mount generator brackets (a) to the tank using the tank mounting brackets (B). Mount the ozone generator fit plate (C) to the generator brackets. Attach generator (D) to the ozone generator fit plate and the generator brackets using the appropriate hardware. Tighten generator mounting screws, level and align the generator. Tighten generator bracket mounting screws.
WLp/WOS-UNITS (Fig. 2): Loosely mount generator brackets (a) to the tank using the tank mounting brackets (B). Be sure to place spacers (C) between the generator mounting brackets and tank mounting brackets. Mount the ozone generator fit plate (D) to the generator brackets. Attach generator (E) to the ozone generator fit plate and the generator brackets using the appropriate hardware. Tighten generator mounting screws, level and align the generator. Tighten generator bracket mounting screws.
WCp-UNITS (Fig. 3): Mount generator (a) to the generator mounting brackets (B) using appropriate hardware. Tighten mounting screws. Hang bracket from the top lid of the clarifying tank.
aTTirE:
proper attire is essential to your safety. It is advised to utilize whatever means necessary to protect eyes, ears, and skin.
inSTaLLaTion
(Fig. �)
(Fig. 2)
(Fig. 3)
A
C
DB
A
E D
B
C
B
A

Mi-T-M® Corona Discharge Ozone Generator Operator's Manual 9
moUnTinG (ConT.):WaLL MOUNT �. Refer to Figure 4 to mark the locations for the four mounting screws.2. Install screws (or other hardware appropriate for mounting surface) through
the four mounting holes built in to the top and bottom end caps on the generator.
ELECTriCaL:MaIN pOWeR your Mi-T-M Corona Discharge Ozone Generator has been pre-wired to your oil/water separator.
NOTE: Refer to the IMPORTANT SAFETY INSTRUCTIONS at the beginning of this manual for important wiring information.
GROUNDING LUG Using a 6-�4aWG conductor, connect the Grounding lug on the right side of the Mi-T-M Corona Discharge Ozone Generator to an appropriate earth contact.
inSTaLLaTion
(Fig. 4)

�0 Mi-T-M® Corona Discharge Ozone Generator Operator's Manual
opEraTion
STarT-Up:Upon completing all of the generator system connections, you are ready tobegin start up procedures.�. Check electrical connections.2. Check for proper voltage.3. Turn on tank circulation system.4. Check for leaks.
opEraTion:Turning on the ozone switch activates the ozone pump and generator. When the tank’s circulation system starts, the green power indicator on the bottom end cap of the Mi-T-M Corona Discharge Ozone Generator and the white “ozone power” indicator(s) on the front should illuminate. Mi-T-M Corona Discharge Ozone Generators should show 2 and 4 white indicators, respectively.
The flow rate of the generator has been pre-set to 15 SCFH. The in-line ball valve should NOT be adjusted or removed.
SHUT-DoWn:The following sequence of steps must be followed for servicing or for storage.
�. Turn off Ozone power Switch.2. Turn off water separator power. 3. Turn off main power to water inlet. 4. If the system is to be shut down for an extended period, disconnect the
Ozone Gas Line from the ozone generator.

Mi-T-M® Corona Discharge Ozone Generator Operator's Manual ��
SYSTEm ELECTro-mECHaniCaL oVErViEW: (Refer to Drawing Below)INDICaTOR LIGHTS�. Main power: The green indicator light on the bottom end cap of the eclipse™ indicates that power is being supplied
to the ozone generator.2. Ozone power: The white indicator light(s) on the front of the Mi-T-M Corona Discharge Ozone
Generator indicate(s) that the ozone power supplies are operating properly. The Mi-T-M Corona Discharge Ozone Generators should show 2 and 4 white “ozone power” indicator lights, respectively. NOTE: The indicators may not all glow equally bright.
INTeRNaL COMpONeNTS �. Ozone Module: each ozone module consists of a power supply connected by two high voltage wires to an
electrode.
SYSTEm mainTEnanCE:�. The white “ozone power "indicator light(s) on the front of the eclipse™ indicate that the ozone power supply is
operating properly. When an indicator light is out, replace the corresponding ozone module aND the indicator light.
2. each ozone module and white indicator light should be replaced after �5,000 hours of operation. even if the white indicator light is glowing, the ozone module may be producing little or no ozone after this period of time.
NOTE: 15,000 hours equals approximately 5 years if the recycle system operates 8 hours/day 365 days of the year, or approximately 2 years if the pool system operates 24 hours/day 365 days of the year.
3. Regularly check and inspect ozone supply tubing for cracks or wear. Replace ozone supply tubing as necessary.4. Regularly check the “ozone check valve” for a proper seal.5. Replace “ozone check valve” (replacement part # 22-0286) every �5,000 hours, or as needed.6. While operating, check to see if bubbles are entering the water.
mainTEnanCE

�2 Mi-T-M® Corona Discharge Ozone Generator Operator's Manual
SErViCEGEnEraTor SErViCinG:The Mi-T-M Corona Discharge Ozone Generator must be removed from the wall before servicing.
TO ReMOVe THe GeNeRaTOR:�. Make sure the power is off by disconnecting the main power source.2. Disconnect the ozone supply tubing from the bottom end cap of the generator.3. Disconnect ground wire.4. Remove the four wall mounting screws.
OpeNING THe GeNeRaTOR:The Mi-T-M Corona Discharge Ozone Generator enclosure consists of two aluminum plates that slide together. They are held in place by the plastic end caps. 1. Lay the generator face up on a hard, flat surface.2. Remove the Top end Cap completely by removing the four screws. Remove only the top two screws of the Base
end Cap.3. Remove the cover grounding screw located on the lower right side of the unit.4. Carefully slide the two enclosure halves apart by gripping the Base End Cap firmly and pulling on the Enclosure
Cover.
NOTE: If the two halves do not slide apart easily, turn the generator over and use a screwdriver to pry the cover off as shown in the drawing below.
OzONe MODULe/INDICaTOR RepLaCeMeNT:The Mi-T-M Corona Discharge Ozone Generators have 2 and 4 ozone modules, respectively. The white indicator lights on the front of the generator correspond from left to right to ozone module number � through 4. For the generators, the ozone modules are numbered beginning with number � at the bottom.
To replace an ozone module:�. Open the generator as described in the section "Opening the Generator".2. Disconnect the tubing at both the inlet and outlet of the ozone electrode.3. Remove the two nuts that secure the ozone electrode to the support bracket.4. Disconnect the plastic power connector from the power supply.5. Remove the two screws that secure the power supply to the metal base.6. Install the new ozone module by reversing the above steps.
To replace an indicator light:�. Remove the two screws that secure the indicator mounting plate.2. pull the plate assembly out of the end cap.3. pull out the faulty indicator lamp(s).4. Install the new indicator and re-secure the mounting plate to the end cap.
Reassemble and reinstall the generator by reversing the steps in the section "Opening the Generator".
Mi-T-M® Corona Discharge Ozone Generator Operator's Manual �3
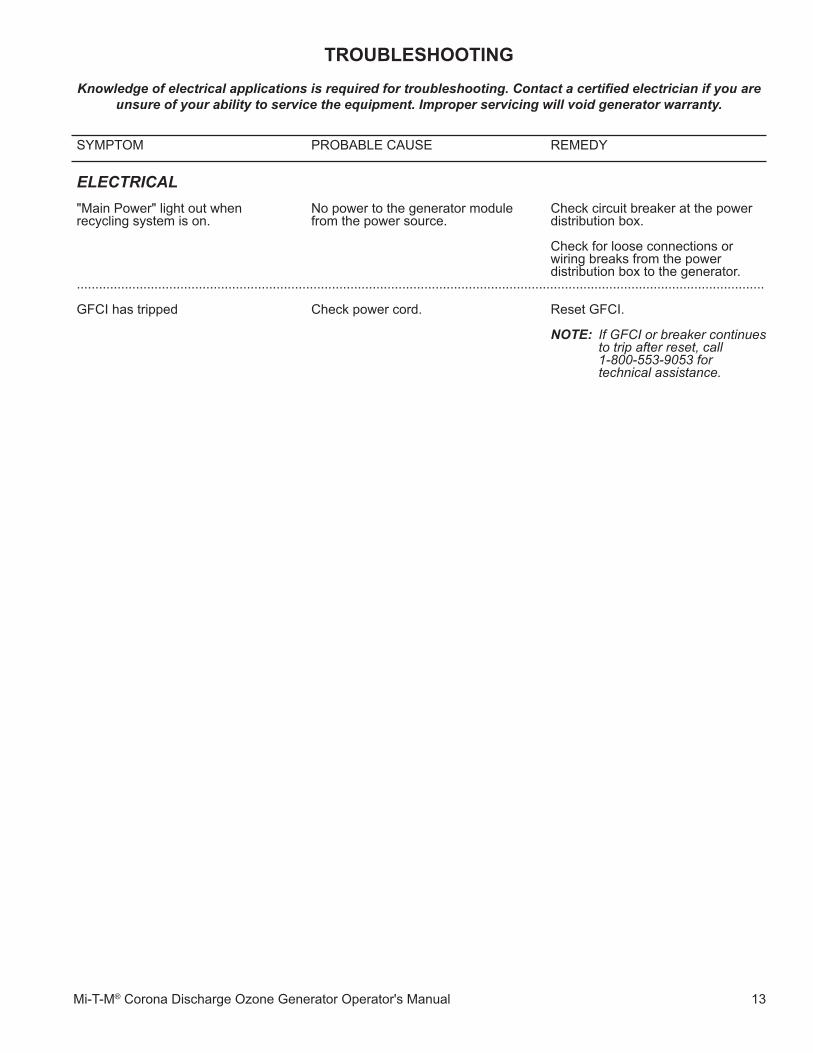
TroUBLESHooTinG
Knowledge of electrical applications is required for troubleshooting. Contact a certified electrician if you are unsure of your ability to service the equipment. Improper servicing will void generator warranty.
SyMpTOM pROBaBLe CaUSe ReMeDy
ELECTRICAL "Main power" light out when No power to the generator module Check circuit breaker at the power recycling system is on. from the power source. distribution box. Check for loose connections or wiring breaks from the power distribution box to the generator. .......................................................................................................................................................................................... GFCI has tripped Check power cord. Reset GFCI. NOTE: If GFCI or breaker continues to trip after reset, call 1-800-553-9053 for technical assistance.

�4 Mi-T-M® Corona Discharge Ozone Generator Operator's Manual
ozonE GEnEraTor moUnTinG (Bio UniTS)B
IO O
zON
e G
eN
eR
aTO
R M
OU
NTI
NG
De
TaIL
-0�2
605-
aS
y

Mi-T-M® Corona Discharge Ozone Generator Operator's Manual �5
BIO OzONe GeNeRaTOR MOUNTING DeTaIL-0�2605-aSy
ozonE GEnEraTor moUnTinG (aFTEr SEriaL #30000122)
rEF. # DESCripTion parT # QTY.
� Screw 27-5032 2
2 Ozone Generator 32-086� �
3 Washer 28-00�0 �0
4 Screw 27-8930 2
5 Screw 27-8835 2
6 Ozone Generator Mounting Bracket 2�-02�6 2
7 Washer 28-0�2� 4
8 Lockwasher 29-�006 4
9 Screw 27-50�6 4
�0 Tank N/a �
�� Locknut 30-8�52 6
�2 Ozone Generator Fit plate 2�-02�9 �

�6 Mi-T-M® Corona Discharge Ozone Generator Operator's Manual
ozonE GEnEraTor moUnTinG (WLp & WoS UniTS)W
Lp_W
OS
OzO
Ne
Ge
Ne
RaT
OR
MO
UN
TIN
G D
eTa
IL-0
�260
5-a
Sy

Mi-T-M® Corona Discharge Ozone Generator Operator's Manual �7
WLp_WOS OzONe GeNeRaTOR MOUNTING DeTaIL-0�2605-aSy
ozonE GEnEraTor
rEF. # DESCripTion parT# QTY.
� Ozone Generator Bracket 2�-02�6 2
2 Locknut 30-8�52 6
3 Washer 28-00�0 �0
4 Ozone Generator F i t p late 2�-02�9 �
5 Ozone Generator 32-086� �
6 Screw 27-5032 2
7 Screw 27-8930 2
8 Screw 27-8835 2
9 Screw 27-503� 4
�0 Lockwasher 29-�006 4
�� Washer 28-0�2� 4
�2 Spacer 33-0358 4
�3 Tank Brackets N/a �

�8 Mi-T-M® Corona Discharge Ozone Generator Operator's Manual
ozonE GEnEraTor moUnTinG (WCp UniTS)W
Cp
OzO
Ne
Ge
Ne
RaT
OR
MO
UN
TIN
G D
eTa
IL-0
�260
5-a
Sy WCp-�0 OzONe GeNeRaTOR MOUNTING DeTaIL-0�2605-aSy
ozonE GEnEraTor moUnTinG (aFTEr SEriaL #30000122)
rEF. # DESCripTion parT # QTY.
� Tank N/a �
2 Locknut 30-8�52 4
3 Washer 28-00�0 6
4 Washer 28-0�20 4
5 Ozone Generator Hanger 2�-0�77 2
6 Ozone Generator 32-0866 �
7 Screw 27-5032 2
8 Screw 27-8930 2

Mi-T-M® Corona Discharge Ozone Generator Operator's Manual �9
STaTEmEnT oF WarranTY
Mi-T-M warrants all parts (except those referred to below) of your new Mi-T-M Corona Discharge Ozone Generator to be free from defects in materials and workmanship during the following periods:
For One (�) year from the date of original purchase.
Defective parts not subject to normal wear and tear will be repaired or replaced at Mi-T-M's option during the warranty period. In any event, reimbursement is limited to the purchase price paid.
EXCLUSionS
�. parts damaged due to: -normal wear, misapplication, modifications/alterations, abuse, -operation at other than recommended speeds, pressures or temperature, -the use of caustic liquids, -chloride corrosion or chemical deterioration, -fluctuations in electrical or water supply, -operating unit in an abrasive, corrosive or freezing environment.
2. parts damaged by failure to follow recommended: -installation, operating and maintenance procedures.
3. This warranty does not cover the cost of: -normal maintenance or adjustments, -labor charges, -transportation charges to Service Center, -freight damage. 4. The use of other than genuine Mi-T-M parts will void warranty. parts returned, prepaid to Mi-T-M's factory or to an authorized Service Center will be inspected and replaced free of charge if found to be defective and subject to warranty. There are no warranties which extend beyond the description of the face hereof. Under no circumstances shall Mi-T-M bear any responsibility for loss of use of the unit, loss of time or rental, inconvenience, commercial loss or consequential damages.
For Service or Warranty consideration, contact:Mi-T-M Corporation, 8650 enterprise Drive, peosta, Ia 52068-0050
563-556-7484 / 800-553-9053 / Fax 563-556-�235Monday-Friday 8:00 a.m. - 5:00 p.m. CST

20 Mi-T-M® Corona Discharge Ozone Generator Operator's Manual
Manufactured by Mi-T-M8650 enterprise Drive, peosta Ia 52068
563-556-7484/ Fax 563-556-�235