operator manual easyflow m - agrotopspray technology 8 person qualification and training the...
TRANSCRIPT

spray technology
Operator manualeasyFlow M

spray technology
1. Introduction 3
2. Installation and startup 24
3. Operation 31
4. Notes 37
5. Spare parts easyFlow M 38
All rights reserved
© Copyright byagrotop GmbHKöferinger Straße 593083 ObertraublingPhone + 49 (0)9453 99380Fax + 49 (0)9453 993845
Translation of the original German operator manual
This manual may only be printed or otherwise reproduced, in full or as extracts, with the explicit written permission of agrotop GmbH.
Any reproduction, duplication, distribution or storage on data media, in any form an manner, without authorization from agrotop GmbH, constitutes a violation of existing copyright laws an will be prosecuted.
Issuing party responsible for the content: agrotop GmbH (draft not for distribution)
Print: agrotop GmbHStatus: 17.08.2018Version: GB V1.40
BA-036-05 Rev: 08/2018
2
Content
Imprint

spray technology3
1. Introduction
1 Container support (optional, recommended for using container >10 l ) 2 easyFlow M basic unit 3 3 m discharge hose to the sprayer (optional, recommended when installed as an external unit) 4 easyFlow container adapter (order seperatly – see page 38 – usually 3-5 are needed) 5 GEKA jaw clutch (optional, for rinsing water connection) 6 Operating and installation instructions
1.1 easyFlow M basic unit and optional accessories
3
2
1
5
4

spray technology4
1.2 General safety instructions
To ensure proper operation of the system, please read these operating instructions carefully before operating the device. Keep the operating instructions for future reference.
Non-compliance to the working instructions and operating instructions can endanger persons as well as the environment and the machine. Non-observance of the safety instructions can lead to the loss of any claims for damages.
Agrotop GmbH assumes no liability for damage and malfunctions resulting from non-compliance with the operating instructions.
We reserve the right to make technical changes that serve to improve the easyFlow M or that increase the safety standard – even without a separate announcement.

spray technology5
General symbols and notes
DANGER!
WARNING!
ATTENTION!
NOTE!
This symbol denotes an imminent danger. Failure to avoid it will result in death or serious injury.
This symbol indicates a potentially imminent danger. Failure to avoid it can result in death or serious injury.
This symbol indicates a potentially imminent danger. Failure to avoid it may result in minor injury.
This symbol indicates a potentially harmful situation. If it is not avoided, the device or something in its vicinity may be damaged.

spray technology6
The following manual uses the abbreviation “PPP” for plant protection products.
Operator must follow all instruction on the label of the PPP.
For better illustration, work-related parts are colour marked in some of the drawings in this manual. Real parts may vary in colour, size and proportions.
The installation options shown in this manual use simplifi ed drawings that may diff er from the real conditions found on the individual sprayers.

spray technology7
Indended Use
When using the easyFlow with plant protection products (PPP) always wear standard personal protective equiptment (PPE) that is recommended during mixing and loading of PPP, such as protective gloves, long sleeved shirts and trousers, shoes and safety glasses.
The easyFlow M must only be used for dosing and transfer of registered liquid PPP, strictly following the instructions for use and installation in this manual. It is not permitted to transfer any inflammable or explosive liquids or other dangerous substances using this kit or any of the containing components. Any use of this device, not explicitly indicated by this manual, is considered unintened and strictly prohibited.
Safety conscious working
Before each use, the device must be checked for operational safety.
The safety instructions listed in this operating manual, the existing regulations for accident prevention and internal operating, operating and internal safety regulations of the operator must be observed.
For safe operation of the machine, the relevant accident prevention regulations, the corresponding state health and safety regulations or the relevant state health and safety and accident prevention regulations of other member states of the European Union or other contracting states of the European Economic Area must be strictly observed.
The effectiveness of operating and control components must not be inadmissible influenced or removed.
If mounted on a trolley, always check that the easyFlow M is placed on an even surface to prevent accidental falls.

spray technology8
Person qualification and training
The easyFlow M system may only be used, maintained and repaired by persons who are familiar with it and have been instructed in the dangers involved.
The area of responsibility, competence and supervision of the personnel must be precisely regulated by the operator. If the personnel does not have the necessary knowledge, it must be trained and instructed.
A person to be trained may only work with the device under the supervision of an experienced person. Furthermore, the operator must ensure that the contents of the operating instructions are understood by the personnel.
Repairs that are not described in this manual may only be carried out by authorized specialist workshops.
First time users may need to establish a routine for quick and easy handling. If you do not feel confident with the dosing procedure or any other actions, we recommend doing one or two test runs with an empty PPP-container to get yourself familiar with the handling procedure.
Unauthorized conversion and spare parts production
Any changes or modifications of this device or parts of it are subject to prior authorization from the manufacturer. Noncompliance to this will result in a loss of any warranty or liability obligations.
Defect components and assemblies must be replaced immediately! Use original spare parts for replacement only. Noncompliance to this will result in a loss of any warranty or liability obligations.

spray technology9
Abuse and residual hazards
The operational safety of the delivered system is only guaranteed under normal use. The limits given in the data sheets must under no circumstances be exceeded.
Residual dangers are special hazards that can not be eliminated despite the safety-compliant design. These residual hazards are not obvious and may be the source of possible injury or health hazards (see European Standard EN 292/1 section 4).
If unforeseen residual hazards occur, the operation must be stopped immediately and, if necessary, the responsible supervisor or the manufacturer must be informed. This will make further decisions and does everything necessary to eliminate the danger that has occurred. If necessary, inform the machine manufacturer.
Behavior in case of accidents
In the event of accidents involving personal injury, the necessary first-aid measures must be initiated immediately, if necessary, medical assistance must be requested and, if necessary, the nearest available supervisor notified.
Legal basis
This product complies with the specifications and requirements of Directive 2006/42/EC (Machinery Directive).

spray technology10
Instructions for storage
The easyFlow M must be stored in a frost-protected place.
To winter the device, remove the hoses, drain the unit completely and put the measuring jug valve in pos. 3 (see page 16).

spray technology11
1 Container support (recommended for PPP container larger than 10 l, see page 20) 2 Hand lever (see page 12 ff.) 3 Bullseye level (see page 21) 4 Measuring jug (see page 21) 5 Measuring jug lever (see page 16 ff.) 6 Discharge connection (installation options see page 27 ff.) 7 Rinsing connection (see page 23) 8 Rinsing lever (see page 18) 9 Blind cap 10 Venting valve (see page 19)
1.3 System explanation
1.3.1 Components and parts of the easyFlow M system
6
5
4
3
2
1
8
9
10
7

spray technology12
1.3.2 Functions of the components and controls
Hand lever
Connecting the PPP-container assembly with the easyFlow system:
Pull the easyFlow container adapter apart and screw it firmly on the PPP container (see page 31).
To connect the easyFlow container adapter the hand lever must be turned counterclockwise to the limit stop, then push lever forward. The blind cap can now be removed (if used).
push to unlock

spray technology13
Engage easyFlow container adapter (fi rmly mounted on PPP container) into the easyFlow basic unit.
By pulling the hand lever backwards to the limit the container adapter is locked and ready for dosing.
WARNING!
NOTE!
Immediately stop working if any leakage is noticed during operating with the easyFlow system to prevent further contamination!
If the lever is hard to pull or inhibited, the container adapter has not latched properly. Slightly push down the PPP container to latch the systems, then pull the lever. The easyFlow is now locked in and dosing can start.

spray technology14
Disconnecting the PPP-container assembly:
Hand lever must be turned counterclockwise until stop before unlocking.
Push the lever to unlock the easyFlow container adapter.
After removing the container adapter assembly, insert the blind cap and lock it in by pulling the hand lever.
push to lock
ATTENTION!
Before disconnecting the easyFlow container adapter (PPP container is still mounted), make sure the faces are properly rinsed and, if the PPP container is empty that the container rinsing has been carried out effi ciently with no remaining PPP residues. For container rinsing see page 31 ff . (partial dosing) or page 34 ff . (empty container).

spray technology
open
close
15
Dosing:
Turn the hand lever clockwise to open the container adapter for dosing of PPP. The transfer rate increases accordingly with increasing opening angle (maximum 90°).
For complete container dosing, make sure the measuring jug lever is in position 2 (down). Turn hand lever clockwise until stop. Start rinsing procedure when container is empty (see page 34 ff.).
For partial dosing, turn the measuring jug lever in position 1 (centre). Gradual turning the hand lever clockwise to meter PPP into the measuring jug. Turning the lever open/close controls the flow rate. Stop dosing when required volume is reached by turning hand lever counterclockwise untill stop. Now turn the measuring jug lever it into position 2 (down) to transfer PPP to sprayer. Rinse contaminated faces of the easyFlow adapter (see rinsing procedure page 31 ff.) before unlock the system.

spray technology16
Measuring jug lever
The measuring jug lever offers three positions. It simultaneously operates the shut-off valve of the measuring jug and the rinsing water valve.
Position 2 :Transfer
Position 3 :Rinsing
Position 1 :Dosing
To dose PPP into the measuring jug, turn the red lever in the horizontal position 1 (dosing). Both valves are closed in this position.
Setting the lever in position 2 (down) opens the valve of the measuring jug to transfer the PPP to the sprayer, the rinsing valve is closed. Transfer could be made by gravity or by using a pump, e.g. connecting it to the plumbing system of the sprayer pump.

spray technology17
DANGER!
Check the discharge hose of the easyFlow M and all connected parts (valves, induction hoppers, etc.) of the discharge/suction line on the sprayer for unobstructed runoff before using the rinsing function. The connected plumbing must allow a free fl ow at all times. All compo-nents must have a min. diameter of 1" (hoses, valves, pumps and couplings). Turn on the sprayer pump and open the valves to the easyFlow M before starting PPP transfer. Restrictions in the discharge or suction pipe can cause damage to the easyFlow M and could cause operator contamination. Do not exceed 6 bar pressure at the clean water rinsing connection.
WARNING!
While transferring liquid out of the easyFlow M system via pump or venturi, don’t exceed a fl ow rate of 100 l/min!
Excessive suction power may close the venting valve (green cap). This could damage the easyFlow M system and cause user contamination.
Position 3 (up) starts the rinsing procedure of the device, for both, the partial dosing or full container transfer. The rinsing water is drained into the plumbing circuit of the sprayer.

spray technology18
Rinsing Lever
Pushing down the rinsing lever separates the interfaces of container adapter and the easyFlow M basic unit in order to ensure rinsing. This procedure is required before disconnecting the container adapter after a partial dosing, but also at the end of the rinsing of an empty container. To operate set the measuring jug valve in pos. 3, then push the rinsing lever. The hand lever must be closed (turn counterclockwise to stop), but still locked (don’t push the lever).
To start the rinsing procedures for an empty PPP container, turn the hand lever on the easyFlow M basic unit clockwise until stop. Rotate the container clockwise during the rinsing to get to all parts of it.
NOTE!
Cleaning must not be carried out on partially emptied PPP container. This can lead to the deterioration of the PSM and damage to the PSM container.

spray technology19
Venting valve
The valve is needed for pressure compensation, when operating the easyFlow M as a closed system. The valve closes automatically in case of overfl ow from the measuring jug during dosing or rinsing, avoiding leaking. It reopens automatically when the liquid level falls.
The integrated button is spring loaded and stays open during normal operation. Pressing the valve button shuts down the valve. This will build up a vacuum, if the easyFlow M is connected to an active suction line. A short push will give a quick pulse and the valve will open again, pressing the button for a longer period will close the valve. A vacuum of at least – 0,15 bar is required to shut the valve permanently, if vacuum drops below – 0,1 bar or the button is pulled the valve will open again.
To use this feature the measuring jug valve must be set to pos. 2 (down). In this position the measuring jug cannot be used for measuring.
When dosing PPP with higher viscosity, it might be helpful to use the vacuum pulse as described above to quick start the dosing process out of a full container.
NOTE!
This is only needed initially; afterwards the valve must stay open to prevent damage from the PPP container and the easyFlow system!

spray technology20
Container support
PPP-containers with volumes larger than 10 l need additional support for secure handling on top of the easyFlow M.
Turn the star knob (A) counterclockwise to adjust the sliding guide (B) to the shape of the container, putting it in a vertical position upon the easyFlow M basic unit.
Fix the knob (A), by turning it clockwise, in the position where the PPP-container is perpendicular, but still with enough free space to rotate.
ATTENTION!
It is not allowed to turn the fi lled-up PPP-container beyond the retaining area of the container support. A tilt over can cause damage to the easyFlow system!

spray technology21
Bullseye level
Use the bullseye to check the proper positioning of the device. The levelling ensures a correct reading of the measuring jug.
Measuring jug
The graduated scale allows an exact reading even for small volumes. Up to 400 ml the scale has steps of 20 ml, over 400 ml there are steps of 50 ml. The measuring jug has a max. capacity of 2250 ml, measuring starts at 60 ml.
NOTE!
The measuring jug is interchangeable as needed. Rinse the system completely before replacing the jug and test it for leaks with clean water before reusing the easyFlow M for dosing of PPP!

spray technology22
Discharge hose
The discharge hose is connected to the valve of the measuring jug. It links the easyFlow to the sprayer.
1.3.3 External connections
NOTE!
If the easyFlow M is used as a stand-by solution the discharge hose should be connected with a dry coupling for a contamination free connection to the sprayer, to reduce the risk of contamination!
The easyFlow M discharge hose must be connected to the suction side of the pump either by a T-fi tting onto the suction line or onto the connection to the induction hopper. If connected to the suction line with a straight link to the induction hopper, ensure that the port to the hopper can be closed (may require an additional valve). This will guarantee full suction power from the pump.
More information connecting the discharge hose can be found from page 27 ff .

spray technology23
NOTE!
Use clean water for fi nal rinsing only!
Rinsing connection
The rinsing water connection has a G 1" BSP female thread. In case of using an external rinsing water hose we recommend for fast and easy connection a G1" GEKA-jaw-clutch (to order see page 38) or any other suitable quick coupling. Make sure the coupling is properly sealed up to the adapter to prevent leakage.

spray technology
220 mm
180 mm
140 mm
24
2. Installation and startup
2.1 General installation instructions
The easyFlow M can be installed directly on a sprayer or at a stationary or mobile filling station or nurse truck.
In either case we recommend connecting the easyFlow M onto the suction side of the sprayer pump, before the suction filter. When installing the easyFlow M on the sprayer a fixed connection can be set on the suction pipe. A connection to the suction line from the induction hopper is also possible, if there is enough suction power (min: – 0,3 bar, max: – 0.8 bar @ max. 100 l/min). In either case we recommend the use of a valve directly on to the connection to the suction line, maintaining it closed when not using the easyFlow M.
Using the easyFlow M on an external filling station requires the use of dry break. Options for anti-spill quick coupling can be found in our agrotop product catalogue.
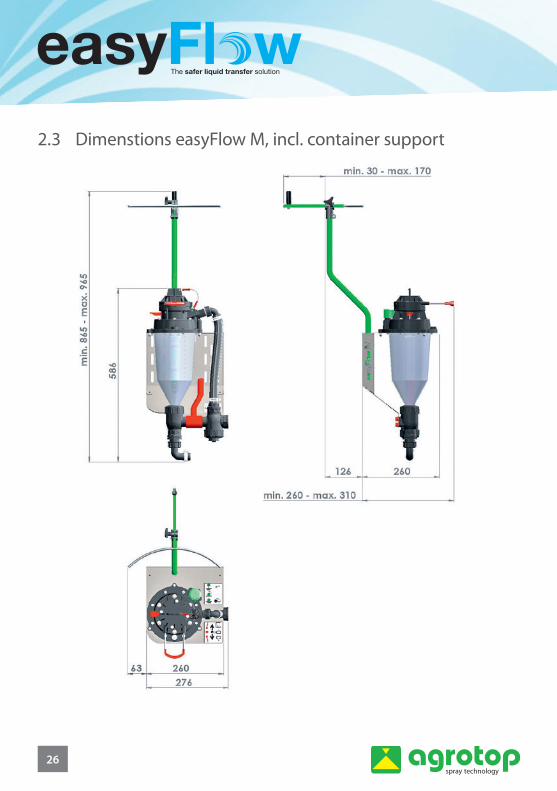
Please notice the dimensions (see page 26) of the easyFlow M to find a suitable place for an installation. Consider also some extra operational space needed for handling and operation of the device and for connecting the PPP containers.
The easyFlow M is assembled on a stainless-steel frame. The perforated plate on the back has several fixing options, facilitating the mounting of it on a sprayer or external support. Use stainless screws M8 to fix the plate.
Different installation options for the easyFlow M can be found from page 27 ff.

spray technology25
2.2 Installation container support (optional)
Set up both pipe connector pads (A) onto the bolts (B).
Secure the pads using the cap nuts and the washers. Tighten the nuts with torque 6 Nm. (see fig. 1).
Insert the pole mounting tube from the container support through the pads until the desired position of the container support is reached. Check with PPP containers size intended to use (see fig. 2). Then fix the tube with the pads using an Allen key.
Turn the tube until the crossbar of the container support is positioned like shown in figure 4. To fix, tighten the bolt (C) (see fig. 3) with an Allen key using torque 2.5 Nm.
Fig. 1
Fig. 2
Fig. 3Fig. 4 Position container support (top view)
A
AB
B
C
spray technology26
2.3 Dimenstions easyFlow M, incl. container support

spray technology27
2.4 Mounting the easyFlow M
2.4.1 Mounting easyFlow M discharge hose
Installation on a sprayer
Connect the discharge hose to the suction side feeding the pump on the sprayer before the suction filter.
Install a valve on the T-fitting to close the connection to the easyFlow M. Keep the valve shut during normal sprayer operation to maintain max. suction performance of the sprayer pump. Open the valve for transfer and dosing of liquid PPP using the easyFlow M closed transfer system.
The Universal-Assembling Kit, part no. 16742, contains all required parts and fittings for this installation option (see page 39).
Suction line
Ball valve
Discharge hose

spray technology28
Installation as an external unit
This installation option is for external mobile units (e.g. nurse trucks) or fixed installed filling stations.
The connection to the sprayer is made by a dry break antispill coupling. Depending on the connection options on the sprayer different installation options are possible.
The following articles described in this installation guide are optional and not part of this easyFlow M package. Using the agrotop part numbers these items can be purchased through local dealers.
a) There is no free port available on the suction side of the sprayer? In this case you can use the universal connection kit part no. 16742, installing it on the suction side of your sprayer. For connecting the discharge hose with the connection kit you need a anti-spill coupling, such as the anti-spill dry coupling consisting of the female part no. 16536 and the male part no. 15638. Install the male part on an easily accessible position on the sprayer. You can mount it directly on the valve of the connection kit (therefore a symmetrical nipple 1" part no. 10852 is required) or use a hose to connect the valve and the male part.
Suction line
Female part
Male part

spray technology29
In all other cases:
b) Connect to an existing 2"-cam-lock (male) using adapter kit part no. 14716. Connect the female coupling, part no. 16536, to the discharge hose from the easyFlow M using the straight hose barb fitting.
or:
c) Connect straight to an anti-spill valve (part. no. 15638, male) already mounted on the sprayer or the induction hopper. Connect the female coupling, part no. 16536, to the discharge hose from the easyFlow M using the straight fitting. Most of the sprayer with connection options for VacuFill®/Eco-Fill transfer systems have this connection option.
Suction line

spray technology30
In any case, it is recommended to set the connection on the sprayer before the main fi lter. Ask your sprayer manufacturer in case you have any questions regarding the correct installation.
2.4.2 Rinsing water connection
For the rinsing water connection use a pressure of min. 3.0 bar to a max. 6.0 bar.
If the water source may contain particles use an adequate fi lter (min. 50 mesh) before the rinsing water connection to the easyFlow.
ATTENTION!
NOTE!
NOTE!
All legal requirements of the country in which the sprayer is operated must be fulfi lled, when connecting the rinsing water connection to a tap from the public water network. An installation of a non-return valve is always recommended here; this is mandatory in many countries!
It is possible to use the recirculation water of the sprayer for initial container rinsing. However, make sure to use clear water for the fi nal rinse in this case, to guarantee a completely clean container!
In case of transfer of liquids from the easyFlow M to the sprayer only by gravity (no pump or pump is not running), make sure the run-out point is below the level of the measuring jug of the easyFlow M, avoiding a backingup of the liquid!

spray technology
✔
31
3. Operation
3.1 Partial discharge
1. Unscrew original cap from the PPP container.
2. Before mounting check if the cap seal of the easyFlow container adapter is in perfect condition and tighten the cap firmly on the container. Check if the easyFlow container adapter is stretched out completely before mounting it onto a PPP container, like shown in the picture (seal cutter must be draw-in).
Screw on easyFlow container adapter firmly on the PPP container. The current container adapter fits on PPP container with 63 mm threads. If the container is sealed do not remove or punch the seal. An automatic seal breaking is integrated in the container adapter.
3. If you don’t use the easyFlow for a longer time, it's recommendable to flush the measuring jug before using it again. This enables a better cleaning result after transferring PPP. Turn the measuring jug lever into position 3, while the blind cap is still locked in. After a short flush turn the measuring jug lever into position 2 to get the cleaning water out of the easyFlow.
4. Turn the hand lever counterclockwise to limit stop and unlock the blind cap by pushing the hand lever. Remove the blind cap.
5. Set the measuring jug lever in pos. 1 (centre, for partial dosing only).
stre
ch

spray technology32
6. Mount the easyFlow container adapter on the easyFlow M basic unit. The container adapter must click in place. Normally the weight of a full container will do this, if not slightly press down the container until the adapters click in and secure by pulling the hand lever. If the hand lever is hard to move, the adapters are not clicked in. Make sure that they are aligned correctly and press down the container.
For larger PPP container the use of the container support (see page 20) might be recommended, for secure handling of the container.
7. Push down the container. If the container is sealed, the integrated seal cutter will open the seal by three quarters. The seal stays connected to the container and will be rinsed with the standard rinsing procedure after emptying the container completely.
8. Turn the hand lever clockwise to open the container adapter, dosing the PPP into the jug. Use gradual opening of the valve for exact dosing. When the required volume is reached close the container adapter by turning the hand lever counter-clockwise to limit stop. Do not yet disengage the container adapter by pushing the hand lever forward.
9. Set measuring jug lever in pos. 2 (down) to transfer the PPP.
10. For rinsing put the measuring jug lever into pos. 3 (up).
11. Simultaneously press the rinsing lever several times for a couple of seconds, rinsing the face plates of the adapters.
12. Finish rinsing by setting the measuring jug valve into position 2 (down). Wait until the system is completely drained.
13. Close the measuring jug valve by putting the measuring jug lever into pos. 1 (centre).
14. Push the hand lever, remove the container with the easyFlow container adapter connected.

spray technology33
15. Strech out the container adapter (like shown under point 2). Don’t remove the container adapter from the container! Store the container while the container adapter is still attached to the container.
16. Install and secure the blind cap by pulling the hand lever.

spray technology
✔
34
3.2 Total discharge
1. Unscrew original cap from the PPP container.
2. Before mounting check if the cap seal of the easyFlow container adapter is in perfect condition and tighten the cap firmly on the container. Check if the easyFlow container adapter is stretched out completely before mounting it onto a PPP container, like shown in the picture (seal cutter must be draw-in).
Screw on easyFlow container adapter firmly. The current container adapter fits on PPP container with 63 mm threads. If the container is sealed do not remove or punch the seal. An automatic seal breaking is integrated in the container adapter.
3. If you don’t use the easyFlow for a longer time, it's recommendable to flush the measuring jug before using it again. This enables a better cleaning result after transferring PPP. Turn the measuring jug lever into position 3, while the blind cap is still locked in. After a short flush turn the measuring jug lever into position 2 to get the cleaning water out of the easyFlow.
4. Turn the hand lever counterclockwise to limit stop and unlock the blind cap by pushing the hand lever. Remove the blind cap.
5. Set the measuring jug lever in pos. 2 (down).
stre
ch

spray technology35
6. Mount the easyFlow container adapter on the easyFlow M basic unit. The container adapter must click in place. Normally the weight of a full container will do this, if not slightly press down the container until the adapters click in and secure by pulling the hand lever. If the hand lever is hard to move, the adapters are not clicked in. Make sure that they are aligned correctly and press down the container.
For larger PPP container the use of the container support (see page 20) might be recommended, for secure handling of the container.
7. Push down the container. If the container is sealed, the integrated seal cutter will open the seal by three quarters. The seal stays connected to the container and will be rinsed with the standard rinsing procedure after emptying the container completely.
8. Turn the hand lever clockwise into stop for starting the discharge.
9. After PPP container is empty set the measuring jug lever in pos. 3 (up) to start the rinsing process.
10. Rotate the PPP container clockwise several times until all residues are removed and container is completely rinsed out.
11. Turn the hand lever counterclockwise to limit stop.
12. Press the rinsing lever several times for a couple of seconds.
ATTENTION!
By turning counterclockwise, the PPP container can come off the container adapter!

spray technology36
13. Finish rinsing by putting the measuring jug lever in pos. 2 (down). Wait until the jug is completely drained.
If there is still liquid in the PPP container, turn the hand lever briefly clockwise to allow it to drain completely. Then turn the hand lever counterclockwise into the stop.
14. Set the measuring jug lever in pos.1 (centre).
15. Push the hand lever, remove the container with the easyFlow container adapter connected.
16. Strech the easyFlow container adapter and screw it off from the empty and clean PPP container. Return the container to the official recycling system for empty PPP containers according to your country’s legislation.
The easyFlow container adapter can be reused on the next PPP container.
17. Install and secure the blind cap.

spray technology
4. Notes
37

spray technology38
5. Spare parts easyFlow M
easyFlow M
Part no.: 16532
Anti spill dry couplingfemale part
incl. hose barb 25 mm
Part no.: 16536
easyFlowcontainer adapter
Part no.: 15954
easyFlowdischarge hose 1"
Part no.: 16873
easyFlowcontainer support
Part no.: 16740
GEKA jaw clutch with male thread 1"
Part no.: 16650

spray technology39
Measuring jug easyFlow M
Part no.: 16571
Adapter for 2" Quick coupling
Part no.: 14716
Anti spill dry couplingmale part
with female thread 1" BSP
Part no.: 15638
Universal mounting kit T-piecefor suction line
for installation onto suction line, incl. gate valve 1" and hose barb
fi ttings 40/50/60 mm
Part no.: 16742

agrotop GmbHKöferinger Straße 593083 Obertraubling (Germany)
Phone +49 (0)9453 9938-0Fax +49 (0)9453 993845
E-Mail [email protected] www.agrotop.com