operation guide p. 16
TRANSCRIPT

Content
sMotorcycle Safety P. 2
Operation Guide P. 16
Maintenance P. 52
Troubleshooting P. 102
Information P. 123
Specifications P. 145
Index P. 149

Welcom
CongratulatiHonda motoHonda makeof satisfied cHonda’s repuevery produc
To ensure yo● Read this o● Follow all r
procedures● Pay close a
contained motorcycle
To protect yotake responsmotorcycle wAlso, observealways perfoother periodi
e
ons on your purchase of a new rcycle. Your selection of a s you part of a worldwide family ustomers who appreciate tation for building quality into t.
ur safety and riding pleasure:wner’s manual carefully.ecommendations and contained in this manual.ttention to safety messages in this manual and on the .
ur investment, we urge you to ibility for keeping your
When service is required, remember that your Honda dealer knows your motorcycle best. If you have the required mechanical “know-how” and tools, you can purchase an official Honda Service Manual to help you perform many maintenance and repair tasks. 2 P. 140
Read the warranty information thoroughly so that you understand the warranty coverage and that you are aware of your rights and responsibilities. 2 P. 141
You may also want to visit our website at www.powersports.honda.com.
www.honda.ca.Happy riding!Canada
ell serviced and maintained. the break-in guidelines, and
rm the pre-ride inspection and c checks in this manual.
California Proposition 65 WarningWARNING: This product contains or emits chemicals known to the State of California to cause cancer and birth defects or other reproductive harm.

A Few W
Your safety, important. Oan importantTo help you safety, we haprocedures alabels and inalerts you to hurt you or oOf course, it warn you aboperating ormust use you
You will finda variety of f● Safety labe● Safety Mes
symbol andDANGER, WThese sign
ords About Safety
and the safety of others, is very perating this motorcycle safely is responsibility.make informed decisions about ve provided operating nd other information on safety this manual. This information potential hazards that could thers.is not practical or possible to out all hazards associated with maintaining a motorcycle. You r own good judgment.
important safety information in orms, including:ls on the motorcycle.
3DANGERYou WILL be KILLED or SERIOUSLY HURT if you don’t follow instructions.
3WARNINGYou CAN be KILLED or SERIOUSLY HURT if you don’t follow instructions.
3CAUTIONYou CAN be HURT if you don’t follow instructions.
Other important information is provided under the following titles:
NOTICE Information to help you avoid damage to your motorcycle,
sages preceded by a safety alert one of three signal words: ARNING, or CAUTION.
al words mean:
other property, or the environment.

Moto
This sectionPlease read
Safety GuideSafety LabelsSafety PrecauRiding PrecauAccessories &Loading ........
rcycle Safety
contains important information for safe riding of your motorcycle.
this section carefully.lines .........................................P. 3................................................P. 7tions .......................................P. 9tions .....................................P. 10 Modifications......................P. 14...............................................P. 15

Safety GFollow these g● Perform all
specified in● Stop the en
away befor● Do not run
enclosed argases is tox
It’s a proven fapparel signifseverity of hewear an apprprotective app
Always We
Safety GuidelinesM
oto
rcycle Safety
uidelinesuidelines to enhance your safety:
routine and regular inspections this manual.gine and keep sparks and flame e filling the fuel tank. the engine in enclosed or partly eas. Carbon monoxide in exhaust ic and can kill you.
act: helmets and protective icantly reduce the number and ad and other injuries. So always oved motorcycle helmet and arel. 2 P. 9
Make sure that you are physically fit, mentally focused and free of alcohol and drugs. Check that you and your passenger are both wearing an approved motorcycle helmet and protective apparel. Instruct your passenger on holding onto the seat strap or your waist, leaning with you in turns, and keeping their feet on the footpegs, even when the motorcycle is stopped.
Even if you have ridden other motorcycles, practice riding in a safe area to become familiar with how this motorcycle works and handles, and to become accustomed to the motorcycle’s size and weight.
ar a Helmet
Before Riding
Take Time to Learn & Practice
3continued

Safety Guide
4
Mo
torcycle Safety
We recommecourse approvFoundation (Mthe basic couwill find the aFor informationearest you, c(800) 446-92
Other rand Your Mocame with yo
Always pay atyou, and do nyou. Be prepaevasive mane
Ride Defen
USA
lines
nd that all riders take a certified ed by the Motorcycle Safety SF). New riders should start with
rse, and even experienced riders dvanced course beneficial.n about the MSF training course all the national toll-free number:
27.
iding tips can be found in the You torcycle Riding Tips booklet that ur motorcycle.
tention to other vehicles around ot assume that other drivers see red to stop quickly or perform an
Make yourself more visible, especially at night, by wearing bright reflective clothing, positioning yourself so other drivers can see you, signaling before turning or changing lanes, and using your horn when necessary.
Never ride beyond your personal abilities or faster than conditions warrant. Fatigue and inattention can impair your ability to use good judgment and ride safely.
Alcohol and riding don’t mix. Even one alcoholic drink can reduce your ability to
sively
Make Yourself Easy to See
Ride within Your Limits
Don’t Drink and Ride
uver.respond to changing conditions, and your reaction time gets worse with every additional drink. Don’t drink and ride, and don’t let your friends drink and ride either.

It’s importantmaintained anInspect your mperform all reexceed load liyour motorcywould make y
Personal safetanyone else hassess the sevis safe to contassistance if nlaws and reguvehicle is invo
If you decide the conditionis still running
Keep Your
If You are I
Safety GuidelinesM
oto
rcycle Safety
to keep your motorcycle properly d in safe riding condition.otorcycle before every ride and
commended maintenance. Never mits (2 P. 15), and do not modify cle or install accessories that our motorcycle unsafe (2 P. 14).
y is your first priority. If you or as been injured, take time to erity of the injuries and whether it inue riding. Call for emergency eeded. Also follow applicable lations if another person or lved in the crash.
check the tightness of critical nuts and bolts, and check the handlebar, control levers, brakes, and wheels. Ride slowly and cautiously.Your motorcycle may have suffered damage that is not immediately apparent. Have your motorcycle thoroughly checked at a qualified service facility as soon as possible.
Honda in Safe Condition
nvolved in a Crash
5continued
to continue riding, first evaluate of your motorcycle. If the engine , turn it off. Inspect for fluid leaks,

Safety Guide
6
Mo
torcycle Safety
Unlike standatransmission sdoes not haveyou with an aengine powerwheel. Thus, experience a sapplication ofshould shut dengine stop sswitch to the stop the engisystem functiindicators.
EmergencyMotorcycleTransmissio
lines
rd motorcycles, or its manual ibling, dual-clutch transmission a clutch lever that would provide dditional means to control the being transmitted to the rear in the unlikely event that you tuck throttle or other unintended power to the rear wheel, you own the engine by use of the witch (2 P. 32). By moving this off position, you will immediately ne but maintain all electrical ons, including lights and
Exhaust contains poisonous carbon monoxide, a colorless, odorless gas. Breathing carbon monoxide can cause loss of consciousness and may lead to death.
If you run the engine in confined or even partly enclosed area, the air you breathe could contain a dangerous amount of carbon monoxide. Never run your motorcycle inside a garage or other enclosure.
Shut-down Procedure for s Equipped with Dual Clutch n
Carbon Monoxide Hazard
3WARNINGCarbon monoxide gas is toxic.Breathing it can cause unconsciousness and even kill you.
Avoid any areas or activities that expose you to carbon monoxide.

Safety LSafety and infmotorcycle prinformation a
Safety LabelsM
oto
rcycle Safety
abelsormation labels on your ovide important safety nd may warn you of potential
hazards that could cause serious injury. Read these labels carefully and don’t remove them.If a label comes off or becomes hard to read, contact your dealer for a replacement.
7continued

Safety Labels
8
Mo
torcycle Safety

Safety P● Ride cautio
handlebar a● Keep passe
or your waifootpegs w
● Always conas well as o
Make sure thawearing an approtection, anclothing. Rideweather and
❙ HelmetShould be safvisibility, and ● Must fit com
chin strap f
Protective A
Safety PrecautionsM
oto
rcycle Safety
recautionsusly and keep your hands on the nd feet on the footpegs.
nger’s hands onto the seat strap st, passenger’s feet on the hile riding.sider the safety of your passenger, ther drivers and riders.
t you and any passenger are proved motorcycle helmet, eye d high-visibility protective defensively in response to road conditions.
● Face shield with unobstructed field of vision or other approved eye protection.
Look for a DOT (Department of Transportation) certification label on any helmet you buy.
❙ Gloves
pparel
3WARNINGNot wearing a helmet increases the chance of serious injury or death in a crash.
Make sure that you and any passenger always wear an approved helmet and protective apparel.
USA
9continued
ety-standard certified, high-correct size for your head
fortably but securely, with the astened.
Full-finger leather gloves with high abrasion resistance

Riding Precau
10
Mo
torcycle Safety
❙ Boots or RidSturdy boots protection
❙ Jacket and PProtective, higand durable lprotective sui
tions
ing Shoeswith non-slip soles and ankle
antshly visible, long-sleeved jacket
ong pants for riding (or a t).
Riding Precautions
During the first 300 miles (500 km) of running, follow these guidelines to ensure your motorcycle’s future reliability and performance.● Avoid full-throttle starts and rapid
acceleration.● Avoid hard braking and rapid down-shifts.● Ride conservatively.
Observe the following guidelines:● Avoid excessively hard braking and down-
shifts.u Sudden braking can reduce the
motorcycle’s stability.
Break-in Period
Brakes
u Where possible, reduce speed before turning; otherwise you risk sliding out.

● Exercise cauu The tires
and brak● Avoid contiu Repeated
descendseriouslytheir effewith intereduce s
● For full brakthe front an
Riding PrecautionsM
oto
rcycle Safety
tion on low traction surfaces. slip more easily on such surfaces ing distances are longer.nuous braking. braking, such as when
ing long, steep slopes can overheat the brakes, reducing ctiveness. Use engine braking rmittent use of the brakes to peed.ing effectiveness, operate both d rear brakes together.
❙ Anti-lock Brake System (ABS)This model is equipped with an Anti-lock Brake System (ABS) designed to help prevent the brakes from locking up during hard braking.● ABS does not reduce braking distance. In
certain circumstances, ABS may result in a longer stopping distance.
● ABS does not function at speeds below 6 mph (10 km/h).
● The brake lever and pedal may recoil slightly when applying the brakes. This is normal.
● Always use the recommended tires to ensure correct ABS operation.
11continued

Riding Precau
12
Mo
torcycle Safety
❙ Engine BrakEngine brakindown when yslowing actioengine brakinbrakes to redusteep slopes.
❙ Wet or RainRoad surfacesbrakes furtheExercise extraconditions.If the brakes griding at low
tions
ingg helps slow your motorcycle ou release the throttle. For further n, downshift to a lower gear. Use g with intermittent use of the ce speed when descending long,
y Conditions are slippery when wet, and wet r reduce braking efficiency. caution when braking in wet
et wet, apply the brakes while speed to help them dry.
● Park on a firm, level surface.● If you must park on a slight incline or loose
surface, park so that the motorcycle cannot move or fall over.
● Make sure that high-temperature parts cannot come into contact with flammable materials.
● Do not touch the engine, muffler, brakes and other high-temperature parts until they cool down.
● To reduce the likelihood of theft, always lock the handlebar and remove the key when leaving the motorcycle unattended.Use of an anti-theft device is also recommended.
Parking

❙ Parking wit1. Stop the en2. Push the sid3. Slowly lean
weight rest4. Turn the hau Turning
stability fall.
5. Turn the ignand remove
Riding PrecautionsM
oto
rcycle Safety
h the Side Standgine.e stand down.
the motorcycle to the left until its s on the side stand.ndlebar fully to the left.the handlebar to the right reduces and may cause the motorcycle to
ition switch to the LOCK position the key. 2 P. 33
Follow these guidelines to protect the engine and catalytic converter:● Use only unleaded gasoline.● Use recommended octane number. Using
lower octane gasoline will result in decreased engine performance.
● Do not use fuels containing a high concentration of alcohol. 2 P. 139
● Do not use stale or contaminated gasoline or an oil/gasoline mixture.
● Avoid getting dirt or water in the fuel tank.
Refueling and Fuel Guidelines
13

Accessories &
14
Mo
torcycle Safety
AccessoModificWe strongly aaccessories thor approved fmake modificoriginal desigModifying yowarranty andoperate on pudeciding to inmotorcycle beand legal.
Modifications
ries & ationsdvise that you do not add any at were not specifically designed or your motorcycle by Honda or ations to your motorcycle from its n. Doing so can make it unsafe.ur motorcycle may also void your make your motorcycle illegal to blic roads and highways. Before stall accessories on your certain the modification is safe
Do not pull a trailer with, or attach a sidecar to, your motorcycle. Your motorcycle was not designed for these attachments, and their use can seriously impair your motorcycle’s handling.
3WARNINGImproper accessories or modifications can cause a crash in which you can be seriously hurt or killed.
Follow all instructions in this owner’s manual regarding accessories and modifications.
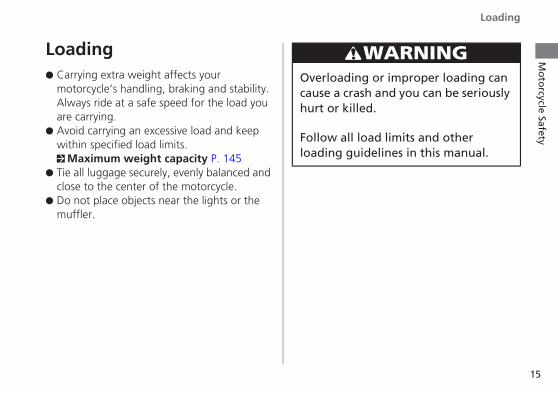
Loading● Carrying ex
motorcycleAlways rideare carrying
● Avoid carrywithin spec2 Maximu
● Tie all luggaclose to the
● Do not placmuffler.
LoadingM
oto
rcycle Safety
tra weight affects your ’s handling, braking and stability. at a safe speed for the load you .ing an excessive load and keep ified load limits.m weight capacity P. 145ge securely, evenly balanced and center of the motorcycle.e objects near the lights or the
3WARNINGOverloading or improper loading can cause a crash and you can be seriously hurt or killed.
Follow all load limits and other loading guidelines in this manual.
15

16
Op
eration
Gu
ide
Parts
LocationRear brake fluid reservoir (P90)
Front brake fluid reservoir (P90)
Throttle grip (P98)
Spark plugs (P79)
Front brake lever
Rear brake pedal
Right side panel (P74)
Brake light switch (P92)
Fuse box (P121)
Accessory socket (P48)
Front utility box (P46)
Engine oil filter (P84)
Rear utility box (P47)
Right under cowl (P73)
Engine oil fill cap/dipstick (P82)
Coolant reserve tank (P88)
Clutch oil filter (P86)

Op
eration
Gu
ide
Side stand (P93)
Fuel fill cap (P43)
Front seat (P72)
Drive chain (P94)
Battery (P78)
Main fuse (P122)
Rear seat (P72)
Rear utility box (P47)
17
Crankcase breather (P99)
Engine oil drain bolt (P84)
Left side panel (P75)

18
Op
eration
Gu
ide
Instru
Display ChWhen the igIf any part oproblems.
buSEL
The displayYou can chaWhen you schanges in aand AT modChanging o
ments
ecknition switch is turned on, all the mode and digital segments will show.f these displays does not come on when it should, have your dealer check for
buttonSETtton
Ring illumination
backlight color and the ring illumination colornge the setting of the display backlight color and the ring illumination color.
et to “COL A” (COLOR A), the backlight color and ring illumination color ccordance with changing between N, D and S or changing between MT mode e. Default setting is “COL A.”f display backlight color and ring illumination color: (P26)
Clock (12-hoTo set the c
Fuel gaugeRemaining f1st (E) segmapproximate
If theflashi
Op
eration
Gu
ide
Tachometer
NOTICEDo not operate the engine in the tachometer red zone. Excessive engine speed can adversely affect engine life.
ur display)lock: (P27)
uel when only ent starts flashing: ly 1.06 US gal (4.0 liters)
Speedometer
Tachometer red zone(excessive engine rpm range)
19continued
fuel gauge indicator repeat ng or turned off: (P108)

20
Instrume
Op
eration
Gu
ide
Odometer mileage [AThe buaverage fueu To reset t
SEL
Odometer
Reserve fu
nts (Continued)
[TOTAL] & Tripmeter [TRIP A/B] & Current fuel mileage & Average fuel VG] & Fuel consumption metertton selects the odometer, tripmeter A, tripmeter B, current fuel mileage,
l mileage and fuel consumption.he tripmeter: (P22)
Tripmeter A Tripmeter B Current fuel mileage
Average fuel mileage
Fuel consumption
Air temperature gaugeShows ambient temperature.Display range: 14 to 122°F (−10 to 50°C)• Below 14°F (−10°C): “- -” is displayed• Above 122°F (50°C): 122°F (50°C) flashesThe temperature readout may be incorrect at low speeds due to reflected heat.
el consumption (P23)
Press the buttonSEL
When the 1st (E) segment of the fuel gauge starts flashing

The average• Current f
Current inWhen “
• Average fAverage fdealer for
• Fuel consTotal fueldealer foru To rese
fuel mileage and fuel consumption will be baseduel mileage:stant fuel mileage. If your speed is less than 3 mph
” is displayed at speeds above 3 mph (5 km/h),uel mileage:uel mileage since tripmeter A was reset. When “ service.umption: consumption since tripmeter A was reset. When service.t the average fuel mileage and fuel consumptio
Op
eration
Gu
ide
on tripmeter A.
(5 km/h), “ ” is displayed. go to your dealer for service.
” is displayed, go to your
“ ” displayed, go to your
n: (P22)
21continued

22
Instrume
Op
eration
Gu
ide
❙ To reset thmileage an
!a To reset trand fuel chold the
!b When the“ ” a
STripmeter A
o
nts (Continued)e tripmeter, average fuel d fuel consumption
ipmeter A, average fuel mileage, onsumption together, press and
button.
y are reset, “0.0” and then re displayed at each indication.
!c Then, the display returns to the last selected indication.
!d To reset tripmeter B, press and hold the button with tripmeter B displayed.
ETAverage fuel mileage
Fuel consumption
r or
or or
SET
Tripmeter B

Reserve fueWhen the 1sstarts flashinfuel mileage meter switchconsumptionsoon as poss
When “ ”for service.
Reserve
l consumption displayt (E) segment of the fuel gauge g, the odometer & tripmeter & meter & fuel consumption es to the reserve fuel . You should refill the tank as ible.
is displayed, go to your dealer
fuel consumption display
• Flashes fromu If you ch
tripmeteconsumpwill autofuel conare not pseconds
After refuellinamount, the dyour motorcyc
Op
eration
Gu
ide
“0.0” gal (US gal) or L (liter).ange the display to odometer, r, fuel mileage meter and fuel tion meter and so on (P20), it matically return to the reserve sumption display if the buttons ressed after for about 10
.
g more than the reserve isplay returns to normal when le travel 0.06 mile (0.1 km).
23continued

24
Instrume
Op
eration
Gu
ide
Gear positiThe gear poare selectedu “-” appeau “-” flashes
with the igu “-” flashe
The indicatou The front u You turn tThis is norm
If the “-” in
nts (Continued)
D indicatorComes on when the D mode is selected in the AT MODE. (P40)
S indicatorComes on when the S mode is selected in the AT MODE. (P40)
on indicatorsition is shown in the gear position indicator when the D, S mode or MT MODE .rs for a few seconds and then goes off when the engine starts. when the engine stop switch position is changed from (Run) to (Off) position nition switch on.
s when the ignition switch is turned on with the engine stop switch (Off) position.
r may flash if:wheel leaves the ground.
he wheel while the motorcycle is upright on the stand.al. To operate the system again, turn the ignition switch off, then on again.dicator is blinking in the gear position window while riding: (P107)

Setting ModFollowing ite• Changing
ring illumi• Backlight b• Clock sett• Changing • Changing • Changing
ems to change sequentially.of display backlight color and nation colorrightness adjustment
ingof speed and mileage unitof fuel mileage meter unitof temperature gauge unit
Ordinary displ
Clock s
Changiring illu
Changi
Backlig
Changi
Press and
Press the
Chang
Op
eration
Gu
ide
ay
etting
ng of display backlight color and mination color
ng of fuel mileage meter unit
ht brightness adjustment
ng of speed and mileage unit
25continued
hold the button and buttonSEL SET
buttonSET
ing of temperature gauge unit

26
Instrume
Op
eration
Gu
ide
In addition, tat display set• The button
seconds• Turn the ig
1 Changingand ring illu!a Turn the i
!b Press and butt
illuminatioSET
nts (Continued)o return to the ordinary display ting. is not pressed for about 30
nition switch off and then on
of display backlight color mination color
gnition switch to ON.
hold the button and the on, the backlight and ring n colors start flashing.
!c Press the button. The backlight and ring illumination colors are switched.u When “COL A” (COLOR AUTO) is set, the
display backlight and the ring illumination colors change in accordance with changing the transmission between N, D, and S or changing between MT mode and AT mode.
u When you select “COL 1” to “COL 25” (COLOR 1 through 25), color is fixed to the set color and will not change.SEL
SEL
Backlight and ring illumination color
!d Press the button. The backlight and illumination colors are set, and then the display moves to the backlight brightness adjustment.
SET

2 Backlight You can adjulevels.
!a Press the switched.
!b Press the and then t
brightness adjustment:st the brightness to one of five
button. The brightness is
button. The backlight is set, he display moves to clock setting.
SEL
SET
3 Clock settin!a Press the
is displayedu Press an
!b Press the start flashin
!c Press the minute is du Press an
fast.
S
S
S
!d Press the then the dspeed and
Op
eration
Gu
ide
g: button until the desired hour
.d hold to advance the hour fast.
button. The minute digits g.
button until the desired isplayed.d hold to advance the minute
EL
ET
EL
27continued
button. The clock is set, and isplay moves to the changing of mileage unit.
SET

28
Instrume
Op
eration
Gu
ide
4 Changing!a Press the
“mph” an
!b Press the mileage umoves to meter uni
nts (Continued) of speed and mileage unit:
button to select either
d “mile” or “km/h” and “km.”
button. The speed and nit is set, and then the display the changing of the fuel mileage t.
5 Changing of fuel mileage meter unit:!a Press the button to select “mile/L” or
“mile/gal.”
If the “km/h” for speed and “km” for mileage are selected, the fuel mileage shown by “L/100 km” or “km/L.”
!b Press the button. The fuel mileage meter unit is set, and then the display moves
SEL
SET
SEL
SET
to the HISS indicator setting.

6 ChangingYou can sele
!a Press the
“°C.”
!b To end the
of temperature gauge unit:ct the temperature gauge unit.
button to select “°F” or
selection, press the button.
SEL
SET
The control isthe setting mothe button is seconds. Evenis maintained.
Op
eration
Gu
ide
automatically switched from de to the ordinary display if
not pressed for about 30 in this case, established setting
29

30
Op
eration
Gu
ide
Indic
PGM-FmalfunComesthe stop swIf it co
ParkingLights ashave notbrake le
ators
Low oil pressure indicatorComes on when the ignition switch is turned on.Goes off when the engine starts.If it comes on while engine is running: (P105)
I (Programmed Fuel Injection) ction indicator lamp (MIL)
High coolant temperature indicator
If it comes on while riding: (P104)
ABS (Anti-lock Brake System) indicator
Comes on when the ignition switch is turned on. Goes off when your speed reaches approximately 6 mph (10 km/h).If it comes on while riding: (P106)
brake indicator a reminder that you released the parking ver.
on briefly when the ignition switch is turned on with the engine stop switch in (Run) position. Comes on when the ignition switch is turned on with the engine itch in the (Off) position.
mes on while engine is running: (P105)

Op
eration
Gu
ide
Right turn signal indicator
Neutral indicatorComes on when the transmission is in Neutral.
31
High beam indicator
Left turn signal indicator

32
Op
eration
Gu
ide
Switc
Ho
u P
Headlight d• : High• : Low•
Shift up swTo shift up t(P42)
hesEngine stop switchShould normally remain in the
(Run) position.u In an emergency, switch to
the (Off) position to stop the engine.
Hazard switchSwitchable when the ignition switch is on. Can be turned to off
Start button
rn button
Turn signal switchressing the switch turns the turn signal off.
N-D switchTo shift between Neutral and AT MODE. (P41)
AT/MT switchTo shift between the AT MODE and MT MODE. (P41)
itch (+)he gear.
Shift down switch (-)To shift down the gear. (P42)
regardless of the ignition switch position.u The signals continue flashing with the
ignition switch is OFF or LOCK position after the hazard switch is on.
immer/Passing light control switch beam beam
: Flashes the high beam headlight.

Steering LLock the steeprevent theft
A U-shaped walso recomm
Ignition SwSwitches thesteering.u Key can be
position.
!a
Op
eration
Gu
ideock
ring when parking to help .
heel lock or similar device is ended.
❙ Locking!a Turn the handlebar all the way to the left.
!b Push the key down, and turn the ignition switch to the LOCK position.u Jiggle the handlebar if the lock is difficult
to engage.
!c Remove the key.
❙ Unlocking
itch electrical system on/off, locks the
removed when in the OFF or LOCK
ONTurns electrical system on for starting/riding.
OFFTurns engine off.
LOCKLocks steering.
Push!b
33continued
Insert the key, push it in, and turn the ignition switch to the OFF position.
Ignition key
Turn

34
Op
eration
Gu
ide
ParkiParking BrBe sure the pparking and u Make sure
before ridinTo apply the Squeeze the parking brakwheel.u The parkin
the parking(P92)
To release thRelease the ppulling in theu Before ridin
indicator isparking bradrag on th
ng Brakeake Leverarking brake is applied while warming up the engine.the parking brake lever is released g.parking brakefront brake lever and pull the e lever back to lock the rear
g brake lock will not function if brake is not adjusted properly.
e parking brakearking brake lever by lightly lever.g, check that the parking brake
turned off and make sure that the
Front brake lever
Parking brake lever
Squeeze
Lightly pull
Apply
Release
Pull
!a
ke is fully released so there is noe rear wheel. Release !b

StartStart your enprocedure, reis cold or wa
!a !f
Op
eration
Gu
ide
ing the Enginegine using the following gardless of whether the engine
rm.
!a Lock the parking brake (parking brake indicator to come on).
!b
!d
!c
!e
NOTICE• If the engine does not start within 5 seconds, turn the
ignition off and wait 10 seconds before trying to start the engine again to recover battery voltage.
• Extended fast idling and revving the engine can damage the engine, and the exhaust system.
• Snapping the throttle or fast idling for more than about 5 minutes may cause exhaust pipe discoloration.
3CAUTIONContact with the spinning rear wheel can cause you to be hurt.
Set the parking brake when the motorcycle is on its maintenance
35
stand.

36
Starting
Op
eration
Gu
ide
!b Make sure (Run)
!c Turn the i
!d Check theindicator t
!e Press the scompletel
!f Make surereleased b
If the engine
!a Open the button for
!b Repeat th
!c If the engiif idling is
!d If the engibefore try
❙ If Engine W
the Engine (Continued) the engine stop switch is in the
position.
gnition switch to the ON position.
transmission in Neutral ( o come on).
tart button with the throttle y closed.
the parking brake lever is efore riding.
does not start:
throttle fully and press the start 5 seconds.
e normal starting procedure.
ne starts, open the throttle slightly unstable.
When you stop the engine!a To stop the engine, put gear to Neutral (
indicator to come on).u If you turn the ignition switch to the OFF
position when the motorcycle in gear, the engine will shut off with the clutch disengaged.
!b Turn the ignition switch off.
!c Pull the parking brake lever when you park the motorcycle.
N
N
ne does not start, wait 10 seconds ing steps !a & !b again.
ill Not Start (P103)

ShiftiYour motorcautomaticallytransmission.(by AT MODE
❙ Recommen
Shifting UpFrom 1st to From 2nd toFrom 3rd toFrom 4th toFrom 5th to
Shifting DoFrom 6th toFrom 5th toFrom 4th toFrom 3rd toFrom 2nd to
USA
Op
eration
Gu
ide
ng Gearsycle is equipped with an controlled 6-speed It can be shifted automatically ) or manually (by MT MODE).
ded Shift Points
2nd 12 mph (20 km/h) 3rd 19 mph (30 km/h) 4th 25 mph (40 km/h) 5th 31 mph (50 km/h) 6th 37 mph (60 km/h)
wn 5th 34 mph (55 km/h) 4th 26 mph (42 km/h)
Shifting DownFrom 6th to 5th 36 mph (58 km/h)From 5th to 4th 28 mph (45 km/h)From 4th to 3rd 21 mph (33 km/h)From 3rd to 2nd 15 mph (24 km/h)From 2nd to 1st 11 mph (18 km/h)
NOTICEImproper shifting can damage the engine, transmission, and drive train. Also, coasting or towing the motorcycle for long distances with the engine off can damage the transmission.
Canada
37continued
3rd 20 mph (32 km/h) 2nd 15 mph (24 km/h) 1st 11 mph (18 km/h)

38
Shifting
Op
eration
Gu
ide
Dual ClutcIn order to rebroad range equipped witMODE (incluoperation anMT MODE (Moperation), was a manual u Always use
sprockets tTransmissio
The Dual Cluself check imengine. “-” aindicator wingoes out.While “-” apgear.
Gears (Continued)h Transmissionspond to rider demands in a of situations, the transmission is h three operating modes, AT ding D mode for regular d S mode for sport riding); and T mode for a 6-speed manual hich delivers the same shift feel
transmission. the recommended tires and o ensure correct Dual Clutch n operation.
tch Transmission system runs a mediately after starting the ppears in the gear position dow for a few seconds, then
N-D switch
AT/MT switch
AT MODE
MT MODE
pears, you cannot shift into

Neutral (N):Neutral is selturn the ignitIf neutral isthe ignitionu Turn the igu If neutral is
engine off You may htransmissionormal.
When you cu Motorcycle
idling.u Throttle is c
change frothrottle is a
u You cannowhile the w
u Side stand
ected automatically when you ion switch to ON.
not selected when you turn switch to ON:nition off and on again. still not selected after turning the then on again. 2 P. 107ear (click) noises when the n shifts to Neutral (N). This is
an change between N and D is stopped and the engine is
ompletely off. It is not possible to m Neutral to D mode while the pplied.
NOTICE• To prevent clut
keep the moto
t change between N and D mode heels are rotating.
is raised.
Op
eration
Gu
ide
ch damage, do not use the throttle to rcycle stopped uphill.
39continued

40
Shifting
Op
eration
Gu
ide
AT MODE: Iautomaticallyconditions.And also usindown switchor down. Thewhen you wafront of a cuYou can choAT MODE: DD mode (ATwhen AT MOfor regular oeconomy.S mode (ATin AT MODE such as whenpulling away
Gears (Continued)n this mode the gears are shifted according to your riding
g the shift up switch (+) or shift (-), you can temporarily shift up se switches are convenient nt to temporarily down-shift in
rve, etc. 2 P. 42ose between two modes within mode and S mode.): This is the standard mode DE is selected. Select D mode
peration and efficient fuel
): Select this mode while riding when you need more power, overtaking, climbing hills, or
MT MODE: MT MODE (6-speed manual operation) You can choose between 6 gears in this mode.
.

Changing b
Changing frPress the D/SThe D mode shown in thegear is selectChanging frNeutralPress N on thChanging bwhile in ATPress the D/SD mode indicChanging bMODEPress the AT/The S or D inMODE is sele
etween Neutral and AT/MT
om Neutral (N) to AT MODE side of the N-D switch (!a).indicator to come on, ”1” is gear position indicator and first ed.om AT or MT MODE to
e N-D switch (!b).etween D mode and S mode MODE side of the N-D switch. The S or ator to come on ( !c,!d).
etween AT MODE and MT
MT switch ( !e).
!c
dicator goes out while MT cted ( !f).
Op
eration
Gu
ide
AT/MT switch
!e !a
!b
!d !f
N-D switch
41continued

42
Shifting
Op
eration
Gu
ide
Riding in MShift up and The selected position indicu If the MT M
does not shthe engine
u The transmwhen you
u You will stais selected.
Gears (Continued)T MODEdown with the + and - switch.gear is shown on the gear ator.ODE is selected, the transmission ift up automatically. Do not allow revs to go into the red zone.ission automatically shifts down slow down, even in MT MODE.rt from 1st gear even if MT MODE
Gear shift operationShifting Up:Press the shift up switch (+) ( !g).Shifting Down:Press the shift down switch (-) ( !h).You cannot continue shifting gears by keeping the shift switch pressed.To continue shifting gears release the switch and press it again.
!g
!h
Shift LimitYou cannot downshift if the engine will exceed the rev limit. 2 P. 37

Refue
Do not fill wi
Fuel type: URecommendPump OctaneTank capaci
❙ Refueling
Fuel fi
Ignition kLoc
Op
eration
Gu
ide
ling
th fuel above the fuel level plate.
nleaded gasoline onlyed fuel octane number: Number (PON) 86 or higher.
Opening the Fuel Fill CapOpen the lock cover, insert the ignition key, and turn it clockwise to open the fuel fill cap.
Closing the Fuel Fill Cap!a After refuelling, push the fuel fill cap closed
until it locks.
!b Remove the key and close the lock cover.u The key cannot be removed if the fuel fill
cap is not locked.
Fuel level plate
ll cap
eyk cover
3WARNINGGasoline is highly flammable and explosive. You can be burned or seriously injured when handling fuel.
• Stop the engine, and keep heat,
43
ty: 3.06 US gal (11.6 liters)and Fuel Guideline (P13)
sparks, and flame away.• Handle fuel only outdoors.• Wipe up spills immediately.

44
Op
eration
Gu
ide
StoraTool KitThe tool kit i
❙ Removing
Rub
ge Equipments located under the front seat.
the front seat (P72)
Document BagThe document bag is located under the front seat of the right side.
❙ Removing the front seat (P72)
Tool kit
ber strap
Document bag
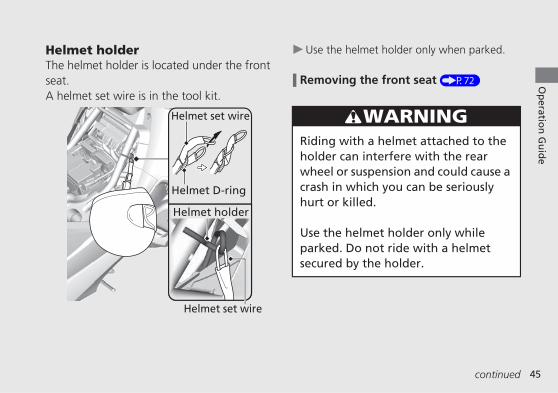
Helmet hoThe helmet hseat.A helmet set
lderolder is located under the front
wire is in the tool kit.
Helmet set wire
Helmet D-ring
Helmet holder
u Use the helm
❙ Removing t
3
Riding withholder can wheel or sucrash in whhurt or kille
Use the helparked. Dosecured by
Helmet set wire
Op
eration
Gu
ide
et holder only when parked.
he front seat (P72)
WARNING a helmet attached to the interfere with the rear spension and could cause a ich you can be seriously d.
met holder only while not ride with a helmet the holder.
45continued

46
Storage
Op
eration
Gu
ide
Front UtiliNever exceedMaximum w
Opening th!a
Insert the clockwise
!b Push the r
Closing the!a Close the
!bRemove th
Left side o
Left side o
Equipment (Continued)ty Box the maximum weight capacity.eight: 4.5 lb (2.0 kg)
e Front Utility Box
ignition key into the lock, and turn and hold it.
elease button.
Front Utility Boxlid until it locks.
e ignition key.
nly
nly
Release button Ignition key
Left side
Right sideLid
Lid
Release button

Rear UtilitNever exceedMaximum w
Lever
Lid
y Box the maximum weight capacity.eight: 6.6 lb (3.0 kg)
Lid
Ignition key
Opening the!a Insert the ig
!b Pull the levu To preve
remove the lever
!c Open the li
Closing the R!a Close the li
u Make su
!b Check if th
!c Remove thu The igni
the lid isto its ori
Op
eration
Gu
ide
Rear Utility Boxnition key, and turn it clockwise.
er upwards.nt damage, do not turn or the key forcibly while pulling up .
d.
ear Utility Boxd until it locks.re that the lid is locked securely.
e lever is in original position.
e ignition key.tion key cannot be removed until locked and the lever is returned ginal position.
47continued

48
Storage
Op
eration
Gu
ide
AccessoryThe accessorfront utility b
Open the covsocket.Rated capaci12W (12V, 1
A
Equipment (Continued) Sockety socket is located in the left ox.
er to access to the accessory
ty isA).
u To prevent the battery run down or weak the battery, keep the engine running while drawing current from the socket.
u Set the headlight in the low beam. The battery run down or damage to the accessory socket cause result.
u To prevent entry of foreign matter into the socket, be sure to close the cover when the accessory socket is not used.
❙ Opening the front utility box (P46)
ccessory socket
Cover

Rear Seat You can folda backrest. Tadjusted to t
Rear seat
(Backrest) back the rear seat and use it as he backrest angle can be hree levels.
Ignition key
To fold back!a Insert the ig
back the recountercloc
!b Remove th
To return!a Insert the ig
hand to supquickly andoriginal pocountercloc
!b Remove th
3
If you ride ware using thyour passenseriously hu
from motopassengerposition. Do not carare using tOp
eration
Gu
ide
nition key into the lock. Fold ar seat while turning the key kwise and holding it.
e ignition key.
nition key into the lock. Use your port the rear seat not fold down return the rear seat to its sition while turning the key kwise and holding it.
e ignition key.
WARNINGith a passenger when you e rear seat as a backrest, ger can be killed or rt by such as falling down
49continued
rcycle because your cannot ride with proper
ry a passenger when you he rear seat as a backrest.

50
Storage
Op
eration
Gu
ide
Rear seat hoRear seat canbackward uskit.
!a Adjust the2 P. 49
!b Remove thseat cover
B
Equipment (Continued)rizontal position adjustment be adjusted forward and
ing the hex wrench in the tool
rear seat to the upright position.
!c While pulling the ratchet plate cover toward rear, remove the rear hook and lift the cover up.
!d Tip the rear seat back in some degree.
Rear seat cover
olts ARear hook
Front hooks
Ratchet plate cover
e bolts A and remove the rear .
Slide the ratchet plate cover forward and remove the front hooks, then lift it up.

Bolts B
Bolt B
!e Remove thposition.
!f After the remake sure
!g Install the r
!h Install the rbolts A.
Op
eration
Gu
ide
e bolts B and adjust the rear seat
ar seat position adjustment, to tighten the bolts B securely.
atchet plate cover.
ear seat cover, then tighten the
51

Maint
Please readcarefully bedata.An optionadepartmen
Importance oMaintenanceMaintenanceRemoving & I
Front Seat...Right UnderSide Panel...Front LowerClip ............Battery .......
Spark Plugs ..Engine Oil ....
enance
“Importance of Maintenance” and “Maintenance Fundamentals”
fore attempting any maintenance. Refer to “Specifications” for servicel tool kit may be available. Check with your Honda dealer’s parts t.
f Maintenance ......................P. 53 Schedule...............................P. 55 Fundamentals ......................P. 58nstalling Body Components... P. 72...............................................P. 72 Cowl......................................P. 73...............................................P. 74 Cover.....................................P. 76
Coolant ....................................................... P. 88Brakes ......................................................... P. 90Side Stand .................................................. P. 93Drive Chain................................................. P. 94Throttle....................................................... P. 98Crankcase Breather.................................... P. 99Other Adjustments .................................. P. 100
Brake Lever ............................................. P. 100
...............................................P. 77...............................................P. 78...............................................P. 79...............................................P. 82Headlight Aim......................................... P. 101

Importa
Keeping yourabsolutely essprotect your iperformance,pollution. Maresponsibility.motorcycle beperiodic checkSchedule. 2 P
Importance
3
Improperlymotorcycleproblem bcrash in whhurt or kill
Always folmaintenanschedules
Main
tenan
cence of Maintenance
motorcycle well-maintained is ential to your safety and to nvestment, obtain maximum avoid breakdowns, and reduce air intenance is the owner’s Be sure to inspect your fore each ride, and perform the s specified in the Maintenance
. 55
For information about the exhaust emission and noise emission requirements of the U.S.Environmental Protection Agency (EPA), the California Air Resources Board (CARB), and Environment Canada (EC). 2 P. 133
Maintenance, replacement or repair of the emission control devices and systems may be performed by any motorcycle repair establishment or individual using parts that are “certified“ to EPA standards.
of Maintenance
WARNING maintaining your or failing to correct a efore you ride can cause a ich you can be seriously
ed.
USA
53
low the inspection and ce recommendations and
in this owner’s manual.

Importance o
54
Main
tenan
ce
Always read tbefore you beyou have the We cannot whazard that cmaintenance.not you shou
Maintenan
f Maintenance
he maintenance instructions gin each task, and make sure that tools, parts, and skills required. arn you of every conceivable an arise in performing Only you can decide whether or ld perform a given task.
Follow these guidelines when performing maintenance.● Stop the engine and remove the key.● Park your motorcycle on a firm, level surface
using the side stand or a maintenance stand to provide support.
● Allow the engine, muffler, brakes, and other high-temperature parts to cool before servicing as you can get burned.
● Run the engine only when instructed, and do so in a well-ventilated area.
ce Safety

Mainten
The maintenmaintenanceensure safe, proper emiss
Maintenanceaccordance wspecificationsequipped tecof these requrecord of mayour motorcyMake sure thmaintenance
Main
tenan
ceance Schedule
ance schedule specifies the requirements necessary to dependable performance, and ion control.
work should be performed in ith Honda’s standards and by properly trained and hnicians. Your dealer meets all irements. Keep an accurate intenance to help ensure that cle is properly maintained. at whomever performs the completes this record.
All scheduled maintenance is considered a normal owner operating cost and will be charged for by your dealer. Retain all receipts. If you sell the motorcycle, these receipts should be transferred with the motorcycle to the new owner.
55continued
Maintenance
56
Main
tenan
ce
Maintenance Lev : Intermediate. W
have the neceare provided in
: Technical. In tserviced by yo
Emiss
ion-
rela
ted
Item
s
Fuel Line
Throttle Oper
Air Cleaner*2
Crankcase Bre
Spark Plug
Valve Clearan
Engine Oil
Engine Oil Filt
Clutch Oil Filte
Engine Idle Sp
Radiator Cool
Cooling System
Evaporative Em
Schedule
el Maintenance Legend
Frequency*1
Items × 1,000 mi 0.6 4 8 12 16 20 24 Refer to page× 1,000 km 1.0 6.4 12.8 19.2 25.6 32.0 38.4
–
ation 98
–
ather*3 99
Every 16,000 mi (25,600 km): Every 32,000 mi (51,200 km): 79
ce –
Initial = 600 mi (1,000 km) or 1 month: Regular = Every 8,000 mi (12,800 km) or 12 months: 82
er 84
r 86
eed –
ant*5 88
–
ission Control System*4 –
I I I
I I I
R R
I R
I
RR
R R R R
R R
I I I I I I I
I I R
I I I
I I
e recommend service by your dealer, unless you ssary tools and are mechanically skilled. Procedures an official Honda Service Manual (2 P. 140).
he interest of safety, have your motorcycle ur dealer.
: Inspect (clean, adjust, lubricate, or replace, if necessary) : Replace : Lubricate : Clean
IR

Notes:*1 : At higher odo*2 : Service more *3 : Service more *4 : 50 STATE (me*5 : Replace every
Non
-Em
issio
n-Re
late
d Ite
ms
Drive Chain
Brake Fluid*5
Brake Pads We
Brake System
Brake Light Sw
Brake Lock Op
Headlight Aim
Side Stand
Suspension
Nuts, Bolts, Fa
Wheels/Tires
Steering Head
Maintenance ScheduleM
ainten
ance
meter readings, repeat at the frequency interval established here.frequently when riding in unusually wet or dusty areas.
Frequency*1
Items × 1,000 mi 0.6 4 8 12 16 20 24 Refer to page× 1,000 km 1.0 6.4 12.8 19.2 25.6 32.0 38.4
Every 500 mi (800 km): 94
90
ar 91
90
itch 92
eration 92
101
93
–
steners –
68
Bearings –
I
I I R I I R
I I I I I I
I I I I
I I I
I I I I I I
I I I
I I I
I I I
I I I I
I I I
I I I I
57
frequently when riding in rain or at full throttle.ets California). 2 years, or at indicated odometer interval, whichever comes first. Replacement requires mechanical skill.

58
Main
tenan
ce
Mainten
To ensure safperform a prethat any probride inspectionbecause havincan be a majo
Check the folyour motorcy● Tire tread w
limits. 2 P.● Lights, horn
normally.● Check the
Adjust slack
Check the folpassenger or ● Combined
2 P. 145● Cargo is se
Pre-ride Ins
ance Fundamentals
ety, it is your responsibility to -ride inspection and make sure lem you find is corrected. A pre- is a must, not only for safety, but g a breakdown, or even a flat tire, r inconvenience.
lowing items before you get on cle:ear and air pressures are within
68, and turn signals operate
condition of the drive chain. and lubricate as needed. 2 P. 94
lowing items if you are carrying a
Check the following items after you get on your motorcycle:● Throttle action moves smoothly without
binding. 2 P. 98● Brake lever and pedal operate normally.● Check the remaining fuel and refuel when
needed. 2 P. 43● Engine stop switch functions properly.
2 P. 32
Check the following items at regular intervals:● Oil level is between the upper and lower
marks. 2 P. 82● Brake fluid level is above the lower mark
(Front) and between the upper and lower marks (Rear). 2 P. 90
● Engine coolant level is between the upper and lower marks. 2 P. 88
pection
cargo:weight is within load limits.
cured properly.
● Parking brake works properly. 2 P. 92● Side stand function properly. 2 P. 93

You should almaintenance regardless of hif you ride fre
Also, check thMaintenance maintenance
Periodic Ch
Tires and wh
Fluid levels
Lights
Controls
Drive chain
FusesNuts & bolts
Maintenance FundamentalsM
ainten
ance
so perform other periodic checks at least once a month ow often you ride, or more often
quently.
e odometer reading against the Schedule and perform all that is due. 2 P. 55
ecks
eels Check the air pressure (2 P. 68), examine tread for wear and damage (2 P. 68), and check the wheels for damage.Check the engine oil level (2 P. 82), engine coolant level (2 P. 88), and brake fluid level (2 P. 90).Check that the headlight, position light, brake light, taillight and turn signals are working properly.Check the freeplay of the throttle grip (2 P. 98).Check the slack (2 P. 94), adjust the slack (2 P. 95), and lubricate
59
(2 P. 66) as needed.Check that you have a full supply of spare fuses.Check the major nuts and bolts, and tighten as needed.

Maintenance
60
Main
tenan
ce
Always use Hequivalents to
When orderinthe model namthe color labeframe under t
Replacing P
Fundamentals
onda Genuine Parts or their ensure reliability and safety.
g colored components, specify e, color, and code mentioned on
l. The color label is attached to the he front seat. 2 P. 72
arts
3WARNINGInstalling non-Honda parts may make your motorcycle unsafe and cause a crash in which you can be seriously hurt or killed.
Color label
Always use Honda Genuine Parts or equivalents that have been designed and approved for your motorcycle.

Your motorcybattery. You delectrolyte levbattery termincorroded.Do not removneed to remo
❙ What to doIf any of the fyour doctor.● Electrolyte u Wash yo
for at leapressure
● Electrolyte u Remove
skin thor
Battery
Maintenance FundamentalsM
ainten
ance
cle has a maintenance-free type o not have to check the battery
el or add distilled water. Clean the als if they become dirty or
e the battery cap seals. There is no ve the cap when charging.
in an emergencyollowing occur, immediately see
splashes into your eyes:ur eyes repeatedly with cool water st 15 minutes. Using water under can damage your eyes.splashes onto your skin:affected clothing and wash your
● Electrolyte splashes into your mouth:u Rinse mouth thoroughly with water, and
do not swallow.
3WARNINGThe battery gives off explosive hydrogen gas during normal operation.
A spark or flame can cause the battery to explode with enough force to kill or seriously hurt you.
Wear protective clothing and a face shield, or have a skilled mechanic do the battery servicing.
61continued
oughly using water.WARNING: Battery posts, terminals, and related accessories contain lead and lead compounds.Wash your hands after handling.

Maintenance
62
Main
tenan
ce
❙ Cleaning th1. Remove the2. If the termi
are coated warm wate
3. If the termithe terminaWear safet
4. After clean
The battery hadealer about battery. Alwaanother maintype.
Fundamentals
e Battery Terminals battery. 2 P. 78
nals are starting to corrode and with a white substance, wash with r and wipe clean.nals are heavily corroded, clean ls with a wire brush or sandpaper. y glasses.
ing, reinstall the battery.
s a limited life span. Consult your
❙ ChargingIf you use electrical accessories that drain the battery or you do not ride frequently, we recommend that you charge the battery every 30 days using a charger designed specifically for your Honda, which can be purchased from your dealer. Read the information that came with your battery charger and follow the instructions on the battery. Avoid using an automobile-type battery charger, as these can overheat a motorcycle battery and cause permanent damage.Make sure the ignition switch is in the OFF position before charging the battery.
NOTICEImproper charging can damage the battery. If you can’t charge the battery or it appears unable to hold a charge, contact your dealer.
when you should replace the ys replace the battery with tenance-free battery of the same

Fuses protect motorcycle. Ifmotorcycle streplace any b
❙ Inspecting aTurn off the iginspect fuses.fuse of the sa“Specification
NOTICEJump starting usyour motorcyclerecommended.
NOTICEInstalling non-Hthe electrical sysdamaging the s
Fuses
Maintenance FundamentalsM
ainten
ance
the electrical circuits on your something electrical on your ops working, check for and lown fuses. 2 P. 121
nd Replacing Fusesnition switch to remove and
If a fuse fails repeatedly, you likely have an electrical fault. Have your motorcycle inspected by your dealer.
ing an automobile battery can damage ’s electrical system and is not Bump starting is also not recommended.
onda electrical accessories can overload tem, discharging the battery and possibly ystem. NOTICE
Replacing a fuse with one that has a higher rating greatly increases the chance of damage to the electrical system.
Blown fuse
63
If a fuse is blown, replace with a me rating. For fuse ratings, see s.” 2 P. 147

Maintenance
64
Main
tenan
ce
Engine oil condeteriorates atime elapsed.Check the engrecommendeor old oil shoupossible.
❙ Selecting thFor recomme“Specification
If you use nonto make sure following stan● JASO T 903● SAE standa● API classific
Engine Oil
Fundamentals
sumption varies and oil quality ccording to riding conditions and
ine oil level regularly, and add the d engine oil if necessary. Dirty oil ld be changed as soon as
e Engine Oilnded engine oil, see s.” 2 P. 146
-Honda engine oil, check the label that the oil satisfies all of the dards: standard*1: MArd*2: 10W-30
*1. The JASO T 903 standard is an index for engine oils for 4-stroke motorcycle engines. There are two classes: MA and MB. For example, the following label shows the MA classification.
*2. The SAE standard grades oils by their viscosity.*3. The API classification specifies the quality and
performance rating of engine oils. Use SG or higher oils, excluding oils marked as “Energy Conserving” or “Resource Conserving” on the circular API service symbol.
Oil code
Oil classification
ation*3: SG or higher
Not recommended Recommended

Do not add oemergency. Usealed containbrake system possible.
Brake Fluid
NOTICEBrake fluid can Wipe up spills im
RecommenHonda DO
3
Clean filleronly DOT 4container.
Maintenance FundamentalsM
ainten
ance
r replace brake fluid, except in an se only fresh brake fluid from a er. If you do add fluid, have the
serviced by your dealer as soon as
The drive chain must be inspected and lubricated regularly. Inspect the chain more frequently if you often ride on bad roads, ride at high speed, or ride with repeated fast acceleration.
If the chain does not move smoothly, makes strange noises, has damaged rollers or loose pins or missing O-rings, or kinks, have the chain inspected by your dealer.
damage plastic and painted surfaces.mediately and wash thoroughly.
ded brake fluid:T 4 Brake Fluid or equivalent
WARNING cap before removing. Use fluid from a sealed
Drive Chain
65continued

Maintenance
66
Main
tenan
ce
Also inspect tsprocket. If eihave the spro
NOTICEUse of a new chchain wear.
Normal (GOOD)
Fundamentals
he front sprocket and rear wheel ther has worn or damaged teeth, cket replaced by your dealer.
❙ Cleaning and LubricatingAfter inspecting the slack, clean the chain and sprockets while rotating the rear wheel. Use a dry cloth with chain cleaner designed specifically for O-ring chains, or neutral detergent. Use a soft brush if the chain is dirty.After cleaning, wipe dry and lubricate with a lubricant designed specifically for use on O-ring chains.
ain with worn sprockets will cause rapid
Worn (REPLACE)
Damaged (REPLACE)
Recommended lubricant:Pro Honda HP Chain Lube or equivalent

Do not use a cleaner, a wirgasoline and cleaner or lubfor O-ring charubber O-ringAvoid gettingAvoid applyinspray onto yo
Pro Honda HPantifreeze and
A concentratinot provide ptemperature pA concentratibetter protect
Recommen
Concentrat50% antif
Maintenance FundamentalsM
ainten
ance
steam cleaner, a high pressure e brush, volatile solvent such as benzene, abrasive cleaner, chain ricant NOT designed specifically ins as these can damage the seals. lubricant on the brakes or tires. g excess chain lubricant to prevent ur clothes and the motorcycle.
is a pre-mixed solution of distilled water.
on of antifreeze below 40% will
This motorcycle is equipped with a viscous type air cleaner element which cannot be cleaned with compressed air or otherwise without degrading its performance.If the filter becomes dirty, replace it with a new one.
Service more frequently when riding in rain, at full throttle, or after the motorcycle is washed or overturned. Service if the deposit level can be
ded Coolant
ion:reeze and 50% distilled water
NOTICEUsing coolant not specified for aluminium engines or using ordinary tap water can cause corrosion.
Air Cleaner
Crankcase Breather
67
roper corrosion and cold rotection.
on of up to 60% will provide ion in colder climates.
seen in the transparent section of the drain tube.If the drain tube overflows, the air filter may become contaminated with engine oil causing poor engine performance. 2 P. 99

Maintenance
68
Main
tenan
ce
❙ Checking thVisually inspepressure gaugleast once a mtires look lowyour tires are
Tires (Inspe
Fundamentals
e Air Pressurect your tires and use an air e to measure the air pressure at onth or any time you think the
. Always check air pressure when cold. 2 P. 146
❙ Inspecting for DamageInspect the tires for cuts, slits, or cracks that exposes fabric or cords, or nails or other foreign objects embedded in the side of the tire or the tread. Also inspect for bumps or bulges in the side walls of the tires.
❙ Inspecting for Abnormal WearInspect the tires for signs of abnormal wear on the contact surface.
cting/Replacing)

❙ Inspecting TInspect the trebecome visiblFor safe ridingwhen the min
Maintenance FundamentalsM
ainten
ance
read Depthad wear indicators. If they
e, replace the tires immediately., you should replace the tires imum tread depth is reached.
Wear indicator location mark
3WARNINGRiding on tires that are excessively worn or improperly inflated can cause a crash in which you can be seriously hurt or killed.
Follow all instructions in this owner’s manual regarding tire inflation and maintenance.
69continued

Maintenance
70
Main
tenan
ce
Have your tireFor recommeminimum trea2 P. 146Follow these tires.● Use the rec
the same siand load ra
● Have the wGenuine bainstalled.
● Do not instthis motorccause the t
● Use only tuThe rims arduring hardtype tire cotire to rapid
Fundamentals
s replaced by your dealer.nded tires, air pressure and d depth, see “Specifications.”
guidelines whenever you replace
ommended tires or equivalents of ze, construction, speed rating, nge.heel balanced with Honda lance weights after the tire is
all a tube inside a tubeless tire on ycle. Excessive heat build-up can ube to burst.beless tires on this motorcycle.e designed for tubeless tires, and acceleration or braking, a tube-
3WARNINGInstalling improper tires on your motorcycle can adversely affect handling and stability, and can cause a crash in which you can be seriously hurt or killed.
Always use the size and type of tires recommended in this owner’s manual.
uld slip on the rim and cause the ly deflate.

The service lifmany factors,riding habits, tire air pressuand environmtires are not in
In addition tomaintenance,annual inspecreach 5 years all tires be remfrom the datetheir conditio
The last four dnumber) indic
Tire Service
Maintenance FundamentalsM
ainten
ance
e of your tires is dependent on including, but not limited to, road conditions, vehicle loading, re, maintenance history, speed, ental conditions (even when the use).
your regular inspections and it is recommended that you have tions performed once the tires old. It is also recommended that oved from service after 10 years
of manufacture, regardless of n or state of wear.
igits of the TIN (tire identification ate the date of manufacture.
❙ Tire Identification Number (TIN)The tire identification number (TIN) is a group of numbers and letters located on the sidewall of the tire.
Life
DOT XXXX XXXX 22 09DOT: This indicates that the tire meets
all requirements of the U.S. Department of Transportation.
!a XXXX: Factory code!b XXXX: Tire type code!c 22 09: Date of manufacture (week & year).
Example: week 22 in year 09.
!a !b !c
Tire Labeling ExampleTire identification number (TIN)
71

72
Main
tenan
ce
Removin
Front Sea
Ignition ke
g & Installing Body Components
t ❙ Removal1. Insert the ignition key into the seat lock,
and turn it counterclockwise. 2. Pull the front seat forward and up.
❙ Installation1. Insert the front and rear prongs into the
front and rear stays on the frame.2. Push back and down on the front of the
seat until it locks in place. Make sure that the front seat is locked securely in position by pulling it up lightly.
The front seat locks automatically when closed. Take care not to lock your key in the under seat compartment.
Prongs
Stays
Front seat
y
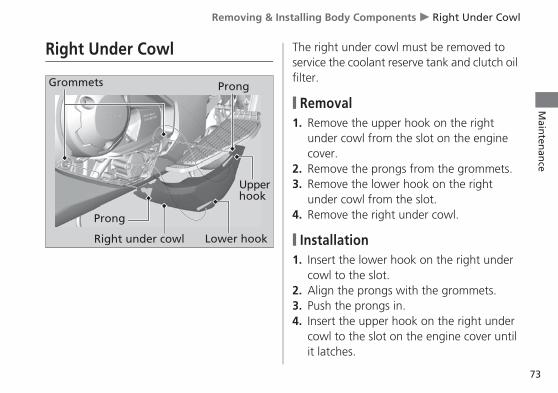
Right Und
Grommets
Rig
Pro
Removing & Installing Body Components u Right Under CowlM
ainten
ance
er Cowl The right under cowl must be removed to service the coolant reserve tank and clutch oil filter.
❙ Removal1. Remove the upper hook on the right
under cowl from the slot on the engine cover.
2. Remove the prongs from the grommets. 3. Remove the lower hook on the right
under cowl from the slot.4. Remove the right under cowl.
❙ Installation1. Insert the lower hook on the right under
cowl to the slot.2. Align the prongs with the grommets.
ht under cowl
ng
Prong
Lower hook
Upper hook
73
3. Push the prongs in.4. Insert the upper hook on the right under
cowl to the slot on the engine cover until it latches.

Removing &
74
Main
tenan
ce
Side Pane
The right sideservice the cospark plugs.The left side service the sp
❙ Removal
1. Remove th2. Remove th
Right side
Right s
Installing Body Components u Side Panel
l
panel must be removed to olant reserve tank and the
panel must be removed to ark plugs.
3. Remove the bolts B.4. Remove the prongs from the grommets.5. Remove the hooks.6. Remove the right side panel.
Right side panel Bolts BProng
HookBolts BGrommet
e bolts A. e right side duct panel.
ide duct panel Bolts A

1. Remove th2. Remove th
Left side
Bolts A
Removing & Installing Body Components u Side PanelM
ainten
ance
e bolts A. e left side duct panel.
3. Remove the bolts B.4. Remove the prongs from the grommets.5. Remove the hooks.6. Remove the left side panel.
❙ Installation
Left side duct panelLeft side panel
ProngHook
Bolts B Grommet
75
Install the parts in the reverse order of removal.

Removing &
76
Main
tenan
ce
Front Low
Clips
Front lower
Bolts
Installing Body Components u Front Lower Cover
er Cover The front lower cover must be removed to service the spark plugs.
❙ Removal1. Remove the right and left side panels.
2 P. 74, 75 2. Remove the clips. 2 P. 77 3. Remove the bolts.4. Remove the front lower cover.
❙ InstallationInstall the parts in the reverse order of removal.
cover
Clips
Bolt

Clip
The clip musfront lower c
❙ Removal1. Press dow
the lock.2. Pull the cl
❙ Installatio1. Push the b
2. Insert the 3. Press dow
clip.
Removing & Installing Body Components u ClipM
ainten
ance
t be removed to remove the over.
n on the center pin to release
ip out of the hole.
nottom of the center pin.
Center pin
77
clip into the hole.n on the center pin to lock the

Removing &
78
Main
tenan
ce
Battery
Negative terminal
Installing Body Components u Battery
❙ RemovalMake sure the ignition switch is off.1. Remove the front seat. 2 P. 722. Unhook the rubber strap.3. Disconnect the negative - terminal from
the battery.4. Disconnect the positive + terminal from
the battery.5. Remove the battery taking care not to
drop the terminal nuts.
❙ InstallationInstall the parts in the reverse order of removal. Always connect the positive + terminal first. Make sure that bolts and nuts are tight.Readjust the clock after the battery is reconnected since the clock goes wrong
Positive terminal
Rubber strap Battery
once the battery disconnected.For proper handling of the battery, see “Maintenance Fundamentals.“ 2 P. 61“Battery Goes Dead.“ 2 P. 117

Spark Pl
Checking
For the recom“Specificatio
Use only the plugs in the r
NOTICEUsing spark pluengine damage.
Main
tenan
ceugs
Spark Plugs
mended spark plugs, see ns.” 2 P. 146
recommended type of spark ecommended heat range.
This motorcycle uses spark plugs that have an iridium coated center electrode.Be sure to observe the following when servicing the spark plugs.● Do not clean the spark plugs. If an
electrode is contaminated with accumulated objects or dirt, replace the spark plug with a new one.
● To check the spark plug gap, use only a ‘‘wire-type feeler gauge.’’ To prevent damaging the iridium coating of the center electrode, never use a ‘‘leaf-type feeler gauge.’’
● Do not adjust the spark plug gap. If the gap is out of specification, replace the spark plug with a new one.
gs an improper heat range can cause
79continued

Spark Plugs u
80
Main
tenan
ce
1. Remove 2. Disconne3. Clean an
plug bas4. Remove
plug wre
Checking Spark Plugs
the front lower cover. 2 P. 76ct the spark plug caps.y dirt from around the spark es.the spark plugs using a spark nch.
5. Inspect the electrodes and center porcelain for deposits, erosion or carbon fouling.If the corrosion or deposit is heavy, replace the plug.
6. Make sure that a 1.1 mm wire-type feeler gauge cannot be inserted between the spark plug gap. If the gauge fits in the gap, replace the plug with a new one.
7. Make sure the plug washer is in good condition.Spark plug caps
Spark plug gap

8. With thethe sparkcross-thr
9. Tighten e● If the o
● If instato prev
1/8 turn
a) First,NGK
b) Thenc) Next,
1/8 t
NOTICEImproperly tightIf a plug is too lotoo tight, the th
Spark Plugs u Checking Spark PlugsM
ainten
ance
plug washers attached, thread plugs in by hand to prevent eading.ach spark plug:ld plug is good:
lling a new plug, tighten it twice ent loosening:
10. Reinstall the spark plug caps. Avoid pinching any cables or wires.
11. Reinstall the front lower cover.
after it seats
tighten the plug:: 2/3 turn after it seats. loosen the plug. tighten the plug again:urn after it seats.
ened spark plugs can damage the engine. se, a piston may be damaged. If a plug is reads may be damaged.
81

82
Main
tenan
ce
Engine O
Checking
1. If the engto 5 minu
2. Turn the iengine an
3. Place yourposition o
4. Remove thclean.
5. Insert the but don’t Check thaupper andcap/dipsti
6. Securely in
il
the Engine Oil
ine is cold, idle the engine for 3 tes.gnition switch off, stop the d wait 2 to 3 minutes. motorcycle in an upright n a firm, level surface.e oil fill cap/dipstick and wipe it
oil fill cap/dipstick until it seats, screw it in.t the oil level is between the lower level marks in the oil fill
ck.stall the oil fill cap/dipstick.
Oil fill cap/dipstick
Upper level
Lower level
Filler opening

Adding E
If the enginelevel mark, ad2 P. 641. Add the re
the upperuPlace yo
positioncheckin
uDo not mark.
uMake soil filler
uWipe u2. Securely r
NOTICEOverfilling with cause damage toand grades of ooperation.
Engine Oil u Adding Engine OilM
ainten
ance
ngine Oil
oil is below or near the lower d the recommended engine oil.
commended oil until it reaches level mark.ur motorcycle in an upright on a firm, level surface when g the oil level.overfill above the upper level
ure no foreign objects enter the opening.p any spills immediately.einstall the oil fill cap/dipstick.
For the recommended oil and oil selection guidelines, see “Maintenance Fundamentals.” 2 P. 64
83
oil or operating with insufficient oil can your engine. Do not mix different brands
il. They may affect lubrication and clutch

Engine Oil u
84
Main
tenan
ce
Changing
Changing thtools. We recmotorcycle s
Use a new Hequivalent sp
1. If the engto 5 min
2. Turn theengine a
3. Park on athe side
4. Place a d
NOTICEUsing the wrongthe engine.
Changing Engine Oil & Filter
Engine Oil & Filter
e oil and filter requires special ommend that you have your erviced by your dealer.
onda Genuine oil filter or ecified for your model.
ine is cold, idle the engine for 3 utes. ignition switch off, stop the nd wait for 2 to 3 minutes. firm, level surface and lower
stand.
5. Remove the oil fill cap/dipstick, drain bolt, and sealing washer to drain the oil.
6. Remove the oil filter with a filter wrench and let the remaining oil drain out. Make sure the prior seal is not stuck to the engine.uDiscard the oil and oil filter at an
oil filter can result in serious damage to
Drain bolt
Sealing washer
rain pan under the drain bolt. approved recycling center.

7. Apply a trubber se
8. Install a n
9. Install a ndrain bol
Torque:
Torque:
Rubber s
Oil filter
Engine Oil u Changing Engine Oil & FilterM
ainten
ance
hin coat of engine oil to the al of a new oil filter.ew oil filter and tighten.
ew sealing washer onto the
10. Fill the crankcase with the recommended oil (2 P. 64) and install the oil fill cap/dipstick.
11. Check the oil level. 2 P. 8212. Check that there are no oil leaks.
19 lbf·ft (26 N·m, 2.7 kgf·m).
eal
Required oilWhen changing oil & engine oil filter:3.6 US qt (3.4 liters)When changing oil only:3.4 US qt (3.2 liters)
85
t. Tighten the drain bolt.
22 lbf·ft (30 N·m, 3.1 kgf·m).

Engine Oil u
86
Main
tenan
ce
Changing
Use a new Hequivalent sp
1. Follow thOil & Filt
2. Remove
NOTICEUsing the wrongdamage to the t
Changing Clutch Oil Filter
Clutch Oil Filter
onda Genuine clutch oil filter or ecified for your model.
e steps 1-6 of Changing Engine er. 2 P. 84the right under cowl. 2 P. 73
3. Remove the clutch oil filter cover, clutch oil filter and spring by removing the clutch oil filter cover bolts.uDiscard the oil and clutch oil filter at
an approved recycling center. clutch oil filter can result in serious ransmission.
Clutch oil filter cover
O-ringSpring Clutch oil filter
OUT-SIDE mark
Bolts

4. Install thrubber seYou will clutch oicover.
5. Replace tof engineinstalling
6. Install thcover.
7. Install thtighten.
8. Install th9. Apply a t
rubber se2 P. 85
10. Install a n
Torque:
Engine Oil u Changing Clutch Oil FilterM
ainten
ance
e new clutch oil filter with the al facing in, toward the engine.see “OUT-SIDE“ mark on the l filter body, toward the filter
he O-ring and apply a thin coat oil to the new O-ring before
it.e spring and the clutch oil filter
e clutch oil filter cover bolts and
e right under cowl. 2 P. 73hin coat of engine oil to the al of a new engine oil filter.
ew engine oil filter and tighten.
11. Install a new sealing washer onto the drain bolt. Install the drain bolt and tighten.
12. Fill the crankcase with the recommended oil (2 P. 64) and install the oil fill cap/dipstick.
13. Check the oil level. 2 P. 8214. Check that there are no oil leaks.
Torque: 22 lbf·ft (30 N·m, 3.1 kgf·m).
Required oilWhen changing oil, engine oil filter & clutch oil filter:3.6 US qt (3.4 liters)
87
19 lbf·ft (26 N·m, 2.7 kgf·m).

88
Main
tenan
ce
Coolant
Checking
1. Place yoursurface.
2. Hold yourposition.
3. Check thathe UPPERreserve ta
the Coolant
motorcycle on a firm, level
motorcycle in an upright
t the coolant level is between and LOWER level marks in the
nk.
If the coolant level is dropping noticeably or the reserve tank is empty, you likely have a serious leak. Have your motorcycle inspected by your dealer.
Adding Coolant
If the coolant level is below the LOWER level, add the recommended coolant (2 P. 67) until the level reaches the UPPER level mark.Add fluid only from the reserve tank cap and do not remove the radiator cap.
UPPER level
LOWER level
Reserve tank

1. Remove th2. Remove th
fluid whileuDo not
mark.uMake s
reserve3. Securely r4. Install the
3
Removing engine is hspray out,
Always letcool downradiator ca
Coolant u Changing CoolantM
ainten
ance
e right side panel. 2 P. 74e reserve tank cap and add monitoring the coolant level.overfill above the UPPER level
ure no foreign objects enter the tank opening.einstall the cap. right side panel.
Changing Coolant
Have your dealer change the coolant unless you have the proper tools and are mechanically qualified.
WARNINGthe radiator cap while the ot can cause the coolant to potentially scalding you.
the engine and radiator
Reserve tank cap
89
before removing the p.
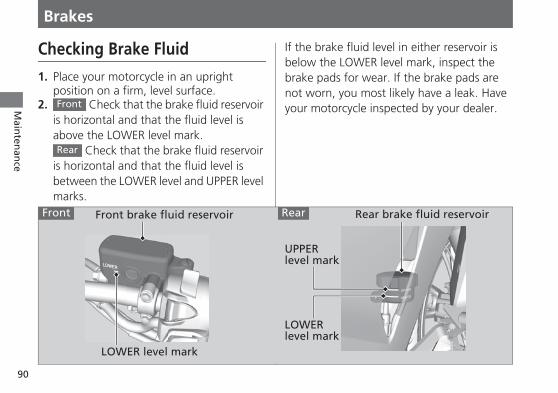
90
Main
tenan
ce
Brakes
Checking
1. Place yourposition o
2. Chis horizonabove the
Cheis horizonbetween tmarks.
Front
Rear
FrFront
Brake Fluid
motorcycle in an upright n a firm, level surface.eck that the brake fluid reservoir tal and that the fluid level is LOWER level mark.ck that the brake fluid reservoir
tal and that the fluid level is he LOWER level and UPPER level
If the brake fluid level in either reservoir is below the LOWER level mark, inspect the brake pads for wear. If the brake pads are not worn, you most likely have a leak. Have your motorcycle inspected by your dealer.
ont brake fluid reservoir Rear
UPPER level mark
Rear brake fluid reservoir
LOWER level mark
LOWER level mark

Inspectin
Check the coindicators.
The pbrake pad is
The pabrake pad is
Front
Rear
Front
Wear indicator
Brakes u Inspecting the Brake PadsM
ainten
ance
g the Brake Pads
ndition of the brake pad wear
ads need to be replaced if a worn to the indicator.ds need to be replaced if a worn to the indicator.
1. Inspect the brake pads from below the brake caliper.
2. Inspect the brake pads from the rear right of the motorcycle.
If necessary have the pads replaced by your dealer.Always replace both left and right brake pads at the same time.
Front
Rear
PadsRear
Pads
91
Disc
Wear indicator
Wear indicator
Disc
Wear indicator

Brakes u Ad
92
Main
tenan
ce
Adjusting
Check the opswitch. Insert hands cover hole.Hold the braadjusting nuoperates toodirection B if
B
Adjusting
Brake light
justing the Brake Light Switch
the Brake Light Switch
eration of the brake light
from front of the front lower
Inspecting the Parking Brake
Place your motorcycle on a firm, level surface. Stop the engine and push your motorcycle while applying the parking brake lever to check the efficacy of the parking brake.
A
nut
switch
Front lower cover holeParking brake lever
ke light switch and turn the t in the direction A if the switch late, or turn the nut in the the switch operates too soon.
If the efficacy of the parking brake becomes weak, have the brake adjusted by your dealer.

Side Sta
1. Check thasmoothly.squeaky, clubricate t
2. Check thetension.
Side stand spring
Main
tenan
cend
t the side stand operates If the side stand is stiff or lean the pivot area and he pivot bolt with clean grease. spring for damage or loss of
3. Sit on the motorcycle and raise the side stand.
4. Start the engine and press the D/S side of N-D switch to switch the transmission into D mode.
5. Lower the side stand all the way. The engine should stop as you lower the side stand. If the engine doesn’t stop, have your motorcycle inspected by your dealer.
93

94
Main
tenan
ce
Drive Ch
InspectinSlack
Check the dralong the chaall points, sobinding.Have the cha
1. Stop the e2. Place your
on a level
ain
g the Drive Chain
ive chain slack at several points in. If the slack is not constant at
me links may be kinked and
in inspected by your dealer.
ngine. motorcycle on the side stand
surface.
3. Check the slack in the lower half of the drive chain midway between the sprockets.
uDo not ride your motorcycle if the slack exceeds 1 15/16 in (50 mm).
Drive chain slack:13/16 to 1 3/16 in (20 to 30 mm)
4. Roll the motorcycle forward and check that the chain moves smoothly.

5. Inspect th6. Clean and
2 P. 66
Adjusting
Adjusting theHave the drivdealer.
When adjustcareful not tosensor and p
1. Stop the e2. Place your
on a level3. Loosen th4. Loosen th
swingarm
Drive Chain u Adjusting the Drive Chain SlackM
ainten
ance
e sprockets. 2 P. 66 lubricate the drive chain.
the Drive Chain Slack
chain requires special tools.e chain slack adjusted by your
ing the drive chain slack, be damage the wheel speed
ulser ring.
ngine. motorcycle on the side stand
surface.
Rear axle nut
Pulser ring Wheel speed sensor
Adjusting plate
Lock nut
Adjusting boltScale graduation
Rear edge of adjusting plate
Lock nut
Scale
95continued
e rear axle nut.e lock nuts on both sides of the .
Adjusting bolt
graduation

Drive Chain u
96
Main
tenan
ce
5. Turn bothnumber ochain slacbolts counchain. Turto provideAdjust thebetween twheel sprCheck the
6. Check reathe end ofwith the sof the swiBoth markis misalignadjusting and reche
7. Tighten th
Torque:
Adjusting the Drive Chain Slack
adjusting bolts an equal f turns until the correct drive k is obtained. Turn the adjusting terclockwise to tighten the n the adjusting bolts clockwise more slack. slack at a point midway he front sprocket and the rear ocket. drive chain slack. 2 P. 94r axle alignment by making sure the chain adjusting plate aligns cale graduations on both sides ngarm.s should correspond. If the axle ed, turn the right or left bolts until the marks are aligned
8. Tighten the drive chain adjusting bolts lightly, then hold the adjusting bolts and tighten the lock nuts.
9. Recheck drive chain slack.
If a torque wrench was not used for installation, see your dealer as soon as possible to verify proper assembly.Improper assembly may lead to loss of braking capacity.
Torque: 15 lbf·ft (21 N·m, 2.1 kgf·m).
ck chain slack.e rear axle nut.
72 lbf·ft (98 N·m, 10.0 kgf·m).

❙ Checking Check the chthe drive chaadjusting plalabel after thproper slack,and must be
If necessary, your dealer.
Chain: D
Drive Chain u Adjusting the Drive Chain SlackM
ainten
ance
the Drive Chain Wearain wear label when adjusting in. If the rear edge of the te enters the red zone on the e chain has been adjusted to the the chain is excessively worn replaced.
have the drive chain replaced by
ID520V0 or RK520KHO
Red zone
97
Rear edge of adjusting plate

98
Main
tenan
ce
Throttle
Checking
With the engrotates smooopen in all stfreeplay is comove smoothcable is daminspected by
Freeplay at1/16 to 1/
Fre
the Throttle
ine off, check that the throttle thly from fully closed to fully eering positions and throttle rrect. If the throttle does not ly, close automatically, or if the
aged, have the motorcycle your dealer.
Adjusting the Throttle Freeplay
1. Slide the cable boot.2. Loosen the lock nut.3. Turn the adjuster until the freeplay is 1/16
to 1/4 in (2 to 6 mm).4. Tighten the lock nut, return the cable
boot, and inspect the throttle action again.
the throttle grip flange:4 in (2 to 6 mm).
eplay
Flange
Throttle grip
–
Cable boot
AdjusterLock nut +

Crankca
Cleaning Breather
1. Place a sucrankcase
2. Remove thfrom the t
3. Drain dep4. Install the
Crankca
Main
tenan
cese Breather
the Crankcase
itable container under the breather tube.e crankcase breather tube plug ube.osits into a suitable container. crankcase breather tube plug.
99
se breather tube plug
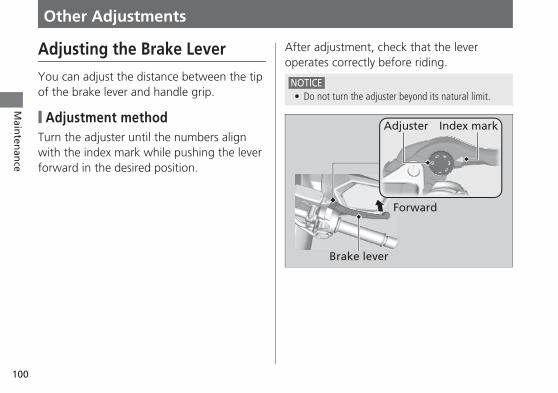
100
Main
tenan
ce
Other A
Adjusting
You can adjuof the brake
❙ AdjustmeTurn the adjuwith the indeforward in th
djustments
the Brake Lever
st the distance between the tip lever and handle grip.
nt methodster until the numbers align x mark while pushing the lever e desired position.
After adjustment, check that the lever operates correctly before riding.
NOTICE• Do not turn the adjuster beyond its natural limit.
Forward
Index markAdjuster
Brake lever

Adjusting
You can adjufor proper alias necessary.Obey local la
Other Adjustments u Adjusting the Headlight AimM
ainten
ance
the Headlight Aim
st vertical aim of the headlight gnment. Turn the knob in or out
ws and regulations.
LowerRaise
Knob
101
Troub
Engine Will NOverheating indicator is
Warning IndiLow Oil PresPGM-FI (ProMalfunctio
ABS (Anti-lo
leshooting
ot Start ...............................P. 103(High coolant temperature on)........................................P. 104cators On or Flashing .........P. 105sure Indicator........................P. 105grammed Fuel Injection) n Indicator Lamp (MIL) ..........P. 105ck Brake System) Indicator ....P. 106
If the “-” Indicator is Blinking in the Gear Position Window While Riding............. P. 107
Other Warning Indication ....................... P. 108Fuel Gauge Failure Indication .................. P. 108
Tire Puncture............................................ P. 109Electrical Trouble ..................................... P. 117
Battery Goes Dead .................................. P. 117Burned-out Light Bulb............................. P. 117
Blown Fuse ............................................. P. 121
Engine W
❙ Starter MDoes Not
Check the fo● Check the
sequence. ● Check that
tank.● Check if th
lamp (MIL)u If the in
dealer a
Trou
blesh
oo
ting
ill Not Start
otor Operates But Engine Startllowing items:correct engine starting 2 P. 35 there is gasoline in the fuel
e PGM-FI malfunction indicator is on.dicator light is on, contact your s soon as possible.
❙ Starter Motor Does Not OperateCheck the following items:● Make sure the engine stop switch is in the
(Run) position. 2 P. 32● Check for a blown fuse. 2 P. 121● Check for a loose battery connection or
battery terminal corrosion. 2 P. 62● Check the condition of the battery
2 P. 117If the problem continues, have your motorcycle inspected by your dealer.
103

104
Trou
blesh
oo
ting
Overhea
The engine isfollowing occ● High coola
come on.● AcceleratioIf this occursroad and perExtended fascoolant temp
1. Stop the eand then ON positio
NOTICEContinuing to riserious damage
ting (High coolant temperature indicator is on)
overheating when the urs:nt temperature indicator to
n becomes sluggish., pull safely to the side of the form the following procedure.t idling may cause the high erature indicator to come on.
ngine using the ignition switch, turn the ignition switch to the n.
2. Check that the radiator fan is operating, and then turn the ignition switch to the OFF position.
Suspect a fault. Do not start the engine. Transport your motorcycle to your dealer.
Allow the engine to cool with the ignition switch in the OFF position.
3. After the engine has cooled, inspect the radiator hose and check if there is a leak. 2 P. 88
Do not start the engine. Transport your motorcycle to your dealer.
4. Check the coolant level in the reserve tank, and add coolant as necessary.
de with an overheated engine can cause to the engine.
If the fan is not operating:
If the fan is operating:
If there is a leak:
2 P. 885. If 1-4 check normal, you may continue
riding, but closely monitor the high coolant temperature indicator.

Warning
Low Oil P
If the low oilpull safely tothe engine.
1. Check thenecessary.
2. Start the euOnly co
pressurRapid accelerthe low oil pespecially if tIf the low oilwhen the oilthe engine a
NOTICEContinuing to ridamage to the e
Trou
blesh
oo
ting
Indicators On or Flashing
ressure Indicator
pressure indicator to come on, the side of the road and stop
engine oil level, and add oil as 2 P. 82ngine.ntinue riding if the low oil e indicator goes off.ation may momentarily cause ressure indicator to come on, he oil is at or near the low level. pressure indicator stays on
If the engine oil level goes down rapidly, your motorcycle may have a leak or another serious problem. Have your motorcycle inspected by your dealer.
PGM-FI (Programmed Fuel Injection) Malfunction Indicator Lamp (MIL)
If the indicator to come on while riding, you may have a serious problem with the PGM-FI system. Reduce speed and have your motorcycle inspected by your dealer as soon as possible.
de with low oil pressure can cause serious ngine.
105
level is at the proper level, stop nd contact your dealer.
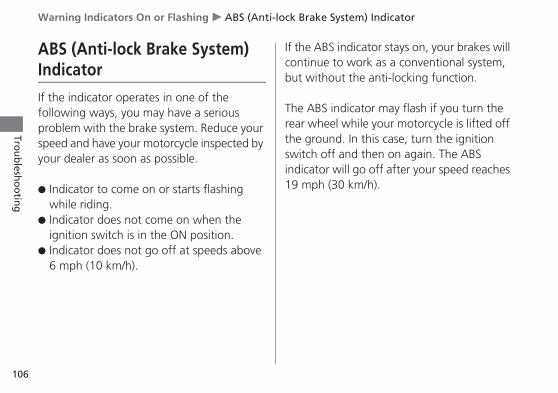
Warning Indi
106
Trou
blesh
oo
ting
ABS (AntIndicator
If the indicatfollowing waproblem withspeed and hayour dealer a
● Indicator towhile ridin
● Indicator dignition sw
● Indicator d6 mph (10
cators On or Flashing u ABS (Anti-lock Brake System) Indicator
i-lock Brake System)
or operates in one of the ys, you may have a serious the brake system. Reduce your ve your motorcycle inspected by s soon as possible.
come on or starts flashing g.oes not come on when the itch is in the ON position.oes not go off at speeds above km/h).
If the ABS indicator stays on, your brakes will continue to work as a conventional system, but without the anti-locking function.
The ABS indicator may flash if you turn the rear wheel while your motorcycle is lifted off the ground. In this case, turn the ignition switch off and then on again. The ABS indicator will go off after your speed reaches 19 mph (30 km/h).
If the “-”
If the “-” indyou may havDual Clutch TPark your moyour motorcyimmediately.There is a poto a dealer, ibelow.1. Turn the i2. Turn the i
the engine
Turn the ignimotorcycle bdisengage thTurn the ignistart the eng
If you cannot
Trou
blesh
oo
ting
Indicator is Blinking in the Gear Position Window While Riding
icator is blinking while riding, e a serious problem with the ransmission system.torcycle in a safe place and have cle inspected by a dealer
ssibility for you to ride yourself f you follow the procedure
gnition switch to OFF.gnition switch to ON and start .
tion switch to OFF and move the ack and forth slightly (to e gears).
Start the engine while applying the front or rear brake lever.
When a gear position is shown in the gear position indicator, you can ride in that gear.Take your motorcycle to your dealer riding at a safe speed.
Damage is preventing you from riding. Have your motorcycle inspected by your dealer immediately.
start the engine:
If you still cannot start the engine:
If you can shift from N to D mode:
If you can’t shift from N to D mode and the “-” indicator is blinking:
107
tion switch to ON again and ine.

108
Trou
blesh
oo
ting
Other W
Fuel Gau
If the fuel sysindicators wiillustration.If this occurspossible.
arning Indication
ge Failure Indication
tem has an error, the fuel gauge ll be displayed as shown in the
, see your dealer as soon as

Tire Pun
Repairing a prequires specWe recommeperformed bAfter an emetire inspected
EmergenRepair Ki
If your tire hamake an emetire repair kitFollow the inemergency tiRiding your mrepair is very(50 km/h). Hdealer as soo
Trou
blesh
oo
ting
cture
uncture or removing a wheel ial tools and technical expertise. nd you have this type of service
y your dealer.rgency repair, always have the /replaced by your dealer.
cy Repair Using a Tire t
s a minor puncture, you can rgency repair using a tubeless
.structions provided with the re repair kit.otorcycle with a temporary tire
Removing Wheels
Follow these procedures if you need to remove a wheel in order to repair a puncture.
3WARNINGRiding your motorcycle with a temporary tire repair can be risky. If the temporary repair fails, you can crash and be seriously injured or killed.
If you must ride with a temporary tire repair, ride slowly and carefully and do not exceed 30 mph (50 km/h) until the tire is replaced.
109continued
risky. Do not exceed 30 mph ave the tire replaced by your n as possible.

Tire Puncture
110
Trou
blesh
oo
ting
When removcareful not tosensor and p
❙ Front WhRemoval
Mounting b
Tape or clot
Wheel sp
u Removing Wheels
ing and installing the wheel, be damage the wheel speed
ulser ring.
eel
1. Park on a firm, level surface.2. Cover right side of the front wheel and
brake caliper with protective tape or cloth.3. On the right side, remove the mounting
bolts and remove the brake caliper.uSupport the brake caliper assembly so
that it doesn’t hang from the brake hose. Do not twist the brake hose.
uAvoid getting grease, oil, or dirt on the disc or pad surfaces.
uDo not pull the brake lever while the brake caliper is removed.
uTake care to prevent the brake caliper from scratching the wheel during removal.
4. Remove the front axle bolt.5. Loosen the right axle pinch bolts.olts
h Brake caliper Pulser ring
Side collar
Axle pinch bolts
Front axle bolt
eed sensor

6. Support yraise the fa mainten
7. Loosen th8. On the lef
shaft, andwheel.
A
Side collar
Tire Puncture u Removing WheelsTro
ub
lesho
otin
g
our motorcycle securely and ront wheel off the ground using ance stand or a hoist.e left axle pinch bolts.t side, withdraw the front axle remove the side collars and
Installation1. Attach the side collars to the wheel.2. On the left side, place the wheel between
the fork legs and insert the lightly greased front axle shaft to the end, through the left fork leg and wheel hub.
3. Align the end of the front axle shaft with the surface of the fork leg.Front axle shaft
Surface of fork reg
111continued
xle pinch boltsEnd of front axle shaft

Tire Puncture
112
Trou
blesh
oo
ting
4. Tighten ththe axle.
5. Tighten th
6. Loosen th7. Tighten th
8. Install themounting
uTake cafrom scinstalla
uUse newinstallin
Torque:
Torque:
Torque:
NOTICEWhen instalfork legs, cato avoid scr
u Removing Wheels
e left axle pinch bolts to hold
e axle bolt.
e left axle pinch bolts.e right axle pinch bolts.
brake caliper and tighten the bolts.
re to prevent the brake caliper ratching the wheel during tion.
mounting bolts when g the brake caliper.
9. Lower the front wheel on the ground.10. Apply the brake lever and pump the fork
several times.11. Retighten the left axle pinch bolts.
12. Raise the front wheel off the ground again, and check that the wheel rotates freely after you release the brake.
13. Uncover the protective tape or cloth.
If a torque wrench was not used for installation, see your dealer as soon as possible to verify proper assembly.Improper assembly may lead to loss of braking capacity.
44 lbf·ft (59 N·m, 6.0 kgf·m).
16 lbf·ft (22 N·m, 2.2 kgf·m).
22 lbf·ft (30 N·m, 3.1 kgf·m).
Torque: 16 lbf·ft (22 N·m, 2.2 kgf·m).
ling the brake caliper into position on the refully fit the brake disc between the pads atching them.

❙ Rear WheRemoval1. Support y
raise the ra mainten
2. Release th3. Remove th
the parkin
Tire Puncture u Removing WheelsTro
ub
lesho
otin
g
el
our motorcycle securely and ear wheel off the ground using ance stand or a hoist.e parking brake.e mounting bolts and remove g brake caliper.
Mounting bolts
Parking brake caliper
113continued

Tire Puncture
114
Trou
blesh
oo
ting
4. Loosen thturn the acan be momaximum
5. Remove thwheel sprforward.
6. Remove th7. Remove th
bracket, ruSuppor
that it dhose. D
uAvoid gdisc to
uDo notwheel i
uDo notwhile th
u Removing Wheels
e rear axle nut, lock nuts and djusting bolts so the rear wheel ved all the way forward for
drive chain slack.e drive chain from the rear
ocket by pushing the rear wheel
e rear axle nut and washer.e rear axle shaft, brake caliper
ear wheel and side collars.t the brake caliper assembly so oesn’t hang from the brake o not twist the brake hose.etting grease, oil, or dirt on the pad surfaces. push the brake pedal while the s removed.
Wheel speed sensor
Pulser ring
Lock nut
Adjusting bolt
Rear axle nut
Right side collar
Washer
Lock nutDrive chain
Left side collar
pull the parking brake lever e wheel is removed.
Rear axle shaft
Adjusting bolt

Installation1. Attach the
their origi2. To install
removal puTake ca
from scinstallat
NOTICEWhen installingfit the brake disthem.
Tire Puncture u Removing WheelsTro
ub
lesho
otin
g
right and left side collars in nal locations on the wheel.the rear wheel, reverse the rocedure.re to prevent the brake caliper ratching the wheel during ion.
3. Make sure that the slot on the brake caliper bracket is positioned in the lug on the swingarm.
the brake caliper into position, carefully c between the pads to avoid scratching
Slot
Swingarm
Brake caliper bracket Lug
115continued

Tire Puncture
116
Trou
blesh
oo
ting
4. Adjust the5. Install and
6. Tighten thlightly, thetighten th
7. After instapedal sevewheel rotthe brakerotate free
Torque:
Torque:
u Removing Wheels
drive chain. 2 P. 95 tighten the rear axle nut.
e drive chain adjusting bolts n hold the adjusting bolts and e lock nuts.
lling the wheel, apply the brake ral times, then recheck the
ates freely. Recheck the wheel if drags or if the wheel does not ly.
8. Install the parking brake caliper and tighten the mounting bolts.
uTake care to prevent the brake caliper from scratching the wheel during installation.
uUse new mounting bolts when installing the parking brake caliper.
If a torque wrench was not used for installation, see your dealer as soon as possible to verify proper assembly.
72 lbf·ft (98 N·m, 10.0 kgf·m).
15 lbf·ft (21 N·m, 2.1 kgf·m).
Torque: 23 lbf·ft (31 N·m, 3.2 kgf·m).
NOTICEWhen installing the brake caliper into position, carefully fit the brake disc between the pads to avoid scratching them.
Improper assembly may lead to loss of braking capacity.

Electrica
Battery G
Charge the bbattery chargRemove the before chargDo not use acharger, as thbattery and cIf the batteryrecharging, c
NOTICEJump starting urecommended, electrical system
Trou
blesh
oo
ting
l Trouble
oes Dead
attery using a motorcycle er.
battery from the motorcycle ing.n automobile-type battery ese can overheat a motorcycle ause permanent damage. does not recover after ontact your dealer.
Burned-out Light Bulb
All light bulb on the motorcycle are LEDs.If there is a LED which is not turned on, see your dealer for this service.
sing an automobile battery is not as this can damage your motorcycle’s .
117continued

Electrical Tro
118
Trou
blesh
oo
ting
❙ Headlight
The headlighIf there is a Lyour dealer f
Headlight
uble u Burned-out Light Bulb
t uses several LEDs.ED which is not turned on, see or this service.
❙ Brake/Tail Light
The brake and tail light uses several LEDs.If there is a LED which is not turned on, see your dealer for this service.
Brake/tail light

❙ Front Tur
The front turseveral LEDs.If there is a Lyour dealer f
Fr
Electrical Trouble u Burned-out Light BulbTro
ub
lesho
otin
g
n Signal/Position Light
n signal/position light uses
ED which is not turned on, see or this service.
❙ Rear Turn Signal Light
The rear turn signal light uses several LEDs.If there is a LED which is not turned on, see your dealer for this service.
ont turn signal/position lights Rear turn signal lights
119continued

Electrical Tro
120
Trou
blesh
oo
ting
❙ License Pl
The license pIf there is a Lyour dealer f
uble u Burned-out Light Bulb
ate Light
late light uses several LEDs.ED which is not turned on, see or this service.
License plate light

Blown Fu
Before handlReplacing Fu
❙ Fuse Box 1. Remove th2. Remove th3. Pull the fu
the tool kblown fuswith a spa
4. Install the5. Install the
Electrical Trouble u Blown FuseTro
ub
lesho
otin
g
se
ing fuses, see “Inspecting and ses.” 2 P. 63
Fusese front seat. 2 P. 72e fuse box cover.ses out with the fuse puller in it one by one and check for a e. Always replace a blown fuse re of the same rating.
fuse box cover. front seat.
Fuse box covers
Spare fuses
121continued

Electrical Tro
122
Trou
blesh
oo
ting
❙ Main Fuse
1. Remove th2. Remove th
the guide3. Disconnec
starter ma
Main fuse
Starter mag
G
uble u Blown Fuse
e front seat. 2 P. 72
4. Pull the main fuse out and check for a blown fuse. Always replace a blown fuse with a spare of the same rating.uSpare main fuse is provided in the
starter magnetic switch.5. Install parts in the reverse order of
removal.
Wire connector
Spare main fuse
netic switch
uide
NOTICEIf a fuse fails repeatedly, you likely have an electrical problem. Have your motorcycle inspected by your dealer.
e starter magnetic switch from .t the wire connector of the gnetic switch.

Keys .............Instruments, CCaring for YoStoring YourTransportingYou & the EnVehicle IdentEmission ConCatalytic ConOxygenated Authorized MWarranty Cov
Information
............................................. P. 124ontrols, & Other Features ...P. 125ur Motorcycle .................... P. 126
Motorcycle......................... P. 129 Your Motorcycle ............... P. 130vironment .......................... P. 131ification Number................ P. 132trol Systems ....................... P. 133
Honda Contacts ........................................P. 142 Reporting Safety Defects..............P. 144USA
verter.................................. P. 138Fuels.................................... P. 139anuals................................ P. 140erage and Service............. P. 141

Keys
124
Info
rmatio
n
Keys
This motorcyctag with a kethe spare key To make a duthe key tag toIf you lose all switch assemremoved by ynumber.
A metal key harea surround
Ignition ke
le has two ignition keys and a key y number and a bar code. Store and the key tag in a safe location. plicate key, take the spare key and your dealer or a locksmith.keys and the key tag, the ignition bly will probably have to be our dealer to determine the keyolder may cause damage to the ing the ignition switch.
y
Ignition key Key tag
Key number and bar code

InstrumOther Fe
The headlightswitch is on. Lthe engine stoDo not turn th
Do not use theemergency. Doengine to suddIf you stop thswitch, turn thso will drain t
The display loexceeds 999,9
Ignition Sw
Engine Sto
Odometer
Instruments, Controls, & Other FeaturesIn
form
ation
ents, Controls, & atures
is always on when the ignition eaving the ignition switch on with pped will drain the battery.e key while riding.
engine stop switch except in an ing so when riding will cause the enly turn off, making riding unsafe.
e engine using the engine stop e ignition switch off. Failing to do
he battery.
The tripmeter A, B returns to 0.0 when the readout exceeds 9,999.9.
The owner’s manual, registration, and insurance information can be stored in the plastic document bag located the front seat of the right side. 2 P. 44
A banking (lean angle) sensor automatically stops the engine and fuel pump if the motorcycle falls over. To reset the sensor, you must turn the ignition switch to OFF and back to the ON position before the engine can be
itch
p Switch
Tripmeter
Document Bag
Ignition Cut-off System
125
cks at 999,999 when the readout 99.
restarted.

Caring for Yo
126
Info
rmatio
n
Caring fFrequent cleaensure the lifemotorcycle mproblems.In particular, sice on roads pcorrosion. Alwthoroughly afroads.
Allow the enghigh-tempera1. Rinse your
garden hos2. If necessary
with mild cu Clean th
plastic coavoid scr
Washing
ur Motorcycle
or Your Motorcyclening and polishing is important to of your Honda. A clean
akes it easier to spot potential
eawater and salts used to prevent romote the formation of ays wash your motorcycle
ter riding on coastal or treated
ine, muffler, brakes, and other ture parts to cool before washing.motorcycle thoroughly using a e to remove loose dirt.
Avoid directing water into the air cleaner, muffler, and electrical parts.
3. Thoroughly rinse your motorcycle with plenty of clean water and dry with a soft, clean cloth.
4. After the motorcycle dries, lubricate any moving parts.u Make sure that no lubricant spills onto the
brakes or tires. Brake discs, pads, drums or shoes contaminated with oil will suffer greatly reduced braking effectiveness and can lead to a crash.
5. Lubricate the drive chain immediately after washing and drying the motorcycle.
6. Apply a coat of wax to prevent corrosion.u Avoid products that contain harsh
detergents or chemical solvents. These can damage the metal, paint, and plastic on
, use a sponge or a soft towel leaner to remove road grime.e headlight lens, panels, and other mponents with extra care to atching them.
your motorcycle.Keep the wax clear of the tires and brakes.
u If your motorcycle has any matte painted parts, do not apply a coat of wax to the matte painted surface.

❙ Washing PrFollow these g● Do not useu High-pre
moving prenderin
● Do not direu Water in
and caus● Dry the brau Water ad
effectivebrakes indry them
● Do not direu Water in
damage belongin
● Do not direu Water in
engine f
Caring for Your MotorcycleIn
form
ation
ecautionsuidelines when washing:
high-pressure washers:ssure water cleaners can damage arts and electrical parts,
g them inoperable.ct water at the muffler: the muffler can prevent starting es rust in the muffler.kes:versely affects braking
ness. After washing, apply the termittently at low speed to help .ct water under the front seat: the under seat compartment can your documents and other gs.
● When you wash your motorcycle, bring the rear seat down to its original position.u Water in the under seat compartment can
damage moving parts rendering them inoperable.
● Do not direct water near the headlight.● Do not use waxes containing compounds on
matte painted surface:u Use a soft cloth or sponge, plenty of
water, and a mild detergent to clean matte painted surfaces. Dry with a soft clean cloth.
127continued
ct water at the air cleaner: the air cleaner can prevent the rom starting.

Caring for Yo
128
Info
rmatio
n
Aluminum wimud, or roadregularly and scratches:● Do not use
cleaners co● Avoid ridin
Follow these and blemishe● Wash gent
of water.● To remove
detergent awater.
● Avoid gettidetergents headlight.
Aluminum
Panels
ur Motorcycle
ll corrode from contact with dirt, salt. Clean aluminum parts follow these guidelines to avoid
stiff brushes, steel wool, or ntaining abrasives.g over or scraping against curbs.
guidelines to prevent scratches s:ly using a soft sponge and plenty
stubborn stains, use diluted nd rinse thoroughly with plenty of
Using plenty of water, clean the windscreen with a soft cloth or sponge. (Avoid using detergents or any kind of chemical cleaner on the windscreen.) Dry with a soft, clean cloth.
For a dirtier windscreen, use a diluted neutral detergent with a sponge and plenty of water. Make sure to wash off all the detergent. (Detergent residue may cause windscreen cracks.)
Replace the windscreen if scratches cannot be removed and they obstruct clear vision.
Components Windscreen
NOTICETo avoid possible scratching or other damage, use only water and a soft cloth or sponge to clean the windscreen.
ng gasoline, brake fluid, or on the instruments, panels, or
Take care to keep battery electrolyte, brake fluid, or other chemical solvents off the windscreen and screen garnish. They will damage the plastic.
The exhaust pbut may beco
To remove mua liquid kitcheclean water. D
If necessary, rcommercially Then rinse bymud or dust.
Exhaust Pip
NOTICEEven though thebecome stainedas they are notic
Storing Your MotorcycleIn
form
ation
ipe and muffler are stainless steel me stained by mud or dust.
d or dust, use a wet sponge and n abrasive, then rinse well with ry with chamois or a soft towel.
emove heat stains by using a available fine texture compound. the same manner as removing
Storing Your MotorcycleIf you store your motorcycle outdoors, you should consider using a full-body motorcycle cover.If you won’t be riding for an extended period, follow these guidelines:● Wash your motorcycle and wax all painted
surfaces (except matte painted surfaces).Coat chrome pieces with rust-inhibiting oil.
● Lubricate the drive chain. 2 P. 66● Place your motorcycle on a maintenance
stand and position a block so that both tires are off the ground.
● After rain, remove the body cover and allow the motorcycle to dry.
● Remove the battery (2 P. 78) to prevent discharge. Charge the battery in a shaded,
e and Muffler
exhaust is made of stainless steel, it can . Remove all marks and blemishes as soon ed.
129continued
well-ventilated area.u If you leave the battery in place,
disconnect the negative - terminal to prevent discharge.

Transporting
130
Info
rmatio
n
After removininspect all maMaintenance
For moour website a“Storage Tips
USA
Your Motorcycle
g your motorcycle from storage, intenance items required by the Schedule.
re information about storage, visit t www.honda.ca and look up ” under the Parts & Service tab.
Transporting Your MotorcycleIf your motorcycle needs to be transported, it should be carried on a motorcycle trailer or a flatbed truck or trailer that has a loading ramp or lifting platform, and motorcycle tie-down straps. Never try to tow your motorcycle with a wheel or wheels on the ground.
NOTICETowing your motorcycle can cause serious damage to the transmission.

You & tOwning and renjoyable, buthe environm
Use a biodegryour motorcythat contain cdamage the alayer.
Choose Sen
You & the EnvironmentIn
form
ation
he Environmentiding a motorcycle can be t you must do your part to protect ent.
adable detergent when you wash cle. Avoid aerosol spray cleaners hlorofluorocarbons (CFCs) which tmosphere’s protective ozone
Put oil and other toxic wastes in approved containers and take them to a recycling center.Call your local or state office of public works or environmental services to find a recycling center in your area, and to get instructions on how to dispose of non-recyclable wastes. Do not place used engine oil in the trash, or pour it down a drain or on the ground. Used oil, gasoline, coolant, and cleaning solvents contain poisons that can hurt refuse workers and contaminate drinking water, lakes, rivers, and oceans.
sible Cleaners
Recycle Wastes
131

Vehicle Ident
132
Info
rmatio
n
Vehicle NumberThe VIN and eidentify your order to registbe required wThe VIN is stasteering headCertification Lthe frame.The engine nuside of the craYou should rethem in a safe
ification Number
Identification
ngine serial numbers uniquely motorcycle and are required in er your motorcycle. They may also hen ordering replacement parts.mped on the right side of the and also appears on the Safety abel attached to the left side of
mber is stamped on the right rear nkcase.cord these numbers and keep place.
VIN
VIN

Emission Control SystemsIn
form
ation
Emission Control SystemsYour motorcycle engine emits combustion by-products, including carbon monoxide (CO), oxides of nitrogen (NOx), and hydrocarbons (HC). Gasoline evaporation also emits hydrocarbons. Controlling the production of NOx, CO, and HC is important for the environment.
Engine number
133continued
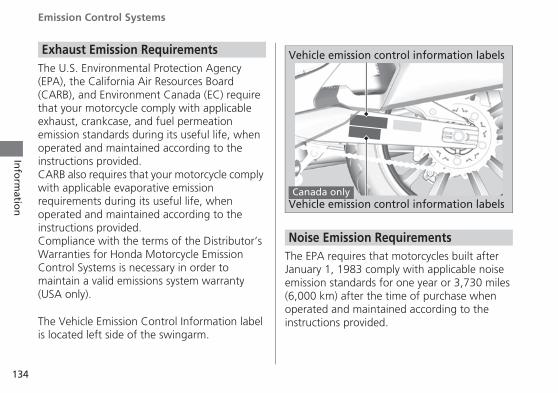
Emission Con
134
Info
rmatio
n
The U.S. Envir(EPA), the Ca(CARB), and Ethat your motexhaust, cranemission stanoperated andinstructions pCARB also reqwith applicabrequirementsoperated andinstructions pCompliance wWarranties foControl Systemaintain a va(USA only).
The Vehicle Eis located left
Exhaust Em
trol Systems
onmental Protection Agency lifornia Air Resources Board nvironment Canada (EC) require orcycle comply with applicable kcase, and fuel permeation dards during its useful life, when maintained according to the rovided.uires that your motorcycle comply le evaporative emission during its useful life, when maintained according to the rovided.ith the terms of the Distributor’s
r Honda Motorcycle Emission ms is necessary in order to lid emissions system warranty
The EPA requires that motorcycles built after January 1, 1983 comply with applicable noise emission standards for one year or 3,730 miles (6,000 km) after the time of purchase when
ission Requirements
Noise Emission Requirements
Vehicle emission control information labels
Vehicle emission control information labelsCanada only
mission Control Information label side of the swingarm.
operated and maintained according to the instructions provided.

The exhaust ethe following adjustment, ayour Honda d
❙ PGM-FI SystThe PGM-FI (puses sequenticomprised of control, and eThe engine coto determine and then con
❙ Ignition TimThe ignition tignition timinCO, and NOx
Exhaust Em
Emission Control SystemsIn
form
ation
mission control system includes components that should not need lthough periodic inspection by ealer is recommended.
emrogrammed fuel injection) system al multiport fuel injection, and is air intake, engine control, fuel xhaust control subsystems.ntrol module (ECM) uses sensors how much air enters the engine, trols how much fuel to inject.
ing Control Systemiming control system adjusts the g to reduce the amount of HC,
❙ Catalytic ConverterThe exhaust system contains a catalytic converters. Catalytic converter uses a catalyst to convert most of the harmful exhaust gas compounds into harmless compounds.
An evaporative emissions control system uses a canister filled with charcoal to adsorb fuel vapor from the fuel tank while the engine is off. The vapor is drawn into the engine and burned while riding.
ission Control System
Evaporative Emission Control System50 STATE (meets California)
135continued
produced.

Emission Con
136
Info
rmatio
n
The engine is system to preemissions intoreturned to ththe air cleane
The fuel tank,hoses use fueto prevent fueTampering widefeat the efftechnologies
Crankcase E
Fuel Perme
trol Systems
equipped with a closed crankcase vent discharging crankcase the atmosphere. Blow-by gas is e combustion chamber through r and the intake manifold.
fuel hoses, and fuel vapor charge l permeation control technologies l vapor emissions.th these components to reduce or ectiveness of the fuel permeation is prohibited.
❙ TAMPERING WITH THE NOISE CONTROL SYSTEM IS PROHIBITED:
U. S. federal law prohibits, and Canadian provincial laws may prohibit, the following acts or the causing thereof: (1) The removal or rendering inoperative by any person, other than for purposes of maintenance, repair or replacement, of any device or element of design incorporated into any new vehicle for the purpose of noise control prior to its sale or delivery to the ultimate purchaser or while it is in use; or (2) the use of the vehicle after such device or element of design has been removed or rendered inoperative by any person.
missions Control System
ation Emission Control
Noise Emission Control System

❙ AMONG THCONSTITUTFOLLOWING
● Removal ofbaffles, heawhich cond
● Removal ofintake syste
● Lack of pro● Removing o
compliancecompliancecompliant c
Emission Control SystemsIn
form
ation
OSE ACTS PRESUMED TO E TAMPERING ARE THE ACTS:
, or puncturing the muffler, der pipes or any other component ucts exhaust gases., or puncturing of any part of the m.per maintenance.r disabling any emissions component, or replacing any component with a non-omponent.
Have your motorcycle inspected and repaired by your dealer if you experience any of the following symptoms:● Hard starting or stalling after starting● Rough idling● Misfiring or backfiring during acceleration● Poor engine performance and poor fuel
economy
Problems Affecting Motorcycle Exhaust Emissions
137

Catalytic Con
138
Info
rmatio
n
CatalytiThis motorcyccatalytic convcontains precin high tempeconvert hydro(CO), and oxiexhaust gasse
A defective capollution andperformance.original Hond
verter
c Converterle is equipped with a three-way erter. The catalytic converter ious metals that serve as catalysts rature chemical reactions that carbons (HC), carbon monoxide des of nitrogen (NOx) in the s into safe compounds.
talytic converter contributes to air can impair your engine’s A replacement unit must be an a part or equivalent.
Follow these guidelines to protect your motorcycle’s catalytic converter.● Always use unleaded gasoline. Leaded
gasoline will damage the catalytic converter.● Keep the engine in good running condition.
A poorly running engine can cause the catalytic converter to overheat causing damage to the converter or the motorcycle.
● If your engine is misfiring, backfiring, stalling, or otherwise not running properly, stop riding and turn off the engine. Have your motorcycle serviced as soon as possible.

OxygenSome convenor an ether colocales to helpair standards.referred to asuse oxygenateand meets thblend require
The followingand have beemotorcycle:● Ethanol (etu Gasoline
markete● Methanol (
volume thainhibitors touse a blend
Oxygenated FuelsIn
form
ation
ated Fuelstional fuels blended with alcohol mpound are available in some reduce emissions to meet clean
These gasolines are collectively oxygenated fuels. If you plan to d fuel, check that it is unleaded
e minimum octane rating and ment.
fuel blends are EPA-approved n approved use in your
hyl alcohol) up to10% by volume. containing ethanol may be d under the name Gasohol.methyl alcohol) up to 5% by
If you accidentally fill your fuel tank with an oxygenated fuel containing higher percentages, you may experience performance problems. To resolve the problem, have your dealer drain the fuel tank and replace with the correct fuel. Fuel system or performance problems resulting from the use of an oxygenated fuel containing higher percentages are not covered by your warranty.
If you notice any undesirable operating symptoms or performance problems, try a different brand of gasoline.
NOTICEImproper use of oxygenated fuels can damage metal, rubber, and plastic parts of your fuel system.Oxygenated fuel can also damage paint. Damage caused by spilled fuel is not covered by warranty.
139
t contain cosolvents and corrosion protect the fuel system. Never containing more than 5%.

Authorized M
140
Info
rmatio
n
AuthoriThe Service MHonda dealerdealer or Helm(USA only, Caorder authori
Also availablemodel, is the which explainvarious systemscooters, and
Publication61MJS0061CSM0031MJS600
anuals
zed Manualsanual used by your authorized is available from your Honda
, Inc.nada: See your Honda dealer to
zed manuals.)
, but not necessary to service your Honda Common Service Manual, s basic service information for s on Honda motorcycles,
all-terrain vehicles.
These Honda manuals are written for the professional technician. However, if you possess the proper tools, observe the safety standards, and are mechanically capable, you should find them easy to use.Special Honda tools are necessary for some procedures.
Order On-Line: www.helminc.com
Order Toll Free: 1-888-CYCLE93(1-888-292-5393)(NOTE: For Credit Card Orders Only)Monday - Friday 8:00 AM - 6:00 PM EST
Item No. Description2015 NC700JD/NC750JD Service ManualCommon Service Manual
2015 NC700JD/NC750JD Owner’s Manual
WarrantService
Your new Howarranties:● Motorcycle● Emission Co● Noise Cont
The responsibthat apply to the WarrantieHonda dealerkeep your HoWarranties Bo
Pleaposted on ou
Coverage
Canada
Warranty Coverage and ServiceIn
form
ation
y Coverage and
nda is covered by the following
Limited Warrantyntrol System Warranty
rol Warranty (USA only)
ilities, restrictions, and exclusions these warranties are explained in s Booklet given to you by your at the time of purchase. Always nda owner’s card with your oklet.
It is important to realize that your warranty applies only to defects in material or workmanship of your Honda. Your warranty coverage does not apply to the normal wear and deterioration associated with use of the motorcycle.
Your warranty coverage is not voided if you perform your own maintenance. However, failures that occur due directly to improper maintenance are not covered by these warranties.
You can extend almost all of your warranty coverage through the Honda Protection Plan (USA only). For more information, see your Honda dealer.
141continued
se refer to the Warranty Booklet r website at www.Honda.ca.

Honda Conta
142
Info
rmatio
n
Please rememrecommendenot included
If you believemotorcycle, cHonda dealerinspection anauthorize thareturn the resexists and is cdealer will peIf you have ancoverage or thService Mana
If a misunderssatisfied withsituation, we with the apprdealership’s mnot satisfied, dealership or
Service
cts
ber that maintenance d in the Maintenance Schedule is in your warranty coverage.
you have a problem with your all the service department of your . Make an appointment for an d diagnosis. You will be asked to t inspection, and your dealer will ults of the inspection. If a problem overed under warranty, your rform the warranty repairs.y questions about your warranty e nature of the repair, talk to the
ger of your Honda dealer.
tanding occurs and you aren’t your dealer’s handling of the
Honda Contacts
If you wish to contact Honda directly to comment on your experiences with your motorcycle or with your dealer, please send your comments to the following address:
American Honda Motor Co., Inc.
Motorcycle Division, American Honda Motor Co., Inc., P.O. Box 2200, Torrance, CA 90509-2200 Mailstop: 100-4C-7B, Telephone: (866) 784-1870.
Honda Canada Inc. Customer Relations Department, 180 Honda Boulevard
Canada
suggest you discuss your problem opriate member of the anagement team. If you are still
contact the owner of the their designated representative.
Markham, Ontario L6C 0H9 Telephone: (888) 946-6329 Fax: (877) 939-0909 E-mail: [email protected]

Please includeletter:● Name, add● Product mo● Date of pur● Dealer nam
We will likely aor possibly acdirectly.
The service deoffers trainedmaintenance available servialso handles w
The parts depParts, Pro HonAccessories (Uand products same quality
Your Hond
Honda ContactsIn
form
ation
the following information in your
ress, and telephone numberdel, year, and VINchasee and address
sk your Honda dealer to respond, knowledge your comments
partment of your Honda dealer personnel to perform regular and most repairs. It has the latest ce information from Honda and arranty inspections and repairs.
The sales department offers the Honda Protection Plan to extend almost all of your warranty coverage (USA only).
Your Honda dealer can also supply information about, riding events, and information about safety training available in your local area, and the Honda Rider’s Club of America (USA only).
The Honda Rider's Club of America (HRCA) sponsors local riding chapters at Authorized Honda Dealerships across the country. You can log on to the HRCA Clubhouse website for more information at www.hrca.honda.com.
a Dealer
Honda Rider’s Club of America (HRCA)
143
artment offers Honda Genuine da products, Honda Genuine SA only), and Honda accessories (Canada only) that provide the that went into your motorcycle.

Reporting Sa
144
Info
rmatio
n
RepDefectsIf you believdefect whiccould causeimmediatelyHighway Tr(NHTSA) in American H
If NHTSA remay open athat a safetvehicles, it mremedy camcannot becoproblems bAmerican H
USA
fety Defects
orting Safety
e that your vehicle has a h could cause a crash or injury or death, you should inform the National
affic Safety Administration addition to notifying onda Motor Co., Inc.
ceives similar complaints, it n investigation, and if it finds y defect exists in a group of
ay order a recall and paign. However, NHTSA me involved in individual
etween you, your dealer, or
To contact NHTSA, you may call the Vehicle Safety Hotline toll-free at:1-888-327-4236 (TTY: 1-800-424-9153); go to http://www.safercar.gov; or write to: Administrator, NHTSA, 1200 New Jersey Avenue, SE., Washington, DC 20590.You can also obtain other information about motor vehicle safety from: http://www.safercar.gov.
onda Motor Co., Inc.

Specifica
■Main Com
*1 Including rider,
Type
Overall lengthOverall widthOverall heightWheelbaseMinimum groundclearanceCaster angleTrailCurb weightMaximum weightcapacity*1
Passenger capacitMinimum turning
Specificatio
ns
tionsSpecifications
ponents
passenger, all luggage, and accessories
NC700JD RC81NC750JD RC8293.7 in (2,380 mm)31.9 in (810 mm)46.1 in (1,170 mm)64.8 in (1,645 mm)
5.1 in (130 mm)
33º 00’4.3 in (110 mm)562 lb (255 kg)
346 lb (157 kg)
y Rider and 1 passenger radius 10.5 ft (3.2 m)
DisplacementNC700JD 40.9 cu-in (670 cm3)NC750JD 45.4 cu-in (745 cm3)
Bore x strokeNC700JD 2.87 × 3.15 in (73.0 x 80.0 mm)NC750JD 3.03 × 3.15 in (77.0 x 80.0 mm)
Compression ratio 10.7:1
FuelUnleaded gasolineRecommended fuel octane number: Pump Octane Number (PON) 86 or higher.
Tank capacity 3.06 US gal (11.6 liters)
BatteryNC700JD YTZ12S 12V-11.0Ah (10 HR)NC750JD YTZ14S 12V-11.2Ah (10 HR)
Gear ratios
1st 2.6662nd 1.9043rd 1.4544th 1.2005th 1.0336thNC700JD 0.837NC750JD 0.864
Reduction ratios NC700JD 1.921 / 2.437
145
(primary / final) NC750JD 1.921 / 2.294

Specification
146
Specificatio
ns
■ Service Da
Tire sizeFR
Tire typeRecommended Tires
FR
Tire air pressureFR
Minimum tread depth
FR
Spark plugs (
Spark plug gap(a
Idle speed(a
s
taront 120/70ZR18M/C (59W)ear 200/50ZR17M/C (75W)
Radial, tubelessront DUNLOP D423F Kear DUNLOP D423 Kront 33 psi (225 kPa, 2.25 kgf/cm2)ear 36 psi (250 kPa, 2.50 kgf/cm2)ront 0.06 in (1.5 mm)ear 0.08 in (2.0 mm)
standard) IFR6G-11K (NGK)non-djustable)
0.039 to 0.043 in (1.00 to 1.10 mm)
non-djustable)
1,200 ± 100 rpm
Recommended engine oil
API Service Classification SG or higher except oils labeled as energy conserving or resource conserving on the circular API service label, SAE 10W-30, JASO T 903 standard MA, Pro Honda GN4 4-stroke oil (USA & Canada) or Honda 4-stroke oil, or an equivalent motorcycle oil
Engine oil capacity
After draining 3.4 US qt (3.2 liters)After draining & engine oil filter change
3.6 US qt (3.4 liters)
After draining, engine & clutch oil filter change
3.6 US qt (3.4 liters)
After disassembly 4.3 US qt (4.1 liters)Recommended brake fluid
Honda DOT 4 Brake Fluid
Cooling system capacity
1.79 US qt (1.69 liters)

■ Lights
■ Fuses
Recommended coolantRecommended drive chain lubricantDrive chain slackStandard drive chain
Standard sprocket sizes
HeadlightBrake/Tail lightFront turn signal/PRear turn signal liLicense plate light
Main fuseOther fuses
SpecificationsSp
ecification
s
■ Torque SpecificationsPro Honda HP Coolant
Pro Honda HP Chain Lube or equivalent
13/16 to 1 3/16 in (20 to 30 mm)DID520V0 or RK520KHONo. of links 112Front sprocketNC700JD 16TNC750JD 17TRear wheel sprocket 39T
LEDLED
osition lights LEDghts LED
LED
Engine oil drain bolt 22 lbf·ft (30 N·m, 3.1 kgf·m)Oil filter 19 lbf·ft (26 N·m, 2.7 kgf·m)Front wheel axle bolt 44 lbf·ft (59 N·m, 6.0 kgf·m)Front wheel brake caliper mounting bolts
22 lbf·ft (30 N·m, 3.1 kgf·m)
Front wheel axle pinch bolt 16 lbf·ft (22 N·m, 2.2 kgf·m)Rear wheel axle nut 72 lbf·ft (98 N·m, 10.0 kgf·m)Drive chain adjusting lock nuts
15 lbf·ft (21 N·m, 2.1 kgf·m)
Parking brake caliper mounting bolts
23 lbf·ft (31 N·m, 3.2 kgf·m)
147
30A30A, 15A, 7.5A

148
Informa
VINEngine No.Color Label Owner’s Na
AddressCity/StatePhone
Dealer’s NamAddressCity/StatePhoneService M
tion Record
& Codeme
e
anager

IndexIndex
AABS (Anti-loIndicator ...
Accessories..Accessory SoAT/MT SwitcAuthorized M
BBackrest ......Battery ........Brake Light SBrakes
Fluid..........Pad Wear ..
Braking .......Bulb
Brake/Tail LFront Turn Headlight ..License PlatRear Turn S
Ind
ex
ck Brake System) ....................................... 30, 106............................................... 14cket ....................................... 48h ............................................ 32
anuals ............................... 140
............................................... 49
......................................... 61, 78witch.................................... 92
......................................... 65, 90
............................................... 91
............................................... 10
ight ...................................... 118
CCaring for Your Motorcycle.................... 126Color Label................................................. 60Coolant ................................................ 67, 88Crankcase Breather ................................... 99
DDigital Clock Adjustment.......................... 27Drive Chain .......................................... 65, 94
EElectrical Trouble..................................... 117Emission Control Systems........................ 133Engine
Number.................................................. 132Oil ...................................................... 64, 82Oil Filter.................................................... 85Overheats............................................... 104
149
Signal.................................... 119............................................. 118e Light.................................. 120ignal..................................... 119
Starting .................................................... 35Stop Switch ...................................... 32, 125Stopping ................................................ 125
Environment ............................................ 131

150
Ind
ex
EquipmentFront UtilityOwner’s MRear Utility Tool Kit .....
FFlooded EngFront Brake Front LowerFront Seat ...Front UtilityFuel
Gauge .......OxygenatedRecommenRemaining .Tank Capac
Fuses............
GGasohol .......Gasoline ......
Box........................................ 46anual....................................... 44Box ......................................... 47............................................... 44
ine ......................................... 35Lever Adjustment ............... 100 Cover..................................... 76............................................... 72 Box ........................................ 46
............................................... 19............................................ 139
ded ......................................... 43......................................... 19, 20ity........................................... 43
HHazard Switch ............................................32Headlight Aim..........................................101Headlight Dimmer Switch .........................32Helmet Holder ...........................................45High Beam Indicator..................................31High Coolant Temperature Indicator ...........................................30, 104
Honda Contacts .......................................142Horn Button...............................................32
IIgnition Cut-off System
Banking Sensor .......................................125Side Stand ................................................93
Ignition Key..............................................124Ignition Switch...................................33, 125Indicators....................................................30
....................................... 63, 121
............................................. 139
............................................... 43
Information Record .................................148Instruments ................................................17

LLabels..........Load Limits .Loading GuiLow Oil Pres
MMaintenance
FundamentImportanceSafety .......Schedule ...
Maximum WModification
NN-D Switch..Neutral Indic
OOdometer ...Oil
Engine ......
Ind
ex
................................................. 7
............................................... 15delines ................................... 15sure Indicator........................ 30
als .......................................... 58.............................................. 53
............................................... 54
............................................... 55eight Limit............................ 15s ............................................ 14
............................................... 32ator....................................... 31
Overheating............................................. 104Oxygenated Fuels.................................... 139
PParking....................................................... 12Parking Brake ............................................ 34Parking Brake Indicator ............................ 30Parts Location............................................ 16Passing light control switch ...................... 32PGM-FI (Programmed Fuel Injection) Malfunction Indicator Lamp (MIL) . 30, 105
Protective Apparel ...................................... 9
RRear Seat.................................................... 49Rear Utility Box.......................................... 47Recommended
Coolant .............................................. 67, 88
151
....................................... 20, 125
......................................... 64, 82
Fuel .......................................................... 43Oil ............................................................ 64
Refueling ................................................... 43
152
Ind
ex
RemovalBattery ......Clip ...........Front LoweFront Seat..Right UndeSide Panel..
Repair Kit ....Reporting SaRiding PrecaRight UnderRing Illumin
SSafety LabelSafety PrecaSEL Button ..SET Button ..Shift Switch.Shifting GeaSide Panel ...Side Stand...Side Stand Ig
............................................... 78
............................................... 77r Cover.................................... 76............................................... 72r Cowl..................................... 73............................................... 74............................................. 109fety Defects ........................ 144utions .................................... 10 Cowl...................................... 73ation....................................... 18
s................................................ 7utions....................................... 9............................................... 18............................................... 18
Specifications ...........................................145Speedometer..............................................19Start Button ...............................................32Starting the Engine ...................................35Steering Lock .............................................33Stopping Engine ......................................125Storage
Equipment ................................................44Front Utility Box ........................................46Owner’s Manual ...............................44, 125Rear Utility Box .........................................47Tool Kit.....................................................44
Storing Your Motorcycle .........................129Switches......................................................32
TTachometer ................................................19Throttle ......................................................98
............................................... 32rs ............................................ 37............................................... 74............................................... 93nition Cut-off System .......... 93
TiresAir Pressure...............................................68Puncture .................................................109Replacing..........................................68, 109
Tool Kit.......................................................44

TransportingTripmeter....TroubleshooTurn Signal I
VVehicle Iden
WWarning IndWarranty CoWashing YouWeight LimiWheels
Front RemoRear Remov
Ind
ex
Your Motorcycle............... 130....................................... 20, 125ting ..................................... 102ndicators............................... 31
tification Number............... 132
icators On ........................... 105verage and Service............. 141r Motorcycle...................... 126
t ..................................... 15, 145
val........................................ 110al ......................................... 113
153