operation & maintenance manual e26 compact excavator
TRANSCRIPT

Operation & Maintenance ManualE26 Compact Excavator
S/N AJRY11001 & AboveS/N B33211001 & Above
6990096 (1-13) Revised (5-13) (3) Printed in U.S.A. © Bobcat Company 2013


OPERATOR SAFETY WARNING
Never operate withoutinstructions.
Read machine signs, andOperation & MaintenanceManual, and Operator’sHandbook.
Do not grasp controlhandles when enteringcab / canopy.
Be sure controls are inneutral before starting.
Sound horn and checkbehind machine beforestarting.
Never operate withoutapproved cab / canopy.
Never modify equipment.
Never use attachmentsnot approved by BobcatCompany.
Avoid steep areas orbanks that could breakaway.
WARNINGOperator must have instructions before operating the machine. Untrained operators can cause injury or death.
CORRECT
NA1448B
Maximum
Never exceed 25 whengoing down or backingup a slope.
OSW66-0409
To leave excavator, lowerthe work equipment andthe blade to the ground.Stop the engine.
W-2001-0502
6808261
CORRECT
NA1435B
STOP
B-21928
CORRECT
Fasten seat belt securely.
Operate controls only from operator’s seat.
Use caution to avoidtipping - do not swingheavy load over side oftrack.
Operate on flat, levelground.
Keep bystanders out ofmaximum reach area.
Do not travel or turn withbucket extended.
Never carry riders.
Never exceed a 15 slopeto the side.
Never travel up a slopethat exceeds 15.
WRONG
NA1439A
WRONG
NA1445A NA1449B
CORRECT
Maximum
CORRECT
Maximum
NA1447B
P-90216
CORRECT WRONG
NA1418
CORRECT
NA1435B
WRONG
NA1419
Safety Alert Symbol: This symbol with a warning statement, means: “Warning, be alert! Your safetyis involved!” Carefully read the message that follows.
The excavator must be equipped with safety items necessary for each job. Ask your dealer about attachments andaccessories.
1. SEAT BELT: Check belt fasteners and check for damaged webbing or buckle. 2. OPERATOR CAB / CANOPY (ROPS and TOPS): Check condition and mounting hardware. 3. OPERATOR’S HANDBOOK: Must be in the cab / canopy. 4. LEFT HAND CONSOLE: When raised must deactivate the travel and hydraulic functions. 5. SAFETY SIGNS (DECALS): Replace if damaged. 6. GRAB HANDLES: Replace if damaged. 7. INTEGRATED SLEW LOCK BRAKE. 8. SAFETY TREAD.: Replace if damaged.
Look in the direction ofrotation and make sureno bystanders are in thework area.
NA1421A
CORRECT
SAFETY EQUIPMENT


CONTENTS
FOREWORD . . . . . . . . . . . . . . . . . . . . . . . . . . . . . . . . . . . . . . . . . . . . . . . . . . . . . . . . . . . . . . .5
SAFETY AND TRAINING RESOURCES . . . . . . . . . . . . . . . . . . . . . . . . . . . . . . . . . . . . . . . . .13
OPERATING INSTRUCTIONS . . . . . . . . . . . . . . . . . . . . . . . . . . . . . . . . . . . . . . . . . . . . . . . . .23
PREVENTIVE MAINTENANCE . . . . . . . . . . . . . . . . . . . . . . . . . . . . . . . . . . . . . . . . . . . . . . . .81
SYSTEM SETUP AND ANALYSIS . . . . . . . . . . . . . . . . . . . . . . . . . . . . . . . . . . . . . . . . . . . . .129
MACHINE SIGN TRANSLATIONS . . . . . . . . . . . . . . . . . . . . . . . . . . . . . . . . . . . . . . . . . . . . .137
SPECIFICATIONS . . . . . . . . . . . . . . . . . . . . . . . . . . . . . . . . . . . . . . . . . . . . . . . . . . . . . . . . .165
WARRANTY . . . . . . . . . . . . . . . . . . . . . . . . . . . . . . . . . . . . . . . . . . . . . . . . . . . . . . . . . . . . . .177
ALPHABETICAL INDEX . . . . . . . . . . . . . . . . . . . . . . . . . . . . . . . . . . . . . . . . . . . . . . . . . . . . .181
REFERENCE INFORMATION
Write the correct information for YOUR Bobcat excavator in the spaces below. Always use these numbers whenreferring to your Bobcat excavator.
Bobcat CompanyP.O. Box 128Gwinner, ND 58040-0128UNITED STATES OF AMERICA
Doosan Benelux SADrève Richelle 167B-1410 WaterlooBELGIUM
Excavator Serial Number
Engine Serial Number
NOTES:
YOUR BOBCAT DEALER:
ADDRESS:
PHONE:
3 E26 Operation & Maintenance Manual

4 E26 Operation & Maintenance Manual

FOREWORD
This Operation & Maintenance Manual was written to give the owner / operator instructions on the safe operationand maintenance of the Bobcat excavator. READ AND UNDERSTAND THIS OPERATION & MAINTENANCEMANUAL BEFORE OPERATING YOUR BOBCAT EXCAVATOR. If you have any questions, see your Bobcatdealer. This manual can illustrate options and accessories not installed on your excavator.
BOBCAT COMPANY IS IS0 9001 CERTIFIED . . . . . . . . . . . . . . . . . . . . . . . . . . . . . . . . . . . . . .7
REGULAR MAINTENANCE ITEMS . . . . . . . . . . . . . . . . . . . . . . . . . . . . . . . . . . . . . . . . . . . . . .7
SERIAL NUMBER LOCATIONS . . . . . . . . . . . . . . . . . . . . . . . . . . . . . . . . . . . . . . . . . . . . . . . . .8Excavator Serial Number . . . . . . . . . . . . . . . . . . . . . . . . . . . . . . . . . . . . . . . . . . . . . . . . . . .8Engine Serial Number . . . . . . . . . . . . . . . . . . . . . . . . . . . . . . . . . . . . . . . . . . . . . . . . . . . . . .8
DELIVERY REPORT . . . . . . . . . . . . . . . . . . . . . . . . . . . . . . . . . . . . . . . . . . . . . . . . . . . . . . . . .8
EXCAVATOR IDENTIFICATION . . . . . . . . . . . . . . . . . . . . . . . . . . . . . . . . . . . . . . . . . . . . . . . . .9
FEATURES, ACCESSORIES AND ATTACHMENTS . . . . . . . . . . . . . . . . . . . . . . . . . . . . . . . .10Standard Items . . . . . . . . . . . . . . . . . . . . . . . . . . . . . . . . . . . . . . . . . . . . . . . . . . . . . . . . . .10Options And Accessories . . . . . . . . . . . . . . . . . . . . . . . . . . . . . . . . . . . . . . . . . . . . . . . . . .10Attachments . . . . . . . . . . . . . . . . . . . . . . . . . . . . . . . . . . . . . . . . . . . . . . . . . . . . . . . . . . . .10Buckets Available . . . . . . . . . . . . . . . . . . . . . . . . . . . . . . . . . . . . . . . . . . . . . . . . . . . . . . . .10Falling Object Guards (FOGS) . . . . . . . . . . . . . . . . . . . . . . . . . . . . . . . . . . . . . . . . . . . . . .11Special Applications Kit . . . . . . . . . . . . . . . . . . . . . . . . . . . . . . . . . . . . . . . . . . . . . . . . . . . .11Special Applications Kit Inspection And Maintenance . . . . . . . . . . . . . . . . . . . . . . . . . . . .11
5 E26 Operation & Maintenance Manual

6 E26 Operation & Maintenance Manual

BOBCAT COMPANY IS IS0 9001 CERTIFIED
ISO 9001 is an international standard that specifies requirements for a quality management system that controls theprocesses and procedures which we use to design, develop, manufacture and distribute Bobcat products.
British Standards Institute (BSI) is the Certified Registrar Bobcat Company chose to assess the Company’s compliancewith the ISO 9001 at Bobcat's manufacturing facilities in Gwinner and Bismarck, North Dakota (U.S.A.), Pontchateau(France), Dobris (Czech Republic) and the Bobcat corporate offices (Gwinner, Bismarck and West Fargo) in North Dakota.Only certified assessors, like BSI, can grant registrations.
ISO 9001 means that as a company we say what we do and do what we say. In other words, we have establishedprocedures and policies, and we provide evidence that the procedures and policies are followed.
REGULAR MAINTENANCE ITEMS
NOTE: Always verify Part Numbers with your Bobcat dealer.
CALIFORNIA PROPOSITION 65 WARNING
Diesel engine exhaust and some of its constituents are known to the State of California to cause cancer, birth defects and other
reproductive harm.
ENGINE OIL FILTER 6657635
BATTERY6670251
FUEL FILTER 6667352
HYDRAULIC FILL / BREATHER CAP6692836
AIR FILTER, Outer 6673752
AIR FILTER, Inner 6673753
FLUID, Hydraulic / Hydrostatic
6903117 - 9,5 L (2.5 U.S. gal)6903118 - 18,9 L (5 U.S. gal)6903119 - 208 L (55 U.S. gal)
PRIMARY HYDRAULIC FILTER 6661248CASE DRAIN HYDRAULIC FILTER7009365
ANTI-FREEZE, Propylene Glycol
6983128 - Premixed6983129 - Concentrate
RADIATOR CAP7022636
ENGINE OIL690310569031076903109
690311369031126903111
SAE 15W40 CE/SG (12 qt)SAE 10W30 CE/SG (12 qt)SAE 30W CE/SG (12 qt)
SAE 15W40 CE/SG (2.5 U.S. gal)SAE 10W30 CE/SG (2.5 U.S. gal)SAE 30W CE/SG (2.5 US gal)
ENGINE OIL690310669031086903110
SAE 15W40 CE/SG (1 U.S. gal)SAE 10W30 CE/SG (1 U.S. gal)SAE 30W CE/SG (1 U.S. gal)
7 E26 Operation & Maintenance Manual

SERIAL NUMBER LOCATIONS
Always use the serial number of the excavator whenrequesting service information or when ordering parts.Early or later models (identification made by serialnumber) can use different parts, or it can be necessary touse a different procedure in doing a specific serviceoperation.
Excavator Serial Number
Figure 1
The excavator serial number plate (Item 1) [Figure 1] islocated on the frame of the machine in the locationshown.
Figure 2
Explanation of excavator Serial Number [Figure 2]:
1. The four digit Model / Engine Combination Modulenumber identifies the model number and enginecombination.
2. The five digit Production Sequence Number identifiesthe order which the excavator is produced.
Engine Serial Number
Figure 3
The engine serial number is located on the top cover (twolocations) (Item 1) [Figure 3].
DELIVERY REPORT
Figure 4
The delivery report [Figure 4] must be completed by thedealer and signed by the owner or operator when theBobcat excavator is delivered. An explanation of the formmust be given to the owner. Make sure it is completed infull.
S39296
1
P-90175
Module 2 - ProductionSequence (Series)
Module 1 - Model / EngineCombination
S40224
1
1
B-16315
8 E26 Operation & Maintenance Manual

EXCAVATOR IDENTIFICATION
[1] BUCKET - Several different buckets and other attachments are available from the Bobcat excavator.[2] ROPS, TOPS - (Roll Over Protective Structure / Tip Over Protective Structure) as standard equipment.
The ROPS / TOPS meets ISO 12117-2 AND ISO 12117.[3] TRACKS - Optional tracks are available.
AUXILIARY QUICK
COUPLERS
ARM CYLINDER
LIFT POINT
OPERATOR’S SEAT WITH SEAT BELT
CONTROL LEVERS
(JOYSTICKS)
BOOM
ARM
BLADE CYLINDER[1] BUCKET
BUCKET CYLINDER
RIGHT SIDE COVER
BLADE
TRACK FRAME
TIE DOWN
TAILGATE
TRACKS [3]
COUNTERWEIGHT
TIE DOWNS / LIFT POINTS
BOOM CYLINDER
MIRRORS(IF EQUIPPED)
OPERATOR’S HANDBOOK
UPPERSTRUCTURE
[2] CANOPY / CAB(ROPS / TOPS)
EM9410EM9411
X-CHANGE™
9 E26 Operation & Maintenance Manual

FEATURES, ACCESSORIES AND ATTACHMENTS
Standard Items
Model E26 Bobcat excavators are equipped with thefollowing standard items:
• 1515 mm (59.6 in) Dozer Blade• Canopy with ROPS / TOPS Approval• 300 mm (11.8 in) Rubber Tracks• Two-Speed Travel• Auto Shift Drive Motors• Auxiliary Hydraulics• Engine Speed Control Dial With Auto Idle Feature• Hydraulic and Travel Control Lockouts• Work Lights - Boom and Frame Mounted• Engine and Hydraulic System Monitor with Shut
Down• Horn• Hydraulic Joystick Controls• Suspension Seat• Retractable Seat Belt• Spark Arrester Muffler • Advanced Diagnostics• X-Change™• Counterweight
Options And Accessories
Below is a list of some equipment available from yourBobcat excavator dealer as Dealer and / or FactoryInstalled Accessories and Factory Installed Options. Seeyour Bobcat dealer for other available options,accessories and attachments.
• Battery (with 600 CCA)• Enclosed Cab With Heater and Air Conditioning• Travel Motion Alarm• Keyless Start• Canopy / Cab Mounted Lights• Long Arm• Direct to Tank Auxiliary Hydraulics• Counterweight (Additional)• Second Auxiliary Hydraulics• Top Guard Kit (FOGS)• Special Application Kit• RFID Kit (Security Key Start System)
Specifications subject to change without notice andstandard items can vary.
Attachments
These and other attachments are approved for use onthis model Bobcat excavator. Do not use unapprovedattachments. Attachments not manufactured by Bobcatcan not be approved.
The versatile Bobcat excavator quickly turns into a multi-job machine with a variety of attachments.
See your Bobcat dealer for information about approvedattachments and attachment Operation & MaintenanceManuals.
• Auger • Breaker• Hydraulic Clamp• 3-Tined Grapple• Compactor• Power Tilt• Ripper• Hydro tilt• Packer wheel• Lazer Receiver
Buckets Available
Increase the versatility of your Bobcat excavator with avariety of bucket sizes.
Many bucket styles, widths and different capacities areavailable for a variety of different applications. Theyinclude Trenching, Digging, Grading, Tilt, to name a few.See your Bobcat dealer for the correct bucket for yourBobcat excavator and application.
10 E26 Operation & Maintenance Manual

FEATURES, ACCESSORIES AND ATTACHMENTS (CONT’D)
Falling Object Guards (FOGS)
Figure 5
Available for special applications that require protectionfrom smaller objects that can fall on the canopy / cab orrestrict material from entering canopy / cab openings[Figure 5] and [Figure 6].
The excavator must have the overhead guard [Figure 5]installed to meet the top guard requirements in ISO10262.
See your Bobcat Dealer for more information.
Special Applications Kit
Figure 6
The excavator must have the special applications kit[Figure 6] installed to meet the front guard requirementsin ISO 10262 - level 1.
Kit includes an upper and lower screen guard.
See your Bobcat Dealer for more information.
Special Applications Kit Inspection And Maintenance
The Special Applications Kit must be regularly inspectedand maintained. Inspect the screen for damage. Replaceparts as necessary.
NA1557
OVERHEADGUARD
NA1560A
SPECIALAPPLICATIONKIT
11 E26 Operation & Maintenance Manual

12 E26 Operation & Maintenance Manual

SAFETY AND TRAINING RESOURCES
SAFETY INSTRUCTIONS . . . . . . . . . . . . . . . . . . . . . . . . . . . . . . . . . . . . . . . . . . . . . . . . . . . .15Before Operation . . . . . . . . . . . . . . . . . . . . . . . . . . . . . . . . . . . . . . . . . . . . . . . . . . . . . . . . .15Safe Operation Is The Operator’s Responsibility . . . . . . . . . . . . . . . . . . . . . . . . . . . . . . . .16Safe Operation Needs A Qualified Operator . . . . . . . . . . . . . . . . . . . . . . . . . . . . . . . . . . . .16Avoid Silica Dust . . . . . . . . . . . . . . . . . . . . . . . . . . . . . . . . . . . . . . . . . . . . . . . . . . . . . . . . .17
FIRE PREVENTION . . . . . . . . . . . . . . . . . . . . . . . . . . . . . . . . . . . . . . . . . . . . . . . . . . . . . . . . .17Maintenance . . . . . . . . . . . . . . . . . . . . . . . . . . . . . . . . . . . . . . . . . . . . . . . . . . . . . . . . . . . .17Operation . . . . . . . . . . . . . . . . . . . . . . . . . . . . . . . . . . . . . . . . . . . . . . . . . . . . . . . . . . . . . .17Electrical . . . . . . . . . . . . . . . . . . . . . . . . . . . . . . . . . . . . . . . . . . . . . . . . . . . . . . . . . . . . . . .17Hydraulic System . . . . . . . . . . . . . . . . . . . . . . . . . . . . . . . . . . . . . . . . . . . . . . . . . . . . . . . .18Fueling . . . . . . . . . . . . . . . . . . . . . . . . . . . . . . . . . . . . . . . . . . . . . . . . . . . . . . . . . . . . . . . .18Starting . . . . . . . . . . . . . . . . . . . . . . . . . . . . . . . . . . . . . . . . . . . . . . . . . . . . . . . . . . . . . . . .18Spark Arrester Exhaust System . . . . . . . . . . . . . . . . . . . . . . . . . . . . . . . . . . . . . . . . . . . . .18Welding And Grinding . . . . . . . . . . . . . . . . . . . . . . . . . . . . . . . . . . . . . . . . . . . . . . . . . . . . .18Fire Extinguishers . . . . . . . . . . . . . . . . . . . . . . . . . . . . . . . . . . . . . . . . . . . . . . . . . . . . . . . .18
PUBLICATIONS AND TRAINING RESOURCES . . . . . . . . . . . . . . . . . . . . . . . . . . . . . . . . . . .19
MACHINE SIGNS (DECALS) . . . . . . . . . . . . . . . . . . . . . . . . . . . . . . . . . . . . . . . . . . . . . . . . . .20No-Text Safety Signs . . . . . . . . . . . . . . . . . . . . . . . . . . . . . . . . . . . . . . . . . . . . . . . . . . . . . .22
13 E26 Operation & Maintenance Manual

14 E26 Operation & Maintenance Manual

SAFETY INSTRUCTIONS
Before Operation
Carefully follow the operating and maintenanceinstructions in this manual.
The Bobcat excavator is highly maneuverable andcompact. It is rugged and useful under a wide variety ofconditions. This presents an operator with hazardsassociated with off highway, rough terrain applications,common with Bobcat excavator usage.
The Bobcat excavator has an internal combustion enginewith resultant heat and exhaust. All exhaust gases cankill or cause illness so use the excavator with adequateventilation.
The dealer explains the capabilities and restrictions ofthe Bobcat excavator and attachment for eachapplication. The dealer demonstrates the safe operationaccording to Bobcat instructional materials, which arealso available to operators. The dealer can also identifyunsafe modifications or use of unapproved attachments.The attachments and buckets are designed for a RatedLift Capacity. They are designed for secure fastening tothe Bobcat excavator. The user must check with thedealer, or Bobcat literature, to determine safe loads ofmaterials of specified densities for the machine -attachment combination.
The following publications and training materials provideinformation on the safe use and maintenance of theBobcat machine and attachments:
• The Delivery Report is used to assure that completeinstructions have been given to the new owner andthat the machine and attachment is in safe operatingcondition.
• The Operation & Maintenance Manual delivered withthe machine or attachment gives operatinginformation as well as routine maintenance andservice procedures. It is a part of the machine and canbe stored in a container provided on the machine.Replacement Operation & Maintenance Manuals canbe ordered from your Bobcat dealer.
• Machine signs (decals) instruct on the safe operationand care of your Bobcat machine or attachment. Thesigns and their locations are shown in the Operation& Maintenance Manual. Replacement signs areavailable from your Bobcat dealer.
• An Operator’s Handbook is fastened to the operatorcab of the excavator. It’s brief instructions areconvenient to the operator. The handbook is availablefrom your dealer in an English edition or one of manyother languages. See your Bobcat dealer for moreinformation on translated versions.
• The AEM Safety Manual delivered with the machinegives general safety information.
• The Compact Excavator Operating Training Course isavailable through your Bobcat dealer. This course isintended to provide rules and practices of correctoperation of the Bobcat excavator. The course isavailable in English and Spanish versions.
• Service Safety Training Courses are available fromyour Bobcat dealer. They provide information for safeand correct service procedures.
• See the PUBLICATIONS AND TRAININGRESOURCES Page in this manual or your Bobcatdealer for Service and Parts Manuals, printedmaterials, videos, or training courses available. Alsocheck the Bobcat web siteswww.training.bobcat.com or www.bobcat.com
The dealer and owner / operator review therecommended uses of the product when delivered. If theowner / operator will be using the machine for a differentapplication(s) he or she must ask the dealer forrecommendations on the new use.
Call Before You DigDial 811 (USA Only)
1-888-258-0808 (USA & Canada)
When you call, you will be directed to a location in yourstate / province, or city for information about buried lines(telephone, cable TV, water, sewer, gas, etc.).
SI EXC-0511
15 E26 Operation & Maintenance Manual

SAFETY INSTRUCTIONS (CONT’D)
Safe Operation Is The Operator’s Responsibility
WARNINGOperator must have instructions before operating themachine. Untrained operators can cause injury ordeath.
W-2001-0502
IMPORTANTThis notice identifies procedures which must befollowed to avoid damage to the machine.
I-2019-0284
DANGERThe signal word DANGER on the machine and in themanuals indicates a hazardous situation which, if notavoided, will result in death or serious injury.
D-1002-1107
WARNINGThe signal word WARNING on the machine and in themanuals indicates a potentially hazardous situationwhich, if not avoided, could result in death or seriousinjury.
W-2044-1107
The Bobcat excavator and attachment must be in goodoperating condition before use.
Check all of the items on the Bobcat Service ScheduleDecal under the 8 - 10 hour column or as shown in theOperation & Maintenance Manual.
Safe Operation Needs A Qualified Operator
For an operator to be qualified, he or she must not usedrugs or alcoholic drinks which impair alertness orcoordination while working. An operator who is takingprescription drugs must get medical advice to determineif he or she can safely operate a machine.
A Qualified Operator Must Do The Following:
Understand the Written Instructions, Rules andRegulations
• The written instructions from Bobcat Companyinclude the Delivery Report, Operation &Maintenance Manual, Operator’s Handbook, SafetyManual and machine signs (decals).
• Check the rules and regulations at your location. Therules can include an employer’s work safetyrequirements. Regulations can apply to local drivingrequirements or use of a Slow Moving Vehicle (SMV)emblem. Regulations can identify a hazard such as autility line.
Have Training with Actual Operation
• Operator training must consist of a demonstration andverbal instruction. This training is given by yourBobcat dealer before the product is delivered.
• The new operator must start in an area withoutbystanders and use all the controls until he or she canoperate the machine and attachment safely under allconditions of the work area. Always fasten seat beltbefore operating.
• Operator Training Courses are available from yourBobcat dealer in English and Spanish. They provideinformation for safe and efficient equipmentoperation. Safety videos are also available.
• Service Safety Training Courses are available fromyour Bobcat dealer. They provide information for safeand correct service procedures.
Know the Work Conditions
• Know the weight of the materials being handled.Avoid exceeding the Rated Lift Capacity of themachine. Material which is very dense will be heavierthan the same volume of less dense material. Reducethe size of load if handling dense material.
• The operator must know any prohibited uses or workareas, for example, he or she needs to know aboutexcessive slopes.
• Know the location of any underground lines. Call localutilities or the TOLL FREE phone number found in theBefore Operation section of this manual.
• Wear tight fitting clothing. Always wear safety glasseswhen doing maintenance or service. Safety glasses,respiratory equipment, hearing protection or SpecialApplications Kits are required for some work. Seeyour Bobcat dealer about Bobcat safety equipmentfor your model.
SI EXC-0511
This symbol with a warning statement means:“Warning, be alert! Your safety is involved!”Carefully read the message that follows.
Safety Alert Symbol
16 E26 Operation & Maintenance Manual

SAFETY INSTRUCTIONS (CONT’D)
Avoid Silica Dust
Cutting or drilling concrete containing sand or rockcontaining quartz can result in exposure to silica dust. Donot exceed Permissible Exposure Limits (PEL) to silicadust as determined by OSHA or other job site Rules andRegulations. Use a respirator, water spray or othermeans to control dust. Silica dust can cause lung diseaseand is known to the state of California to cause cancer.
FIRE PREVENTION
Maintenance
The machine and some attachments have componentsthat are at high temperatures under normal operatingconditions. The primary source of high temperatures isthe engine and exhaust system. The electrical system, ifdamaged or incorrectly maintained, can be a source ofarcs or sparks.
Flammable debris (leaves, straw, etc.) must be removedregularly. If flammable debris is allowed to accumulate, itcan cause a fire hazard. Clean often to avoid thisaccumulation. Flammable debris in the enginecompartment is a potential fire hazard.
The operator’s area, engine compartment and enginecooling system must be inspected every day and cleanedif necessary to prevent fire hazards and overheating.
All fuels, most lubricants and some coolant mixtures areflammable. Flammable fluids that are leaking or spilledonto hot surfaces or onto electrical components cancause a fire.
Operation
Do not use the machine where exhaust, arcs, sparks orhot components can contact flammable material,explosive dust or gases.
Electrical
Check all electrical wiring and connections for damage.Keep the battery terminals clean and tight. Repair orreplace any damaged part or wires that are loose orfrayed.
Battery gas can explode and cause serious injury. Usethe procedure in the Operation & Maintenance Manualfor connecting the battery and for jump starting. Do notjump start or charge a frozen or damaged battery. Keepany open flames or sparks away from batteries. Do notsmoke in battery charging area.
SI EXC-0511
17 E26 Operation & Maintenance Manual

FIRE PREVENTION (CONT’D)
Hydraulic System
Check hydraulic tubes, hoses and fittings for damageand leakage. Never use open flame or bare skin to checkfor leaks. Hydraulic tubes and hoses must be properlyrouted and have adequate support and secure clamps.Tighten or replace any parts that show leakage.
Always clean fluid spills. Do not use gasoline or dieselfuel for cleaning parts. Use commercial nonflammablesolvents.
Fueling
Stop the engine and let it cool before adding fuel. Nosmoking! Do not refuel a machine near open flames orsparks. Fill the fuel tank outdoors.
Starting
Do not use ether or starting fluids on any engine that hasglow plugs or air intake heater. These starting aids cancause explosion and injure you or bystanders.
Use the procedure in the Operation & MaintenanceManual for connecting the battery and for jump starting.
Spark Arrester Exhaust System
The spark arrester exhaust system is designed to controlthe emission of hot particles from the engine and exhaustsystem, but the muffler and the exhaust gases are stillhot.
Check the spark arrester exhaust system regularly tomake sure it is maintained and working properly. Use theprocedure in the Operation & Maintenance Manual forcleaning the spark arrester muffler (if equipped).
Welding And Grinding
Always clean the machine and attachment, disconnectthe battery, and disconnect the wiring from the Bobcatcontrollers before welding. Cover rubber hoses, batteryand all other flammable parts. Keep a fire extinguishernear the machine when welding.
Have good ventilation when grinding or welding paintedparts. Wear dust mask when grinding painted parts.Toxic dust or gas can be produced.
Dust generated from repairing nonmetallic parts such ashoods, fenders or covers can be flammable or explosive.Repair such components in a well ventilated area awayfrom open flames or sparks.
Fire Extinguishers
Know where fire extinguishers and first aid kits arelocated and how to use them. Inspect the fireextinguisher and service the fire extinguisher regularly.Obey the recommendations on the instructions plate.
Sl EXC-0511
18 E26 Operation & Maintenance Manual

PUBLICATIONS AND TRAINING RESOURCES
The following publications are also available for yourBobcat excavator. You can order them from your Bobcatdealer.
For the latest information on Bobcat products and theBobcat Company, visit our web site at www.bobcat.com;you can also order Operator and Service Trainingmaterials online through www.bobcatstore.com
- Complete instructions on the correct operation and theroutine maintenance of the Bobcat excavator.
- Complete maintenance instructions for your Bobcatexcavator.
OPERATION &MAINTENANCEMANUAL
6990096
SERVICE MANUAL
6990097
- Provide basic safety procedures and warnings for yourBobcat excavator
SAFETY MANUAL
6901951
Gives basic operation instructions and safety warnings
Introduces operator to step-by-step basics of compactexcavator operation. Also available in Spanish P/N 6903228
OPERATOR’SHANDBOOK
6987271
COMPACT EXCAVATOROPERATOR TRAININGCOURSE
6903186
Introduces Service Technicians to step-by-step basics ofproper and safe excavator maintenance and servicingprocedures
EXCAVATOR SERVICE SAFETY COURSE
6900916
OPERATORSAFETY DVD
6904762
Provides basic safety instructions contained in allBobcat Safety Videos in both English and Spanish.
EXCAVATOR SAFETY VIDEO
(Mobile device with quick response code application required)
Scan the code above to watch the excavator safetyvideo or view at www.training.bobcat.com.
19 E26 Operation & Maintenance Manual

MACHINE SIGNS (DECALS)
Follow the instructions on all the Machine Signs (Decals) that are on the excavator. Replace any damaged machine signsand be sure they are in the correct locations. Machine signs are available from your Bobcat excavator dealer.
7168039 (2)
6594897
7200532
6987271
OPERATOR’S HANDBOOK
7148145
7148147
7186708RIGHT CONSOLE AREA
7194620(optional)
6737189(optional)7187735
(optional)
7178178
7152748
7178179(optional)
1
7169291(optional)
2
EM9410
20 E26 Operation & Maintenance Manual

MACHINE SIGNS (DECALS) (CONT’D)
Follow the instructions on all the Machine Signs (Decals) that are on the excavator. Replace any damaged machine signsand be sure they are in the correct locations. Machine signs are available from your Bobcat excavator dealer.
6732148
6815993 (2)
7120570
IN ENGINE COMPARTMENT
7172409
EM9411
6595014 (3)
7169006
6708929
6809832
7148157
INSIDE CABINSIDE CANOPY
7202311
7169291
7199543
7206148 - W/ Standard Arm
7206149 - W/ Standard Arm W/Counterweight
7206150 - W / Long Arm W/ Counterweight
6804233
INSIDE TAILGATE
INSIDE RIGHT COVER
7169014
7178177
6818059
7188747
2
21 E26 Operation & Maintenance Manual

MACHINE SIGNS (DECALS) (CONT’D)
No-Text Safety Signs
Safety signs are used to alert the equipment operator ormaintenance person to hazards that can be encounteredin the use and maintenance of the equipment. Thelocation and description of the safety signs are detailed inthis section. Please become familiarized with all safetysigns installed on the excavator.
Vertical Configuration
Horizontal Configuration
The format consists of the hazard panel(s) and theavoidance panel(s):
Hazard panels depict a potential hazard enclosed in asafety alert triangle.
Avoidance panels depict actions required to avoid thehazards.
A safety sign can contain more than one hazard paneland more than one avoidance panel.
NOTE: See the numbered MACHINE SIGNS(DECALS) on Page 20 and Machine Signs(Decals) (Cont’d) on Page 21 for the machinelocation of each corresponding numbered no-text decals as shown below.
1. Thrown Or Flying Objects (7168039)
This safety sign is located on the outside of both tracks.
WARNINGHigh pressure grease can cause serious injury. Donot loosen grease fitting. Do not loosen bleed fittingmore than 1 - 1/2 turns.
Read and understand the Operation & MaintenanceManual for more information.
W-2516-0110
2. High Pressure Gas (7169291)
This safety sign is located on the gas springcomponent(s) supporting the tailgate and also the frontwindow (if equipped).
WARNINGHIGH PRESSURE GAS CAN RELEASE ROD AND
CAUSE SERIOUS INJURY OR DEATH• Do not open cylinder.• See Service Manual for more information.
W-2756-0908
HAZARD PANEL
AVOIDANCE PANEL
HAZARD PANEL
AVOIDANCE PANEL
22 E26 Operation & Maintenance Manual

OPERATING INSTRUCTIONS
INSTRUMENTS AND CONSOLES . . . . . . . . . . . . . . . . . . . . . . . . . . . . . . . . . . . . . . . . . . . . .27Cab Interior Light . . . . . . . . . . . . . . . . . . . . . . . . . . . . . . . . . . . . . . . . . . . . . . . . . . . . . . . .27Left Console . . . . . . . . . . . . . . . . . . . . . . . . . . . . . . . . . . . . . . . . . . . . . . . . . . . . . . . . . . . .27Right Console . . . . . . . . . . . . . . . . . . . . . . . . . . . . . . . . . . . . . . . . . . . . . . . . . . . . . . . . . . .28Indicator Icons . . . . . . . . . . . . . . . . . . . . . . . . . . . . . . . . . . . . . . . . . . . . . . . . . . . . . . . . . . .29STD / ISO Selector Valve . . . . . . . . . . . . . . . . . . . . . . . . . . . . . . . . . . . . . . . . . . . . . . . . . .30Raising And Lowering The Console . . . . . . . . . . . . . . . . . . . . . . . . . . . . . . . . . . . . . . . . . .30Two-Speed Travel . . . . . . . . . . . . . . . . . . . . . . . . . . . . . . . . . . . . . . . . . . . . . . . . . . . . . . . .31Auto Shift Drive Motors . . . . . . . . . . . . . . . . . . . . . . . . . . . . . . . . . . . . . . . . . . . . . . . . . . . .31Auto Idle Feature . . . . . . . . . . . . . . . . . . . . . . . . . . . . . . . . . . . . . . . . . . . . . . . . . . . . . . . . .31
OPERATOR CANOPY (ROPS / TOPS) . . . . . . . . . . . . . . . . . . . . . . . . . . . . . . . . . . . . . . . . . .32Description . . . . . . . . . . . . . . . . . . . . . . . . . . . . . . . . . . . . . . . . . . . . . . . . . . . . . . . . . . . . .32
OPERATOR CAB (ROPS / TOPS) . . . . . . . . . . . . . . . . . . . . . . . . . . . . . . . . . . . . . . . . . . . . . .32Description . . . . . . . . . . . . . . . . . . . . . . . . . . . . . . . . . . . . . . . . . . . . . . . . . . . . . . . . . . . . .32Cab Door . . . . . . . . . . . . . . . . . . . . . . . . . . . . . . . . . . . . . . . . . . . . . . . . . . . . . . . . . . . . . . .33Front Window . . . . . . . . . . . . . . . . . . . . . . . . . . . . . . . . . . . . . . . . . . . . . . . . . . . . . . . . . . .34Front Window . . . . . . . . . . . . . . . . . . . . . . . . . . . . . . . . . . . . . . . . . . . . . . . . . . . . . . . . . . .35Front Wiper . . . . . . . . . . . . . . . . . . . . . . . . . . . . . . . . . . . . . . . . . . . . . . . . . . . . . . . . . . . . .36Window Washer Reservoir . . . . . . . . . . . . . . . . . . . . . . . . . . . . . . . . . . . . . . . . . . . . . . . . .36Right Side Window . . . . . . . . . . . . . . . . . . . . . . . . . . . . . . . . . . . . . . . . . . . . . . . . . . . . . . .37Heating, Ventilation And Air Conditioning Ducting . . . . . . . . . . . . . . . . . . . . . . . . . . . . . . .38
EMERGENCY EXIT . . . . . . . . . . . . . . . . . . . . . . . . . . . . . . . . . . . . . . . . . . . . . . . . . . . . . . . . .39Right Side Rear Window . . . . . . . . . . . . . . . . . . . . . . . . . . . . . . . . . . . . . . . . . . . . . . . . . . .39Front Window . . . . . . . . . . . . . . . . . . . . . . . . . . . . . . . . . . . . . . . . . . . . . . . . . . . . . . . . . . .39
MOTION ALARM SYSTEM . . . . . . . . . . . . . . . . . . . . . . . . . . . . . . . . . . . . . . . . . . . . . . . . . . .40Operation . . . . . . . . . . . . . . . . . . . . . . . . . . . . . . . . . . . . . . . . . . . . . . . . . . . . . . . . . . . . . .40
TRAVEL CONTROLS . . . . . . . . . . . . . . . . . . . . . . . . . . . . . . . . . . . . . . . . . . . . . . . . . . . . . . . .41Forward And Reverse Travel . . . . . . . . . . . . . . . . . . . . . . . . . . . . . . . . . . . . . . . . . . . . . . . .41Turning . . . . . . . . . . . . . . . . . . . . . . . . . . . . . . . . . . . . . . . . . . . . . . . . . . . . . . . . . . . . . . . .41
HYDRAULIC CONTROLS . . . . . . . . . . . . . . . . . . . . . . . . . . . . . . . . . . . . . . . . . . . . . . . . . . . .43Description . . . . . . . . . . . . . . . . . . . . . . . . . . . . . . . . . . . . . . . . . . . . . . . . . . . . . . . . . . . . .43STANDARD Control Pattern . . . . . . . . . . . . . . . . . . . . . . . . . . . . . . . . . . . . . . . . . . . . . . . .43ISO Control Pattern . . . . . . . . . . . . . . . . . . . . . . . . . . . . . . . . . . . . . . . . . . . . . . . . . . . . . . .44Quick Couplers . . . . . . . . . . . . . . . . . . . . . . . . . . . . . . . . . . . . . . . . . . . . . . . . . . . . . . . . . .45Auxiliary Hydraulics . . . . . . . . . . . . . . . . . . . . . . . . . . . . . . . . . . . . . . . . . . . . . . . . . . . . . . .46Relieve Hydraulic Pressure (Excavator And Attachment) . . . . . . . . . . . . . . . . . . . . . . . . . .46Secondary Auxiliary Hydraulics . . . . . . . . . . . . . . . . . . . . . . . . . . . . . . . . . . . . . . . . . . . . .47Relieve Hydraulic Pressure (Excavator And Attachment) . . . . . . . . . . . . . . . . . . . . . . . . . .47Direct To Tank Valve . . . . . . . . . . . . . . . . . . . . . . . . . . . . . . . . . . . . . . . . . . . . . . . . . . . . . .48
BLADE CONTROL LEVER . . . . . . . . . . . . . . . . . . . . . . . . . . . . . . . . . . . . . . . . . . . . . . . . . . .49Raising And Lowering Blade . . . . . . . . . . . . . . . . . . . . . . . . . . . . . . . . . . . . . . . . . . . . . . . .49
23 E26 Operation & Maintenance Manual

ENGINE SPEED CONTROL . . . . . . . . . . . . . . . . . . . . . . . . . . . . . . . . . . . . . . . . . . . . . . . . . .49Setting Engine Speed (RPM) . . . . . . . . . . . . . . . . . . . . . . . . . . . . . . . . . . . . . . . . . . . . . . .49
BOOM SWING . . . . . . . . . . . . . . . . . . . . . . . . . . . . . . . . . . . . . . . . . . . . . . . . . . . . . . . . . . . . .50Operation . . . . . . . . . . . . . . . . . . . . . . . . . . . . . . . . . . . . . . . . . . . . . . . . . . . . . . . . . . . . . .50
DAILY INSPECTION . . . . . . . . . . . . . . . . . . . . . . . . . . . . . . . . . . . . . . . . . . . . . . . . . . . . . . . . .51Daily Inspection And Maintenance . . . . . . . . . . . . . . . . . . . . . . . . . . . . . . . . . . . . . . . . . . .51
PRE-STARTING PROCEDURE . . . . . . . . . . . . . . . . . . . . . . . . . . . . . . . . . . . . . . . . . . . . . . . .52Operation & Maintenance Manual And Operator’s Handbook Locations . . . . . . . . . . . . . .52Entering The Excavator . . . . . . . . . . . . . . . . . . . . . . . . . . . . . . . . . . . . . . . . . . . . . . . . . . . .52Seat Adjustment . . . . . . . . . . . . . . . . . . . . . . . . . . . . . . . . . . . . . . . . . . . . . . . . . . . . . . . . .53Seat Belt . . . . . . . . . . . . . . . . . . . . . . . . . . . . . . . . . . . . . . . . . . . . . . . . . . . . . . . . . . . . . . .53Control Console . . . . . . . . . . . . . . . . . . . . . . . . . . . . . . . . . . . . . . . . . . . . . . . . . . . . . . . . .54Mirror Adjustment . . . . . . . . . . . . . . . . . . . . . . . . . . . . . . . . . . . . . . . . . . . . . . . . . . . . . . . .54
STARTING THE ENGINE . . . . . . . . . . . . . . . . . . . . . . . . . . . . . . . . . . . . . . . . . . . . . . . . . . . . .55Key Switch . . . . . . . . . . . . . . . . . . . . . . . . . . . . . . . . . . . . . . . . . . . . . . . . . . . . . . . . . . . . .55Keyless . . . . . . . . . . . . . . . . . . . . . . . . . . . . . . . . . . . . . . . . . . . . . . . . . . . . . . . . . . . . . . . .56Cold Temperature Starting . . . . . . . . . . . . . . . . . . . . . . . . . . . . . . . . . . . . . . . . . . . . . . . . .57Warming The Hydraulic System . . . . . . . . . . . . . . . . . . . . . . . . . . . . . . . . . . . . . . . . . . . . .58
STOPPING THE ENGINE AND LEAVING THE EXCAVATOR . . . . . . . . . . . . . . . . . . . . . . . . .59Procedure . . . . . . . . . . . . . . . . . . . . . . . . . . . . . . . . . . . . . . . . . . . . . . . . . . . . . . . . . . . . . .59
ATTACHMENTS . . . . . . . . . . . . . . . . . . . . . . . . . . . . . . . . . . . . . . . . . . . . . . . . . . . . . . . . . . . .60Installing And Removing The Attachment (Pin-On X-Change) . . . . . . . . . . . . . . . . . . . . . .60Installing And Removing The Attachment (Pin-On Attachment) . . . . . . . . . . . . . . . . . . . . .66
OPERATING PROCEDURE . . . . . . . . . . . . . . . . . . . . . . . . . . . . . . . . . . . . . . . . . . . . . . . . . . .67Inspect The Work Area . . . . . . . . . . . . . . . . . . . . . . . . . . . . . . . . . . . . . . . . . . . . . . . . . . . .67Basic Operating Instructions . . . . . . . . . . . . . . . . . . . . . . . . . . . . . . . . . . . . . . . . . . . . . . . .67Lowering The Work Equipment (Engine STOPPED) . . . . . . . . . . . . . . . . . . . . . . . . . . . . .67Object Handling . . . . . . . . . . . . . . . . . . . . . . . . . . . . . . . . . . . . . . . . . . . . . . . . . . . . . . . . .68Using The Clamp . . . . . . . . . . . . . . . . . . . . . . . . . . . . . . . . . . . . . . . . . . . . . . . . . . . . . . . .69Excavating . . . . . . . . . . . . . . . . . . . . . . . . . . . . . . . . . . . . . . . . . . . . . . . . . . . . . . . . . . . . . .70Boom Swing . . . . . . . . . . . . . . . . . . . . . . . . . . . . . . . . . . . . . . . . . . . . . . . . . . . . . . . . . . . .72Backfilling . . . . . . . . . . . . . . . . . . . . . . . . . . . . . . . . . . . . . . . . . . . . . . . . . . . . . . . . . . . . . .73Driving The Excavator . . . . . . . . . . . . . . . . . . . . . . . . . . . . . . . . . . . . . . . . . . . . . . . . . . . . .73Operating On Slopes . . . . . . . . . . . . . . . . . . . . . . . . . . . . . . . . . . . . . . . . . . . . . . . . . . . . .74Operating In Water . . . . . . . . . . . . . . . . . . . . . . . . . . . . . . . . . . . . . . . . . . . . . . . . . . . . . . .76Avoiding Track Damage . . . . . . . . . . . . . . . . . . . . . . . . . . . . . . . . . . . . . . . . . . . . . . . . . . .77
TOWING THE EXCAVATOR . . . . . . . . . . . . . . . . . . . . . . . . . . . . . . . . . . . . . . . . . . . . . . . . . . .78Procedure . . . . . . . . . . . . . . . . . . . . . . . . . . . . . . . . . . . . . . . . . . . . . . . . . . . . . . . . . . . . . .78
LIFTING THE EXCAVATOR . . . . . . . . . . . . . . . . . . . . . . . . . . . . . . . . . . . . . . . . . . . . . . . . . . .79Procedure . . . . . . . . . . . . . . . . . . . . . . . . . . . . . . . . . . . . . . . . . . . . . . . . . . . . . . . . . . . . . .79
24 E26 Operation & Maintenance Manual

TRANSPORTING THE EXCAVATOR ON A TRAILER . . . . . . . . . . . . . . . . . . . . . . . . . . . . . . .80Loading And Unloading . . . . . . . . . . . . . . . . . . . . . . . . . . . . . . . . . . . . . . . . . . . . . . . . . . . .80Fastening . . . . . . . . . . . . . . . . . . . . . . . . . . . . . . . . . . . . . . . . . . . . . . . . . . . . . . . . . . . . . .80
25 E26 Operation & Maintenance Manual

26 E26 Operation & Maintenance Manual

INSTRUMENTS AND CONSOLES
Cab Interior Light
Interior light is equipped on excavators with cab.
Figure 7
Press the top of the switch (Item 1) [Figure 7] to turn thelight ON. Press the bottom of the switch to turn OFF.
Left Console
Figure 8
Left Console [Figure 8]
S39297
1
P-91903C
1
2
7 8 9
456
3
REF. NO.
DESCRIPTION FUNCTION / OPERATION
1 Left Joystick (See HYDRAULIC CONTROLSon Page 43.)
2 Horn Press the switch on the bottomof the left joystick to soundhorn.
3 Boom Swing Switch / Secondary Auxiliary Hydraulics (If equipped)
Move the switch to the left toswing the boom to the left.Move the switch to the right toswing the boom to the right.(See Secondary AuxiliaryHydraulics and Boom Swing inthis manual.)
4 Wiper / Washer Switch(If equipped)
Press the switch to the left toturn wiper ON. Press and holdswitch to the left to activatewindow washer. Press theswitch to the right to turn wiperOFF.
5 Not Used - - -
6 Beacon / Strobe Light(If equipped)
Press switch to the left to turnON the beacon / Strobe light.Press the switch to the right toturn OFF.
7 Not Used - - -
8 Not Used - - -
9 Boom Swing Switch / Secondary Auxiliary Hydraulics
Move the switch to the right toactivate the secondaryauxiliary hydraulics. Move theswitch to the left for boomswing function. (SeeSecondary Auxiliary Hydraulicsand Boom Swing in thismanual.)
27 E26 Operation & Maintenance Manual

INSTRUMENTS AND CONSOLES (CONT’D)
Right Console
Figure 9
Right Console [Figure 9]
NOTE: Always turn key switch and all accessories toOFF position when the engine is stopped, thebattery will discharge if the key is left ON.Audible alarm will sound if the key is in the ONposition with the engine stopped.
REF. DESCRIPTION FUNCTION / OPERATION
1 Right Joystick (See HYDRAULIC CONTROLS inthis manual.)
2 Auxiliary Hydraulic Switch
Controls the fluid flow to theauxiliary quick couplers(attachment). (See AuxiliaryHydraulics in this manual.)
3 Blade Control Lever Controls raising and lowering theblade. Pushed all the way forwardputs blade in float position. (SeeBLADE CONTROL LEVER in thismanual.)
4 Engine Speed Control Dial Gauge
Controls rpm of the engine. (See ENGINE SPEED CONTROLin this manual.)
5 Two Speed Button Engages and disengages highrange travel speed. (See Two-Speed Travel in this manual.)
6 Motion Alarm Cancel Switch
This switch temporarily disables themotion alarm. (See MOTION ALARM SYSTEM inthis manual.)
7 Not Used ---8 Auxiliary Power
Outlet12 volt receptacle for accessories.
S40426
17
242318
19
22
20 21
Keyless Panel Shown
4
3
5
1
STOPON
START
7
8
9
1011
12
13
14
15
16
6
2
9 Key Switch (STANDARD Panel Only)
Always perform the PRE-STARTING PROCEDURE. (SeePRE-STARTING PROCEDURE inthis manual), before starting theengine. (See STARTING THEENGINE in this manual).
10 Air ConditioningSwitch(If equipped)
Press top of switch to turn airconditioner ON (light in switch willbe ON), Press bottom of switch toturn OFF.
11 Fan Motor Switch (If equipped)
Turn clockwise to increase fanspeed; counterclockwise todecrease.
12 Temperature Control (If equipped)
Turn clockwise to increasetemperature; counterclockwise todecrease.
13 Recirculation / Fresh Air Control
Turn clockwise for fresh air;counterclockwise for recirculation.(Use recirculation mode forincreased heating and coolingefficiency.)
14 Auxiliary Hydraulic Button
Activates and deactivates auxiliaryhydraulic function. (See AuxiliaryHydraulics in this manual).
15 Information Cycles through (after each buttonpress): hours, job clock, enginerpm, Selectable Auxiliary HydraulicFlow (when activated); in the datadisplay, Item 19.) (See PasswordLockout Feature and MaintenanceClock in this manual).
16 Auto Idle Feature Press once to turn auto idle featureON, press a second time to turnOFF. (See Auto Idle Feature in thismanual).
17 Lights Press once to turn lights ON; pressagain to turn lights OFF.
18 Temperature Shows the engine coolanttemperature.
19 Data Display Screen
The data display screen shows theHourmeter during normal operationof the excavator, When preheat isactivated, the display screen willshow the remaining preheat time.Can also be used to display JobClock, Engine rpm, and SelectableAuxiliary Hydraulic Flow. (See JobClock and Maintenance Clock inthis manual).
20 Fuel Gauge Shows the amount of fuel in thetank.
21 Keyless (OPTIONAL)
(Always perform the PRE-STARTING PROCEDURE, (SeePRE-STARTING PROCEDURE inthis manual), before starting theengine. (See STARTING THEENGINE in this manual).
22 Indicator Icons (See Indicator Icons in this manual).23 Job On when job clock is activated.24 Rpm On when engine rpm is activated.
REF. DESCRIPTION FUNCTION / OPERATION
28 E26 Operation & Maintenance Manual

INSTRUMENTS AND CONSOLES (CONT’D)
Indicator Icons
Figure 10
The right console contains the instrument panel with Indicator Icons [Figure 10].
NOTE: If a Warning Icon (Icons 8, 9, 10 and 12) is illuminated or flashes, appropriate action is needed to avoidpotential machine damage. Service the machine as soon as possible when conditions are present.
REF. NO.
INDICATOR ICONS
When Indicator Icon Is Illuminated When Indicator Icon Is OFF When Indicator Icon Is Flashing
1 Auxiliary Hydraulics Engaged Auxiliary Hydraulics Disengaged (See Service Codes List on Page 131.)
2 High Range Engaged Low Range Engaged (See Service Codes List on Page 131.)
3 Glow Plugs Energized Glow Plugs OFF (See Service Codes List on Page 131.)
4 Hydraulic Traction Drive Activated Hydraulic Traction Drive Deactivated (See Service Codes List on Page 131.)
5 Auto Idle System Engaged Auto Idle System Disengaged (See Service Codes List on Page 131.)
6 Keypad Unlocked Keypad Locked ------
7 Future Use
8 Low Engine Oil Pressure Engine Oil Pressure in operating range Extremely Low Engine Oil Pressure, Enginewill shut down in 10 seconds, (See ServiceCodes List on Page 131.)
9 Plugged Hydraulic Filter or High Hydraulic Oil Temperature
Hydraulic Filter and Oil in operating range.
Extremely High Hydraulic Oil Temperature,Engine will shut down in 10 seconds, (SeeService Codes List on Page 131.)
10 General Warning All system in operating range Extremely High Coolant Temperature orExtremely High Engine rpm, Engine will shutdown in 10 seconds, (See Service CodesList on Page 131.)
11 Low Fuel Level Fuel level in operating range ----
12 Extremely Low Battery Voltage,Engine will shut down in 10 seconds,(See Service Codes List on Page 131.)
Battery Voltage in operating range High or Low Battery Voltage
13 Fasten Seat Belt Reminder - Light stays on for 45 seconds to remind operator to fasten seat belt.
---- ----
14 Future Use
6698609-ICONS
1 32 4 5 6 7
8 9 10 11 12 13 14
29 E26 Operation & Maintenance Manual

INSTRUMENTS AND CONTROLS (CONT’D)
STD / ISO Selector Valve
The STD / ISO selector valve (if equipped) is locatedbelow the operator’s seat, inside the tool box.
Figure 11
From below the operator’s seat, open the tool box cover(Item 1) [Figure 11].
Figure 12
The joystick hydraulic function can be switched fromStandard control pattern to ISO control pattern.
Rotate the lever (Item 1) counterclockwise (Item 2) toselect STANDARD Control Pattern. Rotate the leverclockwise (Item 3) to select ISO Control Pattern[Figure 12].
Raising And Lowering The Console
Raise the console before exiting the cab.
Figure 13
Pull up on the release handle [Figure 13]. The lift springwill assist in raising the console.
Lower the console before operating the excavator.
Push down on the console [Figure 13] until the latch isengaged.
NOTE: When the console is raised, the hydraulic andtraction system functions are locked and willnot operate.
If the engine stops, the boom / bucket(attachments) can be lowered to the groundusing hydraulic pressure in the accumulator.
The control console must be in the lockeddown position, and the key switch in the ONposition.
P-91995
1
P-91996
1
3
2
P-91905
30 E26 Operation & Maintenance Manual

INSTRUMENTS AND CONTROLS (CONT’D)
Two-Speed Travel
Figure 14
Press the button (Item 1) [Figure 14] to engage the HighRange. Press a second time to disengage.
Figure 15
When High Range is engaged, the two speed travel icon(Item 1) [Figure 15] will illuminate.
Press the button (Item 1) [Figure 14] again to disengage.
Auto Shift Drive Motors
The travel motors are equipped with an auto shift featurethat senses hydraulic pressure. When in high range, thetravel motors will automatically shift to low range whenmore torque is required and return to high range whenhydraulic pressure decreases.
NOTE: Always set the travel speed to low range whenloading or unloading the excavator onto atransport vehicle.
Auto Idle Feature
Figure 16
The auto idle feature (when engaged) will reduce theengine speed to low idle when the control levers (joystick,blade, travel, etc.) are in neutral and not used forapproximately 4 seconds. The engine rpm will return tothe set position as soon as any control lever is activated.
The automatic idle switch (Item 1) [Figure 16] is used toengage or disengage the automatic idle feature.
Press the switch (Item 1) once to engage automatic idleand the icon (Item 2) will illuminate. Press the switch(Item 1) a second time to disengage automatic idle, theicon (Item 2) [Figure 16] will be OFF.
NOTE: Always disengage the auto idle feature whenloading or unloading the excavator onto atransport vehicle.
S40425
1
S40556
1 S40556
1
2
31 E26 Operation & Maintenance Manual

OPERATOR CANOPY (ROPS / TOPS)
Description
The Bobcat excavator has an operator canopy (ROPS /TOPS) as standard equipment to protect the operator ifthe excavator is tipped over. The seat belt must be wornfor ROPS / TOPS protection.
Check the ROPS / TOPS canopy, mounting, andhardware for damage. Never modify the ROPS / TOPScanopy. Replace the canopy and hardware if damaged.See your Bobcat dealer for parts.
ROPS / TOPS - Roll Over Protective Structure and TipOver Protective Structure per ISO 12117.
WARNINGNever modify operator cab by welding, grinding,drilling holes or adding attachments unlessinstructed to do so by Bobcat Company. Changes tothe cab can cause loss of operator protection fromrollover and falling objects, and result in injury ordeath.
W-2069-0200
OPERATOR CAB (ROPS / TOPS)
Description
The Bobcat excavator has an optional operator cab(ROPS / TOPS) as standard equipment to protect theoperator if the excavator is tipped over. The seat beltmust be worn for ROPS / TOPS protection.
Check the ROPS / TOPS cab, mounting, and hardwarefor damage. Never modify the ROPS / TOPS cab.Replace the cab and hardware if damaged. See yourBobcat dealer for parts.
ROPS / TOPS - Roll Over Protective Structure and TipOver Protective Structure per ISO 12117.
WARNINGNever modify operator cab by welding, grinding,drilling holes or adding attachments unlessinstructed to do so by Bobcat Company. Changes tothe cab can cause loss of operator protection fromrollover and falling objects, and result in injury ordeath.
W-2069-0200
32 E26 Operation & Maintenance Manual
OPERATOR CAB (ROPS / TOPS) (CONT’D)
Cab Door
Figure 17
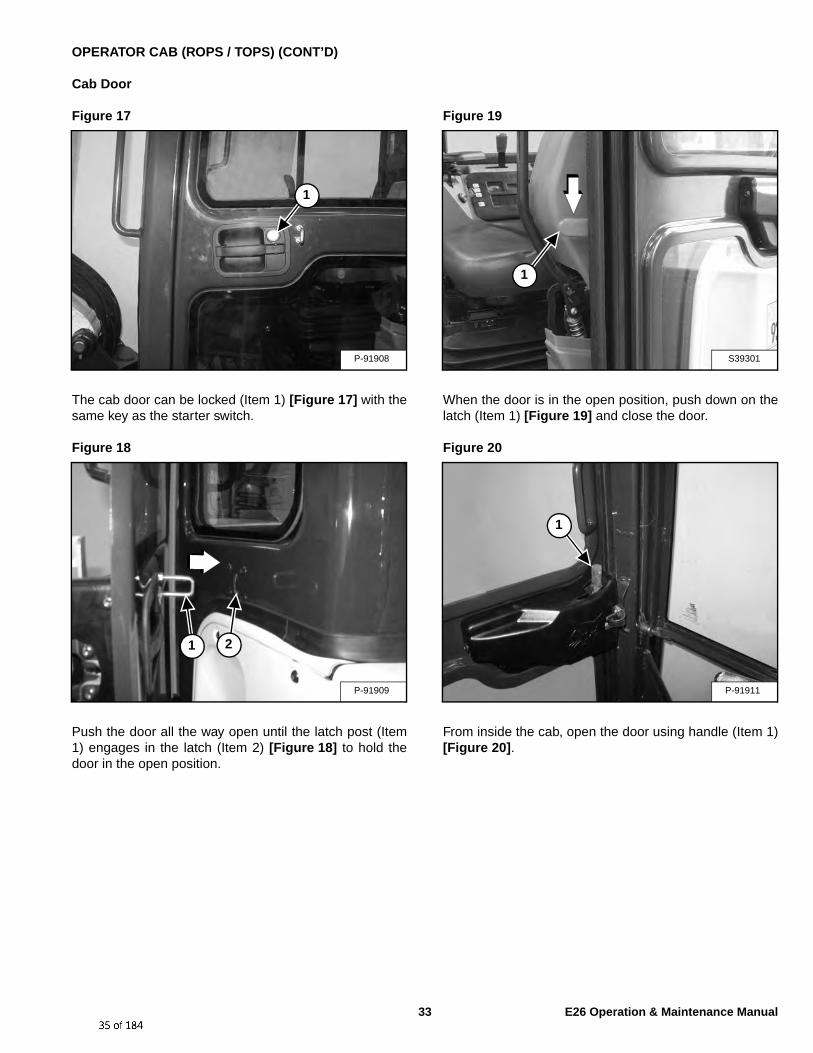
The cab door can be locked (Item 1) [Figure 17] with thesame key as the starter switch.
Figure 18
Push the door all the way open until the latch post (Item1) engages in the latch (Item 2) [Figure 18] to hold thedoor in the open position.
Figure 19
When the door is in the open position, push down on thelatch (Item 1) [Figure 19] and close the door.
Figure 20
From inside the cab, open the door using handle (Item 1)[Figure 20].
P-91908
1
P-91909
1 2
S39301
1
P-91911
1
33 E26 Operation & Maintenance Manual

OPERATOR CAB (ROPS / TOPS) (CONT’D)
Front Window
Opening The Front Window (Early Models)
Figure 21
Press the top window latch (Item 1) [Figure 21] (bothsides).
Figure 22
Use both window grab handles (Item 1) [Figure 22] topull the top of the window in.
Continue moving the window in and up over theoperator’s head until the window is fully raised.
Figure 23
When the window is fully raised, the latch (Item 1)[Figure 23] (both sides) will close on the bracket in thelatched position.
Pull down slightly on the window to make sure it is fullylatched.
Closing The Front Window (Early Models)
Support the window while releasing the window latch(Item 1) [Figure 23] (both sides).
Use both window grab handles (Item 1) [Figure 22] topull the window down fully.
Press the top of the window in until the latch (Item 1)[Figure 21] locks into the latched position (both sides).
Pull inward slightly on the window to make sure it is fullylatched in the closed position.
S40126
1
P-91913
1
P-91914
1
34 E26 Operation & Maintenance Manual

OPERATOR CAB (ROPS / TOPS) (CONT’D)
Front Window
Opening The Front Window (Later Models)
Figure 24
Press the window latch button (Item 1) [Figure 24] (bothsides).
Figure 25
Use both window grab handles (Item 1) [Figure 25] topull the top of the window in.
Continue moving the window in and up over theoperator’s head until the window is fully raised.
Figure 26
When the window is fully raised, the latch (Item 1)[Figure 26] (both sides) will close on the bracket in thelatched position.
Pull down and forward slightly on the window to makesure it is fully latched.
Closing The Front Window (Later Models)
Use both window grab handles to support the windowwhile pressing the window latch button (Item 2)[Figure 26] (both sides).
Use both window grab handles (Item 1) [Figure 25] topull the window down fully.
Press the top of the window in until the latch locks intothe latched position (both sides) [Figure 24].
Pull inward and upward slightly on the window to makesure it is fully latched in the closed position.
P-97681
1
P-91913
1
P-97683
2
1
35 E26 Operation & Maintenance Manual

OPERATOR CAB (ROPS / TOPS) (CONT’D)
Front Wiper
Figure 27
The front window is equipped with a wiper (Item 1)[Figure 27] and washer.
Window Washer Reservoir
Figure 28
The window washer reservoir (Item 1) [Figure 28] islocated under the right side cover.
P-91998
1
S40225
1
36 E26 Operation & Maintenance Manual

OPERATOR CAB (ROPS / TOPS) (CONT’D)
Right Side Window
Opening The Right Rear Window
Figure 29
Pull up on the bottom latch (Item 1) [Figure 29].
Figure 30
Pull the latch (Item 1) [Figure 30] forward to open thewindow until the desired stop. Release the bottom latchand snap the lock in place.
Closing The Right Rear Window
Pull up on the bottom latch (Item 1) [Figure 29] and pushthe latch back to close the window.
Opening The Right Front Window
Figure 31
Pull up on the bottom latch (Item 1) [Figure 31] locatedat the front of the front window.
Figure 32
Pull the latch (Item 1) [Figure 32] forward to open thewindow until the desired stop. Release the bottom latchand snap the lock in place.
Closing The Right Front Window
Pull up on the bottom latch (Item 1) [Figure 31] and pushthe latch back to close the window.
S40127
1
S40135
1
S40128
1
S40136
1
37 E26 Operation & Maintenance Manual

OPERATOR CAB (ROPS / TOPS) (CONT’D)
Heating, Ventilation And Air Conditioning Ducting
Figure 33
The HVAC louvers (Item 1) [Figure 33] can be positionedas needed to direct the air flow to various areas in thecab.
Operating Tip: To increase heating or cooling efficiency,move the Recirculation / Fresh Air Control knob (Item 2)[Figure 33] to the recirculation position. This will allowthe air to recirculate through the HVAC system andimprove temperature control. If left in the fresh airposition, the HVAC system will also need to heat or coolthe ambient air that is drawn in from the outside, slowingand / or reducing the temperature change inside the cab.
S40554
1
1
1
2
38 E26 Operation & Maintenance Manual

EMERGENCY EXIT
The door, the right side rear window and the front window provide exits.
Right Side Rear Window
Figure 34
Exit through the window [Figure 34].
Front Window
Figure 35
Open the front window and exit [Figure 35].
NOTE: If the excavator has a Special Applications Kitinstalled, the front window is NOT anemergency exit.
S40390 P-91913
39 E26 Operation & Maintenance Manual

MOTION ALARM SYSTEM
Operation
Figure 36
This excavator can be equipped with a motion alarmsystem. The motion alarm is located inside the rear (Item1) [Figure 36] of the excavator.
Figure 37
The motion alarm can be temporarily disabled bypressing the motion alarm switch (Item 1) [Figure 37]while the machine is moving. As soon as the travel leversare returned to the neutral position, the motion alarm willbe enabled.
WARNINGThis machine is equipped with a motion alarm.
ALARM MUST SOUND!when operating forward or backward.
Failure to maintain a clear view in the direction oftravel could result in serious injury or death.
The operator is responsible for the safe operation ofthis machine.
W-2786-0309
The motion alarm will sound when the operator movesthe travel control levers (Item 1) [Figure 38] in the eitherthe forward or reverse direction.
If alarm does not sound or for adjustment instructions,see inspection and maintenance instructions for themotion alarm system in the preventive maintenancesection of this manual. (See MOTION ALARM SYSTEMon Page 90.)
S37399
1
S40557
1
40 E26 Operation & Maintenance Manual

TRAVEL CONTROLS
Forward And Reverse Travel
NOTE: The following procedures describe forward,reverse, left and right as seated in theoperator’s seat.
Figure 38
Put the blade so that it is at the front of the machine (asyou sit in the operator’s seat). Slowly move both steeringlevers* (Item 1) [Figure 38] forward for forward travel;backward for reverse travel.
* Travel can also be controlled with foot pedals (Item 2)[Figure 38]. Pivot the heel of the pedals forward foradditional space on the floor.
WARNINGAVOID INJURY OR DEATH
• Check the blade location before traveling. Whenthe blade is to the rear, operate the steeringlevers/foot pedals in the opposite direction towhen the blade is in the front.
• Move the steering levers/foot pedals slowly.Abrupt lever motion will cause the machine tojerk.
W-2235-0396
Turning
Right Turn
Figure 39
Push the left steering lever forward to turn right[Figure 39] while traveling forward.
Figure 40
Pull the left steering lever backward to turn right whiletraveling backward [Figure 40]
P-91919
1
2
Forward
Reverse
Neutral
2
1
NA1457A
Right Turn(Forward)
NA1458A
Right Turn(Reverse)
41 E26 Operation & Maintenance Manual

TRAVEL CONTROLS (CONT’D)
Turning (Cont’d)
Counter-Rotation Right Turn
Figure 41
Push the left steering lever forward and pull the rightsteering lever backward [Figure 41].
Left Turn
Figure 42
Push the right steering lever forward to turn left whiletraveling forward [Figure 42].
Figure 43
Pull the right steering lever backward to turn left whiletraveling backward [Figure 43].
Counter-Rotation Left Turn
Figure 44
Push the right steering lever forward and pull the leftsteering lever backward [Figure 44].
NA1459A
Counter-Rotation(Right Turn)
NA1460A
Left Turn(Forward)
NA1461A
Left Turn(Reverse)
NA1462A
Counter-Rotation(Left Turn)
42 E26 Operation & Maintenance Manual

HYDRAULIC CONTROLS
Description
The work equipment (boom, arm, bucket, andupperstructure slew) is operated by using the left andright control levers (joysticks). These joysticks can beused in either a STANDARD Control Pattern [Figure 45]and [Figure 46] or in the ISO Control Pattern [Figure 47]and [Figure 48]. (See STD / ISO Selector Valve on Page30.)
STANDARD Control Pattern
Left Control Lever (Joystick)
Figure 45
The left lever (joystick) is used to operate the boom andslew the upperstructure [Figure 45].
1. Boom lower.2. Boom lower and slew right.3. Slew right.4. Boom raise and slew right.5. Boom raise.6. Boom raise and slew left.7. Slew left.8. Boom lower and slew left.
Right Control Lever (Joystick)
Figure 46
The right lever (joystick) is used to operate the arm andbucket [Figure 46].
1. Arm out.2. Arm out and bucket dump.3. Bucket dump.4. Arm in and bucket dump.5. Arm in.6. Arm in and bucket curl.7. Bucket curl.8. Arm out and bucket curl.
WARNINGAVOID INJURY OR DEATH
Before leaving the machine:• Lower the work equipment to the ground.• Lower the blade to the ground.• Stop the engine & remove the key.• Raise the control console.
W-2780-0109
S40138EM9408
STD CONTROLPATTERN
S40301EM9313
STD CONTROLPATTERN
43 E26 Operation & Maintenance Manual

HYDRAULIC CONTROLS (CONT’D)
ISO Control Pattern
Left Control Lever (Joystick)
Figure 47
The left lever (joystick) is used to operate the boom andslew the upperstructure [Figure 47].
1. Arm out.2. Arm out and slew right.3. Slew right.4. Arm in and slew right.5. Arm in.6. Arm in and slew left.7. Slew left.8. Arm out and slew left.
Right Control Lever (Joystick)
Figure 48
The right lever (joystick) is used to operate the arm andbucket [Figure 48].
1. Boom lower.2. Boom lower and bucket dump.3. Bucket dump.4. Boom raise and bucket dump.5. Boom raise.6. Boom raise and bucket curl.7. Bucket curl.8. Boom lower and bucket curl.
WARNINGAVOID INJURY OR DEATH
Before leaving the machine:• Lower the work equipment to the ground.• Lower the blade to the ground.• Stop the engine & remove the key.• Raise the control console.
W-2780-0109
S40138EM9306
ISO CONTROLPATTERN
S40301EM9307
ISO CONTROLPATTERN
44 E26 Operation & Maintenance Manual

HYDRAULIC CONTROLS (CONT’D)
Quick Couplers
WARNINGAVOID BURNS
Hydraulic fluid, tubes, fittings and quick couplerscan get hot when running machine and attachments.Be careful when connecting and disconnecting quickcouplers.
W-2220-0396
WARNINGAVOID INJURY OR DEATH
Diesel fuel or hydraulic fluid under pressure canpenetrate skin or eyes, causing serious injury ordeath. Fluid leaks under pressure may not be visible.Use a piece of cardboard or wood to find leaks. Donot use your bare hand. Wear safety goggles. If fluidenters skin or eyes, get immediate medical attentionfrom a physician familiar with this injury.
W-2072-0807
Figure 49
Excavators and attachments are supplied with flushfaced couplers (Item 1) [Figure 49].
To Connect:
Remove any dirt or debris from the surface of both themale and female couplers, and from the outside diameterof the male coupler. Visually check the couplers forcorroding, cracking, damage, or excessive wear, if any ofthese conditions exist, the coupler(s) (Item 1) [Figure 49]must be replaced.
Install the male coupler into the female coupler. Fullconnection is made when the ball release sleeve slidesforward on the female coupler.
To Disconnect:
Figure 50
Hold the male coupler (Item 1). Retract the sleeve (Item2) [Figure 50] on the female coupler until the couplersdisconnect.
S40305
1
1
N-15540
12
45 E26 Operation & Maintenance Manual

HYDRAULIC CONTROLS (CONT’D)
Auxiliary Hydraulics
Figure 51
Press the Auxiliary Hydraulics button on the right console(Item 1) [Figure 51].
Figure 52
Move the switch (Item 1) [Figure 52] on the right controllever to the right to supply hydraulic flow to the femalecoupler. Move the switch to the left to supply hydraulicflow to the male coupler. If you move the switch halfway,the auxiliary functions move at approximately one-halfspeed.
Press the switch (Item 2) [Figure 52] on the front of thehandle to provide constant flow to the female coupler.
NOTE: Pressing the switch (Item 1) to the left whilepressing the switch (Item 2) [Figure 52] on thefront of the handle will provide constant flowto the male coupler.
Press the switch (Item 2) [Figure 52] a second time tostop auxiliary flow to the quick couplers.
Relieve Hydraulic Pressure (Excavator AndAttachment)
Excavator:
Put the attachment flat on the ground.
Stop the engine and turn the key to ON (Standard) orpress ENTER CODE Button (Keyless).
NOTE: The left console must be fully lowered forrelieving hydraulic pressure.
Press AUX HYD Button (Item 1) [Figure 51] and thenmove the switch (Item 1) [Figure 52] to the right and leftseveral times.
Attachments:
• Follow procedure above to release pressure inexcavator.
• Connect male coupler from attachment to femalecoupler of excavator then repeat procedure above.This will release pressure in the attachment.
• Connect the female coupler from the attachment.
Hydraulic pressure in the auxiliary hydraulic system canmake it difficult to engage quick couplers to anattachment.
1
S40556
1
S40301
2
46 E26 Operation & Maintenance Manual

HYDRAULIC CONTROLS (CONT’D)
Secondary Auxiliary Hydraulics
When equipped with secondary auxiliary hydraulics, thesecond set of hydraulic couplers will be mounted on theright side of the arm.
Figure 53
Move the boom swing / secondary auxiliary hydraulicswitch (Item 1) [Figure 53] to the right, secondaryauxiliary hydraulic position.
Figure 54
Move the switch (Item 1) [Figure 54] on the left controllever to the left to supply hydraulic flow to the femalecoupler. Move the switch to the right to supply hydraulicflow to the male coupler. If you move the switch halfway,the auxiliary functions move at approximately one-halfspeed.
Relieve Hydraulic Pressure (Excavator AndAttachment)
Excavator:
Put the attachment flat on the ground.
Stop the engine and turn the key to ON (Standard) orpress ENTER CODE Button (Keyless).
NOTE: The left console must be fully lowered forrelieving hydraulic pressure.
Move the boom swing / secondary auxiliary hydraulicswitch (Item 1) [Figure 53] to the right, secondaryauxiliary hydraulic position.
Move the switch (Item 1) [Figure 54] to the right and leftseveral times.
Attachments:
• Follow procedure above to release pressure inexcavator.
• Connect male coupler from attachment to femalecoupler of excavator then repeat procedure above.This will release pressure in the attachment.
• Connect the female coupler from the attachment.
Hydraulic pressure in the auxiliary hydraulic system canmake it difficult to engage quick couplers to anattachment.
1
P-91925A
1
S40138
47 E26 Operation & Maintenance Manual

HYDRAULIC CONTROLS (CONT’D)
Direct To Tank Valve
The direct to tank valve (if equipped) is located under thecab floor.
Remove the floor mat and floor panel. (See the ServiceManual for the correct procedure.)
Figure 55
Rotate the lever (Item 1) [Figure 55] clockwise to directauxiliary return flow to the hydraulic oil reservoir.
Rotate the lever (Item 1) [Figure 55] counterclockwise fortwo way hydraulic auxiliary flow operation.
S39307
1
48 E26 Operation & Maintenance Manual

BLADE CONTROL LEVER
Raising And Lowering Blade
Figure 56
Pull the lever backward to raise the blade (Item 1)[Figure 56].
Push the lever forward to lower the blade (Item 2)[Figure 56].
Push the lever (Item 3) [Figure 56] forward until the leveris in the locked position to put the blade in the floatposition.
Pull the lever backward to unlock from the float position.
NOTE: Keep blade lowered for increased diggingperformance.
ENGINE SPEED CONTROL
Setting Engine Speed (RPM)
Figure 57
The engine speed control dial (Item 1) [Figure 57]controls engine rpm along with the auto idle feature(when engaged).
Rotate the engine speed control dial counterclockwise(Item 2) to reduce engine rpm. Rotate the engine speedcontrol dial clockwise (Item 3) [Figure 57] to increaseengine rpm.
S40555
2 13
P-91926
1
2 3
49 E26 Operation & Maintenance Manual

BOOM SWING
Operation
Figure 58
The switch (Item 1) [Figure 58] on the left control lever(joystick) controls boom swing. Move the switch to the leftto swing the boom to the left. Move the switch to the rightto swing the boom to the right.
With Secondary Auxiliary Hydraulics:
If the machine is equipped with secondary auxiliaryhydraulic couplers, the switch (Item 2) [Figure 58] isused to select either the boom swing function or thesecondary auxiliary hydraulic function.
Move the switch (Item 2) [Figure 58] to the left to selectboom swing function, move the switch to the right toselect secondary auxiliary hydraulic function.
Figure 59
NOTE: The purpose of the boom swing is to offset theboom with respect to the upperstructure fordigging close to a structure [Figure 59].
P-91903C
1
2
EM8778
50 E26 Operation & Maintenance Manual
DAILY INSPECTION
Daily Inspection And Maintenance
Figure 60
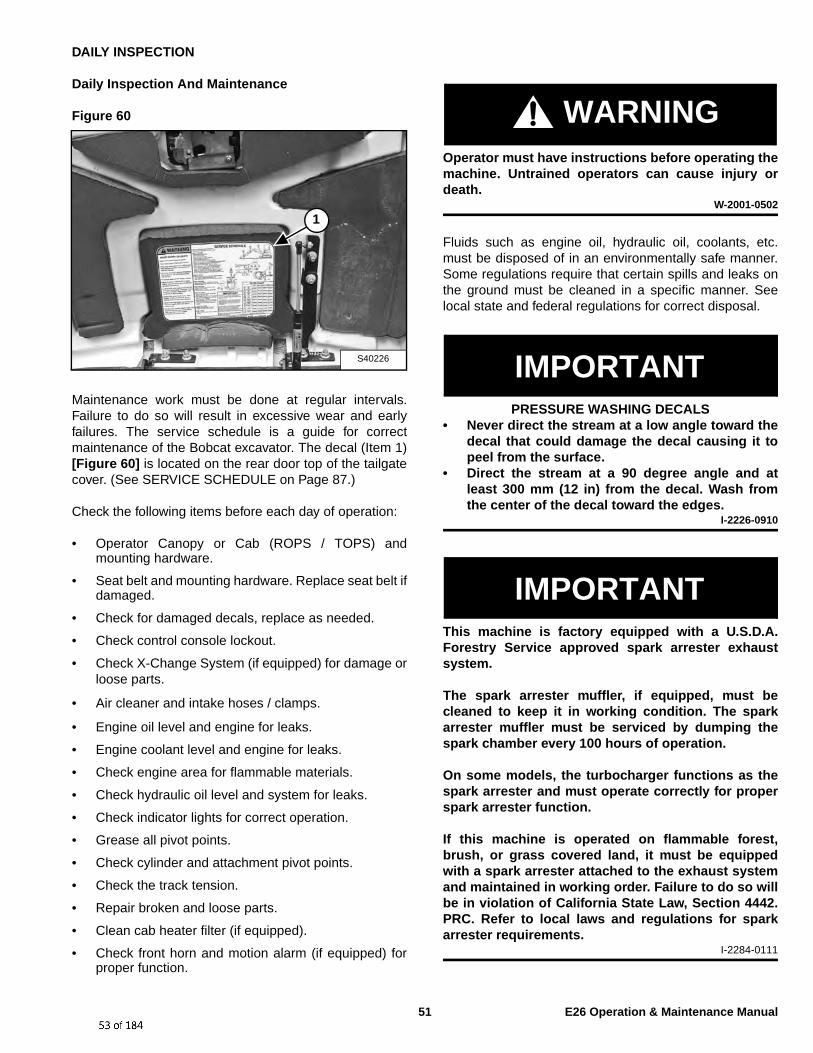
Maintenance work must be done at regular intervals.Failure to do so will result in excessive wear and earlyfailures. The service schedule is a guide for correctmaintenance of the Bobcat excavator. The decal (Item 1)[Figure 60] is located on the rear door top of the tailgatecover. (See SERVICE SCHEDULE on Page 87.)
Check the following items before each day of operation:
• Operator Canopy or Cab (ROPS / TOPS) andmounting hardware.
• Seat belt and mounting hardware. Replace seat belt ifdamaged.
• Check for damaged decals, replace as needed.
• Check control console lockout.
• Check X-Change System (if equipped) for damage orloose parts.
• Air cleaner and intake hoses / clamps.
• Engine oil level and engine for leaks.
• Engine coolant level and engine for leaks.
• Check engine area for flammable materials.
• Check hydraulic oil level and system for leaks.
• Check indicator lights for correct operation.
• Grease all pivot points.
• Check cylinder and attachment pivot points.
• Check the track tension.
• Repair broken and loose parts.
• Clean cab heater filter (if equipped).
• Check front horn and motion alarm (if equipped) forproper function.
WARNINGOperator must have instructions before operating themachine. Untrained operators can cause injury ordeath.
W-2001-0502
Fluids such as engine oil, hydraulic oil, coolants, etc.must be disposed of in an environmentally safe manner.Some regulations require that certain spills and leaks onthe ground must be cleaned in a specific manner. Seelocal state and federal regulations for correct disposal.
IMPORTANTPRESSURE WASHING DECALS
• Never direct the stream at a low angle toward thedecal that could damage the decal causing it topeel from the surface.
• Direct the stream at a 90 degree angle and atleast 300 mm (12 in) from the decal. Wash fromthe center of the decal toward the edges.
I-2226-0910
IMPORTANTThis machine is factory equipped with a U.S.D.A.Forestry Service approved spark arrester exhaustsystem.
The spark arrester muffler, if equipped, must becleaned to keep it in working condition. The sparkarrester muffler must be serviced by dumping thespark chamber every 100 hours of operation.
On some models, the turbocharger functions as thespark arrester and must operate correctly for properspark arrester function.
If this machine is operated on flammable forest,brush, or grass covered land, it must be equippedwith a spark arrester attached to the exhaust systemand maintained in working order. Failure to do so willbe in violation of California State Law, Section 4442.PRC. Refer to local laws and regulations for sparkarrester requirements.
I-2284-0111
S40226
1
51 E26 Operation & Maintenance Manual

PRE-STARTING PROCEDURE
Operation & Maintenance Manual And Operator’sHandbook Locations
Figure 61
Figure 62
Read and understand the Operation & MaintenanceManual (Item 1) [Figure 61] (located inside the storagebox on the back of the operator’s seat) and the Operator’sHandbook (Item 1) [Figure 62] before operating.
Entering The Excavator
Figure 63
Use the grab handles and tracks to enter the canopy /cab [Figure 63].
WARNINGAVOID INJURY OR DEATH
Instructions are necessary before operating orservicing machine. Read and understand theOperation & Maintenance Manual, Operator’sHandbook and signs (decals) on machine. Followwarnings and instructions in the manuals whenmaking repairs, adjustments or servicing. Check forcorrect function after adjustments, repairs orservice. Untrained operators and failure to followinstructions can cause injury or death.
W-2003-0807
P-91990
1
P-92992
1
P-91927A
52 E26 Operation & Maintenance Manual

PRE-STARTING PROCEDURE (CONT’D)
Seat Adjustment
Standard Seat
Figure 64
Release the seat lever (Item 1) [Figure 64] to adjust theseat forward or back.
Sit in the seat and turn the knob (Item 2) [Figure 64] toadjust the position of the back cushion.
Suspension Seat (If Equipped)
Figure 65
Release the seat lever (Item 1) [Figure 65] to adjust theseat forward or back.
Turn the handle (Item 2) to change the adjustment foroperator weight. Turn the handle until the operator’sweight is shown in the window (Item 3) [Figure 65].
Release the lever (Item 4) [Figure 65] to adjust theposition of the back cushion.
Sit in the seat and turn the knob (Item 5) [Figure 65] toadjust the height of the seat.
Seat Belt
Figure 66
Fasten the seat belt [Figure 66].S40327
2
1
P-91928
1
3
2 5
4
P-91929
53 E26 Operation & Maintenance Manual

PRE-STARTING PROCEDURE (CONT’D)
Control Console
Figure 67
Lower the control console [Figure 67].
NOTE: There is a control lock sensor in the leftconsole which deactivates the hydrauliccontrol levers (joysticks) and the tractiondrive system when the control console israised. The console must be in the lockeddown position for the hydraulic control levers(joysticks) and traction system to operate.
NOTE: If the control lock sensor does not deactivatethe control levers and traction system whenconsole is raised, see your Bobcat dealer forservice.
Mirror Adjustment
Figure 68
Adjust mirrors (Item 1) [Figure 68] (if equipped).
P-91905 P-92954
1
54 E26 Operation & Maintenance Manual

STARTING THE ENGINE
Key Switch
WARNINGAVOID SERIOUS INJURY OR DEATH
• Engines can have hot parts and hot exhaust gas.Keep flammable material away.
• Do not use machines in atmosphere containingexplosive dust or gases.
W-2051-0212
Perform the PRE-STARTING PROCEDURE. (See PRE-STARTING PROCEDURE on Page 52.)
Figure 69
Put control levers (Item 1) [Figure 69] in the neutralposition.
Figure 70
Rotate the engine speed control dial (Item 1) [Figure 70]counterclockwise to low idle.
Figure 71
Turn the key (Item 1) [Figure 71] to the ON position. Ifpreheating is required, the glow plugs will automaticallycycle and the remaining preheat time (in seconds) willshow in the data display screen. (Preheat icon will beON).
Turn the key to START and release the key when theengine starts. It will return to the ON position [Figure 71].
WARNINGAVOID INJURY OR DEATH
• Fasten seat belt, start and operate only from theoperator’s seat.
• Never wear loose clothing when working nearmachine.
W-2135-1108
IMPORTANTDo not engage the starter for longer than 15 secondsat a time. Longer use can damage the starter byoverheating. Allow starter to cool for one minutebefore using starter again.
I-2034-0700
Stop the engine if the warning lights and alarm do not goOFF. Check for the cause before starting the engineagain.
Turn the key switch OFF to stop the engine.
P-91919
Forward
Reverse
Neutral
1
P-91926
1
S39309
StopOn
Start
1
55 E26 Operation & Maintenance Manual

STARTING THE ENGINE (CONT’D)
Keyless
WARNINGAVOID SERIOUS INJURY OR DEATH
• Engines can have hot parts and hot exhaust gas.Keep flammable material away.
• Do not use machines in atmosphere containingexplosive dust or gases.
W-2051-0212
Perform the PRE-STARTING PROCEDURE. (See PRE-STARTING PROCEDURE on Page 52.)
Figure 72
Rotate the engine speed control dial (Item 1) [Figure 72]counterclockwise to low idle.
WARNINGAVOID INJURY OR DEATH
• Fasten seat belt, start and operate only from theoperator’s seat.
• Never wear loose clothing when working nearmachine.
W-2135-1108
Figure 73
Press ENTER CODE Button (Item 1) [Figure 73]. Thedisplay will become lighted and there will be two shortbeeps, “CodE” will appear on the display screen.
Use the keypad (Item 2) [Figure 73] to enter thepassword. For each digit that you enter, a dash willappear on the data display screen. (You have 40 secondsto enter the password or the process will abort and youwill need to start over.) If the password was enteredcorrectly, there will be one long beep.
NOTE: If the password was incorrect there will bethree short beeps and “Error” will appear onthe data display screen. Press the ENTERCODE Button again and start over. After threefailed attempts, you must wait 3 minutes to tryagain.
Press the START Button (Item 3) [Figure 73] and hold ituntil the engine starts.
IMPORTANTDo not engage the starter for longer than 15 secondsat a time. Longer use can damage the starter byoverheating. Allow starter to cool for one minutebefore using starter again.
I-2034-0700
P-91926
1
S40288
1
3 4
2
56 E26 Operation & Maintenance Manual

STARTING THE ENGINE (CONT’D)
Keyless (Cont’d)
Press the STOP button (Item 4) [Figure 73] to stop theengine.
Stop the engine if the warning lights and alarm do not goOFF.
Check for the cause before starting the engine again.
Password Lockout Feature
See Password Lockout Feature. (See Password LockoutFeature on Page 134.)
WARNINGAVOID INJURY OR DEATH
When an engine is running in an enclosed area, freshair must be added to avoid concentration of exhaustfumes. If the engine is stationary, vent the exhaustoutside. Exhaust fumes contain odorless, invisiblegases which can kill without warning.
W-2050-0807
Cold Temperature Starting
WARNINGAVOID INJURY OR DEATH
Do not use ether with glow plug (preheat) systems.Explosion can result which can cause injury, death,or severe engine damage.
W-2071-0907
If the temperature is below freezing, perform the followingto make starting the engine easier:
• Replace the engine oil with the correct type andviscosity for the anticipated starting temperature.(See Engine Oil Chart on Page 101.)
• Make sure the battery is fully charged.
• Install an engine heater.
NOTE: If the battery is discharged (but not frozen) abooster battery can be used to jump start theexcavator. (See Using A Booster Battery(Jump Starting) on Page 108.)
Figure 74
Rotate the engine speed control dial (Item 1) [Figure 74]clockwise to high idle.
IMPORTANTDo not engage the starter for longer than 15 secondsat a time. Longer use can damage the starter byoverheating. Allow starter to cool for one minutebefore using starter again.
I-2034-0700
P-91926
1
57 E26 Operation & Maintenance Manual

STARTING THE ENGINE (CONT’D)
Cold Temperature Starting Procedure (Cont’d)
Key Switch
Figure 75
Turn the key to the ON position [Figure 75].
Figure 76
The preheat icon (Item 1) [Figure 76] will illuminate. Theglow plugs will automatically cycle. When the icon goesoff, turn the key to start.
Release the key when the engine starts, it will return tothe ON position.
Stop the engine if the warning lights and alarm do not gooff. Check for the cause before starting the engine again.
When the engine speed increases, move the enginespeed control dial to idle position until the engine warms.
Keyless
Follow STARTING PROCEDURE (See Keyless on Page56.)
If the preheat icon comes ON, wait for it to go off beforepressing the START Button (Item 1) [Figure 76].
The remaining preheat time (in seconds) will count downin the data display screen.
IMPORTANTDo not engage the starter for longer than 15 secondsat a time. Longer use can damage the starter byoverheating. Allow starter to cool for one minutebefore using starter again.
I-2034-0700
IMPORTANTMachines warmed up with moderate engine speedand light load have longer life.
I-2015-0284
WARNINGAVOID INJURY OR DEATH
Do not use ether with glow plug (preheat) systems.Explosion can result which can cause injury, death,or severe engine damage.
W-2071-0907
Warming The Hydraulic System
IMPORTANT
When the temperature is below -30°C (-20°F),hydrostatic oil must be warmed before starting. Thehydrostatic system will not get enough oil at lowtemperatures and will be damaged. Park the machinein an area where the temperature will be above -18°C(0°F) if possible.
I-2007-0910
Let the engine run at least 5 minutes to warm the engineand hydraulic oil before operating the excavator.
S39309
StopOn
Start
1
S40556
1
58 E26 Operation & Maintenance Manual

STOPPING THE ENGINE AND LEAVING THE EXCAVATOR
Procedure
Figure 77
Stop the machine on level ground. Lower the workequipment and the blade to the ground [Figure 77].
Figure 78
Rotate the engine speed control dial (Item 1) [Figure 78]counterclockwise to low idle.
Run the engine at idle speed for about 5 minutes to allowit to cool.
Figure 79
Figure 80
Turn the key switch to STOP [Figure 79] or press theSTOP Button (Keyless Panel) (Item 1) [Figure 80].
Disconnect the seat belt. Remove the key (if equipped)from the switch to prevent operation of machine byunauthorized personnel. Raise the control console andexit the machine.
S40328
P-91926
1
7186708
STOP
ON
START
S40288
1
59 E26 Operation & Maintenance Manual

ATTACHMENTS
Installing And Removing The Attachment (Pin-On X-Change)
Installation
NOTE: Installation and removal of the bucket isshown. The procedure is the same for otherattachments. Disconnect any hydraulic linesthat are operated by hydraulic power beforeremoving any attachments (breaker, auger,etc.).
WARNINGAVOID INJURY OR DEATH
Never use attachments or buckets which are notapproved by Bobcat Company. Buckets andattachments for safe loads of specified densities areapproved for each model. Unapproved attachmentscan cause injury or death.
W-2052-0907
Figure 81
Inspect the pin (Item 1) [Figure 81] for wear or damage.Replace the pin as needed.
Apply a light coat of grease to the ends of the pin (Item 2)[Figure 81].
Figure 82
Start the engine and move the arm toward the bucket[Figure 82].
S40329
2 1 2
S40560
60 E26 Operation & Maintenance Manual

ATTACHMENTS (CONT’D)
Installing And Removing The Attachment (Pin-On X-Change) (Cont’d)
Installation (Cont’d)
Figure 83
Raise the boom until the pins (Item 1) engage the hooks(Item 2) [Figure 83] on the bucket.
Figure 84
Raise the boom and extend the bucket cylinder until theX-Change contacts the attachment back [Figure 84].
With the arm vertical, lower the boom until the hooks(Item 1) of the bucket disengage the pins (Item 2) of theX-Change and the plate (Item 3) [Figure 84] fullyengages in the bucket crossmember.
WARNINGKeep all bystanders 6 m (20 ft) away from equipmentwhen operating. Contact with moving parts, a trenchcave-in or flying objects can cause injury or death.
W-2119-0910
S40559
2
1
S40562
1
23
61 E26 Operation & Maintenance Manual

ATTACHMENTS (CONT’D)
Installing And Removing The Attachment (Pin-On X-Change) (Cont’d)
Installation (Cont’d)
Figure 85
Stop the engine. Turn the start key to the ON position andmove both hydraulic control levers to relieve hydraulicpressure.
Drive the pin (Item 1) [Figure 85] through the bucketmount and X-Change.
Figure 86
Install the retainer pins (Item 1) [Figure 86] (both sides).
Check for proper installation.
Lift the attachment and fully extend and retract the bucketcylinder.
S40330
1
P-49708
1
62 E26 Operation & Maintenance Manual

ATTACHMENTS (CONT’D)
Installing And Removing The Attachment (Pin-On X-Change) (Cont’d)
Removal
NOTE: Removal and installation of the bucket isshown. The procedure is the same for otherattachments. Disconnect any hydraulic linesthat are operated by hydraulic power beforeremoving any attachments (breaker, auger,etc.).
WARNINGAVOID INJURY OR DEATH
Never use attachments or buckets which are notapproved by Bobcat Company. Buckets andattachments for safe loads of specified densities areapproved for each model. Unapproved attachmentscan cause injury or death.
W-2052-0907
Figure 87
Park the excavator on a flat level surface. Put the bucketon the ground [Figure 87].
With the engine off, turn the start key to the ON positionand move both hydraulic control levers to relievehydraulic pressure.
S40561
63 E26 Operation & Maintenance Manual

ATTACHMENTS (CONT’D)
Installing And Removing The Attachment (Pin-On X-Change) (Cont’d)
Removal (Cont’d)
Figure 88
Remove the retainer pin (Item 1) [Figure 88].
Figure 89
Drive the pin (Item 1) [Figure 89] out of the bucket and X-Change mount.
WARNINGAVOID INJURY OR DEATH
Wear safety glasses to prevent eye injury when anyof the following conditions exist:• When fluids are under pressure.• Flying debris or loose material is present.• Engine is running.• Tools are being used.
W-2019-0907
Figure 90
Start the engine, raise the boom approximately one footand retract the bucket cylinder until the X-Change pins(Item 1) engage the hooks (Item 2) [Figure 90] on thebucket.
S40468
1
S40469
1
S40559
1
2
64 E26 Operation & Maintenance Manual

ATTACHMENTS (CONT’D)
Installing And Removing The Attachment (Pin-On X-Change) (Cont’d)
Removal (Cont’d)
Figure 91
Fully retract the bucket cylinder and lower the boom andarm until the bucket is on the ground, and the X-Changepins (Item 1) are disengaged from the hooks (Item 2)[Figure 91].
Move the arm toward the excavator until the X-Changepins are clear of the bucket.
S40560
1
2
65 E26 Operation & Maintenance Manual

ATTACHMENTS (CONT’D)
Installing And Removing The Attachment (Pin-On Attachment)
Installation
WARNINGAVOID INJURY OR DEATH
Stop the machine on a firm flat surface. Whenremoving or installing attachments (such as abucket), always have a second person in theoperator’s seat, give clear signals and work carefully.
W-2140-0189
Figure 92
Install the arm into the bucket and align the mountinghole.
Install the pin (Item 1) [Figure 92] and washers.
Install the link (Item 2) in the bucket and align themounting hole. Install the pin (Item 3) [Figure 92] andwashers.
Figure 93
Install the two retainer pins (Item 1) [Figure 93]. Installgrease in the grease fittings.
Removal
Park the excavator on a flat surface and lower the bucketfully.
Remove the two retainer pins (Item 1) [Figure 93].
Remove the washers and pins (Items 1 and 3)[Figure 92].
Do not damage the dust seals in the arm.
WARNINGAVOID INJURY OR DEATH
Never use attachments or buckets which are notapproved by Bobcat Company. Buckets andattachments for safe loads of specified densities areapproved for each model. Unapproved attachmentscan cause injury or death.
W-2052-0907
P-66527A
1
3
2
P-66528A
1
1
66 E26 Operation & Maintenance Manual

OPERATING PROCEDURE
Inspect The Work Area
Before beginning operation, inspect the work area forunsafe conditions.
Look for sharp drop-offs or rough terrain. Haveunderground utility lines (gas, water, sewer, irrigation,etc.) located and marked. Work slowly in areas ofunderground utilities.
Remove objects or other construction material that coulddamage the excavator or cause personal injury.
Always check ground conditions before starting yourwork:
• Inspect for signs of instability such as cracks orsettlement.
• Be aware of weather conditions that can affect groundstability.
• Check for adequate traction if working on a slope.
Basic Operating Instructions
When operating on a public road or highway, alwaysfollow local regulations. For example: A slow movingvehicle (SMV) sign, or direction signals can be required.
Run the engine at low idle speed to warm the engine andhydraulic system before operating the excavator.
IMPORTANTMachines warmed up with moderate engine speedand light load have longer life.
I-2015-0284
New operators must operate the excavator in an openarea without bystanders. Operate the controls until theexcavator can be handled at an efficient and safe rate forall conditions of the work area.
Operating Near An Edge Or Water
Keep the excavator as far back from the edge as possibleand the excavator tracks perpendicular to the edge sothat if part of the edge collapses, the excavator can bemoved back.
Always move the excavator back at any indication theedge can be unstable.
Lowering The Work Equipment (Engine STOPPED)
The hydraulic control levers control the movement of theboom, arm, bucket and upperstructure slew functions.
The console must be in the locked down position, and thekey switch in the ON position.
Use the control lever to lower the boom.
Figure 94
The joystick lock switch disengages the hydraulic controlfunctions from the joysticks when the console are raised[Figure 94].
NOTE: If the engine stops, the boom / bucket(attachments) can be lowered to the groundusing hydraulic pressure in the accumulator.
The control console must be in the lockeddown position, and the key switch in the ONposition.
Use the control lever to lower the boom.
Lower the control console to engage the hydraulic controlfunctions of the joysticks [Figure 94].
P-91905
67 E26 Operation & Maintenance Manual

OPERATING PROCEDURE (CONT’D)
Object Handling
Do not exceed the Rated Lift Capacity. (See Lift Chart(7206148) With Standard Arm on Page 143.) or (See LiftChart (7206149) With Standard Arm and AdditionalCounterweight (Cont’d) on Page 147.) or (See Lift Chart(7206150) With Long Arm and Additional Counterweighton Page 149.)
WARNINGAVOID INJURY OR DEATH
Do not exceed rated lift capacity. Excessive load cancause tipping or loss of control.
W-2374-0500
Extend the bucket cylinder completely and lower theboom to the ground. Stop the engine.
Wrap the chain assembly around the bucket mountingplate.
Figure 95
Make sure the load is evenly weighted and centered onthe lifting chain, and is secured to prevent the load fromshifting [Figure 95].
Lift and position the load. Once the load is in position andtension is removed from the lift chain (secondary liftsystem), remove the secondary lift system.
EM8775
68 E26 Operation & Maintenance Manual

OPERATING PROCEDURE (CONT’D)
Using The Clamp
Figure 96
The optional lifting clamp attachment gives the excavatora wider range of use and mobility for debris removal[Figure 96].
The lifting clamp cylinder must be fully retracted when themachine is being used for excavating.
The lift capacities are reduced by 122 kg (270 lb) if theexcavator is equipped with the optional lifting clamp.
When Using Primary Auxiliary Hydraulics To ActivateClamp
Engage auxiliary hydraulics. (See Auxiliary Hydraulics onPage 46.)
Figure 97
Move the switch (Item 1) [Figure 97] on the right controllever to the left to open the clamp. Move the switch to theright to close the clamp.
When Using Secondary Auxiliary Hydraulics To ActivateClamp
Engage secondary auxiliary hydraulics. (See SecondaryAuxiliary Hydraulics on Page 47.)
Move the switch (Item 2) [Figure 97] on the left controllever to the right open the clamp. Move the switch to theleft to close the clamp.
N-15513
P-91922
RIGHT HAND CONTROLLEVER (JOYSTICK)PRIMARY AUXILIARYHYDRAULICS
LEFT HAND CONTROLLEVER (JOYSTICK)SECONDARY AUXILIARYHYDRAULICS
12
69 E26 Operation & Maintenance Manual

OPERATING PROCEDURE (CONT’D)
Excavating
Lower the blade to increase digging performance.
Figure 98
Extend the arm, lower the boom, and open the bucket[Figure 98].
Figure 99
Retract the arm, while lowering boom and curling thebucket [Figure 99].
Figure 100
Raise the boom, retract the arm and curl the bucket[Figure 100].
Rotate the upperstructure.
NOTE: Do not allow the bucket teeth to contact theground when slewing the upperstructure.
WARNINGKeep all bystanders 6 m (20 ft) away from equipmentwhen operating. Contact with moving parts, a trenchcave-in or flying objects can cause injury or death.
W-2119-0910
WARNINGAVOID INJURY OR DEATH
Check area to be excavated for overhead orunderground electrical power lines. Keep a safedistance from electrical power lines.
W-2757-0910
NA1436
NA1437
LINE VOLTAGEMINIMUM APPROACH
DISTANCE
50 kV At least 3 m (10 ft)
230 kV At least 5 m (17 ft)
740 kV At least 10 m (33 ft)
NA1441
70 E26 Operation & Maintenance Manual

OPERATING PROCEDURE (CONT’D)
Excavating (Cont’d)
Figure 101
Look in the direction of rotation and make sure there areno bystanders in the work area before rotating theupperstructure [Figure 101].
Figure 102
Extend the arm and uncurl the bucket to dump thematerial into a pile or truck [Figure 102].
IMPORTANTAvoid operating hydraulics over relief pressure.Failure to do so will overheat hydraulic components.
I-2220-0503
Figure 103
Do not dig under the excavator [Figure 103].
Do not use the bucket as a breaker or pile driver. It isbetter to excavate hard or rocky ground after breaking itwith other equipment. This will reduce damage to theexcavator.
Do not move the excavator while the bucket is in theground.
Dig only by moving the boom and arm toward theexcavator.
Do not back dig (digging by moving the boom and armaway from the excavator). Damage to the quick couplerand attachments can occur.
EM8776
EM8777
NA1438
WRONG
71 E26 Operation & Maintenance Manual
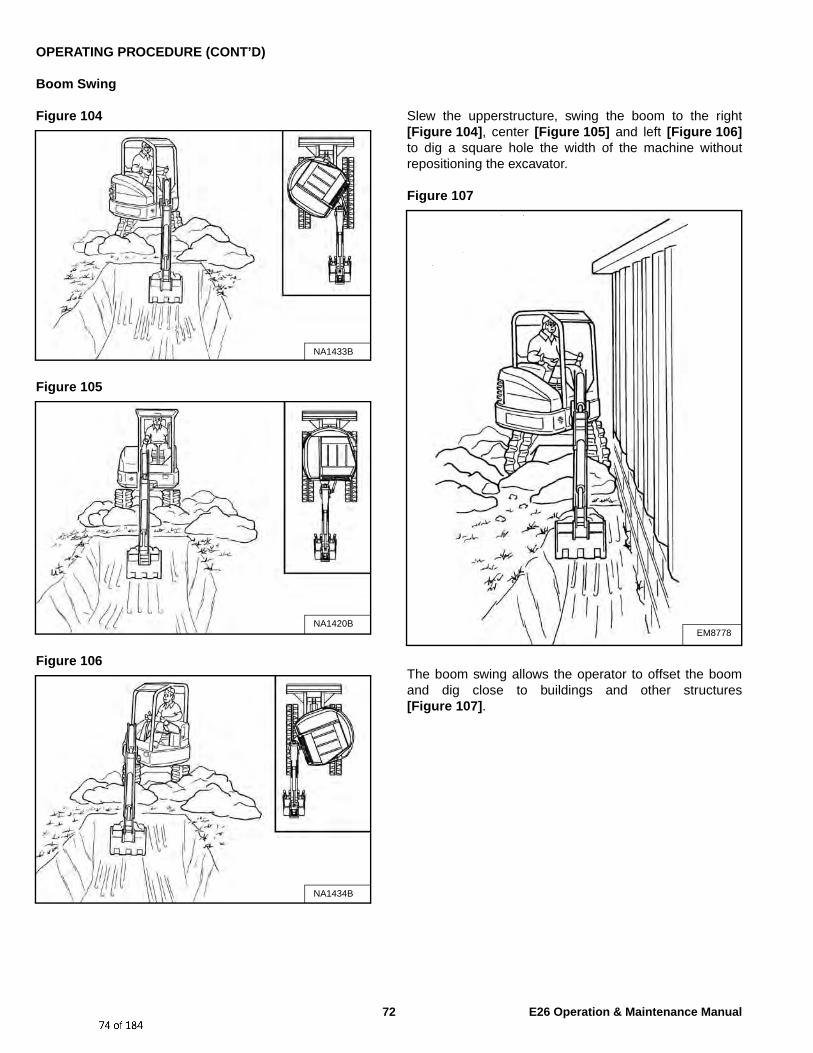
OPERATING PROCEDURE (CONT’D)
Boom Swing
Figure 104
Figure 105
Figure 106
Slew the upperstructure, swing the boom to the right[Figure 104], center [Figure 105] and left [Figure 106]to dig a square hole the width of the machine withoutrepositioning the excavator.
Figure 107
The boom swing allows the operator to offset the boomand dig close to buildings and other structures[Figure 107].
NA1433B
NA1420B
NA1434B
EM8778
72 E26 Operation & Maintenance Manual

OPERATING PROCEDURE (CONT’D)
Backfilling
IMPORTANTAvoid impacting objects with the blade. Damage toblade and undercarriage components may occur.
I-2256-0507
Figure 108
Use the blade to backfill the trench or hole afterexcavating [Figure 108].
Driving The Excavator
When operating on uneven ground, operate as slow aspossible and avoid sudden changes in direction.
Avoid traveling over objects such as rocks, trees, stumps,etc.
When working on wet or soft ground, put planks on theground to provide a solid base to travel on and preventthe excavator from getting stuck.
Figure 109
If one or both tracks have become stuck in soft or wetground, raise one track at a time by turning theupperstructure and pushing the bucket against theground [Figure 109].
Put planks under the tracks and drive the excavator to dryground.
Figure 110
The bucket can also be used to pull the excavator. Raisethe blade, extend the arm and lower the boom. Operatethe boom and arm in a digging manner [Figure 110].
NA1423NA1440
Plank
NA1422
73 E26 Operation & Maintenance Manual

OPERATING PROCEDURE (CONT’D)
Operating On Slopes
WARNINGAVOID INJURY OR DEATH
• Do not travel across or up slopes that are over 15degrees.
• Do not travel down or back up slopes that exceed25 degrees.
• Look in the direction of travel.W-2497-0304
When going down a slope, control the speed with thesteering levers and the speed control dial gauge.
Figure 111
When going down grades that exceed 15 degrees, putthe machine in the position shown, and run the engineslowly [Figure 111].
Operate as slow as possible and avoid sudden changesin lever direction.
Avoid traveling over objects such as rocks, trees, stumps,etc.
Stop the machine before moving the upper equipmentcontrols. Never allow the blade to strike a solid object.Damage to the blade or hydraulic cylinder can result.
WARNINGAVOID INJURY OR DEATH
• Avoid steep areas or banks that could breakaway.
• Keep boom centered and attachments as low aspossible when traveling on slopes or in roughconditions. Look in the direction of travel.
• Always fasten seat belt.W-2498-0304
Figure 112
Figure 113
When traveling up slopes or on side slopes that are 15degrees or less, position the machine as shown and runthe engine slow [Figure 112] and [Figure 113].
Traveling Down or Backing Up Slopes
NA1448
25 Maximum
304 mm(12 in)
Maximum
NA1447
Traveling Up Slopes
15 Maximum
Traveling On Side Slopes
NA1449
15 Maximum
74 E26 Operation & Maintenance Manual
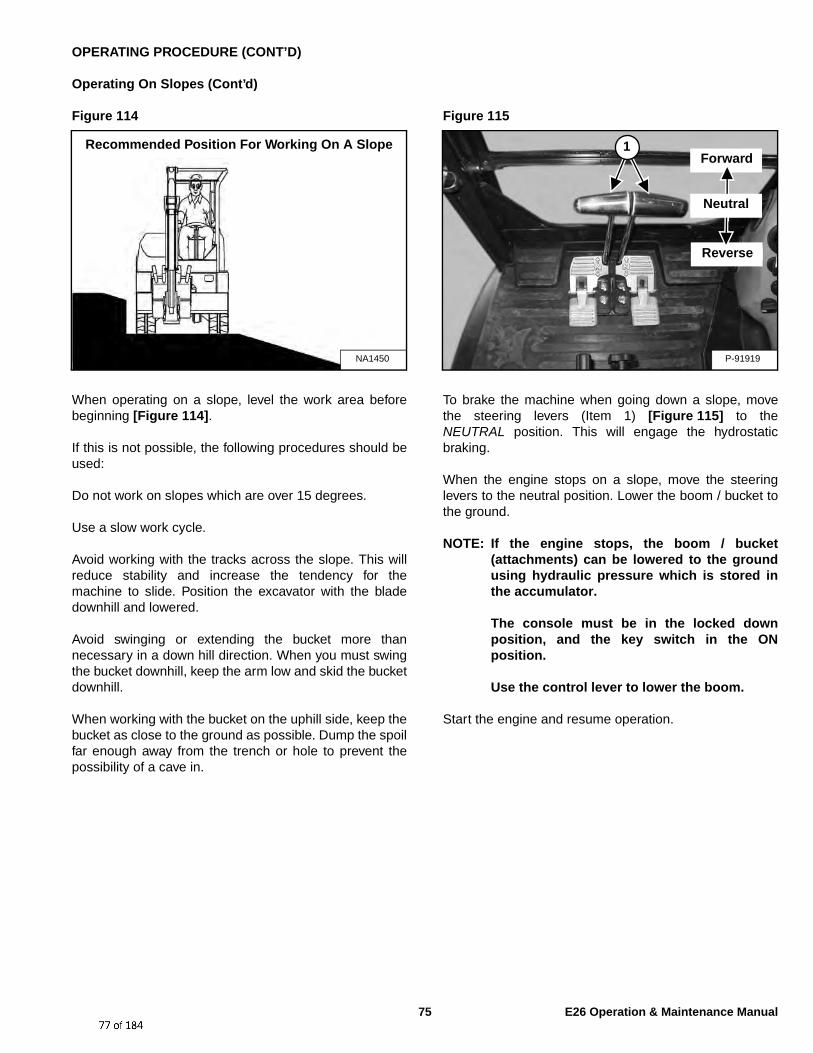
OPERATING PROCEDURE (CONT’D)
Operating On Slopes (Cont’d)
Figure 114
When operating on a slope, level the work area beforebeginning [Figure 114].
If this is not possible, the following procedures should beused:
Do not work on slopes which are over 15 degrees.
Use a slow work cycle.
Avoid working with the tracks across the slope. This willreduce stability and increase the tendency for themachine to slide. Position the excavator with the bladedownhill and lowered.
Avoid swinging or extending the bucket more thannecessary in a down hill direction. When you must swingthe bucket downhill, keep the arm low and skid the bucketdownhill.
When working with the bucket on the uphill side, keep thebucket as close to the ground as possible. Dump the spoilfar enough away from the trench or hole to prevent thepossibility of a cave in.
Figure 115
To brake the machine when going down a slope, movethe steering levers (Item 1) [Figure 115] to theNEUTRAL position. This will engage the hydrostaticbraking.
When the engine stops on a slope, move the steeringlevers to the neutral position. Lower the boom / bucket tothe ground.
NOTE: If the engine stops, the boom / bucket(attachments) can be lowered to the groundusing hydraulic pressure which is stored inthe accumulator.
The console must be in the locked downposition, and the key switch in the ONposition.
Use the control lever to lower the boom.
Start the engine and resume operation.
NA1450
Recommended Position For Working On A Slope
P-91919
1Forward
Reverse
Neutral
75 E26 Operation & Maintenance Manual

OPERATING PROCEDURE (CONT’D)
Operating In Water
Mud and water should be removed from the machinebefore parking. In freezing temperatures, park themachine on boards or concrete to prevent the track orundercarriage from freezing to the ground and preventingmachine movement.
Figure 116
Do not operate or immerse the excavator in water higherthan the bottom of the slew bearing [Figure 116].
Grease the excavator when it has been operated orimmersed in water for a period of time. Greasing forcesthe water out of the lubrication areas.
Water must be removed from the cylinder rods. If waterfreezes to the cylinder rod, the cylinder seals can bedamaged when the rod is retracted.
NA1446
Maximum Water Level
76 E26 Operation & Maintenance Manual

OPERATING PROCEDURE (CONT’D)
Avoiding Track Damage
Mud and water should be removed from the machinebefore parking. In freezing temperatures, park themachine on boards or concrete to prevent the track orundercarriage from freezing to the ground and preventingmachine movement.
Some Causes Of Track Damage:
Figure 117
Incorrect track tension: When the rubber track isdetracting, the idler or sprocket rides on the projections ofthe embedded metal [Figure 117] causing theembedded metal to be exposed to corrosion. (SeeTRACK TENSION on Page 117.)
If rubber track is clogged with stones or foreign objects,these can get wedged between the sprocket / rollers andcause detracting and track stress.
When moisture invades through cuts on the track, theembedded steel cords will corrode. The deterioration ofthe design strength can lead to the breaking of the steelcords.
Figure 118
When rubber tracks drive over projections or sharpobjects in the field, the concentrated forces applied causecuts on the lug side rubber surface [Figure 118]. In caseof making turns on projections, the lug side rubbersurface will have an even higher chance to be cut. If thecuts run through the embedded steel cords, it mightresult in the steel cords' breakage due to their corrosion.
Avoid quick turns on bumpy and rocky fields.
Driving over sharp objects should be avoided. If this isimpossible, do not make turns while driving over sharpobjects.
Figure 119
When rubber tracks drive over sharp projections,intensive stress is applied to the lug side rubber surface,especially at the edges of embedded metals, causingcracks and cuts in the area around the embedded metals[Figure 119].
Avoid extensive stress applied to the lug root wheremetals are embedded. Operators should try to avoiddriving over stumps and ridges.
PI-13035
PI-13045
CutsB-17824
77 E26 Operation & Maintenance Manual

TOWING THE EXCAVATOR
Procedure
There is not a recommended towing procedure for theexcavators.
• The excavator can be lifted onto the transport vehicle.
• The excavator can be skidded a short distance forservice (EXAMPLE: Move onto a transport vehicle)without damage to the hydraulic system. (The trackswill not turn.) There might be slight wear to the trackswhen the excavator is skidded.
• The towing chain (or cable) must be rated at 1.5 timesthe weight of the excavator. (See Performance onPage 171.)
78 E26 Operation & Maintenance Manual
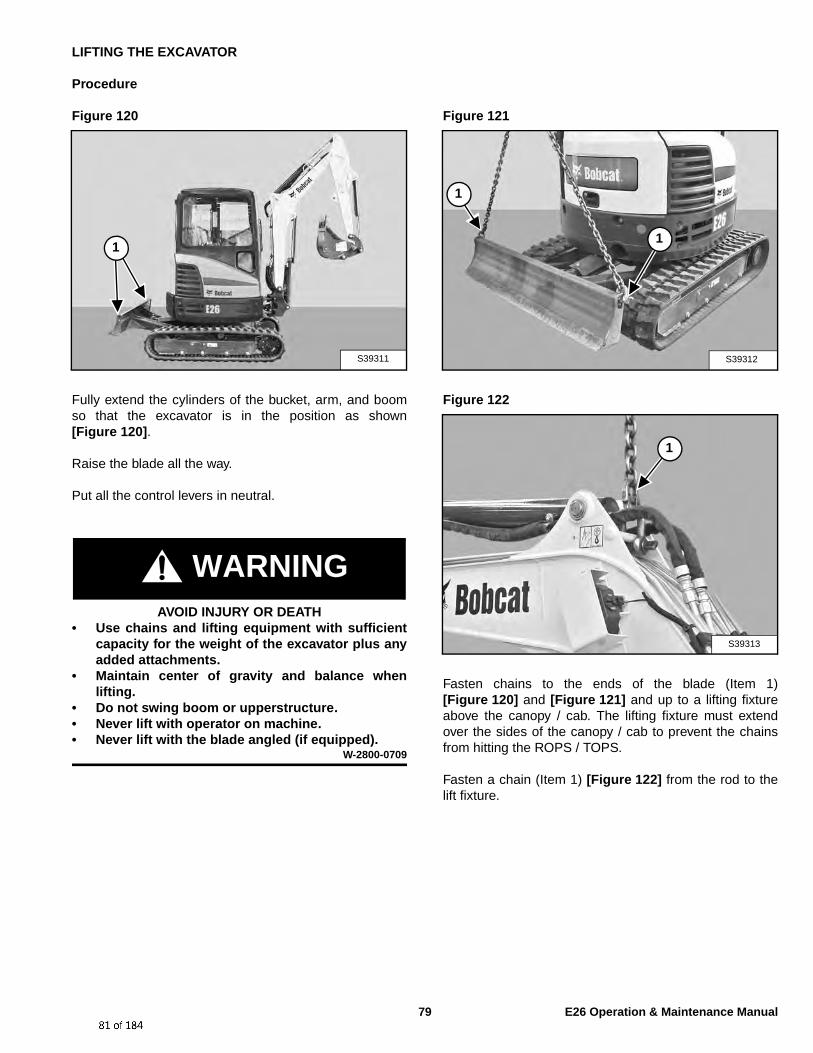
LIFTING THE EXCAVATOR
Procedure
Figure 120
Fully extend the cylinders of the bucket, arm, and boomso that the excavator is in the position as shown[Figure 120].
Raise the blade all the way.
Put all the control levers in neutral.
WARNINGAVOID INJURY OR DEATH
• Use chains and lifting equipment with sufficientcapacity for the weight of the excavator plus anyadded attachments.
• Maintain center of gravity and balance whenlifting.
• Do not swing boom or upperstructure.• Never lift with operator on machine.• Never lift with the blade angled (if equipped).
W-2800-0709
Figure 121
Figure 122
Fasten chains to the ends of the blade (Item 1)[Figure 120] and [Figure 121] and up to a lifting fixtureabove the canopy / cab. The lifting fixture must extendover the sides of the canopy / cab to prevent the chainsfrom hitting the ROPS / TOPS.
Fasten a chain (Item 1) [Figure 122] from the rod to thelift fixture.
S39311
1
S39312
1
1
S39313
1
79 E26 Operation & Maintenance Manual

TRANSPORTING THE EXCAVATOR ON A TRAILER
Loading And Unloading
When transporting the machine, observe the rules, motorvehicle laws, and vehicle limit ordinances. Use atransport and towing vehicle of adequate length andcapacity.
Secure the parking brakes and block the wheels of thetransport vehicle.
Align the ramps with the center of the transport vehicle.Secure the ramps to the truck bed and be sure rampangle does not exceed 15 degrees.
Use metal loading ramps with a slip resistant surface.
Use ramps that are the correct length and width and cansupport the weight of the machine.
The rear of the trailer must be blocked or supported whenloading or unloading the machine to prevent the front ofthe transport vehicle from raising.
Determine the direction of the track movement beforemoving the machine (blade forward).
Disengage the auto idle feature and move the two speedtravel to the low range position.
Figure 123
Move the machine forward onto the transport vehicle[Figure 123].
Do not change direction of the machine while it is on theramps.
Lower the boom, arm, bucket, and blade to the transportvehicle.
Stop the engine and remove the key (if equipped).
Put blocks at the front and rear of the tracks.
Fastening
Figure 124
Figure 125
Fasten chains to the front corners of the blade (Item 1)[Figure 124] and to the tie down loop at both sides of thetrack frame (Item 1) [Figure 125] to prevent it frommoving when going up or down slopes or during suddenstops.
Use chain binders to tighten the chains and then safely tiethe chain binder levers to prevent loosening.
WARNINGAVOID SERIOUS INJURY OR DEATH
Adequately designed ramps of sufficient strength areneeded to support the weight of the machine whenloading onto a transport vehicle. Wood ramps canbreak and cause personal injury.
W-2058-0807
S37397
P-91934
1
1
S37398
1
80 E26 Operation & Maintenance Manual

PREVENTIVE MAINTENANCE
MAINTENANCE SAFETY . . . . . . . . . . . . . . . . . . . . . . . . . . . . . . . . . . . . . . . . . . . . . . . . . . . .85
SERVICE SCHEDULE . . . . . . . . . . . . . . . . . . . . . . . . . . . . . . . . . . . . . . . . . . . . . . . . . . . . . . .87Chart . . . . . . . . . . . . . . . . . . . . . . . . . . . . . . . . . . . . . . . . . . . . . . . . . . . . . . . . . . . . . . . . . .87
CONTROL CONSOLE LOCKOUTS . . . . . . . . . . . . . . . . . . . . . . . . . . . . . . . . . . . . . . . . . . . . .88Inspection And Maintenance . . . . . . . . . . . . . . . . . . . . . . . . . . . . . . . . . . . . . . . . . . . . . . . .88
SEAT BELT . . . . . . . . . . . . . . . . . . . . . . . . . . . . . . . . . . . . . . . . . . . . . . . . . . . . . . . . . . . . . . . .89Inspection And Maintenance . . . . . . . . . . . . . . . . . . . . . . . . . . . . . . . . . . . . . . . . . . . . . . . .89
MOTION ALARM SYSTEM . . . . . . . . . . . . . . . . . . . . . . . . . . . . . . . . . . . . . . . . . . . . . . . . . . .90Description . . . . . . . . . . . . . . . . . . . . . . . . . . . . . . . . . . . . . . . . . . . . . . . . . . . . . . . . . . . . .90Inspecting . . . . . . . . . . . . . . . . . . . . . . . . . . . . . . . . . . . . . . . . . . . . . . . . . . . . . . . . . . . . . .90Adjusting Switch Position . . . . . . . . . . . . . . . . . . . . . . . . . . . . . . . . . . . . . . . . . . . . . . . . . .91
TAILGATE . . . . . . . . . . . . . . . . . . . . . . . . . . . . . . . . . . . . . . . . . . . . . . . . . . . . . . . . . . . . . . . . .92Opening And Closing . . . . . . . . . . . . . . . . . . . . . . . . . . . . . . . . . . . . . . . . . . . . . . . . . . . . .92Adjusting The Latch . . . . . . . . . . . . . . . . . . . . . . . . . . . . . . . . . . . . . . . . . . . . . . . . . . . . . .92
RIGHT SIDE COVER . . . . . . . . . . . . . . . . . . . . . . . . . . . . . . . . . . . . . . . . . . . . . . . . . . . . . . . .93Opening And Closing . . . . . . . . . . . . . . . . . . . . . . . . . . . . . . . . . . . . . . . . . . . . . . . . . . . . .93
CAB FILTERS . . . . . . . . . . . . . . . . . . . . . . . . . . . . . . . . . . . . . . . . . . . . . . . . . . . . . . . . . . . . . .94Cleaning And Maintenance . . . . . . . . . . . . . . . . . . . . . . . . . . . . . . . . . . . . . . . . . . . . . . . . .94
AIR CLEANER SERVICE . . . . . . . . . . . . . . . . . . . . . . . . . . . . . . . . . . . . . . . . . . . . . . . . . . . . .95Daily Check . . . . . . . . . . . . . . . . . . . . . . . . . . . . . . . . . . . . . . . . . . . . . . . . . . . . . . . . . . . . .95Replacing The Filter Elements . . . . . . . . . . . . . . . . . . . . . . . . . . . . . . . . . . . . . . . . . . . . . .95
FUEL SYSTEM . . . . . . . . . . . . . . . . . . . . . . . . . . . . . . . . . . . . . . . . . . . . . . . . . . . . . . . . . . . .97Fuel Specifications . . . . . . . . . . . . . . . . . . . . . . . . . . . . . . . . . . . . . . . . . . . . . . . . . . . . . . .97Biodiesel Blend Fuel . . . . . . . . . . . . . . . . . . . . . . . . . . . . . . . . . . . . . . . . . . . . . . . . . . . . . .97Filling The Fuel Tank . . . . . . . . . . . . . . . . . . . . . . . . . . . . . . . . . . . . . . . . . . . . . . . . . . . . . .98Fuel Filter . . . . . . . . . . . . . . . . . . . . . . . . . . . . . . . . . . . . . . . . . . . . . . . . . . . . . . . . . . . . . .99Draining The Fuel Tank . . . . . . . . . . . . . . . . . . . . . . . . . . . . . . . . . . . . . . . . . . . . . . . . . . . .99Removing Air From The Fuel System . . . . . . . . . . . . . . . . . . . . . . . . . . . . . . . . . . . . . . . .100
ENGINE LUBRICATION SYSTEM . . . . . . . . . . . . . . . . . . . . . . . . . . . . . . . . . . . . . . . . . . . . .101Checking And Adding Engine Oil . . . . . . . . . . . . . . . . . . . . . . . . . . . . . . . . . . . . . . . . . . .101Engine Oil Chart . . . . . . . . . . . . . . . . . . . . . . . . . . . . . . . . . . . . . . . . . . . . . . . . . . . . . . . .101Removing And Replacing Oil And Filter . . . . . . . . . . . . . . . . . . . . . . . . . . . . . . . . . . . . . .102
ENGINE COOLING SYSTEM . . . . . . . . . . . . . . . . . . . . . . . . . . . . . . . . . . . . . . . . . . . . . . . .103Cleaning . . . . . . . . . . . . . . . . . . . . . . . . . . . . . . . . . . . . . . . . . . . . . . . . . . . . . . . . . . . . . .103Checking Level . . . . . . . . . . . . . . . . . . . . . . . . . . . . . . . . . . . . . . . . . . . . . . . . . . . . . . . . .104Removing And Replacing Coolant . . . . . . . . . . . . . . . . . . . . . . . . . . . . . . . . . . . . . . . . . .105
81 E26 Operation & Maintenance Manual
ELECTRICAL SYSTEM . . . . . . . . . . . . . . . . . . . . . . . . . . . . . . . . . . . . . . . . . . . . . . . . . . . . .106Description . . . . . . . . . . . . . . . . . . . . . . . . . . . . . . . . . . . . . . . . . . . . . . . . . . . . . . . . . . . .106Fuse And Relay Location / Identification . . . . . . . . . . . . . . . . . . . . . . . . . . . . . . . . . . . . . .106Battery Maintenance . . . . . . . . . . . . . . . . . . . . . . . . . . . . . . . . . . . . . . . . . . . . . . . . . . . . .108Using A Booster Battery (Jump Starting) . . . . . . . . . . . . . . . . . . . . . . . . . . . . . . . . . . . . .108Removing And Installing The Battery . . . . . . . . . . . . . . . . . . . . . . . . . . . . . . . . . . . . . . . .110
HYDRAULIC SYSTEM . . . . . . . . . . . . . . . . . . . . . . . . . . . . . . . . . . . . . . . . . . . . . . . . . . . . . .111Checking And Adding Hydraulic Oil . . . . . . . . . . . . . . . . . . . . . . . . . . . . . . . . . . . . . . . . .111Hydraulic / Hydrostatic Fluid Chart . . . . . . . . . . . . . . . . . . . . . . . . . . . . . . . . . . . . . . . . . .112Removing And Replacing The Hydraulic Filters . . . . . . . . . . . . . . . . . . . . . . . . . . . . . . . .112Removing And Replacing The Hydraulic Oil . . . . . . . . . . . . . . . . . . . . . . . . . . . . . . . . . . .114
SPARK ARRESTOR MUFFLER . . . . . . . . . . . . . . . . . . . . . . . . . . . . . . . . . . . . . . . . . . . . . . .115Cleaning Procedure . . . . . . . . . . . . . . . . . . . . . . . . . . . . . . . . . . . . . . . . . . . . . . . . . . . . .115
SPARK ARRESTOR MUFFLER . . . . . . . . . . . . . . . . . . . . . . . . . . . . . . . . . . . . . . . . . . . . . . .116
TRACK TENSION . . . . . . . . . . . . . . . . . . . . . . . . . . . . . . . . . . . . . . . . . . . . . . . . . . . . . . . . .117Checking Tension . . . . . . . . . . . . . . . . . . . . . . . . . . . . . . . . . . . . . . . . . . . . . . . . . . . . . . .117Adjusting Tension . . . . . . . . . . . . . . . . . . . . . . . . . . . . . . . . . . . . . . . . . . . . . . . . . . . . . . .118
TRAVEL MOTOR . . . . . . . . . . . . . . . . . . . . . . . . . . . . . . . . . . . . . . . . . . . . . . . . . . . . . . . . . .119Checking And Adding Oil . . . . . . . . . . . . . . . . . . . . . . . . . . . . . . . . . . . . . . . . . . . . . . . . .119Removing And Replacing Oil . . . . . . . . . . . . . . . . . . . . . . . . . . . . . . . . . . . . . . . . . . . . . .119
ALTERNATOR AND FAN BELT . . . . . . . . . . . . . . . . . . . . . . . . . . . . . . . . . . . . . . . . . . . . . . .120Belt Adjustment . . . . . . . . . . . . . . . . . . . . . . . . . . . . . . . . . . . . . . . . . . . . . . . . . . . . . . . . .120Belt Replacement . . . . . . . . . . . . . . . . . . . . . . . . . . . . . . . . . . . . . . . . . . . . . . . . . . . . . . .120
AIR CONDITIONING COMPRESSOR BELT . . . . . . . . . . . . . . . . . . . . . . . . . . . . . . . . . . . . .121Belt Adjustment . . . . . . . . . . . . . . . . . . . . . . . . . . . . . . . . . . . . . . . . . . . . . . . . . . . . . . . . .121Belt Replacement . . . . . . . . . . . . . . . . . . . . . . . . . . . . . . . . . . . . . . . . . . . . . . . . . . . . . . .121
X-CHANGE™ . . . . . . . . . . . . . . . . . . . . . . . . . . . . . . . . . . . . . . . . . . . . . . . . . . . . . . . . . . . . .121Inspection And Maintenance . . . . . . . . . . . . . . . . . . . . . . . . . . . . . . . . . . . . . . . . . . . . . . .121
TRACK ROLLER AND IDLER LUBRICATION . . . . . . . . . . . . . . . . . . . . . . . . . . . . . . . . . . . .122Procedure . . . . . . . . . . . . . . . . . . . . . . . . . . . . . . . . . . . . . . . . . . . . . . . . . . . . . . . . . . . . .122
BUCKET . . . . . . . . . . . . . . . . . . . . . . . . . . . . . . . . . . . . . . . . . . . . . . . . . . . . . . . . . . . . . . . . .122Bucket Teeth Removal And Installation . . . . . . . . . . . . . . . . . . . . . . . . . . . . . . . . . . . . . . .122
LUBRICATION OF THE HYDRAULIC EXCAVATOR . . . . . . . . . . . . . . . . . . . . . . . . . . . . . . .123Lubrication Locations . . . . . . . . . . . . . . . . . . . . . . . . . . . . . . . . . . . . . . . . . . . . . . . . . . . .123
PIVOT PINS . . . . . . . . . . . . . . . . . . . . . . . . . . . . . . . . . . . . . . . . . . . . . . . . . . . . . . . . . . . . . .126Inspection And Maintenance . . . . . . . . . . . . . . . . . . . . . . . . . . . . . . . . . . . . . . . . . . . . . . .126
82 E26 Operation & Maintenance Manual

EXCAVATOR STORAGE AND RETURN TO SERVICE . . . . . . . . . . . . . . . . . . . . . . . . . . . . .127Storage . . . . . . . . . . . . . . . . . . . . . . . . . . . . . . . . . . . . . . . . . . . . . . . . . . . . . . . . . . . . . . .127Return To Service . . . . . . . . . . . . . . . . . . . . . . . . . . . . . . . . . . . . . . . . . . . . . . . . . . . . . . .127
83 E26 Operation & Maintenance Manual

84 E26 Operation & Maintenance Manual

MAINTENANCE SAFETY
Never service the Bobcat CompactExcavator without instructions.
Have good ventilation whenwelding or grinding painted parts.Wear dust mask when grindingpainted parts. Toxic dust and gascan be produced.
Stop, cool and clean engine offlammable materials beforechecking fluids.Never service or adjust machinewith the engine running unlessinstructed to do so in themanual.Avoid contact with leakinghydraulic oil or diesel fuel underpressure. It can penetrate theskin or eyes.Never fill fuel tank with enginerunning, while smoking, or whennear open flame.
Always lower the bucket andblade to the ground before doingany maintenance.Never modify equipment or addattachments not approved byBobcat Company.
Keep body, jewelry and clothingaway from moving parts, electricalcontact, hot parts and exhaust. Wear eye protection to guard frombattery acid, compressed springs,fluids under pressure and flyingdebris when engines are runningor tools are used. Use eyeprotections approved for type ofwelding.Keep tailgate closed except forservice. Close and latch tailgatebefore operating the excavator.
Vent exhaust to outside whenengine must be run for service.Exhaust system must be tightlysealed. Exhaust fumes can killwithout warning.
Cleaning and maintenance arerequired daily.
MSW38-0409
Use the correct procedure to liftand support the excavator.
Lead-acid batteries produceflammable and explosive gases.Keep arcs, sparks, flames andlighted tobacco away frombatteries.Batteries contain acid whichburns eyes or skin on contact.Wear protective clothing. If acidcontacts body, flush well withwater. For eye contact flush welland get immediate medicalattention.
WARNINGInstructions are necessary before operating or servicing machine. Read andunderstand the Operation & Maintenance Manual, Operator’s Handbook andsigns (decals) on machine. Follow warnings and instructions in the manualswhen making repairs, adjustments or servicing. Check for correct function afteradjustments, repairs or service. Untrained operators and failure to followinstructions can cause injury or death. W-2003-0807
Maintenance procedures which are given in the Operation & Maintenance Manual can be performed by the owner /operator without any specific technical training. Maintenance procedures which are not in the Operation & MaintenanceManual must be performed ONLY BY QUALIFIED BOBCAT SERVICE PERSONNEL. Always use genuine Bobcatreplacement parts. The Service Safety Training Course is available from your Bobcat dealer.
Safety Alert Symbol: This symbol with a warning statement, means: “Warning, be alert! Your safety is involved!” Carefully read the message that follows.
P-90216
CORRECT
NA1428
CORRECT CORRECT
NA1425
NA1427
WRONG WRONG
NA1426 NA1429
WRONG
WRONG
NA1430 NA1431
WRONG
B-19798
WRONG
85 E26 Operation & Maintenance Manual

86 E26 Operation & Maintenance Manual

SERVICE SCHEDULE
Chart
Maintenance work must be done at regular intervals. Failure to do so will result in excessive wear and early failures. Theservice schedule is a guide for correct maintenance of the Bobcat excavator.
WARNING
Instructions are necessary before operating or servicing machine. Read andunderstand the Operation & Maintenance Manual, Operator’s Handbook andsigns (decals) on machine. Follow warnings and instructions in the manualswhen making repairs, adjustments or servicing. Check for correct functionafter adjustments, repairs or service. Untrained operators and failure to followinstructions can cause injury or death. W-2003-0807
SERVICE SCHEDULE HOURS
ITEM SERVICE REQUIRED 8-10 50 100 250 500[4]
1000
Engine Coolant Check coolant level. Add premixed coolant as needed.
Engine Oil Check the engine oil level and add as needed.
Hydraulic Oil, Hoses and Tubelines, Reservoir Breather Cap
Check the hydraulic oil level and add as needed. Check for damage and leaks. Repair or replace as needed.
Engine Air Filter and Air System Check condition indicator and empty dust cup as needed. Check air system for leaks.
Tracks Check and adjust track tension as needed.
Indicators and Lights Check for correct operation of all indicators and lights.
Horn and Motion Alarm Check for correct operation and repair as needed. [1]
Operator Canopy / Cab Check condition. Check mounting hardware.
Seat Belt Check condition. Check mounting hardware.
Safety Signs (Decals) Check for damaged signs (decals). Replace any signs that are damaged.
Pivot Points Grease all machinery pivot points.
Cab / Heater Air Filters Clean the filters as needed. [1]
Console Lockout Check console lockout for proper operation.
X-Change Lubricate and inspect for damage or loose parts. [1]
Slew Circle and Pinion Grease two fittings [2]
Fuel Tank and Filter Drain water and sediment from fuel tank and fuel filter.
Battery Check battery, cables, connections and electrolyte level. Add distilled water as needed.
Alternator Belt Check condition and tension. Adjust or replace as needed. [3]
Fuel Filter Replace fuel filter.
Travel Motor Check oil level in both motors.
Engine Oil and Filter Replace oil and filter. [3]
Radiator, Oil Cooler, A/C Condenser
Clean debris from the radiator fins. [1]
Hydraulic Filter, Case Drain Filter and Reservoir Breather
Replace the hydraulic filter, case drain filter and reservoir breather. [3]
Alternator and Starter Check the alternator and starter connections. [3]
Air Compressor Belt Check condition and replace as needed. [1], [3]
Engine Valves Check and adjust the engine valve clearance.
Hydraulic System Replace the hydraulic oil and filters. Clean the reservoir.
Travel Motor Replace the lubricant in both travel motors. [3]
Engine Coolant Drain and flush the cooling system. Replace the coolant. Every 2 years
[1] If Equipped.[2] Service every 10 hours when operating in water.[3] Service at the first 50 hours, then as scheduled.[4] Or every 12 months.
87 E26 Operation & Maintenance Manual

CONTROL CONSOLE LOCKOUTS
Inspection And Maintenance
Figure 126
When the left console is raised [Figure 126], thehydraulic control levers (joysticks) and traction systemmust not function.
Sit in the operator's seat, fasten the seat belt and startthe engine.
Raise the left console [Figure 126].
Move the joystick control levers. There should be nomovement of the boom, arm, slew or bucket.
Move the steering control levers. There should be nomovement of the excavator tracks.
Service the system if these controls do not deactivatewhen the left control console is raised. (See your Bobcatdealer for service.)
P-91936
88 E26 Operation & Maintenance Manual

SEAT BELT
Inspection And Maintenance
WARNINGFailure to properly inspect and maintain the seat beltcan cause lack of operator restraint resulting inserious injury or death.
W-2466-0703
Check the seat belt daily for correct function.
Inspect the seat belt system thoroughly at least onceeach year or more often if the machine is exposed tosevere environmental conditions or applications.
Any seat belt system that shows cuts, fraying, extreme orunusual wear, significant discolorations due to ultravioletUV exposure, dusty / dirty conditions, abrasion to theseat belt webbing, or damage to the buckle, latch plate,retractor (if equipped), hardware or any other obviousproblem should be replaced immediately.
Figure 127
The items below are referenced in [Figure 127].
1. Check the webbing. If the system is equipped with aretractor, pull the webbing completely out and inspectthe full length of the webbing. Look for cuts, wear,fraying, dirt and stiffness.
2. Check the buckle and latch for correct operation.Make sure latch plate is not excessively worn,deformed or buckle is not damaged or casing broken.
3. Check the retractor web storage device (if equipped)by extending webbing to determine if it looks correctand that it spools out and retracts webbing correctly.
4. Check webbing in areas exposed to ultraviolet (UV)rays from the sun or extreme dust or dirt. If the originalcolor of the webbing in these areas is extremely fadedand / or the webbing is packed with dirt, the webbingstrength can have deteriorated.
See your Bobcat dealer for seat belt system replacementparts for your machine.
B-22283
1
2
3
4
89 E26 Operation & Maintenance Manual

MOTION ALARM SYSTEM
Description
This excavator can be equipped with a motion alarmsystem. The motion alarm will sound when the operatormoves the travel control levers in either the forward orreverse direction. Slight movement of the steering leversin either the forward or reverse direction is required withhydraulic components before the motion alarm willsound.
Inspecting
Figure 128
Figure 129
Inspect for damaged or missing motion alarm decal (Item1) [Figure 128] (cab machine) or (Item 1) [Figure 129](canopy machine). Replace if required.
NOTE: The excavator will need to be moved slightlyin both the forward and reverse direction totest the motion alarm. Keep all bystandersaway from machine during test.
WARNINGAVOID INJURY OR DEATH
When an engine is running in an enclosed area, freshair must be added to avoid concentration of exhaustfumes. If the engine is stationary, vent the exhaustoutside. Exhaust fumes contain odorless, invisiblegases which can kill without warning.
W-2050-0807
Sit in the operator’s seat and fasten the seat belt. Startthe engine. (See PRE-STARTING PROCEDURE onPage 52.)
Move the travel control levers (one lever at a time) in theforward direction. The motion alarm must sound. Movethe travel control levers (one lever at a time) in thereverse direction. The motion alarm must sound.
Figure 130
Slightly move both travel control levers in the forwarddirection (until the machine is slowly moving forward) andthen press the motion alarm cancel switch (Item 1)[Figure 130]. The motion alarm will shut off. With themachine still moving forward, move one of the levers tothe neutral position, the motion alarm must sound.Slightly move both travel control levers in the reversedirection (until the machine is slowly moving backward)and then press the motion alarm cancel switch (Item 1)[Figure 130] (the switch icon will be illuminated when themotion alarm is deactivated). The motion alarm will shutoff. With the machine still moving backward, move one ofthe levers to the neutral position, the motion alarm mustsound.Return both levers to neutral and turn excavator key toOFF position. Exit the excavator. (See STOPPING THEENGINE AND LEAVING THE EXCAVATOR on Page 59.)
S40557
1
P-92947
1 S40557
1
90 E26 Operation & Maintenance Manual

MOTION ALARM SYSTEM (CONT’D)
Inspecting (Cont’d)
The motion alarm is mounted to the bottom rear of theexcavator. (To the front of the engine oil pan.)
Figure 131
Inspect the motion alarm electrical connections (Item 1),wire harness (Item 2) [Figure 131] and motion alarmswitch (Item 2) [Figure 132] for tightness and damage.Repair or replace any damaged components.
If the motion alarm switch requires adjustment, see thefollowing information.
WARNINGThis machine is equipped with a motion alarm.
ALARM MUST SOUND!when operating forward or backward.
Failure to maintain a clear view in the direction oftravel could result in serious injury or death.
The operator is responsible for the safe operation ofthis machine.
W-2786-0309
Adjusting Switch Position
The motion alarm switch (Item 1) [Figure 132] is locatedin the travel control valve located under the floor plate.Remove the floor mat and the floor plate. (See theService Manual for the correct procedure.)
Remove the travel levers.
Figure 132
The switch (Item 1) [Figure 132] is non-adjustable. Itmust be fully installed into the travel control valve housingand tightened. Tighten the switch to 18 - 20 N•m (13 - 15ft-lb).
Inspect the motion alarm system for proper function afterswitch replacement.
S39806
1
2
S39822
1
91 E26 Operation & Maintenance Manual
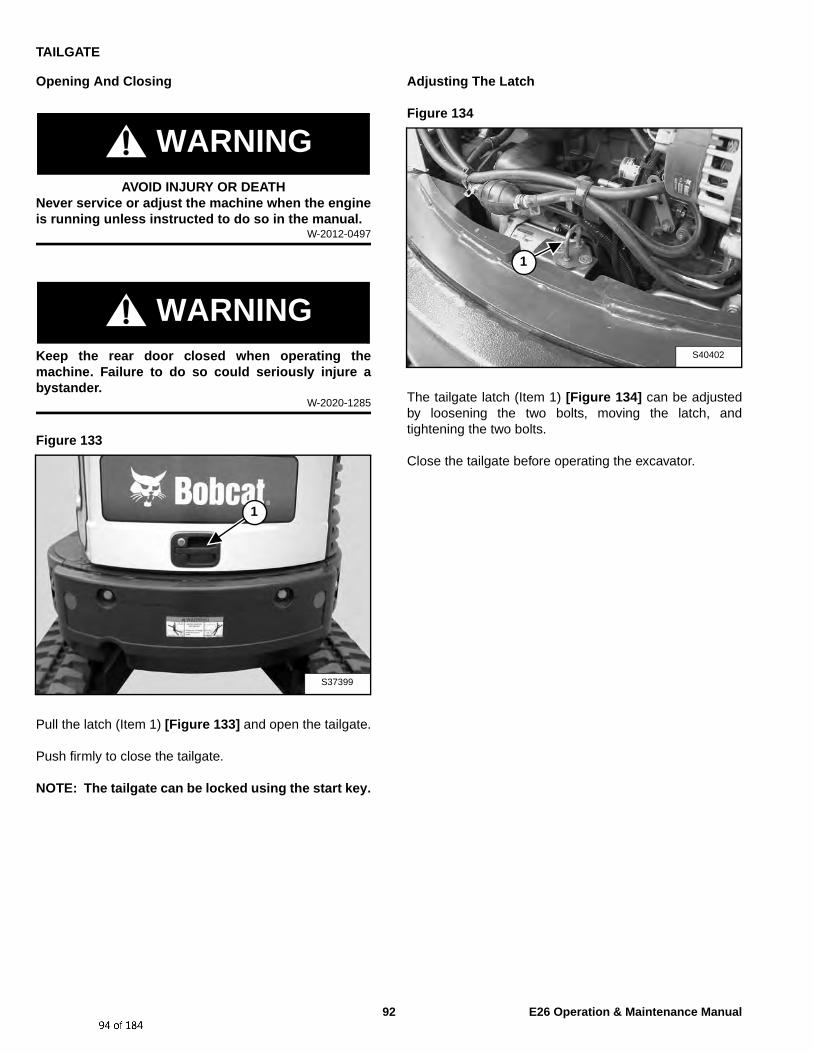
TAILGATE
Opening And Closing
WARNINGAVOID INJURY OR DEATH
Never service or adjust the machine when the engineis running unless instructed to do so in the manual.
W-2012-0497
WARNINGKeep the rear door closed when operating themachine. Failure to do so could seriously injure abystander.
W-2020-1285
Figure 133
Pull the latch (Item 1) [Figure 133] and open the tailgate.
Push firmly to close the tailgate.
NOTE: The tailgate can be locked using the start key.
Adjusting The Latch
Figure 134
The tailgate latch (Item 1) [Figure 134] can be adjustedby loosening the two bolts, moving the latch, andtightening the two bolts.
Close the tailgate before operating the excavator.
S37399
1
S40402
1
92 E26 Operation & Maintenance Manual

RIGHT SIDE COVER
Opening And Closing
Figure 135
Open the tailgate to access the right side cover latch(Item 1) [Figure 135].
Pull up the lever (Item 1) and remove the latch (Item 2)[Figure 135] from the latch post.
Figure 136
Raise the right side cover and rotate forward until it isheld open by the retainer (Item 1) [Figure 136].
To close the right side cover, lift up on the retainer (Item1) [Figure 136] while raising the right side cover. Rotatethe cover back until it is in the fully closed position.Secure the right side cover with the latch (Item 2) andlever (Item 1) [Figure 135].
S39316
1
2
S39317
1
93 E26 Operation & Maintenance Manual

CAB FILTERS
Cleaning And Maintenance
The recirculation filter and the fresh air filter must becleaned regularly. (See SERVICE SCHEDULE on Page87.)
The recirculation filter is located to the right of theoperator seat and the fresh air filter is located under theright side cover.
Recirculation Filter
Figure 137
Turn the fastener (Item 1) 90° turn and open the cover(Item 2) [Figure 137].
Figure 138
Pull the filter (Item 1) [Figure 138] out of the heaterhousing.
Use low air pressure to clean the filter. Replace the filterwhen very dirty.
Installation: Install the filter with the arrows that indicateair flow direction (Item 2) [Figure 138] pointing towardthe heater housing.
Fresh Air Filter
Figure 139
Open the right side cover. (See Opening And Closing onPage 93.)
Turn the fastener (Item 1) 90° and remove the cover (Item2) [Figure 139].
Figure 140
Pull the filter (Item 1) [Figure 140] out of the housing.
Use low air pressure to clean the filter. Replace the filterwhen very dirty.
P-91942
1
2
P-91943
2
1
S40225
2
1
S39319
1
94 E26 Operation & Maintenance Manual

AIR CLEANER SERVICE
See the service schedule for the correct service interval. (See SERVICE SCHEDULE on Page 87.)
Daily Check
Figure 141
Check the condition indicator (Item 1) [Figure 141]. If thered ring shows in the condition indicator, the filter needsto be replaced.
Replace the inner filter every third time the outer filter isreplaced or as indicated.
Replacing The Filter Elements
Outer Filter
Figure 142
Open the two latches (Item 1) [Figure 142] and removethe dust cover (Item 2) [Figure 142].
Figure 143
Pull the outer filter (Item 1) [Figure 143] from the aircleaner housing.
Check the housing for damage.
Clean the housing and the seal surface. DO NOT usecompressed air.
Install a new filter.
S40403
1
2
S40404
1
2
S40405
1
95 E26 Operation & Maintenance Manual

AIR CLEANER SERVICE (CONT’D)
Replacing The Filter Elements (Cont’d)
Figure 144
Install the dust cover (Item 1) and secure the two latches(Item 2) [Figure 144].
Check the air intake hose and the air cleaner housing fordamage. Make sure all connections are tight.
After the outer filter has been replaced, press the button(Item 2) [Figure 141] on the end of the conditionindicator and start the engine. Run at full rpm, thenreduce engine speed and stop the engine. If the red ring(Item 1) [Figure 141] shows in the condition indicator,replace the inner filter.
Inner Filter
Only replace the inner filter under the followingconditions:
• Replace the inner filter every third time the outer filteris replaced.
• After the outer filter has been replaced, press thebutton (Item 2) [Figure 141] on the condition indicatorand start the engine. Run at full rpm, then reduceengine speed and stop the engine. If the red ringshows in the condition indicator, replace the innerfilter.
Figure 145
Remove the dust cover, outer filter and inner filter (Item 1)[Figure 145].
NOTE: Make sure all sealing surfaces are free of dirtand debris.
Install the new inner filter.
Install the outer filter and the dust cover.
Press the button on the condition indicator to remove thered ring.
S40404
2
1
S40406
1
96 E26 Operation & Maintenance Manual

FUEL SYSTEM
Fuel Specifications
Use only clean, high quality diesel fuel, Grade No. 2 orGrade No. 1.
The following is one suggested blending guideline whichshould prevent fuel gelling during cold temperatures:
At a minimum, low sulfur diesel fuel must be used in thismachine. Low sulfur is defined as 500 mg/kg (500 ppm)sulfur maximum.
The following fuels may also be used in this machine:
• Ultra low sulfur diesel fuel. Ultra low sulfur is definedas 15 mg/kg (15 ppm) sulfur maximum.
• Biodiesel blend fuel - Must contain no more than fivepercent biodiesel mixed with low sulfur or ultra lowsulfur petroleum based diesel. This is commonlymarketed as B5 blended diesel fuel. B5 blendeddiesel fuel must meet ASTM D975 (US Standard) orEN590 (EU Standard) specifications.
WARNINGAVOID INJURY OR DEATH
Stop and cool the engine before adding fuel. NOSMOKING! Failure to obey warnings can cause anexplosion or fire.
W-2063-0807
WARNINGAVOID INJURY OR DEATH
Always clean up spilled fuel or oil. Keep heat, flames,sparks or lighted tobacco away from fuel and oil.Failure to use care around combustibles can causeexplosion or fire.
W-2103-0508
Biodiesel Blend Fuel
Biodiesel blend fuel has unique qualities that should beconsidered before using in this machine:
• Cold weather conditions can lead to plugged fuelsystem components and hard starting.
• Biodiesel blend fuel is an excellent medium formicrobial growth and contamination which can causecorrosion and plugging of fuel system components.
• Use of biodiesel blend fuel can result in prematurefailure of fuel system components, such as pluggedfuel filters and deteriorated fuel lines.
• Shorter maintenance intervals can be required, suchas cleaning the fuel system and replacing fuel filtersand fuel lines.
• Using biodiesel blended fuels containing more thanfive percent biodiesel can affect engine life and causedeterioration of hoses, tubelines, injectors, injectorpump and seals.
Apply the following guidelines if biodiesel blend fuel isused:
• Ensure the fuel tank is as full as possible at all timesto prevent moisture from collecting in the fuel tank.
• Ensure that the fuel tank cap is securely tightened.
• Biodiesel blend fuel can damage painted surfaces,remove all spilled fuel from painted surfacesimmediately.
• Drain all water from the fuel filter daily beforeoperating the machine.
• Do not exceed engine oil change interval. Extendedoil change intervals can cause engine damage.
• Before machine storage; drain the fuel tank, refill with100% petroleum diesel fuel, add fuel stabilizer andrun the engine for at least 30 minutes.
NOTE: Biodiesel blend fuel does not have long termstability and should not be stored for morethan 3 months.
TEMPERATURE NO. 2 NO. 1
-9°C (+15°F) 100% 0%
Down to -29°C (-20°F) 50% 50%
Below -29°C (-20°F) 0% 100%
97 E26 Operation & Maintenance Manual

FUEL SYSTEM (CONT’D)
Filling The Fuel Tank
Figure 146
The fuel cap uses the start key to unlock the fuel cap.
Remove the fuel fill cap (Item 1) [Figure 146].
Use a clean, approved safety container to add fuel. Addfuel only in an area that has a free movement of air andno flames or sparks. NO SMOKING!
Install and tighten the fuel fill cap.
Clean up any spilled fuel.
See the service schedule for the service interval when toremove water from or replace the fuel filter. (SeeSERVICE SCHEDULE on Page 87.)
WARNINGAVOID INJURY OR DEATH
Stop and cool the engine before adding fuel. NOSMOKING! Failure to obey warnings can cause anexplosion or fire.
W-2063-0807
WARNINGAVOID INJURY OR DEATH
Always clean up spilled fuel or oil. Keep heat, flames,sparks or lighted tobacco away from fuel and oil.Failure to use care around combustibles can causeexplosion or fire.
W-2103-0508
S40407
1
98 E26 Operation & Maintenance Manual
FUEL SYSTEM (CONT’D)
Fuel Filter
Removing Water
Open the tailgate. (See TAILGATE on Page 92.)
Figure 147
Loosen the drain (Item 1) [Figure 147] at the bottom ofthe filter to drain water from the filter into a container.
Clean up any spilled fuel.
Replacing Elements
Remove the filter (Item 2) [Figure 147].
Clean the area around the filter housing. Put clean oil onthe seal of the new filter. Install the fuel filter and handtighten.
Remove the air from the fuel system. (See Removing AirFrom The Fuel System on Page 100.)
Draining The Fuel Tank
See the service schedule for the correct service interval.(See SERVICE SCHEDULE on Page 87.)
Figure 148
Remove the drain plug (Item 1) [Figure 148].
Drain the fuel into the container.
Reuse, recycle or dispose of fuel in an environmentallysafe manner.
Reinstall the drain plug.
WARNINGAVOID INJURY OR DEATH
Diesel fuel or hydraulic fluid under pressure canpenetrate skin or eyes, causing serious injury ordeath. Fluid leaks under pressure may not be visible.Use a piece of cardboard or wood to find leaks. Donot use your bare hand. Wear safety goggles. If fluidenters skin or eyes, get immediate medical attentionfrom a physician familiar with this injury.
W-2072-0807
S40403
1
2
S40435
1
99 E26 Operation & Maintenance Manual

FUEL SYSTEM (CONT’D)
Removing Air From The Fuel System
After replacing the fuel filter or when the fuel tank has runout of fuel, air must be removed from the fuel systembefore starting the engine.
Open the tailgate. (See Opening And Closing on Page92.)
Figure 149
Figure 150
Open the fuel filter vent (Item 1) [Figure 149] andoperate the hand pump (priming bulb) (Item 2) [Figure150] until the fuel flows from the vent with no air bubbles.
Close the vent (Item 1) [Figure 149].
Start the engine. It can be necessary to open the vent(Item 1) [Figure 150] (at the fuel injection pump) brieflyuntil the engine runs smoothly.
WARNINGAVOID INJURY OR DEATH
Diesel fuel or hydraulic fluid under pressure canpenetrate skin or eyes, causing serious injury ordeath. Fluid leaks under pressure may not be visible.Use a piece of cardboard or wood to find leaks. Donot use your bare hand. Wear safety goggles. If fluidenters skin or eyes, get immediate medical attentionfrom a physician familiar with this injury.
W-2072-0807
S40403
1
S40312
2
1
100 E26 Operation & Maintenance Manual

ENGINE LUBRICATION SYSTEM
Checking And Adding Engine Oil
Check the engine oil after every 8 - 10 hours of operationand before starting the engine. (See SERVICESCHEDULE on Page 87.)
Figure 151
Open the tailgate and remove the dipstick (Item 1)[Figure 151].
Keep the oil level between the marks on the dipstick.
Use a good quality motor oil that meets the correct APIService Classification.
Engine Oil Chart
Figure 152
ENGINE OILRECOMMENDED SAE VISCOSITY NUMBER(LUBRICATION OILS FOR DIESEL ENGINE
CRANKCASE)
TEMPERATURE RANGE ANTICIPATED BEFORE NEXT OIL CHANGE (DIESEL ENGINES MUST USE API
CLASSIFICATION CI-4 OR BETTER)[1] Synthetic Oil - Use recommendation from SyntheticOil Manufacturer.
Use good quality engine oil that meets API ServiceClassification of CI-4 or better [Figure 152].
WARNINGAVOID INJURY OR DEATH
Always clean up spilled fuel or oil. Keep heat, flames,sparks or lighted tobacco away from fuel and oil.Failure to use care around combustibles can causeexplosion or fire.
W-2103-0508
1
S40313
101 E26 Operation & Maintenance Manual

ENGINE LUBRICATION SYSTEM (CONT’D)
Removing And Replacing Oil And Filter
See the service schedule for the service interval forreplacing the engine oil and filter. (See SERVICESCHEDULE on Page 87.)
Rotate upperstructure so that the oil drain plug and the oilfilter access cover is between the tracks.
Run the engine until it is at operating temperature. Stopthe engine.
Open the tailgate. (See Opening And Closing on Page92.)
Figure 153
Place a container under the oil pan. Remove the drainplug (Item 1) [Figure 153] from the bottom of the engineoil pan.
Recycle or dispose of used oil in an environmentally safemanner.
Loosen the three bolts (Item 2) and then remove two ofthe bolts. Rotate the cover (Item 3) [Figure 153] toaccess the oil filter.
Figure 154
Remove the oil filter (Item 1) [Figure 154] and clean thefilter housing surface.
Use a genuine Bobcat replacement filter. Put clean oil onthe filter gasket. Install the filter and hand tighten.
Install and tighten the drain plug (Item 1) [Figure 153].
Reposition the cover, reinstall the two bolts, then tightenthe three bolts (Item 2) [Figure 153].
Figure 155
Remove the fill cap (Item 1) [Figure 155].
Put oil in the engine. (See Checking And Adding EngineOil on Page 101.)
Install the fill cap (Item 1) [Figure 155].
Start the engine and let it run for several minutes.
Stop the engine. Check for leaks at the oil filter. Checkthe oil level.
Add oil as needed if it is not at the top mark on thedipstick.
S40409
2
2
13
S40410
1
S404011
1
102 E26 Operation & Maintenance Manual

ENGINE COOLING SYSTEM
Check the cooling system every day to prevent over-heating, loss of performance or engine damage. (SeeSERVICE SCHEDULE on Page 87.)
Cleaning
Open the right side cover. (See Opening And Closing onPage 93.)
NOTE: Allow the cooling system and engine to coolbefore servicing or cleaning the coolingsystem.
Figure 156
Turn the two quarter turn fasteners (Item 1) and removethe rear side cover (Item 2) [Figure 156].
Figure 157
Loosen the knob (Item 1) [Figure 157]. Slide the knobtoward the front of the machine.
Figure 158
Slide the knob (Item 1) out of the condenser mount (Item2) (if equipped) and the radiator mounting bracket (Item3) [Figure 158]. Be careful not to damage fins.
Figure 159
Use air pressure or water pressure to clean the radiator(Item 1), oil cooler (Item 2) and condenser (if equipped)(Item 3) [Figure 159]. Be careful not to damage finswhen cleaning.
Position the knob (Item 1) so it fits into the radiator mount(Item 3) and the condenser mount (Item 2) [Figure 158](if equipped).
Slide the knob (Item 1) toward the rear of the machineuntil it is fully seated in the slots of the mounting brackets.Tighten the knob (Item 1) [Figure 157]. Be careful not todamage fins.
Reinstall the rear side cover (Item 2) and turn the quarterturn fasteners (Item 1) [Figure 156] to secure the rearside cover.
S40412
1
1
2
S40413
1
S40414
1
2
3
S40415
1
2 3
103 E26 Operation & Maintenance Manual

ENGINE COOLING SYSTEM (CONT’D)
Checking Level
WARNINGAVOID BURNS
Do not remove radiator cap when the engine is hot.You can be seriously burned.
W-2070-1203
WARNINGAVOID INJURY OR DEATH
Wear safety glasses to prevent eye injury when anyof the following conditions exist:• When fluids are under pressure.• Flying debris or loose material is present.• Engine is running.• Tools are being used.
W-2019-0907
IMPORTANTAVOID ENGINE DAMAGE
Always use the correct ratio of water to antifreeze.
Too much antifreeze reduces cooling systemefficiency and may cause serious premature enginedamage.
Too little antifreeze reduces the additives whichprotect the internal engine components; reduces theboiling point and freeze protection of the system.
Always add a premixed solution. Adding full strengthconcentrated coolant can cause serious prematureengine damage.
I-2124-0497
Open the tailgate. (See Opening And Closing on Page92.)
Figure 160
Check the coolant level in the coolant recovery tank (Item1) [Figure 160].
The coolant level must be filled to the COLD FILL linemarked on the on the coolant recovery tank.
NOTE: The cooling system is factory filled withpropylene glycol (purple color). DO NOT mixpropylene glycol with ethylene glycol.
1
S40411
104 E26 Operation & Maintenance Manual

ENGINE COOLING SYSTEM (CONT’D)
Removing And Replacing Coolant
See the service schedule for correct service intervals.(See SERVICE SCHEDULE on Page 87.)
Stop the engine. Open the tailgate. (See Opening AndClosing on Page 92.)
WARNINGAVOID BURNS
Do not remove radiator cap when the engine is hot.You can be seriously burned.
W-2070-1203
Figure 161
When the engine is cool, loosen and remove the coolantfill cap (Item 1) [Figure 161].
Figure 162
Install a hose on the drain valve at the bottom of theradiator. Open the drain valve (Item 1) [Figure 162] anddrain the coolant into a container.
Figure 163
Install a hose on the drain valve located at the back of theengine block. Open the drain valve (Item 1) [Figure 163]and drain the coolant into a container.
NOTE: Engine is removed for photo clarity.
After all the coolant is removed, close both drain valves.
Recycle or dispose of the used coolant in anenvironmentally safe manner.
Mix the coolant in a separate container. (See Capacitieson Page 175.)
NOTE: The cooling system is factory filled withpropylene glycol (purple color). DO NOT mixpropylene glycol with ethylene glycol.
The correct mixture of coolant to provide a -37°C (-34°F)freeze protection is 5 L (5.28 qt) propylene glycol mixedwith 4,4 L (4.64 qt) of water OR 1 U.S. gal propyleneglycol mixed with 3,3 L (3.5 qt) of water.
Add premixed coolant, 47% water and 53% propyleneglycol to the coolant tank until the coolant level reachesthe lower marker on the tank
Use a refractometer to check the condition of propyleneglycol in your cooling system.
Add premixed coolant until the level is correct. Install thecoolant fill cap.
Run the engine until it is at operating temperature. Stopthe engine. Check the coolant level when cool. Addcoolant as needed. Install the coolant fill cap.
Close the tailgate.
S39327
1
S39328
1
S39504
1
105 E26 Operation & Maintenance Manual

ELECTRICAL SYSTEM
Description
Figure 164
The excavator has a 12 volt, negative ground electricalsystem. The electrical system is protected by fuseslocated under the right side cover of the excavator (Item1) [Figure 164]. The fuses will protect the electricalsystem when there is an electrical overload. The reasonfor the overload must be found and corrected beforestarting the engine again.
The battery cables must be clean and tight. Check theelectrolyte level in the battery. Add distilled water asneeded. Remove acid or corrosion from the battery andcables with a sodium bicarbonate and water solution.
Put Battery Saver P/N 6664458 or grease on the batteryterminals and cable ends to prevent corrosion.
WARNINGAVOID INJURY OR DEATH
Batteries contain acid which burns eyes and skin oncontact. Wear goggles, protective clothing andrubber gloves to keep acid off body.
In case of acid contact, wash immediately with water.In case of eye contact get prompt medical attentionand wash eye with clean, cool water for at least 15minutes.
If electrolyte is taken internally drink large quantitiesof water or milk! DO NOT induce vomiting. Getprompt medical attention.
W-2065-0807
Fuse And Relay Location / Identification
A decal is inside the fuse cover to show location and ampratings.
Remove the cover to check or replace the fuses andrelays.
The location and amperage ratings are shown in [Figure165].
Always replace fuses using the same type and capacity.
S40225
1
106 E26 Operation & Maintenance Manual

ELECTRICAL SYSTEM (CONT’D)
Fuse And Relay Location / Identification (Cont’d)
Figure 165
The location and amperage ratings are shown in the table below and on the decal [Figure 165]. Relays are identified bythe letter “R” in the AMP column.
REF ICON DESCRIPTION AMP REF ICON DESCRIPTION AMP REF ICON DESCRIPTION AMP
1 Auto Idle Controller (AIC)
20 9 Switched Power R 17 Panel / Display Controller
25
2 Heater / HVAC 25 10 Fuel Shutoff R 18 ACD Unswitched Power
25
3 Start Key 5 11 Heater / HVAC R 19 LIGHTS 20
4 Fuel Shutoff 25 12 Lights R 20 Power Port 15
5 Wiper / Washer 10 13 NOT USED R
6 Switched Power 20 14 Glow Plugs R
7 Alternator Excite / Heater
25 15 NOT USED R
8 ACD Switched Power
25 16 Starter R
6
7 19
18
5 17
11 13 15
8
10
20
12 14 16
9
1
2
3
4
107 E26 Operation & Maintenance Manual

ELECTRICAL SYSTEM (CONT’D)
Battery Maintenance
Open the right side cover. (See Opening And Closing onPage 93.)
Figure 166
The battery (Item 1) [Figure 166] is located in the front ofthe right side upperstructure.
Figure 167
The battery cables must be clean and tight [Figure 167].Remove acid or corrosion from the battery and cablesusing a sodium bicarbonate and water solution. Coverthe battery terminals and cable ends with battery savergrease to prevent corrosion.
Check for broken or loose connections.
If the battery cables are to be removed for any reason,disconnect the negative (-) cable first. When installing thebattery cables, make the last connection the negative (-)cable to the battery.
The original equipment battery is maintenance free. If areplacement battery is installed, check the electrolytelevel in the battery.
If the electrolyte level is lower than 13 mm (0.50 in) abovethe plates, add distilled water only.
WARNINGAVOID INJURY OR DEATH
Batteries contain acid which burns eyes and skin oncontact. Wear goggles, protective clothing andrubber gloves to keep acid off body.
In case of acid contact, wash immediately with water.In case of eye contact get prompt medical attentionand wash eye with clean, cool water for at least 15minutes.
If electrolyte is taken internally drink large quantitiesof water or milk! DO NOT induce vomiting. Getprompt medical attention.
W-2065-0807
Using A Booster Battery (Jump Starting)
IMPORTANTIf jump starting the excavator from a secondmachine:
When jump starting the excavator from a batteryinstalled in a second machine, make sure the engineis NOT running while using the glow plugs. Highvoltage spikes from a running machine can burn outthe glow plugs.
I-2060-0906
If it is necessary to use a booster battery to start theengine, BE CAREFUL! There must be one person in theoperator’s seat and one person to connect anddisconnect the battery cables.
Be sure the key switch is OFF. The booster battery mustbe 12 volt.
Open the tailgate. (See Opening And Closing onPage 92.)
S40317
1
P9590P9589
108 E26 Operation & Maintenance Manual

ELECTRICAL SYSTEM (CONT’D)
Using A Booster Battery (Jump Starting) (Cont’d)
Figure 168
Connect one end of the first cable to the positive (+)terminal of the booster battery. Connect the other end ofthe same cable to the positive (+) terminal (Item 1)[Figure 168] of the excavator starter.
Figure 169
Connect one end of the second cable to the negative (-)terminal of the booster battery. Connect the other end ofthe same cable to a frame grounding point (Item 1)[Figure 169].
Start the engine. After the engine has started, removethe negative (-) cable first (Item 1) [Figure 169].
Disconnect the cable from the excavator starter (Item 1)[Figure 168].
NOTE: (See Cold Temperature Starting on Page 57.)
IMPORTANTDamage to the alternator can occur if:• Engine is operated with battery cables
disconnected.• Battery cables are connected when using a fast
charger or when welding on the excavator.(Remove both cables from the battery.)
• Extra battery cables (booster cables) areconnected wrong.
I-2223-0903
WARNINGAVOID INJURY OR DEATH
Batteries contain acid which burns eyes and skin oncontact. Wear goggles, protective clothing andrubber gloves to keep acid off body.
In case of acid contact, wash immediately with water.In case of eye contact get prompt medical attentionand wash eye with clean, cool water for at least 15minutes.
If electrolyte is taken internally drink large quantitiesof water or milk! DO NOT induce vomiting. Getprompt medical attention.
W-2065-0807
S40416
1
S40417
1
109 E26 Operation & Maintenance Manual

ELECTRICAL SYSTEM (CONT’D)
Removing And Installing The Battery
Open the right side cover. (See Opening And Closing onPage 93.)
Remove the right side panel.
Figure 170
Disconnect the negative (-) cable (Item 1) [Figure 170]first.
Disconnect the positive (+) cable (Item 2) [Figure 170].
Remove the bolt (Item 3) [Figure 170] and remove thehold-down clamp.
Remove the battery.
Always clean the terminals and the cable ends, evenwhen installing a new battery.
Install the battery. Install the hold-down clamp and tightenthe bolts.
Connect the battery cables. Connect the negative (-)cable (Item 1) [Figure 170] last to prevent sparks.
Tighten the terminal clamp nuts to 7 N•m (5 ft-lb) torque.
WARNINGAVOID INJURY OR DEATH
Batteries contain acid which burns eyes and skin oncontact. Wear goggles, protective clothing andrubber gloves to keep acid off body.
In case of acid contact, wash immediately with water.In case of eye contact get prompt medical attentionand wash eye with clean, cool water for at least 15minutes.
If electrolyte is taken internally drink large quantitiesof water or milk! DO NOT induce vomiting. Getprompt medical attention.
W-2065-0807
S39331
3
12
110 E26 Operation & Maintenance Manual

HYDRAULIC SYSTEM
Checking And Adding Hydraulic Oil
Put the machine on a flat level surface.
Retract the arm and bucket cylinders, put the bucket onthe ground and lower the blade. Stop the engine.
Open the right side cover. (See Opening And Closing onPage 93.)
Figure 171
Park the machine in the position shown [Figure 171].(The preferred method is to check the hydraulic oil whenit is cold.)
Check the hydraulic oil level, it must be visible in the sightgauge (Item 1) [Figure 171]. The decal on the hydraulictank shows the correct fill level.
A - Correct Oil Level COLD (Preferred)B - Correct Oil Level HOT (Optional)
Clean the surface around the reservoir cap and removethe cap from the reservoir (Item 2) [Figure 171].
WARNINGAVOID INJURY OR DEATH
Always clean up spilled fuel or oil. Keep heat, flames,sparks or lighted tobacco away from fuel and oil.Failure to use care around combustibles can causeexplosion or fire.
W-2103-0508
Figure 172
Check the condition of the fill strainer screen (Item 1)[Figure 172]. Clean or replace as necessary.
Be sure the screen is installed before adding fluid.
Add the correct fluid to the reservoir until it is visible in thesight gauge.
Check the cap and clean as necessary. Replace the capif damaged.
Install the cap.
Close the right side cover and tailgate.
S39802S40318
1
B
A
B
A
2
S39804
1
111 E26 Operation & Maintenance Manual

HYDRAULIC SYSTEM (CONT’D)
Hydraulic / Hydrostatic Fluid Chart
Figure 173
HYDRAULIC / HYDROSTATIC FLUIDRECOMMENDED ISO VISCOSITY GRADE (VG)
AND VISCOSITY INDEX (VI)
TEMPERATURE RANGE ANTICIPATEDDURING MACHINE USE
[1] VG 100; Minimum VI 130[2] VG 46; Minimum VI 150[3] BOBCAT All-Season Fluid[4] BOBCAT Synthetic Fluid[5] BOBCAT Biodegradable Hydraulic / HydrostaticFluid (Unlike biodegradable fluids that are vegetablebased, Bobcat biodegradable fluid is formulated toprevent oxidation and thermal breakdown at operatingtemperatures.)
Install the oil fill cap.
Removing And Replacing The Hydraulic Filters
WARNINGAVOID INJURY OR DEATH
Always clean up spilled fuel or oil. Keep heat, flames,sparks or lighted tobacco away from fuel and oil.Failure to use care around combustibles can causeexplosion or fire.
W-2103-0508
Hydraulic Filter
See the service schedule for the correct service interval.(See SERVICE SCHEDULE on Page 87.)
Figure 174
For easier access to change the hydraulic filter, removethe lower right side panel.
Remove the four bolts (Item 1) and the side panel (Item2) [Figure 174]. Remove the side panel.
Open the right side cover. (See Opening And Closing onPage 93.)
S40419
2
1 1
112 E26 Operation & Maintenance Manual

HYDRAULIC SYSTEM (CONT’D)
Removing And Replacing The Hydraulic Filters (Cont’d)
Figure 175
Remove the hydraulic filter (Item 1) [Figure 175].
Clean the housing where the filter gasket makes contact.
Put clean hydraulic oil on the gasket. Install the new filterand hand tighten only. Use a genuine Bobcatreplacement filter.
WARNINGAVOID INJURY OR DEATH
Always clean up spilled fuel or oil. Keep heat, flames,sparks or lighted tobacco away from fuel and oil.Failure to use care around combustibles can causeexplosion or fire.
W-2103-0508
Case Drain Filter
See the service schedule for the correct service interval.(See SERVICE SCHEDULE on Page 87.)
For easier access to change the hydraulic filter, removethe lower right side panel.
Figure 176
Remove the four bolts (Item 1) and the side panel (Item2) [Figure 176]. Remove the side panel.
Open the right side cover. (See Opening And Closing onPage 93.)
Figure 177
Remove the case drain filter (Item 1) [Figure 177].
Clean the housing where the filter gasket makes contact.
Put clean hydraulic oil on the gasket. Install the new filterand hand tighten only.
S39333
1
S40419
2
1 1
S39334
1
113 E26 Operation & Maintenance Manual

HYDRAULIC SYSTEM (CONT’D)
Removing And Replacing The Hydraulic Oil
See the service schedule for the correct service interval.(See SERVICE SCHEDULE on Page 87.)
WARNINGAVOID INJURY OR DEATH
Diesel fuel or hydraulic fluid under pressure canpenetrate skin or eyes, causing serious injury ordeath. Fluid leaks under pressure may not be visible.Use a piece of cardboard or wood to find leaks. Donot use your bare hand. Wear safety goggles. If fluidenters skin or eyes, get immediate medical attentionfrom a physician familiar with this injury.
W-2072-0807
Retract the arm and bucket cylinders, lower the bucket tothe ground. Stop the engine.
Open the tailgate. (See Opening And Closing on Page92.)
Figure 178
The hydraulic oil drain plug (Item 1) [Figure 178] islocated below right side of the upperstructure.
Remove the plug (Item 1) [Figure 178].
Drain the fluid into a container.
Recycle or dispose of the fluid in an environmentally safemanner.
Install the plug (Item 1) [Figure 178].
Add fluid to the reservoir. (See Checking And AddingHydraulic Oil on Page 111.)
Figure 179
With the engine OFF, loosen the plug (Item 1) [Figure179] on the hydraulic pump. Tighten the plug after asteady stream of hydraulic oil, free of any air bubbles,drains from the plug. DO NOT RUN THE MACHINEWITH THE PLUG OPEN.
Figure 180
There is also a port (Item 1) [Figure 180] on thehydraulic cooler for bleeding air. Install a diagnosticcoupler and hose on this fitting to allow air to be bled fromthe hydraulic system after the hydraulic oil has beenreplaced.
Start the engine and operate the machine through thehydraulic functions. Stop the engine. Check the fluid leveland add as needed.
S39337
1
S40420
1
S39453
1
114 E26 Operation & Maintenance Manual

SPARK ARRESTOR MUFFLER
Cleaning Procedure
See the SERVICE SCHEDULE for the correct serviceinterval. (See SERVICE SCHEDULE on Page 87.)
WARNINGAVOID INJURY OR DEATH
When an engine is running in an enclosed area, freshair must be added to avoid concentration of exhaustfumes. If the engine is stationary, vent the exhaustoutside. Exhaust fumes contain odorless, invisiblegases which can kill without warning.
W-2050-0807
WARNINGStop engine and allow the muffler to cool beforecleaning the spark chamber. Wear safety goggles.Failure to obey can cause serious injury.
W-2011-1285
WARNINGNever use machine in atmosphere with explosivedust or gases or where exhaust can contactflammable material. Failure to obey warnings cancause injury or death.
W-2068-1285
WARNINGWhen the engine is running during service, thesteering levers must be in neutral.
Failure to do so can cause injury or death.W-2203-0595
IMPORTANTThis machine is factory equipped with a U.S.D.A.Forestry Service approved spark arrester exhaustsystem.
The spark arrester muffler, if equipped, must becleaned to keep it in working condition. The sparkarrester muffler must be serviced by dumping thespark chamber every 100 hours of operation.
On some models, the turbocharger functions as thespark arrester and must operate correctly for properspark arrester function.
If this machine is operated on flammable forest,brush, or grass covered land, it must be equippedwith a spark arrester attached to the exhaust systemand maintained in working order. Failure to do so willbe in violation of California State Law, Section 4442.PRC. Refer to local laws and regulations for sparkarrester requirements.
I-2284-0111
Do not operate the excavator with a defective exhaustsystem.
Stop the engine. Open the tailgate. (See TAILGATE onPage 92.)
115 E26 Operation & Maintenance Manual

SPARK ARRESTOR MUFFLER
Cleaning Procedure (Cont’d)
Figure 181
Remove the plug (Item 1) [Figure 181] from the bottomof the muffler.
Start the engine and run for about 10 seconds while asecond person, wearing safety glasses, holds a piece ofwood over the outlet of the muffler. The carbon depositswill be forced out of the muffler plug hole (Item 1) [Figure181].
Stop the engine. Install and tighten the plug.
Close the tailgate.
S40557
1
116 E26 Operation & Maintenance Manual
TRACK TENSION
Checking Tension
NOTE: The wear of the pins and bushings on theundercarriage vary with the workingconditions and the different types of soilconditions. It is necessary to inspect tracktension and maintain the correct tension. Seeservice schedule for the correct serviceinterval. (See SERVICE SCHEDULE on Page87.)
Raise the side of the machine (approximately 102 mm [4in]) using the boom and arm.
Figure 182
Figure 183
Raise the blade fully and install jackstands under theblade and track frame (Item 1) [Figure 182] and [Figure183]. Raise the boom until all machine weight is on thejackstands.
Stop the engine.
WARNINGAVOID INJURY
Keep fingers and hands out of pinch points whenchecking the track tension.
W-2142-0903
Rubber Track Clearance
Figure 184
Figure 185
Measure the clearance at either middle track roller. Donot get fingers into pinch points between the track andthe track roller. Use a bolt or a dowel of the appropriatesize to check the gap between the contact edge of theroller and the top edge of the track guide [Figure 184]and [Figure 185].
1
S40421
1
S40422
Track Clearance 10 - 15 mm (0.39 - 0.59 in)
S40331
(0.39 - 0.59”)10 - 15 mm
B-14067
10 - 15 mm(0.39 - 0.59 in)
Track
TrackRoller
TrackFrame
Rubber
117 E26 Operation & Maintenance Manual

TRACK TENSION (CONT’D)
Adjusting Tension
Figure 186
Loosen the access cover bolts and pivot the access coveropen [Figure 186].
Increase Track Tension
Add grease to the fitting (Item 1) [Figure 186] until thetrack tension is correct.
Decrease Track Tension
WARNINGAVOID INJURY OR DEATH
If grease fitting is removed before pressure isreleased, the fitting can come off with great force andcause serious injury or death.
W-2490-0104
Pressure must be released from the grease cylinder todecrease track tension.
Loosen the bleed fitting (NOT the grease fitting) (Item 2)[Figure 186] and release pressure until the track tensionis correct.
NOTE: DO NOT loosen the bleed fitting (Item 2)[Figure 186] for more than eight turns.
Tighten the bleed fitting to 80 - 100 N•m (59 - 74 ft-lb)torque.
Pivot the access cover closed and tighten the accesscover bolts.
Raise the machine and remove the jackstands.
Repeat the procedure for the other side.
Dispose of grease in an environmentally safe manner.
S39487
12
118 E26 Operation & Maintenance Manual

TRAVEL MOTOR
Checking And Adding Oil
Figure 187
Park the excavator on a level surface with the plugs(Items 1 and 2) [Figure 187] in the vertical position asshown.
Remove the plug (Item 1) [Figure 187]. The lube levelmust be at the bottom edge of the hole.
Add lubricant (SAE 90W) through the hole if the lubelevel is low.
Removing And Replacing Oil
See the service schedule for the correct service interval.(See SERVICE SCHEDULE on Page 87.)
Park the excavator on a level surface with plugs (Items 1and 2) [Figure 187] in the vertical position shown.Remove both plugs and drain the lubricant into acontainer.
WARNINGAVOID INJURY OR DEATH
Always clean up spilled fuel or oil. Keep heat, flames,sparks or lighted tobacco away from fuel and oil.Failure to use care around combustibles can causeexplosion or fire.
W-2103-0508
Install the bottom plug (Item 2) [Figure 187]. Addlubricant through the center plug hole until the lube levelis at the bottom edge of the hole.
Install the plug (Item 1) [Figure 187].
S40005
1
2
119 E26 Operation & Maintenance Manual

ALTERNATOR AND FAN BELT
Belt Adjustment
Stop the engine and open the tailgate. (See Opening AndClosing on Page 92.)
Figure 188
Remove belt shield mounting nuts and bolts (Item 1) andremove the belt shield (Item 2) [Figure 188].
Remove the two bolts (Item 3) and the coolant recoverytank (Item 4) [Figure 188].
Figure 189
Loosen the bolt (Item 1) and nut (Item 2) and the bolt(Item 3) [Figure 189] until the alternator can be movedtoward the engine.
If a belt tension tool is available, move the alternator untilthe belt has (new belt = 272 - 292 N [61 - 65 lbf] or usedbelt = 233 - 252 N [53 - 57 lbf] tension.
If a belt tension tool is not available, move the alternatoruntil the belt has 8,0 mm (5/16 in) movement at themiddle of the belt span with 66 N (15 lbf) of force
Tighten the mounting and adjustment bolts.
Install the coolant recovery tank (Item 4) with the twobolts (Item 3) [Figure 188].
Install the belt shield (Item 2) with belt shield mountingnuts and bolts (Item 1) [Figure 188].
Close the tailgate.
Belt Replacement
Remove belt shield mounting nuts and bolts (Item 1) andremove the belt shield (Item 2) [Figure 188].
Remove the two bolts (Item 3) and the coolant recoverytank (Item 4) [Figure 188].
Loosen the bolt (Item 1) and nut (Item 2) and the bolt(Item 3) [Figure 189] until the alternator can be movedtoward the engine.
Remove the old belt and install a new belt.
Install the coolant recovery tank (Item 4) with the twobolts (Item 3) [Figure 188].
Install the belt shield (Item 2) with belt shield mountingnuts and bolts (Item 1) [Figure 188].
Close the tailgate.
S40319
2
1
3
4
S40321
1
3
2
120 E26 Operation & Maintenance Manual

AIR CONDITIONING COMPRESSOR BELT
Belt Adjustment
Figure 190
The air conditioning compressor belt (Item 1) [Figure190] is a special maintenance free type that ispretensioned over the pulleys. This belt eliminates theneed for a tensioning device and does not requireperiodic adjustment. Contact your Bobcat dealer forreplacement parts.
Belt Replacement
The counterweight must be removed to service the airconditioning compressor belt. See your Bobcat dealer forservice.
X-CHANGE™
Inspection And Maintenance
Figure 191
Inspect the X-Change (if equipped) for wear or damage.Inspect the X-Change pins (Item 1) and hooks (Item 2)[Figure 191] (on the attachment) for wear or damage.
Repair or replace damaged parts.
S40423
1
P-49712
2
1
121 E26 Operation & Maintenance Manual

TRACK ROLLER AND IDLER LUBRICATION
Procedure
The track rollers and idlers require no maintenance. Thebearings are a sealed design.
BUCKET
Bucket Teeth Removal And Installation
WARNINGWear safety glasses to prevent eye injury when anyof the following conditions exist:• Pressurized fluids and springs or other stored
energy components.• Flying debris or loose material is present.• Engine is running.• Tools are being used.
W-2505-0604
Position the bucket so the bucket teeth are at a 30° angleup from the ground for accessibility to the teeth.
Lower the boom until the bucket is fully on the ground.
Stop the engine and exit the excavator.
Figure 192
The retaining pin (Item 1) must be installed as shown(notch [Item 2] to the front) for proper fit and toothretention. The side of the tooth point (Item 3) [Figure192] also shows the correct orientation of the retainingpin.
Installation: Position the new tooth point on the shankand install a new retaining pin. Install the retaining pinuntil it is flush with the top of the point.
P-69201A
1
3
2
2
1
122 E26 Operation & Maintenance Manual

LUBRICATION OF THE HYDRAULIC EXCAVATOR
Lubrication Locations
Lubricate the excavator as specified in the serviceschedule for the best performance of the machine. (SeeSERVICE SCHEDULE on Page 87.)
Always use a good quality lithium based multipurposegrease when lubricating the machine. Apply the lubricantuntil extra grease shows.
Lubricate the following locations on the excavator EVERY8 - 10 HOURS:
Figure 193
Ref Description (# of Fittings)
1. Blade Cylinder Rod End (1) [Figure 193].
2. Blade Cylinder Base End (1) [Figure 193].
3. Blade Pivots (2) [Figure 193].
4. Boom Cylinder Base End (1) [Figure 193].
Figure 194
5. Boom Swing Pivot (3) [Figure 194].
6. Boom Swing Cylinder Rod End (1) [Figure 194].
Figure 195
7. Boom Pivot (1) [Figure 195].
S39339
23
41
3
S39340
5
5
6
S40325
7
123 E26 Operation & Maintenance Manual

LUBRICATION OF THE HYDRAULIC EXCAVATOR (CONT’D)
Lubrication Locations (Cont’d)
Figure 196
8. Boom Cylinder Rod End (1) [Figure 196].
Figure 197
9. Arm Cylinder Base End (1) [Figure 197].
Figure 198
10. Arm Cylinder Rod End (1) [Figure 198].
11. Arm Pivot (1) [Figure 198].
Figure 199
12. Bucket Cylinder Base End (1) [Figure 199].
S39341
8
S39461
9
S39342
11
10
P-91981
12
124 E26 Operation & Maintenance Manual

LUBRICATION OF THE HYDRAULIC EXCAVATOR (CONT’D)
Lubrication Locations (Cont’d)
Figure 200
13. Bucket Cylinder Rod End (1) [Figure 200].
14. Bucket Link Pin (1) [Figure 200].
15. Bucket Pivot (1) [Figure 200].
16. Bucket Link (3) [Figure 200].
Figure 201
17. Boom Swing Cylinder Base (1) [Figure 201].
Lubricate the following locations on the hydraulicexcavator EVERY 50 HOURS:
18. Slew Circle (1) [Figure 201].
19. Slew Pinion (1) [Figure 201]. (Install three to fourpumps of grease then rotate the upperstructure 90°.Install three to four pumps of grease and again rotatethe upperstructure 90°. Repeat this until the slewpinion has been greased at four positions.)
P19384
13
14
15
16
16
S39296
19
18
17
125 E26 Operation & Maintenance Manual
PIVOT PINS
Inspection And Maintenance
Figure 202
The pivots and cylinders (Item 1) have a large pin held inposition with a bolt (Item 2) and double nuts (Item 3)[Figure 202] securing the pin.
The two nuts (Item 3) are used as jam nuts to hold thebolt (Item 2) without tightening the bolt (Item 2) to the pinboss. After the nuts (Item 3) are tightened together, thebolt (Item 2) [Figure 202] should be free to spin. Seeyour Bobcat dealer for replacement parts.
S39343
3
1
22
1
3
126 E26 Operation & Maintenance Manual

EXCAVATOR STORAGE AND RETURN TO SERVICE
Storage
Sometimes it can be necessary to store your Bobcatexcavator for an extend period of time. Below is a list ofitems to perform before storage.
• Thoroughly clean the excavator including the enginecompartment.
• Lubricate the excavator.
• Replace worn or damaged parts.
• Drive the excavator onto planks in a dry protectedshelter.
• Lower the boom fully with the bucket flat on theground.
• Put grease on any exposed cylinder rods.
• Put fuel stabilizer in the fuel tank and run the enginea few minutes to circulate the stabilizer to the pumpand fuel injectors.
• Drain and flush the cooling system. Refill withpremixed coolant.
• Replace all fluids and filters (engine, hydraulic).
• Replace all filters (For example: air cleaner, heater,etc.).
• Put all controls in neutral position.
• Remove the battery. Be sure the electrolyte level iscorrect then charge the battery. Store it in a cool dryplace above freezing temperatures and charge itperiodically during storage.
• Cover the exhaust pipe opening.
• Tag the machine to indicate that it is in storagecondition.
Return To Service
After the Bobcat excavator has been in storage, it isnecessary to follow a list of items to return the excavatorto service.
• Check the engine and hydraulic oil levels; checkcoolant level.
• Install a fully charged battery.
• Remove grease from exposed cylinder rods.
• Check all belt tensions.
• Be sure all shields and guards are in place.
• Lubricate the excavator.
• Remove cover from exhaust pipe opening.
• Start the engine and let run for a few minutes whileobserving the instrument panels and systems forcorrect operation.
• Drive the excavator off of the planks.
• Operate machine, check for correct function.
• Stop the engine and check for leaks. Repair asneeded.
127 E26 Operation & Maintenance Manual

128 E26 Operation & Maintenance Manual

SYSTEM SETUP AND ANALYSIS
DIAGNOSTIC SERVICE CODES . . . . . . . . . . . . . . . . . . . . . . . . . . . . . . . . . . . . . . . . . . . . . .131Service Codes List . . . . . . . . . . . . . . . . . . . . . . . . . . . . . . . . . . . . . . . . . . . . . . . . . . . . . .131
DISPLAY CONTROLLER PANEL SETUP . . . . . . . . . . . . . . . . . . . . . . . . . . . . . . . . . . . . . . .133Passwords . . . . . . . . . . . . . . . . . . . . . . . . . . . . . . . . . . . . . . . . . . . . . . . . . . . . . . . . . . . . .133Password Entry (For Starting And Operating The Machine) . . . . . . . . . . . . . . . . . . . . . . .133Changing The Operator Password . . . . . . . . . . . . . . . . . . . . . . . . . . . . . . . . . . . . . . . . . .133Password Lockout Feature . . . . . . . . . . . . . . . . . . . . . . . . . . . . . . . . . . . . . . . . . . . . . . . .134Job Clock . . . . . . . . . . . . . . . . . . . . . . . . . . . . . . . . . . . . . . . . . . . . . . . . . . . . . . . . . . . . .134RPM . . . . . . . . . . . . . . . . . . . . . . . . . . . . . . . . . . . . . . . . . . . . . . . . . . . . . . . . . . . . . . . . .134
MAINTENANCE CLOCK . . . . . . . . . . . . . . . . . . . . . . . . . . . . . . . . . . . . . . . . . . . . . . . . . . . .135Description . . . . . . . . . . . . . . . . . . . . . . . . . . . . . . . . . . . . . . . . . . . . . . . . . . . . . . . . . . . .135Setup . . . . . . . . . . . . . . . . . . . . . . . . . . . . . . . . . . . . . . . . . . . . . . . . . . . . . . . . . . . . . . . . .135Reset . . . . . . . . . . . . . . . . . . . . . . . . . . . . . . . . . . . . . . . . . . . . . . . . . . . . . . . . . . . . . . . . .135
129 E26 Operation & Maintenance Manual

130 E26 Operation & Maintenance Manual

DIAGNOSTIC SERVICE CODES
Service Codes List
CODE CODEC0216 Hydraulic / hydrostatic filter not connected C2102 Glow plugs error ON
C0217 Hydraulic / hydrostatic filter plugged C2103 Glow plugs error OFF
C0309 Battery voltage low C2202 Starter error ON
C0310 Battery voltage high C2203 Starter error OFF
C0311 Battery voltage extremely high
C0314 Battery voltage extremely low C2305 Offset base solenoid short to batteryC0315 Battery voltage shutdown level C2306 Offset base solenoid short to ground
C0322 Battery voltage out of range low C2307 Offset base solenoid open circuit
C0414 Oil pressure extremely low C2405 Offset rod solenoid short to battery
C0415 Oil pressure shutdown level C2406 Offset rod solenoid short to ground
C2407 Offset rod solenoid open circuitC0610 Engine speed high
C0611 Engine speed extremely high C2505 Offset return short to battery
C0613 Engine speed no signal C2506 Offset return short to groundC0615 Engine speed shutdown level C2507 Offset return open circuit
C0618 Engine speed out of range high
C2605 Auxiliary base solenoid short to batteryC0710 Hydraulic oil temperature high C2606 Auxiliary base solenoid short to ground
C0711 Hydraulic oil temperature extremely high C2607 Auxiliary base solenoid open circuit
C0715 Hydraulic oil temperature shutdown levelC0721 Hydraulic oil temperature out of range high C2705 Auxiliary rod solenoid short to battery
C0722 Hydraulic oil temperature out of range low C2706 Auxiliary rod solenoid short to ground
C2707 Auxiliary rod solenoid open circuitC0810 Engine coolant temperature high
C0811 Engine coolant temperature extremely high C2805 Hydraulic exchange error ON
C0815 Engine coolant temperature shutdown level C2806 Hydraulic exchange error OFFC0821 Engine coolant temperature out of range high
C0822 Engine coolant temperature out of range low C3028 Controller memory failure (Log only)
C0921 Fuel level out of range high C3128 Interrupted power failure (Log only)
C0922 Fuel level out of range low
C3323 Main controller not programmedC1221 Front auxiliary control out of range high
C1222 Front auxiliary control out of range low C3397 Main controller programmed (Log only)
C1223 Front auxiliary control not in neutralC4321 Load sense pressure out of range high
C1305 Fuel shut-off hold solenoid short to battery C4322 Load sense pressure out of range low
C1306 Fuel shut-off hold solenoid short to groundC1307 Fuel shut-off hold solenoid open circuit C4516 Throttle controller not connected
C1402 Fuel pull solenoid short error on C6021 Offset controller out of range high
C1403 Fuel pull solenoid short error off C6022 Offset controller out of range lowC6023 Offset controller not in neutral
C2005 Two speed solenoid error ON
C2006 Two speed solenoid error OFF C6204 Load moment in error
131 E26 Operation & Maintenance Manual

DIAGNOSTICS SERVICE CODES (CONT’D)
Service Codes List (Cont’d)
CODE CODEC6305 Console sensor short to battery E0105 Throttle actuator short to battery
C6306 Console sensor short to ground E0106 Throttle actuator short to ground
E0107 Throttle actuator open circuitC6405 Switched power relay short to battery
C6406 Switched power relay short to ground E0123 Throttle actuator not calibrated
C6407 Switched power relay open circuit
E0321 5 volt supply out of range highC6505 Work group lockout short to battery E0322 5 volt supply out of range low
C6506 Work group lockout short to ground
C6507 Work group lockout open circuit E0421 Throttle sensor out of range highE0422 Throttle sensor out of range low
E0521 Throttle actuator feedback out of range highE0522 Throttle actuator feedback out of range low
E3128 Interrupted power failure (Log only)E3297 Main controller programmed (Log only)
132 E26 Operation & Maintenance Manual

DISPLAY CONTROLLER PANEL SETUP
Passwords
All new machines with keyless option arrive at the BobcatDealerships with the panel in locked mode. This meansthat a password must be used to start the engine.
For security purposes, your dealer can change thepassword and also set it in the locked mode. Yourdealer will provide you with the password.
Master Password:
A permanent, randomly selected password is set atthe factory which cannot be changed. This passwordis used for service by the Bobcat dealer if the OwnerPassword is not known; or to change the OwnerPassword.
Owner Password:
There is only one Owner Password (CodE 0). It mustbe used to change the owner or operator passwords.See below for changing the Owner Password.
Operator Password:
There can be up to three operator Passwords (CodE1, CodE 2, CodE 3). See below for changing theOperator Password.
Password Entry (For Starting And Operating TheMachine)
Press ENTER CODE button (Item 1). The panel willbecome lighted and there will be two short beeps. CodEwill appear on the display screen (Item 2) [Figure 203].
NOTE: After you press ENTER CODE you have 40seconds to use the keypad (Item 3)[Figure 203] to enter the password. (If morethan 40 seconds is used, the process willabort and you will need to start over.
Enter the password. For each digit that you enter, a dashwill appear on the display screen. If the password wasentered correctly, there will be one long beep.
NOTE: If the password was incorrect there will bethree short beeps and “Error” will appear onthe display screen. Press the ENTER CODEbutton again and start over. After three failedattempts, you must wait three minutes to tryagain.
You are now ready to start and operate the machine.
If you will be changing the operator password, do notstart the engine. (See Changing The Operator Passwordon Page 133.)
Changing The Operator Password
Figure 203
Perform Password Entry at left, but do not start theengine.
Press and hold the ENTER CODE button (Item 1) for 3seconds. CodE 1 will appear on the display screen (Item2) [Figure 203].
Press the ENTER CODE button until the desired Code(CodE 0, CodE 1, CodE 2, CodE 3) appears. CodE 0 isOwner Password, the other codes are Operatorpasswords.You now have 40 seconds to use the keypad(Item 3) [Figure 203] to enter each digit of a new fourdigit password.
Enter the new four digit password. After the fourth digit isentered, there will be two short beeps and rPEAt willappear.
Re-enter the new four digit password to verify. If the newpasswords match, there will be two short beeps, Codewill appear for 1 second and then the display screen willreturn to HOURMETER function.
NOTE: If the new passwords do not match, there willbe one long beep and “Error” will appear for 1second and then the display screen will returnto HOURMETER function.
2 1
3
NA1558
133 E26 Operation & Maintenance Manual

DISPLAY CONTROLLER PANEL SETUP (CONT’D)
Password Lockout Feature
This allows the operator to Unlock the password featureso that a password does not need to be used every timeyou start the engine.
Perform Password Entry (See Password Entry (ForStarting And Operating The Machine) on Page 133.) (theengine can be started or stopped.) The password entrycan be performed with the engine off or with the enginerunning.
Figure 204
Press the Lock / Unlock button (Item 1). The displayscreen (Item 5) [Figure 204] will continuously alternatefrom UnLoc to CodE for 1 second periods.
Perform Password Entry again.
UnLoc will appear in the display screen (Item 5), theUnlocked Icon (Item 2) will appear in the Icon DisplayArea (Item 3) [Figure 204] and there will be two shortbeeps.
To start an Unlocked system, press the ENTER CODEbutton and press the START button.
When you stop the engine with the system unlocked, youwill hear one long beep every 3 seconds for 15 seconds.
To lock the system again, press the Lock / Unlock button(Item 1) [Figure 204] and enter the password during the15 second period.
Job Clock
The JOB CLOCK can be set to record accumulatedhours for a particular job.
Press and release the information button (Item 4) untilJOB light is ON at the top, center of the display screen(Item 5) [Figure 204].
While the JOB light is ON, press and hold the informationbutton (Item 4) [Figure 204] until the display screenreturns to zero.
This process will clear the accumulated hours and willbegin recording JOB CLOCK time again. (This does notaffect the HOURMETER which continues to record thetotal operating hours of the excavator.)
Pressing the information button (Item 1) [Figure 204]again or pressing the START button will return the displayscreen to HOURMETER function.
RPM
The display screen (Item 5) [Figure 204] can be set todisplay engine rpm.
With the engine running, press and release theinformation button (Item 4) until rpm light is ON at the top,center of the display screen (Item 5) [Figure 204].
Engine rpm is now displayed on the display screen.
Press the information button (Item 4) [Figure 204] againthe return to HOURMETER function.
NA1558
4 2
1
3
5
134 E26 Operation & Maintenance Manual

MAINTENANCE CLOCK
Description
The Maintenance Clock alerts the operator when the nextservice interval is due. EXAMPLE: The MaintenanceClock can be set to a 250 hour interval as a reminder forthe next 250 hour planned maintenance.
Figure 205
During machine operation, a two beep alarm will soundwhen there are less than 10 hours until the next plannedmaintenance.
The hours interval (Item 1) and the [SEr] (Item 2) willalternate in the data display screen (Item 3) [Figure 205]for 10 seconds.
The display will then revert back to the previous displayand will appear for 10 seconds every time the machine isstarted until the maintenance clock is reset.
Setup
See your Bobcat dealer about installation of this feature.
Reset
Figure 206
To reset the panel after the scheduled maintenance iscompleted, do the following:
Turn the key to the OFF position or press the stop button(keyless panel).
Press the information button (Item 1) [Figure 206] to turnthe panel on.
Press and hold the information button (Item 1) and theauxiliary hydraulic button (Item 2) simultaneously until[rESEt] appears in the data display screen (Item 3)[Figure 206].
3
NA1558
21
NA1558
1
23
135 E26 Operation & Maintenance Manual

136 E26 Operation & Maintenance Manual

MACHINE SIGN TRANSLATIONS
MACHINE SIGN TRANSLATIONS . . . . . . . . . . . . . . . . . . . . . . . . . . . . . . . . . . . . . . . . . . . . .139Service Schedule (7188747) . . . . . . . . . . . . . . . . . . . . . . . . . . . . . . . . . . . . . . . . . . . . . .139Warning (7178178) . . . . . . . . . . . . . . . . . . . . . . . . . . . . . . . . . . . . . . . . . . . . . . . . . . . . . .142Lift Chart (7206148) With Standard Arm . . . . . . . . . . . . . . . . . . . . . . . . . . . . . . . . . . . . .143Lift Chart (7206149) With Standard Arm and Additional Counterweight . . . . . . . . . . . . .146Lift Chart (7206150) With Long Arm and Additional Counterweight . . . . . . . . . . . . . . . . .149Warning (7148157) . . . . . . . . . . . . . . . . . . . . . . . . . . . . . . . . . . . . . . . . . . . . . . . . . . . . . .152Warning (7178177) . . . . . . . . . . . . . . . . . . . . . . . . . . . . . . . . . . . . . . . . . . . . . . . . . . . . . .154Warning (6708929) . . . . . . . . . . . . . . . . . . . . . . . . . . . . . . . . . . . . . . . . . . . . . . . . . . . . . .157Warning (6809832) . . . . . . . . . . . . . . . . . . . . . . . . . . . . . . . . . . . . . . . . . . . . . . . . . . . . . .157Warning (6804233) . . . . . . . . . . . . . . . . . . . . . . . . . . . . . . . . . . . . . . . . . . . . . . . . . . . . . .157Warning (7148145) . . . . . . . . . . . . . . . . . . . . . . . . . . . . . . . . . . . . . . . . . . . . . . . . . . . . . .158Warning (7148147) . . . . . . . . . . . . . . . . . . . . . . . . . . . . . . . . . . . . . . . . . . . . . . . . . . . . . .158Using the Pin-On X-Change (6818059) . . . . . . . . . . . . . . . . . . . . . . . . . . . . . . . . . . . . . .159Joystick Control Pattern Selector Lever (7178179) . . . . . . . . . . . . . . . . . . . . . . . . . . . . . .162Warning (6737189) . . . . . . . . . . . . . . . . . . . . . . . . . . . . . . . . . . . . . . . . . . . . . . . . . . . . . .163Warning (7169006) . . . . . . . . . . . . . . . . . . . . . . . . . . . . . . . . . . . . . . . . . . . . . . . . . . . . . .163
137 E26 Operation & Maintenance Manual

138 E26 Operation & Maintenance Manual

MACHINE SIGN TRANSLATIONS
Service Schedule (7188747)
139 E26 Operation & Maintenance Manual

MACHINE SIGN TRANSLATIONS (CONT’D)
Service Schedule (7188747) (Cont’d)
140 E26 Operation & Maintenance Manual
MACHINE SIGN TRANSLATIONS (CONT’D)
Service Schedule (7188747) (Cont’d)
141 E26 Operation & Maintenance Manual

MACHINE SIGN TRANSLATIONS (CONT’D)
Warning (7178178)
142 E26 Operation & Maintenance Manual

MACHINE SIGN TRANSLATIONS (CONT’D)
Lift Chart (7206148) With Standard Arm
143 E26 Operation & Maintenance Manual

MACHINE SIGN TRANSLATIONS (CONT’D)
Lift Chart (7206148) With Standard Arm (Cont’d)
144 E26 Operation & Maintenance Manual

MACHINE SIGN TRANSLATIONS (CONT’D)
Lift Chart (7206148) With Standard Arm (Cont’d)
145 E26 Operation & Maintenance Manual

MACHINE SIGN TRANSLATIONS (CONT’D)
Lift Chart (7206149) With Standard Arm and Additional Counterweight
146 E26 Operation & Maintenance Manual

MACHINE SIGN TRANSLATIONS (CONT’D)
Lift Chart (7206149) With Standard Arm and Additional Counterweight (Cont’d)
147 E26 Operation & Maintenance Manual

MACHINE SIGN TRANSLATIONS (CONT’D)
Lift Chart (7206149) With Standard Arm and Additional Counterweight (Cont’d)
148 E26 Operation & Maintenance Manual
MACHINE SIGN TRANSLATIONS (CONT’D)
Lift Chart (7206150) With Long Arm and Additional Counterweight
149 E26 Operation & Maintenance Manual

MACHINE SIGN TRANSLATIONS (CONT’D)
Lift Chart (7206150) With Long Arm and Additional Counterweight (Cont’d)
150 E26 Operation & Maintenance Manual

MACHINE SIGN TRANSLATIONS (CONT’D)
Lift Chart (7206150) With Long Arm and Additional Counterweight (Cont’d)
151 E26 Operation & Maintenance Manual

MACHINE SIGN TRANSLATIONS (CONT’D)
Warning (7148157)
152 E26 Operation & Maintenance Manual

MACHINE SIGN TRANSLATIONS (CONT’D)
Warning (7148157) (Cont’d)
153 E26 Operation & Maintenance Manual

MACHINE SIGN TRANSLATIONS (CONT’D)
Warning (7178177)
154 E26 Operation & Maintenance Manual

MACHINE SIGN TRANSLATIONS (CONT’D)
Warning (7178177) (Cont’d)
155 E26 Operation & Maintenance Manual

MACHINE SIGN TRANSLATIONS (CONT’D)
Warning (7178177) (Cont’d)
156 E26 Operation & Maintenance Manual

MACHINE SIGN TRANSLATIONS (CONT’D)
Warning (6708929) Warning (6809832)
Warning (6804233)
157 E26 Operation & Maintenance Manual

MACHINE SIGN TRANSLATIONS (CONT’D)
Warning (7148145) Warning (7148147)
158 E26 Operation & Maintenance Manual

MACHINE SIGN TRANSLATIONS (CONT’D)
Using the Pin-On X-Change (6818059)
159 E26 Operation & Maintenance Manual

MACHINE SIGN TRANSLATIONS (CONT’D)
Using the Pin-On X-Change (6818059) (Cont’d)
160 E26 Operation & Maintenance Manual

MACHINE SIGN TRANSLATIONS (CONT’D)
Using the Pin-On X-Change (6818059) (Cont’d)
161 E26 Operation & Maintenance Manual

MACHINE SIGN TRANSLATIONS (CONT’D)
Joystick Control Pattern Selector Lever (7178179)
162 E26 Operation & Maintenance Manual

MACHINE SIGN TRANSLATIONS (CONT’D)
Warning (6737189) Warning (7169006)
163 E26 Operation & Maintenance Manual

164 E26 Operation & Maintenance Manual

SPECIFICATIONS
(E26) EXCAVATOR SPECIFICATIONS . . . . . . . . . . . . . . . . . . . . . . . . . . . . . . . . . . . . . . . . .167Machine Dimensions (Standard Arm) . . . . . . . . . . . . . . . . . . . . . . . . . . . . . . . . . . . . . . . .167Machine Dimensions (Long Arm) . . . . . . . . . . . . . . . . . . . . . . . . . . . . . . . . . . . . . . . . . . .169Performance . . . . . . . . . . . . . . . . . . . . . . . . . . . . . . . . . . . . . . . . . . . . . . . . . . . . . . . . . . .171Controls . . . . . . . . . . . . . . . . . . . . . . . . . . . . . . . . . . . . . . . . . . . . . . . . . . . . . . . . . . . . . . .171Engine (E26 S/N B33211001 & Above) . . . . . . . . . . . . . . . . . . . . . . . . . . . . . . . . . . . . . .172Engine (E26 S/N AJRY11001 & Above) . . . . . . . . . . . . . . . . . . . . . . . . . . . . . . . . . . . . . .172Hydraulic System . . . . . . . . . . . . . . . . . . . . . . . . . . . . . . . . . . . . . . . . . . . . . . . . . . . . . . .173Hydraulic Cylinders . . . . . . . . . . . . . . . . . . . . . . . . . . . . . . . . . . . . . . . . . . . . . . . . . . . . . .174Hydraulic Cycle Times . . . . . . . . . . . . . . . . . . . . . . . . . . . . . . . . . . . . . . . . . . . . . . . . . . .174Electrical . . . . . . . . . . . . . . . . . . . . . . . . . . . . . . . . . . . . . . . . . . . . . . . . . . . . . . . . . . . . . .174Drive System . . . . . . . . . . . . . . . . . . . . . . . . . . . . . . . . . . . . . . . . . . . . . . . . . . . . . . . . . . .174Slew System . . . . . . . . . . . . . . . . . . . . . . . . . . . . . . . . . . . . . . . . . . . . . . . . . . . . . . . . . . .175Undercarriage . . . . . . . . . . . . . . . . . . . . . . . . . . . . . . . . . . . . . . . . . . . . . . . . . . . . . . . . . .175Capacities . . . . . . . . . . . . . . . . . . . . . . . . . . . . . . . . . . . . . . . . . . . . . . . . . . . . . . . . . . . . .175Tracks . . . . . . . . . . . . . . . . . . . . . . . . . . . . . . . . . . . . . . . . . . . . . . . . . . . . . . . . . . . . . . . .175Ground Pressure . . . . . . . . . . . . . . . . . . . . . . . . . . . . . . . . . . . . . . . . . . . . . . . . . . . . . . . .175
165 E26 Operation & Maintenance Manual

166 E26 Operation & Maintenance Manual

(E26) EXCAVATOR SPECIFICATIONS
Machine Dimensions (Standard Arm)
• Where applicable, specification conform to SAE or ISO standards and are subject to change without notice.
EM7543
537 mm(21.0 in)
330 mm(13.0 in)
1543 mm(61.0 in)
1965 mm(77.3 in)
1462 mm(57.5 in)
3345 mm(132.0 in)
4326 mm(170.3 in)
1515 mm(60.0 in)
2412 mm(95.0 in)
300 mm(12.0 in)
770 mm(30.3 in)
1661 mm(65.3 in)
1949 mm(76.7 in)
614 mm(24.0 in)
735 mm(29.0 in)
1456 mm(57.3 in)
167 E26 Operation & Maintenance Manual

(E26) EXCAVATOR SPECIFICATIONS (CONT’D)
Machine Dimensions (Standard Arm) (Cont’d)
• Where applicable, specification conform to SAE or ISO standards and are subject to change without notice.
EM7545
4553 mm(188.8 in)4678 mm(184.2 in)
185°
2132 mm(84.0 in)
385 mm(15.0 in)
315 mm(12.4 in)
3246 mm(128.0 in)
4272 mm(168.0 in)
2582 mm(102.0 in)
1809 mm(71.0 in)
3057 mm(120.3 in)
168 E26 Operation & Maintenance Manual

(E26) EXCAVATOR SPECIFICATIONS (CONT’D)
Machine Dimensions (Long Arm)
• Where applicable, specification conform to SAE or ISO standards and are subject to change without notice.
EM7546
1456 mm(57.3 in)
537 mm(21.0 in)
330 mm(13.0 in)
1543 mm(61.0 in)
1965 mm(77.3 in)
1462 mm(57.5 in)
3345 mm(132.0 in)
4325 mm(170.3 in)
1515 mm(60.0 in)
2412 mm(95.0 in)
300 mm(12.0 in)
840 mm(33.1 in)
1925 mm(75.8 in)
1949 mm(77.0 in)
614 mm(24.0 in)
735 mm(29.0 in)
169 E26 Operation & Maintenance Manual

(E26) EXCAVATOR SPECIFICATIONS (CONT’D)
Machine Dimensions (Long Arm) (Cont’d)
• Where applicable, specification conform to SAE or ISO standards and are subject to change without notice.
EM7547
4966 mm(195.5 in)
4850 mm(191.0 in)
185°
2135 mm(84.0 in)
385 mm(15.0 in)
315 mm(12.4 in)
3239 mm(127.5 in)
4473 mm(176.0 in)
2890 mm(114.0 in)
2089 mm(82.2 in)
3239 mm(127.5 in)
170 E26 Operation & Maintenance Manual

(E26) EXCAVATOR SPECIFICATIONS (CONT’D)
Performance
Controls
Operating weight (canopy w/ rubber tracks, counterweight and standard bucket)
2570 kg (5666 lb)
If equipped with the following, add: Cab w/ Heater, add 130 kg (287 lb);Cab w/ HVAC, add 149 kg (328 lb);
Long Arm, add 10 kg (22 lb)Additional Counterweight, add 183 kg (403 lb)
Travel Speed (Low / High) 2,4 km/h / 4,5 km/h (1.5 mph / 2.8 mph)
Digging Force (per ISO 6015)
With Standard Arm Arm - 15800 N (3552 lb)Bucket - 22200 N (4991 lb)
With Long Arm Arm - 13200 N (2967 lb)Bucket - 22200 N (4991 lb)
Steering Two hand levers (optional foot pedals)
Hydraulics Two hand operated levers (joysticks) control boom, bucket, arm and upperstructure slew
Blade Hand lever
Two Speed Switch on blade lever
Boom Swing Electric switch in left joystick
Auxiliary Hydraulics Electric switch in right joystick
Auxiliary Pressure Release Electric switch in right joystick
Engine Engine speed control dial with auto idle feature, key type start switch
Starting Aid Glow Plugs - activated by key switch
Brakes Travel
Service and Parking Slew
ServiceHolding
Hydraulic lock in motor circuit
Hydraulic lock on motorSpring applied - hydraulic release
171 E26 Operation & Maintenance Manual

(E26) EXCAVATOR SPECIFICATIONS (CONT’D)
Engine (E26 S/N B33211001 & Above)
Engine (E26 S/N AJRY11001 & Above)
Make / Model Kubota V1505-E4B-BCZ-2 Tier 4
Fuel / Cooling Diesel NO.2-D / Liquid
Horsepower (SAE Net) @ 2400 rpm 18,5 kW (24.8 hp)
Torque @ 2100 rpm (SAE) 86,4 N•m (63.7 ft-lb)
Number Of Cylinders 4
Displacement 1,498 L (91.41 in³)
Bore / Stroke 78 x 78,4 mm (2.99 x 2.90 in)
Lubrication Forced Lubrication / Cartridge type
Crankcase Ventilation Closed breathing
Air Cleaner Dual dry replacement paper elements
Ignition Diesel-Compression
Low Idle Speed 1100 ± 50 rpm
High Idle Speed 2500 max rpm
Engine Coolant Propylene Glycol / water mixture (53% PG / 47% water)
Make / Model Kubota V1505-E3B-BCZ-2 Interim Tier 4
Fuel / Cooling Diesel NO.2-D / Liquid
Horsepower (SAE Net) @ 2400 rpm 20,1 kW (27 hp)
Torque @ 2100 rpm (SAE) 93,9 N•m (69.3 ft-lb)
Number Of Cylinders 4
Displacement 1,498 L (91.41 in³)
Bore / Stroke 78 x 78,4 mm (2.99 x 2.90 in)
Lubrication Forced Lubrication / Cartridge type
Crankcase Ventilation Closed breathing
Air Cleaner Dual dry replacement paper elements
Ignition Diesel-Compression
Low Idle Speed 1000 ± 50 rpm
High Idle Speed 2500 max rpm
Engine Coolant Propylene Glycol / water mixture (53% PG / 47% water)
172 E26 Operation & Maintenance Manual

(E26) EXCAVATOR SPECIFICATIONS (CONT’D)
Hydraulic System
Pump Type Engine driven, dual outlet, variable displacement,load sensing, torque limited, piston pump with gear pumps
Pump Capacity Piston Pump
Gear Pump - 1Gear Pump - 2
2 x 28,8 L/minute (2 x 7.6 U.S. gpm)18,4 L/min (4.9 U.S. gpm)6,2 L/min (1.6 U.S. gpm)
Auxiliary Flow 47,2 L/min (12.47 U.S. gpm)
Hydraulic Filter Full flow replaceable, 3 micron synthetic media element
Control Valve 10 spool, parallel series type, open center.
Fluid Type Bobcat Fluid, Hydraulic / Hydrostatic 6903117 - (2.5 U.S. gal)6903118 - (5 U.S. gal)6903119 - (55 U.S. gal)
System Relief Pressure Slew relief pressure Blade, Boom Swing Boom, Arm, Bucket, Travel
Joystick Control Pressure
19098 kPa (191 bar) (2770 psi)20595 kPa (206 bar) (2987 psi)23994 kPa (240 bar) (3480 psi)
3199 kPa (32 bar) (464 psi)
Auxiliary Relief 17995 kPa (180 bar) (2610 psi)
Arm Port Relief Base And Rod End 28992 kPa (290 bar) (4205 psi)
Boom Port Relief Base And Rod End 28992 kPa (290 bar) (4205 psi)
Bucket Port Relief Base And Rod End 25993 kPa (260 bar) (3770 psi)
Blade Port Relief Base End 26993 kPa (270 bar) (3915 psi)
Main Hydraulic Filter Bypass 345 kPa (3,4 bar) (50 psi)
Case Drain 124 - 159 kPa (1,2 - 1,6 bar) (18 - 23 psi)
173 E26 Operation & Maintenance Manual

(E26) EXCAVATOR SPECIFICATIONS (CONT’D)
Hydraulic Cylinders
Hydraulic Cycle Times
Electrical
Drive System
Cylinder Bore Rod Stroke
Boom (cushion up) 69,9 mm (2.75 in) 41,3 mm (1.63 in) 546,1 mm (21.5 in)
Arm (cushion retract / extend)
69,9 mm (2.75 in) 41,3 mm (1.63 in) 492,3 mm (19.4 in)
Bucket 57,2 mm (2.25 in) 31,8 mm (1.25 in) 445,0 mm (17.52 in)
Boom Swing 69,9 mm (2.75 in) 38,1 mm (1.50 in) 385,3 mm (15.17 in)
Blade 82.6 mm (3.25 in) 44,5 mm (1.75 in) 145,0 mm (5.71 in)
Bucket Curl 2,45 seconds
Bucket Dump 1,66 seconds
Arm Retract 2,55 seconds
Arm Extend 1,77 seconds
Boom Raise 3,6 seconds
Boom Lower 4,33 seconds
Boom Swing Left (60°) 3,38 seconds
Boom Swing Right (60°) 4,81 seconds
Blade Raise 1,79 seconds
Blade Lower 2,54 seconds
Starting Aid Glow Plugs
Alternator 12 volt, 90 Amp open frame w/ internal regulator
Battery 12 volt - 530 CCA @ -18°C (0°F)
Starter 12 volt; gear reduction 2,0 kw (2.7 hp)
Instrumentation Fuel gauge, audible alarm, visual warning for engine functions and hourmeter
Lights 37.5 watt (2)
Final Drive Each track is driven by hydrostatic axial piston motor
Drive Reduction 41,9:1 two stage planetary
Gradeability 30*
Brakes Hydraulic lock on motor
174 E26 Operation & Maintenance Manual

(E26) EXCAVATOR SPECIFICATIONS (CONT’D)
Slew System
Undercarriage
Capacities
Tracks
Ground Pressure
Slew Drive Axial piston connected to a planetary drive
Slew Circle Single row shear type ball bearings with internal gear
Gear Reduction 21.5:1
Brake Spring applied, pressure released
Slew Speed 8,9 rpm
Crawler Track Design Sealed track rollers with boxed section track roller frame,grease type track adjuster with shock absorbing recoil spring
Width of crawler 1520 mm (59.8 in)
Fuel Tank 34,6 L (9.14 U.S. gal)
Hydraulic Reservoir Only (Center of Sight Glass)
Tank Cap. 14,7 L (3.88 U.S. gal)
Hydraulic System (with Reservoir) 25,0 L (6.60 U.S. gal)
Cooling System 6,2L (1.64 U.S. gal)
Engine Oil and Filter 6,0 L (6.34 qt)
Final Drive (each) 0,6 L (0.63 qt)
Type Rubber
Width 300 mm (11.8 in)
Number Of Shoes Single Assembly
Number of Track Rollers (per side) 4
Type Rubber
Standard Arm 25,6 kPa (0,256 bar) (3.71 psi)
With long arm 25,7 kPa (0,257 bar) (3.73 psi)
With CTW 27,3 kPa (0,273 bar) (3.96 psi)
With CTW and long arm 27,4 kPa (0,274 bar) (3.97 psi)
175 E26 Operation & Maintenance Manual

176 E26 Operation & Maintenance Manual

WARRANTY
WARRANTY . . . . . . . . . . . . . . . . . . . . . . . . . . . . . . . . . . . . . . . . . . . . . . . . . . . . . . . . . . . . . .179
177 E26 Operation & Maintenance Manual

178 E26 Operation & Maintenance Manual

WARRANTY
WARRANTYBobcat Excavators
Bobcat Company warrants to its authorized dealers and authorized dealers of Bobcat Equipment Ltd.,who in turn warrant to the owner, that each new Bobcat Excavator will be free from proven defects inmaterial and workmanship with respect to (i) all components of the product except as otherwisespecified herein for twelve (12) months, (ii) tracks for twelve (12) months on a prorated basis based onthe remaining depth of the track at the time any defect is discovered, and (iii) Bobcat brand batteries,for an additional twelve (12) months after the initial twelve month warranty period, provided thatBobcat Company shall only reimburse a fixed portion of the cost of replacing the battery during suchadditional twelve months. The foregoing time periods shall all commence after delivery by theauthorized Bobcat dealer to the original buyer.
During the warranty period, the authorized Bobcat dealer shall repair or replace, at Bobcat Company’soption, without charge for parts and labor, any part of the Bobcat product except as otherwisespecified herein which fails because of defects in material or workmanship. The owner shall providethe authorized Bobcat dealer with prompt written notice of the defect and allow reasonable time forrepair or replacement. Bobcat Company can, at its option, require failed parts to be returned to thefactory. Travel time of mechanics and transportation of the Bobcat product to the authorized Bobcatdealer for warranty work are the responsibility of the owner. The remedies provided in this warranty areexclusive.
This warranty does not apply to diesel engine fuel injection pumps and injectors. The owner shall relysolely on the warranty, if any, of the respective manufacturers thereof. This warranty does not coverreplacement of scheduled service items such as oil, filters, tune-up parts, and other high-wear items.This warranty does not cover damages resulting from abuse, accidents, alterations, use of the Bobcatproduct with any accessory or attachment not approved by Bobcat Company, air flow obstructions, orfailure to maintain or use the Bobcat product according to the instructions applicable to it.
THIS WARRANTY IS EXCLUSIVE AND IN LIEU OF ALL OTHER WARRANTIES AND CONDITIONS,EXCEPT THE WARRANTY OF TITLE. BOBCAT COMPANY DISCLAIMS ALL OTHER WARRANTIES ANDCONDITIONS, EXPRESS OR IMPLIED, INCLUDING ANY IMPLIED WARRANTIES OR CONDITIONS OFMERCHANTABILITY OR FITNESS FOR A PARTICULAR PURPOSE. IN NO EVENT SHALL BOBCATCOMPANY OR THE AUTHORIZED BOBCAT DEALER BE LIABLE FOR ANY SPECIAL, INCIDENTAL,INDIRECT OR CONSEQUENTIAL DAMAGES, WHATSOEVER, INCLUDING, BUT NOT LIMITED TO, LOSSOR INTERRUPTION OF BUSINESS, LOST PROFITS, OR LOSS OF MACHINE USE, WHETHER BASEDON CONTRACT, WARRANTY, TORT, NEGLIGENCE, STRICT LIABILITY, STATUTE OR OTHERWISE,EVEN IF BOBCAT COMPANY OR THE AUTHORIZED BOBCAT DEALER HAS BEEN ADVISED OF THEPOSSIBILITY OF SUCH DAMAGES. THE TOTAL LIABILITY OF BOBCAT COMPANY AND THEAUTHORIZED BOBCAT DEALERS WITH RESPECT TO THE PRODUCT AND SERVICES FURNISHEDHEREUNDER SHALL NOT EXCEED THE PURCHASE PRICE OF THE PRODUCT UPON WHICH SUCHLIABILITY IS BASED.
Printed in U.S.A.6570375 (2-09)
179 E26 Operation & Maintenance Manual

WARRANTY (CONT’D)
In this emissions limited warranty, the term “Manufacturer” means Kubota Corporation as the holder of the U.S. EnvironmentalProtection Agency (U.S. EPA) Certificate of Conformity and California Executive Order for the vehicle. The emission control limitedwarranty is in addition to the standard limited warranty for your vehicle.
KUBOTA Corporation
The U.S. Environmental Protection Agency (EPA), the California Air Resources Board (CARB), and KUBOTA Corporation are pleased to explain the Federal andCalifornia Emission Control System Warranty on your non-road engine. In California, new heavy duty off-road engines must be designed, built and equipped to meetCalifornia’s stringent anti-smog standards adopted by the Air Resources Board pursuant to its authority in Chapter 1 and 2, Part 5, Division 26 of the California Healthand Safety Code. In other states of the U.S.A., new non-road engines subject to the provisions of 40 CFR 1039 subpart A must be designed, built and equipped, at thetime of sale, to meet the U.S. EPA regulations for nonroad engines.KUBOTA must warrant the emission control system on your Compression Ignition engine for the period of time listed below provided there has been no abuse,vandalism, neglect, improper maintenance or unapproved modifications to your engine. This emission warranty is applicable in all states of the U.S.A., its provinces andterritories regardless of whether an individual state, province, or territory has enacted warranty provisions that differ from the Federal warranty provisions. This emissionwarranty is also applicable in all provinces and territories of CANADA.Your emission control system may include parts such as the fuel injection system and the air induction system. Also included may be hoses, belts, connectors and otheremission-related assemblies.Where a warrantable condition exists, KUBOTA will repair your engine at no cost to you, including diagnosis (if the diagnostic work is performed at an authorized dealer),parts and labor.EMISSION DESIGN AND DEFECT WARRANTY COVERAGE
The emissions warranty period for the engine begins on the original date of sale to the initial purchaser and continues for each subsequent purchaser for the periodmentioned below.The emissions warranty period for all engines rated under 19kW (25Hp) is 2000 hours of operation or two (2) years of use, whichever first occurs.The emissions warranty period for constant speed engines rated under 37kW (50Hp) with rated speeds greater than or equal to 3000 rpm is 2000 hours of operationor two (2) years of use, whichever first occurs.The emissions warranty period for all other engines not already listed is 3000 hours of operation or five (5) years of use, whichever first occurs.If any emission related part on your engine is defective, the part will be repaired or replaced by KUBOTA free of charge.
OWNER’S WARRANTY RESPONSIBILITIES(a) As the engine owner, you are responsible for the performance of the required maintenance listed in your KUBOTA operator’s manual. KUBOTA recommends
that you retain all receipts covering maintenance on your engine, but KUBOTA cannot deny a warranty claim solely for the lack of receipts or for your failure toensure the performance of all scheduled maintenance.
(b) As the engine owner, you should be aware, however, that KUBOTA may deny your warranty coverage if your engine or a part has failed due to abuse, vandalism,neglect, improper maintenance or unapproved modifications.
(c) Your engine is designed to operate on Ultra Low Sulfur Diesel Fuel only. Use of any other fuel may result in your engine no longer operating in compliance withFederal or California’s emissions requirements.
(d) You are responsible for presenting your engine to the nearest dealer or service station authorized by KUBOTA when a problem exists. The warranty repairsshould be completed in a reasonable amount of time, not to exceed 30 days.
(e) If you have any questions regarding your warranty rights and responsibilities or the location of the nearest authorized dealer or distributor, you should contact:KUBOTA ENGINE AMERICA CORPORATION, Service department at 1-800-532-9808, [email protected] or KUBOTA TRACTOR CORPORATION,National Service Department at 1-800-558-2682, [email protected] or KUBOTA CANADA LTD at (905) 294-7477.
COVERAGEKUBOTA warrants to the initial purchaser and each subsequent purchaser that your engine will be designed, built and equipped, at the time of sale, to meet allapplicable regulations. KUBOTA also warrants to the initial purchaser and each subsequent purchaser that your engine shall be free from defects in materials andworkmanship which cause the engine to fail to conform to applicable regulations for the period mentioned above from the original date of sale.KUBOTA shall remedy warranty defects at any authorized KUBOTA engine dealer or warranty station. Any authorized work done at an authorized dealer or warrantystation shall be free of charge to the owner if such work determines that a warranted part is defective. Any KUBOTA approved or equivalent replacement part(including any KUBOTA approved aftermarket part) may be used for any warranty maintenance or repairs on emission related parts, and must be provided free ofcharge to the owner if the part is still under warranty.KUBOTA is liable for damages to other engine components caused by the failure of a warranted part still under warranty. The use of replacement parts notequivalent to the original parts may impair the effectiveness of your engine emission control system. If such a replacement part is used in the repair or maintenanceof your engine, and KUBOTA determines it is defective or causes a failure of a warranted part, your claim for repair of your engine may be denied.Listed below are the parts covered by the Federal and California Emission Control Systems Warranty. Some parts listed below may require scheduled maintenanceand are warranted up to the first scheduled replacement point for that part. The warranted parts are (if applicable):
Printed in U.S.A.6990354 (10-11)
Your Bobcat dealer is authorized to perform all warranty and service repairs on your diesel engine. To locate a Bobcat dealer, visitwww.bobcat.com or call 1-800-743-4340.
FEDERAL & CALIFORNIA EMISSION CONTROL SYSTEMSLIMITED WARRANTY for NON-ROAD ENGINES (CI)
1) Air-Induction Systema) Intake Manifoldb) Turbocharger Systemc) Charge Air Cooling System (Intercooler)
2) Catalyst or Thermal Reactor Systema) Catalytic converterb) Exhaust manifold
3) Fuel Injection Systema) Fuel Supply Pumpb) Injectorc) Injection Piped) Common Raile) Smoke Puff Limiterf) Speed Timerg) Cold Advance Timerh) Injection Pump
4) Electronic Control Systema) ECUb) Engine Speed / Timing Sensorc) Accelerator Position Sensord) Coolant Temperature Sensore) Atmospheric Pressure Sensorf) Intake Pressure Sensorg) Intake Manifold Temperature Sensorh) Intake Air Flow Sensori) Common Rail Pressure Sensor
5) Exhaust Gas Recirculation Systema) EGR Valveb) EGR Coolerc) EGR Valve Opening Rate Sensor
6) Particulate Controlsa) Any device used to capture particulateemissions.b) Any device used in the regeneration of theparticulate control device.c) Control Device Enclosures and Manifoldingd) Diesel Particulate Filter Temperature Sensore) Differential Pressure Sensor
7) Miscellaneous Itemsa) Closed Breather Systemb) Hoses*, Clamps*, Fittings, Tubing*c) Gaskets, Sealsd) Kubota supplied engine Wiring Harnessese) Kubota supplied engine Elec. Connectorsf) Air Cleaner Element*, Fuel Filter Element*g) Emission Control Information Labels
*Warranty period is equivalent to manufacturer’s recommended first replacement interval as stated in the applicable model’s operator’s manual and/or service(workshop) manual.
MAINTENANCE REQUIREMENTSThe owner is responsible for the performance of the required maintenance as defined by KUBOTA in the operator’s manual.
LIMITATIONSThis Emission Control System Warranty shall not cover any of the following;(a) Repair or replacement required because of misuse or neglect, improper maintenance, repairs improperly performed or replacements not conforming to
KUBOTA specifications that adversely affect performance and/or durability, and alteration or modifications not recommended or approved in writing byKUBOTA.
(b) Replacement of parts and other services and adjustments necessary for required maintenance at and after the first scheduled replacement point.
180 E26 Operation & Maintenance Manual

ALPHABETICAL INDEX
(E26) EXCAVATOR SPECIFICATIONS . . . . . 167AIR CLEANER SERVICE . . . . . . . . . . . . . . . . 95AIR CONDITIONING COMPRESSOR BELT 121ALTERNATOR AND FAN BELT . . . . . . . . . . . 120ATTACHMENTS . . . . . . . . . . . . . . . . . . . . . . . 60BLADE CONTROL LEVER . . . . . . . . . . . . . . . 49BOBCAT COMPANY IS IS0 9001 CERTIFIED . 7BOOM SWING . . . . . . . . . . . . . . . . . . . . . . . . 50BUCKET . . . . . . . . . . . . . . . . . . . . . . . . . . . . 122CAB FILTERS . . . . . . . . . . . . . . . . . . . . . . . . . 94CONTROL CONSOLE LOCKOUTS . . . . . . . . 88DAILY INSPECTION . . . . . . . . . . . . . . . . . . . . 51DELIVERY REPORT . . . . . . . . . . . . . . . . . . . . . 8DIAGNOSTIC SERVICE CODES . . . . . . . . . 131DISPLAY CONTROLLER PANEL SETUP . . . 133ELECTRICAL SYSTEM . . . . . . . . . . . . . . . . 106EMERGENCY EXIT . . . . . . . . . . . . . . . . . . . . 39ENGINE COOLING SYSTEM . . . . . . . . . . . . 103ENGINE LUBRICATION SYSTEM . . . . . . . . 101ENGINE SPEED CONTROL . . . . . . . . . . . . . . 49EXCAVATOR IDENTIFICATION . . . . . . . . . . . . 9EXCAVATOR STORAGE AND RETURN TO SERVICE . . . . . . . . . . . . . . . . . . . . . . . . . . . . 127FEATURES, ACCESSORIES AND ATTACHMENTS . . . . . . . . . . . . . . . . . . . . . . . 10FIRE PREVENTION . . . . . . . . . . . . . . . . . . . . 17FUEL SYSTEM . . . . . . . . . . . . . . . . . . . . . . . . 97HYDRAULIC CONTROLS . . . . . . . . . . . . . . . . 43HYDRAULIC SYSTEM . . . . . . . . . . . . . . . . . 111INSTRUMENTS AND CONSOLES . . . . . . . . . 27LIFTING THE EXCAVATOR . . . . . . . . . . . . . . 79LUBRICATION OF THE HYDRAULIC EXCAVATOR . . . . . . . . . . . . . . . . . . . . . . . . . 123MACHINE SIGN TRANSLATIONS . . . . . . . . 139MACHINE SIGNS (DECALS) . . . . . . . . . . . . . 20MAINTENANCE CLOCK . . . . . . . . . . . . . . . . 135MAINTENANCE SAFETY . . . . . . . . . . . . . . . . 85MOTION ALARM SYSTEM . . . . . . . . . . . . . . . 40MOTION ALARM SYSTEM . . . . . . . . . . . . . . . 90OPERATING PROCEDURE . . . . . . . . . . . . . . 67OPERATOR CAB (ROPS / TOPS) . . . . . . . . . 32OPERATOR CANOPY (ROPS / TOPS) . . . . . 32OPERATOR SAFETY WARNING . . . . . . . . . . . 1
PIVOT PINS . . . . . . . . . . . . . . . . . . . . . . . . . 126PRE-STARTING PROCEDURE . . . . . . . . . . . 52PUBLICATIONS AND TRAINING RESOURCES 19REGULAR MAINTENANCE ITEMS . . . . . . . . . 7RIGHT SIDE COVER . . . . . . . . . . . . . . . . . . . 93SAFETY INSTRUCTIONS . . . . . . . . . . . . . . . 15SEAT BELT . . . . . . . . . . . . . . . . . . . . . . . . . . . 89SERIAL NUMBER LOCATIONS . . . . . . . . . . . . 8SERVICE SCHEDULE . . . . . . . . . . . . . . . . . . 87SPARK ARRESTOR MUFFLER . . . . . . . . . . 115SPARK ARRESTOR MUFFLER . . . . . . . . . . 116STARTING THE ENGINE . . . . . . . . . . . . . . . . 55STOPPING THE ENGINE AND LEAVING THE EXCAVATOR . . . . . . . . . . . . . . . . . . . . . . . . . . 59TAILGATE . . . . . . . . . . . . . . . . . . . . . . . . . . . . 92TOWING THE EXCAVATOR . . . . . . . . . . . . . . 78TRACK ROLLER AND IDLER LUBRICATION 122TRACK TENSION . . . . . . . . . . . . . . . . . . . . . 117TRANSPORTING THE EXCAVATOR ON A TRAILER . . . . . . . . . . . . . . . . . . . . . . . . . . . . . 80TRAVEL CONTROLS . . . . . . . . . . . . . . . . . . . 41TRAVEL MOTOR . . . . . . . . . . . . . . . . . . . . . 119WARRANTY . . . . . . . . . . . . . . . . . . . . . . . . . 179X-CHANGE™ . . . . . . . . . . . . . . . . . . . . . . . . 121
181 E26 Operation & Maintenance Manual

182 E26 Operation & Maintenance Manual