operating procedures paint & prep - image … · operating procedures paint & prep . 2 ......
TRANSCRIPT

OPERATING PROCEDURES PAINT amp PREP
2
BEST PRACTICES
Pg 3 Masking Pg 9 Spray Gun Cleaning (Waterborne)
Pg 4 Sanding System (Prep) Pg 10 Spray Gun Set Up
Pg 5 Sanding System (Repaired Plastic) Pg 11 Respirator Fit Testing
Pg 6 Sanding System (Blends) Pg 12 Fit Test Form
Pg 7 Booth Maintenance - General Pg 13 Technical Support
Pg 8 SATA 3 Stage Filter Maintenance Pg 14 MSDS QR Codes
The suggested procedure on this page is a summary of the manufacturerrsquos procedure For complete details
review the manufacturerrsquos instructions that accompany the products andor that can be found at their websites 3
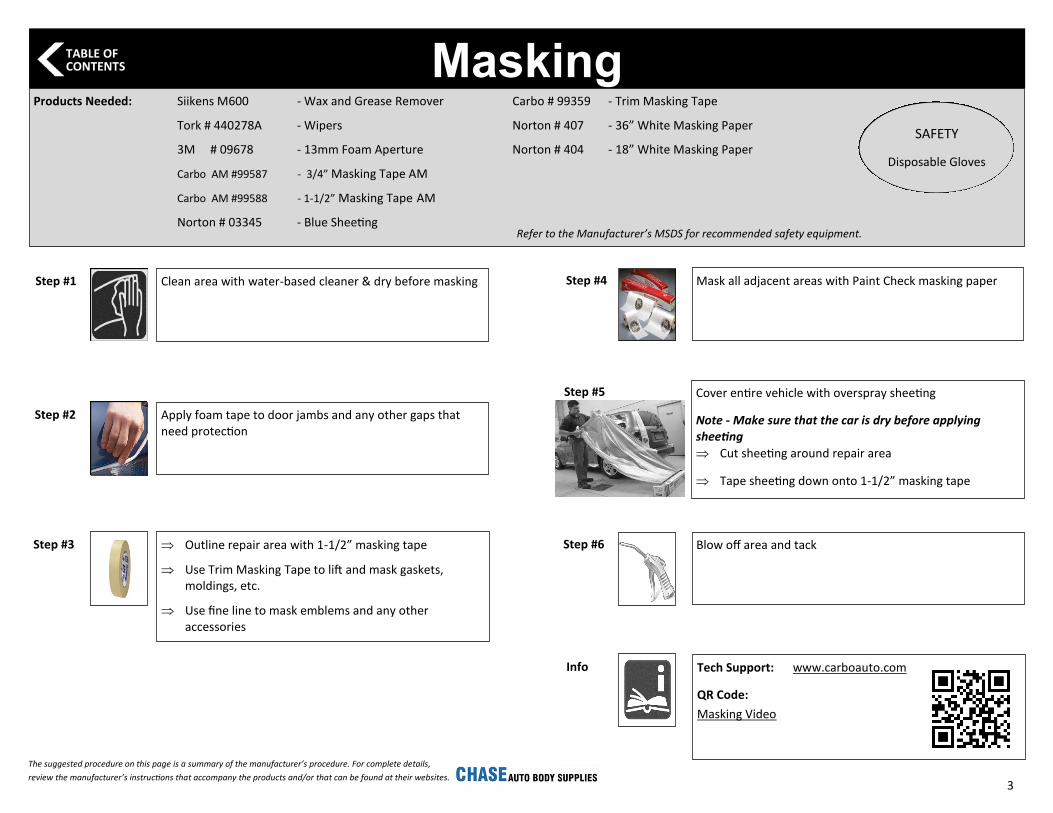
Products Needed Siikens M600 - Wax and Grease Remover Carbo 99359 - Trim Masking Tape
Tork 440278A - Wipers Norton 407 - 36rdquo White Masking Paper
3M 09678 - 13mm Foam Aperture Norton 404 - 18rdquo White Masking Paper
Carbo AM 99587 - 34rdquo Masking Tape AM
Carbo AM 99588 - 1-12rdquo Masking Tape AM
Norton 03345 - Blue Sheeting
Step 1 Clean area with water-based cleaner amp dry before masking
Step 2 Apply foam tape to door jambs and any other gaps that need protection
Step 3 Outline repair area with 1-12rdquo masking tape
Use Trim Masking Tape to lift and mask gaskets moldings etc
Use fine line to mask emblems and any other accessories
Step 5 Cover entire vehicle with overspray sheeting
Note - Make sure that the car is dry before applying sheeting
Cut sheeting around repair area
Tape sheeting down onto 1-12rdquo masking tape
Step 6 Blow off area and tack
Masking
Tech Support wwwcarboautocom
QR Code
Masking Video
Info
Step 4 Mask all adjacent areas with Paint Check masking paper
Refer to the Manufacturerrsquos MSDS for recommended safety equipment
SAFETY
Disposable Gloves
TABLE OF CONTENTS
The suggested procedure on this page is a summary of the manufacturerrsquos procedure For complete details
review the manufacturerrsquos instructions that accompany the products andor that can be found at their websites 4
Products Needed Carbo 99308 - Preppers 6rdquo Soft Density Backup pad Carbo 10891 - Color Prep Gray Scuff Pads
Tork 192479 - Specialist Wipes Carbo 99517 - 400 Grit 6rdquo DA Grip-On Sand Paper
Carbo 99439 - 400 grit soft roll Carbo 99514 - 600 Grit 6rdquo DA Grip-On Sand Paper
Carbo 10890 - Primer Prep Red Scuff Pads
Step 1 Body work comes to the prep department finished in 180 Grit DA sand scratches
Prep department never jumps more than 100 grit step
Step 2 Prepperrsquos sand with 332 offset and a soft pad
Sand around the filler areas ( stay off filler) with 220 grit to remove 180 grit scratches on metal and feathered paint
Step 3 Sand around the filler areas ( stay off filler) with 320 grit to
remove 220 grit scratches on metal and feathered paint
Step 4 Prime as per Siikens recommended procedures
Caution Do not Prime beyond 320 Grit Scratches
NEWmdashNon OEM Panels
Finish sand with 400 Grit 6rdquo DA soft Pad 332 Offset sander
(May use Red Thin Flex Scuff Pad as alternate)
Step 5 ON THE PRIMED AREAS
Block sandmdash starting with 320 grit follow with 400 grit
Step 6 Sand with 600 grit on a DA with a soft padmdashthe total area to be painted Surface must be fully sanded no shiny spots no orange peel
Step 9 Primed OEM and aftermarket Bumpers
Hand sand with 400 Grit Soft Roll or Gray scuff + Blend Prep
IMP Identify Primer amp follow Akzo recommended process
OEM Non-OEM Panels All
Step 8 NEWmdashOEM Panels
Finish sand with 400 Grit 6rdquo DA soft Pad 332 Offset
Sander
Step 10 Unprimed or Raw OEM and Aftermarket Bumpers
Hand sand with Grey Scuff + Plastic Fix
IMP Do Float Test amp follow Akzo recommended process
Info General Rule of sanding steps Do Not jump more that 100 grits between steps from
80 to 400
Preppers on a DA use soft pad + 332 finish sander
Hand sand with 100 grit finer than DA sand for similar scratch performance in finish or use soft backed paper
Sanding System (Prep) SAFETY
P100 or N95 Dust Masks
Disposable Gloves
Safety Glasses
TABLE OF CONTENTS
Refer to the Manufacturerrsquos MSDS for recommended safety equipment
The suggested procedure on this page is a summary of the manufacturerrsquos procedure For complete details
review the manufacturerrsquos instructions that accompany the products andor that can be found at their websites 5
Products Needed Carbo 99518 - 320 Grit 6rdquo DA Medalist discs Carbo 99442 - 800 Grit Soft Roll sand paper
Carbo 99515 - 600 Grit 6rdquo DA Medalist Discs Carbo 99308 - 6rdquo soft density pad
Carbo 99514 - 800 Grit 6rdquo DA Medalist discs
Carbo 99564 - 320 Grit Grip-On Sheet Roll
Carbo 99592 - 600 Grit Grip-On Sheet Roll
Sanding ldquoRepairedrdquo Plastic
This section deals with prep sanding Bumpers that were repaired in the shop
If Bumper is Floating Plastic
DA sand - finishing with 800 grit areas to be primed (following normal sanding process up to 800 grit finish)
Prime Plastic as per Siikens SOP for repaired Plastics
Step 2 Block sand primed areas with 600 Grit
Step 1
Step 2
If Bumper is sinking Plastic
Dry sand to 320 grit entire area to receive primer
Prime Plastic as per Siikens SOP for repaired plastics
Step 1
Repair Plastic often comes to the Prep department with fine ldquohairrdquo on the exposed plastic This is easily dealt with using slow DA speed and a small amount of water (All Carbo sand papers are water tolerant )
Block sand primed areas with 600 Grit
SAFETY
P100 or N95 Masks
Disposable Gloves
Safety Glasses
TABLE OF CONTENTS
The suggested procedure on this page is a summary of the manufacturerrsquos procedure For complete details
review the manufacturerrsquos instructions that accompany the products andor that can be found at their websites 6
Products Needed Siikens - Blend Prep Carbo 99308 - Soft DA Pad
Carbo 10891 - Color Prep Gray Scuff Pads Carbo 42089 - 6rdquo Interface Pad
Carbo 30893 - Clear Prep Gold Scuff Pads Carbo 99514 - 800 Grit 6rdquo sanding disc
Carbo 47283 - 1000 Grit 6rdquo Medalist Film Finishing Disc
Carbo 53381 - 3000 Grit 6rdquo Medalist Foam Finishing Disc
This system assumes damaged repair is completed as per standard sanding preparation system and deals specifically with the A B C D Blend ldquoPanelrdquo area as shown below
Step 1 Sand areas A and B (Blend Panel Area) with 800 Grit soft pad 332 offset sander Remove orange peel where color will be applied on the B portion of the panel 1000 Grit may be preferable when color involves a fine metallic or pearl
Step 3
If Blending of the clearcoat is inevitable (sail panels)
Step 1 Alternately you may wet sand with P800 to P1000 grit on the A + B areas making sure orange peel is removed when color will be going
Step 2
Completely sand areas C + D with 1000 Grit on a 6rdquo DA 332 offset finishing sander and soft + interface pad
Alternatelymdash Sand areas C + D with Gray Thin Flex Scuff Pad and Siikens Blend Prep and watermdashThis can be important on heavy orange peel original finishmdash if the goal is to keep this peel intact
Make a gradual taper (as shown)
Step 3 Or b) Prepare sail panel using Carbo 3000 Grit Foam Finishing Disc On a DA with 332 offset Do Not use an interface pad
Step 3 Either a) Prepare sail panels using some Siikens Blend Prep on a damp sponge until gloss is removed
Step 3 Or c) Prepare sail panel using Carbo Clear Blend Prep Gold scuff pad
Sanding System Blends SAFETY
P100 or N95 Masks
Disposable Gloves
Safety Glasses
TABLE OF CONTENTS
The suggested procedure on this page is a summary of the manufacturerrsquos procedure For complete details
review the manufacturerrsquos instructions that accompany the products andor that can be found at their websites 7
Products Needed Camfil Exhaust Filters Like 90 Particle Control - 10009
Camfil Pre-Filters Like 90 White Out - 10032
Camfil Ceiling Media Like 90 Clear View - 10034
Replace exhaust filters weekly or as needed
Replace Pre-filters semi annually
Replace ceiling media every 12 months or as required
Apply Particle Control Daily to booth floor to actively control all dust movement from cement floor
Apply White-Out amp Clear View every 8 months
In between new applications of White Out
Refresh booth walls with White Out as overspray accumulates
Remove and reapply Clear View as overspray accumulates on glass
Spray Booth Maintenance - General
Tech Support wwwlike90net
QR Code
Particle Control Tech Info
Info Tech Support wwwlike90net
QR Code
White Out Tech Info
Info
Refer to the Manufacturerrsquos MSDS for recommended safety equipment
SAFETY
Safety Glasses
Organic Vapors Respirator
Disposable Gloves
TABLE OF CONTENTS
The suggested procedure on this page is a summary of the manufacturerrsquos procedure For complete details
review the manufacturerrsquos instructions that accompany the products andor that can be found at their websites 8
SATA 3 Stage Filter Maintenance
1st Stage - Clean or replace every 6 months
Replacement Filter 22160
2nd Stage - Replace every 6 months
or
When 2nd pressure gauge shows a 5 psi drop from the
1st pressure gauge
Replacement Filter 81810
3rd Stage - Replace every 3 months
Replacement Filter 85373
Tech Support wwwsatausacom
QR Code
3 Stage Filter Video
Info
3 Stage Filter Part Numbers
1296 CFM Capacity Filter - 92320 (shown above)
72 CFM Capacity Filter - 141218
TABLE OF CONTENTS
The suggested procedure on this page is a summary of the manufacturerrsquos procedure For complete details
review the manufacturerrsquos instructions that accompany the products andor that can be found at their websites 9
Products Needed U-POL 2002 - Water-Based Cleaner SATA 9894 - Nozzle Cleaning Needles
SATA 6007 - Cleaning Brushes SATA 48173 - Gun Lube
SATA 9209 - Small Cleaning Brushes Tork 440278A - Wipers
Spray Gun Cleaning - Waterborne
Step 1 Flush material passage and gun body with water-based cleaner
Step 2 Clean with SATA cleaning brushes
Step 4 Rinse with water-based cleaner
Step 5 Dry air passages and exterior of gun with an air blower
Step 6 Connect air hose and pull trigger on gun to ensure that all cleaning solution is sprayed out of the gun
Step 3 Use SATA nozzle cleaning needle to clean out the air cap holes
Step 7 Use SATA gun lube on all threads and moving parts including the needle
Info Tech Support wwwsatausacom
QR Code
Gun Cleaning Video
Refer to the Manufacturerrsquos MSDS for recommended safety equipment
SAFETY
Safety Glasses
Organic Vapors Respirator
Disposable Gloves
TABLE OF CONTENTS
The suggested procedure on this page is a summary of the manufacturerrsquos procedure For complete details
review the manufacturerrsquos instructions that accompany the products andor that can be found at their websites 10
Spray Gun Set Up
Tech Support wwwsatausacom
QR Code
Spraying Video
Info
Step 1 Select the correct nozzle size per paint companies recommendation
Step 2 Thin paint material to paint companies recommended viscosity
Step 4 Air Micrometer and Fluid Control Knobs - Set air micrometer and fluid control knobs wide open
Step 6 Spray Test Pattern
Adjust fan control and air pressure if needed
Step 7 Step 3
Fan Control Knob - Set fan control knob wide open
Step 5 Incoming Air Pressure - Set incoming air pressure at maximum psi per spray gun manufacturers recommendation
Overlap - Spray panel with a 75 overlap
Gun Distance - HVLP 5rdquo - 6rdquo from surface
RP 6rdquo - 7rdquo from surface
TABLE OF CONTENTS
The suggested procedure on this page is a summary of the manufacturerrsquos procedure For complete details
review the manufacturerrsquos instructions that accompany the products andor that can be found at their websites 11
Respirator Fit Testing
Info Tech Support wwwsassafetycom
QR Code
OSHA Link
QR Code
Fit Test Video
Step 2
Step 3
Step 5
Step 4
Check fit of respirator before conducting fit test
Asses comfort using the points described on the Fit Test Form
Don the Respirator - Have the person being tested don their respirator and then put fit test hood on the person being tested
Sensitivity Test - Check to make sure that the person being tested can detect the Bitrex solution by using the sensitivity solution 9401-03 with nebulizer 1 while not wearing the respirator under the fit test hood
Fit Test - Using the Bitrex solution 9401-04 with nebulizer 2 check to see if the person being tested can detect the Bitrex solution while wearing the respirator under the fit test hood
Follow instructions on Fit Test Form
Products Needed
Step 1 Go to OSHArsquos website to review medical evaluation questionnaire and medical evaluation requirements
See QR code in lower right hand corner
Respirator Fit Tests Should Be Conducted Annually
SAS 9401-01 - Fit Test Kit
SAS 8661-92 - Medium Disposable Respirator
3M 37079 - Medium 12 Mask
3M 37083 - Large 12 Mask
3M 07046 - OV Cartridges
3M 07184 - P100 filters
3M 07194 - Pre-filter
SAS 9401-03 - Sensitivity Solution Replacement Fit Test Products
SAS 9401-04 - Bitrex Solution Refill
SAS 9401-05 - Nebulizer with labels
TABLE OF CONTENTS
TABLE OF CONTENTS
13
Technical Support
wwwlordcom wwwautochemcom
wwwtorkusacom wwwlike90net
wwwcarboautocom
wwwsatausacom wwwsassafetycom wwwu-polcom
TABLE OF CONTENTS
14
MSDS QR Codes TABLE OF CONTENTS
U-Pol 2002
Like 90 10032 Like 90 10009 Like 90 10034

2
BEST PRACTICES
Pg 3 Masking Pg 9 Spray Gun Cleaning (Waterborne)
Pg 4 Sanding System (Prep) Pg 10 Spray Gun Set Up
Pg 5 Sanding System (Repaired Plastic) Pg 11 Respirator Fit Testing
Pg 6 Sanding System (Blends) Pg 12 Fit Test Form
Pg 7 Booth Maintenance - General Pg 13 Technical Support
Pg 8 SATA 3 Stage Filter Maintenance Pg 14 MSDS QR Codes
The suggested procedure on this page is a summary of the manufacturerrsquos procedure For complete details
review the manufacturerrsquos instructions that accompany the products andor that can be found at their websites 3
Products Needed Siikens M600 - Wax and Grease Remover Carbo 99359 - Trim Masking Tape
Tork 440278A - Wipers Norton 407 - 36rdquo White Masking Paper
3M 09678 - 13mm Foam Aperture Norton 404 - 18rdquo White Masking Paper
Carbo AM 99587 - 34rdquo Masking Tape AM
Carbo AM 99588 - 1-12rdquo Masking Tape AM
Norton 03345 - Blue Sheeting
Step 1 Clean area with water-based cleaner amp dry before masking
Step 2 Apply foam tape to door jambs and any other gaps that need protection
Step 3 Outline repair area with 1-12rdquo masking tape
Use Trim Masking Tape to lift and mask gaskets moldings etc
Use fine line to mask emblems and any other accessories
Step 5 Cover entire vehicle with overspray sheeting
Note - Make sure that the car is dry before applying sheeting
Cut sheeting around repair area
Tape sheeting down onto 1-12rdquo masking tape
Step 6 Blow off area and tack
Masking
Tech Support wwwcarboautocom
QR Code
Masking Video
Info
Step 4 Mask all adjacent areas with Paint Check masking paper
Refer to the Manufacturerrsquos MSDS for recommended safety equipment
SAFETY
Disposable Gloves
TABLE OF CONTENTS
The suggested procedure on this page is a summary of the manufacturerrsquos procedure For complete details
review the manufacturerrsquos instructions that accompany the products andor that can be found at their websites 4
Products Needed Carbo 99308 - Preppers 6rdquo Soft Density Backup pad Carbo 10891 - Color Prep Gray Scuff Pads
Tork 192479 - Specialist Wipes Carbo 99517 - 400 Grit 6rdquo DA Grip-On Sand Paper
Carbo 99439 - 400 grit soft roll Carbo 99514 - 600 Grit 6rdquo DA Grip-On Sand Paper
Carbo 10890 - Primer Prep Red Scuff Pads
Step 1 Body work comes to the prep department finished in 180 Grit DA sand scratches
Prep department never jumps more than 100 grit step
Step 2 Prepperrsquos sand with 332 offset and a soft pad
Sand around the filler areas ( stay off filler) with 220 grit to remove 180 grit scratches on metal and feathered paint
Step 3 Sand around the filler areas ( stay off filler) with 320 grit to
remove 220 grit scratches on metal and feathered paint
Step 4 Prime as per Siikens recommended procedures
Caution Do not Prime beyond 320 Grit Scratches
NEWmdashNon OEM Panels
Finish sand with 400 Grit 6rdquo DA soft Pad 332 Offset sander
(May use Red Thin Flex Scuff Pad as alternate)
Step 5 ON THE PRIMED AREAS
Block sandmdash starting with 320 grit follow with 400 grit
Step 6 Sand with 600 grit on a DA with a soft padmdashthe total area to be painted Surface must be fully sanded no shiny spots no orange peel
Step 9 Primed OEM and aftermarket Bumpers
Hand sand with 400 Grit Soft Roll or Gray scuff + Blend Prep
IMP Identify Primer amp follow Akzo recommended process
OEM Non-OEM Panels All
Step 8 NEWmdashOEM Panels
Finish sand with 400 Grit 6rdquo DA soft Pad 332 Offset
Sander
Step 10 Unprimed or Raw OEM and Aftermarket Bumpers
Hand sand with Grey Scuff + Plastic Fix
IMP Do Float Test amp follow Akzo recommended process
Info General Rule of sanding steps Do Not jump more that 100 grits between steps from
80 to 400
Preppers on a DA use soft pad + 332 finish sander
Hand sand with 100 grit finer than DA sand for similar scratch performance in finish or use soft backed paper
Sanding System (Prep) SAFETY
P100 or N95 Dust Masks
Disposable Gloves
Safety Glasses
TABLE OF CONTENTS
Refer to the Manufacturerrsquos MSDS for recommended safety equipment
The suggested procedure on this page is a summary of the manufacturerrsquos procedure For complete details
review the manufacturerrsquos instructions that accompany the products andor that can be found at their websites 5
Products Needed Carbo 99518 - 320 Grit 6rdquo DA Medalist discs Carbo 99442 - 800 Grit Soft Roll sand paper
Carbo 99515 - 600 Grit 6rdquo DA Medalist Discs Carbo 99308 - 6rdquo soft density pad
Carbo 99514 - 800 Grit 6rdquo DA Medalist discs
Carbo 99564 - 320 Grit Grip-On Sheet Roll
Carbo 99592 - 600 Grit Grip-On Sheet Roll
Sanding ldquoRepairedrdquo Plastic
This section deals with prep sanding Bumpers that were repaired in the shop
If Bumper is Floating Plastic
DA sand - finishing with 800 grit areas to be primed (following normal sanding process up to 800 grit finish)
Prime Plastic as per Siikens SOP for repaired Plastics
Step 2 Block sand primed areas with 600 Grit
Step 1
Step 2
If Bumper is sinking Plastic
Dry sand to 320 grit entire area to receive primer
Prime Plastic as per Siikens SOP for repaired plastics
Step 1
Repair Plastic often comes to the Prep department with fine ldquohairrdquo on the exposed plastic This is easily dealt with using slow DA speed and a small amount of water (All Carbo sand papers are water tolerant )
Block sand primed areas with 600 Grit
SAFETY
P100 or N95 Masks
Disposable Gloves
Safety Glasses
TABLE OF CONTENTS
The suggested procedure on this page is a summary of the manufacturerrsquos procedure For complete details
review the manufacturerrsquos instructions that accompany the products andor that can be found at their websites 6
Products Needed Siikens - Blend Prep Carbo 99308 - Soft DA Pad
Carbo 10891 - Color Prep Gray Scuff Pads Carbo 42089 - 6rdquo Interface Pad
Carbo 30893 - Clear Prep Gold Scuff Pads Carbo 99514 - 800 Grit 6rdquo sanding disc
Carbo 47283 - 1000 Grit 6rdquo Medalist Film Finishing Disc
Carbo 53381 - 3000 Grit 6rdquo Medalist Foam Finishing Disc
This system assumes damaged repair is completed as per standard sanding preparation system and deals specifically with the A B C D Blend ldquoPanelrdquo area as shown below
Step 1 Sand areas A and B (Blend Panel Area) with 800 Grit soft pad 332 offset sander Remove orange peel where color will be applied on the B portion of the panel 1000 Grit may be preferable when color involves a fine metallic or pearl
Step 3
If Blending of the clearcoat is inevitable (sail panels)
Step 1 Alternately you may wet sand with P800 to P1000 grit on the A + B areas making sure orange peel is removed when color will be going
Step 2
Completely sand areas C + D with 1000 Grit on a 6rdquo DA 332 offset finishing sander and soft + interface pad
Alternatelymdash Sand areas C + D with Gray Thin Flex Scuff Pad and Siikens Blend Prep and watermdashThis can be important on heavy orange peel original finishmdash if the goal is to keep this peel intact
Make a gradual taper (as shown)
Step 3 Or b) Prepare sail panel using Carbo 3000 Grit Foam Finishing Disc On a DA with 332 offset Do Not use an interface pad
Step 3 Either a) Prepare sail panels using some Siikens Blend Prep on a damp sponge until gloss is removed
Step 3 Or c) Prepare sail panel using Carbo Clear Blend Prep Gold scuff pad
Sanding System Blends SAFETY
P100 or N95 Masks
Disposable Gloves
Safety Glasses
TABLE OF CONTENTS
The suggested procedure on this page is a summary of the manufacturerrsquos procedure For complete details
review the manufacturerrsquos instructions that accompany the products andor that can be found at their websites 7
Products Needed Camfil Exhaust Filters Like 90 Particle Control - 10009
Camfil Pre-Filters Like 90 White Out - 10032
Camfil Ceiling Media Like 90 Clear View - 10034
Replace exhaust filters weekly or as needed
Replace Pre-filters semi annually
Replace ceiling media every 12 months or as required
Apply Particle Control Daily to booth floor to actively control all dust movement from cement floor
Apply White-Out amp Clear View every 8 months
In between new applications of White Out
Refresh booth walls with White Out as overspray accumulates
Remove and reapply Clear View as overspray accumulates on glass
Spray Booth Maintenance - General
Tech Support wwwlike90net
QR Code
Particle Control Tech Info
Info Tech Support wwwlike90net
QR Code
White Out Tech Info
Info
Refer to the Manufacturerrsquos MSDS for recommended safety equipment
SAFETY
Safety Glasses
Organic Vapors Respirator
Disposable Gloves
TABLE OF CONTENTS
The suggested procedure on this page is a summary of the manufacturerrsquos procedure For complete details
review the manufacturerrsquos instructions that accompany the products andor that can be found at their websites 8
SATA 3 Stage Filter Maintenance
1st Stage - Clean or replace every 6 months
Replacement Filter 22160
2nd Stage - Replace every 6 months
or
When 2nd pressure gauge shows a 5 psi drop from the
1st pressure gauge
Replacement Filter 81810
3rd Stage - Replace every 3 months
Replacement Filter 85373
Tech Support wwwsatausacom
QR Code
3 Stage Filter Video
Info
3 Stage Filter Part Numbers
1296 CFM Capacity Filter - 92320 (shown above)
72 CFM Capacity Filter - 141218
TABLE OF CONTENTS
The suggested procedure on this page is a summary of the manufacturerrsquos procedure For complete details
review the manufacturerrsquos instructions that accompany the products andor that can be found at their websites 9
Products Needed U-POL 2002 - Water-Based Cleaner SATA 9894 - Nozzle Cleaning Needles
SATA 6007 - Cleaning Brushes SATA 48173 - Gun Lube
SATA 9209 - Small Cleaning Brushes Tork 440278A - Wipers
Spray Gun Cleaning - Waterborne
Step 1 Flush material passage and gun body with water-based cleaner
Step 2 Clean with SATA cleaning brushes
Step 4 Rinse with water-based cleaner
Step 5 Dry air passages and exterior of gun with an air blower
Step 6 Connect air hose and pull trigger on gun to ensure that all cleaning solution is sprayed out of the gun
Step 3 Use SATA nozzle cleaning needle to clean out the air cap holes
Step 7 Use SATA gun lube on all threads and moving parts including the needle
Info Tech Support wwwsatausacom
QR Code
Gun Cleaning Video
Refer to the Manufacturerrsquos MSDS for recommended safety equipment
SAFETY
Safety Glasses
Organic Vapors Respirator
Disposable Gloves
TABLE OF CONTENTS
The suggested procedure on this page is a summary of the manufacturerrsquos procedure For complete details
review the manufacturerrsquos instructions that accompany the products andor that can be found at their websites 10
Spray Gun Set Up
Tech Support wwwsatausacom
QR Code
Spraying Video
Info
Step 1 Select the correct nozzle size per paint companies recommendation
Step 2 Thin paint material to paint companies recommended viscosity
Step 4 Air Micrometer and Fluid Control Knobs - Set air micrometer and fluid control knobs wide open
Step 6 Spray Test Pattern
Adjust fan control and air pressure if needed
Step 7 Step 3
Fan Control Knob - Set fan control knob wide open
Step 5 Incoming Air Pressure - Set incoming air pressure at maximum psi per spray gun manufacturers recommendation
Overlap - Spray panel with a 75 overlap
Gun Distance - HVLP 5rdquo - 6rdquo from surface
RP 6rdquo - 7rdquo from surface
TABLE OF CONTENTS
The suggested procedure on this page is a summary of the manufacturerrsquos procedure For complete details
review the manufacturerrsquos instructions that accompany the products andor that can be found at their websites 11
Respirator Fit Testing
Info Tech Support wwwsassafetycom
QR Code
OSHA Link
QR Code
Fit Test Video
Step 2
Step 3
Step 5
Step 4
Check fit of respirator before conducting fit test
Asses comfort using the points described on the Fit Test Form
Don the Respirator - Have the person being tested don their respirator and then put fit test hood on the person being tested
Sensitivity Test - Check to make sure that the person being tested can detect the Bitrex solution by using the sensitivity solution 9401-03 with nebulizer 1 while not wearing the respirator under the fit test hood
Fit Test - Using the Bitrex solution 9401-04 with nebulizer 2 check to see if the person being tested can detect the Bitrex solution while wearing the respirator under the fit test hood
Follow instructions on Fit Test Form
Products Needed
Step 1 Go to OSHArsquos website to review medical evaluation questionnaire and medical evaluation requirements
See QR code in lower right hand corner
Respirator Fit Tests Should Be Conducted Annually
SAS 9401-01 - Fit Test Kit
SAS 8661-92 - Medium Disposable Respirator
3M 37079 - Medium 12 Mask
3M 37083 - Large 12 Mask
3M 07046 - OV Cartridges
3M 07184 - P100 filters
3M 07194 - Pre-filter
SAS 9401-03 - Sensitivity Solution Replacement Fit Test Products
SAS 9401-04 - Bitrex Solution Refill
SAS 9401-05 - Nebulizer with labels
TABLE OF CONTENTS
TABLE OF CONTENTS
13
Technical Support
wwwlordcom wwwautochemcom
wwwtorkusacom wwwlike90net
wwwcarboautocom
wwwsatausacom wwwsassafetycom wwwu-polcom
TABLE OF CONTENTS
14
MSDS QR Codes TABLE OF CONTENTS
U-Pol 2002
Like 90 10032 Like 90 10009 Like 90 10034
The suggested procedure on this page is a summary of the manufacturerrsquos procedure For complete details
review the manufacturerrsquos instructions that accompany the products andor that can be found at their websites 3
Products Needed Siikens M600 - Wax and Grease Remover Carbo 99359 - Trim Masking Tape
Tork 440278A - Wipers Norton 407 - 36rdquo White Masking Paper
3M 09678 - 13mm Foam Aperture Norton 404 - 18rdquo White Masking Paper
Carbo AM 99587 - 34rdquo Masking Tape AM
Carbo AM 99588 - 1-12rdquo Masking Tape AM
Norton 03345 - Blue Sheeting
Step 1 Clean area with water-based cleaner amp dry before masking
Step 2 Apply foam tape to door jambs and any other gaps that need protection
Step 3 Outline repair area with 1-12rdquo masking tape
Use Trim Masking Tape to lift and mask gaskets moldings etc
Use fine line to mask emblems and any other accessories
Step 5 Cover entire vehicle with overspray sheeting
Note - Make sure that the car is dry before applying sheeting
Cut sheeting around repair area
Tape sheeting down onto 1-12rdquo masking tape
Step 6 Blow off area and tack
Masking
Tech Support wwwcarboautocom
QR Code
Masking Video
Info
Step 4 Mask all adjacent areas with Paint Check masking paper
Refer to the Manufacturerrsquos MSDS for recommended safety equipment
SAFETY
Disposable Gloves
TABLE OF CONTENTS
The suggested procedure on this page is a summary of the manufacturerrsquos procedure For complete details
review the manufacturerrsquos instructions that accompany the products andor that can be found at their websites 4
Products Needed Carbo 99308 - Preppers 6rdquo Soft Density Backup pad Carbo 10891 - Color Prep Gray Scuff Pads
Tork 192479 - Specialist Wipes Carbo 99517 - 400 Grit 6rdquo DA Grip-On Sand Paper
Carbo 99439 - 400 grit soft roll Carbo 99514 - 600 Grit 6rdquo DA Grip-On Sand Paper
Carbo 10890 - Primer Prep Red Scuff Pads
Step 1 Body work comes to the prep department finished in 180 Grit DA sand scratches
Prep department never jumps more than 100 grit step
Step 2 Prepperrsquos sand with 332 offset and a soft pad
Sand around the filler areas ( stay off filler) with 220 grit to remove 180 grit scratches on metal and feathered paint
Step 3 Sand around the filler areas ( stay off filler) with 320 grit to
remove 220 grit scratches on metal and feathered paint
Step 4 Prime as per Siikens recommended procedures
Caution Do not Prime beyond 320 Grit Scratches
NEWmdashNon OEM Panels
Finish sand with 400 Grit 6rdquo DA soft Pad 332 Offset sander
(May use Red Thin Flex Scuff Pad as alternate)
Step 5 ON THE PRIMED AREAS
Block sandmdash starting with 320 grit follow with 400 grit
Step 6 Sand with 600 grit on a DA with a soft padmdashthe total area to be painted Surface must be fully sanded no shiny spots no orange peel
Step 9 Primed OEM and aftermarket Bumpers
Hand sand with 400 Grit Soft Roll or Gray scuff + Blend Prep
IMP Identify Primer amp follow Akzo recommended process
OEM Non-OEM Panels All
Step 8 NEWmdashOEM Panels
Finish sand with 400 Grit 6rdquo DA soft Pad 332 Offset
Sander
Step 10 Unprimed or Raw OEM and Aftermarket Bumpers
Hand sand with Grey Scuff + Plastic Fix
IMP Do Float Test amp follow Akzo recommended process
Info General Rule of sanding steps Do Not jump more that 100 grits between steps from
80 to 400
Preppers on a DA use soft pad + 332 finish sander
Hand sand with 100 grit finer than DA sand for similar scratch performance in finish or use soft backed paper
Sanding System (Prep) SAFETY
P100 or N95 Dust Masks
Disposable Gloves
Safety Glasses
TABLE OF CONTENTS
Refer to the Manufacturerrsquos MSDS for recommended safety equipment
The suggested procedure on this page is a summary of the manufacturerrsquos procedure For complete details
review the manufacturerrsquos instructions that accompany the products andor that can be found at their websites 5
Products Needed Carbo 99518 - 320 Grit 6rdquo DA Medalist discs Carbo 99442 - 800 Grit Soft Roll sand paper
Carbo 99515 - 600 Grit 6rdquo DA Medalist Discs Carbo 99308 - 6rdquo soft density pad
Carbo 99514 - 800 Grit 6rdquo DA Medalist discs
Carbo 99564 - 320 Grit Grip-On Sheet Roll
Carbo 99592 - 600 Grit Grip-On Sheet Roll
Sanding ldquoRepairedrdquo Plastic
This section deals with prep sanding Bumpers that were repaired in the shop
If Bumper is Floating Plastic
DA sand - finishing with 800 grit areas to be primed (following normal sanding process up to 800 grit finish)
Prime Plastic as per Siikens SOP for repaired Plastics
Step 2 Block sand primed areas with 600 Grit
Step 1
Step 2
If Bumper is sinking Plastic
Dry sand to 320 grit entire area to receive primer
Prime Plastic as per Siikens SOP for repaired plastics
Step 1
Repair Plastic often comes to the Prep department with fine ldquohairrdquo on the exposed plastic This is easily dealt with using slow DA speed and a small amount of water (All Carbo sand papers are water tolerant )
Block sand primed areas with 600 Grit
SAFETY
P100 or N95 Masks
Disposable Gloves
Safety Glasses
TABLE OF CONTENTS
The suggested procedure on this page is a summary of the manufacturerrsquos procedure For complete details
review the manufacturerrsquos instructions that accompany the products andor that can be found at their websites 6
Products Needed Siikens - Blend Prep Carbo 99308 - Soft DA Pad
Carbo 10891 - Color Prep Gray Scuff Pads Carbo 42089 - 6rdquo Interface Pad
Carbo 30893 - Clear Prep Gold Scuff Pads Carbo 99514 - 800 Grit 6rdquo sanding disc
Carbo 47283 - 1000 Grit 6rdquo Medalist Film Finishing Disc
Carbo 53381 - 3000 Grit 6rdquo Medalist Foam Finishing Disc
This system assumes damaged repair is completed as per standard sanding preparation system and deals specifically with the A B C D Blend ldquoPanelrdquo area as shown below
Step 1 Sand areas A and B (Blend Panel Area) with 800 Grit soft pad 332 offset sander Remove orange peel where color will be applied on the B portion of the panel 1000 Grit may be preferable when color involves a fine metallic or pearl
Step 3
If Blending of the clearcoat is inevitable (sail panels)
Step 1 Alternately you may wet sand with P800 to P1000 grit on the A + B areas making sure orange peel is removed when color will be going
Step 2
Completely sand areas C + D with 1000 Grit on a 6rdquo DA 332 offset finishing sander and soft + interface pad
Alternatelymdash Sand areas C + D with Gray Thin Flex Scuff Pad and Siikens Blend Prep and watermdashThis can be important on heavy orange peel original finishmdash if the goal is to keep this peel intact
Make a gradual taper (as shown)
Step 3 Or b) Prepare sail panel using Carbo 3000 Grit Foam Finishing Disc On a DA with 332 offset Do Not use an interface pad
Step 3 Either a) Prepare sail panels using some Siikens Blend Prep on a damp sponge until gloss is removed
Step 3 Or c) Prepare sail panel using Carbo Clear Blend Prep Gold scuff pad
Sanding System Blends SAFETY
P100 or N95 Masks
Disposable Gloves
Safety Glasses
TABLE OF CONTENTS
The suggested procedure on this page is a summary of the manufacturerrsquos procedure For complete details
review the manufacturerrsquos instructions that accompany the products andor that can be found at their websites 7
Products Needed Camfil Exhaust Filters Like 90 Particle Control - 10009
Camfil Pre-Filters Like 90 White Out - 10032
Camfil Ceiling Media Like 90 Clear View - 10034
Replace exhaust filters weekly or as needed
Replace Pre-filters semi annually
Replace ceiling media every 12 months or as required
Apply Particle Control Daily to booth floor to actively control all dust movement from cement floor
Apply White-Out amp Clear View every 8 months
In between new applications of White Out
Refresh booth walls with White Out as overspray accumulates
Remove and reapply Clear View as overspray accumulates on glass
Spray Booth Maintenance - General
Tech Support wwwlike90net
QR Code
Particle Control Tech Info
Info Tech Support wwwlike90net
QR Code
White Out Tech Info
Info
Refer to the Manufacturerrsquos MSDS for recommended safety equipment
SAFETY
Safety Glasses
Organic Vapors Respirator
Disposable Gloves
TABLE OF CONTENTS
The suggested procedure on this page is a summary of the manufacturerrsquos procedure For complete details
review the manufacturerrsquos instructions that accompany the products andor that can be found at their websites 8
SATA 3 Stage Filter Maintenance
1st Stage - Clean or replace every 6 months
Replacement Filter 22160
2nd Stage - Replace every 6 months
or
When 2nd pressure gauge shows a 5 psi drop from the
1st pressure gauge
Replacement Filter 81810
3rd Stage - Replace every 3 months
Replacement Filter 85373
Tech Support wwwsatausacom
QR Code
3 Stage Filter Video
Info
3 Stage Filter Part Numbers
1296 CFM Capacity Filter - 92320 (shown above)
72 CFM Capacity Filter - 141218
TABLE OF CONTENTS
The suggested procedure on this page is a summary of the manufacturerrsquos procedure For complete details
review the manufacturerrsquos instructions that accompany the products andor that can be found at their websites 9
Products Needed U-POL 2002 - Water-Based Cleaner SATA 9894 - Nozzle Cleaning Needles
SATA 6007 - Cleaning Brushes SATA 48173 - Gun Lube
SATA 9209 - Small Cleaning Brushes Tork 440278A - Wipers
Spray Gun Cleaning - Waterborne
Step 1 Flush material passage and gun body with water-based cleaner
Step 2 Clean with SATA cleaning brushes
Step 4 Rinse with water-based cleaner
Step 5 Dry air passages and exterior of gun with an air blower
Step 6 Connect air hose and pull trigger on gun to ensure that all cleaning solution is sprayed out of the gun
Step 3 Use SATA nozzle cleaning needle to clean out the air cap holes
Step 7 Use SATA gun lube on all threads and moving parts including the needle
Info Tech Support wwwsatausacom
QR Code
Gun Cleaning Video
Refer to the Manufacturerrsquos MSDS for recommended safety equipment
SAFETY
Safety Glasses
Organic Vapors Respirator
Disposable Gloves
TABLE OF CONTENTS
The suggested procedure on this page is a summary of the manufacturerrsquos procedure For complete details
review the manufacturerrsquos instructions that accompany the products andor that can be found at their websites 10
Spray Gun Set Up
Tech Support wwwsatausacom
QR Code
Spraying Video
Info
Step 1 Select the correct nozzle size per paint companies recommendation
Step 2 Thin paint material to paint companies recommended viscosity
Step 4 Air Micrometer and Fluid Control Knobs - Set air micrometer and fluid control knobs wide open
Step 6 Spray Test Pattern
Adjust fan control and air pressure if needed
Step 7 Step 3
Fan Control Knob - Set fan control knob wide open
Step 5 Incoming Air Pressure - Set incoming air pressure at maximum psi per spray gun manufacturers recommendation
Overlap - Spray panel with a 75 overlap
Gun Distance - HVLP 5rdquo - 6rdquo from surface
RP 6rdquo - 7rdquo from surface
TABLE OF CONTENTS
The suggested procedure on this page is a summary of the manufacturerrsquos procedure For complete details
review the manufacturerrsquos instructions that accompany the products andor that can be found at their websites 11
Respirator Fit Testing
Info Tech Support wwwsassafetycom
QR Code
OSHA Link
QR Code
Fit Test Video
Step 2
Step 3
Step 5
Step 4
Check fit of respirator before conducting fit test
Asses comfort using the points described on the Fit Test Form
Don the Respirator - Have the person being tested don their respirator and then put fit test hood on the person being tested
Sensitivity Test - Check to make sure that the person being tested can detect the Bitrex solution by using the sensitivity solution 9401-03 with nebulizer 1 while not wearing the respirator under the fit test hood
Fit Test - Using the Bitrex solution 9401-04 with nebulizer 2 check to see if the person being tested can detect the Bitrex solution while wearing the respirator under the fit test hood
Follow instructions on Fit Test Form
Products Needed
Step 1 Go to OSHArsquos website to review medical evaluation questionnaire and medical evaluation requirements
See QR code in lower right hand corner
Respirator Fit Tests Should Be Conducted Annually
SAS 9401-01 - Fit Test Kit
SAS 8661-92 - Medium Disposable Respirator
3M 37079 - Medium 12 Mask
3M 37083 - Large 12 Mask
3M 07046 - OV Cartridges
3M 07184 - P100 filters
3M 07194 - Pre-filter
SAS 9401-03 - Sensitivity Solution Replacement Fit Test Products
SAS 9401-04 - Bitrex Solution Refill
SAS 9401-05 - Nebulizer with labels
TABLE OF CONTENTS
TABLE OF CONTENTS
13
Technical Support
wwwlordcom wwwautochemcom
wwwtorkusacom wwwlike90net
wwwcarboautocom
wwwsatausacom wwwsassafetycom wwwu-polcom
TABLE OF CONTENTS
14
MSDS QR Codes TABLE OF CONTENTS
U-Pol 2002
Like 90 10032 Like 90 10009 Like 90 10034

The suggested procedure on this page is a summary of the manufacturerrsquos procedure For complete details
review the manufacturerrsquos instructions that accompany the products andor that can be found at their websites 11
Respirator Fit Testing
Info Tech Support wwwsassafetycom
QR Code
OSHA Link
QR Code
Fit Test Video
Step 2
Step 3
Step 5
Step 4
Check fit of respirator before conducting fit test
Asses comfort using the points described on the Fit Test Form
Don the Respirator - Have the person being tested don their respirator and then put fit test hood on the person being tested
Sensitivity Test - Check to make sure that the person being tested can detect the Bitrex solution by using the sensitivity solution 9401-03 with nebulizer 1 while not wearing the respirator under the fit test hood
Fit Test - Using the Bitrex solution 9401-04 with nebulizer 2 check to see if the person being tested can detect the Bitrex solution while wearing the respirator under the fit test hood
Follow instructions on Fit Test Form
Products Needed
Step 1 Go to OSHArsquos website to review medical evaluation questionnaire and medical evaluation requirements
See QR code in lower right hand corner
Respirator Fit Tests Should Be Conducted Annually
SAS 9401-01 - Fit Test Kit
SAS 8661-92 - Medium Disposable Respirator
3M 37079 - Medium 12 Mask
3M 37083 - Large 12 Mask
3M 07046 - OV Cartridges
3M 07184 - P100 filters
3M 07194 - Pre-filter
SAS 9401-03 - Sensitivity Solution Replacement Fit Test Products
SAS 9401-04 - Bitrex Solution Refill
SAS 9401-05 - Nebulizer with labels
TABLE OF CONTENTS
TABLE OF CONTENTS
13
Technical Support
wwwlordcom wwwautochemcom
wwwtorkusacom wwwlike90net
wwwcarboautocom
wwwsatausacom wwwsassafetycom wwwu-polcom
TABLE OF CONTENTS
14
MSDS QR Codes TABLE OF CONTENTS
U-Pol 2002
Like 90 10032 Like 90 10009 Like 90 10034

TABLE OF CONTENTS
13
Technical Support
wwwlordcom wwwautochemcom
wwwtorkusacom wwwlike90net
wwwcarboautocom
wwwsatausacom wwwsassafetycom wwwu-polcom
TABLE OF CONTENTS
14
MSDS QR Codes TABLE OF CONTENTS
U-Pol 2002
Like 90 10032 Like 90 10009 Like 90 10034

13
Technical Support
wwwlordcom wwwautochemcom
wwwtorkusacom wwwlike90net
wwwcarboautocom
wwwsatausacom wwwsassafetycom wwwu-polcom
TABLE OF CONTENTS
14
MSDS QR Codes TABLE OF CONTENTS
U-Pol 2002
Like 90 10032 Like 90 10009 Like 90 10034

14
MSDS QR Codes TABLE OF CONTENTS
U-Pol 2002
Like 90 10032 Like 90 10009 Like 90 10034