operating manual energy storage system ess_gen1... · y before testing electrical parts inside the...
TRANSCRIPT

ENG
LISH
*MFL70421101* http://www.lg.com/de/business/solar
OPERATING MANUAL
Energy Storage System
Please read this manual carefully before Installing your set and retain it for future reference.
MODEL D005KD1N111
09/08/2018
Copyright © 2018 LG Electronics Inc. All Rights Reserved.

Getting Started2
Getting Started
1
Safety Information
IMPORTANT : THIS PRODUCT SHOULD NOT BE USED FOR ANY PURPOSE OTHER THAN THE PURPOSE DESCRIBED IN THIS INSTALLATION MANUAL.
WARNING Indicates a potentially dangerous situation. Death or serious injury may result if appropriate precautions are not taken.
y There is high possibility of electric shock or serious burns due to the high voltages in power conditioning circuits.
y High voltages on AC and DC cables. Risk of death or serious injury due to electric shock.
y A potentially hazardous circumstance such as excessive heat or electrolyte mist may occur due to improper operating conditions, damage, misuse and/or abuse.
y This product have potential danger such as death or serious injury by fire, high voltages or explosion if appropriate precautions are not read or fully understood.
y Do not place flammable or potentially explosive objects near the product.
y Do not place any kind of objects on top of the product during operation.
y All work on the PV modules, power conditioning system, and battery system must be carried out by qualified personnel only.
y Electrical installations must be done in accordance with the local and national electrical safety standards.
y Wear rubber gloves and protective clothing (protective glasses and boots) when working on high voltage/high current systems such as PCS and battery systems.
y There is a risk of electric shock. Do not remove cover. There is no user serviceable parts inside. Refer servicing to qualified and accredited service technician.
y Electrical shock hazard. Do not touch uninsulated wires when the product cover is removed.
y In the event of fault, the system must not be restarted. Product maintenance of repairs must be performed by qualified personnel, or personnel from an authorized support center.
Getting Started

Getting Started 3G
etting Started
1
CAUTIONIndicates a situation where damage or injury could occur. If it is not avoided, minor injury and/or damage to property may result.
y This product is intended for residential use only and should not be used for commercial or industrial.
y Before testing electrical parts inside the system, it takes at least 10-minute standby period of time to complete discharging the system.
y The contents included in this box are power conditioning system and its accessories, and the entire weight amounts to over 25 kg. Serious injury may occur due to the heavy weight of the product. Therefore, special care must be taken in handling. Make sure to have at least two persons deliver and remove the package.
y Do not use the damaged, cracked or frayed electrical cables and connectors. Protect the electrical cables from physical or mechanical abuse, such as being twisted, kinked, pinched, closed in a door or walked upon. Periodically examine the electrical cables of your product, and if its appearance indicates damage or deterioration, discontinue use of this product, and have the cables replaced with an exact replacement part by a qualified personnel.
y Ensure that you connect the earth ground wire to prevent possible electric shock. Do not try to ground the product by connecting it to telephone wires, lightning rods or gas pipes.
y The product should not be exposed to water (dripping or splashing) and no objects filled with liquids, such as vases, should be placed on the product.
y To prevent fire or electric shock hazard, do not expose this production to rain or moisture.
y Do not block any ventilation openings. Ensure reliable operation of the product and protect it from over heating. The openings shall never be blocked by placing any object on this product.
y The temperature of metal enclosure may be high during operation.
y In order to avoid radio-interference, all accessories (like a energy meter) intended for connection to the product shall be suitable for use in residential, commercial and light-industry areas. Usually this requirement is fulfilled if the equipment complies with the class B limits of EN55022.
y The product must be disposed of according to local regulations.
y The electrical installation of this unit must only be performed by LGE service person or trained installer, qualified to install PCS.
y If the AC circuit breaker is turned off and the PCS is not operated for a long time, the battery may be overdischarged.
y Connect the DC+ and DC- cables to the correct DC+ and DC- terminals on the product.

Getting Started4
Getting Started
1
y Danger of damaging the PCS by overload. Only connect the proper wire to DC terminal block. Refer to the installation wiring diagram for details.
y Do not step on the product or the product package. The product may be damaged.
y Do not dispose of batteries in a fire. The batteries may explode.
y Do not open or damage batteries. Released electrolyte is harmful to the skin and eyes. It may be toxic.
y A battery can present a risk of electrical shock and high short-circuit current. The following precautions should be observed when working on batteries.
a) Remove watches, ring, or other metal objects.
b) Use tools with insulated handles.
c) Wear rubber bloves, boots and glasses
d) Do not lay tools or metal parts on top of battery.
y Do not leave the ESS in the Fault standby state for a long time because of the battery discharge may occur during the long standby state.
y If the battery fault occurs immediately after starting PCS it means Battery failure. Check the battery SOC also voltage and fault information, and turn off the power of the ESS until service action is taken.
y If the battery SOC is low the battery may charge from the grid for self-protection. (Emergency Charging) This function is to prevent shutdown of the ESS, deep discharge and failure of the Battery Extension Kit. An Emergency Charge is not an ESS fault.
NOTE Indicates a risk of possible damage to the product.
y Before making connections, please make sure the PV array open circuit voltage is within 800 V. Otherwise the product could be damaged.
y Never use any solvents, abrasives or corrosive materials to clean this product.
y Do not store on or place against any objects to the product. It may cause serious defects or malfunction.
y Before making a connection, make sure the PV switch on this product is switched off.
y This unit is designed to feed power to the public grid only. Do not connect this unit to an AC source or generator. Connecting the product to external devices could result in serious damage to your equipment.
y Serving of batteries should be performed or supervised by LG service person or trained installer.
y The battery does not discharged when the load is under the certain level.
Table of Contents 5
1
2
3
4
5
Getting Started
Safety Information . . . . . . . . . . . . . . . . . . . . . . 2
Product Features . . . . . . . . . . . . . . . . . . . . . . . . 6
Name of each part . . . . . . . . . . . . . . . . . . . . . . . 9
Front and Rear . . . . . . . . . . . . . . . . . . . . . . . . . 9
LED indications. . . . . . . . . . . . . . . . . . . . . . . .10
Bottom . . . . . . . . . . . . . . . . . . . . . . . . . . . . . . .11
Operating
Connecting to a mobile device . . . . . . . . . . .12
Installing 'LG EnerVu Plus' App . . . . . . . . .12
Connect via home Wi-Fi . . . . . . . . . . . . . . .13
Connect directly to ESS . . . . . . . . . . . . . . .14
About main screen . . . . . . . . . . . . . . . . . . . . .17
ESS Status menu . . . . . . . . . . . . . . . . . . . . . .18
ESS Setting menu . . . . . . . . . . . . . . . . . . . . . .22
Language . . . . . . . . . . . . . . . . . . . . . . . . . . . . .22
Battery . . . . . . . . . . . . . . . . . . . . . . . . . . . . . . .22
Quick install guide . . . . . . . . . . . . . . . . . . . . .23
Open source . . . . . . . . . . . . . . . . . . . . . . . . . .24
Application information . . . . . . . . . . . . . . .24
Installer Settings . . . . . . . . . . . . . . . . . . . . . .24
ESS information menu . . . . . . . . . . . . . . . . . .25
Energy Analysis . . . . . . . . . . . . . . . . . . . . . . .25
System Information . . . . . . . . . . . . . . . . . . .28
Using EnerVu
Using EnerVu system . . . . . . . . . . . . . . . . . . .29
Creating a new account . . . . . . . . . . . . . . .29
Checking EnerVu activation . . . . . . . . . . . .32
Overview of my EnerVu page . . . . . . . . . .34
Making a statistical graph . . . . . . . . . . . . .36
Checking system event . . . . . . . . . . . . . . . .40
Making a statistical report . . . . . . . . . . . . .40
Transferring your system to other owner .42
Appendix
Maintenance . . . . . . . . . . . . . . . . . . . . . . . . . . .43
Cleaning the product . . . . . . . . . . . . . . . . . .43
Inspecting regularly . . . . . . . . . . . . . . . . . . .43
Contact . . . . . . . . . . . . . . . . . . . . . . . . . . . . . .44
Disposing the product . . . . . . . . . . . . . . . . .44
Specifications . . . . . . . . . . . . . . . . . . . . . . . . . .46
Open Source Software Notice Information 48
Limited Warranty
LIMITED WARRANTY . . . . . . . . . . . . . . . . . . .49
Table of Contents
Getting Started6
Getting Started
1
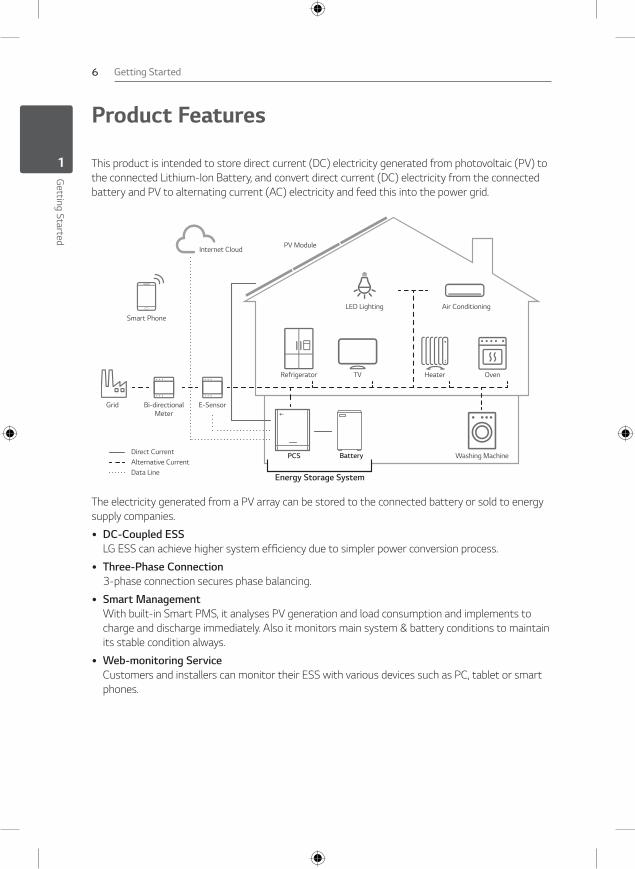
Product Features
This product is intended to store direct current (DC) electricity generated from photovoltaic (PV) to the connected Lithium-Ion Battery, and convert direct current (DC) electricity from the connected battery and PV to alternating current (AC) electricity and feed this into the power grid.
Data LineAlternative CurrentDirect Current
PV Module
Air Conditioning
Washing Machine
OvenTVRefrigerator Heater
Battery
LED Lighting
Grid E-SensorBi-directional Meter
Internet Cloud
PCS
Smart Phone
Energy Storage System
The electricity generated from a PV array can be stored to the connected battery or sold to energy supply companies.
y DC-Coupled ESS LG ESS can achieve higher system efficiency due to simpler power conversion process.
y Three-Phase Connection 3-phase connection secures phase balancing.
y Smart Management With built-in Smart PMS, it analyses PV generation and load consumption and implements to charge and discharge immediately. Also it monitors main system & battery conditions to maintain its stable condition always.
y Web-monitoring Service Customers and installers can monitor their ESS with various devices such as PC, tablet or smart phones.

Getting Started 7G
etting Started
1
Abbreviations on this manual
Abbreviation Designation Explanation
ESS Energy Storage System
Inverter system that stores energy into a battery and uses it.
PCS Power Conditioning System
A device intended to convert DC electricity generated from PV system to AC electricity and feed it to household appliances.
PV Photovoltaic Solar panel system that converts solar energy into direct current electricity
SOC State of charge Current state of a battery
BMS Battery Management System
Electronic system that manages a rechargeable battery.
DC Direct Current -
AC Alternating Current -
DHCP Dynamic Host Configuration Protocol
Standardized network protocol used on Internet Protocol (IP) networks for automatic distributing network configuration parameters, such as IP addresses for interfaces and services.
LAN Local Area Network Network that interconnects computers within a limited area.
IP Internet Protocol A set of rules for sending data across a network

Getting Started8
Getting Started
1
Glossary
Terms Explanation
Azimuth In the Northern hemisphere, the azimuth angle indicates by how much degrees the module surface deviates from a full south aspect. In the southern hemisphere, it indicates the deviation from a full north aspect. The azimuth angle is counted with positive values within the range from south (0°) to west (90°) and it counted with negative values within the range from south (0°) to east (-90°).
Tilt angle The tilt angle indicates by how much degrees the tilt of the module surface deviates from the horizontal.
PV module The PV module refers to a panel designed to absorb the sun’s rays as a source of energy for generating electricity.
PV array Technical device for the conversion of solar energy into electrical energy. All serial and parallel installed and connected to PV modules of a PV system are referred to as a PV array.

Getting Started 9G
etting Started
1
Name of each part
Front and Rear
A
B
C E
D
A PCS body
B LED Indications
C Lower Cover
D Bracket connected part
E Screw holes for wall mounting

Getting Started10
Getting Started
1
LED indications
LED Color Description
Power
Off Grid is not connected.
White Grid is connected.
White (Blink) PCS Fault
Solar
Off Energy is not being generated.
Green Energy is being generated.
White (Blink) PCS Fault
Battery
Off Stand by
Green Battery is in charging
Blue Battery is in discharging
Red (Blink) Battery error
White (Blink) PCS Fault
WLAN
Off Not connected
Green Network connected
Blue Wi-Fi network connected
Red (Blink) Network disconnected

Getting Started 11G
etting Started
1
Bottom
A Battery DC cable connector
B BMS control connector
C PV1(+ and -) connectors
D PV2 (+ and -) connectors
E PV switch (DC Disconnect)
F DRM port (Not supported)
G Ethernet port
H Meter connector
I Heat pump connector (Not supported)
J Wireless connection button
K Wi-Fi dongle port (USB type)
L Additional PE connection hole
M AC grid cable connector
ONOFF

Operating12
Operating
2
Connecting to a mobile device
To connect the system to a mobile device, the LG EnerVu Plus mobile application must be installed on your mobile device. Search and download ‘LG EnerVu Plus’ application from Apple App store or Google Play store.
To connect to the system directly, the Wi-Fi dongle must be connected to the system. Make sure that the supplied Wi-Fi dongle is connected to the system.
Installing 'LG EnerVu Plus' AppDownload ‘LG EnerVu Plus’ on the Apple App Store or Google Play Store.
OR
LG EnerVu Plus
NOTE
y Depending on the device, ‘LG EnerVu Plus’ app may not work.
y LG EnerVu Plus app will be available in version of the software as follow;
- Android O/S : Lollipop (5.0) or later - iOS O/S : iPhone 6 (9.0) or later
Operating
Operating 13O
perating
2
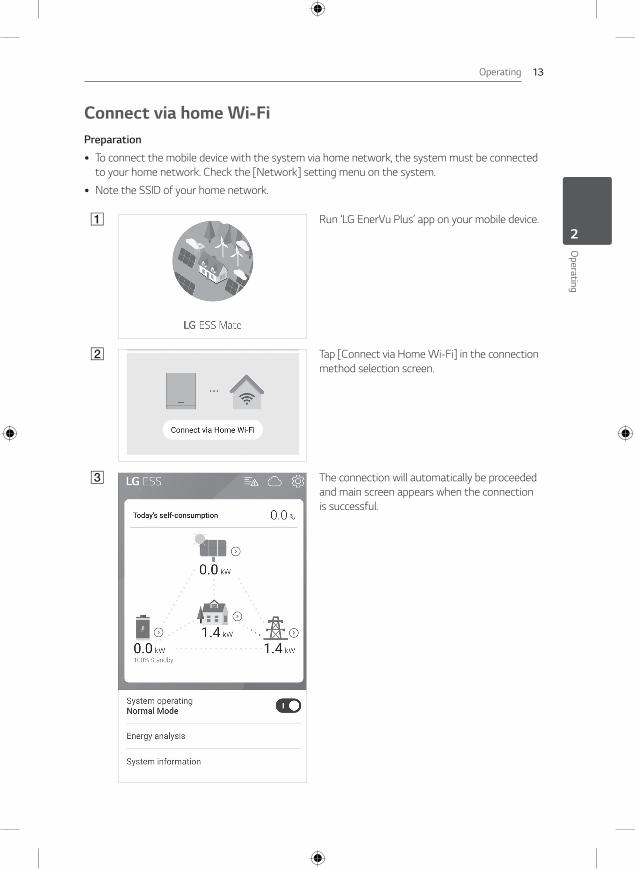
Connect via home Wi-FiPreparation
y To connect the mobile device with the system via home network, the system must be connected to your home network. Check the [Network] setting menu on the system.
y Note the SSID of your home network.
A Run ‘LG EnerVu Plus’ app on your mobile device.
B Tap [Connect via Home Wi-Fi] in the connection method selection screen.
C The connection will automatically be proceeded and main screen appears when the connection is successful.
Operating14
Operating
2
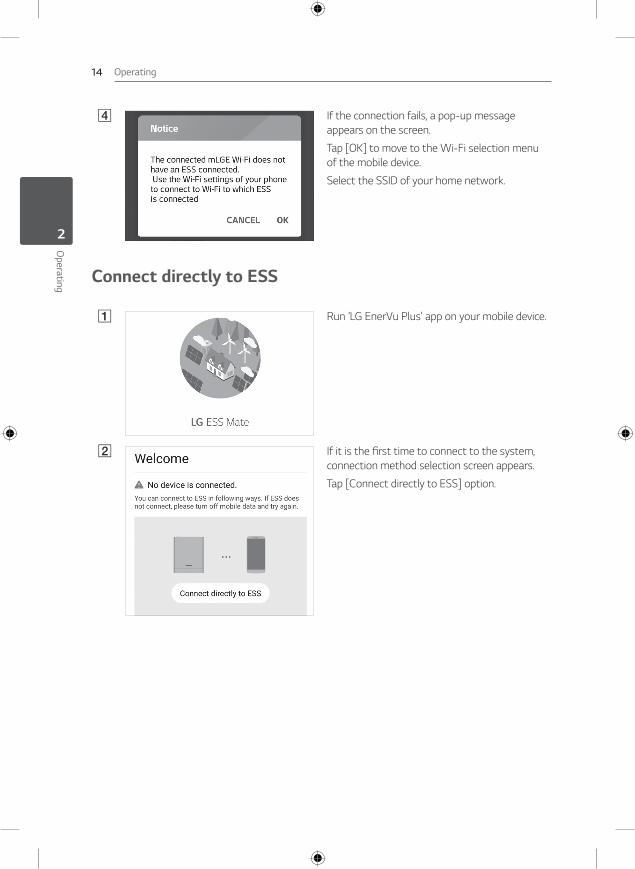
D If the connection fails, a pop-up message appears on the screen.
Tap [OK] to move to the Wi-Fi selection menu of the mobile device.
Select the SSID of your home network.
Connect directly to ESS
A Run ‘LG EnerVu Plus’ app on your mobile device.
B If it is the first time to connect to the system, connection method selection screen appears.
Tap [Connect directly to ESS] option.

Operating 15O
perating
2
C Press and hold the wireless connection button on the system until [WLAN] LED is lights in blue.
On your mobile device, tap [OK] to go to the next step.
NOTE
If the connection has not been made for 5 minutes, the [WLAN] LED lights green and the Wi-Fi signal is disabled.
D Read the guidance and tap [OK] to display Wi-Fi selection screen.
Select the SSID which starts with ‘LGE_ESS’. The password input screen appears.
NOTE
The last 2 characters of the SSID are the same as the last 2 characters of the system registration number.
Example : SSID (LGE_ESS-5E) Registration No. (LGE-ESS-DE1710BKRH00685E)

Operating16
Operating
2
E Input Wi-Fi password in the password field to connect to the system.
The Wi-Fi password is 8 digit numbers. Find the ‘WLAN password’ printed in the label outside of the PCS.
NOTE
If the connection failed, try after turning off the mobile data option on your mobile device.
Android : If the connection is successful, main screen appears as shown in the figure.
iOS : If the connection is successful, run [LG EnerVu Plus] app to display the main screen as shown in the figure.
Operating 17O
perating
2
About main screen
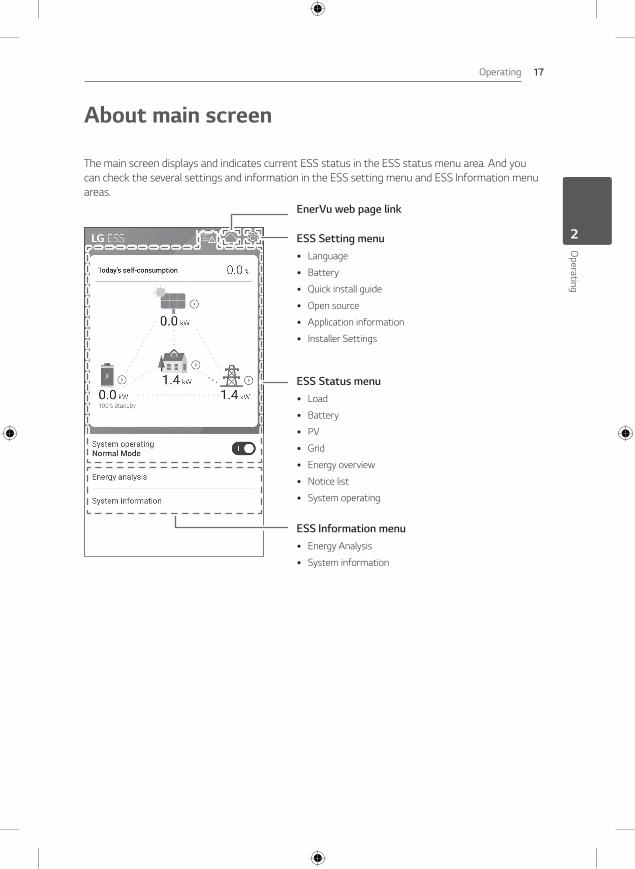
The main screen displays and indicates current ESS status in the ESS status menu area. And you can check the several settings and information in the ESS setting menu and ESS Information menu areas.
ESS Setting menu y Language
y Battery
y Quick install guide
y Open source
y Application information
y Installer Settings
EnerVu web page link
ESS Status menu y Load
y Battery
y PV
y Grid
y Energy overview
y Notice list
y System operating
ESS Information menu y Energy Analysis
y System information

Operating18
Operating
2
ESS Status menu
The main screen displays and indicates current ESS status briefly. When you select an area indicated above, it displays detailed information.
NOTE y The displayed values are not exact values. The values may differ from actual values.
y Please turn on the AP again, if there is a problem at connection with AP.
A Displays a notice list of system status. When there is an error occurred, error code, time and date are displayed on the list.
Refer to installation manual for more information of messages.

Operating 19O
perating
2
B Displays the [Energy Overview] information on the screen.
Today’s self-consumption rate : Displays rate of the consumed energy amount from ESS today.
This month’s CO2 reduction : Displays monthly amonut of CO2 reduction.
Generation: Displays generated energy information.
Feed-in : Displays consumed energy information.
PCS : Displays PCS information.
C Displays generating status of the connected PV briefly.
The status values are the sum of PV1 and PV2.
Brand : PV Manufacturer (Default : LGE)
System Capacity : PV capability
DC Voltage : Current PV voltage
DC Power : Current PV power
DC Current : Current PV electric current
Today’s generation: Generated PV energy today.
Operating20
Operating
2
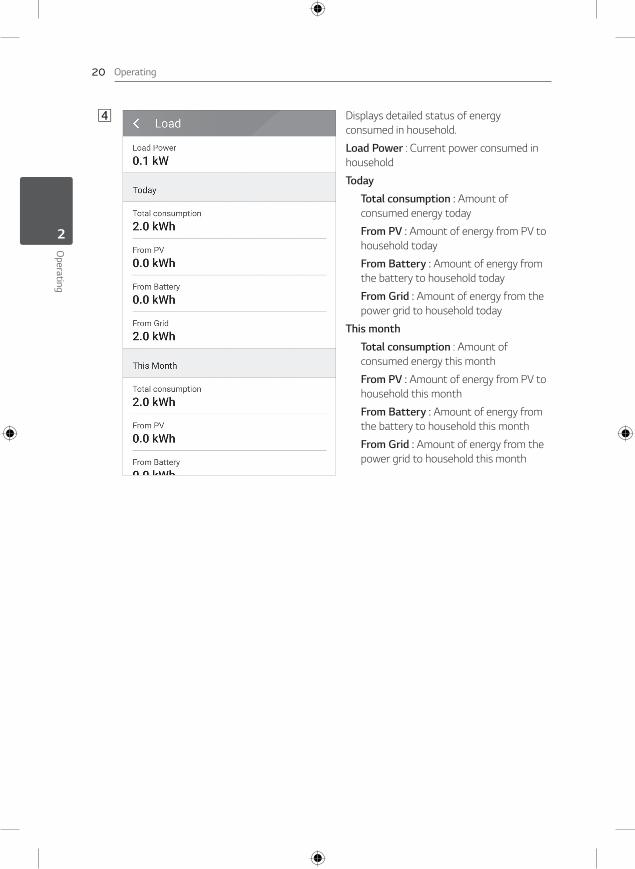
D Displays detailed status of energy consumed in household.
Load Power : Current power consumed in household
Today
Total consumption : Amount of consumed energy today
From PV : Amount of energy from PV to household today
From Battery : Amount of energy from the battery to household today
From Grid : Amount of energy from the power grid to household today
This month
Total consumption : Amount of consumed energy this month
From PV : Amount of energy from PV to household this month
From Battery : Amount of energy from the battery to household this month
From Grid : Amount of energy from the power grid to household this month

Operating 21O
perating
2
E Displays charging and discharging status of the battery briefly.
Battery Status : Charging/Discharging/Standby
Battery SOC: Current SOC (state of charge) level
Winter Mode : Shows winter mode status.
DC Power : Current output power from battery
Today
Charging : Amount of charged energy to the battery today.
Discharging : Amount of discharged energy from the battery today
This month
Charging : Amount of charged energy to the battery in this month
Discharging : Amount of discharged energy from the battery in this month
F Displays current status of power grid.
Power: Current grid power
Voltage: Current grid voltage
Frequency : Current grid frequency
Today
Into Grid : Amount of sold energy today
From Grid : Amount of purchased energy today
This month
Into Grid : Amount of sold energy today and this month
From Grid : Amount of purchased energy this month
G [System Operating]
Tap switch to start or stop system operation.

Operating22
Operating
2
ESS Setting menu
You can adjust general settings of the system. Select [main screen] > [ ] to display the [Setting] screen.
LanguageSelect [ ] > [Language] to display the language selection screen.
Select the desired language between [Deutsch] and [English].
BatterySelect [ ] > [Battery] to display the battery setting screen.
[Winter mode]
Tap this switch to select [Enable] or [Disable].
The minimum SOC level of winter mode can be changed by the installer only.
[Winter Mode Period]
Tap current value to display the setting menu. You can change the period
1. Select the currently selected value. Period setting menu is displayed.
2. Adjust [Month] and [Day] using S or W.
3. Select [APPLY] to complete the setting.
Operating 23O
perating
2
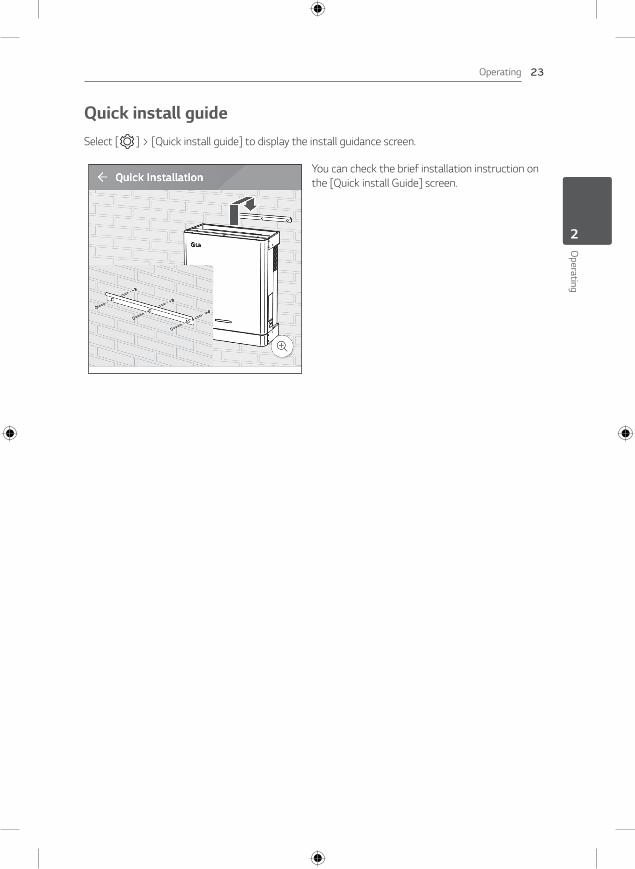
Quick install guideSelect [ ] > [Quick install guide] to display the install guidance screen.
You can check the brief installation instruction on the [Quick install Guide] screen.

Operating24
Operating
2
Open sourceYou can check the open source information of the application and the system.
Select [ ] > [Open source] to display the open source notice screen.
To obtain the source code under GPL, LGPL, MPL, and other open source licenses, that is contained in this product, please visit http://opensource.lge.com.
In addition to the source code, all referred license terms,
warranty disclaimers and copyright notices are available for download. LG Electronics will also provide open source code to you on CD-ROM for a charge covering the cost of performing such distribution (such as the cost of media, shipping, and handling) upon email request to [email protected]. This offer is valid for three(3) years from the date on which you purchased the product.
Application informationSelect [ ] > [Application information] to display the application information screen.
You can check the information of this application such as application name, application package name and application version.
Installer SettingsThe system needs various system settingsby installer when installing. Users are not allowed to enter [Installer Settings] menu. Try not to enter the menu. It may cause serious malfuction on the system, if user changes settings on the[Installer Settings] menu.

Operating 25O
perating
2
ESS information menu
Energy AnalysisOn [Energy Analysis], you can check the statistical information of this system. You can review the amount of energy generated, consumed, sold and purchased on this system. The statistical data of the day, week, month and year are supported.
PV Graph
Analyzes the energy generated and sold from PV within selected period and displays as a graph.
Select [PV Graph] on [Energy Analysis].
Generated energy is marked with green and sold energy is marked with purple on the line graph.
You can change the period by tapping [Day], [Week], [Month] and [Year].
A : Goes to previous [Day], [Week], [Month] or [Year].
D : Goes to next [Day], [Week], [Month] or [Year].

Operating26
Operating
2
Battery Graph
Analyzes the energy charged and discharged on the battery within selected period and displays as a graph.
Select [Batt Graph] on [Energy Analysis].
Charged energy is marked with green, discharged energy is marked with purple, and current status of the battery is marked with yellow on the line graph.
You can change the period by tapping [Day], [Week], [Month] and [Year].
A : Goes to previous [Day], [Week], [Month] or [Year].
D : Goes to next [Day], [Week], [Month] or [Year].

Operating 27O
perating
2
Load Graph
Analyzes the energy consumed and purchased from grid within selected period and displays as a graph.
Select [Load Graph] on [Energy Analysis].
Consumed energy is marked with green, and purchased energy is marked with purple.
You can change the period by tapping [Day], [Week], [Month] and [Year].
A : Goes to previous [Day], [Week], [Month] or [Year].
D : Goes to next [Day], [Week], [Month] or [Year].

Operating28
Operating
2
System Information
Displays system information of this ESS. You can check information on PCS, battery and network status. Scroll up or down to display next or previous information.
Using EnerVu 29U
sing EnerVu
3
Using EnerVu system
When this product is connected to the internet, you can check variety of information such as system status, information, report using LG EnerVu web monitoring system.
NOTE
End users do not have to register in the EnerVu service. However, if the end user does not use this service, it is not possible to enable maintenance via remote service (such as firmware update) over the Internet.
Preparation
y An internet browser installed computer, tablet or mobile with internet access are needed to access LG ESS web monitoring system.
y This product must be connected to internet. Check [Network] setting menu on the system.
Creating a new account
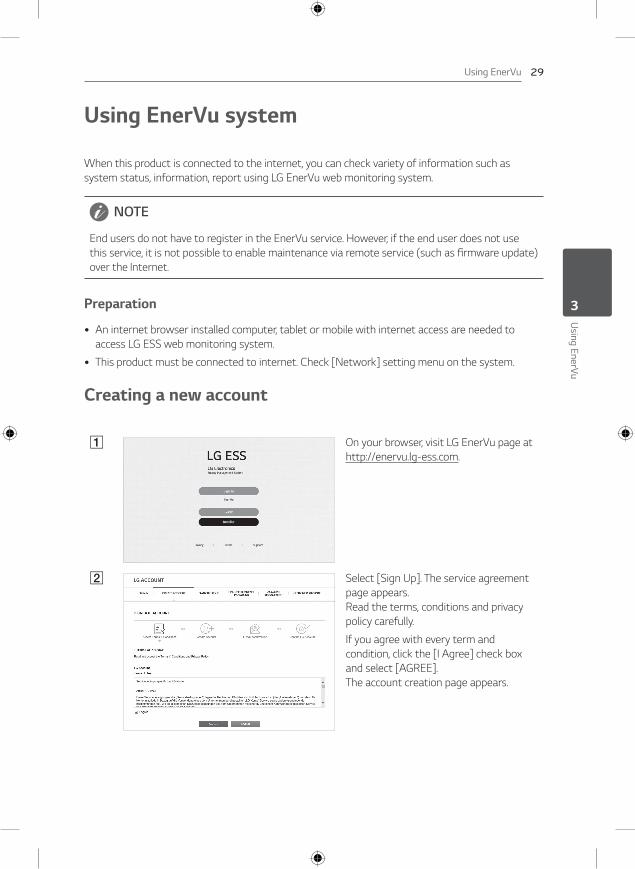
A On your browser, visit LG EnerVu page at http://enervu.lg-ess.com.
B Select [Sign Up]. The service agreement page appears. Read the terms, conditions and privacy policy carefully.
If you agree with every term and condition, click the [I Agree] check box and select [AGREE]. The account creation page appears.
Using EnerVu

Using EnerVu30
Using EnerVu
3
C Fill your mail address in [User ID] field and select [CHECK AVAILABILITY]. Fill in [Password], [Password confirm] and [Birthday] fields and select [CONFIRM]. The e-mail confirmation page appears.
D A confirmation e-mail will be sent to your e-mail address. On your e-mail, select [CONFIRM] to complete the e-mail confirmation.

Using EnerVu 31U
sing EnerVu
3
E On the account creation page, select [CONFIRM] to complete creating your account.
F Select [SIGN IN] to go to the [SIGN IN WITH LG ACCOUNT] page.
Input your [User ID] and [Password] and select [SIGN IN].
G Available LG account services are displayed on the screen.

Using EnerVu32
Using EnerVu
3
Checking EnerVu activation
A On your browser, visit LG EnerVu page at http://enervu.lg-ess.com.
OROn your mobile app, select [ ] to open the LG EnerVu page with a mobile browser.
B Input your [User ID] and [Password] and select [SIGN IN].
C You can see the screen on the left when the registration and activation are completed.
You can see the screen on the left when the registration is in incomplete status.
Input the registration number printed in the label attached outside of the PCS and select [Check] to complete the registration and activation.
Using EnerVu 33U
sing EnerVu
3
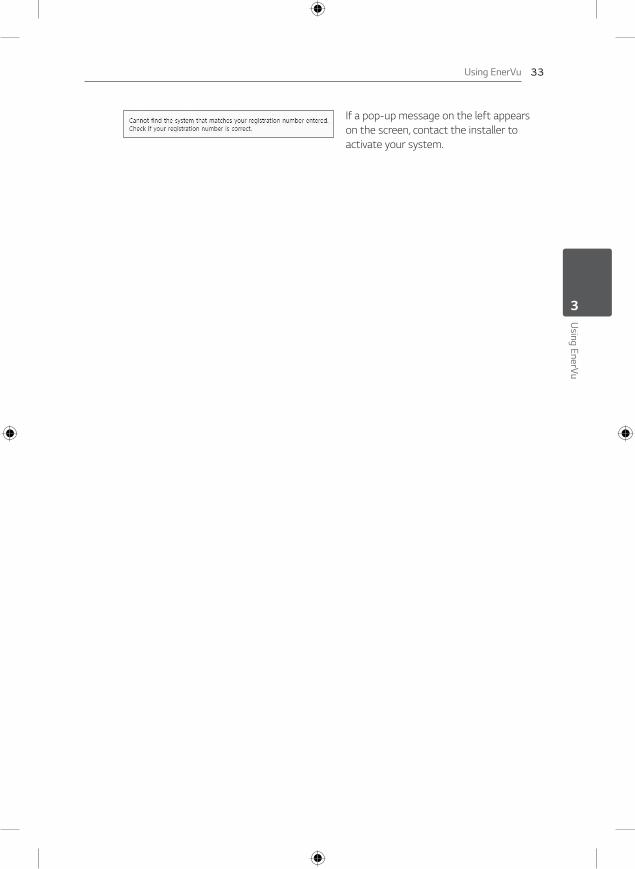
If a pop-up message on the left appears on the screen, contact the installer to activate your system.
Using EnerVu34
Using EnerVu
3
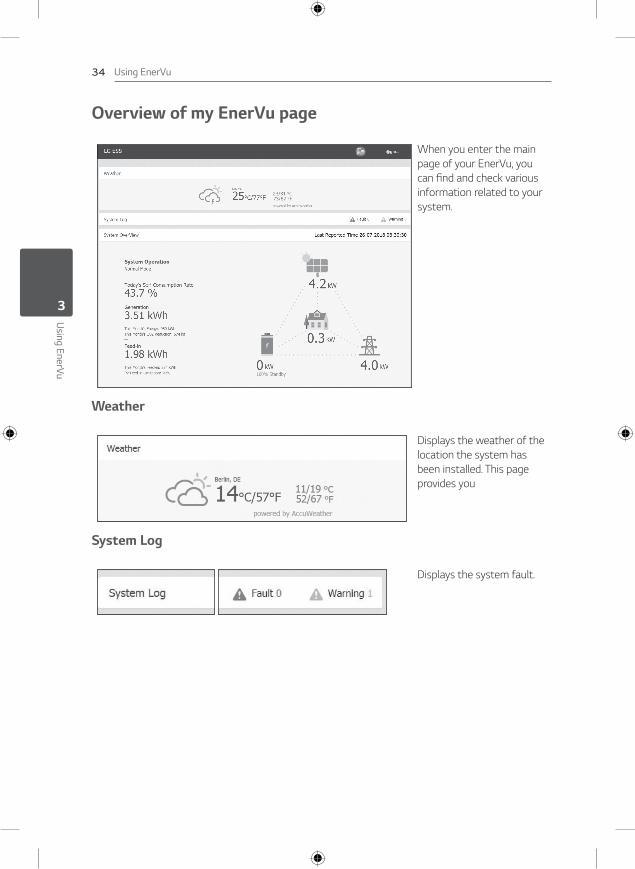
Overview of my EnerVu page
When you enter the main page of your EnerVu, you can find and check various information related to your system.
Weather
Displays the weather of the location the system has been installed. This page provides you
System Log
Displays the system fault.

Using EnerVu 35U
sing EnerVu
3
System Overview
Displays the status of the system. This page provides you with system information such as current power generated from PV, power purchased from grid, power charged/discharged from the battery. ALL the information is renewed every 10 seconds..
Analysis
On this page, you can make a statistical graph of the energy analysis. You can review the amount of energy generated, consumed, sold and purchased on the system. The variety of statistical charts are supported on the page.
On the [Event] tab, you can check the issues occurred on the system.
System Info
Displays information on your system.
Report
You can make a monthly or an yearly report of statistical data for energy management on your system.

Using EnerVu36
Using EnerVu
3
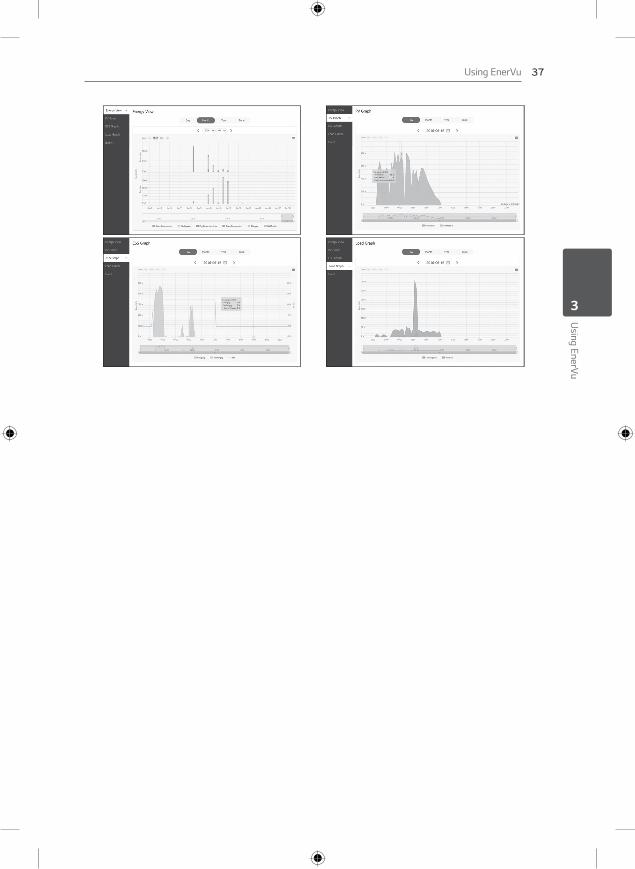
Making a statistical graphYou can make a daily, monthly or an yearly graph of statistical data for energy management on your system.
Select the [Day], [Month], [Year] or [Total] option to make a graph of statistical data.
1. Select a tab on the left side of the screen.
Energy View Makes an overall graph of statistical data.
PV Graph Makes a graph of statistical data on PV. (Generation and Grid feed-in)
ESS Graph Makes a graph of statistical data on ESS (Charging, Discharging and SOC)
Load Graph Makes a graph of statistical data on household load. (Consumption and Purchase)
2. Select a duration option among [Day], [Month], [Year] or [Total].
3. Select a date, month or year to make a statistical graph. After the selection, the graph will be displayed in a short time.
Using EnerVu 37U
sing EnerVu
3

Using EnerVu38
Using EnerVu
3
4. There are several options at the bottom of a graph, click each option to show or hide the statistical information on the graph.
Available options differ depending on the graph. Refer to table described below for more information of graph options.
Tab Graph Options Description
Energy View
CONSUMPTION
Direct Consumption Amount of directly used energy from PV.
Discharging Amount of energy that used from the battery.
Purchased electricity
Purchased energy through the power grid.
GENERATION
Direct Consumption Amount of directly used energy from PV
Charging Amount of energy that charged to the battery.
Grid feed-in Amount of sold energy to the power grid.

Using EnerVu 39U
sing EnerVu
3
PV Graph
Energy
Generation Amount of generated energy from PV.
Grid feed-in Amount of sold energy to the power grid.
ESS Graph
Energy
Charging Amount of energy that charged to the battery.
Discharging Amount of used energy from the battery.
SOC State of charge
Load Graph
Energy
Consumption Amount of used energy from ESS.
Purchase Amount of purchased energy from the power grid.
5. Select [ ] to print a graph or download as an image file.
Using EnerVu40
Using EnerVu
3
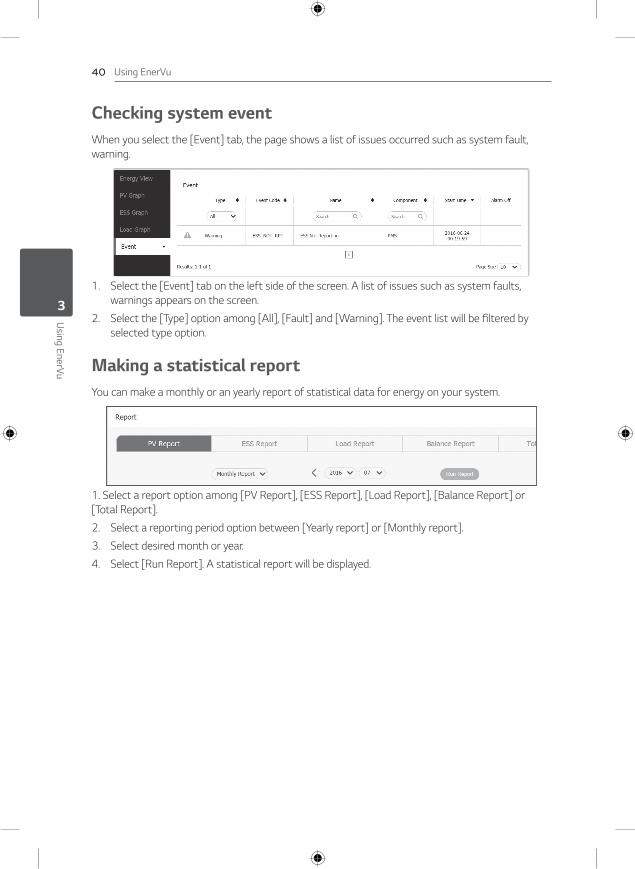
Checking system eventWhen you select the [Event] tab, the page shows a list of issues occurred such as system fault, warning.
1. Select the [Event] tab on the left side of the screen. A list of issues such as system faults, warnings appears on the screen.
2. Select the [Type] option among [All], [Fault] and [Warning]. The event list will be filtered by selected type option.
Making a statistical reportYou can make a monthly or an yearly report of statistical data for energy on your system.
1. Select a report option among [PV Report], [ESS Report], [Load Report], [Balance Report] or [Total Report].
2. Select a reporting period option between [Yearly report] or [Monthly report].
3. Select desired month or year.
4. Select [Run Report]. A statistical report will be displayed.

Using EnerVu 41U
sing EnerVu
3
Select to download the statistical data as Excel.
Select to print the statistical data.

Using EnerVu42
Using EnerVu
3
Transferring your system to other ownerYou can transfer your system to other owner. Once your system is transferred, the system can not be monitored with your account.
Preparation
y Note the email address of recipient.
y The email address of recipient must be registered as a LG member. If the recipient is still not a LG member, an automatic email requesting to become a member will be sent to the recipient.
A On your browser, visit LG EnerVu page at http://enervu.lg-ess.com.
Select [Sign In]. The [SIGN IN WITH LG ACCOUNT] page appears.
Enter your [User ID] and [Password] then select [SIGN IN] to enter the EnerVu web monitoring system.
B Select your [User ID] on top of the screen. A menu appears on the screen.
Select [System transfer]. The system transfer page appears on the screen.
C Enter the email address of the recipient in the [ID] field and select [Check].
If the recipient is not a LG member, a pop-up message appears for sending mail to make a LG account.
D Enter the recipient information in the [First Name] and [Last Name] fields and select [Done] to complete the system transferring.
The system will automatically log off.
Appendix 43A
ppendix
4
Maintenance
Cleaning the productWipe off the outside of the product with a soft towel with lukewarm water and wipe it with a clean hand towel so that dirt will not occur when using a neutral detergent. When cleaning the outside of the product, do not brush it with a rough brush, toothpaste, or flammable materials. Do not use cleaning agents containing flammable substances.
- It may cause discoloration of the product or damage to the product.
- Flammable substances : Alcohol (Ethanol, Methanol, Isopropyl alcohol, Isobutyl alcohol, etc.), Thinner, Benzene, Flammable liquid, Abrasive etc.)
Wiping with strong pressure may damage the surface. Do not leave rubber or plastic products in contact with the product for a long period of time.
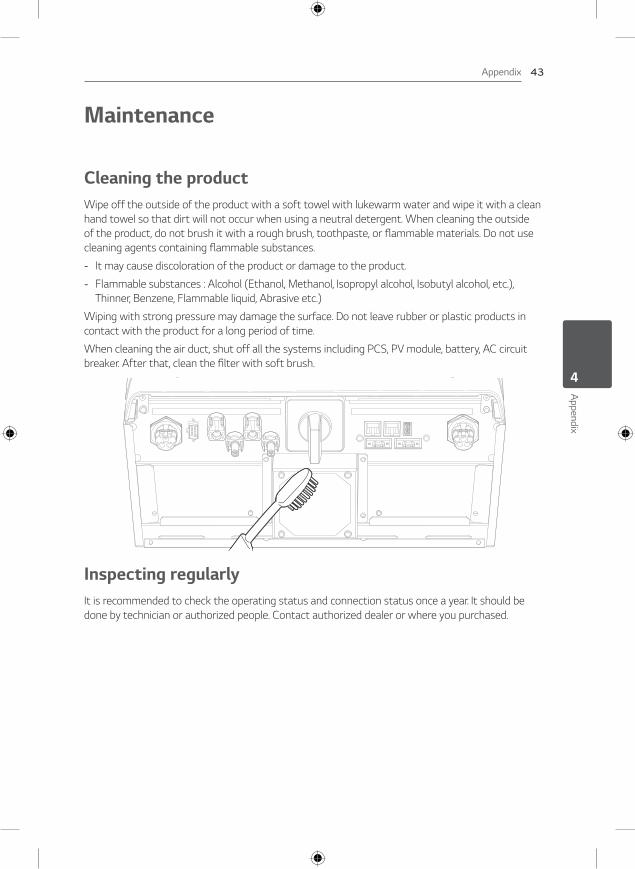
When cleaning the air duct, shut off all the systems including PCS, PV module, battery, AC circuit breaker. After that, clean the filter with soft brush.
Inspecting regularlyIt is recommended to check the operating status and connection status once a year. It should be done by technician or authorized people. Contact authorized dealer or where you purchased.
Appendix

Appendix44
Appendix
4
Contact If you have technical problems or questions, contact installation company or LGE.
1. Installation Company
Address :
Tel :
2. LGE
LG Electronics ESS | Solar Service
E-Service Haberkorn GmbH
Augustenhöhe 7
06493 Harzgerode
Tel : DE: 0049 (0)39484 / 976 380
AT: 0043 (0)720 / 11 66 01
CH: 0041 (0)44 / 505 11 42
E-Mail : [email protected]
LG Electronics Deutschland GmbH
Alfred-Herrhausen-Allee 3-5
65760 Eschborn
Tel. : + 0049 18 06 807 020
E-Mail: [email protected]
Disposing the productWhen the product reached to the end of its service life or defect beyond repair, dispose the product according to the disposal regulations for electronic waste in your area. Disposing the product must be carried out by qualified personnel only. Contact authorized dealer or where you purchased.
1. This crossed-out wheeled bin symbol indicates that waste electrical and electronic products (WEEE) should be disposed of separately from the municipal waste stream.
2. Old electrical products can contain hazardous substances so correct disposal of your old appliance will help prevent potential negative consequences for the environment and human health.
Your old appliance may contain reusable parts that could be used to repair other products, and other valuable materials that can be recycled to conserve limited resources.
3. You can take your appliance either to the shop where you purchased the product, or contact your local government waste office for details of your nearest authorised WEEE collection point. For the most up to date information for your country please see www.lg.com/global/recycling
Appendix 45A
ppendix
4
Removal of waste batteries and accumulators
(Product with embedded battery ONLY)
In case this product contains a battery incorporated within the product which cannot be readily removed by end-users, LG recommends that only qualified professionals remove the battery, either for replacement or for recycling at the end of this product’s working life. To prevent damage to the product, and for their own safety, users should not attempt to remove the battery and should contact LG Service Helpline, or other independent service providers for advice.
Removal of the battery will involve dismantling of the product case, disconnection of the electrical cables/contacts, and careful extraction of the battery cell using specialized tools. If you need the instructions for qualified professionals on how to remove the battery safely, please visit http://www.lge.com/global/sustainability/environment/take-back-recycling
Disposal of waste batteries/accumulators
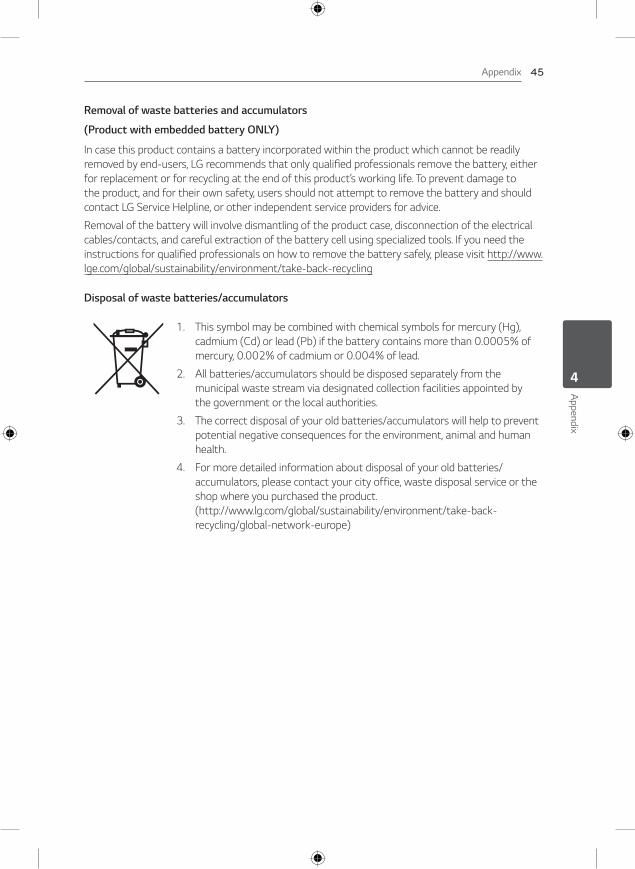
1. This symbol may be combined with chemical symbols for mercury (Hg), cadmium (Cd) or lead (Pb) if the battery contains more than 0.0005% of mercury, 0.002% of cadmium or 0.004% of lead.
2. All batteries/accumulators should be disposed separately from the municipal waste stream via designated collection facilities appointed by the government or the local authorities.
3. The correct disposal of your old batteries/accumulators will help to prevent potential negative consequences for the environment, animal and human health.
4. For more detailed information about disposal of your old batteries/ accumulators, please contact your city office, waste disposal service or the shop where you purchased the product. (http://www.lg.com/global/sustainability/environment/take-back-recycling/global-network-europe)

Appendix46
Appendix
4
Specifications
DC Input
Max. input voltage 800 V
Min. input voltage 210 V
Max. DC power 6,6 kW (3,3 kW per MPPT)
Input voltage range MPPT at rated AC output power
210-680 V
Number of MPPT 2
Number of string per MPPT 1
Max. input current per MPPT 12 A
Backfeed current 0 A
Short circuit current (Isc) per MPPT 13 A
AC Output
Rated grid voltage 3-NPE 400 V / 230 V
AC voltage range 319 — 458 V / 184 — 264.5 V
Frequency (Frequency Range) 50 Hz (47.5 Hz — 51.5 Hz)
Max.Output Power 5.6 kVA
Rated Output Power 5kW
Current Inrush 70 Aac-peak / 0.05 ms
Max. fault current 80 Aac-peak / 20 ms
Max. output overcurrent protection 11 A
Max. output current 8 A
Total harmonic distortion / Power Factor with Rated Power < 5% / ±0.9
Phases 3

Appendix 47A
ppendix
4
Battery
Battery Type Lithium Polymer
Max Charge(Discharge) Power 3.0 kW
Capacity (Expandable) 6.4 kWh (Max. 12.8 kWh)
DoD 90 %
Current Capacity 31.5 Ah
Rated Input Voltage 207.2 V
Efficiency (PCS)
Max. Efficiency (PV to Grid) 97.7 %
European Efficiency (PV to Grid) 96 %
General Data
Dimensions (W/H/D, mm)408 / 490 / 185 (PCS)
408 / 682 / 180 (Battery)
Weight (PCS / Battery) 25 kg / 58 kg
Operating temperature 0 °C to 40 °C

Appendix48
Appendix
4
Feature & function
Noise emission (Typical) < 40 dB
Cooling Forced convection
Topology Transformerless
Degree of protection IP21
Max. permissible value of relative humidity (non-condensing)
85 % (Climate class 3K5)
Warranty (PCS) 10 years
Warranty (Battery) 10 years (SOH 80 %)
Certification (PCS)CE / IEC62109-1/-2, VDE-AR-N-4105 / VDE 0126-1-1 / TOR D4 2016 / OVE / ONORM E 8001-4-712 / IEC61000 series
Certification (Battery) CE / IEC62133 / IEC62619 / UN38.3
Energy Meter Compatibility
Manufacturer Model
ABB
B23 112-100
B23 212-100
B23 312-100
y The noise emission value is measured in a soundproof room and can vary depending on the environment.
y If you are installing in a place sensitive to noise, please consult the installer.
y Design and specifications are subject to change without notice.
Open Source Software Notice Information
To obtain the source code under GPL, LGPL, MPL, and other open source licenses, that is contained in this product, please visit http://opensource.lge.com. In addition to the source code, all referred license terms, warranty disclaimers and copyright notices are available for download. LG Electronics will also provide open source code to you on CD-ROM for a charge covering the cost of performing such distribution (such as the cost of media, shipping, and handling) upon email request to [email protected]. This offer is valid for three (3) years from the date on which you purchased the product.

Limited Warranty 49Lim
ited Warranty
5
LIMITED WARRANTY
This is the LIMITED WARRANTY policy (hereinafter “ LIMITED WARRANTY”) of the LG Electronics, Inc. (‘LGE’)from which you (‘Purchaser’) purchase LG ESS System product. This LIMITED WARRANTY is applicable only to LG ENERGY STORAGE SYSTEM (PCS + Battery) product (hereinafter ‘PRODUCT(S)’) purchased.
Your Product will be repaired or replaced, at LGE’s option, if it proves to be defective in material or workmanship under normal use, during the warranty period listed below, effective from the date of original invoice/ purchase of the Product.
1. Warranty Period
Item Product Type Warranty
ESS
PCS*1 10 years
Battery*2 10 years
Extention Kit 10 years
*1 : PCS (Power Conditioning System)
*2 : Battery Performance Guarantee : Retention CapacityThe warranty start date (“Warranty Start Date”) shall be the date of purchase by the original end use purchaser. If the Customer is unable to provide adequate documentation of the original purchase, the Warranty Start Date shall be 3 months after the product was manufactured.
2. Summary of the Warranty Terms and Conditions
(a) This LIMITED WARRANTY is valid only for PRODUCT(S) sold.
(b) This LIMITED WARRANTY is valid only for PRODUCT(S) purchased directly from LGE or a LGE authorized distributor and Dealer.
(c) Proof of purchase for PRODUCT(S) shall be available for inspection by LGE.
(d) PRODUCT(S) shall be properly installed and operated in accordance with the manufacturer’s instructions.
(e) The records of operating history shall be kept and available for inspection by LGE.
(f) Labor costs for (re)-installation of PRODUCT(S) are not covered under this LIMITED WARRANTY.
(g) Transportation cost to LGE or LGE’s authorized agent or distributor are not covered under this LIMITED WARRANTY.
Limited Warranty

Limited Warranty50
Limited W
arranty
5
3. How this Limited Warranty Applies
Repair or replacement will be made with new or re-manufactured PRODUCT(S) or parts and the replaced PRODUCT(S) or parts shall become the property of LGE.
If LGE determines to replace the PRODUCT(S) and it has been discontinued or is not available, LGE reserves the right, at its sole option, to deliver new or remanufactured PRODUCT(S) that may differ in size, color, shape, model number, and/or power level.
This LIMITED WARRANTY covers the transportation cost for reshipment of any repaired or replaced PRODUCT(S) to the Customer site, but does NOT cover the transportation cost and risk including shipping damage or loss for return of the PRODUCT(S) to LGE or LGE’s authorized agent or distributor(installer) and any other costs associated with installation, removal, or re-installation of the PRODUCT(S).
If a PRODUCT(S) returned to LGE is found not to be defective or this LIMITED WARRANTY has expired, the Customer is responsible to pay for return shipping cost.
The remedies set forth in this LIMITED WARRANTY operate alongside and in addition to all rights and remedies conveyed by German consumer protection laws and regulations and the original warranty period in this LIMITED WARRANTY shall not extend beyond the period set forth therein.
4. Limited Warranty Exclusions
This Limited Warranty does NOT apply to :
(a) PRODUCT(S) with original serial numbers that have been removed, altered, or cannot be readily determined.
Damage and/or failure caused by
(a) installations not in conformance with the PRODUCT(S) specifications, Installation manuals, operation manuals, or labels attached to the PRODUCT(S);
(b) improper wiring, installation, incorrect electrical current, voltage, components or handling;
(c) improper or incorrectly performed maintenance, operation or modification;
(d) repairs not in accordance with LG’s instructions;
(e) inappropriate handling during storage, packaging or transportation;
(f) environmental pollution such as soot, salt damage, or acid rain;
(g) natural forces (earthquakes, tornados, floods, lightning, hurricanes, heavy snow, etc.) and fire, power failures, power surges or other unforeseen circumstances that are beyond LGE’s control;
(h) external stains or scratches that do not affect output or operating;
(i) PRODUCT(S) installed in a location that exceeds operating conditions.
(j) transportation and/or handling, including scratches, dents, chips, and/or other damage to the finish of your Product, unless such damage results from defects in materials or workmanship, and is reported within one (1) week of delivery.

Limited Warranty 51Lim
ited Warranty
5
5. Limitation of Warranty Scope
(a) LGE shall be liable for damages and reimbursement of monies expended in vain within the meaning of section 284 BGB (‘damages’) based on the infringement of contractual or non-contractual obligations only (i) for intent or gross negligence, (ii) for negligent or intentional death, bodily injury or health impact, (iii) for assuming a guarantee as to quality or useful life, (iv) for negligent or intentional breach of significant contractual obligations, (v) based on mandatory liability under the German Product Liability Act, or (vi) based on other mandatory liability.
(b) Damages for the breach of significant contractual obligations is limited to typical, foreseeable damage, except in cases of intent or gross negligence or in cases of liability for death, bodily injury or health impact, mandatory liability in terms of the German Product Liability Act or based on a guaranteed quality.
(c) Additional liability for damages beyond that provided in this section 5 is excluded, irrespective of the legal nature of the asserted claim. This applies especially to claims for damages arising from culpability in connection with the conclusion of the contract, for other breaches of obligations or for tort claims for material damage pursuant to section 823 BGB or for loss of profit.
(d) To the extent that liability for damages with respect to LGE is excluded or restricted, the same applies with respect to the personal liability for damages of its employees, contractors, workers, representatives, agents, etc.
6. Obtaining Warranty Performance
Customers who believe they have a justified claim covered by this LIMITED WARRANTY must immediately notify the authorized LGE representative, or contact LGE directly by writing to:
LG Electronics Deutschland GmbH Alfred-Herrhausen-Allee 3-5 65760 Eschborn Deutschland Tel. : + 0049 18 06 807 020 E-Mail : [email protected] Website : www.lg.com/b2b

How to subscribe to LG ESS web monitoring system
Please read this manual carefully before Installing your set and retain it for future reference.
http://www.lg.com/de/business/solar

2
Table of Contents
Sign up p.3
Accept terms p.4
Input ID p.5
Confirm e-mail p.6
Sign in p.8
Activation p.9
Notice of activation p.10
Check system p.11
NOTE
Since system information is shared by the installer, in order to protect your privacy if you do not wish to register, you do not have to do it.

3
Sign up
Visits the web site http://enervu.lg-ess.com/.
Select the link ‘Sign Up’ if you have not joined the LG accout service, otherwise ‘Sign In’.

4
Accept terms
Check ‘Select All’ and select ‘AGREE’.

5
Input ID
a
e
d
c
a Fill in User ID field and select ‘CHECK AVAILABILITY’ button.
b Check if e-mail is valid for use when pop-up message ‘Email valid for use’ appears.
c Fill in Password and Password confirm fields.
d Fill in Birthday fields.
e Select ‘CONFIRM’.

6
Confirm e-mail
a
a Check EMAIL CONFIRMATION notice and select CONFIRM.
b
b When e-mail is delivered, open “LG Account e-mail authentication”. (Any new accounts with e-mails that are not verified within 48 hours of sign-up will be deleted)

7
c
c Select ‘CONFIRM’ after checking LG Account e-mail authentication The message ‘LG Account creation complete’ shows up.

8
Sign in
Visit the web site http://enervu.lg-ess.com/.
a
a Select the menu ‘Sign In’.
b c
b Input e-mail and password.
c Select ‘SIGN IN’.

9
Activation
You can see the screen on the left when the registration and activation are completed.
You can see the screen on the left when the registration is in incomplete status.Input the registration number printed in the label attached outside of the PCS and select [Check] to complete the registration and activation.
If a pop-up message on the left appears on the screen, contact the installer to activate your system.

10
Notice of activation
If installer activates your ESS, the e-mail notice of activation of the ESS is sent to the your e-mail.

11
Check system
Now you can see your own ESS. Visits the web site http://enervu.lg-ess.com/.
a
a Select the menu ‘Sign In’.
b c
b Input e-mail and password.
c Select ‘SIGN IN’.

12
d You can see your own ESS. If the title ‘Last Report Time’ does not exist, ESS has not yet reported the data for 10 minutes period.