operating instructions non-electric pressure...
TRANSCRIPT

FAILURE TO FOLLOW INSTRUCTIONS AND/ORIMPROPER USE MAY RESULT IN SCALDING,BODILY INJURIES OR EXPLOSION.
When using the pressure steam sterilizer,basic safety precautions should always befollowed:
1. Read and understand instruction manualbefore operating unit.
2. Do not touch hot surfaces. Use handles andpot holders.
3. Close supervision is necessary when thesterilizer is used near children.
4. Extreme caution must be used whenmoving a sterilizer containing hot liquids.
5. Do not use the sterilizer for other thanintended use.
6. Always check the pressure release devicesfor clogging before use.
7. This sterilizer operates under pressure.Improper use may result in scalding injury.Make certain unit is properly closed beforeoperating. Read Operating Instructions.
8. Never loosen wing nuts until the steampressure gauge registers zero and you haveallowed any remaining pressure to escapeby opening the control valve (lever in thevertical position).
9. Do not open the sterilizer until the unit hascooled and internal pressure has beenreduced. Gauge should read zero at thetime. Read Operating Instructions.
10.Never use the sterilizer for cooking orprocessing food.
11. Do not use this sterilizer with oil.
12. Do not subject your sterilizer to suddenextreme temperature changes, as this willcause expansion or contraction which cancrack a cast aluminum utensil. Do not movea sterilizer from a cold storage area directlyonto a hot flame or element. Do not addcold water to a sterilizer which has boileddry and is still hot. Do not cool the sterilizersuddenly by pouring cold water on it orwrapping cold wet towels around it.
13. As in all clinical laboratory settings, wearsafety glasses when attending to yoursterilizer.
SAVE THESE INSTRUCTIONS
1915XGross Volume 15.5 qt.
14.75 liter
1925XGross Volume 25 qt.
24 liter
1941XGross Volume 41.5 qt
39.5 liter
OPERATING INSTRUCTIONSNon-Electric Pressure Steam Sterilizers
Models 1915X, 1925X, 1941X
CAUTION! READ THESE IMPORTANT SAFEGUARDS!
05/09-5M

1
CLEANING When you are done using your sterilizer, youneed to empty the water from the unit, rinsethoroughly and dry completely. Thisprocedure needs to be done daily. Do notleave water in the unit overnight. Rinsethoroughly between water changes. Storeyour sterilizer in a dry area. On your nextuse, fill the sterilizer with clean distilledwater. Distilled water is the recommendedwater. If distilled water is not available, thenyou may use your local water. If your localwater supply contains lime or high levels ofminerals, the unit will require periodiccleaning to remove and prevent the buildupof deposits.
Units should be cleaned whenever there is abuildup of lime or mineral deposits. Aftermany cycles, a white deposit may begin toform on the bottom of the sterilizer. Werecommend cleaning with a lime remover.Manufacturers of coffee makers havecleaning solutions which may be used.There are also solutions available at yourlocal hardware and drug stores that can beused to clean aluminum. Follow themanufacturer's instructions and make up asolution of the cleaner, filling your sterilizerabove the standard operating level. Let thesterilizer stand a few minutes then rinsethoroughly. You may have to repeat thisprocedure a few times to fully remove thelime and mineral deposits from yoursterilizer.
Never heat the sterilizer when filledwith a cleaning solution.
You may also use standard white vinegar toclean your sterilizer. Fill your sterilizer abovethe standard operating level with vinegar andlet it stand a few minutes then rinsethoroughly. You may have to repeat thisprocedure a few times to fully remove thelime and mineral deposits from yoursterilizer.
Elevation above sea level.At altitudes greater than sea level, settings needto be adequately adjusted to compensate for theeffect of altitude on the boiling point of water. Wesuggest you increase pressure by 0.5psi forevery 1000 ft. of elevation above sea level.
City Altitude Steam Pressure RequiredSea level 15-17 psi2000 ft 16-18 psi4000 ft 17-19 psi6000 ft 18-20 psi8000 ft 19-21 psi10,000 ft 20-22 psi
Operating Instructions for Non-Electric Pressure Steam Sterilizers
IMPORTANT: DO NOT OPERATE THIS PRESSURE STEAMSTERILIZER UNTIL YOU HAVE THOROUGHLY READ THESEOPERATING INSTRUCTIONS.
Geared Steam Gauge# 72S
Control Valve#65
Index Alignment Arrow
Overpressure Plug#1010
1941X Cover Shown (1925X and 1915X similar)
Excess Pressure Relief Valve#2050CS
Air Exhaust Tube#2155

2
Figure A
Geared Steam Gauge# 72S
Control Valve#65
Overpressure Plug#1010
Excess Pressure Relief Valve#2050CS
Air Exhaust Tube#2155-41
Side Handle#405
Aluminum Inner Container#2164
Rack#151
Model 1941X shown

3
Model 1925X shown(1915X similar)
Geared Steam Gauge# 72S
Control Valve#65
Overpressure Plug#1010
Excess Pressure Relief Valve#2050CS
Air Exhaust Tube#2155-25 for 1925X#2155-15 for 1915X
Aluminum Inner Container#2162 for 1925X#2163 for 1915X
Rack#111
Figure B

4
OPERATION
1. LUBRICATE METAL-TO-METALSEAL. Apply lubrication to the point oredge where side wall and bevel meet onthe inside of bottom (See Fig. 1 wherearrow tip is pointing). The bevel is not theseat; only the point or edge where bevelmeets the wall. We recommend using ahigh temperature lubricant such as a highvacuum grease. Only a thin film isrequired. Excess amounts may causeleakage or gumming. Most scientificsupply houses have sterilizer lubricant.There are many brands available. As asubstitute, you may also use petroleumjelly or mineral oil.
2. Remove the cover from sterilizer byloosening the bakelite wing nuts in acounter-clockwise motion. Always undotwo opposite wing nuts at a time. Next,remove inner container from the sterilizer.(see Figure A, page 2) Pour clean water(distilled is preferred) into the sterilizerbottom (large outer pot) to a depth of notless than 3⁄4 of an inch nor more than 1inch. Place inner container rack (seeFigure A, page 2) into the bottom of thecontainer (see Figure A, page 2) with thelip or edge side downward. The purposeof the inner container rack is to provide anair space in the bottom of the container sothat air may circulate freely. Place articlesto be sterilized inside the container. (Besure to arrange items so that the freecirculation of steam can occur duringsterilization.) You may wish to place atowel or cloth on top of the items in the
container to absorb any moisture whichmay drip down from the cover. Then placepacked container into the sterilizer. Makecertain that the air exhaust tube channel(located on the inside of the container) isin position on the right side of thecontainer when it is placed in the unit.This is necessary so that when the coveris placed on the unit you can guide the airexhaust tube (Part No. 2155) (see FigureA, page 2) into the channel.
3. Place sterilizer cover on unit,making sure that the indexalignment arrow on the cover alignswith index line/arrow on side ofbottom. Make certain when placing thecover on the unit that the flexible tube isinserted into the guide channel on theinside wall of the aluminum container. It ishelpful to place the container in the unitwith the guide channel on the right handside as you face the unit. Tighten the wingnuts on the cover evenly, always tight-ening down two opposite wing nuts at onetime. This will draw the cover down evenlyand assure a proper seal. NEVER USE AWRENCH OR ANY MECHANICAL DEVICETO TIGHTEN WING NUTS. NEVERHAMMER OR STRIKE THE WING NUTSOR COVER WHILE OPENING ORCLOSING.
4. Place unit on heat source. If the water youhave placed in the unit is cold, it willrequire approximately 35 minutes beforesteam begins escaping from the controlvalve. Since it requires more time to bringcold water up to operating temperaturethan it takes warm or hot water, you canreduce this time factor by:
A. Pouring in hot water in place of cold, or
B. Pouring in cold water and then turningon the heat source so that the water isgetting warmed prior to your beginning thesterilization procedure
In both cases, observe the proper waterlevel.
5. Open CONTROL VALVE (See Fig. 2) byplacing valve lever in an upright position.The steam generated at the bottom of thesterilizer will travel around the outside ofthe container and then down through thematerial in the container to the bottom andforce the air from the bottom of containerup through the flexible air exhaust tubeand out of the control valve. It isimportant that the steam bepermitted to escape vigorously fromthe unit for at least seven minutes,or until you see a continuous flow ofsteam, and then you may close thecontrol valve. This process ofpermitting the steam to escape is calledEXHAUSTING and is necessary to removethe air trapped in the unit. The greatestcause of sterilization failure is thetrapping of air in the material beingsterilized. Trapped air cannotescape. It is imperative that alltrapped air be exhausted.With thecontrol valve in the closed position (SeeFig. 3), pressure will rise inside thesterilizer and will be indicated on thepressure gauge. When pressure gaugereaches 17-19 pounds, reduce heat asnecessary to maintain constant pressureof 17-19 pounds within the unit.
6. STERILIZATION PERIOD. The sterilizationperiod begins when the pressure steamgauge needle registers in the green sterili-zation band shown on the face of thegauge. The sterilization pressure range is17-21 PSI. AT THIS TIME YOU BEGIN
Fig. 1
Metal-to-metal sealApply lubricant here
Open controlvalve
Closed controlvalve
Fig. 2 Fig. 3
Lever horizontalor closed
valve body
steam escapeholes
Lever verticalor open

5
THE TIMING OF THE STERILIZATIONCYCLE AND CONTINUE TIMING FORNOT LESS THAN 35 MINUTES.
7. At the end of the sterilization period, turnoff the heat source and move the lever onthe control valve to an upright (vertical)position so that the steam is permitted toescape. When the lever is in an uprightposition, the steam will escape atmaximum. To avoid touching the hotlever, you may use any object such as apencil or hot pad, etc., to move the leverfrom the closed to open (vertical)position. When the pressure gaugeindicates zero, loosen the wing nutsevenly by turning two opposite wing nutscounter-clockwise at one time. The wingnuts, side handles and top handle will behot. Always use hot pads when handling.Having removed all wing nuts from theslots in the cover, you may lift the coverslightly and turn the cover counter-clockwise for easy removal. Whenremoving the cover, always tilt andangle the cover away from yourselfor any other people in the area toprevent injury from the hot steam.
In the event your cover sticks, use a largestandard screwdriver to pry the top loose.Place the end of the screwdriver at anangle between the cover and bottom neara wing nut assembly. Do not go straightin with the screwdriver or you willdamage the metal-to-metal seal. Gentlypry upward using the screwdriver as alever. Continue to pry upward at eachwing nut assembly area uniformly so thatthe cover is raised evenly. In most cases,the cover should come off rather quickly.If you need further assistance, pleaseread metal-to-metal seal maintenanceinstructions on this page.
The inner container may then be removedfrom sterilizer for unloading. Use hotpads when removing.
To start another sterilization cycle, repeatprocedure as outlined.
If the sterilizer is not going to be usedagain, before putting the unit away, allwater should be emptied from the unitand the unit be thoroughly dried inside. Itis recommended that the water be pouredout of the unit while the bottom is stillwarm. The heat will help dry the unit ifyou leave the cover off for 15 minutesbefore placing the cover on the unit forstorage. For storage purposes, it is onlynecessary to slightly tighten the wingnuts enough to hold the cover on thebottom. When storing, it is recommendedthat the control valve be left in a vertical
position to permit air to circulate into thebottom.
MAINTENANCE:1. METAL-TO-METAL SEAL. (See Fig. 1)Periodically check your seal. The metal-to-metal seal must be lubricated periodi-cally (as stated in the instructions) toprevent the cover from sticking to thebottom because of dryness or lack oflubrication. If the sterilizer is operatedwithout any lubricant, this could result insevere damage to the metal-to-metal sealand make it very difficult to remove thecover in some cases, and also becomevery difficult to maintain a steam-tightseal. It is recommended that a smallamount of high temperature lubricant,such as high vacuum grease, be appliedevery third or fourth use. The metal-to-
metal seal must not be permitted tobecome dry. It is also important to wipeoff the metal-to-metal seal by using aclean towel to remove any build-up offoreign material or particles trapped inthe lubricant. To remove any build-up ofhardenedlubricant onthe seal, use0000 gradesteel wool ina circularmotionaround themetal-to-metal seal.
2. PRESSURE GAUGE, PART NO. 72S. (SeeFig. 4) Do not immerse the pressuregauge in water when cleaning the unit.The pressure gauge normally does notrequire any maintenance except to makecertain the opening into the gauge on theunderside of the cover is open and free ofany foreign matter. If the gauge is everdropped, the unit should not be useduntil the gauge has been checked to
make sure that it is functioning properly.If your gauge needs to be checked, take itto a local scientific supply house.
3.CONTROL VALVE, PART NO. 65. (SeeFig. 2 & 3) To ensure long life and properoperation of the control valve, periodiccleaning is recommended. To clean,
Fig. 4Pressure Gauge
Open controlvalve
Closed controlvalve
Fig. 2 Fig. 3
Lever horizontalor closed
valve body
steam escapeholes
Lever verticalor open
Fig. 1
Metal-to-metal sealApply lubricant here

unscrew the "knurled top" portion andclean thoroughly in hot soapy water. Ifany foreign material has built up insidethe unit, clean the ball and seat using asolvent such as acetone or a similarproduct. Be sure to clean the control valvein hot soapy water once again after usingany solvent.
In the event that you are unable toproperly clean any buildup of foreignmaterial in your control valve, then it isrecommended that the control valve be
discarded and replaced with a newcontrol valve.
4. AIR EXHAUST TUBE, PART NO. 2155.(See Fig. 5) It is essential that the airexhaust tube be frequently checked tomake sure that air passes freely throughit. We recommend that you blow airthrough the air exhaust tube at least oncea month to make certain it is not blockedor plugged with any foreign material. Theair exhaust tube is not part of the controlvalve and can be removed separatelyfrom the cover in the event that it isblocked. Clean out the air exhaust tubeby using a small diameter wire, runningit through the entire length of the tubeseveral times. If you notice a buildup ofany foreign material on the inside of theair passage or a buildup of any corrosionon the inside of the air passage, then it isrecommended that you discard this tubeand replace it with a new air exhausttube.
5. EXCESS PRESSURE RELIEF VALVE,PART NO. 2050CS. (See Fig. 6) Thissterilizer is equipped with a new type ofexcess pressure relief valve. It is
designed forlonger, mainte-nance-freeservice;however, we dorecommend thatthe valve bereplaced everythree years innormal service.The valve isdesigned torelease pressureat 26 PSI (plus/minus 1 PSI). Each valveis equipped with a deflector cap whichwill direct any steam released in adownward direction. Also it is possible tomanually release steam and pressure inthis unit by simply grasping the deflectorcap and pulling upwards slightly. Thedeflector cap will be hot. Always use hotpads when handling. This will instantlyrelease pressure inside the unit until yourelease the cap and the valve, at whichtime the valve instantly reseals, therebystopping any further pressure fromescaping.
6. OVERPRESSURE PLUG, PART NO. 1010.This ALL-AMERICAN Sterilizer isequipped with an additional safety devicewhich is the Overpressure Plug, Part No.1010. The purpose of the overpressureplug is to offer an extra margin of safetywhenever the sterilizer is used. Theoverpressure plug is designed to releasepressure in the range of 30 to 50 PSI.
The overpressure plug is made fromsilicone and is red in color and is foundon the top surface of the sterilizer cover,located directly to the rear of the tophandle, in front of Part No. 2050CSExcess Pressure Relief Valve. See FigureA (page 2) and Figure 7.
For the most efficient results and bestpossible performance, it is recommended
that you replace the overpressure plugevery 6 months. It should always bereplaced whenever it becomes hard ordeformed.
At least every month during period ofuse, the opening in the cover where theoverpressure plug fits should be checkedto determine that no foreign material,residue, or buildup of grease is present,and the opening be cleaned with hotsoapy water (a toothbrush is helpful) tomaintain a clean opening. Thiscleaning/inspection is in addition, ofcourse, to normal daily cleaningperformed after using the unit.
The overpressure plug can be removedfor cleaning using fingers to pull it out ofits opening from the underside of thecover. Before you re-install theoverpressure plug, check the opening inthe cover to be sure that it is absolutelyfree of any foreign material orgrease/residue buildup. After cleaning,reinsert the overpressure plug by pushingthe round top side into the opening fromthe underside of the cover. When theover pressure plug is correctly in position,the indented portion will be visible from
the underside of the cover. Be certain tocheck after inserting plug that the roundtop of plug and top lip are fully thru theopening and that the top lip is not foldedunder. See Figure 7.
Fig. 7
Part No. 1010Overpressure Plug
Top Lip
Cover top side
Top of Plug is rounded
Under side of plug isindented
Fig. 5
6
Fig. 6 Part No.2050CS Excess
Pressure Relief Valve
Deflector Cap

Steam is an ideal sterilizingagent since it kills microbesquickly, and steam has theadditional important property ofself-caused forced penetration.A large volume of steamcondenses to a very smallvolume of water and moresteam is drawn in to replace it.This causes excellentpenetration of fabrics and somepapers and plastic films. Hotair or sterilizing gases do notapproach steam in their abilityto penetrate.
The greatest cause of sterili-zation failure is the trapping ofair in the material beingsterilized so that it cannotescape. When this happens, theair forms a cool air pocketwhich has a lower temperaturethan the surrounding steam. Itcan also form an air-steammixture which has a lowertemperature than the puresteam. The most frequentcauses for this failure aredressing packs wrapped tootightly, made too large, failureto turn basins and other metalor glass containers onto theirsides, and failure to properlyfollow the directions as tocurrent sterilizer operation andmaintenance. (Refer to Item 5,page 4, regarding "exhausting"to remove trapped air.)
It is essential that all sterilizersbe regularly checked for propersteam penetration to the centerof the load. Since the first signof sterilization failure is a dropin the temperature at the centerof the dressing pack orsterilizer load, it is recom-mended that a temperaturemeasuring device be used atthe center of each pack or loadof instruments. Indicating tapeor strips are no substitute forthe self-contained typesas…"melt indicator inside asmall glass vial," as temper-ature accuracy is essential. Thepressure gauge on the sterilizerindicates the approximatetemperature at the exhaust line,not at the center of the packs.The gauge cannot indicate thepresence of trapped air,therefore, center-of-packcontrols or vials are recom-mended. Different types andbrands of sterilizationindicators are available fromyour hospital supply or scien-tific supply dealer.
PRESSURE GAUGEACCURACY: The gauges arerated as having an accuracy of3%-2%-3%. This designatesplus or minus 3% of the fullspan for the first and lastquarter of the dial, and 2% forthe middle 50% of the dial.
More specifically, this gaugerating comes from the pressuregauge standard ANSI B40-1-1980. This standard is entitled"Gauges-Pressure, IndicatingDial Type-Elastic Element," andcovers every aspect of pressuregauge manufacture and use.The gauge is considered"Accuracy Grade B" in accor-dance with this specification.
SOLUTIONS/SUGGESTIONSFOR WET BAGS OR PACKSIN STERILIZER:
1. Place absorbent towelsbetween layers and on top ofitems being sterilized.
2. Use sterile gloves to removethe sterile bags or packs fromcontainer.
3. Use sterile tongs to removesterile bags or packs fromcontainer.
IMPORTANT STERILIZATION FACTSHow Part No. 2050CS
WorksClosed
Resilient seal design prevents leakage.Sealing efficiency increases withincreased pressure up to crackingpressure. Metal-to-metal seat on lowpressure side supports spring load,prevents sticking.
Open
When system pressure overcomes springforce, poppet opens, momentarilyexposing variable orifice between poppetand body to pass increasing flow withminimum pressure rise withoutblowdown.
ResealingResilient seal automatically establishesline of contact with spherical seat. Sealprovides dead tight reseal very close tocracking pressure.
Operating characteristics of the No.2050CS excess pressure relief valve are:
A. Zero leakage to 95-98% of crackingpressure.
B. Increased sealing efficiency aspressure increases. Resilient "Q" ringseal is forced against metal seat aspressure increases up to set crackingpressure.
C. Cracking pressure accuracy. Valvesare preset to required crackingpressure of 26 PSI.
7

8
ALL-AMERICAN PRESSURE STEAM STERILIZER LIMITED WARRANTYThis quality sterilizer is designed and manufactured to provide many years of satisfactory performance under normal use. Wisconsin AluminumFoundry pledges to the original owner that should there be any defects in material or workmanship during the first year after purchase, we willrepair or replace it at our option. This pledge does not apply to damage caused by shipping. To obtain service under the warranty:1. A Return Authorization (RA) Number is required by our company to return any product manufactured by Wisconsin Aluminum Foundry.Merchandise returned without an RA Number will be refused. To obtain an RA Number contact our company by either writing, faxing or callingour Customer Service Department at 920-682-8627. All defective merchandise must be returned to our factory before credit or a replacementwill be issued; do not destroy the defective merchandise. Any products returned must include paperwork stating the reason for the return,when and where the item(s) were purchased, model numbers, quantities, etc., and who to contact with any questions. Prior to return to thefactory, all sterilizers must be cleaned to remove any biological material or contaminants.
2. Return sterilizer, shipping prepaid, direct to:Wisconsin Aluminum Foundry Co., Inc.Consumer Products Division1931 South 14th StreetManitowoc, WI 54220
IMPORTANT — PLEASE READAny alterations, modifications or changes of any type made to the sterilizer or to any component thereof will void this warranty!We want you to obtain maximum performance from using this quality sterilizer and we ask that you take the time to read and follow the operatinginstructions. Failure to follow instructions, damage caused by improper replacement parts, abuse, or misuse will void this pledge. This warrantygives you specific legal rights, and you may also have other rights which vary from state to state. This is Wisconsin Aluminum Foundry'spersonal pledge to you and is being made in place of all other express warranties.
RETURN/SERVICEShould the pressure sterilizer ever be dropped, the unit must be examined to determine if any damage has occurred. We recommend theunit be returned to our factory to be thoroughly checked inside and out for any damage. Prior to return to the factory, all sterilizers mustbe cleaned to remove any biological material or contaminants. We will examine the entire unit, including the control valve and gauge,and determine if the unit has sustained damage, and notify you of our findings.
A Return Authorization (RA) Number is required by our company to return any product manufactured by Wisconsin Aluminum Foundry.Merchandise returned without an RA Number will be refused. To obtain an RA Number contact our company by either writing, faxing orcalling our Customer Service Department at 920-682-8627. All defective merchandise must be returned to our factory before credit or areplacement will be issued; do not destroy the defective merchandise. Any products returned must include paperwork stating the reasonfor the return, when and where the item(s) were purchased, model numbers, quantities, etc., and who to contact with any questions.
Should you have any questions at all about the operation of your ALL-AMERICAN Pressure Sterilizer, please write the ConsumerProducts Division, and we will promptly answer your questions.
To order any replacement parts, please refer to the parts price list. If you do not have a copy of our current parts price list, you may writethe company and one will be forwarded to you by return mail.
9
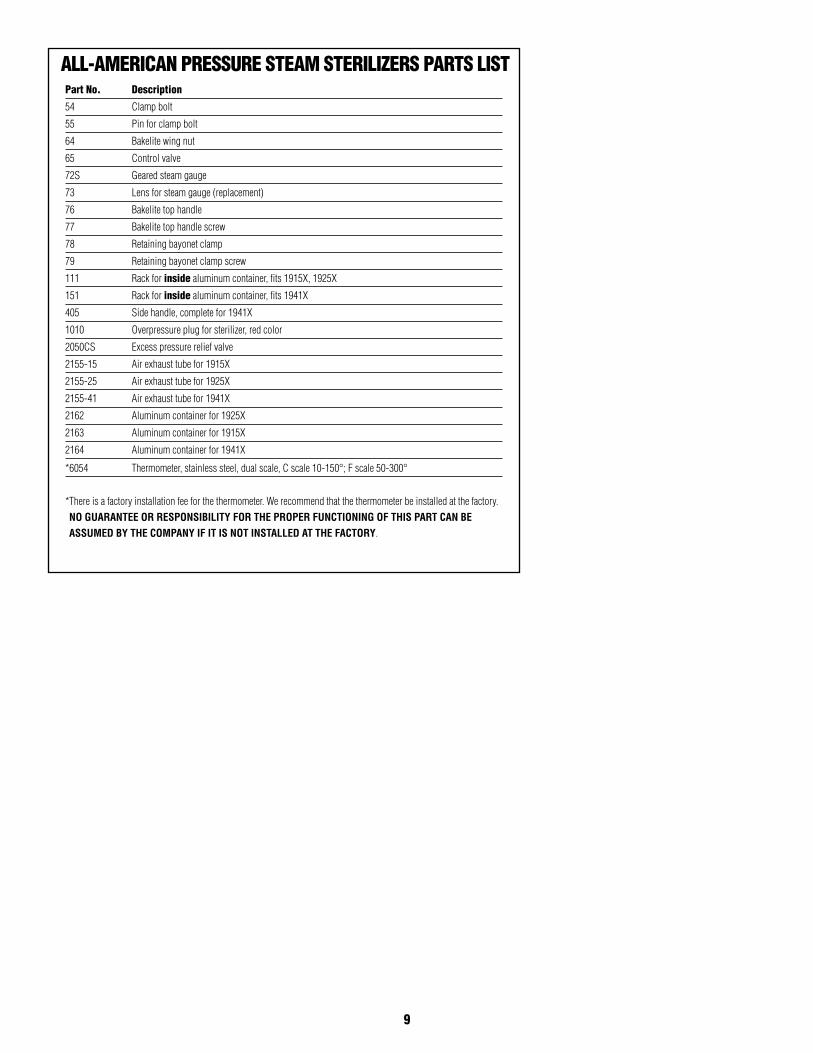
Part No. Description
54 Clamp bolt
55 Pin for clamp bolt
64 Bakelite wing nut
65 Control valve
72S Geared steam gauge
73 Lens for steam gauge (replacement)
76 Bakelite top handle
77 Bakelite top handle screw
78 Retaining bayonet clamp
79 Retaining bayonet clamp screw
111 Rack for inside aluminum container, fits 1915X, 1925X
151 Rack for inside aluminum container, fits 1941X
405 Side handle, complete for 1941X
1010 Overpressure plug for sterilizer, red color
2050CS Excess pressure relief valve
2155-15 Air exhaust tube for 1915X
2155-25 Air exhaust tube for 1925X
2155-41 Air exhaust tube for 1941X
2162 Aluminum container for 1925X
2163 Aluminum container for 1915X
2164 Aluminum container for 1941X
*6054 Thermometer, stainless steel, dual scale, C scale 10-150°; F scale 50-300°
*There is a factory installation fee for the thermometer. We recommend that the thermometer be installed at the factory.NO GUARANTEE OR RESPONSIBILITY FOR THE PROPER FUNCTIONING OF THIS PART CAN BEASSUMED BY THE COMPANY IF IT IS NOT INSTALLED AT THE FACTORY.
ALL-AMERICAN PRESSURE STEAM STERILIZERS PARTS LIST

10
Model 1915X (15 qt/14 liter)Gross Capacity 15 qt/14 literOverall Height 121⁄4" / 31.2cmBottom Height 73⁄4" / 19.7cmInside Diameter 125⁄8" / 32.1cmUnit Weight 15 lbs. / 6.8 kg.Inner Container No. 2163
Inside Depth 53⁄4" / 14.6cmInside Diameter 111⁄8" / 28.3cmCircumference 357⁄8" / 91.1cmCapacity 9.5 qt/9 literVolume 550in3/9029cm3
Carton Dimensions 151⁄2" x 141⁄2" x 131⁄2"39.4cm x 36.8cm x 34.3cm
Shipping Weight 21 lb. / 9.52kg.Unit Pack: 1 Cube: 1.76
Model 1925X (25 qt/24 liter)Gross Capacity 25 qt/24 literOverall Height 163⁄4" / 42.5cmBottom Height 121⁄4" / 31.2cmInside Diameter 125⁄8" / 32.1cmUnit Weight 181⁄4 lbs. / 8.3kgInner Container No. 2162
Inside Depth 101⁄4" / 26cmInside Diameter 111⁄8" / 28.3cmCircumference 357⁄8" / 91.1cmCapacity 17.6 qt/16.6 literVolume 1016in3/16,655cm3
Carton Dimensions 151⁄2" x 141⁄2" x 181⁄2"39.4cm x 36.8cm x 47cm
Shipping Weight 25 lb. / 11.34kg.Unit Pack: 1 Cube: 2.41
Model 1941X (41 qt/39 liter)Gross Capacity 41 qt/39 literOverall Height 19" / 48.3cmBottom Height 141⁄4" / 36.2cmInside Diameter 151⁄4" / 38.7cmUnit Weight 33 lbs. / 15kg.Inner Container No. 2164
Inside Depth 101⁄2" / 26.7cmInside Diameter 14" / 35.6cmCircumference 441⁄2" / 113cmCapacity 27.9 qt/26.4 literVolume 1613in3/26,451cm3
Carton Dimensions 19" x 19" x 201⁄2"48.3cm x 48.3cm x 52.1cm
Shipping Weight 43 lb. / 19.5kg.Unit Pack: 1 Cube: 4.28
SPECIFICATIONS
Model 25X (25 qt/24 liter)Model 25X-120: 120 Volt, 50/60 Hz 1050 watts/8.75 ampsModel 25X-240: 240 Volt, 50/60 Hz 1050 watts/4.38 ampsGross Capacity 25 qt / 24 literOverall Height 163⁄4" / 42.5cmBottom Height 121⁄4" / 31.2cmInside Diameter 125⁄8" / 32.1cmUnit Weight 26 lbs. / 11.8kg.Inner Container No. 2156
Height 81⁄ 2" / 21.6cmDiameter 111⁄8" / 28.3cmCircumference 357⁄8" / 91.1cmCapacity 14.5 qt / 13.7 literVolume 835in3 / 13,688cm3
Carton Dimensions 21" x 171⁄ 2" x 181⁄ 2"56.5cm x 44.5cm x 48.3cm
Shipping Weight 31 lb. / 14.06kg.Unit Pack: 1 Cube: 3.93Optional No. 2180 Support Base 2" / 5cm high
Outside Diameter 123⁄4" / 32.4cmInside Diameter 123⁄8" / 31.4cmElevates Sterilizer Above Surface 13⁄8" / 3.5cm
Model 50X (25 qt/24 liter)Model 50X-120: 120 Volt, 50/60 Hz 1650 watts/13.75 ampsModel 50X-240: 240 Volt, 50/60 Hz 1650 watts/6.88 ampsGross Capacity 25 qt / 24 literOverall Height 163⁄4" / 42.5cmBottom Height 121⁄4" / 31.2cmInside Diameter 125⁄8" / 32.1cmUnit Weight 29 lbs. / 13.2kg.Inner Container No. 2156
Height 81⁄ 2" / 21.6cmDiameter 111⁄8" / 28.3cmCircumference 357⁄8" / 91.1cmCapacity 14.5 qt / 13.7 literVolume 835in3 / 13,688cm3
Carton Dimensions 21" x 171⁄ 2" x 181⁄ 2"56.5cm x 44.5cm x 48.3cm
Shipping Weight 34 lb./15.4kg.Unit Pack: 1 Cube: 3.93Optional No. 2180 Support Base 2" / 5cm high
Outside Diameter 123⁄4" / 32.4cmInside Diameter 123⁄8" / 31.4cmElevates Sterilizer Above Surface 13⁄8" / 3.5cm
Model 75X (41 qt/39 liter)Model 75X-120: 120 Volt, 50/60 Hz 1650 watts/13.75 ampsModel 75X-240: 240 Volt, 50/60 Hz 1650 watts/6.88 ampsGross Capacity 41 qt / 39 literOverall Height 19" / 48.3cmBottom Height 141⁄4" / 36.2cmInside Diameter 151⁄4" / 38.7cmUnit Weight 45 lbs. / 20.4kg.Inner Container No. 4156
Height 101⁄4" / 26cmDiameter 14" / 35.6cmCircumference 441⁄2" / 113cmCapacity 27.3 qt / 25.8 literVolume 1578in3 / 25,856cm3
Carton Dimensions 24" x 24" x 21"61cm x 61cm x 53.3cm
Shipping Weight 51 lb. / 23.1kg.Unit Pack: 1 Cube: 7Optional No. 4180 Support Base 3" / 7.6cm high
Outside Diameter 161⁄4" / 41.3cmInside Diameter 15" / 38.1cmElevates Sterilizer Above Surface 21⁄4" / 5.7cm
ELECTRIC MODELS ARE ALSO AVAILABLE

WISCONSIN ALUMINUM FOUNDRY CO., INC.
CORRESPONDENCE:WISCONSIN ALUMINUM FOUNDRY CO., INC.P.O. BOX 246MANITOWOC, WISCONSIN 54221-0246PHONE: (920) 682-8627FAX: (920) 682-4090web page: store.wafco.comemail: [email protected]
RETURN & SERVICE:WISCONSIN ALUMINUM FOUNDRY CO., INC.CONSUMER PRODUCTS DIVISION1931 SOUTH 14TH STREETMANITOWOC, WI 54220

SI FALLA EN SEGUIR LAS SIGUIENTES INSTRUC-CIONES Y / O SI LAS USA INAPROPIADAMENTETAL VEZ RESULTE CON ESCALDADURAS, LESIONFÍSICA O UNA EXPLOSION.
Cuando este usando el esterilizador eléctrico devapor a presión, las precauciones básicas deseguridad siempre deben de seguirse:
1. Lea y entienda el manual de instrucciones antesde operar esta unidad.
2. No toque superficies calientes. Use agarraderas ycoge ollas.
3. Estricta supervisión es necesaria cuando el ester-ilizador es usado donde hay niños.
4. Tenga extremo cuidado cuando este trasladando elesterilizador con líquidos calientes.
5. No use al esterilizador con otros fines de los yaestablecidos.
6. Antes de ser usados siempre revise los aparatosde presión que no estén obstruidos.
7. Este esterilizador opera bajo presión. El usoinapropiado puede resultar en lesión porquemaduras. Antes de operar este seguro deque la unidad esta perfectamente cerrada. Lealas instrucciones de operación.
8. Nunca afloje las mariposas hasta que la presiónen el manómetro registre cero y ha permitidoque cualquier presión sobrante se ha dejadoescapar al abrir la válvula de control (palanca enposición vertical).
9. No abra el esterilizador hasta que la unidad sehaya enfriado y la presión interna reducida. Enel manómetro se debe leer cero en estemomento. Lea las instrucciones de operación.
10. Nunca use el esterilizador para cocinar oprocesar comida.
11. No use este esterilizador con aceite.
12. No exponga el esterilizador a cambios detemperaturas repentinas y extremadas, pues estopuede causar la expansión o contracción lo cualpuede causar rajaduras en el utensillo dealuminio fundido. No traslade el esterilizador deuna bodega fría directamente al calor de la llamau otro elemento. No le adhiera agua fría al ester-ilizador que ha estado hirviendo, esta seco ytodavía esta caliente. No enfríe repentinamente elesterilizador con agua fría o envolviéndolo entoallas mojadas con agua fría.
13. Como en todos los laboratorios clínicos useanteojos de seguridad cuando este operando suesterilizador.
GUARDE ESTAS INSTRUCIONES.
1915X Volumen bruto 15.5 cuartos / 14.75 litros
1925X Volumen bruto 25 cuartos / 24 litros
1941X Volumen bruto 41.5 cuartos / 39.5 litros
INSTRUCCIONES DE OPERACIÓNEsterilizadores No Eléctricos de Vapor a Presión
Modelos 1915X, 1925X, 1941X
¡CUIDADO! ¡LEA ESTAS IMPORTANTES NORMAS DE SEGURIDAD!

LIMPIANDO Cuando ha terminado de usar el esteril-izador, necesita sacarle el agua a la unidad,enjuáguelo literalmente y séquelo completa-mente. Este procedimiento necesita hacersediariamente. Durante la noche no deje aguaen la unidad. Enjuáguelo literalmente entrecambios de agua. Almacene el esterilizadoren una área seca. La próxima vez que use elesterilizador llénelo con agua limpiadestilada. Agua destilada es el aguarecomendada. Si el agua destilada no esaccesible use el agua local. Si el agua delacueducto local contiene cal o altos nivelesde minerales, la unidad requerirá serlimpiada periódicamente para remover yprevenir las acumulaciones de cal odepósitos de minerales.
Las unidades deben de ser limpiadassiempre que haya acumulaciones de cal ominerales. Después de muchos ciclos, undeposito blanco talvez se empiece a formaren el fondo del esterilizador. Le recomen-damos limpiar con un removedor de cal. Losfabricantes de cafeteras tienen limpiadoresque talvez pueda usar. También haysoluciones disponibles en su ferretería ofarmacias que se pueden usar para limpiar elaluminio. Siga las instrucciones del fabri-cante y haga una solución de limpiador,llenando el esterilizador mas arriba del nivelnormal de operación. Deje el esterilizadorpor pocos minutos y después enjuágueloliteralmente. Tal vez tenga que repetir esteprocedimiento varias veces para removercompletamente la cal y depósitos deminerales.
Nunca caliente el esterilizadorcuando esta lleno con solucioneslimpiadoras.
Usted tal vez use vinagre blanco para limpiarel esterilizador. Llene el esterilizador masarriba del limite normal de operación convinagre déjelo por pocos minutos yenjuáguelo totalmente. Usted tal vez tengaque repetir este procedimiento pocas vecespara remover completamente la cal yminerales del esterilizador.
Elevación sobre el nivel del mar.En altitudes sobre del nivel del mar, hay quehacer ajustes para compensar adecuadamente elpunto en que hierve el agua debido a los efectosde la altitud. Le sugerimos aumentar la presión a0.5psi por cada 1000 pies de altitud sobre elnivel del mar.
Altitud de la ciudad Presión del Vapor requeridaAl nivel del mar 15 –17psi2000 pies 16 – 18psi4000 pies 17 – 19psi6000 pies 18 – 20psi8000 pies 19 – 21psi10.000 pies 20 – 22psi
1
Instrucciones de Operación para Esterilizadores No Eléctricos de Vapor a Presión
IMPORTANTE: NO OPERE ESTE ESTERILIZADOR DE PRESIONAL VAPOR HASTA QUE HAYA LEIDO TOTALMENTE ESTASINTRUSIONES DE OPERACIÓN.
Manómetro de vapor#72S
Válvula de control#65
Flecha del índice dealineación
Tapón deSobrepresión #1010
1941X muestra la tapa (1925X y 1915X similar)
Válvula de escape por exceso depresión #2050CS
Tubo de escape del aire #2155

2
Figura A
Manómetro de vapor#72S
Válvula de control#65
Tapón deSobrepresión #1010
Válvula de escape por exceso depresión #2050CS
Tubo de escape del aire #2155-41
Mango lateral #405Recipiente interno dealuminio #2164
Parrilla #151
Muestra el Modelo 1941X

3
Muestra el Modelo 1925X (1915X similar)
Manómetro de vapor#72S
Válvula de control#65
Tapón deSobrepresión
#1010
Válvula de escape por exceso de presión #2050CS
Tubo de escape del aire #2155-25 para 1925X #2155 – 15 para 1915X
Recipiente interno dealuminio
#2162 para 1925X #2163 para 1915X
Parrilla #111
Figura B

4
OPERACIÓN
1. LUBRIQUE EL SELLO DE METAL-A-METAL. Lubrique el punto o bordedonde el lado de la pared y el bisel sejuntan por dentro en el fondo (Ver Fig. 1donde la punta de la flecha estaseñalando). El bisel no es el asiento;solamente el punto o borde donde elbisel se encuentra con la pared. Lerecomendamos usar lubricante para altatemperatura como la grasa para vacíoalto. Se requiere solamente una capadelgada. Excesos de lubricantes puedencausar escapes y ponerse pegajoso. Ellubricante para el esterilizador se puedeconseguir en almacenes de abastec-imiento científico, hay muchas marcasdisponibles. Como substituto, usted puedeusar pomada de petroleo o aceite mineral.
2. Remueva la tapa del esterilizadorhaciendo girar las mariposas de baquelitaen el sentido contrario a las manecillasdel reloj. Siempre afloje dos mariposasopuestas a la vez. Enseguida, remueva elrecipiente interno del esterilizador (VerFig. A, Pág. 2). Vierta agua limpia (preferi-blemente agua destilada) en el fondo delesterilizador (olla exterior grande) nomenos de 3⁄4" y no mas de 1 puldada.Ponga la parrilla del recipiente interno(ver la figura A pagina 2) en el fondo delrecipiente. (Ver Fig. A pagina 2) con ellabio o borde hacia abajo. El propósito deesta parrilla dentro del recipiente esproveer espacio de aire en el fondo delrecipiente de tal manera que el aire circulelibremente. Ponga los artículos que va aesterilizar en el recipiente. (Este seguro dearreglar los artículos de tal manera que elvapor circule libremente durante la esteril-ización.) Talvez usted quiere poner unatoalla encima de los artículos en el recip-iente para absorber cualquier humedadque se chorree hacia abajo desde la tapa.
Entonces ponga un recipiente empacadodentro del esterilizador. Este seguro que elcanal tubo del aire de escape (localizadodentro del recipiente) esta en su posiciónal lado derecho del recipiente cuando espuesto en la unidad. Esto es necesario, asíque cuando la tapa esta puesta en launidad puede guiar el aire por el tubo deaire de escape (parte No. 2155) (Ver Fig.A, pagina 2) dentro del canal.
3. Ponga la tapa del esterilizador enla unidad, este seguro que la flechade señal en la tapa esta alineadacon la línea de marca a un lado delfondo. Este seguro que cuando pone latapa en la unidad el tubo flexible esinsertado en la guía del canal en la paredinterna del recipiente de aluminio. Es demucha ayuda el poner el recipiente en launidad con la guía del canal al ladoderecho cuando usted esta mirando launidad. Apriete parejo las mariposas en latapa, siempre apriete dos mariposasopuestas a un tiempo. Esto aprieta la tapahacia abajo en una forma pareja y asegurael sello apropiadamente. NUNCA USEUNA LLAVE O CUALQUIER APARATOMECANICO PARA APRETAR LASMARIPOSAS. NUNCA MARTILLE OGOLPIE LAS MARIPOSAS O LA TAPAMIENTRAS LA ESTA ABRIENDO OCERRANDO.
4. Ponga la unidad en la fuente de calor. Siel agua que vertió en la unidad esta fría,requiere aproximadamente 35 minutosantes de que el vapor empiece a escaparsede la válvula de control. Como mástiempo es requerido para calentar el aguafría que el agua caliente hasta la temper-atura de operación usted puede reducireste tiempo al:
A. Verter agua caliente en vez de aguafría, o
B. Verter agua fría y entonces prender launidad de tal manera el agua empieza acalentar antes de empezar el proced-imiento de esterilización.
En ambos casos observe el nivelapropiado del agua.
5. Abra LA VÁLVULA DE CONTROL (Ver Fig.2) al poner la palanca de la válvula en laposición hacia arriba a mano derecha. Elvapor generado en el fondo del esteril-izador recorrerá alrededor por fuera delrecipiente y después hacia abajo a travésdel material en el recipiente hasta el fondoy forza el aire desde el fondo del recip-iente hacia arriba a través del tubo flexibledel aire de escape y afuera de la válvula decontrol. Es importante que el vaporse deje escapar por lo menos porsiete minutos vigorosamente de launidad o hasta que vea un flujocontinuo de vapor y después cierrela válvula de control. Este proceso depermitir que el vapor se escape sedenomina ESCAPANDO y es necesarioremover el aire atrapado en la unidad. Lamayor causa de falla en el esteril-izador es el aire atrapado en elmaterial que esta siendo esteril-izado. El aire atrapado no se puedeescapar. Es imperativo que todo el aireatrapado se deje escapar. Con la válvulade control cerrada (Ver Fig. 3), la presiónaumentara dentro del esterilizador y seráindicado en el manómetro de presión.Cuando el manómetro de presión alcanza17-19 libras, reduzca el calor como seanecesario para mantener una presiónconstante de 17-19 lbs dentro de launidad.
6. PERIODO DE ESTERILIZACIÓN. Esteperiodo empieza cuando la aguja delmanómetro del vapor a presión, seregistra en la banda verde de esteril-ización la cual se puede ver en la cara delmanómetro. La presión de esterilizaciónvaria entre 17-21 PSI. EN ESTEMOMENTO USTED COMIENZA ACRONOMETRAR EL TIEMPO DEL CICLODE ESTERILIZACIÓN Y CONTINUACRONOMETRANDO POR NO MENOS DE35 MINUTOS.
Fig. 1
Sello de metal a metalAplique lubricante aquí
Válvula Controlabierto
Válvula controlcerrada
Fig. 2 Fig. 3
Palanca horizontalo cerrada
Armadura de laVálvula
Huecos de escapede vapor
Palanca vertical o abierta

5
7. Al final del periodo de esterilización apaguela fuente de calor y mueva la palanca en elcontrol de la válvula hacia arriba enposición (vertical) para que el vapor puedaescaparse. Cuando la palanca esta en laposición vertical, el vapor se escapa almáximo. Para evitar tocar la palancacaliente para mover la de la posición(vertical) cerrado a abierto puede usar unobjeto como un lápiz o una almohadillapara objetos calientes etc. Cuando lapresión en el manómetro indica cero, aflojelas mariposas por parejas girando de a dosopuestas al mismo tiempo en sentidocontrario a las manecillas del reloj. Lasmariposas y los mangos laterales y elmango de arriba estarán calientes. Siempreuse almohadillas para objetos calientescuando este operando el esterilizador.Habiendo removido todas las mariposas delas ranuras de la tapa levante un poco latapa y gire la tapa en sentido contrario a lasmanecillas del reloj para zafarla fácilmente.Cuando esta removiendo la tapa,siempre incline y ponga en ángulo latapa lejos de usted u otras personasen el área para evitar lesionesproducidas por el vapor caliente.
En caso de que la tapa se pegue, use undestornillador de pala largo para hacerpalanca y aflojar la. Ponga la punta deldestornillador haciendo ángulo entre latapa y la parte baja del ensamble de lamariposa. No vaya derecho con eldestornillador por que dañaría elempaque de metal a metal. Suavementehaga palanca hacia arriba Continúe levan-tando uniformemente usando el destornil-lador como palanca en cada uno delensamble de las mariposas de tal maneraque la tapa es levantada en una formauniforme. En la mayoría d e los casos latapa debe despegarse rápidamente. Siusted necesita mas asistencia, por favorlea la pagina de instrucciones de manten-imiento del empaque de metal a metal.
El recipiente interior tal vez sea removidodel esterilizador para desocuparlo. Usealmohadillas para objetos calientescuando lo remueve.
Para comenzar otro ciclo de esterilización,repita el procedimiento como se indica:
Si el esterilizador no se va a usar otravez, antes de guardar la unidad, debesacar toda el agua y la unidad debe sersecada por dentro. Se recomienda que elagua sea vaciada de la unidad mientrasque esta caliente en el fondo, pues elcalor ayuda a secarla, deje usted launidad destapada por 15 minutos antesde ponerle la tapa para guardarla. Con elpropósito de guárdala, es solamentenecesario apretar un poquito lasmariposas lo suficiente para sostener latapa en el fondo. Cuando la guarda esrecomendado que deje la válvula decontrol en posición vertical para permitirque el aire circule en el fondo.
MANTENIMIENTO:
1. METAL-A-METAL SELLO. (Ver Fig. 1)Periódicamente revise el sello. El sello delmetal-a-metal debe ser lubricadoperiódicamente (como se expresa en lasinstrucciones) para prevenir que la tapa sepegue en el fondo debido a la resequedado falta de lubricación. Si el esterilizador esoperado sin lubricante, esto puederesultar en daño severo al sello del metal-a-metal y en algunos casos hacer muydifícil el remover la tapa, y también sevuelve muy difícil mantener el sello delvapor apretado. Se recomienda unapequeña cantidad de lubricante para altastemperaturas, como la grasa para altovacío sea aplicada cada tercera o cuartavez que la usa. Al sello del metal-a-metalno se le debe permitir que se seque. Estambién importante limpiar con una toallalimpia el sello del metal-a-metal pararemover cualquier acumulación demateriales extraños o partículas atrapadasen el lubricante. Para remover cualquieracumulación de lubricante endurecido enel sello use un estropajo de 0000 gradosen forma circular alrededor del sello delmetal-a-metal.
2. MANÓMETRO DE PRESION, PARTE NO.72S. (Ver Fig. 4) Cuando este limpiandola unidad no sumerja el manómetro depresión en agua. El manómetro depresión normalmente no requiere ningúnmantenimientoexcepto elestar segurode que laabertura en elmanómetroesta pordebajo de latapa y estaabierta y librede cualquiermateriaextraña. Sialguna vez el manómetro se cae, launidad no debe ser usada hasta que elmanómetro haya sido revisado para estarseguro de que esta funcionando apropi-adamente. Si el manómetro necesita serexaminado, llévelo a un almacén deabastecimiento científico
3. VALVULA DE CONTROL, PARTE No. 65.(Ver Fig. 2 & 3) Para asegurar larga viday operación apropiada de la válvula decontrol, es recomendado limpiarlaperiódicamente. Para limpiar desatornilleuna porción de la "tapa graficada" ylímpiela literalmente en agua jabóncaliente. Si algún material extraño se haacumulado dentro de la unidad, limpie labola y el asiento usando solvente comola acetona o un producto similar. Esteseguro de limpiar la válvula de control enagua jabón caliente una vez mas despuésde usar cualquier solvente. En caso deque no pueda limpiar cualquier acumu-
Fig. 4Manómetro de vapor
Fig. 1
Sello de metal a metalAplique lubricante aquí
Válvula Controlabierto
Válvula controlcerrada
Fig. 2 Fig. 3
Palanca horizontalo cerrada
Armadura de laVálvula
Huecos de escapede vapor
Palanca vertical o abierta

lación de material extraño en al válvulade control, es recomendado que laválvula sea descargada y reemplazadacon una nueva.
4. TUBO DEL AIRE DE ESCAPE, PARTE NO. 2155.
(Ver Fig. 5) Es esencial que el tubo delaire de escape sea frecuentementerevisado para estar seguro de que el airepasa libremente a través del tubo, lerecomendamos soplar aire a través deltubo de escape por lo menos una vez almes para estar seguro de que no establoqueado o atascado con materialesextraños. El tubo del aire de escape no esparte de la válvula de control y puedezafarse de la tapa por separado en casode que este bloqueado. Limpie el tubousando un alambre de diámetro pequeño,pasándolo varias veces a lo largo deltubo. Si nota que hay acumulación dematerial extraño dentro del pasaje de aireo una acumulación de oxido serecomienda reemplazar el tubo por unonuevo.
5. VALVE DE SEGURIDAD PARA EXCESODE PRESION, PARTE NO. 2050CS. (Ver Fig. 6) Este esterilizador estaequipado con un nuevo tipo de válvulade seguridad para el exceso de presión.Esta diseñado para durar largo tiempolibre de mantenimiento; sin embargo,recomendamos que la válvula seareemplazada cada tres años de servicionormal. La válvula esta diseñada paradejar salir la presión a 26 PSI (mas /menos 1 PSI). Cada válvula estaequipada con una tapa deflectora la cualdirige el vapor de escape en direccióndescendente. También es posible,manualmente, dejar salir el vapor y lapresión de esta unidad simplemente,sujetando la tapa deflectora y halándolaun poquito hacia arriba. La tapadeflectora estará caliente. Siempre usealmohadillas para objetos calientes
cuando esteoperando elesterilizador.Esto instan-táneamentedejará escapar lapresión de launidad hastaque suelte latapa y la válvula,en ese momentola válvulainstantánea-mente resella,para pararcualquier otro escape de la presión.
6. TAPON PARA SOBRE-PRESION, PARTENo. 1010. Este esterilizador ALLAMERICAN ESTA EQUIPADO con unaparato adicional de seguridad el cual esun tapón de sobre-presión, Parte No.1010. El propósito de este tapón es elproveer un extra margen de seguridadcuando el esterilizador este en uso. Eltapón de sobre-presión esta diseñadopara dejar salir la presión entre 30 a 50PSI.El tapón de sobre-presión es echo desilicón de color rojo y se encuentraencima de la superficie de la tapa delesterilizador, localizado directamente enla parte de atrás del mango de encimaenfrente de la Parte No. 2050CS Válvulade seguridad para el exceso de presión.Ver las Figuras A (Pág. 2) y la 7.Para obtener los resultados máseficientes y el mejor rendimiento posible,se recomienda que reemplace cada (6)seis meses el tapón de sobre-presión.Este siempre debe ser reemplazadocuando se vuelve duro o deformePor lo menos cada mes durante elperiodo de uso, debe revisar la aberturade la tapa donde el tapón de sobrepresión esta colocado, para determinarque no hay presentes materialesextraños, residuos o acumulación degrasa, y para mantener la limpia laabertura debe ser limpiada con aguajabón (y un cepillo de dientes.) Estainspección y limpieza es además delcurso diario normal de la limpieza que se
hace después de usar la unidad. El tapónde sobre presión se puede remover paralimpiarlo usando los dedos para halarlohacia fuera de la abertura por debajo dela tapa. Antes de reinstalar el tapón desobre presión, revise la abertura en latapa para estar seguro que esta absoluta-mente libre de materiales extraños oacumulaciones de grasa y residuos.Después de limpiar, reinserte el tapón desobre presión empujando el lado deencima de la tapa redonda en la aberturadesde debajo de la tapa. Cuando el tapónde sobre-presión esta en su posicióncorrecta la porción endentada será visibledesde abajo de la tapa. Este seguro derevisar después de haber insertado eltapón de que la parte de arriba redondadel tapón y el labio superior estáncompletamente a través de la abertura yque el labio superior no está doblado pordebajo. Ver la Figure 7.
Fig. 7
Parte No. 1010 Tapón para sobre-presión
Labiosuperior
Lado de encima de latapa
La parte de encima deltapon es redonda
El tapon por debajotiene hendidura
Fig. 5
6
Fig. 6 parte No.2050CS Válvula de
seguridad para excesode presión
Tapa deflectora

El vapor es un agente ideal enla esterilización porque matarápidamente los microbios, y,además, el vapor tiene unapropiedad importante que es lafuerza de penetración por símismo. Un volumen muygrande de vapor se condensacon un volumen muy pequeñode agua y más vapor es intro-ducido para reemplazarlo. Estocausa una penetraciónexcelente en telas algunospapeles y capas de plástico. Elaire caliente o los gases ester-ilizadores ni se acercan alvapor en su habilidad parapenetrar.
La mayor causa de la falla en alesterilización es el aireatrapado en el material que séesta esterilizando, de talmanera que no se puedeescapar. Cuando esto pasa seforma un bolsillo de aire fríoque tiene una temperatura masbaja del vapor que la rodea.Eso también puede formar unamezcla de aire y vapor quetiene una temperatura más bajaque el vapor puro. Las causasmás frecuentes de esta falla sonlos instrumentos envueltos entela muy apretados, muygrades, falla al girar lapalangana y otros recipientesde metal o vidrio en sus lados ytambién la falla en seguir ladirección apropiada como la
operación y mantenimientoactual del esterilizador. (Ver elarticulo 5, pagina 4, sobre"escape" para remover el aireatrapado.)
Es esencial que el esterilizadorsea regularmente revisado poruna penetración apropiada delvapor hacia el centro de lacarga. Desde la primera señalde falla en la esterilización latemperatura baja en el centrode los instrumentos envueltosen tela o la carga para ser ester-ilizada, se recomienda que elaparato para medir la temper-atura sea usado en el centro decada bulto o carga de instru-mentos. Indicando que cinta obandas no son sustituidas portipos contenidos por si mismoscomo… "indicador para derre-tirse dentro de un frasco devidrio pequeño," como laprecisión de la temperatura quees esencial. El manómetro depresión en esterilizador indicaaproximadamente la temper-atura en la línea de escape, noen el centro de los paquetes. Elmanómetro no puede indicar lapresencia del aire atrapado, poreso el control del centro delpaquete o los frascos sonrecomendados. Diferentes tiposy marcas de indicadores deesterilización son disponiblesen el almacén científico o parahospitales.
PRESICION DEL MANÓMETRODE PRESION: Los manómetrosestán clasificados por tener unaprecisión de 3%-2%-3%. Estodesigna mas o menos 3% delespacio total por el primero y elultimo cuarto de la esfera, y 2%por el medio de 50% de laesfera.
Mas específicamente la clasifi-cación de este manómetroviene del manómetro normal depresión ANSI B40-1-1980. Estanorma se denomina"Manómetro – Indicador depresión de tipo esfera conelemento plástico," y cubretodos los aspectos del fabri-cante de manómetros y su uso.El manómetro es consideradode "precisión de grado B" deacuerdo a esta especificación.
Las soluciones/sugerenciaspara bolsas mojadas opaquetes en el esterilizador:
1. Coloque toallas absorbentasentre capas y encima deartículos para ser esterilizado.
2. Usa guantes estériles paraquitar las bolsas o paquetesestériles del recipiente.
3. Usa pinzas estériles paraquitar bolsas o paquetesestériles del recipiente.
DATOS IMPORTANTES DE ESTERILIZACIÓN Como trabaja la Parte No.2050CS?Cerrado
El sello elástico ha sido diseñado paraprevenir escapes. La eficiencia del selloaumenta con el aumento de la presión hastaromper la presión. El asiento de metal-a-metal en el lado de baja presión apoya elresorte de carga, previniendo que se pegue.
Abierto
Cuando el sistema de presión sobre pasa lafuerza del resorte, se abre el cabezal ymomentariamente expone el orificio variableentre el cabezal y el bastidor para pasaraumentando el flujo y elevando la presión aun mínimo sin soplar.
Sello ElásticoEl sello elástico automáticamente establecela línea de contacto con el asiento cilíndrico.El sello provee un resello absolutamenteapretado muy cerca de romper la presión.Las características de operación de laparte No. 2050CS válvula de seguridad parael exceso de presión son:A. De cero escape a 95-98% la presión sedispara.
B. Cuando la presión aumenta la eficienciadel sello también aumenta. El anilloelástico "Q" es forzado contra el asientodel metal cuando la presión aumenta paraajustar la ruptura de la presión.
C. Precisión de la ruptura de la presión. Lasválvulas son preajustadas a 26 PSI parala ruptura de la presión requerida.
7

8
GARANTIA LIMITADA DEL ESTERILIZADOR DE VAPOR A PRESION ALL-AMERICAN La calidad de este esterilizador fue diseñada y fabricada para proveer muchos años de satisfacción de rendimiento bajo el uso normal. Si duranteel primer año después de la compra hay defectos de mano de obra o materiales Wisconsin Aluminum Foundry, al dueño original le reparará oreemplazará a nuestra discreción la unidad. Esta garantía no aplica a daños causados durante el envío. Para obtener servicio bajo la garantía:1. 1. Un numero de autorización para hacer devoluciones (RA) es requerido por nuestra compañía para devolver cualquier producto fabricado enWisconsin por Aluminum Foundry. La mercancía devuelta sin el numero RA será rechazada. Para obtener un numero RA contacte nuestracompañía ya sea por escrito vía fax o llamando a nuestro Departamento de Servicios al Cliente al 920-682-8627. Toda la mercancía defectuosadebe devolverse a nuestra factoría antes darle crédito o reemplazarla; No destruya la mercancía defectuosa. Cualquier producto devuelto debeincluir información por escrito sobre la razón de la devolución, cuando y donde el articulo /s fue comprado, numero del modelo, cantidades etc., ya quien dirigirse para hacerle preguntas. Todos los esterilizadores antes de ser devueltos a la compañía deben de limpiarse pararemover cualquier material biológico o contaminantes. 2. Retorne el esterilizador con los gastos de correo prepagados a:
Wisconsin Aluminum Foundry Co., Inc.Consumer Products Division1931 South 14th StreetManitowoc, WI 54220
IMPORTANTE— POR FAVOR LEA¡Cualquier alteración, modificación o cambio de cualquier tipo hecho al esterilizador o a cualquier componente elimina esta garantía!Queremos que usted obtenga el máximo rendimiento con el uso de este esterilizador de alta calidad y le pedimos que tome el tiempo para leer yseguir las instrucciones de operación. No seguir las instrucciones, puede causar daño al reemplazar las partes in-apropiadamente, el abuso, omal uso anulará esta garantía. Esta garantía le da derechos legales específicos y usted tal vez tenga otros derechos que varían de estado a estado.Esta es la garantía personal que le da Wisconsin Aluminum Foundry, la cual ha sido hecha para usted en lugar de todas las otras garantías.
DEVOLUCION / SERVICIOSi la presión del esterilizador alguna vez se baja, la unidad debe ser examinada para determinar si algún daño ha ocurrido.Recomendamos que la unidad sea devuelta a nuestra factoría para ser examinada literalmente por fuera y por dentro por cualquier daño.Todos los esterilizadores antes de ser devueltos a la compañía deben de limpiarse para remover cualquier material biológico ocontaminantes. Examinaremos la unidad entera, incluyendo la válvula de control y el manómetro, para determinar si la unidad tiene undaño sustancial y notificarlo de lo que encontremos.
Un numero de autorización para devoluciones (RA) es requerido por nuestra compañía para devolver cualquier producto fabricado enWisconsin por Aluminum Foundry. La mercancía devuelta sin el numero RA será rechazada. Para obtener un numero RA contactenuestra compañía ya sea por escrito vía fax o llamando a nuestro Departamento de Servicios al Cliente al 920-682-8627. Toda lamercancía defectuosa debe devolverse a nuestra factoría antes darle crédito o reemplazarla; no destruya la mercancía defectuosa.Cualquier producto devuelto debe incluir información por escrito sobre la razón de la devolución, cuando y donde el articulo /s fuecomprado, numero del modelo cantidades etc., y a quien dirigirse para hacerle preguntas.
Si hay preguntas sobre la operación de su ALL-AMERICAN Esterilizador a presión por favor escriba al Centro de Servicios de la factoríay le responderemos pronto a sus preguntas.
Para ordenar partes, por favor ver la lista de precio de partes. Si no tiene una copia de la lista de precios actualizada, tal vez usted quieraescribir a la compañía y le enviaremos una por correo.

9
Parte No. Descripción
54 Perno de la abrazadera pasador
55 Pasador para el perno de la abrazadera
64 Mariposa de baquelita
65 Válvula de control
72S Manómetro del vapor del equipo
73 Lentes para el manómetro del vapor (repuesto)
76 Mango de baquelita superior
77 Tornillo del mango de baquelita superior
78 Abrazadera del retenedor bayoneta
79 Tornillo de la abrazadera del Retenedor bayoneta
111 Parrilla encaja dentro del recipiente de aluminio para 50X
151 Parrilla encaja dentro del recipiente de aluminio para 75X
405 Mango de lado, completo, para 75X
1010 Tapón de Sobrepresión para el esterilizador, color rojo
2050CS Válvula de seguridad de Exceso de presión
2155-15 Tubo de aire de escape para 1915X
2155-25 Tubo de aire de escape para 1925X
2155-41 Tubo de aire de escape para 1941X
2162 Recipiente de aluminio para 1925X
2163 Recipiente de aluminio para 1915X
2164 Recipiente de aluminio para 1941X
*6054 Termómetro, de acero, de doble escala, C escala 10-150°; F escala 50-300°
*La factoría cobra por la instalación del termómetro. Recomendamos que el termómetro sea reemplazados en al factoría. LA COMPAÑIA NO ASUME NINGUNA GARANTIA ORESPONSABILIDAD POR EL FUNCIONAMIENTO APROPIADO POR PARTES QUE NO HAYAN SIDO INSTALADAS EN LA FACTORIA.
LISTA DE PARTES PARA TODOS ESTERILIZADORES AMERICANOS DE VAPOR A PRESION

10
Modelo 1915X (15 cuartos/14 litros)Capacidad bruta 15 cuartos 14 litrosAltura total 121⁄4" / 31.2cmAltura de fondo 73⁄4" / 19.7cmDiámetro interno 125⁄8" / 32.1cmPeso de la unidad 15 lbs. / 6.8 kg.Recipiente interno No. 2163
Profundidad 53⁄4" / 14.6cmDiámetro interno 111⁄8" / 28.3cmCircunferencia 357⁄8" / 91.1cmCapacidad 9.5 cuartos/9 litrosVolumen 550in3/9029cm3
Dimensiones Del cartón 151⁄2" x 141⁄2" x 131⁄2"39.4cm x 36.8cm x 34.3cm
Peso de envío 21 lb. / 9.52kg.1 Paquete x unidad Cubo: 1.76
Modelo 1925X (25 cuartos/24 litros)Capacidad bruta 25 cuartos/24 litrosAltura total 163⁄4" / 42.5cmAltura de fondo 121⁄4" / 31.2cmDiámetro interno 125⁄8" / 32.1cmPeso de la unidad 181⁄4 lbs. / 8.3kgRecipiente interno No. 2162
Profundidad 101⁄4" / 26cmDiámetro interno 111⁄8" / 28.3cmCircunferencia 357⁄8" / 91.1cmCapacidad 17.6 cuartos/16.6 litrosVolumen 1016in3/16,655cm3
Dimensiones Del cartón 151⁄2" x 141⁄2" x 181⁄2"39.4cm x 36.8cm x 47cm
Peso de envío 25 lb. / 11.34kg.1 Paquete x unidad Cubo: 2.41
Modelo 1941X (41 cuartos/39 litros)Capacidad bruta 41 cuartos/39 litrosAltura total 19" / 48.3cmAltura de fondo 141⁄4" / 36.2cmDiámetro interno 151⁄4" / 38.7cmPeso de la unidad 33 lbs. / 15kg.Recipiente interno No. 2164
Profundidad 101⁄2" / 26.7cmDiámetro interno 14" / 35.6cmCircunferencia 441⁄2" / 113cmCapacidad 27.9 cuartos/26.4 litrosVolumen 1613in3/26,451cm3
Dimensiones Del cartón 19" x 19" x 201⁄2"48.3cm x 48.3cm x 52.1cm
Peso de envío 43 lb. / 19.5kg.1 Paquete x unidad Cubo: 4.28
ESPECIFICACIONES
Modelo 25X (25 cuartos/24 litros)Modelo 25X-120: 120 Volt, 50/60 Hz1050 watts/8.75 ampsModelo 25X-240: 240 Volt, 50/60 Hz1050 watts/4.38 ampsCapacidad bruta 25 cuartos / 24 litrosAltura total 163⁄ 4" / 42.5cmAltura de fondo 121⁄4" / 31.2cmInside Diameter 125⁄8" / 32.1cmPeso de la unidad 26 lbs. / 11.8kg.Recipiente interno No. 2156
Height 81⁄ 2" / 21.6cmDiameter 111⁄8" / 28.3cmCircunferencia 357⁄8" / 91.1cmCapacidad 14.5 cuartos / 13.7 litrosVolumen 835in3 / 13,688cm3
Dimensiones Del cartón 21" x 171⁄ 2" x 181⁄ 2"56.5cm x 44.5cm x 48.3cm
Peso de envío 31 lb. / 14.06kg.1 Paquete x unidad Cubo: 3.93Opcional base de soporte No. 2180 2" / 5cm altura
Diámetro exterior 123⁄ 4" / 32.4cmDiámetro interno 123⁄8" / 31.4cmElevación del esterilizador encima de la superficie
13⁄ 8" / 3.5cm
Modelo 50X (25 cuartos/24 litros)Modelo 50X-120: 120 Volt, 50/60 Hz1650 watts/13.75 ampsModelo 50X-240: 240 Volt, 50/60 Hz1650 watts/6.88 ampsCapacidad bruta 25 cuartos / 24 litrosAltura total 163⁄ 4" / 42.5cmAltura de fondo 121⁄4" / 31.2cmDiámetro interno 125⁄8" / 32.1cmPeso de la unidad 29 lbs. / 13.2kg.Recipiente interno No. 2156
Height 81⁄ 2" / 21.6cmDiameter 111⁄8" / 28.3cmCircunferencia 357⁄8" / 91.1cmCapacidad 14.5 cuartos / 13.7 litrosVolumen 835in3 / 13,688cm3
Dimensiones Del cartón 21" x 171⁄ 2" x 181⁄ 2"56.5cm x 44.5cm x 48.3cm
Peso de envío 34 lb./15.4kg.1 Paquete x unidad Cubo: 3.93Opcional base de soporte No. 2180 2" / 5cm altura
Diámetro exterior 123⁄ 4" / 32.4cmDiámetro interno 123⁄8" / 31.4cmElevación del esterilizador encima de la superficie
13⁄ 8" / 3.5cm
Modelo 75X (41 cuartos/39 litros)Modelo 75X-120: 120 Volt, 50/60 Hz1650 watts/13.75 ampsModelo 75X-240: 240 Volt, 50/60 Hz1650 watts/6.88 ampsGross Capacidad 41 cuartos / 39 litrosAltura total 19" / 48.3cmAltura de fondo 141⁄4" / 36.2cmDiámetro interno 151⁄4" / 38.7cmPeso de la unidad 45 lbs. / 20.4kg.Recipiente interno No. 4156
Height 101⁄4" / 26cmDiameter 14" / 35.6cmCircunferencia 441⁄2" / 113cmCapacidad 27.3 cuartos / 25.8 litrosVolumen 1578in3 / 25,856cm3
Dimensiones Del cartón 24" x 24" x 21"61cm x 61cm x 53.3cm
Peso de envío 51 lb. / 23.1kg.1 Paquete x unidad Cubo: 7Opcional base de soporte No. 4180 3" / 7.6cm altura
Diámetro exterior 161⁄ 4" / 41.3cmDiámetro interno 15" / 38.1cmEElevación del esterilizador encima de la superficie
21⁄ 4" / 5.7cm
MODELOS ELECTRICOS TAMBIÉN LOS HAY DISPONIBLES

WISCONSIN ALUMINUM FOUNDRY CO., INC.
CORRESPONDENCIA:WISCONSIN ALUMINUM FOUNDRY CO., INC.P.O. BOX 246MANITOWOC, WISCONSIN 54221-0246TELEFONO: (920) 682-8627FAX: (920) 682-4090web page: store.wafco.comemail: [email protected]
DEVOLUCIONES & SERVICIO:WISCONSIN ALUMINUM FOUNDRY CO., INC.CONSUMER PRODUCTS DIVISION1931 SOUTH 14TH STREETMANITOWOC, WI 54220