operating instructions controller for automatic mass ... · controller for automatic mass...
TRANSCRIPT

Operating Instructions Controller for Automatic Mass Comparators from Software Version 1.22 for CC.......- L / CCE.......- L Model
98648-006-96
2
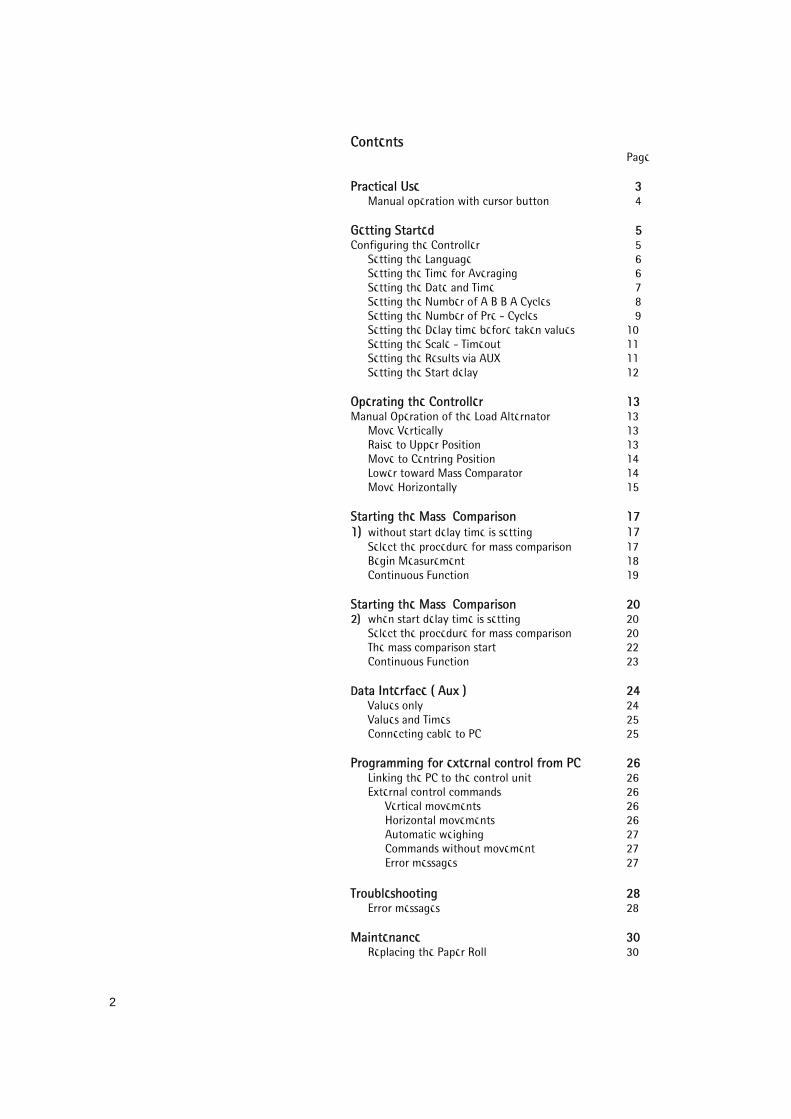
Contents Page Practical Use 3 Manual operation with cursor button 4 Getting Started 55 Configuring the Controller 5 Setting the Language 6 Setting the Time for Averaging 6 Setting the Date and Time 7 Setting the Number of A B B A Cycles 8 Setting the Number of Pre - Cycles 9 Setting the Delay time before taken values 10 Setting the Scale - Timeout 11 Setting the Results via AUX 11 Setting the Start delay 12 Operating the Controller 113 Manual Operation of the Load Alternator 13 Move Vertically 13 Raise to Upper Position 13 Move to Centring Position 14 Lower toward Mass Comparator 14 Move Horizontally 15 Starting the Mass Comparison 17
1) without start delay time is setting 17 Select the procedure for mass comparison 17 Begin Measurement 18 Continuous Function 19 Starting the Mass Comparison 20
2) when start delay time is setting 20 Select the procedure for mass comparison 20
The mass comparison start 22 Continuous Function 23 DData Interface ( Aux ) 24 Values only 24 Values and Times 25 Connecting cable to PC 25 Programming for external control from PC 26 Linking the PC to the control unit 26 External control commands 26 Vertical movements 26 Horizontal movements 26 Automatic weighing 27 Commands without movement 27 Error messages 27 TTroubleshooting 28 Error messages 28 Maintenance 30 Replacing the Paper Roll 30

3
Practical Use The CC.....-L / CCE…..-L controller regulates the load alternator function sequences as well as the collection and evaluation of measured data. The individual values measured are output automatically to the built-in printer with the date and time of measurement and the calculated results. A modern, touch-screen display shows all function sequences and also serves as the user interface for operating the controller. User guidance prompts in plain English will guide you through the simple operation of the device. You can choose the following languages: - German - English - Spanish - French All of the function sequences are displayed and can be activated by pressing the corresponding field on the right hand side of the touch screen e. g. The number in this corresponding field is match marking to the number in front of the function sequence. The corresponding touch fields are not in the same line to the function sequences on the touch screen. Operators errors are virtually impossible! The controller recognizes the position of the load alternator at all times; if you select a function that cannot or should not be performed from a certain position, an error message is displayed and the function is nnot performed. This prevents damage to the mass comparator that could otherwise have been caused by operator error. You can choose the following measurement sequences: 1 x A B B A - cycle 6 x A B B A - cycles 02 - 99 x A B B A - cycles With the 4-position load alternator, you can compare: - 2 weights: N - 2 - 4 weights: N - 1 / N - 2 / N - 3 - Combinations: N - 1 / 1 - 2 / N - 3 / 1 - 3 / N - 2 / 3 - 2 The reset key is to stop the measurement also the emergency interrupt key. As soon as you press the reset key, the load alternator is stopped and remains in the position it was in when you pressed reset. Any measurement sequence running at the time is stop. The display indicates that the function was interrupted. You can also press reset to stop a measurement sequence after you have selected the continuous function.
1

4
Manual operation with the cursor buttons
There are four cursor buttons on the front side. With this cursor buttons you can easy operate the load alternator, in it’s basic movements. That means turning right and left, lifting or lowering the platform. This is helpful for loading the platform from the front side and other applications. The cursor buttons are only active if the main menu appears on the display. See page no. 5 Movement vertically:
Movement horizontally: Four control light identify the current position and the activity of the load alternator. All lights on means that the platform is in the upper position. Movement in all directions is possible. A blinking control light identifies the actually operation relating to the direction of movement. A non active control light means that a movement in this direction is not possible. To start the movement by your choice, press the cursor button. Horizontal movement: - short press turn 90 degrees, - long press (3 sec.) turn 180 degrees, Vertical movement: - short press move - from the top toward to centre, or
- from the centre to the lower position, or - raise from the lower to the centre, or - raise from the centre to the upper position
- long press move - direct from the upper to the lower, - from the lower to the upper position.
Note:
Two control lights on the printer indicate the capacity of the paper A green light means: enough paper A red light means: paper roll come to end
If the paper roll in the printer runs out in the middle of a measuring sequence, the printer switches off. The individual values measured and the results calculated after the printer shuts off are stored in memory. For example: with 6 x A B B A selected, the memory can store data from up to 6 complete measurements. When the memory is full, this is indicated by a crossed-out printer symbol in the display. The load alternator continues according to the selected function sequence. Subsequent measurement data are not stored.
To retain the data stored in memory: - Do not interrupt the measurement sequence - Do not press reset - Do not turn off the controller Place a new roll of paper in the printer (see "Maintenance") The stored data are output to the printer.
5
Getting Started
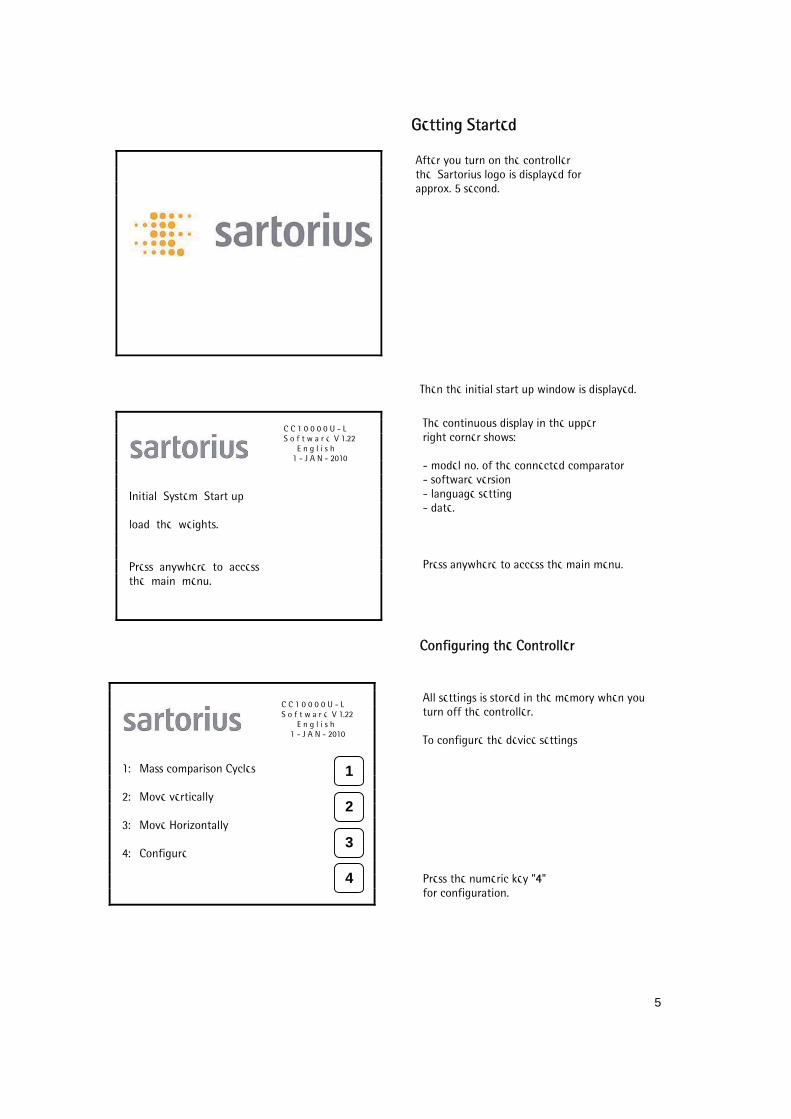
Then the initial start up window is displayed.
Configuring the Controller
After you turn on the controller, the Sartorius logo is displayed for approx. 5 second.
C C 1 0 0 0 0 U - LS o f t w a r e V 1.22 E n g l i s h 1 - J A N - 2010
The continuous display in the upper right corner shows: - model no. of the connected comparator - software version, - language setting, - date. Press anywhere to access the main menu.
Initial System Start up load the weights. Press anywhere to access the main menu.
C C 1 0 0 0 0 U - L S o f t w a r e V 1.22 E n g l i s h 1 - J A N - 2010
1: Mass comparison Cycles 2: Move vertically 3: Move Horizontally 4: Configure
All settings is stored in the memory when you turn off the controller. To configure the device settings,
Press the numeric key "44" for configuration.
1
2
3
4

6
The main configuration windows is displayed. Setting the Language
The display returns to the main configuration
window in the desired language.
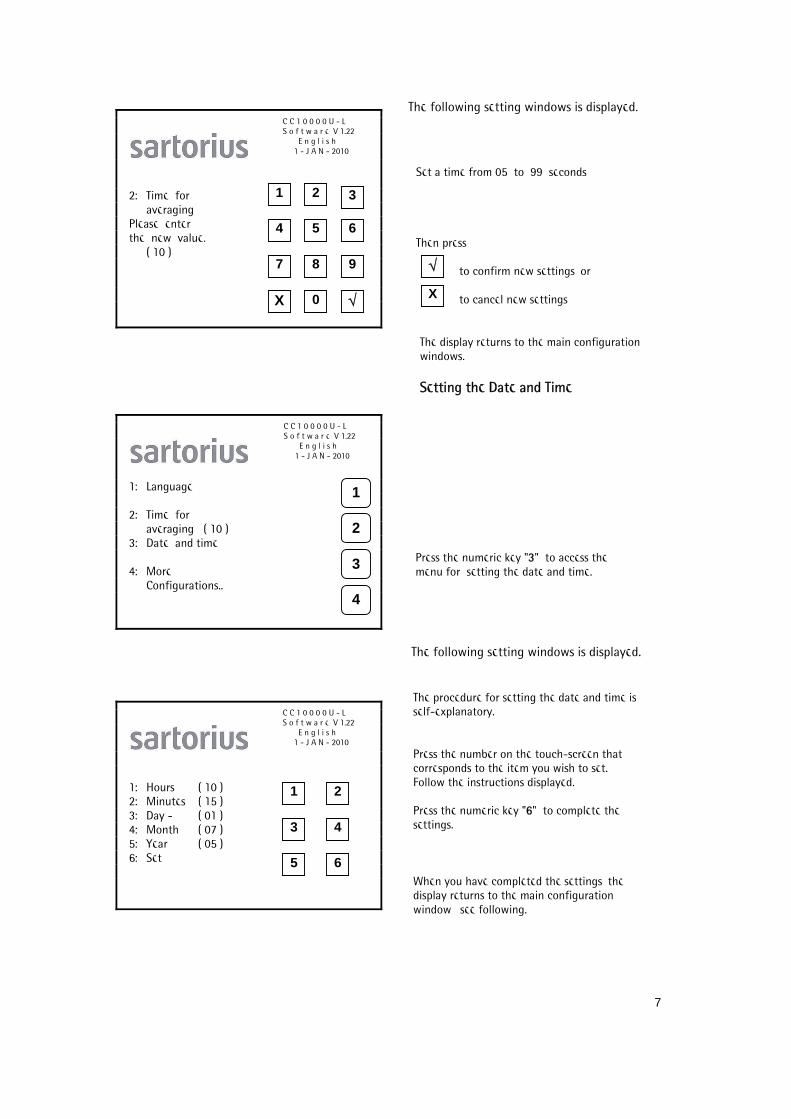
Setting the Time for Averaging
Press the numeric key "11" to access the language menu.
1: Language 2: Time for - averaging ( 10 ) 3: Date and time 4: More Configurations..
C C 1 0 0 0 0 U - L S o f t w a r e V 1.22 E n g l i s h 1 - J A N - 2010
Press the numeric key on the touch- screen that corresponds to the desired language.
1: Deutsch 2: English 3: Español 4: Francais
C C 1 0 0 0 0 U - L S o f t w a r e V 1.22 E n g l i s h 1 - J A N - 2010
C C 1 0 0 0 0 U - L S o f t w a r e V 1.22 E n g l i s h 1 - J A N - 2010
The time for averaging is a period of time during which measured values are transferred to the controller continuously; i.e., each time a weight is placed on the mass comparator and stabilizes. The average calculated from these values is output for further processing. Press the numeric key "22" to access the menu for setting the averaging time.
1: Language 2: Time for - averaging ( 10 ) 3: Date and time 4: More
Configuration..
1
2
3
4
6
21 3
4 5
7 8 9
1
2
3
4
7
The following setting windows is displayed.
The display returns to the main configuration windows. Setting the Date and Time
The following setting windows is displayed.
Set a time from 05 to 99 seconds Then press to confirm new settings, or to cancel new settings
2: Time for averaging Please enter the new value. ( 10 )
C C 1 0 0 0 0 U - LS o f t w a r e V 1.22 E n g l i s h 1 - J A N - 2010
Press the numeric key "33" to access the menu for setting the date and time.
1: Language 2: Time for averaging ( 10 ) 3: Date and time 4: More Configurations..
C C 1 0 0 0 0 U - LS o f t w a r e V 1.22 E n g l i s h 1 - J A N - 2010
The procedure for setting the date and time is self-explanatory. Press the number on the touch-screen that corresponds to the item you wish to set. Follow the instructions displayed. Press the numeric key "66" to complete the settings. When you have completed the settings, the display returns to the main configuration window, see following.
1: Hours ( 10 ) 2: Minutes ( 15 ) 3: Day - ( 01 ) 4: Month ( 07 ) 5: Year ( 05 ) 6: Set
C C 1 0 0 0 0 U - L S o f t w a r e V 1.22 E n g l i s h 1 - J A N - 2010
X
1 2
65
3 4
1
2
3
4
321
4 5 6
7 8 9
X 0

8
The second configuration windows is displayed. Setting the Number of A B B A Cycles
The following setting windows is displayed.
For more configuration:
Press the numeric key "44" to access to the second configurations windows.
C C 1 0 0 0 0 U - L S o f t w a r e V 1.22 E n g l i s h 1 - J A N - 2010
1: Language 2: Time for averaging ( 10 ) 3: Date and time 4: More Configurations..
You can set the desired number of A B B A cycles for a given measurement sequence. The factory setting is 03 x A B B A. To select a different number of ABBA - cycles, Press the numeric key "11" .
1: Set number of A B B A - cycles ( 03 ) 2: Set number of Pre - Cycles ( 00 ) 3: Delay time before taken values ( 20 ) 4: More Configurations..
C C 1 0 0 0 0 U - L S o f t w a r e V 1.22 E n g l i s h 1 - J A N - 2010
Set a number of cycles between 02 and 99. Then press to confirm new settings, or to cancel new settings.
The display returns to the second configuration window.
4: Set number of - A B B A - cycles. Please enter the new value. ( 03 )
C C 1 0 0 0 0 U - L S o f t w a r e V 1.22 E n g l i s h 1 - J A N - 2010
1
2
3
4
X
1
2
3
4
1 2 3
4 5 6
7 8
0X
9

9
To optimize measuring sequences to meet the needs of the ambient conditions, the following settings are required. Setting the Number of Pre - Cycles
The following setting windows is displayed.
This setting enables user-definable A B B A cycles to be performed immediately before the actual measurement. We recommend that you use this setting if, for instance, you plan to start a measurement right after placing weights on the load alternator platform. The factory setting is 00. To select a different number of Pre - cycles, Press the numeric key "22" .
C C 1 0 0 0 0 U - LS o f t w a r e V 1.22 E n g l i s h 1 - J A N - 2010
1: Set number of A B B A - cycles ( 03 ) 2: Set number of Pre - Cycles ( 00 ) 3: Delay time before taken values ( 20 ) 4: More Configurations..
Set a number of cycles between 00 and 99. Then press to confirm new settings, or to cancel new settings. The display returns to the second configuration window.
C C 1 0 0 0 0 U - LS o f t w a r e V 1.22 E n g l i s h 1 - J A N - 2010
2: Set number of Pre - Cycles Please enter the new value. ( 00 )
1: Set number of A B B A - cycles ( 03 ) 2: Set number of Pre - Cycles ( 00 ) 3: Delay time before taken values ( 20 ) 4: More Configurations..
C C 1 0 0 0 0 U - L S o f t w a r e V 1..22 E n g l i s h 1 - J A N - 2010
X
2
3
4
1
1
2
3
4
1 32
5 6
8 9
4
7
0X

10
SSetting the Delay Time Before Taken Values (XX)
The following setting windows is displayed
A third configuration windows is displayed.
This setting defines a period of time before measured values are transmitted after the mass comparator has been loaded. This time begins as soon as the mass comparator is loaded and the load alternator motor shuts off.
Because of, once the mass comparator has been loaded and the stability symbol „g“ is displayed, the weight value may drift slightly until the weight value is recognized as a stable value in order to be transmitted.
This time may differ from location to location and must be determined before performing the actual measurement.
The factory setting is 20.
To select a different number of Delay time, Press the numeric key "33" .
C C 1 0 0 0 0 U - L S o f t w a r e V 1.22 E n g l i s h 1 - J A N - 2010
1: Set number of A B B A - cycles ( 03 ) 2: Set number of Pre - Cycles ( 00 ) 3: Delay time before taken values ( 20 ) 4: More Configurations..
3: Delay time before taken values Please enter the new value. ( 20 )
C C 1 0 0 0 0 U - LS o f t w a r e V 1.22 E n g l i s h 1 - J A N - 2010
Set a number of time between 00 and 99 sec Then press to confirm new settings, or to cancel new settings.
The display returns to the second configuration window.
C C 1 0 0 0 0 U - L S o f t w a r e V 1.22 E n g l i s h 1 - J A N - 2010
For more configurations Press the numeric key "44" .
1: Set number of A B B A - cycles ( 03 ) 2: Set number of Pre - Cycles ( 00 ) 3: Delay time before taken values ( 20 ) 4: More Configurations..
XX
1 32
5
8
6
0
7
4
9
1
2
3
4
2
3
4
1
11
A fourth configuration windows is displayed.
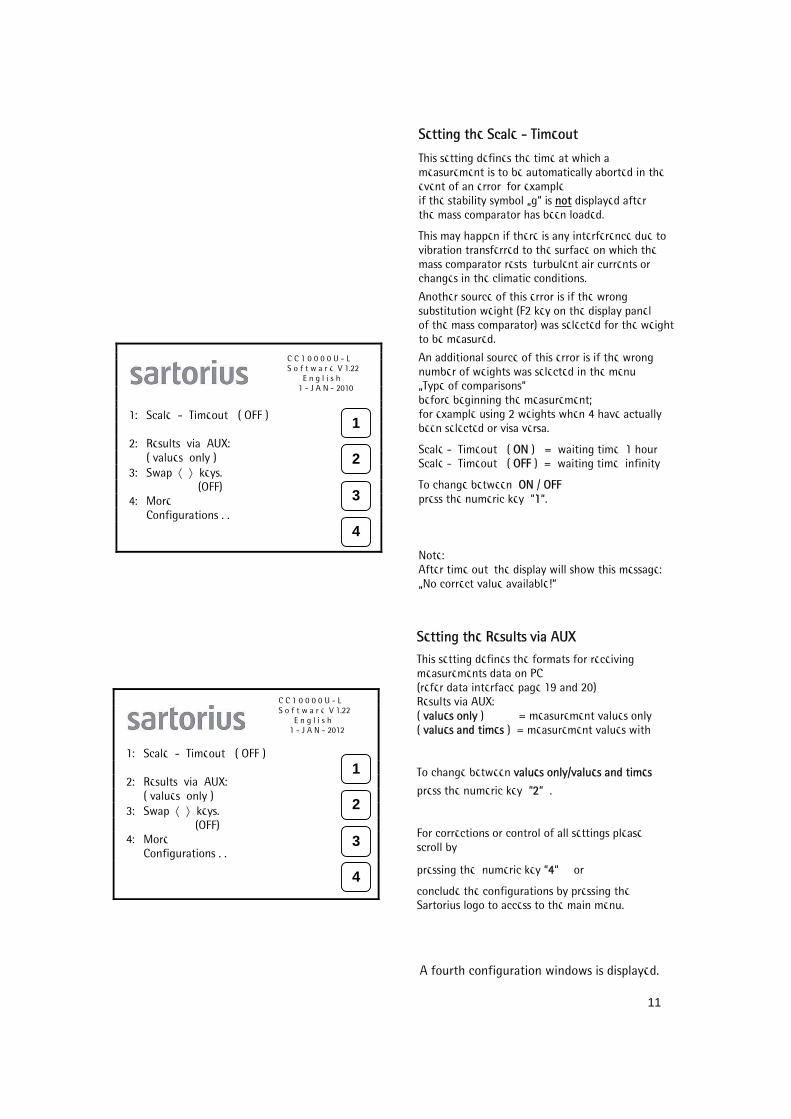
Setting the Scale - Timeout
This setting defines the time at which a measurement is to be automatically aborted in the event of an error, for example, if the stability symbol „g“ is nnot displayed after the mass comparator has been loaded.
This may happen if there is any interference due to vibration transferred to the surface on which the mass comparator rests, turbulent air currents or changes in the climatic conditions.
Another source of this error is if the wrong substitution weight (F2 key on the display panel of the mass comparator) was selected for the weight to be measured.
An additional source of this error is if the wrong number of weights was selected in the menu „Type of comparisons“ before beginning the measurement; for example using 2 weights when 4 have actually been selected or visa versa.
Scale - Timeout ( ON ) = waiting time 1 hour Scale - Timeout ( OFF ) = waiting time infinity
To change between OON / OOFF press the numeric key “11“. Note: After time out, the display will show this message: „No correct value available!“
C C 1 0 0 0 0 U - LS o f t w a r e V 1.22 E n g l i s h 1 - J A N - 2010
1: Scale - Timeout ( OFF ) 2: Results via AUX: ( values only ) 3: Swap keys. (OFF) 4: More Configurations . .
Setting the Results via AUX
This setting defines the formats for receiving measurements data on PC (refer data interface page 19 and 20) Results via AUX: ( vvalues only ) = measurement values only ( vvalues and times ) = measurement values with To change between vvalues only/values and times
press the numeric key “22“ . For corrections or control of all settings please scroll by
pressing the numeric key “44“ , or
conclude the configurations by pressing the Sartorius logo to access to the main menu.
1: Scale - Timeout ( OFF ) 2: Results via AUX: ( values only ) 3: Swap keys. (OFF) 4: More Configurations . .
C C 1 0 0 0 0 U - L S o f t w a r e V 1.22 E n g l i s h 1 - J A N - 2012
1
2
3
4
1
2
3
4

12
The following setting windows is displayed.
C C 1 0 0 0 0 U - L S o f t w a r e V 1.22 E n g l i s h 1 – J A N - 2010
Seting the start delay ( 000 )
This setting make it possible to start the measurements after the deceleration time. max. delay time : 256 Minute This setting is very useful for the of acclimatization of all weights in the same chamber.
To set or change the delay time, Press the numeric key "11"
1: Set start delay ( 000 ) 2: -- -- 3: -- -- 4: More configurations . .
C C 1 0 0 0 0 U - LS o f t w a r e V 1.22 E n g l i s h 1 – J A N - 2010
Set a number of time between 000 and 255 Minute Then press to confirm new settings, or to cancel new settings.
The display returns to the fourth configuration window. For corrections or control of all settings please scroll by
pressing the numeric key „44“, or
conclude the configurations by pressing the Sartorius logo to access to the main menu.
The main window is displayed.
C C 1 0 0 0 0 U - LS o f t w a r e V 1.22 E n g l i s h 1 – J A N - 2010
1: Set start delay ( 000 ) 2: -- -- 3: -- -- 4: More configurations . .
1: Set start delay Please enter the new value. ( 000 )
1
2
3
4
XX
1 32
5
8
6
0
7
4
9
1
2
3
4

13
Operating the Controller Manual Operation of the Load Alternator E.g.: 1. To control the position of the weight 2. To adjust the mass comparator 3. After interrupting a measurement Vertical Movement
RRaise to Upper Position
The main menu is displayed. If not, press the Sartorius logo. Always begin with the "Move vertically" item. Press the number key "22" .
1: Mass comparison cycles 2: Move vertically 3: Move horizontally 4: Configure
C C 1 0 0 0 0 U - L S o f t w a r e V 1.22 E n g l i s h 1 - J A N - 2010
1: Raise load alternator to upper position 2: Move load alternator to centering position 3: Load load alternator toward mass comparator 4: Move horizontally
When you select this function, the load alternator goes through several position shifts until it recognizes the initial raised position. Always activate this function: - after turning on the mass comparator, - after canceling a measurement by pressing reset, and - before configuring the controller. When the menu illustrated on the left is displayed, press the number key "11" .
C C 1 0 0 0 0 U - L S o f t w a r e V 1.22 E n g l i s h 1 - J A N - 2010
The load alternator platform is raised into the upper initial position. If the platform is already in this position when you select this function, it is lowered slightly and then returned to this position. "11: in progress" is displayed while the platform is in motion.
C C 1 0 0 0 0 U - L S o f t w a r e V 1.22 E n g l i s h 1 - J A N - 2010
1: Raise load alternator to upper position 2: Move load alternator to centering position 3: Load load alternator toward mass comparator 4: Move horizontally
1: in progress.
2
3
4
1
1
2
3
4
1
2
3
4
14
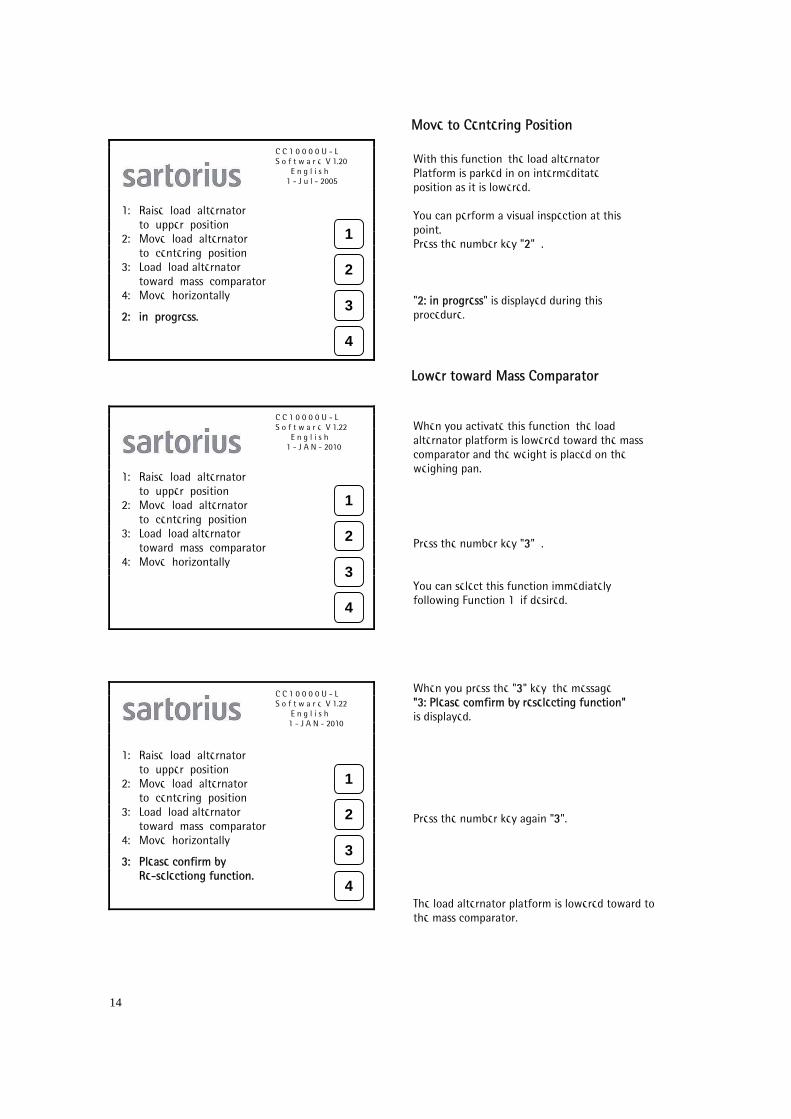
MMove to Centering Position
Lower toward Mass Comparator
1: Raise load alternator to upper position 2: Move load alternator to centering position 3: Load load alternator toward mass comparator 4: Move horizontally
2: in progress.
C C 1 0 0 0 0 U - L S o f t w a r e V 1.20 E n g l i s h 1 - J u l - 2005
With this function, the load alternator Platform is parked in on intermeditate position as it is lowered. You can perform a visual inspection at this point. Press the number key "22" . "22: in progress" is displayed during this procedure.
When you activate this function, the load alternator platform is lowered toward the mass comparator and the weight is placed on the weighing pan.
Press the number key "33" . You can select this function immediately following Function 1, if desired.
1: Raise load alternator to upper position 2: Move load alternator to centering position 3: Load load alternator toward mass comparator 4: Move horizontally
C C 1 0 0 0 0 U - L S o f t w a r e V 1.22 E n g l i s h 1 - J A N - 2010
When you press the "33" key, the message "3: Please comfirm by reselecting function" is displayed. Press the number key again "33". The load alternator platform is lowered toward to the mass comparator.
1: Raise load alternator to upper position 2: Move load alternator to centering position 3: Load load alternator toward mass comparator 4: Move horizontally
3: Please confirm by Re-selectiong function.
C C 1 0 0 0 0 U - L S o f t w a r e V 1.22 E n g l i s h 1 - J A N - 2010
1
2
3
4
1
2
3
4
1
2
3
4

15
When the load alternator platform is in the upper position,
touch the Sartorius logo on the screen to return to the main menu. Horizontal Movement
When you press the "33" key, another window is opened.
1: Raise load alternator to upper position 2: Move load alternator to centering position 3: Load load alternator toward mass comparator 4: Move horizontally
3: in progress.
C C 1 0 0 0 0 U - L S o f t w a r e V 1.22 E n g l i s h 1 - J A N - 2010
"33: in progress" is displayed while the load alternator is in motion. After visual inspection or sensetivity adjustment of the mass comparator, return the load alternator platform to the upper position. Press the number key "11" .
1: Mass Comparison cycles 2: Move vertically 3: Move horizontally 4: Configure
C C 1 0 0 0 0 U – L S o f t w a r e V 1.22 E n g l i s h 1 - J A N – 2010
You can only activate this function when the load alternator is in the raised position. (If necessary, you can ensure that this is the case by selecting Function 2.) Press the number key "33" .
Press the number key that corresponds to the desired function: e.g., to rotate the alternator 180°, press the number key "11" .
1: Turn 180° / Move to next defined position 2: Turn 90° 3: Turn 90° 4: Move vertically
C C 1 0 0 0 0 U - L S o f t w a r e V 1.22 E n g l i s h 1 - J A N - 2010
1
2
3
4
1
2
3
4
1
2
3
4

14
Then press the Sartorius logo on the display To return to the main menu
1: Turn 180° / Move to next defined position 2: Turn 90° 3: Turn 90° 4: Move vertically
1: in progress.
C C 1 0 0 0 0 U - L S o f t w a r e V 1.22 E n g l i s h 1 - J A N - 2010
"11: in progress" is displayed while the load alternator is in motion. Press the corresponding number key to activate other functions as desired.
1: Mass Comparison cycles 2: Move vertically 3: Move horizontally 4: Configure
C C 1 0 0 0 0 U - L S o f t w a r e V 1.22 E n g l i s h 1 - J A N - 2010
The main menu is displayed.
1
2
3
4
1
2
3
4

17
Starting a Measurement 1) without start delay time is setting Before placing a weight on the load alternator platform, make sure that the load alternator is in the initial raised position. See the section entitled "Vertical Movement."
Center the reference and test weights within the marking on the load alternator platform. Always position the reference weight on the "N."
Before beginning the measurement, the reference weight must be in position, on the "N" on the load alternator platform, above the weighing system. See the section entitled "Horizontal Movement." SSelect the procedure for mass comparison
Select the "Mass comparison cycles" item from the main menu. To do this Press the number key "11".
1: Mass comparison cycles 2: Move vertically 3: Move horizontally 4: Configure
C C 1 0 0 0 0 U - L S o f t w a r e V 1.22 E n g l i s h 1 - J A N - 2010
1: 1 A B B A - cycle 2: 6 A B B A - cycles
3: User-defined number of A B B A - cycles ( 03 ) 4: Mass comparison method
When the start menu window opens, select the "Mass comparison method" item ffirst. Press the number key "44".
C C 1 0 0 0 0 U - L S o f t w a r e V 1.22 E n g l i s h 1 - J A N - 2010
1: Mass comparison of two weights 2: Mass comparison of four weights 3: All 6 comparisons (N-1 / 1-2 / N-3 / 1-3 / N-2 / 3-2) 4 Mass comparison cycles
C C 1 0 0 0 0 U - L S o f t w a r e V 1.22 E n g l i s h 1 - J A N – 2010
Select the desired method of mass comparison: e.g.: 1: Mass comparison of two weights
Press the number key "11" .
1
2
3
4
1
2
3
4
1
2
3
4

18
Press the number key "44" to return to the start menu.
Begin Measurement
Press the "22" key again to start the measurement Start the selected measurement sequence, or cancel this input if you wish to select a different number of cycles by pressing another number key, or press the Sartorius logo to return to the main menu.
"11: in progress" is short displayed when you press this key.
1: Mass comparison of two weights 2: Mass comparison of four weights 3: All 6 comparisons (N-1 / 1-2 / N-3 / 1-3 / N-2 / 3-2) 4: Mass comparison cycles
1: in progress.
C C 1 0 0 0 0 U - L S o f t w a r e V 1.22 E n g l i s h 1 - J A N - 2010
When the start menu is displayed, press the number key that corresponds to the desired number of cycles to start the measurement procedure: e.g.: to select 6 A B B A cycles, press the number key"22" . The message 2: Please confirm by re-selecting function is displayed.
1: 1 A B B A - cycle 2: 6 A B B A - cycles 3: User-defined number of A B B A - cycles ( 03 ) 4: Mass comparison method 2: Please confirm by rre-selecting function.
C C 1 0 0 0 0 U - L S o f t w a r e V 1.22 E n g l i s h 1 - J A N - 2010
C C 1 0 0 0 0 U - L S o f t w a r e V 1.22 E n g l i s h 1 - J A N - 2010
1: 1 A B B A - cycle 2: 6 A B B A - cycles 3: User-defined number of A B B A - cycles ( 03 ) 4: Mass comparison method
2: in progress.
To start the selected measurement sequence:
Press the number key once more "22". "22: in progress" is displayed.
1
2
3
4
1
2
3
4
1
2
3
4

19
The measurement procedure starts
The printer begins by printing the current time and date, the mass comparator model designation, the number of A B B A cycles and the number of weights. The load alternator begins by centering the weights. The first weight to be tested is centered first. With 2 weights, this is the weight in position 2. The load alternator platform rotates 180° that the weight in position 2 is above the mass comparator, then begins centering the weight. The weight is placed on the weighing pan and centered by the Centermatic 2 times, in regular cycles. The procedure is then repeated using the reference weight. One ABBA - cycles end the centering procedure.
Continuous Function With the continuous function option, you can repeat complete measurement cycles continuously. To stop the continuous function, press the reset key. Note: Do nnot press the reset key while the load alternator platform is in motion! Starting the Continuous Function
Start the measurement sequence as described above. When the "22: Please confirm by reselecting function" message is displayed, press the number key "22" and hold it until the message 2: in progress. Continuous function! is displayed. The measurement sequence then starts. Press reset key to stop a measurement sequence.
C C 1 0 0 0 0 U - L S o f t w a r e V 1.22 E n g l i s h 1 - J A N - 2010
1: 1 A B B A - cycle 2: 6 A B B A - cycles 3: User-defined number of A B B A - cycles ( 03 ) 4: Mass comparison method
2: in progress. Continuous function!
1
2
3
4
20
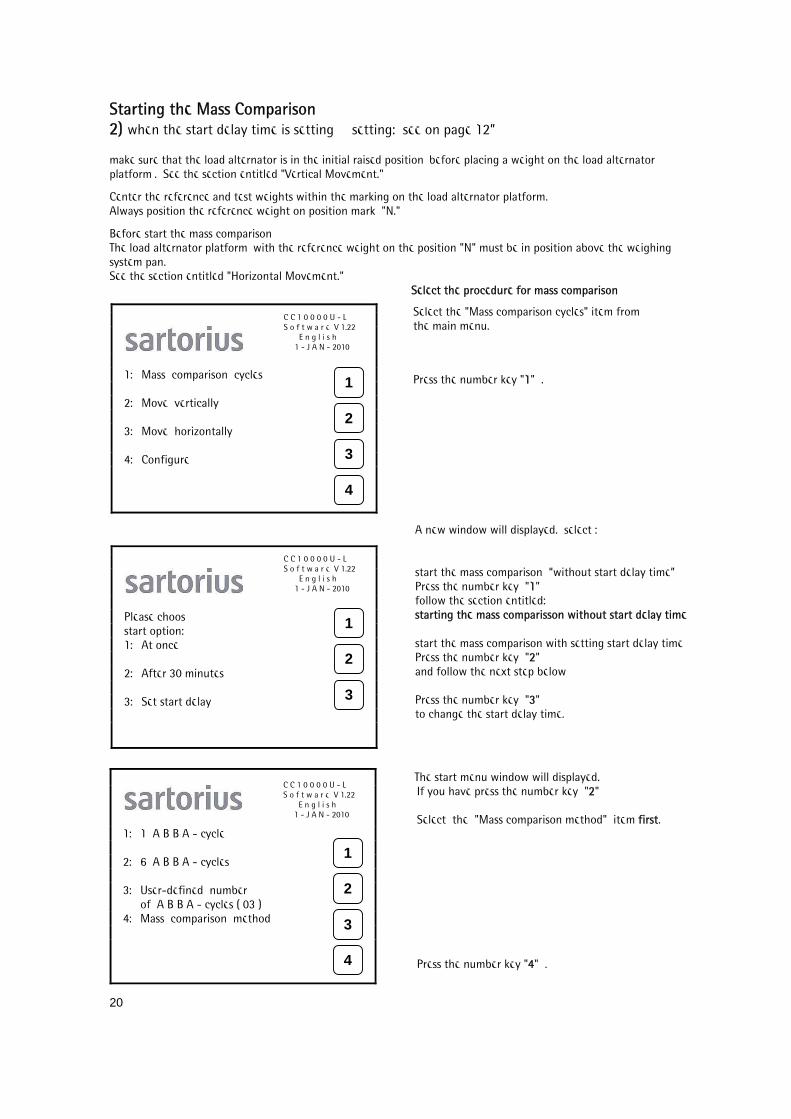
Starting the Mass Comparison 2) when the start delay time is setting, setting: see on page 12” make sure that the load alternator is in the initial raised position, before placing a weight on the load alternator platform,. See the section entitled "Vertical Movement."
Center the reference and test weights within the marking on the load alternator platform. Always position the reference weight on position mark "N."
Before start the mass comparison, The load alternator platform, with the reference weight on the position "N" must be in position above the weighing system pan. See the section entitled "Horizontal Movement." SSelect the procedure for mass comparison
Select the "Mass comparison cycles" item from the main menu. Press the number key "11" .
1: Mass comparison cycles 2: Move vertically 3: Move horizontally 4: Configure
C C 1 0 0 0 0 U - L S o f t w a r e V 1.22 E n g l i s h 1 - J A N - 2010
A new window will displayed. select : start the mass comparison “without start delay time” Press the number key "11" follow the section entitled: starting the mass comparisson without start delay time
start the mass comparison with setting start delay time, Press the number key "22" and follow the next step below Press the number key "33" to change the start delay time.
Please choos start option: 1: At once
2: After 30 minutes 3: Set start delay
C C 1 0 0 0 0 U - L S o f t w a r e V 1.22 E n g l i s h 1 - J A N - 2010
The start menu window will displayed. If you have press the number key "22"
Select the "Mass comparison method" item ffirst. Press the number key "44" .
C C 1 0 0 0 0 U - L S o f t w a r e V 1.22 E n g l i s h 1 - J A N - 2010
1: 1 A B B A - cycle 2: 6 A B B A - cycles
3: User-defined number of A B B A - cycles ( 03 ) 4: Mass comparison method
1
2
3
4
1
2
3
1
2
3
4

21
1: Mass comparison of two weights 2: Mass comparison of four weights 3: All 6 comparisons (N-1 / 1-2 / N-3 / 1-3 / N-2 / 3-2) 4: Mass comparison cycles
1: in progress.
C C 1 0 0 0 0 U - L S o f t w a r e V 1.22 E n g l i s h 1 - J A N - 2010
Select the desired method of mass comparison: e.g.: 1: Mass comparison of two weights
Press the number key "11" . "11: in progress" is sshort displayed
Press the number key "44" to return to the start menu.
C C 1 0 0 0 0 U - L S o f t w a r e V 1.22 E n g l i s h 1 - J A N - 2010
When the start menu is displayed, press the number key that corresponds to the desired number of cycles to start the mass comparison procedure: e.g.: 6 A B B A cycles, press the number key "22" . The message 2: Please confirm by re-selecting function is displayed.
1: 1 A B B A - cycle 2: 6 A B B A - cycles
3: User-defined number of A B B A - cycles ( 03 ) 4: Mass comparison method
1: 1 A B B A - cycle 2: 6 A B B A - cycles
3: User-defined number of A B B A - cycles ( 03 ) 4: Mass comparison method 2: Please confirm by re-selecting function.
C C 1 0 0 0 0 U - L S o f t w a r e V 1.22 E n g l i s h 1 - J A N - 2010
1
2
3
4
1
2
3
4
1
2
3
4
Confirm the selected mass comparison sequence, or cancel by press another number key, or press the Sartorius logo to return to the main menu.
Confirm the selected mass comparison sequence, press the number key "22" again to start the measurement .

22
1: 1 A B B A - cycle 2: 6 A B B A - cycles 3: User-defined number of A B B A - cycles ( 03 ) 2: Mass comparison oof two weights iin progress. 30
C C 1 0 0 0 0 U - L S o f t w a r e V 1.22 E n g l i s h 1 - J A N - 2010
A number will displayed in the window. e. g. 330 This number, identicate the setting start delay time, in minute
The time cont down to ““0” before the mass comparison procedure start automatically
The mass comparison starts
The printer begins by printing the current time and date, the mass comparator model designation, the number of A B B A cycles and the number of weights. The load alternator begins by centering the weights. The first weight to be tested will centered first. as following: e.g. 2 weights on the load alternator. The Testweight is on position 2. The load alternator platform rotates 180° so that the weight of position 2 is above the mass comparator pan. The centering begins. The weight will loaded and unloaded two times on the weighing pan. The Centermatic center the weight in the center position. The load alternator platform rotates 180° back so that the weight of position N is above the mass comparator pan The same procedure for centering N start. One ABBA - cycles end the centering procedure.
1
2
3
4

23
Continuous Function With the continuous function option, you can repeat complete measurement cycles continuously. to stop the continuous function. Press the reset key Note: Do nnot press the reset key while the load alternator platform is in motion! Starting the Continuous Function
Start the measurement sequence as described above. When the "22: Please confirm by reselecting function" message is displayed, press the number key "22" and hold it until the message 2: in progress. Continuous function! is displayed. The mass comparison starts. Press the reset key to stop the continous function,
C C 1 0 0 0 0 U - L S o f t w a r e V 1.22 E n g l i s h 1 - J A N - 2010
1: 1 A B B A - cycle 2: 6 A B B A - cycles 3: User-defined number of A B B A - cycles ( 03 ) 4: Mass comparison method
2: in progress. Continuous function!
1
2
3
4

24
Data Interface ( Aux ) General:
The individual measurements printed out during the measurement process are also available as an ASCII string at the data interface (Aux) and can be received by the PC for further processing, The measurements are always output in a couple of a combined data string.
Two different formats selectable. (refer configurations page 5 and results via AUX on page 11). Results via AUX: 1. ( vvalues only ) = data output of measurements values only 2. ( vvalues and time ) = data output of measurements values with numbers of ABBA - cycles and time.
Values only
The measurements are always output in a couple of a combined data string comprising the measurements A and B oor B and A (separated by a space). The number of characters to be transferred is always 22.
The data output is as follows: Measurement A, 1 space, measurement B and CR (carriage return nno CR/LF). A line feed signal (LF) must be generated each time after data is received from the PC so that the next measured values to be received appear in a new line. Otherwise, the new values will overwrite the former values.
Data output example: CCE1000S-L
Measurement A: - 0.000123, Measurement B: - 0.000456 Data string:
- 0 . 0 0 0 1 2 3 - 0 . 0 0 0 4 5 6 CR
1 2 3 4 5 6 7 8 9 10 11 12 13 1 4 15 16 17 18 19 20 21 22 1 ± sign for measurement A (one space if sign is + ) 2 - 10 measurement value A with decimal point 11 space 12 ± sign for measurement B (one space if sign is + ) 13 - 21 measurement value B with decimal point 22 carriage return The Data string is 22 characters long and to partition as follows. 11 character = measurement A (B) 11 character = measurement B (A) An example for receiving data on PC from the mass comparator and sorted in an excel file. PPC receive: PPC Comparator measurement: measurement A measurement B generated:
1. Measurement AA: 0,000 123, BB: 0,000 456 00,000123 0,000456 LF 2. Measurement B: 0,000 459, A: 0,000 126 00,000126 0,000459 LF 3. Measurement AA: 0,000 125, BB: 0,000 457 00,000125 0,000457 LF 4. Measurement B: 0,000 459, A: 0,000 124 00,000124 0,000459 LF 5. AA: BB:

25
values and times This means that the data string consists of the transaction counter (number of the ABBA cycle), time of value A, value A, time of value B and value B, or these data for B and A, respectively. The calculations of the differences and the final result does not belong to the output. The controller ( control unit ) recognizes different numbers of characters for the measured values so that the data string is correctly sorted with one setting on all automatic mass comparators model. The Data string is 41 characters long and to partition as follows. The partition of the data string is follows:
2 characters = number 1 characters = space 8 characters = time measurement A (B) 10 characters = measurement A (B) 1 characters = space 8 characters = time measurement B (A) 10 characters = measurement B (A) 1 characters = space An example for receiving data on PC from the mass comparator and sorted in an excel file. PPC receive: PPC
Comparator measurement: number measurement measurement time A value A time B value B generated:
1. Measurement AA: 0,000456 BB: 0,000123 11 14:56:29 0,000123 14:58:22 0,000456 LF 2. Measurement B: 0,000456 A: 0,000126 115:02:09 0,000126 15:00:16 0,000456 LF 3. Measurement AA: 0,000125 BB: 0,000457 22 15:04:02 0,000125 15:05:55 0,000457 LF 4. Measurement B: 0,000459 A: 0,000124 115:09:42 0,000124 15:07:49 0,000459 LF 5. Measurement AA: 0,000128 BB: 0,000460 3 15:11:36 0,000128 15:13:29 0,000460 LF 6. Measurement B: A: Connecting cable to PC The two data protocols for the transfer require a semi duplex interface with transmit and receiver lines. As no handshake is required, the relevant handshake lines must be bridged. IBM PC Control Unit _____________________________________________________ female connector (9-pin) male connector (25-pin) Shield ------------------------------------------- Shield
1 -- DCD -------I 2 -- RXD -------I----------------------- TXD -- 2
3 -- TXD -------I----------------------- RXD -- 3 4 -- DTR -------o 5 -- GND -------I----------------------- GND -- 7 6 -- DSR -------o 8 -- CTS -------I

24
Programming for external operation with PC Introduction
The load alternator can be operated from a PC via the “AUX” port. Measurement procedures can be freely programmed as required.
As the data protocol runs in 7 bit / ASCII format, any terminal program on the PC is suitable for testing the functions.
Interface parameters: 9600 Baud EVEN Parity 1 start bit 7 data bits 1 stop bit nno handshake, local echo must be switched off Linking the PC to the control unit Switch on the control unit of the load alternator. Make sure that the main menu is displayed on the controller; if necessary key to the Sartorius logo. To link the PC to the control unit, send a CCR ( Carriage Return only nno CR/LF ) at intervals until the alternator responds with ready for operation “???”.
The control unit display will bring up the message “SSystem controlled externally”. This message will remain on the display as long as the external control condition persists. The built-in printer is disabled.
On the PC monitor, two question marks “???” will be displayed indicating the system’s readiness to receive commands. If further data (parameters, confirmations) are required, this will be indicated by the appearance of a single question mark “??”. All command codes consist of a single letter or numeral. (No Carriage Return “CR” must be sent). The alternator sends back the character it receives (echo) by way of confirmation. Once the command has been executed, “???” will be displayed on the screen. External control commands Vertical movements “11“ Locating top starting position.
“33“ Lowering the centering position (middle position).
“44“ a) Lowering to mass comparator: If load changer centred. Queries with “?“. - “0“ confirms to lowering. b) Locating centering position: If load changer in weighing position.
Executes command immediately it is entered.
“DD“ (Down) Lowering to mass comparator. Executes command immediately it is entered. a) Lowering from the top starting position. b) Lowering from the centering position. Horizontal movements “HH“ Rotate 180° clockwise. “22“ Rotate 180° counter-clockwise. (CC50000S: Change the horizontal end position).
“99“ Rotate 90° clockwise. (CC50000S: Change the horizontal end/centre position).
“NN“ Rotate 90° counter-clockwise.

27
Automatic weighing “55“ 1 x A-B-B-A cycle. Queries with “?“. - Confirms to start with “0“.
“66“ 6 x A-B-B-A cycles. Queries with “?“. a) 1 x 6 x A-B-B-A : - Confirms to start with “0“. b) Permanent function 6 x A-B-B-A : - Enter “66“ repeatedly. Queries with “?“. - Confirms to start with “0“. “77“ 3 - 99 x A-B-B-A cycles freely selectable. Queries with “?“ Enter required number of A-B-B-A measurements.
Note! The number is entered as “a single character” whose ASCII value corresponds to the actual number required. (Enter in the terminal program: if applicable, using ALT and number on the keypad).
- Executes command immediately it is entered. Commands without movement “00“ (Zero) Set evaluation time in seconds 05 - 99. Queries with “?“ Enter evaluation time.
Note! The number is entered as “a single character” whose ASCII value corresponds to the actual number required. (Enter in the terminal program: if applicable, using ALT and number on the keypad).
“88“ Compare mass of only 2 weights. Entry necessary with only 2 weights before start. “AA“ (All 6 comparisons) Mass comparison all 6 combinations. Only possible when 4 weights are used. When required, entry before measurement starts. “RR“ (READ) Take weight value from the mass comparator display.
Possible only when weighing is in progress and the weight is shown with the stability symbol “g”. The weight is transferred after a delay, determined by the evaluation time entered.
Note! The controller reports error and then stops the system if no correct weight is available.
“VV“ (Version) indicates the comparator model and the software version.
Error messages “NNA“ (not available) Function not available from current position. “SSE“ (scale error) No correct weight available, control blocked. “PPE“ (position error) No response from position switch: alternator blocked. The measurements are sent to the PC as a couple of values an ASCII string. The measurements “A” and “B” are separated by: a space (hexadecimal 20), and end with: CR (hexadecimal 0D) A line feed signal (LF) must be generated each time after data is received from the PC so that the next measured values to be received appear in a new line. Otherwise, the new values sent will overwrite the former values.

28
Troubleshooting Error message:
1: Function not possibile from this position!
Cause: Solution: If you press the number key "11" :
The load alternator platform is in the centering or lowered position.
Move the platform to the initial raised position. Press the number key "22" and then press the key "11" while the submenu is displayed.
Error message:
3: Function not possible from this position!
Cause: Solution: If you press the number key "33" :
The load alternator platform is in the centering or lowered position.
Move the platform to the initial raised position. Press the number key "22" and then press the key "11" while the submenu is displayed.
1: Mass comparison cycles
2: Move vertically 3: Move horizontally 4: Configure
1: Function not possible ffrom this position!
C C 1 0 0 0 0 U - L S o f t w a r e V 1.22 E n g l i s h 1 - J A N - 2010
C C 1 0 0 0 0 U - L S o f t w a r e V 1.22 E n g l i s h 1 - J A N - 2010
1 Mass comparison cycles 2: Move vertically 3: Move horizontally 4: Configure
3: Function not possible ffrom this position!
1
2
3
4
1
2
3
4

29
Error message:
Cause: Solution:After a measurement has begun:
The mass comparator has not been turned on.
The controller is not connected to the mass comparator.
The menu has not been configured for data transfer.
You have started a measurement with 2 weights.
Turn on the mass comparator.
Connect the cable.
Check the menu settings in the mass comparator.
Select the comparison method before starting a measurement sequence. See "Starting a Measurement."
During measurement:
Data is not transferred to the controller because the display is not stable; i.e., the stability symbol is not displayed.
Check for and correct unfavorable ambient conditions; e.g. vibrations, drafts or air turbulence, extreme temperature fluctuations.
Error message:
Cause: Solution: After turning on the mass comparator or during measurement:
The load alternator platform is in the centering or lowered position. The power supply has been interrupted. The reset key was pressed.
Move the platform to the initial raised position. Restart measurement.
No correct value available! Please check weights and number loaded - then press the reset button.
C C 1 0 0 0 0 U - L S o f t w a r e V 1.22 E n g l i s h 1 - J A N - 2010
Initial System Startup
Important! First raise load alternator to upper position, then load the weights. Press anywhere to access the main menu.
C C 1 0 0 0 0 U - L S o f t w a r e V 1.22 E n g l i s h 1 - J A N - 2010
30
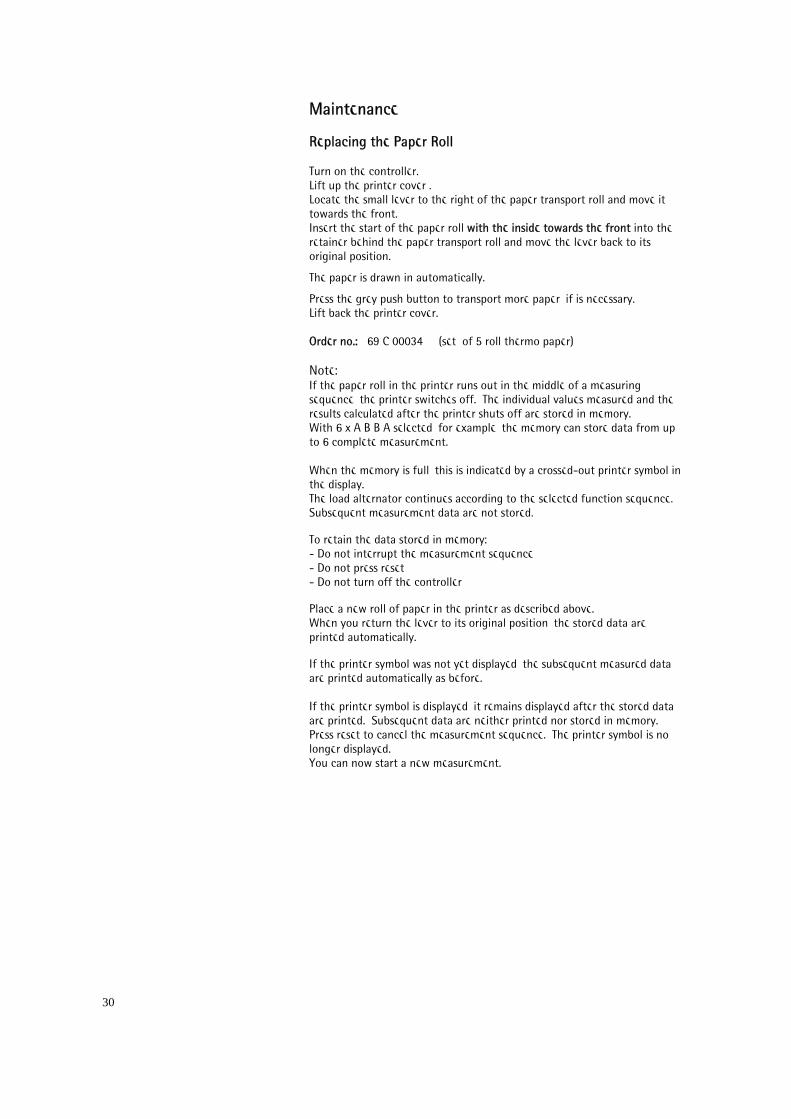
Maintenance Replacing the Paper Roll Turn on the controller. Lift up the printer cover . Locate the small lever to the right of the paper transport roll and move it towards the front. Insert the start of the paper roll wwith the inside towards the front into the retainer behind the paper transport roll and move the lever back to its original position.
The paper is drawn in automatically.
Press the grey push button to transport more paper, if is necessary. Lift back the printer cover. Order no.: 69 C 00034 (set of 5 roll thermo paper) Note: If the paper roll in the printer runs out in the middle of a measuring sequence, the printer switches off. The individual values measured and the results calculated after the printer shuts off are stored in memory. With 6 x A B B A selected, for example, the memory can store data from up to 6 complete measurement. When the memory is full, this is indicated by a crossed-out printer symbol in the display. The load alternator continues according to the selected function sequence. Subsequent measurement data are not stored. To retain the data stored in memory: - Do not interrupt the measurement sequence - Do not press reset - Do not turn off the controller Place a new roll of paper in the printer as described above. When you return the lever to its original position, the stored data are printed automatically. If the printer symbol was not yet displayed, the subsequent measured data are printed automatically as before. If the printer symbol is displayed, it remains displayed after the stored data are printed. Subsequent data are neither printed nor stored in memory. Press reset to cancel the measurement sequence. The printer symbol is no longer displayed. You can now start a new measurement.


Specifications subject to change without notice.
Printed in the EU on paper bleached
without chlorine.
HA_Controller for CC/CCE...-L · KT
Publication No.: WCC6014-e140405
Sartorius Lab Instruments GmbH & Co. KG Weender Landstrasse 94–108 37075 Goettingen, Germany
Phone +49.551.308.0 Fax +49.551.308.3289 www.sartorius.com
Copyright by Sartorius Lab Instruments GmbH & Co. KG, Goettingen, Germany. All rights reserved. No part of this publication may be reprinted or translated in any form or by any means without the prior written permission of Sartorius.The status of the information, specifications and illustrations in this manual is indicated by the date given below. Sartorius reserves the right to make changes to the technology, features, specifications and design of the equipment without notice.
Status: April 2014, Sartorius Lab Instruments GmbH & Co. KG, Goettingen, Germany