operating instructions - altronic incaltronicinc.com/pdf/cpu95/cpu-95-oi-e-2-10.pdf · operating...
TRANSCRIPT

Operating InstructionsCPU-95 Digital Ignition System with Enhanced Display
Form CPU-95 OI-E 2-10

CPU-95 OI-E 2-10 All rights reserved © ALTRONIC, LLC 2010 2
1.0 OVERVIEW 1.1 The Altronic CPU-95 Digital Ignition system with enhanced display has been
designed for application on natural gas fueled engines. This system is field-programmable and offers a variety of advanced control, emissions reduction, primary and spark diagnostics, self diagnostics, serial communications and engine protection features. The system consists of two main parts: an engine mounted Ignition Module (791950-8/16/18, 791952-18 or 791958-16) and a user interface Display Module (791909-1).
1.2 This document provides instructions and descriptions to be used in the operation of the ignition system, and does not cover physical installation. Reference the installation instructions, form CPU-95 II, for instructions regarding installation and mounting.
2.0 IGNITION MODULE OUTPUT SWITCHES, LED INDICATORS AND CONTROL INPUT 2.1 Three output switches in the Ignition Module provide a means of communicating
the current ignition status to other systems. These switches have isolated outputs and share one common return path which is not referenced to engine or power ground. They will be in the open condition when the unit is unpowered. A typical application would be as a relay or solenoid coil driver.
FIRE-CONFIRM OUT switch: closed when the ignition is firing or trying to fire. Could be used as a signal to the control system to turn fuel on.
FAULT OUT switch: closed to signal that the ignition has no diagnostic faults which would result in a self-shutdown. Upon detecting a fault that would result in a self-shutdown of the ignition, this switch will open. Could be used as a signal to the control system to turn fuel off.
ALARM OUT switch: closed to signal that no unacknowledged faults or warnings are present. Upon detection of a diagnostic fault or warning, this switch will open. This output is designed to control an alarm indicator or sounding device.
2.2 Four red LED indicators are provided inside the ignition unit for troubleshooting purposes:
POWER LED: on to indicate that the unit has power and the microprocessor is running. The Power LED flashes to indicate that the unit has power but is not operating correctly. The Power LED is off to indicate that the unit has no power.
TX LED: flashes to indicate that the ignition unit is transmitting on the RS-485 serial link.
RX LED: flashes to indicate that the ignition unit is receiving on the RS-485 serial link.
ALARM LED: turns on to indicate that a warning or fault is present. The ALARM LED flashes when an acknowledged warning is present.
2.3 One RS-485 serial communications port is provided within the Ignition Module.
This port is normally used for communication to the optional Display Module. A PC (personal computer) or a PLC (programmable logic controller) can be connected to the RS-485 port to perform remote monitoring or control functions. The Ignition Module can be operated in a stand-alone mode, but diagnostic and control features would not be accessible. This port is also used to configure the ignition system for its application using a PC and the CPU-95 PC terminal software.
WARNING: DEVIATION FROM THESE INSTRUCTIONS MAY LEAD TO IMPROPER ENGINE OPERATION WHICH COULD CAUSE PERSONAL INJURY TO OPERATORS OR OTHER NEARBY PERSONNEL.
NOTE: If possible, keep the original shipping container. If future transportation or storage is necessary, this container will provide the optimum protection.
NOTE: These instructions pertain to CPU-95 systems equipped with firmware release 4.0, dated 01/01/99 and later. The firmware dates can be displayed from the home screen by pressing “DIAG” and then “ENTER”. The date of the installed firmware is viewed: – Top line (LOGIC) applies to the output module firmware date. – Lower line (DISPLAY) applies to the display module firmware date.
THE IGNITION SYSTEM MUST BE CONFIGURED PRIOR TO USE ON AN ENGINE. REFER TO SECTION 4.9 TO VIEW THE CURRENT CONFIGURATION. REFERENCE FORM CPU-95 PI FOR INSTRUCTIONS DESCRIBING HOW TO CONFIGURE THE IGNITION SYSTEM. VERIFY EEPROM PROGRAMMING PRIOR TO STARTING ENGINE.

CPU-95 OI-E 2-10 All rights reserved © ALTRONIC, LLC 2010 3
2.4 One digital input is provided inside the ignition system (MISC. INPUT). This logic level input is active when shorted to ground, and is used to control any combination of the following features: one-step retard, spark energy level or multi-strike option. These features are enabled based on the special features configuration settings as described in the programming instructions, form CPU-95 PI.
3.0 DISPLAY MODULE USER INTERFACE AND INPUTS
3.1 Display Module: serves as the user interface for the CPU-95 ignition system. An RS-485 two wire serial communications format is used to connect the Display Module to the Ignition Module. This link communicates between the modules using a proprietary protocol.
3.2 LCD DISPLAY: A graphical, back-lit LCD display is used to provide output to the user. A sealed membrane keypad is used to accept user input. The LCD display and the keypad function together to provide an interactive user interface which prompts the user as different functions are selected.
3.3 All actions and adjustments are immediate and are performed on an incremental basis using up and down arrow keys. All keypad adjustments, except individual offset timing adjustments are performed directly in non-volatile EEPROM memory. This EEPROM memory retains previous settings even after an engine shutdown, or an ignition power down.
3.4 Capital letters are used on the LCD display screen to designate an active selection while lower case letters are used to indicate other possible options.
3.5 The Display Module includes an isolated current loop input which can be configured to control spark timing. Reference the programming instructions, form CPU-95 PI.
3.6 One logic level digital input (MISC. INPUT) is available at the Display Module which can be used in the same fashion as the input of the Ignition Module. If either input is shorted to ground, then the MISC. INPUT functions are active.
3.7 The display module incorporates a half duplex RS-485 port which is Modbus RTU slave compliant. The protocol used follows the Modicon Modbus RTU standard. For a complete list of the Modbus register addresses, SEE SECTION 15.0. The CPU-95 terminal program CD contains a PC-based Modbus compatible monitoring program which can be used to access the ignition data remotely.
3.8 One USB peripheral port. The USB port can be configured to allow programming of the attached ignition module when used with CPU-95 Terminal program V2.0 and above. The USB port can also be configured as another Modbus RTU interface.

CPU-95 OI-E 2-10 All rights reserved © ALTRONIC, LLC 2010 4
4.0 UNDERSTANDING THE HOME SCREEN
4.1 A series of home screens are used to describe the current status of the ignition system. The LCD display always reverts back to one of the home screens after a keypad operation is completed or times out. The home screen is designed to display the most critical operating parameters on one screen.
4.2 The READY message is displayed when the ignition is ready for the engine to crank for starting.
4.3 Once the engine begins turning, the SYNCING message is displayed while the ignition system verifies signals from the engine pickups.
4.4 The FIRING message is displayed when the ignition begins firing. Additional data is provided on this screen to describe the selected mode of operation for the ignition. The energy mode (E1,E2,E3) and the single-strike/multi-strike type (SS or MS) are described in the middle of the upper line in small characters.

CPU-95 OI-E 2-10 All rights reserved © ALTRONIC, LLC 2010 5
4.5 The STALLED message is displayed when a loss of rotation is detected after the ignition is firing and neither a SHUTDOWN or FAULT has occurred. This signifies that the engine has stopped without any detected cause from the ignition system.
4.6 The WARNING message will supersede all of the above home screens if a diagnostic warning condition is present. When a diagnostic warning exists, a ** Press DIAG ** message will appear on the display. The Ignition Module will continue to operate under a warning condition while alerting the operator of a potential problem in several ways: by turning on the Alarm LED in the Ignition Module and by changing the state of the Alarm Out switch (switch opens). The Display Module will display the Warning message. The various types of diagnostic warnings are described in SECTION 10.0.
4.7 The FAULT message will supersede all of the above home screens if a diagnostic fault condition is present. When a diagnostic fault exists, a ** Press DIAG ** message will appear on the display. The ignition system will stop operating under a fault condition and will alert the operator to the problem in several ways: by changing the state of the Fire Confirm Out switch (switch opens), by turning on the alarm LED inside the Ignition Module, by changing the state of the Alarm Out switch (switch opens), by changing the state of the Fault Out switch (switch opens), and by displaying the Fault message. The various types of diagnostic faults are described in SECTION 10.0.

CPU-95 OI-E 2-10 All rights reserved © ALTRONIC, LLC 2010 6
4.8 The SHUTDOWN screen will supersede all other home displays if the logic level shutdown input of the Ignition Module or the G-Lead of the output primary connector is grounded or was previously grounded and the engine has not stopped rotating. This screen indicates that the ignition is not firing because a shutdown input was triggered to shutdown the engine. If a diagnostic fault or warning exists while the ignition is in shutdown, a PRESS DIAG message will appear on the display. The Fire Confirm Out switch will change state (switch opens) and the other outputs will function as described above based on the existence of faults or warnings.
4.9 From the HOME SCREEN, pressing the NEXT key allows you to cycle through the configuration comments which describe the configuration of the ignition system.
AT
PRESS TOGO TONEXT
NEXT
The configuration screens are shown starting on the next page.
NOTE: Because EEPROMS can be reconfigured (using a PC and Altronic’s configuration software), these comments should be viewed to identify and verify the configuration settings of the ignition prior to operation. Refer to the programming instructions, form CPU-95 PI, for further information on configuration.

CPU-95 OI-E 2-10 All rights reserved © ALTRONIC, LLC 2010 7
The following types of screens can be viewed by pressing NEXT to advance.
FIRING PATTERN CODE: (P2A360.FS1)SPECIAL FEATURE CODE: (#001) (1 STEP DEFAULT)IGNITION MODULE TYPE: (PART NUMBER)
NEXT
DATE CONFIGURED: (04-09-08)TIME CONFIGURED: (14:15)CONFIGURED BY: (Alt:GRH)TERMINAL VERSION #: (v2.0)
NEXT
CURRENT LOOP CURVE DESCRIPTION AT 4mA 0° RETARD AT 20mA 24° RETARD USER SPECIFIED DESCRIPTION
NEXT
RPM RETARD CURVE DESCRIPTION RETARD 10° BELOW 100rpm RAMP TO 0° AT 200rpm USER SPECIFIED DESCRIPTION
NEXT
LOCATION: USER SPECIFIED DESCRIPTION
NEXT

CPU-95 OI-E 2-10 All rights reserved © ALTRONIC, LLC 2010 8
ENGINE NUMBER OR DESCRIPTION USER SPECIFIED DESCRIPTION
NEXT
SPECIAL USER COMMENTS AREA #1 USER SPECIFIED COMMENTS
NEXT
SPECIAL USER COMMENTS AREA #2 USER SPECIFIED COMMENTS
NEXT
PRESS NEXT TO RETURN TO HOME SCREEN
NEXT
PRESS ESC. FROM ANY SCREEN TO RETURN TO HOME SCREEN
ESC

CPU-95 OI-E 2-10 All rights reserved © ALTRONIC, LLC 2010 9
BREAKDOWN OF FIRING PATTERN CODE: H4A360.FS100#001
H REPRESENTS THE NUMBER OF OUTPUTS USED, IN THIS CASE 8 (F =6, L = 12, ETC.)
4 REPRESENTS THE CYCLE TYPE OF THE ENGINE
2 = TWO-CYCLE
4 = FOUR-CYCLE
A REPRESENTS THE ALTRONIC PATTERN CODE (SEE FORM CPU-95 AL)
360 REPRESENTS THE NUMBER OF GEAR TEETH OR HOLES TO BE SENSED
F REPRESENTS A DESIGNATOR FOR CPU-95 VERSION 1
S REPRESENTS THE CURRENT LOOP RETARD CURVE TYPE
A = 0° AT 4MA / 48° AT 20MA
B = 0° AT 4MA / 36° AT 20MA
C = 0° AT 4MA / 24° AT 20MA
D = 0° AT 4MA / 16° AT 20MA
E = 0° AT 4MA / 8° AT 20MA
N = SPECIAL NON-STANDARD TIMING CURVE VS. CURRENT OR RPM, NON-FACTORY PROGRAMMED
S = SPECIAL NON-STANDARD TIMING CURVE VS. CURRENT OR RPM, FACTORY PROGRAMMED
X = NO CURRENT LOOP CURVE
100 REPRESENTS THE SPECIAL VERSION NUMBER (ONLY EXISTS FOR TYPES N AND S)
#001 REPRESENTS THE SPECIAL FEATURE CODE (TOTAL SUM OF ALL SELECTED OPTIONS; 001=DEFAULT)
064 = FORCE MULTI-STRIKE WHEN RPM IS LESS THAN 250
032 = FORCE MAX ENERGY WHEN RPM IS LESS THAN 250
016 = USE 1 STEP RETARD WHEN RPM IS LESS THAN 250
004 = FORCE MULTI-STRIKE WHEN MISC INPUT IS GROUNDED
002 = FORCE MAX ENERGY WHEN MISC INPUT IS GROUNDED
001 = USE 1 STEP RETARD WHEN MISC INPUT IS GROUNDED
NOTE: This number must be selected and properly documented by the originator.

CPU-95 OI-E 2-10 All rights reserved © ALTRONIC, LLC 2010 10
5.0 ADJUSTING GLOBAL RETARD
5.1 Global retard is an adjustment affecting the timing of all cylinders equally. This adjustment can be equated to the manual timing switch of the Altronic CPU-90 system. Adjustments made as described below will be in effect until another adjustment is made.
5.2 To adjust global retard:
FROM PRESS
TIMING
THEN AT PRESS
‹
THEN AT PRESS
‹
THEN AT NOTE: RESULTANT TIMING SHOWN ON BOTTOM LINE.
PRESS TO PRESS TO PRESS TOINCREASE DECREASE EXIT RETARD RETARD
‹
‹
ESC
CPU-95 OI-E 2-10 All rights reserved © ALTRONIC, LLC 2010 11
5.3 The increment of timing change is dependent on the number of holes or teeth being sensed. The minimum timing change is defined as follows.
If N < 270, then Increment = “45/N” degrees
If N ≥ 270, then timing increment is “90/N” degrees, where N = no. of holes or teeth.
5.4 Global spark timing is determined based on the sum of several spark retard components which include manual retard, current loop retard, rpm retard, and one step retard. The range of total retard is limited to 255 X timing increment. When the sum of all retard components reaches 255 X timing increment, the actual timing will be at the retard limit.
6.0 SELECTION OF GLOBAL TIMING MODES
6.1 Several options exist with regard to global timing modes. Once the global timing mode menu is entered as described below, the status of each option can be viewed and changed.
FROM PRESS
TIMING
THEN AT PRESS
‹
THEN AT PRESS
‹
CPU-95 OI-E 2-10 All rights reserved © ALTRONIC, LLC 2010 12
6.2 The first mode selection can enable or disable the pre-configured retard curve controlled by the 4-20 mA current loop input. The choices are ON or OFF, with the active selection displayed in capital letters. A PC is required to configure the 4-20 mA curve; reference the programming instructions, form CPU-95 PI. When the current loop is on, the current loop value is displayed (xx.x mA) with the “A” capitalized. When the current loop is off, the value is displayed (xx.x ma) with the lower case “a”.
AT NOTE: DISPLAY SHOWS CURRENT LOOP ON.
TO TO FOR TOTURN TURN NEXT EXITON OFF OPTION
‹
‹
NEXT
ESC
6.3 The next mode selection can enable or disable the pre-configured retard curve controlled internally by engine RPM. To configure the RPM retard curve, reference form CPU-95 PI.
AT THE NOTE: DISPLAYNEXT SHOWS RPMOPTION MAP OFF.SCREEN
TO TO FOR TOTURN TURN NEXT EXITON OFF OPTION
‹
‹
NEXT
ESC

CPU-95 OI-E 2-10 All rights reserved © ALTRONIC, LLC 2010 13
6.4 The next mode selection can increase or decrease the one-step retard value. The first screen below is displayed when one-step retard is both configured and is active. The second screen below is displayed when the one-step retard is configured but not active. The default configuration selects one-step retard to be controlled by the Misc. Input terminal. The additional retard would be implemented when the input is grounded. The third screen below is displayed when the one-step retard feature is not configured. The actual engine timing is displayed on this screen so the effect of 1 step retard can be seen during adjustments (if the Misc Input terminal is grounded).
AT THE NOTE: UPPER CASENEXT 1 STEP RET = ON.OPTION SCREEN
OR NOTE: LOWER CASE 1 STEP RETARD = OFF.
OR NOTE: 1 STEP RETARD NOT CONFIGURED.
TO TO TO GO TOINCREASE DECREASE BACK TO EXIT FIRST
‹
‹
NEXT ESC

CPU-95 OI-E 2-10 All rights reserved © ALTRONIC, LLC 2010 14
7.0 ADJUSTING INDIVIDUAL OFFSETS 7.1 The timing of individual cylinders can be offset by up to 3 degrees of advance
or retard from the global timing of the engine. Adjustments made as described below should be considered temporary. The ignition will revert back to the values saved in EEPROM memory on every reset, start or power-up. To save temporary adjustments to EEPROM memory SEE SECTION 8.0.
7.2 Enter the individual timing adjustment menu as described below.
FROM PRESS
TIMING
THEN AT PRESS
‹
THEN At PRESS
‹
7.3 The individual timing adjustment screen identifies the primary output to be adjusted, and the degrees of offset in use for the output.
THEN AT NOTE: 2.5 degrees advance for output A.
TO TO TO TOADVANCE RETARD SELECT EXIT NEXT
‹
‹
CYL.
NEXT
ESC
NOTE: In applications with narrow fir-ing angles, the adjustment range may be limited.
NOTE: The output identification characters can be configured.SEE SECTION 9.0

CPU-95 OI-E 2-10 All rights reserved © ALTRONIC, LLC 2010 15
8.0 INDIVIDUAL CYLINDER OFFSET MODES
8.1 Two additional functions with regard to individual cylinder timing offsets are provided. These functions can be accessed from the individual timing mode menu which can be entered as described below.
FROM PRESS
TIMING
THEN AT PRESS
‹
THEN AT PRESS
‹
8.2 The first function is used to save the current (temporary) individual offsets to EEPROM memory. When this is done, the ignition will load these offset settings every time the engine starts or reset is pressed. Reference SECTION 7.0 to adjust individual (temporary) offsets.
AT THE FIRST OPTION SCREEN
PRESS TO PRESS PRESS TOSAVE FOR NEXT EXIT OFFSETS OPTION
ENTER
ESCNEXT

CPU-95 OI-E 2-10 All rights reserved © ALTRONIC, LLC 2010 16
8.3 The next mode function can be used to reset all cylinder offset values to zero (both temporary memory and EEPROM memory).
AT THE NEXT OPTION SCREEN
PRESS to press PRESS toRESET FOR NEXT exit OFFSETS OPTION
ENTER
NEXT
ESC
CPU-95 OI-E 2-10 All rights reserved © ALTRONIC, LLC 2010 17
9.0 SETUP CONTROL OPTIONS
9.1 Additional control settings and display features can be accessed under the setup menu. Changes made under the Setup menu are stored in EEPROM and remain fixed until changed again. The Setup menu can be entered as described below.
FROM PRESS
SETUP
9.2 The first setup screen permits the operator to enable or disable the Multi-Strike feature.
Note 1: A special feature can be selected during configuration to force Multi-Strike to be active below 250 rpm, or when the Misc. Input is grounded.
This feature is not active in a standard configuration.
Note 2: The Multi-Strike feature is automatically turned off above 1050 rpm.
Note 3: The use of Multi-Strike firings may tend to accelerate spark plug elec-trode erosion.
Note 4: The Multi-Strike feature fires the spark plug 2 times per event (~1100usec apart).
Note 5: On 791958-16 unit only: The Multi-Strike feature is replaced by the VariSpark long duration (~2000 usec) spark.
AT
TO TO FOR TOTURN TURN NEXT EXITON off option MULTI
‹
MULTI
‹
NEXT
ESC
CPU-95 OI-E 2-10 All rights reserved © ALTRONIC, LLC 2010 18
9.3 The next setup screen permits the operator to select one of three ignition energy levels (E1,E2,E3). The energy levels are 75 millijoules (E1), 100 millijoules (E2), 125 millijoules (E3).
Note 1: A special feature can be selected during configuration to use the maxi-mum energy level below 250 rpm, or when the Misc Input is grounded.
This feature is not active in a standard configuration.
Note 2: The energy is automatically limited to E2 when Multi-Strike is active.
Note 3: The use of higher spark energy may tend to accelerate spark plug elec-trode erosion.
AT NOTE: Energy level E1 is displayed.
TO TO FOR TOINCREASE DECREASE NEXT EXIT OPTION
‹
‹
NEXT
ESC
9.4 The next setup screen is used to adjust the engine overspeed setpoint. The setpoint can be adjusted in increments of 10 rpm to a maximum of 2550 rpm.
AT
TO TO FOR TOINCREASE DECREASE NEXT EXIT OPTION
‹
‹
NEXT
ESC

CPU-95 OI-E 2-10 All rights reserved © ALTRONIC, LLC 2010 19
9.5 The next setup screen is used to specify the exact position of the reset pin. Both the reset position and the engine timing are displayed. Adjustments are made here to make the displayed timing match the actual spark timing as verified with a timing light. This adjustment effects the displayed timing but does NOT change the actual timing of the firings.
AT
TO TO FOR TOINCREASE DECREASE NEXT EXIT OPTION
‹
‹
NEXT
ESC
9.6 The next setup screen is used to enable or disable VALUE PROTECTION of all user values in the EEPROM memory. When protection is on, none of the EEPROM settings under the Setup or Timing menus can be changed. This feature can be used to provide limited protection from random changes by inexperienced operators.
AT
TO TURN TO TURN FOR TOON PRO- OFF PRO- NEXT EXITTECTION TECTION OPTION
‹
‹
NEXT
ESC
NOTE: Adjustment of this parameter should be done while individual cylinder offsets are all at zero.

CPU-95 OI-E 2-10 All rights reserved © ALTRONIC, LLC 2010 20
The VALUE PROTECTION can be password protected. The password PROTECTION LOCK is enabled when programming options from the PC terminal program. See the Programming Instructions, form CPU-95 PI for details. When password protection is enabled the following menu appears instead of the VALUE PROTECTION menu.
To enter the password press, use the function keys F1, F2, F3, F4 where F1=1, F2=2, F3=3, F4=4 where the number entered is equal to the user assigned five digit password. After the last digit of the proper password is entered, the VALUE PROTECTION menu shown above will appear. If the password is not known, press the ESC key to exit or the NEXT key to go on to the next setup menu.
9.7 The last setup screen permits the operator to enter an ignition test mode. This test mode can fire all outputs in rotation, or individual outputs at a slow rate. This feature can be used to troubleshoot primary wiring and Output Module operation. Test mode will terminate if rotation of the engine is sensed. Diagnostic features do not function while in test mode.
AT
PRESS FOR PRESS PRESS TOTEST MODE FOR NEXT EXIT OPTION
ENTER
NEXT
ESC
THEN BEFORE STARTING TEST MODE
PRESS TO PRESS TOVERIFY EXIT PURGED
ENTER
NEXT
NOTE: The Test-Mode is enabled by the user during initial setup of display module from PC terminal program. See form CPU-95 PI for details.
WARNING: The operator MUST fully purge the engine of combustible mix-tures prior to selecting the test mode operation. Pressing the enter key again is a confirmation of this action.

CPU-95 OI-E 2-10 All rights reserved © ALTRONIC, LLC 2010 21
Then the test mode screen indicates that the ignition is firing and permits the operator to select the output to be fired.
AT
PRESS TO PRESS TO PRESS TOSELECT SELECT EXIT PREVIOUS THE NEXT OUTPUT
‹
OUTPUT
‹
ESC
Test-Mode selection rotates as described below.
MODEL # ROTATION SEQUENCE
791950-8: ALL, A, B, C, D, E, F, K, L
791950-16, 791958-16: ALL, A, B, C, D, E, F, K, L, M, N, P, R, S, T, U, V, ALL
791950-18: ALL, A, B, C, D, E, F, G, H, K, L, M, N, P, R, S, T, U, V, ALL
791952-18: ALL (Individual output test mode not available.)

CPU-95 OI-E 2-10 All rights reserved © ALTRONIC, LLC 2010 22
9.8 The communications menu allows the adjustment of various aspects of the display module’s two user ports.
AT
PRESS TO PRESS TO PRESS TOACCESS GO TO THE EXIT THE MENU NEXT MENU
ENTER
ESC
AT
PRESS TO MODIFY THE VALUE
‹
‹
PRESS TO PRESS TO PRESS TOADVANCE TO GO TO THE EXIT THE NEXT NEXT MENU SELECTION
ESC
Node ID can be set anywhere from 1 to 254. The auxiliary RS-485 (Modbus RTU) port can have the following baud rates 9600, 19200, 38400, 57600, 115200. Always no parity, 8 data bits, and 1 stop bit (N81). The USB port has the following modes: TERMINAL, MODBUS RTU, and DEBUG. The TERMINAL mode allows the display to act as a go between for programming the CPU-95 ignition directly. This will work for CPU-95 Terminal Program version 2.0 and above. Baud rate selection in the TERMINAL mode is unnecessary as the terminal program accesses the USB port natively. The MODBUS RTU mode follows the node ID, and the USB baud rate. This mode uses the virtual com port driver that is a part of the USB driver on the CDROM. The USB port virtual com port baud rate can be set to the following: 9600, 19200, 38400, 57600, 115200. The DEBUG mode is used by the factory for testing purposes.
NEXT
ENTER NEXT

CPU-95 OI-E 2-10 All rights reserved © ALTRONIC, LLC 2010 23
9.9 The CLOCK SETUP menu is used to set the desired calendar date and time used by the datalog feature of the display module.
AT
PRESS TO PRESS TO PRESS TOACCESS GO TO THE EXIT THE MENU NEXT MENU
ESC
AT
PRESS TO MODIFY THE VALUE
‹
‹
PRESS TO PRESS TO PRESS TOADVANCE TO GO TO THE EXIT THE NEXT NEXT MENU SELECTION
ENTER NEXT
ENTER NEXT ESC
NOTE: The display module’s real time clock does not automatically adjust for daylight savings time.
CPU-95 OI-E 2-10 All rights reserved © ALTRONIC, LLC 2010 24
9.10 The Display Module supports data logging of the information normally available from the display of the CPU-95. The unit retains 255 datalogs which are stored in a FIFO (first in, first out) manner. When 255 logs are stored, the oldest log is purged and the newest added. The oldest data is stored as log no. 255 and the newest as no. 1; there is also a copy of the current values available as datalog 0. The datalogs can be accessed by the special PC terminal program supplied with the unit or by a special Modbus command sent by the user-supplied PLC or computer system. More detailed information is provided on the terminal CD.
The DATALOG SETUP menu appears after the COMMUNICATION SETUP menu. If datalogs are not being used, press the NEXT key to proceed to the CYLINDER LABELS menu.
AT
PRESS TO PRESS TO PRESS TOENTER THE GO TO THE EXIT DATALOG NEXT MENU MENU
ESC
AT
PRESS TO MODIFY THE VALUE
‹
‹
PRESS TO PRESS TO PRESS TOADVANCE TO GO TO THE EXIT THE NEXT NEXT MENU SELECTION
ESC
It is possible to setup the system so that any change to the ignitiontiming will trigger a datalog event (an exception report). Exceptionreports are automatically generated for alarms or shutdowns.
ENTER NEXT
ENTER NEXT
CPU-95 OI-E 2-10 All rights reserved © ALTRONIC, LLC 2010 25
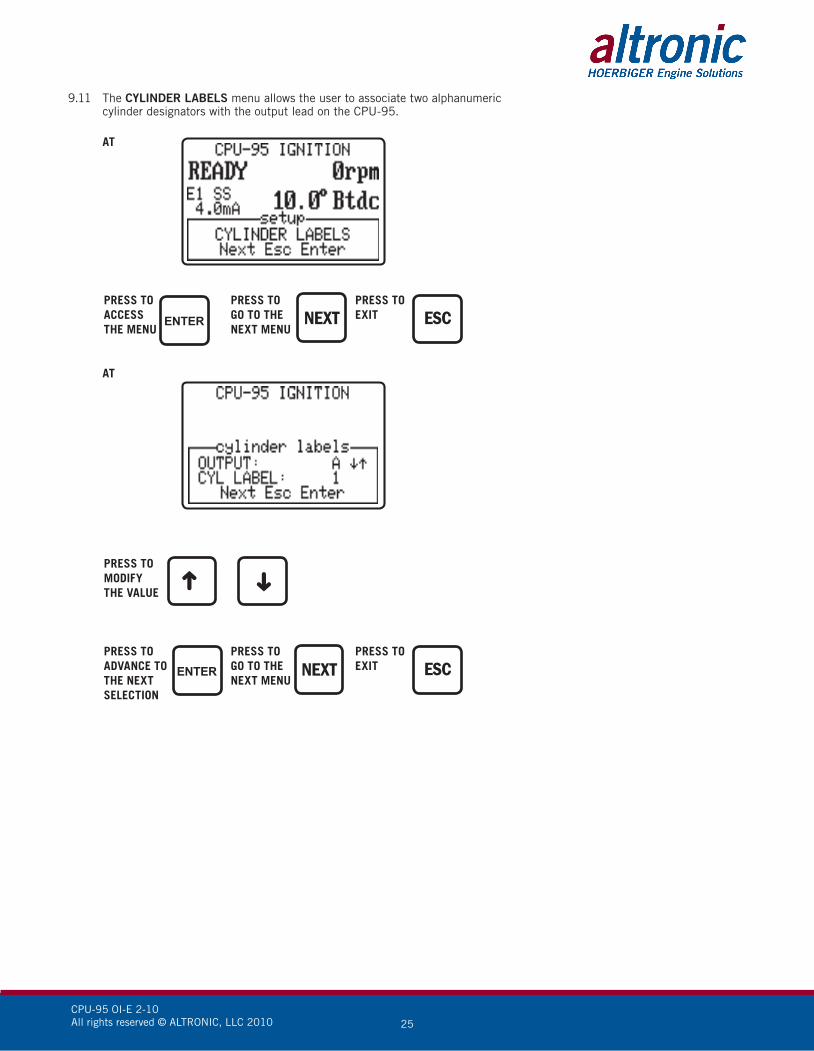
9.11 The CYLINDER LABELS menu allows the user to associate two alphanumeric cylinder designators with the output lead on the CPU-95.
AT
PRESS TO PRESS TO PRESS TOACCESS GO TO THE EXIT THE MENU NEXT MENU
ESC
AT
PRESS TO MODIFY THE VALUE
‹
‹
PRESS TO PRESS TO PRESS TOADVANCE TO GO TO THE EXIT THE NEXT NEXT MENU SELECTION
ESC
ENTER NEXT
ENTER NEXT

CPU-95 OI-E 2-10 All rights reserved © ALTRONIC, LLC 2010 26
10.0 CPU-95 DIAGNOSTICS
10.1 A diagnostic fault represents the most severe classification of problems. The presence of a diagnostic fault will inhibit the ignition from firing. When a fault is detected several things will occur:
n Ignition will stop firing.
n Fire Confirm Out switch will open.
n Fault Out switch will open.
n Alarm Out switch will open.
n Alarm LED in the ignition unit will turn on.
n Home status will read FAULT, and the bottom line will read PRESS DIAG.
10.2 A diagnostic warning represents the least severe classification of problems. The ignition will continue to fire in the presence of a diagnostic warning. When a warning is detected, several things will occur:
n Alarm Out switch will open.
n Alarm LED in the ignition unit will turn on.
n Home status will read WARNING, and the bottom line will read PRESS DIAG.
10.3 If the Alarm Out switch is being used to turn on an audible alarm or flasher, the user can acknowledge the alarm as described below.
PRESS
ALARMACK
Acknowledgment of the alarm results in the following until a reset is
commanded or until another fault or warning may occur.
n Alarm Out switch will return to its closed position.
n Alarm LED will flash to indicate that an alarm is present but acknowledged.
NOTE: Diagnostic FAULTS will super-sede diagnostic WARNINGS.

CPU-95 OI-E 2-10 All rights reserved © ALTRONIC, LLC 2010 27
10.4 When a fault or warning is present, the operator can display the actual cause of the diagnostic as depicted below.
FROM THE PRESSHOMESCREEN
DIAG
Then from the diagnostic description screens use the following keys.
PRESS TO OR PRESS PRESS TOVIEW NEXT TO VIEW EXIT NEXT
ENTER
NEXT
ESC
10.5 Diagnostic Fault screens, in order of display priority:
When zero gear-tooth pulses are seen between two reset pulses.
When too many gear-tooth pulses are seen without a reset pulse.
When there are no Hall-effect pickup pulses or when the pick-ups are not synchronized.

CPU-95 OI-E 2-10 All rights reserved © ALTRONIC, LLC 2010 28
When too many or too few gear-tooth pulses are seen between reset pulses.
The received number of pulses is displayed.
When the engine speed exceeds the overspeed setpoint.
Maximum observed speed is also displayed.
10.6 Diagnostic Warning screens, in order of display priority:
This screen indicates that the current-loop has deviated outside the limits of 2 mA and 22 mA. The current loop follows the configured curve which is specified from 0-25 mA. This diagnostic is active only if the current loop retard is on.
This screen indicates that at some point no loop data was received from the Display Module. In this condition, the timing for 0 mA is used. This test is active only if the current loop retard is on.
This screen indicates that the firing pattern configuration data saved in EEPROM memory is incorrect or incomplete. The EEPROM memory must be reprogrammed or replaced.

CPU-95 OI-E 2-10 All rights reserved © ALTRONIC, LLC 2010 29
This screen indicates that diagnostics have identified an open circuit on the primary output pin A (Cyl 1). Normally indicates faulty wiring or a failed coil.
This screen indicates that diagnostics have identified a short circuit condition on the primary output pin B (Cyl 2). This would normally indicate a coil is miswired, or the primary wire is shorted.
This screen indicates that the diagnostics have identified a low spark demand condition on the plug at the C coil (Cyl 3). This is often caused by a shorted spark plug or shorted secondary wire.
This screen indicates that the diagnostics have identified a high spark demand condition on the spark plug at the D coil (Cyl 4). This is often caused by worn spark plugs.
This screen indicates that the diagnostics have identified a no spark condition on the plug at the E coil (Cyl 5). No spark occurred since the demand was greater than the output capability of the coil.

CPU-95 OI-E 2-10 All rights reserved © ALTRONIC, LLC 2010 30
This screen indicates that the diag-nostics have detected a condition where the average value of output F (Cyl 6) is significantly lower than the average of all the active outputs on the engine.
This screen indicates that the diag-nostics have detected a condition where the average value of output K (Cyl 7) is significantly higher than the average of all the active outputs on the engine.
This screen indicates that the Diagnostic Module has detected that output L (Cyl 8) is firing with significant cycle-to-cycle variation.
10.7 After all of the diagnostics have been read, the user can reset the warnings and faults by pressing the reset key as pictured below.
PRESS PRESSTO EXIT
ESC
RESET
Pressing the reset key performs all of the following actions:
• Clears all diagnostic warnings from memory.
• Clears all diagnostic faults from memory.
• Clears a latched shutdown condition when the input is no longer grounded.
• Causes temporary cylinder timing offsets to be overwritten from EEPROM memory.

CPU-95 OI-E 2-10 All rights reserved © ALTRONIC, LLC 2010 31
11.0 UNDERSTANDING AND USING THE SECONDARY SPARK DIAGNOSTICS
11.1. The spark reference number is a unitless number which correlates with voltage demand at the spark plug and is calculated for every firing of each cylinder. As the voltage increases, the reference number also increases. The number is non-linear and will increase faster at higher voltages (above 20kV). The usefulness of the number lies not in its absolute value, but rather in how the number changes over time as the spark plugs erode. With a little experience, the engine operator will be able to tell when spark plugs require changing. Abnormal conditions in the ignition system, such as open or short circuits in the primary and secondary wiring, can also be detected.
11.2 The reference “cylinder spark data” number can be viewed separately for each ignition output (cylinder) in two ways, and compared to the average of the entire engine:
n Instantaneous value: shown in ( )
n Cylinder average value: cavg
FROM THE PRESSHOME SCREEN TO VIEW DISPLAY SCREEN
PRESS TO VIEW PRESSTO VIEW GRAPH OF TO ADJUSTNEXT CURRENT SPARK
CYLINDER
F1 CYLINDER OFFSET
PRESS PRESSTO VIEW TONEXT EXIT
CYLINDER
NEXT
ESC
F1
F3 F4

CPU-95 OI-E 2-10 All rights reserved © ALTRONIC, LLC 2010 32
11.3 The offset adjustment screen (F4) permits the operator to adjust an offset to the spark reference number (± 15 counts) to compensate for minor variations in reference numbers between individual coils of the same type and voltage demand.
FROM THE PRESSHOME SCREEN TO VIEW DISPLAY SCREEN
PRESS PRESS PRESS TO VIEW TO VIEW TO NEXT NEXT EXIT
CYLINDER
F4 CYLINDER
ESC
PRESS TO VIEW BASE
DISPLAY
F1
11.4 The spark reference number is used in conjunction with comparative thresholds to set diagnostic codes for several different ignition system and spark plug conditions. When a threshold is violated twice in a row, the corresponding diagnostic flag is set for the appropriate cylinder. The diagnostic flags are latching and will exist until the unit is restarted or until a reset or power-down occurs.
Open Primary CAVG < 1
Shorted Primary CAVG < 50
Low Spark Voltage CAVG < user programmable threshold (typ. 100)
High Spark Voltage CAVG > user programmable threshold (typ. 180), also Forces E2
No Secondary Spark CAVG > user programmable threshold (typ. 250), also Forces E3
Low From Engine (EAVG - CAVG) > user programmable threshold (typ. 20)
High From Engine (CAVG - EAVG) > user programmable threshold (typ. 20)
F1
NEXT
NOTE: Improper use of this feature may limit the effectiveness of the diagnos-tic system and result in spark refer-ence numbers that mask real or create false problems.

CPU-95 OI-E 2-10 All rights reserved © ALTRONIC, LLC 2010 33
11.5 The spark reference number is also used to automatically change spark energy for different ignition system conditions. The minimum energy setting is selected under the Setup Menu (SEE SECTION 9.3). Energy will automatically be adjusted in response to the engine average spark reference number (EAVG) based on four individual thresholds listed below. Additionally, spark energy will automatically be increased when a High Spark Voltage or No Secondary Spark warning exists for any cylinder.
Auto Enable E2 EAVG > user programmable threshold (typical 200)
Auto Disable E2 EAVG < user programmable threshold (typical 190)
Auto Enable E3 EAVG > user programmable threshold (typical 205)
Auto Disable E3 EAVG < user programmable threshold (typical 195)
11.6 The above user programmable thresholds need to be adjusted based on the type of coil being used and on the operating characteristics (specifically, voltage demand) of the engine. There are known differences between various types of Altronic coils, and slight variations are normal between coils of the same type. In order to maximize the usefulness of the cylinder spark reference number, it is recommended that all coils be of the same type and vintage (production date). This will aid greatly in detecting variations in one cylinder vs. the general trend in the engine. The typical ranges to be expected in normal operation with new spark plugs are:
Older 501061 (blue) coils: 70 to 90
Current 501061 (blue) coils: 90 to 120
Current 591010 (red) coils: 120 to 140
Current 501061-S (shielded blue) coils: 110 to 130
Current 591007 / 591011A / 591011B coils: 70 to 90
11.7 The indicated thresholds were designed to be adjustable so that the user can customize these diagnostics to fit the specific needs of each engine. It will take some testing and adjustment to obtain thresholds that optimize the use of these features. For maximum benefit, the spark reference number for each cylinder should be recorded at normal operating load with new spark plugs installed and then monitored over a period of time for changes. The HI SPARK VOLTAGE alarm level should be set (typically) at 180 initially and can be adjusted as experience dictates. A gradual increase in the spark reference number is expected over time as the spark plug electrodes erode.

CPU-95 OI-E 2-10 All rights reserved © ALTRONIC, LLC 2010 34
11.8 In addition to energy control and the diagnostic flags, the reference numbers can also be used for predictive purposes:
A. As the numbers increase toward the preset HI SPARK VOLTAGE threshold (SEE SECTION 12.3), the operator knows that a change of spark plugs should be scheduled. With this information, this function can be determined on an actual need basis rather than a predetermined schedule. Also, unexpected engine misfiring or shutdowns can be avoided by tracking the reference numbers on a routine basis.
B. The reference numbers can provide an early warning of a difference in operation in a given cylinder(s). A reading higher (or lower) than the other cylinders, when such a difference is not normally present, tells the operator of a potential problem; this allows further troubleshooting and evaluation to take place before an unexpected operational problem develops. (SEE SECTION 12.5, 12.6.)
11.9 Other Information regarding the spark reference number:
A. The spark energy setting has only a small effect on the reference number if the spark plug fires correctly. Therefore, the high and low voltage thresholds should hold across the energy settings if the spark plugs continue to fire correctly. On the other hand, a worn plug may not fire consistently on energy setting E1 but will on energy setting E2; in this case there will be a significant difference in the reference number when the energy setting is changed. Operators may be able to increase spark plug life by operating initially with new spark plugs on E1 energy setting and use the HI SPARK VOLTAGE alarm as an indicator to manually increase the energy progressively to E3.
B. The spark reference number is designed to work with one coil per output. Where two coils are connected to the same primary lead, the number will tend to be an average of the conditions at the two spark plugs. While some of the benefits of the spark reference number can still be realized, the usefulness of the number in detecting deviations between cylinders (alarm levels) will be reduced.
NOTE: See Section 11.5 for automatic system adjustment of ignition energy.

CPU-95 OI-E 2-10 All rights reserved © ALTRONIC, LLC 2010 35
12.0 THRESHOLD ADJUSTMENT SCREENS
12.1 Nine threshold adjustment screens enable the operator to calibrate thresholds used to diagnose potential ignition problems and control ignition energy based on the spark reference numbers. All of the threshold screens have the same button functions as described with the first threshold screen. All thresholds are accessed under the F2 key.
FROM PRESS TO VIEW FIRST THRESHOLD SCREEN
12.2 If the CAVG reference number of a cylinder is below the LO SPARK VOLTAGE threshold, a diagnostic warning for that cylinder will occur. This test will identify a low voltage demand condition which may result from a shorted coil, secondary lead or spark plug. To disable diagnostic, set value to zero.
PRESS TO VIEW PRESSTO VIEW GRAPH OF TO ADJUSTNEXT CURRENT SPARK
CYLINDER
F2 CYLINDER
NEXT OFFSET
PRESS TO PRESS TOINCREASE DECREASETHRESHOLD THRESHOLD
F2
ESC
‹
‹

CPU-95 OI-E 2-10 All rights reserved © ALTRONIC, LLC 2010 36
12.3 If the CAVG reference number of a cylinder is above the HI SPARK VOLTAGE threshold, a diagnostic warning for that cylinder will occur. When a high spark warning is present, the ignition energy will automatically be increased to at least E2. This test will identify a high voltage demand condition which may result, for example, from worn spark plugs or poor air-fuel ratio control. To disable, set to 255.
12.4 If the CAVG reference number of a cylinder is above the NO SECONDARY SPARK threshold, a diagnostic warning for that cylinder will occur. When a no secondary spark warning is present, the ignition energy will automatically be increased to E3 as long as the system is not in multi-strike mode. This test will identify cylinder firings that do not result in a spark — an open circuit condition at the secondary of the coil resulting from a worn spark plug, or a disconnected or failed secondary wire. To disable, set to 255.
12.5 If the difference between EAVG and CAVG reference numbers is greater than the LO FROM ENGINE threshold, a diagnostic warning for that cylinder will occur. This test will identify a cylinder whose voltage demand is too far below the average engine voltage demand.
Default = 60

CPU-95 OI-E 2-10 All rights reserved © ALTRONIC, LLC 2010 37
12.6 If the difference between CAVG and EAVG reference numbers is greater than the HI FROM ENGINE threshold, a diagnostic warning for that cylinder will occur. This test will identify a cylinder whose voltage demand is too far above the average engine voltage demand.
Default = 60
12.7 If the COV reference number is greater than the HI VARIATION COV threshold,
a diagnostic warning for that cylinder will occur. This test will identify a cylinder whose cycle-to-cycle voltage demand has become erratic.
Default = 255 (disabled)
12.8 If the EAVG reference number is greater than the EAVG E2 ENABLE threshold, the energy will be increased to at least E2. This feature can be used to automatically increase the spark energy as the voltage demand of the engine increases.
Default = 200

CPU-95 OI-E 2-10 All rights reserved © ALTRONIC, LLC 2010 38
12.9 If the energy is at level E2 and if the base energy setting under the Setup key is E1, then the EAVG E2 DISABLE threshold setting is used to automatically decrease the energy from E2.
Default = 190
12.10 If the EAVG reference number is greater than the EAVG E3 ENABLE threshold, the energy will be increased to level E3 if multi-strike is not active. This feature can be used to automatically increase to the maximum energy to attempt to keep the engine running until worn plugs can be serviced.
Default = 205
12.11 If the energy is at E3 and if the base energy setting under the Setup key is not E3, then the EAVG E3 DISABLE threshold setting is used to automatically decrease the energy from E3.
Default = 195
NOTE: This threshold must be at least 2 counts below the EAVG E2 ENABLE threshold. SEE SECTION 12.8
NOTE: This threshold must be at least 2 counts below EAVG E3 ENABLE thresh-old. SEE SECTION 12.10

CPU-95 OI-E 2-10 All rights reserved © ALTRONIC, LLC 2010 39
13.0 GRAPHING
13.1 The display module has two graphs of the spark diagnostic data.
FROM PRESS
F3
13.2 The first graph shows all cylinders CAVG (cylinder average) spark diagnostic number in relation the EAVG (engine average).
PRESS TO TOGGLE PRESS TO BETWEEN OUTPUT INCREASE/ LEAD AND CYLINDER DECREASE
LABEL THE ZOOM
‹
‹
PRESS TO INCREMENT PRESS TO ACCESS THETHE CYLINDER BEING CURRENT SELECTEDVIEWED CYLINDER GRAPH
NEXT
F3
PRESS TO VIEW THE PRESS TO ADJUST THECURRENT SELECTED CURRENT SELECTEDCYLINDER CYLINDER SPARK OFFSET
F1
F4
PRESS TO ADJUST THE PRESS TO EXITCURRENT SELECTED CYLINDER TIMING OFFSET
TIMING
ESC
MAN

CPU-95 OI-E 2-10 All rights reserved © ALTRONIC, LLC 2010 40
13.3 The second graph shows each individual cylinder. The solid line is the cylinder data while the dashed line is the engine average. In this picture, 144 corresponds to the spark number that is top of the graph and 104 is the bottom.
PRESS TO TOGGLE PRESS TO CHANGE THEBETWEEN GRAPHING LAYOUT OF THE GRAPHINST AND CAVG
MAN
ENTER
PRESS TO VIEW THE PRESS TO ADVANCE TODATALOG GRAPH THE NEXT CYLINDER
AUTO
NEXT
PRESS TO ACCESS THE PRESS TO VIEW THEGRAPH IN SECTION 13.2 CURRENT SELECTED CYLINDER
F3
F1
PRESS TO ADJUST THE PRESS TO ADJUST THECURRENT SELECTED CURRENT SELECTED CYLINDER SPARK OFFSET CYLINDER TIMING OFFSET
F4
TIMING
PRESS TO EXIT
ESC
Pressing ENTER the first time will display ↓↑ and allows the user to move the graphed lines up and down using the arrow keys. This changes the spark number used for the top and bottom limits of the graph. Pressing ENTER the second time will display the ↕ and allows the user to change the zoom level using the arrow keys. Pressing ENTER a third time exits the adjustments.

CPU-95 OI-E 2-10 All rights reserved © ALTRONIC, LLC 2010 41
13.4 The datalog graph allows the user to view the history of a given cylinder.
PRESS TO PRESS TO CHANGE THECHANGE THE LAYOUT OF THE GRAPHRANGE OF DATA
LOGS USED
ENTER
PRESS TO VIEW THE PRESS TO ADVANCE TO“LIVE” GRAPH THE NEXT CYLINDER
AUTO
NEXT
PRESS TO ACCESS THE PRESS TO VIEW THEGRAPH IN SECTION 13.2 CURRENT SELECTED CYLINDER
F3
F1
PRESS TO ADJUST THE PRESS TO ADJUST THE CURRENT SELECTED CURRENT SELECTED CYLINDER SPARK OFFSET CYLINDER TIMING
F4 OFFSET
TIMING
PRESS TO EXIT
‹
‹
ESC

CPU-95 OI-E 2-10 All rights reserved © ALTRONIC, LLC 2010 42
14.0 IGNITION CLONING
14.1 Backing up the CPU-95 eeprom.
FROM PRESS
AUTO
PRESS TO PRESS TO PRESS TOSELECT BEGIN THE EXITPROGRAM SELECTED
OPTION
‹
OPTION
ESC
If a previous ignition has been stored in the display module, an overwrite confirmation is displayed.
PRESS TO PRESS TOCONTINUE EXITWITH THE BACKUP
ENTER
ESC
ENTER

CPU-95 OI-E 2-10 All rights reserved © ALTRONIC, LLC 2010 43
The first phase of the backup is to read the ignition eeprom contents.
PRESS TO ABORT
ESC
The second phase is to read the ignition again for verification.
PRESS TO ABORT
ESC
After reading and verifying, the contents are written to the eeprom of the display module.
Done.
PRESS TO EXIT
ESC

CPU-95 OI-E 2-10 All rights reserved © ALTRONIC, LLC 2010 44
14.2 Programming the CPU-95 EEPROM
It is possible to program the CPU-95 system through the enhanced display, P/N 791909-1, via USB, from a computer without a RS485 card. Refer to programming instructions CPU-95 PI 4-08. The user must first confirm the program option.
PRESS TO PRESS TOCONTINUE EXITPROGRAMMING
The display module now writes the eeprom contents of the CPU-95 ignition.
Next, the display module will read back what was written for verification.
With verification complete, the ignition is reset.
ENTER ESC
WARNING: THE CPU-95 MUST BE PROGRAMMED PRIOR TO USE.REFER TO PROGRAMMING INSTRUCTIONS CPU-95 PI 4-08.

CPU-95 OI-E 2-10 All rights reserved © ALTRONIC, LLC 2010 45
Done.
PRESS TO EXIT
ESC
CPU-95 OI-E 2-10 All rights reserved © ALTRONIC, LLC 2010 46
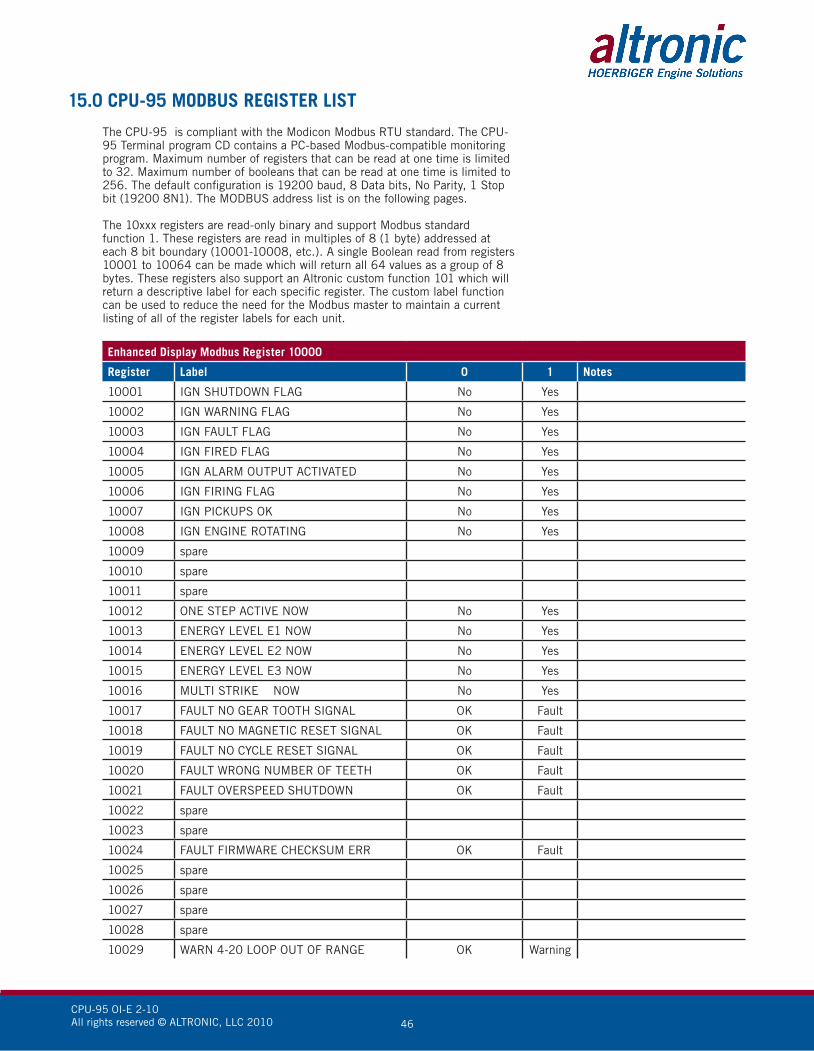
15.0 CPU-95 MODBUS REGISTER LIST
The CPU-95 is compliant with the Modicon Modbus RTU standard. The CPU-95 Terminal program CD contains a PC-based Modbus-compatible monitoring program. Maximum number of registers that can be read at one time is limited to 32. Maximum number of booleans that can be read at one time is limited to 256. The default configuration is 19200 baud, 8 Data bits, No Parity, 1 Stop bit (19200 8N1). The MODBUS address list is on the following pages.
The 10xxx registers are read-only binary and support Modbus standard
function 1. These registers are read in multiples of 8 (1 byte) addressed at each 8 bit boundary (10001-10008, etc.). A single Boolean read from registers 10001 to 10064 can be made which will return all 64 values as a group of 8 bytes. These registers also support an Altronic custom function 101 which will return a descriptive label for each specific register. The custom label function can be used to reduce the need for the Modbus master to maintain a current listing of all of the register labels for each unit.
Enhanced Display Modbus Register 10000
Register Label 0 1 Notes
10001 IGN SHUTDOWN FLAG No Yes
10002 IGN WARNING FLAG No Yes
10003 IGN FAULT FLAG No Yes
10004 IGN FIRED FLAG No Yes
10005 IGN ALARM OUTPUT ACTIVATED No Yes
10006 IGN FIRING FLAG No Yes
10007 IGN PICKUPS OK No Yes
10008 IGN ENGINE ROTATING No Yes
10009 spare
10010 spare
10011 spare
10012 ONE STEP ACTIVE NOW No Yes
10013 ENERGY LEVEL E1 NOW No Yes
10014 ENERGY LEVEL E2 NOW No Yes
10015 ENERGY LEVEL E3 NOW No Yes
10016 MULTI STRIKE NOW No Yes
10017 FAULT NO GEAR TOOTH SIGNAL OK Fault
10018 FAULT NO MAGNETIC RESET SIGNAL OK Fault
10019 FAULT NO CYCLE RESET SIGNAL OK Fault
10020 FAULT WRONG NUMBER OF TEETH OK Fault
10021 FAULT OVERSPEED SHUTDOWN OK Fault
10022 spare
10023 spare
10024 FAULT FIRMWARE CHECKSUM ERR OK Fault
10025 spare
10026 spare
10027 spare
10028 spare
10029 WARN 4-20 LOOP OUT OF RANGE OK Warning

CPU-95 OI-E 2-10 All rights reserved © ALTRONIC, LLC 2010 47
Register Label 0 1 Notes
10030 spare
10031 WARN EEPROM CHECKSUM FAIL OK Warning
10032 WARN FAIL DETECT DISP MODULE OK Warning
10033 spare
10034 WARN HI VOLTAGE OK Warning
10035 WARN NO SECONDARY SPK OK Warning
10036 WARN HI FROM ENGINE OK Warning
10037 WARN LO FROM ENGINE OK Warning
10038 WARN LO VOLTAGE OK Warning
10039 WARN PRIMARY SHORT OK Warning
10040 WARN PRIMARY OPEN OK Warning
10041 PROTECTION ENABLED EEPROM No Yes
10042 SERIAL RETARD ENABLED EEPROM No Yes
10043 RPM RETARD MAP ENABLED EEPROM No Yes
10044 4-20ma RET MAP ENABLED EEPROM No Yes
10045 BASE ENERGY E1 SELECT EEPROM No Yes
10046 BASE ENERGY E2 SELECT EEPROM No Yes
10047 BASE ENERGY E3 SELECT EEPROM No Yes
10048 MULTI-STRIKE SELECT EEPROM No Yes
10049 FIRE CONFIRM OUTPUT No Firing
10050 SHUTDOWN OUTPUT Shutdown No
10051 ALARM OUTPUT Alarm No
10052 spare
10053 TRANSCODER 4x 8x
10054 SKIP CONTROL (internal)
10055 CMDPAGE2 (internal)
10056 TWO CYCLE No Yes
10057 spare
10058 spare
10059 spare
10060 CHKPAGE2 (interal)
10061 MISC INPUT No Yes
10062 MISC REMOTE INPUT No Yes
10063 spare
10064 spare
10065 20 OUTPUT MODULE No Yes
10066 18 OUTPUT MODULE No Yes
10067 DUAL CAPACITOR MODULE No Yes
10068 WITH FILTER MODULE No Yes
10069 spare
10070 spare
10071 spare
10072 spare

CPU-95 OI-E 2-10 All rights reserved © ALTRONIC, LLC 2010 48
Register Label 0 1 Notes
10073 MISC. USE ONESTEP
10074 MISC. FIRE MAX ENERGY
10075 MISC. FIRE MULTISTRIKE
10076 spare
10077 RPM < 200 USE ONESTEP No Yes
10078 RPM < 200 FIRE MAX ENERGY No Yes
10079 RPM < 200 FIRE MULTI No Yes
10080 spare
10081 spare
10082 spare
10083 spare
10084 spare
10085 WITH OFFSET No Yes
10086 TEST DENY (internal)
10087 TEST ACT (internal)
10088 TEST REQ (internal)
10089 spare (A or A1)
10090 WARN HI VOLTAGE (A or A1) OK Warning
10091 WARN NO SECONDARY SPK (A or A1) OK Warning
10092 WARN HI FROM ENGINE (A or A1) OK Warning
10093 WARN LO FROM ENGINE (A or A1) OK Warning
10094 WARN LO VOLTAGE (A or A1) OK Warning
10095 WARN SHORTED PRIMARY (A or A1) OK Warning
10096 WARN OPEN PRIMARY (A or A1) OK Warning
10097 spare (B or A2) OK Warning
10098 WARN HI VOLTAGE (B or A2) OK Warning
10099 WARN NO SECONDARY SPK (B or A2) OK Warning
10100 WARN HI FROM ENGINE (B or A2) OK Warning
10101 WARN LO FROM ENGINE (B or A2) OK Warning
10102 WARN LO VOLTAGE (B or A2) OK Warning
10103 WARN SHORTED PRIMARY (B or A2) OK Warning
10104 WARN OPEN PRIMARY (B or A2) OK Warning
10105 spare (C or B1) OK Warning
10106 WARN HI VOLTAGE (C or B1) OK Warning
10107 WARN NO SECONDARY SPK (C or B1) OK Warning
10108 WARN HI FROM ENGINE (C or B1) OK Warning
10109 WARN LO FROM ENGINE (C or B1) OK Warning
10110 WARN LO VOLTAGE (C or B1) OK Warning
10111 WARN SHORTED PRIMARY (C or B1) OK Warning
10112 WARN OPEN PRIMARY (C or B1) OK Warning
10113 spare (D or B2) OK Warning
10114 WARN HI VOLTAGE (D or B2) OK Warning
10115 WARN NO SECONDARY SPK (D or B2) OK Warning

CPU-95 OI-E 2-10 All rights reserved © ALTRONIC, LLC 2010 49
Register Label 0 1 Notes
10116 WARN HI FROM ENGINE (D or B2) OK Warning
10117 WARN LO FROM ENGINE (D or B2) OK Warning
10118 WARN LO VOLTAGE (D or B2) OK Warning
10119 WARN SHORTED PRIMARY (D or B2) OK Warning
10120 WARN OPEN PRIMARY (D or B2) OK Warning
10121 spare (E or C1) OK Warning
10122 WARN HI VOLTAGE (E or C1) OK Warning
10123 WARN NO SECONDARY SPK (E or C1) OK Warning
10124 WARN HI FROM ENGINE (E or C1) OK Warning
10125 WARN LO FROM ENGINE (E or C1) OK Warning
10126 WARN LO VOLTAGE (E or C1) OK Warning
10127 WARN SHORTED PRIMARY (E or C1) OK Warning
10128 WARN OPEN PRIMARY (E or C1) OK Warning
10129 spare (F or C2) OK Warning
10130 WARN HI VOLTAGE (F or C2) OK Warning
10131 WARN NO SECONDARY SPK (F or C2) OK Warning
10132 WARN HI FROM ENGINE (F or C2) OK Warning
10133 WARN LO FROM ENGINE (F or C2) OK Warning
10134 WARN LO VOLTAGE (F or C2) OK Warning
10135 WARN SHORTED PRIMARY (F or C2) OK Warning
10136 WARN OPEN PRIMARY (F or C2) OK Warning
10137 spare (K or D1) OK Warning
10138 WARN HI VOLTAGE (K or D1) OK Warning
10139 WARN NO SECONDARY SPK (K or D1) OK Warning
10140 WARN HI FROM ENGINE (K or D1) OK Warning
10141 WARN LO FROM ENGINE (K or D1) OK Warning
10142 WARN LO VOLTAGE (K or D1) OK Warning
10143 WARN SHORTED PRIMARY (K or D1) OK Warning
10144 WARN OPEN PRIMARY (K or D1) OK Warning
10145 spare (L or D2) OK Warning
10146 WARN HI VOLTAGE (L or D2) OK Warning
10147 WARN NO SECONDARY SPK (L or D2) OK Warning
10148 WARN HI FROM ENGINE (L or D2) OK Warning
10149 WARN LO FROM ENGINE (L or D2) OK Warning
10150 WARN LO VOLTAGE (L or D2) OK Warning
10151 WARN SHORTED PRIMARY (L or D2) OK Warning
10152 WARN OPEN PRIMARY (L or D2) OK Warning
10153 spare (M or E1) OK Warning
10154 WARN HI VOLTAGE (M or E1) OK Warning
10155 WARN NO SECONDARY SPK (M or E1) OK Warning
10156 WARN HI FROM ENGINE (M or E1) OK Warning
10157 WARN LO FROM ENGINE (M or E1) OK Warning
10158 WARN LO VOLTAGE (M or E1) OK Warning

CPU-95 OI-E 2-10 All rights reserved © ALTRONIC, LLC 2010 50
Register Label 0 1 Notes
10159 WARN SHORTED PRIMARY (M or E1) OK Warning
10160 WARN OPEN PRIMARY (M or E1) OK Warning
10161 spare (N or E2) OK Warning
10162 WARN HI VOLTAGE (N or E2) OK Warning
10163 WARN NO SECONDARY SPK (N or E2) OK Warning
10164 WARN HI FROM ENGINE (N or E2) OK Warning
10165 WARN LO FROM ENGINE (N or E2) OK Warning
10166 WARN LO VOLTAGE (N or E2) OK Warning
10167 WARN SHORTED PRIMARY (N or E2) OK Warning
10168 WARN OPEN PRIMARY (N or E2) OK Warning
10169 spare (P or F1) OK Warning
10170 WARN HI VOLTAGE (P or F1) OK Warning
10171 WARN NO SECONDARY SPK (P or F1) OK Warning
10172 WARN HI FROM ENGINE (P or F1) OK Warning
10173 WARN LO FROM ENGINE (P or F1) OK Warning
10174 WARN LO VOLTAGE (P or F1) OK Warning
10175 WARN SHORTED PRIMARY (P or F1) OK Warning
10176 WARN OPEN PRIMARY (P or F1) OK Warning
10177 spare (R or F2) OK Warning
10178 WARN HI VOLTAGE (R or F2) OK Warning
10179 WARN NO SECONDARY SPK (R or F2) OK Warning
10180 WARN HI FROM ENGINE (R or F2) OK Warning
10181 WARN LO FROM ENGINE (R or F2) OK Warning
10182 WARN LO VOLTAGE (R or F2) OK Warning
10183 WARN SHORTED PRIMARY (R or F2) OK Warning
10184 WARN OPEN PRIMARY (R or F2) OK Warning
10185 spare (S or K1) OK Warning
10186 WARN HI VOLTAGE (S or K1) OK Warning
10187 WARN NO SECONDARY SPK (S or K1) OK Warning
10188 WARN HI FROM ENGINE (S or K1) OK Warning
10189 WARN LO FROM ENGINE (S or K1) OK Warning
10190 WARN LO VOLTAGE (S or K1) OK Warning
10191 WARN SHORTED PRIMARY (S or K1) OK Warning
10192 WARN OPEN PRIMARY (S or K1) OK Warning
10193 spare (T or K2) OK Warning
10194 WARN HI VOLTAGE (T or K2) OK Warning
10195 WARN NO SECONDARY SPK (T or K2) OK Warning
10196 WARN HI FROM ENGINE (T or K2) OK Warning
10197 WARN LO FROM ENGINE (T or K2) OK Warning
10198 WARN LO VOLTAGE (T or K2) OK Warning
10199 WARN SHORTED PRIMARY (T or K2) OK Warning
10200 WARN OPEN PRIMARY (T or K2) OK Warning
10201 spare (U or L1) OK Warning

CPU-95 OI-E 2-10 All rights reserved © ALTRONIC, LLC 2010 51
Register Label 0 1 Notes
10202 WARN HI VOLTAGE (U or L1) OK Warning
10203 WARN NO SECONDARY SPK (U or L1) OK Warning
10204 WARN HI FROM ENGINE (U or L1) OK Warning
10205 WARN LO FROM ENGINE (U or L1) OK Warning
10206 WARN LO VOLTAGE (U or L1) OK Warning
10207 WARN SHORTED PRIMARY (U or L1) OK Warning
10208 WARN OPEN PRIMARY (U or L1) OK Warning
10209 spare (V or L2) OK Warning
10210 WARN HI VOLTAGE (V or L2) OK Warning
10211 WARN NO SECONDARY SPK (V or L2) OK Warning
10212 WARN HI FROM ENGINE (V or L2) OK Warning
10213 WARN LO FROM ENGINE (V or L2) OK Warning
10214 WARN LO VOLTAGE (V or L2) OK Warning
10215 WARN SHORTED PRIMARY (V or L2) OK Warning
10216 WARN OPEN PRIMARY (V or L2) OK Warning
10217 spare ( M1) OK Warning
10218 WARN HI VOLTAGE ( M1) OK Warning
10219 WARN NO SECONDARY SPK ( M1) OK Warning
10220 WARN HI FROM ENGINE ( M1) OK Warning
10221 WARN LO FROM ENGINE ( M1) OK Warning
10222 WARN LO VOLTAGE ( M1) OK Warning
10223 WARN SHORTED PRIMARY ( M1) OK Warning
10224 WARN OPEN PRIMARY ( M1) OK Warning
10225 spare ( M2) OK Warning
10226 WARN HI VOLTAGE ( M2) OK Warning
10227 WARN NO SECONDARY SPK ( M2) OK Warning
10228 WARN HI FROM ENGINE ( M2) OK Warning
10229 WARN LO FROM ENGINE ( M2) OK Warning
10230 WARN LO VOLTAGE ( M2) OK Warning
10231 WARN SHORTED PRIMARY ( M2) OK Warning
10232 WARN OPEN PRIMARY ( M2) OK Warning
10233 spare ( N1) OK Warning
10234 WARN HI VOLTAGE ( N1) OK Warning
10235 WARN NO SECONDARY SPK ( N1) OK Warning
10236 WARN HI FROM ENGINE ( N1) OK Warning
10237 WARN LO FROM ENGINE ( N1) OK Warning
10238 WARN LO VOLTAGE ( N1) OK Warning
10239 WARN SHORTED PRIMARY ( N1) OK Warning
10240 WARN OPEN PRIMARY ( N1) OK Warning
10241 spare ( N2) OK Warning
10242 WARN HI VOLTAGE ( N2) OK Warning
10243 WARN NO SECONDARY SPK ( N2) OK Warning
10244 WARN HI FROM ENGINE ( N2) OK Warning

CPU-95 OI-E 2-10 All rights reserved © ALTRONIC, LLC 2010 52
Register Label 0 1 Notes
10245 WARN LO FROM ENGINE ( N2) OK Warning
10246 WARN LO VOLTAGE ( N2) OK Warning
10247 WARN SHORTED PRIMARY ( N2) OK Warning
10248 WARN OPEN PRIMARY ( N2) OK Warning
10249 –10256 RESERVED
Enhanced Display Modbus Register 30000
Register Label Units Size (bits) Min Max Notes
30001 ENGINE RPM 1 RPM/bit 16
30002 MAX SEEN RPM 10 RPM/bit 16
30003 OVERSPEED SETTING 10 RPM/bit 16
30004 FAULT GEAR TEETH COUNTS counts 16
30005 4-20 ANALOG INPUT 0.098mA/bit 16
30006 COUNTS TO DEGREES SCALER - 16
30007 GLOBAL TIMING DISPLAY VALUE - 16
30008 MANUAL RETARD SETTING - 16
30009 ONESTEP RETARD SETTING - 16
30010 ANALOG RETARD FROM TABLE - 16
30011 RPM RETARD FROM TABLE - 16
30012 SERIAL RETARD FROM REMOTE - 16
30013 MAX INDIVIDUAL OFFSET - 16
30014 STANDARD INDIVIDUAL OFFSET - 16
30015 REFERENCE ANGLE OF RESET PIN 16
30016 NUMBER OF CYLINDERS - 16
30017 ENGINE AVERAGE DIAG - 16
30018 LO SPARK DIAG THRESHOLD - 16
30019 HI SPARK DIAG THRESHOLD - 16
30020 NO SPARK DIAG THRESHOLD - 16
30021 LO FROM ENGINE THRESHOLD - 16
30022 HI FROM ENGINE THRESHOLD - 16
30023 RESERVED - 16 0 65535
30024 E2 ENABLE THRESHOLD - 16
30025 E2 DISABLE HYSTERISIS - 16
30026 E3 ENABLE THRESHOLD - 16
30027 E3 DISABLE HYSTERISIS - 16
30028 CYL TIMING OFFSET (A,A,A1) - 16
30029 CYL TIMING OFFSET (B,B,A2) - 16
30030 CYL TIMING OFFSET (C,C,B1) - 16
30031 CYL TIMING OFFSET (D,D,B2) - 16
30032 CYL TIMING OFFSET (E,E,C1) - 16
30033 CYL TIMING OFFSET (F,F,C2) - 16
30034 CYL TIMING OFFSET (K,G,D1) - 16

CPU-95 OI-E 2-10 All rights reserved © ALTRONIC, LLC 2010 53
Register Label Units Size (bits) Min Max Notes
30035 CYL TIMING OFFSET (L,H,D2) - 16
30036 CYL TIMING OFFSET (M,K,E1) - 16
30037 CYL TIMING OFFSET (N,L,E2) - 16
30038 CYL TIMING OFFSET (P,M,F1) - 16
30039 CYL TIMING OFFSET (R,N,F2) - 16
30040 CYL TIMING OFFSET (S,P,K1) - 16
30041 CYL TIMING OFFSET (T,R,K2) - 16
30042 CYL TIMING OFFSET (U,S,L1) - 16
30043 CYL TIMING OFFSET (V,T,L2) - 16
30044 CYL TIMING OFFSET ( U,M1) - 16
30045 CYL TIMING OFFSET ( V,M2) - 16
30046 CYL TIMING OFFSET ( N1) - 16
30047 CYL TIMING OFFSET ( N2) - 16
30048 CAVG (A,A,A1) - 16
30049 CAVG (B,B,A2) - 16
30050 CAVG (C,C,B1) - 16
30051 CAVG (D,D,B2) - 16
30052 CAVG (E,E,C1) - 16
30053 CAVG (F,F,C2) - 16
30054 CAVG (K,G,D1) - 16
30055 CAVG (L,H,D2) - 16
30056 CAVG (M,K,E1) - 16
30057 CAVG (N,L,E2) - 16
30058 CAVG (P,M,F1) - 16
30059 CAVG (R,N,F2) - 16
30060 CAVG (S,P,K1) - 16
30061 CAVG (T,R,K2) - 16
30062 CAVG (U,S,L1) - 16
30063 CAVG (V,T,L2) - 16
30064 CAVG ( U,M1) - 16
30065 CAVG ( V,M2) - 16
30066 CAVG ( N1) - 16
30067 CAVG ( N2) - 16
30068 DIAG OFFSET (A,A,A1) - 16
30069 DIAG OFFSET (B,B,A2) - 16
30070 DIAG OFFSET (C,C,B1) - 16
30071 DIAG OFFSET (D,D,B2) - 16
30072 DIAG OFFSET (E,E,C1) - 16
30073 DIAG OFFSET (F,F,C2) - 16
30074 DIAG OFFSET (K,G,D1) - 16
30075 DIAG OFFSET (L,H,D2) - 16
30076 DIAG OFFSET (M,K,E1) - 16
30077 DIAG OFFSET (N,L,E2) - 16

CPU-95 OI-E 2-10 All rights reserved © ALTRONIC, LLC 2010 54
Register Label Units Size (bits) Min Max Notes
30078 DIAG OFFSET (P,M,F1) - 16
30079 DIAG OFFSET (R,N,F2) - 16
30080 DIAG OFFSET (S,P,K1) - 16
30081 DIAG OFFSET (T,R,K2) - 16
30082 DIAG OFFSET (U,S,L1) - 16
30083 DIAG OFFSET (V,T,L2) - 16
30084 DIAG OFFSET ( U,M1) - 16
30085 DIAG OFFSET ( V,M2) - 16
30086 DIAG OFFSET ( N1) - 16
30087 DIAG OFFSET ( N2) - 16
30088 COV (A,A,A1) - 16
30089 COV (B,B,A2) - 16
30090 COV (C,C,B1) - 16
30091 COV (D,D,B2) - 16
30092 COV (E,E,C1) - 16
30093 COV (F,F,C2) - 16
30094 COV (K,G,D1) - 16
30095 COV (L,H,D2) - 16
30096 COV (M,K,E1) - 16
30097 COV (N,L,E2) - 16
30098 COV (P,M,F1) - 16
30099 COV (R,N,F2) - 16
30100 COV (S,P,K1) - 16
30101 COV (T,R,K2) - 16
30102 COV (U,S,L1) - 16
30103 COV (V,T,L2) - 16
30104 COV ( U,M1) - 16
30105 COV ( V,M2) - 16
30106 COV ( N1) - 16
30107 COV ( N2) - 16
30108 –30127 RESERVED - 16 0 65535
30128 FAULT GEAR TEETH ACTUAL - 16
30129 4-20 ANALOG INPUT mA * 10 16
30130 GLOBAL TIMING DISPLAY degrees * 10 16
30131 MANUAL RETARD SETTING degrees * 10 16
30132 ONESTEP RETARD SETTING degrees * 10 16
30133 ANALOG RETARD FROM TBL degrees * 10 16
30134 RPM RETARD FROM TBL degrees * 10 16
30135 SERIAL RETARD degrees * 10 16
30136 REF. ANGLE OF RESET PIN degrees * 10 16
30137 MAX INDIVIDUAL OFFSET degrees * 10 16
30138 CYL TIM. OFF. (A,A,A1) degrees * 10 16

CPU-95 OI-E 2-10 All rights reserved © ALTRONIC, LLC 2010 55
Register Label Units Size (bits) Min Max Notes
30139 CYL TIM. OFF. (B,B,A2) degrees * 10 16
30140 CYL TIM. OFF. (C,C,B1) degrees * 10 16
30141 CYL TIM. OFF. (D,D,B2) degrees * 10 16
30142 CYL TIM. OFF. (E,E,C1) degrees * 10 16
30143 CYL TIM. OFF. (F,F,C2) degrees * 10 16
30144 CYL TIM. OFF. (K,G,D1) degrees * 10 16
30145 CYL TIM. OFF. (L,H,D2) degrees * 10 16
30146 CYL TIM. OFF. (M,K,E1) degrees * 10 16
30147 CYL TIM. OFF. (N,L,E2) degrees * 10 16
30148 CYL TIM. OFF. (P,M,F1) degrees * 10 16
30149 CYL TIM. OFF. (R,N,F2) degrees * 10 16
30150 CYL TIM. OFF. (S,P,K1) degrees * 10 16
30151 CYL TIM. OFF. (T,R,K2) degrees * 10 16
30152 CYL TIM. OFF. (U,S,L1) degrees * 10 16
30153 CYL TIM. OFF. (V,T,L2) degrees * 10 16
30154 CYL TIM. OFF. ( U,M1) degrees * 10 16
30155 CYL TIM. OFF. ( V,M2) degrees * 10 16
30156 CYL TIM. OFF. ( N1) degrees * 10 16
30157 CYL TIM. OFF. ( N2) degrees * 10 16
30158 –30240 RESERVED - 16 0 65535
30241 InStat 001-016 - 16
30242 InStat 017-032 - 16
30243 InStat 033-048 - 16
30244 InStat 049-064 - 16
30245 InStat 065-080 - 16
30246 InStat 081-096 - 16
30247 InStat 097-112 - 16
30248 InStat 113-128 - 16
30249 InStat 129-144 - 16
30250 InStat 145-160 - 16
30251 InStat 161-176 - 16
30252 InStat 177-192 - 16
30253 InStat 193-208 - 16
30254 InStat 209-224 - 16
30255 InStat 225-240 - 16
30256 InStat 241-256 - 16
30257 –30384 RESERVED - 16 0 65535

CPU-95 OI-E 2-10 All rights reserved © ALTRONIC, LLC 2010 56
Enhanced Display Modbus Register 40000
Register Label Units Bits Min Max Default Notes
40001 MANUAL RETARD SETTING degrees * 10 16 0 65535 0
40002 CYLINDER TIMING OFFSET (A,A,A1) degrees * 10 16 0 65535 0
40003 CYLINDER TIMING OFFSET (B,B,A2) degrees * 10 16 0 65535 0
40004 CYLINDER TIMING OFFSET (C,C,B1) degrees * 10 16 0 65535 0
40005 CYLINDER TIMING OFFSET (D,D,B2) degrees * 10 16 0 65535 0
40006 CYLINDER TIMING OFFSET (E,E,C1) degrees * 10 16 0 65535 0
40007 CYLINDER TIMING OFFSET (F,F,C2) degrees * 10 16 0 65535 0
40008 CYLINDER TIMING OFFSET (K,G,D1) degrees * 10 16 0 65535 0
40009 CYLINDER TIMING OFFSET (L,H,D2) degrees * 10 16 0 65535 0
40010 CYLINDER TIMING OFFSET (M,K,E1) degrees * 10 16 0 65535 0
40011 CYLINDER TIMING OFFSET (N,L,E2) degrees * 10 16 0 65535 0
40012 CYLINDER TIMING OFFSET (P,M,F1) degrees * 10 16 0 65535 0
40013 CYLINDER TIMING OFFSET (R,N,F2) degrees * 10 16 0 65535 0
40014 CYLINDER TIMING OFFSET (S,P,K1) degrees * 10 16 0 65535 0
40015 CYLINDER TIMING OFFSET (T,R,K2) degrees * 10 16 0 65535 0
40016 CYLINDER TIMING OFFSET (U,S,L1) degrees * 10 16 0 65535 0
40017 CYLINDER TIMING OFFSET (V,T,L2) degrees * 10 16 0 65535 0
40018 CYLINDER TIMING OFFSET ( U,M1) degrees * 10 16 0 65535 0
40019 CYLINDER TIMING OFFSET ( V,M2) degrees * 10 16 0 65535 0
40020 CYLINDER TIMING OFFSET ( N1) degrees * 10 16 0 65535 0
40021 CYLINDER TIMING OFFSET ( N2) degrees * 10 16 0 65535 0
40022 –40215 RESERVED - 16 0 65535 0
40216 CYLINDER LABEL (A,A,A1) - 16 0 65535 0
40217 CYLINDER LABEL (B,B,A2) - 16 0 65535 0
40218 CYLINDER LABEL (C,C,B1) - 16 0 65535 0
40219 CYLINDER LABEL (D,D,B2) - 16 0 65535 0
40220 CYLINDER LABEL (E,E,C1) - 16 0 65535 0
40221 CYLINDER LABEL (F,F,C2) - 16 0 65535 0
40222 CYLINDER LABEL (K,G,D1) - 16 0 65535 0
40223 CYLINDER LABEL (L,H,D2) - 16 0 65535 0
40224 CYLINDER LABEL (M,K,E1) - 16 0 65535 0
40225 CYLINDER LABEL (N,L,E2) - 16 0 65535 0
40226 CYLINDER LABEL (P,M,F1) - 16 0 65535 0
40227 CYLINDER LABEL (R,N,F2) - 16 0 65535 0
40228 CYLINDER LABEL (S,P,K1) - 16 0 65535 0
40229 CYLINDER LABEL (T,R,K2) - 16 0 65535 0
40230 CYLINDER LABEL (U,S,L1) - 16 0 65535 0
40231 CYLINDER LABEL (V,T,L2) - 16 0 65535 0
40232 CYLINDER LABEL ( U,M1) - 16 0 65535 0
40233 CYLINDER LABEL ( V,M2) - 16 0 65535 0
40234 CYLINDER LABEL ( N1) - 16 0 65535 0

CPU-95 OI-E 2-10 All rights reserved © ALTRONIC, LLC 2010 57
Register Label Units Bits Min Max Default Notes
40235 CYLINDER LABEL ( N2) - 16 0 65535 0
40236 Modbus RTU Node ID - 16 1 254 1
40237 Auxiliary Port Baud Rate - 16 0 4 0 0=9.6k,1=19.2k,2=38.4k,3=57.6k,4=115.2k
40238 USB Port Mode - 16 0 2 0 0=Terminal,1=Modbus,2=Debug
40239 USB Port Baud Rate - 16 0 4 0 0=9.6k,1=19.2k,2=38.4k,3=57.6k,4=115.2k
40240 Datalog Interval seconds 16 0 11 2
40241 Datalog Power On Erase - 16 0 1 0 0=No, 1=Yes
40242 Datalog Continue Log At Stop - 16 0 1 0 0=No, 1=Yes
40243 Datalog Track Timing Change - 16 0 1 0 0=No, 1=Yes
40244 Test Mode Availability - 16 0 2 1
40245 Value Protect Password (Keys) - 16 0 65535 0
40246 Value Protect Password (Keys) - 16 0 65535 0
40247 Value Protect Password (Keys) - 16 0 65535 0
40248 Value Protect Password (Keys) - 16 0 65535 0
40249 Value Protect Password (Keys) - 16 0 65535 0
40250 Cylinder Bar Graph Center - 16 20 235 130
40251 Cyl Bar Graph Counts Per Point counts 16 1 5 2
40252 EAVG Bar Graph Spread - 16 1 255 30
40253 RTC Year year 16 2007 2099 0
40254 RTC Date - 16 0 65535 0 msb=month,lsb=day
40255 RTC Time - 16 0 65535 0 msb=hour,lsb=minutes
40256 Key Commands - 16 0 65535 0

CPU-95 OI-E 2-10 All rights reserved © ALTRONIC, LLC 2010 58
SPECIFICATIONS
POWER: 24VDC @ 150mA NOMINAL, 32VDC @ 250mA MAX.ENCLOSURE: WEATHERPROOF, POWDER COATED ALUMINUMFIELD CONNECTIONS: PLUG-IN TERMINAL STRIPS ON BACKCONTROL INPUTS: 1. RS-485 SERIAL COMMUNICATIONS PORT 2. MISCELLANEOUS INPUT – ONE STEP RETARD (DEFAULT), ALSO MULTI-STRIKE, MAX. ENERGY LEVEL (CONFIGURED THROUGH P.C.) 3. 4–20mA CURRENT LOOP INPUT 4. AUXILIARY RS-485 MODBUS RTU PORT 5. USB