openstack* neutron with intel architecture - 01.org · introduction 2 by using this document, in...
TRANSCRIPT
OpenStack* Neutron with Intel®
Architecture
Getting Started Guide
July 2014

Introduction
2
By using this document, in addition to any agreements you have with Intel, you accept the terms set forth below.
You may not use or facilitate the use of this document in connection with any infringement or other legal analysis concerning
Intel products described herein. You agree to grant Intel a non-exclusive, royalty-free license to any patent claim thereafter
drafted which includes subject matter disclosed herein
INFOMATION IN THIS DOCUMENT IS PROVIDED IN CONNECTION WITH INTEL PRODUCTS. NO LICENSE, EXPRESS OR IMPLIED,
BY ESTOPPEL OR OTHERWISE, TO ANY INTELLECTUAL PROPERTY RIGHTS IS GRANTED BY THIS DOCUMENT. EXCEPT AS PROVIDED IN INTEL'S TERMS AND CONDITIONS OF SALE FOR SUCH PRODUCTS, INTEL ASSUMES NO LIABILITY WHATSOEVER
AND INTEL DISCLAIMS ANY EXPRESS OR IMPLIED WARRANTY, RELATING TO SALE AND/OR USE OF INTEL PRODUCTS
INCLUDING LIABILITY OR WARRANTIES RELATING TO FITNESS FOR A PARTICULAR PURPOSE, MERCHANTABILITY, OR
INFRINGEMENT OF ANY PATENT, COPYRIGHT OR OTHER INTELLECTUAL PROPERTY RIGHT.
A "Mission Critical Application" is any application in which failure of the Intel Product could result, directly or indirectly, in
personal injury or death. SHOULD YOU PURCHASE OR USE INTEL'S PRODUCTS FOR ANY SUCH MISSION CRITICAL APPLICATION,
YOU SHALL INDEMNIFY AND HOLD INTEL AND ITS SUBSIDIARIES, SUBCONTRACTORS AND AFFILIATES, AND THE DIRECTORS,
OFFICERS, AND EMPLOYEES OF EACH, HARMLESS AGAINST ALL CLAIMS COSTS, DAMAGES, AND EXPENSES AND REASONABLE
ATTORNEYS' FEES ARISING OUT OF, DIRECTLY OR INDIRECTLY, ANY CLAIM OF PRODUCT LIABILITY, PERSONAL INJURY, OR
DEATH ARISING IN ANY WAY OUT OF SUCH MISSION CRITICAL APPLICATION, WHETHER OR NOT INTEL OR ITS
SUBCONTRACTOR WAS NEGLIGENT IN THE DESIGN, MANUFACTURE, OR WARNING OF THE INTEL PRODUCT OR ANY OF ITS
PARTS.
Intel may make changes to specifications and product descriptions at any time, without notice. Designers must not rely on the
absence or characteristics of any features or instructions marked "reserved" or "undefined". Intel reserves these for future
definition and shall have no responsibility whatsoever for conflicts or incompatibilities arising from future changes to them. The
information here is subject to change without notice. Do not finalize a design with this information.
The products described in this document may contain design defects or errors known as errata which may cause the product to
deviate from published specifications. Current characterized errata are available on request.
Contact your local Intel sales office or your distributor to obtain the latest specifications and before placing your product order.
Copies of documents which have an order number and are referenced in this document, or other Intel literature, may be obtained
by calling 1-800-548-4725, or go to: http://www.intel.com/design/literature.htm
Intel® Hyper-Threading Technology (Intel® HT Technology): Available on select Intel® Core™ processors. Requires an Intel® HT
Technology enabled system. Consult your PC manufacturer. Performance will vary depending on the specific hardware and
software used. For more information including details on which processors support HT Technology, visit
http://www.intel.com/info/hyperthreading.
Intel® Virtualization Technology (Intel® VT) requires a computer system with an enabled Intel® processor, BIOS, and virtual
machine monitor (VMM).
Functionality, performance or other benefits will vary depending on hardware and software configurations. Software applications
may not be compatible with all operating systems. Consult your PC manufacturer. For more information, visit
http://www.intel.com/go/virtualization
Any software source code reprinted in this document is furnished for informational purposes only and may only be used or copied
and no license, express or implied, by estoppel or otherwise, to any of the reprinted source code is granted by this document.
Intel processor numbers are not a measure of performance. Processor numbers differentiate features within each processor
family, not across different processor families. Go to: http://www.intel.com/products/processor_number/
Intel, Atom, the Intel logo, the Intel Inside logo, and Xeon are trademarks of Intel Corporation in the U.S. and/or other countries.
*Other names and brands may be claimed as the property of others.
Copyright © 2014, Intel Corporation. All rights reserved.
Introduction
3
Contents
1 Introduction ...................................................................................................... 5
2 Requirements .................................................................................................... 5
2.1 Hardware ............................................................................................... 5 2.2 Software ................................................................................................ 5 2.3 Pre-requisites ......................................................................................... 5
3 Topology .......................................................................................................... 6
3.1 Multi Node ............................................................................................. 6
4 Linux* Configuration .......................................................................................... 6
4.1 Sudoers ................................................................................................. 6 4.2 Configuring Proxies ................................................................................. 7
4.2.1 Configure a Git Proxy Wrapper to Allow Access to Git Repos............ 7 4.2.2 Configure External Proxy ............................................................ 8
4.3 Package Dependencies (for Ubuntu*) ........................................................ 8 4.4 Package Dependencies (for Fedora*) ......................................................... 9 4.5 Libvirt Config .......................................................................................... 9
5 Devstack Configuration..................................................................................... 10
5.1 Pulling from Repo and Applying Patches ................................................... 10 5.1.1 Devstack ................................................................................ 10 5.1.2 Nova ...................................................................................... 10 5.1.3 Neutron .................................................................................. 11
5.2 Local.conf Configuration ........................................................................ 11 5.2.1 Huge Pages ............................................................................. 11
5.3 Starting Openstack Services ................................................................... 12 5.4 Availability Zones (Optional) .................................................................. 12
6 Sample Configuration ....................................................................................... 12
6.1 Sample Configurations for Multi Node Topology ........................................ 12 6.1.1 Multi Node .............................................................................. 12
6.1.1.1 Sample Controller local.conf ....................................... 12 6.1.1.2 Sample Compute local.conf ........................................ 13 6.1.1.3 Sample local.conf – Openstack* Accelerated OVS Compute
Node ....................................................................... 15 6.2 Issues ................................................................................................. 16
Figures
Figure 1. Multi Node Topology Diagram .............................................................................. 6

Introduction
4
Revision History
Date Revision Description
July 2014 1.1 Second release.
§
Introduction
5
1 Introduction
This document details the steps required to enable Intel® DPDK vSwitch and DPDK enabled OpenVswitch* with Openstack* (Icehouse release).
2 Requirements
2.1 Hardware
2x Intel® Grizzly Pass server boards: CPU: 2x Intel® Xeon® CPU E5-2697 v2 @ 2.70 GHz RAM: Minimum 16 GB; Recommended 64 GB.
1x Ethernet Controller on each board: Intel® Ethernet Server Adapter X520-SR2
2x Physical Networks
2.2 Software
Ubuntu* 12.04 64-bit Server Edition http://releases.ubuntu.com/12.04/ubuntu-12.04.4-server-amd64.iso OR
Fedora* 20 (minimal install) http://ftp.upjs.sk/pub/fedora/linux/releases/20/Fedora/x86_64/iso/Fedora-20-x86_64-netinst.iso
Devstack - http://devstack.org/
OpenStack* – http://openstack.org/
Devstack Patches from Intel
Nova Patches from Intel
Neutron Patches from Intel
2.3 Pre-requisites
Operating system is pre-installed
Hardware topology is configured as per Chapter 3
Access to the Internet
VT-x has been enabled in BIOS
NTP is running on the boards
Topology
6
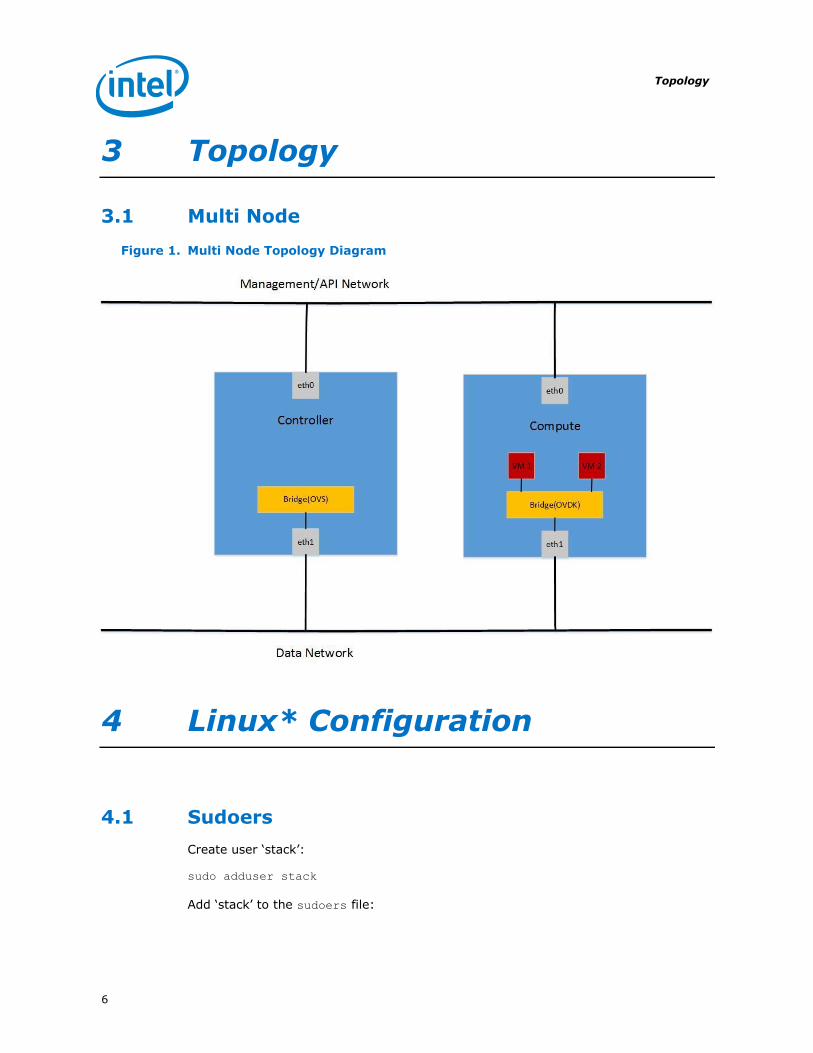
3 Topology
3.1 Multi Node
Figure 1. Multi Node Topology Diagram
4 Linux* Configuration
4.1 Sudoers
Create user ‘stack’:
sudo adduser stack
Add ‘stack’ to the sudoers file:
Linux* Configuration
7
sudo su -c 'echo "stack ALL=(ALL) NOPASSWD: ALL" >> /etc/sudoers'
For example: sudo cat /etc/sudoers
#
# This file MUST be edited with the 'visudo' command as root.
#
# Please consider adding local content in /etc/sudoers.d/ instead of
# directly modifying this file.
#
# See the man page for details on how to write a sudoers file.
#
Defaults env_reset
Defaults mail_badpass
Defaults
secure_path="/usr/local/sbin:/usr/local/bin:/usr/sbin:/usr/bin:/sbin:/bin
"
# Host alias specification
# User alias specification
# Cmnd alias specification
# User privilege specification
root ALL=(ALL:ALL) ALL
# Members of the admin group may gain root privileges
%admin ALL=(ALL) ALL
# Allow members of group sudo to execute any command
%sudo ALL=(ALL:ALL) ALL
# See sudoers(5) for more information on "#include" directives:
#includedir /etc/sudoers.d
stack ALL=(ALL) NOPASSWD: ALL
4.2 Configuring Proxies
4.2.1 Configure a Git Proxy Wrapper to Allow Access to Git
Repos
sudo vi /home/stack/git-proxy-wrapper
#!/bin/sh
_proxy=<PROXY>
_proxyport=<PROXYPORT>
exec socat STDIO SOCKS4:$_proxy:$1:$2,socksport=$_proxyport
sudo chown stack:stack /home/stack/git-proxy-wrapper
sudo chmod +x /home/stack/git-proxy-wrapper
Linux* Configuration
8
4.2.2 Configure External Proxy
sudo vi /home/stack/.bashrc
export GIT_PROXY_COMMAND=~/git-proxy-wrapper
export http_proxy=<PROXY>
export https_proxy=<PROXY>
export NO_PROXY=127.0.0.1,127.0.1.1,<YOUR HOST IP ADDRESS>,<YOUR
CONTROLLER IP ADDRESS>
export no_proxy=127.0.0.1,127.0.1.1,<YOUR HOST IP ADDRESS>,<YOUR
CONTROLLER IP ADDRESS>
sudo chown stack:stack /home/stack/.bashrc
To enable bashrc defined variables: source ~/.bashrc
4.3 Package Dependencies (for Ubuntu*)
Install the following dependencies:
sudo su stack
cd ~
sudo apt-get update
sudo apt-get upgrade -y
sudo apt-get install -y git
sudo apt-get install -y socat
sudo apt-get install -y zlib1g-dev
sudo apt-get install -y python-dev
sudo apt-get install -y libxslt-dev
sudo apt-get install -y zip screen
sudo apt-get install -y libvirt-bin
sudo apt-get install -y build-essential
sudo apt-get install -y python-passlib python-setuptools
curl -o pip.tar.gz https://pypi.python.org/packages/source/p/pip/pip-
1.4.1.tar.gz
tar xvfz pip.tar.gz
cd pip-1.4.1
sudo -E python setup.py install
sudo pip install dogpile.cache --proxy=`echo $http_proxy`
sudo pip install --upgrade setuptools --proxy=`echo $http_proxy`
sudo apt-get install -y ntp
date ; sudo service ntp stop ; sudo ntpdate -s <ntp-server-address>; sudo
service ntp start ; date
sudo apt-get purge -y apparmor
Reboot:
Linux* Configuration
9
sudo reboot
4.4 Package Dependencies (for Fedora*)
Install the following dependencies:
sudo su stack
cd ~
sudo yum update
sudo yum install -y git
sudo yum install -y socat
sudo yum install -y zlib-devel
sudo yum install -y python-devel
sudo yum install -y libxslt1-devel
sudo yum install -y unzip screen tar
sudo yum install -y libvirt
sudo yum install -y automake gcc
sudo yum install -y python-passlib python-setuptools
sudo yum install -y patch
sudo yum install -y kernel-devel
sudo yum install –y kernel-modules-extra
sudo yum install -y net-tools
sudo yum install -y python-lxml
sudo yum install -y ntp
curl -o pip.tar.gz https://pypi.python.org/packages/source/p/pip/pip-
1.4.1.tar.gz
tar xvfz pip.tar.gz
cd pip-1.4.1
sudo -E python setup.py install
sudo pip install dogpile.cache --proxy=`echo $http_proxy`
date ; sudo service ntpd stop ; sudo ntpdate -s <ntp-server-address>;
sudo service ntpd start ; date
sudo vi /etc/selinux/config
set SELINUX=permissive
Reboot:
sudo reboot
4.5 Libvirt Config
Libvirt must be configured to allow use of Huge Pages and USVHost:
sudo vi /etc/libvirt/qemu.conf
Devstack Configuration
10
Uncomment the cgroup_controllers line
Uncomment the hugetlbfs_mount line and modify as below
hugetlbfs_mount = "/mnt/huge"
Uncomment the whole crgoup_devices_acl array and add ensure the
following entries are included
"/dev/null", "/dev/full", "/dev/zero", "/dev/random",
"/dev/urandom", "/dev/ptmx", "/dev/kvm", "/dev/kqemu",
"/dev/rtc", "/dev/hpet", "/dev/net/tun", "/mnt/huge",
"/dev/vhost-net”
Restart libvirt:
For Ubuntu*: sudo restart libvirt-bin
For Fedora*: sudo service libvirtd restart
5 Devstack Configuration
5.1 Pulling from Repo and Applying Patches
5.1.1 Devstack
cd /home/stack
git clone https://github.com/openstack-dev/devstack.git
cd devstack
git checkout ea548cd5ce1c0899bc12cd2ff957546ecb7e88b9
patch -p1 < <PATH TO PATCH>/devstack.patch
Clone Nova and Neutron into /opt/stack and apply patches in that directory:
sudo mkdir /opt/stack
sudo chown stack:stack /opt/stack
5.1.2 Nova
cd /opt/stack
git clone https://github.com/openstack/nova.git
cd nova
git checkout 2014.1.1
patch -p1 < <PATH TO PATCH>/nova.patch
Devstack Configuration
11
5.1.3 Neutron
cd /opt/stack
git clone https://github.com/openstack/neutron.git
cd neutron
git checkout 2014.1.1
patch -p1 < <PATH TO PATCH>/neutron.patch
5.2 Local.conf Configuration
Create a local.conf file in the devstack directory.
For a sample local.conf, see Section 6.1 Sample Configurations for Multi Node
Topology.
5.2.1 Huge Pages
To be able to run OVDK, hugepages must be configured.
When stack.sh is run, devstack allocates the specified number of hugepages and
mounts them.
There are two variables that can be set in local.conf:
OVDK Accelerated ovs Description
OVDK_NUM_HUGEPAGES OVS_NUM_HUGEPAGES
The number of hugepages
to be allocated on each CPU node
OVDK_HUGEPAGE_MOUNT OVS_HUGEPAGE_MOUNT
Where to mount the
hugepages, by default it is: /mnt/huge
See Section 6.1.1.2 Sample Compute local.conf – Openstack* Compute Node for an
example.
Note: At least 2 GB of memory in each node must be allocated to allow OVDK to run.
Any VM’s instantiated on a compute node with OVDK will run in hugepage memory, so
to run OVDK + 4 VM’s with 1 GB of memory, at least 4 GB of memory on each NUMA node needs to be reserved for hugepages. On a system with 2 MB hugepage size, that
is 2048 pages per node. On a node with Accelerated ovs VM don’t use hugepage
backed memory.
Sample Configuration
12
5.3 Starting Openstack Services
To run:
./stack.sh
Note: Depending on your environment and configuration you may need to flush your iptable rules for some Openstack* services. Ensure your environment is secure before doing so.
Note: On the controller node, after the stack.sh has completed, issue the command:
sudo ovs-vsctl add-port br-eth1 eth1
5.4 Availability Zones (Optional)
To configure Availability Zones, run on the controller:
cd /home/stack/devstack/
source openrc admin demo
nova aggregate-create <AZ NAME> <AZ NAME>
nova aggregate-add-host <AZ NAME> <HOSTNAME TO ADD TO AZ>
nova availability-zone-list
Note: Depending on your environment and configuration you may need to add your hosts to /etc/hosts.
6 Sample Configuration
6.1 Sample Configurations for Multi Node Topology
Refer to Figure 1.
6.1.1 Multi Node
For a multi node topology, a local.conf file must be configured on the controller and
all compute nodes in the environment.
6.1.1.1 Sample Controller local.conf
#CONTROLLER CONFIG FILE
Sample Configuration
13
[[local|localrc]]
HOST_IP=<HOST IP ADDRESS>
HOST_NAME=$(hostname)
HOST_IP_IFACE=<eth0>
FORCE=yes
MYSQL_PASSWORD=password
DATABASE_PASSWORD=password
RABBIT_PASSWORD=password
ADMIN_PASSWORD=password
SERVICE_PASSWORD=password
HORIZON_PASSWORD=password
SERVICE_TOKEN=tokentoken
disable_service n-net
disable_service n-cpu
enable_service q-svc
enable_service q-agt
enable_service q-dhcp
enable_service q-l3
enable_service q-meta
enable_service neutron
Q_AGENT=openvswitch
Q_ML2_PLUGIN_MECHANISM_DRIVERS=openvswitch
Q_ML2_PLUGIN_TYPE_DRIVERS=vlan,flat,local
DEST=/opt/stack
SCREEN_LOGDIR=$DEST/logs/screen
LOGFILE=${SCREEN_LOGDIR}/xstack.sh.log
LOGDAYS=1
ENABLE_TENANT_VLANS=True
ML2_VLAN_RANGES=default:1000:1010
PHYSICAL_NETWORK=default
OVS_PHYSICAL_BRIDGE=br-eth1
MULTI_HOST=1
[[post-config|$NOVA_CONF]]
[DEFAULT]
firewall_driver=nova.virt.firewall.NoopFirewallDriver
novncproxy_host=0.0.0.0
novncproxy_port=6080
6.1.1.2 Sample Compute local.conf
#COMPUTE NODE CONFIG FILE
[[local|localrc]]
FORCE=yes
HOST_IP=<HOST IP ADDRESS>
HOST_NAME=$(hostname)
HOST_IP_IFACE=eth0
Sample Configuration
14
SERVICE_HOST_NAME=<CONTROLLER HOST NAME>
SERVICE_HOST=<CONTROLLER IP ADDRESS>
MYSQL_HOST=$SERVICE_HOST
RABBIT_HOST=$SERVICE_HOST
GLANCE_HOST=$SERVICE_HOST
GLANCE_HOSTPORT=$SERVICE_HOST:9292
KEYSTONE_AUTH_HOST=$SERVICE_HOST
KEYSTONE_SERVICE_HOST=$SERVICE_HOST
MYSQL_PASSWORD=password
RABBIT_PASSWORD=password
ADMIN_PASSWORD=password
SERVICE_PASSWORD=password
HORIZON_PASSWORD=password
SERVICE_TOKEN=tokentoken
disable_all_services
enable_service n-cpu
enable_service q-agt
enable_service rabbit
Q_AGENT=ovdk
Q_ML2_PLUGIN_MECHANISM_DRIVERS=openvswitch
Q_ML2_PLUGIN_TYPE_DRIVERS=vlan
OVDK_NUM_HUGEPAGES=8192
OVDK_GIT_TAG=9ba3d92f16ec0d8f07abd9d2ba222d44bdfbf44d
#OVDK_PRE_10_VERSION=False
#OVDK_REPO=/opt/stack/ovdk
#OVDK_DPDK_DIR=/opt/stack/dpdk
#OVDK_BUILD_FROM_PACKAGE=True
#OVDK_PACKAGE_URL=<path-to-ovdk>
#OVDK_DPDK_BUILD_FROM_PACKAGE=False
#OVDK_DPDK_GIT_REPO=http://dpdk.org/git/dpdk
#OVDK_DPDK_GIT_TAG=<git-commit>
#DPDK_PCI_BIND=dpdk_nic_bind.py
DEST=/opt/stack
SCREEN_LOGDIR=$DEST/logs/screen
LOGFILE=${SCREEN_LOGDIR}/xstack.sh.log
LOGDAYS=1
ENABLE_TENANT_VLANS=True
ML2_VLAN_RANGES=default:1000:1010
PHYSICAL_NETWORK=default
OVS_PHYSICAL_BRIDGE=br-eth1
MULTI_HOST=1
[[post-config|$NOVA_CONF]]
[DEFAULT]
firewall_driver=nova.virt.firewall.NoopFirewallDriver
vnc_enabled=True
vncserver_listen=0.0.0.0
vncserver_proxyclient_address=$HOST_IP
Sample Configuration
15
6.1.1.3 Sample local.conf – Openstack* Accelerated OVS Compute Node #COMPUTE NODE CONFIG FILE
[[local|localrc]]
FORCE=yes
HOST_IP=<HOST IP ADDRESS>
HOST_NAME=$(hostname)
HOST_IP_IFACE=eth0
SERVICE_HOST_NAME=<CONTROLLER HOST NAME>
SERVICE_HOST=<CONTROLLER IP ADDRESS>
MYSQL_HOST=$SERVICE_HOST
RABBIT_HOST=$SERVICE_HOST
GLANCE_HOST=$SERVICE_HOST
GLANCE_HOSTPORT=$SERVICE_HOST:9292
KEYSTONE_AUTH_HOST=$SERVICE_HOST
KEYSTONE_SERVICE_HOST=$SERVICE_HOST
MYSQL_PASSWORD=password
RABBIT_PASSWORD=password
ADMIN_PASSWORD=password
SERVICE_PASSWORD=password
HORIZON_PASSWORD=password
SERVICE_TOKEN=tokentoken
disable_all_services
enable_service n-cpu
enable_service q-agt
enable_service rabbit
Q_AGENT=openvswitch
Q_ML2_PLUGIN_MECHANISM_DRIVERS=openvswitch
Q_ML2_PLUGIN_TYPE_DRIVERS=vlan
OVS_NUM_HUGEPAGES=8192
OVS_DATAPATH_TYPE=netdev
DEST=/opt/stack
SCREEN_LOGDIR=$DEST/logs/screen
LOGFILE=${SCREEN_LOGDIR}/xstack.sh.log
LOGDAYS=1
ENABLE_TENANT_VLANS=True
ML2_VLAN_RANGES=default:1000:1010
PHYSICAL_NETWORK=default
OVS_PHYSICAL_BRIDGE=br-eth1
MULTI_HOST=1
Sample Configuration
16
[[post-config|$NOVA_CONF]]
[DEFAULT]
firewall_driver=nova.virt.firewall.NoopFirewallDriver
vnc_enabled=True
vncserver_listen=0.0.0.0
vncserver_proxyclient_address=$HOST_IP
6.2 Issues
Ensure the eth1 is down before running stack.sh on the OVDK Compute node.
When hard rebooting a virtual machine on the OVDK Compute node the
interaction between the switch and the virtual machine may become unstable. Restarting devstack is known to solve the issue.
§