openessence installation guide - jhuapl.edu · openessence uses the geoserver web application to...
TRANSCRIPT

OpenESSENCE Installation Guide
Prepared by The Johns Hopkins University Applied Physics Laboratory, for the Armed Forces Health Surveillance Center, Division of GEIS Operations

OpenESSENCE Installation Guide
i
Table of Contents
Installation Overview ...................................................................................................................... 1
Installing and Configuring Java ....................................................................................................... 2
Installing PostgreSQL ...................................................................................................................... 8
Installing PostGIS .......................................................................................................................... 13
Creating a New Database .............................................................................................................. 18
Installing and Configuring Apache Tomcat ................................................................................... 22
Installing the PostgreSQL JDBC Driver for Tomcat ....................................................................... 27
Configuring Tomcat for Secure Socket Layer (SSL) Communication ............................................ 28
Configuring Tomcat for Optimal OpenEssence Performance....................................................... 32
Downloading OpenESSENCE and GeoServer WAR Files ............................................................... 34
Deploying OpenEssence and GeoServer to Tomcat ..................................................................... 36
GeoServer Site Configuration ....................................................................................................... 41
Resetting the OpenESSENCE Administrator Password ................................................................. 51
Starting OpenEssence ................................................................................................................... 53
OpenESSENCE Installation Guide
1
Installation Overview
OpenESSENCE requires several software products and some environment customization to function properly:
• Java Development Kit – the software runtime used for OpenESSENCE execution • PostgreSQL – an open-source database for surveillance data • Apache Tomcat – a web application server, hosting the OpenESSENCE software and
providing it to browser users
NOTE: Version numbers of these products may change over time and may not exactly match versions seen in screen shots in this guide.
This guide describes the installation of these products, customization of your environment, and deployment of the demo version of OpenESSENCE. This version is a fully functioning version of OpenESSENCE that contains dummy data for demonstration purposes. This guide assumes that you are installing on a Windows 7 computer. Installation is very similar for other recent versions of Windows.
Some OpenESSENCE configuration files require changes to indicate installation-specific details such as database user name and password. These changes require the installer to have write access to the directories containing the configuration files. If the system is running the Windows 7 operating system and you have limited administrative access, you will need to copy configuration files to a location that allows edits, such as the Windows Desktop. Once edited, the original files can be overwritten by using copy and replace. If issues during the installation process still exist, please contact the local administrator.
In several places throughout this guide, you will be asked to download either a 32-bit version of a particular application, or a 64-bit version. In general, if you are using Windows XP, you should select the 32-bit version of the application. If you are using Windows 7, you should select the 64-bit version of the application.
Even though we have tried to be as thorough as possible in these instructions, this guide assumes that you have a moderate amount of experience in downloading and installing web applications, starting and stopping services, using the Windows command prompt, and navigating through the file system.

OpenESSENCE Installation Guide
2
Installing and Configuring Java
OpenEssence requires Oracle’s Java Development Kit (JDK) for execution. You must install Java and configure the JAVA_HOME and Path environment variables as described here.
1. In your browser, go to http://www.oracle.com/technetwork/java/javase/downloads/index.html. Click DOWNLOAD under JDK.
Do not download Server JRE or JRE; those are not required.
2. Check the Accept License Agreement box on the download page and select the Java distribution you would like to use. If you are running 32-bit Windows (such as Windows XP), you must choose 32-bit Java for Windows (Windows x86). If you are running 64-bit Windows (such as Windows 7), you may choose either 32-bit or 64-bit Java; we recommend 64-bit (Windows x64).
OpenESSENCE Installation Guide
3
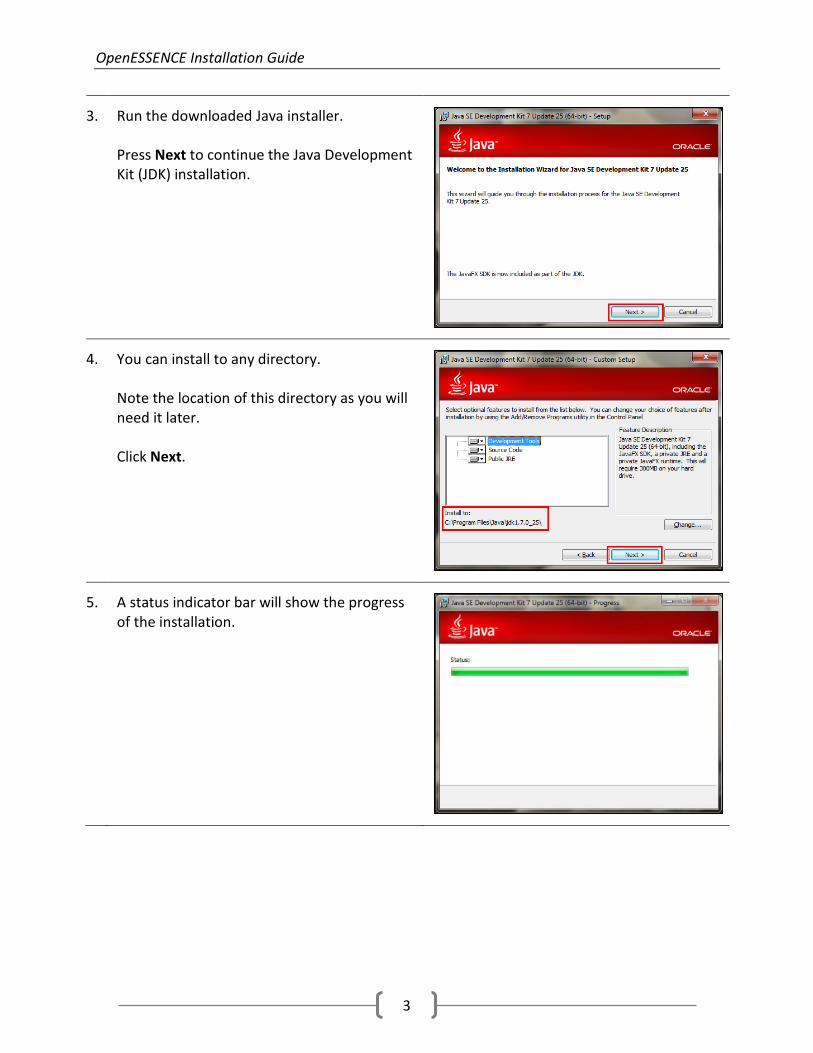
3. Run the downloaded Java installer. Press Next to continue the Java Development Kit (JDK) installation.
4. You can install to any directory. Note the location of this directory as you will need it later. Click Next.
5. A status indicator bar will show the progress of the installation.

OpenESSENCE Installation Guide
4
6. After the JDK has installed, the Java Runtime Environment (JRE) will be installed. Press Next.
7. At the end of the Java installation you should see this screen. You do not need to click Next Steps. Click Close.
8. Now you will need to configure environment variables for Java. Click the Windows Start Menu. Right-click on Computer and choose Properties.
9. Click Advanced System Settings. Depending on your system settings, you may need to enter your Windows user ID and password to access the Advanced System Settings application.
OpenESSENCE Installation Guide
5
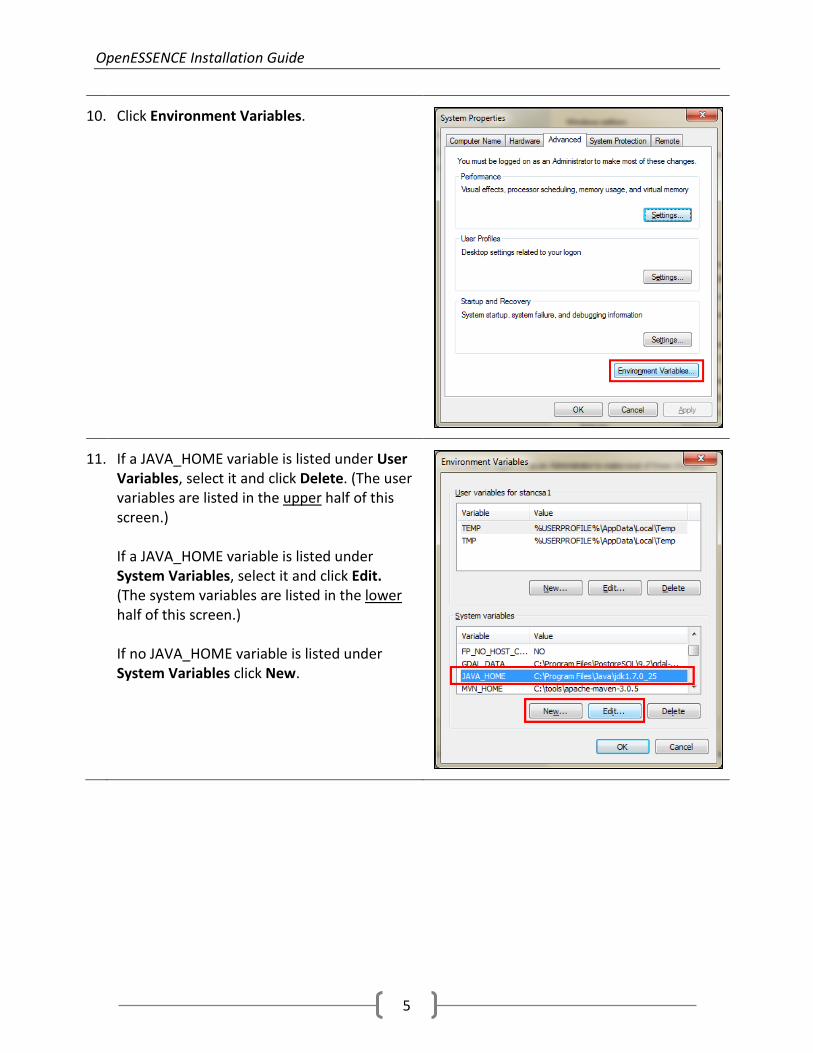
10. Click Environment Variables.
11. If a JAVA_HOME variable is listed under User Variables, select it and click Delete. (The user variables are listed in the upper half of this screen.) If a JAVA_HOME variable is listed under System Variables, select it and click Edit. (The system variables are listed in the lower half of this screen.) If no JAVA_HOME variable is listed under System Variables click New.

OpenESSENCE Installation Guide
6
12. Enter the name of the directory in which you installed Java (from Step 4) for Variable_ value. The variable name should be JAVA_HOME. Make sure that you specify the base directory for the Java installation and not the bin directory that’s inside it. Click OK to save the value.
13. Select the Path variable under System Variables and click Edit. (It is highly unlikely that the Path variable does not already exist, but if it does not, press New.)
14. Add the following text in front of the existing value in the Variable_value field (press the HOME key to make sure you are at the beginning of the field): %JAVA_HOME%\bin;
Click OK to save the value.
Close all other dialog boxes by clicking OK.

OpenESSENCE Installation Guide
7
15. To verify that the path was set correctly, open a CMD window:
a) Click the Windows Start button b) Type cmd in the text field and press
ENTER
You should see a black command screen window (as shown in the next step).
16. At the prompt, type where java
and press ENTER.
You should see the following path: C:\Program Files\Java\jdk1.7.0_25\bin\java.exe

OpenESSENCE Installation Guide
8
Installing PostgreSQL
These installation instructions are based on PostgreSQL 9.2 and assume that the system does not currently have another server running on port 5432 (the default PostgreSQL port) on the target machine.
1. To check if port 5432 is available, open a command prompt (from the Windows Start menu, type cmd in the search box and press ENTER).
At the command prompt, type netstat –ano | findstr 5432
and press ENTER. There should be no process associated with the port.
2. Open your browser and go to http://www.postgresql.org/download .
Click Windows under the pre-built binary packages section.
3. Click the Download link.

OpenESSENCE Installation Guide
9
4. Select either the 32-bit or 64-bit installer for Windows.
If you are running 32-bit Windows, you must choose 32-bit PostgreSQL for Windows (Win x86-32)
If you are running 64-bit Windows, you may choose either 32-bit or 64-bit PostgreSQL; we recommend 64-bit (Win x86-64)
5. Run the downloaded installer.
Click Next to continue.
6. Select the installation directory for PostgreSQL. The default directory is recommended.
Note the location of this directory; you will need it when installing PostGIS. Press Next to continue.

OpenESSENCE Installation Guide
10
7. Select the directory where your data will be stored. The default directory is recommended. Press Next to continue.
8. Enter and retype a password for your database administrator (the administrator user ID is postgres).
Note the password. This password will be used to access the database by OpenESSENCE. PostgreSQL will warn if the password does not match your system requirements.
Press Next to continue.
9. Enter the port on which the PostgreSQL server will listen for incoming requests. The default port, 5432, is recommended unless there is a conflict on your machine.
Press Next to continue.

OpenESSENCE Installation Guide
11
10. Choose the locale for your database. The default (Default locale) is recommended.
Press Next to continue.
11. Press Next to start the installation.
12. A status indicator bar will show the progress of the installation.

OpenESSENCE Installation Guide
12
13. Uncheck the Launch Stack Builder at exit? option. Click Finish to complete the PostgreSQL installation.
OpenESSENCE Installation Guide
13
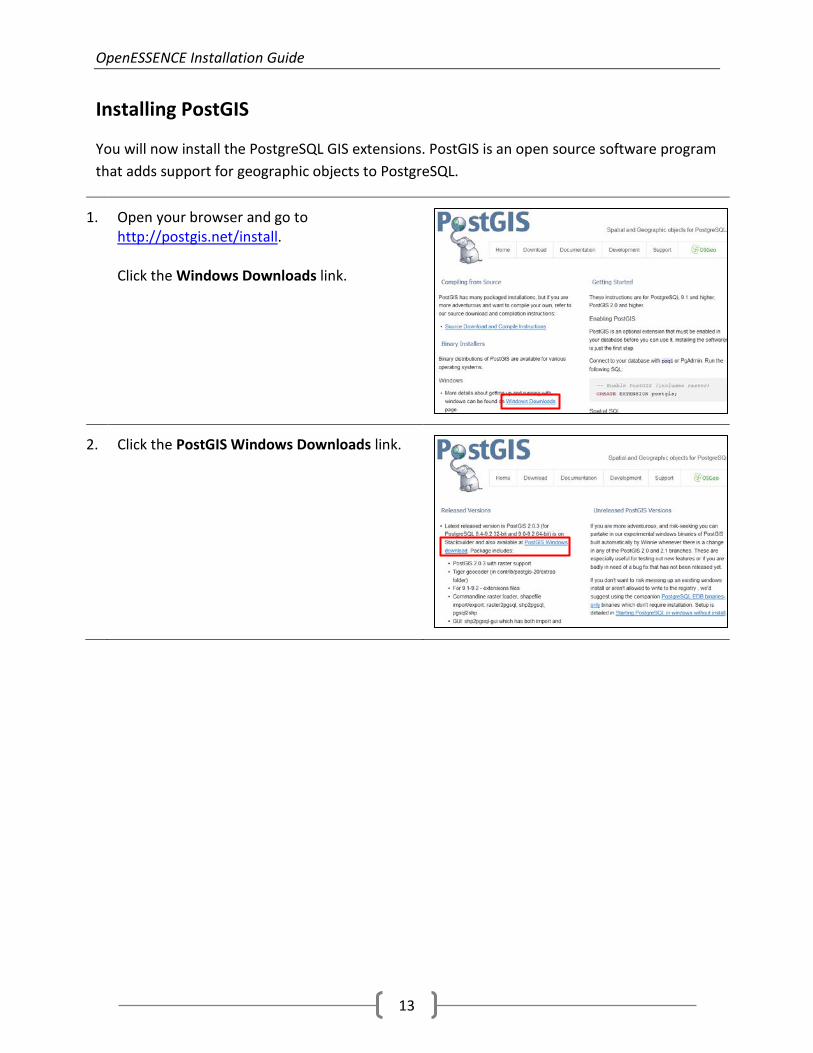
Installing PostGIS
You will now install the PostgreSQL GIS extensions. PostGIS is an open source software program that adds support for geographic objects to PostgreSQL.
1. Open your browser and go to http://postgis.net/install. Click the Windows Downloads link.
2. Click the PostGIS Windows Downloads link.

OpenESSENCE Installation Guide
14
3. Choose the latest version of PostGIS (in this example, the latest version is pg92).
4. Download the 32-bit or 64-bit version of PostGIS. If you are running 32-bit Windows (such as Windows XP), you must choose 32-bit PostGIS for Windows (postgis-pg##-setup-####.exe). If you are running 64-bit Windows (such as Windows 7), you may choose either 32-bit or 64-bit PostGIS; 64-bit is recommended (postgis-pg##x64-setup-####.exe). NOTE: You must use the same version (32 bit or 64 bit) for both PostgreSQL and PostGIS.

OpenESSENCE Installation Guide
15
5. Run the installer.
Click I Agree to accept the terms of the license agreement.
6. Check the Create spatial database box to create a new database.
Click Next to continue.
7. For the install location, choose the same folder in which you installed PostgreSQL. (That folder may already appear in the Destination Folder field.)
Click Next to continue.

OpenESSENCE Installation Guide
16
8. Enter the user name (postgres).
Enter the password you selected when installing PostgreSQL.
Click Next to continue.
9. In the Database Name field, use the default name provided, postgis20.
Click Install to start the installation.
10. A status indicator bar will show the progress of the installation.
OpenESSENCE Installation Guide
17
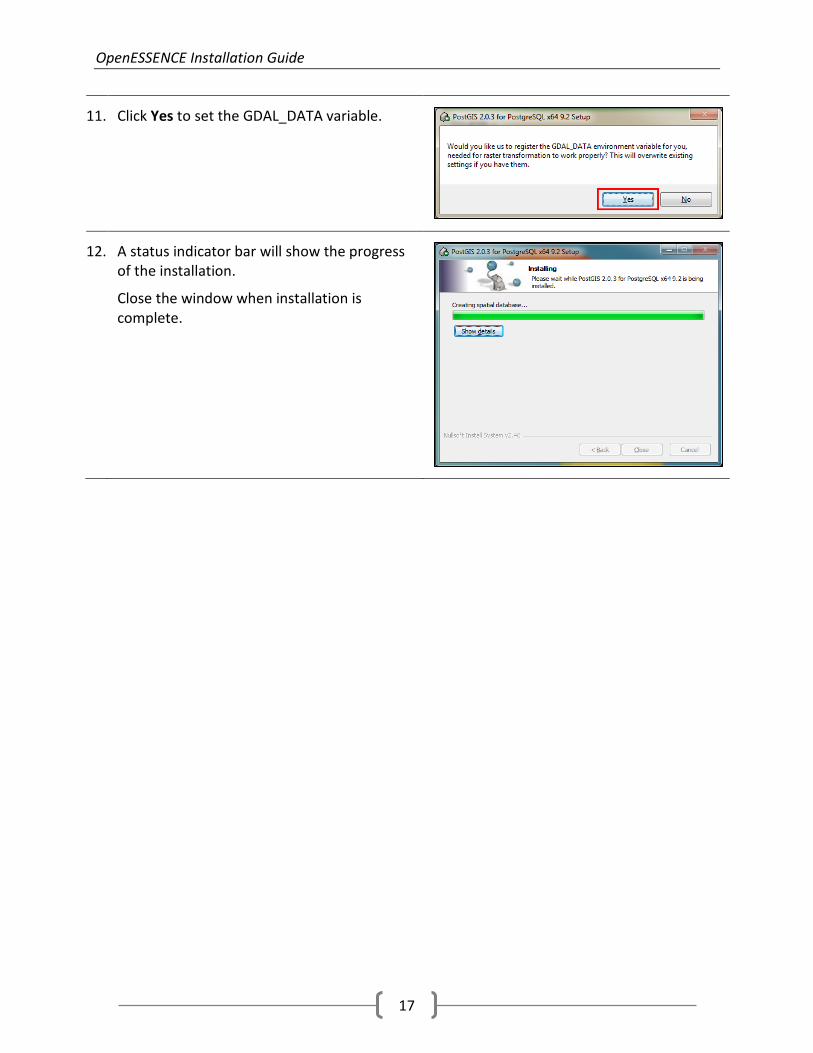
11. Click Yes to set the GDAL_DATA variable.
12. A status indicator bar will show the progress of the installation.
Close the window when installation is complete.

OpenESSENCE Installation Guide
18
Creating a New Database
We will now create a new initial database that contains the basic schema. We will overwrite this initial database with a backup copy of the OpenESSENCE demo version (in the next section). To create a new database:
1. Launch the PostgreSQL administrative tool by doing the following:
a) Click the Windows Start button b) Start typing pgadmin in the text box c) When pgAdmin III appears in the
Programs list, select it
2. Under Servers, right-click PostgreSQL 9.2 (localhost:5432) and choose Connect.

OpenESSENCE Installation Guide
19
3. Enter your database password (the one associated with user ID postgres).
4. Right-click Databases and select New Database…
5. Enter a name for the database. In this instance, the database name should be openessence.
Note the name of the database as you will need it when configuring Tomcat and GeoServer later.

OpenESSENCE Installation Guide
20
6. Switch to the Definition tab.
In the Template field, select template_postgis_20 as your database template.
Click OK to create the database.
7. Download the OpenESSENCE SQL script file from the SAGES website. In your browser, go to http://www.jhuapl.edu/sages/tools.htm.
Click Download next to OpenESSENCE 2.0. When prompted, choose to save the ZIP to a location on your computer (such as the Desktop). Once it is downloaded, right click on the ZIP file and select Extract All to extract the compressed files.
The ZIP file contains 6 files. For the current step, you need to be concerned only with openessence.sql. The other files will be used in subsequent sections of this guide.
8. Click on the new database to select it.
Click the SQL button on the toolbar to open the SQL query window.

OpenESSENCE Installation Guide
21
9. Open the openessence.sql file containing the database setup script. Click the Open file icon on the toolbar, or click File>Open from the menu bar.
10. Before the SQL file executes, you may receive a question asking if you want to save changes. Click No.
This message occurs because there may be some text in the SQL editor screen when it is first opened. When we open the SQL file, that text will be overwritten.
11. Press the Execute query button on the toolbar.
The queries should run quickly. You will see results similar to those shown on the right.
After running the queries, you can close the pgAdmin windows.

OpenESSENCE Installation Guide
22
Installing and Configuring Apache Tomcat
These installation instructions assume that you do not currently have any other server running on port 8080 (the default Tomcat port) on the target machine. If you do have something running on port 8080 (you can check by using this command at the CMD prompt: netstat –ano | findstr 8080) and cannot install on another machine, change the ports as referenced in the Tomcat manual (found on the Apache Tomcat website: http://tomcat.apache.org).
1. Open your browser and go to http://tomcat.apache.org/
Select Tomcat 7.0 under the Download section.
NOTE: OpenESSENCE has not been tested on Tomcat versions later than 7.0.
2. Click the 32-bit/64-bit Windows Service Installer link.
We will refer to the directory in which Tomcat is installed as <tomcat home>.
OpenESSENCE Installation Guide
23
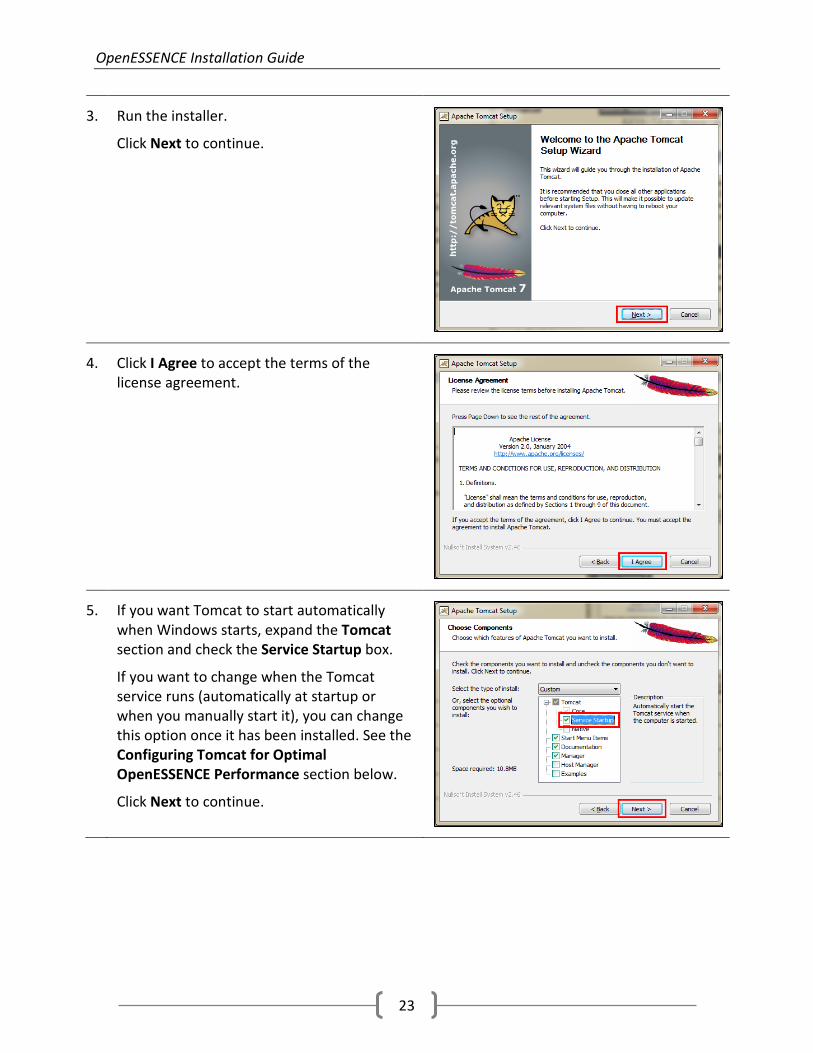
3. Run the installer.
Click Next to continue.
4. Click I Agree to accept the terms of the license agreement.
5. If you want Tomcat to start automatically when Windows starts, expand the Tomcat section and check the Service Startup box.
If you want to change when the Tomcat service runs (automatically at startup or when you manually start it), you can change this option once it has been installed. See the Configuring Tomcat for Optimal OpenESSENCE Performance section below.
Click Next to continue.

OpenESSENCE Installation Guide
24
6. If there is another service running on port 8005, 8009 or 8080, you can change the values here. (This is not usually the case. However, some tools, like Oracle XE, listen to port 8080, which would require you to change the Tomcat port.) Check the ports at a command prompt: netstat –ano | findstr 8005 netstat –ano | findstr 8009 netstat –ano | findstr 8080
NOTE: Even though an administrator password is optional, we recommend creating a username and password for the Tomcat Administrator Login. You will need the Tomcat admin password later in this guide.
Click Next to continue.
7. Choose the location of your Java installation. Make sure to select the jre folder.
Click Next to continue.

OpenESSENCE Installation Guide
25
8. Choose the location in which you want to install Tomcat.
It is strongly recommended that you change this to a directory for which you have access to edit/add/remove contents on your machine.
For example, c:\tools\Tomcat 7.0 works well.
We will refer to this directory as: <tomcat home>
Click Install to start the installation.
9. A status indicator bar will show the progress of the installation.
10. Uncheck Show Readme and click Finish. Tomcat will start. You may see a dialog indicating that the Tomcat service is attempting to start.
OpenESSENCE Installation Guide
26
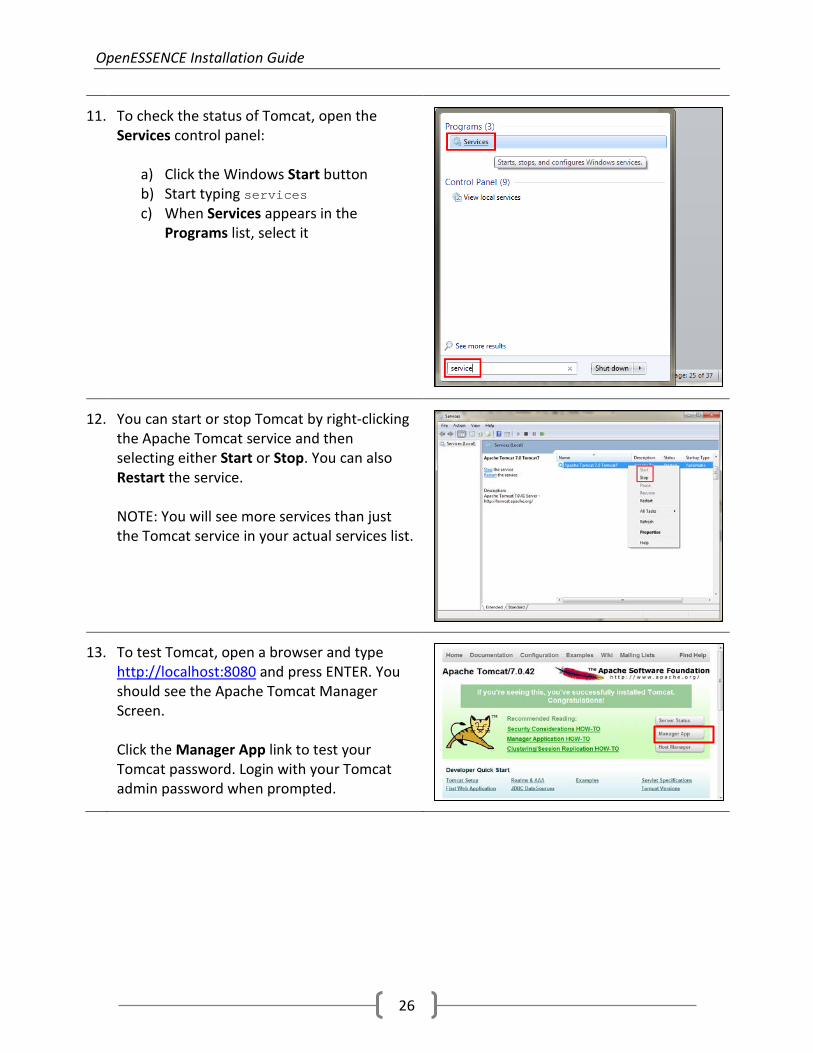
11. To check the status of Tomcat, open the Services control panel:
a) Click the Windows Start button b) Start typing services c) When Services appears in the
Programs list, select it
12. You can start or stop Tomcat by right-clicking the Apache Tomcat service and then selecting either Start or Stop. You can also Restart the service. NOTE: You will see more services than just the Tomcat service in your actual services list.
13. To test Tomcat, open a browser and type http://localhost:8080 and press ENTER. You should see the Apache Tomcat Manager Screen. Click the Manager App link to test your Tomcat password. Login with your Tomcat admin password when prompted.

OpenESSENCE Installation Guide
27
Installing the PostgreSQL JDBC Driver for Tomcat
The JDBC driver enables Tomcat to communicate with the PostgreSQL database.
1. Open your browser and go to http://jdbc.postgresql.org/download.html Click the JDBC 4 PostgreSQL Driver link for the version of PostgreSQL you installed.
2. Save the JAR file to <tomcat home>\lib.
OpenESSENCE Installation Guide
28
Configuring Tomcat for Secure Socket Layer (SSL) Communication
You will now create a certificate and configure Tomcat for SSL communication.
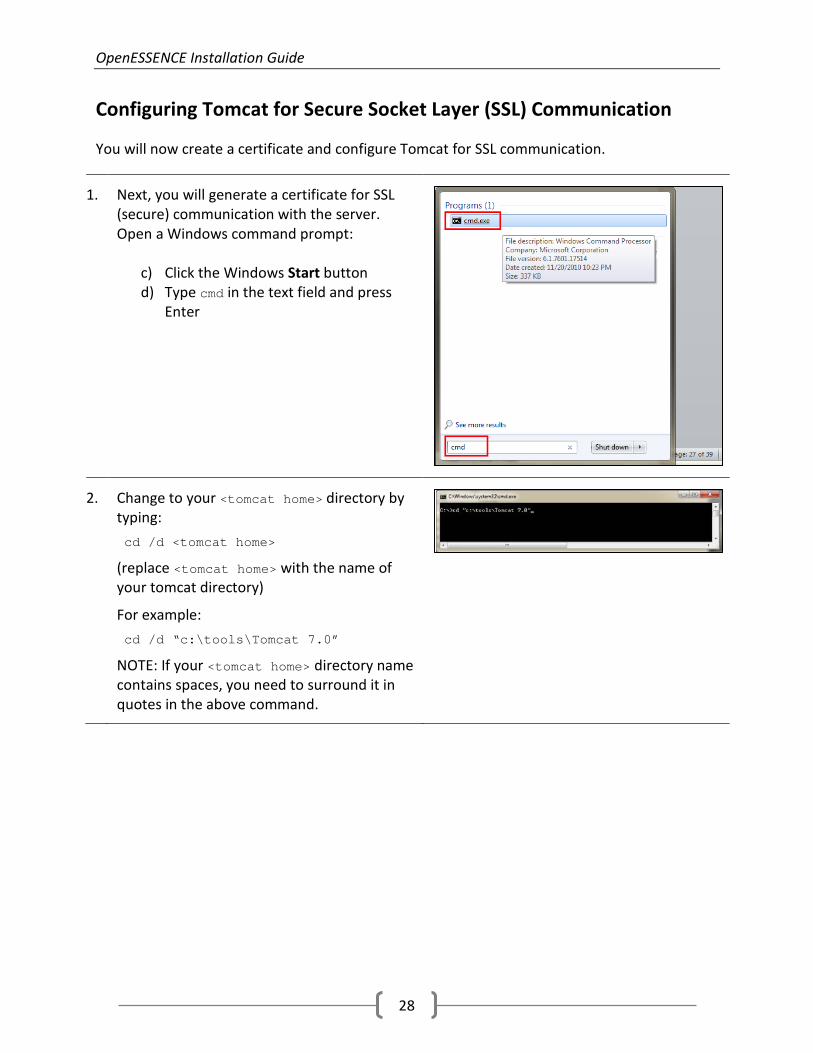
1. Next, you will generate a certificate for SSL (secure) communication with the server. Open a Windows command prompt:
c) Click the Windows Start button d) Type cmd in the text field and press
Enter
2. Change to your <tomcat home> directory by typing: cd /d <tomcat home>
(replace <tomcat home> with the name of your tomcat directory)
For example: cd /d “c:\tools\Tomcat 7.0”
NOTE: If your <tomcat home> directory name contains spaces, you need to surround it in quotes in the above command.

OpenESSENCE Installation Guide
29
3. Run the following command (all on one line) to generate a keystore. keytool -genkey -alias tomcat -keyalg RSA -keystore keystore
Enter the following information: - Keystore password (re-enter when
prompted) - First/Last Name
o use localhost for local testing o use your domain name for
production (e.g. www.jhuapl.edu)
- Org unit, org, city/locality, state/province, country code – enter appropriate values for your organization
- Type yes to confirm the entries - When prompted to enter a password
for <tomcat>, press RETURN (this will use the keystore password)
4. Edit <tomcat home>\conf\server.xml using an editor such as Wordpad.
Find the block of text that starts with: <Connector port="8443"
5. Remove the XML comments tags (<!-- and -->) that are around it.

OpenESSENCE Installation Guide
30
6. Add keystoreFile and keystorePass to the end of the Connector tag so it contains the following. Use the password you used when creating the keystore. <Connector port="8443" protocol="HTTP/1.1" SSLEnabled="true" maxThreads="150" scheme="https" secure="true" clientAuth="false" sslProtocol="TLS" keystoreFile="keystore" keystorePass="<your keystore password>"/>
7. Test by (re)starting Tomcat via the Services control panel (as described above when installing Tomcat).
Check the Tomcat log output in the following file corresponding to today’s date: <tomcat home>\logs\catalina.yyyy-mm-dd.log
You should see INFO messages, ending with INFO: Server startup in ### ms
If you see the following error messages, you should verify the XML edits in the previous step.
SEVERE: Error starting endpoint java.io.FileNotFoundException: <tomcat home>\bad-keystore-name (The system cannot find the file specified)
or SEVERE: Error starting endpoint java.io.IOException: Keystore was tampered with, or password was incorrect

OpenESSENCE Installation Guide
31
8. To test Tomcat with SSL communication, open a browser and type https://localhost:8443 and press ENTER.
You may see a security warning. Press Continue or Proceed Anyway (depending on the browser you are using). You should see the Apache Tomcat Manager Screen.

OpenESSENCE Installation Guide
32
Configuring Tomcat for Optimal OpenEssence Performance
When running Tomcat with OpenEssence and GeoServer web applications, it is often necessary to adjust the default memory settings. The JVM (Java Virtual Machine) that Tomcat uses can also be configured to provide debugging information over a specified port.
1. Start the Tomcat Configuration Tool:
a) Click the Windows Start button b) Type tomcat in the text field c) Click Configure Tomcat from the
Programs list
2. Click the Java tab.
Add -XX:MaxPermSize=184m to the list of Java Options (case sensitive).
Set Initial Memory Pool to 512.
Set Maximum Memory Pool to 1024.
The pool sizes can be adjusted higher if you are running a 64-bit Java installation and you have sufficient memory, but the sizes given here reasonable for running OpenESSENCE.
Click Apply to apply the changes.

OpenESSENCE Installation Guide
33
3. The default startup type is automatic, which means that the Tomcat service will start when the computer starts. You can change the startup type for the service from automatic to manual using the Startup type option on the General tab. If the startup type is manual, you must start the service (from this screen) in order for OpenESSENCE to function.
On this screen, you can also start and stop the Tomcat service using the Start and Stop buttons. This may be a convenient alternative to starting and stopping the service via the Services control panel.
OpenESSENCE Installation Guide
34
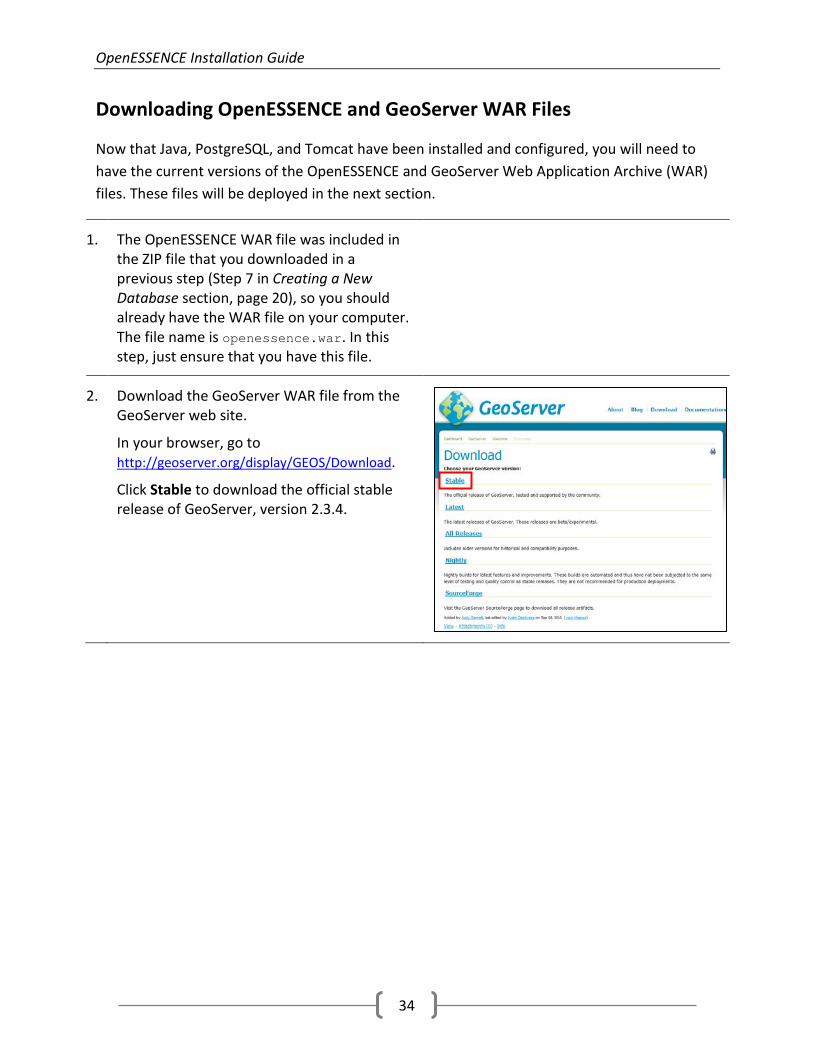
Downloading OpenESSENCE and GeoServer WAR Files
Now that Java, PostgreSQL, and Tomcat have been installed and configured, you will need to have the current versions of the OpenESSENCE and GeoServer Web Application Archive (WAR) files. These files will be deployed in the next section.
1. The OpenESSENCE WAR file was included in the ZIP file that you downloaded in a previous step (Step 7 in Creating a New Database section, page 20), so you should already have the WAR file on your computer. The file name is openessence.war. In this step, just ensure that you have this file.
2. Download the GeoServer WAR file from the GeoServer web site.
In your browser, go to http://geoserver.org/display/GEOS/Download.
Click Stable to download the official stable release of GeoServer, version 2.3.4.

OpenESSENCE Installation Guide
35
3. Select the Web Archive download format. The download will start automatically. Ignore any forms that may be presented.
The WAR file will be zipped (compressed). Double-click the zip file to access the WAR file.

OpenESSENCE Installation Guide
36
Deploying OpenEssence and GeoServer to Tomcat
This section will describe how to deploy the OpenESSENCE WAR file and the GeoServer WAR file to Tomcat and set up the OpenESSENCE site configuration directory.
1. Stop Tomcat if it is currently running.
You can do this through the Services control panel or through the Tomcat Configuration tool (described in the previous section).
2. Delete previous OpenESSENCE and GeoServer deployments (if any):
• Look in <tomcat home>\webapps • Delete any files or folders that start with
openessence or geoserver • Look in <tomcat
home>\work\Catalina\localhost • Delete any files or folders that start with
openessence or geoserver

OpenESSENCE Installation Guide
37
3. Copy or move the openessence.war and geoserver.war files (that you downloaded in the previous sections) into: <tomcat home>\webapps
4. Restart Tomcat to deploy the war files.
When started, Tomcat will expand the openessence.war file into the following directory: <tomcat home>\webapps\openessence
It will do the same for geoserver.war.

OpenESSENCE Installation Guide
38
5. Stop Tomcat (so we can cleanly edit some configuration files).
6. Find the following directory: <tomcat home>\webapps\openessence\WEB-INF\classes\config
7. Edit the db.properties file using Wordpad.
At the end of the db.url line, make sure the database name is openessence.
Change the value for db.password to the password you used when installing PostgreSQL. NOTE: Lines starting with the # sign are comments and are ignored.

OpenESSENCE Installation Guide
39
8. (Optional) If you want to specify: • Web Map Server other than the default
(/geoserver/wms). This is the URL that the client should use for WMS service requests. Using a relative URL is recommended so that you do not run into cross-origin issues.
• Stale data cleanup other than the default (1 minute). This indicates how often old data should be removed, in PostgreSQL interval syntax. See http://www.postgresql.org/docs/current/static/datatype-datetime.html#DATATYPE-INTERVAL-INPUT for syntax details. The value for this property should not include the word “interval”.
Using a text editor such as Notepad, create a file called map.properties in the folder: <tomcat home>\webapps\openessence\WEB-INF\classes\config
Add wmsserver and/or postgres.cleanup properties as shown (you do not need the comment lines that start with #).
9. Make sure the PostgreSQL service is started.

OpenESSENCE Installation Guide
40
10. Restart Tomcat.

OpenESSENCE Installation Guide
41
GeoServer Site Configuration
OpenEssence uses the GeoServer web application to providing mapping capabilities. Some configuration of GeoServer is necessary.
1. From the OpenESSENCE ZIP folder that you downloaded in a previous section (Creating a New Database section, step 7, page 20), copy the following four files: openessence_district_base.sld openessence_district_base.xml openessence_district_overlay.sld openessence_district_overlay.xml
into the following directory: <tomcat home>\webapps\geoserver\data\styles
These files are GeoServer styles that will be used with the demo version of OpenESSENCE.
2. Log into GeoServer by opening your browser and going to
https://localhost:8443/geoserver
NOTE: You will see a warning about the site security certificate not being trusted. This is because we set up a self-signed certificate for SSL communication with the server.
Because we know this is our site, click Proceed anyway (we are using Chrome as the browser; your browser may display a slightly different message).

OpenESSENCE Installation Guide
42
3. Log into GeoServer.
The default login information is:
user: admin password: geoserver
4. Change the admin password by clicking on Users under Security.

OpenESSENCE Installation Guide
43
5. From the Users list, select the admin user.
6. Change the password and click Save. Note the password; it will be used again during the installation.
OpenESSENCE Installation Guide
44
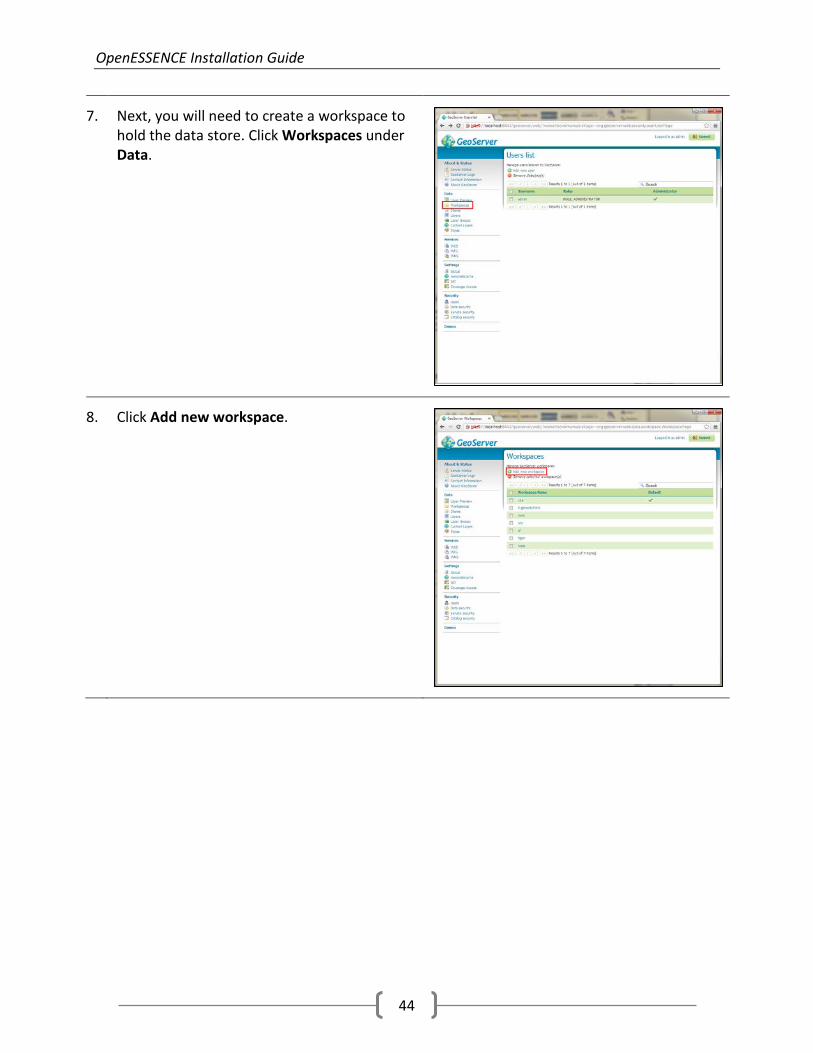
7. Next, you will need to create a workspace to hold the data store. Click Workspaces under Data.
8. Click Add new workspace.

OpenESSENCE Installation Guide
45
9. Enter openessence as the name of the workspace.
Enter a namespace URI that is appropriate for your organization; for example, JHU/APL might use: http://jhuapl.edu/openessence
Check the Default Workspace box.
Click Submit to create the workspace.
10. Next, you will need to create a data store.
Click Stores under Data.
11. Click Add new Store.

OpenESSENCE Installation Guide
46
12. Select PostGIS – PostGIS Database.
13. Enter the following data source information:
• Data Source Name – the name you want to give your data store. For example oedemo
• Description – a short description of the data store
• Database – enter openessence • Schema – enter public • User – enter postgres • Passwd - enter your PostGres user
password
Scroll down and click Save.

OpenESSENCE Installation Guide
47
14. Choose layers to publish.
We will use district_geometry from the openessence database as the base layer.
Click Publish next to district_geometry.
15. On the Edit Layer form, scroll down to the Coordinate Reference Systems section. Click Find next to Declared SRS.
16. In the Search box, type 4326 and press ENTER. In the results list, click 4326.

OpenESSENCE Installation Guide
48
17. Click Compute from data and Compute from Native Bounds.
18. Choose a style for the layer.
Click the Publishing tab. Scroll down to Default Style under WMS Settings. Select the openessence_district_base style.
Press Save to save the layer.

OpenESSENCE Installation Guide
49
19. Click Layer Preview to verify that the layer works properly.
20. Scroll down and click OpenLayers next to openessence:district_geometry.

OpenESSENCE Installation Guide
50
21. You will see the layer displayed. This is the district_geometry layer.
22. We now need to add an overlay layer. Repeat steps 14-20.
For step 14, select district_counts from openessence to publish.
For step 18, on the Publishing tab, choose openessence_district_overlay as the default style.
For step 20, click OpenLayers next to openessence:district_counts. The layer is shown on the right.
OpenESSENCE Installation Guide
51
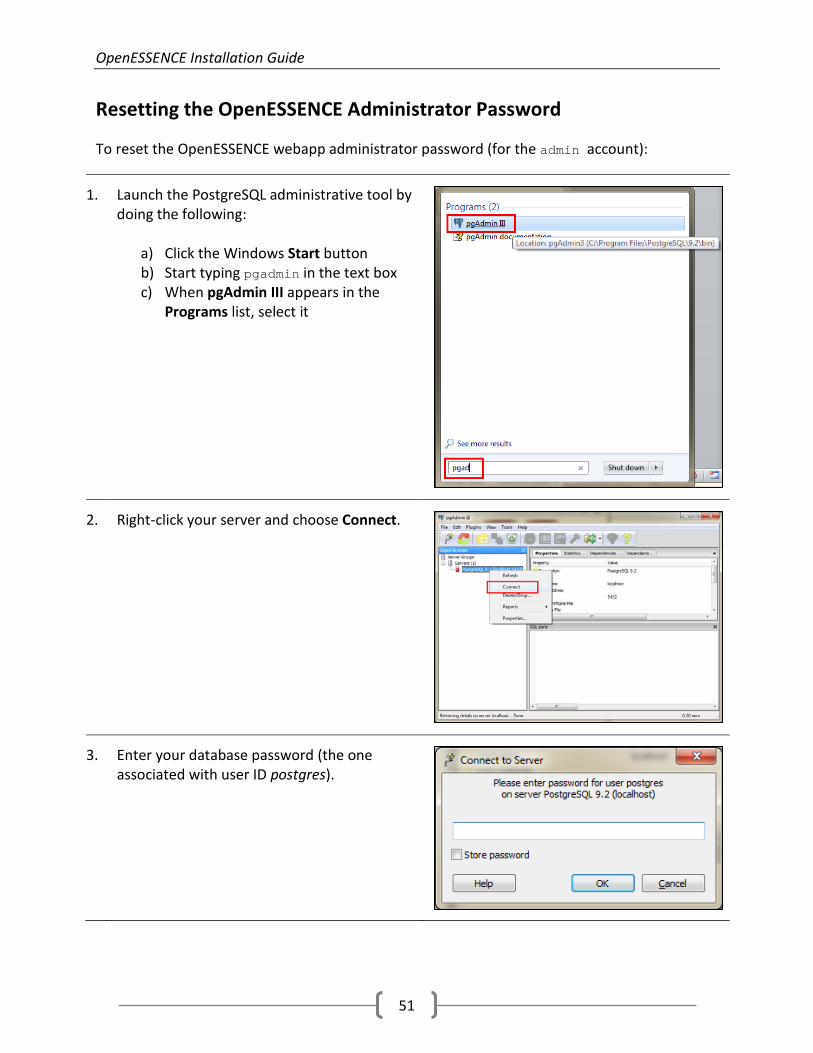
Resetting the OpenESSENCE Administrator Password
To reset the OpenESSENCE webapp administrator password (for the admin account):
1. Launch the PostgreSQL administrative tool by doing the following:
a) Click the Windows Start button b) Start typing pgadmin in the text box c) When pgAdmin III appears in the
Programs list, select it
2. Right-click your server and choose Connect.
3. Enter your database password (the one associated with user ID postgres).

OpenESSENCE Installation Guide
52
4. Select the database you are using.
Click the SQL button on the toolbar to open the SQL query window.
5. Delete the text that appears automatically in the SQL Editor window.
Type (or copy/paste) the following SQL command in the editor window: UPDATE "users" set password = '805c31ff4a51bb8641c1fd00ce3eccb680e49be3', salt = 'bACzDYExfadmin203948576' where name = 'admin'; Click Execute Query on the toolbar to set up the database.
This will reset the administrator password to admin, for the admin account.
You should immediately log into OpenESSENCE and change the administrator password (see next section).

OpenESSENCE Installation Guide
53
Starting OpenEssence
Once everything is installed and configured, OpenESSENCE will run whenever the Tomcat server is running. Follow the steps below to start OpenESSENCE.
1. Open your browser and go to
https://localhost:8443/openessence
(Depending on your browser, you may see the certificate warning before this page. Click Proceed anyway.)
Enter the username and password from your database.
Username: admin Password: <password created in the previous section>
Username: user Password: OEuser1
2. You should see the Welcome screen for the OpenESSENCE demo.
To check proper operation, click View Individual Patient Data.

OpenESSENCE Installation Guide
54
3. Click Time Series.
4. Choose CDC-C1 for Detector. Choose Visit Date / Daily for Resolution. Click OK.

OpenESSENCE Installation Guide
55
5. A time series chart should appear. This chart is based on demo data.
6. To check the map functionality, select View Individual Patient Data from the Navigation Menu and then click Map.
7. The following map will be displayed.

OpenESSENCE Installation Guide
56
8. To change the password for the admin account, you must be logged in as admin. Select Users from the Navigation Menu under Administration.
9. Select the admin account from the list of users and then click Edit from the menu bar.
Enter the new password (and confirm). Scroll down and click Save.