online vt cs module unity third person camera and ... 4624... · tutorial 3 – git and unity ......
TRANSCRIPT

1
Online VT CS Module
Unity Third Person Camera and Character Control
CS 4624 Virginia Tech, Blacksburg VA
John McElmurray, Julian Adams
5/8/2013

2
Table of Contents
Executive Summary .......................................................................................................... 4
Project Overview ............................................................................................................... 5
Module Overview .............................................................................................................. 6
An Overview of Unity ........................................................................................................ 7
Mecanim Animation System ........................................................................................................................................ 7 The Unity Community and Services ......................................................................................................................... 8
Unity Forums ................................................................................................................................................................................. 8 Unity Answers .............................................................................................................................................................................. 8 The Asset Store ........................................................................................................................................................................... 8
Users' Manual ..................................................................................................................... 9
Minimum Skill Requirements ......................................................................................................................................... 9 Getting Started ..................................................................................................................................................................... 9
Installation of Unity .................................................................................................................................................................. 9 Installation of GitHub and SourceTree .................................................................................................................... 9
Unity Module Cross-Disciplinary Tutorials ........................................................................................................... 10 Tutorial 1 – Introduction .................................................................................................................................................... 10 Tutorial 2 – GIT and Unity (Windows) ...................................................................................................................... 10 Tutorial 3 – GIT and Unity (Mac) ................................................................................................................................ 10 Tutorial 4 – Scene Setup, Creating Test Rooms ............................................................................................. 10 Tutorial 5 – Mecanim: Creating basic running and idle nodes ......................................................... 11 Tutorial 6 – Mecanim: Controller Logic for Basic Running and Idle ............................................... 11 Tutorial 7 – Third Person Camera: Basic Follow Camera ........................................................................ 11 Tutorial 8 – Third Person Camera: Player Orbit Camera ......................................................................... 11 Tutorial 9 – Third Person Camera: Compensating for Wall Collisions ............................................ 12 Tutorial 10 – Third Person Camera: Targeting/Camera Repositioning ........................................ 12 Tutorial 11 – Third Person Camera: First Person Look Mode ................................................................. 12 Tutorial 12 – Third Person Camera: Player Orbit Camera Polish ....................................................... 12 Tutorial 13 – Mecanim: Pivoting From Idle and Moving States.......................................................... 12 Tutorial 14 – Mecanim: Using State and Transition Information ........................................................ 13 Tutorial 15 – Third Person Camera: Free Camera Mode ........................................................................ 13 Tutorial 16 – Mecanim: Blending Blend Trees – Walk, Run, Jog, Sprint ........................................ 13 Tutorial 17 – Mecanim: Jumping and Animation Clip Curves ........................................................... 13
Xbox 360 Controls Diagram ........................................................................................................................................ 14
Developer's Manual ........................................................................................................ 14
GitHub Information ........................................................................................................................................................... 14 Project Inventory ................................................................................................................................................................ 15
Unity Assets ................................................................................................................................................................................. 15 Unity Scripts ................................................................................................................................................................................ 15
Video Storyboard .............................................................................................................................................................. 15 Potential Features for Future Developers .......................................................................................................... 17
Mass Effect Over the Shoulder Camera ............................................................................................................. 17 Weapon Crosshair Targeting Camera ................................................................................................................. 18
3
Advanced Mecanim Blend Trees ............................................................................................................................ 18 Using the Camera Frustum for Better Wall Collision ................................................................................... 19
Lessons Learned .............................................................................................................. 22
Timeline/schedule ............................................................................................................................................................. 22 Problems and Solutions ................................................................................................................................................. 22
Acknowledgements ....................................................................................................... 24
References ....................................................................................................................... 25

4
Deliverables
Video tutorials:
http://www.youtube.com/playlist?list=PLKFvhfT4QOqlEReJ2lSZJk_APVq5sxZ-x
Code: https://github.com/jm991/UnityThirdPersonTutorial
Executive Summary
America’s entertainment software industry creates a wide array of computer
and video games to meet the demands and tastes of audiences as diverse as
our nation’s population. Today’s gamers include millions of Americans of all ages
and backgrounds. In fact, more than two-thirds of all American households play
games. This vast audience is fueling the growth of this multi-billion dollar industry
(Essential Facts About the Computer and Video Game Industry, 2006).
The Computer Science Department at Virginia Tech has comprised a course to
facilitate the future of art and game development. CS 4644: Creative
Computing Studio Capstone is an intensive immersion into different approaches
of game design and 3D modeling. The course allows students to develop an
understanding of the scientific and technological principles associated with the
design and development of computer and console games for both
entertainment and serious applications. Students are encouraged to use a wide
range of game engines as they work in teams to conduct an end-to-end
integrative design project, the most popular being Unity.
Unity is a game development ecosystem: a powerful rendering engine fully
integrated with a complete set of intuitive tools and rapid workflows to create
interactive 3D content; easy multiplatform publishing; thousands of quality,
ready-made assets in the Asset Store; and a knowledge-sharing Community.

5
Unity is free to a large proportion of developers and affordable for the rest. For
independent developers and studios, Unity’s democratizing ecosystem smashes
the time and cost barriers to creating uniquely beautiful games. They are using
Unity to build a livelihood doing what they love: creating games that hook and
delight players on any platform. It is for this reason that our group decided to
work with the Professors of the Creative Computer Studio Capstone to deliver a
module that will quickly get students up and running with Unity game
development.
Project Overview
The purpose of our project is to create a set of online, cross-disciplinary tutorials
for making games with the Unity game engine. The tutorials will cater to both art
and computer science students enrolled in the Creative Computing Studio
course. The tutorials can also serve as a guide for anyone interested in game
development and will be made publically available with the code. Students will
gain the knowledge to script game mechanic logic, develop camera devices
through which the player views the world, and implement character controllers
using preexisting animations through retargeting. By the end of the tutorials
students should feel empowered and comfortable enough to begin creating
their own games.
The course is aimed at an intermediate level to meet the needs of Virginia Tech
students who already know how to program or create 3D art, but don’t
understand how to apply that knowledge to a game engine. This course is not
intended as a step-by-step tutorial series; it takes a troubleshooting-based
approach by addressing common pitfalls we encountered taking the gaming
capstone in previous semester. Each of the videos can be watched individually
to learn the related techniques. Students will learn and apply principles from the
course not to a sample file, but to their own game's needs.
6
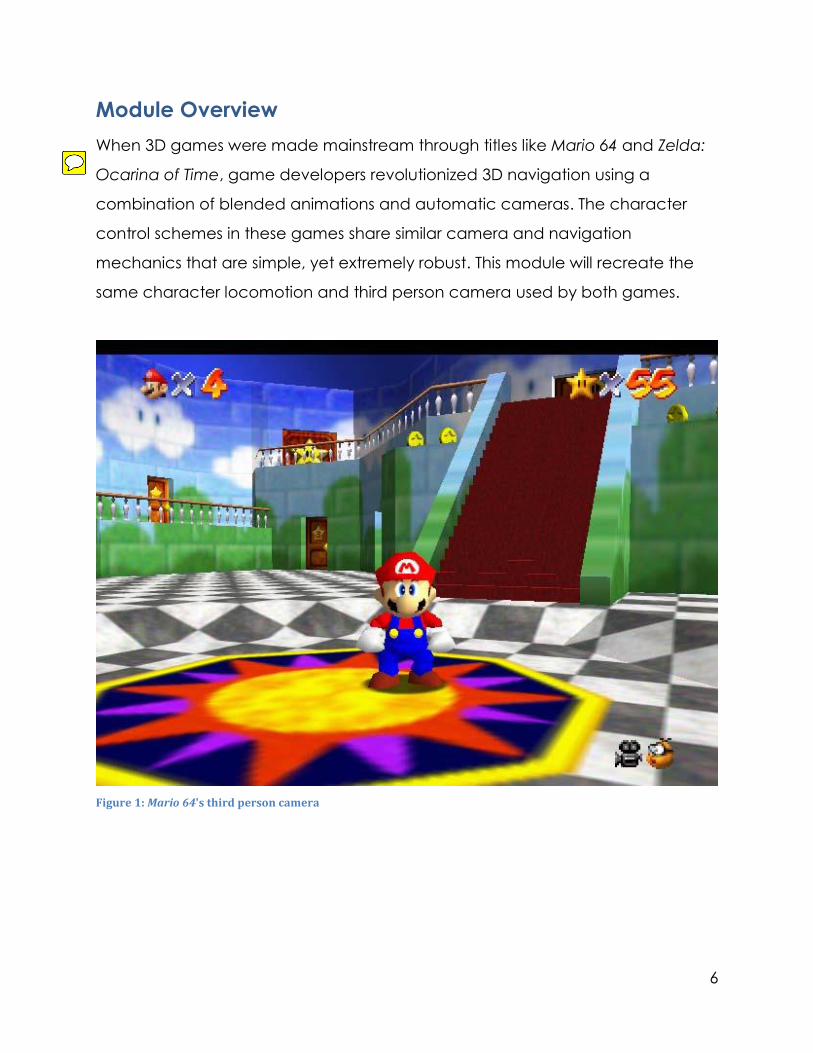
Module Overview
When 3D games were made mainstream through titles like Mario 64 and Zelda:
Ocarina of Time, game developers revolutionized 3D navigation using a
combination of blended animations and automatic cameras. The character
control schemes in these games share similar camera and navigation
mechanics that are simple, yet extremely robust. This module will recreate the
same character locomotion and third person camera used by both games.
Figure 1: Mario 64's third person camera

7
Figure 2: Legend of Zelda: Wind Waker's third person camera
An Overview of Unity
This section introduces the user to the Unity animation system and community
services.
Mecanim Animation System
Unity 4.0 includes a rich and sophisticated animation system called Mecanim,
which we will be using exclusively for this tutorial series. Mecanim provides:
Easy workflow and setup of animations on humanoid characters
Animation retargeting - the ability to apply animations from one character
model onto another
Simplified workflow for aligning animation clips using finite state machines
Convenient preview of animation clips, transitions and interactions
between them. This allows animators to work more independently of

8
programmers, prototype and preview their animations before gameplay
code is hooked in
Management of complex interactions between animations with a visual
programming tool
Animating different body parts with different logic
The Unity Community and Services
Unity Forums
The forums are the central hub of the Unity community discussions and chatter.
Voice your opinion, show what you're working on, and check out the cool things
others are doing. The forums are also a great place to contact other Unity
developers if you need to build or expand your team.
Link: http://forum.unity3d.com/forum.php
Unity Answers
Unity Answers is the Unity community site for concrete Unity questions and
answers. Beginners and experts alike are welcome to post, helping each other
out with Unity. The built-in voting system helps finding the best answers quicker.
Link: http://answers.unity3d.com/index.html
The Asset Store
The Asset Store is a critical time and effort-saving resource when creating a
game. Character models, props, materials and textures, landscape painting
tools, game creating tools, audio effects and music, visual programming
solutions, scripts and editor extensions are all available. You can download
helpful learning resources, such as demos, and tutorials for car physics,
character customizations, C#, landscape creation and more.
Link: http://unity3d.com/asset-store/

9
Users' Manual
This section explains everything a user of our module might want to know about
the content of our work.
Minimum Skill Requirements
The user should have a working knowledge of an object orientated
scripting programming language, preferably C#
A basic understanding of vector geometry
Some graphics programming knowledge is helpful but not required
Getting Started
Unity Technologies offers a free and pro version of Unity. Unity Pro has several
additional features some of which include real-time shadows, post processing
effects (motion detection, edge detection), and some extra version control
features. In the end, Pro is not necessary for creating a quality title, though it will
add a polished look to any game. The pro version comes with a $1500 price tag,
but first time users have the option of a thirty-day evaluation. Studica.com offers
Unity Pro to students at a discounted price.
Installation of Unity
Installation is simple for both Mac and Windows users. Unity download and
Installation instructions can be found at the following link:
Link: http://unity3d.com/unity/download/
Installation of GitHub and SourceTree
When working on any team-based projects it is always a good idea to utilize
version control. In software engineering, version control is any practice that
tracks and provides control over changes to source code. Game developers
use version control software to maintain documentation and configuration files
as well as source code. This module will take advantage of the GitHub web-

10
based hosting service. To maintain the source code we will utilize the GitHub
client (for Windows systems) and SourceTree (for Mac users).
Link: http://sourcetreeapp.com/
Link: http://github.com
Unity Module Cross-Disciplinary Tutorials
This section contains details on our 17 part Unity YouTube video series. A playlist
containing all of the videos can be found on YouTube and is approximately 3
hours long.
Tutorial 1 – Introduction
We start the tutorial series by comparing a demo of the final tutorial code and
our inspiration, the 3D Mario and Legend of Zelda series - two popular titles that
defined the standard for third person camera control when they were
introduced on the Nintendo 64.
YouTube Link: http://youtu.be/b0PvJ4AWvWQ
Tutorial 2 – GIT and Unity (Windows)
There are some quirks to setting up Unity for source control. In the first of the GIT
tutorial videos, we cover how to create a new repository, use a .gitignore file,
store asset meta data as files, and save binary scenes in the YAML text format
for diff’ing in Windows.
YouTube Link: http://youtu.be/sExZ8ft0GSA
Tutorial 3 – GIT and Unity (Mac)
Following the Windows GIT tutorial, this video details the same processes in the
Mac operating system.
YouTube Link:
Tutorial 4 – Scene Setup, Creating Test Rooms
This optional tutorial shows our scene setup process, file structure organization,
and creation of two new scenes for testing. The first scene is a large, cube-

11
shaped room for testing locomotion and the second is a more practical
example map inspired by Outset Island in Legend of Zelda: Wind Waker.
YouTube Link: http://youtu.be/1yOyO06xm34
Tutorial 5 – Mecanim: Creating basic running and idle nodes
In the first Mecanim tutorial, we create a simple animation graph for idling and
running. We end with the creation of “Speed” and “Direction” parameters in the
character controller.
YouTube Link: http://youtu.be/7-OUZecgXv0
Tutorial 6 – Mecanim: Controller Logic for Basic Running and Idle
After creating the animation parameters, we begin scripting logic for our
character controller by supplying values for speed and direction based on
player input from the Xbox controller.
YouTube Link: http://youtu.be/MIDt4eIlv8c
Tutorial 7 – Third Person Camera: Basic Follow Camera
We begin the camera tutorials by introducing the most basic kind of third person
camera – one that smoothly follows at a fixed distance up and away from the
character. This camera has its downfalls, namely that backwards motion on the
joystick is handled no differently from forward motion. We will incrementally build
from this script in the coming tutorials.
YouTube Link: http://youtu.be/PO5_aqapZXY
Tutorial 8 – Third Person Camera: Player Orbit Camera
The first step to adding more complex interaction between the player and
camera is the player orbit camera. In this addition to the camera script, we
properly handle backwards joystick movement by mimicking the interaction
seen in Mario and Legend of Zelda. In these games, the character’s left and
right movements orbit around the camera allowing the character to run both
towards the camera and away from it.
12
YouTube Link: http://youtu.be/lnguV1v38z4
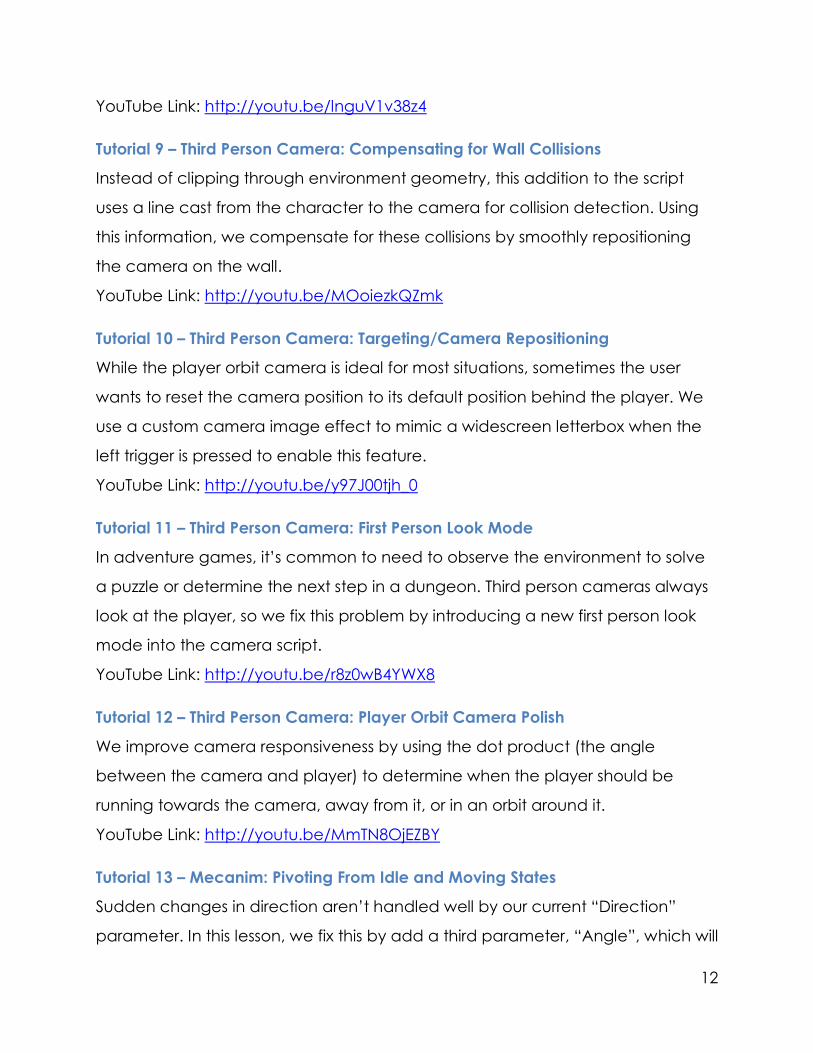
Tutorial 9 – Third Person Camera: Compensating for Wall Collisions
Instead of clipping through environment geometry, this addition to the script
uses a line cast from the character to the camera for collision detection. Using
this information, we compensate for these collisions by smoothly repositioning
the camera on the wall.
YouTube Link: http://youtu.be/MOoiezkQZmk
Tutorial 10 – Third Person Camera: Targeting/Camera Repositioning
While the player orbit camera is ideal for most situations, sometimes the user
wants to reset the camera position to its default position behind the player. We
use a custom camera image effect to mimic a widescreen letterbox when the
left trigger is pressed to enable this feature.
YouTube Link: http://youtu.be/y97J00tjh_0
Tutorial 11 – Third Person Camera: First Person Look Mode
In adventure games, it’s common to need to observe the environment to solve
a puzzle or determine the next step in a dungeon. Third person cameras always
look at the player, so we fix this problem by introducing a new first person look
mode into the camera script.
YouTube Link: http://youtu.be/r8z0wB4YWX8
Tutorial 12 – Third Person Camera: Player Orbit Camera Polish
We improve camera responsiveness by using the dot product (the angle
between the camera and player) to determine when the player should be
running towards the camera, away from it, or in an orbit around it.
YouTube Link: http://youtu.be/MmTN8OjEZBY
Tutorial 13 – Mecanim: Pivoting From Idle and Moving States
Sudden changes in direction aren’t handled well by our current “Direction”
parameter. In this lesson, we fix this by add a third parameter, “Angle”, which will

13
use a quick turn animation for large direction deltas in both idle and locomotion
states.
YouTube Link: http://youtu.be/zy9E-w4QM2o
Tutorial 14 – Mecanim: Using State and Transition Information
Values are still sent to the pivot animation during animation transitions, causing
inaccuracies due to the angle value becoming smaller during these periods.
Using the controller logic script, we fix inaccurate values by detecting the
transition states and stopping the values from being sent to the character
controller until after the pivot is completed.
YouTube Link: http://youtu.be/0ZCoj79lLAc
Tutorial 15 – Third Person Camera: Free Camera Mode
Another common feature in adventure games is the ability to free the camera
from its automatic repositioning and allow the player to position it according to
their needs. We extend the camera script to accommodate this.
YouTube Link: http://youtu.be/vOgkxOR1vxo
Tutorial 16 – Mecanim: Blending Blend Trees – Walk, Run, Jog, Sprint
Expanding from the single run animation blend tree using the direction
parameter, we blend in walk, jog, and sprint animations based on the speed
parameter. More information on blend trees can be found at:
http://docs.unity3d.com/Documentation/Manual/AnimationBlendTrees.html.
YouTube Link: http://youtu.be/Or5NgQbOu7s
Tutorial 17 – Mecanim: Jumping and Animation Clip Curves
We create clip curves in the jump animation to manipulate the Y position and
collider height on the character model.
YouTube Link: http://youtu.be/AXIJvlanI6Q

14
Xbox 360 Controls Diagram
Figure 3: Control setup for our demo code
On Windows, these controls correspond to:
3rd Axis: Reset Camera
5th Axis Up: First Person Mode
5th Axis Down: Free Camera
Button 0 (A): Jump
Button 1 (B): Exit First Person
Button 2 (X): Sprint
On Mac, these controls correspond to:
5th Axis: Reset Camera
4th Axis Up: First Person Mode
4th Axis Down: Free Camera
Button 16 (A): Jump
Button 17 (B): Exit First Person
Button 18 (X): Sprint For more information on controller button bindings in the Unity Input Manager,
consult this wiki page.
Developer's Manual
This section contains all relevant information for future developers to easily pick
up where our module left off.
GitHub Information
This project is open source and available on the GitHub server:

15
Link: https://github.com/jm991/UnityThirdPersonTutorial
For read write access add the following address to your GitHub Client:
Link: https://github.com/jm991/UnityThirdPersonTutorial.git
Project Inventory
This is an inventory of some of the data, program, and script files - with
explanation of each. Due to the large amount of code required for this project,
some of the files have been omitted, but can be found in the GitHub repository.
Note: All Unity scripts for this project have been documented and commented.
Unity Assets
Beta Character: Downloadable from Mixamo’s animation site
Fairy Forest Scene: rebuilt from Legend of Zelda: Wind Waker
Unity Scripts
SceneViewCameraFollow.cs: Debug script to allow multiple scene view
cameras in the editor to be setup to follow game objects. Author - Joshua
Berberick. Found on the Unify Wiki.
BarsEffect.cs: Contains the logic to support the targeting bars effect
camera feature.
ThirdPersonCamera.cs: The main camera script that controls the three
camera features: Behind the back, First person look, and third person free
cam.
CharacterControllerLogic.cs: Supplies the character control logic,
information and parameters to the Mecanim character animation
controller.
Video Storyboard
The tutorials have been color coded so that users can find relevant information
quickly, rather than watching the entire tutorial series from start to finish:
Setup, introduction
GIT
Mecanim

16
Camera
Tutorial 1 - Introduction Tutorial 2 – Git Windows Tutorial 3 – Git Mac
Tutorial 4 – Scene Setup Tutorial 5 – Mecanim
Nodes
Tutorial 6 – Mecanim
Logic
Tutorial 7 - Follow
Camera
Tutorial 8 – Orbit Camera Tutorial 9 – Camera
Collision
Tutorial 10 – Camera
Targeting/Resetting
Tutorial 11 – Camera First
Person
Tutorial 12 – Orbit Camera
Polish
Tutorial 13 – Mecanim
Pivoting
Tutorial 14 – Mecanim
Transition Info
Tutorial 15 – Free Camera

17
Tutorial 16 – Mecanim
Blend Trees
Tutorial 17 – Mecanim
Clip Curves
Potential Features for Future Developers
If future developers wish to continue our module we would encourage them to
implement and create tutorials on the following features:
Mass Effect Over the Shoulder Camera
Figure 4: Mass Effect "over the shoulder" style camera

18
Weapon Crosshair Targeting Camera
Figure 5: Gears of War camera crosshair for targeting
The Animated Soldier (incl. movement scripts) is a fully rigged 3D model with
complex camera scripts. This is a great reference for implementing both the
Targeting Camera and Over the Shoulder Camera. It is available for free on the
Unity Asset Store. Link: https://www.assetstore.unity3d.com/#/content/1727
Advanced Mecanim Blend Trees
In Unity 4.1, 2D blend trees were introduced to clean up blended blend trees like
the ones found in Lesson 16. Additionally, since two parameters can be sent to
these trees, strafing, walking backwards, and walking forwards is easily achieved
using a blend tree similar to the one below:

19
Figure 6: 2D blend tree for strafing
We encourage future developers to explore the possibilities of this new type of
node in Mecanim in conjunction with the targeting camera mode.
Using the Camera Frustum for Better Wall Collision
While the collision we implemented in Lesson 9 was an improvement, it still
allowed the user to see outside of the world. One way to fix this is to cast rays
from the camera’s viewport along each of the four corners of the viewing
volume in order to check for collision. If there is no collision at a corner, the
camera can be smoothly moved in from the wall in the direction of the corner.
Some sample code to calculate rays from the frustum can be found below:
private void CompensateForWalls(Vector3 fromObject, ref Vector3 toTarget)
{
UpdateFrustrumPlanes();
Vector3 point = Vector3.zero;
Vector3 direction = Vector3.zero;
PlanePlaneIntersection(out point, out direction, planes[(int) Frustrum.Left],
planes[(int) Frustrum.Top]);
Debug.DrawRay(camera.ViewportToWorldPoint(new Vector3(0, 1,
camera.nearClipPlane)), -1f * direction, Color.yellow);
PlanePlaneIntersection(out point, out direction, planes[(int) Frustrum.Top],
planes[(int) Frustrum.Right]);
Debug.DrawRay(camera.ViewportToWorldPoint(new Vector3(1, 1,
camera.nearClipPlane)), -1f * direction, Color.yellow);
PlanePlaneIntersection(out point, out direction, planes[(int) Frustrum.Right],
planes[(int) Frustrum.Bottom]);
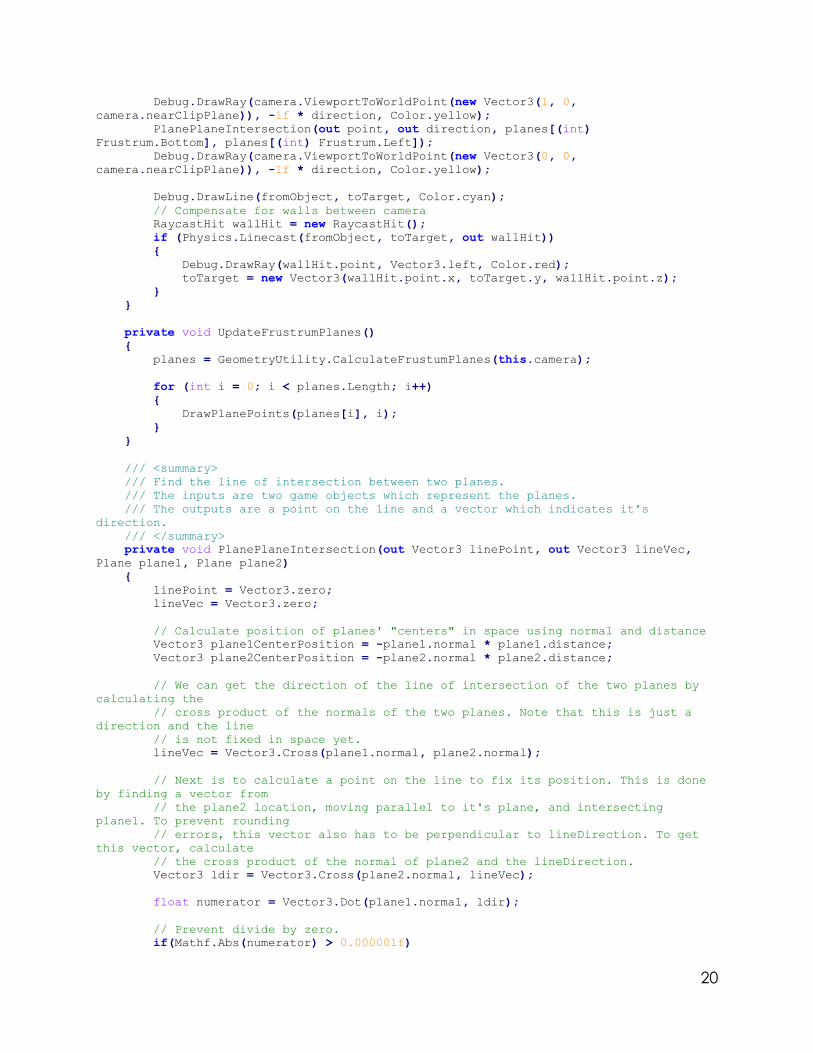
20
Debug.DrawRay(camera.ViewportToWorldPoint(new Vector3(1, 0,
camera.nearClipPlane)), -1f * direction, Color.yellow);
PlanePlaneIntersection(out point, out direction, planes[(int)
Frustrum.Bottom], planes[(int) Frustrum.Left]);
Debug.DrawRay(camera.ViewportToWorldPoint(new Vector3(0, 0,
camera.nearClipPlane)), -1f * direction, Color.yellow);
Debug.DrawLine(fromObject, toTarget, Color.cyan);
// Compensate for walls between camera
RaycastHit wallHit = new RaycastHit();
if (Physics.Linecast(fromObject, toTarget, out wallHit))
{
Debug.DrawRay(wallHit.point, Vector3.left, Color.red);
toTarget = new Vector3(wallHit.point.x, toTarget.y, wallHit.point.z);
}
}
private void UpdateFrustrumPlanes()
{
planes = GeometryUtility.CalculateFrustumPlanes(this.camera);
for (int i = 0; i < planes.Length; i++)
{
DrawPlanePoints(planes[i], i);
}
}
/// <summary>
/// Find the line of intersection between two planes.
/// The inputs are two game objects which represent the planes.
/// The outputs are a point on the line and a vector which indicates it's
direction.
/// </summary>
private void PlanePlaneIntersection(out Vector3 linePoint, out Vector3 lineVec,
Plane plane1, Plane plane2)
{
linePoint = Vector3.zero;
lineVec = Vector3.zero;
// Calculate position of planes' "centers" in space using normal and distance
Vector3 plane1CenterPosition = -plane1.normal * plane1.distance;
Vector3 plane2CenterPosition = -plane2.normal * plane2.distance;
// We can get the direction of the line of intersection of the two planes by
calculating the
// cross product of the normals of the two planes. Note that this is just a
direction and the line
// is not fixed in space yet.
lineVec = Vector3.Cross(plane1.normal, plane2.normal);
// Next is to calculate a point on the line to fix its position. This is done
by finding a vector from
// the plane2 location, moving parallel to it's plane, and intersecting
plane1. To prevent rounding
// errors, this vector also has to be perpendicular to lineDirection. To get
this vector, calculate
// the cross product of the normal of plane2 and the lineDirection.
Vector3 ldir = Vector3.Cross(plane2.normal, lineVec);
float numerator = Vector3.Dot(plane1.normal, ldir);
// Prevent divide by zero.
if(Mathf.Abs(numerator) > 0.000001f)

21
{
Vector3 plane1ToPlane2 = plane1CenterPosition - plane2CenterPosition;
float t = Vector3.Dot(plane1.normal, plane1ToPlane2) / numerator;
linePoint = plane2CenterPosition + t * ldir;
}
}
private void DrawPlanePoints(Plane p, int i)
{
Color myCol = Color.white;
switch (i)
{
case 0:
myCol = Color.blue; // left
break;
case 1:
myCol = Color.red; // right
break;
case 2:
myCol = Color.magenta; // bottom
break;
case 3:
myCol = Color.yellow; // top
break;
case 4:
myCol = Color.cyan; // near
break;
case 5:
myCol = Color.green; // far
break;
default:
break;
}
Vector3 pCenterPos = -p.normal * p.distance;
Debug.DrawRay(pCenterPos, Vector3.up * 0.1f, myCol);
}
Figure 7: View frustum and volume
22
Lessons Learned
This section is a reflection on our experiences with the project.
Timeline/schedule
At the outset of our project, we had a hard time deciding what it was we
wanted to teach in the tutorials. At first, we had decided on Mecanim and
ShaderLab, the lighting and shading language in Unity. We then moved to trying
to code an entire game prototype. With guidance from our sponsors, we settled
on the 3rd person camera and Mecanim character control idea that led to this
project by the midterm. Our rough schedule was as follows:
3/27 – 4/3
Polish camera and character control scripts
3/31
Record GIT intermediate tutorial
4/2
Edit GIT intermediate tutorial
4/3 – 4/10
Testing scripts and bug fixes
4/10 – 4/17
Record Character Control and Camera tutorials
4/17 – 4/24
Edit Character Control and Camera tutorials
4/24
Present final product to clients
Problems and Solutions
The biggest challenge for us was deciding on what we wanted to focus our
tutorials on. As discussed above, the numerous changes to the original proposal
led to some randomization. However, once we reflected on the work we had
done at the midterm, it was much easier to properly scope the project and
have a compelling final product.
Our largest technical challenge was the Orbit Camera, which had bugs up until
the final days of the semester. Once we realized we needed to rotate the

23
character model along with changing its direction and convert the joystick axis
movement to the character’s coordinate system, the project continued on at a
smooth pace.
Our recording process also suffered from a few problems. We invested in a Yeti
microphone, but it gave out during the 4th tutorial. We had to improvise and
used a cheaper Logitech dynamic USB microphone. It took some getting
accustomed to, but by the 7th tutorial, our audio sounded high quality again.
We also had some issues exporting 3 hours’ worth of tutorials from Camtasia, but
using the export setting that treated each marker as a separate video helped.
We could not use lossless due to the huge size of the 1080p recordings, so we
settled for h.264 MP4 files set to 100% quality as our intermediary step before
taking the tutorials into Premiere Pro for editing.
24
Acknowledgements
We would like to acknowledge the following individuals for their efforts towards
the successful completion of this project.
Prof. Dane Webster
Associate Professor: CS 4644
School of Visual Art Department, Virginia Tech
Website: danewebster.com
Email: [email protected]
Phone: (540)-231-2952
Dr. Yong Cao
Assistant Professor: CS 4644
Computer Science Department, Virginia Tech
Website: www.cs.vt.edu/~yongcao
Email: [email protected]
Phone: (540)-231-0415
Prof. Vincent Argentina
Instructor: CS 4644
School of Visual Art Department, Virginia Tech
Email: [email protected]
Phone: (540)-231-2951
Dr. Edward Fox
Professor: CS 4624
Computer Science Department, Virginia Tech
Website: fox.cs.vt.edu
Email: [email protected]
Phone: (540)-231-5113

25
References
"Essential Facts About the Computer and Video Game Industry." Entertainment
Software Association. The Entertainment Software Association, n.d. Web. 4
May 2013.
"Mecanim Animation System." Unity - Learn. Unity Technologies, n.d. Web. 05
May 2013.
<http://docs.unity3d.com/Documentation/Manual/MecanimAnimationSy
stem.html>.
"Revision Control." Wikipedia. Wikimedia Foundation, 30 Apr. 2013. Web. 04 May
2013.