one mail partnered – client deployment guide · one mail/one mail partnered-client deployment...
TRANSCRIPT
ONE® Mail Partnered – Client Deployment Guide Instructions for Microsoft Exchange 2010 Server
Version: 1.2
Document ID: 3235
Document Owner: ONE Mail Product Team

ONE Mail/ONE Mail Partnered-Client Deployment Guide-Instructions for MS Exchange 2010/v1.2/DOC ID 3235 ii
Copyright Notice Copyright © 2014, eHealth Ontario
All rights reserved No part of this document may be reproduced in any form, including photocopying or transmission electronically to any computer, without prior written consent of eHealth Ontario. The information contained in this document is proprietary to eHealth Ontario and may not be used or disclosed except as expressly authorized in writing by eHealth Ontario.
Trademarks Other product names mentioned in this document may be trademarks or registered trademarks of their respective companies and are hereby acknowledged.

ONE Mail/ONE Mail Partnered-Client Deployment Guide-Instructions for MS Exchange 2010/v1.2/DOC ID 3235 iii
Document Control The electronic version of this document is recognized as the only valid version.
Approval History APPROVER(S) TITLE/DEPARTMENT APPROVED DATE
ONE Mail Product Team ONE Mail Product Team 2013-06-28
Revision History VERSION NO. DATE SUMMARY OF CHANGE CHANGED BY
0.01 2010-02 Initial draft Ognjen Andrijasevic Ognjen Andrijasevic
1.0 2010-05 Reviewed version with changes recommended by David Thabet
Ognjen Andrijasevic
1.1 2010-05 Added Appendix A – Known Issues Ognjen Andrijasevic
1.2 2013-05 Updated for Internet Deployments SMI Team
Document ID
3235
Document Sensitivity Level Medium

ONE Mail/ONE Mail Partnered-Client Deployment Guide-Instructions for MS Exchange 2010/v1.2/DOC ID 3235 1
Contents
Contents 1
1.0 Introduction 2
2.0 Intended Audience 2
3.0 Overview 2
4.0 Creating CSR(s) 3 4.1 Generating a CSR ................................................................................................................................................ 4 4.2 Send the CSR to eHealth Ontario ....................................................................................................................... 6
5.0 Receive the Certificates 7
6.0 Install SSHA CA Root certificate 8
7.0 Installing an Exchange Certificate 14
8.0 Verifying the Exchange certificate installation 16
9.0 Setup Receive Connector 18
10.0 Setup Send Connector 23
11.0 Post Configuration Changes 32
12.0 Appendix A - Known Issues 34

ONE Mail/ONE Mail Partnered-Client Deployment Guide-Instructions for MS Exchange 2010/v1.2/DOC ID 3235 2
1.0 Introduction
This document describes the steps required to connect Microsoft Exchange Server 2010 to ONE Mail Partnered product for secure e-mail routing:
• Generate a request for a PKI certificate
• Install SSHA CA Root certificate
• Install the created certificate
• Setup Send Connector for routing e-mail to ONE Mail Partnered environment
• Setup Receive Connector for routing e-mail from ONE Mail Partnered environment to your corporate messaging system
These instructions apply to Microsoft Exchange Server 2010 installed on Windows Server 2008 R2.
NOTE: There is possibility to simplify process of migration from previous versions, if you have our certificate installed on your old server, and that certificate is exportable. In that case, you can export that certificate, and install it to new server, and skip steps related to generating new request and installing new certificate.
It is important to understand that we generated certificate for your organization, not for your server. Single certificate can be installed on multiple servers in your organization.
2.0 Intended Audience
This document is intended for technical personnel at eHealth Ontario client organizations who are involved in registering computer applications with eHealth Ontario. This includes:
• Application Owners
• Their delegates
3.0 Overview
The process of connecting to ONE Mail Partnered is as follows:
1. Register the application (for which you require a certificate) with eHealth Ontario, if this hasn’t been previously done.
2. Obtain a PKI Reference Number from eHealth Ontario. This number will be required to create and submit your request to eHealth Ontario.
3. Create the Certificate Signing Request (CSR). The CSR is created on the machine where the certificate is to be used. The process of creating a CSR generates a matching public and private RSA key pair and stores the private key on the machine and puts the public key into the CSR.

ONE Mail/ONE Mail Partnered-Client Deployment Guide-Instructions for MS Exchange 2010/v1.2/DOC ID 3235 3
4. Send the CSR (with Reference Number) to the eHealth Ontario Deployment Team
5. Receive the created certificate back from the eHealth Ontario Deployment Team
6. Install SSHA CA Trusted Root certificate
7. Install the certificate. This should be done on the same machine where the CSR was created.
8. Enable only this certificate for SMTP service.
9. Setup Send Connector on Exchange Server 2010
10. Setup Default Receive Connector on Exchange Server 2010
4.0 Creating CSR(s)
Note: Even in MS Exchange Server 2010 you will find GUI for Certificate Management, few important futures are not possible to be configured in GUI and that is a reason why instructions are still provided for MS Exchange Shell.
Note: For each request to be generated you require the corresponding Reference Number (example: 8934282) for this identity. These are obtained from the eHealth Ontario Deployment Team. A unique Reference Number is required for each certificate that is to be created.

ONE Mail/ONE Mail Partnered-Client Deployment Guide-Instructions for MS Exchange 2010/v1.2/DOC ID 3235 4
4.1 Generating a CSR
To generate a CSR for Microsoft Exchange 2010 use Exchange Management Shell, as explained below:
• Login to your Microsoft Exchange 2010 gateway server
• Click Start > Programs > Microsoft Exchange Server 2010 > Exchange Management Shell
• The shell windows will be displayed

ONE Mail/ONE Mail Partnered-Client Deployment Guide-Instructions for MS Exchange 2010/v1.2/DOC ID 3235 5
• Type-in the following command and press “Enter”
New-ExchangeCertificate -GenerateRequest –PrivateKeyExportable $true -Keysize 1024 -SubjectName "C=CA,S=ON, O=<Your_Organization_Name>,CN=<Reference Number>" -DomainName <YourPrimarySMTPDomainName>| Out-File "C:\Cert\CSR.txt"
Note: New-ExchangeCertificate utility requires the user to enter at least one Domain Name. This name is supposed to be added to the certificate Alternative Subject Name List. Currently, eHealth Ontario Certificate Authority does not support alternative subject name certificate property. As a result, the value provided for this field will be ignored by eHealth Ontario CA. However, to meet the utility requirement you need to provide a valid domain name.
• If the command is successfully executed open the created file specified in the | Out-File parameter. The file should have a similar content:

ONE Mail/ONE Mail Partnered-Client Deployment Guide-Instructions for MS Exchange 2010/v1.2/DOC ID 3235 6
• Complete the above procedure for each certificate you need to create, entering a new Reference Number, and a new output file name for each request. This will result in a new CSR each time the procedure is executed.
4.2 Send the CSR to eHealth Ontario
Forward the CSR/CSRs to the eHealth Ontario Deployment Team. They will return a certificate created from the CSR and the SSHA CA Root certificate.

ONE Mail/ONE Mail Partnered-Client Deployment Guide-Instructions for MS Exchange 2010/v1.2/DOC ID 3235 7
5.0 Receive the Certificates
When the certificate is created by eHealth Ontario CA, it will be sent to you in a file.
Its contents will resemble the following:
-----BEGIN CERTIFICATE----- MIIGYAYJKoZIhvcNAQcCoIIGUTCCBk0CAQExADALBgkqhkiG9w0BBwGgggY1MIIG MTCCBRmgAwIBAgIEQA9uVDANBgkqhkiG9w0BAQUFADCBpjETMBEGCgmSJomT8ixk ARkWA3NzaDEbMBkGCgmSJomT8ixkARkWC1N1YnNjcmliZXJzMRUwEwYDVQQLEwxT U0ggU2VydmljZXMxETAPBgNVBAsTCFNlY3VyaXR5MQwwCgYDVQQLEwNQS0kxOjA4 BgNVBAMTMVNtYXJ0IFN5c3RlbXMgZm9yIEhlYWx0aCBBZ2VuY3kgUm9vdCBDQSAt IFRlc3RpbmcwHhcNMDYwMjE3MDEwNDQxWhcNMDkwMjE3MDEzNDQxWjCBkzETMBEG CgmSJomT8ixkARkWA3NzaDEbMBkGCgmSJomT8ixkARkWC3N1YnNjcmliZXJzMRQw EgYDVQQLEwtTdWJzY3JpYmVyczESMBAGA1UECxMJSG9zcGl0YWxzMQ8wDQYDVQQL EwZPTFNUU1QxFTATBgNVBAsTDEFwcGxpY2F0aW9uczENMAsGA1UEAxMESElTNjCB nzANBgkqhkiG9w0BAQEFAAOBjQAwgYkCgYEAwmVaRaRrPLO+ZY44H2ZIX1s6jpA3 H24UDEOKYfaZ1gZesltzYDphXOMp/7ZnP350TnbiZQqpNFLqqckFOWskJSC83PEU xMa5jJU1xTfdpGWtnYrvT+mi0q3x+KGQ4y7DDtD4KSAWXkkIKndiYH9mvPBQ+q4X aqHqmFN/DZw/kTECAwEAAaOCAvowggL2MAsGA1UdDwQEAwIHgDArBgNVHRAEJDAi gA8yMDA2MDIxNzAxMDQ0MVqBDzIwMDgwMzI1MDUzNDQxWjCBxQYIKwYBBQUHAQEE gbgwgbUwgbIGCCsGAQUFBzAChoGlbGRhcDovL3NzaHBraTJhMDAwMXUuc3Vic2Ny aWJlcnMuc3NoL2NuPVNtYXJ0IFN5c3RlbXMgZm9yIEhlYWx0aCBBZ2VuY3kgUm9v dCBDQSAtIFRlc3RpbmcsIG91PVBLSSwgb3U9U2VjdXJpdHksIG91PVNTSCBTZXJ2 aWNlcywgZGM9U3Vic2NyaWJlcnMsIGRjPXNzaD9jQUNlcnRpZmljYXRlMIIBigYD VR0fBIIBgTCCAX0wgcGggb6ggbukgbgwgbUxEzARBgoJkiaJk/IsZAEZFgNzc2gx GzAZBgoJkiaJk/IsZAEZFgtTdWJzY3JpYmVyczEVMBMGA1UECxMMU1NIIFNlcnZp Y2VzMREwDwYDVQQLEwhTZWN1cml0eTEMMAoGA1UECxMDUEtJMTowOAYDVQQDEzFT bWFydCBTeXN0ZW1zIGZvciBIZWFsdGggQWdlbmN5IFJvb3QgQ0EgLSBUZXN0aW5n MQ0wCwYDVQQDEwRDUkwyMIG2oIGzoIGwhoGtbGRhcDovL2NybHUuc3NoYS5jYS9j bj1TbWFydCUyMFN5c3RlbXMlMjBmb3IlMjBIZWFsdGglMjBBZ2VuY3klMjBSb290 JTIwQ0ElMjAtJTIwVGVzdGluZyxvdT1QS0ksb3U9U2VjdXJpdHksb3U9U1NIJTIw U2VydmljZXMsZGM9U3Vic2NyaWJlcnMsZGM9c3NoP2NlcnRpZmljYXRlUmV2b2Nh dGlvbkxpc3QwHwYDVR0jBBgwFoAUoDjQCKRd/Fk7eTuqfcpZKT5GWRowHQYDVR0O BBYEFDtLS1NyMiADLtzKP/vfrPTThIQVMAkGA1UdEwQCMAAwGQYJKoZIhvZ9B0EA BAwwChsEVjcuMQMCBLAwDQYJKoZIhvcNAQEFBQADggEBAB45Jjvk7NeokO2/iy+H X142NV7wRR1lBmcJKLxYE3YgrGw7C7kBRjBEZbjoQy8g1Mniop8m1kA6tiJreuF2 kAxElilGu1DK5IqrA+lW7S3b7G5XipgC7jF8iQ9zUhblTsfLfLKZ0r/exPX3LE/P RYeqIUbATXfc/tuwcPm4kjRigpNIs+uEJAgkoOr73A1U2SLlGf1Q+EhSyTQ2qRI/ lIDTnEACHXbgEhU4qG8p+cN2GDcN8HJUqVLGlH6GOzfpl+6rZVeHfapUqf+hWmtX LCjcOCVZeaS6GpzIlbBlhRLae6glPUNQUqfX0P8dxCitvY20w0mePuikS1dFsAMz MGYxAA== -----END CERTIFICATE-----
Proceed to the next section to install the certificate generated from the CSR.

ONE Mail/ONE Mail Partnered-Client Deployment Guide-Instructions for MS Exchange 2010/v1.2/DOC ID 3235 8
6.0 Install SSHA CA Root certificate
Note: You must also install the SSHA Root Certificate; this is not the certificate which you installed earlier in Personal Certificates storage for local computer. If you are missing this certificate in your installation package please contact eHealth Ontario and they will provide this to you.
Install the SSHA CA Root certificate using Microsoft Management Console (MMC).
• From the Start menu, select Run. In the Run dialog box, type mmc and click OK.
• The Microsoft Management Console is displayed. From the File menu, select Add/Remove Snap-in.

ONE Mail/ONE Mail Partnered-Client Deployment Guide-Instructions for MS Exchange 2010/v1.2/DOC ID 3235 9
• On the Standalone tab, click Add. From the Available Standalone Snap-in list box, select “Certificates”, and then click Add.
• In Certificates snap-in pop-up window select Computer account and press Next.

ONE Mail/ONE Mail Partnered-Client Deployment Guide-Instructions for MS Exchange 2010/v1.2/DOC ID 3235 10
• In Select Computer pop-up window select Local Computer option and click on Finish button.
• In Stand Alone snap-in window press Close button and in Add/Remove window click on OK to exit.
• In Microsoft Management Console (MMC), expend the Certificates snap-in.
• In the console tree, select Trusted Root Certificate Authorities – Certificates container.

ONE Mail/ONE Mail Partnered-Client Deployment Guide-Instructions for MS Exchange 2010/v1.2/DOC ID 3235 11
• Right click on it and select All Task -> Import
• Browse to the SSHA CA Root certificate received from eHealth Ontario and click Next
In the File to Import screen click on Browse button, select SSHA CA Root Certificate which you received from SSHA and click on Next to proceed.

ONE Mail/ONE Mail Partnered-Client Deployment Guide-Instructions for MS Exchange 2010/v1.2/DOC ID 3235 12
• In Certificate Store screen verify that Place all certificates in the following store and Trusted Root Certification Authorities options are selected and click on Next to proceed.
• In Completing screen verify selected options and click on Finish to exit.

ONE Mail/ONE Mail Partnered-Client Deployment Guide-Instructions for MS Exchange 2010/v1.2/DOC ID 3235 13
• Open Certificates folder in the Trusted Root Certificate Authorities and verify if SSHA CA Root certificate is installed
• You have successfully installed the SSHA CA Root certificate.
ONE Mail/ONE Mail Partnered-Client Deployment Guide-Instructions for MS Exchange 2010/v1.2/DOC ID 3235 14
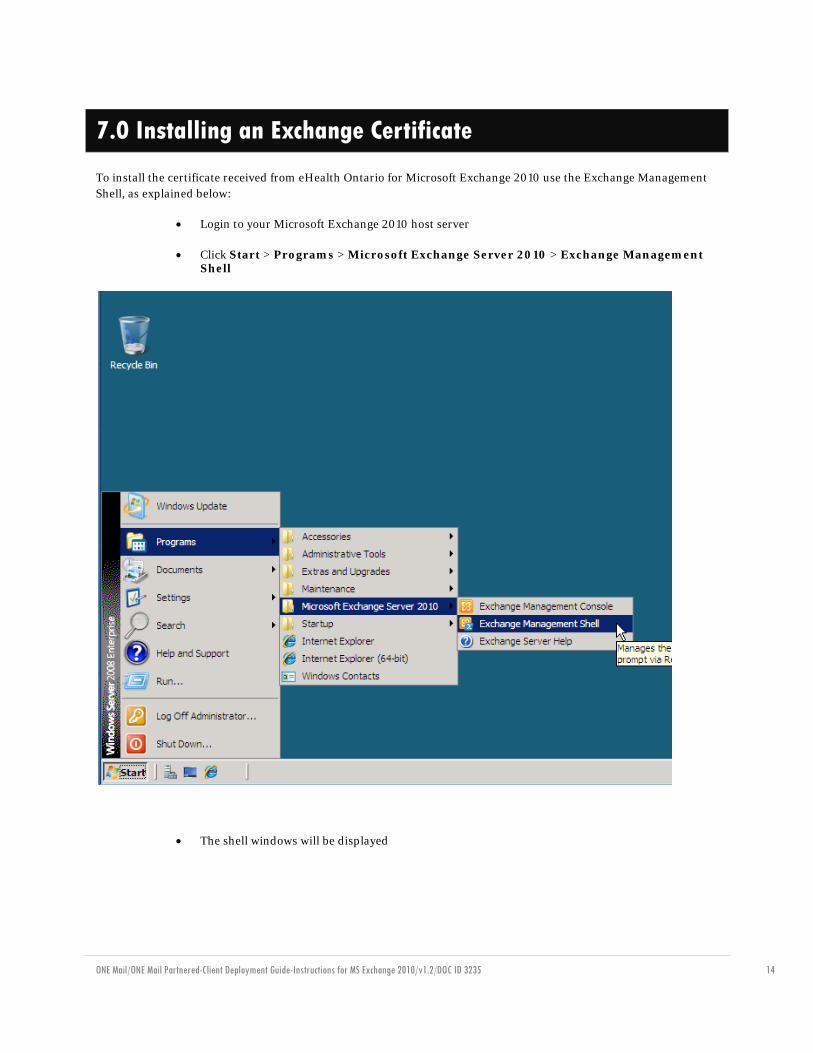
7.0 Installing an Exchange Certificate
To install the certificate received from eHealth Ontario for Microsoft Exchange 2010 use the Exchange Management Shell, as explained below:
• Login to your Microsoft Exchange 2010 host server
• Click Start > Programs > Microsoft Exchange Server 2010 > Exchange Management Shell
• The shell windows will be displayed

ONE Mail/ONE Mail Partnered-Client Deployment Guide-Instructions for MS Exchange 2010/v1.2/DOC ID 3235 15
• Type-in the following command and press Enter
Import-ExchangeCertificate –FileData ([Byte[]]$(Get-Content –Path c:\Cert\<SSHACertFileName> –Encoding byte –ReadCount 0))
The command (if successfully executed) will install the certificate and now you should enable it for SMTP service:
Note: You have to specify the path and name of the certificate which was issued by eHealth Ontario for you, based on your previous CSR. Do not specify the path and name of the SSHA Root Certificate, that certificate will be installed later in another location.
• Type-in the following command and press Enter
Enable-ExchangeCertificate –Thumbprint <eHo_Certificate_ThumbPrint> -Services SMTP
Where eHo_Cerificate_ThumbPrint is thumbprint of eHealth Ontario issued certificate visible in output of previous command.

ONE Mail/ONE Mail Partnered-Client Deployment Guide-Instructions for MS Exchange 2010/v1.2/DOC ID 3235 16
The command (if successfully executed) will enable this certificate for SMTP service:
NOTE: If you find that installed certificate is not associated with encryption keys please follow the steps from Appendix A to correct this problem.
8.0 Verifying the Exchange certificate installation
To verify the certificate installation, run Get-ExchangeCertificate command from Exchange Management Shell. The command should provide the certificate subject name, its thumbprint and a list of enabled services (S - SMTP for this example shown here).
Note: Important: If you have multiple certificates in this output, please follow this procedure to verify that only the right certificate is enabled to be used by SMTP service.
• Type-in the following command and press Enter

ONE Mail/ONE Mail Partnered-Client Deployment Guide-Instructions for MS Exchange 2010/v1.2/DOC ID 3235 17
Get-ExchangeCertificate –Thumbprint eHo_Certificate_ThumbPrint |Format-List
Where eHo_Cerificate_ThumbPrint is thumbprint of eHealth Ontario issued certificate visible in output of Get-ExchangeCertificate command.
In the “Services” property of this certificate you should see only SMTP service as in the example shown below:

ONE Mail/ONE Mail Partnered-Client Deployment Guide-Instructions for MS Exchange 2010/v1.2/DOC ID 3235 18
9.0 Setup Receive Connector
To configure a Default Receive Connector for ONE Mail Partnered environment on your Exchange Server 2010, use the Exchange Management Console as explained below:
• Login to your Microsoft Exchange 2010 hub transport server.
• Click Start > Programs > Microsoft Exchange Server 2010 > Exchange Management Console
• NOTE: Screenshots are taken for this section are taken on MS Exchange Server 2007, but the functions and procedures are similar on MS Exchange Server 2010.
• In the left tree pane expand Server Configuration and select Hub Transport container. In upper middle pane, select your hub transport server, and in left pane, select New Receive Connector :

ONE Mail/ONE Mail Partnered-Client Deployment Guide-Instructions for MS Exchange 2010/v1.2/DOC ID 3235 19
• In Introduction window of wizard specify name for new connector (exp. From ONE Mail) and click on Next to proceed:
• In the Local Network settings window under Specify the FQDN this connector will provide in response to HELO or EHLO: field, specify the name which is listed in subject line of eHealth Ontario’s certificate issued to your organization and click on Next to proceed.

ONE Mail/ONE Mail Partnered-Client Deployment Guide-Instructions for MS Exchange 2010/v1.2/DOC ID 3235 20
For example you can run Get-ExchangeCertificate –ThumbPrint eHo_Certificate_ThumbPrint | fl command, and in subject line find CN component of the certificate:
• In Remote Network settings window, you need to add IP address of eHealth Ontario’s TLS-OUT servers here by selecting down arrow button next to +Add and chose IP Address... option.
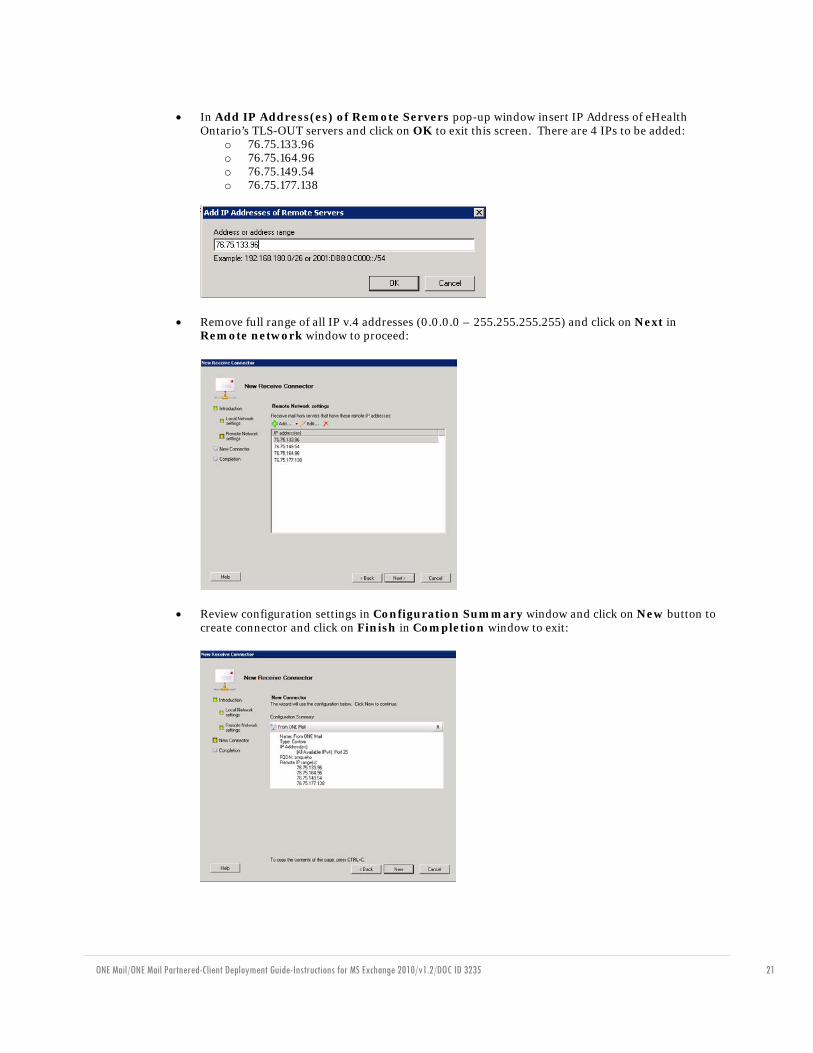
ONE Mail/ONE Mail Partnered-Client Deployment Guide-Instructions for MS Exchange 2010/v1.2/DOC ID 3235 21
• In Add IP Address(es) of Remote Servers pop-up window insert IP Address of eHealth Ontario’s TLS-OUT servers and click on OK to exit this screen. There are 4 IPs to be added:
o 76.75.133.96 o 76.75.164.96 o 76.75.149.54 o 76.75.177.138
• Remove full range of all IP v.4 addresses (0.0.0.0 – 255.255.255.255) and click on Next in Remote network window to proceed:
• Review configuration settings in Configuration Summary window and click on New button to create connector and click on Finish in Completion window to exit:

ONE Mail/ONE Mail Partnered-Client Deployment Guide-Instructions for MS Exchange 2010/v1.2/DOC ID 3235 22
• Double click on newly created connector From eHealth Ontario to get properties and switch to Authentication tab and only select the following options:
o Transport Layer Security (TLS)
o Basic Authentication
o Integrated Windows authentication
• Switch to the Permission Groups tab and select all available permission groups except Partners and click on Apply to save changes and exit Exchange Management Console.
• Run Services.msc tool and restart Microsoft Exchange Transport service to immediately apply all changes.

ONE Mail/ONE Mail Partnered-Client Deployment Guide-Instructions for MS Exchange 2010/v1.2/DOC ID 3235 23
10.0 Setup Send Connector
To create and configure a Send Connector for the ONE Mail Partnered environment on your Exchange Server 2010 use Exchange Management Console, as explained below:
Note: Do not create this connector until “deployment date”.
Note: If you already have Send Connector configured on your server, please change priority of this connector to 20, by taking Properties of that Send Connector, switch to Address Space tab, edit exiting address space and change Cost value from 1 to 20. After that proceed with creation of the new Send Connector to connect to eHealth Ontario’s ONE Mail Partnered program.
• Login to your Microsoft Exchange 2010 host server.
• Click Start > Programs > Microsoft Exchange Server 2010 > Exchange Management Console.

ONE Mail/ONE Mail Partnered-Client Deployment Guide-Instructions for MS Exchange 2010/v1.2/DOC ID 3235 24
NOTE: Screenshots are taken for this section is taken on MS Exchange Server 2007, but the functions and procedures are similar on MS Exchange Server 2010.
• In Exchange Management Console, in the left tree pane browse to Organization To n Configuration to Hub Transport container. Then select the Send Connector tab. If you have Send Connector configured to route your out-bound e-mail directly to Internet or to your previous ISP you need to delete that connector.

ONE Mail/ONE Mail Partnered-Client Deployment Guide-Instructions for MS Exchange 2010/v1.2/DOC ID 3235 25
• To create new Send Connector, in the right action pane select New Send Connector.
• On the New SMTP Send Connector introduction screen select the name of the new connector and insert in the Name field (ex. To ONE Mail Smart Host). From the Select the intended use for this Send connector drop down menu select Custom and press Next.

ONE Mail/ONE Mail Partnered-Client Deployment Guide-Instructions for MS Exchange 2010/v1.2/DOC ID 3235 26
• In the Address space screen click the Add button
• In the Add Address Space window type “*” in the Domain box and press OK.

ONE Mail/ONE Mail Partnered-Client Deployment Guide-Instructions for MS Exchange 2010/v1.2/DOC ID 3235 27
• In the Address space screen you will see the new address space, press Next to proceed:
• In Network settings screen select option Route mail through the following smart host: and press the Add button.
• In the Add smart host pop up window select Fully qualified domain name (FQDN): and insert eHealth Ontario’s TLS-IN FQDN smtp.tls.one-mail.on.ca and press OK.

ONE Mail/ONE Mail Partnered-Client Deployment Guide-Instructions for MS Exchange 2010/v1.2/DOC ID 3235 28
• Back in the Network settings screen, you will now see new smart host and press Next to proceed.
• In the Authentication Settings screen select only Basic Authentication option and insert user name and password provided by eHealth Ontario, then press Next to proceed.
• In the Source Server screen select only your Hub Transport server and press Next to proceed.

ONE Mail/ONE Mail Partnered-Client Deployment Guide-Instructions for MS Exchange 2010/v1.2/DOC ID 3235 29
• In the Configuration Summary screen review selected options and press New to proceed.
• In the Completion screen press Finish to exit.
• Now open Exchange Management Shell from Start Menu.

ONE Mail/ONE Mail Partnered-Client Deployment Guide-Instructions for MS Exchange 2010/v1.2/DOC ID 3235 30
• Then type command:
Get-SendConnector –Identity “Your_Send_Connector_Name” |fl
“Your_Send_Connector_Name” is the name which you specified during connection creation.
Check following fields in output:
ONE Mail/ONE Mail Partnered-Client Deployment Guide-Instructions for MS Exchange 2010/v1.2/DOC ID 3235 31
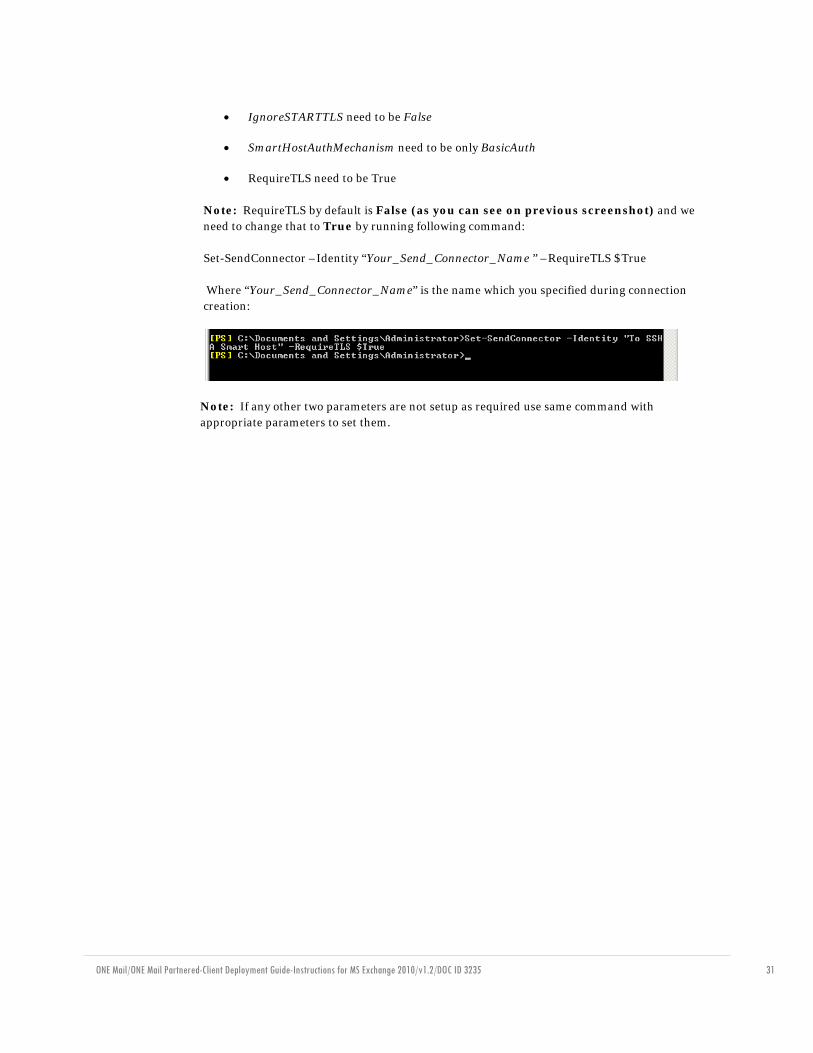
• IgnoreSTARTTLS need to be False
• SmartHostAuthMechanism need to be only BasicAuth
• RequireTLS need to be True
Note: RequireTLS by default is False (as you can see on previous screenshot) and we need to change that to True by running following command:
Set-SendConnector –Identity “Your_Send_Connector_Name ” –RequireTLS $True
Where “Your_Send_Connector_Name” is the name which you specified during connection creation:
Note: If any other two parameters are not setup as required use same command with appropriate parameters to set them.
ONE Mail/ONE Mail Partnered-Client Deployment Guide-Instructions for MS Exchange 2010/v1.2/DOC ID 3235 32
11.0 Post Configuration Changes
Once full integration with ONE Mail Partnered program is implemented and tested, and you are fully disconnected from your previous ISP service, you will need to remove all old Send and Receive Connector configurations by following those steps.
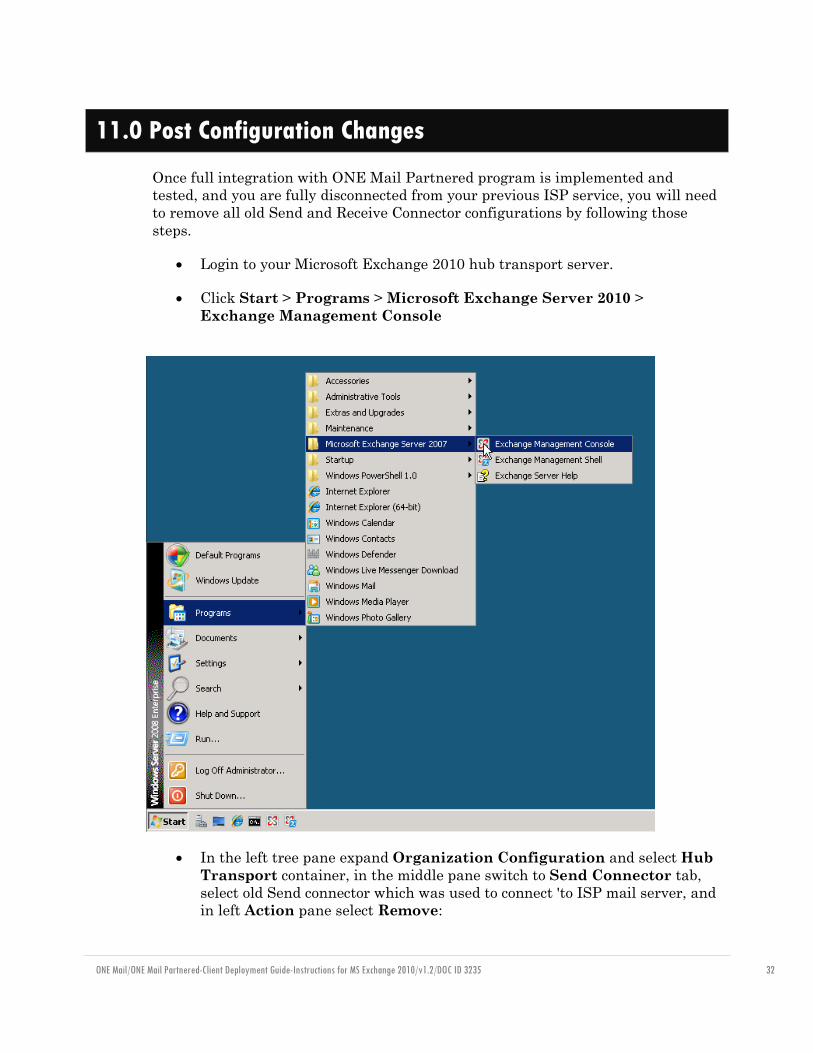
• Login to your Microsoft Exchange 2010 hub transport server.
• Click Start > Programs > Microsoft Exchange Server 2010 > Exchange Management Console
• In the left tree pane expand Organization Configuration and select Hub
Transport container, in the middle pane switch to Send Connector tab, select old Send connector which was used to connect 'to ISP mail server, and in left Action pane select Remove:

ONE Mail/ONE Mail Partnered-Client Deployment Guide-Instructions for MS Exchange 2010/v1.2/DOC ID 3235 33
• In the left tree pane expand Server Configuration and select Hub Transport container, in the lower middle pane select old Receive connector which was used to receive mail from ISP mail server, and in left Action pane select Remove:

ONE Mail/ONE Mail Partnered-Client Deployment Guide-Instructions for MS Exchange 2010/v1.2/DOC ID 3235 34
12.0 Appendix A - Known Issues
1. In case that you find that newly installed certificate is not associated with encryption keys, you will experience this error:
“The certificate with thumbprint <certificate thumbprint> was found but is not valid for use with Exchange Server (reason: PrivateKeyMissing).”
In that case you should run following command:
certutil –repairstore my <serial number of certificate>
Where <serial number of certificate> can be find by running Get-ExchangeCertificate <eHo_Certificate_ThumbPrint> |Format-List