oma-love is in the air pillow - media.rainpos.com · oma-love is in the air pillow (partial ith for...
TRANSCRIPT
OMA-Love Is In The Air Pillow
(Partial ITH for 6x10” hoops)
This Valentine’s Day pillow is made as a mostly in the hoop project. The
background is quilted and the contrast strips and borders are applied
during the first hooping and finished on the sewing machine. The second
very quick hooping, applies the Velcro strips to the back pieces. A small
amount of machine stitching is required to complete the pillow.
Detailed instructions with many photos are included with your purchase.
Intended for use with a 12x16” travel size pillow
Please note: Because of the nature of the center design, there are a
number of jump stitches that could not be avoided.
Dimensions Stitch Counts
Front 6.00x9.99” 15,377
Velcro Closure back 5.75x9.39” 2,462
Finished Size of Pillow Cover: 12.00x16.00”
1

SUPPLIES NEEDED
Fusible fleece (Pellon 987F light weight)
3 contrasting/coordinating cotton fabrics
(1 for the center background; 1 for the contrasting border strips and another
one for the wide borders)
Embroidery adhesive spray
Small curved tip scissors
Spray sizing or spray starch.
10.00x0.75” Velcro tape to match your pillow case fabric (both hook and loop
portions)
(1) 12.00x16.00 travel size pillow form
Painter’s tape
Clover Mini or Wedge Iron
Polymesh (preferred) or medium tear away stabilizer*
*What’s the difference between those two stabilizers?
Polymesh will give a softer feel to the embroidery and will probably hold up
better than the tear away. Tear away will give the final product a bit more
substance at the start but probably won’t hold up to multiple washes as well
as Polymesh. The choice is yours.
A Word about Spray Adhesive
Please make sure you are truly using temporary adhesive spray
specifically made for machine embroidery. I have excellent results
with 505 Spray.
When using spray adhesives, please make sure you remove the hoop from
your machine. Do NOT unhoop embroidery, unless instructed to.
NEVER spray the hoop while still on the machine and never spray close
to the machine.
2

Be sure to follow manufacturer’s instructions when using adhesive spray.
If you feel uncomfortable about using spray adhesive, you can always tape
down your fabric.
A Word about Tape
You will find that I use Painters’ tape throughout my projects. I have found
that it gives a much more professional look to the end result because there
is less shifting of fabric. Painters’ tape tears easily and should the needle
accidentally travel through the tape, it does not “gum up”.
IN PREPARATION
(most is the same for both 7x11” and 8x12” versions, except for center)
CUT
(1) 5.00x9.00” piece of fusible fleece (light weight – Pellon 987F)
(1) 11.00x7.00” piece of cotton fabric for the center
(2) 1.50x11.50” pieces of cotton fabric for the long narrow borders
(2) 1.50x7.00” pieces of cotton fabric for the short narrow borders
(2) 4.50x17.00” pieces of cotton fabric for the long wide outer borders
(2) 4.50x7.00” pieces of cotton fabric for the shorter wide outer borders
(1) 17.00x13.00” piece of cotton fabric for the back (top)
(1) 17.00x10.00” piece of cotton fabric for back (bottom)
(1) 10.00x3/4” piece of Velcro closure (both hook and loop portions)
3

Preparing the back fabric
Press your two back pieces and label them.
Serge one of the long (17.00” edges on both pieces). You can also zigzag
the edge on your sewing machine.
Take the bottom fabric (the smaller piece) and turn the fabric 3.00” to the
back, wrong side against wrong side. Press fold.
(Shows a different pillow, but the process for the back is the same.)
Press fold edge.
Now, from the edge measure up 2.50” and with a fabric marker draw a line
across the width of the fabric. This will be your stitching line.
4

Alternately, you can also adhere a piece of painter’s tape to the bed of your
machine, with the inner edge 2.50” away from the needle. Then guide your
fabric along the edge of the tape, as shown below.
The reason for stitching down the fabric like that is that it will allow the fabric to stay flat when you stick the two pieces of Velcro together.
Lay aside both pieces for later use.
5

COLOR STITCHOUTS
FRONT
Hoop a stabilizer of your choice. Your first color will be stitched directly
onto the stabilizer.
1. Placement guideline for fusible fleece
After 1, remove hoop from machine. Do NOT unhoop embroidery.
Apply temporary spray adhesive to the top of your stabilizer.
Take the fusible fleece and place it inside the stitched guideline.
After placing the fusible fleece, apply temporary spray adhesive to the
top of the fleece. Place the center fabric over the fleece, right side up,
centering the fabric from top to bottom and left to right.
Return hoop to machine and continue stitching.
2. Tackdown of center fabric and quilting stitches
3. Hearts, Love
4. Flower stem, stems of seeds and center of seed head, as well
as “is in the air”
After 4, place the two shorter, narrower border strips against the
short sides of the center fabric’s tackdown line. The fabric should be
6

facing right side down and the edge should be extending ever so
slightly into the seam allowance – enough to just cover the tackdown
line.
Secure with pieces of tape and continue stitching.
5. Tackdown of the two shorter inner borders
After 5, remove hoop from machine; do NOT unhoop.
Turn the border strips right side up and press the attached edges
with either a Clover Mini or Wedge iron.
7

Now, take the longer narrow border strips and place them also,
right side down, against the longer side of the tackdown stitches.
Can you see the notch in the center of the long sides? That marks
the center of the border strip.
Fold the border strips in half, wrong sides together, and place
them against the tackdown line, with the fold at the center mark.
Now unfold the strips all the way so that the right side of the fabric is
down and one of the long edges is barely covering the tackdown
stitches. Tape in position and continue stitching.
8

6. Attaching of longer inner border strips
After 6, turn the border strips right side up, press (like you did
before) and secure the raw edges with tape. This is an important
step to make sure that the contrast border strips are all the same
size when the pillow is finished.
Continue stitching.
7. Tackdown of border strips (this becomes the placement line)
It is now time to attach the outer borders. We will start with the
short sides again.
Take the two short fabric pieces that you cut for the sides and place
them, right side down, against the tackdown stitches you just
finished stitching.
9
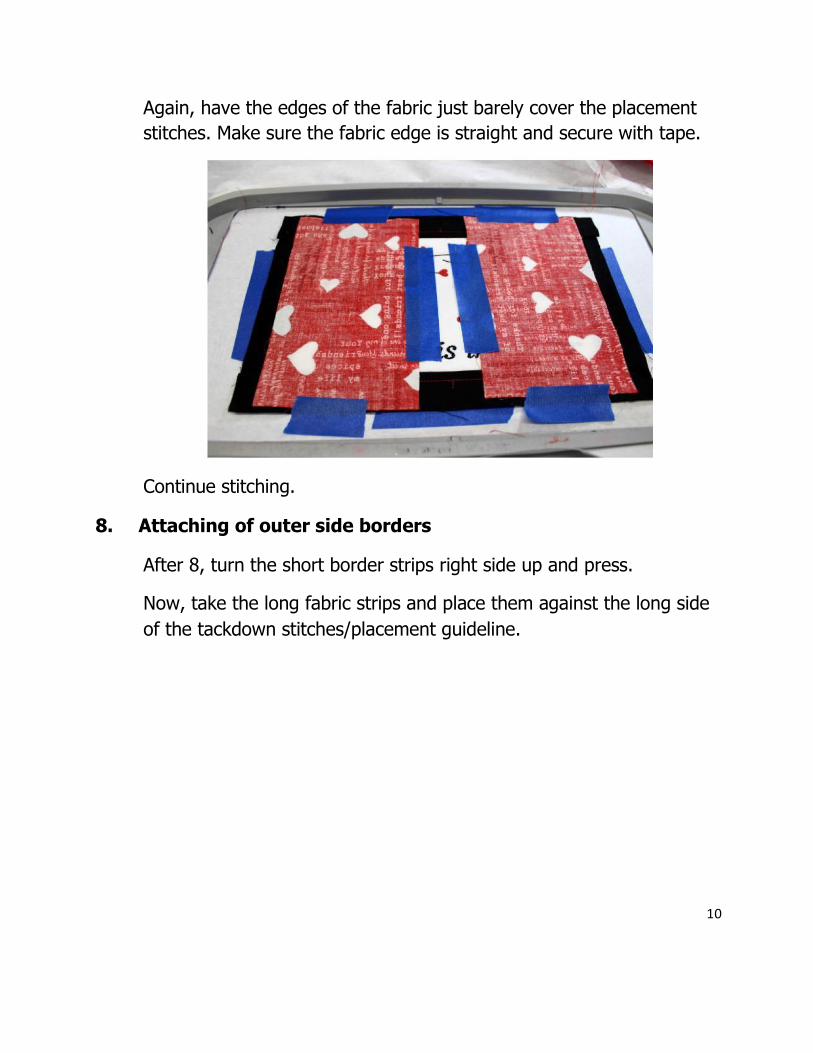
Again, have the edges of the fabric just barely cover the placement
stitches. Make sure the fabric edge is straight and secure with tape.
Continue stitching.
8. Attaching of outer side borders
After 8, turn the short border strips right side up and press.
Now, take the long fabric strips and place them against the long side
of the tackdown stitches/placement guideline.
10
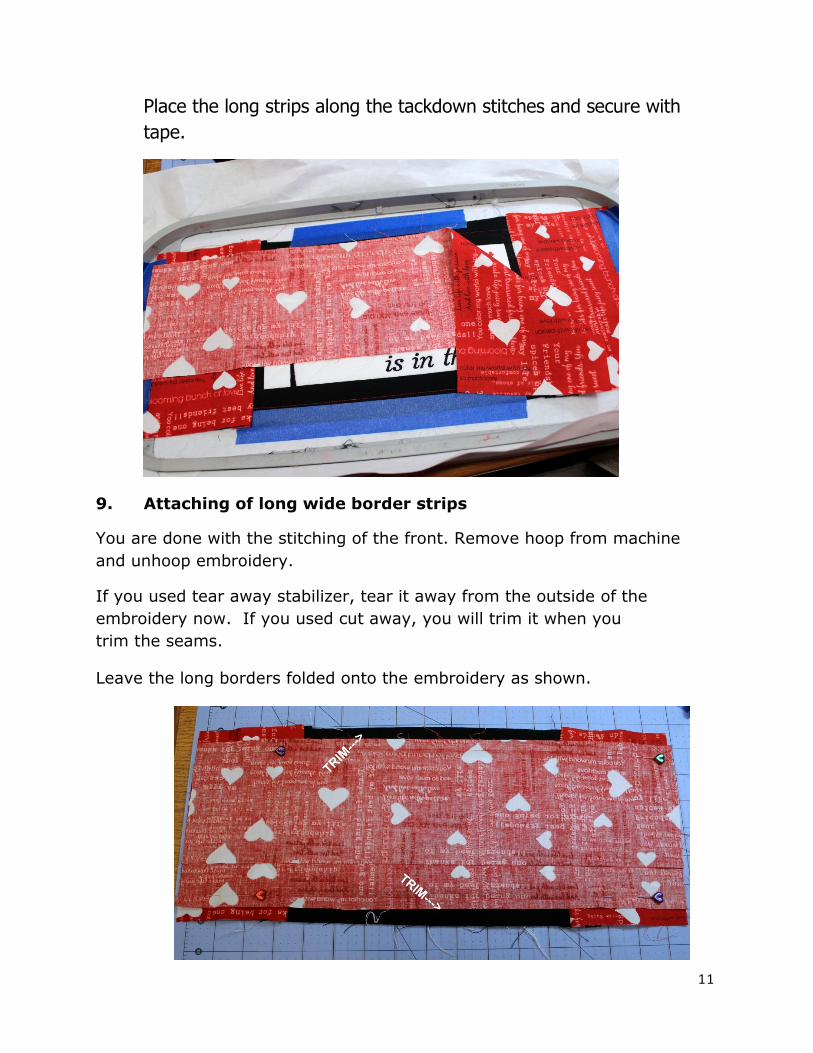
Place the long strips along the tackdown stitches and secure with
tape.
9. Attaching of long wide border strips
You are done with the stitching of the front. Remove hoop from machine
and unhoop embroidery.
If you used tear away stabilizer, tear it away from the outside of the
embroidery now. If you used cut away, you will trim it when you
trim the seams.
Leave the long borders folded onto the embroidery as shown.
11

Pin the 4 open areas and then, with a rotary cutter, trim away the excess
seam allowance.
You will now need to finish the 2 long seams.
12

With the long top/bottom border strips still folded back over the
embroidery, finish stitching the seams. Do so by stitching towards the
edge. That way you avoid “wrinkles”. Do this to all 4 areas.
Now it’s time to press everything. Sometimes the embroidery pulls on the
fabric and your design may not be completely even along the sides.
Square off your embroidery and measure it carefully, making sure
it measures 16.50x12.50”.
Lay aside for later use.
13

BACK (top and bottom)
Hoop a tear away stabilizer. Your first color will be stitched directly onto
the stabilizer.
In this hooping you will be applying Velcro tape to both the bottom and the
top back of the pillow.
1. Fabric placement lines
After 1, remove hoop from machine. Apply temporary spray
adhesive to the top of your stabilizer.
Now, take the prepared fabric pieces for the back and fold them in
half along the edge fold for the bottom piece and along the serged
edge for the top piece. Have right sides together, as shown.
(These photos show a different pillow, but the process is the same.)
14

Mark center point by finger pressing. Do this to both fabric pieces.You will now place the folded fabric pieces against the placement lines, as shown below. It does not matter which part you are placing first on the stabilizer or which part at the top or bottom. As long as you are placing the folded edge of the bottom piece against one placement line and the serged, unfolded edge of the top against the other placement line.
Place the center point of the fabric pieces, wrong side down, against
the center notch of the placement line. The fabric long edge should
be lining up with the long placement line.
(Place the fabric so that the center notch will be covered
completely once you open up the fabric.)
Now open up the fabric so that the right side will be facing up.
Part of the fabric will be hanging over the hoop frame. Tape.
15

Tape in position.
Continue stitching.
2. Placement guideline for Velcro
After 2, take your glue stick and apply glue to the centers of the
placement guidelines.
Now, take the soft side of the 11.00” piece of Velcro and place it, right
side up, over/within the placement guideline of the bottom piece.
(That’s the piece with the folded over edge). Try to be accurate and
press down on the Velcro with your fingers.
Tape the short ends.
16
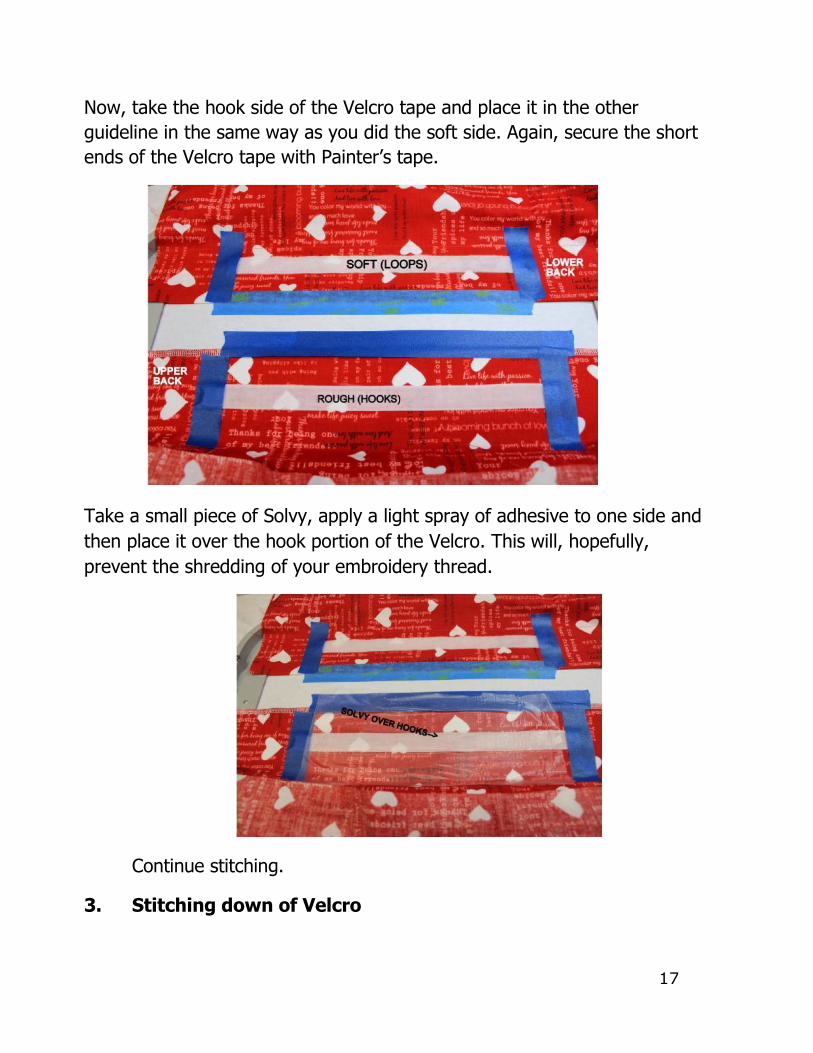
Now, take the hook side of the Velcro tape and place it in the other
guideline in the same way as you did the soft side. Again, secure the short
ends of the Velcro tape with Painter’s tape.
Take a small piece of Solvy, apply a light spray of adhesive to one side and
then place it over the hook portion of the Velcro. This will, hopefully,
prevent the shredding of your embroidery thread.
Continue stitching.
3. Stitching down of Velcro
17
After 3, remove hoop from machine and unhoop embroidery.
Tear away stabilizer from the back of the Velcro.
On the right side of the fabrics, trim the excess Velcro on the short ends to
about 1/4”.
That wasn’t too hard, was it?
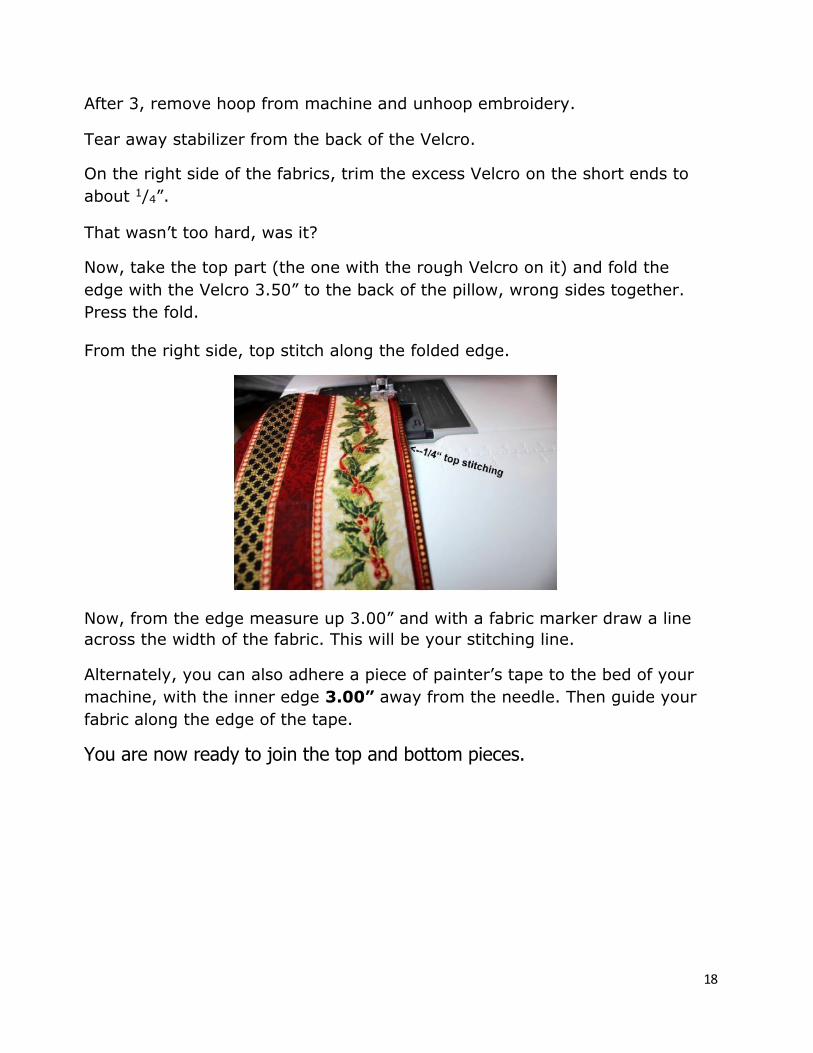
Now, take the top part (the one with the rough Velcro on it) and fold the
edge with the Velcro 3.50” to the back of the pillow, wrong sides together.
Press the fold.
From the right side, top stitch along the folded edge.
Now, from the edge measure up 3.00” and with a fabric marker draw a line
across the width of the fabric. This will be your stitching line.
Alternately, you can also adhere a piece of painter’s tape to the bed of your
machine, with the inner edge 3.00” away from the needle. Then guide your
fabric along the edge of the tape.
You are now ready to join the top and bottom pieces.
18

Bring the two Velcro pieces close together as shown.
Now, place them on top of each other, making sure the sides match.
Tape in position.
Square off the piece to measure 16.50x12.50”.
Place the front and back on top of each other, right sides together and with
a 1/4” seam allowance stitch all around the pillow case.
Turn right side out.
Press. Place pillow form inside. Not all travel pillows are the same. Some
are “thinner” than others. If you find that the corners are “empty”, put a 19

fluff of polyester stuffing into them. Also, at times I have had to make the
seam 1/2” because the pillow just wasn’t a true 12x16”.
And there you are. I hope you are pleased with the end result.
TIPS
1. This embroidery could easily be made into framed art.
Just stitch the center portion only. Attach the contrast
border strips or leave them off.
2. If you place little puffs of stuffing inside the pillow corners,
be careful the stuffing doesn’t get caught on the Velcro!
I hope you have enjoyed making this project. Please remember that we
always love receiving photos of your finished projects made with our
designs.
For questions or feedback, feel free to contact [email protected].
Thank you for your purchase! 20