olga on-line grants application - ca state parks on-line grants application off-highway motor...
TRANSCRIPT

OLGA On-line Grants Application
Off-Highway Motor Vehicle Recreation
Grants and Cooperative
Agreements Program

Select Off-Highway
Vehicles Link

Select
Grants Tab

When you scroll over tab, you will see a drop down menu for quick access links

Select Apply
for Grants
On this page you will find important dates
and the Grants Division contact information

On this page you will find OLGA Instructions
Select On-line Grants
Application link

Before your begin, you will need to turn off your pop-up blocker.
You may review
preliminary and final
applications from prior
years by selecting
Review Preliminary
Application or Review
Final Application Links.

OLGA Instructions The following six steps will allow you to navigate through OLGA:
Step 1: Register Your Agency
Step 2: Create User Profile
Step 3: Project Director Request
Step 4: Create Application
Step 5: Assign Users to Projects
Step 6: Enter Grant Application

OLGA
NAVIGATION TOOLS


Step 1: Register Your Agency
All agencies must enter their agency information in OLGA. This
information will only need to be entered once per agency.
Your agency information must be entered into OLGA before you can:
• Create a User Profile (OLGA login), and Enter a Project Director
request. (If your agency is already registered, skip to Step 2:
Create User Profile.)
Note: You will need to know your agency's nine (9)-digit Federal ID in
order to register your agency.

On the OLGA “Home Page”, click “Register Your Agency” This action will bring up the “Agency
Registration” screen.

Complete the required fields in the Agency Registration form and submit via email.

Step 2: Create User Profile OLGA requires users to create a user profile to access the various
functionalities of OLGA. Each user must have a valid user name and password
to login to OLGA.
Note: New users may login and start using OLGA only after they have been:
• Activated by OHMVR Division staff and Assigned permissions by the
agency's designated Project Director.
Each user completes their user profile by entering their user information in
OLGA. If you are also applying for an RTP grant, you can use the same user
profile; however, you will need to complete a separate project director request.
Note: Your User Profile remains in OLGA, you do not need to create a new one
for each grant cycle.
Before you attempt to create your user profile, ensure that your agency
information has been registered in OLGA. (See Step 1: Register Your
Agency.)

On the “Home Page” click “Create User Profile”. This action will bring up the User Profile screen.
You will see a square with three dots throughout the application process; we refer to this as
the “Show Look Up” menu. When you select it, it will display field options in a “Lookup” screen.

Complete the required fields under “User Details” (* denotes a required field).
Note: Create your own login name (User Name) and password. The user login name and
password you create will be your user id to login in the future.
Select the Show Look Up menu for “Designation/Title”. This action will bring up the Lookup
menu.
User Names and Passwords are alphanumeric. User Names
must have a minimum length of 3 characters and a maximum
length of 10 characters. Passwords must have a minimum length
of 5 characters and a maximum of 15 characters.

Select your title. If one is not provided, click “Other”.

Select the Show Look Up menu for “Role Code”.

Select “Grant Applicant”. You will see several codes listed, but those applying for our Grant are a
“Grant Applicant”. This is an off –the-shelf product so there will be some options that are not
applicable to our program.

Select the Show Look Up menu for “Parent Agency”.

Select “Agency”. Make sure that you select your correct agency, if you select the wrong agency,
your project director will not be able to assign you as a user.

Select the Show Look Up menu for “County”.

Select the County in which your office is located.

You are required to answer at least one security question. Click on the “Show Security” button.

From Show Look Up menu select a security question and provide an answer. Click the “OK”
button at the bottom of the screen.
You are only
required to
answer one
security question.
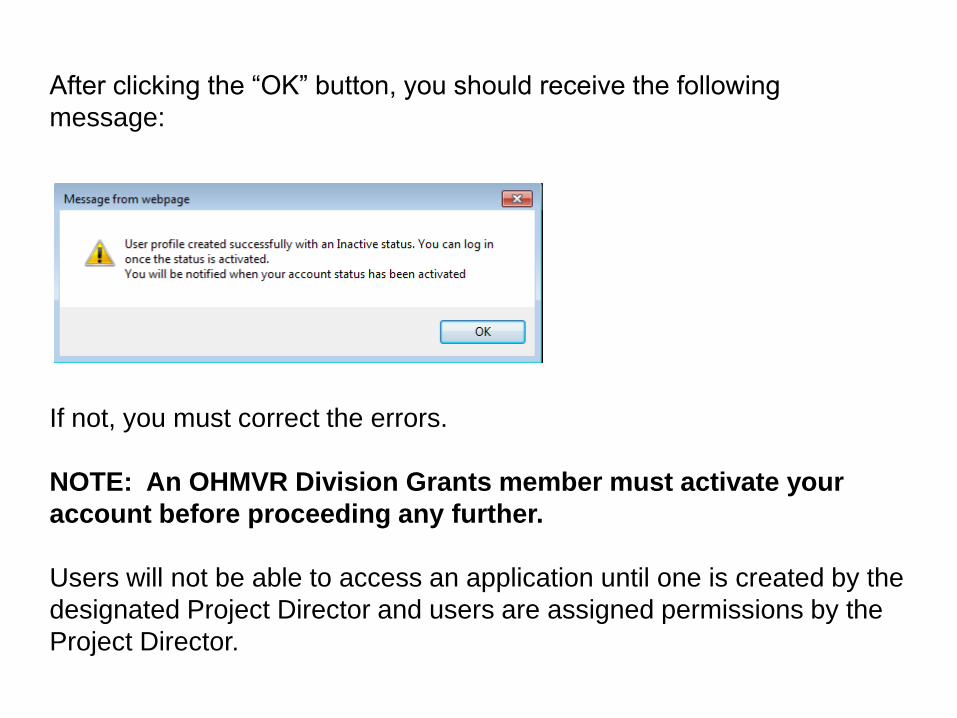
After clicking the “OK” button, you should receive the following
message:
If not, you must correct the errors.
NOTE: An OHMVR Division Grants member must activate your
account before proceeding any further.
Users will not be able to access an application until one is created by the
designated Project Director and users are assigned permissions by the
Project Director.

Step 3: Project Director Request A Project Director is a person from the grantee agency responsible for
performing administrative functions in OLGA for their agency. A Project Director
is responsible for the following tasks:
• Creating an application
• Assigning users access to projects
• Updating agency information
• Submitting the application
Note: Project Directors must be activated by OHMVR Division staff and
will be notified by email once activated.
A new Project Director must be established for each grant cycle.
We recommend one Project Director per agency, but you can assign more than
one. Just remember that anyone with the Project Director status has the ability
to submit the application. Once the application is submitted, it cannot be
recalled.

On the “Home Page”, click on the “Project Director Request”.

Complete the required fields (* indicates a required field). Confirm your agency by selecting the
“Yes” button.
Note: Once you input your user
login name and password, your
selection will automatically
populate into the “Agency” field.

Select the Show Lookup menu for “Grant Category”.

Select the Show Lookup menu for “Grant Program”.

Once all required fields are completed, click the “OK” button.

If done correctly, you will see the following message:
If not, you must correct the errors.
NOTE: An OHMVR Division Grants member must activate the Project
Director Request before proceeding any further.
Once you submit the Project Director Request, OHMVR Division will notify you by
email that your request has been activated.
At that point, as a Project Director, you may proceed with completing the following
processes:
• Creating an Application
• Assigning Users
Users will not be able to access an application until one is created by the Project
Director and users are assigned permissions.

Change/Forgot Password
To change your password, select “Change Password” on the OLGA
Login page.
• You must know your User Name and Password.
• If you do not know your User Name, please contact your Grant
Administrator.
If you forgot your password, select “Forgot Password” on the OLGA
Login page.
• If you do not know your User Name and/or Security
Question(s)/Answer(s), please contact your Grant Administrator.

To change your password, select “Change Password”.

You must know your User Name and Password. If you do not know your User Name, please
contact your Grant Administrator. If you do not know your password, you will need to use the forgot
password button.

If you forgot your password, select “Forgot Password”.

If you do not know your User Name and or Security Questions/Answers, please contact your
Grant Administrator.

OLGA Instructions
Step 4: Create Application
Step 5: Assign Users to Projects
Step 6: Enter Grant Application

Step 4: Create an Application
• Once a user has been activated as a Project Director by
OHMVR Division staff, they may create an application.
• Each Applicant submits one application for each grant cycle;
however, the application may contain multiple projects.
• Only an approved Project Director may create an application.

The Project Director must login to OLGA from the OLGA “Login" screen.

Then select "OLGA Menu" from the footer of the "Welcome screen

The "User Menu" screen will display, then select "Create Application."

The page will automatically default to the review screen. Click the Setup button, then select the
Show Lookup menu for “Grant Program”.

Select Grant Program; your selection will automatically populate the “Grant Program” field.
If you do not see the
current grant cycle, you
have not created a
project director request
for the grant cycle or
your request has not
been approved.

To create projects, select the Show Lookup menu under project code.

Select the appropriate box to select the project which you will be applying. Your selection will
automatically populate the “Project Title” field and assign a “Project Reference #”.
You may apply for several projects in one application. Based on your agency type, the projects
you are eligible to apply for will display.
Skip this field

To add additional projects, select the Show Lookup menu for the project code field and repeat
steps.

If you are applying for more than one project of the same type, you may add an additional
description to the “Project Title” field.
Once you have created all projects for which you will be applying, click the “OK” button to save
entries.

You will receive the following message:

After you click okay you will see blank fields; don’t worry. Click the “Find” button to refresh the
screen.
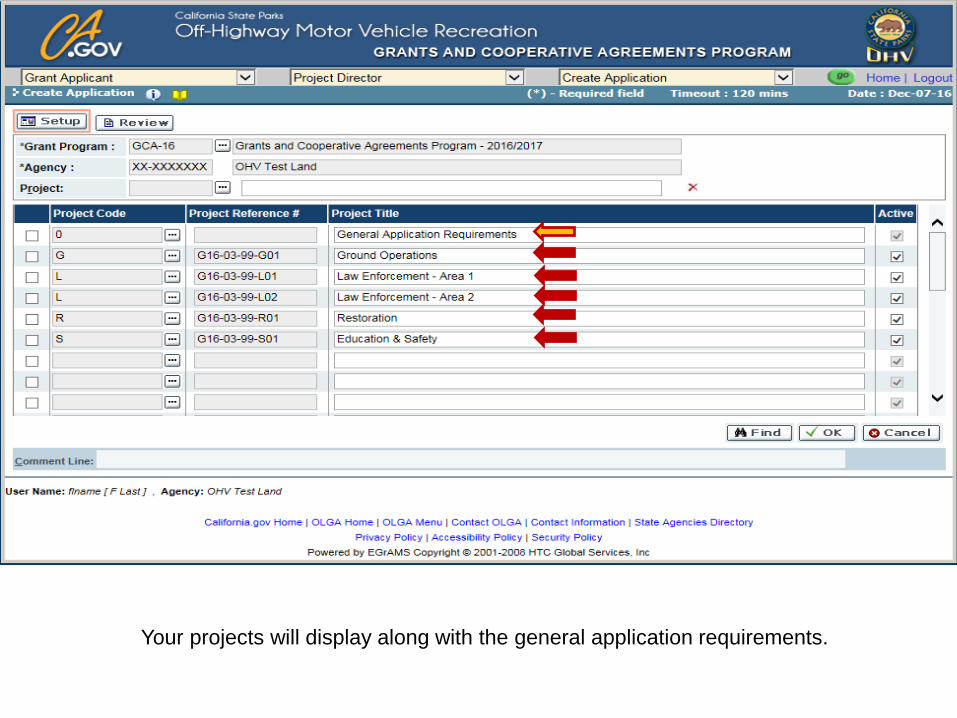
Your projects will display along with the general application requirements.

Deactivate Project
• You may not delete a project from your application once
saved.
• You MAY deactivate project(s).

In the ‘Active’ column, select to uncheck the box for the project(s) you want to deactivate. Once
you have unchecked all the project(s) you want to deactivate, click the “OK” button to save.
Note: If the ‘Active’ box is greyed-out this indicates the project is inactive. Inactive project(s) will
still display in the ‘Application Entry’ screen.

After you have deactivated your project(s) and clicked “OK”, you will see this message.

Again, you will see blank fields; click the “Find” button to refresh your screen.

To assign users (Step 5), select “OLGA Menu” to return to the User Menu screen.

Step 5: Assign Users to Projects
• OLGA allows your agency to have multiple users working on your
application.
• It requires a user identified as a Project Director with an 'active' status
to assign projects and permissions for other users.
• Once the Project Director has created an application, the Project
Director may then give other agency users authorization to work on
the application/project(s).

From the "User Menu" screen select “Assign User to Projects."

Click the Setup button (agency and program should auto populate), then select the Show Lookup
menu for “User”. This action will bring up the user ”Lookup” screen.

The Show Lookup window will display all users that created a user profile under your agency.
Click the appropriate box to select the user for whom you are assigning permissions. You can only
select one at a time.

Verify the “User Status” is defaulted to “Active”, then click “Find”.

This will display your active projects that you created. Verify again that the “User Status” is
defaulted to “Active”. Click the Show Lookup menu button for permissions for the project on
which the user will be working on.

Permissions:
Project Administrator – responsible for
performing the administrative tasks for the
agency and has full access to the grant
application, including permission to submit.
Granter Writer – responsible for entering the
grant application and has full access to the
grant application.
Reviewer – responsible for reviewing the grant
application.
Financial Officer – responsible for reviewing
the budgetary aspects of the grant application.
Authorized Representative – responsible for
approving contracts and payments.
Select the appropriate box that fits the permission you want to assign the user for that project.
Your selection will automatically populate into the “Permission” field. Most will be a Grant Writer;
the other titles do not apply. Again, this is an off-the shelf product.
X Please Note: If you assign permissions as a project administrator, the user will have the same
rights as a Project Director and will have the ability to create projects, assign users, and submit
the application.

Note: If you want to LIMIT users’ access further to: Read, Write, or No Access (NA), select the box
under the “Cat. Appl.”. Then click the Show Lookup menu (orange box) under the “Category”
column for the project(s) you selected.

For each "Section", click the appropriate access option for the user. Once access options for
each "Section" has been selected, click the “OK” button to “Save”.

Note: If you wish to remove "Cat. Appl." which limits Users' access within a project, then click the
"Cat. Appl." button to uncheck this feature and click “OK”. When all permissions have been
assigned for user, click “OK”. Follow the previous steps to assign permissions to additional users.
Remember, you can only assign permission to one user at a time.
To Enter Grant Application (Step 6), select “OLGA Menu” to return to the User Menu screen

Step 6: Enter Grant Application
• Once Users have been assigned permissions they may begin working on the project(s) created by the Project Director.

From the "User Menu" screen select “Enter Grant Application."

Select the Show Lookup menu to select Program.

Select appropriate Grants and Cooperative Agreements program.

Click “Go”.

This will bring up the projects you created along with the General Application Requirements. Click
on the General Requirements or project to start your application process.
Gray box denotes
that project has
been inactivated.

You will see this message pop-up frequently reminding you of the
submission deadline date:

Select blue tabs to
access pages. Some
tabs will contain
multiple pages.
Use arrows to
scroll across
tabs. Use arrow
to move to
next page
under tab. Copies content from
previous applications.
Be sure to edit your
content thoroughly when
using the copy button.
We recommend that
Validate after you
complete each tab.

The Show Documents link has links to different documents, including the regulations, HMP/Soil
guidelines, application instructions, location map, which you will need to complete for this tab.

The index tab is a useful tool for establishing where you are at with the project completion. You can
delete content on a page, see if you have errors, and if you have attachments. If you click on the
red error button , it will tell you where the error is located.
Status
Error Error
Delete content
on page
Document
attached Error Links to pages

The window will display the errors for that page. If you select the box, it will take you to the page
where the error occurred.
To return to the “Enter
Grant Application” page,
click the “Close” button.

If you have errors, you will see the error buttons in various locations. We recommend
clearing errors before proceeding to the next task. To complete your project cost-estimate,
click a project link, in this case, Law Enforcement 1.

To easily navigate, use the “Show Tree”. Highlight the desired link and click “OK”.

To complete the project cost-estimate, click on the “Project Cost-Estimate” tab.

Each page represents a line item; in this case staff. Select the Show Lookup menu under
Description to begin; this will display a title menu.
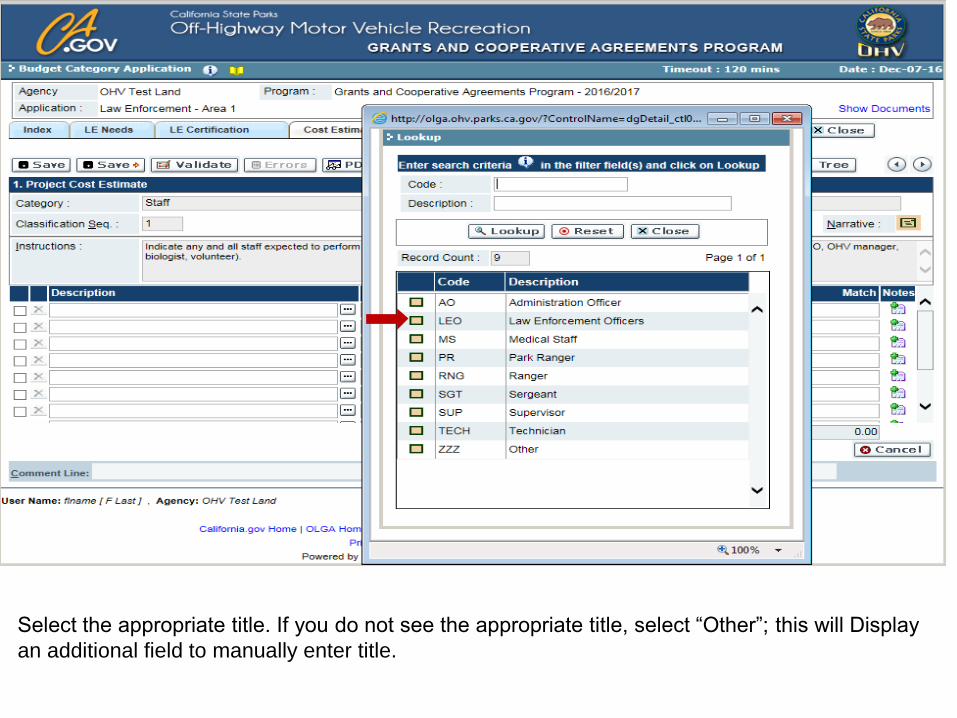
Select the appropriate title. If you do not see the appropriate title, select “Other”; this will Display
an additional field to manually enter title.

To provide additional detail, use the “Notes” box to the right.

To see layout, you can save a pdf. at any time.


To view a summary of your cost-estimate, click on the “Show Tree” button, highlight the Project
Cost Summary at the bottom, and select “OK”.

This will give you an overall view of the line items you have completed. To go back to any line
item, select the blue link to the left. Note: You cannot make any adjustments on the summary
page; you must return to the line item page.

Once you have completed the General Application requirements and Projects, you will need to
submit them. Click on the “Grant Application Preview” link.

If you see the red circle with an x , you have errors that must be removed before you can
submit. We recommend validating after you complete each tab to avoid errors at the end.

To submit, you will check the buttons under validate and submit, then click the “Submit” button.
NOTE: You can submit projects individually, but when you submit the first project, the General
Application Requirements with be submitted. You will receive an message saying you have been
successfully moved to the next stage.