ok-screen demonstration ok... · ok-screen demonstration . ... person summary tabs overview . ......
TRANSCRIPT

OK-SCREEN Demonstration
Walter Jacques Administrative Program Manager Oklahoma National Background Check Program Oklahoma State Department of Health (855) 584-3550 / (405) 271-3598 Email: [email protected] Website: http://onbc.health.ok.gov
1

2
Key Items
Slide(s) Item End-User Security Agreement Quick Intro Consent and Release Form Adding a New Applicant The Research Registries Screen Final Registry Results Processing an applicant with no findings (All Cleared) Credit Card Payment for Single Application Authorization to Fingerprint Form Online Scheduling of Fingerprinting Fingerprinting Locations in Oklahoma Printing Background Check Form / Final Registry Results Provisional Hire Person Summary Tabs Overview Hiring an Applicant Already in the System (but no Determination) Receiving a Determination from the ONBCP Permanent Hire Adding an applicant who already has an Eligible Determination Batch Payment Processing Viewing a Criminal History Report
2 4-7
8-11 12-28 29-52
56 59
61-69 70-76 77-90
91 92-94 95-99
100-104 105-111
112 113-117 118-123 133-142 143-150

The User Status Page
Your provider accounts will be shown here.
Your UserID will be shown here.
3
The Menu Bar options are
based on user permissions.
Important Messages and forms will be posted here.
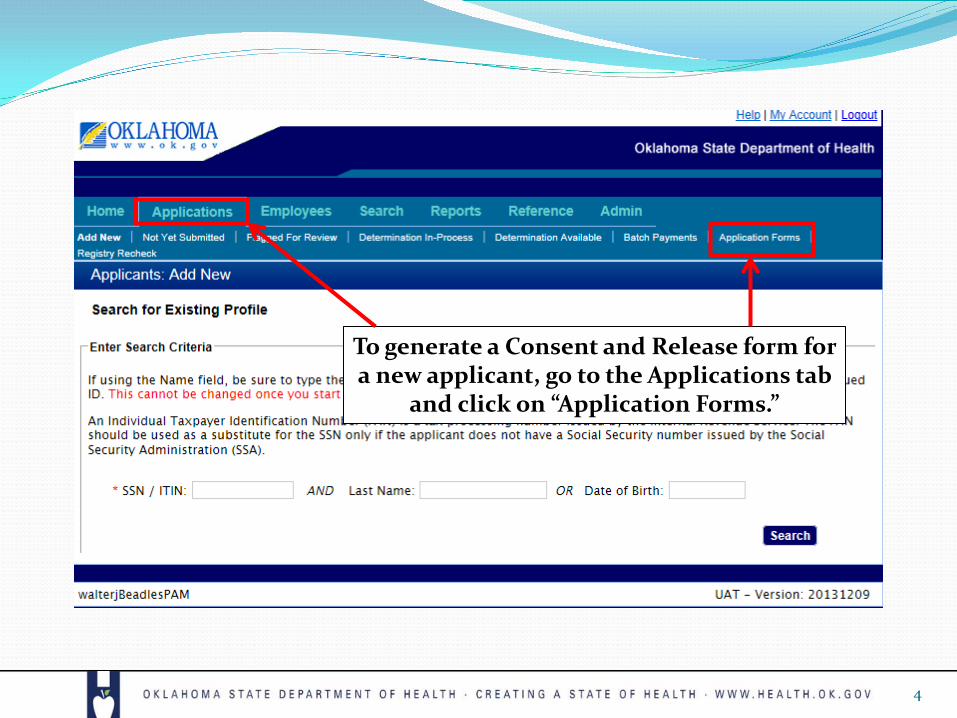
To generate a Consent and Release form for a new applicant, go to the Applications tab
and click on “Application Forms.”
4

You will then see this screen.
5

Click on the “Consent and Release” form hyperlink. When you request a form from OK-Screen, you will be prompted by a message like
this to either open the file, save it or cancel.
6
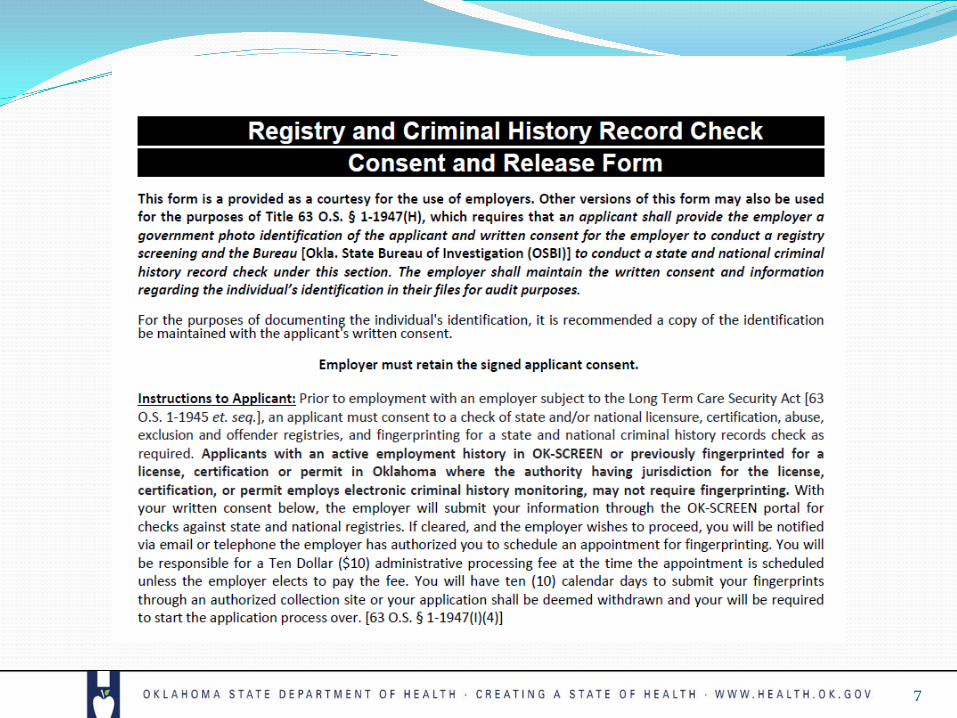
7
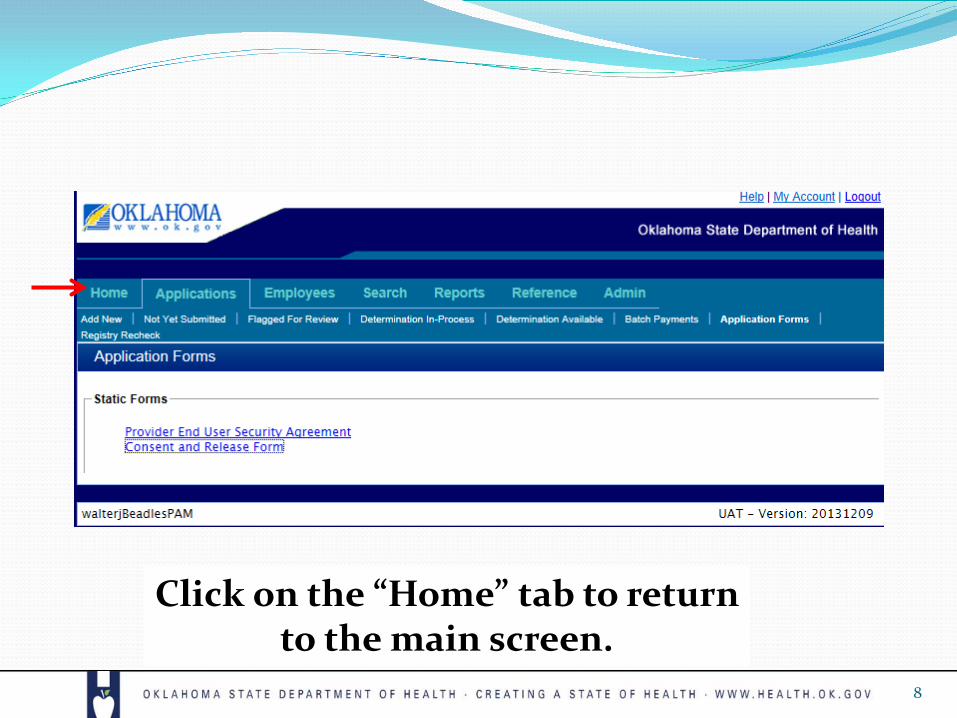
Click on the “Home” tab to return to the main screen.
8
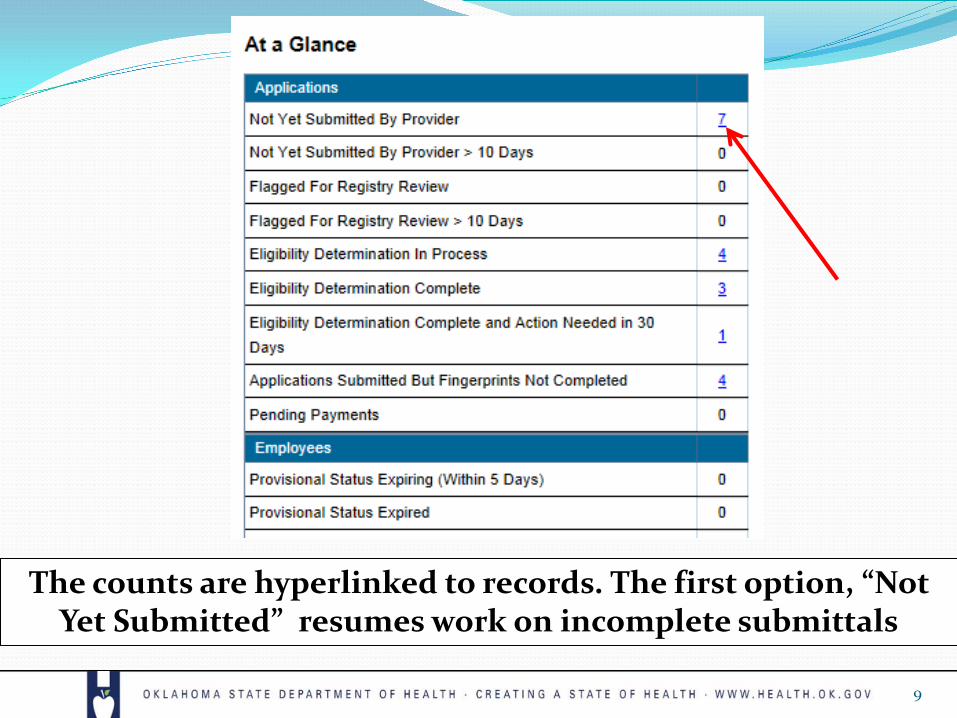
The counts are hyperlinked to records. The first option, “Not Yet Submitted” resumes work on incomplete submittals
9

The last names are hyperlinked to view the record or the user can resume or withdraw the record.
10

Select ‘Applications’ to start a new entry.
11

Select ‘Add New’ and enter the SSN and Last Name OR Date of Birth
Note that OKSCREEN does not rely on your web browser’s back button. Instead use the back button on the screen or select options from the menu bar.
12
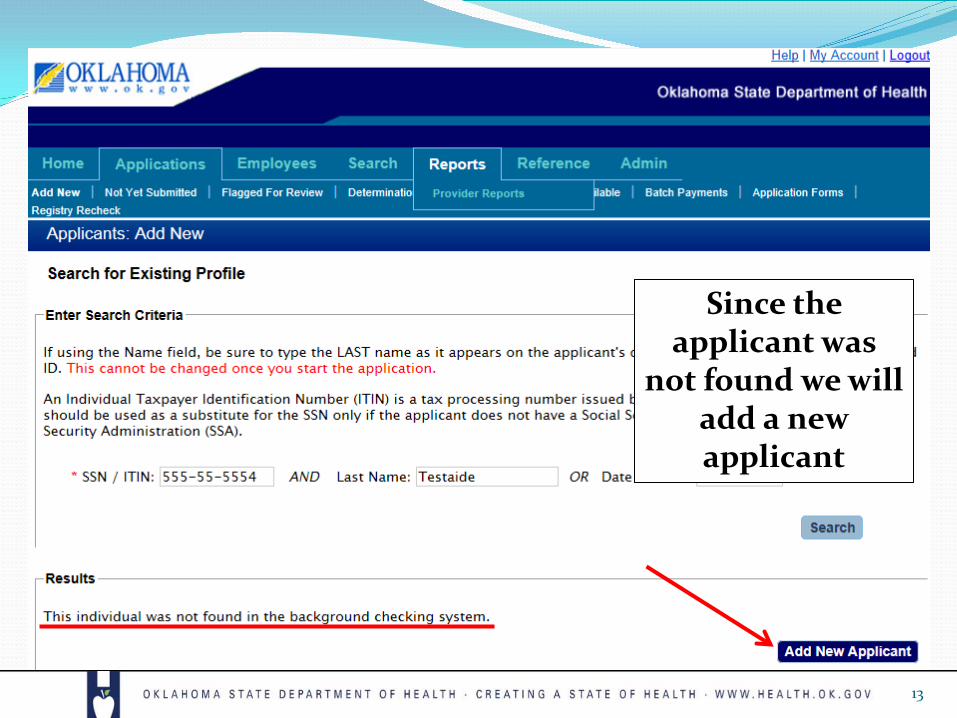
Since the applicant was
not found we will add a new applicant
13
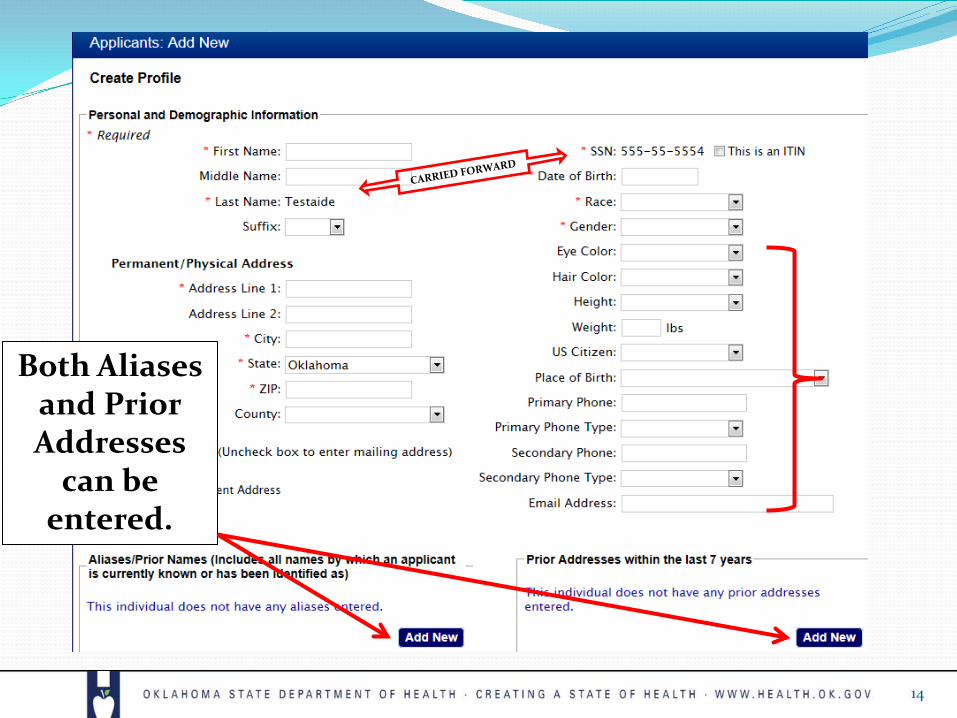
Both Aliases and Prior Addresses
can be entered.
14

15

Let’s say Millie worked in Texas and Arkansas previously. Select ‘Add New’
16

17

18
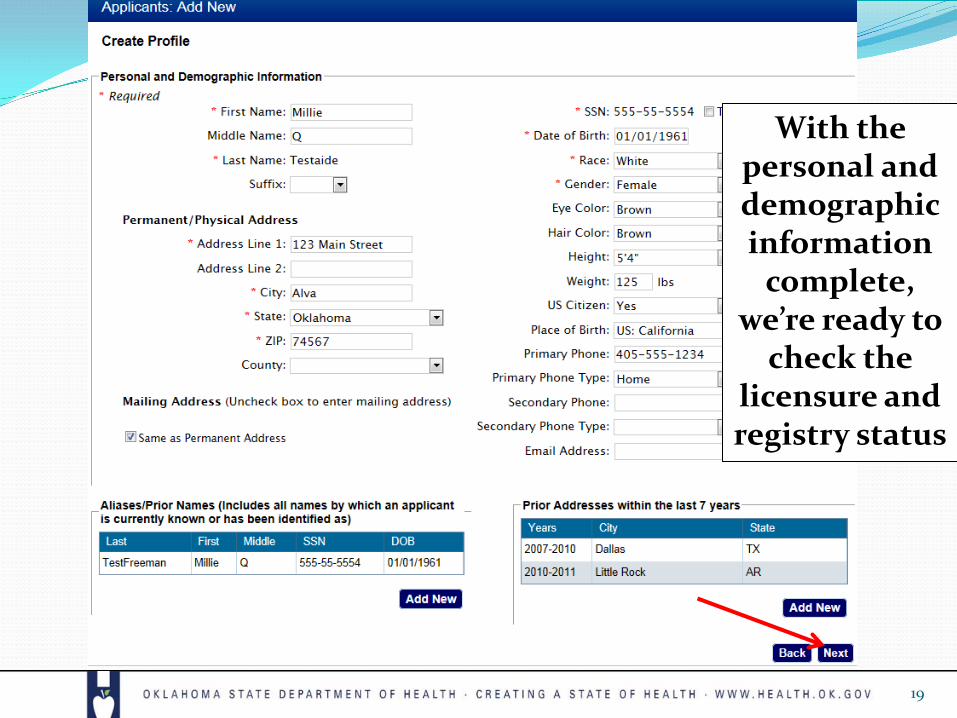
With the personal and demographic information
complete, we’re ready to
check the licensure and registry status
19

If the applicant has a license not discovered in the system you may record that information by selecting the ‘Add license/Certification’ button.
20

21

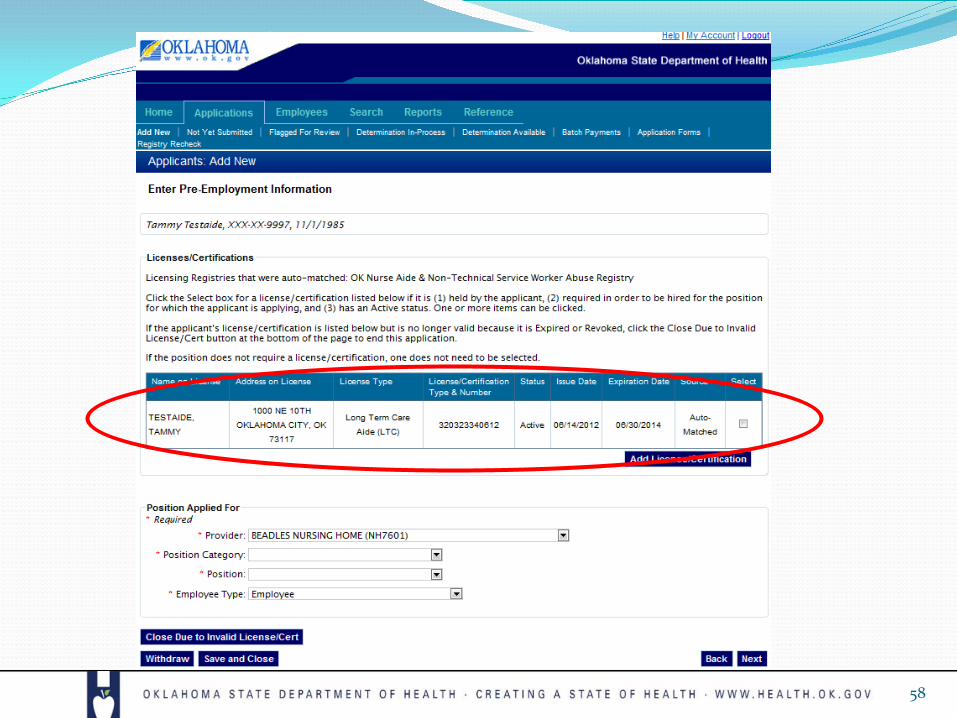
Click the Select box for a license/certification listed if it is (1) held by the applicant, (2) required in order to be hired for the position for which the applicant is
applying, and (3) has an Active status. One or more items may be shown and can be clicked.
22
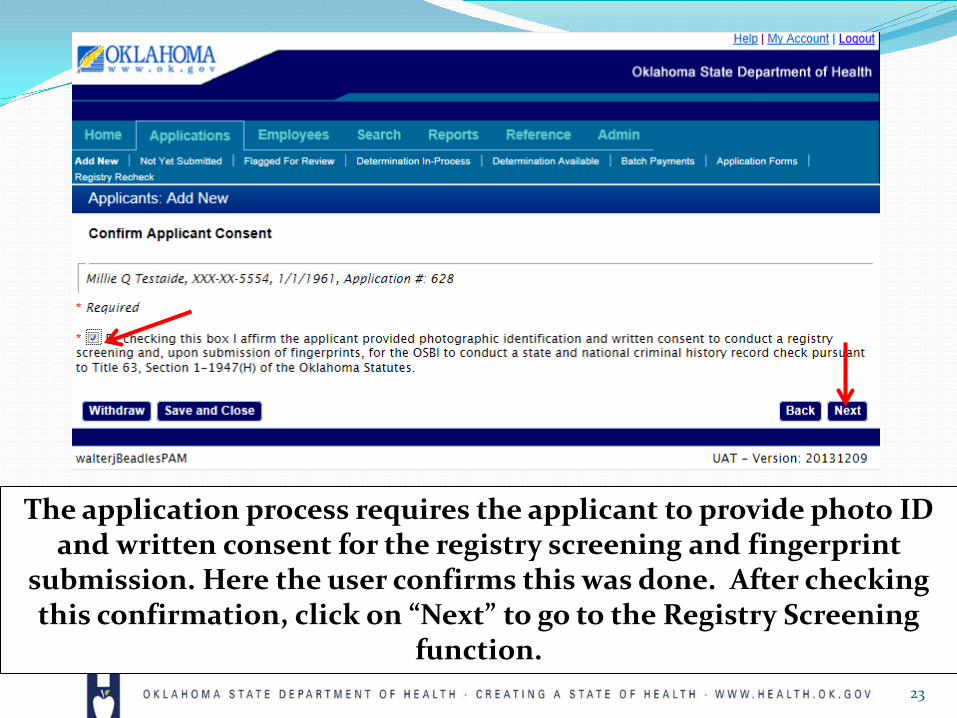
The application process requires the applicant to provide photo ID and written consent for the registry screening and fingerprint
submission. Here the user confirms this was done. After checking this confirmation, click on “Next” to go to the Registry Screening
function. 23

This is the Research Registries screen
where you can check your applicant for a
presence on the listings.
24
This drop-down will not be enabled until you click
on the hyperlink to the corresponding registry.
Registries that are not auto-matched are searched by clicking the hyperlink to open a new web browser window. Click on the first registry
listed which is a required registry search under the new law

The Research Registries screen expands based on
the addresses selected. In this
example the nurse aide
registries from Arkansas and
Texas have been added based on
our earlier selections. Note
that some registries are
optional.
Note that some registries are
optional.
25

You may still add registries using the ‘Research Registries Not Listed’ button
26

27

28

Notice that the KS Nurse Aide Registry now appears on the Registry Research page. We’ll
look at how to process the registries. 29

This is the Child Care Restricted
Registry or Joshua’s List. Click on the Public Inquiry.
30

This search can be done
based on SSN or Name.
Click on Find SSN.
31

You are looking to
see that this applicant is NOT on the
registry.
32

After a hyperlink has been activated its use is recorded in the ‘Research Requirements’ column. The ‘Research Results’ drop down list is now activated to record the results. Click
on the down arrow and select “Cleared.”
33

The options are ‘Cleared,’ ‘Not Cleared’ or ‘Flagged for Review.’ For any selection, the date and time of selection is recorded along with the user account responsible for making the determination. We will select ‘Not
Cleared’ for the purposes of demonstration on the next slide.
34

If ‘Not Cleared’ or ‘Flagged for Review’ are selected, entries in the comment box are
required as indicated by the red asterisks.
35

Where ‘Auto-Match’ is shown this indicates the SSN is automatically checked against the database. A zero indicates there were no abuse
findings matched on that SSN and the results may be marked ‘cleared.’ You do not need to select the hyperlink where automatch is
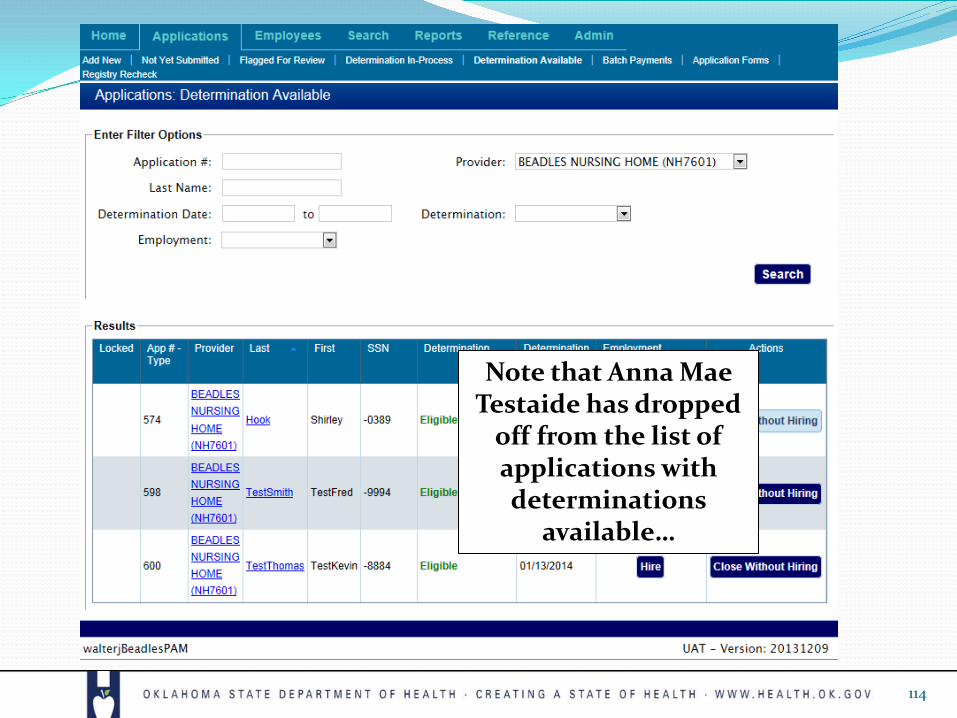
available, just use the drop down box.
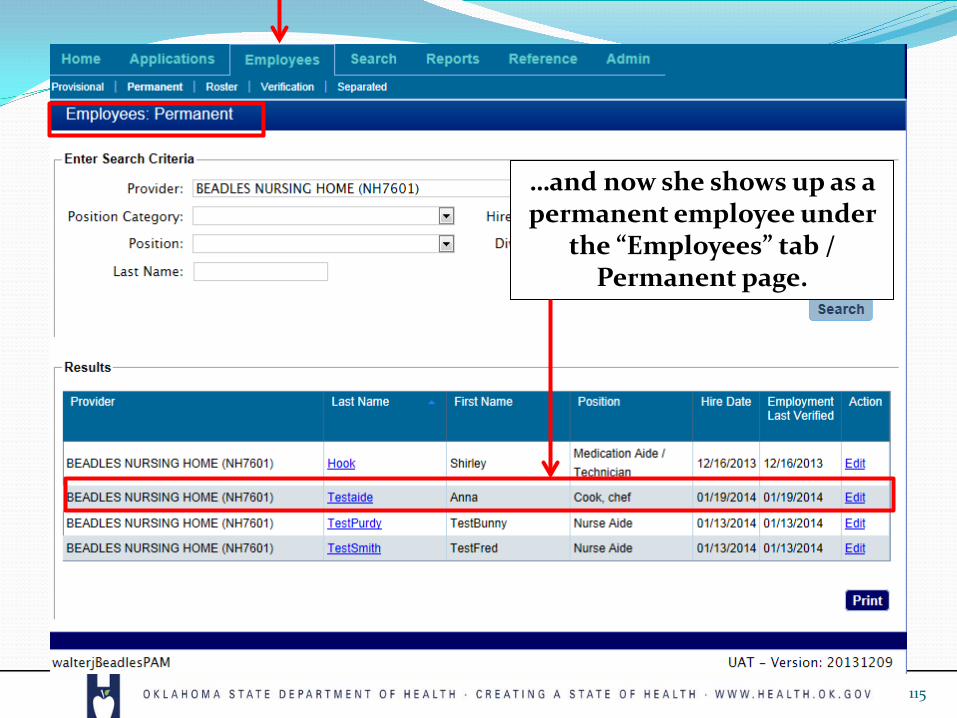
36
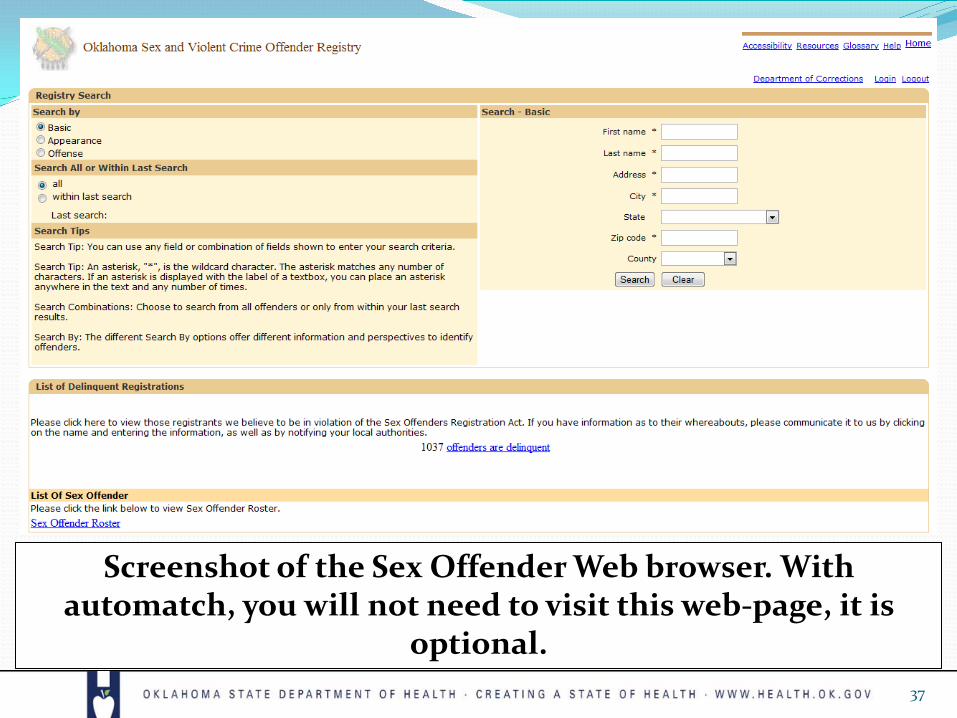
Screenshot of the Sex Offender Web browser. With automatch, you will not need to visit this web-page, it is
optional. 37

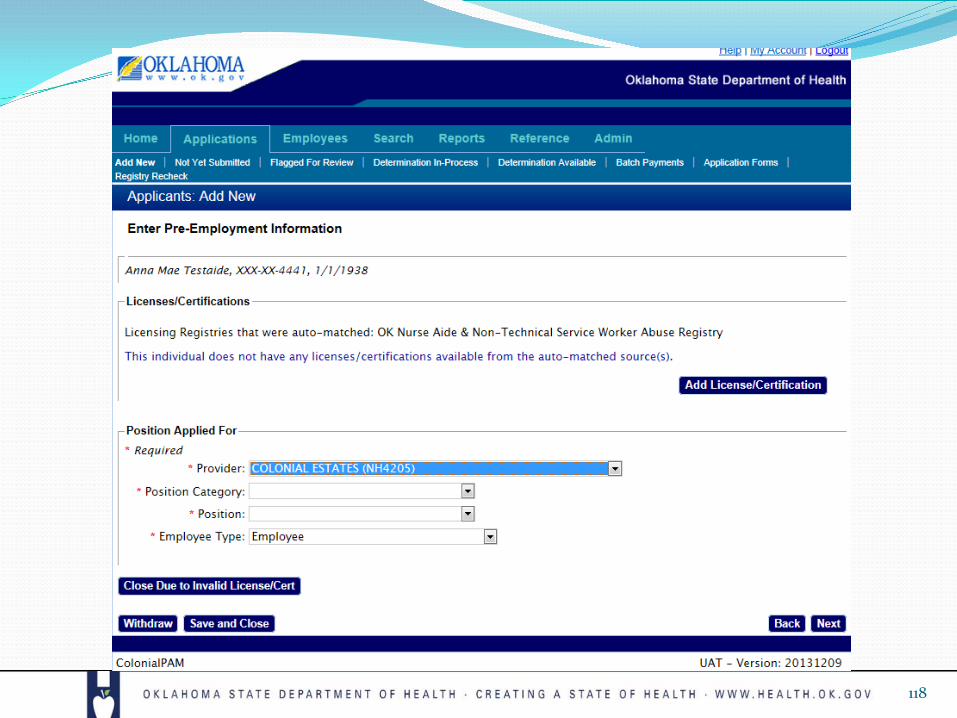
Screenshot of the List of Excluded Individuals/Entities Search. With automatch, you will not need to visit this web-page unless you have a name match. In which
case, you will need to confirm by visiting the page to match on SSN.
38

Here’s the results screen capture from the List of Excluded Individuals/Entities Search. In OK-SCREEN, use the Ctrl-F4 key combination
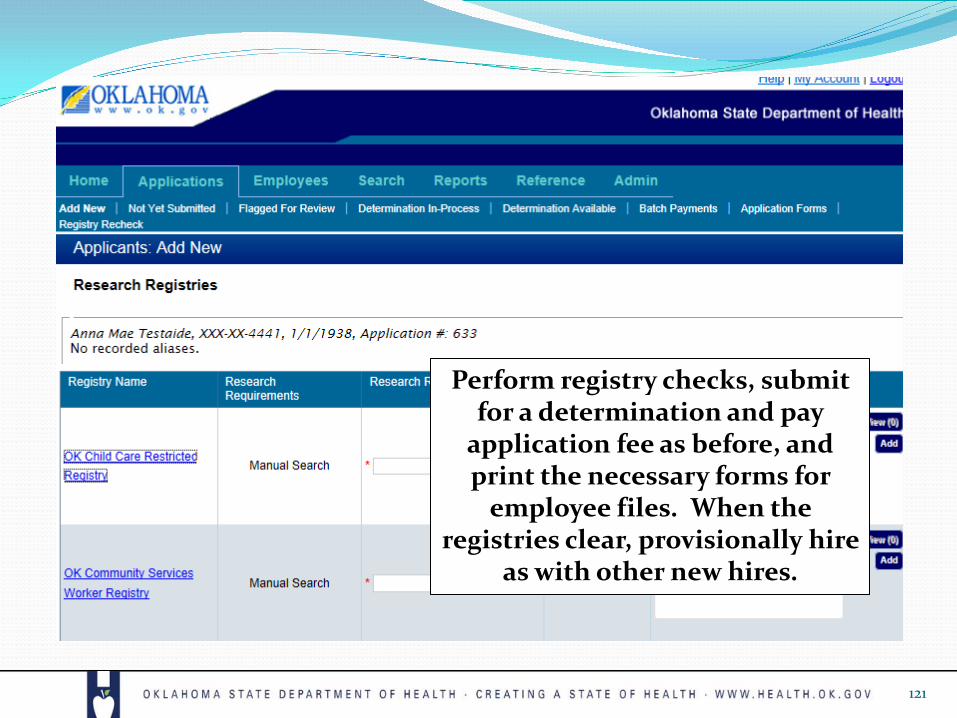
to quickly close a browser window and record the results.
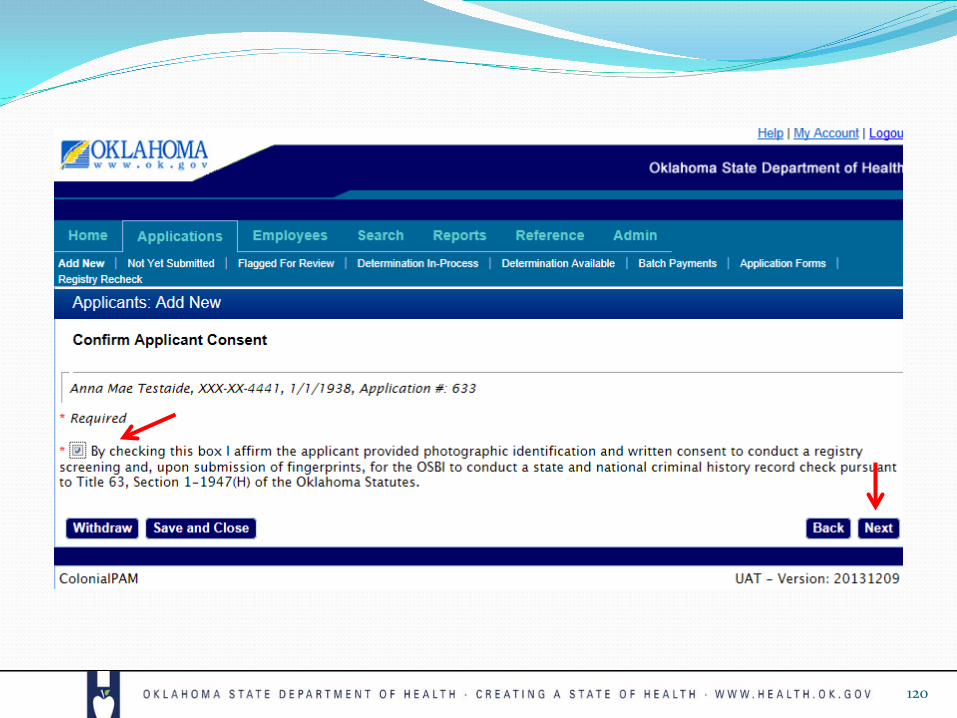
39

40
A name search may return several p0ssible matches. If you are unsure about a match, you can click on “Verify” to check the SSN against this record.

41
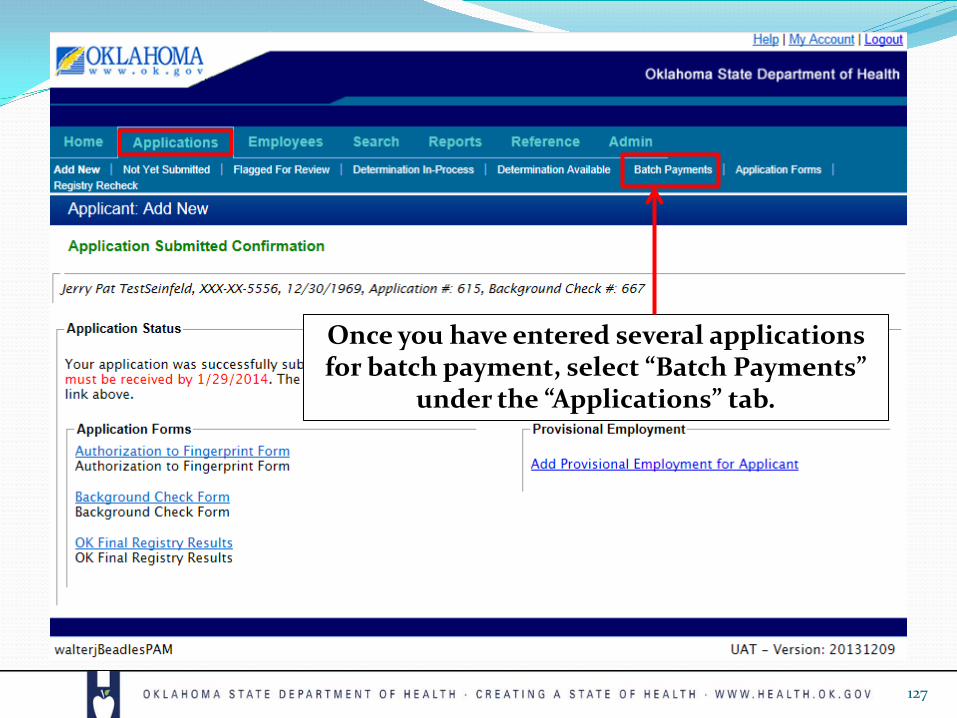
Type the SSN of your applicant in this box and click on “Verify.”

42

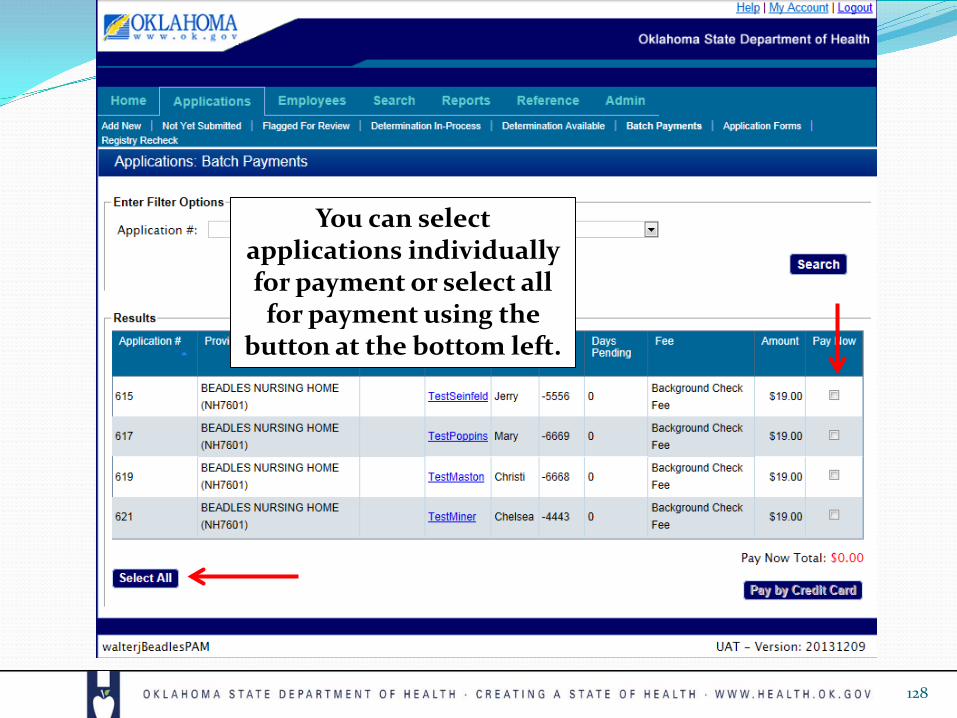
The OK On-Demand Court Records provide a name based manual search of Oklahoma Court Records
43

With a name based court records search you may find
multiple matches on a name. You will need to compare other data such as middle name, date
of birth, and address to confirm a match. That’s why we’re moving to a fingerprint based background check but
this can be a valuable pre-screening tool.
44
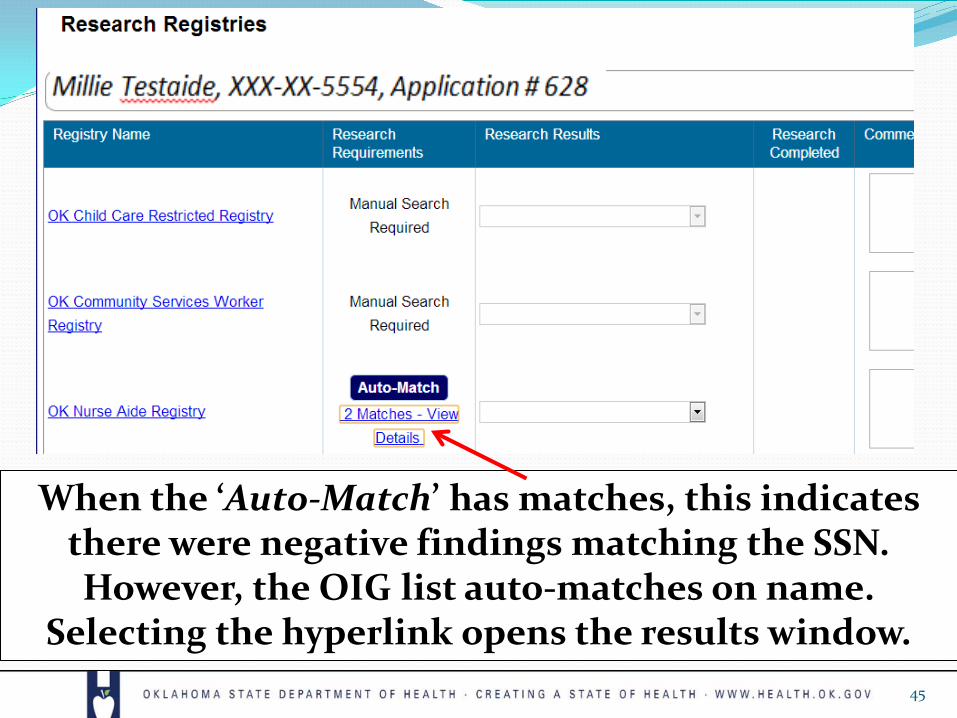
When the ‘Auto-Match’ has matches, this indicates there were negative findings matching the SSN. However, the OIG list auto-matches on name.
Selecting the hyperlink opens the results window. 45
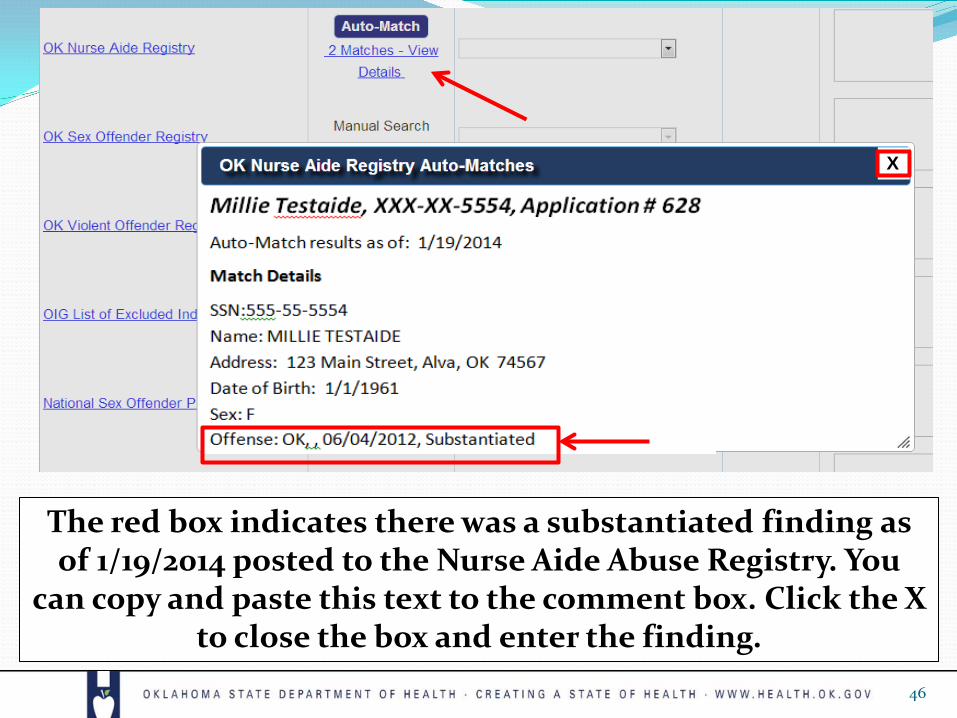
The red box indicates there was a substantiated finding as of 1/19/2014 posted to the Nurse Aide Abuse Registry. You
can copy and paste this text to the comment box. Click the X to close the box and enter the finding.
X
46
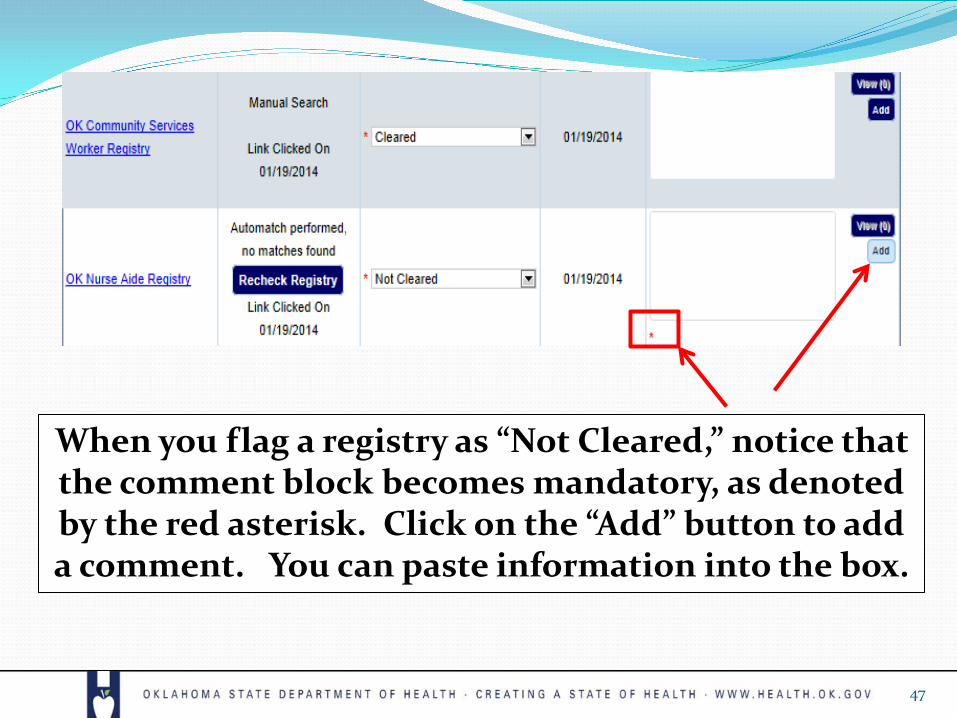
When you flag a registry as “Not Cleared,” notice that the comment block becomes mandatory, as denoted by the red asterisk. Click on the “Add” button to add a comment. You can paste information into the box.
47

This is the dialog box that will appear when you click on the “Add” button. Enter the text and click on
“Save.”
48
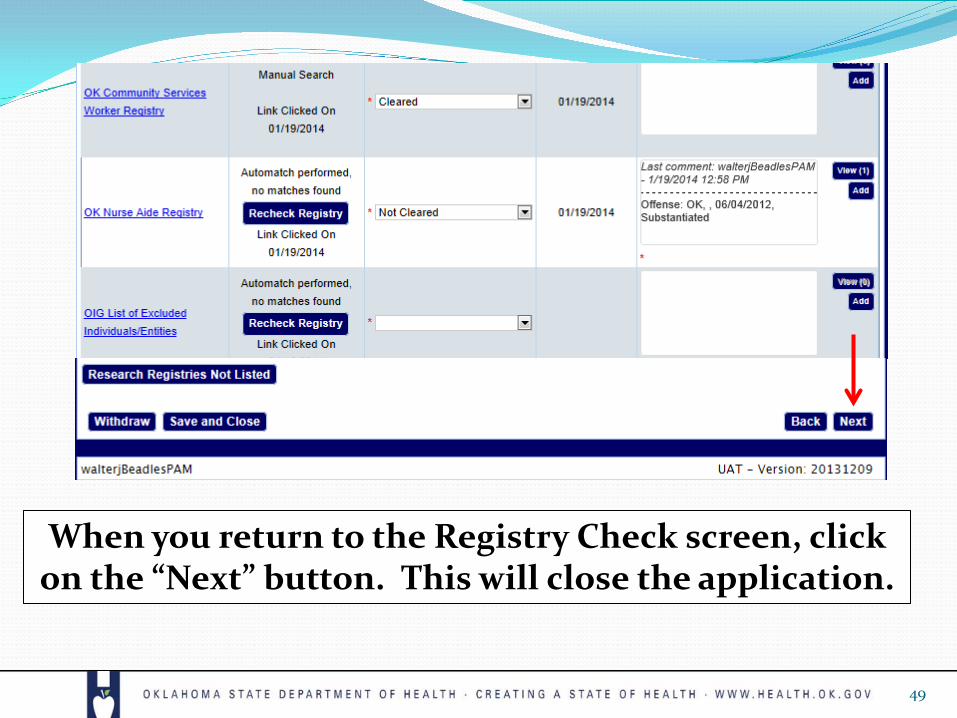
When you return to the Registry Check screen, click on the “Next” button. This will close the application.
49

You will be asked if you are sure that you want to close the application that was not cleared. If this is
correct, click on “Yes.” 50

This is the confirmation that you have closed the application. Click on “OK Final Registry Results”
hyperlink to open the report. 51

You will get the message below asking if you want to open or save the OK Final Registry Results report. We’ll open
it.
52

This is the first page of a
several-page report. Its length will
depend on the registries that you may have added. Note
identifiers for the provider,
OK-Screen and the applicant.
53

Note the annotation from
the Oklahoma Nurse Aide
Registry.
54

Note that some of the registries
were not checked because
the review was halted after a
negative finding. Each registry
includes contact information.
55

56
Adding an applicant that is already in OK-SCREEN

57
58

59

60

Once ALL registries have been checked and/or appropriately marked
“Cleared,” press the “Next” button.
61
Note that this says the link was clicked on 1/16/14 but selecting the link is not
required where the automatch indicates no
matches were found.
Processing an applicant with no findings on the Registry Checks (all come back
“Cleared”).
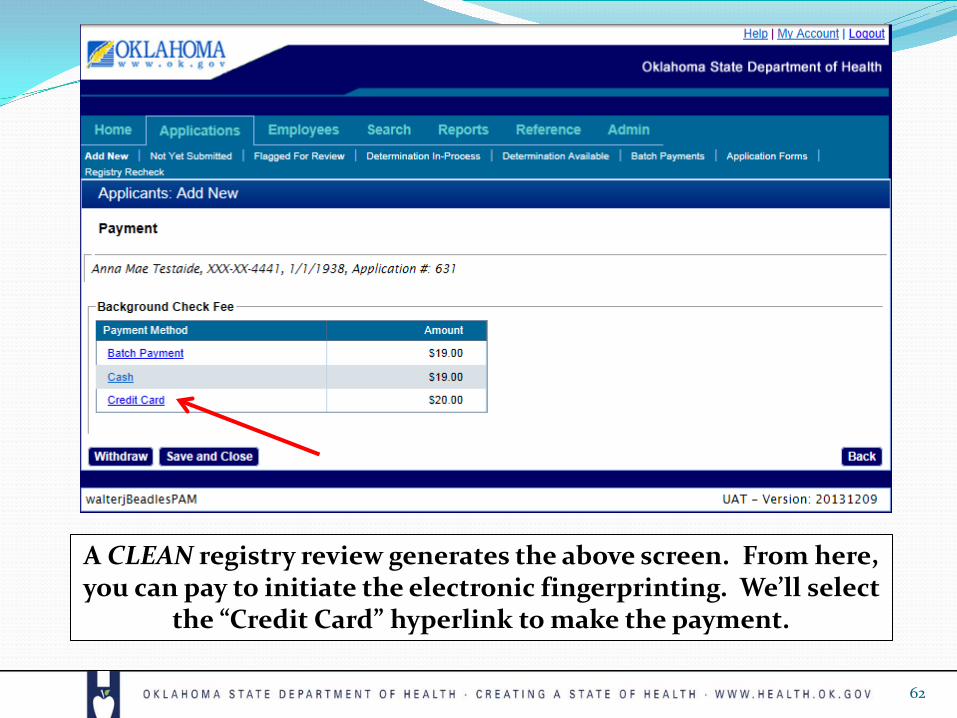
A CLEAN registry review generates the above screen. From here, you can pay to initiate the electronic fingerprinting. We’ll select
the “Credit Card” hyperlink to make the payment.
62
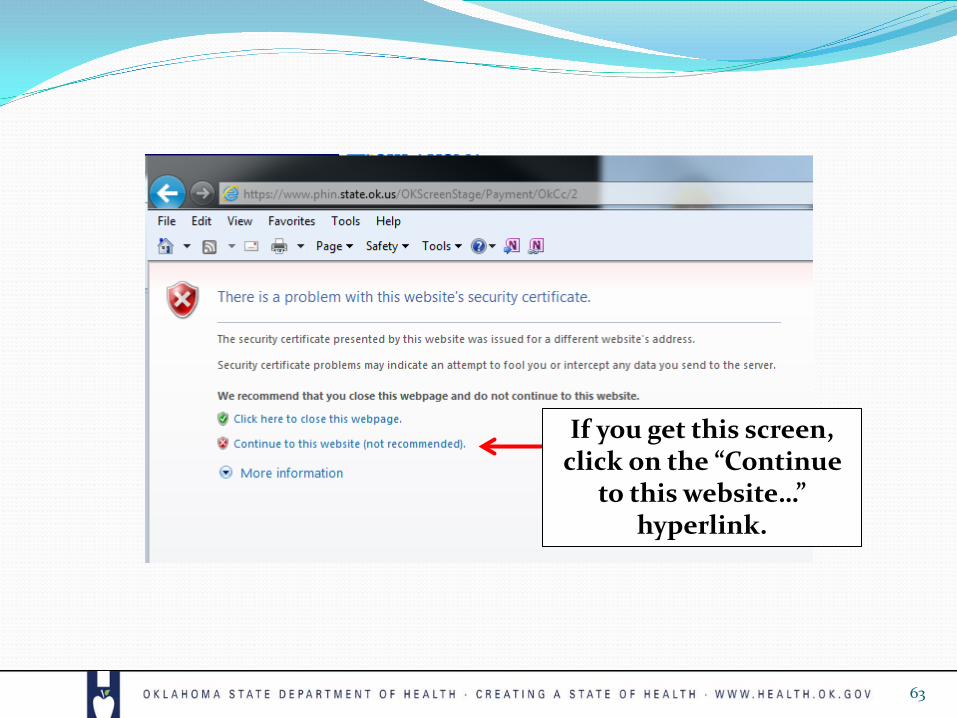
If you get this screen, click on the “Continue
to this website…” hyperlink.
63

Fill out the screen like making a PayPal
payment.
64

65
Note: This dummy credit card information will work
for testing purposes*
* Limited Testing

Click on “Process Payment.”
66

Click on “OK.”
67

Click on “Submit” to continue. Notice the
new email that arrives almost
instantaneously.
68
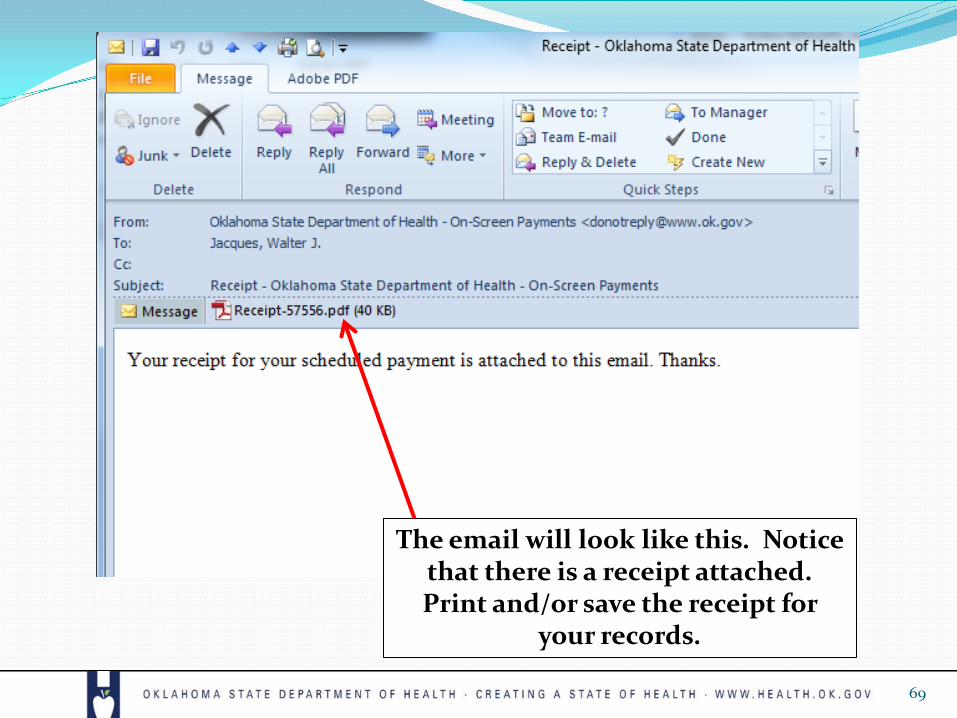
The email will look like this. Notice that there is a receipt attached. Print and/or save the receipt for
your records.
69
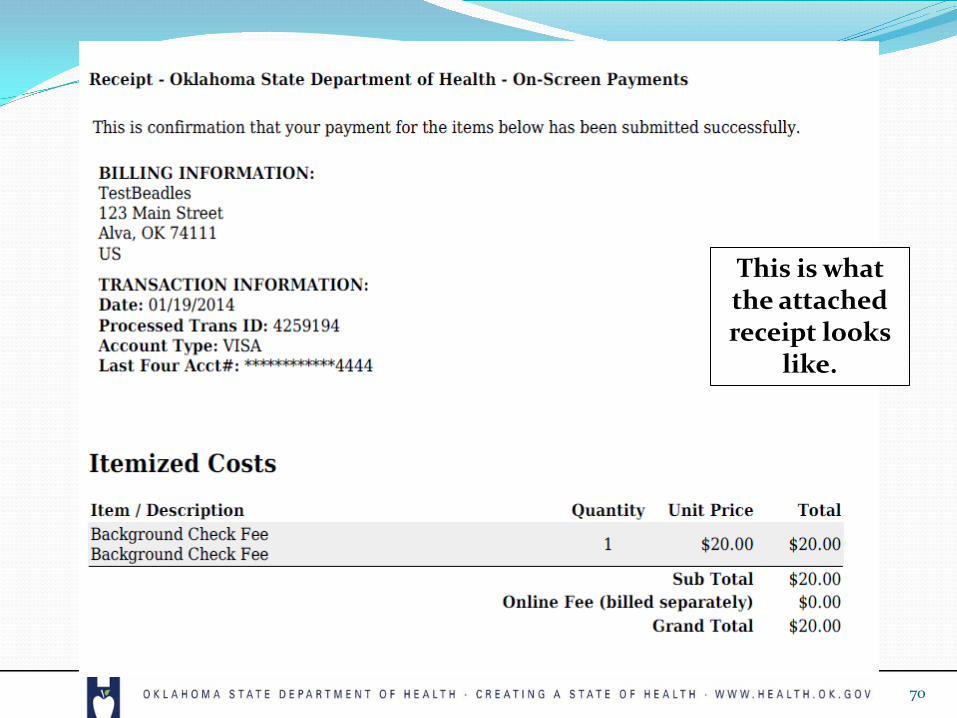
This is what the attached receipt looks
like.
70

Now you can print an Authorization to Fingerprint and/or a Name Based
Background Check Request Form, in addition to the Final Registry Results
Report.
71

72
This is the Authorization to
Fingerprint form. The link opens this form which includes a live hyperlink that can be used to schedule or
change a fingerprinting appointment. This form
will be revised to include a phone number which may also be used
to schedule appointments:
877-219-0197.

73
From the Adobe Viewing window click on the email icon to send the file
as an email attachment.

74
Select the “Attach to Email” button and click on “Attach”

75
Your email browser window will open for adding the
address subject and memo.

76
The detailed information in the Authorization to Fingerprint
includes key data for scheduling the appointment with IdentoGo:
The DI # : 684 The last name: Testaide
The Date of Birth: 1/1/1961

Select “Online Scheduling.”
77

Select a language using a button to
the right.
78

79
80

81
Enter the applicant detail
Enter the applicant’s Determination # from the Authorization to Fingerprint Form along with the last name and date of birth.

Enter a ZIP Code to search for the
nearest fingerprinting location and
then click on the “Go” button.
82

Select an open appointment
on the calendar from
a location nearest you.
83

Select a time of day and click on “Go.”
84

The applicant information is reviewed and additions are
made as necessary.
Once you’ve completed the form, click on
the “Send Information”
button.
85

86
A final Information Verification page is reviewed and if the info is correct select
Go.
87
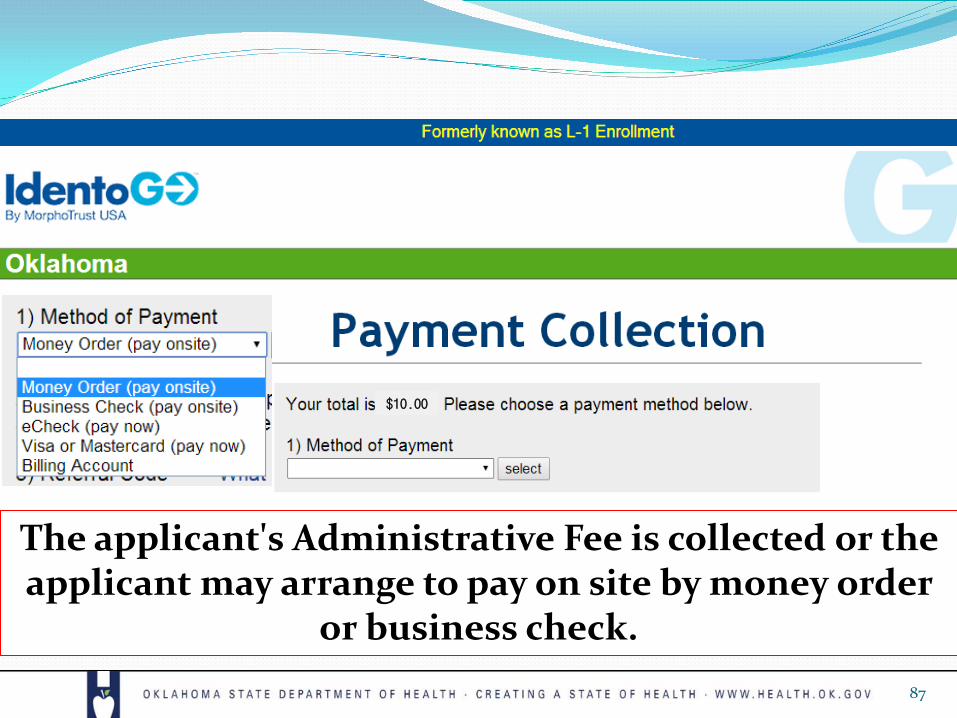
$10.00
The applicant's Administrative Fee is collected or the applicant may arrange to pay on site by money order
or business check.

88
$10.00
If paying by debit or
credit card, final
payment is made by
selecting the “Continue to US Bank E-
Pay, the IdentoGo payment portal.

89
If paying by debit or credit card, payment
source is entered here
and submitted.
$10.00
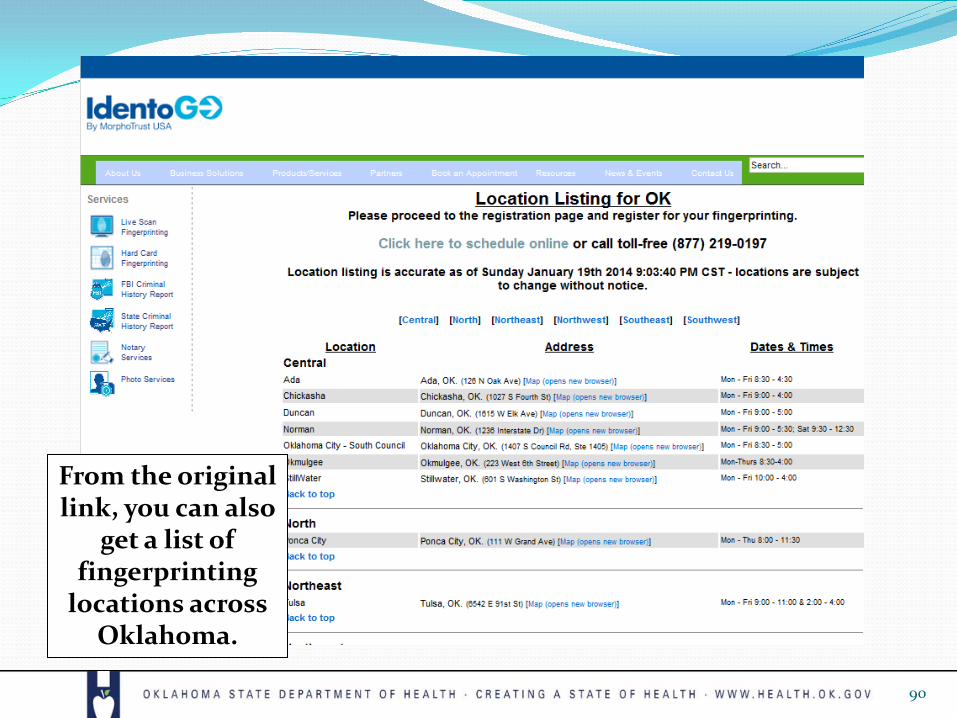
From the original link, you can also
get a list of fingerprinting
locations across Oklahoma.
90

Other print options are the Authorization to Fingerprint form and the Final Registry
Results Report.
91

Now select ‘Add Provisional Employment for Applicant’ if you wish to provisionally hire the applicant during the
pending fingerprinting and determination. An applicant may be provisionally hired for up to sixty (60) days.
92

93

94

The status of Anna Testaide is now
“Eligibility Determination in Process.”
95

The aide now shows up under
“Determinations in Process.”
96

The Person Summary has four tabs. This is the
Profile tab. Click on the other three tabs to see
their content.
97

The Applications tab. Note the hyperlinked
options.
98
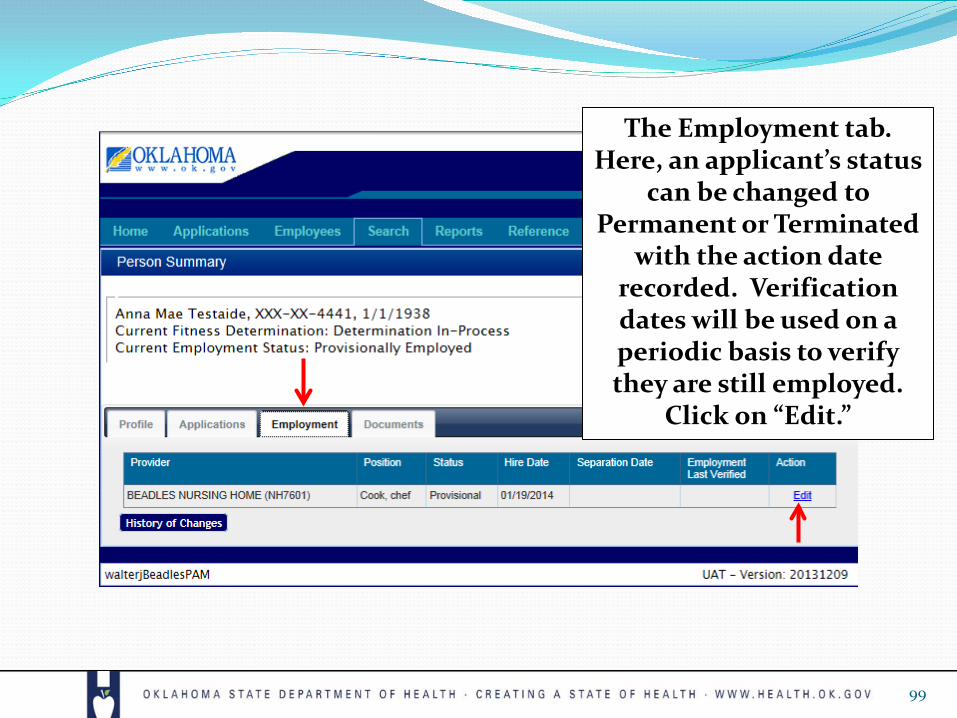
The Employment tab. Here, an applicant’s status
can be changed to Permanent or Terminated
with the action date recorded. Verification dates will be used on a periodic basis to verify they are still employed.
Click on “Edit.”
99

100
(If an applicant has an employment history in OK-SCREEN, it will appear on the Employment Tab.)

Note that you cannot permanently hire Anna Testaide until you have a
determination of “Eligible.” You can only separate her at this point.
101

The Documents tab. From here the user can view various documents generated from the screening and
background check process.
102

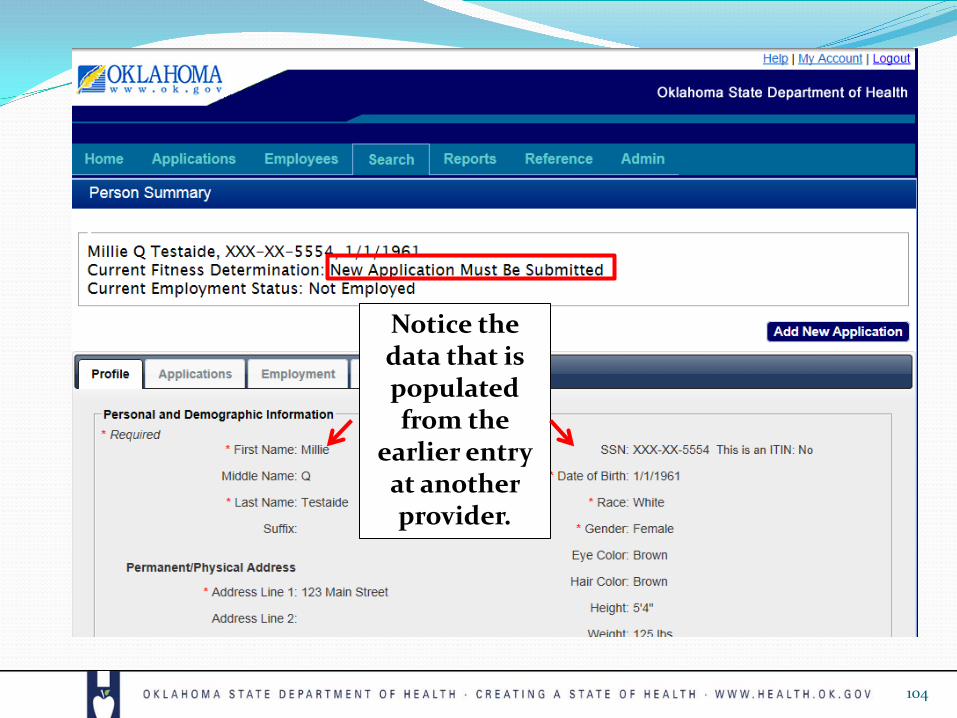
Let’s look at what happens when an applicant is already in the system. This is what a different provider would see when entering an
application for the same aide. From the Add New screen a new applicant’s SSN and last name have been entered. Select Search.
103
104
Notice the data that is populated from the
earlier entry at another provider.

105

Note that on the Employment tab, one
provider does not see the employment status of an
applicant at another provider.
106

On the “Applications” tab, select “Add New” and
you can begin an application for this
person.
107

Enter the Position Category, Position and Employee Type, then
click on “Next.”
108

Continue to follow the process of entering an applicant as previously shown…
109

When the Determination has been made by the ONBCP, this causes the Provider Account
Manager at the provider initiating the application to receive an email like this:
110

The Provider Account Manager clicks on this link to see the
completed determination.
111

Click on the “Hire” button next to Anna…
112
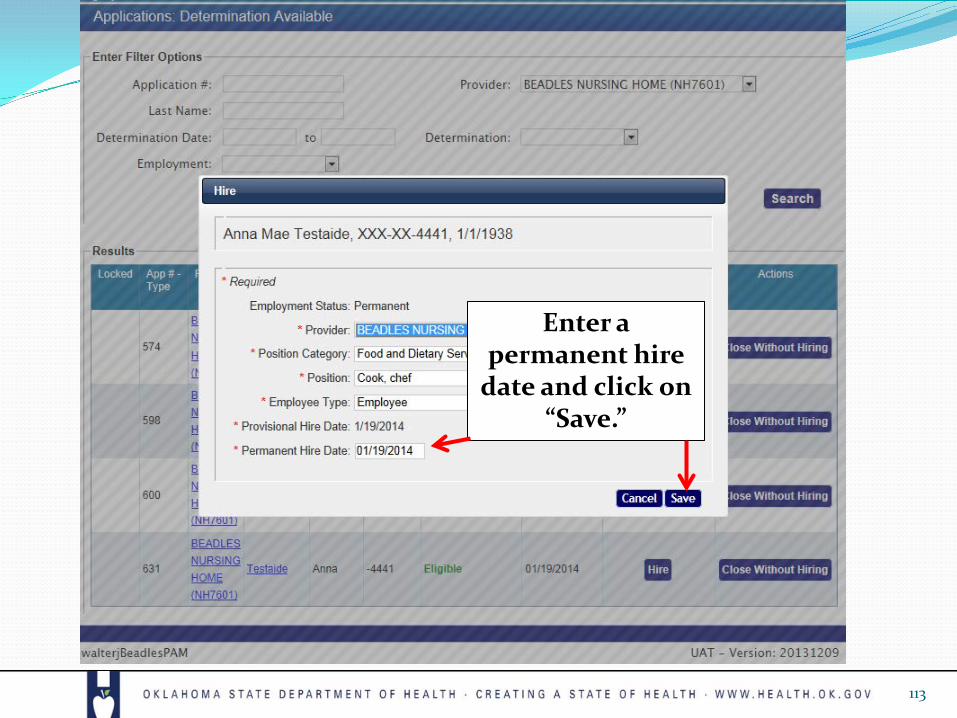
Enter a permanent hire
date and click on “Save.”
113
Note that Anna Mae Testaide has dropped
off from the list of applications with determinations
available…
114
…and now she shows up as a permanent employee under
the “Employees” tab / Permanent page.
115

116
Now we’re going to try adding an applicant who already has a
determination of “Eligible.”

117
118

119
120
121
Perform registry checks, submit for a determination and pay
application fee as before, and print the necessary forms for
employee files. When the registries clear, provisionally hire
as with other new hires.

122
Batch submission and payment processing

After clearing all of the registry checks for each applicant, click on the
“Next” button.
123
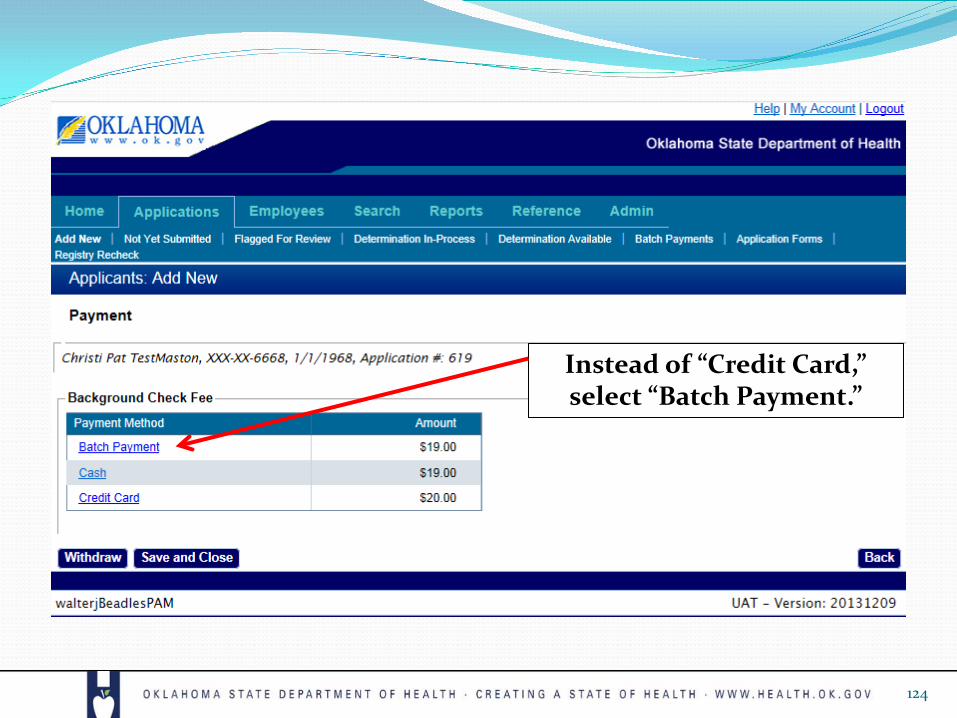
Instead of “Credit Card,” select “Batch Payment.”
124
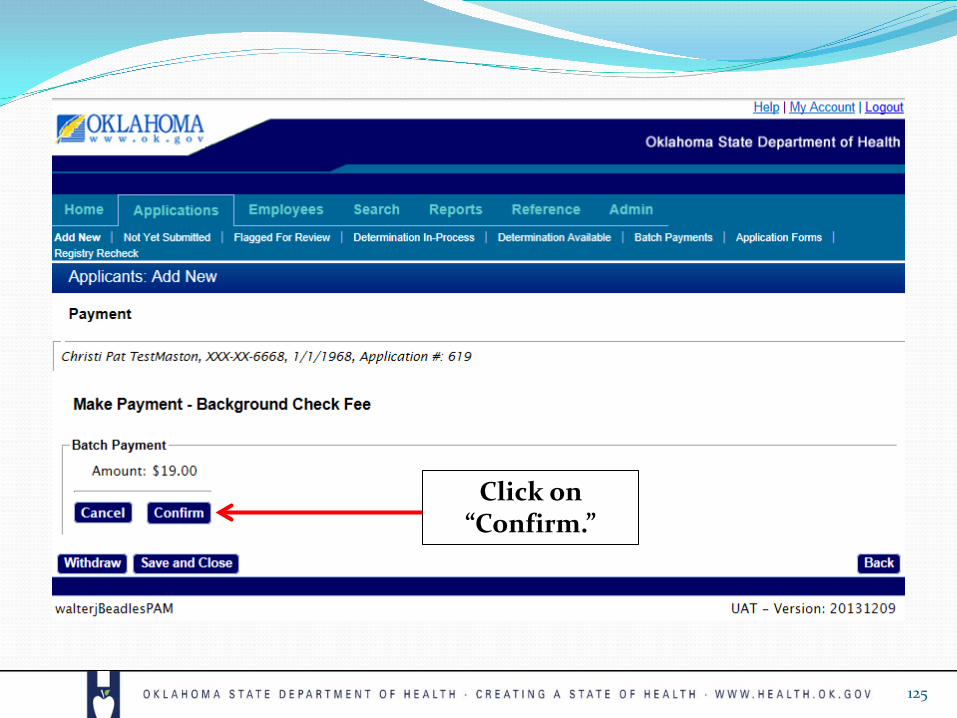
Click on “Confirm.”
125
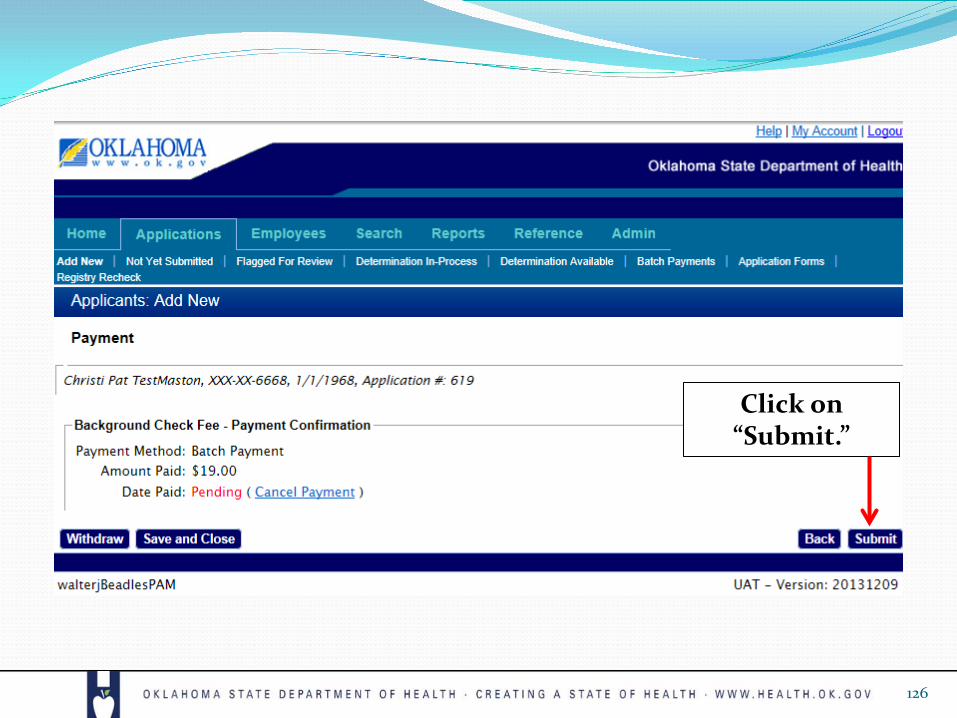
Click on “Submit.”
126
Once you have entered several applications for batch payment, select “Batch Payments”
under the “Applications” tab.
127
You can select applications individually for payment or select all
for payment using the button at the bottom left.
128

Once the application(s) that you want to pay by batch are selected, click on “Pay by Credit Card.”
129

Once you select “Pay by Credit Card,” you will come to the
same screen as an individual credit card payment shown
earlier in this demonstration. Proceed in the same manner as
before.
130

131
Billing Payment Option

132

Viewing a Criminal History Report

Look for a record with a completed eligibility
determination.

Select the name of the person by clicking on
the hyperlink.

Select the “Documents” tab.

Under “Uploaded Documents,” click on the link indicating a criminal history report.

Click on one of the buttons to Open or Save the document, or cancel the operation.

The .pdf document with the criminal history report will open and look something like this
(minus the redacted content).

There will be an entry for each charge and its
associated information (disposition, etc.).

This concludes the demonstration. Browse the application by clicking on the various options. You may
enter real data from an applicant to screen the employee.
If you note an error or problem in OK-SCREEN please make a note of it. You may capture the screen image by pressing your print screen (PrtScn) button and pasting the image (Ctrl-V) in an email, or Word document, and
sending it to the OK-SCREEN staff here: [email protected].
You may also contact the helpline at 405-271-3598 or toll free 1-855-584-3550.
141
142
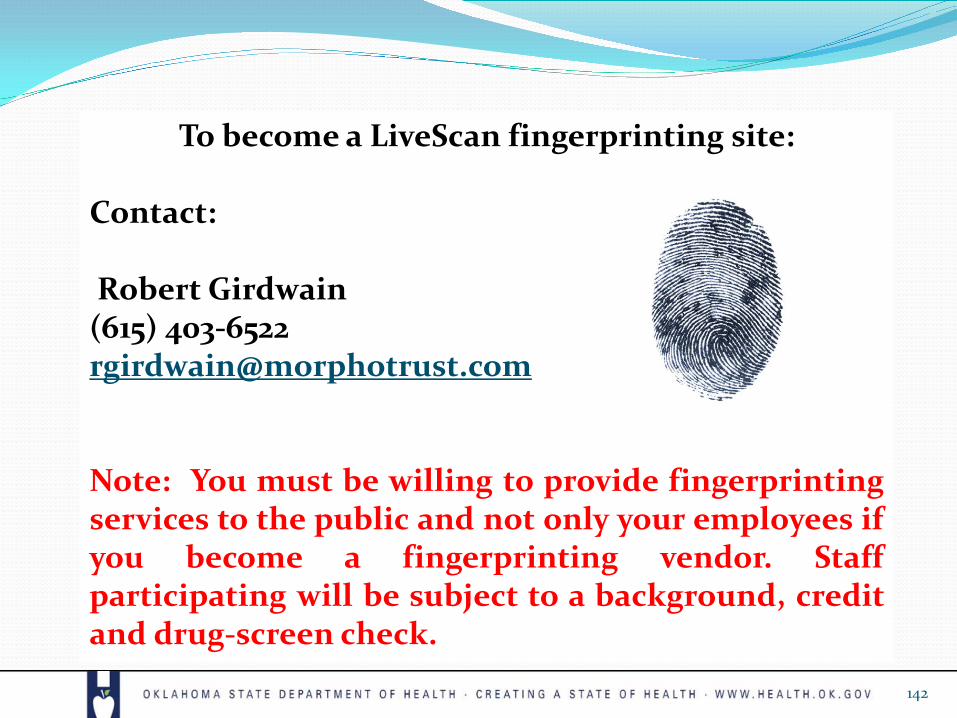
To become a LiveScan fingerprinting site:
Contact: Robert Girdwain (615) 403-6522 [email protected]
Note: You must be willing to provide fingerprinting services to the public and not only your employees if you become a fingerprinting vendor. Staff participating will be subject to a background, credit and drug-screen check.