office desk
TRANSCRIPT

8/12/2019 Office Desk
http://slidepdf.com/reader/full/office-desk 1/12
OFFICE DESK
This design here has plenty of storage space--sevendrawers in all--and plenty of surface area too, nearly16 sq. ft. Its cool, clean lines suggest a seriousness of
purpose that's good for any work environment. Thisdesign is also the starting point for the credenza andwall-unit pieces that follow. All three are based on thesame easy-to-build module. On the desk, eachmodule has one file drawer and two utility drawers. Onthe credenza, each has two file drawers. And on thewall unit, you can choose drawers or doors. Here, wego into great detail about building the modules and thedrawers. So be sure to review these instructions evenif you plan only to build one of the others.
This desk is loaded with space. Eachpedestal has one file and two utilitydrawers. And, there's a pencil drawer inbetween.
Desk pedestals
Begin construction by laying out your desk partson sheets of 3/4-in. birch plywood. Cut them torough size using a circular saw and astraightedge guide. Then, use a table saw to rip
and crosscut the parts to the finished size. Thequickest and least expensive way to edge-bandthe panels is to apply veneer edge tape. Thistape comes in strips that are 13/16 in. wide x 8 ft.long, and it has hot-melt adhesive on its backside. To bond the veneer to the edge, just clampthe panel in a vise, then using a household iron --set on High -- press the tape onto the edge(Photo 1). The heat activates the glue.
Once the veneer edging has cooled-which takes
only a minute or two -- use a sharp chisel to trimthe tape flush to the panel's surface (Photo 2).
Next, lay out the location of the joining-plate slotson the case bottom, back and top rails. Use theplate joiner to cut the slots (Photo 3).
1--Finish the plywood edges with iron-onveneer tape. Set the iron for high heatand press down to activate the hot-meltglue.
2--Trim the edging tape flush to the panel
with a sharp chisel. Cut with the graindirection, not against it, to prevent
8/12/2019 Office Desk
http://slidepdf.com/reader/full/office-desk 2/12
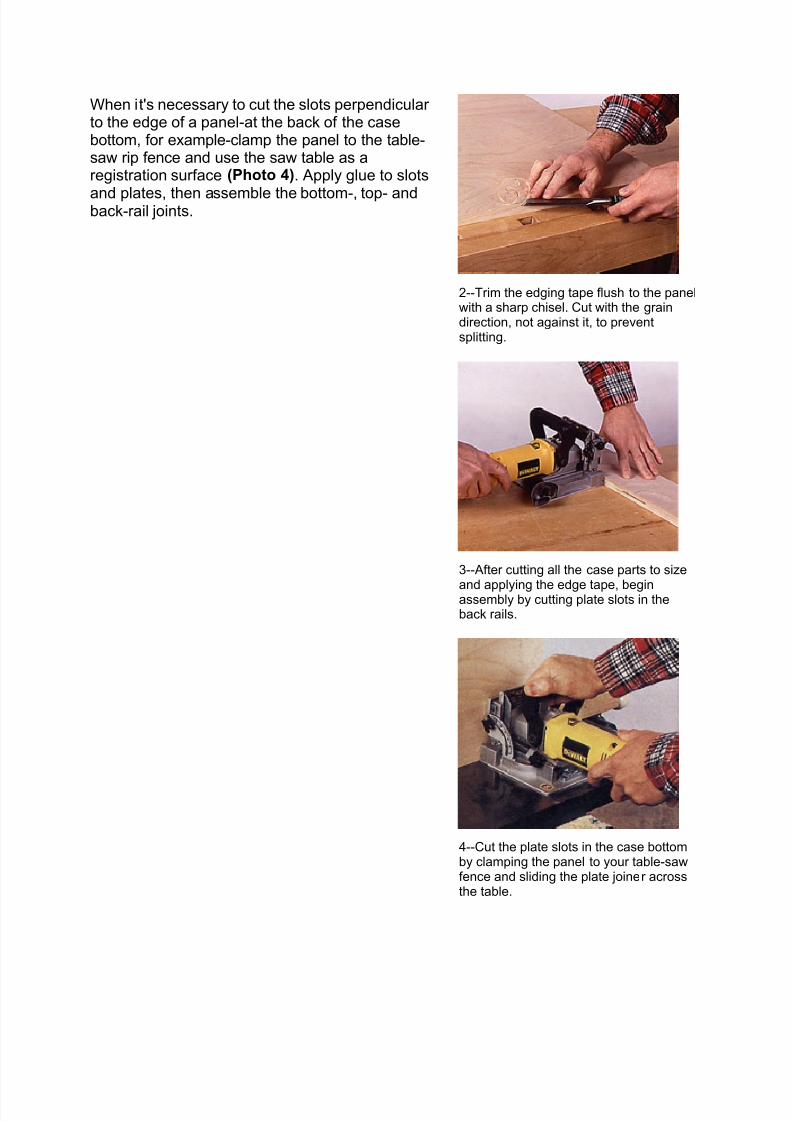
When it's necessary to cut the slots perpendicularto the edge of a panel-at the back of the casebottom, for example-clamp the panel to the table-saw rip fence and use the saw table as aregistration surface (Photo 4). Apply glue to slots
and plates, then assemble the bottom-, top- andback-rail joints.
2--Trim the edging tape flush to the panelwith a sharp chisel. Cut with the graindirection, not against it, to preventsplitting.
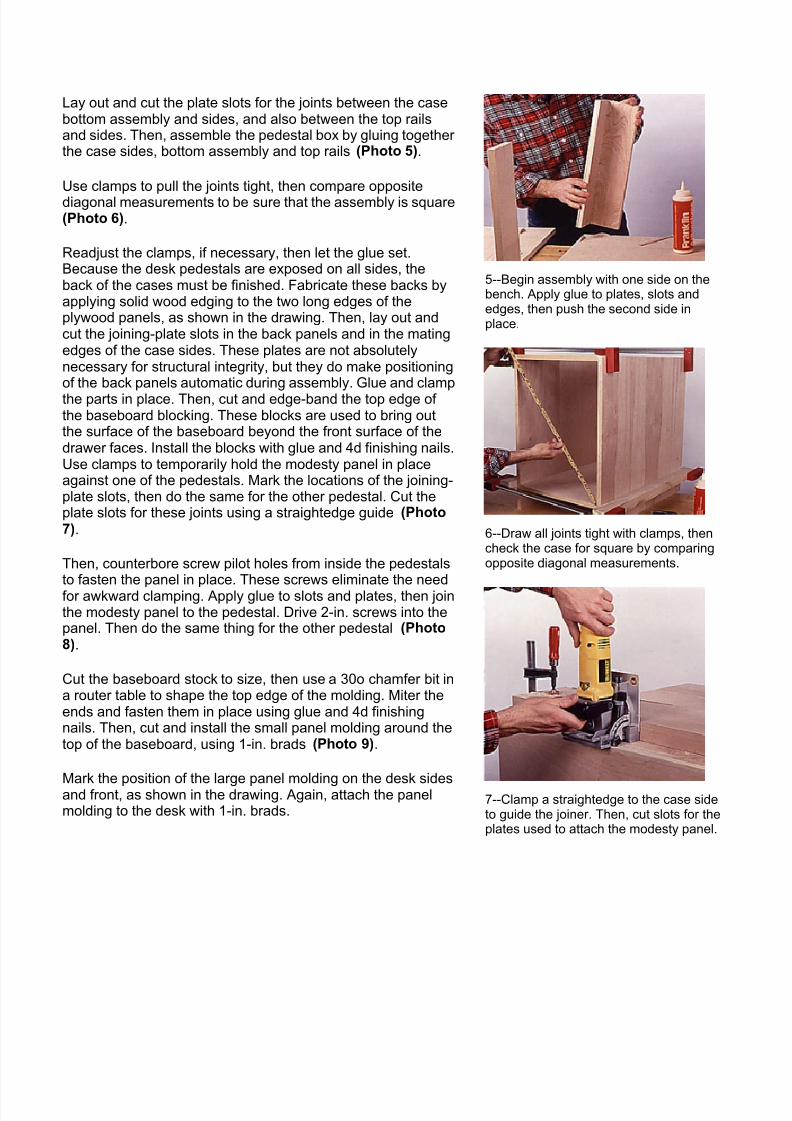
3--After cutting all the case parts to size
and applying the edge tape, beginassembly by cutting plate slots in theback rails.
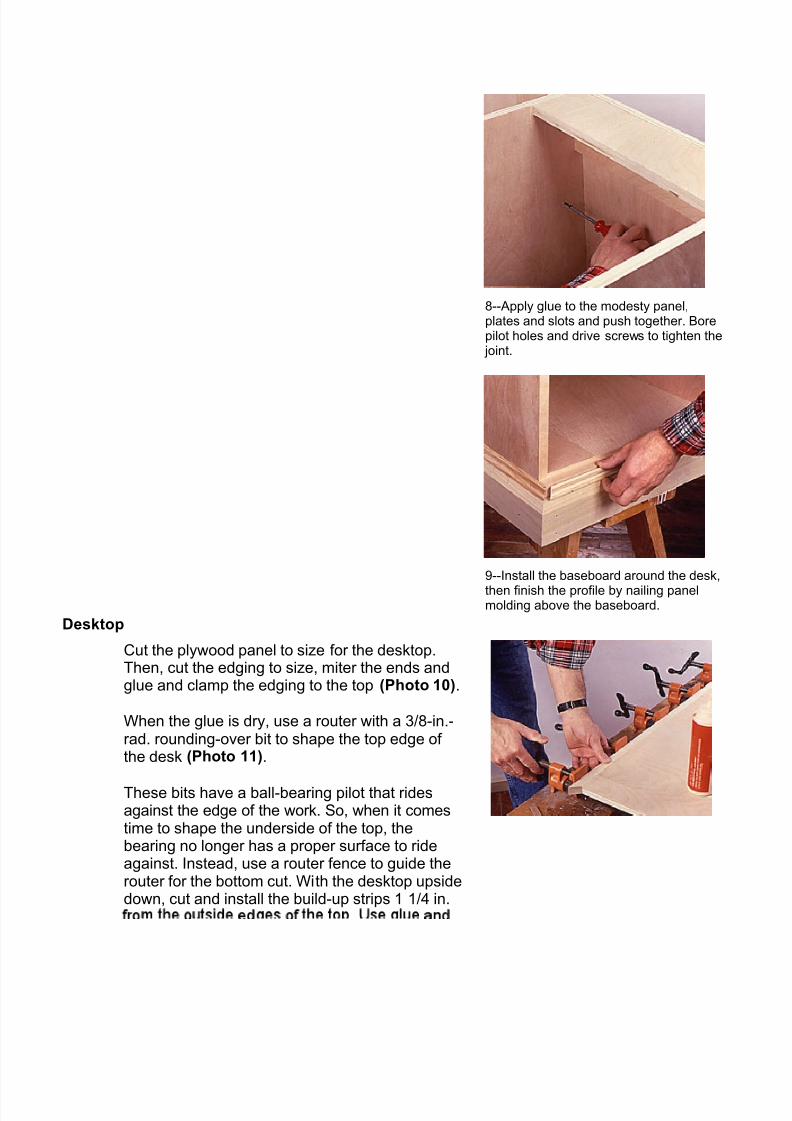
4--Cut the plate slots in the case bottomby clamping the panel to your table-sawfence and sliding the plate joiner acrossthe table.
8/12/2019 Office Desk
http://slidepdf.com/reader/full/office-desk 3/12
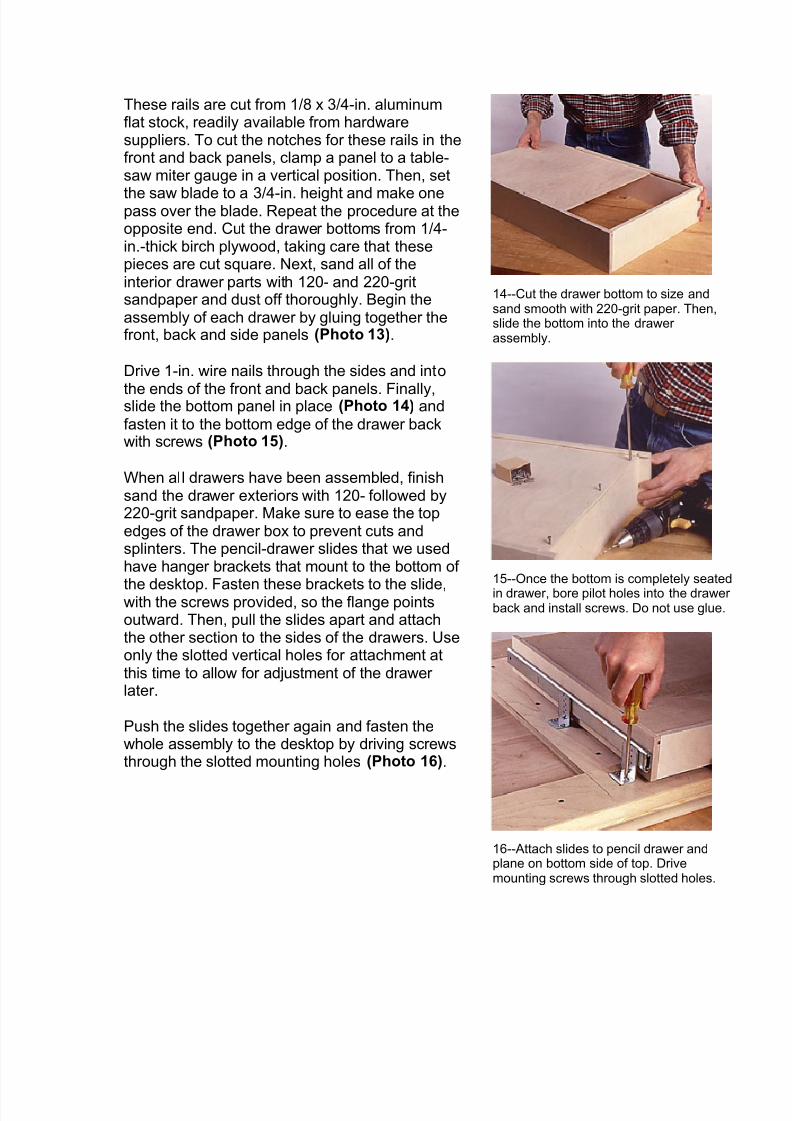
Lay out and cut the plate slots for the joints between the casebottom assembly and sides, and also between the top railsand sides. Then, assemble the pedestal box by gluing togetherthe case sides, bottom assembly and top rails (Photo 5).
Use clamps to pull the joints tight, then compare oppositediagonal measurements to be sure that the assembly is square(Photo 6).
Readjust the clamps, if necessary, then let the glue set.Because the desk pedestals are exposed on all sides, theback of the cases must be finished. Fabricate these backs byapplying solid wood edging to the two long edges of theplywood panels, as shown in the drawing. Then, lay out andcut the joining-plate slots in the back panels and in the matingedges of the case sides. These plates are not absolutelynecessary for structural integrity, but they do make positioningof the back panels automatic during assembly. Glue and clampthe parts in place. Then, cut and edge-band the top edge ofthe baseboard blocking. These blocks are used to bring outthe surface of the baseboard beyond the front surface of thedrawer faces. Install the blocks with glue and 4d finishing nails.Use clamps to temporarily hold the modesty panel in placeagainst one of the pedestals. Mark the locations of the joining-plate slots, then do the same for the other pedestal. Cut theplate slots for these joints using a straightedge guide (Photo7).
Then, counterbore screw pilot holes from inside the pedestalsto fasten the panel in place. These screws eliminate the needfor awkward clamping. Apply glue to slots and plates, then jointhe modesty panel to the pedestal. Drive 2-in. screws into thepanel. Then do the same thing for the other pedestal (Photo8).
Cut the baseboard stock to size, then use a 30o chamfer bit ina router table to shape the top edge of the molding. Miter theends and fasten them in place using glue and 4d finishingnails. Then, cut and install the small panel molding around thetop of the baseboard, using 1-in. brads (Photo 9).
Mark the position of the large panel molding on the desk sidesand front, as shown in the drawing. Again, attach the panelmolding to the desk with 1-in. brads.
5--Begin assembly with one side on thebench. Apply glue to plates, slots andedges, then push the second side inplace.
6--Draw all joints tight with clamps, thencheck the case for square by comparingopposite diagonal measurements.
7--Clamp a straightedge to the case sideto guide the joiner. Then, cut slots for theplates used to attach the modesty panel.
8/12/2019 Office Desk
http://slidepdf.com/reader/full/office-desk 4/12
8--Apply glue to the modesty panel,plates and slots and push together. Borepilot holes and drive screws to tighten the
joint.
9--Install the baseboard around the desk,
then finish the profile by nailing panelmolding above the baseboard.
Desktop
Cut the plywood panel to size for the desktop.Then, cut the edging to size, miter the ends andglue and clamp the edging to the top (Photo 10).
When the glue is dry, use a router with a 3/8-in.-rad. rounding-over bit to shape the top edge ofthe desk (Photo 11).
These bits have a ball-bearing pilot that ridesagainst the edge of the work. So, when it comestime to shape the underside of the top, thebearing no longer has a proper surface to rideagainst. Instead, use a router fence to guide therouter for the bottom cut. With the desktop upsidedown, cut and install the build-up strips 1 1/4 in.

8/12/2019 Office Desk
http://slidepdf.com/reader/full/office-desk 5/12
from the outside edges of the top. Use glue andscrews to fasten the strips. Next, cut and installthe cove molding against the build-up strips(Photo 12).
To provide proper fastening of the top to thepedestals and to provide a place to hang thepencil-drawer slides, install two cross strips asshown in the drawing.
11--Glue and clamp the edge banding inplace and, when glue is dry, route the topedge with a 3e8-in.-rad. rounding-over bit.
12--After the support strips have beeninstalled on the bottom of the top, miter
and nail cove molding to edges of strips.Drawers
The drawers are constructed of 1/2-in.-thick Balticbirch plywood. Begin by ripping and crosscuttingthe material to size for drawer sides, fronts andbacks. Cut the dadoes at the front edge of thedrawer sides using dado blades in a table orradial-arm saw. Then, cut the dadoes at the backedge of the sides. Follow this by cutting a rabbetat each end of the front and back panels, againusing the dado blades. These rabbets form atongue on the end of the drawer fronts and backsthat fits neatly into the dadoes in the sides. Cutthe same dado on the ends of the pencil-drawerpartition. Finish the joinery cuts by making agroove in the sides and front to accept the drawerbottom. The file drawers are designed to acceptaluminum rails that support hanging file folders.These rails are cut from 1/8 x 3/4-in. aluminum
8/12/2019 Office Desk
http://slidepdf.com/reader/full/office-desk 6/12
These rails are cut from 1/8 x 3/4-in. aluminumflat stock, readily available from hardwaresuppliers. To cut the notches for these rails in thefront and back panels, clamp a panel to a table-saw miter gauge in a vertical position. Then, set
the saw blade to a 3/4-in. height and make onepass over the blade. Repeat the procedure at theopposite end. Cut the drawer bottoms from 1/4-in.-thick birch plywood, taking care that thesepieces are cut square. Next, sand all of theinterior drawer parts with 120- and 220-gritsandpaper and dust off thoroughly. Begin theassembly of each drawer by gluing together thefront, back and side panels (Photo 13).
Drive 1-in. wire nails through the sides and into
the ends of the front and back panels. Finally,slide the bottom panel in place (Photo 14) andfasten it to the bottom edge of the drawer backwith screws (Photo 15).
When all drawers have been assembled, finishsand the drawer exteriors with 120- followed by220-grit sandpaper. Make sure to ease the topedges of the drawer box to prevent cuts andsplinters. The pencil-drawer slides that we usedhave hanger brackets that mount to the bottom of
the desktop. Fasten these brackets to the slide,with the screws provided, so the flange pointsoutward. Then, pull the slides apart and attachthe other section to the sides of the drawers. Useonly the slotted vertical holes for attachment atthis time to allow for adjustment of the drawerlater.
Push the slides together again and fasten thewhole assembly to the desktop by driving screwsthrough the slotted mounting holes (Photo 16).
14--Cut the drawer bottom to size andsand smooth with 220-grit paper. Then,slide the bottom into the drawerassembly.
15--Once the bottom is completely seated
in drawer, bore pilot holes into the drawerback and install screws. Do not use glue.
16--Attach slides to pencil drawer andplane on bottom side of top. Drivemounting screws through slotted holes.

8/12/2019 Office Desk
http://slidepdf.com/reader/full/office-desk 7/12
Before installing the drawer slides on the filedrawers, make kerf cuts in the drawer front andback pieces to accommodate the aluminum barstock that supports the hanging files. Then, cut thebar stock to length and file the ends smooth. Next,
place a drop of 5-minute epoxy in the kerfs andslide the bars into position (Photo 17).
The drawer slides we used on the box and filedrawers are different in design than the ones usedfor the pencil drawer. But the basic installationsystem is the same. Carefully read the instructionsthat accompany the slides, then lay out thelocations of the screw centerlines on the drawerboxes. Fasten one side of each slide to the sides ofthe boxes, using the vertically slotted holes (Photo
18).
Bore pilot holes for the mounting screws, and hangthe other side of each slide on the sides of thepedestals. Once all the drawers are installed,check for proper operation and fit. Make anynecessary adjustments, then install the rest of theslide mounting screws. Remove the drawers fromthe cases and place the desktop in position overthe pedestals. Use clamps to temporarily hold thetop in place while you screw through the pedestal
stretchers into the bottom side of the desktop(Photo 19).
Next, cut and edge-band the drawer face panels.Since aligning these faces can be a slow andpainstaking task, we used drawer face adjusters to
join the faces and drawer fronts. These adjustersallow for 3/16 in. of movement of the face in anydirection, making alignment easy. To mount thefaces, first clamp them to the boxes in their desiredposition. Bore a 3/16-in.-dia. hole for each adjuster
through the drawer box front and just slightly intothe back side of the face. This marks the location ofthe adjuster. Remove the face and use the drillpress to bore a 25mm x 1/2-in.-deep recess foreach adjuster, centered on the pilot holes. Then,use a hammer to tap an adjuster into each recess(Photo 20).
17--Cut aluminum bars for hanging filesto length. Then, apply a dab of epoxy tothe support slots and push the bars inplace.
18--Install the slides on the other drawer
assemblies. Again, use the slotted holesso you can easily adjust the parts later.
19--Place top on the desk pedestals andclamp in place. Bore pilot holes throughthe rails into the top and install screws.
8/12/2019 Office Desk
http://slidepdf.com/reader/full/office-desk 8/12
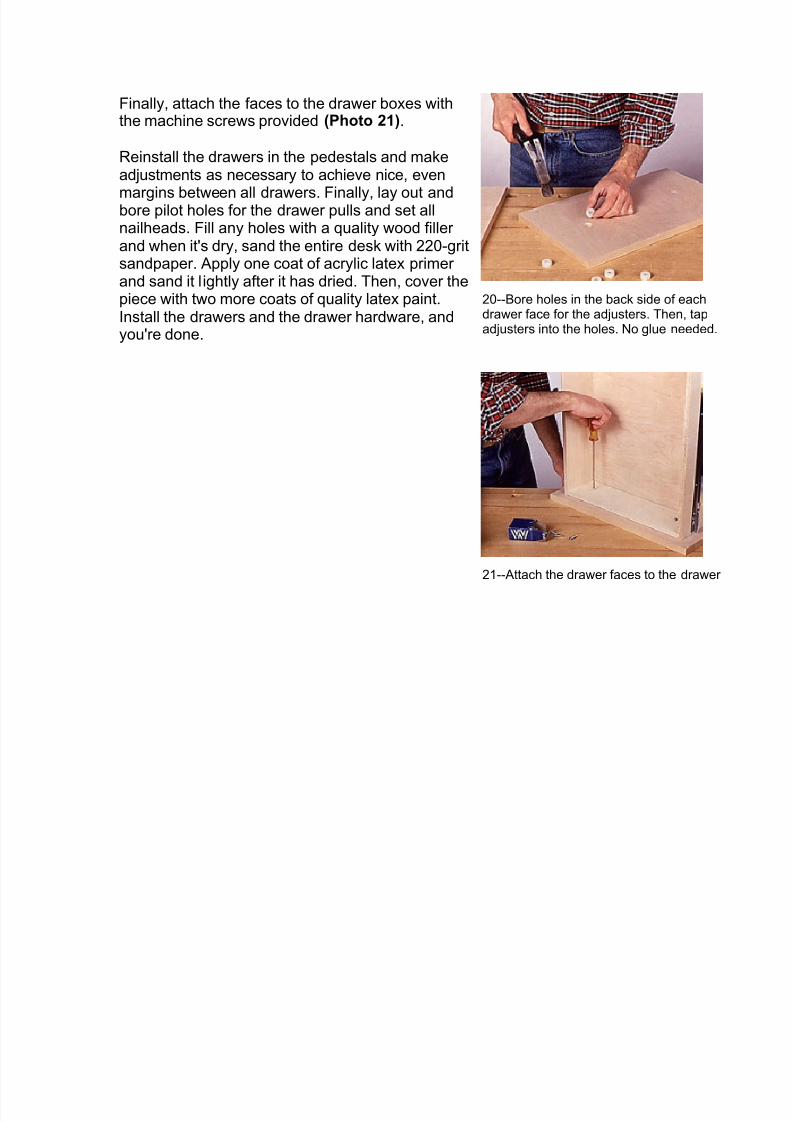
Finally, attach the faces to the drawer boxes withthe machine screws provided (Photo 21).
Reinstall the drawers in the pedestals and makeadjustments as necessary to achieve nice, even
margins between all drawers. Finally, lay out andbore pilot holes for the drawer pulls and set allnailheads. Fill any holes with a quality wood fillerand when it's dry, sand the entire desk with 220-gritsandpaper. Apply one coat of acrylic latex primerand sand it lightly after it has dried. Then, cover thepiece with two more coats of quality latex paint.Install the drawers and the drawer hardware, andyou're done.
20--Bore holes in the back side of eachdrawer face for the adjusters. Then, tapadjusters into the holes. No glue needed.
21--Attach the drawer faces to the drawer

8/12/2019 Office Desk
http://slidepdf.com/reader/full/office-desk 9/12
MATERIALS LIST-OFFICE
DESK
No. Size and description (use)
4 3/4 x 27 x 27 1/4" plywood (side)
8 3/4 x 4 x 16 1/2" plywood (rail)
2 3/4 x 16 1/2 x 27 1/4" plywood (bottom)
2 3/4 x 4 1/4 x 18" plywood (blocking)
2 3/4 x 18 x 27" plywood (panel)
1 3/4 x 27 x 33" plywood (modesty panel)
24 ft. 3/4 x 3 3/16" x poplar (base molding)
24 ft. 3/8 x 1 1/16" pine (base trim)
I 50 ft. 11/16 x 1 5/8" pine (panel molding)
1 3/4 x 4 x 28 3/4" plywood (support strip)
2 3/4 x 4 x 61" plywood (support strip)
2 3/4 x 4 x 20 3/4" plywood (support strip)
1 3/4 x 29 3/4 x 70" plywood (top)
2 3/4 x 3/4 x 71 1/2" poplar (edge band)
2 3/4 x 3/4 x 31 1/4" poplar (edge band)
18 ft. 3/4 x 3/4" pine (cove molding)
4 1/2 x 4 1/2 x 15" plywood (drawer front)
2 1/2 x 9 3/4 x 15" plywood (drawer front)
1 1/2 x 3 x 28 1/2" plywood (drawer front)
4 1/2 x 4 x 15" plywood (drawer back)
2 1/2 x 9 1/4 x 15" plywood (drawer back)

8/12/2019 Office Desk
http://slidepdf.com/reader/full/office-desk 10/12
2
1/2 x 2 1/2 x 28 1/2" plywood (drawer back, partition)
8 1/2 x 4 1/2 x 20" plywood (drawer side)
4 1/2 x 9 3/4 x 26" plywood (drawer side)
2 1/2 x 3 x 20" plywood (drawer side)
41/4 x 15 x 18 3/4" plywood (drawer
bottom)
21/4 x 15 x 24 3/4" plywood (drawer bottom)
11/4 x 18 3/4 x 28 1/2" plywood (drawer bottom)
4 3/4 x 5 9/16 x 18" plywood (drawer face)
2 3/4 x 11 1/8 x 18" plywood (drawer face)
1 3/4 x 3 1/4 x 32 3/4" plywood (drawer face)
As reqd. iron-on veneer tape
As reqd. No. 20 joining plates
4 pr. No. 3037 Accuride drawer slide, 20" long
2 pr. No. 4034 Accuride drawer slide, 26" long
1 pr. No. 2009 Accuride drawer slide, 20" long
14 No. 28936 drawer face adjusters
4 1/8 x 3/4 x 19 1/4" aluminum flat stock (filehangers)
7 No. G 18.01 brass drawer pulls
21 5/8" No. 5 rh screws
24 1 1/4" No. 8 fh screws

8/12/2019 Office Desk
http://slidepdf.com/reader/full/office-desk 11/12
8 2" No. 8 fh screws
As reqd. 1" brads
As reqd. 4d finishing nails
Misc: 120- and 220-grit sandpaper,
carpenter's glue, epoxy glue, wood filler,latex primer, latex paint

8/12/2019 Office Desk
http://slidepdf.com/reader/full/office-desk 12/12