oci accounting systemmember.ocisystem.com/helpac/docs/basic_tng_10072013.pdf · oci accounting...
TRANSCRIPT

OCI Accounting System
User Manual
Created: Wednesday, July 10, 2013
Copyright © OC Innovations Pte Ltd. All Rights Reserved.

OCI Accounting System
copyright © OC Innovations Pte Ltd. All rights reserved. http://www.ocisystem.com/
The information contained in this document is subject to change without notice.This document contains proprietary information which is protected by copyright.
All rights are reserved. No part of this document may be photocopied, reproduced, or translated to another language without the prior written consent of OC Innovations Pte Ltd.
Table of Contents
Chapter 1: Basic Training
1 Ready?
1.1 Orientation
1.1.1 Familiarizing
1.1.1.1 User-Interface
1.1.1.2 System Terminology
1.1.1.3 Accounting Terminology
1.1.2 Navigating
1.1.2.1 Login
1.1.2.2 Opening Modules
1.1.2.3 Opening Module on the move
1.1.2.4 Switching Modules
1.1.2.5 Closing Modules
1.1.2.6 Searching Function
1.1.2.7 Advance Search on Documents
1.2 Personalizing
1.2.1 Using Favourite
1.2.1.1 Adding links to Favourite
1.2.1.2 Removing links from Favourite
1.2.1.3 Switching Column Sequence
1.2.2 Changing Column Widths
1.2.3 Hiding or Un-hiding Columns
1.3 Preparation
1.3.1 Entering Company Information
1.3.2 Setting Financial Periods & Locking Accounting Data
1.3.3 Formatting Document Running Numbers
1.3.4 Configuring Document Defaults
1.3.4.1 Setting Quotation Standard Terms & Conditions
1.3.4.2 Changing Default Payment Mode for Receipt & Payment Voucher
1.3.5 Chart of Accounts
1.3.5.1 Creating an Expense Account
1.3.5.2 Creating a Fixed Asset Accounts
1.3.5.3 Renaming a Bank Accounts
1.3.6 Payment Mode
2 Get Set…
2.1 Entering Opening Balance
2.1.1 Opening GL, Sales Invoices, Supplier Invoices & Stock
2.1.2 Check if Opening entries are correct
2.2 Setting Up
2.2.1 Creating Business Partner
2.2.1.1 Creating New Customers
2.2.1.2 Creating New Supplier
2.2.1.3 Amedning a Customer Business Partner to also a Supplier
2.2.2 Creating Items
12345679101112131415161718192021232425262830323335373839414345464750515253555758

2.2.2.1 Creating New Service Item
3 Go!!!
3.1 Selling & Collecting (Accounts Receivables)
3.1.1 Quotation
3.1.1.1 Issuing a New Quotation
3.1.1.2 Understading of buttons
3.1.1.3 Understanding Contract, Approved, Close & Import to Invoice
3.1.1.4 Changing to different Printout Format
3.1.1.5 Exporting to PDF
3.1.2 Delivery Order
3.1.2.1 Confirming a Quotation into an Order
3.1.2.2 Issuing a DO by importing details from Quotation
3.1.3 Sales Invoice
3.1.3.1 Creating Sales Invoices by importing from Delivery Order
3.1.4 Credit Note
3.1.4.1 Issue a Credit Note
3.1.5 Receipt
3.1.5.1 Trade Related Receipt
3.1.5.1.1 Off-Setting Sales Invoice with Credit Note
3.1.5.1.2 Receiving Payment from Customer
3.1.5.1.3 Receiving Bulk Payments from Customer
3.1.5.1.4 Taking in Customer Deposits
3.1.5.2 Non-Trade Related Receipt
3.1.5.2.1 Receiving Other Funds
3.2 Buying & Paying (Accounts Payables)
3.2.1 Supplier Invoice
3.2.2 Payment Voucher
3.2.2.1 Trade Related
3.2.2.2 Non-Trade Related
3.2.2.3 Bank Transfer
3.2.2.4 Cheque Printing
3.2.2.4.1 Setting New Cheque Layout & Fine Tuning
4 Result
4.1 Details Tracing
4.1.1 Viewing Transaction GL Entries
4.1.2 View History Log
4.2 Document Listing Reports
4.2.1 Invoice Listing
4.3 Financial Reports
4.3.1 Drill Down Function
4.3.2 Profit & Loss Income Statement
4.4 GST
4.4.1 Preparing GST F5
4.4.2 Printing & Submitting GST F5
4.4.3 Making Changes to Committed F5 Total
4.4.4 Generating of IAF
4.5 Bank Reconciliation
4.6 Job Costing
4.6.1 Creating Job Code
59
636465666768707172737576777879808183858688899091929394959697101102103104105106107108109110111113115116117119120

4.6.2 Applying Job Code
4.6.3 Get Job’s Report
5 Maintenance
5.1 Access Control
5.1.1 Users & Role Management
5.1.1.1 Creating a new Role
5.1.1.2 Creating and Assigning User to new Role
5.1.1.3 Login in as a limited user
5.2 Data Management
5.2.1 Manual Backup
5.2.2 System Auto Backup
5.3 Services
5.3.1 System Updates
5.3.2 Remote Access Service
6. FAQ
6.1 Settings
6.1.1.1 How do I setup Multiple Running Number Series?
6.1.1.2 What is Check Similar Reference at Default Settings Registration?
6.1.1.3 How can I insert an Image Picture to Item?
6.2 Using
6.2.1 What is in Properties Tab?
6.2.1.1 What is Created Date & By and Updated Date & By?
6.2.1.2 How can I use Document Attachment? - Attach, View, Download & Delete
6.2.1.3 What are those References & Comment for in Properties tab?
6.2.2 How do I create Sales Personnel Names?
6.3 Processing
6.3.1 What is Batch Print?
6.3.1.1 Batch printing of Cheques
6.3.1.2 Batch printing of Envelopes
6.4 Others
6.4.1 What is IAF
Chapter 2: Index
121123124125126127129131132133134136137138139140141143145146147148149151152153154155157159160
161
1 Ready?2 Get Set…3 Go!!!4 Result5 Maintenance6. FAQ
Basic Training
Basic Training . 1
OCI Accounting System

1.1 Orientation1.2 Personalizing1.3 Preparation
1 Ready?
2 . Basic Training
OCI Accounting System

1.1.1 Familiarizing1.1.2 Navigating
1.1 Orientation
Basic Training . 3
OCI Accounting System

1.1.1.1 User-Interface1.1.1.2 System Terminology1.1.1.3 Accounting Terminology
1.1.1 Familiarizing
4 . Basic Training
OCI Accounting System

Topic:
1.1.1.1 User-Interface
Home > Basic Training > 1 Ready? > 1.1 Orientation > 1.1.1 Familiarizing > 1.1.1.1 User-Interface
1.1.1.1 User-Interface
1. Segment A --> Activities
2. Segment B --> Modules
3. Segment C --> Documents
4. Segment D --> Preview
Created by:Admin Last Modified: Admin 6/21/2013 4:04 PM
Basic Training . 5
OCI Accounting System

Topic:
1.1.1.2 System Terminology
Home > Basic Training > 1 Ready? > 1.1 Orientation > 1.1.1 Familiarizing > 1.1.1.2 System Terminology
1.1.1.2 System Terminology
General
1. Activities - Sales, Purchases, Adjustment, Report, Setup, Maintenance
2. Modules Are the documents you can printout – e.g. Quotation, D.O. Invoice, Receipt, P.O. Payments, etc.
Sales
1. Business Partners (Customer) - Is your Customers, Debtors or Account Receivables
2. Receipt (Trade) - For you to receive customers’ payments
3. Receipt (NonTrade) For taking in funds into the company’s bank. Note that you did issue any invoice.
Purchases
1. Business Partners (Vendors) - Supplier , Creditor or Account Payable
2. Receive Order - Is meant for you to receive stock items
3. Payment - For payments to your suppliers
4. Payment (Non-Trade) - For your other expense payments that you have not key them into Supplier Invoice module.
5. Payment (Bank) - For transfer of funds between company bank accounts
Others
1. Item (Inventory) - Products that you trade
2. Item (Service) - Services that your offer
3. Item (Remark) - A description for you to add in printout out documents – e.g. Quotations, Invoices, P.O., etc.
4. History Log - An audit of the historical amendments of the documents’ content, modified by and date & time
Created by:Admin Last Modified: Admin 6/21/2013 4:07 PM
6 . Basic Training
OCI Accounting System

Topic:
1.1.1.3 Accounting Terminology
Home > Basic Training > 1 Ready? > 1.1 Orientation > 1.1.1 Familiarizing > 1.1.1.3 Accounting Terminology
1.1.1.3 Accounting Terminology
1. This is to view the codes in Chart of Account module.
Click Setup Activity --> Click Accounts --> Click Chart of Accounts Module.
2. Click Edit.
This is to view the Category setup in the respective Chart of Accounts.
Description Codes Category Example
Current Assets Deposits to suppliers
Basic Training . 7
OCI Accounting System

Current Assets CAS 0000
Trade Debtors Customers
Inventory Stock
Bank Bank Accounts
Fixed Assets FAS 0000
Fixed Assets Vehicle & Equipment
Fixed Assets
Accumulated
Depreciation
Corresponding
Depreciation Account
Current Liabilities CLI 0000
Current Liabilities Accruals
Trade Creditors Suppliers
Long-Term Liabilities LTL 0000 Long-Term Liabilities Loan
Owner Equity OEQ 0000
Share Capital Owners’ Capital
P/L Unappropriated Retain Earnings
Income INC 0000
Sales or Revenue Trading Income
Other Income Non-Trading Income
Cost of Sales COS 0000 Cost of Sales Purchases
Expenses EXP 0000
Expenses Trading Expenses
Other Expenses Non-Trading Expenses
Created by:Admin Last Modified: Admin 6/25/2013 10:49 AM
8 . Basic Training
OCI Accounting System

1.1.2.1 Login1.1.2.2 Opening Modules1.1.2.3 Opening Module on the move1.1.2.4 Switching Modules1.1.2.5 Closing Modules1.1.2.6 Searching Function1.1.2.7 Advance Search on Documents
1.1.2 Navigating
Basic Training . 9
OCI Accounting System
Topic:
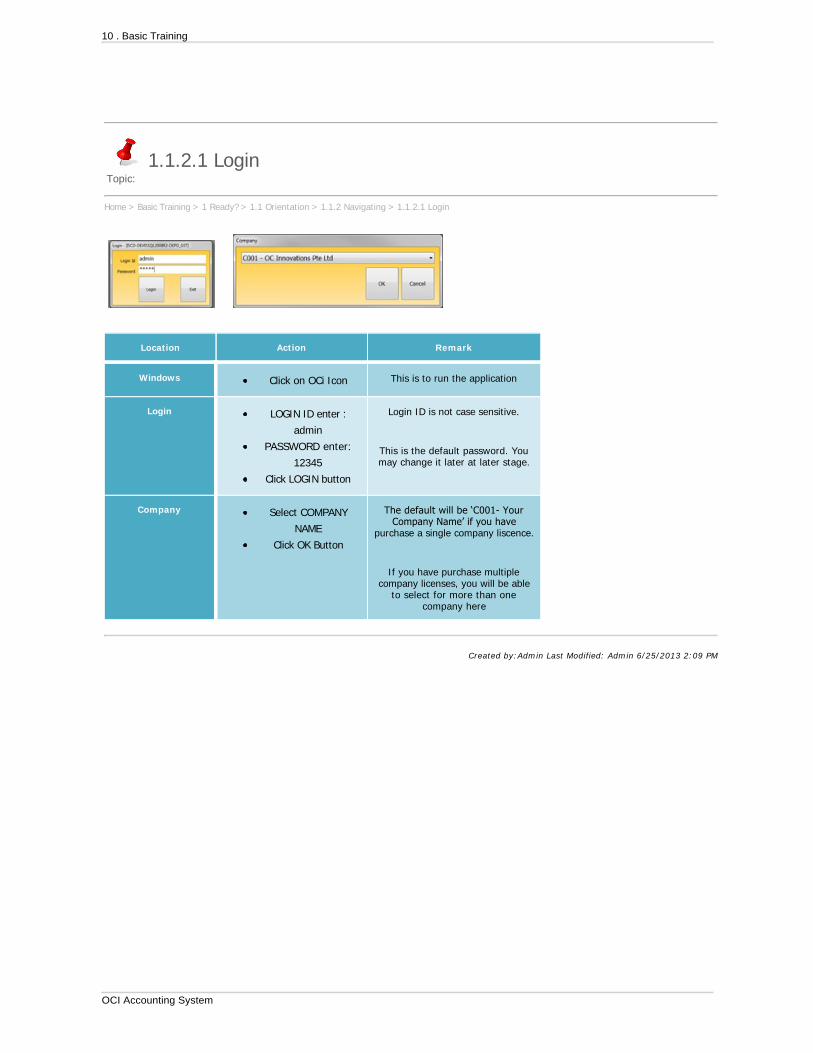
1.1.2.1 Login
Home > Basic Training > 1 Ready? > 1.1 Orientation > 1.1.2 Navigating > 1.1.2.1 Login
Location Action Remark
Windows Click on OCi Icon This is to run the application
Login LOGIN ID enter :
admin
PASSWORD enter:
12345
Click LOGIN button
Login ID is not case sensitive.
This is the default password. Youmay change it later at later stage.
Company Select COMPANY
NAME
Click OK Button
The default will be ‘C001 YourCompany Name’ if you have
purchase a single company liscence.
If you have purchase multiplecompany licenses, you will be able
to select for more than onecompany here
Created by:Admin Last Modified: Admin 6/25/2013 2:09 PM
10 . Basic Training
OCI Accounting System

Topic:
1.1.2.2 Opening Modules
Home > Basic Training > 1 Ready? > 1.1 Orientation > 1.1.2 Navigating > 1.1.2.2 Opening Modules
Location Action Remark
Menu > Sales Activity Click SALES Activity
Click QUOTATION
Module
Click INVOICE Module
These will open the Quotation andD.O. Module for you to work on
Menu > PurchasesActivity
Click PURCHASES
Activity
Click SUPPLIER
INVOICE
You can also open up modules in otheractivity at the same time
Created by:Admin Last Modified: Admin 6/25/2013 2:10 PM
Basic Training . 11
OCI Accounting System

Topic:
1.1.2.3 Opening Module on the move
Home > Basic Training > 1 Ready? > 1.1 Orientation > 1.1.2 Navigating > 1.1.2.3 Opening Module on the move
Location Action Remark
Menu >
Purchases Activity>
Supplier Invoice
Click NEW
Move mouse to
VENDOR box
Right-Click
Select & Click OPEN
By pointing the mouse on the certainentry boxes, and right-click, it willopen up the respective modules.
In this case, you can see thatBusiness Partner is opened.
In this screen, you can open thefollowing modules on the move.
Business Partner
Payment Terms
Currency
Employee
Item Code
Created by:Admin Last Modified: Admin 6/25/2013 2:11 PM
12 . Basic Training
OCI Accounting System

Topic:
1.1.2.4 Switching Modules
Home > Basic Training > 1 Ready? > 1.1 Orientation > 1.1.2 Navigating > 1.1.2.4 Switching Modules
Location Action Remark
Windows > Top Menu Bar
Click Windows
Select QUOTATION
Select INVOICE
You are able to call previously modules tothe top to work on.
You can switch between modules andwork on them simultaneously withouthaving to close them.
Created by:Admin Last Modified: Admin 6/25/2013 2:12 PM
Basic Training . 13
OCI Accounting System
Topic:
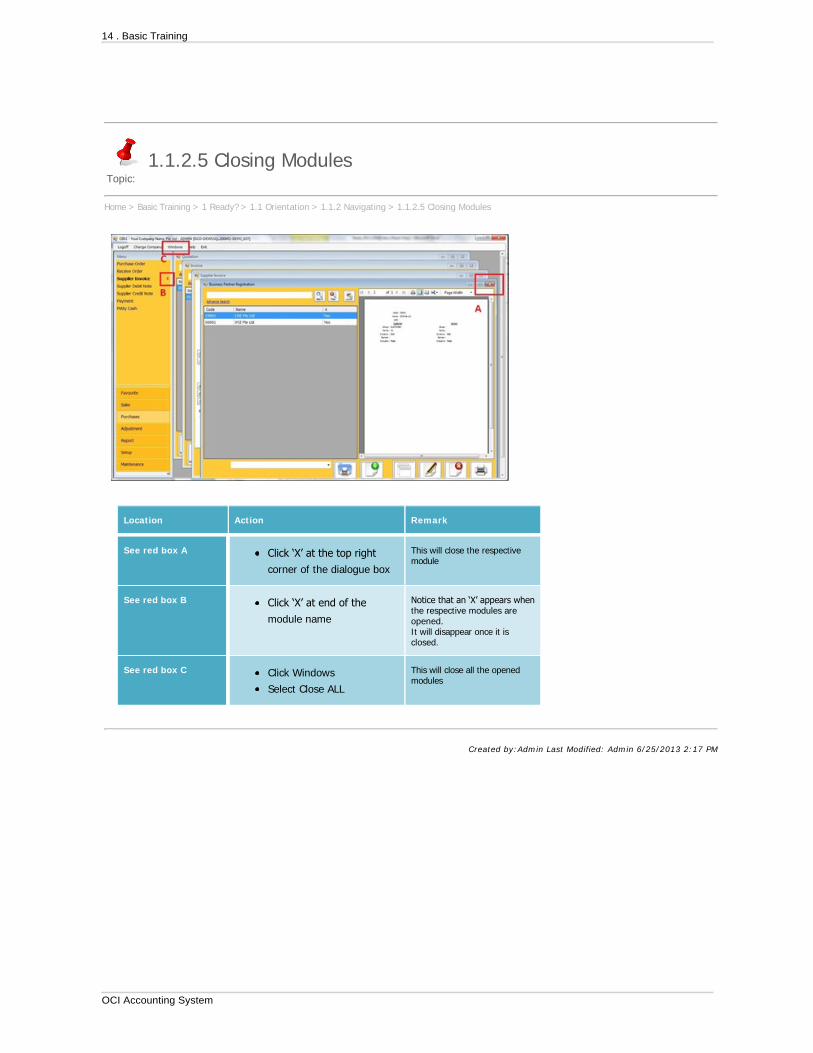
1.1.2.5 Closing Modules
Home > Basic Training > 1 Ready? > 1.1 Orientation > 1.1.2 Navigating > 1.1.2.5 Closing Modules
Location Action Remark
See red box A
Click ‘X’ at the top right
corner of the dialogue box
This will close the respectivemodule
See red box B
Click ‘X’ at end of the
module name
Notice that an ‘X’ appears whenthe respective modules areopened.It will disappear once it isclosed.
See red box C
Click Windows
Select Close ALL
This will close all the openedmodules
Created by:Admin Last Modified: Admin 6/25/2013 2:17 PM
14 . Basic Training
OCI Accounting System

Topic:
1.1.2.6 Searching Function
Home > Basic Training > 1 Ready? > 1.1 Orientation > 1.1.2 Navigating > 1.1.2.6 Searching Function
Location Action Remark
Setup Activity>Chart of Account>
Click SETUP Activity
Click ACCOUNTS
Click Chart of Account
Module
To open up Chart of Account Module.You may use any other modules.
SEARCH Box enter loan
in
SEARCH Button
Listing has shortened. It has filteredfor description that contain ‘loan’
CLEAR Button This is to show the entire list
SEARCH Box enter 1000
Click SEARCH Button
Code containing ‘1000’ has beenfiltered instead.
Note that the search function will filterboth codes and descriptions
Created by:Admin Last Modified: Admin 6/25/2013 2:18 PM
Basic Training . 15
OCI Accounting System

Topic:
1.1.2.7 Advance Search on Documents
Home > Basic Training > 1 Ready? > 1.1 Orientation > 1.1.2 Navigating > 1.1.2.7 Advance Search on Documents
Location Action Remark
Sales Activity>
Invoice Module
Click SALES Activity
Click INVOICE
Click ADVANCE SEARCH You can search by Date,Document, Customer, etc
Click CRITERIA drop down
box
Select BETWEEN
Select FROM date: 1 Jan
2012
Select TO date: 31 Mar
2012
Click OK
Here you will search documentsthat fall with Jan to Mar 2012.
Click ADVANCE SEARCH
Select CRITERIA drop
down box
From the Criteria list selection,you can see that you can search
for exact match, range orcontaining
Created by:Admin Last Modified: Admin 6/25/2013 2:39 PM
16 . Basic Training
OCI Accounting System

1.2.1 Using Favourite1.2.2 Changing Column Widths1.2.3 Hiding or Un-hiding Columns
1.2 Personalizing
Basic Training . 17
OCI Accounting System
1.2.1.1 Adding links to Favourite1.2.1.2 Removing links from Favourite1.2.1.3 Switching Column Sequence
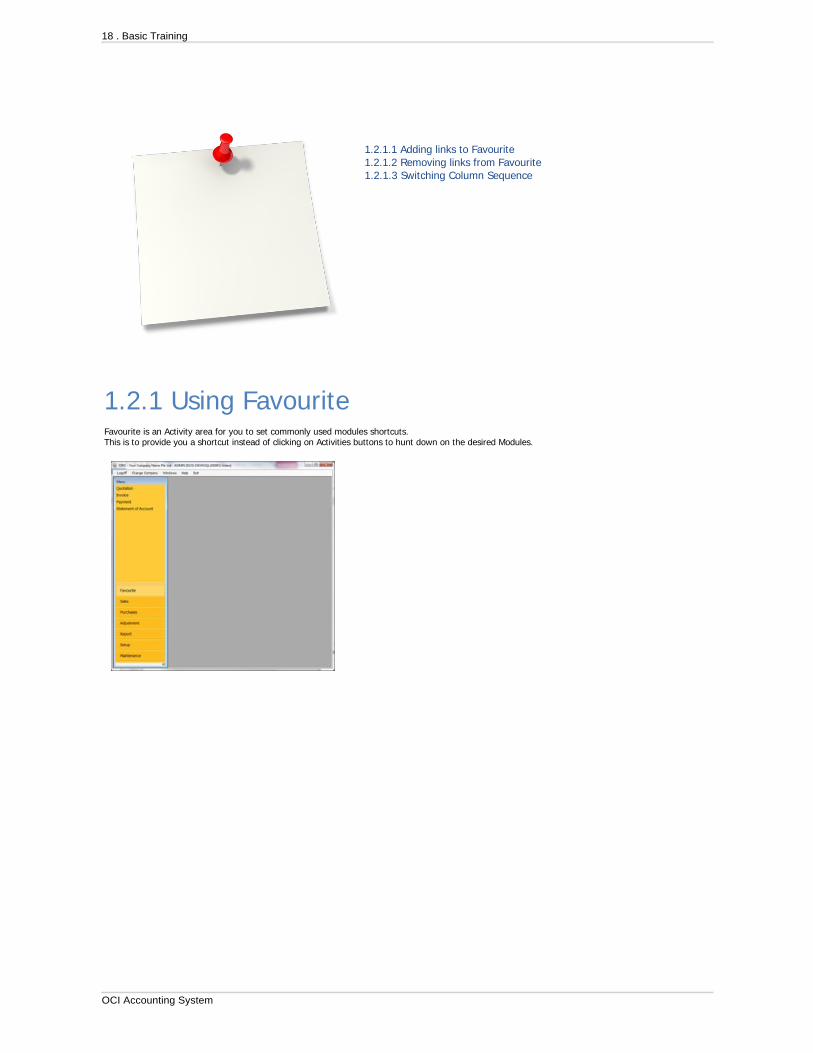
1.2.1 Using FavouriteFavourite is an Activity area for you to set commonly used modules shortcuts.This is to provide you a shortcut instead of clicking on Activities buttons to hunt down on the desired Modules.
18 . Basic Training
OCI Accounting System

Topic:
1.2.1.1 Adding links to Favourite
Home > Basic Training > 1 Ready? > 1.2 Personalizing > 1.2.1 Using Favourite > 1.2.1.1 Adding links to Favourite
Location Action Remark
FavouriteActivity>
Click Favourite Activity You can see that there are nomodule links there
Sales Activity Click SALES Activity
Right-Click QUOTATION
Click ADD TO
FAVOURITE
Right-Click INVOICE
Click ADD TO
FAVOURITE
Adding links to Favourite Activity
This will enable you to addQuotation & Invoice modules
shortcuts to the favouriteactivity
PurchaseActivity
Click PURCHASE Activity
Right-Click PAYMENT
Click ADD TO
FAVOURITE
This will enable you to addPayment module shortcut to the
favourite activity
Report Activity Click REPORT Activity
Click AR/AP Group
Right-Click STATEMENT
OF ACCOUNT
Click ADD TO
FAVOURITE
This will enable you to addStatement of Account module
shortcut to the favourite activity
Created by:Admin Last Modified: Admin 6/25/2013 2:21 PM
Basic Training . 19
OCI Accounting System

Topic:
1.2.1.2 Removing links from Favourite
Home > Basic Training > 1 Ready? > 1.2 Personalizing > 1.2.1 Using Favourite > 1.2.1.2 Removing links from Favourite
Location Action Remark
FavouriteActivity>
Click FAVOURITE Activity
Right-Click QUOTATION
Click REMOVE FROM
FAVOURITE
Right-Click INVOICE
Click REMOVE FROM
FAVOURITE
Right-Click PAYMENT
Click REMOVE FROM
FAVOURITE
Right-Click STATEMENT
OF ACCOUNT
Click REMOVE FROM
FAVOURITE
You will remove all theshortcut links at Favourite
Activity
Created by:Admin Last Modified: Admin 6/25/2013 2:22 PM
20 . Basic Training
OCI Accounting System
Topic:
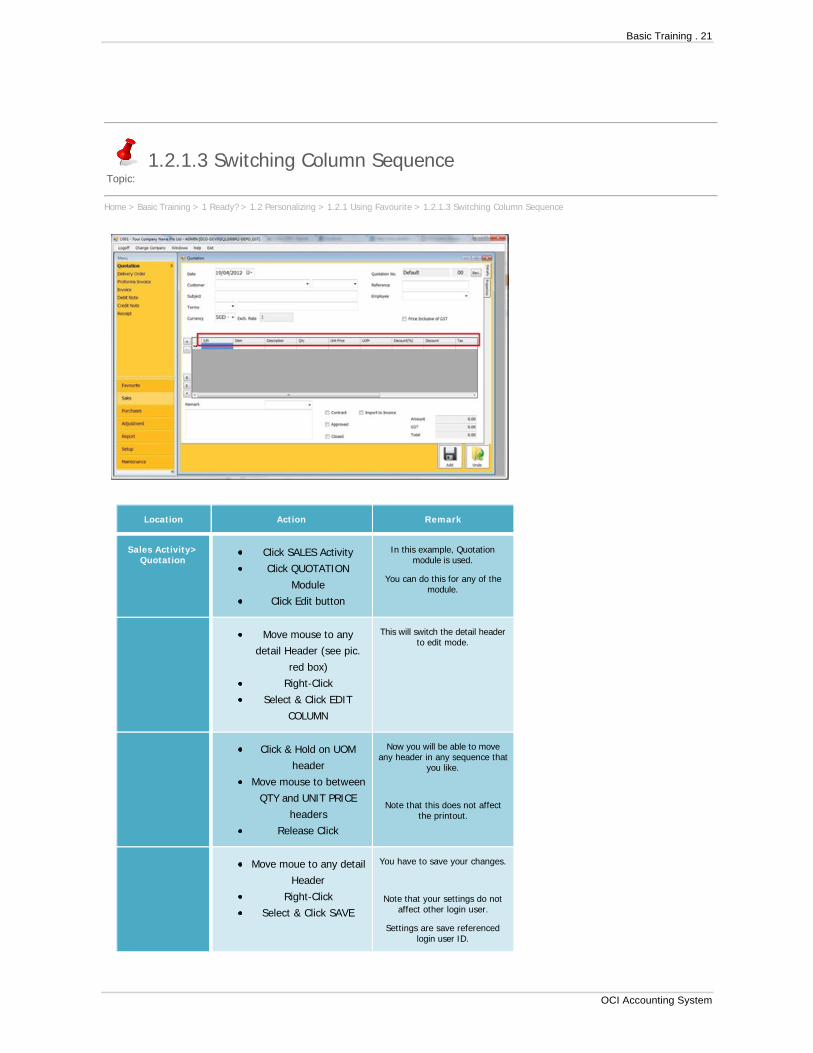
1.2.1.3 Switching Column Sequence
Home > Basic Training > 1 Ready? > 1.2 Personalizing > 1.2.1 Using Favourite > 1.2.1.3 Switching Column Sequence
Location Action Remark
Sales Activity>Quotation
Click SALES Activity
Click QUOTATION
Module
Click Edit button
In this example, Quotationmodule is used.
You can do this for any of themodule.
Move mouse to any
detail Header (see pic.
red box)
Right-Click
Select & Click EDIT
COLUMN
This will switch the detail headerto edit mode.
Click & Hold on UOM
header
Move mouse to between
QTY and UNIT PRICE
headers
Release Click
Now you will be able to moveany header in any sequence that
you like.
Note that this does not affectthe printout.
Move moue to any detail
Header
Right-Click
Select & Click SAVE
You have to save your changes.
Note that your settings do notaffect other login user.
Settings are save referencedlogin user ID.
Basic Training . 21
OCI Accounting System

Created by:Admin Last Modified: Admin 6/25/2013 2:23 PM
22 . Basic Training
OCI Accounting System
Topic:
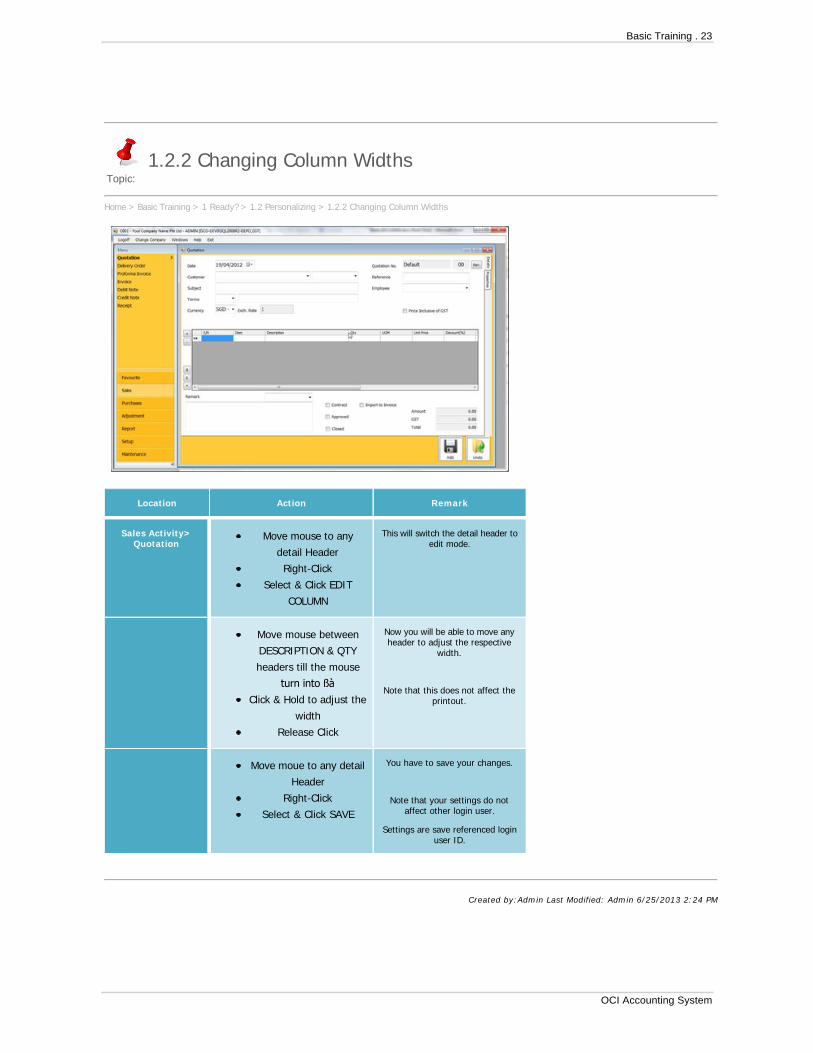
1.2.2 Changing Column Widths
Home > Basic Training > 1 Ready? > 1.2 Personalizing > 1.2.2 Changing Column Widths
Location Action Remark
Sales Activity>Quotation
Move mouse to any
detail Header
Right-Click
Select & Click EDIT
COLUMN
This will switch the detail header toedit mode.
Move mouse between
DESCRIPTION & QTY
headers till the mouse
turn into ßà
Click & Hold to adjust the
width
Release Click
Now you will be able to move anyheader to adjust the respective
width.
Note that this does not affect theprintout.
Move moue to any detail
Header
Right-Click
Select & Click SAVE
You have to save your changes.
Note that your settings do notaffect other login user.
Settings are save referenced loginuser ID.
Created by:Admin Last Modified: Admin 6/25/2013 2:24 PM
Basic Training . 23
OCI Accounting System

Topic:
1.2.3 Hiding or Un-hiding Columns
Home > Basic Training > 1 Ready? > 1.2 Personalizing > 1.2.3 Hiding or Un-hiding Columns
Location Action Remark
Sales Activity>Quotation
Move mouse to any
detail Header
Right-Click
Select & Click EDIT
COLUMN
This will switch the detail header toedit mode.
Column Dialog Right-Click at header
again
Select & Click
HIDE/UNHIDE COLUMN
This is to hide or unhide detailcolumns
Note that this does not affect theprintout.
Un-Tick on DISCOUNT
(%)
Un-Tick on DISCOUNT
Click OK
This is to hide the Discount(%) andDiscount column
Notice that the 2 columnsdisappeared after you click OK.
Move mouse to any
detail Header
Right-Click
Select & Click SAVE
You have to save your changes.
Note that your settings do notaffect other login user.
Settings are save referenced loginuser ID.
Created by:Admin Last Modified: Admin 6/25/2013 2:25 PM
24 . Basic Training
OCI Accounting System

1.3.1 Entering Company Information1.3.2 Setting Financial Periods & Locking Accounting Data1.3.3 Formatting Document Running Numbers1.3.4 Configuring Document Defaults1.3.5 Chart of Accounts1.3.6 Payment Mode
1.3 Preparation
Basic Training . 25
OCI Accounting System

Topic:
1.3.1 Entering Company Information
Home > Basic Training > 1 Ready? > 1.3 Preparation > 1.3.1 Entering Company Information
Location Action Remark
Setup Activity>Company
Click SETUP activity
Click COMPANY
DETAILS
Click COMPANY
module
Click EDIT
This is to edit the company information
ADDRESS
TEL
FAX
WEBSITE
COMPANY
REGISTRATION NO.
You may enter your company detailshere
ACCOUTING
CURRENCY
This is the base currency that theaccounting General Ledger is work on.
Unless you have special approval fromthe authority, it should be in Singapore
Dollars
26 . Basic Training
OCI Accounting System

OPENING
ADJUSTMENT
ACCOUNT
CLI6000 Opening Adjustment is thedefault current liability account.
The system will adjust and post anyunbalanced opening entries to this
account.
Unless necessary, you do not need tochange this default account.
Note that the only possibility for you tomake an unbalanced entry is during your
opening balance entry.
EXCHANGE
GAIN/(LOSS)
ACCOUNT
EXP1200 Exchange (Gain)/Loss is thedefault expense account.
For users that have multi-currencytransactions, the system will
automatically calculate the difference inexchange values of the transaction and
adjust it to this account.
Unless necessary, you do not need tochange this default account.
GST REGISTERED
GST CURRENCY
GST REGISTRAION
NO.
If your company is GST registered, youtick on it and enter the relevant
information.
If you are not a GST registeredcompany, but may do so in future,
please note that you should only tick onthe check box on the exact day your
company is officially registered.
Created by:Admin Last Modified: Admin 6/25/2013 2:26 PM
Basic Training . 27
OCI Accounting System

Topic:
1.3.2 Setting Financial Periods & Locking Accounting Data
Home > Basic Training > 1 Ready? > 1.3 Preparation > 1.3.2 Setting Financial Periods & Locking Accounting Data
Location Action Remark
Setup Activity>A/C Setting
Click SETUP activity
Click ACCOUNTs
Click A/C Setting
module
Click EDIT
This is to open and set the AccountingRegistration in edit mode.
ACCOUNTING LOCK
PERIOD
This is to lock the data. Addition orchanges to the transaction dated
before this set date will be disallowed.
E.g. If you have closed your account
for 31st Mar 12 accounting, you
should set the date to 31st Mar 12.
LOCK TYPE Upon clicking on it, you can see thatthere are 4 types of locking method.
For basic user, it is recommended thatyou use CANNOT EDIT LOCK PERIODTRANSACTION. This is most secured
and easiest to understand lockingmethod.
28 . Basic Training
OCI Accounting System

RETAINING EARNING
ACCOUNTING (FOR
YEAR END CLOSING)
OEQ0001 Accumulated Profit & Loss isthe default Owner Equity account.
When you do your financial year endclosing, the system will adjust yourprofit or loss to this balance sheet
account for carrying forward to thenext financial year.
Unless necessary, you do not need tochange this default account.
ACCOUNTING PERIOD You should set START and END datesas the period for your financial year.
Note that you can set multiplefinancial periods and concurrently
work on them without closing.
Under Status, you can see that thereis Open, Finalising & Close.
Open is the current the financialperiod you are working on.
Finalising is set when you are doingyour financial year end closing. Thissetting is required as it is linked to
Year End Closing Module.
Close is set when you have completedclosing your financial year.
Note that you can re-open a closedFinancial Period to re-work on it.
Click SAVE
Close the module
Created by:Admin Last Modified: Admin 6/25/2013 2:27 PM
Basic Training . 29
OCI Accounting System

Topic:
1.3.3 Formatting Document Running Numbers
Home > Basic Training > 1 Ready? > 1.3 Preparation > 1.3.3 Formatting Document Running Numbers
Location Action Remark
Setup Activity>Running No.
Click SETUP activity
Click COMPANY
DETAILS
Click Running No.
module
Select QUOTATION
Click EDIT
This is to open Quotation RunningNo. Registration to edit mode.
TYPE This is the document type. In thisexample you are working on the
Quotation running number, hence itshould be set to Quotation.
NAME Give a meaningful name to thisrunning number series; otherwise
you can leave it as default.
To understand further see page 50 -6.1.1.1 How do I setup Multiple
Running Number Series
30 . Basic Training
OCI Accounting System

FORMAT Format is the system Formula of therunning number.
Formula is within square brackets [and ]
Anything outside these squarebrackets is ignored.
Formula:
[0000] = 4 digits running nos.
[000000] = 6 digits running nos.
[YY] = display year in 2 digits, e.g.11
[YYYY] = display year in 4 digits e.g.2011
[MM] = display month in 2 digits,e.g. 08
[DD] = display date in 2 digits, e.g.31
[UU] = display User ID in 2 digits,e.g. SJ
Note Alpha formula must be in Caps
To see if you have set the formulaecorrectly, see EXAMPLE field below.
NEXT NUMBER You can enter your next runningnumber for the system to run here.
If you are starting a fresh series, setthis to 1.
EXAMPLE This will display the number that youset.
You should not see any ‘[‘ or ‘]’ if youhave set your formula correctly.
RESET Auto-Reset No. to One
Note formula must have [YY] to reset on yearly basis
…must have [MM] to reset on monthly basis
Otherwise you’ll generate duplicate numbers
Click UPDATE
Close the module
This is to save your changes.
Created by:Admin Last Modified: Admin 6/25/2013 2:29 PM
Basic Training . 31
OCI Accounting System

1.3.4.1 Setting Quotation Standard Terms & Conditions1.3.4.2 Changing Default Payment Mode for Receipt & Payment Voucher
1.3.4 Configuring Document Defaults
32 . Basic Training
OCI Accounting System
Topic:
1.3.4.1 Setting Quotation Standard Terms & Conditions
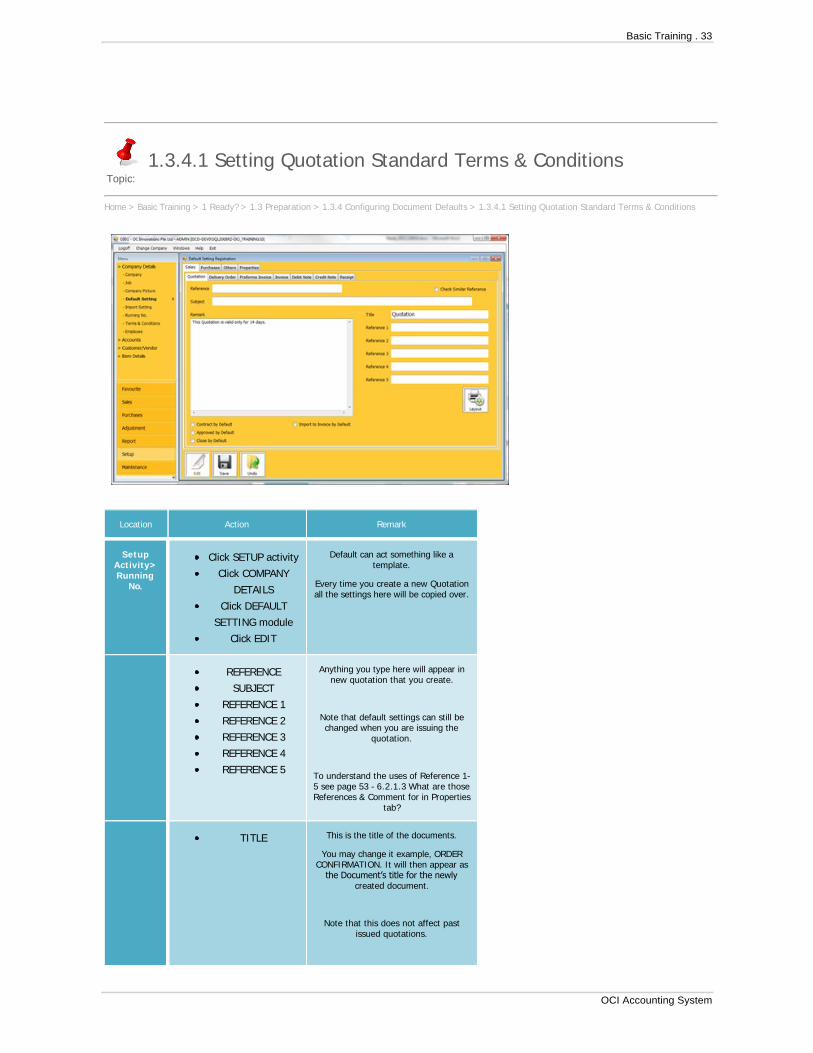
Home > Basic Training > 1 Ready? > 1.3 Preparation > 1.3.4 Configuring Document Defaults > 1.3.4.1 Setting Quotation Standard Terms & Conditions
Location Action Remark
SetupActivity>Running
No.
Click SETUP activity
Click COMPANY
DETAILS
Click DEFAULT
SETTING module
Click EDIT
Default can act something like atemplate.
Every time you create a new Quotationall the settings here will be copied over.
REFERENCE
SUBJECT
REFERENCE 1
REFERENCE 2
REFERENCE 3
REFERENCE 4
REFERENCE 5
Anything you type here will appear innew quotation that you create.
Note that default settings can still bechanged when you are issuing the
quotation.
To understand the uses of Reference 1-5 see page 53 - 6.2.1.3 What are thoseReferences & Comment for in Properties
tab?
TITLE This is the title of the documents.
You may change it example, ORDERCONFIRMATION. It will then appear asthe Document’s title for the newly
created document.
Note that this does not affect pastissued quotations.
Basic Training . 33
OCI Accounting System

CONTRACT BY
DEFAULT
APPROVED BY
DEFAULT
CLOSE BY DEFAULT
IMPORT TO
INVOICE BY
DEFAULT
To understand their uses, see page 27 -3.1.1.3 Understanding Contract,
Approved, Close & Import to Invoice
REMARK enter This
Quotation is Valid
for 14 days only.
This remark will then appear at everynew quotation you create.
Note that this does not affect pastissued quotations.
CHECK SIMILAR
REFERENCE
To understand the use see page 51 -6.1.1.2 What is Check Similar Reference
Click SAVE
Close the module
This is to save your changes.
Created by:Admin Last Modified: Admin 6/25/2013 2:41 PM
34 . Basic Training
OCI Accounting System

Topic:
1.3.4.2 Changing Default Payment Mode for Receipt & PaymentVoucher
Home > Basic Training > 1 Ready? > 1.3 Preparation > 1.3.4 Configuring Document Defaults > 1.3.4.2 Changing Default Payment Mode for Receipt &Payment Voucher
Location Action Remark
Setup Activity>Running No.
Click SETUP activity
Click COMPANY details
Click DEFAULT SETTING
module
Click EDIT
Click RECEIPT tab
MODE clicks the
dropdown box to change
to the required one.
You can change your defaultbank for receiving funds here.
Note that default settings canstill be changed when you are
issuing the Receipt.
To understand on how to useMode see page 19 - 1.3.6
Payment Mode
Click PURCHASES tab
Click PAYMENT tab
This is to amend default forPayment
Basic Training . 35
OCI Accounting System

MODE clicks the
dropdown box and
change to the required
one.
Change accordingly
A/C PAYEE ONLY
BEARER
REMARK
To understand the purpose ofthem, See page 37 - 3.2.2.4
Cheque Printing
Click SAVE
Close the module
This is to save your changes.
Created by:Admin Last Modified: Admin 6/25/2013 2:31 PM
36 . Basic Training
OCI Accounting System

1.3.5.1 Creating an Expense Account1.3.5.2 Creating a Fixed Asset Accounts1.3.5.3 Renaming a Bank Accounts
1.3.5 Chart of Accounts
Basic Training . 37
OCI Accounting System

1.3.5.1 Creating an Expense Account
Topic:
1.3.5.1 Creating an Expense Account
Home > Basic Training > 1 Ready? > 1.3 Preparation > 1.3.5 Chart of Accounts > 1.3.5.1 Creating an Expense Account
Location Action Remark
Setup Activity>Account Module
Click SETUP activity
Click ACCOUNTS
Click CHART OF
ACCOUNT module
Click NEW
CODE enter EXP3301 Enter EXP as it is anexpense account, and a
unique number
CATEGORY select
EXPENSE -
ADMINISTRATIVE
Select the appropriatecategory
DESCRIPTION rename to
Other Fee
Give a short description
Click ADD
Close the module
This is to save yourchanges.
Created by:Admin Last Modified: Admin 6/25/2013 2:43 PM
38 . Basic Training
OCI Accounting System

Topic:
1.3.5.2 Creating a Fixed Asset Accounts
Home > Basic Training > 1 Ready? > 1.3 Preparation > 1.3.5 Chart of Accounts > 1.3.5.2 Creating a Fixed Asset Accounts
Location Action Remark
Setup Activity>Account Module
Click SETUP activity
Click ACCOUNTS
Click CHART OF
ACCOUNT module
Click NEW
For fixed asset account, wehave to setup the
corresponding accumulatedaccount first.
CODE enter FAS1005 Enter FAS as it is an fixedasset, and a unique number
CATEGORY select FIXED
ASSETS ACC,
DEPRECIATION
Select the appropriatecategory
DESCRIPTION rename to
Acc. Depn. For YH1234A
Give a short description
Click ADD This is to save your changes.
Basic Training . 39
OCI Accounting System

Location Action Remark
Setup Activity>Account Module
Click SETUP activity
Click ACCOUNTS
Click NEW
Now we can setup the actual fixedasset account
CODE enter FAS0005 Enter FAS as it is an fixed asset,and a unique number
CATEGORY select FIXED
ASSETS
Select fixed asset.
Notice that Dep. A/C appears. Thisis for you to link to the appropriate
depreciation account.
This system link is for the laterreport purpose.
DESCRIPTION rename to
YH1234A
Give a short description
DEP. A/C select FAS
1005 Acc Depn for
YH1234A which you have
setup earlier
Now you can see why you have theset the accumulated depreciationaccount prior to the fixed asset
account.
Click ADD
Close the module
This is to save your changes.
Created by:Admin Last Modified: Admin 6/25/2013 2:45 PM
40 . Basic Training
OCI Accounting System

Topic:
1.3.5.3 Renaming a Bank Accounts
Home > Basic Training > 1 Ready? > 1.3 Preparation > 1.3.5 Chart of Accounts > 1.3.5.3 Renaming a Bank Accounts
Location Action Remark
Setup Activity>Account Module
Click SETUP activity
Click ACCOUNTS
Click CHART OF
ACCOUNT module
Select CAS1000 Bank 1
Click EDIT
CATEGORY BANK This define the nature type forthis chart of account
DESCRIPTION rename to
UOB AC
Give a short description
CURRENCY SGD
Singapore dollars
This defines the currency of thisbank account.
BANK INITIAL rename to
UOB
Give a Bank initial for easyreference.
Note that this will appear as anoption with the currency in
cheques setup.
See page 37 - 3.2.2.4.1 SettingNew Cheque Layout & Fine
Tuning
Basic Training . 41
OCI Accounting System

REMARK enter 123-
45678-9
You may like to add further toyour description. E.g. Account
No.
Note that both Description andRemark will appear in GL report.
OPEN ITEM This is a beta field for technicaluse.
INACTIVE Tick on this box only if you wouldlike to discontinue using this
Account.
Note that ticking on it will notdelete it from the list, but willmake it unavailable for use
during document transactionentry.
CHEQUE SETTINGS
PREFIX enter UOB
NEXT CHEQUE NUMBER
enter 300300
Assuming that you are cuttingout cheque for this bank
account, you can enter thecheque number here.
Note that the system will run thischeque number automatically.
Click UPDATE
Close the module
This is to save your changes.
Created by:Admin Last Modified: Admin 6/25/2013 2:35 PM
42 . Basic Training
OCI Accounting System

Topic:
1.3.6 Payment Mode
Home > Basic Training > 1 Ready? > 1.3 Preparation > 1.3.6 Payment Mode
To link the Bank Account for use at Receipt Voucher, Payment Voucher & Petty Cash, you are required to setup the Payment Mode.
Location Action Remark
Setup Activity>Account Module
Click SETUP activity
Click ACCOUNTS
Click PAYMENT MODE
module
Select Mode 1
Click EDIT
DESCRIPTION rename to
UOB Bank
Give a short description.
You may setup UOB TT, UOB Giro,etc. if you would like to differentiateand have control over those modes.
Otherwise, you can keep thingsimple by having a single mode for a
bank account.
TYPE This set which document transactionthe mode is for. Payment/Receipt or
Petty Cash.
AC is defaulted to
CAS1000 UOB AC 123-
45678-9
As this was default setup for Bank 1Account, after renaming that
account, you can see that it reflecthere accordingly.
Basic Training . 43
OCI Accounting System
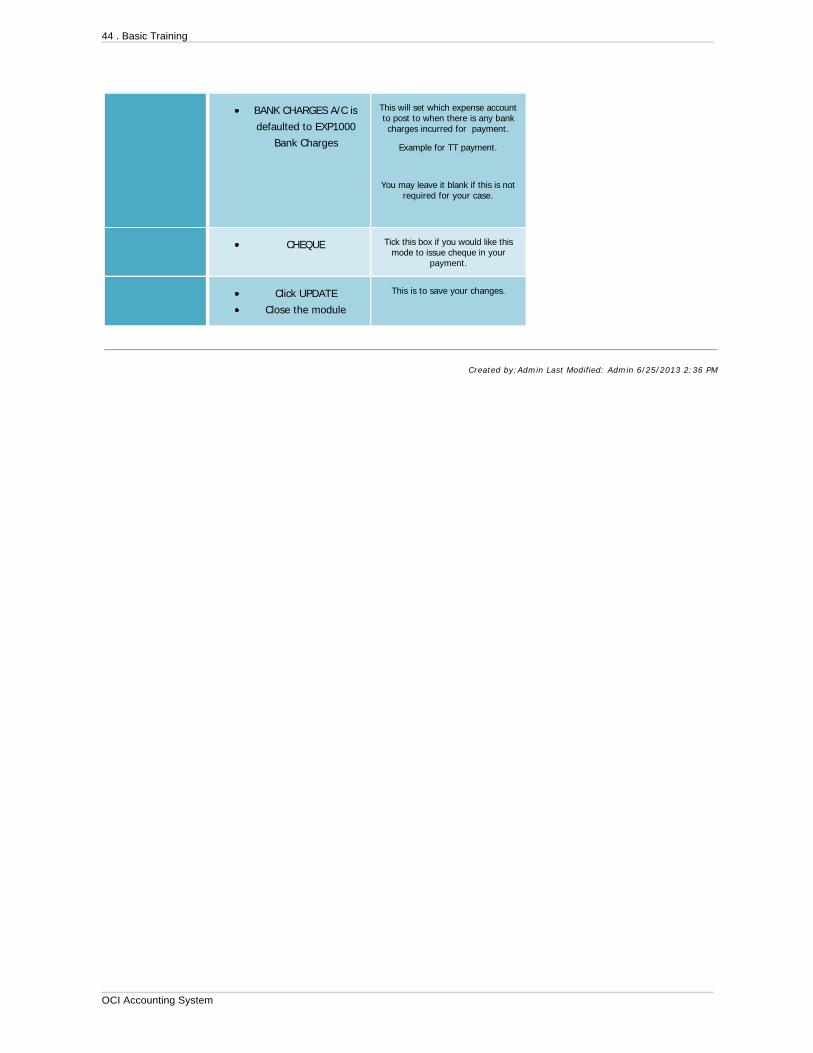
BANK CHARGES A/C is
defaulted to EXP1000
Bank Charges
This will set which expense accountto post to when there is any bankcharges incurred for payment.
Example for TT payment.
You may leave it blank if this is notrequired for your case.
CHEQUE Tick this box if you would like thismode to issue cheque in your
payment.
Click UPDATE
Close the module
This is to save your changes.
Created by:Admin Last Modified: Admin 6/25/2013 2:36 PM
44 . Basic Training
OCI Accounting System

2.1 Entering Opening Balance2.2 Setting Up
2 Get Set…
Basic Training . 45
OCI Accounting System

2.1.1 Opening GL, Sales Invoices, Supplier Invoices & Stock2.1.2 Check if Opening entries are correct
2.1 Entering Opening Balance
46 . Basic Training
OCI Accounting System

Topic:
2.1.1 Opening GL, Sales Invoices, Supplier Invoices & Stock
Home > Basic Training > 2 Get Set… > 2.1 Entering Opening Balance > 2.1.1 Opening GL, Sales Invoices, Supplier Invoices & Stock
As you have not started your business yesterday, you are already operating with balances in your accounts. These need to be brought forward to system.
First you have to decide on a DATE to start using OCi system. E.g. 1st Apr 2012Next, workout the Trial Balance from beginning of your financial year to 1st Apr 2012 i.e. from 1st Jan 2012 to 31st Mar 2012.
Location Action Remark
Setup Adjustment>
Opening GL module
Click ADJUSTMENT
activity
Click OPENING GL
module
Click NEW
Enter in all the Trial Balanceitems EXCEPT for Debtors,
Creditors & Stock Accounts.
Basic Training . 47
OCI Accounting System

Location Action Remark
Setup Adjustment>
Opening Invoicemodule
Click ADJUSTMENT
activity
Click OPENING INVOICE
module
Click NEW
Assuming if your Trial Balanceindicate $50,000 of debtors,this means that you have thisamount of Sales Invoices thatyour customer have yet paid
you as at 31st Mar 2012.
You have to enter them inOpening Invoice as it can them
capture which Invoice No.,Date, Customer and Amount.
Note that total OpeningInvoices must add up todebtor’s $50,000 value.
Location Action Remark
48 . Basic Training
OCI Accounting System

Setup Adjustment>
Opening SupplierInvoice module
Click ADJUSTMENT
activity
Click OPENING SUPPLIER
INVOICE module
Click NEW
Assuming if your Trial Balanceindicate $30,000 of creditors, thismeans that you have this amountof Supplier Invoices that you have
yet paid them as at 31st Mar 2012.
You have to enter them in OpeningSupplier Invoice as it can capturethem which Supplier Invoice No.,
Date, Customer and Amount.
Note that total Opening SupplierInvoices must add up to creditor’s
$30,000 value.
Location Action Remark
Setup Adjustment>
Opening Stockmodule
Click ADJUSTMENT
activity
Click OPENING STOCK
module
Click NEW
Assuming if your Trial Balanceindicates $10,000 of stocks,you have to enter them in
Opening Stock.
This is to capture the stockitems code, quantity, unit
price.
Note that total OpeningStock must add up to$10,000 stock value.
Created by:Admin Last Modified: Admin 6/25/2013 2:51 PM
Basic Training . 49
OCI Accounting System
Topic:
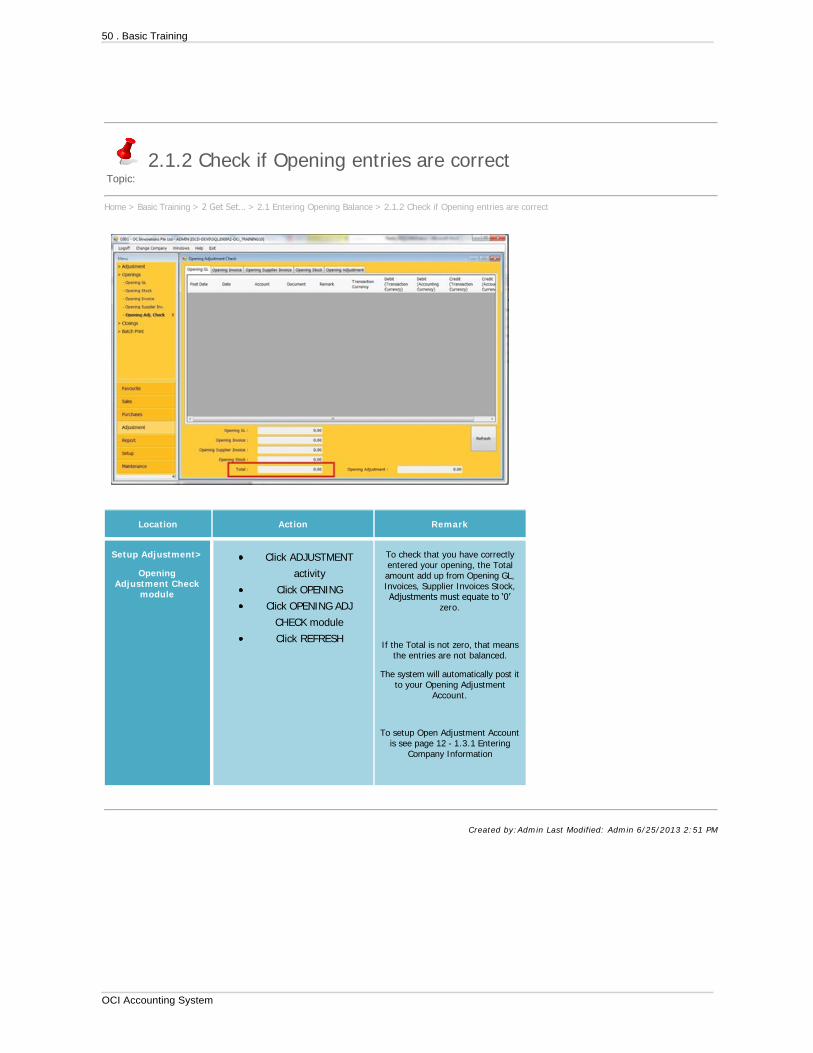
2.1.2 Check if Opening entries are correct
Home > Basic Training > 2 Get Set… > 2.1 Entering Opening Balance > 2.1.2 Check if Opening entries are correct
Location Action Remark
Setup Adjustment>
OpeningAdjustment Check
module
Click ADJUSTMENT
activity
Click OPENING
Click OPENING ADJ
CHECK module
Click REFRESH
To check that you have correctlyentered your opening, the Totalamount add up from Opening GL,Invoices, Supplier Invoices Stock,Adjustments must equate to ‘0’
zero.
If the Total is not zero, that meansthe entries are not balanced.
The system will automatically post itto your Opening Adjustment
Account.
To setup Open Adjustment Accountis see page 12 - 1.3.1 Entering
Company Information
Created by:Admin Last Modified: Admin 6/25/2013 2:51 PM
50 . Basic Training
OCI Accounting System
2.2.1 Creating Business Partner2.2.2 Creating Items
2.2 Setting Up
Basic Training . 51
OCI Accounting System

2.2.1.1 Creating New Customers2.2.1.2 Creating New Supplier2.2.1.3 Amedning a Customer Business Partner to also a Supplier
2.2.1 Creating Business PartnerBusiness Partner can be either your Customer, Supplier or Both. In any case, you are only required to create only one Business Partner Code.
52 . Basic Training
OCI Accounting System

Topic:
2.2.1.1 Creating New Customers
Home > Basic Training > 2 Get Set… > 2.2 Setting Up > 2.2.1 Creating Business Partner > 2.2.1.1 Creating New Customers
Location Action Remark
Setup> Customer/Vendor>
Business Partner
module
Click SETUP activity
Click CUSTOMER/VENDOR
Click BUSINESS PARTNER module
Click NEW
BP CODE enter ECPL01 Enter a unique code. You may enter any alpha numericcode, as long as it is not a duplicate.
NAME enter EveryDay Customer Pte Ltd Name of the customer
UEN (IAF) enter 197001234A
COUNTRY select Singapore
DEFAULT Tick The default address that the system pick when you areissuing your document.
Note that you can still change your selection while issuingthe document.
ADDRESS CODE enter a. 1 b. 2 c. 3
ADDRESS NAME enter a. Office b. Retail c.
Warehouse
Enter a unique code and give a short descriptive name forthis customer address.
In this example, we create 3 addresses.
Note that you can enter unlimited number of address forthe same customer.
Basic Training . 53
OCI Accounting System
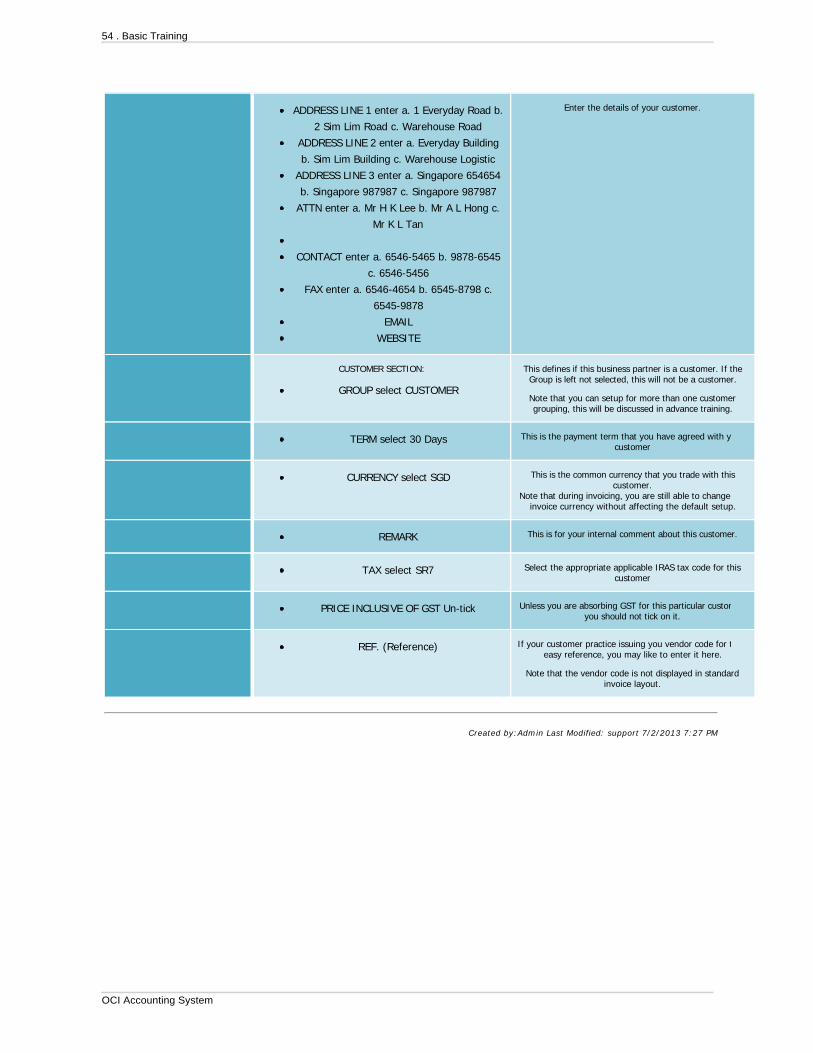
ADDRESS LINE 1 enter a. 1 Everyday Road b.
2 Sim Lim Road c. Warehouse Road
ADDRESS LINE 2 enter a. Everyday Building
b. Sim Lim Building c. Warehouse Logistic
ADDRESS LINE 3 enter a. Singapore 654654
b. Singapore 987987 c. Singapore 987987
ATTN enter a. Mr H K Lee b. Mr A L Hong c.
Mr K L Tan
CONTACT enter a. 6546-5465 b. 9878-6545
c. 6546-5456
FAX enter a. 6546-4654 b. 6545-8798 c.
6545-9878
WEBSITE
Enter the details of your customer.
CUSTOMER SECTION:
GROUP select CUSTOMER
This defines if this business partner is a customer. If theGroup is left not selected, this will not be a customer.
Note that you can setup for more than one customergrouping, this will be discussed in advance training.
TERM select 30 Days This is the payment term that you have agreed with yourcustomer
CURRENCY select SGD This is the common currency that you trade with thiscustomer.
Note that during invoicing, you are still able to change theinvoice currency without affecting the default setup.
REMARK This is for your internal comment about this customer.
TAX select SR7 Select the appropriate applicable IRAS tax code for thiscustomer
PRICE INCLUSIVE OF GST Un-tick Unless you are absorbing GST for this particular customer,you should not tick on it.
REF. (Reference) If your customer practice issuing you vendor code for theireasy reference, you may like to enter it here.
Note that the vendor code is not displayed in standardinvoice layout.
Created by:Admin Last Modified: support 7/2/2013 7:27 PM
54 . Basic Training
OCI Accounting System

Topic:
2.2.1.2 Creating New Supplier
Home > Basic Training > 2 Get Set… > 2.2 Setting Up > 2.2.1 Creating Business Partner > 2.2.1.2 Creating New Supplier
Location Action Remark
Setup>Customer/Vendor>
Business Partner
module
Click NEW
Basic Training . 55
OCI Accounting System

BP CODE enter ISPL01
NAME enter Interesting
Supplier Pte Ltd
UEN (IAF) enter
197601234B
COUNTRY select
Singapore
DEFAULT Tick
ADRESS CODE enter 1
ADDRESS NAME enter
Office
ADDRESS LINE 1 enter
1 Interesting Road
ADDRESS LINE 2 enter
Interesting Building
ADDRESS LINE 3 enter
Singapore 654654
ATTN enter Mr H K Lee
CONTACT enter 6546-
5465
FAX enter 6546-4654
WEBSITE
VENDOR SECTION:
GROUP select SUPPLIER
This defines if thisbusiness partner is a
supplier.
TERM select 7 Days
CURRENCY select SGD
REMARK
TAX select TX7
PRICE INCLUSIVE OF
GST Un-Tick
REF. (Reference)
Created by:Admin Last Modified: Admin 6/25/2013 2:54 PM
56 . Basic Training
OCI Accounting System

Topic:
2.2.1.3 Amedning a Customer Business Partner to also a Supplier
Home > Basic Training > 2 Get Set… > 2.2 Setting Up > 2.2.1 Creating Business Partner > 2.2.1.3 Amedning a Customer Business Partner to also a Supplier
Location Action Remark
Setup>Customer/Vendor>
Business Partner
Module
Select the Customer
Click EDIT
CUSTOMER SECTION:
GROUP select
CUSTOMER
This defines if thisbusiness partner as a
customer.
VENDOR SECTION:
GROUP select SUPPLIER
This set this businesspartner as a supplier too.
Click UPDATE
Created by:Admin Last Modified: Admin 6/25/2013 2:54 PM
Basic Training . 57
OCI Accounting System

2.2.2.1 Creating New Service Item
2.2.2 Creating ItemsItems are used in the content of your document like your Quotation, Delivery Order, Sales Invoices, Purchase Order, Supplier’s Invoice, etc.
58 . Basic Training
OCI Accounting System

Topic:
2.2.2.1 Creating New Service Item
Home > Basic Training > 2 Get Set… > 2.2 Setting Up > 2.2.2 Creating Items > 2.2.2.1 Creating New Service Item
Location Action Remark
Setup>
Item Details>
Item module
Click SETUP activity
Click ITEM DETAILS
Click ITEM module
Click NEW
CODE enter SVC001 Enter a unique code.
GROUP select Service
Group
This set if this item is a service,inventory or a Remark Item.
DESCRIPTION enter
Deliver Service Collect
From: Delivery To:
Contact: (shift-enter for
new line entry)
Enter the description that youwould like to appear on the
document.Note that you can enter multiple
lines. At the document you may stillbe able to add or amend the
description.
UOM enter Trip Unit of Measure e.g. Pcs, Kg, M,Lot, etc.
QTY DECIMAL enter 2 This set of number of decimalpoints to display at the document.
COST PRICE enter 0 This Unit Price amount will appearin Purchase Activity e.g. P.O.,R.O. and Supplier Invoice, etc.
In this example, it is 0 as this itemis for sales use.
Basic Training . 59
OCI Accounting System
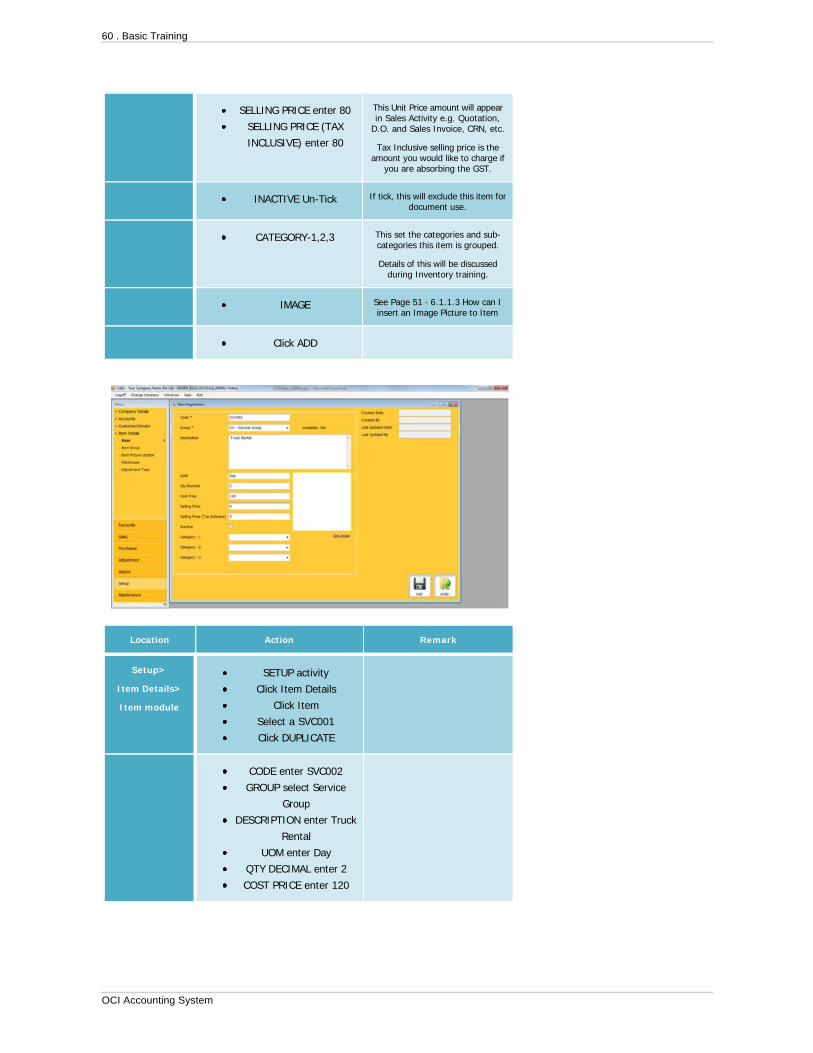
SELLING PRICE enter 80
SELLING PRICE (TAX
INCLUSIVE) enter 80
This Unit Price amount will appearin Sales Activity e.g. Quotation,
D.O. and Sales Invoice, CRN, etc.
Tax Inclusive selling price is theamount you would like to charge if
you are absorbing the GST.
INACTIVE Un-Tick If tick, this will exclude this item fordocument use.
CATEGORY-1,2,3 This set the categories and sub-categories this item is grouped.
Details of this will be discussedduring Inventory training.
IMAGE See Page 51 - 6.1.1.3 How can Iinsert an Image Picture to Item
Click ADD
Location Action Remark
Setup>
Item Details>
Item module
SETUP activity
Click Item Details
Click Item
Select a SVC001
Click DUPLICATE
CODE enter SVC002
GROUP select Service
Group
DESCRIPTION enter Truck
Rental
UOM enter Day
QTY DECIMAL enter 2
COST PRICE enter 120
60 . Basic Training
OCI Accounting System

SELLING PRICE enter 0
SELLING PRICE (TAX
INCLUSIVE) enter 0
INACTIVE Un-Tick
CATEGORY-1,2,3
Click ADD
Selling prices are 0 as this item isintent for Purchase use.
Created by:Admin Last Modified: Admin 6/25/2013 2:56 PM
Basic Training . 61
OCI Accounting System

3.1 Selling & Collecting (Accounts Receivables)3.2 Buying & Paying (Accounts Payables)
3 Go!!!
62 . Basic Training
OCI Accounting System

3.1.1 Quotation3.1.2 Delivery Order3.1.3 Sales Invoice3.1.4 Credit Note3.1.5 Receipt
3.1 Selling & Collecting (Accounts Receivables)
Basic Training . 63
OCI Accounting System

3.1.1.1 Issuing a New Quotation3.1.1.2 Understading of buttons3.1.1.3 Understanding Contract, Approved, Close & Import to Invoice3.1.1.4 Changing to different Printout Format3.1.1.5 Exporting to PDF
3.1.1 Quotation
64 . Basic Training
OCI Accounting System

Topic:
3.1.1.1 Issuing a New Quotation
Home > Basic Training > 3 Go!!! > 3.1 Selling & Collecting (Accounts Receivables) > 3.1.1 Quotation > 3.1.1.1 Issuing a New Quotation
Location Action Remark
Sales> Quotation>
Click SALES Activity
Click QUOTATION
module
Click NEW
Customer Select
EveryDay Customer Pte
Ltd
S/N enters 1. ITEM
select SVC001
DESCRIPTION add
Collect From: Changi
Airport Deliver To:
Jurong Island Contact:
Mr Ho
QTY enter 20
Check amount is
1,712.00
Click ADD
Created by:Admin Last Modified: Admin 6/25/2013 2:58 PM
Basic Training . 65
OCI Accounting System

Topic:
3.1.1.2 Understading of buttons
Home > Basic Training > 3 Go!!! > 3.1 Selling & Collecting (Accounts Receivables) > 3.1.1 Quotation > 3.1.1.2 Understading of buttons
Understanding [+], [-], [$], [S] and [*] buttons
Location Action Remark
[+] and [-] Buttons
enable user to add or
delete rows to the
document content.
Note that every row added musthave item code selected,
otherwise the system will notallow this document to be saved.
[$] enable you to check
the past selling prices.
Note that with this you are alsoable to check selling prices toother customers for the same
item.
[S] check on the stock
status for this item
[*] will batch update of
the detail content. E.g.
S/No or Unit Prices
Created by:Admin Last Modified: Admin 6/25/2013 3:00 PM
66 . Basic Training
OCI Accounting System

Topic:
3.1.1.3 Understanding Contract, Approved, Close & Import toInvoice
Home > Basic Training > 3 Go!!! > 3.1 Selling & Collecting (Accounts Receivables) > 3.1.1 Quotation > 3.1.1.3 Understanding Contract, Approved, Close &Import to Invoice
Location Action Remark
CONTRACT Tick on Contract if you want thesystem to monitor fulfillmentstatus. Meaning quantitiescommitted in Order versus
quantities Delivered.
APPROVED This will mark this Quotation as aconfirmed order.
CLOSED This will stop the system frommonitoring this Quotation in
Outstanding Quotation Report.
It will also make this Quotationunavailable import to D.O. or
Invoice
IMPORT TO INVOICE By default, after Quotation youshould be doing D.O. However, if
you not issuing any D.O. butissuing the invoice afterward, you
must Tick this box.
Created by:Admin Last Modified: Admin 6/25/2013 3:01 PM
Basic Training . 67
OCI Accounting System

Topic:
3.1.1.4 Changing to different Printout Format
Home > Basic Training > 3 Go!!! > 3.1 Selling & Collecting (Accounts Receivables) > 3.1.1 Quotation > 3.1.1.4 Changing to different Printout Format
Location Action Remark
SALES>QUOTATION
Click on LAYOUT Document Properties Dialoguebox will appear
Un-Tick all the DEFAULT
boxes
Un-Tick the Default box releasethe pre-set layout format you
have set in Default Settings. Seepage 14 - 1.3.4 Configuring
Document Defaults
PAPER Chose the printout paper size
PRINT WITH
LETTERHEAD
Un-Tick if you would like print onpre-printed letterhead.
PRINT ITEM IMAGE This will enable the item pictureto be displayed the on the
printout.
See page 51 - 6.1.1.3 How can Iinsert an Image Picture to Item
LAYOUT You can select different layoutsexample service or trading
layouts.
QUERY Use Standard. If you select Hide 0 Unit Price,items without price will not be
printed out the document.
68 . Basic Training
OCI Accounting System

ONE TIME Will not save these settings butenable you to do a one-time
printout.
Click UPDATE to save the
settings
Note that this only apply to thisparticular Quotation.
New Quotation will be stillformatted a per Default Settings.
Created by:Admin Last Modified: Admin 6/25/2013 3:02 PM
Basic Training . 69
OCI Accounting System

Topic:
3.1.1.5 Exporting to PDF
Home > Basic Training > 3 Go!!! > 3.1 Selling & Collecting (Accounts Receivables) > 3.1.1 Quotation > 3.1.1.5 Exporting to PDF
Location Action Remark
SALES>QUOTATION
Click on LAYOUT This button is available for AllDocument and Report modules.
Note that exporting in Excel &Word is not supported for
documents – Quotation, D.O.,P.O., Invoices, etc.
Exporting in Excel & Word is onlyavailable for Reports – e.g.
Listings, P&L, Balance Sheet, etc.
Created by:Admin Last Modified: Admin 6/25/2013 3:03 PM
70 . Basic Training
OCI Accounting System

3.1.2.1 Confirming a Quotation into an Order3.1.2.2 Issuing a DO by importing details from Quotation
3.1.2 Delivery Order
Basic Training . 71
OCI Accounting System

Topic:
3.1.2.1 Confirming a Quotation into an Order
Home > Basic Training > 3 Go!!! > 3.1 Selling & Collecting (Accounts Receivables) > 3.1.2 Delivery Order > 3.1.2.1 Confirming a Quotation into an Order
Location Action Remark
SALES>QUOTATION
Click SALES activity
Click QUOTATION
module
Select on the Quotation
No. you would like to
confirm
Click EDIT
Click APPROVED
Click UPDATE
To understand more aboutApproved see page 27 - 3.1.1.3
Understanding Contract,Approved, Close & Import to
Invoice
Created by:Admin Last Modified: Admin 6/25/2013 3:04 PM
72 . Basic Training
OCI Accounting System

Topic:
3.1.2.2 Issuing a DO by importing details from Quotation
Home > Basic Training > 3 Go!!! > 3.1 Selling & Collecting (Accounts Receivables) > 3.1.2 Delivery Order > 3.1.2.2 Issuing a DO by importing details fromQuotation
Location Action Remark
SALES>DELIVERY ORDER
Click SALES activity
Click DELIVERY ORDER
module
Click NEW
CUSTOMER select
EveryDay Customer Pte
Ltd
You have to first select thecustomer before the import
process.
ADDRESS select
Warehouse
You can select alternate addressfor D.O.
Click IMPORT
Click QUOTATION
Click QO.12/000001
After clicking on import, you areable to view the outstanding
documents that you can import inD.O.
Click ADD ALL ROWS
Click BACK
This will import the entire contentof the Quotation into D.O.
Basic Training . 73
OCI Accounting System

Location Action Remark
QTY amend to 12
Click ADD
Assuming we are doing a partialdelivery
Created by:Admin Last Modified: Admin 6/25/2013 3:06 PM
74 . Basic Training
OCI Accounting System
3.1.3.1 Creating Sales Invoices by importing from Delivery Order
3.1.3 Sales Invoice
Basic Training . 75
OCI Accounting System

Topic:
3.1.3.1 Creating Sales Invoices by importing from Delivery Order
Home > Basic Training > 3 Go!!! > 3.1 Selling & Collecting (Accounts Receivables) > 3.1.3 Sales Invoice > 3.1.3.1 Creating Sales Invoices by importing fromDelivery Order
Location Action Remark
SALES>INVOICE
Click SALES activity
Click INVOICE module
Click NEW
CUSTOMER select
EveryDay Customer Pte
Ltd
You have to first select thecustomer before the import
process
Click IMPORT
Click D.O.
Click DO.12/000001
After clicking on import, you areable to view the outstanding
documents that you can import inInvoice.
Click ADD ALL ROWS
Click BACK
This will import the entire contentof the D.O. into Invoice.
QTY amend to 10
Click ADD
Assuming you are doing a partialinvoice.
Created by:Admin Last Modified: Admin 6/25/2013 3:08 PM
76 . Basic Training
OCI Accounting System

3.1.4.1 Issue a Credit Note
3.1.4 Credit Note
Basic Training . 77
OCI Accounting System

Topic:
3.1.4.1 Issue a Credit Note
Home > Basic Training > 3 Go!!! > 3.1 Selling & Collecting (Accounts Receivables) > 3.1.4 Credit Note > 3.1.4.1 Issue a Credit Note
Location Action Remark
SALES>CREDIT NOTE
Click SALES activity
Click CREDIT NOTE
module
Click NEW
CUSTOMER select
EveryDay Customer Pte
Ltd
S/N enter 1
ITEM select SVC001
DESCRIPTION amend to
Discount on Delivery
Service
You may amend the descriptionappropriately
QTY enter 1
UNIT PRICE enter 10
Click ADD
Assuming you are giving a $10discount before GST.
Created by:Admin Last Modified: Admin 6/25/2013 3:09 PM
78 . Basic Training
OCI Accounting System

3.1.5.1 Trade Related Receipt3.1.5.2 Non-Trade Related Receipt
3.1.5 Receipt
Basic Training . 79
OCI Accounting System
3.1.5.1.1 Off-Setting Sales Invoice with Credit Note3.1.5.1.2 Receiving Payment from Customer3.1.5.1.3 Receiving Bulk Payments from Customer3.1.5.1.4 Taking in Customer Deposits
3.1.5.1 Trade Related Receipt
80 . Basic Training
OCI Accounting System

Topic:
3.1.5.1.1 Off-Setting Sales Invoice with Credit Note
Home > Basic Training > 3 Go!!! > 3.1 Selling & Collecting (Accounts Receivables) > 3.1.5 Receipt > 3.1.5.1 Trade Related Receipt > 3.1.5.1.1 Off-SettingSales Invoice with Credit Note
Location Action Remark
SALES>RECEIPT
Click SALES activity
Click RECEIPT module
Click NEW
CUSTOMER select
EveryDay Customer Pte
Ltd
Click IMPORT
Click DOCU
OUTSTANDING
Click ADD ALL ROWS
You can see that there are 2documents outstanding.
CN.12/000001 and IV.12/000001
AMOUNT amend 10.70
Click ADD to create
Receipt
The Invoice amount is amendedto $10.70 same as the Credit
Note quantum amount.
You can understand it as if youare using the Credit Note value tooff-set/pay for the invoice of this
same amount.
TOTAL check if it is Zero
Click ADD
The total amount of this receiptmust zero as you did not
physically receive any paymentfrom customer.
Basic Training . 81
OCI Accounting System

Created by:Admin Last Modified: Admin 6/25/2013 3:10 PM
82 . Basic Training
OCI Accounting System

Topic:
3.1.5.1.2 Receiving Payment from Customer
Home > Basic Training > 3 Go!!! > 3.1 Selling & Collecting (Accounts Receivables) > 3.1.5 Receipt > 3.1.5.1 Trade Related Receipt > 3.1.5.1.2 ReceivingPayment from Customer
Location Action Remark
SALES> RECEIPT Click Sales activity
Click Receipt module
Click NEW
CUSTOMER select
EveryDay Customer Pte
Ltd
REFERENCE enter
OCBC600601
RECEIVED AMT enter
500
Enter the cheque details
In this example, assumingcustomer is making a partial
payment of $500
Basic Training . 83
OCI Accounting System

Location Action Remark
SALES> RECEIPT Click IMPORT
Click DOCU OUSTANDING
Click ADD ALL ROWS
DESCRIPTION enter
Partial Payment
AMOUNT amend to 500
Amend the amount to $500 as itis not a full payment
Click ADD
Created by:Admin Last Modified: Admin 6/25/2013 3:11 PM
84 . Basic Training
OCI Accounting System
Topic:
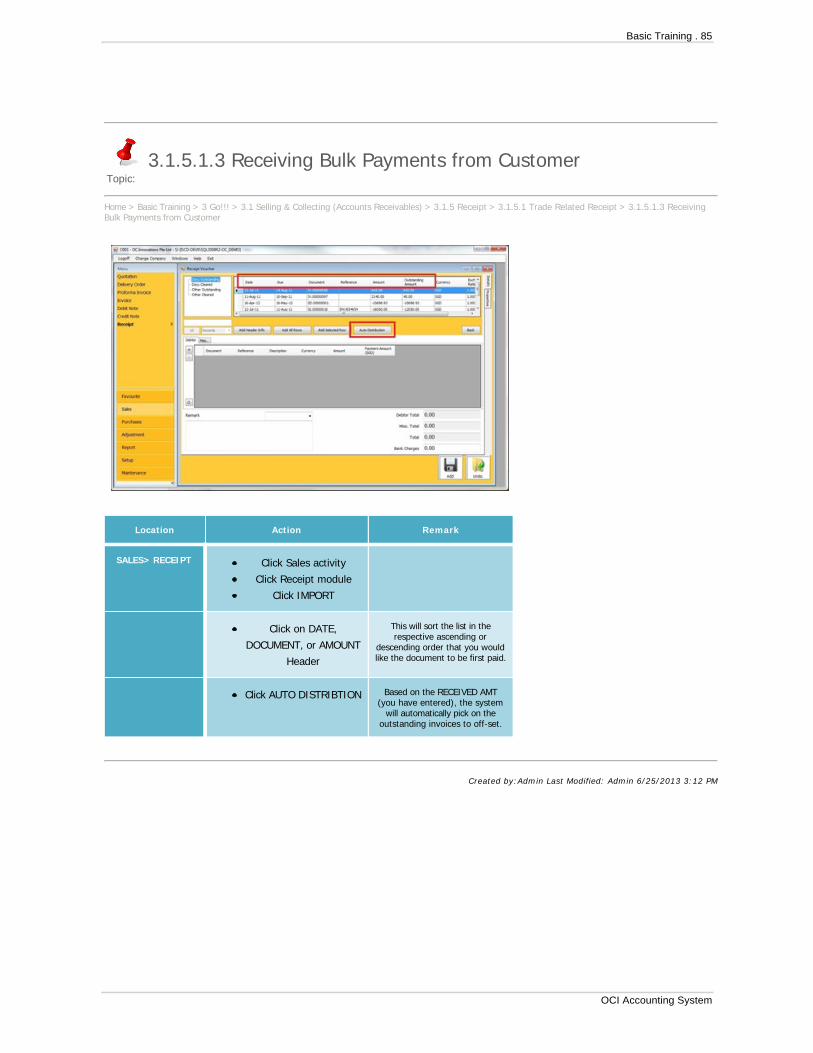
3.1.5.1.3 Receiving Bulk Payments from Customer
Home > Basic Training > 3 Go!!! > 3.1 Selling & Collecting (Accounts Receivables) > 3.1.5 Receipt > 3.1.5.1 Trade Related Receipt > 3.1.5.1.3 ReceivingBulk Payments from Customer
Location Action Remark
SALES> RECEIPT Click Sales activity
Click Receipt module
Click IMPORT
Click on DATE,
DOCUMENT, or AMOUNT
Header
This will sort the list in therespective ascending or
descending order that you wouldlike the document to be first paid.
Click AUTO DISTRIBTION Based on the RECEIVED AMT(you have entered), the system
will automatically pick on theoutstanding invoices to off-set.
Created by:Admin Last Modified: Admin 6/25/2013 3:12 PM
Basic Training . 85
OCI Accounting System

Topic:
3.1.5.1.4 Taking in Customer Deposits
Home > Basic Training > 3 Go!!! > 3.1 Selling & Collecting (Accounts Receivables) > 3.1.5 Receipt > 3.1.5.1 Trade Related Receipt > 3.1.5.1.4 Taking inCustomer Deposits
Location Action Remark
SALES> RECEIPT Click Sales activity
Click Receipt module
Click NEW
PAYER Select EveryDay
Customer Pte Ltd
Click [O] button
DOCUMENT enter
Deposit
Click OK
This will create a ‘Deposit’document/account to facilitate
receiving on the deposit payment
To issue the receipt,
continue the process as
per 32 - 3.1.5.1.2
Receiving Payment from
Customer
At later stage, to use the deposit for off-set for payment, it can be found at the following.
86 . Basic Training
OCI Accounting System

Location Action Remark
SALES> RECEIPT Click IMPORT
Click OTHER
OUSTANDING
You will see any depositpayments from customer.
Created by:Admin Last Modified: Admin 6/25/2013 3:14 PM
Basic Training . 87
OCI Accounting System
3.1.5.2.1 Receiving Other Funds
3.1.5.2 Non-Trade Related Receipt
88 . Basic Training
OCI Accounting System

Topic:
3.1.5.2.1 Receiving Other Funds
Home > Basic Training > 3 Go!!! > 3.1 Selling & Collecting (Accounts Receivables) > 3.1.5 Receipt > 3.1.5.2 Non-Trade Related Receipt > 3.1.5.2.1Receiving Other Funds
Location Action Remark
SALES> RECEIPT Click NEW
PAYER TYPE Select Non-
Trade
This will switch the receipt modeinto receiving other funds
PAYER enter Mr Director
Ong
REFERENCE enter
DBS900900
RECEIVED AMT enter
100000
Enter payments details
ACCOUNT select OEQ1001
DESCRIPTION enter Capital
Top-Up
AMOUNT enter 100000
Click ADD
Assuming the director is topingup capital of $100k
Created by:Admin Last Modified: Admin 6/25/2013 3:15 PM
Basic Training . 89
OCI Accounting System

3.2.1Supplier
3.2.2Payment
3.2.1 Supplier Invoice3.2.2 Payment Voucher
3.2 Buying & Paying (Accounts Payables)
90 . Basic Training
OCI Accounting System

Topic:
3.2.1 Supplier Invoice
Home > Basic Training > 3 Go!!! > 3.2 Buying & Paying (Accounts Payables) > 3.2.1 Supplier Invoice
Location Action Remark
PURCHASES>SUPPLIER INVOICE
Click PURCHASES
Click SUPPLIER INVOICE
Click NEW
VENDOR select Interesting
Supplier Pte Ltd
REFERENCE enter
INV.12345
S/N. enter 1
ITEM select SVC002
QTY enter 5
Enter the supplier’s invoicedetails
Click ADD
Created by:Admin Last Modified: Admin 6/25/2013 3:16 PM
Basic Training . 91
OCI Accounting System

3.2.2.1 Trade Related3.2.2.2 Non-Trade Related3.2.2.3 Bank Transfer3.2.2.4 Cheque Printing
3.2.2 Payment Voucher
92 . Basic Training
OCI Accounting System
Topic:
3.2.2.1 Trade Related
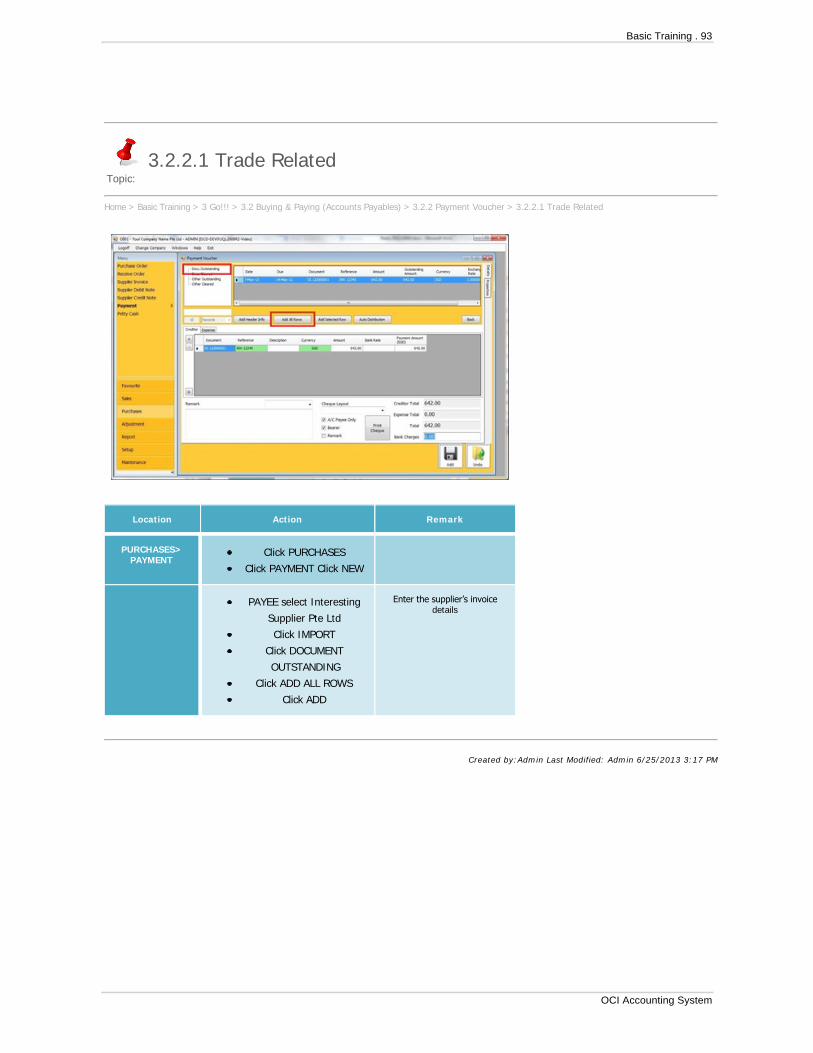
Home > Basic Training > 3 Go!!! > 3.2 Buying & Paying (Accounts Payables) > 3.2.2 Payment Voucher > 3.2.2.1 Trade Related
Location Action Remark
PURCHASES>PAYMENT
Click PURCHASES
Click PAYMENT Click NEW
PAYEE select Interesting
Supplier Pte Ltd
Click IMPORT
Click DOCUMENT
OUTSTANDING
Click ADD ALL ROWS
Click ADD
Enter the supplier’s invoicedetails
Created by:Admin Last Modified: Admin 6/25/2013 3:17 PM
Basic Training . 93
OCI Accounting System

Topic:
3.2.2.2 Non-Trade Related
Home > Basic Training > 3 Go!!! > 3.2 Buying & Paying (Accounts Payables) > 3.2.2 Payment Voucher > 3.2.2.2 Non-Trade Related
Location Action Remark
PURCHASES>PAYMENT
Click Purchases activity
Click Payment module
Click NEW
PAYEE TYPE click Non-
Trade
PAYEE enter Singtel
ACCOUNT select EXP4001
DESCRIPTION enter Bill
No.1234
AMOUNT enter 500
Click ADD
Created by:Admin Last Modified: Admin 6/25/2013 3:18 PM
94 . Basic Training
OCI Accounting System

Topic:
3.2.2.3 Bank Transfer
Home > Basic Training > 3 Go!!! > 3.2 Buying & Paying (Accounts Payables) > 3.2.2 Payment Voucher > 3.2.2.3 Bank Transfer
Location Action Remark
PURCHASES>PAYMENT
Click Purchases activity
Click Payment module
Click NEW
PAYEE TYPE click Bank
PAYEE enter Cash
ACCOUNT select CAS0010
DESCRIPTION enter Top-
Up Petty Cash
RECEIVE AMOUNT enter
300
This is the amount the receivingbank (in this case is a petty cash
box) will get.
Note that this amount may differfrom paying bank due toexchange and valuation.
PAYMENT AMOUNT enter
300
Click Add
This is the amount thewithdrawing bank will pay out.
Created by:Admin Last Modified: Admin 6/25/2013 3:19 PM
Basic Training . 95
OCI Accounting System

3.2.2.4.1 Setting New Cheque Layout & Fine Tuning
3.2.2.4 Cheque Printing
96 . Basic Training
OCI Accounting System

Topic:
3.2.2.4.1 Setting New Cheque Layout & Fine Tuning
Home > Basic Training > 3 Go!!! > 3.2 Buying & Paying (Accounts Payables) > 3.2.2 Payment Voucher > 3.2.2.4 Cheque Printing > 3.2.2.4.1 Setting NewCheque Layout & Fine Tuning
Location Action Remark
PURCHASES>PAYMENT
Click Purchases activity
Click Payment module
Click EDIT on one of the
payment
CHEQUE LAYOUT do a
Right-Click
Click NEW
Click Create
Basic Training . 97
OCI Accounting System

Location Action Remark
PURCHASES>PAYMENT
CODE enter Canon
TYPE select SGD-UOB
DEFAULT Tick
NAME enter Canon Printer
Click WIZARD
Location Action Remark
PRINTER select Laser
Printer
FEEDING select Centre
CHEQUE TYPE select UOB
Click OK
Enter your printer specifications
Upon click ok, the preset marginsfor the respective bank will set to
your layout.
98 . Basic Training
OCI Accounting System

Location Action Remark
To fine tune, click on the respectiveelement and click the arrows button on
the right section.
Click PAYEE NAME Assuming if you want to move thePayee name to be printed 3mm
above the line
Click on for 3 times Every one click move therespective element by 1mm in the
arrow direction
Click PRINT for trial
printout
Click ADD when done.
Close the CHEQUE LAYOUT
module
Location Action Remark
Basic Training . 99
OCI Accounting System

CHEQUE LAYOUT select
CANON
This is to select the layout settingpreviously setup
A/C PAYEE ONLY Tick This will crossed-out the cheque.
BEARER Tick This will strike-off the Bearer.
Remark Un-Tick You may tick this if you want theremark to be also printed on the
cheque.
Click PRINT CHEQUE Insert a cheque into printer andyou may get the cheque printed.
Created by:Admin Last Modified: Admin 6/25/2013 3:22 PM
100 . Basic Training
OCI Accounting System

4.1 Details Tracing4.2 Document Listing Reports4.3 Financial Reports4.4 GST4.5 Bank Reconciliation4.6 Job Costing
4 Result
Basic Training . 101
OCI Accounting System

4.1.1 Viewing Transaction GL Entries4.1.2 View History Log
4.1 Details Tracing
102 . Basic Training
OCI Accounting System
Topic:
4.1.1 Viewing Transaction GL Entries
Home > Basic Training > 4 Result > 4.1 Details Tracing > 4.1.1 Viewing Transaction GL Entries
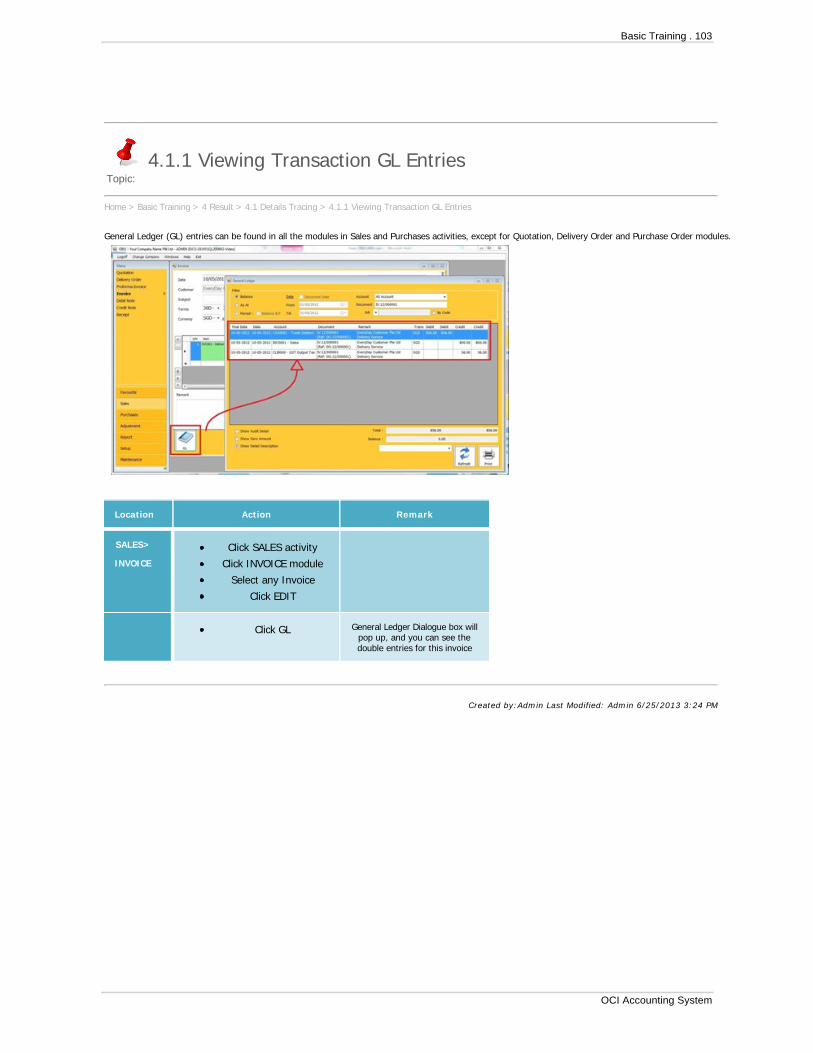
General Ledger (GL) entries can be found in all the modules in Sales and Purchases activities, except for Quotation, Delivery Order and Purchase Order modules.
Location Action Remark
SALES>
INVOICE
Click SALES activity
Click INVOICE module
Select any Invoice
Click EDIT
Click GL General Ledger Dialogue box willpop up, and you can see thedouble entries for this invoice
Created by:Admin Last Modified: Admin 6/25/2013 3:24 PM
Basic Training . 103
OCI Accounting System

Topic:
4.1.2 View History Log
Home > Basic Training > 4 Result > 4.1 Details Tracing > 4.1.2 View History Log
Location Action Remark
SALES>
INVOICE
Click SALES activity
Click INVOICE module
Select any Invoice
Click HISTORY LOG You will notice that the list is onlydisplaying the selected document
number.
It indicates number of time this sameinvoice has been amended.
In this example, you can see that theinvoice has been amended, as there is
more than one version.
You can see that the invoice’s date hasbeen changed.
Note that you may click VIEW to see thedetails of every version.
Created by:Admin Last Modified: Admin 6/25/2013 3:25 PM
104 . Basic Training
OCI Accounting System
4.2.1 Invoice Listing
4.2 Document Listing ReportsDocument Listings are available for all modules in Sales and Purchase activities
Basic Training . 105
OCI Accounting System

Topic:
4.2.1 Invoice Listing
Home > Basic Training > 4 Result > 4.2 Document Listing Reports > 4.2.1 Invoice Listing
Location Action Remark
SALES>
INVOICE
Click SALES activity
Click INVOICE module
Select a report
Click REPORT
Created by:Admin Last Modified: Admin 6/25/2013 3:26 PM
106 . Basic Training
OCI Accounting System

4.3.1 Drill Down Function4.3.2 Profit & Loss Income Statement
4.3 Financial Reports
Basic Training . 107
OCI Accounting System
Topic:
4.3.1 Drill Down Function
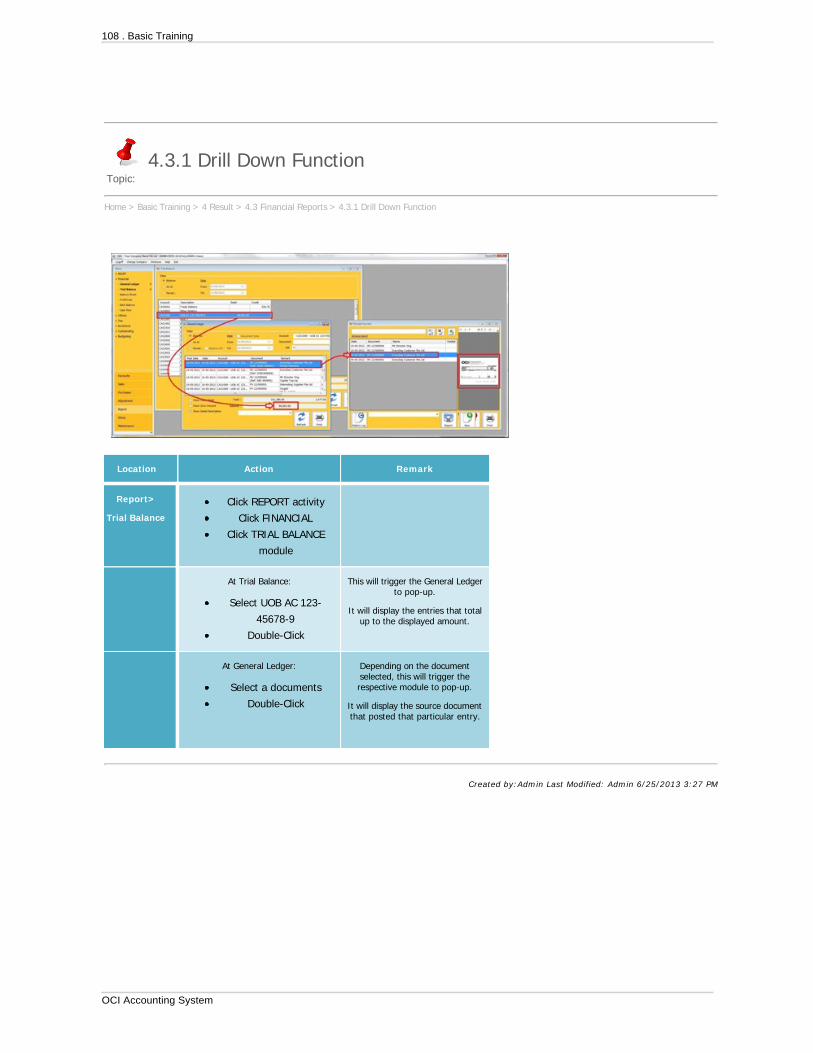
Home > Basic Training > 4 Result > 4.3 Financial Reports > 4.3.1 Drill Down Function
Location Action Remark
Report>
Trial Balance
Click REPORT activity
Click FINANCIAL
Click TRIAL BALANCE
module
At Trial Balance:
Select UOB AC 123-
45678-9
Double-Click
This will trigger the General Ledgerto pop-up.
It will display the entries that totalup to the displayed amount.
At General Ledger:
Select a documents
Double-Click
Depending on the documentselected, this will trigger therespective module to pop-up.
It will display the source documentthat posted that particular entry.
Created by:Admin Last Modified: Admin 6/25/2013 3:27 PM
108 . Basic Training
OCI Accounting System

Topic:
4.3.2 Profit & Loss Income Statement
Home > Basic Training > 4 Result > 4.3 Financial Reports > 4.3.2 Profit & Loss Income Statement
Location Action Remark
Report>
Profit/Loss
Click REPORT activity
Click FINANCIAL
Click PROFIT/LOSS
module
FROM & TO select period
Click REFRESH
Printout to select report
Click PRINT
Note that you can also drill downon the displayed list.
Created by:Admin Last Modified: Admin 6/25/2013 3:27 PM
Basic Training . 109
OCI Accounting System

4.4.1 Preparing GST F54.4.2 Printing & Submitting GST F54.4.3 Making Changes to Committed F5 Total4.4.4 Generating of IAF
4.4 GST
110 . Basic Training
OCI Accounting System

Topic:
4.4.1 Preparing GST F5
Home > Basic Training > 4 Result > 4.4 GST > 4.4.1 Preparing GST F5
Location Action Remark
Report>
Tax>
GST
Click REPORT activity
Click TAX
Click GST module
Before you are able to submit a F5report, you are required to
Commit the period in to a DateRange Serial.
The following will show you how todo so.
DATE RANGE select Trial
Generation
Select Trial Generation for if youare generating a F5 report for the
period for the first time.
FROM and TO select
first and last day of the
period/quarter
Click REFRESH This will enable the system toextract all the transactions within
the period.
Note that if a PREVIOUS Tabappear, that would means that
there are transactions before theperiod that were not committed
for submission
Basic Training . 111
OCI Accounting System

Printout select Tax Listing
Report (Trial)
Click PRINT
You may do a printout to check ifthe listed transactions are correct.
Once you are sure that they arecorrect, you can lock them by
committing it.
Click COMMIT F5 TOTAL This enable the system to lock thetransactions that tabulate up to
the total.
The transactions will be recordedin a Date Range Serial newly
generated. The name of the serialis basically the period dates.
Since the transactions arerecorded in the new Date Range
Serial, there will be no moretransactions display in Trial
Generation.
DATE RANGE select the
newly generated serial
Click REFRESH
After refresh, the previously‘disappeared’ generated list is now
listed.
Created by:Admin Last Modified: Admin 6/25/2013 3:29 PM
112 . Basic Training
OCI Accounting System
Topic:
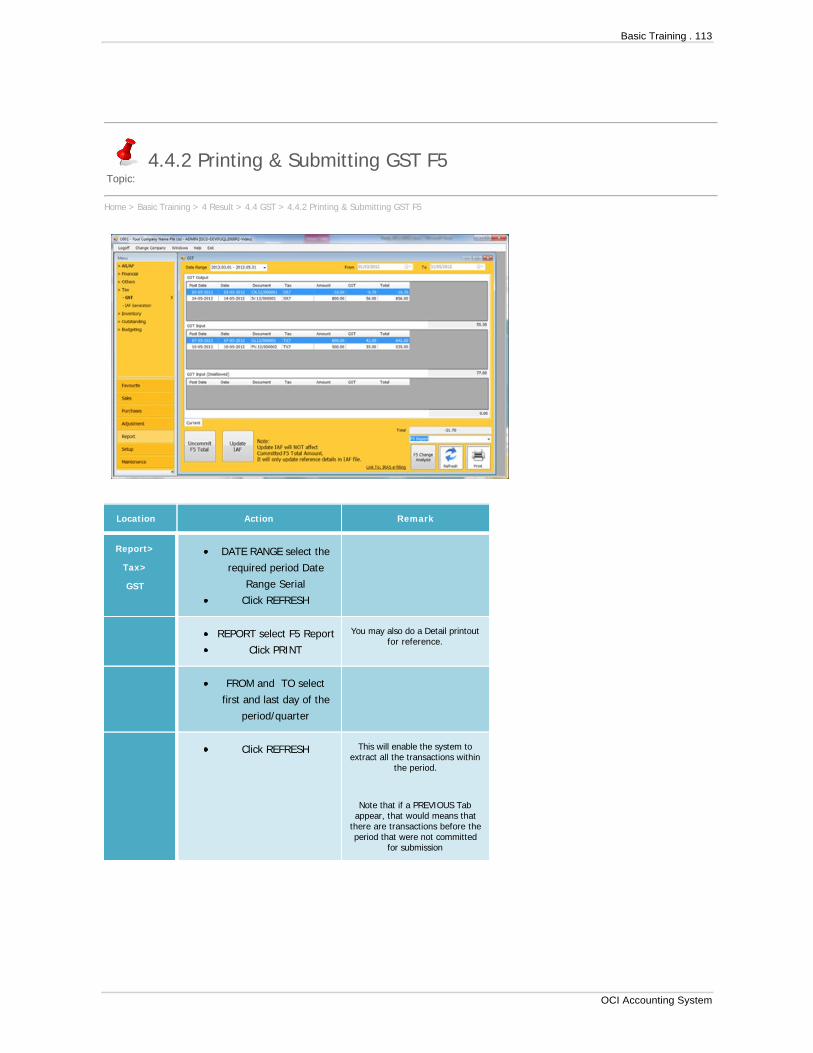
4.4.2 Printing & Submitting GST F5
Home > Basic Training > 4 Result > 4.4 GST > 4.4.2 Printing & Submitting GST F5
Location Action Remark
Report>
Tax>
GST
DATE RANGE select the
required period Date
Range Serial
Click REFRESH
REPORT select F5 Report
Click PRINT
You may also do a Detail printoutfor reference.
FROM and TO select
first and last day of the
period/quarter
Click REFRESH This will enable the system toextract all the transactions within
the period.
Note that if a PREVIOUS Tabappear, that would means that
there are transactions before theperiod that were not committed
for submission
Basic Training . 113
OCI Accounting System

Click COMMIT F5 TOTAL This enable the system to lock thetransactions that tabulate up to
the total.
The transactions will be recordedin a Date Range Serial newly
generated. The name of the serialis basically the period dates.
Since the transactions arerecorded in the new Date Range
Serial, there will be no moretransactions display in Trial
Generation.
DATE RANGE select the
newly generated serial
Click REFRESH
Click Print
After refresh, the previously‘disappeared’ generated list is now
listed.
Created by:Admin Last Modified: Admin 6/25/2013 3:30 PM
114 . Basic Training
OCI Accounting System

Topic:
4.4.3 Making Changes to Committed F5 Total
Home > Basic Training > 4 Result > 4.4 GST > 4.4.3 Making Changes to Committed F5 Total
Location Action Remark
Report>
Tax>
GST
DATE RANGE select the
required period Date
Range Serial
Click REFRESH
Click F5 CHANGES
ANALYSIS
A dialogue pop-up displaying ifthere are any changes to the
figures.
Any difference in amount will bedisplayed in Red.
Click UNCOMMIT F5
TOTAL
Once you are sure that you wouldlike the system to recalculate theF5 total, you can released/unlock
the recorded transactions byclicking on Uncommitted.
Note that this will not delete thetransactions but release them for
later calculation.
Repeat process in Page
42 - 4.4.2 Printing &
Submitting GST F5
Created by:Admin Last Modified: Admin 6/25/2013 3:30 PM
Basic Training . 115
OCI Accounting System

Topic:
4.4.4 Generating of IAF
Home > Basic Training > 4 Result > 4.4 GST > 4.4.4 Generating of IAF
Location Action Remark
Report>
Tax>
IAF
Generation
Click REPORT activity
Click TAX
Click IAF GENERATION
module
DATE RANGE select the
required date range
serial
To generate the a new daterange serial see page 42 - 4.4.2
Printing & Submitting GST F5
Select XML or TEXT
FORMAT
Select the required formatrequested by IRAS
Click GENERATE
Enter a name for the IAF
file
Browse to the location to
save the file
You may attach this file for IRASofficer for audit.
Created by:Admin Last Modified: Admin 6/25/2013 3:31 PM
116 . Basic Training
OCI Accounting System

Topic:
4.5 Bank Reconciliation
Home > Basic Training > 4 Result > 4.5 Bank Reconciliation
Location Action Remark
Adjustment>
Closings>
BankReconciliation
Click NEW
BANK select bank you
would like to reconcile
DATE select the month
and enter the year
Click GENERATE This will list out all the transactionsrelating to the bank for the period
PREVIOUS ENDING
BALANCE
Check that this matches the openingbalance of your statement received from
the bank
DEPOSIT
WITHDRAWAL
CURRENT ENDING
BALANCE
The amounts here will add up when youtick on the list
EXACT ENDING BALANCE
enter the balance show
on statement by the
bank
Basic Training . 117
OCI Accounting System

TICK on POST presented
items
DIFFERENCE
The objective is to tick on the presenteditems so that the Current Ending Balance
matches the Exact Ending Balance.
This means the Difference will be zero,which means your bank is reconciled.
Note to ‘untick’ an item you haveaccidentally ticked, you can
Click on Presented Tab and tick on them.You will notice that it will roll back to the
Un-Presented Tab list.
Click ADD
Created by:Admin Last Modified: Admin 6/25/2013 3:31 PM
118 . Basic Training
OCI Accounting System

4.6.1 Creating Job Code4.6.2 Applying Job Code4.6.3 Get Job’s Report
4.6 Job Costing
Basic Training . 119
OCI Accounting System
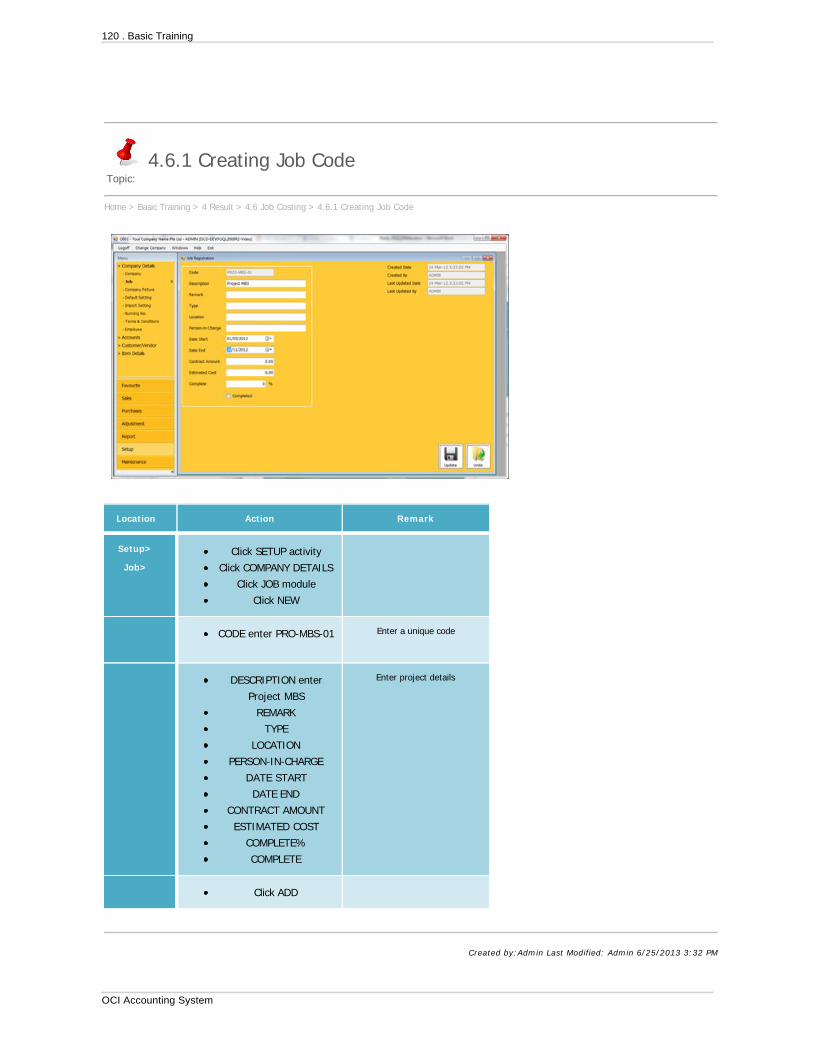
Topic:
4.6.1 Creating Job Code
Home > Basic Training > 4 Result > 4.6 Job Costing > 4.6.1 Creating Job Code
Location Action Remark
Setup>
Job>
Click SETUP activity
Click COMPANY DETAILS
Click JOB module
Click NEW
CODE enter PRO-MBS-01 Enter a unique code
DESCRIPTION enter
Project MBS
REMARK
TYPE
LOCATION
PERSON-IN-CHARGE
DATE START
DATE END
CONTRACT AMOUNT
ESTIMATED COST
COMPLETE%
COMPLETE
Enter project details
Click ADD
Created by:Admin Last Modified: Admin 6/25/2013 3:32 PM
120 . Basic Training
OCI Accounting System

Topic:
4.6.2 Applying Job Code
Home > Basic Training > 4 Result > 4.6 Job Costing > 4.6.2 Applying Job Code
Location Action Remark
Sales>
Invoice
Select a the Sales
Invoice
Click EDIT
Select an appropriate job
code
JOB select Project MBS Select an appropriate job code torelate to this sales invoice.
Note that if there are more thanone line items in the invoice, youcan assign the value of different
job code the same invoice.
Click UPDATE
Basic Training . 121
OCI Accounting System

Location Action Remark
Purchase>
SupplierInvoice
Click Purchases activity
Click Supplier Invoice
module
Select a the Supplier’s
Invoice
Click EDIT
JOB select Project MBS Select an appropriate job code torelate to this sales invoice.
Note that if there is more than oneline items in the supplier invoice,
you can assign the value ofdifferent job code the same
invoice.
Click UPDATE
Created by:Admin Last Modified: Admin 6/25/2013 3:33 PM
122 . Basic Training
OCI Accounting System

Topic:
4.6.3 Get Job’s Report
Home > Basic Training > 4 Result > 4.6 Job Costing > 4.6.3 Get Job’s Report
Location Action Remark
Report>
Other>
Job Costing
Click REPORT activity
Click OTHERS
Click Job Costing
JOB select Project MBS
Click REFRESH
INCOME
COST OF GOODS
EXPENSES
You will be able to see thosedocuments value that you haveearlier tagged – sales invoice andsupplier invoice appearing the list.
Note that you can do a drill-downby doing a double-click on the line
of the list.
Click PRINT You can do a printout of the jobprofit & loss.
Created by:Admin Last Modified: Admin 6/25/2013 3:34 PM
Basic Training . 123
OCI Accounting System

5.1 Access Control5.2 Data Management5.3 Services
5 Maintenance
124 . Basic Training
OCI Accounting System
5.1.1 Users & Role Management
5.1 Access Control
Basic Training . 125
OCI Accounting System

5.1.1.1 Creating a new Role5.1.1.2 Creating and Assigning User to new Role5.1.1.3 Login in as a limited user
5.1.1 Users & Role ManagementUser is the name and details of the user, while Role are the duties that the particular user or list of users perform.To setup access control, you have to first create a Role.
126 . Basic Training
OCI Accounting System

Topic:
5.1.1.1 Creating a new Role
Home > Basic Training > 5 Maintenance > 5.1 Access Control > 5.1.1 Users & Role Management > 5.1.1.1 Creating a new Role
Location Action Remark
Maintenance>
AccessControl>
Roles
Click MAINTENANCE
activity
Click ACCESS CONTROL
Click ROLES module
Click NEW
CODE enter S001
NAME enter Sales
Person
Give a description
Click QUOTATION
button
On the modules you wish to allow therole to perform, click on the button
Note that you can select all themodules by click on the header.
TICK ALL Tick will enable role to have all accessto this module.
Repeat the process for other modulesyou wish the role to perform.
Note that only for Enhance Version,you are able to control READ, NEW,
EDIT, DELETE, PRINT, VIEW HISTORY
Click ADD
Basic Training . 127
OCI Accounting System

Created by:Admin Last Modified: Admin 6/25/2013 3:36 PM
128 . Basic Training
OCI Accounting System

Topic:
5.1.1.2 Creating and Assigning User to new Role
Home > Basic Training > 5 Maintenance > 5.1 Access Control > 5.1.1 Users & Role Management > 5.1.1.2 Creating and Assigning User to new Role
Location Action Remark
Maintenance>
AccessControl>
Roles
Click MAINTENANCE
activity
Click ACCESS CONTROL
Click USER module
Click NEW
LOGIN ID enter wendy This is login id the user have toenter with every access
NAME enter Wendy Koh
CODE enter WK This code is use to tagging indocument running nos.
PASSWORD enter 12345 You may pre-enter a passwordfor this user.
Note that the user can changetheir password later.
TEMPLATE USER
TEMPLATE
These are customize fields meantfor other project
ROLES tick Sales Person Select the role that this userperforms.
Note that if more than one roleare selected, the user will have
access to the modules granted inthe selected roles.
Basic Training . 129
OCI Accounting System

Click ADD
Created by:Admin Last Modified: Admin 6/25/2013 3:38 PM
130 . Basic Training
OCI Accounting System

Topic:
5.1.1.3 Login in as a limited user
Home > Basic Training > 5 Maintenance > 5.1 Access Control > 5.1.1 Users & Role Management > 5.1.1.3 Login in as a limited user
Location Action Remark
At top left corner
Click LOG OFF
LOGIN ID enter wendy
PASSWORD enter 12345
Click SALES activity You should be able to see that theuser can only access to Quotation
module
Click MAINTENANCE
activity
Note that the user can changetheir password and default setting
even without your allocation.
Created by:Admin Last Modified: Admin 6/25/2013 3:38 PM
Basic Training . 131
OCI Accounting System

5.2.1 Manual Backup5.2.2 System Auto Backup
5.2 Data Management
132 . Basic Training
OCI Accounting System

Topic:
5.2.1 Manual Backup
Home > Basic Training > 5 Maintenance > 5.2 Data Management > 5.2.1 Manual Backup
Location Action Remark
Maintenance>
Data Management>
Backup
Click MAINTENANCE
activities
Click DATA MANAGEMENT
Click BACKUP module
FILE enter the path and
name of the backup file
You may browse tothe path by click
on […]
Click BACKUP
Click (…)
Select C. drive
Select Document & Setting
ALL users
Desktop
Click OK
A file will becreated.
You can restoreyour database
from this file to rollback you database
to a previousstatus.
Created by:Admin Last Modified: Admin 6/25/2013 3:39 PM
Basic Training . 133
OCI Accounting System

Topic:
5.2.2 System Auto Backup
Home > Basic Training > 5 Maintenance > 5.2 Data Management > 5.2.2 System Auto Backup
Location Action Remark
Maintenance>
Data Management>
Backup
Click MAINTENANCE activities
Click DATA MANAGEMENT
Click AUTO BACKUP SETTING
module
You can set thesystem to perform anauto backup regularly
ENABLE AUTO BACKUP tick
BACKUP EVERY 3 Days
Click (…)
Select C. drive
Select Document & Setting
ALL users
Desktop
Click OK
Set the interval for theregular backup.
LOCATION browse to the
folder to save the backup files
NAME enter a name
Note that regularbackups do no
overwrite previousfiles.
Every backup filescreated will have a
date and time stampas part of their backup
name.
Click SAVE
134 . Basic Training
OCI Accounting System
Created by:Admin Last Modified: Admin 6/25/2013 3:40 PM
Basic Training . 135
OCI Accounting System

5.3.1 System Updates5.3.2 Remote Access Service
5.3 Services
136 . Basic Training
OCI Accounting System

Topic:
5.3.1 System Updates
Home > Basic Training > 5 Maintenance > 5.3 Services > 5.3.1 System Updates
Location Action Remark
Top menu
Click HELP
Select UPDATE
NOW…
Click YES
This will enable the system tocheck for any new update
version.
Note that internet connectionis required for this process.
The system will do a backupof you data, download the
latest version and autoupdate your system
accordingly
Created by:Admin Last Modified: Admin 6/25/2013 3:41 PM
Basic Training . 137
OCI Accounting System

Topic:
5.3.2 Remote Access Service
Home > Basic Training > 5 Maintenance > 5.3 Services > 5.3.2 Remote Access Service
Remote Access service is performed when OCi Support Team need to access your computer via internet to remotely take control your computer.This is the best way to understand the issue that you are reporting and to rectify them.Note that is a secured means of access and the team does not have the ability to connect to your computer without your permission. You are required to run the remote application and inform the team about the ID before a remote connection can be established.
Location Action Remark
Top menu
Click HELP
Select START
REMOTE…
Click YES
This will enable the system to
download a 3rd partyapplication to facilitate a
secure connection betweenOCi Support team to your
computer.
Note that internet connectionis required for this process.
You have to keep theapplication running in order to
enable the connection.
Before the Support Team isable to establish a
connection, you have toadvise them YOUR ID asshown in the red box.
Note that the ID will changefrom time to time to ensure
security.
Created by:Admin Last Modified: Admin 6/25/2013 3:42 PM
138 . Basic Training
OCI Accounting System

6.1 Settings6.2 Using6.3 Processing6.4 Others
6. FAQ
Basic Training . 139
OCI Accounting System

6.1.1.1 How do I setup Multiple Running Number Series?6.1.1.2 What is Check Similar Reference at Default Settings Registration?6.1.1.3 How can I insert an Image Picture to Item?
6.1 Settings
140 . Basic Training
OCI Accounting System
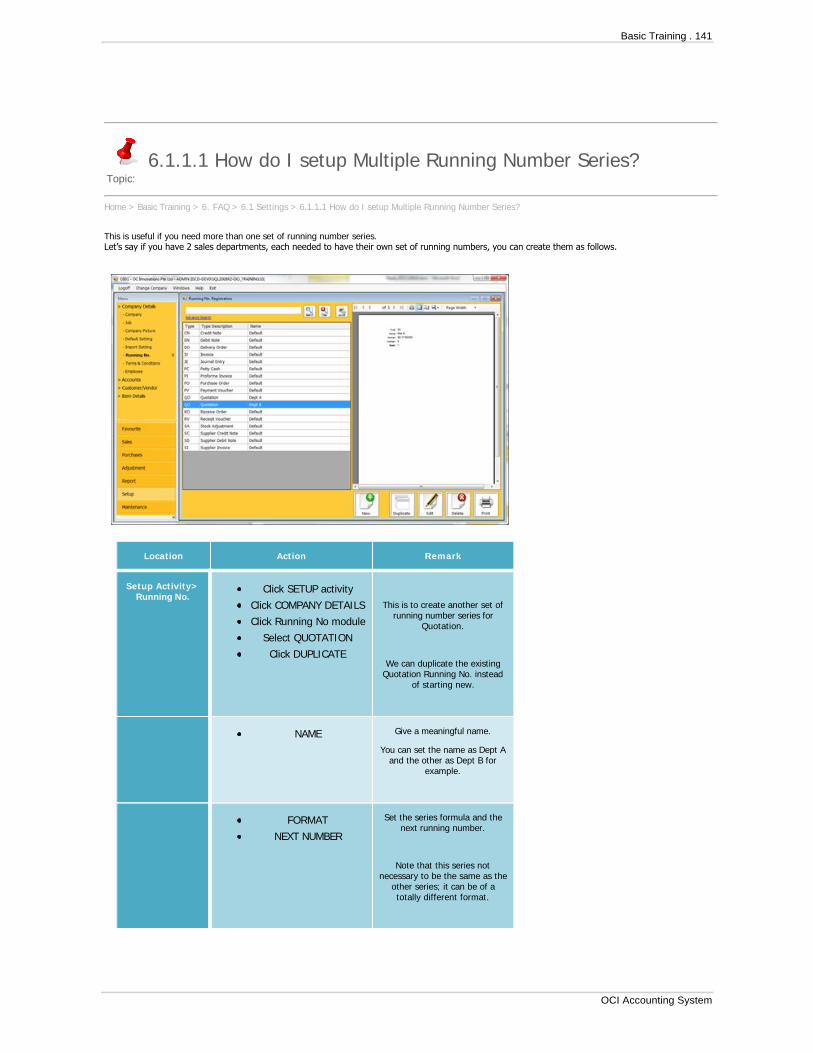
Topic:
6.1.1.1 How do I setup Multiple Running Number Series?
Home > Basic Training > 6. FAQ > 6.1 Settings > 6.1.1.1 How do I setup Multiple Running Number Series?
This is useful if you need more than one set of running number series.Let’s say if you have 2 sales departments, each needed to have their own set of running numbers, you can create them as follows.
Location Action Remark
Setup Activity>Running No.
Click SETUP activity
Click COMPANY DETAILS
Click Running No module
Select QUOTATION
Click DUPLICATE
This is to create another set ofrunning number series for
Quotation.
We can duplicate the existingQuotation Running No. instead
of starting new.
NAME Give a meaningful name.
You can set the name as Dept Aand the other as Dept B for
example.
FORMAT
NEXT NUMBER
Set the series formula and thenext running number.
Note that this series notnecessary to be the same as the
other series; it can be of atotally different format.
Basic Training . 141
OCI Accounting System

Click ADD
Close the module
This is to save your changes.
Created by:Admin Last Modified: Admin 6/25/2013 3:44 PM
142 . Basic Training
OCI Accounting System

Topic:
6.1.1.2 What is Check Similar Reference at Default SettingsRegistration?
Home > Basic Training > 6. FAQ > 6.1 Settings > 6.1.1.2 What is Check Similar Reference at Default Settings Registration?
Location Action Remark
Setup Activity>Running No.
Click SETUP activity
Click COMPANY
DETAILS
Click DEFAULT SETTING
module
Click RECEIPT tab
Click EDIT
MODE You can change yourdefault bank for receiving
funds here.
Note that default settingscan still be changed when
you are issuing theReceipt.
To understand on how touse Mode see page 19 -
1.3.6 Payment Mode
Click SAVE
Close the module
This is to save yourchanges.
Basic Training . 143
OCI Accounting System

Created by:Admin Last Modified: Admin 6/25/2013 3:45 PM
144 . Basic Training
OCI Accounting System
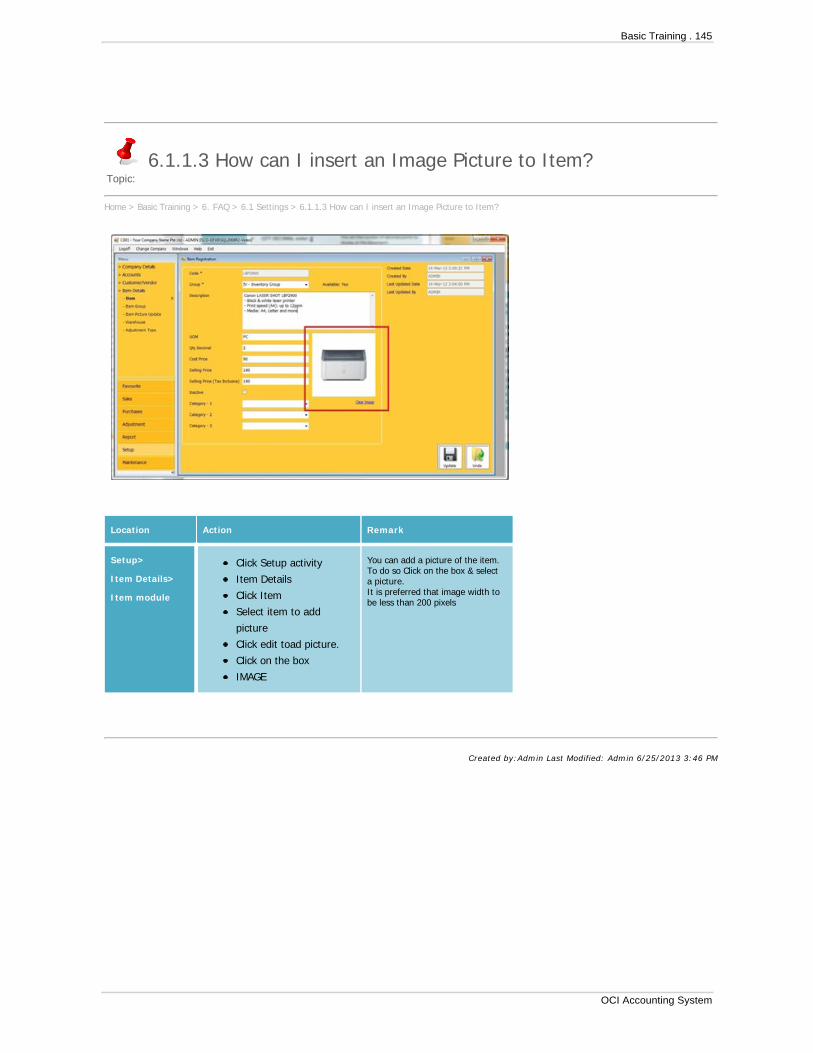
Topic:
6.1.1.3 How can I insert an Image Picture to Item?
Home > Basic Training > 6. FAQ > 6.1 Settings > 6.1.1.3 How can I insert an Image Picture to Item?
Location Action Remark
Setup>
Item Details>
Item module
Click Setup activity
Item Details
Click Item
Select item to add
picture
Click edit toad picture.
Click on the box
IMAGE
You can add a picture of the item. To do so Click on the box & selecta picture.It is preferred that image width tobe less than 200 pixels
Created by:Admin Last Modified: Admin 6/25/2013 3:46 PM
Basic Training . 145
OCI Accounting System

6.2.1 What is in Properties Tab?6.2.2 How do I create Sales Personnel Names?
6.2 Using
146 . Basic Training
OCI Accounting System

6.2.1.1 What is Created Date & By and Updated Date & By?6.2.1.2 How can I use Document Attachment? - Attach, View, Download &Delete6.2.1.3 What are those References & Comment for in Properties tab?
6.2.1 What is in Properties Tab?
Basic Training . 147
OCI Accounting System

Topic:
6.2.1.1 What is Created Date & By and Updated Date & By?
Home > Basic Training > 6. FAQ > 6.2 Using > 6.2.1 What is in Properties Tab? > 6.2.1.1 What is Created Date & By and Updated Date & By?
Location Action Remark
Sales Activity >
Quotation
Click SALES activity
Click QUOATION module
Click NEW
PROPERTIES tab
Note that all transactionaldocuments (eg. Quotation,
Invoices, etc) have a propertiestab
For audit purpose, everydocument created and amended
will be recorded.
CREATED DATE
CREATED BY
This record the date and timeuser have newly created the
documents.
LAST UPDATED DATE
LAST UPDATED BY
This records who and whenamendments were made.
Created by:Admin Last Modified: Admin 6/25/2013 3:48 PM
148 . Basic Training
OCI Accounting System

Topic:
6.2.1.2 How can I use Document Attachment? - Attach, View,Download & Delete
Home > Basic Training > 6. FAQ > 6.2 Using > 6.2.1 What is in Properties Tab? > 6.2.1.2 How can I use Document Attachment? - Attach, View, Download &Delete
Attaching of documents or pictures can be found in all modules.
Location Action Remark
Purchase>
Payment
Click PURCHASE activity
Click PAYMENT module
Select any document
Click EDIT
Click PROPERTIES tab
Attachment for files to documentis meant for future reference
purpose.
Physical files are streamed intothe database. In another words,when you backup your database,
attachments are also included.
Attachments will not be display inany of the printout.
Attaching:
ATTACHMENTS box
Right-Click
Browse to location of
the file you would like
attached
Click OPEN
Click SAVE
ATTACHMENTS
You can attach any file or files tothis document.
In this example, a scanned copyof a receipt is attached.
This will be useful for futurereference or audit.
Basic Training . 149
OCI Accounting System

Viewing:
Move mouse to
attached files
Click on the file
Double-Click
The system will allow viewing ofthe attached file if you have thenecessary supporting application.
Meaning, if you have attached anExcel file, you are not to view it
unless you have an Excelapplication.
Downloading:
Move mouse to
attached files
Click on the file
Right-Click
Select SAVE AS…
You may download attachmentfrom the server to your drive.
Deleting:
Move mouse to
attached files
Click on the file
Right-Click
Select DELETE
ATTACHMENT
This will permanently delete thefile from your server database.
Created by:Admin Last Modified: Admin 6/25/2013 3:49 PM
150 . Basic Training
OCI Accounting System

Topic:
6.2.1.3 What are those References & Comment for in Propertiestab?
Home > Basic Training > 6. FAQ > 6.2 Using > 6.2.1 What is in Properties Tab? > 6.2.1.3 What are those References & Comment for in Properties tab?
Location Action Remark
Purchases>
Payment
Click PURCHASE activity
Click PAYMENT module
Select any document
Click EDIT
Click Properties Tab
REFERENCE 1 -5 These are custom fields cateredfor customized projects use.
You may use them to enteradditional information, however itwill not be displayed or printout in
standard document.
Customised printout of the fields’information can be created.
Administrative fee applicable.
COMMENT This is meant for your internal use.Example you may like to record
the reason of amends pertainingto this document.
This will not be displayed orprintout anywhere.
Created by:Admin Last Modified: Admin 6/25/2013 3:51 PM
Basic Training . 151
OCI Accounting System

Topic:
6.2.2 How do I create Sales Personnel Names?
Home > Basic Training > 6. FAQ > 6.2 Using > 6.2.2 How do I create Sales Personnel Names?
Location Action Remark
Setup>
CompanyDetails>
Employee
Click SETUP activity
Click COMPANY DETAILS
Click EMPLOYEE module
Click NEW
Employee can be used as the SalesPerson or Purchasing Staff to bedisplayed in Sales or Purchasing
documents respectively.
CODE enter LT Enter a unique code
NAME enter Linda Tan
Click Add to save changes
Enter name of the company staff
Created by:Admin Last Modified: Admin 6/25/2013 3:52 PM
152 . Basic Training
OCI Accounting System

6.3.1 What is Batch Print?
6.3 Processing
Basic Training . 153
OCI Accounting System

6.3.1.1 Batch printing of Cheques6.3.1.2 Batch printing of Envelopes
6.3.1 What is Batch Print?
154 . Basic Training
OCI Accounting System

Topic:
6.3.1.1 Batch printing of Cheques
Home > Basic Training > 6. FAQ > 6.3 Processing > 6.3.1 What is Batch Print? > 6.3.1.1 Batch printing of Cheques
Location Action Remark
Adjustment>
Batch Print>
Cheque
Click ADJUSTMENT
activity
Click BATCH PRINT
Click CHEQUE module
Batch print is meant for you tomass print your cheque at one
go.
MODE select UOB Bank Select which bank’s cheque youwish to do a batch print.
LIST selects the Cheque
Nos. that you wish to
mass printout.
You can do :
a. multiple selections by pressingand holding on to CTRL button onyour keyboard and click on your
mouse.
b. range selection by pressingand holding on to SHIFT buttonon your keyboard and click on
your mouse.
Items selected are highlighted inblue.
CHEQUE LAYOUT selects
the required layout
settings for the printer.
Click PRINT
Feed in the stack of cheque youwish to batch print, ensure youget the running numbers in thecorrect sequence before hitting
print.
Basic Training . 155
OCI Accounting System

Created by:Admin Last Modified: Admin 6/25/2013 3:53 PM
156 . Basic Training
OCI Accounting System

Topic:
6.3.1.2 Batch printing of Envelopes
Home > Basic Training > 6. FAQ > 6.3 Processing > 6.3.1 What is Batch Print? > 6.3.1.2 Batch printing of Envelopes
Location Action Remark
Adjustment>
Batch Print>
Envelope
Click ADJUSTMENT
activity
Click BATCH PRINT
Click ENVELOPE module
Envelope Batch print is meant foryou to mass print addresses on
envelopes for your use.
CATEGORY select
Customer
Select the Business PartnerCategory you wish to batch print.
LIST selects the Business
Partners location that you
wish to mass printout.
You can do :
a. multiple selections by pressingand holding on to CTRL button onyour keyboard and click on your
mouse.
b. range selection by pressingand holding on to SHIFT buttonon your keyboard and click on
your mouse.
Items selected are highlighted inblue.
ENVELOPE selects the
required layout settings
for the printer.
Click PRINT
Feed in the stack of envelopesyou wish to batch print and click
print.
Basic Training . 157
OCI Accounting System
Created by:Admin Last Modified: Admin 6/25/2013 3:53 PM
158 . Basic Training
OCI Accounting System

6.4.1 What is IAF
6.4 Others
Basic Training . 159
OCI Accounting System
Topic:
6.4.1 What is IAF
Home > Basic Training > 6. FAQ > 6.4 Others > 6.4.1 What is IAF
IAF stands for IRAS (Inland Revenue Authority of Singapore) Audit File.It is a standard electronic file that IRAS would request from businesses for the purpose of audit which IRAS has recommended a set of principles that softwaredevelopers should endeavour to comply.
Generating of IAF is a compulsory part of process for users to qualify for relevant government grant.In OCI System , you are required to diligently enter the applicable information into those fields that is mark ‘(IAF)’, which is require to generate the said IAF.
However, as far as the system is concern, field that are marked ‘(IAF)’ are optional. The system does not require that information to function properly.
End of Basic Training Guide.
Thank you for using OCi System. If you have further questions on using OCi System, you will be happy to know that you can find help in the following:
Help website: http://help.ocisg.comEmail Helpdesk: [email protected] Helpdesk: (+65) 6295-5177Subscribe: www.facebook.com/AccountingSystem
OC Innovations Pte Ltd809 French Road #05-158 Kitchener ComplexSingapore 200809
Created by:Admin Last Modified: Admin 6/25/2013 3:56 PM
160 . Basic Training
OCI Accounting System

Index