obtfpm- import lc issuance - docs.oracle.com lc... · branch any time before submit. once...
TRANSCRIPT

User Manual
OBTFPM- Import LC Issuance Release 14.1.0.0.0 Part No:E97615-01
O B T F P M I m p o r t L C I s s u a n c e _ U s e r M a n u a l p g . 1
Oracle Banking Trade Finance Process Management User Guide
Oracle Financial Services Software Limited
Oracle Park
Off Western Express Highway
Goregaon (East)
Mumbai, Maharashtra 400 063
India
Worldwide Inquiries:
Phone: +91 22 6718 3000
Fax: +91 22 6718 3001
www.Oracle.com/financialservices/
Copyright ©,[2018], Oracle and/or its affiliates. All rights reserved.
Oracle and Java are registered trademarks of Oracle and/or its affiliates. Other names may be trademarks of their respective owners.
U.S. GOVERNMENT END USERS: Oracle programs, including any operating system, integrated software, any programs installed on the
hardware, and/or documentation, delivered to U.S. Government end users are “commercial computer software” pursuant to the
applicable Federal Acquisition Regulation and agency-specific supplemental regulations. As such, use, duplication, disclosure, modifi-
cation, and adaptation of the programs, including any operating system, integrated software, any programs installed on the hardware,
and/or documentation, shall be subject to license terms and license restrictions applicable to the programs. No other rights are
granted to the U.S. Government.
This software or hardware is developed for general use in a variety of information management applications. It is not developed or
intended for use in any inherently dangerous applications, including applications that may create a risk of personal injury. If you use
this software or hardware in dangerous applications, then you shall be responsible to take all appropriate failsafe, backup, redun-
dancy, and other measures to ensure its safe use. Oracle Corporation and its affiliates disclaim any liability for any damages caused
by use of this software or hardware in dangerous applications.
This software and related documentation are provided under a license agreement containing restrictions on use and disclosure and
are protected by intellectual property laws. Except as expressly permitted in your license agreement or allowed by law, you may not
use, copy, reproduce, translate, broadcast, modify, license, transmit, distribute, exhibit, perform, publish or display any part, in any
form, or by any means. Reverse engineering, disassembly, or decompilation of this software, unless required by law for interoperabil-
ity, is prohibited.
The information contained herein is subject to change without notice and is not warranted to be error-free. If you find any errors,
please report them to us in writing.
This software or hardware and documentation may provide access to or information on content, products and services from third
parties. Oracle Corporation and its affiliates are not responsible for and expressly disclaim all warranties of any kind with respect to
third-party content, products, and services. Oracle Corporation and its affiliates will not be responsible for any loss, costs, or damages
incurred due to your access to or use of third-party content, products, or services.

O B T F P M I m p o r t L C I s s u a n c e _ U s e r M a n u a l p g . 2
1 TABLE OF CONTENTS 2 Overview of OBTFPM .................................................................................................................................. 3
2.1 Benefits ............................................................................................................................................... 3
2.2 Key Features ........................................................................................................................................ 3
2.3 Import LC Issuance .............................................................................................................................. 3
2.4 Import LC Issuance - Process Flow Diagram ....................................................................................... 4
3 Registration ................................................................................................................................................. 4
3.1 Main .................................................................................................................................................... 4
3.2 Application Details .............................................................................................................................. 6
3.3 LC Details ............................................................................................................................................. 7
4 Scrutiny ..................................................................................................................................................... 11
4.1 Main .................................................................................................................................................. 11
4.2 Application Details ............................................................................................................................ 12
4.3 LC Details ........................................................................................................................................... 13
4.4 Scrutiny - Availability & Shipment ..................................................................................................... 18
4.5 Payment Details. .............................................................................................................................. 24
4.6 Scrutiny - Additional Details .............................................................................................................. 28
4.7 Summary ........................................................................................................................................... 34
5 Data Enrichment ....................................................................................................................................... 35
5.1 Main .................................................................................................................................................. 35
5.2 Availability & Shipment ..................................................................................................................... 39
5.3 Payment ............................................................................................................................................ 43
5.4 Documents & Conditions .................................................................................................................. 46
5.5 Additional Details .............................................................................................................................. 48
5.6 Data Enrichment - Summary ............................................................................................................. 52
6 Multi Level Approval ................................................................................................................................. 53
7 Customer - Acknowledgement ................................................................................................................. 54
8 Customer - Reject Letter ........................................................................................................................... 55
9 Customer Response - Draft Confirmation ................................................................................................. 56
10 Exception Approval - Limit Check ......................................................................................................... 59
11 Exception - Know Your Customer (KYC) ................................................................................................ 60
12 Exception - Amount Block ..................................................................................................................... 61
13 Reference and Feedback ....................................................................................................................... 63

O B T F P M I m p o r t L C I s s u a n c e _ U s e r M a n u a l p g . 3
Welcome to Oracle Banking Trade Finance Process Management - Import LC Issuance
Welcome to the Oracle Banking Trade Finance Process Management (OBTFPM) User Manual. This manual provides an overview on the OBTFPM application and takes you through the various steps involved in creating and processing trade finance transactions. This document will take you through on how to create and handle trade finance transaction in OBTFPM.This document is intended for helping users to conveniently create and process trade finance transactions in OB-TFPM
2 OVERVIEW OF OBTFPM OBTFPM is a trade finance middle office platform, which enables your bank to streamline the trade finance operations. With OBTFPM, customers can send request for new trade finance transaction either by visiting the branch (Non Online channels) or through SWIFT/Trade Portals/ other external systems (Online Channels). OBTFPM has customer specific templates that enable fast and easy processing of Trade transactions that re-occur periodically.
2.1 Benefits OBTFPM application provides service for the customers and financial institutions. This service helps the cor-porate clients to manage and control multipleTrade Finance Transaction across the Globe in different curren-cies. OBTFPM allows you to:
Handle all Trade Finance transactions in a single Platform
Provides audit trail from the creation to closure of the transaction
Amount block support for customer account
Create acknowledgement to Customers
Enable uploading of related documents
Integrated with back end applications for tracking limits, creating limit earmarks and amount
blocks, checking KYC, AML and Sanction checks status
Create, track and close exceptions for the above checks.
2.2 Key Features
Stand-alone system agnostic to backend application
Requires very little change to bank’s existing core systems
Faster time to market
Capability to interface with corporate ERP and SWIFT to Corporate
Highly configurable based on corporate specific needs
Flexibility in modifying processes
2.3 Import LC Issuance An Import LC Issuance is a Trade Finance transaction where the Applicant (importer customer) approaches a bank and requests the bank to issue a Letter of Credit on their behalf to the beneficiary (Exporter). The Letter of Credit stipulates the required documents and the conditions to be met by the beneficiary while shipping

O B T F P M I m p o r t L C I s s u a n c e _ U s e r M a n u a l p g . 4
under the said LC. On receipt of credit compliant documents, the Issuing Bank is obliged to make payment under the LC The various stages involved for Issuance of an Import Letter of Credit are
Receive and Verify Document (Non Online Channel)- Registration Stage
Input Application Details
Upload of related Mandatory and Non Mandatory documents
Verify Documents and Capture Details (Online/Non Online Channels)- Scrutiny Stage
Input/Modify Details of LC - Data Enrichment Stage
Check for Limit Approval
Check for Amount Block
Check for Sanctions & KYC
Earmark Limits/Collaterals/Amount Block
Create Import LC
Capture Remarks
Generate Acknowledgements and Draft LC copies
Notify customer on any negative statuses in any of the stages
Handoff to Back Office
2.4 Import LC Issuance - Process Flow Diagram
3 REGISTRATION
3.1 Main If the Letter Of Credit request is given through branch either by Fax, Mail, Email or physical application form, the Import LC Issuance process starts from the Registration Stage. To register request for new Import LC Issuance received at the front desk (as an application received physi-cally/received by Email/mail/fax). During registration, you can capture the basic details of the application,

O B T F P M I m p o r t L C I s s u a n c e _ U s e r M a n u a l p g . 5
check the signature of the applicant and upload related documents. You should also be able to capture some additional product related details as an option. On submit of the request, the customer should be notified with acknowledgment and the request should be available for an LC Issuance expert to handle in the next stage As a registration user, you will be able to login to the Trade Middle Office application with appropriate
credentials. On login, you should be able to view the dashboard screen with dashboards, widgets mapped for your user profile.
Dashboard > Trade Finance> Import LC Issuance
Dashboard > Trade Finance> Import LC Issuance>Create New
From user dashboard landing page, either from the ‘Create New’ or from the ‘Left menu bar’, you should be able to create a new Import LC Issuance.
On selecting, Import LC Issuance, a new screen will open to capture the details.
As a registration user, you can provide the basic application details.

O B T F P M I m p o r t L C I s s u a n c e _ U s e r M a n u a l p g . 6
3.2 Application Details Received from Applicant Bank: Import LC Issuance request can be received from the applicant or the applicant’s bank. If the request for LC issuance has been received from the applicant’s bank this field has to be checked.
Received from- Customer Id: You have to select the customer id of customer from whom the issuance request has been received (applicant’s bank or applicant) as the case may be.
Customer Name: This field will default the name of the customer whose customer id has been chosen in the Received from – Customer Id field.
Branch: System will default the customer’s home branch. You can edit the defaulted branch to another branch any time before Submit. Once submitted, the branch cannot be edited.
Currency Code: a).You are allowed to type the currency code. On entering the first character the curren-cies matching the letter would be filtered.
b) You can also select from the drop-down.
Amount: You are allowed to input the LC value with decimal places (as per currency type). You can type abbreviations like 1T to display 1,000.00, 1M to display as 1,000,000.00.
Priority: System will default based on priority maintenance and you can change the same. Values are High, Medium and Low
Submission Mode: For transactions created via registration, the submission mode will default as ‘Desk’. You are allowed to change the defaulted mode to another mode. Allowed values are Desk, Fax, Email and Courier.
Process Reference Number: Unique sequence number for the transaction. This is auto generated by the system based on process name and branch code.
Application Date: System will default the branch’s current date. You can change the date to a back date but not future date.
Customer Reference Number: You can input the Customer Reference Number. System to validate that this is a unique number. The value here will be picked up as user reference number in LC. If there is no value here, Documentary Credit No. will be populated in user reference number in LC.

O B T F P M I m p o r t L C I s s u a n c e _ U s e r M a n u a l p g . 7
3.3 LC Details As a registration user, you will be able to optionally fill the details in the following LC Details data segment
Product Code: The product code LOV will have all the product codes applicable for Import LC issuance. You have to select appropriate product code.
Product Description The product description for the product code selected will be populated by the sys-tem.

O B T F P M I m p o r t L C I s s u a n c e _ U s e r M a n u a l p g . 8
Advising Bank: You can search the LOV with Advising Bank name, customer ID.
Party type with banks would only be displayed in LOV.
The system will display the
a) SWIFT code (if available),
b) Name and address of the bank
On selection of the record if swift code is available, then swift code will be defaulted, if swift code is not available then the bank's name and address will be defaulted.
Form of Documentary Credit: You will be able to select the type of LC (Documentary credit) from the drop down list. Dropdown will default the value IRREVOCABLE and you can change the values.
The dropdown values are, IRREVOCABLE, IRREVOCABLE TRANSFERRABLE, IRREVOCABLE STANDBY, IR-REVOC TRANS STANDBY, REVOCABLE, REVOCABLE TRANSFERRABLE, REVOCABLE STANDBY and REVOC TRANS STANDBY
Documentary Credit Number: The documentary credit number generated by the backend application will be populated here once you have selected the product code.
Reference to Pre Advice – You can input details of any Pre-advice issued by the bank.
Date of Issue: System will default the branch’s current date in date of issue. You will not be able to change the defaulted date. System will populate the Date of Issue field with branch date on approval if date of approval is later than date of registration.
Applicable Rules: You will be able to select Applicable Rules from drop down. System will default UCP LATEST VERSION.
You can change from any of the following values: UCP LATEST VERSION, EUCP LATEST VERSION, UCPURR LATEST VERSION, EUCPURR LATEST VERSION, OTHR and ISP LATEST VERSION
Date of Expiry: You can input the expiry date of the LC in this field. The date in this field cannot be before the issue date. The expiry date can be equal or greater than the issue date. If the Expiry Date is before the issue date – system will provide an error and if the ‘Expiry Date is equal to the Issue Date’, the system will provide a override message
Place of Expiry: You can enter the Place of Expiry.
Applicant Bank: In the application details, if the request is received from applicant bank, the applicant bank details captured will be defaulted here. In case the request is not received from the applicant bank then this field will be blank. If the request is received direct from the applicant, you will not be able to enter any value here.
Beneficiary Name: If the beneficiary if a customer of the bank, you can select the beneficiary from the LOV. In case beneficiary is not a customer of the bank, then you have to choose WALKIN customer id and enter the beneficiary details. If beneficiary is a customer, system will display override if KYC status is not Valid
Percentage Credit Amount Tolerance: You can capture numeric two digit value. If Tolerance is more than 10%, override message will be displayed.
Either tolerance or maximum credit amount is applicable and not both. In case both have data, system will display an error.
Maximum Credit Amount: If there is a maximum credit amount available under the LC, the same has to be captured in this field. Either tolerance or maximum credit amount should be captured and not both. In case both have data, system should validate and display an error.

O B T F P M I m p o r t L C I s s u a n c e _ U s e r M a n u a l p g . 9
Additional Amount covered: You can enter any additional amount under the LC in this field.
Documents and Checklist:
Documents: System will display the mandatory and optional documents. You can upload the applicable documents. If mandatory documents are not uploaded, system will display an error on submit. The possi-ble documents submitted under an Import LC Issuance request are
Import LC Application Form (Mandatory) Pro-forma Invoice Purchase Order Collateral – Deposit Receipt Letter of Indemnity Import license Insurance Policy Others
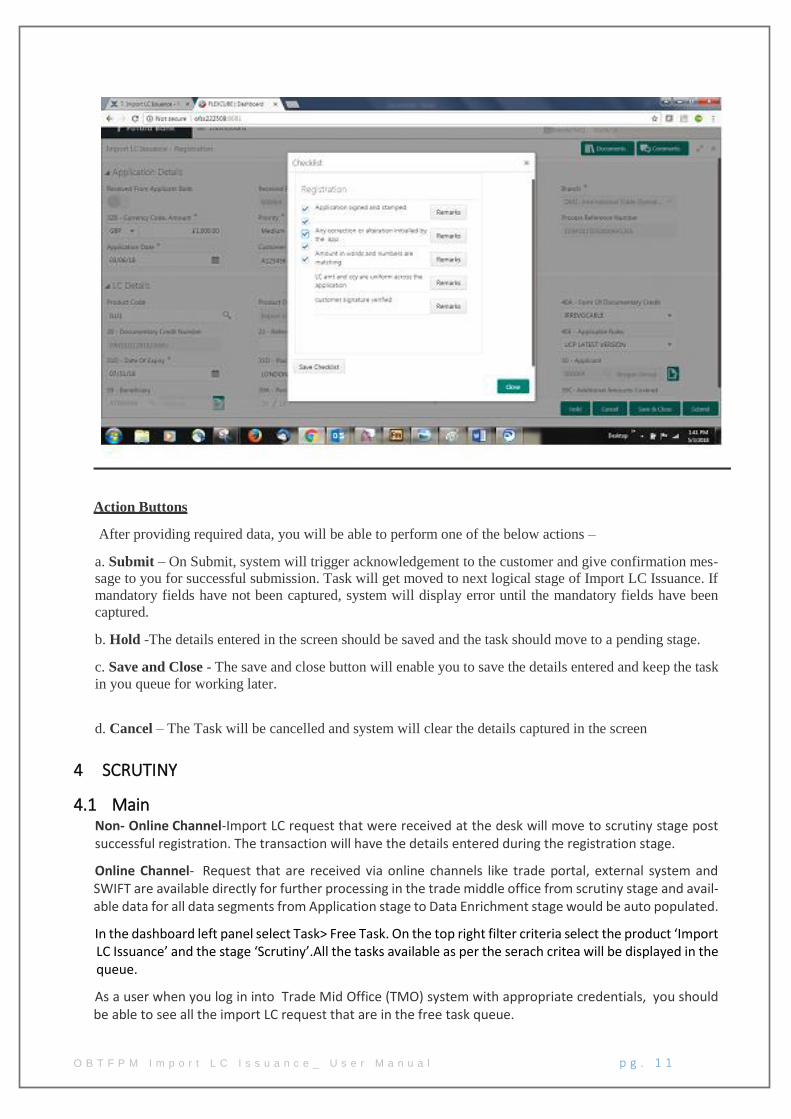
Checklist: System will display the mandatory and optional checklist items. You have to check on the ap-plicable checklist items. If mandatory checklist items are not marked, system will display an error on sub-mit.
The checklist items under Registration Stage are:
Application signed and stamped Customer signature verified LC amount and currency are uniform across the application Amount in words and numbers are matching Any correction or alteration initialed by the applicant
On Submit - Acknowledgment will be issued to the customer through customer’s preferred media. A sim-ple acknowledgment will be sent in case application details alone are captured. A detailed acknowledge-ment will be sent if LC Details screen is also captured.
In case of request received through online channels, system would send the acknowledgment automati-cally on receipt of the request.
Please refer to the acknowledgment formats for further details

O B T F P M I m p o r t L C I s s u a n c e _ U s e r M a n u a l p g . 1 0
O B T F P M I m p o r t L C I s s u a n c e _ U s e r M a n u a l p g . 1 1
Action Buttons
After providing required data, you will be able to perform one of the below actions –
a. Submit – On Submit, system will trigger acknowledgement to the customer and give confirmation mes-
sage to you for successful submission. Task will get moved to next logical stage of Import LC Issuance. If
mandatory fields have not been captured, system will display error until the mandatory fields have been
captured.
b. Hold -The details entered in the screen should be saved and the task should move to a pending stage.
c. Save and Close - The save and close button will enable you to save the details entered and keep the task
in you queue for working later.
d. Cancel – The Task will be cancelled and system will clear the details captured in the screen
4 SCRUTINY
4.1 Main Non- Online Channel-Import LC request that were received at the desk will move to scrutiny stage post successful registration. The transaction will have the details entered during the registration stage.
Online Channel- Request that are received via online channels like trade portal, external system and SWIFT are available directly for further processing in the trade middle office from scrutiny stage and avail-able data for all data segments from Application stage to Data Enrichment stage would be auto populated.
In the dashboard left panel select Task> Free Task. On the top right filter criteria select the product ‘Import LC Issuance’ and the stage ‘Scrutiny’.All the tasks available as per the serach critea will be displayed in the queue.
As a user when you log in into Trade Mid Office (TMO) system with appropriate credentials, you should be able to see all the import LC request that are in the free task queue.

O B T F P M I m p o r t L C I s s u a n c e _ U s e r M a n u a l p g . 1 2
You should be able to acquire the free tasks that you are authorised to work on through widget or menu.
You should be able to enter/update the following fields. Some of the fields that are already having value from registration/online channels may not be editable.
4.2 Application Details The application details data segment would have values for requests received from both non online and online channels.
All fields displayed under Application details section, would be read only except for the priority field.
Received from Applicant Bank: Read only field. If the request of LC issuance has been received from the applicant’s bank, this field will have value.
Received from - Customer Id: Read-only field. Customer id of customer from whom the issuance request has been received (applicant’s bank or applicant) will be displayed here.
Customer Name: Read-only field. This field will display the name of the customer whose customer id has been chosen in the Customer ID field.
Branch: Read-only field. Customer’s home branch or any other branch where the customer has chosen to get the LC Issued will be displayed here.
Currency Code: Read-only field. 3 character currency code is displayed here.
Amount: Read-only field. LC value with decimal places (as per currency) is displayed here.
Priority: The priority maintained for the customer/ priority chosen by registration user is defaulted, but the value can be edited
Submission Mode: Read-only field.
Non-Online channel- value captured in registration is displayed.
Online channels- Trade Portal, SWIFT or Other External Systems will be displayed.
Process Reference Number – Read only - Auto generated by the system based on process name and branch code.
Application Date: Read-only field. The application date is displayed here.
Customer Reference Number – Online channel – Read only field. Non online channel – You can enter or update. System will validate whether it is unique.

O B T F P M I m p o r t L C I s s u a n c e _ U s e r M a n u a l p g . 1 3
4.3 LC Details In this data segment, during registration if you have captured input, the same will be available and if not, you can capture the details.
For Online channels, the details will be auto populated, some of the fields may be editable, and others are read-only.
Template:
For non-online transactions, Template can be used. The Template id if previously known can be entered and on tab out, the filed details available in the template will be updated.
VIEW TEMPLATE: When you click on the look up, system will display the templates available for the ap-plicant. You can select the relevant template and the details will be populated. The details pertaining to the subsequent screen in scrutiny and data enrichment screens will be persisted and populated when you move to the relevant screens.
Before populating the screens, system will check if there are existing values and display a override mes-sage ' Value exist already in few fields - Do you want to use the template - Yes/No'. If the you click on Yes the details pre entered will be over-written with the template values.
USE TEMPLATE: You can directly update the template id or template name and click on the Use Template button. System will validate the Template id or Template Name and populate the relevant values in the screen. If the Template id or Template Name provided is different from the chosen applicant id, system will display an error message, 'Check the Template id/Template Name'. Before populating the screens, system will check if there are existing values and display a override message ' Value exist already in few fields - Do you want to use the template - Yes/No'. If you click on Yes the details pre entered will be over-written with the template values. While if the you clicks No - Template will not be used.

O B T F P M I m p o r t L C I s s u a n c e _ U s e r M a n u a l p g . 1 4

O B T F P M I m p o r t L C I s s u a n c e _ U s e r M a n u a l p g . 1 5
Product Code:
Non online channel – Read only if already captured in Registration stage.
Non-online channel – if not captured in registration and Online channel: The product code LOV will have
all the product codes with product type starting with ‘I’. You can select appropriate product.
Product Description: The product description for the product code selected should be populated.
Advising Bank: All Channels:You should be able to select the advising bank from the LOV.
You can search through LOV.
Party type with banks should only be displayed in LOV.
The system should display the
a) SWIFT code (if available),
b) Name and address of the bank
On selection of the record if swift code is available, then swift code will be defaulted, if swift code is not
available then the bank's name and address to be defaulted. The SWIFT key should be maintained with swift
key validation as 'Y'. If the swift key maintenance is 'N', then the bank name needs to be populated.
The values should be editable if already captured in registration or online request.
Form of Documentary Credit: Read only for On line channel request and Non online channel – already
captured in registration
Non Online channel not captured in registration - The type of LC (documentary credit) is selected from the
drop down list
Available values are
IRREVOCABLE

O B T F P M I m p o r t L C I s s u a n c e _ U s e r M a n u a l p g . 1 6
IRREVOCABLE TRANSFERRABLE
IRREVOCABLE STANDBY
IRREVOC TRANS STANDBY
REVOCABLE
REVOCABLE TRANSFERRABLE
REVOCABLE STANDBY
REVOC TRANS STANDBY
Documentary Credit Number:
Non online channel – If already generated in registration stage, the same will be displayed.
Online channel and non- online channel where not captured already in registration – The documentary credit number will be generated and displayed as a read only item as soon as the product code is chosen.
Reference to Pre advice: Read only -Online channel and non-online channel already captured in registra-tion
Non Online- not captured in registration - User to enter the pre advice reference. This will not be validated.
Date of Issue:
Online channel - Read only
Non-online -User can enter the details if not captured during registration stage. User can update if already captured during registration stage
- Branch date to be defaulted, (future date is allowed but back value is not allowed). System will populate the date of approval if the LC is approved on a future date.
Applicable Rules:
1. Online channel - Read only
2. Non Online Channel -You can enter the details if not captured during registration stage and update if captured during registration. System defaults UCP LATEST VERSION. Possible values - UCP LATEST VER-SION, EUCP LATEST VERSION, UCPURR LATEST VERSION, EUCPURR LATEST VERSION, OTHR and ISP LATEST VERSION
Date of Expiry:
1. Online channel – read only 2. Non online channel - You can enter the details if not captured during registration stage. Cannot be earlier than Issue Date. If expiry date is equal to issue date override message to be provided You can update if already captured during registration stage.
Place of Expiry
Online channel – Read only
Non online channel - User inputs/ You can update the Place of Expiry.
Applicant Bank:
1. Online channel - editable
2. Non online channel - You can search through LOV,
Party type with banks should only be displayed in LOV.

O B T F P M I m p o r t L C I s s u a n c e _ U s e r M a n u a l p g . 1 7
The system should display the
a)SWIFT code(if available) , b)name and address of the bank
On selection of the record if swift code is available then swift code will be defaulted, if swift code is not
available then the bank's name and address to be defaulted.
You can update if already captured during registration stage.
Applicant:
1. Online channel – Read-only
2. Non-online channel – If the application is received from the applicant and customer id is already captured,
the customer details to be populated by the system.
If the application is received from the applicant bank, then the applicant information is captured by you
The user can search through LOV,
Party type with customers should only be displayed in LOV.
Only customers who have a valid KYC status will be available for selection in LOV.
You can update if already captured in Registration stage.
Beneficiary Name:
1. Online channel - read only
2. Non online channel - You can enter the details if not captured during registration stage.
You can update if already captured during registration stage.
3. If WALKIN CUSTOMER is chosen user should be allowed to edit the details
4. If beneficiary is a customer of the bank KYC to be done
You can update if already captured in registration.
Percentage Credit Amount Tolerance:
1. Online channel - read only,
2. Non online channel - You can enter the details if not captured during registration stage.
You can update if already captured during registration stage.
3. Should be a numeric two digit value. For Tolerance value more than 10 %, override message to be dis-
played.
Maximum Credit Amount:
1. Online channel - read only
2. Non online channel - You can enter the details if not captured during registration stage.
You can update if already captured during registration stage.
2. 39A (% credit amount tolerance) and 39B are optional fields. Either 39A or 39B can be entered not both
Additional Amount covered:
1. Online channel - read only
2.Non online channel - defaults from registration, you can update

O B T F P M I m p o r t L C I s s u a n c e _ U s e r M a n u a l p g . 1 8
If not captured in registration, any additional amount highlighted under the LC application is captured in
this field.
Documents and Checklist
Documents: No Documents are to be uploaded in this stage.
Checklist:
Verified the documents uploaded/ linked
Verified the Remarks Details
Applicant Details and LC currency and amount entered in Registration stage are correct
The terms of LC are not in violation of UCP or other applicable rules
Action Buttons
After providing required data you should be able to perform any of the below action –
a. Submit - On Submit, system should validate for all mandatory field values and the task should move to
the next logical stage.
b. Hold - You should be able to retain all the entered data and should not submit the task. Task should remain in Pending state.
c. Reject - On click of Reject, you should be able to select a Reject Reason from a list displayed by the system.
Possible Reject Codes are – R1- Documents missing, R2- Signature Missing, R3- Input Error, R4- Insufficient Balance- Limits, R5 - Others. You will be able to select a Reject code and give a Reject Description.
Other users should be able to see the reject reason in remarks window throughout the process
d. Cancel -You should be able to cancel the DE window and return to dashboard. The data input will not be saved.
e. Refer - You should be able to refer the task back to the DE user. I should be able to select a Refer Reason from the values displayed by the system. Possible Refer Codes are – R1- Documents missing, R2- Signature Missing, R3- Input Error, R4- Insufficient Balance- Limits, R5 - Others. You would be able to select a Refer code and give a Refer Description
If the user submits without visiting other mandatory hops, then error message should be displayed and force the user to visit mandatory tabs/update mandatory fields
4.4 Scrutiny - Availability & Shipment
You should be able to verify/ Input/Update Availability, Shipment and Goods details of an Import LC re-quest for the different fields under the respective data segments as given below:
Application Details:
The application details captured earlier will be displayed as a read only field.
Availability
Available With:
Online Channel – Read – Only

O B T F P M I m p o r t L C I s s u a n c e _ U s e r M a n u a l p g . 1 9
Non-Online Channel – User to capture details
1. If the LC is restricted to any particular bank,
You can search through LOV. Party type with banks should only be displayed in LOV.
The system should display the
a)SWIFT code(if available) ,
b)name and address of the bank
On selection of the record if swift code is available, then swift code will be defaulted, if swift code is not available then the bank's name and address to be defaulted.
2. You can enter free text - (YOURSELVES, WITH ANY BANK etc.).
Available by:
Online Channel – Read-only
Non online channel – You can choose one of the following values from
Dropdown:BY ACCEPTANCE, BY DEF PAYMENT, BY MIXED PAYMENT, BY NEGOTIATION, BY PAYMENT
VALIDATION:
1) If By Mixed payment is selected, there must be a value in tag 42M- Mixed payment
2) If By deferred payment is selected, there must be a value in tag 42P- Deferred payment
3) if By payment is selected, payment at sight is applicable. And it should be applicable for Sight Type of product only.
Drafts at:
Online Channel – Read-only,
Non online Channel – You can enter details.
Drawee:
This field will have value only if ‘Drafts at’ field has values.
Online Channel – editable
Non online channel – user to enter details.
You can search through LOV,
Party type with banks should only be displayed in LOV.
The system should display the
a)SWIFT code(if available) ,
b)name and address of the bank
On selection of the record if swift code is available then swift code will be defaulted, if swift code is not available then the bank's name and address to be defaulted.
If 42C (Drafts at) is entered 42A (Drawee) is mandatory and vice versa.
Mixed Payment Details: If Available By filed is provided with value - BY MIXED PAYMENT, only then this field can be entered. You can input/update values in this field for both online and non-online channels.

O B T F P M I m p o r t L C I s s u a n c e _ U s e r M a n u a l p g . 2 0
Deferred Payment Details: If Available By filed is provided with value - BY DEFFERED PAYMENT, only then this field can be entered. You can input/update values in this field for both online and non- online channels.
Shipment
Partial Shipment:
Online channel – Read- only
Non online Channel - You can select from the List of Values- ALLOWED/ CONDITIONAL/ NOT ALLOWED.

O B T F P M I m p o r t L C I s s u a n c e _ U s e r M a n u a l p g . 2 1
Transshipment:
Online channel – Read- only
Non online Channel - You can select from the List of Values- ALLOWED/ CONDITIONAL/ NOT ALLOWED.
Place of Taking in charge:
Online channel – Read- only
Non online Channel - You can enter the details.
Port/Airport of Loading:
Online channel – Read- only
Non online Channel - You can enter the details.
Port/Airport of Discharge:
Online channel – Read- only
Non online Channel - You can enter the details.
Place of Final Destination:
Online channel – Read- only
Non online Channel - You can enter the details.
System will validate that one field from place of taking charge or port/airport of loading and one field from port/airport of discharge or Place of Final destination has value. If not, system will display error.
Latest Date of Shipment:
Online channel – Read- only
Non online Channel - You can enter the details. The latest date by which the shipment has to be done is captured by the user in this field.
Only one of the fields Latest date of Shipment (44C) or Shipment period (44D) need to be entered, not both. System will validate and display error in case both the fields have values.
Shipment Period:
Online channel – Read- only
Non online Channel - You can enter the details.
Either of the fields Latest date of Shipment (44C) or Shipment period (44D) have to be entered, not both. System will validate and display error in case both the fields have values.

O B T F P M I m p o r t L C I s s u a n c e _ U s e r M a n u a l p g . 2 2
Good Details
Good and/or Services code:
Online Channel- Not Applicable
Non Online Channels-
1. LOV picklist to choose the goods or service.
2. There should be a provision to highlight if the goods/service is licensed, prohibited or freely tradeable
3. If the goods are prohibited, system should display an error message
O B T F P M I m p o r t L C I s s u a n c e _ U s e r M a n u a l p g . 2 3
4. If goods are licensed, you should be able to utilize a license available for the applicant (separate license maintenance will enable this)
Description of Good and/or Services code:
If request is received from online channels - Goods description as received will get defaulted in goods description - Goods code field will be disabled.
You will have the facility to edit the description to classify as per goods/PO type
If License is applicable it should be sent as a different field. License field will be editable as this will enable you to fetch the corresponding license details from the license maintenance.
If the goods are prohibited, and if the online channels still sends in the LC Issuance request, this has to be operationally handled and request should be rejected.
Non online channels - The description of the goods as per the goods code is defaulted in this field.
Import License Details:
Online Channel and Non-online Channel –
You can fetch the License details using LOV. The details are populated in the fields given below.
License Number: The license number is populated by system.
License Issue Date: The license issue date is populated by system.
License Effective Date: The license effective date is populated by system.
License Expiry Date: The license expiry date is populated by system.
Issuing Authority: Value is populated by system.
License Available Value- Currency and Amount: Value is populated by system.
License Available Quantity and units: Value is populated by system.
License Utilized Value – Currency and Amount: You have to input the currency and amount of license to be utilized.
License Utilized Quantity and units – You have to enter the quantity and units to be utilized.
Verify: You click on Verify.
Save and Close: On capturing the license details, you can click on Save and Close.
Cancel: If you click on Cancel, the details captured will not be saved.
Response Message:
System will display ‘Available’ or ‘Not Available’ based on backend response.
INCO Terms: – The you can select the INCO terms from the list of values. For online channel submission, the field will be read-only, while for non- online channels the field value can be entered by the user.
INCO Terms Description: The INCO description for the selected INCO terms gets displayed in this field
Documents and Checklist:
Documents: No documents are required for upload in this screen.
Checklist:

O B T F P M I m p o r t L C I s s u a n c e _ U s e r M a n u a l p g . 2 4
1. User to endorse Import License (if applicable),
2. User to verify Insurance policy if applicable.
Remarks: You should be able to capture remarks as well as see remarks made in the earlier screens/stages.
Action Buttons
After providing required data you should be able to perform any of the below action –
a. Submit - On Submit, system should validate for all mandatory field values and the task should move to the next logical stage. If the user submits without visiting other mandatory hops, then error message should be displayed and force the user to visit mandatory tabs/update mandatory fields
b. Hold - You should be able to retain all the entered data and should not submit the task. Task should remain in Pending state.
c. Reject - On click of Reject, user should be able to select a Reject Reason from a list displayed by the system.
Possible Reject Codes are – R1- Documents missing, R2- Signature Missing, R3- Input Error, R4- Insufficient Balance- Limits, R5 - Others. You would be able to select a Reject code and give a Reject Description.
Other users should be able to see the reject reason in remarks window throughout the process
d. Cancel - You should be able to cancel the task window and return to dashboard. The data input will not be saved.
e. Save and Close - On click of Save and Close I should be able to close the task and reopen it to work later.
f. Back – On click of Back, system should move the task to the previous segment
g. Next - On click of Next, system should move the task to the next data segmenent
4.5 Payment Details. Application Details
All fields displayed under Application section will be read-only except Priority and fields will display data captured during registration stage in case of Non Online request and information populated direct from SWIFT in case of online requests. The data segment is collapsible and the user open or close the data segment
Payment Details
Special Payment conditions for beneficiary: Online and Non-online channels – You can enter/update. If any special payment condition has to be provided to beneficiary, the details for the same are captured in this field. This field is applicable from Nov 2018.
Special Payment conditions for receiving bank: Online and Non-online channels – You can enter/update. If any special payment condition has to be provided to receiving bank, the details for the same are captured in this field. This field specifies special payment conditions applicable to the receiving bank without disclo-sure to the beneficiary, for example, post-financing request/conditions for receiving bank only. This field is applicable from Nov 2018.
Period of Presentation: Online Channel – Read-only. Non- Online channel – You can enter the days in number. If the period of presentation is based on any event other than shipment, then you can capture the event name in text along with the number of days in number.

O B T F P M I m p o r t L C I s s u a n c e _ U s e r M a n u a l p g . 2 5
Confirmation Instructions: Online Channel – Read only. Non Online Channel - The confirmation instruction for the LC is selected in this field by you from the available LOV values – CONFIRM, MAY ADD, WITHOUT.
Requested Confirmation Party: (Applicable only from Nov2018). Both Online and Non-Online Channels – You can input/Update details.
Applicable only if field 49 - confirmation instruction is 'confirm' or 'may add'. You can search through LOV, Party type with banks should only be displayed in LOV. The system should display the
a) SWIFT code (if available),
b) Name and address of the bank
On selection of the record if swift code is available then swift code will be defaulted, if swift code is not available then the bank's name and address to be defaulted.
Reimbursing:
If reimbursing bank is available you update the field.
Online Channel - You can update the details received.
Non online channel -
a. You can search through LOV. Party type with banks should only be displayed in LOV. The system should display the
i) SWIFT code (if available),
ii) Name and address of the bank
On selection of the record if swift code is available, then swift code will be defaulted, if swift code is not available then the bank's name and address to be defaulted.
Instructions to P/A/N Bank:
Online Channel- You can update details received.
Non online channel – You can enter details here.
Advise through Bank:
Online Channel – You can update the details received.
Non-Online Channel -
You can search through LOV. Party type with banks should only be displayed in LOV. The system should display the
a) SWIFT code (if available) ,
b) Name and address of the bank
On selection of the record if swift code is available, then swift code will be defaulted, if swift code is not available then the bank's name and address to be defaulted.
Sender to Receiver Information:
Online Channel – You can update details received.
Non Online Channel – You can enter details (FFT).

O B T F P M I m p o r t L C I s s u a n c e _ U s e r M a n u a l p g . 2 6

O B T F P M I m p o r t L C I s s u a n c e _ U s e r M a n u a l p g . 2 7
Documents and Checklist:
Documents: No documents are uploaded in this stage.
Checklist:
You can verify if standard bank clauses are added in Instructions to P/A/N bank if applicable
You can verify if standard bank clauses are added in Sender to receiver information if applicable.
Remarks: User should be able to capture remarks as well as see remarks made in the earlier screens/stages.
Action Buttons
After providing required data you will be able to perform any of the below action –
a. Submit - On Submit, system should validate for all mandatory field values and the task should move to the next logical stage. If the you submit without visiting other mandatory hops, then error message should be displayed and force you to visit mandatory tabs/update mandatory fields
b. Hold - You should be able to retain all the entered data and should not submit the task. Task should remain in Pending state.
c. Reject - On click of Reject, you should be able to select a Reject Reason from a list displayed by the system.
Possible Reject Codes are – R1- Documents missing, R2- Signature Missing, R3- Input Error, R4- Insufficient Balance- Limits, R5 - Others. The user would be able to select a Reject code and give a Reject Description.
Other users should be able to see the reject reason in remarks window throughout the process
d. Cancel - You should be able to cancel the task window and return to dashboard. The data input will not be saved.
e. Save and Close - On click of Save and Close you should be able to close the task and reopen it to work later.
f. Back – On click of Back, system should move the task to the previous segment

O B T F P M I m p o r t L C I s s u a n c e _ U s e r M a n u a l p g . 2 8
g. Next - On click of Next, system should move the task to the next data segment
4.6 Scrutiny - Additional Details As a Scrutiny user, you should be able to scrutinize new Import LC Issuance request. You can verify and update the basic details in the Additional Details related fields
Application Details
All fields displayed under Application section will be read-only except Priority and fields will display data captured during registration stage in case of Non online request and information populated direct from SWIFT in case of Online requests. The data segment is collapsible and the user open or close the data segment. Non- Online Channel -
The Application details, LC Details, Availability, Shipment, Goods and Payment related fields would have been already captured.
Online Channel - Request that are received via Online channels like trade portals, external system and SWIFT, enter the trade middle office in the scrutiny stage. The details provided in the Online channels get populated in the Middle office respective data fields.
Based on the details captured so far, as a Scrutiny user you will check if limits are available for the LC to be issued and capture if any collateral is required.You will also check if the defaulted charges and commis-sion are fine and change them if required.
Limit Details
The various additional details should be available as tile. Each tile can be selected and the respective screen will open for you to capture details.
This is a multi-grid section with facility to attach more than one line.
Limit Details
Customer ID: Applicant’s/Applicant Bank customer ID should get defaulted.
Line ID:.The various lines available and mapped under the customer id gets listed in the dropdown and the user can choose. LINE ID-DESCRIPTION should be available for selection along with Line ID. When you click on 'verify', the system will return value if the limit check was successful or Limit not Available, if limit check fails, and the outstanding limit after the transaction value will be shown in the limit outstanding amount.
Contribution %: System will default this to 100%. You can change this. If contribution is more than 100%, system to display a override.
Once contribution % is input system will default the amount.
System to validate that Limit Contribution% plus Collateral % is equal to 100. Otherwise system to provide override.
Contribution Currency: The LC currency should be defaulted in this field
Contribution Amount: You capture the contribution amount to be utilized under the selected limit.
Limit Check Response: Response can be ‘Success’ or ‘Limit not Available’
Limit Available Amount: This field will display the value of available limit, i.e., limit available without any earmark.
b. Collateral Details

O B T F P M I m p o r t L C I s s u a n c e _ U s e r M a n u a l p g . 2 9
Collateral Type: Cash Collateral (CASA) will be the default value available as collateral type. You can select either Cash Collateral or Deposits
Collateral %: You will enter the percentage of collateral to be linked to this transaction. If the value is more than 100% system will display override message.
Once collateral % is input system will default the amount.
System to validate that Limit Contribution% plus Collateral % is equal to 100. Otherwise system to provide override.
Currency: The LC currency should be defaulted in this field
Contribution Amount: The collateral contribution amount is captured in this field
Settlement Account The CASA accounts of the customer will be listed and you can choose the settlement account. You can verify the balance available in the settlement account by clicking on verify balance but-ton.
Settlement Account Branch: This field defaults the branch in which the selected settlement account is maintained
Documents and Checklist:
Documents: You can upload any additional documents including mandatory documents. System will dis-play error message if mandatory documents are not uploaded.
Checklists: You can verify items listed in the checklist. If the mandatory checklist items are not selected, then the system displays an error
Charges Details
After payment, on selecting <Next> and landing on the additional tab, the default commission, charges and tax if any will get populated.
If default charges are available under the product, they should be defaulted here with values. If customer or customer group specific charges are maintained, then the same will be defaulted from backend system.
Currency: Defaults the currency in which the charges have to be collected
Amount: An amount that is maintained under the product code defaults in this field. But you can edit the same.
Modified Amount: From the default value, if the rate is changed or the amount is changed, the same is updated in the modified amount field.
Billing: If charges are handled by separate billing engine, then by selecting billing the details to be availa-ble for billing engine for further processing
Defer: If charges have to be deferred and collected at any future step, this check box has to be selected.
Waive: If charges have to be waived, this check box has to be selected.
Based on the customer maintenance, the charges should be marked for Billing or for Defer.
If you change the defaulted charging to defer or billing or waive, system must capture the user details and the modification details in the ‘Remarks’ place holder.
Charge Party: Charge party will be Applicant by Default. You can change the value to Beneficiary
a. Commission Details

O B T F P M I m p o r t L C I s s u a n c e _ U s e r M a n u a l p g . 3 0
If default commission is available under the product, it should be defaulted here with values.
Currency: Defaults the currency in which the Commission has to be collected
Amount: An amount that is maintained under the product code defaults in this field. But you can edit the same.
Modified Amount: From the default value, if the rate is changed or the amount is changed, the same is updated in the modified amount field.
Rate: Defaults from product. You can change the rate.
Billing: If charges/commission is handled by separate billing engine, then by selecting billing the details to be available for billing engine for further processing
Defer: If charges/commissions has to be deferred and collected at any future step, this check box has to be selected.
Waive: If charges/commission has to be waived, this check box has to be selected.
Based on the customer maintenance, the charges/commission can be marked for Billing or for Defer.
If you change the defaulted Commission to defer or billing or waive, system must capture the user details and the modification details in the ‘Remarks’ place holder.
Charge Party: Charge party will be ‘Applicant’ by Default. You can change the value to Beneficiary
Tax Details
The tax component is calculated based on the commission. The tax component defaults if maintained in the product level. Tax detail cannot be updated by you and any change in Tax amount on account of mod-ification of charges/ commission will be available on click of Re-Calculate button or on hand off to back-end system.
Currency: The tax currency is the same as the commission.
Amount: The tax amount defaults based on the percentage of commission maintained. You can edit the same.
71B- Charges from Beneficiary: You can input the amount to be collected from beneficiary on account of this transaction.
Revolving Details
Revolving: You can select if the LC is revolving or not using the slider button.
Revolving In: The LC can revolve with Time or Units. The you can select the mode of revolving in this field.
Revolve Units: You can capture the units by which the LC revolves.
Revolving Frequency: In case the LC revolves with time, then this field should be updated. This field cap-tures the frequency in days and months by which the LC revolves.
Next reinstatement date: This field defaults the date of next instatement for the LC based on the revolving frequency selected.
Cumulative: This field is a checkbox to indicate if the LC value has to be cumulative or not on reinstate-ment.
Automatic reinstatement: This field enables you to have automatic reinstatement on the reinstatement day without manual intervention.

O B T F P M I m p o r t L C I s s u a n c e _ U s e r M a n u a l p g . 3 1

O B T F P M I m p o r t L C I s s u a n c e _ U s e r M a n u a l p g . 3 2

O B T F P M I m p o r t L C I s s u a n c e _ U s e r M a n u a l p g . 3 3
Action Buttons
After providing required data you should be able to perform any of the below action –
a. Submit - On Submit, system should validate for all mandatory field values and the task should move to the next logical stage. If you submit without visiting other mandatory hops, then error message should be displayed and force the user to visit mandatory tabs/update mandatory fields
b. Hold - You should be able to retain all the entered data and should not submit the task. Task should remain in Pending state.
c. Reject - On click of Reject, you should be able to select a Reject Reason from a list displayed by the system.
Possible Reject Codes are – R1- Documents missing, R2- Signature Missing, R3- Input Error, R4- Insufficient Balance- Limits, R5 - Others. The user would be able to select a Reject code and give a Reject Description.
Other users should be able to see the reject reason in remarks window throughout the process
d. Cancel - You should be able to cancel the task window and return to dashboard. The data input will not be saved.
e. Save and Close - On click of Save and Close you should be able to close the task and reopen it to work later.

O B T F P M I m p o r t L C I s s u a n c e _ U s e r M a n u a l p g . 3 4
f. Back – On click of Back, system should move the task to the previous segment
g. Next - On click of Next, system should move the task to the next data segment
4.7 Summary You can review the summary of details updated in scrutiny Import LC Issuance request
As a user when you log in to Oracle Banking Trade Finance Process Management (OBTFPM) system, you should be able to see the summary tiles. The tiles should display a list of important fields with values.You should be also able to drill down from summary Tiles into respective data segments.
Tiles Displayed in Summary
· Main- You should be able to see details about application details and LC details. You should be able to modify details if required.
· Party Details –You should be able to see the party details like beneficiary, advising bank etc.
· Availability and Shipment- You should be able to see already captured availability and shipment details. You should be able to modify details if required.
· Payments- You should be able to see all details related to payments. You should be able to modify any details if required.
· Limits and Collaterals- You should be able to see captured details of limits and collateral. You should be able to update data of any field in details.
· Charges- You should be able to see details provided for charges. You should be able to update the details if required.
· Revolving Details- You should be able to drill down into Revolving details tile to see more information on revolving LC if applicable.
Action Buttons
After providing required data you should be able to perform any of the below action –
a. Submit - On Submit, system should validate for all mandatory field values and the task should move to the next logical stage. If you submit without visiting other mandatory hops, then error message should be displayed and force the user to visit mandatory tabs/update mandatory fields

O B T F P M I m p o r t L C I s s u a n c e _ U s e r M a n u a l p g . 3 5
b. Hold - You should be able to retain all the entered data and should not submit the task. Task should remain in Pending state.
c. Reject - On click of Reject, you should be able to select a Reject Reason from a list displayed by the system.
Possible Reject Codes are – R1- Documents missing, R2- Signature Missing, R3- Input Error, R4- Insufficient Balance- Limits, R5 - Others. The user would be able to select a Reject code and give a Reject Description.
Other users should be able to see the reject reason in remarks window throughout the process
d. Cancel - You should be able to cancel the DE window and return to dashboard. The data input will not be saved.
e. Save and Close - On click of Save and Close you should be able to close the task and reopen it to work later.
f. Back – On click of Back, system should move the task to the previous segment
5 DATA ENRICHMENT You can input new Import LC Issuance request. As part of data enrichment, you can enter/update basic details of the incoming request.
5.1 Main Non- Online Channel:-Import LC request that were received at the desk will move to scrutiny and there-after to data enrichment stage post successful registration. The task will have the details entered up to the scrutiny stage.
Online Channel: Request that are received via online channels like trade portal, external system and SWIFT, are further processed in the scrutiny stage and moved to DE stage.
When you log in into Trade Mid Office (TMO) system with appropriate credentials, You should be able to see all the import LC request that are in the free task queue.
You should be able to acquire the free tasks that you are eligible to work on through widget or menu.
You should be able to enter/update the following fields. Some of the fields that are already having value from may not be editable.
Application Details All fields displayed under Application section will be read-only except Priority and fields will display data captured during registration stage in case of Non online request and information populated direct from SWIFT in case of online requests. The data segment is collapsible and the user open or close the data segment. LC Details
In this data segment, in registration if you have captured input, the same will be available and if not, you can capture the details.
For Online channels, the details will be auto populated, some of the fields may be editable, and others are read-only.
Template:
For non-online transactions, Template can be used. Template can be used only if it is not already used in Scrutiny stage.

O B T F P M I m p o r t L C I s s u a n c e _ U s e r M a n u a l p g . 3 6
VIEW TEMPLATE: When you click on the look up, system will display the templates available for the appli-cant. You can select the relevant template and the details will be populated. The details pertaining to the subsequent screen in data enrichment will be persisted and populated when the user moves to the rele-vant screens.
Before populating the screens, system will check if there are existing values and display a override mes-sage ' Value exist already in few fields - Do you want to use the template - Yes/No'. If you clicks on Yes the details pre entered will be over-written with the template values.
USE TEMPLATE: You can directly update the template id or template name and click on the Use Template button. System will validate the Template id or Template Name and populate the relevant values in the screen. If the Template id or Template Name provided is different from the chosen applicant id, system will display an error message, 'Check the Template id/Template Name'. Before populating the screens, system will check if there are existing values and display override message ' Value exist already in few fields - Do you want to use the template - Yes/No'. If you click on Yes the details pre entered will be over-written with the template values. While if the user clicks No - Template will not be used.
Product Code: All channels – Read only.
Product Description: Read only - The product description for the product code selected is displayed.
Advising Bank: All Channels: You should be able to select the advising bank from the LOV.
The user can search through LOV.Party type with banks should only be displayed in LOV.
The system should display the
a) SWIFT code (if available),
b) Name and address of the bank
On selection of the record if swift code is available, then swift code will be defaulted, if swift code is not available then the bank's name and address to be defaulted. The SWIFT key should be maintained with swift key validation as 'Y'. If the swift key maintenance is 'N', then the bank name needs to be populated. If the SWIFT KEY validation is ‘N’ then the medium of transmitting the message should not be SWIFT
The values should be editable if already captured in registration/scrutiny or online request
Form of Documentary Credit: Read only for online channel request and Non online channel – editable if already captured.
Available values are
IRREVOCABLE
IRREVOCABLE TRANSFERRABLE
IRREVOCABLE STANDBY
IRREVOC TRANS STANDBY
REVOCABLE
REVOCABLE TRANSFERRABLE
REVOCABLE STANDBY
REVOC TRANS STANDBY
Documentary Credit Number:
All channels – Read only
Reference to Pre advice: Read only -Online channel
Non online channel – Editable if already captured and user can enter if not captured earlier.

O B T F P M I m p o r t L C I s s u a n c e _ U s e r M a n u a l p g . 3 7
Date of Issue:
Online channel - read only
Non online – read only
Branch date is displayed here. If approval date is later than branch date, then system will update this field with approval date.
Applicable Rules:
1. Online channel - Read only
2. Non Online Channel –You can update the values captured earlier.
You can update if already captured during registration stage. Possible values - UCP LATEST VERSION, EUCP LATEST VERSION, UCPURR LATEST VERSION, EUCPURR LATEST VERSION, OTHR, ISP LATEST VERSION"
Date of Expiry:
1. Online channel – read only
2.Non online channel -
You can update if already captured.
Place of Expiry
Online channel – Read only
Non online channel - You can input/ updates the Place of Expiry.
Applicant Bank:
1. Online channel - editable
2. Non online channel - You can search through LOV,
Party type with banks should only be displayed in LOV.
The system should display the
A) SWIFT code (if available) , b)name and address of the bank
On selection of the record if swift code is available then swift code will be defaulted, if swift code is not available then the bank's name and address to be defaulted.
You can update if already captured.
Applicant:
1. Online channel – Read-only
2. Non-online channel – You can update the details captured earlier.
If the application is received from the applicant and customer id is already captured, the customer details to be populated by the system.
If the application is received from the applicant bank, then the applicant information is captured by you
You can search through LOV,
Party type with customers should only be displayed in LOV.
Only customers who have a valid KYC status will be available for selection in LOV. KYC checks are not applicable if Applicant is not a customer of the bank and WALKIN customer ID is used for the Applicant
Beneficiary:
1. Online channel - read only
2. Non online channel - You can update the details captured earlier.

O B T F P M I m p o r t L C I s s u a n c e _ U s e r M a n u a l p g . 3 8
3. If WALKIN CUSTOMER is chosen you should be allowed to edit the details
4. If beneficiary is a customer of the bank KYC status to be valid. If not system to display override.
Percentage Credit Amount Tolerance:
1. Online channel - read only,
2. Non online channel – You can enter details or user can update the details captured earlier.
3. Should be a numeric two digit value. For Tolerance value more than 10 %, override message to be displayed.
Maximum Credit Amount:
1. Online channel - read only
2. Non online channel - You can enter the details if not captured.You can also update if already captured.
39A (% credit amount tolerance) and 39B are optional fields. Either 39A or 39B can be entered not both
Additional Amount covered:
1. Online channel - read only
2.Non online channel – If already captured, you can update
If not captured already, you can enter any additional amount highlighted under the LC application is cap-tured in this field.
Documents and Checklist
Documents: No documents to be uploaded in this stage.
Checklist:
Verified the Remarks Details
Verified Documents uploaded if any.
Applicant Details and LC currency and amount entered are correct
Action Buttons
After providing required data I should be able to perform any of the below action –
a. Submit - On Submit, system should validate for all mandatory field values and the task should move to the next logical stage. If you submit without visiting other mandatory hops, then error message should be displayed and force the user to visit mandatory tabs/update mandatory fields

O B T F P M I m p o r t L C I s s u a n c e _ U s e r M a n u a l p g . 3 9
b. Hold - You should be able to retain all the entered data and should not submit the task. Task should remain in Pending state.
c. Reject - On click of Reject, you should be able to select a Reject Reason from a list displayed by the system.
Possible Reject Codes are – R1- Documents missing, R2- Signature Missing, R3- Input Error, R4- Insufficient Balance- Limits, R5 - Others. The user would be able to select a Reject code and give a Reject Description.
Other users should be able to see the reject reason in remarks window throughout the process
d. Save and Close - You should be able to save the data and close the screen. The data gets saved and you should be able work on it further later.
e. Cancel - You should be able to cancel the DE window and return to dashboard. The data input will not be saved.
f. Next - On click of Next, the task moves to the next data segment.
5.2 Availability & Shipment
As a Data enrichment user, you should be able to verify/ Input/Update Availability, Shipment and Goods details of an Import LC request for the different fields under the respective data segments as given below:
Application Details
All fields displayed under Application section will be read-only except Priority and fields will display data captured during registration stage in case of Non online request and information populated direct from SWIFT in case of online requests. The data segment is collapsible and the user open or close the data segment.
Availability
Available With:
Online Channel – Read – Only
Non-Online Channel – You can input details if not captured already. If captured already, user can update details
1. If the LC is restricted to any particular bank,
You can search through LOV. Party type with banks should only be displayed in LOV.
The system should display the
a)SWIFT code(if available) ,
b)name and address of the bank
On selection of the record if swift code is available, then swift code will be defaulted, if swift code is not available then the bank's name and address to be defaulted.
2. You can enter free text - (YOURSELVES, WITH ANY BANK etc.).
Available by:
Online Channel – Read-only
Non online channel – You can input details if not captured already. If captured already, you can update details. Values in the drop down are:
BY ACCEPTANCE, BY DEF PAYMENT, BY MIXED PAYMENT, BY NEGOTIATION, BY PAYMENT
VALIDATION:

O B T F P M I m p o r t L C I s s u a n c e _ U s e r M a n u a l p g . 4 0
1) If By Mixed payment is selected, there must be a value in tag 42M- Mixed payment
2) If By deferred payment is selected, there must be a value in tag 42P- Deferred payment
3) if By payment is selected, payment at sight is applicable. And it should be applicable for Sight Type of product only.
Drafts at:
Online Channel – Read-only,
Non online Channel – You can input details if not captured already. If captured already, you can update details
Drawee:
This field will have value only if ‘Drafts at’ field has values.
Online Channel – editable
Non online channel – You can input details if not captured already. If captured already, you can update details
The user can search through LOV.
Party type with banks should only be displayed in LOV.
The system should display the
a)SWIFT code(if available) ,
b)name and address of the bank
On selection of the record, if swift code is available then swift code will be defaulted, if swift code is not available then the bank's name and address to be defaulted.
If 42C (Drafts at) is entered 42A (Drawee) is mandatory and vice versa.
Mixed Payment Details: If Available By filed is provided with value - BY MIXED PAYMENT, only then this field can be entered. You can input/update values in this field for both online and non-online channels.
Deferred Payment Details: If Available By filed is provided with value - BY DEFFERED PAYMENT, only then this field can be entered. You can input/update values in this field for both online and non- online channels.
Shipment
Partial Shipment:
Online channel – Read- only
Non online Channel - You can input details if not captured already. If captured already, you can update details User can select from the List of Values- ALLOWED/ CONDITIONAL/ NOT ALLOWED.
Transshipment:
Online channel – Read- only
Non online Channel - You can input details if not captured already. If captured already, you can update details User can select from the List of Values- ALLOWED/ CONDITIONAL/ NOT ALLOWED.
Place of Taking in charge:
Online channel – Read- only
Non online Channel - You can input details if not captured already. If captured already, you can update details
Port/Airport of Loading:
Online channel – Read- only

O B T F P M I m p o r t L C I s s u a n c e _ U s e r M a n u a l p g . 4 1
Non online Channel - You can input details if not captured already. If captured already, you can update details.
Port/Airport of Discharge:
Online channel – Read- only
Non online Channel -You can input details if not captured already. If captured already, you can update details.
Place of Final Destination:
Online channel – Read- only
Non online Channel - You can input details if not captured already. If captured already, you can update details.
System will validate that one field from place of taking charge or port/airport of loading and one field from port/airport of discharge or Place of Final destination has value. If not, system will display error.
Latest Date of Shipment:
Online channel – Read- only
Non online Channel - You can input details if not captured already. If captured already, you can update details. The latest date by which the shipment has to be done is captured by you in this field.
Only one of the fields Latest date of Shipment (44C) or Shipment period (44D) need to be entered, not both. System will validate and display error in case both the fields have values.
Shipment Period:
Online channel – Read- only
Non online Channel - You can input details if not captured already. If captured already, you can update details.
Either of the fields Latest date of Shipment (44C) or Shipment period (44D) have to be entered, not both. System will validate and display error in case both the fields have values.
Good Details
Good and/or Services code:
Online channel- Not Applicable
Non Online Channel- – You can input details if not captured already. If captured already, you can update details
1. LOV picklist to choose the goods or service.
2. There should be a provision to highlight if the goods/service is licensed, prohibited or freely tradeable.
3. If the goods are prohibited, system should display an error message.
4. If goods are licensed, you should be able to utilize a license available for the applicant.
Description of Good and/or Services code:
If request is received from online channels - Goods description as received will get defaulted in goods description - Goods code field will be disabled.
You will have the facility to edit the description to classify as per goods/PO type
If License is applicable it should be sent as a different field. License field will be editable as this will enable you to fetch the corresponding license details from the license maintenance.
If the goods are prohibited, and if the online channels still sends in the LC Issuance request, this has to be operationally handled and request should be rejected.

O B T F P M I m p o r t L C I s s u a n c e _ U s e r M a n u a l p g . 4 2
Non online channels - The description of the goods as per the goods code is defaulted in this field. You can update the description.
Import License Details:
Online Channel and Non-online Channel –
You can fetch the License details using LOV. The details are populated in the fields given below.
License Number: The license number is populated by system.
License Issue Date: The license issue date is populated by system.
License Effective Date: The license effective date is populated by system.
License Expiry Date: The license expiry date is populated by system.
Issuing Authority: Value is populated by system.
License Available Value- Currency and Amount: Value is populated by system.
License Available Quantity and units: Value is populated by system.
License Utilized Value – Currency and Amount: You can input the currency and amount of license to be utilized.
License Utilized Quantity and units – You can enter the quantity and units to be utilized.
Verify: You click on Verify.
Save and Close: On capturing the license details, you can click on Save and Close.
Cancel: If you click on Cancel, the details captured are not saved.
Response Message: System will display ‘Available’ or ‘Not Available’ based on the response received from back office.
INCO Terms: – You selects the INCO terms from the list of values. For online channel submission, the field will be read-only, while for non- online channels the field value can be entered/updated if already entered by you.
INCO Terms Description: The INCO description for the selected INCO terms gets displayed in this field
Documents and Checklist:
Documents: No documents are to be uploaded in this stage.
Checklist:
User to endorse Import License if applicable
User to verify Insurance policy if applicable.
Remarks: You should be able to capture remarks as well as see remarks made in the earlier screens/stages.

O B T F P M I m p o r t L C I s s u a n c e _ U s e r M a n u a l p g . 4 3
Action Buttons
After providing required data I should be able to perform any of the below action –
a. Submit - On Submit, system should validate for all mandatory field values and the task should move to the next logical stage. If you submit without visiting other mandatory hops, then error message should be displayed and force the user to visit mandatory tabs/update mandatory fields.
b. Hold - You should be able to retain all the entered data and should not submit the task. Task should remain in Pending state.
c. Reject - On click of Reject, user should be able to select a Reject Reason from a list displayed by the system.
Possible Reject Codes are – R1- Documents missing, R2- Signature Missing, R3- Input Error, R4- Insufficient Balance- Limits, R5 - Others. The user would be able to select a Reject code and give a Reject Description.
Other users should be able to see the reject reason in remarks window throughout the process
d. Cancel - You should be able to cancel the DE window and return to dashboard. The data input will not be saved.
e. Save and Close - On click of Save and Close you should be able to close the task and reopen it to work later.
f. Back – On click of Back, system should move the task to the previous segment
e. Next - On click of Next, system should move the task to the next data segment
5.3 Payment As a Data enrichment User, you can enter/ verify payment details for Import LC Issuance.
Application Details:
All fields are Read-only. The application tile can be collapsed. If you want to change the priority value, the user has to navigate to Main screen to change the priority.
Payment Details
Special Payment conditions for beneficiary: Online and Non-online channels – You can enter/update. If any special payment condition has to be provided to beneficiary, the details for the same are captured in this field. This field is applicable from Nov 2018.
O B T F P M I m p o r t L C I s s u a n c e _ U s e r M a n u a l p g . 4 4
Special Payment conditions for receiving bank: Online and Non-online channels – You can enter/update. If any special payment condition has to be provided to receiving ban, the details for the same are captured in this field. This field specifies special payment conditions applicable to the receiving bank without disclo-sure to the beneficiary, for example, post-financing request/conditions for receiving bank only. This field is applicable from Nov 2018.
Period of Presentation: Online Channel – Read-only. Non- Online channel – You can update if already entered. If not you can enter the days in number. If the period of presentation is based on any event other than shipment, then you can also captures the event name in text along with the number of days in num-ber.
Confirmation Instructions: Online Channel – Read only. Non Online Channel - You can enter if not cap-tured earlier. You can update if captured already.
The confirmation instruction for the LC is selected in this field by the user from the available LOV values – CONFIRM, MAY ADD, WITHOUT.
Requested Confirmation Party: (Applicable only from Nov2018). Both Online and Non-Online Channels – You can input/Update details.
Applicable only if field 49 - confirmation instruction is 'confirm' or 'may add'. You can search through LOV, Party type with banks should only be displayed in LOV. The system should display the
a) SWIFT code (if available),
b) Name and address of the bank
On selection of the record if swift code is available then swift code will be defaulted, if swift code is not available then the bank's name and address to be defaulted.
Reimbursing:
Online Channel - You can update the details received.
Non online channel - You can enter if not captured earlier. You can update if captured already.
a. You can search through LOV. Party type with banks should only be displayed in LOV. The system should display the
i) SWIFT code (if available),
ii) Name and address of the bank
On selection of the record if swift code is available, then swift code will be defaulted, if swift code is not available then the bank's name and address to be defaulted.
Instructions to P/A/N Bank:
Online Channel- You can update details received.
Non online channel – You can enter if not captured earlier. You can update if captured already.
Advise through Bank:
Online Channel – You can update the details received.
Non-Online Channel - You can search through LOV. Party type with banks should only be displayed in LOV. The system should display the
a) SWIFT code (if available),
b) Name and address of the bank
On selection of the record if swift code is available, then swift code will be defaulted, if swift code is not available then the bank's name and address to be defaulted.
Sender to Receiver Information:

O B T F P M I m p o r t L C I s s u a n c e _ U s e r M a n u a l p g . 4 5
Online Channel – You can update details received.
Non Online Channel – You can enter if not captured earlier. You can update if captured already.
Documents and Checklist:
Documents: No Documents are uploaded in this stage.
Checklist: You can verify if standard bank clauses are added in Instructions to P/A/N bank if applicable
You can verify if standard bank clauses are added in Sender to receiver information if applicable.
Remarks: You should be able to capture remarks as well as see remarks made in the earlier screens/stages.
Action Buttons
After providing required data you should be able to perform any of the below action –
a. Submit - On Submit, system should validate for all mandatory field values and the task should move to the next logical stage. If you submits without visiting other mandatory hops, then error message should be displayed and force you to visit mandatory tabs/update mandatory fields.
b. Hold - You should be able to retain all the entered data and should not submit the task. Task should remain in Pending state.
c. Reject - On click of Reject, you should be able to select a Reject Reason from a list displayed by the system.
Possible Reject Codes are – R1- Documents missing, R2- Signature Missing, R3- Input Error, R4- Insufficient Balance- Limits, R5 - Others. The user would be able to select a Reject code and give a Reject Description.
Other users should be able to see the reject reason in remarks window throughout the process
d. Cancel - You should be able to cancel the DE window and return to dashboard. The data input will not be saved.
e. Save and Close - On click of Save and Close you should be able to close the task and reopen it to work later.
f. Back – On click of Back, system should move the task to the previous segment
g. Next - On click of Next, system should move the task to the next data segment

O B T F P M I m p o r t L C I s s u a n c e _ U s e r M a n u a l p g . 4 6
5.4 Documents & Conditions You can enter/ update Documents and conditions details for new Import LC Issuance
Application Details
All fields displayed under Application section will be read-only except Priority and fields will display data captured during registration stage in case of Non online request and information populated direct from SWIFT in case of online requests. The data segment is collapsible and the user open or close the data segment.
Documents Required:
Online Channel – System will default the details received in the Description column. Based on the details populated, you can go and pick corresponding values for Document code, originals and copy.
Non- Online - The bank user can further edit (add or remove) the documents and or document description as per requirement. System to display override if both 'BL' and 'Airway Bill' are chosen.
Based on the ‘Product’ selected, system will default the documents required under the LC. User can edit the details, delete an existing document and also add additional documents to the defaulted list.
Additional Conditions:
Online Channel – System will default the details received in the description column. System will parse the additional conditions required field into multiple line items based on line de-limitter (+) and shall populate each line item as a separate description. You can read the description make any changes required to the description. You should be able to add more conditions.
Non-online channel- User should be able to use FFT to capture additional conditions. You can edit the description populated from FFT. You should also be able to add additional FFT.
Documents and Checklist:
Documents: No documents are required for upload in this screen.
Checklist: 1. User to verify if standard clauses are added to Additional conditions.
Remarks: You should be able to capture remarks as well as see remarks made in the earlier screens/stages.

O B T F P M I m p o r t L C I s s u a n c e _ U s e r M a n u a l p g . 4 7
Action Buttons:
After providing required data I should be able to perform any of the below action –
a. Submit - On Submit, system should validate for all mandatory field values and the task should move to the next logical stage. If the user submits without visiting other mandatory hops, then error message should be displayed and force the user to visit mandatory tabs/update mandatory fields
b. Hold - You should be able to retain all the entered data and should not submit the task. Task should remain in Pending state.
c. Reject - On click of Reject, you should be able to select a Reject Reason from a list displayed by the system.
Possible Reject Codes are – R1- Documents missing, R2- Signature Missing, R3- Input Error, R4- Insufficient Balance- Limits, R5 - Others. The user would be able to select a Reject code and give a Reject Description.
Other users should be able to see the reject reason in remarks window throughout the process
d. Cancel -You should be able to cancel the DE window and return to dashboard. The data input will not be saved.
e Save and Close – You should be able to save the task and open it later to work on it.
f. Back – On click of Back, system should move the task to the previous data segment
g. Next - On click of Next, system should move the task to the next data segment

O B T F P M I m p o r t L C I s s u a n c e _ U s e r M a n u a l p g . 4 8
5.5 Additional Details You can verify and update the basic details in the Additional Details related fields.
Non- Online Channel - Import LC request that were received at the desk, will move to data enrichment stage post successful registration and scrutiny. The transaction will have the details updated from the scrutiny stage.
Online Channel- The details provided in the online channels get populated in the Middle office respective data fields.
The Application details, LC Details, Availability, Shipment, Goods and Payment related fields would have been already captured.
Limit Details
The various additional details should be available as tile. Each tile can be selected and the respective screen will open for you to capture details.
“This is a multi-grid section with facility to attach more than one line. “
Limit Details: You can update the details captured during Scrutiny stage and click on Limit verification in Data Enrichment (DE) stage. If limit information is not captured during Scrutiny stage, the same can be done in DE stage.
Customer ID: Applicant’s/Applicant Bank customer ID should get defaulted.
Line ID: .The various lines available and mapped under the customer id gets listed in the dropdown and the you can choose.
Line Id Description: You should be available for selection along with Line ID. When you click on 'verify', the system will return value if the limit check was successful or Limit not Available, if limit check fails, and the outstanding limit after the transaction value will be shown in the limit outstanding amount.
Contribution %: System will default this to 100%. You can change this. If contribution is more than 100%, system to display a override.
System to validate that Limit Contribution% plus Collateral % is equal to 100. Otherwise system to provide override.
Contribution Currency: The LC currency should be defaulted in this field
Contribution Amount: Once contribution % in updated system will default the amount
Limit Check Response: Response can be ‘Success’ or ‘Limit not Available’
Limit Available Amount: This field will display the value of available limit.ie, limit available without any earmark
Collateral Details
You can update the details captured during Scrutiny stage in Data Enrichment (DE) stage. If collateral in-formation is not captured during Scrutiny stage, the same can be done in DE stage
Collateral Type: Cash Collateral (CASA) will be the default value available as collateral type. You can select either Cash Collateral or Deposits
Collateral %: You can enter the percentage of collateral to be linked to this transaction. If the value is more than 100% system will display override message.
System to validate that Limit Contribution% plus Collateral % is equal to 100. Otherwise system to provide override.
Currency: The LC currency should be defaulted in this field
Contribution Amount: On Collateral % input system will default the amount

O B T F P M I m p o r t L C I s s u a n c e _ U s e r M a n u a l p g . 4 9
Settlement Account :The CASA accounts of the customer will be listed and the user to choose the settle-ment account. You can verify the balance available in the settlement account by clicking on verify balance button.
Settlement Account Branch: This field defaults the branch in which the selected settlement account is maintained
Documents and Checklist:
Documents: You can upload any additional documents including mandatory documents. System will dis-play error message if mandatory documents are not uploaded.
Checklists: You can verify items listed in the checklist. If the mandatory checklist items are not selected, then the system displays an error
Charges Details :You can update the details captured during Scrutiny stage and click on Re-Calculate but-ton in Data Enrichment (DE) stage.
After payment, on selecting <Next> and landing on the additional tab, the default commission, charges and tax if any will get populated.
If default charges are available under the product, they should be defaulted here with values.
Currency: Defaults the currency in which the charges have to be collected
Amount: An amount that is maintained under the product code defaults in this field. But you can edit the same.
Modified Amount: From the default value, if the rate is changed or the amount is changed, the same is updated in the modified amount field.
Billing: If charges are handled by separate billing engine, then by selecting billing the details to be available for billing engine for further processing
Defer: If charges have to be deferred and collected at any future step, this check box has to be selected.
Waive: If charges have to be waived, this check box has to be selected.
Based on the customer maintenance, the charges should be marked for Billing or for Defer.
You can change the defaulted charging to defer or billing or waive, system must capture the user details and the modification details in the ‘Remarks’ place holder.
Charge Party: Charge party will be Applicant by Default. You can change the value to Beneficiary
Commission Details
If default commission is available under the product, it should be defaulted here with values.
Currency: Defaults the currency in which the Commission has to be collected
Amount: An amount that is maintained under the product code defaults in this field. But you can edit the same.
Modified Amount: From the default value, if the rate is changed or the amount is changed, the same is updated in the modified amount field.
Rate: Defaults from product. You can change the rate.
Billing: If charges/commission is handled by separate billing engine, then by selecting billing the details to be available for billing engine for further processing
Defer: If charges/commissions has to be deferred and collected at any future step, this check box has to be selected.
Waive: If charges/commission has to be waived, this check box has to be selected.

O B T F P M I m p o r t L C I s s u a n c e _ U s e r M a n u a l p g . 5 0
Based on the customer maintenance, the charges/commission can be marked for Billing or for Defer.
If you changes the defaulted Commission to defer or billing or waive, system must capture the user details and the modification details in the ‘Remarks’ place holder.
Charge Party: Charge party will be ‘Applicant’ by Default. You can change the value to Beneficiary
Tax Details
The tax component is calculated based on the commission. The tax component defaults if maintained in the product level. Tax detail cannot be updated by you and any change in Tax amount on account of mod-ification of charges/ commission will be available on click of Re-Calculate button or on hand off to back-end system.
Currency: The tax currency is the same as the commission.
Amount: The tax amount defaults based on the percentage of commission maintained. You can edit the same.
71B- Charges from Beneficiary: User will input the amount to be collected from beneficiary on account of this transaction.
Revolving Details
You can update the details captured during Scrutiny stage in Data Enrichment (DE) stage. If revolving de-tails is not captured during Scrutiny stage, the same can be done in DE stage.
Revolving: You can select if the LC is revolving or not using the slider button.
Revolving In: The LC can revolve with Time or Units. You can select the mode of revolving in this field.
Revolve Units: You can capture the units by which the LC revolves.
Revolving Frequency: In case the LC revolves with time, then this field should be updated. This field cap-tures the frequency in days and months by which the LC revolves.
Next reinstatement date: This field defaults the date of next instatement for the LC based on the revolving frequency selected.
Cumulative: This field is a checkbox to indicate if the LC value has to be cumulative or not on reinstate-ment.
Automatic reinstatement: This field enables the user to have automatic reinstatement on the reinstate-ment day without manual intervention.
Draft Confirmation
You can view the draft LC message (outgoing MT700 SWIFT message format) being displayed on the pre-view message text box.
If you want to send a copy of the draft LC for customer confirmation, the same can be done by choosing the customer response slider as ‘yes’. On submit of the data enrichment stage the mail message to the customer will be sent.
The task will not move to approval but to ‘pending customer response ‘stage. Upon receipt of customer’s confirmation, the transaction moves to approval.
In case the customer asks for changes, the transaction will move to data enrichment and after necessary changes, it will move to approval.

O B T F P M I m p o r t L C I s s u a n c e _ U s e r M a n u a l p g . 5 1
Action Buttons
After providing required data you should be able to perform any of the below action –

O B T F P M I m p o r t L C I s s u a n c e _ U s e r M a n u a l p g . 5 2
a. Submit - On Submit, system should validate for all mandatory field values and the task should move to the next logical stage. If you submit without visiting other mandatory hops, then error message should be displayed and force the user to visit mandatory tabs/update mandatory fields.
b. Hold - You should be able to retain all the entered data and should not submit the task. Task should remain in Pending state.
c. Reject - On click of Reject, user should be able to select a Reject Reason from a list displayed by the system.
Possible Reject Codes are – R1- Documents missing, R2- Signature Missing, R3- Input Error, R4- Insufficient Balance- Limits, R5 - Others. The user would be able to select a Reject code and give a Reject Description.
Other users should be able to see the reject reason in remarks window throughout the process
d. Cancel - You should be able to cancel the DE window and return to dashboard. The data input will not be saved.
e. Save and Close - On click of Save and Close you should be able to close the task and reopen it to work later.
f. Back – On click of Back, system should move the task to the previous segment
g. Next - On click of Next, system should move the task to the next data segment
5.6 Data Enrichment - Summary As a user when you log in into Trade Mid Office (TMO) system, You should be able to see the summary tiles. The tiles should display a list of important fields with values. You should be also able to drill down from summary Tiles into respective data segments.
Tiles Displayed in Summary
· Main- You should be able to see details about application details and LC details. You should be able to modify details if required.
· Party Details – You should be able to see the party details like beneficiary, advising bank etc.
· Availability and Shipment- You should be able to see already captured availability and shipment details. You should be able to modify details if required.
· Payments- You should be able to see all details related to payments. You should be able to modify any details if required.
· Limits and Collaterals- You should be able to see captured details of limits and collateral. You should be able to update data of any field in details.
· Charges- You should be able to see details provided for charges.You should be able to update the details if required.
· Revolving Details-You should be able to see Revolving details. You should be able to update the details if required
· Documents and Conditions –You should be able to see the Documents required grid and the addi-tional conditions grid. You should be able to update the details if required.
· Preview Message – You should be able to see the preview details grid and should be able to update the details if required.
· Compliance – You should be able to see the compliance details tiles. The status should be verified for KYC and to be initiated for AML and Sanction Checks.
Documents and Checklist-
Documents: No documents upload required for this stage.

O B T F P M I m p o r t L C I s s u a n c e _ U s e r M a n u a l p g . 5 3
Checklist: Nil
Remarks: You should be able to see remarks captured by other users.
Create Template : You should be able to create a new template by using the data captured in the trans-action.
Template Name – You should be able to give a name to the Template.
The following fields will be enabled when creating template.
6 MULTI LEVEL APPROVAL You can view the summary of details updated in multilevel approval stage of Import LC Issuance request
You can log in into Trade Mid Office (TMO) system, You should be able to see the summary tiles. The tiles should display a list of important fields with values. You should be also able to drill down from summary Tiles into respective data segments where you verify the details of all fields under the data segment.
Authorization Re-Key (This is applicable only for non-online channels)
As an approval user, you should be able to open the import LC application document from the Documents window and re-key some of the critical field values from the request in the Re-key screen. System will validate that the re-key values are equal to the values captured in the screen by the user. If the values captured match with the values available in the screen, system will allow you to open the transaction screens for further verification. If the re-key values are different from the values captured by you, then system will display an error message. Some of the fields below will dynamically be available for re-key.
Field Name
Applicant Name
LC Currency, Amount
Beneficiary Name
Expiry Date
Advising Bank
Re-key is applicable to the first approver in case of multiple approvers. All approvers will however be able see the summary tiles and the details in the screen by drill down from tiles.
Tiles Displayed in Summary
· Main- You should be able to see details about application details and LC details. You should be able to modify details if required.
· Party Details –You should be able to see the party details like beneficiary, advising bank etc.
· Availability and Shipment- You should be able to see already captured availability and shipment details
· Payments- You should be able to see all details related to payments.
· Limits and Collaterals- I should be able to see captured details of limits and collateral. I should be able to update data of any field in details.
· Charges- You should be able to see details provided for charges
· Revolving Details- You should be able to see Revolving details.
· Documents and Conditions – You should be able to see the Documents required grid and the additional conditions grid
· Preview Message – You should be able to see the preview details grid

O B T F P M I m p o r t L C I s s u a n c e _ U s e r M a n u a l p g . 5 4
· Compliance – You should be able to see the compliance details tiles. The status should be verified for KYC, AML and Sanction Checks.
Documents and Checklist- You should be able to verify already attached documents.
Based on the transaction value, there can be one or more approvers.
After verification, on submit the transaction gets approved and if there are additional approvals, the task will move to the next approver. After all approvals, the system will hand-off the transaction details to the back end system for posting.
Documents and Checklist
Documents: As an approval you should be able to open the uploaded documents and verify them.
Checklist: Verify the uploaded documents.
Remarks : As approval user, you should be able to view the remarks captured in the process during earlier stages.
Action Buttons
After providing required data you should be able to perform any of the below action –
a. Submit - On Submit, system should validate for all mandatory field values and the task should move to the next logical stage. If there are more approvers, task will move to the next approver for approval. If there are no more approvers, the transaction is handed off to the back end system for posting.
b. Hold - You should be able to retain all the entered data and should not submit the task. Task should remain in Pending state.
c. Reject - On click of Reject, you should be able to select a Reject Reason from a list displayed by the system.
Possible Reject Codes are – R1- Documents missing, R2- Signature Missing, R3- Input Error, R4- Insufficient Balance- Limits, R5 - Others. The user would be able to select a Reject code and give a Reject Description.
Other users should be able to see the reject reason in remarks window throughout the process
d. Cancel - You should be able to cancel the DE window and return to dashboard. The data input will not be saved.
d. Refer - You should be able to refer the task back to the DE user. I should be able to select a Refer Reason from the values displayed by the system. Possible Refer Codes are – R1- Documents missing, R2- Signature Missing, R3- Input Error, R4- Insufficient Balance- Limits, R5 - Others. The user would be able to select a Refer code and give a Refer Description
7 CUSTOMER - ACKNOWLEDGEMENT To:
<CUSTOMER NAME> DATE: DD-MM-YYYY
<CUSTOMER ADDRESS>
Dear Sir,

O B T F P M I m p o r t L C I s s u a n c e _ U s e r M a n u a l p g . 5 5
SUB: Acknowledgement to your LC Application number <CUSTOMER REFERENCE NUMBER> dated <APPLICATION DATE>
This letter is to inform you that we have received your application for issue of Import LC with the below details:
CUSTOMER NAME: <CUSTOMER NAME>
CURRENCY/AMOUNT: <LC CCY/AMT>
YOUR REFERENCE NO: <CUSTOMER REFERENCE NUMBER>
OUR REF NUMBER: <PROCESS REFERENCE NUMBER>
We have also received the following Documents from you for processing the request:
Document Name 1
Document Name 2
n.Document Name n
We have registered your request. Please quote our reference < PROCESS REF NUMBER> in any future correspondence.
This acknowledgement does not constitute issuance of LC.
Thank You for banking with us.
Regards,
<DEMO BANK>
Notice: This document is strictly private, confidential and personal to its recipients and should not be copied, distributed or re-produced in whole or in part, nor passed to any third party. The information contained in this e-mail/ message and/or attachments to it may contain confidential or privileged information. If you are not the intended recipient, any dissemination, use, review, distribution, printing or copying of the information contained in this message and/or attachments to it are strictly prohibited. If you have received this communication in error, please notify us by reply e-mail or telephone and immediately and permanently delete the message and any attachments. Thank you
8 CUSTOMER - REJECT LETTER FROM:
<BANK NAME>
<BANK ADDRESS>
TO: DATE <DD/MM/YYYY>
<CUSTOMER NAME>
<CUSTOMER ADDRESS>
<CUSTOMER ID>

O B T F P M I m p o r t L C I s s u a n c e _ U s e r M a n u a l p g . 5 6
Dear Sir,
SUB: Your Import LC Application <Customer Reference Number> under our Process Ref <Process Ref No> - Rejected
Further to your recent Import LC application request dated <Application Date -DD/MM/YYYY>, under our process ref no <process ref no>, this is to advise you that we will not be able to issue the required LC.
After a thorough review of your application and the supporting documents submitted, we have concluded we will not be able to issue the LC due to the below reason
<Reject Reason >
On behalf of Demo Bank, we thank you for your ongoing business and trust we will continue to serve you in future.
For any further queries about details of your Import LC application review, please contact us at our bank customer support ph.no xxxxxxxxxxxx
Yours Truly
Authorized Signatory
9 CUSTOMER RESPONSE - DRAFT CONFIRMATION
The customer response can be received both by online and non-online mode.
In non-online mode, you will have a physical response of the customer
.
In online mode the customer will share their response online that will be automatically update in the customer response field in the task, which is available in the customer response pending stage.
When you log in into Trade Mid Office (TMO) system, you be able to see the customer response pending tasks for trade transactions in your queue. On opening the task, you can see customer response screen.
Application Details
All fields displayed under Application section will be read-only except Priority and fields will display data captured during registration stage in case of Non Online request and information populated direct from SWIFT in case of Online requests. The data segment is collapsible and the you can open or close the data segment
.
Customer Response
All fields displayed under Application details section, would be read only.

O B T F P M I m p o r t L C I s s u a n c e _ U s e r M a n u a l p g . 5 7
Language: Read Only field
Draft Message: Read Only field
Draft Confirmation
Draft Confirmation required Read Only field
Customer Response: This field will be available for you to update any of the below response based on the customer’s reply
Accepted
Not accepted - Change and Send for Review Again
Not accepted - Change and Proceed
Pending
For non-online response – the default would be pending. You will be able select from the drop list if the customer has accepted the draft or has request for change based on the above drop list responses.
For Online response – Read Only
Customer Remarks: You can capture the remarks of the customer.
Response Date: Non-Online channel – You can update the date on which the customer response has been received.
Online Channel – Read Only
Tiles Displayed in Summary
· Main- You will be able to see details about application details and LC details.
· Party Details – You will be able to see the party details like beneficiary, advising bank etc.
· Availability and Shipment- You will be able to see already captured availability and shipment details
· Payments- You will be able to see all details related to payments.
· Limits and Collaterals-You will be able to see captured details of limits and collateral.
· Charges- You will be able to see details for charges, commission and taxes
· Revolving Details- You will be able to see Revolving details.
· Documents and Conditions –You will be able to see the Documents required grid and the additional conditions grid.
· Preview Message – You will be able to see the preview details grid
· Compliance – You will be able to see the compliance details tiles with statues
Documents – You will be able to view the documents uploaded in the system. You will also be able upload documents if customer response has been received through non- online channel.
Remarks: You can also capture remarks if required. You can also be able to view the remarks captured during earlier stages.
Action Buttons
a. Submit - On Submit, system should validate for all mandatory field values and the task should move to the next logical stage.

O B T F P M I m p o r t L C I s s u a n c e _ U s e r M a n u a l p g . 5 8
b. Hold - You will be able to retain all the entered data and should not submit the task. Task should remain in Pending state.
c. Reject - On click of Reject, you should be able to select a Reject Reason from a list displayed by the system.
Possible Reject Codes are – R1- Documents missing, R2- Signature Missing, R3- Input Error, R4- Insufficient Balance- Limits, R5 - Others. The user would be able to select a Reject code and give a Reject Description.
Other users should be able to see the reject reason in remarks window throughout the process
d. Cancel - You should be able to cancel the DE window and return to dashboard. The data input will not be saved.
e. Refer - You should be able to refer the task back to the DE user. You should be able to select a Refer Reason from the values displayed by the system. Possible Refer Codes are – R1- Documents missing, R2- Signature Missing, R3- Input Error, R4- Insufficient Balance- Limits, R5 - Others. The user would be able to select a Refer code and give a Refer Description
Draft Confirmation - Screen

O B T F P M I m p o r t L C I s s u a n c e _ U s e r M a n u a l p g . 5 9
10 EXCEPTION APPROVAL - LIMIT CHECK When you log in into Trade Mid Office (TMO) system limit exception queue, You will be able to see the limit check failed tasks for trade transactions in your queue. On opening the task, you will be able to see the sum-mary tiles. The tiles should display a summary of important fields with values.
The transactions that have failed limit check due to non-availability of limits will be available for further han-dling.
As a Limit check Exception approver you can do the following
· Approve – a) Limit enhanced in the backend (outside this process)
b) Without enhancing limit in the backend
· Refer – a) Refer back to DE providing alternate limit id to map
b) Refer additional collateral to be mapped
· Reject - the transaction due to non-availability of limits capturing reject reason
Application Details
All fields displayed under Application section will be read-only except Priority and fields will display data cap-tured during registration stage in case of Non online request and information populated direct from SWIFT in case of online requests. The data segment is collapsible and the user open or close the data segment.
Tiles Displayed in Summary
Main- You will be able to see details about application details and GI details
Party Details – You will be able to see the party details like beneficiary, advising bank etc.
Guarantee Details – You will be able to see the Counter Guarantee Details and Guarantee Text and Sender to Receiver Information
Limits and Collaterals- You will be able to see captured details of limits and collateral.
Charges- You will be able to see details provided for charges
Compliance – You will be able to see the compliance details tiles.
Legal Verification – You will be able to see the message preview and legal verification vetting comments
Draft Confirmation – You will be able to see the message preview
Documents – You will be able to view the documents uploaded in the system.
Remarks : The error that has caused failure in handoff will get captured in the ’Remarks’. You can also capture remarks if required. You will also be able to view the remarks captured during earlier stages.
Action Buttons
After providing required data I should be able to perform any of the below action –
Hold - You should be able to retain all the entered data and should not submit the task. Task
should remain in Pending state.
Reject – On click of Reject, you will be able to select a Reject Reason from a list displayed by the
system.
Possible Reject Codes are – R1- Documents missing, R2- Signature Missing, R3- Input Error, R4-
Insufficient Balance- Limits, and R5 – Others (user can enter narration). The user would be able to
select a Reject code and give a Reject Description.

O B T F P M I m p o r t L C I s s u a n c e _ U s e r M a n u a l p g . 6 0
Other users should be able to see the reject reason in remarks window throughout the process.
Cancel -You should be able to cancel the DE window and return to dashboard. The data input will
not be saved.
Refer -You should be able to refer the task back to the DE user. You should be able to select a
Refer Reason from the values displayed by the system. Possible Refer Codes are – R1- Documents
missing, R2- Signature Missing, R3- Input Error, R4- Insufficient Balance- Limits, R5 - Others. The
user would be able to select a Refer code and give a Refer Description
Approve - On approve, system should validate for all mandatory field values, the limit check is
approved, and task should move to the next logical stage.
11 EXCEPTION - KNOW YOUR CUSTOMER (KYC) When you log in into Trade Mid Office (TMO) system KYC (Know Your Customer) exception queue, you will be able to see the KYC exception failed tasks for trade finance transactions in your queue. On opening the task, you can see summary tiles. The tiles should display a summary of important fields with values.
The transactions that have failed KYC due to non-availability / expired KYC verification
As KYC Exception approver,you can pick up a transaction and do the following actions
· Approve – a) After changing the KYC status in the backend application (outside this process)
b) Without changing the KYC status in the backend application
· Reject (with appropriation reject reason)
Application Details
All fields displayed under Application details section, would be read only.
Tiles Displayed in Summary
Main- You will be able to see details about application details and LC details
Limits and Collaterals- You will be able to see captured details of limits and collateral.
Compliance: You will be able to see the compliance details tiles.
Remarks: You will also be able to view the remarks captured during earlier stages.
Action Buttons
After providing required data you should be able to perform any of the below action –
Hold - You be able to retain all the entered data and should not submit the task. Task should
remain in Pending state.
Reject – On click of Reject, you will be able to select a Reject Reason from a list displayed by the
system.
Possible Reject Codes are – R1- Documents missing, R2- Signature Missing, R3- Input Error, R4- Insufficient
Balance- Limits, and R5 – Others (user can enter narration). The user would be able to select a Reject code
and give a Reject Description.
Other users should be able to see the reject reason in remarks window throughout the process.

O B T F P M I m p o r t L C I s s u a n c e _ U s e r M a n u a l p g . 6 1
Cancel - You will be able to cancel the DE window and return to dashboard. The data input will not
be saved.
Approve - on approve, system should validate for all mandatory field values, the limit check is approved, and task should move to the next logical stage.
12 EXCEPTION - AMOUNT BLOCK When you og in into Trade Mid Office (TMO) system amount block exception queue, you will be able to see the amount block failed tasks for trade transactions in your queue. On opening the task, you will see summary tiles. The tiles should display a summary of important fields with values.
The transactions that have failed amount block due to non-availability of amount in respective
As part of amount block, system will check if sufficient balance is available in the account to create the block. On hand-off, system will debit the blocked account to the extent of block and credit charges/ commission account in case of charges block or credit the amount in suspense account for blocks created for collateral.
Exception is created when sufficient balance is not available for blocking the settlement account and the same can be addressed by the approver in the following ways:
· Approve – a) Settlement amount will be funded (outside of this process)
b) Allow account to be overdrawn during hand-off
· Refer – a) Refer back to DE providing alternate settlement account to be used for block
b) Different collateral to be mapped or utilize lines in place of collateral
· Reject – Reject the transaction due to non-availability of sufficient balance in settlement account
Application Details
All fields displayed under Application section will be read-only except Priority and fields will display data captured during registration stage in case of Non Online request and information populated direct from SWIFT in case of Online requests. The data segment is collapsible and the user open or close the data segment
Tiles Displayed in Summary
Main- You will be able to see details about application details and GI details
Limits and Collaterals- You will be able to see captured details of limits and collateral.
Charges-You will be able to see details provided for charges
Remarks : You will also be able to view the remarks captured during earlier stages.
Documents : You will be able to view all the documents uploaded as part of the process.
Action Buttons
After providing required data I should be able to perform any of the below action –
Hold - You will be able to retain all the entered data and should not submit the task. Task
should remain in Pending state.

O B T F P M I m p o r t L C I s s u a n c e _ U s e r M a n u a l p g . 6 2
Reject – On click of Reject, you should be able to select a Reject Reason from a list displayed by
the system.
Possible Reject Codes are – R1- Documents missing, R2- Signature Missing, R3- Input Error, R4- Insufficient
Balance- Limits, and R5 – Others (user can enter narration). You will be able to select a Reject code and give
a Reject Description.
Other users should be able to see the reject reason in remarks window throughout the process.
Cancel - You will be able to cancel the DE window and return to dashboard. The data input will
not be saved.
Refer - You will be able to refer the task back to the DE user.You will be able to select a Refer
Reason from the values displayed by the system. Possible Refer Codes are – R1- Documents
missing, R2- Signature Missing, R3- Input Error, R4- Insufficient Balance- Limits, R5 - Others. The
user would be able to select a Refer code and give a Refer Description
Approve - On approve, system should validate for all mandatory field values, and task should
move to the next logical stage

O B T F P M I m p o r t L C I s s u a n c e _ U s e r M a n u a l p g . 6 3
13 REFERENCE AND FEEDBACK
References
For more information on any related features, you can refer to the following documents: Oracle Banking Procedure User Guide
Oracle Banking Common Core
Feedback and Support
Oracle welcomes customers' comments and suggestions on the quality and usefulness of the document. Your feedback is important to us. If you have a query that is not covered in this user guide or if you still need assistance, please contact documentation team.