object snap
TRANSCRIPT

1
Birla Vishvakarma Mahavidyalaya

Object snap

MEMB113 | Dept. of Mechanical Engineering | UNITEN | 20050
9 A
uto
CA
D P
art
2
Content
• OSNAP• OTRACK• BLOCK & INSERT• Draw command: rectangle,
polygon• Edit command: trim, offset,
extend, array

MEMB113 | Dept. of Mechanical Engineering | UNITEN | 20050
9 A
uto
CA
D P
art
2
Drawing aid: Object snap• Object snap or OSNAP
– Are functions to aid the drawing process, a very useful tool– To snap on a geometric point on an object– Can be turned off or on by clicking OSNAP button on status bar or press
CTRL+F or F3 key– When turned on, the cursor will jump or snap to the certain point on an object
e.g. mid-point of a line or tangent of a circle– Includes visual aid – AutoSnap– Several OSNAP modes available, can activate any number at a time
Endpoint
Midpoint
Intersection
Apparent IntersectionExtension
Center
QuadrantTangent
Perpendicular
ParallelInsert
Node
Nearest
MEMB113 | Dept. of Mechanical Engineering | UNITEN | 20050
9 A
uto
CA
D P
art
2
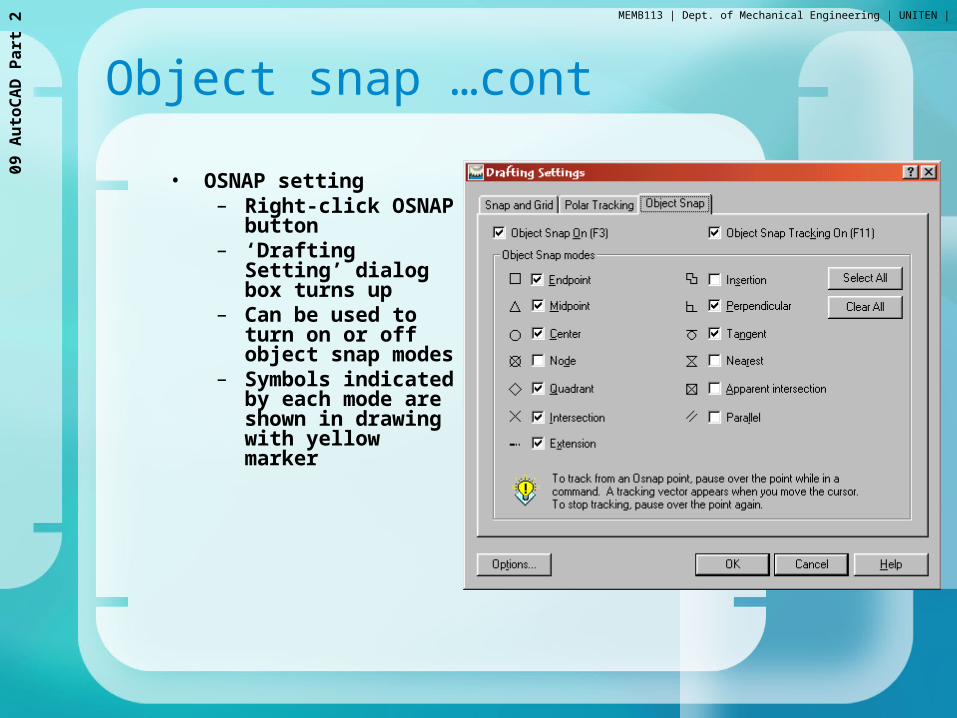
Object snap …cont
• OSNAP setting– Right-click OSNAP
button– ‘Drafting Setting’
dialog box turns up– Can be used to turn
on or off object snap modes
– Symbols indicated by each mode are shown in drawing with yellow marker

MEMB113 | Dept. of Mechanical Engineering | UNITEN | 20050
9 A
uto
CA
D P
art
2
Object snap …cont• How to use:
– You need to have an object on drawing area– Then you need to be in a drawing command, e.g. CIRCLE, LINE,
ARC, etc.– Hover the mouse over the existing object,
• Yellow marker shows up with tool tip• Indicating what type of geometric point snap can be done
Endpoint Midpoint Intersection Example of OTRACK

MEMB113 | Dept. of Mechanical Engineering | UNITEN | 20050
9 A
uto
CA
D P
art
2
Object snap modes…cont
• Endpoint– Snap to endpoint of the nearest entity, e.g. end of a line
• Midpoint– Snap to the midpoint of an entity, e.g. midpoint of a straight line, or arc
• Center– Snap to the center of entity such as circle, arc or ellipse
• Node– Snap to the nearest point (entity)
• Quadrant– Snap to the quarter position on the circumference of an arc, circle or ellipse
• Intersection– Snap to the intersection of two entities
• Tangent– Snap to the tangent of entities such as circle, arc or ellipse
• Nearest– Snap to the nearest point on an entities
• Perpendicular– Snap to the point perpendicular to an entity such as straight line
MEMB113 | Dept. of Mechanical Engineering | UNITEN | 20050
9 A
uto
CA
D P
art
2
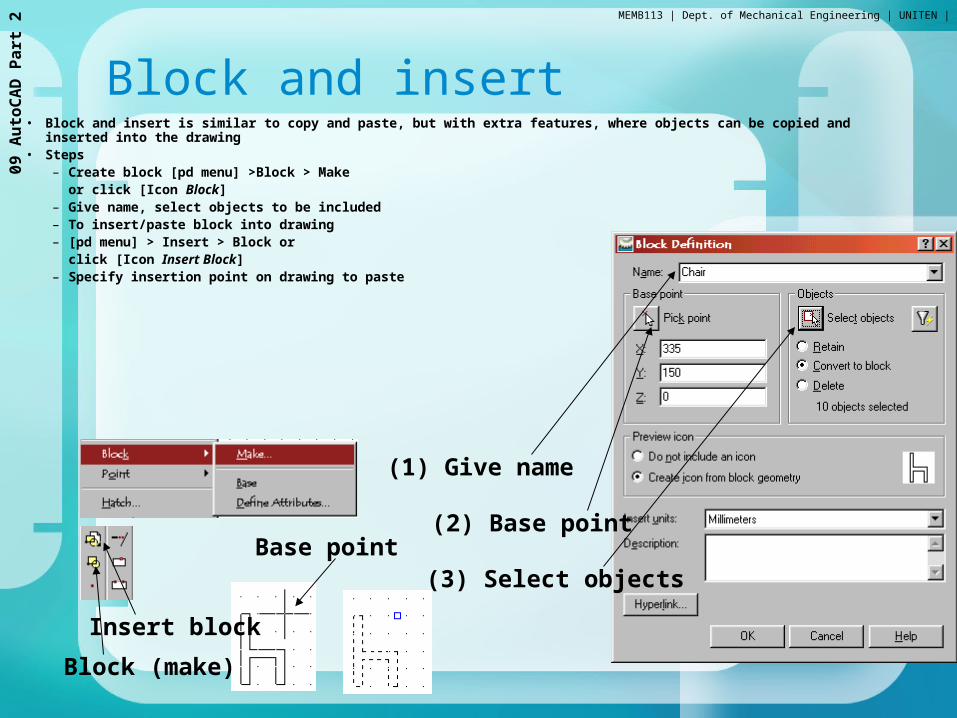
Block and insert• Block and insert is similar to copy and paste, but with extra features, where objects can be copied and inserted into the
drawing• Steps
– Create block [pd menu] >Block > Make or click [Icon Block]
– Give name, select objects to be included– To insert/paste block into drawing – [pd menu] > Insert > Block or
click [Icon Insert Block]– Specify insertion point on drawing to paste
Base point
(1) Give name
(2) Base point
(3) Select objects
Block (make)
Insert block

MEMB113 | Dept. of Mechanical Engineering | UNITEN | 20050
9 A
uto
CA
D P
art
2
Block & insert ... cont• To use/paste the block in drawing
– [pd menu] > Insert > Block.. Or [Icon Insert Block]– command:insert {enter}
Insert iconSelect block
Insertion point Scale Rotation

MEMB113 | Dept. of Mechanical Engineering | UNITEN | 20050
9 A
uto
CA
D P
art
2
Rectangle• To draw a rectangular object
– [pd menu] > Draw > Rectangle or [Icon Rectangle] or Command:rectangle or rectang
Rectangle shape
Rectangle – with 0.25 chamfer
Rectangle – with 0.25 fillet
2nd point1st pointRectangle icon

MEMB113 | Dept. of Mechanical Engineering | UNITEN | 20050
9 A
uto
CA
D P
art
2
Polygon• To draw many- & equal- side closed object e.g hexagon,
pentagon etc.– [pd menu] > Draw > Polygon or [Icon Polygon] or
Command: polygon
Center - Inscribed
Center - Circumscribed Edge1st point
2nd point
1st point
2nd point
1st point
2nd point
Examples of polygon drawn
Polygon icon

MEMB113 | Dept. of Mechanical Engineering | UNITEN | 20050
9 A
uto
CA
D P
art
2
Offset• To create copy of existing object at a certain distance
– Concentric circles and squares, parallel lines and curves– [pd menu] > Modify > Offset or [Icon Offset]– Specify the distance– Select the object– Click on the side to place the object
Before After
Offset icon
Before After
Before After

MEMB113 | Dept. of Mechanical Engineering | UNITEN | 20050
9 A
uto
CA
D P
art
2
Trim
• To remove a certain part of an object based on other object(s)– [pd menu] > Modify > Trim or [Icon Trim]
Cutting edge
Part to be removed
Before After
Cutting edgeBefore After
Part to be removed
Cutting edge
Part to be removedBefore After
Cutting edge
Part to be removed
Cutting edge
Part to be removed
Before After
Before After
MEMB113 | Dept. of Mechanical Engineering | UNITEN | 20050
9 A
uto
CA
D P
art
2
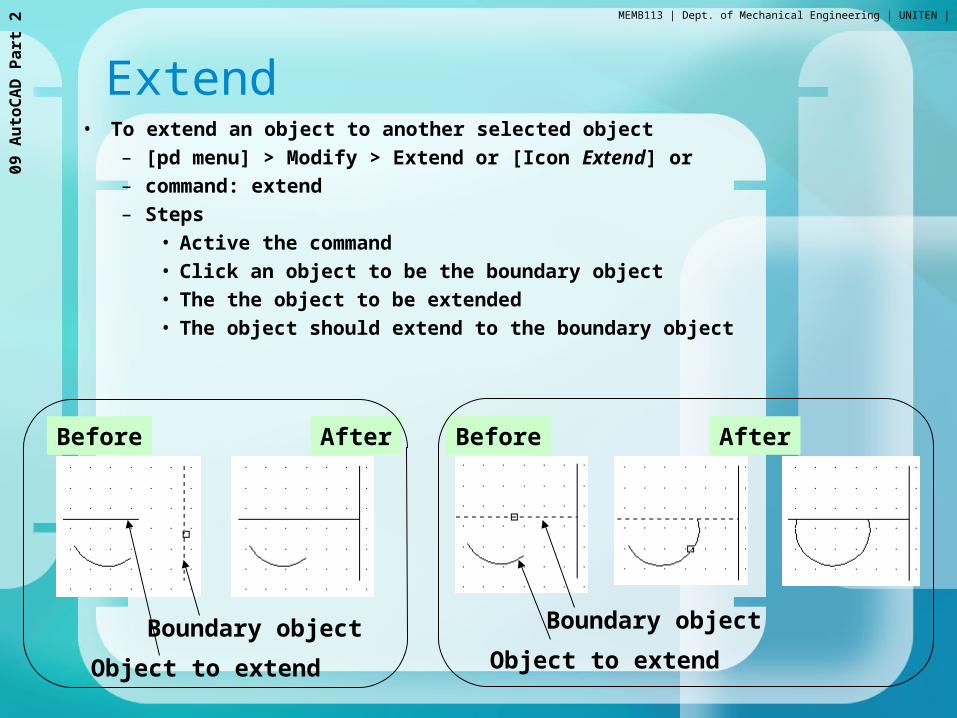
Extend• To extend an object to another selected object
– [pd menu] > Modify > Extend or [Icon Extend] or – command: extend– Steps
• Active the command
• Click an object to be the boundary object
• The the object to be extended
• The object should extend to the boundary object
Boundary object
Before After Before After
Object to extend
Boundary object
Object to extend

MEMB113 | Dept. of Mechanical Engineering | UNITEN | 20050
9 A
uto
CA
D P
art
2
Array
• Creates multiple copies with a certain pattern and distance
• 2 types: rectangular and polar
Rectangular array
– [pd menu] > Modify > Array…– [icon Array]– Array Window will be displayed
AfterBefore
Array icon

MEMB113 | Dept. of Mechanical Engineering | UNITEN | 20050
9 A
uto
CA
D P
art
2
Array …cont
– Click Select object button– Click on object(s) or entity
to be copied– Press enter– Change the value of rows
and columns accordingly– Type in offset distance
and direction
Row offset =1Column offset =1.5Angle of array = -30
Select object(s) buttonRectangular array
No. of rowsNo. of columns
Distance between objects
Angle of array
Arrangementpreview
Angle of array

MEMB113 | Dept. of Mechanical Engineering | UNITEN | 20050
9 A
uto
CA
D P
art
2
Array …cont
– Click on Polar Array– Select object(s)– Specify center point– Select method
• No.of item & angle to fill• No.of item & angle
between item• Angle to fill & angle
between item– Specify the required value– Click on ‘rotate item as
copied’ check box if required
Polar array
– [pd menu] > Modify > Array…– [icon Array]

MEMB113 | Dept. of Mechanical Engineering | UNITEN | 20050
9 A
uto
CA
D P
art
2
Array …cont
Before After
No. of item = 8Angle to fill = 360Rotate = No
Before After
No. of item = 6Angle to fill = -180Rotate = No
Before After
No. of item = 8Angle to fill = 360Rotate = Yes
Persented by
Dhruvit kardani 130080125007
Nishant desai 130080125003
Piyush lathiya 130080125011
Isha modi 130080125014