obip kshop
DESCRIPTION
OBIP kshopTRANSCRIPT
Oracle Business Intelligence Publisher
Author: Niket ChitreDate : 11/10/2008Key Words : BI Publisher, PublisherDeclaration :I/We hereby declare that this document is based on my/our personal experiences and/or experiences of my/our project members. To the best of my/our knowledge, this document does not contain any material that infringes the copyrights of any other individual or organization including the customers of Infosys.
The PPT serves as a training material for trainings conducted by/for Oracle BI Team. It gives a step-by-step procedure to be followed for developing, viewing and scheduling reports in BI Publisher

2
What is Oracle BI Publisher?
Oracle BI Publisher is a tool which enables the users to create, schedule and deliver pre canned or pre build reports. It uses templates which are designed in the required format to render the reports required by the user.
Oracle BI publisher is a versatile reporting tool, as it supports various commonly accepted output formats like Word document, PDF file and an excel sheet.
It can connect to different types of data sources to get the report data.

3
What is Oracle BI Publisher? Contd…
It supports all the databases, flat file formats like CSV and XLS.
It also supports XML.
Oracle BI Publisher can be used as a stand-alone reporting product or integrated with the Oracle Business Intelligence Suite Enterprise Edition. Thus, it has a exclusive connectivity to Oracle BI where it can fetch the data directly out of an oracle BI Answers query.

4
Logging In to Oracle BI Publisher
Depending on the type of installation you have done, you can invoke BI Publisher as follows:
If you have installed BI Publisher along with Oracle BI Enterprise Edition, then you can select All Programs > Oracle Business Intelligence > BI Publisher from the Start menu.
If you have installed BI Publisher in stand-alone mode, then select All Programs > Oracle - Oracle Home > BI Publisher Server from the Start menu.OracleHome - refers to Oracle Home name, where you installed Oracle BI Publisher.

5
Logging In to Oracle BI Publisher Contd…
This displays the Welcome screen for BI Publisher.

6
Logging In to Oracle BI Publisher Contd…
As you have logged in as the Administrator, the welcome page displays the Reports, Schedules, and Admin tabs.
For the users who do not have administrator privileges, the Admin tab is not displayed.

7
Setting Preferences in BI Publisher
By clicking on the Preferences link, a new window with General Preferences and Account tabs is opened.
The Account tab is used to change the password of your administrator account. (If you have installed BI Publisher along with Oracle BI Enterprise Edition, for the integration between these to work, for any given user account , you should set the same password in BI Administration Tool and in BI Publisher.)

8
Setting Preferences in BI Publisher Contd…
The Accounts tab screen:-

9
Setting Preferences in BI Publisher Contd…
The General Preferences screen:-

10
Setting Preferences in BI Publisher Contd…
On the above page you can:
Set the appropriate options for UI Language, Reports Locale, Reports Time Zone according to your requirements.
You can also enable the accessibility option.

11
BI Publisher –The Admin Tab
The admin tab screen is as follows:

12
BI Publisher –The Admin Tab Contd…
Create a BI Publisher data source
Before creating a query on the database, you need to define connection details in the Admin tab.
Go to Admin > Data Source
You can then choose any of the given options and proceed.

13
BI Publisher –The Admin Tab Contd…
After clicking on your desired data source link, a screen as the following is displayed.
You can choose to edit a given data source by clicking on its name or you can also add a new data source.

14
BI Publisher –The Admin Tab Contd…
You can make the required changes in the update data source that you are editing.

15
BI Publisher –The Admin Tab Contd…
Before clicking on Apply after making the changes, click Test Connection.
When the confirmation message saying that connection is successfully established, click Apply.
In case of file data source, specify a name for your data source and put in the path of your storage drive where your data files are located.

16
BI Publisher –The Reports Tab
The reports tab screen is as follows:

17
BI Publisher –The Reports Tab Contd…
On the reports page, click on the folder in which you want to create a new report.
On the left hand side pane click on ‘Create a new report’ link
Enter the report name that you want to create. A report will be created as shown below.

18
BI Publisher –The Reports Tab Contd…
Click on edit link below the report to open the report in the edit mode.
Set the options that appear in the general settings page.
Give a brief description about the report in the description option.
Set the default data source as Oracle BIEE or Demo. Also check the properties as per the requirements.

19
BI Publisher –The Reports Tab Contd…
The general properties page:

20
BI Publisher –The Reports Tab Contd…
Next click on the Data Model and click new to define a data source for this report.
Select the type and data source for the new data set.
You can also choose to cache the results by checking the cache results checkbox.

21
BI Publisher –The Reports Tab Contd…
CASE 1: Type- SQL Query Now click on the query builder to create the SQL Query if you
specified the type as SQL Query.

22
BI Publisher –The Reports Tab Contd…
Query Builder:

23
BI Publisher –The Reports Tab Contd…
You can drag and drop the tables you want to use in your query.
Check the columns you want to be displayed. Joins can be made by selecting the common columns between the tables.
Conditions can be specified as below. Sort order, group by clause can also be specified.

24
BI Publisher –The Reports Tab Contd…
You can view the generated SQL in the SQL tab.
The results can be viewed in the Results tab as shown below.
Click on Save to save the query.

25
BI Publisher –The Reports Tab Contd…
Click on save to save the changes made to the report.

26
BI Publisher –The Reports Tab Contd…
CASE 2 : Type- File
If the Type specified is File:
In the details section, select the data source from the drop down and put in the name of the file which you want to be used as the report data source.

27
BI Publisher –The Reports Tab Contd…
Click on Save to save the changes made to the report.
After saving click on View to see if XML data is loaded successfully.

28
BI Publisher –The Reports Tab Contd…
CASE 3: Type-Oracle BI Answers
Else in case of Oracle BI Answers as the specified type, you can browse and select from the options available.

29
List Of Values and Parameters
List of Values : We can create a list of values in the BI Publisher report which can be used to filter certain set of values from the report. (This feature is better supported for relational database connections, as we can have flexible list of values which can be dynamically modified.)
Parameter: Parameters along with the list of values allows the user to limit the number of reports at the output.
For Oracle BI Answers, the list of values and parameters are disabled.

30
Creating a Report with Parameters and List of Values
Click the Parameters node in the Report pane and click New to create a parameter.
Enter the values for identifier, data type, default value, parameter type and display label.

31
Creating a Report with Parameters and List of Values
When you save and view the report, the report will be displayed according to the parameter value specified as default.

32
Creating a Report with Parameters and List of Values
Select the Parameter Type:
• Text - this type allows the user to enter a text entry to pass as the parameter.
• Menu - this type presents an LOV. Enter the Display Label and select from the LOVs you defined in the previous step. You may also enable the following options:
1)Multiple Selection - allows the user to select multiple entries from the list.
2) Can select all - inserts an "All" option in the list.
3) Refresh other parameters on change - performs a partial page refresh to refresh any other parameters whose values are dependent on the value of this one.

33
Creating a Report with Parameters and List of Values
• Date - passes a date parameter. If you select a Parameter Type of Date, the Data Type automatically defaults to Date. Enter the following:
1)Display Label and Text Field Size in characters.
2) Date Format String
3) Date From and Date To
• Hidden - select this option to pass the default value always, without allowing the user to see or change it.

34
Creating a Report with Parameters and List of Values
Using List Of Values
Click List of Values, and click New to create a new list of values.

35
Creating a Report with Parameters and List of Values
Enter a Name for the list and select a Type: SQL Query or Fixed Data. If you select SQL Query:
•Select a Connection from the data source list.
• Select Cache Result if you want the results of the query cached for the report session.
• Enter the SQL query or use the Query Builder.

36
Creating a Report with Parameters and List of Values
If you select Fixed Data:
Select the Add link to add the Label and Value pairs for the LOV.

37
Creating a Report with Parameters and List of Values
The List Of Values come as a drop down list as shown.

38
Adding Layouts to the Report Definition
BI Publisher offers various designing templates for your reports as follows
Rich Text Format(RTF) Uses MS Word to design the template
Portable Document Format(PDF) PDF templates are used primarily for using predefined forms as templates for
your reports
Microsoft Excel(XLS) MS Excel is used to design the template
XSL Stylesheet XSL formatting language is used for creating a template
eText Specialized RTF templates

39
Adding Layouts to the Report Definition
Defining layouts consists of 2 steps: Upload a template file Assign the template file to a Layout definition

40
Adding Layouts to the Report Definition(Steps)
From the BI Publisher Report Editor, select Layouts
Use the Browse button to locate the template file in your local system and then select Upload
The Template will now appear in the Manage Template Files Section. Multiple Templates can be uploaded for one report
Select the New icon to create the Layout Definition for the template/templates uploaded

41
Adding Layouts to the Report Definition(Steps)
Enter a Name for the layout definition. This name will appear in the Template list on the View report page. Select the Template file from the list of uploaded templates to correspond to this layout definition. Select the appropriate template type you are uploading: RTF, PDF, Excel, XSL or eText. Select the Output Format types to allow for this layout. If the template type is RTF, you can either select All Formats or limit the allowed formats by selecting only those
desired.

42
Adding Layouts to the Report Definition(Steps)
Select Save. The Layout will now appear as an available template when you run the report.
Select a Default Template. The Default Template will be used by default by the online viewer and the scheduler unless the user selects another.

43
Creating an RTF Template
Download Template Builder from the BI Publisher Folder and Report Tasks Region

44
Creating an RTF Template
The toolbar and the menu provide two methods of performing many of the same functions, including:
Insert data fields into your RTF templates Insert tables, forms, charts, and crosstabs Preview your template in multiple outputs Browse and update the content of form fields Validate your template Perform calculations on fields within the template Connect to the Oracle BI Publisher server or the Oracle BI server to
retrieve data to build your template Publish your template to the Oracle BI Publisher server
2 methods : Connected Mode Disconnected Mode

45
Connected Mode
Open Microsoft Word, from the Oracle BI Publisher menu, select Log On. Enter your BI Publisher credentials and the URL for the BI Publisher server.
(Contact your system administrator if you do not know the URL.) The Open Template dialog presents the same folder structure as your BI
Publisher Reports home page. Select the report for which you want to build a
template. Select Open Report to load the data to the Template Builder; or double-click
<New> in the Layout Templates pane. Create the Template by inserting fields, tables, charts etc. according to the
requirements. To upload your template to the BI Publisher server and add it to your report
definition, select Publish Template As from the Oracle BI Publisher menu. Enter a name for your template in the Upload as New dialog. Note that this
is the name that appears under Layouts in the Report Editor (Optional) Limit the output formats for this template.

46

47
Disconnected Mode
Generate a sample data file.
From the Report Editor or from the Reports page, select View. If no layouts are defined for your report, then the output type will default to xml, otherwise, choose data for the output type. Select Export. Save the results as an XML file to a local directory.
Open Microsoft Word with the Template Builder installed. From the Oracle BI Publisher menu select Data and then select Load
Sample XML Data. Locate your sample data file in your local directory and select Open. A pop up message will indicate your data has loaded successfully.
Create the Template by inserting fields, tables, charts etc. according to the requirements
Upload your layout template file as explained in the above section.

48
Enabling Bursting
Using BI Publisher's bursting feature you can split a single report based on a key in the report data and deliver the report based on a second key in the report data.
Driven by the delivery key, you can apply a different template, output format, delivery method, and locale to each split segment of your report.

49
Enabling Bursting Contd…
Example implementations include:
Invoice generation and delivery based on customer-specific layouts and delivery preference.
Financial reporting to generate a master report of all cost centers, bursting out individual cost center reports to the appropriate manager.
Generation of pay slips to all employees based on one extract and delivered via e-mail.

50
Enabling Bursting Contd…
The report data must contain an element by which the report will be split and an element by which the report will be delivered.
Enabling a report for bursting consists of the following steps:
Open the report in Edit mode.
Select Bursting under the report definition.
Select the Enable Bursting check box.
Select the Split By and Deliver By elements.

51
Enabling Bursting Contd…

52
Enabling Bursting Contd…
The Split By element is the data element from the report file that you wish to split the report by.
The Deliver By element is the data element from the report file by which to determine the delivery method.
Select the data source for the delivery XML.
The delivery XML can be sourced from the same data source as the main data set, or it can be generated from a different data source.
Enter the SQL query to build the delivery XML.

53
Enabling Bursting Contd…
Based on the SQL query that you provide on the Bursting criteria page of the Report Editor, BI Publisher will build the delivery XML data set.
The delivery XML data set contains the information to deliver your burst report appropriately to each recipient.
The delivery data in this XML document is used as a mapping table for each Deliver By element.

54
Scheduling BI Publisher Reports
Enables you to schedule long-running reports, to be run at a specified time and date
Enables you to select a time and date at which the load on the system is low, to run your daily/weekly and/or monthly reports
Two main components of the BI Publisher Scheduler are as follows:
Configuring the BI Publisher Scheduler Scheduling and Viewing Saved Output

55
Configuring the BI Publisher Scheduler(Steps)
Log in to the BI Publisher as Administrator (Password: Administrator)
In the Admin tab, click on the Scheduler Configuration Link in the System Maintenance section
In the Scheduler Configuration sub-tab: Select Oracle 10g from the Database Type drop-down list. Enter Connection String in the format: jdbc:oracle:thin:@<Host name>:
<Port>:<SID> Enter Username and Password Ensure that oracle.jdbc.driver.OracleDriver is selected as Database
Driver Class Click Test Connection

56
Configuring the BI Publisher Scheduler(Steps)
Click Install Schema to install the required tables and restart the BI Publisher Server or OC4J service after this configuration

57
Scheduling and Viewing Saved Reports(Steps)
Login to BI Publisher and go to the Reports tab
Select a report that you want to schedule and click on the Schedule option
Select the Report Parameters such as Template and Output Format to be used
Set the Job Properties which include : Job Name Report Formatting Locale Report Formatting Time Zone Report Formatting Calendar Public - select this check box to make this job available to all users with access
to the report. Save Data for Republish - select this check box if you want the XML data from
the report run saved. Save Output - select this check box if you want the report output saved Use Unicode

58
Scheduling and Viewing Saved Reports(Steps)

59
Scheduling and Viewing Saved Reports(Steps)
In the Time section, set the date and time when the report has to be run
If you select Run Once, select the Run Date and Run Time. If you select Run Daily/Weekly select the days of the week, the Run Time,
Active Start Date to begin the recurring job and the Active End Date to end the recurring schedule.
If you select Run Monthly, select the month, the day of the month to run the
report, the Run Time, the Active Start Date to begin running the report and the Active End Date. To select multiple days of the month to run the report, enter each day separated by a comma (example: 1,15,28).

60
Scheduling and Viewing Saved Reports(Steps)
You can now see the Scheduled Report in the Schedules tab You can suspend, resume or delete a report that has been
scheduled

61
Scheduling and Viewing Saved Reports(Steps)
Click the History tab to view the report history Click the icon in the Document column to view the saved
report

62
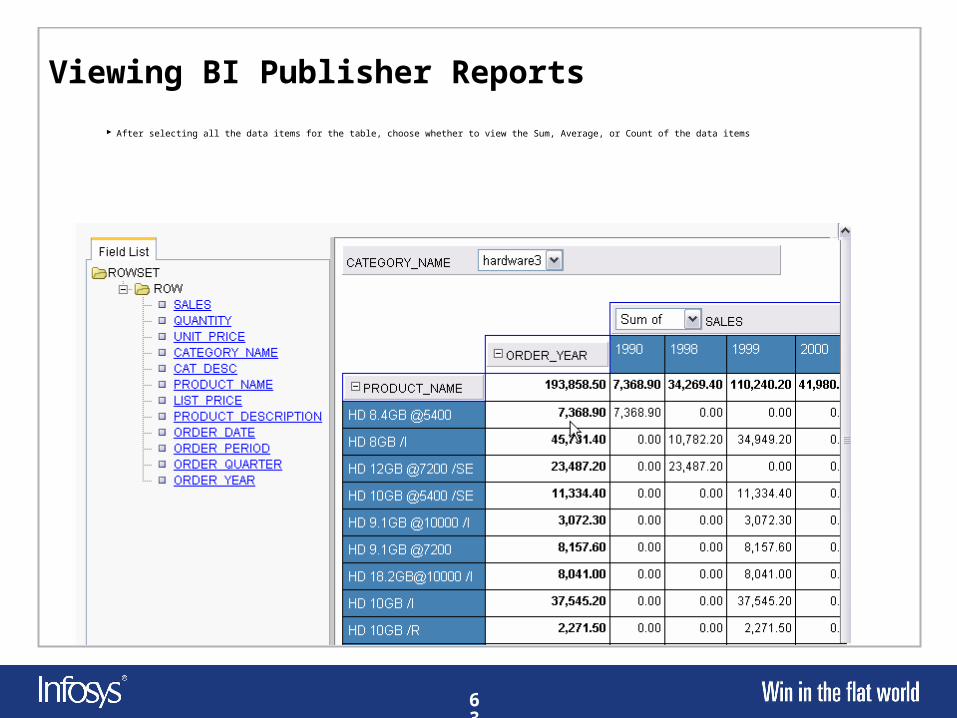
Viewing BI Publisher Reports
Using Online Analyzer Allows you to create a pivot table of your data Analyses the report data by dragging and dropping the different fields
into row, column and summary positions Allows you to filter the report data displayed in the pivot table by using
page-level data items Drag and drop the desired field to the Page item area and then choose
from the values that immediately populate the list
63
Viewing BI Publisher Reports
After selecting all the data items for the table, choose whether to view the Sum, Average, or Count of the data items

64
Viewing BI Publisher Reports
Using Analyzer for Excel enables you to Export the results of the report query to an Excel spreadsheet Log in to BI Publisher Enterprise from Excel to refresh your data, apply
new parameters, and apply a template to the report data Create Excel templates and upload them to the BI Publisher server Access and run your reports from an Excel session
Select the Excel Analyzer button from the View report page. You will be prompted to Save or Open the report .xls file.
When you open the file, select Enable Macros from the Excel dialog.

65
Viewing BI Publisher Reports
BI Publisher Menu in Excel
Login– allows you to log in to the BI Publisher server Show Report Parameters – displays the updateable parameters
and available templates for the report in a toolbar Analyzer for Excel Toolbar
To update the data, select a new parameter value then select Refresh Data to refresh the data in the current sheet.
To apply a template, select the template, then select Refresh Formatted Data. This will download the report as HTML into a new worksheet. Select the new worksheet to see the data with the new template applied.
To change the parameters from this worksheet, select the new values, then select Refresh Data, then select Refresh Formatted Data.

66
Viewing BI Publisher Reports
Update Excel Template - If you used the Open Template dialog to download a template from the BI Publisher server, use this option to upload the updated layout back to the server.
Add as a New Excel Template - Use this option to upload modifications to an existing template under a different name.
View Report Online – Launches the View report page

67
Viewing BI Publisher Reports
Open Layout Template - Downloads and opens the selected template in the Template Builder and loads the XML data. To start a new template, select <New> from the list of templates then select Open Layout Template; or double-click <New>.
Open Report - Loads the XML data of the selected report to the Template Builder

Thank You
“The contents of this document are proprietary and confidential to Infosys Technologies Ltd. and may not be disclosed in whole or in part at any time, to any third party without the prior written consent of Infosys Technologies Ltd.”
“© 2006 Infosys Technologies Ltd. All rights reserved. Copyright in the whole and any part of this document belongs to Infosys Technologies Ltd. This work may not be used, sold, transferred, adapted, abridged, copied or reproduced in whole or in part, in any manner or form, or in any media, without the prior written consent of Infosys Technologies Ltd.”