nx-osv 9000 - cisco.com ·...
TRANSCRIPT

NX-OSv 9000
This chapter contains the following sections:
• About NX-OSv 9000, page 1
• NX-OSv 9000 Guidelines and Limitations, page 2
• Benefits of Virtualization Using the NX-OSv 9000, page 2
• NX-OSv 9000 Software Functionality, page 3
• NX-OSv 9000 Resource Requirements, page 7
• VMware ESXi Support Information, page 8
• KVM-QEMU Support Information, page 8
• VirtualBox Support Information, page 8
• VMware Fusion Support Information, page 8
• NX-OSv 9000 Installation/Deployment, page 9
• NX-OSv 9000 Software Upgrade and Downgrade, page 9
• NX-OSv 9000 Configuration, page 9
• NX-OSv 9000 Deployment, page 10
• Network Topology Examples , page 27
About NX-OSv 9000The NX-OSv 9000 is a virtual platform that is designed to simulate the control plane aspects of a networkelement running Cisco Nexus 9000 software. The NX-OSv 9000 shares the same software image running onCisco Nexus 9000 hardware platform although no specific hardware emulation is implemented. When thesoftware runs as a virtual machine, line card (LC) ASIC provisioning or any interaction from the controlplane to hardware ASIC is handled by the NX-OSv 9000 software data plane.
The NX-OSv 9000 for the Cisco Nexus 9000 Series provides a useful tool to enable the devops model andrapidly test changes to the infrastructure or to infrastructure automation tools. This enables customers tovalidate configuration changes on a simulated network prior to applying them on a production network. Someusers have also expressed interest in using the simulation system for feature test ,verification, and automation
NX-OSv 9000 Guide 1

tooling development and test simulation prior to deployment. NX-OSv 9000 can be used as a programmabilityvehicle to validate software defined networks (SDNs) and Network Function Virtualization (NFV) basedsolutions.
NX-OSv 9000 Guidelines and LimitationsNX-OSv 9000 has the following guidelines and limitations:
• After initial setup of the NX-OSv 9000, youmust configure the booting image in your system. Otherwise,the NX-OSv 9000 drops to the loader> prompt after reload/shut down.switch# configure terminalswitch(config)# boot nxos n9000-dk9.7.0.3.I2.0.454.binswitch(config)# copy running-config startup-config
• The NX-OSv 9000 uses vNICs that are entered from the KVM/QEMU command line or from the GUIon ESXi for networking either externally or internally within a hypervisor server. The first NIC is alwaysused as the NX-OSv 9000 management interface. The subsequence NICs are used as data ports as e1/1,e1/2, ... e1/9. Ten NICs are allowed with nine NICs for data ports.
Beginning with Cisco NX-OS Release 7.0(3)I5(2), a maximum of 64 data ports (e1/1,e1/2, ... e1/64) are supported.
Note
Connect only the first NIC for the NX-OSv 9000 VM as themanagement interface to your LAN physicalswitch or vSwitch (VMNetwork) connecting directly to a physical switch. Do not connect any data portvNIC to any physical switch that conflicts with your server management connectivity.
• NX-OSv 9000 only supports the ESXi standard vSwitchwhenVMs are interconnectedwithin a hypervisoror an external physical switch.
• The vSwitch mapping to data port interface is required to have Promiscuous Mode as the Accept modein order to pass traffic between VMs.
• Multicast snooping should be disabled on net-devices configured as bridges on Linux-host machines.These net-devices are used to connect VMs in the NX-OSv 9000 setup.
• The NX-OSv 9000 operates as a bridge that generates BPDU packets on its Ethernet interfaces as itparticipates in Spanning Tree Protocol (STP). It also forwards broadcast, unknown unicast, and multicasttraffic as expected by classic bridging logic. Do not connect the NX-OSv 9000 data plane interfaces tothe upstream network in a manner that would create bridging loops or interfere with upstream STPoperation.
• Beginning with Cisco NX-OS Release 7.0(3)I6(1), NX-OSv 9000 is supported in the Virtual InternetRouting Lab (VIRL) and the Cisco Modeling Lab (CML) environment running as a VM.
• Beginning with Cisco NX-OS Release 7.0(3)I6(1), VXLANBGP EVPN is supported on NX-OSv 9000.
Benefits of Virtualization Using the NX-OSv 9000This virtual platform provides these virtualization benefits in a cloud environment and you are not limited tothe type of hardware as well as other resources.
NX-OSv 9000 Guide2
NX-OSv 9000NX-OSv 9000 Guidelines and Limitations

DescriptionBenefits
This virtual platform provides these virtualizationbenefits in a cloud environment and users is notlimited to hardware as well as other resources.
The minimum RAM/memory requirementfor an NX-OSv 9000 based VM is 4GB
Note
Hardware Independence
The resources used by NX-OSv 9000 are managedby the hypervisor, and can be shared among VMs.The amount of hardware resources that VM severallocates to a specific VM, can be reallocated toanother VM on the server.
Resource Sharing
You can easily move a VM from one server toanother, Thus, you can move the NX-OSv 9000 froma server in one physical location to a server in anotherphysical location without moving any hardwareresources.
Flexibility in Deployment
Users can change network connectivity andconfiguration in amatter of mins without any physicalcabling.
Dynamic Networking
NX-OSv 9000 Software FunctionalityNX-OS 7.0(3)I6(1) Release and Earlier Releases
Beginning Cisco NX-OS 7.0(3)I5(1), NX-OSv 9000 supports emulation and implementation on a subset ofhardware dependent features. Enablement of such features in the forwarding plane allows users to simulatea more realistic deployment scenario such as an NX-OS hardware platform.
The following are restrictions and host environment differences for NX-OSv 9000:
• Interface throughputs are currently rate-limited to prevent any production usage. The interface rate-limitis set as 4M per device.
• For the Oracle VM VirtualBox hypervisor, the SATA block device must be used due to the image sizeincrease from the 7.0(3)I5(1) branch which impacts the legacy bios IDE controller size limit. SATAblock devices also significantly improve disk performance, especially for initial boot up time. The IDEcontroller can be used in the VMware ESXi and the KVM/QEMU hypervisor, but it is significantlyslower than the SATA controller.
• A SATA block device can also be used in KVM/QEMU hyerpvisor, but it requires QEMU 2.2.0 or laterversion. Similar to the Oracle VM VirtualBox hypervisor, a performance improvement can be obtainedin the KVM/QEMU environment.
Supported Features
The following table displays specific Layer 2 and Layer 3 software feature support based on branch/lineup.
NX-OSv 9000 Guide 3
NX-OSv 9000NX-OSv 9000 Software Functionality

Table 1: Supported Layer 2 and Layer 3 Features (Software)
Support StatementCisco NX-OS 7.0(3)I5(1), 7.0(3)I5(2),and 7.0(3)I6(1) Releases
Nexus Feature NameTechnologyBranch/Lineup
SupportedBash ShellOS Infra
SupportedGuest Shell
SupportedSSH
SupportedRPM Installation
Supported for the managementinterface in Cisco NX-OS Release7.0(3)I5(1) and for all interfaces inCisco NX-OS Release 7.0(3)I5(2)and Cisco NX-OS Release7.0(3)I6(1)
POAP
SupportedNXAPIProgrammability
SupportedPuppet Integration (Native)
SupportedPuppet Integration (Guest Shell)
SupportedChef Integration (Native)
SupportedChef Integration (Guest Shell)
SupportedCDPL3 Features
SupportedLLDP
Supported (No BFD, EVPN)
VXLAN EVPN issupported inRelease7.0(3)I6(1) andlater.
Note
BGP v4
Supported (No BFD, EVPN)BGP v6
Supported (No BFD, EVPN)OSPFv2
Supported (No BFD, EVPN)OSPFv3
SupportedEIGRP
SupportedRIP
NX-OSv 9000 Guide4
NX-OSv 9000NX-OSv 9000 Software Functionality

Support StatementCisco NX-OS 7.0(3)I5(1), 7.0(3)I5(2),and 7.0(3)I6(1) Releases
Nexus Feature NameTechnologyBranch/Lineup
SupportedL2 Switching UnicastL2 Features
SupportedL2 Switching Broadcast
Supported as Broadcast (notexplicit Mcast) , No PIM or McastGroup support
L2 Switching Multicast
SupportedMAC learning
SupportedStatic/Router MAC
SupportedSwitchport
Supported1. 802.1q Trunk
Supported2. 802.1q Access
SupportedSTP
SupportedL3 SVI
SupportedSubinterfaces
Supported (Flood and Learn); BGPEVPN without ARP suppressionin Cisco NX-OS Release7.0(3)I6(1) and later.
VXLAN
Not supported in Cisco NX-OSRelease 7.0(3)I5(1), but supportedin Cisco NX-OS Release7.0(3)I5(2) and Cisco NX-OSRelease 7.0(3)I6(1)
vPC
SupportedPort channel
The NX-OSv 9000 features in this table have been verified to operate only with the Cisco devices mentionedin this document.
Note
If a networking or system feature is not identified as a supported feature in this document, it should beconsidered as unsupported despite that it may seem to work correctly. Unsupported features did not have anylevel of regression testing on NX-OSv 9000.
NX-OSv 9000 Guide 5
NX-OSv 9000NX-OSv 9000 Software Functionality

Table 2: NX-OS Features Not Supported (Not Tested)
LimitationsNX-OS Features
Not supported on NX-OSv 9000.QoS
Not supported on NX-OSv 9000.BFD
Not supported on NX-OSv 9000.ACL
Not supported on NX-OSv 9000.Policy maps
Not supported on NX-OSv 9000.ARP Suppression
Not supported on NX-OSv 9000.SPAN
Not supported on NX-OSv 9000.IGMP Snooping
Not supported on NX-OSv 9000.AMT
Not supported on NX-OSv 9000.LISP
Not supported on NX-OSv 9000.OTV
The following list (not comprehensive) contains known system limitations.
Table 3: NX-OS System Limitations
LimitationsSystem Capabilities
NX-OSv 9000 does not integrate the L2FM module and L2FDWR data plane. Itmaintains its ownMACTable. Therefore the behavior of theMAC address relatedCLIs will be different from the physical platform.
MAC Address
NX-OSv 9000 re-uses a software data plane that was created for L2FDWR.Withthis data plane, NX-OSv 9000 will not be able to account for and display trafficrelated statistics (such as interface statistics).
Statistics
The consistency checker has a hardware dependency and hence is not supportedon NX-OSv 9000. All ‘show’ and ‘exec’ commands will result with appropriateerror/warnings.
Consistency Checker
Low data plane performance. Additional rate limiter is in place to limit the totalamount of traffic received by NX-OSv 9000 to 4M.
Network Throughput
TOR-ISSU is not supported.TOR-ISSU
NX-OSv 9000 virtual interfaces serve as the ‘Ethernet Ports’. The link status ofthese links within the NX-OS is dependent on the Hypervisor’s capability.
Link Status
NX-OSv 9000 Guide6
NX-OSv 9000NX-OSv 9000 Software Functionality

LimitationsSystem Capabilities
Connectivity between the two ends of the interface link is simulated, hence it isimportant that you shut the interface in both the ends, followed by no shut at boththe ends of the interface link.
Link-down
NX-OSv 9000 Feature UI/CLI Difference From Hardware Platform
Feature enablement in the NX-OSv 9000 virtual platform is the same as Cisco Nexus 9000 hardware platform.
For example, the following features can be enabled:
• feature telnet
• feature bash-shell
• feature ospf
• feature bgp
• feature interface-vlan
• feature nv overlay
However, not all commands are available for NX-OSv 9000, such as hardware data plane specific commands.Some of these commands exist in the command parse chain, but these commands might not display correctoutput information. It is not possible for the virtual platform to verify all commands on NX-OSv 9000 thatexist for the Cisco Nexus 9000 hardware platform.
A few commands are critical for NX-OSv 9000 to display Layer 2/Layer 3 information, but are not providedfor the NX-OSv 9000 platform. The following displays substitute commands:
Substitute for NX-OSv 9000NX-OS Hardware Platform Commands
show system internal l2fwder macshow mac address-table
clear mac address-table datapath static|dynamicclear mac address-table
NX-OSv 9000 Resource RequirementsThe NX-OSv 9000 uses the Cisco Nexus 9000 Series hardware software image. It requires the minimumresources as shown in the following list. These resources are generally not oversubscribed on any server.
• 8G memory
• Minimum 4G. We recommend a 8G VM configuration for complex topology and enabling features.
• 1-4 vCPUs
• 4G hard disk
• 1 serial port
• 1 network interface card (NIC)
NX-OSv 9000 Guide 7
NX-OSv 9000NX-OSv 9000 Resource Requirements

Server Software Requirements
The NX-OSv 9000 can run on Cisco Unified Computing System (UCS) servers or servers from leading vendorsthat support VMware ESXi 5.1 (Post Build 1065491/ ESXi 5.5) or the combination of Ubuntu Linux 14.04LTSor later version and KVM-QEMU 2.0.
if you only need a standalone NX-OSv 9000 node, the NX-OSv 9000 can also be deployed on a laptop or andApple Mac Pro with a virtual box hypervisor as long as your laptop meets basic resource requirements.
VMware ESXi Support InformationThe virtual machine (VM) runs on the VMware vSphere Hypervisor. You can use the same VMware vSpherehypervisor to run serial VMs. Use the VMware vSphere Client GUI to create and manager VMs.
The VMware vSphere Client is an application for creating, configuring, and managing VMs on the VMwarevCenter Server. The NX-OSv 9000 can boot from a virtual disk located on the data store. You can performbasic administration tasks such as starting and stopping the NX-OSv 9000, using the VMware vSphere Client.
VMWare vCenter Server manages the vSphere environment and provides unified management of all the hostsand VMs in the data center from a single console.
For more information about how Cisco and VMware work together, see http://www.vmware.com/cisco.
For more information about VMware features and operations, see the https://www.vmware.com/support/pubs/.
KVM-QEMU Support InformationThe kernel-based Virtual Machine (KVM) is an open-source, full-virtualization solution for Linux on x86hardware, containing virtualization extensions. It consists of a loadable kernel module, kvm.ko, that providesthe core virtualization infrastructure and a processor-specific module, ivm-intel.ko or kvm-amd.ko
Quick Emulator (QEMU) is a free and open-source software product that performs hardware virtualization.You can run QEMU on the Cisco UCS server with KVM installed. The recommended version of QEMU forthe NX-OSv 9000 reference platform is version 2.2.0 or later.
VirtualBox Support InformationVirtualBox is a powerful x86 and AMD64/Intel 64 virtualization product for enterprise as well as for thehome user. It is free software available as Open Source Software under the terms of the GNU General PublicLicense (GPL) version 2 and you can obtain more information and download from https://www.virtualbox.org/web site.
VMware Fusion Support InformationVMware Fusion is also a powerful virtualization product for enterprise as well as PC user.
NX-OSv 9000 Guide8
NX-OSv 9000VMware ESXi Support Information

NX-OSv 9000 Installation/DeploymentNX-OSv 9000 currently does not support virtio block disk. To optimize performance, specific virtual artifactformats are recommended to be used in particular hypervisor.
Virtual Artifact FormatHypervisor
Virtual Machine Disk Image (vmdk), OpenVirtualization Appliance (ova)
EXSi
QEMU Copy OnWrite (qcow2),Open VirtualizationAppliance (ova)
KVM/Qemu
Virtual Machine Disk Image (vmdk), or packagedbox
Virtual Box
Open Virtualization Appliance (ova)VMware Fusion
NX-OSv 9000 Software Upgrade and DowngradeThe software upgrade and downgrade of NX-OSv 9000 does not follow normal hardware platform procedures.A common upgrade method for NX-OSv 9000 is to tftp or scp a new image into the bootflash, then boot thenew image from the loader> prompt or set the boot image in "config t; boot nxos bootflash:new_image.bin".A similar approach is used for downgrade.
This approach requires sufficient bootflash disk space to hold another image. As such, the nxos.7.0.3.I2.2aimage is not upgradable to a new release. In this case, you can create a new VM based on thenxosv-final.7.0.3.I2.2d release; and then upgrade to a new release.
Note
NX-OSv 9000 ConfigurationBeginning with Cisco NX-OS Release 7.0(3)I5(2), Cisco NX-OSv 9000 supports the Cisco Virtual ApplianceConfiguration (CVAC). This out-of-band configuration mechanism is similar to the POAP autoconfiguration,but instead of downloading the configuration across the network as POAP does, CVAC receives theconfiguration injected into the Cisco NX-OSv 9000 environment on a CD-ROM. The configuration is detectedand applied at startup time.
CVAC can be used for a bootstrap configuration (supplying just enough configuration to bring the switch intoa reachable state suitable for subsequent configuration using Telnet, RESTful APIs, or other standardmechanisms) or a full configuration (taking the entire configuration of another router and replicating it intoa newly launched platform VM). The configuration should be in a plain-text file called nxos_config.txt. Youcan package the configuration file onto the CD-ROM using the following command:mkisofs -output nxosconfig.iso -l --relaxed-filenames --iso-level 2 <file(s) to add>
NX-OSv 9000 Guide 9
NX-OSv 9000NX-OSv 9000 Installation/Deployment

If the system does not detect a CVAC configuration, the POAP process begins, and the POAP interfaceprompts you for the initial installation. See PowerOn Auto Provisioning for a newly installed switch.
The Cisco NX-OSv 9000 supports the same control plane features and configuration that are supported onthe Cisco Nexus 9000 Series hardware platforms. The configuration commands for the control plane featuresfollow the same syntax as the Cisco Nexus 9000 Series switches.
NX-OSv 9000 Deployment
Provisioning the NX-OSv 9000 in the ESXi Hypervisor
Before You Begin
You must have already installed your ESXi hypervisor.
Step 1 Log into the VMware vSphere Client.
Step 2 Select your server's IP address and click the Create a new virtual machine link.Step 3 In the Configuration screen, click the Custom button and click Next.Step 4 In the Name and Location screen, enter your virtual machine's name and click Next.Step 5 In the Storage screen, select the datastore and click Next.Step 6 In the Virtual Machine Version screen, choose the Virtual Machine Version button and click Next.Step 7 In the Guest Operating System screen, choose Other (64-bit), Version, and click Next.Step 8 In the CPUs screen, choose Number of cores per virtual socket value and click Next.Step 9 In theMemory screen, enter the memory size and click Next.
The minimum size is 4 GB, but the preferable size is 8GB.
Note
Step 10 In the Network screen, select the number of NICs you want to connect.The first NICmust be the management interface. Do not connect all dataports to the management interface.Note
Step 11 In the SCSI Controller screen, choose your SCSI controller, and click Next.Step 12 In the Select a disk screen, choose the Use an existing virtual disk button, and click Next.Step 13 In the Select Existing Disk screen:
a) Browse to the location of the n9000v-dk9-final.7.0.3.I2.1.vmdk file and click OK.b) Click Next.
Step 14 In the Advanced Options screen, confirm that the Virtual Device Node is IDE (0:0), and click Next.Step 15 In theReady to Complete screen, chose the Edit the virtual machine settings before completion check box, and click
Continue.Step 16 In the Virtual Machine Properites screen, click the Add button to add a Serial Port, confirm that the Virtual Device
Node is IDE (0:0), and click Next.Step 17 In the Device Type screen, choose Serial Port and click Next.Step 18 In the Serial Port Type screen, choose the Connect via Network button, and click Next.Step 19 In the Network Serial Port Settings screen:
NX-OSv 9000 Guide10
NX-OSv 9000NX-OSv 9000 Deployment

a) In the Network Backing frame, choose the Server button.b) Enter telnet and the server IP address in the Port URI field, and click Next.
Step 20 In the Ready to Complete screen, click Finish.Step 21 In the Getting Started tab, click the Edit virtual machine settings link.Step 22 In the vSphere Client, select the name of the virtual machine and click the Options tab.Step 23 In the Virtual Machine Properties screen, choose Boot Options in the Setting column.Step 24 In the Firmware panel, choose the EFI button and click OK.Step 25 Power on the virtual machine.
NX-OSv 9000 Deployment on KVM/QEMU HypervisorThe NX-OSv 9000 can be brought up in the KVM/QEMU hypervisor. The following table lists the parametersthat are supported for the NX-OSv 9000 deployment on KVM/QEMU.
DescriptionExampleParameter
Path to QEMU executable.(The QEMU software can bedownloaded from http://wiki.qemu.org/download fordifferent versions.)
/usr/bin/qemu-system-x86_64/path_to/qemu
Recommended, as theNX-OSv 9000 does notsupport VGA.
-nographic-nographic
Required. The NX-OSv 9000uses EFI boot and requires acompatible BIOS image tooperate.
We recommend using thelatest OVMF BIOS file withthe SATA controller for betterperformance in terms of diskoperation. QEMU 2.6 isrecommended with the SATAcontroller. For moreinformation, see http://www.linux-kvm.org/page/OVMF.
-bios bios.bin-bios file
The NX-OSv 9000 supportsone to four vCPUs, but two tofour are recommended.
-smp 4-smp
NX-OSv 9000 Guide 11
NX-OSv 9000NX-OSv 9000 Deployment on KVM/QEMU Hypervisor

DescriptionExampleParameter
Minimummemory is required.-m 8096-m memory
Requires at least one.-serial telnet:localhost:8888,server,nowait
or
-serial telnet:server_ip:8888,server,nowait
-serialtelnet:host:port,server,nowait
The net/net or netdev/devicepairs are for networking avirtual network interface card(vNIC).
The _s_f represents the PCIslot number and functionnumber. QEMU 2.0 or abovehas the capability to plug in atleast 20 PCI slots and fourfunctions, whichaccommodates about 80vNICs in total. The slot rangeis from 3 to 19, and thefunction number range is from0 to 3.
The mac= option passes theMAC address of each vNICMAC address to the VMinterfaces. The first -netdev isautomatically mapped to themgmt0 interface on the VM.The second -netdev is mappedto the e1/1 interface and so onup to the sixty-fifth on e1/64.Make sure these MACaddresses are unique for eachnetwork device.
-netsocket,vlan=x,name=nl_s0,listen=localhost:12000
-net nic,vlan=x,model=e1000,macaddr=aaaa.bbbb.cccc
-netdev socket,listen=localhost:12000,id=eth_s_f
-device e1000,addr=s.f,netdev=eth_s_f,
mac=aaaa.bbbb.cccc,multifunction=on,romfile=
or
-netdev tap,ifname=tap_s_f,script=no,
downscript=no,id=eth_s_f
-device e1000,addr=s.f,netdev=eth_s_f,
mac=aaaa.bbbb.ccc,multifunction=on,romfile=
-net ... -net ...
or
-netdev ... -device ...
This flag is required for theNX-OSv 9000.
-enable-kvm-enable-kvm
NX-OSv 9000 Guide12
NX-OSv 9000NX-OSv 9000 Deployment on KVM/QEMU Hypervisor
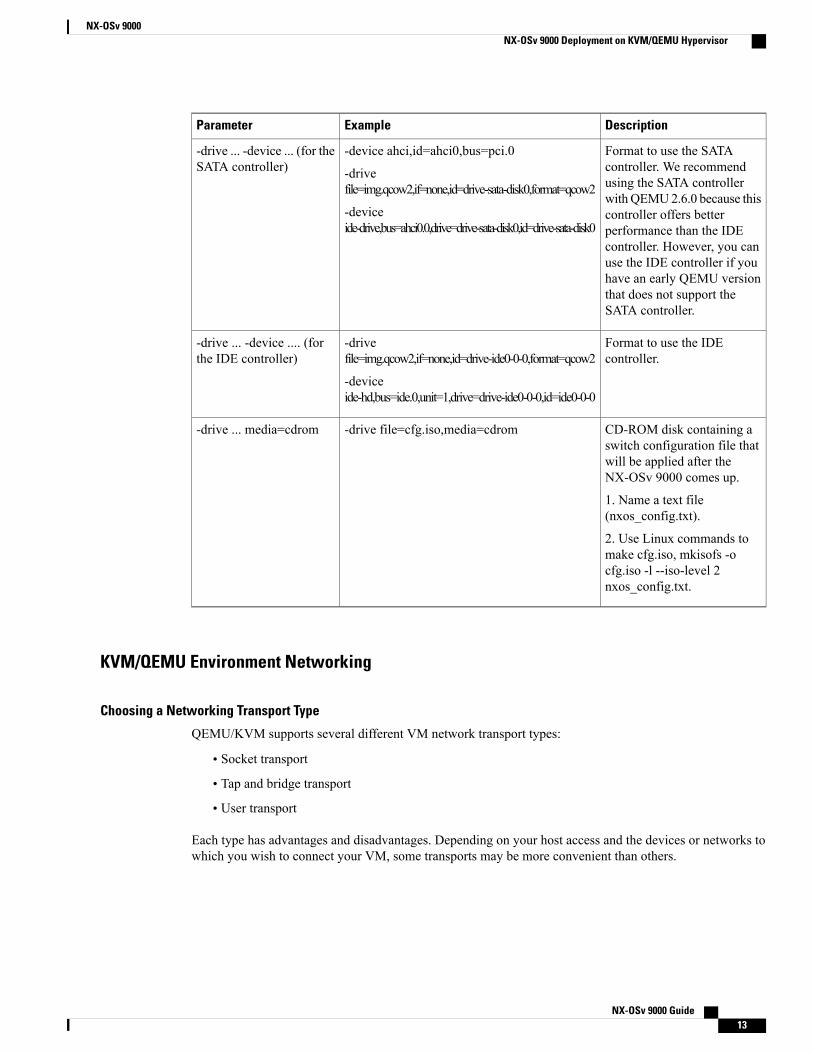
DescriptionExampleParameter
Format to use the SATAcontroller. We recommendusing the SATA controllerwithQEMU2.6.0 because thiscontroller offers betterperformance than the IDEcontroller. However, you canuse the IDE controller if youhave an early QEMU versionthat does not support theSATA controller.
-device ahci,id=ahci0,bus=pci.0
-drivefile=img.qcow2,if=none,id=drive-sata-disk0,format=qcow2
-deviceide-drive,bus=ahci0.0,drive=drive-sata-disk0,id=drive-sata-disk0
-drive ... -device ... (for theSATA controller)
Format to use the IDEcontroller.
-drivefile=img.qcow2,if=none,id=drive-ide0-0-0,format=qcow2
-deviceide-hd,bus=ide.0,unit=1,drive=drive-ide0-0-0,id=ide0-0-0
-drive ... -device .... (forthe IDE controller)
CD-ROM disk containing aswitch configuration file thatwill be applied after theNX-OSv 9000 comes up.
1. Name a text file(nxos_config.txt).
2. Use Linux commands tomake cfg.iso, mkisofs -ocfg.iso -l --iso-level 2nxos_config.txt.
-drive file=cfg.iso,media=cdrom-drive ... media=cdrom
KVM/QEMU Environment Networking
Choosing a Networking Transport Type
QEMU/KVM supports several different VM network transport types:
• Socket transport
• Tap and bridge transport
• User transport
Each type has advantages and disadvantages. Depending on your host access and the devices or networks towhich you wish to connect your VM, some transports may be more convenient than others.
NX-OSv 9000 Guide 13
NX-OSv 9000NX-OSv 9000 Deployment on KVM/QEMU Hypervisor
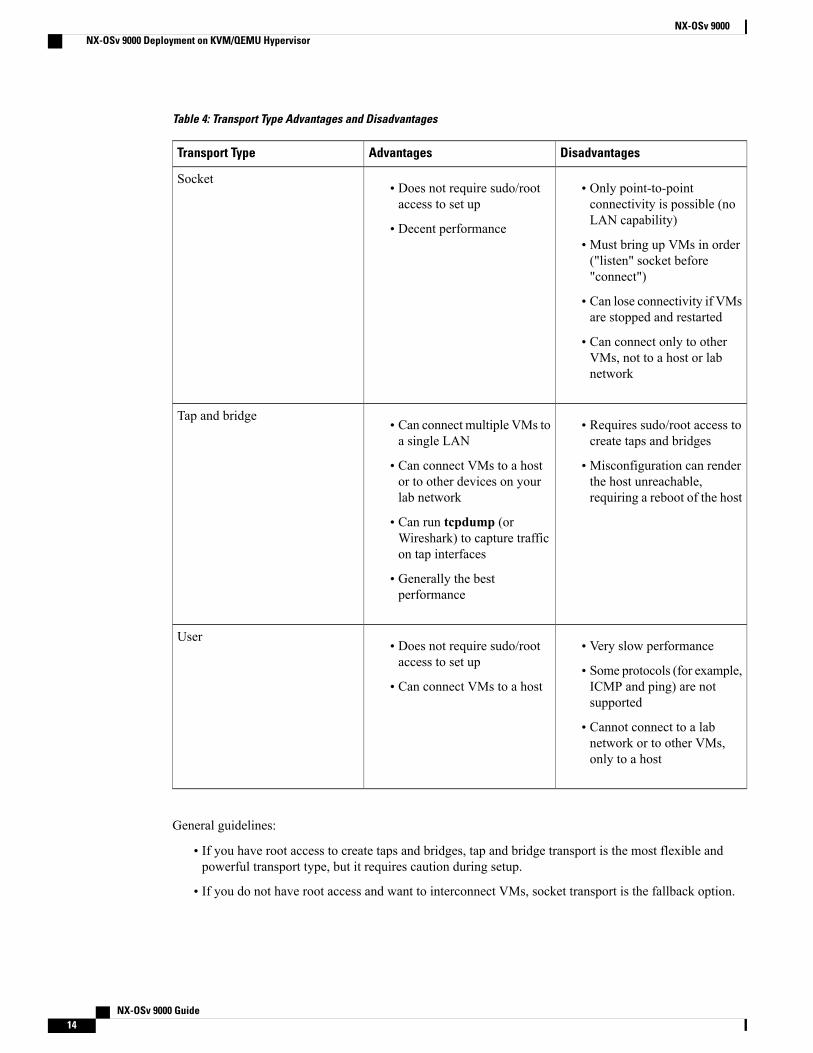
Table 4: Transport Type Advantages and Disadvantages
DisadvantagesAdvantagesTransport Type
• Only point-to-pointconnectivity is possible (noLAN capability)
• Must bring up VMs in order("listen" socket before"connect")
• Can lose connectivity if VMsare stopped and restarted
• Can connect only to otherVMs, not to a host or labnetwork
• Does not require sudo/rootaccess to set up
• Decent performance
Socket
• Requires sudo/root access tocreate taps and bridges
• Misconfiguration can renderthe host unreachable,requiring a reboot of the host
• Can connect multiple VMs toa single LAN
• Can connect VMs to a hostor to other devices on yourlab network
• Can run tcpdump (orWireshark) to capture trafficon tap interfaces
• Generally the bestperformance
Tap and bridge
• Very slow performance
• Some protocols (for example,ICMP and ping) are notsupported
• Cannot connect to a labnetwork or to other VMs,only to a host
• Does not require sudo/rootaccess to set up
• Can connect VMs to a host
User
General guidelines:
• If you have root access to create taps and bridges, tap and bridge transport is the most flexible andpowerful transport type, but it requires caution during setup.
• If you do not have root access and want to interconnect VMs, socket transport is the fallback option.
NX-OSv 9000 Guide14
NX-OSv 9000NX-OSv 9000 Deployment on KVM/QEMU Hypervisor

• If you do not have root access and want to connect the VM to the host, user transport will work but haslimitations.
• If you have no need for network connectivity, you do not need a transport at all (see Networking CLICommands).
Networking CLI Commands
You have two ways to add NICs using the QEMU CLI. One (-net/-net) is simpler but officially deprecated.The other (-netdev/-device) is the current recommendation but is slightly more complex. In both cases, twoQEMU commands are required per NIC. One defines the NIC's appearance to the NX-OSv 9000 (primarilyits MAC address), and the other defines the underlying transport mechanism.
New CLIOld CLITask
-devicemodel,netdev=string,macaddr=macaddr
Typical values formodelwhen usingthe new CLI are virtio-net-pci ore1000.
Note
-netnic,model=model,vlan=number,macaddr=macaddr
Typical values for model when usingthe old CLI are virtio or e1000.
Note
Create NIC
-netdev transport,options,id=string-net transport,options,vlan=numberDefinenetworktransportfor NIC
If your VM does not require connectivity to other hosts or VMs, you can omit the -net transport... or -netdevtransport... commands entirely. As a result, NICs are visible to the guest and configurable for testing but donot pass packets.
With the old CLI, the vlan=number parameter is used to link the two commands together. (Both commandsfor a NIC should use the same number.) With the new CLI, the netdev=string and id=string parameters servethis purpose. (The string values must match.)
Socket Transport
Point-to-point connections between VMs can use TCP sockets as the transport mechanism. One VMwill opena listen socket, and the other VM will connect to this socket.
New CLIOld CLITask
-netdev socket,listen=host1:port,...-net socket,listen=host1:port,...First VM
-netdevsocket,connect=host1:port,...
-net socket,connect=host1:port,...Second VM
In socket transport, the listen VM must be started before the connect VM; otherwise, the connection betweenVMs will not be successfully established. Similarly, if the listen VM is terminated and relaunched, you mightneed to terminate and relaunch the connect VM, which can be challenging in complex topologies.
NX-OSv 9000 Guide 15
NX-OSv 9000NX-OSv 9000 Deployment on KVM/QEMU Hypervisor

In QEMU versions prior to 1.4, you cannot use -netdev socket as it will fail with the following error:Property 'model.netdev' can't find value 'netdev'. If you are using QEMU 1.0 or 1.2.x, you must use -netfor socket transports.
Note
Tap and Bridge TransportThe host can provide tap interfaces connected to a virtual bridge in order to provide LAN connectivity betweenmultiple VMs. Each VMNIC uses an individual tap interface as its designated transport, and the host connectsthe taps to a shared bridge as needed.
The bringup-script and teardown-script parameters are pointers to scripts used to dynamically create and teardown the tap interfaces. If you are using previously created tap interfaces, set these parameters to "no" toindicate that no such script is needed.
You can use the tcpdump command to capture traffic on tap interfaces, which can be very useful fortroubleshooting.
Connecting Two VMsYou can connect VMs to each other by adding the appropriate tap interfaces for each VM to a logical Ethernetbridge.
Before You Begin
You need sudo access to run the commands in this procedure.
DETAILED STEPS
PurposeCommand or Action
Creates two tap interfaces.openvpn --mktun --dev
Example:sudo openvpn --mktun --dev mytap0sudo openvpn --mktun --dev mytap1
Step 1
sudo ifconfig mytap0 upsudo ifconfig mytap1 up
Creates a bridge.brctl addbr bridge-name
Example:$ sudo brctl addbr mybridge0
Step 2
Adds tap interfaces to the bridge.brctl addif bridge-name tap-name
Example:$ sudo brctl addif mybridge0 mytap0$ sudo brctl addif mybridge0 mytap1
Step 3
Ensures that the bridge is up andrunning to bridge the traffic.
ifconfig bridgename up
Example:$ sudo ifconfig mybridge0 up
Step 4
NX-OSv 9000 Guide16
NX-OSv 9000NX-OSv 9000 Deployment on KVM/QEMU Hypervisor

PurposeCommand or Action
Verifies the bridge setup.brctl show
Example:bridge name bridge id STP enabled interfacesmybridge0 8000.1217b6e4a8f3 no mytap0 mytap1$
Step 5
Starts VMs using tap transport.qemu-system-x86_64
Example:$ qemu-system-x86_64 ... -nettap,ifname=mytap0,script=no,downscript=no &
Step 6
$ qemu-system-x86_64 ... -nettap,ifname=mytap1,script=no,downscript=no &
or$ qemu-system-x86_64 ... -netdevtap,id=mytap0,ifname=mytap0,script=no,downscript=no \ -devicee1000,netdev=mytap0,mac=00:10:20:30:40:50 &$ qemu-system-x86_64 ... -netdevtap,id=mytap1,ifname=mytap1,script=no,downscript=no \ -devicee1000,netdev=mytap1,mac=00:11:22:33:44:55 &
Simulating a Large Number of Network Interfaces on KVM/QEMU
You can increase the number of network interfaces for a guest VM by specifying the PCI address in the -deviceoption.
In the following example, users should have 1+2 network interfaces in the NX-OSv 9000 guest. The firstvNIC maps to the NX-OSv 9000 management interface. The second and third vNICs map to the NX-OSv9000 e1/1 and e1/2 data ports, respectively.
Make sure that you download the latest BIOS image as well as QEMU 2.2 or a later version when youuse the following examples.
Note
VM1qemu-system-x86_64 -smp 4 -enable-kvm -m 8192 -bios -nographic -serial telnet:localhost12000,server,nowait \
-netdevice socket,listen=locahost:13000,id=eth_3_0 -devicee1000,addr=3.0,netdevice=eth_3_0,mac=00:01:80:ff:00:00 \
-netdevice socket,listen=locahost:13001,id=eth_3_1 -devicee1000,addr=3.1,netdevice=eth_3_1,mac=00:01:80:ff:00:01 \
-netdevice socket,listen=locahost:13002,id=eth_3_2 -devicee1000,addr=3.2,netdevice=eth_3_2,mac=00:01:80:ff:00:02 \
-device ahci,id=ahci0,bus=pci.0 -drivefile=r1.nxosv-final.7.0.3.I5.1.qcow2,if=none,id=drive-sata-disk0,id=drive-sata-disk0,format=qcow2\
-device ide-drive,bus=ahci0.0,drive=drive-sata-disk0,id=drive-sata-disk0
NX-OSv 9000 Guide 17
NX-OSv 9000NX-OSv 9000 Deployment on KVM/QEMU Hypervisor

VM2qemu-system-x86_64 -smp 4 -enable-kvm -m 8192 -bios bios.bin -nographic -serialtelnet:localhost 12100, server,nowait -netdevice
-netdevice socket,connect=locahost:13000,id=eth_3_0 -devicee1000,addr=3.0,netdevice=eth_3_0,mac=00:01:80:ff:00:10 \
-netdevice socket,connect=locahost:13001,id=eth_3_1 -devicee1000,addr=3.1,netdevice=eth_3_1,mac=00:01:80:ff:00:11 \
-netdevice socket,connect=locahost:13002,id=eth_3_2 -devicee1000,addr=3.2,netdevice=eth_3_2,mac=00:01:80:ff:00:12 \
-device ahci,id=ahci0,bus=pci.0 -drivefile=r2.nxosv-final.7.0.3.I5.1.qcow2,if=none,id=drive-sata-disk0,id=drive-sata-disk0,format=qcow2\
-device ide-drive,bus=ahci0.0,drive=drive-sata-disk0,id=drive-sata-disk0
NX-OSv 9000 Management Connectivity External to the KVM Hypervisor Server
The general approach to having VM connectivity to outside the device is to pass a tap (in QEMU/KVMcommand invocation) that is connected to a physical interface on the server through a bridge. The first tapinterface -netdev in QEMU/KVM command invocation is mapped to the management interface on VM,mgmt0. We recommend using the secondary physical port in the KVM server instead of the primary physicalport, which services the connectivity to this device. Doing so will prevent connectivity issues from the serverto any users.
The following example shows how to connect the VM management interface using net device eth1 in theKVM hypervisor.
Creating a management bridge that is attached to physical interface net device eth1 in the server:
sudo brctl addbr mgmt_br0sudo brctl addif mgmt_br0 eth1sudo ifconfig eth1 0.0.0.0 upsudo ifconfig mgmt_br0 <ip> netmask 255.255.255.0 upsudo ifconfig eth1 upsudo route add default <gateway ip> mgmt_br0
Creating a tap that is used for the -netdev parameter in the QEMU command invocation:
sudo openvpn --mktun --dev tap_net1sudo brctl addif mgmt_br0 tap_net1sudo ifconfig tap_net1 up
Deploying NX-OSv 9000 on VirtualBoxNX-OSv 9000 deployment on VirtualBox uses one of two forms of distributed virtual artifacts: VMDK orPre-packaged Box. The simplest method is to use Pre-packaged Box along with Vagrant software. However,the box is created for simple standalone VM deployment with very minimal configuration. This procedure iscovered in Deploying NX-OSv 9000 on VirtualBox with Vagrant Using a Pre-Packaged Box, on page 23.
Some basic steps and concepts are shown here to create a virtual machine similar to other kinds of VM guests.These instructions are generally for Mac users, but slight differences are highlighted for Window users.
NX-OSv 9000 Guide18
NX-OSv 9000Deploying NX-OSv 9000 on VirtualBox

Creating a VM in a VirtualBox Environment Using VMDK
Before You Begin
Hardware
• More than 12 GB of memory.
• More than 4 cores of CPU.
Software
• Mac OS X
◦Install VirtualBox
◦Install Vagrant
◦Install socat for serial console:
Homebrew:ruby -e "$(curl -fsSL
https://raw.githubusercontent.com/Homebrew/install/master/install)"socat:brew install socat
• Windows
◦Install VirtualBox
◦Install Vagrant
◦Install PuTTY for serial console. (For more information, see www.putty.org.)
◦Install Git to access tools, such as SSH. (For more information, see www.git-for-windows.github.io.)
DETAILED STEPS
PurposeCommand or Action
Copy VMDK to your local hard drive. Launch VirtualBox and click theNew icon.
Step 1
Enter the Name as n9kv, select the Type as Linux, and select the Versionas Other Linux (64-bit).
Step 2
Enter the Memory size (RAM) as 8192 MB.Step 3
Select Use an existing virtual hard drive file. Click the folder icon(bottom right side) and select the VMDK created in step 1.
Step 4
Select your VM and click Settings.Step 5
NX-OSv 9000 Guide 19
NX-OSv 9000Deploying NX-OSv 9000 on VirtualBox

PurposeCommand or Action
Adding the SATA controllerenables VirtualBox to bootwhen the system image sizeexceeds 512 MB.
NoteIn the Attributes of Settings, highlight the IDE controller. Select AddSATA controller and add the VMDK file. ClickOK to save the settings.
Step 6
Click the System icon.Step 7
• On the Motherboard tab:
◦Check the Enable EFI checkbox.
◦Ensure the Modify Boot order so that hard disk is first.
• On the Processor tab:
◦Ensure the Processor is 2.
• On the Accelerator tab:
◦Ensure that VT-x/AMD-V is checked.
Click the Audio icon. Uncheck the Enable Audio checkbox.Step 8
Click the Network icon.Step 9
• On the Adapter 1 tab:
◦Check the Enable Network Adapter checkbox.
◦Ensure the Port Forwarding configuration is:
◦Name = ssh
◦Host Port = 2222
◦Guest Port = 22
For Windows, on the SerialPorts tab/Port 1 tab:
Note
• Ensure Path/Address is\\.\pipe\COM1.
Click the Ports icon.Step 10
• On the Serial Ports tab/Port 1 tab:
◦Check the Enable Serial Port checkbox.
◦Ensure that Port Mode is Host Pipe.
◦CheckCreate Pipe (or uncheck Connect to existing pipe/socket).
◦Ensure Port/File Path is /tmp/test.
Click the Ports icon.Step 11
• On the USB tab:
NX-OSv 9000 Guide20
NX-OSv 9000Deploying NX-OSv 9000 on VirtualBox

PurposeCommand or Action
◦Uncheck the Enable USB 2.0 (EHCI) controller checkbox.
Starts the VM.Click the Start button.Step 12
Ensure that you have theproper serial console setup inyour Mac or Windowsenvironment. For moreinformation, see Setup SerialConsole on VirtualBoxEnvironment, on page 21.
Note
Setup Serial Console on VirtualBox Environment
Mac OS X
1 Use the 'socat' utility to connect to the serial port (console access) of the VM.
a Install Homebrew and then use homebrew to install 'socat'.
Homebrew:ruby -e "$(curl -fsSL
https://raw.githubusercontent.com/Homebrew/install/master/install)"socat:brew install socat
b Run the socat command from an xterm.
socat unix-connect:/tmp/test stdin
2 Go through the NXOS boot process.
a Answer 'no' for the secure password.
b Set admin password to 'admin'.
3 Configure the router.
switch# conf tEnter configuration commands, one per line. End with CNTL/Z.switch(config)# interface mgmt0switch(config-if)# ip address 10.0.2.15/24 <--- NOTE: can use "ip address dhcp" hereinsteadswitch(config-if)# no shutswitch(config-if)# endswitch# conf tEnter configuration commands, one per line. End with CNTL/Z.switch(config)# username vagrant password vagrant role network-adminswitch(config)# username vagrant shell bashswitch(config)# boot nxos bootflash:nxos.7.0.3.I2.2d.bin <--- Note: use correct imagename from "dir" command outputswitch(config)# copy r s[########################################] 100%
NX-OSv 9000 Guide 21
NX-OSv 9000Deploying NX-OSv 9000 on VirtualBox

Copy complete.switch(config)#
Windows
1 Open PuTTY.
2 Open "Basic options for your PuTTY session".
a Specify "\\.\pipe\COM1" for Serial line path.
b Select "Serial" for "Connection type".
c Select "9600" for "Speed".
3 Go through the NXOS boot process.
a Answer 'no' for the secure password.
b Set admin password to 'admin'.
4 Configure the router.
switch# conf tEnter configuration commands, one per line. End with CNTL/Z.switch(config)# interface mgmt0switch(config-if)# ip address 10.0.2.15/24 <--- NOTE: can use "ip address dhcp" hereinsteadswitch(config-if)# no shutswitch(config-if)# endswitch# conf tEnter configuration commands, one per line. End with CNTL/Z.switch(config)# username vagrant password vagrant role network-adminswitch(config)# username vagrant shell bashswitch(config)# boot nxos bootflash:nxos.7.0.3.I2.2d.bin <--- Note: use correct imagename from "dir" command outputswitch(config)# copy r s[########################################] 100%Copy complete.switch(config)#
Set Up SSH Passwordless Connection to VM
Navigate to login screen and login as vagrant (password: vagrant). Place the vagrant insecure key into the'authorized_keys' file.
switch(config)# exitswitch# exit
User Access Verificationswitch login: vagrantPassword:-bash-4.2$-bash-4.2$ pwd/var/home/vagrant-bash-4.2$ cd .ssh-bash-4.2$ pwd/var/home/vagrant/.ssh-bash-4.2$ echo"ssh-rsa AAAAB3NzaC1yc2EAAAABIwAAAQEA6NF8iallvQVp22WDkTkyrtvp9eWW6A8YVr+kz4TjGYe7gHzIw+niNltGEFHzD8+v1I2YJ6oXevct1YeS0o9HZyN1Q9qgCgzUFtdOKLv6IedplqoPkcmF0aYet2PkEDo3MlTBckFXPITAMzF8dJSIFo9D8HfdOV0IAdx4O7PtixWKn5y2hMNG0zQPyUecp4pzC6kivAIhyfHilFR61RGL+GPXQ2MWZWFYbAGjyiYJnAmCP3NOTd0jMZEnDkbUvxhMmBYSdETk1rRgm+R4LOzFUGaHqHDLKLX+FIPKcF96hrucXzcWyLbIbEgE98OHlnVYCzRdK8jlqm8tehUc9c9WhQ== vagrant insecure public key" > authorized_keys
NX-OSv 9000 Guide22
NX-OSv 9000Deploying NX-OSv 9000 on VirtualBox

-bash-4.2$ cat authorized_keysssh-rsa AAAAB3NzaC1yc2EAAAABIwAAAQEA6NF8iallvQVp22WDkTkyrtvp9eWW6A8YVr+kz4TjGYe7gHzIw+niNltGEFHzD8+v1I2YJ6oXevct1YeS0o9HZyN1Q9qgCgzUFtdOKLv6IedplqoPkcmF0aYet2PkEDo3MlTBckFXPITAMzF8dJSIFo9D8HfdOV0IAdx4O7PtixWKn5y2hMNG0zQPyUecp4pzC6kivAIhyfHilFR61RGL+GPXQ2MWZWFYbAGjyiYJnAmCP3NOTd0jMZEnDkbUvxhMmBYSdETk1rRgm+R4LOzFUGaHqHDLKLX+FIPKcF96hrucXzcWyLbIbEgE98OHlnVYCzRdK8jlqm8tehUc9c9WhQ== vagrant insecure public key-bash-4.2$
Deploying NX-OSv 9000 on VirtualBox with Vagrant Using a Pre-Packaged Box
Step 1 Open a terminal in your Mac or PC (GitBash) and make a directory (for example, box-test).Step 2 Download a released image to this directory (for example, nxosv-final.7.0.3.I2.2d.box).Step 3 Execute "vagrant init".Step 4 Execute "tar xvd nxosv-final.7.0.3.I2.2d.box nxosv_config.iso" to unpack the NX-OSv switch configuration file. (The
nxosv_config.iso file packagedwith this .box file is for demonstration purposes. You can customize your own configurationbased on CVAC/bootstrap procedures to make your own .iso configuration file.)
Step 5 Execute "vagrant box add box-test nxosv-final.7.0.3.I2.2d.box".Step 6 Modify the ./Vagrant file to customize all VM configurations. See Vagrant Configuration Examples.Step 7 Bring up the VM using the "vagrant up" command in the current directory.Step 8 Wait for a few minutes to let the bootup finish. Then proceed to the next step.Step 9 Execute "vagrant ssh" to access the NX-OSv bash shell and enter "vagrant" for the password. If "vagrant ssh" fails, go
to step 12 (serial console window) to determine the reason for the failure.Step 10 Execute "su admin" to access the CLI and enter "admin" or the password.Step 11 Execute the boot image command: "config t; boot nxos bootflash:nxos.7.0.3.I2.2d.bin".Step 12 Save the configuration using "copy r s".Step 13 You can monitor the booting process from the serial console using "socat UNIX-CONNECT:/tmp/test STDIN" in another
terminal. For Windows PC users, use putty to connect to the serial console through the "\\.\pipe\COM1" name pipe.Step 14 Shut down the VM using "vagrant halt -f".
Vagrant Configuration Examples
Mac Users# -*- mode: ruby -*-
# vi: set ft=ruby :
# All Vagrant configuration is done below. The "2" in Vagrant.configure
# configures the configuration version (we support older styles for
# backwards compatibility). Please don't change it unless you know what
# you're doing.
Vagrant.configure(2) do |config|
# The most common configuration options are documented and commented below.
NX-OSv 9000 Guide 23
NX-OSv 9000Deploying NX-OSv 9000 on VirtualBox

# For a complete reference, please see the online documentation at
# https://docs.vagrantup.com.
# Every Vagrant development environment requires a box. You can search for
# boxes at https://atlas.hashicorp.com/search.
# config.vm.base_mac = "0800276CEEAA"
config.vm.define "n9kv1" do |n9kv1|
n9kv1.vm.box = "box-test"
n9kv1.ssh.insert_key = false
n9kv1.vm.boot_timeout = 180
n9kv1.vm.synced_folder '.', '/vagrant', disabled: true
n9kv1.vm.network "private_network", ip: "192.168.1.2", auto_config: false,virtualbox__intnet: "nxosv_network1"
n9kv1.vm.network "private_network", auto_config: false, virtualbox__intnet:"nxosv_network2"
n9kv1.vm.network "private_network", auto_config: false, virtualbox__intnet:"nxosv_network3"
n9kv1.vm.network "private_network", auto_config: false, virtualbox__intnet:"nxosv_network4"
n9kv1.vm.network "private_network", auto_config: false, virtualbox__intnet:"nxosv_network5"
n9kv1.vm.network "private_network", auto_config: false, virtualbox__intnet:"nxosv_network6"
n9kv1.vm.network "private_network", auto_config: false, virtualbox__intnet:"nxosv_network7"
n9kv1.vm.provider :virtualbox do |vb|
vb.customize ['modifyvm',:id,'--nicpromisc2','allow-all']
vb.customize ['modifyvm',:id,'--nicpromisc3','allow-all']
vb.customize ['modifyvm',:id,'--nicpromisc4','allow-all']
vb.customize ['modifyvm',:id,'--nicpromisc5','allow-all']
vb.customize ['modifyvm',:id,'--nicpromisc6','allow-all']
vb.customize ['modifyvm',:id,'--nicpromisc7','allow-all']
vb.customize ['modifyvm',:id,'--nicpromisc8','allow-all']
vb.customize "pre-boot", [
"storageattach", :id,
"--storagectl", "SATA",
"--port", "1",
"--device", "0",
NX-OSv 9000 Guide24
NX-OSv 9000Deploying NX-OSv 9000 on VirtualBox

"--type", "dvddrive",
"--medium", "./nxosv_config.iso",
]
end
end
end
Windows PC Users# -*- mode: ruby -*-
# vi: set ft=ruby :
# All Vagrant configuration is done below. The "2" in Vagrant.configure
# configures the configuration version (we support older styles for
# backwards compatibility). Please don't change it unless you know what
# you're doing.
Vagrant.configure(2) do |config|
# The most common configuration options are documented and commented below.
# For a complete reference, please see the online documentation at
# https://docs.vagrantup.com.
# Every Vagrant development environment requires a box. You can search for
# boxes at https://atlas.hashicorp.com/search.
# config.vm.base_mac = "0800276CEEAA"
config.vm.define "n9kv1" do |n9kv1|
n9kv1.vm.box = "box-test"
n9kv1.ssh.insert_key = false
n9kv1.vm.boot_timeout = 180
n9kv1.vm.synced_folder '.', '/vagrant', disabled: true
n9kv1.vm.network "private_network", ip: "192.168.1.2", auto_config: false,virtualbox__intnet: "nxosv_network1"
n9kv1.vm.network "private_network", auto_config: false, virtualbox__intnet:"nxosv_network2"
n9kv1.vm.network "private_network", auto_config: false, virtualbox__intnet:"nxosv_network3"
n9kv1.vm.network "private_network", auto_config: false, virtualbox__intnet:"nxosv_network4"
n9kv1.vm.network "private_network", auto_config: false, virtualbox__intnet:"nxosv_network5"
n9kv1.vm.network "private_network", auto_config: false, virtualbox__intnet:"nxosv_network6"
NX-OSv 9000 Guide 25
NX-OSv 9000Deploying NX-OSv 9000 on VirtualBox

n9kv1.vm.network "private_network", auto_config: false, virtualbox__intnet:"nxosv_network7"
n9kv1.vm.provider :virtualbox do |vb|
vb.customize ['modifyvm',:id,'--uartmode1','server','\\\\.\pipe\COM1']
vb.customize ['modifyvm',:id,'--nicpromisc2','allow-all']
vb.customize ['modifyvm',:id,'--nicpromisc3','allow-all']
vb.customize ['modifyvm',:id,'--nicpromisc4','allow-all']
vb.customize ['modifyvm',:id,'--nicpromisc5','allow-all']
vb.customize ['modifyvm',:id,'--nicpromisc6','allow-all']
vb.customize ['modifyvm',:id,'--nicpromisc7','allow-all']
vb.customize ['modifyvm',:id,'--nicpromisc8','allow-all']
vb.customize "pre-boot", [
"storageattach", :id,
"--storagectl", "SATA",
"--port", "1",
"--device", "0",
"--type", "dvddrive",
"--medium", "./nxosv_config.iso",
]
end
end
end
Deleting the VM
Step 1 Shut down the VM.nxosv-user@fe-ucs-dt13:~/n9kv/box-test$ vagrant halt --force box-test ==> box-test:Forcing shutdown of VM...nxosv-user@fe-ucs-dt13:~/n9kv/box-test$
Step 2 Delete the VM from the system.nxosv-user@fe-ucs-dt13:~/n9kv/box-test$ vagrant destroy box-test
box-test: Are you sure you want to destroy the 'box-test' VM? [y/N] y==> box-test: Destroying VM and associated drives...nxosv-user@fe-ucs-dt13:~/n9kv/box-test$
NX-OSv 9000 Guide26
NX-OSv 9000Deploying NX-OSv 9000 on VirtualBox

Network Topology ExamplesA key advantage of NX-OSv 9000 is that you can set up a quick networking topology without hardware orcomplicated cabling tasks to obtain a look and feel about a Cisco Nexus 9000 switch platform.
For example, you can quickly set up a two node system with a server connecting to a NX-OSv 9000 virtualmachine on laptop. A more complex system can also be setup with a large resource server to do a multiplenode simulation. With the topology, you can do tooling and automation in a simulated network that could beapplied in a real customer network environment. The following examples show how to interconnect VMs ona laptop or UCS servers.
VirtualBox Topology on a Laptop
An example diagram above is a typical configuration with NX-OSv 9000 and Ubuntu VM two node system.In this case, Both Ubuntu VM and NX-OSv 9000 would obtain IPs statically or dynamically visa DHCPprotocol reachable from cloud. Similarly, both Ubuntu andNX-OSv 9000 can bemanaged throughmanagementnetwork. Ubuntu VM can send/receive packets to NX-OSv 9000 through NX-OSv 9000 data ports, eth1/1,eth1/2, and eth1/3, or ... e1/9.
Key to Setup:
NX-OSv 9000 Guide 27
NX-OSv 9000Network Topology Examples

• Bridge or NAT to Laptop physical ethernet port for management connectivity
• Internal Network for data ports between VMs, change "Promiscuous Mode" to "Allow All"
NX-OSv 9000 Guide28
NX-OSv 9000Network Topology Examples

NX-OSv 9000 Guide 29
NX-OSv 9000Network Topology Examples

Three Node Topology with Traffic Generator
The nodes in the above diagram are instantiated using the hypervisor specific machine definitions. Fornetworking, each data port interface pair needs to be connected to unique bridge/vSwitch. All the managementports of the NX-OSv 9000 (mgmt0) need to be connected to the management bridge and provided a uniqueIP address, which will enable access to these devices from an external network.
Each data port interface pair that needs to be interconnected should be mapped to the same Bridge/vSwitch.Similar to VirtualBox topology, vSwitch/Bridge must have "Promiscuous Mode" set to "Accept" and "VlanID" to "All" for networking to work between NX-OSv 9000 nodes. Please read "Troubleshooting" sectionfor hypervisor specific handling for data port communication.
NX-OSv 9000 Guide30
NX-OSv 9000Network Topology Examples

Five Nodes VXLAN Topology
This topology can simulate basic vxlan functionality on NX-OSv 9000 platform. Similar bridge/vSwitch setupshould be done as shown in other topology examples.
NX-OSv 9000 Guide 31
NX-OSv 9000Network Topology Examples

NX-OSv 9000 Guide32
NX-OSv 9000Network Topology Examples