nv100 - sharkclean.com · nv100 owner’s guide nv100_26_ib_eng_110317_2.indd 1 11-03-17 10:40 am
TRANSCRIPT

www.sharkclean.com
NV100
Owner’s Guide
NV100_26_IB_ENG_110317_2.indd 1 11-03-17 10:40 AM

TOLL FREE: 1-800-798-7398 1www.sharkclean.com
English
Contents
Important Safety Instructions 2
Getting Started 4
Assembly 4
Using the Vacuum 6
Emptying the Dust Cup Assembly 7
Proper Care of Your Vacuum 8
Troubleshooting 9
Checking for Blockages 10
Maintenance 11
Warranty and Registration 13
ThankyouforpurchasingtheShark®Navigator™Vacuum.
Thismanualcoversmodel:
NV10026
TECHNICAL SPECIFICATIONS
Voltage:120V.
Watts:700W
Amps:5.83A
Hertz:60Hz
NV100_26_IB_ENG_110317_2.indd 2-1 11-03-17 10:40 AM
2 TOLL FREE: 1-800-798-7398 3www.sharkclean.com
English
WARNING:TO REDUCE THE RISK OF ELECTRIC SHOCK OR INJURY DO NOT USE OUTDOORS OR ON WET SURFACES.
GENERAL CLEANING:
20. DO NOTrunthevacuumoverlarge-sizedobjects.
21. DO NOTpickuphardorsharpobjectssuchasglass,nails,screwsorcoinsthatcoulddamagethevacuumcleaner.
22. DO NOTpickupsmokingorburningobjectssuchashotcoals,cigarettebuttsormatches.
23. DO NOTpickupflammableorcombustiblematerialssuchaslighterfluid,gasoline,keroseneoruseinareaswheretheymaybepresent.
24. DO NOTpickuptoxicsolutionssuchaschlorinebleach,ammoniaordraincleaner.
25. DO NOTuseinanenclosedspacewherevaporsarepresentfrompaint,paintthinner,moth-proofingsubstances,flammabledustorotherexplosiveortoxicmaterials.
26. DO NOTvacuumupanyliquids.
27. DO NOTimmersevacuumcleanerinwaterorotherliquids.
28.DO NOTuseoutdoorsoronwetsurfaces;useonlyondrysurfaces.
29.Useextracarewhencleaningonstairs.
30.Beforeturningonthevacuum:
• Makesurethatdustcup,andallfiltersareinplaceafterroutinemaintenance.
• Makesurethatallcomponentsandfiltersarethoroughlydryafterroutinecleaning.
• OnlyusefiltersandaccessoriesprovidedbyEURO-PROOperatingLLC[Failuretodosowillvoidthewarranty]
WHEN USING YOUR SHARK® NAVIGATOR™ VACUUM, BASIC SAFETY PRECAUTIONS SHOULD ALWAYS BE FOLLOWED, INCLUDING THE FOLLOWING:
READ ALL INSTRUCTIONS BEFORE USING YOUR SHARK® NAVIGATOR™ VACUUM.
POLARIZED PLUG: Thisappliancehasapolarizedplug(onebladeiswiderthantheother).Asasafetyfeature,thisplugwillfitintoapolarizedoutletonlyoneway.Do not force into the outlet or try to modify the plug to fit.
GENERAL ELECTRICAL SAFETY:
1. Unplugfromelectricaloutletwhennotinuseandbeforeservicing.
2. DO NOTusevacuumwithadamagedcordorplug.
3. DO NOT pullorcarryvacuumbythecord.
4. DO NOTunplugbypullingoncord;tounplug,grasptheplug,notthecord.
5. DO NOThandleplugorvacuumcleanerwithwethands.
6. DO NOTrunthevacuumoverthepowercord.
7. DO NOTcloseadooronthecord.
8. DO NOTpullcordaroundsharpedgesorcorners.
9. DO NOT leaveappliancewhenpluggedin.
10. Keeppowercordawayfromheatedsurfaces.
11. Turnoffallcontrolsbeforepluggingorunpluggingvacuumcleaner.
GENERAL USE:
12. Useonlyasdescribedinthismanual.
13. DO NOTputanyobjectsintoopenings.
14.Keepyourworkareawelllit.
15. Keepthevacuummovingoverthecarpetsurfaceatalltimestoavoiddamagingthecarpetfibers.
16. DO NOTplacevacuumonunstablesurfacessuchaschairsortables.
17. DO NOTallowyoungchildrentooperatethevacuumoruseasatoy.
18. Closeattentionisnecessarywhenusedbyornearchildren.
19. DO NOTusevacuumcleaneriftheapplianceisnotworkingasitshould,hasadamagedplugorcord,iftheunithasbeendropped,damaged,leftoutdoorsorsubmergedinwater.ReturntoEURO-PROOperatingLLCforexamination,repairoradjustment.
IMPORTANT SAFETY INSTRUCTIONSFor Household Use Only
HOSE ATTACHMENTS:
31. DO NOT putanyobjectintoopenings.Donotusewithanyopeningblocked.Keepfreeoflint,hairandanythingthatmayreduceairflow.
32. DO NOT useifairflowisrestricted;iftheairpaths,thehoseortheextensiontubebecomeblocked,turnthevacuumcleaneroff.Removeallobstructionsbeforeyouturnontheunitagain.
33. Keeptheendofthehose,wandsandotheropeningsawayfromface,bodyandlooseclothing.
34.Keeprotatingbrushandsuctionopeningsawayfromhair,face,fingers,uncoveredfeetorlooseclothing.
35. Onlyusemanufacturer’srecommendedattachments.
SAVE THESE INSTRUCTIONS
NV100_26_IB_ENG_110317_2.indd 2-3 11-03-17 10:40 AM
4 TOLL FREE: 1-800-798-7398 5www.sharkclean.com
English
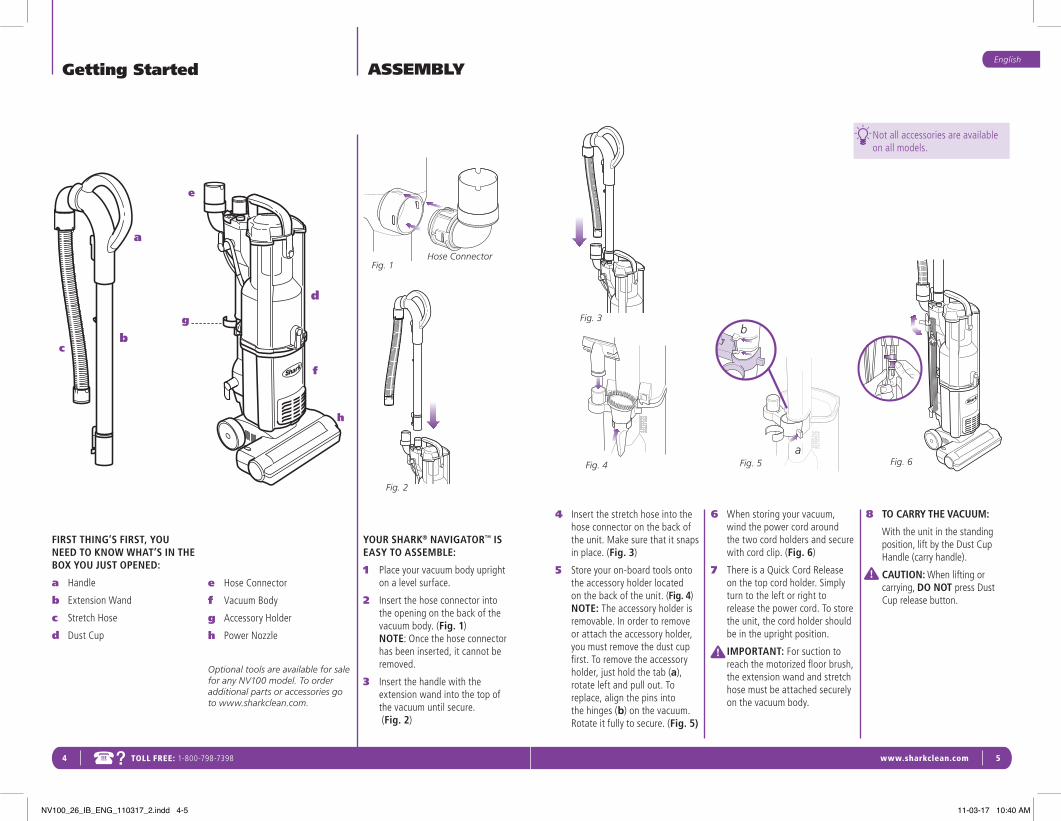
8 TOCARRYTHEVACUUM:
Withtheunitinthestandingposition,liftbytheDustCupHandle(carryhandle).
CAUTION:Whenliftingorcarrying,DONOTpressDustCupreleasebutton.
Fig. 1
FIRSTTHING’SFIRST,YOUNEEDTOKNOWWHAT’SINTHEBOXYOUJUSTOPENED:
a Handle
b ExtensionWand
c StretchHose
d DustCup
Getting Started
YOURSHARK®NAVIGATOR™ISEASYTOASSEMBLE:
1 Placeyourvacuumbodyuprightonalevelsurface.
2 Insertthehoseconnectorintotheopeningonthebackofthevacuumbody.(Fig.1)NOTE:Oncethehoseconnectorhasbeeninserted,itcannotberemoved.
3 Insertthehandlewiththeextensionwandintothetopofthevacuumuntilsecure.(Fig.2)
4 Insertthestretchhoseintothehoseconnectoronthebackoftheunit.Makesurethatitsnapsinplace.(Fig.3)
5 Storeyouron-boardtoolsontotheaccessoryholderlocatedonthebackoftheunit.(Fig.4)NOTE:Theaccessoryholderisremovable.Inordertoremoveorattachtheaccessoryholder,youmustremovethedustcupfirst.Toremovetheaccessoryholder,justholdthetab(a),rotateleftandpullout.Toreplace,alignthepinsintothehinges(b)onthevacuum.Rotateitfullytosecure.(Fig.5)
6 Whenstoringyourvacuum,windthepowercordaroundthetwocordholdersandsecurewithcordclip.(Fig.6)
7 ThereisaQuickCordReleaseonthetopcordholder.Simplyturntotheleftorrighttoreleasethepowercord.Tostoretheunit,thecordholdershouldbeintheuprightposition.
IMPORTANT:Forsuctiontoreachthemotorizedfloorbrush,theextensionwandandstretchhosemustbeattachedsecurelyonthevacuumbody.
ASSEMBLY
Notallaccessoriesareavailableonallmodels.
Fig. 6
Fig. 2
Fig. 4 Fig. 5
f
h
a
e
c
d
b
e HoseConnector
f VacuumBody
g AccessoryHolder
h PowerNozzle
Optional tools are available for sale for any NV100 model. To order additional parts or accessories go to www.sharkclean.com.
g Fig. 3
Hose Connector
b
a
NV100_26_IB_ENG_110317_2.indd 4-5 11-03-17 10:40 AM

6 TOLL FREE: 1-800-798-7398 7www.sharkclean.com
English
Using the Vacuum
YourShark®Navigator™canbeusedtocleanallsurfacetypes.
1 Pluginthevacuum.
2 PushthePowerbutton( ).(Fig.7)
3 Placeyourfootonthepowernozzleandpullthehandlebacktowardsyou.(Fig.8)
NOTE:Thisvacuumhasaseparatebrushrollbutton( )onthetopofthevacuum.(Fig.9)
4 CLEANCARPETS:
Engagethebrushrollbypushingthebrushrollbutton( )tothe“ON”position.Thebrushrolllightwillturngreen.(Fig.9)
IMPORTANT:Toprotectyourcarpets,thebrushrollwillonlyturnonwhenyouhavepulledthehandlebacktowardsyouandreleasedthepowernozzle.
IMPORTANT:Thebrushrollindicatorlightonthepowernozzlewillilluminatesolidredifthereisablockage.(Fig.10)ThisfeatureisdesignedtoprotectyourLifetimeBeltthatpowersyourbrushroll.SeeCheckingforBlockagesonpage11.
5 CLEANBAREFLOORS:
Forcleaningbarefloorsortocleanwiththehose,pushthebrushrollbutton( )tothe“OFF”positionforsuctiononly.Thebrushrolllightwillturnoff.Thebrushrollwillnotspininthismode.
IndicatorLight
6 CLEANABOVE-FLOORSWITHHOSE:
Youcanattachtheaccessoriesontothehandleorontotheextensionwandforalongerreach.
a Standthevacuumintouprightposition.
b Toremovethehandleonly,pressthehandlereleasebutton.(Fig.11)
c Toremovethehandlewiththeextensionwand,presstheextensionwandreleasebuttononthebackofthevacuum.(Fig.12)
d Pushtheselectedtoolintotheendofthehandleorhandlewithextensionwandforlongerreachandbegincleaning.
To order additional parts and accessories, go to www.sharkclean.com.
Forsuctiontoreachthepowernozzle,theextensionwandandstretchhosemustbeattachedsecurelyonthevacuumbody.
Theheightofyourpowernozzlehasbeenoptimizedforeasypushingandsuperiorcleaningonallfloortypes.Thereisnoneedtomakeanyheightadjustmentsasyoutransitiontodifferentfloor&carpettypes.
Fig. 10
DONOTpullvacuumcleaneraroundbythehose.
DONOTover-extendthehose.Alwaysholdthevacuumsothatitdoesnottipover.
Fig. 11
Emptying the Dust Cup Assembly
ForbestresultsemptytheDustCupAssemblyaftereachuse;orasneededduringprolongedusage.orwhenitreachestheMAXfillline.
DONOTOVERFILL.
Turnvacuumoffbeforeemptying.
TOEMPTYTHEDUSTCUPASSEMBLY:
1 PresstheDustCupreleasebuttonandremovethedustcupfromthevacuum.(Fig.13)
2 GripcarryhandleandpressthebottomDustCupDoorreleasebutton.(Fig.14)
3 OptionA:forQuickEmpty:InsertDustCupAssemblydeepinsidetrashreceptacletocontaindustanddebris.(Fig.15)
PressthebottomDustCupDoorreleasebutton;tapcontainergentlytodislodgeandreleasedustanddebris.
Closethebottomdooruntilitsnapsinplace.
Important:IftheDustCupDoordoesnotswingopenfreelyafterpressingthereleasebutton,pushthedooropenusingthebottomdoortabs.
4 OptionB:ForAllergySufferers:WrapatrashbagaroundtheDustCupAssemblyleavingspaceatthebottomforthedoortoswingopen.(Fig.16)
LocatetheDustCupDoorreleasebuttonwithinthetrashbagandpresstoreleaseasyoushakethedustcuptoemptydustanddebris.
Closethebottomdooruntilitsnapsinplace.
Note:OptionBcanalsobeperformedoutsideofthehometofurtherminimizereleasingdustbackintotheair.CarryjusttheDustCupAssemblyandtrashbagoutside.
Note:Itmaybecomenecessarytooccasionallycleanthemetalscreeninsidethedustcup.Toclean,pressthetopdustcupreleasebutton(Fig.17),pulloutthemetalscreenandremoveanyexcessdirt.Thenreplacethemetalscreeeninsidethedustcupandclosethetoplid.(Fig.18)
Fig. 18
Fig. 14
Fig. 15
Fig. 16
Fig. 17
Fig. 12Fig. 8
Fig. 7
Fig. 9
Fig. 13
DustcupReleaseButton
NV100_26_IB_ENG_110317_2.indd 6-7 11-03-17 10:40 AM

8 TOLL FREE: 1-800-798-7398 9www.sharkclean.com
English
CAUTION:Unplugthevacuumwhilecleaningfilters;failuretodosomightresultinelectricshock.
Proper Care of Your Shark® Upright Vacuum
COMPONENT MAINTENANCESCHEDULE
Rinseandairdryevery3monthsundernormaluse.
Emptyeachtimeyouvacuum.
Pre-MotorFoamFilter
DustCup
Rinseandairdryevery3monthsundernormaluse.Pre-MotorFeltFilter
Cleanonceevery12monthsundernormaluse.Post-MotorFilter
1
2
3
4
CLEANINGTHEPRE-MOTORFILTERS
1 Removethedustcup.
2 Pullthe2filtersoutfromthetopofthemotorbase.(Fig.18)
3 Rinsethefiltersthoroughlyinlukewarmwateruntilthewaterrunsclear.
4 Squeezeoutexcesswaterandletair-dryforatleast24hoursbeforereplacing.Donotuseahairdryerorotherheatingmethodstodry.
5 Placethefeltfilterinfirst,thenthefoamfilter.
6 Replacethedustcup.
Post-MotorFilter
Fig. 19
CLEANINGTHEPOST-MOTORFILTER
1 Removethefiltercoverfromthefrontofthevacuumbypullinguponthetabandpullingthecoverawayfromthevacuum.(Fig.19)
2 Removethefilterfromtheframeandwashthefilterunderthetapusinglukewarmwater.
4 Allowthefiltertoairdryfor24hours.Donotuseahairdryerorotherheatingmethodstodry.
5 Oncethefilterisdry,replaceitbackintothevacuum.
6 Replacethecoverbyinsertingthetwotabsintotheholesatthetopandandthenswingingthecoverdownuntilitclicksintoplace.
NOTE:Filtersmayappeardirtybutfrequentcleaningoftheseisnotnecessary.Seemaintenancescheduleabove.
DONOTputthefiltersinthewashingmachineordishwasher.
NOTE:Thematerialinthefilterwilldiscolorovertime.ThisisNORMALandwillnotaffecttheperformanceofthefilter.
Pre-MotorFoamFilterFeltFilter
Fig. 18
TroubleshootingWARNING:Toreducetheriskofelectricshock,thepowercordmustbedisconnectedbeforeperformingmaintenance/troubleshootingchecks.
Topurchasereplacementparts,pleasevisitourwebsite:www.sharkclean.com.
PROBLEM POSSIBLEREASONS&SOLUTIONS
Vacuumwillnotrun.Checktoseeifthevacuumispluggedinproperly.Checkthecircuitbreaker/fuse.ChecktheOn/Offbutton.
Vacuumisnotpickingupdirt.
Checkfilterstoseeiftheyneedcleaning.Followinstructionsforrinsinganddryingthefiltersbeforere-insertingbackintothevacuum.(See“Maintenance”sectionsforinstructions.)Dustcupmaybefull;emptydustcup.Checkhoseandhoseconnectionsforblockages;clearblockagesifrequired.Ifdustcupisempty,andattachmentinletsareclear,checkforotherblockages.(See“CheckingforBlockages”forinstructions.)
Airflowisrestricted.Nosuctionorlightsuction.
Checkfilterstoseeiftheyneedcleaning.Followinstructionsforrinsinganddryingthefiltersbeforere-insertingbackintothevacuum.(See“Maintenance”sectionsforinstructions.)Dustcupmaybefull;emptydustcup.Checkhose,hoseconnections,nozzlesandaccessoriesforblockages;clearblockagesifrequired.Ifdustcupisempty,andattachmentinletsareclear,checkforotherblockages.(See“CheckingforBlockages”forinstructions.)
Bushrolldoesnotturnon.
Pressthebrushrollbutton( )tothe“ON”position.Thebrushrolllightnearthisbuttonwillilluminategreenwhen“ON”.Placeyourfootonthefloorbrushandpullthehandlebacktoengagethebrushroll.Iftheredlightonthepowernozzleisilluminated,seethesectiononCheckingforBlockages.
Vacuumturnsoffonitsown.
Thisvacuumcleanerisequippedwithamotorprotectivethermostat.Ifforsomereasonyourvacuumoverheats,thethermostatwillautomaticallyturntheunitoff.Shouldthisoccur,performthefollowingstepstorestartthemotorthermostat:
1.Pressthepowerbutton( )tothe(Off)position.2.Unplugthevacuum.3.Emptythedustcupandcleanfilters.(See“Maintenance”sectionsfor
instructions.)4.Checkforblockagesinhose,accessoriesandinletopenings.
(See“CheckingforBlockages”forinstructions.)5.Allowtheunittocoolforaminimumof45minutes.6.Pluginthevacuum.
7.Pressthepowerbutton( )tothe(On)positiontorestartthevacuum.
Note:Ifvacuumstilldoesnotstart,contactCustomerServiceat:1-800-798-7398.
NV100_26_IB_ENG_110317_2.indd 8-9 11-03-17 10:40 AM
10 TOLL FREE: 1-800-798-7398 11www.sharkclean.com
EnglishChecking for Blockages
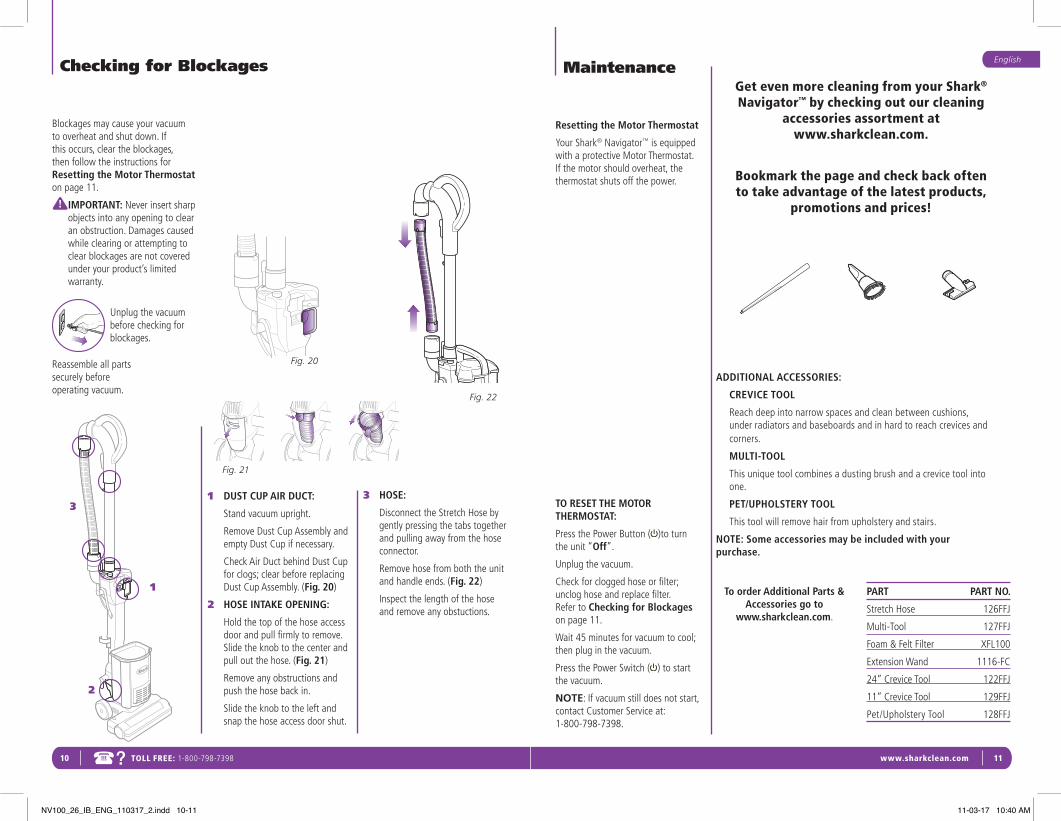
Blockagesmaycauseyourvacuumtooverheatandshutdown.Ifthisoccurs,cleartheblockages,thenfollowtheinstructionsforResettingtheMotorThermostatonpage11.
IMPORTANT:Neverinsertsharpobjectsintoanyopeningtoclearanobstruction.Damagescausedwhileclearingorattemptingtoclearblockagesarenotcoveredunderyourproduct’slimitedwarranty.
Unplugthevacuumbeforecheckingforblockages.
Reassembleallpartssecurelybeforeoperatingvacuum.
1
2
31 DUSTCUPAIRDUCT:
Standvacuumupright.
RemoveDustCupAssemblyandemptyDustCupifnecessary.
CheckAirDuctbehindDustCupforclogs;clearbeforereplacingDustCupAssembly.(Fig.20)
2 HOSEINTAKEOPENING:
Holdthetopofthehoseaccessdoorandpullfirmlytoremove.Slidetheknobtothecenterandpulloutthehose.(Fig.21)
Removeanyobstructionsandpushthehosebackin.
Slidetheknobtotheleftandsnapthehoseaccessdoorshut.
3 HOSE:
DisconnecttheStretchHosebygentlypressingthetabstogetherandpullingawayfromthehoseconnector.
Removehosefromboththeunitandhandleends.(Fig.22)
Inspectthelengthofthehoseandremoveanyobstuctions.
Fig. 20
Fig. 21
Maintenance
ResettingtheMotorThermostat
YourShark®Navigator™isequippedwithaprotectiveMotorThermostat.Ifthemotorshouldoverheat,thethermostatshutsoffthepower.
TORESETTHEMOTORTHERMOSTAT:
PressthePowerButton( )toturntheunit“Off”.
Unplugthevacuum.
Checkforcloggedhoseorfilter;uncloghoseandreplacefilter.RefertoCheckingforBlockagesonpage11.
Wait45minutesforvacuumtocool;thenpluginthevacuum.
PressthePowerSwitch( )tostartthevacuum.
NOTE:Ifvacuumstilldoesnotstart,contactCustomerServiceat:1-800-798-7398.
ToorderAdditionalParts&Accessoriesgoto
www.sharkclean.com.
PART PARTNO.
StretchHose 126FFJ
Multi-Tool 127FFJ
Foam&FeltFilter XFL100
ExtensionWand 1116-FC
24”CreviceTool 122FFJ
11”CreviceTool 129FFJ
Pet/UpholsteryTool 128FFJ
Get even more cleaning from your Shark® Navigator™ by checking out our cleaning
accessories assortment at www.sharkclean.com.
Bookmark the page and check back often to take advantage of the latest products,
promotions and prices!
ADDITIONALACCESSORIES:
CREVICETOOL
Reachdeepintonarrowspacesandcleanbetweencushions,underradiatorsandbaseboardsandinhardtoreachcrevicesandcorners.
MULTI-TOOL
Thisuniquetoolcombinesadustingbrushandacrevicetoolintoone.
PET/UPHOLSTERYTOOL
Thistoolwillremovehairfromupholsteryandstairs.
NOTE:Someaccessoriesmaybeincludedwithyourpurchase.
Fig. 22
NV100_26_IB_ENG_110317_2.indd 10-11 11-03-17 10:40 AM
12 TOLL FREE: 1-800-798-7398 13www.sharkclean.com
English
Euro-Pro Three-Year (3) Limited Warranty
EURO-PROOperatingLLCwarrantsthisproducttobefreefromdefectsinmaterialandworkmanshipforaperiodofthree(3)yearsfromthedateoftheoriginalpurchase,whenutilizedfornormalhouseholduse,subjecttothefollowingconditions,exclusionsandexceptions.
Ifyourappliancefailstooperateproperlywhileinuseundernormalhouseholdconditionswithinthewarrantyperiod,returnthecompleteapplianceandaccessories,freightprepaidto:
•U.S.:EURO-PROOperatingLLCForcustomerservicesupportcall1-800-798-7398orvisitwww.sharkclean.com
•Canada:EURO-PROOperatingLLC4400BoisFranc,St.Laurent,QuébecH4S1A7
Iftheapplianceisfoundtobedefectiveinmaterialorworkmanship,EURO-PROOperatingLLCwillrepairorreplaceitfreeofcharge.Proofofpurchasedateand$16.99tocoverthecostofreturnshippingandhandlingmustbeincluded.*
Non-durablepartsincluding,withoutlimitation,filters,brushesandelectricalpartswhichnormallyrequirereplacementarespecificallyexcludedfromwarranty.
TheliabilityofEURO-PROOperatingLLCislimitedsolelytothecostoftherepairorreplacementoftheunitatouroption.Thiswarrantydoesnotcovernormalwearofpartsanddoesnotapplytoanyunitthathasbeentamperedwithorusedforcommercialpurposes.Thislimitedwarrantydoesnotcoverdamagecausedbymisuse,abuse,negligenthandlingordamageduetofaultypackagingormishandlingintransit.Thiswarrantydoesnotcoverdamageordefectscausedbyorresultingfromdamagesfromshippingorrepairs,serviceoralterationstotheproductoranyofitsparts,whichhavebeenperformedbyarepairpersonnotauthorizedbyEURO-PROOperatingLLC.
Thiswarrantyisextendedtotheoriginalpurchaseroftheunitandexcludesallotherlegaland/orconventionalwarranties.TheresponsibilityofEURO-PROOperatingLLCifany,islimitedtothespecificobligationsexpresslyassumedbyitunderthetermsofthelimitedwarranty.InnoeventisEURO-PROOperatingLLCliableforincidentalorconsequentialdamagesofanynaturewhatsoever.Somestatesdonotpermittheexclusionorlimitationofincidentalorconsequentialdamages,sotheabovemaynotapplytoyou.
Thiswarrantygivesyouspecificlegalrights,andyoumayalsohaveotherrightswhichvaryfromstatetostateorprovincetoprovince.
*IMPORTANT:Carefullypackitemtoavoiddamageinshipping.Besuretoincludeproofofpurchasedateandtoattachtagtoitembeforepackingwithyourname,completeaddressandphonenumberwithanotegivingpurchaseinformation,modelnumberandwhatyoubelieveistheproblemwithitem.Werecommendyouinsurethepackage(asdamageinshippingisnotcoveredbyyourwarranty).Marktheoutsideofyourpackage“ATTENTIONCUSTOMERSERVICE”.Weareconstantlystrivingtoimproveourproducts,thereforethespecificationscontainedhereinaresubjecttochangewithoutnotice.
Product Registration
Pleasevisitwww.sharkclean.comorcall1-800-798-7398toregisteryournewShark®productwithinten(10)daysofpurchase.Youwillbeaskedtoprovidethestorename,dateofpurchaseandmodelnumberalongwithyournameandaddress.
Theregistrationwillenableustocontactyouintheunlikelyeventofaproductsafetynotification.Byregisteringyouacknowledgetohavereadandunderstoodtheinstructionsforuse,andwarningssetforthintheaccompanyinginstructions.
Notes
NV100_26_IB_ENG_110317_2.indd 12-13 11-03-17 10:40 AM

Euro-ProOperatingLLC
Newton,MA02459
English:1-800-798-7398
www.sharkclean.com
Copyright©Euro-ProOperatingLLC2011
PrintedinChina
Illustrationsmaydifferfromactualproduct.
NV100.26.E.110317.2.
NV100_26_IB_ENG_110317_2.indd 14 11-03-17 10:40 AM