nursery manual for native plants
TRANSCRIPT

Luna, Tara; Wilkinson, Kim M. 2009. 7: Collecting, processing, and storing seeds. In: Dumroese, R. Kasten; Luna, Tara; Landis, Thomas D., editors. Nursery manual for native plants: A guide for tribal nurseries - Volume 1: Nursery management. Agriculture Handbook
730. Washington, D.C.: U.S. Department of Agriculture, Forest Service. p. 113-131.

113
Collecting, Processing, and Storing SeedsTara Luna and Kim M. Wilkinson 7
Nurseries that work to strengthen and expand the presence of native species
are concerned about fostering diverse populations that are strong and well
adapted. For many native plants, however, the natural diversity of wild popu-
lations has been depleted. Habitat loss has reduced the range and sheer num-
ber of plants. For plants with commercial value, unsustainable harvesting
practices may have reduced the number of plants with desirable characteris-
tics while leaving behind inferior plants. This process of depleting a popula-
tion of the best genetic properties so that future populations are weaker than
the original is called “genetic degradation.” Seed collection for plant propaga-
tion is an opportunity to reverse the trends of genetic degradation and species
loss. Nurseries have a key role in conserving the gene pool of native plants.
G E N E T I C D I V E R S I T Y A N D S E E D CO L L E C T I O N E T H I C S
Today, seed collection ethics is an important consideration in native plant
nurseries, and traditional indigenous practices serve as a valuable model. Col-
lecting from a wide genetic base fosters a more diverse gene pool at the out-
planting site. This practice can protect a planting against unforeseen
biological and environmental stresses and also protect against inbreeding in
future generations. For restoration and conservation projects, maintaining ge-
netic diversity is a key part of project objectives. This important topic will be
discussed in greater detail later in this chapter, but the first step is learning
more about flowers and seeds.
A variety of dry native fruits and seeds by Tara Luna.

114 CO L L E C T I N G , P R O C E S S I N G , A N D S TO R I N G S E E D S
U N D E R S TA N D I N G F LO W E R S A N D S E E D S
Seed collectors and growers need to be able to identify
fruits and seeds to ensure collection of the right struc-
ture at the right stage of development. It is not uncom-
mon for novices to collect open fruits after the seeds
have dispersed or immature fruits or cones. In some
species, what appears to be a seed is actually a thin-
walled fruit containing the seed. Furthermore, a collec-
tor must be able to recognize mature seeds from
immature or nonfilled seeds. Protocols describing
flowering, fruits, seeds, and methods of seed collec-
tion, processing, and storage can be found in volume 2
of this handbook.
Plants are classified according to whether they pro-
duce spores or seeds. Spore-bearing plants such as
ferns produce clusters of spores on the undersides of
leaves that may or may not be covered with a papery
covering. Spores can be collected like seeds just before
they disperse, but they require special growing condi-
tions to develop into plants. For further discussion on
fern spore collection, see volume 2 of this handbook.
Seed-bearing plants are classified into two groups,
gymnosperms and angiosperms, based on their flower
types. Gymnosperms do not bear true flowers and are
considered more primitive than angiosperms. Instead,
gymnosperms bear male and female cones on the
same tree. Male cones typically develop on the tips of
branches and fall off after pollen is shed. Female cones
enlarge and become more visible following pollination
and fertilization, and seeds are borne naked on the
mature scales. Gymnosperm cones can be dehiscent,
indehiscent, or fleshy. Dehiscent cones have scales
that open at maturity to release the seeds (figure 7.1A),
whereas indehiscent cones rely on animals to pry
them open and disperse the seeds. In dehiscent and
indehiscent cones, the seeds are usually winged (figure
7.1B). Fleshy cones resemble berries and their seeds
lack wings. Gymnosperm seeds include an embryo,
nutritive tissue, and seedcoat (figure 7.1C).
Angiosperms bear true flowers, and seeds are en-
closed in an ovary that develops and surrounds the
seeds after fertilization. Pollen is transferred from the
anthers (male reproductive structures) to the stigma
surmounting the pistil (female reproductive structure).
Following pollination and fertilization, the ovary
enlarges into a fruit that contains one to many seeds.
Thus, a fruit is a ripened ovary that develops and sur-
Figure 7.1—(A) Cones of gymnosperms can be dehiscent at maturity, as seen in Douglas-fir which (B) release winged seeds. (C) Gymnosperm seeds include an embryo, nutritive tis-sue, and seedcoat. Photos by Thomas D. Landis, illustration from Dumroese and others (1998).
B
A
C

115TA R A LU N A A N D K I M M . W I L K I N S O N
rounds the seed after fertilization. It protects the seed
and provides it with nutrition during development and
helps with the dispersal of mature seeds. The seed is a
ripened ovule consisting of a seedcoat, the nutritive
tissue (endosperm), and the embryo, although embryo
size varies widely among species (figures 7.2A–C).
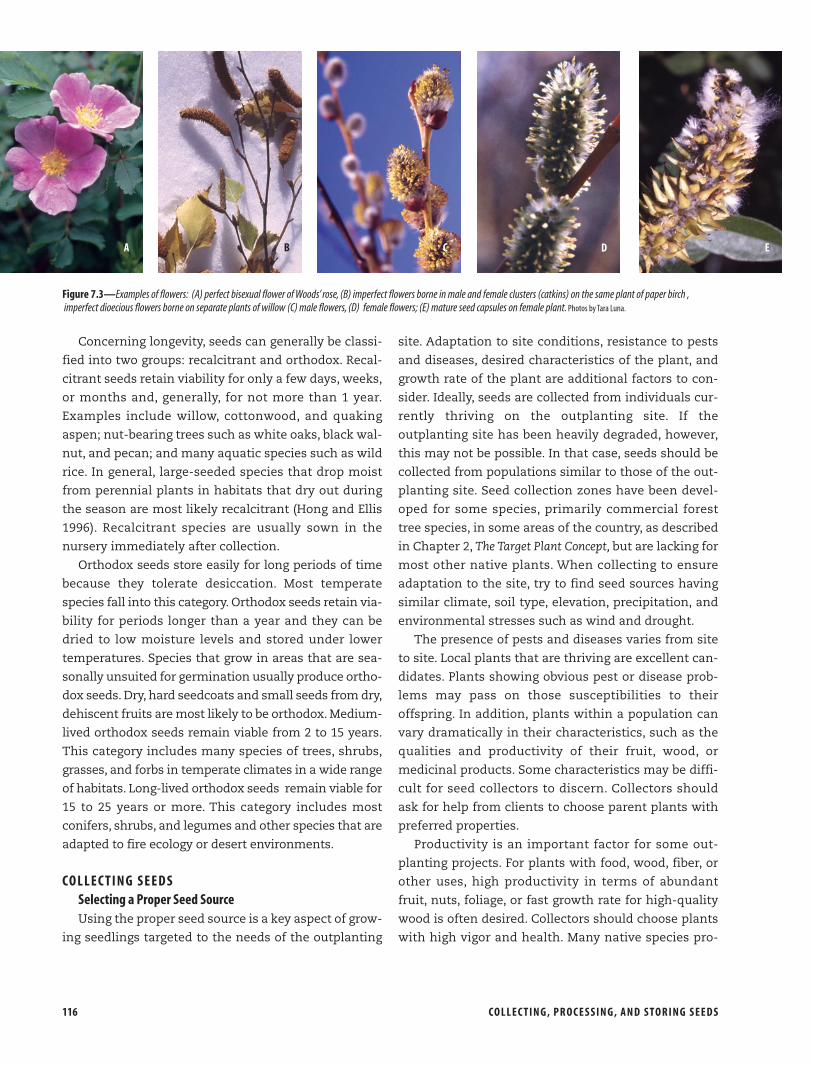
Most species of angiosperms have perfect (bisexual)
flowers, meaning they contain both the male and
female reproductive structures in the same flower (fig-
ure 7.3A). Perfect flowers can be showy or very small
and inconspicuous. Some species have imperfect flow-
ers, meaning that separate male and female flowers
are borne in single-sex flower clusters on the same
plant (figure 7.3B). Some species are dioecious, mean-
ing that individual plants are either male or female
(figures 7.3C and D). Thus, only the female plants will
bear fruits and seeds (figure 7.3E).
Because of the wide variety of flower types, result-
ing fruits also vary tremendously, and this variety
greatly influences how seeds are collected, processed,
cleaned, and stored. Dry, dehiscent fruits are those that
are woody or papery and split open at maturity. Some
examples include capsules (figure 7.4A), legumes or
pods (figure 7.4B), and follicles (figure 7.4C). Dry, inde-
hiscent fruits are those in which both the fruit and
seed form an integrated part of the dispersal unit and
do not split open at maturity. Seeds of these species are
surrounded by thin shells that are fused with the outer
layer of the fruit and are dispersed as single units that
resemble a seed and often have winged appendages.
Examples of dry, indehiscent fruits include achenes
(figure 7.5A), schizocarps (figure 7.5B), samaras, and
nuts (figure 7.5C). Fleshy fruits are those in which the
tissue of the ovary is strongly differentiated. The peri-
carp is the part of a fruit formed by the ripening of the
ovary wall. It is organized into three layers: the skin
(exocarp), the often fleshy middle (mesocarp), and the
membranous or stony inner layer (endocarp). These
layers may become skin-like and leathery, fleshy, or
stringy during development. Fleshy fruits such as
berries, drupes, and pomes are indehiscent (figure 7.6).
Berries contain a fleshy pericarp with many seeds,
while drupes have a tough stony endocarp (known as
the stone or pit) that encloses only a single seed. Fur-
thermore, some fruits are known as aggregate fruits,
which are actually clusters of many fruits that develop
from single flowers, each bearing one seed.
Figure 7.2—Angiosperm fruits and seeds vary greatly among species: (A) Americanplum, (B) quaking aspen, and (C) shagbark hickory. In some species, the embryo is not visi-ble to the naked eye. Illustrations from Schopmeyer (1974).
C
B
A
Concerning longevity, seeds can generally be classi-
fied into two groups: recalcitrant and orthodox. Recal-
citrant seeds retain viability for only a few days, weeks,
or months and, generally, for not more than 1 year.
Examples include willow, cottonwood, and quaking
aspen; nut-bearing trees such as white oaks, black wal-
nut, and pecan; and many aquatic species such as wild
rice. In general, large-seeded species that drop moist
from perennial plants in habitats that dry out during
the season are most likely recalcitrant (Hong and Ellis
1996). Recalcitrant species are usually sown in the
nursery immediately after collection.
Orthodox seeds store easily for long periods of time
because they tolerate desiccation. Most temperate
species fall into this category. Orthodox seeds retain via-
bility for periods longer than a year and they can be
dried to low moisture levels and stored under lower
temperatures. Species that grow in areas that are sea-
sonally unsuited for germination usually produce ortho-
dox seeds. Dry, hard seedcoats and small seeds from dry,
dehiscent fruits are most likely to be orthodox. Medium-
lived orthodox seeds remain viable from 2 to 15 years.
This category includes many species of trees, shrubs,
grasses, and forbs in temperate climates in a wide range
of habitats. Long-lived orthodox seeds remain viable for
15 to 25 years or more. This category includes most
conifers, shrubs, and legumes and other species that are
adapted to fire ecology or desert environments.
CO L L E C T I N G S E E D S
Selecting a Proper Seed Source
Using the proper seed source is a key aspect of grow-
ing seedlings targeted to the needs of the outplanting
site. Adaptation to site conditions, resistance to pests
and diseases, desired characteristics of the plant, and
growth rate of the plant are additional factors to con-
sider. Ideally, seeds are collected from individuals cur-
rently thriving on the outplanting site. If the
outplanting site has been heavily degraded, however,
this may not be possible. In that case, seeds should be
collected from populations similar to those of the out-
planting site. Seed collection zones have been devel-
oped for some species, primarily commercial forest
tree species, in some areas of the country, as described
in Chapter 2, The Target Plant Concept, but are lacking for
most other native plants. When collecting to ensure
adaptation to the site, try to find seed sources having
similar climate, soil type, elevation, precipitation, and
environmental stresses such as wind and drought.
The presence of pests and diseases varies from site
to site. Local plants that are thriving are excellent can-
didates. Plants showing obvious pest or disease prob-
lems may pass on those susceptibilities to their
offspring. In addition, plants within a population can
vary dramatically in their characteristics, such as the
qualities and productivity of their fruit, wood, or
medicinal products. Some characteristics may be diffi-
cult for seed collectors to discern. Collectors should
ask for help from clients to choose parent plants with
preferred properties.
Productivity is an important factor for some out-
planting projects. For plants with food, wood, fiber, or
other uses, high productivity in terms of abundant
fruit, nuts, foliage, or fast growth rate for high-quality
wood is often desired. Collectors should choose plants
with high vigor and health. Many native species pro-
116 CO L L E C T I N G , P R O C E S S I N G , A N D S TO R I N G S E E D S
Figure 7.3—Examples of flowers: (A) perfect bisexual flower of Woods’ rose, (B) imperfect flowers borne in male and female clusters (catkins) on the same plant of paper birch ,imperfect dioecious flowers borne on separate plants of willow (C) male flowers, (D) female flowers; (E) mature seed capsules on female plant. Photos by Tara Luna.
A B C ED

117TA R A LU N A A N D K I M M . W I L K I N S O N
duce large seed crops only periodically. In good seed
years, seed quality and quantity tends to be high.
Heavy seed crops generally occur several years apart,
and are often followed by light seed crops the following
year. The interval between heavy seed-bearing years is
referred to as periodicity.
For woody plants, growth form is also a key character-
istic. For example, trees may range in form from small,
multistemmed, shrubby individuals to large, straight-
stemmed individuals. Depending on the preferred char-
acteristics for the project needs, seed collectors can
gather seeds from parents with the desired form.
Finally, the genetic quality of seeds used in the nurs-
ery can be a major factor in the success of an outplant-
ing project. Seed selection is definitely an area in
which “quality over quantity” should be the standard.
Care in selecting seed sources can foster plants that
are more productive, better adapted to local site condi-
tions, and better suited to achieve the results planned
for the project. The long-term ecological viability and
sustainability of a planting is also at stake, because
projects should contain enough diversity to reproduce
healthy and productive offspring for future genera-
tions while remaining resilient to environmental
stresses.
Ecology of the Species
To become an efficient seed collector, you need to
learn as much as possible about each species. During
the first few years, novice seed collectors need to
spend as much time in the field as possible and keep
good notes (figure 7.7A). Monitoring the development
of the seed crop throughout the season is an important
part of seed collection. Any observations may also pro-
vide clues on how to germinate the seeds. Good field
experience has no substitute.
Be sure to record the time of flowering for each
species. Flowering is easily observed in species with
showy flowers but requires more attention for wind-pol-
linated species such as conifers, grasses, and willows.
Most developing fruits become visible only a few weeks
after flowering and pollination. Over time, recognizing
the flowering sequence of the local flora allows the seed
collection schedule to be simplified by keying it to the
flowering period of a few index species. Familiarity with
the species and local site conditions allows the develop-
ment of a locale-specific seed collection schedule.
Figure 7.4—Dry, dehiscent fruits such as (A) capsules (penstemon), (B) legumes or pods(lupine), and (C) follicles (milkweed) should be collected as soon as the sutures along thefruit wall begin to spilt open. Photos by Tara Luna.
A B
C

118 CO L L E C T I N G , P R O C E S S I N G , A N D S TO R I N G S E E D S
Another important factor to consider is that each
species has its own flower and fruit arrangement, pol-
lination strategy, and mode of seed dispersal. Some
species will flower and fruit over an extended period of
time, while others will flower and fruit only once dur-
ing the growing season. Other species, such as redosier
dogwood, may produce several distinct fruit crops in a
season on individual plants. If broad genetic represen-
tation is the collection goal, you will need to collect
fruits at several times during the season.
Each species has different types of flower arrange-
ments, which will have different blooming sequences.
Within a single plant, there is often a range of fruit
maturity stages. For example, species such as lupine
have a flower stalk with a prolonged period of flower-
ing and many different stages of fruit development.
The seed collector will need to selectively harvest only
the fully mature fruits and make repeated visits to the
collection site (figure 7.7B).
Be aware of the dispersal strategy of the species
before attempting to collect seeds. Fruits have devel-
oped many highly specialized devices that aid in the
protection of seeds and the dispersal away from parent
plants. Wind dispersal is very common; dispersal units
are very small and light or equipped with specially
formed devices for flying. Those devices include air-
filled cavities, seeds or indehiscent fruits that are com-
pletely covered with hair like cotton, and seeds that are
equipped with various kinds of wings or parachutes
(figure 7.8). Collectors need to time collection before
seed dispersal and windy days.
Other species, such as geranium, ceanothus, and
lupine, disperse their seeds by force upon maturation.
In these cases, you may need to bag the developing
fruits with cloth to capture the seeds (figure 7.9). Use a
fine-mesh cloth with a weave that allows light trans-
mission but is small enough to prevent the seeds from
falling through the cloth. Tie the bags over developing
seed stalks so that seeds will be captured when they
are dispersed.
Fleshy fruits are sources of food for animals, and col-
lectors need to time their collection before the fruit is
consumed. In some cases, it may be necessary to bag or
cage fruits or indehiscent cones to obtain seeds. For
example, the indehiscent cones of whitebark pine cones
depend on birds and squirrels for seed dispersal, so they
are caged with mesh wire to prevent animal predation.
Figure 7.5—Dry, indehiscent fruits such as (A) achenes (arrowleaf balsamroot), (B)schizocarps (biscuitroot), and (C) nuts (oak) are actually single units in which the fruit wallsare fused to the seeds. Photos by Tara Luna.
Figure 7.6—Fleshy fruits of native plants, from top left: drupes of chokecherry, berries ofsnowberry, pomes of Cascade mountain-ash, berries of kinnikinnick and tall huckleberry,aggregate fruits of thimbleberry, berries of serviceberry, and hips of Woods’ rose. Center:drupes of redosier dogwood. Photo by Tara Luna.
A
CB

119TA R A LU N A A N D K I M M . W I L K I N S O N
Factors Affecting Seed Formation and Collection Timing
Environmental conditions during the growing sea-
son can be either beneficial or detrimental to flowering
and seed development. Sudden frosts during flowering
can eliminate fruit production for that year. Prolonged
periods of cool weather will limit pollinator activity
that can result in reduced fruit production. Periods of
cold rains will also slow the rate of fruit maturation.
Drought and high temperatures may promote flower-
ing, but prolonged moisture stress may cause plants to
abort developing fruits and seeds. In cases in which
fruits do develop, overall seed viability may be low or
seeds may be unfilled. For these reasons, perform a cut
test on seeds just prior to collection, as discussed in
detail in the following section.
Seed maturation is temperature dependent and is
therefore affected by elevation, latitude, and aspect.
Populations found on open, south-facing slopes will
mature sooner than those on protected, north-facing
slopes. Low-elevation populations usually mature first,
and seed collectors can follow seed maturity upslope
with increasing elevation. Collectors should use favor-
able microenvironments to their advantage. For exam-
ple, populations growing in full sunlight tend to
produce more seeds than those that are heavily shaded.
Good soil nutrient status at the collection site also pro-
motes good seed production. Locations that recently
have been burned are good sources for herbaceous
species because the overstory has been removed and a
flush of nutrients has been made available to the plants
during flowering, fruit, and seed formation. Older,
burned areas are good collection sites for shrubs,
which will flower and fruit for several years.
Sites intensely browsed by wildlife and livestock are
poor choices for seed collection because animals often
consume the current season’s growth, which limits
flowering and seed production. Certain insects and
fungi also consume seeds. Fruits or seeds that have
small exit holes, are discolored, or are misshaped
should be avoided.
Correct timing is the most critical element in seed col-
lection. Effective native seed collection involves a num-
ber of steps to ensure that seeds are collected at the right
stage. If seeds are collected before they are fully mature,
the effort often results in poor seed viability. Because
most seeds are disseminated away from the parent plant
upon maturation, arriving at the site too late may result
Figure 7.7—Monitoring the development of fruits and seeds, such as (A) willow, is a nec-essary part of collecting native plant seeds. Collection should be timed just as the fruits fullymature, (B) as Linda Markins is doing with these panicled bulrush fruits and (C) Alex Glad-stone with these rose hips, but before the fruits disseminate away from the plant. Photo A by
Dawn Thomas, B by Terrence Ashley, C by Tara Luna.
A
B
C

120 CO L L E C T I N G , P R O C E S S I N G , A N D S TO R I N G S E E D S
in the loss of seeds for the season. Proper seed collection
timing requires the following practices:
Locate populations of desired species early in the
season.
Monitor potential sites just after flowering when
fruits are becoming visible.
Record the dates of flowering, fruit, and cone forma-
tion. Cones are often a 2-year crop, so you can assess
cone crop the year prior to collection.
Observe carefully the weather patterns during polli-
nation, fruit formation, and maturation.
Visit the site frequently to monitor the development
and quality of the seed crop.
Use collection dates from previous years to predict
target collection dates and other information.
Use a cutting test of a few sample seeds to deter-
mine maturity prior to collection.
Collect seeds during dry weather.
Ensuring That Seeds Are Healthy
The easiest way to ensure that seeds are healthy and
ready for harvest is to use a cut test. A cut test allows
inspection for mature, abnormal, infested, or empty
seeds. Several seeds from several individuals within the
population should be examined. The two essential tools
are a hand lens and a safety razor, knife, or scalpel for
cutting. With care, cut the fruit or seed along its longest
axis. Inspect the seeds for their internal coloring, how
completely the internal tissue fills the seedcoat cavity,
and for the presence of an embryo. Depending on the
species, the embryo may completely fill the cavity or be
tiny and embedded in the endosperm.A microscope may
be needed for examining very-small–seeded species. If
the seedcoat is soft and the contents are watery and soft,
the seed is immature. If the seedcoat is hard and the con-
tents are firm and light tan to white in color, the seed is
approaching maturity or is fully mature. Some species
can be collected just prior to maturity if the entire inflo-
rescence is cut and the seeds are allowed to cure proper-
ly before cleaning. Generally, the optimum time for seed
collection is when fruits are splitting open at the top.
Seed Collection Tools
The choice of tools depends on the species to be col-
lected. Select tools that will not damage the plant or
the seeds. Some general collection methods include
Figure 7.9—Seeds that disseminate by force with explosive capsules, like snowbrushceanothus, are best collected by tying cheesecloth bags over the developing fruits. Photo by
Tara Luna.
Figure 7.8—Wind-dispersed seeds, like those of arctic dryad, can be challenging to collectbecause they must be gathered when they are fully mature but before the wind blows themaway. Photo by Tara Luna.

hand picking or hand stripping, cutting fruit clusters,
raking or shaking branches over a canvas tarp, bagging
or caging developing fruits or cones, and tying canvas
tarps between large woody plants. The following tools
and supplies are useful when collecting seeds from
natural stands:
Labels, permanent markers, pencils, and seed col-
lection forms to attach to bags.
Scissors, pruning shears, hand scythes, and
extendible pruning poles for taller trees.
A hand lens to examine seeds to ensure they are
full.
Safety razor blades or a sharp pocketknife for the
cutting test of seeds and to examine fruits.
Large paper bags for dry fruits.
White plastic bags for fleshy fruits.
Canvas tarps.
Hand gloves.
Wooden trays for collecting the seeds of low-grow-
ing plants.
A storage box or cooler to keep collections from
being overheated during transport.
Binoculars for spotting fruits in taller trees.
Fine-mesh bags, cages, fine-mesh cloth, and rubber
bands for species with rapid dispersal.
Maintaining Genetic Diversity through the Ethical Harvest
of Seeds
To maintain genetic diversity, follow these guidelines:
Collect seeds from a minimum of 30 individual
plants—50 to 100 individuals is better.
Avoid collecting from single individuals or small
populations with fewer than 30 individuals, unless
you are propagating a rare species.
Collect from distant individuals to reduce the chance
of collecting only close relatives; however, this may
not be possible with species that occur in small
patches.
Collect a few seeds from as many individuals as pos-
sible to ensure a good genetic representation of the
population.
As much as possible, collect seeds from habitat sim-
ilar in elevation, aspect, and soils to that of the out-
planting site to ensure genetic adaptation.
For trees, gather seeds from throughout the canopy.
Some other ethical guidelines and common sense
approaches to collecting include these practices:
Do not collect all the seeds from a site. Suggestions
vary, but most state that only 10 to 50 percent of the
total seed crop should be collected from each site.
Leave enough seeds as a food source for animals
and to ensure the reproduction of the population.
Avoid soil disturbance and plant damage while col-
lecting seeds, especially in fragile habitats.
If possible, allow an area to rest for at least two
growing seasons between collections. Keep in mind
that longer periods may be needed for some species
and locations.
Be absolutely certain of the identity of species being
collected. If in doubt, collect a plant specimen for
later identification.
If avoidable, do not collect from weed-infested areas.
Collect relatively even amounts from each plant; no
single plant should be overrepresented in the collec-
tion.
P R O C E S S I N G S E E D S
Proper processing of fruits and seeds begins the
moment the fruit or seed is removed from the parent
plant. Proper processing includes temporary handling
from the field to the nursery; temporary storage at the
nursery; and prompt and proper seed extraction.
Temporary Handling from Field to Nursery
In general, it is best to transport material from the
field to the nursery as quickly as possible, avoiding
exposure to direct sun, high temperatures, and physi-
cal abuse. Dry fruits, seeds, and cones can be left inside
their paper collection bags for short durations. Placing
plastic bags filled with fleshy fruits inside coolers will
help prevent them from fermenting and being dam-
aged by high temperatures.
Temporary Storage at the Nursery
Recalcitrant SeedsRecalcitrant seeds cannot withstand drying below a
critical moisture level, so they are usually sown imme-
diately after processing. During temporary storage
before sowing, seeds must be kept fully hydrated by
placing them in trays under moist burlap or in plastic
bags filled with moistened sand or peat moss at cool
121TA R A LU N A A N D K I M M . W I L K I N S O N
122 CO L L E C T I N G , P R O C E S S I N G , A N D S TO R I N G S E E D S
temperatures. Relative humidity should be maintained
at 80 to 90 percent.
Dry Fruits and ConesAt the nursery, small quantities of dry fruits and
cones can be dried in paper bags or envelopes as long
as the contents are loose. Large quantities must be
dried immediately by spreading the material on a tarp
or mesh screen, but the material will need to be turned
several times a day. Turning the material prevents it
from becoming too hot, drying in an uneven manner,
or becoming moldy.
The best way to dry material is to spread the contents
evenly on a drying rack. A drying rack consisting of a
simple wooden frame with multiple screens can be con-
structed at low cost and will make efficient use of space
in a seed drying room or greenhouse (figure 7.10). Drying
racks should be made with mesh screens that allow air
movement but prevent seed loss. Different mesh
screens will be necessary for different seed sizes. Dry,
dehiscent fruits should also be covered with a fine-
mesh cloth to prevent the loss of seeds after fruits open.
Good air movement, low relative humidity, and temper-
atures between 65 and 80 °F (18 and 27 °C) promote even
drying and eliminate moisture buildup that can cause
mold and damaging temperatures. A ventilated green-
house or storage shed works well for this purpose. Tem-
perature control is very important; you should use a
shadecloth to keep temperatures from rising too high.
Avoid rewetting dry fruits after collection. Also, make
sure to exclude animals from the seed drying area.
Fleshy Fruits and ConesFleshy fruits and cones are very susceptible to fer-
mentation and subsequent damaging overheating. On
the other hand, it is important not to let the fruits dry
out because this can make cleaning much more diffi-
cult. The best procedure is to temporarily store fleshy
fruits in white plastic bags in a cool place or refrigera-
tor until the seeds can be processed.
Processing Fruits and Cleaning Seeds
Seed cleaning is necessary before sowing or long-
term storage. In some cases, seeds will fail to germi-
nate if they are not removed from the fruits. Seeds of
some species germinate more quickly and evenly if
they are removed completely from their coverings. For
example, Nebraska sedge has shown improved germi-
nation by removing the papery sac (perigynia) sur-
rounding the seed (Hoag and others 2001). Germination
is often improved if the seeds are extracted from stony
endocarps (pits) prior to treatment and sowing.
Most native plant nurseries regularly deal with small
seedlots. Seed cleaning and processing can be laborious
and time consuming, and specialized cleaning equip-
ment can be expensive. A variety of “low tech” methods
and devices are easy to use, cheap, readily available,
and work very well with a variety of fruit types. Some
are described below. Whichever method of cleaning is
chosen, the seed cleaning area of the nursery should be
well ventilated. Some fruits can cause allergic reactions
and fine dust can irritate skin, eyes, and lungs. It is
important to wear gloves and dust masks during clean-
ing and to wash your hands afterward.
Cleaning Recalcitrant SeedsMany species that have recalcitrant seeds, such as
maple, often can be collected quite cleanly and are
sown immediately. Others, such as members of the
white oaks, need additional cleaning that is typically
accomplished by flotation in water. Immediately after
collection, acorns are placed in a bucket of water. Gen-
erally, the viable acorns sink whereas the nonviable
acorns, trash, and debris float. As a side benefit, the
soaking helps keep the acorns hydrated until they are
sown. If acorns are collected in very dry conditions,
viable acorns may also temporarily float. In this situa-
tion, a longer soak duration, perhaps even overnight,
may be necessary to allow enough time for good
acorns to hydrate and sink. Do a cut test to fine-tune
the procedure.
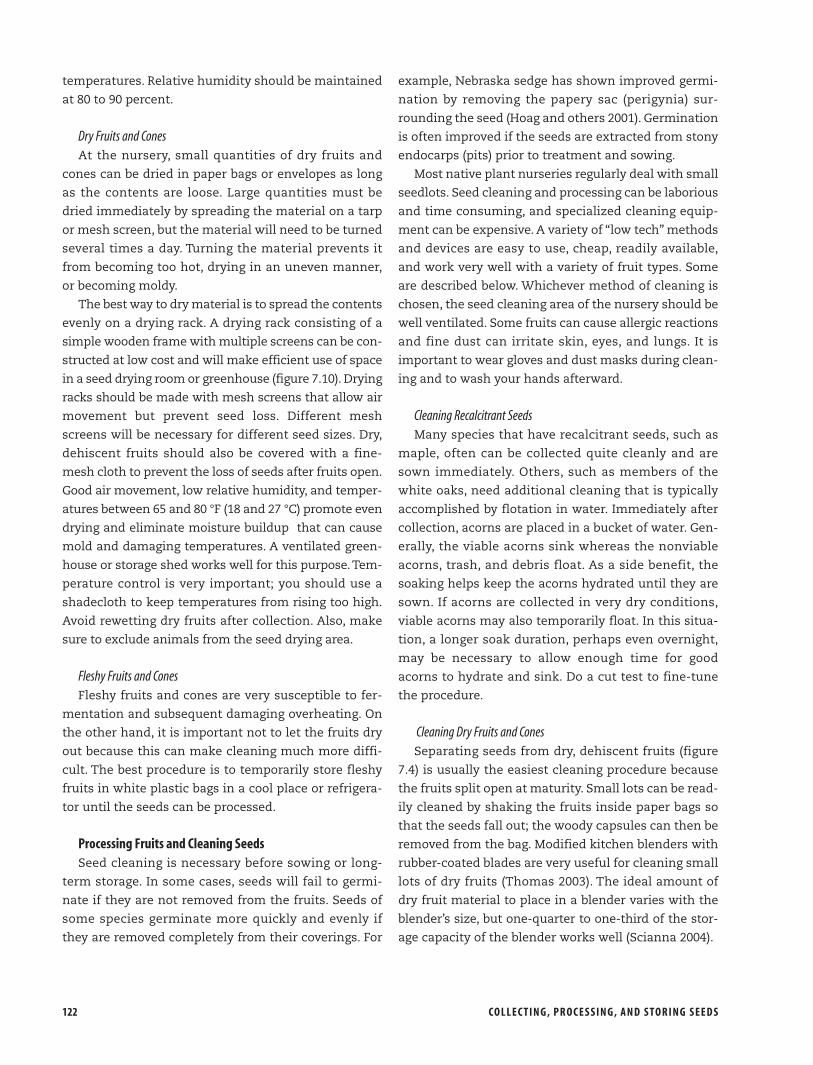
Cleaning Dry Fruits and ConesSeparating seeds from dry, dehiscent fruits (figure
7.4) is usually the easiest cleaning procedure because
the fruits split open at maturity. Small lots can be read-
ily cleaned by shaking the fruits inside paper bags so
that the seeds fall out; the woody capsules can then be
removed from the bag. Modified kitchen blenders with
rubber-coated blades are very useful for cleaning small
lots of dry fruits (Thomas 2003). The ideal amount of
dry fruit material to place in a blender varies with the
blender’s size, but one-quarter to one-third of the stor-
age capacity of the blender works well (Scianna 2004).

Extracted seeds will be mixed with pitch globules, dry
leaves, wings, and small pieces of cones or dry fruits.
Screening is the easiest way to separate dry, indehiscent
fruits and seeds. Screens can be constructed of hard-
ware cloth and wooden frames. Commercial screens are
also available in a range of sizes (figure 7.11).At least two
screen sizes are needed. The top screen has openings
large enough to allow the fruits and seeds to pass
through and the bottom screen has smaller openings
that allow fine chaff, but not the seeds, to pass through.
By placing the collected material on the top screen and
shaking, most of the trash can be removed. When sepa-
rating other small-seeded plants, such as sedges, rush-
es, and some wildflowers, you will need screens with
very fine mesh or kitchen sieves to properly separate
seeds from other debris. Finally, finer chaff and empty
seeds can be further removed by placing them in front of
a fan on a low setting or running them through a series
of fine kitchen sieves.
Larger quantities of dry fruits can be cleaned with a
variety of commercial equipment, such as hammer-
mills, clippers, dewingers, specific gravity separators,
and air separators. The equipment of choice depends
on the seeds being cleaned, the amount of debris in the
collection, and the desired purity (cleanliness) require-
ments of the seedlot. A hammermill uses rotating
hammers and stationary anvils to smash, crush, and
tear dry fruits into smaller fragments to extract the
seeds (figure 7.12A). Clippers are used to remove
appendages and hulls from seeds and to separate out
larger chaff material (figure 7.12B). Dewingers are used
to remove winged appendages from seeds and fruits
and are most commonly used with conifer seeds.
Conifer cones, after the scales open, can be resacked
and shaken by hand or tumbled in a wire cage to dis-
lodge additional seeds from the cone scales. Serotinous
cones, such as jack pine or lodgepole pine, require expo-
sure to heat before the scales open. Cones need to be
exposed to 170 °F (77 °C) temperatures either by placing
the cones in ovens for a period of a few minutes to a few
hours or dipping them in hot water for a few minutes. If
an oven is used, cones will need to be checked frequent-
ly during drying and removed when most have opened
enough to allow the extraction of seeds. If the cones are
123TA R A LU N A A N D K I M M . W I L K I N S O N
Figure 7.10—Dry seeds require good ventilation to prevent mold de-velopment during post harvest handling and drying.Photo by Dawn Thomas.
Figure 7.11—Screens are used to separate large debris, seeds, and fine chaff from the seedlot and are avail-able commercially in a wide range of screen holes sizes to complement any species. Photo by Tara Luna.

124 CO L L E C T I N G , P R O C E S S I N G , A N D S TO R I N G S E E D S
dipped in hot water, the combination of heat and drying
after the soak should be sufficient to open them. Seeds
can then be removed from cones as described previous-
ly. Most conifer seeds are dewinged before sowing and
this can be done by filling a burlap or cloth sack one-
fourth full, tying or folding it shut, and gently kneading
the seeds by squeezing and rubbing from outside the
sack. Friction between the seeds and between the seeds
and burlap will detach the wings. Remember to knead
slowly and gently because too much friction might dam-
age the seeds.This process requires only a few minutes.
A few species, such as western redcedar, longleaf pine,
and firs, have very tight wings that should be left on the
seeds. Repeat the screening process again with a mesh
size that retains seeds but allows the smallest debris to
pass through (Dumroese and others 1998). Large seed-
lots are probably best processed by seed companies.
The last step is fanning or winnowing, which sepa-
rates detached wings, hollow seeds, and seed-sized
impurities from good seeds. The most efficient, high-
tech, method is using an agricultural seed cleaning or
fanning mill, but these machines require careful
adjustment for each species to prevent retaining too
many impurities or blowing away too many sound
(full) seeds. Another method that works well is win-
nowing in front of a fan (figure 7.13). When seeds are
poured slowly in front of a small electric fan, they sep-
arate according to weight from the base of the fan.
Most heavy, sound seeds will come to rest near the
base of the fan, and hollow seeds, wings, and lighter
impurities will tend to blow farther away. Moving from
the fan outward, periodically collect a small sample of
seeds and cut them in half to check for soundness,
determining where the hollow seeds are and discard-
ing them. All species will probably require several suc-
cessive separations to obtain the desired degree of
seed purity. A good target for most species is 90 percent
or more sound seeds (Dumroese and others 1998).
Cleaning Fleshy Fruits and ConesSeeds in fleshy fruits should be processed soon after
collection to avoid fermentation, mummification, exces-
sive heating, or microbial infestation; all of which can
damage seeds.The first step in cleaning is to soak fleshy
fruits in water to soften the pulp. The soak may need to
last a few hours to a few days, depending on the species,
and the water should be changed every few hours. After
Figure 7.12—Commercial seed cleaners such as (A) a hammermill or (B) clipper s are use-ful for cleaning large lots of native seeds. Photos by J. Chris Hoag.
B
A
Figure 7.13—Use a small fan to winnow empty seeds and wings from filled seeds. Theheavier filled seeds will land closer to the fan while lighter empty seeds and wings will landfarther way. Illustration from Dumroese and others (1998).

125TA R A LU N A A N D K I M M . W I L K I N S O N
the pulp is soft, flesh can be removed by hand squeezing
or mashing using a wooden block, rolling pin, or other
device. The flesh can also be removed by wet screening,
which involves hand rubbing the fruits against screens
using a steady stream of water to eliminate the pulp.
Kitchen food processors and blenders with modified
rubber-coated blades can be used for small lots of fleshy
fruits. With both devices, run them for a minute or so to
produce a puree of fruit and seeds. The puree should be
placed in a bucket and water added slowly; viable seeds
will sink and debris, including hollow seeds, will float to
the surface. By slowly and continually adding water,
most of the debris will float off, leaving clean seeds at
the bottom of the bucket (Truscott 2004). If fleshy fruits
of species with dormant seeds are being cleaned, they
need to be washed with water to remove any remaining
pulp and dried for several days before storage. Remem-
ber that the way in which seeds and fruits are handled
during collection, temporary storage, postharvest han-
dling, and cleaning can directly affect seed quality and
viability, as well as seed storage life.
Cleaning Tools for Fleshy and Dry FruitsSmall, hobby-size rock tumblers are useful for dry,
indehiscent fruits; rehydrating and cleaning fleshy
fruits; or removing barbs or other appendages from
seeds and fruits. Wet tumbling uses pea gravel or
crushed stones and water in a rubber-lined tumbler
vessel. Add just enough water so that the gravel and
fruit makes a slurry. The tumbler can be run overnight
and checked the following day. After a course of tum-
bling, the contents are dumped into a sieve and the
pulp or debris is washed off, leaving clean seeds
(Dreesen 2004) (figure 7.14). Another useful tool is the
common kitchen blender with modified blades.
Kitchen blenders can be used for small lots of fleshy
and dry fruits after the impeller blades are coated with
rubberized plastic coating (the material used to coat
handtool handles) to prevent damage to the seeds (fig-
ure 7.15) (Thomas 2003).
Testing Cleaned Seeds
After the seeds are cleaned, it is a good idea to deter-
mine the quality of the seeds by testing seed viability,
seed germination, or both. Seed viability and seed ger-
mination do not mean the same thing and growers
need to know the difference between them. Seed via-
Figure 7.14—A small hobby-size rock tumbler can be used to clean dry fruits with hard-to-remove appendages or fleshy fruits. Photo by Tara Luna.
Figure 7.15—Modifying kitchen blender blades by using rubber coating allows the grower toclean small lots of dry and fleshy fruits without damaging the seeds.Photo by R.Kasten Dumroese.
bility tests estimate the potential for seeds to germi-
nate and grow, whereas seed germination tests meas-
ure the actual germination percentage and rate. A seed
germination test allows you to know the rate and per-
cent germination to expect and thereby determine
sowing rates so that seeds are used efficiently.
Seed Viability TestsCutting tests, described previously, are the simplest
seed viability tests and are usually performed during
seed collection and often just before treating seeds for
sowing. Cutting tests should also be done on seedlots
that have been stored for a long period of time to visu-

126 CO L L E C T I N G , P R O C E S S I N G , A N D S TO R I N G S E E D S
Figure 7.16—Tetrazolium (TZ) tests stain living tissue red and can be used to estimateseed viability of a seedlot. Shown here is noble fir (left to right): dead embryo, damaged em-bryo, healthy seed. From Stein and others (1986).
ally assess their condition. Cutting tests can reveal
whether or not the seed is healthy, but really cannot
tell anything about the potential for germination. A
better test is the tetrazolium (TZ) test, a biochemical
method in which seed viability is determined by a color
change that occurs when particular seed enzymes
react with a solution of triphenyltetrazolium chloride.
Living tissue changes to red, while nonliving tissue
remains uncolored (figure 7.16). The reaction takes
place with dormant and nondormant seeds and results
can be obtained within a couple of hours. Although the
TZ test is easy to do, the interpretation of results
requires experience. For this reason, most nurseries
send their seed samples to seed analysts that have the
necessary laboratory equipment and experience for
testing. A third viability test is an excised embryo test.
Embryos are carefully removed from seeds and allowed
to grow independently of the seed tissue. Seeds often
must be soaked for several days to remove hard seed-
coats, and excision of the embryo is an exacting proce-
dure that normally requires the aid of a microscope. As
when doing TZ testing, most nurseries send their seed
samples to seed analysts for excised embryo testing.
Germination TestsSeed germination tests are regularly done by nurs-
eries to determine seed sowing rates. If the species
being tested has some type of seed dormancy, an
appropriate treatment to remove dormancy will be
needed before the germination test. Many nurseries
will test dormant seedlots before and after the dor-
mancy treatment to check its effectiveness. Testing
measures the germination rate and percentage. The
germination rate indicates how promptly seeds germi-
nate, whereas the germination percentage indicates
how many seeds germinate. Knowing the germination
percentage is important for determining how many
seeds to sow per container, and knowing the germina-
tion rate (speed) provides information on how long
seeds will continue to germinate after sowing. See
Chapter 8, Seed Germination and Sowing Options, for
details about sowing rates and methods. Germination
tests reflect the potential of a seed to germinate and
actual germination in the nursery may vary greatly.
This difference occurs because of the inherent variabil-
ity of germination in most native species and also
because of differences in the environmental conditions
during testing and growing at the nursery.
Use the following steps to conduct a germination test:
Select an area in the greenhouse or office that can
be kept clean.
Line the bottom of plastic trays, Petri dishes, or sim-
ilar containers with paper towels. For large-seeded
species, line the bottom with sterile sand (bake sand
in an oven at 212 °F (100 °C) for at least 1 hour to
sterilize it) or unmilled Sphagnum peat moss.
Moisten the paper towels or other substrate with
distilled water.
Remove equally sized samples from each bag of the
same seedlot, or, if there is only one container of the
seedlot, from different portions of the container. Mix
these samples together to form a representative
sample (figure 7.17).
Make four replicates of 100 seeds each and place
them on the moist substrate in the container. The
containers may be covered to reduce evaporation
from the substrate.
Use distilled water to remoisten the substrate as
necessary, but never allow standing water to remain
in the container.
Place the containers under optimum germination
conditions—ideally those in which light, tempera-
ture, and humidity can be controlled. Conditions sim-
ilar to the nursery will yield more meaningful results.
Count the number of germinants on a weekly basis
for up to 4 weeks on herbaceous species and up to 3
months on woody species. Seed treatments that
yield a high percentage of germination promptly are
the best.

127TA R A LU N A A N D K I M M . W I L K I N S O N
Purchasing Seeds from a Reputable Source
Knowing the original collection source of seeds is
crucial to ensure that locally adapted, genetically
appropriate materials are used. For example, some
species, such as yarrow and prairie Junegrass, are
native throughout the northern hemisphere so seeds
from across the continent, or from Europe, are com-
monly sold. However, within each species are genetic
variations; local populations have adapted to local cli-
mate, soils, and other site conditions. Local plant mate-
rials, collected from the same or similar area as the
outplanting site, have been shown to perform better
than non-local sources. Using locally-adapted seed
sources is a key factor in ensuring the survival of the
plants as well as the protection of local genetic
resources. For some species, transfer guidelines may
exist. For other species, people must decide on a case-
by-case basis what makes sense, considering climate,
soil type, elevation, and other site conditions (With-
row-Robinson and Johnson 2006).
Seed companies may collect seeds to order based on
customer needs. If not, it is best to ask what sources
the company has, rather than asking for a particular
source—unscrupulous dealers may claim to have
exactly what you want. Seeds must be high quality and
free of weeds. When purchasing seeds, obtain and keep
a certificate of the seed analysis for each seedlot. The
seed analysis must have the scientific name of the
species and cultivated variety (if applicable). It is also
important to obtain information on the origin of the
seeds; an estimate of viability; the percentage of pure
live seeds (PLS); and the percentage of other crop
seeds, weed seeds, and inert material.
Native cultivated varieties are available for some
native grasses and forbs and are shown on the tag follow-
ing the scientific name as a “named” variety. Cultivars are
developed by selecting individual plants that undergo
further selection for traits that allow for economical seed
production. Cultivated varieties are typically used when
wild sources are unavailable or when large quantities of
seeds are needed for a restoration project.
The germination percentage reflects the germina-
tion potential of the seeds at a particular point in time.
This potential is usually described as the percentage of
100 seeds that germinate between 0 and 28 days. Many
native species, however, do not germinate within that
timeframe. Instead, they are tested with dye (TZ) to
determine the amount of living seeds. Often, seed dis-
tributors will provide a TZ estimate of viability instead
of a germination percentage.
The percentage of PLS is a seed quality index that is
calculated during seed testing (figure 7.18). PLS is a basis
Figure 7.17—Seeds cans be tested by collecting primary samples from anentire seedlot to make up a composite sample. The composite sample is fur-ther divided into samples tested at the nursery or submitted to a seed labora-tory for testing. Illustration by Jim Marin.

for comparing seedlots that differ in purity (the percent-
age of clean seeds) and viability. Purchase only seeds with
high PLS values and with very low percentages of weed
seeds and other inert materials. It is often a good idea to
ask about where the species was grown or collected to
determine what weeds may be present in the seedlot.
Avoid purchasing generic wildflower seed mixtures.
Often, these mixes include species that were originally
native to another portion of the country or are foreign,
nonnative species. Some species are aggressive and
can displace native plant populations, and some mixes
may contain noxious weeds. Purchase wildflower seed
mixes only from reputable seed dealers that can pro-
vide the exact species composition with locally adapt-
ed seed sources.
S TO R I N G S E E D S
It can be quite beneficial to store seeds, especially for
those species that yield seeds irregularly or to take ad-
vantage of a bumper crop of seeds. In addition, long-
term seed storage is an important conservation
method for threatened and endangered species. For
proper seed storage, seeds must be mature and free of
mechanical injury. The viability of seeds after storage
depends on their viability at harvest, how they were
handled during processing, and storage conditions.
Even under the best conditions, seeds degrade—the
degree of longevity varies by species.
As previously discussed, recalcitrant seeds retain
viability for only a few days or, at most, a year; they are
usually stored only temporarily before sowing. Some
species, however, can be stored for a few months as
long as seeds retain high moisture content (35 to 50
percent) under high relative humidity conditions and
are exposed to good air movement (stored in unsealed
containers) and cool temperatures.
In nature, orthodox seeds of most conifers and hard-
wood trees usually survive less than 3 years. Under
proper storage conditions, however, they may retain
high viability after 25 years in storage (Landis and others
1999). Many hard-seeded species, such as lupine and
American lotus, can remain viable under artificial stor-
age conditions for even longer periods of time.
Storing orthodox seeds requires three basic princi-
ples: low relative humidity, low seed moisture content,
and cool temperatures. These principles have been
used for thousands of years. Indeed, the domestication
of New World crops, such as corn, beans, and squash,
by indigenous farmers was in part due to the storabili-
ty of seeds (figures 7.19A and B).
The two most important factors affecting orthodox
seed longevity under storage conditions are seed mois-
128 CO L L E C T I N G , P R O C E S S I N G , A N D S TO R I N G S E E D S
Figure 7.18—Pure live seeds (PLS) is the percentage of the bulk seed weight that is composed of viable seeds. In this example, results of a purity test show 95 percent of the bulk weightis composed of seeds.The subsequent germination test indicates that 83 percent of the seeds germinated. Multiplying percentage purity by percentage germination yields 79 percent PLS.Illustration from Steinfeld and others (2007).

129TA R A LU N A A N D K I M M . W I L K I N S O N
ture content and temperature. A small change in seed
moisture content has a large effect on the storage life
of seeds. Therefore, it is important to know the mois-
ture content to predict the possible storage life of a
seedlot. With most orthodox species, the proper seed
moisture content for storage is generally between 6
and 10 percent. An electronic moisture meter can be
used to measure seed moisture content and is avail-
able from several suppliers.
After the seeds are clean, air-dry them in shallow
trays for 2 to 4 weeks before storage to reduce the
moisture content. Stir them once a week or often
enough to prevent uneven drying. Put the seeds in an
airtight container and label it well. Most species can be
stored at temperatures slightly below to above freezing
with good, long-term storage results.
Use the following guidelines to properly store ortho-
dox seeds:
Maintain low relative humidity and low tempera-
tures in the storage environment to maximize the
storage life of the seeds (figure 7.20A).
Because relative humidity increases with a decrease
in temperature, reduce relative humidity in the stor-
age environment so dried seeds do not uptake addi-
tional moisture. For a small nursery, self-defrosting
refrigerator will provide good results as long as the
refrigerator is not used for other purposes.
Use moisture-proof containers to maintain the
proper seed moisture level. Small seedlots can be
stored using sealed jars with rubber gaskets on the
lids or envelopes kept in a sealed, thick-walled plas-
tic tub with an airtight lid (figure 7.20B). Heat-sealed
foil-lined plastic pouches used for food are effective
and can be sealed and resealed with an ordinary
clothes iron.
Storage Methods for Orthodox Seeds
Three methods of storage are used by small nurseries:
freezer, cooler, and room temperature-low humidity
storage. If freezer or cooler storage is being used and long
power outages could occur, consider using a backup
power supply; short-term fluctuations are generally not
a problem. Storing seeds in a frozen condition is usually
best for long-term storage. Most seeds of temperate
species can be stored at temperatures at or slightly below
freezing, although many species can be stored at 0 to
-5 °F (-18 to -21 °C) in a small household freezer. Seeds are
prepared by drying to low levels of seed moisture con-
tent. Seeds can be damaged by freezing if the seed mois-
ture content is very high. Be sure to store seeds in airtight
containers. When removing frozen seeds from the freez-
er, allow the container to reach room temperature before
opening it. This practice prevents water condensation
from forming on the seeds.
Some species will not tolerate freezing and can be
cold-stored in a refrigerator. Seeds should be placed in an
airtight container and kept at 38 to 41 °F (3 to 5 °C); use a
self-defrosting refrigerator that maintains relative
humidity between 10 and 40 percent. If the door is rarely
opened, the humidity in a self-defrosting unit will main-
tain low relative humidity levels.
Figure 7.19— The basic principles of seed storage, keeping seeds with low moisture contents stored in airtight containers at low relative humidity, has remained unchanged for thou-sands of years. (A)The indigenous farmers of the Southwestern United States practiced and continue to practice these techniques successfully to perpetuate many indigenous varieties ofcrops and native plants. (B) The domestication of New World crops such as corn was in part due to the storability of seeds. Photos by Richard Hannan.
A B

130 CO L L E C T I N G , P R O C E S S I N G , A N D S TO R I N G S E E D S
Although orthodox seeds can be stored at room tem-
perature as well, they will deteriorate faster than those
stored at lower temperatures. Ideally, room tempera-
ture storage should be used only on seedlots that are
held for a short time. The seed moisture content at the
time of storage should be at the low end of the range—
6 to 8 percent. Seeds must be placed in airtight contain-
ers and stored in a room or area with low relative
humidity. This storage method works best in the more
arid portions of the country.
Silica gels, available from hobby shops and florists,
can be used to maintain low seed moisture content.They
have been used on short-lived native grass seeds placed
into long-term storage to enhance longevity and should
be tried with other short-lived native species (Dremann
2003). A good rule of thumb is to pour about a teaspoon
(about 5 ml) of silica gel into a paper envelope and place
Figure 7.20—(A) Orthodox seeds should be properly dried before storage and kept in mois-ture-proof containers under cool conditions with low humidity. (B) Each seedlot should be la-beled noting origin, date, and the viability percentage. Small lots can be stored in envelopes aslong as they are kept in a moisture proof container (B).Photo A by R. Kasten Dumroese, B by Tara Luna.
A
B
it inside a tightly sealed jar for every 2 ounces (57 g) of
seeds that need to be stored. The silica gel will remove
water vapor and ensure that seeds remain at the proper
storage moisture. To recharge them, the gels can be
baked in an oven (150 °F [66 °C]) for an hour or so.
Storage Methods for Recalcitrant Seeds
Some nut- and acorn-bearing species can be stored
for several months as long as the seeds have high seed
moisture content (35 to 50 percent) and are stored
under cool and moist conditions. Nondormant seeds
need to have constant gas exchange, so they are usually
stored in unsealed containers in plastic bags filled with
moist peat moss in the refrigerator.
Sowing Seeds after Long-Term Storage
In some cases, seeds of large-seeded species that
have been dried to low moisture levels may be dam-
aged by absorbing water too quickly. Therefore, when
rehydrating these seeds, remove them from storage
and spread them evenly in a sealed plastic tub. Place
moistened paper towels in the tub so that the towels
do not touch the seeds directly. Water vapor released
from the towels will be slowly absorbed by the seeds;
after a couple of days, the seeds will be able to handle
water uptake without injury.
S U M M A R Y
Most native plant species are propagated by seeds to
preserve wide genetic variability that is needed for suc-
cessful seedling establishment and survival in the natu-
ral environment. Growers must become familiar with
the type of fruits and seeds they plan to collect and
propagate: they should know the species. Seed source is
critical because it affects seedling growth in the nursery
and also is important to the adaptability of the seedling
to the outplanting site. Maintaining genetic diversity
using proper, ethical collection techniques is very im-
portant.The manner in which seeds are handled during
collection and postharvest handling and cleaning can
greatly affect their viability. Seeds of some species are
inherently short lived and cannot be stored for periods
longer than a few months. Most temperate species,
however, have orthodox seeds and can be successfully
stored if optimum conditions are provided. Seed quality
and testing are necessary to plan and produce a high-
quality seedling crop in a timely manner.

L I T E R AT U R E C I T E D
Dreesen, D. 2004. Tumbling for seed cleaning and conditioning. Native Plants Journal 5:
52-54.
Dremann, C. 2003. Observations on Bromus carinatus and Elymus glaucus seed storage
and longevity. Native Plants Journal 4: 61-64.
Dumroese, R.K.; Landis,T.D.;Wenny, D.L. 1998. Raising forest tree seedlings at home: sim-
ple methods for growing conifers of the Pacific Northwest from seeds. Contribution
No. 860. Moscow, ID: University of Idaho, Idaho Forest, Wildlife, and Range Experi-
ment Station. 56 p.
Hoag, J.C.; Dumroese, R.K.; Sellers, M.E. 2001. Perigynium removal and cold moist stratifi-
cation improve germination of Carex nebrascensis (Nebraska sedge). Native Plants
Journal 2: 63-66.
Hong,T.D.; Ellis, R.H. 1996. A protocol to determine seed storage behavior. IPGRI Technical
Bulletin No. 1. Rome, Italy: International Plant Genetic Resources Institute.
Landis, T.; Tinus, R.W.; Barnett, J.P. 1999. The container tree nursery manual: volume 6,
seedling propagation. Agriculture Handbook 674. Washington, DC: U.S. Department
of Agriculture, Forest Service. 167 p.
Schopmeyer,C.S.,technical coordinator.1974.Seeds of Woody Plants in the United States.
Agriculture Handbook 450.Washington, D.C.: U.S. Department of Agriculture, Forest
Service. 883 p.
Scianna, J.D. 2004. Blending dry seeds clean. Native Plants Journal 5: 47-48.
Stein,W.I., Danielson, R., Shaw, N.,Wolff, S., Gerdes, D.1986.Users guide for seeds of west-
ern trees and shrubs. General Technical Report PNW-193. Corvallis, OR: U.S. Depart-
ment of Agriculture, Pacific Northwest Station. 45 p.
Steinfeld, D.E.; Riley, S.A.;Wilkinson, K.M.; Landis,T.D.; Riley, L.E.2007.Roadside revegeta-
tion: an integrated approach to establishing native plants. Vancouver, WA: Federal
Highway Administration, U.S. Department of Transportation, Technology Develop-
ment Report. FHWA-WFL/TD-07-005. 413 p.
Thomas,D.2003.Modifying blender blades for seed cleaning.Native Plants Journal 4:72-73.
Truscott, M. 2004. Cuisinart for cleaning elderberry (Sambucus spp. L. [Caprifoliaceae]).
Native Plants Journal 5: 46.
Withrow-Robinson, B.; Johnson, R. 2006. Selecting native plant materials for restoration
projects: insuring local adaptation and maintaining genetic diversity. Corvallis, OR:
Oregon State University Extension Service. EM-8885-E. 10 p.
A P P E N D I X 7 . A . P L A N T S M E N T I O N E D I N T H I S C H A P T E R
American lotus, Nelumbo lutea
American plum, Prunus americana
arctic dryad, Dryas octopetala
arrowleaf balsamroot, Balsamorhiza sagittata
biscuitroot, Lomatium species
black walnut, Juglans nigra
Cascade mountain-ash, Sorbus scopulina
ceanothus, Ceanothus species
chokecherry, Prunus virginiana
cottonwood, Populus species
Douglas-fir, Pseudotsuga menziesii
fir, Abies species
geranium, Geranium species
jack pine, Pinus banksiana
kinnikinnick, Arctostaphylos uva-ursi
lodgepole pine, Pinus contorta
longleaf pine, Pinus palustris
lupine, Lupinus species
maple, Acer species
milkweed, Asclepias species
Nebraska sedge, Carex nebrascensis
noble fir, Abies procera
oaks, Quercus species
panicled bulrush, Scirpus microcarpus
paper birch, Betula papyrifera
pecan, Carya illinoinensis
penstemon, Penstemon species
prairie Junegrass, Koeleria macrantha
quaking aspen, Populus tremuloides
redosier dogwood, Cornus sericea
rose, Rosa species
serviceberry, Amelanchier alnifolia
shagbark hickory, Carya ovata
snowberry, Symphoricarpos albus
snowbrush ceanothus, Ceanothus velutinus
tall huckleberry, Vaccinium membranaceum
thimbleberry, Rubus parviflorus
western redcedar, Thuja plicata
white oaks, Quercus species
whitebark pine, Pinus albicaulis
wild rice, Zizania palustris
willow, Salix species
Woods’ rose, Rosa woodsii
yarrow, Achillea millefolium
131TA R A LU N A A N D K I M M . W I L K I N S O N