north dakota university systemcts.ndus.edu/wp-content/uploads/2017/11/payroll-manual-9... ·...
TRANSCRIPT

Ac
Connect ND
November 2017
Payroll Page 1
North Dakota
University System
Payroll Manual
PEOPLESOFT VERSION 9.1

Ac
Connect ND
November 2017
Payroll Page 2
Table of Contents
EMPLOYEE TAX DISTRIBUTION .................................................................................................. 6
Overview .................................................................................................................... 6
Update Tax Distribution Data ............................................................................................................. 6
Tax Distribution ........................................................................................................... 9
States/Localities ....................................................................................................... 11
EMPLOYEE TAX DATA ............................................................................................................... 12
Overview .................................................................................................................. 12
Employee Tax Data Search ...................................................................................... 12
Federal Tax Data ...................................................................................................... 14
Tax Treaty/Non-Resident Data ......................................................................................................18
State Tax Data .......................................................................................................... 20
State withholding elements ................................................................................................................23
Lock-in Details .................................................................................................................................24
Local Tax Data ......................................................................................................... 24
UPDATE PAYROLL OPTIONS .................................................................................................... 25
Overview .................................................................................................................. 25
Payroll Options Search ............................................................................................. 25
Payroll Options 1 ...................................................................................................... 27
Distribution Mail Option ....................................................................................................................27
Payroll Options 2 ...................................................................................................... 28
Paycheck Location Option Section ....................................................................................................28
Deductions Taken Section..................................................................................................................29
DIRECT DEPOSIT......................................................................................................................... 30
Overview .................................................................................................................. 30
Important Note .......................................................................................................... 30
Single Deposit .......................................................................................................... 31
Deposit Information ...........................................................................................................................32
Distribution Information ............................................................................................. 33
Distribution ............................................................................................................... 33
Error Messages ...................................................................................................................................34
Multiple Accounts ..................................................................................................... 35
Inactivating Direct Deposits ...................................................................................... 39
Set up of new Bank Tables ....................................................................................... 41
GENERAL DEDUCTIONS ............................................................................................................ 44
Overview .................................................................................................................. 44
General Deductions .................................................................................................. 44
General Deduction Data .....................................................................................................................46

Ac
Connect ND
November 2017
Payroll Page 3
Example of updating an existing general deduction .................................................. 48
General Deduction Override ..................................................................................... 50
Deduction Override Settings Section .................................................................................................51
Example of adding a general deduction with an amount ...................................................................52
GARNISHMENTS.......................................................................................................................... 53
Overview .................................................................................................................. 53
Garnishment Specification Data ............................................................................... 54
General Deduction .................................................................................................... 68
Examples: How to set up a child support garnishment for North Dakota ................... 70
How to set up a writ of garnishment .......................................................................... 74
How to set up a federal tax levy ................................................................................ 79
How to set up prorated garnishments ....................................................................... 83
How to change a garnishment amount ..................................................................... 89
How to end a garnishment ........................................................................................ 92
How to suspend a garnishment ................................................................................ 92
ADDITIONAL PAY ........................................................................................................................ 94
Overview .................................................................................................................. 94
Adding and Updating Additional Pay ......................................................................... 94
Additional Pay Payment Details ................................................................................ 95
Additional Pay Job Information ................................................................................. 97
Combination code in additional pay...................................................................................................99
Additional Pay Tax Information ............................................................................... 102
BALANCE ID’S, PAY GROUPS, PAY CALENDARS AND PAY RUN ID’S.............................. 114
Overview ................................................................................................................ 114
HE STUDENT TAX UPDATE ...................................................................................................... 116
Overview ................................................................................................................ 116
Queries ................................................................................................................... 116
TIME ENTRY ............................................................................................................................... 122
Overview ................................................................................................................ 122
Higher Ed Time Entry Search ................................................................................. 123
Higher Ed Time Entry Page .................................................................................... 125
Payline Security Search .......................................................................................... 127
Payline Security Component ................................................................................... 129
Create On-Cycle Manual Paysheet ......................................................................... 138
Creating a Gross-up Paycheck ............................................................................... 141

Ac
Connect ND
November 2017
Payroll Page 4
PAY CALCULATION AND PAY CONFIRMATION .................................................................... 144
Overview ................................................................................................................ 144
Tax calculation for paid over contract employees ................................................... 144
PAYCHECK AND ADVICE PRINTING ....................................................................................... 146
Overview ................................................................................................................ 146
Print Paychecks ...................................................................................................... 146
Create PDF Paycheck/Advice Forms ...................................................................... 148
Reprint/Reissue Checks ......................................................................................... 150
PAYROLL CORRECTIONS ........................................................................................................ 154
Overview ................................................................................................................ 154
One-Time Payroll Deduction ................................................................................... 154
One-Time Garnishments/Child Support .................................................................. 161
One-Time Taxes ..................................................................................................... 163
Paycheck Reversal ................................................................................................. 165
Off-Cycle Paychecks .............................................................................................. 169
Print Paychecks ...................................................................................................... 175
PAYCHECK REVERSAL/ADJUSTMENT .................................................................................. 179
Overview: Creating an Adjustment .......................................................................... 179
Comparison of Reversing and Adjusting Checks .................................................... 180
Understanding Paycheck Adjustments ................................................................... 181
Running Paycheck Reversal/Adjustment ................................................................ 182
Deleting Paycheck Reversal/Adjustment ................................................................ 184
Entering Adjustment Information on the Paysheet .................................................. 186
Scenario 1: Changing Funding Source Only ........................................................... 189
Scenario 2: Changing an Earnings Code ............................................................... 195
Scenario 3: NDUS owes Employee ....................................................................... 197
Scenario 4: Employee Owes NDUS and is still employed ...................................... 203
Scenario 5: Employee owes NDUS and is no longer employed ............................. 210
Scenario 6: Correcting a previously Adjusted Check.............................................. 211
INQUIRING ON EMPLOYEE PAYROLL INFORMATION ......................................................... 212
Overview ................................................................................................................ 212
Review Paycheck ................................................................................................... 212
Paycheck Earnings ................................................................................................. 214
Paycheck Taxes ..................................................................................................... 216
Paycheck Deductions ............................................................................................. 217
Review Paycheck Summary ................................................................................... 218
Balance Reviews .................................................................................................... 220
Check Year-to-Date ................................................................................................ 221
Earning Balances ................................................................................................... 223

Ac
Connect ND
November 2017
Payroll Page 5
Deduction Balances ................................................................................................ 225
Arrears Balances .................................................................................................... 227
Garnishment Balances ........................................................................................... 229
Special Accumulator Balances ............................................................................... 231
NDUS Special Accumulator Codes ......................................................................... 233
Tax Balances .......................................................................................................... 234
1042 Tax Balances ................................................................................................. 236
Prepay Tax Balances .............................................................................................. 238
W-2 Information Summary ...................................................................................... 239
NEW HIRE REPORT ................................................................................................................... 241
Overview ................................................................................................................ 241
SSA VERIFICATION ................................................................................................................... 244
Overview ................................................................................................................ 244
BANK RECONCILIATION .......................................................................................................... 247
Overview ................................................................................................................ 247
Check Reconciliation Program ................................................................................ 247
Check Reconciliation Report ................................................................................... 248
Check Reconciliation Form ..................................................................................... 252
Manually deleting and negotiating paychecks ......................................................... 253
HE Chk Recon – Delete Chks ..........................................................................................................253
HE Chk Recon – Manual Neg ..........................................................................................................254
PAYROLL AND TAX RECONCILIATIONS ................................................................................ 257
Overview ................................................................................................................ 257
Payroll Reconciliation ............................................................................................. 257
Federal Taxes......................................................................................................... 259
State Taxes ............................................................................................................ 264
W-2 Wage and Tax Statements .............................................................................. 266
W-2 INSTRUCTIONS .................................................................................................................. 269
Overview ................................................................................................................ 269
W-2C INSTRUCTIONS ............................................................................................................... 270
APPENDIX A: EARNINGS CODES ............................................................................................ 272
APPENDIX B: PROCESSING SCHEDULE ............................................................................... 273
APPENDIX C: PAYROLL RECONCILIATION FORM ............................................................... 274

Ac
Connect ND
November 2017
Payroll Page 6
APPENDIX D: EXAMPLES OF PROCESS REQUEST PARAMETERS FOR VARIOUS
PAYROLL REPORTS ................................................................................................................. 275
Employee Tax Distribution
OVERVIEW This chapter defines the tax distribution component and explains how to setup an employee’s tax distribution.
UPDATE TAX DISTRIBUTION DATA
PeopleSoft automatically creates the Employee Tax Distribution page during the hire process. The system defaults state/provincial and local tax data to the Employee Tax Distribution page using the Tax Location ID specified on the employee’s Job Data record and the corresponding information on the Tax Location Table. Every employee must have at least one Tax Distribution record. To complete the Employee Tax Distribution page, use the following navigational path: Payroll for North America > Employee Pay Data USA > Tax Information > Update Tax Distribution. The following search dialog box displays: Tax Distribution Update Page
Ac
Connect ND
November 2017
Payroll Page 7
Enter an Employee ID in EmplID field.
Click on the button. The following Employee Tax Distribution page displays: Employee Tax Distribution Page
This record is automatically created with the hire process, however this page should be reviewed to make sure that the correct information has been populated.

Ac
Connect ND
November 2017
Payroll Page 8
The employee’s name appears right under the tab name. ID - The employee's identification number displays here. Empl Rcd# - The employee's record number displays here.

Ac
Connect ND
November 2017
Payroll Page 9
TAX DISTRIBUTION Effective Date – The effective date will be the same as the date of hire and should not be changed.
Note: If there is ever a change to the employee’s Job record where the Tax Location changes, the Tax Distribution record will be automatically updated ONLY if the change to the Job record is done as an UPDATE (effective dated row inserted). If a change to the Tax Location code on the Job record is done AS A CORRECTION, the Tax Distribution record WILL NOT be automatically updated. You will receive a warning to this effect when saving the record. If you continue and save the record as a Correction, then you will have to navigate to the Tax Distribution record and MANUALLY update it.
Country - The default country established displays here. Insert Pre-filled Tax Location - Select this checkbox to make the system automatically:
Search for the employee's job record for the Tax Location Code.
Determine all states/provinces and localities associated with that code.
Create the appropriate number of tax distribution rows.
Note: The system will only insert records that have been set up on the Tax Location Table (See Employee Tax Data section).

Ac
Connect ND
November 2017
Payroll Page 10
Selecting the Insert Pre-filled Tax Location checkbox for <enter employee id here> resulted in the following: Employee Tax Distribution Page
If you use this option, enter the percentage of time the employee works at each location listed.

Ac
Connect ND
November 2017
Payroll Page 11
STATES/LOCALITIES State – Enter the state in which the employee works. Locality – Enter the locality of the state, if applicable. The states of North Dakota and Minnesota have no local taxes, so this field will not be populated. Distribution % - Enter the percent of the employee's time or earnings that apply to the selected state/locality in the State and Locality field(s). This tax distribution is for work location-based taxes only; this does not include resident-based taxes. If the employee works in one locality, the Distribution % should be 100 for that row. However, if an employee is hired or transferred into a tax location that represents more than one locality, you must distribute taxes among the different states or localities. All the percentages must total 100%. You cannot save the page until the Distribution % values total 100%.
Note: You can distribute taxes for salaried and exempt hourly employees only. Normally, employees within the NDUS will only have one row in the States/Localities Section—the state in which they perform the majority of their job duties.
Click on located at the bottom of the page.
Ac
Connect ND
November 2017
Payroll Page 12
Employee Tax Data
OVERVIEW This chapter defines the employee tax data component and explains how to setup an employee’s tax data.
EMPLOYEE TAX DATA SEARCH The Employee Tax Data pages are used to record and maintain federal, state and local tax information that PeopleSoft will use to calculate taxes for employees. This page is populated during the hire process and should be reviewed and updated according to the W-4 of the new hire. To use these pages, click on the following navigational path: Payroll for North America > Employee Pay Data USA > Tax Information > Update Employee Tax Data. The following search dialog box displays: Employee Tax Data Update Page

Ac
Connect ND
November 2017
Payroll Page 13
Enter an Employee ID in the EmplID field.
Click on the button. The Employee Tax Data – Federal Tax Data page appears: Employee and Federal Tax Data

Ac
Connect ND
November 2017
Payroll Page 14
FEDERAL TAX DATA Use the Federal Tax Data page to record and maintain the federal tax information that is used by the system to calculate federal taxes for employees. Federal taxes include Federal Income Tax withholding data, special tax withholding status, Earned Income Credit (EIC) information and Tax Treaty/NR alien tax information. The employee’s name appears under the Federal Tax Data tab. Person ID - The employee's identification number displays here.
Tax Data
Company – The Company code associated with the employee’s tax record displays here. Effective Date – Since this record is created during the hire process, the date will be the same as the date of hire. This date should not be changed for the original tax data. The hire process creates a default tax record for each new employee. After hire, you will likely come back to this record and insert a new effective dated row to reflect the actual tax filing status the employee provides you when they submit their W-4. Updated By – Date Last Updated – This display-only field indicates whether the employee's federal tax data was last updated by the hire process, an online system operator or by a Web user, using the PeopleSoft Self-Service Web Application. The date of the most recent update displays here.
Note: To calculate federal and state income taxes, the system uses the paycheck issue date to determine what row it is going to choose from Employee Tax Data. For example, if a new row is added to Employee Tax Data with an effective date of June 6, 2011, this new row will be used to calculate the taxes on the paycheck issued June 15, 2011.
Federal Withholding Elements
Special Withholding Tax Status: Select one of the following from the drop down list:
None – (Default) No special tax status exists. Under this option, the system will calculate federal withholding tax based on the employee's gross, marital status, and withholding allowances.
Note: If you select this option, and you specify an amount or percentage in the Additional Withholding group box, the system will calculate taxes based on the information in the tax table PLUS the indicated additional withholding.

Ac
Connect ND
November 2017
Payroll Page 15
Maintain taxable gross – Use this option for employees who claim Exempt status on their W-4 form. No taxes will be withheld but a taxable gross will be maintained (see note 1 below). This option can also be used to override the normal tax calculation with an amount or percentage indicated in the Additional Withholding Amount or Percentage fields. The system determines the taxable gross and the withholding is either a flat amount or a percentage of the Federal Taxable wages (see note 2 below).
Note 1: Run the query NDU_PY_FED_EXEMPT to find current employees who are claiming exempt. This list can be used to manually remove the exemption for those employees who did not submit an updated Form W-4. Exemption from federal withholding expires on February 16. Employees must complete and submit a new Form W-4 to their campus’s Payroll office to continue their federal exemption. Note 2: If Maintain Taxable Gross is selected and an amount or percentage is entered in FWT Additional Amount, upon saving the page, the system will issue the following warning message: “Warning-Add’l Amount or % cannot be entered when Special Withholding Tax Status is ‘Maintain Taxable Gross’. Per form W-4: For regular wages, withholding must be based on allowances you claimed and may not be a flat amount or percentage of wages. The additional withholding amount or percentage must be removed.” While it is recommended to remove the amount or percentage in this situation, the system will still calculate the withholding based on the flat amount or percentage of taxable gross if the data is not removed.
No taxable gross; no tax taken – Indicates that FWT will not be withheld from the employee's pay and that the Federal Taxable gross balance will not reflect the pay an employee receives. Note: this selection should never be used for any NDUS employees. Nonresident alien – Select this option if the employee is a Non-Resident Alien (Not a U.S. Citizen) or a Resident Alien (Not a US Citizen, but with Resident Alien Status) with Treaty Benefits. When this option is selected, the appropriate taxation information for the non-resident alien will be entered further down the page under the Tax Treaty/NR Data section. Tax Marital Status – Select either Single or Married based on the Marital status of the employee. Most Non-Resident Aliens must have a Single Status however the status of Married can be entered for a non-resident alien employee when Form W9 Recd = Yes or when NRA Withholding Rule = Not Applicable (See Tax Treaty/NRA section on page 18 & 19 for more information). Withholding Allowance - Enter the number of allowances that the employee claims for federal withholding tax purposes. This number should match the number on the employee's W-4 form. Most Non-Resident Aliens must have one withholding allowance.
If married, but withholding at single rate, select Single status and check here. Check the box, if applicable.
FWT Additional Amount - Use the Amount and Percentage fields to indicate that additional
FWT taxes are to be taken. You can specify both an amount and a percentage, if appropriate.
The effect of this field depends on the option you select in the Special Tax Withholding Status
group box.

Ac
Connect ND
November 2017
Payroll Page 16
Amount – Enter an additional flat amount to be withheld. Percentage – Enter an additional percentage to be withheld.
Earned Income Credit Status- Earned Income Credit is a payment from the government
that is available to individuals who meet a number of qualifications related to family and
income status. Employees can choose to receive advance Earned Income Credit payments
with each paycheck, by filling out Form W-5.
Select one of the following from the drop down list: Not applicable – This is the default value. The employee is not eligible for this credit. No payment will be made. Single, or Head of Household – The employee is eligible for the credit and is single or the head of the household Married, without spouse filing- the employee is married and eligible for the credit, and is the only one filing Married, both spouses filing – The employee is eligible for the credit and is married with both spouses filing.
Note: The payment amounts are determined by rates on the Federal/State Tax Table under $E.
Exempt from FUT: this check box should be marked if the employee is exempt from FUTA tax. For NDUS employees, this box will be marked. W-4 and W-5 Processing Status W-4 Processing Status – Currently not used by NDUS. W-5 Processing Status – This is used with the W-5 Business Process Designer that is run at year-end to identify employees who must submit new forms in order to retain their Advanced Earned Income Credit status. This process triggers a database agent that looks for all non-terminated employees for whom Single, or Married without spouse filing is selected.
Note: W-5 Business Process Designer is a part of workflow that will not be implemented immediately. Until workflow is implemented, a query will be used to identify the employees with a W-5 status.
Select one of the following W-5 Processing Status radio buttons, only if applicable: None – W-5 processing is not applicable to the employee.

Ac
Connect ND
November 2017
Payroll Page 17
Notification Sent – Indicates that the employee has been notified to submit a new Form W-5. New W-5 Received – Indicates that a new Form W-5 has been received.
Lock-In Details
Letter Received – Select this checkbox if a letter has been received from the IRS specifying the allowances an employee is allowed to take. Limit on Allowance - Enter the maximum number of allowances the IRS specified for this employee in the above referenced letter. The value that you enter in the Withholding Allowances field cannot exceed the value you enter in this field. State Tax Options Use Total Wage for Multi-State: This checkbox is used if taxable wages from all work states should be used from all work states in the calculation of state taxes. (Not used by NDUS.) Always create W2 for NQDC Rptg: Not used by NDUS.
Note: The Federal, State, and Local Tax Data pages are a set of chained pages. You cannot change data or enter a new effective dated row except by inserting it on the Federal Tax Data page. This does not mean that you have to always change federal tax data if the change is really only to State tax data, but you will start such a transaction by inserting a row on the page first. You should notice that the effective date field is only enterable on the Federal Tax page and is display only on the State and Local pages.

Ac
Connect ND
November 2017
Payroll Page 18
TAX TREATY/NON-RESIDENT DATA
Note: Skip this section if the employee is a resident of the United States. Note: Campuses that use Windstar may have the data in this section updated automatically by the interface from Windstar.
This section is used to enter information for non-resident alien employees and resident alien employees with a tax treaty. The information in the Tax Treaty/NR Data Table assigns the employee to a tax treaty table and allows the eligible employee to be subject to a reduced tax treaty rate.
To claim benefits of a treaty, an employee must have a visa and be a resident of one of the treaty countries. An employee can claim benefits for only one treaty at any particular time. Employees who want to claim benefits under a tax treaty must submit a written statement to their employer, along with applicable forms.
Use the Form 8233 Recd (form 8233 recorded) and Form W8-BEN Recd (form W8-benefit recorded) check boxes to determine the employee's eligibility for reduced tax treaty rates. You must mark the correct form for the specified income code by the end of the current pay period. Otherwise, the affected earning will be taxed as W-2 earnings instead of 1042 earnings.
Country - Select a country from the list. This is the country whose treaty applies to the employee.
Treaty ID: Select the treaty ID from the look up.
Form W9 Recd - If applicable to the employee (Resident Aliens), select yes from the drop down list.
Form W9 Effect Date - Enter the effective date of the W9. Employees who file a Form
W9 are notifying you that they are eligible to be treated like US citizens for tax purposes.
Taxpayer ID Number – Do not use this field. If you enter a value here, the system uses this value instead of the SSN when producing the 1042 forms.
NRA Withholding Rule – Used for specifying the status of nonresident alien employees
for purposes of calculating special federal tax withholding. Click on the drop-down arrow to choose one of the following rules:
Subject to Rule – Default value. All nonresident alien employees who are subject to the special NRA withholding tax calculation should be set up using this rule.
Exempt from Rule – Employees who are exempted by IRS rules from provisions of the special NRA withholding tax calculation (example, students from India) should be set up using this rule.
Not Applicable – Employees who have lived in the U.S. for a long period of time who are to be taxed using the same withholding tax calculation as U.S. citizens should be set up using this rule.

Ac
Connect ND
November 2017
Payroll Page 19
Education and Government
Date of Entry: Enter the date that the employee entered the USA.
Treaty Expiration Date: The treaty expiration date appears. The system calculates the date based on the Date of Entry and rules established on the Tax Treaty/NR Data Table.
Form 8233 Received: - Form 8223 is required for all income codes except 15 (scholarships and fellowships). Select Yes or No from the drop down list.
8233 Effective Date: If Form 8233 Recd field is set to Yes, enter the appropriate date.
8233 Expiration Date: Normally this date is 12/15 of the current calendar year. This is because treaties expire at the end of the calendar year and employees must complete a new 8233 form each year to continue treaty benefits. NDUS uses 12/15 as the expiration date because the pay period ending 12/15 is the last paycheck issued in the current calendar year.
Form W8 Received - Form W8-BEN is required for scholarship and fellowship income. Select Yes or No from the drop down list.
Form W8 Effective Date – If Form W8 Rec’d field is set to yes, enter the appropriate date.
Form W8 Expiration Date: If Form W8 Rec’d field is set to yes, enter the appropriate date.
Note: The 8233 Exp Date is information only and is not used in the calculation process in PeopleSoft. This means that treaties will not automatically stop at the end of the calendar year. If an employee is no longer eligible for a treaty, the user must add a new effective dated row in Employee tax Data and update the Tax Treaty/NR Data to stop the treaty benefits.
The system populates the Allowable Earnings Codes group box with information entered on the Treaty/NR Alien Table page according to the Country and Treaty ID you specify.
Income Code (for 1042-S): The description for each income code is listed.
Eligible Earnings Per Year - The earnings caps that apply to each income code as per the tax treaties for nonresident aliens.
Tax Rate After Form Received - For nonresident aliens, whose forms (8223 or W8-BEN) have been completed and are in effect, this is the tax rate that is applied to their income until the income exceeds the maximum earnings specified.
Tax Rate Before Form Received - For nonresident aliens the tax rate that is applied to the employee's income if their forms (8223 or W8-BEN) have not been completed.

Ac
Connect ND
November 2017
Payroll Page 20
STATE TAX DATA Click on the State Tax Data tab. The following employee’s State Tax Data page now displays: State Tax Data Page
Use the State Tax Data page to record and maintain state tax information that the system will use to calculate state taxes for employees.
Tax Data
Company – The Company code associated with the employee’s tax record displays here. Effective Date – Since this record is created during the hire process, the date will be the same as the date of hire. This date is the date from the Federal Tax Data tab. The hire process creates a default tax record for each new employee. After hire, you will likely come back to this record and insert a new effective dated row to reflect the actual tax filing status the employee provides you when they submit their W-4.

Ac
Connect ND
November 2017
Payroll Page 21
State Information
State – When an employee is first hired into Job Data, the system automatically creates a State Tax Data page. It defaults to the state code using the state found in the employee’s Home address in Personal Information. If the state code needs to be changed, the user can update it.
Note: State income taxes are generally calculated in the employee's state of residence. SDI and SUT, if applicable, are calculated for the employee's primary work state. If the employee works for multiple companies (for NDUS, this would mean working for more than one College or University concurrently), the tax data is defined by Company (for example, UND for University of North Dakota, or BSC for Bismarck State College). If the employee works in multiple states, or lives in a state other than the state of employment, each state must be identified on these pages.
Resident – Select this checkbox if the state selected in the State field is the state of residence.
Note: The work state is derived from the employee's Tax Location on the Job Data Table and is used by paysheets when calculating state tax deductions. The Resident checkbox indicates whether the employee is a resident of the work state; the default is on.
Non-Resident Statement Filed – If an employee is not a resident of North Dakota and has submitted a Non-Resident Statement (NDWR), this box should be checked. NDWR forms must be renewed on an annual basis, so this field must be reviewed in February of each year to determine if a new form has been submitted. Run the query NDU_PY_EE_STATE_TAX_DATA to find employees who claim Minnesota as their residence. UI Jurisdiction (unemployment insurance jurisdiction) – Default value is checked for North Dakota. This represents the employee’s work state. Exempt from SUT – If the employee is at least a half-time student, in a non-benefited position, working less than 40 hours per week, this box should be checked. Note that a custom process is available for NDUS that will systematically update the SUT status for student and non-student temporary employees. It is a campus decision whether they choose to use the custom process to make this type of update or enter the updates manually. Please refer to the Student Tax Update section on how to use the custom process.

Ac
Connect ND
November 2017
Payroll Page 22
Note: If an employee lives in one state and works in another, the Resident check box will be marked for the resident state, and the UI Jurisdiction box will be marked for the work state. The work state is defined by the Tax Location code assigned on the employees Job Record. For most employees, the resident state and the work state will be the same, and therefore both will be marked. Below is an example of an employee who lives in MN and works in ND.
Resident State Tax Page
Non-Resident State Tax Page
IMPORTANT NOTE: Currently for the campuses in the North Dakota University System,
most campuses only report state taxes for one or more of the following states: North
Dakota, Minnesota, Montana, California, and/or Colorado. Since NDUS campuses
report only for these states, the campuses need to verify that any new employees
entered into HRMS have the correct state set up in their Employee Tax Data page.
When an employee is hired into HRMS, the state from their home address defaults into
the Employee Tax Data page. This is why the campus should verify everything in
Employee Tax Data for new hires prior to Paysheet Creation so the correct state tax
applies to any wages that are paid.
For an example, if the employee’s home address is in the state of Florida, then Florida is what will be set up in Employee Tax Data. The campus does not report tax withholdings to Florida, therefore they would not want to withhold Florida taxes from the wages. The campus needs to update the page to delete the row for Florida and add the row for North Dakota.

Ac
Connect ND
November 2017
Payroll Page 23
STATE WITHHOLDING ELEMENTS
Special Withholding Tax Status – Select one of the following from the drop down list: None - This is the default value. No special tax status exists. Under this option, the system will calculate state withholding tax based on the employee's gross, marital status, and withholding allowances. If you select None in the Special Tax Status group box and you specify an amount or a percentage in the Additional Amount Adjustment group box, the system will calculate taxes based on the information in the tax table PLUS the indicated additional withholding. Maintain Gross Taxable SWT will be zero unless specified in “Additional Withholding” – Overrides the normal tax calculation with an amount or a percentage indicated in the Additional Amount Adjustment group box. The tax withheld then becomes either the flat amount or a percentage of the taxable wages.
Note: Use this option for employees claiming Exempt status on the W-4 form. Simply leave the additional Amount or additional Percentage fields blank, and no tax will be withheld.
No taxable gross; no tax taken – Indicates that the state withholding taxes will not be withheld from the employee's pay. This box should not be checked for NDUS employees. Nonresident alien; Fed Rules – Since North Dakota does not honor tax treaties, selection of this option for non-resident aliens will result in regular state withholding. This option is valid only when the Non-Resident Alien option is selected for Federal Taxes. Tax Marital Status – Select either Single (S) or Married (M) based on the Marital status of the employee. For MN residents the options are Single; Married but legally separated; or Spouse is a nonresident alien (S), Married (M), or Married, but withhold at higher Single rate (B). Withholding Allowances – Defaults to 0. This field is used to enter the number of allowances that the employee claims for state withholding tax purposes and should match the number on the employee's W-4 Withholding Allowance Certificate. The Amount and Percentage fields operate exactly as they do on the Federal Tax Data page. Amount – Enter an additional flat amount to withhold. Percentage – Enter an additional percentage to withhold. The additional withholding is calculated by taking a percentage of the taxable wages. Additional Allowances – Not used by NDUS

Ac
Connect ND
November 2017
Payroll Page 24
LOCK-IN DETAILS
Letter Received – Select this checkbox if a letter has been received from the IRS or the state taxing authority that specifies the allowances an employee is allowed to take. Limit On Allowances – Enter the maximum number of allowances possible. The value that you enter in Withholding Allowances cannot exceed the value you enter in Limit On Allowances.
LOCAL TAX DATA Note: North Dakota (and Minnesota) do not currently impose local taxes. Therefore, this page will not be used.

Ac
Connect ND
November 2017
Payroll Page 25
Update Payroll Options
OVERVIEW This chapter defines the Payroll Options component and explains the procedures in updating an employee’s payroll options.
PAYROLL OPTIONS SEARCH The payroll options pages are used to enter optional payroll processing information. The information entered on these pages includes check distribution options and payroll deduction subset options.
Note: Not All Payroll Options pages are required for payroll processing, with the exception of multiple jobs processing, when the single check option has been selected.
To begin using the Payroll Options pages, use the following navigational path: Payroll for North America > Employee Pay Data USA > Update Payroll Options The following search dialog box displays: Update Payroll Options Page

Ac
Connect ND
November 2017
Payroll Page 26
Enter an Employee ID in the Empl ID field. If EMPLID is unknown, enter the name in the following format: Name = first name or initial, Last Name = last name or part of last name with wild card.
Click on the button. The Payroll Options 1 page displays: Payroll Options 1 Page
The Payroll Options 1 page is used to enter optional employee payroll processing, such as where the check should be distributed, and payroll deduction subset options. In the section directly under the Payroll Options 1 tab the Employee Name, Employee ID number and the Company Name appears.
Ac
Connect ND
November 2017
Payroll Page 27
PAYROLL OPTIONS 1
Paycheck Delivery Option – This option indicates what address it should print under the employee's name on the check stub. When the system prints paychecks, it formats the address and chooses the detail it prints according to these choices: the Company Distribution radio button is the default selection. The Postal Service radio button should be selected only if the employee’s check should be mailed via the Postal Service.
DISTRIBUTION MAIL OPTION
If Postal Service is selected for the Paycheck Delivery Option, select one of the following radio buttons to indicate the distribution address.
Home Address. Select this option to send checks to the employee's home address. The system automatically displays the home address from the employee's Personal Information page.
Mailing Address. Select this option to send checks to the employee's mailing address. The system automatically displays the mailing address from the employee's Personal Information page.
Check Address. Select this option to send checks to an address other than the employee's home or mailing address. You'll enter the address in the address fields below.
Update Check Address hyperlink., If none of the above options are sufficient, you can actually change the check address right on this page and the system will cross update the same address in the employee’s Personal Information record. When you click this hyperlink, the address fields change to allow data entry. The system will show “Current and Future Addresses”. Use the effective date carefully, as it will be saved to the Personal Information record.
Country – Enter country. Address 1, Address 2, and Address 3 - If you selected the Check Address option, enter the address to which checks should be sent. If you selected Home Address or Mailing Address, the system completes this field automatically, based on the employee's Personal Information. City – Enter the city. County – Enter the county. State – Enter the state. Postal – Enter the postal code.

Ac
Connect ND
November 2017
Payroll Page 28
PAYROLL OPTIONS 2
Click on the Payroll Options 2 page. The Payroll Options 2 page displays: Payroll Options 2 Page
The Payroll Options 2 page is used to enter optional employee payroll processing, such as where the check should be distributed, and payroll deduction subset options. Primary Pay Group: The primary pay group should equal the pay group assigned to the employee’s primary job in Job Data. Paysheet creation uses the primary pay group as a key field. Important Note: If you change an employee’s primary paygroup on Job Data you MUST change the paygroup on Payroll Options. Job Data and Payroll Options are not synced.
PAYCHECK LOCATION OPTION SECTION
The Paycheck Location Option radio buttons specify which location code is used as a sort option for printing paychecks for this pay group.
Home Department Location. The Location Code (on the Department Table)
associated with the Department ID on the employee's job record is used as a sort option for printing checks.
Job Location. Not currently being used by NDUS.
Other Location. Not currently being used by NDUS.
Ac
Connect ND
November 2017
Payroll Page 29
Mail Drop ID – .Paychecks and advices are currently set up to sort on this field. Institutions may customize the order their forms are printed by:
Leave blank if alphabetical order is preferred
Entering department numbers (if department order is preferred).
Entering customized numbering system for other orders. Paycheck Name – Use Paycheck Name to indicate a name, other than the employee name entered on Personal Options 1, to whom the paycheck should be made out. This field is not formatted, so enter the name exactly as it should appear on the paycheck. This needs to be entered BEFORE payroll is confirmed.
DEDUCTIONS TAKEN SECTION
NDUS selects the No Override which is the default for this section and the Deduction Subset ID is left blank.
Click located at the bottom of the page.

Ac
Connect ND
November 2017
Payroll Page 30
Direct Deposit
OVERVIEW This chapter defines the direct deposit component and explains how to set an employee up with a direct deposit. NDUS requires each employee the option of direct deposit. When an employee submits paperwork for direct deposit, the system can send a prenotification of the account and the Transit/routing number to the employee’s bank, if desired. The bank will attempt to process the information in order to simply validate the numbers. If the bank can successfully prenote, the employee’s funds will be deposited in the first payroll after this validation is successful. If the bank cannot post the account information, it will notify the appropriate payroll office, who will in turn request the employee to correct the data or submit new forms. In the event that the bank cannot process the routing and/or account number, the employee will continue to receive a paper paycheck. Timing for the processing of new direct deposits and/or changes to existing direct deposits is driven by when the employee submits the information and when the prenote process is run by NDUS. Note: Checking the prenotification required box is not mandatory and the default is to NOT prenote and the checkbox is NOT checked.
IMPORTANT NOTE It is critically important to note that the Direct Deposit record is different from virtually all other employee data in PeopleSoft. The difference being that the Direct Deposit data for an employee is shared across ALL payroll systems using the ConnectND PeopleSoft System (including all twelve universities). For this reason, any changes made to existing data on this record affect all of the employee’s paychecks across any organizations. It is recommended that your campus direct deposit forms inform the employee of this and that the forms inquire if they currently work at any other ConnectND organization. The direct deposit information is app messaged to the Financials system.

Ac
Connect ND
November 2017
Payroll Page 31
SINGLE DEPOSIT The Direct Deposit page is used to record the information that is required to enable the direct deposit of employee pay to checking and/or savings bank accounts. Once you receive direct deposit paperwork from an employee (make sure they are hired first), you can begin the process of defining the direct deposit details. The employee should have included a cancelled check (not a deposit slip) with the routing/transit and account numbers along the bottom. To begin the process, use the following navigational path: Payroll for North America > Employee Pay Data USA > Request Direct Deposit The following search dialog box appears: Request Direct Deposit Page
Enter the Empl ID. If EMPLID is unknown, input last name in the Last Name field. If applicable, you can also enter the first name (or first initial) in the Name field.
Click on the button. From the search results returned, click on the appropriate EMPLID.

Ac
Connect ND
November 2017
Payroll Page 32
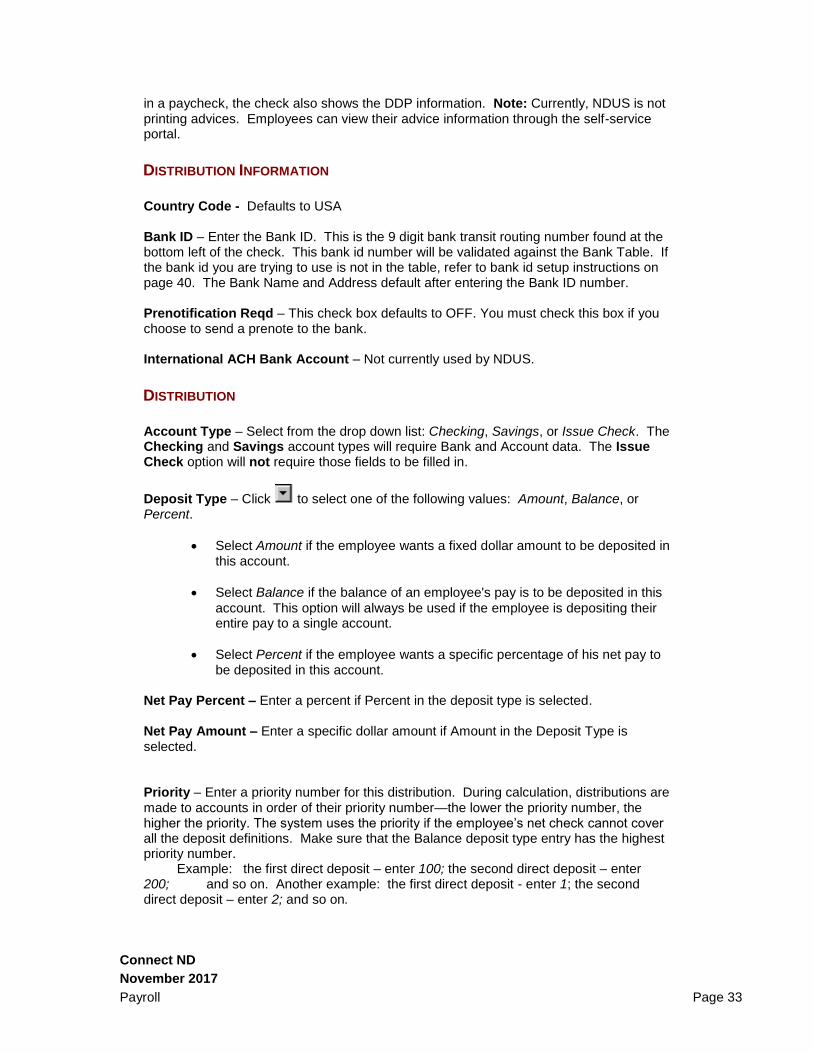
The Direct Deposit page displays: Direct Deposit Page
The employee’s name appears under the Direct Deposit page tab. The employee’s Person ID displays across from the name to the right. To setup a Direct Deposit, enter information into the fields as described.
DEPOSIT INFORMATION
Effective Date – Defaults to the current date. Enter the date the direct deposit action becomes effective.
Status – Click the to select either Active or Inactive. Select Active if the direct deposit is to be processed. Select Inactive when a direct deposit is no longer to be processed. Suppress DDP Advice Print – Select this checkbox to issue their pay advice electronically. If an employee has a part of his check being direct deposited and a part
Ac
Connect ND
November 2017
Payroll Page 33
in a paycheck, the check also shows the DDP information. Note: Currently, NDUS is not printing advices. Employees can view their advice information through the self-service portal.
DISTRIBUTION INFORMATION
Country Code - Defaults to USA Bank ID – Enter the Bank ID. This is the 9 digit bank transit routing number found at the bottom left of the check. This bank id number will be validated against the Bank Table. If the bank id you are trying to use is not in the table, refer to bank id setup instructions on page 40. The Bank Name and Address default after entering the Bank ID number. Prenotification Reqd – This check box defaults to OFF. You must check this box if you choose to send a prenote to the bank. International ACH Bank Account – Not currently used by NDUS.
DISTRIBUTION Account Type – Select from the drop down list: Checking, Savings, or Issue Check. The Checking and Savings account types will require Bank and Account data. The Issue Check option will not require those fields to be filled in.
Deposit Type – Click to select one of the following values: Amount, Balance, or Percent.
Select Amount if the employee wants a fixed dollar amount to be deposited in this account.
Select Balance if the balance of an employee's pay is to be deposited in this
account. This option will always be used if the employee is depositing their entire pay to a single account.
Select Percent if the employee wants a specific percentage of his net pay to be deposited in this account.
Net Pay Percent – Enter a percent if Percent in the deposit type is selected. Net Pay Amount – Enter a specific dollar amount if Amount in the Deposit Type is selected. Priority – Enter a priority number for this distribution. During calculation, distributions are made to accounts in order of their priority number—the lower the priority number, the higher the priority. The system uses the priority if the employee’s net check cannot cover all the deposit definitions. Make sure that the Balance deposit type entry has the highest priority number. Example: the first direct deposit – enter 100; the second direct deposit – enter 200; and so on. Another example: the first direct deposit - enter 1; the second direct deposit – enter 2; and so on.

Ac
Connect ND
November 2017
Payroll Page 34
Account # - Enter the employee's bank account number. The account number represents the employee's checking or savings account into which the money is deposited. This number is typically located in the bottom center of the check.
Prenote Date The Prenote Date displays here when the next payroll is run if prenote is selected. Prenotification Status – To verify that the Bank ID and Account numbers are valid, the system creates a prenote status file the first time it processes direct deposits for each employee, if selected. If prenote is not selected, the status will remain as Not Submtd.
Click on located at the bottom of the page.
ERROR MESSAGES
If you indicate that the direct deposit is going into a Checking or Savings account in the Account Type Group box, you must complete the Bank ID and Account # fields. The system needs to know that data to properly direct the funding to the employee’s bank and account. If one or both of these fields is left empty, the system will issue an error message.
Ac
Connect ND
November 2017
Payroll Page 35
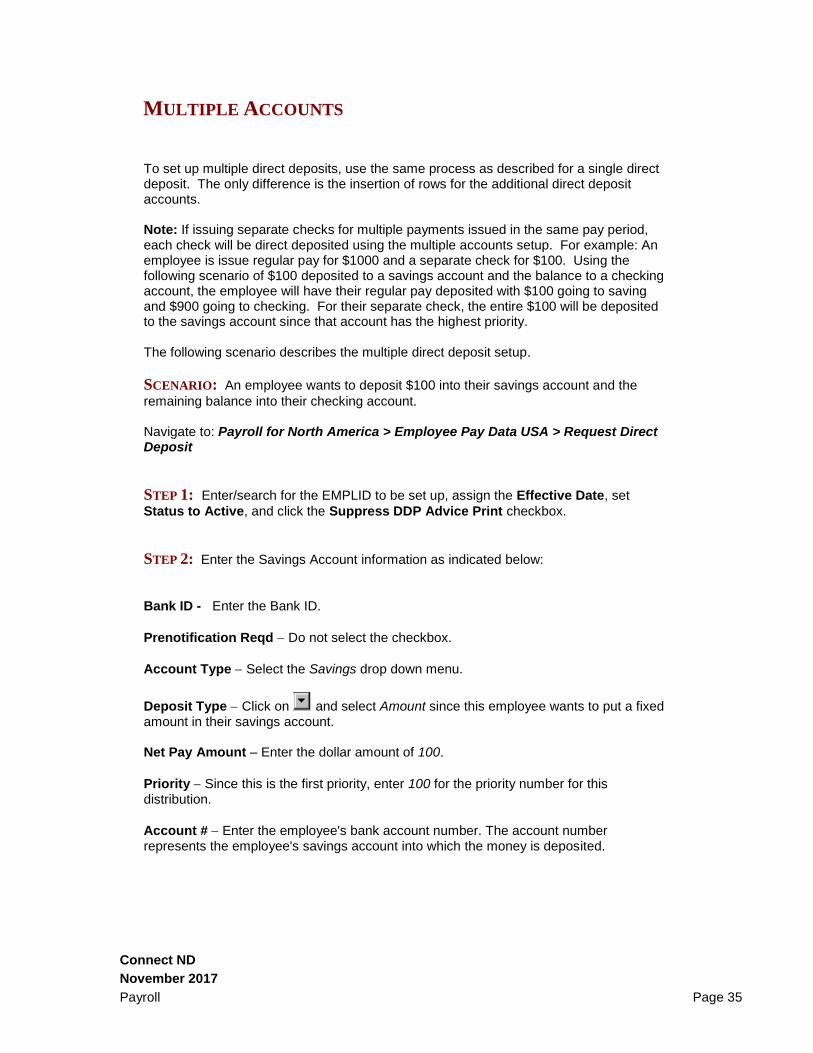
MULTIPLE ACCOUNTS
To set up multiple direct deposits, use the same process as described for a single direct deposit. The only difference is the insertion of rows for the additional direct deposit accounts. Note: If issuing separate checks for multiple payments issued in the same pay period, each check will be direct deposited using the multiple accounts setup. For example: An employee is issue regular pay for $1000 and a separate check for $100. Using the following scenario of $100 deposited to a savings account and the balance to a checking account, the employee will have their regular pay deposited with $100 going to saving and $900 going to checking. For their separate check, the entire $100 will be deposited to the savings account since that account has the highest priority. The following scenario describes the multiple direct deposit setup.
SCENARIO: An employee wants to deposit $100 into their savings account and the
remaining balance into their checking account. Navigate to: Payroll for North America > Employee Pay Data USA > Request Direct Deposit
STEP 1: Enter/search for the EMPLID to be set up, assign the Effective Date, set
Status to Active, and click the Suppress DDP Advice Print checkbox.
STEP 2: Enter the Savings Account information as indicated below:
Bank ID - Enter the Bank ID.
Prenotification Reqd Do not select the checkbox.
Account Type Select the Savings drop down menu.
Deposit Type Click on and select Amount since this employee wants to put a fixed amount in their savings account. Net Pay Amount – Enter the dollar amount of 100.
Priority Since this is the first priority, enter 100 for the priority number for this distribution.
Account # Enter the employee's bank account number. The account number represents the employee's savings account into which the money is deposited.

Ac
Connect ND
November 2017
Payroll Page 36
Prenote Date The Prenote Date displays here when the next payroll is run. Running the prenote process also changes the Prenotification Status to Submitted.
Prenotification Status To verify that the Bank ID and Account numbers are valid, the system will create a prenote status file the first time it processes direct deposits for each employee. When entering new direct deposit information, and prior to the running of Prenote, this status will be set to Not Submitted.
STEP 3: Click the button as shown below to add a row for the checking account
information.
Ac
Connect ND
November 2017
Payroll Page 37
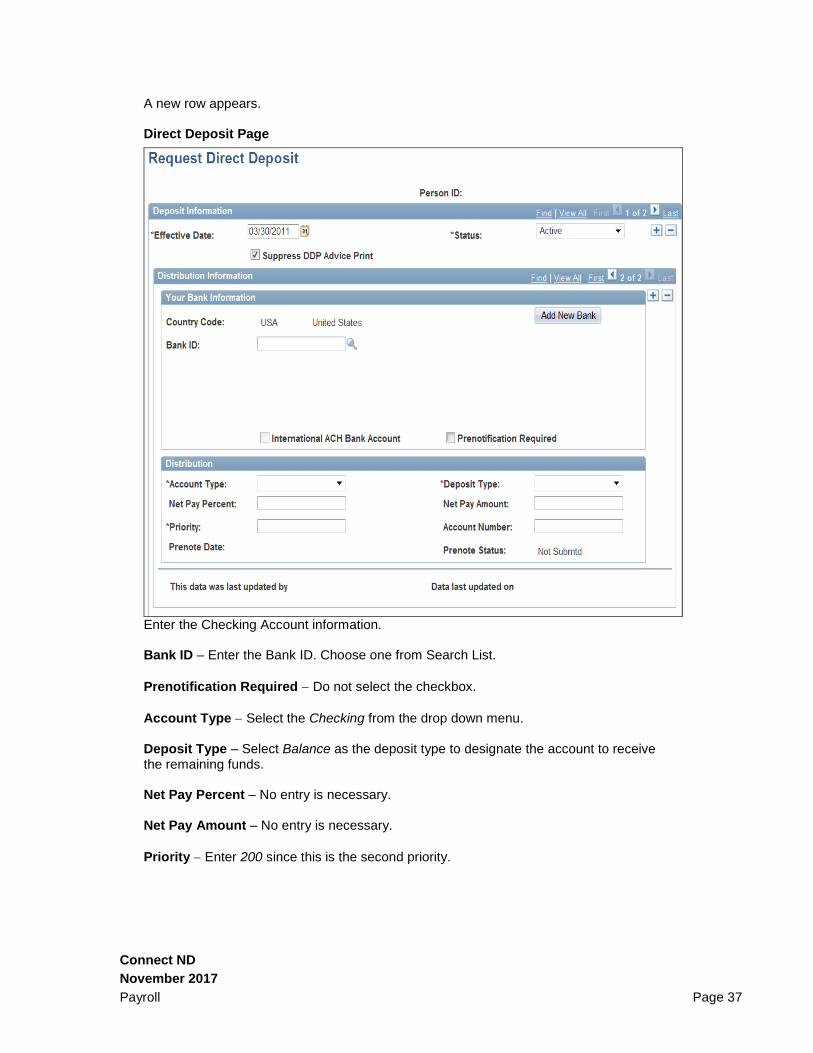
A new row appears. Direct Deposit Page
Enter the Checking Account information. Bank ID – Enter the Bank ID. Choose one from Search List.
Prenotification Required Do not select the checkbox.
Account Type Select the Checking from the drop down menu. Deposit Type – Select Balance as the deposit type to designate the account to receive the remaining funds. Net Pay Percent – No entry is necessary. Net Pay Amount – No entry is necessary.
Priority Enter 200 since this is the second priority.

Ac
Connect ND
November 2017
Payroll Page 38
Account # - Enter the employee's bank account number. (For this example, make one up) The account number represents the employee's checking account into which the money is deposited.
Prenote Date The Prenote Date displays here when the next payroll is run, if selected.
Prenotification Status To verify that the Bank ID and Account numbers are valid, the system will create a prenote status file the first time it processes direct deposits for each employee, if selected.
Click on located at the bottom of the page.

Ac
Connect ND
November 2017
Payroll Page 39
INACTIVATING DIRECT DEPOSITS To inactivate direct deposits for employees, use the following navigational path: Payroll for North America > Employee Pay Data USA > Request Direct Deposit The following search dialog box now displays: Direct Deposit Request Page
Enter the EmplID or Last Name
Click on the button and the Direct Deposit page appears. To inactivate an employee’s direct deposit follow the instructions listed below:
Step 1: Click on the button located directly below the Deposit Information title bar.
A new effective-dated row appears: Direct Deposit Page

Ac
Connect ND
November 2017
Payroll Page 40
Step 2: Enter the date the direct deposits become inactive in the Effective Date field.
Step 3: Click the and select Inactive in the Status field.
Click on located at the bottom of the page.
Note: This will inactivate all entries and the employee will now receive a check.

Ac
Connect ND
November 2017
Payroll Page 41
SET UP OF NEW BANK TABLES
When setting up new bank direct deposit information for an employee, if a search on Bank ID results in no matching values, that means the bank is not currently set up in the system. Return to the top menu to set up new bank information by going to the following set up screen: Setup HRMS > Common Definitions > Banking > Banks. The following screen will appear:
Find An Existing Value Page
Click on Add a New Value. Country: Enter the country code of USA. (Note: The Bank of North Dakota currently does not process direct deposit information to countries other than USA.) Bank ID: Enter the bank/routing number. This is the 9 digit bank transit routing number found at the bottom left of the check.
Click on .

Ac
Connect ND
November 2017
Payroll Page 42
Add A New Value Page
The Status should be set to Active from the drop down menu. Choose Bank Type from the drop down menu (optional). Enter the bank name and short description. To enter the
bank address, click on the button.
Enter the address for the bank.

Ac
Connect ND
November 2017
Payroll Page 43
Click Then click on Save on the Bank Table tab. Edit Address Link

Ac
Connect ND
November 2017
Payroll Page 44
General Deductions
OVERVIEW This chapter defines the General Deduction component and explains the procedures in setting up an employee’s general deduction. This chapter also explains how to override the payment schedule at the employee level. General Deductions are defined for each Company on the Company General Deduction Table. Employees will have General Deduction Data set up based on the General Deduction Codes established for the Company code to which they are assigned. For example, if a person is employed by the University of North Dakota (Company code UND), then the General Deductions that can be established for that employee will be determined by the General Deductions set up on the Company General Deduction Table for Company UND.
GENERAL DEDUCTIONS Use the General Deduction Data page to assign general deductions (non-benefit related) to an employee and to define the calculation method. The most common types of general deductions are union dues, charitable contributions, and garnishments. All General Deduction codes used by NDUS begin with the letter “H”. To begin the general deduction process, use the following navigational path: Payroll for North America > Employee Pay Data USA > Deductions > Create General Deductions. The following search dialog box now displays: Create General Deductions Page

Ac
Connect ND
November 2017
Payroll Page 45
Enter an Employee ID in the EmplID field. If EMPLID is unknown, enter name in the following format: Name = first name or initial, Last Name = last name or part of last name with wild card.
Click on the button. From the search results returned, click on the appropriate EMPLID. The following General Deduction Data page displays:
General Deduction Data Page

Ac
Connect ND
November 2017
Payroll Page 46
GENERAL DEDUCTION DATA The following sections and fields are contained on the General Deduction Data page.
Deduction Code – Enter the deduction code, or select the code by clicking on . The selections available edit directly from the Company General Deduction table associated with the Company in which the employee is employed.
Deduction Details Section
Effective Date – The current date defaults. Enter the date that the deductions will take effect. This should be the first day of the pay period. For example, if a deduction is supposed to be deducted from a paycheck that will be issued on Sept 15, with the NDUS pay lag, the pay period is 8/16 through 8/31. The effective date to enter should be 8/16/XXXX. Take on all Paygroups – This option applies only to employees who have jobs in more than one pay group. It identifies whether or not to take the deduction when the employee's pay group is not being processed. The system will take the deduction only when the employee’s primary paygroup is paid if this flag is not turned on. If it is checked on, the system will take the deduction from all jobs where the deduction is active. By default, the flag in on and should remain on. Calculation Routine – The Calculation Routine determines how a deduction will be calculated for an employee. The system default value is Default to Deduction Table.
Click to select the appropriate Deduction Calculation Routine from the list. The following describes the delivered selections available from the drop down list. -Calculated by Salary System –Not used by NDUS. -Default to Deduction Table uses the deduction calculation routine specified on the Deduction Table. If you select this option, the system takes the amount or percent from the Deduction Table; thus, the Flat/Addl Amount (flat/additional amount) field and the Deduction Rate or % field on this page is not available for entry. -Flat Amount establishes the deduction as a flat amount. Enter the amount in the Flat/Addl Amount field, which is treated as an amount per pay period. -Percent of Federal Gross calculates the deduction as a percent of Federal gross income. Enter the percent in the Deduction Rate or % field. -Percent of Net Pay calculates the deduction as a percent of net pay. Enter the percent in the Deduction Rate or % field. -Percent of Special Earnings calculates the deduction as a percent of a special accumulator, such as a 457 plan. Enter the percent in the Deduction Rate or % field. Special Accumulator Codes are set up on the General Deduction Table. -Percent of Total Gross calculates the deduction as a percent of total gross income. Enter the percent in the Deduction Rate or % field.

Ac
Connect ND
November 2017
Payroll Page 47
-Percentage - Not used by NDUS. -Rate x Hours Worked calculates the deduction as rate multiplied by hours worked (hours with the FLSA flag selected). Enter the rate in the Deduction Rate or % field. -Rate x Special Hours calculates the deduction as a rate multiplied by hours that have a special accumulator associated with them. Enter the rate in the Deduction Rate or % field. The Special Accumulator Code is set up on the General Deduction Table. -Rate x Total Hours calculates the deduction as a rate multiplied by total hours. Enter the rate in the Deduction Rate or % field. -Special Deduction Calculation indicates that you have written a special calculation that you want to use. This option requires technical assistance. Ded. Stopped by Self Serv User – This checkbox is selected by default. If the employee stops a voluntary deduction using the Voluntary Deduction Update self-service Web application, the system will select this checkbox. This will only apply to specific deductions. Deduction End Date – Select the date when the deduction should no longer be taken. Example: If a paycheck issued on 9/15 is the last paycheck in which the deduction should be taken, with the NDUS pay lag, the pay period is 8/16 through 8/31. The effective date to enter should be 8/31/XXXX. Deduction Rate or % - Enter a rate or percent depending on the value selected in the Calculation Routine field. Loan Interest % -- Not used by NDUS. Flat/Addl Amount – Depending on the value selected in the Calculation Routine field, you may need to enter a flat or additional amount in this field.
Note: The system maintains the maximum calendar year deduction amount for the deduction in the Deduction Table. The system checks this maximum before processing the deduction during Pay Calculation.
Goal Amount – Enter the limit for the total amount of the deduction. Once this goal is met, the deduction will end. However, if there is a maximum yearly deduction, and the maximum has been reached, the system does not take the deduction, regardless of whether the goal amount has been reached. For example, if the maximum yearly deduction amount allowed for a deduction is $80, and an employee's goal amount for the same deduction is $100, the system stops taking the deduction when $80 is reached. Current Goal Balance – This field displays the total amount taken to date from the employee's pay for this deduction when the Goal Amount field has been populated. The system updates this amount after every payroll run, during the Pay Confirmation process. When the Current Goal Balance equals the Goal Amount for this deduction, the system stops the deduction. If you want the deduction to start again, you must increase the Goal Amount to the new total to be deducted.

Ac
Connect ND
November 2017
Payroll Page 48
This data was last updated by, On – Each time the general deduction is updated, the system indicates whether an Online Operator or a Web User made the update, and it displays the date of the most recent update. Online operators can update online using the General Deduction Data page. The employee, also known as the Web user, can update using the Voluntary Deduction self-service application.
EXAMPLE OF UPDATING AN EXISTING GENERAL
DEDUCTION Scenario: An employee elects to change the amount of their AFLAC general deduction. The current pay period deduction is $16.71. The amount will change to $17.71 effective with pay issued on 03/31/2011. The current set up is below: General Deduction Data Page
Add a new row by clicking on the in the Deduction Details section. Enter the effective date of 03/01/2011. Change the Flat/Addl Amount to $17.71.
Click .

Ac
Connect ND
November 2017
Payroll Page 49
An example of the updates are shown below. General Deduction Data Page

Ac
Connect ND
November 2017
Payroll Page 50
GENERAL DEDUCTION OVERRIDE The General Deduction Override page is used to override deduction settings contained on the Deduction Table for a particular employee.
Note: This page will be used when setting up monthly deductions.
To begin the process, use the following navigational path: Payroll for North America > Employee Pay Data USA > Deductions > Override General Deductions The following search dialog screen appears: Deduction Override Page
Enter an Employee ID in the EmplID field. If EMPLID is unknown, enter name in the following format: Name = first name or initial, Last Name = last name or part of last name with wild card.
Ac
Connect ND
November 2017
Payroll Page 51
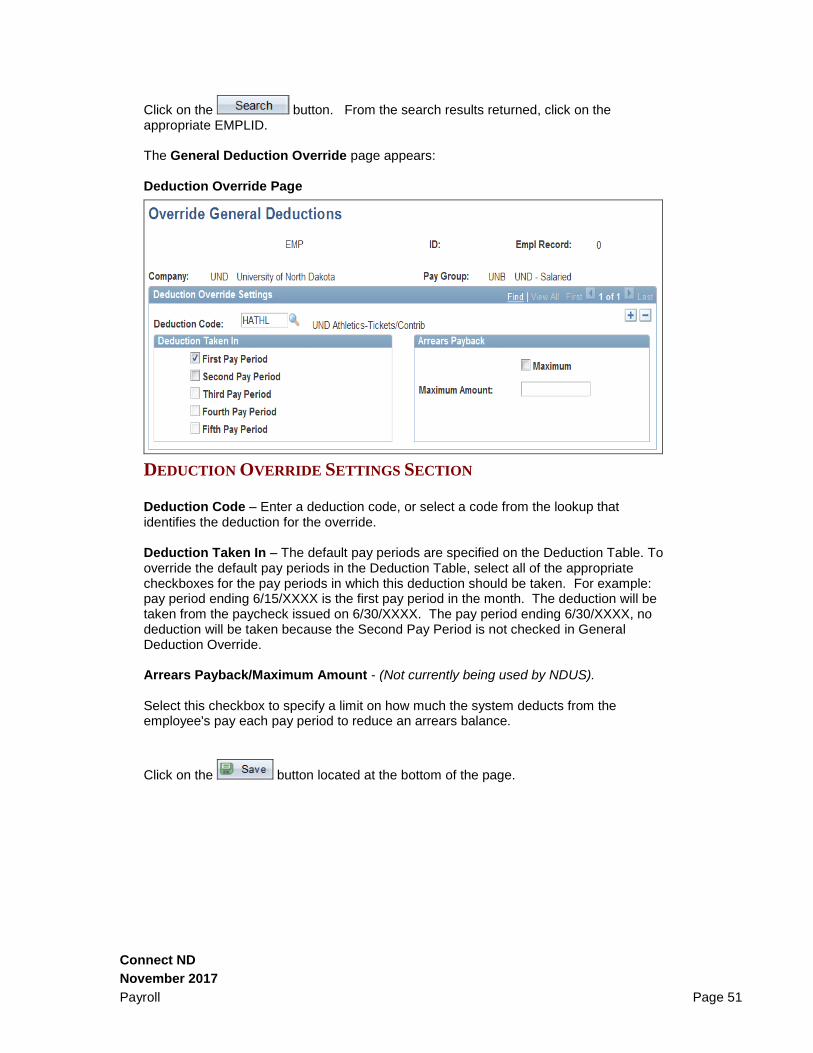
Click on the button. From the search results returned, click on the appropriate EMPLID. The General Deduction Override page appears: Deduction Override Page
DEDUCTION OVERRIDE SETTINGS SECTION Deduction Code – Enter a deduction code, or select a code from the lookup that identifies the deduction for the override. Deduction Taken In – The default pay periods are specified on the Deduction Table. To override the default pay periods in the Deduction Table, select all of the appropriate checkboxes for the pay periods in which this deduction should be taken. For example: pay period ending 6/15/XXXX is the first pay period in the month. The deduction will be taken from the paycheck issued on 6/30/XXXX. The pay period ending 6/30/XXXX, no deduction will be taken because the Second Pay Period is not checked in General Deduction Override. Arrears Payback/Maximum Amount - (Not currently being used by NDUS). Select this checkbox to specify a limit on how much the system deducts from the employee's pay each pay period to reduce an arrears balance.
Click on the button located at the bottom of the page.

Ac
Connect ND
November 2017
Payroll Page 52
EXAMPLE OF ADDING A GENERAL DEDUCTION WITH AN AMOUNT Scenario: An employee chooses to have the United Way deduction automatically deducted from payroll. Follow the steps to setup this deduction.
1. Click on the key in the General Deduction box to add a new deduction code. 2. Enter the deduction code or if not known, click on the look up button. 3. Enter the effective date the deduction is to begin. (Example: If the deduction is to be
taken from paycheck issued 1/31/xxxx, the effective date should be 1/1/xxxx). 4. In the Deduction Calculation Routine field, choose Flat Amount from the drop down
menu. 5. Enter the flat amount and goal amount (if applicable).
Click on the button.
Ac
Connect ND
November 2017
Payroll Page 53
Garnishments
OVERVIEW In PeopleSoft, Garnishment setup and processing is used to handle tax levies, child support payments, wage garnishments and other mandated deductions from paychecks. Keep in mind that the term “garnishment”, in this chapter and elsewhere, is often used generically to refer to all such deductions. PeopleSoft Payroll gives the user flexibility in garnishment processing. Not only can ordinary automated garnishments be set up within the Payroll system, but the user can have the system account for court orders that call for specific disposable earnings. Furthermore, users can set up individual deduction schedules to comply with court orders stipulating garnishments that vary in amount by pay period.

Ac
Connect ND
November 2017
Payroll Page 54
GARNISHMENT SPECIFICATION DATA Use the following navigation path to display the Garnishment Spec Data pages: Payroll for North America > Employee Pay Data USA > Deductions > Create Garnishments The following search dialog box displays: Create Garnishments Page
Enter the Employee ID in the EmplID field. If you don’t know the EMPLID, you may use the name field to search, using the following format: Name = first name or initial, Last Name = last name or part of last name with wild card.
Click on the button. From the search results returned, click on the appropriate EMPLID. The Garnishment Spec Data 1 page displays:

Ac
Connect ND
November 2017
Payroll Page 55
Garnishment Spec Data 1 Page
The Garnishment Spec Data 1 page is used to enter actual garnishment order information. Garnish ID – Set up one garnishment specification for each garnishment order received for an employee. Each garnishment specification must have a unique code entered in the Garnish ID field, for each unique EMPLID. The first garnishment will be 1 and incremented by 1 with subsequent garnishments. For example: John Doe has 2 garnishments using Garnish ID 1 and 2. A third garnishment is received so that garnishment will be assigned with Garnish ID 3. Status – As the status changes throughout the life of the garnishment, it is the user’s responsibility to update this field.
Note: Updating garnishment status is important because it affects the payroll
processing of the garnishment deduction.
Select the Status value from the following options by clicking . - Received. Select this option when you first establish a new garnishment record. - Approved. Select this option when you inform the court, authorized agency, or government agency that the company will comply with the garnishment or levy. - Completed. Select this option when the garnishment has been paid in full.

Ac
Connect ND
November 2017
Payroll Page 56
- Rejected. Select this option if you can't comply with the garnishment or levy. For example, if the employee has been terminated and there are no wages to garnish, you can reject the garnishment. -Cancelled. Select this status if the garnishment order is cancelled by the issuing agency, such as the U.S. Department of Education for Student Financial Assistance. -Released. Select this status if the garnishment order is released by the issuing agency, such as the IRS. -Terminated. Select this value if the garnishment order is terminated by the issuing agency, such as the California Franchise Tax Board. - Suspended. Select this option if you need to stop the garnishment deduction in payroll, but want to preserve the garnishment specification data.
Note: If you select Received or Approved, the system processes the garnishment when you run Pay Calculation; if you select Completed, Rejected, or Suspended, Cancelled, Released, or Terminated the system will ignore the garnishment during the calculation process. When setting up a garnishment for the first time and withholding is to be taken on the next payroll, select Approved.
Note: Do NOT change the status of a garnishment until after all Accounts Payable processing is completed for the pay period.
Received On – Enter the date and time you received the writ of garnishment or tax levy from the court, authorized agency, or government agency. Respond By – Indicates the date and time by which you need to tell the court, authorized agency, or government agency whether you can comply with the garnishment order.
Garnishment Type – Click to display the list of garnishment or levy types. Select one of the following options: - Writ of Garnishment. Typical garnishment type for failure to pay. - Tax Levy. Failure to pay taxes. - Chapter 13 Bankruptcy. Chapter 13 bankruptcy in the U.S. - Wage Assignment. Similar to a Writ (that is, signifying a failure to pay). - Child Support. Typically ordered by a family court. If the garnishment is this type, select either Current or Arrears, as applicable, in the Garnishment Support Type field.
Ac
Connect ND
November 2017
Payroll Page 57
- Spousal Support. Typically ordered by a family court. If the garnishment is this type, select either Current or Arrears, as applicable, in the Garnishment Support Type field. - Dependent Support. Typically ordered by a family court. If the garnishment is this type, select either Current or Arrears, as applicable, in the Garnishment Support Type field. - Student Loan Repayment. Relates specifically to the repayment of student loans, and is similar to a Writ. Support Type - Applies only for Child Support, Spousal Support and Dependent Support type garnishments. Select Current or Arrears, as appropriate. Court Document IDs- these fields are used to identify garnishment documents from the court.
Enter the Case Number in the first field.
The second field will be used for Friend of the Court garnishments only. Enter the FIBS Code.
Court Name – Enter the name of the court that issued the garnishment order. Remarks- this field is used to enter any special instructions or comments about this garnishment Click on the Garnishment Spec Data 2 tab. Garnishment Spec Data 2 Page
The Garnishment Spec Data 2 page displays. Use the Garnishment Spec Data 2 page to enter information regarding the payee. SetID – enter SetID of SHARE: the value you select here will determine the list of Vendors you can select from in the Vendor ID field (below).
Ac
Connect ND
November 2017
Payroll Page 58
Vendor ID – Select the Vendor ID by clicking on . This will instruct the system to pay the garnishment through Accounts Payable. Note that the vendor table is shared between State and Higher Education. To assure that you are selecting a Higher Ed vendor, you must select an NDUS vendor that has a short description name starting with an “H”. Location – If a vendor ID is selected, select the specific location for this garnishment from among the locations setup for the payee on the vendor table.
Remit Address – click on the to select from a list of valid addresses associated with the Vendor ID you just selected: it represents the remittance address. This selection will
automatically populate the remaining address fields. Note: the link can be used to update the vendor address. Payee Name- enter the name the Garnishment payment should be issued to, if it is different than the Vendor Name. Contact- Name and Phone- enter contact information here, as applicable.
Note: The Garnishment Payee has to be set up on the Garnishment Payee Table prior to setting up the garnishment.
Country – not enterable if you have selected a Vendor ID. If you did not select a Vendor ID, enter USA and tab out. The Address fields then become available for data entry. Click on the Garnishment Spec Data 3 tab. The Garnishment Spec Data 3 page displays: Garnishment Spec Data 3 Page

Ac
Connect ND
November 2017
Payroll Page 59
The Garnishment Spec Data 3 page is used to define garnishment deduction parameters and any applicable limitations.
Deductions Section
Deduction Schedule – For NDUS, select Deduct by Schedule. Since the Deduct by Schedule option is selected, use the Garnishment Specification Data 5 page to create the deduction schedule and complete the deduction information. Priority – Used for garnishments to which proration rules do not apply. Indicate the processing priority of this garnishment in relation to all other garnishments for the employee. Use this field when the employee has more than one garnishment. If the Priority field is left blank, or assign the same priority number to more than one garnishment specification, the system will determine the processing priority by sorting the specifications by Garnish ID. A lower priority number refers to a higher priority in garnishing the wages (a garnishment with priority of 1 will take place before a garnishment with priority of 2). Note: PeopleSoft Payroll provides for proration of garnishments for those states that allow proration of garnishments when an employee has more than one of the same type. If the garnishment proration option is used, the system will use the value in the Priority field only for garnishments to which proration does not apply. Include Company Fee Within DE – This is used to instruct the system to deduct this fee from the employee’s disposable earnings before garnishment deductions are taken. The default is checked.

Ac
Connect ND
November 2017
Payroll Page 60
Include Payee Fee Within DE – This is used to instruct the system to deduct this fee from the employee’s disposable earnings before garnishment deductions are taken. The default is checked.
Limitations Section
The fields in the Dates group box impose time and amount restrictions on the garnishment deduction that is being setup. This functionality is useful when an employee has multiple garnishment orders from states where: 1. Regulations prohibit the collection of more than one garnishment order at a time; or, 2. They impose time limits on the collection of a garnishment. Start Date – If you want the garnishment deduction to start immediately, leave the Start Date field blank. Otherwise, enter the date the deduction should begin. Stop Date – Leave the Stop Date field blank if you want the garnishment deduction to go on until the garnishment is satisfied. Otherwise, enter the date the deduction should stop. The garnishment stop date must be greater than the check date for a pay period to have the garnishment withheld for that pay period. For example, if the pay period has a pay period end date of 7/15/xxxx and a check date of 7/31/xxxx then the garnishment Stop Date must be greater than 7/31/xxxx in order to have the garnishment withheld in the 7/15/xxxx pay period. Calculate Stop Date – In certain situations, when the exact stop date is unknown, you can have the system calculate one for you by selecting the checkbox. For example, some states have rules for garnishments (like a Writ), specifying a term of 90 days. In other words, you can only garnish money for 90 days. The 90-day term does not begin until you actually begin taking money from the employee, that is, until the employee has money available to garnish. Consider the following scenario: you may receive a garnishment order on September 1. If the employee has another garnishment of a higher priority, there may not be any money left to garnish until November. In this situation, you won’t be able to enter a stop date because you don’t know what the exact start date will be. Instead, select Calculate Stop Date and enter the length of the garnishment term (in
this example, 90) in Stop Date Days. As soon as the system can take money for this
garnishment, it: Calculates the stop date by adding 90 days to the processing date of the current pay period. Enters that date in the Stop Date field. Clears the Calculate Stop Date check box. From this point on, the system will take the garnishment until the end of the term or until other limits are satisfied. Stop Date Days – Enter the length of the garnishment term if you are using the Calculate Stop Date option. The Stop Date will be automatically populated once this garnishment has been run through the first payroll. Limit Amount – Enter the garnishment limit amount, if applicable. This is the total amount due for the garnishment. For example, an IRS tax levy will specify exactly how much is owed in total for this debt.

Ac
Connect ND
November 2017
Payroll Page 61
Limit Balance – this field reflects what has been collected thus far against the garnishment. The balance is updated after each payroll confirmation where the garnishment deduction has taken place. When the limit balance equals the limit amount, the system will automatically stop taking the deduction. However, the Limit Balance field does not reflect adjustments made to garnishment balances. Any time an online balance adjustment is made to garnishments, the same update should be made to the Limit Balance field. Calculations for garnishment limit processing use the YTD garnishment balance field on the Garnishment Balance page. Be sure to update the Limit Balance field with that value after making any adjustments to garnishment balances.
Monthly Limit Amounts
Garnishment - Enter the monthly garnishment limit amount if applicable. For example, a child support order will typically specify how much should be withheld on a pay period basis. It is important to note that in processing monthly limitations, the system uses the actual paycheck date—not the pay period end date, which may be in a different month. Depending on your pay cycle, you can calculate what the monthly maximum would be, and enter that amount here. This will ensure that the employee never has more than the amount specified withheld from pay over the course of a month, no matter how many paychecks (both on and off cycle) are issued each month. Company Fee – Not currently used by NDUS. Payee Fee – Not currently used by NDUS. Click on the Garnishment Spec Data 4 tab. The Garnishment Spec Data 4 page displays: Garnishment Spec Data 4 Page
Note: The Garnishment Spec Data 4 page is not used by NDUS. The Maximum Allowed is selected from the drop down menu by default.

Ac
Connect ND
November 2017
Payroll Page 62
Click on the Garnishment Spec Data 5 tab. To display the Garnishment Spec Data 5
tab, click on the located to the right of the Garnishments Spec Data 4 tab. The Garnishments Spec Data 5 page displays: Garnishments Spec Data 5 Page
Note: The Garnishment Spec Data 5 page is used to set the payment schedule for the garnishment. In order to use this page, you must select the Deduct by Schedule option on the Garnishment Spec Data 3 page. This is currently the option that is being used for all garnishment orders at NDUS. Keep in mind that this page requires one row for each pay period of the month (first and second) and both rows must be manually inserted/updated when creating or changing this data.
Pay Frequency – Select S (semi-monthly) by clicking on or type it in.
Pay Period- Click on the symbol to add a row for the second pay period and enter the applicable information.
Deduction Calculation Routine Section
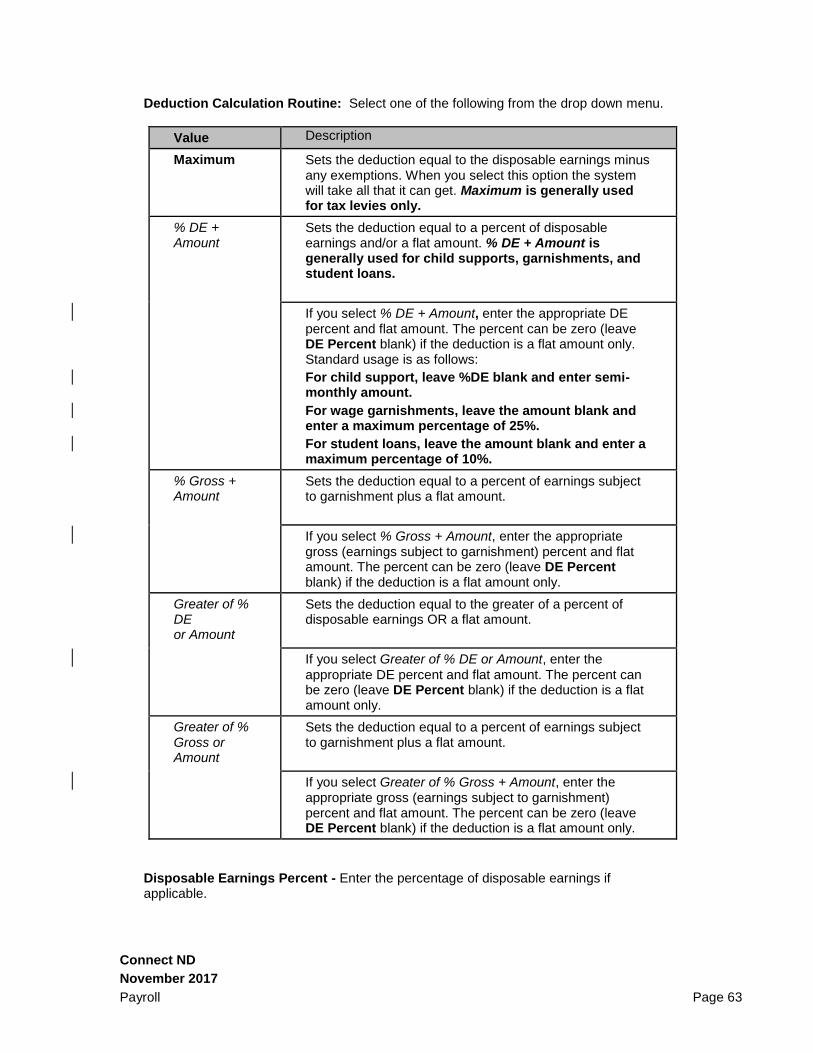
Ac
Connect ND
November 2017
Payroll Page 63
Deduction Calculation Routine: Select one of the following from the drop down menu.
Value Description
Maximum Sets the deduction equal to the disposable earnings minus any exemptions. When you select this option the system will take all that it can get. Maximum is generally used for tax levies only.
% DE + Amount
Sets the deduction equal to a percent of disposable earnings and/or a flat amount. % DE + Amount is generally used for child supports, garnishments, and student loans.
If you select % DE + Amount, enter the appropriate DE percent and flat amount. The percent can be zero (leave DE Percent blank) if the deduction is a flat amount only. Standard usage is as follows:
For child support, leave %DE blank and enter semi-monthly amount.
For wage garnishments, leave the amount blank and enter a maximum percentage of 25%.
For student loans, leave the amount blank and enter a maximum percentage of 10%.
% Gross + Amount
Sets the deduction equal to a percent of earnings subject to garnishment plus a flat amount.
If you select % Gross + Amount, enter the appropriate gross (earnings subject to garnishment) percent and flat amount. The percent can be zero (leave DE Percent blank) if the deduction is a flat amount only.
Greater of % DE or Amount
Sets the deduction equal to the greater of a percent of disposable earnings OR a flat amount.
If you select Greater of % DE or Amount, enter the
appropriate DE percent and flat amount. The percent can be zero (leave DE Percent blank) if the deduction is a flat amount only.
Greater of % Gross or Amount
Sets the deduction equal to a percent of earnings subject to garnishment plus a flat amount.
If you select Greater of % Gross + Amount, enter the appropriate gross (earnings subject to garnishment) percent and flat amount. The percent can be zero (leave DE Percent blank) if the deduction is a flat amount only.
Disposable Earnings Percent - Enter the percentage of disposable earnings if applicable.

Ac
Connect ND
November 2017
Payroll Page 64
Flat Amount – Enter the amount to be deducted.
Processing Fees Section
Greater of % Deduction or Flat Amount – If necessary, you can also specify different processing fees for each pay period. NDUS is not currently utilizing this functionality. Click on Garnishment Spec Data 6 tab. The Garnishment Spec Data 6 page now displays: Garnishment Spec Data 6 Page
The Garnishment Spec Data 6 page is used to indicate which garnishment rule governs each garnishment.
Assignments Section
Law Source – The location providing the definition or specifics outlining the garnishment rule. Select the appropriate state for which this garnishment should be calculated by
clicking on . For example, if a child support order is received from the state of North Dakota, ND would be selected as the Garnish Law Source. Rule ID – A unique code assigned to a table of exemption rules used in the calculation of disposable earnings. Both the Garnishment Law Source and Rule ID are maintained by the software vendor and, when combined, function as the identifier for each rule. Select the applicable Rule ID for each Garnish Law Source.

Ac
Connect ND
November 2017
Payroll Page 65
DE Definition ID – (Disposable Earnings Definition ID) the garnishment DE Definition ID is displayed here. The DE Definition is attached to the Garnishment Rule ID. For example, if you select a Garnish Law Source as ND and a Rule ID “General”, the DE Definition that will display is “Federal”, as that is the DE Definition that is tied to the Rule ID of “General”. When an employee has more than one garnishment in a single state, the system determines proration rules based on the garnish law source. If the garnishments are for more than one state, the system uses the proration rule of the employee's resident state.
Exemption Parameters Section
The system uses the values entered in the Exemption Parameters group box to calculate the most favorable garnishment deduction amount for the employee. Depending on the exemption calculation that applies to this rule, the system may use one or more of the exemption parameters here to calculate the amount of disposable earnings that are exempt from garnishment. You only have to enter the exemption parameters that are appropriate to the rule. If there are no exemption parameters appropriate to the Rule, then no data will be entered here. Dependent/Exemption Count – Enter the number of dependents or exemptions claimed by the employee. Allowance Count – Exempt Amount – If a specific exemption amount is determined by the court, enter the amount in this field. Amount Frequency – If a specific exemption amount frequency (daily, weekly, or
monthly) is determined by the court, click on the to select the appropriate option.
Click on located at the bottom of the page to complete the process.
Deductions Allowed in DE Calculation
For U.S. garnishments that allow specific deductions to be considered when calculating disposable earnings, the system dynamically populates this group box when you define a new garnishment for an employee and run the first payroll calculation. Click on the Garnishment Spec Data 7 tab. Garn Spec Data 7 page displays: Garnishment Spec Data 7 Page

Ac
Connect ND
November 2017
Payroll Page 66
This page is only applicable when more than one of the same garnishment type is being processed for an employee. In the U.S., when an employee has more than one garnishment in a single state, the system determines proration rules based on the garnish law source. If the garnishments are for more than one state, the system uses the proration rule of the employee's work state. For each GARNID, enter the following information: Proration Rule State: enter the State code associated with the garnishment being prorated
Proration Rule ID: click on the to select from the Proration Rules associated with the Proration Rule State. A proration rule is a set of rules used to determine what order to deduct multiple garnishments.
Proration Override
Court Ordered Percent: enter the court ordered proration override %
Court Ordered Amount: enter the court ordered proration override flat amount.
Pay Mode
Pay Mode: Specify how PeopleSoft Payables makes the garnishment payment. The following options are available:

Ac
Connect ND
November 2017
Payroll Page 67
Pay as Deducted: select this value to pay the vendor each time PeopleSoft Payroll calculates and withholds this deduction. NDUS will use this option. Pay at Specified Date: select this value to pay the vendor on a date that you specify in the AP Payment Date Type field. Pay When Collection Completed: Select this value to pay the vendor only when you reach the goal amount or deduction end date. (This pay mode is valid for general deductions and garnishments.) AP Payment Date Type: Specify which type of date to use when creating the accounts payable voucher. This field becomes available when you select Pay at Specified Date in the Pay Mode field. NDUS will use the Check Date option. Separate AP Payment: Select this check box if the payment for this garnishment should be on a separate check when PeopleSoft Payables makes the payment. The default is to not issue separate payments. NDUS will NOT check this box.
Click on the button located at the bottom of the page.

Ac
Connect ND
November 2017
Payroll Page 68
GENERAL DEDUCTION After the garnishment specification pages are setup, the next step is to assign the deduction code at the employee level in order for the system to process the garnishment deduction. If an employee has more than one garnishment, only one garnishment deduction needs to be setup. To setup the garnishment deduction code navigate to the General Deduction Data page. To begin the process of assigning a garnishment to an employee, click on the following navigational path: Payroll for North America> Employee Pay Data USA> Deductions> Create General Deductions. Enter the Employee ID in the EmplID field.
Click on the button. The General Deduction Data page displays: General Deduction Data Page
Deduction Code – If the deduction code field is blank, it means that there is no general deduction currently setup for the employee. If the deduction code field is populated, you will need to review the current deductions, to see if HGARN has already been set up. If
not, insert a new row in the General Deduction section by clicking on the in that section.
Enter the deduction code for garnishment (HGARN) or choose it by clicking the .

Ac
Connect ND
November 2017
Payroll Page 69
Effective Date - Enter the effective date of this deduction. All other fields do not need to be populated. Calculation values were setup on the Garnishment Specification pages.
Click

Ac
Connect ND
November 2017
Payroll Page 70
EXAMPLES: HOW TO SET UP A CHILD SUPPORT
GARNISHMENT FOR NORTH DAKOTA
Scenario: A new child support order issued from North Dakota was received on January
2. The order is for current monthly support of $324.75. The following are the steps for
set up of the new garnishment.
Step #1: In Garnishment Spec Data 1, enter the Garnish ID, Status, Received and
Respond Date/Time, Garnishment Support Type, Court Name, Court Document ID(s).
(The Court Name and the Document ID’s can be found on the documents received from
the child support agency.) The Remarks section is optional.
Garnishment Specification Data Page

Ac
Connect ND
November 2017
Payroll Page 71
Step #2: In Garnishment Spec Data 2, enter the SetID (SHARE), Vendor ID, Location,
and Remit Address code.
Garnishment Specification Data Page
Step 3: In Garnishment Spec Data 3, enter the Deduction Schedule (Deduct by
Schedule), Priority (normally the same as the Garnish ID on the first tab) and the monthly
garnishment amount. The default for Include Company Fee and Payee Fee is ON. The
Start Date, Stop Date, Stop Date Days, Limit Amount and Limit Balance fields do not
apply with a child support garnishment. The Company Fee and Pay Fee fields are
optional.
Garnishment Specification Data Page

Ac
Connect ND
November 2017
Payroll Page 72
Step 4: Garnishment Spec Data 4 tab can be skipped.
Step 5: In Garnishment Spec Data 5, enter the Pay Frequency (S), Pay Period (First)
and the flat dollar amount. Use the system default of %DE+Amount. Add another row by
clicking on the + key in the Deduct by Schedule Option section. Enter the Pay Frequency
(S), Pay Period (Second) and the flat dollar amount. The processing fees sections are
optional.
Garnishment Specification Data Page

Ac
Connect ND
November 2017
Payroll Page 73
Step #6: In Garnishment Spec Data 6, enter the Garnish Law Source and Rule ID. The
Exemption Parameters and the Deductions Allowed in DE Calc is not applicable.
Garnishment Specification Data Page
Step #7: Garnishment Spec Data 7 can be skipped. Save the record.

Ac
Connect ND
November 2017
Payroll Page 74
HOW TO SET UP A WRIT OF GARNISHMENT
Scenario: A writ of garnishment is received on November 1. The employee owes a total
of $4,239.93 remitted to Ward K Johnson PC. They complete a dependent worksheet
and claim 2 dependents. Complete the garnishment setup as follows:
Step #1: In Garnishment Spec Data 1, enter the Garnish ID, Status, Received and
Respond Date/Time, Garnishment Support Type, Court Name, Court Document ID(s).
(The Court Name and the Document ID’s can be found on the documents received from
the debt collection agency.) The Remarks section is optional.
Garnishment Specification Data Page

Ac
Connect ND
November 2017
Payroll Page 75
Step #2: In Garnishment Spec Data 2, enter the SetID (SHARE), Vendor ID Location
and Remit Address Code. The Payee Name and Contact Name and Phone number are
optional.
Garnishment Specification Data Page

Ac
Connect ND
November 2017
Payroll Page 76
Step #3: In Garnishment Spec Data 3, enter the Deduction Schedule (Deduct by
Schedule), Priority (normally the same as the Garnish ID on the first tab). The default for
Include Company Fee and Payee Fee is ON. Enter the Start Date and the Stop Date or
Stop Date Days. The Calculate Stop Date box is optional but if checked, do not enter
any values in the Stop Date or Stop Date Days fields. Enter the Limit Amount from the
garnishment order documents. In the Monthly Limit Amounts section, leave the
Garnishment field blank and the Company Fee and Pay Fee fields are optional.
Garnishment Specification Data Page
Step 4: Garnishment Spec Data 4 tab can be skipped.

Ac
Connect ND
November 2017
Payroll Page 77
Step 5: In Garnishment Spec Data 5, enter the Pay Frequency (S), Pay Period (First)
and Flat Amount ($25.00). Use the system default of %DE+Amount. Add another row by
clicking on the + key in the Deduct by Schedule Option section. Enter the Pay Frequency
(S), Pay Period (Second) and Flat Amount ($25.00). Use the system default of
%DE+Amount. The processing fees sections are optional.
Garnishment Specification Data Page

Ac
Connect ND
November 2017
Payroll Page 78
Step #6: In Garnishment Spec Data 6, enter the Garnish Law Source and Rule ID. If the
employee claimed any dependents, input the number in both the Dep/Exempt Count field.
The Exempt Amount field is not applicable. No entry is allowed in the Deductions
Allowed in DE Calc section.
Garnishment Specification Data Page
Step #7: Garnishment Spec Data 7 can be skipped. Save the record.
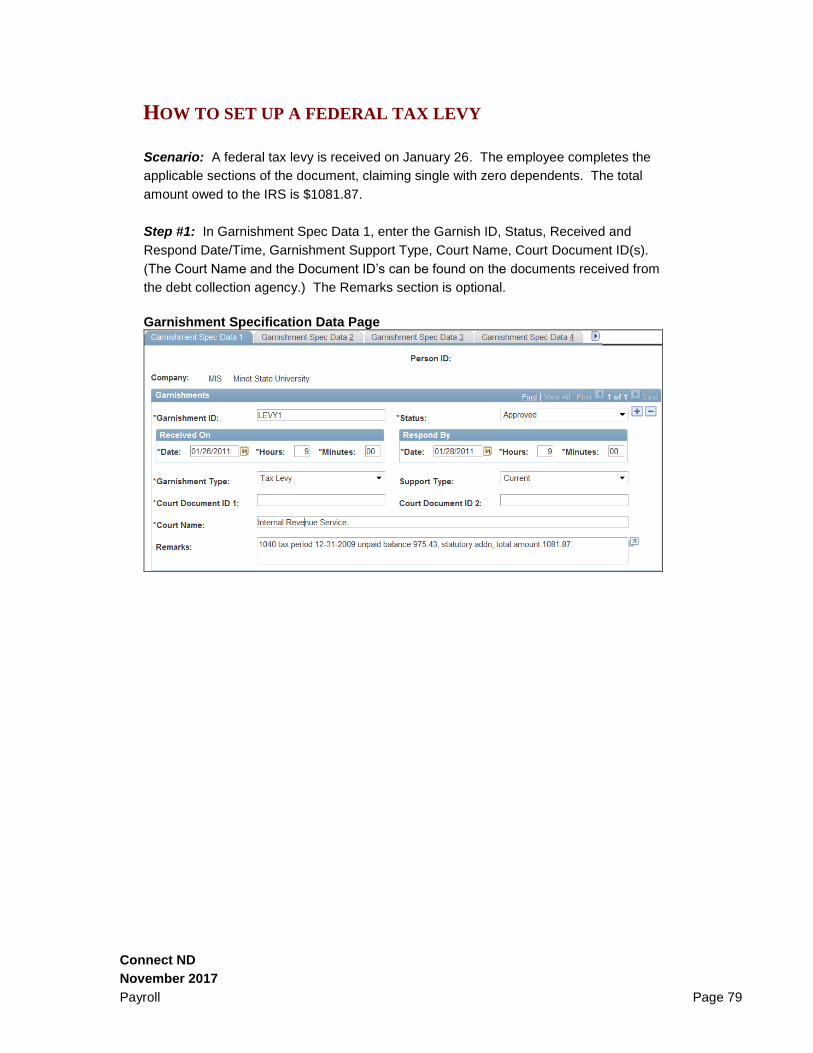
Ac
Connect ND
November 2017
Payroll Page 79
HOW TO SET UP A FEDERAL TAX LEVY
Scenario: A federal tax levy is received on January 26. The employee completes the
applicable sections of the document, claiming single with zero dependents. The total
amount owed to the IRS is $1081.87.
Step #1: In Garnishment Spec Data 1, enter the Garnish ID, Status, Received and
Respond Date/Time, Garnishment Support Type, Court Name, Court Document ID(s).
(The Court Name and the Document ID’s can be found on the documents received from
the debt collection agency.) The Remarks section is optional.
Garnishment Specification Data Page

Ac
Connect ND
November 2017
Payroll Page 80
Step #2: In Garnishment Spec Data 2, enter the SetID (SHARE), Vendor ID, Location,
and Remit Address code. The Payee Name and Contact Name and Phone number are
optional.
Garnishment Specification Data Page
Step #3: In Garnishment Spec Data 3, enter the Deduction Schedule (Deduct by
Schedule), Priority (normally the same as the Garnish ID on the first tab). The default for
Include Company Fee and Payee Fee is ON. Enter the Start Date. Normally for a tax
levy there would be no stop date since deductions continue until the IRS sends a release
for the levy. Enter the Limit Amount given on the IRS document. In the Monthly Limit
Amounts section, leave the Garnishment field blank and the Company Fee and Pay Fee
fields are optional.
Garnishment Specification Data Page

Ac
Connect ND
November 2017
Payroll Page 81
Step 4: Garnishment Spec Data 4 tab can be skipped.
Step 5: In Garnishment Spec Data 5, enter the Pay Frequency (S), Pay Period (First). In
the Deduction Calculation Routine section, select Maximum Allowed from the drop down
menu. Add another row by clicking on the + key in the Deduct by Schedule Option
section. Enter the Pay Frequency (S), Pay Period (Second) and select Maximum
Allowed from the drop down menu. The processing fees sections are optional.
Garnishment Specification Data Page
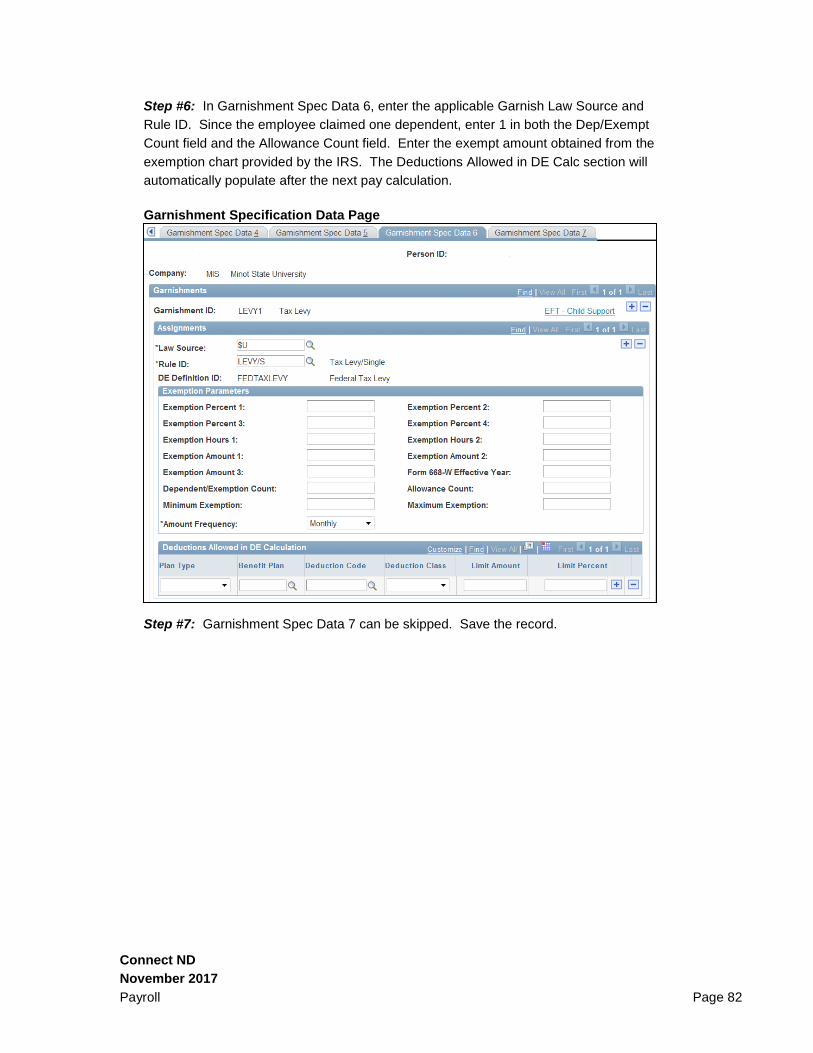
Ac
Connect ND
November 2017
Payroll Page 82
Step #6: In Garnishment Spec Data 6, enter the applicable Garnish Law Source and
Rule ID. Since the employee claimed one dependent, enter 1 in both the Dep/Exempt
Count field and the Allowance Count field. Enter the exempt amount obtained from the
exemption chart provided by the IRS. The Deductions Allowed in DE Calc section will
automatically populate after the next pay calculation.
Garnishment Specification Data Page
Step #7: Garnishment Spec Data 7 can be skipped. Save the record.

Ac
Connect ND
November 2017
Payroll Page 83
HOW TO SET UP PRORATED GARNISHMENTS
Scenario: An employee has two child support orders from two different states. The
employee is part time and both orders are for an amount higher than what can be taken.
ND Child Support stated the payments need to be split between the two states. ND
Order is for $276.60 per pay period and the NY order is for $211.25 per pay period. This
example will show how to prorate by percentage the total withholding to pay each order.
Step #1: In Garnishment Spec Data 1, enter the Garnish ID, Status, Received and
Respond Date/Time, Garnishment Support Type, Court Name, Court Document ID(s).
(The Court Name and the Document ID’s can be found on the documents received from
the child support agency.) The Remarks section is optional. You will do this for both
garnishments with different Garnish ID’s.
Garnishment Specification Data Page

Ac
Connect ND
November 2017
Payroll Page 84
Step #2: In Garnishment Spec Data 2, enter the SetID (SHARE), Vendor ID, Location,
and Remit Address code. The Payee Name and Contact Name and Phone number are
optional.
Garnishment Specification Data Page
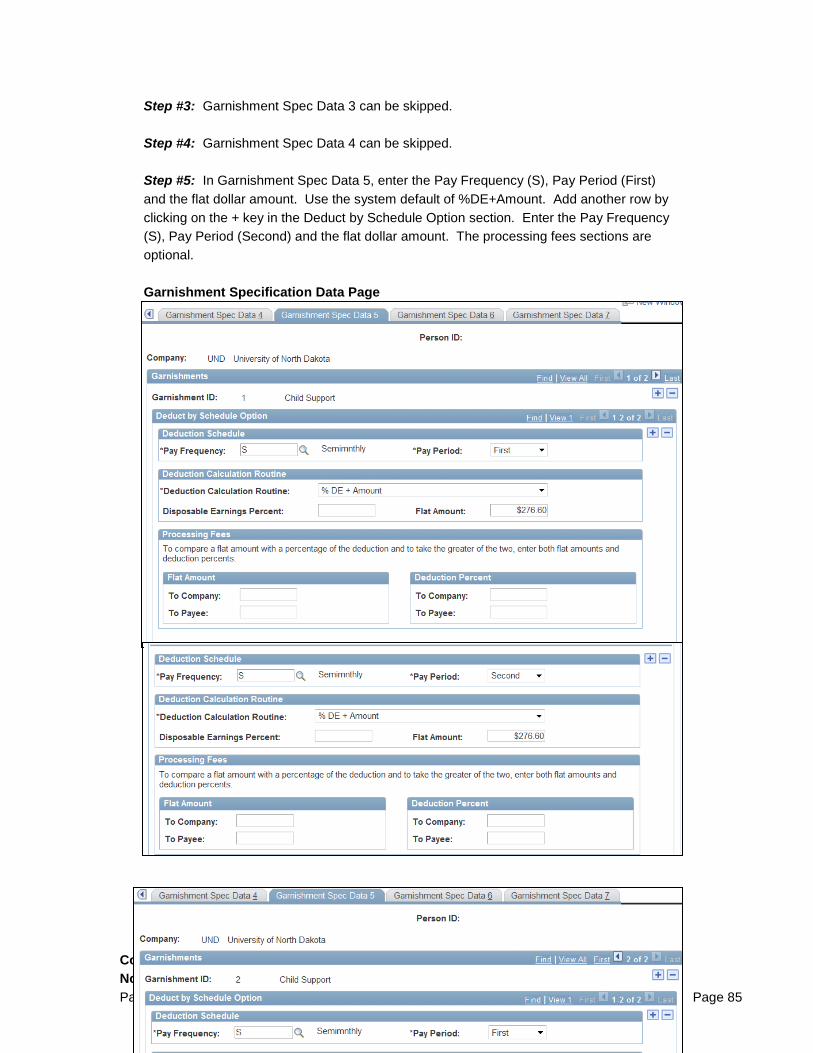
Ac
Connect ND
November 2017
Payroll Page 85
Step #3: Garnishment Spec Data 3 can be skipped.
Step #4: Garnishment Spec Data 4 can be skipped.
Step #5: In Garnishment Spec Data 5, enter the Pay Frequency (S), Pay Period (First)
and the flat dollar amount. Use the system default of %DE+Amount. Add another row by
clicking on the + key in the Deduct by Schedule Option section. Enter the Pay Frequency
(S), Pay Period (Second) and the flat dollar amount. The processing fees sections are
optional.
Garnishment Specification Data Page

Ac
Connect ND
November 2017
Payroll Page 86
Step #6: In Garnishment Spec Data 6, enter the Garnish Law Source and Rule ID. The
Exemption Parameters and the Deductions Allowed in DE Calc is not applicable.
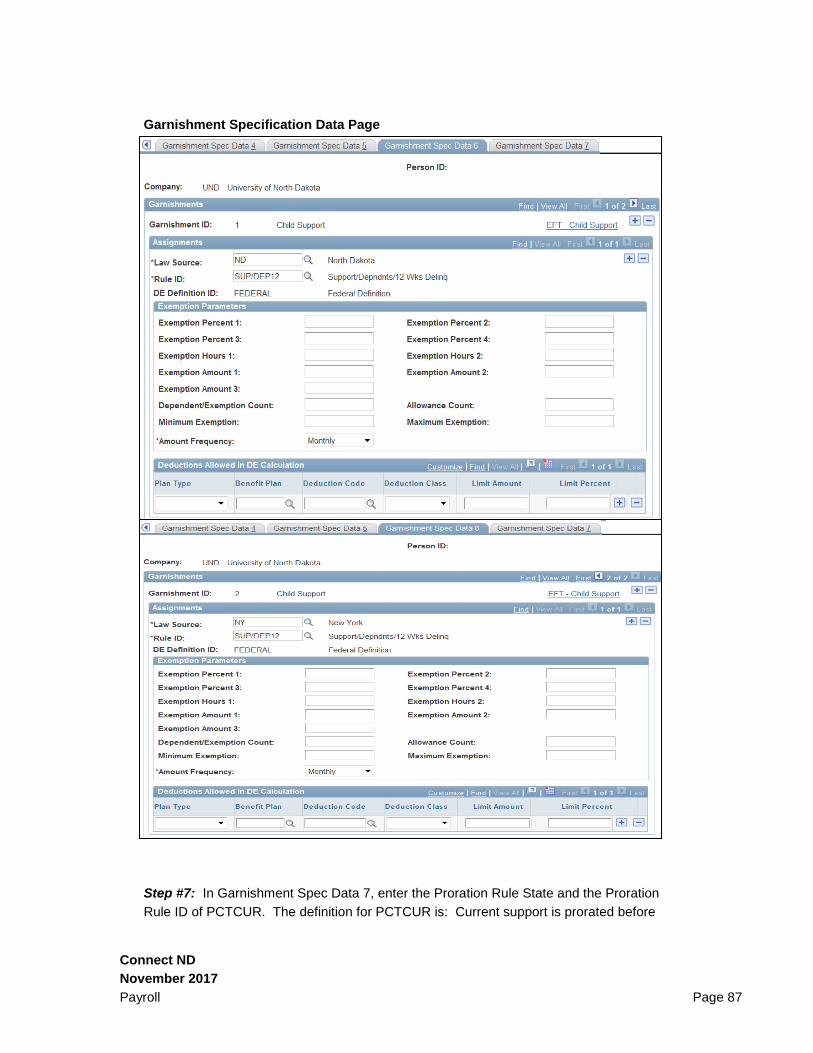
Ac
Connect ND
November 2017
Payroll Page 87
Garnishment Specification Data Page
Step #7: In Garnishment Spec Data 7, enter the Proration Rule State and the Proration
Rule ID of PCTCUR. The definition for PCTCUR is: Current support is prorated before
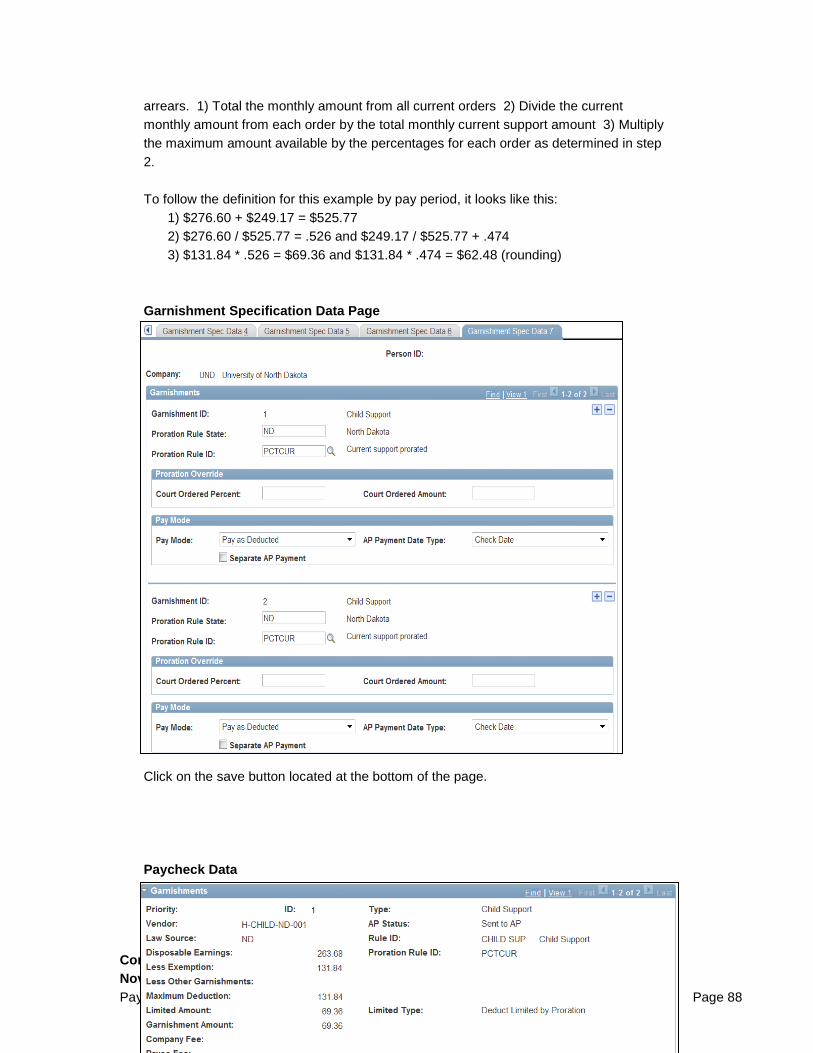
Ac
Connect ND
November 2017
Payroll Page 88
arrears. 1) Total the monthly amount from all current orders 2) Divide the current
monthly amount from each order by the total monthly current support amount 3) Multiply
the maximum amount available by the percentages for each order as determined in step
2.
To follow the definition for this example by pay period, it looks like this:
1) $276.60 + $249.17 = $525.77
2) $276.60 / $525.77 = .526 and $249.17 / $525.77 + .474
3) $131.84 * .526 = $69.36 and $131.84 * .474 = $62.48 (rounding)
Garnishment Specification Data Page
Click on the save button located at the bottom of the page.
Paycheck Data

Ac
Connect ND
November 2017
Payroll Page 89
HOW TO CHANGE A GARNISHMENT AMOUNT
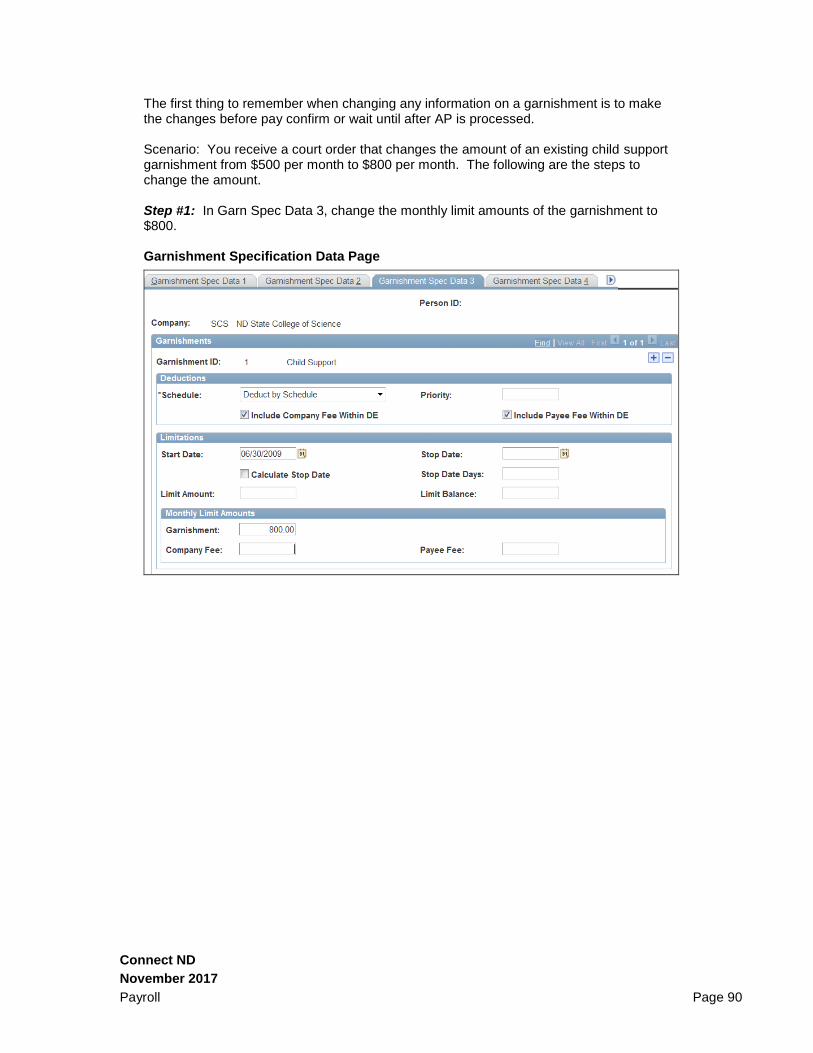
Ac
Connect ND
November 2017
Payroll Page 90
The first thing to remember when changing any information on a garnishment is to make the changes before pay confirm or wait until after AP is processed. Scenario: You receive a court order that changes the amount of an existing child support garnishment from $500 per month to $800 per month. The following are the steps to change the amount. Step #1: In Garn Spec Data 3, change the monthly limit amounts of the garnishment to $800. Garnishment Specification Data Page

Ac
Connect ND
November 2017
Payroll Page 91
Step #2: In Garn Spec Data 5, there should be two rows setup for the first and second pay periods. On the first pay period, change the flat amount to $400. Click on the arrow to get to the second pay period and change the flat amount to $400. Garnishment Specification Data Page
Step #3: Click on the SAVE button to save the record.

Ac
Connect ND
November 2017
Payroll Page 92
HOW TO END A GARNISHMENT The first thing to remember when changing any information on a garnishment is to make the changes before pay confirm or wait until after AP is processed. Scenario: You receive a court order that says a garnishment has been completed. The following are steps to show you how to stop a garnishment. Step #1: In Garn Spec Data 1, change the Status to completed to end the garnishment. Garnishment Specification Data Page
Step #2: Click on the SAVE button to save the record.
HOW TO SUSPEND A GARNISHMENT

Ac
Connect ND
November 2017
Payroll Page 93
The first thing to remember when changing any information on a garnishment is to make the changes before pay confirm or wait until after AP is processed. Scenario: You receive a court order that says a garnishment should be suspended. The following are steps to show you how to suspend a garnishment. Step #1: In Garn Spec Data 1, change the Status to Suspended to stop the garnishment. (To make the garnishment active again, simply change the Status back to Approved) Garnishment Specification Data Page
Step #2: Click on the SAVE button to save the record.
NOTE: It is HIGHLY recommended to check every garnishment each pay period before pay confirm whether or not there has been changes to the Garn Spec Data to ensure accuracy.

Ac
Connect ND
November 2017
Payroll Page 94
Additional Pay
OVERVIEW This section provides an overview of additional pay earnings and discusses how to enter additional pay earnings information. Additional Pay is used to set up earnings that are in addition to compensation entered on Job Data. Examples of additional pay include summer salary for contract faculty, overload payments for faculty, housing or car allowances, and more.
ADDING AND UPDATING ADDITIONAL PAY The Additional Pay pages are used to set up earnings that an employee is paid on a regular basis, in addition to regular pay. An example is Acting/Interim Assignment. Current NDUS Additional Pay Earnings Codes are listed in Appendix A of this manual.
Note: New Earning Codes may be added, or existing Codes are subject to change per the discretion of the University System.
To begin the process of adding additional pay, use the following navigational path: Payroll for North America > Employee Pay Data USA > Create Additional Pay. The following employee Additional Pay page will appear. Additional Pay Page

Ac
Connect ND
November 2017
Payroll Page 95
ADDITIONAL PAY PAYMENT DETAILS
The Additional Pay Payment Details section is used to define payment data for each additional pay earning. The following section defines the fields that are found on the Additional Pay Payment Details section.
Earnings Code – The appropriate code can be entered or selected by clicking on the . Effective Date – Defaults the current date and can be changed according to when this additional pay record is effective. Addl Seq # - Every additional pay entry that is set up requires an additional sequence number. The system uses this number to uniquely identify the additional pay and, if necessary, to distinguish it from other rows of data that are set up. For example, if additional pay needs to be charged to different departments. The additional sequence number that is entered here is brought forward to the Paysheet pages. The additional sequence number should always be 1, unless there are multiple Additional Pay records for an earnings type. For example, there may be a previous effective dated row set up that has not been completely paid out yet and need to add a new effective dated row using the same earnings type. In this case, the previous row is set up with an Addl Seq #1 and the new row would be Addl Seq #2. Earning End Date – Specifies the date the system uses to stop the additional pay earnings. Rate Code – Only used for the Multiple Components of Pay option. (This field is not currently being used by NDUS.) Reason – Used for informational purposes to indicate why the employee is receiving additional pay. Earnings – Used to create an additional pay based on a fixed amount. Hours – Will default from the job record if left blank. (This field is optional and is not currently being used by NDUS.) Hourly Rate – Will default from the job record if left blank. (This field is optional and is not currently being used by NDUS.) Goal Amt – Used to specify the limit an employee will be paid for this additional pay. Once this amount has been reached the additional pay will stop.
Ac
Connect ND
November 2017
Payroll Page 96
Goal Bal – Displays the total amount earned to date when the Goal Amt field has been populated. This amount is updated by the system every time the Pay Confirmation process is run. When the Goal Amt equals the Goal Bal, the system automatically stops paying the additional pay. Sep Chk# - Specifies if the additional pay should be calculated on a separate check, for handling of deductions and/or taxes differently than their normal pay. The system can produce up to 99 separate checks in addition to the regular paycheck. If this field is left blank, all earnings are rolled together in one check with regular pay.
Disable Direct Deposit Select Disable Direct Deposit checkbox if the additional pay is not to be included in the employee's direct deposit. In this case, a separate check will be processed for the additional pay amount as long as a check number is entered in the Sep Chk # field. Prorate Additional Pay – Select Prorate Additional Pay checkbox if you want the system to prorate the additional pay, based on the employee's job record. If the employee has a mid-period, effective-dated change on their job record, the system prorates the additional pay. The system does not prorate the additional pay based on the effective date of this additional pay record. See example 3 at the end of this section. Ok to Pay - When the OK to Pay checkbox is selected, the system flags the employee to be paid and checks the OK to Pay checkbox on the Paysheet page before processing the paycheck. Applies to Pay Period - The Applies to Pay Periods checkboxes indicate the pay periods in which the additional pay is received. Since NDUS is processing payroll on a semi-monthly schedule, first and second pay periods will automatically be checked.

Ac
Connect ND
November 2017
Payroll Page 97
ADDITIONAL PAY JOB INFORMATION Click on the arrow next to Job Information to display the following section. Job Information Page
By default, Additional Pay Job Information is charged to the same Department, Job Code, and GL account as the employee’s regular pay. Use the Additional Pay Job Information section to change default additional pay settings.
Note: As a rule, NDUS Additional Pay will be charged to the same department as designated for all other earnings. The combo code defaults from the department budget table. Skip Additional Pay Job Information section unless assigning earnings to different combination code.

Ac
Connect ND
November 2017
Payroll Page 98
The following are the fields that are found in the Additional Pay Job Information section: The Job Information group box shows default compensation information as entered on the employee’s job record. The Default Job Data group box shows the default accounting information as entered on the employee’s job record. The Job Data Overrides group box enables you to make adjustments to individual additional pay earnings. Position – Select a new position if you want to override the default position. (Note: NDUS does not override this data.) Business Unit – Select a new business unit if you want to override the default business unit. (Note: NDUS does not override this data.) Department – Select a new department identification if you want to override the default department. (Note: NDUS does not override this data.) Job Code – Select a new job code if you want to override the default job. (Note: NDUS does not override this data.) Combination Code* – Select a new combo code if you want to override the default code. To select a new combo code, click on the Edit Chartfields hyperlink. GL Pay Type – This field displays the type of GL transaction you are sending to GL. (This field is not used by NDUS.) Addl Shift – Select the appropriate shift for the override. Default is Use Job.
Click on the button located at the bottom of the page.
Note: These fields enable you to make adjustments to individual Additional Pay earnings. If these fields are left blank the system uses the default accounting information from the employee’s current job data.
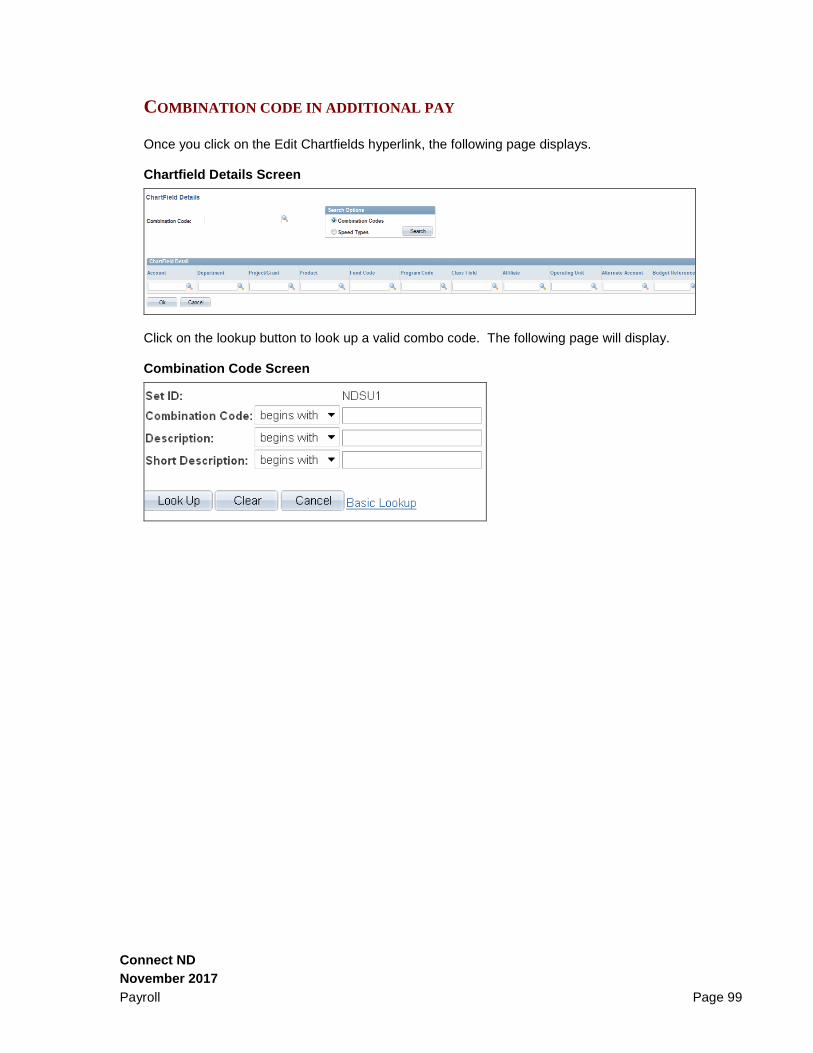
Ac
Connect ND
November 2017
Payroll Page 99
COMBINATION CODE IN ADDITIONAL PAY
Once you click on the Edit Chartfields hyperlink, the following page displays. Chartfield Details Screen
Click on the lookup button to look up a valid combo code. The following page will display. Combination Code Screen

Ac
Connect ND
November 2017
Payroll Page 100
To search for a combo code, click on the look up button or enter in part of the combo code and then click on look up to view a list of valid combo codes. Click on the combo code you need. Search Results Screen
Once you click on the combo code you need, it will bring you back to the previous page displayed below with your combo code. By choosing the combo code from the look up button, it will default to the chartfield values associated with the combo code. Chartfield Details Screen
Click on Clicking Ok will bring you back to the Job Information page with the combo code you selected.

Ac
Connect ND
November 2017
Payroll Page 101
Job Information Screen
Click on the button located at the bottom of the page. **You will notice there is an eraser icon present next to the combo code after you enter a combo code override. This icon can be clicked to Delete the Combination Code selected.
Ac
Connect ND
November 2017
Payroll Page 102
ADDITIONAL PAY TAX INFORMATION Click on the arrow next to Tax information to display the following section: Tax Information Page
Use the Additional Pay Tax Information section to override the employee tax data for Additional Pay earnings.
Note: As a rule, NDUS Additional Pays apply to the same job information and will not be overridden. Skip Additional Pay Tax Information section unless the taxation data is different from what is set up on the job data pages.
Ac
Connect ND
November 2017
Payroll Page 103
The following section defines the fields that are found in the Tax Information section. State – Used when the employee’s work state for the additional pay is different from the employee’s regular pay. Tax Periods – Specifies the number of pay periods that the additional pay should be taxed over. The system uses this field in conjunction with tax frequency to determine how much tax to withhold each pay period. Locality – Used when the employee’s locality for the additional pay is different from the employee’s regular pay. Tax Method – Indicates the tax calculation method to be used for the additional pay. Tax Frequency – Indicates the frequency for calculating taxes for the additional pay. Benefit Deductions Taken: Indicates whether/how benefit deductions should be taken in relation to the Additional Pay Benefit Ded Subset ID: Indicates whether/how a benefit deduction subset should be used in relation to the Additional Pay. General Deductions Taken: Indicates whether/how general deductions should be taken in relation to the Additional Pay
General Ded Subset ID: Indicates whether/how a general deduction subset should be
used in relation to the Additional Pay.
Click on the button located at the bottom of the page.

Ac
Connect ND
November 2017
Payroll Page 104
Values and descriptions used for Benefits Deductions Taken and General Deductions Taken:
NoOverride: This is the default value. If this is unchanged, the deductions specified on the Pay Calendar table, and Benefit Deduction Processing Override pages are not overridden on the paysheet for this additional pay on a separate check.
DeductionTable Governs: Select to take an employee’s normal deductions when additional pay is paid on a separate check. This does not apply if it is added to a regular check.
None: Select to take no deductions when additional pay is paid on a separate check. This does not apply if it is added to a regular check.
Deduction Table Subset Governs: Select to take only the deductions defined in the Subset ID field when additional pay is paid on a separate check. This does not apply if it is added to a regular check.
Values and descriptions used for Benefit Ded Subset ID and General Deduction Subset ID. A Subset ID must be selected if you select Subset in the Benefit Deductions Taken field.
CON: Prepay and employer deductions. This subset is used for employees on contract pay only. All employer and employee deductions will be taken along with any prepay deductions.
HFS: Flexcomp Deductions Only. Not used by Higher Ed.
HGA: Garnishment Only. Not used by Higher Ed.
PER: PERS only. Not used by Higher Ed.
RET: Retirement only deducted. This included PERS retirement and TIAA.
SUP: Supplemental payroll. Not used by Higher Ed.
SVG: Savings Plans and Retirement deducted.

Ac
Connect ND
November 2017
Payroll Page 105
Example 1: Set up Additional Pay of Summer Salary (H05) for an employee. Step 1: Go to Create Additional Pay (Payroll for North America>Employee Pay Data USA>Create Additional Pay) and enter the EmplID or name of the employee and click on Search. Create Additional Pay Screen
Step 2:
Once in the Additional Pay set up page, begin by entering the appropriate earnings code for the additional pay. If the code is known it can by typed in otherwise use the lookup to search for the Earnings Code.
Then enter the appropriate Effective Date. For example, if the Additional Pay earnings are to be earned from 9/1 through 12/15 (paid 9/30 through 12/31), the effective date to enter would be 09/01 of the current year.
Next, in the Payment Details section, enter a Sequence number. This value is usually 1 but another example using different sequence numbers will follow this example.
Next entering an End Date is optional but for this example an End Date of 12/15 has been entered.
The Rate Code and Reason Code fields can be skipped.
In the Earnings field, enter the amount to be earned per pay period. In this example an amount of $100.00 has been entered.
Ac
Connect ND
November 2017
Payroll Page 106
The Hours and Hourly Rate fields can be skipped.
For the Goal Amount, enter the total amount to be paid for the additional pay. In this
example an amount of $700.00 has been entered.
The Goal Balance field is left blank. This field gets updated by the system during Pay Confirmation when the additional earnings are confirmed.
The Sep Ck# field should be used when the additional pay should be paid on a separate check. Higher Ed normally issues separate checks for Summer Salary so that the earnings and associated deductions and taxes can be distributed to a chosen funding source.
Next click the check box for OK to Pay.
The ‘Applies To Pay Periods’ default to First and Second. See the following illustration of the values listed in step #2: Additional Pay Screen

Ac
Connect ND
November 2017
Payroll Page 107
Step 3: Job Information
Note that entering a Combo Code override in this section is optional. If no Combo Code is entered, the system will use the funding source(s) found in the position’s Department Budget Table for distribution of the earnings, deductions and taxes.
IF a Combo Code override needs to be entered, open the Job Information section by
clicking on the icon. Note that Default Job Data values appear on this page.
In the Job Data Override section the only value that should be overridden in the Combination Code. Do NOT override any of the other values.
To override the Combo Code, click on the hyperlink. This takes you to a page called Chartfield Details. If you know the Combo Code, type the value in the Combination Code field. If the code is not known, click on the lookup and search for the appropriate Combo Code. Then click OK and the system will revert back to the main Job Information page. The Combo Code will be populated with the value that was selected.
See the following illustration for the values listed in step #3:
Job Information Screen
Ac
Connect ND
November 2017
Payroll Page 108
ChartField Details Screen
Step 4: Tax Information
By entering Benefit Subsets, you are controlling what benefits apply to the additional pay earnings. Especially when paying additional pay on a separate check, typically only retirement benefits apply to the earnings or no benefits apply at all. Note that entering Benefit Subsets is optional.
To set up benefits so only retirement applies to the earnings, select the value of Subset for Benefit Deductions Taken and General Deductions Taken.
Then enter the value of RET for Benefit Deduction Subset ID and General Deduction Subset ID.
See the following illustration for the values listed in step 4: Tax Information Screen

Ac
Connect ND
November 2017
Payroll Page 109
To set up the page so no deductions are applied to the earnings, select a value of None for Benefit Deductions Taken and General Deduction Taken.
Leave the value blank for Benefit Deduction Subset ID and General Deduction Subset ID.
These values are illustrated below. Tax Information Screen
Verify that everything is entered correctly and click on . Example 2: The following is an example of how to enter an update to Additional Pay using an earnings code that already exists. Step 1: Go to Create Additional Pay (Payroll for North America>Employee Pay Data USA>Create Additional Pay) and enter the EmplID or name of the employee and click on Search. Create Additional Pay Screen

Ac
Connect ND
November 2017
Payroll Page 110
Step 2:
Once in the Additional Pay set up page, begin by scrolling through the existing additional pays that are set up to see if the Earnings Code needed is already being
used. Once you find it, click on the key in the Effective Date section to add a new row.
Notice in the illustration below that there are two sequenced rows set up using the same earnings code. This means the employee had multiple earnings using the same earnings code and normally the earnings are distributed to different funding sources.
Additional Pay Screen

Ac
Connect ND
November 2017
Payroll Page 111
After adding a new effective dated row, please review the Payment Details section. Notice both sequenced rows carried forward from the previous entry along with the amounts for Earnings. Users need to remember to either update the information in each sequenced row to correspond to the new information being entered and/or delete unneeded sequenced row(s). If the user is not careful to verify each row, the system will load the data to the paysheet and the employee will be paid incorrectly. See below:
Additional Pay Screen
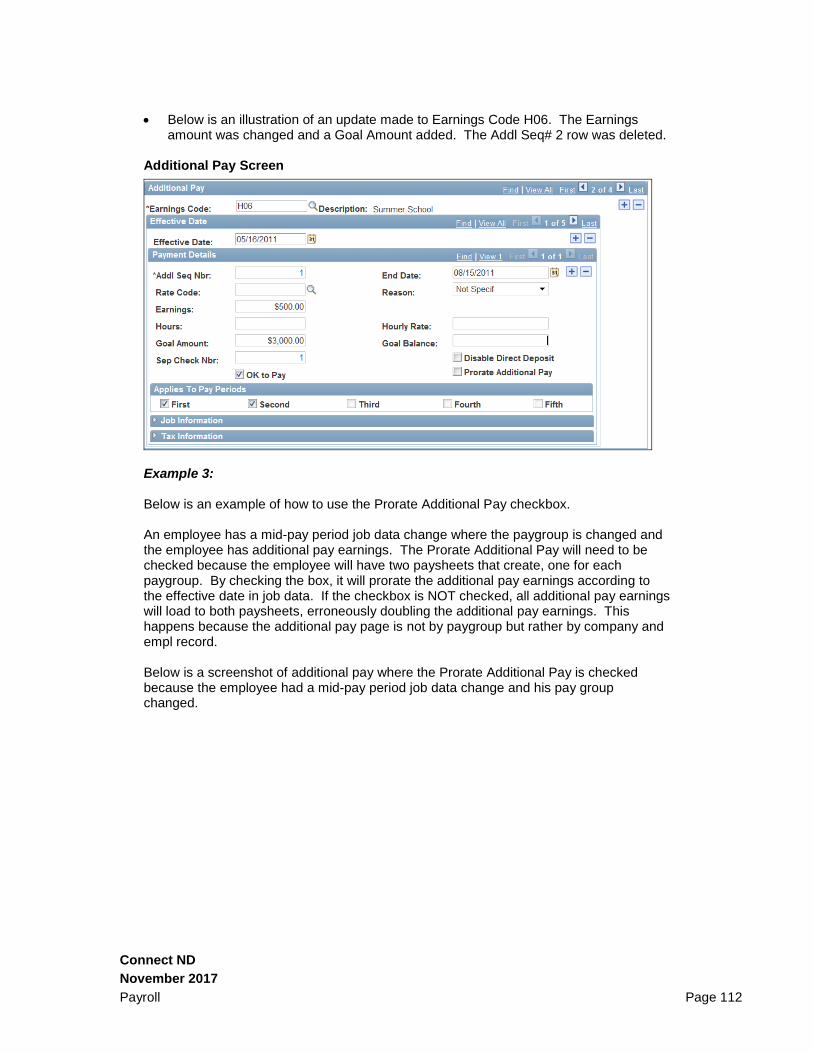
Ac
Connect ND
November 2017
Payroll Page 112
Below is an illustration of an update made to Earnings Code H06. The Earnings amount was changed and a Goal Amount added. The Addl Seq# 2 row was deleted.
Additional Pay Screen
Example 3: Below is an example of how to use the Prorate Additional Pay checkbox. An employee has a mid-pay period job data change where the paygroup is changed and the employee has additional pay earnings. The Prorate Additional Pay will need to be checked because the employee will have two paysheets that create, one for each paygroup. By checking the box, it will prorate the additional pay earnings according to the effective date in job data. If the checkbox is NOT checked, all additional pay earnings will load to both paysheets, erroneously doubling the additional pay earnings. This happens because the additional pay page is not by paygroup but rather by company and empl record. Below is a screenshot of additional pay where the Prorate Additional Pay is checked because the employee had a mid-pay period job data change and his pay group changed.
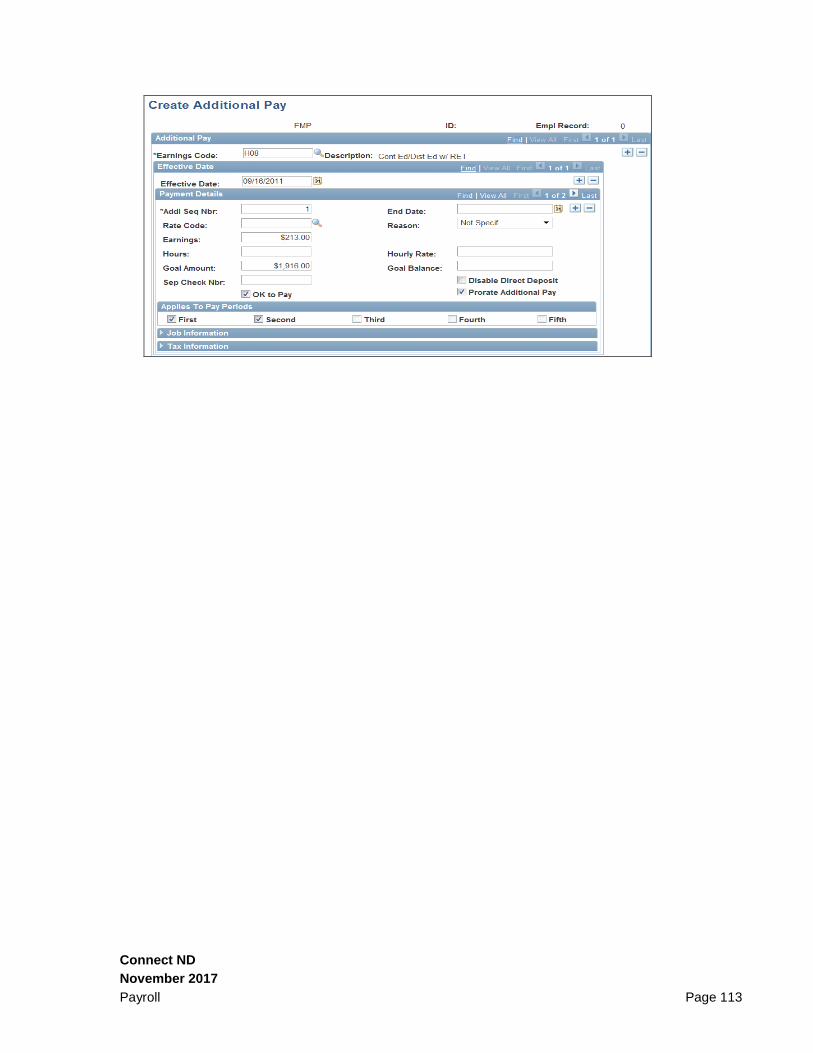
Ac
Connect ND
November 2017
Payroll Page 113

Ac
Connect ND
November 2017
Payroll Page 114
Balance ID’s, Pay Groups, Pay Calendars and Pay Run ID’s
OVERVIEW
PeopleSoft Payroll employs four organizational tools or concepts to help you categorize employee types and streamline payroll processing: Balance ID’s, Pay Groups, Pay Calendars, and Pay Run ID’s.
Balance ID’s enable you to define any number of balance types – calendar year, fiscal year, benefit year, and so on, for which you can maintain employee balances. The Balance ID’s control the way earnings, deductions and tax balances are stored in the system. Higher Ed has Calendar Year (CY) and Fiscal Year (FY) Balance ID’s.
Pay Groups represent groups of employees who share certain characteristics:
the company for which they work, how often they are paid, and the country in which they reside. PeopleSoft Payroll calculates employees by the pay groups you establish on the Pay Group Table. Each institution in Higher Ed has four Pay Groups. The names of each of the pay groups begin with the first two characters of their three character company code and the type of employee is identified by the third character of the Pay Group name. The third character identifies the following types of employees:
B = Salaried C = Contract H = Contract Hourly-Benefited N = Hourly
For example, an hourly employee at Mayville State would be assigned the paygroup of MAN. A contract employee at Lake Region would be assigned the pay group of LRC.

Ac
Connect ND
November 2017
Payroll Page 115
Pay Calendar Tables identify the begin and end dates of each payroll cycle, the check date, and the pay groups that will be paid on each date. Pay calendars are created by Pay Group for both on cycle (regularly scheduled pay) and off cycle (supplemental) payroll processing.
Pay Run ID’s is a unique identifier for each payroll, within each institution. The Pay Run ID, allows you to limit your searches and reports to a particular pay period and institution. The Pay Run ID is a seven characters name in the following format: XXXYYMMDD XXX=Three Character Company Code YY=Year MM=Month DD=Day

Ac
Connect ND
November 2017
Payroll Page 116
HE Student Tax Update Students who are enrolled and regularly attending classes at the institution on at least a half-time basis are exempt from FICA taxes1 as well as state unemployment insurance (UI)2. A custom process created for Higher Education is available in PeopleSoft HRMS that verifies active employees in HR with Campus Solutions to determine if the employee should be exempt from FICA and UI. It then updates both statuses in HR based on how many units (credits) they are enrolled for.
OVERVIEW
The HE Student Tax Update process is linked to Campus Solutions. The process looks for anyone enrolled in classes for the current academic term and compares that data with active employees in the HR system for a given business unit. If an employee’s EmplID from the Student system matches with an EmplID in HR, the process then determines if the FICA status in Job Data and Exempt from SUT status in Employee Tax Data require an update. The process determines a student’s half-time status by the number of credits entered in a setup table. If the process selects an EmplID to update in HR based on their half-time status in Student, it then updates the FICA status in Job Data to EXEMPT and updates the Exempt from SUT status in Employee Tax Data to EXEMPT (checkbox is flagged). Alternately, if the process determines that an employee’s status is only part-time or does not exist in Student, it then updates the FICA status in Job Data to SUBJECT and turns off the flag in Employee Tax Data for the Exempt from SUT status.
QUERIES Prior to running the HE Student Tax Update process, there are queries available to monitor what the process will update when it is run. It is recommended that these queries be run prior to running the HE Student Tax Update process and save the data. The queries do not update employee records like the process does. They report the records that will be updated when the process is run. Once the process is run, if you go back and try to run the queries again, you will not get the same data because most or all of the data has been updated. The queries available are:
NDU_PY_STUDENT_TAX_UPDATE
NDU_PY_STUDENT_CREDIT_INFO
NDU_PY_STUDENT_CREDITS_SUMMARY
1 Rev. Proc. 98-16, 1998-5 IRB, IRC Sec(s). 3121. 2 Employers Handbook on Unemployment Insurance in North Dakota, Page 17.

Ac
Connect ND
November 2017
Payroll Page 117
An example of the NDU_PY_STUDENT_TAX_UPDATE column headings appears
below. The only prompt is for Business Unit. The query will return data based on the
most current open Pay Calendar. The academic term displayed will be based on the pay
period begin and end dates found in the Pay Calendar.
Examples of data selected for an update appear below.
Example #1: Below, the employee is Temporary and enrolled for 16.0 credits and his
current FICA status in Job Data is SUBJECT (N) and SUT status in Employee Tax Data
is SUBJECT (N). The HE Student Tax Update process will change the FICA and SUT
statuses to EXEMPT.
Example#2: Below, the employee is Regular and not enrolled for classes. The FICA
status in Job Data is SUBJECT (N), which is correct, but the SUT status in Employee Tax
Data is EXEMPT (Y), which is not correct. The HE Student Tax Update process will not
enter an update in Job Data but will update the SUT status to SUBJECT (N).
Example #3: Below, the employee is temporary and not enrolled for classes. The FICA status in Job Data is Exempt (E) and the SUT status in Employee Tax Data is Exempt (Y). The HE Student Tax Update process will only update the SUT status to SUBJECT (N). This is because the employee has a visa status and there is a separate interface (Windstar) that is used to monitor the FICA tax status for international employees.
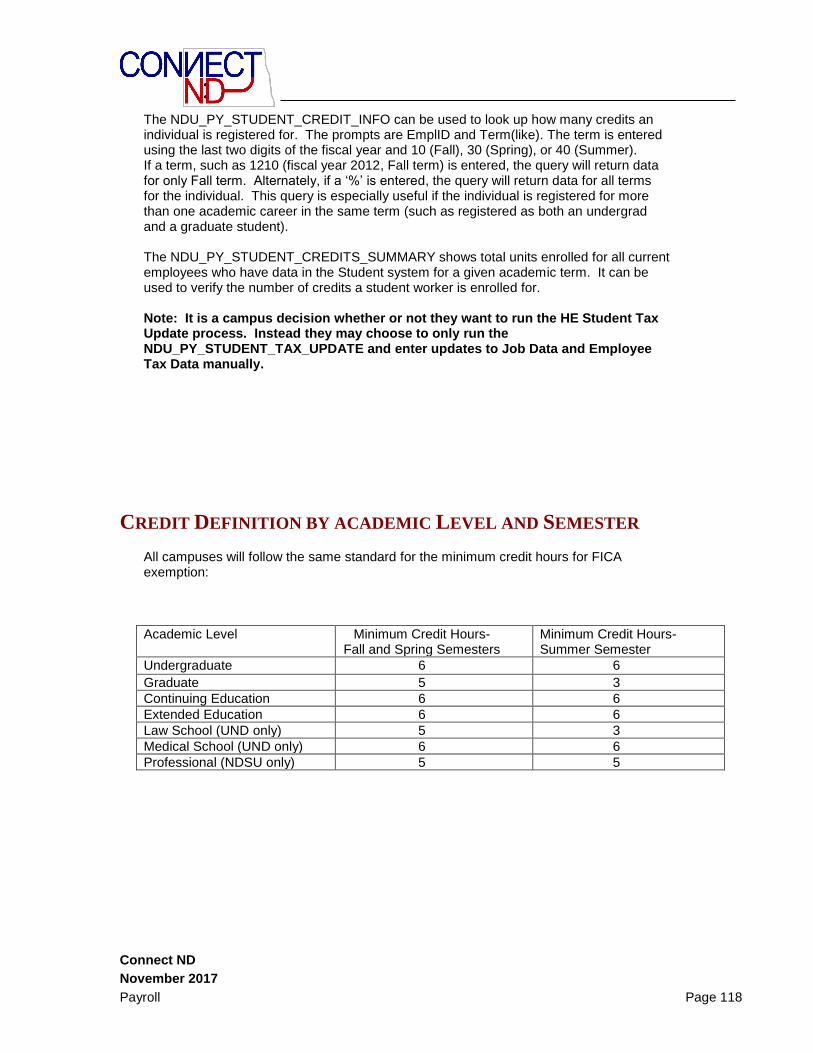
Ac
Connect ND
November 2017
Payroll Page 118
The NDU_PY_STUDENT_CREDIT_INFO can be used to look up how many credits an individual is registered for. The prompts are EmplID and Term(like). The term is entered using the last two digits of the fiscal year and 10 (Fall), 30 (Spring), or 40 (Summer). If a term, such as 1210 (fiscal year 2012, Fall term) is entered, the query will return data for only Fall term. Alternately, if a ‘%’ is entered, the query will return data for all terms for the individual. This query is especially useful if the individual is registered for more than one academic career in the same term (such as registered as both an undergrad and a graduate student). The NDU_PY_STUDENT_CREDITS_SUMMARY shows total units enrolled for all current employees who have data in the Student system for a given academic term. It can be used to verify the number of credits a student worker is enrolled for. Note: It is a campus decision whether or not they want to run the HE Student Tax Update process. Instead they may choose to only run the NDU_PY_STUDENT_TAX_UPDATE and enter updates to Job Data and Employee Tax Data manually.
CREDIT DEFINITION BY ACADEMIC LEVEL AND SEMESTER All campuses will follow the same standard for the minimum credit hours for FICA exemption:
Academic Level Minimum Credit Hours- Fall and Spring Semesters
Minimum Credit Hours-Summer Semester
Undergraduate 6 6
Graduate 5 3
Continuing Education 6 6
Extended Education 6 6
Law School (UND only) 5 3
Medical School (UND only) 6 6
Professional (NDSU only) 5 5

Ac
Connect ND
November 2017
Payroll Page 119
PROCESS The process is located at the following navigation: Payroll for North America > Employee Pay Data USA > Tax Information > HE Student Tax Update. The following page appears: HE Student Tax Update
Enter an existing Run Control ID and click . If you have not used this page, click on the hyperlink Add a New Value and enter a new Run Control ID, then
click . The following page appears: Student Tax Data Update
Enter the information in the following fields: Business Unit: Enter your 5-character Business Unit code.

Ac
Connect ND
November 2017
Payroll Page 120
Note: The process will look at the most current open Pay Calendar to determine the pay period begin and end dates. It will also locate the academic term that corresponds with the pay period begin and end dates.
Click . On the Process Scheduler Request page, select the server name of PSNT and select the HE Student Tax Update (in blue font) process. See example below. See example below.
Click .
After clicking OK to run the process, click on the Process Monitor hyperlink to monitor the status of your process.
Once it’s finished and the status says Success, click on the blue process name, NDU531PY. Then click on the NDUINTFC link.
Then click on the View Log/Trace link.
Then click on the NDUINTFC_xxxxxx.PDF link (xxxxxx is the process instance number).
The report will contain the data that was updated along with different messages that the user should review. An example appears below.
The process inserts an effective dated row into Job Data for each employee it updates. In the case where the employee has a future dated row, the HE Student Tax Update

Ac
Connect ND
November 2017
Payroll Page 121
process will insert the update row in the appropriate date sequence. The updated FICA status will also be carried forward to the future row(s). The process updates all employees who appeared on the NDU_PY_STUDENT_TAX_UPDATE query except international employees with a visa status. In that case, it only updates the SUT status. The NDU_PY_STUDENT_TAX_UPDATE query should be run again after the HE Student Tax Update is complete. This is to verify that everyone was updated. The only rows that may remain are the international employees. These may remain because of their FICA status which needs to be reviewed and updated with the Windstar interface.
Note: The time that this process is run is critical. It should be run by each campus after all Job Data updates are entered and prior to the central HRMS team processing Paysheet Creation. It can be run more than once, if necessary, but it is recommended that the NDU_PY_STUDENT_TAX_UPDATE query always be run first so the data can be reviewed prior to running the update process.

Ac
Connect ND
November 2017
Payroll Page 122
Time Entry
OVERVIEW There are two distinct means of entering time worked and other one-time payments into PeopleSoft Payroll. This chapter provides instruction in both the Higher Ed Time Entry page and the Payline Security pages.
The Higher Ed Time Entry page was created to streamline the time entry process as much as possible by providing a page that meets the majority of high-volume time entry situations. This page can only be used to enter hours worked and leave hours that are paid at the employee’s standard rate of pay. These hours are loaded automatically to the Payline Security via a program that is run by the campus and the SITS HRMS team every evening prior to pay calculation.
The Payline Security pages provide much more flexibility in how time is entered. The pages can be used to enter time at override rates of pay and can be used to enter one-time dollar amount payments, along with one-time deductions, garnishments, and taxes.
Keep in mind that all values entered into these pages are one-time only. They affect only the current pay period and do not affect any subsequent payrolls. In addition, all pages in this chapter are only usable before a payroll has been confirmed. Once a payroll has been confirmed, Higher Ed Time Entry, Paysheets, and Payline Security will not display any values for that payroll.

Ac
Connect ND
November 2017
Payroll Page 123
HIGHER ED TIME ENTRY SEARCH To enter time using Higher Ed Time Entry, navigate to: ND HE Applications > Payroll > HE Time Entry OR Payroll for North America > Payroll Processing USA > Update Paysheets > HE Time Entry.
The following search page displays:
This search page is a flexible means of defining the order in which you want to enter time. The page returns rows in the order of only the fields you enter. You can use a “%” as a wildcard to retrieve all values in order for a certain field. The following are brief descriptions of the Search fields on this page; all search keys are optional when using this page: Employee ID: PeopleSoft Employee ID Employee Rec Nbr: Employee Record Number is the number of the employee’s job. Usually zero unless the employee holds more than one job concurrently in the North Dakota HRMS system. If the employee holds multiple jobs, be sure to choose the record number associated with the job for which time is being reported.

Ac
Connect ND
November 2017
Payroll Page 124
Position Number: Employee Position Number Company: The Company code for your institution. Department: The Department ID used in PeopleSoft. Pay Period End Date: Ending date of the pay period. For our semi-monthly pay periods, this corresponds to the 15th or the last day of the month. Compensation Frequency: A one-letter code for the compensation schedule. ‘A’ = Annual or salaried employee; ‘C’ = Contract, meaning less than 12 month salaried, and ‘H’ = Hourly. Paygroup: This is the PeopleSoft Paygroup. Name: Employee Name As an example of a search, say you want to see all values for your company in name order, you enter the Company along with “%” in the name field.
Note: The search will always order in precedence of the lowest search value that you enter. So, when Department and Name are entered, the rows are ordered first by Name and then by Department ID.
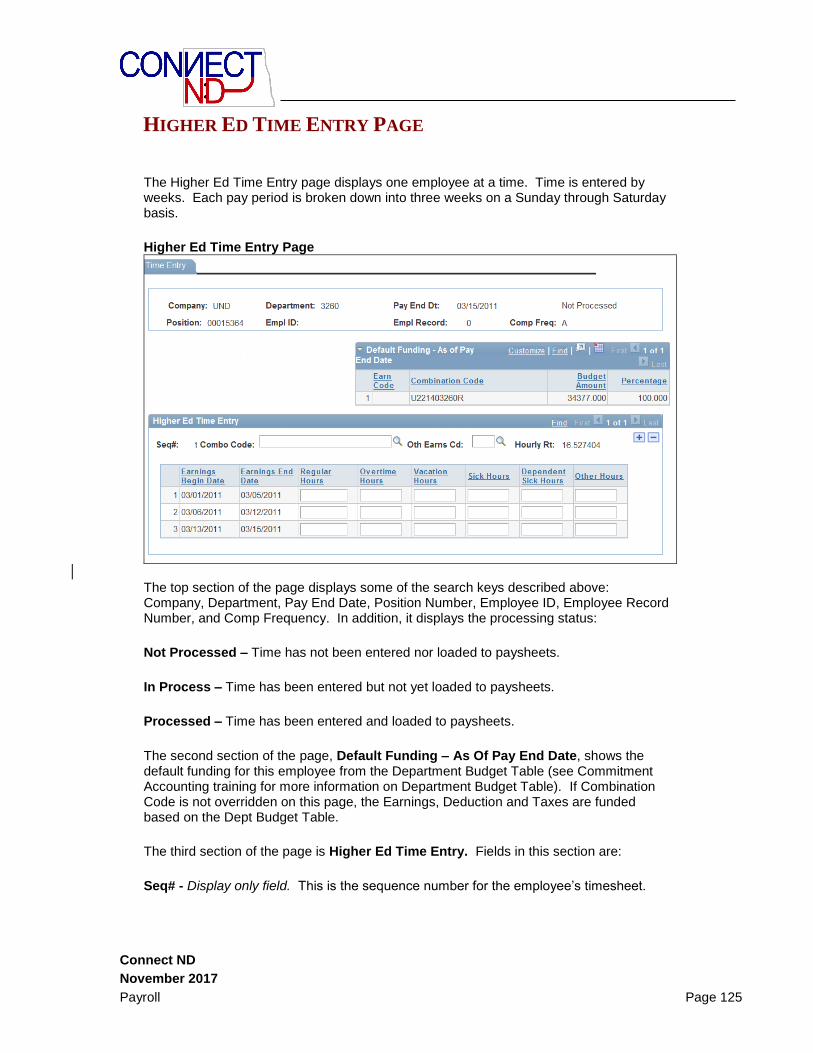
Ac
Connect ND
November 2017
Payroll Page 125
HIGHER ED TIME ENTRY PAGE
The Higher Ed Time Entry page displays one employee at a time. Time is entered by weeks. Each pay period is broken down into three weeks on a Sunday through Saturday basis.
Higher Ed Time Entry Page
The top section of the page displays some of the search keys described above: Company, Department, Pay End Date, Position Number, Employee ID, Employee Record Number, and Comp Frequency. In addition, it displays the processing status:
Not Processed – Time has not been entered nor loaded to paysheets.
In Process – Time has been entered but not yet loaded to paysheets.
Processed – Time has been entered and loaded to paysheets.
The second section of the page, Default Funding – As Of Pay End Date, shows the default funding for this employee from the Department Budget Table (see Commitment Accounting training for more information on Department Budget Table). If Combination Code is not overridden on this page, the Earnings, Deduction and Taxes are funded based on the Dept Budget Table.
The third section of the page is Higher Ed Time Entry. Fields in this section are:
Seq# - Display only field. This is the sequence number for the employee’s timesheet.

Ac
Connect ND
November 2017
Payroll Page 126
Combination Code – Override funding source for the earnings. The earnings and, in most cases, associated fringe dollars, are funded from this Combination Code instead of from Department Budget Table. If you leave blank, the earnings are funded based upon the Department Budget Table. To use multiple Combination Codes, insert another row.
Other Earnings Code – A one-time earnings code associated with hours entered into the Other Hours column. Other Earnings Code must be populated if Other Hours are entered. To use multiple Other Earnings Codes, insert another row.
Hourly Rate – Display only field. This is the employee’s hourly rate at which these hours are paid. To pay hours at a different rate, use the Payline Security component.
Earnings Begin and End Date – Display only fields. The begin and end Dates in which the time was worked. For hours worked in prior pay periods, use the Payline Security component.
Regular Hours – Regular hours worked.
Overtime Hours – Overtime hours worked. These hours are automatically paid at one and a half times the employee’s hourly rate. In some cases, the hourly rate paid is automatically calculated higher due to the Fair Labor Standards Act.
Vacation Hours – Vacation or annual leave hours taken.
Sick Hours – Sick hours taken.
Dependent Sick Hours – Dependent Sick hours taken.
Other Hours – Hours worked or leave hours taken that are associated with the selected Other Earnings Code.
Click on the button located at the bottom of the page.
Ac
Connect ND
November 2017
Payroll Page 127
PAYLINE SECURITY SEARCH The Payline Security page provides a flexible means of entering hours worked, leave hours taken, and one-time payments. To navigate to the Payline page, go to Payroll for North America > Payroll Processing USA > Update Paysheets > By Payline Security
Click on the value that you are looking for.

Ac
Connect ND
November 2017
Payroll Page 128
The following are brief descriptions of the Search fields on this page. All search keys are optional when using this page: Company: The Company code for your institution. Paygroup: This is the PeopleSoft Paygroup. Pay End Date: Ending date of the pay period. For our semi-monthly pay periods, this corresponds to the 15th or the last day of the month. Off Cycle: Indicates a check that is outside of the regular payroll cycle. Page Nbr: PeopleSoft Page Number is a numeric grouping of employees’ paycheck information. Generally, there are seven employees per page number. Line Nbr: PeopleSoft Line Number indicates the sequence of an employee within a Page. Empl ID: The PeopleSoft Employee ID. Job Pay Data Change: This is an indicator if there have been Job Data changes that may impact the results of pay calculation. “Calc Reqd” means that the next payroll calculation may change the paysheet data and the calculated results. Partial Pay Period: This is an indicator if the paysheet data does not reflect a full pay period due to a Job Data event such as a late hire or a mid-period status change. Name: Employee Name.

Ac
Connect ND
November 2017
Payroll Page 129
PAYLINE SECURITY COMPONENT The Payline Security component consists of four pages that can be used to enter time worked, leave time, one-time earnings amounts, one-time deductions, and one-time taxes. The Payline tab appears as follows: Payline Tab
The top scroll area of the page contains the search key values. It is important to never change any of these fields, including Pay End Date, Page#, and Empl Rcd#. Other fields on the page:
Manual Check: Do not use!! Leave this as the default of OFF. This is only used when a check is cut by hand and not printed out of PeopleSoft.
Addl#: Display Only - visible when Addl# is greater than zero. This is an important field, along with Earnings Begin and End Dates, to help you keep track of what time period you are entering pay information for. The field counts from zero upwards to indicate the individual earnings rows for the employee. Every time you insert an earnings row, the new row is created with the next Addl# in sequence.
Earnings Begin/End Dates: Define the range of dates for which the hours on this row were worked. This training manual refers to this range of dates as the Earnings Period.
OK to Pay: Always turn on to issue payment for the Earnings row. If turned off, payments, deductions, garnishments, and taxes associated with that row are not

Ac
Connect ND
November 2017
Payroll Page 130
calculated and not paid. An employee must have a minimum of one Earnings row with OK to Pay ON for a paycheck to calculate.
Override Hourly Rate: When ON, this field links the payline security hourly rate to the employee’s default hourly rate on Job Data. Turn this field ON if changing the Hourly Rate for this payline.
No Direct Deposit: Rarely used for On-Cycle. Defaults ON for Off-Cycle. Turning this field ON would cause an employee that is setup to Direct Deposit to have a paycheck issued instead for this one payment.
Gross-Up: Rarely used - Use only with Off-Cycle. Leave this field OFF for normal on-cycle processing. Turning this ON has the system calculate the check as a Net Pay Gross-Up.
SepChk#: Only visible for rows that are inserted by hand. Only used for contract employees receiving one-time pay outside of their contract period or for employees receiving a salary advance. In those cases, set this field to 1. This causes all deductions and taxes to be calculated separately on each check for the employee.
Reason: Only visible for rows that are Contract Pay, inserted by hand, or loaded from Time Entry. This is an informational field describing where the payline row originated.
Reg Rate Cd: Do not use.
Reg Hours: If the regular hours worked for the earnings period differed from the system default, enter them here. Use only for Hourly employees.
OT Rate Cd: Do not use.
OT Hours: Enter any Overtime hours worked within the earnings period.
Hourly Rate: Defaults to the employee’s job data hourly rate effective for the earnings period. To change this from the default, you must also click on Override Hourly Rate.
Regular Salary: For salaried employees only, defaults to the employee’s salary from Job Data for the earnings period. Overriding this value is not recommended. Any additional or one-time earnings should be entered in the Other Earnings scroll area.

Ac
Connect ND
November 2017
Payroll Page 131
Job Pay: Field only visible when ON. Normally not visible for Hourly employees. When ON, this field links the payline security data to the employee’s Job Data. Critical fields such as Hourly Rate and Salary always revert to the Job Data value as long as Job Pay is on. Turn this OFF if modifying payline data such as salary or the fields in the Additional Data link. Once you turn OFF the Job Pay, it cannot be turned back on.
The following screen shot shows the Job Pay flag in Payline Security. This flag defaults to ON during Paysheet Creation for salaried employees. When the Job Pay flag is ON, the pay calc process will look at Job Data for any changes that may have occurred since the last calc. It will update the Paysheet with changes made in Job Data if the flag is still turned on. Sometimes it is necessary to turn the Job Pay flag off in Payline Security. If this happens, the link between Payline Security and Job Data is broken for that paysheet. You cannot turn the flag back on once it is checked off as the field disappears if it is checked off. The following is a display of the Payline Security page with the Job Pay flag turned on. Payline Security Page
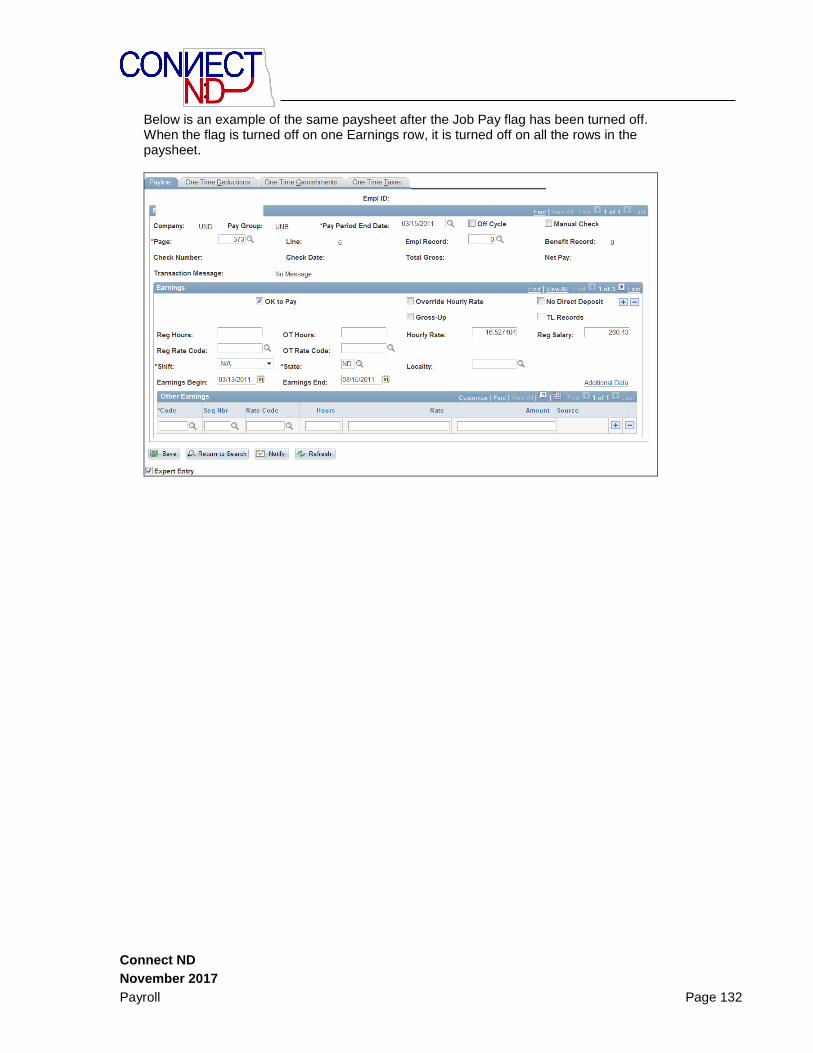
Ac
Connect ND
November 2017
Payroll Page 132
Below is an example of the same paysheet after the Job Pay flag has been turned off. When the flag is turned off on one Earnings row, it is turned off on all the rows in the paysheet.

Ac
Connect ND
November 2017
Payroll Page 133
Additional Data Link: This link displays a number of additional fields that apply to the earnings row. All of these fields default from Job Data and if you change them, be certain to turn OFF the Job Pay flag. The Combo Code field on this page is where the funding source can be overridden for a one-time payment. The page appears as below:
Clicking cancel from the Additional Data page returns you to the Payline Security. Other Earnings Scroll Area: This scroll area serves two purposes. It is where salaries for contract employees will appear (under earnings code H02). And, this is where any one-time earnings or hours can be entered for an employee. Example of the scroll area for a contract employee:
For a non-contract employee without any recurring additional pays, the scroll area defaults blank as seen below:
Fields in the Other Earnings scroll area: Code: Required. This is the Earnings Code for the other hours or amount.

Ac
Connect ND
November 2017
Payroll Page 134
Seq#: This field links earnings that are loaded automatically from Additional Pay (Chapter 1) to this payment. For normal one-time payments, this field must be left blank. Rate Code: Do not use. Hours: Hours worked or leave hours. Usually you will enter either Hours or Amount, but not both. Rate: Hourly rate, only enter here if differs from the Hourly Rate on the Earnings level.
Amount: One-time earnings amount. Usually you will enter either Hours or Amount, but not both. One-Time Deductions Tab The One-Time Deductions tab allows one-time additions and overrides to the employee’s enrolled deductions. The primary usage for this tab is to override deductions for contract employees outside of their normal work contract, make corrections to deductions from previous pay periods and increase deductions for newly hired employees. It appears as follows:
Note that the rows on this tab correspond directly with the rows on the Payline tab. Use the Addl# field to keep track of which row you are looking at. As with the Payline tab, the OK to Pay for this earnings row must be ON for the One-Time Deductions to take effect. Other critical fields: Benefit and General Deductions Taken/Ben and Gen Ded Subset: The Ded Taken and Subset provide the ability to limit the types of deductions that are taken for a

Ac
Connect ND
November 2017
Payroll Page 135
particular paycheck. Ded Taken defaults to ‘Subset’ and Ded Subset to ‘CON’. In this case, the Deductions portion of the page looks as follows:
When making a payment to those same contract employees outside of their paid contract period, a new earnings row needs to be added with the RET subset. All earnings should be associated with this Addl# on the Payline tab. As follows:
The other fields on the One-Time Deductions page are related to general deductions and benefits. One-Time Garnishments Tab The One-Time Garnishments tab provides a means of overriding or adding to the predefined garnishments for the employee. Since this page only affects the pay period for which it is entered, it is recommended that you only enter this page in truly one-time change situations. More practical is to make changes to the Garnishment Spec Data page. Full details on garnishment fields are available in the Garnishment Spec chapter. One-Time Garnishment Tab

Ac
Connect ND
November 2017
Payroll Page 136
One-Time Taxes Tab The One-Time Taxes tab is a means of overriding taxes for this pay period only. Since this page only affects the pay period for which it is entered, it is recommended that you only enter this page in truly one-time change situations. More practical is to make changes to the Employee Tax Data page. One-Time Taxes
Entering Taxable Business Expenses on the Payline Business expenses, such as meals, that are reimbursed to an employee through Accounts Payable are taxable. The reimbursements amounts must be added to the employee’s taxable gross and applicable FICA taxes and federal and state income taxes withheld.

Ac
Connect ND
November 2017
Payroll Page 137
A query is available in PeopleSoft Financials to extract employee business expenses. The query name is NDU_GL33_TXBLEXP. The user is prompted for a business unit, from date and to date. A view of the query results is shown below. Preview Table Page
The campus payroll department works with the Accounts Payable department to obtain this information for entry into the employee’s Payline Security screen. Earnings codes H87 (Moving Expenses) and H88 (Meal Allowance) have been established to use for entering employee taxable business expenses into the Payline. On Payline Security, add another row for Earnings and in the Other Earnings section, input the earnings code along with the total amount of taxable expenses. This amount is added to the employee’s taxable gross pay for purposes of calculating the applicable FICA taxes and income taxes. Only the additional taxes are deducted from the employee’s paycheck. The amount is not included in the employee’s pay. If the employer-paid taxes are to be paid from a different funding source than the default, click on the Additional Data link and override the account code in the field provided.
Campus policy will dictate how often employee business expenses are added to the taxable gross pay. It is recommended that expenses are queried from Financials and given to Payroll for input no less than on a quarterly basis.
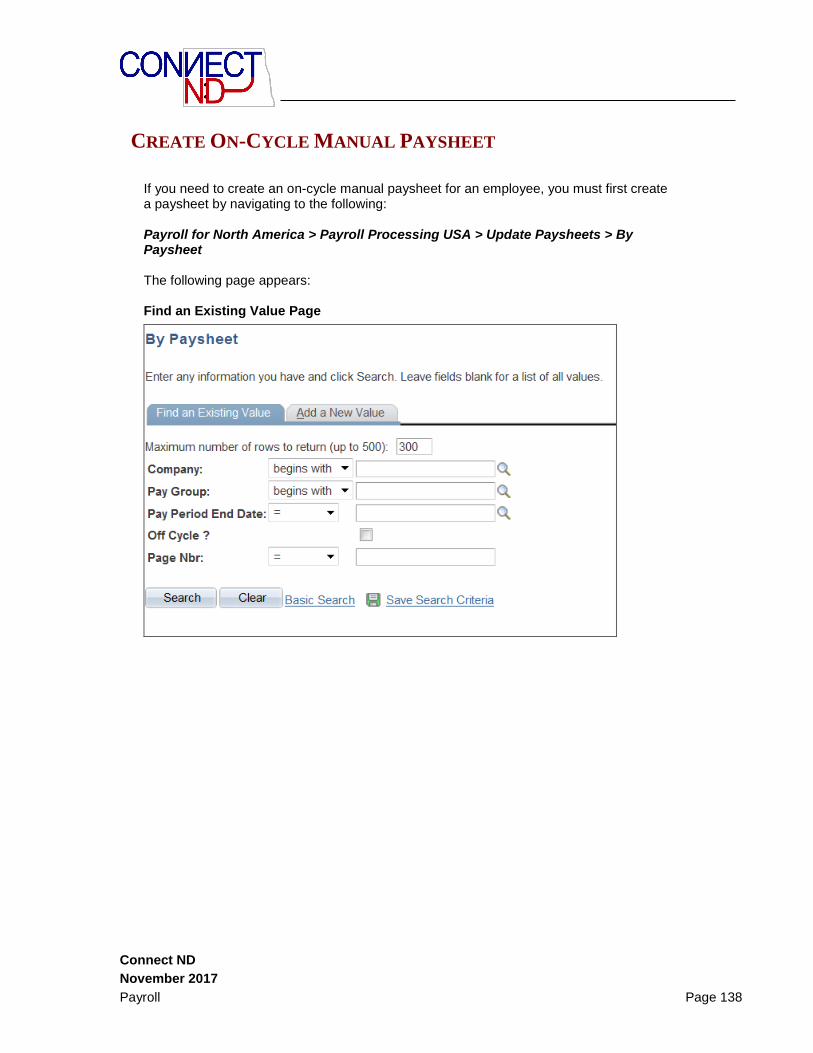
Ac
Connect ND
November 2017
Payroll Page 138
If you need to create an on-cycle manual paysheet for an employee, you must first create a paysheet by navigating to the following: Payroll for North America > Payroll Processing USA > Update Paysheets > By Paysheet The following page appears: Find an Existing Value Page
CREATE ON-CYCLE MANUAL PAYSHEET

Ac
Connect ND
November 2017
Payroll Page 139
To add a new paysheet, click on the hyperlink Add a New Value.
The following page appears:
By Paysheet Page
Enter information in the following fields:
Company: Enter the 3-character company name
Pay Group: Enter the pay group of the employee(s) you wish to calculate.
Pay End Date: Enter the pay period ending date of the on-cycle payroll currently being processed.
Off-Cycle: Do Not Check
Page #’s: Enter page number 900. If you are issuing on-cycles for more than one employee at the same time and in the same paygroup, you can add more than one employee to a page by clicking the + sign on the Paysheet page (see below). However, if you need to add more employees’ on-cycles for the same pay period at a later time, you need to increment the Page # you are adding by 1 each time. For example, Page # 901, 902, etc. Never use page # 999. NOTE: For the bigger campuses, page 900 may already be in use due to the large number of employee’s. To ensure these larger campuses have a blank paysheet, start at page #1000.

Ac
Connect ND
November 2017
Payroll Page 140
Click
The following page appears:
Paysheet Page
Enter the Empl ID and the Empl Rcd #. It is very important that you use the correct Empl Rcd # if the employee has multiple jobs. Click on the Refresh link at the bottom of the page and the employee’s name and hourly rate are populated. Enter the check date equal to the on-cycle payroll issue date. NEVER check the Manual Check box. Verify that the No Direct Deposit box is not checked if the employee is setup for direct deposit.
Enter hours and amounts to be paid. For instructions on entering hours and amounts, see the section on Paylines and Paysheets. One-time deductions and garnishments can also be entered, by clicking the appropriate tab. Remember that if the employee has employer or employee paid benefits or deductions, those will always be calculated, unless you enter Benefits and General Deductions Taken as None or a Subset on the One-Time deduction page.
Click .

Ac
Connect ND
November 2017
Payroll Page 141
CREATING A GROSS-UP PAYCHECK
Go to: Payroll for North America>Payroll Processing>Update Paysheets>By Paysheet. Click
on ‘Add a New View’. Enter the correct Company, Pay Group, Pay Period End Date, and Page
Nbr. Do not select Off Cycle. Click Add.
Enter the EmplID and Empl Record # (look up the empl record in Job Data. Do NOT assume it is record 0). Click the Refresh button at the bottom of the screen. This will populate the name and Benefit Record number.
Select the OK to Pay
Select the Gross-Up
In the Other Earnings section, enter an Earnings Code and the Amount
In the One-Time Deductions tab, change the Benefit Deductions and General Deductions fields to ‘None’ (see screen shot of One-Time Deductions tab).
Save the paysheet.

Ac
Connect ND
November 2017
Payroll Page 142
After all the paysheets are set up and saved, run a pay calc.
Verify the paycheck.
In the following example, the taxable earnings are $150.00. With the gross-up, the
earnings amount becomes $209.39. The funding source(s) set up in the Department
Budget Table OR entered as a combo code override will be charged an additional $59.39
which is the employee’s share of the tax withholdings.

Ac
Connect ND
November 2017
Payroll Page 143
Paycheck taxes shows $209.39 is added to the employee’s taxable gross and shows the
withholding amounts.

Ac
Connect ND
November 2017
Payroll Page 144
Pay Calculation and Pay Confirmation
OVERVIEW The core process in PeopleSoft Payroll is the calculation process. The “Calc” as it’s commonly referred to, is intended to be an iterative process, which means that you can run it over and over, checking the results and changing data until the results are as you want them to be. The iterative process generally depends on running the process in preliminary mode and not final mode. Preliminary mode executes different processes than final calc and those processes allow the changing of and recalculating of data that gives PeopleSoft Payroll its flexibility and strength. This method of processing allows you to report on, analyze and balance your payroll before checks are ever cut.
The calc process uses the HR data in the employee’s Job Record, along with any additional information keyed onto the paylines. The Payline Security and the Review Paycheck inquiry pages are used often during the pay calculation process to check the results and confirm that changes made are in effect.
The calculation process also performs many audits of the data to alert you to potential problems, errors in taxes and deductions and employee data issues. All errors must be cleaned up before the confirmation process is run, and checks and advices are issued. PeopleSoft delivers reports and online pages to help you see any errors.
The SITS HRMS team will create paysheets and run a Preliminary calculation one to three days after the pay period ends. Preliminary calculations will then be run nightly by SITS. Campuses are responsible for running preliminary payroll calculations during business hours. Please see Appendix B for a more detailed payroll processing schedule. See Appendix C for the schedule of daily HE Timeloads and preliminary calculations by campus.
Pay Confirmation is the process that locks the payroll, so that no other changes can be made. This process is run centrally by the SITS HRMS team, immediately following the Final Calculation.
TAX CALCULATION FOR PAID OVER CONTRACT
EMPLOYEES
Paid Over Contract Employees:
No Other Earnings: The tax calculation will be over payment periods

Ac
Connect ND
November 2017
Payroll Page 145
With Other Earnings: From additional pay loaded to paysheet on the same check. The tax
calculation will be over payment periods for all earnings
With Other Earnings on a Separate Check for the same Empl Record. The tax calculation
will be over payment periods for both checks
With Other Earnings for another Empl Record/Pay Group on the Same Check: The tax
calculation will annualize over 12 for all earnings
With Other Earnings for another Empl Record/Pay Group on the Separate Check: The tax
calculation will be over payment periods for the contract empl rcd/paygroup and annualize
over 12 for the separate check
Manual Paysheet Created: The annual tax periods defaults in correctly to the paysheet
Row Added to the Paysheet, Other Earnings Entered: The annual tax periods defaults in
correctly. It copies the additional data information from the previous row, which should be
correct
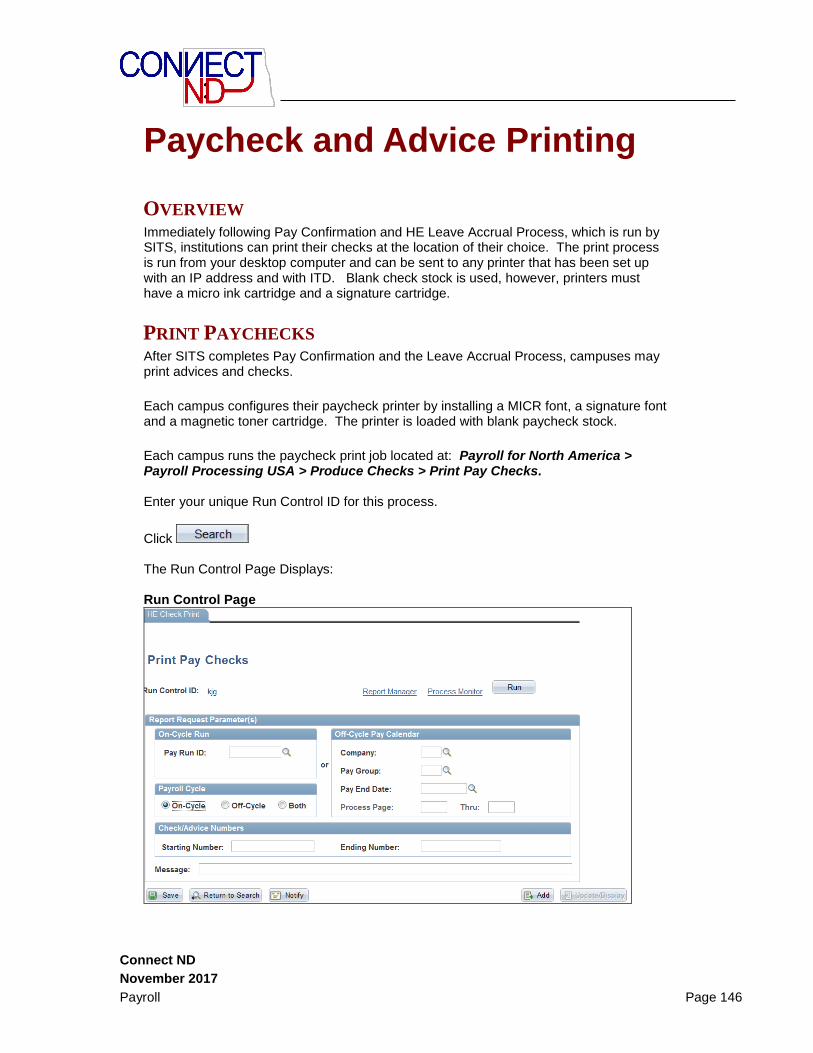
Ac
Connect ND
November 2017
Payroll Page 146
Paycheck and Advice Printing
OVERVIEW Immediately following Pay Confirmation and HE Leave Accrual Process, which is run by SITS, institutions can print their checks at the location of their choice. The print process is run from your desktop computer and can be sent to any printer that has been set up with an IP address and with ITD. Blank check stock is used, however, printers must have a micro ink cartridge and a signature cartridge.
PRINT PAYCHECKS After SITS completes Pay Confirmation and the Leave Accrual Process, campuses may print advices and checks.
Each campus configures their paycheck printer by installing a MICR font, a signature font and a magnetic toner cartridge. The printer is loaded with blank paycheck stock.
Each campus runs the paycheck print job located at: Payroll for North America > Payroll Processing USA > Produce Checks > Print Pay Checks. Enter your unique Run Control ID for this process.
Click The Run Control Page Displays: Run Control Page

Ac
Connect ND
November 2017
Payroll Page 147
Enter the Pay Run ID for the pay period that you want to print checks. Click the On-Cycle radio button. Optional: Enter a message that you would like to appear on all of the
paychecks for this pay period. Click The Process Scheduler Page appears: Process Scheduler Page
Enter/Verify the following information:
Server Name: PSNT
Select HE Check Print (NDUPY007)
Type: Printer
Format: HP
Output Destination: Your printer’s code from ITD
Click
The Run Control Page appears again. Click on the Process Monitor hyperlink. Your print job will be the first job under the blue header.
Click on until the Run Status shows success and Distribution Status shows Posted. Click on the Details hyperlink, next to your job. Click on View/Log Trace. Review files for any potential errors. Checks should start printing shortly after clicking the OK button. The format of the paycheck has been customized for Higher Education. The sort order of the check is also modified in the program to be by Company, Mail Drop ID and Employee name. Institutions can customize the sort order of their checks by entering their own identifiers in the Mail Drop ID field. The Mail Drop ID is found at: Payroll for North America > Employee Pay Data USA > Update Payroll Options. Click on Payroll Options 2 tab.

Ac
Connect ND
November 2017
Payroll Page 148
CREATE PDF PAYCHECK/ADVICE FORMS
After SITS completes Pay Confirmation and the Leave Accrual Process, create pay paycheck/advice in PDF for self-service viewing. Each campus runs the Create PDF Advice Forms print job located at:
Payroll for North America > Payroll Processing USA > Create Direct Deposits > Create PDF Advice Forms
Enter in Pay Run ID for the pay period for which you want to create PDF Advices for viewing in Self-Service.
Select
Click

Ac
Connect ND
November 2017
Payroll Page 149
Select HE Create Self Serv PDF Forms and click OK
When the Run Status shows success the paychecks are available to view in PDF. Employee’s may view via self-service ND HE Self Service > Payroll and Compensation > View Paycheck HR/Payroll may view employees self-service PDF paycheck/advice at Payroll for North America > Payroll Processing USA Produce Payroll > Review Self Service Paycheck

Ac
Connect ND
November 2017
Payroll Page 150
REPRINT/REISSUE CHECKS This process is run when a paycheck has been lost, destroyed or stolen. The Paycheck Reprint program moves the lost/destroyed/stolen paycheck(s) into the Dead Paycheck File.
Note: The Reprint/Reissue Paychecks process only changes the check number of the paycheck. It does not change the issue date. For checks that are older than 6 months, use the Reverse Paycheck process instead and then issue an off cycle check.
The authorized campus payroll officer runs the Paycheck reprint process at: Payroll for North America > Payroll Processing USA > Produce Checks > Reprint Checks.
Reprint Checks Tab
Enter your unique Run Control ID for this process.
Click The Run Control Page Displays:
Run Control Page

Ac
Connect ND
November 2017
Payroll Page 151
Enter the correct Form ID, Form Alignment Count can be blank. Enter the same check # in both First Check # and Last Check # in Reprint Range. Enter the original issue date.
Click
The Process Scheduler Page appears: Process Scheduler Page
Enter/Verify the following information:
Server Name: PSNT
Type: None
Format: None
Click

Ac
Connect ND
November 2017
Payroll Page 152
The Run Control Page appears again. Click on the Process Monitor hyperlink. Your print job will be the first job under the blue header.
Click on Until the Run Status shows success and Distribution Status shows posted. Click on the Details hyperlink, next to your job. Click on View/Log Trace. Review files for any potential errors. View the results online by selecting: Payroll for North America > Periodic Payroll Events > Check Reconciliation > Review Dead Checks. Review Dead Checks
Search by entering the Form ID and the number of the check you are replacing. The form ID is the characters CHK, followed by the three character company code. For example, the Form ID for NDSCS checks would be CHKSCS.
Click The Dead Paycheck screen displays. Dead Paycheck Page

Ac
Connect ND
November 2017
Payroll Page 153
The system will show you the number of the replacement check. Note the number of the replacement check.
You may now reprint your check(s) as you normally print checks, by running the paycheck print process at ND HE Applications > Payroll > HE Check Print OR Payroll for North America > Payroll Processing USA > Produce Checks > HE Check Print. Enter the replacement check number as the Starting Check number. Please refer to the pay check printing instructions which you can find starting on page 153.
NOTE: Remember to enter the Pay Run ID of the original pay period the check was
issued in. DO NOT enter the current Pay Run ID that is being used for other off-cycle
checks.
Check(s) should start printing shortly after clicking the OK button.

Ac
Connect ND
November 2017
Payroll Page 154
Payroll Corrections
OVERVIEW This section identifies general types of payroll problems and takes you through the steps to correct each. The following will be discussed:
1. Correct an employee deduction that was incorrect in a previous pay period
2. Correct an employer deduction(s) that was incorrect in a previous pay period
3. Correct a garnishment or child support that was incorrect in a previous pay period
4. Correct taxes that were incorrect in a previous pay period
5. Paycheck Reversal
6. Off-cycle checks
ONE-TIME PAYROLL DEDUCTION
To correct or adjust a Benefit or General Deduction amount, it is recommended that you wait until paysheets have been created for the next on-cycle pay period.
Note: If a correction is needed, prior to the next on-cycle payroll, see instructions later in this section for Payroll Reversal and Off-cycle check.

Ac
Connect ND
November 2017
Payroll Page 155
After on-cycle paysheets have been created, navigate to Payroll for North America > Payroll Processing USA > By Payline Security.
The following search page displays:
Payline Security Search Page
Enter the Company code for your institution and the EmplID or Employee name of the employee you want to correct.
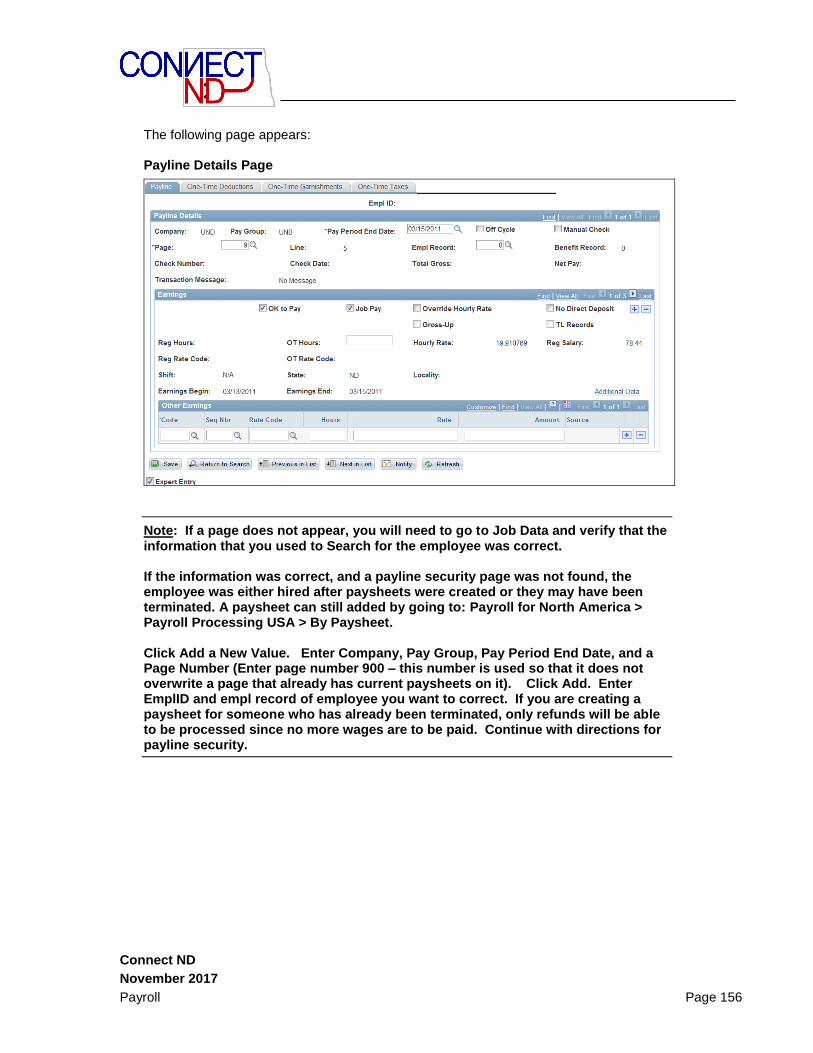
Ac
Connect ND
November 2017
Payroll Page 156
The following page appears: Payline Details Page
Note: If a page does not appear, you will need to go to Job Data and verify that the information that you used to Search for the employee was correct. If the information was correct, and a payline security page was not found, the employee was either hired after paysheets were created or they may have been terminated. A paysheet can still added by going to: Payroll for North America > Payroll Processing USA > By Paysheet. Click Add a New Value. Enter Company, Pay Group, Pay Period End Date, and a Page Number (Enter page number 900 – this number is used so that it does not overwrite a page that already has current paysheets on it). Click Add. Enter EmplID and empl record of employee you want to correct. If you are creating a paysheet for someone who has already been terminated, only refunds will be able to be processed since no more wages are to be paid. Continue with directions for payline security.

Ac
Connect ND
November 2017
Payroll Page 157
Click on One-Time Deduction Tab. The One-Time Deductions tab allows one-time additions and overrides to the employee’s enrolled deductions. The primary usage for this tab is to override deductions for contract employees outside of their normal work contract, make corrections to deductions from previous pay periods and increase deductions for newly hired employees. It appears as follows:
One-Time Deductions Page
Note that the rows on this tab correspond directly with the rows on the Payline tab. Use the Addl# field to keep track of which row you are looking at. As with the Payline tab, the OK to Pay for this earnings row must be ON for the One-Time Deductions to take effect. Other critical fields: Benefit and General Deductions Taken/Ben and Gen Ded Subset: The Ded Taken and Subset provide the ability to limit the types of deductions that are taken for a particular paycheck. The default for regular employees is: Deduction for both Benefits Deductions Taken and General Deductions Taken, with blank fields for both Ben Ded Subset and Genl Ded Subset
This default means that all benefits and deductions that the employee is enrolled in, will be calculated and deducted this paycheck.

Ac
Connect ND
November 2017
Payroll Page 158
If you do not want any deductions taken from the check you would set the Deductions and Benefits to None:
If you want to limit the employer and employee deductions that are taken from the paycheck, you will need to choose Subset for Benefit Deduction Taken and General Deduction Taken and then enter one of the following subsets in each subset field: CON - System will only take employer and employee paid premiums. In a case where there is no gross pay for the employee: If there is money in Prepay, the system will take the amount from prepay, however, if there is not any money in prepay, the premium amount will be sent to arrears and will be deducted with the next paycheck the employee receives. This is the setup for employees that are on Summer Leave. See below for setup:
RET - The system will not take any deductions, other than retirement and then only if the employee is eligible and the Earnings Code calculates retirement.
When making a payment to contract employees outside of their paid contract period, a new earnings row needs to be added with the RET subset. A separate check needs to be associated with the additional earnings and then the RET subset is used on the row that includes the earnings.

Ac
Connect ND
November 2017
Payroll Page 159
SVG - The system will not take any deductions, other than retirement AND savings plan, and then only if the employee is eligible and the Earnings Code calculates retirement.
When making a payment to contract employees outside of their paid contract period, a new earnings row needs to be added with the SVG subset. A separate check needs to be associated with the additional earnings and then the SVG subset is used on the row that includes the earnings. The other fields on the One-Time Deductions page are related to general deductions and benefits. Plan Type: Select the Plan Type from the drop-down menu that contains the deduction that you want to adjust. Benefit Plan: Select the Benefit Plan from the drop-down menu that contains the deduction that you want to adjust. If the deduction is a General Deduction, no choices will appear, so leave this field blank. Ded Code/Class: The deduction code must match the code for the deduction type that you are adjusting. The one-character field immediately to the right of the Ded Code/Class is for the tax classification of the adjustment. Choose the appropriate class from the drop-down menu. To create a one-time addition for both the employer and the employee portions of TIAA/CREF, create two entries: one for the deduction classification of before-tax (employee share), the other for Pre-Tax Benefit (Employer share). The following is an example of a TIAA-CREF adjustment:
Sales Tax: Not used by NDUS.

Ac
Connect ND
November 2017
Payroll Page 160
Deduction Calculation Routine: Define how to calculate the deduction: Flat Amount, Percent of Net Pay, or Percentage. Normally flat amount is used together with entering the amount in the Flat/Addl Amt field. If you select a calculation routine that uses a rate or percent, you can enter the rate or percent in the Rate/Percent field. One-Time Code:
Addition: Select this value to add the calculated/flat amount specified on this page to the regular calculation.
Arrs Paybk (Arrears payback): Select this value to ignore standard arrears processing and calculate arrears to be processed as specified on this page. The system limits the arrears payback to the amount that you specify in the Flat/Add’l Amt field. For example, if an employee has an arrears balance of $1000 and you specify a one-time arrears payback deduction of $400, the system takes only up to $400 for that pay period. Note: The One-Time Arrears payback feature is not for situations when an employee gives you a check to pay back an owed arrears amount.
Override: Select this value to ignore the regular calculation and replace it with the calculation specified on this page. To stop a deduction, use this option, set the deduction calculation routine to Flat Amount, and leave the Flat/Addl Amt field blank. Apply the same technique to stop an arrears payback one time.
Refund: Select this value to calculate the deduction normally, according to the Deduction Table rules and apply the refund amount. For example, if the normal deduction is $100 and you entered a one-time deduction refund of $75.00, the resulting deduction amount is $25. If the normal deduction is 0 (the employee does not currently have this deduction), the system refunds the amount entered here.
Click . To add additional one-time deductions/refunds/ overrides for other benefit plans or deductions, click on the + under the One Time Deduction Data Override.

Ac
Connect ND
November 2017
Payroll Page 161
ONE-TIME GARNISHMENTS/CHILD SUPPORT Navigate to the employee’s payline or paysheet. Payroll for North America > Payroll Processing USA > By Payline Security.
Click on the One-Time Garnishments Tab to display the following: One-Time Garnishments Page
In order to override a garnishment, the employee must have the garnishment/child support set up on the Garnishment Spec Data Page and the General Deduction of HGARN assigned to the employee. Complete the fields as described below:
Garnishment ID: Select the Garnishment Specification Data record to override.
Priority: Enter the priority to override from the Garnishment Spec Data pages.
One-Time Code:
Override: Select this value to ignore the regular calculation and replace it with the
calculation specified on this page.
Refund: Select this value to refund a garnishment amount. Enter the amount to refund to the employee. The system does not calculate the refund amount.

Ac
Connect ND
November 2017
Payroll Page 162
Suspend: Select this value to stop the garnishment deduction for the current pay period.
NOTE: If you override or refund this garnishment, the system uses all the Calculation and Processing Fees fields on this page to calculate the garnishment, even if they are blank. For example, if you leave the fields in the Processing Fees group box blank, the system treats them as though you entered zero.
Deduction Calculation Routine: These values are the same as those on the Garnishment Spec Data pages. Use “No exempt; %DE + Amount” only for those cases where you want to override all garnishment exemptions.
DE Percent (disposable earnings percent): Enter the percent of disposable earnings to use in the override calculation.
Flat Amount: Enter the flat amount to use in the override calculation.
Click .

Ac
Connect ND
November 2017
Payroll Page 163
ONE-TIME TAXES
Navigate to the employee’s payline or paysheet. Payroll for North America > Payroll Processing USA > By Payline Security.
Click on the One-Time Taxes Tab to display the following:
One-Time Taxes Page
Enter information in the appropriate fields: Additional Taxes: This box determines whether the system takes, on an individual check, the additional withholding specified on the Federal Tax Data 1 page, and the State Tax Data 1 page. The default is selected. If you do not want to take the employee’s regular additional taxes out of a check, clear this check box.

Ac
Connect ND
November 2017
Payroll Page 164
The system ignores this check box in the following situations:
The one-time code is Override
The Maintain Taxable Gross option on the employee Tax Data page is selected.
One-Time Code and One-Time Tax Amount:
Addition: Select this value to add the amount specified on this page to the regular calculation. You cannot use this value if the system did not take normal taxes. If the system did not take normal taxes, it does not take the additional amount that you enter here.
Override: Select this value to ignore the regular calculation and replace it with the amount specified on this page. Enter 0 (or leaving the One-Time Tax Amount field blank) is a valid override amount.
Refund: Select this value to calculate the taxes normally and then apply the refund amount. For example, if the normal tax is $100 and you entered a one-time tax refund of $75, the resulting tax amount is $25. You cannot use this value if the system did not take normal taxes. If the system did not take normal taxes, it does not refund the amount you enter here.
Note: In general, do not use the Paysheet – One-Time page to change taxes that have wage limits associated with them, such as FICA, State Disability and State Unemployment. The system recalculates taxes with maximums every time you run the Pay Calculation process. If you make an adjustment this pay period, the system corrects it in the next pay period.

Ac
Connect ND
November 2017
Payroll Page 165
PAYCHECK REVERSAL This process describes how to reverse an existing paycheck that was issued incorrectly. If a replacement check is needed, please see the instructions for issuing an Off Cycle check.
Use the following navigation:
Payroll for North America > Payroll Processing USA > Reverse/Adjust Paychecks
The following page appears:
Find an Existing Value Page

Ac
Connect ND
November 2017
Payroll Page 166
Enter an existing Run Control ID and click . If you have not used this page, click on the hyperlink Add a New Value and enter a new Run Control ID.
Click .
The following page appears:
Paycheck Reversal/Adjustment Page
Enter information into the following fields:
Company: Enter your 3-Character company code
Pay Group: Enter the employee’s pay group for the check you want to reverse.
Pay Period End Date: Enter the pay period end date of the next on-cycle payroll period to be processed. Since the previous payroll has already been confirmed and locked, you cannot make changes to that payroll.
Paycheck Number: Enter the number of the paycheck to be reversed.
Paycheck Issue Date: Enter the date the paycheck was issued (Date on the check).
Empl ID: The employee’s EmplID and name are populated after the paycheck number and issue date are entered.

Ac
Connect ND
November 2017
Payroll Page 167
Verify that the Reversal radio button and the Current Accounting Period Option radio button are selected. Do NOT select the radio button for Reversal/Adjustment.
Click . This process creates a negative image of the existing paycheck. To verify that the pay check has been reversed, navigate to
Payroll for North America > Payroll Processing USA > Produce Payroll > Review Paycheck
Enter the check number. Click .
Since a paycheck reversal constitutes an off-cycle payroll, you must run an off-cycle payroll confirm process to confirm the reversal.
Navigate to:
Payroll for North America > Payroll Processing USA > Produce Payroll > Confirm Pay
The following page appears:
Confirm Pay Page

Ac
Connect ND
November 2017
Payroll Page 168
Enter an existing Run Control ID and click . If you have not used this page,
click on hyperlink Add a New Value and enter a new Run Control ID. Click .
The Pay Confirmation page appears:
Pay Confirmation Page
Enter information in the fields on the right side of the page:
Company: Enter the 3-character company name
Pay Group: Enter the pay group of the employee(s) you wish to calculate (Each pay group that contains an off-cycle paycheck must be calculated separately.)
Pay End Date: Enter the next unprocessed on-cycle pay end date.
Page #’s: Enter if you only want specific pages to be confirmed.
Click .
Check for errors on the Payroll Error Report found at:
Payroll for North America > Payroll Processing USA > Review Processing Messages > Review Payroll Error Messages
If there are errors, they are corrected and Pay Confirmation is run iteratively until all such errors are resolved.

Ac
Connect ND
November 2017
Payroll Page 169
OFF-CYCLE PAYCHECKS If you need to create an off-cycle paycheck for an employee, you must first create a paysheet by navigating to the following: Payroll for North America > Payroll Processing USA > Update Paysheets > By Paysheet The following page appears: By Paysheet Page
To add a new paysheet, click on the hyperlink Add a New Value. The following page appears:

Ac
Connect ND
November 2017
Payroll Page 170
Enter information in the following fields:
Company: Enter the 3-character company name
Pay Group: Enter the pay group of the employee(s) you wish to calculate (Each pay group that contains an off-cycle paycheck must be calculated separately.)
Pay End Date: Enter the next unprocessed on-cycle pay end date.
Off-Cycle: Check
Page #’s: Enter page number 900. If you are issuing off-cycles for more than one employee at the same time, you can add more than one employee to a page by clicking the + sign on the Paysheet page (see below). However, if you need to add more employees’ off-cycles for the same pay period at a later time, you need to increment the Page # you are adding by 1 each time. For example, Page # 901, 902, etc. Never use page # 999.
Click .
The following page appears:
Paysheet Page

Ac
Connect ND
November 2017
Payroll Page 171
Enter the Empl ID and the Empl Rcd #. It is very important that you use the correct Empl Rcd # if the employee has multiple jobs. Click on the Refresh link at the bottom of the page and the employee’s name and hourly rate are populated. Enter a check date, which is equal to or after the issue date for the previous pay period and prior to the issue date of the next on-cycle pay period. NEVER check the Manual Check box. Verify that the No Direct Deposit box is checked. Off-Cycle checks cannot be direct deposited.
Enter hours and amounts to be paid. For instructions on entering hours and amounts, see the section on Paylines and Paysheets. One-time deductions and garnishments can also be entered, by clicking the appropriate tab. Remember that if the employee has employer or employee paid benefits or deductions, those will always be calculated, unless you enter Benefits and General Deductions Taken as None or a Subset on the One-Time deduction page.
Click .
If you need to create an off-cycle check for another employee, click the + sign to the right of the EmplID and a new paysheet is created. You can keep on adding pages and entering data until complete. Make sure all the employees are in the same pay group.
Run the Off-Cycle Pay Calculation by navigating to:
Payroll for North America > Payroll Processing USA > Produce Payroll > Calculate Pay

Ac
Connect ND
November 2017
Payroll Page 172
The following page appears:
Calculate Pay Page
Enter an existing Run Control ID and click . If you have not used this page,
click on hyperlink Add a New Value and enter a new Run Control ID. Click . The following page appears:
Pay Calculation Page
Enter the information for the Off-Cycle Run on the right side of the page.
Company: Enter the 3-character company name
Pay Group: Enter the pay group of the employee(s) you wish to calculate (Each pay group that contains an off-cycle paycheck must be calculated separately.)

Ac
Connect ND
November 2017
Payroll Page 173
Pay End Date: Enter the next unprocessed on-cycle pay end date.
Page #: Enter if you only want specific pages to be calculated.
(Re)Calculate All Checks: Verify radio button is on.
Click .
Check for errors on the Payroll Error Report found at:
Payroll for North America > Payroll Processing USA > Review Processing Messages > Review Payroll Error Messages
If there are errors, make the necessary corrections. Pay Calculation is run iteratively until all such errors are resolved.
After all off-cycle paychecks have been reviewed for accuracy and there are no error messages, run Payroll Confirm. Navigate to:
Payroll for North America > Payroll Processing USA > Produce Payroll > Confirm Pay
The following page appears:
Confirm Pay Page
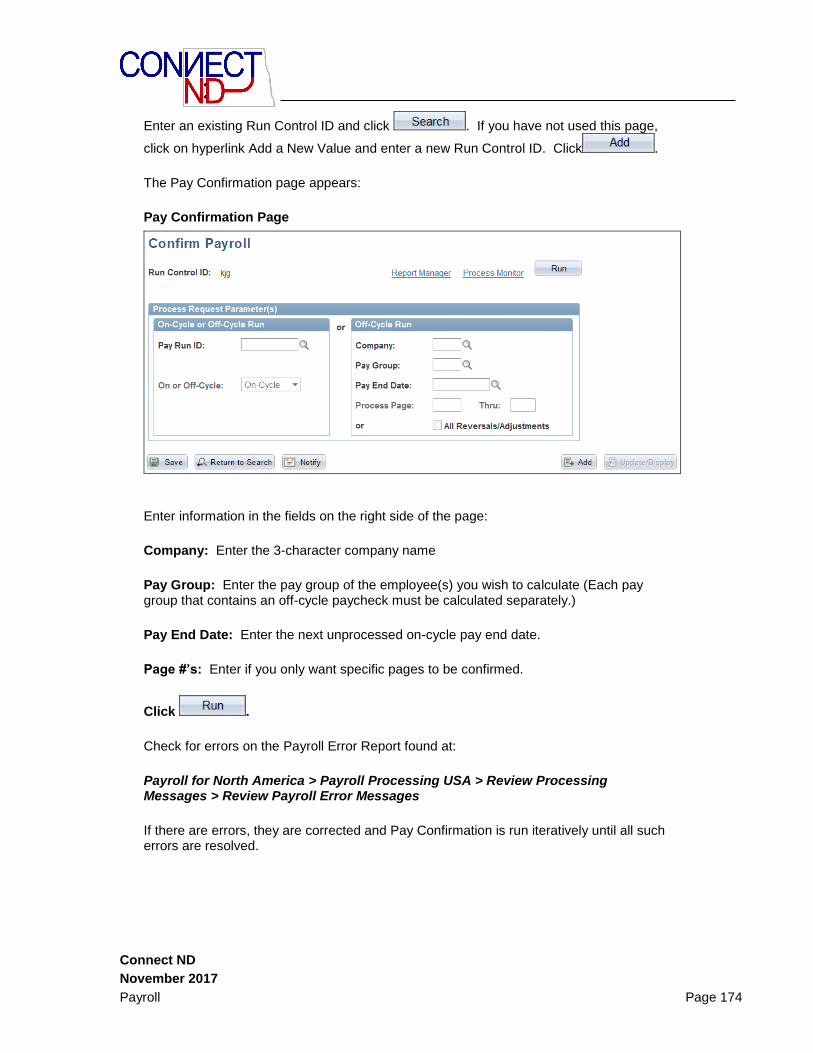
Ac
Connect ND
November 2017
Payroll Page 174
Enter an existing Run Control ID and click . If you have not used this page,
click on hyperlink Add a New Value and enter a new Run Control ID. Click .
The Pay Confirmation page appears:
Pay Confirmation Page
Enter information in the fields on the right side of the page:
Company: Enter the 3-character company name
Pay Group: Enter the pay group of the employee(s) you wish to calculate (Each pay group that contains an off-cycle paycheck must be calculated separately.)
Pay End Date: Enter the next unprocessed on-cycle pay end date.
Page #’s: Enter if you only want specific pages to be confirmed.
Click .
Check for errors on the Payroll Error Report found at:
Payroll for North America > Payroll Processing USA > Review Processing Messages > Review Payroll Error Messages
If there are errors, they are corrected and Pay Confirmation is run iteratively until all such errors are resolved.

Ac
Connect ND
November 2017
Payroll Page 175
PRINT PAYCHECKS After verifying that the Off Cycle check or checks have been confirmed, the check can be printed by going to the following navigation:
Payroll for North America > Payroll Processing USA > Produce Checks > Print Pay Checks
The following search screen appears:
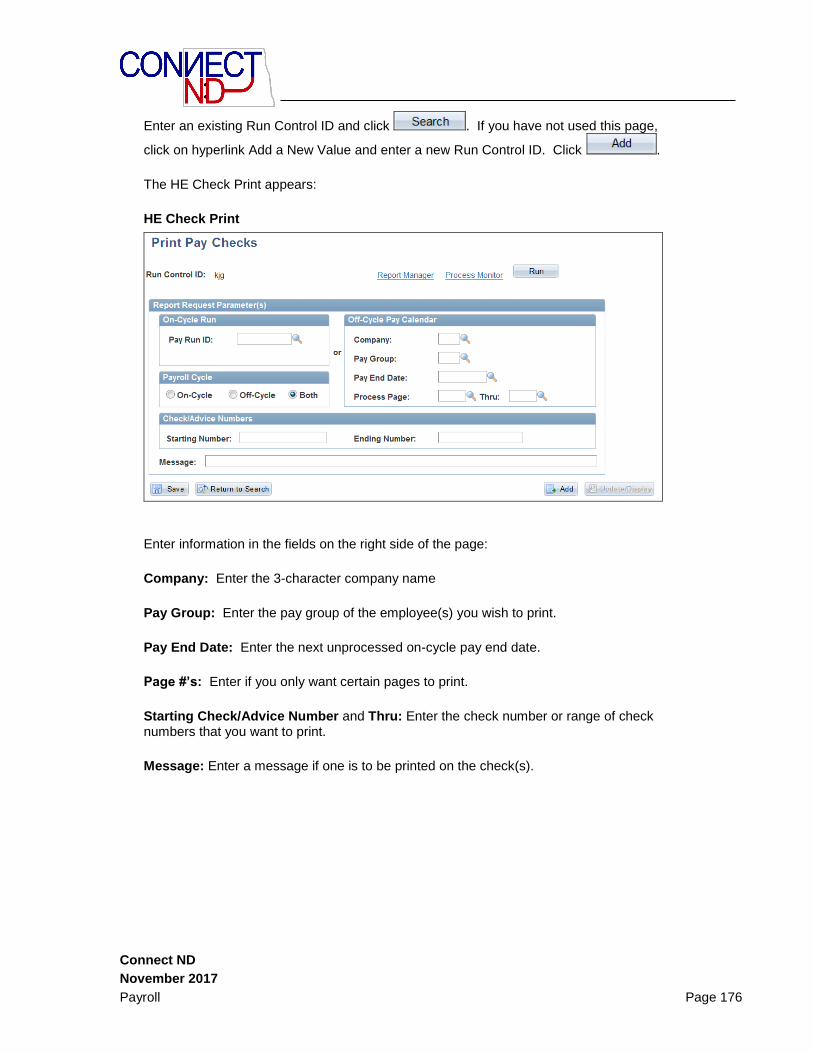
Ac
Connect ND
November 2017
Payroll Page 176
Enter an existing Run Control ID and click . If you have not used this page,
click on hyperlink Add a New Value and enter a new Run Control ID. Click .
The HE Check Print appears:
HE Check Print
Enter information in the fields on the right side of the page:
Company: Enter the 3-character company name
Pay Group: Enter the pay group of the employee(s) you wish to print.
Pay End Date: Enter the next unprocessed on-cycle pay end date.
Page #’s: Enter if you only want certain pages to print.
Starting Check/Advice Number and Thru: Enter the check number or range of check numbers that you want to print.
Message: Enter a message if one is to be printed on the check(s).

Ac
Connect ND
November 2017
Payroll Page 177
Click .
The Process Scheduler Page appears: Process Scheduler Page
Enter/Verify the following information: Server Name: PSNT Type: Printer Format: HP Output Destination: Your printer’s code from ITD
Click The Run Control Page appears again. Click on the Process Monitor hyperlink. Your
print job will be the first job under the blue header. Click on until the Run Status shows success and Distribution Status shows Posted. Click on the Details hyperlink, next to your job. Click on View/Log Trace. Review files for any potential errors. Checks should start printing shortly after clicking the OK button.

Ac
Connect ND
November 2017
Payroll Page 178
The paycheck(s) will include all information for the off-cycle payment. However, it should be noted that the leave information on the check is not updated based on any off-cycle hours. During the next on-cycle process, the off-cycle information will be picked up and applied appropriately to the leave balances.
During the next on-cycle payroll process, the post-confirm interfaces and processes pick-up and process the off-cycle information associated with the pay end date. This includes Leave Accrual, Actuals Distribution, benefits interfaces, General Ledger Interface and Accounts Payable interface.
Note: If you run off-cycle payrolls, you must run reports the next pay period selecting the Both radio button (to indicate both on-and off-cycle payrolls). Otherwise your reports will not pick up the off-cycle payroll.

Ac
Connect ND
November 2017
Payroll Page 179
PAYCHECK REVERSAL/ADJUSTMENT Paycheck Reversal/Adjustment functionality is part of the North Dakota University System’s
(NDUS) Human Resources Management business process and software. This delivered
functionality consists of two primary functions:
Reversal – used to Reverse an erroneous paycheck that has not been cashed or deposited.
Adjustment – used to Adjust pay data for a paycheck that has been cashed or deposited.
The focus of the Paycheck Reversal/Adjustment is to process pay corrections in a manner that
will, if appropriate, update the following pay data:
Paycheck
Actuals Distribution
Accounts Payable Interface to GL
General Ledger
Effort Reporting
OVERVIEW: CREATING AN ADJUSTMENT
The delivered Paycheck Reversal/Adjustment process can be used to correct one of the following situations:
No change in net pay.
e.g., employee’s earnings, deductions, and/or taxes are charged to the wrong combo code.
NDUS owes the employee money.
e.g., employee is paid for 2 hours of overtime as opposed to 5.
The employee owes NDUS.
e.g., employee is paid for 5 hours of overtime as opposed to 2.
Note. It is recommended the Paycheck Reversal/Adjustment process be used to correct current year paychecks only. While it is possible to use the process to correct prior calendar year paychecks, the processing is more complicated due to changes in tax rates and deduction amounts. It is recommended to use the delivered Direct Retro Distribution process to correct distributions that happened in a prior calendar year.

Ac
Connect ND
November 2017
Payroll Page 180
COMPARISON OF REVERSING AND ADJUSTING CHECKS
The Paycheck Reversal/Adjustment process produces different results, depending on whether
Reversal or Reversal/Adjustment is selected.
Reversal – Produces a negative image of the original pay record, with all the amounts changed
from positive to negative. This effectively backs the check out of the system.
Adjustment – Produces an off-cycle paysheet page with two pay lines: 1. A reversing adjustment
with a net pay of zero 2 An adjustment line used to enter the information for how the check
should have been.
Delete Reversal/Adjustment – Select to delete an unwanted reversal or reversal/adjustment. This
is only an option if the reversal/adjustment has not been confirmed.
According to best practice:
Run a Reversal if the check/direct deposit has not been cashed/deposited.
Run an Adjustment if the check/direct deposit has been cashed/deposited.

Ac
Connect ND
November 2017
Payroll Page 181
UNDERSTANDING PAYCHECK ADJUSTMENTS
There are 3 possible outcomes to Adjusting a Paycheck:
No change in net pay.
NDUS owes – PS will produce a check for the amount owed.
Employee owes – amount owed can go into an arrears balance to be taken out of subsequent
paychecks.
Note. After being confirmed, adjustment checks cannot be adjusted.

Ac
Connect ND
November 2017
Payroll Page 182
RUNNING PAYCHECK REVERSAL/ADJUSTMENT
Note 1. The Paycheck Reversal/Adjustment process will error out if there are open Adjustments when Paysheet Creation is run. Note 2. Run Paycheck Reversal/Adjustment after Paysheets have been created, not before.
NOTE: If reversing/adjusting more than one check for the same employee, it is
recommended to run each separately.
Run Control ID – For every paycheck reversal/adjustment run control entered, PS sets up a
separate off-cycle paysheet page and line.
Company – Enter the company associated with the paycheck that will be reversed and adjusted.
Paygroup – Enter the paygroup associated with the paycheck that will be reversed and adjusted.
Pay Period End Date – Enter the PPE date associated with the on-cycle calendar with paysheets
created. NOTE: Do NOT run a paycheck reversal/adjustment for a PPE date with no paysheets
created. Paysheets MUST be created before running a reversal/adjustment for selected PPE
date.

Ac
Connect ND
November 2017
Payroll Page 183
Paycheck Number – Enter the paycheck number associated with the paycheck that will be
reversed and adjusted.
Paycheck Issue Date – Enter the paycheck issue date associated with the paycheck that will be
reversed and adjusted.
Paygroup – PS populates these fields based upon data entered under the selection criteria side
of the page.
Pay period end date - PS populates these fields based upon data entered under the selection
criteria side of the page.
Off Cycle - PS populates these fields based upon data entered under the selection criteria side of
the page.
Page # - PS populates these fields based upon data entered under the selection criteria side of
the page.
Line # - PS populates these fields based upon data entered under the selection criteria side of
the page.
Separate Check - PS populates these fields based upon data entered under the selection criteria
side of the page.
Reversal – Select to process a check reversal.
Reversal/Adjustment – Select for check reversal and an adjustment check.
Delete Current Reversal/Adjustment – To delete an unwanted reversal or reversal/adjustment,
setup a run control with this option selected and run the paycheck reversal/adjustment process.
Origial – Do not select – the GL journal date will be the same as the pay period end date of the
original check being reversed/adjusted. NDUS does NOT select this option.
Current – If selected the GL journal date will be the same as the pay period end date selected for
specified reversal/adjustment. NDUS SELECTS THIS OPTION.
Specified – If selected then FY and accounting period become editable. NDUS does NOT select
this option.
Fiscal Year – This will be display only when Current is selected for accounting period option.
Accounting Period - This will be display only when Current is selected for accounting period
option.

Ac
Connect ND
November 2017
Payroll Page 184
DELETING PAYCHECK REVERSAL/ADJUSTMENT
Note 1. The delete process can only be used on Reversal/Adjustment checks that have not
been confirmed.
Run Control ID – For every paycheck reversal/adjustment run control entered, PS sets up a
separate off-cycle paysheet page and line.
Company – Enter the company associated with the paycheck that will be reversed and adjusted.
Paygroup – Enter the paygroup associated with the paycheck that will be reversed and adjusted.
Pay Period End Date – Enter the PPE date associated with the on-cycle calendar with paysheets
created. NOTE: Do NOT run a paycheck reversal/adjustment for a PPE date with no paysheets
created. Paysheets MUST be created before running a reversal/adjustment for selected PPE
date.
Paycheck Number – Enter the paycheck number associated with the paycheck that will be
reversed and adjusted.

Ac
Connect ND
November 2017
Payroll Page 185
Paycheck Issue Date – Enter the paycheck issue date associated with the paycheck that will be
reversed and adjusted.
Paygroup – PS populates these fields based upon data entered under the selection criteria side
of the page.
Pay period end date - PS populates these fields based upon data entered under the selection
criteria side of the page.
Off Cycle - PS populates these fields based upon data entered under the selection criteria side of
the page.
Page # - PS populates these fields based upon data entered under the selection criteria side of
the page.
Line # - PS populates these fields based upon data entered under the selection criteria side of
the page.
Separate Check - PS populates these fields based upon data entered under the selection criteria
side of the page.
Reversal – Select to process a check reversal.
Reversal/Adjustment – Select for check reversal and an adjustment check

Ac
Connect ND
November 2017
Payroll Page 186
ENTERING ADJUSTMENT INFORMATION ON THE PAYSHEET
The Paycheck Reversal/Adjustment program creates an off-cycle paysheet page. The first
paysheet entry appears as a Reversing Adjustment, with all fields unavailable and a net pay of
zero (blank).
Paysheet
Note. If one of the paylines or the paysheet is a reversal payline, you cannot add or delete
paylines on the page.
Transaction Message – Delivered values are as follows:
Reversal – indicates that the check is a reversal
Reversing Adjustment – indicates a pay earnings record that has been adjusted. It
appears on the original pay earnings record. This will always be the first payline and
uneditable for a reversal adjustment.
Adjustment – indicates a pay earnings record that is created by the reversal program. It
appears on the pay earnings record that is used to recalculate an employee’s pay.
Adjustment Partial Period – indicates that the employees with the adjusted pay earnings
record has had a job record change, with an effective date that falls between the pay
period begin and end dates prior to running the reversal/adjustment.
Adjustment Pay Data Change – indicates that one or more of the employees adjusted
reocrds has been updated since the last time paysheets were created or the pay

Ac
Connect ND
November 2017
Payroll Page 187
calculation was run. PS recalculates such records during the next pay calculation if they
have not already been recalculated.
Adj PayChg Partl Period – indicates for an employee who had an adjustment – Pay Data
Change message, that a change has been made to the job record with an effective date
falling between the pay period begin and end dates and it has already been recalculated.
Check # - This is the check number of the paycheck that is being reversed/adjusted.
Adjustment Paysheet
Click Next in List to scroll to the next system-generated paysheet entry, the Adjustment paysheet.
This is where you enter the necessary adjustment information for earnings, deductions, and
taxes.
Transaction Message – delivered values are as follows:
Reversal – indicates that the check is a reversal
Reversing Adjustment – indicates a pay earnings record that has been adjusted. It
appears on the original pay earnings record. This will always be the first payline and
uneditable for a reversal/adjustment.
Adjustment – indicates a pay earnings record that is created by the Reversal Program. It
appears on the pay earnings record that is used to recalculate an employees pay.
Adjustment Partial Period – Indicates that the employee with the adjusted pay earnings
record has had a job record change, with an effective date that falls between the pay period begin and end dates prior to running the reversal/adjustment.
Adjustment Pay Data Change – indicates that one or more of the employees adjusted
reocrds has been updated since the last time paysheets were created or the pay

Ac
Connect ND
November 2017
Payroll Page 188
calculation was run. PS recalculates such records during the next pay calculation if they
have not already been recalculated.
Adj PayChg Partl Period – indicates for an employee who had an adjustment – Pay Data
Change message, that a change has been made to the job record with an effective date
falling between the pay period begin and end dates and it has already been recalculated.
Check Date – PS defaults current date or system date. Change to the check date of the
original paycheck being reversed/adjusted.
Note: PS uses this date to determine rate of pay, benefits eligibility, deductions, and tax
calculation.

Ac
Connect ND
November 2017
Payroll Page 189
SCENARIO 1: CHANGING FUNDING SOURCE ONLY
Occasionally an employee’s funding source for a prior period paycheck that has been
cashed/deposited needs to be changed. The delivered paycheck reversal/adjustment program
can be used to process a prior period revision.
It does not matter whether the employee is currently active or not. Run the paycheck
reversal/adjustment program for the erroneous paycheck. Enter a paysheet override for the
funding source that needs to be updated.
Paysheet
Reversing Adjustment
Adjustment

Ac
Connect ND
November 2017
Payroll Page 190
Note. Changes to any information on the Additional Data page might require inserting an additional payline if the changes do not apply to the entire period covered by the begin and end dates on the payline.
Additional Data Hyperlink
Click on the Edit Chartfields hyperlink to change the combination code. If not combo code is
entered then PS will use the combo code entered on the Department Budget Table for the
effective date closest to but not after the Off Cycle pay period this adjustment is linked to.
Run Off Cycle Pay Calc

Ac
Connect ND
November 2017
Payroll Page 191
The fields on the right side of the page under Off-Cycle Run need to be entered. Enter the
company, paygroup, pay end date, page number.
Payroll Error Message
Run Off Cycle Pay Confirm

Ac
Connect ND
November 2017
Payroll Page 192
After Adjustment is Confirmed - Original Paycheck
Paycheck Earnings
Paycheck Taxes

Ac
Connect ND
November 2017
Payroll Page 193
Paycheck Deductions
PS uses the NETPAY deduction equal to the employee’s net pay on the original check to reverse
the amount paid to the employee.
Adjusted Paycheck
Paycheck Earnings

Ac
Connect ND
November 2017
Payroll Page 194
Note: This type of adjustment resulted in a net effect zero check. The issue date should be the
same as the original check.
Paycheck Taxes
Paycheck Deductions
Note: PS uses the NETPAY deduction equal to the employee’s net pay on the original check to
reverse the amount paid to the employee.

Ac
Connect ND
November 2017
Payroll Page 195
SCENARIO 2: CHANGING AN EARNINGS CODE
Occasionally an employee’s earnings code for a prior period paycheck that has been
cashed/deposited needs to be changed. The delivered paycheck reversal/adjustment program
can be used to process a prior period revision.
It does not matter whether the employee is currently active or not. Run the paycheck
reversal/adjustment program for the erroneous paycheck. Change any earnings code in the
adjusting paysheet that needs updating.
Note. If both a funding source and an earnings code needs to be changed on the same
paycheck, both can be processed at the same time.
In the following scenario, the earnings code is being updated from H14 to H01. The process,
Paycheck earnings, deductions and taxes are the same as in Scenario 1.
Reversing Adjustment

Ac
Connect ND
November 2017
Payroll Page 196
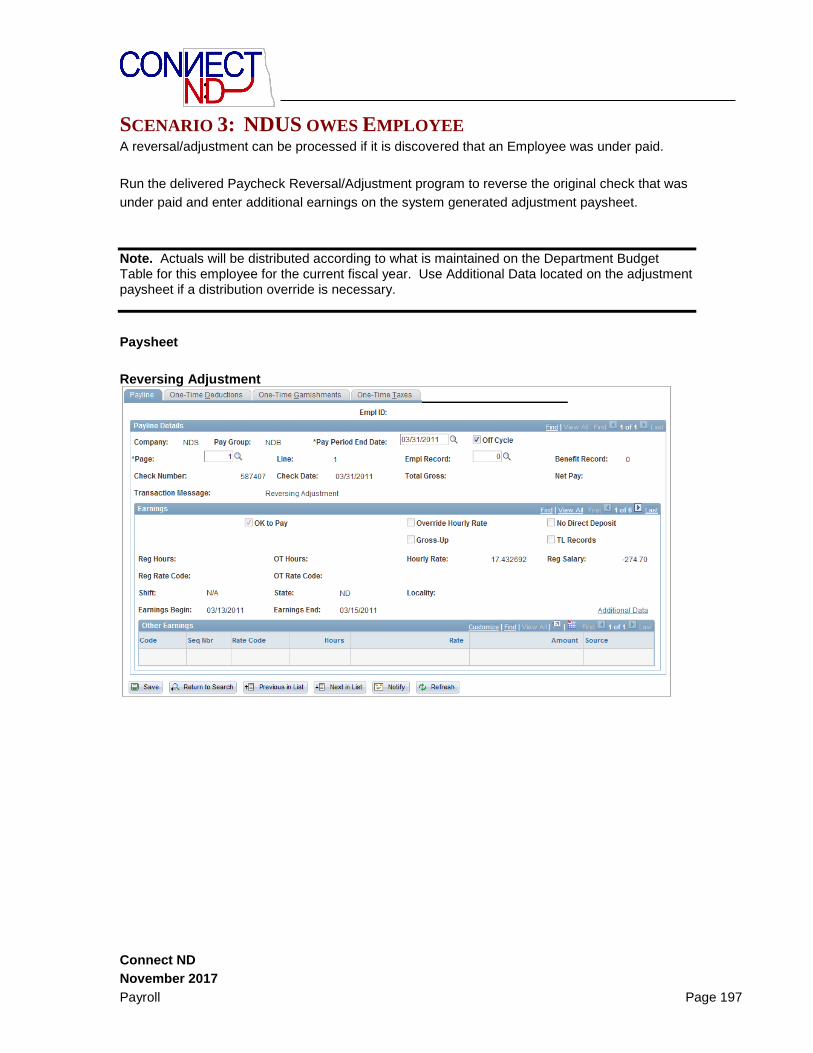
Ac
Connect ND
November 2017
Payroll Page 197
SCENARIO 3: NDUS OWES EMPLOYEE A reversal/adjustment can be processed if it is discovered that an Employee was under paid.
Run the delivered Paycheck Reversal/Adjustment program to reverse the original check that was
under paid and enter additional earnings on the system generated adjustment paysheet.
Note. Actuals will be distributed according to what is maintained on the Department Budget Table for this employee for the current fiscal year. Use Additional Data located on the adjustment paysheet if a distribution override is necessary.
Paysheet
Reversing Adjustment

Ac
Connect ND
November 2017
Payroll Page 198
ADJUSTMENT
Check Date: Change to the checkdate of the paycheck being reversed/adjusted.
Code: Enter the Earnings Code and amount the employee should have been paid.
Note: Click on the Additional Data hyperlink to enter a combo code override if necessary.
Once the changes are entered and saved in the paysheet, run an off-cycle pay calc. Check
payroll error messages and review the adjustment in Review Paycheck. Once the check is
verified for accuracy, run an off-cycle pay confirm to confirm the reversal adjustment.
After Adjustment is Confirmed - Original Paycheck

Ac
Connect ND
November 2017
Payroll Page 199
Paycheck Earnings
Paycheck Taxes
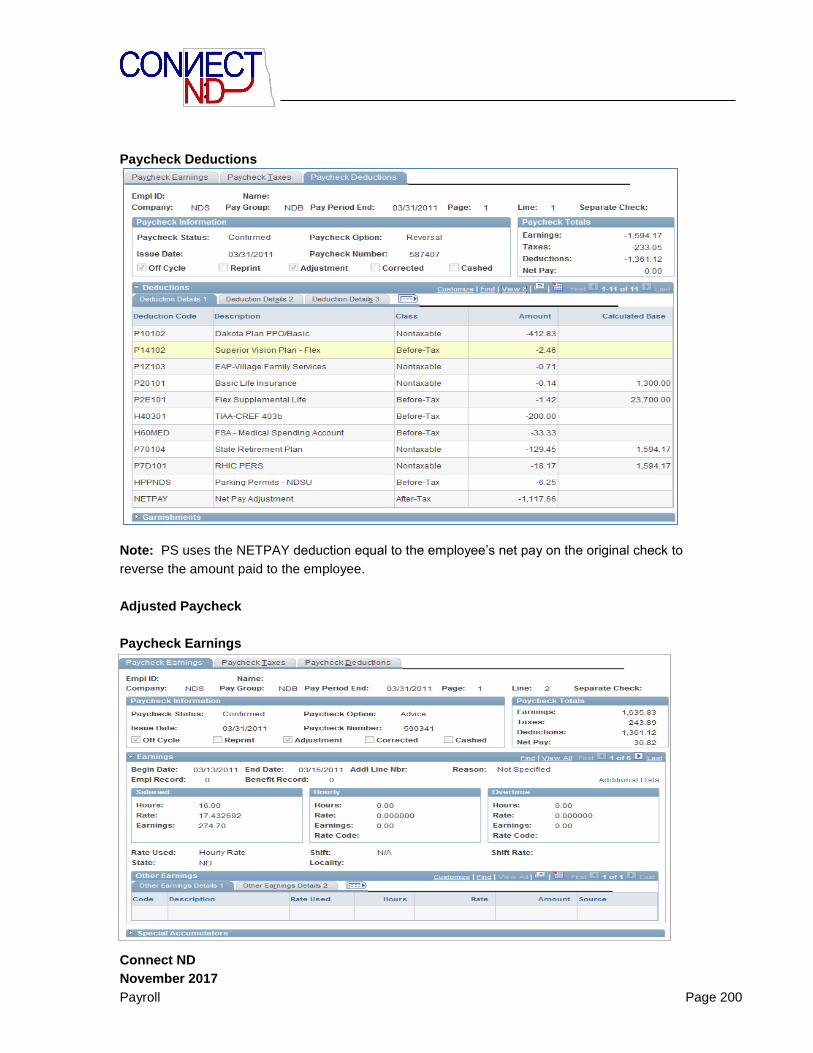
Ac
Connect ND
November 2017
Payroll Page 200
Paycheck Deductions
Note: PS uses the NETPAY deduction equal to the employee’s net pay on the original check to
reverse the amount paid to the employee.
Adjusted Paycheck
Paycheck Earnings
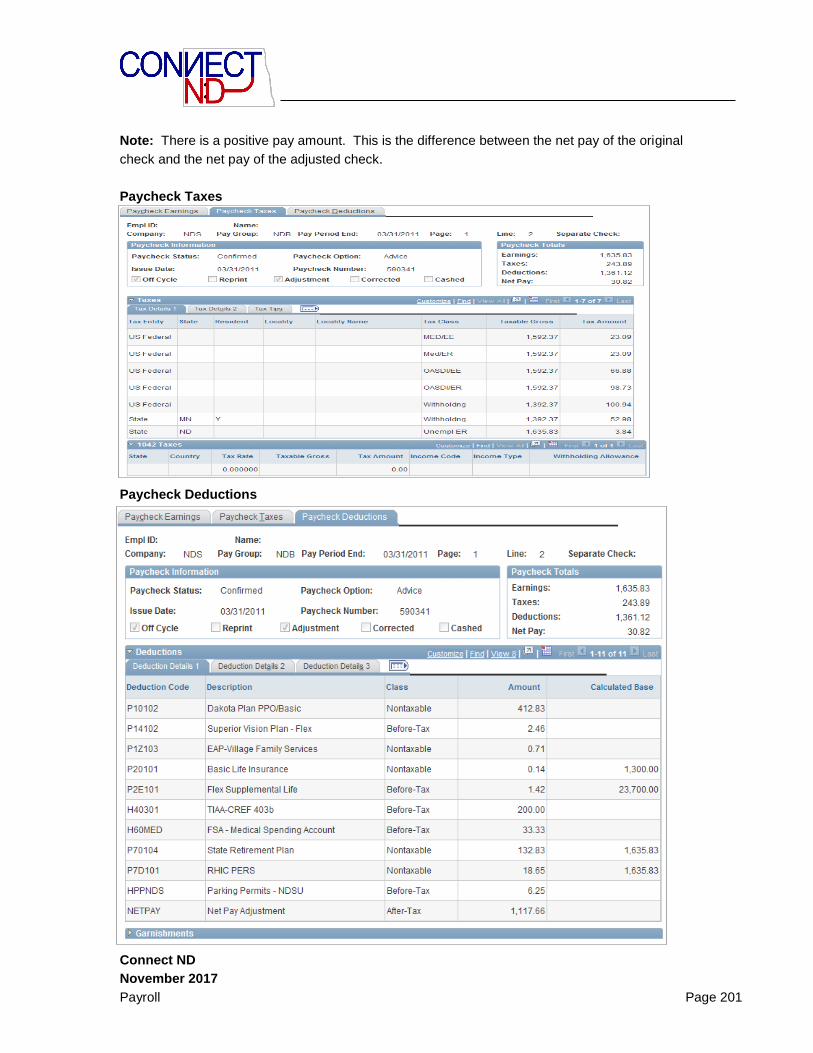
Ac
Connect ND
November 2017
Payroll Page 201
Note: There is a positive pay amount. This is the difference between the net pay of the original
check and the net pay of the adjusted check.
Paycheck Taxes
Paycheck Deductions

Ac
Connect ND
November 2017
Payroll Page 202
Note: PS uses the NETPAY deduction equal to the employee’s net pay on the original check to
reverse the amount paid to the employee.

Ac
Connect ND
November 2017
Payroll Page 203
SCENARIO 4: EMPLOYEE OWES NDUS AND IS STILL EMPLOYED PS is designed to produce checks for positive or zero amounts. A negative paycheck amount is
not valid.
So if an employee owes NDUS, and is still employed, NDUS can get the money back using
delivered functionality. By entering amount owed as an adjustment earnings that is linked to a
payback deduction, the system will maintained the amount owed in an arrears balance. This
arrears balance will automatically be deducted from subsequent pay until the arrears balance
(i.e., amount owed) is zero.
In effect, NDUS “gives” the employee the amount owed by using an adjustment earnings code on
the adjustment paysheet. Pay Calc converts the earnings to the corresponding payback
deduction code.
Note. Actuals will be distributed according to what is maintained on the Department Budget Table for this employee for the current fiscal year. Use Additional Data located on the adjustment paysheet if a distribution override is necessary.
Due to the complexity of NDUS, the NETPAY deduction code will be added to each campus’s
Company General Deduction Table. The following is a table showing the Adjustment Deduction
Codes and Adjustment Earnings Codes assigned to each company in the NDUS.
Unit Campus Account
Charged
To
Adjustment
Deduction Code
Adjustment
Earnings Code
BSC01 Bismarck State College 124005 HBSCPB AJB
DSU01 Dickinson State University 124005 HDSUPB AJD
LRSC1 Lake Region State College 124005 HLRSPB AJL
MASU1 Mayville State University 124005 HMAYPB AJM
MISU1 Minot State University 124005 HMISPB AJI
MISUB Dakota College at Bottineau 124005 HMIBPB AJJ
NDSCS NDSCS 124005 HSCSPB AJC
NDSU1 North Dakota State University 124005 HNDSPB AJS
NDUSO North Dakota University System
Office
124005 HUSOPB AJO
UND01 University of North Dakota 124005 HUNDPB AJU
VCSU1 Valley City State University 124005 HVCSPB AJV
WSC01 Williston State College 124005 HWSCPB AJW

Ac
Connect ND
November 2017
Payroll Page 204
Paysheet
Reversing Adjustment
Adjustment
In this example, the employee should not have been paid for 11.35 hours. The earnings code
and hours were removed.
Change the check date of the paycheck being reversed/adjusted. Run an off-cycle pay calc then
review payroll error messages.

Ac
Connect ND
November 2017
Payroll Page 205
Payroll Error Message
The Message Data field at the bottom of the page displays a negative amount, which is the
amount the system has calculated the employee owes NDUS. PS treats this as an error because
it is designed to produce checks for positive or zero amounts. A negative paycheck amount is not
valid.
PS caluclated the adjustment amount based on earnings, taxes, and deductions effected when
earnings amount is negated.
Correcting Error Message
On the adjustment paysheet, enter the overpayment amount as a positive amount under Other
Earnings, using the earnings code you set up for negative adjustments.
The system converts the earnings to a deduction (assigning it to the corresponding payback
deduction code) and puts the amount the employee owes into an arrears balance to be
processed in the next payroll.
Run another off-cycle pay calc, verify there are no error messages and verify Review Paycheck.
Adjustment

Ac
Connect ND
November 2017
Payroll Page 206
After Adjustment is Confirmed: Original Paycheck
Paycheck Earnings
PS defaulted flags indicating this cashed/deposited check has been Reversed and some type of
Adjustment to this check has occurred subsequent to this check being cashed/deposited.
Paycheck Taxes

Ac
Connect ND
November 2017
Payroll Page 207
Paycheck Deductions
PS uses the NETPAY deduction equal to the employee’s net pay on the original check to reverse
the amount paid to the employee.
Adjusted Paycheck
Paycheck Earnings

Ac
Connect ND
November 2017
Payroll Page 208
This type of adjustment resulted in a net effect zero check. The amount is entered as a positive
number in order to calculate the net pay as zero. PS will add this amount to an Arrears Balance
then deduct it from subsequent checks until the balance is paid.
Paycheck Taxes
Paycheck Deductions
PS uses the NETPAY deduction equal to the employee’s net pay on the original check to reverse
the amount paid to the employee.
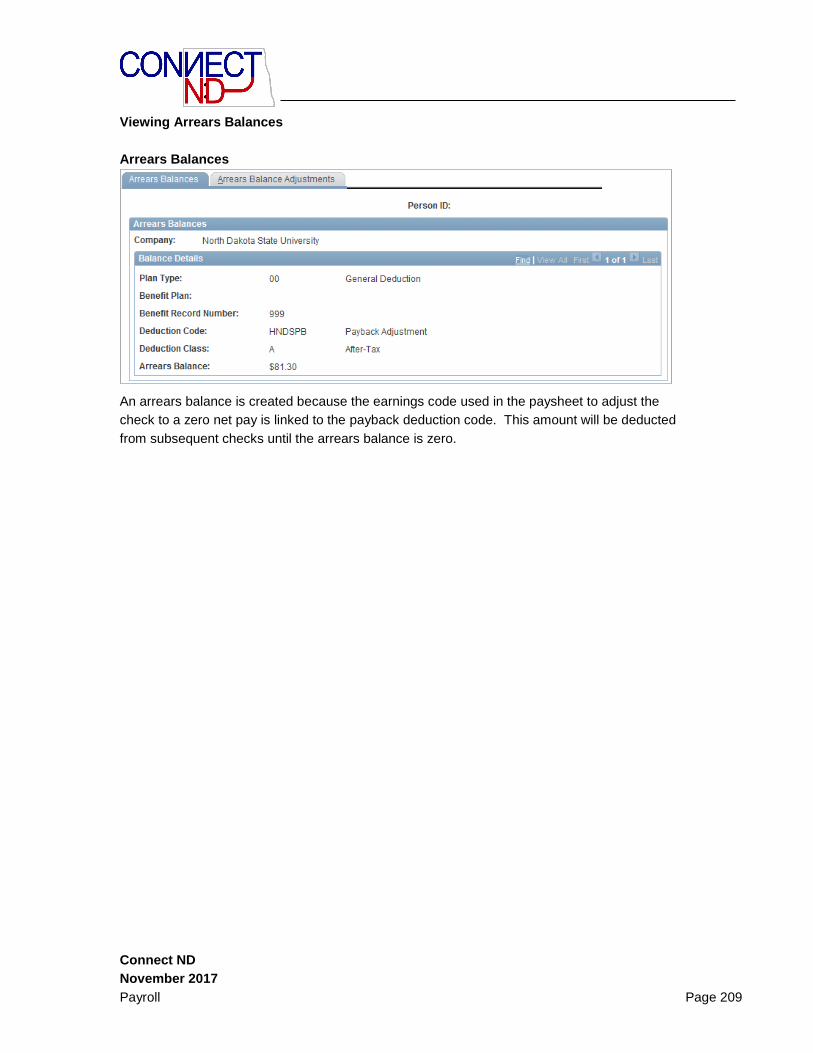
Ac
Connect ND
November 2017
Payroll Page 209
Viewing Arrears Balances
Arrears Balances
An arrears balance is created because the earnings code used in the paysheet to adjust the
check to a zero net pay is linked to the payback deduction code. This amount will be deducted
from subsequent checks until the arrears balance is zero.

Ac
Connect ND
November 2017
Payroll Page 210
SCENARIO 5: EMPLOYEE OWES NDUS AND IS NO LONGER
EMPLOYED
Scenario 4 is the same as Scenario 3 except the employee is no longer employed and, therefore,
will not receive any subsequent pay in order to deduct the arrears balance created by the
Reversal/Adjustment. In this case, set up an Accounts Receivable with your Business Office to
receive a payment from the employee. The employee can reimburse the company by personal
check.
Also, go to Payroll for North America > Periodic Payroll Events USA > Balance Adjustments
> Arrears. Enter the information to change the arrears balance to zero, effectively wiping out the
arrears balance.

Ac
Connect ND
November 2017
Payroll Page 211
SCENARIO 6: CORRECTING A PREVIOUSLY ADJUSTED CHECK
System functionality does not allow a subsequent Reversal/Adjustment to be processed on a
paycheck that is already flagged as Adjusted. Therefore, if an adjusted paycheck is incorrect,
there would be manual steps to fixing it. Consult with the CND HR team if something needs to be
fixed.
Also, do NOT process a Retro Distribution on a Reversal/Adjustment. The process will adjust the
original funding, not the adjusted funding.

Ac
Connect ND
November 2017
Payroll Page 212
INQUIRING ON EMPLOYEE PAYROLL
INFORMATION
OVERVIEW This section will provide you with instructions on how to extract employee payroll related information from your PeopleSoft system.
REVIEW PAYCHECK Use the Review Paycheck pages to inquire on employee’s earnings, payroll tax deductions, and other paycheck deductions. Use the following navigational path to begin the inquiry process: Payroll for North America > Payroll Processing USA > Produce Payroll > Review Paycheck The search dialog screen displays: Review Paycheck Page
Enter an EmplID or Name.
Ac
Connect ND
November 2017
Payroll Page 213
Note: You may search by other criteria if needed. Such as: Company, Pay Group, Pay Period End Date, Pay Check #, Name, Page #, Line# & Separate Check #.
Click .

Ac
Connect ND
November 2017
Payroll Page 214
PAYCHECK EARNINGS
The Paycheck Earnings page is used to view detailed earnings information and totals for calculated taxes, deductions, and net pay. Paycheck Earnings Page
Special Accumulators

Ac
Connect ND
November 2017
Payroll Page 215
The following information is displayed on the Paycheck Earnings Page:
Pay Group
Empl ID
Pay Period End Date
Check Number
Issue Date
Earnings
Taxes
Deductions
Net Pay
Pay Cycle
Pay Begin-End Dates
Salaried / Hourly / Overtime Earnings
Other Earnings
Special Accumulators
Click on the Paycheck Taxes tab.

Ac
Connect ND
November 2017
Payroll Page 216
PAYCHECK TAXES The Paycheck Taxes page is used to view detailed tax information and totals for calculated earnings, deductions, and net pay. Paycheck Taxes Page
Listed under the Taxes menu will be displayed the following tax information for an employee.
Tax Entity (Federal and State)
State/Resident/Locality
Tax Class (Employer-ER and Employee-EE)
Taxable Gross
Tax Amount
No Limit Gross
AP Status Other Section Include:
Tax Tips
Other

Ac
Connect ND
November 2017
Payroll Page 217
PAYCHECK DEDUCTIONS Click on the Paycheck Deductions tab.
The Paycheck Deductions page is used to view detailed deduction information and totals for calculated earnings, taxes, and net pay. Paycheck Deductions Page
Listed under the Deductions menu will be displayed an employee’s deductions record information, including but not limited to:
Benefit Deductions
Garnishments
Union Dues
All other general deductions
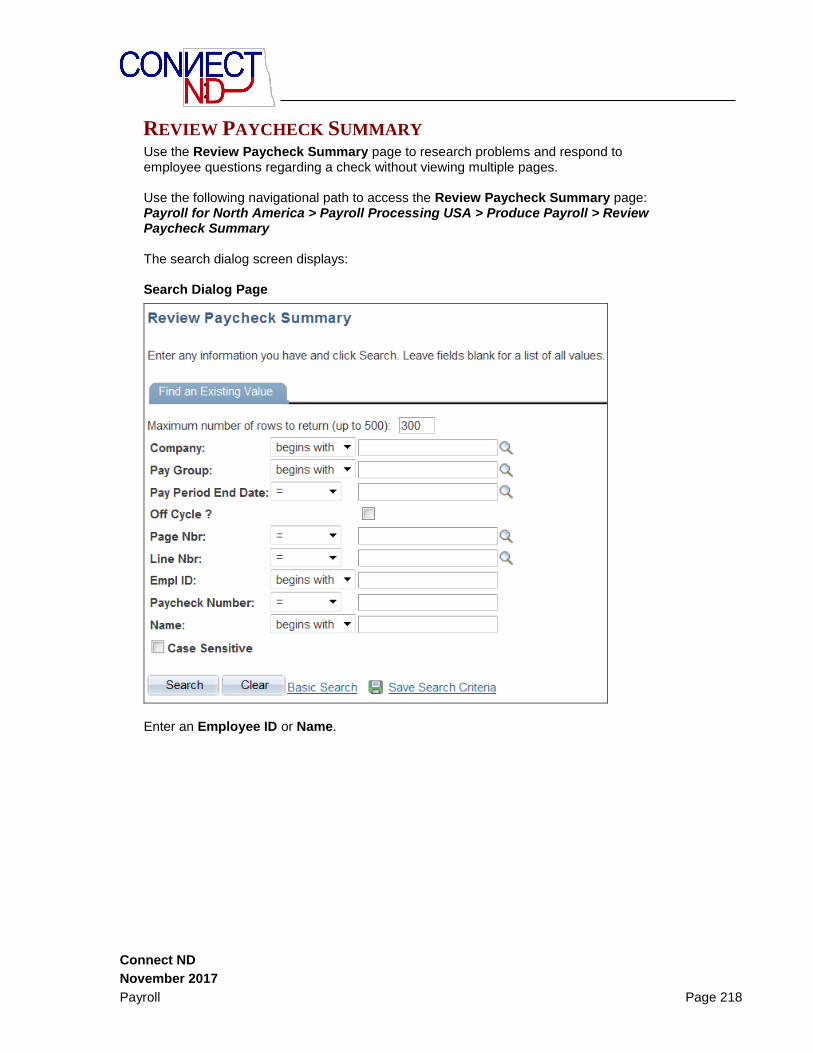
Ac
Connect ND
November 2017
Payroll Page 218
REVIEW PAYCHECK SUMMARY Use the Review Paycheck Summary page to research problems and respond to employee questions regarding a check without viewing multiple pages. Use the following navigational path to access the Review Paycheck Summary page: Payroll for North America > Payroll Processing USA > Produce Payroll > Review Paycheck Summary The search dialog screen displays: Search Dialog Page
Enter an Employee ID or Name.

Ac
Connect ND
November 2017
Payroll Page 219
Click . Notice on this page you can view information such as earnings, taxes, and deductions for a single paycheck. Paycheck Summary Page

Ac
Connect ND
November 2017
Payroll Page 220
BALANCE REVIEWS
Note: For each of the following sections about balance reviews, only one example of the initial search dialog screen will be provided. The search screen is identical in the Balance Reviews section.

Ac
Connect ND
November 2017
Payroll Page 221
CHECK YEAR-TO-DATE The Check Year-to-Date page allows you to view employee Check Balances and Check Balance Adjustments YTD totals listed by Quarters. Use the following navigational path to access the Check Year-to-Date page: Payroll for North America > Periodic Payroll Events USA > Balance Reviews > Check Year-To-Date. The search dialog screen displays: Check Year-To-Date Page
Enter an Employee ID in the Empl ID field. If EMPLID is unknown, input name in the following format: Name = first name or initial, Last Name = last name or part of last name with wild card
Click .
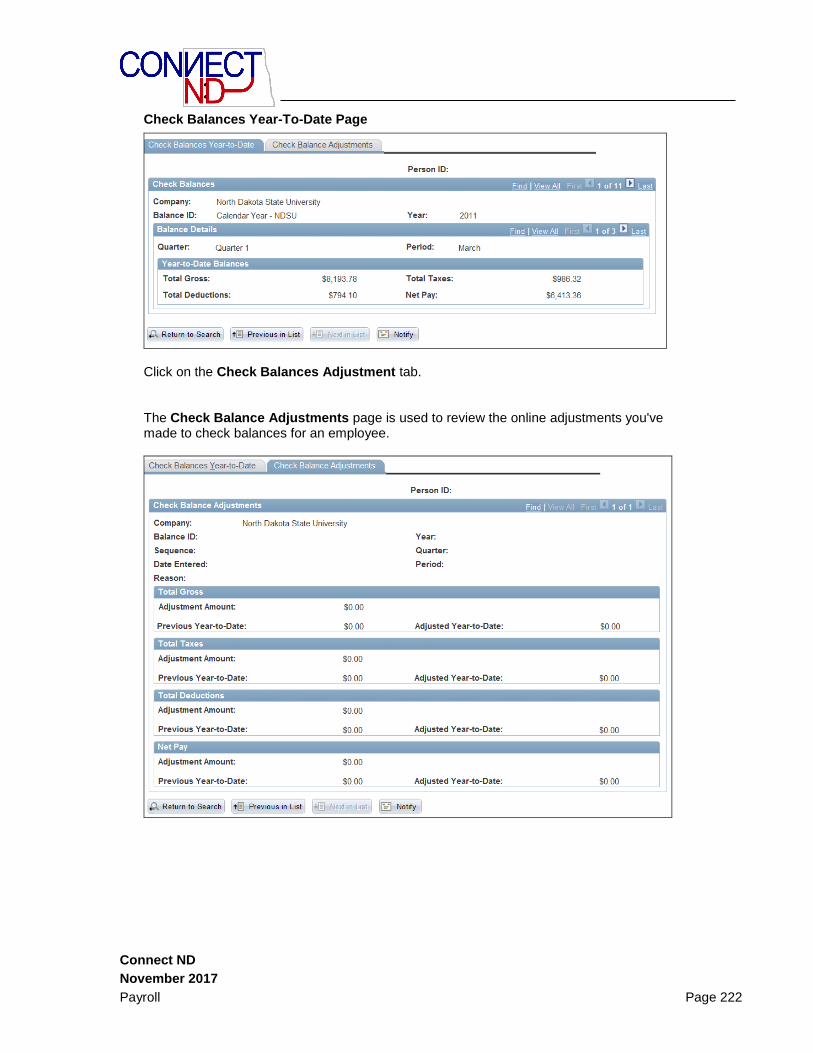
Ac
Connect ND
November 2017
Payroll Page 222
Check Balances Year-To-Date Page
Click on the Check Balances Adjustment tab. The Check Balance Adjustments page is used to review the online adjustments you've made to check balances for an employee.
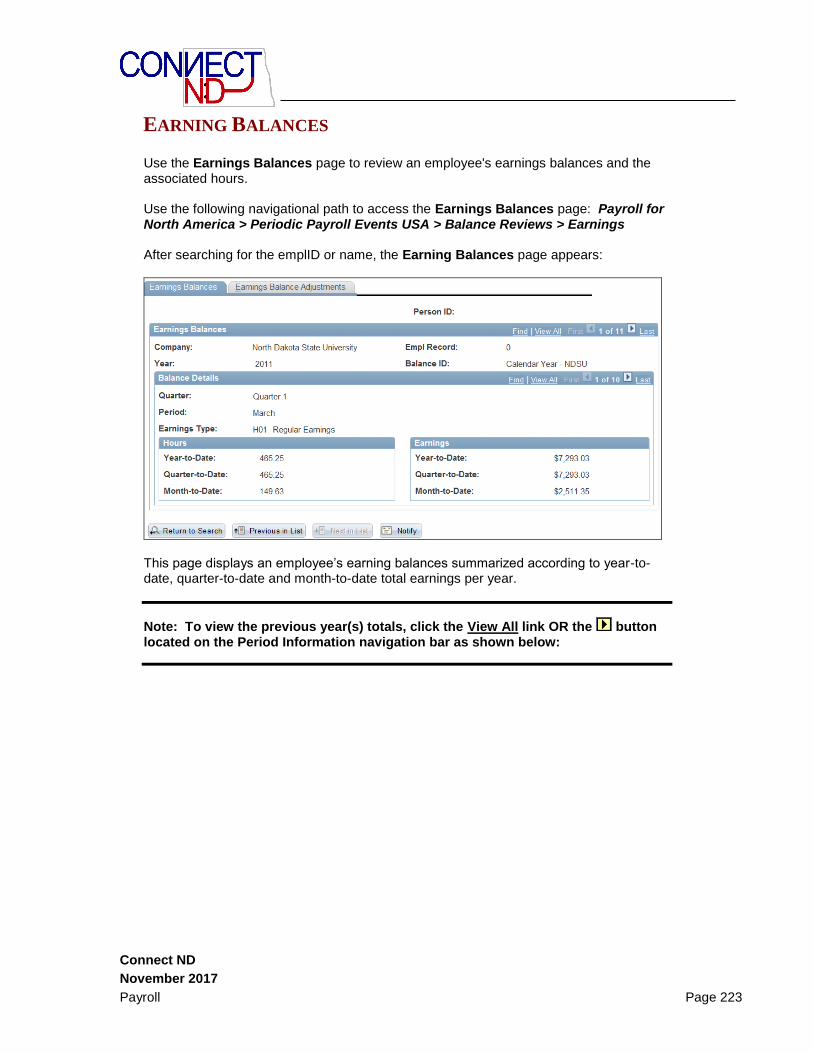
Ac
Connect ND
November 2017
Payroll Page 223
EARNING BALANCES Use the Earnings Balances page to review an employee's earnings balances and the associated hours. Use the following navigational path to access the Earnings Balances page: Payroll for North America > Periodic Payroll Events USA > Balance Reviews > Earnings After searching for the emplID or name, the Earning Balances page appears:
This page displays an employee’s earning balances summarized according to year-to-date, quarter-to-date and month-to-date total earnings per year.
Note: To view the previous year(s) totals, click the View All link OR the button located on the Period Information navigation bar as shown below:

Ac
Connect ND
November 2017
Payroll Page 224
Click on the Earnings Balance Adjustment tab. Earnings Balance Adjustment Tab
The Earnings Balance Adjustments page is used to review the online adjustments you've made to earnings balances for an employee.

Ac
Connect ND
November 2017
Payroll Page 225
DEDUCTION BALANCES The Deduction Balances page is used to scroll through an employee's deduction balances. Use the following navigational path to access the Deduction Balances page: Payroll for North America > Periodic Payroll Events USA > Balance Reviews > Deductions. After searching for the EmplID or name, the Deduction Balances page will appear: Deduction Balances Page
This page displays an employee’s deduction balances summarized according to year-to-date, quarter-to-date and month-to-date total deductions per year.

Ac
Connect ND
November 2017
Payroll Page 226
Click on the Deduction Balance Adjustments tab. Deduction Balance Adjustments Tab
The Deduction Balance Adjustments page is used to review the online adjustments you've made to deduction balances for an employee.
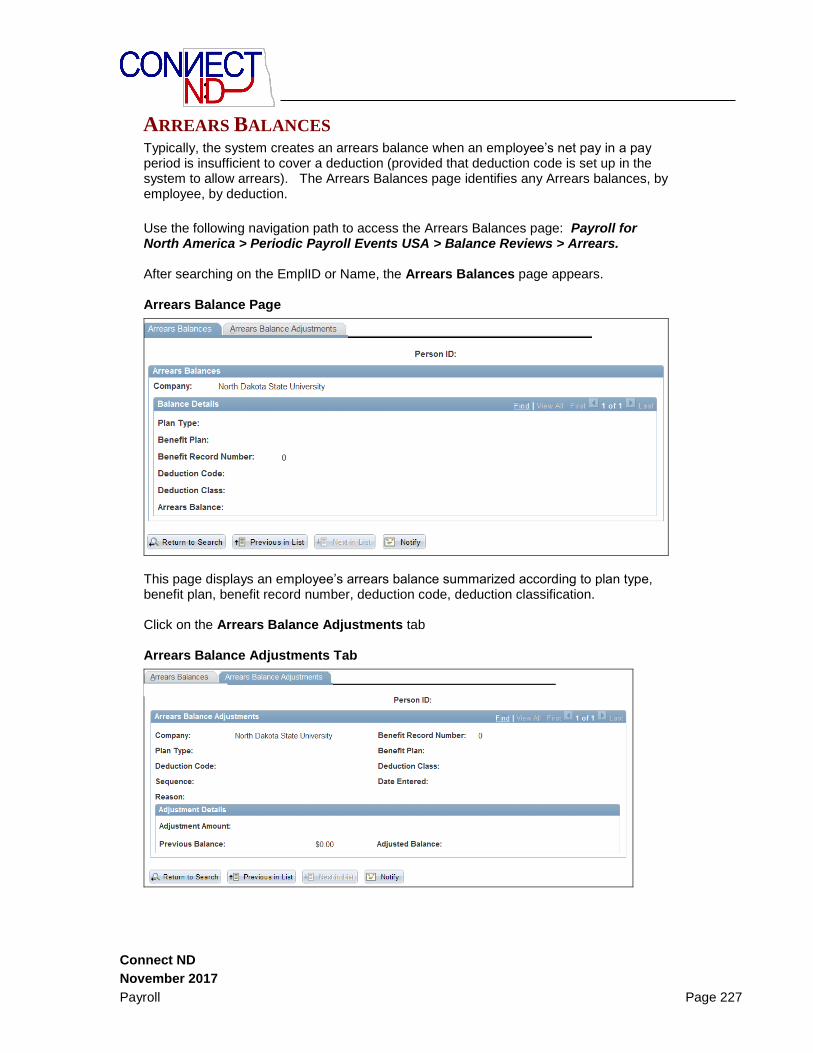
Ac
Connect ND
November 2017
Payroll Page 227
ARREARS BALANCES Typically, the system creates an arrears balance when an employee’s net pay in a pay period is insufficient to cover a deduction (provided that deduction code is set up in the system to allow arrears). The Arrears Balances page identifies any Arrears balances, by employee, by deduction.
Use the following navigation path to access the Arrears Balances page: Payroll for North America > Periodic Payroll Events USA > Balance Reviews > Arrears. After searching on the EmplID or Name, the Arrears Balances page appears. Arrears Balance Page
This page displays an employee’s arrears balance summarized according to plan type, benefit plan, benefit record number, deduction code, deduction classification. Click on the Arrears Balance Adjustments tab Arrears Balance Adjustments Tab

Ac
Connect ND
November 2017
Payroll Page 228
The Arrears Balance Adjustments page is used to review the online adjustments you've made to arrears balances for an employee.

Ac
Connect ND
November 2017
Payroll Page 229
GARNISHMENT BALANCES The Garnishment Balances page gives you a clear picture of the garnishments that have been taken, if you are garnishing an employee’s wages. Use the following navigational path to access the Garnishment Balances page: Payroll for North America > Periodic Payroll Events USA > Balance Reviews > Garnishments. After searching on the EmplID or Name, and the Garnishment Balances page appears: Garnishment Balances Page
This page displays an employee’s garnishment balances summarized according to year-to-date, quarter-to-date and month-to-date total garnishments per year.

Ac
Connect ND
November 2017
Payroll Page 230
Click on the Garnishment Balance Adjustments tab. Garnishment Balance Adjustments Tab
The Garnishment Balance Adjustments page is used to review the online adjustments you've made to garnishment balances for an employee.

Ac
Connect ND
November 2017
Payroll Page 231
SPECIAL ACCUMULATOR BALANCES Use the Special Accumulator Balances page to review an employee's hours and earnings balances for special accumulators such as 457 plans. Use the following navigational path to access the Special Accumulator Balances page: Payroll for North America > Periodic Payroll Events USA > Balance Reviews > Special Accumulators. After searching on the EmplID or Name, and the Special Accumulator Balances page appears: Special Accumulator Balances Page
This page displays an employee’s special accumulator balances summarized according to year-to-date, quarter-to-date and month-to-date totals per year. Click on the Special Accumulator Balance Adjustments tab.

Ac
Connect ND
November 2017
Payroll Page 232
Special Accumulator Balance Adjustments Tab
The Special Accumulator Balance Adjustments page is used to review the online adjustments you've made to special accumulators balances for an employee.

Ac
Connect ND
November 2017
Payroll Page 233
NDUS SPECIAL ACCUMULATOR CODES

Ac
Connect ND
November 2017
Payroll Page 234
TAX BALANCES The Tax Balances page is used to review an employee's federal, state, and local tax balances. Use the following navigational path to access the Tax Balances page: Payroll for North America > Periodic Payroll Events USA > Balance Reviews > Taxes. After searching on the EmplID or Name, the Tax Balances page appears: Tax Balances Page
This page displays an employee’s tax balances per Tax Balance Class and summarized according to year-to-date, quarter-to-date and month-to-date totals per year.
Note: To view another Tax Class, click the View All link OR button located on the Tax Balances navigation bar.

Ac
Connect ND
November 2017
Payroll Page 235
Click on the Tax Balance Adjustments tab. Use the Tax Balance Adjustment page to review any online adjustments made to an employee's tax balance record. Tax Balance Adjustment Page

Ac
Connect ND
November 2017
Payroll Page 236
1042 TAX BALANCES The 1042 Balances page shows all information regarding and 1042 income that an employee may have earned. 1042 income is only earned by non-resident aliens.
The navigation to the 1042 Tax Balances Page is: Payroll for North America > Periodic Payroll Events USA > Balance Reviews > 1042 Taxes.
After searching on the EmplID or Name, the 1042 Tax Balances page appears: 1042 Tax Balances Page

Ac
Connect ND
November 2017
Payroll Page 237
Click on the 1042 Tax Balance Adjustments tab. Use the 1042 Tax Balance Adjustment page to review any online adjustments made to an employee's tax balance record. 1042 Tax Balance Adjustment Page

Ac
Connect ND
November 2017
Payroll Page 238
PREPAY TAX BALANCES The Prepay Balances page displays an employee’s current prepay balance. Contract employees have prepay balances, which are used to pay mandatory employee-paid deductions, during the time he is not receiving a check as a contract employee.
The navigation to the Prepay Balance Inquiry screen is: Payroll for North America > Periodic Payroll Events USA > Balance Reviews > 1042 Taxes. After searching on the EmplID or Name, the Prepay Balance Page appears, with the prepay balance for the selected employee.
Prepay Balance Page
Use the Prepay Balance Adjustment page to review any online adjustments made to an employee's prepay balance record. Prepay Balance Adjustment Page

Ac
Connect ND
November 2017
Payroll Page 239
W-2 INFORMATION SUMMARY
Once SITS has completed year-end processing and W-2 Forms have been issued from Peoplesoft, You will be able to see an employee’s summarized W-2 information online with the following page.
Navigation: Payroll for North America > US Annual Processing > Create W-2 Data > Review/Update Year-End Data
The W-2 Information Summary Page appears:
The W-2 Information Summary Page

Ac
Connect ND
November 2017
Payroll Page 240
This page displays the employee’s address, social security number, and Employer SWT ID by Company and Year and employee. Although it will not pertain to the State, the system can issue multiple State W-2 Forms if the employee worked in more than one state during the year.

Ac
Connect ND
November 2017
Payroll Page 241
New Hire Report
OVERVIEW The purpose of the New Hire Report is to give campuses the information that is sent to Child Support Enforcement. They are a division of the Department of Human Services. The information that is sent to them is done electronically on the 2nd and 17th of each month. This process is set up to automatically run and the information sent to Child Support. Campuses do not need to initiate it. The report is designed to include employees that have a hire date within a given pay period. It will also include employees that were entered within that pay period with a prior hire date. The report is located at the following navigation: Workforce Monitoring > Meet Regulatory Rqmts > Regulatory Reports > PRWORA-Newhire. It is a campus option, not a requirement, to run the report. The following page appears:
Enter a Run Control ID and click . If you have not used this page, click on
the hyperlink Add a New Value and enter a new Run Control ID, then click .

Ac
Connect ND
November 2017
Payroll Page 242
The following page appears:
Enter the information on the following fields: Regulatory Region: North Dakota Company: Enter your 3-character company code. From Date: Enter the first day of the pay period. Thru Date: Enter the last day of the pay period. File Name: This field MUST be filled in to run the processes to produce a report. You can enter anything for your file name (i.e. business unit, company, etc.).
Click on and then click on . The process scheduler request page appears. Change the Format to PDF. Click
.
Click on until you see two process types that show a Run Status of Success and a Distribution Status of Posted. The second process name is PER036. This report is automatically produced when you run this process.

Ac
Connect ND
November 2017
Payroll Page 243
Click on the Details hyperlink of the SQR Report (PER036). Then click on View/Log Trace and then open the PDF file that was created.

Ac
Connect ND
November 2017
Payroll Page 244
SSA Verification
OVERVIEW The purpose of the Social Security Verification is to give campuses information that is incorrect according the Social Security Administration. A file is created from PeopleSoft and sent to SSA four times a year. SSA sends an error file back which is run into PeopleSoft. Campuses then run the SSA Verification Error Report and update data as necessary. This process is set up to automatically run and the information sent to SSA. Campuses do not need to initiate this process. An email is sent to the campuses indicating the file has been processed and the report can be run. This process is run April 1, September 1, December 1, and December . The report is designed to include employees that have a hire date within a given pay period. It also includes employees that were entered into PeopleSoft within that pay period with a prior hire date. The report is located at the following navigation: ND HE Applications > Payroll > Reports > HE SSA Data File Error Rpt OR Payroll for NA > Employee Pay Data USA > Tax Information > HE SSA Data File Error Rpt. It is a campus option, not a requirement, to run the report. The following page appears:
Enter a Run Control ID and click . If you have not used this page, click on
the hyperlink Add a New Value and enter a new Run Control ID, then click . The run control does not need to be unique.

Ac
Connect ND
November 2017
Payroll Page 245
The following page appears:
Enter the information on the following fields: From Date and Thru Date: Enter the date of the most recent file that was imported to get the most recent results. Enter prior dates to get results from prior files. Business Unit: Enter the business unit List Active EEs or Any EE with Earnings in the Current Year: Select this checkbox to list errors for active employees that may or may not have year to date earnings and inactive employees that have earnings in the current year. Leaving this checkbox unselected will list errors for all employees, even those who have been terminated for years.
Click on and then click on . The process scheduler request page appears. Change the Format to PDF. Click
.

Ac
Connect ND
November 2017
Payroll Page 246
Click until the process shows a Run Status of Success and a Distribution Status of Posted.
Click on the Details hyperlink, then click on View/Log Trace hyperlink. Open the PDF file that was created.
Ac
Connect ND
November 2017
Payroll Page 247
Bank Reconciliation
OVERVIEW This chapter defines the Payroll check reconciliation process.
CHECK RECONCILIATION PROGRAM On the last working day of each month, the Bank of North Dakota prepares an electronic dataset that consists of a listing of all payroll checks that have cleared through your account at the Bank of North Dakota and the date that each was processed. HECN then automatically runs the Check Reconciliation Process (PAY015A) on the second working day of each month. This process will electronically transfer the Bank of North Dakota dataset to the HRMS Peoplesoft server and then compare the file received from Bank of North Dakota to the information in Peoplesoft for all higher education institutions. This comparison includes the identification of all:
Computer and manual checks, including check reversals, that the Bank of North Dakota processed during the current period and indicates their status as such in Peoplesoft.
Outstanding checks; that is, all checks that are confirmed, are not reversing entries, and are not yet cashed.
Unprocessed manual checks.

Ac
Connect ND
November 2017
Payroll Page 248
CHECK RECONCILIATION REPORT After the second working day of the month, the institution runs a Check Reconciliation Report (PAY015B). This report is located at: Payroll for North America > Periodic Payroll Events USA > Check Reconciliation > Reconciliation Report. Reconciliation Report Page
Click Add a New Value to create a new Run Control ID or enter your personal Run Control
ID and click . The Run Control Page Displays: Run Control Page

Ac
Connect ND
November 2017
Payroll Page 249
Click on the button. The Process Scheduler Request page displays: Process Scheduler Request Page
Verify the following values are as indicated:
Server Name: PSNT Type: Web Format: PDF
Click button. Process Request Page displays: Process Request Page
The first line under the solid blue box is the job that you are currently running. If the Run
Status is not Success, click periodically until the Run Status is Success Distribution Status is Posted.
Note: If Run Status shows Error, the process did not work. Click on Return to the Check Reconciliation Report page and then click start over with a new Run Control ID. If this process still does not work, call the Help Desk.
Click on the Details hyperlink on the same line. The Process Detail page displays:

Ac
Connect ND
November 2017
Payroll Page 250
Process Detail Page

Ac
Connect ND
November 2017
Payroll Page 251
Click on the View Log/Trace hyperlink. View Log Trace Page
Click on the Pay015B PDF hyperlink. This will bring you to the Check Reconciliation Report. Identify your institution’s section by using the Edit-Find command on this page to search for the Account Number. The Account Number is listed on each page of the report, immediately under the Report ID number in the upper left hand corner. Print your section of the report, by using the range of pages print command. The report will indicate the Checks Reconciled From the Bank, Outstanding Checks and Manual Checks (if there are any).
NOTE: This report will not be available after the next month’s reconciliation is run.
Since the Check Reconciliation process identifies the checks that have cleared the bank in Peoplesoft and provides you with a list of all outstanding checks, you will generally only need the total of outstanding checks and manual checks from this report. The following template can be used to reconcile your account (attach Check Reconciliation Report to back of Template).

Ac
Connect ND
November 2017
Payroll Page 252
NOTE: Bank of North Dakota computes interest on account balances. If requested they will set up an automatic transfer of the monthly accrued interest from your payroll bank account to your general operating bank account on the first working day of each month. The previous month’s interest will still be included in the bank account balance, but can easily be subtracted out during the reconciliation process above.
Using your Bank Statement and your report to complete the following:
CHECK RECONCILIATION FORM
Institution: Month Current Bank Statement Balance $ Outstanding Checks Total - Outstanding Deposits + Interest Included in Account Balance - Corrections Required + __________ Adjusted Bank Statement Balance =$ 0.00

Ac
Connect ND
November 2017
Payroll Page 253
MANUALLY DELETING AND NEGOTIATING PAYCHECKS Higher Ed has developed custom processes to allow manual deletion and manual negotiation of paychecks. These pages are located at the following navigation: Payroll for North America > Payroll Processing USA > Produce Checks > HE Check Recon – Delete Chks and HE Chk Recon – Manual Neg. The processes are also located at ND HE Applications > Payroll > HE Check Recon – Delete Chks and HE Chk Recon – Manual Neg.
On the Check Reconciliation Report, sometimes there are check numbers appearing as “Unprocessed Manual Checks”. Possible reasons for such information showing up on the check reconciliation report could be 1) the check number was miss-keyed by the Bank of North Dakota resulting in a miss-match between the file sent by BND and the data in PeopleSoft. 2) Negative manual check requests processed by HRMS-SITS resulting in a check number being used that will never route through BND’s system. Below is an example of a check number showing on the report as unprocessed:
A user can delete these erroneous paycheck numbers by navigating to the initial search page for the Delete Chks process. Delete Chks Page
Enter the appropriate bank account number for your campus and click .
HE Chk Recon – Delete Chks

Ac
Connect ND
November 2017
Payroll Page 254
Below is an example of the same check numbers showing in the Check Recon report in the HE Check Recon – Delete Chks page:
In order to remove this check number from future check reconciliation reports, click on
the . This action removes the check number from the Paycheck Due Table in PeopleSoft which is where paychecks are placed waiting to be negotiated by the Check Recon process.
The manual negotiation process can be used to code a paycheck as negotiated when it appears as outstanding on the Check Recon report. A possible reason for a paycheck appearing on the report as outstanding when it has already been cashed could be the check number was miss-keyed by the Bank of North Dakota resulting in a miss-match between the file sent by BND and the data in PeopleSoft. An example of the report follows:
HE Chk Recon – Manual Neg

Ac
Connect ND
November 2017
Payroll Page 255
Below is the initial search page for the Manual Neg process. Manual Neg Page
Enter your three character company ID and a pay period end date and click on
. An example of what might appear follows:
Ac
Connect ND
November 2017
Payroll Page 256
To mark a paycheck as negotiated (cashed), click the check box on the right side of the page that is associated with the correct check number and amount. Then click on
. This action removes the check number from the Paycheck Due Table in PeopleSoft which is where paychecks are placed waiting to be negotiated by the Check Recon process. It will also not appear on the next Check Recon report.

Ac
Connect ND
November 2017
Payroll Page 257
Payroll and Tax Reconciliations
OVERVIEW This chapter defines the steps and reports used to view and reconcile earnings, deductions and taxes, in order to make timely and accurate tax deposits on a pay period, monthly, quarterly, and annual basis.
PAYROLL RECONCILIATION
Payroll and tax data must be reconciled:
By Pay Period
By Month
By Quarter
By Year (At Year-end)
During reconciliation, earnings, deductions and taxes must be verified for each of the time periods listed above.
Peoplesoft generates the reports that provide you with the information to reconcile and balance each payroll period.

Ac
Connect ND
November 2017
Payroll Page 258
These reports provide the data used in reconciliations:
Report Name Report ID Navigation
Deduction Register PAY001 Payroll for North America > Payroll Processing USA > Pay Period Reports
HE Deduction Register
NDUPY 535 Payroll for North America > Payroll Processing USA > Pay Period Reports Or ND HE Applications >Payroll Reports
Employer Benefit Contributions
PAY021 Payroll for North America > Payroll Processing USA > Pay Period Reports
HE Employer Benefit Contribution Reports
NDUPY 526 Payroll for North America > Payroll Processing USA > Pay Period Reports Or ND HE Applications > Payroll Reports
Check Register PAY004 Payroll for North America > Payroll Processing USA > Produce Checks
DDP Register DDP002 Payroll for North America > Payroll Processing USA > Create Direct Deposits
Deductions In Arrears
PAY007 Payroll for North America > Payroll Processing USA > Pay Period Reports
Deductions Not Taken
PAY008 Payroll for North America > Payroll Processing USA > Pay Period Reports
Employees Not Processed
PAY010 Payroll for North America > Payroll Processing USA > Produce Payroll
Fed Liability By State
TAX014 Payroll for North America > Pay Period Tax Reports USA
Payroll Register PAY002 Payroll for North America > Payroll Processing USA > Pay Period Reports
HE Pay Register 2 NDUPY 580 Payroll for North America > Payroll Processing USA > Pay Period Reports Or ND HE Applications > Payroll Reports
HE Dept Pay Register
NDUPY 510 Payroll for North America > Payroll Processing USA > Pay Period Reports Or ND HE Applications > Payroll Reports
Payroll Summary PAY018 Payroll for North America > Payroll Processing USA > Pay Period Reports
Other Earnings Register
PAY006 Payroll for North America > Payroll Processing USA > Pay Period Reports
Tax Deposit Summary
TAX001 Payroll for North America > Pay Period Tax Reports USA
Tax Balances Audit TAX015 Payroll for North America > US Quarterly Processing > Quarterly Reports
Reports in bold are required for reconciliation.
Ac
Connect ND
November 2017
Payroll Page 259
An Excel spreadsheet has been created to assist you in reconciling each pay period earnings, deductions and taxes. See Appendix C for a hard copy of this spreadsheet.
A soft copy, which provides all formulas, is available upon request.
FEDERAL TAXES
In order to ensure that you keep your employee tax balances accurate, PeopleSoft delivers reports that you can run to verify when specific out of balance situations occur. If you run these reports and then make appropriate corrections on a pay period basis, balancing and submitting your quarterly taxes will be a much easier process.
Step 1: Each pay period, Run the TAX900 Error Listing:
Navigation: Payroll for North America > US Annual Processing > Audit and Error Reports > Error Listing.
Before the report is run, the reporting year must be set to the correct value on the Annual Tax Reporting Parameters page. The central CND-HRMS team monitors and assures the tax year is set to the correct values.
The TAX900 report provides the following information: Lists employees who have negative tax balances or reportable wage amounts that would cause overflow in fields when the system writes W-2 data to magnetic media. It also checks for other error conditions. Normally, you run this report at year-end, but you can run it at other times to verify social security numbers (SSNs), or to check for negative tax balances and other error conditions. Notice that the high level sort for this report is COMPANY, and then EMPLID within the Company. The run control parameters for this report do not allow you to specify that the report be run for a specific company: it will run for ALL existing company codes.

Ac
Connect ND
November 2017
Payroll Page 260
Step 2: Each pay period, Run the TAX015 Tax Balance Audit report:
Navigation: Payroll for North America > US Quarterly Reporting > Quarterly Reports > Tax Balance Audit. You need to specify the year and the quarter for which you are running the report.
Tax Balance Audit Report
Process Scheduler Request
For each tax class and tax jurisdiction, this report compares the employee QTD tax balance with the sum of Tax Detail records from each payroll run, making it possible to verify that system computations are correct for these balances. Notice that the high level sort for this report is COMPANY, and then EMPLID within the Company. The run control parameters for this report do not allow you to specify that the report be run for a specific company: it will run for ALL existing company codes.

Ac
Connect ND
November 2017
Payroll Page 261
Step 3: Run Quarterly Reports:
Prior to running the following reports, it will be necessary to specify the appropriate reporting period on the Quarterly Tax Reporting Parameters page. The central CND-HRMS team monitors and assures the tax year and quarter are set to the correct values. Both Higher Education and State utilize these pages and will work together whenever the tax year or quarter needs to be updated or changed. The Balance ID is always “CY” for Calendar Year. This table drives the quarterly reporting periods for both Federal and State.
TAX106 W-4 IRS: Lists employees who claim either exemption from federal withholding or more than 10 allowances. This report can be run for all employees or for a specific EMPLID. You also have the option of running it to identify ONLY exempt employees, ONLY employees who claim more than 10 exemptions, or to identify both exempt employees AND those that claim more than 10 exemptions. This report can be submitted with the quarterly 941. Navigation: Payroll for North America > Employee Pay Data USA > Tax Information > W-4 IRS Report OR Payroll Interface, Reports, W-4 IRS.
TAX010FD Tax Summary Federal: Summarizes period-to-date income tax withheld, disability, FICA, and unemployment taxes at the federal level. Run the report monthly or quarterly. Use this report in conjunction with the supporting employee detail report (TAX007) to fill out the detail on the Employer’s Quarterly Federal Tax Return (941). Input the Year and Quarter or Period you wish to process. Notice that the high level sort for this report is Company/FEIN. Run control parameters for this report do not allow you to specify that the report be run for a specific company: it will run for ALL existing company codes. Navigation: Payroll for North America > Pay Period Tax Reports USA > Tax Summary-Federal
TAX001 Tax Deposit Summary: Provides pay period details of federal, state, and local taxes withheld from employees, and liabilities incurred for employer-paid taxes. This report is submitted by RUNID, and can be requested to reflect On Cycle, Off Cycle or both types of payrolls, related to a specific RUNID. It is recommended that this report always be run including both On and Off Cycle. Use this report as supporting documentation to TAX010FD to identify total tax liability for a reporting period. Navigation: Payroll for North America > Pay Period Tax Reports USA > Tax Deposit Summary.
TAX007 Quarterly Federal Tax Summary: Provides, for each employee, quarter-to-
date (QTD) federal withholding, FICA, and unemployment taxes. It lists employees by social security number and name, and it provides page and company totals. Notice that the high level sort for this report is Company, and then Social Security number within the Company. Run control parameters for this report do not allow you to specify that the report be run for a specific company: it will run for ALL existing company codes. This is the supporting detail to the TAX010FD referenced above. Navigation: Payroll for North America > US Quarterly Processing > Quarterly Reports > Federal Tax Summary.
Note: The central CND-HRMS team provides updated spreadsheets to use for reconciling quarterly data. These spreadsheets are provided quarterly and sent through e-mail. It is the campuses decision whether they utilize these spreadsheets or their own system for quarterly tax reconciliation. It is a campus responsibility to run all the reports, perform the reconciliations, complete the proper documentation and submit the forms to the proper reporting agencies by the dates due.

Ac
Connect ND
November 2017
Payroll Page 262
Step 4: Federal Balancing Procedure:
1. Review the output of TAX900 Error Listing. Make corrections to the EMPLID record, according to the error that is generated. This report will generate errors for the following conditions:
Missing or invalid Federal FEIN
Missing Social Security Numbers
The following Social Security Numbers
a. 000-00-0000
b. 111-11-1111
c. 333-33-3333
d. 123-45-6789
Any SSN having 000 as the first 3 digits
Employees with no Federal Tax Data Record
Employees with a negative gross (Tax Gross YTD<0)
Negative Tax (Tax YTD<0)
Earned Income Credit <0
Box 3 Social Security wages >$94,200 (for year 2006)
Box 4 Social Security tax withheld not equal to 6.2% of Box 3 Social Security wages
Box 6 Medicare tax not equal to 1.45% of Box 5 Medicare Wages
Non-employee taxable gross and/or tax withheld
a. Review the output of TAX015 Quarter Tax Balances Audit Report. Make corrections to any EMPLID records that appear, according to the error that is generated. This is an exception report; that is, it lists only employees whose balances are not equal to the sum of the detail records. The report includes:
Tax class.
Balance type.
Payline detail sum.
QTD balance.
Discrepancy between the balance and the detail sum.
Normally, you should have no employees listed on this report. If they appear, investigate the source of the discrepancy immediately. If the out of balance relates to Social Security or Medicare taxes not equal to 6.2% or 1.45% of wages respectively, verify whether the employee is still active (not terminated and scheduled to receive subsequent pay) in the

Ac
Connect ND
November 2017
Payroll Page 263
system. If so, the system should auto correct once the next pay check is processed. If this is not the case, you will need to process an adjustment for the employee, either through the paysheet process, or using the on-line adjustment pages. Be sure to validate that the wages recorded are accurate according to the pay detail available.
2. Review the output of TAX010FD (run for the quarter, not by period) Quarterly Federal Tax Summary Report and related detail provided on TAX007 Quarterly Federal Tax Report- Employee Detail. QTD taxable wages and taxes shown on the TAX010FD for both the employee and employer are the numbers to be used to fill out corresponding fields on form 941. Validate that Taxable Wages and Employee Tax totals cross foot between the two reports. Also validate that Taxes and Taxable Wages for both Social Security and Medicare cross foot (6.2% and 1.45% respectively). Make sure that both EE and ER taxable grosses and taxes are equivalent. If there are OASDI or Medicare differences, check the TAX015- many times these differences are identified there. If difference is more than what is already known, review TAX007 detail. Each page has a subtotal for both Employee and Employer taxable grosses and taxes. Review each page and calculate the taxes by subtotaled page to identify where the discrepancy has occurred. As an additional balancing aide, a query could be developed to compare actual FICA taxes withheld to calculated tax liability, and identify differences. This is similar in scope to TAX015.
3. Run TAX010FD by period (period = month. For example, period 5 is tax liability for May) to identify tax liability by month. Use this information to fill out line 17 of form 941, which identifies Monthly Summary of Federal Tax Liability. To tie this data out, you may also run TAX001 Tax Deposit Summary by RUNID for all RUNID’s in a given month. The liabilities identified here for a given month should tie out to the total liability for a specified month on TAX010FD (for example, total all TAX001’s for RUNID’s processed in May. These totals should tie to the total liability for period 5 on TAX010FD). The Payroll Summary Report (PAY018) also contains summary data for tax liability for a specified RUNID. This can be used as supporting documentation as well.
Ac
Connect ND
November 2017
Payroll Page 264
STATE TAXES
Note: Prior to running the following reports, make sure that the appropriate reporting period has been specified. This should already have been validated/updated when processing quarterly Federal data.
Step 1: Run the following quarterly reports;
TAX002MN Quarterly State Employee Wage Listing- Report provides quarterly state employee unemployment wage listings, specific to Minnesota. When running this report, the state specific parameters include Report Due Date, Employer's Phone, and Earnings Code. Notice that the high level sort for this report is FEIN/Company, and then Social Security number within the Company. Run control parameters for this report do not allow you to specify that the report be run for a specific company: it will run for ALL existing company codes. Also, subtotals per page are provided, but no grand total by Company. Navigation: Payroll for North America > US Quarterly Processing > State Quarterly Wage Reporting > State Wage Listing Report.
TAX002ND Quarterly State Employee Wage Listing- Report provides quarterly state unemployment employee wage listings, specific to North Dakota. There are no state specific parameters required. Notice that the high level sort for this report is FEIN/Company, and then Social Security number within the Company. Run control parameters for this report do not allow you to specify that the report be run for a specific company: it will run for ALL existing company codes. Also, subtotals per page are provided, but no grand total by Company. Navigation: Payroll for North America > US Quarterly Processing > State Quarterly Wage Reporting > State Wage Listing Report.
TAX010ST Quarterly State Tax Summary Report - summarizes period to date income tax withheld, disability and unemployment taxes at the state and local levels. Run the report monthly or quarterly. Notice that the high level sort for this report is Company/FEIN. Run control parameters for this report do not allow you to specify that the report be run for a specific company: it will run for ALL company codes in the database. This report is the state equivalent of the TAX010FD Quarterly Federal Tax Summary Report. Enter Calendar Year, Quarter and Period for which this report should be run. Navigation: Payroll for North America > Pay Period Tax Reports USA > Tax Summary-State.
TAX008 Quarterly State Tax Report- Employee Detail: Summarizes employee QTD state withholding, disability, and unemployment taxes. It lists employees by social security number and name, and it provides page and company totals. Notice that the high level sort for this report is Company, then state and then SSN within the state. Run control parameters for this report do not allow you to specify that the report be run for a specific company: it will run for ALL company codes in the database. This is the supporting detail to TAX010ST. Additionally, this is the state equivalent of TAX007 Quarterly Federal Tax Summary. Navigation: Payroll for North America > US Quarterly Processing > Quarterly Reports > State Tax Summary.
TAX017 Quarterly State Unemployment Tax Verification: Run quarterly to verify that the appropriate employer unemployment tax for the quarter being reported has been calculated and posted to the employees’ Tax Balance records. Navigation: Payroll for North America > US Quarterly Processing > Quarterly Reports > State Unemployment Tax.

Ac
Connect ND
November 2017
Payroll Page 265
Step 2: State Quarterly Balancing Procedure
1. Review the output of TAX010ST Quarterly State Tax Summary Report (run for the quarter, not by period) and related detail provided on TAX008 Quarterly State Tax Report- Employee Detail. QTD totals for each company and state within the company should cross foot between the two reports. Use the QTD taxable wage and tax figures to report data at the state level.
2. To identify totals by period, run TAX010ST by period. When you add totals for each period, these figures will be equal to the quarterly totals identified in step one above. To further tie this data out, you may also run TAX001 Tax Deposit Summary by RUNID for all RUNID’s in a given month. The liabilities identified here for a given month should tie out to the total liability for a specified month/period on TAX010ST (for example, total all TAX001’s for RUNID’s processed in May. These totals should tie to the total liability for period 5 on TAX010ST). The Payroll Summary Report (PAY018) also contains summary data for tax liability for a specified RUNID. This can be used as supporting documentation as well.
3. Use the output from TAX002MN and TAX002ND as supporting employee detail for unemployment wages. The employee detail provided here should cross foot with the employee detail for unemployment wages on the TAX008.

Ac
Connect ND
November 2017
Payroll Page 266
W-2 WAGE AND TAX STATEMENTS W-2 Wage and Tax Statements are coordinated by the HRMS-HECN team. The team
sets up the tables and runs some of the setup processes needed in order to produce W-2
statements and works with each campus to help with printing and distribution. The
HECN team also is responsible for filing all federal and state MMREF reports (electronic
filing of W-2 data). In January of each year, detailed instructions for producing W-2
statements will be distributed to each campus. The following are instructions for
reprinting W-2 statements issued prior to 2011. Instructions for viewing and printing
employee W-2 forms issued for tax year 2011 and after will follow.
Reprinting W-2’s
1. File a Help Desk ticket to request the tax year needed for the reprint.
2. Make sure to have blank W-2 forms loaded in the printer where they will be printed. Forms go in face down, bottom first and set three sheets of blank paper on top of the form(s). (If the user prefers, they can test print to blank paper first.)
3. Go to: Payroll for North America > US Annual Processing > W-2 Reporting > Print Year End Forms.
4. After entering a Run ID, on the first tab, US/Territory Print, select the Reprint check-box and click on Reissued Statement in the Reprint Description field.
5. Check the button for Selected Employees and enter the Employee ID for the person who’s W-2 needs to be printed. More than one Employee ID can be entered here by
clicking on the key, but assure there are enough forms in the printer.
6. Click . 7. On the Process Scheduler Request page, select W-2 US Print File, change the Type
to ‘Printer’, the Format to ‘LP’, and enter your printer destination code in the Output Destination box.
8. Click and the process will run straight to the printer.

Ac
Connect ND
November 2017
Payroll Page 267
Below are print screens of the process.
US / Territory Print Page
Process Scheduler Request Page

Ac
Connect ND
November 2017
Payroll Page 268
Viewing and Printing W-2’s issued for tax year 2011 and after 1. Go to: Payroll for North America > US Annual Processing > Create W-2 Data >
View W-2/W-2c Forms.
2. Enter an Empl ID or name and click . 3. For the Tax Year desired, click on the Year End Form link to open another tab that
will contain the W-2 information. Click on the Filing Instructions link to open another tab that will contain the current W-2 employee instructions.
4. Either form can be printed.
Below are print screens of the process.

Ac
Connect ND
November 2017
Payroll Page 269
W-2 Instructions
OVERVIEW The HECN team sets up the tables and runs some of the setup processes needed in
order to produce W-2 statements and works with each campus to help with printing and
distribution. The HECN team is also responsible for filing all federal and state MMREF
reports (electronic filing of W-2 data).
View W-2 Data
The following navigation is to view the W-2 information that is loaded by HECN. Payroll
for North America > U.S. Annual Processing > Create W-2 Data > Review/Update
Year End Forms
YE Record Error Listing
The YE Record Error Listing shows address errors that need to be cleaned up prior to
printing W-2’s.

Ac
Connect ND
November 2017
Payroll Page 270
W-2c Instructions
1. Create a Form W-2c.
a. Go to Payroll for NA>US Annual Processing>W-2 Adjustments>Create W-2c
US/Territories.
b. Click on Add a New Value.
c. Enter the Company, Calendar Year, and EmplID. The Tax Form Identification
should remain set at W-2.
d. Click Add.
e. The First Name, Last Name, Address and Social Security number will populate
using the values loaded into the original Form W-2. If the SSN, Name or Address
needs to be updated, enter the new values. For a change to the name or SSN,
the previous and new values will show is the correct boxes when the W-2c form is
created. After the W-2c process is completed for a batch, the system increments
this number by one and assigns a new batch number to all the W-2c records
entered until the next time the process is run.
f. If updating an Employee Status, select the appropriate box.
g. To update W-2 Details, enter the appropriate W-2 Box number and State (if
updating information specific to a state). The Previous and Corrected Amounts
will auto-populate. Enter the appropriate Increase or Decrease Amount then tab
out of the field. The amount in the Correct column should update accordingly.
h. Once all the boxes have the corrected entered, Click Save.
i. Keep adding a new value to create more Form W-2c’s.
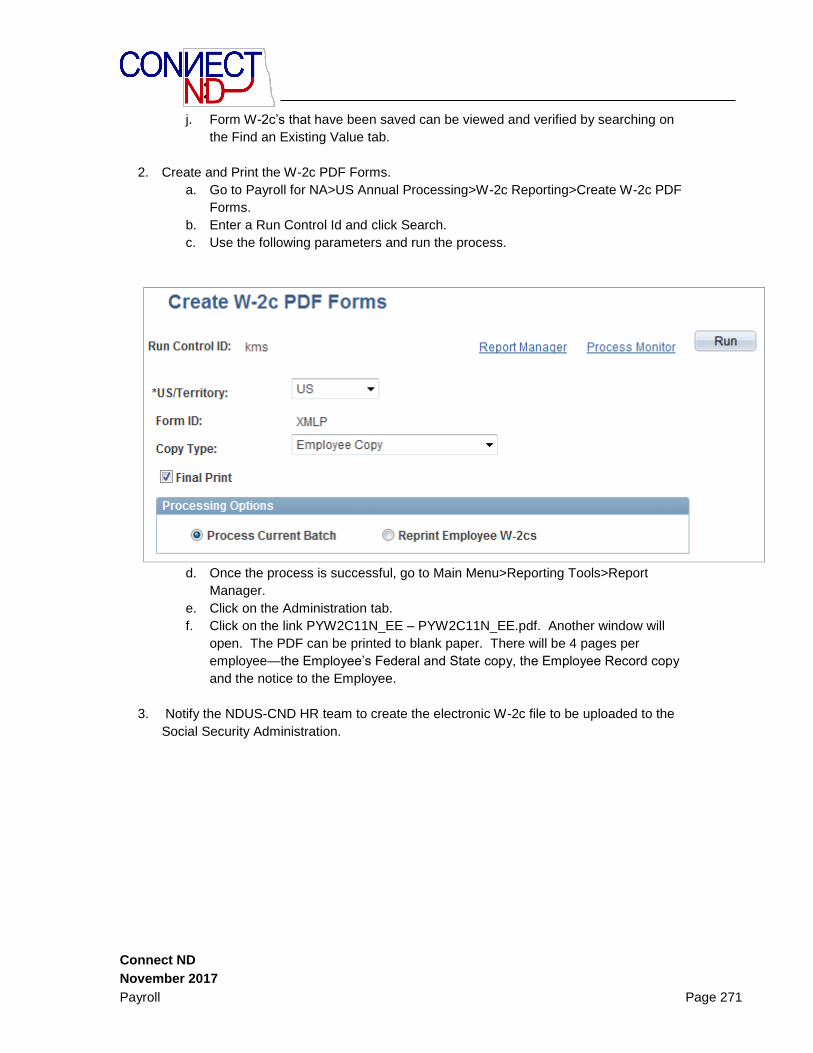
Ac
Connect ND
November 2017
Payroll Page 271
j. Form W-2c’s that have been saved can be viewed and verified by searching on
the Find an Existing Value tab.
2. Create and Print the W-2c PDF Forms.
a. Go to Payroll for NA>US Annual Processing>W-2c Reporting>Create W-2c PDF
Forms.
b. Enter a Run Control Id and click Search.
c. Use the following parameters and run the process.
d. Once the process is successful, go to Main Menu>Reporting Tools>Report
Manager.
e. Click on the Administration tab.
f. Click on the link PYW2C11N_EE – PYW2C11N_EE.pdf. Another window will
open. The PDF can be printed to blank paper. There will be 4 pages per
employee—the Employee’s Federal and State copy, the Employee Record copy
and the notice to the Employee.
3. Notify the NDUS-CND HR team to create the electronic W-2c file to be uploaded to the
Social Security Administration.

Ac
Connect ND
November 2017
Payroll Page 272
Appendix A: Earnings Codes

Ac
Connect ND
November 2017
Payroll Page 273
Appendix B: Processing Schedule

Ac
Connect ND
November 2017
Payroll Page 274
Appendix C: Payroll Reconciliation Form

Ac
Connect ND
November 2017
Payroll Page 275
Appendix D: Examples of Process Request Parameters for various payroll reports