nonstop development environment for eclipse 4.0 user guide
TRANSCRIPT
NonStop Development Environment forEclipse 4.0 User Guide
HP Part Number: 732674-001Published: October 2013Edition: NSDEE 4.0 and later versions, J06.10 and subsequent J-series RVUs, H06.21 and subsequent H-series RVUs

© Copyright 2012, 2013 Hewlett-Packard Development Company, L.P.
Confidential computer software. Valid license from HP required for possession, use or copying. Consistent with FAR 12.211 and 12.212, CommercialComputer Software, Computer Software Documentation, and Technical Data for Commercial Items are licensed to the U.S. Government undervendor’s standard commercial license.
Warranties
The information contained herein is subject to change without notice. The only warranties for HP products and services are set forth in the expresswarranty statements accompanying such products and services. Nothing herein should be construed as constituting an additional warranty. HP shallnot be liable for technical or editorial errors or omissions contained herein.
Acknowledgements
Microsoft® and Windows® are U.S. registered trademarks of Microsoft Corporation. Java is a U.S. trademark of Oracle and/or its affiliates.
UNIX® is a registered trademark of The Open Group.

Contents1 Introduction.............................................................................................11
New and changed features for NSDEE 4.0................................................................................11Related documentation............................................................................................................11
2 Before you begin......................................................................................133 Getting started.........................................................................................14
Preparing the Workbench........................................................................................................14Specifying your preferences.....................................................................................................14Specifying tool locations..........................................................................................................14Configuring connections to NonStop systems..............................................................................15Creating projects....................................................................................................................16
Creating a managed project from scratch..............................................................................16Creating a managed project from existing sources ................................................................21
Creating a managed project using existing sources outside your workspace..........................22Creating a managed project by pulling existing sources into your workspace........................24
Creating multiple projects to build a single application...........................................................26Creating a local makefile project from scratch........................................................................30Creating a local makefile project from existing sources............................................................31Creating a remote makefile project.......................................................................................32
Ensuring the C/C++ indexer runs.............................................................................................33Adding folders and files to projects...........................................................................................34Viewing and changing properties of managed projects...............................................................34
Changing tools options using the Settings property page........................................................35Specifying build variables and environment variables.............................................................36
Building, deploying, and launching a project.............................................................................36Building a project..............................................................................................................37Deploying a project............................................................................................................37Launching a project............................................................................................................38
4 Concepts.................................................................................................39NSDEE overview....................................................................................................................39
Managed and unmanaged builds........................................................................................39Local projects....................................................................................................................39Remote projects.................................................................................................................40C/C++ indexer database...................................................................................................40
The NonStop Development perspective......................................................................................40Views...............................................................................................................................41Preferences.......................................................................................................................42Wizards, tools, and actions.................................................................................................42
Building NonStop projects.......................................................................................................43Build configurations (local projects only)...............................................................................43Building with make on Windows..........................................................................................44SQL managed builds .........................................................................................................44The SQL/MX preprocessor, managed build, and header files..................................................44
Environment variables and build variables.................................................................................44COMP_ROOT...................................................................................................................46MXSQLC and MXSQLCO....................................................................................................46NSDEE_SYS_INCLUDE_PATH...............................................................................................46NSDEE_SYS_INCLUDE_PATH_ESC.......................................................................................47PATH................................................................................................................................47Deploy.jar and NSDEE_POSIX_BIN......................................................................................48NSDEE_CONN_PORT, nsdee-auth, and Deploy.jar................................................................48
Contents 3
DependencyHandling.........................................................................................................49TARGET_SYSTYPE..............................................................................................................49NSDEE_DEPLOY_SYSTEM, NSDEE_DEPLOY_USER, NSDEE_DEPLOY_DEST,NSDEE_DEPLOY_FILENAME................................................................................................49SQL/MX_COBOL_PREPROCESSOR_LOC..............................................................................50Multi-user environments.......................................................................................................51
Managed build makefiles........................................................................................................51Handling dependencies in managed builds...............................................................................52
How managed makefiles create dependency files..................................................................52How NSDEE adds rules to handle deleted headers................................................................54How SQL/MX preprocessor file header dependencies are handled..........................................54How to change or disable dependency file creation...............................................................55
Tool chains............................................................................................................................56Tools for a simple C project.................................................................................................56Tools for a simple C project with SQL/MP.............................................................................58Tools for a simple C project with SQL/MX.............................................................................59
Customizing managed builds ..................................................................................................62Creating custom make targets..............................................................................................62Running commands before and after builds...........................................................................62Running commands before and after deployment...................................................................64
Using NonStop projects with an SCM tool.................................................................................65Using Samba with NSDEE.......................................................................................................65
5 Tasks......................................................................................................66Configuring Tool Locations.......................................................................................................66
Adding cross compiler locations..........................................................................................66Adding SQL/MX preprocessor locations...............................................................................67Adding Cygwin/Msys locations...........................................................................................67
Configuring connections to NonStop.........................................................................................68Adding network connection preferences................................................................................68Changing SSH and SFTP settings.........................................................................................70Changing Telnet and FTP settings.........................................................................................71Enabling 256-bit encryption for SSH.....................................................................................72Exporting connection configurations.....................................................................................72Importing connection configurations.....................................................................................73
Importing ETK projects.............................................................................................................73Preparing to import ETK projects..........................................................................................74Importing one or more ETK projects......................................................................................75
Importing NSDEE 2.x projects..................................................................................................75Importing external NSDEE projects............................................................................................77Creating projects....................................................................................................................77
Creating Windows-hosted projects with managed builds.........................................................78Creating Windows-hosted makefile projects...........................................................................81Creating Windows-hosted projects from existing source...........................................................83Creating remote projects.....................................................................................................84
Launching a NonStop application from NSDEE .........................................................................86Creating a run configuration...............................................................................................87Launching an application using a saved run configuration.......................................................90
Setting build variables.............................................................................................................90Changing build options (project properties) ...............................................................................91Specifying DEFINES for SQL/MP tables.....................................................................................93Building for both OSS and Guardian .......................................................................................94Removing erroneous errors and warnings in C/C++ editors.........................................................95
Erroneous errors and warnings after creating a project...........................................................95Erroneous errors and warnings for SQL Statements.................................................................96
4 Contents
Disabling specific code analysis errors and warnings...........................................................100Disabling erroneous syntax warnings..................................................................................101
Specifying locations for C/C++ headers, COBOL COPY libraries, and pTAL source files................103Instructing NSDEE not to build source files...............................................................................104
Excluding a single COPY library........................................................................................104Excluding all sources in a folder.........................................................................................105
Turning off SQL/MP builds for source files and folders...............................................................106Turning off SQL/MP builds for specific source files................................................................106Turning off SQL/MP builds for all sources in a folder............................................................107
Configuring indexing for C and C++ sources...........................................................................108Indexing headers for makefile projects................................................................................108Changing the system headers indexed when changing build configurations ............................110Forcing a rebuild of the C/C++ index................................................................................111
Adding externally-built objects and linkfiles to managed builds...................................................111Linking libraries in managed builds.........................................................................................112Adding and customizing build targets.....................................................................................114
Creating a makefile.targets file for managed builds..............................................................114Adding build targets .......................................................................................................115Creating custom build targets for managed projects.............................................................116Creating custom deploy targets .........................................................................................118
Filtering NonStop Project Explorer view content........................................................................120Using NSDEE with SCM tools: examples and procedures...........................................................121
Using NSDEE with an external SCM tool ............................................................................121Using NSDEE with an SCM plug-in....................................................................................122
Adding a local NonStop project to an SVN repository.....................................................122Checking in project files...............................................................................................123Checking out project files.............................................................................................123
Creating a remote folder in a local project via Samba...............................................................123Creating a linked folder....................................................................................................123Performance considerations for using Samba with Eclipse......................................................125
6 Reference .............................................................................................126Views and editors.................................................................................................................126
NonStop Project Explorer view...........................................................................................128COBOL and pTAL editors..................................................................................................128C/C++ editor.................................................................................................................129Outline view....................................................................................................................129Make Target view............................................................................................................129Problems view.................................................................................................................129Tasks view......................................................................................................................129Console view..................................................................................................................129Properties view................................................................................................................129Target Management terminal ............................................................................................129
New project wizards.............................................................................................................132Local new project wizards.................................................................................................132
NonStop C, C++, COBOL, and pTAL Project wizard pages..............................................132Basic Settings page.....................................................................................................133Initial Build Settings page (managed builds)...................................................................133Initial Build Settings page (makefile projects)...................................................................134Remote Settings page..................................................................................................134Select Configurations page...........................................................................................136
Import Existing Code wizard..............................................................................................136Remote Makefile Project wizard.........................................................................................136
New file, folder, and class wizards.........................................................................................137New File.........................................................................................................................137
Contents 5
New File from Template....................................................................................................138New Folder.....................................................................................................................138New C/C++ Class Wizard...............................................................................................138New Header File.............................................................................................................138New Source File..............................................................................................................138New Source Folder..........................................................................................................139
Tools...................................................................................................................................139Open Remote File dialog..................................................................................................139Transfer Files Wizard........................................................................................................139Import ETK Projects wizard................................................................................................140Import NSDEE 2.x Project wizard.......................................................................................141Launch Visual Inspect dialog.............................................................................................141Remote file browser..........................................................................................................142
Preferences..........................................................................................................................142NonStop Development......................................................................................................143Code Templates...............................................................................................................143Network Connections.......................................................................................................143
Add or Remove Connection Configurations dialog...........................................................144Secure Shell Settings dialog..........................................................................................144Telnet/FTP settings.......................................................................................................145
Tool Locations..................................................................................................................145Cross Compilers page.................................................................................................145SQL/MX Preprocessors page........................................................................................146Cygwin/Msys Page settings..........................................................................................147
Transfer Files Wizard........................................................................................................147Properties............................................................................................................................148
Resources.......................................................................................................................148Builders..........................................................................................................................148C/C++ Build...................................................................................................................148Make Settings.................................................................................................................148Build Variables................................................................................................................148Discovery Options............................................................................................................149Environment....................................................................................................................149Logging..........................................................................................................................149Settings..........................................................................................................................149
Tool Settings page.......................................................................................................149Build Steps page.........................................................................................................150Build Artifact page......................................................................................................150Binary Parsers.............................................................................................................150Error Parsers...............................................................................................................150
Settings (Remote).............................................................................................................150Deploy Target Settings group........................................................................................150System for SQL/MX Compile group...............................................................................150Destination for Deploy Target group...............................................................................151System for SQL/MX Preprocessor (INVOKE Processing) group...........................................151System for SQL/MP Compile and Deploy group..............................................................151System for SQL/MP Preprocessing group........................................................................151
Tool Chain Editor.............................................................................................................151Guardian File Transfer......................................................................................................151C/C++ General..............................................................................................................151Project References............................................................................................................151Refactoring History...........................................................................................................152Remote Settings...............................................................................................................152Run/Debug Settings.........................................................................................................152
Menus.................................................................................................................................152
6 Contents
NonStop Tools menu........................................................................................................152Context menu for NonStop Project Explorer.........................................................................152
Icons...................................................................................................................................1527 Support and other resources....................................................................155
Supported Release Version Updates (RVUs)..............................................................................155Intended audience................................................................................................................155Related information...............................................................................................................155Publishing history..................................................................................................................155HP encourages your comments...............................................................................................155Technical support.................................................................................................................155
A Sample programs and projects................................................................156B Tips on setting up password free logins with Open SSH...............................157Index.......................................................................................................160
Contents 7
Figures1 Remote Makefile Project wizard.........................................................................................322 Build Settings wizard dialog..............................................................................................333 Properties for MakeCar project..........................................................................................354 NonStop Development perspective.....................................................................................415 Build configuration selection combo box.............................................................................436 Settings for projects with SQL/MP compilation, SQL/MX compilation, and no SQL
compilation.....................................................................................................................507 Setting the location of SQL/MX Preprocessor for COBOL......................................................518 Layout of simple project....................................................................................................529 Miscellaneous option category for the C Linker....................................................................5710 Creating a project with SQL/MP support.............................................................................5811 Tools with SQL/MP settings...............................................................................................5912 Creating a project with SQL/MX support............................................................................6013 Tool chain for simple C project with SQL/MX......................................................................6014 Location of SQL/MX preprocessor output............................................................................6115 Adding pre-build and post-build steps.................................................................................6316 An example of Tool Locations properties ............................................................................6617 Add Cross Compiler Location dialog..................................................................................6718 Add SQL/MX Preprocessors Location dialog.......................................................................6719 New project wizard for connection configurations................................................................6820 Network Connections preferences page..............................................................................6921 Add or Remove Connection Configurations dialog................................................................6922 Secure Shell Settings dialog..............................................................................................7023 Telnet/FTP Settings dialog.................................................................................................7124 Export Connection Configurations dialog ...........................................................................7325 Import Connection Configurations wizard............................................................................7326 ETK import wizard............................................................................................................7427 Import Projects Completed dialog (ETK imports)...................................................................7528 Import Projects Warning dialog (ETK imports)......................................................................7529 Import NSDEE 2.x Projects wizard......................................................................................7630 Import Projects Warning dialog (NSDEE 2.x imports)............................................................7731 NonStop COBOL Project wizard........................................................................................7832 Initial Build Settings page (COBOL executable project) .........................................................7933 Select Configurations page (managed build project) ............................................................8134 Initial Build Settings page (makefile project).........................................................................8235 Select Configurations page (makefile project).......................................................................8336 Import Existing Code wizard .............................................................................................8437 Remote Makefile Project wizard ........................................................................................8538 Build Settings page..........................................................................................................8639 Run Configurations dialog.................................................................................................8740 Arguments page..............................................................................................................8841 Environment page for OSS launches...................................................................................8942 Environment page for Guardian launches ...........................................................................8943 Launching a saved run configuration...................................................................................9044 Selecting a program to run................................................................................................9045 Build Variables property page...........................................................................................9146 Edit Existing Build Variable dialog......................................................................................9147 Tool Settings tabbed page................................................................................................9248 Miscellaneous category for C compiler ..............................................................................9249 SQL/MP Preprocessor category ........................................................................................9350 Miscellaneous category for COBOL SQL/MP Compile and Deploy........................................9351 Manage Configurations dialog..........................................................................................94

52 Create New Configuration dialog......................................................................................9553 Symbols tab of the Path and Symbols property page...........................................................10054 Disabling record field errors............................................................................................10155 C/C++ Index Markers annotation preferences...................................................................10256 Syntax warnings after “Text as” deselected........................................................................10357 Includes settings page....................................................................................................10458 Exclude a single COPY library from a build ......................................................................10559 File excluded from build (pin indicator).............................................................................10560 Exclude a folder from a build...........................................................................................10661 Folder with non-default properties (tack indicator)...............................................................10662 Specifying locations of COPY libraries to include in build (for COBOL compilers)...................10763 File with non-default settings............................................................................................10764 Turn off SQL/MP folder...................................................................................................10865 File with non-default settings............................................................................................10866 Paths and Symbols page with C++ selected.......................................................................10967 Paths and Symbols dialog...............................................................................................11068 Indexer page.................................................................................................................11069 Add file path dialog.......................................................................................................11170 Entering a shared library................................................................................................11271 Adding libraries to link ..................................................................................................11272 Adding rld ...................................................................................................................11373 rld in library list.............................................................................................................11374 Creating makefile.target file.............................................................................................11475 Editor Selection dialog ...................................................................................................11576 Create Make Target dialog.............................................................................................11677 Make Target View .........................................................................................................11678 Changing clean to clean-all....................................................................................11779 Example of output form make clean-all.......................................................................11880 Changing the default deploy target name.........................................................................11981 Adding a project to the subversion repository....................................................................12282 Pre-selected files for check-in............................................................................................12383 New Folder wizard (expanded view)................................................................................12484 Linked folder contents ....................................................................................................12485 Show View dialog with C/C++ specific views....................................................................12786 Show View dialog with NonStop Development view...........................................................12787 Adding a subvolume to a remote Guardian project.............................................................13888 Remote browsing for a Guardian file................................................................................14289 Default COBOL source template.......................................................................................14390 Tool Settings page.........................................................................................................14991 Using Cygwin Open SSH settings with NSDEE...................................................................159
Tables1 Wizards for creating new files and folders...........................................................................342 Property pages for builds..................................................................................................353 Build variables and environment variables ..........................................................................454 Telnet/FTP settings...........................................................................................................715 NonStop views..............................................................................................................1266 NonStop C, C++, COBOL, and pTAL Project wizard page settings.......................................1327 Project types..................................................................................................................1328 Initial Build Settings page settings (managed builds)...........................................................1339 Initial Build Settings page settings (makefile projects)..........................................................13410 Remote Settings page settings (no SQL) ............................................................................134
11 Remote Settings page settings (SQL/MX) ..........................................................................13512 Remote Settings page settings (SQL/MP) ..........................................................................13513 Import Existing Code wizard settings................................................................................13614 Remote Makefile page settings.........................................................................................13715 Build Settings page settings.............................................................................................13716 Settings in the Open Remote File dialog............................................................................13917 Transfer Files wizard controls...........................................................................................14018 Import ETK Projects wizard settings...................................................................................14119 Import NSDEE 2.x Project wizard settings..........................................................................14120 Network Connection settings...........................................................................................14321 Add or Remove Connection Configurations dialog settings..................................................14422 Secure Shell Settings dialog settings.................................................................................14423 Telnet/FTP settings.........................................................................................................14524 Cross Compiler page settings..........................................................................................14525 Add Cross Compiler dialog settings..................................................................................14626 SQL/MX Preprocessors page settings...............................................................................14627 Add SQL/MX Preprocessor Location dialog settings...........................................................14628 Cygwin/Msys page settings............................................................................................14729 Transfer File Wizard preference page settings....................................................................14730 NonStop icons...............................................................................................................153
Examples1 Project Includes folder.......................................................................................................472 Indexer options................................................................................................................473 Sample build rule for Door.o in subdir.mk...........................................................................534 Sample build rule for testmx.c ...........................................................................................555 A simple C tool chain for TNS/E........................................................................................566 Primary build targets for a C program with SQL/MX............................................................617 Build Output with pre-build and post-build steps...................................................................648 Adding custom pre-deploy and post-deploy targets...............................................................649 Sample definitions of my-pre-deploy and my-post-deploy.......................................................6510 Incorrect errors for new project source file...........................................................................9611 Example of errors and warnings shown for SQL statements....................................................9712 Errors for get_dept_rec................................................................................................9813 Errors for get_dept_rec removed...................................................................................9914 Custom Guardian deploy target.......................................................................................120

1 IntroductionThe NonStop Development Environment for Eclipse (NSDEE) is a set of Eclipse plug-ins that extendEclipse's C/C++ Development Tooling (CDT) to provide an integrated development environment(IDE) for developing NonStop applications on Windows. NSDEE supports building applicationsand editing source files both locally (on Windows) and remotely (on NonStop). NSDEE alsoprovides facilities for transferring locally-built executables to NonStop systems and the ability tolaunch NonStop applications from the IDE.Additionally, NSDEE provides integrated debugging of NonStop TNS/E applications, runningprocesses, and snapshot files.
NOTE: TNS/E debugging features and documentation are purchased separately.
NSDEE supports application development in C, C++, COBOL, and pTAL for both OSS and Guardianplatforms, and for both TNS/E and TNS/R architectures. NSDEE additionally supports embeddedSQL.Because NSDEE extends CDT, NSDEE offers a particularly rich development environment forWindows-hosted C and C++ application development. Using CDT's indexed database of C andC++ source code, C and C++ users can enjoy the benefit of a large range of indexing-basedfeatures such as static call hierarchies, type hierarchies, opening method definitions from call sitesin source code, and more.This manual supplements Eclipse and CDT documentation, providing documentation specific toNonStop development.
NOTE: For installation instructions for NSDEE 4.0, refer to the NSDEE 4.0 Quick Start on theNSDEE installation media.
New and changed features for NSDEE 4.0Product changes for NSDEE 4.0 include:• Upgrade to Eclipse Juno 4.2 and CDT 8.1
• Support for Windows XP SP3, Windows 7 x86/x64, and Windows 8 x86/64
• Support for Java 6 (JRE 1.6) and Java 7 (JRE 1.7)
• Support for remote terminal plug-in use with NSDEE (Target Management Terminal). For moreinformation, see http://www.eclipse.org/tm/tutorial/index.php.
NOTE: This plug-in is in the Eclipse CDT package. For alternative package installations,install separately from the third-party.zip file provided in the NSDEE installation media.
• Sample programs and projects included with the product
• Removal of NSDEE 2.1 perspective
Related documentationThe following manuals provide useful information about NonStop application development:• Guardian Programmer's Guide
• Open System Services User's Guide
• Guardian User's Guide
• SQL/MP Programming Manual for C
• SQL/MP Programming Manual for COBOL85
New and changed features for NSDEE 4.0 11

• SQL/MX Programming Manual for C and COBOL
• Inspect Manual for information on debugging TNS/R applications
• Native Inspect Manual for information on debugging TNS/E applications
• TACL Reference Manual for information on NonStop variables, commands, and built-in functions
• ODBC/MX Client Driver manuals for information on ODBC driver error messagesAll these manuals are available in the NonStop Technical Library (NTL) at:www.hp.com/go/nonstop-docsFor more information on compilers, see• The COBOL Manual for TNS/E Programs available on the NTL.
• The man pages for cross compilers in the NSDEE product at Help→Help Contents.
• The product documentation delivered with the cross compiler.
12 Introduction
2 Before you beginNSDEE provides capabilities for building applications on both local Windows and remote NonStopsystems. Local Windows-hosted builds require a make program (as provided by Cygwin or Msys)and cross compilers for building NonStop applications on Windows. Remote NonStop-hostedbuilds typically require make (OSS) or gmake (Guardian) and native compilers for NonStopsystems.To use NSDEE for either local or remote builds, you must install both Eclipse Juno 4.2 and C/C++Development Tooling (CDT) 8.1. Both are available on the NSDEE installation media. The NSDEEinstallation media also includes the NSDEE 4.0 Quick Start which provides instructions for installingthese items and NSDEE 4.0.Additionally, local Windows-hosted builds also require Cygwin or Msys for make-driven builds.Both are available on the NSDEE installation media. NonStop cross compilers and, for SQL/MXapplications, an SQL/MX preprocessor are also required. Cross compilers and the SQL/MXpreprocessor are sold separately from NSDEE.This manual supplements the Eclipse Workbench Guide and the C/C++ Development User Guide,which are included online with Eclipse and CDT. For basic information on using Eclipse, see theEclipse Workbench Guide. For more information about using CDT, see the C/C++ DevelopmentUser Guide. These manuals are available in the NonStop Technical Library (NTL) at:www.hp.com/go/nonstop-docs
13
3 Getting startedThis chapter provides an introduction to how to use NSDEE, from creating and building projectsto enabling C/C++ features based on indexing.
Preparing the WorkbenchThe scenarios described in this chapter assume that you:• Are familiar with basic Workbench features, such as views and perspectives.
• Are familiar with Workbench terminology, such as context menu, which refers to the pop-upmenu that appears when you right-click in a view.
• Have opened the NonStop Development perspective (by selecting Window→OpenPerspective→Other... and then choosing the NonStop Development perspective from the OpenPerspective dialog).
• Are using the default layout of the NonStop Development perspective.
NOTE:You can return all views and editors to their default locations by selecting Window→ ResetPerspective... and then selecting Yes in the resulting Reset Perspective dialog.
Specifying your preferencesPreferences are an important mechanism to ensure Eclipse works the way you want and areaccustomed to. For example, key preferences available from Window→Preferences→General→Keysallow you to customize key definitions for typing, such as the key definitions associated with Emacsor Microsoft Visual Studio. Preferences provided by CDT available fromWindow→Preferences→C/C++ include code style and smart typing preferences. NonStop-specificpreferences are described in “NonStop Development” (page 143). For other preferences, refer tothe Eclipse and CDT documentation.
Specifying tool locationsBefore you can build on Windows, NSDEE must have access to the locations for three types oftools:• NonStop cross compilers and linkers
• SQL/MX preprocessors (only needed when building SQL/MX applications)
• The location of a bin directory containing make and other tools (provided by Cygwin orMsys)
If these tools are installed at standard locations, then NSDEE automatically finds them. To verifythat NSDEE has detected tool locations:1. Open the preferences for tool locations:
a. Select Window→Preferences to open the Preferences dialog.b. Expand NonStop Development in the left side menu.c. Select Tool Locations.
TIP: For a shortcut, select NonStop Tools→Configure Tool Locations...
2. Select the Cross Compilers tab if it is not already selected. This tab lists all the cross compilerlocations (and associated RVUs) detected. In some instances, such as when cross compilersare installed after installing and opening NSDEE, cross compilers are not detected. If the crosscompilers are not detected:
14 Getting started

a. Select Add... to open the Add Cross Compiler Location dialog.b. Verify the Location: where the cross compilers are installed.c. Ensure that the Auto-detect root folders radio button is selected.d. Select OK.
If the cross compilers are installed at non-standard locations, see “Configuring ToolLocations” (page 66) for information on how to add those locations to your Tool Locationpreferences.
3. Select the SQL/MX Preprocessors tab to show all SQL/MX preprocessors on your system, ifany. If existing preprocessors are not shown:a. Select Add... to open the Add SQL/MX Preprocessor Location dialog.b. Verify the Location: where the SQL/MX preprocessor is installed.c. Ensure that the Auto-detect root folders radio button is selected.d. Select OK.
If the preprocessors are installed at non-standard locations, see “Configuring ToolLocations” (page 66) for information on how to add those locations to your Tool Locationpreferences.
4. Select the Cygwin/Msys tab. Either Cygwin or Msys must be installed to run make. Both areavailable on the NSDEE installation media.NSDEE automatically detects the Cygwin bin directory if it is installed at C:\cygwin\binand automatically detects the Msys bin directory if it is installed at C:\msys\1.0\bin.Otherwise, you must specify the installation locations.
NOTE: If the bin directory is in your Windows PATH environment variable or if you launchEclipse from a Cygwin shell (assuming the Cygwin shell's PATH variable includes an entry forCygwin's bin directory), setting a Cygwin or Msys bin directory is not necessary.
Configuring connections to NonStop systemsThe Network Connections preferences page is where you define how to connect to NonStopsystems when launching applications, transferring files, or deploying build results.Connection configurations are saved in the form system_name_or_IP (user_ID_or_alias). For eachnamed configuration you can specify preferred connection protocols (SSH/SFTP or Telnet/FTP)and can also configure protocol-specific options. These connection configurations are used when,for example, you create a project and specify where the build results are deployed or where SQLcompiles occur.To create a connection configuration:1. Open the preferences for connectivity:
a. Select Window→Preferences to open the Preferences dialog box.b. Expand NonStop Development in the left side menu.c. Select Network Connections.
TIP: For a shortcut, select NonStop Tools→Configure Connections...
2. Enter a system name or IP address in the System: field.3. Enter a NonStop user ID or alias in the User name: field.4. Select either the SSH/SFTP or Telnet/FTP radio button.5. If changes to default settings are necessary, select the Settings... button to the right of the radio
button for your preferred protocol. A Settings dialog specific to your preferred protocol opens.For details on Settings dialogs, see “Settings” (page 149).
Configuring connections to NonStop systems 15

6. Select the Connect button to verify the connection.
NOTE: A password prompt appears before the connection completes.
7. Select OK to save the connection configuration and close the Preferences dialog.
NOTE: NSDEE provides the Connect button to test new connection configurations. However,the Configure Connections dialog and the Connect button are not necessary to establishconnections because NSDEE automatically establishes connections as needed.
8. To specify multiple connection configurations, open the Network Connections preferences andselect Add/Remove.... For details, see “Configuring connections to NonStop” (page 68).
Creating projectsProjects provide a way for you to organize and build applications in NSDEE. Before creating aproject, know which type of project best suits your needs: a makefile (unmanaged) project or amanaged project.The makefile project is the simplest type of project provided by NSDEE. Makefile projects buildyour application using a makefile provided by you. Makefile projects are ideal for use with anexisting code base that builds using existing makefiles. NSDEE supports makefile projects for bothlocal Windows-hosted builds and for remote builds on a NonStop server.If you are creating a new application or have an application for which you do not have a makefile,then you can use a project for which NSDEE creates makefiles and manages your builds. Managedprojects are available only for local Windows-hosted builds.This section provides examples of how to create makefile and managed projects from scratch orusing an existing code base. This section also provides an example of how to create multiplemanaged projects to build a single application.
NOTE: For the most detailed descriptions of project wizards, read the sections about creatingprojects from scratch. Other sections regarding project creation focus on short descriptions of howto create projects.
Creating a managed project from scratchBefore creating a managed project, determine the primary language for the project. The primarylanguage determines the linker used to create the final build object. Also determine whether thefinal build object will be an executable or some type of library.Project creation is similar for all managed projects regardless of language. This section providesan example of creating a C executable project.To create a C project, from the NonStop Development perspective:1. Open the NonStop C Project wizard using one of the following methods:
• Select File→New→C Project.
• Select C Project from the pull-down menu of the New NonStop Project icon in the maintool bar.
• Select New→C Project from the context menu of the NonStop Project Explorer view.2. In the resulting NonStop C Project wizard:
16 Getting started
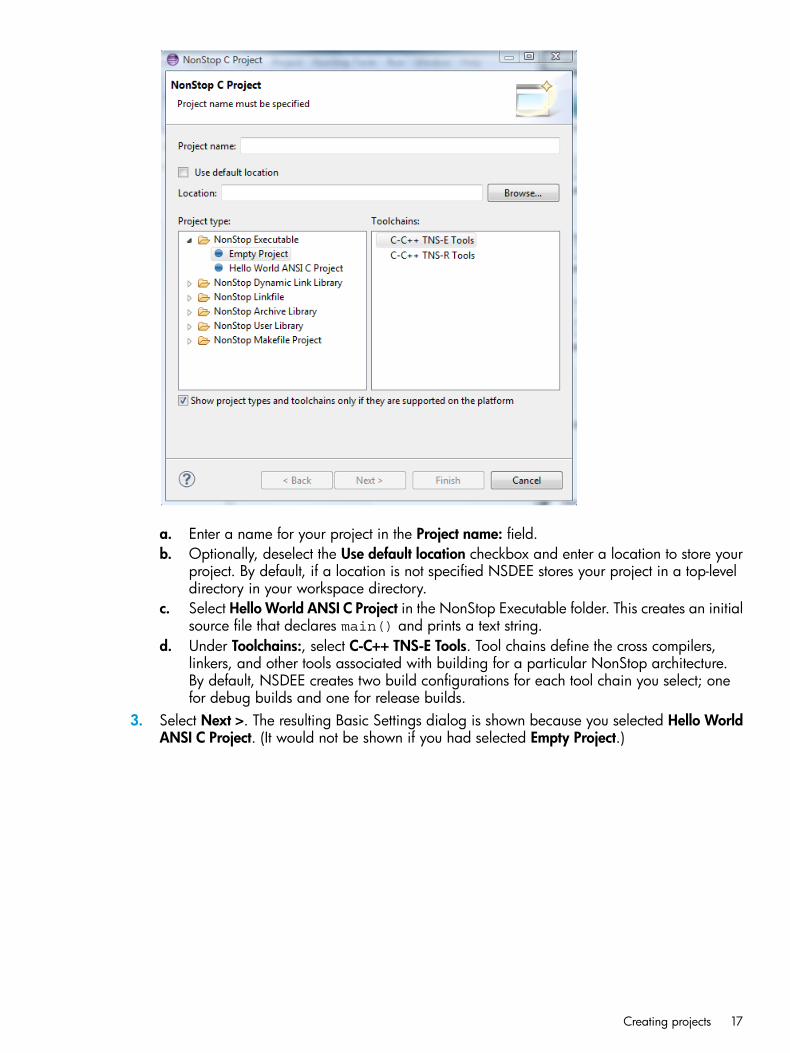
a. Enter a name for your project in the Project name: field.b. Optionally, deselect the Use default location checkbox and enter a location to store your
project. By default, if a location is not specified NSDEE stores your project in a top-leveldirectory in your workspace directory.
c. Select Hello World ANSI C Project in the NonStop Executable folder. This creates an initialsource file that declares main() and prints a text string.
d. Under Toolchains:, select C-C++ TNS-E Tools. Tool chains define the cross compilers,linkers, and other tools associated with building for a particular NonStop architecture.By default, NSDEE creates two build configurations for each tool chain you select; onefor debug builds and one for release builds.
3. Select Next >. The resulting Basic Settings dialog is shown because you selected Hello WorldANSI C Project. (It would not be shown if you had selected Empty Project.)
Creating projects 17

On the Basic Settings dialog:• Configure author and copyright information to be placed in the comment header of the
source file.• Configure the text string used in the print statement of the source file.
• Set the name of the initial source directory.These fields can also remain unchanged.
4. Select Next > to open the Initial Build Settings dialog.5. On the Initial Build Settings dialog, configure initial build settings for your project:
• The platform to build (OSS or Guardian)
• The location of the cross compilers to use
• Any additional languages to use
18 Getting started
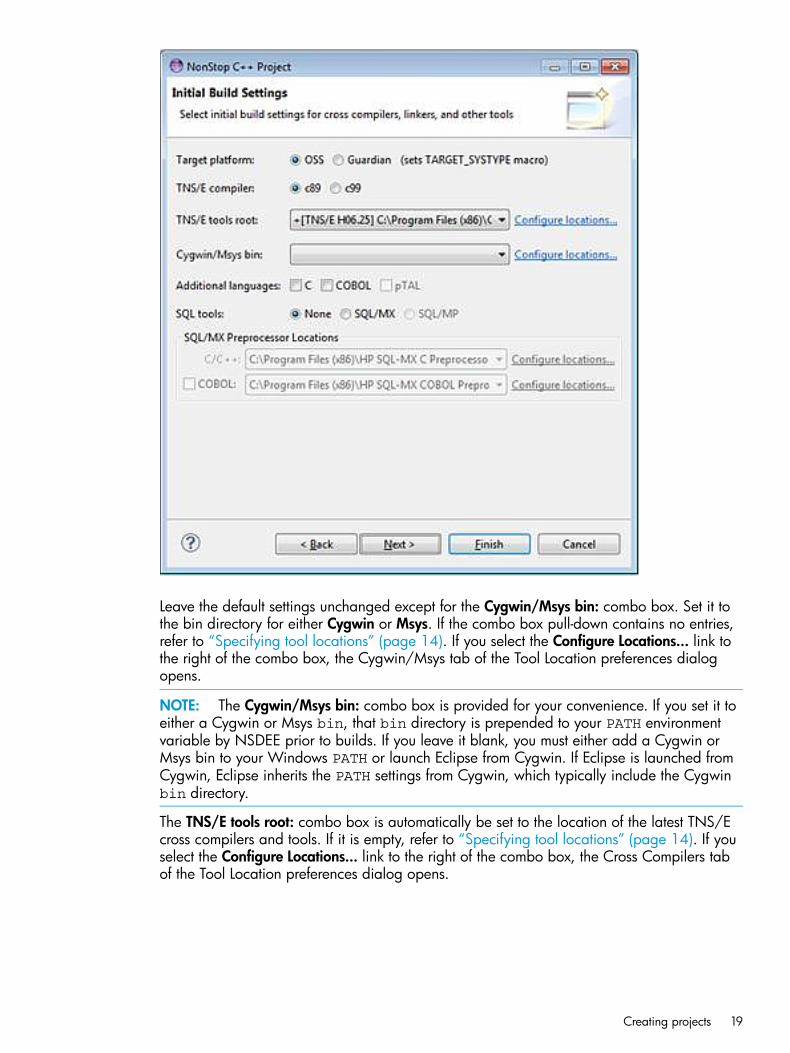
Leave the default settings unchanged except for the Cygwin/Msys bin: combo box. Set it tothe bin directory for either Cygwin or Msys. If the combo box pull-down contains no entries,refer to “Specifying tool locations” (page 14). If you select the Configure Locations... link tothe right of the combo box, the Cygwin/Msys tab of the Tool Location preferences dialogopens.
NOTE: The Cygwin/Msys bin: combo box is provided for your convenience. If you set it toeither a Cygwin or Msys bin, that bin directory is prepended to your PATH environmentvariable by NSDEE prior to builds. If you leave it blank, you must either add a Cygwin orMsys bin to your Windows PATH or launch Eclipse from Cygwin. If Eclipse is launched fromCygwin, Eclipse inherits the PATH settings from Cygwin, which typically include the Cygwinbin directory.
The TNS/E tools root: combo box is automatically be set to the location of the latest TNS/Ecross compilers and tools. If it is empty, refer to “Specifying tool locations” (page 14). If youselect the Configure Locations... link to the right of the combo box, the Cross Compilers tabof the Tool Location preferences dialog opens.
Creating projects 19

6. Select Next >. The resulting Remote Settings dialog opens. Specify a transfer location on aNonStop server for final build objects. If you chose SQL/MP or SQL/MX on the previouspage, specify NonStop server locations for SQL compiles.
If you added a connection configuration (see “Configuring connections to NonStop systems”(page 15)), you can choose that system from the Target system/user (-h/-u): combo box dropdown and provide a target destination and file name. Or leave the settings blank and addthem to the project at a later time. You can also open the Network Connections preferencepage from the Remote Settings page by selecting the Edit... button.
7. Select Next >. The resulting Select Configurations dialog shows the build configurations thatNSDEE will create for this project. Build configurations are a group of settings to use for abuild. By default, NSDEE creates build configurations specific to debug and release builds ofthe project. You can add additional build configurations after project creation.
20 Getting started

The Advanced settings... button opens project properties for the project you are about tocreate. Change tool options, environment variables, and other project settings in Projectproperties. These settings are available after you create a project by selecting your project inthe NonStop Project Explorer view and then selecting Properties from the context menu.Leave this page unchanged.
8. Select Finish. NSDEE creates your project. A project folder icon representing your project isdisplayed in the NonStop Project Explorer view. Expand the folder to see the contents of yourproject. For information about how to build, deploy, and launch your project, see “Building,deploying, and launching a project” (page 36).Your project contains a folder named Includes. This is a link to the system include directoryof the cross compilers and tools you chose during project creation. CDT uses this link to helpbuild a database of C and C++ symbols. For more information, see “Ensuring the C/C++indexer runs” (page 33).
Creating a managed project from existing sourcesManaged projects are used to build and manage existing application sources. Managed projectsare created differently, depending on where you want your sources to reside (inside or outside ofyour workspace) and how the existing sources were built previously.
Creating projects 21
If the existing source base consists of ETK projects, consider using the Import ETK Projects wizard.The Import ETK Projects wizard imports not only your sources, but also many tool settings such ascompiler and linker options. For details, see “Importing ETK projects” (page 73).This section provides examples of how to create managed projects from existing sources for twoscenarios:• Creating a project and using the sources outside your workspace using a sample program
Car.• Copying the sources into your workspace using a sample program GeneralCpp.The sources for both programs are in:eclipse install directory\plugins\com.hp.nsdee_4.0.n\Examples.zip
The following examples assume Examples.zip is unzipped to C:\Examples.
NOTE: This section focuses on examples of creating projects from existing sources. For moredetailed descriptions of project creation wizards, see “Creating a managed project from scratch”(page 16).
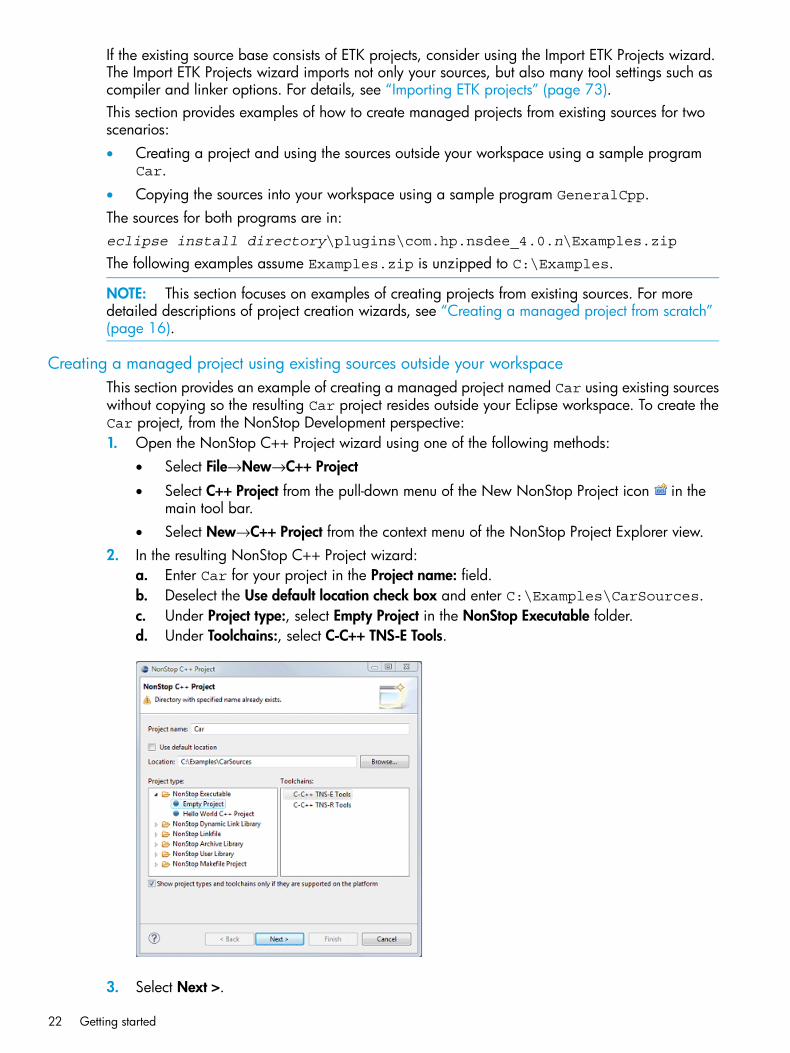
Creating a managed project using existing sources outside your workspaceThis section provides an example of creating a managed project named Car using existing sourceswithout copying so the resulting Car project resides outside your Eclipse workspace. To create theCar project, from the NonStop Development perspective:1. Open the NonStop C++ Project wizard using one of the following methods:
• Select File→New→C++ Project
• Select C++ Project from the pull-down menu of the New NonStop Project icon in themain tool bar.
• Select New→C++ Project from the context menu of the NonStop Project Explorer view.2. In the resulting NonStop C++ Project wizard:
a. Enter Car for your project in the Project name: field.b. Deselect the Use default location check box and enter C:\Examples\CarSources.c. Under Project type:, select Empty Project in the NonStop Executable folder.d. Under Toolchains:, select C-C++ TNS-E Tools.
3. Select Next >.
22 Getting started

4. In the Initial Build Settings dialog, do not change the defaults. Specify either a Cygwin orMsys bin using the Cygwin/Msys bin: combo box if you want NSDEE to prepend thecorresponding bin to PATH before builds.The following dialog shows the Msys bin specified.
5. Select Next >. The resulting Remote Settings dialog opens. To deploy Car to a NonStopsystem, enter a remote system and user, and specify a remote location.
6. Select Finish.The Car project is now listed in the NonStop Project Explorer view. Open the Car project folderto see an Includes directory (a link to the system headers available from the cross compilersand tools), a headers directory (containing header files for the project), and a src directory(containing the rest of the sources for the project).The Car folder also contains .project and .cproject files, but these are not visible by default.To view them:1. Select Filters... from the local pull-down menu for the NonStop Project Explorer view. Open
the C Element Filters dialog.
2. In the C Element Filters dialog, deselect .*resources.
Creating projects 23

3. Select OK in the C Element Filters dialog.To hide .project and .cproject, return to the C Element Filters dialog.The .project and .cproject files define attributes of the Car project, including anycustomizations. If you save your projects in a Source Configuration Management system, you mustsave these files in addition to your source code.For information about how to build, deploy, and launch Car, first see “Viewing and changingproperties of managed projects” (page 34) because the build will fail unless you specify the locationof the headers directory to the cross compiler. Then see “Building, deploying, and launching aproject” (page 36).
Creating a managed project by pulling existing sources into your workspaceThis section provides an example of creating a managed project named GeneralCpp usingexisting sources copied into your workspace. This is a two-step process. First, you create an emptyproject. Then, you import the sources for GeneralCpp.To create the GeneralCpp project, from the NonStop Development perspective:1. Open the NonStop C++ Project wizard using one of the following methods:
• Select File→New→C++ Project
• Select C++ Project from the pull-down menu of the New NonStop Project icon in themain tool bar.
• Select New→C++ Project from the context menu of the NonStop Project Explorer view.2. In the resulting NonStop C++ Project wizard:
a. Enter GeneralCpp in the Project name: field.b. Under Project type:, select Empty Project in the NonStop Executable folder.c. Under Toolchains:, select C-C++ TNS-E Tools.
24 Getting started

3. Select Next >.4. In the Initial Build Settings dialog, do not change the defaults. Specify either a Cygwin or
Msys bin using the Cygwin/Msys bin: combo box if you want NSDEE to prepend thecorresponding bin to PATH before builds.The following dialog shows the Msys bin specified.
5. Select Next >. The resulting Remote Settings dialog opens. To deploy GeneralCpp to aNonStop system, enter a remote system and user, and specify a remote location.
6. Select Finish.To import the sources for GeneralCpp into your project:1. Select the GeneralCpp project folder in the NonStop Project Explorer view.2. Select Import... from the context menu for the NonStop Project Explorer view to open the Import
wizard.
Creating projects 25
3. In the Import wizard, expand the general folder and select File System.4. Select Next > to continue to the File system wizard.5. Enter in the File system wizard From directory: field:
C:\Examples\GeneralCppSources
6. A folder for GeneralCppSources will appear in the left-hand list box. Expand the folder butdo not select its check box.
7. Under GeneralCppSources, select the check boxes for the include and source directories.8. Select Finish.The include and source directories now appear under the GeneralCpp project folder.For information about how to build, deploy, and launch GeneralCpp, first see “Viewing andchanging properties of managed projects” (page 34) because the build will fail if the location ofthe headers directory is not specified to the cross compiler. Then see “Building, deploying, andlaunching a project” (page 36).
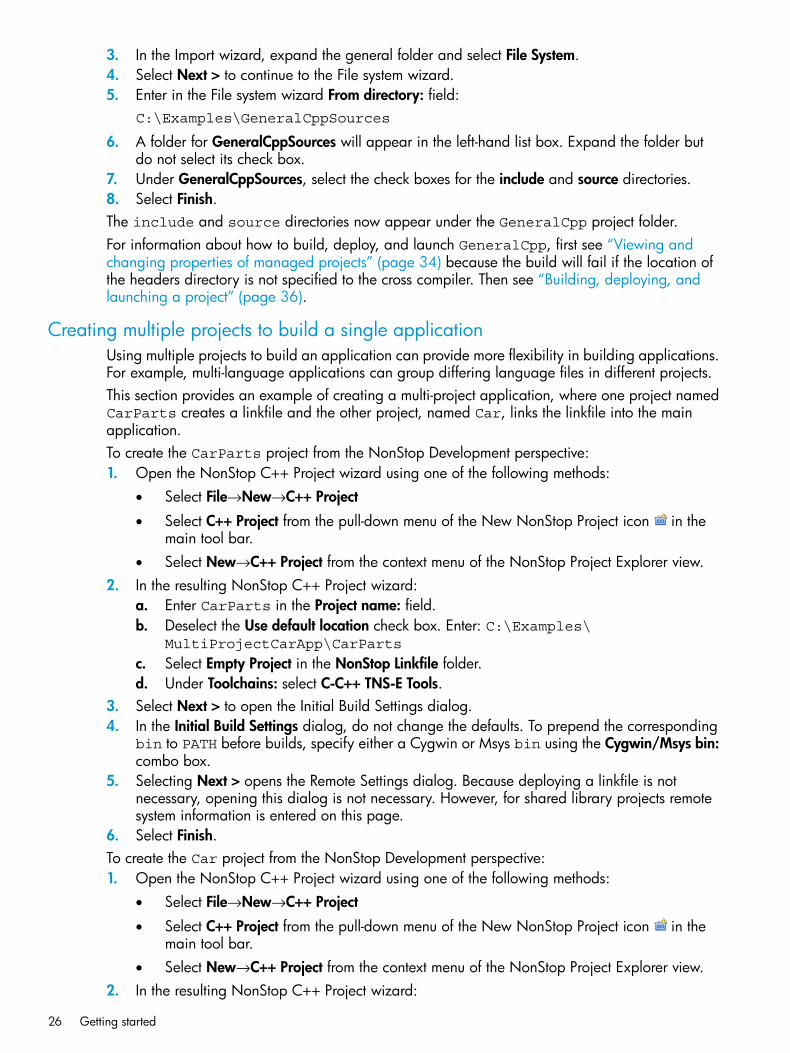
Creating multiple projects to build a single applicationUsing multiple projects to build an application can provide more flexibility in building applications.For example, multi-language applications can group differing language files in different projects.This section provides an example of creating a multi-project application, where one project namedCarParts creates a linkfile and the other project, named Car, links the linkfile into the mainapplication.To create the CarParts project from the NonStop Development perspective:1. Open the NonStop C++ Project wizard using one of the following methods:
• Select File→New→C++ Project
• Select C++ Project from the pull-down menu of the New NonStop Project icon in themain tool bar.
• Select New→C++ Project from the context menu of the NonStop Project Explorer view.2. In the resulting NonStop C++ Project wizard:
a. Enter CarParts in the Project name: field.b. Deselect the Use default location check box. Enter: C:\Examples\
MultiProjectCarApp\CarParts
c. Select Empty Project in the NonStop Linkfile folder.d. Under Toolchains: select C-C++ TNS-E Tools.
3. Select Next > to open the Initial Build Settings dialog.4. In the Initial Build Settings dialog, do not change the defaults. To prepend the corresponding
bin to PATH before builds, specify either a Cygwin or Msys bin using the Cygwin/Msys bin:combo box.
5. Selecting Next > opens the Remote Settings dialog. Because deploying a linkfile is notnecessary, opening this dialog is not necessary. However, for shared library projects remotesystem information is entered on this page.
6. Select Finish.To create the Car project from the NonStop Development perspective:1. Open the NonStop C++ Project wizard using one of the following methods:
• Select File→New→C++ Project
• Select C++ Project from the pull-down menu of the New NonStop Project icon in themain tool bar.
• Select New→C++ Project from the context menu of the NonStop Project Explorer view.2. In the resulting NonStop C++ Project wizard:
26 Getting started

a. Enter Car in the Project name: field.b. Deselect the Use default location check box and enter: C:\Examples\
MultiProjectCarApp\Car
c. Select Empty Project in the NonStop Executable folder.d. Under Toolchains:, select C-C++ TNS-E Tools.
3. Select Next > to open the Initial Build Settings dialog.4. In the Initial Build Settings dialog, do not change the defaults. To prepend the corresponding
bin to PATH before builds, specify either a Cygwin or Msys bin using the Cygwin/Msys bin:combo box.
5. Select Next >. To deploy Car to a NonStop system, select a remote system and user andspecify a remote location.
6. Select Finish.Change the properties of the Car project to reference the CarParts project so CarParts buildsbefore the Car project. To set a reference to CarProjects in the Car projects properties:1. Select the Car project in the NonStop Project Explorer view.2. Select Properties from the NonStop Project Explorer view context menu.3. In the Properties for Car dialog, select Project References in the list of property pages on the
left.
4. In the Project References page on the right (and shown above), select the checkbox forCarParts.
5. Select OK.Point the Car project to include files in the CarParts project. Link Car in the build artifact (linkfile)created by CarParts. From the NonStop Development perspective:1. Select the Car project in the NonStop Project Explorer view.2. Select Properties from the NonStop Project Explorer view context menu.3. In the Properties for Car dialog, expand C/C++ Build and select the sub-item Settings.
Creating projects 27
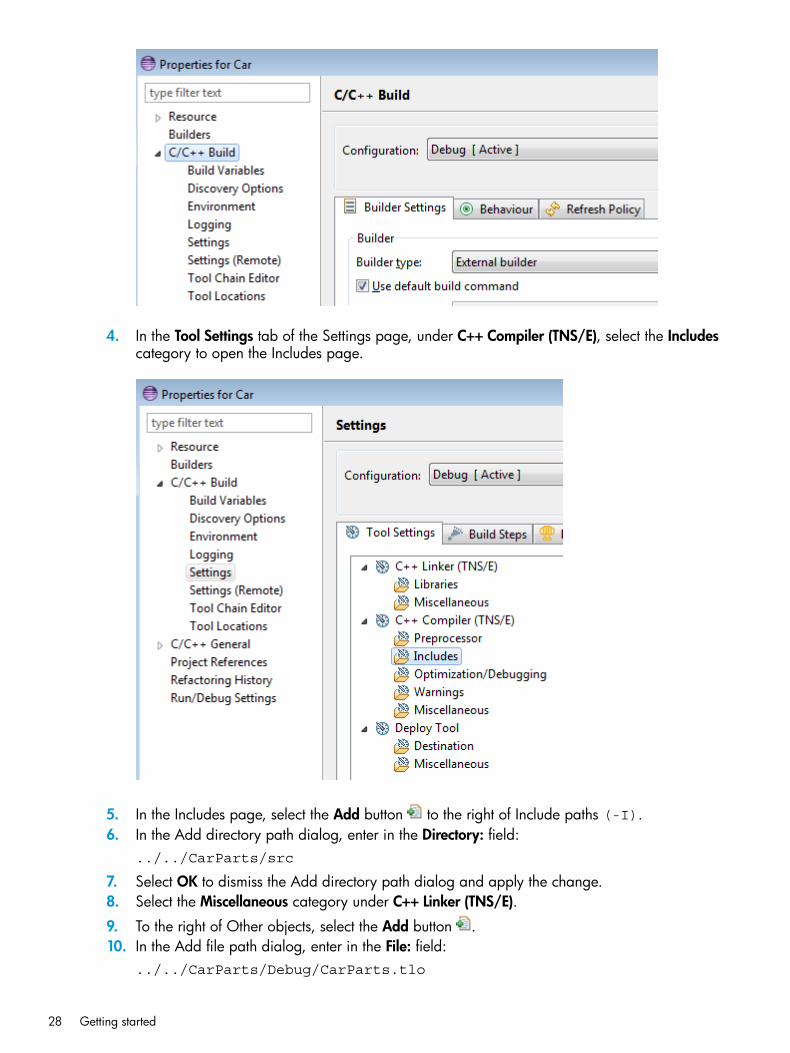
4. In the Tool Settings tab of the Settings page, under C++ Compiler (TNS/E), select the Includescategory to open the Includes page.
5. In the Includes page, select the Add button to the right of Include paths (-I).6. In the Add directory path dialog, enter in the Directory: field:
../../CarParts/src
7. Select OK to dismiss the Add directory path dialog and apply the change.8. Select the Miscellaneous category under C++ Linker (TNS/E).
9. To the right of Other objects, select the Add button .10. In the Add file path dialog, enter in the File: field:
../../CarParts/Debug/CarParts.tlo
28 Getting started

11. Select OK to dismiss the Add file path dialog and apply the change.12. Make a similar change to the Release build configuration.
In the Configuration: combo box at the top of the page, change the configuration to Release.
13. In the Miscellaneous page for the C++ Linker (TNS/E), select the Add button to the right ofOther objects.
14. In the Add file path dialog, enter in the File: field:../. ./CarParts/Release/CarParts.tlo
15. Select OK to dismiss the Add file path dialog and apply the change.16. Select OK to dismiss the Properties for Car dialog and apply the change.Now your projects are ready to build. From the NonStop development perspective:1. Select Car in the NonStop Project Explorer view.2. Select the build icon in the tool bar.When the build completes, text similar to the following appears in the Console view (whereCarParts.tlo is linked into Car.txe):Building target: Car.txeInvoking: C++ Linker (TNS/E)c89 -Wcplusplus -Wsystype=guardian -Wcall_shared -o "Car.txe" ./src/Car.o ./src/CarTest.o ../. ./CarParts/Debug/CarParts.tloFinished building target: Car.txe
**** Build Finished ****
Creating projects 29

TIP: The Console view separates build output for each project. Because the Car project builtlast, its build output is shown in the Console view. If you select CarParts in the NonStop ProjectExplorer view, the Console shows build output for CarParts.
TIP:Building Car and CarParts produces more output than the default Console view can display.By default, the Console view limits output shown to 500 lines. Increase this from the preferencepage available from Window→Preferences→C/C++→Build→Console.
For information on how to deploy and run Car.txe from NSDEE, see “Building, deploying, andlaunching a project” (page 36).
Creating a local makefile project from scratchCreate a makefile project using one of the following methods:• Create a makefile project
• Create a managed project as described in “Creating a managed project from scratch” (page16) so that the initial makefiles are created for you. To manage the generated makefiles,deselect Generate Makefiles automatically in the C/C++ Build page of the project properties.
This section focuses on creating a makefile project. To create a local makefile project from scratch,select one of the new project actions from the context menu of the NonStop Project Explorer viewfor either the C, C++, COBOL, or pTAL. For makefile projects, the resulting project is the sameregardless of the language associated with the new project wizard. The following example usesthe NonStop C Project wizard.To create a local makefile project from scratch:1. From the context menu of the NonStop Project Explorer view, select New→Makefile Project
with Existing Code. This opens the Import Existing Code wizard.2. In the Import Existing Code wizard:
a. Enter Makecar in the Project name: field.b. Optionally, deselect the Use default location check box and enter a location to store your
project. By default, if a location is not specified NSDEE stores your project in a top-leveldirectory in your workspace directory.
c. Select Empty Project under the NonStop Makefile Project folder.d. Under Toolchains:, select C-C++ TNS-E Tools. For Makefile projects, tool chains define
where the C/C++ indexer looks for system headers. Optionally, NSDEE sets upCOMP_ROOT (which cross compilers use to find headers) based on your tool chainselections.By default, one build configuration named Default is created for each tool chain youselect.
3. Select Next > to open the Initial Build Settings dialog.4. In the Initial Build Settings dialog, select the tools root the C/C++ indexer uses to find symbols
in system headers. To have NSDEE to set the COMP_ROOT environment variable (and you donot plan to set it in your makefile), select the check box labeled Set COMP_ROOT and updatePATH based on tools root above.
5. Select Finish.NSDEE creates your project. The NonStop Explorer view shows the root of your project using aproject folder icon followed by the project name. To see the project content, expand the folderwhich initially contains only an Includes folder. The Includes folder is a link to the systeminclude directory of the cross compilers and tools indicated during project creation. CDT uses thislink to help build a database of C and C++ symbols. For more information, see “Ensuring theC/C++ indexer runs” (page 33).
30 Getting started

You must create your own directory, sources, and makefile.
Creating a local makefile project from existing sourcesThis section provides an example of creating a makefile project from existing sample sources fora simple application named Car. To get the sources for Car, unzip the file:eclipse install directory\plugins\com.hp.nsdee_4.0.n\Examples.zip
The following example assumes Examples.zip is unzipped to C:\Examples.To create a local makefile project from sources for Car from the NonStop Development perspective:1. From the context menu of the NonStop Project Explorer view, select New→Makefile Project
with Existing Code. This Import Existing Code wizard opens.2. In the Import Existing Code wizard:
a. Enter MakeCar in the Project name: fieldb. Enter in the Existing Code Location field:
C:\Examples\CarWithMakefile
c. The Tools root: combo box contains the location of cross compilers and tools for aparticular RVU. If not, see “Adding cross compiler locations” (page 66).
d. If you want NSDEE to prepend the corresponding bin to PATH before builds, specifyeither a Cygwin or Msys bin using the Cygwin/Msys bin: combo box.
e. Leave the Set COMP_ROOT and update PATH based on tools root above selected so theCOMP_ROOT environment variable is set to the Tools root: selection.
3. Select Finish.The MakeCar project is now in the NonStop Project Explorer view. Open the MakeCar projectfolder to see the Includes directory (a link to the system headers available from the cross compilersand tools), a headers directory (containing header files for the project), and a src directory(containing the rest of the sources for the project).The .project and .cproject files are in the MakeCar folder, but these are not visible bydefault.To view these files:1. Select Filters... from the local pull-down menu for the NonStop Project Explorer view to open
the C Element Filters dialog.
2. In the C Element Filters dialog, deselect .*resources.3. Select OK.To hide .project and .cproject, use the C Element Filters dialog. The .project and.cproject files define attributes of the MakeCar project, including any customizations. If yousave your projects in a Source Configuration Management system, you must save these files inaddition to your source code. For information about how to build, deploy, and launch MakeCar,see “Building, deploying, and launching a project” (page 36).
Creating projects 31

Creating a remote makefile projectRemote makefile projects are hosted on a NonStop system where the source files and makefilesreside. Creating a remote makefile project allows you to edit remote source files and launch buildsfrom NSDEE. Remote makefile projects are created either from scratch or with the project to buildexisting source using existing makefiles.To create a remote project, from the NonStop Development perspective:1. Select New→Remote Makefile Project from the context menu of the NonStop Project Explorer
view.2. In the Remote Makefile Project wizard (Figure 1 (page 32)), enter a name in the Project name:
field.
Figure 1 Remote Makefile Project wizard
3. From the Build system: combo, select a NonStop system for the project location. If a NonStopsystem connection is not yet configured, select Edit….
4. Enter the remote OSS or Guardian path where your project will reside in the Project location:field, or choose Browse… to browse for a location.
5. In the Platform: row, choose either the OSS or Guardian button depending on which platformyou project will reside.
6. Select the Connect to Build System… button to establish a connection to the NonStop systemspecified in step 3. The button is disabled if a connection is already established.
7. The Referenced remote makefile projects: list is empty unless previously created remote projectsare in your current workspace. The list allows you to specify other remote projects that mustbe built before your current project is built.
8. Select Next > to continue to the Build Settings wizard dialog (Figure 2 (page 33)).
32 Getting started
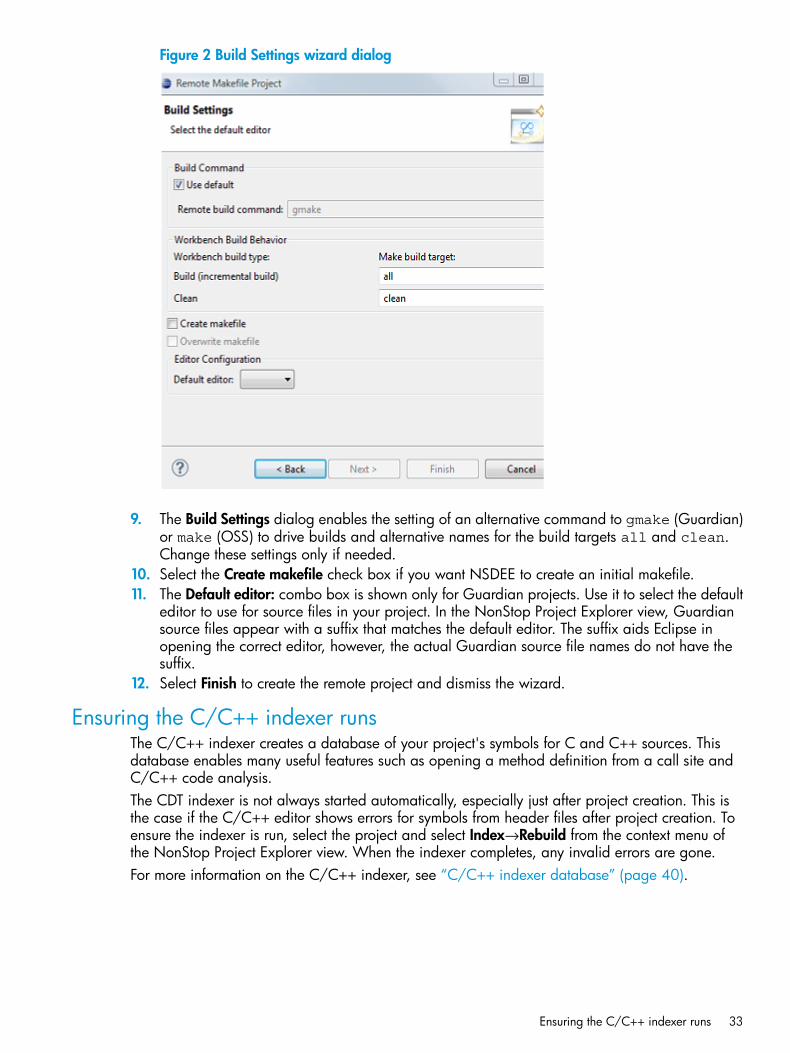
Figure 2 Build Settings wizard dialog
9. The Build Settings dialog enables the setting of an alternative command to gmake (Guardian)or make (OSS) to drive builds and alternative names for the build targets all and clean.Change these settings only if needed.
10. Select the Create makefile check box if you want NSDEE to create an initial makefile.11. The Default editor: combo box is shown only for Guardian projects. Use it to select the default
editor to use for source files in your project. In the NonStop Project Explorer view, Guardiansource files appear with a suffix that matches the default editor. The suffix aids Eclipse inopening the correct editor, however, the actual Guardian source file names do not have thesuffix.
12. Select Finish to create the remote project and dismiss the wizard.
Ensuring the C/C++ indexer runsThe C/C++ indexer creates a database of your project's symbols for C and C++ sources. Thisdatabase enables many useful features such as opening a method definition from a call site andC/C++ code analysis.The CDT indexer is not always started automatically, especially just after project creation. This isthe case if the C/C++ editor shows errors for symbols from header files after project creation. Toensure the indexer is run, select the project and select Index→Rebuild from the context menu ofthe NonStop Project Explorer view. When the indexer completes, any invalid errors are gone.For more information on the C/C++ indexer, see “C/C++ indexer database” (page 40).
Ensuring the C/C++ indexer runs 33

Adding folders and files to projectsNSDEE provides a number of wizards for adding folders and files to a project. All of these wizardsare available from the New sub-menu of the NonStop Project Explorer view context menu.Table 1 (page 34) summarizes the wizards available and their capabilities.
Table 1 Wizards for creating new files and folders
DescriptionWizard
Creates a new file and optionally populates the new file with contents of a named templateassociated with the file extension entered. For local projects, also use this wizard to create alink to a file outside of your project.
File from Template
Creates a source file. Similar to File from Template, this wizard optionally populates the newfile with the contents of a template. It also provides a Configure... button which opens the
Source File
Preferences dialog to the Code Templates page. Use the Code Templates page to customizetemplates for new files.
Creates a C or C++ header file and optionally populates the new file with the contents of aheader file template.
Header File
Creates a new folder. For local projects, also use this wizard to create a link to a folder outsideyour project. For remote projects, also use this wizard to add existing remote directories orsubvolumes as top-level folders in a project.
Folder
Creates a new folder. Use this wizard to create new source folders for managed projects.Source Folder
Viewing and changing properties of managed projectsThough managed projects create makefiles, if you do not want to use default tool options, youmust configure how your projects are built by cross compilers and other tools. The project propertiesallow you to change how your application is built. You can change build variables and environmentvariable values, cross compiler and linker options, and the tools used to build your application.This section provides a brief overview of the types of properties available for managed projectsthat change how your application is built.To view the properties for a project, select the project in the NonStop Project Explorer, then selectProperties from the context menu. Figure 3 (page 35) shows the properties for the MakeCar project(see “Creating a local makefile project from existing sources” (page 31)) with the C/C++ Buildnode expanded.
34 Getting started
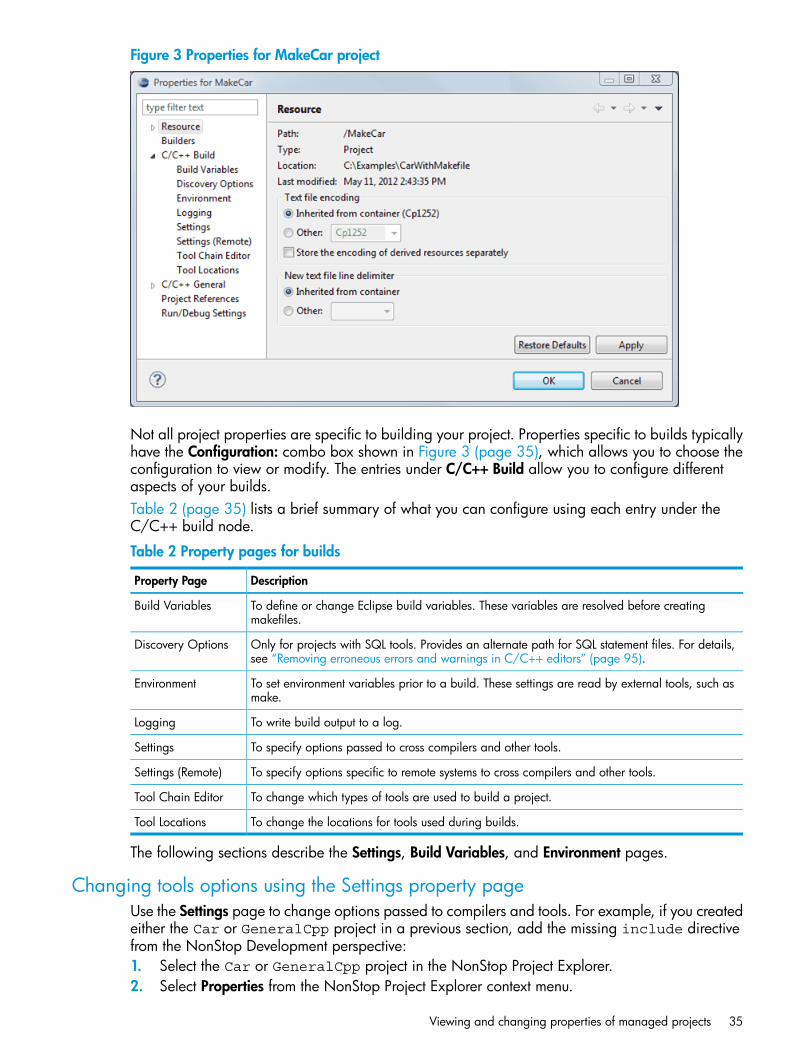
Figure 3 Properties for MakeCar project
Not all project properties are specific to building your project. Properties specific to builds typicallyhave the Configuration: combo box shown in Figure 3 (page 35), which allows you to choose theconfiguration to view or modify. The entries under C/C++ Build allow you to configure differentaspects of your builds.Table 2 (page 35) lists a brief summary of what you can configure using each entry under theC/C++ build node.
Table 2 Property pages for builds
DescriptionProperty Page
To define or change Eclipse build variables. These variables are resolved before creatingmakefiles.
Build Variables
Only for projects with SQL tools. Provides an alternate path for SQL statement files. For details,see “Removing erroneous errors and warnings in C/C++ editors” (page 95).
Discovery Options
To set environment variables prior to a build. These settings are read by external tools, such asmake.
Environment
To write build output to a log.Logging
To specify options passed to cross compilers and other tools.Settings
To specify options specific to remote systems to cross compilers and other tools.Settings (Remote)
To change which types of tools are used to build a project.Tool Chain Editor
To change the locations for tools used during builds.Tool Locations
The following sections describe the Settings, Build Variables, and Environment pages.
Changing tools options using the Settings property pageUse the Settings page to change options passed to compilers and tools. For example, if you createdeither the Car or GeneralCpp project in a previous section, add the missing include directivefrom the NonStop Development perspective:1. Select the Car or GeneralCpp project in the NonStop Project Explorer.2. Select Properties from the NonStop Project Explorer context menu.
Viewing and changing properties of managed projects 35

3. In the Properties dialog, expand C/C++ Build and select Settings.4. In the Settings page, select the Tool Settings tab (if the Tool Settings page is not already
displayed).5. In the Tool Settings page, select the Includes category under C++ Compiler (TNS/E) to display
Include path (-I) settings (which should be empty).
6. At the top of the Include path (-I) settings, select the Add... icon to open the Add directorypath dialog.
7. In the Add directory path dialog, enter one of the following:../headers (for Car project)../include (for GeneralCpp project)Because builds occur in a subdirectory of the project (typically in a Debug or Release directory),the include directories are one level up from the build directory.
8. Select OK to add the include path and dismiss the dialog.9. Select OK to apply the change and close the Properties dialog.
Car and/or GeneralCpp can now be built. To build now, see Building, deploying, andlaunching a project (page 36).
Specifying build variables and environment variablesBoth build variables and environment variables provide ways to alter builds. Build variables areinternal to Eclipse and are evaluated prior to creating makefiles and launching a build. Environmentvariables are passed to the shell where the build is launched.CDT automatically creates build variables for each environment variable set when Eclipse islaunched. Build variables are referenced using braces and environment variables are referencedusing parentheses. For example:${PWD}— build variable$(PWD)— environment variableNSDEE passes the build platform macro TARGET_SYSTYPE to compilers and linkers. For example,in the Tool Settings tab on the Settings property page select the Miscellaneous item for the C++Linker or the C++ Compiler, you see this setting:
If you select the main page for C++ Linker on the Tool Settings page, you see that${TARGET_SYSTYPE} is evaluated immediately in the All options: box because it displays:-Wsystype=oss -Wcall_shared
Change the -Wsystype= argument to the following environment variable syntax instead of buildvariable syntax:
Return to the main page for C++ Linker, the All options: box now contains:-Wsystype=$(TARGET_SYSTYPE) -Wcall_shared
In this case, $(TARGET_SYSTYPE) is evaluated by the build shell and the build fails unless anenvironment variable is set to oss or guardian.
Building, deploying, and launching a projectThe steps for building, deploying, and launching a project are similar for all types of NSDEEprojects. However, remote projects can be launched before deploying to a NonStop system.
36 Getting started
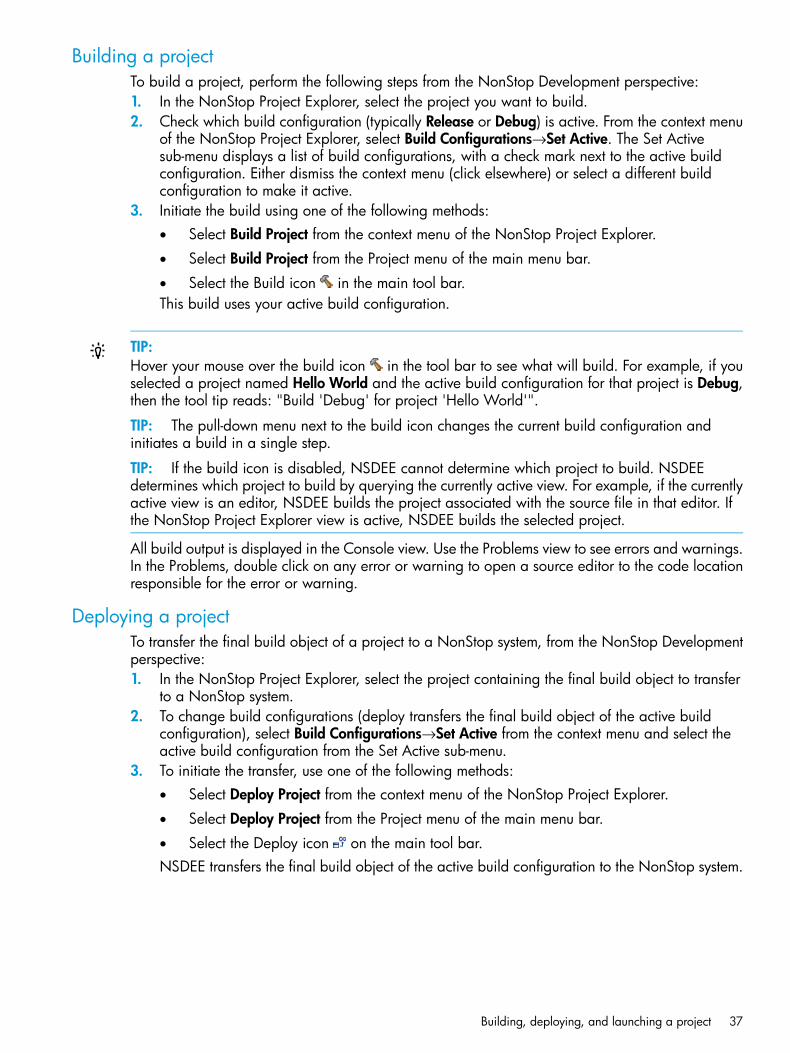
Building a projectTo build a project, perform the following steps from the NonStop Development perspective:1. In the NonStop Project Explorer, select the project you want to build.2. Check which build configuration (typically Release or Debug) is active. From the context menu
of the NonStop Project Explorer, select Build Configurations→Set Active. The Set Activesub-menu displays a list of build configurations, with a check mark next to the active buildconfiguration. Either dismiss the context menu (click elsewhere) or select a different buildconfiguration to make it active.
3. Initiate the build using one of the following methods:• Select Build Project from the context menu of the NonStop Project Explorer.
• Select Build Project from the Project menu of the main menu bar.
• Select the Build icon in the main tool bar.This build uses your active build configuration.
TIP:Hover your mouse over the build icon in the tool bar to see what will build. For example, if youselected a project named Hello World and the active build configuration for that project is Debug,then the tool tip reads: "Build 'Debug' for project 'Hello World'".
TIP: The pull-down menu next to the build icon changes the current build configuration andinitiates a build in a single step.
TIP: If the build icon is disabled, NSDEE cannot determine which project to build. NSDEEdetermines which project to build by querying the currently active view. For example, if the currentlyactive view is an editor, NSDEE builds the project associated with the source file in that editor. Ifthe NonStop Project Explorer view is active, NSDEE builds the selected project.
All build output is displayed in the Console view. Use the Problems view to see errors and warnings.In the Problems, double click on any error or warning to open a source editor to the code locationresponsible for the error or warning.
Deploying a projectTo transfer the final build object of a project to a NonStop system, from the NonStop Developmentperspective:1. In the NonStop Project Explorer, select the project containing the final build object to transfer
to a NonStop system.2. To change build configurations (deploy transfers the final build object of the active build
configuration), select Build Configurations→Set Active from the context menu and select theactive build configuration from the Set Active sub-menu.
3. To initiate the transfer, use one of the following methods:• Select Deploy Project from the context menu of the NonStop Project Explorer.
• Select Deploy Project from the Project menu of the main menu bar.
• Select the Deploy icon on the main tool bar.NSDEE transfers the final build object of the active build configuration to the NonStop system.
Building, deploying, and launching a project 37

TIP:Hover your mouse over the deploy icon on the tool bar to see which project will deploy. Forexample, if you selected project Hello World and the active build configuration for that project isDebug, then the tool tip reads: "Deploy 'Debug' for project 'Hello World'".
TIP: The pull-down menu next to the deploy icon changes the current build configuration andinitiate a deploy in a single step. This action also initiates a build, if needed, before attempting totransfer a project final build object.
TIP: If the deploy icon is disabled, NSDEE cannot determine which project to deploy. NSDEEdetermines which project to deploy by querying the currently active view. For example, if thecurrently active view is an editor, NSDEE deploys the project associated with the source file in thateditor. If the NonStop Project Explorer view is active, NSDEE deploys the selected project.
All deploy output is shown in the Console view.
Launching a projectTo run a final build object for a project on NonStop from NSDEE, from the NonStop Project Explorer:1. To open the Run Configurations dialog, select Run→Run Configurations....2. Select the NonStop Application entry from the list of launchers on the left of the Run
Configurations dialog, then select New from the context menu. (Alternatively, you candouble-click the NonStop Application entry.) This creates a new configuration namedNew_configuration.
3. Enter a meaningful name, such as the name of the project the configuration will launch in theName: field.
4. In the Main tab of the configuration:a. Select the platform you want to launch (Guardian or OSS).b. Enter the name of your project in the NonStop project: field.c. Select a system/user name pair from the NonStop system: combo box. This is the
connection configuration that NSDEE uses to log on and launch your project. If no systemsare configured, select Edit... and refer to “Configuring connections to NonStop systems”(page 15).
d. Enter the location where your application deployed in the NonStop executable's path onNonStop system: field.
NOTE: If you have not deployed your project to a NonStop system, you can select thecheck box for Local executable to be transferred to NonStop path specified above: totransfer your executable prior to launch.
5. Specify arguments to your program (if any) in the Arguments tab.6. Select the Run button to launch your program.NSDEE initiates a login if it has not already established a connection to the launch system. All I/Ofor your program is directed to the Console view.
TIP:After you create a Run launch configuration and launch it, you can relaunch it in the future byselecting it from the pull-down menu of the Run icon in the tool bar.
38 Getting started
4 ConceptsThis chapter supplements the "Concepts" chapter of the C/C++ Development User Guide, providingdetails specific to NonStop development.
NSDEE overviewNSDEE extends Eclipse's C/C++ Development Tooling (CDT) to enable its use for developingNonStop applications, including applications built with C, C++, COBOL, pTAL, SQL/MP, andSQL/MX. NSDEE provides the full range CDT development capabilities for Windows-hosted Cand C++ projects, and a subset of CDT capabilities for COBOL and pTAL projects and for remoteprojects using any programming language.In NSDEE, your application's sources must be grouped into named projects which can then becompiled into a final build object such as an executable or library. A typical use scenario is tocreate one project for the final build target (such as an executable file) and separate projects forbuilding supporting libraries that are linked into the final executable.NonStop projects can be either local or remote. For local projects, source files reside on Windowsand builds are performed on Windows using cross compilers. For remote projects, sources resideon a remote NonStop system and builds are performed on remote NonStop systems using nativecompilers, however, edits and builds are initiated from NSDEE running on Windows.
Managed and unmanaged buildsNSDEE provides two approaches to building applications—managed builds and unmanagedbuilds. Managed builds are available only for local Windows-hosted builds. Managed buildscreate makefiles and manage builds on your behalf (though you can still customize managed buildsvia makefile include declarations in auto-generated makefiles). Unmanaged builds require thatyou supply your own makefile. Unmanaged builds are supported for both local and remote projects.For managed builds, you must specify one or more tool chains for use in builds when you createa project. A tool chain is a group of tools (such as NonStop cross compilers) used to build anapplication for a particular target architecture. NSDEE supports both TNS/R and TNS/E toolchains, and automatically detects the locations of tools installed in standard locations.
Local projectsMost resources for local projects (such as source files and cross compilers) reside on your Windowssystem. Local project builds occur on Windows and are typically driven by the make program asprovided by either Cygwin or Msys on Windows. NSDEE invokes make, for example, when youchoose Build Project from the Project menu.To create a local project from scratch, select one of the following local project types from File→New:• C Project
• C++ Project
• COBOL Project
• pTAL ProjectThe type of project you choose corresponds to the compiler you want to drive the final link for theproject. For executable projects, this is the compiler associated with the language of the main entrypoint for the executable. For library projects, the compiler that drives linking is less important, butHP recommends selecting a project type that reflects the language most commonly used in thelibrary to be built.
NSDEE overview 39

Selecting a local project type from File→New menu opens a new project wizard. The followingtypes of projects are available:
• NonStop Executable — A project that manages builds of an executable file.
• NonStop Dynamic Link Library — A project that manages builds of a library that can bedynamically loaded at run time.
• NonStop Linkfile — A project that manages builds of a linkfile, which is a collection of objectfiles that can be linked into another project build. Linkfile projects allow you to break up yourapplication into multiple projects.
• NonStop Archive Library — A project that manages builds of an archive file using the ar tool.
• NonStop User Library — A project that manages builds of a user library (TNS/R only).
• NonStop Makefile Project — A project that does not manage builds. You must supply yourown makefile for this type of project.
To create a NonStop Makefile Project using an existing code base on Windows, selectFile→New→Makefile Project with Existing Code. Though you do not get the advantage of managedbuilds with Makefile projects, you still get other advantages the IDE provides, including use of theC/C++ indexer for C and C++ sources. For more information, see “C/C++ indexer database”(page 40).
Remote projectsThe resources for remote projects reside almost entirely on NonStop systems. Sources residing onNonStop systems can be edited using NSDEE on Windows in much the same way as local filesare edited. NSDEE typically initiates builds on NonStop systems by invoking make (OSS) or gmake(Guardian) on a NonStop system when you choose Build Project from the Project menu.To create a remote project, select File→New→Remote Makefile Project.
C/C++ indexer databaseIn addition to basic file editing and build support, NSDEE supports using CDT's C/C++ indexeron your local NonStop projects. The C/C++ indexer runs in a background thread and parsesC/C++ sources to create a database for C/C++ searches, navigation features, and parts of thecontent assist feature. The indexer is run only on C/C++ source files in local NonStop projects.For a detailed overview of how CDT's source file parsing and indexing works, see the followingEclipse document on the web: Overview of Parsing.
NOTE: The C/C++ indexer gets symbols for system headers using the location of the tool chainused by the first active build configuration. By default, the C/C++ indexer continues to use thatinitial location even if you change from a TNS/R tool chain to TNS/E or vice versa. However, thisbehavior is configurable. For more information, see “NSDEE_SYS_INCLUDE_PATH” (page 46).
The NonStop Development perspectiveThe NonStop Development perspective (Figure 4 (page 41)) is an Eclipse perspective dedicatedto developing NonStop applications. The perspective default views and layouts are similar to CDT'sC/C++ perspective. In addition, most menus and tool bar actions are the same as those in theC/C++ perspective.
40 Concepts

Figure 4 NonStop Development perspective
ViewsThe views shown in Figure 4 (page 41) are:• The NonStop Project Explorer view, which provides access to your NonStop projects and their
associated properties and files. Also use the NonStop Project Explorer view to select projectsto build and to select build configurations to use in builds. For details, see “NonStop ProjectExplorer view” (page 128).
• The Outline view (on the right), which shows a list of functions and fields declared in the mostrecently active source editor. The Outline view can be used to quickly navigate to methoddeclarations in the source editor. For details, see “Outline view” (page 129).
• The Make Target view (on the right, behind the Outline view). Specify custom build targets inyour makefiles to initiate builds of these targets from the Make Target view. These targets canbe specified for both managed and unmanaged builds. For details, see “Make Target view”(page 129).
• At the bottom, the Problems view lists build errors and warnings across all open projects.Double-click on an error or warning to open up the file responsible for the error or warning.Temporarily remove errors and warnings for a particular project by closing that project in theNonStop Project Explorer view.
• Also at the bottom, the Console view displays both build output and handles I/O for yourapplication when it is launched or debugged from Eclipse. The Console view shows I/O foronly one application at a time. You can switch which I/O is shown using Display SelectedConsole. For details, see “Console view” (page 129).
In addition to the above views, the center of the NonStop Development perspective typically containsany number of editors open on source files. At a minimum, source editors provide syntaxhighlighting. C and C++ editors also have extensive formatting options. For local projects whoseC and C++ sources have been indexed by CDT, source editors also provide content assist, openingfunction declarations, and other features available from CDT.
The NonStop Development perspective 41

PreferencesPreferences allow you to change the default behavior of Eclipse. Change preference settings usingthe Preferences dialog Window→Preferences.Many preference settings in Eclipse apply to NSDEE, particularly those under the General andC/C++ categories in the Preferences dialog. Preferences specific to the NonStop Developmentperspective are available under the NonStop Development category. For more information aboutNonStop Development preferences, see “NonStop Development” (page 143).
Wizards, tools, and actionsIn addition to the many wizards and tools provided by Eclipse and CDT, NSDEE provides wizardsand tools created specifically for NonStop development. These are available from the NonStopTools menu of the NonStop Development perspective. A number of actions available in menus andthe main tool bar are enhanced to support NonStop remote development and development ofprograms using COBOL, pTAL, and SQL.
NonStop Tools MenuFrom the NonStop Tools menu, select any of the following:
• Transfer Files — Transfer one or more files from a local project to a NonStop system.
• Configure Tool Locations — Set preferences for tool locations on Windows (cross compilers,linkers, SQL/MX preprocessors, and the location of make).
• Configure Connections — Set login information and preferred communication protocols forone or more NonStop systems.
• Open Remote File — Open a remote file in the NonStop Development perspective (andoptionally edit the file).
• Launch Visual Inspect — Launch Visual Inspect externally.
• Import ETK Project — Import an ETK project and convert it to an NSDEE project.
• Import NSDEE 2.x Project — Import an NSDEE 2.x managed make or standard make projectand convert it to an NSDEE 4.0 project.
The main tool bar provides these NonStop-specific actions:
DescriptionIcon
Opens new project or new file.
Builds active configurations of selected project.
Opens Network Connections preferences.
Opens the new C++ Project wizard by default, or any of the new NonStop project wizards ifyou choose from the icon's pull-down menu.
Opens the New Source Folder wizard by default or either the New Source Folder or New Folderwizard if you choose from the icon's pull-down menu. The New Source Folder wizards can beused for local projects only, whereas the New Folder wizard can be used for either local orremote projects.
Opens the New Source File wizard by default or either the New Source File wizard or the NewFile from Template wizard if you choose from the icon's pull-down menu. The New Source Filewizard can be used for local projects only, whereas the New File from Template wizard can beused for either local or remote projects.
Opens the New C++ Class wizard. The New C++ Class wizard can be used for local projectsonly.
42 Concepts

DescriptionIcon
Invokes make deploy for a local project where the deploy makefile target transfers a just builtexecutable to a NonStop server. The pull-down menu for this action lets you choose which buildconfiguration to deploy.
Debugs configurations.
Runs configurations.
Runs the last configuration.
Opens the File Search dialog.
Building NonStop projectsEclipse defines two build actions that you can invoke from several places in the IDE — Build Projectand Clean actions. By default, these actions invoke make all and make clean respectively. Inaddition, Eclipse defines the actions Build All (to build all projects in your workspace) and BuildWorking Set (to build a predefined group of projects).NSDEE adds another build action, Deploy Project, which invokes make deploy by default andis used to transfer the result of a build to a NonStop system.
TIP: By default, Eclipse initiates builds automatically whenever you save a source file. This workswell for Java builds, but can be cumbersome for C, C++, COBOL, and pTAL builds. To turn thisfeature off, deselect Build Automatically on the Project menu. All of these build actions are availablefrom the Project menu, and many are also available from the main tool bar and from the contextmenu for the NonStop Project Explorer view.
Build configurations (local projects only)Local Windows-hosted projects allow you to define any number of build configurations, whereeach build configuration you define targets differing build characteristics such as target architecture,debuggability, and optimization.By default, NSDEE creates release and debug build configurations for each tool chain (TNS/R,TNS/E, or both) you select at project creation time. You can modify these initial build configurationsor add to them. For example, you could add a build configuration to build for a different platform.For details, see “Building for both OSS and Guardian ” (page 94).Build configuration settings are actually a subset of a project's properties. To open the Propertiesdialog for a given project, select the project in the NonStop Project Explorer view and then selectProperties from the context menu. In the Properties dialog, all build configuration settings areavailable by selecting the C/C++ Build topic on the left or one of its subtopics. (Even for COBOLand pTAL projects, build configuration settings are available via the C/C++ Build topic or one ofits subtopics.) The build settings are shown on the right.
TIP: Property pages specific to build configurations settings are easy to spot because their pagesalways show the build configuration selection combo box near the top and as shown inFigure 5 (page 43). The combo box allows you to apply changes to the chosen build configuration.
Figure 5 Build configuration selection combo box
Building NonStop projects 43
Building with make on WindowsTo build with make on Windows, either Cygwin or Msys must be installed. Both are available onthe NSDEE installation media. The path to the bin directory containing the make program mustbe part of your PATH environment variable. A Cygwin or Msys bin directory can be added toPATH either outside of NSDEE (for example, by adding bin to your Windows PATH) or by NSDEEprepending a bin path to PATH when builds are launched. For more information on NSDEEprepending a bin path to PATH, see “NSDEE_CONN_PORT, nsdee-auth, and Deploy.jar” (page 48).
SQL managed buildsNSDEE's managed builds support both SQL/MX and SQL/MP. To create a project with managedbuilds that support SQL/MX or SQL/MP, you must select the SQL/MX or SQL/MP radio buttonon the Initial Build Settings dialog of the new project wizard. When you create a project thatsupports SQL/MX or SQL/MP, NSDEE adds SQL tools to the tool chain for your project. For moreinformation, see “Tool chains” (page 56).SQL builds require access to a NonStop system to process SQL statements during object buildsand for final SQL compilation. This access requires that compilers and linkers authenticate yourcredentials during builds. NSDEE provides the program nsdee-auth that obtains your passwordfrom NSDEE and passes it to compilers and linkers during builds. For details, see“NSDEE_CONN_PORT, nsdee-auth, and Deploy.jar” (page 48).
IMPORTANT: If you build an SQL/MP project behind a Windows firewall, the firewall will blockPortmapper.exe. To prevent this block, create a new firewall rule to allow Portmapper.exefor both TCP and UDP.
The SQL/MX preprocessor, managed build, and header filesManaged builds run the SQL/MX preprocessor on SQL/MX preprocessor files as a separate stepfrom source file compilation, which results in each preprocessor run creating a source file. Becausethe source file is derived, it is written to the output directory for the build and not the source directorywhere the preprocessor file resides. For C and C++ sources, this means relative paths to headerfiles are different for preprocessor files and the source files derived from them.
Environment variables and build variablesFor local projects, NSDEE sets a number of environment variables and build variables on yourbehalf. Build variables are internal to Eclipse and are evaluated prior to creating makefiles andlaunching a build. Environment variables, on the other hand, are passed to the shell in which abuild is launched and are evaluated when discovered by make in makefiles.Build variables and environment variables look similar. Build variables are enclosed in curly braces:for example, ${VARNAME}; whereas environment variables are enclosed in parentheses: forexample, $(VARNAME). The following sections describe each of the build variables and environmentvariables defined by NSDEE. Table 3 (page 45) provides an overview of build variables andenvironment variables and for which types of projects NSDEE sets these variables.When an environment variable is added, the variable is set along with its origin type, BUILDSYSTEM or USER: CONFIG.BUILD SYSTEM
If an environment variable, COMP_ROOT for example, is added as part of Project creation orproject property modification where the variable is defined, the origin is set to BUILD SYSTEM.The variable is set to BUILD SYSTEM when NSDEE sets the variable.
USER: CONFIG
When a user adds or overrides an environment variable, then the variable is added with itsorigin marked as USER: CONFIG. When the value of a variable such as COMP_ROOT (whichwas set during project creation and hence marked as a BUILD SYSTEM) is updated by the
44 Concepts

user, then the origin is set to USER: CONFIG. If the user deletes a USER: CONFIG variablewhich was updated over a BUILD SYSTEM variable such as COMP_ROOT, then that variableis reset as a BUILD SYSTEM variable with the original definition. If the user deletes a variablewhich was not a BUILD SYSTEM variable (but one created by the user) such as PROJECT_LIB,then the variable is just deleted from the list of environment variables.
The origin of the environment variable has no dependency on the way the environment variableis used in the project build.
Table 3 Build variables and environment variables
PurposeLocal Projects TypeTypeVariable Name
Specifies location of systemheaders for cross compilers.
environmentCOMP_ROOT Managed, unmanaged(optional for unmanaged)
Location of the SQL/MXpreprocessor DLL for C/C++SQL/MX projects.
environmentMXSQLC Managed, unmanaged(optional for unmanaged)
Location of the SQL/MXpreprocessor DLL for COBOLSQL/MX projects.
environmentMXSQLC Managed, unmanaged(optional for unmanaged)
Specifies where C/C++ indexercan find system headers.
environmentNSDEE_SYS_INCLUDE_PATH Managed, unmanaged
Used in C/C++ headerdependency generation to
environmentNSDEE_SYS_INCLUDE_PATH_ESC Managed
(optionally) remove systemheaders from dependency lists.
Specifies where cross compilersand make program are located.
environmentPATH Managed, unmanaged(optional for unmanaged)
Prepending the cross compilerbin location is optional forunmanaged projects. Prependingthe make program bin locationis optional for both managed andunmanaged projects.
Specifies the RVU (for example,H06.23 or G06.32) associated
environmentNONSTOPOSVERSION Managed, unmanaged
with the current compilers/linkerssetting in the Tool Locationsproject property page associatedwith the cross compiler.
Specifies a port NSDEE listens onfor remote requests during buildsfor passwords and file transfers.
ManagedenvironmentNSDEE_CONN_PORT
Specifies the oss or guardianoption to the -Wsystype option
ManagedbuildTARGET_SYSTYPE
for compilers and linkers and tothe -q option to the Deploy tool.
Specifies how NSDEE shouldhandle dependency generationfor C/C++ makefiles.
ManagedbuildDependencyHandling
Specifies location of bin directoryfor either Cygwin or Msys. Used
Managed, unmanagedenvironmentNSDEE_POSIX_BIN
to workaround limitation of usingMsys with Deploy.jar.
These specify information aboutthe system, user, destination, and
Managed, unmanagedenvironNSDEE_DEPLOY_SYSTEMNSDEE_DEPLOY_USER
file specified in the SettingsNSDEE_DEPLOY_DEST
Environment variables and build variables 45

Table 3 Build variables and environment variables (continued)
PurposeLocal Projects TypeTypeVariable Name
(Remote) property page. You canuse these variables to createcustom deploy targets.
NSDEE_DEPLOY_FILENAME
Used as argument to-Wcobol="CONSULT..." forprojects using SQL/MX.
ManagedenvironmentSQLMX_COBOL_PREPROCESSOR
NOTE: Many more build variables are set up by Eclipse and CDT available to use in makefilesand in the Tool Settings tab of the Settings property page. These include ${ProjName} (name ofyour project), ${ProjDirPath} (full path to your project), ${ConfigName} (name of your activebuild configuration), and many more. For details, see the Eclipse Workbench Guide or the C/C++Development User Guide.
COMP_ROOTCOMP_ROOT is an environment variable that tells cross compilers where to look for system headerfiles. For TNS/E systems, $COMP_ROOT/usr/include is the equivalent of $SYSTEM.SYSTEMon Guardian and /usr/include on OSS. (For more information, see NonStop languageprogrammer's guides such as the C/C++ Programmer's Guide for NonStop Systems).You can install multiple versions of compilers, typically under:C:\Program Files\HP NonStop\RVU_IDon your Windows system, where RVU_ID is the ID of the RVU a particular set of tools was releasedon. (For older installations, the location is C:\Program Files\Compaq ETK-NSE\Examples of actual COMP_ROOT locations:C:\Program Files\HP NonStop\H06.24 (RVU H06.24 for TNS/E)C:\Program Files\HP NonStop\G06.32 (RVU G06.32 for TNS/R)NSDEE sets COMP_ROOT based on your choices using the following combo boxes when you createa project:
The same combo boxes are available on the Tool Locations property page if you change crosscompilers after project creation.If you choose two tool chains for a project, COMP_ROOT is defined differently for TNS/R and TNS/Ebuild configurations.Managed builds always define COMP_ROOT. Having NSDEE define COMP_ROOT for unmanagedbuilds is optional. Do not have NSDEE set COMP_ROOT if your makefile already sets it.
MXSQLC and MXSQLCOMXQLC and MXSQLCO are set to the locations of the C and COBOL versions of the DLL for SQL/MXpreprocessing named mxsqlcnt.dll based on settings in the Tool Locations property page.
NSDEE_SYS_INCLUDE_PATHNSDEE uses the NSDEE_SYS_INCLUDE_PATH environment variable to define where the C/C++indexer looks for system headers. NSDEE_SYS_INCLUDE_PATH is derived from the tools roots
46 Concepts

used to set COMP_ROOT. For TNS/E, NSDEE_SYS_INCLUDE_PATH is set toCOMP_ROOT\user\include, for TNS/R, it is set to COMP_ROOT\include.The value of NSDEE_SYS_INCLUDE_PATH shows up under an Includes list which looks similar toa top-level folder under a project as shown in Example 1 “Project Includes folder”.
Example 1 Project Includes folder
NOTE: The indexer uses the NSDEE_SYS_INCLUDE_PATH associated with the first buildconfiguration set for a project. The indexer does not change where it looks for system headerswhen you change the activate build configuration to one with a different tool chain (even thoughthe system headers will be different). The reason for this is that, depending on the size of yourproject, it can be time consuming for the indexer to recreate its database every time you changeyour active build configuration.
You can change where the indexer looks using the indexer property page for a project. At thebottom of that page is the group box as shown previously in Example 1 “Project Includes folder”.
Example 2 Indexer options
By default, a fixed build configuration is used, but you can choose Use active build configurationif you want the indexer to rebuild its database each time you change target architectures. Or, youcan select Use fixed build configuration to continue using a fixed build configuration. However,you can change which build configuration is used by changing the value in the combo box shownin Example 2 “Indexer options”.
NSDEE_SYS_INCLUDE_PATH_ESCNSDEE_SYS_INCLUDE_PATH_ESC is passed as an argument to the grep command whengenerating header dependency files to remove system headers as dependencies. For details, see“Handling dependencies in managed builds” (page 52).
PATHFor managed builds, NSDEE always prepends $COMP_ROOT/usr/bin (TNS/E) or$COMP_ROOT/bin (TNS/R) to your PATH environment variable prior to starting a build. Thisbehavior is optional for non-managed builds. (For non-managed builds, you can toggle this behaviorin the new project wizard or in the Tool Locations property page.)Both managed and non-managed builds optionally prepend the location of a Cygwin or Msys bindirectory (the location of make and other tools) to PATH prior to a build. You can configure this
Environment variables and build variables 47

behavior in the new project wizard or in the Tool Locations property page by either leaving theCygwin/Msys location combo empty (to disable this behavior) or by setting it to either a Cygwinor Msys bin directory.
Deploy.jar and NSDEE_POSIX_BINDeploy.jar is a program that transfers files from Windows to NonStop. It is typically invokedby a deploy makefile target. Deploy.jar uses NSDEE_POSIX_BIN to workaround a limitationof launching a Java application with the Msys bin directory first in PATH. The limitation is thatMsys prepends the root of the Msys location to UNIX-style pathnames in Deploy.jar arguments.Deploy.jar checks NSDEE_POSIX_BIN to see if it has been prepended to remote OSS pathsand, if so, Deploy.jar removes it from the path.
NOTE: If you add Msys bin to the beginning of PATH outside of NSDEE (instead of havingNSDEE do this), you must define NSDEE_POSIX_BIN yourself in order for Deploy.jar to removeit from OSS paths.
NSDEE_CONN_PORT, nsdee-auth, and Deploy.jarNSDEE_CONN_PORT is an environment variable that is set to a port number that NSDEE listens tofor file transfer and password requests.Deploy.jar checks if NSDEE_CONN_PORT is set. If it is, Deploy.jar forwards the file transferrequest to NSDEE.Deploy.jar is a program that transfers files from Windows to NonStop. It is typically invokedby a deploy makefile target. Deploy.jar checks if NSDEE_CONN_PORT is set. If it is,Deploy.jar forwards the file transfer request to NSDEE.If NSDEE_CONN_PORT is not set (as when you invoke make outside of NSDEE), Deploy.jarchecks if $HOST_PASS pass is set. If it is, Deploy.jar uses its own copy of FTP or SFTP to transfera file and uses $HOST_PASS as the password.nsdee-auth is a small program that also checks if NSDEE_CONN_PORT is set. If it is, it requestspasswords from NSDEE via that port. If NSDEE already has the password, it is returned on theport. Otherwise, NSDEE prompts for a password.If NSDEE_CONN_PORT is not set, nsdee-auth checks $HOST_PASS and returns its value if set(just as Deploy.jar does when make is invoked outside of NSDEE is not set), nsdee-authchecks $HOST_PASS and returns the value if set (just as Deploy.jar does when make is invokedoutside of NSDEE).nsdee-auth is invoked on compiler command lines via back-ticks to provide a password to the-Wsqluser option. For example:c89 -Wsqlhost=pelican -Wsqluser=swdev.chloe,`nsdee-auth invoke pelican swdev.chloe` ...
To view the usage massage, invoke nsdee-auth with the -h option.$ ./nsdee-auth -hUsage: C:\e3.7\eclipse\plugins\com.hp.nsdee_1.0.0\Tools\nsdee-auth.exe deploy|invoke|mpcomp host user
However, you are not required to use nsdee-auth directly. NSDEE writes it to makefiles so themake program can invoke it.The deploy, invoke, and mpcomp arguments to nsdee-auth are only meaningful when youinvoke make outside of NSDEE. When you invoke make outside of NSDEE, you must set yourpassword as the value of one of the following environment variables (which make nsdee-authpass your password to tools):SQLMX_PASS — checked by nsdee-auth for SQL/MX compiles which occur when you invokemake deploy (nsdee-auth is passed deploy option in this case).SQLMX_INVOKE_PASS — used when SQL/MX preprocessor is invoked (nsdee-auth is passedthe invoke argument).
48 Concepts
HOST_PASS — used if none of the above are set. HOST_PASS is the environment variable youset if all tools use the same host and user settings (for simplicity).If you fail to set one of the above environment variables when invoking make outside of NSDEE,the command using nsdee-auth as an argument to, -Wsqluser (for example) fails and theoutput includes a message such as the following from nsdee-auth: C:\e3.7\eclipse\plugins\com.hp.nsdee_1.0.0\Tools\nsdee-auth.exe \
ERROR: Neither SQLMX_PASS nor HOST_PASS are set.
DependencyHandlingThe DependencyHandling build variable allows you to modify how NSDEE generates headerfile dependencies for source files in managed builds. You can set it to:• none to turn off generation of dependencies
• makeonly to limit generation of dependencies to those that can be generated without usingNSDEE (as when invoking make outside of NSDEE)
• full to generate a full list of dependencies (but not system header dependencies)System header dependencies are not generated by default. NSDEE generates them if you specifymakeonly+systemHeaders or full+systemHeaders. For details on how NSDEE generatesdependencies, see “Handling dependencies in managed builds” (page 52).
TARGET_SYSTYPETARGET_SYSTYPE is a build variable set by NSDEE based on your choice of OSS or Guardianradio buttons at project creation time. ${TARGET_SYSTYPE} is the default argument for all tooloptions that take oss or guardian as an argument (-Wsystype= for compiler and linker tools,-q for Deploy.jar).This is useful when changing the target platform for a build configuration. You need only changethe variable value and not each and every instance of -Wsystype= and -q options across tools.
NSDEE_DEPLOY_SYSTEM, NSDEE_DEPLOY_USER, NSDEE_DEPLOY_DEST,NSDEE_DEPLOY_FILENAME
NSDEE defines the above four environment variables for local projects to create custom deploytargets. (For an example of this, see “Creating custom deploy targets ” (page 118)). These variablesare set to the remote settings that you specify at project creation time or via the Settings (Remote)property page.The values set depend on whether your project builds do SQL/MX or SQL/MP compilation.Figure 6 (page 50) shows which fields NSDEE uses to set environment variables for projects thatperform SQL/MP compilation, SQL/MX compilation, and projects that do not perform SQLcompilation.
Environment variables and build variables 49

Figure 6 Settings for projects with SQL/MP compilation, SQL/MX compilation, and no SQLcompilation
SQL/MX_COBOL_PREPROCESSOR_LOCFor COBOL projects with SQL/MX, NSDEE sets the environment variableSQLMX_COBOL_PREPROCESSOR_LOC to the location of the SQL/MX preprocessor for COBOLas specified in the Tool Locations project property page. SQLMX_COBOL_PREPROCESSOR_LOCis used in the -Wcobol="CONSULT..." argument in the Miscellaneous page of the COBOLCompiler tool to pass the location of esqlcli.o as shown in Figure 7 (page 51).
50 Concepts

Figure 7 Setting the location of SQL/MX Preprocessor for COBOL
Multi-user environmentsWhen a project is developed in a shared environment where the project sources reside on eachuser’s private Windows system, each user must customize the project settings to their individualsystem environment. Some project properties that might need validation to customize the projectbuild environment are:• Build Variables Project properties→C/C++ Build→Build Variables for any variables set by the
user, especially variables pertaining to Paths.• Environment Variables Project properties→C/C++ Build→Environment for any variables set
by the user, especially variables pertaining to Paths.• Tools Location Project properties→C/C++ Build→Tool Locations for paths pointing to compilers,
preprocessors and Cygwin/Msys locations.• For Managed builds, check for path settings in:
Includes and Miscellaneous in Compiler or Preprocessor Settings Project properties→C/C++Build→Settings→ <language> Compiler (<TNS Type>)
◦
◦ Libraries, Miscellaneous and Other objects in Linker Settings Project properties→C/C++Build→Settings→ <language> Linker (<TNS Type>)
• If the NonStop system remote deploy is also not in a shared location, then check forcustomization in Remote Settings Project properties→C/C++ Build→Settings (Remote).
NOTE:HP recommends using relative paths when developing projects in a multi-developer environment.
For more details on multi-developer environments, see the Eclipse documentation Platform Plug-inDeveloper Guide→Reference→Other reference information→Multi-user installs.
Managed build makefilesWhen you initiate a build for a managed project, NSDEE generates makefiles before invokingmake. Three of these makefiles are written to the top-level build directory. Typically two buildconfigurations are created per architecture. If, for example, your application is built only for TNS/E,then the two top-level build directories are named Debug and Release. These directories arecreated when you first build using a debug or release build configuration.
Managed build makefiles 51

This table lists the three automatically-generated makefiles that are written to the top-level builddirectory:
PurposeMakefile
The primary makefile for a build configuration. It contains the build rules for "all", "clean",and "deploy".
makefile
Contains definitions of USER_OBJS and LIBS, two build macros that are set toout-of-project object files and libraries, respectively, that are passed to the linker for thefinal link step.
objects.mk
Defines a list of source macros, such as C_SRCS, and all of the subdirectories thatcontribute source code to the build.
sources.mk
NSDEE also creates a makefile for each source directory containing sources to be built. The sourcedirectory names and hierarchy are mirrored under a Debug or Release folder (depending on thebuild configuration). For each such mirrored directory, NSDEE creates a subdir.mk file whichcontains the rules for building the sources in the containing directory. Mirrored directories alsocontain the build output of source built from the original source directory. Figure 8 (page 52) showsthe layout of a simple project with one source directory named src and one top-level build directorynamed Debug.
Figure 8 Layout of simple project
Handling dependencies in managed buildsTo ensure C and C++ objects are rebuilt when dependent header files are changed, NSDEE addsbuild-rules commands to generate dependency files.
How managed makefiles create dependency filesFor C and C++, NSDEE-generated makefiles generate header file dependencies for objects byre-running the compiler invocation with the addition of the -WM option (so the compiler listsdependencies). The second compiler invocation is part of the same build rule that builds the objectfile. This ensures that every time a particular object file is built, the header file dependencies forthat file are regenerated.Example 3 “Sample build rule for Door.o in subdir.mk” shows an example of a build rule for anobject file named Door.o in a subdir.mk file for a project named CarParts.
52 Concepts

Example 3 Sample build rule for Door.o in subdir.mk
src/Door.o: ../src/Door.cpp @echo 'Building file: $<' @echo 'Invoking: C++ Compiler (TNS/E)' c89 -Wcplusplus -g -Woptimize=1 -Ww -Wsystype=oss -c -Wversion3 -o"$@" "$<" && c89 -Wcplusplus -g -Woptimize=1 -Ww -Wsystype=oss -c \-Wversion3 -WM "$<" | grep -v -e '$(NSDEE_SYS_INCLUDE_PATH_ESC)' -e \'Door.cpp' | sed -e 's/[ ].*CarParts\\Debug\\\.\.\// ..\//g' >src/Door.d @echo 'Finished building: $<' @echo ' '
The second invocation of c89 in Example 3 “Sample build rule for Door.o in subdir.mk” generatesa list of all headers Door.o depends on, including all system headers. By default, NSDEE doesnot include system headers in the final result. Including system headers as dependencies addssignificant overhead to builds. If system headers (or RVUs) change, HP recommends a full rebuild.However, you can turn on system header dependency generation. For details, see “How to changeor disable dependency file creation” (page 55).NSDEE writes build rules so that the compiler generates a dependency list that is piped to grepto remove system headers.-v -e '$(NSDEE_SYS_INCLUDE_PATH_ESC)'
The source file -v -e Door.cpp as the dependency is specified for the .o file at the top of thebuild rule."src/Door.o: ../src/Door.cpp"
Or another example:-e $(NSDEE_RVU)
The source file -e Door.cpp as the dependency is specified for the .o file at the top of the buildrule.src/Door.o: ../src/Door.cpp
Following the grep command, the dependency list is then piped to a sed command that convertsfull paths generated by the compiler to relative paths, but only if those paths were passed to thecompiler as relative paths. (This is only important if your make program does not support Windowspaths as dependencies.) Relative paths that the compiler has changed to absolute paths contain"../" or "../.." in the path.For example, if you added this include path to your project settings for a project named Car:-I../../CarParts/src
The compiler would emit a rule similar to the following for an object file (CarTest.o) that dependson Door.h in CarParts/src:CarTest.o:C:\Examples\MultiProjectCarApp\Car\Debug\src\../../CarParts/src/Door.h
The sed command would convert the path to:CarTest.o: ../../CarParts/src/Door.h
Whereas if you specified the full path, as in:-IC:\Examples\MultiProjectCarApp\CarParts\src
the compiler would emit this rule:CarTest.o: C:\Examples\MultiProjectCarApp\Car\Debug\src\Door.h
and the sed command would not change it.
NOTE: The make program provided by Msys already provides a make program that handlesWindows paths. Cygwin does not. However, the NSDEE installation media contains a version ofmake you can use with Cygwin that also works with Windows paths.
Handling dependencies in managed builds 53

In Example 3 “Sample build rule for Door.o in subdir.mk”, the remaining output from sed is writtento Debug/src/Door.d, the same directory Door.o is written to, and the dependency file pathis written to Debug/src/subdir.mk in the form:CPP_DEPS += \ ./src/Door.d
The top-level makefile includes such dependency files using this statement:-include $(CPP_DEPS)
How NSDEE adds rules to handle deleted headersBy default, NSDEE makes a final adjustment to dependency files after they are generated by thecompiler and piped through grep and sed. These adjustments ensure that removing header filesdoes not result in build failures.For example, if CarTest.o has these dependencies:CarTest.o: ../src/Car.hCarTest.o: ../../CarParts/src/Wheel.hCarTest.o: ../../CarParts/src/Door.hCarTest.o: ../../CarParts/src/Window.hCarTest.o: ../../CarParts/src/Engine.h
and you remove the file Wheel.h, the next build of CarTest.o will fail because make will beunable to locate Wheel.h. This is because dependency files are generated after object files arebuilt.So NSDEE does a final pass over dependency files to address this issue by adding dummy rulesfor header files that resolve to nothing. At the same time, NSDEE cleans up the list of object files.The result on the above example would look like:CarTest.o: ../src/Car.h ../../CarParts/src/Wheel.h ../../CarParts/src/Door.h \ ../../CarParts/src/Window.h ../../CarParts/src/Engine.h../src/Car.h:../../CarParts/src/Wheel.h:../../CarParts/src/Door.h:../../CarParts/src/Window.h:
../../CarParts/src/Engine.h:
NOTE: If you invoke make outside of NSDEE, the updates NSDEE makes to dependency fileswill not occur. This is not a problem unless you remove a header file. You can work around thisissue when doing builds outside of NSDEE by invoking make clean and then rebuilding, or byediting out the dependencies on non-existent headers.
How SQL/MX preprocessor file header dependencies are handledFor SQL/MX preprocessor files (files ending with .ec, .eC, and so on), the SQL/MX preprocessorgenerates an initial dependency file that replaces the source file extension with .dep This extensiondifferentiates SQL/MX header dependencies from C/C++ header dependencies, which are writtento files with the extension .d. By default, the SQL/MX preprocessor processes only SQL/MX-specificheader files using the .mxh extension, which is the model that NSDEE supports.NSDEE directs the SQL/MX preprocessor to write the dependency file to the output directory byspecifying the -V option to the SQL/MX preprocessor invocation. However, the dependency filegenerated by the SQL/MX preprocessor is not in a form the make program can parse. To formatthe dependency file that make can parse, the build rule pipes the content of the file through aseries of sed commands to change original output. Where testmx.ec is a source file andtestmx.mxh and testmx2.mxh are files included by testmx.ec:C:\Users\doon\workspace\mxprog\src\testmx.ec testmx.mxh testmx2.mxh
The series of sed commands then transforms the SQL/MX dependency output to the followingform:
54 Concepts
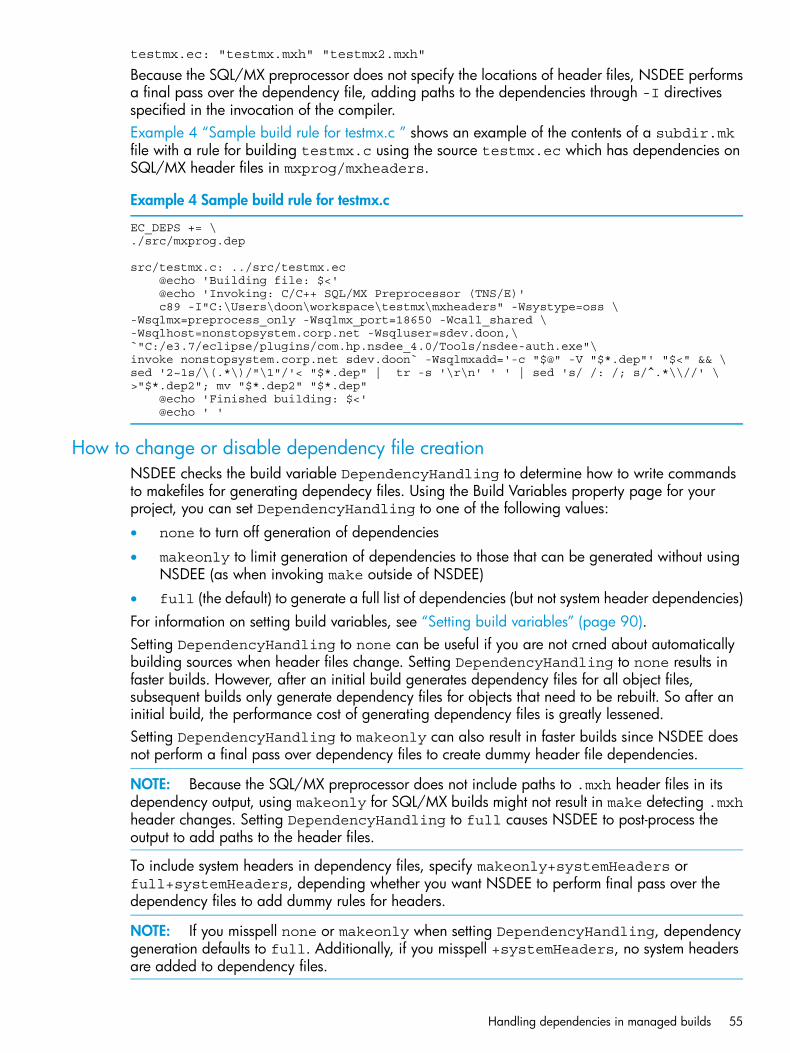
testmx.ec: "testmx.mxh" "testmx2.mxh"
Because the SQL/MX preprocessor does not specify the locations of header files, NSDEE performsa final pass over the dependency file, adding paths to the dependencies through -I directivesspecified in the invocation of the compiler.Example 4 “Sample build rule for testmx.c ” shows an example of the contents of a subdir.mkfile with a rule for building testmx.c using the source testmx.ec which has dependencies onSQL/MX header files in mxprog/mxheaders.
Example 4 Sample build rule for testmx.c
EC_DEPS += \./src/mxprog.dep
src/testmx.c: ../src/testmx.ec @echo 'Building file: $<' @echo 'Invoking: C/C++ SQL/MX Preprocessor (TNS/E)' c89 -I"C:\Users\doon\workspace\testmx\mxheaders" -Wsystype=oss \-Wsqlmx=preprocess_only -Wsqlmx_port=18650 -Wcall_shared \-Wsqlhost=nonstopsystem.corp.net -Wsqluser=sdev.doon,\`"C:/e3.7/eclipse/plugins/com.hp.nsdee_4.0/Tools/nsdee-auth.exe"\invoke nonstopsystem.corp.net sdev.doon` -Wsqlmxadd='-c "$@" -V "$*.dep"' "$<" && \sed '2~1s/\(.*\)/"\1"/'< "$*.dep" | tr -s '\r\n' ' ' | sed 's/ /: /; s/^.*\\//' \>"$*.dep2"; mv "$*.dep2" "$*.dep" @echo 'Finished building: $<' @echo ' '
How to change or disable dependency file creationNSDEE checks the build variable DependencyHandling to determine how to write commandsto makefiles for generating dependecy files. Using the Build Variables property page for yourproject, you can set DependencyHandling to one of the following values:• none to turn off generation of dependencies
• makeonly to limit generation of dependencies to those that can be generated without usingNSDEE (as when invoking make outside of NSDEE)
• full (the default) to generate a full list of dependencies (but not system header dependencies)For information on setting build variables, see “Setting build variables” (page 90).Setting DependencyHandling to none can be useful if you are not crned about automaticallybuilding sources when header files change. Setting DependencyHandling to none results infaster builds. However, after an initial build generates dependency files for all object files,subsequent builds only generate dependency files for objects that need to be rebuilt. So after aninitial build, the performance cost of generating dependency files is greatly lessened.Setting DependencyHandling to makeonly can also result in faster builds since NSDEE doesnot perform a final pass over dependency files to create dummy header file dependencies.
NOTE: Because the SQL/MX preprocessor does not include paths to .mxh header files in itsdependency output, using makeonly for SQL/MX builds might not result in make detecting .mxhheader changes. Setting DependencyHandling to full causes NSDEE to post-process theoutput to add paths to the header files.
To include system headers in dependency files, specify makeonly+systemHeaders orfull+systemHeaders, depending whether you want NSDEE to perform final pass over thedependency files to add dummy rules for headers.
NOTE: If you misspell none or makeonly when setting DependencyHandling, dependencygeneration defaults to full. Additionally, if you misspell +systemHeaders, no system headersare added to dependency files.
Handling dependencies in managed builds 55

Tool chainsA tool chain is a group of tools used to build an application for a particular target architecture.The term “tool chain” more specifically refers to a list of tools defined for a managed project andthe options that are passed to those tools when they are invoked during builds. To view the toolchains associated with a project, open the Settings property page. A project can have two toolchains at most, one for TNS/R and one for TNS/E.
Tools for a simple C projectIf you create a simple C project, the tool chain consists of a C Linker, a C Compiler, and a DeployTool. The Deploy Tool transfers the final build object of a project to a NonStop system using theprogram Deploy.jar, which is part of NSDEE. Example 5 “A simple C tool chain for TNS/E”shows a TNS/E tool chain for a simple C project as it appears in the Tool Settings tab of the Settingsproperty page.
Example 5 A simple C tool chain for TNS/E
Use the Tool Settings tab to customize how tools are invoked via makefiles. When you select atool on the left-hand side of the Tool Settings page, the right-hand side shows the main page forthe tool on the right. The main page shows:• The command invoked by the tool in the Command: text box. You can change the command
invoked by the tool. For example, you can invoke the linker directly instead of using c89 toinvoke the linker.
• Options passed to the tool when it is invoked in the All options: text box. This does not includeobjects or libraries that are part of the command line. Options cannot be edited from the mainpage of a tool, but can be edited using the tool option categories (see Figure 9 (page 57).
• Build variables used to group parts of the tool command-line invocation. To reorder how thecommand is invoked, rearrange these build variables. However, the command-line patterngenerally does not need to change.
To change options for a tool, select one of the option categories on the left below the main entryfor the tool. That opens the corresponding page on the right. Figure 9 (page 57) shows theMiscellaneous option category for C Linker.
56 Concepts

Figure 9 Miscellaneous option category for the C Linker
All tools include a Miscellaneous options page to specify most tool options. Explicitly defined tooloptions, such as the Verbose check box in Figure 9 (page 57), are for common options and areprovided for your convenience. Alternately, enter -Weld=-verbose directly in the additionaloptions box.Option categories are required for the following entities:• Object files from other projects. Specify these in the Other objects list on the Miscellaneous
page of linkers. See Figure 9 (page 57). Object files listed in Other objects are written to theobjects.mk file, where they become part of the USER_OBJS definition, as in:USER_OBJS := ../../linkfileproj/Debug/linkfile.o
$(USER_OBJS) is passed to the linker in the final build step in the main makefile.
• Libraries from other projects. Specify these, as well as library search paths, in the Librariesoption category for linkers. Libraries listed in the Libraries option category are written to theobjects.mk file, where they become part of the LIBS definition, as in:LIBS := -lfoo -lbar
NSDEE prepends -l to each library added to the list of libraries. $(LIBS) is passed to thelinker in the final build step in the main makefile.
• Include paths. Specify these in the Includes options category for compilers. Adding includepaths this way results in the include paths being added to the top-level Includes folder of yourproject, which in turn causes CDT's C/C++ indexer to search your include paths for symbolsin your source files.
Tool chains 57
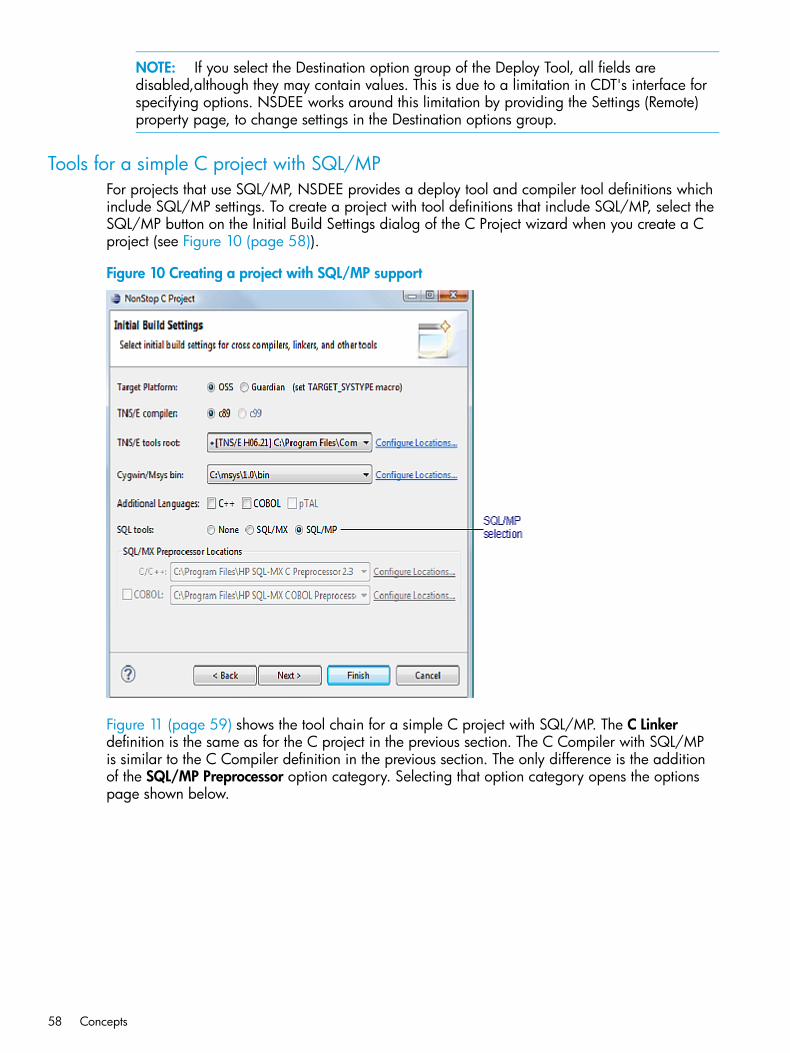
NOTE: If you select the Destination option group of the Deploy Tool, all fields aredisabled,although they may contain values. This is due to a limitation in CDT's interface forspecifying options. NSDEE works around this limitation by providing the Settings (Remote)property page, to change settings in the Destination options group.
Tools for a simple C project with SQL/MPFor projects that use SQL/MP, NSDEE provides a deploy tool and compiler tool definitions whichinclude SQL/MP settings. To create a project with tool definitions that include SQL/MP, select theSQL/MP button on the Initial Build Settings dialog of the C Project wizard when you create a Cproject (see Figure 10 (page 58)).
Figure 10 Creating a project with SQL/MP support
Figure 11 (page 59) shows the tool chain for a simple C project with SQL/MP. The C Linkerdefinition is the same as for the C project in the previous section. The C Compiler with SQL/MPis similar to the C Compiler definition in the previous section. The only difference is the additionof the SQL/MP Preprocessor option category. Selecting that option category opens the optionspage shown below.
58 Concepts

Figure 11 Tools with SQL/MP settings
NOTE: All options settings related to remote NonStop systems and locations are disabled onoptions pages due to a CDT limitation. To change values for such settings, go to the Settings(Remote) property pages.
TIP: Turn off SQL preprocessing options for any source file or any source directory by selectingthe source file or directory and opening the Settings page. To turn off SQL preprocessing options,deselect the Build with SQL/MP preprocessor check box.
The C SQL/MP Compile and Deploy tool is the C compiler with options for an SQL/MP compile.Because the procedure for an SQL/MP compile includes transferring the final build object to aNonStop system, projects built with SQL/MP do not need the NSDEE Deploy.jar program forthe file transfer.
Tools for a simple C project with SQL/MXFor projects that use SQL/MX, NSDEE provides the same tool definitions as projects that do notuse SQL, but also provides two additional tools; a C/C++ SQL/MX Compile tool and a C/C++SQL/MX Preprocessor tool. To create a project with tool definitions that include SQL/MX, selectthe SQL/MX button on the Initial Build Settings dialog of the C Project wizard when you create aC project. See Figure 12 (page 60).
Tool chains 59

Figure 12 Creating a project with SQL/MX support
Figure 13 (page 60) shows the tool chain for a simple C project with SQL/MX.
Figure 13 Tool chain for simple C project with SQL/MX
NOTE: All option settings related to remote NonStop systems and locations are disabled onoptions pages due to a CDT limitation. To change values for such settings, go to the Settings(Remote) property pages.
The C/C++ SQL/MX Preprocessor tool invokes the C compiler with options for preprocessingSQL/MX statements in .ec or .sql files. Because the resulting .c files are products of a build,they are written to the mirror source directory under the build directory associated with the active
60 Concepts

build configuration. Figure 14 (page 61) shows where the sqlmx.c file is written for a Debugbuild of sqlmx.ec.
Figure 14 Location of SQL/MX preprocessor output
The C/C++ SQL/MX Compile tool invokes the C compiler with options for performing an SQL/MXcompile. The deploy target for the main makefile or SQL/MX builds results in both an SQL/MXcompile and an invocation of Deploy.jar. Example 6 “Primary build targets for a C programwith SQL/MX” shows an example of the primary build targets for SQL/MX projects.
Example 6 Primary build targets for a C program with SQL/MX
# All Targetall: sqlmx.txe
# Tool invocationssqlmx.txe: $(OBJS) $(USER_OBJS) @echo 'Building target: $@' @echo 'Invoking: C Linker (TNS/E)' c89 -Wsystype=oss -Wcall_shared -o "sqlmx.txe" $(OBJS) $(USER_OBJS) $(LIBS) @echo 'Finished building target: $@' @echo ' '
sqlmx_compile: sqlmx.txe @echo 'Invoking: C/C++ SQL/MX Compile (TNS/E)' c89 -Wsqlloc="/home/chloe/testdir" -Wmxcmp=replace \ -Wsqlhost=nonstopsystem.corp.net -Wsqluser=sdev.chloe, \ `"C:/e3.7/eclipse/plugins/com.hp.nsdee_1.0.0/Tools/nsdee-auth.exe" \ deploy nonstopsystem.corp.net sdev.chloe` -Wmxcmp_files="sqlmx.txe" @echo 'Finished building: $@' @echo ' '
deploy: sqlmx_compile @echo 'Invoking: Deploy Tool' java -jar "C:/e3.7/eclipse/plugins/com.hp.nsdee_1.0.0/Tools/Deploy.jar" \ -dir="/home/chloe/testdir" -r="test.txe" -q=oss -code=800 -mode=bin \ -p=22 -t=sftp -h=nonstopsystem.corp.net -u=sdev.chloe -f="sqlmx.txe" @echo 'Finished building: $@' @echo ' '
As in Example 6 “Primary build targets for a C program with SQL/MX”, make all (Project> Build Project) builds the executable, sqlmx.txe and all dependent object files, whereasmake deploy (Project > Deploy Project) initiates an SQL/MX compile (dependenttarget sqlmx_compile) followed by a file transfer using Deploy.jar.
Tool chains 61

Customizing managed buildsAlthough managed builds generate makefiles, you can still customize managed builds. NSDEEprovides two separate mechanisms for customizing managed builds. The first mechanism involveswriting your own version of top-level makefile targets. The second mechanism involves using projectproperties to add commands to be invoked before and after Build Project and Deploy Projectactions.
Creating custom make targetsManaged builds support customization with the following three include statements written to everytop-level auto-generated makefile, one per build configuration:-include ../makefile.init-include ../makefile.defs-include ../makefile.targets
The above include statements pull in text from the files makefile.init, makefile.defs, andmakefile.targets. NSDEE does not create any of the three files, but you can create any orall of them. No errors are generated if any of the three files are not present when the makefile isused.The makefile.init file is included at the top of the top-level makefile. Use it to add your ownmakefile initialization.The makefile.defs file is included in the top-level makefile just before build targets. Use it todefine your own makefile macros or to alter predefined macros such as those declared in theauto-generated make include files, objects.mk and source.mk. For example, you can addobjects built by another project by specifying the path to the objects using the USER_OBJS macrodefined in objects.mk (as makefile.defs is included "after" objects.mk in the top-levelmakefile). USER_OBJS is included on the command-line of the final build target for a project. Fordetails, see “Adding externally-built objects and linkfiles to managed builds” (page 111).The makefile.targets file is included at the bottom of the top-level makefile. Use it to addyour own build targets, which you can then build with the Make Target view by also adding yourown build targets in that view.You can also use makefile.targets to override predefined build targets. For details, see“Creating a makefile.targets file for managed builds” (page 114).
Running commands before and after buildsSet up commands to run before and after builds, and before and after deploying the final buildobject. Figure 15 (page 63) shows an example of using project properties to set simple commandsto issue before and after a build.
62 Concepts

Figure 15 Adding pre-build and post-build steps
Example 7 “Build Output with pre-build and post-build steps” shows the pre-build and post-buildtargets added to the main makefile on the next build as a result of setting the project properties.This example also shows how the "all" target depends on "pre-build", and the rule for the finalexecutable (Car.txe in this case) invokes the post-build step with $(MAKE)--no-print-directory post-build.
Customizing managed builds 63

Example 7 Build Output with pre-build and post-build steps
# All Targetall: pre-build main-build
# Main-build Targetmain-build: Car.txe
# Tool invocationsCar.txe: $(OBJS) $(USER_OBJS) @echo 'Building target: $@' @echo 'Invoking: C++ Linker (TNS/E)' c89 -Wcplusplus -Wsystype=guardian -Wcall_shared -o "Car.txe" $(OBJS) $(USER_OBJS) $(LIBS) @echo 'Finished building target: $@' @echo ' ' $(MAKE) --no-print-directory post-build . . .pre-build: -@echo 'Pre-build action' -echo "Build is starting..." -@echo ' '
post-build: -@echo 'Post-build action' -echo "Build has completed" -@echo ' '
Running commands before and after deploymentCommands can be set to run before and after deploying the final build object. Unlike pre-buildand post-build steps, you must define your own pre-deploy and post-deploy targets, and can usenames other than "pre-deploy" and "post-deploy" as target names.Example 8 “Adding custom pre-deploy and post-deploy targets” shows adding targets using theSettings (Remote) project property page.
Example 8 Adding custom pre-deploy and post-deploy targets
Adding my-pre-deploy and my-post-deploy targets writes a deploy target similar to thefollowing to the main makefile on your next build:deploy: Car.txe my-pre-deploy @echo 'Invoking: Deploy Tool' java -jar "C:/e3.7/eclipse/plugins/com.hp.nsdee_1.0.0/Tools/Deploy.jar"...
64 Concepts

@echo 'Finished building: $@' @echo ' ' $(MAKE) --no-print-directory my-post-deploy
NSDEE does not create these targets. You must create these targets in a makefile.targets fileas a top-level file in the project. The main makefile includes the deploy targets defined with thismethod.Example 9 “Sample definitions of my-pre-deploy and my-post-deploy” shows sample definitionsthat print some text, but can be defined in more useful ways.
Example 9 Sample definitions of my-pre-deploy and my-post-deploy
my-pre-deploy: @echo "Pre-deploying . . ." @echo "Pre-deploy complete!" @echo ' '
my-post-deploy: @echo "Post-deploying . . ." @echo "Post-deploy complete!" @echo ' '
Using NonStop projects with an SCM toolNSDEE local projects can be used with a software configuration management (SCM) tool in oneof two ways. The first is to use an Eclipse plug-in provided for use with an SCM tool to check-inand check-out files directly in Eclipse. Examples of such plug-ins include the Subclipse plug-in forSubversion and the Eclipse CVS Client for CVS. The second is to use an SCM outside of Eclipseto check-in and check-out files, and to import projects from the SCM file repository into the NSDEENonStop Project Explorer for editing and building.NSDEE saves all project information in two files directly under the project directory. These files are.project and .cproject, which save information in XML format. These two files must bechecked in to your SCM repository in addition to your source files. The content of these files issaved whenever you change project settings or add build targets.For remote projects, NSDEE saves minimal information on your local Windows system. This savedinformation is also written to .project and .cproject files.To enable viewing .project and .cproject in the NonStop Project Explorer view, see “FilteringNonStop Project Explorer view content” (page 120). For an example of using NSDEE with SCMtools, see “Using NSDEE with SCM tools: examples and procedures” (page 121).
TIP:To ensure full repeatability of builds, in addition to saving project files in an SCM repository alsoadd the following files to your SCM repository (typically after a final product build):• System headers provided in the cross compiler installation area.
• Any files you copy to your PC to use in builds such as SPI headers, link libraries, and so on.
• All makefiles (if you use makefile projects) or all makefile fragments you contribute to managedbuilds such as makefile.targets.
Using Samba with NSDEENSDEE supports creating links in local projects to mapped Samba drives on NonStop systems.These links appear as folders in your local projects. Creating a linked folder enables draggingand dropping files to and from the mapped location on NonStop. For more information on creatinglinked folders, see “Using Samba with NSDEE” (page 65).
Using NonStop projects with an SCM tool 65
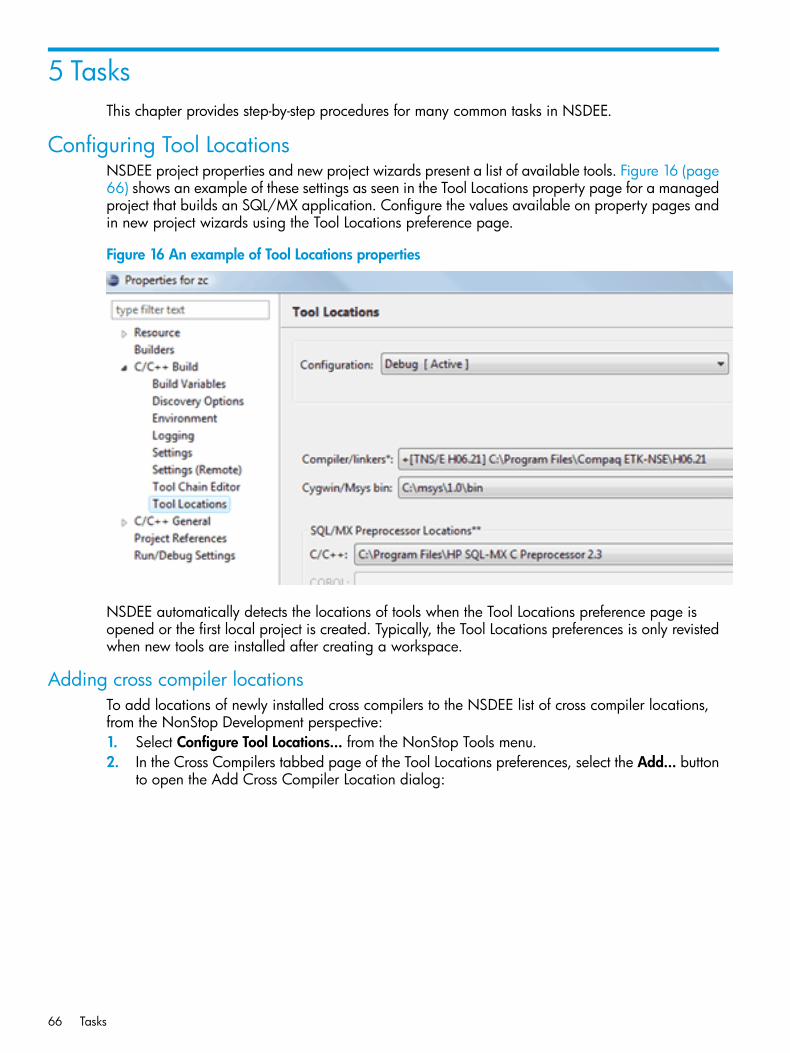
5 TasksThis chapter provides step-by-step procedures for many common tasks in NSDEE.
Configuring Tool LocationsNSDEE project properties and new project wizards present a list of available tools. Figure 16 (page66) shows an example of these settings as seen in the Tool Locations property page for a managedproject that builds an SQL/MX application. Configure the values available on property pages andin new project wizards using the Tool Locations preference page.
Figure 16 An example of Tool Locations properties
NSDEE automatically detects the locations of tools when the Tool Locations preference page isopened or the first local project is created. Typically, the Tool Locations preferences is only revistedwhen new tools are installed after creating a workspace.
Adding cross compiler locationsTo add locations of newly installed cross compilers to the NSDEE list of cross compiler locations,from the NonStop Development perspective:1. Select Configure Tool Locations... from the NonStop Tools menu.2. In the Cross Compilers tabbed page of the Tool Locations preferences, select the Add... button
to open the Add Cross Compiler Location dialog:
66 Tasks

Figure 17 Add Cross Compiler Location dialog
3. The Location: field contains the location where all NonStop cross compilers are typicallyinstalled and the Auto-detect button is selected.Select OK.
4. Back on the Tool Locations preference page, select OK. The locations of any newly installedcompilers are added to the list.
Adding SQL/MX preprocessor locationsTo add the location of a newly installed SQL/MX preprocessor to the NSDEE list of preprocessorlocations, from the NonStop Development perspective:1. Select Configure Tool Locations... from the NonStop Tools menu.2. On the Tool Locations preference page, select the SQL/MX Preprocessors tab.3. On the SQL/MX Preprocessors page, select the Add... button to open the Add SQL/MX
Preprocessors Location dialog:
Figure 18 Add SQL/MX Preprocessors Location dialog
4. The Location: field contains the location where SQL/MX preprocessors are typically installedand the Auto-detect button is selected.Select OK.
5. Back on the Tool Locations preference page, select OK. The location of the newly installedSQL/MX preprocessor is added to the list.
Adding Cygwin/Msys locationsTo add the bin directory location for the newly-installed Cygwin or Msys, from the NonStopDevelopment perspective:
Configuring Tool Locations 67

1. Select Configure Tool Locations... from the NonStop Tools menu.2. On the Tool Locations preference page, select the Cygwin/Msys tab.3. On the Cygwin/Msys page, enter the Cygwin bin directory path in the Cygwin bin: field or
the Msys bin directory path in the Msys bin: field. Alternatively, select Browse... to open adirectory browser to find the location.
4. Select OK.
Configuring connections to NonStopThe Network Connections preferences page provides a central location to add and configurenetwork connections to NonStop systems. NSDEE manages NonStop system connection informationusing named connection configurations, where the names take the form:system_name_or_IP (user_ID_or_alias)You can create any number of these configurations. Each configuration specifies the connectionprotocol (SSH/SFTP or Telnet/FTP) and any optional protocol-specific settings. Share theseconfigurations between workspaces using export and import wizards.These connection configurations are available through combo boxes in project creation wizards,project properties, and various tools. Figure 19 (page 68) shows an example of a new projectwizard with a combo box containing three separate connection configurations.
Figure 19 New project wizard for connection configurations
Adding network connection preferencesTo add network connections to NonStop systems, perform the following steps from the NonStopDevelopment perspective:1. To open the Network Connections preference page, select NonStop Tools→Configure
Connections...
68 Tasks

Figure 20 Network Connections preferences page
2. On the preference page, select Add/Remove...3. In the Add or Remove Connection Configurations dialog, enter an IP address or a system
name in the System: field and click the Add button.
TIP: If one or more remote connections are already configured and you want to reuse thesettings from an existing configuration, select it in the list of connection configurations, thenselect Copy, and then OK. As a result, the System combo contains a copy of the system nameselected, the User name: field is empty, and your preferred protocol and settings are identicalto the copied configuration. Optionally, alter the system name and add a user name.
Figure 21 Add or Remove Connection Configurations dialog
Configuring connections to NonStop 69

4. To dismiss the Add or Remove Connection Configurations dialog, select OK. The system or IPaddress you entered appears in the System: combo box.
TIP: If this is the first configured connection, enter the system name in the System: combo.However, you must select Add/Remove... to add additional systems.
5. Enter a user name or alias in the User name: field.6. Select the preferred protocol. To always use secure, encrypted authentication and for encrypted
file transfers and remote program launches, select SSH/SFTP. For information on changingprotocol settings, see one of the sections below.
7. To apply changes and dismiss the Preferences dialog, select OK .
Changing SSH and SFTP settingsTo change SSH and SFTP settings, from the NonStop Development perspective:1. To open the Network Connections preference page (Figure 20 (page 69)), select NonStop
Tools→Configure Connections....2. Use the System: combo box to select the connection configuration to change.3. Open the Secure Shell Settings dialog (Figure 22 (page 70)) by selecting the Settings... button
to the right of the SSH/SFTP button.
Figure 22 Secure Shell Settings dialog
4. Actions available in the Secure Shell Settings dialog:• Enter a different port (the default for SSH is 22).
• Select the Use public key authentication check box for public key authentication andspecify the location of your private key file in the Private key file: field.
NOTE: Using public key authentication requires creating public/private key pairs andregistering the public key on the connecting NonStop system. For details on how to useSSHCOM's alter command to add and register a public key, see the NonStop SSHReference Manual.NSDEE does not provide a facility for generating a public/private key pairs. However,this capability is available from the SSH2 preference page for Eclipse by selectingWindow→Preferences→General→Network Connections.
• Change the location of the known_hosts file or disable checking the known hosts filefor trusted hosts.
NOTE: If you deselect Check for known hosts, you are prompted to verify the trustedstatus of the host during every login.
70 Tasks

5. After making changes, select OK to return to the Preference dialog.6. Select OK to apply your changes and dismiss the Preferences dialog.
For more information on SSH and SFTP, see the NonStop SSH Reference Manual.
Changing Telnet and FTP settingsTo change Telnet and FTP settings, from the NonStop Development perspective:1. To open the Network Connections preference page (Figure 20 (page 69)) select NonStop
Tools→Configure Connections....2. Use the System: combo box to select the connection configuration to change.3. Open the Telnet/FTP Settings dialog (Figure 23 (page 71)) by selecting the Settings... button
to the right of the Telnet/FTP button.
Figure 23 Telnet/FTP Settings dialog
4. Table 4 (page 71) describes the settings you can change in the Telnet/FTP Settings dialog.
Table 4 Telnet/FTP settings
DescriptionSetting
Enter port NSDEE uses to connect to the Telnet server on theNonStop system. (Default is 23.)
Telnet port: field
Enter port NSDEE uses to connect to FTP server on the NonStopsystem. (Default is 21.)
FTP port: field
Select to use active protocol when opening FTP ports.Active FTP button
Select to use passive protocol when opening FTP ports.Passive FTP button
Select to save password in encrypted form after first successfullogin. NSDEE uses saved password for subsequent logins.
Save password (encrypted) button
Select when directly connecting to a STATIC window based onthe IPv4 or IPv6 address of the client.
Default (no service or window choice) button
Configuring connections to NonStop 71
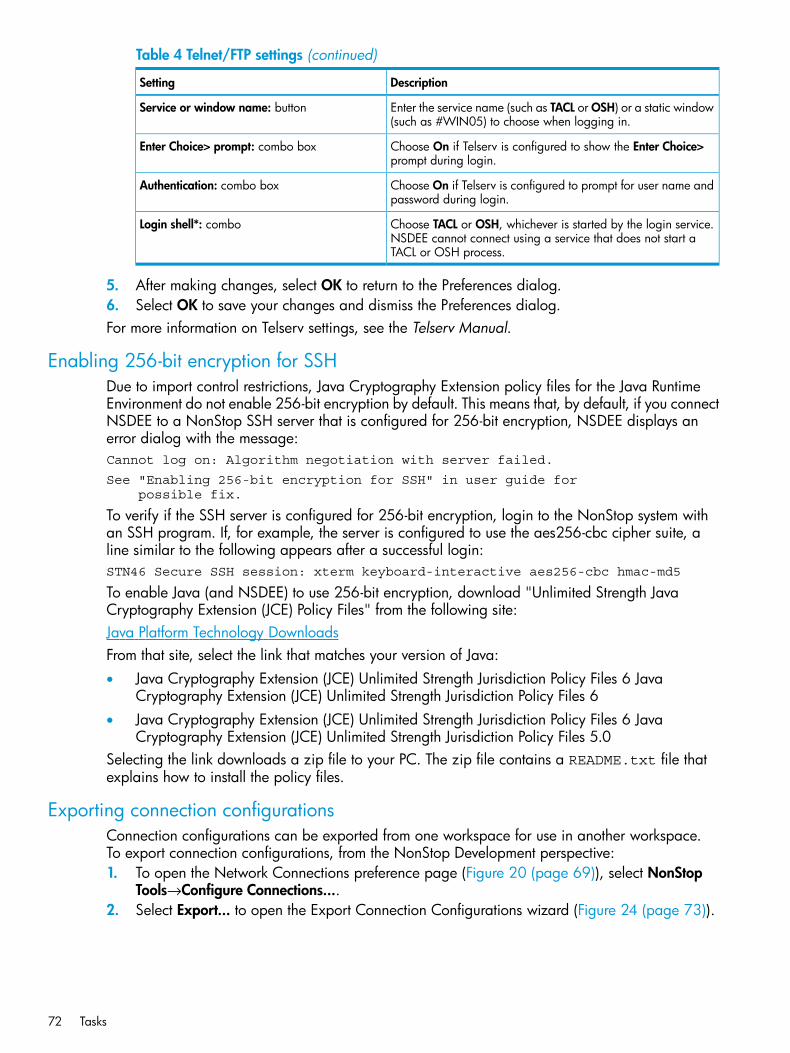
Table 4 Telnet/FTP settings (continued)
DescriptionSetting
Enter the service name (such as TACL or OSH) or a static window(such as #WIN05) to choose when logging in.
Service or window name: button
Choose On if Telserv is configured to show the Enter Choice>prompt during login.
Enter Choice> prompt: combo box
Choose On if Telserv is configured to prompt for user name andpassword during login.
Authentication: combo box
Choose TACL or OSH, whichever is started by the login service.NSDEE cannot connect using a service that does not start aTACL or OSH process.
Login shell*: combo
5. After making changes, select OK to return to the Preferences dialog.6. Select OK to save your changes and dismiss the Preferences dialog.For more information on Telserv settings, see the Telserv Manual.
Enabling 256-bit encryption for SSHDue to import control restrictions, Java Cryptography Extension policy files for the Java RuntimeEnvironment do not enable 256-bit encryption by default. This means that, by default, if you connectNSDEE to a NonStop SSH server that is configured for 256-bit encryption, NSDEE displays anerror dialog with the message:Cannot log on: Algorithm negotiation with server failed.
See "Enabling 256-bit encryption for SSH" in user guide for possible fix.
To verify if the SSH server is configured for 256-bit encryption, login to the NonStop system withan SSH program. If, for example, the server is configured to use the aes256-cbc cipher suite, aline similar to the following appears after a successful login:STN46 Secure SSH session: xterm keyboard-interactive aes256-cbc hmac-md5
To enable Java (and NSDEE) to use 256-bit encryption, download "Unlimited Strength JavaCryptography Extension (JCE) Policy Files" from the following site:Java Platform Technology DownloadsFrom that site, select the link that matches your version of Java:• Java Cryptography Extension (JCE) Unlimited Strength Jurisdiction Policy Files 6 Java
Cryptography Extension (JCE) Unlimited Strength Jurisdiction Policy Files 6• Java Cryptography Extension (JCE) Unlimited Strength Jurisdiction Policy Files 6 Java
Cryptography Extension (JCE) Unlimited Strength Jurisdiction Policy Files 5.0Selecting the link downloads a zip file to your PC. The zip file contains a README.txt file thatexplains how to install the policy files.
Exporting connection configurationsConnection configurations can be exported from one workspace for use in another workspace.To export connection configurations, from the NonStop Development perspective:1. To open the Network Connections preference page (Figure 20 (page 69)), select NonStop
Tools→Configure Connections....2. Select Export... to open the Export Connection Configurations wizard (Figure 24 (page 73)).
72 Tasks
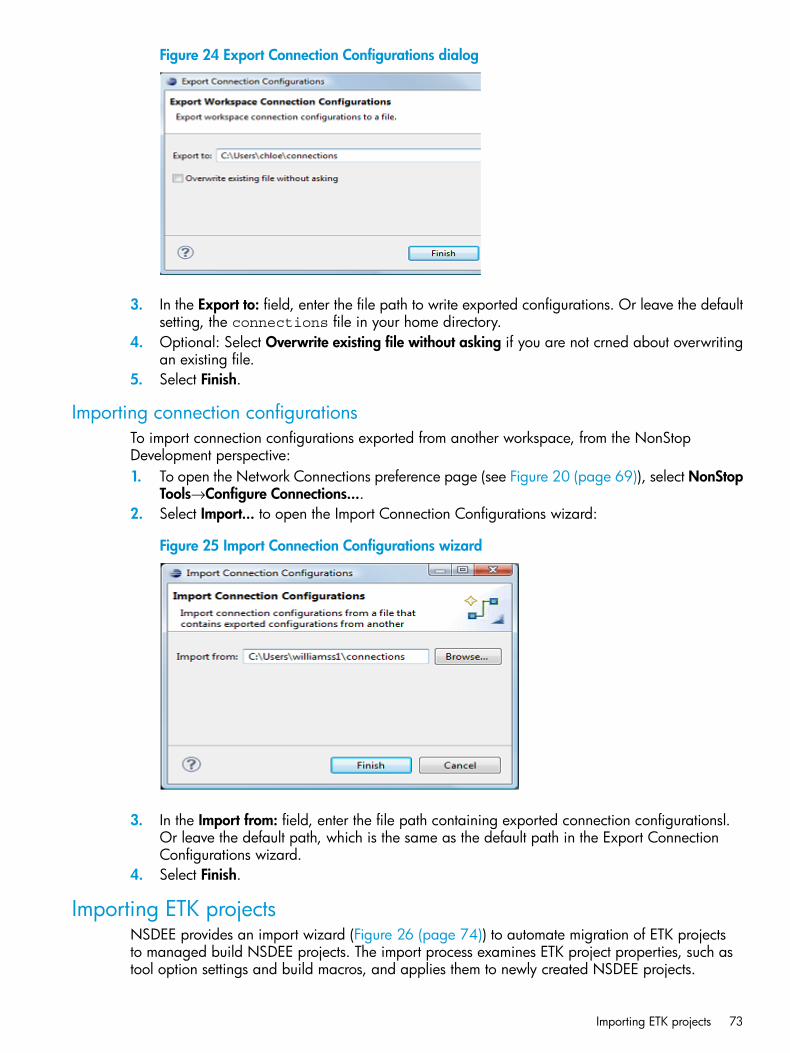
Figure 24 Export Connection Configurations dialog
3. In the Export to: field, enter the file path to write exported configurations. Or leave the defaultsetting, the connections file in your home directory.
4. Optional: Select Overwrite existing file without asking if you are not crned about overwritingan existing file.
5. Select Finish.
Importing connection configurationsTo import connection configurations exported from another workspace, from the NonStopDevelopment perspective:1. To open the Network Connections preference page (see Figure 20 (page 69)), select NonStop
Tools→Configure Connections....2. Select Import... to open the Import Connection Configurations wizard:
Figure 25 Import Connection Configurations wizard
3. In the Import from: field, enter the file path containing exported connection configurationsl.Or leave the default path, which is the same as the default path in the Export ConnectionConfigurations wizard.
4. Select Finish.
Importing ETK projectsNSDEE provides an import wizard (Figure 26 (page 74)) to automate migration of ETK projectsto managed build NSDEE projects. The import process examines ETK project properties, such astool option settings and build macros, and applies them to newly created NSDEE projects.
Importing ETK projects 73

Figure 26 ETK import wizard
Eclipse and NSDEE projects have more constrained structures than ETK projects. NSDEE projectsare typically confined to the directory structure under the top-level directory of the project. Buildoutput is typically written to a subdirectory of the project and external project files are referencedin compiler and linker options and are not directly part of the project.ETK project structures are less constrained and can vary greatly among solutions. Build output isoften written outside of projects, and the files shown as part of the project often do not actuallyexist under the project directory.
IMPORTANT: Migration of Visual Studio or CORBA projects is not supported.
Preparing to import ETK projectsBefore you use the Import ETK Projects wizard, plan the process for importing projects.Before importing ETK projects, decide where the NSDEE projects will reside. Copying ETK projectsinto your workspace only works well for ETK projects that are self-contained (with all project filesunder a top-level project directory). If you want your NSDEE projects to point to files already undersource control, do not use the Copy projects into workspace option in the import wizard. Point yourproject to the location of the files under source control instead. NSDEE does not change yourproject structure, however it adds .project and .cproject as top-level project files.HP recommends a trial run of importing ETK projects to NSDEE to identify outstanding issues afterthe import process. After importing ETK projects, the import wizard points to a log file containingerrors or warnings. After resolving these log file issues, try building each imported project one ata time and review issues, if any. Also verify that ETK macros are successfully mapped to NSDEEequivalents, “build variables” in Eclipse. For information on viewing project build variables, see“Setting build variables” (page 90).
NOTE: The ETK macros SolutionExt, ETKInstallDir, and macro names that begin withCORBA are not supported and are not set in imported ETK projects.
74 Tasks

For insolvable problems with imported ETK projects, HP encourages you to contact your HP Supportrepresentative.
Importing one or more ETK projectsTo import one or more ETK projects associated with a solution, from the NonStop Developmentperspective:1. Select Import ETK Projects... from the NonStop Tools menu.2. In the Import ETK Projects wizard, enter the path of the solution file associated with the ETK
projects. Or select Browse... to browse for the solution file. The Projects: list automatically listsand selects all projects associated with the solution file.
3. Deselect any projects in the Projects: list that you do not want to import.4. Ensure that the Copy projects into workspace check box is selected only if you want NSDEE
to copy the contents of ETK projects into your workspace. Otherwise, deselect the check box.5. Optional: Select Add project to working sets. For information on working sets, see the Eclipse
Workbench Guide.6. Select Finish to import all selected ETK projects.If the import completes without errors or warnings, NSDEE displays the following dialog (whichyou can dismiss by selecting OK).
Figure 27 Import Projects Completed dialog (ETK imports)
If the import completes with errors or warnings, a dialog similar to the following appears. To openthe log and view the contents, select the link. You can also open the log file at:workspace/.metadata/etkmigration/solution_name.log
Figure 28 Import Projects Warning dialog (ETK imports)
Importing NSDEE 2.x projectsTo convert NSDEE 2.1 or 2.0 local projects to NSDEE 4.0 projects, use the Import NSDEE 2.xProjects wizard. For details, see “Import NSDEE 2.x Projects wizard” (page 76). The import wizardconverts NSDEE 2.x local projects to NSDEE 4.0 projects.
Importing NSDEE 2.x projects 75
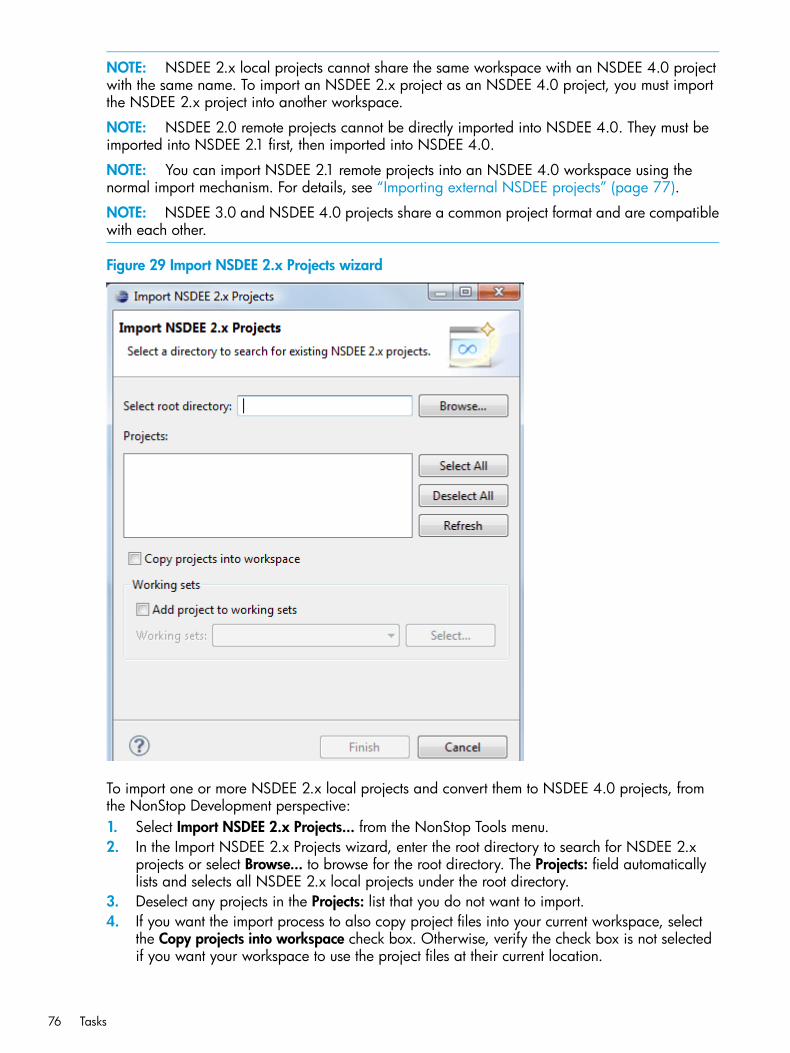
NOTE: NSDEE 2.x local projects cannot share the same workspace with an NSDEE 4.0 projectwith the same name. To import an NSDEE 2.x project as an NSDEE 4.0 project, you must importthe NSDEE 2.x project into another workspace.
NOTE: NSDEE 2.0 remote projects cannot be directly imported into NSDEE 4.0. They must beimported into NSDEE 2.1 first, then imported into NSDEE 4.0.
NOTE: You can import NSDEE 2.1 remote projects into an NSDEE 4.0 workspace using thenormal import mechanism. For details, see “Importing external NSDEE projects” (page 77).
NOTE: NSDEE 3.0 and NSDEE 4.0 projects share a common project format and are compatiblewith each other.
Figure 29 Import NSDEE 2.x Projects wizard
To import one or more NSDEE 2.x local projects and convert them to NSDEE 4.0 projects, fromthe NonStop Development perspective:1. Select Import NSDEE 2.x Projects... from the NonStop Tools menu.2. In the Import NSDEE 2.x Projects wizard, enter the root directory to search for NSDEE 2.x
projects or select Browse... to browse for the root directory. The Projects: field automaticallylists and selects all NSDEE 2.x local projects under the root directory.
3. Deselect any projects in the Projects: list that you do not want to import.4. If you want the import process to also copy project files into your current workspace, select
the Copy projects into workspace check box. Otherwise, verify the check box is not selectedif you want your workspace to use the project files at their current location.
76 Tasks

5. Select Add project to working sets if desired. For information on working sets, see the EclipseWorkbench Guide.
6. Select Finish to import all selected NSDEE 2.x projects as NSDEE 4.0 projects.If the import completes without errors or warnings, the following dialog appears. Dismiss the dialogby selecting OK).
If the import completes with errors or warnings, a dialog similar to Figure 30 (page 77) appears.To open the log and view the contents, select the link. You can also open the log file at:workspace/.metadata.nsdee2xmigration/project_name.log
Figure 30 Import Projects Warning dialog (NSDEE 2.x imports)
Importing external NSDEE projectsTo import existing NSDEE 4.0 projects into your current workspace, perform the following stepsfrom the NonStop Development perspective:1. Select Import... from the File menu.2. In the Import wizard, select General→Existing Projects into Workspace, then select Next >.3. In the field next to the Select root directory: button (which is selected by default), enter the root
directory to search for NSDEE 4.0 projects, or select Browse... to browse for the root directory.The Projects: list automatically lists and selects all NSDEE 4.0 projects under the root directory.
4. Deselect any projects in the Projects: list that you do not want to import.5. If you want the import process to also copy project files into your current workspace, select
the Copy projects into workspace check box. Otherwise, verify the check box is not selectedif you want your workspace to use the project files at their current location.
6. Select Add project to working sets if desired. For information on working sets, see theWorkbench User Guide.
7. Select Finish to import all selected NSDEE 4.0 projects into your current workspace.
Creating projectsThis section provides general steps for creating NSDEE local and remote projects. For specificexamples of creating different project types, see “Getting started” (page 14).
Importing external NSDEE projects 77
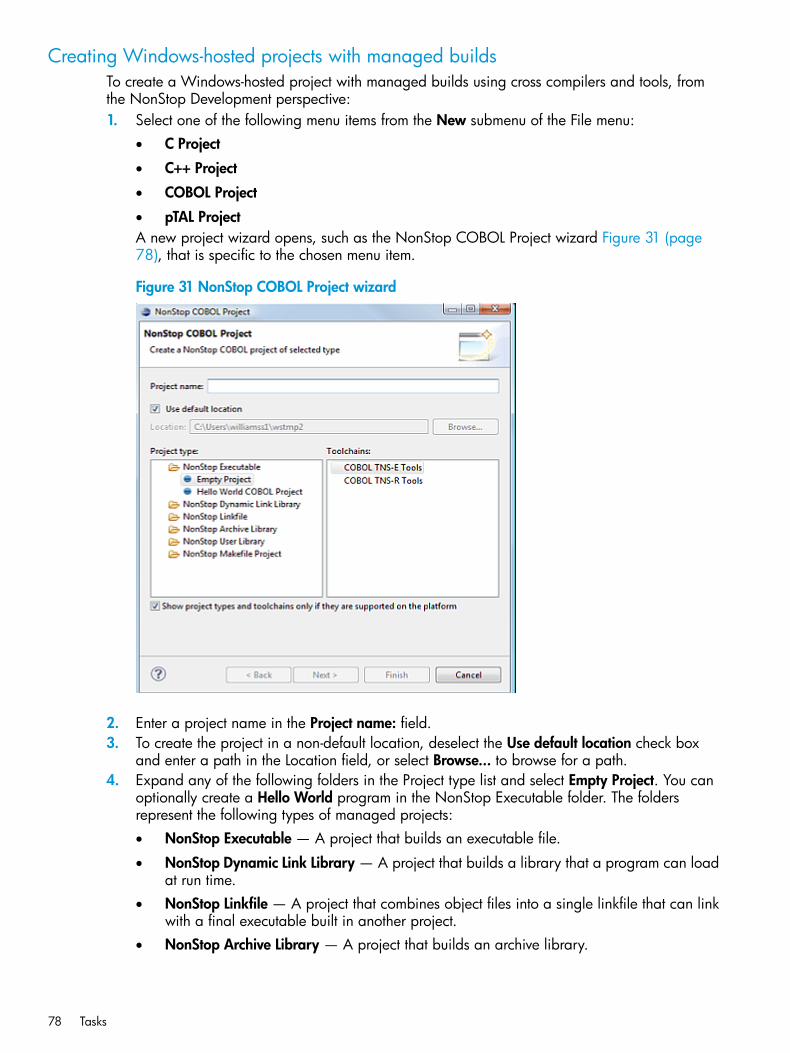
Creating Windows-hosted projects with managed buildsTo create a Windows-hosted project with managed builds using cross compilers and tools, fromthe NonStop Development perspective:1. Select one of the following menu items from the New submenu of the File menu:
• C Project
• C++ Project
• COBOL Project
• pTAL ProjectA new project wizard opens, such as the NonStop COBOL Project wizard Figure 31 (page78), that is specific to the chosen menu item.
Figure 31 NonStop COBOL Project wizard
2. Enter a project name in the Project name: field.3. To create the project in a non-default location, deselect the Use default location check box
and enter a path in the Location field, or select Browse... to browse for a path.4. Expand any of the following folders in the Project type list and select Empty Project. You can
optionally create a Hello World program in the NonStop Executable folder. The foldersrepresent the following types of managed projects:• NonStop Executable — A project that builds an executable file.
• NonStop Dynamic Link Library — A project that builds a library that a program can loadat run time.
• NonStop Linkfile — A project that combines object files into a single linkfile that can linkwith a final executable built in another project.
• NonStop Archive Library — A project that builds an archive library.
78 Tasks
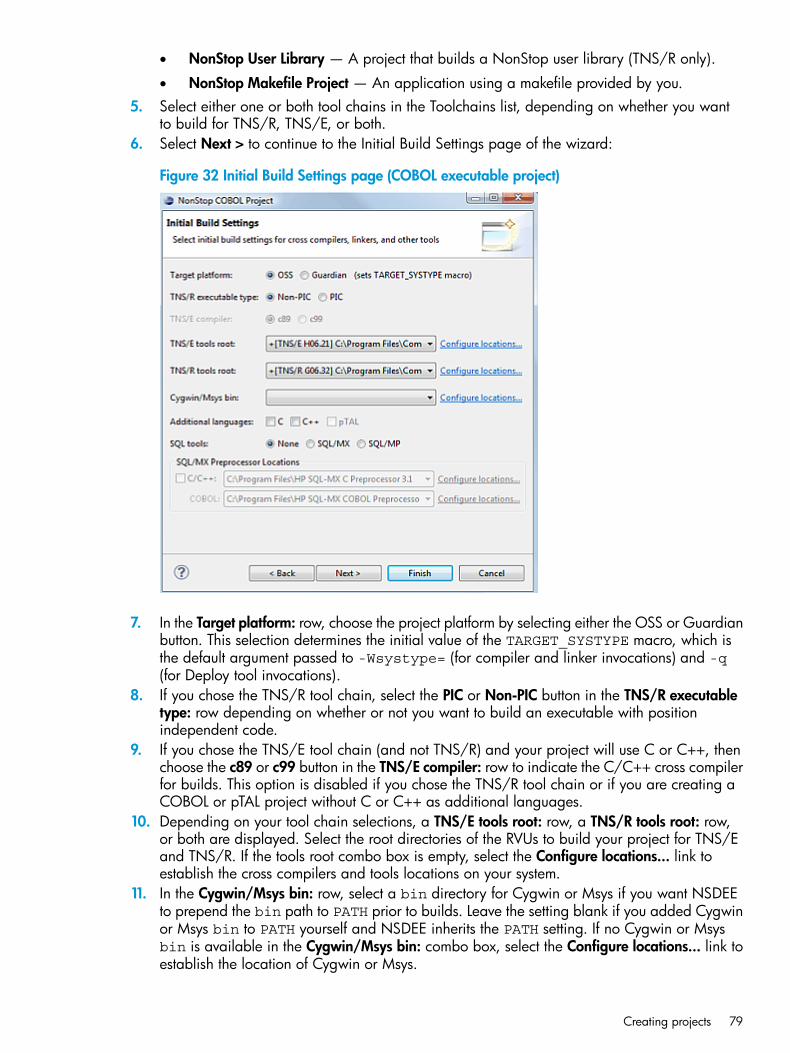
• NonStop User Library — A project that builds a NonStop user library (TNS/R only).
• NonStop Makefile Project — An application using a makefile provided by you.5. Select either one or both tool chains in the Toolchains list, depending on whether you want
to build for TNS/R, TNS/E, or both.6. Select Next > to continue to the Initial Build Settings page of the wizard:
Figure 32 Initial Build Settings page (COBOL executable project)
7. In the Target platform: row, choose the project platform by selecting either the OSS or Guardianbutton. This selection determines the initial value of the TARGET_SYSTYPE macro, which isthe default argument passed to -Wsystype= (for compiler and linker invocations) and -q(for Deploy tool invocations).
8. If you chose the TNS/R tool chain, select the PIC or Non-PIC button in the TNS/R executabletype: row depending on whether or not you want to build an executable with positionindependent code.
9. If you chose the TNS/E tool chain (and not TNS/R) and your project will use C or C++, thenchoose the c89 or c99 button in the TNS/E compiler: row to indicate the C/C++ cross compilerfor builds. This option is disabled if you chose the TNS/R tool chain or if you are creating aCOBOL or pTAL project without C or C++ as additional languages.
10. Depending on your tool chain selections, a TNS/E tools root: row, a TNS/R tools root: row,or both are displayed. Select the root directories of the RVUs to build your project for TNS/Eand TNS/R. If the tools root combo box is empty, select the Configure locations... link toestablish the cross compilers and tools locations on your system.
11. In the Cygwin/Msys bin: row, select a bin directory for Cygwin or Msys if you want NSDEEto prepend the bin path to PATH prior to builds. Leave the setting blank if you added Cygwinor Msys bin to PATH yourself and NSDEE inherits the PATH setting. If no Cygwin or Msysbin is available in the Cygwin/Msys bin: combo box, select the Configure locations... link toestablish the location of Cygwin or Msys.
Creating projects 79

12. In the Additional languages: row, choose any additional languages you intend to use in theproject. This results in the addition of cross compilers to the project tool chain. You can addtools after project creation using the Tool Chain Editor property page.
13. In the SQL tools: row, select SQL/MX or SQL/MP if the project source contains SQL statements.This results in the addition of SQL-specific tools being to the project tool chain.
14. If you chose the SQL/MX button in step 13, the SQL/MX Preprocessor Locations group boxis enabled. The fields in the group box specify the location of the SQL/MX preprocessors forC/C++ and COBOL. If the fields are empty, select Configure locations... to establish theirlocation.
15. Select Next > to continue to the Remote Settings page. The settings on this page (shown herefor a NonStop COBOL project) are optional and can also be set after project creation usingthe Settings (Remote) project property page.
The Remote Settings page contains tabs if you selected both TNS/E and TNS/R tool chains(one for each platform). On this page, enter the NonStop system to deploy the project-builtobject, as well as the location on the system. This page also contains additional settings forSQL compilation and preprocessing if you selected SQL/MX or SQL/MP on the previouspage.
16. To continue to the Select Configurations page, select Next >. For details, see Figure 33 (page81). This page shows the default build configurations created. Deselect any build configurationsyou do not want included in your project. This page is provided by CDT. For more information,see the C/C++ Development User Guide.
80 Tasks
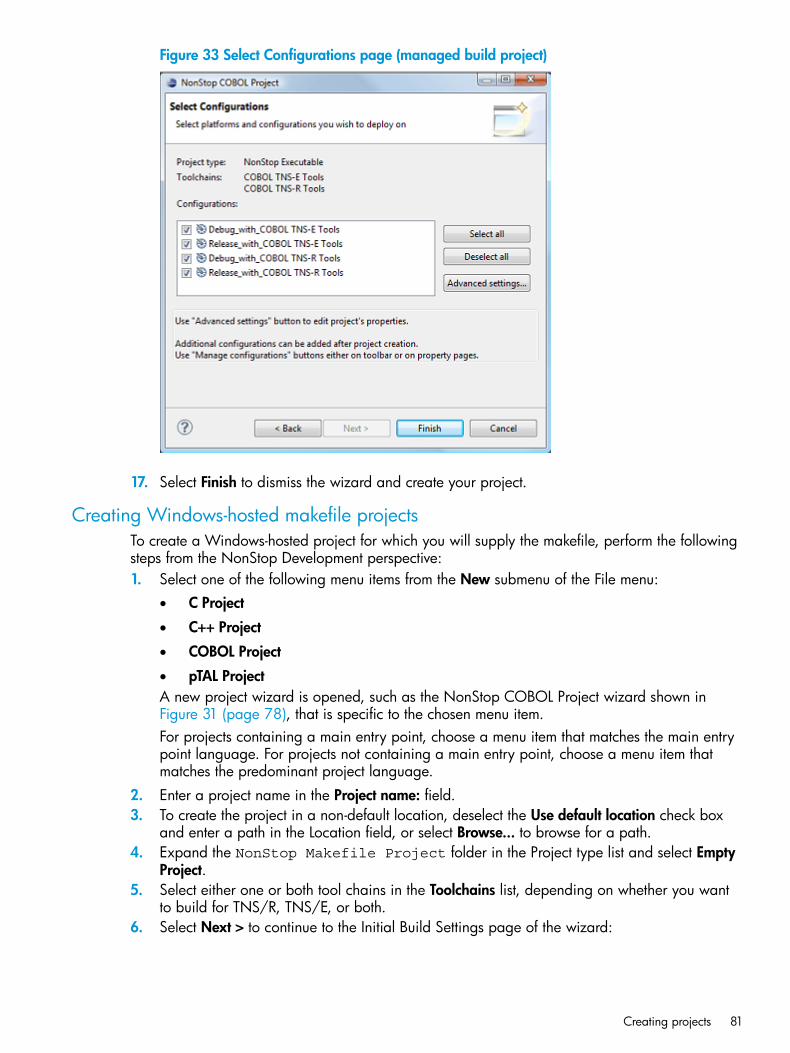
Figure 33 Select Configurations page (managed build project)
17. Select Finish to dismiss the wizard and create your project.
Creating Windows-hosted makefile projectsTo create a Windows-hosted project for which you will supply the makefile, perform the followingsteps from the NonStop Development perspective:1. Select one of the following menu items from the New submenu of the File menu:
• C Project
• C++ Project
• COBOL Project
• pTAL ProjectA new project wizard is opened, such as the NonStop COBOL Project wizard shown inFigure 31 (page 78), that is specific to the chosen menu item.For projects containing a main entry point, choose a menu item that matches the main entrypoint language. For projects not containing a main entry point, choose a menu item thatmatches the predominant project language.
2. Enter a project name in the Project name: field.3. To create the project in a non-default location, deselect the Use default location check box
and enter a path in the Location field, or select Browse... to browse for a path.4. Expand the NonStop Makefile Project folder in the Project type list and select Empty
Project.5. Select either one or both tool chains in the Toolchains list, depending on whether you want
to build for TNS/R, TNS/E, or both.6. Select Next > to continue to the Initial Build Settings page of the wizard:
Creating projects 81
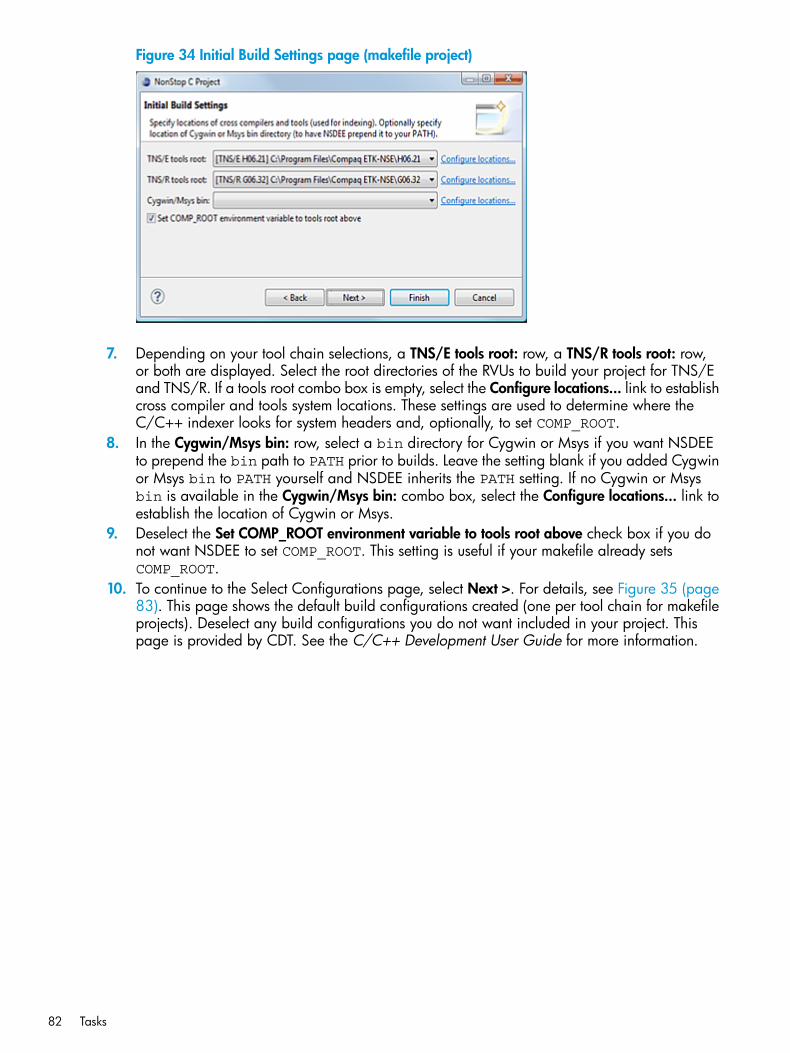
Figure 34 Initial Build Settings page (makefile project)
7. Depending on your tool chain selections, a TNS/E tools root: row, a TNS/R tools root: row,or both are displayed. Select the root directories of the RVUs to build your project for TNS/Eand TNS/R. If a tools root combo box is empty, select the Configure locations... link to establishcross compiler and tools system locations. These settings are used to determine where theC/C++ indexer looks for system headers and, optionally, to set COMP_ROOT.
8. In the Cygwin/Msys bin: row, select a bin directory for Cygwin or Msys if you want NSDEEto prepend the bin path to PATH prior to builds. Leave the setting blank if you added Cygwinor Msys bin to PATH yourself and NSDEE inherits the PATH setting. If no Cygwin or Msysbin is available in the Cygwin/Msys bin: combo box, select the Configure locations... link toestablish the location of Cygwin or Msys.
9. Deselect the Set COMP_ROOT environment variable to tools root above check box if you donot want NSDEE to set COMP_ROOT. This setting is useful if your makefile already setsCOMP_ROOT.
10. To continue to the Select Configurations page, select Next >. For details, see Figure 35 (page83). This page shows the default build configurations created (one per tool chain for makefileprojects). Deselect any build configurations you do not want included in your project. Thispage is provided by CDT. See the C/C++ Development User Guide for more information.
82 Tasks

Figure 35 Select Configurations page (makefile project)
11. Select Finish to dismiss the wizard and create your project.
Creating Windows-hosted projects from existing sourceTo create a project using an existing source base, perform the steps in one of the followingprocedures:• “Creating Windows-hosted projects with managed builds” (page 78)
• “Creating Windows-hosted makefile projects” (page 81)with a slight change to change to step 3. Deselect the Use default location check box and enterthe path to the existing code base in the Location field, or select Browse... to browse for the location.All other steps are the same.For an existing code base with a makefile, you can also create a project using the Import ExistingCode wizard, which creates a project with a single build configuration. From the NonStopDevelopment perspective:1. Select Makefile Project with Existing Code from the New submenu of the File menu to open
the Import Existing Code wizard (Table 13 (page 136)).
Creating projects 83

Figure 36 Import Existing Code wizard
2. Enter a project name in the Project Name group box.3. Enter the location of your source base in the Existing Code Location group box, or select
Browse... to browse for the location.4. In the Tools root: row, select the root directory of the RVU to build your project. If the tools
root combo box is empty, select the Configure locations... link to establish the cross compilerand tools system location. This setting determines where the C/C++ indexer looks for systemheaders and, optionally, sets COMP_ROOT.
5. In the Cygwin/Msys bin: row, select a bin directory for Cygwin or Msys if you want NSDEEto prepend the bin path to PATH prior to builds. Leave the setting blank if you added Cygwinor Msys bin to PATH yourself and NSDEE inherits the PATH setting. If no Cygwin or Msysbin is available in the Cygwin/Msys bin: combo box, select the Configure locations... link toestablish the location of Cygwin or Msys.
6. Deselect the Set COMP_ROOT environment variable to tools root above check box if you donot want NSDEE to set COMP_ROOT This setting is useful if your makefile already setsCOMP_ROOT.
7. Select Finish to dismiss the wizard and create your project.
Creating remote projectsTo create a remote makefile project with new or existing sources, from the NonStop Developmentperspective:1. To open the Remote Makefile Project wizard, select Remote Makefile Project from the New
submenu of the File menu.
84 Tasks
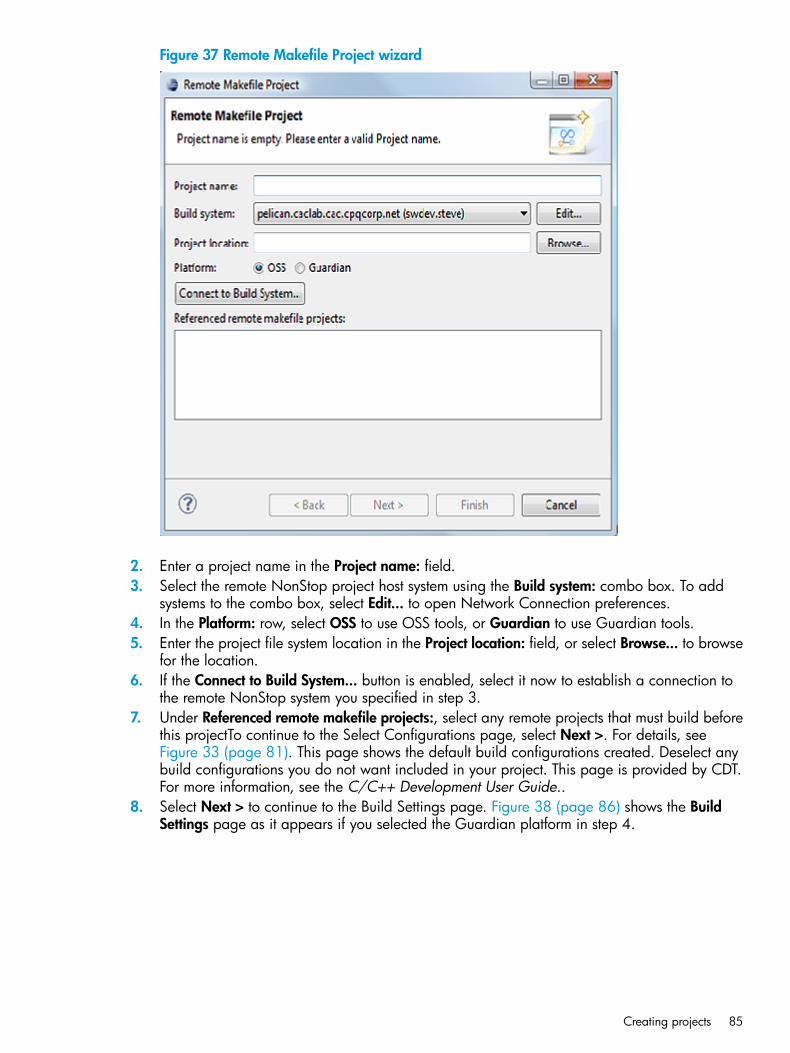
Figure 37 Remote Makefile Project wizard
2. Enter a project name in the Project name: field.3. Select the remote NonStop project host system using the Build system: combo box. To add
systems to the combo box, select Edit... to open Network Connection preferences.4. In the Platform: row, select OSS to use OSS tools, or Guardian to use Guardian tools.5. Enter the project file system location in the Project location: field, or select Browse... to browse
for the location.6. If the Connect to Build System... button is enabled, select it now to establish a connection to
the remote NonStop system you specified in step 3.7. Under Referenced remote makefile projects:, select any remote projects that must build before
this projectTo continue to the Select Configurations page, select Next >. For details, seeFigure 33 (page 81). This page shows the default build configurations created. Deselect anybuild configurations you do not want included in your project. This page is provided by CDT.For more information, see the C/C++ Development User Guide..
8. Select Next > to continue to the Build Settings page. Figure 38 (page 86) shows the BuildSettings page as it appears if you selected the Guardian platform in step 4.
Creating projects 85

Figure 38 Build Settings page
9. Optional: Set a non-default build command and non-default Build and Clean makefile targetnames.
10. If a makefile does not exist under the remote project location, select the Create makefile checkbox to have NSDEE create an empty makefile for you.
11. If you selected the Guardian platform in step 4, select the default editor to open Guardiansource files in the Default editor: combo box. This generates extensions for source files inremote projects. For example, if you choose the C editor, all sources in a Guardian projectare shown with a .c extension. CDT uses file extensions to determine which default editoropens a file.
12. Select Finish to dismiss the wizard and create your project.
Launching a NonStop application from NSDEETo launch a NonStop application from NSDEE, create a run configuration using the RunConfigurations dialog:
86 Tasks

Figure 39 Run Configurations dialog
After a run configuration is created and saved, it can be used to run applications without changinginformation in the run configuration.The following sections describe:• “Creating a run configuration” (page 87)
• “Launching an application using a saved run configuration” (page 90)
Creating a run configurationTo create a run configuration, perform the following steps from the NonStop Developmentperspective:1. Select Run Configurations... from the Run menu of the main menu bar to open the Run
Configurations dialog.2. Double-click NonStop Application in the list of run configuration types on the left side of the
dialog (or select NonStop Application and then select New from the context menu). This willcreate a new run configuration on the right that has tabbed pages named Main, Arguments,Environment, and Common (see Figure 39 (page 87)).
3. In the Name: field above the tabbed pages, enter a name for your new run configuration (orleave the default, New_configuration).
4. In the Main tabbed page:a. Select the launch type (Guardian or OSS).b. Enter the name of an NSDEE project in the NonStop project: field (or select Browse.. to
select from a list of NSDEE projects).c. Select a system from the NonStop system: combo box. (Select Edit.. to open Network
Configurations preferences to add a connection configuration.)
Launching a NonStop application from NSDEE 87

d. Enter a path to the executable you want to run in the NonStop executable's path onNonStop system: field (or select Browse... to browse for executables on the remote system).
e. Optional: If the program you want to run is on your local Windows system and you wantto transfer it to the NonStop system prior to launching it, select the check box for Localexecutable to be transferred to NonStop path specified above:, then enter the local pathof the executable (or select Browse... to browse for the executable).
NOTE: This option is disabled for remote projects.
5. To enter run command options, program arguments, or to select a non-default remote workingdirectory:a. Select the Arguments tab to show the Arguments page:
Figure 40 Arguments page
b. Enter run command options in the Run command options: text field. You can enter optionson more than one line, as any newlines will be converted to spaces when your programis run.
c. Enter program arguments in the Program arguments: text field. You can enter argumentson multiple lines, as any newlines will be converted to spaces when your program is run.
d. Select the Set initial $volume.subvolume checkbox (or the Set working directory checkbox if you selected the OSS platform) that will be the working directory for your program(or select Browse... to browse the remote system for a working directory).
6. Optional: To set environment variables (OSS) or DEFINEs, ASSIGNs, and PARAMs (Guardian)prior to launching your application:a. Select the Environment tab to show the Environment page.
Figure 42 (page 89) shows the Environment page for OSS launches. Figure 41 (page89) shows the environment tab for Guardian launches.
88 Tasks

Figure 41 Environment page for OSS launches
Figure 42 Environment page for Guardian launches
b. Select the top radio button to enter environment variables settings (OSS) or DEFINEs,ASSIGNs, and PARAMs settings (Guardian) directly in the text box below it. For OSS,these settings will be issued directly in the shell. Be sure to use export so that yourapplication will inherit settings, as in, for example:export MY_PROGRAM_VAR="somevalue"
For Guardian DEFINEs, ASSIGNs, and PARAMs, list them as you would enter them at aTACL prompt.Alternatively, you can specify your environment settings in a file on the remote system,select the bottom radio button, and below the button enter the path of the remote file (orselect Browse... to browse for it).• For OSS, the remote file is executed using this syntax:
$ . /path/to/remote/file
• For Guardian, the remote file is executed using obey:TACL>obey $volume.subvol.rfile
7. Optional: The Common page is provided by CDT and is documented in the C/C++Development User Guide.
Launching a NonStop application from NSDEE 89
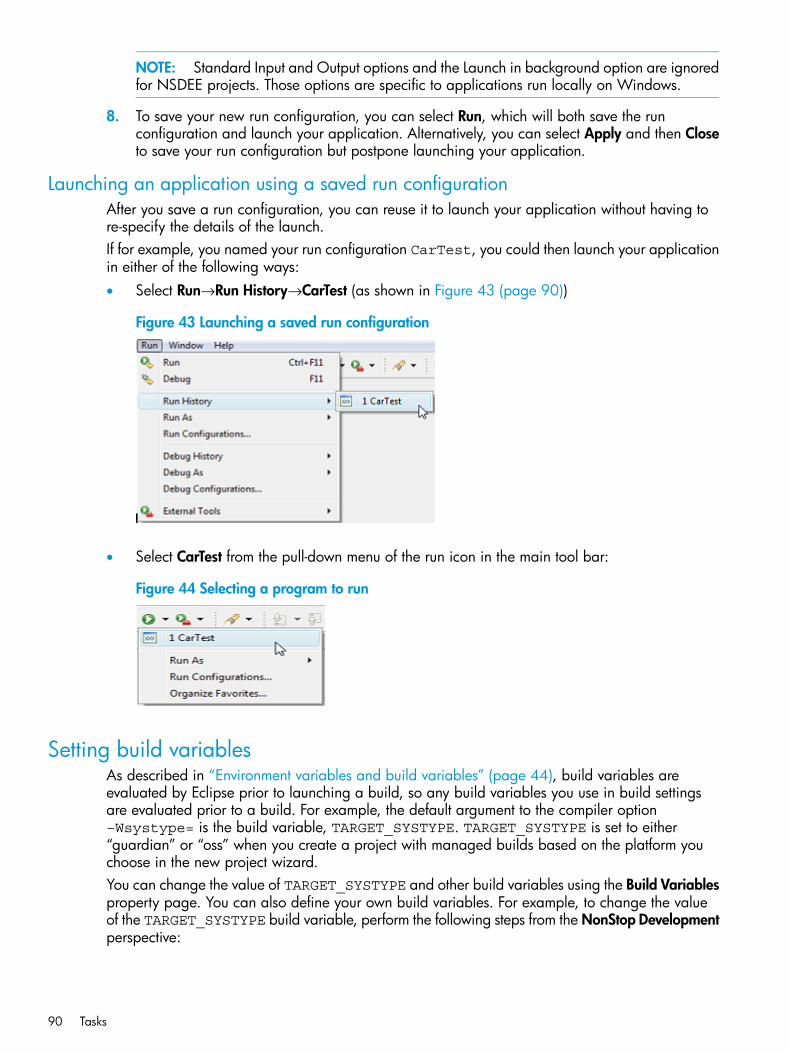
NOTE: Standard Input and Output options and the Launch in background option are ignoredfor NSDEE projects. Those options are specific to applications run locally on Windows.
8. To save your new run configuration, you can select Run, which will both save the runconfiguration and launch your application. Alternatively, you can select Apply and then Closeto save your run configuration but postpone launching your application.
Launching an application using a saved run configurationAfter you save a run configuration, you can reuse it to launch your application without having tore-specify the details of the launch.If for example, you named your run configuration CarTest, you could then launch your applicationin either of the following ways:• Select Run→Run History→CarTest (as shown in Figure 43 (page 90))
Figure 43 Launching a saved run configuration
• Select CarTest from the pull-down menu of the run icon in the main tool bar:
Figure 44 Selecting a program to run
Setting build variablesAs described in “Environment variables and build variables” (page 44), build variables areevaluated by Eclipse prior to launching a build, so any build variables you use in build settingsare evaluated prior to a build. For example, the default argument to the compiler option–Wsystype= is the build variable, TARGET_SYSTYPE. TARGET_SYSTYPE is set to either“guardian” or “oss” when you create a project with managed builds based on the platform youchoose in the new project wizard.You can change the value of TARGET_SYSTYPE and other build variables using the Build Variablesproperty page. You can also define your own build variables. For example, to change the valueof the TARGET_SYSTYPE build variable, perform the following steps from the NonStop Developmentperspective:
90 Tasks

1. In the NonStop Projects Explorer view, select a project that you want to changeTARGET_SYSTYPE for.
2. Select Properties from the context menu of the NonStop Projects Explorer view.3. Select the Build Variables entry under C/C++ Build (see Figure 45 (page 91)).
Figure 45 Build Variables property page
4. Select the Show system variables check box, then select TARGET_SYSTYPE (seeFigure 45 (page 91)).
5. Select the Edit… button to open the Edit Existing Build Variable dialog:
Figure 46 Edit Existing Build Variable dialog
6. Change the text in the Value: field to guardian instead of oss (or vice versa).7. Select OK to dismiss the dialog.8. Select OK to apply the change and dismiss the Properties dialog.For additional information on build variables, see the C/C++ Development User Guide.
Changing build options (project properties)The Settings property page lets you change the options passed to the tools used in managed builds.The Tool Settings tabbed page of the Settings property page shows all the tools in the tool chaindefined for your project. For a discussion of tool chains, see “Tool chains” (page 56).
Changing build options (project properties) 91
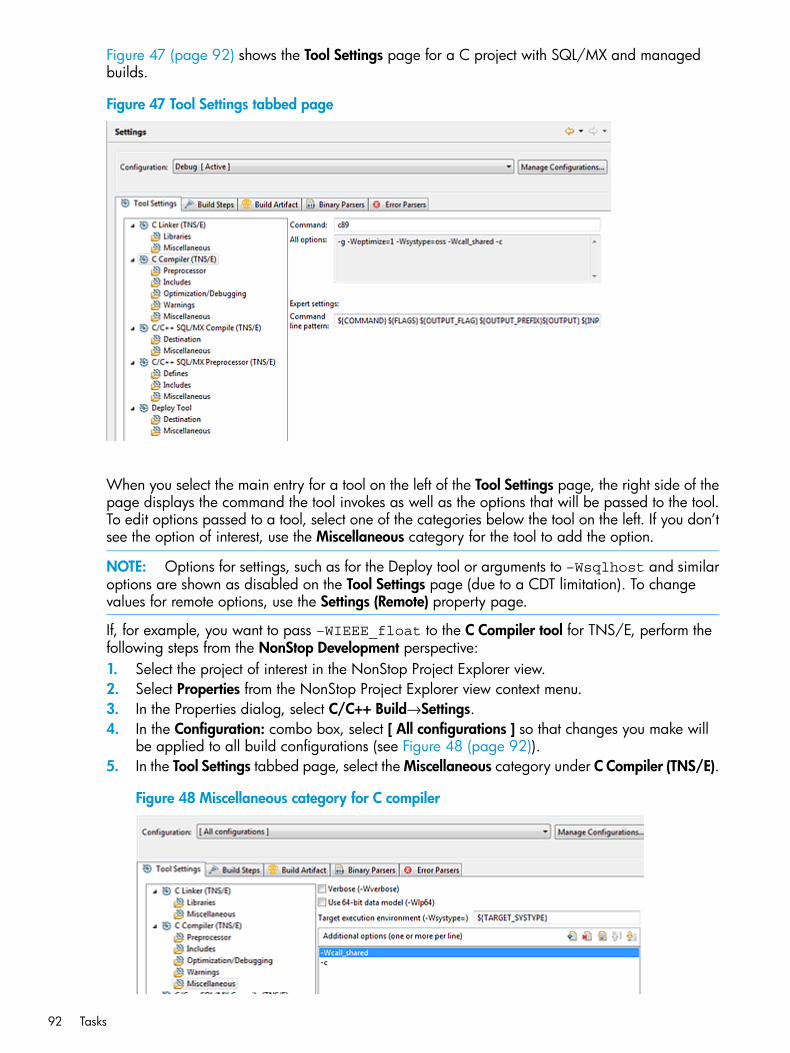
Figure 47 (page 92) shows the Tool Settings page for a C project with SQL/MX and managedbuilds.
Figure 47 Tool Settings tabbed page
When you select the main entry for a tool on the left of the Tool Settings page, the right side of thepage displays the command the tool invokes as well as the options that will be passed to the tool.To edit options passed to a tool, select one of the categories below the tool on the left. If you don’tsee the option of interest, use the Miscellaneous category for the tool to add the option.
NOTE: Options for settings, such as for the Deploy tool or arguments to –Wsqlhost and similaroptions are shown as disabled on the Tool Settings page (due to a CDT limitation). To changevalues for remote options, use the Settings (Remote) property page.
If, for example, you want to pass –WIEEE_float to the C Compiler tool for TNS/E, perform thefollowing steps from the NonStop Development perspective:1. Select the project of interest in the NonStop Project Explorer view.2. Select Properties from the NonStop Project Explorer view context menu.3. In the Properties dialog, select C/C++ Build→Settings.4. In the Configuration: combo box, select [ All configurations ] so that changes you make will
be applied to all build configurations (see Figure 48 (page 92)).5. In the Tool Settings tabbed page, select the Miscellaneous category under C Compiler (TNS/E).
Figure 48 Miscellaneous category for C compiler
92 Tasks

6. Select the Add button to open the Enter Value dialog.7. Enter –WIEEE_float in the Enter Value dialog, then select OK.8. Select OK to apply your change and dismiss the Properties dialog.
Specifying DEFINES for SQL/MP tablesCross compilers provide the –Wdef_obey= option for passing in an Obey file which sets upDEFINEs. You can, for example, use ADD DEFINE statements to map logical SQL table namesto physical table names and avoid hard coding SQL table names in source code. If you set upsuch a file for a COBOL project, for instance, you should pass it to both the COBOL Compiler withSQL/MP and COBOL SQL/MP Compile and Deploy tools in your project’s tool chain. For example,if you created a file named C:\\mydefines.txt that contains your ADD DEFINE statementsfor a TNS/E COBOL program with SQL/MP, you would perform the following steps to pass thefile to the compiler and linker:1. Select the COBOL SQL/MP project in the NonStop Project Explorer view.2. Select Properties from the context menu of the NonStop Project Explorer view.3. Select C/C++ Build→Settings on the left of the Properties dialog.4. Select [ All configurations ] in the Configuration: combo box if you want your changes to be
applied to all build configurations.5. In the Tool Settings tabbed page, select the SQL/MP Preprocessor category for the COBOL
Compiler with SQL/MP (TNS/E) tool (see Figure 49 (page 93)).
Figure 49 SQL/MP Preprocessor category
6. Select the Add button to open the Enter Value dialog.7. Enter –Wdef_obey=C:\mydefines.txt in the Enter Value dialog, then select OK.8. Select the Miscellaneous category for the COBOL SQL/MP Compiler and Deploy (TNS/E) tool
(Figure 50 (page 93)).
Figure 50 Miscellaneous category for COBOL SQL/MP Compile and Deploy
Specifying DEFINES for SQL/MP tables 93

9. Select the Add button to open the Enter Value dialog.10. Enter –Wdef_obey=C:\mydefines.txt in the Enter Value dialog, then select OK.11. Select OK to apply your change and dismiss the Properties dialog.
Building for both OSS and GuardianWhen you create a project with managed builds, the initial project is set up to build for OSS orGuardian, but not both. To build a project for both OSS and Guardian, create new buildconfigurations and set the TARGET_SYSTYPE build macro to a different value in the newconfigurations.Consider, for example, a project named HelloWorld that was created to be built for OSS andTNS/E. From the NonStop Development perspective, you would perform the following steps to addbuild configurations that build for Guardian:1. Select the HelloWorld project in the NonStop Project Explorer view.2. Select Build Configurations→Manage… from the context menu of the NonStop Project Explorer
view to open the Manage Configurations dialog:
Figure 51 Manage Configurations dialog
3. Select New… to open the Create New Configuration dialog (Figure 52 (page 95)) which youwill use to create a new build configuration.
94 Tasks

Figure 52 Create New Configuration dialog
4. Enter a name for the build configuration (such as Debug Guardian) and optionally enter adescription.
5. Make sure Existing configuration is selected and that the configuration specified to the rightof it is Debug. As a result, all settings in the Debug configuration are copied to your newconfiguration.
6. Select OK to add the new configuration and dismiss the Create New Configuration dialog.7. Repeat steps 3 through 6, but name the new configuration Release Guardian and copy settings
from the existing configuration named, Release.8. Select OK to apply your changes and dismiss the Manage Configurations dialog.9. In the Build Variables properties page of the HelloWorld project, set TARGET_SYSTYPE to
“guardian” for both the Release Guardian and Debug Guardian build configurations. Fordetails on how to set TARGET_SYSTYPE, refer to “Setting build variables” (page 90).
For more information on creating and managing build configurations, refer to the C/C++Development User Guide.
Removing erroneous errors and warnings in C/C++ editorsThe C/C++ editor shows the results of code analysis of the source file it is opened on. When yousee incorrect analysis, there is usually something you can do remove erroneous errors and warnings.This section describes how you can remove different types of erroneous errors and warnings.
Erroneous errors and warnings after creating a projectA defect in CDT can result in the indexer not running when you create a project, which results inerroneous errors being shown as in this example:
Removing erroneous errors and warnings in C/C++ editors 95

Example 10 Incorrect errors for new project source file
You can remove the erroneous errors by forcing the indexer to run:1. In the NonStop Project Explorer view, select the project associated with the source file.2. Select Index→Rebuild from the NonStop Project Explorer view context menu.
Erroneous errors and warnings for SQL StatementsBy default, CDT’s C/C++ code analysis marks SQL statements in C/C++ source with errors andwarnings. To ameliorate this issue, NSDEE provides a file that lists SQL statements that CDT willload as empty #define macros. The file is named .sqlmxStatements.txt (for SQL/MX) or.sqlmpStatements.txt (for SQL/MP) and is added as a top-level file when you create a newproject with managed builds and with SQL tools. Example 11 “Example of errors and warningsshown for SQL statements” shows an example of the types of erroneous errors and warnings shownfor SQL/MX statements in C/C++ editors.
NOTE: The .sqlmxStatements.txt and .sqlmpStatements.txt files are not visible bydefault. For information making files starting with “.” visible in the NonStop Project Explorer view,see “Filtering NonStop Project Explorer view content” (page 120).
TIP: You can specify a non-default location for the SQL statements file from the Discovery Optionsproperty page.
96 Tasks

Example 11 Example of errors and warnings shown for SQL statements
The .sqlmxStatements.txt and .sqlmpStatements.txt files are read only when Eclipseis started. You must restart Eclipse after creating a project before erroneous errors are removedfrom editors.Example 12 “Errors for get_dept_rec” shows the same editor and file as Example 11 “Exampleof errors and warnings shown for SQL statements” does, but after restarting Eclipse. Though manyerroneous errors have been removed, some still remain. Most of the erroneous errors are causedby the SQL record get_dept_rec because it is not defined for C. To workaround this sort oferror, you can add get_dept_rec to the .sqlmxStatements.txt file, but you must restartEclipse before CDT will read the .sqlmxStatements.txt file again.
NOTE: Because C macros are case sensitive, the .sqlmxStatements.txt and.sqlmpStatements.txt files contain three versions of each SQL statement—one in uppercase,one in lowercase, and one in lowercase except for the first letter. If you use other variations ofcase in your code, you will need to add those variations to the appropriate SQL statements file.
Removing erroneous errors and warnings in C/C++ editors 97
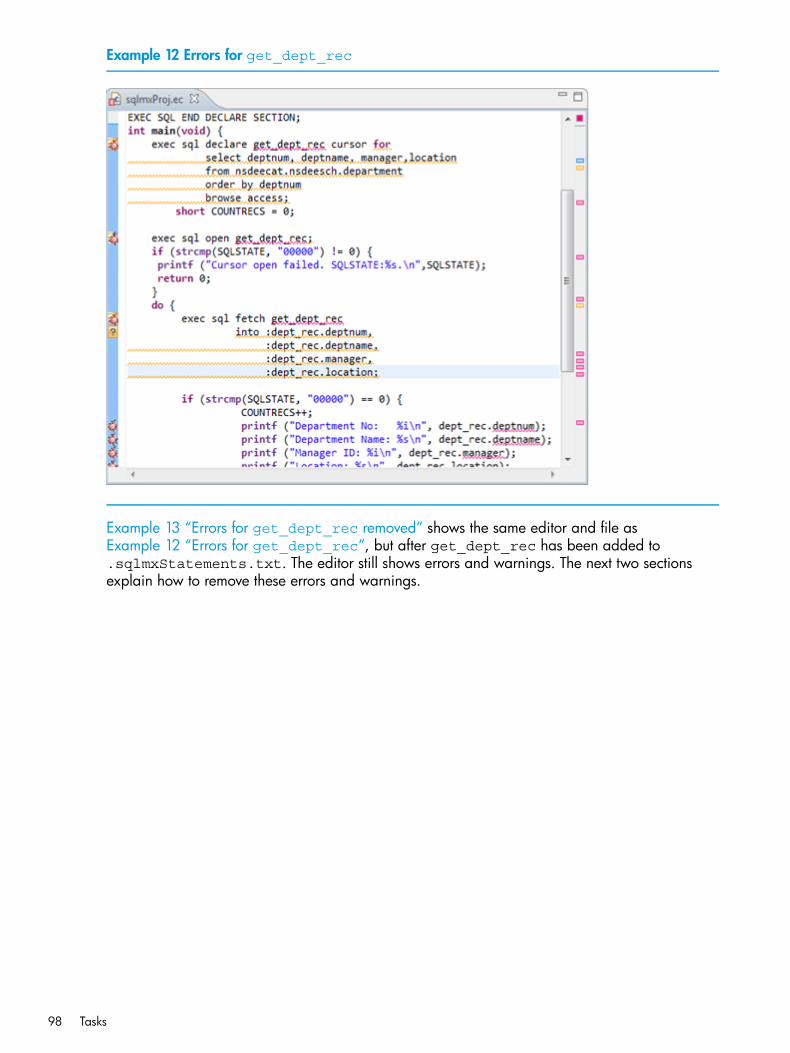
Example 12 Errors for get_dept_rec
Example 13 “Errors for get_dept_rec removed” shows the same editor and file asExample 12 “Errors for get_dept_rec”, but after get_dept_rec has been added to.sqlmxStatements.txt. The editor still shows errors and warnings. The next two sectionsexplain how to remove these errors and warnings.
98 Tasks
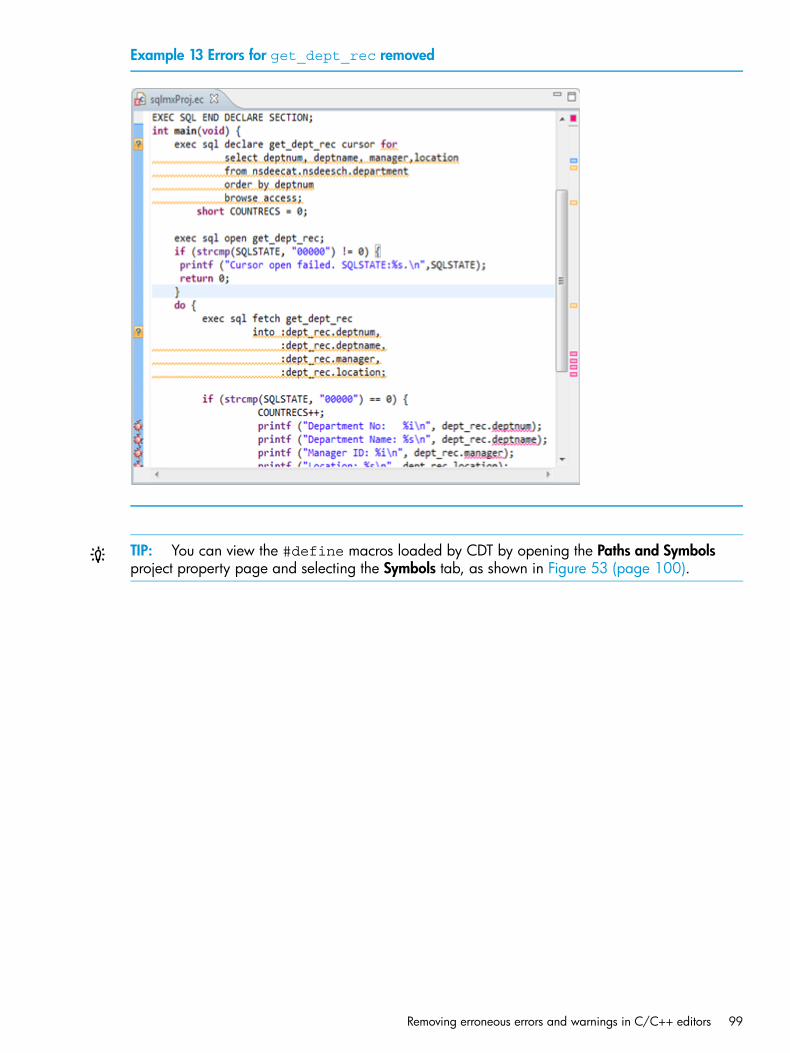
Example 13 Errors for get_dept_rec removed
TIP: You can view the #define macros loaded by CDT by opening the Paths and Symbolsproject property page and selecting the Symbols tab, as shown in Figure 53 (page 100).
Removing erroneous errors and warnings in C/C++ editors 99
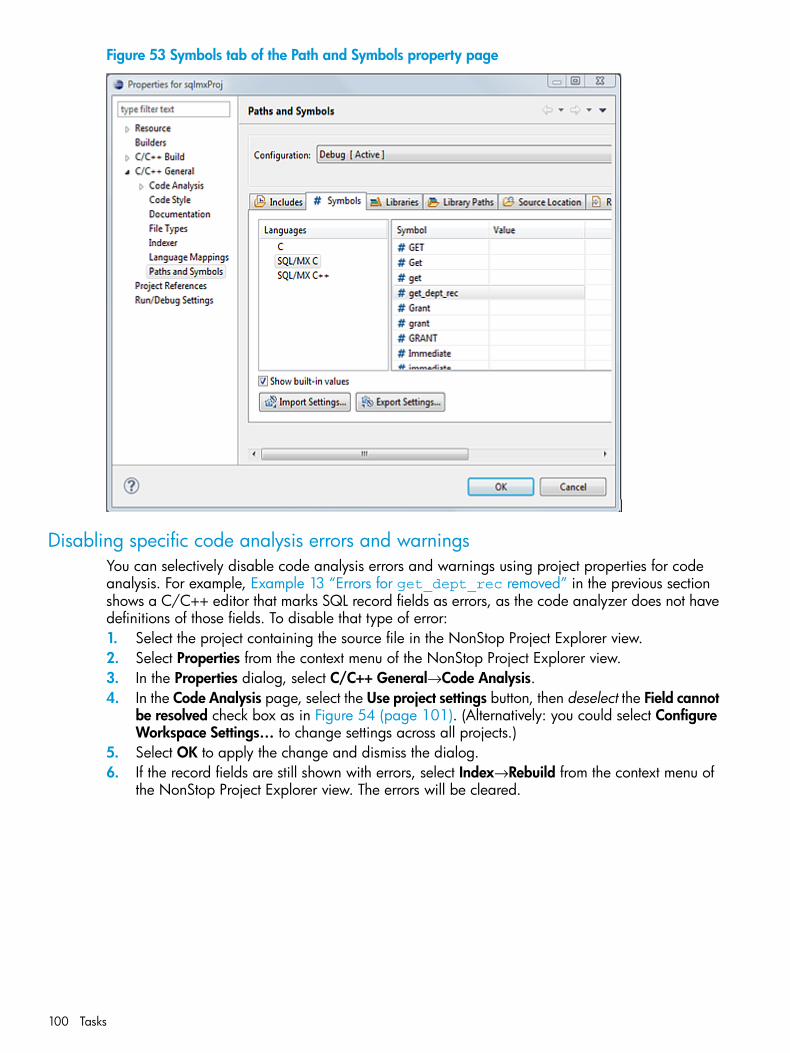
Figure 53 Symbols tab of the Path and Symbols property page
Disabling specific code analysis errors and warningsYou can selectively disable code analysis errors and warnings using project properties for codeanalysis. For example, Example 13 “Errors for get_dept_rec removed” in the previous sectionshows a C/C++ editor that marks SQL record fields as errors, as the code analyzer does not havedefinitions of those fields. To disable that type of error:1. Select the project containing the source file in the NonStop Project Explorer view.2. Select Properties from the context menu of the NonStop Project Explorer view.3. In the Properties dialog, select C/C++ General→Code Analysis.4. In the Code Analysis page, select the Use project settings button, then deselect the Field cannot
be resolved check box as in Figure 54 (page 101). (Alternatively: you could select ConfigureWorkspace Settings… to change settings across all projects.)
5. Select OK to apply the change and dismiss the dialog.6. If the record fields are still shown with errors, select Index→Rebuild from the context menu of
the NonStop Project Explorer view. The errors will be cleared.
100 Tasks

Figure 54 Disabling record field errors
Disabling erroneous syntax warningsWhen the C/C++ indexer shows erroneous syntax warnings (as shown in Example 13 “Errors forget_dept_rec removed”, you cannot disable the warnings using the Code Analysis propertypage as shown in the previous section. You have the option of disabling these warnings altogetheror making them less obtrusive. By making them less obtrusive, you still get the benefit of syntaxchecking, but you decrease the annoyance of having valid SQL code marked with warnings.To change how syntax warnings are displayed, perform the following steps:1. Select Window→Preferences to open the Preferences dialog.2. In the Preferences dialog, expand the tree on the left and select General→Editors→Text
Editors→Annotations to open the Annotations preference page.3. In the Annotations page, select C/C++ Indexer Markers (see Figure 55 (page 102)).
Removing erroneous errors and warnings in C/C++ editors 101
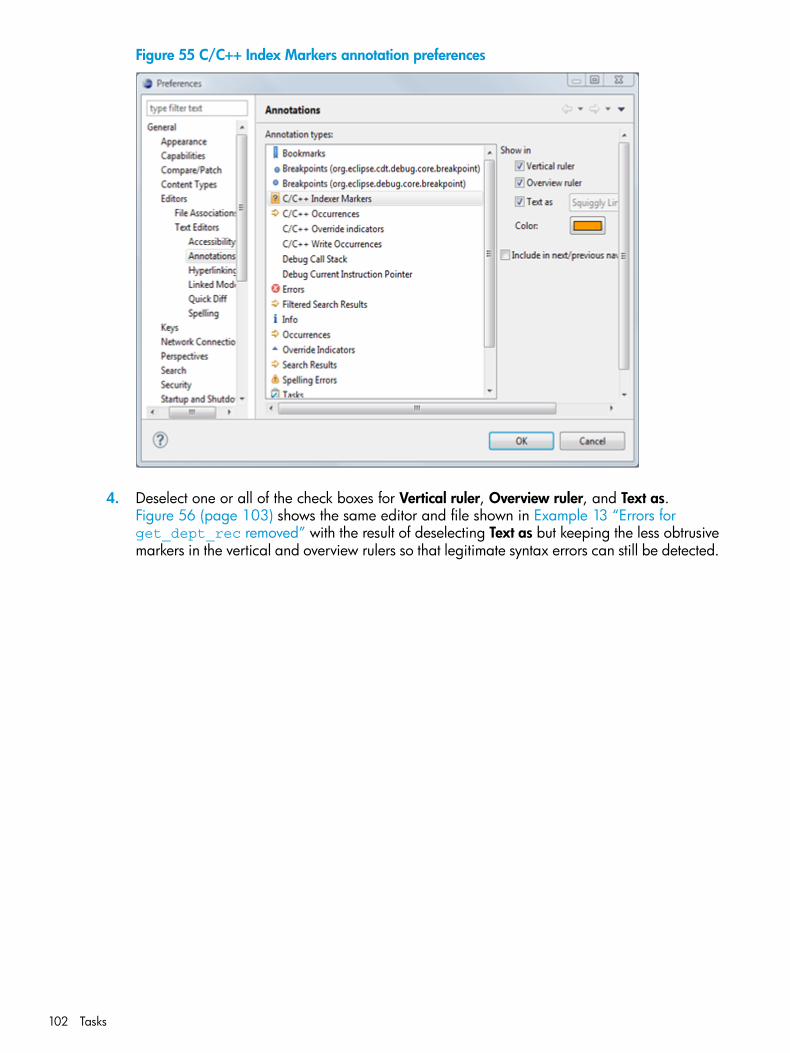
Figure 55 C/C++ Index Markers annotation preferences
4. Deselect one or all of the check boxes for Vertical ruler, Overview ruler, and Text as.Figure 56 (page 103) shows the same editor and file shown in Example 13 “Errors forget_dept_rec removed” with the result of deselecting Text as but keeping the less obtrusivemarkers in the vertical and overview rulers so that legitimate syntax errors can still be detected.
102 Tasks

Figure 56 Syntax warnings after “Text as” deselected
5. Select OK to apply your changes and dismiss the Preferences dialog.
Specifying locations for C/C++ headers, COBOL COPY libraries, andpTAL source files
For managed builds, NSDEE provides an Includes settings category for all cross compiler toolsand SQL/MX preprocessor tools. Specifying the locations of files to be included in builds similarfor all of these tools for including C/C++ headers, COBOL COPY libraries, or pTAL SOURCE files.To specify files in Includes settings, open a project's properties, locate the Includes page for thecompiler or SQL/MX preprocessor of interest. You can find the Includes page for any of these toolsby opening project properties and selecting C/C++ Build→Settings and selecting the Includes entryunder the tool of interest.For example, to specify the locations of COPY libraries for COBOL compilers, perform the followingsteps from the NonStop Development perspective (and similar steps for any other tool):1. Select a COBOL project in the NonStop Project Explorer view.2. Select Properties from the NonStop Project view context menu.3. Select C/C++ Build→Settings at the left of the Properties dialog.4. In the Tool Settings tabbed page, select the Includes entry under the COBOL Compiler tool.
5. Select the Add button to bring up the Add directory path dialog.6. In the Add directory path dialog, enter the path of the directory containing the COPY libraries.
NOTE: To enter a relative path, enter a path relative to the build directory, which is adirectory with the name of the configuration being built that is created in a directory underthe root project directory.
7. Select OK to add the path. Figure 57 (page 104) shows the Includes page after adding arelative path.
8. Select OK to apply the setting and close the Properties dialog.
Specifying locations for C/C++ headers, COBOL COPY libraries, and pTAL source files 103
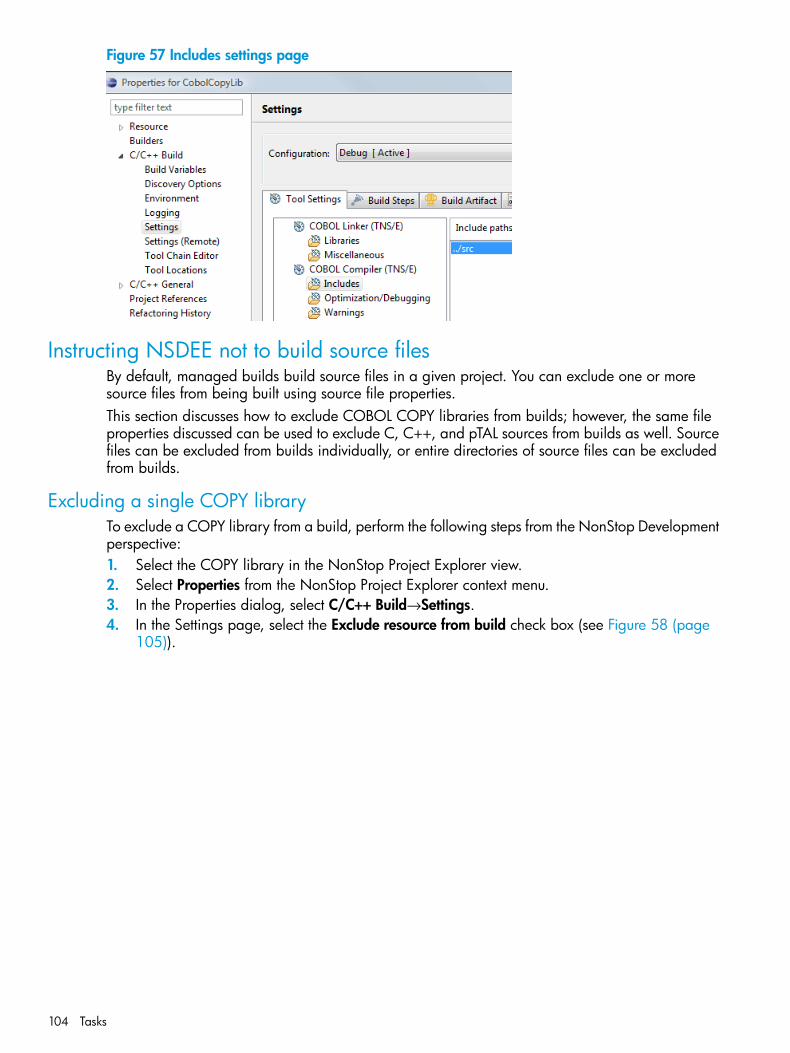
Figure 57 Includes settings page
Instructing NSDEE not to build source filesBy default, managed builds build source files in a given project. You can exclude one or moresource files from being built using source file properties.This section discusses how to exclude COBOL COPY libraries from builds; however, the same fileproperties discussed can be used to exclude C, C++, and pTAL sources from builds as well. Sourcefiles can be excluded from builds individually, or entire directories of source files can be excludedfrom builds.
Excluding a single COPY libraryTo exclude a COPY library from a build, perform the following steps from the NonStop Developmentperspective:1. Select the COPY library in the NonStop Project Explorer view.2. Select Properties from the NonStop Project Explorer context menu.3. In the Properties dialog, select C/C++ Build→Settings.4. In the Settings page, select the Exclude resource from build check box (see Figure 58 (page
105)).
104 Tasks

Figure 58 Exclude a single COPY library from a build
5. Select OK to apply the change and dismiss the Properties dialog. The file excluded from thebuild is shown with a pin through it, as a reminder in Figure 59 (page 105):
Figure 59 File excluded from build (pin indicator)
Excluding all sources in a folderTo exclude a folder containing only COBOL COPY libraries from a build, perform the followingsteps from the NonStop Development perspective:1. Select the folder in the NonStop Project Explorer view.2. Select Properties from the NonStop Project Explorer context menu.3. In the Properties dialog, select C/C++ Build→Settings.4. In the Settings page, select the Exclude resource from build check box (see Figure 60 (page
106)).
Instructing NSDEE not to build source files 105
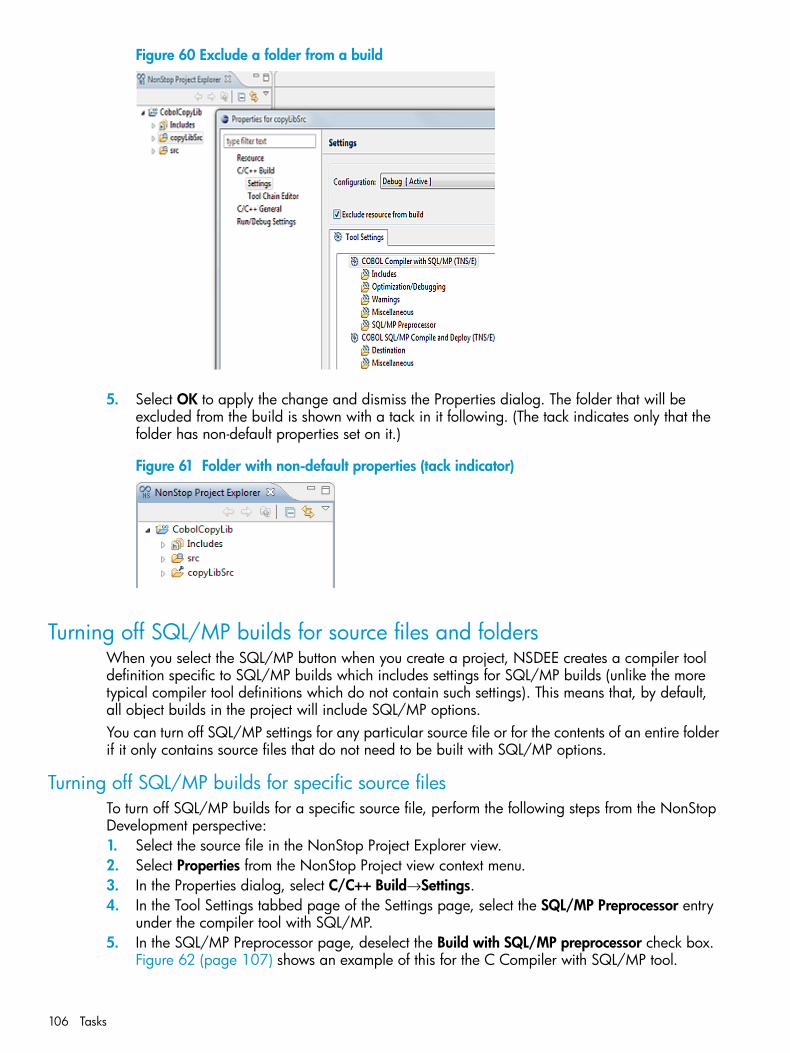
Figure 60 Exclude a folder from a build
5. Select OK to apply the change and dismiss the Properties dialog. The folder that will beexcluded from the build is shown with a tack in it following. (The tack indicates only that thefolder has non-default properties set on it.)
Figure 61 Folder with non-default properties (tack indicator)
Turning off SQL/MP builds for source files and foldersWhen you select the SQL/MP button when you create a project, NSDEE creates a compiler tooldefinition specific to SQL/MP builds which includes settings for SQL/MP builds (unlike the moretypical compiler tool definitions which do not contain such settings). This means that, by default,all object builds in the project will include SQL/MP options.You can turn off SQL/MP settings for any particular source file or for the contents of an entire folderif it only contains source files that do not need to be built with SQL/MP options.
Turning off SQL/MP builds for specific source filesTo turn off SQL/MP builds for a specific source file, perform the following steps from the NonStopDevelopment perspective:1. Select the source file in the NonStop Project Explorer view.2. Select Properties from the NonStop Project view context menu.3. In the Properties dialog, select C/C++ Build→Settings.4. In the Tool Settings tabbed page of the Settings page, select the SQL/MP Preprocessor entry
under the compiler tool with SQL/MP.5. In the SQL/MP Preprocessor page, deselect the Build with SQL/MP preprocessor check box.
Figure 62 (page 107) shows an example of this for the C Compiler with SQL/MP tool.
106 Tasks
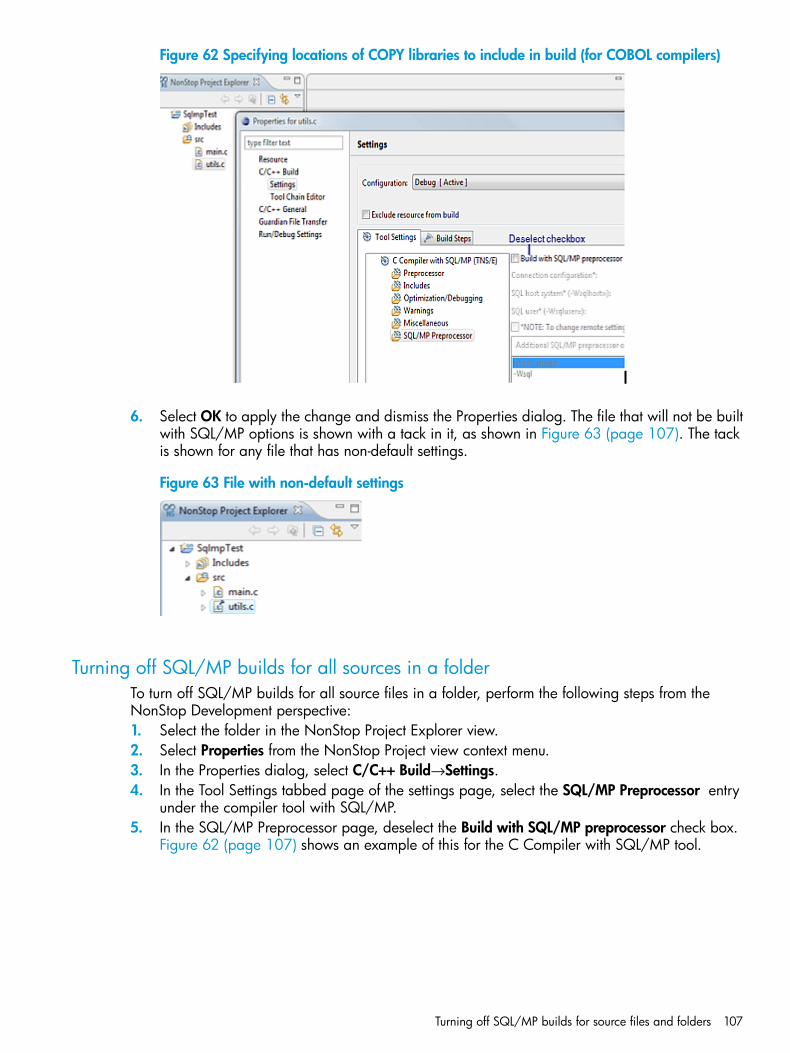
Figure 62 Specifying locations of COPY libraries to include in build (for COBOL compilers)
6. Select OK to apply the change and dismiss the Properties dialog. The file that will not be builtwith SQL/MP options is shown with a tack in it, as shown in Figure 63 (page 107). The tackis shown for any file that has non-default settings.
Figure 63 File with non-default settings
Turning off SQL/MP builds for all sources in a folderTo turn off SQL/MP builds for all source files in a folder, perform the following steps from theNonStop Development perspective:1. Select the folder in the NonStop Project Explorer view.2. Select Properties from the NonStop Project view context menu.3. In the Properties dialog, select C/C++ Build→Settings.4. In the Tool Settings tabbed page of the settings page, select the SQL/MP Preprocessor entry
under the compiler tool with SQL/MP.5. In the SQL/MP Preprocessor page, deselect the Build with SQL/MP preprocessor check box.
Figure 62 (page 107) shows an example of this for the C Compiler with SQL/MP tool.
Turning off SQL/MP builds for source files and folders 107

Figure 64 Turn off SQL/MP folder
6. Select OK to apply the change and dismiss the Properties dialog. The folder that will not bebuilt with SQL/MP options is shown with a tack in it, as shown in Figure 65 (page 108). Thetack is shown for any folder that has non-default settings.
Figure 65 File with non-default settings
Configuring indexing for C and C++ sourcesWhen you create a local project, NSDEE sets an environment variable namedNSDEE_SYS_INCLUDE_PATH to the location of the include directory for system headers underthe compiler and linkers location you chose during project creation. NSDEE_SYS_INCLUDE_PATHdetermines where the C/C++ indexer looks for system headers. The initial pathNSDEE_SYS_INCLUDE_PATH is set to is shown under the Includes folder of your project.The C/C++ indexer will also search any paths you specify in Includes pages for compiler tools inmanaged projects, and these paths will also be displayed under the top-level Includes folder foryour project. For this reason, it is important that you specify includes for managed projects usingthe Includes option page and not the Miscellaneous options page for a compiler.The following sections describe additional ways you can configure the indexer.
Indexing headers for makefile projectsFor local makefile projects, the C/C++ indexer will not be able to locate your header filesautomatically. You can indicate where your header files are located by performing the followingsteps form the NonStop Development perspective:1. Select a makefile project in the NonStop Project Explorer view.2. Select Properties from the NonStop Project Explorer context menu.3. Select C/C++ General→Paths and Symbols to open the Paths and Symbols page.
108 Tasks

4. In the Includes tabbed page of the Paths and Symbols page, select either C or C++ dependingon whether the include directory contains C or C++ source. (Select C++ if the include directorycontains both.)
Figure 66 Paths and Symbols page with C++ selected
5. Select Add... to open the Add directory path dialog:
6. Enter the path of an include directory you want the C/C++ indexer to search. If you enter aproject relative path, select the Is a workspace path check box.
7. Select OK to add the path for the includes list for C or C++ and dismiss the Add directorypath dialog.
8. Select OK to apply your change and dismiss the Properties page.9. A Paths and Symbols dialog will open asking if you want to immediately rebuild the index
(see Figure 67 (page 110)). Select No if you do not want an immediate rebuild, else selectYes.
Configuring indexing for C and C++ sources 109
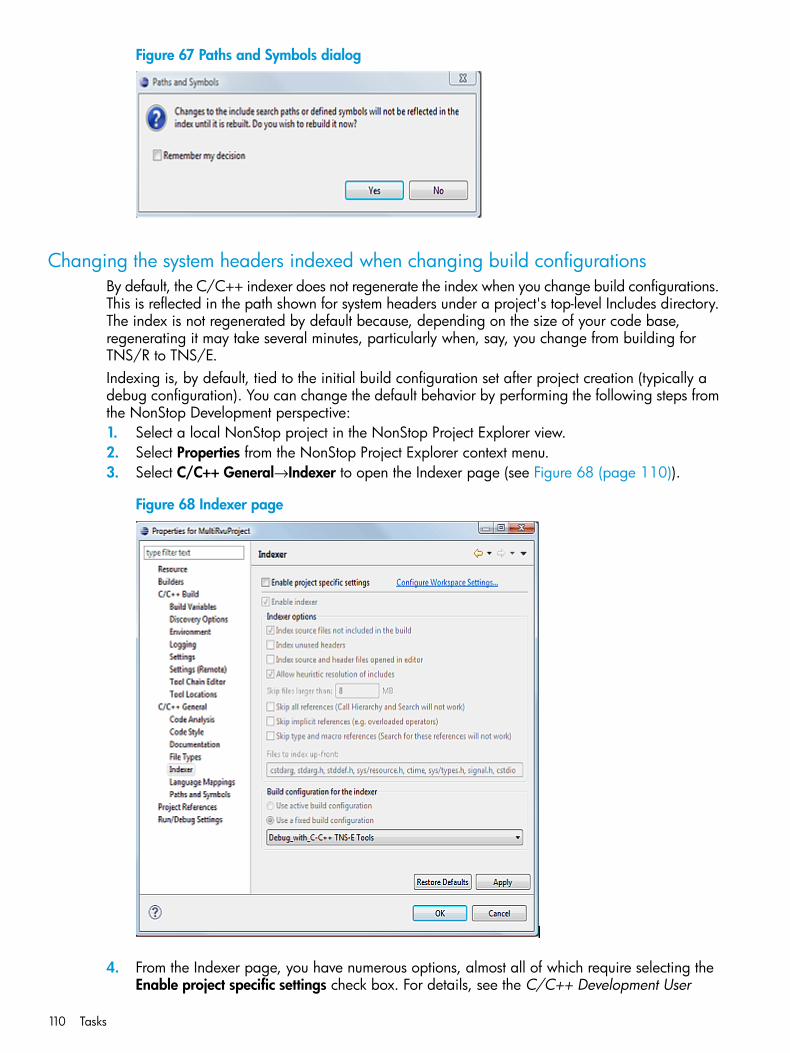
Figure 67 Paths and Symbols dialog
Changing the system headers indexed when changing build configurationsBy default, the C/C++ indexer does not regenerate the index when you change build configurations.This is reflected in the path shown for system headers under a project's top-level Includes directory.The index is not regenerated by default because, depending on the size of your code base,regenerating it may take several minutes, particularly when, say, you change from building forTNS/R to TNS/E.Indexing is, by default, tied to the initial build configuration set after project creation (typically adebug configuration). You can change the default behavior by performing the following steps fromthe NonStop Development perspective:1. Select a local NonStop project in the NonStop Project Explorer view.2. Select Properties from the NonStop Project Explorer context menu.3. Select C/C++ General→Indexer to open the Indexer page (see Figure 68 (page 110)).
Figure 68 Indexer page
4. From the Indexer page, you have numerous options, almost all of which require selecting theEnable project specific settings check box. For details, see the C/C++ Development User
110 Tasks

Guide. To change the configuration used by the indexer, select a different build configurationin the combo box in the Build configuration for the indexer group box.
5. Select Apply, then OK, to apply the change and dismiss the Properties page.
NOTE: A CDT defect requires that you select both Apply and OK for the change to takeeffect.
Forcing a rebuild of the C/C++ indexSometimes you may want to force a rebuild of the C/C++ index if it appears that the indexer hasnot run or needs to be run again. One example is that the indexer sometimes fails to run immediatelyafter project creation, leading to spurious errors shown in the C/C++ editor for symbols that shouldhave been detected.To force a rebuild of the index, perform the following steps from the NonStop Developmentperspective:1. Select a local NonStop project in the NonStop Project Explorer view.2. Select Index→Rebuild from the context menu.
Adding externally-built objects and linkfiles to managed buildsWhen a project build depends on objects or linkfiles built in other projects or that exist outside ofyour workspace, it is important to specify these files in the Other objects list of the linker tool sothat the files get inserted into the final build rule properly. For example, if your C applicationdepends on a linkfile named utils.tlo in the project Utils, you would add utils.tlo to thelinker tool by performing the following steps from the NonStop Development perspective:1. In the NonStop Project Explorer view, select the project that depends on utils.tlo.2. Select Properties from the context menu for the NonStop Project Explorer view to open the
Properties page for the project.3. In the Properties page, select C/C++ Build→Settings on the left to open the Settings page. The
Tool Settings tabbed page will be open by default.4. Select the Miscellaneous entry under the C Linker.
5. Select the Add button ( ) for Other objects to open the Add file path dialog.6. Enter the path to utils.tlo in the File: field in the Add file path dialog (as shown in
Figure 69 (page 111)), then select OK to dismiss it and add the path to Other objects.
Figure 69 Add file path dialog
7. Optional: Repeat steps 5 and 6 for other build configurations. (Select a different buildconfiguration in the Configuration combo box, then repeat steps 5 and 6. Make sure to usethe appropriate build directory, such as Release, that matches the build configuration youselected for the current project using the Configuration combo box.)
8. Select OK to apply your changes and dismiss the Properties dialog.
Adding externally-built objects and linkfiles to managed builds 111

Linking libraries in managed buildsTo link an application against libraries, use the normal mechanisms that compilers provide byputting the options in the list of Additional options in the Linker tool's Miscellaneous page. Youalso need to link against librld.so to enable your application to load dynamic libraries.For example, if your TNS/E C application needs to link against two shared libraries, one namedstdll.tso in project StaticDLL and the other named dydll.tso in project DynamicDLL, youwould perform the following steps to link your main application against the libraries:1. In the NonStop Project Explorer view, select the project that depends on stdll.tso and
dydll.tso.2. Select Properties from the context menu for the NonStop Project Explorer view to open the
Properties page for the selected project.3. In the Properties page, select C/C++ Build→Settings on the left to open the Settings page. The
Tool Settings tabbed page will be open by default.4. Select the Miscellaneous entry under the C Linker (TNS/E) tool.
5. Select Add for Additional options to open the Enter Value dialog.6. in the Enter Value dialog, enter -Weld= followed by the linker option used to specify libraries
(-lib) as shown in Figure 70 (page 112).
Figure 70 Entering a shared library
7. Select OK to dismiss the Enter Value dialog and to add the -Weld option to Other objects.8. Repeat steps 5 through 7, but specify the path to dydll.tso instead of stdll.tso. Figure 71
(page 112) shows the Additional options list with the two libraries added.
Figure 71 Adding libraries to link
9. Optional: Repeat steps 5 through 8 for other build configurations. (Select a different buildconfiguration in the Configuration combo box, then repeat steps 5 through 8. Make sure to
112 Tasks
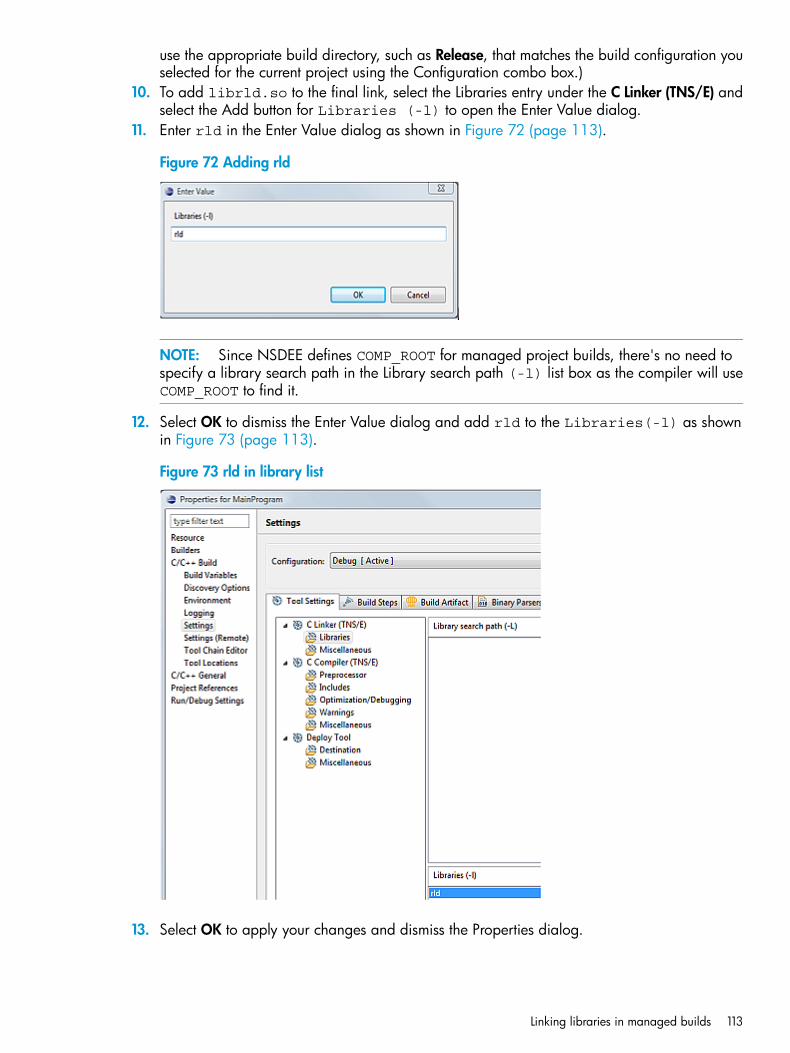
use the appropriate build directory, such as Release, that matches the build configuration youselected for the current project using the Configuration combo box.)
10. To add librld.so to the final link, select the Libraries entry under the C Linker (TNS/E) andselect the Add button for Libraries (-l) to open the Enter Value dialog.
11. Enter rld in the Enter Value dialog as shown in Figure 72 (page 113).
Figure 72 Adding rld
NOTE: Since NSDEE defines COMP_ROOT for managed project builds, there's no need tospecify a library search path in the Library search path (-l) list box as the compiler will useCOMP_ROOT to find it.
12. Select OK to dismiss the Enter Value dialog and add rld to the Libraries(-l) as shownin Figure 73 (page 113).
Figure 73 rld in library list
13. Select OK to apply your changes and dismiss the Properties dialog.
Linking libraries in managed builds 113
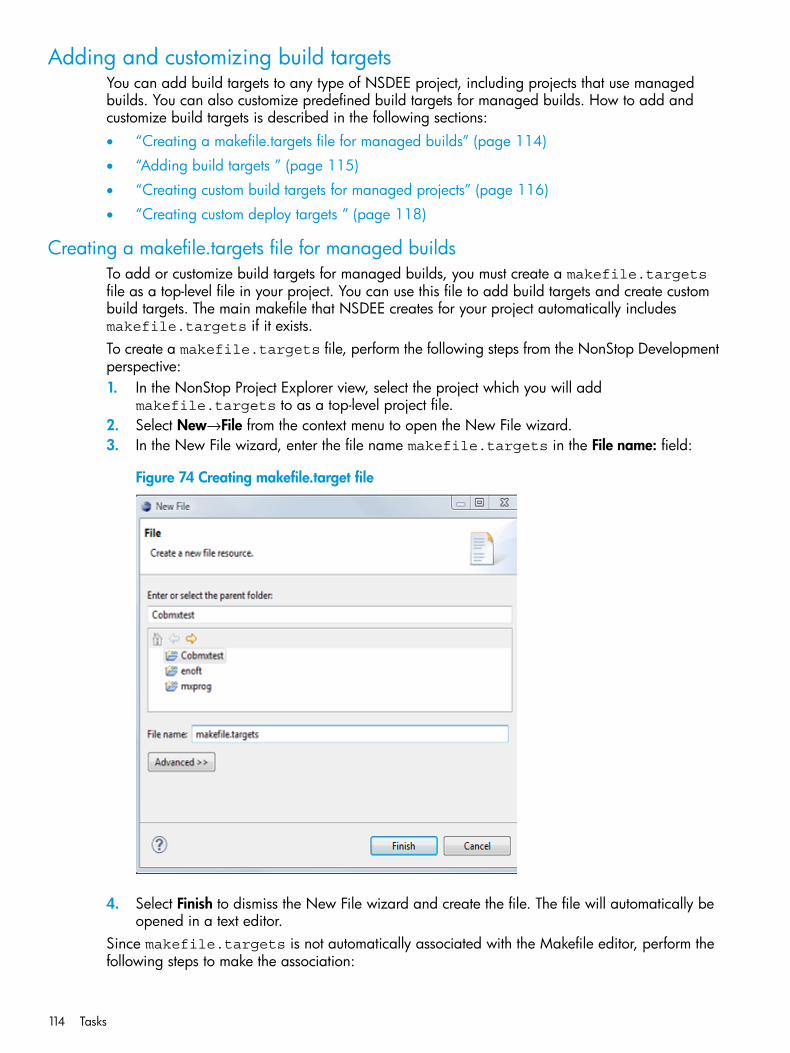
Adding and customizing build targetsYou can add build targets to any type of NSDEE project, including projects that use managedbuilds. You can also customize predefined build targets for managed builds. How to add andcustomize build targets is described in the following sections:• “Creating a makefile.targets file for managed builds” (page 114)
• “Adding build targets ” (page 115)
• “Creating custom build targets for managed projects” (page 116)
• “Creating custom deploy targets ” (page 118)
Creating a makefile.targets file for managed buildsTo add or customize build targets for managed builds, you must create a makefile.targetsfile as a top-level file in your project. You can use this file to add build targets and create custombuild targets. The main makefile that NSDEE creates for your project automatically includesmakefile.targets if it exists.To create a makefile.targets file, perform the following steps from the NonStop Developmentperspective:1. In the NonStop Project Explorer view, select the project which you will add
makefile.targets to as a top-level project file.2. Select New→File from the context menu to open the New File wizard.3. In the New File wizard, enter the file name makefile.targets in the File name: field:
Figure 74 Creating makefile.target file
4. Select Finish to dismiss the New File wizard and create the file. The file will automatically beopened in a text editor.
Since makefile.targets is not automatically associated with the Makefile editor, perform thefollowing steps to make the association:
114 Tasks

1. Close the text editor open on makefile.targets.2. Select makefile.targets in the NonStop Project Explorer view.3. Select Open With→Other... from the context menu of the NonStop Project Explorer view to
open the Editor Selection dialog:
Figure 75 Editor Selection dialog
4. In the Editor Selection dialog, select Makefile Editor.5. Select OK to dismiss the dialog and open makefile.targets in the Makefile editor. The
Makefile editor will now be the default editor for makefile.targets in the containingproject.
Adding build targetsAdding a build target consists of both adding the target to a makefile and adding the same targetto the Make Target view so you can start a build of the target from NSDEE.For both local and remote makefile projects, you must add additional targets to your own makefile.For projects that use managed builds, add the additional targets to the makefile.targets file.For details on creating this file, see “Creating a makefile.targets file for managed builds” (page114).To add targets you define to the Make Target view, perform the following steps from the NonStopProject Explorer view:1. In the Make Target view, select the project you want to add a build target to.2. Select New... from the context menu of the Make Target view to open the Create Make Target
dialog.3. In the Create Make Target dialog, enter the name of the target in the Target name: field as
shown in Figure 76 (page 116):
Adding and customizing build targets 115

Figure 76 Create Make Target dialog
4. Select OK to add the target and dismiss the dialog. Figure 77 (page 116) shows a target namedmy_target added to the project Car in the Make Target view.
Figure 77 Make Target View
5. Double-click the new target to launch a build with that target. For example, if you were todouble-click the my_target target shown in the above figure, NSDEE would invoke makemy_target.
Creating custom build targets for managed projectsYou can create custom build targets to replace the standard all, clean, and deploy targetsthat are generated automatically for managed builds. To do this, you first need to change the nameof the target of interest in project properties so that the corresponding menu item (Build Project,Clean Project, or Deploy Project) invokes make using your custom target name instead of the defaulttarget name of all, clean, or deploy. Then, define your custom build target in amakefile.targets file.For example, say you want to create your own clean target that also cleans COBOL list (.L) files,which NSDEE does not do (and assume that you do not want to turn off generation of list files usingthe -Wnolist option). First, change the clean target to clean-all, the clean target you willdefine in makefile.targets. Second, create a makefile.targets file with your clean-alltarget.To change the clean target to clean-all, perform the following steps from the NonStopDevelopment perspective:
116 Tasks
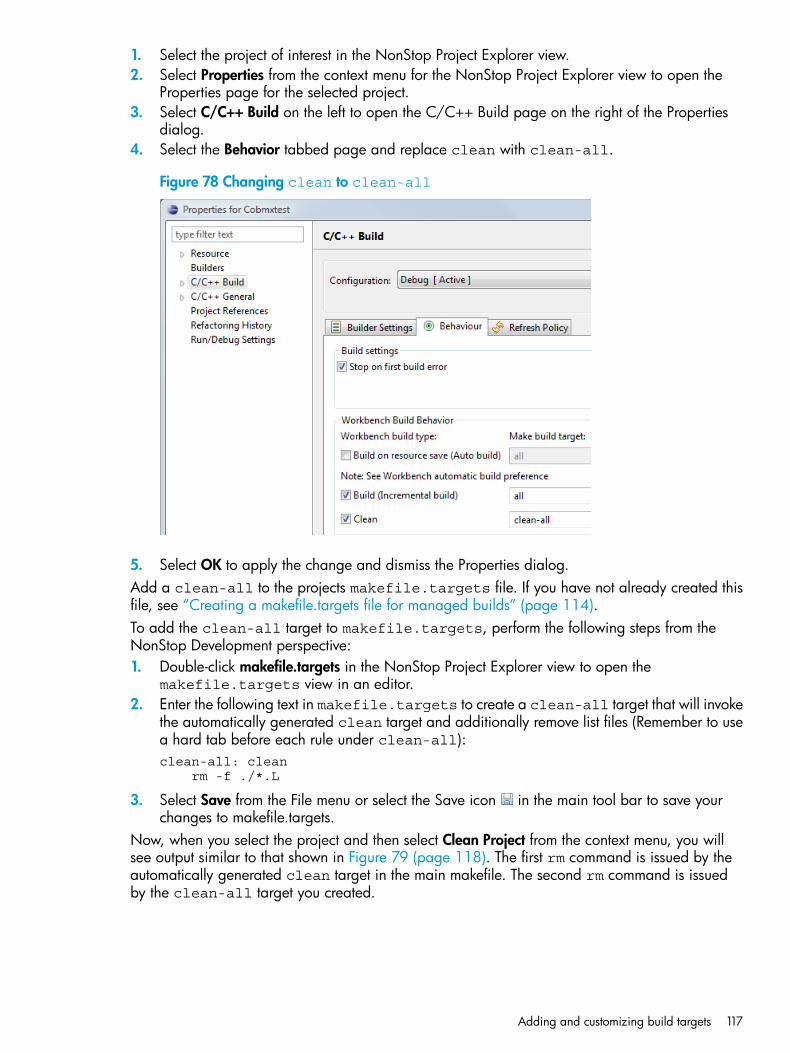
1. Select the project of interest in the NonStop Project Explorer view.2. Select Properties from the context menu for the NonStop Project Explorer view to open the
Properties page for the selected project.3. Select C/C++ Build on the left to open the C/C++ Build page on the right of the Properties
dialog.4. Select the Behavior tabbed page and replace clean with clean-all.
Figure 78 Changing clean to clean-all
5. Select OK to apply the change and dismiss the Properties dialog.Add a clean-all to the projects makefile.targets file. If you have not already created thisfile, see “Creating a makefile.targets file for managed builds” (page 114).To add the clean-all target to makefile.targets, perform the following steps from theNonStop Development perspective:1. Double-click makefile.targets in the NonStop Project Explorer view to open the
makefile.targets view in an editor.2. Enter the following text in makefile.targets to create a clean-all target that will invoke
the automatically generated clean target and additionally remove list files (Remember to usea hard tab before each rule under clean-all):clean-all: clean rm -f ./*.L
3. Select Save from the File menu or select the Save icon in the main tool bar to save yourchanges to makefile.targets.
Now, when you select the project and then select Clean Project from the context menu, you willsee output similar to that shown in Figure 79 (page 118). The first rm command is issued by theautomatically generated clean target in the main makefile. The second rm command is issuedby the clean-all target you created.
Adding and customizing build targets 117

Figure 79 Example of output form make clean-all
Creating custom deploy targetsYou can create custom deploy targets for both local managed and makefile projects. The advantageof creating custom deploy targets is that, if you use, for example, sftp (an Open SSH programfor file transfers available with Cygwin), you can create much more flexible and complex deploytargets.This section provides sample steps for creating a custom deploy target for a managed projectnamed Car that transfers an executable to OSS, sets permissions on the file, and runs sftp's lscommand to show the permissions set. This section also describes how to create similar deploytargets for Guardian using sftp.Using sftp in a deploy target requires setting up passphrase authentication so that sftp canconnect in batch mode without requesting a password from you. For information on setting uppassphrase authentication, see “Sample programs and projects” (page 156).The following steps are specific to projects using managed builds; however, the steps for makefileprojects are the same if you use your own makefile instead of makefile.targets.To create a custom deploy target for the project Car, perform the following steps from the NonStopDevelopment perspective:1. Select the Car project in the NonStop Project Explorer view.2. Select Properties from the context menu for the NonStop Project Explorer view to open the
Properties page for the Car project.3. Select Settings (Remote) on the left to open the Settings (Remote) property page on the right.4. In the Deploy Target Settings group box of the Settings (Remote) page, change the Deploy
target: field from deploy to custom_deploy, as in Figure 80 (page 119). This will causethe Deploy Project action on the context menu of the NonStop Project Explorer view to issuethe command make custom_deploy instead of make deploy.
118 Tasks

Figure 80 Changing the default deploy target name
5. Select OK to save your change and close the Properties dialog.6. Create a top-level file named makefile.targets. (For details, see “Creating a
makefile.targets file for managed builds” (page 114)).7. Add text similar to the following to makefile.targets (Remember to use a hard tab before
the echo command):custom_deploy: all echo -e "put ./Car.txe $(NSDEE_DEPLOY_DEST)/$(NSDEE_DEPLOY_FILENAME)\n \chmod 754 $(NSDEE_DEPLOY_DEST)/$(NSDEE_DEPLOY_FILENAME)\n \ls -l $(NSDEE_DEPLOY_DEST)/$(NSDEE_DEPLOY_FILENAME)\n \exit" | sftp -b - $(NSDEE_DEPLOY_USER)@$(NSDEE_DEPLOY_SYSTEM)
The above custom_deploy target uses echo -e to pipe a series of commands to thestandard input of sftp instead of passing sftp a batch file. This allows the custom_deploytarget to take advantage of the environment variables set based on project properties in theSettings (Remote) property page. For details on environment variables, see “Environmentvariables and build variables” (page 44).Setting all as a dependency for custom_deploy, above, ensures that the project has beenbuilt before the sftp command runs.
8. Select Save from the File menu or select the Save icon in the main tool bar to save yourchanges to makefile.targets.
9. Select the Car project in the NonStop Project Explorer view, then select Deploy Project fromthe context menu to deploy the file Car.txe from the Car project. The Console view showsoutput similar to the following:**** Build of configuration Debug for project Car ****
make custom_deployecho -e "put ./Car.txe /home/chloe/test/car\n \chmod 754 /home/chloe/test/car\n \ls -l /home/chloe/test/car\n \exit" | sftp -b - [email protected]> put ./Car.txe /home/chloe/test/carUploading ./Car.txe to /home/chloe/test/carsftp> chmod 754 /home/chloe/test/carChanging mode on /home/chloe/test/carsftp> ls -l /home/chloe/test/car-rwxr-xr-- 0 26143 102 3010816 Apr 4 16:43 /home/chloe/test/carsftp> exit
Adding and customizing build targets 119

**** Build Finished ****
The custom_deploy target above shows only a few of the many sftp commands available.Additionally, you can issue ssh commands to execute commands on NonStop servers if sftpdoes not provide all the commands you need. For custom Guardian deploy targets, sftp isnot as flexible; however, you can combine both sftp and ssh commands to get the samecustom_deploy target behavior.Example 14 “Custom Guardian deploy target” shows an example of a custom_deploytarget from Guardian. To use the NSDEE_DEPLOY_DEST environment variable, you must setthe deploy destination in the Settings (Remote) page to a path in the form/G/volume/subvolume.
Example 14 Custom Guardian deploy target
# Change "/G/volume/subvol" format required for sftp to $volume.subvolume format.GUARDIAN_PATH = $(subst /,.,$(subst /G/,\$$,$(NSDEE_DEPLOY_DEST))).$(NSDEE_DEPLOY_FILENAME)
custom_deploy: all echo -e "put ./Car.txe $(NSDEE_DEPLOY_DEST)/$(NSDEE_DEPLOY_FILENAME),800\n \exit" | sftp -b - $(NSDEE_DEPLOY_USER)@$(NSDEE_DEPLOY_SYSTEM) echo -e "fup secure $(GUARDIAN_PATH), NOGO\n \fileinfo $(GUARDIAN_PATH)" | ssh -s [email protected] tacl
The use of GUARDIAN_PATH above converts a path such as "/G/volume/subvolum" to"\$$volume.subvolum", a path suitable to pass to a Guardian command. (The "\$$" is a"double-escape" sequence; "$$" escapes the dollar sign for make and "\$" escapes the dollarsign for the shell.) Build output to the Console view from the above target is similar to the following:make custom_deploy echo -e "put ./Car.txe /G/data4/doontest/car,800\n \exit" | sftp -b - [email protected]> put ./Car.txe /G/data4/doontest/car,800Uploading ./Car.txe to /G/data4/doontest/car,800sftp> exitecho -e "fup secure \$data4.doontest.car, NOGO\n \fileinfo \$data4.doontest.car" | ssh -s [email protected] tacl TACL (T9205H01 - 10MAY2011), Operating System H06, Release H06.25.00(C) Copyright 2005-2011 Hewlett Packard Development Company, L.P.CPU 0, process has no backupApril 5, 2012 12:42:21(Invoking $SYSTEM.SYSTEM.TACLLOCL)(Invoking $DATA4.DOON2.TACLCSTM)Current volume is $DATA4.DOON21> 2> $DATA4.DOONTEST
CODE EOF LAST MODIFIED OWNER RWEP PExt SExt
CAR 800 3010816 05APR2012 12:42 102,31 NOGO 14 112
**** Build Finished ****
Filtering NonStop Project Explorer view contentTo make project files visible:1. Select Filters... from the local pull-down menu for the NonStop Project Explorer view to open
the C Element Filters dialog.
120 Tasks

2. In the C Element Filters dialog, deselect .*resources.
3. Select OK in the C Element Filters dialog.
Using NSDEE with SCM tools: examples and proceduresYou can use local projects with a software configuration management (SCM) tool in one of twoways. The first is to use an Eclipse plug-in provided for use with an SCM tool to check-in andcheck-out files directly in Eclipse. The second is to use an SCM outside of Eclipse to check-in andcheck-out files, and to import projects from the SCM's file repository into NSDEE's NonStop ProjectExplorer for editing and building.Because a number of SCM tools are available, this section uses Subversion as an example of usingNSDEE with SCM tools. This section only provides minimal guidance. For details on any particularSCM tool, refer to the tool's own documentation.
NOTE: It is important to save NSDEE project files (.project and .cproject) using your SCMtool just as you save your source files. These files contain important information about projectproperties and build targets. To make project files visible in the NonStop Project Explorer view,see “Filtering NonStop Project Explorer view content” (page 120).
Using NSDEE with an external SCM toolTo use NSDEE local projects with an external SCM tool, check-in and check-out project files outsideof Eclipse using the SCM tool, but edit project files and build projects within NSDEE. you haveimported a local project into an SCM system, you can then work with the project in NSDEE usingthe following general steps in the NonStop Development perspective:1. Import the project into NSDEE (see “Importing external NSDEE projects” (page 77)). Verify
the Copy projects into workspace check box in the Import wizard is deselected. This ensuresthat the file changes you make are located where the SCM tool detects the changes.
2. Edit sources in Eclipse. When you are ready to check-in changes, return to the SCM tool. Itdetects the files you changed and you can use the SCM tool to check-in your changes.
3. Depending on your SCM tool, when you want to add files or directories to your project, itmay be best to do this using the SCM tool. you have added files or directories:
Using NSDEE with SCM tools: examples and procedures 121

a. Return to Eclipse and select the project you added files or directories to in the NonStopProject Explorer view.
b. Select Refresh from the context menu. NSDEE detects the new files and directories.4. To check out changes to a project contributed by others:
a. Use the SCM tool to update with the change.b. Select Refresh from the context menu of the NonStop Project Explorer view. NSDEE detects
any changed files and updates them.
Using NSDEE with an SCM plug-inThis section describes how to use the Subclipse plug-in for Subversion with NSDEE managedprojects. Other SCM tools use similar but differing procedures. Three main activities are describedin this section:• “Adding a local NonStop project to an SVN repository” (page 122)
• “Checking in project files” (page 123)
• “Checking out project files” (page 123)This section provides only an example. For detailed information about Subclipse, see the onlinehelp for Subclipse - Subversion Eclipse Plugin.
Adding a local NonStop project to an SVN repositorySay you created a simple managed C project named HelloWorld and you want to add it to aSubversion repository that you set up in the Subversion Repository Exporing perspective at thelocation C:\svn-repository. To add HelloWorld to the repository, perform the followingsteps from the NonStop Development perspective:1. In the NonStop Project Explorer view, select the HelloWorld project.2. From the context menu, select Team→Share Project... to open the Share Project wizard.3. In the Share Project wizard, select SVN.4. Select Next >. In the following page, your repository should already be selected as well as
the Use existing repository location: button. (Do not change these selections.)5. Select Next >. The next page shows file:///C:/svn-repository/HelloWorld as the
location of HelloWorld in the repository (see Figure 81 (page 122)).
Figure 81 Adding a project to the subversion repository
6. Select Finish.7. A dialog opens asking if you want to open the Team Synchronizing perspective. Select Yes
to see HelloWorld in this perspective. Regardless of your choice, HelloWorld is added
122 Tasks

to the repository. That perspective is particularly useful for viewing file history and for comparingand merging file versions.
To see HelloWorld in the SVN Repositories view (in the SVN Repository Exploring perspective):1. In the SVN Repositories view, select file:///C:/svn-repository2. Select Refresh from the context menu.3. Expand file:///C:/svn-repository (if it is not already expanded).4. Select the HelloWorld directory under file:///C:/svn-repository.5. Select Refresh from the context menu.
Checking in project filesContinuing from the example in the previous section, you can now check in files for HelloWorldby selecting the HelloWorld project in the NonStop Project Explorer view in the NonStopDevelopment perspective by performing the following steps:1. Select the HelloWorld project.2. Select Team→Commit... from the context menu to open the Commit dialog. The Commit dialog
appears with the files to verigy in pre-selected, as shown in Figure 82 (page 123). Notice thatthe .project and .cproject files are selected, which is important for saving projectsettings.
3. In the Commit dialog, optionally enter a comment, then select OK to check-in your projectfiles.
Figure 82 Pre-selected files for check-in
If you change HelloWorld.c, you can use the same procedure to check it in to the repositorywhen your changes are complete.
Checking out project filesAfter you have checked in a project to a repository, you can check it out in any Eclipse workspaceadded to the SVN Repository Exploring perspective in that workspace. Continuing with the examplefrom the previous section, you can check out HelloWorld into a different workspace by performingthe following steps from the SVN Repository Exploring perspective:1. In the SVN Repositories view, expand file:///C:/svn-repository and select the HelloWorld
folder.2. Select Checkout... from the context menu to open the Checkout from SVN wizard.3. Select Finish in the Checkout from SVN wizard to check out the latest version of HelloWorld.4. Return to the NonStop Development perspective to work with the newly checked-out project.
Creating a remote folder in a local project via SambaIf you use Samba to access the OSS file system from Windows, you can create linked folders inyour local projects that point to network drives mapped to Samba mount points. This sectiondescribes how to create a linked folder and also describes some of the performance considerationsof using Samba and Eclipse.
Creating a linked folderThe New folder wizard provides the capability of creating project folders that appear to be undera local project but are actually links outside your workspace. You can use this capability to link to
Creating a remote folder in a local project via Samba 123

network drives mapped to Samba mount points so you can drag and drop folders and files betweenNonStop and your Eclipse project. This also allows you to open and edit remote files directly inEclipse in the same manner you would open and edit local files.To create a linked folder to a network drive, consider the following scenario: Say you have driveS: mapped to an OSS location on a NonStop system and you want to create a linked folder(NonStopFolder) to that location in a project named TestProj. To create the link, perform the followingsteps from the NonStop Development perspective:1. Select TestProj in the NonStop Project Explorer view.2. Select New→Folder from the context menu.3. In the Folder field: of the New Folder wizard, enter NonStopFolder.4. Select Advanced>> to expand the advanced area of the New Folder wizard.5. Select the Link to alternate location button and enter S:\in the field below the button.
Figure 83 (page 124) shows the New Folder wizard with the advanced area expanded andthe information specified in steps 3 and 5 entered.
6. Select Finish.
Figure 83 New Folder wizard (expanded view)
After you select Finish, NSDEE creates a linked folder under your project (as shown in Figure 84(page 124)). Expand the folder to view the contents of the location the network drive is mapped to.
Figure 84 Linked folder contents
124 Tasks

NOTE: Accessing OSS files via Samba imposes some restrictions on file names. For details, seethe Samba on NonStop User Manual. This manual is available in the NonStop Technical Library(NTL) at:www.hp.com/go/nonstop-docs
Performance considerations for using Samba with EclipseSamba is considered a chatty protocol. Though its performance is good in a local intranet, it canbe slow over the internet. Another consideration is that the Eclipse file system implementationperuses all files and directories under your workspace, including those you link to outside yourworkspace via Samba. Eclipse does this for a number of reasons, including file history managementand undo capabilities.You can mitigate performance issues by setting up Samba sharepoints on OSS that limit the portionof the file system accessed. For example, mounting the root directory of OSS and linking to it inEclipse results in poor performance because Eclipse attempts to peruse the entire OSS file system.However, if you mount an OSS directory that contains only a small number of files andsub-directories, performance is improved, especially on an intranet.For details on setting up Samba sharepoints, see the Samba on NonStop User Manual.
Creating a remote folder in a local project via Samba 125

6 ReferenceThe NonStop Development perspective is an extension of the C/C++ perspective. This chapterprovides reference information about the many ways in which the C/C++ perspective is extendedin NSDEE.
Views and editorsThe NonStop Development perspective provides the same views and editors available in the C/C++perspective with the addition of COBOL and pTAL editor views and the addition of the NonStopProject Explorer view.By default, the NonStop Development perspective shows the views in Table 5 (page 126). For detailson views provided by CDT, refer to the C/C++ Development User Guide.
Table 5 NonStop views
DescriptionProviderView
Displays projects in a tree structure so you can browse, open, andmanage your project's files. Using the context menu, you can perform
NSDEENonStop ProjectExplorer
many actions from the NonStop Project Explorer, such as initiating buildsand changing the active build configuration.
An editor for COBOL source files that provides syntax highlighting.NSDEECOBOL Editor
An editor for pTAL source files that provides syntax highlighting.NSDEEpTAL Editor
An editor for C/C++ source files that provides many specialized featuresfor C/C++.
CDTC/C++ Editor
Provides a list of build errors and warnings for all open projects shownin the NonStop Project Explorer. Double-click a warning or error to openan editor to the file location responsible for the error or warning.
CDTProblems
Automatically lists C/C++ source file comments containing the textFIXME or TODO. Double-click an entry to open a C/C++ source file thatcontains the comment. You can also add your own task entries.
CDTTasks
Displays output of running processes (including build processes andNonStop applications launched from NSDEE) and accepts keyboardinput to a running process.
CDTConsole
Displays properties of the resource (such as a project, directory, or file)selected in the NonStop Project Explorer.
CDTProperties
Displays a list of structural elements of a C/C++ source file open in aC/C++ editor. (Does not display an outline for COBOL or pTAL sources.)
CDTOutline
Allows you to initiate builds for custom make targets. If you add a custommake target to a makefile.targets file (see “Creating a
CDTMake Target
makefile.targets file for managed builds” (page 114)), you can add thattarget to the Make Target view as a named build icon. Then you caninitiate a build of that target by double-clicking the named build icon inthe Make Target view.
CDT provides additional views for showing call hierarchies, type hierarchies, and more. To seeall views available to you, select Window→Show View→Other... to open the Show View dialog.Figure 85 (page 127) shows the Show View dialog with C/C++-specific views visible.
126 Reference

Figure 85 Show View dialog with C/C++ specific views
Many of the views shown in the NonStop Development perspective are available in the Generalfolder shown in the above figure, whereas the Make Target view is available in the Make foldershown above.
NOTE: You can restore the NonStop Development perspective's default views and default viewlocations by selecting Window→Reset Perspective....
Figure 86 (page 127) shows the one view specific to NonStop available from the Show View dialog.
Figure 86 Show View dialog with NonStop Development view
Views and editors 127
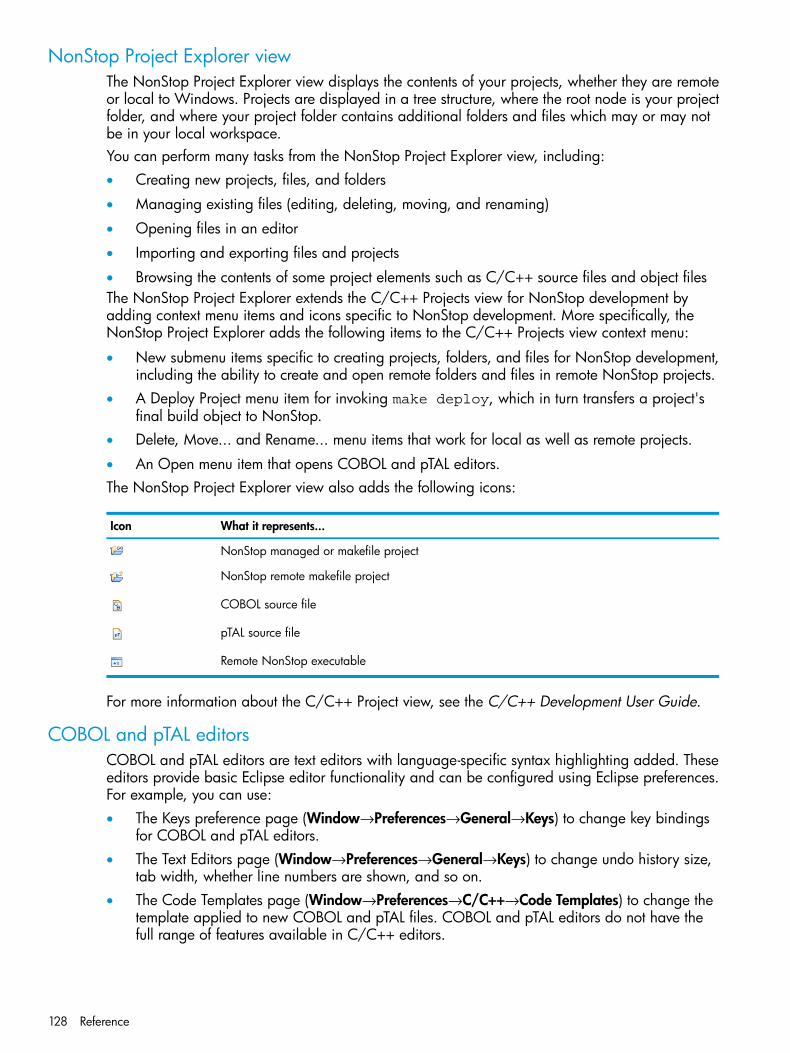
NonStop Project Explorer viewThe NonStop Project Explorer view displays the contents of your projects, whether they are remoteor local to Windows. Projects are displayed in a tree structure, where the root node is your projectfolder, and where your project folder contains additional folders and files which may or may notbe in your local workspace.You can perform many tasks from the NonStop Project Explorer view, including:• Creating new projects, files, and folders
• Managing existing files (editing, deleting, moving, and renaming)
• Opening files in an editor
• Importing and exporting files and projects
• Browsing the contents of some project elements such as C/C++ source files and object filesThe NonStop Project Explorer extends the C/C++ Projects view for NonStop development byadding context menu items and icons specific to NonStop development. More specifically, theNonStop Project Explorer adds the following items to the C/C++ Projects view context menu:
• New submenu items specific to creating projects, folders, and files for NonStop development,including the ability to create and open remote folders and files in remote NonStop projects.
• A Deploy Project menu item for invoking make deploy, which in turn transfers a project'sfinal build object to NonStop.
• Delete, Move... and Rename... menu items that work for local as well as remote projects.
• An Open menu item that opens COBOL and pTAL editors.The NonStop Project Explorer view also adds the following icons:
What it represents...Icon
NonStop managed or makefile project
NonStop remote makefile project
COBOL source file
pTAL source file
Remote NonStop executable
For more information about the C/C++ Project view, see the C/C++ Development User Guide.
COBOL and pTAL editorsCOBOL and pTAL editors are text editors with language-specific syntax highlighting added. Theseeditors provide basic Eclipse editor functionality and can be configured using Eclipse preferences.For example, you can use:• The Keys preference page (Window→Preferences→General→Keys) to change key bindings
for COBOL and pTAL editors.• The Text Editors page (Window→Preferences→General→Keys) to change undo history size,
tab width, whether line numbers are shown, and so on.• The Code Templates page (Window→Preferences→C/C++→Code Templates) to change the
template applied to new COBOL and pTAL files. COBOL and pTAL editors do not have thefull range of features available in C/C++ editors.
128 Reference
C/C++ editorThe C/C++ editor provides a rich set of features for editing C and C++ source files. For details,see the C/C++ Development User Guide.
Outline viewThe Outline view provides an outline of C/C++ methods in the currently active C/C++ editor andcan be used to quickly navigate to methods in the active editor. For details, see the C/C++Development User Guide.
Make Target viewYou can use the Make Target view to launch builds using make targets that you have defined inaddition to the standard all, clean, and deploy targets. The Make Target view can be usedfor all project types, both local and remote. For details, see the C/C++ Development User Guide.
Problems viewThe Problems view shows warnings and errors across all open projects. You can quickly navigateto source locations responsible for a warning or error by double-clicking the warning or error inthe Problems view. For details, see the C/C++ Development User Guide.
Tasks viewThe Tasks view provides a place for you to track tasks. It automatically adds TODO and FIXMEentries that you add to your source code comments in C and C++ source files (but not in pTAL norCOBOL sources). For details, see the C/C++ Development User Guide.
Console viewThe Console view shows build output and output of programs you launch on NonStop, and providesa debug console for NSDEE's Debug product. For builds that involve more than one project, theConsole view switchs to showing the build output for a particular project when you select thatproject in the NonStop Project Explorer view. For details, see the C/C++ Development User Guide.
Properties viewThe properties view shows properties for the currently selected item in the NonStop Project Explorerview. For details, see the C/C++ Development User Guide.
Target Management terminal
How to open the Terminal viewTo open the Terminal view:• Open the Show View dialog by selecting Window→Show View→Others….
• In Show View dialog, select Terminal under the Terminal folder.
Views and editors 129
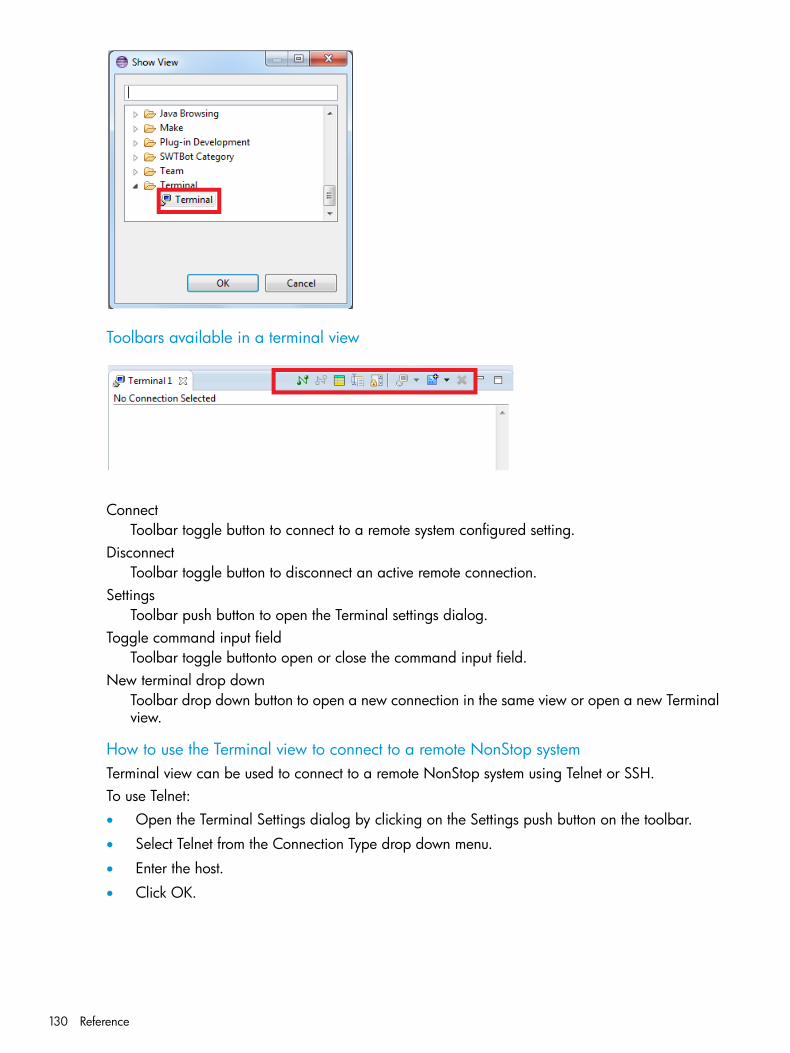
Toolbars available in a terminal view
ConnectToolbar toggle button to connect to a remote system configured setting.
DisconnectToolbar toggle button to disconnect an active remote connection.
SettingsToolbar push button to open the Terminal settings dialog.
Toggle command input fieldToolbar toggle buttonto open or close the command input field.
New terminal drop downToolbar drop down button to open a new connection in the same view or open a new Terminalview.
How to use the Terminal view to connect to a remote NonStop systemTerminal view can be used to connect to a remote NonStop system using Telnet or SSH.To use Telnet:• Open the Terminal Settings dialog by clicking on the Settings push button on the toolbar.
• Select Telnet from the Connection Type drop down menu.
• Enter the host.
• Click OK.
130 Reference

To use SSH:• Open the Terminal Settings dialog by clicking on the Settings push button on the toolbar.
• Select SSH from the Connection Type drop down menu.
• Enter the host, user, and password.
• Click OK.
Target Management terminal limitations
• The Guardian command tedit is not supported.
• The block mode is not supported.
• For SSH connections, the OSH command exit terminates the connection instead of takingyou back to the TACL prompt.
• SSH connections usually take you to an OSH prompt. To switch to a TACL prompt, entergtacl at the OSH prompt and re-enter login credentials. For example:/: gtaclTACL 1> logon super.superPassword:
Views and editors 131

For more information about Target Management, see http://www.eclipse.org/tm/tutorial/index.php.
New project wizardsNSDEE provides separate project wizards for local and remote projects, as well as one importwizard that creates local makefile projects from existing source. This section describes each ofthese wizards.
Local new project wizardsFour separate new project wizards can be used for local projects. Each is language-specific butalmost identical otherwise. Each wizard has four-to-five wizard pages, all of which are describedbelow.
NonStop C, C++, COBOL, and pTAL Project wizard pagesExcept for their names, the first page of all four local new project wizards are the same. The settingson the first page for these wizards are described in Table 6 (page 132).
Table 6 NonStop C, C++, COBOL, and pTAL Project wizard page settings
DescriptionSetting
Enter name for top-level project folder.Project name:
Deselect to create project outside of workspace; else,project is created as a top-level directory in yourworkspace.
Use default location
If you deselect Use default location, enter path of yourproject in this field.
Location:
Choose type of project to create. Table 7 (page 132)describes the project types in the list.
Project type:
Choose one or both tool chains depending on whether youwant to build for TNS/E, TNS/R, or both.
Toolchains:
This check box is not applicable to NonStop projects. (Newproject wizards are extended from CDT where the checkbox is useful.)
Select project types and toolchains only if they aresupported on the platform
Table 7 (page 132) describes the project types listed in the Project type: list.
Table 7 Project types
DescriptionSetting
Select Empty Project to create a managed project thatbuilds an executable. Select the Hello World project in the
NonStop Executable
language associated with the project (for example, HelloWorld COBOL project) to create a project with a samplesource file for a hello world program.
Select Empty Project to create a managed project thatbuilds a dynamic link library.
NonStop Dynamic Link LIbrary
Select Empty Project to create a managed project thatbuilds a linkfile. (Linkfile projects provide a way to breakupyour application into multiple projects.
NonStop Linkfile
Select Empty Project to create a managed project to buildan archive library.
NonStop Archive Library
132 Reference

Table 7 Project types (continued)
DescriptionSetting
Select Empty Project to create a managed project thatcreates a user library (TNS/R only).
NonStop User Library
Select Empty Project to create a makefile project whereyou supply the makefile.
NonStop Makefile project
Basic Settings pageThe Basic Settings page appears only if you select a hello world executable project on the firstwizard page. Whatever fields you fill in on the Basic Settings page are written to the commentheader in the hello world source file written to your project.
Initial Build Settings page (managed builds)The Initial Build Settings page lets you configure the tools managed builds use to build your project.(The same page for makefile projects is described in the next section.) Table 8 (page 133) describeseach of the settings on the Initial Build Settings page for managed builds. Which settings are visibledepends on which project type and tool chains you chose on the first wizard page.
Table 8 Initial Build Settings page settings (managed builds)
DescriptionSetting
Choose the OSS or Guardian button, depending on whichplatform you want your initial project to build for. Your
Target Platform:
choice is used to set the TARGET_SYSTYPE macro, whichis passed to tool options that take OSS and Guardianoptions.
Select the Non-PIC or PIC button depending on whetheryou want to build position independent code. This option
TNS/R executable type:
only appears only when you select the TNS/R tool chainfor an executable project.
Select the c89 or c99 button depending on whether youwant to build with the C89 or C99 compiler on TNS/E.(C99 is not available for TNS/R.)
TNS/E compiler:
Select the root location of the RVU you want to use forTNS/E builds. The locations in the combo box are
TNS/E tools root:
preceded by a plus sign if the RVU has all the tools youneed or a minus sign if the RVU does not. (This selectionis available only when you select the TNS/E tool chain onthe first wizard page.)
Select the root location of the RVU you want to use forTNS/R builds. The locations in the combo box are
TNS/R tools root:
preceded by a plus sign if the RVU has all the tools youneed or a minus sign if the RVU does not. (This selectionis available only when you select the TNS/R tool chain onthe first wizard page.)
Select the location of a bin directory for either Cygwin orMsys (where make and other programs for builds are
Cygwin/Msys bin:
located). NSDEE prepends bin to PATH before launchingbuilds. Leave the combo blank if PATH already has anentry for a Cygwin or Msys bin.
Select check boxes for any additional languages youexpect the project to use.
Additional languages:
New project wizards 133
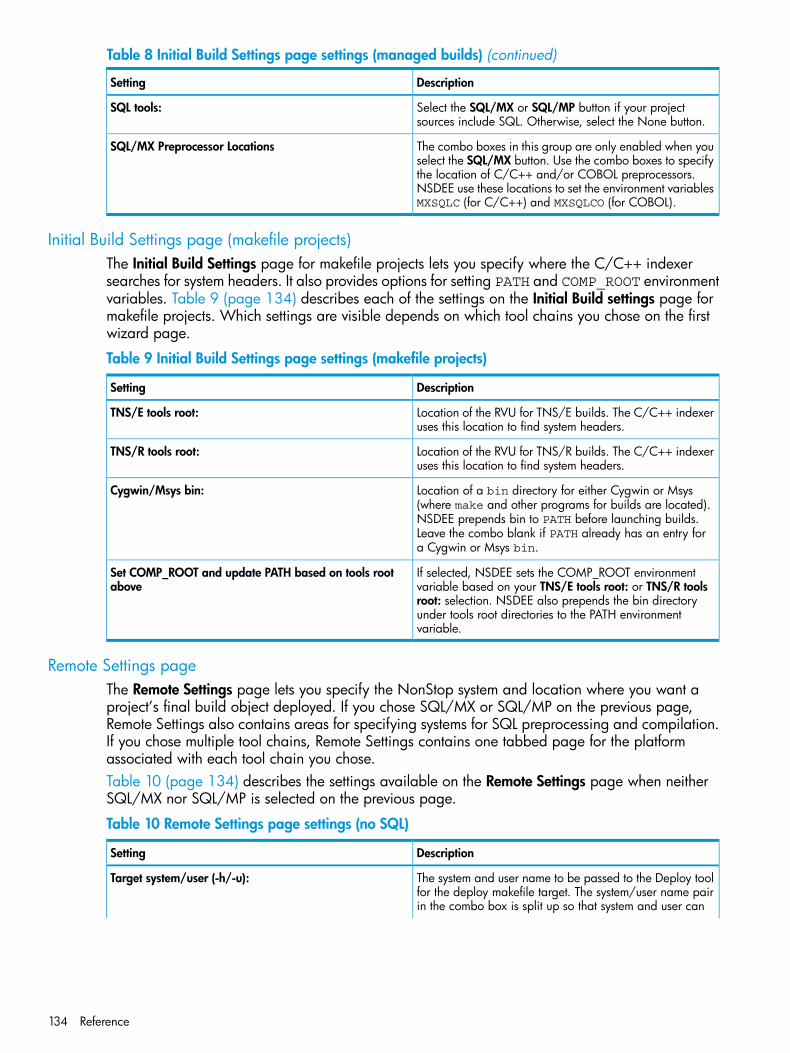
Table 8 Initial Build Settings page settings (managed builds) (continued)
DescriptionSetting
Select the SQL/MX or SQL/MP button if your projectsources include SQL. Otherwise, select the None button.
SQL tools:
The combo boxes in this group are only enabled when youselect the SQL/MX button. Use the combo boxes to specify
SQL/MX Preprocessor Locations
the location of C/C++ and/or COBOL preprocessors.NSDEE use these locations to set the environment variablesMXSQLC (for C/C++) and MXSQLCO (for COBOL).
Initial Build Settings page (makefile projects)The Initial Build Settings page for makefile projects lets you specify where the C/C++ indexersearches for system headers. It also provides options for setting PATH and COMP_ROOT environmentvariables. Table 9 (page 134) describes each of the settings on the Initial Build settings page formakefile projects. Which settings are visible depends on which tool chains you chose on the firstwizard page.
Table 9 Initial Build Settings page settings (makefile projects)
DescriptionSetting
Location of the RVU for TNS/E builds. The C/C++ indexeruses this location to find system headers.
TNS/E tools root:
Location of the RVU for TNS/R builds. The C/C++ indexeruses this location to find system headers.
TNS/R tools root:
Location of a bin directory for either Cygwin or Msys(where make and other programs for builds are located).
Cygwin/Msys bin:
NSDEE prepends bin to PATH before launching builds.Leave the combo blank if PATH already has an entry fora Cygwin or Msys bin.
If selected, NSDEE sets the COMP_ROOT environmentvariable based on your TNS/E tools root: or TNS/R tools
Set COMP_ROOT and update PATH based on tools rootabove
root: selection. NSDEE also prepends the bin directoryunder tools root directories to the PATH environmentvariable.
Remote Settings pageThe Remote Settings page lets you specify the NonStop system and location where you want aproject’s final build object deployed. If you chose SQL/MX or SQL/MP on the previous page,Remote Settings also contains areas for specifying systems for SQL preprocessing and compilation.If you chose multiple tool chains, Remote Settings contains one tabbed page for the platformassociated with each tool chain you chose.Table 10 (page 134) describes the settings available on the Remote Settings page when neitherSQL/MX nor SQL/MP is selected on the previous page.
Table 10 Remote Settings page settings (no SQL)
DescriptionSetting
The system and user name to be passed to the Deploy toolfor the deploy makefile target. The system/user name pair
Target system/user (-h/-u):
in the combo box is split up so that system and user can
134 Reference
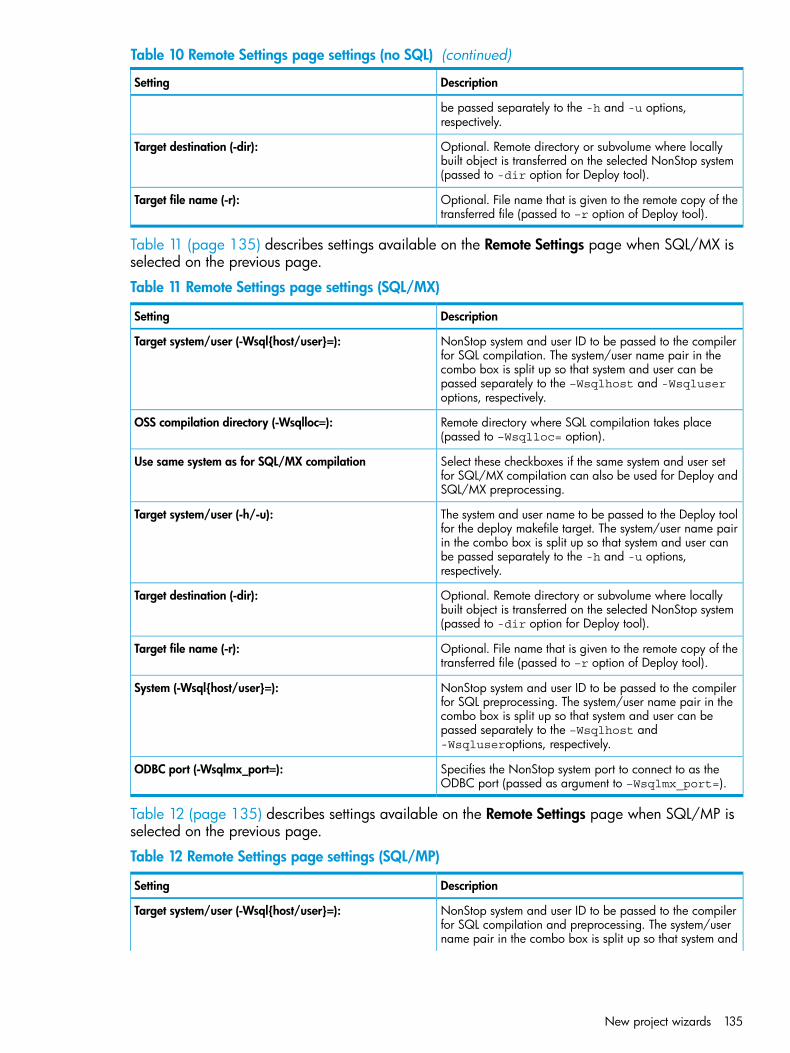
Table 10 Remote Settings page settings (no SQL) (continued)
DescriptionSetting
be passed separately to the -h and -u options,respectively.
Optional. Remote directory or subvolume where locallybuilt object is transferred on the selected NonStop system(passed to -dir option for Deploy tool).
Target destination (-dir):
Optional. File name that is given to the remote copy of thetransferred file (passed to –r option of Deploy tool).
Target file name (-r):
Table 11 (page 135) describes settings available on the Remote Settings page when SQL/MX isselected on the previous page.
Table 11 Remote Settings page settings (SQL/MX)
DescriptionSetting
NonStop system and user ID to be passed to the compilerfor SQL compilation. The system/user name pair in the
Target system/user (-Wsql{host/user}=):
combo box is split up so that system and user can bepassed separately to the –Wsqlhost and -Wsqluseroptions, respectively.
Remote directory where SQL compilation takes place(passed to –Wsqlloc= option).
OSS compilation directory (-Wsqlloc=):
Select these checkboxes if the same system and user setfor SQL/MX compilation can also be used for Deploy andSQL/MX preprocessing.
Use same system as for SQL/MX compilation
The system and user name to be passed to the Deploy toolfor the deploy makefile target. The system/user name pair
Target system/user (-h/-u):
in the combo box is split up so that system and user canbe passed separately to the -h and -u options,respectively.
Optional. Remote directory or subvolume where locallybuilt object is transferred on the selected NonStop system(passed to -dir option for Deploy tool).
Target destination (-dir):
Optional. File name that is given to the remote copy of thetransferred file (passed to –r option of Deploy tool).
Target file name (-r):
NonStop system and user ID to be passed to the compilerfor SQL preprocessing. The system/user name pair in the
System (-Wsql{host/user}=):
combo box is split up so that system and user can bepassed separately to the –Wsqlhost and-Wsqluseroptions, respectively.
Specifies the NonStop system port to connect to as theODBC port (passed as argument to –Wsqlmx_port=).
ODBC port (-Wsqlmx_port=):
Table 12 (page 135) describes settings available on the Remote Settings page when SQL/MP isselected on the previous page.
Table 12 Remote Settings page settings (SQL/MP)
DescriptionSetting
NonStop system and user ID to be passed to the compilerfor SQL compilation and preprocessing. The system/user
Target system/user (-Wsql{host/user}=):
name pair in the combo box is split up so that system and
New project wizards 135

Table 12 Remote Settings page settings (SQL/MP) (continued)
DescriptionSetting
user can be passed separately to the –Wsqlhost and-Wsqluser options, respectively.
Optional. Specifies the file name given to the final buildoutput when it is copied to a NonStop system (passed asargument to –Wsqlprog=).
Target file name (-Wsqlprog=):
Optional. Specifies the working directory to use on theNonStop system (passed as argument to –Wsqlprog=).
Working subvolume (-Wsqlwork=):
Optional. Specifies subvolume catalog (passed as argumentto –Wsqlcomp=catalog).
Catalog location (-Wsqlcomp=catalog ):
Select this checkbox if the same system and user set forSQL/MP compilation can also be used for SQL/MPpreprocessing.
Use same system as for SQL/MP compilation
Select Configurations pageThe Select Configurations page lets you choose the initial build configurations created for a project.For details, see the C/C++ Development User Guide.
Import Existing Code wizardThe Import Existing Code wizard provides a simple way to create a makefile project for an existingcode base. To open the wizard, select Create Makefile Project with Existing Code from the Newsubmenu of the context menu for the NonStop Project Explorer view. Table 13 (page 136) describesthe settings for the Import Existing Code wizard.
Table 13 Import Existing Code wizard settings
DescriptionSetting
Enter name for top-level project folder.Project name:
Location of existing code base.Existing Code Location
Location of the RVU for builds. The C/C++ indexer usesthis location to find system headers.
Tools root:
Location of a bin directory for either Cygwin or Msys(where make and other programs for builds are located).
Cygwin/Msys bin:
NSDEE prepends bin to PATH before launching builds.Leave the combo blank if PATH already has an entry fora Cygwin or Msys bin.
If selected, NSDEE sets the COMP_ROOT environmentvariable based on your Tools root: selection. NSDEE also
Set COMP_ROOT and update PATH based on tools rootabove
prepends the bin directory Tools root: selection to the PATHenvironment variable.
Remote Makefile Project wizardThe Remote Makefile Project wizard lets you create makefile projects hosted on NonStop. TheRemote Makefile Project wizard has two wizard pages named Remote Makefile Project and BuildSettings. Table 14 (page 137) describes the settings for the Remote Makefile Project wizard.
136 Reference
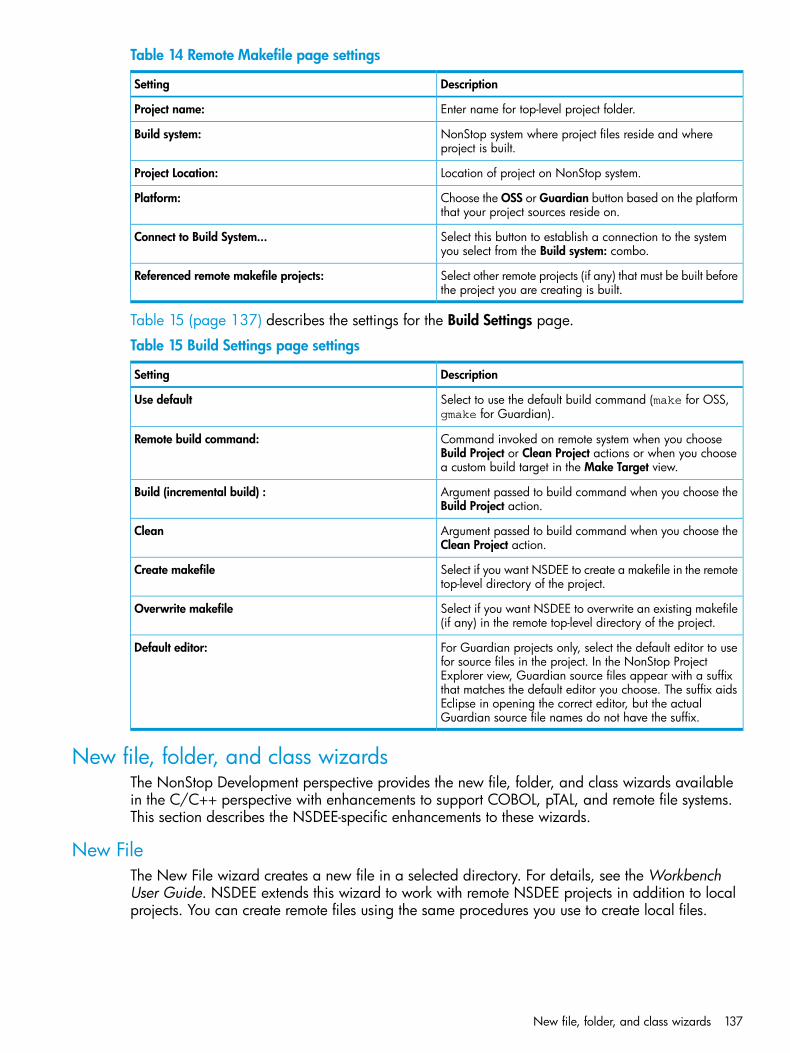
Table 14 Remote Makefile page settings
DescriptionSetting
Enter name for top-level project folder.Project name:
NonStop system where project files reside and whereproject is built.
Build system:
Location of project on NonStop system.Project Location:
Choose the OSS or Guardian button based on the platformthat your project sources reside on.
Platform:
Select this button to establish a connection to the systemyou select from the Build system: combo.
Connect to Build System...
Select other remote projects (if any) that must be built beforethe project you are creating is built.
Referenced remote makefile projects:
Table 15 (page 137) describes the settings for the Build Settings page.
Table 15 Build Settings page settings
DescriptionSetting
Select to use the default build command (make for OSS,gmake for Guardian).
Use default
Command invoked on remote system when you chooseBuild Project or Clean Project actions or when you choosea custom build target in the Make Target view.
Remote build command:
Argument passed to build command when you choose theBuild Project action.
Build (incremental build) :
Argument passed to build command when you choose theClean Project action.
Clean
Select if you want NSDEE to create a makefile in the remotetop-level directory of the project.
Create makefile
Select if you want NSDEE to overwrite an existing makefile(if any) in the remote top-level directory of the project.
Overwrite makefile
For Guardian projects only, select the default editor to usefor source files in the project. In the NonStop Project
Default editor:
Explorer view, Guardian source files appear with a suffixthat matches the default editor you choose. The suffix aidsEclipse in opening the correct editor, but the actualGuardian source file names do not have the suffix.
New file, folder, and class wizardsThe NonStop Development perspective provides the new file, folder, and class wizards availablein the C/C++ perspective with enhancements to support COBOL, pTAL, and remote file systems.This section describes the NSDEE-specific enhancements to these wizards.
New FileThe New File wizard creates a new file in a selected directory. For details, see the WorkbenchUser Guide. NSDEE extends this wizard to work with remote NSDEE projects in addition to localprojects. You can create remote files using the same procedures you use to create local files.
New file, folder, and class wizards 137
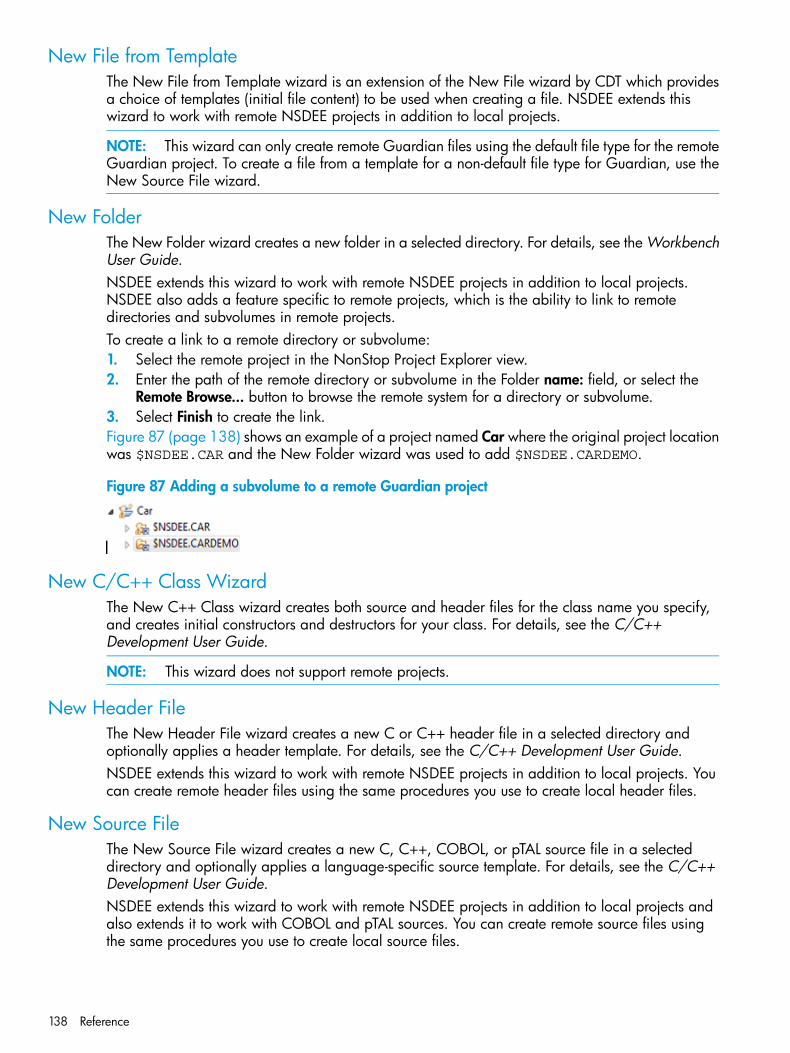
New File from TemplateThe New File from Template wizard is an extension of the New File wizard by CDT which providesa choice of templates (initial file content) to be used when creating a file. NSDEE extends thiswizard to work with remote NSDEE projects in addition to local projects.
NOTE: This wizard can only create remote Guardian files using the default file type for the remoteGuardian project. To create a file from a template for a non-default file type for Guardian, use theNew Source File wizard.
New FolderThe New Folder wizard creates a new folder in a selected directory. For details, see the WorkbenchUser Guide.NSDEE extends this wizard to work with remote NSDEE projects in addition to local projects.NSDEE also adds a feature specific to remote projects, which is the ability to link to remotedirectories and subvolumes in remote projects.To create a link to a remote directory or subvolume:1. Select the remote project in the NonStop Project Explorer view.2. Enter the path of the remote directory or subvolume in the Folder name: field, or select the
Remote Browse... button to browse the remote system for a directory or subvolume.3. Select Finish to create the link.Figure 87 (page 138) shows an example of a project named Car where the original project locationwas $NSDEE.CAR and the New Folder wizard was used to add $NSDEE.CARDEMO.
Figure 87 Adding a subvolume to a remote Guardian project
New C/C++ Class WizardThe New C++ Class wizard creates both source and header files for the class name you specify,and creates initial constructors and destructors for your class. For details, see the C/C++Development User Guide.
NOTE: This wizard does not support remote projects.
New Header FileThe New Header File wizard creates a new C or C++ header file in a selected directory andoptionally applies a header template. For details, see the C/C++ Development User Guide.NSDEE extends this wizard to work with remote NSDEE projects in addition to local projects. Youcan create remote header files using the same procedures you use to create local header files.
New Source FileThe New Source File wizard creates a new C, C++, COBOL, or pTAL source file in a selecteddirectory and optionally applies a language-specific source template. For details, see the C/C++Development User Guide.NSDEE extends this wizard to work with remote NSDEE projects in addition to local projects andalso extends it to work with COBOL and pTAL sources. You can create remote source files usingthe same procedures you use to create local source files.
138 Reference

New Source FolderThe New Source Folder wizard creates a new source directory for projects with managed builds.It is important to use this wizard for projects with managed builds because it automatically precludesissues with nested folders in builds by setting filters for nested source folders. You can view andedit these filters from the Source Location tab of the Paths and Symbols property page. For details,see the C/C++ Development User Guide.
NOTE: This wizard does not support remote projects.
ToolsThe NonStop Tools menu in the NonStop Development perspective provides tools for tasks thataren’t part of the typical edit-build-deploy cycle of work. Two of the menu items on the NonStopTools menu (Configure Tool Locations… and Configure Connections…) are actually shortcuts topreference pages described in “Preferences” (page 42). The other menu items open the toolsdescribed in this section, as well as a remote file system browser which can be opened from manydialogs.
Open Remote File dialogThe Open Remote File dialog opens a file on a remote NonStop system so you can edit the file inEclipse. When NSDEE opens the file, it downloads and opens a cached local copy. Each timeyou save the local copy, NSDEE uploads the file to the NonStop system. NSDEE also detects andreports issues should your local copy become out of sync with the remote file (as when someoneelse makes an edit to the local file).You can also use the Open Remote File dialog to create a file on a NonStop system. If NSDEEdetects that the path you specify doesn’t exist, it asks you if you want to create a new file.Table 16 (page 139) describes settings in the Open Remote File dialog.
Table 16 Settings in the Open Remote File dialog
DescriptionSettings
Choose the OSS or Guardian button based on the platformthe file resides on.
Platform:
Select the NonStop system the file resides on.System:
Enter the full path to the remote file.File location:
Select the type of editor to open the file with.Editor:
Select to open the remote file and dismiss the dialog.Open
Select to cancel opening a remote file and to dismiss thedialog.
Cancel
Transfer Files WizardThe Transfer Files export wizard transfers one or more project files to a location on a NonStopsystem. You can use the Transfer Files wizard to transfer a single file, multiple files, or all filescontained in a project, including executable and object files.You can open the Transfer Files wizard by selecting Export... from the context menu of the NonStopProject Explorer and then selecting HP NonStop Development→Transfer Files, or you can selectTransfer Files... from the NonStop Tool menu.If you select a project or project directories or files before opening the Transfer Files wizard, thewizard opens with your selections already made. The Transfer Files wizard has three main areas.The top area is for choosing files to be transferred. The middle Destination group box is where
Tools 139
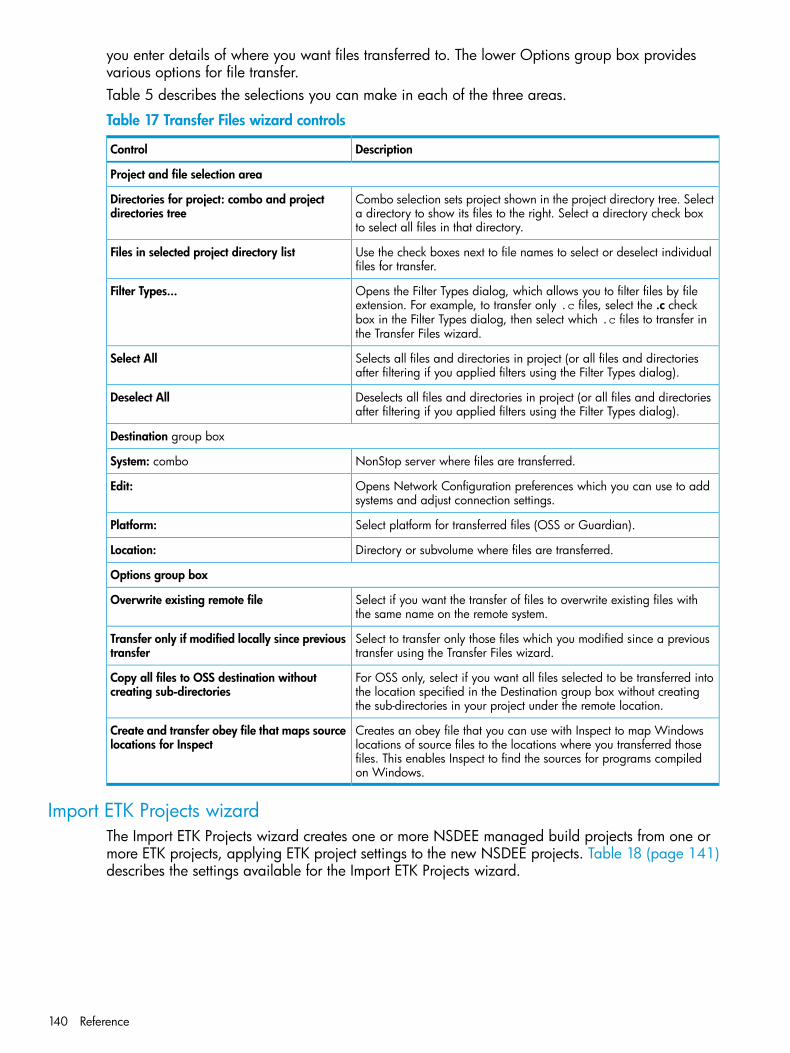
you enter details of where you want files transferred to. The lower Options group box providesvarious options for file transfer.Table 5 describes the selections you can make in each of the three areas.
Table 17 Transfer Files wizard controls
DescriptionControl
Project and file selection area
Combo selection sets project shown in the project directory tree. Selecta directory to show its files to the right. Select a directory check boxto select all files in that directory.
Directories for project: combo and projectdirectories tree
Use the check boxes next to file names to select or deselect individualfiles for transfer.
Files in selected project directory list
Opens the Filter Types dialog, which allows you to filter files by fileextension. For example, to transfer only .c files, select the .c check
Filter Types...
box in the Filter Types dialog, then select which .c files to transfer inthe Transfer Files wizard.
Selects all files and directories in project (or all files and directoriesafter filtering if you applied filters using the Filter Types dialog).
Select All
Deselects all files and directories in project (or all files and directoriesafter filtering if you applied filters using the Filter Types dialog).
Deselect All
Destination group box
NonStop server where files are transferred.System: combo
Opens Network Configuration preferences which you can use to addsystems and adjust connection settings.
Edit:
Select platform for transferred files (OSS or Guardian).Platform:
Directory or subvolume where files are transferred.Location:
Options group box
Select if you want the transfer of files to overwrite existing files withthe same name on the remote system.
Overwrite existing remote file
Select to transfer only those files which you modified since a previoustransfer using the Transfer Files wizard.
Transfer only if modified locally since previoustransfer
For OSS only, select if you want all files selected to be transferred intothe location specified in the Destination group box without creatingthe sub-directories in your project under the remote location.
Copy all files to OSS destination withoutcreating sub-directories
Creates an obey file that you can use with Inspect to map Windowslocations of source files to the locations where you transferred those
Create and transfer obey file that maps sourcelocations for Inspect
files. This enables Inspect to find the sources for programs compiledon Windows.
Import ETK Projects wizardThe Import ETK Projects wizard creates one or more NSDEE managed build projects from one ormore ETK projects, applying ETK project settings to the new NSDEE projects. Table 18 (page 141)describes the settings available for the Import ETK Projects wizard.
140 Reference
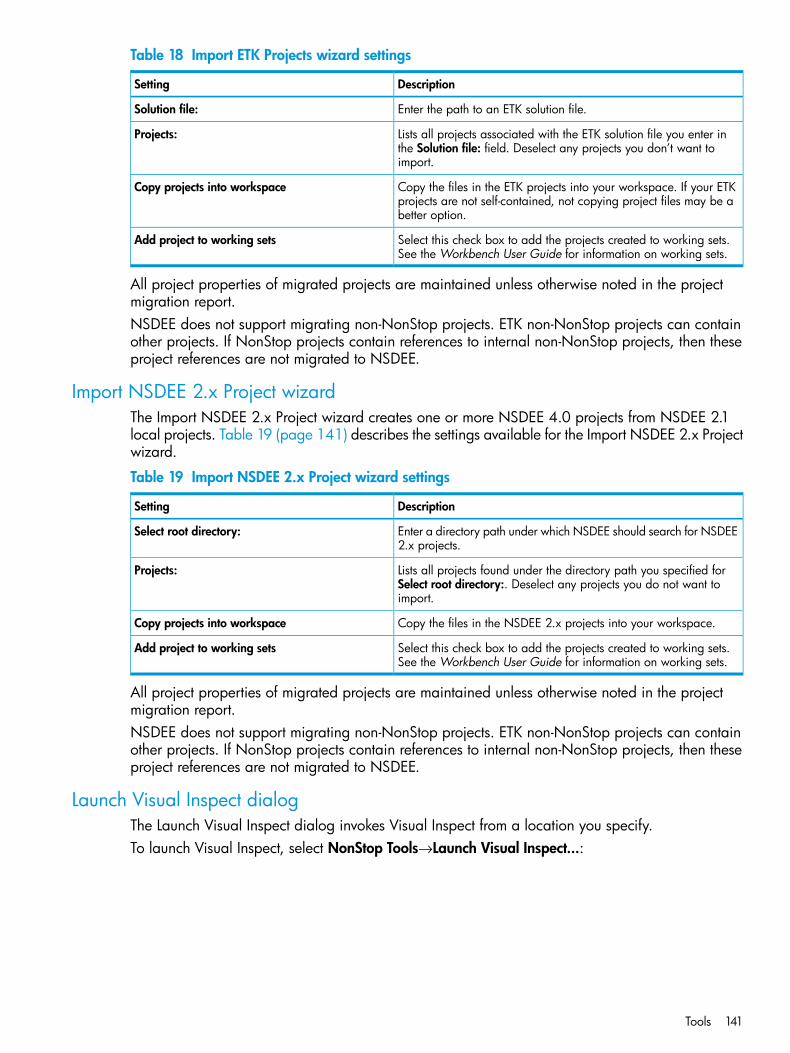
Table 18 Import ETK Projects wizard settings
DescriptionSetting
Enter the path to an ETK solution file.Solution file:
Lists all projects associated with the ETK solution file you enter inthe Solution file: field. Deselect any projects you don’t want toimport.
Projects:
Copy the files in the ETK projects into your workspace. If your ETKprojects are not self-contained, not copying project files may be abetter option.
Copy projects into workspace
Select this check box to add the projects created to working sets.See the Workbench User Guide for information on working sets.
Add project to working sets
All project properties of migrated projects are maintained unless otherwise noted in the projectmigration report.NSDEE does not support migrating non-NonStop projects. ETK non-NonStop projects can containother projects. If NonStop projects contain references to internal non-NonStop projects, then theseproject references are not migrated to NSDEE.
Import NSDEE 2.x Project wizardThe Import NSDEE 2.x Project wizard creates one or more NSDEE 4.0 projects from NSDEE 2.1local projects. Table 19 (page 141) describes the settings available for the Import NSDEE 2.x Projectwizard.
Table 19 Import NSDEE 2.x Project wizard settings
DescriptionSetting
Enter a directory path under which NSDEE should search for NSDEE2.x projects.
Select root directory:
Lists all projects found under the directory path you specified forSelect root directory:. Deselect any projects you do not want toimport.
Projects:
Copy the files in the NSDEE 2.x projects into your workspace.Copy projects into workspace
Select this check box to add the projects created to working sets.See the Workbench User Guide for information on working sets.
Add project to working sets
All project properties of migrated projects are maintained unless otherwise noted in the projectmigration report.NSDEE does not support migrating non-NonStop projects. ETK non-NonStop projects can containother projects. If NonStop projects contain references to internal non-NonStop projects, then theseproject references are not migrated to NSDEE.
Launch Visual Inspect dialogThe Launch Visual Inspect dialog invokes Visual Inspect from a location you specify.To launch Visual Inspect, select NonStop Tools→Launch Visual Inspect...:
Tools 141

Remote file browserNSDEE provides a remote file browser that is opened by the Browse… button in many dialogs.The name of the browser varies according to what type of object you are browsing for. When youare browsing for a file, for example, the browser name is Choose a file.Figure 88 (page 142) shows the remote browser when opened to choose a Guardian file.
Figure 88 Remote browsing for a Guardian file
The Contents of: field at the top of the browser shows the directory, volume, or subvolume whosecontent (files and folders) is shown in the center of the dialog. You can edit the Contents of: field
and select Return or the load contents button to see the contents of the location you enter. You
can choose the up button to view the contents of the parent directory and double-click folderentries in the folder and file list to open and view the content of a child folder.The field at the bottom is for a file or folder name, depending on what your search. Selecting afile or folder above it adds the file or folder name to the field, as appropriate.
PreferencesPreferences specific to NSDEE are available in the Preferences dialog under the category, NonStopDevelopment. The General and C/C++ categories also have many settings that alter the defaultbehavior of NSDEE.To open the Preferences dialog, choose Preferences from the Windows menu. Preference categoriesare listed to the left of the dialog.
142 Reference

NonStop DevelopmentThe NonStop Development preference page provides one preference setting, which is the defaultselection for OSS or Guardian for dialogs that give you a choice of platform.
Code TemplatesThe Code Templates preference page provides a link to the C/C++ Code Templates page, whereyou can change the templates applied to new files you create. NSDEE adds COBOL and pTALsource file templates to those provided by CDT (see Figure 89 (page 143)). For details on changingtemplates, refer to the C/C++ Development User Guide.
Figure 89 Default COBOL source template
Network ConnectionsThe Network Connections preference page provides a central place to configure connections toremote systems. Connections configured using this page appear in combo boxes in the form:systemName (userID) in project property pages, launchers, and other dialogs where a NonStopsystem and user ID must be input. Table 20 (page 143) describes the settings in the NetworkConnections preference page.
Table 20 Network Connection settings
DescriptionSetting
Combo box containing list of system/user name pairs. Settings onthe Network Connections page apply to the currently selected
System: combo
system and user name. To add a system, select the Add/Remove…button.
Select to add or remove a system from the System: combo box.Add/Remove… button
User name or alias to use when connecting to a specified system.User name: field
Select to use SSH and SFTP protocols (default).SSH/SFTP button
Preferences 143
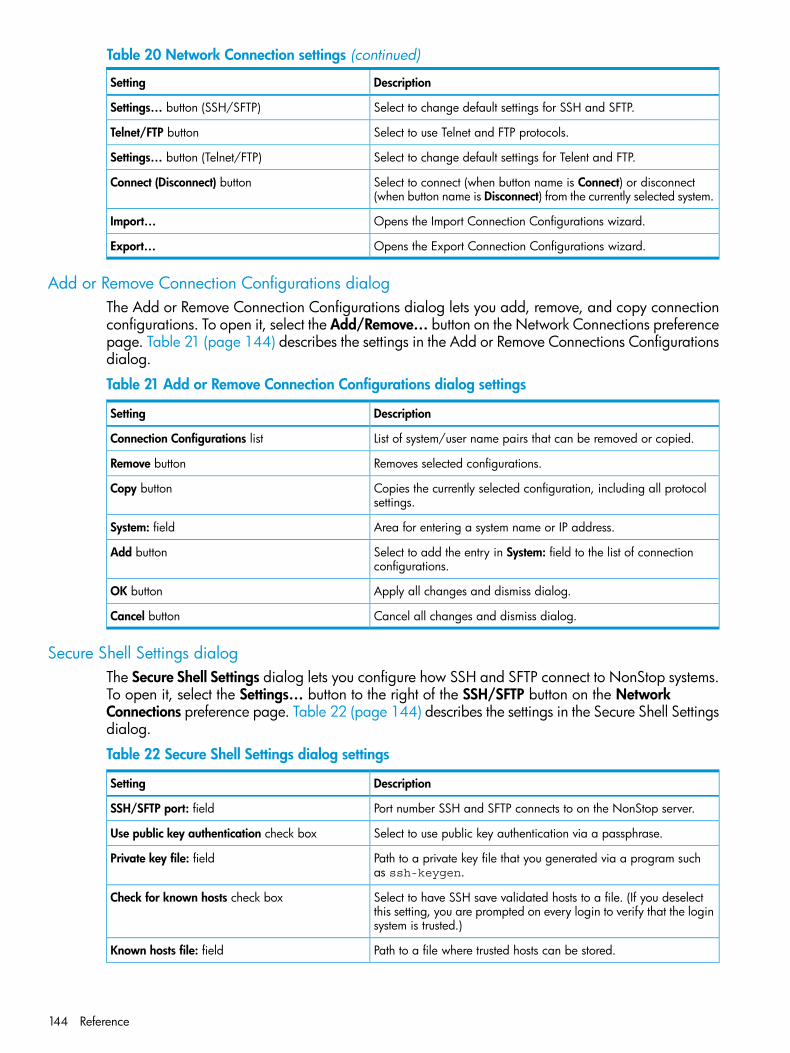
Table 20 Network Connection settings (continued)
DescriptionSetting
Select to change default settings for SSH and SFTP.Settings… button (SSH/SFTP)
Select to use Telnet and FTP protocols.Telnet/FTP button
Select to change default settings for Telent and FTP.Settings… button (Telnet/FTP)
Select to connect (when button name is Connect) or disconnect(when button name is Disconnect) from the currently selected system.
Connect (Disconnect) button
Opens the Import Connection Configurations wizard.Import…
Opens the Export Connection Configurations wizard.Export…
Add or Remove Connection Configurations dialogThe Add or Remove Connection Configurations dialog lets you add, remove, and copy connectionconfigurations. To open it, select the Add/Remove… button on the Network Connections preferencepage. Table 21 (page 144) describes the settings in the Add or Remove Connections Configurationsdialog.
Table 21 Add or Remove Connection Configurations dialog settings
DescriptionSetting
List of system/user name pairs that can be removed or copied.Connection Configurations list
Removes selected configurations.Remove button
Copies the currently selected configuration, including all protocolsettings.
Copy button
Area for entering a system name or IP address.System: field
Select to add the entry in System: field to the list of connectionconfigurations.
Add button
Apply all changes and dismiss dialog.OK button
Cancel all changes and dismiss dialog.Cancel button
Secure Shell Settings dialogThe Secure Shell Settings dialog lets you configure how SSH and SFTP connect to NonStop systems.To open it, select the Settings… button to the right of the SSH/SFTP button on the NetworkConnections preference page. Table 22 (page 144) describes the settings in the Secure Shell Settingsdialog.
Table 22 Secure Shell Settings dialog settings
DescriptionSetting
Port number SSH and SFTP connects to on the NonStop server.SSH/SFTP port: field
Select to use public key authentication via a passphrase.Use public key authentication check box
Path to a private key file that you generated via a program suchas ssh-keygen.
Private key file: field
Select to have SSH save validated hosts to a file. (If you deselectthis setting, you are prompted on every login to verify that the loginsystem is trusted.)
Check for known hosts check box
Path to a file where trusted hosts can be stored.Known hosts file: field
144 Reference
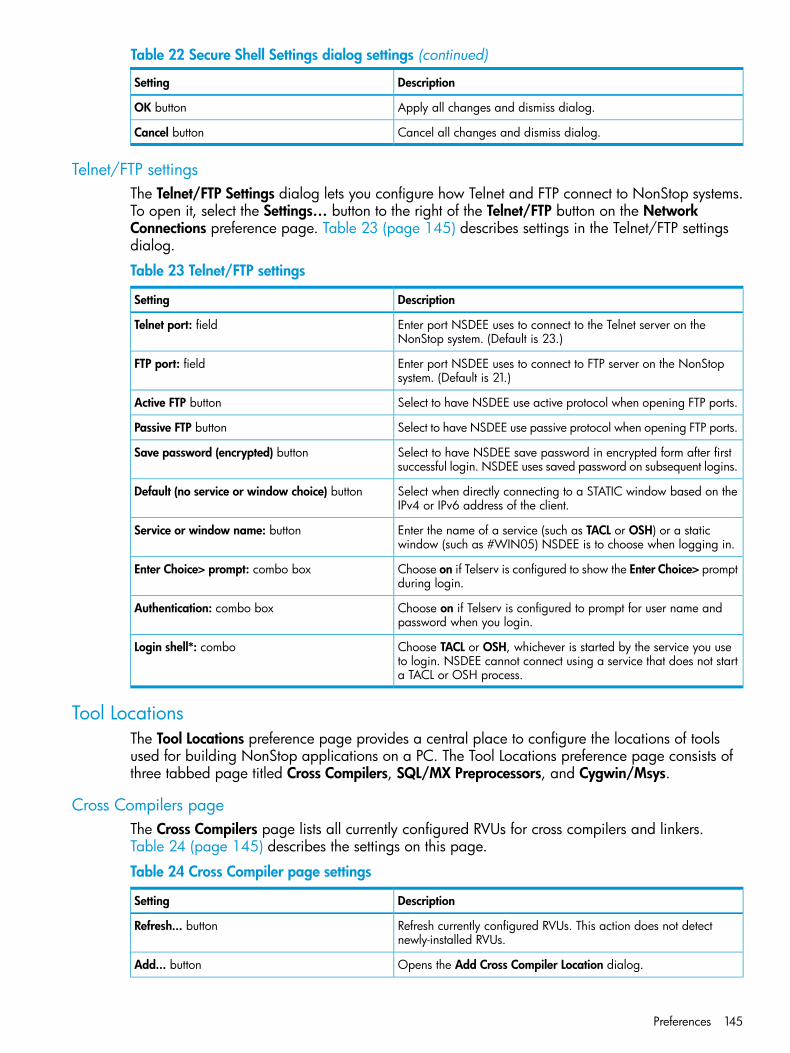
Table 22 Secure Shell Settings dialog settings (continued)
DescriptionSetting
Apply all changes and dismiss dialog.OK button
Cancel all changes and dismiss dialog.Cancel button
Telnet/FTP settingsThe Telnet/FTP Settings dialog lets you configure how Telnet and FTP connect to NonStop systems.To open it, select the Settings… button to the right of the Telnet/FTP button on the NetworkConnections preference page. Table 23 (page 145) describes settings in the Telnet/FTP settingsdialog.
Table 23 Telnet/FTP settings
DescriptionSetting
Enter port NSDEE uses to connect to the Telnet server on theNonStop system. (Default is 23.)
Telnet port: field
Enter port NSDEE uses to connect to FTP server on the NonStopsystem. (Default is 21.)
FTP port: field
Select to have NSDEE use active protocol when opening FTP ports.Active FTP button
Select to have NSDEE use passive protocol when opening FTP ports.Passive FTP button
Select to have NSDEE save password in encrypted form after firstsuccessful login. NSDEE uses saved password on subsequent logins.
Save password (encrypted) button
Select when directly connecting to a STATIC window based on theIPv4 or IPv6 address of the client.
Default (no service or window choice) button
Enter the name of a service (such as TACL or OSH) or a staticwindow (such as #WIN05) NSDEE is to choose when logging in.
Service or window name: button
Choose on if Telserv is configured to show the Enter Choice> promptduring login.
Enter Choice> prompt: combo box
Choose on if Telserv is configured to prompt for user name andpassword when you login.
Authentication: combo box
Choose TACL or OSH, whichever is started by the service you useto login. NSDEE cannot connect using a service that does not starta TACL or OSH process.
Login shell*: combo
Tool LocationsThe Tool Locations preference page provides a central place to configure the locations of toolsused for building NonStop applications on a PC. The Tool Locations preference page consists ofthree tabbed page titled Cross Compilers, SQL/MX Preprocessors, and Cygwin/Msys.
Cross Compilers pageThe Cross Compilers page lists all currently configured RVUs for cross compilers and linkers.Table 24 (page 145) describes the settings on this page.
Table 24 Cross Compiler page settings
DescriptionSetting
Refresh currently configured RVUs. This action does not detectnewly-installed RVUs.
Refresh... button
Opens the Add Cross Compiler Location dialog.Add... button
Preferences 145
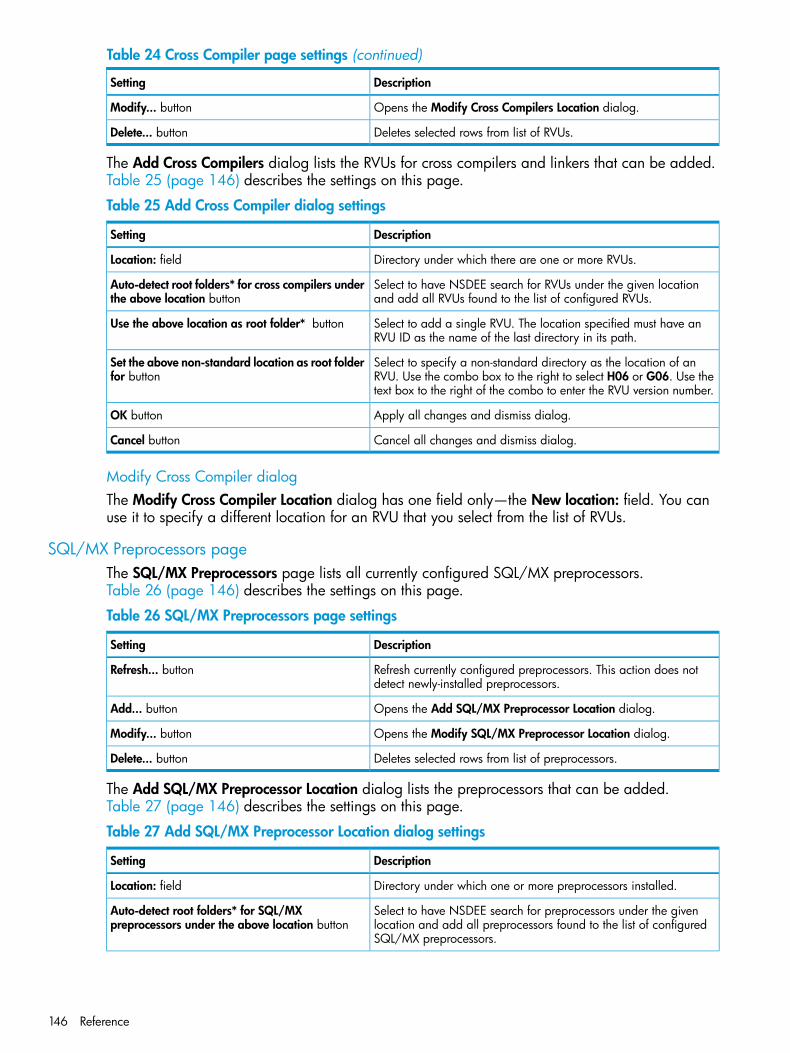
Table 24 Cross Compiler page settings (continued)
DescriptionSetting
Opens the Modify Cross Compilers Location dialog.Modify... button
Deletes selected rows from list of RVUs.Delete... button
The Add Cross Compilers dialog lists the RVUs for cross compilers and linkers that can be added.Table 25 (page 146) describes the settings on this page.
Table 25 Add Cross Compiler dialog settings
DescriptionSetting
Directory under which there are one or more RVUs.Location: field
Select to have NSDEE search for RVUs under the given locationand add all RVUs found to the list of configured RVUs.
Auto-detect root folders* for cross compilers underthe above location button
Select to add a single RVU. The location specified must have anRVU ID as the name of the last directory in its path.
Use the above location as root folder* button
Select to specify a non-standard directory as the location of anRVU. Use the combo box to the right to select H06 or G06. Use thetext box to the right of the combo to enter the RVU version number.
Set the above non-standard location as root folderfor button
Apply all changes and dismiss dialog.OK button
Cancel all changes and dismiss dialog.Cancel button
Modify Cross Compiler dialogThe Modify Cross Compiler Location dialog has one field only—the New location: field. You canuse it to specify a different location for an RVU that you select from the list of RVUs.
SQL/MX Preprocessors pageThe SQL/MX Preprocessors page lists all currently configured SQL/MX preprocessors.Table 26 (page 146) describes the settings on this page.
Table 26 SQL/MX Preprocessors page settings
DescriptionSetting
Refresh currently configured preprocessors. This action does notdetect newly-installed preprocessors.
Refresh... button
Opens the Add SQL/MX Preprocessor Location dialog.Add... button
Opens the Modify SQL/MX Preprocessor Location dialog.Modify... button
Deletes selected rows from list of preprocessors.Delete... button
The Add SQL/MX Preprocessor Location dialog lists the preprocessors that can be added.Table 27 (page 146) describes the settings on this page.
Table 27 Add SQL/MX Preprocessor Location dialog settings
DescriptionSetting
Directory under which one or more preprocessors installed.Location: field
Select to have NSDEE search for preprocessors under the givenlocation and add all preprocessors found to the list of configuredSQL/MX preprocessors.
Auto-detect root folders* for SQL/MXpreprocessors under the above location button
146 Reference

Table 27 Add SQL/MX Preprocessor Location dialog settings (continued)
DescriptionSetting
Select to add a single preprocessor. The location specified musthave as the last directory in its path a name that conforms topreprocessor naming conventions.
Use the above location as root folder* button
Select to specify a non-standard directory as the location of theSQL/MX preprocessor. Use the combo box to the right to select C
Set the above non-standard location as root folderfor button
or COBOL version of the preprocessor name. Use the text box tothe right of the combo to enter the preprocessor's version number.
Apply all changes and dismiss dialog.OK button
Cancel all changes and dismiss dialog.Cancel button
Modify SQL/MX Preprocessor dialogThe Modify SQL/MX Preprocessor Location dialog has one field only—the New location: field. Youcan use it to specify a different location for an SQL/MX preprocessor that you select from the listof preprocessors.
Cygwin/Msys Page settingsThe Cygwin/Msys page lists the bin locations for Cygwin and Mysys. Table 28 (page 147) describesthe settings on this page.
Table 28 Cygwin/Msys page settings
DescriptionSetting
Select if tools are located in a Cygwin bin directory. Enter the pathof the Cygwin bin directory. Select Browse... if tools are locatedin a different bin.
Cygwin bin: field
Select if tools are located in a Mysys bin directory. Enter the pathof the Mysys bin directory. Select Browse... if tools are located ina different bin.
Mysys bin: field
Select to restore the default bin directory location.Restore defaults... button
Apply all changes and dismiss dialog.Apply button
Cancel all changes and dismiss dialog.Cancel button
Transfer Files WizardThe Transfer Files wizard preference page lets you change the default settings for the Transfer Fileswizard. To open it, select the Settings… button to the right of the Telnet/FTP button on the NetworkConnections preference page. Table 29 (page 147) describes the preference settings on this page.
Table 29 Transfer File Wizard preference page settings
DescriptionSetting
Group for setting transfer destination preferences.Destination group box
Default system/user name pair.System: combo box
Select to have OSS as the default destination platform.OSS button
Select to have Guardian as the default destination platform.Guardian button
Use the platform preference on the Network Connections preferencepage for this preference.
Use default platform setting button
Default location to transfer files.Location: field
Preferences 147
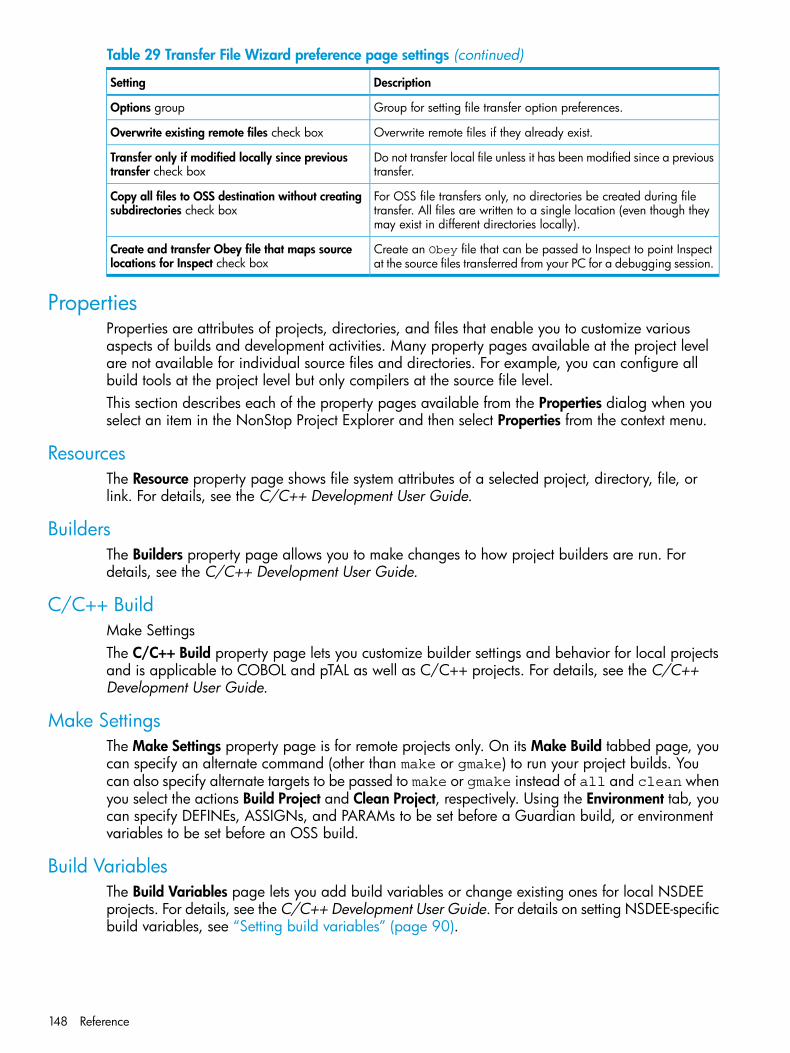
Table 29 Transfer File Wizard preference page settings (continued)
DescriptionSetting
Group for setting file transfer option preferences.Options group
Overwrite remote files if they already exist.Overwrite existing remote files check box
Do not transfer local file unless it has been modified since a previoustransfer.
Transfer only if modified locally since previoustransfer check box
For OSS file transfers only, no directories be created during filetransfer. All files are written to a single location (even though theymay exist in different directories locally).
Copy all files to OSS destination without creatingsubdirectories check box
Create an Obey file that can be passed to Inspect to point Inspectat the source files transferred from your PC for a debugging session.
Create and transfer Obey file that maps sourcelocations for Inspect check box
PropertiesProperties are attributes of projects, directories, and files that enable you to customize variousaspects of builds and development activities. Many property pages available at the project levelare not available for individual source files and directories. For example, you can configure allbuild tools at the project level but only compilers at the source file level.This section describes each of the property pages available from the Properties dialog when youselect an item in the NonStop Project Explorer and then select Properties from the context menu.
ResourcesThe Resource property page shows file system attributes of a selected project, directory, file, orlink. For details, see the C/C++ Development User Guide.
BuildersThe Builders property page allows you to make changes to how project builders are run. Fordetails, see the C/C++ Development User Guide.
C/C++ BuildMake SettingsThe C/C++ Build property page lets you customize builder settings and behavior for local projectsand is applicable to COBOL and pTAL as well as C/C++ projects. For details, see the C/C++Development User Guide.
Make SettingsThe Make Settings property page is for remote projects only. On its Make Build tabbed page, youcan specify an alternate command (other than make or gmake) to run your project builds. Youcan also specify alternate targets to be passed to make or gmake instead of all and clean whenyou select the actions Build Project and Clean Project, respectively. Using the Environment tab, youcan specify DEFINEs, ASSIGNs, and PARAMs to be set before a Guardian build, or environmentvariables to be set before an OSS build.
Build VariablesThe Build Variables page lets you add build variables or change existing ones for local NSDEEprojects. For details, see the C/C++ Development User Guide. For details on setting NSDEE-specificbuild variables, see “Setting build variables” (page 90).
148 Reference

Discovery OptionsThe Discovery Options page provides settings for local SQL/MP or SQL/MX C/C++ projects. Thesettings assist you in turning off warnings and errors shown for SQL statements in C/C++ editors.For details, see “Removing erroneous errors and warnings in C/C++ editors” (page 95).
EnvironmentThe Environment property page lets you configure what environment variables are set when youbuild your project and is available for local projects only. To set environment variables for remoteprojects, use the Environment tab of the Make Settings property page. For details, see the C/C++Development User Guide. For details on setting NSDEE-specific environment variables, see“Environment variables and build variables” (page 44).
LoggingThe Logging property page lets you specify a log file where build output is written to in additionto being written to the Console view. This property page is for local projects only. For details, seethe C/C++ Development User Guide.
SettingsThe Settings property page is primarily for use with local projects with managed builds, thoughthe Binary and Error Parsers tabbed pages are available for local makefile projects as well. Thissection describes each of the tabbed pages available in the Settings property page.
Tool Settings pageThe Tool Settings tabbed page lets you configure options passed to compilers, SQL tools, andlinkers during builds. The list of tools on the left of the Tool Settings page is determined by the toolchain and tool selections you made when you created your project. (For a description of NSDEEtool chains, see “Tool chains” (page 56)).The left side of the Tool Settings page shows the tools used to build your project. Each tool on theleft side has a main entry with subcategories under it (such as the C Linker (TNS/E) main entry inand its two subcategories, Libraries and Miscellaneous as shown in Figure 90 (page 149)).
Figure 90 Tool Settings page
Select the main entry for a tool to see or alter the command used for the tool. Select a subcategoryof the tool to change or add options to pass to the tool when it is invoked during builds.All tools have a Miscellaneous category which you can use to enter most any tool option. However,be sure to use categories to set tool options that are directly represented in categories, such asinclude paths in the Includes category and library paths in the Libraries category. Managed buildsuse information from these pages when creating makefiles.
Properties 149

For your convenience, OSS man pages for many tools are available via Help→Help Contents underthe entry for NonStop Cross-Compilers and Tools man pages. Cross compilers and tools use almostall the same options as the native OSS versions of the same tools. PC-specific options aredocumented in the help file provided with NonStop cross compilers and tools. You can also accessPC-specific help from the top-level page for NonStop Cross-Compilers and Tools man Pages usingthe View buttons. Cross compiler documentation is also available as part of the cross-compilerproduct.
NOTE: Due to CDT limitations, remote settings (such as those for the Deploy tool and for SQLoptions for specifying NonStop systems) are disabled in the Tool Settings page. To change valuesfor remote settings, use the Settings (Remote) page.
Build Steps pageThe Build Steps tabbed page lets you specify commands to be invoked prior to and after builds.For details, see the C/C++ Development User Guide.
Build Artifact pageThe Build Artifact tabbed page lets you change the default setting for the name used for final buildoutput. For executable projects, for example, the default final build output is named{$ProjName}.txe. For details, see the C/C++ Development User Guide.
Binary ParsersThe Binary Parsers page lets you choose which binary parsers are used to access informationabout binaries (source files and methods) for display in the NonStop Project Explorer view whenyou expand a binary object in a project. Typically, you should not need to alter this page. Fordetails, see the C/C++ Development User Guide.
Error ParsersThe Error Parsers page lets you choose which parsers are run on build output. These parsers lookfor errors and warnings and, when found, add them to the Problems view along with relevantinformation about the errors and warnings such as the source locations they are associated with.Typically, you should not need to alter this page. For details, see the C/C++ Development UserGuide.
Settings (Remote)The Settings (Remote) property page provides all tool options for remote settings for local projectsas well as deploy makefile target options. Depending on whether your project includes SQL tools,two-to-four group boxes display on the Settings (Remote) page. This section describes each of thegroup boxes.
NOTE: NonStop systems, destinations, and user IDs specified on this page are used to set anumber of environment variables available during builds. For details, see “NSDEE_DEPLOY_SYSTEM,NSDEE_DEPLOY_USER, NSDEE_DEPLOY_DEST, NSDEE_DEPLOY_FILENAME” (page 49).
Deploy Target Settings groupYou can use the Deploy Target Settings group to provide a custom deploy target name. For details,see “Creating custom deploy targets ” (page 118). You can also use this group to specify pre-deployand post-deploy build targets for both managed builds and makefile projects. For details, see“Running commands before and after deployment” (page 64).
System for SQL/MX Compile groupThis group is available for SQL/MX projects only. Use it to specify the NonStop system and SQLcompilation location.
150 Reference

Destination for Deploy Target groupThis group is available for SQL/MX projects and projects that do not use SQL. Use this group tospecify the NonStop system and location where you want the Build Deploy action to transfer yourfinal build object.
System for SQL/MX Preprocessor (INVOKE Processing) groupThis group is available for SQL/MX projects. Use it to specify the NonStop system for SQL/MXINVOKE preprocessing.
System for SQL/MP Compile and Deploy groupThis group is available for SQL/MP projects. Use it to specify the NonStop system and SQLcompilation location, as well as where the Build Deploy action transfers your final build object.
System for SQL/MP Preprocessing groupThis group is available for SQL/MP projects. Use it to specify the NonStop system for SQL/MPpreprocessing.
Tool Chain EditorThe Tool Chain Editor property page lists the tools used in managed builds. You can use this pageto add tools to your build that were not added at project creation time. For details, see the C/C++Development User Guide.
WARNING! DO NOT select Restore Defaults and apply the changes. The "default" tool chainis all tools available for a given platform (TNS/E or TNS/R). If you do choose and apply RestoreDefaults, use the Tool Chain Editor property page to remove tools not needed for your projectbuilds.
Guardian File TransferThe Guardian File Transfer property page is available for files only. Use it to set the file code andfile name to be used for transfers of files in your project. The Transfer Files wizard (available fromthe NonStop Tools menu) uses these settings when transferring files from your project to the Guardianfile system.
C/C++ GeneralThe C/C++ General property page and the pages under it (Code Analysis, Code Style, and so on)are all described in the C/C++ Development User Guide.
NOTE: By default, the C/C++ indexer continues to use the RVU you chose at project creationtime to gather symbols from system headers, even when you switch to using an RVU for a differentplatform. For information on how to change the default behavior, see “NSDEE_SYS_INCLUDE_PATH”(page 46).
NOTE: If you use Discovery Options to turn off warnings and errors on SQL statements in C/C++editors, you can check if the settings have been applied using the Symbols tabbed page of thePaths and Symbols property page. See “Removing erroneous errors and warnings in C/C++editors” (page 95).
Project ReferencesThe Project References property page allows you to specify projects that the current project needsbuilt before the current project itself is built. Project references can also be added by selecting thereferencing projects in C/C++ General→Paths and Symbols→Project References. For details, seethe C/C++ Development User Guide.
Properties 151

Refactoring HistoryThe Refactoring History property page records all refactoring done for a given project and providesfacilities for perusing this history. For details, see the C/C++ Development User Guide.
Remote SettingsThe Remote Settings property page is for remote projects only. It lets you change the NonStopsystem that hosts a remote project.
Run/Debug SettingsThe Run/Debug Settings property page is not supported for NonStop projects.
MenusThe NonStop Development perspective contributes one menu to the main menu bar—the NonStopTools menu. In addition, the NonStop Project Explorer view contributes many NonStop-specificitems to its context menu. This section describes the items in both of these menus.
NonStop Tools menuThe NonStop Tools menu in the NonStop Development perspective provides a single place whereyou can open dialogs, wizards, and preferences pages that are specific to NonStop applicationdevelopment. Many items on the NonStop Tools menu can be accessed in other ways.The Configure Tool Locations... menu item is a short cut to opening the Tool Locations preferencepage. Similarly, the Configure Connections... menu item is a short cut to opening the NetworkConfigurations preference page. Both of these preference pages are described in “Preferences”(page 42) and both can be accessed via Window→Preferences→NonStop.The NonStop tools menu also provides short cuts to import wizards for ETK projects (Import ETKProjects...) and NSDEE 2.x projects (Import NSDEE 2.x Projects) as well as an export wizard fortransferring files from local projects to NonStop systems (Transfer Files...). These import and exportwizards are described in “Tools” (page 139)Two tools can only be opened using the NonStop Tools menu—the Open Remote File dialog andthe Launch Visual Inspect dialog. Both are described in the “Tools” (page 139) section.
Context menu for NonStop Project ExplorerThe context menu for the NonStop Project Explorer view is that of the C/C++ Projects view withthe addition of a Deploy Project menu item (to invoke make deploy) and the addition to the Newsubmenu of NonStop-specific actions for creating projects, folders, and files. For details on thecontent of this context menu, see the C/C++ Development User Guide.
IconsNSDEE provides a number of icons for actions specific to development of NonStop applications.For information about Eclipse and CDT icons, see the Reference section of the Eclipse WorkbenchGuide and the C/C++ Development User Guide, respectively.Table 10 describes the NonStop-specific icons in Eclipse.
152 Reference
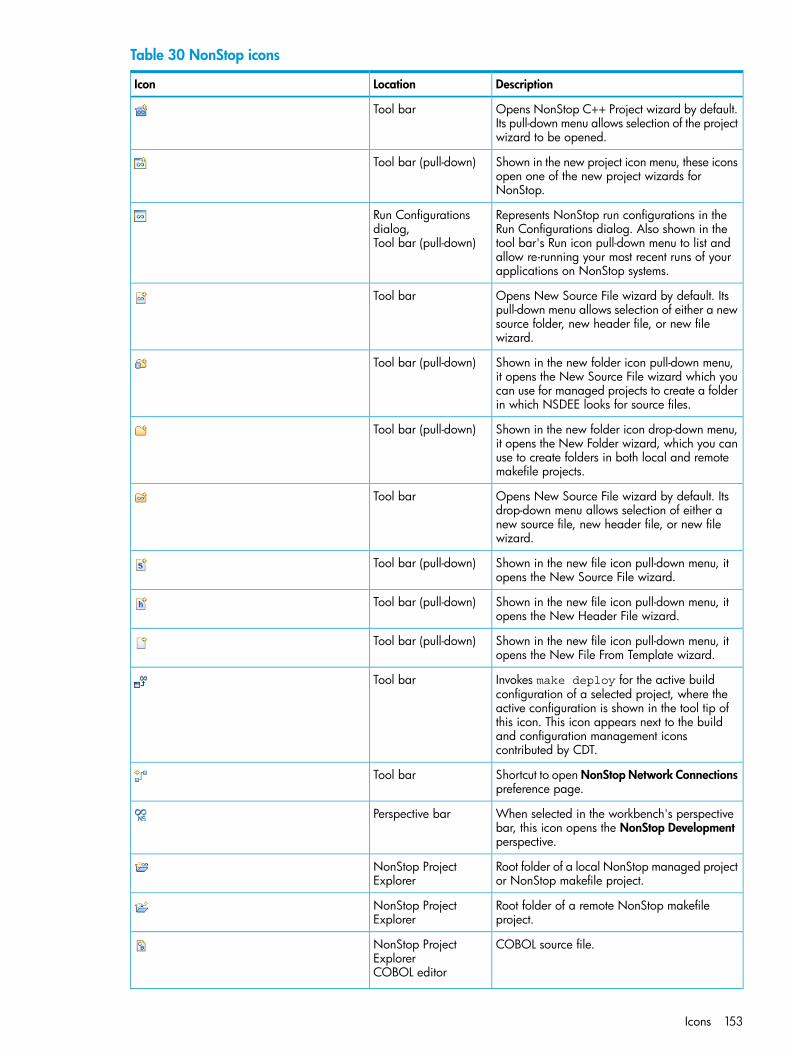
Table 30 NonStop icons
DescriptionLocationIcon
Opens NonStop C++ Project wizard by default.Its pull-down menu allows selection of the projectwizard to be opened.
Tool bar
Shown in the new project icon menu, these iconsopen one of the new project wizards forNonStop.
Tool bar (pull-down)
Represents NonStop run configurations in theRun Configurations dialog. Also shown in the
Run Configurationsdialog,
tool bar's Run icon pull-down menu to list andTool bar (pull-down)allow re-running your most recent runs of yourapplications on NonStop systems.
Opens New Source File wizard by default. Itspull-down menu allows selection of either a new
Tool bar
source folder, new header file, or new filewizard.
Shown in the new folder icon pull-down menu,it opens the New Source File wizard which you
Tool bar (pull-down)
can use for managed projects to create a folderin which NSDEE looks for source files.
Shown in the new folder icon drop-down menu,it opens the New Folder wizard, which you can
Tool bar (pull-down)
use to create folders in both local and remotemakefile projects.
Opens New Source File wizard by default. Itsdrop-down menu allows selection of either a
Tool bar
new source file, new header file, or new filewizard.
Shown in the new file icon pull-down menu, itopens the New Source File wizard.
Tool bar (pull-down)
Shown in the new file icon pull-down menu, itopens the New Header File wizard.
Tool bar (pull-down)
Shown in the new file icon pull-down menu, itopens the New File From Template wizard.
Tool bar (pull-down)
Invokes make deploy for the active buildconfiguration of a selected project, where the
Tool bar
active configuration is shown in the tool tip ofthis icon. This icon appears next to the buildand configuration management iconscontributed by CDT.
Shortcut to open NonStop Network Connectionspreference page.
Tool bar
When selected in the workbench's perspectivebar, this icon opens the NonStop Developmentperspective.
Perspective bar
Root folder of a local NonStop managed projector NonStop makefile project.
NonStop ProjectExplorer
Root folder of a remote NonStop makefileproject.
NonStop ProjectExplorer
COBOL source file.NonStop ProjectExplorerCOBOL editor
Icons 153

Table 30 NonStop icons (continued)
DescriptionLocationIcon
pTAL source file.NonStop ProjectExplorerpTAL editor
NonStop executable file in a remote project.NonStop ProjectExplorer
Transfer Files export wizard for transferring localproject files to NonStop systems.
Export wizardNonStop Tools menu
Import NSDEE 2.x project as an NSDEE 4.0managed project.
Import wizardNonStop Tools menu
Import ETK project as an NSDEE 4.0 managedproject.
Import wizard
Import connection configurations exported fromanother workspace.
Import wizard
Export connection configurations.Export wizard
154 Reference
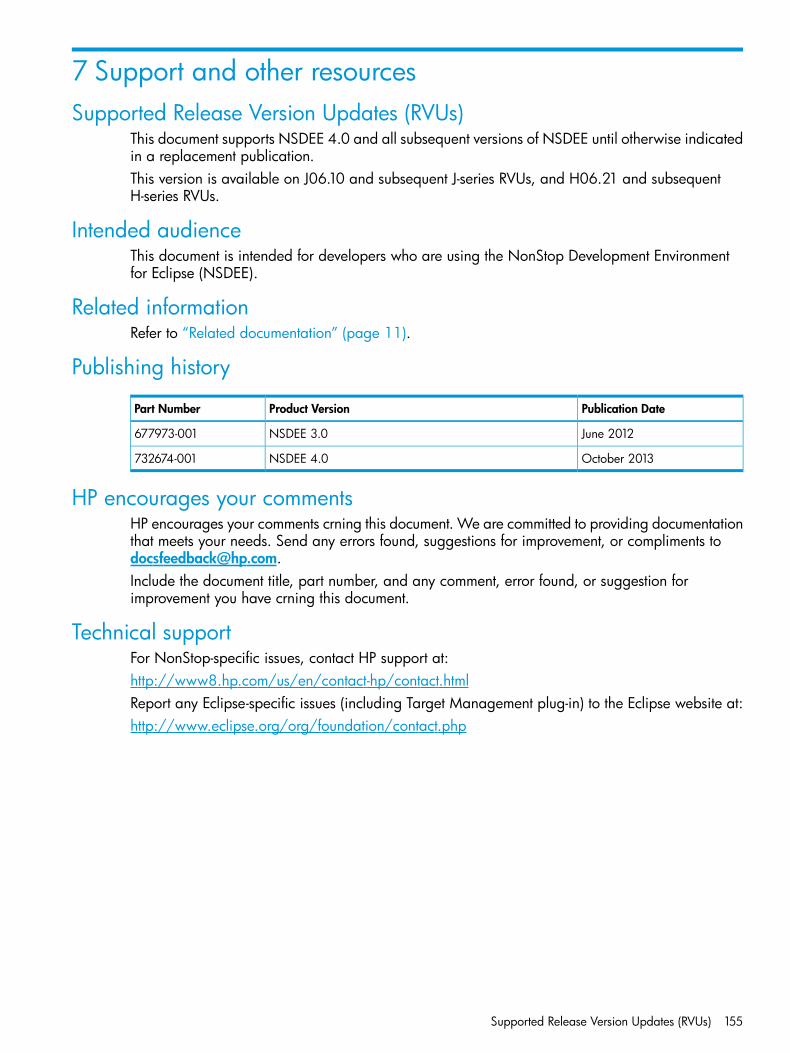
7 Support and other resourcesSupported Release Version Updates (RVUs)
This document supports NSDEE 4.0 and all subsequent versions of NSDEE until otherwise indicatedin a replacement publication.This version is available on J06.10 and subsequent J-series RVUs, and H06.21 and subsequentH-series RVUs.
Intended audienceThis document is intended for developers who are using the NonStop Development Environmentfor Eclipse (NSDEE).
Related informationRefer to “Related documentation” (page 11).
Publishing history
Publication DateProduct VersionPart Number
June 2012NSDEE 3.0677973-001
October 2013NSDEE 4.0732674-001
HP encourages your commentsHP encourages your comments crning this document. We are committed to providing documentationthat meets your needs. Send any errors found, suggestions for improvement, or compliments [email protected] the document title, part number, and any comment, error found, or suggestion forimprovement you have crning this document.
Technical supportFor NonStop-specific issues, contact HP support at:http://www8.hp.com/us/en/contact-hp/contact.htmlReport any Eclipse-specific issues (including Target Management plug-in) to the Eclipse website at:http://www.eclipse.org/org/foundation/contact.php
Supported Release Version Updates (RVUs) 155

A Sample programs and projectsSample programs and projects are included with the NSDEE product. To access these files, unzipthe Examples.zip file located at:<eclipse install directory>\plugins\com.hp.nsdee_4.0.0\Examples.zip can be unzipped to any location, for example C:\Examples. This file containsthe following projects:CarSources.zip
A simple Car example for CPP for creating a managed project using existing sources withoutcopying so that the resulting project resides outside your Eclipse workspace
CarWithMakefile.zipAn example of creating a makefile project from existing sample sources for a simple application
GeneralCppSources.zipA simple Car example for CPP, similar to the example Car project
ManagedBuildWithLibraries.zipA simple Car application to demonstrate managed build with libraries
MultiProjectCarApp.zipAn example of creating a multi-project application, where one project named CarParts createsa linkfile, and the other project named Car links the linkfile into the main application
NestedFoldersCarApp.zipA simple Car project to demonstrate nested folder structure in an application
CobolSamplApp.zipA simple Cobol application that can be used as a Car project
PtalSampleAppA simple PTAL application that can be used as a Car project
MxMpSampleApp.zipProvides simple SQL/MX and MP samples. For details, refer to readme.txt included in thisfile. This file contains the following MX and MP projects:Cmxtextsample
A simple C SQL/MX application which demonstrates SQL/MX invokeCobmxtest
A simple Cobol SQL/MX application which demonstrates SQL/MX invoketestmp
A simple C SQL/MP application which demonstrates SQL/MP invoketestmpcob
A simple Cobol SQL/MP application which demonstrates SQL/MP invoke
156 Sample programs and projects

B Tips on setting up password free logins with Open SSHIf you install Open SSH with Cygwin, you can use the sftp program to provide more flexible andbetter performing deploy targets for both managed builds and makefile project builds. For details,see “Creating custom deploy targets ” (page 118). Using sftp in your deploy target, however,requires that you set up passphrase logins for SSH so the deploy target can run sftp in batchmode without having to supply a password.This appendix provides tips on setting up both Open SSH on your Windows host and configuringHP NonStop SSH on NonStop servers for passphrase logins. For more information on Open SSH,refer to the man pages for ssh, sftp, ssh-keygen, and ssh-agent. For more information onsetting up HP NonStop SSH, refer to the NonStop SSH Reference Manual.The following are general steps for setting up passphrase logins for user ID swdev.doon for theNonStop system nonstopsystem.corp.net. Substitute your own user ID and system name asappropriate.1. On your personal Windows system, generate a public/private key pair using the ssh-keygen
command. You'll be asked for a passphrase (twice). The passphrase should be a phrase thatyou can easily remember. The longer the phrase, the better the security. The passphrase isused when encrypting and decrypting your private key. When asked for a file where the keyis to be saved, just hit RETURN to accept the default.Here is the ssh-keygen command and its output (where XXXXXX represents the passphraseentered):$ ssh-keygen -t dsa -C [email protected]/Generating public/private dsa key pair.Enter file in which to save the key (/home/doon/.ssh/id_dsa): Enter passphrase (empty for no passphrase): XXXXXXXXXXXEnter same passphrase again: XXXXXXXXXXXYour identification has been saved in /home/doon/.ssh/id_dsa.Your public key has been saved in /home/doon/.ssh/id_dsa.pub.The key fingerprint is:f7:7a:7e:4b:e9:39:c4:85:9c:e5:22:e9:a0:75:07:08 [email protected] key's randomart image is:+--[ DSA 1024]----+| E. . || . . .|| + = || o + * o|| So.+ + o || .. .. o. || ..o || ..oo. || .o..+o |+-----------------+
2. Add your public key on NonStop servers of interest. This requires running as super.super.If you cannot login as super.super, contact your system administrator.First, find the SSH process name on the NonStop server (typically $ssh0) and open it withsshcom (sample commands are shown below). Use alter user to set your public key.Give it a name (such as key1). You can use that name to delete the public key in the future.Provide your public key on of two ways. You can provide the fingerprint (which you can getfrom the output of ssh-keygen above) or you can point SSH at a file containing the publickey. (The example below provides the fingerprint.)Here are sample commands to go to the SSH volume, find the SSH process, and set yourpublic key:$SYSTEM STARTUP 5> volume zssh$SYSTEM ZSSH 6> status *,prog *Process Pri PFR %WT Userid Program file Hometerm$SSH0 0,611 150 P 005 255,255 $SYSTEM.ZSSH.SSH2 $ZHOME$ZPTY 0,792 168 P 011 255,255 $SYSTEM.ZSSH.STN $ZHOME$ZPTY B 1,1054 168 P 001 255,255 $SYSTEM.ZSSH.STN $ZHOME$SYSTEM ZSSH 7> sshcom $ssh0SSHCOM_H16_06FEB03OPEN $ssh0% alter user swdev.doon, publickey key1 fingerprint f7:7a:7e:4b:e9:39:c4:85:9c:e5:22:e9:a0:75:07:08% exit
157

If the alter user command complains that it does not know your user ID, then use the adduser command. For example:% alter user swdev.doon, publickey key1 fingerprint f7:7a:7e:4b:e9:39:c4:85:9c:e5:22:e9:a0:75:07:08alter user swdev.doon, publickey key1 fingerprint f7:7a:7e:4b:e9:39:c4:85:9c:e5:22:e9:a0:75:07:08Error, user swdev.doon not found% add user swdev.doonadd user swdev.doonOK, user swdev.doon added% alter user swdev.doon, publickey key1 fingerprint f7:7a:7e:4b:e9:39:c4:85:9c:e5:22:e9:a0:75:07:08alter user swdev.doon, publickey key1 fingerprint f7:7a:7e:4b:e9:39:c4:85:9c:e5:22:e9:a0:75:07:08OK, user swdev.doon altered% exit
3. Try connecting to the NonStop server from a Cywin shell as in this example:$ ssh [email protected] passphrase for key '/home/doon/.ssh/id_dsa': . . .
You should be prompted for your passphrase, but not for your password.4. Now try a password free login from a Cygwin shell. First, start ssh-agent:
$ ssh-agentSSH_AUTH_SOCK=/tmp/ssh-fuLUopQ796/agent.796; export SSH_AUTH_SOCK;SSH_AGENT_PID=7864; export SSH_AGENT_PID;echo Agent pid 7864;$
Export SSH_AUTH_SOCK and SSH_AGENT_PID, then run ssh-add, which prompts you foryour passphrase and communicates success to ssh-agent:$ export SSH_AUTH_SOCK=/tmp/ssh-fuLUopQ796/agent.796; export SSH_AUTH_SOCK;$ export SSH_AGENT_PID=7864; export SSH_AGENT_PID;$ ssh-addEnter passphrase for /home/doon/.ssh/id_dsa: Identity added: /home/doon/.ssh/id_dsa (/home/doon/.ssh/id_dsa)$
Now try logging on from the same Cygwin shell. You should not be prompted for a passphrasenor a password. Any local processes started as descendents of your current shell can performpassword free logins to the remote system since ssh-agent handles the authentication foryou.NSDEE does not interact with ssh-agent, but sftp invoked by a make deploy project does,allowing sftp to run in batch mode without the need for a password. For this to work, youmust launch NSDEE from a Cygwin shell (or a descendant shell or xterm). You may want tocreate an alias for this purpose, such as:$ alias eclipse='/cygdrive/c/e3.7.2/eclipse/eclipse -vm \ "C:\Program Files\Java\jdk1.5.0_22\bin\javaw.exe"'
Enter eclipse at the Cygwin prompt.5. If you want NSDEE to use passphrase authentication using the information you set up in
Cygwin, use the Settings dialog for Network Configurations preferences for SSH to configureNSDEE to use your Cygwin Open SSH settings as in Figure 91 (page 159).
158 Tips on setting up password free logins with Open SSH

Figure 91 Using Cygwin Open SSH settings with NSDEE
159
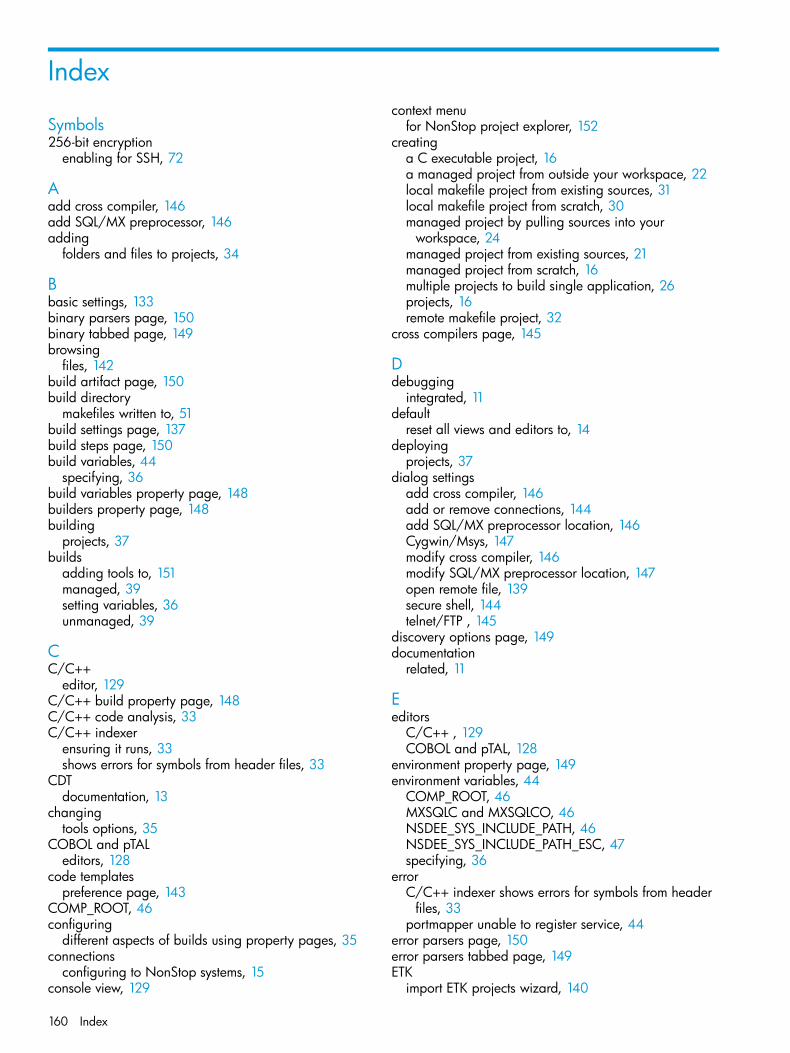
Index
Symbols256-bit encryption
enabling for SSH, 72
Aadd cross compiler, 146add SQL/MX preprocessor, 146adding
folders and files to projects, 34
Bbasic settings, 133binary parsers page, 150binary tabbed page, 149browsing
files, 142build artifact page, 150build directory
makefiles written to, 51build settings page, 137build steps page, 150build variables, 44
specifying, 36build variables property page, 148builders property page, 148building
projects, 37builds
adding tools to, 151managed, 39setting variables, 36unmanaged, 39
CC/C++
editor, 129C/C++ build property page, 148C/C++ code analysis, 33C/C++ indexer
ensuring it runs, 33shows errors for symbols from header files, 33
CDTdocumentation, 13
changingtools options, 35
COBOL and pTALeditors, 128
code templatespreference page, 143
COMP_ROOT, 46configuring
different aspects of builds using property pages, 35connections
configuring to NonStop systems, 15console view, 129
context menufor NonStop project explorer, 152
creatinga C executable project, 16a managed project from outside your workspace, 22local makefile project from existing sources, 31local makefile project from scratch, 30managed project by pulling sources into your
workspace, 24managed project from existing sources, 21managed project from scratch, 16multiple projects to build single application, 26projects, 16remote makefile project, 32
cross compilers page, 145
Ddebugging
integrated, 11default
reset all views and editors to, 14deploying
projects, 37dialog settings
add cross compiler, 146add or remove connections, 144add SQL/MX preprocessor location, 146Cygwin/Msys, 147modify cross compiler, 146modify SQL/MX preprocessor location, 147open remote file, 139secure shell, 144telnet/FTP , 145
discovery options page, 149documentation
related, 11
Eeditors
C/C++ , 129COBOL and pTAL, 128
environment property page, 149environment variables, 44
COMP_ROOT, 46MXSQLC and MXSQLCO, 46NSDEE_SYS_INCLUDE_PATH, 46NSDEE_SYS_INCLUDE_PATH_ESC, 47specifying, 36
errorC/C++ indexer shows errors for symbols from header
files, 33portmapper unable to register service, 44
error parsers page, 150error parsers tabbed page, 149ETK
import ETK projects wizard, 140
160 Index

importing projects, 73example files
for NSDEE, 31examples, 156exporting
connection configurations, 72
Ffile
browsing, 142
Ggetting started
how to use NSDEE, 14
Iicons
build icon, tips on using, 37deploy icon, tips on using, 38NonStop project explorer view, 128NonStop-specific icons in Eclipse, 152run icon, tips on using, 38
import existing code wizard, 136importing
connection configurations, 73ETK projects, 73import ETK projects wizard, 140import existing code wizard, 136import NSDEE 2.x project wizard, 141NSDEE 2.x projects, 75
increasingnumber of lines shown in output, 30
initial build settings, makefile projects, 134initial build settings, managed builds, 133installing
NSDEE, 13
Llaunching
projects, 38Visual Inspect, 141
limitationCDT, 33how to increase number of lines shown, 30
logging property page, 149
Mmake settings property page
make settings, 148make target view, 129makefile
remote makefile project wizard, 136top-level build directory, 51
managed projectsviewing and changing properties, 34
menuNonStop tools menu, 139
modify cross compiler, 146modify SQL/MX preprocessor, 147
MXSQLC, 46MXSQLCO, 46
Nnetwork connections
preference page, 143settings, 144
new projectslocal
wizards, 132wizards, 132
NonStop applicationsdocumentation for, 11
NonStop developmentpreference page, 143
NonStop development perspective, 40views, 41
NonStop project explorercontext menu, 152
NonStop project explorer view, 128icons, 128
NonStop systemsconfiguring connections to, 15
NSDEEinstalling, 13introduction, 11location of Example files, 31overview, 39versions supported, 155
NSDEE 2.ximport NSDEE 2.x project wizard, 141importing projects, 75
NSDEE_SYS_INCLUDE_PATH, 46NSDEE_SYS_INCLUDE_PATH_ESC, 47
OOpen SSH
using to set up password free logins, 157opening
method definition from a call site, 33outline view
in active C/C++ editor, 129overview
NSDEE, 39
Ppages
basic settings, 133binary parsers, 150build artifact, 150build settings, 137build steps, 150build variables, 148builders property, 148C/C++ build property page, 148cross compiler settings, 145discovery options, 149environment, 149error parsers, 150
161

initial build settings, makefile projects, 134initial build settings, managed builds, 133logging, 149make settings, 148properties, 148remote settings, 134
no SQL settings, 134settings for SQL/MP, 136SQL/MX settings, 135
resources property, 148select configurations, 136settings, 149settings (remote), 150SQL/MX preprocessors, 146tool chain editor, 151tool settings, 149
perspectiveNonStop development, 40
portmapper errorWindows firewall, 44
preference pagecode templates, 143network connections, 143NonStop development, 143tool locations, 145transfer file wizard settings, 147
preferences, 142specifying, 14
preferences pagenetwork connections, 15
prerequisites, 13before building on Windows, 14
problems view, 129project types, 133project wizard pages
for NonStop C, C++, COBOL, and pTAL, 132projects
adding folders and files to , 34building, 37creating, 16creating local makefile project from existing sources,
31creating local makefile project from scratch, 30creating managed project by pulling sources into your
workspace, 24creating managed project from existing sources, 21creating managed project from outside your workspace,
22creating managed project from scratch, 16creating multiple projects to build single application,
26creating remote makefile project, 32deploying, 37launching, 38local, 39remote, 40tips on the deploy icon, 38tips on using the build icon, 37types created by new project wizard, 40
propertiespages, 148viewing and changing for managed projects, 34
properties view, 129Property pages
using settings page to change tools options, 35property pages
build variables, 148builders, 148C/C++ build, 148environment, 149for builds, 35logging, 149make settings, 148resource, 148settings, 149settings (remote), 150tool chain editor, 151
Rremote file browser, 142remote makefile project wizard, 136remote settings, 134
no SQL settings, 134SQL/MP settings, 136SQL/MX settings, 135
resetall views and editors to default, 14
resources property page, 148
Ssamples, 156secure shell settings, 144select configurations page, 136settings
add cross compiler, 146add or remove connections, 144add SQL/MX preprocessor location, 146cross compiler page, 145Cygwin/Msys, 147deploy target settings group, 150import ETK project wizard, 141import NSDEE 2.x project wizard, 141modify cross compiler, 146modify SQL/MX preprocessor location, 147network connections, 144remote makefile project wizard, 136SQL/MX preprocessors, 146telnet/FTP, 71, 145transfer file wizard preference page, 147
settings (remote) property page, 150settings property page, 149specifying
build variables, 36environment variables, 36preferences, 14tool locations, 14
SQL/MX preprocessors, 146SSH
162 Index
enabling 256-bit encryption, 72support, 155
Ttasks view, 129technical support, 155telnet/FTP
settings, 71terminal view, 129tips
build icon, 37deploy icon, 38relaunching a run configuration, 38
tool chain editor property page, 151tool locations
preference page, 145specifying, 14
tool settings pages, 149Tools
Changing options, 35tools
changing options, 35NonStop tools menu, 139
Vviewing and changing
properties for managed projects, 34views
console, 129make target, 129NonStop development perspective, 41NonStop project explorer, 128outline, 129problems, 129properties, 129tasks, 129terminal, 129
views and editors, 126Visual Inspect
dialog for launching, 141
Wwizards
adding folders and files to a project, 34import ETK projects, 140import existing code, 136import NSDEE 2.x project, 141new C/C++ class, 138new class, 137new file, 137new file from template, 138new folder, 137, 138new header file, 138new project, 132
local , 132New Project wizard, local projects created by, 40new source file, 138new source folder, 139pages for
NonStop C, C++, COBOL, and pTAL projects, 132remote makefile project, 136transfer files, 139, 147transfer files wizard controls, 140
Workbenchdocumentation, 13preparing, 14
163